microsoft office excel 2013 core microsoft office excel 2013 core courseware # 3253 lesson 2:...
TRANSCRIPT

Microsoft Office
Excel 2013 CoreMicrosoft Office
Excel 2013 CoreCourseware # 3253
Lesson 2: Constructing Cell Data
Microsoft Office
Excel 2013 Core
© CCI Learning Solutions Inc. 2
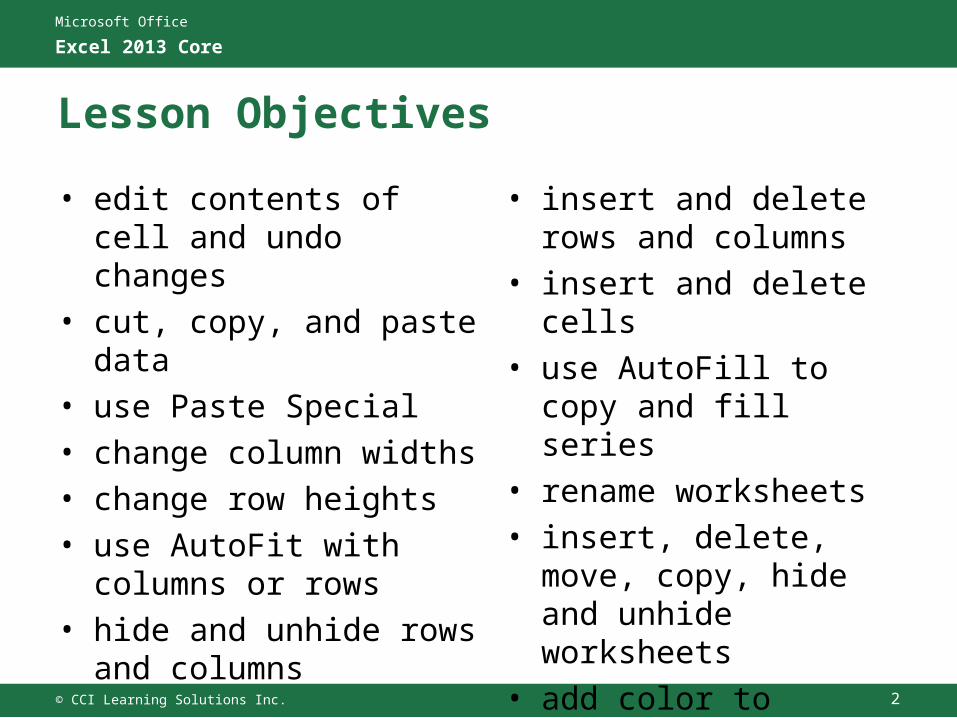
Lesson Objectives
• insert and delete rows and columns
• insert and delete cells• use AutoFill to copy
and fill series• rename worksheets• insert, delete, move,
copy, hide and unhide worksheets
• add color to worksheet tabs
• edit contents of cell and undo changes
• cut, copy, and paste data
• use Paste Special• change column widths• change row heights• use AutoFit with
columns or rows• hide and unhide rows
and columns
Microsoft Office
Excel 2013 Core
© CCI Learning Solutions Inc. 3
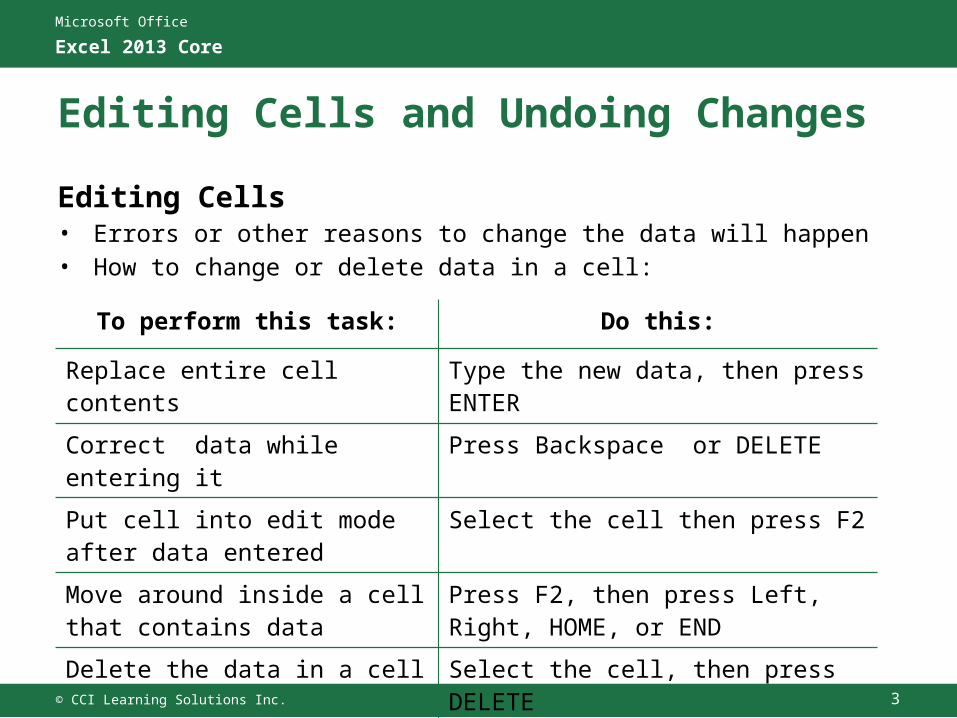
Editing Cells and Undoing Changes
Editing Cells• Errors or other reasons to change the data will happen• How to change or delete data in a cell:
To perform this task: Do this:
Replace entire cell contents Type the new data, then press ENTER
Correct data while entering it Press Backspace or DELETE
Put cell into edit mode after data entered
Select the cell then press F2
Move around inside a cell that contains data
Press F2, then press Left, Right, HOME, or END
Delete the data in a cell Select the cell, then press DELETE

Microsoft Office
Excel 2013 Core
© CCI Learning Solutions Inc. 4
Editing Cells and Undoing ChangesUndoing and Redoing Changes• Quick Access Toolbar has an Undo and a Redo
button:
• To un-do the last change– Click (Undo) button– Press CTRL+Z
• To reverse the last Undo (aka re-do)– Click (Redo) button– Press CTRL+Y
• Maximum of last 100 commands can be undone

Microsoft Office
Excel 2013 Core
© CCI Learning Solutions Inc. 5
Copying and Moving Data
• Very common to copy and move data from one range of cells to another
• Can copy and move to:– Different part of same worksheet– Different worksheet in same workbook– Different workbook

Microsoft Office
Excel 2013 Core
© CCI Learning Solutions Inc. 6
Copying and Moving Data
Copy To Clipboard
– Click (Copy)
– Press CTRL+C (same as most other Windows programs)
– Right-click selected item and then click Copy
Cut (Move)
– Click (Cut) button in the Ribbon
– Press CTRL+X (same as most other Windows programs)
– Right-click selected item and then click Cut

Microsoft Office
Excel 2013 Core
© CCI Learning Solutions Inc. 7
Copying and Moving Data
Paste
– Click (Paste)
– Press CTRL+V (same as most other Windows programs)
– Right-click selected item and then click Paste
• Blinking marquee appears around cells which will be pasted to new location
• When pasting range of cells, only need to select one cell– Excel will paste below and to right of this cell

Microsoft Office
Excel 2013 Core
© CCI Learning Solutions Inc. 8
Append Data to Worksheet
• Add to a worksheet by entering data into blank cells
• In most cases, do not leave blank rows or columns between new and old data if the data is related to each other
• In some cases, you can leave blank rows and columns to improve readability

Microsoft Office
Excel 2013 Core
© CCI Learning Solutions Inc. 9
Using Paste Special
• Paste command pastes everything from selected cell range into target cell including data, formulas, formatting,
and comments
• Paste Special command enables you to selectively choose how data pasted
• To activate the Paste Special command, on Home tab, in Clipboard group, click arrow for Paste, click Paste Special

Microsoft Office
Excel 2013 Core
© CCI Learning Solutions Inc. 10
Using Paste Special
Paste Specifies what components of data in Clipboard are pasted to target cells.
Operation
Specifies how any data in target cells treated.
Skip blanks
Avoids overwriting existing data in target cells if there no data from clipboard for that cell.
Transpose
Rotates data; data in Clipboard listed down column now lists across row in target cells, and vice versa.

Microsoft Office
Excel 2013 Core
© CCI Learning Solutions Inc. 11
Using Mouse Only• 4 headed cursor symbol to
move selected cell(s)
• To make a copy of the selected cell(s), use CTRL
Copying and Moving Cells Using the Mouse

Microsoft Office
Excel 2013 Core
© CCI Learning Solutions Inc. 12
Inserting Rows and Columns
• Can insert one or more rows or columns at same time• To insert row(s) or column(s):
– Select using row or column header(s)– On Home tab, in Cells group, click
Format, and click Insert Sheet Rows or Insert Sheet Columns
– or right-click selected row(s) or column(s), then click Insert
• All rows starting from highlighted rows shift down• All columns starting from highlighted
columns shift rightto right
Microsoft Office
Excel 2013 Core
© CCI Learning Solutions Inc. 13
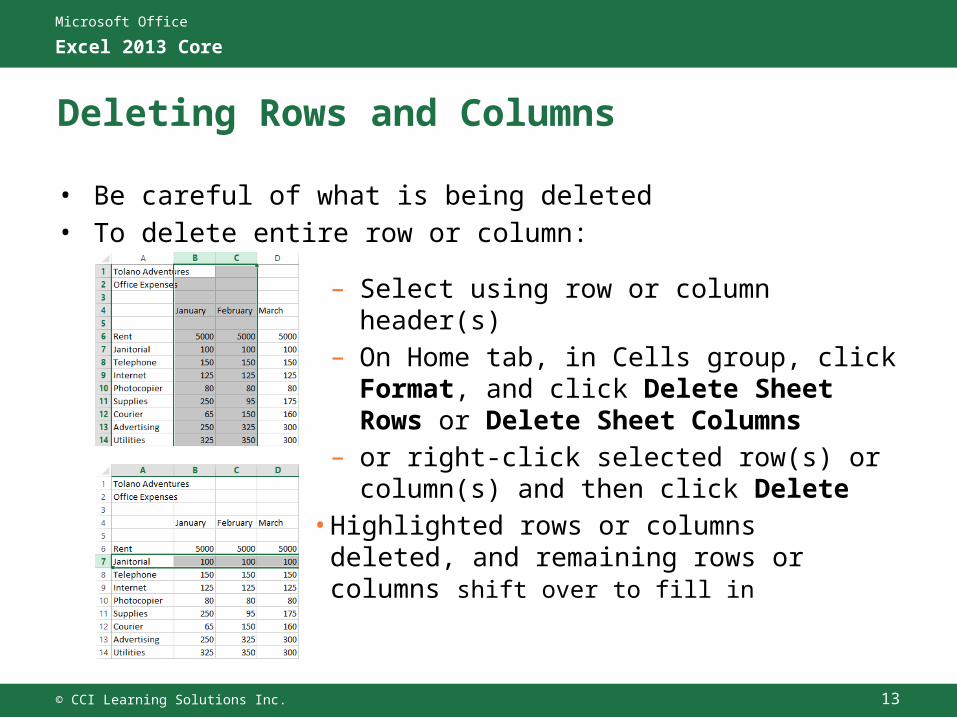
Deleting Rows and Columns
• Be careful of what is being deleted• To delete entire row or column:
– Select using row or column header(s)– On Home tab, in Cells group, click
Format, and click Delete Sheet Rows or Delete Sheet Columns
– or right-click selected row(s) or column(s) and then click Delete
• Highlighted rows or columns deleted, and remaining rows or columns shift over to fill in
Microsoft Office
Excel 2013 Core
© CCI Learning Solutions Inc. 14
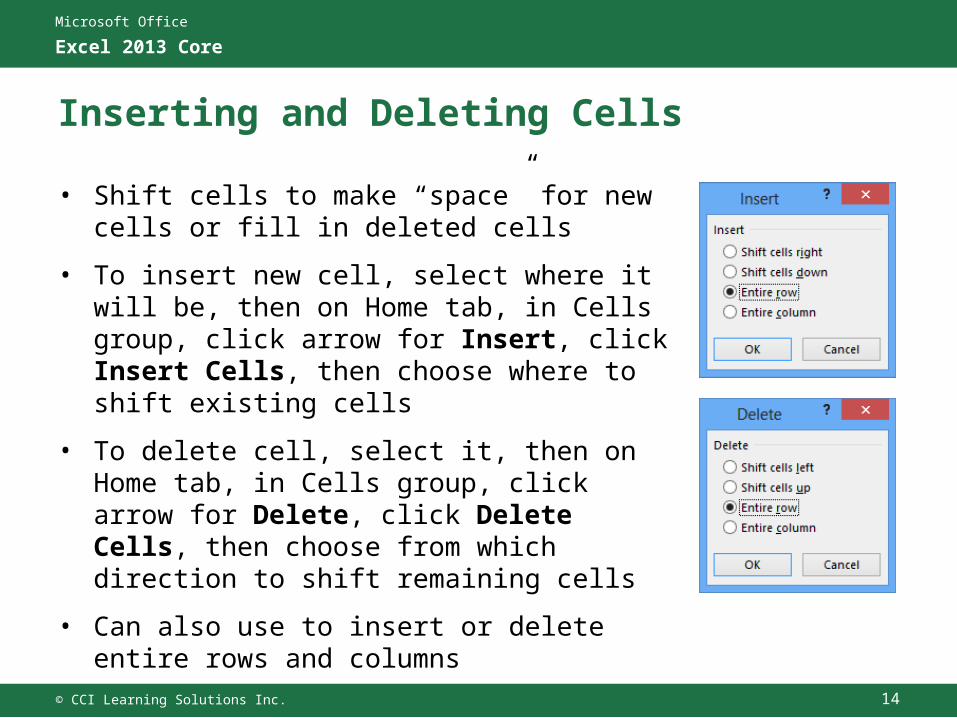
Inserting and Deleting Cells
• Shift cells to make “space” for new cells or fill in deleted cells
• To insert new cell, select where it will be, then on Home tab, in Cells group, click arrow for Insert, click Insert Cells, then choose where to shift existing cells
• To delete cell, select it, then on Home tab, in Cells group, click arrow for Delete, click Delete Cells, then choose from which direction to shift remaining cells
• Can also use to insert or delete entire rows and columns

Microsoft Office
Excel 2013 Core
© CCI Learning Solutions Inc. 15
Changing the Column Widths
• Standard column width is 8.43
– If adjacent cells are empty, text data overflows to those cells otherwise, text data will be truncated at cell boundary
– If numeric or date value is too large, Excel automatically widens column width to show value or changes the format to scientific notation
– If you reduce width, numeric or date value that is too large will display as #######
• Can set between 0 and 255 for width

Microsoft Office
Excel 2013 Core
© CCI Learning Solutions Inc. 16
Changing the Column Widths
• To change column width:– On Home tab, in Cells group, click Format and then click Column
Width, or
– place cursor on vertical line at right of column heading and drag to appropriate width, or
– right-click column heading, and then click Column Width
Using AutoFit• Have Excel automatically resize columns for content
– Select cell with the desired width, then on Home tab, in Cells group, click Format and then click AutoFit Column Width, or
– double-click right side of column to be adjusted to width of widest value in the entire column

Microsoft Office
Excel 2013 Core
© CCI Learning Solutions Inc. 17
Adjusting the Row Height
• Can be changed manually or using AutoFit
• To change row height:– On Home tab, in Cells group, click Format and then click Row
Height, or– Place cursor at bottom of row heading, then drag to new height
• To AutoFit row height:– On Home tab, in Cells group, click Format and then click AutoFit
Row Height, or– double-click bottom of row heading
Microsoft Office
Excel 2013 Core
© CCI Learning Solutions Inc. 18
Hiding/Unhiding Rows & Columns
• Hide rows or columns because:
– Need to print large worksheet; hiding less important rows or columns improves readability of overall worksheet
– Hidden columns or rows store intermediate calculations for complex formulas
– Hidden columns or rows contain confidential data
• Can detect hidden row or columns by gaps in row or column headers
• Remain hidden until unhidden
• Formulas in hidden or visible cells referencing hidden cells continue to be active
• Hidden rows and columns do not appear when printing worksheet until unhidden

Microsoft Office
Excel 2013 Core
© CCI Learning Solutions Inc. 19
Hiding/Unhiding Rows & Columns
• To hide row or column, select headings first:
– On Home tab, in Cells group, click Format, click Hide & Unhide, and then Hide Columns or Hide Rows, or
– right-click selected rows or columns and then click Hide, or
– drag right edge of column header to left, or bottom edge of row header upwards
• To unhide row or column, select headings on both sides of hidden rows or columns:
– On Home tab, in Cells group, click Format, click Hide & Unhide, and then Unhide Columns or Unhide Rows, or
– right-click selected rows or columns and then click Unhide, or
– drag right edge of hidden column to right, or bottom edge of hidden row downwards

Microsoft Office
Excel 2013 Core
© CCI Learning Solutions Inc. 20
Using AutoFill
Copy Cells Text, values, or formulas copied with their formatting. Does not create series.
Fill Series Creates simple linear series and copies formatting of source cell.
Fill Formatting Only
Copies formatting from source cell but leaves contents of target cells unchanged.
Fill Without Formatting
Creates simple linear series without copying formatting of source cell.
Fill Months Use for month name series.

Microsoft Office
Excel 2013 Core
© CCI Learning Solutions Inc. 21
Managing Worksheets
• Workbook is collection of one or more worksheets– Each worksheet can be independent from each other, or related
to each other
– Try to store related information in one workbook for convenience and productivity
• New workbook automatically includes one worksheet
• Use tab scrolling buttons to display other worksheet tabs
• Remove worksheets no longer needed– Cannot undo deleted worksheet
Scroll sheet tabs to the left Display next worksheet Scroll sheet tabs to the right New sheet Display previous worksheet Sheet tabs Resize handle
Microsoft Office
Excel 2013 Core
© CCI Learning Solutions Inc. 22
Renaming Worksheets
• Can assign more descriptive names
• Excel adjusts tab size for number of characters in
name– Keep tab names short for easy navigation
• To rename worksheet tab:– Double-click sheet tab for renaming, or– right-click sheet tab and then click Rename

Microsoft Office
Excel 2013 Core
© CCI Learning Solutions Inc. 23
Inserting or Deleting Worksheets
• To insert new blank worksheet:
– Click at end of worksheet tabs, or
– On Home tab, in Cells group, click arrow under Insert and then click Insert Sheet, or
– Right-click sheet tab where worksheet to be inserted, click Insert, click Worksheet template and click OK
• To delete worksheet:
– On Home tab, in Cells group, click Delete, and click Delete sheet, or
– right-click sheet tab and click Delete

Microsoft Office
Excel 2013 Core
© CCI Learning Solutions Inc. 24
Moving or Copying Worksheets
• Organize multi-worksheet workbooks, or make copy of existing worksheet
• To move or copy worksheet within workbook:– Right-click sheet tab to be moved or copied and click Move or
Copy, or– to quickly move worksheet, drag sheet tab to new location, or– to quickly copy worksheet, click sheet tab, press CTRL and drag
to new location
• Can also move or copy a worksheet from one workbook to another. The two workbooks must be opened.

Microsoft Office
Excel 2013 Core
© CCI Learning Solutions Inc. 25
Hiding/Unhiding Worksheets
• Prevent other users from viewing data or formulas used
• Can hide as many worksheets in workbook as needed, in any sequence
• Must have at least one unhidden worksheet
• When unhiding worksheets, select worksheet to unhide from dialog box displaying all hidden worksheets
• To hide or unhide a worksheet:– On Home tab, in Cells group, click Format, point
at Hide & Unhide, then click Hide Sheet orUnhide Sheet, or
– Right-click worksheet tab, click Hide Sheet or Unhide Sheet

Microsoft Office
Excel 2013 Core
© CCI Learning Solutions Inc. 26
Adding Color to Worksheet Tabs
• Use color on worksheet tabs to help identify worksheets
• Color will appear as line below worksheet name when worksheet active, with colored background when not active
• Can choose from standard or theme colors for worksheet tabs.
• To display color palette for worksheet tab, click worksheet tab and then:
– On Home tab, in the Cells group, click Format and click Tab Color, or
– right-click the worksheet tab and click Tab Color.

Microsoft Office
Excel 2013 Core
© CCI Learning Solutions Inc. 27
Lesson Summary
• edit contents of cell and undo changes
• cut, copy, and paste data
• use Paste Special• change column widths• change row heights• use AutoFit with
columns or rows• hide and unhide rows
and columns
• insert and delete rows and columns
• insert and delete cells• use AutoFill to copy
and fill series• rename worksheets• insert, delete, move,
copy, hide and unhide worksheets
• add color to the worksheet tabs

Microsoft Office
Excel 2013 Core
© CCI Learning Solutions Inc. 28
Review Questions
1. Suppose you used the Copy and then the Paste command to copy the contents of cells A1 to cell B1, but you do not want to copy the cell formatting to cell B1. What can you do to fix it?
2. Provide examples of when using the AutoFit command would be the best option to change the width of a column.
3. Explain how pressing Delete to delete the contents of a cell differs from using the Delete Cells command.
4. Provide examples of when you may want to hide rows or columns.
5. Explain the difference between using the Copy and AutoFill features.
6. How would you set up the values if the AutoFill series is not a common series, such as weekdays, months, or years?

Microsoft Office
Excel 2013 Core
© CCI Learning Solutions Inc. 29
Review Questions
7. Provide examples of when you might want to duplicate a worksheet.
8. What is the maximum length of a worksheet tab name?
9. How many new worksheets can you add to an Excel workbook?
10. When you insert a new worksheet using the Insert Worksheet tab, the new worksheet tab appears
a. To the left of the current worksheet tab
b. To the far left of all worksheet tabs
c. To the far right of all worksheet tabs
d. In a random position, depending on which worksheet is active
e. To the right of the current worksheet tab