microsoft office powerpoint 2007 trainingagrimoon.com/wp-content/uploads/ms_ppt.pdfadd sound effects...
TRANSCRIPT

Microsoft® Office PowerPoint® 2007 Training
Add sound effects to a presentation

Add sound effects to a presentation
Course contents
• Overview: This sounds easy
• Lesson 1: Play a sound file
• Lesson 2: Play music from a CD
Each lesson includes a list of suggested tasks and a set of test questions.

Add sound effects to a presentation
Overview: This sounds easy
Including a sound effect on a PowerPoint slide can introduce the slide or make a point.
You can play sounds in a presentation either by inserting a sound file or by playing music from a CD.
This course tells you how to do both—from choosing a way to make an inserted sound start and specifying how long it should play to learning how to set up your CD tracks.

Add sound effects to a presentation
Course goals
• Insert sound files and select how each one should start and stop.
• Set up a slide element so that it triggers the sound.
• Guarantee that your sound will play when you present.
• Play a CD for a slide show and select the tracks you want.

Lesson 1
Play a sound file

Add sound effects to a presentation
Play a sound file In this lesson, you’ll learn how to insert a sound file of your own or a sound effect from the clip library into a slide.
You use PowerPoint sound tools to control how the sound plays, using basic settings for starting the sound and playing it across slides.
Then you can go further by opening the Custom Animation task pane and giving PowerPoint precise instructions for starting and stopping the sound.
Add sound effects to a presentation
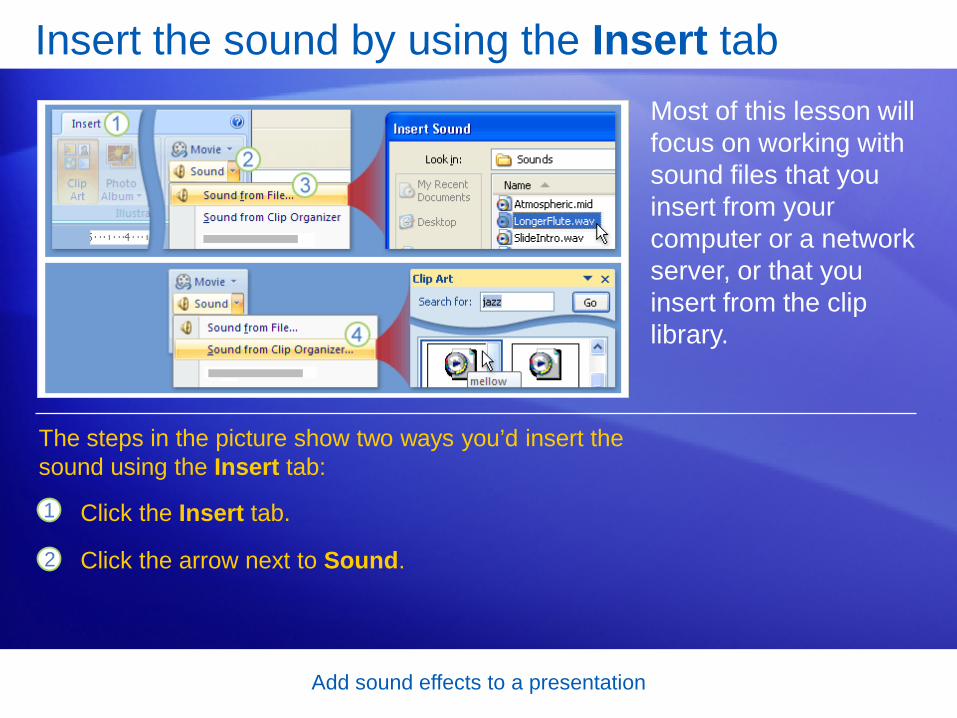
Insert the sound by using the Insert tab Most of this lesson will focus on working with sound files that you insert from your computer or a network server, or that you insert from the clip library.
1
2
Click the Insert tab.
Click the arrow next to Sound.
The steps in the picture show two ways you’d insert the sound using the Insert tab:

Add sound effects to a presentation
Insert the sound by using the Insert tab Most of this lesson will focus on working with sound files that you insert from your computer or a network server, or that you insert from the clip library.
To insert a sound file from your computer or a network server, click Sound from File. Browse to the file, and double-click it to insert it.
The steps in the picture show two ways you’d insert the sound using the Insert tab:
3

Add sound effects to a presentation
Insert the sound by using the Insert tab Most of this lesson will focus on working with sound files that you insert from your computer or a network server, or that you insert from the clip library.
To insert a sound from the clip library, click Sound from Clip Organizer, and search for the clip in the Clip Art task pane. Scroll to the clip you want, and click it to insert it into the slide.
The steps in the picture show two ways you’d insert the sound using the Insert tab:
4

Add sound effects to a presentation
Insert the sound by using the Insert tab Before the sound is inserted, you’re prompted with a message asking how you want it to start.
The sound appears as a sound icon on your slide, and it plays right after you insert it, so you know what it sounds like.
To hear the sound again in normal view, double-click it.

Add sound effects to a presentation
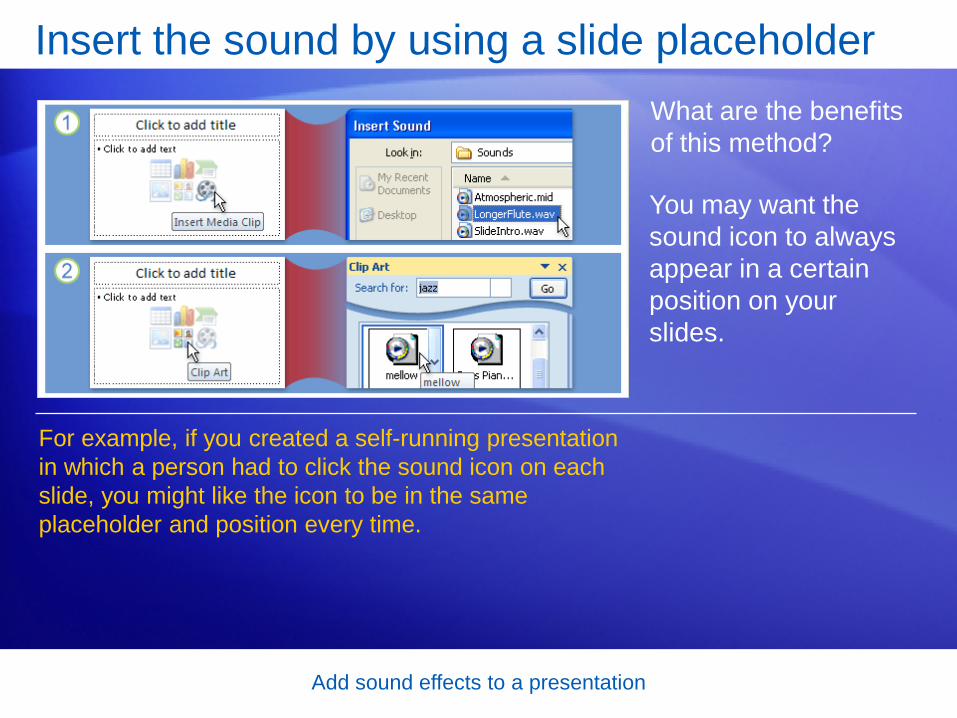
Insert the sound by using a slide placeholder You can use the icons that are part of some slide layouts to insert a sound file. The effect is the same—you’re inserting a sound file, but from within the slide instead of from the Insert tab.
The slide must have a layout that includes a content placeholder, as shown in the picture.
The content placeholder is the area outlined by a dotted border on the slide. Your content goes within this border.

Add sound effects to a presentation
Insert the sound by using a slide placeholder When you see the icons, as shown here, you’ll know that this placeholder can contain text or other things, such as pictures, sounds, or graphics.
1
2
Click the Insert Media Clip icon to browse for sound files on your computer or a network server.
Click the Clip Art icon to open the Clip Art task pane and search for sounds to insert.
Add sound effects to a presentation
Insert the sound by using a slide placeholder What are the benefits of this method?
You may want the sound icon to always appear in a certain position on your slides.
For example, if you created a self-running presentation in which a person had to click the sound icon on each slide, you might like the icon to be in the same placeholder and position every time.

Add sound effects to a presentation
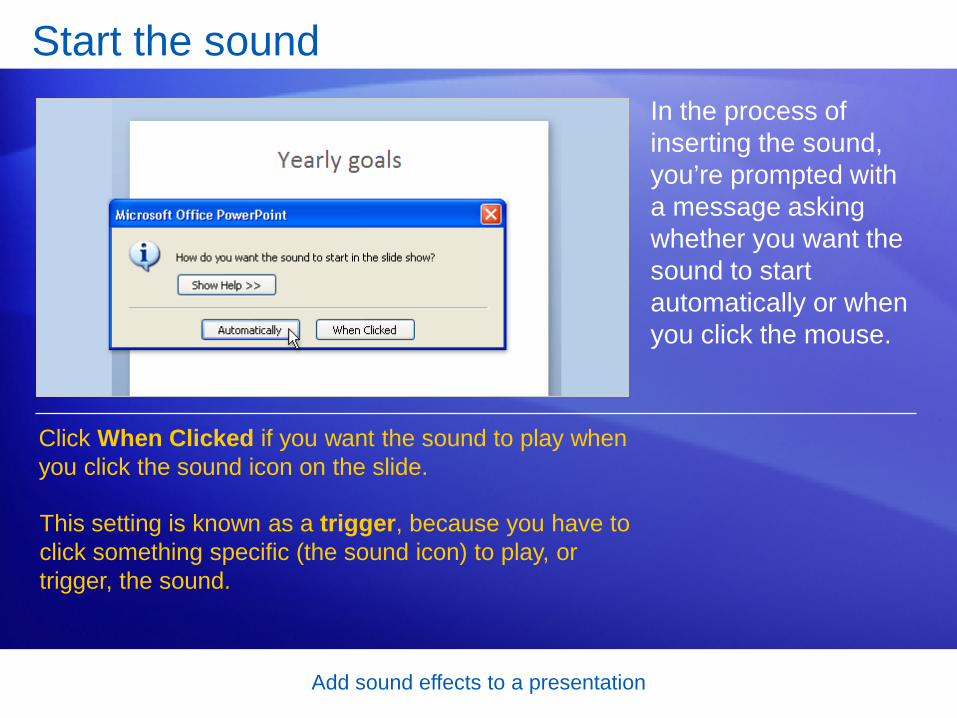
Start the sound In the process of inserting the sound, you’re prompted with a message asking whether you want the sound to start automatically or when you click the mouse.
Choose Automatically if you want the sound to start by itself.
If you have no other media effects on the slide, the sound plays when the slide is displayed. If you already have an effect on the slide, such as an animation, sound, or movie, the sound plays after it’s finished.
Add sound effects to a presentation
Start the sound In the process of inserting the sound, you’re prompted with a message asking whether you want the sound to start automatically or when you click the mouse.
Click When Clicked if you want the sound to play when you click the sound icon on the slide.
This setting is known as a trigger, because you have to click something specific (the sound icon) to play, or trigger, the sound.

Add sound effects to a presentation
Play the sound across slides So you’ve inserted the sound, and it starts either by itself or when you click the sound icon.
The sound will play through to the end and then stop—unless you click the slide for any reason while it is still playing, which will stop the sound.

Add sound effects to a presentation
Play the sound across slides What if you have a long-playing sound that you want to keep playing even when you click the mouse to start something else?
1
2
Select the sound icon.
On the Ribbon, under Sound Tools, click the Options tab.
In the Sound Options group, in the Play Sound list, select Play across slides.
3
You can play it across slides.

Add sound effects to a presentation
Play the sound across slides
For example, you may want it to play through the current slide only and then stop, or to stop after a set number of slides.
You’d make these adjustments by using the Custom Animation task pane.
You may want to make further adjustments to the sound.

Add sound effects to a presentation
Set a time for stopping the sound You can set very specific options for a sound in the Custom Animation task pane.
You work with the sound here because it is considered an effect, similar to animation effects.
You can set up all of these effects to stop or start at certain times and to play in a certain order.
Add sound effects to a presentation
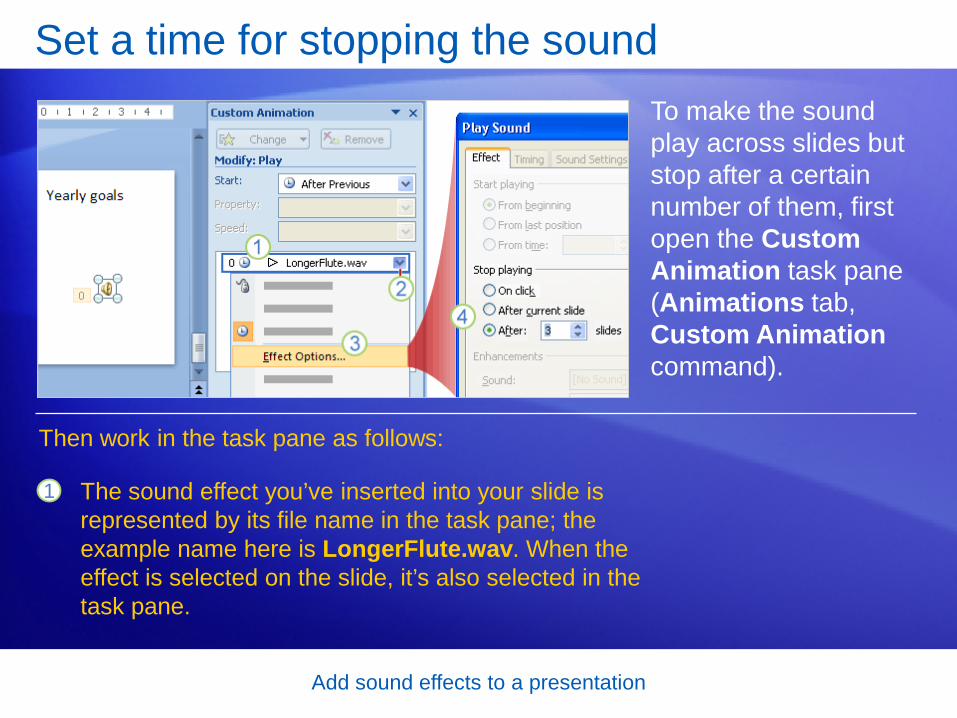
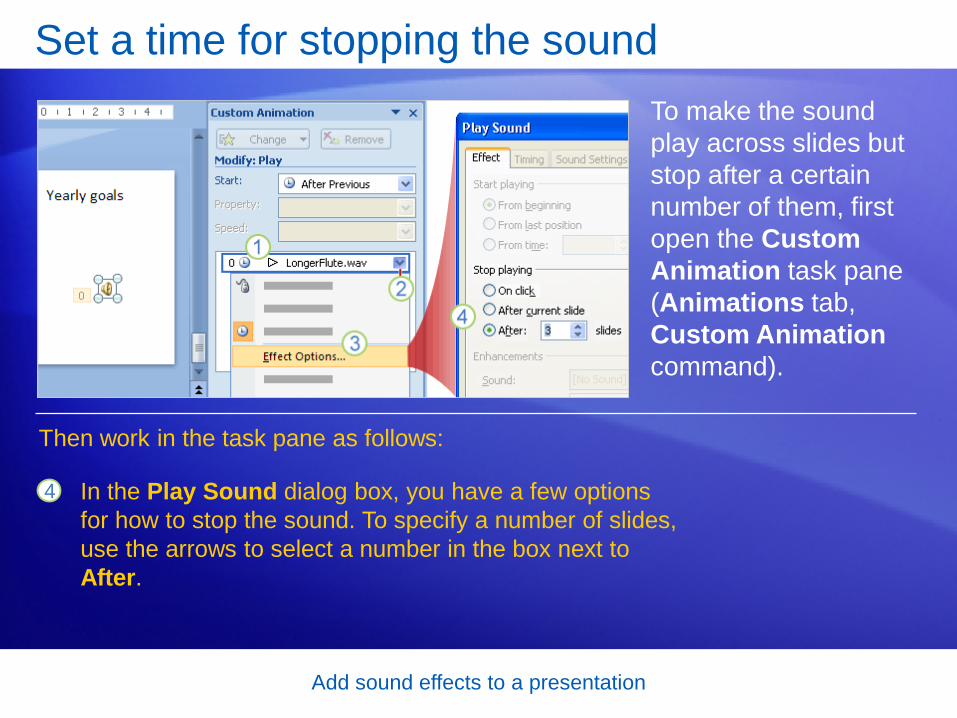
Set a time for stopping the sound To make the sound play across slides but stop after a certain number of them, first open the Custom Animation task pane (Animations tab, Custom Animation command).
The sound effect you’ve inserted into your slide is represented by its file name in the task pane; the example name here is LongerFlute.wav. When the effect is selected on the slide, it’s also selected in the task pane.
Then work in the task pane as follows:
1

Add sound effects to a presentation
Set a time for stopping the sound To make the sound play across slides but stop after a certain number of them, first open the Custom Animation task pane (Animations tab, Custom Animation command).
Click the arrow next to the sound effect to display its menu.
Then work in the task pane as follows:
2
3 On the menu, click Effect Options.
Add sound effects to a presentation
Set a time for stopping the sound To make the sound play across slides but stop after a certain number of them, first open the Custom Animation task pane (Animations tab, Custom Animation command).
In the Play Sound dialog box, you have a few options for how to stop the sound. To specify a number of slides, use the arrows to select a number in the box next to After.
Then work in the task pane as follows:
4

Add sound effects to a presentation
Set a time for stopping the sound The sound in this example, set to play through three slides, will start playing when the slide into which it’s inserted is displayed and will continue through the next two slides after that.
When you click to a fourth slide, the sound will stop.
For this option to be effective, the sound needs to be long enough to continue playing through the specified number of slides.

Add sound effects to a presentation
Change how the sound starts You can change the way you’ve set your sound to begin by using Custom Animation options too.
1 In the task pane, the effect appears with a clock next to it, which means it will start automatically after a previous effect—such as an animation effect or another sound if there is one; or after display of the slide if there’s no other effect.

Add sound effects to a presentation
Change how the sound starts You can change the way you’ve set your sound to begin by using Custom Animation options too.
2
3
To change the start setting, click the arrow next to the effect in the list, and click Start On Click.
The effect then appears with a mouse icon next to it, and the setting is reflected in the Start box. The sound will now play when you click the mouse.

Add sound effects to a presentation
Change how the sound starts There’s one difference here that you should be aware of.
The choice of Start On Click in this context sets up the sound to play when you click the slide, rather than when you click the sound icon.
To make the sound icon be the thing you click to start the effect, you have to set it up as the trigger for the sound.

Add sound effects to a presentation
Set up a trigger to play the sound As you’ve learned, there are various ways to start a sound.
Here’s one with some fun possibilities: Trigger the sound by clicking a specific item on the slide.
When you first insert a sound, if you choose to have it start “when clicked,” a trigger is automatically set up for you; the sound icon itself is the trigger.
But you can make other things set off the sound as well: text, for example, or a picture, or an arrow shape that signals (with a bing, bang, or bong) the next slide.

Add sound effects to a presentation
Set up a trigger to play the sound The picture illustrates the process.
1
2
The sound must be inserted into the slide, and the element that you want to click must be on the slide also. In this case, say you want the trigger to be the arrow shape shown here.
In the Custom Animation task pane, click the arrow next to the sound effect, and click Timing on the menu.

Add sound effects to a presentation
Set up a trigger to play the sound The picture illustrates the process.
3 In the Play Sound dialog box, under Triggers, click Start effect on click of.
4 Click the arrow on the item there, and select the thing you want as the trigger. In the example, you’d choose Right Arrow 6 (the name for the arrow shape).

Add sound effects to a presentation
Set up a trigger to play the sound When a sound is set up to play by trigger, it has a bar above it in the effects list, saying what triggers the sound:
On the slide, a little hand appears next to the sound icon, showing that it plays by trigger.

Add sound effects to a presentation
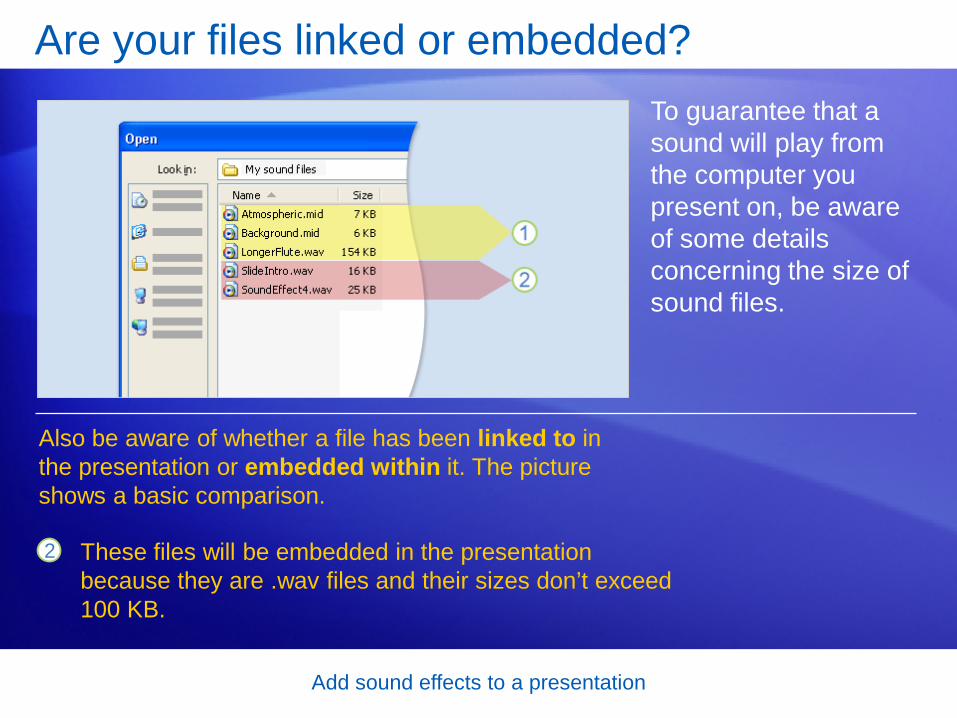
Are your files linked or embedded? To guarantee that a sound will play from the computer you present on, be aware of some details concerning the size of sound files.
1 These files will be linked to the presentation because either they are not .wav files or they are .wav files that exceed the maximum size limit of 100 KB.
Also be aware of whether a file has been linked to in the presentation or embedded within it. The picture shows a basic comparison.
Add sound effects to a presentation
Are your files linked or embedded? To guarantee that a sound will play from the computer you present on, be aware of some details concerning the size of sound files.
2 These files will be embedded in the presentation because they are .wav files and their sizes don’t exceed 100 KB.
Also be aware of whether a file has been linked to in the presentation or embedded within it. The picture shows a basic comparison.
Add sound effects to a presentation
• A linked file is not actually contained within the presentation. Instead, PowerPoint creates a link to the file based on where it’s stored when you insert it into the presentation, for example, on your computer or on a server that your computer is connected to. So when you “insert,” you’re really just creating a link to the file. PowerPoint relies on that link to find and play the sound.
• What determines whether a sound file is inserted as a linked file? File size and file type. PowerPoint creates a link for any .wav type of file that is more than 100 kilobytes (KB) in size and for all other types of sound files, regardless of size. (The last four characters of the file name—for example, “.wav”—tell you what type of sound file it is.)
Are your files linked or embedded? Here’s more information about linked files.
Add sound effects to a presentation
• An embedded file is part of the presentation. If you copy the presentation to another location, the embedded sound file travels with the presentation and you can count on it to play.
• What determines whether PowerPoint embeds the file? Again, file type and file size. If the sound is a .wav file that is 100 KB or less in size, it’s embedded.
• And a general note to remember for both linked and embedded files: The presenting computer must have a sound card and speakers to play your sound effects.
Are your files linked or embedded? Here’s more information about embedded files:

Add sound effects to a presentation
How to deal with linked files Here are some best practices for working with linked files so that PowerPoint will find and play them when you’re in a presenting situation.
Best practice 1: When you’re creating the presentation, before you insert the sound file, copy the sound file into the same folder as your presentation. Then insert it from that location.
PowerPoint will create a link to it based on the sound file’s location within your folder.

Add sound effects to a presentation
How to deal with linked files Here are some best practices for working with linked files so that PowerPoint will find and play them when you’re in a presenting situation.
Best practice 2: When your presentation is complete and you’re preparing to copy or distribute it, use Package for CD.
This feature copies all the files to one location (a CD or folder) with your presentation and automatically updates all the links for the media files.

Add sound effects to a presentation
Suggestions for practice 1. Insert a sound as background music.
2. Insert a sound and make it play continuously.
3. Specify a stopping point.
4. Change the start setting.
5. Set up a trigger for the sound.
6. Insert a sound by using a slide placeholder.
7. View the path to your sound files.
Online practice (requires PowerPoint 2007)

Add sound effects to a presentation
Test 1, question 1 What’s a best practice for working with sound files? (Pick one answer.)
1. Never use linked files.
2. Before you insert sound files, copy them into the same folder as your presentation file.

Add sound effects to a presentation
Test 1, question 1: Answer Before you insert sound files, copy them into the same folder as your presentation file.
This way, each time you insert a file, PowerPoint will create a link to it in that location. As long as you keep the file in the same folder as your presentation, PowerPoint will find it to play it.

Add sound effects to a presentation
Test 1, question 2 On the Ribbon, where do you find the command for inserting sound files? (Pick one answer.)
1. The Options tab, under Sound Tools.
2. The Animations tab, Animations group.
3. The Insert tab, Media Clips group.
Add sound effects to a presentation
Test 1, question 2: Answer The Insert tab, Media Clips group.
In Media Clips, you click Sound and then choose whether to insert from a file or from the clip library.

Add sound effects to a presentation
Test 1, question 3 For a sound on a slide, you’ve selected the option to hide the sound icon when you present. Which of these start settings is not compatible with hiding the icon? (Pick one answer.)
1. The sound starts automatically.
2. The sound starts when you click the slide.
3. The sound starts when you click a shape on the slide.
4. The sound starts when you click the sound icon on the slide.

Add sound effects to a presentation
Test 1, question 3: Answer The sound starts when you click the sound icon on the slide.
This way of starting won’t be compatible with hiding the sound icon. You’d need to change the start so it doesn't rely on the sound icon's being visible.

Lesson 2
Play music from a CD

Add sound effects to a presentation
Play music from a CD Playing music from a CD gives you a wealth of choices for background music. You can select tracks to play throughout a presentation or to set a mood at the start and end of a show.
An advantage of using a CD is that you don’t affect the file size of your presentation. The thing you have to remember is to bring the CD along when you present.
In this lesson, you’ll see how to make your presentation play the tracks you want.
Add sound effects to a presentation
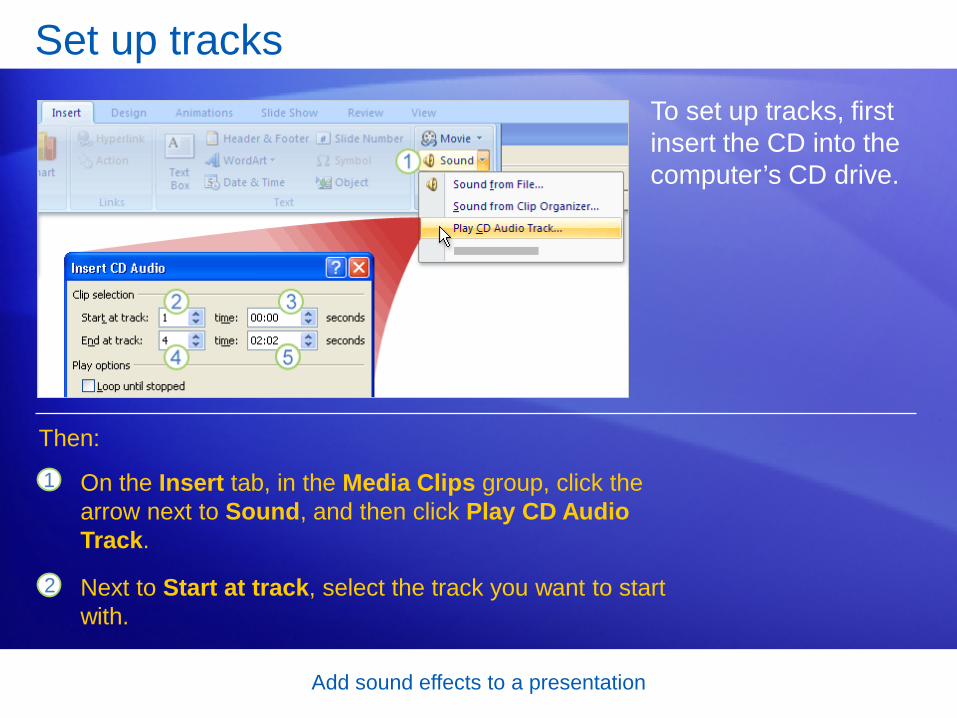
Set up tracks To set up tracks, first insert the CD into the computer’s CD drive.
1
2
On the Insert tab, in the Media Clips group, click the arrow next to Sound, and then click Play CD Audio Track.
Next to Start at track, select the track you want to start with.
Then:

Add sound effects to a presentation
Set up tracks To set up tracks, first insert the CD into the computer’s CD drive.
3 In the time box, specify at what time within the track to start playing the CD. The 00:00 setting means the track will start at its beginning.
Then:
Next to End at track, select the track you want to end with. You can end with the same track you started with.
4

Add sound effects to a presentation
Set up tracks To set up tracks, first insert the CD into the computer’s CD drive.
In the time box, specify at what time within the track to stop playing the CD. To play the full track, put its full playing time here. (But note that if the slide show ends before the track is finished, the music stops.)
Then:
5
Add sound effects to a presentation
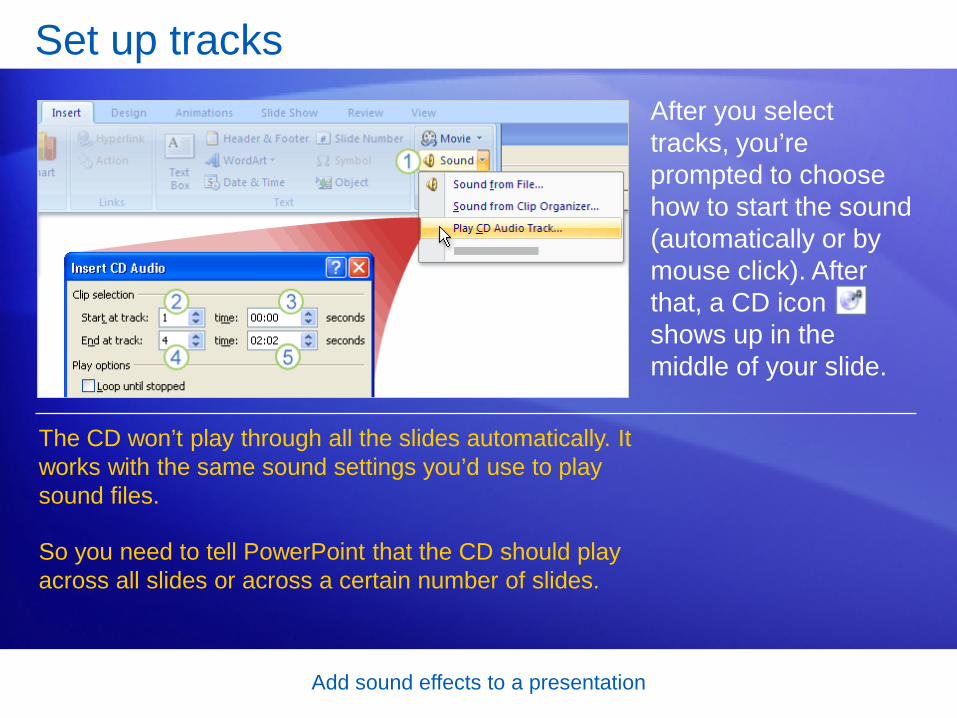
Set up tracks After you select tracks, you’re prompted to choose how to start the sound (automatically or by mouse click). After that, a CD icon shows up in the middle of your slide.
The CD won’t play through all the slides automatically. It works with the same sound settings you’d use to play sound files.
So you need to tell PowerPoint that the CD should play across all slides or across a certain number of slides.

Add sound effects to a presentation
Set up tracks After you select tracks, you’re prompted to choose how to start the sound (automatically or by mouse click). After that, a CD icon shows up in the middle of your slide.
The CD will stop when the show reaches the end of the last slide that it’s specified to play through.
If the slide show is set to loop, the CD will resume with its first programmed track when the slide show restarts.

Add sound effects to a presentation
Suggestions for practice 1. Play music through a whole presentation.
2. Play music at the start and end of a show.
Online practice (requires PowerPoint 2007)

Add sound effects to a presentation
Test 2, question 1 Besides speakers, a CD-ROM drive, and a sound card, what’s an indispensable item for your presentation if you’re playing music from a CD? (Pick one answer.)
1. Popcorn and candy.
2. The CD itself.
3. Your presentation. It’s got the CD icons in it, so just start it and your tracks will play.

Add sound effects to a presentation
Test 2, question 1: Answer The CD itself.
The music won’t play without the inserted CD.
Add sound effects to a presentation
Test 2, question 2 The total playing time for track 3 is 03:30. How would you set up the track if you wanted the CD to start 1 minute into the track and end 30 seconds later? (Pick one answer.)
1. Starting track: 3; starting time: 00:00. Ending track: 3; ending time: 01:30.
2. Starting track: 3; starting time: 01:00. Ending track: 3; ending time: 00:30.
3. Starting track: 3; starting time: 01:00. Ending track: 3; ending time: 01:30.

Add sound effects to a presentation
Test 2, question 2: Answer Starting track: 3; starting time: 01:00. Ending track: 3; ending time: 01:30.
The ending time equals the number of seconds of play plus the time you set the track to start.

Add sound effects to a presentation
Test 2, question 3 To open the dialog box that has the options for setting up CD tracks, what do you need to do? (Pick one answer.)
1. Insert the CD into the CD-ROM drive, open your presentation, and display the slide that you want the sound to start on.
2. Insert the CD into the CD-ROM drive, open your presentation, and display the slide that you want the sound to start on. Then click the Insert tab. In the Media Clips group, click the arrow next to Sound, and click Play CD Audio Track.

Add sound effects to a presentation
Test 2, question 3: Answer Insert the CD into the CD-ROM drive, open your presentation, and display the slide that you want the sound to start on. Then click the Insert tab. In the Media Clips group, click the arrow next to Sound, and click Play CD Audio Track.
Once you’ve “inserted” the CD, if you want to modify your track settings, simply click the CD icon on the slide, and click Options under Sound Tools. You can change your track settings on the Options tab.

Add sound effects to a presentation
Quick Reference Card
For a summary of the tasks covered in this course, view the Quick Reference Card.

Microsoft® Office PowerPoint® 2007 Training
Create your first presentation

Create your first presentation
Course contents
• Overview: Get set with the basics
• Lesson 1: Create your slides
• Lesson 2: Choose a theme, add more content
• Lesson 3: Proof, print, and prep for the show
Each lesson includes a list of suggested tasks and a set of test questions.

Create your first presentation
Overview: Get set with the basics
Have you been asked to put together a PowerPoint presentation, but you’re not sure how to start?
This course will teach you everything you need to know to create and deliver a presentation.
You’ll find out how to create slides, put content on them, and make them look good. Then you’ll learn how to prepare speaker notes and handouts and get ready to present.

Create your first presentation
Course goals
• Create slides and add text.
• Insert pictures and other content.
• Apply a theme for the presentation’s overall look.
• Print handouts and notes.
• Prepare to give the show.

Lesson 1
Create your slides

Create your first presentation
Create your slides This is a glimpse of the PowerPoint window.
This lesson will give you an introduction to the window and help you feel comfortable working there.
You’ll also see how to add new slides, choose a layout for a slide, and add text as well as reuse slides from another presentation.
Finally, you’ll find out how to prepare notes as you create the show, to refer to when you present.

Create your first presentation
Get to know your workspace This is the view that first opens in PowerPoint. It’s called Normal view.
You work here to create slides.
1
2
The slide pane is the big area in the middle. You work directly on the slide in this space.
On the slide, the boxes with the dotted borders are called placeholders. Here’s where you type your text, insert art, or add other content.
There are three main areas of Normal view.

Create your first presentation
Get to know your workspace This is the view that first opens in PowerPoint. It’s called Normal view.
You work here to create slides.
On the left are small, or thumbnail, versions of the slides in your presentation, with the one you’re working on highlighted. This area is the Slides tab.
There are three main areas of Normal view.
3

Create your first presentation
Get to know your workspace This is the view that first opens in PowerPoint. It’s called Normal view.
You work here to create slides.
In the bottom area is the notes pane, where you type the notes that you’ll refer to while you present.
There are three main areas of Normal view.
4

Create your first presentation
Add new slides When PowerPoint opens, there’s only one slide in the show.
You add the other slides.
The most obvious way to add a new slide is by clicking New Slide on the Home tab, as the picture shows.

Create your first presentation
Add new slides When PowerPoint opens, there’s only one slide in the show.
You add the other slides.
There are two ways to use the New Slide button:
1 If you click the top part of the button, where the slide icon is, a new slide is immediately added beneath the slide that’s selected on the Slides tab.

Create your first presentation
Add new slides When PowerPoint opens, there’s only one slide in the show.
You add the other slides.
There are two ways to use the New Slide button:
2 If you click the bottom part of the button, you get a gallery of layouts for the slide. You choose a layout, and the slide is inserted with that layout.

Create your first presentation
Add new slides If you add a slide without choosing a layout, PowerPoint applies one automatically.
You can change it if you want: Right-click the slide that has the layout you want to replace, and then point to Layout.

Create your first presentation
Pick layouts for slides A slide layout arranges your slide content.
For example, you may want both a list and a picture on the slide, or a picture and a caption.
Layouts contain different types of placeholders and placeholder arrangements to support whatever your content is.

Create your first presentation
Pick layouts for slides The picture shows the layouts that PowerPoint starts with automatically.
1
2
The Title Slide layout, shown here as it looks in the layouts gallery, is applied to the first slide in the show (the one that’s already there when you start).
On the slide, the Title Slide layout contains placeholders for a title and subtitle.

Create your first presentation
Pick layouts for slides The picture shows the layouts that PowerPoint starts with automatically.
The layout you’ll probably use the most for other slides is called Title and Content, shown here as it looks in the layouts gallery.
3
4 On the slide, this layout has a placeholder for the slide title, and a second, all-purpose placeholder that contains text as well as several icons.

Create your first presentation
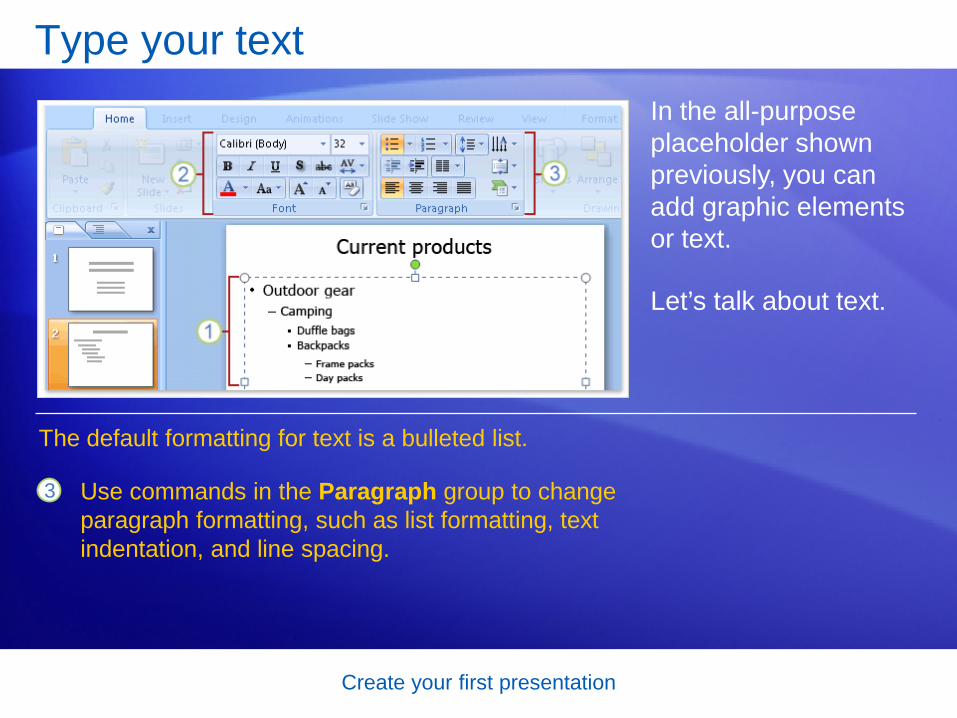
Type your text In the all-purpose placeholder shown previously, you can add graphic elements or text.
Let’s talk about text.
1
2
You can use different levels of text within bulleted lists to make minor points under major points.
On the Ribbon, use commands in the Font group to change character formatting, such as font color and size.
The default formatting for text is a bulleted list.
Create your first presentation
Type your text In the all-purpose placeholder shown previously, you can add graphic elements or text.
Let’s talk about text.
3 Use commands in the Paragraph group to change paragraph formatting, such as list formatting, text indentation, and line spacing.
The default formatting for text is a bulleted list.

Create your first presentation
Insert slides from another presentation You may need to use slides from an existing presentation in your show.
Here’s how to do it.
1
2
On the Home tab, click the arrow next to New Slide, as if you were going to insert a new slide and choose a layout for it first.
Below the layout gallery, click Reuse Slides.

Create your first presentation
Insert slides from another presentation You may need to use slides from an existing presentation in your show.
This is how to do it.
3 In the Reuse Slides task pane, under Insert slide from, click Browse to find the presentation or slide library that has the slides you want. Then click the arrow to open those slides in the task pane.

Create your first presentation
Insert slides from another presentation You may need to use slides from an existing presentation in your show.
This is how to do it.
When you find the slide you want, take notice of the Keep source formatting check box at the very bottom of the pane. If you want to retain the exact look of the slides you’re inserting, be sure this check box is selected before you insert the slide.
4

Create your first presentation
Insert slides from another presentation You may need to use slides from an existing presentation in your show.
This is how to do it.
Click each slide you want to insert. Each one is copied into the open presentation, below the currently selected slide or below your cursor, if you’ve positioned it beneath a slide thumbnail.
5

Create your first presentation
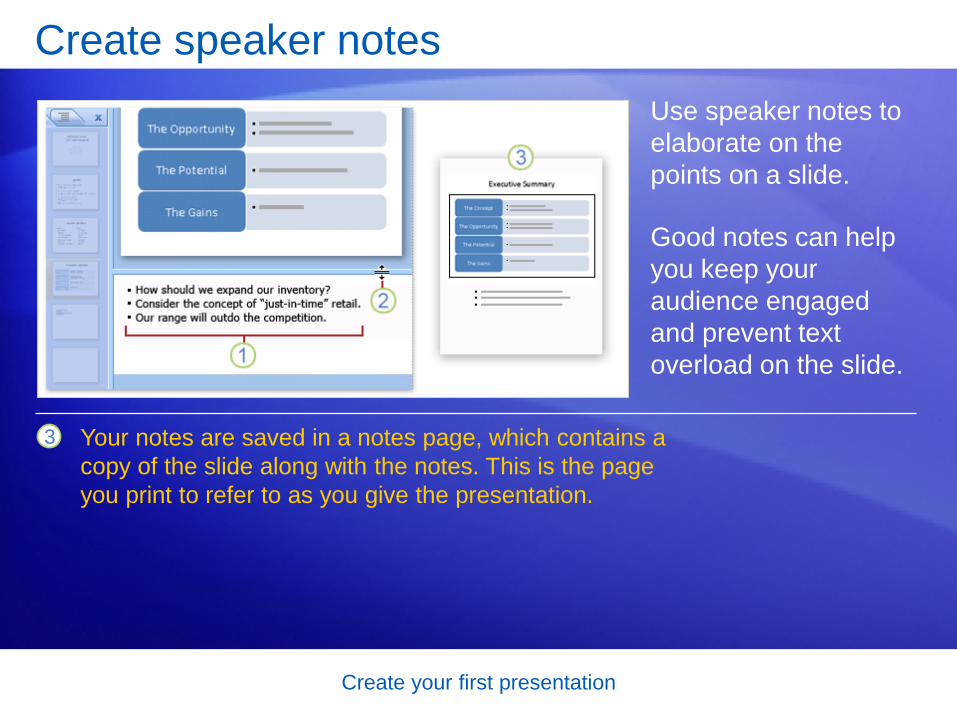
Create speaker notes Use speaker notes to elaborate on the points on a slide.
Good notes can help you keep your audience engaged and prevent text overload on the slide.
1
2
As you develop the content on your slides, type your notes in the notes pane, below the slide.
You can enlarge the notes pane so that it’s easier to work in by dragging the split bar.
Create your first presentation
Create speaker notes Use speaker notes to elaborate on the points on a slide.
Good notes can help you keep your audience engaged and prevent text overload on the slide.
3 Your notes are saved in a notes page, which contains a copy of the slide along with the notes. This is the page you print to refer to as you give the presentation.

Create your first presentation
Suggestions for practice 1. Get familiar with the areas of the PowerPoint window.
2. Type text.
3. Add new slides.
4. Navigate and add more text.
5. Use text indents and formatting.
6. Work with text automatic text fit.
7. Type and view notes.
Online practice (requires PowerPoint 2007)

Create your first presentation
Test 1, question 1 In the PowerPoint window, what’s the main area for adding slide content? (Pick one answer.)
1. The Slides tab, where the slide thumbnails are, on the left of the window.
2. The notes pane.
3. The slide pane, in the middle of the window.

Create your first presentation
Test 1, question 1: Answer The slide pane, in the middle of the window.
Work in the slide pane to add text, pictures, shapes, media files, or other content to your slides.

Create your first presentation
Test 1, question 2 When you add a new slide, how do you choose a layout for it first? (Pick one answer.)
1. On the Home tab, click the top half of the New Slide button.
2. On the Home tab, click the bottom half of the New Slide button, where the arrow is.
3. Right-click a slide thumbnail on the Slides tab, and click New Slide.
Create your first presentation
Test 1, question 2: Answer On the Home tab, click the bottom half of the New Slide button, where the arrow is.
Clicking the arrow displays the slide layouts. When you select one, a slide is inserted with that layout.
Create your first presentation
Test 1, question 3 What’s a quick way to replace a slide’s current layout with a different layout? (Pick one answer.)
1. Click the bottom half of the New Slide button on the Home tab.
2. Right-click the slide that has the layout you want to replace, and point to Layout.

Create your first presentation
Test 1, question 3: Answer Right-click the slide that has the layout you want to replace, and point to Layout.
This opens the gallery of layouts. You click one to apply it to the slide. Another way is to select the thumbnail of the slide with the layout you want to change, and click Layout on the Home tab. That displays the gallery, where you choose a layout to apply.

Lesson 2
Choose a theme, add more content
Create your first presentation
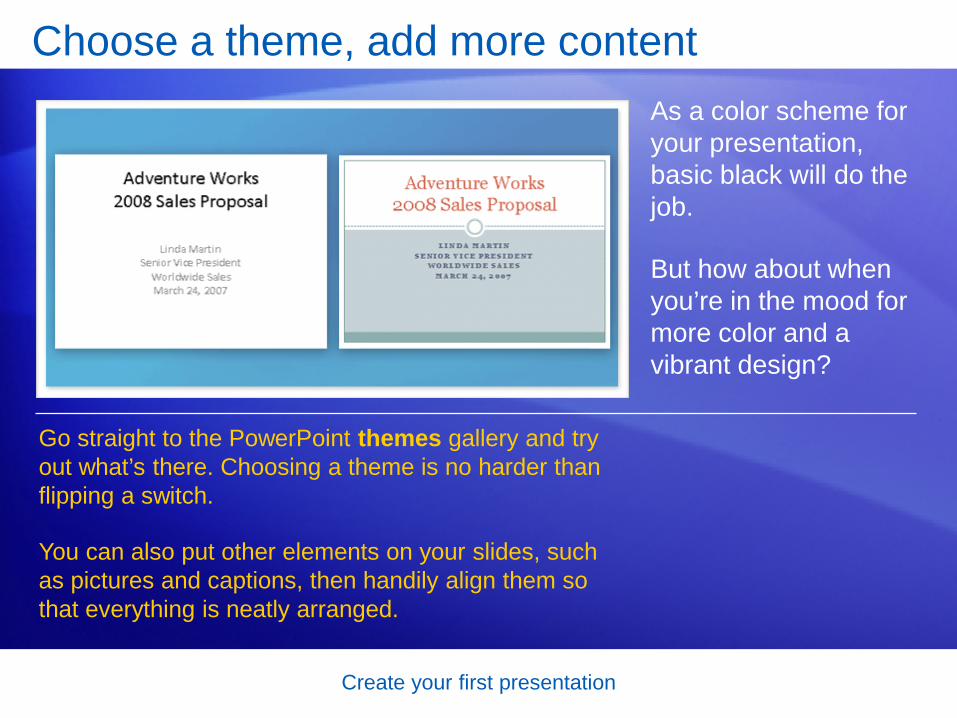
Choose a theme, add more content As a color scheme for your presentation, basic black will do the job.
But how about when you’re in the mood for more color and a vibrant design?
Go straight to the PowerPoint themes gallery and try out what’s there. Choosing a theme is no harder than flipping a switch.
You can also put other elements on your slides, such as pictures and captions, then handily align them so that everything is neatly arranged.

Create your first presentation
The beauty of themes Every presentation has a theme.
Some are just more colorful than others.
The theme determines the look and colors of your slides and gives your presentation a consistent appearance.
Here, you see three title slides that have the same content but that use different themes.

Create your first presentation
The beauty of themes Every presentation has a theme.
Some are just more colorful than others.
A theme includes these elements, offered as a package:
• Background design
• Color scheme
• Font types and sizes
• Placeholder positions

Create your first presentation
The beauty of themes The color scheme affects background colors, font colors, fill colors for shapes, border colors, hyperlinks, and slide elements like tables and charts.
And if you have placeholders, the theme honors the layout you’ve chosen; it just moves things around a little.

Create your first presentation
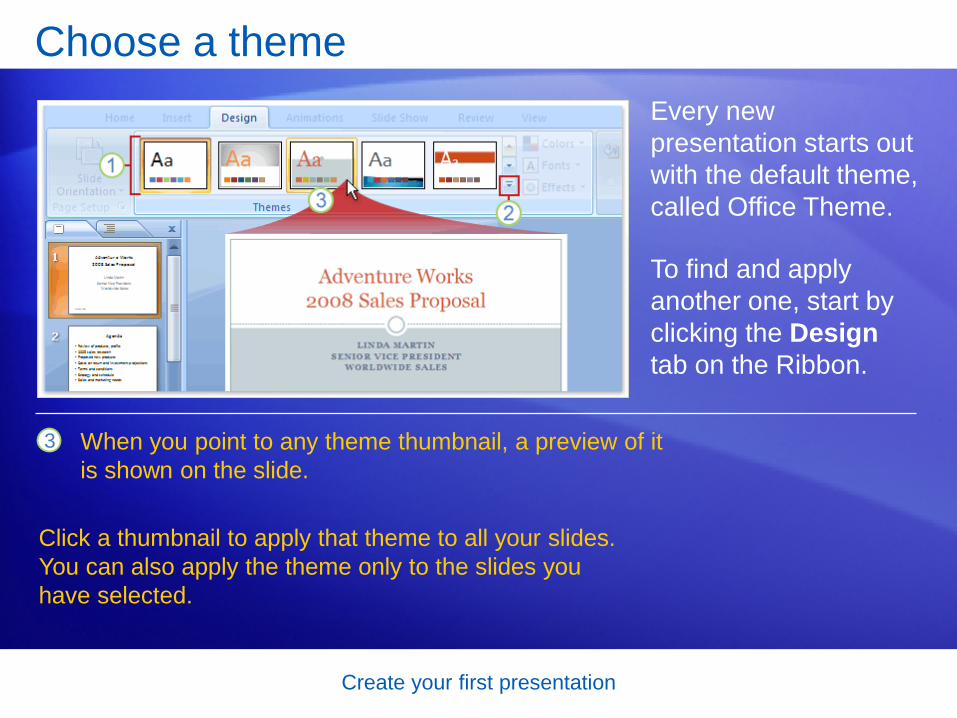
Choose a theme Every new presentation starts out with the default theme, called Office Theme.
To find and apply another one, start by clicking the Design tab on the Ribbon.
1
2
Theme samples, in the form of the small thumbnails you see here, will show in the Themes group.
To see additional themes, click the More button on the right of the group.
Create your first presentation
Choose a theme Every new presentation starts out with the default theme, called Office Theme.
To find and apply another one, start by clicking the Design tab on the Ribbon.
3 When you point to any theme thumbnail, a preview of it is shown on the slide.
Click a thumbnail to apply that theme to all your slides. You can also apply the theme only to the slides you have selected.
Create your first presentation
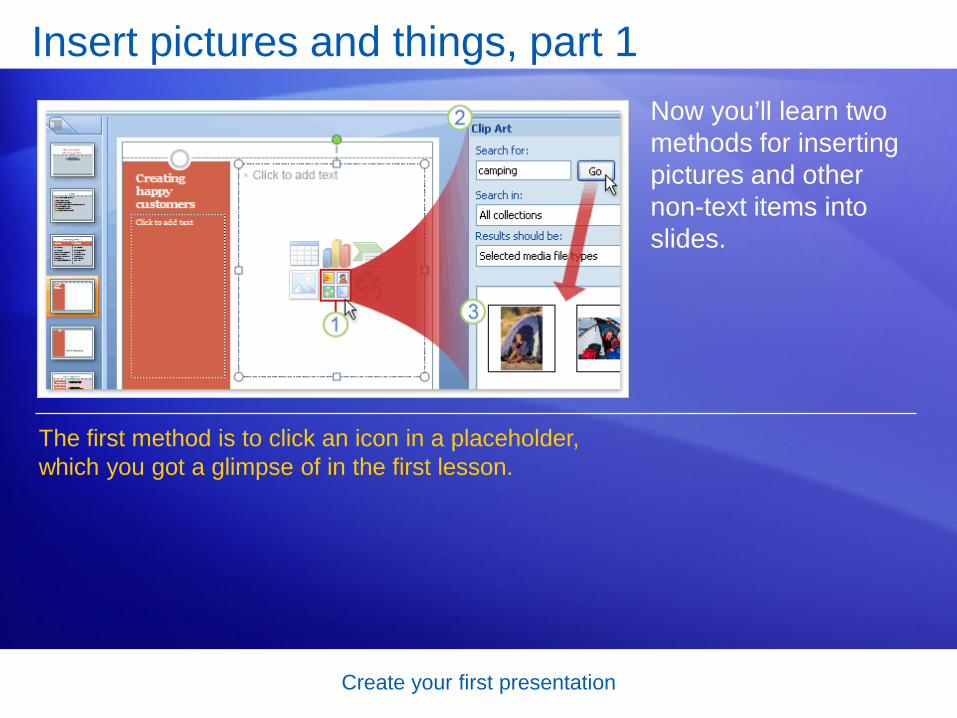
Insert pictures and things, part 1 Now you’ll learn two methods for inserting pictures and other non-text items into slides.
The first method is to click an icon in a placeholder, which you got a glimpse of in the first lesson.

Create your first presentation
Insert pictures and things, part 1 Now you’ll learn two methods for inserting pictures and other non-text items into slides.
1
2
Click the Clip Art icon in the placeholder.
The Clip Art task pane opens. There, type a keyword in the Search for box that suggests the sort of clip you want. Then click Go.
The picture illustrates how to insert a piece of clip art:

Create your first presentation
Insert pictures and things, part 1 Now you’ll learn two methods for inserting pictures and other non-text items into slides.
Clips appear that fit the keyword. Click one of them to insert it into the slide. The picture is automatically sized and positioned within the placeholder.
The picture illustrates how to insert a piece of clip art: 3

Create your first presentation
Insert pictures and things, part 2 Another way to insert slide items is to use the Insert tab on the Ribbon.
All of the things you could insert from the slide pane are also available on the Insert tab, plus more—including shapes, hyperlinks, text boxes, headers and footers, and media clips such as sounds.

Create your first presentation
Insert pictures and things, part 2 The picture shows the array of things available on the Insert tab.
1
2
Text boxes are handy when you want to add text somewhere and need another placeholder for it, such as for a picture caption. On the Insert tab, click Text Box.
Draw the box on the slide and type in it.
A typical thing to insert is a text box, as shown.

Create your first presentation
Insert pictures and things, part 2 What’s the better method?
Since you have two choices for how to insert some things, which one is recommended?
It mostly comes down to what you find handiest. One thing to consider is how you want the inserted item to be positioned on the slide.

Create your first presentation
Edit slide elements After inserting a picture, you may want to make adjustments such as resizing, cropping, or changing the brightness.
Use Picture Tools for this.
1
2
So, select the picture.
Picture Tools appear above the Ribbon. Use options on the Format tab to work with the picture.
Picture Tools are available when the picture is selected.

Create your first presentation
Edit slide elements There are tools for the range of things you can insert, from tables, charts, and SmartArt™ graphics to text boxes and shapes, sounds, and videos.
Just select the inserted item to see the relevant tab on the Ribbon.

Create your first presentation
Arrange slide elements Once you’ve put all the things that you want on the slide, you need to align them so they look just right.
For example, in this picture, the text box with the caption will look best once it’s aligned evenly with the picture—either flush left, or correctly centered.

Create your first presentation
Arrange slide elements You use the Arrange commands to align slide elements.
1
2
3
To align the caption so it’s flush left with the picture, first select both placeholders.
In Picture Tools, find the Arrange group on the Format tab.
Click the Align button, and then click Align Left.

Create your first presentation
Suggestions for practice 1. Choose a new theme.
2. Insert a picture.
3. Resize the picture.
4. Add a caption.
5. Align the picture and caption.
6. Bonus: Add an animation effect.
Online practice (requires PowerPoint 2007)

Create your first presentation
Test 2, question 1 When you apply a theme, it always affects every slide in the presentation. (Pick one answer.)
1. True.
2. False.

Create your first presentation
Test 2, question 1: Answer False.
If you want the theme to apply to only one slide or a few slides, select those slides. Then display the theme gallery, right-click the theme you want, and click Apply to Selected Slides.

Create your first presentation
Test 2, question 2 You can insert a text box from an icon within certain slide layouts. (Pick one answer.)
1. True.
2. False.
Create your first presentation
Test 2, question 2: Answer False.
You can insert pictures, charts, SmartArt graphics, tables, and media files by using the icons within content layouts. To insert a text box, however, you go to the Insert tab. There, click Text Box, and then draw the box on the slide.
Create your first presentation
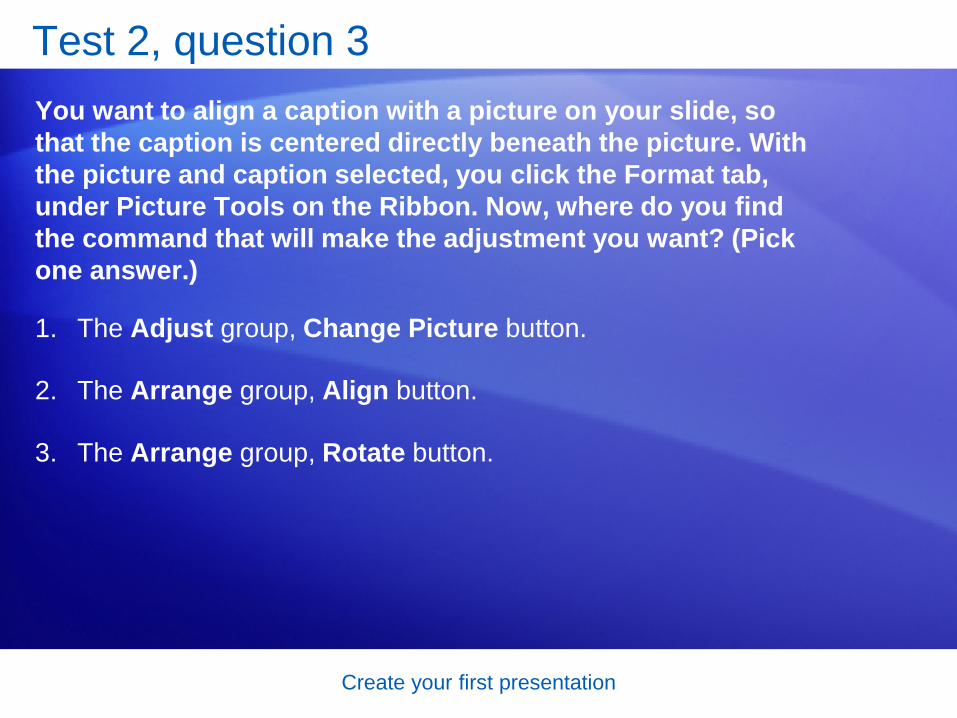
Test 2, question 3 You want to align a caption with a picture on your slide, so that the caption is centered directly beneath the picture. With the picture and caption selected, you click the Format tab, under Picture Tools on the Ribbon. Now, where do you find the command that will make the adjustment you want? (Pick one answer.)
1. The Adjust group, Change Picture button.
2. The Arrange group, Align button.
3. The Arrange group, Rotate button.

Create your first presentation
Test 2, question 3: Answer The Arrange group, Align button.
This button opens a menu that contains several alignment commands. The Align Center command is what you’re after.

Lesson 3
Proof, print, and prep for the show
Create your first presentation
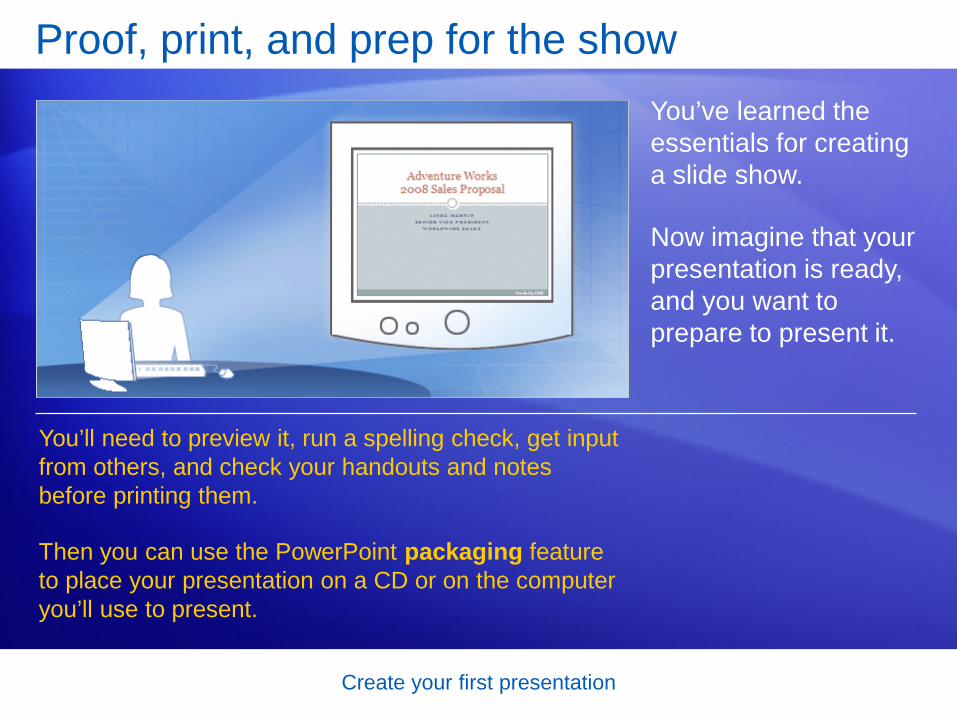
Proof, print, and prep for the show You’ve learned the essentials for creating a slide show.
Now imagine that your presentation is ready, and you want to prepare to present it.
You’ll need to preview it, run a spelling check, get input from others, and check your handouts and notes before printing them.
Then you can use the PowerPoint packaging feature to place your presentation on a CD or on the computer you’ll use to present.

Create your first presentation
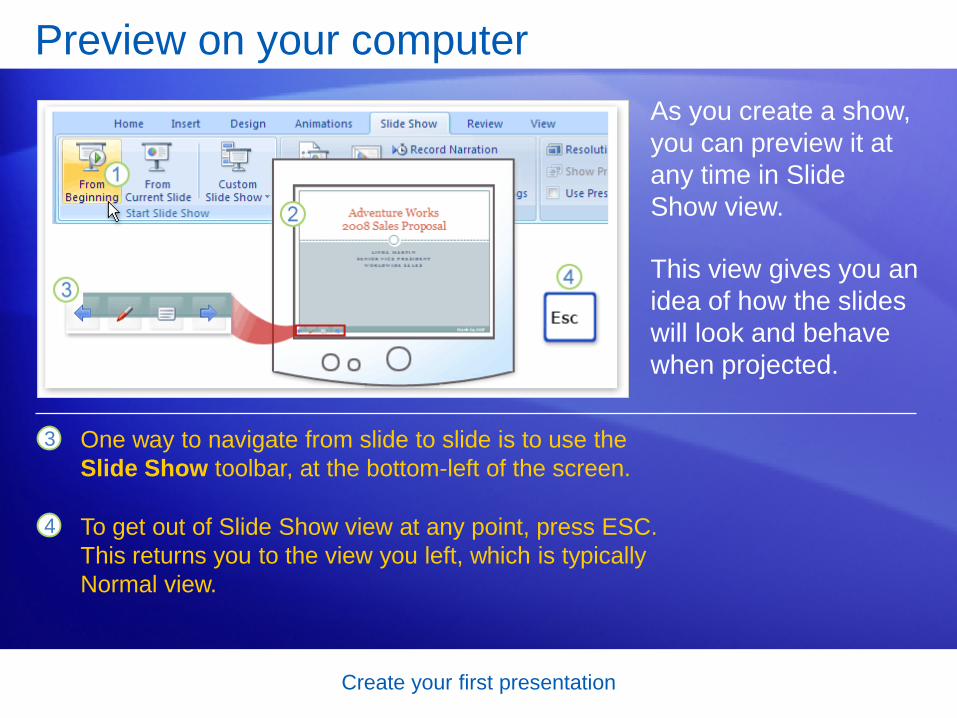
Preview on your computer As you create a show, you can preview it at any time in Slide Show view.
This view gives you an idea of how the slides will look and behave when projected.
1
2
To open Slide Show view, click the Slide Show tab, and click a command in the Start Slide Show group—to start on the first slide or current slide.
Slide Show view fills your computer screen.
Create your first presentation
Preview on your computer As you create a show, you can preview it at any time in Slide Show view.
This view gives you an idea of how the slides will look and behave when projected.
3 One way to navigate from slide to slide is to use the Slide Show toolbar, at the bottom-left of the screen.
To get out of Slide Show view at any point, press ESC. This returns you to the view you left, which is typically Normal view.
4

Create your first presentation
• Press F5 to start on the first slide.
• Press SHIFT+F5 to start on the current slide.
Preview on your computer Here are some other ways to open Slide Show view:
When you do this, the show begins on the slide that’s currently selected on the Slides tab.
• Click the Slide Show button in the lower-right portion of the PowerPoint window, next to the Zoom slider.
• Click the Slide Show button on the View tab. The show begins on the first slide no matter which slide is currently selected.
Create your first presentation
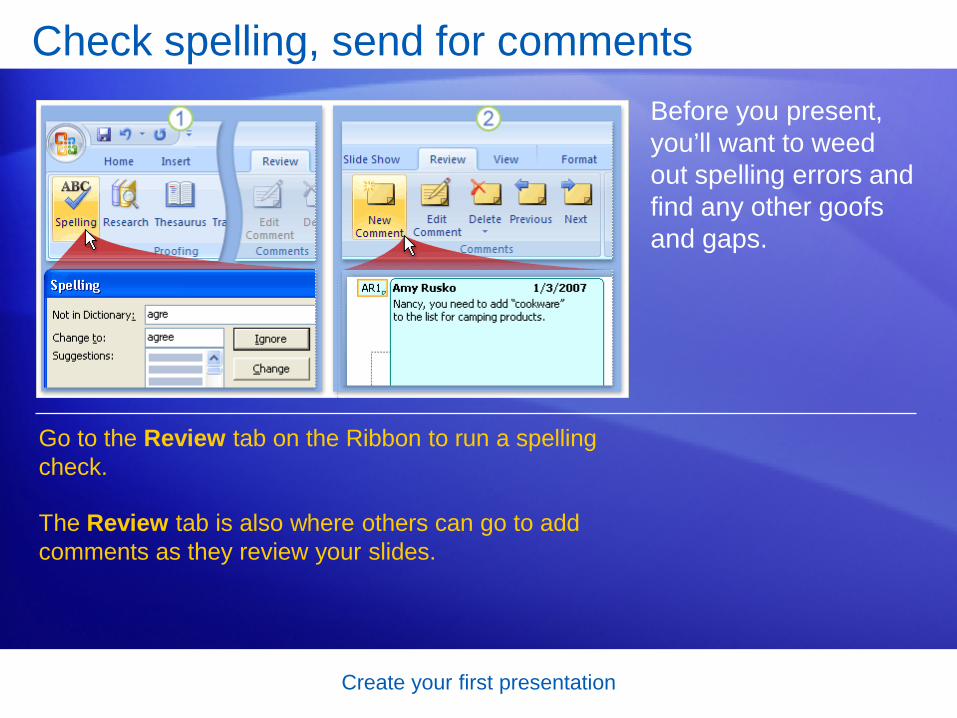
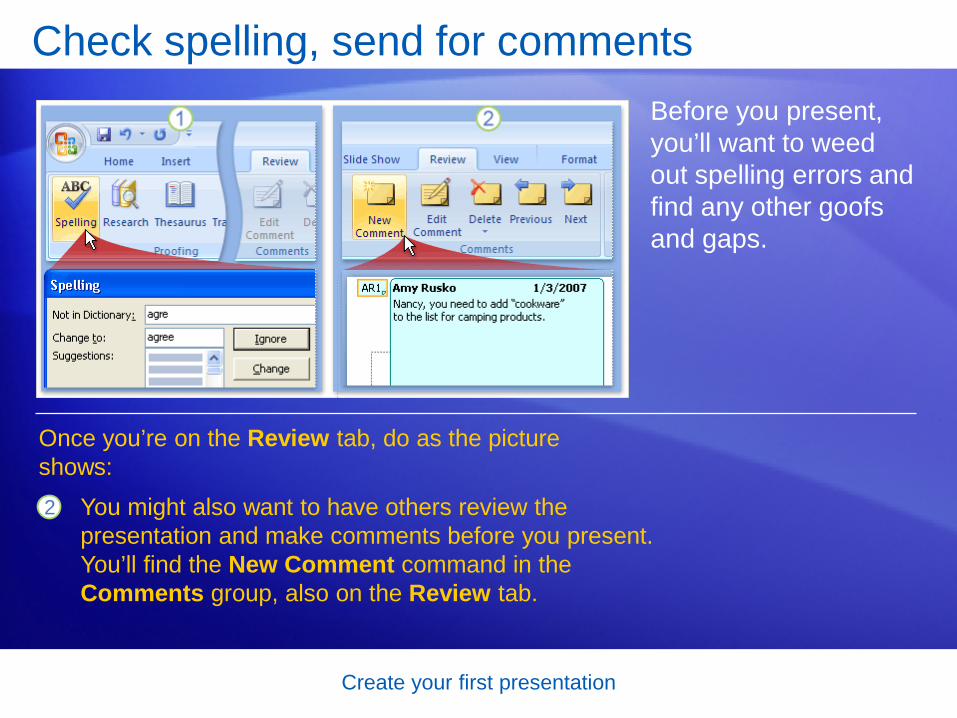
Check spelling, send for comments Before you present, you’ll want to weed out spelling errors and find any other goofs and gaps.
Go to the Review tab on the Ribbon to run a spelling check.
The Review tab is also where others can go to add comments as they review your slides.

Create your first presentation
Check spelling, send for comments Before you present, you’ll want to weed out spelling errors and find any other goofs and gaps.
Once you’re on the Review tab, do as the picture shows: 1 In the Proofing group, click Spelling, and make
selections as the spelling checker moves through your slides.
Create your first presentation
Check spelling, send for comments Before you present, you’ll want to weed out spelling errors and find any other goofs and gaps.
Once you’re on the Review tab, do as the picture shows: 2 You might also want to have others review the
presentation and make comments before you present. You’ll find the New Comment command in the Comments group, also on the Review tab.

Create your first presentation
Print handouts The most common type of PowerPoint printout for audiences is called a handout.
Handouts can have one or several slides per page, up to nine.
A good practice is to use Print Preview to select the handout type you want, as shown here. That way you can see how the handout will look before printing.

Create your first presentation
Print handouts To print handouts, start by clicking Print Preview on the menu that opens when you click the Microsoft Office Button .
1
2
In Print Preview, click the arrow in the Print What box to display the list of handout types.
Choose the handout type you want.
Then follow the steps shown in the picture.

Create your first presentation
Print handouts To print handouts, start by clicking Print Preview on the menu that opens when you click the Microsoft Office Button .
When you click the handout type, you’re shown a preview of how your slides will look when printed in that format. You can navigate through all the handout pages. The handout type with the 3 slides per page option also includes lines for audience notes.
Then follow the steps shown in the picture.
3
When you’re ready to print, click Print.

Create your first presentation
Print speaker notes You’ve printed handouts to give to your audience.
Now print speaker notes for yourself, which you can refer to as you present.
It’s a good practice to look at your speaker notes before you print them, to see if they look as you’re expecting them to.

Create your first presentation
Print speaker notes To print speaker notes, click the Microsoft Office Button, point to Print, and then click Print Preview.
1
2
Select Notes Pages in the Print What list.
Your notes pages are shown in the preview window, starting with the first slide (unless you specify otherwise).
Then follow the steps shown in the picture.

Create your first presentation
Print speaker notes
If something isn’t formatted as you’d intended, or if note text has been cut off, make the necessary adjustments either in Notes Page view or in Normal view.
After you’ve checked your notes and you’re ready to print, click Print.
To print speaker notes, click the Microsoft Office Button, point to Print, and then click Print Preview.
Then follow the steps shown in the picture.

Create your first presentation
Add footer text to handouts and notes Print Preview also affords you the chance to add or adjust footers in your handouts and notes.
By default, printed handouts and notes have page numbers.
But they can show other things, such as footer text.

Create your first presentation
Add footer text to handouts and notes Follow these steps if you want your printouts to show other content.
1
2
Click Options, and then click Header and Footer.
To show footer text, such as “Draft” or “Confidential,” select the Footer option, and then type the text you want in the box.

Create your first presentation
Add footer text to handouts and notes Follow these steps if you want your printouts to show other content.
The selections you make on the Notes and Handouts tab in the Header and Footer dialog box apply to your handouts and your notes pages.

Create your first presentation
Color options for printing Depending on what kind of printer you’re using, you can print your presentation in Color, Grayscale, or Pure Black and White.
Here’s how to select an option for printing:
1 Under Print Preview, click Options, and point to Color/Grayscale. Then select from the menu. Your slides will be previewed and printed with that choice applied.

Create your first presentation
Color options for printing Depending on what kind of printer you’re using, you can print your presentation in Color, Grayscale, or Pure Black and White.
Here’s how to select an option for printing:
The first preview example shows a slide that will be printed in color.
2
3 The second preview example shows a slide that will be printed in grayscale.

Create your first presentation
Color options for printing Depending on what kind of printer you’re using, you can print your presentation in Color, Grayscale, or Pure Black and White.
Here’s how to select an option for printing:
The last preview example shows a slide that will be printed in pure black and white.
4

Create your first presentation
Package the presentation The PowerPoint Package for CD feature bundles your presentation file and any other files you need and copies them into one folder or directly to a CD.
If you copy your files to a folder, you can burn the folder to a CD later.
You can also copy the files to a network server that you have access to from your presenting computer.

Create your first presentation
Package the presentation The picture shows how to package your presentation and related files.
1 Click the Microsoft Office Button.
Point to Publish, and click Package for CD.
In the dialog box that opens, make selections for what you want to be included in the package, and copy your file or files to either a folder or a CD.
2
3

Create your first presentation
Package the presentation The picture shows how to package your presentation and related files.
Important: Always save your presentation before packaging it to a folder or CD.

Create your first presentation
• To package and then copy to a CD from PowerPoint, you must be running Microsoft Windows® XP or later on your computer, and you must have a CD burner.
• If you’re running Microsoft Windows 2000, you can still use this feature to package the presentation files to a folder, and then use a third-party program to burn the folder to a CD.
Package the presentation Requirements for packaging to a CD

Create your first presentation
Suggestions for practice 1. Preview the show on your computer.
2. Run a spelling check.
3. Send the presentation for comments.
4. Prepare to print handouts.
5. Choose a color setting and print handouts.
6. Check your notes in Notes Page view.
7. Package the presentation.
Online practice (requires PowerPoint 2007)

Create your first presentation
Test 3, question 1 Which key do you press to go into Slide Show view and start on the first slide? (Pick one answer.)
1. ESC.
2. F5.
3. F7.

Create your first presentation
Test 3, question 1: Answer F5.
And to start on the selected slide, you’d press SHIFT+F5.

Create your first presentation
Test 3, question 2 Which handout option would you choose if you wanted the handout to include lines for audience notes? (Pick one answer.)
1. The 3 slides per page option.
2. The 1 slide per page option.
3. The Notes Pages option.

Create your first presentation
Test 3, question 2: Answer The 3 slides per page option.

Create your first presentation
Test 3, question 3 You’re in Print Preview looking at your notes pages, and you find that some of the text formatting for the notes is not what you wanted. You can go ahead and correct this in Print Preview. (Pick one answer.)
1. True.
2. False.

Create your first presentation
Test 3, question 3: Answer False.
You need to close Print Preview and open Notes Page view to fix the formatting.
Create your first presentation
Quick Reference Card
For a summary of the tasks covered in this course, view the Quick Reference Card.

Microsoft® Office PowerPoint® 2007 Training
Discover the power of custom layouts

Discover the power of custom layouts
Course contents
• Overview: Choices that suit your content
• Lesson: The power of layouts
The lesson includes a list of suggested tasks and a set of test questions.

Discover the power of custom layouts
Overview: Choices that suit your content
Would you like more slide layout choices than those available in the built-in layouts? Want to create a slide arrangement that perfectly suits your company’s slide content?
Take this course to learn about working in Slide Master view to create your own layout.
You’ll find out how to add and arrange placeholders, insert a picture, and then save the layout to use over and over in future presentations.

Discover the power of custom layouts
Course goals
• Create a custom slide layout.
• Add a picture (logo) to your layout.
• Use the custom slide layout in your presentation.
• Save the custom slide layout for reuse in future presentations.
Lesson
The power of layouts
Discover the power of custom layouts
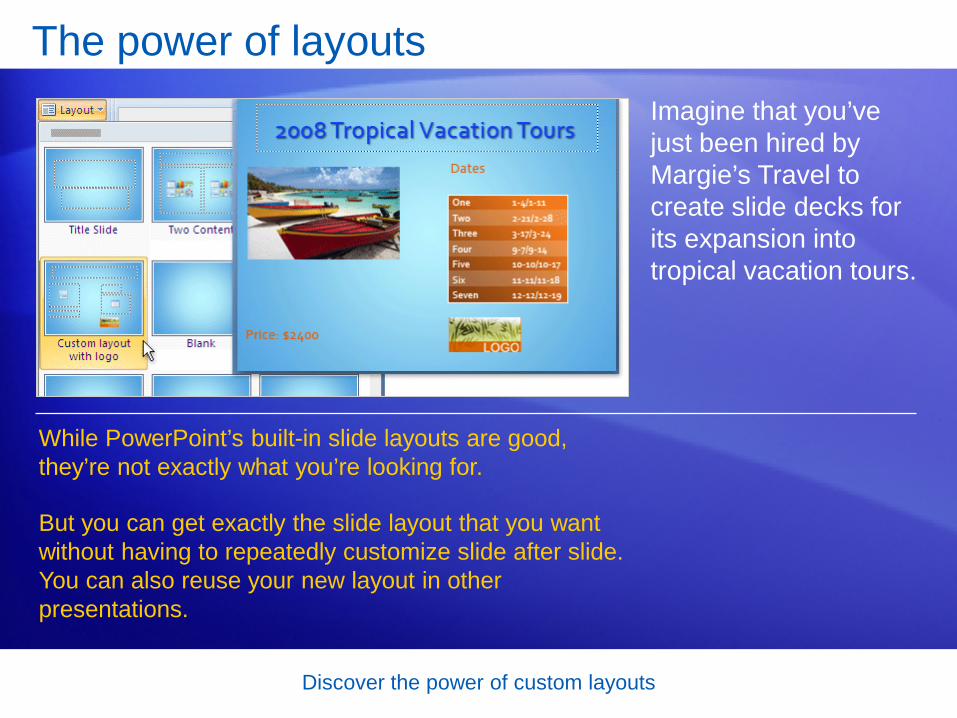
The power of layouts Imagine that you’ve just been hired by Margie’s Travel to create slide decks for its expansion into tropical vacation tours.
While PowerPoint’s built-in slide layouts are good, they’re not exactly what you’re looking for.
But you can get exactly the slide layout that you want without having to repeatedly customize slide after slide. You can also reuse your new layout in other presentations.

Discover the power of custom layouts
Layouts and placeholders Before jumping into creating a custom layout, let’s spend a minute examining layouts and placeholders.
Layouts specify the overall arrangement of slide content, while placeholders contain the individual pieces that you can arrange to your liking.
All slides have a default layout, but you can override it with another.

Discover the power of custom layouts
Layouts and placeholders The picture shows the basic placeholders on a slide.
1
2
Title and Subtitle placeholders (boxes with dotted borders)
Text placeholder with placeholder selected

Discover the power of custom layouts
Layouts and placeholders The picture shows the basic placeholders on a slide.
3 Content placeholder used for both body text and slide content such as clip art, SmartArt graphics, tables, shapes, pictures, and charts
4 Header and footer (Date, Footer, Slide Number) placeholders

Discover the power of custom layouts
Go to Slide Master view Here’s the same slide in Normal view and Slide Master view.
To open Slide Master view, on the View tab, in the Presentation Views group, click Slide Master.
Before you create your custom slide layout, let’s spend a moment learning more about Slide Master view.

Discover the power of custom layouts
Slide Master view Slide Master view is a behind-the-scenes view that lets you see and change placeholders and layouts, and make across-the-board changes.
Thumbnails of the layouts appear under the slide master because layouts, along with information such as theme colors, fonts, effects, and background styles, are part of the design shown in the slide master.

Discover the power of custom layouts
Slide Master view The picture shows the elements of Slide Master view.
1
2
3
Slide master thumbnail
Layout thumbnails
Slide master slide in main slide area

Discover the power of custom layouts
Slide Master view In Slide Master view, placeholders can contain only text, even though this text doesn’t appear in your presentation and doesn’t print.
Rather, it is custom prompt text, there to remind you of what to do in the placeholder.
For example, when creating a presentation in Normal view, you may see Click to add text, which is the default custom prompt text for the text placeholder.

Discover the power of custom layouts
Create a custom layout Here’s how to add a custom layout.
1
2
Click Insert Layout.
Newly inserted custom layouts have four placeholders: the Title and three Footers (Date, Footer, and Slide Number).

Discover the power of custom layouts
Create a custom layout Here’s how to add a custom layout.
3 To easily find and reuse your custom layout later, click the Rename button, type a name you can easily recognize in the Layout name box in the Rename Layout dialog box, and then click Rename.
Discover the power of custom layouts
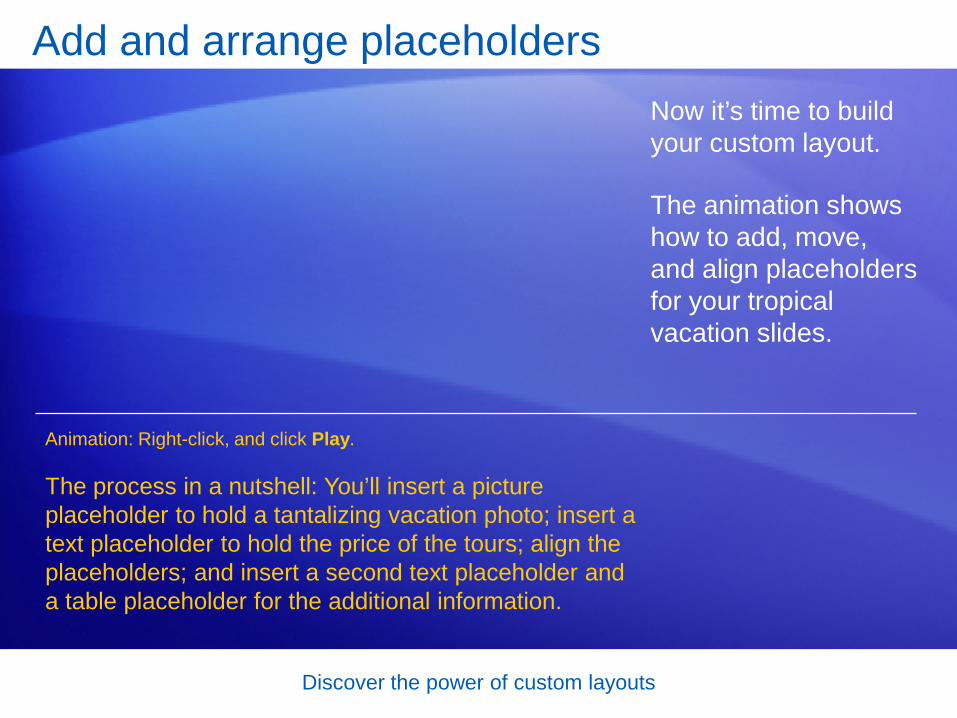
Add and arrange placeholders Now it’s time to build your custom layout.
The animation shows how to add, move, and align placeholders for your tropical vacation slides.
The process in a nutshell: You’ll insert a picture placeholder to hold a tantalizing vacation photo; insert a text placeholder to hold the price of the tours; align the placeholders; and insert a second text placeholder and a table placeholder for the additional information.
Animation: Right-click, and click Play.

Discover the power of custom layouts
Add and arrange placeholders Now it’s time to build your custom layout.
The picture shows how placeholders can be added and aligned on the Master title slide.
The process in a nutshell: You insert a picture placeholder to hold a tantalizing vacation photo; insert a text placeholder to hold the price of the tours; and align the placeholders as shown in the picture.
You can then insert a second text placeholder and a table placeholder for the additional information.

Discover the power of custom layouts
Add a logo If you want the company logo to appear on the tropical vacation slides that use your layout, you’ll add it to the custom layout.
1 Click Picture, locate the logo file, and then click Insert.
Do the following:

Discover the power of custom layouts
Add a logo Caution: Pictures, particularly high-resolution photographs, can quickly inflate the file size of your presentation.
So you’ll want to optimize your pictures to make them as small as possible.

Discover the power of custom layouts
Use your custom layout Now that you’ve created the custom layout with the logo, you can return to Normal view.
Your custom layout is now available for use in this presentation.
And the easiest way to use your custom layout is to add new slide to your presentation.

Discover the power of custom layouts
Use your custom layout So on the Home tab, in the Slides group, click New Slide, and then click Tropical vacation layout.
1
2
Slide 2 in the presentation before you add the layout
Your custom layout inserted after slide 2
The before and after:

Discover the power of custom layouts
Save as a template You can save your presentation as a template.
The advantages are that you can:
• Use the exact slide layout in other presentations.
• Apply the template to existing presentations to quickly update the way they look.

Discover the power of custom layouts
Save as a template You can save your presentation as a template.
The advantages are that you can:
• Use the template to quickly create a new presentation.
• Easily share your template file with others in your company.

Discover the power of custom layouts
Save as a template Here’s how to save the presentation as a template file.
1. Click the Microsoft Office Button, point to Save As, and then click Other Formats.
2. In the File name box, type a file name that you will recognize.
3. In the Save as type list, click PowerPoint Template (*.potx), and then click Save.

Discover the power of custom layouts
Save as a template To use your template, instead of selecting a blank presentation after clicking New, select your template from My Templates, as shown here.
After you apply the template to a presentation, any custom and built-in layouts are available from the New Slide and Layout galleries on the Home tab, in the Slides group.
Discover the power of custom layouts
Suggestions for practice 1. Open Slide Master view.
2. Insert and rename a custom layout.
3. Add and arrange placeholders.
4. Add a logo to your layout.
5. Use your layout.
6. Save as a template.
7. Use the template to create a new presentation.
Online practice (requires PowerPoint 2007)
Discover the power of custom layouts
Test question 1 You can create custom layouts in any view. (Pick one answer.)
1. True.
2. False.

Discover the power of custom layouts
Test question 1: Answer False.
You create custom layouts in Slide Master view.

Discover the power of custom layouts
Test question 2 To have a picture appear in all slides, where do you add it? (Pick one answer.)
1. To the slides you want to see it on.
2. To the slide master.
3. All layouts.
Discover the power of custom layouts
Test question 2: Answer To the slide master.
Any picture or other object that you add to the slide master, such as a shape or SmartArt graphic, appears on all of your slides.

Discover the power of custom layouts
Test question 3 A custom layout can be useful because of which of the following? (Pick one answer.)
1. You can create it once and then use it for multiple presentations.
2. It is flexible and gives you more options than the built-in layouts.
3. You can have multiple custom layouts in the same presentation.
4. You can easily create a slide arrangement that exactly matches your company’s slide content.
5. All of the above.

Discover the power of custom layouts
Test question 3: Answer All of the above.
They’re all excellent reasons to create a custom layout.
Discover the power of custom layouts
Quick Reference Card
For a summary of the tasks covered in this course, view the Quick Reference Card.

Microsoft® Office PowerPoint® 2007 Training
Get up to speed

Get up to speed
Course contents
• Overview: A hands-on introduction
• Lesson 1: Get your bearings—what’s changed and why
• Lesson 2: Get to work in PowerPoint
• Lesson 3: A new file format
The first two lessons include a list of suggested tasks, and all include a set of test questions.

Get up to speed
Overview: A hands-on introduction
When you first open PowerPoint 2007, you’ll see that the user interface has changed. A new structure is in place for PowerPoint commands.
This new design will help you more easily find and use the features you need and create great presentations.
This course will give you a head start with what’s changed and why. After learning what’s new, you won’t want to turn back.

Get up to speed
Course goals
• Gain an understanding of how the new user interface works, and learn to use it with confidence.
• Find out how to do the things you typically do to create and prepare a presentation.
• Learn to use the new file format in PowerPoint in the way that’s best for you.

Lesson 1
Get your bearings—what’s changed and why

Get up to speed
Get your bearings—what’s changed and why The most noticeable change in PowerPoint 2007 is at the top of the window.
Instead of menus and toolbars, there’s a tall band across the screen.
This band is called the Ribbon, and it contains many, very visual commands arranged into groups.
The Ribbon is now your control center for creating a presentation.

Get up to speed
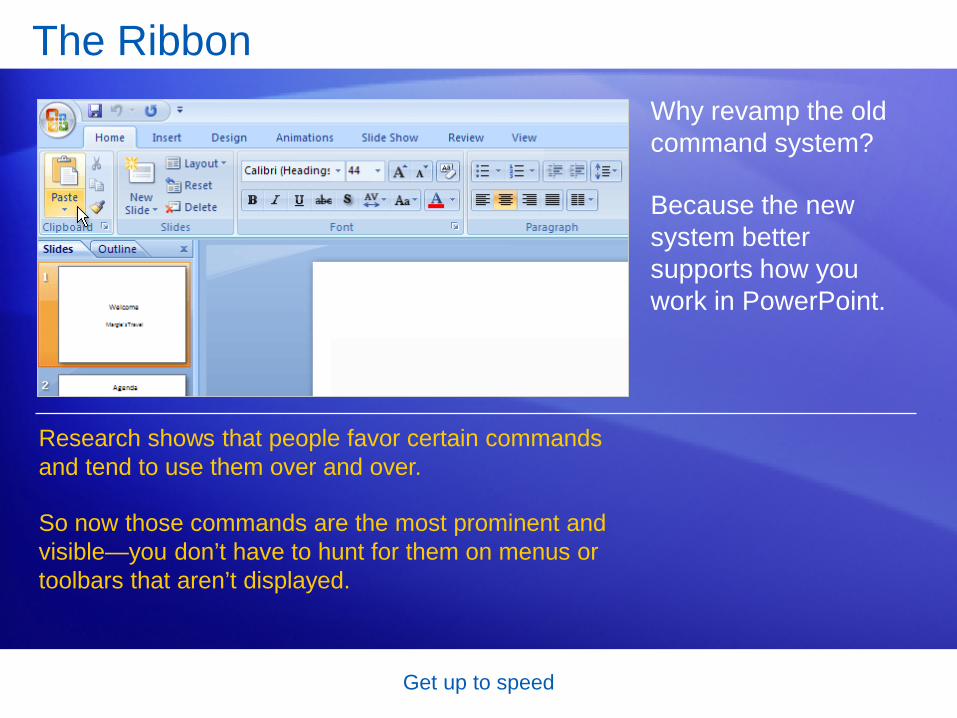
The Ribbon Why revamp the old command system?
Because the new system better supports how you work in PowerPoint.
Research shows that people favor certain commands and tend to use them over and over. So now those commands are the most prominent and visible—you don’t have to hunt for them on menus or toolbars that aren’t displayed.
Animation: Right-click, and click Play.
Get up to speed
The Ribbon Why revamp the old command system?
Because the new system better supports how you work in PowerPoint.
Research shows that people favor certain commands and tend to use them over and over.
So now those commands are the most prominent and visible—you don’t have to hunt for them on menus or toolbars that aren’t displayed.

Get up to speed
The tabs: Devoted to the main tasks The Ribbon is made up of several tabs—the Home tab and others.
Other tabs include Insert, Design, Animations, Slide Show, Review, and View.
The animation introduces them.
Animation: Right-click, and click Play.
Get up to speed
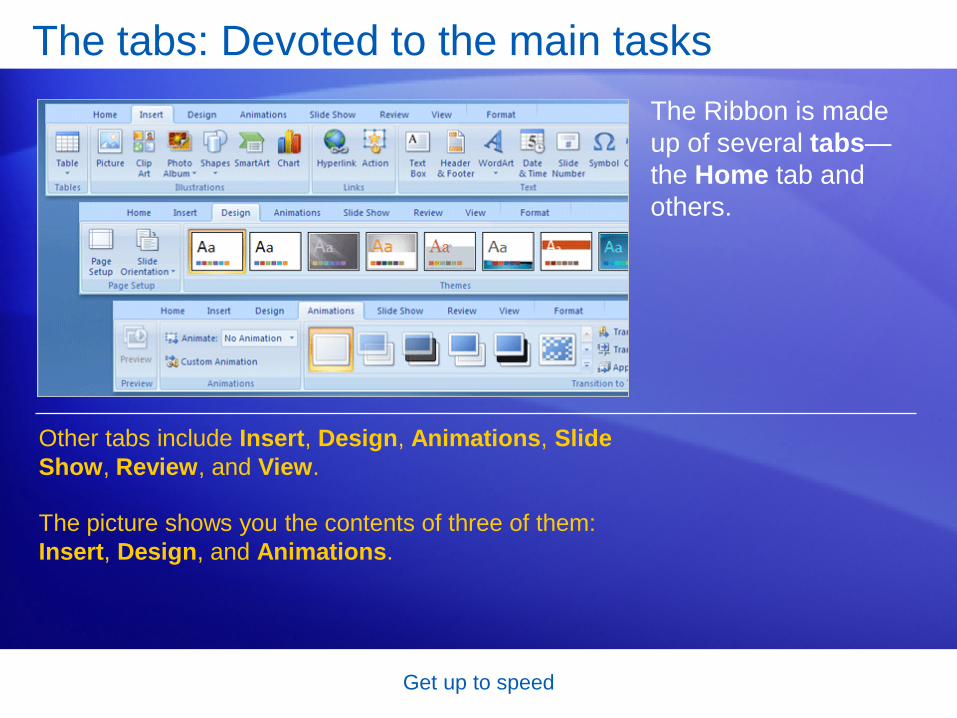
The tabs: Devoted to the main tasks The Ribbon is made up of several tabs—the Home tab and others.
Other tabs include Insert, Design, Animations, Slide Show, Review, and View.
The picture shows you the contents of three of them: Insert, Design, and Animations.

Get up to speed
Display the galleries PowerPoint often offers many choices for something, such as styles for a shape, or types of WordArt or animation effects.
1
2
A few types of transition effects show on the Ribbon.
To see the full gallery of choices, click the More arrow.
For example, say you wanted to add transition effects to a slide. In that case:

Get up to speed
Display the galleries PowerPoint often offers many choices for something, such as styles for a shape, or types of WordArt or animation effects.
Point to any effect in the gallery to see it previewed on the slide. Then click to apply it.
For example, say you wanted to add transition effects to a slide. In that case:
3

Get up to speed
Use advanced options Clearly, there are more commands and options than will fit into a group.
Only the most commonly used commands show up.
1
2
Click the diagonal arrow, called the Dialog Box Launcher, that appears in the lower corner.
A dialog box opens with more options to choose from.
When you don’t see an option that you want in a group, such as the Font group shown here:

Get up to speed
Use advanced options The arrow appears in the group when you’re doing work on the slide that might call for commands in that group.
For instance, when you click within a text placeholder on the slide, the arrow appears in every group of the Home tab that has commands related to working with text.
Tip: You can gain screen real estate by temporarily hiding Ribbon commands. Just double-click the name of the displayed tab.
Get up to speed
The Quick Access Toolbar As you work on a presentation, you take some actions that are general or repetitive and that don’t have to do with a particular phase of the process.
For such things, use the Quick Access Toolbar. It’s the small group of buttons on the left, above the Ribbon. It contains commands for general actions such as Save, Undo, and Repeat or Redo.
Animation: Right-click, and click Play.
[Author: .swf gets inserted here; delete this placeholder before inserting .swf file.]

Get up to speed
The Quick Access Toolbar As you work on a presentation, you take some actions that are general or repetitive and that don’t have to do with a particular phase of the process.
For such things, use the Quick Access Toolbar. It’s the small group of buttons on the left, above the Ribbon.
It contains commands for these types of general actions, such as Save, Undo, and Repeat or Redo.

Get up to speed
Changing views You need to change your view often in PowerPoint, and you’ve always done it easily by using buttons.
That hasn’t changed.
The buttons for Normal, Slide Sorter, and Slide Show views are still there.
But now they’re part of a new toolbar that includes a zoom slider and a button that refits the slide to the window after you’ve zoomed in or out.

Get up to speed
Changing views You need to change your view often in PowerPoint, and you’ve always done it easily by using buttons.
That hasn’t changed.
1
2
View buttons are the same but have moved from the lower left of the window to the lower right.
You drag the zoom slider to enlarge or shrink your view of the slide. Or click the minus (-) and plus (+) buttons.
The picture shows the changes:

Get up to speed
Changing views You need to change your view often in PowerPoint, and you’ve always done it easily by using buttons.
That hasn’t changed.
Click this button to refit the slide to the window after zooming.
The picture shows the changes:
3

Get up to speed
Keyboard shortcuts If you rely on the keyboard more than the mouse when you work in PowerPoint, you’ll want to know that the Ribbon design comes with new shortcuts that have a new name: Key Tips.
This brings two big advantages:
• Now there are shortcuts for every single button, which wasn’t the case for menu commands in earlier versions.
• Shortcuts often require pressing fewer keys.

Get up to speed
Keyboard shortcuts If you rely on the keyboard more than the mouse when you work in PowerPoint, you’ll want to know that the Ribbon design comes with new shortcuts that have a new name: Key Tips.
Here’s how you use the new keyboard shortcuts:
1
2
Start by pressing ALT.
Key Tips appear in little white squares on various parts of the Ribbon. Press one of the keys to get to more commands and buttons.

Get up to speed
Keyboard shortcuts If you rely on the keyboard more than the mouse when you work in PowerPoint, you’ll want to know that the Ribbon design comes with new shortcuts that have a new name: Key Tips.
Here’s how you use the new keyboard shortcuts:
3 Press one of the Key Tips in a group to complete the sequence.

Get up to speed
• Keyboard shortcuts of old that begin with CTRL are still intact, and you can use them as you always have.
– For example, the shortcut CTRL+C still copies something to the clipboard, and the shortcut CTRL+V still pastes something from the clipboard.
• The old ALT+ shortcuts that accessed menus and commands are also intact. However, you need to know the full key sequence to use this kind of shortcut.
Keyboard shortcuts What about the old keyboard shortcuts?

Get up to speed
Suggestions for practice 1. Type and format text, and fix a list.
2. Add a slide.
3. See more options and tabs.
4. Customize the Quick Access Toolbar.
5. Switch views and zoom.
6. Hide the Ribbon.
7. Bonus exercise: Add headers and footers.
Online practice (requires PowerPoint 2007)

Get up to speed
Test 1, question 1 You want to use the Copy and Paste buttons to work with text. Where do you find them on the Ribbon? (Pick one answer.)
1. The Insert tab.
2. The Home tab.
3. The Quick Access Toolbar.

Get up to speed
Test 1, question 1: Answer The Home tab.
You can also use the old shortcuts: CTRL+X to cut, CTRL+C to copy, and CTRL+V to paste.

Get up to speed
Test 1, question 2 In which group on the Home tab would you find the Line Spacing button? (Pick one answer.)
1. The Font group.
2. The Paragraph group.
3. The Slides group.

Get up to speed
Test 1, question 2: Answer The Paragraph group.
This button is grouped with other ones that format paragraphs, such as Bullets, Numbering, and Columns.

Get up to speed
Test 1, question 3 How do you hide a portion of the Ribbon? (Pick one answer.)
1. Click the Close button in the upper-right corner of the Ribbon.
2. Double-click the name of any tab.
3. Double-click the tab that is displayed.

Get up to speed
Test 1, question 3: Answer Double-click the name of any tab that is displayed.
This hides Ribbon groups. To redisplay the full Ribbon, click any tab.

Lesson 2
Get to work in PowerPoint

Get up to speed
Get to work in PowerPoint Ready to get to work?
Here’s a primer for doing what you’re used to doing when you create a presentation.
You’ll find out how to start a new presentation in PowerPoint 2007 and how to give your slides a background and set of colors.
You’ll also learn how to use the Ribbon tabs and tools to insert elements into the slides, style them as you want, and then set up the show and get ready to print.

Get up to speed
Start a new presentation New presentations begin with the Microsoft Office Button, located at the upper left of the window.
Here’s how to start.
1
2
3
Click the Microsoft Office Button .
Click New on the menu that opens.
Choose an option in the New Presentation window. You can start with a blank slide or base the presentation on a template or existing presentation.

Get up to speed
Choose a theme A theme supplies the look and feel of the presentation design.
Choose a theme for the presentation right at the start, so you can see how all your content will look.
The Design tab is the place to go for themes.
A gallery appears there under Themes. Each theme has a name, which shows in the ScreenTip.

Get up to speed
Choose a theme You can see a preview of how your theme will look, before you apply it.
1
2
3
Rest the pointer over a theme thumbnail (the one shown is called Flow).
The temporary preview appears on the slide.
You can click the More arrow to the right of the Themes group to get more choices and information.
Seeing the effect before you apply it saves you the step of undoing it if you don’t like it.

Get up to speed
Tailor the theme The theme you choose is a complete design.
But where’s the fun if you can’t do some tweaking?
The Design tab has other galleries in case you want to modify the theme.
Each provides a preview on the slide as you rest the mouse pointer over gallery choices.

Get up to speed
Tailor the theme Here’s how to tweak the theme.
1
2
Use the Colors, Fonts, and Effects galleries, all on the Design tab.
Look at other Background Styles. The choices use the theme colors.

Get up to speed
Tailor the theme Here’s how to tweak the theme.
Point to a thumbnail to get a preview of the alternative background.
4
3
To apply your own background, such as a photograph, click Format Background.

Get up to speed
Add slides, pick layouts When you insert a slide, you can insert one that automatically applies a layout.
You can also choose a layout before you insert the slide.
1
2
On the Home tab, click New Slide (below the slide icon). This displays the layout choices.
Click a layout to insert a slide with that layout.
To choose a layout before you insert a slide:

Get up to speed
Add slides, pick layouts PowerPoint 2007 layouts are more robust than before.
An example is the Title and Content layout. In the middle of its one placeholder is this set of icons:
Several of them include “content” placeholders, which you can use for either text or graphics.

Get up to speed
Add slides, pick layouts PowerPoint 2007 layouts are more robust than before.
Click any of the icons to insert that type of content—a table, chart, SmartArt™ graphic, picture from a file, piece of clip art, or video file.
Several of them include “content” placeholders, which you can use for either text or graphics.

Get up to speed
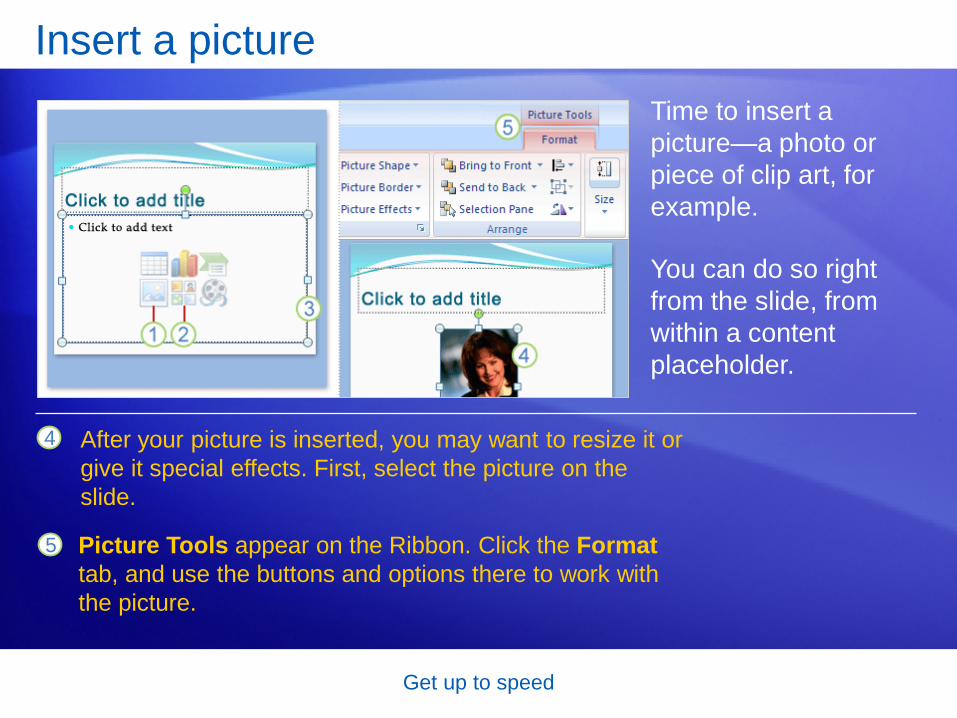
Insert a picture Time to insert a picture—a photo or piece of clip art, for example.
You can do so right from the slide, from within a content placeholder.
1
2
3
To insert a picture of your own, click the Insert Picture from File icon.
To insert a piece of clip art, click the Clip Art icon.
The picture will be positioned within the placeholder border.
Get up to speed
Insert a picture Time to insert a picture—a photo or piece of clip art, for example.
You can do so right from the slide, from within a content placeholder.
After your picture is inserted, you may want to resize it or give it special effects. First, select the picture on the slide.
4
5 Picture Tools appear on the Ribbon. Click the Format tab, and use the buttons and options there to work with the picture.

Get up to speed
Insert a picture Inserting a picture from the slide itself is handy.
It’s an especially good method if you have more than one placeholder on the slide because when you insert by using the slide icons, the picture goes within the placeholder that contains the icon.
Get up to speed
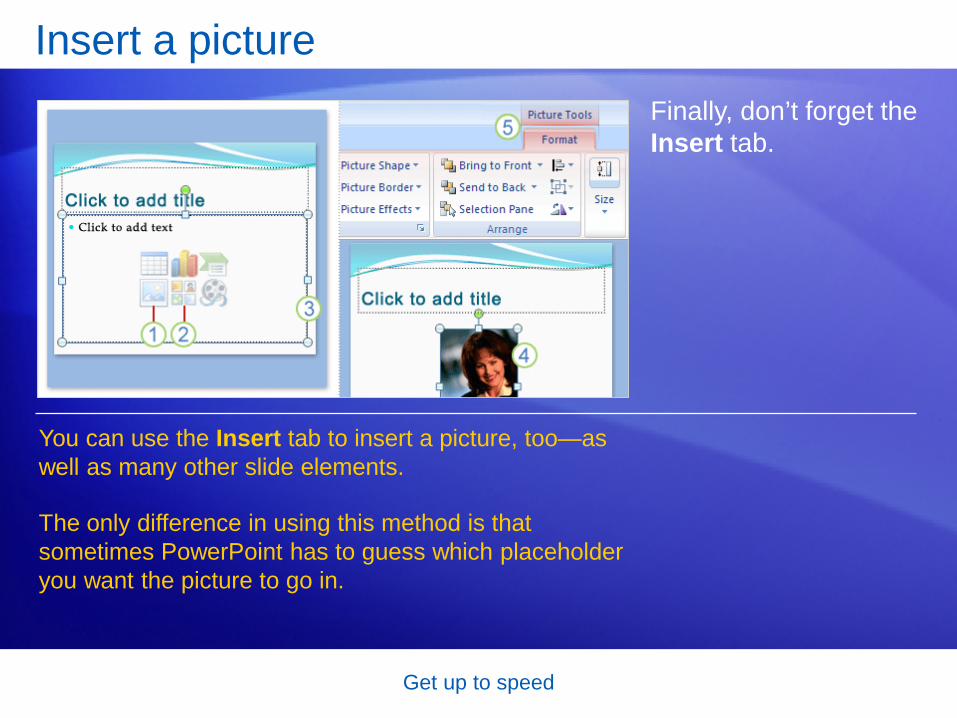
Insert a picture Finally, don’t forget the Insert tab.
You can use the Insert tab to insert a picture, too—as well as many other slide elements.
The only difference in using this method is that sometimes PowerPoint has to guess which placeholder you want the picture to go in.

Get up to speed
Insert a text box caption For your picture’s caption, insert a text box.
You’ll find this on the Insert tab.
1
2
3
Click the Format tab.
Display the shapes gallery and point to any style.
A preview of the style appears on the slide, applied to the text box.
When you insert the text box, Drawing Tools appear.

Get up to speed
Insert an org chart As you saw earlier, you can insert a picture and other graphics by using icons in the Title and Content layout.
These include an icon for SmartArt graphics. SmartArt graphics offer org chart layouts as well as all other layouts for diagrams in PowerPoint 2007.

Get up to speed
Insert an org chart As you saw earlier, you can insert a picture and other graphics by using icons in the Title and Content layout.
When you click the SmartArt graphic icon…
…you get a full gallery of the graphical layouts available.
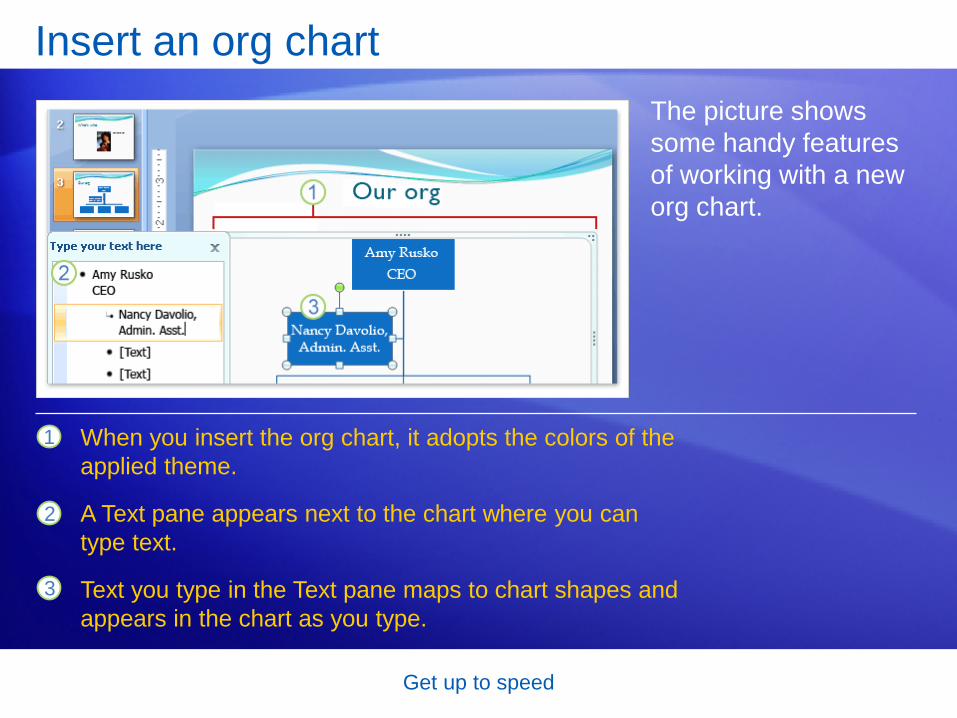
Get up to speed
The picture shows some handy features of working with a new org chart.
1
2
3
When you insert the org chart, it adopts the colors of the applied theme.
A Text pane appears next to the chart where you can type text.
Text you type in the Text pane maps to chart shapes and appears in the chart as you type.
Insert an org chart

Get up to speed
Also, now you can work in the other direction: convert an existing bulleted list on a slide into a graphic.
Just use the Convert to SmartArt button on the Home tab.
Look for SmartArt on the Insert tab if you prefer to insert your diagram that way.
Insert an org chart

Get up to speed
Apply a simple animation To apply a simple animation to your org chart, go to the Animations tab.
1
2
3
With the chart selected, click the arrow next to the Animate box to get the list of effects.
Select an option for making the org chart pieces appear on the slide.
As you point to an option, PowerPoint shows you a preview of the animation effect.

Get up to speed
Set up the show, check spelling, review Time to put the final touches on your slide show.
The commands for the finishing tasks are on the Slide Show and Review tabs.
Narration, setup, and more: Use the Slide Show tab to create narration and run through the show.
Spelling, research, and comments: On the Review tab, run spelling checks, use the Research service and thesaurus, and use comments to review the presentation.

Get up to speed
Set up the show, check spelling, review How do you check your spelling?
1
2
On the Review tab, click Spelling.
Select from the options you’re used to.
The same way you always have.

Get up to speed
Print, distribute, and set program options Now it’s time to set options for previewing, printing, and distributing your presentation.
1
2
Point to Print to open Print Preview.
Click PowerPoint Options to change program-wide settings such as your default view or whether to turn spelling checker on or off.
Then:
Start by clicking the Microsoft Office Button.

Get up to speed
Suggestions for practice 1. Choose a theme and then customize it.
2. Insert a picture.
3. Insert a text box.
4. Position the text and align slide elements.
5. Turn off some “automatic” features.
6. Create and then animate an org chart.
7. Tie up loose ends.
Online practice (requires PowerPoint 2007)

Get up to speed
Test 2, question 1 You’ve applied a theme to your slides but you’d like a different font style. What should you do? (Pick one answer.)
1. Go to the slide master and change the fonts there.
2. Select all the slides. On the Design tab, click Fonts, and choose a different set of font styles for your title and body text.
3. On the Design tab, click Fonts, and choose a different set of font styles for your title and body text.

Get up to speed
Test 2, question 1: Answer On the Design tab, click Fonts, and choose a different set of font styles for your title and body text.
This change will apply to all your slides; you don’t have to select them first.

Get up to speed
Test 2, question 2 You’ve finished the presentation and you want to run the spelling checker. Where is it on the Ribbon? (Pick one answer.)
1. The Review tab.
2. The Home tab.
3. The Slide Show tab.
Get up to speed
Test 2, question 2: Answer The Review tab.

Get up to speed
Test 2, question 3 If you want to change a setting that applies to PowerPoint as a whole, such as turning the spelling checker off or on, what are your first steps? (Pick one answer.)
1. Click the Microsoft Office Button, and point to Prepare.
2. Click the Microsoft Office Button, and click PowerPoint Options.

Get up to speed
Test 2, question 3: Answer Click the Microsoft Office Button, and click PowerPoint Options.
This takes you to the various types of system settings for PowerPoint.

Lesson 3
A new file format
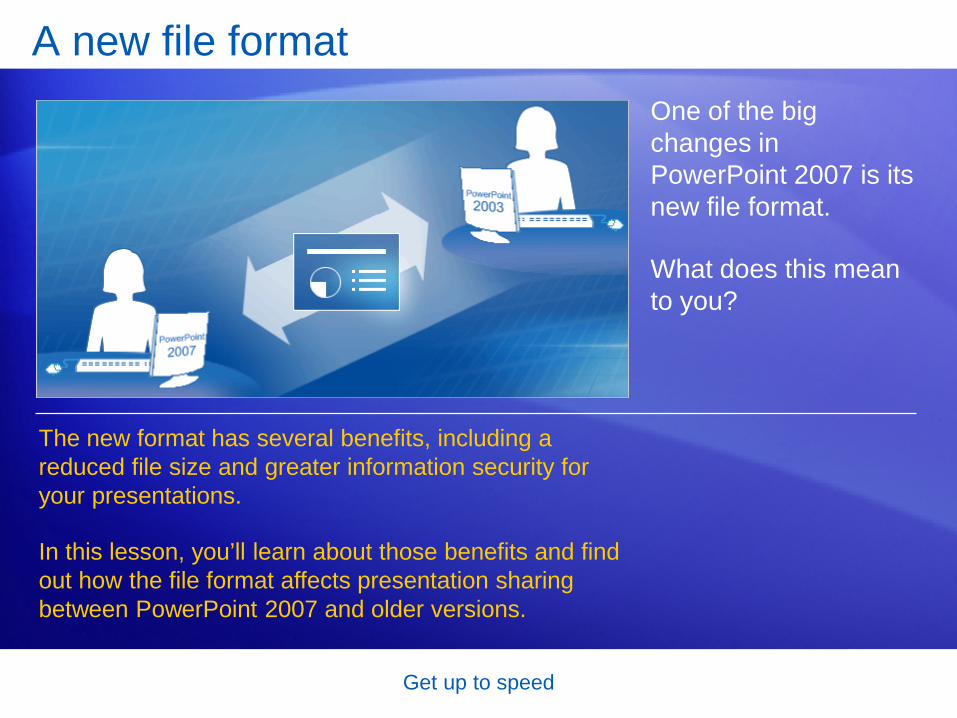
Get up to speed
A new file format One of the big changes in PowerPoint 2007 is its new file format.
What does this mean to you?
The new format has several benefits, including a reduced file size and greater information security for your presentations.
In this lesson, you’ll learn about those benefits and find out how the file format affects presentation sharing between PowerPoint 2007 and older versions.

Get up to speed
Benefits of the new format The format is part of the new Office Open XML Formats.
It’s based on the XML programming language, and it offers many benefits.
• Safer presentations
• Reduced file size
• Improved information security
• Improved damaged-file recovery
• Easier integration
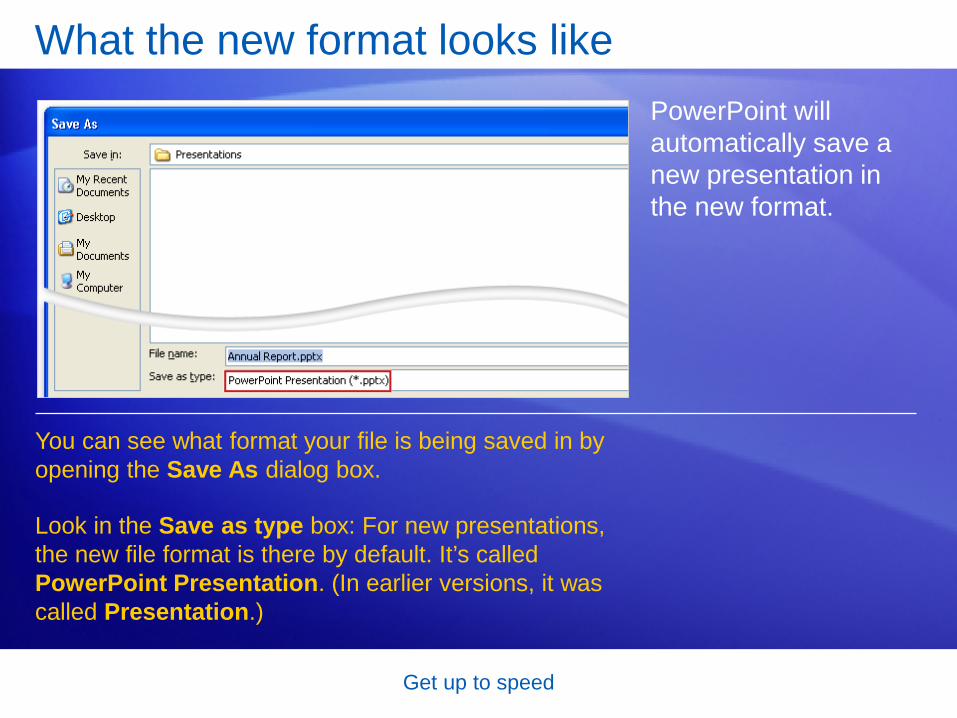
Get up to speed
What the new format looks like PowerPoint will automatically save a new presentation in the new format.
You can see what format your file is being saved in by opening the Save As dialog box.
Look in the Save as type box: For new presentations, the new file format is there by default. It’s called PowerPoint Presentation. (In earlier versions, it was called Presentation.)

Get up to speed
Opening a presentation in an earlier version You’ve just saved a presentation in the new format.
But your colleague, who needs to work on it, is using an earlier version of PowerPoint.
Can she open the PowerPoint 2007 file? Yes.
Say your colleague is working in PowerPoint 2000. When she opens the presentation, she will be asked if she wants to download a converter that will let her open your presentation.

Get up to speed
Opening a presentation in an earlier version You’ve just saved a presentation in the new format.
But your colleague, who needs to work on it, is using an earlier version of PowerPoint.
The presentation she sees may not look exactly like the one you created if it contains features from PowerPoint 2007 that she doesn’t have.
But she can open, edit, and save it in the format for PowerPoint 2007.

Get up to speed
• The official name of the converter is the Microsoft Office Compatibility Pack for 2007 Office Word, Excel, and PowerPoint File Formats, and it’s offered free by Microsoft.
• This Compatibility Pack works only with Microsoft Office 2003 SP1, Office XP SP3, and Office 2000 SP3. It works only on the following operating systems: Microsoft Windows Server® 2003, Windows XP SP1, and Windows 2000 SP4.
Notes:
Opening a presentation in an earlier version

Get up to speed
Opening and saving existing presentations What about all the presentations you created in earlier versions of PowerPoint?
There’s no problem opening and editing an older presentation in PowerPoint 2007.
What you’ll need to decide is whether to keep the presentation in its original format or save it in the new format. PowerPoint 2007 helps you make the decision.

Get up to speed
Opening and saving existing presentations Checking for compatibility
As you work, PowerPoint takes note of things you add to the file that may not work the same in the old format.
Then when you click Save, PowerPoint displays the Compatibility Checker dialog box. It details what will happen to those elements if you save the file in its original format, PowerPoint 97-2003 (.ppt).
When you open the presentation, PowerPoint 2007 recognizes it as being in the old format.

Get up to speed
Saving in the old format Why would you save in the old format?
If someone needed to work in the file who didn’t have PowerPoint 2007 or the Compatibility Pack.
As the Compatibility Checker on the previous slide indicated, saving in the old format would mean some differences for the person opening the file in PowerPoint 2003.
A new SmartArt graphic, for example, would become one object, like a picture, and therefore uneditable.
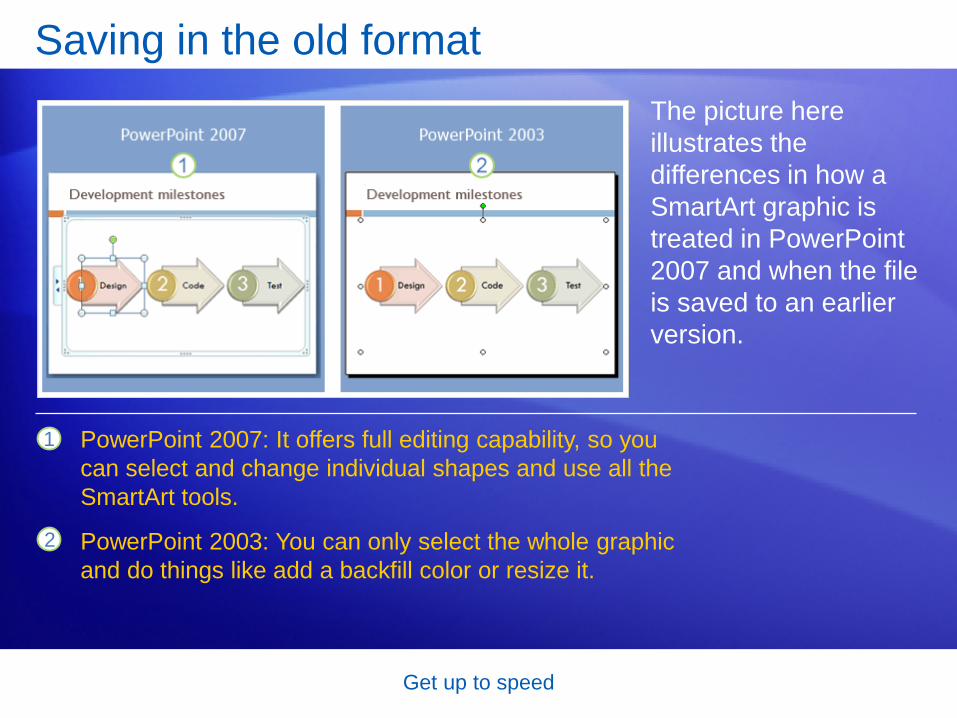
Get up to speed
Saving in the old format The picture here illustrates the differences in how a SmartArt graphic is treated in PowerPoint 2007 and when the file is saved to an earlier version.
1
2
PowerPoint 2007: It offers full editing capability, so you can select and change individual shapes and use all the SmartArt tools.
PowerPoint 2003: You can only select the whole graphic and do things like add a backfill color or resize it.

Get up to speed
Saving in the old format “Roundtripping”
If the graphic is basically untouched by the person working in an older PowerPoint version, it will retain all its PowerPoint 2007 properties.
This means that when it’s opened again in PowerPoint 2007, it will be fully editable.
If the graphic did get some change when in the older version, such as a picture washout, it becomes one object, and is thus uneditable when opened again in PowerPoint 2007.

Get up to speed
Automatic upgrades in older presentations You might have had this seemingly odd experience.
You open an older presentation in PowerPoint 2007, you add no PowerPoint 2007 features to it, and when you save, it the Compatibility Checker appears saying that a PowerPoint 2007 feature won’t be editable if you save in the old format.
Huh?

Get up to speed
Automatic upgrades in older presentations This happens because PowerPoint 2007 automatically upgrades certain types of formatting and elements so they’ll look as good as PowerPoint can make them.
An example is WordArt.
If the older presentation has WordArt in it, the WordArt is upgraded so that it uses the latest effects, new in PowerPoint 2007.

Get up to speed
Automatic upgrades in older presentations The picture shows the difference.
1
2
WordArt logo created in PowerPoint 2003.
The same logo when opened in PowerPoint 2007—instant face-lift!

Get up to speed
The Convert command for quick conversion A way to save an older presentation in the new format is to apply the Convert command in PowerPoint 2007.
The effect is that PowerPoint does an “in place” replacement of the old presentation file, converting it to the new format. The file then no longer exists in the old format.

Get up to speed
The Convert command for quick conversion To use the command, you open the presentation, and then click the Microsoft Office Button.
1
2
Click Convert to save it in the new file format.
A message appears explaining what the Convert command will do. Click OK to complete the command.
Then:

Get up to speed
Test 3, question 1 Which of these benefits does the new file format provide? (Pick one answer.)
1. Increased information security.
2. Decreased file size and improved damaged-file recovery.
3. Easier integration.
4. All of the above.

Get up to speed
Test 3, question 1: Answer All of the above.
These constitute the chief benefits of the new PowerPoint file format.

Get up to speed
Test 3, question 2 You’ve saved a PowerPoint 2007 presentation in the new format, and you want it to be fully editable by a colleague who will work on it using PowerPoint 2003. What is the main thing your colleague needs in order to open and work on the presentation in its new format? (Pick one answer.)
1. Compatibility Checker.
2. Compatibility Pack.
3. The Convert command.

Get up to speed
Test 3, question 2: Answer Compatibility Pack.
One thing your colleague needs to install is the Microsoft Office Compatibility Pack for 2007 Office Word, Excel, and PowerPoint File Formats. PowerPoint will prompt your coworker to install the converter when he or she tries to open the file. Other requirements include eligible versions of the Microsoft Office system and Microsoft Windows, with the latest service packs and updates.

Get up to speed
Test 3, question 3 You go to open a PowerPoint file and you see these two filenames: Annual Report.ppt and Annual Report.pptx. Which one uses the new format for PowerPoint 2007? (Pick one answer.)
1. Annual Report.pptx.
2. Annual Report.ppt.

Get up to speed
Test 3, question 3: Answer Annual Report.pptx.
The x on the end tells you that this is a presentation that was saved using the new, XML-based format.
Get up to speed
Quick Reference Card
For a summary of the tasks covered in this course, view the Quick Reference Card.

Microsoft® Office PowerPoint® 2007 Training
Personalize your slide design

Personalize your slide design
Course contents
• Overview: Standout presentations
• Lesson: Put themes to work for you
The lesson includes a list of suggested tasks and a set of test questions.

Personalize your slide design
Overview: Standout presentations
Do you want to customize your PowerPoint 2007 presentation to make it stand out?
Watch this presentation to learn what themes are, how to change or customize themes, and how to change the slide background to a color, texture, or picture.
You’ll also find out how to save your theme so you can easily use it for other presentations.

Personalize your slide design
Course goals
• Change the slide background using a color or picture.
• Customize the theme of your presentation.
• Save your customized theme for reuse in future presentations.
Lesson
Put themes to work for you

Personalize your slide design
Put themes to work for you You work for Margie’s Travel, which is expanding into tropical vacation tours. You want to make your presentations stand out by creating a unique, reusable look.
Themes make it easy to create professional-looking presentations. Themes ensure that all parts of your slide (such as the background, text, tables, and shapes) always complement one another.

Personalize your slide design
Anatomy of a theme It’s important to stand out from your competition, so you don’t want your tropical vacation tour slides to look like any other company’s slides.
Changing or customizing a theme can set your presentation apart and make it memorable.
Before diving into how to do this, let’s spend a moment dissecting themes.

Personalize your slide design
Anatomy of a theme Themes are a combination of colors, fonts, effects, and backgrounds applied to one slide, several slides, or an entire presentation.
Themes appear in the Themes gallery on the Design tab.
As shown in the picture, when you open the Themes gallery, you can see the themes used in the presentation that you have open, any custom themes, and the built-in themes.

Personalize your slide design
Anatomy of a theme When you rest your pointer on a thumbnail in the Themes gallery, you get a preview of what the theme would look like if you applied it to your presentation.
This is called Live Preview. Without clicking or committing to anything, you can see your slide with dozens of different themes applied to it.
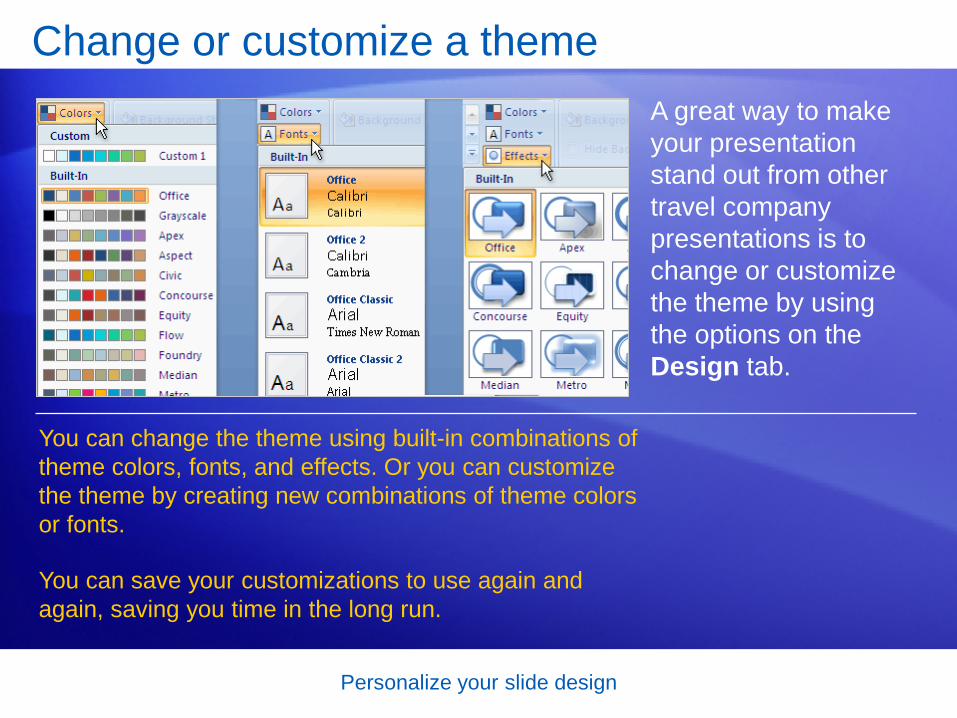
Personalize your slide design
Change or customize a theme A great way to make your presentation stand out from other travel company presentations is to change or customize the theme by using the options on the Design tab.
You can change the theme using built-in combinations of theme colors, fonts, and effects. Or you can customize the theme by creating new combinations of theme colors or fonts.
You can save your customizations to use again and again, saving you time in the long run.

Personalize your slide design
Customize theme colors To guarantee that your presentation will have your unique stamp, you can customize the theme colors by picking different colors.
When you click the Colors button, the Theme Colors gallery displays all the color sets from the built-in themes, along with the corresponding theme name.
To create custom colors, click Create New Theme Colors at the bottom of the Theme Colors gallery.

Personalize your slide design
Customize theme colors To guarantee that your presentation will have your unique stamp, you can customize the theme colors by picking different colors.
1
2
Slide with built-in Flow theme.
Same slide with customized colors.
The picture shows an example:

Personalize your slide design
Change the slide background After you customize the colors, it’s time to add a background to the slide.
To change the background style, click the Background Styles button on the Design tab.
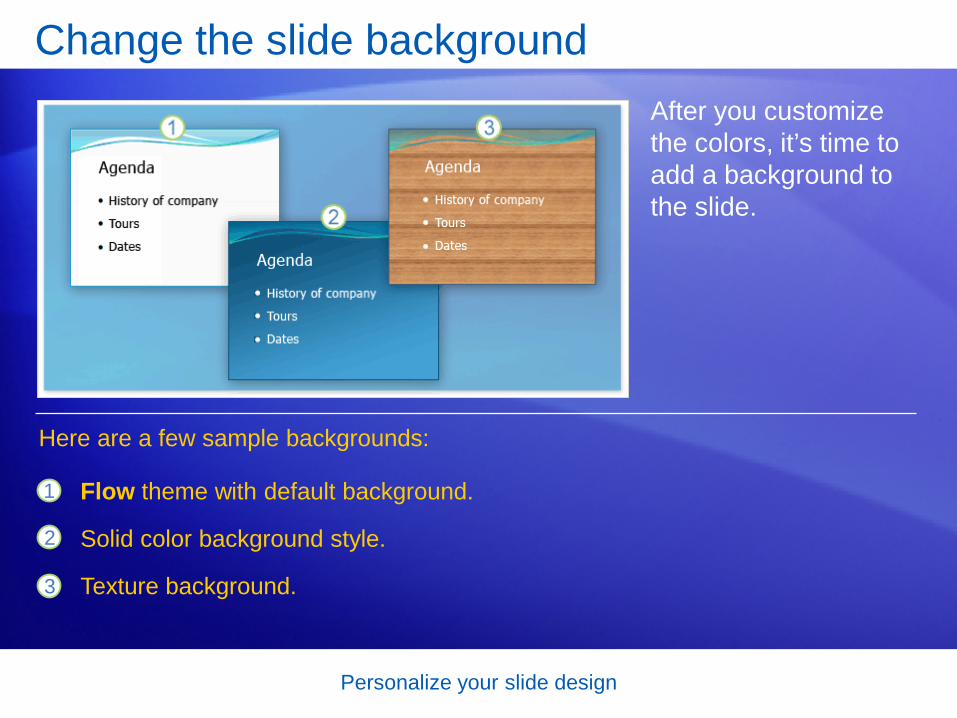
Personalize your slide design
Change the slide background After you customize the colors, it’s time to add a background to the slide.
1
2
3
Flow theme with default background.
Solid color background style.
Texture background.
Here are a few sample backgrounds:

Personalize your slide design
Change the slide background Background styles are determined by the theme, so as the theme changes, so do the gallery choices.
Just as you can with themes, you can apply background styles to some or all the slides in your presentation. Right-click the thumbnail, and then click the slide option you want.
Place your pointer over any thumbnail for a live preview of how that background will look applied to your slide.

Personalize your slide design
Use a picture for a slide background Since you’re creating slides for tropical vacations, to get your clients started dreaming, let’s use a picture for your slide background instead of a color or texture.
1
2
These are the panes and tabs of the Format Background dialog box. Switching panes changes the available options.
To use a picture or texture for a slide background instead of a solid or gradient fill, click this option.

Personalize your slide design
Use a picture for a slide background Since you’re creating slides for tropical vacations, to get your clients started dreaming, let’s use a picture for your slide background instead of a color or texture.
3 To insert a picture from a file, click File, and then locate the picture that you want to add. To paste a picture from the Clipboard or another program, copy the picture, and then click Clipboard. To use clip art, click Clip Art, and then type a word that describes the clip in the Search text box.

Personalize your slide design
Fade a picture Now that you’ve added a picture, it needs to be faded or washed out so it won’t compete with any text or other content on your slide.
1
2
A slide with its original picture background.
A slide after the Washout option has been applied.
For example, here you see:

Personalize your slide design
Fade a picture To change the brightness or contrast of a picture, you use the options in the Picture pane in the Format Background dialog box.
Click Recolor to open the gallery, where you can apply a stylized effect (such as washout, grayscale, or sepia tone) to a picture.
Then, to get this effect, click Washout under Color Modes.

Personalize your slide design
Save as a new theme file To reuse your theme in other tropical vacation presentations, you need to save your theme as a theme file.
1
2
3
Click the More button to open the Themes gallery.
Open the Save Current Theme dialog box, where you can save your theme.
Themes that you customize and save appear here.

Personalize your slide design
Suggestions for practice 1. Try out themes.
2. Create custom theme colors.
3. Change the slide background.
4. Use a picture for a slide background.
5. Wash out a picture.
6. Save as a new theme.
Online practice (requires PowerPoint 2007)

Personalize your slide design
Test question 1 When you apply a theme, it always affects every slide in the presentation. (Pick one answer.)
1. True.
2. False.
Personalize your slide design
Test question 1: Answer False.
If you right-click the theme thumbnail that you want to apply, you can select which slide or slides to apply the theme to.

Personalize your slide design
Test question 2 A theme is composed of colors, fonts, effects, and what else? (Pick one answer.)
1. Text.
2. Shapes.
3. Backgrounds.

Personalize your slide design
Test question 2: Answer Backgrounds.
Each theme has 12 built-in Background Styles, and you can always create or customize your own.

Personalize your slide design
Test question 3 To see a Live Preview of a Theme or Background Style, you do which of the following? (Pick one answer.)
1. Rest your pointer over the thumbnail displayed in the gallery.
2. Right-click the thumbnail.
3. Double-click the thumbnail.

Personalize your slide design
Test question 3: Answer Rest your pointer over the thumbnail displayed in the gallery.
You can use Live Preview to see what themes, backgrounds, and other Quick Styles look like before they are applied to your slide or presentation.

Personalize your slide design
Quick Reference Card
For a summary of the tasks covered in this course, view the Quick Reference Card.

PowerPoint 2007
Introduction to sample animation effectsThe most popular animation effects that you can use in your Microsoft Office Power-Point 2007 presentations include entrance, exit, and sound effects applied to individual bullets of text, and motion paths applied to objects.
NOTES
• For more information about animation effects, or for procedures about how to apply a built-in animation effect to one or more slides, see Ani-mate text or objects.
• For more information about adding transitions between slides, including the different types that are available and how to add sound to slide tran-sitions, see Add transitions between slides.
Top of Page
Apply entrance and exit animation effects to bullets of textUse the steps below to add entrance and exit animation effects to bullets of text, select the trigger event that puts the effects in motion, and set the speed and direction for the motion of the effects.
TIP You can apply the steps in these procedures to objects as well. Instead of selecting text, select the object that you want to animate.
Apply an entrance animation effect 1. Select the first bullet of text that you want to add an entrance animation
effect to.

2. On the Animations tab, in the Animations group, click Custom Ani-mation.
3. In the Custom Animation task pane, click Add Effect, point to En-trance, and then click Fly In.
4.
5. To specify the settings for the fly-in effect, under Modify: Fly In, do the following:
• To specify how and when the fly-in effect will start, in the Start list, select On Click.
• To specify the direction from which the bullet of text will start, in the Direction list, select From Left.
• To specify the speed of the bullet of text, in the Speed list, select Very Fast.
6. Repeat steps 1 through 4 for each bullet of text that you want to add this entrance animation effect to.
7. Test the animation effect.
NOTE Effects appear in the Custom Animation list in the order that you add them.

Apply an exit animation effectAfter adding an entrance effect to two bullets of text, your slide and the Custom Anima-tion task pane looks something like this.
1. Select the first bullet of text that you want to add an exit animation effect to.
2. In the Custom Animation task pane, click Add Effect, point to Exit, and then click More effects.
3. NOTE If you do not see the Custom Animation task pane, on the Animations tab, in the Animations group, click Custom Animation.
4. In the Add Exit Effect dialog box, under Subtle, click Faded Swivel, and then click OK.

5.
6. To specify the settings for the exit effect, under Modify: Faded Swivel, do the following:
• To specify how and when the exit effect will disappear by using the faded swivel pattern, in the Start list, select On Click.
• To specify the speed at which the bullet of text disappears, in the Speed list, select Medium.

7. Select the second bullet of text that you want to add an exit animation effect to.
8. In the Custom Animation task pane, click Add Effect, point to Exit, and then click Checkerboard.
9. To specify the settings for the exit effect, under Modify: Checkerboard, do the following:
• To specify when the exit effect will disappear using the checker-board pattern, in the Start list, select After Previous.
• NOTE By choosing After Previous, the second bullet will disappear im-mediately after the first bullet disappears.
• To specify the direction the exit effect will take using the checker-board pattern, in the Direction list, select From Left.
• To specify the speed at which the bullet of text disappears, in the Speed list, select Very Fast.
10. Repeat steps 1 through 7 for each bullet of text that you want to add this exit animation effect to.
11. Test the animation effect.
NOTE Effects appear in the Custom Animation list in the order that you add them.
Apply sound effects to bullets of textUse the steps below to apply sound effects to the bullets of text that you added anima-tion effects to. To start, your slide looks something like this.

And the Custom Animation task pane looks something like this.
Do the following:
1. In the Custom Animation task pane, in the Custom Animation list, click the arrow to the right of the animation effect applied to the first bul-let of text, and then click Effect Options.

2.
3. On the Effect tab, under Enhancements, in the Sound list, do one of the following:
• Select a sound.
• To add a sound from a file, select Other Sound, and then locate the sound file that you want to use.
4. Repeat steps 1 and 2 for each bullet of text that you want to add a sound effect to.
5. Test the animation effect.

Apply a motion path to an object IMPORTANT Before you apply a motion path to an object, you need to add the object, such as a picture or clip art, to a slide by using clip art from the Microsoft Clip Organizer. Choose clip art or a picture that has a transparent background, because when you ap-ply the motion path, the clip art appears (without a background) to be moving across the slide as a single object.
To apply an animation effect to a SmartArt graphic, see Animate your SmartArt graphic.
1. After you add the object to the slide, drag it to the location on the slide where you want the object to start moving from.
2. Click the object.
3. On the Animations tab, in the Animations group, click Custom Ani-mation.
4. In the Custom Animation task pane, click Add Effect, point to Motion Paths, point to Draw Custom Path, and then click Scribble.
5. NOTE The pointer becomes a pen.
6. Starting at the clip art or other object, draw the path that you want your object to follow on the slide, and then click where the object should stop moving.
7. Test the animation effect.

The clip art object with the fourth animation effect applied to it
The motion path
The entrance animation effect applied to the first bullet of text
The exit animation effect applied to the first bullet of text
The entrance animation effect applied to the second bullet of text
The exit animation effect applied to the second bullet of text

Test your animation effectsAfter you add one or more animation effects, to make sure that they work, click Play at the bottom of the Custom Animation task pane.

Microsoft® Office PowerPoint® 2007 Training
Get visual with SmartArt™ graphics

Get visual with SmartArt graphics
Course contents
• Overview: Take a graphical approach
• Lesson 1: Be smart in choosing graphics
• Lesson 2: How to create SmartArt graphics
• Lesson 3: Style, polish, and update graphics
Two of the lessons include a list of suggested tasks, and each lesson includes a set of test questions.

Get visual with SmartArt graphics
Overview: Take a graphical approach As a presenter, you’re used to including text in your slide content. But sometimes a graphical approach is more effective.
SmartArt graphics help you illustrate processes, concepts, hierarchies, and relationships in a dynamic and visual way.
Here you’ll see examples of SmartArt graphic layouts and learn how to use and apply them to add rich visuals and variety to any PowerPoint 2007 show.

Get visual with SmartArt graphics
Course goals • Use SmartArt graphics effectively with your content.
• Create SmartArt graphics based on existing text or from scratch.
• Edit the look and layout of SmartArt graphics to fit your content.
• Update diagrams created in previous versions of PowerPoint so they look consistent with your PowerPoint 2007 SmartArt graphics.

Lesson 1
Be smart in choosing graphics

Get visual with SmartArt graphics
Be smart in choosing graphics A SmartArt graphic is a visual representation of information. It’s very easy to create.
This picture shows a graphical timeline that captures the milestones in a production schedule.
• Put the main points from a bulleted list into related shapes that don’t follow a strict vertical format. Then color the graphic for impact and clarity.
• Show a process, using connected shapes and arrows to make a sequence direct and clear.
Here are some other ways to use a SmartArt graphic:

Get visual with SmartArt graphics
Types of SmartArt graphics When you want to use a SmartArt graphic, you’ll have a gallery of layouts to choose from.
Layouts are collected in full in the All category within the Choose a SmartArt Graphic dialog box.
Then, as the animation shows, layouts are broken down into different types including List, Process, Cycle, and so on.
Animation: Right-click, and click Play.

Get visual with SmartArt graphics
Types of SmartArt graphics When you want to use a SmartArt graphic, you’ll have a gallery of layouts to choose from.
Layouts are collected in full in the All category within the Choose a SmartArt Graphic dialog box.
Then, as the picture shows, they’re broken down into different types including List, Process, Cycle, Hierarchy, Relationship, Matrix, and Pyramid.

Get visual with SmartArt graphics
List-type graphics This SmartArt graphic uses a List-type layout.
The graphic keeps the vertical list idea but separates the general concepts, shown in the shapes on the left, from the details.
Those are reserved for the longer shapes, with smaller text, on the right.

Get visual with SmartArt graphics
List-type graphics This SmartArt graphic uses a List-type layout.
List layouts are typically for items that you want to group but that don’t follow a step-by-step process.
To keep text size readable, you’ll want to limit the amount of text you put in the shapes within the graphic.

Get visual with SmartArt graphics
Lists with pictures This graphical List layout includes shapes that are meant for pictures you insert.
There’s room for descriptive text in the shapes on the right.
There are several other List layouts that include shapes for pictures.
These layouts save you the trouble of having to position and size the pictures once you insert them. They do that work for you.

Get visual with SmartArt graphics
Process-type graphics The SmartArt graphic here uses a Process-type layout that contains repeating shapes and one long, winding arrow to connect each step and show a directional flow.
You could substitute any shapes for these.
For example, you might want to use standard flowchart shapes to represent different types of steps.
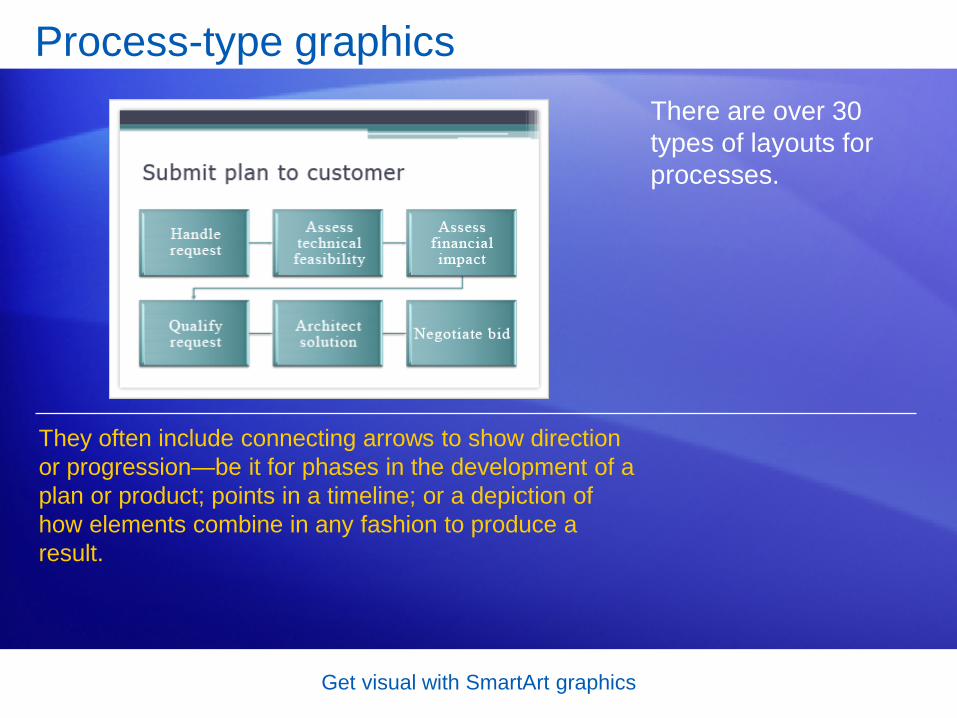
Get visual with SmartArt graphics
Process-type graphics There are over 30 types of layouts for processes.
They often include connecting arrows to show direction or progression—be it for phases in the development of a plan or product; points in a timeline; or a depiction of how elements combine in any fashion to produce a result.

Get visual with SmartArt graphics
Processes with numbered steps This Process-type layout includes shapes that lend themselves to including numbers for the steps.
The arrows keep the timeline idea and hold the text that describes each phase.
This layout emphasizes the broad picture. Other ones might give more emphasis to the textual details of the steps.

Get visual with SmartArt graphics
Performance management Wash, rinse, repeat.
That’s a short way to describe content for the Cycle type of SmartArt graphic.
The type shown here illustrates a circular, or repeating, process.
The layout effectively shows both the cycle and how each piece of it fits into a whole.
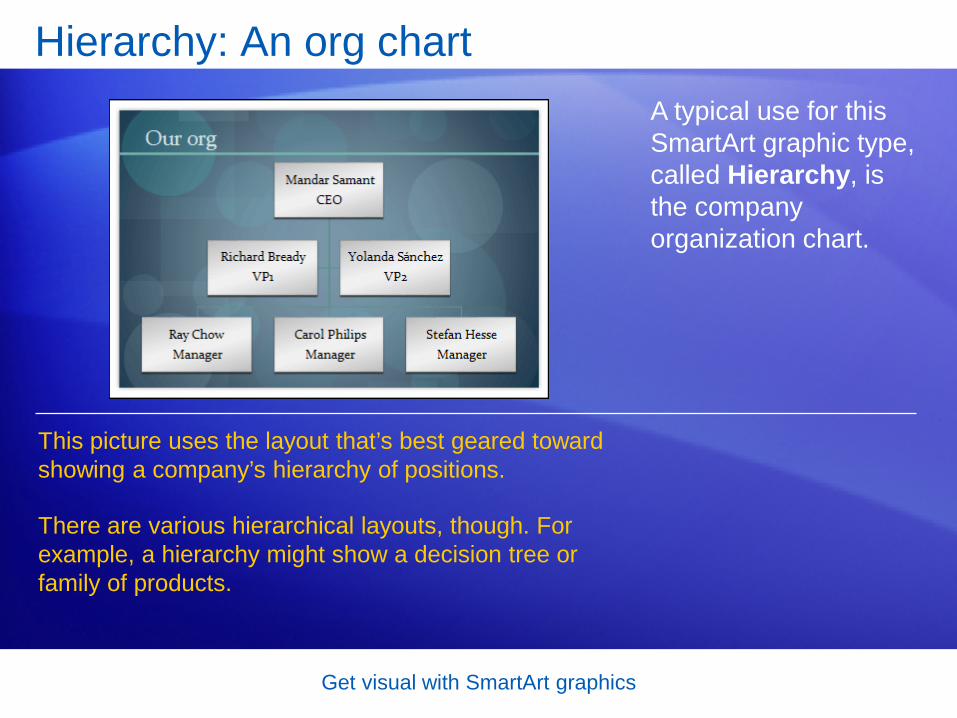
Get visual with SmartArt graphics
Hierarchy: An org chart A typical use for this SmartArt graphic type, called Hierarchy, is the company organization chart.
This picture uses the layout that’s best geared toward showing a company’s hierarchy of positions.
There are various hierarchical layouts, though. For example, a hierarchy might show a decision tree or family of products.

Get visual with SmartArt graphics
Hierarchy: Family of products This Hierarchical layout shows the branches of a family of outdoor equipment.
It works vertically, using shape size, text, and color-coding to make the levels clear.

Get visual with SmartArt graphics
Relationships: Radial, Venn, Target The Relationship-type layouts cover a range of diagram types, including radial, Venn, and target.
1 This SmartArt graphic uses a Converging Radial layout, in which several elements relate to or affect one central thing.
These typically depict a connection between two or more sets of things or information.

Get visual with SmartArt graphics
Relationships: Radial, Venn, Target The Relationship-type layouts cover a range of diagram types, including radial, Venn, and target.
2 The Basic Venn layout, consisting of two or more overlapping circles, shows how areas or concepts overlap and come together at the center intersection.
These typically depict a connection between two or more sets of things or information.
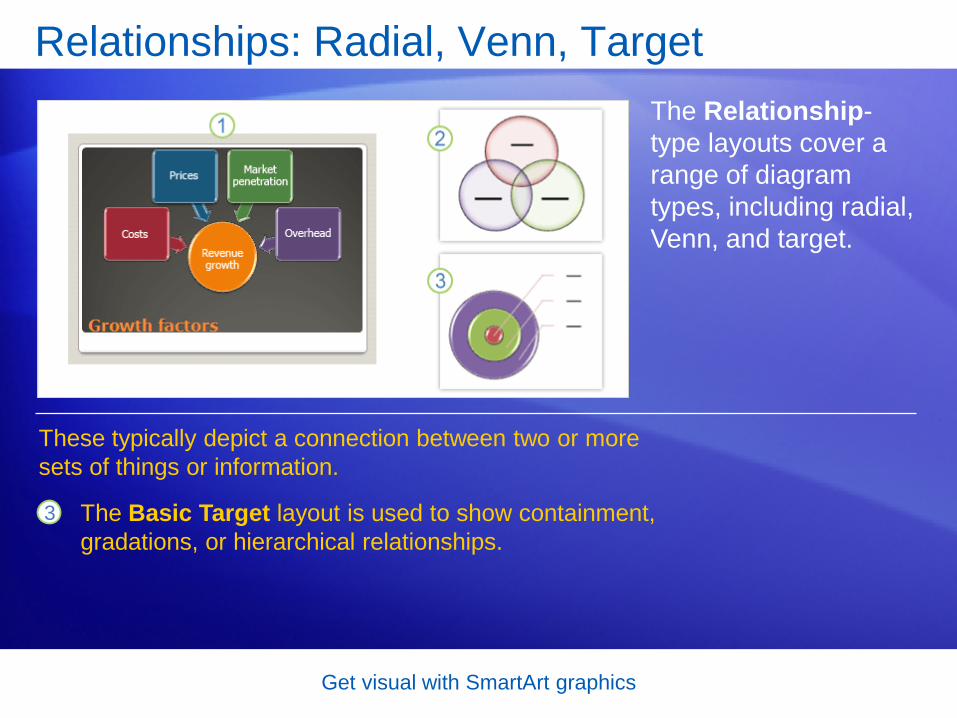
Get visual with SmartArt graphics
Relationships: Radial, Venn, Target The Relationship-type layouts cover a range of diagram types, including radial, Venn, and target.
3 The Basic Target layout is used to show containment, gradations, or hierarchical relationships.
These typically depict a connection between two or more sets of things or information.

Get visual with SmartArt graphics
Matrix The Matrix layout type shows the relationship of components to a whole. This layout type can depict more complex relationships by using axes, such as the example here.
This layout is called a Grid Matrix. Each axis functions to show a range in terms of cost and of craft.
The layout itself includes the quadrants and the axes, but it’s set up so you can add whatever labels apply, outside the axes.

Get visual with SmartArt graphics
Pyramid The Pyramid-type layouts show proportional, foundation-based, or hierarchical relationships or processes that typically build upward.
This example shows an ever-refining process that starts with gathering unfiltered data, shown at the bottom, continues upward with sifting through the data, and moves toward drawing conclusions about it.
The layout is designed to give you more room for text as the pyramid narrows.

Get visual with SmartArt graphics
Test 1, question 1 When might you use a SmartArt graphic? (Pick one answer.)
1. Whenever you have a bulleted list on a slide.
2. Whenever your information will have more impact, clarity, or usefulness if shown graphically.
3. Whenever you want to animate your points as you talk.

Get visual with SmartArt graphics
Test 1, question 1: Answer Whenever your information will have more impact, clarity, or usefulness if shown graphically.
Some information is easier for an audience to grasp when shown in diagram form as opposed to described in a paragraph.

Get visual with SmartArt graphics
Test 1, question 2 What’s a common feature of Process-type layouts that distinguishes them from List layouts? (Pick one answer.)
1. They include numbers.
2. They all go in a horizontal direction.
3. They often use arrows to show the direction of the flow.
Get visual with SmartArt graphics
Test 1, question 2: Answer They often use arrows to show the direction of the flow.
The List layouts are more suitable for grouping types of information that might have a logical order but don’t describe essential steps in a sequence.

Get visual with SmartArt graphics
Test 1, question 3 You’ve found just the layout you want for your SmartArt graphic, but it doesn’t have room for all the text you had in mind. What’s a good solution? (Pick one answer.)
1. Say less than you’d planned.
2. Find the layout with the biggest shapes possible and fill them to the brim with your text.
3. Put only your key points in the SmartArt graphic, and save the rest for your notes.

Get visual with SmartArt graphics
Test 1, question 3: Answer Put only your key points in the SmartArt graphic, and save the rest for your notes.
People don’t want to read everything, anyway. Distill your key points for the SmartArt graphic, and fill in the gaps with your speaking.

Lesson 2
How to create SmartArt graphics

Get visual with SmartArt graphics
How to create SmartArt graphics You’ve gotten an overview of the types of SmartArt graphics available. Now, get the nuts and bolts for how to create one.
There are a couple of starting points.
You can either convert an existing list on your slide, or insert a blank graphic and then add content to it.
Then, refine the graphic: Add text to shapes by using a handy Text pane; move shapes and text where you want them in the layout; and try another layout if you decide there’s a better one.

Get visual with SmartArt graphics
Convert a list to a graphic You can easily convert a text list to a SmartArt graphic.
The animation shows the conversion of a bulleted list.
Just click the text in the list, click Convert to SmartArt Graphic on the Ribbon, and choose one of the layouts from the gallery that opens.
Animation: Right-click, and click Play.

Get visual with SmartArt graphics
Convert a list to a graphic You can easily convert a text list to a SmartArt graphic.
The picture shows how a bulleted list has been converted.
To do this, just click the text in the list, click Convert to SmartArt Graphic on the Ribbon, and choose one of the layouts from the gallery that opens.
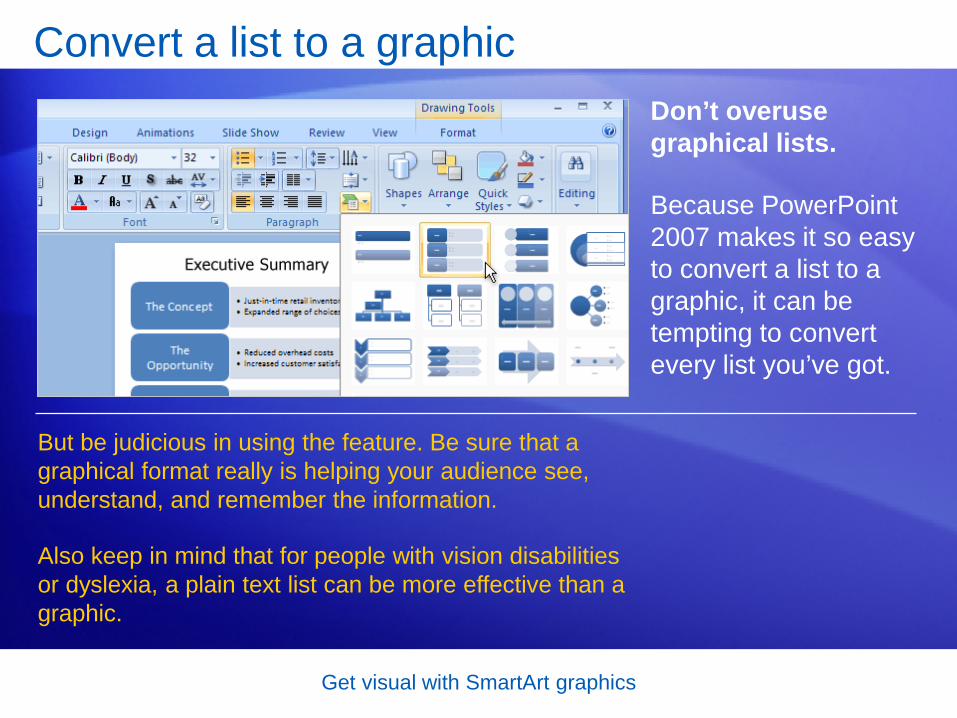
Get visual with SmartArt graphics
Convert a list to a graphic Don’t overuse graphical lists.
Because PowerPoint 2007 makes it so easy to convert a list to a graphic, it can be tempting to convert every list you’ve got.
But be judicious in using the feature. Be sure that a graphical format really is helping your audience see, understand, and remember the information.
Also keep in mind that for people with vision disabilities or dyslexia, a plain text list can be more effective than a graphic.

Get visual with SmartArt graphics
• This conversion feature applies to text only, within a placeholder or any other shape.
• Of the Microsoft Office programs that offer SmartArt graphics, only PowerPoint 2007 has the ability to convert existing text or a list to a SmartArt graphic.
• For existing diagrams, there’s a way to update them to be SmartArt graphics, but that is separate from this conversion feature. That process is shown at the end of the third lesson.
Convert a list to a graphic A few additional notes about converting lists to SmartArt graphics:
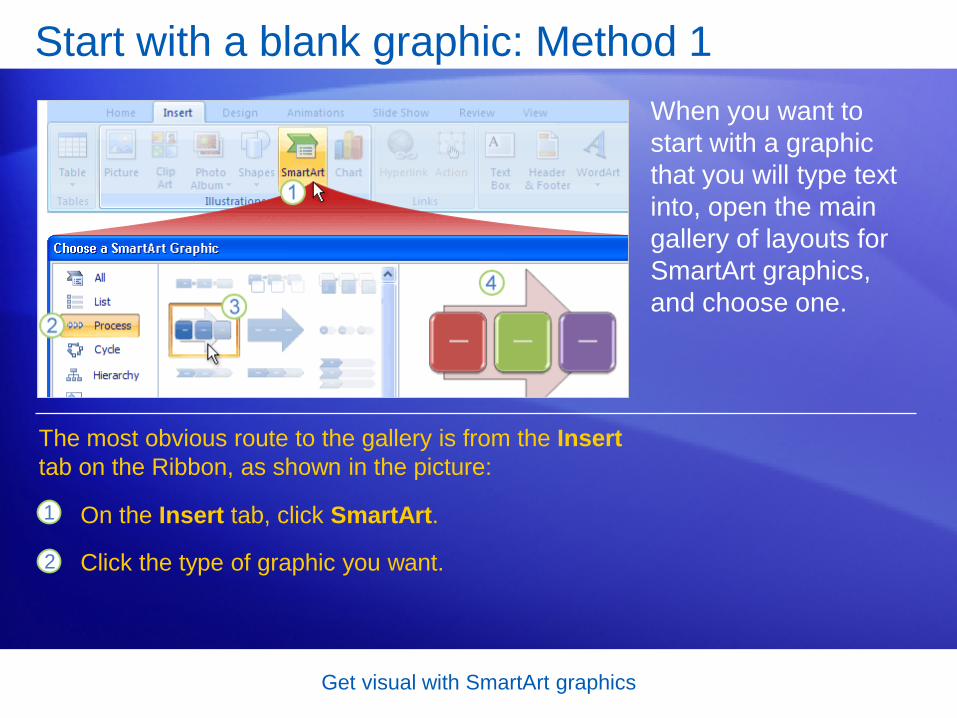
Get visual with SmartArt graphics
Start with a blank graphic: Method 1 When you want to start with a graphic that you will type text into, open the main gallery of layouts for SmartArt graphics, and choose one.
1
2
On the Insert tab, click SmartArt.
Click the type of graphic you want.
The most obvious route to the gallery is from the Insert tab on the Ribbon, as shown in the picture:

Get visual with SmartArt graphics
Start with a blank graphic: Method 1 When you want to start with a graphic that you will type text into, open the main gallery of layouts for SmartArt graphics, and choose one.
3 Click one of the layouts shown.
The most obvious route to the gallery is from the Insert tab on the Ribbon, as shown in the picture:
4 A larger example of the layout and a description appear in the preview area. Click OK to put the layout on the slide.

Get visual with SmartArt graphics
Start with a blank graphic: Method 2 In PowerPoint 2007, there’s another way to insert a SmartArt graphic: Click the SmartArt graphic icon that is part of many slide layouts.
1
2
Click the SmartArt graphic icon that’s part of the slide layout.
The SmartArt graphic gallery opens so that you can choose a layout.
The picture illustrates this:

Get visual with SmartArt graphics
Start with a blank graphic: Method 2 One advantage to this method is that the graphic is always inserted within the placeholder that contains the icon.
That’s mainly an issue if your slide layout includes two placeholders that could contain the graphic.
By inserting the graphic using the SmartArt graphic icon in the desired placeholder, you know it will be inserted where you want it.
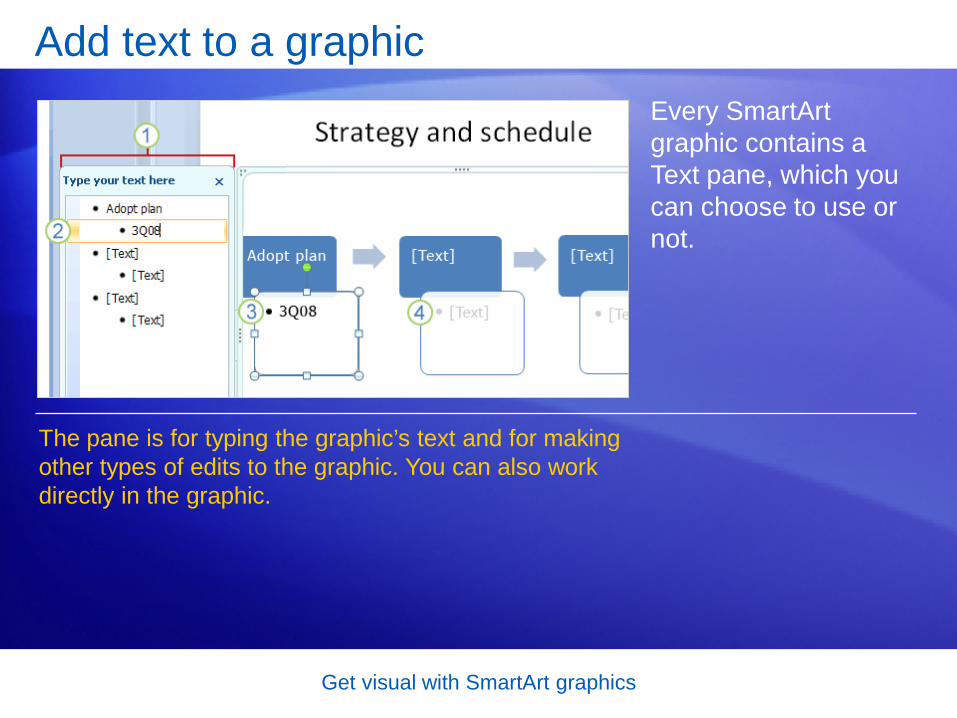
Get visual with SmartArt graphics
Add text to a graphic Every SmartArt graphic contains a Text pane, which you can choose to use or not.
The pane is for typing the graphic’s text and for making other types of edits to the graphic. You can also work directly in the graphic.

Get visual with SmartArt graphics
Add text to a graphic The picture illustrates the Text pane and process of adding text.
1
2
The Text pane sits to the side of the graphic.
You type your text in the pane.

Get visual with SmartArt graphics
Add text to a graphic The picture illustrates the Text pane and process of adding text.
3 The text appears automatically in the corresponding shape in the graphic.
4 Notice that the graphic comes with default text so that you get a sense of where your text will go.

Get visual with SmartArt graphics
Add text to a graphic If you find it frustrating to select and work within the shapes in the graphic, you’ll welcome the Text pane.
No more fiddling with shape selection in order to type—just focus on and work with text without being distracted by the graphic.
By contrast, if you prefer to type directly into shapes in the graphic, do that. Or go back and forth, as it suits you.

Get visual with SmartArt graphics
Add text to a graphic In any case, the Text pane is handy if you’ve got lots of text to put in, or if you want a space for organizing text.
You can also manipulate (add, delete, and move) text and shapes by working from the Text pane.
And finally, there’s an accessibility benefit: If you use a screen reader, the Text pane gives you a way to read and create a graphic on a slide, as long as you’re in editing view.

Get visual with SmartArt graphics
How text maps to shapes The type of layout you choose for the SmartArt graphic determines how text in the Text pane maps to shapes in the graphic.
The pictures show two different treatments.
On the left, the layout supports top-level text in one set of shapes, the primary ones that have the arrows between them.
The second-level text, indented in the Text pane, appears in the lower shapes, which are also slightly indented and include a bullet.

Get visual with SmartArt graphics
How text maps to shapes The type of layout you choose for the SmartArt graphic determines how text in the Text pane maps to shapes in the graphic.
The pictures show two different treatments.
By contrast, in the picture on the right, the layout puts all the text, first-level and second-level, into one shape. It indicates the second-level text by using bullets and a smaller font.
So, how your text is displayed depends on the layout you choose.

Get visual with SmartArt graphics
• Some layouts may not contain enough main points or levels in their shapes to accommodate your text. If so, a red X appears next to that text in the Text pane.
• If you apply another layout whose shapes do accommodate all the text, the text then appears in the graphic. But if you save the presentation while using the layout that didn’t show some of the text, that text will be lost.
How text maps to shapes More about text and layouts:
And a bit about automatic text sizing:
• As you type, PowerPoint adjusts font size so that text fits within the shapes. When you’re through typing in all your content, if some of the font sizes aren’t to your liking, you can resize text within individual shapes.

Get visual with SmartArt graphics
Manipulating text and shapes The animation shows a variety of ways in which you can affect the graphic while working from the Text pane.
Of course, you can work within the graphic itself to add and remove shapes and do anything else you want to do—and that may be your preference. Just be aware that the Text pane is good for more than just typing in text.
Animation: Right-click, and click Play.
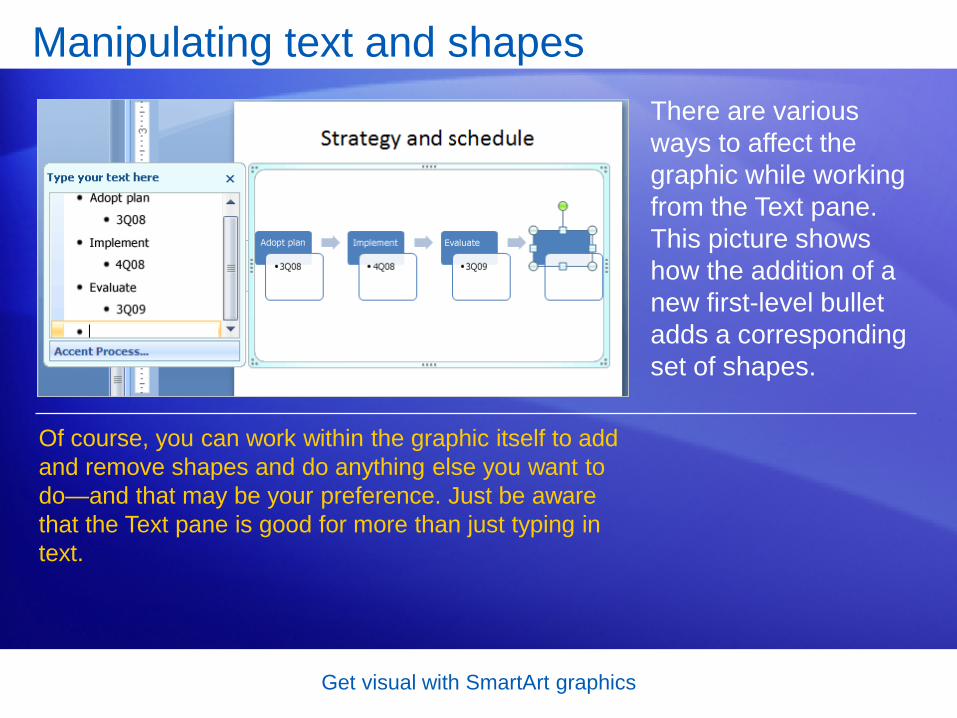
Get visual with SmartArt graphics
Manipulating text and shapes There are various ways to affect the graphic while working from the Text pane. This picture shows how the addition of a new first-level bullet adds a corresponding set of shapes.
Of course, you can work within the graphic itself to add and remove shapes and do anything else you want to do—and that may be your preference. Just be aware that the Text pane is good for more than just typing in text.

Get visual with SmartArt graphics
Try a different layout What if you decide you want a different layout altogether? You can easily switch to another one.
1
2
3
With the graphic selected on the slide, click the Design tab in SmartArt Tools. (These tools are available whenever the graphic is selected.)
Click a layout thumbnail in the Layouts group.
That layout is applied to the graphic.

Get visual with SmartArt graphics
Try a different layout If you’ve made customizations (such as altering the structure of the graphic by adding and deleting shapes) but then decide to start over, you can reset the graphic.
On the Design tab in SmartArt Tools, click Reset Graphic:
This resets the whole graphic.
Get visual with SmartArt graphics
Suggestions for practice 1. Convert a list to a SmartArt graphic.
2. Add text to a graphic.
3. Promote text and add a shape to a graphic.
4. Insert a blank graphic.
5. Insert a graphic by using the Insert tab.
6. Swap the layout.
7. Add text and work with shapes.
Online practice (requires PowerPoint 2007)

Get visual with SmartArt graphics
Test 2, question 1 You want to convert a bulleted list to a SmartArt graphic. What are the first steps? (Pick one answer.)
1. Click anywhere within the bulleted list, and then click Convert to SmartArt Graphic on the Home tab.
2. Click the Insert tab, and click SmartArt Graphic in the Illustrations group.
3. Click anywhere within the bulleted list, and then click the Design tab.

Get visual with SmartArt graphics
Test 2, question 1: Answer Click anywhere within the bulleted list, and then click Convert to SmartArt Graphic on the Home tab.
You can also right-click within the list that you want to convert, and point to Convert to SmartArt on the shortcut menu.

Get visual with SmartArt graphics
Test 2, question 2 You learned a couple of different methods for inserting a blank SmartArt graphic: You can click the SmartArt button on the Insert tab, or you can click the SmartArt graphic icon from within a slide layout. What’s one advantage to using the latter method? (Pick one answer.)
1. The new graphic is put within a placeholder.
2. The new graphic is put within the same placeholder as the icon.
3. You get more layout choices in the Choose a SmartArt Graphic dialog box.

Get visual with SmartArt graphics
Test 2, question 2: Answer The new graphic is put within the same placeholder as the icon.
You’d care about this if there were multiple placeholders on the slide and you wanted the graphic in a specific one.

Get visual with SmartArt graphics
Test 2, question 3 You can work from the Text pane to add or remove a shape from the graphic. (Pick one answer.)
1. True.
2. False.

Get visual with SmartArt graphics
Test 2, question 3: Answer True.
Assuming that the layout you’re using supports additional shapes, you can add a shape by adding a new primary-level bullet in the Text pane. To remove the shape, you’d delete the bullet from the Text pane.

Lesson 3
Style, polish, and update graphics

Get visual with SmartArt graphics
Style, polish, and update graphics Time to explore the world of SmartArt graphic design. For example, work with galleries of styles and color variations to make a graphic look professional and polished.
See, too, how the overall design of the presentation, called a theme, affects the design of your graphics.
And finally, learn about the choices you have for working with diagrams from older presentations, whether it’s upgrading them to look like SmartArt graphics or maintaining their original appearance.

Get visual with SmartArt graphics
Presentation theme: Basis for how slides look Before learning about how you can work with specific styles and colors for your SmartArt graphic, you need to learn about themes.
1
2
This first slide has the plainest PowerPoint theme applied, called Office Theme. It is applied by default.
The second slide is the same slide with a different theme applied, called Module.
A theme supplies the design of the whole presentation. It’s the basis for how all slides and slide elements look.

Get visual with SmartArt graphics
Presentation theme: Basis for how slides look As you see, the graphics look quite different just because of the theme.
The theme determines the background design, slide colors, placeholder layout, text positioning, and font styles.
Working within the theme, you can select different styles and color variations just for the SmartArt graphic.

Get visual with SmartArt graphics
SmartArt styles: Example 1 Just as a presentation has an assortment of themes available to give it its overall look, each SmartArt graphic layout has a range of styles available to it.
There is a default style applied to the graphic when it’s first inserted, but you can choose a different one.
For example, the picture shows the same graphic you saw previously, with the Office Theme still applied to the slide—but now a different style is applied to the graphic.

Get visual with SmartArt graphics
SmartArt styles: Example 2 In this example, one of the styles in the 3-D category is applied, called Cartoon.
It does even more to make the shapes seem slightly lifted off the slide.
The main shapes have a bevel and highlight on either end. And the long shapes have a similar highlight all along the top and bottom.
The dark color of the main shapes is uniform, suggesting a flatter, shinier finish, unlike the more gradient, or gradual, color in the first style.

Get visual with SmartArt graphics
SmartArt styles: Example 2 In this example, one of the styles in the 3-D category is applied, called Cartoon.
It does even more to make the shapes seem slightly lifted off the slide.
In brief, here are some things you’ll find within styles:
• Color-shade variations that stick within the current color range.
• Different treatments of shape fills and borders.

Get visual with SmartArt graphics
SmartArt styles: Example 2 In this example, one of the styles in the 3-D category is applied, called Cartoon.
It does even more to make the shapes seem slightly lifted off the slide.
• Varying dimensionality: Shapes can look flat to rounded to fully dimensional (two-sided) to tilted.
• Visual effects such as reflection, shadows, and glows.
In brief, here are some things you’ll find within styles:

Get visual with SmartArt graphics
Change the style’s colors Though the current style for the SmartArt graphic includes colors, you can change the colors by using the gallery that’s shown in this picture.
The gallery is on the Design tab within SmartArt Tools on the Ribbon. It’s in the SmartArt Styles group.

Get visual with SmartArt graphics
Change the style’s colors Though the current style for the SmartArt graphic includes colors, you can change the colors by using the gallery that’s shown in this picture.
1
2
3
Click Change Colors, next to the style choices.
Point to any color variation.
Look at the preview on the graphic. As usual, click the thumbnail to apply the colors.
To change the style’s colors:

Get visual with SmartArt graphics
Change the style’s colors The color choices use the spectrum of colors that are part of the presentation theme.
They’re divided by row into the primary colors of the scheme, shown at the top, and the accent colors—which on your slides are used for a range of things, such as color fills and hyperlink text.
If you change the theme for the presentation, your graphic’s colors will be updated to match the new theme.

Get visual with SmartArt graphics
Do more with shapes The style you’ve applied to the graphic has given it a great look. Yet there’s more you can do, working at the level of individual shapes within the graphic.
1
2
Select the shape or shapes you want to change. The picture shows several shapes selected.
On the Format tab, look in the Shape Styles group for Shape Effects, and click its arrow.
Use the Format tab within SmartArt Tools:

Get visual with SmartArt graphics
Do more with shapes The style you’ve applied to the graphic has given it a great look. Yet there’s more you can do, working at the level of individual shapes within the graphic.
3 Choose from the effects, such as the Shadow effects. Or choose a different bevel, a reflection, or a glow. There’s also a gallery of styles to the left of this menu that are just for shapes.
Use the Format tab within SmartArt Tools:
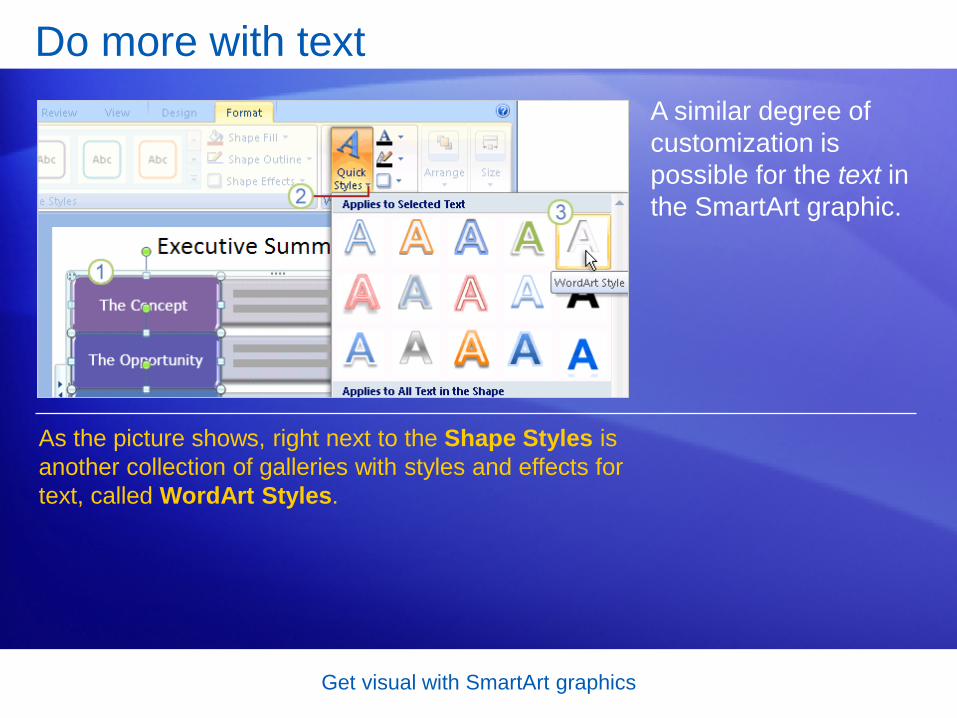
Get visual with SmartArt graphics
Do more with text A similar degree of customization is possible for the text in the SmartArt graphic.
As the picture shows, right next to the Shape Styles is another collection of galleries with styles and effects for text, called WordArt Styles.

Get visual with SmartArt graphics
Do more with text Here’s how to apply WordArt formatting to your text.
1
2
3
Select the shapes that contain the text you want to format.
On the Format tab, click the arrow next to Quick Styles. (This is in the WordArt Styles group.)
Pick a WordArt style. It will apply to all the text in the selected shapes.
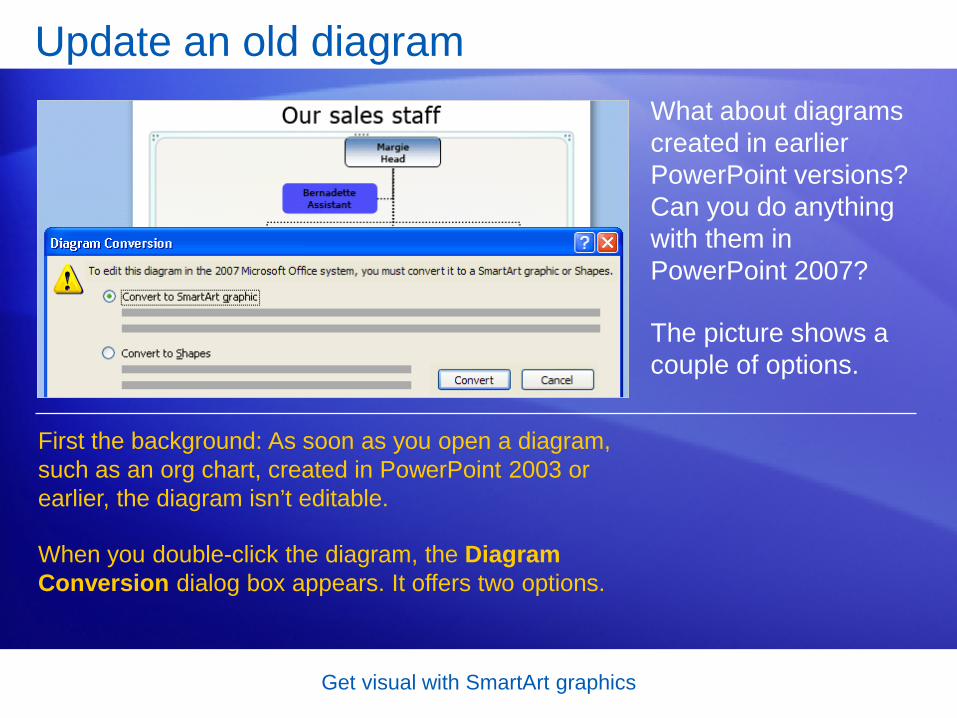
Get visual with SmartArt graphics
Update an old diagram What about diagrams created in earlier PowerPoint versions? Can you do anything with them in PowerPoint 2007?
The picture shows a couple of options.
First the background: As soon as you open a diagram, such as an org chart, created in PowerPoint 2003 or earlier, the diagram isn’t editable.
When you double-click the diagram, the Diagram Conversion dialog box appears. It offers two options.

Get visual with SmartArt graphics
Update an old diagram The first option is to convert the diagram to a SmartArt graphic.
The conversion applies an appropriate layout, a default style, and colors from the current theme, which you can change as you like.
The converted diagram has available to it all the design and formatting tools of any SmartArt graphic.

Get visual with SmartArt graphics
Update an old diagram The second option is to convert the diagram into shapes that you can format.
After you convert a diagram into shapes, you can use all the formatting options available to any shape in PowerPoint.
(These are part of Drawing Tools, which apply to shapes and placeholders, and are not part of SmartArt Tools).
This choice retains absolute fidelity to the diagram’s original look and behavior.

Get visual with SmartArt graphics
• Once converted, if your diagram is opened in an earlier version of PowerPoint, it won’t be editable as a diagram. It will instead open as a picture.
• If you make no significant changes to the diagram and then reopen it in PowerPoint 2007, it will be editable as usual, as a SmartArt graphic.
• You can use this conversion feature for diagrams created in versions as old as PowerPoint 2000.
Update an old diagram More on converting to a SmartArt graphic:
Get visual with SmartArt graphics
• If you convert the diagram to shapes, it won’t be updated to use a SmartArt graphic layout and style, or exact colors from the theme. Also, none of the galleries on the Design tab in SmartArt Tools will be available.
• Significantly, this choice means that the diagram will be editable by someone opening it up in PowerPoint 2003 or earlier.
Update an old diagram More on converting to editable shapes:

Get visual with SmartArt graphics
Suggestions for practice 1. Apply a theme.
2. Choose different styles and color variations.
3. Change shape styles and add visual effects.
4. Add text effects.
5. Update an older diagram.
Online practice (requires PowerPoint 2007)

Get visual with SmartArt graphics
Test 3, question 1 If you want an entire graphic to use different colors within the currently applied theme, what’s the best thing to do? (Pick one answer.)
1. Apply a new color variation from the Change Colors gallery.
2. Apply a new color from the Shape Styles gallery.

Get visual with SmartArt graphics
Test 3, question 1: Answer Apply a new color variation from the Change Colors gallery.
This gallery, on the Design tab in SmartArt Tools, offers variations and colors that stay within the range determined by the presentation’s theme and apply to the whole graphic.

Get visual with SmartArt graphics
Test 3, question 2 You want a soft edge and special outline around just one shape. Where do you find this type of formatting? (Pick one answer.)
1. Design tab, in SmartArt Tools.
2. Format tab, in SmartArt Tools.

Get visual with SmartArt graphics
Test 3, question 2: Answer Format tab, in SmartArt Tools.
Work with the Shape Fill and Shape Outline galleries on this tab to make your changes.

Get visual with SmartArt graphics
Test 3, question 3 You’re editing an old presentation that contains an organization chart. You’ve already converted some bulleted lists to SmartArt graphics, and you want your organization chart to have a similar look. You also have to edit the org chart by adding and removing a few names in it. What should you do? (Pick one answer.)
1. Delete the old org chart and start again.
2. Double-click a shape in the org chart and, in the conversion dialog box, choose to convert the chart to a SmartArt graphic.
3. Double-click a shape in the org chart and, in the conversion dialog box, choose to convert the chart to shapes.

Get visual with SmartArt graphics
Test 3, question 3: Answer Double-click a shape in the org chart and, in the conversion dialog box, choose to convert the chart to a SmartArt graphic.
You may lose some of your old formatting, but the new formatting will match the rest of your presentation. You can then edit the chart as needed.

Get visual with SmartArt graphics
Quick Reference Card
For a summary of the tasks covered in this course, view the Quick Reference Card.