microsoft office xp - training.cuna.org · web viewwhen word identifies a misspelled word, you...
TRANSCRIPT

HIWAY FEDERAL CREDIT UNION
Level 1 Lunch-N-Learn, May 2005
Microsoft Office Word 2002
Microsoft Office Word 2002

Table of Contents
Introduction.....................................................................................................................................................................3Menu Bar....................................................................................................................................................................3Standard Toolbar.........................................................................................................................................................3The Word Window.....................................................................................................................................................4
Setting Margins...............................................................................................................................................................5The Page Setup dialog box.........................................................................................................................................5
Auto Correct....................................................................................................................................................................6The AutoCorrect dialog box.......................................................................................................................................6
Save a New Document....................................................................................................................................................7Save As dialog box.....................................................................................................................................................7
Clip Art...........................................................................................................................................................................8Insert Clip Art.............................................................................................................................................................8
Lab Activity....................................................................................................................................................................9Creating an Announcement – Day 1...........................................................................................................................9Lab Activity Procedures...........................................................................................................................................10Lab Activity Procedures Continued..........................................................................................................................11
Basic Text Editing.........................................................................................................................................................12Selecting Text...........................................................................................................................................................12Drag and Drop Text..................................................................................................................................................12Text Formatting........................................................................................................................................................13Alignment.................................................................................................................................................................13
Document Editing.........................................................................................................................................................14Find and Replace Text..............................................................................................................................................14Cut, Copy & Paste.....................................................................................................................................................14Using Undo & Redo..................................................................................................................................................15Check Spelling..........................................................................................................................................................15Microsoft Help Text Box..........................................................................................................................................15
Table Basics..................................................................................................................................................................16Insert a Table.............................................................................................................................................................16A Table with Four Columns & Four Rows...............................................................................................................16
Lab Activity..................................................................................................................................................................17Lab Activity Procedures Day 2.................................................................................................................................17Lab Activity Procedures Day 2 Continued...............................................................................................................18
Basic Desktop Publishing.............................................................................................................................................19Drawing Toolbar.......................................................................................................................................................19Line Color and Styles................................................................................................................................................19
Hyperlinks.....................................................................................................................................................................20Create a Hyperlink....................................................................................................................................................20
Lab Activity..................................................................................................................................................................21Lab Activity Procedures Day 3.................................................................................................................................21
Mail Merge Basics........................................................................................................................................................22Mail Merge Basics....................................................................................................................................................22Steps 1-3 to Creating a Mail Merge..........................................................................................................................23Steps 4-6 to Creating a Mail Merge..........................................................................................................................24Mail Merge Toolbar..................................................................................................................................................25
Preview & Print Basics.................................................................................................................................................26Preview a Document.................................................................................................................................................26Print...........................................................................................................................................................................27
Lab Activity..................................................................................................................................................................28Lab Activity Procedures Day 4.................................................................................................................................28Lab Activity Procedures Day 4 Continued...............................................................................................................29Lab Activity Procedures Day 4 Continued...............................................................................................................30

Introduction
Menu Bar
Standard Toolbar
Pearson Prentice Hall DDC: Learning Microsoft Office Word 2003 3 Lunch-N-Learn
Introduction
Show/Hide
buttonUndoSave PrintOpen Insert
Hyperlink
New blank
document
Submenu
Shortcut KeyCommand
nameIcon
9 menus
Using Menus:Word groups commands into 9 menus.You can expand the menu to see all the commands.Commands that are not available appear dimmed on the expanded menu.If a toolbar button is available for a menu command, the icon will display to the left of the command name.A checkmark/bullet to the left of the toggle command indicates that command is already active.An ellipsis (…) indicates that the command opens a dialog box.An arrowhead indicates that the command opens a submenu.

Introduction
The Word Window
1.
_____________________
Pearson Prentice Hall DDC: Learning Microsoft Office Word 2003 4 Lunch-N-Learn
Introduction
1 2
4
5
109
7
6
8
3
Title BarRulersInsertion pointTool BarTask paneView buttonsSelect Browse ObjectStatus barMode buttonsType question for help box

2. _____________________3. _____________________4. _____________________5. _____________________6. _____________________7. _____________________8. _____________________9. _____________________10. _____________________
Microsoft Access: Learning Microsoft Access 2002 DDC Publishing Lunch-N-Learn5

Setting Margins
The Page Setup dialog box
Pearson Prentice Hall DDC: Learning Microsoft Office Word 2003 6 Lunch-N-Learn
Setting Margins
Set Margins: Margins are measured in inches. Default margins in Word are 1.25”
on the left and right and 1” on the top and bottom.
Vertical Alignment: Vertical Alignment is used to adjust
the position of all text on a page in relation to the top and bottom margins.
Centering vertically can improve the appearance of some one page documents, such as flyers or invitations.
Set vertical alignment on the Layout tab.

Auto Correct
The AutoCorrect dialog box
Pearson Prentice Hall DDC: Learning Microsoft Office Word 2003 7 Lunch-N-Learn
Auto Correct
AutoCorrect: Is a word feature that automatically
corrects common spelling and typing errors as you type.
Word comes with a built-in list of common typing errors.
If AutoCorrect changes text that was not incorrect, use Undo or the AutoCorrect button to reverse the change.
AutoCorrect can be disabled.

Save a New Document
Save As dialog box
Pearson Prentice Hall DDC: Learning Microsoft Office Word 2003 8 Lunch-N-Learn
Save a New Document
Drop Down List
Places bar File name box Contents of current location
Saving a New Word Document:To have a file available for future use, you must save it with a valid document name.When saving a document use the Save As dialog box to give it a name and select its location.Word automatically adds a period and a three character file extension to the end of the file name to identify the file type.By default, the file extension is .doc

Clip Art
Insert Clip Art
Pearson Prentice Hall DDC: Learning Microsoft Office Word 2003 9 Lunch-N-Learn
Clip Art
Clip Art: Use the Clip Art task pane to find
and insert clip art. Word displays thumbnail-sized
previews. The Insert clip art button also opens
the Clip Art task pane.
Hover over the thumbnail and the menu to insert will appear.

Lab ActivityCreating an Announcement – Day 1
Today’s activity will take approximately 15-20 minutes for beginners.
Scenario:
You’re in charge of announcing your family’s semiannual get-together this summer. The event is taking place on the 4 of July. One of your responsibilities involves creating an announcement informing all family members about the exciting event. For this event you will prepare the announcement shown in Figure 1.
Each day you will use step by step instructions to create and format the announcement. On Day 4 one announcement will be mailed and one will be sent via e-mail as an attachment. Your final steps will involve sending the announcement to your classmates.
Pearson Prentice Hall DDC: Learning Microsoft Office Word 2003 10 Lunch-N-Learn
Lab Activity
Figure 1: Shows the results on Day 4

Lab Activity
Lab Activity Procedures
Steps for Day 1
1) Open Microsoft Worda) Double click on the Microsoft Word icon from your desktop
2) Set the Margins and Page Orientationa) Click on the “File” menu and “Page Setup…”b) Set the bottom and top margin at 1”c) Set the left and right margin at 1.25”
3) Setup AutoCorrect optionsa) Click on the “Tools” menu and “AutoCorrect Options…”b) Choose the “AutoCorrect” tab and enter the letters “July” in the “Replace”
fieldc) In the “With:” field enter “July 11, 2005”d) Click “OK”
4) Save the document using “File Save As”a) Click on the “File” menu and “Save As…”b) Choose the folder or drive that the document will be saved under from the
drop down listc) In the “File Name” field type “Family Reunion 2005”d) Click “Save”
Pearson Prentice Hall DDC: Learning Microsoft Office Word 2003 11 Lunch-N-Learn
Lab Activity

Lab ActivityLab Activity Procedures Continued
Steps for Day 1 continued
5) Insert Clip Arta) Click on the “Insert” menu b) Go to “Picture” and click “Clip Art…”c) In the “Search text:” field type the words “summer”d) Hover over the picture of your choice and when the drop down arrow appears
to the right of it, left click and choose “Insert”
6) Format Picturea) Select the Pictureb) From the “Format” menu, click “Picture” to open the Format Picture dialog
boxc) Click on the “Size” tab and adjust your picture so that it’s approximately an
inch in heightd) Change the Vertical and Horizontal alignment to place the picture in the top
left corner of the announcement.7) Press [Enter] twice leaving two blank spaces
8) Enter the text shown in illustration A
Pearson Prentice Hall DDC: Learning Microsoft Office Word 2003 12 Lunch-N-Learn
Lab Activity

Basic Text Editing
Selecting Text
Drag and Drop Text
Pearson Prentice Hall DDC: Learning Microsoft Office Word 2003 13 Lunch-N-Learn
Basic Text Editing
Selecting Text Tips:You must select text, graphics, and other objects before you can edit them (i.e. enlarge, move, delete, etc.)!To select a word or group of words, place your insertion point at the beginning of the text while still holding down the left mouse button until you’ve highlighted all the information you want selected.Click a word twice to select the wordClick three times anywhere in the paragraph to select entire paragraph
Example of Selected Text
Example of a Selected Picture.
Black/White dots indicate that it is selected
Drag and Drop Text Tips:Drag and Drop is a feature that can be used in place of cut and paste.This command can be performed in three easy steps:1. Select the text you want to move.2. Left click the selected text and drag it
to the desired location. Use the dotted line to identify the insertion point.
3. Release the mouse button to drop the text.
Example of steps 1 – 3 shown above is taken from Teacher2Teacher.

Basic Text Editing
Text Formatting
Alignment
Pearson Prentice Hall DDC: Learning Microsoft Office Word 2003 14 Lunch-N-Learn
Formatting Name
FormattingToolbar Icon
Keyboard Shortcut
Font Type
Drop down list
Ctrl + Shift + F
Font Style
Bold, Italics, Underline
Ctrl + D
Font Size
Drop down list from 8-72 pts
Ctrl + Shift + ] (1pt)
or Ctrl + Shift + P
Font Color
Font Color (Dark Blue)
Ctrl + D
Font Effects All Caps, Superscript, Hidden, etc. Ctrl + D
Basic Text Editing
When using the Formatting Font dialog box, you can preview the look and effects of your text.
Left Align
Right Align
Center Align
Justify

Document Editing
Find and Replace Text
Cut, Copy & Paste
Pearson Prentice Hall DDC: Learning Microsoft Office Word 2003 15 Lunch-N-Learn
Task Keyboard Shortcut
CUT Ctrl + XCOPY Ctrl + CPASTE Ctrl + V
Document Editing
Find and Replace Dialog Box Tips: The Find and Replace commands are
useful for correcting errors that occur several times in a document, such as a misspelled name.
In addition to text, you can find and replace formatting, symbols, and special characters such as paragraph marks.
Cut Paste
CopyFormat Painter
Clipboard: The Clipboard will hold the last 24
items cut or copied.

Document Editing
Using Undo & Redo
Check Spelling
Microsoft Help Text Box
Pearson Prentice Hall DDC: Learning Microsoft Office Word 2003 16 Lunch-N-Learn
Document Editing
Undo Mistakes
The arrow next to Undo displays a list of the most recent actions you can undo.
When you undo an action, you also undo all actions above it in the list.
You can undo one action at a time by clicking the UNDO button on the Standard toolbar.
If you later decide you didn't want to undo an action, click Redo on the Standard toolbar.
Spelling and Grammar dialog Box:
You can check spelling in the entire document or part of a document.
To check part of the document, select the text that you want to it to check before running spell check.
When Word identifies a misspelled word, you can correct the spelling, ignore it, or add the word to the dictionary.
Type a keyword to search the help menu

Table Basics
Insert a Table
A Table with Four Columns & Four Rows
Pearson Prentice Hall DDC: Learning Microsoft Office Word 2003 17 Lunch-N-Learn
Table Basics
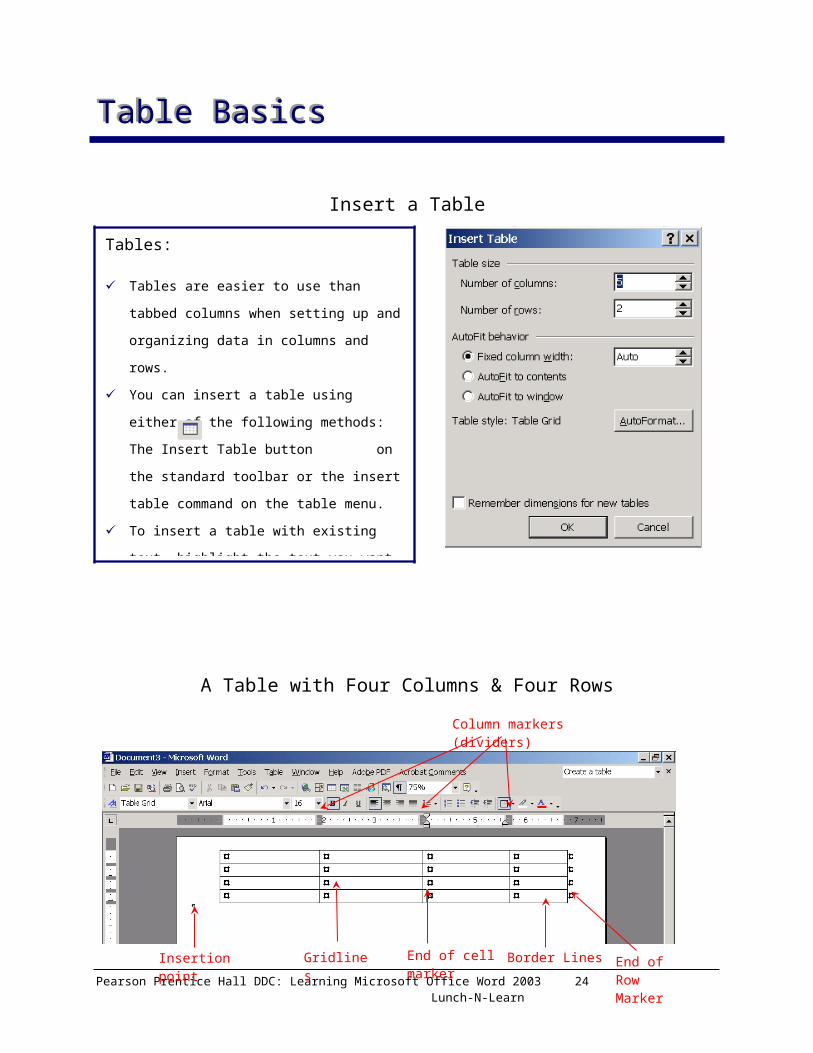
Tables:
Tables are easier to use than tabbed columns when setting up and organizing data in columns and rows.
You can insert a table using either of the following methods: The Insert Table button on the standard toolbar or the insert table command on the table menu.
To insert a table with existing text, highlight the text you want to appear within the table then insert.
In addition, you can use the tables and
borders button to draw a table.
Column markers (dividers)
Insertion point
Gridlines End of cell marker
Border Lines End of Row Marker

Lab Activity
Lab Activity Procedures Day 21) Open Your Word Document from the day before
a) Click on the Microsoft Word icon from your desktopb) Click the open folder from the standard toolbarc) Open the folder that you saved the file under the day befored) Double click on the file to open.
2) Edit the text shown below using the undo, redo, bold, italics, underline, cut, copy, and paste toolbar buttons as well as the drag and drop text feature.
Pearson Prentice Hall DDC: Learning Microsoft Office Word 2003 18 Lunch-N-Learn
The Family’s Name Semi-Annual Get-Together is Just Around-the-Corner!Despite the season’s endless entertainment options, we have not taken a vacation from holding
family events before this one,
this year’s semi-annual get-together! Many have proven to be loads of fun! Summer is the
season for exciting events, vacations from work and time spent with friends and family. Come to join us
St. Paul and enjoy free entertainment featuring “Urban Renewal Bluegrass” along with lunch and Press Enter Center this sentence
refreshments! You don’t want to miss this year’s free gifts, prizes and much, much more!Activities/Event
Activities for this event include: Pie eating contest , Golf Tournament , Scavenger Hunt ,
Karaoke contest , Dance contest , and Carriage rides around town.
When? July 11, 2005
Where? St. Paul, MN
For more information contact YOUR NAME at 651-258-3992 or via email at YOUR E-MAIL
Press Enter Press Enter Press Enter Press Enter
Press EnterPress Enter
Drag and drop text
Insert Table2 columns8 rowsCenter Table & Text
Center Text & Edit(See illustration B)
Press Enter after the family’s name and CenterFamily’s Name in ItalicsChange Font to Monotype Cursiva (18pts)
Lab Activity

Lab Activity
Lab Activity Procedures Day 2 Continued
3) Use Find and Replace to correct the following texta) Click on the “Edit” menu and choose “Replace”b) In the “Find What” field enter “When?”c) In the “Replace With” field enter “WHEN:”d) Repeat the same steps to replace “Where?” with “WHERE:”e) Repeat the same steps to replace “July 11” with “July 04”f) Repeat the same steps to replace “St. Paul” with “Cottage Grove”
Pearson Prentice Hall DDC: Learning Microsoft Office Word 2003 19 Lunch-N-Learn
Lab Activity

Basic Desktop Publishing
Drawing Toolbar
Line Color and Styles
Pearson Prentice Hall DDC: Learning Microsoft Office Word 2003 20 Lunch-N-Learn
Basic Desktop Publishing
Line Formatting:
By default drawing objects have a solid single line border.
Select line color and style from the palettes on the right end of the Drawing toolbar, or open the object’s Format dialog box for additional options.
Line Style
Line Object
Drawing Toolbar:
You can insert two types of graphics objects into a Word document: DRAWING OBJECTS and PICTURES.
The drawing toolbar gives you quick and easy ways to insert: Pictures, Shapes, Text Boxes, Clip Art, Organizational Charts, etc.
Insert Diagram/Org Chart
Text Box
AutoShape Menu
Clip Art Fill Effects
The Line Style button
displays different styles.

Hyperlinks
Create a Hyperlink
Pearson Prentice Hall DDC: Learning Microsoft Office Word 2003 21 Lunch-N-Learn
Hyperlinks
Hyperlinks:
A hyperlink is text or graphics linked to a destination file or location.
Hyperlinks are used to link two documents, to a website, or to an e-mail address.
By default, you must press Ctrl and click the hyperlink in order to link to its destination. However, this can be setting can be changed.
Use the Insert Menu or the Insert Hyperlink button on the Standard toolbar to open the following dialog box.

Lab Activity
Lab Activity Procedures Day 31) Draw a line using the Drawing toolbar
a) Click on the Line button from the drawing toolbarb) Draw a horizontal line directly under the picture and 1st sentence in the
announcement.c) Adjust the length as needed by selecting the line (tip: to maintain a straight
line hold the shift key down while adjusting the length).
2) Format the line color and stylea) Select the lineb) Click on the “Format” menu and choose “Autoshape…” to open the
“Format Autoshape” dialog boxc) In the “Line” section, choose the style, weight, and colord) Click “OK” when complete
3) Insert a website and e-mail Hyperlinka) Select the following text: Urban Renewal Bluegrassb) Click the “Insert” menu and choose “Hyperlink…”c) Choose “Existing File or Web Page” button on the left pane of the
hyperlink dialog boxd) In the “Address” field, enter: http://www.tcmusic.net/musician90.htmle) Click “OK”f) Select your e-mail addressg) Click on the “Insert Hyperlink” buttonh) Click on the “E-mail Address” button on the left pane of the hyperlink dialog
boxi) In the “E-mail Address” field enter your e-mail addressj) In the “Subject” field enter “Family Name Reunion 2005”k) Click “OK” when complete
Pearson Prentice Hall DDC: Learning Microsoft Office Word 2003 22 Lunch-N-Learn
Lab Activity

Mail Merge Basics
Mail Merge Basics
Pearson Prentice Hall DDC: Learning Microsoft Office Word 2003 23 Lunch-N-Learn
Mail Merge Basics
Mail Merge Tips:
Use mail merge to create mass mailings, envelopes, e-mail messages, labels, or directories.
To create a mail merge, you must have TWO files:1. A main document, which contains information that will not change
as well as merge fields and merge blocks that act as placeholders for information.
2. A data source file, which contains information like names and addresses.
You can use the Mail Merge task pane or the Mail Merge toolbar to access mail merge features and commands.
Use the Mail Merge task pane (like a wizard) to create a mail merge document in 6 easy steps.
Step 1 of 6
The wizard displays the 4 document options here.

Mail Merge Basics
Steps 1-3 to Creating a Mail Merge
Pearson Prentice Hall DDC: Learning Microsoft Office Word 2003 24 Lunch-N-Learn
Mail Merge Basics
Step 1 of 6Step 2 of 6
Step 3 of 6
Mail Merge Basics
Steps 4-6 to Creating a Mail Merge
Pearson Prentice Hall DDC: Learning Microsoft Office Word 2003 25 Lunch-N-Learn
Mail Merge Basics
Step 4 of 6
Step 6 of 6Step 5of 6

Mail Merge Basics
Mail Merge Toolbar
Pearson Prentice Hall DDC: Learning Microsoft Office Word 2003 26 Lunch-N-Learn
Mail Merge Basics
Merge to Printer
Main Document Setup
Open Data
Source
Insert Address
Block
Insert Merge Fields
View Merged
Data
Highlight Merged Fields
Mail Merge Toolbar Buttons:
Main Document Setup button – sets up a main document for mail merge with preset formats.
Open Data Source button – Attaches an existing data source to the main document.
Insert Address Block button – Provides a list of address formats to insert into your main document for mail merge.
Insert Merge Fields button – Allows you to choose each merge field you want to insert.
View Merged Data button – Displays the main document merged with information from the selected data records.
Highlight Merge Fields button – Places a background to merge fields so that you can easily find them.
Merge to Printer button – Runs the mail merge and prints the results.

Preview & Print Basics
Preview a Document
Pearson Prentice Hall DDC: Learning Microsoft Office Word 2003 27 Lunch-N-Learn
Preview & Print Basics
Previewing Documents:
Print Preview is used to display a document as it will look when printed.
By default, one full page of a document at a time. However, you may set it to display up to six pages at one time.
You can change the Zoom setting in Print Preview to zoom in or out on the document.

Preview & Print Basics
Pearson Prentice Hall DDC: Learning Microsoft Office Word 2003 28 Lunch-N-Learn
Preview & Print Basics
Printing Documents:
Printing creates a hard copy version of a document. Your computer must be connected to a printer in order to
print. You can quickly print a single copy of the current
document using the print button on the standard toolbar, OR you can use the Print dialog box to select Print Options.

Lab Activity
Lab Activity Procedures Day 41) Run Spell and Grammar Check
a) Click on the “Spelling and Grammar” check button from the standard toolbar
b) Choose the correct spelling and click replace for any misspelled textc) Click “OK” when complete
2) Print Previewa) Click on the “Print Preview” buttonb) Click on close when complete and make any necessary changes to text or
object placement
3) There are 10 guest that do not have e-mail so you will have to create a mail merge to mail them the announcement, Create a mail merge for your envelopesa) Open a blank Word documentb) Click on the “View” menu and choose “Task Pane”c) Change the “Task Pane” to “Mail Merge” by click on the triangle at the top
of the task paned) Step 1 of 6: Click in the “Envelopes” radio button and click on the Next linke) Step 2 of 6: Click on the “Envelope options…” link
i) Choose the envelope style and click “OK”ii) Click on the “Next: Select recipients” link
f) Step 3 of 6: Click in the “Type a new list” radio buttoni) Click on the “Create” linkii) Click on the “Customize” buttoniii) Delete the Title, Company Name, Home, and Work Phone fields and click
“OK”iv) Enter the following guest:
Pearson Prentice Hall DDC: Learning Microsoft Office Word 2003 29 Lunch-N-Learn
Lab Activity

30

Lab Activity
Lab Activity Procedures Day 4 Continued
Last Name First Name Address Line City State Zip CodeKaplan George 980 Main Street Phoenix AZ 85281Boyd Patricia 65 Blueberry Minneapolis MN 55422Thompson Hannah 3232 Chestnut St Saint Paul MN 55102Grogan Laurence 12202 Hill Street Saint Paul MN 55107Franklin Christina 622 Fox Street Minneapolis MN 55422Streeter Jessica 786 Elm Street San
FranciscoCA 94107
Suhail Nakahmi 73 Applewood Jenkintown PA 19046Alex Daniels 592 Roosevelt Auburn MN 55103Mahony Liz 7865 Stuart Drive Newton MA 01468
g) Click “Next: Arrange Your Envelop” link
4) Step 4 of 6: Place your cursor in the Mailing Address insertion pointa) Click on the “Address Block” link
i) Choose the recipient name format and click “OK”b) Click “Next: Preview Your Envelope” link
5) Step 5 of 6: Allows you to preview the envelopes one at a time and a chance to edit if necessary.a) Click on the “Next: Complete the merge” link
6) Step 6 of 6: Allows you the option to print the envelopes or save your changes for a later date.a) Save your changes using Family Reunion 2005 Mailing List as the data source
name
Pearson Prentice Hall DDC: Learning Microsoft Office Word 2003 31 Lunch-N-Learn
Lab Activity

Lab Activity
Lab Activity Procedures Day 4 Continued
7) Send an e-mail invitation to your classmate to test the look of your announcement.a) Close your announcementb) Click on the “Open” folder from the standard toolbarc) Find the document that you want to send via e-maild) Highlight/Select the documente) Right click on the documentf) Choose “Send to” “Mail Recipient”g) This will automatically prompt an e-mail message and attach the documenth) Click “Send/OK” to send the message
Pearson Prentice Hall DDC: Learning Microsoft Office Word 2003 32 Lunch-N-Learn
Lab Activity