microsoft system center endpoint protection 2012
TRANSCRIPT

P a g e | 1
Microsoft System Center Endpoint Protection 2012 – Professionally & Quickly Expose
Table of Contents
Chapter 1 - Planning - Designing and Implementation.
Chapter 2 - Installation Software.
Chapter 3 - Create and Assign Policies.
Chapter 4 - Deploy SCEP Clients.
Chapter 5 - Monitoring and Logging, Reporting.
Chapter 6 - Debugging and Troubleshooting - Workaround.
Release Notes
The following matters contains guides and articles that will expose you to
System Center Endpoint Protection 2012 Technology - Professionally & Quickly.

P a g e | 2
Microsoft System Center Endpoint Protection 2012 – Professionally & Quickly Expose
Chapter 1
Planning - Designing and Implementation
Prerequisites:
The following table lists the external Necessaries for running Endpoint Protection in
Configuration Manager.
Necessary Details
Windows Server Update Services (WSUS)
must be installed and configured for
software updates synchronization if you
want to use Configuration Manager
software updates to deliver definition and
engine updates.
See Prerequisites for Software Updates in
Configuration Manager
Some definition update methods require
that client computers have Internet access.
If you use any of the following
methods to update definitions on
client computers, the client computer
must be able to access the Internet.
Updates distributed from
Microsoft Update
Updates distributed from
Microsoft Malware Protection
Center
Clients download definition
updates by using the built-in
System account. You must
configure a proxy server for
this account to enable these
clients to connect to the
Internet. You can use
Windows Group Policy to
configure a proxy server on
multiple computers.
An SMTP server if you want to send email
alerts See Step 1 (Optional): Configure Email
Settings for Alerts in the How to

P a g e | 3
Microsoft System Center Endpoint Protection 2012 – Professionally & Quickly Expose
Configure Alerts for Endpoint Protection
in Configuration Manager topic.
Hotfix requirement to deploy Windows
Firewall policies. If you want to deploy Windows Firewall
policies to computers running Windows
Server 2008 and Windows Vista Service
Pack 1, you must first install Hotfix
KB971800 on these computers.
Configuration Manager Necessaries
The following table lists the dependencies within Configuration Manager for running Endpoint Protection.
Necessary Details
The Endpoint Protection point site system role must
be installed before you can use Endpoint Protection.
It must be installed on one site system server only,
and it must be installed at the top of the hierarchy on
a central administration site or a stand-alone
primary site.
Site System Requirements section of theSupported
Configurations for Configuration Manager.
For more information about to install this site system
role, see How to Configure Endpoint Protection in
Configuration Manager
For more information about to install this site system
role, see How to Configure Endpoint Protection in
Configuration Manager.
A software update point site system role must be
installed and configured to deliver definition updates
if you want to use Configuration Manager software
updates to deliver definition and engine updates.
For more information about the requirements for the
software update point site system role, see the Site
System Requirements section of the Supported
Configurations for Configuration Manager.
For more information about how to install this site
system role and configure it for Endpoint Protection,
see Configuring Software Updates in Configuration
Manager and How to Configure Endpoint Protection
in Configuration Manager.
Client settings that install the Endpoint Protection
client and configure Endpoint Protection
For information about the system requirements for
the Endpoint Protection client, see the Computer
Client Requirements in the Supported Configurations
for Configuration Manager topic.
For more information about how to configure the
client settings for Endpoint Protection, see Step 5:
Configure Custom Client Settings for Endpoint

P a g e | 4
Microsoft System Center Endpoint Protection 2012 – Professionally & Quickly Expose
Protection in the How to Configure Endpoint
Protection in Configuration Manager topic.
The reporting services point site system role must be
installed before Endpoint Protection reports can be
displayed.
See Reporting in Configuration Manager.
Security permissions to manage Endpoint Protection You must have the following security permissions to
manage Endpoint Protection:
To create and manage subscriptions to
Endpoint Protection
alerts:Create, Delete, Modify, Read, Set
Security Scope for the Alert
Subscription object.
To create and modify alerts for
Endpoint Protection: Create, Delete,Modify,
Modify Report, Read, Run Report for
the Alerts object.
To create and modify antimalware
policies: Create, Delete, Modify,Modify
Default, Modify Report, Read, Read
Default, Run Report,Set Security Scope for
the Antimalware Policy object.
To deploy antimalware and Windows Firewall
policies to computers:Audit
Security, Delete, Deploy Antimalware
Policies, Deploy Firewall Policies, Enforce
Security, Read, Read Resource for
theCollection object.
To view and manage Endpoint Protection in
the Configuration Manager
console: Read permissions for
the Site object.
To create and modify Windows Firewall
policies: Create Policy,Delete
Policy, Modify Policy, Read Policy, Read
Settings for theWindows Firewall
Policy object.

P a g e | 5
Microsoft System Center Endpoint Protection 2012 – Professionally & Quickly Expose
The Endpoint Protection Manager security role
includes these permissions that are required to
manage Endpoint Protection in Configuration
Manager.
To perform the following actions, you must be a
member of the Full Administrator security role.
Configure the Endpoint Protection point site
system role.
Configure email notification for Endpoint
Protection alerts.
For more information, see Configure Role-Based
Administration in theConfiguring Security for
Configuration Manager topic.
Best Practices:
Configure custom client settings for Endpoint Protection When you configure client settings for Endpoint Protection, do not use the default client settings
because they apply settings to all computers in your hierarchy. Instead, configure custom client
settings and assign these settings to collections of computers in your hierarchy.
When you configure custom client settings, you can do the following:
Customize antimalware and security settings for different parts of your organization.
Test the effects of running Endpoint Protection on a small group of computers before you deploy it
to the entire hierarchy.
Add more clients to the collection over time to phase your deployment of the Endpoint Protection
client.
Distributing definition updates by using software updates
If you are using Configuration Manager Software updates to distribute definition updates,
consider placing definition updates in a package that does not contain other software
updates. This keeps the size of the definition update package smaller which allows it to
replicate to distribution points more quickly.
P a g e | 6
Microsoft System Center Endpoint Protection 2012 – Professionally & Quickly Expose
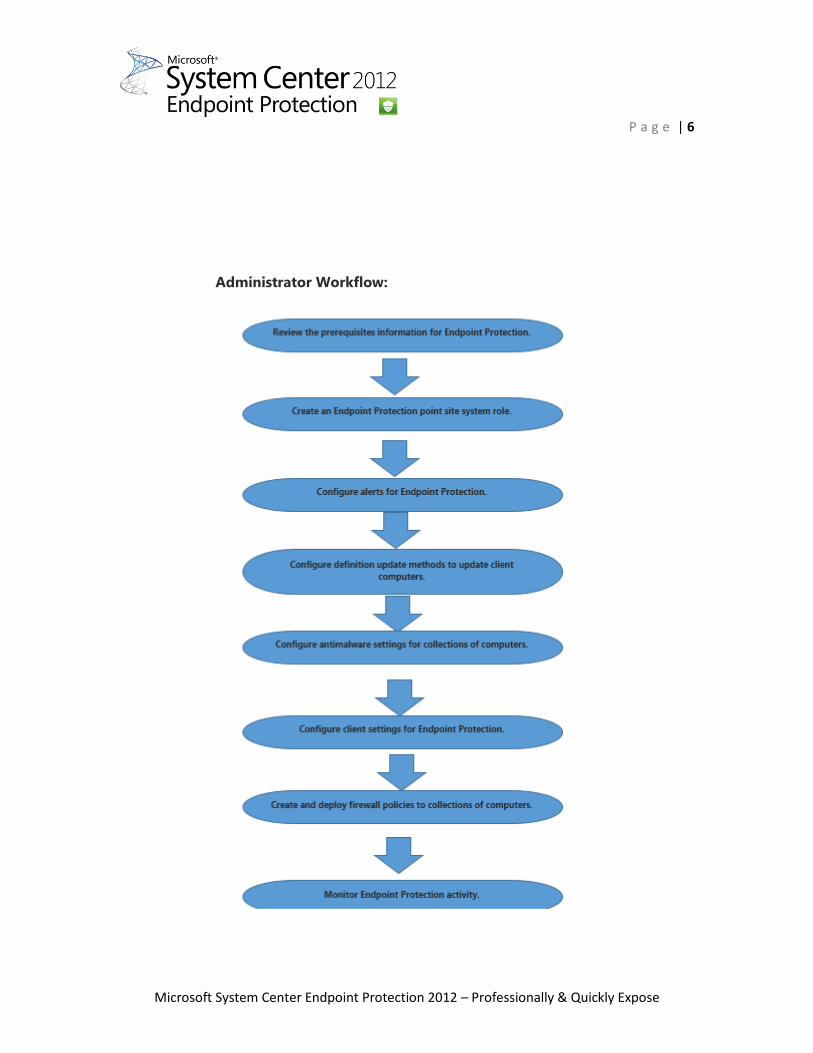
Administrator Workflow:

P a g e | 7
Microsoft System Center Endpoint Protection 2012 – Professionally & Quickly Expose
Chapter 2
Installation Software
Steps for Configure Endpoint Protection in Configuration Manager:
Add site system role:
1. In Administration workspace - expand Site Configuration.
2. Select Servers and Site System Roles.
3. Select Add Site System Roles.
4. Marks ✔ Endpoint Protection point.
5. Finish after role added.
Steps to Configure Alerts for Endpoint Protection in Configuration Manager:
You can configure Endpoint Protection alerts in Microsoft System Center 2012
Configuration Manager to notify administrative users when specific security events occur
in your hierarchy. Notifications display in the Endpoint Protection dashboard in the
Configuration Manager console, in reports, and you can configure them to be emailed to
specified recipients.
Step 1
(Optional): Configure
email settings for
alerts.
Before you can configure email subscriptions for alerts,
you must configure an SMTP server in your hierarchy.
An SMTP server can only be specified at the top-level site of your Configuration
Manager hierarchy.
Step 2: Configure
alerts by collection.
Configure the properties of a device collection and specify settings for alerts.
Step 3
(Optional): Configure
email subscriptions for
specific alerts.
Select the Endpoint Protection alerts in the Monitoring workspace, and create
subscriptions by specifying email addresses to send the Endpoint Protection alerts.

P a g e | 8
Microsoft System Center Endpoint Protection 2012 – Professionally & Quickly Expose
Steps to Configure Definition Updates for Endpoint Protection in Configuration Manager:
Updates distributed from Configuration Manager – This method uses Configuration
Manager software updates to deliver definition and engine updates to computers in your
hierarchy.
Updates distributed from Windows Server Update Services (WSUS) – This method uses
your WSUS infrastructure to deliver definition and engine updates to computers.
Updates distributed from Microsoft Update – This method allows computers to connect
directly to Microsoft Update in order to download definition and engine updates. This
method can be useful for computers that are not often connected to the business
network.
Updates distributed from Microsoft Malware Protection Center – This method will
download definition updates from the Microsoft Malware Protection Center.
Updates from UNC file shares – With this method, you can save the latest definition and
engine updates to a share on the network. Clients can then access the network to install
the updates.
To configure definition update sources
1. In the Configuration Manager console, click Assets and Compliance. 2. In the Assets and Compliance workspace, expand Endpoint Protection, and then
click Antimalware Policies. 3. Open the properties page of the Default Antimalware Policy or create a new
antimalware policy. For more information about how to create antimalware policies. 4. In the Definition updates section of the antimalware properties dialog box, click Set
Source. 5. In the Configure Definition Update Sources dialog box, select the sources to use for
definition updates. You can click up or down to modify the order in which these sources are used.
6. Click OK to close the Configure Definition Update Sources dialog box.
To configure an automatic deployment rule to deliver definition updates
1. In the Configuration Manager console, click Software Library.
2. In the Software Library workspace, expand Software Updates, and then click Automatic
Deployment Rules.
3. On the Home tab, in the Create group, click Create Automatic Deployment Rule.
P a g e | 9
Microsoft System Center Endpoint Protection 2012 – Professionally & Quickly Expose
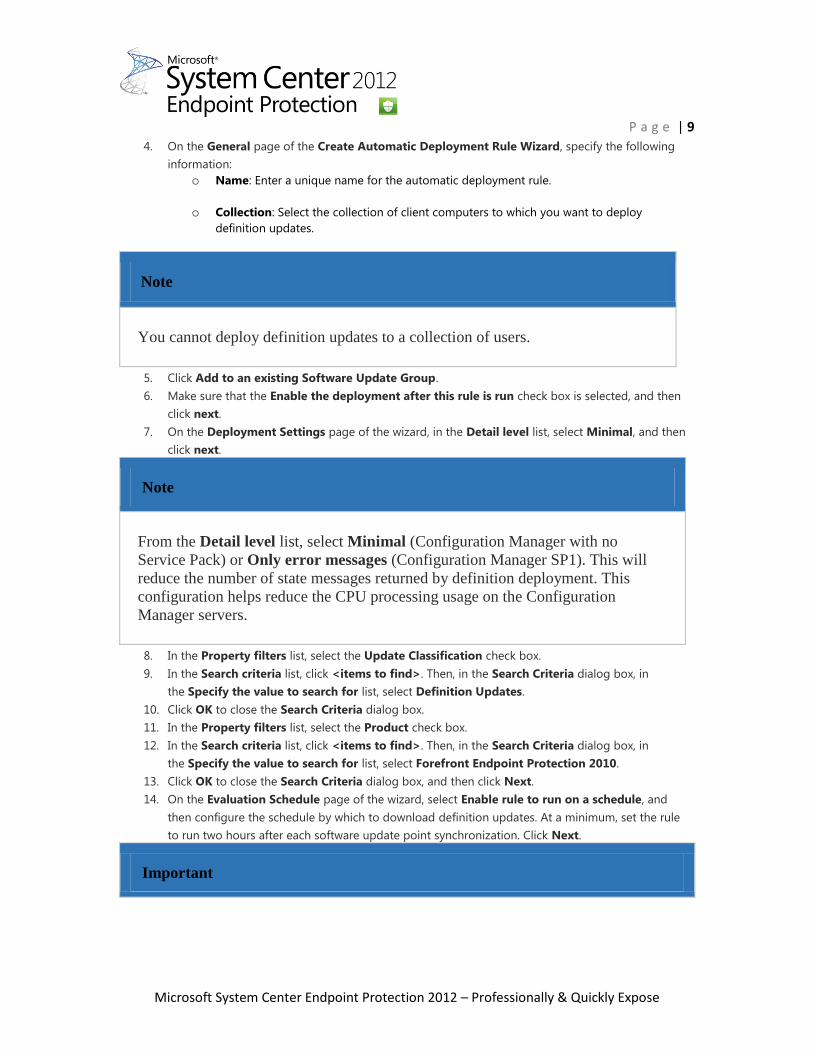
4. On the General page of the Create Automatic Deployment Rule Wizard, specify the following
information:
o Name: Enter a unique name for the automatic deployment rule.
o Collection: Select the collection of client computers to which you want to deploy
definition updates.
Note
You cannot deploy definition updates to a collection of users.
5. Click Add to an existing Software Update Group.
6. Make sure that the Enable the deployment after this rule is run check box is selected, and then
click next.
7. On the Deployment Settings page of the wizard, in the Detail level list, select Minimal, and then
click next.
Note
From the Detail level list, select Minimal (Configuration Manager with no
Service Pack) or Only error messages (Configuration Manager SP1). This will
reduce the number of state messages returned by definition deployment. This
configuration helps reduce the CPU processing usage on the Configuration
Manager servers.
8. In the Property filters list, select the Update Classification check box.
9. In the Search criteria list, click <items to find>. Then, in the Search Criteria dialog box, in
the Specify the value to search for list, select Definition Updates.
10. Click OK to close the Search Criteria dialog box.
11. In the Property filters list, select the Product check box.
12. In the Search criteria list, click <items to find>. Then, in the Search Criteria dialog box, in
the Specify the value to search for list, select Forefront Endpoint Protection 2010.
13. Click OK to close the Search Criteria dialog box, and then click Next.
14. On the Evaluation Schedule page of the wizard, select Enable rule to run on a schedule, and
then configure the schedule by which to download definition updates. At a minimum, set the rule
to run two hours after each software update point synchronization. Click Next.
Important

P a g e | 10
Microsoft System Center Endpoint Protection 2012 – Professionally & Quickly Expose
For performance reasons, in Configuration Manager with no Service Pack, do not
schedule automatic deployment rules to deliver definition updates more than once
each day. In Configuration Manager SP1, do not schedule automatic deployment
rules to deliver definition updates more than three times a day.
15. On the Deployment Schedule page of the wizard, configure the following settings:
o Time based on: Select UTC if you want all clients in the hierarchy to install the latest
definitions at the same time. The actual installation time will vary within a two-hour
window. This setting is a recommended best practice.
o Software available time: Specify the available time for the deployment that is created by
this rule. The specified time must be at least one hour after the automatic deployment rule
runs. This helps to ensure that the content has sufficient time to replicate to the
distribution points in your hierarchy. Some definition updates might also include
antimalware engine updates, which might take longer to reach distribution points.
o Installation deadline: Select As soon as possible.
Note
Software update deadlines are varied over a two-hour period to prevent all clients from
requesting an update at the same time.
16. Click Next.
17. On the User Experience page of the wizard, in the User notifications list, select Hide in Software
Center and all notifications. This ensures that the definition updates install silently. Click Next.
18. On the Alerts page of the wizard, you do not have to configure any alerts. Endpoint Protection in
Configuration Manager generates any alerts that might be required. Click Next.
19. On the Download Settings page of the wizard, select the necessary software updates download
behavior, and then click next.
20. On the Deployment Package page of the wizard, select an existing deployment package or create
a new deployment package to contain the software update files associated with the rule.
Note
Consider placing definition updates in a package that does not contain other software
updates. This strategy keeps the size of the definition update package smaller, which
allows it to replicate to distribution points more quickly.
21. On the Distribution Points page of the wizard, select one or more distribution points to which the
content for this package will be copied, and then click next.

P a g e | 11
Microsoft System Center Endpoint Protection 2012 – Professionally & Quickly Expose
22. On the Download Location page of the wizard, select Download software updates from the
Internet, and then click Next.
23. On the Language Selection page of the wizard, select each language version of the updates to be
downloaded, and then click next.
24. Complete the Create Automatic Deployment Rule Wizard.
25. Verify that the new rule is displayed in the Automatic Deployment Rules node of the
Configuration Manager console.
To configure definition downloads from a file share
1. In the Configuration Manager console, click Assets and Compliance.
2. In the Assets and Compliance workspace, expand Endpoint Protection, and then
click Antimalware Policies.
3. Open the properties page of the Default Antimalware Policy or create a new
antimalware policy. For more information about how to create antimalware policies.
4. In the Definition updates section of the antimalware properties dialog box, click Set
Source.
5. In the Configure Definition Update Sources dialog box, select Updates from UNC file
shares.
6. Click OK to close the Configure Definition Update Sources dialog box.
7. Click Set Paths. Then, in the Configure Definition Update UNC Paths dialog box, add
one or more UNC paths to the location of the definition updates files on a network share.
8. Click OK to close the Configure Definition Update UNC Paths dialog box.

P a g e | 12
Microsoft System Center Endpoint Protection 2012 – Professionally & Quickly Expose
Chapter 3
Create and Assign Policies
Create and Deploy Antimalware Policies for Endpoint Protection in Configuration Manager:
You can deploy antimalware policies to collections of Microsoft System Center 2012 Configuration Manager
client computers to specify how Endpoint Protection protects them from malware and other threats. These
antimalware policies include information about the scan schedule, the types of files and folders to scan, and
the actions to take when malware is detected. When you enable Endpoint Protection, a default antimalware
policy is applied to client computers. You can also use additional policy templates that are supplied or create
your own custom antimalware policies to meet the specific needs of your environment.
Note
Configuration Manager supplies a selection of predefined templates that are optimized for
various scenarios and can be imported into Configuration Manager. These templates are
available in the folder
<ConfigMgr Install Folder>\AdminConsole\XMLStorage\EPTemplates.
Important
If you create a new antimalware policy and deploy it to a collection, this antimalware
policy overrides the default antimalware policy.
Use the procedures in this topic to create or import antimalware policies and assign them to
System Center 2012 Configuration Manager client computers in your hierarchy.
Note
Before you perform these procedures, ensure that Configuration Manager is configured
for Endpoint Protection as described in Configuring Endpoint Protection in Configuration
Manager.

P a g e | 13
Microsoft System Center Endpoint Protection 2012 – Professionally & Quickly Expose
To modify the default antimalware policy
1. In the Configuration Manager console, click Assets and Compliance.
2. In the Assets and Compliance workspace, expand Endpoint Protection, and then
click Antimalware Policies.
3. Select the antimalware policy Default Client Antimalware Policy and then, on the Home tab, in
the Properties group, click Properties.
4. In the Default Antimalware Policy dialog box, configure the settings that you require for this
antimalware policy, and then click OK.
Note
For a list of settings that you can configure, see List of Antimalware Policy
Settings in this topic.
To create a new antimalware policy
1. In the Configuration Manager console, click Assets and Compliance.
2. In the Assets and Compliance workspace, expand Endpoint Protection, and then
click Antimalware Policies.
3. On the Home tab, in the Create group, click Create Antimalware Policy.
4. In the General section of the Create Antimalware Policy dialog box, enter a name and a
description for the policy.
5. In the Create Antimalware Policy dialog box, configure the settings that you require for this
antimalware policy, and then click OK.
Note
For a list of settings that you can configure, see List of Antimalware Policy
Settings in this topic.
6. Verify that the new antimalware policy is displayed in the Antimalware Policies list.

P a g e | 14
Microsoft System Center Endpoint Protection 2012 – Professionally & Quickly Expose
To import an antimalware policy 1. In the Configuration Manager console, click Assets and Compliance.
2. In the Assets and Compliance workspace, expand Endpoint Protection, and then
click Antimalware Policies.
3. In the Home tab, in the Create group, click Import.
4. In the Open dialog box, browse to the policy file to import, and then click Open.
5. In the Create Antimalware Policy dialog box, review the settings to use, and then click OK.
6. Verify that the new antimalware policy is displayed in the Antimalware Policies list.
To deploy an antimalware policy to client computers 1. In the Configuration Manager console, click Assets and Compliance.
2. In the Assets and Compliance workspace, expand Endpoint Protection, and then
click Antimalware Policies.
3. In the Antimalware Policies list, select the antimalware policy to deploy. Then, on the Home tab, in
the Deployment group, click Deploy.
Note
The Deploy option cannot be used with the default client malware policy.
4. In the Select Collection dialog box, select the device collection to which you want to deploy the
antimalware policy, and then click OK.
List of Antimalware Policy Settings
Many of the antimalware settings are self-explanatory. Use the following sections for more information
about the settings that might require more information before you configure them.
Scheduled Scans
Setting name Description

P a g e | 15
Microsoft System Center Endpoint Protection 2012 – Professionally & Quickly Expose
Default Actions
Select the action to take when malware is detected on client computers.
The following actions can be applied, depending on the alert threat level of the detected malware.
Recommended – Use the action recommended in the malware definition file.
Quarantine – Quarantine the malware but do not remove it
Remove – Remove the malware from the computer.
Allow – Do not remove or quarantine the malware.
Setting name Description
Scan type You can specify one of two scan types to run on client computers:
Quick scan – This type of scan checks the in-memory
processes and folders where malware is typically found. It
requires fewer resources than a full scan.
Full Scan – This type of scan adds a full check of all local
files and folders to the items scanned in the quick scan. This
scan takes longer than a quick scan and uses more CPU
processing and memory resources on client computers.
In most cases, use Quick scan to minimize the use of system
resources on client computers. If malware removal requires a full
scan, Endpoint Protection generates an alert that is displayed in the
Configuration Manager console.
The default value is Quick scan.
Randomize the scheduled
scan start times (within 30
minutes)
Select True if you want to help avoid flooding the network, which
can occur if all computers send their antimalware scans results to
the Configuration Manager database at the same time.
This setting is also useful when you run multiple virtual machines
on a single host. Select this option to reduce the amount of
simultaneous disk access for antimalware scanning.
P a g e | 16
Microsoft System Center Endpoint Protection 2012 – Professionally & Quickly Expose
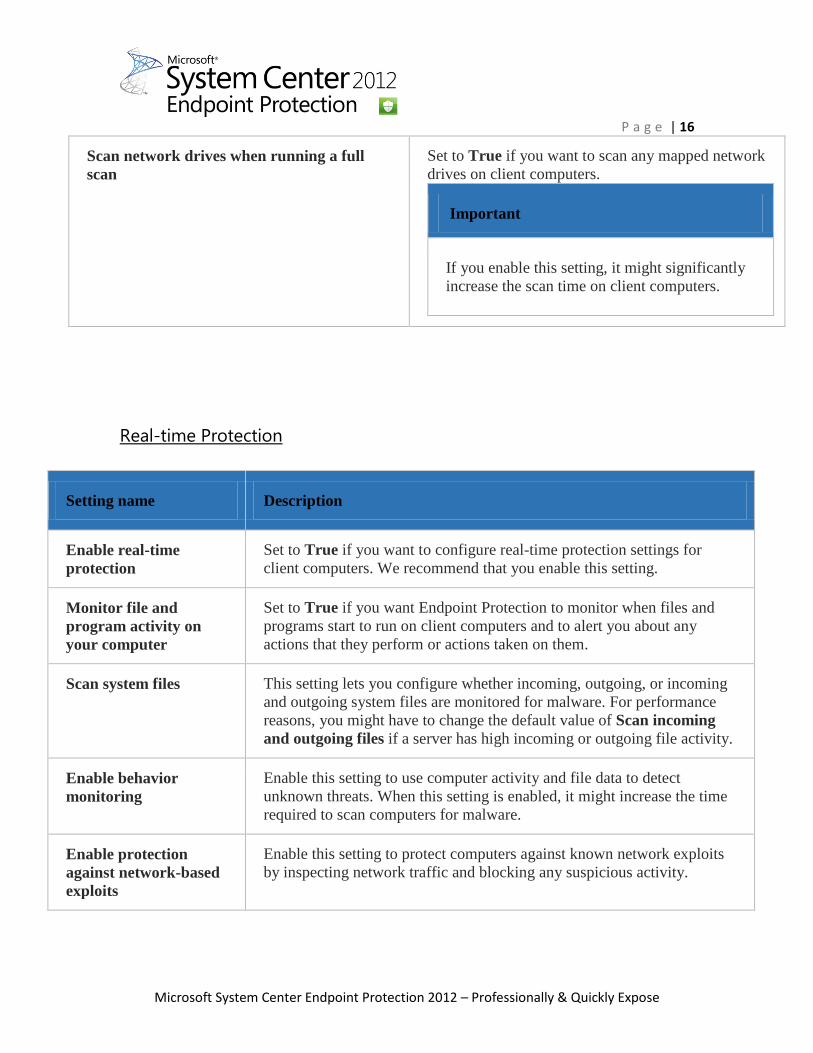
Scan network drives when running a full
scan
Set to True if you want to scan any mapped network
drives on client computers.
Important
If you enable this setting, it might significantly
increase the scan time on client computers.
Real-time Protection
Setting name Description
Enable real-time
protection
Set to True if you want to configure real-time protection settings for
client computers. We recommend that you enable this setting.
Monitor file and
program activity on
your computer
Set to True if you want Endpoint Protection to monitor when files and
programs start to run on client computers and to alert you about any
actions that they perform or actions taken on them.
Scan system files This setting lets you configure whether incoming, outgoing, or incoming
and outgoing system files are monitored for malware. For performance
reasons, you might have to change the default value of Scan incoming
and outgoing files if a server has high incoming or outgoing file activity.
Enable behavior
monitoring
Enable this setting to use computer activity and file data to detect
unknown threats. When this setting is enabled, it might increase the time
required to scan computers for malware.
Enable protection
against network-based
exploits
Enable this setting to protect computers against known network exploits
by inspecting network traffic and blocking any suspicious activity.

P a g e | 17
Microsoft System Center Endpoint Protection 2012 – Professionally & Quickly Expose
Enable script scanning Set this setting to True if you want to scan any scripts that run on
computers for suspicious activity.
Exclusion Settings
Setting name Description
Excluded files
and folders
Click Set to open the Configure File and Folder Exclusions dialog box and
specify the names of the files and folders to exclude from Endpoint Protection
scans.
If you want to exclude files and folders that are located on a mapped network drive,
specify the name of each folder in the network drive individually. For example, if a
network drive is mapped as F:\MyFolder and it contains subfolders named Folder1,
Folder2 and Folder 3, specify the following exclusions:
F:\MyFolder\Folder1
F:\MyFolder\Folder2
F:\MyFolder\Folder3
Threat Overrides
Setting name Description
Threat name and override
action
Click Set to customize the remediation action to take for each threat
ID when it is detected during a scan.

P a g e | 18
Microsoft System Center Endpoint Protection 2012 – Professionally & Quickly Expose
Note
The list of threat names might not be available
immediately after the configuration of
Endpoint Protection. Wait until the Endpoint Protection
point has synchronized the threat information, and then
try again.
Definition Updates
Setting name Description
Set sources and order for
Endpoint Protection client
updates
Click Set Source to specify the sources for definition and scanning
engine updates, and to also specify the order in which they are used. If
Configuration Manager is specified as one of the sources, then the other
sources are used only if software updates fails to download the client
updates.
If you use any of the following methods to update the definitions on
client computers, then the client computers must be able to access the
Internet.
Updates distributed from Microsoft Update
Updates distributed from Microsoft Malware Protection Center
Important

P a g e | 19
Microsoft System Center Endpoint Protection 2012 – Professionally & Quickly Expose
Clients download definition updates by using the built-in
system account. You must configure a proxy server for this
account to enable these clients to connect to the Internet.
Important
If you have configured a software updates automatic
deployment rule to deliver definition updates to client
computers, these updates will be delivered regardless of the
definition updates settings.
P a g e | 20
Microsoft System Center Endpoint Protection 2012 – Professionally & Quickly Expose
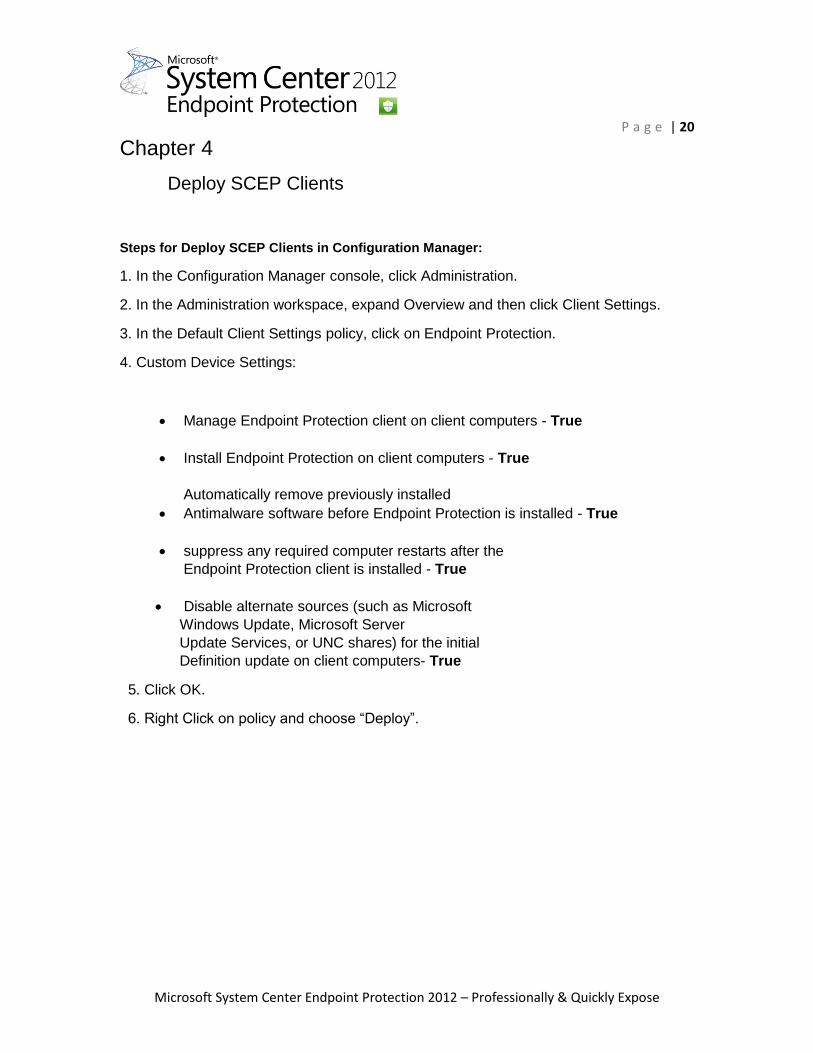
Chapter 4
Deploy SCEP Clients
Steps for Deploy SCEP Clients in Configuration Manager:
1. In the Configuration Manager console, click Administration.
2. In the Administration workspace, expand Overview and then click Client Settings.
3. In the Default Client Settings policy, click on Endpoint Protection.
4. Custom Device Settings:
Manage Endpoint Protection client on client computers - True
Install Endpoint Protection on client computers - True
Automatically remove previously installed
Antimalware software before Endpoint Protection is installed - True
suppress any required computer restarts after the
Endpoint Protection client is installed - True
Disable alternate sources (such as Microsoft
Windows Update, Microsoft Server
Update Services, or UNC shares) for the initial
Definition update on client computers- True
5. Click OK.
6. Right Click on policy and choose “Deploy”.

P a g e | 21
Microsoft System Center Endpoint Protection 2012 – Professionally & Quickly Expose
Chapter 5
Monitoring and Logging, Reporting
You can monitor Endpoint Protection in your Microsoft System Center 2012 Configuration Manager
hierarchy by using the System Center 2012 Endpoint Protection Status node in
the Monitoring workspace, the Endpoint Protection node in the Assets and Compliance workspace, and
by using reports.
How to Monitor Endpoint Protection by Using the System Center 2012
Endpoint Protection Status Node 1. In the Configuration Manager console, click Monitoring.
2. In the Monitoring workspace, click System Center 2012 Endpoint Protection Status.
3. In the Collection list, select the collection for which you want to view status information.
Important
Collections are available for selection in the following cases:
o When you select View this collection in the Endpoint Protection
dashboard on the Alerts tab of the <collection name>Properties dialog
box.
o When you deploy an Endpoint Protection antimalware policy to the
collection.
o When you enable and deploy Endpoint Protection client settings to the
collection.
4. Review the information that is displayed in the Security State and Operational State sections. You
can click any status link to create a temporary collection in theDevices node in the Assets and
Compliance workspace. The temporary collection contains the computers with the selected status.
Important
Information that is displayed in the System Center 2012 Endpoint Protection
Status node is based on the last data that was summarized from the Configuration
Manager database and might not be current. If you want to retrieve the latest data,
on the Home tab, click Run Summarization, or click Schedule Summarization to
adjust the summarization interval.

P a g e | 22
Microsoft System Center Endpoint Protection 2012 – Professionally & Quickly Expose
How to Monitor Endpoint Protection in the Assets and Compliance
Workspace
1. In the Configuration Manager console, click Assets and Compliance.
2. In the Assets and Compliance workspace, perform one of the following actions:
o Click Devices. In the Devices list, select a computer, and then click the Malware
Detail tab.
o Click Device Collections. In the Device Collections list,
o select the collection that contains the computer you want to monitor and then, on
the Home tab, in the Collection group, click Show Members.
3. In the <collection name> list, select a computer, and then click the Malware Detail tab.
How to Monitor Endpoint Protection by Using Reports Use the following reports to help you view information about Endpoint Protection in your hierarchy. You can
also use these reports to help troubleshoot any Endpoint Protection problems. For more information about
how to configure reporting in Configuration Manager, see Reporting in Configuration Manager. The
Endpoint Protection reports are in the Endpoint Protection folder.
Report name Description
Antimalware Activity Report Displays an overview of antimalware activity for
a specified collection.
Infected Computers Displays a list of computers on which a specified
threat is detected.
Top Users By Threats Displays a list of users with the most number of
detected threats.
User Threat List Displays a list of threats that were found for a
specified user account.

P a g e | 23
Microsoft System Center Endpoint Protection 2012 – Professionally & Quickly Expose
Malware Alert Levels
Use the following table to identify the different Endpoint Protection alert levels that might be displayed in
reports, or in the Configuration Manager console.
Alert level Description
Failed Endpoint Protection failed to remediate the malware. Check your logs for
details of the error.
Note
For a list of Configuration Manager and
Endpoint Protection log files, see the Endpoint
Protection section in the Technical Reference for Log
Files in Configuration Manager topic.
Removed Endpoint Protection successfully removed the malware.
Quarantined Endpoint Protection moved the malware to a secure location and prevented
it from running until you remove it or allow it to run.
Cleaned The malware was cleaned from the infected file.
Allowed An administrative user selected to allow the software that contains the
malware to run.
No Action Endpoint Protection took no action on the malware. This might occur if the
computer is restarted after malware is detected and the malware is no
longer detected; for instance, if a mapped network drive on which malware
is detected is not reconnected when the computer restarts.
Blocked Endpoint Protection blocked the malware from running. This might occur
if a process on the computer is found to contain malware.

P a g e | 24
Microsoft System Center Endpoint Protection 2012 – Professionally & Quickly Expose
Chapter 6
Debugging and Troubleshooting – Workaround
This chapter handle with some of the most SCEP Debugging & troubleshooting cases:
Case No.1
Failed to apply policy after deployed the SCEP 2012 client Download Available
SYMPTOMS
Check by monitoring the deployment - we get the error logs below :
Article Translations الشرق الاوسط )العربية)

P a g e | 25
Microsoft System Center Endpoint Protection 2012 – Professionally & Quickly Expose
RESOLUTION
1. Browse to the Clients path below:
C:\ Windows\System32\GroupPolicy\Machine\
2. Delete the file "Registry.pol "
3. Restart the Client Service "SMS Agent"
Case No.2
Automatic Deployment Rule – Access denied
SYMPTOMS
1. Implemented SCEP under Configmgr 2012
2. Enabled a Automatic Deployment Rule SCEP updates.
When I tried to run it - nothing occur.
When invigorating the console's updated the Last error - 0X87D204174
Check by Monitoring
It showed a lot of Error code = 5 which means access denied.
So i checked the security settings on the Package Source folder.(
\\configmanagerserver\Sourcefiles\Updates\ )
The system account already had full permission, But I had forgot to change the Share Permissions.

P a g e | 26
Microsoft System Center Endpoint Protection 2012 – Professionally & Quickly Expose
RESOLUTION
By default the group everyone has “read” permissions on all created shares, So I changed it to “Full Control”
and to restrict access I configure the NTFS Folder permissions determine the access.
Note: When you run download and distribute updates in the SCCM console manually it is using you
credentials to download and copy the files to the Package Source, when you use an automatic rule the
SCCM Site Server’s computer account is used.
Case No.3
Custom Endpoint Protection threat overrides are missing
SYMPTOMS
Threat overrides that you had previously authored in the Forefront Endpoint Protection (FEP) or System
Center 2012 Endpoint Protection (SCEP) area of the Configuration Manager console are missing. Clients
are also missing threat overrides set by FEP or SCEP policy. Threats you choose to allow via policy are
cleaned by the FEP or SCEP client when they should be allowed.

P a g e | 27
Microsoft System Center Endpoint Protection 2012 – Professionally & Quickly Expose
Cause
This can happen if the threat override section in the FEP or SCEP policy is overwritten with blank data.
There are two situations that can cause the threat override section to be overwritten with blank data and
either situation causes the symptoms described in this article. The situations are listed below:
FEP or SCEP policy is edited from the Configuration Manager console on a computer that
does not have the FEP or SCEP client software installed.
A data race condition in the UI can also cause this problem if a FEP or SCEP policy is
opened, edited, and saved before FEP or SCEP definition enumeration is completed in the
UI. Because the UI is not fully populated, a blank section is saved for threat overrides. This
enumeration process typically takes less than a minute. This process only occurs the first
time a FEP or SCEP policy is opened in a Configuration Manager UI session, or when
definitions are updated on the FEP or SCEP client that protects the computer hosting the
Configuration Manager console.
Resolution
Do not edit FEP or SCEP policy from a Configuration Manager console on a computer that does
not have the FEP 2010 or SECP 2012 client software installed. If the computer hosting the
Configuration Manager console does not have the FEP client software installed, you must install
the FEP or SECP client software to avoid this problem.
To resolve the second cause, you must give the FEP or SECP policy UI sufficient time to load the
override section of policy. You can verify that the section is loaded by clicking
the Antimalware tab, and then clicking Overrides. If the dialog box displays a Loading
Data message, the override data is not yet loaded into the UI (this process typically takes less than
a minute). If you see the custom threat override data in this section, the data is loaded and the
policy can be applied.
Case No.4
How to download and install System Center 2012 Endpoint Protection for Linux
SUMMARY
This article describes how to download and install Microsoft System Center 2012 Endpoint
Protection for Linux.
MORE INFORMATION
To download and install System Center 2012 Endpoint Protection for Linux, follow these steps.
Note System Center 2012 Endpoint Protection for Linux is part of Core Cal and will be available
on the Volume Licensing Site or together with the purchase of System Center 2012.
Note The commands in these steps may vary in each distribution.

P a g e | 28
Microsoft System Center Endpoint Protection 2012 – Professionally & Quickly Expose
1. Download the System Center 2012 Endpoint Protection for Linux installation
package.
Note System Center 2012 Endpoint Protection for Linux is distributed as a binary
file. The file name for the installation package varies according to the distribution for
which it is designed. For example, the Scep.i386.deb.bin file is intended for Debian
distributions, the Scep.i386.rpm.bin file is intended for RedHat and SUSE
distributions, and the Scep.i386.tgz.bin file is intended for other Linux distributions.
2. Run the installation package. To do this, type the following command, and then
press Enter.
Note The placeholder file_name represents the name of the file that you
downloaded in step 1.
sh ./file_name
3. After the installation is complete, verify that the main System Center 2012 Endpoint
Protection for Linux services are running. To do this, type the following command,
and then press Enter:
ps -C scep_daemon
4. Verify that a message is returned that resembles the following:
PID TTY TIME CMD
2226 ? 00:00:00 scep_daemon
2229 ? 00:00:00 scep_daemon
Note At least two System Center 2012 Endpoint Protection for Linux daemon
processes run in the background. The first PID is the process and threads manager.
The second PID is the System Center 2012 Endpoint Protection for Linux scanning
process.
.

P a g e | 29
Microsoft System Center Endpoint Protection 2012 – Professionally & Quickly Expose
Case No.5
Error message when you try to install System Center 2012 Endpoint
Protection for Mac: "There were errors with the installation”
Symptoms
When you try to install Microsoft System Center 2012 Endpoint Protection for Mac, you receive an
error message that resembles the following:
There were errors with the installation. You may want to try installing again.
The Installation failed.
Resolution
To resolve this issue, use the following methods. If Method 1 does not resolve the issue, go to
Method 2:
Method 1
1. Click Close to close the error message window.
2. On the Go menu, click Applications.
3. Double-click System Center 2012 Endpoint Protection for Mac.
4. Verify that System Center 2012 Endpoint Protection for Mac starts as expected. To do this, click
the System Center Endpoint Protection for Mac icon in the menu bar, and then click Open System
Center 2012 Endpoint Protection.
Method 2
If System Center 2012 Endpoint Protection for Mac does not start as expected, follow these steps:
1. Restart the system into safe mode
2. Delete all SCEP applications bundles from /Application folder that you can found in it
3. Make a normal restart
4. Run 4.5.9X Uninstaller from 4.5.X dmg
5. execute from Terminal: rm -Rf ~/.scep/
6. cd /Library/Application\ Support/Microsoft/
7. sudo rm -Rf *scep/
NOTE: install.log can be found at /var/log/install.log

P a g e | 30
Microsoft System Center Endpoint Protection 2012 – Professionally & Quickly Expose
Case No.6
How to manually uninstall System Center 2012 Endpoint Protection for Mac
SUMMARY
This article describes how to uninstall Microsoft System Center 2012 Endpoint Protection for Mac
when the installation DVD or the downloaded installation package is unavailable.
MORE INFORMATION
To uninstall System Center 2012 Endpoint Protection for Mac when the installation DVD or the
downloaded installation package is unavailable, follow these steps:
1. Close all open windows.
2. On the Go menu, click Utilities.
3. Double-click Activity Monitor.
4. Under Process Name, click scep_gui, and then click Quit Process.
5. Click Force Quit.
6. On the Go menu, click Applications.
7. Control + click System Center 2012 Endpoint Protection, and then click Move to
Trash.
Note Type your administrator password if you are prompted.
8. Restart your computer.

P a g e | 31
Microsoft System Center Endpoint Protection 2012 – Professionally & Quickly Expose
Case No.7
This article describes the information that may be collected from a machine when running System
Center Endpoint Protection Diagnostics
Information Collected
WMI information
Description File Name
EP related info from WMI {Computername}_EP_CCM_WMI.log
Virtualization Information
Description File Name
Virtualization Information Output {Computername}_Virtualization.TXT
{Computername}_Virtualization.htm
System State Information
Description File Name
Scheduled tasks {Computername}_schtasks.csv
{Computername}_schtasks.txt
Services {Computername}_SC_Services_Output.txt
Running processes {Computername}_TaskList.txt
Environment Variables {Computername}_EnvironmentVariables.txt
Filter Manager - Minifilter drivers and
instances
{Computername}_Fltmc.TXT

P a g e | 32
Microsoft System Center Endpoint Protection 2012 – Professionally & Quickly Expose
System Information
Description File Name
NFO Format {Computername}_msinfo32.nfo
Text Format {Computername}_msinfo32.txt
System Center Configuration
Description File Name
Agent Logs (CAB) {Computername}_ConfigMgrAgentLogs.CAB
Resultant Set of Policy (RSoP)
Description File Name
GPResult /z output {Computername}_GPResult.txt
GPResult /H output {Computername}_GPResult.htm
Installed updates/hotfixes
Description File Name
Update/Hotfix history {Computername}_Hotfixes.TXT
{Computername}_Hotfixes.htm
{Computername}_Hotfixes.CSV
File/Folder information
Description File Name
Antimalware APPData tree {Computername}_EP_APPDATA_TREE.log
P a g e | 33
Microsoft System Center Endpoint Protection 2012 – Professionally & Quickly Expose
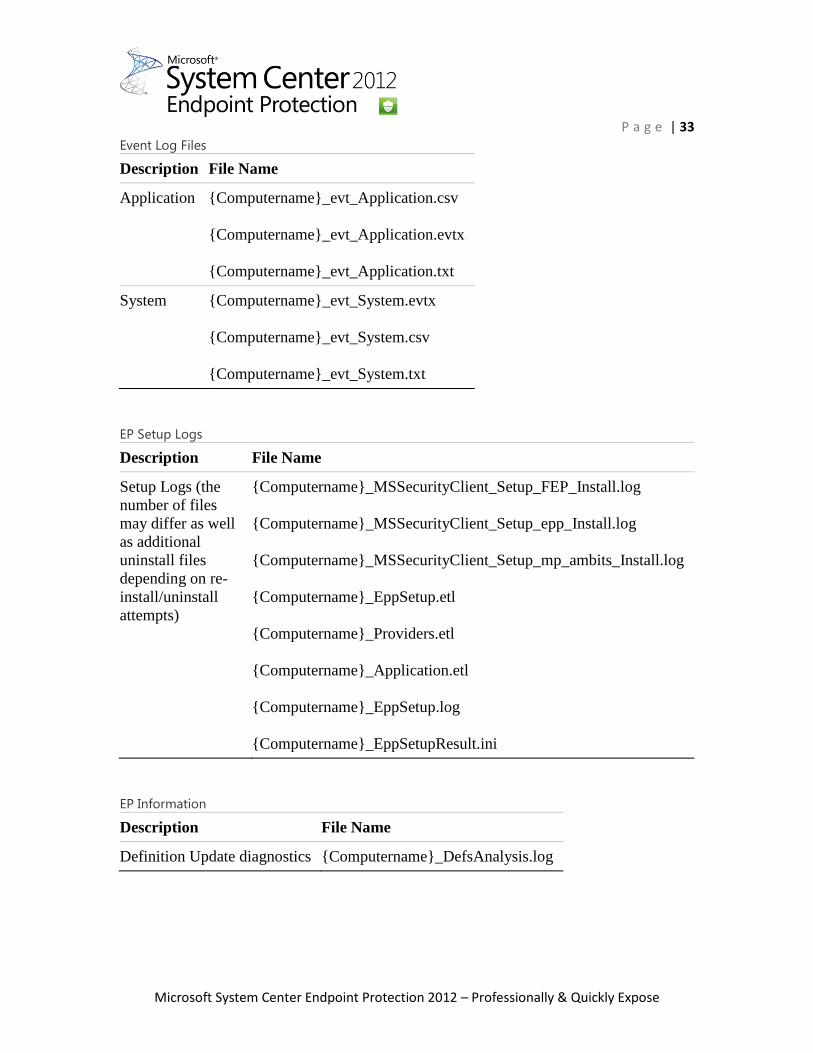
Event Log Files
Description File Name
Application {Computername}_evt_Application.csv
{Computername}_evt_Application.evtx
{Computername}_evt_Application.txt
System {Computername}_evt_System.evtx
{Computername}_evt_System.csv
{Computername}_evt_System.txt
EP Setup Logs
Description File Name
Setup Logs (the
number of files
may differ as well
as additional
uninstall files
depending on re-
install/uninstall
attempts)
{Computername}_MSSecurityClient_Setup_FEP_Install.log
{Computername}_MSSecurityClient_Setup_epp_Install.log
{Computername}_MSSecurityClient_Setup_mp_ambits_Install.log
{Computername}_EppSetup.etl
{Computername}_Providers.etl
{Computername}_Application.etl
{Computername}_EppSetup.log
{Computername}_EppSetupResult.ini
EP Information
Description File Name
Definition Update diagnostics {Computername}_DefsAnalysis.log

P a g e | 34
Microsoft System Center Endpoint Protection 2012 – Professionally & Quickly Expose
Collecting Log files
Description File Name
Windows Security Center {Computername}_SecurityCenter.txt
AutoRuns Information
Description File Name
Autoruns output {Computername}_Autoruns.htm
{Computername}_Autoruns.XML
Antimalware client support files
Description File Name
Antimalware client support files MPSupportFiles.cab
MPLog-<date>-<time>.log
MPDetection-<date>-<time>.log
KB for SCEP updates all the time so I’ll provide more
Articles and guides in due course .