microsoft - university of virginia · moving the legend ... recipients from an existing list, from...
TRANSCRIPT

Microsoft® Word 2010 – Intermediate
Microsoft Word 2010 Intermediate
Page ii ©2010 EZ-REF Courseware
COPYRIGHT Copyright ©2010 by EZ-REF Courseware, Ladera Ranch, CA http://www.ezref.com/ All rights reserved. This publication, including the student manual, instructor's guide and exercise files, or any part thereof, may not be reproduced or transmitted in any form or by any means, electronic or mechanical, without prior written permission of EZ-REF Courseware.
TRADEMARKS EZ-REF is a trademark of EZ-REF Courseware. All other products or brand names mentioned are trademarks or registered trademarks of their respective holders. DISCLAIMER While EZ-REF Courseware has taken care to ensure the accuracy and quality of these materials, all material is provided without any warranty whatsoever, including, but not limited to, the implied warranties of merchantability or fitness for a particular purpose. Any persons or businesses mentioned in the text of this manual are strictly fictitious. Any resemblances to existing or deceased persons, or existing or defunct businesses, is entirely coincidental. Product Code: WORD 2010-2 14.9

Microsoft Word 2010 Intermediate
©2010 EZ-REF Courseware Page iii
TABLE OF CONTENTS
MAIL MERGE ............................................................................................................................................... 2 FORMATTING A FIELD .................................................................................................................................... 12 WORKING WITH THE MAIL MERGE TOOLS................................................................................................. 14
INSERTING A HYPERLINK ....................................................................................................................... 17
WORKING WITH WORDART .................................................................................................................... 22 CHANGING OUTLINE COLOR AND STYLE ................................................................................................... 24 CHANGING FILL COLORS ............................................................................................................................... 25 ADDING A SHAPE EFFECT ............................................................................................................................. 26 USING A PREDEFINED SHAPE FOR WORD ART ........................................................................................ 27 CHANGING THE WORD ART STYLE ............................................................................................................. 27 CHANGING TEXT FILL ..................................................................................................................................... 28 CHANGING TEXT OULINE .............................................................................................................................. 28 CHANGING TEXT EFFECTS ........................................................................................................................... 29 CHANGING TEXT DIRECTION ........................................................................................................................ 29
ADDING SHAPES ...................................................................................................................................... 31 SELECTING OBJECTS..................................................................................................................................... 32 MOVING OBJECTS........................................................................................................................................... 32 RESIZING OBJECTS ........................................................................................................................................ 33 DELETING SHAPES ......................................................................................................................................... 33 OOPS! UNDELETING ....................................................................................................................................... 33 ROTATING OBJECTS ...................................................................................................................................... 34
WORKING WITH TABLES ......................................................................................................................... 36 REPOSITIONING THE TABLE ......................................................................................................................... 38 RESIZING THE TABLE ..................................................................................................................................... 38 SELECTING COLUMNS/ROWS ...................................................................................................................... 39 CHANGING THE COLUMN WIDTH ................................................................................................................. 39 CHANGING THE ROW HEIGHT ...................................................................................................................... 40 USING THE RIBBON TO CHANGE WIDTH/HEIGHT ..................................................................................... 40 APPLYING CHARACTER AND PARAGRAPH ATTRIBUTES ....................................................................... 41 CHANGING THE TEXT DIRECTION ............................................................................................................... 41 CHANGING THE ALIGNMENT......................................................................................................................... 41 CHANGING CELL MARGINS ........................................................................................................................... 42 INSERTING A COLUMN/ROW ......................................................................................................................... 43 DELETING COLUMNS/ROWS ......................................................................................................................... 44 CHANGING TABLE PROPERTIES .................................................................................................................. 44 MERGING CELLS ............................................................................................................................................. 45 SPLITTING CELLS ............................................................................................................................................ 46 SPLITTING THE TABLE ................................................................................................................................... 47 PLACING BORDERS AROUND THE TABLE.................................................................................................. 49 USING TABLE STYLES .................................................................................................................................... 53 APPLYING TABLE STYLE OPTIONS .............................................................................................................. 54 DRAWING/ERASING BORDERS ..................................................................................................................... 54 CHANGING THE PEN STYLE .......................................................................................................................... 55 CHANGING THE PEN WEIGHT ....................................................................................................................... 56 CHANGING THE PEN COLOR ........................................................................................................................ 56 MOVING A TABLE ............................................................................................................................................ 57 RESIZING THE TABLE ..................................................................................................................................... 57 DELETING A TABLE ......................................................................................................................................... 57 HIDING/DISPLAYING THE GRIDLINES .......................................................................................................... 58 CONVERTING EXISTING TEXT TO A TABLE ................................................................................................ 58 DRAWING A TABLE.......................................................................................................................................... 59 INSERTING A QUICK TABLE .......................................................................................................................... 60 SORTING TABLE DATA ................................................................................................................................... 61

Microsoft Word 2010 Intermediate
Page iv ©2010 EZ-REF Courseware
CREATING & MODIFYING CHARTS ....................................................................................................... 63 INSERTING A CHART ...................................................................................................................................... 63 ADDING A CHART TITLE ................................................................................................................................. 64 CHANGING THE TYPE OF CHART ................................................................................................................ 64 EDITING DATA .................................................................................................................................................. 65 PARTS OF A CHART ........................................................................................................................................ 65 SELECTING CHART OBJECTS ...................................................................................................................... 67 CHANGING THE CHART STYLE .................................................................................................................... 67 CHANGING THE CHART LAYOUT ................................................................................................................. 67 SIZING THE CHART ......................................................................................................................................... 68 MOVING THE LEGEND .................................................................................................................................... 68 APPLYING TEXT ATTRIBUTES TO CHART OBJECTS ................................................................................ 69 CHANGING FONT & POINT SIZE FOR CHART TEXT .................................................................................. 69 APPLYING NUMERIC FORMATS TO CHART OBJECTS ............................................................................. 70 CUSTOMIZING FILL EFFECTS ....................................................................................................................... 71 CUSTOMIZING THE OUTLINE ........................................................................................................................ 71 ADDING A SHAPE EFFECT............................................................................................................................. 72

Microsoft Word 2010 Intermediate
©2010 EZ-REF Courseware Page v
INTERMEDIATE WORD 2010
This course is broken down into "modules" that cover the objectives that should be achieved during this class. Each major topic starts on a new page followed by these sections:
USAGE This section offers a brief explanation of what the command/function is
used for, how it works and some possible examples. This is not intended to substitute your own explanation and examples.
This icon will be placed to the left of all mouse actions so that students can easily see when the mouse may be used to perform a task. This section lists the keystrokes or function keys the user may press as a shortcut for performing the current command.
NOTE: This box alerts students of things to watch out for. The post-it note in the left column always indicates an important note to remember.
TIP: This box will let the students in on a little secret or shortcut when working with Word. When they see this icon, they’ll know that a "TIP is available.


Microsoft Word 2010 Intermediate
©2010 EZ-REF Courseware Page 1
Mail Merge
Microsoft Word 2010 Intermediate
Page 2 ©2010 EZ-REF Courseware
MAIL MERGE
USAGE: Mail merge is used for those people who have a specific letter or
form that needs to be sent to several different people. Instead of typing the letter over and over, you can create the letter once in what Word refers to as a Main document and then create a Data Source file with the names and addresses of people who should receive the letter. Once these two files have been created, you simply merge them together, creating an original letter for each address in the data file. You can also use the merge feature to create envelopes, labels, e-mail messages and directories.
THE DATA SOURCE
The data source acts as a rolodex file. In the rolodex file, each card is like a record, it contains the information for one person/contact. On that card you have various pieces of information such as a first and last name, company, street address, city and so on. These pieces of data will make up the fields of a data source file.
As mentioned, the data source file contains the list of names and addresses that are to be used to create the form letters. Each name and address is divided into what are called fields. A single field will contain one piece of information, such as a first name.
Each field must have its own unique name (title) so you can use that name in the main file to indicate where it should be printed.
All the information for one person is stored in one complete record. A record consists of a row of information. The first row within the Data Source File is referred to as the Header Row. This row consists of the fields making up the file. Each record in a data file (address list) represents one person.
NOTE: Each record of a data source file must have the same number of fields. If you don't have any data for that field, simply leave the field blank.

Microsoft Word 2010 Intermediate
©2010 EZ-REF Courseware Page 3
To create a mail merge, follow the steps outlined below:
Start in a blank document.
Click on this tool (located within the Start Mail
Merge section on the Mailings Ribbon)
From the pull-down list, select
Step by Step Mail Merge Wizard…
The task pane (located along the right side of the screen) will change to display the Mail Merge wizard, as shown below:

Microsoft Word 2010 Intermediate
Page 4 ©2010 EZ-REF Courseware
From within the first step of the Mail Merge task pane, select
the type of mail merge document you want to create. You can create a mail merge for letters, e-mail messages, envelopes, labels or an address directory.
Once you have made your selection, click on
to move to the second step.
The next step is used to specify whether you want to use the
current file as the starting document, if you would rather use one of the built-in templates, or your own existing document.
After making your selection, click on to move to the third Mail Merge step.

Microsoft Word 2010 Intermediate
©2010 EZ-REF Courseware Page 5
The next step of the Mail Merge wizard is used to select
recipients from an existing list, from your Microsoft Outlook contacts or by typing the list yourself.
If you have chosen to type a new list, click on to begin adding the necessary information for each letter (e.g., each contact’s name, address, city, state and zip code).
NOTE: If you had chosen to use an existing list, your next step would include a dialog box where you would be asked to select the file you want to use as your data source.
Microsoft Word 2010 Intermediate
Page 6 ©2010 EZ-REF Courseware
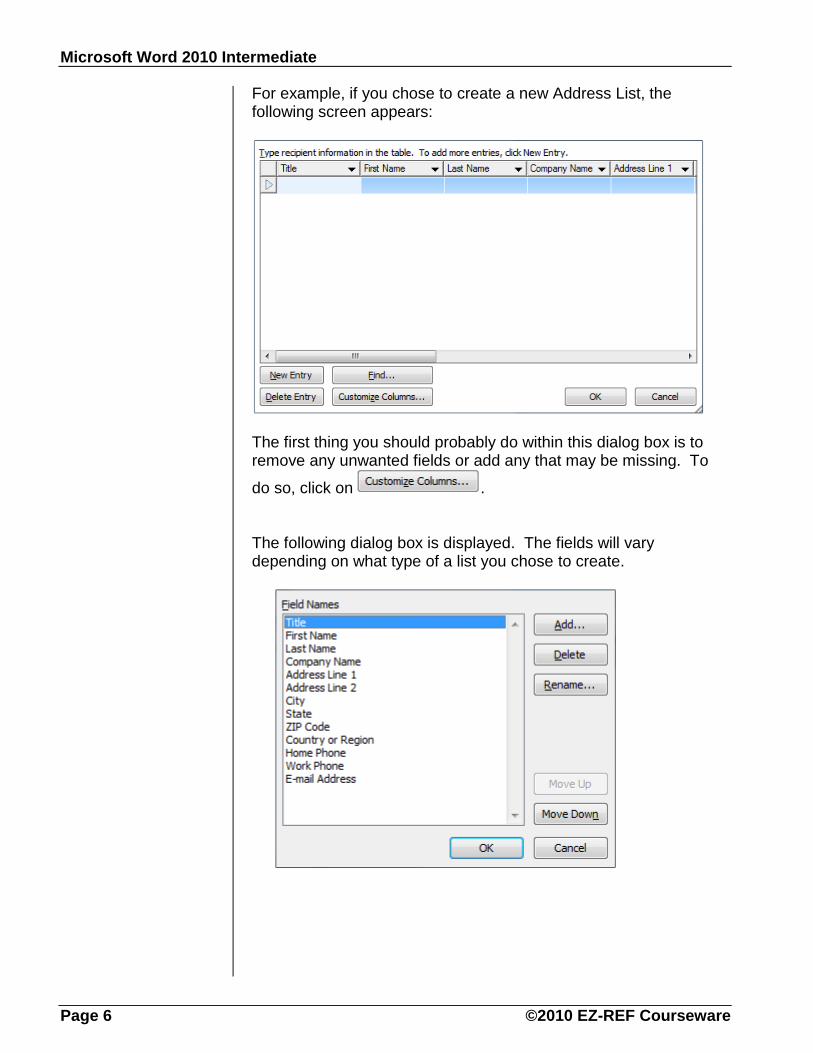
For example, if you chose to create a new Address List, the following screen appears:
The first thing you should probably do within this dialog box is to remove any unwanted fields or add any that may be missing. To
do so, click on . The following dialog box is displayed. The fields will vary depending on what type of a list you chose to create.
Microsoft Word 2010 Intermediate
©2010 EZ-REF Courseware Page 7
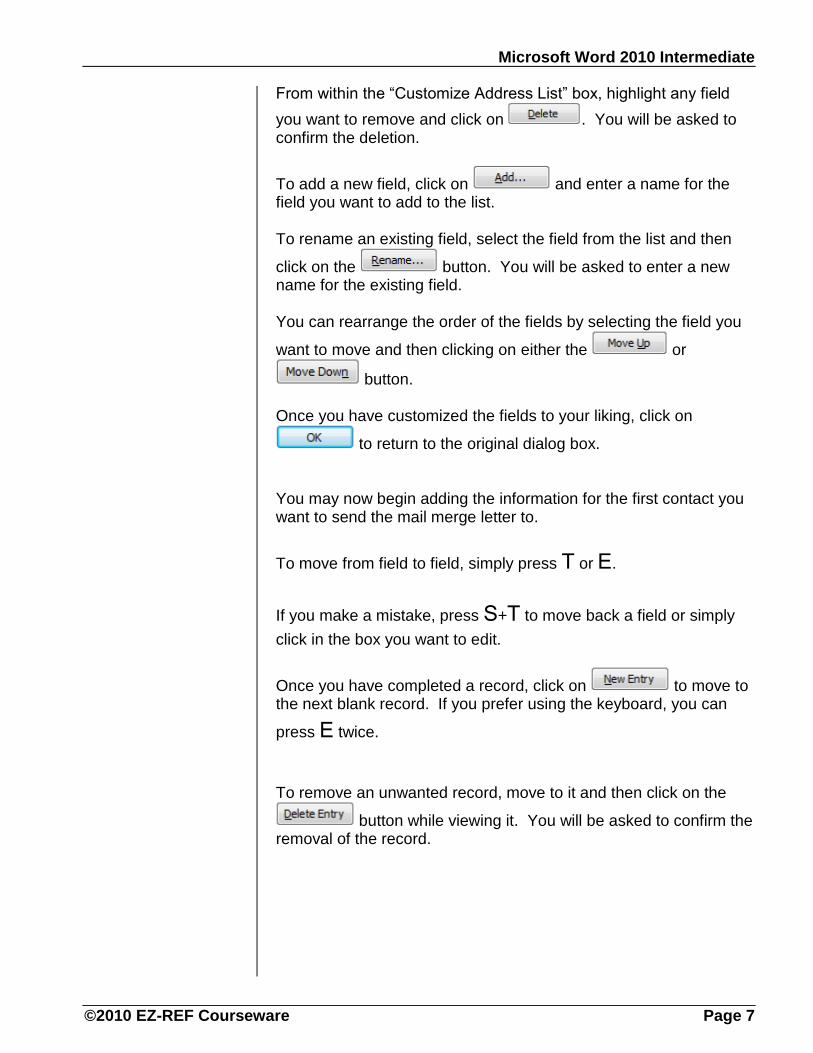
From within the “Customize Address List” box, highlight any field
you want to remove and click on . You will be asked to confirm the deletion.
To add a new field, click on and enter a name for the field you want to add to the list.
To rename an existing field, select the field from the list and then
click on the button. You will be asked to enter a new name for the existing field.
You can rearrange the order of the fields by selecting the field you
want to move and then clicking on either the or
button.
Once you have customized the fields to your liking, click on
to return to the original dialog box.
You may now begin adding the information for the first contact you want to send the mail merge letter to.
To move from field to field, simply press T or E.
If you make a mistake, press S+T to move back a field or simply
click in the box you want to edit.
Once you have completed a record, click on to move to the next blank record. If you prefer using the keyboard, you can
press E twice.
To remove an unwanted record, move to it and then click on the
button while viewing it. You will be asked to confirm the removal of the record.

Microsoft Word 2010 Intermediate
Page 8 ©2010 EZ-REF Courseware
If you have a long list of addresses, you can quickly locate a record. Word will search through your list and locate any records containing the text you have entered.
Once you are finished entering the list of addresses you want to
use as your data source, click on .
The next step is to save the list. Notice that Word
automatically assigns the extension .mdb to the document. This indicates that the list you just created is being saved as a Microsoft Access database.
The “Mail Merge Recipients” list is displayed on your screen:

Microsoft Word 2010 Intermediate
©2010 EZ-REF Courseware Page 9
To quickly sort the list by any column (field), simply click on the field name. To sort a field in descending order, click on the same column heading a second time.
To filter the records so that only certain ones are displayed in the
list, click on the down arrow beside the column (field) you want to use to set the criteria for filtering. A pull-down list of options will appear - allowing you to create a filter for that column. For example, you may want to display only those clients in California. To do so, you would click on the down arrow beside the column containing the state and choose “CA” from the list.
To remove an existing filter, click on the down arrow a second time and choose (All) from the list.
There are a series of options listed at the bottom of the list to perform more advanced sorts, filter your records, find duplicates, find recipients, and validate addresses (if you have validation software installed on your system).
Click on to close the “Mail Merge Recipients” list and return to the wizard.

Microsoft Word 2010 Intermediate
Page 10 ©2010 EZ-REF Courseware
Click on to move to the next step within
the Mail Merge wizard.
If you started off in a blank document, you are now ready to write the actual letter that will be sent to the recipients in the list you have just created.
Simply begin typing in the letter as you normally would.

Microsoft Word 2010 Intermediate
©2010 EZ-REF Courseware Page 11
To insert the information from the data file into your letter, place your cursor at the location where the information should be inserted and then select one of the following options from the task pane:
Select this option to format and insert the complete address block at the current cursor location.
Choose this option to select the format for the greeting and to insert it at the current cursor location.
If you have electronic postage software installed on your system and have chosen to create envelopes as your document, you can use this option to add electronic postage to your envelopes.
You can use this option to insert any other field from your data file into the main document.
The following diagram shows how the codes look in your letter:
<<AddressBlock>> <<GreetingLine>> Congratulations! You may have won a million dollars! All you need to do is order yet another magazine from us and we may be contacting you. We know you already have subscribed to 83 of our magazines in the hopes of winning but keep trying. The next one may be the winner. Remember, <<First_Name>>, if you do not continue to subscribe to new magazines, we will have to take your name off the list and give your ten million dollars to someone else. You wouldn't want that to happen to you, would you? So, get out that checkbook and order a new one. Johnny isn’t around anymore and Jay won’t give me a job so I need the money! Sincerely, Ed McMahon
Microsoft Word 2010 Intermediate
Page 12 ©2010 EZ-REF Courseware
FORMATTING A FIELD
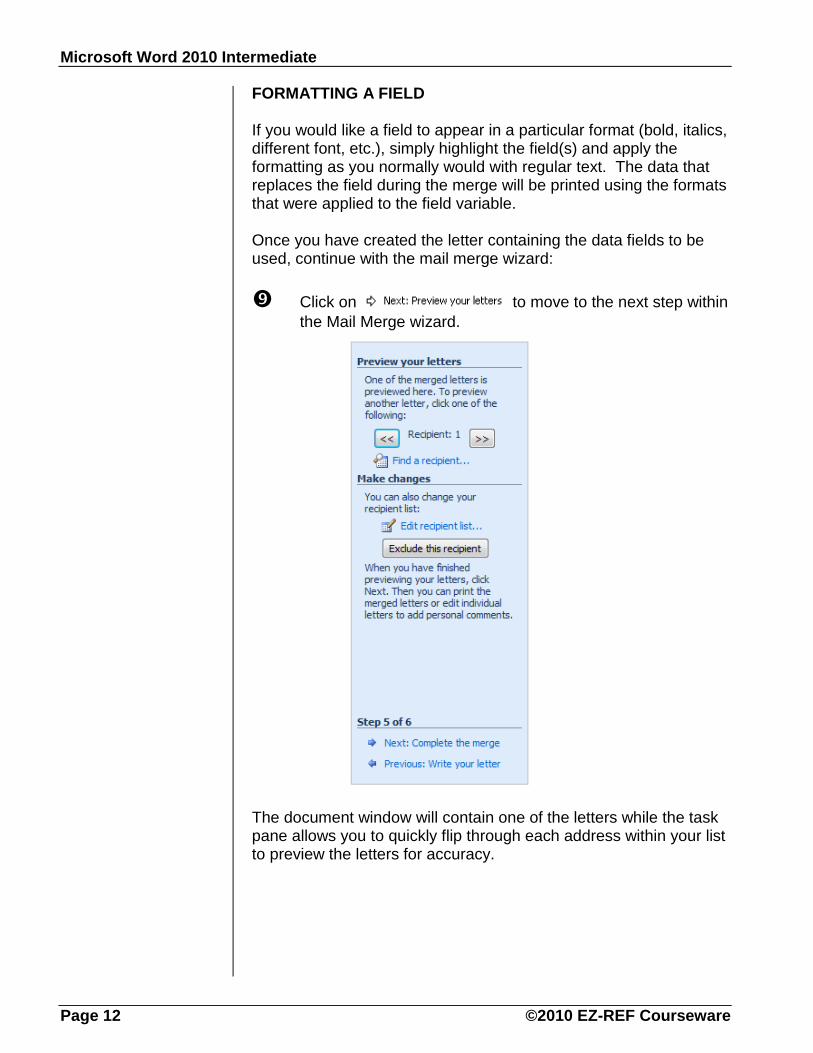
If you would like a field to appear in a particular format (bold, italics, different font, etc.), simply highlight the field(s) and apply the formatting as you normally would with regular text. The data that replaces the field during the merge will be printed using the formats that were applied to the field variable. Once you have created the letter containing the data fields to be used, continue with the mail merge wizard:
Click on to move to the next step within
the Mail Merge wizard.
The document window will contain one of the letters while the task pane allows you to quickly flip through each address within your list to preview the letters for accuracy.

Microsoft Word 2010 Intermediate
©2010 EZ-REF Courseware Page 13
If you see a mistake that needs to be corrected from within the
Address List, click on to make changes.
If you decide for some reason that one of the recipients should not receive this particular letter, display the letter addressed to the
recipient you want to exclude and then click on .
Click on to move to the final step within
the Mail Merge wizard.
Once you are sure everything looks correct, you can either click on
to go ahead and begin printing the merged documents or
click on to create a new document containing each of the merged letters so that you can then edit the letters individually. Once you have completed the merge process, you may want to
close the task pane. To do so, click on the close button (which is located in the upper right corner of the task pane).
Microsoft Word 2010 Intermediate
Page 14 ©2010 EZ-REF Courseware
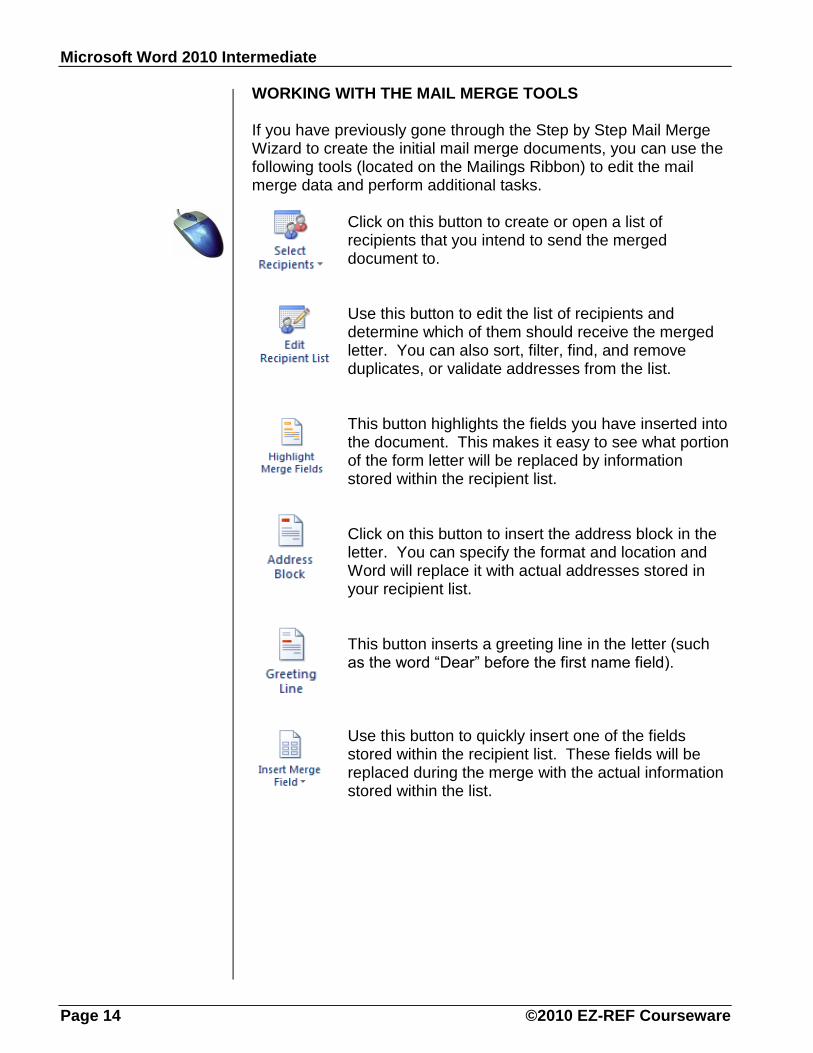
WORKING WITH THE MAIL MERGE TOOLS If you have previously gone through the Step by Step Mail Merge Wizard to create the initial mail merge documents, you can use the following tools (located on the Mailings Ribbon) to edit the mail merge data and perform additional tasks.
Click on this button to create or open a list of recipients that you intend to send the merged document to. Use this button to edit the list of recipients and determine which of them should receive the merged letter. You can also sort, filter, find, and remove duplicates, or validate addresses from the list. This button highlights the fields you have inserted into the document. This makes it easy to see what portion of the form letter will be replaced by information stored within the recipient list.
Click on this button to insert the address block in the letter. You can specify the format and location and Word will replace it with actual addresses stored in your recipient list. This button inserts a greeting line in the letter (such as the word “Dear” before the first name field). Use this button to quickly insert one of the fields stored within the recipient list. These fields will be replaced during the merge with the actual information stored within the list.
Microsoft Word 2010 Intermediate
©2010 EZ-REF Courseware Page 15
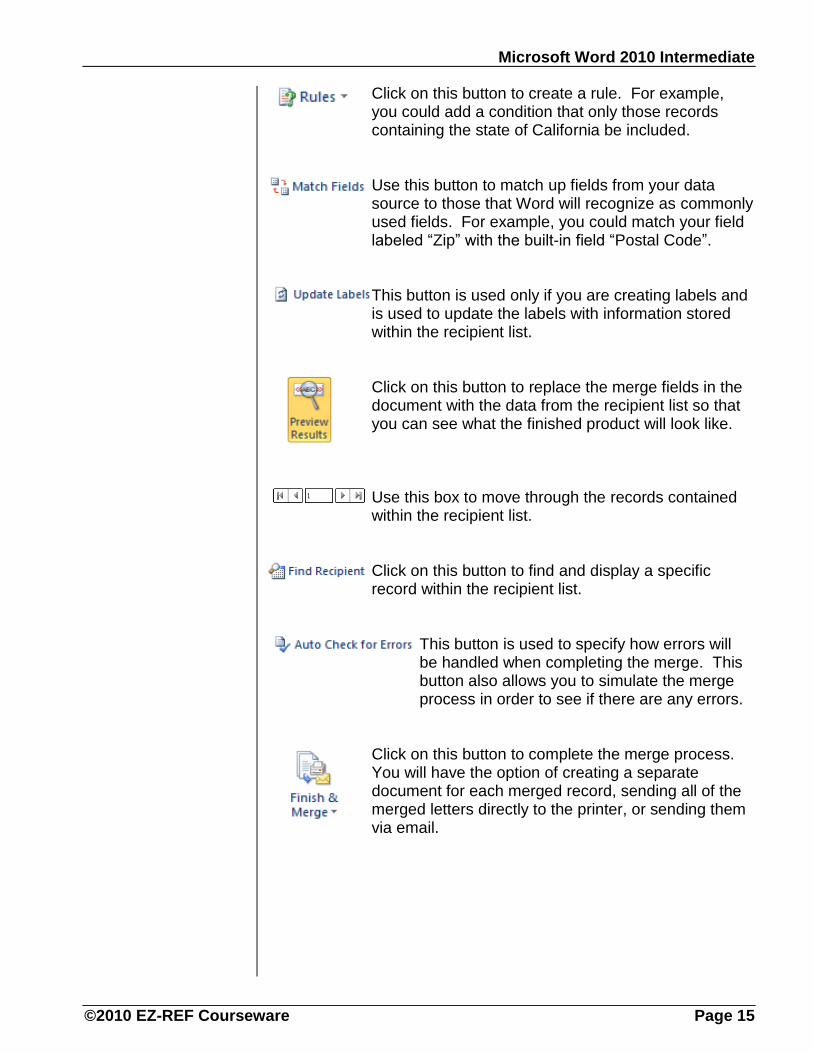
Click on this button to create a rule. For example, you could add a condition that only those records containing the state of California be included. Use this button to match up fields from your data source to those that Word will recognize as commonly used fields. For example, you could match your field labeled “Zip” with the built-in field “Postal Code”. This button is used only if you are creating labels and is used to update the labels with information stored within the recipient list. Click on this button to replace the merge fields in the document with the data from the recipient list so that you can see what the finished product will look like. Use this box to move through the records contained within the recipient list. Click on this button to find and display a specific record within the recipient list.
This button is used to specify how errors will be handled when completing the merge. This button also allows you to simulate the merge process in order to see if there are any errors.
Click on this button to complete the merge process. You will have the option of creating a separate document for each merged record, sending all of the merged letters directly to the printer, or sending them via email.

Microsoft Word 2010 Intermediate
Page 16 ©2010 EZ-REF Courseware
Inserting a Hyperlink
Microsoft Word 2010 Intermediate
©2010 EZ-REF Courseware Page 17
INSERTING A HYPERLINK USAGE: You can insert a hyperlink in the middle of your document. A
hyperlink typically points to a Web page on the Internet, which can be useful for accessing a Web site directly from within Word.
You can also define a hyperlink to point to a location within the current document, open a new file or create an e-mail message.
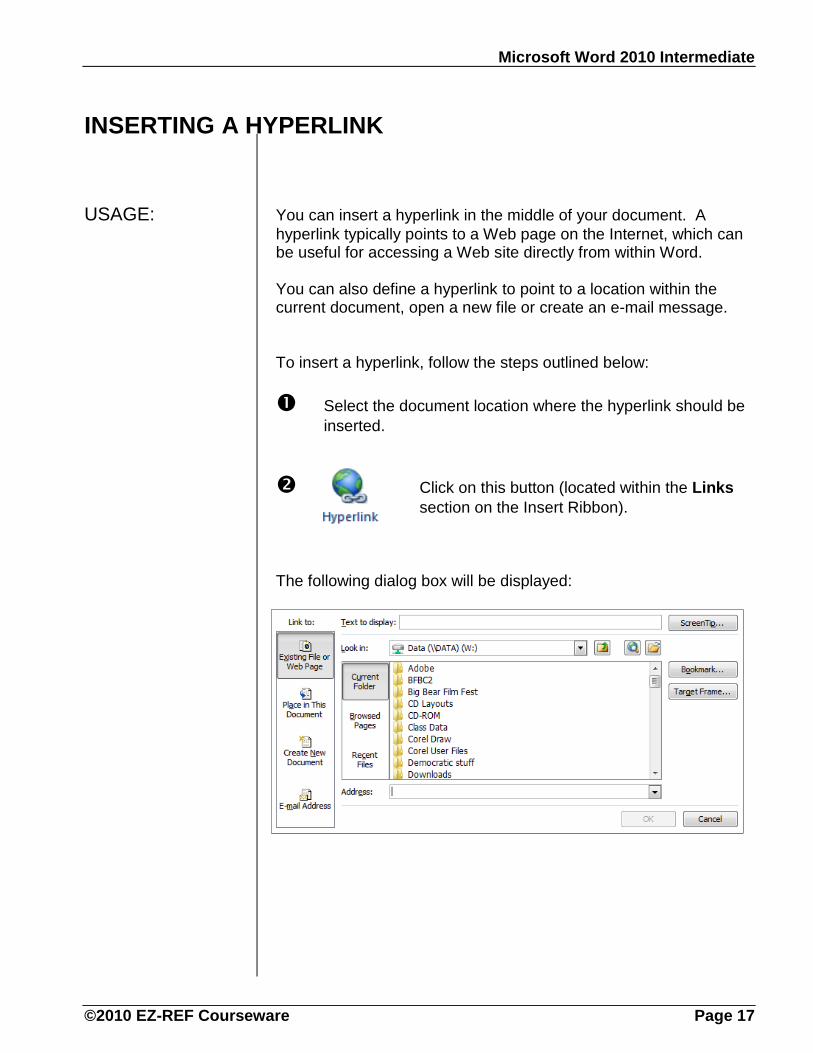
To insert a hyperlink, follow the steps outlined below:
Select the document location where the hyperlink should be
inserted.
Click on this button (located within the Links
section on the Insert Ribbon).
The following dialog box will be displayed:

Microsoft Word 2010 Intermediate
Page 18 ©2010 EZ-REF Courseware
The dialog box contains the following options:
Text to display Use this box to add or edit the text you would like displayed for the hyperlink (i.e., ‘Click Here’). If you have selected an image or other object, this box will not be available.
Click on this button to add a pop-up tip that will be displayed when a visitor hovers their mouse pointer over the hyperlink. This can be helpful for adding instructions (such as adding the tip “Click Here to Submit Your Order” over a hyperlink that points to an order form).
Look in By default, Word lists the pages contained within the current folder.
To locate a page or file stored in a location other than the one currently selected, click on
the down arrow just to the right of the this box and select a new location to search for the hyperlink.
Microsoft Word 2010 Intermediate
©2010 EZ-REF Courseware Page 19
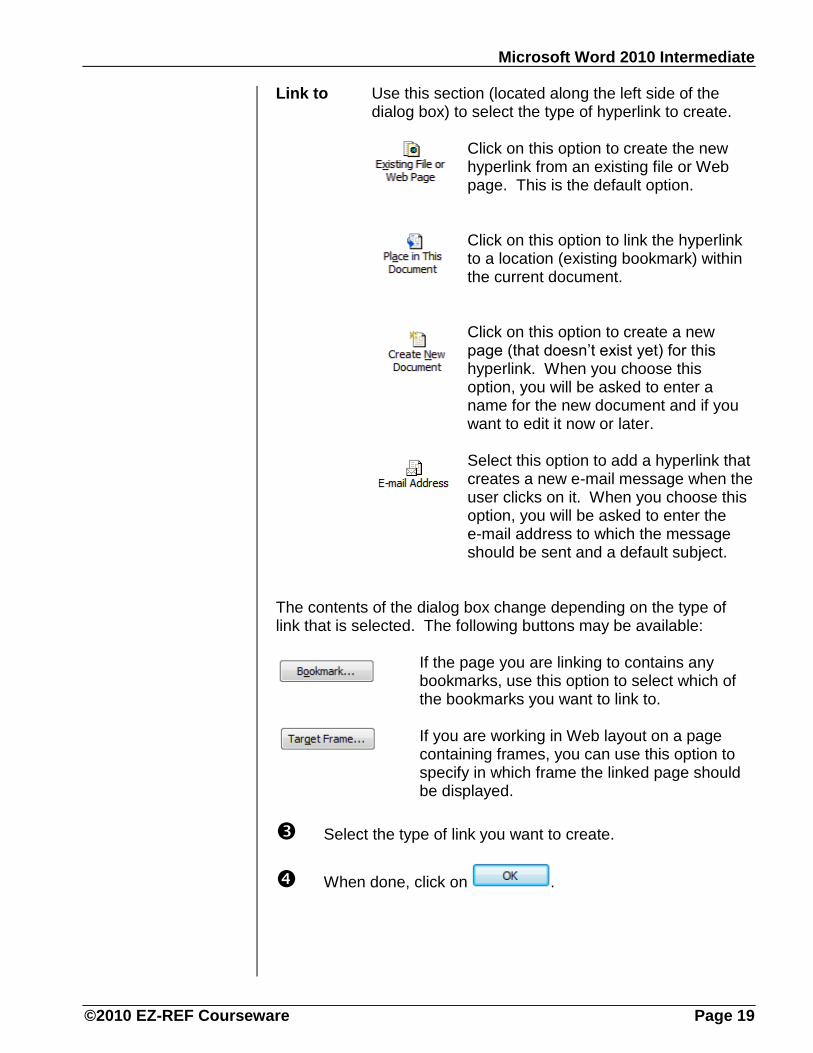
Link to Use this section (located along the left side of the dialog box) to select the type of hyperlink to create.
Click on this option to create the new hyperlink from an existing file or Web page. This is the default option.
Click on this option to link the hyperlink to a location (existing bookmark) within the current document.
Click on this option to create a new page (that doesn’t exist yet) for this hyperlink. When you choose this option, you will be asked to enter a name for the new document and if you want to edit it now or later.
Select this option to add a hyperlink that creates a new e-mail message when the user clicks on it. When you choose this option, you will be asked to enter the e-mail address to which the message should be sent and a default subject.
The contents of the dialog box change depending on the type of link that is selected. The following buttons may be available:
If the page you are linking to contains any bookmarks, use this option to select which of the bookmarks you want to link to.
If you are working in Web layout on a page containing frames, you can use this option to specify in which frame the linked page should be displayed.
Select the type of link you want to create.
When done, click on .

Microsoft Word 2010 Intermediate
Page 20 ©2010 EZ-REF Courseware

Microsoft Word 2010 Intermediate
©2010 EZ-REF Courseware Page 21
Working with WordArt

Microsoft Word 2010 Intermediate
Page 22 ©2010 EZ-REF Courseware
WORKING WITH WORDART
USAGE: Word includes a feature that adds a block of text to your document
that has been pre-formatted with various special effects. This feature is referred to as WordArt.
To insert a WordArt object, follow these steps:
Click on this tool (located within the Text
section of the Insert Ribbon) to add a WordArt object to your document.
A pull-down list will appear displaying the various styles of WordArt, as shown below:
From the pull-down list, click on the style to apply.

Microsoft Word 2010 Intermediate
©2010 EZ-REF Courseware Page 23
Once you select a style, an object will be placed in your document, prompting you to enter the actual text, as illustrated below:
Enter the text in the box provided.
If you need to edit the text or other attributes, simply click on the object and the WordArt tools will appear across the top of your screen.
NOTE: If you are working in a document that was created in an older version of Word, the WordArt features will revert to that version of Word.
Microsoft Word 2010 Intermediate
Page 24 ©2010 EZ-REF Courseware
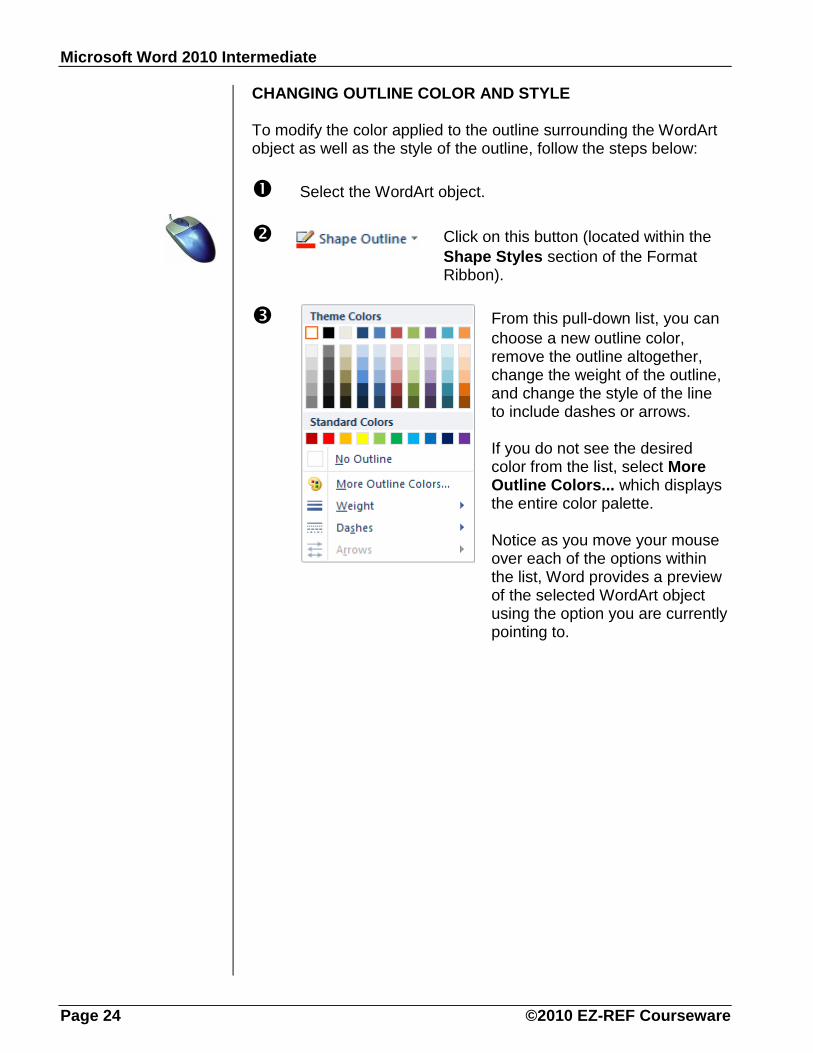
CHANGING OUTLINE COLOR AND STYLE
To modify the color applied to the outline surrounding the WordArt object as well as the style of the outline, follow the steps below:
Select the WordArt object.
Click on this button (located within the
Shape Styles section of the Format Ribbon).
From this pull-down list, you can
choose a new outline color, remove the outline altogether, change the weight of the outline, and change the style of the line to include dashes or arrows.
If you do not see the desired color from the list, select More Outline Colors... which displays the entire color palette. Notice as you move your mouse over each of the options within the list, Word provides a preview of the selected WordArt object using the option you are currently pointing to.

Microsoft Word 2010 Intermediate
©2010 EZ-REF Courseware Page 25
CHANGING FILL COLORS
To modify the fill color, picture, gradient, and texture applied to the box surrounding a WordArt object, follow the steps outlined below:
Select the WordArt object to be modified.
Click on this button (located within the
Shape Styles section on the Format Ribbon).
From this pull-down list, you can
choose a new fill color, remove the fill altogether, or change the fill to include a picture, a gradient, or a texture.
If you do not see the desired color from the list, select More Fill Colors... which displays the entire color palette. Notice as you move your mouse over each of the options within the list, Word provides a preview of the selected WordArt object using the option you are currently pointing to.
A gradient typically consists of two colors gradually blending from one color to the other. You can select the colors to be used as well as the intensity and the direction in which the gradient will be generated. Textures are basically small patches of patterns that resemble real-life textures such as marble, cloth, grass, paper, wood, etc. Rather than using one of the built-in textures or patterns, you can choose to fill a WordArt object with a custom picture. Word recognizes most graphic file formats to provide you with a wide variety of options

Microsoft Word 2010 Intermediate
Page 26 ©2010 EZ-REF Courseware
ADDING A SHAPE EFFECT
Adding a shape effect (such as a shadow or a bevel effect) can give the WordArt object a more custom look and feel to help it to stand out from the rest of the document.
To apply a shape effect to a WordArt object, follow these steps:
Select the WordArt object to be modified.
Click on this button (located within the
Shape Styles section on the Format Ribbon).
From this pull-down list, choose the
shape effect you wish to apply to the selected object.
Notice as you move your mouse over
each of the options within the list, Word provides a preview of the selected WordArt object using the option you are currently pointing to.

Microsoft Word 2010 Intermediate
©2010 EZ-REF Courseware Page 27
USING A PREDEFINED SHAPE FOR WORD ART You can use one of the predefined WordArt shapes by following the steps below:
Select the WordArt object to be modified.
Use the section shown below (located within the Shape Styles section of the Format Ribbon).
Use the buttons to scroll up and down through the list of
available styles. Click on to display all of the shapes within a single box.
CHANGING THE WORD ART STYLE You can also choose a different style for the text by following the steps outlined below:
Select the WordArt object to be modified.
Use the section shown below (located within the WordArt Styles section of the Format Ribbon).
Use the buttons to scroll up and down through the list of
available styles. Click on to display all of the text styles within a single box.

Microsoft Word 2010 Intermediate
Page 28 ©2010 EZ-REF Courseware
CHANGING TEXT FILL To change the text fill of the WordArt object, follow these steps:
Select the WordArt object to be modified.
Click on this tool (located within the WordArt
Styles section of the Format Ribbon).
From this pull-down list, choose the text
fill to be applied. CHANGING TEXT OULINE To change the text outline of a WordArt object, follow these steps:
Select the WordArt object to be modified.
Click on this tool (located within the
WordArt Styles section of the Format Ribbon).
From this pull-down list, choose the text
outline color to be applied.
Microsoft Word 2010 Intermediate
©2010 EZ-REF Courseware Page 29
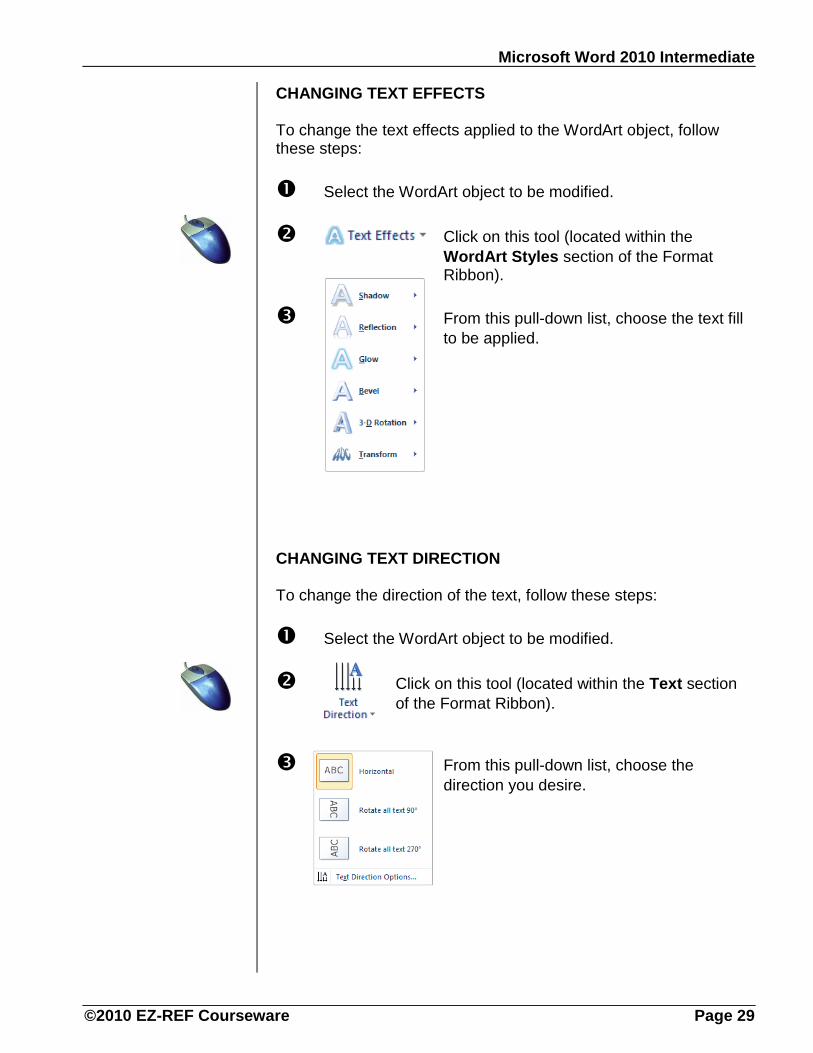
CHANGING TEXT EFFECTS To change the text effects applied to the WordArt object, follow these steps:
Select the WordArt object to be modified.
Click on this tool (located within the
WordArt Styles section of the Format Ribbon).
From this pull-down list, choose the text fill
to be applied. CHANGING TEXT DIRECTION To change the direction of the text, follow these steps:
Select the WordArt object to be modified.
Click on this tool (located within the Text section
of the Format Ribbon).
From this pull-down list, choose the
direction you desire.
Microsoft Word 2010 Intermediate
Page 30 ©2010 EZ-REF Courseware
Adding Shapes

Microsoft Word 2010 Intermediate
©2010 EZ-REF Courseware Page 31
ADDING SHAPES
USAGE: You can also insert one of the many shape objects that come with
Word. For example, there are smiley faces, arrows, stars, and callout boxes to give your document a more polished look and feel. To add a shape to the current page, follow these steps:
Click on this button (located within the Illustrations
section of the Insert Ribbon).
From the pull-down list select the
category and then the exact shape you want to create.
Position the cross-hair pointer where the top left corner of
the shape should begin.
Click and hold the [LEFT] mouse button down to drag the
pointer to the size and position where the bottom right corner of the shape should appear.
Release the mouse button when you are done drawing.

Microsoft Word 2010 Intermediate
Page 32 ©2010 EZ-REF Courseware
SELECTING OBJECTS
Once the shape (or WordArt object) has been added to your page, if you move away and work on a different part of your document and then realize you want to edit the object, you’ll need to go back and select it.
To select the object, follow the steps outlined below:
Move to the middle of the object until you see a four-way
arrow
Click the [LEFT] mouse button.
The object is selected when it has the outline of a box with small circular handles. A rotation handle appears at the top of the selected object.
MOVING OBJECTS
You can move objects around within your document by dragging them from one location to another using your mouse, as outlined in the steps shown below.
Move to the middle of the selected item. Be sure you see a
four-way arrow
Click and drag the object to its new location.
Once you reach the new location, release the mouse button.
Microsoft Word 2010 Intermediate
©2010 EZ-REF Courseware Page 33
RESIZING OBJECTS
You can easily change a object’s size.
To resize an object, follow the steps outlined below:
After the object has been selected, move the mouse
so the tip of the arrow touches one of the surrounding circular handles. The pointer will change to one of these double-sided arrows
Use one of the four corner handles to change the object’s
height and width at the same time.
When done, release the button.
DELETING SHAPES
If you decide to remove an object from your document, follow the steps outlined below:
Select the object to be deleted.
Press the = key and the object will be removed.
OOPS! UNDELETING
If you mistakenly delete an object from your document, Word allows you to quickly undo the deletion, as shown below:
Click on this tool (located on the Quick Access toolbar) to Undo the delete. To undo more than one action, click on
the down arrow beside the tool to select the number of actions.

Microsoft Word 2010 Intermediate
Page 34 ©2010 EZ-REF Courseware
ROTATING OBJECTS
Word makes it easy to position objects in the exact angle you need.
Follow these steps to rotate a shape.
Select the object you wish to rotate.
Select the rotation handle (which is automatically
displayed above the selected object). The pointer will
change to a rotation icon ( ).
Begin dragging the mouse to rotate the selected object. As
you drag, the pointer will change shape again ( ).
Drag the handle in the direction you want to rotate.
An outline appears as you rotate to help position the object.
When you are finished, let go of the mouse button and the
object will be redrawn in its new position.

Microsoft Word 2010 Intermediate
©2010 EZ-REF Courseware Page 35
Working with Tables
Microsoft Word 2010 Intermediate
Page 36 ©2010 EZ-REF Courseware
WORKING WITH TABLES
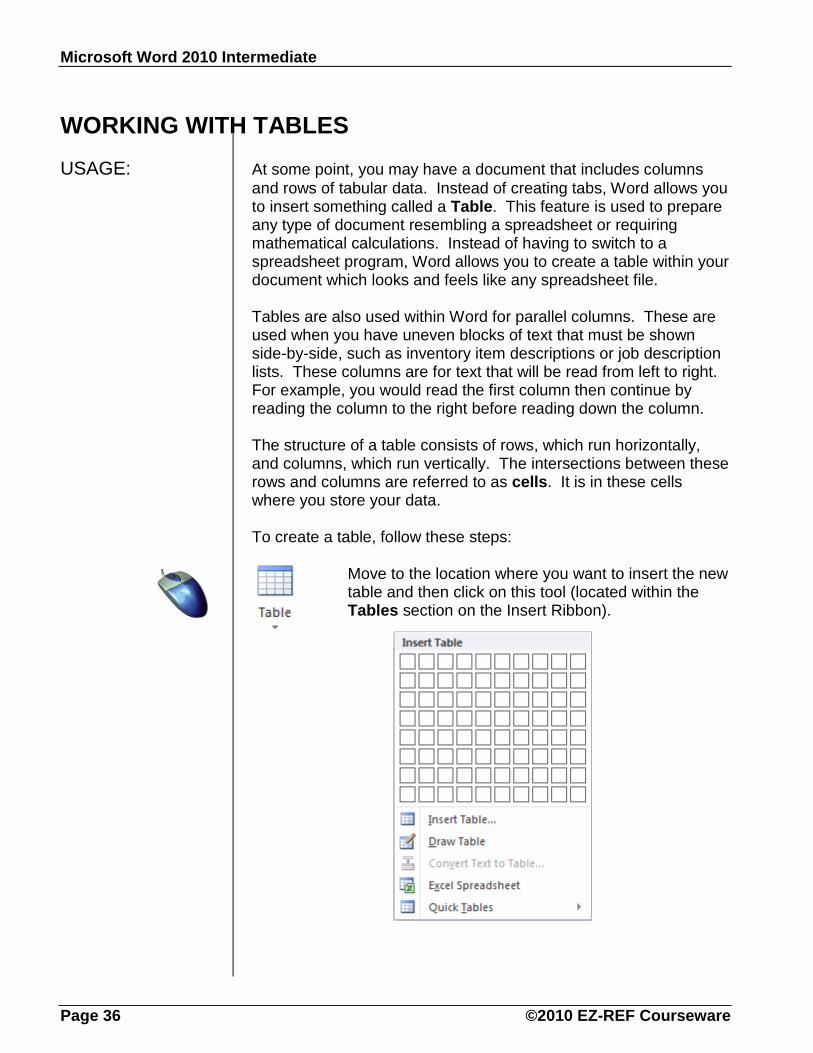
USAGE: At some point, you may have a document that includes columns
and rows of tabular data. Instead of creating tabs, Word allows you to insert something called a Table. This feature is used to prepare any type of document resembling a spreadsheet or requiring mathematical calculations. Instead of having to switch to a spreadsheet program, Word allows you to create a table within your document which looks and feels like any spreadsheet file.
Tables are also used within Word for parallel columns. These are used when you have uneven blocks of text that must be shown side-by-side, such as inventory item descriptions or job description lists. These columns are for text that will be read from left to right. For example, you would read the first column then continue by reading the column to the right before reading down the column.
The structure of a table consists of rows, which run horizontally, and columns, which run vertically. The intersections between these rows and columns are referred to as cells. It is in these cells where you store your data.
To create a table, follow these steps:
Move to the location where you want to insert the new
table and then click on this tool (located within the Tables section on the Insert Ribbon).

Microsoft Word 2010 Intermediate
©2010 EZ-REF Courseware Page 37
If you selected Insert Table… from the pull-down list, the following dialog box will be displayed:
Enter the number of columns and rows required for the table in the boxes provided. Notice you can define a fixed column width or can instruct Word to AutoFit each column based on its contents or the size of the document window. Even if you leave the setting at Auto, Word allows you to adjust the column width while within the table itself.
There is also a checkbox that instructs Word to remember the current dimensions for any future tables you may create.
When done, choose . You will be returned to the document and placed inside the first cell of the new table.

Microsoft Word 2010 Intermediate
Page 38 ©2010 EZ-REF Courseware
The following movement keys may be used within tables:
T Moves to the next cell
S+T Moves to the previous cell
TIP: If you are in the last cell of the last row, pressing T
will create a new row for you.
REPOSITIONING THE TABLE
You can quickly reposition the table by dragging the 4-way arrow (which is located in the upper left corner - just above the table).
Grab the 4-way arrow and drag the table to its new location. As you drag, an outline of the table moves with you. When you reach the desired location for the table, release the mouse button.
RESIZING THE TABLE
You can also resize the table by dragging the small hollow box (which is located in the bottom right corner of the table).
Grab the small hollow box and drag it in (to shrink the table) or out (to expand the table). When the table has reached the desired size, release the mouse button.
NOTE: You must be viewing the document in the print layout view to see the hollow box!

Microsoft Word 2010 Intermediate
©2010 EZ-REF Courseware Page 39
SELECTING COLUMNS/ROWS
To select a column, point to the upper table border (just above the column you want to select). When the pointer changes to a down arrow , click once to select the current column. To select more than one column, click and drag to highlight each column.
To select a row, point to the left of the table border (just outside of the row you want to select). When the pointer changes to a
diagonal arrow , click once to select the current row. To select more than one row, click and drag to highlight each row.
To select a single cell, point to the inside of the left border of the
cell until you see a black arrow appear. When you see the black arrow, click once to select the current cell. To select more than one cell, click and drag to highlight each cells.
CHANGING THE COLUMN WIDTH
You may change the width of a single column or a group of columns within Word's table feature. Using the mouse, place your cursor in one of the cells within the column to adjust or select the columns (if you want to adjust multiple columns).
You may use the ruler as shown in the diagram below:
Another method of changing the column width is to move the mouse pointer to the right edge of the column (in the table itself) until it changes to a double-sided arrow:
When you see the double arrow, click and drag the column border left/right to its new width.

Microsoft Word 2010 Intermediate
Page 40 ©2010 EZ-REF Courseware
CHANGING THE ROW HEIGHT
You can also change the height of a single row or a group of rows within the table, as outlined in the steps shown below:
Place the mouse pointer on the bottom gridline of the
row you want to adjust. A thin cross-hair will appear. Drag up or down to adjust the row’s height.
When the desired height is reached, release the mouse
button and the row will adjust to its new height.
USING THE RIBBON TO CHANGE WIDTH/HEIGHT
If you prefer, you can also access the Layout Ribbon to change the width of a column or the height of a row, as shown below: Use this tool to change the row height of the
currently selected cell. Use this tool to change the column width of the
currently selected cell. Click on this tool to choose from a pull-down
list of options. For example, you can choose to adjust the column width for the currently selected cell(s) to accommodate the cells contents, the size of the window, or you can specify and exact size.
Use this tool to distribute the height of the
selected rows evenly. This can be helpful if you had adjusted the row height and then printed your document and saw that it looked uneven. This option can correct that problem.
Use this tool to ensure that columns are evenly
spaced by selecting to distribute the width of the selected columns evenly.

Microsoft Word 2010 Intermediate
©2010 EZ-REF Courseware Page 41
APPLYING CHARACTER AND PARAGRAPH ATTRIBUTES
The Home Ribbon can be accessed as always to center the contents within a cell or to apply an attribute (e.g., different font, point size, apply bold, etc.). Select the cell(s) to be affected and then click on the appropriate tool.
CHANGING THE TEXT DIRECTION
While working within a table, you might want to change the direction of the text so that it reads sideways going up or down.
To change the direction of text within a cell, select the cell(s) to be adjusted and then click on this tool (located within the Alignment section of the Layout Ribbon). Notice that each time you click on this tool, the direction is changed.
CHANGING THE ALIGNMENT
You can also change the alignment of data within a cell or group of cells by clicking one of these tools (located within the Alignment section of the Layout Ribbon).

Microsoft Word 2010 Intermediate
Page 42 ©2010 EZ-REF Courseware
CHANGING CELL MARGINS
You can also adjust the cell margins and the spacing between cells for your table.
Click on this tool (located within the Alignment section of the Layout Ribbon).
A dialog box will be displayed. In the boxes provided, select the top, bottom, left, and right margins for each cell. Notice you can also change the spacing between cells. There’s also a checkbox to automatically adjust the cell size to accommodate the contents of the cell.
Once you’ve made your selection, choose .

Microsoft Word 2010 Intermediate
©2010 EZ-REF Courseware Page 43
INSERTING A COLUMN/ROW
Once you have created a table, you may want to add a column/row to it.
To insert a new column or row, follow the steps outlined below:
Select the entire column or row where you want the new
column/row inserted.
Click on this tool to insert a row above the currently
selected one. Click on this tool to insert a row below the currently
selected one.
Click on this tool to insert a column to the left of the
currently selected one.
Click on this tool to insert a column to the right of the
currently selected one.
If you select more than one column or row and then click on the table tool, Word will assume you want to insert as many rows/columns as you have selected.
NOTE: A fast way of adding a new row to the end of a table is to move your cursor to the far right cell of the last
row and press the T key once. Word will
automatically add a new row to the end of the table.

Microsoft Word 2010 Intermediate
Page 44 ©2010 EZ-REF Courseware
DELETING COLUMNS/ROWS
Once you have created a table, you may want to remove a column/row.
To remove a column or row, follow the steps outlined below:
Select the column(s) or row(s) to be removed.
Click on this tool and then select what it is you
want to delete from the pull-down list.
Notice you can choose to delete the currently selected cell(s), column(s), row(s) or the entire table.
CHANGING TABLE PROPERTIES To make several changes at once to your table, you can access the Table Properties dialog box. Click on this tool (located within the Table section on
the Layout Ribbon) to access a dialog box where you can change the width, alignment and text wrapping properties for the table. This dialog box also contains tabs to modify the row, column, or cell properties.

Microsoft Word 2010 Intermediate
©2010 EZ-REF Courseware Page 45
MERGING CELLS
Word offers an option referred to as Merge Cells which combines a group of selected cells into one large cell. This can be useful for creating cells that span more than one row and/or column.
For example, to create a row heading that spans the width of a table, you would begin by merging all cells for the first row into one large cell and then centering a title in that single cell.
To merge two or more cells into a single cell, follow the steps outlined below:
Select the cells you want to combine.
Select this tool (located within the Merge section on
the Layout Ribbon).
Another method for merging cells is to combine two or more cells into a single one using the eraser tool to “erase” the boundaries between the cells you want to combine (merge), as outlined below:
Click on this tool to select the Eraser.
Move the mouse within the table structure. Notice that the
mouse pointer has changed to an eraser . Click on the boundaries between the cells to be merged.
When done, click on this tool a second time to de-
select the Eraser.

Microsoft Word 2010 Intermediate
Page 46 ©2010 EZ-REF Courseware
SPLITTING CELLS
If you have a cell that you would like to split into two or more cells, follow the steps outlined below:
Select the cell you want to split.
Click on this tool (located within the Merge section on
the Layout Ribbon)
You will be taken to a dialog box where you’ll be asked to
enter the number of columns and rows to split the selected cell into. From within the dialog box, enter the number of columns and rows you want to split the cell across. If you had selected more than one cell to split, there is also a checkbox that allows you to merge the contents of the cells into one cell before the split occurs.
When done, choose .

Microsoft Word 2010 Intermediate
©2010 EZ-REF Courseware Page 47
Another method for splitting cells is outlined in the steps below:
Click on this tool (located within the Draw Borders
section on the Design Ribbon) to select the Draw Table tool.
Move the mouse within the table structure. Notice that the
mouse pointer has changed to a pencil . Use the pencil to draw the borders within the cell you wish to split. Word applies the last used pen style, weight, and color to the new borders you are drawing.
When done, click on this tool a second time to de-
select the Draw Table tool.

Microsoft Word 2010 Intermediate
Page 48 ©2010 EZ-REF Courseware
SPLITTING THE TABLE
After creating a table and entering data, you may decide that you would have preferred creating two or more separate tables. Rather than having to create a new table and then cut & paste the data from the first table into the second one, you can have Word split the table.
Word automatically splits tables based on the current row.
Before continuing, be sure to place your cursor in the row where you want the split to occur. The current row will become the first row within the new table.
Click on this tool (located within the Merge section on the Layout Ribbon).
Your table should now be split into two. If needed, you can continue splitting until you have the desired number of tables.

Microsoft Word 2010 Intermediate
©2010 EZ-REF Courseware Page 49
PLACING BORDERS AROUND THE TABLE
The default borders surrounding the table can easily be customized as needed. Each cell can have a different set of borders allowing you to create a variety of table formats.
Follow these three steps to add a border to a cell or group of cells:
Select the cell(s) you want to format.
Click on the down arrow beside this tool
(located within the Table Styles section on the Design Ribbon) to select the type of border to apply.
A pull-down list of the available borders is displayed:
From the list provided, choose the type of border you would
like to apply to the selected cell(s).

Microsoft Word 2010 Intermediate
Page 50 ©2010 EZ-REF Courseware
To further customize the borders (such as adding a shadow effect or a 3D look), select Borders and Shading… from the pull-down list.
The following dialog box will be displayed:
There are three tabs available that allow you to customize the borders for the table, the entire page, or customize the shading that is assigned to the cells.

Microsoft Word 2010 Intermediate
©2010 EZ-REF Courseware Page 51
THE BORDERS TAB
Setting Select one of the preset styles along this section. The Preview section shows how the borders will look within the table. Select None to remove existing borders.
Style To customize your own borders, select a Line Style and use the Preview section to click on the edge where you want to apply the border. To remove an existing line, click on the edge of the line to remove.
Color It is also possible to change the Color of the borders.
Click on the down arrow beside the word "Automatic" to select the desired color.
Width Click on the down arrow to choose the width of the line to apply.
Preview This section provides a brief view of how the borders will be applied. You can click within the preview to add/remove borders or use the buttons provided.
Apply to Click on the down arrow to choose whether to apply the borders to the selected cell(s), paragraph, or the entire table.

Microsoft Word 2010 Intermediate
Page 52 ©2010 EZ-REF Courseware
THE SHADING TAB
This third tab is used to apply shading to the selected cell(s):
The following options are available:
Fill Choose a fill color from the palette provided.
Patterns Click on the down arrow beside this box to select from a list of patterns to apply.
Color Click on the down arrow beside this option to choose a pattern color to apply.
Apply to Click on the down arrow to choose whether to apply the shading to the selected cell(s), paragraph, or the entire table.
When done, choose .
Instead of accessing the dialog box shown above,
you can click on the down arrow beside this tool (located within the Table Styles section on the Design Ribbon) to apply shading to the selected cell(s).

Microsoft Word 2010 Intermediate
©2010 EZ-REF Courseware Page 53
USING TABLE STYLES
You can further customize your table by selecting from one of the many predefined table styles available within Word. To apply one of these styles, follow these steps:
Select the table by clicking on any of the cells within it.
Use the section shown below (located within the Table Styles section on the Design Ribbon) to choose a different style for the table.
Notice as you drag the mouse over the various styles within the list, your table will change to display a preview of what it will look like if you select that style.
Use the buttons to scroll up and down through the list of available styles.
Click on to display the entire list of table styles within a single pull-down list.

Microsoft Word 2010 Intermediate
Page 54 ©2010 EZ-REF Courseware
APPLYING TABLE STYLE OPTIONS The section labeled “Table Styles Options” on the Design Ribbon are used to further format your table. Using this section, you can choose to display or hide the header row, create and display or hide a total row, and display or hide banded rows (whereby even and odd rows are displayed differently to make reading them easier). You can also use this section to display special formatting for the first column, the last column, or create banded columns to make them easier to read. DRAWING/ERASING BORDERS If you’d rather draw the borders yourself, you can easily do so by using the tools within the Draw Borders section of the Design Ribbon. You will need to start by selecting the type of border, the pen color and the weight of the border(s) you wish to draw and then click and drag to actually begin drawing.
Click on the down arrow beside this tool to select the type of border you wish to draw.
Click on the down arrow beside this tool to select the weight of the border you wish to add.
Click on the down arrow beside this tool to select the pen color you wish to use.
Microsoft Word 2010 Intermediate
©2010 EZ-REF Courseware Page 55
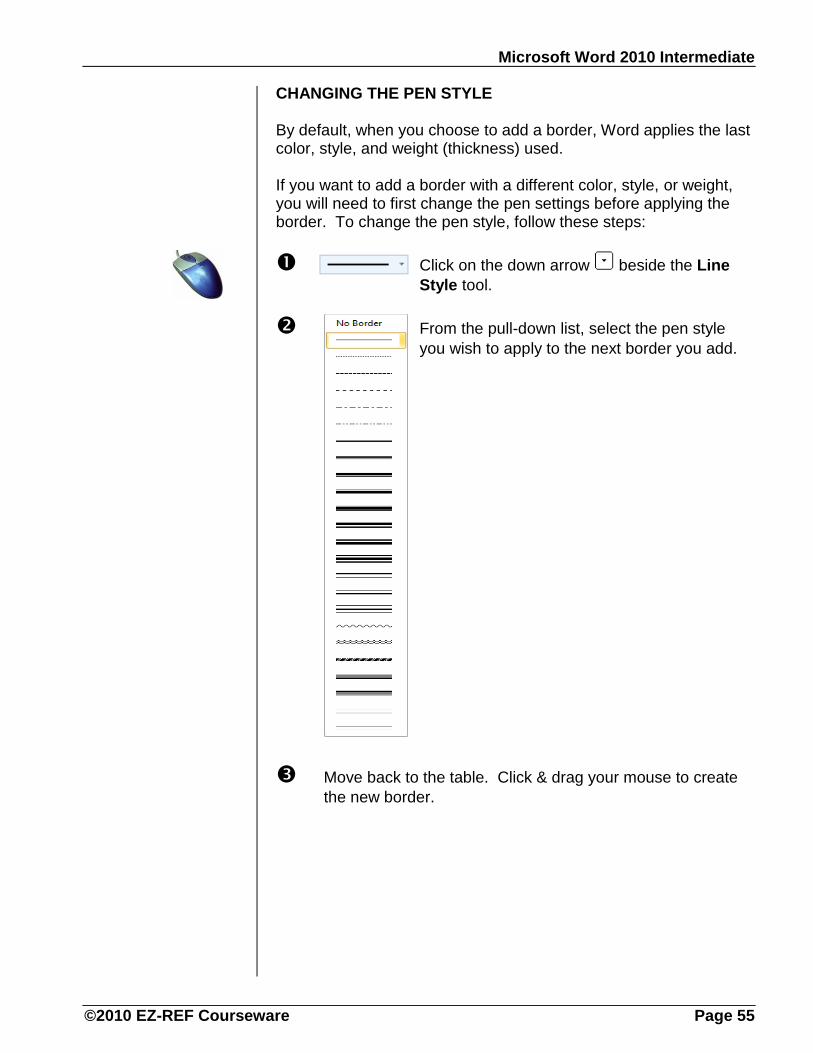
CHANGING THE PEN STYLE By default, when you choose to add a border, Word applies the last color, style, and weight (thickness) used. If you want to add a border with a different color, style, or weight, you will need to first change the pen settings before applying the border. To change the pen style, follow these steps:
Click on the down arrow beside the Line
Style tool.
From the pull-down list, select the pen style
you wish to apply to the next border you add.
Move back to the table. Click & drag your mouse to create
the new border.

Microsoft Word 2010 Intermediate
Page 56 ©2010 EZ-REF Courseware
CHANGING THE PEN WEIGHT To change the weight (thickness) of the pen for the next border you apply, follow these steps:
Click on the down arrow beside the Line
Weight tool.
From the pull-down list, select a new pen
weight to apply to the next border you add.
You can now add a border and the new pen weight will be applied.
CHANGING THE PEN COLOR To change the pen color for the next border, follow these steps:
Click on the Pen Color tool.
Select the color to apply from the pull-
down list.
If you don’t see the color you want to apply, choose More Colors…
You can now add a border and the new pen color will be applied.

Microsoft Word 2010 Intermediate
©2010 EZ-REF Courseware Page 57
MOVING A TABLE
Like any other object within a document, a table can be moved or resized. To move the table, point to one of the borders surrounding it until
you see the mouse pointer change to four-way arrow and then click and drag it to a new location.
RESIZING THE TABLE To resize the table, point to one of the outer borders until you see
one of these double-sided arrows . Click and drag to increase/decrease the size of the table. DELETING A TABLE
To remove a table from your document, click on this tool (located within the Rows & Columns section on the Layout Ribbon). From the pull-down list, select Delete Table. You will not be asked to confirm the deletion. However, if you change your mind, you can click on
the Undo tool (located on the Quick Access toolbar) to undo the deletion.

Microsoft Word 2010 Intermediate
Page 58 ©2010 EZ-REF Courseware
HIDING/DISPLAYING THE GRIDLINES
If you have removed all of the borders from a table, you will notice that it is hard to see the individual cells. To help you edit a table with no borders, Word allows you to display some gridlines which define the rows and columns.
Click on this tool (located within the Table section on the Layout Ribbon) to toggle gridlines on/off.
CONVERTING EXISTING TEXT TO A TABLE
If you have already created text using tabs or commas as separators, you can convert that information to a table.
Sometimes mailing lists, spreadsheet data or mainframe data are provided in the form of a list, with each item (field) separated by a comma.
If you want to use this data in a table, Word will easily convert the list to a table for you, as outlined in the steps shown below:
Select the lines of text that are to be converted into a table.
Click on the table tool.
From the pull-down list, choose Convert Text to Table…
A dialog box will be opened where you will be prompted to
enter how many columns and rows should be created. Once
you enter that information, click on . Word will convert the tabbed or comma-separated items to a table format based on the information you entered.

Microsoft Word 2010 Intermediate
©2010 EZ-REF Courseware Page 59
DRAWING A TABLE
Another feature within this application is the ability to draw your own more complex table. For example, you can create a table consisting of cells with different heights on the same row or a different number of columns on each row.
Since you are actually allowed to draw the table borders, you can customize the new table to whatever dimensions you require.
Follow these steps to draw the table:
Click on this tool (located within the Tables section on
the Insert Ribbon)
From the pull-down list, choose Draw Table.
Notice that your mouse pointer has changed to the
shape of a pencil. Click and drag to draw the outer border of the table. When you release the mouse button, the table will consist of one large cell.
Continue to click and drag from edge to edge to draw the
inner borders. These borders will consist of the columns and rows for the new table. When you release the mouse button you should see the table has been divided into multiple cells.
Once created, use the Erase tool to remove any unwanted borders you may have inadvertently drawn.

Microsoft Word 2010 Intermediate
Page 60 ©2010 EZ-REF Courseware
INSERTING A QUICK TABLE
Word also comes with a group of table templates that can be inserted into your document based on a gallery of preformatted tables. These table templates contain sample data to help you visualize what the table will look like when you begin adding your own data.
Follow these steps to insert a Quick Table:
Place your cursor at the document location where you
want to insert the table and then click on this tool (located within the Tables section on the Insert Ribbon)
From the pull-down list, choose Quick Tables (located at
the very bottom of the list).
Scroll through the list of available table templates until you
see the one you want to use for your table. To select it, simply click on the sample provided in the list.
Notice you can also save a table to the gallery so that it becomes a template for future tables to be based on. To do that you would have first created a table and then selected it before entering this list.
Once the table has been inserted, you can edit its data so
that the new table contains the information you require.

Microsoft Word 2010 Intermediate
©2010 EZ-REF Courseware Page 61
SORTING TABLE DATA
Word also allows you to sort your table. When sorting, Word assumes the first row contains headings that you do not want moved with the sort and that the text in other columns should move with the sorted data.
Click in the column you want to sort.
Click on the Sort tool (located within the Data section
on the Layout Ribbon).
A dialog box will be displayed, allowing you to sort on up to
three fields (columns). Select the first column to sort by and whether to sort in ascending (A-Z) or descending (Z-A) order. Next, select the second column (if needed) to sort by. For example, you might want to first sort by Last name and then by first name. You can also specify whether the first row within your table contains data that should also be sorted or titles (headers) that should be excluded from the sort. Options include how to separate fields (by tabs, commas), whether case should be sensitive, and what language.
When done, click .

Microsoft Word 2010 Intermediate
Page 62 ©2010 EZ-REF Courseware
Creating & Modifying
Charts

Microsoft Word 2010 Intermediate
©2010 EZ-REF Courseware Page 63
CREATING & MODIFYING CHARTS
USAGE: When you create a chart, Excel automatically is run so that the data
is input through a spreadsheet and then plotted/charted within Microsoft Word.
INSERTING A CHART
Click on this tool (located within the Illustrations
section of the Insert Ribbon). The following box will be displayed:
Along the left side of this box, Word lists the various chart categories while the right side of the box displays the types of charts available within the currently selected category.
Select the type of chart to create and click on .
Microsoft Word 2010 Intermediate
Page 64 ©2010 EZ-REF Courseware
A new chart will have been added and Excel will have also been opened in a separate window so that you may begin entering the data representing the chart. Type over the generic data that has been placed in the spreadsheet. Notice that the chart updates as you make changes to the spreadsheet.
The two windows should be placed together on the screen so that you can easily click back and forth in the window you want to work
in. However, if you want to maximize either window, click on the button (located within the upper right corner of the window).
ADDING A CHART TITLE Across the top of the chart you should see a generic title. Click on that title to customize it. You can then select the title and access the Font section of the Home Ribbon to change the font, font size, font color, and text attributes for the chart title.
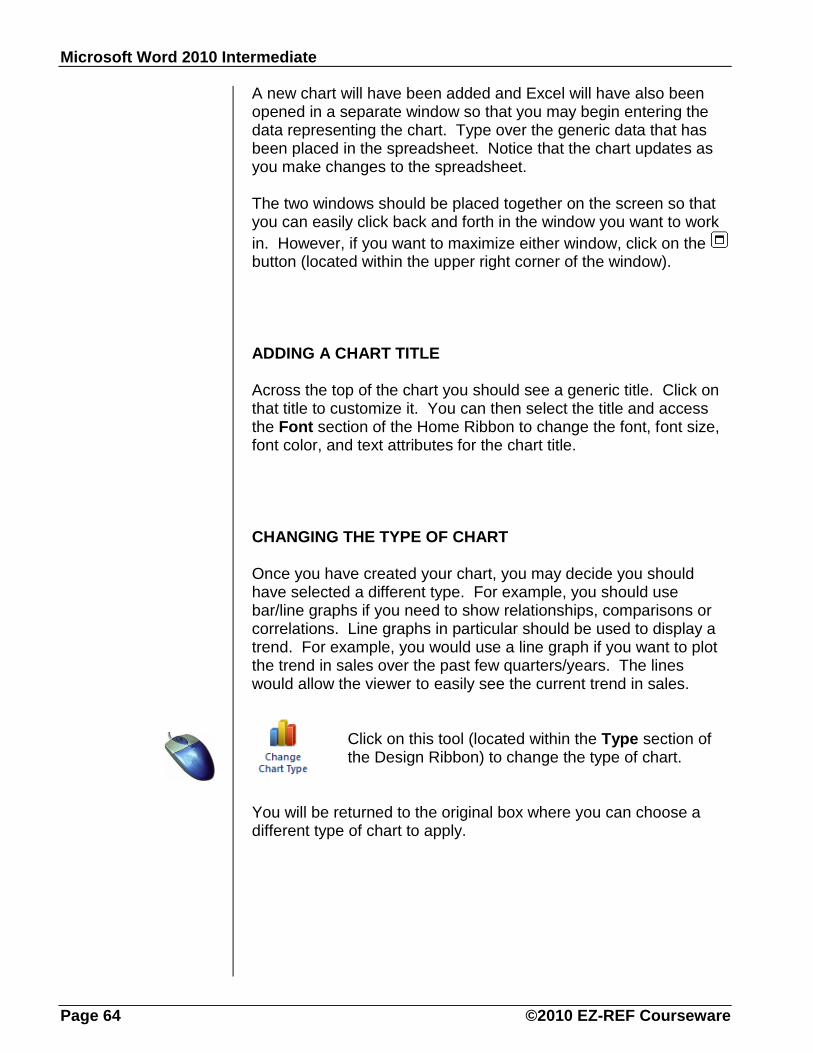
CHANGING THE TYPE OF CHART
Once you have created your chart, you may decide you should have selected a different type. For example, you should use bar/line graphs if you need to show relationships, comparisons or correlations. Line graphs in particular should be used to display a trend. For example, you would use a line graph if you want to plot the trend in sales over the past few quarters/years. The lines would allow the viewer to easily see the current trend in sales.
Click on this tool (located within the Type section of the Design Ribbon) to change the type of chart.
You will be returned to the original box where you can choose a different type of chart to apply.

Microsoft Word 2010 Intermediate
©2010 EZ-REF Courseware Page 65
EDITING DATA
If you somehow close the Excel window or can’t find it, click on this tool to open the spreadsheet to edit the data representing your chart.
PARTS OF A CHART
Each bar/line chart can consist of either a single series or multiple series. Word allows you to plot several series.
Word refers to these graphs as XY because they are made up of an x-axis (the horizontal axis consisting of the category indicators) and a y-axis (the vertical axis containing the values being plotted). The y-axis can be located on the left (y1) or right side (y2) of the chart. Some charts contain both a y1 and y2 axis.
A sample bar chart is displayed in the diagram below:
Each data value is represented by a bar on the graph and is identified by a "label" along the x-axis.

Microsoft Word 2010 Intermediate
Page 66 ©2010 EZ-REF Courseware
On the other hand, you would use pie charts if you need to show parts of a whole. Pie charts show each data item as an individual part of the total value. For example, use a pie chart if you have a list of expenses and would like to see how much each individual expense contributes to the total amount.
Each pie chart consists of a single set of data values. For example, you can have a pie chart that displays expenses, but a pie chart with expenses and income categories combined would not make much sense as neither category contributes to the other.
Each pie has a set of labels that identifies each slice and a set of values for each slice, as illustrated in the diagram below:
The spreadsheet to the left is used to enter the different data labels and values for the chart.
Each value should have a name or "label" assigned to it so that it can be identified on the chart. Notice how each slice represents a small part of the total value.
To modify the data, click on the data form to activate it.
Once activated, you would use the first row and first column to enter the data series and category names.

Microsoft Word 2010 Intermediate
©2010 EZ-REF Courseware Page 67
SELECTING CHART OBJECTS To select various chart objects, click on the item (x-axis labels, y-axis labels, legend, data series, chart title, etc.). Handles will surround the selected item. To modify a text object, simply select the object and then access the Font section of the Home Ribbon.
CHANGING THE CHART STYLE Use the section shown below (within the Chart Styles section of the Design Ribbon) to choose a different chart style.
Use the buttons to scroll up and down through the list of available
styles. Click on to display all the chart styles within a single box. CHANGING THE CHART LAYOUT Use the section shown below (within the Chart Layout section of the Design Ribbon) to choose a different chart layout.
Use the buttons to scroll through the list of available styles. Click
on to display all of the chart layouts within a single box.
Microsoft Word 2010 Intermediate
Page 68 ©2010 EZ-REF Courseware
SIZING THE CHART
To size the chart, follow the steps outlined below:
Click on any of the outside borders surrounding the chart.
Be sure you see the handles around the chart.
Place the tip of your mouse pointer on one of
the handles. The pointer changes to a double-sided arrow. Click and drag the [LEFT] mouse button to resize the chart.
When done, release the mouse button.
MOVING THE LEGEND
It is also possible to move the legend to a more appropriate location, if desired. To do so, select it and then drag it to a new location, as outlined in the steps below:
Select the legend by clicking on it once. Be sure you see
the handles surrounding the object.
Move the mouse pointer to one of the borders
surrounding the legend box until you see the four-way arrow. Click and hold the [LEFT] button down while dragging the legend to its new location.
When you reach the desired location, release the mouse
button.
Microsoft Word 2010 Intermediate
©2010 EZ-REF Courseware Page 69
APPLYING TEXT ATTRIBUTES TO CHART OBJECTS
You can quickly apply attributes to text within chart objects the same way you applied attributes to any text object.
Before continuing, select the text object to modify. Next, click on one of the following tools (located within the Font section of the Home Ribbon):
Click on this tool to turn bold on and off.
Click on this tool to turn italics on and off.
Click on this tool to turn underline on and off.
The first time you select an attribute, it is turned on. The second time you select the attribute, it is turned off.
CHANGING FONT & POINT SIZE FOR CHART TEXT
Before continuing, select the text object to modify.
Click on the down arrow beside the Font tool (located within the Font section on the Home Ribbon).
Select the new font from the pull-down list.

Microsoft Word 2010 Intermediate
Page 70 ©2010 EZ-REF Courseware
APPLYING NUMERIC FORMATS TO CHART OBJECTS
The numbers along the axis are automatically formatted based on the cells within the Excel spreadsheet. If you decide, however, that you would like to change their format, you can do so easily by using the following tools (located within the Number section of the Home Ribbon within Excel).
Before continuing, select the values you wish to modify.
Formats the current selection for currency with a dollar sign, a comma as a thousand separator and 2 decimal places.
Formats the current selection for percentage by multiplying the numbers by 100 and adds the percent sign to the end with 0 decimal places.
Formats the selection for comma by adding a comma as a thousand separator and two decimal places.
Increases the number of decimal places displayed. Each time this button is selected another decimal place is added to the selection.
Decreases the number of decimal places displayed. Each time this button is selected another decimal place is removed from the selection.
Click on the down arrow beside this tool (located within the Number section of the Home Ribbon) to choose from a list of formats.

Microsoft Word 2010 Intermediate
©2010 EZ-REF Courseware Page 71
CUSTOMIZING FILL EFFECTS
You can also customize the fill effects of a single series or the entire background of the chart, as outlined in the steps below:
Select the series or background to be customized.
Click on the down arrow to the right
of this tool (located within the Shape Styles section of the Format Ribbon).
Select the fill color and or fill effect
(picture, gradient, or texture) that you would like applied to the currently selected data series.
CUSTOMIZING THE OUTLINE In addition to changing the fill effect, you can also change the outline of the bars on the chart by following these steps:
Select the series or background to be customized.
Click on the down arrow to the right
of this tool (located within the Shape Styles section of the Format Ribbon).
Select the outline color, weight, and
style for the currently selected data series.

Microsoft Word 2010 Intermediate
Page 72 ©2010 EZ-REF Courseware
ADDING A SHAPE EFFECT
Adding a shape effect (such as a shadow or a bevel effect) can give a series of bars or columns on the chart a more custom look and feel to help it to stand out.
To apply a shape effect to a data series, follow the steps below:
Select the data series to be modified.
Click on this tool.
From this pull-down list, choose the
shape effect you wish to apply to the selected data series.
Notice as you move your mouse over
each of the options within the list, Word provides a preview of the selected data series using the option you are currently pointing to.

Microsoft Word 2010 Intermediate
©2010 EZ-REF Courseware Page 73