midi, meet tricaster - newtekftp.newtek.com/pub/download/utilities/whitepaper-tricaster-midi... ·...
TRANSCRIPT

TriCaster™ is a trademark of NEWTEK. All other brand names, product names, or trademarks belong to their respective holders.
MIDI Control for TriCaster™ Demonstration using iPad™
MIDI, meet TriCaster MIDI stands for Musical Instrument Digital Interface. The MIDI protocol was developed in the 1980’s to allow electronic instruments and other digital music tools to communicate with each oth-er. It is probably best to understand MIDI by realizing what it is not. MIDI is not sound, but rather a series of digital messages such as “note on,” ”note off,” “pitchbend,” “sustain,” “velocity,” and more. These messages are transmitted between devices and precisely define a song. The advent of MIDI, electronic music and digital communications has given rise to literally thousands of control-ler products representing every combination of desirable options. A TriCaster is a full video production system which integrates every production component needed to produce high-quality, multi-camera events and deliver them to any screen – live to air, display, web stream, record for on-demand, and social network media, simultaneously. It also includes the most powerful switcher-effects engine available and mix/effect banks to deliver super-charged vis-uals and virtual environments. MIDI is usually associated with music devices; however MIDI can control any device that can read and process a MIDI command. TriCaster is now one such device. TriCaster includes a macro li-brary and editor which allows simple or complex functions to be triggered on the TriCaster through just one control key or, through its MIDI integration, triggered by a single MIDI note. Sets of func-tions can be set to a timer such as a MIDI sequencer so events can be synchronized to specific times, and against a backdrop of other MIDI-controlled production events, by simply having the sequencer send notes to the TriCaster. While MIDI offers the possibility of adding integration automation to a show, it also can provide ad-ditional live control. On many productions you want to have additional people assisting, each using a different part of the TriCaster under their control. Perhaps your productions make use of a partic-ular feature and it would be useful to have a customized interface to access it quickly. The MIDI support in TriCaster allows us to access these new workflows using controls that are likely availa-ble at your nearest electronics or music store.
Building more Control To demonstrate, this document has been put together that will explain how to setup the TriCaster with an iPad MIDI app customized for Social Media Publishing through TriCaster macros, which allow you to build customized controls for almost any workflow imaginable. Of course, the iPad

2
emulation is more complex than connecting a real MIDI device to a TriCaster, but the iPad example shows the flexibility and extensibility of this interface without requiring that you purchase a MIDI controller just yet. The unique social media ability found in the TriCaster allows clips or stills to be published to Facebook™, Twitter™ and YouTube™ during production. While easy to use, in many cases the main TriCaster operator is not the person that makes the call on what will be posted to a social media site. Putting this functionally in the hands of another operator is what is needed, and this example provides another operator the ability to capture clips in the DDRs and publish to social network sites, using the built-in TriCaster functionality through an entirely new control console. Of course this idea can be extended to control any aspect of TriCaster with however many consoles and operators you choose. MIDI enables this customization and workflow to be realized. This document explains how to set up MIDI control using an iPad so that another operator can control part of the show. There are several items needed to make this work:
• First is a TriCaster 410, 460, 860, or 8000 with the latest software version.
• An iPad, it must be running iOS 4.3 or later.
• The TouchOSC app to be installed on the iPad. It is located in the App Store or at https://itunes.apple .com/us/app/touchosc/id288120394. This software will allow you to build a customized MIDI interface. There is also a free application called MIDIPads Lite that you can use to try this out if you want to verify operation before purchasing TouchOSC. TouchOSC also has an Android™ version.
• TouchOSC Editor: you can download it from this link. http://hexler.net/software/touchosc
• rtpMIDI: you can download it from this link; put it on a USB stick. http://www. tobias-erichsen.de/software/rtpmidi.html
• Apple Bonjour™ PS for Windows: you can download it from this link; put it on a USB stick. http://support.apple.com/kb/DL999
• A wireless router to which your TriCaster system is connected. The TriCaster and the iPad need to be running on the same subnetwork. If your TriCaster can poll Air-Play or is able to be controlled by the NewTek iPad Audio Mixer app then your net-working configuration is correctly set up.
Once you have the rtpMIDI and Bonjour applications downloaded on the memory stick, plug the USB memory stick into your TriCaster. In the TriCaster interface, go into the Administration tools and exit into Windows.
Plug & Play? While this demonstration on iPad allows users to experiment with MIDI without investing in any ad-ditional hardware, you might be wondering ‘why is this so difficult to set up?’ The reality is that set-ting up a MIDI device to control TriCaster is generally as easy as adding a new keyboard or mouse to a system – simpler than adding most ‘plug and play’ printers to a computer, and certainly too easy to merit a whitepaper. Today most MIDI controls have USB interfaces that will plug di-rectly into a TriCaster, be recog-nized by the Windows operating system (or include a ‘plug and play’ Windows driver), and be immediately available to assign to macros in the TriCaster macro panel by simply tapping the but-tons on the control itself.

3
Emulating a MIDI device over the network The rtpMIDI software will enable the iPad to communi-cate with the TriCaster over TCP/IP yet appear to the TriCaster as a MIDI device. Alternately, a real MIDI de-vice could simply be connected to the TriCaster by employing a hardware MIDI interface, but we’ve made the assumption that you’ll be able to try this on an iPad tonight. To get started, from an Explorer window unzip the rtpMIDI software and double-click on rtpMIDI installer file. If rtpMIDI indicates that Apple Bonjour isn’t found, exit the installer and run the Apple Bonjour installer first, then install rtpMIDI after that has completed. In either case, use the default install settings. After rtpMIDI has installed, you will find the rtpMIDI icon on the desktop. Double-click on this icon to configure rtpMIDI. We will use the rtpMIDI interface to configure our TriCaster system and the remote devices with which it will communicate. The example screen-shots show a demo system configured in the software, yours will be similar but with different system names. First click the upper ‘+’ button below the panel called ‘My Sessions’.
MIDI Sequencing Using a TriCaster in this way is not difficult. One such example would be to have the TriCaster serve as a video playback device for a stage show where music, lights and video are integrated into a stunning visual production. There are many different ways to set up such an arrangement. In the past, hardware sequencers were the king of stage perfor-mances but, these days, software sequencers running on standard PCs or Macs generally are suffi-cient or even preferred gear for performing the required tasks. Using a MIDI sequencing applica-tion like Pro Tools or Logic Pro X, it is possible add a general MIDI track to sequences and play out the MIDI commands at a specific times. Please reference your se-quencer’s manual for instructions on patching tracks to MIDI output ports. Before control of a TriCaster is successful, assignment of each macro to a MIDI note is neces-sary. Section 17 of the TriCaster User Guide gives full instructions for assigning Macros to shortcuts. Instead of assigning keystrokes, each macro will be assigned to the correct MIDI note for the specific system configura-tion. Once the notes are as-signed, it is then a matter of re-cording that note to “play” at the specific time during the se-quence.

4
Once you click on this button, you will see the name of your TriCaster appear in the list. It will probably say ‘TriCaster-XD’, but it may say something different. Next to the TriCaster name is a checkbox; check this box. Doing so should also make the ‘Ena-bled’ checkbox turn on; if it doesn’t, check it as well.
Now we need to configure the iPad. It is possible that you might see your iPad already listed in the directory panel. It is best to manually add your iPad into rtpMIDI, because MIDI communication on-ly occurs when the iPad app is open. Manually adding the iPad into the directory will make the de-vice always set up even when the app isn’t running.
It is recommended that your iPad be configured with a static IP address for this. You can do this either by setting up a static IP in the iPad’s network settings or configuring the router to reserve an IP address for the device in the DHCP server’s assignments table. Making these changes is not in the scope of this document; check your networking gear to see which option can work for you.
For now just set up the system using the current IP of your iPad. You can use it this way, but you will need to go through these steps each time your power up your equipment because a new IP address might get assigned to the iPad when it starts. Manually configuring for a static IP will avoid this.
To find the iPad’s IP address open the ‘Settings’ application. On the left side of the Settings panel are the Wi-Fi settings; tap on it to select it.

5
The right side panel will show the Wi-Fi access points; the one with a checkmark is the Wi-Fi ac-cess point to which you are connected. Press on its blue arrow to get details on the connection. At the top of the details page will be the iPad’s IP address.
Back on the TriCaster, click on the lower ‘+’ button below the directory listing in rtpMIDI. A window will open asking for a name and host/port information. The name can be anything you like, but for the host/port, type in the IP number as displayed on the iPad followed by a colon and the number ‘5004’. For example, if the iPad’s IP address is 192.168.1.11, you would enter ‘192.168.1.11:5004’.
6
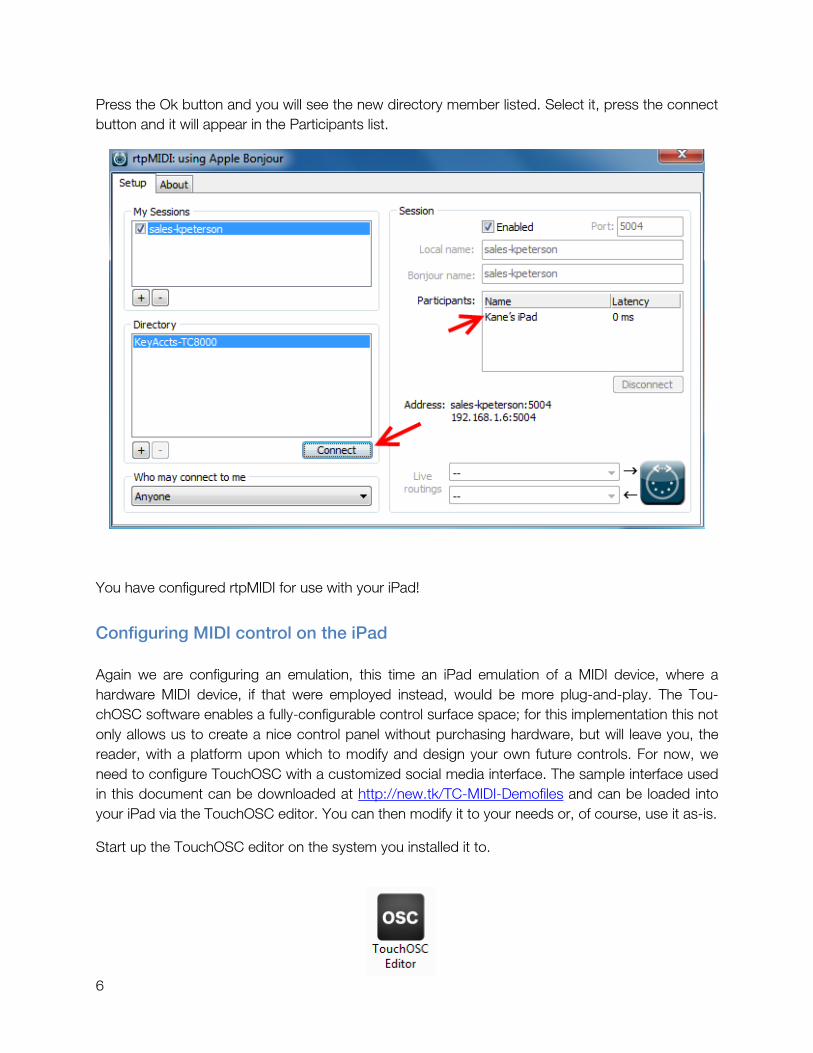
Press the Ok button and you will see the new directory member listed. Select it, press the connect button and it will appear in the Participants list.
You have configured rtpMIDI for use with your iPad!
Configuring MIDI control on the iPad Again we are configuring an emulation, this time an iPad emulation of a MIDI device, where a hardware MIDI device, if that were employed instead, would be more plug-and-play. The Tou-chOSC software enables a fully-configurable control surface space; for this implementation this not only allows us to create a nice control panel without purchasing hardware, but will leave you, the reader, with a platform upon which to modify and design your own future controls. For now, we need to configure TouchOSC with a customized social media interface. The sample interface used in this document can be downloaded at http://new.tk/TC-MIDI-Demofiles and can be loaded into your iPad via the TouchOSC editor. You can then modify it to your needs or, of course, use it as-is.
Start up the TouchOSC editor on the system you installed it to.

7
The TouchOSC Editor window will open. Click on the Open icon in the toolbar to load the layout.
In the dialog box that opens, find the file called ‘TriCaster.touchosc’ and open it. This file is included in the ‘TouchOSC iPad Layout’ folder of the ZIP archive (http://new.tk/TC-MIDI-Demofiles) referred to previously. When the interface is displayed in TouchOSC, press the Sync button on the toolbar.
And Android Too! While the Android OS does not include CoreMIDI to tranceive MIDI over RTP as iOS does, it is possible to make an Android tab-let work using another computer to act as an OSC-to-RTP bridge. To do so, you’ll need a separate PC running rtpMIDI and Bonjour just as you’ve installed on the TriCaster. You will also need to install MIDI Bridge (http://hexler .net/software/touchosc). Config-ure rtpMIDI by adding your com-puter as before but, prior to checking the box beside its name to make it active, set the Live
Routing options (lower right) to TouchOSC Bridge. Then add the TriCaster system from the Direc-tory window as a Participant. In TouchOSC, under Connections select MIDI Bridge and turn it on. Select your bridge computer. Your tablet will communicate with the bridge, and the bridge will now communicate with the Tri-Caster using rtpMIDI.

8
Now open the TouchOSC application on your iPad. Press the icon in the corner of the interface with a dot in it; this will open the TouchOSC menu.
From the TouchOSC menu, press the label under ‘Layout’ to choose a layout.

9
From the list of layouts, press the button marked ‘Add’.
The TouchOSC will now listen on your network for the Editor application; the system running Tou-chOSC Editor will show up after a few moments. If it doesn’t, make sure your iPad and computer running TouchOSC are on the same network.
Once the layout has been loaded, you will see the list of all available layouts. Choose the one la-beled ‘TriCaster’ from the layout list.
10
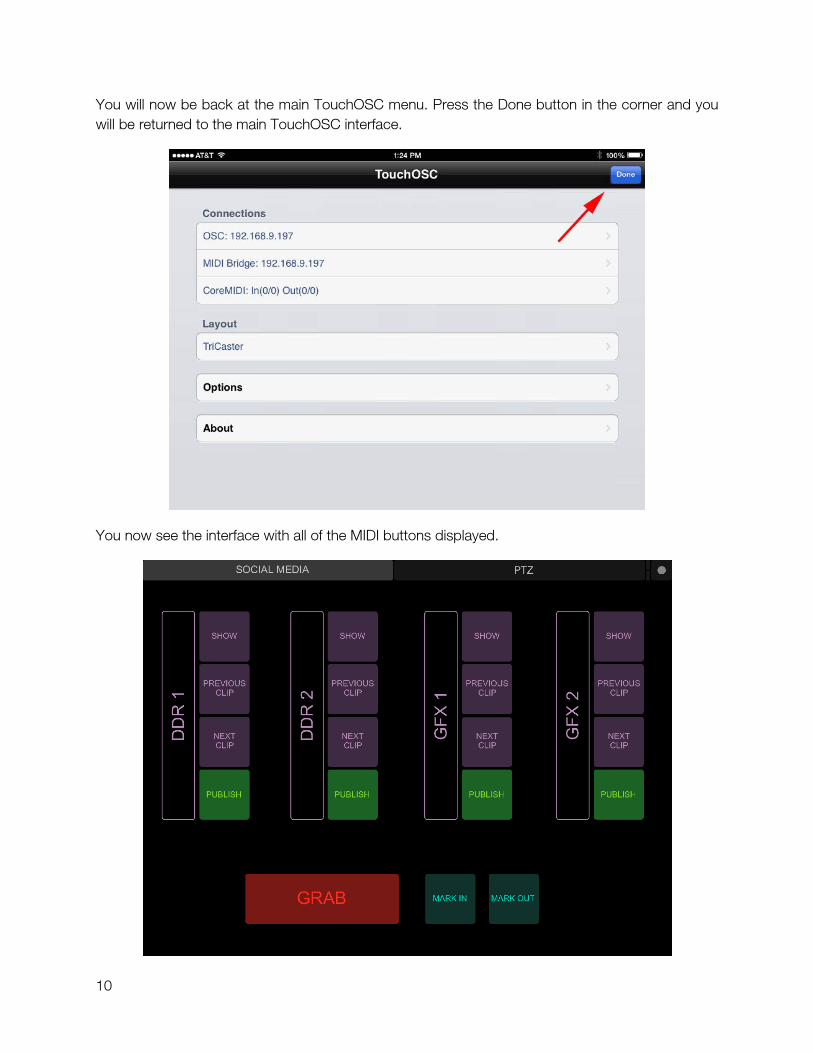
You will now be back at the main TouchOSC menu. Press the Done button in the corner and you will be returned to the main TouchOSC interface.
You now see the interface with all of the MIDI buttons displayed.

11
Connecting MIDI notes to TriCaster macros The last thing we need to do is connect the buttons in the TouchOSC interface to the macro commands in the TriCaster. For this technical demonstration, like a cooking show we have includ-ed two resources: a discussion of how to connect MIDI notes to TriCaster macros via the TriCaster macro window, and also a shortcut in the package you’ve downloaded which will process the macro connections for this specific demo to get all the buttons mapped in a very short time.
Let’s begin with the shortcut to create the macro file you will actually use. The macro file contains TriCaster macros and their MIDI triggers. Oddly, rtpMIDI adds the TriCaster’s hostname to the MIDI command name, so included is a batch process which will add your TriCaster’s hostname to every macro in the file. ChangeHostname.bat is included in the files that have been provided, along with straightforward instructions. To get started please copy the ChangeHostname.bat and the ‘default’ folder to your TriCaster and follow the instructions provided in ‘Macro Processing Instructions.pdf’.
Once you have created the macro file with your rtpMIDI commands, you can import to the TriCaster. Begin by opening the macro window on the TriCaster.
Right click in an empty part of the macro window and select Import. Import the macro file named ‘TouchOSC-Social_Media.xdm’ found where you’ve copied the files to the TriCaster. This file im-port loads all the relevant macros and linked MIDI command triggers for the social media Tou-chOSC panel into your TriCaster. You may begin using the new control immediately; the remainder of this section shows how each macro gets assigned were you to do it yourself. Please review this simple process so you’re familiar with assigning macros to MIDI controls for your own endeavors.
12
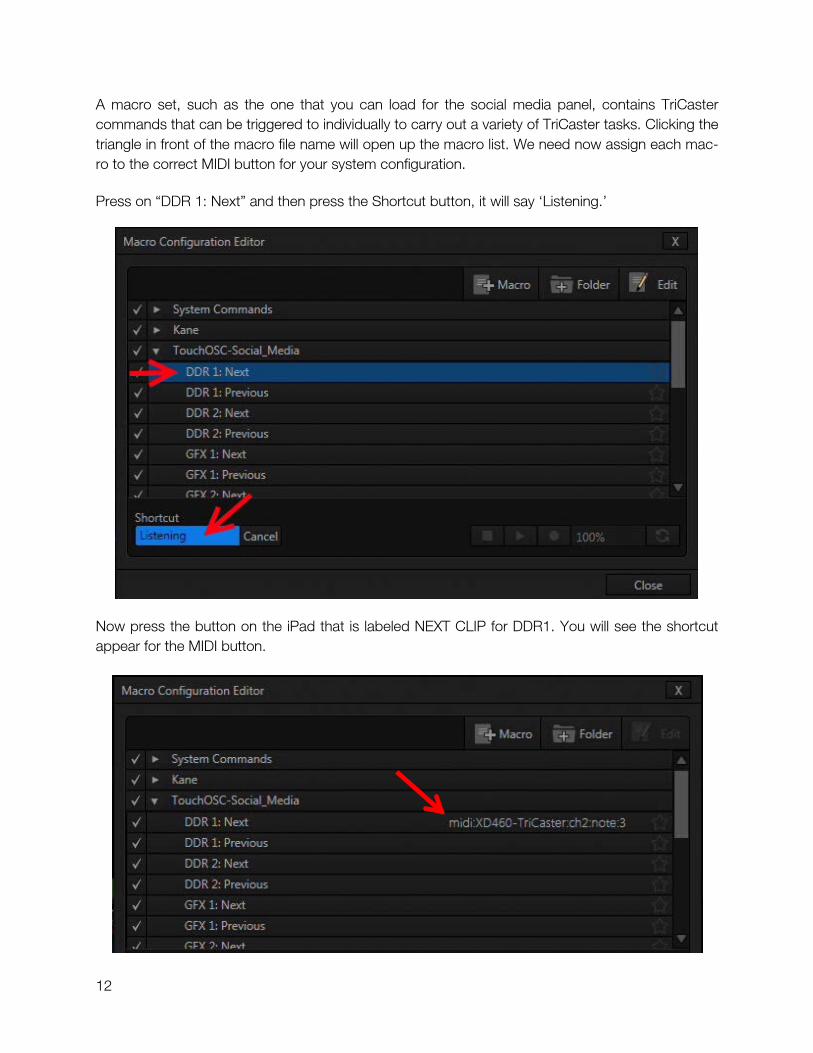
A macro set, such as the one that you can load for the social media panel, contains TriCaster commands that can be triggered to individually to carry out a variety of TriCaster tasks. Clicking the triangle in front of the macro file name will open up the macro list. We need now assign each mac-ro to the correct MIDI button for your system configuration. Press on “DDR 1: Next” and then press the Shortcut button, it will say ‘Listening.’
Now press the button on the iPad that is labeled NEXT CLIP for DDR1. You will see the shortcut appear for the MIDI button.

13
Use these same steps to assign the rest of the macros to the buttons on the iPad interface. Once you have assigned all of the buttons you are finished and ready to start using your new Social Me-dia interface.
Next Steps You may have noticed that a number of additional layouts are included with the TriCaster.touchosc file. While we are not going into detail as to how to utilize these examples, you will find many of these layouts useful and can configure them following exactly the same steps as shown here for social media control. Furthermore these layouts may serve to encourage you to create MIDI con-trols that go beyond what is included in this demo and more exactly meet the needs of your work-flow. With MIDI control for TriCaster, truly there has never been a better way to either expand the control of a show to additional operators, or integrate a TriCaster into an automated live event. We en-courage you to experiment with the iPad control as we’ve outlined here, to simplify the implemen-tation by attaching a physical MIDI device, or to expand the capability by connecting to your exist-ing MIDI-based automation via a hardware interface. We look forward to your success!
Kane Peterson, Will Waters, and Peter Haller, of NewTek Sales and Support Services, were contributors to this whitepaper.