mimarsinan installaware enterprise
TRANSCRIPT

MimarSinan InstallAWARE 3 Professional/Enterprise Printed Documentation
Copyright © 1996-2004 MimarSinan International. All rights reserved.
MimarSinan InstallAWARE 3


i
Table Of Contents
InstallAWARE Help Library .............................................................................................. 1
InstallAWARE is Aware................................................................................................. 1
What's New ..................................................................................................................... 3
Getting Started ................................................................................................................ 5
Working in the IDE..................................................................................................... 5
Developing Setups .................................................................................................... 14
Getting Results.............................................................................................................. 26
Interface Elements .................................................................................................... 26
Setup Logic ............................................................................................................... 32
Performance .............................................................................................................. 36
Reference ...................................................................................................................... 38
Project Options.......................................................................................................... 38
Project Wizard .......................................................................................................... 42
Scripting.................................................................................................................... 49
Dialog Editor............................................................................................................. 98
Support Files ........................................................................................................... 104
Plug-In Development .................................................................................................. 112
Automation ................................................................................................................. 119
Win32 DLL............................................................................................................. 122
Index ............................................................................................................................... 135


1
InstallAWARE Help Library
Welcome to MimarSinan InstallAware. InstallAware is a next-generation tool for creating scriptable, web enabled, Windows Installer based setup programs.
Use this Help system to find conceptual, procedural, and reference information about InstallAware.
The following Web pages offer additional assistance, information, and resources:
MimarSinan Home Page MimarSinan Product Support MimarSinan InstallAware Home Page
Note:
Not all features described in this Help system are available in all editions of the product. If your Internet access is limited by network security, or if your computer is protected by a personal firewall, the Web-based links in this Help system might not function properly.
InstallAWARE is Aware InstallAware is Web Aware
Every member of the MimarSinan InstallAware product family is aware of online distribution. Setups can be built for and executed directly from the web. Of course, support for traditional distribution methods such as CD/DVD media is also provided.
InstallAware's web aware installation technology offers the following compelling distribution advantages:
Only required/chosen features will be downloaded during setup, conserving bandwidth
Broken/interrupted downloads will automatically resume when setup is restarted

Printed Documentation
2
Proxy servers are fully supported - users will be prompted automatically if necessary
InstallAware is Scripting Aware
MimarSinan InstallAware embraces and extends Windows Installer like no other product available today. Using standards compliant Windows Installer technology comes at a cost: loss of scripting, and conditional setup flow. If you have attempted Windows Installer before, you have most likely found yourself concentrating on not what to install, but how to install.
InstallAware's unique technology remains within the bounds of Windows Installer, and brings genuine scripting to this platform:
Your entire setup is a visual script with conditional execution and branching Each installation action in your script is automatically converted into Windows
Installer tables When your script is running, only Windows Installer actually modifies the
target system No matter how complex your installation script is...it always remains fully ICE
compliant, at no extra effort on your part!
InstallAware is Windows Installer Aware
All members of the MimarSinan InstallAware family of products use the latest in installation technology: Windows Installer. Coming direct from Microsoft, Windows Installer has become the standard in software installation and provides a streamlined, robust installation experience. Windows Installer is integrated into each recent version of Windows, and can be added to earlier versions of Windows as well.
InstallAware, at no extra effort on your part, gives you the following:
Absolutely no knowledge of Windows Installer or its complex database is required
Your entire setup is executed by Windows Installer, providing for bullet-proof installations
Using Windows Installer means your application qualifies for testing to receive the Designed for Windows certification
Windows Installer databases created by InstallAware are all ICE compliant, meaning they will pass installer testing during the certification process

InstallAWARE Help Library
3
What's New What's New
InstallAware 3.0 contains the following new features for developing Windows Installer setups.
IDE
The IDE is now implemented in Win32 and the .NET Framework is no longer required.
The new Visual view allows you to visually modify your setups without having to author code. Changes made in the Visual view automatically update your installation script. Changes made to your installation script are automatically reflected back in the Visual view.
IDE Layouts are saved seperately for the Visual and Code views. Changing your view automatically changes your active layout as well.
The Refactor Paths option allows you to update hard-coded paths in your setup scripts, a helpful option when your setup files change location.
Tools and Libraries
The Code Signing Tool is available for signing executables and libraries outside of the IDE build process.
The command line build tool is now implemented in Win32 and no longer requires the .NET Framework.
The automation library is now implemented in Win32 and no longer requires the the .NET Framework.
Plug-Ins
The new Call DLL Function plug-in allows you to call any function inside an arbitrary DLL, without requiring a pre-defined set of function parameters.
Plug-Ins may now display custom text in the code editor. Plug-In templates have been updated to show samples of displaying custom
text in the code editor.
Setup Engine
Setups containing Web Media Blocks now run up to 50% faster.

Printed Documentation
4
If Web Media Blocks are found inside the same folder as the main setup executable, the installation engine now attempts to use the found blocks directly from that location, instead of downloading them from the Web. If this attempt fails, the installation engine will fall back to downloading from the web.
Setup User Interface
Two new setup themes are available. You may now customize the icon which is used in the main setup executable.
The same icon also updates the Add-Remove Programs applet and is visible during installer self extraction.
A new Flash control is available for use in installation dialogs. An ideal usage scenario would be to provide interactive Flash billboards during installation progress.
A Select Destination Directory window may now be spawned from button controls. This mechanism provides an alternative to displaying a tree view in the destination folder step of install wizards.
Multiple state changes for dialogs are now allowed in the installation wizard.
New Scripting Commands
The Create File Type command allows you to define a file type and the extensions belonging to that type, to become associated with your application.
The Get Environment command retrieves the value of an environment variable.
The Get File Version command retrieves the version string of a file suitable for display and debugging.
The Get Temporary File command obtains a temporary file name. The Install Assembly command installs a .NET assembly, either into the
Global Assembly Cache, or a custom folder. The Parse String command enables you to parse a string based on a pattern. The Set Environment command sets the value of an environment variable. The Register Library command registers or unregisters a library
(DLL/OCX/EXE/TLB).
Upgrading from InstallAware 2.x
Upgrading setups created in InstallAware 2.x to InstallAware 3.0 is automatic. Simply open your project in the new IDE as before and continue working normally.

InstallAWARE Help Library
5
However, the considerations below apply while working with 2.x projects:
If you plan on using 3.0 projects back in 2.x, you should not use any new plug-ins and/or installation commands, as these will not be available in the older versions and your scripts will fail to load.
Do not attempt to auto-upgrade setups created in version 2.x using a setup created in version 3.0. Simply change the Product Code used in your setups to assure that 3.0 setups will not attempt to auto-upgrade 2.x setups.
Getting Started Working in the IDE
Loading and Saving Projects
Starting a New Project
When you open InstallAware for the first time, the New Project dialog will be automatically displayed. At any other time when you wish to start a new project:
Click the New icon on the toolbar. Choose File New Other.
New Project Dialog
The New Project dialog helps you choose from various types of setup projects when you are starting a new project.
Project Wizard
The Project Wizard will guide you step by step through the creation of a new setup project. When you are finished with the wizard, you will have created a fully functional installation script. You may then further customize that script in the script editor.
Because it is entirely visual, and generates setups that will work out-of-the-box, the Project Wizard is generally recommended for starting new installations.
Project Templates

Printed Documentation
6
Project templates are essentially pre-built setups that you can customize as necessary. They will need to be modified in the script editor before they can be used to deploy your products.
Plug-Ins
Plug-ins are extensions to the IDE and the setups you generate. Several plug-in projects are available which can be used in your favorite programming environment as starting points for creating InstallAware plug-ins.
Opening a Project
There are several ways to open an existing project with InstallAware.
Opening from Windows Explorer
Double-click the project file (with .MPR extension) to open it with InstallAware.
Opening from the IDE
Click the Open icon on the toolbar, or choose File Open Project, or press CTRL+O and browse to the project that you wish to open.
Choose File Reopen to quickly open a previously saved project.
Saving and Moving a Project
You will want to save the project you are working on, or perhaps to move it to a different location. InstallAware projects are comprised of the project file (.MPR extension), script file (.MIA extension), dialog resources, and other support items. The best way to save and move projects is through the IDE itself.
Saving a Project
To save a project that is open in the IDE:
Click the Save icon on the toolbar. Choose File Save Project, or press CTRL+S.
Moving a Project

InstallAWARE Help Library
7
To move a project, first open it in the IDE. Then:
Choose File Save Project As. All elements of your project will be saved and moved to a new folder.
Note:
If you had previously changed your default script file location (.MIA extension), your script file will not be moved automatically.
Importing from Express
InstallAware Express projects have a .MPRX extension and cannot be directly opened in InstallAware. You may however import an existing project you created in the Express edition of InstallAware. To import an Express project, follow these steps:
Open the project in Express. Build the project. Building an Express project generates an InstallAware
project automatically. Navigate to the build folder, locate the generated Enterprise file (.MPR
extension), and open it.
Using the Project Manager
Displaying the Project Manager
The Project Manager window gives you a graphical outlook on the script, dialogs, and files you have included in your project. To display this window:
Choose View Project Manager. Press CTRL+ALT+P.
Modifying the Script File
Each InstallAware project references a script file, with a .MIA extension. You may change the script file, or where it is located, without altering the remainder of your

Printed Documentation
8
project. By default, the script file carries the same name as the project file, and is located in the same project folder.
Warning:
After you modify the default script file, if you later decide to move the project, the script file will not be automatically moved to the new project location.
To Change the Script File Location
Display the Project Manager. Select the Script node in the tree view. Right-click on the script file. Choose Save Script File As, and browse to the new location where you wish
to save the script file.
To Modify the Referenced Script File
Display the Project Manager. Select the Script node in the tree view. Right-click on the script file. Choose Change Script File, and browse to the new script file you would like to
use.
Modifying Project Dialogs
Each project contains references to the dialogs that are a part of its user interface. You may edit, add, and remove existing dialogs.
To Add New Dialogs
Display the Project Manager. Select the Dialogs node in the tree view. Right-click and choose Add Dialogs to Project, or press INSERT. If you wish to add an entire themed collection of dialogs, check Add a Pre-
Built, Themed Collection of Dialogs, and select the theme from the drop down menu. If you wish to add a single dialog instead, check Choose Dialogs to Add by File Name, and browse to the dialog file.
All selected dialogs will be copied to the project folder, and will be added to your project as references.
Warning:

InstallAWARE Help Library
9
If you add a dialog that already exists in your project folder, the new dialog will overwrite the old one.
To Edit Dialogs
Display the Project Manager. Select the Dialogs node in the tree view. Double-click the dialog you wish to edit, or select it and press ENTER. The
dialog will open in the Dialog Editor. Modify your dialog as necessary and remember to save your changes.
To Remove Dialogs
Display the Project Manager. Select the Dialogs node in the tree view Highlight each dialog you would like to remove. You may select multiple
dialogs. Right-click your selection and choose Remove Dialogs from Project, or press
DELETE.
Modifying Support Files
Each installation project contains support files that are used as resources during your setup. For instance, your license agreement file is a support file. Support files are compressed into the main setup executable during builds and are available while the installation is running at the folder referenced by the SUPPORTDIR variable.
To Add Support Files
Adding files such as setup splash screens, license agreements, readme files, is necessary for most setups:
Display the Project Manager. Select the Support Files node in the tree view. Right-click and choose Add Files to Project, or press INSERT. Browse to the
files you wish to add. You may select multiple files.
Remember that you may include any file as a support file, and access it while the installation is running using the SUPPORTDIR variable.
To Remove Support Files

Printed Documentation
10
You may wish to eliminate support files that you no longer use:
Display the Project Manager. Select the Support Files node in the tree view. Highlight each support file you would like to remove. You may select multiple
files. Right-click your selection and choose Remove Files from Project, or press
DELETE.
Modifying Merge Modules
Your installation projects may contain one or more Windows Installer Merge Modules. Merge Modules are available as .MSM files and are fully self-contained pieces of setup logic and data, used in extending Windows Installer installations. The most typical usage of a Merge Module is to add support for installing a particular application runtime to your setup solution.
Once you add a Merge Module to your setup, the runtime it contains will be properly installed, with no further steps or configuration required. You may add as many Merge Modules as required to your project simultaneously.
To Add Merge Modules
Follow the steps below to add a new Merge Module to your setup:
Display the Project Manager. Select the Merge Modules node in the tree view. Right-click and choose Add Merge Modules to Project, or press INSERT.
Browse to the Merge Modules you wish to add. You may select multiple Merge Modules.
To Remove Merge Modules
You may wish to eliminate Merge Modules that you no longer need:
Display the Project Manager. Select the Merge Modules node in the tree view. Highlight each Merge Module you would like to remove. You may select
multiple files. Right-click your selection and choose Remove Merge Modules from Project,
or press DELETE.

InstallAWARE Help Library
11
Editing Scripts
Using the Script Editor
The script editor is where you create the heart of your installation. The setup script drives the entire installation, determines your setup logic, and modifies the target system. You will frequently work in the script editor while authoring your installation. The script editor is entirely visual, and has a pseudo-code appearance.
Writing your Setup Script
When working in the script editor, you will add commands that perform setup actions, edit existing commands and fine tune their behavior, and of course remove commands which you wish to eliminate.
Adding Commands
The list of available commands is displayed to the left of the installation script. To add a command:
Double-click the command you wish to add, or select it and press ENTER. The command will be added on top of the script item selected in the installation script.
Drag and drop the command from the command list to the installation script. The command will be added on top of the script item you release the mouse button on.
Editing Commands
Using the mouse or the arrow keys, navigate in your script to the command you wish to edit.
Double-click the command, or press ENTER. If the command has options you can edit, a dialog box will appear allowing
you to make your changes.
Removing Commands
Using the mouse or the keyboard, highlight the lines you wish to remove. Press DELETE.
Script Editing Features

Printed Documentation
12
The script editor has several convenient features you may use while working with your setup code.
Clipboard Functions
Using the mouse or keyboard, highlight the code to cut or copy. Or, select the code you wish to paste above.
Right-click the code, and choose Cut, Copy, or Paste. You may also use the shortcuts CTRL+X, CTRL+C, CTRL+V.
Moving Code Up or Down
Using the mouse or keyboard, highlight the code to move. Right-click the code, and choose Move Up or Move Down.
Commenting Code
Using the mouse or keyboard, highlight the code to comment out (or comment in, if it is already commented out).
Right-click the code, and choose Comment Out/In.
Searching for Text
Choose Edit Find. Type the text to search for. Click the Find Next button. The next script line containing your text will be
highlighted.
Note:
The search tool searches across only the visible pseudo-code portion of your script.
Customizing Script Appearance
You may change the way your script looks in the script editor. Choose Tools Options to display the IDE Options window, and then:
Select the Font tab to change the script font and size. Select the Color tab to change the way script commands are syntax
highlighted.

InstallAWARE Help Library
13
IDE Tools
The InstallAware IDE is complemented by tools and plug-ins which work hand-in-hand with it. Note that the installation of these tools is optional, and they will not work unless they have been installed. If you realize you failed to install a necessary tool, simply re-run the InstallAware setup and Modify your existing installation to add the required tools.
The Database Validator
To start the Database Validator, choose Tools Validate Database. Use the validator to make sure your setup script compiles into a valid MSI database, capable of receiving the Designed for Windows logo certification.
The Dialog Editor
To start the Dialog Editor, choose Tools Start Dialog Editor, or press F12. Use the editor to customize dialogs that are part of your user interface.
The Translator
To start the Translator, choose Tools Start Translator. Use the translator to localize your setups into different languages.
Code Signing
To start Code Signing, choose Tools Code Sign. Use the code sign tool to manually signcode your executables and libraries using authenticode technology.
Plug-Ins
Plug-ins enhance both the IDE and the setups you create. To see a list of available plug-ins, choose Tools Plug-Ins, or press F11. You may add new plug-ins by installing them, or uninstall existing ones to remove them. Each available plug-in will be shown on the Commands list and you may use it like any other command while editing your setup script.
IDE Layouts
The InstallAware IDE is configurable with docking tool windows. IDE layouts provide a quick way to save your docking configuration. Moreover, they let you quickly change configuration, which makes them very practical to use. For instance, you may use to a particular layout while coding your setup, and switch to another while debugging.
Choosing a Layout

Printed Documentation
14
The list of available layouts is shown on the toolbar. Simply click the drop-down button and select the layout you wish to activate.
Saving a Layout
If you have customized your IDE and wish to save your changes, you may store them in a new (or existing) IDE layout:
Click the Save Layout icon on the toolbar. Choose View Layouts Save Current Layout.
Deleting a Layout
To remove layouts you do not use anymore:
Choose View Layouts Delete.
Developing Setups
Authoring
Authoring Process
The process of developing a setup can be summarized in the steps below.
Determine Requirements Design Setup Logic Define User Interface Create Baseline Project Code Installation Logic Install Application Data Build and Test Deploy
Determine Requirements
Before starting work on your installation, lay some conceptual groundwork. This will save you time later, as missed requirements can result in hard to reproduce bugs. Requirements that must be determined include:

InstallAWARE Help Library
15
Minimum computer hardware requirements (display resolution, color depth, physical memory)
Minimum computer software requirements (operating system version, Internet Explorer version, any required third party software)
Redistributable DLLs (programming language support libraries) Component updates (programming language runtimes) Database platforms (data access components)
InstallAware provides easy ways to check for hardware/software requirements, and install required component updates where necessary. Leverage the power of MimarSinan InstallAware, checking for and enforcing your system requirements.
Design Setup Logic
Your setup logic is essentially the "what happens when" of your installation program. Careful planning and foresight will ensure your setups install right the first time.
Make a list of possible installation scenarios, including:
Fresh installs Upgrades Cross-grades
Define the user experience with your installation - what information will you be asking the user for a successful setup? Some examples:
Licensing checks Application features Any custom information
Focus on technical aspects of your setup:
Differences between 9X and NT based installs Application feature interdependencies Shared third party components
Define User Interface

Printed Documentation
16
Based on the target audience of your product, carefully pick a user interface. InstallAware ships with ten pre-built setup themes that range from conservative to fashionable, providing you with a good starting point in designing your user interface (to sample the themes, choose Tools Dialog Sampler in the IDE, and pick the theme to try).
InstallAware's Dialog Editor helps you further customize your setup theme and add/remove elements to/from your dialogs. If you need to obtain information from end-users which are specific to your particular product, simply add additional controls to your existing dialogs, or even create new dialogs, extracting the required information. InstallAware makes it very easy to add custom elements to setup dialogs, and access that information from the setup script.
Create Baseline Project
Once you have laid the conceptual groundwork for your installation, you can actually begin coding your setup. While there are many ways to start coding, including starting from a completely blank project, the quickest route would be to use the Project Wizard. The wizard will visually guide you through each major step of creating a setup program and delivers a fully working project script for you. You may then immediately deploy this setup, or customize the script further as suits your needs.
Code Installation Logic
Thanks to the unique scripting technology that MimarSinan InstallAware makes available on the Windows Installer platform, you are free to use as many conditional statements and branched executions in your setup as you want. Utilize the power of genuine scripting for Windows Installer, and enjoy complete freedom in your installation. Check for different circumstances and act upon them as necessary. Below are some ideas to get you started:
Import data from previous application versions Define and let the user choose from application features Act differently on varying target system configurations Import/export data from/to the registry and configuration files Check local file versions Read/write from/to text files

InstallAWARE Help Library
17
Install Application Data
When you have successfully interviewed the user and got the necessary responses from your setup dialogs, you are ready to begin modifying the target system. InstallAware's unique scripting engine makes it possible to execute each action that changes target system state through Windows Installer. No custom actions or any third party technologies are involved. Each of your installation commands will execute directly through Windows Installer.
A short selection of available installation commands, all executing natively through Windows Installer:
Install files Copy/move local files Edit registry Edit INI files Create shortcuts Install and/or remove other Windows Installer setups
Build and Test
After you have completed coding your setup, it is time to build your setup. Building a setup converts your installation script, along with all requisite files, to a fully working installation that you can distribute to your end users. Of course, it is necessary to test your installation under all anticipated execution environments before moving ahead to the deployment phase.
Deploy
After you have coded, built, and tested your setup to your satisfaction - it is time for deployment. In a nutshell, deploying your setup is making it available to your end-users. This can mean a lot of different things - publishing your product on a web page and pressing it on a CD to name the two most common options.
Building
Compiling

Printed Documentation
18
To compile your project:
Choose Project Compile, or press CTRL+F9.
Compiling a project does the following:
Check your script for correct syntax and valid variable references. Update your Windows Installer database file.
Compiling a project is automatically performed when you do a build or a batch build.
While to deploy a project you need to rebuild it, compiling can help save you time in between multiple debugging runs. You do not need to rebuild your project if you have only changed your setup script (and not any of the installed files) since your last build.
Building
To build your project:
Choose Project Build, or press sHIFT+F9.
Building a project does the following:
Compile your project. Pull all referenced files and folders. Generate your selected deployment layout.
You will need to rebuild your project before deploying it. After a build, your setup is ready for testing and deployment. You also need to rebuild your project while debugging if any of the files referenced in your installation have changed.
Building can take a lot of time, especially if you are using a compressed or web deployment type. Consider setting the uncompressed deployment type to accelerate your builds while developing your setup. In some instances a compile may also be used in place of a build.
Batch Building
To batch build your project:

InstallAWARE Help Library
19
Choose Project Batch Build, or click the Build Multiple Releases icon on the toolbar.
A batch build is essentially the same as a regular build. However, the product code does not change in between batch builds (even if it is enabled in your settings), and you may build more than one deployment type at a single pass. Batch builds are especially useful when you have finished development, and wish to update your installation with the latest application files and/or are building for multiple deployment types.
Build Settings
Build settings control how your setups are built. These settings allow for changing the deployment type (uncompressed, compressed, web), among other things. To access your build settings, choose Project Options or press SHIFT+CTRL+F11.
Authenticode Node
This page lets you digitally sign your packages with authenticode. Provide the paths to your certificate and key files to enable code signing. The default value for the time stamp URL is http://timestamp.verisign.com/scripts/timstamp.dll.
Build Node
This page lets you configure your deployment type. The various kinds of deployment types, along with their uses, are explained below. Pick the one that is most suitable for your target audience. If you will be debugging your setup inside the IDE, also ensure the Debug Build checkbox on this page is checked.
Uncompressed Directory Layout
Your setup is contained in multiple files spanning several layers of multiple nested folders. Each file is uncompressed and immediately available, minimizing installation time, since files will not be uncompressed from an archive or downloaded before installation.
This type of deployment is ideal for CD/DVD media where disk space is not a concern and multiple files/folders can be stored. It also works well on network drives.
Compressed Single Self-Installing EXE
Your setup is contained inside a single self extracting file. This file, when run, will first extract its contents to a temporary folder, and then start the main setup program. In essence, when executed, the compressed layout converts into the uncompressed layout.

Printed Documentation
20
This type of deployment is suitable for Internet distribution, since the entire setup is contained inside a single file.
Compressed Web-Based EXE
Your setup is comprised of a self extracting file, which similarly to the compressed layout, extracts its contents and starts the main setup; as well as web media blocks, which are defined in your setup script and are downloaded as required from the web.
This type of deployment is ideal for Internet distribution. Setup will download only the web media blocks which are required on the target system. This saves download times and bandwidth since users will not waste either downloading portions of your application and/or its runtimes which they do not need.
Compression Node
This page lets you configure the strength of the compression employed while creating your setups. By default, the optimal settings for your system will be selected. To customize your compression parameters:
Click Create New to create a new compression profile, if you have not previously done so.
The profile editor opens with your new compression profile. The compression profile contains several settings that may be configured. Edit your compression profile.
Click OK in the profile editor to save your changes, and highlight the new profile in the compression node to activate your new settings.
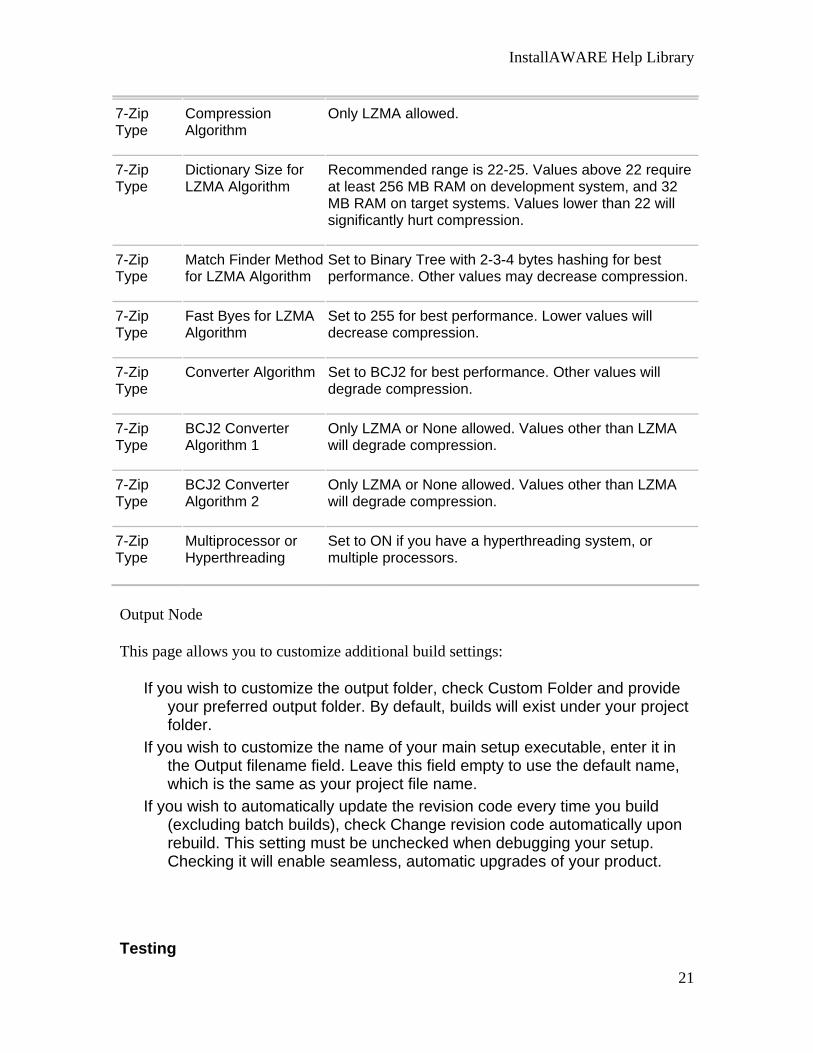
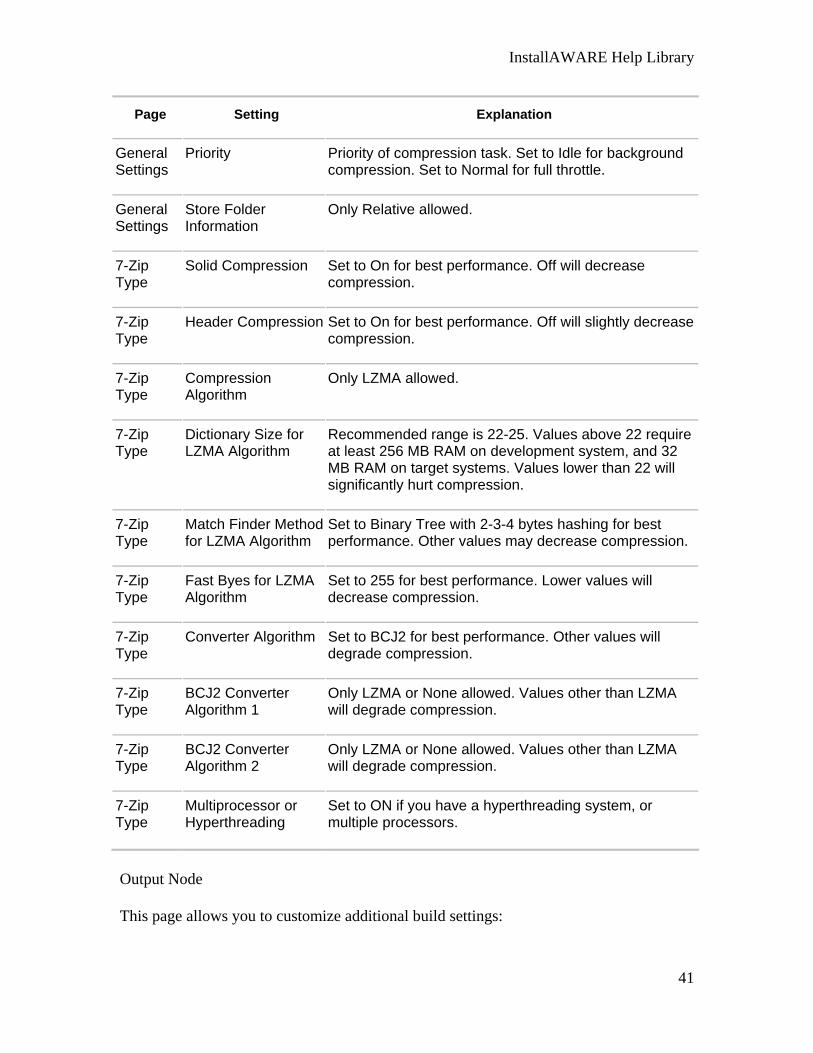
The table below briefly describes relevant settings in the profile editor.
Page Setting Explanation
General Settings
Priority Priority of compression task. Set to Idle for background compression. Set to Normal for full throttle.
General Settings
Store Folder Information
Only Relative allowed.
7-Zip Type
Solid Compression Set to On for best performance. Off will decrease compression.
7-Zip Type
Header Compression Set to On for best performance. Off will slightly decrease compression.
InstallAWARE Help Library
21
7-Zip Type
Compression Algorithm
Only LZMA allowed.
7-Zip Type
Dictionary Size for LZMA Algorithm
Recommended range is 22-25. Values above 22 require at least 256 MB RAM on development system, and 32 MB RAM on target systems. Values lower than 22 will significantly hurt compression.
7-Zip Type
Match Finder Method for LZMA Algorithm
Set to Binary Tree with 2-3-4 bytes hashing for best performance. Other values may decrease compression.
7-Zip Type
Fast Byes for LZMA Algorithm
Set to 255 for best performance. Lower values will decrease compression.
7-Zip Type
Converter Algorithm Set to BCJ2 for best performance. Other values will degrade compression.
7-Zip Type
BCJ2 Converter Algorithm 1
Only LZMA or None allowed. Values other than LZMA will degrade compression.
7-Zip Type
BCJ2 Converter Algorithm 2
Only LZMA or None allowed. Values other than LZMA will degrade compression.
7-Zip Type
Multiprocessor or Hyperthreading
Set to ON if you have a hyperthreading system, or multiple processors.
Output Node
This page allows you to customize additional build settings:
If you wish to customize the output folder, check Custom Folder and provide your preferred output folder. By default, builds will exist under your project folder.
If you wish to customize the name of your main setup executable, enter it in the Output filename field. Leave this field empty to use the default name, which is the same as your project file name.
If you wish to automatically update the revision code every time you build (excluding batch builds), check Change revision code automatically upon rebuild. This setting must be unchecked when debugging your setup. Checking it will enable seamless, automatic upgrades of your product.
Testing
Printed Documentation
22
Running Inside the IDE
While the most straightforward way to test your setups will be to execute them from the build output location, you may find it convenient, and at certain times necessary, to run the setup in the IDE, so as to be able to debug your setups. You may execute any setup inside the IDE, however the following special considerations do apply:
In the Project Options dialog, on the Build node, make sure the Debug Build checkbox is checked. You may choose any deployment type as long as this checkbox is checked.
In the Project Options dialog, on the Output node, make sure the Change product code automatically upon rebuild checkbox is unchecked.
Build your project at least once before beginning debugging. Remember to rebuild whenever you change your installation files and/or build mode. Rebuilding is not necessary when you change the installation script.
The SUPPORTDIR variable, and other variables which refer to the location of the running setup program, will refer to your project folder.
The EXEFILE variable, and other variables which refer to the running setup program, will refer to the InstallAware IDE executable file itself.
Debugging
The InstallAware IDE includes integrated debugging capabilities. As long as you have prepared to run your setup inside the IDE, you may make free use of any of the powerful debugging tools described below.
Running in the Debugger
Set breakpoints as necessary. Breakpoints alert you when a certain line in your script has been reached and pause program execution. Highlight each line you wish to set a breakpoint on, and choose Run Set Breakpoint, or press F5.
To execute your setup and stop only at your breakpoints, choose Run Run, or press F9.
To execute your setup line by line, stopping at each line, choose Run Step, or press F8.
To terminate the execution of your current program, choose Run Reset, or press CTRL+F2. Be sure to close any currently active dialogs shown by your setup before terminating.
Using Variable Watches

InstallAWARE Help Library
23
Variable watches help you monitor the state of each of the variables used in your setup. You can therefore find out if your expected setup logic is working correctly. Moreover, you can change the values of variables while setup is running.
Displaying the Watches Window
You must first open the Watches Window which displays the variable names and their values.
Choose View Watches, or press CTRL+ALT+W.
Adding a Watch
Choose Run Add Watch, or press CTRL+f5. Type in the name of the variable you wish to watch.
Changing a Variable Value
Single-click on the Value column entry corresponding to the variable name displayed under the Variable column that you wish to override. Type in the new value.
Removing a Watch
Highlight the watch to remove. Press DELETE.
Logged Execution
Some bugs you encounter in your testing may be very difficult to reproduce, and occur only on systems which you do not have debugging access to. Under these circumstances, you can always try logged execution, in addition to the age-old method of displaying message boxes on the screen. Logged execution will create a log file and record both the internal state of the installation (along with all variable values) and the native Windows Installer log inside a plain text file. To execute a logged setup, use the following command line:
<setup.exe> /l=<path to logfile>
If your logfile path contains spaces, be sure to enclose them in double quotes.

Printed Documentation
24
Compatibility Testing
Because of the wide variety of Windows platforms available today, it is vital that you perform compatibility setting on your setups. Below is a list of all available Windows versions, excluding an even greater number of service packs available for each version:
Windows 95 Gold Windows 95 B (OSR2) Windows 95 C (OSR2.1) Windows 98 Windows 98 Second Edition Windows ME Windows NT 4 Windows NT 4 Terminal Server Windows 2000 Windows XP Windows 2003
At last count, this leaves us with eleven Windows versions, falling under the general 9X and NT families. Rest assured that each Windows version will behave differently in some subtle way, but noticeable enough just to impact your application.
MimarSinan InstallAware features a wide array of runtime components which you may install on the target system if they are not found. This helps cushion the impact that different Windows versions may have on your application. Never assume other Windows computers have all the patches, runtime components, and updates your development system is running on. And, powered by the web deployment feature, InstallAware helps assure users that already have the updates will not waste a single byte or second downloading them again.
MimarSinan International strongly recommends you include all target editions of Windows in your testing plans.
Deployment
After a project has been built and tested, it is ready for deployment. The output folder of your build, the location where you can find the files to deploy, varies by the build type.
Uncompressed Builds: <BUILD Folder>\release\uncompressed Compressed Builds: <BUILD Folder>\release\single Web Builds: <BUILD Folder>\release\web

InstallAWARE Help Library
25
The particular steps for deployment varies by build type as well.
Deploying Uncompressed Builds
An uncompressed build requires the entire build folder to be deployed. You may deploy onto any medium that is capable of replicating the exact directory structures generated by the build. This includes network drives, hard disks, and removable media (such as CDs and DVDs, which the uncompressed build mode is most suitable for).
Please note that the uncompressed layout, while storing your application files in a readily accessible state, does not permit you to randomly replace those files. Because of the nature of Windows Installer and the way it handles resiliency, if you wish to update any of the files in the installation package, you will have to rebuild the installation. Simply copying the updated file to the proper location in the build folders may cause your installation to fail.
An uncompressed build may be launched by running either the .EXE file or the .MSI file that carries the project name in the build output folder.
Deploying Compressed Builds
To deploy a compressed build, simply copy the single .EXE file that is located in the build output folder. Compressed builds provide the most flexibility in choosing your target media, since they will work with practically all media types (they neither require a directory structure to be preserved, nor Internet connectivity).
A compressed build may be launched by running the single .EXE file.
Deploying Web Builds
A web build has two steps of deployment. The first step is to place the .EXE file found in the root directory of your build folder on your desired target medium. This can be practically any location. This .EXE file is your main installation file.
The next step is publishing your web media blocks on the web. The media blocks each end with a .7zip file extension. The file names will correspond exactly to the web media blocks they contain. For instance, a web media block named mainapp will be contained inside the file mainapp.7zip. Each of these media blocks must be available for HTTP download on the precise URL as specified in the web media block script item. Continuing the above example, if the mainapp media block has the Download URL field set to http://www.mycompany.com/first_component.dat, then the file mainapp.7zip must be renamed first_component.dat and published to the root of the http://www.mycompany.com web server.
Deploying Web Builds Offline

Printed Documentation
26
A new feature in InstallAware 3.0 is the ability to deploy your entire web builds offline. If the main setup executable can locate some or all of the web media blocks it requires directly in the same folder as itself, it will first attempt to use these local copies of the web media blocks, instead of downloading them. If this attempt fails, or for web media blocks which cannot be found locally, setup will download from the web.
This option is primarily intended for use in quick deployment and testing scenarios. If you do not intend to download web media blocks during installation, Compressed or Uncompressed builds will always deliver better performance.
Getting Results Interface Elements
Change Setup Icon
You may customize the default setup icon that is used in several places throughout your setup:
Setup self extraction progress window Setup self extractor program Main setup program Setup dialogs system menu Taskbar program button Add-Remove Programs applet
To customize the setup icon
In the Project Options dialog (SHIFT+CTRL+F11), select the Add-Remove node beneath the Project node.
Click the Load Icon button and choose your custom icon.
To revert to the default icon
Remove the file icon.ico from your list of support files.
Change Your Setup Theme

InstallAWARE Help Library
27
If after creating your project you decide you wish to use another setup theme, change it using the following procedure:
Display the Project Manager . Select the Dialogs node in the tree view. Right-click and choose Add Dialogs to Project. Check Add a Pre-Built, Themed Collection of Dialogs, and select the new
theme from the drop down list.
Warning:
If you had customized any of the existing dialogs in your old theme, you will lose all those changes when the old dialogs are overwritten with the new ones from your changed theme.
Creating New Setup Themes
You may wish to customize existing setup dialogs to include your own corporate elements, and make them available for re-use in all your installation projects. The most efficient way of doing this would be by creating your own setup theme.
To create your own setup theme :
Navigate to the InstallAware installation folder using your favorite file manager. Then navigate inside the Dialogs directory.
Duplicate the folder containing the theme closest to the new theme you wish to create. For instance, if you wish to base your new theme on the Classic theme, make a copy of the Classic folder and give it a unique name, such as MyTheme.
Start the Dialog Editor. Using the editor, open each dialog stored in the MyTheme folder, and
customize all elements as necessary: Be sure to preserve existing intra-dialog relations. Also preserve pre-defined dialog behavior.
After you have customized all dialogs, use your new theme as you would any other pre-defined theme.
Feel free to send us any interesting themes you have created. We will include them for download in our online theme gallery for everyone to download and use.
Warning:

Printed Documentation
28
Be sure to store a copy of your theme folder somewhere safe, so you can use it on other computers with InstallAware, or when you need to reinstall InstallAware on your own computer.
Customizing Dialog Bitmaps
If you wish to customize the standard elements of any setup dialog, including the bitmaps shown, simply edit your dialogs in the Dialog Editor and update the desired elements.
Display the Project Manager. Double-click the dialog to edit, or select it and press enter.
Remember to save your changes before exiting the Dialog Editor. If you attempt to edit a new dialog while the old one is still showing, the editor will discard changes made to the old dialog (unless, of course, you had previously saved it).
Displaying a Splash Screen
To display a splash screen while the installation is initializing, simply create a .BMP file and add it to the setup. All bitmap types at all color resolutions are supported; however you may want to keep to 256 colors on your bitmap in consideration of older systems with graphics cards that cannot display higher resolutions.
Name the bitmap file setup.bmp. Display the Project Manager. Add the bitmap to the project as support files.
If you later need to remove or update the splash screen, simply modify its file as a regular support file. The Project Manager will maintain a reference to your bitmap file in your project and the bitmap file will be placed in your project folder.
License and ReadMe Files
To display license and readme files in your setup dialogs, you need to add the files to your setup project. Rich text and plain text files may be used for displaying licensing and readme information.

InstallAWARE Help Library
29
Name the license agreement file license.rtf or license.txt. Name the readme file readme.rtf or readme.txt. Display the Project Manager. Add the files to the project as support files.
If you later need to remove or update these files, simply modify them as regular support files. The Project Manager will maintain a reference to these files in your project and the files will be accessible in your project folder.
Using Interactive Progress Flash
You may use interactive Flash movies as part of your installation dialogs, and in particular inside a progress dialog, to educate and entertain your users while your product is installing. Flash movies provide an unprecedented rich medium for use as installation billboards, with no limits on your creativity.
Adding a Flash Control to a Dialog
In order to display interactive Flash movies in your dialogs, you first need to add a Flash control to your dialogs.
Open the dialog in the Dialog Editor. Choose the Browser tab on the component palette. Select and add the FlashFrame control to your dialog. Double-click the new control to bring up the Define Interactive Characteristics
window. Choose the Object Behavior tab, and under the Receives Information drop-
down, select Installation Billboards.
Adding a Flash Movie to a Setup
After adding the Flash control to your setup dialogs, you will want to add the movie itself.
Set the file name of the Flash movie to add as movie.swf. Display the Project Manager. Add the SWF file as a support file.
If you later need to remove or update your movie, simply modify it as a regular support file. The Project Manager will maintain a reference to this file in your project and the file itself will be accessible in your project folder.
Printed Documentation
30
Flash Runtime Deployment
To display Flash movies, the player runtime needs to be present on the end-user system. The moment a dialog containing the FlashFrame control is shown, InstallAware will automatically attempt to install the player runtime if it is not already available. If the installation fails, the dialog will not render the movie, but no setup error will occur - your installation will continue normally.
The runtime file that is used in this automated installation process is automatically added to your project as a support file under the name flash.ocx. This addition occurs moment you add a movie to your setup. You may replace the default runtime file with a newer/older version of the runtime. To do so, simply add the desired version of the runtime file as a support file under the name flash.ocx to your project. You may also delete the runtime file from the list of support files, however in this case if the end-user system lacks the runtime, none of your movies will render (although the setup itself will not be affected).
Using Interactive Progress HTML
If you were impressed by the interactive HTML content available on the InstallAware progress dialog, you will be pleased to know that you may include the same feature in your own setups. You just need to create your HTML content and the files to your project.
Name the entry point for your progress HTML index.htm. Create any additional HTML files. The files may reference one another, and
include links to graphics. Make sure none of the links on any of the pages has path specifiers -
everything should work in a flat directory structure. Display the Project Manager. Add all the HTML files and required support files (such as .GIF and .JPEG
files) to the project as support files.
If you later need to remove or update these files, simply modify them as regular support files. The Project Manager will maintain a reference to these files in your project and the files will be accessible in your project folder.
The native HTML viewer on the progress dialog does not require any runtime controls (such as the Internet Explorer control), offering maximum freedom and compatibility with all existing Windows versions. The viewer is also capable of parsing most HTML tags, supports page backgrounds, animated GIFs, page refreshes, external links to websites, and more.

InstallAWARE Help Library
31
Using Static Progress Billboards
While interactive HTML content is available on the InstallAware progress dialog, you may choose to take a more traditional route and instead display static billboards.
Author an HTML file for each billboard to display: Name the first file index.htm, Add a META REFRESH tag to each HTML file, pointing it to the next
file, Display a billboard graphic (and other relevant information) in each
HTML file. Make sure none of the links on any of the pages has path specifiers -
everything should work in a flat directory structure. Display the Project Manager. Add all the HTML files and required support files (such as .GIF and .JPEG
files) to the project as support files.
If you later need to remove or update these files, simply modify them as regular support files. The Project Manager will maintain a reference to these files in your project and the files will be accessible in your project folder.
The native HTML viewer on the progress dialog does not require any runtime controls (such as the Internet Explorer control), offering maximum freedom and compatibility with all existing Windows versions. The viewer is also capable of parsing most HTML tags, supports page backgrounds, animated GIFs, page refreshes, external links to websites, and more.
Testing Interactive Elements
While developing your setup, you may want to test the appearance of interactive progress elements, such as HTML files and Flash movies, exactly as they would appear on your progress dialogs during setup.
Open your progress dialog in the Dialog Editor. Place the files belonging to your interactive progress elements inside the
interop\templates folder of your InstallAware installation folder. Test your progress dialog.

Printed Documentation
32
Setup Logic
Run Installed Application
After creating a new setup project using the Project Wizard, if you wish to add support for running your installed application after a successful install, make the following changes in your setup script:
Search for the text:
TO-DO: Insert command that starts your application here
Select the text and insert a Run Program command above it. Specify in the Run Program command the name and path to your application.
For instance, if your application executable is called myapp.exe, specify the following Run Program command:
$TARGETDIR$\myapp.exe
Creating a Start Menu Uninstall Entry
When an InstallAware setup finishes installing on the target system, it automatically adds an entry to the Control Panel Add-Remove Programs applet. However you may also wish to create a shortcut for maintenance/uninstallation directly on the start menu group for your application. InstallAware includes a convenience variable that holds the full path and file name of the maintenance setup program which you may use for this purpose. This variable is UNINSTALLLINK. Creating a shortcut that targets $UNINSTALLLINK$ will achieve your desired effect.
The Meaning of Product and Revision Codes
The product/revision codes specified on the project options dialog are used by Windows Installer to uniquely identify your installation. If you author two installations that use the same product and revision codes, Windows Installer will treat both as installations of the same product. Therefore, pay attention to the following:
For different products, always use different product and revision codes. Whenever you generate a new project, InstallAware will automatically generate a new product and revision code for you.

InstallAWARE Help Library
33
For different versions of the same product, including product updates, you may use identical product codes, however you must use a different revision code. Having identical product codes but different revision codes between installer packages indicates that one of the packages is an upgrade.
Disk Space Calculations
If your products installation is reporting estimated disk space requirements as 0 or inaccurately, you are not making proper use of the Get Component State command in your script. InstallAware requires this command be used at least once in your installation to be able to accurately predict target disk space requirements. Please see the command reference for more information.
Multiple Installations
If you re-run an installation after it has already installed on the target system, it will display a maintenance user interface, instead of an installation user interface. This is because Windows Installer detects that the product is already installed, and enters maintenance mode.
Unfortunately, there is no way to prevent this type of behavior in Windows Installer setups. You may however change the product and revision codes every time you change your product version to help users reinstall multiple versions of the same product, or upgrade over an older version.
Upgrade Installs
InstallAware has a facility to seamlessly upgrade your older product versions to newer ones. If you use the Project Wizard to generate your setup scripts, this behavior is already implemented for you. In general, the method used for old version detection and upgrades is as follows:
Both the old product to be upgraded and the new product which is the upgrade should have the same product code. However they should have different revision codes. Read more about these codes.
Printed Documentation
34
Provided the above condition is met, the NEEDSUPGRADE pre-defined script variable will be automatically set to TRUE if a previous version of the product is found, and FALSE if not.
Check this variable and use the (Un)Install MSI Setup command to automatically remove previous versions of your product, before allowing the main setup to begin.
Notes
You may use the (Un)Install MSI Setup command with both InstallAware and non-InstallAware setups.
If your InstallAware setup has custom uninstallation logic, try uninstalling it using the Run Program command and an uninstallation command line, assuring that your custom logic executes.
Uninstalling from the Command Line
You may silently remove InstallAware setups using setup command line parameters.
Silently Uninstalling
<setup.exe> /s MODIFY=FALSE REMOVE=TRUE
In the above example, setup.exe denotes the main setup executable.
Setup Commands Preceding Apply Uninstall
InstallAware, unlike most other installation authoring toolkits, offers a unified, single script which gives you complete control over the entire installation process, including the uninstallation. However, because of design limitations in Windows Installer, you need to refrain from using new Windows Installer commands before an Apply Uninstall command. Doing so can break the integrity of your setup database and cause uninstalls to fail.
The Install - Uninstall Cycle
The points below explain the design limitation in Windows Installer.
The first time you are installing, your script executes several Windows Installer commands as required by your application. These changes are then made effective when the Apply Install command is called from your
InstallAWARE Help Library
35
script. At that point, InstallAware invokes the Windows Installer service and completes the installation.
When the setup is run again (in maintenance mode), and a repair/modify action is chosen, your script again executes the pertaining Windows Installer commands, and then calls Apply Install once again to update the system. If the set of installed features changed between the original and maintenance installs, Windows Installer is intelligent enough to reflect those changes to the system: Windows Installer commands which do not execute as a result of changed feature sets are automatically undone (example: Install Files commands belonging to unselected features are undone, since those commands did not execute in this run).
To achieve the above flexibility, Windows Installer keeps its own internal record of which actions executed during the last run.
When Apply Uninstall is called, all the Windows Installer commands from the last run will be undone, effectively uninstalling the application.
If however, immediately before executing the Apply Uninstall command, new Windows Installer commands are executed, this will destroy Windows Installer's internal records of the last standing actions. The net result will be that all installed files and registry settings belonging to your application will be orphaned on the system, without actually being removed.
Workarounds
If you simply must use Windows Installer commands before uninstalling, you may do so by following the exact procedure below.
For your new commands to work as expected, you need to call Apply Install first.
Keep in mind this will undo actions which executed during the previous run, and may cause a premature removal of some files/registry entries.
After this step is complete, call Apply Uninstall normally to undo the changes you just made and remove all traces of your application from the system.
Keep in mind that you may use non-Windows Installer commands freely at any point in your script, including immediately above the Apply Uninstall command. The Call DLL Function command especially provides a lot of flexibility in being able to invoke virtually all of the Windows API directly from your setup.
New Windows Installer Commands May Not Be Necessary
Windows Installer already has mechanisms to work around this limitation. In particular, if you wish to delete files created by your application after it was installed, it may seem that new Delete Files commands are required right above the Apply Uninstall command. However this is not the case. The Delete Files command has an option which explicitly specifies when files are to be deleted - while installing, while uninstalling, or both.

Printed Documentation
36
To delete files created by your application after it was installed:
Call the Delete Files command as part of your main installation routine (the install/maintain block), and not the uninstallation routine.
In the options for the Delete Files command, indicate that the deletion is to occur during an uninstall.
Windows Installer adds this command to its internal record, and will remove the specified files when Apply Uninstall is called at a later time.
Unfortunately, Windows Installer does not provide a mechanism to remove registry keys that are not created explicity during the installation. However, InstallAware accomodates this need by providing a non-Windows Installer command to facilitate this task.
To delete registry keys created by your application after it was installed:
Call the Delete Registry command as part of your uninstallation routine. This is not a Windows Installer command command, so it is safe to call right
above the Apply Uninstall command.
Performance
Compress Better
MimarSinan InstallAware utilizes a very advanced form of LZMA compression, featuring Binary Call Jump converter algorithms. While LZMA with BCJ2 is optimized especially for program files and crunches data like no other algorithm available today, keep the following points in mind to obtain maximum compression:
Files that have been compressed before cannot be recompressed. For example, lets say the size of your uncompressed setup is 36 MB. Assume that when ZIPped, the setup size decreases to 11 MB, and when LZMAd instead, the setup size decreases to 4 MB. Now this might lead us to think that if we use LZMA on the 11 MB ZIP, we would gain an additional 7 MB. This is not the case. No matter how strong a compression algorithm is, it can never recompress files that have been already compressed.
Make sure your help files are not pre-compressed. Help compilers may produce compressed output.
Make sure your application executables are not pre-compressed. Software protection tools, alongside executable packers, may produce compressed output.
Make sure any other data files used by your application are not pre-compressed. For instance, do not compress database files used by your application.

InstallAWARE Help Library
37
If some of your files must be compressed, use maximum compression on them. Remember, pre-compressed files - no matter how weakly they are originally compressed - can never be recompressed.
Encrypted files cannot be recompressed.
Notes
• The compression example given above refers to the actual setup program of CompreXX. Feel free to download CompreXX and validate our findings for yourself.
• Rest assured results with your own setups will also be equally remarkable.
Increasing Build Speeds
While you are testing and debugging your setups, you may find yourself frequently rebuilding your projects. Follow the guidelines below to shorten your code-build-test cycle:
• Use the Uncompressed Directory Layout build mode while you are in development. Because no compression is involved in this build mode, it will provide the fastest build times.
• If you must use one of the other build modes, customize your compression settings to shorten the time it takes to compress your data:
1. Create a custom compression profile through the Build Settings dialog
2. Set the Dictionary Size for LZMA Algorithm to 20 and Converter Algorithm to None for maximum compression throughput.
3. Use this custom compression profile in all your test builds. • If you are using the Compressed Web-Based EXE build mode, you may
further accelerate your build cycle by eliminating rebuilding web media blocks which have not changed since the last build. Enable the Skip on Build option in your Web Media Block commands which you wish to avoid rebuilding.
Sharing Web Media Blocks
If you have web media blocks with identical file contents across multiple setups, such as web media blocks containing common setup pre-requisites, you may share them across your setups:

Printed Documentation
38
• Make sure each web media block contains an identical collection of files. • Use the same Download URL in each Web Media Block command.
This way, you will have a single global copy of the web media block file online, instead of one copy for each setup project that uses it.
Reference Project Options
Project Settings
Project settings control aspects of your installation which are not available in your installation script. These settings allow for changing the product name and code, among other things. To access your build settings, choose Project Options or press SHIFT+CTRL+F11.
Project Node
This page lets you define the most basic aspects of your installation.
Manufacturer
Enter your company name here.
Product Name
Enter the name of the product the setup will install here. This name will be available in the setup script as the TITLE variable.
Product Version
Enter the version of the product being installed here.
Product Code
Click the Generate button to generate a new product code. The product code uniquely identifies your installation to Windows Installer. It must be unique in each different product, as well as different versions of the same product. This code will be available in the script as the PRODUCTCODE variable.
Upgrades Product with Product Code

InstallAWARE Help Library
39
If your installation upgrades a previous version, enter the product code of that version here.
Language
Choose the language of your installation from the drop-down list.
Summary Node
This page lets you compose the summary stream information that will be available in the Windows Installer database. Be sure to set a unique Revision Code by pressing the Generate button any time you change your Product Code defined on the Project Node.
Add-Remove Node
This page lets you configure the way your application appears on the Control Panel Add-Remove Programs applet. Fill in the fields as necessary. The value entered for the Publisher Name field will be available in the setup script as the COMPANY variable.
Compiler Variables Node
The list of all defined compiler variables for the current project is displayed on this page. Press the Add button to define a new variable. Double-click an existing variable, or choose an existing variable and press the Edit button to modify it. Press the Delete button after selecting one or more compiler variables to remove them.
Build Settings
Build settings control how your setups are built. These settings allow for changing the deployment type (uncompressed, compressed, web), among other things. To access your build settings, choose Project Options or press SHIFT+CTRL+F11.
Authenticode Node
This page lets you digitally sign your packages with authenticode. Provide the paths to your certificate and key files to enable code signing. The default value for the time stamp URL is http://timestamp.verisign.com/scripts/timstamp.dll.
Build Node
This page lets you configure your deployment type. The various kinds of deployment types, along with their uses, are explained below. Pick the one that is most suitable for your target audience. If you will be debugging your setup inside the IDE, also ensure the Debug Build checkbox on this page is checked.

Printed Documentation
40
Uncompressed Directory Layout
Your setup is contained in multiple files spanning several layers of multiple nested folders. Each file is uncompressed and immediately available, minimizing installation time, since files will not be uncompressed from an archive or downloaded before installation.
This type of deployment is ideal for CD/DVD media where disk space is not a concern and multiple files/folders can be stored. It also works well on network drives.
Compressed Single Self-Installing EXE
Your setup is contained inside a single self extracting file. This file, when run, will first extract its contents to a temporary folder, and then start the main setup program. In essence, when executed, the compressed layout converts into the uncompressed layout.
This type of deployment is suitable for Internet distribution, since the entire setup is contained inside a single file.
Compressed Web-Based EXE
Your setup is comprised of a self extracting file, which similarly to the compressed layout, extracts its contents and starts the main setup; as well as web media blocks, which are defined in your setup script and are downloaded as required from the web.
This type of deployment is ideal for Internet distribution. Setup will download only the web media blocks which are required on the target system. This saves download times and bandwidth since users will not waste either downloading portions of your application and/or its runtimes which they do not need.
Compression Node
This page lets you configure the strength of the compression employed while creating your setups. By default, the optimal settings for your system will be selected. To customize your compression parameters:
1. Click Create New to create a new compression profile, if you have not previously done so.
2. The profile editor opens with your new compression profile. The compression profile contains several settings that may be configured. Edit your compression profile.
3. Click OK in the profile editor to save your changes, and highlight the new profile in the compression node to activate your new settings.
The table below briefly describes relevant settings in the profile editor.
InstallAWARE Help Library
41
Page Setting Explanation
General Settings
Priority Priority of compression task. Set to Idle for background compression. Set to Normal for full throttle.
General Settings
Store Folder Information
Only Relative allowed.
7-Zip Type
Solid Compression Set to On for best performance. Off will decrease compression.
7-Zip Type
Header Compression Set to On for best performance. Off will slightly decrease compression.
7-Zip Type
Compression Algorithm
Only LZMA allowed.
7-Zip Type
Dictionary Size for LZMA Algorithm
Recommended range is 22-25. Values above 22 require at least 256 MB RAM on development system, and 32 MB RAM on target systems. Values lower than 22 will significantly hurt compression.
7-Zip Type
Match Finder Method for LZMA Algorithm
Set to Binary Tree with 2-3-4 bytes hashing for best performance. Other values may decrease compression.
7-Zip Type
Fast Byes for LZMA Algorithm
Set to 255 for best performance. Lower values will decrease compression.
7-Zip Type
Converter Algorithm Set to BCJ2 for best performance. Other values will degrade compression.
7-Zip Type
BCJ2 Converter Algorithm 1
Only LZMA or None allowed. Values other than LZMA will degrade compression.
7-Zip Type
BCJ2 Converter Algorithm 2
Only LZMA or None allowed. Values other than LZMA will degrade compression.
7-Zip Type
Multiprocessor or Hyperthreading
Set to ON if you have a hyperthreading system, or multiple processors.
Output Node
This page allows you to customize additional build settings:

Printed Documentation
42
• If you wish to customize the output folder, check Custom Folder and provide your preferred output folder. By default, builds will exist under your project folder.
• If you wish to customize the name of your main setup executable, enter it in the Output filename field. Leave this field empty to use the default name, which is the same as your project file name.
• If you wish to automatically update the revision code every time you build (excluding batch builds), check Change revision code automatically upon rebuild. This setting must be unchecked when debugging your setup. Checking it will enable seamless, automatic upgrades of your product.
Project Wizard
Project Wizard
The Project Wizard offers a completely visual way to generate your installation scripts. To display the wizard:
1. Save any changes you have made to the installation open in the IDE. 2. Choose File New Project Wizard, or click the New icon on the toolbar,
and double-click the Project Wizard icon.
After you have displayed the wizard, navigate through the pages using the Back and Next buttons, or by directly clicking the section you wish to navigate to. When you click Next on the last page of the wizard, a fully operational setup script will be generated, which you may further customize and edit in the script editor.
Product
The Product page allows you to enter general information about your product. The information entered here will be used throughout the setup.
Name
The name of your product.
Version
The version number of your product.

InstallAWARE Help Library
43
Manufacturer
The company that is the manufacturer of the product.
Copyright
Legal copyright information.
Website
The product website.
Conditions
The Conditions page allows you to check the target system for a minimum of available hardware and software. It also enables installing runtime components on the target system, if they are not already found. An enhanced selection of runtime components is available with the Enterprise edition of InstallAware.
Minimum Operating System
If you choose an operating system, the installation will not proceed unless the target computer has at least that operating system installed. If you choose an operating system platform, the installation will not work on any platform except the chosen one.
Minimum Internet Explorer Version
If you choose an IE version, the installation will not proceed unless the target computer has a browser that is the chosen version or newer.
Minimum Memory
This feature allows to check for a minimum of physical memory installed on the target system. The installation will not proceed unless the minimum indicated amount of physical memory is installed. This feature does not check for available virtual memory.
Minimum Resolution
This feature allows to check for a minimum display resolution on the target system. The installation will not proceed unless the minimum resolution is available on the target system.
Windows Installer 2.0

Printed Documentation
44
Version 2.0 of Windows Installer must be present on the target system for the installation to run. Make sure this component is checked to assure Windows Installer 2.0 will be installed if not already present.
Warning:
If you uncheck this component, your setups may fail .
Microsoft .NET Framework 1.1
If your application runs on the .NET Framework, check this component to install Microsoft .NET Framework 1.1 on the target system, if not already present.
Microsoft JSharp Redistributable
If your application is both a .NET application and also requires the JSharp redistributable, check this component. The JSharp redistributable will be installed if not already present on the target system.
DirectX 9b
If your application is a game, or makes use of the DirectX APIs, check this component. The DirectX 9b redistributable will be installed if not already present on the target system.
MDAC Refresh 2.8
If your application is a database application that makes use of data access components, check this. The MDAC 2.8 refresh will be installed if not already present on the target system.
Visual Basic VM SP6
If your application is a Visual Basic 6 application, check this component. The Visual Basic 6, Service Pack 6 virtual machine will be installed if not already present on the target system.
Visual C++ Runtime SP6
If your application is a Visual C++ application and is dynamically linked to ADO/DAO/MFC/VC language DLLs, check this component. The Visual C++ 6 Runtime, Service Pack 6, will be installed if not already present on the target system.
Features

InstallAWARE Help Library
45
A feature enhances the functionality of an application, however the application does not require the feature to operate. While not all applications will have features, most sophisticated applications will. Moreover, if you are installing more than one application with your installation, each application may be defined as a feature.
Features are defined on the Features page:
• To add a new feature, choose the parent feature, and click New . If the feature is a top-level feature (it has no parent), choose All Features and click New.
• To delete a feature, choose the feature, and click Delete. All sub features of the selected feature will also be deleted.
• To rename a feature, choose the feature, click Rename, and type in the new name for the feature.
• If your application has no features, delete all items on this screen except the All Features item, which cannot be deleted.
• The user will only see the features defined on this tab if (s)he performs a custom setup. Only the first feature defined on this tab (without any subfeatures) will be installed if the user requests a minimum installation.
• Each defined feature will be placed in its own Web Media Block. The All Features feature will be placed in an Offline Media Block.
Files
Copying files onto the target system is one of the most vital setup functions to be performed. The Files page allows you to choose which files and folders are copied onto the target system.
Adding Files
1. First, use the combo box to choose which feature the files to copy belong to. Unless that feature is selected during setup, the files will not be copied. Use the Feature Independent selection to indicate files that should be copied regardless of selected features.
2. Choose the target folder on the destination system that the files should be copied into.
3. Click the Add Files button and choose one or more files to copy into the chosen folder.
4. If you select some files in error, highlight them and click the Delete button. 5. If you need to copy files into subfolders of the designated target folder,
add the items as folders instead.

Printed Documentation
46
Adding Folders
• First, use the combo box to choose which feature the folders to copy belong to. Unless that feature is selected during setup, the folders will not be copied. Use the Feature Independent selection to indicate folders that should be copied regardless of selected features.
• Choose the target folder on the destination system that the folder should be copied into. The folder will become a subfolder inside the destination folder.
• Click the Add Folder button and choose a folder to copy into the destination folder. The chosen folder will be copied along with all files and further subfolders inside it.
• If you select a folder in error, highlight them and click the Delete button. • If you need to copy individual files instead of folders, add the items as files
instead.
Shortcuts
Shortcuts defined on the Shortcuts page allow the end-user to launch the installed application, from the Desktop, Start Menu, or Explorer through file associations.
Before defining shortcuts, make sure you have selected some files to be installed on the target system using the Files page. Then:
1. Click the New button. 2. In the file browser, navigate to the feature that contains the file which the
shortcut will point to. 3. Navigate to the file itself and click OK. 4. If you choose a file in error, click Delete to remove it from the shortcuts
list. 5. To rename the shortcut, click the Rename button. 6. The following options are available for your shorcuts. You may select
more than one option simultaneously: o Place shortcut in Start Menu: Creates a shortcut in the Start Menu
folder for your application. o Place shortcut on the Desktop: Creates a shortcut on the Desktop
for your application. o Associate a file type with shortcut: Creates a file association with
the executable the shortcut points to, and the indicated file extension (do not enter a period character before the file extension).

InstallAWARE Help Library
47
Registry
The Registry page assists you in defining registry entries for your application. The registry is frequently used to store system-wide application information.
1. First, use the combo box to choose which feature the registry entires belong to. Unless that feature is selected during setup, the registry entries will not be created. Use the Feature Independent selection to indicate registry entires that should be created regardless of feature selection.
2. Choose a target key for the registry entry. 3. Click New and add the subkey(s) your registry entry falls under. 4. If you add a subkey in mistake, click Delete. 5. Click New and create your registry entry. Leave the Value Name field
empty if you will be creating a default value. 6. To correct a registry entry, choose it and then click Edit. 7. To delete a registry entry, choose it and then click Delete.
Dialogs
The Dialogs page helps you choose a dialog theme and a maintenance mode for the user interface of your setup.
Dialog Theme
The dialog theme controls the appearance of your setup user interface. Regardless of the actual dialogs you choose to display, the theme determines how the general appearance of the dialogs will be. You will most likely want to preview the available themes before settling on a theme for your setup project.
To preview available dialog themes, choose a theme, and click View Theme. Different themes will be better suited to different types of applications. Be sure to try each theme.
Maintenance Mode
The maintenance mode setting determines what happens when the user re-runs setup, after having already installed your product on his/her computer. Please note that re-running setup after your product has been installed is identical to choosing your product's Change/Remove button in the Control Panel Add Remove Programs listing.
I wish to allow a maintenance user interface

Printed Documentation
48
If this setting is enabled, the user will be presented with a maintenance dialog, offering three options: Modify, Repair, and Remove.
• If Modify is chosen, a feature selection dialog will be shown, and the product will be reinstalled using the newly selected features.
• If Repair is chosen, the product will be reinstalled using exisiting feature selections.
• If Remove is chosen, the product will be uninstalled.
If either Modify or Repair has been chosen, the product will be reinstalled. This may mean that product configuration files modified by the user may be replaced with their originals.
I prefer to provide an uninstall option only
If this setting is enabled, the user will be asked whether (s)he wants to uninstall the product, and if comfirmed, the product will be removed from the user's system.
Media
The Media page offers a selection of build modes, encompassing a wide variety of distribution channels.
Uncompressed Directory Layout
The setup is comprised of a collection of uncompressed files and folders, spanning multiple directories, and several levels deep. This media type is ideally suited for software distribution on CDs/DVDs. Because no compression is applied, setup performance will be at maximum. However for the same reason, disk space requirements will also be highest.
The multiple levels of files and folders generated by this media type make it impractical for distribution over the Internet, or where single files are required to contain the entire installation.
Compressed Single Self-Installing EXE
The entire setup is packaged into a single executable file. When run, this executable file will first extract its contents onto a temporary location, and then start the installation. This is the most economical media layout in terms of disk space. Both because the entire setup is located inside a single file, and the superior compression employed, this media type is also ideal for Internet distribution.

InstallAWARE Help Library
49
Compressed Web-Based EXE
The setup is split into multiple web blocks, which are dynamically downloaded from the Internet at install time as required. Only the runtime components which the user does not already have, along with the features requested for the install, are downloaded. While the splitting reduces some of the compression gains, this media type offers the optimal performance, because of the selective download feature.
The setup is started by a single executable file which will download other blocks as necessary. The single file can be distributed on any medium, and the web blocks must be placed on a web server.
Build in Custom Folder
If you wish to change the build folder of your setup projects (default is the project folder), check Build in Custom Folder, and click Browse to choose the new build folder.
Build Project Now
Checking this item will immediately build a release of your project as soon as you click the Next button on this wizard page.
Scripting
Introduction
Classes of Commands
There are several types of commands which are available to you in your scripting. Each command type is highlighted differently in the script editor. These command classes are enumerated below.
Comment
Comments refer both to Comment commands and also portions of code which have been commented out.
Flow Control
These alter program flow, and include commands like Wizard Loop and If.
Plug-In
Printed Documentation
50
Plug-in commands perform highly customized actions, from installing runtimes to downloading files.
Directive
Compiler directives are not constrained by program flow and perform compile time tasks, such as the Web Media Block command.
Windows Installer
Windows Installer commands actually perform installation tasks and modify the target system. Every command in InstallAware which effects the target system is a Windows Installer command.
Modify System
Modify system commands finalize queued changes and execute Windows Installer. The Apply Changes command is in this category.
Label
Label commands are used in conjunction with GoTo Label commands.
Statement
Commands that display dialogs, obtain general system information, and perform other similar tasks fall in this category.
Pre-Defined Variables
Each InstallAware project contains pre-defined variables. These variables are automatically initialized when setup begins based on the state of the target system, your project settings, and whether the application has been previously installed or not. The full list of pre-defined variables and the values they contain is displayed below:
• ABORT: TRUE if the Cancel button has been clicked,FALSE if not. Setting this variable has no effect on the state of the Cancel button.
• ALLUSERS: Initially TRUE if platform is NT, FALSE if not. Set to TRUE to perform an installation for all users and FALSE to perform an installation for the current user only.
• CMDLINE: The command line string passed to the installation program. • COMPANY: The company manufacturing the product, as set in the
Publisher Name field of the project options dialog.

InstallAWARE Help Library
51
• COMPLETE: Initially TRUE. Indicates whether a complete installation will be performed.
• DATADIR: The root of the directory containing the files to be installed. • EXEDIR: The folder containing the setup executable itself. • EXEFILE: The full path and file name of the setup executable. • LASTERROR: Initially an empty string. After Windows Installer executes,
set to the last error that occured during execution, if any. • LICENSE: Initially FALSE. Indicates acceptance of the EULA. • LOGGED: Initially set to the full path for the log file requested in the
command line. If an empty string, indicates no logging has been requested at the command line. Set to a valid path name to enable logging from script.
• MAINTENANCE: Initially TRUE if application has been installed before, FALSE otherwise.
• MINIMUM: Initially FALSE. Indicates whether a minimum installation will be performed.
• MODIFY: Initially TRUE. Indicates if the existing installation should be modified.
• MSIFILE: The full path and file name of the setup installation database. • NEEDSUPGRADE: TRUE if a previous version of the product was found,
FALSE otherwise. • NEWLINE: This is not a real variable, but indicates a new line character. • PERSONALIZED: Initially FALSE. Indicates whether a custom setup
should be performed. • PRODUCTCODE: Set to the full GUID of the product code, as set in the
installation database and configured at the project options dialog. • PROGRESS: Initially 0. A numerical representation of the current position
in installation progress, where 0 is nothing and 100 is complete. This value is displayed in progress dialogs.
• PROGRESSTEXT: Initially an empty string. A string description of the current installation task. This value is displayed in progress dialogs.
• REBOOTCOMPUTER: Initially FALSE. After Windows Installer executes, indicates whether the computer needs to be rebooted for the changes to take effect.
• REMOVE: Initially FALSE. Indicates whether the product should be uninstalled.
• REPAIR: Initially FALSE. Indicates whether the existing product installation should be repaired.
• REVISIONCODE: Set to the full GUID of the revision code, as set in the installation database and configured at the project options dialog.
• ROOTDIR: The folder containing the setup executable itself.
Printed Documentation
52
• RUNAPP: Initially TRUE. Indicates whether the application should be executed at the end of the installation.
• SFXFILE: If an uncompressed directory layout is used, this variable is empty. Otherwise set to the file name of the self extracting executable which bootstrapped the installer.
• SFXPATH: If an uncompressed directory layout is used, this variable is empty. Otherwise set to the full path of the folder containing the self extracting executable which bootstrapped the installer.
• SILENT: Initial value set on the command line. TRUE if a silent install should be performed, and FALSE if not. Set the value of this variable from the script to change silent installation mode.
• STARTMENU: Initial value set to the name of the product being installed, as set in the project options dialog.
• SUPPORTDIR: Points to the full path of the temporary folder that support files are extracted to before installation beings.
• TARGETDIR: Initial value set to <Program Files Directory>\Application Title, using the name of the product being installed as the application title.
• TEMPDIR: Full path to the temporary folder location on the target system. • TITLE: Initial value set to the name of the product being installed, as set in
the Product Name field of the project options dialog. • USERCOMPANY: Initial value set to the name of the company that
licensed Windows on the system the product is being installed. • USERNAME: Initial value set to the name of the person that licensed
Windows on the system the product is being installed. • UNINSTALLLINK: Initial value set to the full path of the uninstallation
setup program. • WIZARD: Initial value set to NEXT.
Using Variables
Most commands in InstallAware work with variables. You will be storing the state of your installation, choices the end user made, among other things, in your script variables. Keep the following things in mind when working with variables:
• When specifying a variable for a command that expects a variable, just type in the variable name. For instance, if the variable is called MYVAR, simply type MYVAR.
• With commands that do not specifically expect a variable, and work with string literals, you may still use variables, however you must dereference them. The syntax for dereferencing a variable in InstallAware is enclosing the variable name between dollar signs. For instance, if the variable is

InstallAWARE Help Library
53
called MYVAR, dereference the variable using $MYVAR$. You may freely combine multiple dereferenced variables in your string literals.
Unless the command you are working with explicitly indicates otherwise, you can always use either a variable or a dereferenced variable.
Pre-Defined Compiler Variables
In addition to pre-defined variables, each InstallAware project also contains pre-defined compiler variables. These compiler variables are automatically initialized when you compile your setup based on your project settings, even if you have not explicity defined them. Explicitly defining a compiler variable will override the implicitly defined value. The full list of pre-defined compiler variables and the values they contain is displayed below:
• BUILDMODE: CD if the deployment type is Uncompressed Directory Layout, SFX if the deployment type is Compressed Single Self-Installing EXE, WEB if the deployment type is Compressed Web-Based EXE.
Using Compiler Variables
InstallAware offers compiler variables in addition to regular, script variables. Compiler variables may be thought of as IFDEF statements available in traditional programming languages. The Compiler Variable If, Compiler Variable Else, and Compiler Variable End statements allow conditional compilation. In addition, much like constants, compiler variables may be used in the script to represent unchanging values.
The values compiler variables can take are set at compile time, either from the IDE or from the command line.
• When specifying a compiler variable for a command that expects a compiler variable, just type in the variable name. For instance, if the variable is called MYCOMPVAR, simply type MYCOMPVAR.
• With commands that do not specifically expect a variable, and work with string literals, you may still use compiler variables, however you must dereference them. The syntax for dereferencing a compiler variable in InstallAware is enclosing the variable name between pound signs. For instance, if the variable is called MYCOMPVAR, dereference the variable using #MYVAR#. You may freely combine multiple dereferenced compiler variables in your string literals.

Printed Documentation
54
You can always use compiler variables where regular string expressions are allowed, even if regular (script) variables have been prohibited.
Built-In Commands
Apply Changes
This command applies all pending changes to the target system. Each queued installation action will execute through Windows Installer in a single pass when this command is called.
Return Success State in Variable
This variable holds the result of the installation action. The following values are returned:
Value Meaning
CANCEL Installation was cancelled by the user.
COMPLETE Installation was completed successfully.
ERROR An error occured during installation. The error description is available in the LASTERROR variable.
REBOOT Installation was completed successfully, however a reboot is required.
Action to Perform
• Check Install Product to install your product for the first time, or in maintenance mode.
• Check Uninstall Product to remove a previously installed product.
Notes
• If no commands which effect the target system have been authored into your setup, this action will fail.
• In wizard generated installs, the SUCCESS variable is used to hold the outcome of this command.
• More than one Apply Changes command may be used in your script if necessary.

InstallAWARE Help Library
55
Check File Version
This command compares a file version number to another file or a pre-set version string.
Variable
This variable holds TRUE if the file indicated by the Is File parameter is newer. If the file carries the same version or is older, the variable holds FALSE.
Is File
Indicates the source file for the comparison. Only a single file may be specified. If the specified file does not contain version information, its version will be assumed to be 0.0.0.0.
Newer than File
To compare with another file, check this item and provide the target file for the comparison. Only a single file may be specified. If the specified file does not contain version information, its version will be assumed to be 0.0.0.0.
Newer than Version Number
To compare with a version string, check this item and provide the version string. If the version string is absent, it will be assumed to be 0.0.0.0.
Comment
This installation command helps you create a remark in your code. It has no effect on the installation.
Edit Comment
Type your remark here. Leave this field empty to display an empty line in your script.
Compiler Variable Else

Printed Documentation
56
This command is used in conjunction with Compiler Variable If commands. It has no configurable parameters. It is used to direct conditional compilation.
Compiler Variable End
This command is used in conjunction with Compiler Variable If commands. It has no configurable parameters. It is used to direct conditional compilation.
Compiler Variable If
This command is used to achieve conditional compilation. It is used in conjunction with the Compiler Variable Else and Compiler Variable End commands.
Variable
Type the name of the variable, according to the value of which the conditional evaluation will be performed.
Comparison
Choose a comparison type from the drop down menu. If both variables contain integer values, a numeric comparison will be performed. If at least one variable contains a non-integer value, a string comparison will be performed.
Reverse Comparison
Check this checkbox if you wish to execute an if not evaluation.
Compare With
Provide the string literal to perform the comparison with.
Control Service
This command starts or stops, and optionally deletes a service.
Service Name

InstallAWARE Help Library
57
Enter the name of the service to control here.
Command Line Arguments
Provide any command line arguments to the service file here.
Control
Using the drop down list, choose the type of control to perform on the indicated service.
Wait for service state change completion
Check this item to wait until the control operation completes on the service. Uncheck this item to return as soon as the control operation request has been sent to the service.
Convert Path
This command converts a long file name path to a short file name path, or vice versa. Long file name paths may contain spaces and extended characters; short file name paths may not contain either. This command is especially useful when passing command line parameters to external programs. It is best to use short file names because embedded spaces in paths may be interpreted as new parameters, and the program may not recognize the double quote character that generally surrounds long path names. An example for such a program with which short path names should be used is rundll32.exe.
Variable
This variable holds the path to convert. It will be replaced with the updated path after the conversion.
Operation
• Check Convert to Short Path to convert a long path name to a short path name.
• Check Convert to Long Path to convert a short path name to a long path name.
Notes
• If the original path cannot be found, the command will return an empty string in the variable.

Printed Documentation
58
Copy/Move Local Files
This command copies or moves files that are already present on the target system into a new location on the target system. It should not be used for installing new files onto the system.
Source Folder
Specifies the source path for copying files from. Must point to a valid folder.
Source Files
Specifies the source files to copy. You may use wildcards. You may not use any variables in this field, only string literals are allowed.
Target Folder
Specifies the target path for copying files to. Must point to a valid folder.
Target Files
Fill in this field only if you wish to rename the target files as part of the operation. You may use wildcards. You may not use any variables in this field, only string literals are allowed.
If the Source Files field is *.txt and the Target Files field is *.dat, each file ending with a .txt extension on the Source Folder will be copied to the Target Folder as a file ending with a .dat extension.
Copy Files
Check to indicate the operation is to copy files.
Move Files
Check to indicate the operation is to move files.
Notes
• Files copied or moved by this command are not removed upon uninstallation. Therefore, if removal of such files is required, accompany each Copy/Move Local Files command with a Delete Files command that is set to undo the copy/move local action.

InstallAWARE Help Library
59
Create File Type
This command creates a new file type, binds one or more file extensions to the file type, and associates the file type with an application.
File Type
The file type to create. This file type will own one or more extensions and be associated with an application.
Opens With
Full path to the application executable which is associated with the file type.
Description
The end-user visible description for the file type.
Icon File
If a custom icon will be used instead of the default icon of the application that is being associated with the file type, enter the full path to the file containing the custom icon here. You may specify an executable, library, or icon file.
Icon Number
If an icon other than the first icon should be used, enter the index of the icon to use here.
List of Extensions Belonging to File Type
Enter the file extensions that are owned by the file type. You should provide at least one file extension.
Verb
Enter a canonical or custom verb indicating an operation that is available for this file type in the system shell, such as Open or Print.
Parameters
Enter the command line parameters to be passed to the application associated with this file type for the current verb.
DDE Command, DDE Application, DDE Topic

Printed Documentation
60
If the application supports DDE, enter the values into the DDE fields to be passed to the application associated with this file type for the current verb. Otherwise leave these fields empty.
Notes
• This command is internally implemented as a series of Write Registry calls.
Create Folder
This command creates a new folder, or multiple sets of folders, on the target system.
Folder
Indicates the full path to the folder to create.
Notes
• Installation actions will automatically create their required target folders, if they are not already found. You do not need to use the Create Folder command to explicitly create such folders.
Create ODBC DSN
This command creates an ODBC data source.
Data Source Name
Enter the name of the data source here. If you wish to duplicate the settings of a DSN already existing on your system, click the drop-down arrow and choose the DSN to capture.
Driver Name
Enter the name of the data provider here.
Registration
• Check Per Machine to create a System DSN. • Check Per User to create a User DSN.

InstallAWARE Help Library
61
Attributes
Specify your data source attributes here. You may enter multiple attributes by pressing CTRL+ENTER.
Notes
• Do not dereference variables using $ signs in the Attributes field. • Dereference variables using square brackets instead. • For instance, instead of using $TARGETDIR$, use [TARGETDIR].
Create Shortcut
This command creates a shortcut to a file on the target system. The shortcut may point to any file on the target system, including pre-existing files.
Shortcut to File
The full path of the file that the shortcut will open.
Link Name
The name of the shortcut as it will appear on screen.
Link Location
The folder that will contain the shortcut.
Link Description
The tooltip hint for the shortcut.
Command Line Parameters
If the file specified by the Shortcut to File parameter will be launched using command line parameters, enter them here.
Startup In Folder
If you wish to customize the folder in which the file specified by the Shortcut to File parameter will be launched, specify that folder here.
Icon File Path

Printed Documentation
62
If you wish to customize the shortcut icon, enter the full path to that file in this field. No variables are allowed, only string literals are accepted. The path must point to a file on your development system. This field cannot be used to point to files on the target system. The icon will be extracted during compile time of your installation.
Icon Number
If you specified an Icon File Path, also indicate the number of the icon as it is found in the file for the shortcut.
Window Size
Choose a startup window size for the file specified by the Shortcut to File parameter.
Define Component
This command defines a setup component which will be visible in dialog boxes that display available application features.
Component Name
Enter the name for the component here. Specify subcomponents of parent components using the \ character, much as you would specify subfolders of a parent folder. Note that parent components also need to be explicitly defined if you wish them to respond to user selections.
The name of the component entered here will be visible in dialog boxes that display available application features.
Component is Initially Selected
Check this checkbox if the component should be selected by default.
Component Description
Enter a multi-line description of your component here. Press CTRL+ENTER for a line break. This information will be visible in dialog boxes that display available application feature descriptions.
Delete Files

InstallAWARE Help Library
63
This command deletes files already present on the target system.
Delete from Folder
Specify the full path to the folder containing the files to delete.
Files
Specifies the files to delete. You may use wildcards. You may not use any variables in this field, only string literals are allowed.
Delete when Installing
Check to have the files deleted when the product is being installed or maintained.
Delete when Uninstalling
Check to have the files deleted when the product is being uninstalled.
Notes
• If you use the Copy/Move Local Files command in your script, you may want to pair each such command with a Delete Files command that undoes the operation using the Delete when Uninstalling option, since the local files command does not undo its action upon uninstallation.
Delete Registry
This command deletes a value or an entire key from the system registry.
Root
Select the root of the delete operation using the drop down menu.
Key
Type the name of the key to delete (from).
Value
Type the value to delete. Leave empty to delete the default value. If you are deleting the entire key, this field is ignored.
Printed Documentation
64
Delete Entire Key (and subkeys)
Check this item to delete the entire key, along with any subkeys it contains.
Delete Value Only
Check this item to delete the named value only.
Warning
• Windows Installer does not provide a mechanism to delete registry keys. This action will not execute through the Windows Installer engine and is provided as a convenience for the setup developer.
• We recommend you create all registry keys used by your application as part of your setup. Doing so assures Windows Installer will automatically remove all such keys upon uninstallation.
Display Dialog
This command displays a dialog that is part of your user interface.
Dialog
Click the drop down arrow to select a dialog that is available for use in your project.
Modal
If the dialog is part of a wizard loop, or queries the user for some information, check this checkbox. If the dialog is a progress dialog, and must remain visible on screen while some installation task is executing, uncheck this checkbox.
If Variable
If you wish to display the dialog only if a particular variable is set to TRUE or FALSE, type the name of that variable here, and select the appropriate condition.
Return Result in Variable
Applicable only the modal dialogs. Setting a variable in this field allows you to determine how the user exited the dialog. Possible values the variable may hold are explained below.

InstallAWARE Help Library
65
Value Meaning
NOTMODAL The dialog was not displayed modally.
NEXT The user exited the dialog by clicking the Next button.
BACK The user exited the dialog by clicking the Back button.
CANCEL The user exited the dialog by clicking the Cancel button.
Notes
• In wizard generated installs, the WIZARD variable is used to hold the return value of the dialog.
Does File/Folder Exist
This command lets you check for the existence of a file or folder on the target system.
Variable
Type the name of the variable that will hold TRUE if the item exists and FALSE if it does not.
Path
Type the full path of the item to check for.
Check for File
Check this box if the item must be a file.
Check for Folder
Check this box if the item must be a folder.
Edit INI File
This command creates, updates or removes a .INI file entry on the target system.

Printed Documentation
66
INI File Path
Type the full path to the INI file to edit. Do not include the name of the INI file in this field.
INI File Name
Type the name of the INI file to edit. You may not use any variables in this field, only string literals are allowed.
Section
Type the name of the INI section to edit.
Key
Type the name of the section key to edit.
Value
Type the value the key under the indicated section should take.
Action
Choose the desired editing action from the drop down list.
End
This command is used in conjunction with If commands. It has no configurable parameters. It is used to direct program flow.
Extract Path
This command manipulates a path string to extract the requested drive, folder, file name, or file extension information.
Variable
This variable holds the path to convert. It will be replaced with the updated path after the conversion.

InstallAWARE Help Library
67
Operation
Choose the type of operation to perform. The table below lists the result of each of the available operations against a sample path value of C:\Program Files\My Company\application.exe.
Operation Resulting Value
Extract Full File Name application.exe
Extract File Name Only application
Extract File Extension Only exe
Extract File Folder C:\Program Files\My Company\
Extract Parent Folder C:\Program Files\
Extract Parent Drive C:\
Get Component State
This command determines if a component defined using the Define Component command is selected for installation.
Component Name
Type the name of the component here, including its full path as originally used in the Define Component command.
Selection State Variable
Type the name of the variable that will receive TRUE if the component is selected and FALSE if it is not.
Notes
• In wizard generated installs, the SELECTED variable is used to test selection of each component.
• InstallAware calculates disk space requirements for each component in connection with the Get Component State command. Each installation

Printed Documentation
68
action following a Get Component State command is added to the disk cost of the component that the command checks the selection of. You must use Get Component State commands for each of your components for accurate disk space requirements reporting.
Get Environment
This command obtains the value of an environment variable.
Environment Variable
The name of the environment variable that the value will be obtained from.
Variable
The name of the script variable that will receive the value of the environment variable.
Get File Version
This command obtains the version number of a file.
File Path
Full path to the file that version information should be extracted from.
Variable
The name of the variable that receives version information. The version is represented in human readable form. If version information is not found in the file, this variable will contain the value 0.0.0.0.
Notes
• To compare a file version to another file version, use the Check File Version command.
Get Folder Location

InstallAWARE Help Library
69
This command obtains the location of a pre-defined folder on the target system.
Variable
Type the name of the variable to hold the folder location.
Folder
Choose the pre-defined folder that the location should be obtained for.
Get for All Users
Has effect only on NT operating systems. If checked, the command will attempt to obtain the location of the pre-defined folder that is shared by all users of the target system, if it is available.
Notes
• If the requested location cannot be found, the variable will hold an empty string.
• In wizard generated installs, the following variables hold the following folder locations:
Variable Folder Location
PROGRAMFILES Typically C:\Program Files
COMMONFILES Typically C:\Program Files\Common Files
SHORTCUTFILESALL Typically C:\Documents and Settings\All Users\Start Menu\Programs
SHORTCUTFILES Typically C:\Documents and Settings\<user>\Start Menu\Programs
DESKTOPDIR Typically C:\Documents and Settings\<user>\Desktop
WINDIR Typically C:\Windows
WINSYSDIR Typically C:\Windows\System32
Get INI File Settings
Printed Documentation
70
This command reads the value of a section key from a .INI file.
Variable
Type the name of the variable to hold the obtained value here.
INI File
Type the full path to the INI file containing the value.
Section
Type the name of the INI section.
Key
Type the name of the section key.
Notes
• If the requested INI file, section, or key cannot be found, the variable will hold an empty string.
Get System Settings
This command obtains information on whether the target system meets minimum capabilities.
Variable
Type the name of the variable that will hold TRUE if the system meets the minimum capability, and FALSE if not.
Capability
Choose the capability to check for using the drop down menu.
Notes
• This function only checks for a minimum capability. For instance, if you are checking for 32 MB Physical Memory, the function will return TRUE if the target system contains at least 32 MB physical memory, and more.

InstallAWARE Help Library
71
Get Temporary File
This command obtains a temporary file name.
Variable
This variable receives a fully qualified temporary file name, located in the system temporary files folder.
Notes
• This function does not create a file with the given name, it only obtains a legal temporary file name.
GoTo Label
This command directs program execution to the indicated Label. The label must be previously defined.
GoTo Label
Type the name of the label to direct program execution to, as exactly defined by the Label command.
Notes
• If the GoTo Label is called while inside a conditional block, the block will be immediately exited.
Hide Dialog
This command is used to remove a non-modal dialog from the screen. The dialog will have been previously shown using the Display Dialog command. It does not have any configurable options and will simply remove the last non-modal dialog displayed on-screen.
Hide Dialog is generally used to remove a progress dialog from the screen before showing a finish dialog after a completed installation.

Printed Documentation
72
If
This command is used to direct program flow conditionally after performing an evaluation. It is used in conjunction with the Else If, Else, and End commands.
Variable
Type the name of the variable, according to the value of which the conditional evaluation will be performed.
Comparison
Choose a comparison type from the drop down menu. If both variables contain integer values, a numeric comparison will be performed. If at least one variable contains a non-integer value, a string comparison will be performed.
Reverse Comparison
Check this checkbox if you wish to execute an if not evaluation.
Compare With
Type the name of the second variable for comparison. You may also use a string literal in this field instead of a variable.
Install Assembly
This command installs a .NET assembly and registers it on the target system.
Source Assembly
Enter the full path to the assembly to install.
Install into the Global Assembly Cache
Check this box to install the assembly into the GAC.
Install into Custom Path
Check this box to install the assembly into a location outside the GAC. The assembly will still be registered on the target system.

InstallAWARE Help Library
73
Install Files
This command is used to install files on the target system.
Source Path
Provide the full path to the files to install. These files must exist on your development system and no variables are allowed in this field. Only a string literal may be used here. Wildcards are allowed. This field will be resolved at compile time to the actual files found on your system by the compiler. Check the Include subfolders if wildcards used checkbox to perform a recursive operation.
Target Path
Provide the full path to install the files on the target system. If this field is left emtpy, the TARGETDIR variable is assumed.
Set Attributes
Check each of the file attributes you wish to set on the files after they have been installed on the target system.
File Properties
Check the relevant file properties for the files you are installing.
Copy Options
Check all the desired file copying and removal safeguides.
Notes
• For accurate disk space requirements, please see the comments following the Get Component State command.
• Windows Installer's default behavior is to overwrite files on the target system if the ones you are copying are newer.
• If you checked File is Self Registering DLL, remember that all files that the Install Files command pertains to must be self registering. If a self registration error occurs, Windows Installer will roll back the entire installation as part of its resiliency mechanism.
• If files you are installing require to be self registered in a particular order, do not check the File is Self Registering DLL option. Windows Installer

Printed Documentation
74
does not allow the self registration order of files to be specified. Instead, use the Register Library command to manually self register those files.
• If you checked File is Vital for Installation, setup will not succeed unless the files in question are selected for installation.
Install ODBC Driver
This command installs an ODBC data provider.
Driver Name
Enter the name of the data provider here. If you wish to duplicate the settings of a driver already installed on your system, click the drop-down arrow and choose the driver to capture.
Driver DLL
Choose the driver DLL file. If the driver requires other files as well, install them normally using the Install Files command.
Setup DLL
Choose the driver setup DLL file.
Target Path
Enter the folder on the target system where the driver should be installed.
Attributes
Specify your data provider attributes here. You may enter multiple attributes by pressing CTRL+ENTER.
Languages
Enter the numeric language identifiers for the data provider here. For instance, the identifier for English (US) is 1033. Leave this field empty if the driver is language neutral.
Install Service

InstallAWARE Help Library
75
This command installs a service.
Service File
Choose the service entry point file. If the service requires other files as well, install them normally using the Install Files command.
Target Path
Enter the folder on the target system where the service should be installed.
Languages
Enter the numeric language identifiers for the service here. For instance, the identifier for English (US) is 1033. Leave this field empty if the driver is language neutral.
Service Name
Enter the name of the service, as it will be identified to the system. You may also use this name with the Control Service command.
Display Name
Enter the display name for the service, as it will appear in the Services Control Panel Application.
Service Description
Enter the ddescription for the service, as it will appear in the Services Control Panel Application.
Service Type
Choose the type of service being installed in the drop-down menu.
Service Interacts with Desktop
Check this item if the service interacts with the user. Uncheck it if the service does not interact with the user.
Load Order Group
If you wish to define the service as part of a load order group, enter the name of that group here.
Dependencies on Services and Load Order Groups

Printed Documentation
76
If the service requires that other services must have already been started before it can execute, specify the names of those services in this field:
• To specify a service name, enter the name of the service. • To specify a load order group, consisting of multiple services, enter the
name of the load order group prefixed with the + character. • If you need to specify dependencies on multiple services and/or load order
groups, seperate each name with the ~ character.
Service Startup
Choose how the service should start when the system is being started using the drop-down menu.
Startup Error Handling
Choose how errors occuring during an attempted service startup as part of a system start should be handled using the drop-down menu.
Account Name
If the service should run in the context of a particular user account, enter the name of that account here.
Account Password
If the service should run in the context of a particular user account, enter the password for that user account here.
Command Line Arguments
If there are any command line arguments to pass to the service, enter those arguments here.
Is MSI Setup Installed
This command checks whether a Windows Installer setup is presently installed on the system.
Product Code (Guid)
Enter the product code for the Windows Installer setup to check for in this field.

InstallAWARE Help Library
77
Variable
This variable returns TRUE if the indicated setup is installed. Otherwise, the variable holds FALSE.
Notes
• The NEEDSUPGRADE pre-defined variable automatically indicates whether a previous version of the running setup has been found on the system.
• Existing installations may be removed using the (Un)Install MSI Setup command.
Label
This command defines a label that program execution can be directed to using the GoTo Label command.
Edit Label
Type the name of the label as you will exactly use in the GoTo Label command.
Notes
• You may not place a label inside an if/else if/else/end block.
Mathematics
This command performs a numerical calculation.
Operand 1
Enter the first operand here. If a variable is used, be sure it represents an integer.
Operand 2
Enter the second operand here. If a variable is used, be sure it represents an integer.
Operation
Choose the type of arithmetic to perform.

Printed Documentation
78
Return Result in Variable
Type the variable that should hold the outcome of the operation.
Notes
• If an illegal operation is attempted, such as division by zero or string arithmetic, the result variable will hold an empty string.
MessageBox
This command displays a message box to the user. The message box may contain useful information and also prompt the user for a decision.
Title
Indicates the title of the message box.
Message
Type the message to display here. You may type a message that spans multiple lines by pressing CTRL+ENTER.
Icon
Choose an icon for your message box.
Buttons
Select which buttons should be available on the message box.
Return Result in Variable
If you wish to know which message box button the user pressed, provide the variable to hold that information here. The variable will hold the exact text of the message box button pressed, all in uppercase, as specified in the Buttons field.
Read from Text File
This command helps you read a single line of text from a text file.

InstallAWARE Help Library
79
Read from File
Enter the full path of the file on the target system to read from.
Into Variable
Enter the variable that will receive the text read.
Return EOF Check in Variable
Provides a way to determine if the end of file has been reached. The variable specified here will contain TRUE if the file end has been reached, and FALSE if not.
Notes
• The variable specified in the Into Variable field will only be written to if the text file exists and can be successfully read from. An empty string in this variable, if it was not previously empty, will indicate that the source text file contained an empty line.
• If the file is being read from for the first time, it will be automatically opened. Any previously opened file will be automatically closed.
• If the file is being read from is already open, the read will continue from the last file position.
• If the end of file has been reached, or at the end of the installation, the file will be automatically closed.
Read Registry
This command reads data from a key in the system registry.
Variable
Type the name of the variable to receive the read value.
Root
Select the root of the read operation using the drop down menu.
Key
Type the name of the key to read from.
Value
Printed Documentation
80
Type the value to read. Leave empty to read the default value.
Notes
• If the key/value to read from does not exist, or cannot be opened, the variable will hold an empty string.
Reboot and Resume
This command will reboot the target system, after safely exiting the installation. It will then restart the installation from the beginning. It does not have any configurable parameters.
This command is ideal for use during pre-requisite installation.
Reboot Computer
This command will reboot the target system, after safely exiting the installation. It does not have any configurable parameters.
Register Library
This command registers or unregisters a library (DLL/OCX/EXE/TLB).
Library
Full path to the library to register or unregister.
Operation
Choose whether to register or unregister the library.
Return Result in Variable
If you wish to know the result of the (un)registration operation, enter a variable name here. If the (un)registration succeeds, the variable will be set to TRUE, otherwise FALSE.
InstallAWARE Help Library
81
Notes
• Windows Installer does not permit the self registration of executable files or type libraries. You may use this command to self register executables or type libraries.
• Windows Installer does not permit specifying the order of self registration. If the libraries you are installing are inter-dependent and require to be registered in a particular order, do not register them through Windows Installer (do not check the File is Self Registering DLL option in the Install Files command). Use this command instead.
• Files you self register with this command during an installation must be explicitly unregistered when they are being removed (such as deselection during an installation maintenance operation or a complete uninstallation).
Run Program
The Run Program command enables you to execute a program on the target system, optionally wait for its completion, and obtain execution result (provided, of course, the program sets a return value).
Run Program
Type the full path to the executable that is to be run.
Hide Program Window
If you wish to hide the window of the executable, check this checkbox.
Command Line
If you will be using any command line parameters, enter them in this field.
Wait For Program to Finish
If you wish to pause the installation script until the indicated program completes executing, check this checkbox.
Return Result in Variable
If the program you are running sets a return value, you may capture it inside a variable by providing the name of the variable in this field.
Notes
• Some programs may have difficulty with long path names used in their command lines. It may be best to use the Convert Path command on such paths before executing the program.

Printed Documentation
82
Set Component State
This command sets the selection state of a component previously defined by the Define Component command.
Component Name
Type the name of the component here, including its full path as originally used in the Define Component command.
Component is Selected
Check this checkbox to set component state to selected, uncheck it to set the state to unselected.
Notes
• Wizard generated installations deselect each defined component, other than the first one, when doing a minimum setup.
Set Variable
The Set Variable command declares a variable, and initializes it to a particular value. If the variable was previously declared, it takes on the new value specified by the command. Variables must be defined before they can be used in If commands, dialog boxes, or plug-in actions.
Set Variable
Type the name of the variable to define or re-initialize.
To Value
Type the value for the variable. Leave the field empty to set the variable equal to an empty string.
Terminate Install

InstallAWARE Help Library
83
This command performs an orderly shutdown of the installation. The installation will immediately exit and clean up after itself. It has no configurable parameters.
Terminate Program
This command attempts a safe shutdown of a running application. It does not force the application to close, however it attempts to dismiss any open dialogs the application may have running and sends a close request to the main application window.
Program Window Title Contains
Enter text that the program window caption is expected to contain. The text is case sensitive. The text does not have to contain the exact caption of the window, only a portion of it.
Window Class Name
If you wish to narrow the matching list of windows containing the text entered above by specifying a window class, enter it here.
Notes
• Fill in at least one of the fields as required. • While specifying a window class will enhance precision, it is generally not required.
Web Media Block
This command is directive for the compiler, and is not constrained by conditional execution blocks. It has meaning only when used with Web builds and has no effect on Uncompressed or Compressed build types.
The Web Media Block command indicates that each installation command which installs files on the target system should place those files in the named source media block. Multiple media blocks may be defined and re-defined in any order. Each media block is effective until a subsequent media block is encountered. At least one media block must be defined before a Web build is be compiled.
Web Media Block Name
The name of the web media block. Must not exceed 8 characters and should follow the traditional short file naming convention. When the installation is built, each file

Printed Documentation
84
belonging to this media block will be placed inside an archive called <web media block name>.7zip.
Download URL
Specify the full HTTP download URL where the media block can be downloaded from at install time. The file <web media block name>.7zip should be uploaded and available immediately at this exact location for download.
Skip on Build
If files in your media block have not changed since the last time you built this setup, check this box to skip rebuilding this media block. Since media blocks are highly compressed, generating them takes time. This will save you time when you are testing and rebuilding your setup, and the media block in question has not been effected.
Notes
• If you specify an empty string in the Web Media Block Name field, an OFFLINE CONTENT block will be defined instead. This block will not be converted into a downloadable web media block, but instead packaged with the main setup executable itself. Use this option to include files which you will always install in your main setup program.
• Splice your entire setup into as many media blocks as required. You may use any combination and number of web and offline blocks to achieve your desired effect. We recommend you install your essential application files in an offline block, and place all of your runtime component updates and optional application features each in their own media blocks.
• Wizard generated projects contain an offline block for Feature Independent files, a seperate web block for each defined application feature, and again a seperate web block for each component update to be installed.
Wizard Loop
The Wizard Loop command provides a convenient way to author a setup wizard. A setup wizard is composed of multiple dialogs shown one after another sequentially, also allowing for backward traversal, and optional skipping of some dialogs based on user selections and installation requirements.
This command starts a wizard loop and has no configurable parameters. The wizard loop may only contain Display Dialog commands inside it and must be closed with an End command.

InstallAWARE Help Library
85
Write Registry
The Write Registry command records information to the system registry.
Root
Pick the root of the registry where the keys and values should be written to.
Key
Type the full key path.
Value
Type the value name to record. Leave empty to set the default value, which is always a string.
Data
Provide the actual data that will be recorded. Check Write as String to record the value as a string. Check Write as Integer to record the value as an integer.
Write to Text File
This command enables you to output a single line of text to a text file. This command does NOT execute through Windows Installer and is provided as a convenience to the setup author. Use the Edit INI File command to write to a text file through Windows Installer.
Write to File
Indicates the full path of the file on the target system to write to.
Value
Indicates the value to write. Check Write to Start of File to insert the value at the beginning of the text file. Check Write to End of File to append the value at the end of the text file.
Notes
• If the file being to written to does not already exist, it will be created. • The file will be opened for writing, written to, and then closed immediately after the write.

Printed Documentation
86
Plug-In Commands
(Un)Install MSI Package
This plug-in provided command installs, re-installs, or uninstalls a Windows Installer setup. A full Windows Installer setup command line may be specified. The progress of the Windows Installer setup will be captured and displayed as part of the installation progress.
Action String
The action string designates whether the Windows Installer setup will be installed, re-installed, or uninstalled. Custom action strings may also be used, for instance to change the installed feature set of an application.
Enter any legal Windows Installer command line parameter here. Click one of the Install, Re-Install or Uninstall buttons to automatically generate a standard command line parameter.
Use Package Guid
Check this field and enter the package guid of the Windows Installer setup to operate on. The package guid option is most useful when you intend to uninstall an already installed Windows Installer setup, and do not wish to include the MSI file for the setup.
Use Package File
Check this field and enter the full path to the Windows Installer setup database file to operate on. The package file option is most useful when you intend to install a Windows Installer setup, and will be distributing the MSI file with your own setup.
Package is InstallAware generated installation
Check this field if the command will be used to operate on an InstallAware setup. This command will fail on InstallAware setups unless this field is checked. Checking this field for non-InstallAware setups is not recommended.
Log File
If you wish to log the result of the (un)installation, enter the full path to the log file to use here.
Return Result in Variable

InstallAWARE Help Library
87
This variable, if previously defined, will hold one of the following values based on the result of the (un)install operation:
Value Meaning
SUCCESS Installation was completed successfully.
ERROR An error occured during installation.
REBOOT Installation was completed successfully, however a reboot is required.
Return Last Error in Variable
If an error occured during installation, this variable, were it previously defined, will hold a textual description of that error.
Notes
• Think of this command as a shell to Windows Installer. • If you wish to install a Windows Installer setup as part of your application:
1. Add the MSI database of the setup to your project as a support file. 2. Use this command with the Use Package File option, and specify
the path to the MSI database using the form $SUPPORTDIR$\<setup database>.msi.
• If you wish to uninstall a previous version of your own application using this command:
1. Check if a previous version of your application exists on the system using the NEEDSUPGRADE variable.
2. Use this command with the Use Package Guid option, and specify $PRODUCTCODE$ as the package guid.
.NET Framework
This plug-in provided command checks for or installs the Microsoft .NET Framework on the target system.
Check for Framework
Check this checkbox to check for the presence of the framework, and not install it.

Printed Documentation
88
Install Framework version
Check this checkbox to install the framework if it is not already present.
.NET 1.0
If this checkbox is checked, version 1.0 of the framework will be check for/installed.
.NET 1.1
If this checkbox is checked, version 1.1 of the framework will be check for/installed.
Return result in variable
If you specify a previously defined variable in this field, it will hold framework information as follows:
• TRUE: Framework check requested. Requested version of framework is available.
• FALSE: Framework check requested. Requested version of framework is NOT available.
• SUCCESS: Framework install requested. Framework was installed successfully, or was already available. No reboot is required.
• ERROR: Framework install requested. Framework was not installed successfully, a reboot is pending or system does not meet minimum requirements.
Notes
• Wizard generated installations contain example of logic for proper detection and installation of runtime components.
Call DLL Function
This plug-in provided command calls a function exported from a DLL. The function must be available under the specified function name and use the __stdcall calling convention.
DLL Path
The full path to the DLL file that exports the function. If a full path is not specified, the DLL will be loaded using the same guidelines that the LoadLibrary API call uses.
Function Name
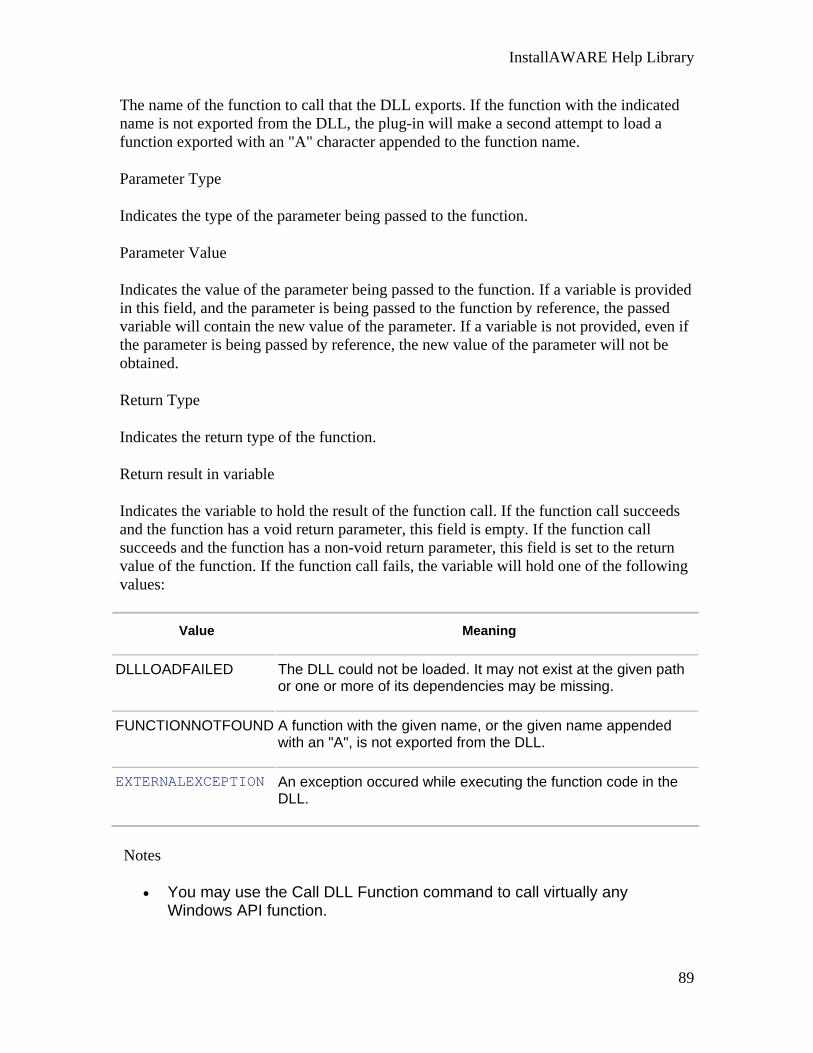
InstallAWARE Help Library
89
The name of the function to call that the DLL exports. If the function with the indicated name is not exported from the DLL, the plug-in will make a second attempt to load a function exported with an "A" character appended to the function name.
Parameter Type
Indicates the type of the parameter being passed to the function.
Parameter Value
Indicates the value of the parameter being passed to the function. If a variable is provided in this field, and the parameter is being passed to the function by reference, the passed variable will contain the new value of the parameter. If a variable is not provided, even if the parameter is being passed by reference, the new value of the parameter will not be obtained.
Return Type
Indicates the return type of the function.
Return result in variable
Indicates the variable to hold the result of the function call. If the function call succeeds and the function has a void return parameter, this field is empty. If the function call succeeds and the function has a non-void return parameter, this field is set to the return value of the function. If the function call fails, the variable will hold one of the following values:
Value Meaning
DLLLOADFAILED The DLL could not be loaded. It may not exist at the given path or one or more of its dependencies may be missing.
FUNCTIONNOTFOUND A function with the given name, or the given name appended with an "A", is not exported from the DLL.
EXTERNALEXCEPTION An exception occured while executing the function code in the DLL.
Notes
• You may use the Call DLL Function command to call virtually any Windows API function.
Printed Documentation
90
DirectX Runtime
This plug-in provided command checks for or installs the DirectX Runtime on the target system.
Check for runtime version at least 8.1
Check this checkbox to check for the presence of the most commonly required version of the runtime.
Check for runtime version at least 9b
Check this checkbox to check for the presence of the latest available version of the runtime
Get available version
Check this checkbox to obtain the exact version of the runtime.
Install Runtime version 9b
Check this checkbox to install version 9b of the runtime.
Return result in variable
If you specify a previously defined variable in this field, it will hold runtime information as follows:
• <version>: Runtime version check requested. Variable receives the full DirectX version string from the system registry. The version string for version 9b of the runtime is 4.09.00.0902. The version string for version 8.1 of the runtime is 4.08.01.0810.
• TRUE: Runtime check requested. Requested version of runtime is available.
• FALSE: Runtime check requested. Requested version of runtime is NOT available.
• SUCCESS: Runtime was installed successfully, or was already available. No reboot is required.
• REBOOT: Runtime was installed successfully. However, a reboot IS required.
• ERROR: Runtime was not installed successfully, system does not meet minimum requirements.

InstallAWARE Help Library
91
Notes
• Wizard generated installations contain example of logic for proper detection and installation of runtime components.
Download File
This plug-in provided command downloads any file from the Internet.
URL
Enter the full HTTP URL to the file that should be downloaded.
Local file path and name
Enter the full path for the local copy of the file on the target system. If file already exists, and the Allow resume broken downloads checkbox is checked, it will be assumed to be a previously broken download and the Download File command will attempt to resume the download from where it left off.
Return result in variable
If you wish to receive information on whether the file was successfully downloaded, enter the variable to hold success information here. Possible values are:
• SUCCESS: File was downloaded successfully. • ERROR: File was not downloaded successfully. Check Internet
connectivity.
Proxy Server
If you wish to redirect the download through a proxy server, provide that information here.
Proxy Port
If the proxy server requires port information, enter that here.
Allow resume broken downloads
Check this checkbox to permit continuation of broken downloads. Uncheck it to always download files from the beginning.

Printed Documentation
92
Notes
• Since downloads can take some amount of time, it is recommended you use the Display Dialog command to show a progress dialog while your download is taking place.
Internet Explorer 6 (SP1)
This plug-in provided command installs or re-installs Internet Explorer 6 Service Pack 1.
Install Internet Explorer 6 (SP1)
Choose whether to perform a complete, standard, or minimal installation of Internet Explorer using the drop-down menu.
Shell Integration
Choose whether you wish to:
• Make Internet Explorer the default browser, and create all shell shortcuts • Create the shell shortcuts only • Just install the Internet Explorer browser control, and do not create any
shortcuts (useful if your application requires the browser control)
Return result in variable
If you indicate a previously defined variable in this field, it will hold one of the following values, based on the outcome of the attempted installation:
• REBOOT: Installation completed successfuly, system must be restarted for changes to apply
• ERROR: Installation failed
Notes
• This command does not check whether a current or newer version of Internet Explorer already exists on the system. It will re-install Internet Explorer even if it has already been installed.
• Use the Get System Settings command to check for an existing version of Internet Explorer.

InstallAWARE Help Library
93
JSharp Runtime
This plug-in provided command checks for or installs the Microsoft JSharp Runtime version 1.1 on the target system.
Check for Runtime
Check this checkbox to check for the presence of the runtime, and not install it.
Install Runtime
Check this checkbox to install the runtime if it is not already present.
Return result in variable
If you specify a previously defined variable in this field, it will hold framework information as follows:
• TRUE: Runtime check requested. Requested version of runtime is available.
• FALSE: Runtime check requested. Requested version of runtime is NOT available.
• SUCCESS: Runtime install requested. Runtime was installed successfully, or was already available. No reboot is required.
• ERROR: Runtime install requested. Runtime was not installed successfully, a reboot is pending or system does not meet minimum requirements.
Notes
• Wizard generated installations contain example of logic for proper detection and installation of runtime components.
MDAC Refresh
This plug-in provided command checks for or installs the MDAC Refresh on the target system. This runtime installation contains the following components: ADO, ODBC, OLE DB, and JET.
Check for at least version 2.8
Check this checkbox to check for the presence of the latest available version of the refresh.

Printed Documentation
94
Get available version
Check this checkbox to obtain the exact version of the runtime.
Install version 2.8
Check this checkbox to install version 2.8 of the refresh.
Return result in variable
If you specify a previously defined variable in this field, it will hold runtime information as follows:
• <version>: Refresh version check requested. Variable receives the full MDAC version string as reported by the system. The version string for version 2.8 of the refresh is 2.8.
• TRUE: Refresh check requested. Requested version of refresh is available.
• FALSE: Refresh check requested. Requested version of refresh is NOT available.
• SUCCESS: Refresh was installed successfully, or was already available. No reboot is required.
• REBOOT: Refresh was installed successfully. However, a reboot IS required.
• ERROR: Refresh was not installed successfully, system does not meet minimum requirements.
• CANCEL: Refresh was not installed successfully, operation aborted by user.
• DISKFULL: Refresh was not installed successfully, destination drive lacks sufficient free space.
Notes
• Wizard generated installations contain example of logic for proper detection and installation of runtime components.
MSXML 4 SP2
This plug-in provided command checks for or installs Microsoft XML 4.0 Service Pack 2.0 onto the system.
Check for MSXML 4.0 SP2

InstallAWARE Help Library
95
Check this checkbox to check for the presence of the module, and not install it.
Install MSXML 4.0 SP2
Check this checkbox to install the module if it is not already present.
Return result in variable
If you specify a previously defined variable in this field, it will hold framework information as follows:
• TRUE: Module check requested. Requested version of module is available.
• FALSE: Module check requested. Requested version of module is NOT available.
• SUCCESS: Module install requested. Module was installed successfully, or was already available. No reboot is required.
• ERROR: Module install requested. Module was not installed successfully, an error occured or system does not meet minimum requirements.
• REBOOT: Module install requested. Module was installed successfully, and a reboot is pending.
Visual Basic VM
This plug-in provided command checks for or installs the Visual Basic 6 Virtual Machine (Service Pack 6) on the target system.
Check for Runtime version SP5
Check this checkbox to check for the presence of the most commonly required version of the runtime.
Check for Runtime version SP6
Check this checkbox to check for the presence of the latest available version of the runtime
Install Runtime
Check this checkbox to install the runtime.
Return result in variable
Printed Documentation
96
If you specify a previously defined variable in this field, it will hold runtime information as follows:
• <version>: Runtime version check requested. Variable receives the full virtual machine version string from the virtual machine DLL file. The version string for SP6 of the runtime is 6.0.97.82. The version string for SP5 of the runtime is 6.0.89.64.
• TRUE: Runtime check requested. Requested version of runtime is available.
• FALSE: Runtime check requested. Requested version of runtime is NOT available.
• SUCCESS: Runtime was installed successfully, or was already available. No reboot is required.
• REBOOT: Runtime was installed successfully. However, a reboot IS required.
Notes
• Wizard generated installations contain example of logic for proper detection and installation of runtime components.
Visual C++ Runtime
This plug-in provided command checks for or installs the Visual C++ 6 (Service Pack 6) runtime on the target system. This runtime installation contains the following components: MFC, ATL, and language DLLs.
Check for Runtime
Check this checkbox to check for the presence of the runtime, and not install it.
Install Runtime
Check this checkbox to install the runtime if it is not already present.
Return result in variable
If you specify a previously defined variable in this field, it will hold framework information as follows:
• TRUE: Runtime check requested. Requested version of runtime is available.

InstallAWARE Help Library
97
• FALSE: Runtime check requested. Requested version of runtime is NOT available.
• SUCCESS: Runtime install requested. Runtime was installed successfully, or was already available. No reboot is required.
• ERROR: Runtime install requested. Runtime was not installed successfully, a reboot is pending or system does not meet minimum requirements.
Notes
• Wizard generated installations contain example of logic for proper detection and installation of runtime components.
Windows Installer
This plug-in provided command checks for or installs the Windows Installer runtime version 1.1 on the target system.
Check for Runtime version 2.0
Check this checkbox to check for the presence of the runtime, and not install it.
Install Runtime version 2.0
Check this checkbox to install the runtime if it is not already present.
Return result in variable
If you specify a previously defined variable in this field, it will hold framework information as follows:
• TRUE: Runtime check requested. Requested version of runtime is available.
• FALSE: Runtime check requested. Requested version of runtime is NOT available.
• SUCCESS: Runtime install requested. Runtime was installed successfully, or was already available. No reboot is required.
• ERROR: Runtime install requested. Runtime was not installed successfully, a reboot is pending or system does not meet minimum requirements.
Warning

Printed Documentation
98
• Version 2.0 of the Windows Installer runtime must be installed on the target system for your application installation to succeed.
Notes
• Wizard generated installations contain example of logic for proper detection and installation of runtime components.
Windows Media Format 9
This plug-in provided command installs support for Windows Media Format version 9.
Check for format version at least 9
Check this checkbox to check for the presence of the format, and not install it.
Install format version 9
Check this checkbox to install the format if it is not already present.
Return result in variable
If you specify a previously defined variable in this field, it will hold framework information as follows:
• TRUE: Format check requested. Requested version of format is available. • FALSE: Format check requested. Requested version of format is NOT
available. • SUCCESS: Format install requested. Format was installed successfully, or
was already available. No reboot is required. • REBOOT: Format install requested. Format was installed successfully. A
reboot is required before format will be available for use. • ERROR: Format install requested. Format was not installed successfully,
a reboot is pending or system does not meet minimum requirements.
Dialog Editor
Starting the Dialog Editor
There are several ways to start the MimarSinan InstallAware User Interface Editor.

InstallAWARE Help Library
99
• Start the Dialog Editor from the Start Menu shortcut. • Press the F12 key while the InstallAware IDE is running. • Double-click or press ENTER while a dialog is selected in the Project
Manager window. This will load the selected dialog into the editor.
Once the Dialog Editor is started, if an existing dialog is not already loaded, choose File Open to load a dialog into the editor, or work with the empty dialog design.
Using the Dialog Editor
You may use the Dialog Editor to perform any of the following tasks:
• Add new controls to existing dialogs • Customize or remove existing controls on dialogs • Pass the values of dialog controls and script variables between one
another • Customize themes and graphical elements to meet your needs • Design entire themes from scratch
Once you've started the Dialog Editor, the general editing process can be summarized in the following steps:
1. If the dialog you wish to edit is not already loaded, choose File Open to load it. You may also prefer to start with an empty dialog (to do so, start the editor without any command line parameters, for instance from the Start Menu shortcut).
2. Explore the various tabs (Standard, Additional, Win32, Browser) and get a feel for the available range of dialog controls.
3. Click on the control you wish to add to the dialog. Then click on the dialog where you wish to place the control.
4. Position and size the control precisely using the grab handles. You may also use the keyboard in this process.
5. Explore and set the various properties of the control as visible in the Object Properties window.
6. Add any further controls, and modify/remove existing ones as required. 7. Define the way controls in the dialog respond to one another. For
instance, you may want to disable a Next button until the license agreement has been accepted.
8. Specify how your dialog receives information from the setup script. For instance, you may want to define which controls receive the list of available application features.

Printed Documentation
100
9. InstallAware makes it very easy to pass variables between the dialogs and the script. Associate dialog controls with variables.
10. Choose File Save to save your dialog, or File Save As to save it under a new file name.
11. Choose Tools Test Dialog to test your dialog before finalizing your changes. If you need to close the dialog while testing, press ALT+F4.
Dialog Controls
The table below summarizes available dialog controls, the tabs they are available on, and example areas for their use.
Page Control Usage
Standard Label Display static text
Standard Edit Box Obtain information from user
Standard Memo Display readme, license agreements
Standard Button Navigate between dialogs, exit setup
Standard Check Box Accept license agreement, display other choices
Standard Radio Button Accept license agreement, display mutually exclusive choices
Standard List Box Display list of items
Standard Combo Box Display drop-down list of items
Standard Group Box Define a group, use for isolating radio buttons
Standard Panel Add a panel or bevel
Additional Bitmap Button A button with a bitmap
Additional Speed Button A button with a bitmap and no text
Additional Masked Edit Edit box with masked characters, useful for passwords

InstallAWARE Help Library
101
Additional Picture Any bitmap or icon, clickable
Additional Shape A geometric shape in any color
Additional Bevel Bevel useful for defining dialog regions
Additional Static Text Display textual progress, clickable links
Win32 Rich Text Display RTF files, license agreements, readme information
Win32 Track Bar Allow user to select a numeric range
Win32 Progress Bar Display installation progress
Win32 Up Down Button Single step increment and decrement
Win32 Animation Display built in Windows animation, or custom AVI file
Win32 Check-List Box Useful for displaying a selectable, flat list of setup features
Win32 Tree View Useful for displaying multiple hierarchies of nested setup features
Browser HTML View Display interactive html or billboards during installation progress
Browser File List Box For file selection
Browser Directory List Box
For folder selection
Browser Drive Combo Box
For drive selection
Browser Filter Combo Box
To constrain file types shown on the file list box
Browser Shell Tree View For Explorer style folder selection
Browser Shell List View For Explorer style file selection
Browser Shell Combo Box
For Explorer style folder selection

Printed Documentation
102
Intra-Dialog Relations
While working on dialogs, you will realize you need to constrain the behavior of controls shown on the dialogs. A step-by-step procedure is provided below for defining relations between your dialogs.
1. Make sure the dialog contains the controls that are expected to interact with one another.
2. Double-click one of the controls. The Define Interactive Characteristics dialog appears. Select the Object Rules tab on this dialog.
3. If you have any existing relations previously defined, they show under the Existing Rules pane. You may highlight rules and move their processing order up or down, or delete the rules altogether. Keep in mind that rules will be processed at runtime following a top-down order.
4. In the When Control drop down menu, select the control whose state will effect the other control. Controls are listed on this drop down menu by their Name property accessible from the Object Properties window.
5. Choose the property you wish to check for in the Has Property drop down menu.
6. Enter the property value in the Equal To field as a string. You may also check not if you wish to test for the exclusion of this property.
7. In the Change Control drop down menu, choose the target control. 8. Pick the Property Value to modify from the drop down menu. 9. Enter the new value into the To New Value field as a string. 10. Click the Add button to add your new rule to the list of existing rules. Click
Replace instead to replace the currently highlighted rule in the Existing Rules pane with the new rule.
11. If you later wish to customize an existing rule, simply click that rule in the Existing Rules pane. All fields in the rule editor will be automatically populated. You can update your rule and click Replace to store your changes.
12. Be sure to click Close on the dialog to finalize your changes, and save your dialog in the main editor.
Notes
• To see example dialog relations in action, open any license agreement dialog.
• Test the behavior you defined in the main editor by choosing Tools Test Dialog.
InstallAWARE Help Library
103
Dialog Behavior
In addition to defining relationships between dialog controls themselves, you will also want to connect dialog controls with the installation itself, so that the dialog will receive and display information about the running setup, such as progress information. The procedure for setting up these connections is described below.
1. Make sure the dialog contains the controls that you wish to display script information in.
2. Double-click one of the controls. The Define Interactive Characteristics dialog appears. Select the Object Behavior tab on this dialog.
3. In the Control drop down menu, select the control that will receive setup information. Controls are listed on this drop down menu by their Name property accessible from the Object Properties window.
4. Depending on the kind of control selected, the fields Receives Information, Writes Values to Variable, and Performs Action will disable or enable.
5. Interact with the enabled fields to define the setup information that the control will reflect.
6. Be sure to click Close on the dialog to finalize your changes, and save your dialog in the main editor.
Notes
• To see example dialog behaviors in action, open any pre-defined setup dialog. Each dialog will have some behaviors defined.
• Test the behavior you defined in the main editor by choosing Tools Test Dialog.
Passing Variables
MimarSinan InstallAware makes it very easy to connect variables used in the setup script to dialog elements. This makes extracting information the user entered into the setup dialogs a trivial task.
Passing Values from Dialogs to the Script
1. Make sure the dialog contains the control that you wish to extract information from.

Printed Documentation
104
2. Double-click the desired control. The Define Interactive Characteristics dialog appears. Select the Object Behavior tab on this dialog.
3. In the Control drop down menu, confirm the desired control is selected. Controls are listed on this drop down menu by their Name property accessible from the Object Properties window.
4. If the control contains any meaningful information that can be passed back to the script, the Writes Values to Variable field will enable.
5. Type in the Write Values to Variable field the name of the script variable that you wish to hold control information. This variable must already be defined in your setup script.
6. Be sure to click Close on the dialog to finalize your changes, and save your dialog in the main editor.
An example dialog box illustrating this concept is the setup type dialog.
Passing Values from the Script to Dialogs
While under most circumstances the above procedure will establish a two-way link between the control and the script variable in question, you may want to explicitly obtain the value of a variable, and assign it to a dialog control as a property. You may then use this property in controlling the state of other dialog controls.
1. Add a label to the dialog. Give the label a descriptive name. 2. Set the visible property of the label to FALSE using the Object Properties
window. Since this control is only used internally, we do no want the end user to see it.
3. Set the caption property of the label to the dereferenced variable. For instance, if the script variable you wish to capture is called MYVAR, set the caption to $MYVAR$.
4. Use the caption property of this label in defining intra-dialog relations.
An example dialog box illustrating this concept is the finish dialog.
Support Files
Support Files
InstallAware uses support files at several places throughout the installation. Support files are not actually installed onto the target system, but they are part of the installation package. They are available temporarily while the installation is executing and are cleaned up when the installer finishes execution. Some example support files are:

InstallAWARE Help Library
105
• License agreement and readme files • Progress dialog content • Setup splash screen
You may add custom items to support files and access these files at runtime using the SUPPORTDIR pre-defined script variable. An example support file could be a small applet you need to run as part of your installation.
Modifying Support Files
Each installation project contains support files that are used as resources during your setup. For instance, your license agreement file is a support file. Support files are compressed into the main setup executable during builds and are available while the installation is running at the folder referenced by the SUPPORTDIR variable.
To Add Support Files
Adding files such as setup splash screens, license agreements, readme files, is necessary for most setups:
1. Display the Project Manager. 2. Select the Support Files node in the tree view. 3. Right-click and choose Add Files to Project, or press INSERT. Browse to
the files you wish to add. You may select multiple files.
Remember that you may include any file as a support file, and access it while the installation is running using the SUPPORTDIR variable.
To Remove Support Files
You may wish to eliminate support files that you no longer use:
1. Display the Project Manager. 2. Select the Support Files node in the tree view. 3. Highlight each support file you would like to remove. You may select
multiple files. 4. Right-click your selection and choose Remove Files from Project, or press
DELETE.

Printed Documentation
106
Displaying a Splash Screen
To display a splash screen while the installation is initializing, simply create a .BMP file and add it to the setup. All bitmap types at all color resolutions are supported; however you may want to keep to 256 colors on your bitmap in consideration of older systems with graphics cards that cannot display higher resolutions.
1. Name the bitmap file setup.bmp. 2. Display the Project Manager. 3. Add the bitmap to the project as support files.
If you later need to remove or update the splash screen, simply modify its file as a regular support file. The Project Manager will maintain a reference to your bitmap file in your project and the bitmap file will be placed in your project folder.
Change Setup Icon
You may customize the default setup icon that is used in several places throughout your setup:
• Setup self extraction progress window • Setup self extractor program • Main setup program • Setup dialogs system menu • Taskbar program button • Add-Remove Programs applet
To customize the setup icon
1. In the Project Options dialog (SHIFT+CTRL+F11), select the Add-Remove node beneath the Project node.
2. Click the Load Icon button and choose your custom icon.
To revert to the default icon
1. Remove the file icon.ico from your list of support files.
License and ReadMe Files

InstallAWARE Help Library
107
To display license and readme files in your setup dialogs, you need to add the files to your setup project. Rich text and plain text files may be used for displaying licensing and readme information.
1. Name the license agreement file license.rtf or license.txt. 2. Name the readme file readme.rtf or readme.txt. 3. Display the Project Manager. 4. Add the files to the project as support files.
If you later need to remove or update these files, simply modify them as regular support files. The Project Manager will maintain a reference to these files in your project and the files will be accessible in your project folder.
Using Interactive Progress Flash
You may use interactive Flash movies as part of your installation dialogs, and in particular inside a progress dialog, to educate and entertain your users while your product is installing. Flash movies provide an unprecedented rich medium for use as installation billboards, with no limits on your creativity.
Adding a Flash Control to a Dialog
In order to display interactive Flash movies in your dialogs, you first need to add a Flash control to your dialogs.
1. Open the dialog in the Dialog Editor. 2. Choose the Browser tab on the component palette. 3. Select and add the FlashFrame control to your dialog. 4. Double-click the new control to bring up the Define Interactive
Characteristics window. 5. Choose the Object Behavior tab, and under the Receives Information
drop-down, select Installation Billboards.
Adding a Flash Movie to a Setup
After adding the Flash control to your setup dialogs, you will want to add the movie itself.
1. Set the file name of the Flash movie to add as movie.swf. 2. Display the Project Manager. 3. Add the SWF file as a support file.

Printed Documentation
108
If you later need to remove or update your movie, simply modify it as a regular support file. The Project Manager will maintain a reference to this file in your project and the file itself will be accessible in your project folder.
Flash Runtime Deployment
To display Flash movies, the player runtime needs to be present on the end-user system. The moment a dialog containing the FlashFrame control is shown, InstallAware will automatically attempt to install the player runtime if it is not already available. If the installation fails, the dialog will not render the movie, but no setup error will occur - your installation will continue normally.
The runtime file that is used in this automated installation process is automatically added to your project as a support file under the name flash.ocx. This addition occurs moment you add a movie to your setup. You may replace the default runtime file with a newer/older version of the runtime. To do so, simply add the desired version of the runtime file as a support file under the name flash.ocx to your project. You may also delete the runtime file from the list of support files, however in this case if the end-user system lacks the runtime, none of your movies will render (although the setup itself will not be affected).
Using Interactive Progress HTML
If you were impressed by the interactive HTML content available on the InstallAware progress dialog, you will be pleased to know that you may include the same feature in your own setups. You just need to create your HTML content and the files to your project.
1. Name the entry point for your progress HTML index.htm. 2. Create any additional HTML files. The files may reference one another,
and include links to graphics. 3. Make sure none of the links on any of the pages has path specifiers -
everything should work in a flat directory structure. 4. Display the Project Manager. 5. Add all the HTML files and required support files (such as .GIF and .JPEG
files) to the project as support files.
If you later need to remove or update these files, simply modify them as regular support files. The Project Manager will maintain a reference to these files in your project and the files will be accessible in your project folder.
The native HTML viewer on the progress dialog does not require any runtime controls (such as the Internet Explorer control), offering maximum freedom and compatibility

InstallAWARE Help Library
109
with all existing Windows versions. The viewer is also capable of parsing most HTML tags, supports page backgrounds, animated GIFs, page refreshes, external links to websites, and more.
Using Static Progress Billboards
While interactive HTML content is available on the InstallAware progress dialog, you may choose to take a more traditional route and instead display static billboards.
1. Author an HTML file for each billboard to display: o Name the first file index.htm, o Add a META REFRESH tag to each HTML file, pointing it to the
next file, o Display a billboard graphic (and other relevant information) in each
HTML file. 2. Make sure none of the links on any of the pages has path specifiers -
everything should work in a flat directory structure. 3. Display the Project Manager. 4. Add all the HTML files and required support files (such as .GIF and .JPEG
files) to the project as support files.
If you later need to remove or update these files, simply modify them as regular support files. The Project Manager will maintain a reference to these files in your project and the files will be accessible in your project folder.
The native HTML viewer on the progress dialog does not require any runtime controls (such as the Internet Explorer control), offering maximum freedom and compatibility with all existing Windows versions. The viewer is also capable of parsing most HTML tags, supports page backgrounds, animated GIFs, page refreshes, external links to websites, and more.
The Localization Process
MimarSinan InstallAware contains all the tools and resources necessary for you to localize your setups. The process of localizing your setup is described in the following steps:
1. In the Project Options dialog (SHIFT+CTRL+F11), select the Project node and choose the desired target language under the Language drop down menu.

Printed Documentation
110
2. Edit your installation script in the script editor, and localize all strings used in your script.
3. Edit your installation dialogs, and localize all strings used in the installation dialogs.
4. Open the Translator utility (choose Tools Start Translator) and localize all strings falling under your target language.
5. Rebuild your setup, and deploy.
Building from the Command Line
MimarSinan InstallAware includes a command line build utility which you may use in batch files, automated build processes, or just plain from the command line. The utility is invoked as follows:
miabuild.exe <projectfile> [/o=<outputfolder>] [/b=<buildtype>] [COMPILERVAR1=VALUE1 ... COMPILERVARN=VALUEN] <projectfile> Full/partial path to the .MPR project file <outputfolder> Optional parameter, full/partial path to custom build output folder <buildtype> Optional parameter, build type 0: Uncompressed directory layout 1: Compressed Single Self Installing EXE 2: Compressed Web-Based EXE [COMPILERVARN=VALUEN] Optional parameter, compiler variable-value pairs for conditional compilation
The command line build utility returns the following codes to indicate success/failure:
• 0: Build completed successfully • 1: Error during build, or user cancelled build • 2: Invalid command line parameters

InstallAWARE Help Library
111
• 3: Unhandled fatal exception during build
Setup Command Line Parameters
Every InstallAware setup supports command line parameters for silent and logged installs. In addition, you may also set/override the values of variables used in your installation from the command line.
You may freely combine all of the parameters displayed below. See uninstalling from the command line for an example.
Silent Installs
With the silent install command line parameter set, the entire installation will execute silently, without a user interface, or any user intervention. When input is required on dialog boxes, the default values of dialog controls will be used.
<setup.exe> /s
In the above example, setup.exe denotes the main setup executable.
Logged Installs
If the logging command line parameter is set, the installation will keep a verbose log of all the internal installation variables, as well as Windows Installer's own installation log.
<setup.exe> /l=<logfile.ext>
In the above example, setup.exe denotes the main setup executable, and logfile.ext is the full path to the desired log file.
Setting Variable Values
To set the values of setup variables from the command line, possibly overriding their default values in the process, specify the variables and their values as follows:
<setup.exe> <VARIABLE_1>=<VALUE_1> [ ... <VARIABLE_N>=<VALUE_N>]
In the above example, setup.exe denotes the main setup executable, VARIABLE_1 is the name of a variable to set, and VALUE_1 provides the value the variable is set to receive. You may set values for an arbitrary number of variables from the command line.
Printed Documentation
112
Plug-In Development Plug-In Authoring Overview
The InstallAware IDE and setups are plug-in extensible. This document describes how to develop plug-ins for extending InstallAware installations. To jump start your plug-in development, display the New Project dialog in the InstallAware IDE (choose File New Other) and pick a plug-in template project.
Plug-In Files
A plug-in consists of two DLLs:
• Design-Time/Compile-Time DLL. Invoked from the IDE while setup is being designed, and compiled.
• Run-Time DLL. Invoked from the running setup program while product is actually being installed.
More files may be present in the plug-in folder as required by the plug-in. These files may be support files for the DLLs, or files that the plug-in makes available to the running setup.
Design-Time/Compile-Time DLL
This DLL should:
• Display user interface, allowing programmer to configure plug-in options • Participate in the build process, by copying the runtime dll, and required
support files, to the build location
This DLL may include dependencies on other libraries.
Run-Time DLL
This DLL should:
• Perform the actual plug-in task while install is running • Properly return updated state of variables to calling process • Update progress for lengthy operations with callbacks

InstallAWARE Help Library
113
This DLL must not have any runtime dependencies. It should be able to carry out its task in any operating environment, since it will be called from the setup at runtime in a production environment.
Plug-In Registration
A plug-in should create keys in the system registry, letting the InstallAware development environment know of its existence.
HKEY_LOCAL_MACHINE SOFTWARE MimarSinan InstallAware 2.0 Plug-Ins {Plug-In Name} (Default) = {Full Path to Plug-In Design-Time/Compile-Time DLL} Action = {Plug-In Name} Execute = {File Name (without path) to Plug-In Run-Time DLL} Script = {Plug-In Script Display}
Plug-In Name
The name of the plug-in. This will also be used for displaying the plug-in command on the commands list.
Plug-In Script Display
The text that will be displayed in the script editor when a plug-in command has been added into the script.
Design Time Exports
The functions which must be exported by the design time DLL and their expected behavior is described below.
CompileTimeBuild

Printed Documentation
114
This function is called when the project is being compiled. The function should copy the necessary files for its operation, modify the Windows Installer database if necessary, and indicate whether it will require access to setup files during installation.
bool WINAPI CompileTimeBuild( int MSIHandle, const char* State, const char* BuildPath, bool Build, bool& Fetch );
MSIHandle
Handle to the Windows Installer database being currently generated.
State
The state of the plug-in represented as a string. This state parameter is opaque to InstallAware. The plug-in generates and returns state information in the DesignTimeEdit function also located in this DLL.
BuildPath
The full path to the folder where the plug-in must copy its build files to. At a minimum, the plug-in should copy its Run-Time DLL to this build location. The plug-in may also copy other files as needed (for instance, if the plug-in installs any files, it should also copy those files).
Build
Indicates whether files should actually be copied.
Fetch
If the plug-in requires access to the setup media (that is, the files it copied to BuildPath, excluding the runtime DLL file) for the current value of the State parameter, the plug-in should set this variable to TRUE. Otherwise, the variable should be set to FALSE.
InstallAware uses this information to determine if a web media block should be downloaded at runtime while the plug-in is executing.
DesignTimeEdit

InstallAWARE Help Library
115
This function is called when the plug-in command is being added to the script for the first time, or an already existing command edited. The function should display a plug-in defined window enabling the user to configure plug-in settings (such as, what the plug-in does at install time). These settings will be passed back to the caller enabling their storage in a persistent medium.
int WINAPI DesignTimeEdit( int Window, const char* State, const char* NewState );
Window
Handle to parent window, the InstallAware IDE.
State
The existing state of the plug-in represented as a string. This state parameter is opaque to InstallAware. The plug-in generates and returns state information in this function.
If the command is being added to the script for the first time, this parameter will be NULL. The plug-in should initialize its user interface and reflect default plug-in settings, or display the settings previously configured by the user.
NewState
The new state of the plug-in represented as a string. This state parameter is opaque to InstallAware. The plug-in generates and returns state information in this function.
The plug-in should generate this string based on the settings configured by the user in the plug-in defined window. If NewState is not NULL, the plug-in should pass the state string back to the caller. The caller will then store this state information for later use in setup projects and running setups.
Remarks
The DesignTimeEdit function will always be called twice:
1. The first call of the function will always have the NewState parameter set to NULL. The function should display its user interface, generate the NewState string, and store it in a buffer. The function should return the length of the buffer as its result. This will enable the caller to allocate sufficient memory to hold the NewState string. If the user cancelled the operation in the plug-in user interface, the

Printed Documentation
116
function should return -1 indicating that command insertion to the script was aborted. In this case, the function will not be called again, since it is not necessary to obtain state information anymore.
2. The second call of the function will always pass a non-NULL NewState parameter, with just enough space to hold the NewState string. In this second iteration, the function should not display a user interface at all. It should instead copy to the buffer pointed to by the NewState variable the NewState string it generated and stored in the first iteration. In the second iteration, the function should always return 0.
DesignTimeText
This function returns custom plug-in text for display in the script editor. This function is optional.
int WINAPI DesignTimeText( const char* State, const char* Text );
State
The existing state of the plug-in represented as a string. This state parameter is opaque to InstallAware. The state parameter passed here has been previously generated by the plug-in in the DesignTimeEdit function.
Text
The human readable representation of the plug-in state, as will be displayed in the script editor.
Remarks
The DesignTimeText function will always be called twice:
1. The first call of the function will always have the Text parameter set to NULL. The function should parse the State parameter, generate the Text string, and store it in a buffer. The function should return the length of the buffer as its result. This will enable the caller to allocate sufficient memory to hold the Text string.
2. The second call of the function will always pass a non-NULL Text parameter, with just enough space to hold the Text string. In this second iteration, the function should not re-parse the State parameter at all. It should instead copy to the buffer pointed to by the Text variable the Text

InstallAWARE Help Library
117
string it generated and stored in the first iteration. In the second iteration, the function should always return 0.
AboutPlugIn
This function displays the plug-in about box, containing general and copyright information on the plug-in.
void WINAPI AboutPlugIn( int Window );
Window
Handle to parent window, the InstallAware IDE.
Run-Time Exports
The functions which must be exported and called by the run-time DLL, and their assumed behavior, is described below.
PlugInProgressIndicator
This is a setup executable defined callback function. The plug-in will receive the address of the callback function in the RunTimeExecute function, also located in this DLL. It should periodically call this function to keep the setup user interface updated of the overall progress of the task the plug-in is performing.
typedef BOOL (WINAPI* lpPlugProgressIndicator)( int, const char* );
Integer Parameter
This parameter should contain the numeric representation of the overall task progress, where 0 is nothing and 100 is complete.
Char* Parameter
This parameter should contain a textual description of the currently executing task.
Boolean Return

Printed Documentation
118
The callback function will return TRUE if the plug-in is permitted to continue its task. If the setup has been cancelled by the user, the callback function will return FALSE. In this case, the plug-in should immediately end its task and clean up after itself.
RunTimeExecute
This function will perform the actual plug-in task, and update script variables as necessary. It will be called at runtime by the setup executable.
int WINAPI RunTimeExecute( int Window, const char* Variables, const char* State, lpPlugProgressIndicator Progress, int& Return, char* NewVariables );
Window
Handle to parent setup window.
Variables
This parameter contains the names and values of all variables used in the setup script as a comma delimited string list of the form <variable name>,<variable value>,...,<variable name>,<variable value>. If a variable name or value contains embedded spaces, the entire value will be enclosed in double quotes.
State
The state of the plug-in represented as a string. This state parameter is opaque to InstallAware. The plug-in generates and returns state information in the DesignTimeEdit function located in the design time DLL.
In essence, this variable tells the plug-in what to do.
Progress
Pointer to the progress callback function which the function must periodically call, both updating the setup user interface, and allowing the user to abort the operation if so required.
Return
InstallAWARE Help Library
119
Reserved. Set to 0.
NewVariables
The new state of the installation variables. The plug-in should modify the script variables list received in the Variables parameter and return it in this parameter if NewVariables is not NULL. Of course, if the plug-in did not change the state of any script variable, the plug-in should instead return a copy of the original Variables parameter.
If NewVariables is NULL, the plug-in should internally store the script variables. See the remarks for more information.
Remarks
The RunTimeExecute function will always be called twice:
1. The first call of the function will always have the NewVariables parameter set to NULL. The function should perform its installation action, perpare the NewVariables string, and store it in a buffer. The function should return the length of the buffer as its result. This will enable the caller to allocate sufficient memory to hold the NewVariables string.
2. The second call of the function will always pass a non-NULL NewVariables parameter, with just enough space to hold the NewVariables string. In this second iteration, the function should not perform an installation action at all. It should instead copy to the buffer pointed to by the NewVariables variable the NewVariables string it generated and stored in the first iteration. In the second iteration, the function should always return 0.
Automation Automation Overview
InstallAware ships with an automation interface that can be used to programmatically emit and build complete setup projects. The automation interface is available as both a standard Win32 DLL, callable from any Windows application, and as a COM object, for use in ASP scripts on a web server. Use the interface that is most convenient for your project requirements.
Win32 DLL
The Win32 DLL may be used by any application which is capable of calling standard Windows DLLs. The DLL exports several functions and can perform the following tasks:

Printed Documentation
120
• Emit installation scripts • Emit project files • Build projects
Example projects using the DLL, including headers for the DLL, are located in the Automation\Examples folder inside your InstallAware installation folder.
Please see the runtime files section for information on where to locate the DLL and its dependencies.
COM Object
The COM object is ideal for scripting access to the automation interface from ASP pages on a web server. This way, you could generate a custom install dynamically from a web page, build it, and deliver it to the site visitor. The COM object implements the IDispatch interface and provides the following functionality:
• Emit installation scripts • Build projects
An example ASP page which uses the interface, as well as the COM object itself, will be present in one of the following locations on your system:
• If you have IIS installed, under the ia folder inside your web server root directory.
• If you do not have IIS installed, inside the Automation\Web Support folder in your InstallAware installation folder.
Please see the runtime files section for information on where to locate the object and its dependencies.
Runtime Files
InstallAware and applications based on InstallAware automation/build technologies require the following sets of runtimes. The runtimes mentioned below are redistributable with your own applications if you have licensed the Enterprise or Architect edition of InstallAware, unless explicitly noted otherwise.
Libraries
Library files provide core functionality. These files, found in the Automation\Libraries folder of your main InstallAware installation folder, must be located inside the same folder as your application:

InstallAWARE Help Library
121
• miaforms.dll • miainfo.dll • mext.dll • actex.dll • dependent.exe • MSIDBWrap.dll • mmergemod.dll • mergemod.dll • mGacInfo.dll • interop\miastub.exe • interop\mia.dll
The last two libraries must reside inside subfolders relative to the root of the application as indicated above.
The library mergemod.dll must be self-registered on the target system if you are planning to use Merge Modules as part of your build process.
If you are planning on code signing your setups, you should also duplicate the authenticode subfolder (found beneath your main InstallAware installation folder) in the destination directory of your application..
Plug-Ins
If your installation makes use of plug-ins (and virtually all installers do), the plug-ins must also be present on the target system (they are already installed on your development system). To install plug-ins on the target system, first check if your plug-in vendor allows redistribution of the plug-in (all InstallAware supplied plug-ins are redistributable). Then:
1. Copy the plug-in folder to the target system 2. Create the plug-in registry entries on the target system
You may obtain the plug-in files and registry entries by observing your development system. See the plug-in authoring overview for more information.
Compression
The compression layer used by InstallAware is available in a self installing form. The installer is found in the following location relative to the root of your InstallAware installation folder: Automation\Libraries\miacomp.exe. You may install/uninstall the layer silently to provide the required compression services to your applications.
Command Line Build Tool
Printed Documentation
122
This tool is available in the root your InstallAware installation folder as miabuild.exe, and is redistributable under the InstallAware Enterprise license or the InstallAware Architect license.
The tool requires the Libraries/Plug-Ins/Compression runtimes described above for proper operation.
Automation Libraries
Win32 DLL
The DLL is available at the following path, relative to the root of your InstallAware installation folder: Automation\Libraries\miaauto.dll.
It is redistributable under the InstallAware Architect license. It is NOT redistributable under the InstallAware Enterprise license.
The DLL requires the Libraries/Plug-Ins/Compression runtimes described above for proper operation.
COM Object
The COM Object files are mAutoWeb.dll and mAutoWebStub.exe. They are found at one of the following locations:
• If you have IIS installed, under the ia folder inside your web server root directory.
• If you do not have IIS installed, inside the Automation\Web Support folder in your InstallAware installation folder
These files are redistributable under the InstallAware Architect license. They are NOT redistributable under the InstallAware Enterprise license.
The COM object requires the Libraries/Plug-Ins/Compression runtimes described above for proper operation. Before the COM object may be used, its server DLL, mAutoWeb.dll, must be self-registered using regsvr32.
Win32 DLL
Using the Win32 DLL
The steps for programmatically emitting and building an InstallAware setup are summarized as follows:
InstallAWARE Help Library
123
1. Use the script management functions to programmatically generate a setup script.
2. Store the total number of lines used in your script for use in step 3 below. 3. Use the project management functions to programmatically generate a
setup project. Have the project reference an existing setup script. 4. Use the build function to build a newly generated or existing setup project.
Script Management Functions
miaInitializeScript miaAddCommand miaFinalizeScript miaGetTotalLines
Project Management Functions
miaInitializeProject miaSetScriptFile miaClearDialogFiles miaClearSupportFiles miaClearMergeFiles miaAddDialogFile miaAddSupportFile miaAddMergeFile miaFinalizeProject
Build Function
miaBuildProject
Structure
COMMATEXT
Script Management
miaInitializeScript
This function initializes in-memory structures for programmatically emitting a new InstallAware script.
void WINAPI miaInitializeScript();

Printed Documentation
124
miaAddCommand
This function adds an installation command to the in-memory installation script.
void WINAPI miaAddCommand( const char* Command, const char* Parameters );
Command
Provides the name of the command to add. The command may be a built-in or plug-in defined command.
Parameters
Provides the parameters for the command. Each command has a unique set of parameters.
All command parameters must be combined into a single string value, formatted as COMMATEXT.
If the command does not expect a parameter, pass NULL in this parameter.
miaFinalizeScript
This function flushes in-memory structures for an InstallAware script to disk and forms a valid MIA script file which may later be referenced from a setup project.
void WINAPI miaFinalizeScript( const char* SaveFile );
SaveFile
Specifies the full path to the script file. It is recommended the project file end with a MIA extension since this is the standard file extension used for InstallAware scripts.

InstallAWARE Help Library
125
miaGetTotalLines
This function obtains the total number of lines that the in-memory script is comprised of. It must be called before the script is finalized.
int WINAPI miaGetTotalLines();
Project Management
miaInitializeProject
This function initializes in-memory structures for programmatically emitting a new InstallAware project.
void WINAPI miaInitializeProject( bool BuildDebug, int BuildLayout, const char* CompressProfile, bool BuildInFolder, const char* BuildCustomFolder, const char* OutputFile, bool AutoIncrement, const char* Conditionals, const char* Manufacturer, const char* Name, const char* Code, const char* UpgradeCode, const char* Version, const char* Language, const char* Title, const char* Subject, const char* Author, const char* Comments, const char* Revision, const char* arPublisher, const char* arContact, const char* arHelp, const char* arUpdates, const char* arComments

Printed Documentation
126
);
BuildDebug
Indicates whether the project will be built in debug mode.
BuildLayout
Indicates the media type to be used in builds by default. The following values are possible:
• 0: Uncompressed Directory Layout • 1: Compressed Self Extracting EXE • 2: Compressed Web Based EXE
CompressProfile
Indicates the name of the compression profile to use in builds. This is typically Structured, but may point towards a custom profile as well.
BuildInFolder
If this value is false, builds will take place in the folder pointed at by the BuildCustomFolder parameter.
If this value is true, builds will take place in the default location, which is the project folder.
BuildCustomFolder
Specifies the custom build folder to use. Ignored unless the BuildInFolder parameter is false.
OutputFile
Allows to override the default name of the setup.exe install launcher file. By default, the name of the launcher file is identical to the project file name. Specify an alternate file name in this field to use a different file name.
AutoIncrement
Indicates whether the project revision code should be automatically updated each time a new build is made.
Please note that building a project from the command line or the automation interface will not increment the revision code.

InstallAWARE Help Library
127
Conditionals
Provides a list of compiler variables for conditional compilation in the form "VAR1=VALUE1","VAR2=VALUE2".
Manufacturer, Name, Code, UpgradeCode, Version, Language, Title, Subject, Author, Comments, Revision
Sets the corresponding fields as used in the Project Properties and Summary Information pages on the Project Options dialog in the InstallAware IDE.
arPublisher, arContact, arHelp, arUpdates, arComments
Sets the corresponding fields as used in the Control Panel Add-Remove Programs Listing page on the Project Options dialog in the InstallAware IDE.
miaSetScriptFile
This function sets the script file referenced by an InstallAware project.
void WINAPI miaSetScriptFile( const char* ScriptFile );
ScriptFile
Specifies the script file to use:
• If a file name without path information is used, the script file will be assumed to exist in the same folder as the project file. This allows for maximum portability when moving projects to different folders/computers.
• If a file name with path information is used, the script file must exist in the absolute path referenced. This may make it more difficult to move projects, because the script file will still be expected to reside in the same folder.
Note
The script file does not need to exist at the time the function is called. This function only sets the project reference for the script file, it does not attempt to access the script file itself.

Printed Documentation
128
miaClearDialogFiles
This function clears the list of dialog files referenced by an InstallAware project.
void WINAPI miaClearDialogFiles();
miaClearSupportFiles
This function clears the list of support files referenced by an InstallAware project.
void WINAPI miaClearSupportFiles();
miaClearMergeFiles
This function clears the list of Merge Modules referenced by an InstallAware project.
void WINAPI miaClearMergeFiles();
miaAddDialogFile
This function adds a dialog file to an InstallAware project.
void WINAPI miaAddDialogFile( const char* Dialog );
Dialog
Specifies the full path to the dialog file to use. The dialog file must already exist. The dialog file will be copied to the project folder when the project is finalized using the miaFinalizeProject function.

InstallAWARE Help Library
129
miaAddSupportFile
This function adds a support file to an InstallAware project.
void WINAPI miaAddSupportFile( const char* Support );
Support
Specifies the full path to the support file to use. The support file must already exist. The support file will be copied to the project folder when the project is finalized using the miaFinalizeProject function.
miaAddMergeFile
This function adds a Merge Module to an InstallAware project.
void WINAPI miaAddMergeFile( const char* Merge );
Merge
Specifies the full path to the Merge Module to use. The Merge Module must already exist. The Merge Module will be copied to the project folder when the project is finalized using the miaFinalizeProject function.
miaFinalizeProject
This function flushes in-memory structures for an InstallAware project to disk and forms a valid MPR project file which may later be used by the IDE, the command line build tool, or the automation interface.
void WINAPI miaFinalizeProject( const char* SaveFile, int ScriptLines );

Printed Documentation
130
SaveFile
Specifies the full path to the project file. It is recommended the project file end with a MPR extension since this is the standard file extension used for InstallAware projects.
ScriptLines
Indicates the number of lines present in the script file referenced by the project. This value may be obtained using the miaGetTotalLines function.
Building
miaBuildProject
This function builds an existing InstallAware project.
bool WINAPI miaBuildProject( const char* Project, const char* Output, const char* Log, const char* Conditionals, int Mode );
Project
Specifies the full path to the MPR project file.
Output
Specifies the full path to the build output folder.
If NULL, the default project output folder will be used.
Log
Specifies the full path to the log file. The log file will receive verbose information on the build process, and may be helpful for tracking build errors.
If NULL, no log file will be created.
Conditionals

InstallAWARE Help Library
131
Provides a list of compiler variables for conditional compilation in the form "VAR1=VALUE1","VAR2=VALUE2".
Mode
Specifies the kind of media to build. Use one of the following values:
• 0: Uncompressed Directory Layout • 1: Compressed Self Extracting EXE • 2: Compressed Web Based EXE
COMMATEXT
This structure represents a collection of multiple items in a single comma-delimited string. Each item is additionally surrounded by a double quote.
For example, the collection of the following strings:
Stri,ng 1 Stri"ng 2 String 3 String5
will be represented as the following single string:
"Stri,ng 1","Stri""ng 2","String 3","","String5"
Using the COM Object
The COM object implements an IDispatch interface and can be called from environments supporting the interface. For instance, use the COM object to dynamically emit InstallAware setup scripts and build them from webpages via ASP scripting.
mAutoWeb.CoInstallAware Methods
InitializeScript AddCommand FinalizeScript

Printed Documentation
132
mAutoWeb.CoInstallAware Properties
BuildProject GetTotalLines
Example ASP Script
Set IA = Server.CreateObject("mAutoWeb.CoInstallAware") IA.InitializeScript IA.AddCommand "Set Variable","PREREQ","FALSE" IA.FinalizeScript Request("ScriptFile") Dim LineCount LineCount = IA.GetTotalLines Dim BuildResult BuildResult = IA.BuildProject(Request("ProjectFile"), "$NULL$", Request("LogFile"), 0)
Command Parameters
Each installation command, whether built-in or plug-in provided, has a unique set of parameters. The parameters are often very similar to, although not identical, to the values entered in the IDE while the command editing window is open.
To discover the exact parameters of any command
1. In the IDE, add the command to your script. Use meaningful values while completing the fields. This will help you recognize parameter ordering.
2. Copy the command to the clipboard. Open Notepad, and paste the command from the clipboard. The command will paste as plain text.
3. Observe the text. The values following the GUID are the command parameters. Each line after the GUID represents a single command parameter.
4. You will recognize how parameter fields are ordered via the values you entered in step 1 above.
5. Add the command to your script programmatically using all parameters discovered in this way.
Notes

InstallAWARE Help Library
133
• If there are empty lines among command parameters, it indicates those fields are reserved. Simply duplicate the exact behavior in your automation projects
• If there are no lines after the GUID, it indicates the command has no parameters
• See the automation example projects for more information


135
Index A
Apply Changes 54
Authoring Process 14
Automation Overview 120
B
Batch Building 19
Behavior 103
Build 17
Build Settings 19, 39
Building 18, 110
C
Call DLL Function 89
Change Setup Icon 26, 106
Change Your Setup Theme 27
Check File Version 55
Classes
Commands 50
Classes 50
Code Installation Logic 16
COM Object
Using 132
COM Object 132
Command Line 34, 110
Command Parameters 132
Commands
Classes 50
Commands 50
COMMATEXT 131
Comment 56
Compatibility Testing 24
Compiler Variable Else 56
Compiler Variable End 56
Compiler Variable If 56
Compiling 18
Compress Better 36
Conditions 43
Control Service 57
Controls 100
Convert Path 57
Copy/Move Local Files 58
Create Baseline Project 16
Create File Type 59

Printed Documentation
136
Create Folder 60
Create ODBC DSN 61
Create Shortcut 61
Creating
Start Menu Uninstall Entry 32
Creating 32
Creating New Setup Themes 27
Customizing Dialog Bitmaps 28
Customizing Script Appearance 12
D
Debugging 22
Define Component 62
Define User Interface 16
Delete Files 63
Delete Registry 64
Deploy 17
Deployment 25
Design Setup Logic 15
Design Time Exports 114
Determine Requirements 15
Dialog Editor
Starting 99
Using 99
Dialog Editor 99
Dialogs 47
DirectX Runtime 90
Disk Space Calculations 33
Display Dialog 64
Displaying
Project Manager 7
Splash Screen 28, 106
Displaying 7, 28, 106
Does File/Folder Exist 65
Download File 91
E
Edit INI File 66
End 67
Express 7
Extract Path 67
F
Features 45
Files 45
G
Get Component State 68
Get Environment 68
Get File Version 68

Index
137
Get Folder Location 69
Get INI File Settings 70
Get System Settings 70
Get Temporary File 71
GoTo Label 71
H
Hide Dialog 72
I
IDE 22
IDE Layouts 13
IDE Tools 13
If 72
Importing 7
Increasing Build Speeds 37
Inside
Running 22
Inside 22
Install Application Data 17
Install Assembly 73
Install Files 73
Install MSI Package 86
Install ODBC Driver 74
Install Service 75
InstallAware 1, 2
Internet Explorer 92
Intra-Dialog Relations 102
J
JSharp Runtime 93
L
Label 77
License 29, 107
Localization Process 110
Logged Execution 23
M
Mathematics 78
MDAC Refresh 94
Meaning
Product 32
Meaning 32
Media 48
MessageBox 78
MiaAddCommand 124
MiaAddDialogFile 129
MiaAddMergeFile 129
MiaAddSupportFile 129
MiaBuildProject 130

Printed Documentation
138
MiaClearDialogFiles 128
MiaClearMergeFiles 128
MiaClearSupportFiles 128
MiaFinalizeProject 130
MiaFinalizeScript 125
MiaGetTotalLines 125
MiaInitializeProject 125
MiaInitializeScript 124
MiaSetScriptFile 127
MimarSinan InstallAware Enterprise 1
Modifying
Script File 8
Modifying 8
Modifying Merge Modules 10
Modifying Project Dialogs 8
Modifying Support Files 9, 105
Moving
Project 6
Moving 6
MSI Setup Installed 77
MSXML 4 SP2 95
Multiple Installations 33
N
NET Framework 88
New Project
Starting 5
New Project 5
New Project Dialog 5
O
Opening
Project 6
Opening 6
P
Passing Variables 104
Plug-In Authoring Overview 112
Pre-Defined Compiler Variables 53
Pre-Defined Variables 51
Product
Meaning 32
Product 32, 42
Project
Moving 6
Opening 6
Project 6
Project Manager

Index
139
Displaying 7
Project Manager 7
Project Settings 38
Project Wizard 42
R
Read 79
Read Registry 79
ReadMe Files 29, 107
Reboot 80
Reboot Computer 80
Register Library 80
Registry 47
Resume 80
Revision Codes 32
Run Installed Application 32
Run Program 81
Running
Inside 22
Running 22
Runtime 96
Run-Time Exports 117
Runtime Files 121
S
Saving 6
Script Editor
Using 11
Script Editor 11
Script File
Modifying 8
Script File 8
Scripting Aware 2
Set Component State 82
Set Variable 82
Setup Command Line Parameters 111
Setup Commands Preceding Apply Uninstall 34
Sharing Web Media Blocks 38
Shortcuts 46
SP1 92
Splash Screen
Displaying 28, 106
Splash Screen 28, 106
Start Menu Uninstall Entry
Creating 32
Start Menu Uninstall Entry 32
Starting

Printed Documentation
140
Dialog Editor 99
New Project 5
Starting 5, 99
Support Files 105
T
Terminate Install 83
Terminate Program 83
Test 17
Testing Interactive Elements 31
Text File
Write 85
Text File 79, 85
U
Un 86
Uninstalling 34
Upgrade Installs 33
Upgrading from InstallAware 2.x 5
Using
COM Object 132
Dialog Editor 99
Script Editor 11
Win32 DLL 123
Using 11, 99, 123, 132
Using Compiler Variables 53
Using Interactive Progress Flash 29, 107
Using Interactive Progress HTML 30, 109
Using Static Progress Billboards 31, 109
Using Variables 53
V
Visual Basic VM 95
Visual C 96
W
Web Aware 1
Web Media Block 83
What's New 3
Win32 DLL
Using 123
Win32 DLL 123
Windows Installer 97
Windows Installer Aware 2
Windows Media Format 98
Wizard Loop 85
Write
Text File 85
Write 85
Write Registry 85

141