mini-stability ball exercise manual - open barre fitness · 2017-08-03 · mini-stability ball...
TRANSCRIPT
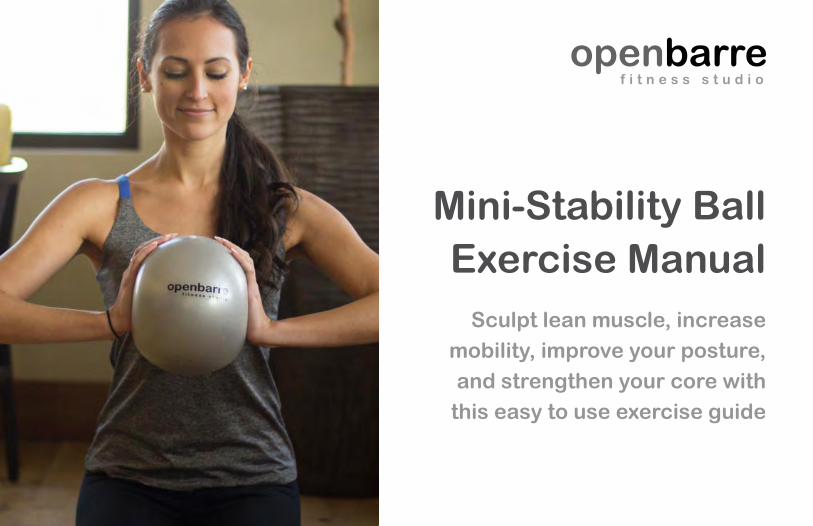
Mini-Stability Ball Exercise Manual
Sculpt lean muscle, increase mobility, improve your posture, and strengthen your core with
this easy to use exercise guide


Page 1
Page 2-21
Page 22-27
Page 28-37
Page 38-41
Page 42-43
Introduction
Abs
Thighs
Glutes
Arms
Back
Table of Contents


1
The Open BarreTM Mini Exercise Ball is used to more effectively & efficiently target the muscles
you’re strengthening. It’s very important to pay attention to the correct alignment of each
exercise, so make sure you read through and understand the set-up of the exercise beforehand.
It’ll ensure that you’re keeping your body safe as well as using your time wisely.
The ball is inflatable and deflatable, so you can use the straw (or a pump) to fill it to your desired
firmness level. Generally, the firmer the ball, the more challenging! It will start to lose air over
time, so you can simply pull the white cap out (or dig into the ball to locate the tip of the plug
and press it out from the inside), blow/ pump more air into the ball, and replace the cap nice and
tight. It’s ok that some air will escape before plugging it back up with the cap. Just make sure
that you blow up the ball a tad more than desired... and of course try to be quick with the plug to
stop the air-loss.
For more exercises and tutorials, visit http://vimeo.com/openbarrefitness.
Introduction

2
Abs / 1. Incline leg-drop
Starting position set up:
- Lying on your back, press your hips up and position the ball directly under your hips/tailbone.
- Slowly lift your legs up into a tabletop position to find your balance.
- Keep your spine as flat as possible (Do NOT let your back arch).
- While squeezing your navel to spine, straighten your legs straight overhead.
- Relax your neck and shoulders and let your core keep you balanced on the ball.
- You will only be moving your legs, so keep your spine completely still!
Things to keep in mind:The ‘work’ is all in the stabilization of your spine, so remember that the stillness and alignment of your spine should be your #1 focus. Only move through the range of motion that you can handle while keeping your torso still and flat. As you gain strength, you will be able to drop your legs further down towards the ground, increasing your range of motion. ALWAYS move with control. Don’t use momentum or you’ll be cheating yourself out of the results & strength you deserve :)

3
Variation 1
Keeping your legs straight, alternate between lifting and lowering your legs together (photo 1 → photo 2). Repeat!
Starting with both legs at your lowest point (photo 2), lift ONE leg straight up, and lower it back down (photo 2). Then switch to the other leg. Repeat both sides!
2
1
Variation 2
Easiest Modification
• Starting with both legs straight up (photo 1), drop ONE leg down to lowest point at a time (photo 2). Repeat.

4
Abs / 1. Incline leg-drop (Continued)
5
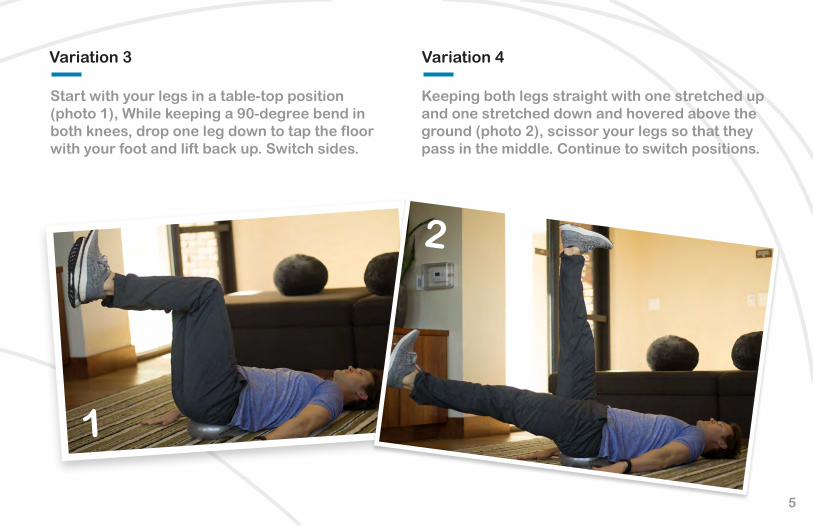
Variation 3
Start with your legs in a table-top position (photo 1), While keeping a 90-degree bend in both knees, drop one leg down to tap the floor with your foot and lift back up. Switch sides.
Keeping both legs straight with one stretched up and one stretched down and hovered above the ground (photo 2), scissor your legs so that they pass in the middle. Continue to switch positions.
Variation 4
2
1
6
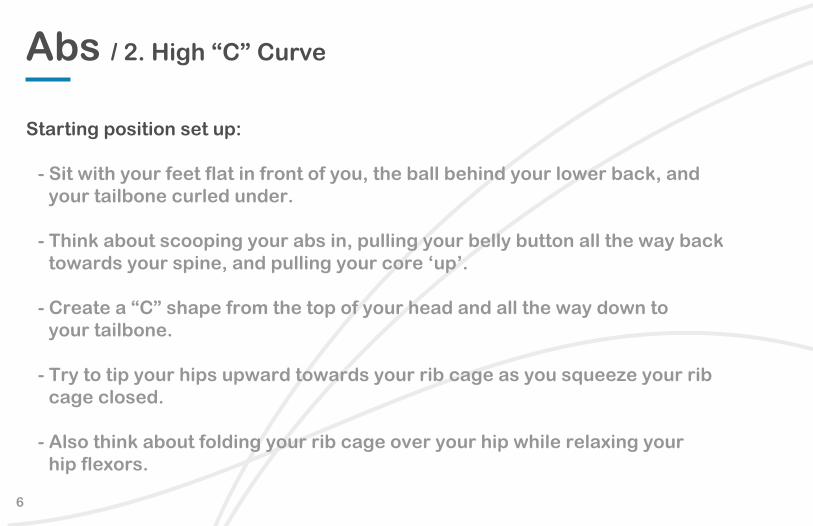
Abs / 2. High “C” Curve
Starting position set up:
- Sit with your feet flat in front of you, the ball behind your lower back, and your tailbone curled under.
- Think about scooping your abs in, pulling your belly button all the way back towards your spine, and pulling your core ‘up’.
- Create a “C” shape from the top of your head and all the way down to your tailbone.
- Try to tip your hips upward towards your rib cage as you squeeze your rib cage closed.
- Also think about folding your rib cage over your hip while relaxing your hip flexors.

7
Variation 1
Options for hand placement (in order from easiest to most challenging):
1. Behind you on the ground— fingertips pointing towards your body
2. Holding behind your thighs with a soft bend in your elbows (shown in photo)
3. Arms reaching straight forward
4. Prayer position at your chest
5. Hands lightly behind your head
6. Arms reaching straight forward
Pulse yourself back and up at your lowest point (only tiny movements). Repeat.
Curl your tailbone up towards the ceiling, and release (you do this by squeezing your lower abs to perform a pelvic tilt). Repeat.
Variation 2
Twist side to side, from your waist. Repeat.
Variation 3

8
Abs / 3. Low “C” Curve
Starting position set up:
- Lowering your body down to the ground one vertebra at a time, place the ball directly between your shoulder blades.
- Press the small of your back down against the floor, and manually tilt your pelvis so that your hip bones are pulled closer to your rib cage (You should feel a deep engagement of your core already).
- Your feet should stay flat on the ground throughout the entire exercise.
Things to keep in mind:You can bring your hands back behind your head for extra neck support. In order to avoid straining your neck, try to keep it as relaxed as possible, while relying on the control of your core to create the movement.

9
Variation 1 (Crunches)
STEP 1: Start with your chest pressing open and your back relaxed over the ball.
1 2
STEP 2: Pull your navel down to your spine as you press your lower back down into the ground. Simultaneously lift your shoulder blades up off of the ball as much as possible while keeping your neck long. Repeat!
10
Abs / 3. Low “C” Curve (Continued)

11
Variation 2 (Oblique Crunches)
Using one hand to support your head, reach the other hand towards your ankle and crunch up further as you twist to one side for several repetitions. Repeat the other side!
12
12
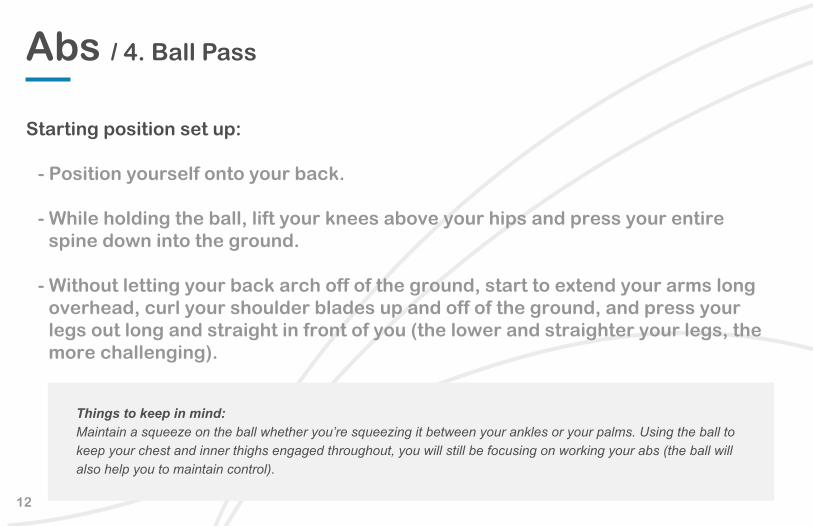
Abs / 4. Ball Pass
Starting position set up:
- Position yourself onto your back.
- While holding the ball, lift your knees above your hips and press your entire spine down into the ground.
- Without letting your back arch off of the ground, start to extend your arms long overhead, curl your shoulder blades up and off of the ground, and press your legs out long and straight in front of you (the lower and straighter your legs, the more challenging).
Things to keep in mind:Maintain a squeeze on the ball whether you’re squeezing it between your ankles or your palms. Using the ball to keep your chest and inner thighs engaged throughout, you will still be focusing on working your abs (the ball will also help you to maintain control).
13
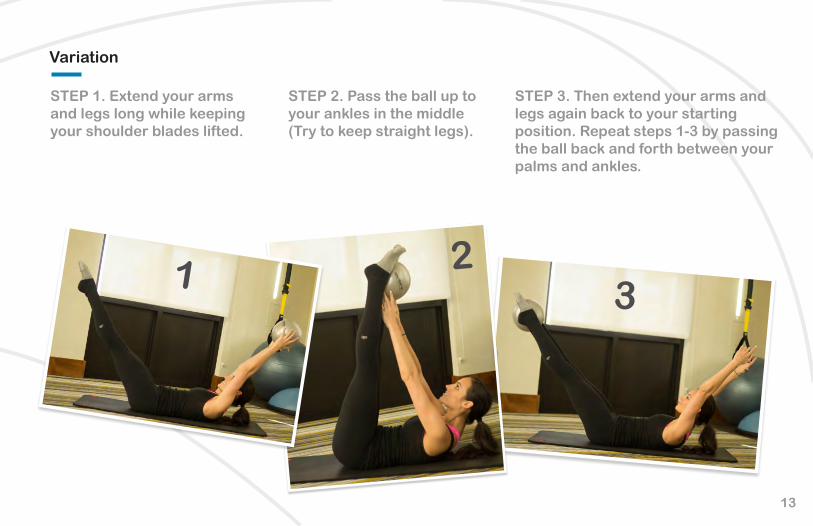
Variation
STEP 1. Extend your arms and legs long while keeping your shoulder blades lifted.
STEP 2. Pass the ball up to your ankles in the middle (Try to keep straight legs).
STEP 3. Then extend your arms and legs again back to your starting position. Repeat steps 1-3 by passing the ball back and forth between your palms and ankles.
1 23

14
Abs / 5. Side Plank
Starting position set up:
- To work through your obliques, roll onto your side with your forearm down on the ground, perpendicular to your body.
- Bring the ball in front of your chest, and use your top arm to press into the ball as you lift your hips up off of the ground to make one long line from your feet to the crown of your head.
- Make sure to keep your hips and chest squared off (hips and shoulders always in the same vertical plane).
15
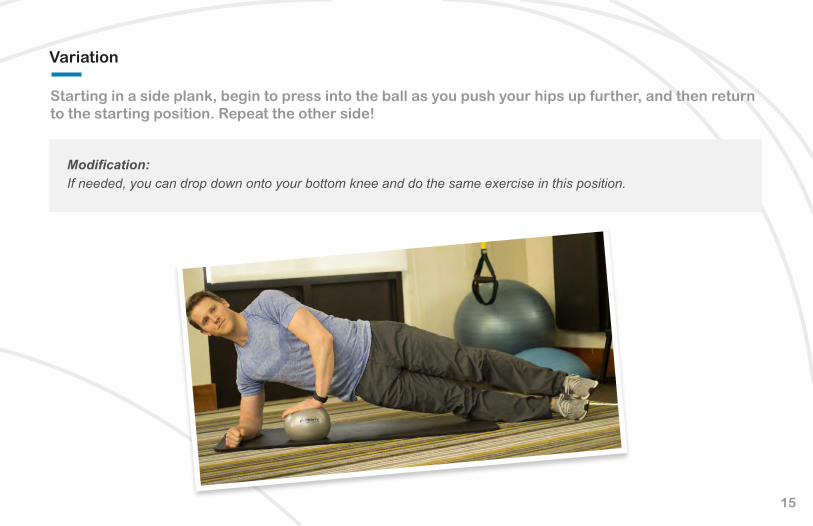
Variation
Starting in a side plank, begin to press into the ball as you push your hips up further, and then return to the starting position. Repeat the other side!
Modification:If needed, you can drop down onto your bottom knee and do the same exercise in this position.

16
Abs / 6. Oblique Side Crunches
Starting position set up:
- Lie down on your side, and prop yourself up on your forearm.
- Keep your shoulders pressing down away from your ears, especially on the bottom side.
- Bend your bottom leg to 90 degrees, and place the ball directly under your side-waist.
- Try to keep your shoulders & hips stacked so that your body doesn’t tilt forward or backward.
- Keep squeezing your abs in tight and keep your spine as neutral as possible.
- Begin to contract your obliques to lift some of your body weight off of your forearm.
Things to keep in mind:Try to use your arm as little as possible. You want to make sure your obliques are the focus—not your supporting arm.

17
Variation
From the starting position (photo below), take lateral crunches, allowing your bottom arm to extend long as your rib cage peels higher off of the ball. Keep your shoulders square and try to use your arm as little as possible.
Optional add-on:Holding your highest lateral crunch position, pulse your lifted leg up.
18
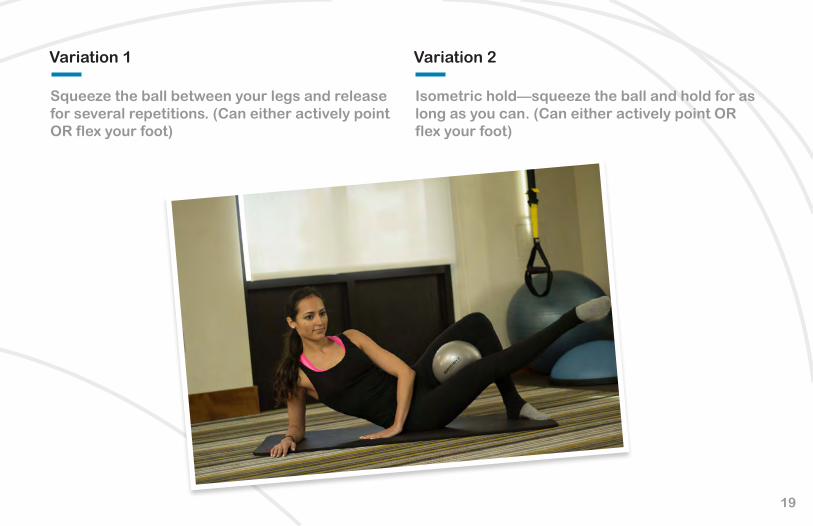
Abs / 7. Oblique & Inner Thigh Squeezes
Starting position set up:
- Lie down on your side, and prop yourself up on your forearm.
- Tilt your top hip back just a few inches, angling your hips to face slightly up towards the ceiling.
- You should be resting on the more meaty part of your seat—not on the hip bone.
- Now place your top leg’s foot flat on the ground behind your bottom leg.
- Lift your bottom leg up off of the ground and place the ball between your thighs up by your knees.
- Keep your chest lifted, shoulders down and away from your ears, and abs pulled in as tight as you can!
19
Variation 1
Squeeze the ball between your legs and release for several repetitions. (Can either actively point OR flex your foot)
Variation 2
Isometric hold—squeeze the ball and hold for as long as you can. (Can either actively point OR flex your foot)

20
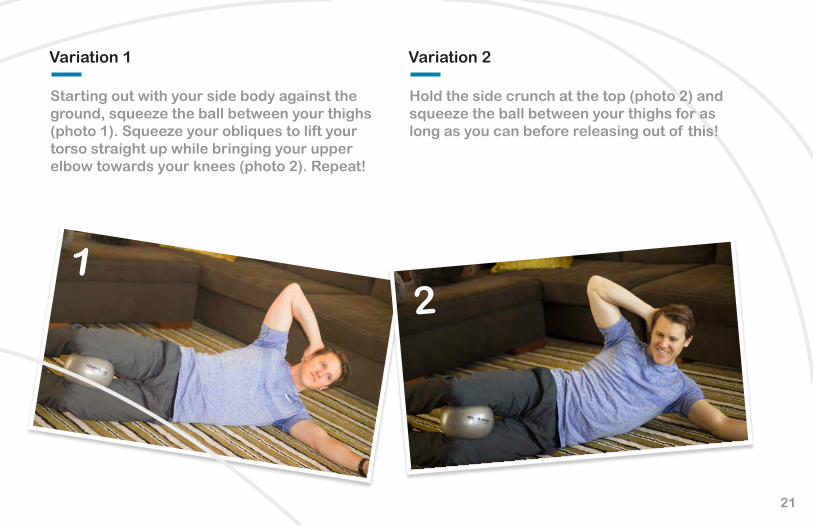
Abs / 8. Side Crunch/ Inner Thigh Burner
Starting position set up:
- Lie down on your side and bend your knees.
- Place the ball between your thighs, and bring your knees SLIGHTLY forward.
- Extend your bottom arm out long in front of you and bring your top hand behind your head.
- Focus on keeping your abs pulled in tight.
Things to keep in mind:Relax the arm that’s on the ground and try to use it as little as possible in order to keep the work in your obliques.
21
Variation 1
Starting out with your side body against the ground, squeeze the ball between your thighs (photo 1). Squeeze your obliques to lift your torso straight up while bringing your upper elbow towards your knees (photo 2). Repeat!
Variation 2
Hold the side crunch at the top (photo 2) and squeeze the ball between your thighs for as long as you can before releasing out of this!
12

22
Thighs / 1. Parallel Plies
Starting position set up:
- Option to use a surface (countertop, back of a chair, railing, etc.) for balance.
- Place the ball as high as you can between your inner thighs.
- Walk your feet in closer and parallel (the closer your feet are to one another, the more challenging it will be)!
- Lift your heels off of the ground, and keep an equal dispersion of weight on balls of your feet and through all ten toes.
- In order to keep your knees pointing straight forward, bend them slightly and squeeze into the ball with your thighs.
Things to keep in mind:Keep your shoulders down and back, and your core tight. Imagine you have a heavy tailbone, and lengthen long through your lower back to maintain a neutral spine. (Don’t let your back over-arch or your hips press out behind you).

23
Variation 1
Keeping a bend in your knees, squeeze the ball and release.
Variation 2
Holding the squeeze of the ball, pulse down and up, never fully straightening out your legs. Find your lowest point (similar to the photo here), and move down an inch and up an inch repeatedly.
Note:Especially with this exercise, you want to fatigue out your muscles. You’ll want to keep going until your legs are shaking, and then even longer. This is what the “barre shake” is all about!
24
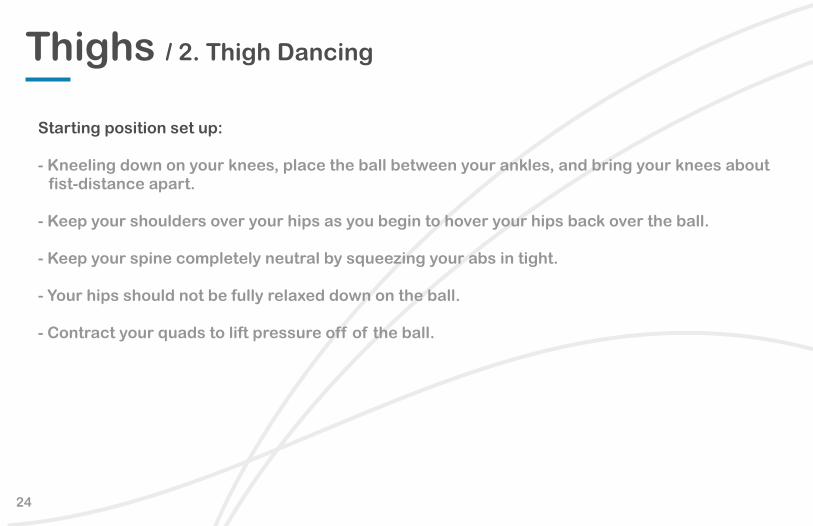
Thighs / 2. Thigh Dancing
Starting position set up:
- Kneeling down on your knees, place the ball between your ankles, and bring your knees about fist-distance apart.
- Keep your shoulders over your hips as you begin to hover your hips back over the ball.
- Keep your spine completely neutral by squeezing your abs in tight.
- Your hips should not be fully relaxed down on the ball.
- Contract your quads to lift pressure off of the ball.
25
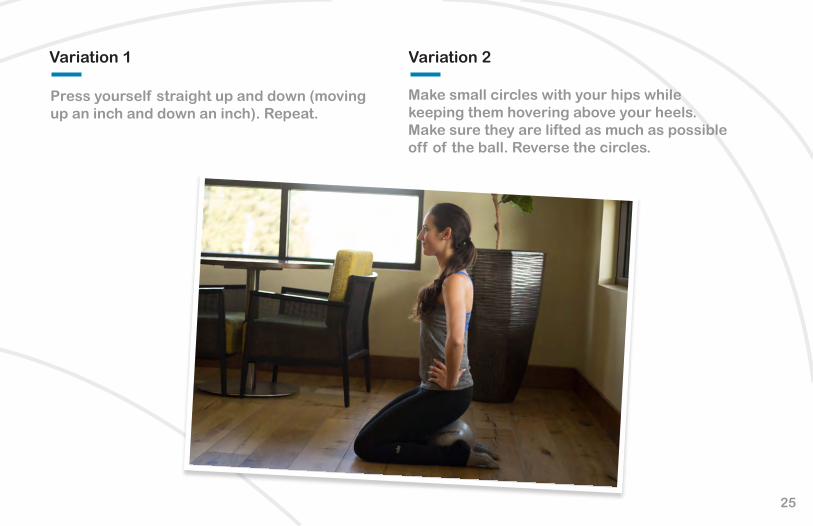
Variation 1
Press yourself straight up and down (moving up an inch and down an inch). Repeat.
Make small circles with your hips while keeping them hovering above your heels. Make sure they are lifted as much as possible off of the ball. Reverse the circles.
Variation 2

26
Thighs / 3. Lunges
Starting position set up:
- Use a steady surface, such as a countertop, chair-back, railing, etc., and come into a classic lunge position (pictured on next page).
- Make sure your shoulders stay directly over your hips, and your front knee doesn’t pass your toes.
- Check that your front knee is pointing straight ahead and isn’t caving in or out to the side.
- Place the ball directly under your back leg’s knee.
- Focus on keeping your hips square (don’t let the back leg’s hip come behind the other hip).
- Keep your spine neutral, chest and chin lifted, and shoulders down and back.

27
Variation 1
Press yourself up and down an inch, lowering your knee further into the ball and back to the starting position. Stay down low—you should never lift completely off of the ball. Repeat!
Variation 2
Holding the lunge position, begin to lift and lower your front heel several times while your back leg stays still.

28
Glutes / 1. Donkey Kicks & Hamstring Curls
Starting position set up:
- Come down onto all-fours, wrists directly under shoulders, and knees directly under hips.
- Keep a neutral spine (natural curve of the back—careful not to over-arch and dip into your lower back).
- Place the ball behind one of your knees, and squeeze into the ball to keep it in place (and to activate your hamstrings, of course).
- Keeping both of your hips square (in line with one another), lift the leg with the ball up towards the ceiling while flexing your foot.
- Keep your spine completely still throughout any variations with this exercise, especially your lower back.
- Keep your neck in line with the rest of your spine.

29
Variation 1
From the starting point (photo 1), pulse your top leg up and down an inch.
From the starting point (photo 1), keep your knee high as you squeeze the ball and bring your heel in closer to your seat. Release (but not all the way, keep the ball in place), and repeat.
Variation 2
Optional Modification:You can do any of the previous variations down on your forearms if you feel too much pressure in your wrists!

30
Glutes / 2. Back Dancing
Starting position set up:
- Lie down onto your back, and bend your knees to place your feet flat on the ground a few inches apart.
- The further away from the rest of your body your feet are, the more challenging.
- Pull your navel down to your spine, press your spine down into the ground, and relax your neck and shoulders.
- Focus on driving your heels down into the ground and squeezing your glutes to lift your hips, starting with your tailbone and peeling up one vertebra at a time.
- Place the ball between your mid-thighs.

31
Variation 1
Hold your hips lifted as you squeeze and release the ball. Repeat.
Continuously squeeze the ball as you lower your hips all the way down to the ground and immediately lift them back up(full range of motion)! Repeat.
Variation 2
Optional Add-on:Any of these variations can be done with your heels lifted OR toes lifted!

32
Glutes / 3. Back Dancing + Ball Stabilization
Set up is the same as for back dancing, but with different placement of the ball:
- Lying down on your back, bend your knees to place one of your feet flat on the ball in front of you, and the other on the ground beside it.
- The further away from the rest of your body your feet are, the more challenging.
- Pull your navel down to your spine, press your spine down into the ground, and relax your neck and shoulders.
- Squeeze your glutes to lift your hips carefully, starting with your tailbone and peeling up one vertebra at a time.
- Keep your hips in line by engaging your core.

33
Variation 1
Keep your hips lifted and press your hips up and down an inch. Repeat.
Drop your hips down and lift them up, using full range of motion. Repeat.
Variation 2
Things to keep in mind:You can do these exercises with one foot on the ball and the other on the ground, or you can carefully bring both feet up onto the ball for even more of a challenge! Also, find your balance before practicing any of the variations and be extra careful and controlled.

34
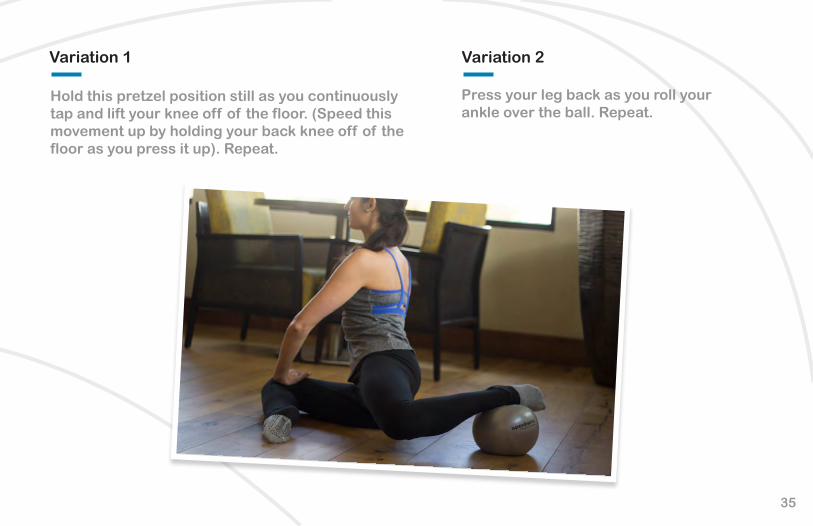
Glutes / 4. Seated Pretzel
Starting position set up:
- Sit with legs zig-zagged (pictured on next page). - Push your back leg’s knee behind your body and place the ball underneath your back ankle.
- Squeeze the glutes of your back leg to create and keep a rotation of your rib cage away from your lifted leg.
- To feel the work more in your glute, make sure the knee of your back leg is further back behind the side of your hip.
- Actively squeeze your glutes as you keep your abs engaged and shoulders down and back!
35
Variation 1
Hold this pretzel position still as you continuously tap and lift your knee off of the floor. (Speed this movement up by holding your back knee off of the floor as you press it up). Repeat.
Press your leg back as you roll your ankle over the ball. Repeat.
Variation 2
36
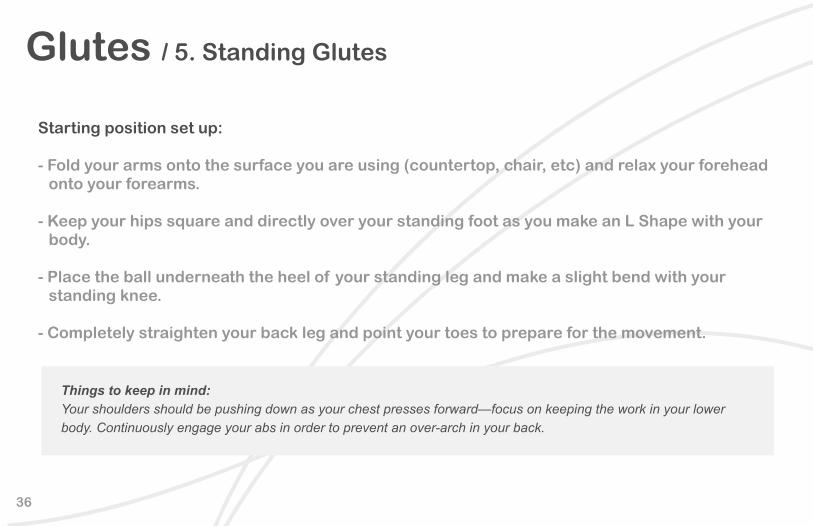
Glutes / 5. Standing Glutes
Starting position set up:
- Fold your arms onto the surface you are using (countertop, chair, etc) and relax your forehead onto your forearms.
- Keep your hips square and directly over your standing foot as you make an L Shape with your body.
- Place the ball underneath the heel of your standing leg and make a slight bend with your standing knee.
- Completely straighten your back leg and point your toes to prepare for the movement.
Things to keep in mind:Your shoulders should be pushing down as your chest presses forward—focus on keeping the work in your lower body. Continuously engage your abs in order to prevent an over-arch in your back.

37
Variation 1
Tap your straight leg’s foot down on the ground and immediately lift back up (photo 1→2). Repeat!
Bend your back leg until it’s at a 90 degree angle and point your toes up towards the ceiling. Begin to press your toes up higher towards the ceiling with tiny pulsing movements (photo 3). Repeat!
Variation 2
1 23

38
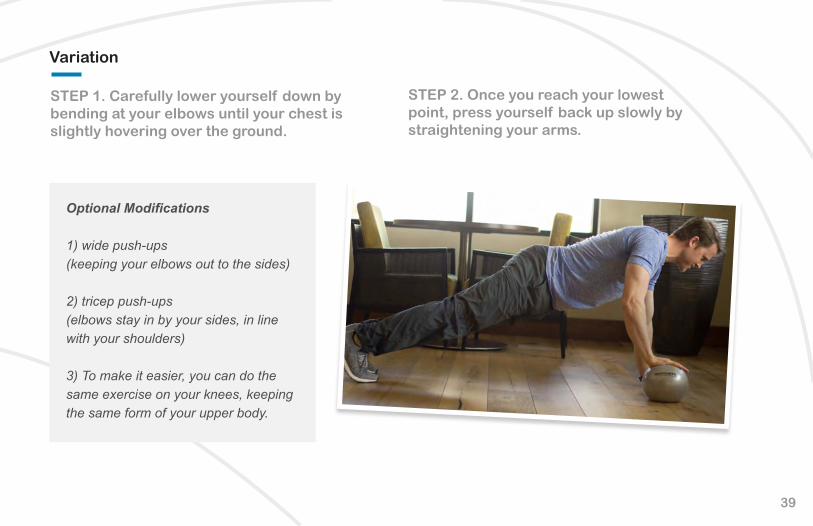
Arms / 1. Ball Push-ups
Starting position set up:
- Lower onto the ground into a plank position with your arms and legs about an inch or two wider than shoulder-distance apart (pictured on next page).
- Place the ball underneath the palm of one of your hands.
- Make sure that your body stays in a straight line from your heels to the crown of your head, and hug your abs around your spine to keep your core engaged.
- Your neck should be long and your gaze slightly in front of you.
Things to keep in mind:Having the ball underneath one hand makes it more difficult to keep your weight equally distributed, so focus on making sure your shoulders stay in one even line throughout the movement.
39
Variation
STEP 1. Carefully lower yourself down by bending at your elbows until your chest is slightly hovering over the ground.
STEP 2. Once you reach your lowest point, press yourself back up slowly by straightening your arms.
Optional Modifications
1) wide push-ups(keeping your elbows out to the sides)
2) tricep push-ups(elbows stay in by your sides, in line with your shoulders)
3) To make it easier, you can do the same exercise on your knees, keeping the same form of your upper body.
40
Arms / 2. Chest Squeezes
Starting position set up:
- Sitting or standing comfortably with your shoulders over your hips, place the ball in front of your chest with your palms pressing it evenly on both sides.
- Keep your elbows bent and in line with your wrists (photo 1).
Things to keep in mind:Focus on keeping good posture by avoiding any hunching of your shoulders.

41
Variation
Keeping a continuous squeeze of the ball, press your arms straight out in front of you (photo 2). Return back to starting position and repeat.
1 2

42
Back / 1. Roll-up
Starting position set up:
- Lie down on your stomach with your arms and legs long, and place your wrists over the ball, as you look straight down:

43
Variation
STEP 1. Pull your shoulders as far down and away from your ears as possible as you start to press down onto the ball, lifting your torso up above the ground.
1 2
STEP 2. Look up and stretch your neck as you reach the top.
STEP 3. Squeeze your shoulder blades and lats (the area right underneath your armpits) together.
STEP 4. Hold at the top, then slowly roll back down. Repeat!