mini-tiger - mettler toledo balances & scales for industry ... · mettler toledo mini-tiger 3...
TRANSCRIPT

Mini-Tiger
Operation manual
Bedienungsanleitung
Istruzioni per l'uso
Manuel d'utilisation
Gebruiksaanwijzing
Manual de Operación
Manual de Operaçâo
C METTLER TOLEDO Printed in China 03/01
GB
DE
IT
FR
NL
ES
PT

METTLER TOLEDO
2 Mini-Tiger
Dimensions
Abmessungen
Dimensioni
Dimensionen
Afmetingen
Dimensiones
Dimensôes
DE
IT
FR
NL
ES
PT
GB

METTLER TOLEDO
Mini-Tiger 3
GEO-Value
The GEO-Value of verified balances explains for which location of use the balance has been verified. This GEO-Value is shown on the balance weight display shortly after switch on the balance. Further details see „GEO-Value table“.
GEO-Wert
Der GEO-Wert gibt bei vom Hersteller geeichten Waagen an, für welchen Aufstellungsort die Waage geeicht ist. Dieser GEO-Wert wird kurz nach dem Einschalten der Waage im Gewichtsfeld des Display angezeigt. Genaueres ist der folgenden Tabelle „GEO-Value Table“ zu entnehmen.
Valeur GEO
La valeur GEO de balances poinçonnées indique pour quelle localisation la balance a été approuvée. Cette valeur GEO est indiquée sur l’afficheur de poids de la balance peu de temps après sa mise en marche. Pour de plus amples détails, consultez le tableau des valeurs GEO (GEO-VALUE TABLE).
Valore-GEO
Il volore di GEO delle bilance omologate,identifica per quale area le bilance sono state verificate all‘ uso. All‘ accensione dello strumento questo valore viene mostrato brevemente sul display del peso. Per ulteriori informazioni vedere la tabella „GEO-Value Table“.
GEO-waarde
De GEO-waarde geeft aan voor welke lokatie de weegschaal door de fabrikant geijkt is. De GEO-waarde wordt kort na het aanzetten van de weegschaal in de gewichtsuitlezing zichtbaar. Meer informatie over de Geo-waarde kan in de bijgevoegde tabel „GEO-Value Table“ worden gelezen.
Valor GEO
El valor GEO indica, para las balanzas verificables, las ubicaciones para las cuales han sido verificadas por el fabricante. Este valor GEO aparece brevemente en el campo de peso del display tras la conexión de la balanza. Para más detalles, ver tabla de valores GEO (GEO-VALUE TABLE).
VALOR GEO
O valor GEO de balaças verificadas explica que cada local de utilização destas foi verificado. Este valor GEO aparecerá no display de peso da balança durante o arranque da mesma. Para mais detalhes consultar „A TABELA DE VALORES GEO“ (GEO-VALUE TABLE).
GEO-Value table Country Geo-Width Geo-Value (default)
Austria 46°22‘ – 49°01‘ 18 Belgium 49°30‘ – 51°30‘ 20 Bulgaria 41°41‘ – 44°13‘ 16 Croatia 42°24‘ – 46°32‘ 18 Czechia 48°34‘ – 51°03‘ 20 Denmark 54°34‘ – 57°45‘ 23 France 41°20‘ – 51°00‘ 19 Finland 59°48‘ – 70°05‘ 25 Germany 47°00‘ – 55°00‘ 20 Greece 34°48‘ – 41°45‘ 15 Hungary 45°45‘ – 48°35‘ 19 Ireland 51°05 – 55°05‘ 22 Iceland 63°17‘ – 67°09‘ 26 Italy 35°47‘ - 47°05‘ 17 Latvia 55°30 – 58°04‘ 23 Luxembourg 49°27‘ – 50°11‘ 20 Liechtenstein 47°03‘ – 47°14‘ 18 Lithuania 53°54‘ – 56°24‘ 22 Netherland 50°46‘ – 53°32‘ 20 Norway 57°57‘ - 71°11‘ 24 Poland 49°00‘ – 54°30‘ 21 Portugal 36°58‘ – 42°10‘ 15 Romania 43°37‘ – 48°15‘ 18 Sweden 55°20‘ – 69°04‘ 24 Switzerland 45°49‘ – 47°49‘ 18 Slovakia 47°44‘ – 49°46‘ 19 Slovenia 45°26‘ – 46°35‘ 18 Spain 36°00‘ – 43°47‘ 15 Turkey 35°51‘ – 42°06‘ 16 United Kingdom 49°00‘ – 62°00‘ 21
DE
IT
FR
NL
ES
PT
GB

METTLER TOLEDO
4 Mini-Tiger
GB
The Mini-Tiger scale is a compact digital price computing scale with many features. All our equipment is assembled, tested and packed with great care, if you might find something which is not according to your expectations, please contact us immediately. The Mini-Tiger scale is a high precision weighing instrument, which has to be approved and stamped by Weights and Measures. This scale is stamped in our production plant or by your local Weights & Measures office. Please check the stamping stickers on the scale before use. Please read this instruction manual carefully. Properly used and maintained, this scale will provide years of accurate weighing. Please handle it as you would any piece of fine electronic equipment.
Metrological instructions
Important note Contents
on legal-for-trade scales in EEC Installation 5 countries Precautions 5
Factory calibrated scales carry this Environment 5 identification on the label applied Unpacking and inspection 5 on the package. Setup 5 Scales identified by the green "M" Power up sequence 5 label applied on the identification Display and keyboard 6 plate, can be operated immediately. Operator display 6 Scales calibrated in two stages Keys and cursors 6 Carry the opposite identification on Customer display 6 the label applied on the package. Operations 7
These scales have already been calibrated Straight weighing 7 (declaration of construction conformity according Re-zero function 7 to EN 45501-8.2) and should be calibrated Tare function 7 again at their working place. PLU (Price Look Up) function 7 This second calibration must be performed by the Power saving feature 7 certified METTLER TOLEDO after-sales service. By-Count function 8
Accumulation Function 8 Please contact your local METTLER TOLEDO Battery maintenance 8 agency. Set-up 9
Appendix 10 Retail scales, used for legal trade, must be Error Messages 10 submitted for calibration and verification. Maintenance 10 Do respect the current metrological directives in Specifications 10 your country.
Introduction
M
M
M

METTLER TOLEDO
Mini-Tiger 5
GB
Precautions This chapter gives detailed instructions and important information to install the Mini-Tiger scale successfully.
Environment Before you install your Mini-Tiger scale, identify the best location for the equipment. The proper environment enhances the operation and longevity of the scale. Keep in mind the following factors, which might have a negative influence on the scale's operation: ☞Vibration Vibration diminishes the scale’s ability to measure accurately. Electrical machinery such as conveyors and drill presses can cause inaccurate and non-repeatable readings. The scale may also read inaccurately if it is not leveled properly. ☞Air current Moving air can cause the scale to read an additional force (add. weight) and have the same effect as vibration. ☞Friction A scale cannot measure accurately if an object is rubbing or pressing against the platter. Unpacking and inspection Please inspect the package as it is delivered by the carrier. If the shipping container is damaged, check for internal damage and file a freight claim with the carrier if necessary. If the container is undamaged, open the box, remove the scale and place it on a solid, flat surface. Please keep the packing material and shipping insert in case you need to return the scale to METTLER TOLEDO. The Mini-Tiger is a precision instrument and may be permanently damaged if not shipped in factory approved packaging. Package contents for all Mini-Tiger units include: ☞ Mini-Tiger scale ☞ platter ☞ AC-DC power adapter ☞ operation manual Setup Open the box and pull up the scale, including the packing material. Remove the packing material from each side of the scale. Set the unit on a sturdy, level surface. Level the scale by turning the adjustable feet on the bottom of the unit. When the bubble indicator is in the centre of the circle, Mini-Tiger is levelled correctly. Bubble indicator: Good Wrong All four feet must touch the surface to make sure that Mini-Tiger does not rock. Put the platter on top of Mini-Tiger. Unpack the power adapter and plug it into the bottom of the scale. Plug the line cord into a properly grounded AC power outlet.
Power up sequence Press the power key to turn on the Mini-Tiger. The Mini-Tiger goes through a series of self-tests when it is turned on. The scale performs a diagnostic test on its ROM and RAM, and proceeds to normal operating mode. The power-up sequence is as follows: • Light all segments of the display characters. This verifies operation of all segments. • Display the software revision and part number. • Display GEO value in weight window. • Capture zero and be ready for normal operation.
Note: Before switching on the Mini-Tiger scale, always make sure there is nothing on the platter.
Installation

METTLER TOLEDO
6 Mini-Tiger
GB
Operator display Keys and Cursors Not all scales have all following functions, please check the overlay of your scale to see which keys it has.
Key Name Function 0 through 9 Numeric Key To enter unit price, plu number and other data
>0< Zero Key To return the scale to gross zero if drifting occurs >T< Tare Key To tare the scale C Clear Key To clear unit price or accumulator*.
PLU PLU Key To enter or recall a PLU Accumulation Key* To add current total price into accumulation memory + * Enter key* To enter data
X * By-count Key* To calculate the price of non-weighing item
Cursor Description
>0< To be lit when weight is gross 0.
To be lit when power is AC or battery is fully charged.
(-) To be lit when power is battery, it blinks to indicate the voltage of battery is lower than the required.
Net To be lit when tare is existed.
X* To be lit in by-count mode.
Add* To be lit when total price is added to accumulation memory.
Total* To be lit when accumulation memory is not zero. * These functions and cursors are not available in the scale to EU countries. Customer display
Display and keyboard
47Mini-Tiger
PLUADD
>0< NET
TOTAL
kg
€
METTLER TOLEDO
€ /kg
102X3
85
96
+>T<
C>0<
X
€/kg kg
NET>0<
METTLER TOLEDO€
TOTALADDX

METTLER TOLEDO
Mini-Tiger 7
GB
Straight weighing Place the item to be weighed on the platter. Enter the unit price (The price to pay will come up in the total price display simultaneously). Remove the item from the platter, all displays will return to 0.
Re-zero function There are two ways to re-zero the scale:
1. Power-up Zero 2. Push button Zero
☞ Power-up Zero The scale will automatically capture zero when it is turned on. The power-up zero capture range is +/-10% of the scale capacity. When the scale is turned on with a weight on the platter of more than +/-10% of the capacity, the scale will not capture zero (the weight display will show "-----") and the scale will not be ready for use. After removing the weight the scale will capture "zero".
>0< ☞ Pushbutton Zero The ZERO key re-zeros the scale over a range of +/-2% of the scale capacity. To use this function, the scale must be in the gross weighing mode(NET cursor must be off) and in a no motion condition. When the weight on the platter is more then +/-2% of the scale capacity the depression of the zero key will not be accepted.
Tare Function The Tare key subtracts the weight of the wrapping material.
☞ Pushbutton Tare >T< Place the empty container or wrapping material on the platter.
Press >T< key. Place the item to be weighed in the container or on the wrapping material and then onto the platter. Enter the unit price. Remove the weighed item, as well as the container or wrapping material from the platter, the displays will show all 0.
PLU (Price Look Up) Function The PLU function stores 25 PLU's in the scale's memory. They can be used for frequently sold goods, where the prices
can be looked up by simply entering the PLU number.
☞ Storing a PLU Enter the required unit price. Press and hold the PLU key until two beeps is heard. In the weight display appears: "PLU". Enter the PLU number (between 1 and 25) and wait for approx. 3 seconds, until the scale beeps twice.
☞ Recalling a PLU PLU Press the PLU key followed by the desired one or two-digit number. The stored unit price will appear in the unit price
display.
Power Saving Feature Power saving feature is used to save battery power. When using the battery and the scale is idle for 2 minutes, both the price and total price displays will turn off, the weight display will only display one 0 on the right and the battery in use cursor is lit. This indicates that the scale is in the power saving cycle. When weight is placed on the platter or a key is pressed, the scale will wake up
Operations

METTLER TOLEDO
8 Mini-Tiger
GB
automatically. If there is still no key operation and weight change 15 minutes after power saving status occurred, the scale will be turned off automatically. This function can be enabled or disabled through setting of the softswitch (group 1, step 4: “Automatic Power Off”).
By-Count function* X By-Count function is used to calculate the price of non-weighing items.
1) Enter deal quantity (1-99), press By-Count key, then enter the deal price. 2) Press enter key. The scale is now ready for by-count operation. The by-count cursor* is illuminated. 3) Enter the quantity to be sold, the scale will display the total price. 4) Press clear key to return the scale to weighing mode.
Accumulation Function* + Perform a transaction as described in straight weighing, by-count or tare mode sections.
Press the accumulation key. The total price will be added to the accumulated total. The illuminated cursors will point to “TOTAL*” and “ADD*”. The weight display will show message “totAL”, the unit price display will show the number of accumulations and the total price display will show the accumulated total price. Repeat the above two steps until all desired transactions are accumulated. There are three ways to return the scale back to the normal weigh mode: 1: Pressing the clear key to clear an accumulator, and return to weighing mode. 2: Press tare key to tare and back to weighing mode. 3: Press numeric key to enter new price and return to weighing mode. Press accumulation key to recall accumulation when total price is zero or total price field is blank.
* These functions and cursors are not available in the scale to EU countries.
Rechargeable lead-acid battery If charging kit is installed, the scale can charge the lead-acid battery (6V/5Ah). To charge a lead-acid battery, connect the scale to the external power supply. The battery will be charged regardless the scale is on or off. It usually takes not more than 12 hours to charge the battery to full capacity depending on the voltage of the battery. If the battery is has been deep-discharged, a prolonged charging time is required to bring the battery back to full capacity. There are two battery cursors, one is , and the other is (-) . Cursor is lit to indicate the battery capacity is full and current power source is power supply, and it flashes to indicate that battery is being charged. Cursor (-) is lit to indicate that current power source is battery, and it flashes to indicate that voltage of the battery is lower than the required. The scale shows “L Bat” in the weight window and stop weighing when the cursor (-) begins blinking, and the scale will be turned off automatically about 10 seconds later. In this case, please charge the batteries. If the unit is plugged into the wall outlet when battery power is used, the power source will automatically switch to the wall transformer. And when the AC power is off, power source will automatically switch to battery.
Notice The battery should be recharged at least every 5 months regardless it is used or not. After a long time storage, e.g. over 3 months, it is desired to cycle (charge/discharge) the battery 3 times to let it restore to full capacity. When replacing the battery, pay much attention to the poles. The positive (+) terminal must be connected to the red connector and the negative (-) terminal must be connected to the black connector. If connected wrongly, the battery will be damaged.
Battery Maintenance

METTLER TOLEDO
Mini-Tiger 9
GB
Several parameters in the scale can be changed to enable you to set up the scale to your individual needs.
In setting mode, >T< is called toggle key, + is called enter key. Press toggle key to choose the required parameter. Press enter key to step to the next function. ☞ Access to operator set-up mode
Press and hold C key until “grP 1” is displayed when turn on the scale.
kg €/kg €
Grp 1 >0< (-) NET X ADD TOTAL
Press the enter key. kg €/kg €
Grp 1 Step 3 on >0< (-) NET X ADD TOTAL
With step 3 the Beep can be switched on or off. ON -The scale will beep when a key is pressed. OFF-No sound is made when a key is pressed. Press toggle key to toggle between on and off. Press enter key to step to the next function.
kg €/kg €
Grp 1 Step 4 on >0< (-) NET X ADD TOTAL
With step 4 the auto power off can be set. OFF- Disable automatic power-off function. ON -Enable automatic power-off function. Press entry key to step to the next function.
kg €/kg €
Grp 1 Step 6 on >0< (-) NET X ADD TOTAL
With step 6 Auto clear of tare and unit price can be switched on or off. ON-Enable automatic clearing when weight is removed from platter. OFF-Disable automatic clearing when weight is removed from platter. Press enter key twice to step to the next function.
kg €/kg €
Grp 2 Step 7 o >0< (-) NET X ADD TOTAL
With group 2 step 7 way to output data can be selected. O- outside command from PC or printer. The command format is “P”. 1- Command output 2- Stable output 3- Continuous output Press enter key to step to the next function.
kg €/kg €
Grp 2 Step 8 2 >0< (-) NET X ADD TOTAL
With group 2 step 8 content of output can be selected. 0- weight only 1- weight and unit price or weight and item number 2- weight and unit price and total price Press enter key to step to the next function.
kg €/kg €
Grp 2 Step 8 off >0< (-) NET X ADD TOTAL
With group 2 step 9 content of entry can be selected. OFF- enter unit price ON- enter item number When “on” is selected, price computing function is disabled, the entry in the unit price window is item number up to 5 digit, and the total price window will be blank. Press enter key to step to the next function.
kg €/kg €
Grp 2 Step 10 off >0< (-) NET X ADD TOTAL
With group 2 step 10 output format can be selected. OFF- Single line ON - multi-line Press enter key twice to step to the next function.
kg €/kg €
Grp 3 Step 1 1 >0< (-) NET X ADD TOTAL
Depending on the environment a filter can be set to get a stable reading of the weight. 0 - No digital filtering. 1 - Light digital filtering. 2 - Heavy digital filtering. Press enter key to step to the next function.
kg €/kg €
save >0< (-) NET X ADD TOTAL
Now select if you want to save the previous setting, if yes depress enter key. If not, press toggle key.
kg €/kg €
abort >0< (-) NET X ADD TOTAL
Press enter key to abort the settings.
Setup

METTLER TOLEDO
10 Mini-Tiger
GB
Error Messages The 8434 will display an error message if a scale problem or incorrect keyboard entry is sensed. The error codes are: E11 RAM error E16 ROM error E18 EEPROM error
METTLER TOLEDO Service
E33 Total price >9999.99 or the number of transaction >99 Clear total display
E34 PLU number >25 PLU nuber 1~25 No PLU No PLU is found Program PLU nnnnn in weight window Weight is more than full capacity plus 9e nnnnnn in total price window Total price is more than 9999.99
Remove items from platter
uuuuu in weight display can not capture zero Remove items from platter or calibrate the scale
Maintenance Remove power by removing the line cord or transformer from the wall outlet. Use a clean, damp cloth to wipe the exterior surfaces. DO NOT use solvents and chemicals to clean the unit. DO NOT attempt to remove the cover or perform service or maintenance on the internal parts of the scale. Specifications Capacity : 6 kg or 15 kg Divisions : 2 or 5 gram Weight display : 5 digits Unit price display : 5 digits Total price display : 6 digits Operating temperature : -10°C to +40°C Storage temperature : -25°C to +50°C Power supply : 12Vdc Power consumption : 200mA Charging current : 400mA Plug in Power supply: I/P : 230VAC 50Hz O/P : 12VDC 800mA Specifications subject to change without notice.
Appendix

METTLER TOLEDO
Mini-Tiger 11
DE
Die Mini-Tiger Waage ist eine preisrechnende, digitale Kompaktwaage mit vielen praktischen Funktionen. Unsere Produkte werden mit großer Sorgfalt gefertigt, getestet und verpackt. Sollten Sie dennoch einen Anlass zur Unzufriedenheit haben, wenden Sie sich bitte schnellstmöglich an uns. Die Mini-Tiger Waage ist ein empfindliches, zugelassenes und geeichtes Messinstrument. Die Waage ist am Ende des Produktionsprozesses in unserem Werk oder durch Ihr örtliches Eichamt geeicht worden. Bitte überprüfen Sie das Vorhandensein der notwendigen Eichmarke vor dem Gebrauch. Bitte lesen Sie diese Bedienungsanleitung sorgfältig und genau. Bei einem pfleglichen und anwendungsgerechten Umgang, wird Ihnen die Waage über viele Jahre genaue und exakte Messwerte anzeigen. Die Waage sollte mit der gleichen Sorgfalt behandelt werden, wie Sie andere elektronische Geräte bedienen und benutzen.
Installation 12 Aufstellhinweise 12 Aufstellort 12 Auspacken und Kontrolle 12 Einrichten 12 Einschalten 12 Anzeige und Tastatur 13 Bedieneranzeige 13 Funktion der einzelnen Tasten 13 Kundenanzeige 13 Bedienung 14 Wägemodus 14 Nullstellung der Waage 14 Tarier-Funktion 14 Arbeiten mit PLU 14 Energiesparmodus 15 Akkuwartung 15 Grundeinstellung 16 Anhang 17 Fehlermeldungen 17 Wartung 17 Technische Daten 17
Einführung
Installation
Eichhinweise
Wichtiger Vermerk für geeichte Waagen in EG-Ländern
Werksgeeichte Waagen tragen vorstehendes Kennzeichen auf dem Packetikett.
Waagen mit grünem „M“-Kleber auf dem Eichschild dürfen sofort in Betrieb genommen werden.
Waagen, die in zwei Schritten geeicht werden, sind mit vorstehendem Zeichen aufdem Packetikett markiert. Diese Waagen unterliegen bereits dem ersten Eichschritt (Bestätigung der Baukonformität nach EN 45501-8.2) undmüssen am Verwendungsort geeicht werden. Die Eichung ist durch den behördlich zertifizierten METTLER TOLEDO Service durchzuführen. Bitte nehmen Sie mit Ihrem METTLER TOLEDO Kundendienst Kontakt auf.
Ladenwaagen, die in offenen Verkaufsstellen betrieben werden, müssen grundsätzlich geeicht sein. Bitte beachten Sie die Eichbestimmungen, die für IhrLand gültig sind.
M
M
M
Inhaltsverzeichnis

METTLER TOLEDO
12 Mini-Tiger
DE
Aufstellhinweise Dieses Kapitel enthält detaillierte Anweisungen und wichtige Informationen für die korrekte Installation der Waage.
Aufstellort Bitte prüfen Sie den Aufstellort vor der Installation auf seine Tauglichkeit, um einen einwandfreien und lang anhaltenden Einsatz der Waage zu gewährleisten. Die nachfolgenden Einflüsse können sich negativ bzw. störend auf die Funktion der Waage auswirken: ☞Erschütterungen Erschütterungen beeinflussen bzw. verhindern die exakte Gewichtsermittlung. Elektrische Maschinen (z.B. Laufbänder, Schneidemaschine) können zu ungenauen oder nicht reproduzierbaren Ergebnissen führen. Steht die Waage nicht im Lot, kann dies ebenfalls zu verfälschten Messwerten führen. ☞Windeinflüsse durch Zug Luftbewegungen können eine nicht unerhebliche Kraft auf die Lastplatte auswirken und zu einem unkorrekten (erhöhten) Messwert, ähnlich der Einflüsse durch Erschütterung, führen. ☞Reibung Insofern die Lastplatte infolge von äußeren mechanischen Widerständen (z.B. Gegenstand drückt oder reibt gegen die Lastplatte) kein freies Spiel hat, kann keine genaue Messung erfolgen.
Auspacken und Kontrolle Bitte untersuchen Sie sofort nach Erhalt der Ware die Verpackung auf äußere Beschädigungen. Sollte die Verpackung eine Beschädigung aufweisen, kontrollieren Sie bitte den Verpackungsinhalt auf Vollständigkeit bzw. weitergehende Defekte, soweit dies möglich ist, und teilen Sie den Schaden sowohl dem Spediteur als auch Ihrem Händler zwecks Regulierung mit. Ansonsten brechen Sie bitte das Transportsiegel, öffnen den Karton, entnehmen nacheinander das Steckernetzgerät sowie die Waage mit der getrennt gepackten Lastplatte, und stellen diese auf einer flachen aber festen Unterlage ab. Wenngleich alle Verpackungsmaterialien umweltschonend entsorgt werden können, empfehlen wir die gesamte Verpackung für eventuelle, spätere Zwecke aufzubewahren. Die Mini-Tiger Waage ist ein Präzisions-Messinstrument und kann ernsthaften Schaden nehmen, wenn sie nicht sorgfältig gesichert transportiert wird. Der Inhalt des versiegelten Kartons sollte folgende Teile umfassen: ☞ Mini-Tiger Waage ☞ Lastplatte ☞ Steckernetzgerät ☞ Bedienungsanleitung
Einrichten Bitte entnehmen Sie die Waage inklusive dem Verpackungsmaterial der Kartonage. Entfernen Sie an beiden Seiten der Waage das Verpackungsmaterial. Platzieren Sie die Waage auf einer stabilen, flachen Unterlage. Bringen Sie die Waage durch Drehen der beweglichen Füsse ins Lot (die Libelle hilft Ihnen dabei). Wenn die Luftblase der Libelle in Übereinstimmung mit dem kleinen aufgedruckten Ring ist, ist die Mini-Tiger-Waage korrekt im Lot. Libelle: Richtig Falsch Die Waage sollte nun sicher und fest stehen (kein Wackeln). Legen Sie die Lastplatte auf die vier aus der Oberschale ragenden Aufnahmen. Stecken Sie das Steckernetzgerät in eine ordnungsgemäss geerdete 230-V-Schutzkontaktsteckdose ein.
Einschalten Drücken Sie die Taste und die Waage wird eingeschaltet. Nach dem Einschalten führt die Waage eine Reihe von Selbsttests durch, u.a. einen Diagnosetest der ROM- und RAM-Speicherbereiche und geht dann in den Wägemodus über. Der Einschaltvorgang läuft wie folgt ab: • Alle LED-Segmente der Anzeige leuchten auf, um die einwandfreie Funktion der Anzeige zu prüfen. • Die Waage zeigt den Ländercode, den geografischen Abgleichwert, die Softwarenummer und die
Software-Revisionsnummer an. • Die Waage zeigt „------“ an, sucht den Nullpunkt und ist einsatzbereit. Achtung: Bitte stellen Sie immer sicher, dass beim Einschalten nichts auf der Lastplatte steht!
Installation

METTLER TOLEDO
Mini-Tiger 13
DE
Bedieneranzeige Funktion der einzelnen Tasten
Taste Bezeichnung Funktion
0 ~ 9 Numerische Tasten Eingabe des Einzelpreises, der PLU oder anderer Daten.
>0< Nullstell-Taste Nullstellung der Waage auf Brutto-Null bei Driften der Waage.
>T< Tara-Taste Tarierung eines Behältnisses.
C Lösch-Taste Löschen der Eingabe bzw. Summe über die Tastatur.
PLU PLU-Taste Speichern oder Abrufen einer PLU.
+ *
X *
Indikator Beschreibung
>0< Leuchtet wenn Gewicht gleich Null ist.
Leuchtet wenn Gerät unter Netzversorgung betrieben wird oder der Akku voll aufgeladen ist.
(-) Leuchtet bei Akku-Betrieb. Blinkt wenn die Akku-Kapazität zu gering ist.
Net Leuchtet bei Verwendung von Tara.
X*
Add*
Total* * Diese Funktionen und Indikatoren sind aus eichtechnischen Gründen nicht funktionsfähig bei den Waagen für EU-Länder. Kundenanzeige
Anzeige und Tastatur
€/kgkg
NET>0<
METTLER TOLEDO€
TOTALADD
47Mini-Tiger
PLUADD
>0< NET
TOTAL
kg
€
METTLER TOLEDO
€ /kg
102X3
85
96
+>T<
C>0<
X

METTLER TOLEDO
14 Mini-Tiger
DE
Wägemodus
Legen Sie das zu wiegende Gut auf die Lastplatte und geben Sie mittels der numerischen Tasten den Einzelpreis ein. (Der Gesamtpreis wird rechnerisch ermittelt und im entsprechenden Anzeigefeld gleichzeitig dargestellt.) Nachdem Sie das Wägegut von der Lastplatte entfernt haben, kehrt die Waage in den Ausgangszustand zurück und in der Anzeige erscheint 0.
Nullstellung der Waage
Die Nullstellung kann auf zwei Arten erfolgen, beim Einschalten oder durch Tastendruck
☞ Nullstellung beim Einschalten Beim Einschalten fängt die Waage automatisch den Nullpunkt. Dabei steht ein Fangbereich von ±10 % der maximalen Wägekapazität bereit. Im Falle, dass die Waage mit einer Überlast von mehr als 10 % oder einer Unterlast von mehr als10 % der Wägekapazität eingeschaltet wird, übersteigt/unterschreitet dies die erlaubte Bandbreite und der Nullpunkt wird nicht gefangen (in der Anzeige erscheint „-----"). Die Waage ist nicht einsatzbereit. Der Nullpunkt wird nach Entfernung des Gewichtes von der Lastplatte oder nach Auflegen des fehlenden Gewichts gefangen.
>0< ☞ Nullstellung durch Tastendruck Die Nullstell-Taste ermöglicht die Nullstellung über einen Bereich von ±2% der maximalen Wägekapazität. Um diese Funktion nutzen zu können, muss die Waage im Wägemodus ohne TARA-Speicherung (NET-Indikation wird nicht angezeigt) und die Lastplatte zur Ruhe gekommen sein. Die erfolgreiche Nutzung (Akzeptanz) dieser Nullstell-Funktion ist nur bei einer Gewichtsabweichung innerhalb der eichtechnisch erlaubten Toleranz von ±2% der maximalen Wägekapazität möglich.
Tarier-Funktion
>T< Die Tara-Taste erlaubt den Abzug des Verpackungsmaterials (z.B. Behältnis)
☞ Tarier-Funktion Legen Sie das leere Behältnis oder das Papier/die Folie auf die Lastplatte. Drücken Sie die Tara-Taste. Die Gewichtsanzeige zeigt nun „0“ an. Füllen Sie das zu wiegende Gut in das Behältnis oder legen Sie es auf das Papier/die Folie. Geben Sie den Einzelpreis mittels der numerischen Tasten ein und lesen Sie den Gesamtpreis ab. Nach Entfernung des Wägegutes und des Behältnisses bzw. des Verpackungsmaterials kehrt die Waage in den Ausgangszustand zurück und in der Anzeige erscheint „0“. Arbeiten mit PLU (Price Look Up)
Die Mini-Tiger Waage kann bis zu 25 PLUs (Einzelpreise) speichern. Zumeist werden Preise häufig verkaufter Produkte abgespeichert und dann bei Bedarf durch Eingabe der PLU-Nummer abgerufen. ☞ Anlegen einer PLU (Einzelpreis) Geben Sie den gewünschten Einzelpreis ein.
PLU Drücken und halten Sie dann die PLU-Taste, bis Sie zwei Piep-Töne hören. In der Gewichtsanzeige erscheint: „PLU”. Geben Sie nun mittels der numerischen Tasten die anzulegende PLU-Nummer (zwischen 1 und 25) ein und warten Sie ca. 2 Sekunden. Durch einen zweimaligen Piep-Ton wird die Speicherung der PLU bestätigt.
Bedienung

METTLER TOLEDO
Mini-Tiger 15
DE
☞ Abrufen einer PLU
Drücken Sie die PLU-Taste PLU und danach die ein- oder zweistellige PLU-Nummer. Der gespeicherte Wert wird in der Anzeige wiedergegeben. Energiesparmodus Der Energiesparmodus dient dazu Akku-Leistung einzusparen, wenn die Waage im eingeschalteten Zustand übergangsweise nicht benutzt wird. Wird die Waage mit Akku betrieben und es findet 2 Minuten lang keine Aktion an der Waage statt (Tastendruck, Gewichtsänderung), so schaltet die Waage automatisch die beiden Preisanzeigen ab. In der Gewichtsanzeige erscheint lediglich eine Null (0) und der Akku-Indikator ( (-) ) leuchtet. Wird in dieser Phase ein Gewicht auf die Lastplatte gebracht oder wird eine Taste betätigt, schaltet die Waage automatisch wieder vom Energiesparmodus in den Wägemodus. Die Waage “wacht auf”. Sollte die Waage länger als 15 Minuten nicht benutzt werden, so schaltet sie sich automatisch ab. Diese Funktion kann über die “Grundeinstellungen” deaktiviert werden (Grp1, Step 4).
Wiederaufladbarer Lead-Acid Akku (Option) Für die Mini-Tiger Waage besteht optional die Möglichkeit ein Akkukit zu bestellen. Wenn das Akkukit installiert ist, kann die Waage den Lead-Acid Akku mit der Kapazität 6V/5Ah aufladen. Um den Akku aufzuladen schliessen Sie den Versorgungsstecker des Steckernetzgerätes an die Waage an. Stecken Sie nun das Steckernetzgerät in eine ordnungsgemäss geerdete 230-V-Schutzkontaktsteckdose. Unabhängig davon, ob die Waage Ein- oder Ausgeschaltet ist, lädt diese den Akku nun auf. Um den Akku auf die volle Kapazität aufzuladen benötigt die Waage im Normalfall ca.12 Stunden. Sollte der Akku tief-entladen worden sein, so kann sich die Ladezeit zusätzlich erhöhen. Am Waagendisplay finden Sie zwei Akku-Indikatoren, und (-) . Der Indikator leuchtet wenn der Akku voll aufgeladen ist und bei angeschlossenem Steckernetzteil (Netzspannungsbetrieb). Wird der Akku gerade geladen, so blinkt dieser Indikator (Voraussetzung: Waage ist eingeschaltet). Der Indikator (-) leuchtet, wenn die Waage über den Akku betrieben wird. Wenn dieser Indikator blinkt, so bedeutet dies, daß die Akku-Kapazität zu gering ist und der Akku aufgeladen werden muß. In der Gewichts-Anzeige wird “L Bat” angezeigt und der Wiegevorgang wird gestoppt. 10 Sekunden später schaltet die Waage ab. Sie sollten nun den Akku wieder aufladen. Bitte beachten! Der Akku sollte mindestens alle 5 Monate aufgeladen werden, unabhängig davon ob er verwendet wurde oder nicht. Nach einem längeren Zeitraum ohne Aufladung (z.B. 3 Monate) ist es notwendig, daß der Akku wieder in seinen normalen Ladezyklus gelangt. Nach 3 Ladezyklen erreicht der Akku wieder seine maximale Kapazität. Bitte verwenden Sie nur das angegebene Akkukit! Der Tausch des Akkukits muß durch einen Mettler-Toledo Fachmann durchgeführt werden, da es bei falscher Installation zu Folgeschäden kommen kann!
Akkuwartung

METTLER TOLEDO
16 Mini-Tiger
DE
Durch die Änderung der Parameter können Sie die Waage Ihren individuellen Bedürfnissen anpassen. Im Konfigurationsmodus sind die folgenden Tasten mit neuen Funktionen belegt: >T< : zwischen den verfügbaren Parametern wechseln (TOGGLE-Taste)
+ : zur nächsten Funktion wechseln (ENTER-Tasten) ☞ Auswahl der Bedienerkonfiguration
Drücken und halten Sie die C -Taste. Schalten Sie die Waage ein. Nun muß in der Gewichtsanzeige “grP1” erscheinen. Tasten nun loslassen.
kg €/kg €
Grp 1 >0< (-) NET X ADD TOTAL
Drücken Sie die ENTER-Taste kg €/kg €
Grp 1 Step 3 on >0< (-) NET X ADD TOTAL
In Step 3 können Sie den Tastenton deaktivieren . ON - Waage piept, wenn eine Taste gedrückt wird. OFF- Waage piept nicht, wenn eine Taste gedrückt wird Drücken Sie die TOGGLE-Taste um zwischen ON und OFF zu wechseln. Mit der ENTER-Taste gelangen Sie zur nächsten Funktion.
kg €/kg €
Grp 1 Step 4 on >0< (-) NET X ADD TOTAL
In Step 4 können Sie die Energiesparfunktion deaktivieren. OFF- Energiesparmodus ausgeschaltet ON - Energiesparmodus eingeschaltet Mit der ENTER-Taste gelangen Sie zur nächsten Funktion.
kg €/kg €
Grp 1 Step 6 on >0< (-) NET X ADD TOTAL
In Step 6 können Sie die automatische Löschung von Tara und Einzelpreis deaktivieren. ON-Tara und Einzelpreis werden nach dem Entfernen des Wägegutes von der Lastplatte automatisch gelöscht. OFF- Tara und Einzelpreis werden nach dem Entfernen des Wägegutes von der Lastplatte nicht automatisch gelöscht. Drücken Sie die ENTER-Taste zweimal um zur nächsten Funktion zu gelangen.
kg €/kg €
Grp 2 Step 7 o >0< (-) NET X ADD TOTAL
! Reserviert für weitere Funtionen ! Mit der ENTER-Taste gelangen Sie zur nächsten Funktion.
kg €/kg €
Grp 2 Step 8 2 >0< (-) NET X ADD TOTAL
! Reserviert für weitere Funtionen ! Mit der ENTER-Taste gelangen Sie zur nächsten Funktion.
kg €/kg €
Grp 2 Step 9 off >0< (-) NET X ADD TOTAL
! Reserviert für weitere Funtionen ! Mit der ENTER-Taste gelangen Sie zur nächsten Funktion.
kg €/kg €
Grp 2 Step 10 off >0< (-) NET X ADD TOTAL
! Reserviert für weitere Funtionen ! Drücken Sie die ENTER-Taste zweimal um zur nächsten Funktion zu gelangen.
kg €/kg €
Grp 3 Step 1 1 >0< (-) NET X ADD TOTAL
In Grp3 Step1 können Sie die digitale Filterung auswählen. 0 – Keine digitale Filterung. 1 – Leichte digitale Filterung. 2 – Starke digitale Filterung Mit der ENTER-Taste gelangen Sie zur nächsten Funktion.
kg €/kg €
save >0< (-) NET X ADD TOTAL
Wenn Sie die Änderungen speichern möchten drücken Sie die ENTER-Taste. Möchten Sie abbrechen, so drücken Sie die TOGGLE-Taste
kg €/kg €
abort >0< (-) NET X ADD TOTAL
Drücken Sie die ENTER-Taste um abzubrechen.
Grundeinstellungen

METTLER TOLEDO
Mini-Tiger 17
DE
Fehlermeldungen Im Falle, dass die Waage eine Fehlermeldung anzeigt, schalten Sie immer zuerst die Waage aus und nach einer Pause (ca. 5 Sekunden) wieder ein. Sollte die Fehlermeldung danach noch immer angezeigt werden, so kann dies die folgenden Ursachen haben:
E11 RAM error E16 ROM error E18 EEPROM error
METTLER TOLEDO Service rufen
E34 PLU zu gross PLU 1~`25 eingeben No PLU Keine PLU PLU programmieren nnnnn in der Gewichts anzeige
Überlast Gewicht von der Lastplatte entfernen
uuuuuu Unterlast Waage nullstellen Wartung Reinigen Sie die Waage regelmässig mit einem Tuch. Achten Sie bitte darauf, dass kein Wasser in das Waageninnere gelangt. Die Edelstahllastplatte kann von der Waage abgenommen und mit Wasser und gewöhnlichem Haushaltsreiniger gesäubert werden. Technische Daten Wägebereiche : 6 oder 15 kg Teilung : 2 oder 5 Gramm Gewichtsanzeige : 5 Stellen Grundpreisanzeige : 5 Stellen Betragsanzeige : 6 Stellen Betriebstemperatur : -10°C bis +40°C Lagertemperatur : -25°C bis +50°C Versorgungsspannung : 12Vdc Stromaufnahme : 200mA Ladestrom : 400mA Steckernetzgerät: I/P : 230VAC 50Hz O/P : 12VDC 800mA Änderung technischer Daten und Leistungsmerkmale vorbehalten.
Anhang

METTLER TOLEDO
18 Mini-Tiger
IT
La bilancia Mini-Tiger è una bilancia digitale compatta per il calcolo dell’importo. Tutti i nostri strumenti vengono assemblati, testati e imballati accuratamente. Vi preghiamo di contattarci immediatamente, qualora vengano riscontrati dei problemi. La bilancia Mini-Tiger è uno strumento di pesatura approvato e verificato in unica fase nell’ambito del Sistema di garanzia della Qualità della METTLER TOLEDO. Si prega di controllare l’integrità dei sigili metrici prima dell’uso. Vi preghiamo di leggere con attenzione le presenti istruzioni per l’uso. Un corretto utilizzo ed una adeguata manutenzione garantiranno una accurata rilevazione del peso nel tempo. Trattandosi di una apparecchiatura elettronica di precisione, raccomandiamo di maneggiarla con la massima cura.
Note metrologiche
Indice Importante Introduzione 18 Note per bilance in uso commercio in rapporto Installazione 19
con terzi, nei Paesi UE Precauzioni 19 Ambiente 19
Disimballaggio e controllo 19 Installazione 19
Sequenza di accensione 19 Le bilance verificate in fabbrica in un’unica fase Visori e tastiera 20 riportano questo contrassegno sull’etichetta Visore operatore 20 dell’imballlo. Tasti e indicatori 20
Visore cliente 20 Le bilance che sulla targhetta metrologica Funzioni 21 riportano questo contrassegno (M su sfondo Pesata semplice 21 verde) sono state verificate in una fase e Azzeramento 21 pertanto possono essere messe in servizio. Tara 21
PLU (Price Look Up) 21 Le bilance che riportano questo contrassegno Risparmio energia 22 sull’etichetta dell’imballo e non riportano la M Manutenzione batteria 22 su sfondo verde sulla targhetta metrologica, Configurazione 23 devono essere verificate in due fasi. Appendice 24
Per queste bilance la prima fase di verifica è stata eseguita Messaggi di errore 24 presso il produttore (Dichiarazione di conformità Manutenzione 24 Rif. EN 45501 p 8.2). La seconda fase della verifica Specifiche 24
deve essere eseguita presso il luogo di utilizzo da un tecnico autorizzato del Servizio di Assistenza Tecnica METTLER TOLEDO prima della messa in servizio.
Introduzione
M
M
M

METTLER TOLEDO
Mini-Tiger 19
IT
Precauzioni Questo capitolo contiene istruzioni dettagliate e importanti informazioni per una corretta installazione della bilancia. Ambiente Prima di installare la bilancia Mini-Tiger, identificare quale sia il luogo più adatto. Una collocazione adeguata garantisce un corretto funzionamento e la longevità dello strumento. Tenere inoltre presente che i seguenti fattori possono influenzare negativamente il funzionamento della bilancia: ☞Vibrazioni Le vibrazioni diminuiscono l’accuratezza della misura del peso. Macchinari elettrici come nastri trasportatori o presse possono causare misure non accurate e non ripetibili. La bilancia può anche fornire misure non accurate se non viene livellata correttamente. ☞Correnti d’aria Correnti d’aria possono generare forze addizionali gravanti sul piatto di pesata che comportano, come nel caso delle vibrazioni, misure non accurate. ☞Attriti Prestare attenzione che durante la rilevazione del peso, non vi siano oggetti estranei a contatto con il piatto di pesata. Disimballaggio e controllo Verificare il contenuto dell’imballo al momento della consegna. Se l’imballo esterno è danneggiato, verificare l’integrità del contenuto ed inoltrare eventuali reclami al vettore. Se l’imballo è intatto, aprirlo, estrarre la bilancia e posizionarla su un piano d’appoggio solido. Conservare il materiale dell’imballo nel caso aveste necessità di ritornare la bilancia presso METTLER TOLEDO. La bilancia Mini-Tiger è uno strumento di precisione e può rimanere danneggiata in modo permanente se il trasporto viene effettuato in imballi differenti da quello originale. Ogni imballo contiene: ☞ Bilancia Mini-Tiger ☞ Piatto di pesata ☞ Adattatore AC-DC ☞ Istruzioni per l’uso
Installazione Aprire l’imballo ed estrarre la bilancia assieme al materiale di imballaggio. Rimuovere il materiale di imballaggio da ogni lato della bilancia. Posizionare lo strumento su un appoggio solido e piano. Procedere al livellamento ruotando opportunamente i piedini regolabili. Quando la bolla d’aria si trova al centro dell’indicatore, la Mini-Tiger è livellata correttamente. Indicatore: Corretto Errato Verificare che tutti e quattro i piedini tocchino la superficie del piano d’appoggio per evitare oscillazioni dello strumento. Applicare il piatto di pesata. Collegare l’adattatore AC-DC alla parte posteriore della bilancia. Collegare il cavo di alimentazione ad una presa di corrente dotata di messa a terra. Sequenza di accensione Premere il tasto di accensione. La Mini-Tiger esegue un test diagnostico (controllo ROM e RAM), e quindi si predispone in modalità operativa. La sequenza di accensione avviene nel seguente modo: • Illuminazione di tutti i segmenti dei visori per verificarne la corretta funzionalità. • Visualizzazione dell’indice di revisione del firmware e del numero di serie. • Visualizzazione del valore GEO nella finestra del peso. • Azzeramento e passaggio in modalità operativa. Nota: Prima di accendere la bilancia, assicurarsi che non vi sia nulla sul piatto di pesata.
Installazione

METTLER TOLEDO
20 Mini-Tiger
IT
Visore operatore Tasti e indicatori Non tutte le bilance hanno le stesse funzioni; controllare la tastiera e i visori della propria bilancia per verificare quali tasti ed indicatori sono presenti.
Tasto Funzione Descrizione 0 a 9 Tasti numerici Introduzione prezzo unitario, numero PLU o altri dati.
>0< Tasto azzeramento Azzeramento della bilancia. >T< Tasto tara Effettua un’operazione di tara. C Tasto Cancellazione Cancellazione prezzo unitario.
PLU Tasto PLU inserimento o richiamo di un PLU. Tasto Somma*
+ * Tasto Enter Tasto di conferma X * Tasto X*
Indicatore Descrizione
>0< Si accende quando il peso è a zero.
Si accende quando è presente l’alimentazione di rete e la batteria è completamente carica.
(-) Si accende quando l’alimentazione è a batteria, lampeggia quando la batteria è scarica.
Net Si accende quando è presente una tara.
X *
Add*
Total* * Queste funzioni e questi indicatori non sono disponibili nelle bilance destinate ai Paesi UE. Visore cliente
Visori e Tastiera
€/kg kg
NET>0<
METTLER TOLEDO€
TOTALADD
47Mini-Tiger
PLUADD
>0< NET
TOTAL
kg
€
METTLER TOLEDO
€ /kg
102X3
85
96
+>T<
C>0<
X
X

METTLER TOLEDO
Mini-Tiger 21
IT
Pesata semplice Posizionare la merce da pesare sul piatto della bilancia. Impostare il prezzo unitario. Il peso e l’importo corrispondente vengono simultaneamente visualizzati sui rispettivi visori. Rimuovendo la merce dal piatto, i visori ritorneranno a zero.
Azzeramento Esistono due modalità per azzerare la bilancia:
1. Azzeramento all’accensione 2. Tasto Azzeramento
☞ Azzeramento all’accensione La bilancia si posiziona automaticamente sullo zero ogni volta che viene accesa. L’intervallo di ricerca dello zero è compreso entro +/-10% della portata della bilancia. Se la bilancia viene accesa mentre sul piatto grava un peso superiore al 10% della portata, l’azzeramento non è possibile (il visore del peso visualizza "-----"). Scaricare il piatto di pesata per consentire la ricerca dello zero.
>0< ☞ Tasto Azzeramento Il tasto Azzeramento consente la ricerca dello zero entro un intervallo del +/-2% della portata della bilancia. Per utilizzare questa funzione, la bilancia deve essere in modalità di pesata lorda (l’indicatore NET deve essere spento) e in condizione di stabilità. Quando il peso che grava sul piatto supera il +/-2% della portata della bilancia, la pressione del tasto Azzeramento non comporta alcun effetto.
Tara Il tasto Tara serve per sottrarre il peso del materiale di confezionamento.
☞ Tasto Tara >T< Posizionare il contenitore vuoto o il materiale di confezionamento sul piatto.
Premere il tasto >T< . Posizionare la merce da pesare all’interno del contenitore o del materiale di confezionamento. Impostare il prezzo unitario. Rimuovendo la merce ed il materiale di confezionamento dal piatto, i visori ritorneranno a zero.
PLU (Price Look Up) La Mini-Tiger dispone di 25 posizioni di memoria PLU, per gli articoli venduti con maggior frequenza.
Ogni prezzo unitario può essere visualizzato richiamando il corrispondente numero di PLU.
☞ Memorizzazione di un PLU Inserire il prezzo unitario desiderato. Tenere premuto il tasto PLU e rilasciarlo solamente dopo che la bilancia avrà emesso due segnali sonori consecutivi. Sul visore del peso appare la scritta: "PLU". Inserire il numero di PLU desiderato (fra 1 e 25) e attendere circa 3 secondi, fino a che la bilancia non emette due segnali sonori.
☞ Richiamo di un PLU PLU Premere il tasto PLU seguito dal numero desiderato. Il corrispondente prezzo unitario apparirà sul visore.
Funzioni

METTLER TOLEDO
22 Mini-Tiger
IT
Risparmio energia La bilancia Mini-Tiger è dotata di un sistema di risparmio energetico per aumentare al massimo l’autonomia della bilancia durante il funzionamento a batteria. Praticamente, se la bilancia rimane inattiva per 2 minuti, i visori del prezzo unitario e dell’importo si spengono, mentre sul visore del peso appare uno zero sul lato destro. L’indicatore dell’alimentazione a batteria rimane acceso. La bilancia si trova ora nella modalità di risparmio energetico che consente di ridurre al minimo il consumo di energia. Non appena viene posizionato un peso sul piatto o viene premuto un tasto, la bilancia si riattiverà automaticamente. Dopo il passaggio in modalità di risparmio energetico, se per 15 minuti non viene premuto alcun tasto e il peso rimane stabile la bilancia si spegne automaticamente. Quest’ultima funzione può essere attivata o disattivata nel menu di configurazione. (gruppo 1, step 4: “Spegnimento automatico”).
Batteria al piombo ricaricabile Se è installato il kit per la ricarica, è possibile ricaricare la batteria al piombo (6V/5Ah) collegando la bilancia alla rete di alimentazione. La ricarica avviene indipendentemente dal fatto che la bilancia sia accesa o spenta. Generalmente una ricarica completa richiede al massimo 12 ore. Se la batteria è completamente scarica, è necessario un tempo di ricarica prolungato per riportarla ad uno stato di piena efficienza. Sulla bilancia sono presenti due indicatori per la batteria: e (-) . L’indicatore acceso segnala che la batteria è completamente carica e la bilancia è alimentata tramite rete esterna, mentre quando lampeggia indica che la batteria è in fase di carica. L’indicatore (-) invece si accende, quando la bilancia è alimentata a batteria, mentre lampeggia quando la batteria è scarica. Quando l’indicatore (-) comincia a lampeggiare, la bilancia mostra la scritta “L Bat” nel visore del peso e si spegne automaticamente entro 10 secondi. In tal caso, ricaricare la batteria. Se la bilancia viene collegata alla rete di alimentazione esterna mentre sta funzionando a batteria, automaticamente commuta l’alimentazione sulla rete esterna. Se viene a mancare l’alimentazione esterna, la bilancia commuta automaticamente all’alimentazione tramite batteria.
Nota La batteria deve essere ricaricata almeno ogni 5 mesi, indipendentemente dal suo utilizzo. Dopo un lungo periodo di inattività, per es. più di 3 mesi, è preferibile scaricare e ricaricare completamente la batteria tre volte consecutive prima di ritornare al normale utlizzo. In caso di sostituzione della batteria, prestare molta attenzione ai poli. Il terminale positivo (+) deve essere collegato al connettore rosso, mentre il terminale negativo (-) deve essere collegato al connettore nero. In caso di collegamento errato, la batteria può danneggiarsi irreparabilmente.
Manutenzione batteria

METTLER TOLEDO
Mini-Tiger 23
IT
Nella modalità di Configurazione vengono utilizzati i seguenti tasti: >T< : Tasto di selezione. + : Tasto di conferma.
Premere il tasto di selezione >T< per selezionare il parametro
desiderato. Premere il tasto + per confermare la scelta e passare al parametro successivo. ☞Accesso alla modalità di Configurazione
Accendere la bilancia tenendo premuto il tasto C fino a che sul visore appare “Grp 1”.
Kg €/kg €
Grp 1 >0< (-) NET X ADD TOTAL
Premere il tasto di conferma. kg €/kg €
Grp 1 Step 3 on >0< (-) NET X ADD TOTAL
Step 3: Abilitazione/disabilitazione segnale sonoro. ON – Emissione di un segnale sonoro ogni volta che viene premuto un tasto. OFF – Nessun segnale sonoro viene emesso quando viene premuto un tasto. Effettuare la scelta con il tasto di selezione e premere il tasto di conferma per passare al parametro seguente
kg €/kg €
Grp 1 Step 4 on >0< (-) NET X ADD TOTAL
Step 4: Spegnimento automatico. OFF – Spegnimento automatico inattivo. ON – Spegnimento automatico attivo. Effettuare la scelta con il tasto di selezione e premere il tasto di conferma per passare al parametro seguente
Kg €/kg €
Grp 1 Step 6 On >0< (-) NET X ADD TOTAL
Step 6: Cancellazione automatica tara e prezzo unitario. ON- Attiva la cancellazione automatica della tara e del prezzo unitario quando si rimuove la merce dal piatto. OFF- Disattiva la cancellazione automatica della tara e del prezzo unitario quando si rimuove la merce dal piatto. Effettuare la scelta con il tasto di selezione e premere due volte il tasto di conferma per passare al parametro seguente
Kg €/kg €
Grp 2 Step 7 o >0< (-) NET X ADD TOTAL
Grp 2 Step 7: ! Riservato per ulteriori funzioni ! Premere il tasto di conferma per passare al parametro successivo.
Kg €/kg €
Grp 2 Step 8 2 >0< (-) NET X ADD TOTAL
Grp 2 Step 8: ! Riservato per ulteriori funzioni ! Premere il tasto di conferma per passare al parametro seguente.
Kg €/kg €
Grp 2 Step 9 Off >0< (-) NET X ADD TOTAL
Grp 2 Step 9: ! Riservato per ulteriori funzioni ! Premere il tasto di conferma per passare al parametro seguente.
Kg €/kg €
Grp 2 Step 10 off >0< (-) NET X ADD TOTAL
Grp 2 Step 10: ! Riservato per ulteriori funzioni ! Premere il tasto di conferma per passare al parametro seguente.
kg €/kg €
Grp 3 Step 1 1 >0< (-) NET X ADD TOTAL
Grp 3 Step 1: Filtro digitale In funzione dell’ambiente esterno, può essere selezionato un filtro per ottimizzare la rilevazione del peso. 0 – Nessun filtro digitale. 1 – Filtro digitale debole. 2 – Filtro digitale forte. Effettuare la scelta con il tasto di selezione e premere il tasto di conferma.
Kg €/kg €
Save >0< (-) NET X ADD TOTAL
Per salvare le impostazioni premere il tasto di conferma (la bilancia torna nella modalità di pesata). Se non si desidera salvare le impostazioni, premere il tasto di selezione.
Kg €/kg €
Abort >0< (-) NET X ADD TOTAL
Premere il tasto di conferma per uscire senza salvare le impostazioni.
Configurazione

METTLER TOLEDO
24 Mini-Tiger
IT
Messaggi di errore
In caso di malfunzionamento o di introduzioni da tastiera errate, la bilancia visualizza un codice di errore. Per prima cosa spegnere la bilancia e dopo una pausa di circa 5 secondi riaccenderla. Se la condizione di errore permane, consultare la tabella seguente:
E11 Errore RAM E16 Errore ROM E18 Errore EEPROM
Rivolgersi al Servizio di Assistenza METTLER TOLEDO
E33 L’importo è >9999.99 o il numero di transazione è >99 Cancellare con C
E34 Numero di PLU >25 Introdurre PLU 1~25 No PLU PLU inesistente Programmare il PLU “nnnnn” nel visore del peso Il peso supera la portata max + 9e “nnnnnn” nel visore dell’importo L’importo è maggiore di 9999.99
Rimuovere gli articoli dal piatto
“uuuuuu” nel visore del peso Azzeramento impossibile Scaricare il piatto o tarare la bilancia
Manutenzione Scollegare il cavo di alimentazione. Utilizzare un panno umido e pulito per pulire le superfici esterne. Non utilizzare solventi o altre sostanze chimiche per pulire la bilancia. Non tentare di smontare la bilancia per eseguire operazioni di manutenzione delle parti interne. Specifiche Capacità : 6 o15 kg Divisioni : 2 o 5 g Indicatore del peso : 5 cifre Indicatore Prezzo unitario : 5 cifre Indicatore dell importo : 6 cifre Temperatura d’impiego : da -10°C a +40°C Temperatura d’immagazzinaggio : da -25°C a +50°C Tensione : 12Vdc Potenza assorbita : 200mA Carica di corrente : 400mA Alimentatore: I/P : 230 VAC 50Hz O/P : 12 VDC 800 mA Con riserva di modifiche delle caratteristiche tecniche e funzionali.
Appendice

METTLER TOLEDO
Mini-Tiger 25
FR
Nous vous remercions d’avoir choisi notre balance compacte de comptoir. Vous avez ainsi acquis un produit de haute technologie qui vous offrira un nombre de fonctions important. Il a été conçu pour vous offrir le meilleur service pendant de longues années. Pour profiter au maximum des performances de votre appareil et pour votre sécurité, veuillez lire attentivement ce manuel et suivre les recommandations suivantes. Les balances poids/prix utilisées pour la vente directe au public, doivent obligatoirement être vérifiées par un organisme notifié.Respecter impérativement les prescriptions métrologiques en vigueur dans votre pays.
Intructions métrologiques
Note importante Contents
Indication légale des balances de Installation 26 Commerce en CEE Précautions 26 Les balances calibrées en usine sont Conditins d’installation 26 Identifiées par cette vignette apposée Vérification 26 Sur l’emballage Installation 26 Les balances identifiées par un "M" Mise sous tension 26 Vert sur la plaque d’identification Afficheurs et clavier 27 Peuvent être utilisées immédiatement. Afficheur opérateur 27 Les balances calibrées en deux étapes Clavier 27 sont identifiées par la vignette ci-contre Afficheur client 27 appose sur l’emballage. Fonctionnement 28
Ces balances ont déjà été soumise à la première Pesée 28 Étappe de verification (EN 45501-8.2) et doivent Zéro poids 28 Encore être vérifiées sur le lieu d’utilisation. Fonction Tare 28 Fonction PLU 28 Cette seconde étape doit être effectuée par un Fonction ECO 28 Organisme agree. Fonction Batterie 29 Fonction change 29 Les balances utilisées dans le cadre de transactions Maintenance Batterie 29 Commerciales doivent faire l’objet d’un calibrage et Configuration 30 d’une verification suivant les directives métrologiques Appendix 31 de votre pays. Messages d’erreur 31
Maintenance 31 Caractéristiques techniques 31
Introduction
M
M
M

METTLER TOLEDO
26 Mini-Tiger
FR
Précautions Ce chapitre contient les instructions et informations importantes pour réussir l’installation de votre balance Mini-Tiger .
Conditions d’installation Avant d’installer votre balance Mini-Tiger , preparer le poste de travail. Un environnement sain optimisera le fonctionnement et la durée de vie de votre balance.Veiller sur les différents points suivants, source d’altération des performances de votre appareil : ☞ Les Vibrations Les vibrations perturbent la precision des measures. Les appareils tells que hachoirs et trancheurs peuvent provoquer des pesées inexactes. La balance doit être installée sur un support stable. ☞Les courants d’air De forts courants d’air peuvent provoquer une derive de poids positive et avoir les memes effets que les vibrations. ☞FLes frottements Une balance ne peut pas indiquer un poids correct si le plateau n’est pas libre de tout frottement. Vérification du matériel Il est conseillé d’inspecter le carton livré par le transporteur.Si l’emballage est abîme, contrôler le bon état de l’appareil et faire une réclamation auprès du transporteur si nécessaire. Il est préconisé de conserver l’emballage de l’appareil en cas de retour vers votre distributeur. La Mini-Tiger iest un instrument de precision qui subirait des dommages irrémédiables si il n’était pas transporté dans l’emballage d’origine. Produit et accessories :: ☞ Balance Mini-Tiger ☞ plateau ☞ Adaptateur secteur (230/12V) ☞ manuel d’utilisation Installation Poser la balance sur un support robuste. Ajuster le niveau de la balance à l’aide des 4 pieds. Lorsque la bulle du niveau ( situé à l’arrière de la balance ) est au centre du cercle bloquer les pieds à l’aide des écrous. Indicateur de niveau: Bon Mauvais S’assurer que les quatre pieds sont bien en contzct avec le support. Poser le plateau sur la balance. Connecter l’adaptateur secteur sur la balance .Puis connecter sur une prise secteur 230V.
Mise sous tension Appuyer sur la touché pour démarreer la balance. La balance fait une serie d’autotest lors de son initialisation. La balance effectue un diagnostique ROM et RAM , puis s’initialise en mode pesée. La séquence de démarrage est la suivante: • Test des afficheurs. • Numéro de programme. • Valeur GEO . • Remise a zero.
Note: Avant de démarrer la balance , s’assurer qu’elle soit libre de tout frottement et que le plateau soit vide.
Installation
METTLER TOLEDO
Mini-Tiger 27
FR
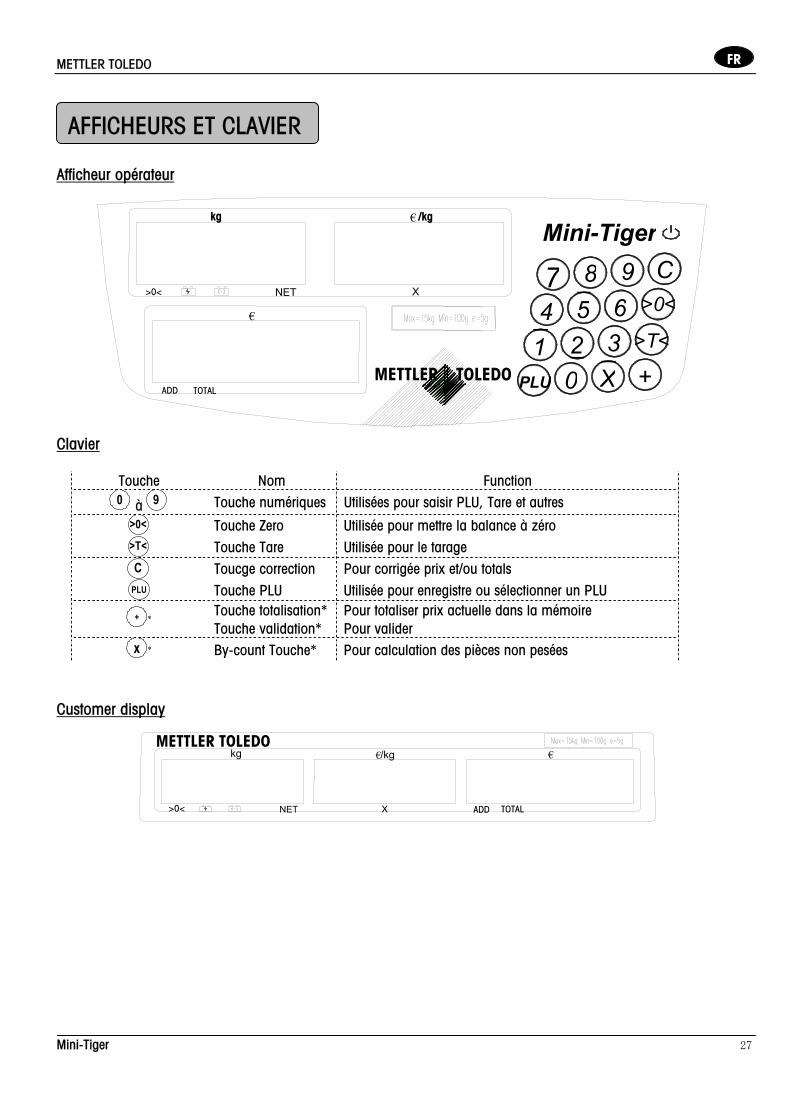
Afficheur opérateur Clavier
Touche Nom Function 0 à 9 Touche numériques Utilisées pour saisir PLU, Tare et autres
>0< Touche Zero Utilisée pour mettre la balance à zéro >T< Touche Tare Utilisée pour le tarage C Toucge correction Pour corrigée prix et/ou totals
PLU Touche PLU Utilisée pour enregistre ou sélectionner un PLU Touche totalisation* Pour totaliser prix actuelle dans la mémoire + * Touche validation* Pour valider
X * By-count Touche* Pour calculation des pièces non pesées Customer display
AFFICHEURS ET CLAVIER
€/kg kg
NET>0<
METTLER TOLEDO€
TOTALADD
47Mini-Tiger
PLUADD
>0< NET
TOTAL
kg
€
METTLER TOLEDO
€ /kg
102X3
85
96
+>T<
C>0<
X
X

METTLER TOLEDO
28 Mini-Tiger
FR
Pesée Poser la pièce à peser sur le plateau. Saisir la prix unitaire en centimes (le prix à payer est calculé simultanément). Décharger le plateu, tous les afficheurs retournent à zero.
Zéro poids Il y a deux moyens de recaler la balance à zero.
1. eteindre et rallumer la balance. 2. Appuyer sur la touché >0<
☞ Eteindre et rallumer la balance. LMa balance effectue automatiquement un calage à zero à l’allumage.Ce calage prend en compte une variation de +/- 10% de la portée max. de la balance.Lorsque la balance est allumée avec un poids supérieur à +/- 10% de la portée max., la balance ne peut pas effectuer son auto-zéro ( l’afficheur poids indique "-----« ) et la balance ne peut pas être utilisée. La balance prendra son auto-zéro lorsque le plateau sera déchargé.
>0< ☞ La touché >0< Cette function permet un calage avec +/- 2% de la portée max. de la balance. Pour utiliser cette fonction, la balance doit être en mode pesée brut ( vouyant NET éteint) et stable. Lorsque le poids sur le plateau est supérieur à +/- 2% de la portée max. lde la balance, la fonction est inutilisable
Function Tare La function Tare soustrait le poids de l’emballage du produit ( poids NET).
☞ Touche Tare >T< Poser l’emballage du produit sur le plateau.
Appuyer sur la touché >T< . Ploser le produit emballé sur le plateau de la balance. Saisissez un prix unitaire. Décharger le plateau, tous les afficheurs retournent à zero.
Fonction PLU (Price Look Up) La MINI-Tiger vous permet d’enregistrer en mémoire les 25 prix unitaires (PLU) les plus utilizes.
☞ Mémorisation des PLU : Saisir le prix unitaire. Appuyer quelques secondes sur la touché PLU jusqu’à emission d’un signal sonore. L’afficheur poids indique: "PLU". Entrer le numéro de PLU ( entre 1 et 25) et attendre environ 3 secondes jusqu’à l’émission d’un double signal sonore.
☞ Sélection d’un PLU : PLU Appuyer sur la touché PLU puis tabuler un numéro ( entre 1 et 25 ) de PLU mémorisé.
Le prix enregistré apparaît dans la fenêtre Prix Unitaire.
Fonctionnement

METTLER TOLEDO
Mini-Tiger 29
FR
Fonction Eco. Cette function permet d’économiser l’autonomie de la batterie. Lors de l’utilisation de la balance sur batterie, le mode ECO se déclanche automatiquement a près 2 minutes d’inactivité.Les fenêtres Prix Unitaire et Prix à Payer s’éteignent , la fenêtre Poids affiche seulement un 0 et le témoin de charge batterie. Un poids sur le plateau ou l’action sur une touche réveille automatiquement la MINI-TIGER. S’il n’y a aucune operation pendant plus de 15 minutes la balance s’éteint d’elle-même afin de préserver l’autonomie de la batterie. Cette fonction peut être validée ( Paramètre Automatic Power-off 1.4).
Batterie rechargable ICertaines versions de balances sont équipées d’un circuit de recharge de la batterie qui permet de recharger facilement l’accumulateur d’une capacité de (6V/5Ah). Pour recharger la batterie, connecter simplement la abalance à une prise 230 V par l’intermediaire de l’adaptateur secteur fourni. La balance sera rechargée que la balance soit en fonctionnement ou non. La charge de la batterie à pleine capacité ne prend généralement pas plus de 12 H , néanmoins, ce temps peut être prolongé, si la batterie a été excessivement déchargée. La balance est équipée de 2 voyants batterie. Le premier , , est affiché quand la batterie est chargée à pleine capacité et que la balance est raccordée au secteur 230V.Il clignote pour indiquer que la batterie est en cours de charge. Le second, (-) I, est affiché quand la balance fonctionne sur la batterie sans être connectée au secteur 230V. Il clignote pour indiquer que la batterie est déchargée et que la tension est trop faible. Dans ce cas, recharger ou changer la batterie dès que possible, il ne reste qu’environ 15 minutes d’autonomie. En cas de coupure d’alimentation secteur, la balance commute automatiquement sur le fonctinnement batterie.
Note La batterie doit être recharge tous les 5 mois qu’elle ait été utilisée ou non.Après un long stockage ( supérieur à 3 mois ), la batterie ne retrouvera sa capacité optimale qu’après 3 cycles complets de charge / décharge. Important : Veiller à respecter la polarité de la batterie lors de son remplacement.La borne positive (+) doit être branchée au connecteur rouge et la négativev(-() au connecteur noir.Une inversion dans le branchement endommagera gravement le batterie.
Maintenance Batterie

METTLER TOLEDO
30 Mini-Tiger
FR
Dans ce mode l’utilisateur peut changer certaines functions directement à pertir du clavier. Fonctionalité des touches dans ce mode. >T< Cette touché permet de passer au groupe suivant ou modifier la valeur d’un champ.( touche changement ) + Cette touche permet de sélectionner un groupe et aller au champ suivant. ( touche acceptation ) ☞ Mode configuration
A l’alumage de la balance appuyer sur la touche C jusqu’à l’appariton du message “grP 1” .
Kg €/kg €
Grp 1 >0< (-) NET X ADD TOTAL
Appuyer sur Kg €/kg €
Grp 1 Step 3 On >0< (-) NET X ADD TOTAL
Groupe 1 champ 3 activation du Buzzer. ON –Emission d’un Beep au clavier. OFF- Mode silence. Appuyer sur changement pour basculer entre ON et OFF. Appuyer sur acceptation pour valider.
Kg €/kg €
Grp 1 Step 4 on >0< (-) NET X ADD TOTAL
Groupe 1 champ 4 Extinction automatique . OFF- Oui ON -Non Appuyer sur acceptation pour valider
Kg €/kg €
Grp 1 Step 6 on >0< (-) NET X ADD TOTAL
Groupe 1 champ 6 Tare et Prix volatilles. ON-Tare et et Prix volatiles. OFF-Tare et Prix Unitaire fixe. Appuyer 2 fois sur acceptation pour valider .
kg €/kg €
Grp 2 Step 7 O >0< (-) NET X ADD TOTAL
Groupe 2 champ 7 commande externe. O- Emission vers PC ou Imprimante.. La commande est “P”. 1- Commande d’émission. 2- Emission après stabilité. 3- Emission en continue. Appuyer sur acceptation pour valider
kg €/kg €
Grp 2 Step 8 2 >0< (-) NET X ADD TOTAL
Groupe 2 champ 8 sélection du message. 0- Poids seul 1- Poids et Prix unitaire ou Poids et nombre 2- Poids, Prix Unitaire et Prix à payer Appuyer sur acceptation pour valider.
kg €/kg €
Grp 2 Step 9 off >0< (-) NET X ADD TOTAL
Groupe 2 champ 9 Mode poids seul. OFF- Non ON- Oui Lorsque “on” est selectionné la fenêtre prix à payer reste vide. Appuyer sur acceptation pour valider.
kg €/kg €
Grp 2 Step 10 off >0< (-) NET X ADD TOTAL
Groupe 2 champ 10 Format massage externe. OFF- Une seule ligne ON – Ligne Multiple Appuyer sur acceptation pour valider .
kg €/kg €
Grp 3 Step 1 1 >0< (-) NET X ADD TOTAL
Groupe 3 champ 1 stabilité renforcée suivant l’exposition du vent.. 0 – Vent faible ou nul 1 – Vent moyen 2- Vent fort. Appuyer sur changement pour basculer entre ON et OFF. Appuyer sur acceptation pour valider.
kg €/kg €
save >0< (-) NET X ADD TOTAL
Maintenant si vous souhaitez enregistrer les nouvelles valeurs appuyer sur acceptation.
kg €/kg €
abort >0< (-) NET X ADD TOTAL
Appuyer sur acceptation pour quitter le menu sans enregistrer.
Parametres

METTLER TOLEDO
Mini Tiger 31
FR Messages d’erreur La Mini-Tiger affiche des message d’erreur en cas de dysfonctionnement ou de frappes erronées sur le clavier. Les codes sont les suivant. : E11 Erreur RAM E16 Erreur ROM E18 Erreur EEPROM
METTLER TOLEDO Service
E33 Le prix à payer exceed 999.99 ou le nombre de transactions exceed 99. Effacer accumulateur
E34 N° PLU >25 N° PLU 1~25 No PLU PLU inexistant Programmer PLU nnnnn sur écran inférieure Surcharge poids nnnnnn sur écran prix à payer Dépassement prix à payer
Enlever produits du plateau
Maintenance Eteindre la balance avant de débrancher l’adaptateur secteur de la prise 230V. Utiliser un chiffon doux , légèrement humide si nécessaire, pour nettoyer votre balance. Ne jamais utiliser de solvants ou de produits corrisifs. Ne jamais essayer de démonter la balance.Faire appel au service technique. Caractéristiques techniques Capacité : 6 ou 15 kg Précision : 2 ou 5 g Affichage poids : 5 digits Affichage prix unitaire : 5 digits Affichage montant total : 6 digits Plage de T° : de -10°C a +40°C (utilisation) : de -25°C a + 50°C (stockage) Alimentation : 12Vdc Cons. d’énergie : 200mA Courant : 400mA Fiche courant: Tension d’entrée : 230VAC 50Hz Tension de sortie : 12VDC 800mA Sous réserve de modification des caractéristiques techniques et fonctionnalités.
Appendix

METTLER TOLEDO
32 Mini-Tiger
NL
De Mini Tiger weegschaal is een compacte, digitale prijscalculatieweegschaal met vele mogelijkheden. Al onze apparatuur is met grote zorg samengesteld, getest en verpakt. Als u een item niet in orde vindt, neem dan onmiddellijk contact op met de leverancier. De Mini Tiger weegschaal is een precisieweeginstrument, dat door het Nederlands Meetinstituut (NMi) moet worden goedgekeurd en gecertificeerd. Deze weegschaal is gecertificeerd in onze fabriek of door uw lokale NMi-kantoor. Gelieve vóór gebruik de officiële certificatiestickers op de weegschaal te controleren. Lees deze instructiehandleiding zorgvuldig. Mits op de juiste wijze gebruikt en onderhouden is het mogelijk om met deze weegschaal jarenlang nauwkeurig te wegen. Ga met de weegschaal om zoals u met elk ander gevoelig elektronisch apparaat zou omgaan.
Metrologische instructies Belangrijke opmerking over rechtsgeldig verhandelbare weegschalen in landen van de EEG
Door de fabriek gekalibreerde weegschalen zijnvoorzien van deze identificatie op het label, datop de verpakking is aangebracht.
Weegschalen aangeduid met het groene "M"-label dat op het identificatieplaatje is aangebracht, kunnen direct worden gebruikt.
Weegschalen die in twee fases worden gecalibreerd, hebben de tegengestelde identificatie op het label, dat op de verpakking isaangebracht.
Deze weegschalen zijn reeds in de eerste fase gecontroleerd(verklaring van conformiteit volgens EN 45501-8.2) en zouden op de werkplek de tweede fase moeten ondergaan.Deze tweede fase moet worden uitgevoerd door de gecertificeerde klantenservice van METTLER TOLEDO.
Gelieve contact op te nemen met uw lokale METTLER TOLEDO kantoor.
Kleinhandelsweegschalen, die worden gebruikt voor rechtsgeldige handel, moeten aan calibrering en controle worden onderworpen. Neem de huidige metrologische richtlijnen van uw land in acht.
M
M
M
Installatie 33
Voorzorgsmaatregels 33 Omgeving 33 Uitpakken en controleren 33 Installeren 33 Opstartprocedure 34
Display en toetsenbord 34 Operatordisplay 34 Toetsenbord 34 Klantendisplay 35
Handelingen 35 Correct wegen 35 IJkfunctie 35 Tarrafunctie 36 PLU (Price Look Up)functie 36 Stroombesparing 36 Optel functie 36 Accumulatie functie 37
Batterijonderhoud 37 Instelling 38 Appendix 39
Foutmelding 39 Onderhoud 39 Technische gegevens 39
Inhoud
Inleiding

METTLER TOLEDO
Mini Tiger 33
NL
Voorzorgsmaatregels In dit hoofdstuk vindt u gedetailleerde instructies en belangrijke informatie om de Mini Tiger weegschaal met succes te kunnen installeren. Omgeving Bepaal voordat u de weegschaal installeert wat de beste locatie voor de apparatuur is. De juiste omgeving verbetert het functioneren en verlengt de gebruiksduur van de weegschaal. Houd rekening met de volgende factoren, welke een negatieve invloed op het functioneren van de weegschaal kunnen hebben: Trilling Trilling vermindert het vermogen van de weegschaal om nauwkeurig te meten. Elektrische machines zoals transporteurs en kolomboormachines kunnen onnauwkeurige en niet-herhaalbare waarden tot gevolg hebben. Ook als de weegschaal niet goed waterpas gesteld is, is het mogelijk dat deze niet nauwkeurig leest. Luchtstroming Bewegende lucht kan tot gevolg hebben dat de weegschaal een extra kracht registreert (extra gewicht) en heeft hetzelfde effect als trilling. Wrijving Een weegschaal kan niet nauwkeurig meten als een voorwerp langs het weegplateau wrijft of op het weegplateau drukt. Uitpakken en controleren Gelieve de verpakking te controleren als deze door de vervoerder geleverd is. Controleer op interne schade ingeval de verpakkingsdoos beschadigd is, en dien, indien noodzakelijk, een schadeclaim bij de vervoerder in. Als de verpakkingsdoos onbeschadigd is, open de doos, haal de weegschaal eruit en plaats deze op een stevig, vlak oppervlak. Gelieve het verpakkingsmateriaal en de verzendbijlage te bewaren ingeval u de weegschaal aan METTLER TOLEDO moet retourneren. De Mini Tiger is een precisie-instrument en kan blijvend beschadigen als deze niet wordt verzonden in een door de fabriek goedgekeurde verpakking. Bij alle Mini Tiger weegschalen omvat de inhoud van de verpakking het volgende:
• Mini Tiger weegschaal • Plateau • Adapter • Bedieningshandleiding
Installeren Open de doos en haal de weegschaal, inclusief het verpakkingsmateriaal, eruit. Verwijder daarna het verpakkingsmateriaal van elke zijde van de weegschaal. Plaats het apparaat op een stabiel, vlak oppervlak. Stel de weegschaal waterpas door de verstelbare voetjes aan de onderzijde van het apparaat te draaien. De Mini Tiger is goed waterpas gesteld als de luchtbelaanwijzer zich in het midden van de cirkel bevindt. Luchtbelaanwijzer Goed Fout Alle vier voetjes moeten op het oppervlak staan om ervoor te zorgen dat de Mini Tiger niet wiebelt. Plaats het weegplateau bovenop de Mini Tiger. Haal de voedingsadapter uit de verpakking en steek deze in de onderzijde van de weegschaal. Steek de stekker in een wandcontactdoos voorzien van een goede aarding.
Installatie

METTLER TOLEDO
34 Mini-Tiger
NL Opstartprocedure en uitzetten van weegschaal Druk op de opstartknop om de weegschaal aan te zetten. De Mini Tiger doorloopt een aantal zelftests als deze wordt ingeschakeld. De weegschaal voert een diagnostische test uit op zijn ROM en RAM, en schakelt dan verder naar de normale bedieningsmodus. De opstartprocedure is als volgt:
• Alle segmenten van de displaykarakters gaan branden. Hierdoor wordt de werking van alle segmenten gecontroleerd.
• De weegschaal geeft het softwareproductidentificatienummer en het revisienummer • De weegschaal geeft de GEO- (geostatistische) waarde weer in het wicht veld. • De weegschaal geeft “------“ weer, ijkt en is gereed voor normaal gebruik.
Opmerking: Zorg er altijd voor dat er niets op het weegplateau ligt als u de Mini Tiger weegschaal aanzet. Operatordisplay Toetsenbord
Toets Naam Functie 0 through
9 Numerieke toetsen Voer eenheidsprijs, PLU-nummer of andere data
>0< Nul-toets Zet de weegschaal terug op bruto nul ingeval afwijking
optreedt >T< Tarra-toets Tarreer het gewicht van de doos. C Clear-toets Verwijder de invoer via toetsenbord of accumulatie
PLU PLU-toets Sla PLU op of roep PLU opnieuw op Enter-toets Om data in te voeren
+ * Accumulatie toets Om de actuele totaalprijs in het accumulatie geheugen op te slaan
X * Opteltoets Om de prijs te berekenen van een stuks artikel
Display en toetsenbord
47Mini-Tiger
PLUADD
>0< NET
TOTAL
kg
€
METTLER TOLEDO
€ /kg
102X3
85
96
+>T<
C>0<
X

METTLER TOLEDO
Mini Tiger 35
NL
Cursor Description
>0< Licht op als gewicht is 0
Licht op als spanning is AC of batterij is volledig opgeladen
(-) Licht op als de spanning van een batterij komt. Het knippert om aan te duiden als de spanning lager is dan nodig
Net Licht op als er een tara is
X * Licht op in optelmode
Add* Licht op als de totaalprijs wordt toegevoegd aan het accumulatie geheugen
Total* Licht op als het accumulatie geheugen niet nul is *Deze functies en cursors zijn niet beschikbaar in de weegschaal voor de EU landen. Klantendisplay
Correct wegen Plaats het te wegen item op het weegplateau. Voer de eenheidsprijs in. (De prijs die moet worden betaald, zal gelijktijdig in het display voor de totaalprijs verschijnen.) Verwijder het item van het weegplateau. Alle displays zullen weer “0” weergegeven. IJkfunctie Er zijn twee manieren om de weegschaal te ijken 1. ijken bij opstarten 2. ijken met druktoets IJken bij opstarten De weegschaal zal automatisch “nul” registreren als deze wordt aangezet. Het nulregistratiebereik bij opstarten is ±10% van de capaciteit van de weegschaal. Als de weegschaal wordt aangezet met op het weegplateau een gewicht van meer dan 10% van de capaciteit of met minder dan –10% gewicht, dan zal de weegschaal geen “nul” registreren (het display voor het gewicht zal "------" weergeven) en zal de weegschaal niet gebruiksgereed zijn. Nadat het gewicht verwijderd is of op de weegschaal geplaatst is, zal de weegschaal “nul” registreren. IJken met druktoets De NUL-toets ijkt de weegschaal over een bereik van ±2% van de capaciteit van de weegschaal. Om deze functie te gebruiken, moet de weegschaal zich in brutogewichtmodus bevinden (NET-cursor moet uitgeschakeld zijn) en in onbeweegbare toestand. Als het gewicht op het weegplateau meer dan ±2% van de capaciteit van de weegschaal bedraagt, zal het indrukken van de nul-toets niet worden geaccepteerd.
Handelingen
€/kg kg
NET>0<
METTLER TOLEDO€
TOTALADD
>0<

METTLER TOLEDO
36 Mini-Tiger
NL
Tarrafunctie De Tarra-toets vermindert het gewicht van het verpakkingsmateriaal (bijvoorbeeld een doos) Tarrafunctie Plaats de lege doos of het verpakkingsmateriaal op het weegplateau.
Druk op de >T< toets. Plaats het te wegen item in de doos of op het verpakkingsmateriaal en daarna op het weegplateau. Voer de eenheidsprijs in. Verwijder het gewogen item en de doos of het verpakkingsmateriaal van het weegplateau. Het display zal “0” aangeven. PLU (Price Look Up) functie De PLU-functie kan maximaal 25 PLU’s opslaan. Deze kunnen worden gebruikt voor goederen die vaak worden verkocht, waarbij de prijzen eenvoudig kunnen worden opgevraagd door het PLU-nummer in te voeren. Een PLU opslaan Voer de vereiste eenheidsprijs in. Druk op de PLU-toets en houd deze ingedrukt totdat er twee geluidssignalen hoorbaar zijn. In het display voor het gewicht verschijnt: “PLU”. Voer het PLU-nummer in (tussen 1 en 25) en wacht ongeveer 3 seconden totdat de weegschaal twee geluidssignalen geeft. Een PLU opnieuw oproepen Druk op de PLU-toets gevolgd door het vereiste PLU-nummer. De opgeslagen prijs zal in het display verschijnen. Stroombesparing De stroombesparing optie wordt gebruikt om batterijen te sparen. Als de batterij gebruikt wordt en de weegschaal staat 2 minuten stil zal de display van de prijs en de display van de totaalprijs uitgeschakeld worden. Het gewicht display laat alleen één nul zien aan de rechterzijde en de batterij in gebruik item zal oplichten. Dit duidt erop dat de stroombesparing is actief. Zodra er gewicht op het plateau wordt geplaatst of een toets wordt aangeraakt zal de weegschaal automatisch weer geactiveerd worden. Als na 15 minuten de weegschaal nog niet gebruikt is zal de weegschaal automatisch uitschakelen. Deze functie kan in- of uitgeschakeld worden door de soft-schakelaar te zetten in de juiste stand (groep 1, stap 4: “Automatische spanning uit”). Optel functie*
X De optelfunctie wordt gebruikt om de prijs te berekenen van stuks artikelen.
1) Toets afgesproken aantal in (1-99), druk op de opteltoets, geeft nu de afgesproken prijs in. 2) Druk op de enter toets. De weegschaal staat nu klaar voor de optel bewerking. De optelcursor is nu opgelicht. 3) Toets het aantal in dat verkocht wordt, de weegschaal geeft in het display de totaalprijs. 4) Druk op de correctie toets om de weegschaal in de weegmode te zetten.
>T<
PLU

METTLER TOLEDO
Mini Tiger 37
NL
Accumulatie Functie*
+ Voer een transactie uit zoals beschreven bij het afwegen, optel of tarra mode onderwerp.
Druk de accumulatie toets in. De totale prijs wordt toegevoegd aan het accumulatietotaal. De lichtgevende cursors zullen “TOTAAL” en “PLUS” aanduiden. Het gewicht display zal de boodschap “TOTAAL” aangeven. Het display van de eenheidsprijs zal het aantal accumulaties weergeven en het totaal display zal de geaccumuleerde totaalprijs weergeven. Herhaal de bovenstaande twee stappen totdat de gewenste aantal transacties zijn geaccumuleerd. Er zijn drie manieren om de weegschaal op de normale weegmode te zetten: 1. Druk de C-toets om de accumulatie ongedaan te maken en naar de weegmode terug te keren. 2: Druk de tarratoets om te tarreren en terug te gaan naar de weegmode. 3: Druk een numerieke toets om een nieuwe prijs in te geven en terug te gaan naar de weegmode. Druk op de accumulatie toets om het accumuleren op te roepen zodra de totaalprijs nul is of het veld blanco is. * Deze functies en cursors zijn niet beschikbaar voor de EU landen.
Herlaadbare lood zuur batterij Als de oplaadeenheid is geïnstalleerd kan de weegschaal de batterij opladen (6V/5Ah). Om de batterij op te laden dient de stroomkabel in het stopcontact gestoken te worden. De batterij zal opgeladen worden ongeacht of de weegschaal uit of aan staat. Normaal neemt het niet meer dan 12 uur in beslag om de batterij op te laden tot de volledige capaciteit. Afhankelijk van het voltage van de batterij. Als de batterij ver is ontladen is er een langere oplaadtijd nodig om de batterij weer volledig op te laden. Er zijn twee batterij aanduidingen, één is , en de ander is (-) . De aanduiding wordt opgelicht om aan te geven dat de batterij capaciteit volledig is en dat de huidige spanningsbron het stopcontact is. De aanduiding knippert om aan te geven dat de batterij wordt opgeladen. De aanduiding (-) wordt opgelicht om aan te geven dat de huidige spanning van de batterij komt. De aanduiding knippert om aan te geven dat de batterij spanning lager is dan nodig. De weegschaal laat “L Bat” in het wicht display zien en stopt met wegen als de aanduiding (-) begint te knipperen. De weegschaal zal automatisch uitschakelen na 10 seconden.In dit geval dienen de batterijen opgeladen te worden. Als de weegschaal met het stopcontact is verbonden terwijl de batterij wordt gebruikt zal de spanning automatisch van het stopcontact worden afgenomen. Als het stopcontact wordt uitgeschakeld zal de batterij automatische de weegschaal overnemen. Notice De batterij dient herladen te worden na elke 5 maanden ongeacht of deze gebruikt wordt of niet. Na een lange opslagtijd (meer dan 3 maanden), is het nodig om de batterij 3 maal op te laden en te ontladen om de batterij te herstellen naar volledige capaciteit. Zodra de batterij wordt vervangen dient er goed op de polen van de batterij gelet te worden. De positieve (+) pool moet op de rode connector aangesloten te worden en de negatieve (-) pool dient op de zwarte connector aangesloten te worden.Als er verkeerd wordt aangesloten kan er schade aan de batterij optreden.
Batterij onderhoud

METTLER TOLEDO
38 Mini-Tiger
NL
Verschillende parameters van de weegschaal kunnen worden gewijzigd, zodat u de mogelijkheid hebt om de weegschaal volgens uw eigen wensen in te stellen.
In instelmodus hebben de volgende toetsen een andere functie. : om te wisselen tussen beschikbare parameters. : is de enter toets
Toets de wisseltoets om de benodigde parameter te kiezen. Toets de enter toets om naar de volgende functie te stappen Selecteren van de operatorinstelmodus
Druk en hou de C toets vast totdat “grP 1’in het display verschijnt als de weegschaal wordt aangezet.
kg /kg€ €
Grp 1 >0< (-) NET X ADD TOTAL
Druk op de enter toets. kg /kg€ €
Grp 1 Step 3 on >0< (-) NET X ADD TOTAL
Met stap 3 kan het geluidssignaal aan of uitgeschakeld worden. Aan = de schaal zal piepen als een toets ingedrukt wordt Uit = Er is geen geluidssignaal hoorbaar als een toets wordt ingedrukt.
Druk op de >T< toets om te wisselen tussen aan en uit. Druk op de enter toets om naar de volgende functie te gaan.
kg /kg€ €
Grp 1 Step 4 on >0< (-) NET X ADD TOTAL
Met stap 4 kunt u “Auto Power-off” selecteren. Uit = uitschakelen auto power off functie Aan = inschakelen auto power off functie Druk op de enter toets om naar de volgende functie te gaan.
kg /kg€ €
Grp 1 Step 6 on >0< (-) NET X ADD TOTAL
Met stap 6 kunt u de Automatische verwijdering van Tarra en Eenheidsprijs instellen. Aan = Verwijder eenheidsprijs en tarra na elke weging. Uit = Verwijder na elke weging eenheidsprijs en tarra niet. Druk tweemaal op de enter toets om naar de volgende functie te gaan.
kg /kg€ €
Grp 2 Step 7 o >0< (-) NET X ADD TOTAL
Met groep 2 stap 7 kunt u selecteren hoe data kan worden aangeboden. 0 = van buiten aangeboden commando van PC of printer. Het commando formaat is “P”. 1 = Commando output
2 = Stable output 3 = Continue output Druk op de enter toets voor de volgende functie.
kg /kg€ €
Grp 2 Step 8 2 >0< (-) NET X ADD TOTAL
Met groep 2 stap 8 kan de mode van de output worden geselecteerd 0 = alleen wegen 1 = gewicht en eenheidsprijs of gewicht en itemnummer 2 = gewicht, eenheidsprijs en totaalprijs Druk op de enter toets voor de volgende functie.
kg /kg€ €
Grp 2 Step 9 off >0< (-) NET X ADD TOTAL
Met groep 2 stap 9 kan de mode van invoer geselecteerd worden. Uit = eenheidsprijs invoeren Aan = item nummer invoeren Als aan geselecteerd is, wordt de prijsberekening uitgeschakeld en is de invoer in het veld prijs een item nummer van 5 digits. Het veld totaalprijs is blanco. Druk de enter toets voor de volgende functie.
kg /kg€ €
Grp 2 Step 10 off >0< (-) NET X ADD TOTAL
Met groep 2 stap 10 kan het output formaat geselecteerd worden. Uit = enkele lijn Aan = multi-lijn Druk op de enter toets voor de volgende functie.
kg /kg€ €
Grp 3 Step 1 1 >0< (-) NET X ADD TOTAL
Afhankelijk van de omgeving kan er een filter gezet worden om een stabiel gewicht af te lezen. 0 = geen digitale filtering 1 = Lichte digitale filtering 2 = Zware digitale filtering Druk op de enter toets voor de volgende functie.
Kg /kg€ €
save >0< (-) NET X ADD TOTAL
Selecteer als u de settings wil opslaan. Ja = laat de enter toets los Nee = druk wissel toets
Kg /kg€ €
abort >0< (-) NET X ADD TOTAL
Druk de enter toets om af te sluiten.
Instelling
>T<
+

METTLER TOLEDO
Mini Tiger 39
NL
Foutmeldingen De 8434 zal een error op het display laten verschijnen indien de schaal een probleem ondervindt of een verkeerde selectie gemaakt wordt op het toetsenbord. De volgende error codes zijn er : E11 RAM error E16 ROM error E18 EEPROM error
METTLER TOLEDO Service
E33 Totaal prijs >9999.99 of het aantal transacties >99 Totaal display leegmaken E34 PLU nummer >25 PLU nummer 1~25 Geen PLU Er is geen PLU gevonden Programmeer PLU nnnnn in gewicht display Het gewicht is meer dan de volledige capaciteit plus 9ennnnnn in totaalprijs display De totaalprijs is meer dan 9999.99
Haal de items van het weegplateau
uuuuuu in gewicht display Komt niet op het nulpunt Haal de items van het weegplateau of calibreer de weegschaal
Onderhoud Verwijder de stroom door de stroomkabel uit het stopcontact te halen. Gebruik een droge schone doek om de buitenkant van de weegschaal schoon te maken. Gebruik geen oplosmiddelen of chemicalien om de weegschaal schoon te maken. Technische gegevens Capaciteit : 6 of 15 kg Eenheden : 2 of 5 gram Gewichtsuitlezing : 5 posities Prijs per kg uitlezing : 5 posities Totaal bedrag uitlezing : 6 posities Gebruikstemperatuur : -10°C tot +40°C Bewaar temperatuur : -25°C tot +50°C Voeding : 12Vdc Energie verbruik : 200mA Laadstroom : 400mA Netspanning adapter: - Ingangspanning : I/P 230VAC 50HZ - Uitgangspanning : O/P 12VDC 800mA Technische wijzigingen voorbehouden.
Appendix

METTLER TOLEDO
40 Mini-Tiger
ES
La balanza Mini-Tiger es un modelo digital compacto de balanza comercial con numerosas características. El equipo ha sido ensamblado, verificado y embalado con extremo cuidado, no obstante, si encuentra algún defecto o falta, por favor consulte directamente con su Distribuidor Autorizado más cercano. La balanza Mini-Tiger es un instrumento de pesaje de alta precisión que debe superar la correspondiente aprobación metrológica del organismo de Pesas y Medidas. El sello de aprobación puede colocarse en nuestra planta de producción o en su oficina local de Pesas y Medidas. Verifique este sello antes de usar la balanza. Por favor, lea atentamente las instrucciones de este manual. Con un uso y mantenimiento adecuado, esta balanza trabajará perfectamente durante años. Por favor, trátela como lo haría con cualquier otro equipo electrónico.
Introducciónn
Advertencia metrológica
Nota importante sobre metrología legal en países de la UE
Las balanzas verificadas en fábrica llevan esteindicativo en el embalaje.
Las balanzas que llevan esta etiqueta verdecon una “M” sobre la placa de característicasestán listas para operar.
Las balanzas que han pasado el primer paso deverificación, llevan este distintivo en laetiqueta del embalaje.
Estas balanzas han pasado la 1ª fase de verificación enfábrica (Declaración de Conformidad según EN45501-8.2) y deben ser calibradas de nuevo en el lugarde utilización. Esta segunda verificación debe ser realizada por personalacreditado de METTLER TOLEDO.
Póngase en contacto con su distribuidor local de METTLERTOLEDO. Las balanzas comerciales deben ser calibradas yverificadas. Debe respetarse la normativa metrológica vigente en cadazona o país.
M
M
M
Instalación 41
Precauciones 41 Ambiente 41 Inspección ocular 41 Ajuste 41 Encendido 41
Visor y teclado 42 Visor del vendedor 42 Teclado 42 Visor del cliente 42
Operación 43 Pesaje directo 43
Puesta a cero 43 Tara 43 PLU 43 Ahorro energía 43 Cálculo Cambi 43 Batería 44 Ajustes 45 Apéndices 46 Mensajes de error 46 Mantenimiento 46 Especificaciones 46
Contenido

METTLER TOLEDO
Mini Tiger 41
ES
Precauciones Este capítulo describe en detalle los pasos necesarios para la correcta instalación de la balanza Mini-Tiger. Ambiente Antes de instalar la balanza, localice la ubicación más adecuada. Una ubicación y un ambiente correcto puede mejorar las prestaciones de la balanza y aumentar su vida útil. A continuación se dan algunos factores ambientales que pueden influir negativamente en el funcionamiento de la balanza. ☞Vibración La presencia de vibraciones disminuye la precisión de las pesadas. La proximidad de maquinaria eléctrica, como cintas, taladros, etc., puede afectar a la precisión y repetibilidad de las lecturas. Es necesaria una buena nivelación de la balanza para un funcionamiento correcto. ☞Corrientes de aire Las corrientes de aire pueden ejercer una presión sobre la balanza (peso adicional) y tienen un efecto por tanto similar al de las vibraciones. ☞Fricción La balanza no pesa correctamente si algo roza o presiona contra el plato de carga. Inspección ocular Por favor, inspeccione el embalaje tras su entrega por el transportista. Si el embalaje presenta daños, verifique si hay daños internos y rellene la correspondiente reclamación. Si la caja no presenta daños, saque la balanza y colóquela en una superficie estable y plana. Guarde el embalaje por si tuviera que devolver la balanza a METTLER TOLEDO. La balanza Mini-Tiger es un instrumento de precisión, y como tal podría resultar dañado por un mal embalaje o un trato poco cuidadoso durante el transporte. Una caja Mini-Tiger incluye: ☞ balanza Mini-Tiger ☞ 1 plato ☞ 1 adaptador AC-DC ☞ 1manual de instrucciones Ajuste Abra la caja y saque cuidadosamente la balanza de su embalaje, retirando las protecciones laterales. Coloque la balanza en una superficie plana y estable. Proceda a nivelar la balanza girando las patas regulables de la parte inferior hasta que la burbuja del nivel quede centrada, tal como se indica a continuación. Nivel de burbuja: Bien Mal Las 4 patas regulables deben apoyar en la superficie de apoyo para que la Tiger II no quede coja. Colocar el plato de carga de la Mini-Tiger. Desempaquete el conector de red y conéctelo en la parte inferior de la balanza. Enchufe el adaptador a una toma de corriente alterna de tensión adecuada y con toma de tierra.
Encendido Pulsando la tecla se enciende la balanza. Tras el encendido, la Mini-Tiger, realiza una serie de autotests y verifica sus memorias ROM y RAM antes de pasar al modo normal. La secuencia de encendido es la siguiente: • Se iluminan todos los segmentos del visor para comprobar que funcionan correctamente. • La balanza muestra la versión de software y el nº de artículo. • La balanza presenta el valor GEO en la ventana de peso. • Se hace una puesta a cero automática, y la balanza queda lista para funcionar.
Nota: Antes de encender la Mini-Tiger, asegúrese de que no haya nada sobre el plato.
Instalación

METTLER TOLEDO
42 Mini-Tiger
ES
Visor del vendedor Teclas y cursores No todas las balanzas dispones de las mismas funciones. Verificar en el teclado las funciones disponibles.
Tecla Nombre Función 0 a 9 Teclas numéricas Para entrar precio unitario, nº PLU y otros datos.
>0< Tecla Cero Para retornar la balanza a cero bruto si hay deriva. >T< Tecla Tara Para tarar la balanza C Tecla Borrado Para borrar precio unitario.
PLU Tecla PLU Para entrar o llamar a un PLU
Cursor Descripción
>0< Se enciende cuando el peso bruto es 0.
Se enciende cuando se alimenta con tension alterna o la batería está totalmente cargada.
(-) Se enciende cuando opera con bateria, parpadeando para indicar que la tension de la batería está por debajo de la requerida.
Net Se enciende cuando se ha aplicado una tara. Visor del cliente
Visor y teclado
€/kg kg
NET>0<
METTLER TOLEDO€
TOTALADD
47Mini-Tiger
PLUADD
>0< NET
TOTAL
kg
€
METTLER TOLEDO
€ /kg
102X3
85
96
+>T<
C>0<
X
X

METTLER TOLEDO
Mini Tiger 43
ES
Pesaje directo
Coloque el artículo a pesar sobre el plato. Introduzca el precio unitario. Inmediatamente aparece el importe a pagar en el visor correspondiente.
Quite el artículo del plato. Todos los visores retornan a 0.
Puesta a cero
Hay 2 formas de poner a cero la balanza: 1. Puesta a cero tras el encendido 2. Tecla de puesta a cero
☞ Puesta a cero tras el encendido La balanza se pone a cero automáticamente al encenderla. El margen dentro del cual la balanza puede ponerse a cero al encender es un 10%, aproximadamente de la capacidad de la balanza. Si el peso existente en el plato al encender la balanza supera el 10% de capacidad o es inferior a –10% (en el visor aparecerá “-------“), la balanza no se pondrá a 0. Cuando coloque o quite peso de la balanza, ésta recuperará el “cero”.
☞ Tecla de puesta a cero La tecla CERO permite la puesta a cero de la balanza en un margen aproximado del 2% de su capacidad. Para utilizar esta función, la balanza debe estar en el modo peso bruto, con el cursor NET apagado y con el peso estable. Si el peso sobre la balanza supera el 2% de la capacidad, la tecla CERO no tendrá efecto.
Tecla de tara La actuación de esta tecla permite deducir el peso del envase o del contenedor del artículo.
☞ Tarado Coloque el contenedor o envase sobre el plato. Pulse la tecla T. Coloque el artículo a pesar dentro del contenedor o sobre el envase. Introduzca el precio unitario. Vacíe el plato retirando el artículo y el contenedor o envase. Los visores volverán a 0.
PLU (Price Look Up) La balanza dispone de memoria para 25 PLU para guardar los precios de los artículos más vendidos, y se puede acceder a ellos con sólo introducir el número del PLU.
. ☞ Memorizar un PLU Entrar el precio unitario. Pulsar y mantener pulsada la tecla PLU hasta oir 2 pitidos. En el visor de peso aparece: "PLU". Entrar el nº de PLU [ de 1 a 25 ] y esperar unos 3 segundos hasta que la balanza emita 2 pitidos.
☞ Llamar un PLU PLU Pulsar la tecla PLU seguida del Nº PLU de 1 ó 2 dígitos. El precio correspondiente aparecerá en el visor.
Ahorro de energía Esta función sirve para ahorrar consumo a la batería. Cuando la balanza no se utiliza durante 2 minutos, se apagan los visores del precio unitario y del importe, y el visor de peso presenta solo un 0 a la derecha, manteniéndose encendido el cursor de batería en uso. Esto indica que la balanza está en el modo de ahorro de energía. Cuando se coloque peso sobre la balanza, o se pulse una tecla, la balanza se despierta automaticamente. Si una vez entrada en el modo de ahorro de energía, pasan otros 15 minutos sin cambio de peso, la balanza se desconectará automaticamente. Esta función puede desactivarse actuando sobre los conmutadores de soft [grupo 1, paso 4, "Apagado automático"].
Operación
>0<
>T<

METTLER TOLEDO
44 Mini-Tiger
ES
Batería recargable Si está instalado el kit de carga, se puede recargar la batería de plomo ácido (6V/5Ah). Para ello conectar la balanza a una fuente externa de alimentación. La batería se recargará aunque la balanza esté apagada. Normalmente no se requieren más de 12 horas para recargar la batería a plena carga, dependiendo de su tensión. Si la batería se ha descargado totalmente, puede requerirse un mayor tiempo de recarga. Hay 2 cursores de batería, uno es , y el otro (-) . El cursor se enciende para indicar que la batería está totalmente cargada y que la balanza está operando bajo tensión de red, y parpadea indicando que la batería está siendo cargada. El cursor (-) indica que la balanza está operando con batería, y cuando parpadea indica baja tension de la batería. La balanza muestra “L Bat” en el visor de peso y deja de pesar cuando el cursor (-) comienza a parpadear, apagandose automaticamente 10 segundos después. En tales casos, proceder a recargar la batería. Si el adaptador de red está enchufado a una toma de corriente mientras se está usando la batería, la alimentación cambiará automaticamente a la tension de red. Cuando se desconecte de la toma de corriente, la balanza conmutará a alimentación por batería.
Nota La batería debería recargarse cada 5 meses aprox. con indenpendencia de que se use o no. Si ha estado almacenada durante un largo tiempo, por ejemplo más de 3 meses, es conveniente someter la batería a 3 ciclos de carga/descarga, para restablecer toda su capacidad. Al sustituir la batería, poner mucha atención a los polos. El terminal positivo (+) ha de conectarse al conector rojo y el terminal negativo (-) al conector negro. Una conexion equivocada dañaría la batería.
Bateria

METTLER TOLEDO
Mini Tiger 45
ES
Se pueden cambiar varios ajustes de la balanza para adaptarla a las necesidades particulares de cada usuario.
En modo Ajuste, >T< sirve para conmutar, y + como tecla Enter. Pulsar la tecla conmutar para seleccionar el parámetro deseado, y Enter para pasar a la siguiente función. ☞ Acceso al ajuste del operador
Presionar y mantener C hasta que aparezca “grP 1” cuando se enciende la balanza.
kg €/kg €
Grp 1 >0< (-) NET X ADD TOTAL
Pulsar la tecla Enter. kg €/kg €
Grp 1 Step 3 on >0< (-) NET X ADD TOTAL
En paso 3 se puede validar/invalidar el tono audible. ON –Pitido cuando se pulsa una tecla. OFF-No hay pitido cuando se pulsa una tecla. Con tecla conmutar cambiar entre ON/OFF. Pulsar Enter para pasar a la siguiente función.
kg €/kg €
Grp 1 Step 4 on >0< (-) NET X ADD TOTAL
En paso 4 se selecciona el modo de autoapagado. OFF- Inhibe función autoapagado. ON – Valida función autoapagado. Pulsar Enter para pasar a la siguiente función..
kg €/kg €
Grp 1 Step 6 on >0< (-) NET X ADD TOTAL
En paso 6 se selecciona el autoborrado de tara y de precio unitario. ON-Permite autoborrado cuando se retira el peso de la balanza. OFF-Inhibe autoborrado cuando se retira el peso de la balanza. Pulsar Enter 2 veces para saltar a siguiente función.
kg €/kg €
Grp 2 Step 7 o >0< (-) NET X ADD TOTAL
En grupo 2 paso 7, se selecciona el tipo de salida. O- comando externo desde PC o impresora. Comando: “P”. 1- Salida bajo demanda 2- Salida estable 3- Salida continua Pulsar Enter para pasar a la siguiente función.
kg €/kg €
Grp 2 Step 8 2 >0< (-) NET X ADD TOTAL
En grupo 2, paso 8, se selecciona el contenido de la salida. 0- solo peso 1- peso y precio o precio y nº PLU 2- peso, precio e importe Pulsar Enter para pasar a la siguiente función.
kg €/kg €
Grp 2 Step 8 off >0< (-) NET X ADD TOTAL
En grupo 2, paso 9, se selecciona el tipo de entrada. OFF- entrar precio unitario ON- entrar nº artículo Cuando se selecciona “on” se inhabilita la función de cómputo de importe, y la entrada en el visor de precio se toma como nº artículo de hasta 5 dígitos, quedando en blanco el visor de importe. Pulsar Enter para pasar a la siguiente función.
kg €/kg €
Grp 2 Step 10 off >0< (-) NET X ADD TOTAL
Paso 10 de grupo 2, para seleccionar formato de salida. OFF- linea simple ON - multilínea Pulsar Enter 2 veces para saltar a siguiente función.
kg €/kg €
Grp 3 Step 1 1 >0< (-) NET X ADD TOTAL
Se puede programar un filtro para conseguir lecturas de peso más estables. 0 - Sin filtro digital. 1 – Filtro digital suave. 2 – Filtro digital fuerte. Pulsar Enter para pasar a la siguiente función.
kg €/kg €
save >0< (-) NET X ADD TOTAL
Ahora se selecciona si se desean guardar los ajustes anteriores. Para guardar pulsar Enter. Para cancelar pulsar tecla conmutación.
kg €/kg €
abort >0< (-) NET X ADD TOTAL
Pulsar Enter para cancelar los ajustes.
Ajuste

METTLER TOLEDO
46 Mini-Tiger
ES
Mensajes de error La balanza dá un mensaje de error cuando se detecta un problema o se pulsa una tecla equivocada. E11 RAM error E16 ROM error E18 EEPROM error
METTLER TOLEDO Service
E33 Importe >9999.99 Borrar E34 Nº PLU >25 PLU nuber 1~25 No PLU No se encuentra PLU Programar el PLU
nnnnn en visor de peso El peso supera el alcance de la balanza más 9 divisiones
nnnnnn en visor de importe Importe > 9999.99 Vaciar el plato
uuuuuu en visor de peso No se coge el cero Vaciar el plato o recalibrar la balanza
Mantenimiento Quitar la tension retirando el adaptador de red de su enchufe. Usar un paño limpio para limpiar las superficies exteriores. NO utilizan disolventes ni agentes químicos para limpiar la balanza. NO intente quitar la tapa de la balanza ni efectuar por su cuenta tareas de servicio o mantenimiento. Especificaciones
Capacidad : 6 o15 kg Divisiones : 2 o 5 g Temperatura de trabajo : -10°C a +40°C Temperatura almacenaje : -25°C a +50°C Alimentación : 12Vcc Consumo : 200mA Adaptador de red: I/P : 230VAC 50Hz O/P : 12VDC 800mA Modificaciones técnicas y de suministro reservadas.
Apendice

METTLER TOLEDO
Mini-Tiger 47
PT
A balança Mini-Tiger é um modelo digital compacto de balança comercial com numerosas características. A balança foi produzida, verificada e embalada com extremo cuidado, não obstante, se encontrar algum defeito, por favor consulte directamente o seu Distribuidor Autorizado. A balança Mini-Tiger é um instrumento de pesagem de alta precisão que deve superar a aprovação correspondente metrológica do organismo de Pesos e Medidas. O selo de aprovação pode colocar-se na nossa fábrica ou na oficina local de Pesos e Medidas. Verifique este selo antes de usar a balança. Por favor, leia atentamente estas instruções. Com um uso e manutenção adequadas, esta balança trabalhará perfeitamente durante anos. Por favor, trate-a como faria com qualquer outro aparelho electrónico.
Introdução
Advertência metrológica
Nota importante sobre metrología legal nos países da UE
As balanças verificadas na fábrica têm esteindicativo na embalagem.
As balanças que têm esta etiqueta verde comum “M” sobre a placa de características estãoprontas para pesar.
As balanças que passaram o primeiro passo deverificação, têm este distintivo na etiqueta daembalagem.
Estas balanças passaram a 1ª fase de verificação nafábrica (Declaração de Conformidade segundo EN45501-8.2) e devem ser calibradas de novo no seu localde utilização. Esta segunda verificação deve ser realizada por perssoalreconhecido pela METTLER TOLEDO. Contacte o seu distribuidor local da METTLER TOLEDO. As balanças comerciais devem ser calibradas everificadas. Deve respeitarse a normativa metrológica vigente em cadazona ou país.
M
M
M
Instalação 48
Precauções 48 Ambiente 48 Inspecção ocular 48 Afinações 48 Ligar 48
Visor e teclado 49 Visor do vendedor 49 Teclado 49 Visor do cliente 49
Operação 50 Pesagem directa 50
Azeramento 50 Tara 50 PLU 50 Poupar energia 50 Cálculo Cambio 51 Bateria 51 Afinações 52 Apêndices 53 Mensagens de erro 53 Manutenção 53 Dados tecnicos 53
Conteúdo

METTLER TOLEDO
48 Mini-Tiger
PT
Precauções Este capítulo descreve em detalhe os passos necessários para a correcta instalação da balança Mini-Tiger. Ambiente Antes de instalar a balança, defina o local mais adequado. Uma boa localização e um ambiente correcto pode melhorar as prestações da balança e aumentar a sua vida útil. A seguir referimos alguns factores ambientais que podem influenciar negativamente o funcionamento da balança. ☞Vibração A presença de vibrações diminuí a precisão das pesagens. A proximidade de maquinaria eléctrica, como tapetes, vitrines, etc., pode afectar a precisão e repetibilidade das leituras. É necessária uma boa nivelação da balança para um funcionamento correcto. ☞Correntes de ar As correntes de ar poden exercer uma pressão sobre a balança (peso adicional) e tem um efeito similar ao das vibrações. ☞Fricção A balança não pesa correctamente se algo rossar ou pressionar contra o prato de carga. Inspecção ocular Por favor, inspeccione a embalagem após a sua entrega pela transportadora. Se a embalagem apresentar danos, verifique se há danos internos e preencha a reclamação correspondente. Se a caixa não apresentar danos, tire a balança e coloque-a numa superfície estável e plana. Guarde a embalagem para o caso de ter de enviar a balança para a METTLER TOLEDO. A balanza Mini-Tiger é um instrumento de precisão, e como tal poderia resultar danificada por uma má embalagem ou um trato pouco cuidadoso durante o transporte. Uma caixa Mini-Tiger incluí: ☞ balança Mini-Tiger ☞ 1 prato ☞ 1 adaptador AC-DC ☞ 1manual de instruções Afinação Abra a caixa e retire cuidadosamente a balança da embalagem, retirando as protecções laterais. Coloque a balança numa superfície plana e estável. Nivele a balança girando os pés reguláveis da parte inferior até que a bolha de nível fique centrada, tal como se indica a seguir. Nivel da bolha: Bem Mal Os 4 pés reguláveis devem apoiar-se na superfície de apoio para que a Tiger II não fique côxa. Colocar o prato de carga na Mini-Tiger. Desembale o transformador e ligue-o na parte inferior da balança. ligue o transformador a uma tomada de corrente alternada de tensão adequada e com fio terra.
Ligar Premindo a tecla liga-se a balança. Após ligar, a Mini-Tiger, realiza uma série de autotestes e verifica as memórias ROM e RAM antes de passar ao modo normal. A sequência de ligar é a seguinte: • Iluminam-se todos os segmentos do visor para comprovar que funcionam correctamente. • A balança mostra a versão de softwar e o nº do artigo. • A balança apresenta o valor GEO no visor de peso. • Faz-se um azeramento automático, e a balança fica pronta para funcionar.
Nota: Antes de ligar a Mini-Tiger, certifique-se de que não tem nada sobre o prato.
Instalação

METTLER TOLEDO
Mini-Tiger 49
PT
Visor do vendedor Teclas e cursores Nem todas as balanças dispõe das mesmas funções. Verificar no teclado as funções disponivéis.
Tecla Nome Função 0 a 9 Teclas numéricas Para meter preço unitário, nº PLU e outros dados.
>0< Tecla Zero Para voltar ao zero bruto se há enganos. >T< Tecla Tara Para tarar a balança C Tecla Apagar Para apagar preço unitário.
PLU Tecla PLU Para meter ou chamar um PLU
Cursor Descrição
>0< Acende-se quando o peso bruto é 0.
Liga quando se alimenta com tensão alterna ou a bateria está totalmente carregada.
(-) Liga quando opera com bateria, piscando para indicar que a tensão da bateria está abaixo da necessária.
Net Liga-se quando se aplica uma tara. Visor do cliente
Visor e teclado
€/kg kg
NET>0<
METTLER TOLEDO€
TOTALADD
47
Mini-Tiger
PLUADD
>0< NET
TOTAL
kg
€
METTLER TOLEDO
€ /kg
102X3
85
96
+>T<
C>0<
X
X

METTLER TOLEDO
50 Mini-Tiger
PT
Pesagem directa
Coloque o artigo a pesar sobre o prato. Introduza o preço unitário. Imediatamente aparece o total a pagar no visor correspondente.
Retire o artículo do prato. Todos os visores voltam a 0.
Azeramento
Há 2 formas de colocar a zero a balança: 1. Azeramento após ligar 2. Tecla de azeramento
☞ Azeramento após ligar A balança azera automáticamente ao ligá-la. A margem dentro da qual a balança pode pôr-se a zero ao ligar é de 10%, aproximadamente da capacidade máx. desta. Se o peso existente no prato ao ligar supera os 10% da capacidade ou é inferior a –10% (no visor aparecerá “-------“), a balança não ligará a 0. Quando colocar ou retirar peso da balança, esta recuperará o “zero”.
☞ Tecla de azeramento A tecla ZERO permite o azeramento da balança numa margem aproximada de 2% da sua capacidade. Para utilizar esta função, a balança deve estar no modo peso bruto, com o cursor NET apagado e com o peso estável. Se o peso sobre a balança supera os 2% da capacidade, a tecla ZERO não fará efeito.
Tecla de tara A actuação desta tecla permite descontar o peso do recipiente ou da embalagem do artigo.
☞ Tarar Coloque o recipiente ou a embalagem sobre o prato. Prima a tecla T. Coloque o artigo a pesar dentro do recipiente ou sobre a embalagem. Introduza o preço unitário. Esvazie o prato retirando o artigo e o conteúdo ou embalagem. Os visores voltarão a 0.
PLU (Price Look Up) A balança dispõe de memória para 25 PLU para guardar os preços dos artigos mais vendidos, e pode-se aceder a eles introduzindo simplesmente o número do PLU.
. ☞ Memorizar um PLU Meter o preço unitário. Premir e manter premida a tecla de PLU até ouvir 2 apitos. No visor de peso aparece: "PLU". Meter o nº de PLU [ de 1 a 25 ] e esperar uns 3 segundos até que a balança emita 2 apitos.
☞ Chamar um PLU PLU Premir a tecla de PLU seguida do Nº PLU de 1 ou 2 dígitos. O preço correspondente aparecerá no visor.
Poupar energia Esta função serve para poupar consumo da bateria. Quando a balança não se utiliza durante 2 minutos, apagam-se os visores do preço unitário e do total, e o visor de peso apresenta só um 0 à direita, mantendo-se ligado o cursor de bateria em uso. Isto indica que a balança está no modo de poupar de energia. Quando se coloque peso sobre a balança, o se prima uma tecla, a balança desperta automaticamente. Se por sua vez já estiver no modo de poupar energía, passam outros 15 minutos sem mudar de peso, a balança desligará automaticamente. Esta função pode desactivar-se actuando sobre os comutadores de soft [grupo 1, passo 4, "Apagar automáticamente"].
Operação
>0<
>T<

METTLER TOLEDO
Mini-Tiger 51
PT
Bateria recarregável Se está instalado o kit de carga, pode-se recarregar a bateria de gás ácido (6V/5Ah). Para isso ligar a balança a uma fonte externa de alimentação. A batería recarregará a não ser que a balança esteja apagada. Normalmente não se requerem mais de 12 horas para recarregar a bateria a plena carga, dependendo da sua tensão. Se a bateria sa descarregar totalmente, pode requerer-se mais tempo de recarga. Há 2 cursores de bateria, um é , e o outro (-) . O cursor liga para indicar que a bateria está totalmente carregada e que a balança está a operar com tensão de rede, e pisca indicando que a bateria está sendo carregada. O cursor (-) indica que a balança está operando com bateria, e quando pisca indica baixa tensão da bateria. A balança mostra “L Bat” no visor de peso e deixa de pesar quando o cursor (-) començar a piscar, apagando-se automaticamente 10 segundos depois. Nestes casos, proceder a recarregar a bateria. Se o transformador estiver ligado a uma tomada de corrente enquanto se está a usar a bateria, a alimentação mudará automaticamente para a tensão de rede. Quando se desligue a tomada de corrente, a balança comutará para alimentação por bateria.
Nota A bateria deve recarregar-se cada 5 meses aprox. com independência de que se use o não. Se esteve armazenada durante um longo tempo, por exemplo mais de 3 meses, é conveniente submeter a bateria a 3 ciclos de carga/descarga, para reestablecer toda a sua capacidade. A sustituir a bateria, ter muita atenção às polarizações. O terminal positivo (+) tem de ligar-se à ficha vermelha e o terminal negativo (-) à ficha preto. Uma ligação errada danifica a bateria.
Bateria

METTLER TOLEDO
52 Mini-Tiger
PT
Podem mudar-se vários opções da balança para adaptá-la às necessidades particulares de cada operador.
No modo afinação, >T< serve para comutar, e + como tecla Enter. Premir a tecla comutar para seleccionar o parâmetro desejado, e Enter para passar para a função seguinte. ☞ Acesso à afinação do operador
Pressionar e manter C até que apareça “grP 1” quando se ligar a balança.
kg €/kg €
Grp 1 >0< (-) NET X ADD TOTAL
Premir a tecla Enter. kg €/kg €
Grp 1 Step 3 on >0< (-) NET X ADD TOTAL
No passo 3 pode-se validar/invalidar o tom audível. ON –Apita quando se prime uma tecla. OFF-Não apita quando se prime uma tecla. Com tecla comutar mudar entre ON/OFF. Premir Enter para passar para a função seguinte.
kg €/kg €
Grp 1 Step 4 On >0< (-) NET X ADD TOTAL
No passo 4 selecciona-se o modo de autoapagar. OFF- Inibe função autoapagar. ON – Valida função autoapagar. Premir Enter para passar à função seguinte.
kg €/kg €
Grp 1 Step 6 On >0< (-) NET X ADD TOTAL
No passo 6 sselecciona-se o autoapagar da tara e de preço unitário. ON-Permite autoapagar quando se retirar o peso da balança. OFF-Inibe autoapagar quando se retira o peso da balança. Premir Enter 2 vezes para saltar à função seguinte.
kg €/kg €
Grp 2 Step 7 O >0< (-) NET X ADD TOTAL
No grupo 2 passo 7, selecciona-se o tipo de saída p/ RS. O- comando externo desde PC ou impressora. Comando: “P”. 1- Saída a pedido 2- Saída estável 3- Saída continua Premir Enter para passar à função seguinte.
kg €/kg €
Grp 2 Step 8 2 >0< (-) NET X ADD TOTAL
No grupo 2, passo 8, selecciona-se o conteúdo da saída. 0- so peso 1- peso e preço ou preço e nº PLU 2- peso, preço e total Premir Enter para passar à função seguinte.
kg €/kg €
Grp 2 Step 8 Off >0< (-) NET X ADD TOTAL
No grupo 2, passo 9, selecciona-se o tipo de entrada. OFF- meter preço unitário ON- meter nº artigo Quando se selecciona “on” inabilita-se a função de envio do total, e a entrada no visor de preço toma-se como nº de artigo até 5 dígitos, ficando em branco o visor do total. Premir Enter para passar à função seguinte.
kg €/kg €
Grp 2 Step 10 Off >0< (-) NET X ADD TOTAL
Passo 10 de grupo 2, para seleccionar formato de saída. OFF- linha simples ON – multilinha Premir Enter 2 vezes para saltar à função seguinte.
Kg €/kg €
Grp 3 Step 1 1 >0< (-) NET X ADD TOTAL
Pode programar-se um filtro para conseguir leituras de peso mais estáveis. 0 - Sem filtro digital. 1 – Filtro digital suave. 2 – Filtro digital forte. Premir Enter para passar à função seguinte.
kg €/kg €
save >0< (-) NET X ADD TOTAL
Agora selecciona-se se desejam guardar as afinações anteriores. Para guardar premir Enter. Para cancelar premir tecla comutação.
kg €/kg €
abort >0< (-) NET X ADD TOTAL
Premir Enter para cancelar as afinações.
Afinação

METTLER TOLEDO
Mini-Tiger 53
PT
Mensagens de erro A balança dá uma mensagem de erro quando se detecta um problema ou se prime uma tecla equivocada. E11 RAM error E16 ROM error E18 EEPROM error
METTLER TOLEDO Service
E33 Total >9999.99 Apagar E34 Nº PLU >25 numero do PLU 1~25 No PLU Não se encontra PLU Programar o PLU
nnnnn no visor de peso O peso supera o alcance da balança mais 9 divisões
nnnnnn no visor do total Total > 9999.99 Esvaziar o prato
uuuuuu no visor de peso Não se chega ao zero Esvaziar o prato ou calibrar a balança Manutenção Desligar a balança retirando o transformador da tomada. Usar um pano limpo para limpar as superfícies exteriores. NÃO utilizar dissolventes nem agentes químicos para limpar a balança. NÃO tente tirar a tampa da balança nem efectuar por sua conta tarefas de serviço o manutenção. Dados tecnicos Alcance : 6 ou15 kg Divisôes : 2 ou 5 g Temperatura de trabalho : -10°C até +40°C Temperatura armazenagem : -25°C até +50°C Alimentaçâo : 12Vcc Consumo : 200mA Adaptador de rede: I/P : 230VAC 50Hz O/P : 12VDC 800mA Modificaçôes técnicas e de suministro reservadas.
Apendice

54 Mini-Tiger
DECLARATION OF CONFORMITY We: Wir: Nous: Noi: Nosotros: Wij: Nos:
METTLER-TOLEDO (CHANGZHOU) SCALE & SYSTEM LTD. 111 Changxi Rd. Changzhou Jiangsu, People’s Republic of China 213001
declare under our sole responsibility, that the product, erklären in alleiniger Verantwortung, dass das Produkt, déclarons sous notre seule responsabilité, que le produit dichiariamo sotto nostra unica responsabilità, che il prodotto, declaramos bajo nuestra sola responsabilidad, que el producto verklaren er volledig verantwoordelijk voor te zijn, dat het produkt declaramos de nossa única respondabilidade, que o producto Model/Type: RN00..C.... to which this declaration relates, is in conformity with the following standards and normative document(s): auf das sich diese Erklärung bezieht, mit den folgenden EG-Richtlinien und Normen übereinstimmt: auquel se rapporte cette déclaration, est conforme aux Directives du Conseil européen et aux normes suivantes: a cui si riferisce questa dichiarazione, è conforme alle seguenti Direttiva del Consiglio e norme: al cual se refiere esta declaración conforme a las siguientes directivas y normas: waarop deze verklaring betrekking heeft, overeenkomt met de volgende EG-richtlijnen en normen: à qual faz referência a presente Declaração, responde às directivas do Conselho Europeu, e às seguintes normas:
EC marking EC Directive: Applicable Standards:
73/23/EEC Low Voltage
EN61010
89/336/EEC EMC
EN50022 CLASS B EN50082-1 EN61000-3-2 EN61000-3-3
0103
90/384/EEC Non-automatic Weighing Instruments
EN45501 1)
1) T6050 EC Type approval certificate Changzhou, Jan, 2003 METTLER TOLEDO (CHANGZHOU) SCALE & SYSTEM LTD.
David Zheng President
Chu Jinlan Quality Assurance Manager
year

C METTLER TOLEDO P/N: 71207233 Printed in China 03/1
AT Mettler-Toledo Gesellschaft mbH., Favoritner Gewerbering 17, 1100 Wien,
Tel. (0222) 604 19 80, Telefax (0222) 604 28 80, Telex 111302 BE Mettler-Toledo S. A., Frans Walravenstraat 84, 1651 Lot (Beersel),
Tel. (2) 334 02 11, Fax (2) 378 16 65 CH Mettler-Toledo (Schweiz) AG, Im Langacher, 8606 Greifensee,
Tel. (01) 944 45 45, Telefax (01) 944 45 10 DE Mettler-Toledo GmbH, Postfach 110840, 35353 Giessen,
Tel. (0641) 507-555, Telefax (0641) 507-218, Telex 482912 ES Mettler-Toledo S.A.E., Avda. San Pablo 28, 28820 Coslada (Madrid),
Tel. (91) 674.89.30, Fax (91) 669 33 47 FR Mettler-Toledo S.A., 18/20 Avenue de la Pépiniére, 78222 Viroflay Cedex,
Tél. 01 30 97 17 17, Fax 01 30 97 16 16 IT Mettler-Toledo S.p.A.,Via Vialba 42, 20026 Novate Milanese,
Tel. (02) 33 332.1, Telefax (02) 35 62 973 NL Mettler-Toledo B.V., Postbus 6006, 4000 HA Tiel,
Tel. (0344) 63 83 63, Telefax (0344) 63 83 90 PT Biporto, Lda, Rua da Industria Lote 13 4760-758 Vila Nova, Famaliçao, PORTO
Tel.252 330 840 Fax. 252 330 843 Técnica nº. Único 707 200 141 GB Mettler-Toledo Ltd.,64 Boston Road,Beaumont Leys,Leicester LE4 1AW,
Tel.0116 235 7070