mis 3200 – unit 1.2 visual c#.net oop objects toolbox naming convention html: properties and...
TRANSCRIPT

MIS 3200 – Unit 1.2
• Visual C#.NET• OOP• Objects• Toolbox• Naming Convention• HTML: Properties and Limitations• Style Sheets

What is Visual C#.NET
• Object Oriented Programming Language (OOP)• Uses an Integrated Development Environment (IDE), which is a program
used to do your work, just like MS Word is used to create documents• The IDE Visual Studio Express 2012 (VS Express)• The IDE has a Graphical User Interface (GUI)• Used for creating software programs• Also used for creating web pages
OOP
•Object• An encapsulation of data and code that represents
something of importance to the developer• So an Object is a piece of software that is created by
abstract piece software (called a Class) which governs the features that would be in included when it is created. • These features or characteristics are unique
and are comprised of• Properties, methods, and events
•Programming Language• Give instructions to a computer, which in turn executes the
instructions

Object Characteristics
Property - An attribute of an object• Examples: Colors, Fonts, Height, Top
• Methods – something that an object does or knows how to do• Examples: Move, Add, Clear, Print
• Events – something that happens to an object• Examples: Click, KeyPress, DoubleClick
Objects - continued
• Created, or instantiated, from classes• A class is a template that defines an object and its characteristics
• Similar to a blueprint. For example, the blueprint of a house describes the characteristics, or properties, of the house such as number of rooms, bathrooms, windows, doors, stairs, size, etc. When you build a house you create an instance of the house – a real object with properties described in the blueprint.

Naming objects
• Names are used to reference the object in the program code• Each name should identify the type of object and the function of the
object• Each object name has two parts
• A lower case prefix and• A usage identifier that describes the function of the object.
• Use CamelBack notation

Tool Box Objects
• Visual Studio Express for Web (VSE) has alarge collection of Objects or Controls locatedin the toolbox.• Controls are added to a web page
by dragging them from the Toolboxand dropping them on the page.

Some Naming prefixes
• btn ---- Button• ckb ---- Check Box• cbo ---- Combo Box• hsb ---- Horizontal Scroll Bar• lbl ---- Label• lst ---- List Box•mnu --- Menu• rb ---- Radio Button• tmr ---- Timer• txt ---- Text Box• vsb ---- Vertical Scroll Bar
See the Coding Standards handoutfor a full list of prefixes.

Example object names
Unacceptable Names
Button1
Name
The_List
Acceptable Names
btnExit
lblName
lstCollege
txtStreetAddress
Tools for Web Site Design
•HTML (structure)•Style sheets (presentation)•Code•Modify the the look of the page•Respond to events• Implement business logic

Open your MIS Web Site
• Before your start … be sure to copy your ASPPub folder to your desktop! Do this always.• To do this, click on the ASPNET shortcut on your desktop,
right-click and copy the ASPPub folder (not ASPPub.old), paste the ASPPub folder to your desktop.• Start Visual Web Developer, click File, click Open Web Site,
click on the ASPPub folder on your desktop and click Open.
The next slide shows what this should look like

Opening a web site
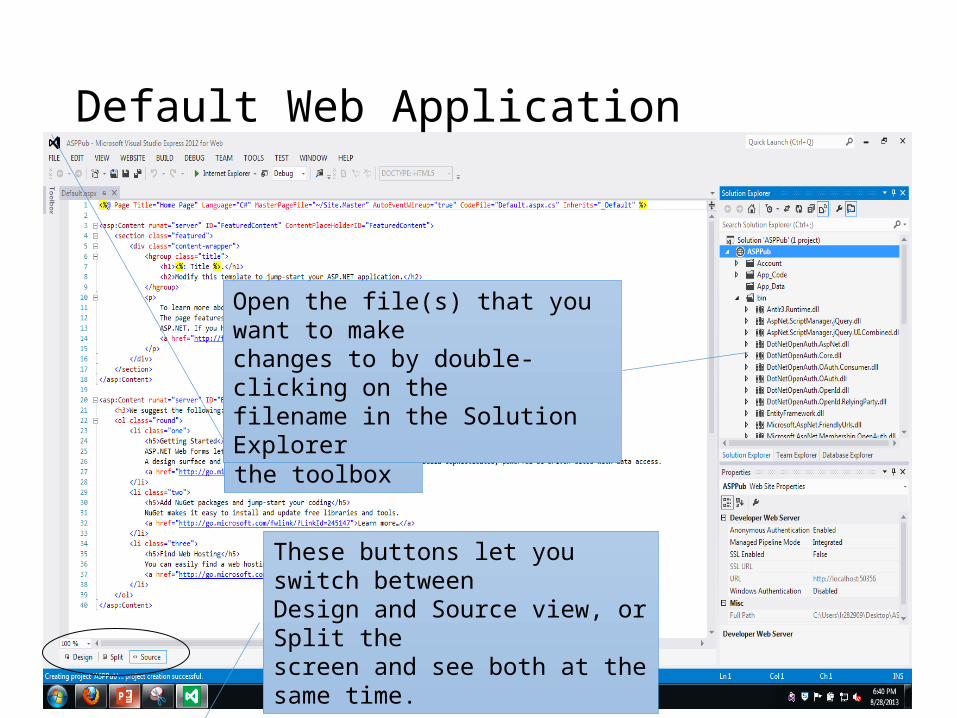
Default Web Application
Click here to seethe toolbox
These buttons let you switch betweenDesign and Source view, or Split the screen and see both at the same time.
Open the file(s) that you want to make changes to by double-clicking on the filename in the Solution Explorer

Split View
Selecting text or a control in one viewautomatically selects in same thing inthe other view.
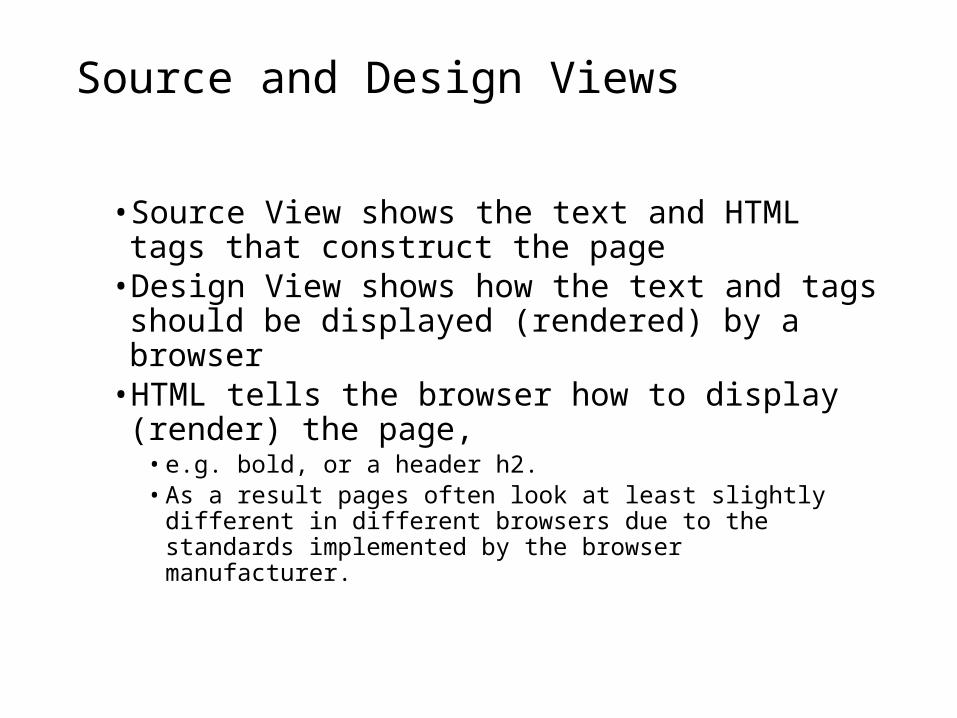
Source and Design Views
• Source View shows the text and HTML tags that construct the page• Design View shows how the text and tags should be
displayed (rendered) by a browser • HTML tells the browser how to display (render) the page, • e.g. bold, or a header h2. • As a result pages often look at least slightly different in different browsers
due to the standards implemented by the browser manufacturer.

HTML
•HyperText Markup Language• Used to describe how the text should be displayed• Paragraphs, lists, headings, bold or emphasized text, etc.• Uses “tags” that always appear in pairs, an opening tag and a closing tag
• <p>This is a paragraph</p>• <h2>This is a second level heading</h2>• <strong>this would be displayed in bold</strong>

More HTML
• A few tags have the opening and closing combined• This is the tag for a new line (a break) <br />• This is the tag for a horizontal line <hr />
• Tags can be nested but must not overlap
Correct nesting: note that browsers ignore extra spaces and line breaks
incorrect nesting: the green squiggles are VWD telling you something is wrong.
Some browsers attempt to display pages, evenwhen there are errors in the HTML and otherbrowsers don’t. You should ALWAYS checkyour pages in different browsers.

Working with HTML
• You can enter or edit HTML tags directly in Source view.• For example, to add a title to your home page, edit line 1 in source view
replacing “Home Page” with “Joe Bobcat’s Portfolio” (but use your own name!)

Working with HTML - 2
• You can also use VWD tools to add HTML to your page.• Working in Split view, (see next slide)
• Select “My MIS Courses” in Design view• From the Block Format dropdown list, select Heading3• Notice that the text has changed in Display view• And HTML has been added to the Source view
The next slide shows whatthis should look like

Using HTML from Design View
1) Select the text you want to modify
2) Select the tool you want to use,In this case Block Format

Editing HTML Properties
After selecting something in either Source or Design View you can use the Properties Explorer to see all the Properties associated with the selected object in the right hand column, in this case the Page object. Notice that the Page object has many more properties than are shown on line 1 where you only see properties that have assigned values.
These buttons let you change howthe properties are organized, either by Category or Alphabetically. Yourinstructors prefer Alphabetically.

Style Sheets
• Styles contain a series of rules that define design oriented properties of a control• Styles may be defined in a web page or in one or more
external Style Sheets.• Several style sheets may work together to influence how a
single control is displayed

Creating Styles in Design View
• VWD automatically creates a style when it can’t use HTML to handle a design request• For example, if you want to change the color of some text…• In Design View of Default.aspx, select MY MIS COURSES• From the toolbar at the top of VWD,• select the Background Color tool• (the right icon: ) • Click on a Bobcat green, then OK• Click on the Foreground Color tool
(the left icon)• Click the center white spot on the color pallet, then OK

Styles in Design View 2
The heading text is now white with a dark green background
VWD created style1 with rules that setthe foreground (color) to white andthe background to dark green
The style is “applied” to the headingthrough the Class property

Cascading Style Sheets - CSS
•Many different style sheets may influence a control•The final result depends on the cascading order of
the style sheets with each new style sheet potentially modifying the settings of previous sheets•VWD has a CSS Properties window that can help
understand and modify CSS

Using CSS Properties (L1 prep)
• Let’s change the color of the title on our master page (complete these steps before the L1)• Load the master page by double-clicking Site.master in the Solution explorer• Switch to Design mode• Click on the header area in the Design View• On the Status bar (at the bottom) click the tag for “<header>”• A box gets highlighted in the Desgn View. Click and drag to resize bottom of the
header box so that the header encompasses all your header text• Next we will display the CSS properties windows
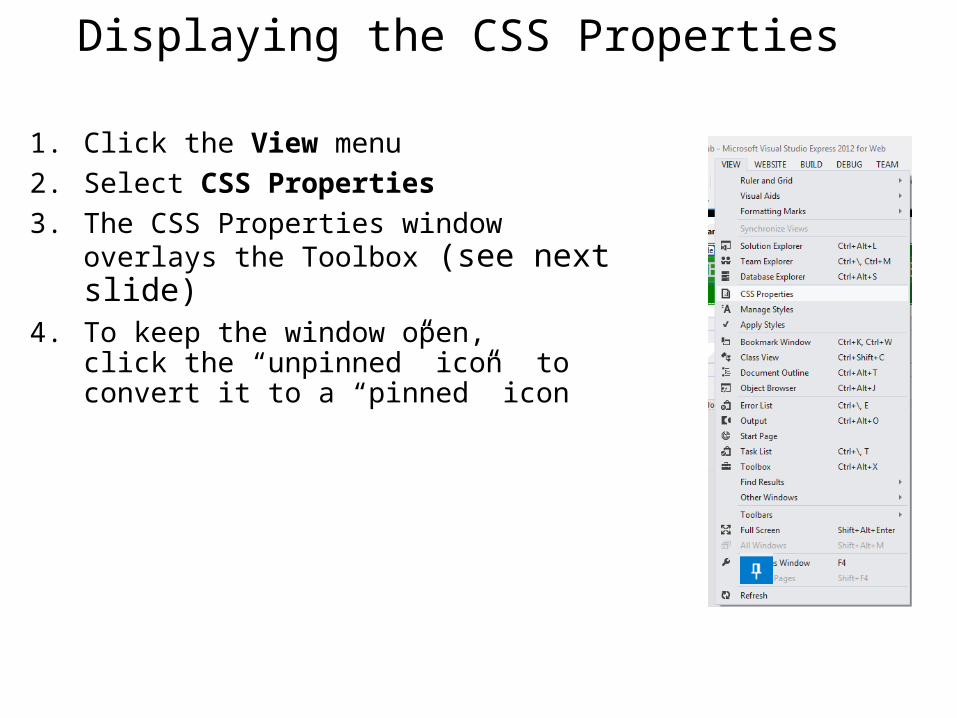
Displaying the CSS Properties
1. Click the View menu2. Select CSS Properties3. The CSS Properties window overlays the
Toolbox (see next slide)4. To keep the window open,
click the “unpinned” icon to convert it to a “pinned” icon
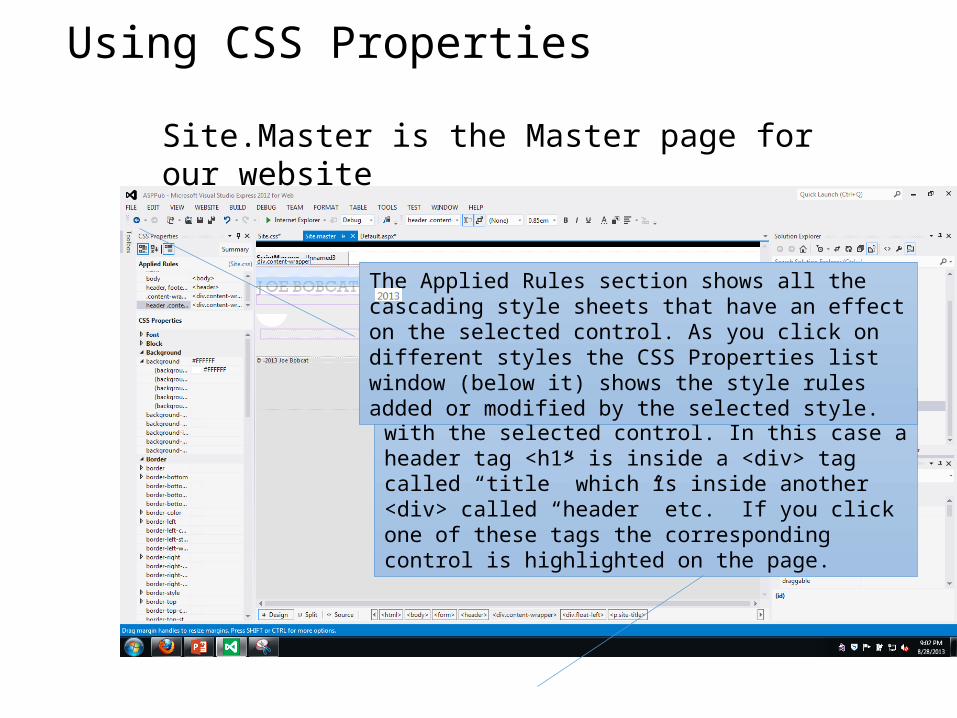
Using CSS Properties
This shows all the HTML tags associated with the selected control. In this case a header tag <h1> is inside a <div> tag called “title” which is inside another <div> called “header” etc. If you click one of these tags the corresponding control is highlighted on the page.
The Applied Rules section shows all the cascading style sheets that have an effect on the selected control. As you click on different styles the CSS Properties list window (below it) shows the style rules added or modified by the selected style.
Site.Master is the Master page for our website

Change a property
1. Click the next to background to expandthe list of propertiesand click in the box to the right of (background-color)
2. Click the little down arrow3. Select “More Colors” for the
color pallet, and pick Bobcat Geen.

Master page header change

More changes
•Click to the right of the About button•You should see <ul#menu> selected
at the bottom of the window•Use the CSS Properties window to change the color
of this control to the same thing you used in the previous slide•Save all of the open files (Site.master and
Content/Site.css) and open Default.aspx
this is where the style sheets are actually stored
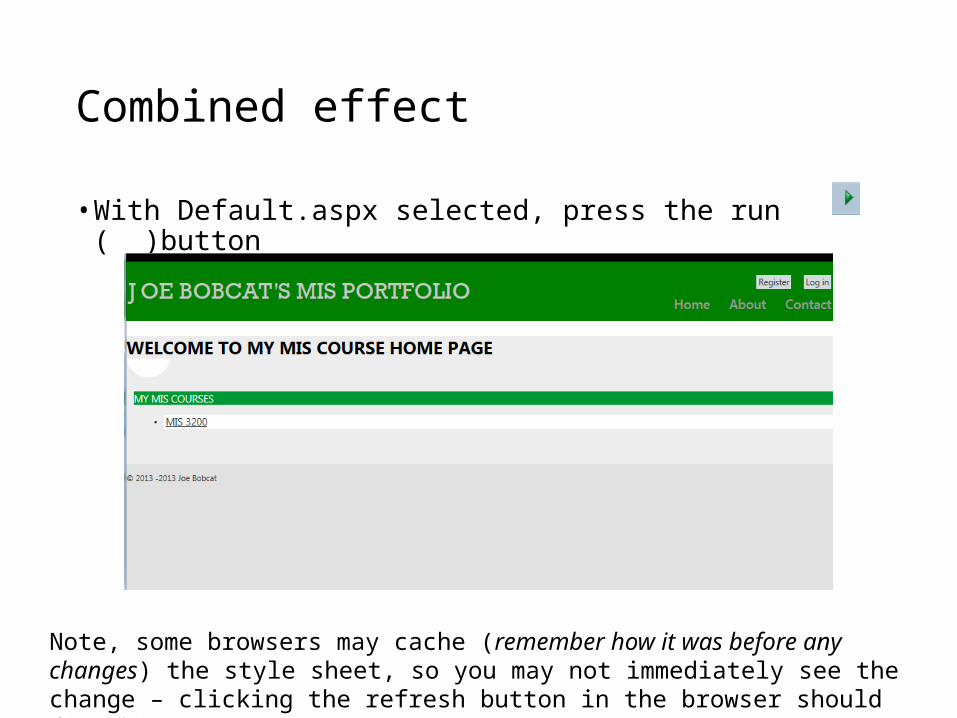
Combined effect
• With Default.aspx selected, press the run ( )button
Note, some browsers may cache (remember how it was before any changes) the style sheet, so you may not immediately see the change – clicking the refresh button in the browser should fix this
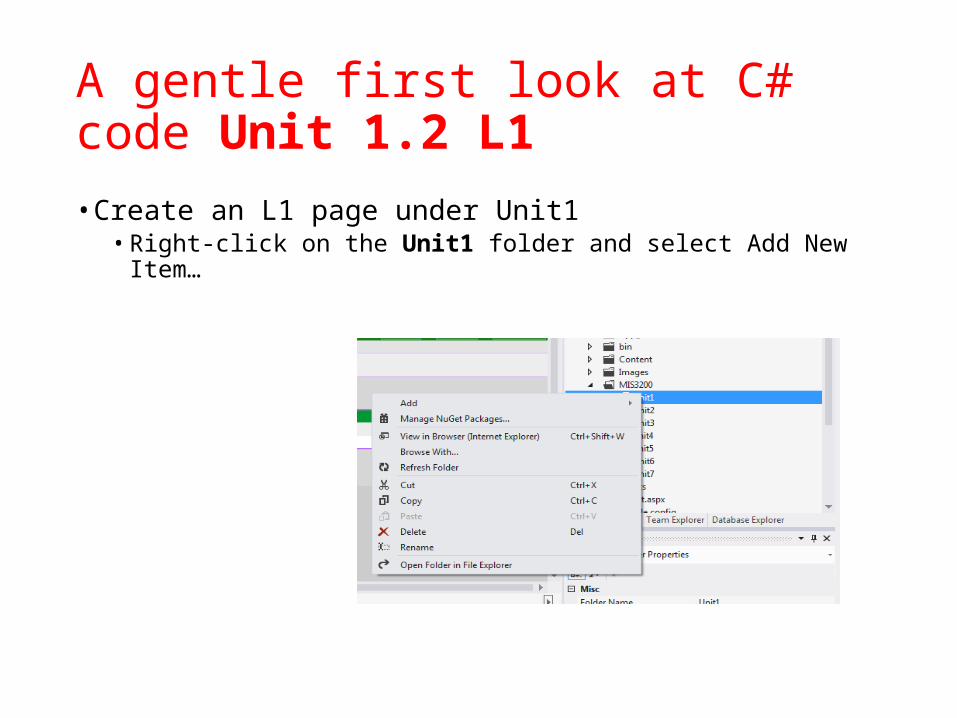
A gentle first look at C# code Unit 1.2 L1
• Create an L1 page under Unit1• Right-click on the Unit1 folder and select Add New Item…
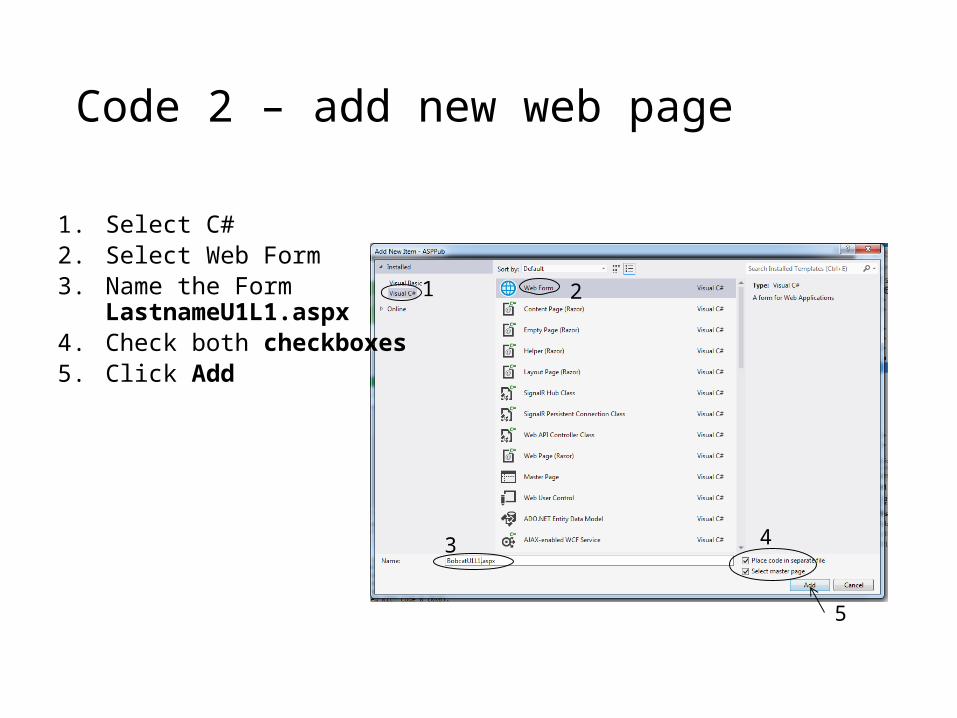
Code 2 – add new web page
1. Select C#2. Select Web Form3. Name the Form
LastnameU1L1.aspx4. Check both checkboxes5. Click Add
1 2
3 4
5

Code 3 – select Master Page
• Because you checked Select master page you will see this page. Select the one master page you have • (later there may be two or more to
choose from) • click OK

Code 4 – change the Title
6. From Source view, change the page Title to “Yourname – U1L1 – First Code”
7. Switch to Design view8. Click in the MainContent area and type “Please enter your name:
”

Code 5 – add a TextBox
9. Expand and pin the Toolbox10. Locate the TextBox control
(you may have to scroll down the ToolBox)11. Click on the TextBox, drag it after the text you just entered and
drop it

Code 6 - naming the TextBox
12. Name the TextBoxa. Be sure the new TextBox is selectedb. Sort the Properties window alphabetically (right-click the TextBox and
choose Properties if you do not see the Properties Window)c. Scroll to the top until you see (ID)d. Select the default name, TextBox1, and replace it with txtName

Code 7
13. Add the next Controla. Click to the right of the TextBoxb. Press Enter to create a new paragraphc. Locate the Button Control in the ToolBoxd. Drag a Button to the new paragraphe. Change the Button’s (ID) property to btnDemof. Change the Button’s Text property to Click to see message

Code 8 – adding a Label
14. Add one additional Controla. Click to the right of the Button and press Enterb. Locate the Label Control on the Toolbox and drag it to the new
paragraph.c. Change the Label’s (ID) to lblOutputd. By default the Text of a Label is set to Label – we need to delete that
texte. Set the Label’s Visible property to False

Code 9 – take a look
• Run the page
• Does anything happen when you press the button?• Why? Or Why not?

Code 10 – where we are
• We added three Objects (Controls) to our web page• We changed several properties of the Controls• But we haven’t told the page to pay attention to any events• We do that with methods linked to Objects
Code 11 – create a method
15. To create a method linked to the most common event a Button sees, the Click event, simply double-click the Button.• VS Express creates the method on a special page called the “code-behind”
page and takes you to it

Code 12 – Code-behind page
The page has the same name as the aspxpage with the addition of .cs for C#. It isalso shown in the Solution Explorer nestedunder the .aspx page.
This is the new method. All methods that deal withevents start with “protected void” and end withsomething similar to what you see in the () – we willdiscuss all of this later in the course. The methodname, btnDemo_Click, is constructed from the Control’s (ID) and the name of the event.
These tell you wherethe cursor is on the page, in this case online 16, column 9 –in the middle of ournew method.

Code 13 – the plan
• What we want to happen• Get the name from txtName• Add a welcome message• Put the results in lblMessage• Make lblMessage visible

Code 14 – the process
•We will have to write a few lines of C# code• Everything in C# is case sensitive so when we want to refer
to our TextBox we say txtName. If we use any other capitalization C# won’t know what we mean.• C# organizes code into blocks contained inside braces, { }.
For example, all the code we need for btnCDemo_Click must go between the braces that are currently on lines 15 and 17.• Every line of code in C# ends with a “;”
(much like sentences in English end with a period)
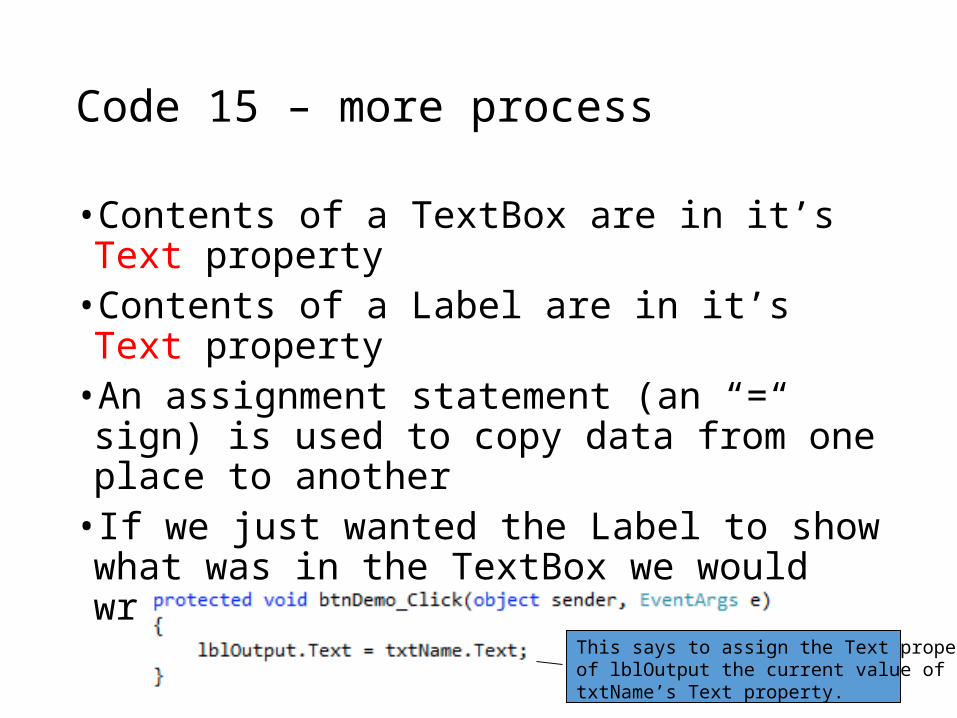
Code 15 – more process
•Contents of a TextBox are in it’s Text property•Contents of a Label are in it’s Text property•An assignment statement (an “=“ sign) is used to
copy data from one place to another• If we just wanted the Label to show what was in the
TextBox we would write
This says to assign the Text property of lblOutput the current value of thetxtName’s Text property.

Code 16 – a little help
•VWD provides a great deal of help when we are writing code.•As soon as you start typing VWD starts suggesting
this you might mean as in this example where only the lower case letter “l” was entered
If you continue typing the list will narrowto only those items that contain all yourletters. You can use the arrow keys tomove up and down the list. Once youselect the item you want you can pressthe Tab key to have it entered on the page.

Code 17 – and more help
• Object names are separated from property names by a period• After you enter the object name, type a period and VWD will show
you all the things that can come next
Select the Property you want usingany of the techniques mentioned onthe previous slide. (Properties are indicated by the icon you see to theleft of Text)
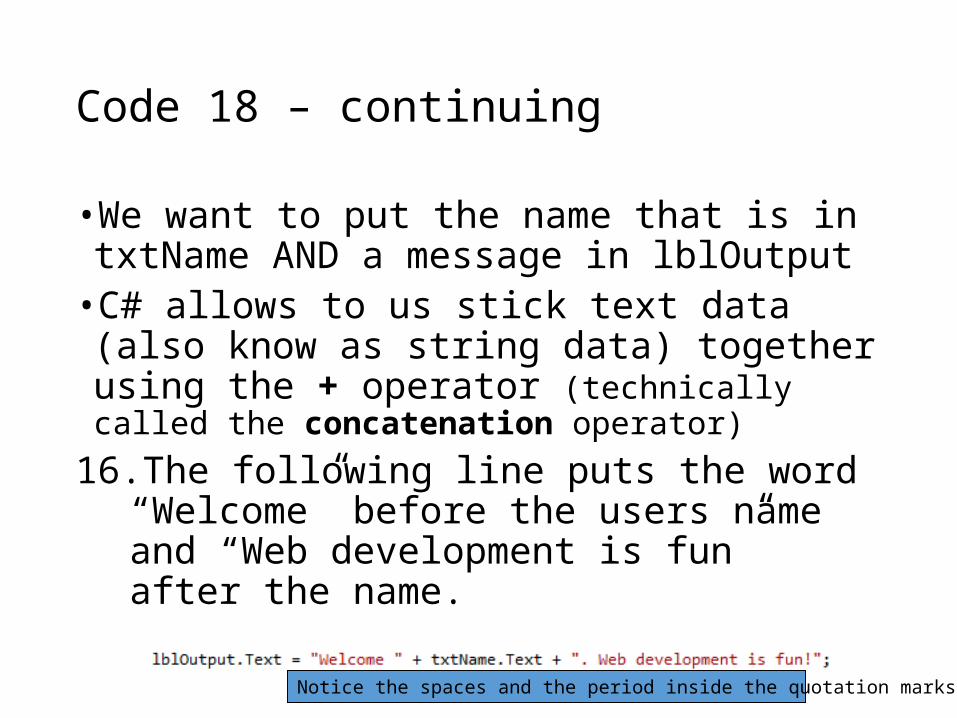
Code 18 – continuing
•We want to put the name that is in txtName AND a message in lblOutput•C# allows to us stick text data (also know as string
data) together using the + operator (technically called the concatenation operator)
16. The following line puts the word “Welcome” before the users name and “Web development is fun” after the name.
Notice the spaces and the period inside the quotation marks

Code 19 – almost done
17. We need to make lblOutput visible. We do this by setting it’s Visible property to True.
18. Finally, to help the user we want the cursor to be in txtName when the page loads. This is how you can do that.
Note that this is in a different method, the Page_Load method. We will talk about this method and what is happening here in class.Also note that Focus() is a method of web controls – methods will always require the use of parentheses
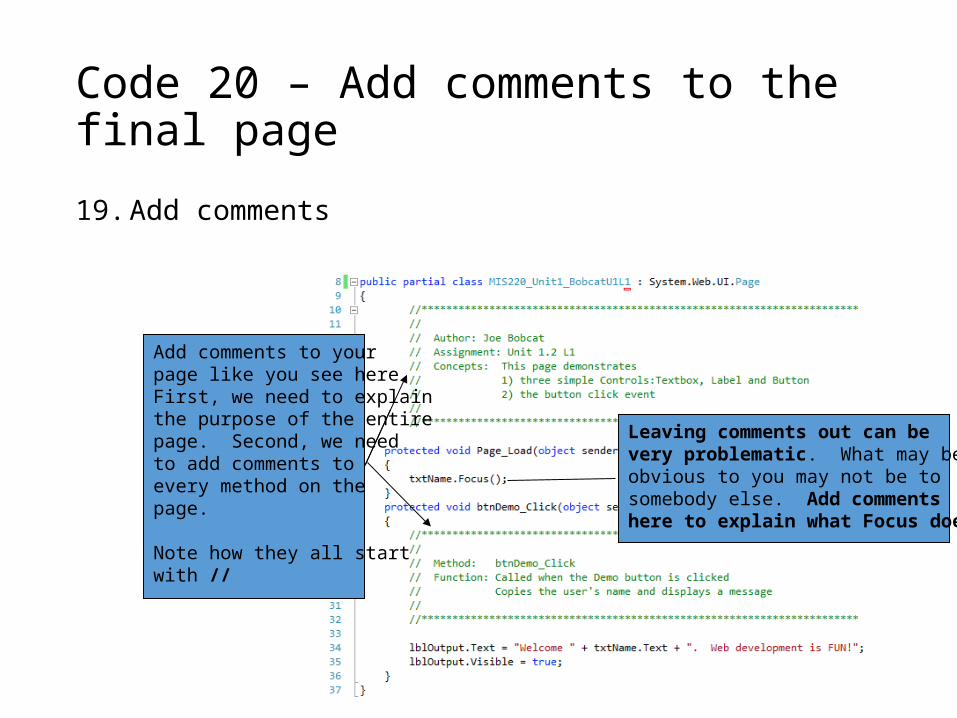
Code 20 – Add comments to the final page
19. Add comments
Add comments to your page like you see here.First, we need to explainthe purpose of the entirepage. Second, we need to add comments to every method on the page.
Note how they all startwith //
Leaving comments out can be very problematic. What may beobvious to you may not be to somebody else. Add comments here to explain what Focus does.

Comments
It is important to include descriptive comments. It is amazing what you will forget in old code. Also, you never know who else may be working on your code – help them by providing details about how it works!
// indicates that any following text is a comment
Notice the placement of the comments. To describe the btnDemo_Click method, they are placed within the { } brackets

And the result is …

Oops, one more thing
We need to link this web page to our MIS3200 page20. Click on the MIS3200 folder21. Open the MIS3200 home page you made last
class22. Click after your welcome message and press
Enter23. Drag a Hyperlink control into the new paragraph
Oops, continued
24. Change the (ID) of the Hyperlink to hlUnit1L125. Change it’s Text to “Unit1 L1”26. Select NavigateUrl and click the … to open the Selet URL window27. Locate and select your page in the Unit 1 folder (see next page)28. Press OK
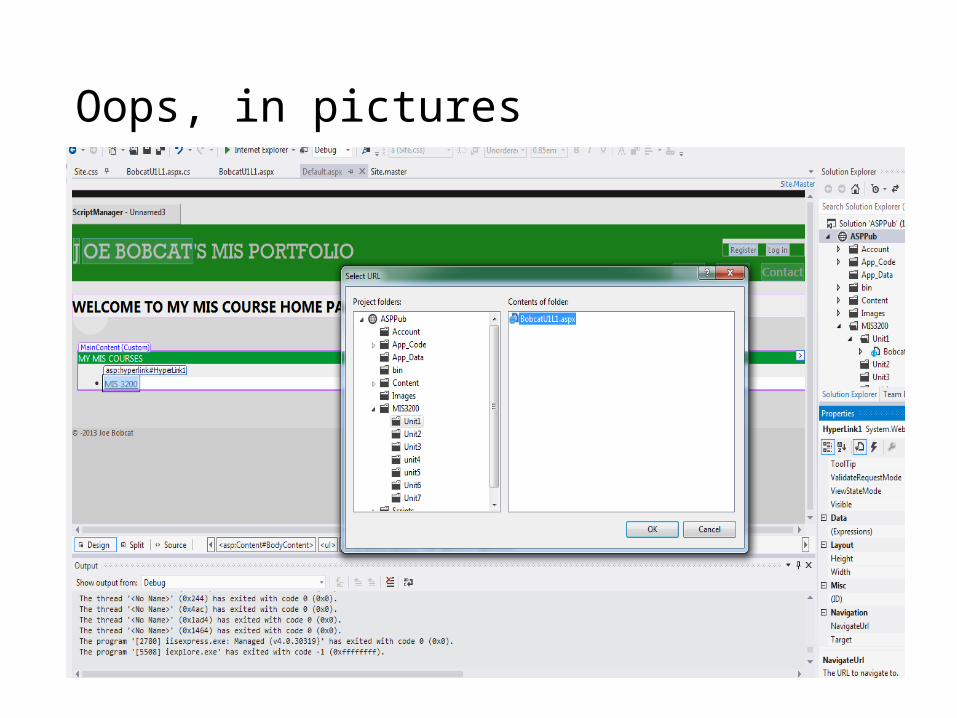
Oops, in pictures

And finally …
29. You should now be able to get to your new page, starting from your MIS3200 class page – try and and make sure it works. Submit your MIS Portfolio’s public URL to the Unit 1.2 L1 drop box.(see Unit 1.1, slides 40-41 for help on moving your ASPPub folder to your ASPNET account)
This last step is VERY important. You will only receive creditfor L1 and L2 work and for homework assignments if we canfind them from your MIS Portfolio and MIS class (MIS3200LastnameFirstname.aspx) page!!

Summary - two views, one page
• Visual Web Developer (WVD) provides two different views of a web page• Source View
• Shows the HTML that defines the page• Allows us to work directly with HTML tags
• Design View• Shows what the page will look like• Allows us to design a page using drag-and-drop controls
• Split View (not a new view, rather the combination of both)

Directions for Unit 1.2 L2
This assignment allows you to develop your About page1. Open the About page in Source view (About.aspx)
a. Change the Page Title to “About Joe Bobcat” (but, use your own name!) – note, do not re-name or move the About.aspx file
2. Switch to Design mode3. Change the ABOUT heading to ABOUT ME
a. Change the heading to the same color as your master page heading
b. Change the text color to White

Directions - Continued
4. Delete Put Content Here and replace it with a table (Table menu, Insert Table) with 4 rows and 2 columns.a. Label the top left column: Local Addressb. Label the top right column: Permanent Addressc. Make both of the labels bold and larger than the other textd. Add your address information in the other cells of the table
(if you are not comfortable putting in your address since this could be accessed by anyone on the Internet, just make up one)

Directions - Continued
5. Create an Images folder under ASPPub (this will hold images for all of your MIS courses eventually – this is different than the Images folder we created under MIS3200)
6. Download an image of you from somewhere and put it in the Image folder (if you don’t have one right now then use a different image)
7. Select the table.style1 (note, it may be table.style2 or higher) press the right arrow key to get out of the table and press the Enter key to create a new paragraph
8. Add a Button under the tablea. Change its (ID) to btnSeeMeb. Change the Text property to See Me

Directions – Continued 2
9. Add a second Button next to the firsta. Change its (ID) to btnHideMeb. Change the Text property to Hide Mec. Change Visible property to False
10. Click to the right of the button, press the space bar twice11. Drag an Image Control to the page
a. Change the (ID) of the Image to imgMeb. Select the ImageUrl property, click …, select your image in the
Images folderc. Change the Visible property to False
Directions – Continued 3
12. Double-click the See Me button to create a method (see slide 54, step 17 for help with the following)
a. Make imgMe visibleb. Make btnHideMe visiblec. Make btnSeeMe invisible
13. Return to the aspx page in Design view and double-click the Hide Me buttona. In the new method, make imgMe invisibleb. Make btnHideMe invisiblec. Make btnSeeMe visible
Directions – Continued 4
14. In the Page_Load methoda. Set Focus to btnSeeMe
15. Add required page level and method level comments (including Page_Load! - slides 55 & 56)
16. Create a link to the About page on your MIS220 home pagea. Name the hyperlink hlUnit1L2b. Change its Text to Unit1 L2
17. Run and test the page18. Copy the ASPPub folder to the ASPNET server and submit the
MIS Portfolio URL to the Unit 1.2 L2 dropbox

For our next class…
• Remember to complete your L3 before our next class (see the drop box for directions).• Prepare for the Unit 1 quiz by reviewing the Unit 1.1 & 1.2 lecture
notes (and any notes from class).

Review!
• What Property of a label controls what the user sees in the object?• The prefix for a button is_____?• What do the following
acronyms mean: OOP, GUI, RAD
• Identify the following as events or properties:• BackColor• Click• Text• BorderStyle• Page_Load• Visible