mis user’s manual - dol grantee reporting system · iii. adding new cases ... (ncp) ... this...
TRANSCRIPT
_____________________________________________
ENHANCED TRANSITIONAL JOBS DEMONSTRATION (ETJD)
MIS User’s Manual
February 2012
Employment and Training Administration
U.S. Department of Labor 200 Constitution Avenue, NW
Washington, DC 20210
____________________________________________
Page | 1
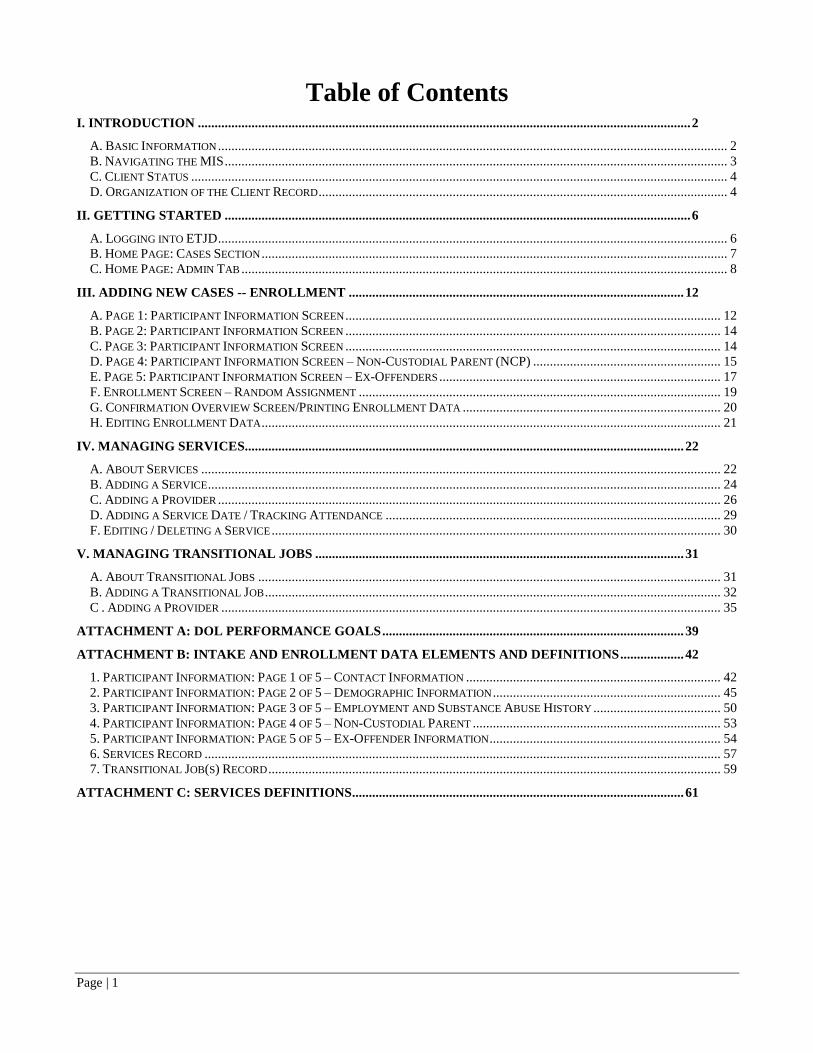
Table of Contents I. INTRODUCTION ................................................................................................................................................... 2
A. BASIC INFORMATION ........................................................................................................................................................ 2 B. NAVIGATING THE MIS ...................................................................................................................................................... 3 C. CLIENT STATUS ................................................................................................................................................................ 4 D. ORGANIZATION OF THE CLIENT RECORD .......................................................................................................................... 4
II. GETTING STARTED ........................................................................................................................................... 6
A. LOGGING INTO ETJD ........................................................................................................................................................ 6 B. HOME PAGE: CASES SECTION ........................................................................................................................................... 7 C. HOME PAGE: ADMIN TAB ................................................................................................................................................. 8
III. ADDING NEW CASES -- ENROLLMENT .................................................................................................... 12
A. PAGE 1: PARTICIPANT INFORMATION SCREEN ................................................................................................................ 12 B. PAGE 2: PARTICIPANT INFORMATION SCREEN ................................................................................................................ 14 C. PAGE 3: PARTICIPANT INFORMATION SCREEN ................................................................................................................ 14 D. PAGE 4: PARTICIPANT INFORMATION SCREEN – NON-CUSTODIAL PARENT (NCP) ........................................................ 15 E. PAGE 5: PARTICIPANT INFORMATION SCREEN – EX-OFFENDERS .................................................................................... 17 F. ENROLLMENT SCREEN – RANDOM ASSIGNMENT ............................................................................................................ 19 G. CONFIRMATION OVERVIEW SCREEN/PRINTING ENROLLMENT DATA ............................................................................. 20 H. EDITING ENROLLMENT DATA ......................................................................................................................................... 21
IV. MANAGING SERVICES................................................................................................................................... 22
A. ABOUT SERVICES ........................................................................................................................................................... 22 B. ADDING A SERVICE ......................................................................................................................................................... 24 C. ADDING A PROVIDER ...................................................................................................................................................... 26 D. ADDING A SERVICE DATE / TRACKING ATTENDANCE .................................................................................................... 29 F. EDITING / DELETING A SERVICE ...................................................................................................................................... 30
V. MANAGING TRANSITIONAL JOBS .............................................................................................................. 31
A. ABOUT TRANSITIONAL JOBS .......................................................................................................................................... 31 B. ADDING A TRANSITIONAL JOB ........................................................................................................................................ 32 C . ADDING A PROVIDER ..................................................................................................................................................... 35
ATTACHMENT A: DOL PERFORMANCE GOALS .......................................................................................... 39
ATTACHMENT B: INTAKE AND ENROLLMENT DATA ELEMENTS AND DEFINITIONS ................... 42
1. PARTICIPANT INFORMATION: PAGE 1 OF 5 – CONTACT INFORMATION ............................................................................ 42 2. PARTICIPANT INFORMATION: PAGE 2 OF 5 – DEMOGRAPHIC INFORMATION .................................................................... 45 3. PARTICIPANT INFORMATION: PAGE 3 OF 5 – EMPLOYMENT AND SUBSTANCE ABUSE HISTORY ...................................... 50 4. PARTICIPANT INFORMATION: PAGE 4 OF 5 – NON-CUSTODIAL PARENT .......................................................................... 53 5. PARTICIPANT INFORMATION: PAGE 5 OF 5 – EX-OFFENDER INFORMATION ..................................................................... 54 6. SERVICES RECORD .......................................................................................................................................................... 57 7. TRANSITIONAL JOB(S) RECORD ....................................................................................................................................... 59
ATTACHMENT C: SERVICES DEFINITIONS................................................................................................... 61

Page | 2
I. Introduction This manual has been developed to assist Enhanced Transitional Jobs Demonstration (ETJD) grantees
use the management information system (MIS) that the Department of Labor (DOL) has created for the
demonstration program. The ETJD MIS is a tool for both administrators and case managers. The
purpose of this manual is to provide new users of the system with the core information they need to
successfully use and navigate the system. Each data screen in the MIS has a title, and in this manual
when we refer to a particular data screen, the name of that screen is shown in bold green typeface.
The system also has links and action tabs on many of the data screens that jump staff directly to
another data screen or another section of the ETJD MIS system. In this manual when we are
referencing a link or an action tab, it is shown in bold blue typeface.
A. Basic Information
The EJTD is a research effort and grantees are expected to comply with the guidelines and procedures
that have been created to recruit and enroll eligible clients in both the treatment and control groups.
Furthermore, DOL has assigned specific goals for this demonstration effort. A list of the goals and
performance expectations are included in this manual and can be found in Attachment A.
The EJTD MIS system has a number of reoccurring design features for entering and saving data. The
major recurring features are outlined in the bullets which follow.
Required Data Fields: * Fields for which a data entry is required are marked with red
asterisks. When this field applies, the record will not save unless enters the data. An example
of a red asterisk data item is shown in the Date Format description which follows.
Date Format: The MIS has a standard approach for entering dates which is to use a numeric,
two digit month entry followed by a two digit number entry for the day and ending with a four
digit entry to represent the year (example shown below).
Selection/ Radio Buttons: -- The system often uses radio buttons where staff checks one data
entry from a pre-defined set of data options (example shown below).
Save Save/Continue -- At the bottom of the data entry screens that are a part of
the enrollment record section, staff has two options – “Save,” which will save the data in the
current data screen and staff will remain in that screen, and “Save/Continue” which also saves
the data but will move staff to the next data screen in the progression.
Save Cancel -- At the bottom of many of the data entry screens that are a part of the
services and transitional jobs data records, staff will have the option to “Save,” which will save
the data in the current data screen and typically take staff back to the last participant overview
or summary screen or the option to “Cancel” which does not save any data that has been
entered and also takes staff back to the last participant overview or summary screen.

Page | 3
Almost all of the data screens include the option to “print this page.” The
printer icon is typically at the top right part of the data screen, and when staff clicks on the
icon, it will automatically link to your printer and print the current data screen.
B. Navigating the MIS
The ETJD MIS is an interactive system that uses Tabs to organize the sections of the system and links
to assist staff to navigate while in the system. The sections of the system will ultimately include:
Cases Section
Reports Section
Tools Section
Admin Section
These are shown on the screen shot of the system's Home Page in Picture I-1. These four options are
typically displayed on every screen in the MIS system. This is an early edition of the MIS and does
not include all of the features that will ultimately be a part of the system. Therefore, several of the
sections shown above -- the Reports and Tools sections -- are not yet operational.
Picture I-1: Home Page
Navigating to client records in the ETJD MIS is also a straightforward process. It is accomplished
from the Cases: Overview screen shown in Picture I-2 which is the screen users see when they select
the "Manage Cases" option of the Cases tab on the Home Page. Each client’s name is linked to
his/her case file. By clicking on the name, you are taken to the Summary screen of the client’s case
and a series of Tabs that represent the different portion of the client records which are available (see
Picture I-2). In this edition of the MIS, only the “Enrollment,” “Services” and “Transitional Jobs”
tabs of the client's record are operational.
Sections of the system

Page | 4
Picture I-2: Cases: Overview
C. Client Status
The EJTD MIS system assigns clients a status contingent upon their assignment to one of the two
groups in the program (Control and Treatment – treatment meaning that the client is slated to receive
services from the program) and their status in the program. The client status is also shown on the
screen shot of the Cases: Overview screen in the above Picture.
With this edition of the MIS system, the following client status terms are used:
In Process: This indicates that the enrollment process is not complete, and the client has not
been assigned to either the Control or Treatment group.
Control: This status indicates that the client has completed the enrollment process and has
undergone random assignment and has been assigned to the Control group.
Active: This status indicates that the client has completed the enrollment process and has
undergone random assignment and has been assigned to the Treatment group.
In later editions of the MIS, additional client statuses -- like Exited and Exited and In Follow-Up --
will be added to the system.
D. Organization of the Client Record
As shown on the Summary screen in Picture I-3, the client's case record in the MIS has been divided
into sections that generally mirror the flow of people through the program. The specific parts of the
client case file that will ultimately be included in the MIS are:
Enrollment Record
Client status Click on client’s
name to go to
case file

Page | 5
Services Record
Transitional Job Record
Outcomes Record
Exit Record
Follow-Up Record
Case Notes
This edition of the MIS User's Manual will cover the first three sections of the MIS: Enrollment,
Services and Transitional Job Records. As the other sections are added, the Manual will be updated.
Picture I-3: Summary
Current Operational
Tabs

Page | 6
II. Getting Started
A. Logging into ETJD
The ETJD MIS is an Internet-based data records system. To access the system, you need:
A personal computer (PC) workstation with a connection to the Internet,
Internet browser software, like Microsoft Internet Explorer, and
A valid password issued by DOL or, if you are a case manager or other grantee staff person, a
user name, which is your email address, and a password, which is sent to staff by the MIS
system when the grantee administrator registers staff in the system.
The designated grantee’s representative will log into the system using the grantee URL and password
that DOL sends to them. The grantee login screen is shown below (Picture II-1).
Picture II-1: Grantee Login
Grantees logging in through this page will be able to create user accounts for staff. As the grantee
creates users in the system, that user will receive an email from the system. The email will contain
staff's URL as well as staff's initial password and user name (email address).
Once a user’s account has been created by the grantee, staff will be able to log into the ETJD system
through the following login page (See Picture II-2 which follows). On the initial login, staff will be
asked to reset his/her password. This provides the opportunity for staff to select a password that is
easier to remember.

Page | 7
Picture II-2: Case Manager Login
Once logged in, staff will see the Home Page screen (Picture II-3).
Picture II-3: Home Page
B. Home Page: Cases Section
The Home Page screen (Picture II-3) offers staff four options of which only two are currently
operational: the Cases Section and the Admin Section.

Page | 8
The Cases tab provides two options. By first clicking on the Cases tab (see red arrow in the screen shot above) staff is presented with these two options:
Add a Case: Takes staff to a new enrollment screen so that a new client can be enrolled.
Manage Cases: Takes staff to the Case: Overview screen where existing clients are listed and information on services and jobs can be added to the record.
Sections III, IV and V of this manual provide detailed information as to how these two features are
used to add cases and manage the records.
C. Home Page: Admin Tab
With this edition, the only other tab on the Home Page screen that is operational is the Admin tab. As
is illustrated in the screen shot that follows (Picture II-4) this tab – for staff who have Grantee
Administrator’s roles -- offers three options:
Manage Users
Unlock User
Change Password
For staff who has been assigned the “Case Manager” role, the only option they will see is the Change
Password option. Each of these options is briefly described following the Home Page screen shot.
Picture II-4: Home Page
Manage Users: Several actions can be taken while in the Manage Users screen:
By clicking on one of the listed users, you can pull their user information forward and edit the

Page | 9
information.
You can change the roles of each user.
You can deactivate staff so that they lose access to the MIS system.
Lastly, by clicking on the "Add New User" link, you can add a new person to the system.
These options are highlighted in the following screen shots (Pictures II-5, 6 and 7).
As is shown in Picture II-7, the system has several user roles. They are:
Case Manager
Supervisor
Sub Grantee
Grantee Administrator
In this edition of the system, all the roles are not fully developed. The two that are currently
operational are the Case Manager and the Grantee Administrator. The full range of roles will be added
in the next edition. It is important to note that staff that are assigned the Case Manager role will only
be able to work with and view cases that are assigned to them, With the Administrator role, a staff
person sees and can work with all the clients that are in the system.
Picture II-5: Manage Users
Click on User Name to
edit information, change
rights or deactivate
Click to add a new
user
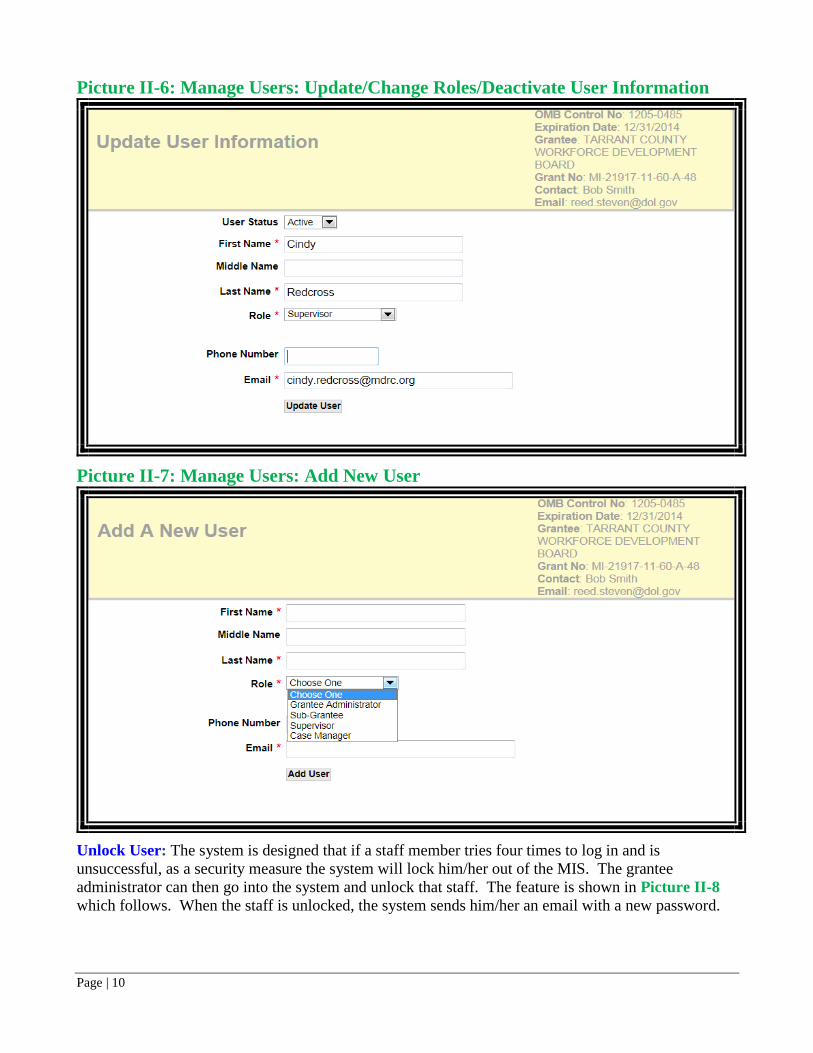
Page | 10
Picture II-6: Manage Users: Update/Change Roles/Deactivate User Information
Picture II-7: Manage Users: Add New User
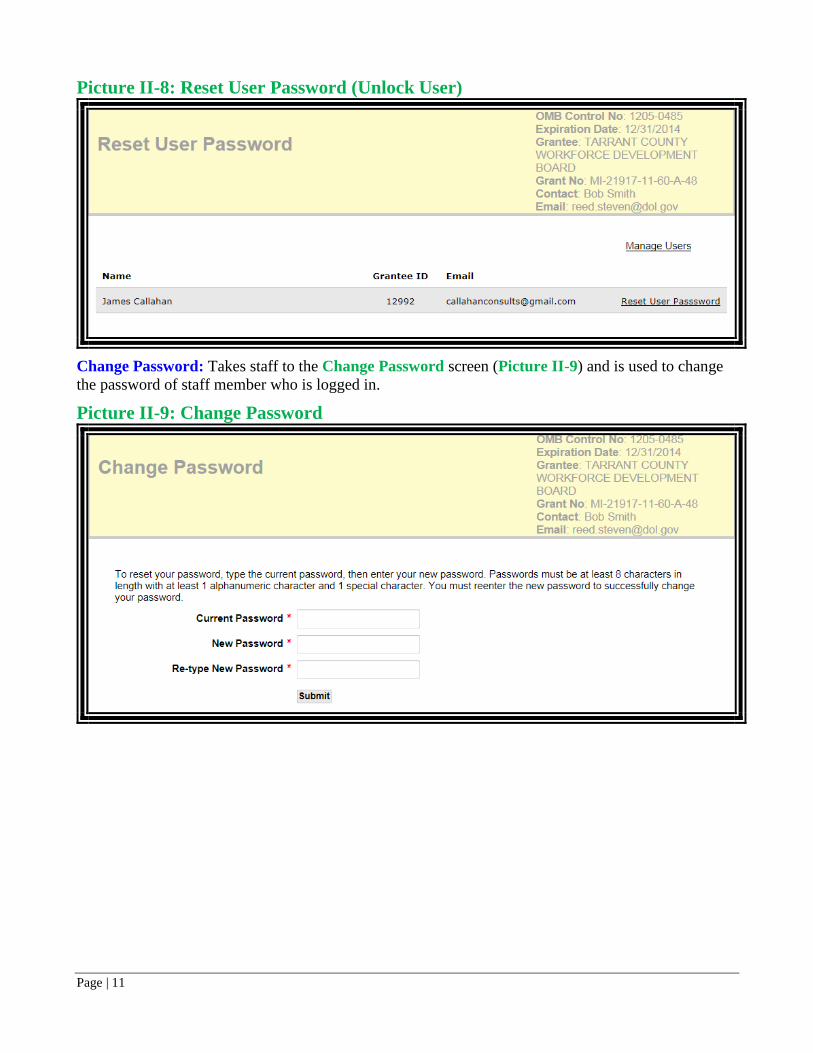
Unlock User: The system is designed that if a staff member tries four times to log in and is
unsuccessful, as a security measure the system will lock him/her out of the MIS. The grantee
administrator can then go into the system and unlock that staff. The feature is shown in Picture II-8
which follows. When the staff is unlocked, the system sends him/her an email with a new password.
Page | 11
Picture II-8: Reset User Password (Unlock User)
Change Password: Takes staff to the Change Password screen (Picture II-9) and is used to change
the password of staff member who is logged in.
Picture II-9: Change Password
Page | 12
III. Adding New Cases -- Enrollment This part of the manual outlines the enrollment of clients. Depending on your grant and the
characteristics of the person you are enrolling, you may not complete all of these pages. For example,
if your program is designed to work with non custodial parents (NCPs) and the person you are
enrolling is not an ex-offender, you would not complete Page 5 (the Ex-Offender Participant
Information page) for that client. As these distinctions apply, they will be pointed out in the
instructions.
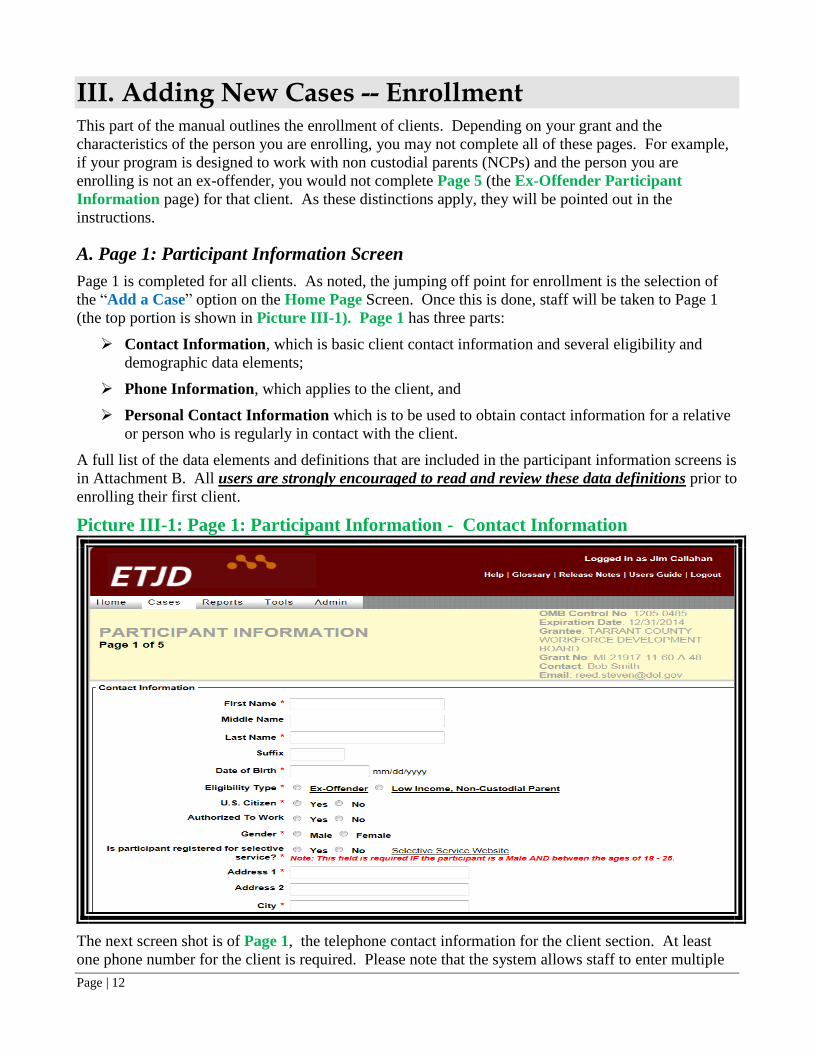
A. Page 1: Participant Information Screen
Page 1 is completed for all clients. As noted, the jumping off point for enrollment is the selection of
the “Add a Case” option on the Home Page Screen. Once this is done, staff will be taken to Page 1
(the top portion is shown in Picture III-1). Page 1 has three parts:
Contact Information, which is basic client contact information and several eligibility and
demographic data elements;
Phone Information, which applies to the client, and
Personal Contact Information which is to be used to obtain contact information for a relative
or person who is regularly in contact with the client.
A full list of the data elements and definitions that are included in the participant information screens is
in Attachment B. All users are strongly encouraged to read and review these data definitions prior to
enrolling their first client.
Picture III-1: Page 1: Participant Information - Contact Information
The next screen shot is of Page 1, the telephone contact information for the client section. At least
one phone number for the client is required. Please note that the system allows staff to enter multiple
Page | 13
telephone numbers by clicking on the "Additional Phone" link which adds the data blocks needed to
record additional phone numbers for the client.
Picture III-2: Page 1: Participant Information - Phone Information
The last screen shot of Page 1 shows the personal contact information for a person or family member
that is able to contact the client. At least one contact person for each client is required. Please note
that the system allows staff to enter multiple personal contacts by clicking on the "Add Additional
Contact" link which adds the data blocks needed to record additional people as contact for the client.
Picture III-3: Page 1: Participant Information - Personal Contact Information
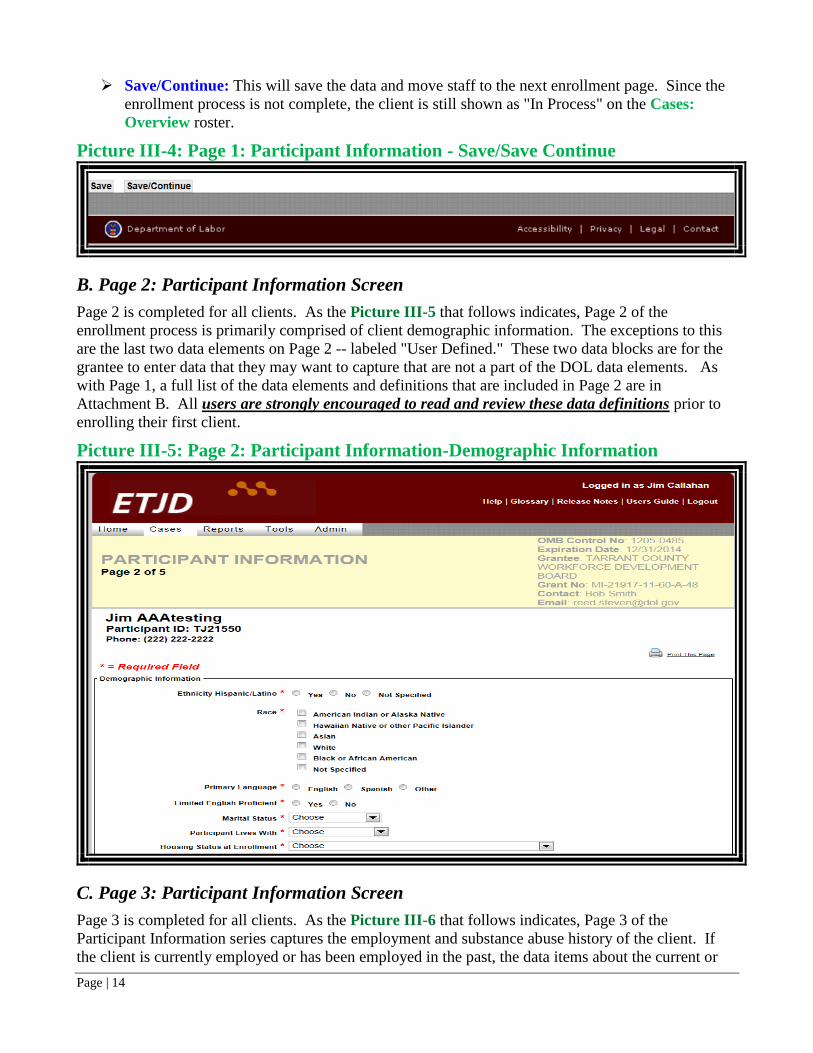
Once you have completed the data entry on page one, you have two options (see Picture III-4 below):
Save: This will save the data, but staff remains on this page. Since the enrollment process is
not complete, the client’s program status is shown as "In Process" on the Cases: Overview
roster, or
Click Additional Phone
to add additional phone
contact information
Click Add Additional
Contact to add additional
people who can contact
the client
Page | 14
Save/Continue: This will save the data and move staff to the next enrollment page. Since the
enrollment process is not complete, the client is still shown as "In Process" on the Cases:
Overview roster.
Picture III-4: Page 1: Participant Information - Save/Save Continue
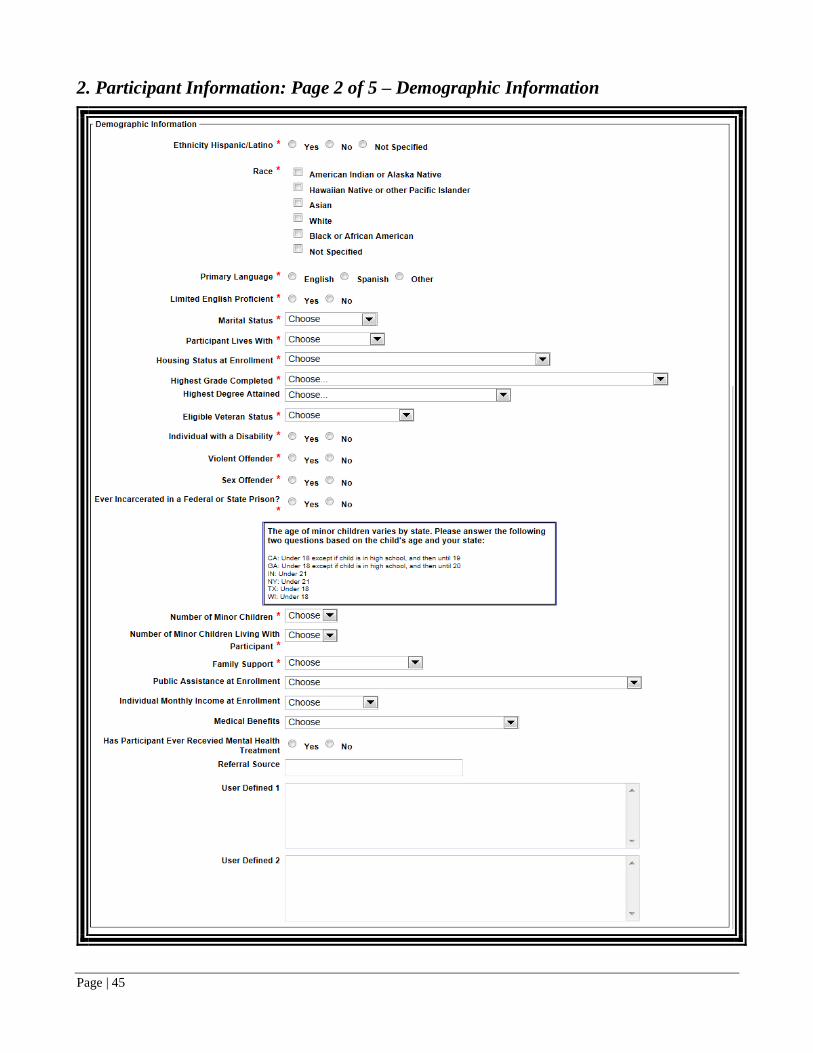
B. Page 2: Participant Information Screen
Page 2 is completed for all clients. As the Picture III-5 that follows indicates, Page 2 of the
enrollment process is primarily comprised of client demographic information. The exceptions to this
are the last two data elements on Page 2 -- labeled "User Defined." These two data blocks are for the
grantee to enter data that they may want to capture that are not a part of the DOL data elements. As
with Page 1, a full list of the data elements and definitions that are included in Page 2 are in
Attachment B. All users are strongly encouraged to read and review these data definitions prior to
enrolling their first client.
Picture III-5: Page 2: Participant Information-Demographic Information
C. Page 3: Participant Information Screen
Page 3 is completed for all clients. As the Picture III-6 that follows indicates, Page 3 of the
Participant Information series captures the employment and substance abuse history of the client. If
the client is currently employed or has been employed in the past, the data items about the current or
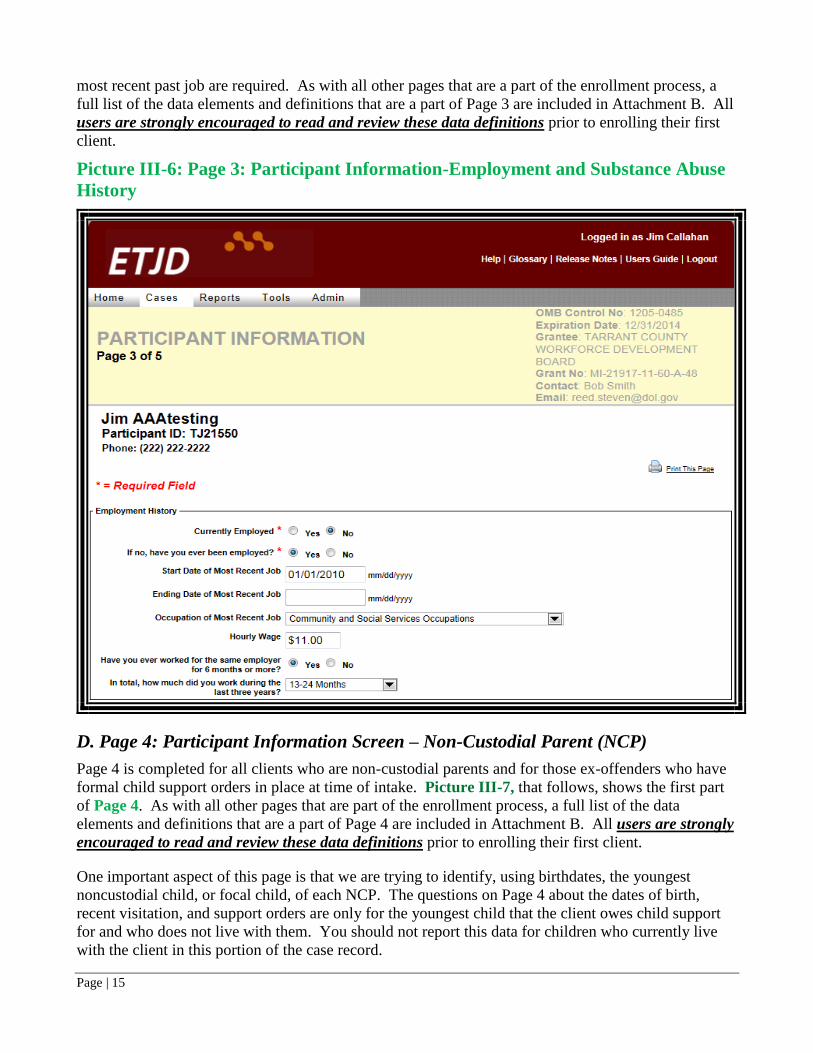
Page | 15
most recent past job are required. As with all other pages that are a part of the enrollment process, a
full list of the data elements and definitions that are a part of Page 3 are included in Attachment B. All
users are strongly encouraged to read and review these data definitions prior to enrolling their first
client.
Picture III-6: Page 3: Participant Information-Employment and Substance Abuse
History
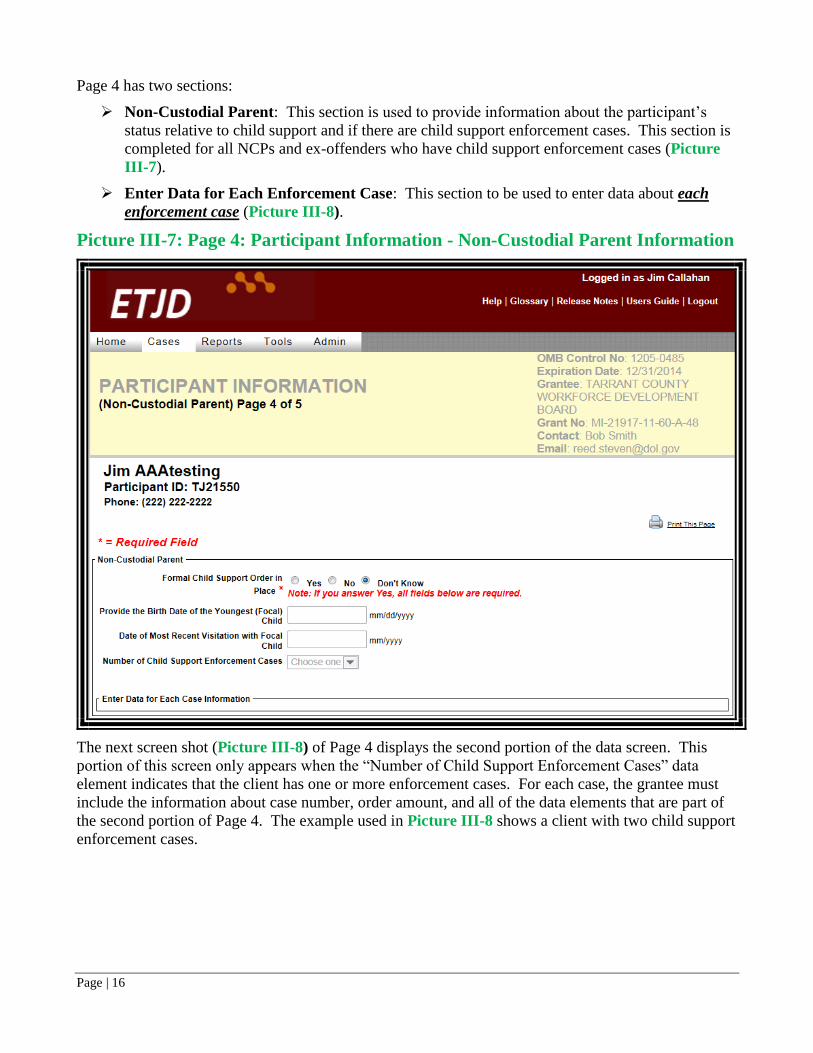
D. Page 4: Participant Information Screen – Non-Custodial Parent (NCP)
Page 4 is completed for all clients who are non-custodial parents and for those ex-offenders who have
formal child support orders in place at time of intake. Picture III-7, that follows, shows the first part
of Page 4. As with all other pages that are part of the enrollment process, a full list of the data
elements and definitions that are a part of Page 4 are included in Attachment B. All users are strongly
encouraged to read and review these data definitions prior to enrolling their first client.
One important aspect of this page is that we are trying to identify, using birthdates, the youngest
noncustodial child, or focal child, of each NCP. The questions on Page 4 about the dates of birth,
recent visitation, and support orders are only for the youngest child that the client owes child support
for and who does not live with them. You should not report this data for children who currently live
with the client in this portion of the case record.
Page | 16
Page 4 has two sections:
Non-Custodial Parent: This section is used to provide information about the participant’s
status relative to child support and if there are child support enforcement cases. This section is
completed for all NCPs and ex-offenders who have child support enforcement cases (Picture
III-7).
Enter Data for Each Enforcement Case: This section to be used to enter data about each
enforcement case (Picture III-8).
Picture III-7: Page 4: Participant Information - Non-Custodial Parent Information
The next screen shot (Picture III-8) of Page 4 displays the second portion of the data screen. This
portion of this screen only appears when the “Number of Child Support Enforcement Cases” data
element indicates that the client has one or more enforcement cases. For each case, the grantee must
include the information about case number, order amount, and all of the data elements that are part of
the second portion of Page 4. The example used in Picture III-8 shows a client with two child support
enforcement cases.

Page | 17
Picture III-8: Page 4: Participant Information – Non-Custodial Parent
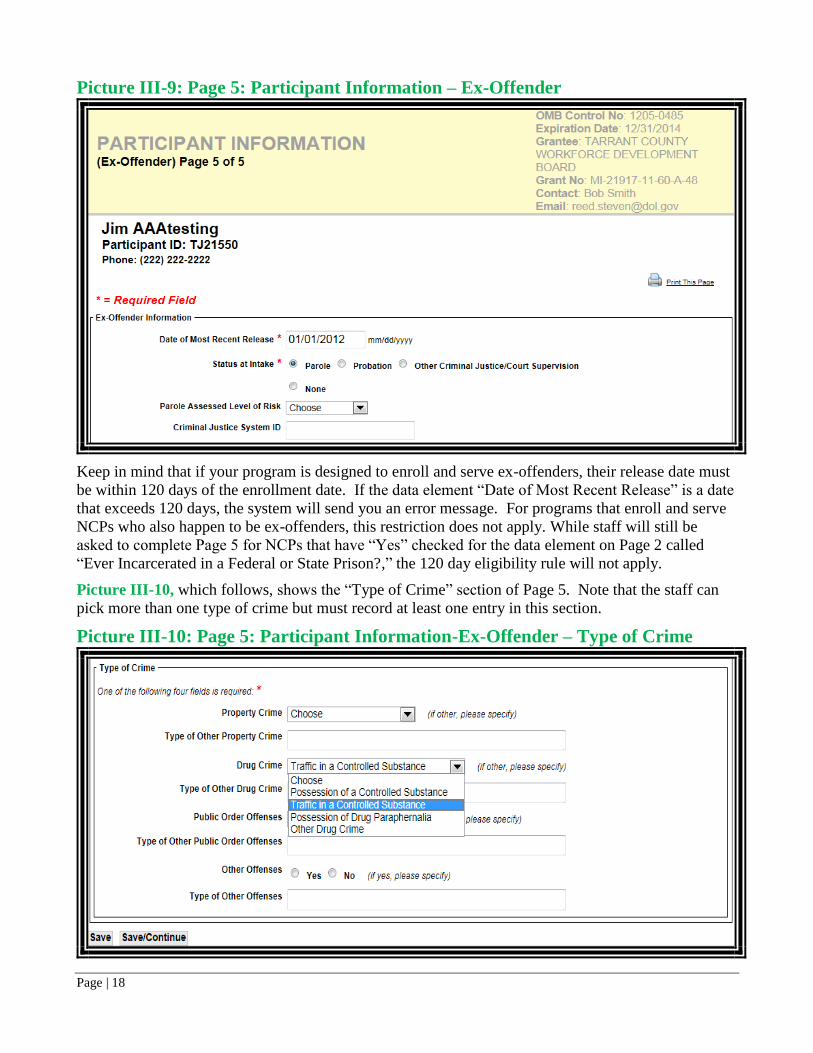
E. Page 5: Participant Information Screen – Ex-Offenders
Page 5 is completed for clients who are enrolled as ex-offenders and for NCP clients that staff has
checked “yes” for the data element on Page 2 called “Ever Incarcerated in a Federal or State Prison?”
Picture III-9 that follows is the top portion of Page 5. The entire page has two sections:
Ex-Offender Information and
Type of Crime
Both are briefly described below. As with all other pages that are part of the enrollment process, a full
list of the data elements and definitions that are part of Page 5 are included in Attachment B. All users
are strongly encouraged to read and review these data definitions prior to enrolling their first client.
Page | 18
Picture III-9: Page 5: Participant Information – Ex-Offender
Keep in mind that if your program is designed to enroll and serve ex-offenders, their release date must
be within 120 days of the enrollment date. If the data element “Date of Most Recent Release” is a date
that exceeds 120 days, the system will send you an error message. For programs that enroll and serve
NCPs who also happen to be ex-offenders, this restriction does not apply. While staff will still be
asked to complete Page 5 for NCPs that have “Yes” checked for the data element on Page 2 called
“Ever Incarcerated in a Federal or State Prison?,” the 120 day eligibility rule will not apply.
Picture III-10, which follows, shows the “Type of Crime” section of Page 5. Note that the staff can
pick more than one type of crime but must record at least one entry in this section.
Picture III-10: Page 5: Participant Information-Ex-Offender – Type of Crime

Page | 19
F. Enrollment Screen – Random Assignment
After staff completes the last Participant Information screen, if they use the “Save/Continue” option,
they are taken to the Enrollment screen, shown in Picture III-11. If they “Save” the data and at a
later time want to complete the enrollment process, the client record can be accessed from the Cases:
Overview screen and staff must scroll through the completed Participant Information screens using
the “Save/Continue” option to reach the Enrollment screen.
Picture III-11: Enrollment Screen
At this point in the enrollment process, the staff must complete the MDRC random assignment process
to ascertain if the eligible person is to be assigned to the control or treatment group. Picture III-11,
shows the link that is provided to the MDRC web site. Grantees will need the Participant ID that is
listed on the Enrollment screen. Grantees go to the MDRC web site, shown in Picture III-12, log on
using the information provided by MDRC and follow the directions provided by MDRC to complete
the random assignment process. Once the MDRC process is complete, staff return to the Enrollment
screen, select the "Control" or "Treatment" button and save the record to complete the enrollment.
Picture III-12: MDRC Screen
Click to go to the MDRC
random assignment web
site
Participant ID

Page | 20
G. Confirmation Overview Screen/Printing Enrollment Data
Once the enrollment process is complete, if the grantee wishes to print out all the enrollment
information this can be accomplished by printing the Confirmation Overview screen. Picture III-
13: Enrollment Screen, shows the link that is provided at the bottom of the screen to access the full
enrollment data set, called the confirmation page. The Confirmation Overview screen is shown in
Picture III-14.
Picture III-13: Enrollment Screen
Picture III-14: Confirmation: Overview Screen (Top Portion)
Click to go to the
confirmation page

Page | 21
H. Editing Enrollment Data
Except for selected enrollment data items – like client name, birth date, eligibility type and group
assignment – the enrollment data in the system can be edited by staff. Editing enrollment data is
accomplished by using the “Edit” link that takes staff to Page 1 of the Participant Information screen
as shown via the red arrow in Picture III-15. Once on Page 1, staff may select any of the Participant
Information screens and edit the data (as shown in Picture III-16). Once editing is accomplished,
staff clicks on the “Save/Continue” link at the bottom of the screen and the edit is complete.
Picture III-15: Summary
Picture III-16 - Participant Information Pages
Click on the page you
want to edit
Click on “Edit” to go to
Page 1 of the participant
information screens

Page | 22
IV. Managing Services
The ETJD MIS, when fully developed, will have a full range of administrative and case management
features that will assist staff with both management and case management tasks. This edition of the
ETJD MIS includes two important components of the fully developed system – the client services and
the transitional jobs components.
A. About Services
In addition to the critical role services play in assisting clients to become successful, the MIS system
also uses services, or the lack of services, as a default exit mechanism. Any enrollee who has not
received a service from one of the services listed in groups 1 through 5 in the list that follows for a
period of 90 days, or who is not actively engaged in a transitional job, will be automatically exited
from the system. Note, the receipt of any service that is listed under the Supportive Services category,
group 6 in the list below, does not count as a service that will keep an enrollee active in the program.
The services and the groups they fall under are:
1. Education or Job Training
English as a Second Language
GED Preparation
Math/Reading Remediation
On-the-Job Training (OJT)
Vocational/Occupational Skills Training
Other Education or Job Training
2. Workforce Preparation Activities Career/Life Skills Counseling/Planning
Formal Assessment/Testing
Internship
Subsidized Employment
Work Readiness Training
Workforce Information Services
Other Workforce Preparation Activities
3. Community Involvement Activities Community Service
Other Community Involvement Activities
4. Mentoring Activities Individual Mentoring
Group Mentoring
5. Parenting/Child Support Services Child Support Order Assistance
Child Visitation Assistance
Parenting Class
Other Parenting/Child Support Service
Page | 23
6. Supportive Services Case Management Services
Child Care Service
Cognitive/Behavioral Services
Health Service - Dental or Physical Care Service
Health Service - Mental Health Service
Health Service - Substance Abuse Treatment
Incentive Payments
Needs-Related Payments
Transportation Service
Other Follow-Up/Job Retention Service
Other Supportive Service
A brief description of each service is included in Attachment C.
Another aspect of the service system in the MIS is that all services are linked to providers that the
grantee enters in the system. In that the typical program experience indicates that a core of service
partners are used for many different clients, this has been added as a time saving device and allows the
staff to enter detailed provider information once and then use that entry each time the same provider is
utilized. The process for adding providers is outlined in this section.
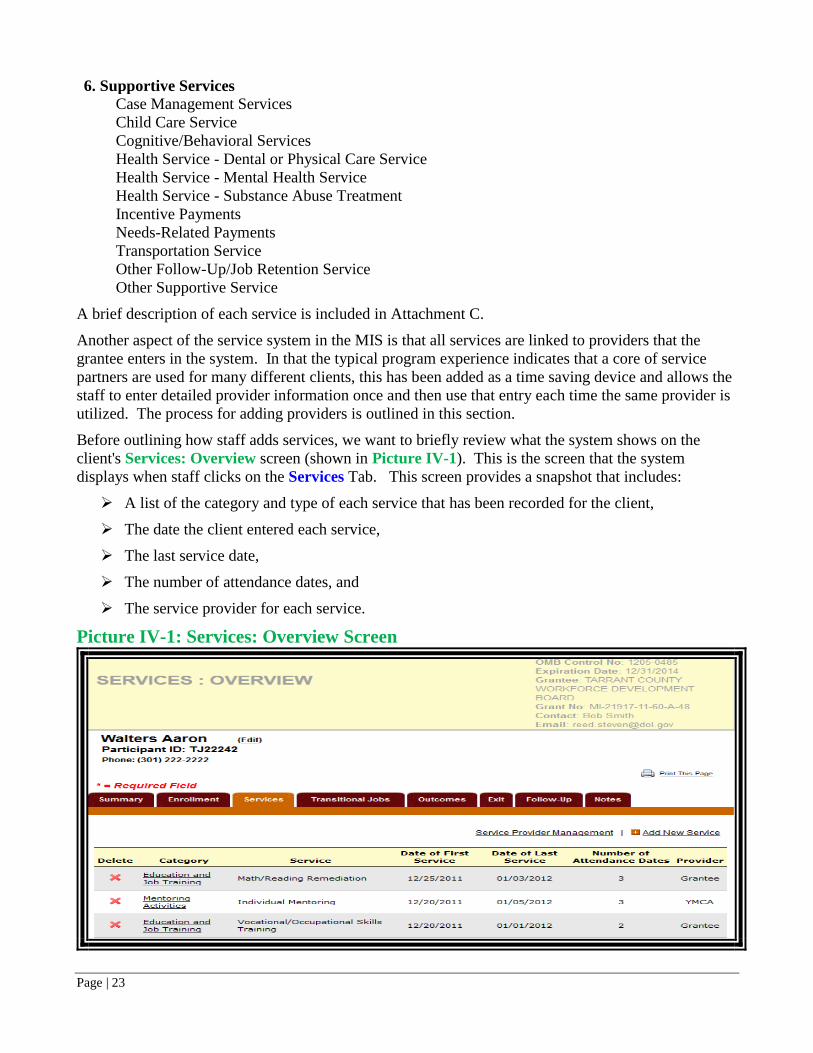
Before outlining how staff adds services, we want to briefly review what the system shows on the
client's Services: Overview screen (shown in Picture IV-1). This is the screen that the system
displays when staff clicks on the Services Tab. This screen provides a snapshot that includes:
A list of the category and type of each service that has been recorded for the client,
The date the client entered each service,
The last service date,
The number of attendance dates, and
The service provider for each service.
Picture IV-1: Services: Overview Screen
Page | 24
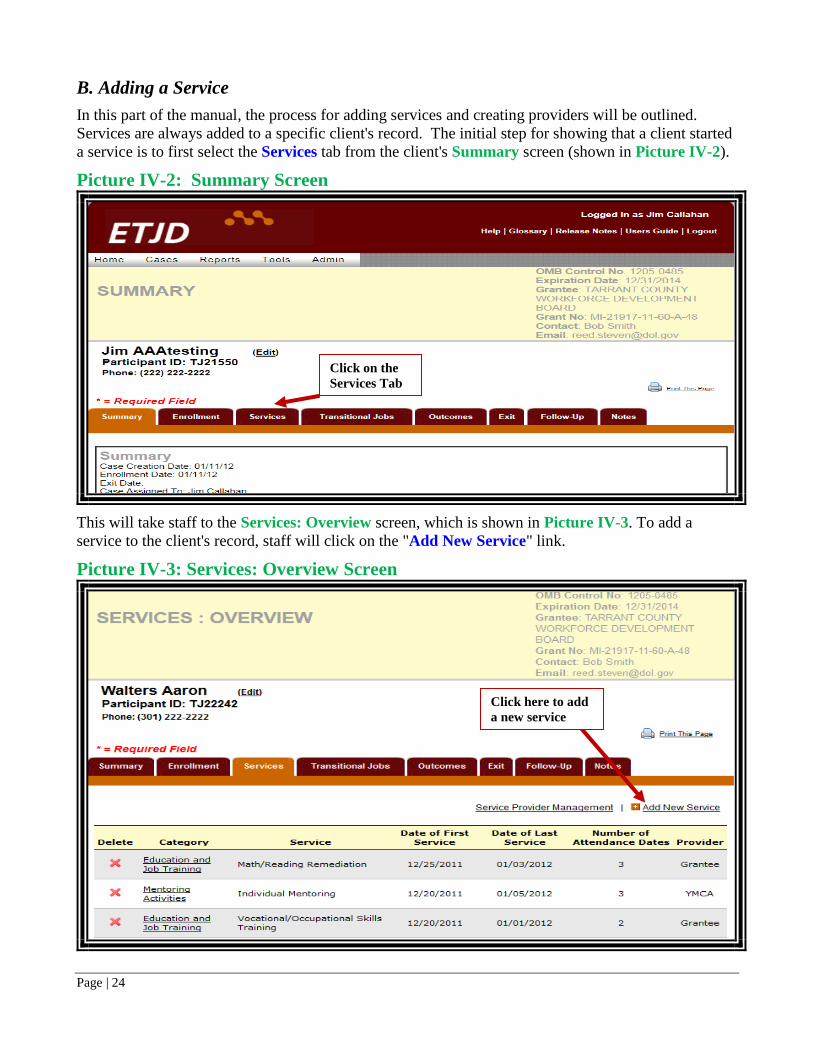
B. Adding a Service
In this part of the manual, the process for adding services and creating providers will be outlined.
Services are always added to a specific client's record. The initial step for showing that a client started
a service is to first select the Services tab from the client's Summary screen (shown in Picture IV-2).
Picture IV-2: Summary Screen
This will take staff to the Services: Overview screen, which is shown in Picture IV-3. To add a
service to the client's record, staff will click on the "Add New Service" link.
Picture IV-3: Services: Overview Screen
Click on the
Services Tab
Click here to add
a new service

Page | 25
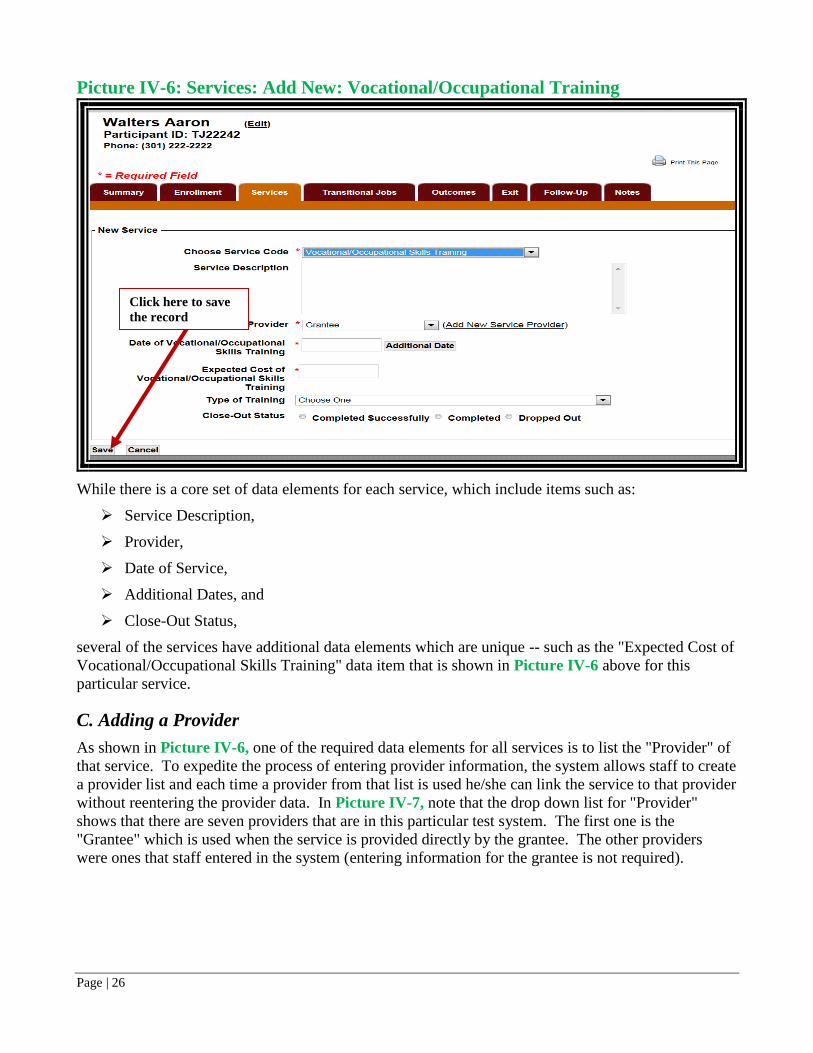
Clicking on the "Add New Service" link brings up the Services: Add New Screen, shown below.
Picture IV-4: Services: Add New Screen
By clicking on the "Choose Service Code" drop down box, a list of all the groups of services will
appear, as is shown in Picture IV-5. Staff then selects the appropriate service that the client has
started and, as is shown in Picture IV-6 (which is on the next page), the additional data elements for
recording that particular service are shown. Once the data is completed, staff finalizes the recording of
the service by clicking on the "Save" link at the bottom of the screen.
Picture IV-5: Services: Add New Screen
Click here to add
a new service
Page | 26
Picture IV-6: Services: Add New: Vocational/Occupational Training
While there is a core set of data elements for each service, which include items such as:
Service Description,
Provider,
Date of Service,
Additional Dates, and
Close-Out Status,
several of the services have additional data elements which are unique -- such as the "Expected Cost of
Vocational/Occupational Skills Training" data item that is shown in Picture IV-6 above for this
particular service.
C. Adding a Provider
As shown in Picture IV-6, one of the required data elements for all services is to list the "Provider" of
that service. To expedite the process of entering provider information, the system allows staff to create
a provider list and each time a provider from that list is used he/she can link the service to that provider
without reentering the provider data. In Picture IV-7, note that the drop down list for "Provider"
shows that there are seven providers that are in this particular test system. The first one is the
"Grantee" which is used when the service is provided directly by the grantee. The other providers
were ones that staff entered in the system (entering information for the grantee is not required).
Click here to save
the record

Page | 27
Picture IV-7: Services: Add New
There are two ways of entering a new provider into the system. The first is from the Services:
Overview screen by clicking on the "Service Provider Management" link (see Picture IV-8). Staff
is taken to the Provider: Overview screen which is a list of all service providers that have been
entered in the system. From this screen, shown in Picture IV-9, you can add a new provider via the
"Add New Services Provider" link.
Picture IV-8: Services: Overview Screen
Click here to go
to provider list
Click here to add a
new provider

Page | 28
Picture IV-9: Provider: Overview
The second process for adding a new provider is by using the "Add New Service Provider" link that
is on the Services: Add New screen (see Picture IV-7). Either approach takes staff to the Providers:
Add New screen shown below in Picture IV-10 which follows.
Picture IV-10: Providers: Add New
Click here to add
a new provider
Page | 29
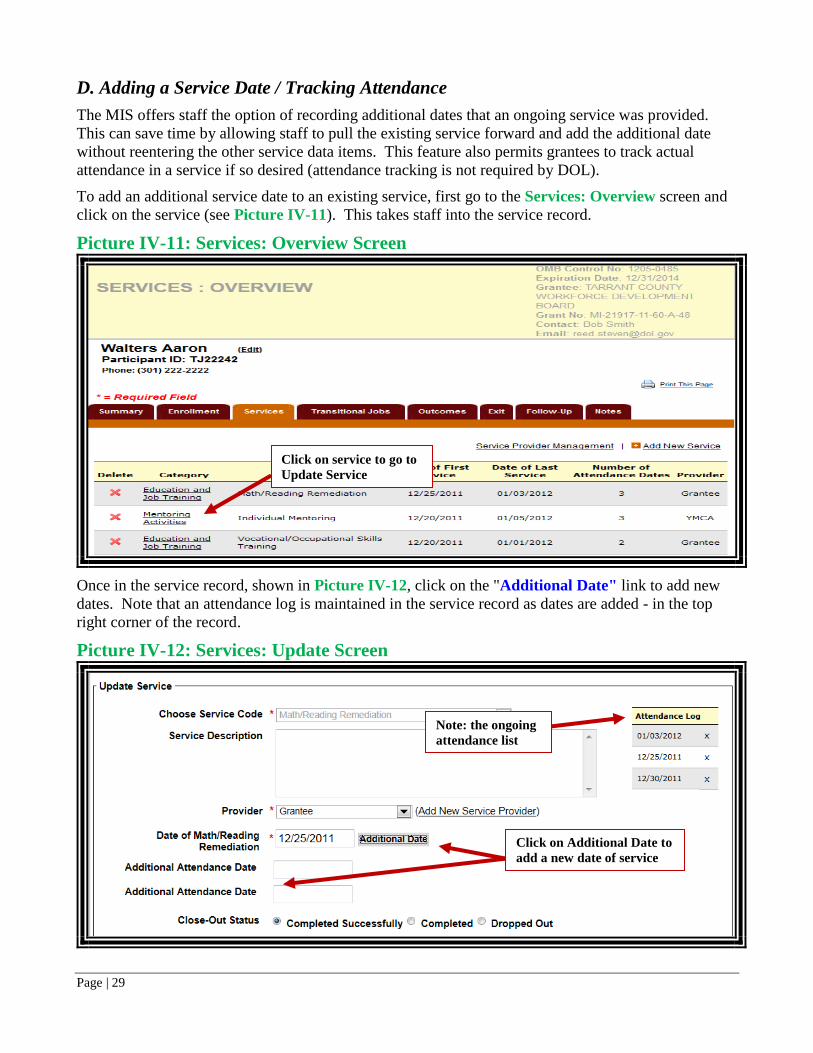
D. Adding a Service Date / Tracking Attendance
The MIS offers staff the option of recording additional dates that an ongoing service was provided.
This can save time by allowing staff to pull the existing service forward and add the additional date
without reentering the other service data items. This feature also permits grantees to track actual
attendance in a service if so desired (attendance tracking is not required by DOL).
To add an additional service date to an existing service, first go to the Services: Overview screen and
click on the service (see Picture IV-11). This takes staff into the service record.
Picture IV-11: Services: Overview Screen
Once in the service record, shown in Picture IV-12, click on the "Additional Date" link to add new
dates. Note that an attendance log is maintained in the service record as dates are added - in the top
right corner of the record.
Picture IV-12: Services: Update Screen
Click on service to go to
Update Service
Note: the ongoing
attendance list
Click on Additional Date to
add a new date of service

Page | 30
F. Editing / Deleting a Service
The MIS offers staff the option of editing and/or deleting existing service records. To delete a service,
first go to the Services: Overview screen and click on the service (see Picture IV-13). This takes
staff into the Services: Delete screen (see Picture IV-14) where you click on "Confirm Delete" at the
bottom of the screen to finish the deletion.
Picture IV-13: Services: Overview Screen
Picture IV-14: Services: Delete
Click here to
delete the service
Click here to
delete the service
Page | 31
V. Managing Transitional Jobs
A. About Transitional Jobs
A transitional job (TJ) is the core service that all grantees are charged with providing to their clients.
Accordingly, the MIS has been designed to capture all pay periods for all clients that work in a
transitional job(s). Furthermore, the system has been designed to offer the grantee a means for
tracking clients in the TJ, building a summary for each client that shows wages, pay periods and
providers.
Like the services section, the TJ file also includes the building of a provider list. This is not the same
list as the one used in the services section of the MIS. In that the typical program experience indicates
that a core of TJ partners may be used for many different clients, this has been added as a time saving
device and allows the staff to enter detailed TJ provider information once and then use that entry each
time the same provider is utilized to provide a job experience. The process for adding TJ providers is
discussed in this section.
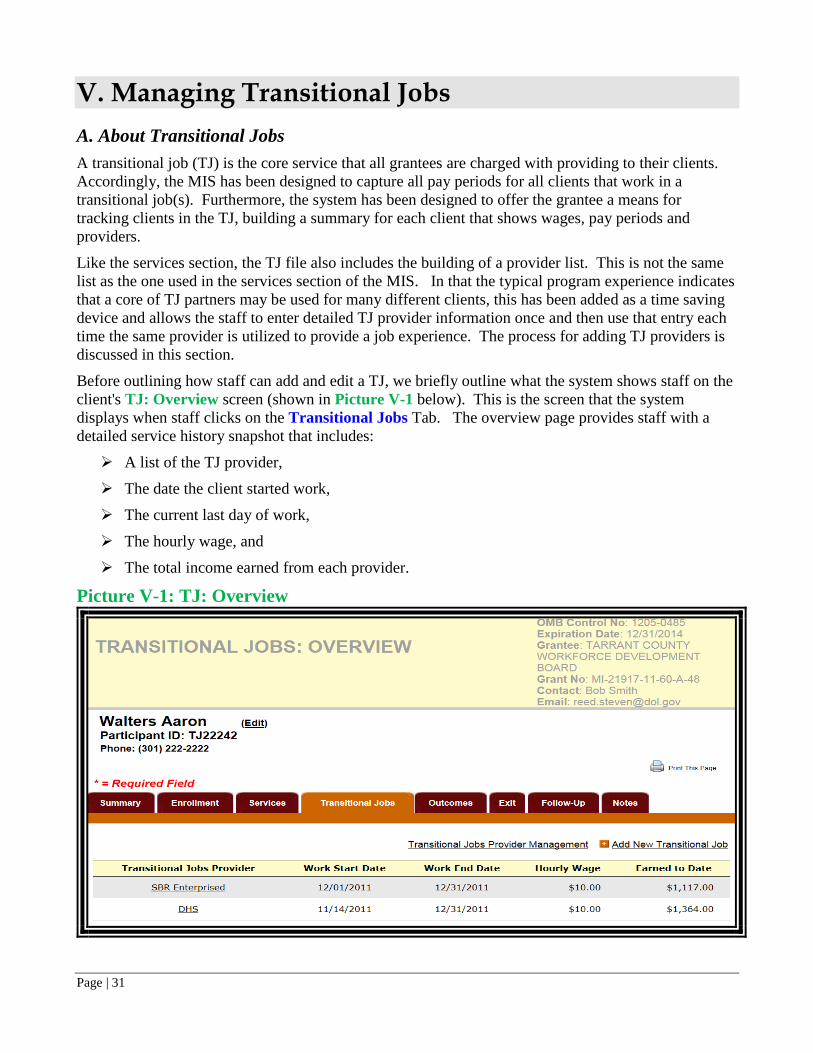
Before outlining how staff can add and edit a TJ, we briefly outline what the system shows staff on the
client's TJ: Overview screen (shown in Picture V-1 below). This is the screen that the system
displays when staff clicks on the Transitional Jobs Tab. The overview page provides staff with a
detailed service history snapshot that includes:
A list of the TJ provider,
The date the client started work,
The current last day of work,
The hourly wage, and
The total income earned from each provider.
Picture V-1: TJ: Overview
Page | 32
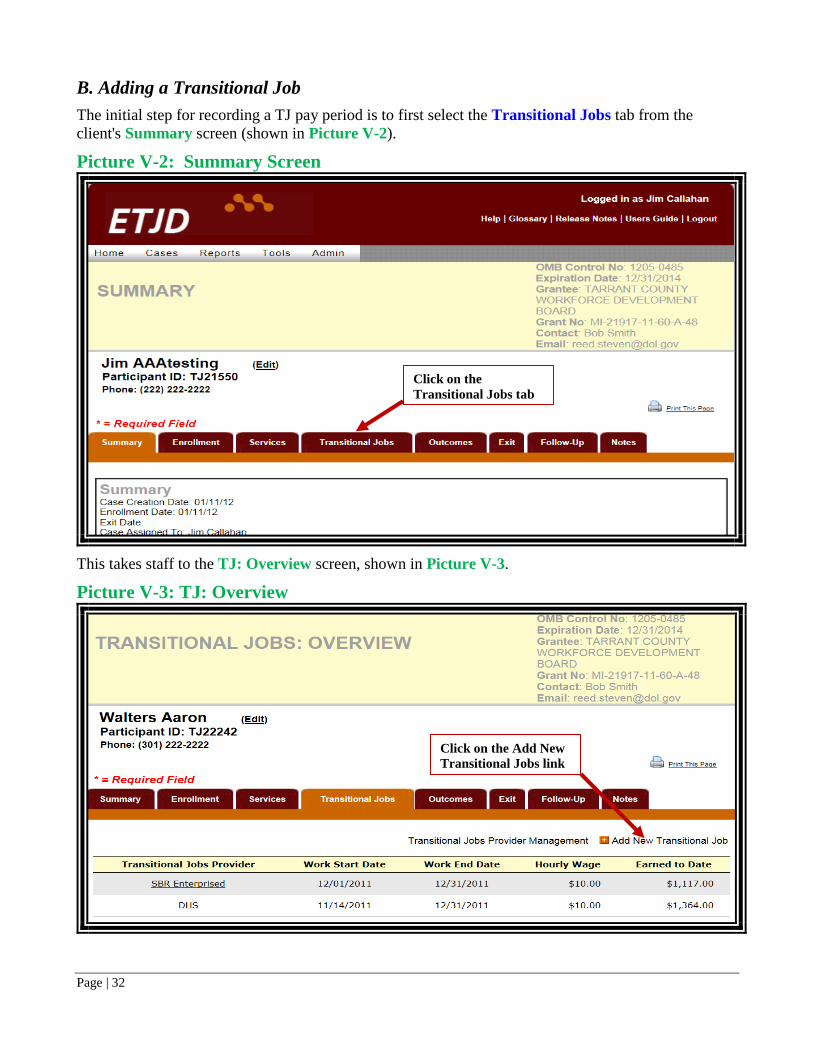
B. Adding a Transitional Job
The initial step for recording a TJ pay period is to first select the Transitional Jobs tab from the
client's Summary screen (shown in Picture V-2).
Picture V-2: Summary Screen
This takes staff to the TJ: Overview screen, shown in Picture V-3.
Picture V-3: TJ: Overview
Click on the
Transitional Jobs tab
Click on the Add New
Transitional Jobs link
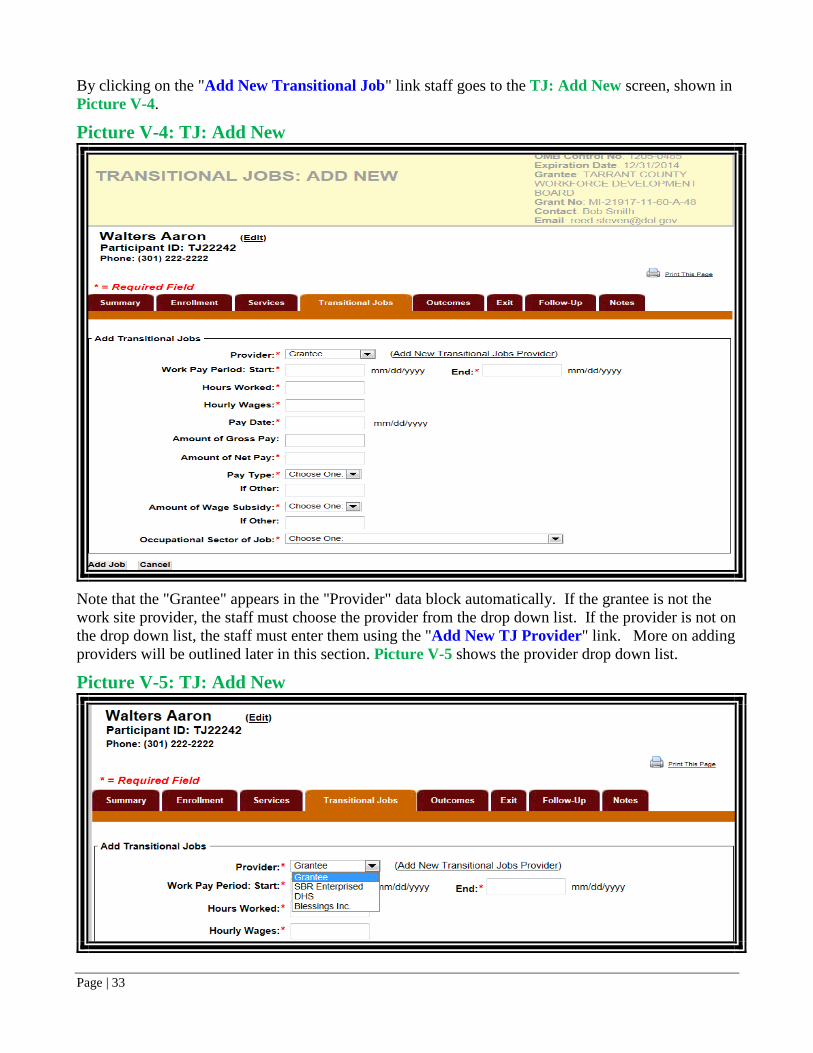
Page | 33
By clicking on the "Add New Transitional Job" link staff goes to the TJ: Add New screen, shown in
Picture V-4.
Picture V-4: TJ: Add New
Note that the "Grantee" appears in the "Provider" data block automatically. If the grantee is not the
work site provider, the staff must choose the provider from the drop down list. If the provider is not on
the drop down list, the staff must enter them using the "Add New TJ Provider" link. More on adding
providers will be outlined later in this section. Picture V-5 shows the provider drop down list.
Picture V-5: TJ: Add New

Page | 34
Based on previous program experiences, it is anticipated that many clients will have multiple pay
periods with the same TJ work site provider. When the same provider is being used multiple times, the
MIS system has a slightly streamlined process that staff may adopt for entering pay periods following
the initial one. This process starts with the TJ: Overview screen and instead of clicking on the "Add
New Transitional Job" link, staff will click on the provider for which he/she wants to record a second
or subsequent pay period.
Picture V-6: TJ: Overview
The screen that appears is the TJ: Detail screen, shown in Picture V-7. By clicking on the "Add
Transitional Job - (Provider Name)" a TJ: Add New screen appears that has four of the data items
completed (see Picture V-8 on the next page). If needed, these completed items may also be edited.
Picture V-7: TJ: Detail
Click on Provider to
go to the TJ: Detail
Click on Add TJ -
Provider Name

Page | 35
Picture V-8: TJ: Add New
Fill in the pay and dates and click on "Add Job," and the new pay period for the same provider will be
added to the client's record.
C . Adding a Provider
As shown in Picture V-8, one of the required data elements for all TJ pay period entries is "Provider."
To expedite the process of entering provider information, the system allows staff to create a TJ
provider list, and each time a provider from that list is used, he/she can link the payroll period to that
provider without reentering the TJ provider data. In Picture V-5, note that the drop down list for
"Provider" shows that there are three providers that are in the system. The first one is the "Grantee"
which is used when the TJ work site is provided directly by the grantee. The other TJ providers were
ones that staff entered in the system (information for the grantee is not entered).
To add a provider, staff starts at the TJ: Overview screen and clicks on the "Transitional Jobs
Provider Management," -- as shown in Picture V-9.
Click on Add Job to
save new pay period
for the same provider

Page | 36
Picture V-9: TJ: Overview
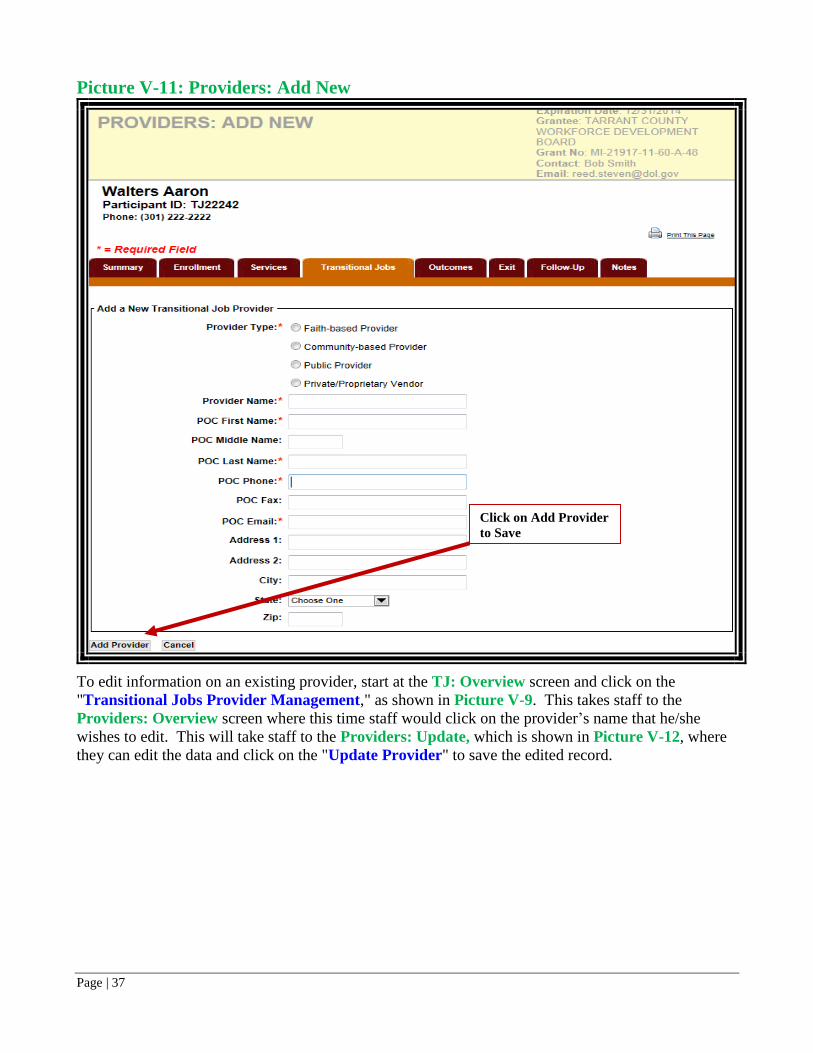
This takes staff to the Providers: Overview screen where they click on "Add New Transitional Jobs
Provider." This will take staff to the Providers: Add New screen that is shown in Picture V-11.
Picture V-10: Providers: Overview
Click on Provider
Management
Click on Provider
Management
Page | 37
Picture V-11: Providers: Add New
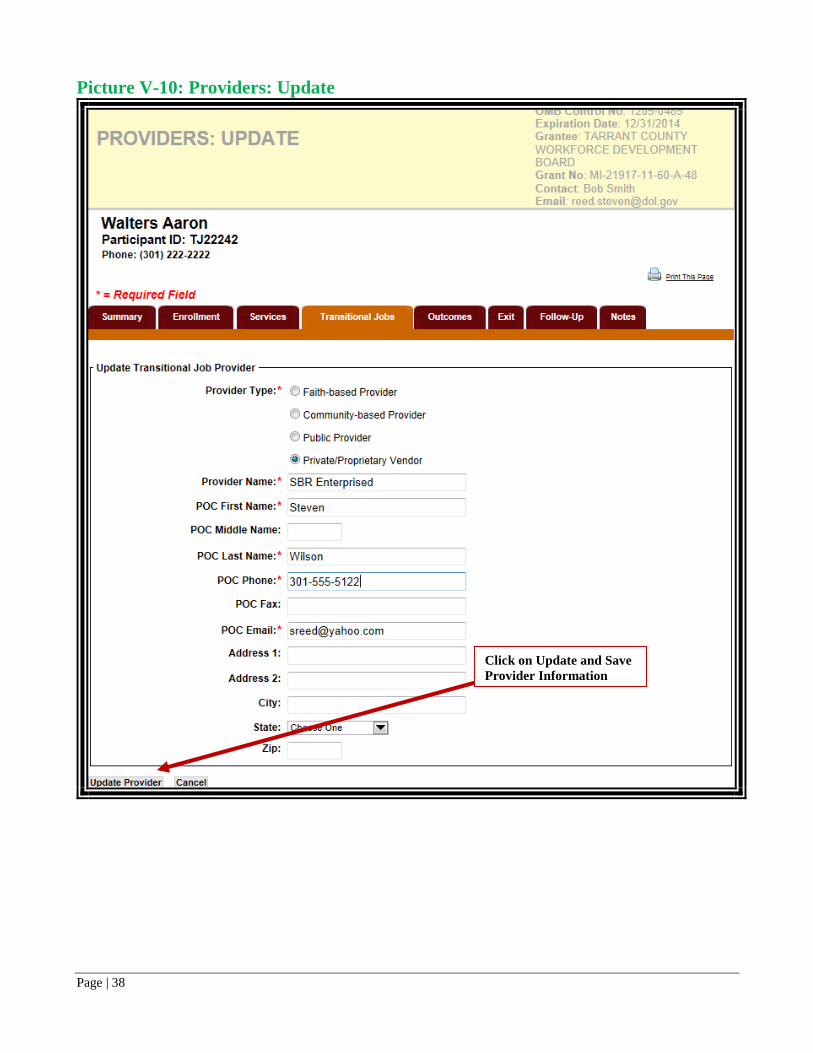
To edit information on an existing provider, start at the TJ: Overview screen and click on the
"Transitional Jobs Provider Management," as shown in Picture V-9. This takes staff to the
Providers: Overview screen where this time staff would click on the provider’s name that he/she
wishes to edit. This will take staff to the Providers: Update, which is shown in Picture V-12, where
they can edit the data and click on the "Update Provider" to save the edited record.
Click on Add Provider
to Save
Page | 38
Picture V-10: Providers: Update
Click on Update and Save
Provider Information

Page | 39
Attachment A: DOL Performance Goals

Page | 40

Page | 41

Page | 42
Attachment B: Intake and Enrollment Data Elements and Definitions
1. Participant Information: Page 1 of 5 – Contact Information

Page | 43
Page 1: Contact Information
Data Element Definition Format First Name * Record the participant’s first name. Required Text Box
Middle Record the individual’s middle initial or name. Optional Text Box
Last Name * Record the participant’s last name. Required Text Box
Suffix Record any suffix the client uses (Mr./ Dr./etc.) Optional Text Box
Date of Birth * Enter the participant's date of birth.
Eligibility Type
*
Indicate the eligibility type by selecting:
Ex-Offender or
Low Income, Non-Custodial Parent Field is required -- user may select only one option. (If the
client meets both eligibility criteria, grantees will be asked to
collect data that pertains to both types of client but will be held
responsible for eligibility and performance factors that related
only to the eligibility type the program was funded to serve.)
Radio Button
Citizenship
Status * Indicate the citizenship status of the client by selecting:
"Yes" if the client is a citizen or
"No" if the client is not a citizen.
Required
Radio Button
Authorized to
Work Check:
"Yes" if the individual has documentation showing that it is
legal for him/her to work in the U.S.
"No" if the individual does not have documentation showing
that it is legal for him/her to work in the U.S.
Radio Button
Gender * Indicate the participant's gender by selecting:
"Male" if the individual is male, or
"Female" if the individual is female.
Required
Radio Button
Is participant
registered for
selective service?
*
If the client is a male between the age of 18 - 26, indicate the
draft registration status of the client by selecting:
"Yes" if the client is registered or
"No" if the client is not a registered.
Note: if the client is not registered, they must either register
(which may be done on-line) or submit information to the
Selective Service detailing why they did not register. Until they
are registered or granted an exemption, they may not be eligible
for the program. There is a link to the Selective Service site
where the client can register:
http://www.sss.gov/regist%20information.htm.
Required
Radio Button
Address 1* Enter the actual number and street where the person resides.
Required
Text Box
Address 2 Enter any secondary information relative to the street address of
the client’s current residence, or if there is a different mailing
address (like a post office box) it may also be entered here.
Text Box
City * Enter the City or Town of participant's residence. Required Text Box
Page | 44
State * From the drop down list provided, select the two-letter
abbreviation for the State of residence. Required
Drop Down
Box
Zip * Enter the six-digit zip code for the participant's address. Required Numeric
format -
11111
Email If the client has an email address, enter it. Text Box
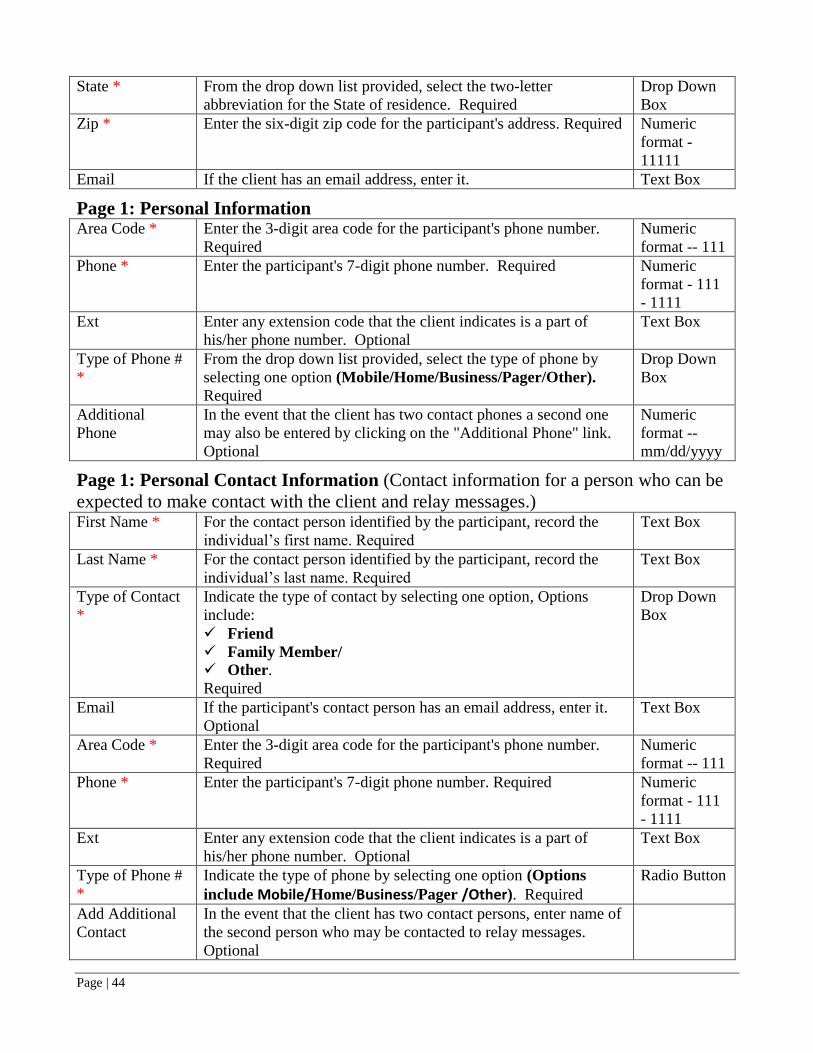
Page 1: Personal Information Area Code * Enter the 3-digit area code for the participant's phone number.
Required
Numeric
format -- 111
Phone * Enter the participant's 7-digit phone number. Required Numeric
format - 111
- 1111
Ext Enter any extension code that the client indicates is a part of
his/her phone number. Optional
Text Box
Type of Phone #
*
From the drop down list provided, select the type of phone by
selecting one option (Mobile/Home/Business/Pager/Other).
Required
Drop Down
Box
Additional
Phone
In the event that the client has two contact phones a second one
may also be entered by clicking on the "Additional Phone" link.
Optional
Numeric
format --
mm/dd/yyyy
Page 1: Personal Contact Information (Contact information for a person who can be
expected to make contact with the client and relay messages.) First Name * For the contact person identified by the participant, record the
individual’s first name. Required
Text Box
Last Name * For the contact person identified by the participant, record the
individual’s last name. Required
Text Box
Type of Contact
*
Indicate the type of contact by selecting one option, Options
include:
Friend
Family Member/
Other.
Required
Drop Down
Box
Email If the participant's contact person has an email address, enter it.
Optional
Text Box
Area Code * Enter the 3-digit area code for the participant's phone number.
Required
Numeric
format -- 111
Phone * Enter the participant's 7-digit phone number. Required Numeric
format - 111
- 1111
Ext Enter any extension code that the client indicates is a part of
his/her phone number. Optional
Text Box
Type of Phone #
*
Indicate the type of phone by selecting one option (Options
include Mobile/Home/Business/Pager /Other). Required
Radio Button
Add Additional
Contact
In the event that the client has two contact persons, enter name of
the second person who may be contacted to relay messages.
Optional
Page | 45
2. Participant Information: Page 2 of 5 – Demographic Information

Page | 46
Page 2: Demographic Information
Data Element Definition Format Ethnicity
Hispanic/Latino
*
Indicate the participant's ethnicity by selecting:
Yes or
No or
Not specified if the client does not disclose his/her ethnicity.
Required
Radio
Button
Race * Indicate the participant's ethnicity by selecting:
American Indian or Alaska Native if the client is American Indian
or Alaska Native.
Hawaiian Native or other Pacific Islander if the client is a
Hawaiian Native or other Pacific Islander.
Asian if the client is Asian.
White if the client is White.
Black or African American if the client is Black or African
American.
Not specified if the client does not disclose his/her ethnicity.
Required
Radio
Button
Primary
Language *
Indicate the participant's Primary Language by selecting:
English or
Spanish or
Other.
Required
Radio
Button
Limited English
Proficient *
Indicate the participant's English Proficiency by selecting:
"Yes" if the client is Proficient or
"No" it the client is not Proficient.
Required
Radio
Button
Marital Status * Indicate the participant's Marital Status by selecting:
Never Married
Currently Married
Separated
Divorced
Widowed
Required
Drop
Down
Participant Lives
With *
Indicate who the participant lives with by selecting:
Alone
Wife/Husband
Girlfriend/Boyfriend
Parent/Stepparent
Friend(s)
Grandparent
Own Child(ren)
Other Child(ren)
Sister/Brother
Other Relative
Drop
Down
Page | 47
Other Non-Relative.
Required
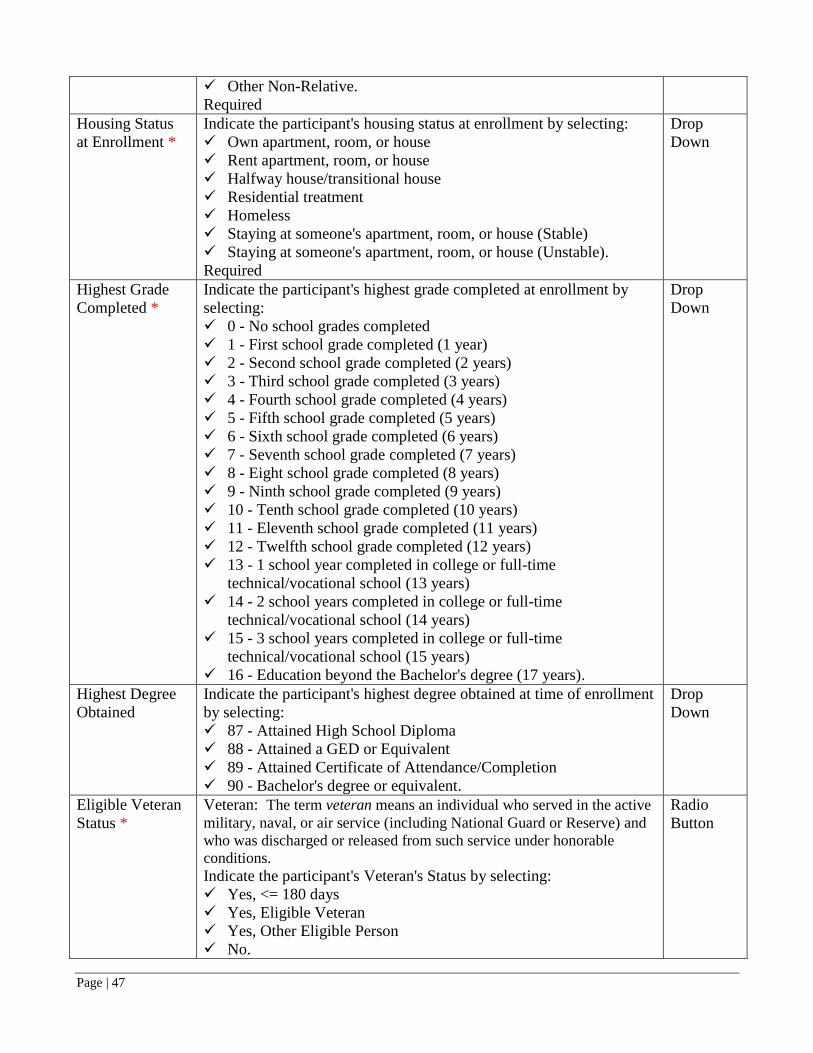
Housing Status
at Enrollment *
Indicate the participant's housing status at enrollment by selecting:
Own apartment, room, or house
Rent apartment, room, or house
Halfway house/transitional house
Residential treatment
Homeless
Staying at someone's apartment, room, or house (Stable)
Staying at someone's apartment, room, or house (Unstable).
Required
Drop
Down
Highest Grade
Completed *
Indicate the participant's highest grade completed at enrollment by
selecting:
0 - No school grades completed
1 - First school grade completed (1 year)
2 - Second school grade completed (2 years)
3 - Third school grade completed (3 years)
4 - Fourth school grade completed (4 years)
5 - Fifth school grade completed (5 years)
6 - Sixth school grade completed (6 years)
7 - Seventh school grade completed (7 years)
8 - Eight school grade completed (8 years)
9 - Ninth school grade completed (9 years)
10 - Tenth school grade completed (10 years)
11 - Eleventh school grade completed (11 years)
12 - Twelfth school grade completed (12 years)
13 - 1 school year completed in college or full-time
technical/vocational school (13 years)
14 - 2 school years completed in college or full-time
technical/vocational school (14 years)
15 - 3 school years completed in college or full-time
technical/vocational school (15 years)
16 - Education beyond the Bachelor's degree (17 years).
Drop
Down
Highest Degree
Obtained
Indicate the participant's highest degree obtained at time of enrollment
by selecting:
87 - Attained High School Diploma
88 - Attained a GED or Equivalent
89 - Attained Certificate of Attendance/Completion
90 - Bachelor's degree or equivalent.
Drop
Down
Eligible Veteran
Status *
Veteran: The term veteran means an individual who served in the active
military, naval, or air service (including National Guard or Reserve) and
who was discharged or released from such service under honorable
conditions.
Indicate the participant's Veteran's Status by selecting:
Yes, <= 180 days
Yes, Eligible Veteran
Yes, Other Eligible Person
No.
Radio
Button
Page | 48
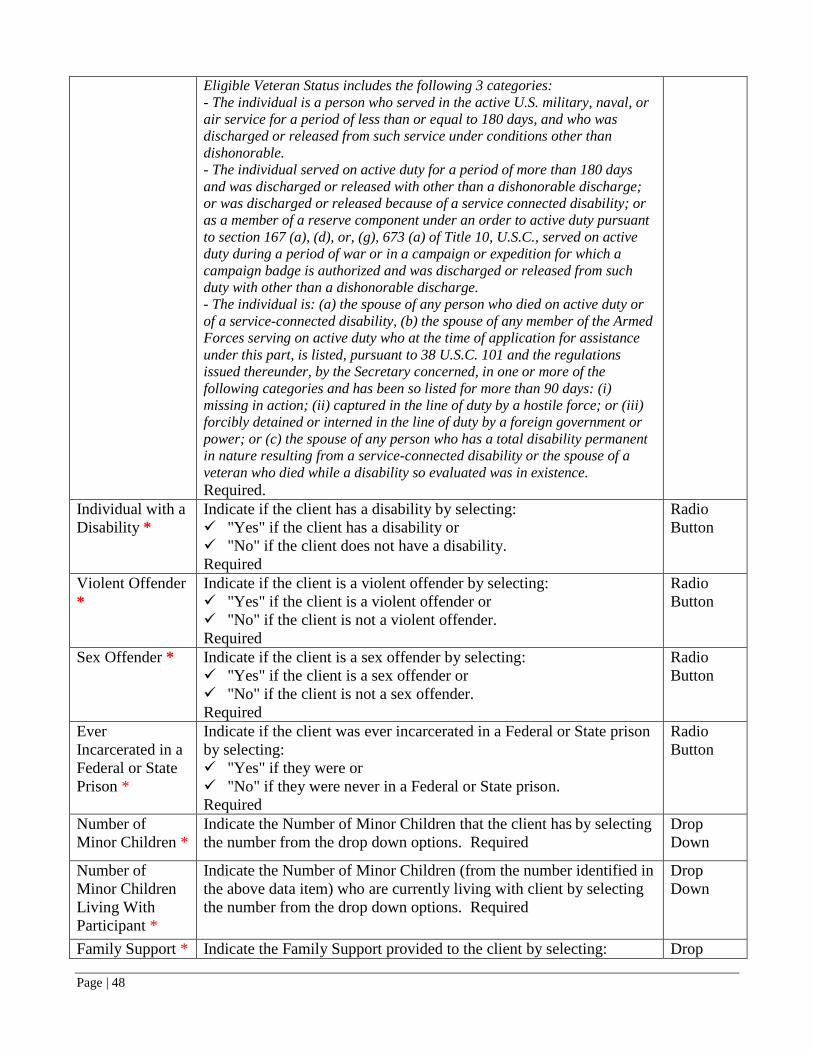
Eligible Veteran Status includes the following 3 categories:
- The individual is a person who served in the active U.S. military, naval, or
air service for a period of less than or equal to 180 days, and who was
discharged or released from such service under conditions other than
dishonorable.
- The individual served on active duty for a period of more than 180 days
and was discharged or released with other than a dishonorable discharge;
or was discharged or released because of a service connected disability; or
as a member of a reserve component under an order to active duty pursuant
to section 167 (a), (d), or, (g), 673 (a) of Title 10, U.S.C., served on active
duty during a period of war or in a campaign or expedition for which a
campaign badge is authorized and was discharged or released from such
duty with other than a dishonorable discharge.
- The individual is: (a) the spouse of any person who died on active duty or
of a service-connected disability, (b) the spouse of any member of the Armed
Forces serving on active duty who at the time of application for assistance
under this part, is listed, pursuant to 38 U.S.C. 101 and the regulations
issued thereunder, by the Secretary concerned, in one or more of the
following categories and has been so listed for more than 90 days: (i)
missing in action; (ii) captured in the line of duty by a hostile force; or (iii)
forcibly detained or interned in the line of duty by a foreign government or
power; or (c) the spouse of any person who has a total disability permanent
in nature resulting from a service-connected disability or the spouse of a
veteran who died while a disability so evaluated was in existence.
Required.
Individual with a
Disability *
Indicate if the client has a disability by selecting:
"Yes" if the client has a disability or
"No" if the client does not have a disability.
Required
Radio
Button
Violent Offender
*
Indicate if the client is a violent offender by selecting:
"Yes" if the client is a violent offender or
"No" if the client is not a violent offender.
Required
Radio
Button
Sex Offender * Indicate if the client is a sex offender by selecting:
"Yes" if the client is a sex offender or
"No" if the client is not a sex offender.
Required
Radio
Button
Ever
Incarcerated in a
Federal or State
Prison *
Indicate if the client was ever incarcerated in a Federal or State prison
by selecting:
"Yes" if they were or
"No" if they were never in a Federal or State prison.
Required
Radio
Button
Number of
Minor Children *
Indicate the Number of Minor Children that the client has by selecting
the number from the drop down options. Required
Drop
Down
Number of
Minor Children
Living With
Participant *
Indicate the Number of Minor Children (from the number identified in
the above data item) who are currently living with client by selecting
the number from the drop down options. Required
Drop
Down
Family Support * Indicate the Family Support provided to the client by selecting: Drop

Page | 49
Place to Live
Job
Substance Abuse Treatment
Transportation
Financial Support
None.
Required
Down
Public
Assistance at
Enrollment
Indicate the Public Assistant at enrollment the client receives by
selecting:
Social Security Insurance (SSI) or Social Security Disability
(SSD)
Temporary Assistance for Needy Families (TANF)
Welfare for single adults or general assistance (GA)
Unemployment insurance
Food stamps/SNAP
Division of AIDS Services Income Support (DAS)
Other government sources.
No Benefits.
Drop
Down
Individual
Monthly Income
at Enrollment
Indicate the Individual Monthly Income at Enrollment the client
receives by selecting:
None
$1 - $500
$501 - $1,000
$1,001 - $2,500
$2,501 - $5,000
More than $5,000.
Drop
Down
Medical Benefits Indicate the Medical Benefits the client receives by selecting:
Medicaid
Medicare
Private health insurance from work or family member
Other
None.
Drop
Down
Mental Health
Treatment
Indicate if the client has received mental health treatment by selecting:
"Yes" if the client has received treatment or
"No" if the client has not received mental health treatment.
Radio
Button
Referral Source Enter name of the organization that referred the client to your
program.
Text Box
User Defined 1 Text box for grantee to use to record other data. Text Box
User Defined 2 Text box for grantee to use to record other data. Text Box

Page | 50
3. Participant Information: Page 3 of 5 – Employment and Substance Abuse History
Page 3: Employment and Substance Abuse History
Data Element Definition Format Currently
Employed *
Indicate the client employment status by selecting:
"Yes" if the client is currently working or
"No" if the client is not currently working.
Required
Radio
Button
If no, have you
ever been
employed? *
Indicate if the client has ever been employed by selecting:
"Yes" if the client has had a job or
"No" it the client has never worked.
Required if answer to above data element is “no.”
Radio
Button
Start Date of
Most Recent Job
Enter the date that the participant's last job started. Numeric
format --
mm/dd/yyyy
Ending Date of
Most Recent Job
Enter the date that the participant's last job ended. Numeric
format --
mm/dd/yyyy
Occupation of
Most Recent Job
Indicate the job title of the most recent job:
Architecture and Engineering
Drop Down
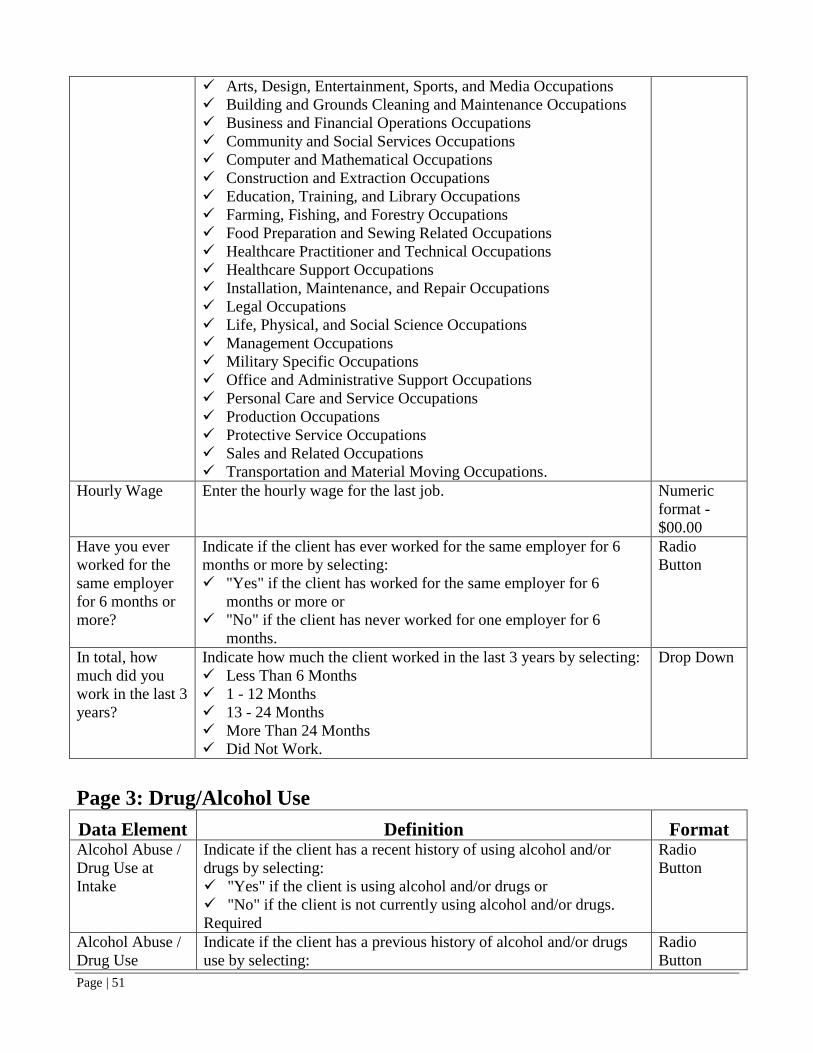
Page | 51
Arts, Design, Entertainment, Sports, and Media Occupations
Building and Grounds Cleaning and Maintenance Occupations
Business and Financial Operations Occupations
Community and Social Services Occupations
Computer and Mathematical Occupations
Construction and Extraction Occupations
Education, Training, and Library Occupations
Farming, Fishing, and Forestry Occupations
Food Preparation and Sewing Related Occupations
Healthcare Practitioner and Technical Occupations
Healthcare Support Occupations
Installation, Maintenance, and Repair Occupations
Legal Occupations
Life, Physical, and Social Science Occupations
Management Occupations
Military Specific Occupations
Office and Administrative Support Occupations
Personal Care and Service Occupations
Production Occupations
Protective Service Occupations
Sales and Related Occupations
Transportation and Material Moving Occupations.
Hourly Wage Enter the hourly wage for the last job. Numeric
format -
$00.00
Have you ever
worked for the
same employer
for 6 months or
more?
Indicate if the client has ever worked for the same employer for 6
months or more by selecting:
"Yes" if the client has worked for the same employer for 6
months or more or
"No" if the client has never worked for one employer for 6
months.
Radio
Button
In total, how
much did you
work in the last 3
years?
Indicate how much the client worked in the last 3 years by selecting:
Less Than 6 Months
1 - 12 Months
13 - 24 Months
More Than 24 Months
Did Not Work.
Drop Down
Page 3: Drug/Alcohol Use
Data Element Definition Format Alcohol Abuse /
Drug Use at
Intake
Indicate if the client has a recent history of using alcohol and/or
drugs by selecting:
"Yes" if the client is using alcohol and/or drugs or
"No" if the client is not currently using alcohol and/or drugs.
Required
Radio
Button
Alcohol Abuse /
Drug Use
Indicate if the client has a previous history of alcohol and/or drugs
use by selecting:
Radio
Button

Page | 52
Previously "Yes" if the client previously used alcohol and/or drugs or
"No" if the client had not previously used alcohol and/or drugs.
Required
Alcohol Abuse /
Drug Use
Treatment at
Intake
Indicate if the client is currently receiving treatment for alcohol
and/or drug use by selecting:
"Yes" if the client is receiving treatment for alcohol and/or drug
use or
"No" if the client is not receiving treatment for alcohol and/or
drug use.
Required
Radio
Button
Alcohol Abuse /
Drug Use
Treatment
Previously
Indicate if the client previously received treatment for alcohol and/or
drug use by selecting:
"Yes" if the client previously received treatment for alcohol
and/or drug use or
"No" if the client has not previously received treatment for
alcohol and/or drug use.
Required
Radio
Button
If Previously
Treated for
Alcohol Abuse
or Drug Use,
How Many
Times?
If Previously Treated for Alcohol Abuse or Drug Use, indicate the
number of times the client has been in treatment.
Numeric
format 11

Page | 53
4. Participant Information: Page 4 of 5 – Non-Custodial Parent
This section only applies if the client is a non-custodial parent at the time if intake and for those ex-
offenders who have formal child support orders in place. Page 4 has two parts:
Non-Custodial Parent: used to provide information about the participant’s status relative to
child support and if there are child support enforcement cases.
Enter Data for Each Enforcement Case: a section to be used to enter data about each
enforcement case.
Page 4: Non-Custodial Parent
Data Element Definition Format Formal Child
Support Order in
Place? *
Indicate if the client has a formal child support order in place by
selecting:
"Yes" if the client has an order, or
"No" if the client does not have a formal order in place, or
“Don’t Know” if the client does not know if there is a formal
child support order in place.
Required
Radio
Button
Provide the Birth
Date of the
Youngest (Focal)
Child
Enter the date the Birth Date of the Youngest (Focal) Child. This
is the child for which the support order is in place and is not living
with the participant.
Numeric
format --
mm/dd/yyyy
Date of Most
Recent Visitation
Enter the date of Most Recent Visitation with Focal Child in terms
of the last month and the last year.
Numeric
format --

Page | 54
with Focal Child mm/
- yyyy
Number of Child
Support
Enforcement
Cases
Indicate Number of Child Support Enforcement Cases by
selecting:
1
2
3
4
5
6
7
8
9
10
Drop Down
For each child support enforcement case, complete the following:
Data Element Definition Format Child Support
Case Number *
Enter the Child Support Case Number. Numeric
format
Order Amount * Enter the amount of payment the client has been ordered to
make.
Numeric
format --
$XXX.XX
Payment Schedule
*
Indicate the payment schedule by selecting:
Weekly
Bi-Weekly
Monthly
Other.
Drop Down
If other, specify: If the “Other” payment option was selected, type in a
description of the other payment option/schedule.
Text Box
Does the Payment
Include
Arrearages? *
Indicate if the payment includes arrearages by selecting:
"Yes" if the payment does, or
"No" if the payment does not include arrearages.
Drop Down
5. Participant Information: Page 5 of 5 – Ex-Offender Information
This section has two parts and only applies if the client is an ex-offender:
Ex-Offender Information: Used to record the basic ex-offender information of the
participant.
Type of Crime: Used to record the last offense that the client was incarcerated for.

Page | 55
Page 5: Ex-Offender
Data Element Definition Format Date of Most
Recent Release *
Enter the date of the Most Recent Release from prison. Note that
if the program design is for ex-offenders, this date must be
within 120 days of the enrollment date.
Numeric
format --
mm/dd/yyyy
Status at Intake:
*
Indicate the client's status at intake by selecting:
Parole
Probation
Other Criminal Justice/Court Supervision
None.
Radio
Button
Parole Assessed
Level of Risk
Indicate the Parole Assessed Level of Risk by selecting:
Low
Moderate
Moderate - High
High
Drop Down

Page | 56
Very High.
Criminal Justice
ID
Enter the Criminal Justice ID Number Numeric
format
Type of Criminal
Justice ID
Indicate the Type of Criminal Justice ID by selecting:
Federal ID
State ID
Department of Correction ID
Local probation agency ID
Local jail ID
Other.
Drop Down
Other Criminal
Justice ID
If the “Other” option was selected, type in a description or name
of this selection.
Text Box
Date of
Incarceration for
Most Recent
Crime Prior to
Participation
Enter the date of Incarceration for Most Recent Crime Prior to
Participation.
Numeric
format --
mm/dd/yyyy
Institution at
Which the
Participant Most
Recently Was
Incarcerated
Prior to
Enrollment
Enter the Institution at Which the Client Most Recently Was
Incarcerated Prior to Enrollment.
Text Box
Type of
Institution
Indicate the Type of institution by selecting:
Federal Prison
State Prison
City/County Jail.
Radio
Button
Total Time
Incarcerated: *
Enter the total time incarcerated in terms of the year and months
for the last period of incarceration.
Numeric
format --
XX/
- XX
Age of First
Juvenile or Adult
Conviction:
Indicate the participant’s age when he/she was first convicted of
either a juvenile or adult crime.
Numeric
format --
XX
Indicate the crime for the most recent incarceration:
Data Element Definition Format Property Crime If the most recent crime was a property crime, check off on the
following:
Burglary
Larceny
Major Vehicle Theft
Receiving stolen property
Other.
Drop Down

Page | 57
Type of Other
Property Crime
If “Other” was selected, indicate the name of the other type of
property crime committed.
Text Box
Drug Crime If the most recent crime was a Drug crime check on of the
following:
Possession of a controlled substance
Traffic in a controlled substance
Possession of drug paraphernalia
Sale of a controlled substance
Other.
Drop Down
Type of Other
Drug Crime
If “Other” was selected, indicate the name of the other type of
Drug crime committed.
Text Box
Public Order
Offense
If the most recent crime was a Public Order Offense, check off
the following:
Commercial vice
Gambling
Animal cruelty
Driving intoxicated
Other.
Drop Down
Type of Other
Public Order
Offense
If “Other” was selected, indicate the name of the other type of
Public Order Offense committed.
Text Box
Other Offense Indicate if the client was convicted of some other offense by
selecting:
"Yes" if they were convicted of some other offense or
"No" if they were not convicted of another offense.
Radio
Button
Type of Other
Offense
If Yes is checked for the Other Offense, indicate the name of the
Other Offense crime committed.
Text Box
6. Services Record
There are six groups of services, each with two or more services. A list of all the
services with brief definitions for each is in Attachment C. A separate form should be
used for each service and dates may be recorded for a service which is ongoing.

Page | 58
Services Record
Data Element Definition Format
Service Code * Select the appropriate service type from the options presented. Drop Down
Service
Description
Enter a brief description of the service. Text
Provider * Using the drop down menu, select the provider that is providing
the service -- if it is a new provider and not on the menu, add the
new provider.
Drop Down
Date of Service * Enter the date that the client actually started the service. Numeric
format --
mm/dd/yyyy
Additional Date(s)
of Service
If an ongoing service, staff may enter additional dates that the
client participated and/or received the service.
Numeric
format --
mm/dd/yyyy
Close-Out Status When the service is complete, staff may record the status of the
completed service in terms of the client:
Completed Successfully
Completed
Dropped Out
Radio
Button
59
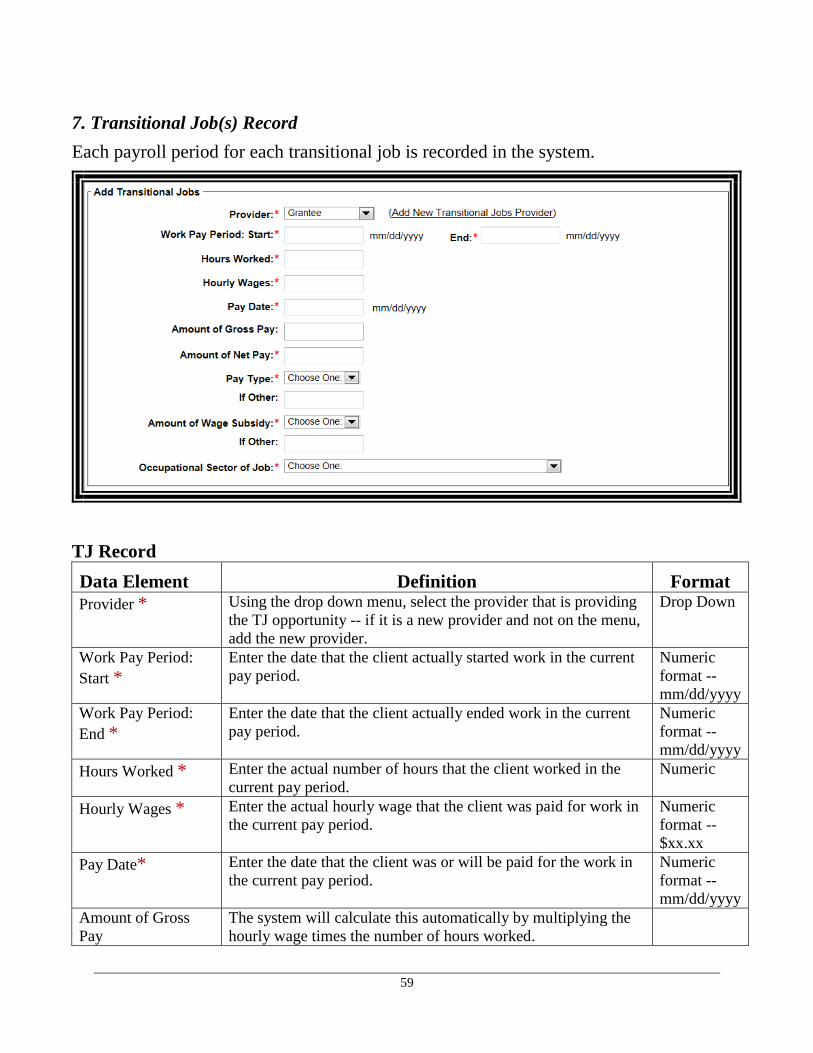
7. Transitional Job(s) Record
Each payroll period for each transitional job is recorded in the system.
TJ Record
Data Element Definition Format
Provider * Using the drop down menu, select the provider that is providing
the TJ opportunity -- if it is a new provider and not on the menu,
add the new provider.
Drop Down
Work Pay Period:
Start *
Enter the date that the client actually started work in the current
pay period.
Numeric
format --
mm/dd/yyyy
Work Pay Period:
End *
Enter the date that the client actually ended work in the current
pay period.
Numeric
format --
mm/dd/yyyy
Hours Worked * Enter the actual number of hours that the client worked in the
current pay period.
Numeric
Hourly Wages * Enter the actual hourly wage that the client was paid for work in
the current pay period.
Numeric
format --
$xx.xx
Pay Date* Enter the date that the client was or will be paid for the work in
the current pay period.
Numeric
format --
mm/dd/yyyy
Amount of Gross
Pay
The system will calculate this automatically by multiplying the
hourly wage times the number of hours worked.

60
Amount of Net * Enter the amount of net pay that the client was paid for work in
the current pay period.
Numeric
format --
$xxx.xx
Pay Type * Select one of the pay types from the drop down list:
Cash - if the client was paid in cash
Check - if the client was paid by check
EFT - if an electronic funds transfer was used (ex., a deposit
to a checking or savings account)
Other - if some other method was used, describe the other in
the text box that follows.
Drop Down
If Other If "Other" was checked, please describe. Text Box
Amount of Wage
Subsidy *
Select the percentage of grant funds that are being used to
subsidize the TJ wage:
100%
75%
50%
0%
Other - if some other percentage was used, describe the other
in the text box that follows.
Drop Down
If Other If "Other" was checked, please describe. Text Box
Occupational Sector
of Job *
From the list provided in the drop down menu, select the
occupational sector that is the closest match to the job the client
was engaged in during the work period.
Drop Down

61
Attachment C: Services Definitions
The services and definitions are:
1. Education or Job Training
a. English as a Second Language English as a second language is formal instruction specifically
intended to assist the client improve or learn the English
language.
b. GED Preparation GED Prep is formal instruction specifically aimed at assisting
the client to prepare for or take the GED exam. This is not basic
and remedial education.,
c. Math/Reading Remediation Math/Reading Remediation consists of classroom instruction
designed to improve a participant’s reading and/or math skills
for those participants who are determined to be basic literacy
skills deficient. Basic education skills include reading
comprehension, math computation, writing, speaking, listening,
problem solving, reasoning, and the capacity to use these skills.
d. On-the-Job Training (OJT) OJT is job placement that includes training provided by an
employer. OJT is not a Transitional Job and is not tracked
using the TJ screens in the system. With OJT the employer
hires the client as a part of their workforce with the expectation
that the person hired will be a permanent member of their
workforce. The employer pays the participant while he/she is
engaged in productive work. The job provides knowledge or
skills essential to the full and adequate performance of the job
they were hired for. OJT provides reimbursement to the
employer of up to 50% of the wage rate of the participant, and is
limited in duration to a period appropriate to the occupation for
which the participant is being trained. Once the training is
concluded it is expected that the OJT then becomes a job
placement outcome.
e. Vocational/Occupational Skills
Training
Vocational/Occupational Skills Training is a type of long term
occupational training consisting of specific classroom and work-
based study in a specific occupation leading to a degree or
certificate.
f. Other Education or Job Training This category is used when an education or job training service
that does not come under one of the services listed in a thru c is
provided to a client.
2. Workforce Preparation Activities
a. Career/Life Skills
Counseling/Planning
This is any formal counseling and/or instruction provided on a
specific life skill or related to career guidance. This differs from
ongoing counseling/case management in that this service has a
curriculum with specific content that is provided to the client.
b. Formal Assessment/Testing This is any formal testing provided to a client in order to assess
them.
c. Internship An Internship consists of unpaid, onsite work experience
designed to improve an enrollee’s occupational skills and
readiness for the world of work.
d. Subsidized Employment Subsidized Employment is employment that is in any part
subsidized by federal funds that are not a part of the grantee's
funds awarded under the ETJD initiative. Subsidized
employment is not a Transitional Job.
e. Work Readiness Training Work Readiness Training includes world of work awareness,

62
labor market knowledge, occupational information, values
clarification and personal understanding, career planning and
decision-making, and job search techniques (resumes,
interviews, applications, and follow-up letters). It also includes
positive work habits, attitudes, and behavior such as punctuality,
regular attendance, presenting a neat appearance, getting along
and working well with others, exhibiting good conduct,
following instructions and completing tasks, accepting
constructive criticism from supervisors and co-workers, showing
initiative and reliability, and assuming the responsibilities
involved in maintaining a job.
f. Workforce Information Services Workforce Information Services include, but are not limited to,
providing written information on state and local labor market
conditions; industries, occupations and characteristics of the
workforce; area business identified skills needs; employer wage
and benefit trends; short- and long-term industry and
occupational projections; worker supply and demand; and job
vacancies survey results. Workforce information also includes
local employment dynamics information such as workforce
availability; business turnover rates; job creation; job
destruction; new hire rates, worker residency, commuting
pattern information; and the identification of high growth and
high demand industries.
g. Other Workforce Preparation
Activities
This category is used when a workforce prep service that does
not come under one of the services listed in a thru f is provided
to a client.
3. Community Involvement Activities
a. Community Service Community Service is an activity in which the participants
perform volunteer work that benefits the community.
b. Other Community Involvement
Activities
This category is used when a community service that does not
come under a is provided to a client.
4. Mentoring Activities
a. Individual Mentoring Individual Mentoring Activities are a sustained, one-on-one
relationship between a mentor and participant.. Through
continued involvement, a mentor offers support and guidance in
the individual’s development to become a responsible member
of the community. A variety of approaches may be used such as
coaching, training, discussion, and counseling.
b. Group Mentoring Group Mentoring Activities are a meetings/classes and/or events
where mentors and participants come together and interact and
which serve to further the development of the participant.
Through continued involvement, group mentoring offers support
and guidance in the individual’s development to become a
responsible member of the community.
5. Parenting/Child Support Services
a. Child Support Order Assistance When the case manager or other grantee staff directly assist the
client in matters related to their child support order, use this
service category to report this service/activity.
b. Child Visitation Assistance When the case manager or other grantee staff directly assist the
client in matters related to their child visitation rights or directly
facilitates visitation activities, use this service category to report
this service/activity.
63
c. Parenting Class Parenting class is formal instruction designed to assist the client
to learn about and improve parenting skills.
d. Other Parenting/Child Support
Service
This category is used when a parenting/child support service that
does not come under one of the services listed in a thru c is
provided to a client.
6. Supportive Services
a. Case Management Services Case management services are specific meetings between a
client and their assigned program case manager.
b. Child Care Service Child Care Services provide participants during program
participation with child care that can be inside or outside the
home, as well as after-school programs. It usually includes
supervision and shelter.
c. Cognitive/Behavioral Services Cognitive behavioral therapy (CBT) is a psychotherapeutic
approach: a talking therapy. CBT aims to solve problems
concerning dysfunctional emotions, behaviors and cognitions
through a goal-oriented, systematic procedure in the present.
d. Health Service - Dental or Physical
Care Service
This includes both non emergency and emergency medical,
surgical and/or dental care provided to clients.
e. Health Service - Mental Health
Service
Mental Health Treatment is any formal treatment for anxiety,
depression, impulse control, mood, adjustment, personality
issues, or other conditions related to mental health provided by a
licensed or certified mental health provider.
f. Health Service - Substance Abuse
Treatment
Treatment of a condition for which the abuse of or addiction to a
controlled substance is a major feature.
g. Incentive Payments Incentive payments are cash and/or other non-monetary
payments made to a client to recognize. reward and/or
encourage the successful completion of certain types of positive
program milestones.
h. Needs-Related Payments Needs-Related Payments provide financial assistance to
participants for the purpose of enabling individuals to participate
in training.
i. Transportation Service Transportation Services include assistance or cash paid to
participants for the purpose of transportation.
j. Other Follow-Up/ Job Retention
Service
Services provided following exit from the program intended to
support the participant and ensure placement retention and/or
career advancement.
k. Other Supportive Service This category is used when a supportive service that does not
come under one of the services listed in a thru j is provided to a
client.