mitel® express messenger - committed2service.com express messenger... · introduction 4 section 1:...
TRANSCRIPT
M I T E L ® E X P R E S S M E S S E N G E R
S Y S T E M A D M I N I S T R A T I O N M A N U A L
NOTICE
The information contained in this document is believed to be accurate in all respects but is notwarranted by Mitel Corporation (MITEL). The information is subject to change without notice andshould not be construed in any way as a commitment by MITEL or any of its affiliates or subsidiaries.MITEL and its affiliates and subsidiaries assume no responsibility for any error or omissions in thisdocument. Revisions of this document or new editions of it may be issued to incorporate any suchchanges.
Nothing in this document may be reproduced in any manner, either wholly or in part for any usewhatsoever, without written permission from Mitel Corporation.
TRADEMARKS
Mitel design is a registered trademark of Mitel Corporation.
SX-200 is a registered trademark of Mitel Corporation.
This product contains software licensed from Annabooks.Portions of software copyright 1994 Datalight, Inc.
All other product names specified in this document are trademarks of their corresponding owners.
Mitel Express Messenger System Administration Manual Release 4.0
9109-080-025-NAJuly 2004, Issue 6
,, Trademark of Mitel Corporation. Copyright 2004, Mitel Corporation.All rights reserved.Printed in Canada.
*
www.mitel.com/messaging
Table of Contents
i
Table of Contents
SECTION 1: INTRODUCTION........................................................................... 4
Intended Audience .................................................................................... 5
How to use this Document ....................................................................... 6
Useful Tips ................................................................................................ 7
Additional References............................................................................. 11
Testing Mitel Express Messenger.......................................................... 12
Setting Up Express Messenger for the First Time ............................... 12
SECTION 2: SETTING UP MITEL EXPRESS MANAGER.............................. 15
Installing Express Manager onto a PC.................................................. 15
Connecting your PC to Express Messenger .......................................... 16
Starting Mitel Express Manager ........................................................... 18
Logging In To Express Messenger From Express Manager ................ 19
About the Login Passcodes..................................................................... 20
SECTION 3: ABOUT MAILBOXES .................................................................. 21
Reserved Mailboxes ................................................................................ 21
General Usage Mailboxes....................................................................... 22
Single-Digit Mailboxes ........................................................................... 26
Menu Tree Maiboxes (Multi-Level Auto Attendant) ............................ 29
Hospitality Mailboxes............................................................................. 32
About the Auto Attendant...................................................................... 33
SECTION 4: CHANGING MAILBOX PARAMETERS ...................................... 35
Accessing the System Administrator’s Mailbox.................................... 36
New (or Repeat) Installation.................................................................. 38
Add, Edit, or Delete a Mailbox from a Telephone................................. 39
Add, Edit, or Delete a Mailbox from Express Manager........................ 45
SECTION 5: PERFORMING SYSTEM ADMINISTRATION FROM ATELEPHONE.................................................................................................... 53
Setting Date, Time, and Business Hours .............................................. 53
Recording System Greetings .................................................................. 54
Setting or Changing System Parameters.............................................. 60
Setting and Changing Passcodes ........................................................... 64
Creating Distribution Lists .................................................................... 65
Message Notification .............................................................................. 67
Using FAX Finder................................................................................... 73
Table of Contents
ii
SECTION 6: PERFORMING SYSTEM ADMINISTRATION FROMEXPRESS MANAGER ..................................................................................... 75
Setting the Date, Time, and Business Hours........................................ 75
Selecting Alternate Greetings................................................................ 76
Setting the FAX parameters .................................................................. 77
Setting and Displaying Site Information .............................................. 78
Changing Passcodes................................................................................ 79
Setting Up Notification........................................................................... 80
Using FAX Finder................................................................................... 82
Setting FAX Parameters ........................................................................ 83
Selecting the Directory Prompt (First or Last Name).......................... 84
Enabling Softkey Support ...................................................................... 84
Enabling Auto attendant Transfer to Any PBX Extension.................. 85
Setting the Automatic Route Select Code ............................................. 85
Setting the Account Code Access Code.................................................. 85
Enabling or Disabling Personal Contact Numbers............................... 86
Setting the Voice Prompt Language...................................................... 86
Setting the Language Change Mailbox Number .................................. 87
Setting up RAD Ports ............................................................................. 88
Setting up a DID Server......................................................................... 91
Enabling the Bilingual Voice Prompts Option...................................... 94
Enabling the Hospitality Option............................................................ 95
Enabling the PMS Option ...................................................................... 96
Enabling Express Messenger Release 4.0 Options............................... 98
Performing Backups ............................................................................... 99
Performing Restores ............................................................................. 101
Performing Upgrades ........................................................................... 102
Upgrading from Release 1.0 to Release 2.0 Software......................... 105
Upgrading from Release 1.0 to Release 2.1 Software......................... 106
Upgrading from Release 2.0 to Release 2.1 Software......................... 106
Upgrading to Release 3.0 Software...................................................... 107
Upgrading an Express Messenger Card to SupportAdditional Ports or Release 3.0 Software Features............................ 110
Upgrading to Release 4.0 Software Features...................................... 112
Viewing System Logs............................................................................ 112
Table of Contents
iii
SECTION 7: PERFORMING MAINTENANCE AND TROUBLESHOOTING. 113
APPENDIX A: MITEL EXPRESS MANAGER MENUS.................................. 121
APPENDIX B: GLOSSARY ............................................................................ 133
APPENDIX C: EXPRESS MANAGER SYSTEM MESSAGES ...................... 135
APPENDIX D: EXPRESS MANAGER SYSTEM LOG MESSAGES(DIAG.DAT) .................................................................................................... 145
APPENDIX E: PMS PROTOCOL SUPPORT ................................................ 171
INDEX............................................................................................................. 173
Introduction
4
Section 1: Introduction
Welcome to Mitel Express Messenger, the complete voice messaging systemdesigned to improve communication between your company, clients, customers,and employees.
Features provided by Express Messenger include:
• An Automated Attendant that plays different greetings during openand closed business hours, provides a company directory that usesextension numbers or names as the dialing method, and allowssingle-digit option selection.
• Subscriber mailboxes that are passcode protected.
• A tutorial that assists new subscribers with mailbox setup.
• Simple message retrieval.
• Easy to use menus that allow subscribers to send urgent, private, orcertified messages.
• Notification of waiting messages whether subscribers are in or outof the office.
Express Messenger’s Automated Attendant provides two immediate benefits foryour company:
• Your receptionist has more time for calls that require specialassistance and other activities within your business.
• All telephone calls are answered automatically. Even when anemployee is not available, callers can leave a message beforehanging up.
Introduction
5
Express Messenger includes tools to help get your voice mail up and running quickly.After that, you can customize the system to meet your specific business needs.
Two important topics are at the end of Section 1:
• Testing Express Messenger
• Setting Up Express Messenger for the First Time.
Intended AudienceThis document is written for the System Administrator responsible for the ExpressMessenger voice mail system.
Typical System Administrator duties include:
• Adding and changing mailboxes. Mailboxes are where employeessend and listen to messages.
• Recording company greetings and announcements.
• Setting up outside notification numbers for pagers, cellular phones,and so forth.
• Backing up the system.
• Answering employee questions.
• Maintaining the voice mail system.
Introduction
6
How to use this DocumentAn Express Messenger dealer has already installed Express Messenger on yourPBX and performed the necessary system programming to make it work for you.Read the System Administration Manual from beginning to end to find out how tooptimize Express Messenger to your business requirements.
Use the glossary in Appendix B if you are unsure of any terminology used here.
Conventions
This System Administration Manual uses the following conventions.
• Voice Prompts and Responses
Italics represent references to the spoken word, such as examples of thecompany and mailbox greetings.
• Boxes
NOTE: A box surrounds important notes that provide additionalinformation about a topic or refer you to other material.
CAUTION: Cautions alert you to the possibility of damage toequipment or software.
WARNING: Warnings alert you to the possibility of personal injury.
• Telephone Keys
Square brackets always surround numbers or letters that you enter from thetelephone keypad. For example:
[1] [2] ... [0] [#] [*]
If you need to press several keys in succession, the square brackets surroundall the numbers. For example:
[1234]
• Mailbox Numbers
Depending on your PBX dial plan, mailbox numbers can be2, 3, 4, or 5 digits.
• Buttons and Flexible Buttons
Angle brackets always surround telephone button names and flexible buttonfunctions. For example:
⟨Message⟩ ⟨Microphone⟩ ⟨Hold⟩
Introduction
7
Useful TipsSome people are reluctant to use their telephone for anything other than makingcalls. Encourage users to experiment with different options offered by MitelExpress Messenger.
Here are some tips to help everyone benefit from having a voice mail system.
• Explaining Mitel Express Messenger to Customers
The best way to make customers feel comfortable about Express Messenger isthrough employees who are enthusiastic about it − customers will sense theirpositive attitude. If employees use their mailboxes and return calls in a timelyfashion, customers will feel secure about the new system.
Encourage employees to keep their mailbox greeting current and to check formessages frequently, particularly if their telephone doesn’t have a messagelight or if they have been away from their office. Respond to messagespromptly − not two or three days later.
• Mailbox Greetings
Employee mailboxes use two types of greetings: "permanent" and "temporary". Callersalways hear the permanent greeting unless you record a temporary greeting. A permanentgreeting should be general enough to cover all situations. A temporary greeting describesa specific situation and lasts for a user-specified number of days.
Here are examples of both types of greetings:
Permanent greeting:
"You have reached Christine Conner. I can’t answer your call right now, so please leaveyour name, number, and a short message − I will get back to you as soon as possible. If youneed immediate assistance, press [0] and ask to be transferred to my associate, Julie Jones."
Temporary greeting:
"Hi! You have reached Julie Jones. I will be on vacation from Friday, June 18,through Friday, June 25. I’ll be back on Monday, June 28, so please leave amessage and I’ll get back to you as soon as possible. If you require immediateassistance, press [0] and ask to be transferred to Christine Conner."
The mailbox user specifies the number of days for the temporary greeting tolast, from 01 to 99, expiring at midnight of the last day. If specified to last onlyone day, the message starts immediately and expires at midnight of the day theuser records it.
Employees who create a new temporary greeting every day show callers thatthey are really using Express Messenger.
Introduction
8
• Duration of Messages in a Mailbox
Express Messenger saves messages for 15 days. A System Administrator canchange the number of days, on a mailbox-by-mailbox basis, by using ExpressManager. Express Messenger deletes each saved message as soon as themessage is older than the specified number of days.
• Saved Messages and System Size
If too many messages are saved on Express Messenger at any one time, the systemwill become full and not be able to take new messages.
− If Express Messenger’s storage space is 90% full, users will hear thiswarning when they log into their mailboxes:
“The system is nearly full. Please erase any unnecessary messages.”
− If Express Messenger’s storage space is 98% full, its limit has beenreached and it will stop taking messages. Users will hear:
“I’m sorry, but the system is full. Please try again at a later time.”
• “Reply” and “Forward”
“Reply” and “Forward” options in the “Listen” menu only work with othermailboxes within this Express Messenger. Users cannot reply to a messagethat originates from an outside line or forward a message to an outsidetelephone number.
• Type Ahead
Callers always hear a menu when Express Messenger answers the telephone.If you know which keys to use, press them immediately and move through thesystem as fast as you wish. Although the menus are brief, voice prompts areonly for convenience. Occasionally, when interrupting prompts, the systemmay not detect the key. In this case, press the key again.
• Message Length and Conditions
Express Messenger does not limit the length of any message. However, afterfive minutes, Express Messenger interrupts the caller and asks if they wish tocontinue recording. If there is no reply, Express Messenger stops recordingand disconnects the line. Similarly, if the caller stops talking for more thanfour seconds or has a very faint connection, Express Messenger gives themthe option to continue recording.
Introduction
9
• Phantom Messages
To eliminate unwanted or unintended messages, Express Messengerautomatically stops recording a message if it hears a steady, non-voice tone,such as dial tone. Express Messenger may interpret background noise, such asin a factory, as a steady tone and mistakenly disconnect the caller. Using a cartelephone when the car windows are open can also cause an unwanteddisconnection. The caller should try again from a quieter location.
• Music-on-Hold
There is always a delay between the time Express Messenger answers anoutside call and the time someone answers the telephone or ExpressMessenger sends the call to a mailbox. On most telephone systems, the callerhears nothing while Express Messenger transfers the call unless you installMusic-on-Hold. Music can be alternated with product advertisements to keepcallers interested while they wait for an answer to their call.
Note: Express Messenger ports can operate as Recorded AnnouncementDevices (RAD) to provide Music-on-Hold or other audio. For moreinformation, see page 88.
• The Operator’s Mailbox
Messages left in the operator’s mailbox (mailbox 0) need to be checkedregularly. Assign someone the task of frequently checking the operator’smailbox and forwarding any messages to the appropriate persons.
If the operator is away from the telephone or unable to answer (such as at night or whenthe business is closed), callers may become irritated if they have to wait through too manyrings before being transferred to the operator’s mailbox. To avoid irritating callers in thismanner, either set the call forwarding on the operator’s telephone to Express Messengeror set a shorter transfer-recall time.
The default passcode for the operator's mailbox is [99, 999, or 9999].
• The Operator's Telephone
A special feature of Express Messenger is that the auto attendant attempts totransfer calls to the operator even if the console is busy. This allows theoperator an opportunity to put the current call on hold and answer the new call.
• Message Notification to Extensions
If a subscriber's telephone does not have a message light, Express Messengercan use the Message Notification feature to inform the subscriber whenmessages arrive in their mailbox.
One of the five available notification methods is to ring any internal extensionnumber. If you enter the mailbox owner's extension as the alternate number,that extension will ring when a message arrives. Refer to Message Notificationin the Section 4, Changing Mailbox Parameters for more information.
Introduction
10
• Bilingual Prompts
Express Messenger can be set up to play voice mail prompts in two of threelanguages: English, French or Spanish. Outside callers choose the languagethey want when prompted by the auto attendant. Subscribers can request theirpreferred language from the system administrator.
NOTE: Support for bilingual voice prompts is an optional feature ofMitel Express Messenger Release 3.0.
• Record A Call
Subscribers can use Express Messenger to record their telephoneconversations. The recordings are stored in the subscriber’s mailbox separatedfrom regular voice mail messages.
NOTE: Record A Call is an optional feature of SX-200 EL/MLLIGHTWARE 18, Release 1. For more information, see the SX-200EL/ML Technical Documentation. Instructions on using Record ACall are included in the telephone user guides produced with SupersetManual Maker (PN 9132-900-000-NA, Issue 8).
IMPORTANT: Record a Call should only be used in conjunctionwith the laws of the jurisdiction where the call is placed from and/orthe laws of the jurisdiction of the place being called. MITEL is notliable for misuse of this feature in a manner that does not conformwith the applicable law; for example: laws involving wiretapping,eavesdropping, electronic surveillance, call recording etc. Dealersshould warn the customer in writing that they are responsible to usethis feature in accordance with the law and that in many jurisdictionsboth parties must be made aware that the call is being recorded inorder to comply.
Introduction
11
Additional References
Installation Guide
Your Express Messenger dealer used an Installation Guide to install ExpressMessenger into your PBX. An Installation Worksheet is included with theInstallation Guide. Ask your dealer for a copy of the Installation Guide.
User Guide
Each Express Messenger subscriber should have a User Guide for daily messagemanagement. It provides step-by-step instructions on how to call ExpressMessenger, set up a personal mailbox, and send or retrieve messages. The guide ison the Documentation diskettes included with the Express Messenger card and onthe Manual Maker web site at http://edocs.mitel.com/manual /maker.
User Guide information is not repeated in this manual. Keep a copy of the UserGuide with this manual.
Instructions on using Record A Call are included in the telephone user guidesproduced with Manual Maker.
Wallet Card
Each subscriber should also have a Wallet Card for quick reference to the ExpressMessenger Menu system.
Front Desk User Guide & Guest User Guide
In hotel or motel applications, the front desk attendant should have a front deskuser guide. This guide provides instructions on how to administer guest mailboxes.
A guide on using Express Messenger from a guest phone should be left in eachguest room. The guide can be ordered by calling Mitel Networks CustomerService. Specify part number 51001140A for the English/French version or51001154A for the English/Spanish version. PDF versions of the guide are alsoavailable for downloading from the Manual Maker web site athttp://edocs.mitel.com/manual /maker.
Introduction
12
Testing Mitel Express MessengerPerform the following tests to verify that Mitel Express Messenger is workingproperly.
Because PBX programming frequently blocks users from accessing an outside lineand then dialing back in to the main number (tying up two Central Office trunks inthe process), parts of this test may need to be performed from off-site. The SystemAdministrator could call in from home and then verify the message upon arrival.
1. Call the business using an outside line. Verify that you hear thecompany open or closed greeting (as appropriate) and that the messageis clear and understandable.
2. Call the business using several outside lines. Verify the number of ringsallowed before Express Messenger answers.
3. Call the business using an outside line. When Express Messengeranswers, press 0 and verify that Express Messenger transfers the call tothe attendant.
4. Call the Express Messenger hunt group using an internal line. Verifythat you do not hear the company greeting. Verify the number of ringsallowed before answer.
5. Call the Express Messenger hunt group using an internal line. Verify thatyou do not hear the company greeting. When Express Messenger answers,press 0 and verify that Express Messenger transfers the call to theattendant.
Setting Up Express Messenger for the First TimeWhen first setting up Express Messenger, perform the following activities (detailedprocedures for each activity are elsewhere in this manual). Do all activities from atelephone first (some activities cannot be performed from Express Manager). Keepthe Installation Worksheet in front of you because much of the information youwill be prompted for is on that sheet.
You can set up Express Messenger to operate either as a unilingual or bilingualsystem. A unilingual system prompts users in English (the default language),French or Spanish. A bilingual system provides prompts in two of the threeavailable languages.
NOTE: Spanish prompts are only available on MEM Release 2.1 systemsor later and French prompts on MEM Release 3.0 or later. Bilingualoperation is an optional feature of MEM Release 3.0. For moreinformation, see Enabling the Bilingual Prompts Option on page 94.
Introduction
13
Unilingual Systems
To set up a system with greetings and prompts in one language:
1. Enter the necessary information onto the Express MessengerInstallation Worksheet.
2. Identify the Message Center number for accessing Express Messengerports (provided by the PBX installer).
3. To log in, dial the Express Messenger message center number.
Express Messenger answers and prompts you for a mailbox number.
4. Enter the system administrator mailbox number: default is [99, 999, or 9999].
5. To set up a system to prompt in the current language (default English), press1, and then skip to step 7.
OR
6. To set up a system to prompt in another language:
− dial the Technician’s passcode (default 8642), followed by 9. ExpressMessenger prompts you for a Technician’s Function Code.
− dial 20001 for English, 20002 for Spanish, or 20003 for French. You areprompted for another Function Code.
− dial 10281. The system resets.
− After the system resets, log into the administrator’s mailbox again. Thesystem is now prompting in the selected language. Continue the set up atstep 7.
7. Express Messenger prompts you for a passcode.
8. Enter the default passcode [1234].
9. Enter [1] for a new installation.
10. Set the number of digits for mailbox length to 2, 3, or 4 digits (default is 3digits).
11. Enter current date and time in 24-hour format.
12. Program the opening and closing time for each day of the week.
13. Enter the Operator’s extension number.
14. Create a mailbox for each user’s extension.
15. Create the required single digit mailboxes.
16. Prepare and record primary company greetings for open hours and closedhours.
17. Set the Send Message access code (the code is provided by the PBX installeron the Installation Worksheet as Feature Access Code 41).
Introduction
14
Bilingual Systems
To set up a system with greetings and prompts in two languages:
1. Follow the above procedure to set up the system to operate in onelanguage.
2. Log into the administrator mailbox.
3. When prompted for a passcode, dial the Technician’s passccode(default 8642).
4. Dial 9.
Express Messenger prompts for another Technician’s function code.
5. Dial 20272 followed by the 11-digit code required to enable the BilingualVoice Prompts option. You must call the Mitel Corporation order desk toget the code. For more information on enabling the Bilingual VoicePrompts language, see page 94.
Express Messenger responds with “Enabled.”
6. Set the default language (if different than the language specified in step1) by dialing 20001 for English, 20002 for Spanish, or 20003 forFrench.
7. Set the alternate language by dialing 20011 for English, 20012 forSpanish, or 20013 for French.
8. Dial 10281 to reset the system.
9. After the system resets, log into the System Administrator Mailboxagain.
10. When prompted, enter the default passcode (1234).
11. Using the Greetings menu (press 4 from the main menu) to verifyexisting greetings and then record new greetings in the alternatelanguage, including the bilingual welcome greeting.
Setting up Mitel Express Manager
15
Section 2: Setting up Mitel Express Manager
For optimum performance, install the Mitel Express Manager program on yourPC’s hard drive. You do not need to shut down your voice mail system whileinstalling Express Manager on your computer.
Installing Express Manager onto a PCThe following software must be resident on your PC to install and run ExpressManager:
• DOS version 3.3 or higher
• Windows 3.1 or higher.
To install the Express Manager software on your PC’s hard drive:
1. Place the disk labeled Mitel Express Manager into your 3 1/2" floppydrive.
2. At the DOS prompt, change to the drive in which you placed the disk.For example,
C>a: [Enter]
3. At the DOS prompt, run the install program.
A:\>install [Enter]
Installation of Express Manager will continue automatically until completion.Carefully read and follow any notification about software or documentationchanges that display on your screen.
Installation is complete when the DOS prompt returns to your screen. You can nowuse Express Manager to maintain your company’s voice mail system.

Setting up Mitel Express Manager
16
Connecting your PC to Express MessengerYou Run Express Manager from DOS on your PC. You can connectyour PC
• directly to a port on the Express Messenger Card, or
• remotely through a modem connection that allows you tocommunicate to Express Messenger using your telephone system.
Express Manager requires the following hardware:
• IBM or IBM-compatible 286 computer (PC) or higher with aminimum of 2 MB of disk space and 640 KB of memory (RAM).
• VGA monitor (color or monochrome).
• Express Messenger voice mail card installed in the PBX.
• Internal or external modem.
Connecting your PC Directly to the Express Messenger Card
1. Plug one end of the custom RS-232 cable into an unused COM port onthe PC.
2. Plug the other end of the cable into the Express Messenger cardconnector. You must open the PBX door to connect the cable.
The custom RS-232 cable is a PC-to-PC cable with 9-pin female DB9connectors on each end. Wires between pines 1 and 4 and between 2and 3 of the connectors cross over within the cable; that is, it is a nullmodem cable.
Note that Mitel Corporation does not supply the cable. Two recommendedcables are
− Belkin F3B207-06 (6 feet)
− Belkin F3B207-10 (10 feet).
Setting up Mitel Express Manager
17
3. Access a DOS prompt.
Navigate to the directory that contains the Express Messenger application bytyping
CD EXPRESS [Enter]
4. To start Express Manager, type
EXPRESS [Enter]
The Express Manager Login screen appears after several seconds.
5. Select Login from the File menu and enter the Administrator passcode(default [1234]).
6. Program Express Messenger as described in this manual.
7. After you have completed your programming session, remove the cableand replace the PBX front door.
Connecting your PC Remotely
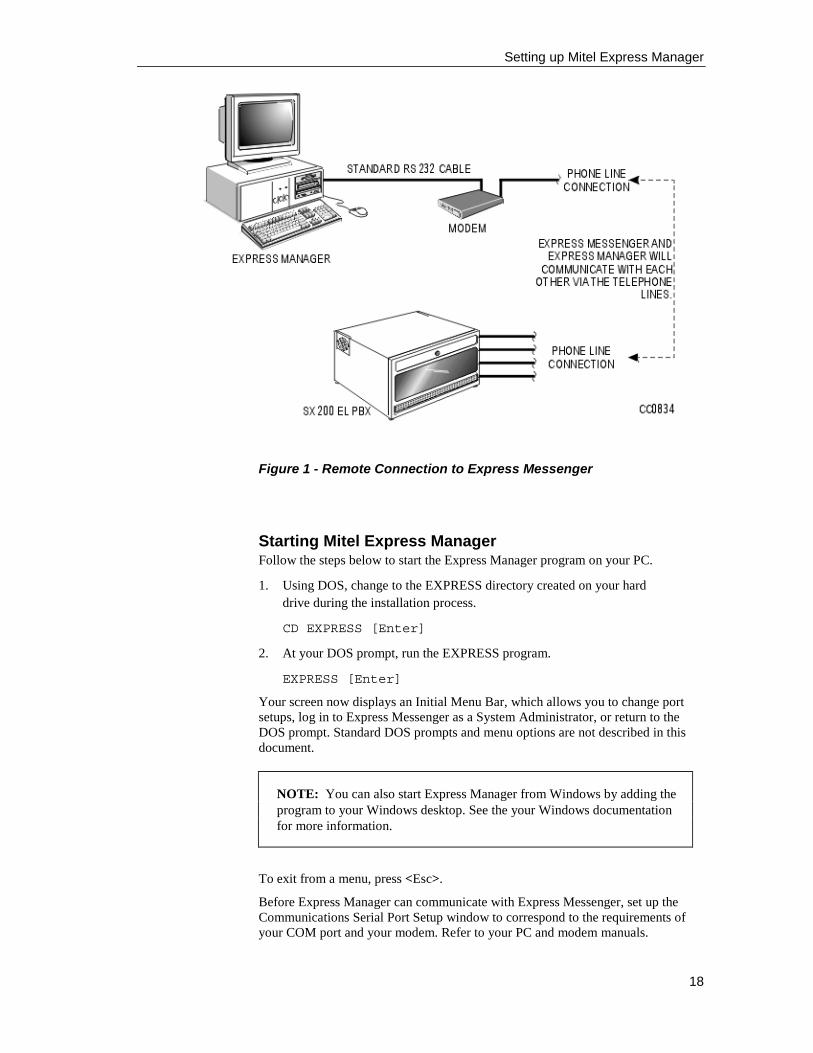
Figure 1 illustrates the proper connection for remote access to Express Messenger.A serial port on your remote PC connects through a modem to the voice mailsystem.
To connect a PC remotely
1. Connect a PC directly to the Express Messenger card and login toExpress Manager application (see Connecting Your PC Directly to theExpress Messenger Card on page 16 for instructions).
2. Select the Options menu, then Communications, and then complete theSerial Port Setup window according to the requirements of the remotelylocated PC port that is connected to your modem. Refer toCommunications on page 125 for instructions on how to complete thiswindow.
3. Disconnect the local PC from the Express Manager card and replace thePBX front door.
4. Connect your remotely located PC to a modem.
5. Access a DOS prompt.
6. Navigate to the directory that contains the Express Manager applicationby typing
CD EXPRESS [Enter]
7. To start Express Manager, type
EXPRESS [Enter]
8. Select Login from the File menu.
9. Enter the Administrator passcode ([1234] unless changed duringinstallation) and the telephone number of the voice mail system (autoattendant) in the initial login window.
Setting up Mitel Express Manager
18
Figure 1 - Remote Connection to Express Messenger
Starting Mitel Express ManagerFollow the steps below to start the Express Manager program on your PC.
1. Using DOS, change to the EXPRESS directory created on your harddrive during the installation process.
CD EXPRESS [Enter]
2. At your DOS prompt, run the EXPRESS program.
EXPRESS [Enter]
Your screen now displays an Initial Menu Bar, which allows you to change portsetups, log in to Express Messenger as a System Administrator, or return to theDOS prompt. Standard DOS prompts and menu options are not described in thisdocument.
NOTE: You can also start Express Manager from Windows by adding theprogram to your Windows desktop. See the your Windows documentationfor more information.
To exit from a menu, press <Esc>.
Before Express Manager can communicate with Express Messenger, set up theCommunications Serial Port Setup window to correspond to the requirements ofyour COM port and your modem. Refer to your PC and modem manuals.
Setting up Mitel Express Manager
19
Logging In To Express Messenger From Express ManagerFollow these steps to log in to Express Manager, after Express Manager has beenstarted as just described. Each screen is described following this procedure.
1. From the initial screen (Figure 45), click on Ok, in the About window.
2. From the File menu, shown in Figure 46, click on File.
3. From the Login window (Figure 47), enter the Administrator’s password;If you are connecting through a modem, enter the telephone number of thevoice mail system (auto attendant), and then click Ok.
CAUTION: Always wait at least 10 seconds between logins.
4. From the seven available menus, select the menu and window for theactivities to be performed.
5. At the end of a session, log out from the File menu.
Setting up Mitel Express Manager
20
About the Login PasscodesThe passcode you use to log in to the Express Manager determines which menuitems are available to you. There are two types of passcodes:
• Manager
Log in using the Manager passcode to perform all the system administration,mailbox management, and maintenance functions except, installing (or re-installing) Express Messenger, accessing Remote Files and changing theAdministrator Passcode or passcode length.
• Administrator
Log in using the Administrator passcode to allow all manager functions plusauthority to install (or re-installing) Express Messenger, and access to RemoteFiles and Administrative Passcodes functions.
IMPORTANT: Give the Manager passcode to the person that performsthe day-to-day operations, such as adding mailboxes and changinggreetings. The Manager passcode provides limited access to the databasethereby reducing the likelihood of novice users causing serious disruptionsto the system. (Note that users are still prompted to begin a newinstallation when they enter the Manager Passcode but get the response“Invalid Selection” when they attempt to do so.)
To protect system security, keep the passcodes confidential.
About Mailboxes
21
Section 3: About Mailboxes
Mitel Express Messenger uses different types of mailboxes. Some are reserved forsystem functions and others are available for general use. Each mailbox type hasdifferent characteristics and uses. Mailbox numbers normally correspond to atelephone’s extension number.
This section describes the different mailbox types. It also describes how the AutoAttendant handles a mailbox number that is not the same as the extension number.
Read this section to determine how to use the different mailbox features. Refer tothe next section, Changing Mailbox Parameters, for step-by-step instructions onhow to add, edit, or delete mailboxes and how to enable or disable other ExpressMessenger features.
Reserved Mailboxes
The Operator
Mailbox 0 is reserved for the Operator's mailbox. Callers will leave messages inthis mailbox if they,
• do not know who to contact,
• are calling from a rotary dial telephone and cannot access menus ormailboxes.
Check for messages left in the Operator’s mailbox several times each day. Thedefault passcode for the operator's mailbox is [99, 999, or 9999]. If the passcodelength has been changed, add the appropriate number of zeros to the end of thepasscode; for example, [123400].
The Directory
Mailbox 9 is reserved for the personnel directory. It cannot take messages. Callersuse it to reach an employee by dialing the first six letters of the employee’s first orlast name (as defined).
Administrative Functions
Mailboxes 90 through 97 or 990 through 997 or 9990 through 9997 are reservedfor Express Messenger self-administrative functions.
The Modem
Mailbox 98 is reserved for the Express Messenger built-in modem used for remoteadministration or maintenance.
About Mailboxes
22
The System Administrator’s Mailbox
Mailbox 99 or 999 or 9999 is reserved for the system administrator. It is notassociated with an extension and does not take messages. Any touch-tonetelephone in your company can access this mailbox. The default passcode is[1234]. To maintain system security, change this passcode at first login.
General Usage MailboxesExpress Messenger has four types of mailboxes:
• Extension
• Message-Only
• Transfer-Only
• Information-Only
The system administrator assigns mailbox types. Each type serves a differentpurpose and has its own characteristics. Mailbox types are described on thefollowing pages.
NOTE: These examples assume that your PBX is programmed so thatthe Express Messenger Auto Attendant answers your primary businessnumber(s). If that is not true, then the Operator sends calls to ExpressMessenger only when the caller wants to leave a voice message.
Extension Mailbox
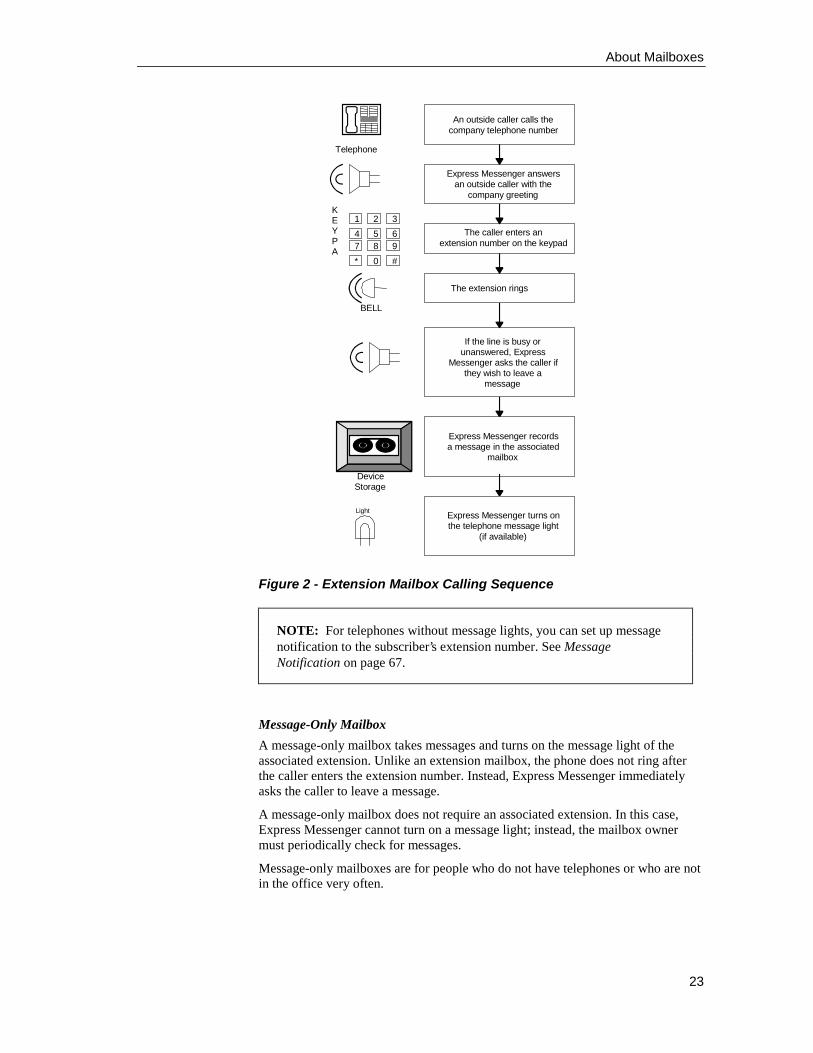
An extension mailbox is the default mailbox type. The mailbox number is usuallythe same as the subscriber’s extension number. Figure 2 shows the callingsequence for an Extension mailbox.
About Mailboxes
23
Figure 2 - Extension Mailbox Calling Sequence
NOTE: For telephones without message lights, you can set up messagenotification to the subscriber’s extension number. See MessageNotification on page 67.
Message-Only Mailbox
A message-only mailbox takes messages and turns on the message light of theassociated extension. Unlike an extension mailbox, the phone does not ring afterthe caller enters the extension number. Instead, Express Messenger immediatelyasks the caller to leave a message.
A message-only mailbox does not require an associated extension. In this case,Express Messenger cannot turn on a message light; instead, the mailbox ownermust periodically check for messages.
Message-only mailboxes are for people who do not have telephones or who are notin the office very often.
Express Messenger answersan outside caller with the
company greeting
An outside caller calls thecompany telephone number
The caller enters anextension number on the keypad
The extension rings
If the line is busy orunanswered, Express
Messenger asks the caller ifthey wish to leave a
message
Telephone
1 2 3
4 5 67 8 9
* 0 #
BELL
KEYPA
Express Messenger recordsa message in the associated
mailbox
DeviceStorage
Express Messenger turns onthe telephone message light
(if available)
Light
About Mailboxes
24
Examples:
Out-of-town sales representativesDelivery driversPart-time and seasonal employeesFrequent customers.
Figure 3 illustrates how a message-only mailbox works.
Figure 3 - Message-only Mailbox Calling Sequence
Express Messengeranswers an outside callerwith the company greeting
Outside caller initiates thecall
The caller enters anextension number on the
keypad
The caller bypasses thetelephone and goes directly
to Express Messenger
Express Messenger asksthe caller if they wish to
leave a message
Telephone
1 2 3
4 5 67 8 9
* 0 #
KE
YP
AD
Express Messengerrecords a message in the
associated mailbox
DeviceStorage
Express Messenger turnson the telephone message
light (if available)
Light
About Mailboxes
25
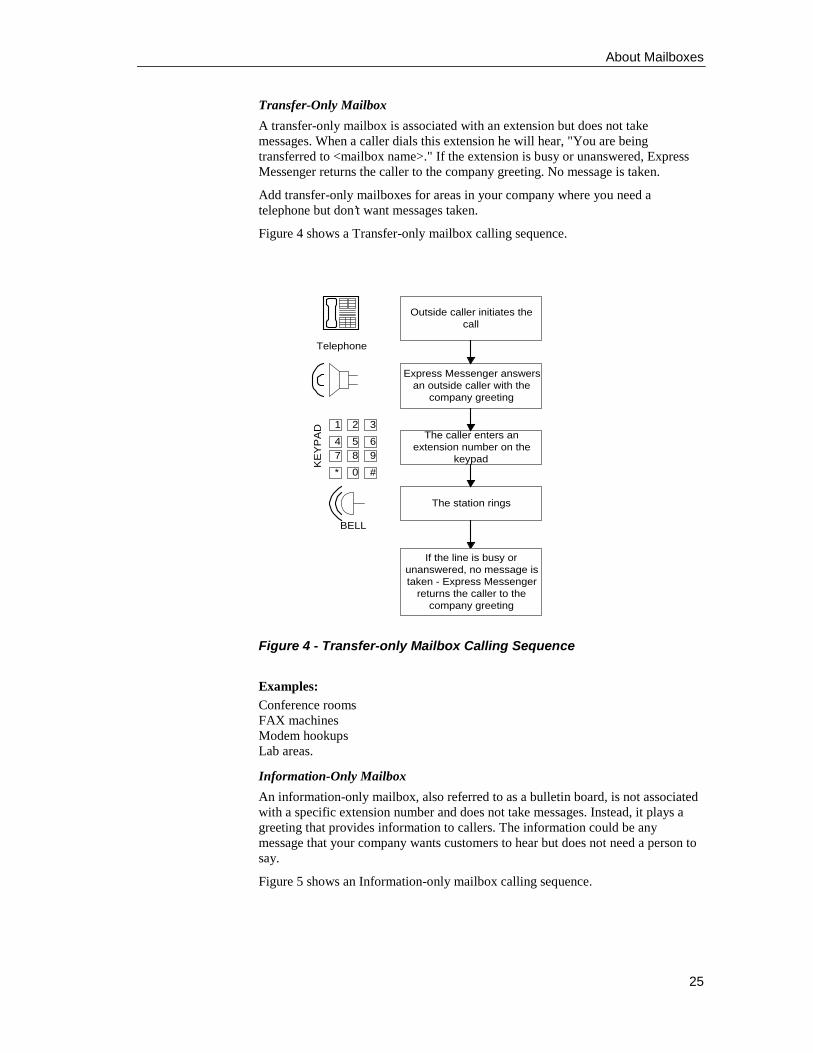
Transfer-Only Mailbox
A transfer-only mailbox is associated with an extension but does not takemessages. When a caller dials this extension he will hear, "You are beingtransferred to <mailbox name>." If the extension is busy or unanswered, ExpressMessenger returns the caller to the company greeting. No message is taken.
Add transfer-only mailboxes for areas in your company where you need atelephone but don’t want messages taken.
Figure 4 shows a Transfer-only mailbox calling sequence.
Figure 4 - Transfer-only Mailbox Calling Sequence
Examples:Conference roomsFAX machinesModem hookupsLab areas.
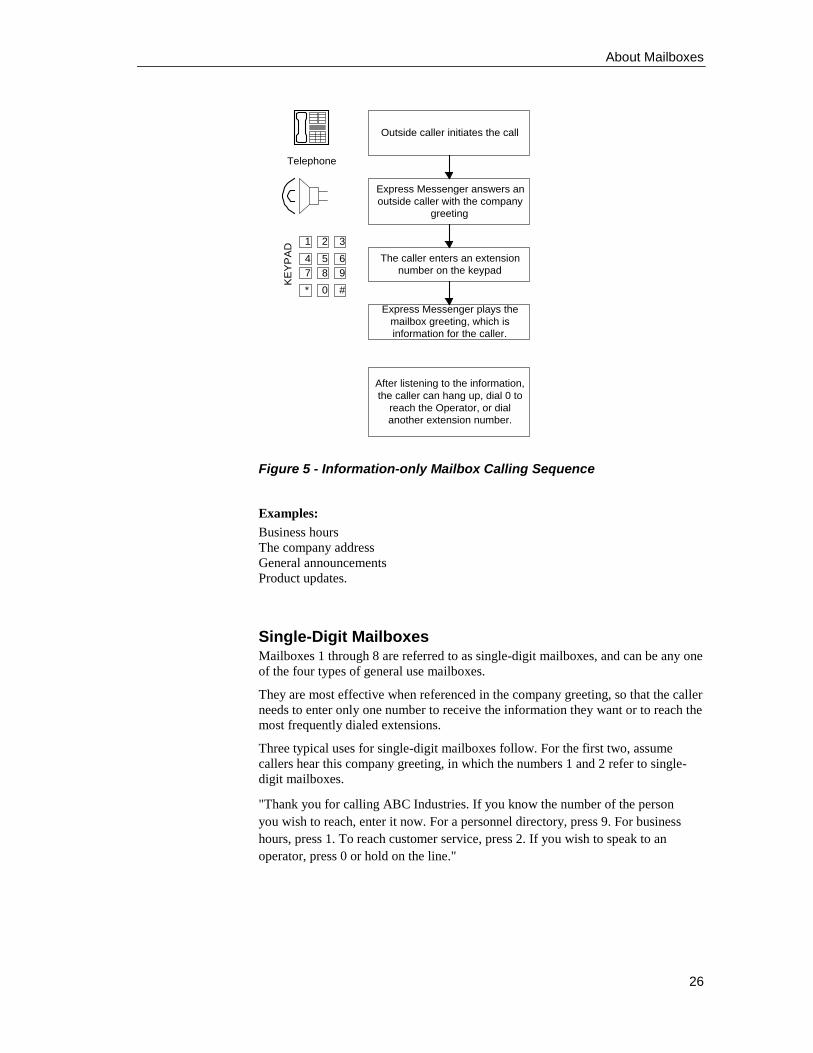
Information-Only Mailbox
An information-only mailbox, also referred to as a bulletin board, is not associatedwith a specific extension number and does not take messages. Instead, it plays agreeting that provides information to callers. The information could be anymessage that your company wants customers to hear but does not need a person tosay.
Figure 5 shows an Information-only mailbox calling sequence.
Express Messenger answersan outside caller with the
company greeting
Outside caller initiates thecall
The caller enters anextension number on the
keypad
The station rings
If the line is busy orunanswered, no message istaken - Express Messenger
returns the caller to thecompany greeting
Telephone
1 2 3
4 5 67 8 9
* 0 #
BELL
KE
YP
AD
About Mailboxes
26
Figure 5 - Information-only Mailbox Calling Sequence
Examples:Business hoursThe company addressGeneral announcementsProduct updates.
Single-Digit MailboxesMailboxes 1 through 8 are referred to as single-digit mailboxes, and can be any oneof the four types of general use mailboxes.
They are most effective when referenced in the company greeting, so that the callerneeds to enter only one number to receive the information they want or to reach themost frequently dialed extensions.
Three typical uses for single-digit mailboxes follow. For the first two, assumecallers hear this company greeting, in which the numbers 1 and 2 refer to single-digit mailboxes.
"Thank you for calling ABC Industries. If you know the number of the personyou wish to reach, enter it now. For a personnel directory, press 9. For businesshours, press 1. To reach customer service, press 2. If you wish to speak to anoperator, press 0 or hold on the line."
Express Messenger answers anoutside caller with the company
greeting
Outside caller initiates the call
The caller enters an extensionnumber on the keypad
Express Messenger plays themailbox greeting, which isinformation for the caller.
After listening to the information,the caller can hang up, dial 0 to
reach the Operator, or dialanother extension number.
Telephone
1 2 3
4 5 67 8 9
* 0 #K
EY
PA
D
About Mailboxes
27
Example 1:
Mailbox 1 is an Information-Only mailbox. A typical greeting for mailbox 1 couldbe:
"ABC Industries is open for business Monday through Friday from 9 am to 6 p.m.and on Saturdays from 9am to 1 p.m.”
The caller listens to the information and hangs up when they are done.
Example 2:
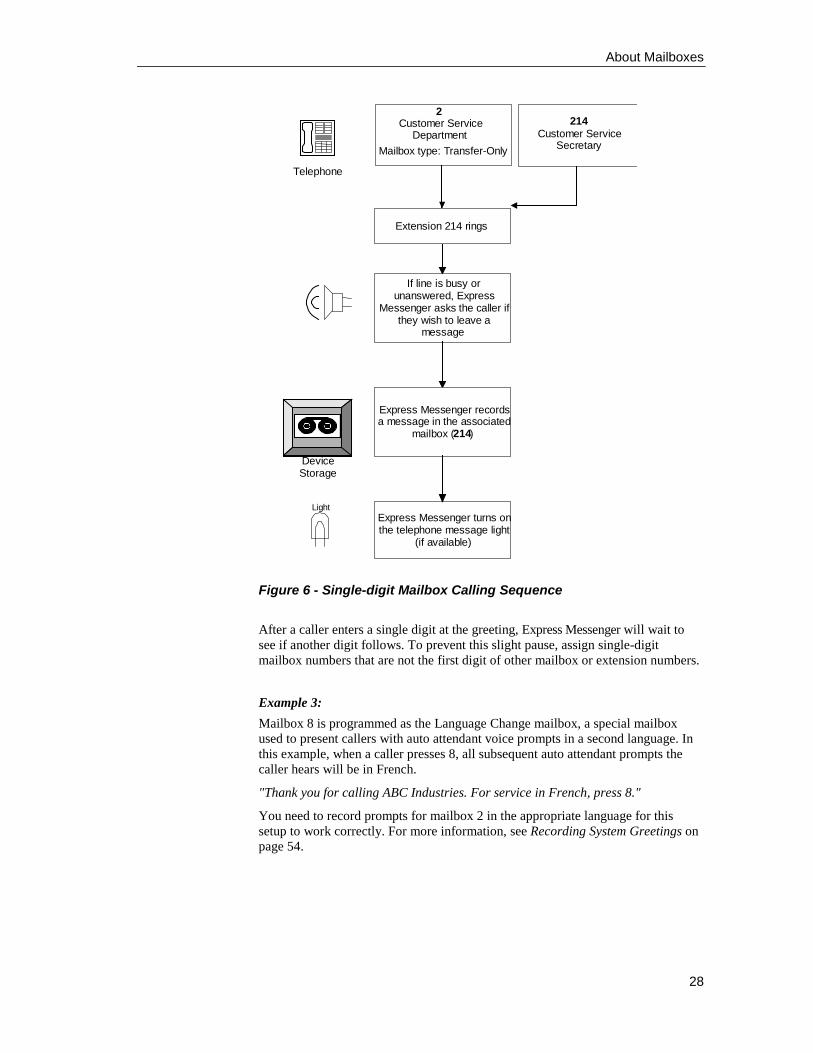
Mailbox 2 is an Extension mailbox. For this example, we’ll assume extension 214is the Customer Service telephone.
When the caller presses 2, extension 214 rings. The caller might hear the followinggreeting if the telephone is busy or not answered.
"All of our Customer Service representatives are busy at the moment. Please leaveyour name, telephone number and a brief message. Someone will get back to youas soon as possible."
You need to record the appropriate name and greeting for mailbox 2 for this setupto work correctly.
If extension 214 also belongs to a subscriber, such as the customer service secretary,callers can dial 214 directly to reach that person. The secretary can have a personalgreeting identifying himself or herself as the owner of the mailbox but only if Mailbox2 is programmed as a Transfer-Only mailbox. Express Messenger saves all departmentand personal messages in mailbox 214.
A subscriber can serve as the destination for any number of single-digit mailboxes.
NOTE: Always add a new single digit mailbox first before changing thecompany greeting to refer to it.
Figure 6 shows the calling sequence for a Single-digit mailbox.
About Mailboxes
28
Figure 6 - Single-digit Mailbox Calling Sequence
After a caller enters a single digit at the greeting, Express Messenger will wait tosee if another digit follows. To prevent this slight pause, assign single-digitmailbox numbers that are not the first digit of other mailbox or extension numbers.
Example 3:
Mailbox 8 is programmed as the Language Change mailbox, a special mailboxused to present callers with auto attendant voice prompts in a second language. Inthis example, when a caller presses 8, all subsequent auto attendant prompts thecaller hears will be in French.
"Thank you for calling ABC Industries. For service in French, press 8."
You need to record prompts for mailbox 2 in the appropriate language for thissetup to work correctly. For more information, see Recording System Greetings onpage 54.
214Customer Service
Secretary
2Customer Service
Department
Extension 214 rings
If line is busy orunanswered, Express
Messenger asks the caller ifthey wish to leave a
message
Telephone
Express Messenger recordsa message in the associated
mailbox (214)
DeviceStorage
Express Messenger turns onthe telephone message light
(if available)
Light
Mailbox type: Transfer-Only
About Mailboxes
29
NOTES:
1) The language change applies to the current auto attendant session only.If the caller is returned to the voice mail system during the same call, thesystem will again prompt the caller to select a language.
2) Bilingual prompts require Mitel Express Messenger Release 3.0 or later.For more information, see Enabling the Bilingual Prompts Option on page 94.
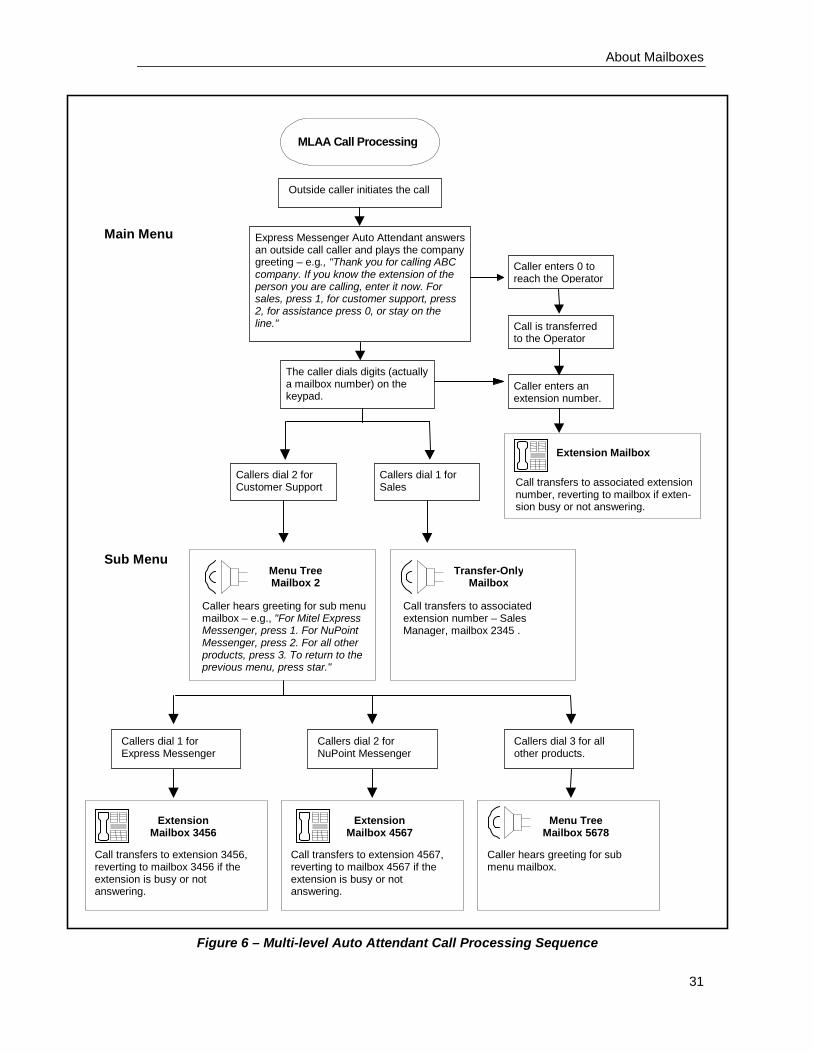
Menu Tree Maiboxes (Multi-Level Auto Attendant)Menu Tree Mailboxes allow you to set up Multi-Level Auto Attendant (MLAA)—a hierarchical menu structure that provides callers with better self-service access tothe department or person they're seeking. In an MLAA system, callers reaching theAuto Attendant are routed from the main menu through to one or more additionalsub menus until their call is answered.
You can program up to 10 menu levels with each level having its own greeting andprompts. The greeting at the top level (called the main menu) is the primarycompany greeting with the usual prompts to dial an extension number, “0” for alive operator, and other digits to reach destinations such as Sales or TechnicalSupport. At the subsequent levels (the sub menus) the greetings prompt callers tomake further selections. The greeting for a Technical Support node might offerchoices based on product type as follows:
"For Express Messenger technical support, press 1. For NuPoint Messengertechnical support, press 2. For all other products, press 3. To return to theprevious menu, press star. To repeat the choices, press pound."
From this menu, dialing 1 or 2 transfers the caller to a technical supportrepresentative. Dialing 3 might route the caller to yet another sub menu node withmore choices.
Note: The star and pound prompts help make the system easy to use. Be sure toinclude them in your greetings, particularly the star prompt if you have multiplemenu levels.
An example:
The illustration on the next page shows a typical MLAA implementation. Thegreeting at the top level is the main company greeting with the usual prompts todial an extension number, 0 for a live operator, and other digits to reachdestinations such as Sales (1) or Customer Support (2).
Mailbox 1 is a transfer-only mailbox that takes the caller to the Sales Manager whohas mailbox 2345.
Mailbox 2 is a Menu Tree mailbox. It takes the caller to a sub menu that plays thefollowing greeting:
"For Mitel Express Messenger, press 1. For NuPoint Messenger, press 2. For allother products, press 3. To return to the previous menu, press star. To repeat thechoices, press pound "
About Mailboxes
30
“1” is an extension mailbox belonging to the Express Messengertechnical support phone (Extension 3456). The greeting for this mailboxmight be
"All of our technical support representatives are busy at the moment. Please leaveyour name, telephone number and a brief message. Someone will get back to youas soon as possible."
NOTE: If extension 3456 belonged to a subscriber, such as the secretary for thetechnical support department, Mailbox 1 could be made a Transfer-Only mailboxinstead of an Extension mailbox. Callers could then dial 3456 to reach the secretary andleave messages for him or her. For more information on setting up a Transfer-Onlymailbox for such an application, see Example 2 on page 27.
“2” is also an extension mailbox. It belongs to the NuPoint Messenger technicalsupport phone (extension 4567) and has a greeting similar to Mailbox 1.
“3” is a Menu Tree mailbox that takes the caller to another sub menu of choices.The number for this Menu Tree mailbox is 5678. A single-digit mailbox could beused but because there are so few on them, a regular extension mailbox is usedinstead.
See page 40 for instructions on using a telephone to add Menu Tree Mailboxes andpage 45 for instructions on using Express Manager to adding the mailboxes.
About Mailboxes
31
Figure 6 – Multi-level Auto Attendant Call Processing Sequence
ExtensionMailbox 3456
Call transfers to extension 3456,reverting to mailbox 3456 if theextension is busy or notanswering.
MLAA Call Processing
Main Menu
The caller dials digits (actuallya mailbox number) on thekeypad.
Express Messenger Auto Attendant answersan outside call caller and plays the companygreeting – e.g., "Thank you for calling ABCcompany. If you know the extension of theperson you are calling, enter it now. Forsales, press 1, for customer support, press2, for assistance press 0, or stay on theline."
Outside caller initiates the call
Caller enters 0 toreach the Operator
Call is transferredto the Operator
Caller enters anextension number.
Callers dial 2 forCustomer Support
Callers dial 1 forSales
Sub Menu
Callers dial 1 forExpress Messenger
Callers dial 2 forNuPoint Messenger
Callers dial 3 for allother products.
Menu TreeMailbox 2
Caller hears greeting for sub menumailbox – e.g., "For Mitel ExpressMessenger, press 1. For NuPointMessenger, press 2. For all otherproducts, press 3. To return to theprevious menu, press star."
Transfer-OnlyMailbox
Call transfers to associatedextension number – SalesManager, mailbox 2345 .
ExtensionMailbox 4567
Call transfers to extension 4567,reverting to mailbox 4567 if theextension is busy or notanswering.
Menu TreeMailbox 5678
Caller hears greeting for submenu mailbox.
Call transfers to associated extensionnumber, reverting to mailbox if exten-sion busy or not answering.
Extension Mailbox
About Mailboxes
32
Hospitality MailboxesThe Hospitality Option for hotel or motel applications provides two new types ofmailboxes: guest mailbox and front desk mailbox. These mailbox types are onlyavailable if the Hospitality Option or PMS Option is enabled. See Enabling theHospitality Option on page 95 or Enabling the PMS Option on page 96.
Front Desk Mailbox
The front desk attendant uses the front desk mailbox to administer the guestmailboxes. From the front desk mailbox, an attendant can
• help guests access their messages
• set the status of a guest mailbox to checked-in or checked-out
• set the language for the mailbox voice prompts (available insystems with Mitel Express Messenger Release 3.0 or later)
• move a guest’s messages to another mailbox
• access a guest’s mailbox
• access the standard voice mail features (the front desk mailboxprovides access to the Main Menu options for the front deskextension mailbox).
Guest Mailboxes
Guest mailboxes are assigned to the telephone extension in each guest room. Guestmailboxes provide guests with basic voice mail functionality. Guests can
• play messages that they have received
• create their own greetings
• set their own wake-up calls.
About Mailboxes
33
About the Auto AttendantFigure 7 illustrates the call processing steps that the Auto Attendant uses. Someimportant points of information follow:
• Callers dial a mailbox number even though they are prompted todial an extension or extension number. The mailbox’s associatedextension number is used to transfer the call. By default, a mailboxextension number is the same as the mailbox number. You canchange the extension number by entering the mailbox see EditMailbox on page 40.
• Single-digit mailboxes provide callers with easy to remembernumbers that get them to their party quickly. When callers press asingle-digit, they are accessing a mailbox number which isassociated with an extension number. Each extension isprogrammed with a mailbox number to use for message storageand retrieval. Therefore, messages for single-digit mailboxes arerouted to the mailbox number programmed on the phone.
About Mailboxes
34
Figure 7 - Auto Attendant Call Processing
Auto AttendantCall Processing
Express Messenger AutoAttendant answers an outsidecaller and plays the company
greeting
Outside caller initiates the call
The caller dials digits (actuallya mailbox number) on the
keypad
The station rings
Extension Only Call transfers to associated extension
number. When busy or no answer, callreverts to the mailbox numberprogrammed for the extension
Message OnlyCall sent directly to mailbox number
dialed
1 2 3
4 5 67 8 9
* 0 #
BELL
KEYPAD
Information Only
Call is transferredto the Operator
Caller enters 0 toreach the Operator
Transfer Only
Caller hears greeting formailbox number dialed.
Call transfers to associatedextension number. When busyor no answer, caller dials 0 oranother mailbox number
Notes: Any incoming external call that is madefrom a rotary phone to the auto attendant isautomatically routed to the operator.
Any internal call that is made from a rotaryphone to the auto attendant is disconnectedafter hearing the programmed greeting followedby “Thank you for calling. Goodbye”.
Changing Mailbox Parameters
35
Section 4: Changing Mailbox Parameters
You can modify any mailbox parameters that were set during initial installation.This section tells you how to add, edit, and delete mailboxes, and perform generalExpress Messenger maintenance.
The Mitel Express Messenger system is designed around the functionality of themailbox, and much of its power comes from the flexibility you have in customizingmailboxes. The table below summarizes each mailbox type and the functions itsupports.
Many mailbox parameters can also be modified from a PC running ExpressManager. Within this section, access from a DTMF telephone is described first,followed by access from Express Manager.
Mailbox Type
Function Extension MessageOnly
TransferOnly
InformationOnly
MenuTree
Guest FrontDesk
Transfers callerto theassociatedextension
Yes No Yes No Yes Yes Yes
Allowstransfers to theoperator
Yes Yes Yes Yes Yes Yes Yes
Plays themailboxgreeting orinformation
Yes Yes No Yes Yes Yes Yes
Records amessage
Yes Yes No No No Yes Yes
Notifies usersof messages
Yes Yes No No No Yes Yes
Changing Mailbox Parameters
36
Accessing the System Administrator’s MailboxYou must log in to the administrator’s mailbox to modify Express Messengersettings. Follow these steps to log in to the administrator’s mailbox.
1. From any internal DTMF telephone, lift the handset and obtain dialtone.
2. Dial the Express Messenger message center number. ExpressMessenger answers and plays the greeting.
3. Press [*] when you hear the greeting.
4. Express Messenger prompts you for a mailbox number.
5. Enter the system administrator mailbox number: [99 or 999 or 9999].
6. Express Messenger prompts you for a passcode.
7. Enter the passcode for the System Administrator’s mailbox.
8. See Setting and Changing Passcodes on page 64 to change thepasscode or passcode length. You are now logged in to the systemadministrator's mailbox. Follow the voice prompts for instructions oruse this section of the manual for reference.
Figure 8 shows the full system administrator menu.
Changing Mailbox Parameters
37
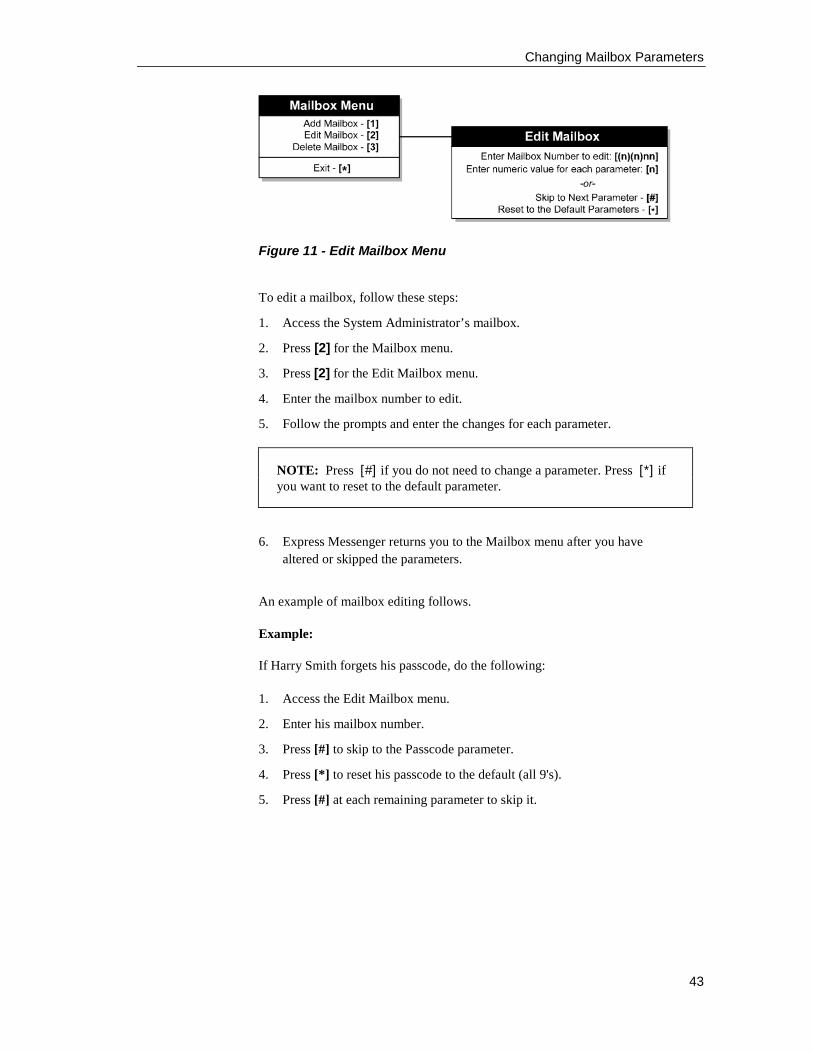
Figure 8 - System Administrator Menu
RAD GreetingsRAD Greetings
RAD Greetings
Record RAD Greetings
Configure RADGreeting Set
Changing Mailbox Parameters
38
New (or Repeat) InstallationFigure 9 shows the New Installation menu.
Figure 9 - New Installation
When you perform a new installation, the only system parameter you mustoverwrite is the FAX extension number. Note that if you are logged in as Manager,the New Installation [1] option is not available.
All other system parameters, greetings, mailbox setups, date and time settings,passcode length, and business hours are preserved. This allows you to upgrade thePBX without having to re-enter greetings and mailboxes.
Do not use the New Installation procedure to change your mailboxes. Instead, usethe Add Mailbox, Edit Mailbox, and Delete Mailbox procedures.
To re-install Express Messenger, follow these directions.
1. Access the System Administrator’s mailbox.
2. Select option number [1] from the main administration menu, thenfollow the prompts.
NOTE: If you had your dealer install Express Messenger initially, youmay want to have him or her perform the re-installation as well. If you didthe initial installation, then follow the original Installation Worksheets forthe new installation.
Main MenuNew Installation - [1]
Add, Edit, Delete Mailbox - [2]
Set Date/Time - [3]Change Business Hours/
System Greetings - [4]System Parameters - [5]
Passcodes - [6]Distribution Lists - [7]
Exit - [ ]*
New Installation
Exit - [ ]*
Changing Mailbox Parameters
39
Add, Edit, or Delete a Mailbox from a Telephone
Add Mailbox
Add a mailbox when you need a new mailbox; if the mailbox already exists andyou want to change it, use the Edit Mailbox function. Figure 10 shows the AddMailbox menu.
NOTE: No one can use a mailbox until the system administrator adds it.
Figure 10 - Add Mailbox Menu
To add a mailbox, follow this procedure:
1. Access the System Administrator’s mailbox.
2. Enter [2] for the Mailbox menu.
3. Enter [1] for the Add Mailbox menu.
4. Enter the mailbox number to add.
5. Use the keypad to enter the first five letters of the first name or lastname (as defined) of the person assigned to this mailbox. Use 7 for Qand 9 for Z.
If you do not want to include the mailbox in the directory, press [#] instead.
6. Press [#] when finished.
To add single-digit mailboxes
1. Decide which single-digit mailboxes to use for what purpose.
2. Access the System Administrator's mailbox.
3. Add each single-digit mailbox using the Add Mailbox procedure but donot attach a name to the mailbox. When prompted for a name, press #to skip to the next prompt.
Mailbox MenuAdd Mailbox - [1]Edit Mailbox - [2]
Delete Mailbox - [3]
Exit - [ ]*
Add MailboxEnter Mailbox Number to add: [(n)(n)nn]
When Done - [#]
Changing Mailbox Parameters
40
NOTE: After you enter a single-digit, Express Messenger pauses to makesure you are not entering more digits. Wait until Express Messengerprompts you for the mailbox name before pressing [#].
4. Edit the mailbox using the Edit Mailbox procedure to associate it withthe proper extension number and to specify the mailbox type as eitherextension or message only.
5. For each single-digit mailbox, create the proper greeting.
6. Create or change the company greeting, if desired, to include thesingle-digit mailboxes.
To add a Menu Tree mailbox:
1. Access the System Administrator’s mailbox.
2. Add a mailbox for each sub-level menu using the procedure on theprevious page for adding mailboxes.
Using the following greeting as an example,
"Thank you for calling ABC company. If you know the extension of the personyou are calling, enter it now. For sales, press 1, for customer support, press 2,for assistance press 0, or stay on the line."
create two mailboxes: one for sales and one for customer support.
Note: You do not need to assign an extension to Menu Tree mailboxes.
3. Edit the mailbox using the Edit Mailbox procedure below to specify themailbox type as Menu Tree.
4. Log into each Menu Tree mailbox, using the mailbox’s number andpasscode.
5. Record a greeting with the required prompts – for example, “For MitelExpress Messenger, press 1. For NuPoint Messenger, press 2. For allother products, press 3. To return to the previous menu, press star. Torepeat the choices, press pound ."
6. Assign the next level mailboxes to the digits specified in the greeting.Continuing with the above example, assign digit 1 to the mailboxbelonging to the Express Messenger technical support phone and thedigit 3 to the mailbox belonging to the NuPoint Messenger technicalsupport phone.
Changing Mailbox Parameters
41
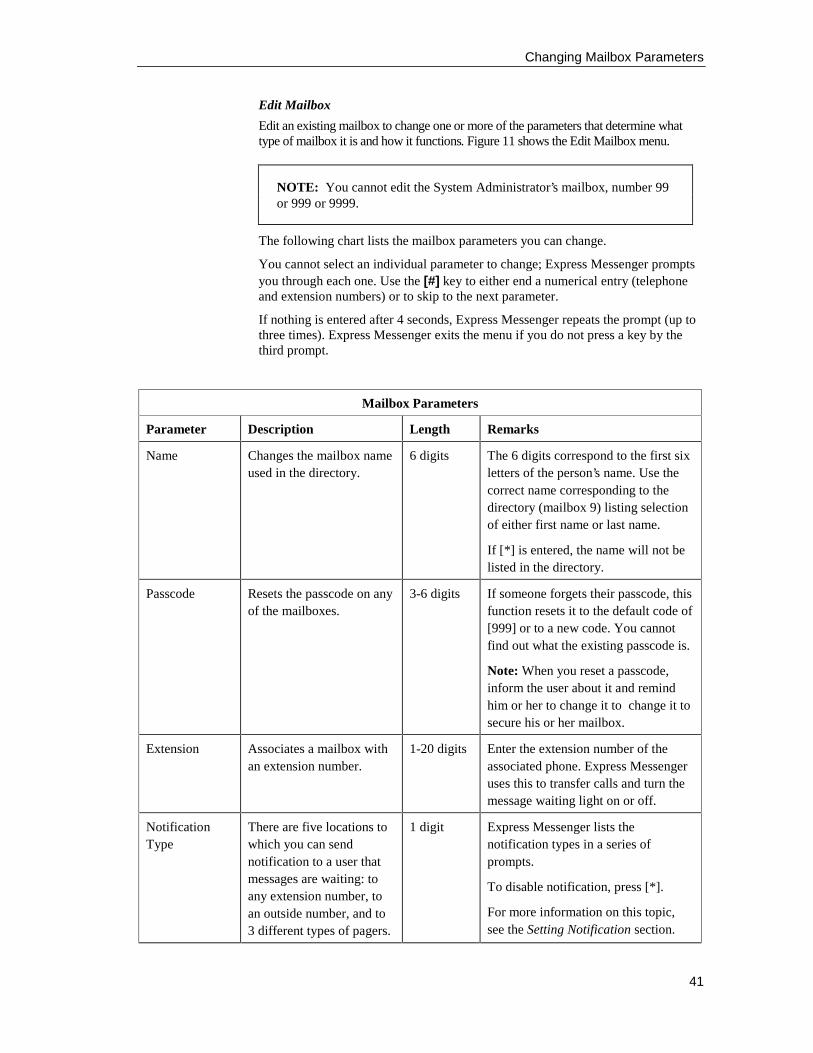
Edit Mailbox
Edit an existing mailbox to change one or more of the parameters that determine whattype of mailbox it is and how it functions. Figure 11 shows the Edit Mailbox menu.
NOTE: You cannot edit the System Administrator’s mailbox, number 99or 999 or 9999.
The following chart lists the mailbox parameters you can change.
You cannot select an individual parameter to change; Express Messenger promptsyou through each one. Use the [#] key to either end a numerical entry (telephoneand extension numbers) or to skip to the next parameter.
If nothing is entered after 4 seconds, Express Messenger repeats the prompt (up tothree times). Express Messenger exits the menu if you do not press a key by thethird prompt.
Mailbox Parameters
Parameter Description Length Remarks
Name Changes the mailbox nameused in the directory.
6 digits The 6 digits correspond to the first sixletters of the person’s name. Use thecorrect name corresponding to thedirectory (mailbox 9) listing selectionof either first name or last name.
If [*] is entered, the name will not belisted in the directory.
Passcode Resets the passcode on anyof the mailboxes.
3-6 digits If someone forgets their passcode, thisfunction resets it to the default code of[999] or to a new code. You cannotfind out what the existing passcode is.
Note: When you reset a passcode,inform the user about it and remindhim or her to change it to change it tosecure his or her mailbox.
Extension Associates a mailbox withan extension number.
1-20 digits Enter the extension number of theassociated phone. Express Messengeruses this to transfer calls and turn themessage waiting light on or off.
NotificationType
There are five locations towhich you can sendnotification to a user thatmessages are waiting: toany extension number, toan outside number, and to3 different types of pagers.
1 digit Express Messenger lists thenotification types in a series ofprompts.
To disable notification, press [*].
For more information on this topic,see the Setting Notification section.
Changing Mailbox Parameters
42
NotificationNumber
Sets the telephone numberto be dialed when amessage is received.
1-35 digits This parameter will only be asked forif notification is enabled.
To disable notification, press [*].
NotificationAccess
Allows the user to set theirown notification type andnumber.
1 digit To enable user access, press [1].
To disable user access, press [2].
Mailbox Type Sets mailboxes to beextension, message-only,transfer-only, information-only, menu tree, guest, orfront desk.
1 digit If [*] is entered, an extension mailboxis automatically set.
The guest and front desk mailboxesare only available if the HospitalityOption is enabled.
Language Sets the language for thevoice mail prompts that theuser of this mailbox hears.This option applies only tobilingual systems. Formore information, seeSetting the Voice PromptLanguage on page 84. Seealso, Enabling theBilingual Prompts Optionon page 94.
1 digit Express Messenger lists the languagesin a series of prompts.
Changing Mailbox Parameters
43
Figure 11 - Edit Mailbox Menu
To edit a mailbox, follow these steps:
1. Access the System Administrator’s mailbox.
2. Press [2] for the Mailbox menu.
3. Press [2] for the Edit Mailbox menu.
4. Enter the mailbox number to edit.
5. Follow the prompts and enter the changes for each parameter.
NOTE: Press [#] if you do not need to change a parameter. Press [*] ifyou want to reset to the default parameter.
6. Express Messenger returns you to the Mailbox menu after you havealtered or skipped the parameters.
An example of mailbox editing follows.
Example:
If Harry Smith forgets his passcode, do the following:
1. Access the Edit Mailbox menu.
2. Enter his mailbox number.
3. Press [#] to skip to the Passcode parameter.
4. Press [*] to reset his passcode to the default (all 9's).
5. Press [#] at each remaining parameter to skip it.
Changing Mailbox Parameters
44
Delete Mailbox
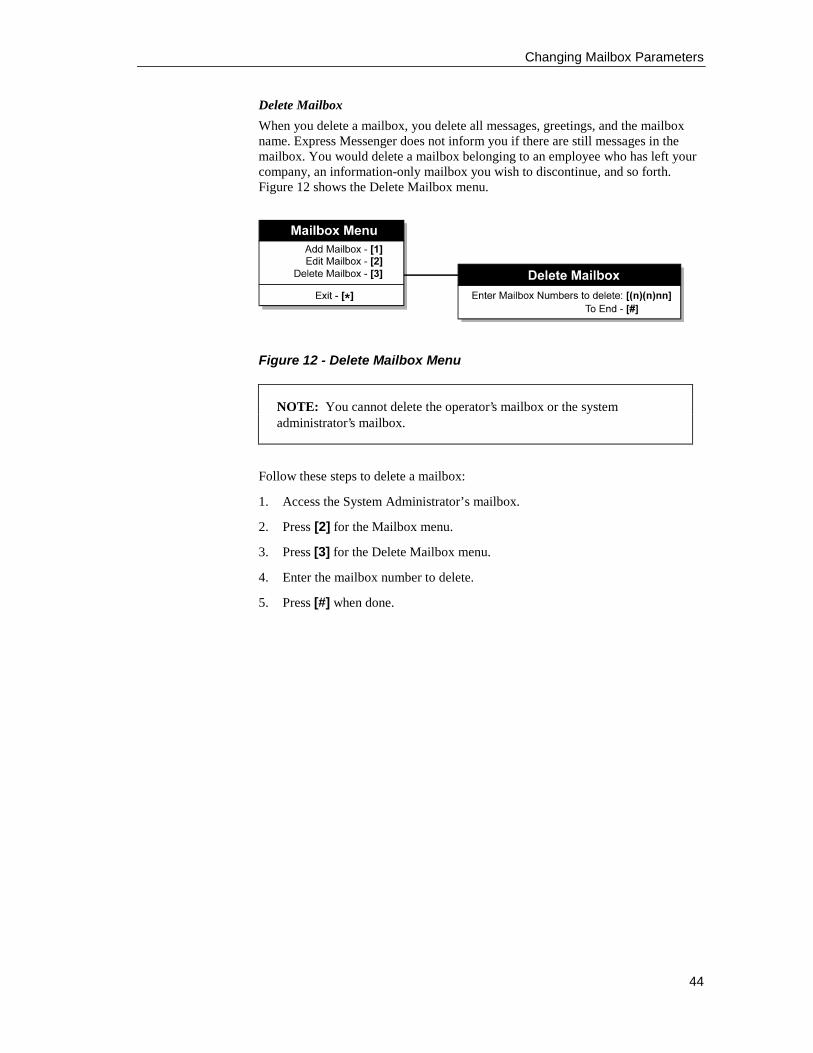
When you delete a mailbox, you delete all messages, greetings, and the mailboxname. Express Messenger does not inform you if there are still messages in themailbox. You would delete a mailbox belonging to an employee who has left yourcompany, an information-only mailbox you wish to discontinue, and so forth.Figure 12 shows the Delete Mailbox menu.
Figure 12 - Delete Mailbox Menu
NOTE: You cannot delete the operator’s mailbox or the systemadministrator’s mailbox.
Follow these steps to delete a mailbox:
1. Access the System Administrator’s mailbox.
2. Press [2] for the Mailbox menu.
3. Press [3] for the Delete Mailbox menu.
4. Enter the mailbox number to delete.
5. Press [#] when done.
Changing Mailbox Parameters
45
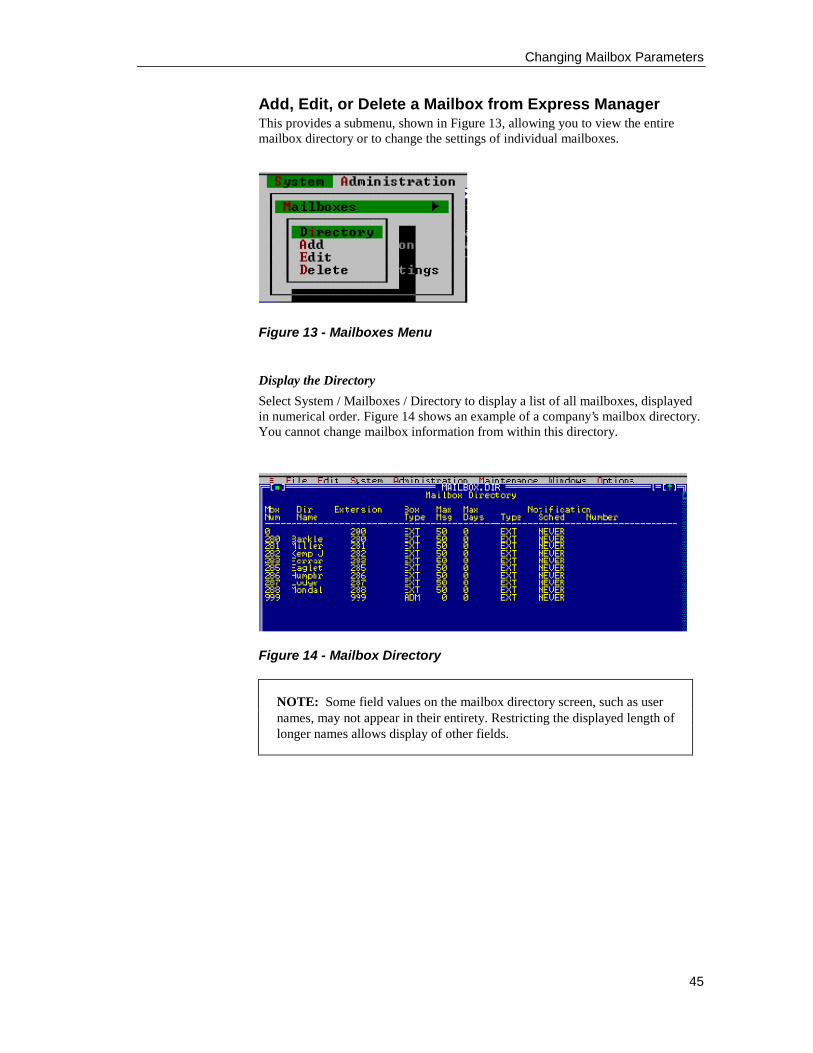
Add, Edit, or Delete a Mailbox from Express ManagerThis provides a submenu, shown in Figure 13, allowing you to view the entiremailbox directory or to change the settings of individual mailboxes.
Figure 13 - Mailboxes Menu
Display the Directory
Select System / Mailboxes / Directory to display a list of all mailboxes, displayedin numerical order. Figure 14 shows an example of a company’s mailbox directory.You cannot change mailbox information from within this directory.
Figure 14 - Mailbox Directory
NOTE: Some field values on the mailbox directory screen, such as usernames, may not appear in their entirety. Restricting the displayed length oflonger names allows display of other fields.
Changing Mailbox Parameters
46
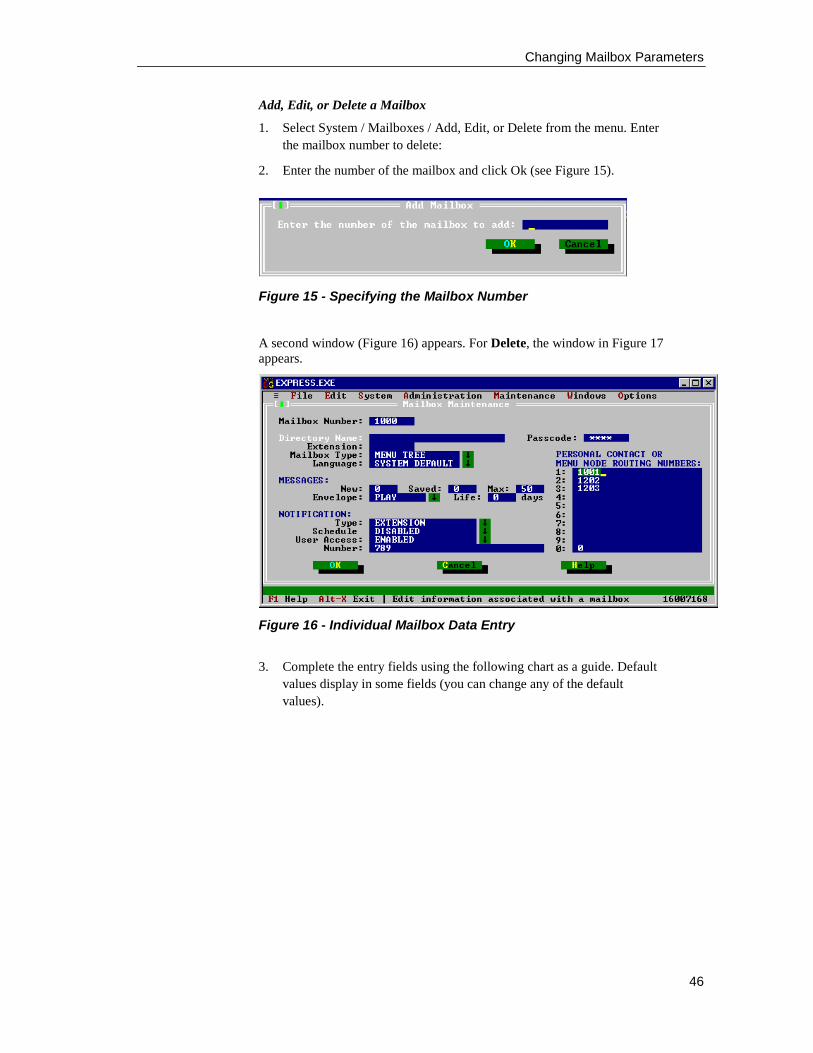
Add, Edit, or Delete a Mailbox
1. Select System / Mailboxes / Add, Edit, or Delete from the menu. Enterthe mailbox number to delete:
2. Enter the number of the mailbox and click Ok (see Figure 15).
Figure 15 - Specifying the Mailbox Number
A second window (Figure 16) appears. For Delete, the window in Figure 17appears.
Figure 16 - Individual Mailbox Data Entry
3. Complete the entry fields using the following chart as a guide. Defaultvalues display in some fields (you can change any of the defaultvalues).
Changing Mailbox Parameters
47
Add or Edit a Mailbox
Field: Enter as follows:
Directory Name Type up to a 21-character name to identify the user of the new mailbox. Enter thename in the format you choose. Express Manager takes only the first twocharacters for the directory in mailbox 9. Enter the name (first name first or lastname first) according to the option selected in the System Miscellaneous window.
This name also displays on the MAILBOX DIRECTORY window.
Passcode Type a 3 to 6-digit passcode. Express Messenger requires users to enter theircurrent passcode to retrieve their messages. The passcode is always displayed asasterisks.
Note: The default passcode is all 9s. Only the user of each mailbox should changeit. Express Messenger automatically prompts subscribers to record their name andpermanent greeting the first time that they access their mailbox ExpressMessenger continues to prompt subscribers until they change the default passcode.If a user forgets his or her passcode, reset it entering all 9s. Tell the user the newcode and remind he or she to change it to secure his or her mailbox.
Extension Enter the extension number where you want Express Messenger to direct the callsfor this user mailbox. This is normally a 2 to 4-digit extension number but can beup to 13 characters long. Do not use the following numbers: 0 (reserved foroperator), 9 (reserved for directory listing) or any other mailbox beginning withthe number 9 (reserved for system use). Default is extension number.
OperatorExtension
Sets the location to which calls are directed when a caller presses “0” whilelistening to a mailbox greeting and recording prompt. A location can be any PBXdestination from 1 to 20 digits including extensions, external telephone numbers,hunt group access codes and system abbreviated speed dialing numbers.
The default setting sends calls to Mailbox 0, the mailbox usually reserved for thecompany-wide operator. Specifying a destination other than the company-wideoperator is useful in multi-tenant applications where a voice mail system servicestwo or more businesses. With flexible Dial “0” destinations, each business canredirect their calls to separate locations. The feature also enables you toaccommodate users who want callers to transfer to a departmental secretary, ratherthan a company-wide operator.
NOTE: The Operator Extension cannot be set from the SystemAdministrator’s mailbox.
Changing Mailbox Parameters
48
Add or Edit a Mailbox
Mailbox Type Click on the down arrow to the right of the field to display a menu, and then selectthe type of mailbox to set up:
Extension: This is the typical mailbox type associated with anextension. Express Messenger takes messages for abusy or unanswered extension.
Information: This mailbox is for audio information for the caller toonly hear. The caller cannot leave a message. Forexample, the message (or greeting) for this mailboxcould recite the company’s business hours or drivingdirections to your location.
Message Only: Express Messenger does not transfer calls to this typeof mailbox. Express Messenger immediately plays themailbox greeting and prompts the caller to leave amessage.
Transfer Only: Callers transferred to this mailbox cannot leave amessage. They may hear a prerecorded informationalannouncement or instruction.
Menu Tree: Menu Tree Mailboxes allow you to set up ahierarchical menu structure for multi-level autoattendant (MLAA) operation. In an MLAA system,callers reaching the Auto Attendant are routed fromthe main menu through to one or more additional submenus until their call is answered. Express Messengerplays greetings for this type of mailbox and transferscallers to and from the mailbox.
Guest: A Guest mailbox provides hotel or motel guests withbasic voice mail features. Guests can play messages,record their own greetings, and set up their own wake-up calls. This mailbox type is only available if theHospitality Option is enabled. See Enabling theHospitality Option on page 95 or Enabling the PMSOption on page 96.
Front Desk Callers transferred to this mailbox cannot leave amessage. They may hear a prerecorded informationalannouncement or instruction. This mailbox type isonly available if the Hospitality Option or PMSOption is enabled. See Enabling the HospitalityOption on page 95 or Enabling the PMS Option onpage 96.
Changing Mailbox Parameters
49
Add or Edit a Mailbox
Language Click on the down arrow to the right of the field to display a menu, and then selecta language for the voice mail prompts that the user of this mailbox hears. SelectSystem Default to set the language to whatever was specified for the entire systemduring installation.
Support for multilingual prompts requires MEM Release 3.0 or later. Forinformation on upgrading your system, see Performing Upgrades on page 102.
(Messages)New
A read-only field that displays the number of new messages in the user’s mailbox.
(Messages)Saved
A read-only field that displays the number of saved messages in the user’smailbox.
Max Number (ofmessages)
Enter a number up to 100 to specify the maximum number of messages that youwant Express Messenger to save in the mailbox.
(Message) Life Enter a number up to 99 specifying the number of days a saved message canremain in the mailbox before Express Messenger automatically deletes it.
Use 0 to revert to the system default (15 days).
Use 99 to indicate that Express Messenger should never delete messages.
NOTE: New messages can remain in the mailbox indefinitely.
(Messages)Envelope
Click on the field to display a menu. Select Play or No play if you want the user tohear the priority, date and time, plus caller ID information for each message.
Play: Automatically plays the message envelope with each message;no user input required.
No play: Suppresses the message envelope; the user must press a key tohear the envelope.
Changing Mailbox Parameters
50
Add or Edit a Mailbox
(Notification)Type
Click on the arrow to the right of the field to display a menu. Select the device onwhich Express Messenger calls the user (the system must have the Notificationfunction turned on to activate paging for any mailbox). Double click the requireddevice.
Digital Pager: Tells Express Messenger to notify the subscriber at a digital-type pager.
Disabled: Express Messenger should not notify the subscriber.
Extension: Tells Express Messenger to notify the subscriber at an insideextension.
Message Pager: Tells Express Messenger to notify the subscriber at amessage-type pager.
Telephone: Tells Express Messenger to notify the subscriber at an outsidetelephone number.
Tone Pager: Tells Express Messenger to notify the subscriber at a tone-type pager.
NOTE: If there is no number in the Notification Number field,notification cannot occur even if you enable it.
(Notification)Schedule
Click on the down arrow next to the field to display a menu. Select when youwant Express Messenger to notify the user.
Around The Clock: Express Messenger notifies the subscriber whenever amessage arrives.
Disabled: Express Messenger does not notify the subscriber.
Closed: Express Messenger notifies the subscriber only duringclosed business hours.
Open: Express Messenger notifies the subscriber only duringopen business hours.
(Notification)User Access
Enabled: User can change his or her pager number.
Disabled: User cannot change his or her pager number. The systemadministrator must change it.
(Notification)Number
Enter the telephone number (up to 35 digits) for Express Messenger to call foruser notification. Valid digits include 0 to 9, and the [*], [#], and [,] keys.

Changing Mailbox Parameters
51
Add or Edit a Mailbox
Personal Contactor Menu NodeRoutingNumbers
Personal Contact Enter numbers (cell phone, pager, fax, extensionNumbers: etc.) where callers can contact a mailbox owner instead of
leaving a message. Callers reaching the owner’s mailboxwill hear the owner’s greeting followed by prompts such as"...to reach this person’s cell phone, press C, the 2 key."Callers responding to a prompt will be transferred to thecorresponding number.
Extension-type mailboxes can be programmed with up toten contact numbers, one to each digit key [0] through [9].Key [2] is reserved for cellular phone numbers, key [3] forfax numbers, and key [7] for pager numbers. The promptsfor the reserved keys are predefined (i.e., “canned”) andplay in the language specified for the mailbox. The [0] keyis normally the ‘transfer to operator’ key. If it isreprogrammed as a personal contact key, and you laterwish to return it to a “transfer to operator” key, then deletethe entry in the 0 field, leaving it blank.
Guest-type mailboxes are limited to two contact numbers:one for cell phone, the other for pager.
NOTE: The Personal Contact Numbers feature canbe enabled or disabled system-wide. For moreinformation see page 86.
Menu Node Applies to Menu Tree mailboxes used for Multi-level autoattendant. Enter the mailbox number where calls should gowhen a caller presses the associated key. The greetingrecorded for the Menu Node mailbox prompts callers forthe key, as in the following greeting:
For Mitel Express Messenger, press 1. For NuPointMessenger, press 2. For all other products, press 3.
NOTE: Once you have added a mailbox to Express Messenger, instruct thenew user to access the mailbox and record his or her name and personalgreeting. This is a good time to give the user a User Guide and to let theuser follow step-by-step instructions on how to personalize a mailbox.
Changing Mailbox Parameters
52
Deleting a Mailbox
Select Delete from the System / Mailboxes menu; the window in Figure 17appears.
1. Enter the number of the mailbox you want to delete in the DeleteMailbox window.
Do not delete the following mailboxes:0 (reserved for operator)9 (reserved for directory listing)Any mailbox beginning with the number 9 (reserved for system use).
Figure 17 - Deleting a Mailbox
2. Select Ok to delete the mailbox. A confirmation window (Figure 18)appears to verify the mailbox you want to delete.
Figure 18 - Confirmation Window
Performing System Administration from a Telephone
53
Section 5: Performing System Administrationfrom a Telephone
Setting Date, Time, and Business HoursDuring Express Messenger installation, your Express Messenger dealer shouldhave set the date and time. You have the option to allow Express Messenger tomonitor the PBX system time so that date and time changes you make on yourPBX will be automatically inherited by Express Messenger, thereby keeping thetwo system times in synchronization. In this case, you should not have to repeat theprocess of updating the date an time on Express Messenger.
Business hours are the opening and closing times for your company. They can bedifferent for each day of the week. Figure 19 shows the Date/Business Hoursmenu.
Figure 19 - Date/Business Hours Menu
Setting Date and Time
Follow these steps to set the date and time:
1. Access the System Administrator’s mailbox.
2. Press [3] for the Date/Business Hours menu.
3. Press [1] for the Set Date/Time menu.
4. Enter the month, day, and year, using two digits for each: [mmddyy] -- for example, 061100 = June 11, 2000.
The date format for French is [ddmmyy].
5. Enter the current time, using four digits, in the 24-hour format:[hhmm] – for example, 1420 = 2:20 PM.
Express Messenger returns you to the Date/Business Hours menu.
Performing System Administration from a Telephone
54
Checking Date and Time
Follow these steps to check the date and time:
1. Access the System Administrator’s mailbox.
2. Press [3] for the Date/Business Hours menu.
3. Press [1] for the Set Date/Time menu.
4. Press [#] to skip the entry of the date, then again to skip entry of thetime. Express Messenger then reports the date and time currentlyentered on the system.
Express Messenger returns you to the main Date/Business Hours menu.
Setting Business Hours
Follow these steps to set business hours:
1. Access the System Administrator’s mailbox.
2. Press [3] for the 'Date/Business Hours' menu.
3. Press [2] for the 'Set Business Hours' menu.
4. Express Messenger cycles through the days of the week asking you toinput the opening and closing times for each day, beginning withSunday. If your business will not be open on the day listed, enter[0000] for both the opening and closing times.
Enter the opening time (in 24-hour format): [hhmm].
Enter the closing time (in 24-hour format): [hhmm].
Express Messenger returns you to the Date/Business Hours menu.
Recording System GreetingsIn the System Greetings menu, you record a company greeting for ExpressMessenger to use when answering the telephone. For hotel/motel applications, youalso record a greeting that guests hear when they call Express Messenger toretrieve messages or set wake-up calls. There are three types of greetings: aprimary greeting set, an alternate greeting set and a RAD greeting set (RAD standsfor Recorded Announcement Device. Express Messenger can provide RADfunctionality on any of its ports. For more information, see page 88.) Each of thesesets has an open greeting, a closed greeting, and a temporary greeting. Figure 20shows the System Greetings menu.
For bilingual systems, you record a welcome greeting and a set of primary,alternate, and temporary greetings in the two languages—for example, English andFrench.
Performing System Administration from a Telephone
55
Figure 20 - The Greetings Menu
The Primary greeting set contains the greetings recorded during installation, whichExpress Messenger uses until you record and assign an Alternate greeting set.
You can record up to 8 alternate greeting sets (numbered 2 through 9), and assigneach set to a different Express Messenger port. This feature provides flexibility.For example, two or more businesses can share a single PBX and ExpressMessenger unit, or a single business can have specialized greetings for 800numbers. Assigning alternate greeting sets to Express Messenger ports is donethrough the System Parameters menu. However, determining which outside lineseach Express Messenger port should answer is done through PBX programming.Call your Express Messenger dealer for assistance.
Both the primary and alternate greeting sets have open, closed, and temporarygreetings. Selection of the proper greeting occurs as follows:
• If the PBX Night/Day Switching mode is set to Day service andyou enable synchronization of the PBX system time, the systemplays the open greeting to callers.
• If the PBX Night/Day switching mode is set to Night1 or Night2service and you enable synchronization of the PBX system time,the auto attendant plays the closed greeting to callers. For example,if someone forgets to activate Night mode before closing the officewhen Night/Day Switching is enabled, the auto attendant plays theopen greeting to all callers regardless of the system time. If you donot enable synchronization with PBX time, Express Messengerreferences the business hours specified during initial installation. Itplays the open greeting when your company is open and the closedgreeting when your company is closed.
• The temporary greeting overrides both the Night/Day Switchingmode and System Business Hours and plays to all callers for thenumber of days you specify.
Open Greeting – [1]Closed Greeting – [2]
Temporary Greeting – [3]Bilingual Welcome Greeting – [4]**
Exit – [ ]
Primary Greeting
Open Greeting – [1]Closed Greeting – [2]
Temporary Greeting – [3]Bilingual Welcome Greeting – [4]**
Exit – [ ]
Alternate Greeting
• Record Greeting:
Accept – [1]Review – [2]
Re-record – [3]Cancel – [ ]
For All Greetings
• Enter number of days:
[n] or [nn]
• Record Greeting
For Temporary Greetings
Record Greeting:
In default language – [1]In alternate language – [2]
For Bilingual Greetings
Primary Greeting – [1]Alternate Greeting – [n]
(assign number)Guest Login Greeting – [9]*
Exit – [ ]
System Greetings
* Requires Hospitality Option or PMS Option** Requires Bilingual Voice Prompts Option
Performing System Administration from a Telephone
56
For bilingual systems, you must record a bilingual welcome greeting that includesan instruction to dial the Language Change Mailbox number. When callers dial thenumber, all subsequent prompts Express Messenger plays will be in the alternatelanguage.
Primary Greeting Set
Follow these steps to record the primary greeting set:
1. Access the System Administrator’s mailbox.
2. Press [4] for the System Greetings menu.
3. Press [1] to set the primary greeting.
4. If prompted, press [1] to assign greetings in the default systemlanguage or [2] for the alternate language.
5. Follow the instructions on the next page(s) for assigning Open, Closedor Temporary greetings for your primary greeting set.
Alternate Greeting Set
Follow these steps to record an alternate greeting set:
1. Access the System Administrator’s mailbox.
2. Press [4] for the System Greetings menu.
3. Select a number, 2 through 9, for an alternate greeting set.
4. Follow the instructions on the next page(s) for making Open, Closed, orTemporary greetings for your alternate greeting set.
Performing System Administration from a Telephone
57
Open or Closed Greetings
To set open or closed greetings for a primary or alternate greeting set:
1. After making your selection for either a primary or an alternate greeting(from the previous page):
2. Press [1] for an Open greeting.
-or-
3. Press [2] for a Closed greeting.
4. If prompted, press [1] to assign greetings in the default systemlanguage or [2] for the alternate language.
5. Record the greeting speaking clearly into a handset, not a speakerphone.
6. Press any key to stop recording.
7. After recording, select one of the following options:
[1] Accept[2] Review[3] Re-record[*] Cancel
Express Messenger returns you to the ’System Greetings’ menu.
If you are recording bilingual greetings, repeat the above procedure beginning atstep 2 for the other language.
Temporary Greetings
Temporary greetings are used during the holidays or vacation periods, which lastonly a few days or weeks. A temporary greeting overrides both the open and closedgreetings. An example of a temporary greeting is given below.
"Happy Holidays from all of us at ABC Company. We are closed from Friday,December 23 until Monday, January 2. To leave a message, enter the number ofthe person you wish to reach or press 9 for the directory."
You are first prompted for the number of days, between 01 and 99, that thegreeting should play. After that, follow the same sequence as the open and closedgreetings: record the greeting, then select from the available options. To cancel anexisting temporary greeting, enter 00 for the number of days.
To set temporary greetings for a primary or alternate greeting set:
1. Choose the primary or alternate greeting set and then press [3] to createa temporary greeting.
2. Enter the number of days for the greeting to play: [nn]
3. Enter a 2-digit number between 01 and 99. If you enter 00, the greetingis canceled.
4. If prompted, press [1] to assign greetings in the default systemlanguage or [2] for the alternate language.
Performing System Administration from a Telephone
58
5. Record the greeting, speaking clearly into a handset, not a speakerphone.
6. Press any key to stop recording.
7. After finishing, select one of the following options:
[1] Accept[2] Review[3] Re-record[*] Cancel
Express Messenger returns you to the ’System Greetings’ menu.
To disable an existing temporary greeting, first record something over the currentgreeting, then select ‘00’ for the number of days.
If you are recording bilingual greetings, repeat the above procedure beginning atstep 2 for the other language.
Bilingual Welcome Greeting
The Bilingual Welcome Greeting is the first greeting that the Express MessengerAuto Attendant plays when it answers an outside call. You record the greeting inthe two languages specified during installation of Express Messenger. Include inthe greeting an instruction to callers to dial the Language Change Mailbox numberfor service in the alternate language. The default Language Change Mailboxnumber is 8.
The Bilingual Welcome Greeting is only available if the Bilingual Voice PromptsOption is enabled. See page 94 for more information.
Follow these steps to record the Bilingual Welcome Greeting:
1. Access the System Administrator’s mailbox.
2. Press [4] for the System Greetings menu.
3. Press [1] to set the primary greeting.
4. Press [4] to set the bilingual welcome greeting.
5. Record the greeting, speaking clearly into a handset, not a speakerphone. The following, is a typical bilingual in English and French:
“Thank you for calling ABC Industries. Merci d’appeler les Industries ABC.Pour le service en francais, composez 8.”
6. Press any key to stop recording.
7. After finishing, select one of the following options:
[1] Accept[2] Review[3] Re-record[*] Cancel
Express Messenger returns you to the ’System Greetings’ menu.
Performing System Administration from a Telephone
59
Guest Login Greeting
The Guest Login Greeting plays when Express Messenger answers a call from atelephone assigned to a guest mailbox.
The Guest Login Greeting is only available if the Hospitality Option (with orwithout PMS Support). See page 95 for more information.
Follow these steps to record the Guest Login Greeting:
1. Access the System Administrator’s mailbox.
2. Press [4] for the System Greetings menu.
3. Press [9] to set the Guest Login greeting.
Record the greeting, speaking clearly into a handset, not a speaker phone. Forbilingual systems, record the greeting in both languages.
4. Press any key to stop recording.
5. After finishing, select one of the following options:
[1] Accept[2] Review[3] Re-record[*] Cancel
Express Messenger returns you to the 'System Greetings' menu.
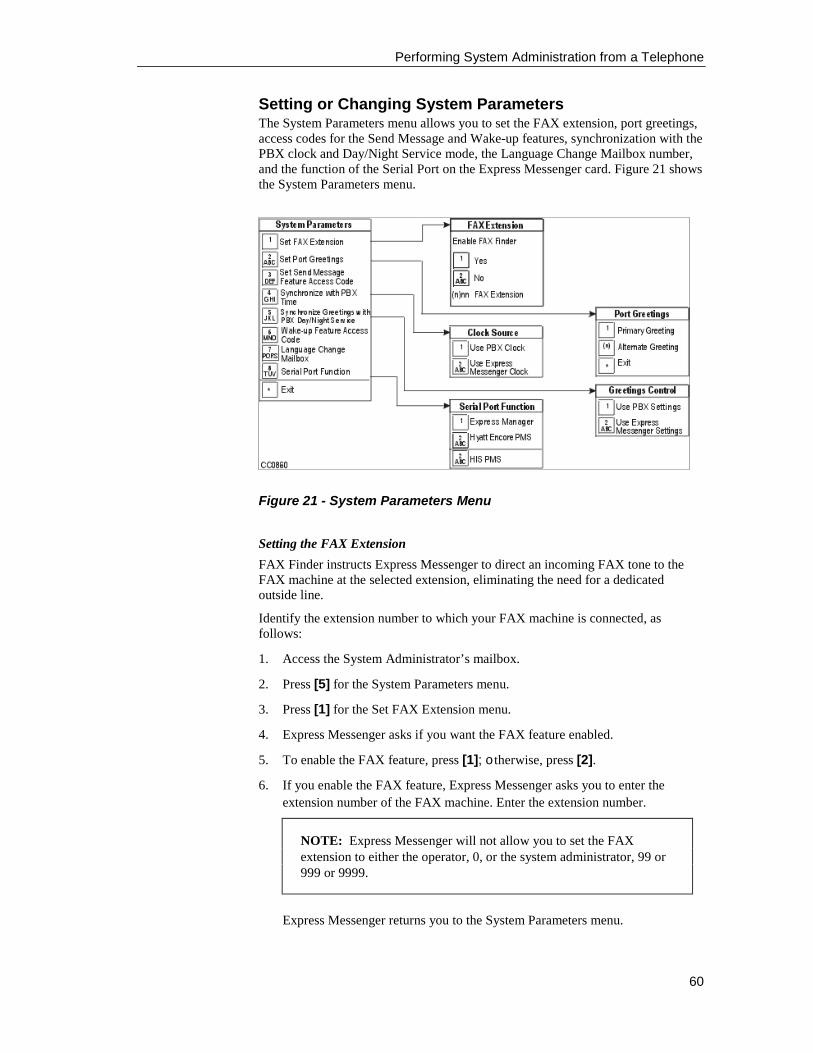
Performing System Administration from a Telephone
60
Setting or Changing System ParametersThe System Parameters menu allows you to set the FAX extension, port greetings,access codes for the Send Message and Wake-up features, synchronization with thePBX clock and Day/Night Service mode, the Language Change Mailbox number,and the function of the Serial Port on the Express Messenger card. Figure 21 showsthe System Parameters menu.
Setting the FAX Extension
FAX Finder instructs Express Messenger to direct an incoming FAX tone to theFAX machine at the selected extension, eliminating the need for a dedicatedoutside line.
Identify the extension number to which your FAX machine is connected, asfollows:
1. Access the System Administrator’s mailbox.
2. Press [5] for the System Parameters menu.
3. Press [1] for the Set FAX Extension menu.
4. Express Messenger asks if you want the FAX feature enabled.
5. To enable the FAX feature, press [1]; otherwise, press [2].
6. If you enable the FAX feature, Express Messenger asks you to enter theextension number of the FAX machine. Enter the extension number.
NOTE: Express Messenger will not allow you to set the FAXextension to either the operator, 0, or the system administrator, 99 or999 or 9999.
Express Messenger returns you to the System Parameters menu.
Figure 21 - System Parameters Menu
Performing System Administration from a Telephone
61
Setting Port Greetings
You can assign different greetings for each Express Messenger voice mail port,either the primary greeting set or one of eight alternate greeting sets. For example,if you have a 4-port system, you can assign one set of greetings for the first twoports and a different set of greetings for the last two ports.
The System Parameters menu assigns alternate greeting sets to Express Messengerports. However, PBX programming determines which outside lines each ExpressMessenger port should answer.
To assign greetings to Express Messenger ports:
1. Access the System Administrator’s mailbox.
2. Press [5] for the System Parameters menu.
3. Press [2] for the Assign Greetings menu.
4. For each port, Express Messenger asks if the caller should hear theprimary greeting or an alternate greeting.
For the primary greeting set, enter: [1]
For an alternate greeting, enter the greeting set number: [n]
After you respond for each port, Express Messenger returns to the SystemParameters menu.
Setting the Send Message Feature Access Code
The PBX requires a Send Message Feature Access Code to allow ExpressMessenger to send a command to light or extinguish the Message Lamp at theselected extension, eliminating the need for a dedicated outside line.
1. Access the System Administrator’s mailbox.
2. Press [5] for the System Parameters menu.
3. Press [3] for the Set Send Message Feature Access Code menu.
4. Express Messenger asks you to enter the Send Message Feature AccessCode.
5. Enter the feature access code, as provided by the PBX installer.
Performing System Administration from a Telephone
62
Synchronizing Express Messenger with the PBX Time
You can use either the PBX clock or the Express Messenger internal clock as thetime source for the Express Messenger system. By default, the system uses itsinternal clock.
1. Access the System Administrator’s mailbox.
2. Press [5] for the System Parameters menu.
3. Press [4] for the Set Clock Source menu.
4. Press [1] to set the PBX clock as the time sourceorPress [2] to set the Express Messenger internal clock as the time source.
Synchronizing Express Messenger Greetings with the PBX Day/Night Setting
You can set the system to use the open or closed greeting based on the PBXDay/Night mode settings or based on the Express Messenger business hours. Bydefault, the system uses the Express Messenger business hours.
The PBX installer must set the PBX clock to the correct format for the PBXDay/Night mode to function. See the Installation Worksheet (Form 04: ClockFormat) for the required PBX programming.
1. Access the System Administrator’s mailbox.
2. Press [5] for the System Parameters menu.
3. Press [5] for the Set Greeting Control menu.
4. Press [1] to select the PBX Day/Night mode settingsorPress [2] to select the Express Messenger business hours.
Setting the Wake-up Feature Access Code
This feature access code applies to systems that have the Hospitality Optionenabled. Guests dial the access code to set and cancel automatic wake-up calls. Thecode must match the code that you programmed in Form 02 of the PBX (refer tothe Installation Worksheet).
1. Access the System Administrator’s mailbox.
2. Press [5] for the System Parameters menu.
3. Press [6] for the Wake-up Feature Access Code menu.
4. Enter the feature access code, as provided by the PBX installer.
Performing System Administration from a Telephone
63
Setting the Language Change Mailbox NumberYou can program the system to provide voice prompts in a second language. Whencallers reach the auto attendant or a subscriber’s mailbox, they can dial theLanguage Change Mailbox number specified in the greeting to hear subsequentprompts in the second language.
NOTE: Bilingual voice prompts is a feature of Mitel Express MessengerRelease 3.0. For information on enabling bilingual prompts, see page 94.
1. Access the System Administrator’s mailbox.
2. Press [5] for the System Parameters menu.
3. Press [7] for the Language Change Mailbox menu.
4. Press [1] to enable the Language Change mailbox or Press [2] todisable it.
5. Enter the mailbox number.
Setting the Serial Port Function
The serial port on the Express Messenger card can be set to communicate with aPC running Express Manager or a Hyatt Encore or HIS Property ManagementSystem (PMS). Connecting a PMS to Express Messenger requires the PMS Option;for more information, see page 96.
You can switch the port from PMS to Express Manager to make changes to thevoicemail system at any time. When communication with the PMS is restored,Express Messenger will automatically update its database with mailbox statuschanges made from the PMS.
NOTE: Because Express Messenger cannot indicate check-ins and check-outs to the PMS, guests should always be checked in and out from thePMS. For a complete list of PMS functions supported, see Appendix E.
1. Access the System Administrator’s mailbox.
2. Press [5] for the System Parameters menu.
3. Press [8] for the Serial Port Function menu.
4. Press [1] to set the serial port function to Express Manager, [2] to setthe port to Hyatt Encore PMS, or [3] to set the port to HIS PMS.
5. Set the communications parameters on the PMS terminal to match theExpress Messenger card.
Hyatt Encore HISBaud Rate: 1200 2400
Parity: Even EvenCharacter length: 7 7
Number of stop bits: 1 1
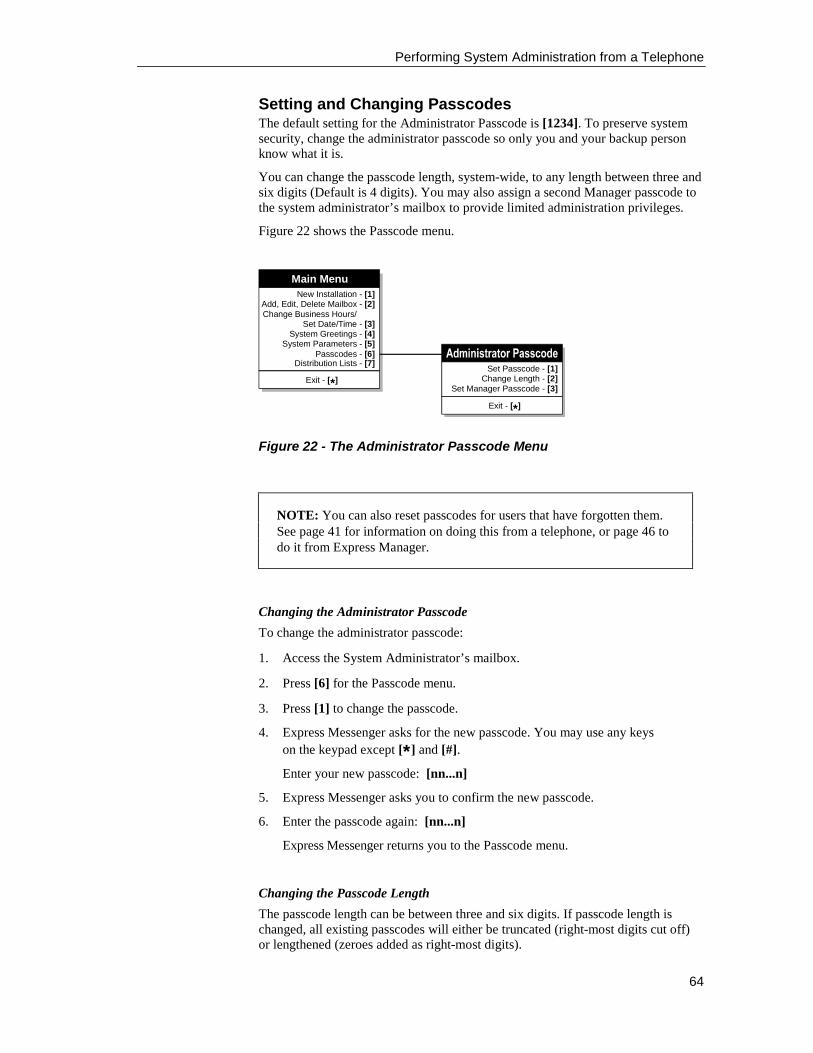
Performing System Administration from a Telephone
64
Setting and Changing PasscodesThe default setting for the Administrator Passcode is [1234]. To preserve systemsecurity, change the administrator passcode so only you and your backup personknow what it is.
You can change the passcode length, system-wide, to any length between three andsix digits (Default is 4 digits). You may also assign a second Manager passcode tothe system administrator’s mailbox to provide limited administration privileges.
Figure 22 shows the Passcode menu.
Figure 22 - The Administrator Passcode Menu
NOTE: You can also reset passcodes for users that have forgotten them.See page 41 for information on doing this from a telephone, or page 46 todo it from Express Manager.
Changing the Administrator Passcode
To change the administrator passcode:
1. Access the System Administrator’s mailbox.
2. Press [6] for the Passcode menu.
3. Press [1] to change the passcode.
4. Express Messenger asks for the new passcode. You may use any keyson the keypad except [*] and [#].
Enter your new passcode: [nn...n]
5. Express Messenger asks you to confirm the new passcode.
6. Enter the passcode again: [nn...n]
Express Messenger returns you to the Passcode menu.
Changing the Passcode Length
The passcode length can be between three and six digits. If passcode length ischanged, all existing passcodes will either be truncated (right-most digits cut off)or lengthened (zeroes added as right-most digits).
Main MenuNew Installation - [1]
Add, Edit, Delete Mailbox - [2]
Set Date/Time - [3]Change Business Hours/
System Greetings - [4]System Parameters - [5]
Passcodes - [6]Distribution Lists - [7]
Exit - [ ]*Set Passcode - [1]
Change Length - [2]Set Manager Passcode - [3]
Exit - [ ]*
Performing System Administration from a Telephone
65
To change the administrator passcode length:
1. Access the System Administrator’s mailbox.
2. Press [6] for the Passcode menu.
3. Press [2] to change the passcode length.
4. Express Messenger asks for the new passcode length; valid choices arebetween 3 and 6 digits.
Enter the new passcode length: [n]
NOTE: All passcodes on the system will be this new length, theadministrator passcode as well as user passcodes. Notify allsubscribers before making this change.
Express Messenger will confirm the new length and return you to thePasscode menu.
Changing the Manager Passcode
You may assign a second passcode (called the Manager Passcode) to the systemadministrator’s mailbox. This passcode allows the user to perform all systemadministration functions except the following:
• Installing a new Express Messenger
• Changing the system administrator or manager passcode
• Changing the system passcode length
To change the manager passcode:
1. Access the System Administrator’s mailbox.
2. Press [6] for the Passcode menu.
3. Press [3] to change the manager passcode.
4. Express Messenger asks for the new passcode. You may use any keyson the keypad except [*] and [#].
5. Enter your new passcode: [nn...n]
Express Messenger asks you to confirm the new passcode.
6. Enter the passcode again: [nn...n]
Express Messenger returns you to the Administration Passcode menu.
Creating Distribution ListsBoth you and your subscribers can set up distribution lists consisting of multiplemailbox numbers. This feature makes it easier to send or forward a message to agroup of people.
Performing System Administration from a Telephone
66
Distribution list number 00 is already set up to allow subscribers to broadcast amessage to every mailbox in the system. As a System Administrator, you can setup global distribution lists, numbered 01to 04, which all subscribers can use butcannot change. In addition, distribution lists numbered between 05 and 09 may beset up by subscriber to broadcast a message to each mailbox in therespective list.
Figure 23 shows the ’Distribution Lists’ menu.
Figure 23 - The Distribution Lists Menu.
Add To A Distribution List
To create a new distribution list or to add mailbox numbers to an existing list:
1. Access the System Administrator’s mailbox.
2. Press [7] for the Distribution Lists menu.
3. Enter a 2-digit distribution list number, 01 to 04.
4. Press [1] to add mailbox numbers to this list.
After you enter each mailbox number, Express Messenger confirms that thenumber has been added. Continue to add mailbox numbers until all areentered.
If you enter a mailbox number that already exists, Express Messenger tells youthe number is a duplicate but Express Messenger does not enter the numbertwice.
5. Press [#] when you enter the last mailbox number to stop adding.
Review A Distribution List
To review an existing distribution list:
1. Access the System Administrator’s mailbox.
2. Press [7] for the Distribution Lists menu.
3. Enter a 2-digit distribution list number, 01 to 04.
Distribution ListsSelect Dist List No. - [nn]
Exit - [ ]*
Enter Mailbox Numberto Delete: [(n)(n)nn]
Enter Mailbox Numberto Add: [(n)(n)nn]When Done - [#]
Add to List - [1]Review List - [2]
Delete from List - [3]Name List - [4]
Exit - [ ]*
Performing System Administration from a Telephone
67
4. Press [2] to review the mailbox numbers in this list.
Provided the list contains mailbox numbers, Express Messenger itemizes themailboxes contained in the list by speaking the name associated with eachmailbox. If no personal names are recorded, Express Messenger reads all themailbox numbers to you.
5. Press any key to interrupt the review and return to the Distribution Lists menu.
Delete From Distribution List
To delete a mailbox from an existing distribution list:
1. Access the System Administrator’s mailbox.
2. Press [7] for the Distribution Lists menu.
3. Enter a 2-digit distribution list number, 01 to 04.
4. Press [3] to delete a mailbox number from this list.
5. Enter the number of the mailbox to be deleted. Express Messengerconfirms that the mailbox number is deleted and returns you to theDistribution Lists menu.
Name A Distribution List
To record a name for a distribution list:
1. Access the System Administrator’s mailbox.
2. Press [7] for the Distribution Lists menu.
3. Enter a 2-digit distribution list number, 01 to 04.
4. Press [4] to record a name for this list.
5. Press any key to stop recording. Express Messenger returns you to theDistribution Lists menu.
Message NotificationThis feature allows users to be notified whenever messages arrive in their mailbox.Express Messenger supports five types of notification:
• To an internal extension (that does not have a message indicator).
• To an outside telephone number.
• To a message pager.
• To a tone-only pager (or beeper).
• To a digital pager.
A notification number can be assigned for each Express Messenger mailboxsubscriber.
Performing System Administration from a Telephone
68
How It Works
For internal extension numbers and outside phone numbers:
1. Express Messenger calls the notification number when the subscriber’smailbox receives its first new message. It does not call for subsequentmessages.
2. Express Messenger action depends on the response at that number:
− If the notification number is busy or does not answer, Express Messengertries calling again at each quarter hour (hh:00, hh:15, hh:30, or hh:45).This procedure is repeated twice for no answer status, three times for busystatus. The message light on the user’s phone remains lit until the usersaves or deletes all new messages.
− If the phone is answered, Express Messenger prompts for the user’spasscode. The user can listen to their message immediately.
For pagers:
Every time the subscriber’s mailbox receives a new message, Express Messengercalls the notification number.
− If the notification number is busy or does not answer, Express Messengertries calling again at each quarter hour (hh:00, hh:15, hh:30, or hh:45).This procedure is repeated twice for no answer status, three times for busystatus. The message light on the user’s phone remains lit until the usersaves or deletes all new messages.
− Express Messenger starts the paging procedure again every time a newmessage arrives.
Performing System Administration from a Telephone
69
Using Pagers
• Pager Types
There are three types of pagers Express Messenger can use: a beeper (or tone-only), a messaging type, and a digital type. The following table describes, ingeneral, how Express Messenger works with each pager type. The process canchange depending on the pager number parameters you enter for individualmailboxes.
Pager Type How Express Messenger Works
Tone-only Dials the phone number of the pager.
Message Dials the phone number of the pager and announces:"(Name) ... You have new messages. Please access yourmailbox through the pager speaker.”
Digital Dials the phone number of the pager and displays:
(remainder of pager number) 555*1212* (mailboxnumber)
Change ‘555-1212’ to your company’s telephonenumber using Express Manager.
• Pager Number Parameters
Pager numbers can vary in length, but some pagers require pauses or otheractions to occur within the pager number. The [*] key plus a digit define thesespecific actions as shown in the following chart.
Command Function AudioPlayback
Displays inExpressManager as...
*1 Pause 1 second “comma” ,
*3 Dials the [#] key “pound” #
*4 Wait for dial tone “star 4” W
*5 Wait for answer “star 5” X
*6 Do not wait foranswer
“star 6” Y
*7n Pause n seconds,where n is between1 and 9 seconds
“star 7(1-9)”
P(1-9)
** Dials the [*] key “star” *
Performing System Administration from a Telephone
70
• Helpful Tips for Setting Up Pager Notification
− Each pager needs its own distinct number sequence to work correctly.When you set up the pager number in a mailbox, the subscriber shouldsupply you with the characteristics and requirements of their pager.
− There is a 35-character limit to the total number of digits in a pagernumber.
− The *5 (wait for answer) parameter takes affect at the point where ExpressMessenger first encounters it in the pager number. Any subsequent *5parameters are ignored. If the call is answered and the pager is digital,Express Messenger dials the remainder of the pager number followed bythe call back number (555-1212 unless changed) and mailbox number.
− Use the *6 (do not wait for answer) parameter for time-based pagers.Express Messenger does not wait for any signals to perform the actiondictated by the pager type: play a prompt or display the call back number.You must place the *6 parameter at the end of the pager number.
− In the absence of a *5 or *6 parameter in the pager number, ExpressMessenger dials the entire mailbox pager number and waits for an answer.If the call is answered, it performs the action dictated by the pager type:plays a prompt or displays the call back number.
− If you have a digital pager and decide to put the callback number andmailbox number in the mailbox notification number, include a ‘Do notwait for answer’ command (*6) in the notification number and make it abeeper type (‘tone-only’) pager. Doing this prevents Express Messengerfrom dialing the system-wide callback number.
Performing System Administration from a Telephone
71
• Pager Examples
Assume that the pager number is 123-4567, the subscriber’s pin number is54321, and the mailbox number is 201.
To specify this action on adigital pager...
Enter this pager number... Subscriber sees...
Dial the pager number
Wait for an answer
Display the call back number andmailbox number
1234567 5551212*201
Dial the pager number
Wait for an answer
Pause 2 seconds
Dial a pin number
Pause 3 seconds
Display the call back number andmailbox number
1234567*5*7254321*73 5551212*201
Dial 9 for outside line
Dial the pager number
Do not wait for an answer but waitthree seconds
Display the mailbox number threetimes separated by a two seconddelay
Display the call back number andmailbox number
91234567*73201*72201*72201*6 20120101551212*201
Performing System Administration from a Telephone
72
Setting Up Notification
Before notification can take place, either:
1. Edit the mailbox associated with each user requiring notification andenter the notification type and number. This process causes notificationto be on 24 hours a day for the user.
NOTE: Each user can turn their notification off or adjust thenotification schedule as needed. Refer users to their ExpressMessenger User Guide for these procedures.
OR
You can allow individual users to modify their own mailbox type and number.Refer to the Edit Mailbox section for information on Notification Access.
2. Enter the notification type and number. Refer to Edit Mailbox on page40 for a description of the notification parameters.
a. Notification Type. Indicate where notification is to take place:
internal extension [1]outside phone number [2]message pager [3]tone-only pager (beeper) [4]digital pager [5]
b. Notification Number. The user supplies this number to you. Ifthe number is a pager number, use the information given inPager Number Parameters, for entering pager numbers.
c. Notification Access. Give the user the ability to modify his orher own notification type and number.

Performing System Administration from a Telephone
73
Using FAX FinderUsing Express Messenger, your PBX can receive FAXs, eliminating the need for adedicated outside FAX line.
When adding FAX capability, Express Messenger asks to which extension theFAX is connected and automatically configures that extension to a ’transfer-only’mailbox. When a FAX tone comes in, Express Messenger transfers the call to thatextension. If the receiving FAX machine is busy when a new FAX call comes in,the sending FAX machine hears a busy signal.
Some older FAX machines do not generate the tones necessary for triggering theFAX transfer function. In this case, the person sending the FAX has to manuallydial the extension number of your FAX machine after they reach the AutoAttendant. To let callers know which extension the FAX machine is on, give theextension number in your company greeting.
Example:
If your FAX machine is at extension 217, your company greeting might read:
"Thank you for calling the CBA company. If you know the number of the party youwould like to reach, enter it now. For a personnel directory, enter 9. To reach ourFAX machine, enter 217. For assistance, press 0 or remain on the line."
Enabling FAX Finder
To enable the FAX Finder:
1. Access the System Administrator’s mailbox.
2. Press [5] for the 'System Parameters' menu.
3. Press [3] for the 'Set FAX Extension' menu.
4. Express Messenger asks if you want the FAX feature enabled.
To enable the FAX feature, press [1].
Otherwise, press [2].
5. If you enable the FAX feature, Express Messenger asks you to enterthe extension number the FAX machine is on.
Enter the extension number:
NOTE: Express Messenger will not allow you to set the FAXextension to either the operator (0) or the system administrator (99 or999 or 9999).
Express Messenger now returns you to the 'System Parameters' menu.
Performing System Administration from a Telephone
74
For An Incoming FAX
Whenever Express Messenger detects FAX tone on an outside line, it directs thesignal to a selected extension. A transfer-only mailbox is associated with the FAXextension; if a caller using a FAX machine tries to enter that mailbox, ExpressMessenger plays the following message:
"...Please hold while I try the FAX machine..."
If the caller stays on the line and the FAX machine answers, they would hear thecustomary FAX tone.
For An Outgoing FAX
To send an outbound FAX, dial the destination number.
Example: If the destination FAX number is 636-1234 and 9 is a prefix foroutgoing calls, enter the following numbers on your FAX machine: [96361234].
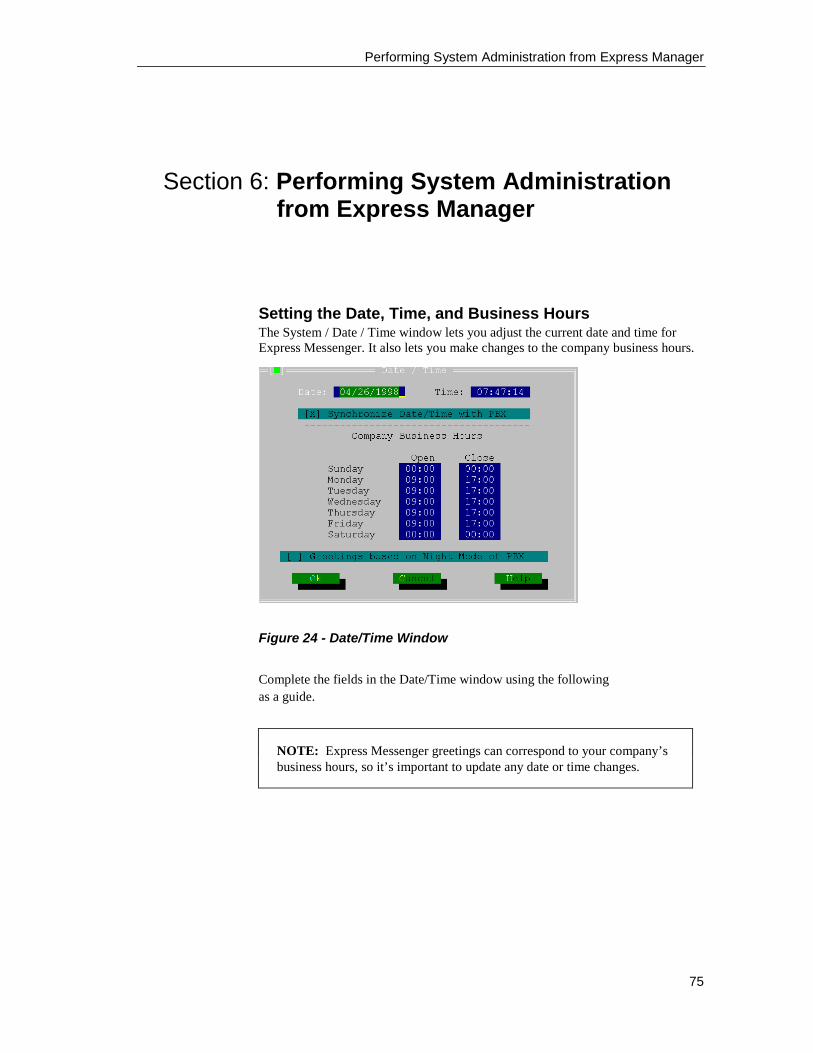
Performing System Administration from Express Manager
75
Section 6: Performing System Administrationfrom Express Manager
Setting the Date, Time, and Business HoursThe System / Date / Time window lets you adjust the current date and time forExpress Messenger. It also lets you make changes to the company business hours.
Figure 24 - Date/Time Window
Complete the fields in the Date/Time window using the followingas a guide.
NOTE: Express Messenger greetings can correspond to your company’sbusiness hours, so it’s important to update any date or time changes.
Performing System Administration from Express Manager
76
Setting Date and Time
Field: Enter as follows:
Date (Month) Enter 1 or 2 digits between 01 and 12 to indicate the current month. (01 forJanuary; 12 for December.)
Date (Day) Enter 1 or 2 digits between 01 and 31 to indicate the current day within the month.
Date (Year) Enter 2 digits to indicate the current year. Values between 93 and 99 indicate1993-1999. All other values indicate the year 2000 and beyond.
SynchronizeDate/Time withPBX
Select this checkbox to synchronize Express Messenger date and time to that ofthe PBX.
Time Enter 1 or 2 digits to set the current hour. Specify a value between 0 and 23 toindicate 24-hour time. (Zero indicates 12:00 midnight; 6 indicates 6:00 a.m.; 23indicates 11:00 p.m.) Press [→] and type 2 digits between 00 and 59 to set theminutes.
Open For each day, Sunday through Saturday, specify when the company opens. Type 1or 2 digits between 0 and 23 to set the hour. Press [→] and type 2 digits between00 and 59 to set the minutes.
Close For each day, Sunday through Saturday, specify the beginning of non-businesshours for the company. Type 1 or 2 digits between 0 and 23 to set the hour. Press[→] and type 2 digits between 00 and 59 to set the minutes.
00:00 in both the Open and Close fields indicates that the company is closed thatday.
Greetings Basedon Night Modeof PBX
Select this checkbox to synchronize Express Messenger greetings to the PBXNight Mode setting.
Selecting Alternate GreetingsYou can select different greeting sets for different Express Messenger ports,allowing your business to have multiple greetings. First record alternate greetingsets by calling Express Messenger from a telephone via the System Administrator’smailbox.
1. Select the Alternate Greetings window (Figure 25) from the Systemmenu.
2. Assign the required greeting to each port by deleting the currentgreeting number and entering the new greeting number.
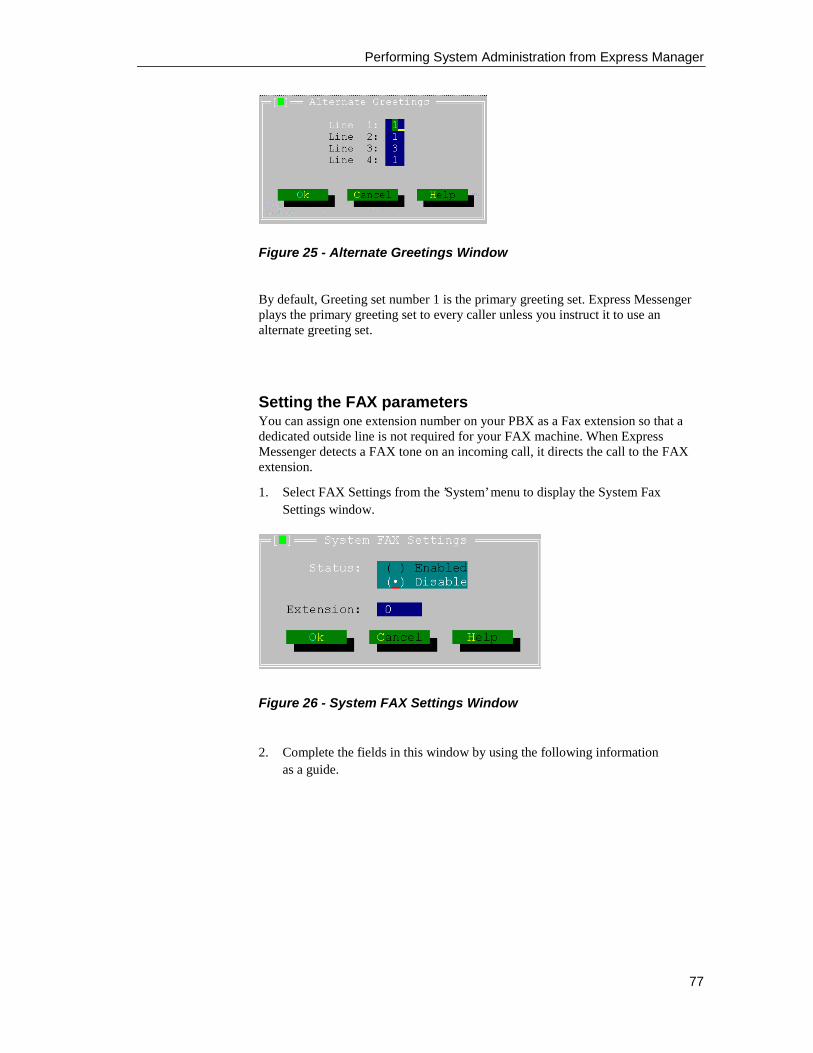
Performing System Administration from Express Manager
77
Figure 25 - Alternate Greetings Window
By default, Greeting set number 1 is the primary greeting set. Express Messengerplays the primary greeting set to every caller unless you instruct it to use analternate greeting set.
Setting the FAX parametersYou can assign one extension number on your PBX as a Fax extension so that adedicated outside line is not required for your FAX machine. When ExpressMessenger detects a FAX tone on an incoming call, it directs the call to the FAXextension.
1. Select FAX Settings from the ’System’ menu to display the System FaxSettings window.
Figure 26 - System FAX Settings Window
2. Complete the fields in this window by using the following informationas a guide.
Performing System Administration from Express Manager
78
System FAX Settings
Field: Enter as follows:
Status Click the appropriate field to indicate whether or not ExpressMessenger should direct calls to a facsimile machine.
Enabled: Allows Express Messenger to direct calls to theFAX extension.
Disabled: Prevents Express Messenger from directing calls tothe FAX extension.
When you set the Status field to Disabled, the Extension fielddefaults to 0.
Extension Enter the extension number to which the fax machine isconnected.
Setting and Displaying Site InformationThe System / Site Information window displays the company name, ExpressMessenger serial number, Hour Capacity of the disk drive for messages, and thenumber of configured ports.
Enter a company name and select Ok. The remaining fields are display only.
Figure 27 - Site Information Window
Performing System Administration from Express Manager
79
Changing PasscodesFrom the Administration menu select either Administrator passcode or ManagerPasscode to change the Administrator passcode or the Manager passcode. TheAdministrator passcode also allows the user to set the length of all ExpressMessenger passcodes.
Figure 28 - Passcode Window
Change either Administrator or Manager passcode (or both) by completing thefields in the passcode window using the following information as a guide. TheManager Passcode window is the same excluding the Passcode Length: field.
Administrator Passcode
Field: Enter as follows:
PasscodeLength
Enter a number from 3 to 6 indicating how many digits apasscode should contain. This number dictates the length for allpasscodes in the system. Make no entry if passcode length is toremain the same.
Enter the following information only for the passcode that you want to change.Make no entry for a passcode that is to remain the same.
NewPasscode
Enter the new 3 to 6-digit passcode to replace the currentpasscode.
Verify NewPasscode
Enter the new passcode again to confirm your keystrokes.
Performing System Administration from Express Manager
80
Setting Up Notification1. Edit the Notification parameters in the user’s mailbox. See page 50 for
a description of the notification parameters.
− Click on the down-arrow to the right of the Type parameter to display amenu. Click the desired notification type.
Figure 29 - Notification Type
− Click on the down-arrow to the right of the Schedule parameter to displaya menu. Click the desired notification schedule.
Figure 30 - Notification Schedule
− Enter the telephone number (up to 35 digits) that the Express Messengershould call to notify the user. Valid digits include 0 to 9, and the [*], [#],and [,] keys.
− Click OK.
2. Select Notification from the System drop-down menu to open theSystem Notification window (see Figure 31).
Performing System Administration from Express Manager
81
− Enable the Notification Calls parameter. If enabled here and for asubscriber’s mailbox, notification takes place when a message is left in asubscriber’s mailbox.
− Specify the telephone number that Express Messenger should display ondigital pagers. Express Messenger automatically attaches *<mailbox#> tothe dial setting to display the mailbox that received the message.Subscribers dial this number to call Express Messenger and hear theirmessages.
− Enter the access code for Feature Access Code 41, Send Message, asprogrammed on the PBX.
− Click OK.
Figure 31 - System Notification Window
Performing System Administration from Express Manager
82
System Notification
Field: Enter as follows:
Digital PagerCallback No.
Enter up to 20 characters for the telephone number that is todisplay on digital paging devices when Express Messengernotifies a subscriber. Valid digits include 0 to 9, and the [*],[#], and [,] keys.
MWI FeatureAccess Code
Enter the code for Feature Access Code 41, Send Message, asprogrammed in the PBX (refer to the Installation Worksheet).
WakeupFeatureAccess Code
Enter the code for Feature Access Code 02, Automatic Wake-up, as programmed in the PBX (refer to the InstallationWorksheet). This feature access code is required by theHospitality Option and PMS Option to allow guests to setautomatic wake-up calls.
NotificationCalls
Select either:
Enabled: Turns the notification feature on for all ExpressMessenger mailboxes.
Disabled: Turns notification off for all Express Messengermailboxes.
Using FAX FinderUsing Express Messenger, your PBX can receive FAXs, eliminating the need for adedicated outside FAX line.
When adding FAX capability, Express Messenger asks to which extension theFAX is connected and automatically configures that extension to a ’transfer-only’mailbox. When a FAX tone comes in, Express Messenger transfers the call to thatextension. If the receiving FAX machine is busy when a new FAX call comes in,the sending FAX machine hears a busy signal.
Some older FAX machines do not generate the tones necessary for triggering theFAX transfer function. In this case, the person sending the FAX has to manuallydial the extension number of your FAX machine after they reach the AutoAttendant. To let callers know which extension the FAX machine is on, give theextension number in your company greeting.
Example:
If your FAX machine is at extension 217, your company greeting might read:
"Thank you for calling the CBA company. If you know the number of the party youwould like to reach, enter it now. For a personnel directory, enter 9. To reach ourFAX machine, enter 217. For assistance, press 0 or remain on the line."
Performing System Administration from Express Manager
83
Setting FAX ParametersSelect Fax Settings from the System menu to display the window.
You can assign one extension number on your telephone system as a Faxextension. When Express Messenger detects a FAX tone on an incoming call, itdirects the call to the FAX extension. A dedicated outside line for your FAXmachine is not needed. Complete the fields in this window using the followinginformation as a guide.
1. Set the Status to Enabled.
2. Enter the number of the extension where the FAX machine isconnected, and then select Ok.
Figure 32 - System FAX Settings Screen
System FAX Settings
Field: Enter as follows:
Status Click the appropriate field to indicate whether or notExpress Messenger should direct calls to a facsimilemachine.
Enabled: Allows Express Messenger to direct callsto the FAX extension.
Disabled: Prevents Express Messenger from directingcalls to the FAX extension.
When you set the Status field to Disabled, the Extensionfield defaults to 0.
Extension Enter the extension number to which the fax machine isconnected.
Performing System Administration from Express Manager
84
Selecting the Directory Prompt (First or Last Name)Express Messenger can prompt callers who call the directory (Mailbox 9) by eithertheir first name or their last name. To select the directory prompt
1. From the System menu select System Miscellaneous.
The System Miscellaneous Window opens (see Figure 33).
2. In the Mailbox Name Directory By field select FIRST NAME or LASTNAME.
3. Click Ok.
Figure 33 - System Miscellaneous Window
Enabling Softkey SupportThe SX-200 EL/ML PBX provides voice mail softkeys on SUPERSET 4025,SUPERSET 4125, and SUPERSET 4150 telephones. Instead of dialing single-digitcodes to select Mitel Express Messenger menu options, users can press softkeys. Forexample, to listen to message, a user can press the Play Message softkey instead ofdialing the digit 7. Note that softkeys are not available for all menu options.
The SX-200 EL/ML PBX requires LIGHTWARE 17, Release 3.1, UR1 software orlater, and you must enable Option 97 "Support Softkey Access to Voice mail" in Form4 (System Options). Refer to the SX-200 EL/ML Technical Documentation forinstructions on how to program voice mail softkey support on the SX-200 EL/MLPBX. You require a Mitel Options Password to enable this option on the PBX.
To enable softkey support on the Express Messenger system,
1. From the System menu, select System Miscellaneous.
The System Miscellaneous Window opens (see Figure 33).
2. In the Softkey Support field select ENABLED.
3. Click Ok.
Performing System Administration from Express Manager
85
Enabling Auto attendant Transfer to Any PBX ExtensionThe Express Messenger Auto Attendant can transfer incoming calls to anyextension whether programmed with a mailbox or not. For this to work, the PBXdial plan and mailbox numbers must have the same number of digits. To preventcallers from accessing PBX trunks, you can program the system to deny transferswhen the leading digit dialed matches the first digit of a trunk group access code.
1. From the System menu select Language.
The System Miscellaneous Window opens (see Figure 34).
2. Set Dial Any Extension Support to Enabled.
3. In the Block Ext.That Begins With field, enter the leading digit of thetrunk group access codes you want to restrict.
You can enter up to 12 digits to restrict access to 12 different trunkgroups. Separate each digit with a comma.
4. Click OK.
Setting the Automatic Route Select CodeThe Automatic Route Selection (ARS) code is used to access outside lines formessage notification calls and personal contact calls. ARS codes are programmedby the PBX technician.
1. From the System menu select Miscellaneous.
The System Miscellaneous Window opens (see Figure 33).
2. Enter the Automatic Route Select Code.
3. Click OK.
Setting the Account Code Access CodeAccount codes are used by the PBX to register personal contact calls in the SMDRlogs. The PBX generates these logs for call accounting purposes. Account codescan range from 4 to 12 digits and cannot contain an * or #.
Note: If extension numbers are less than three digits in length, SMDR logging ofpersonal contact calls will not work unless additional digits are added to theaccount code access code. The combined length of the extension number and theaccess code must be four digits or more. Enter the required access code length inPBX Form 4, Option 55.
1. From the System menu select Miscellaneous.
The System Miscellaneous Window opens (see Figure 33).
2. Enter the Account Code Access Code.
3. Click OK.
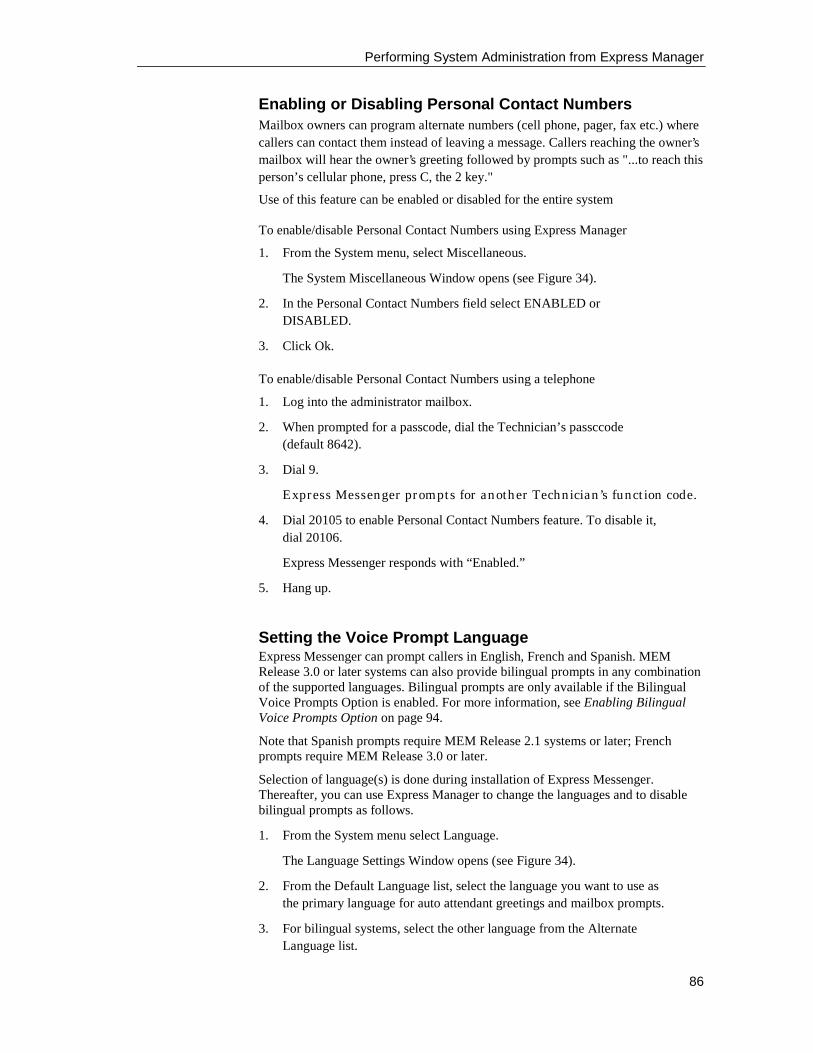
Performing System Administration from Express Manager
86
Enabling or Disabling Personal Contact NumbersMailbox owners can program alternate numbers (cell phone, pager, fax etc.) wherecallers can contact them instead of leaving a message. Callers reaching the owner’smailbox will hear the owner’s greeting followed by prompts such as "...to reach thisperson’s cellular phone, press C, the 2 key."
Use of this feature can be enabled or disabled for the entire system
To enable/disable Personal Contact Numbers using Express Manager
1. From the System menu, select Miscellaneous.
The System Miscellaneous Window opens (see Figure 34).
2. In the Personal Contact Numbers field select ENABLED orDISABLED.
3. Click Ok.
To enable/disable Personal Contact Numbers using a telephone
1. Log into the administrator mailbox.
2. When prompted for a passcode, dial the Technician’s passccode(default 8642).
3. Dial 9.
Express Messenger prompts for another Technician’s function code.
4. Dial 20105 to enable Personal Contact Numbers feature. To disable it,dial 20106.
Express Messenger responds with “Enabled.”
5. Hang up.
Setting the Voice Prompt LanguageExpress Messenger can prompt callers in English, French and Spanish. MEMRelease 3.0 or later systems can also provide bilingual prompts in any combinationof the supported languages. Bilingual prompts are only available if the BilingualVoice Prompts Option is enabled. For more information, see Enabling BilingualVoice Prompts Option on page 94.
Note that Spanish prompts require MEM Release 2.1 systems or later; Frenchprompts require MEM Release 3.0 or later.
Selection of language(s) is done during installation of Express Messenger.Thereafter, you can use Express Manager to change the languages and to disablebilingual prompts as follows.
1. From the System menu select Language.
The Language Settings Window opens (see Figure 34).
2. From the Default Language list, select the language you want to use asthe primary language for auto attendant greetings and mailbox prompts.
3. For bilingual systems, select the other language from the AlternateLanguage list.
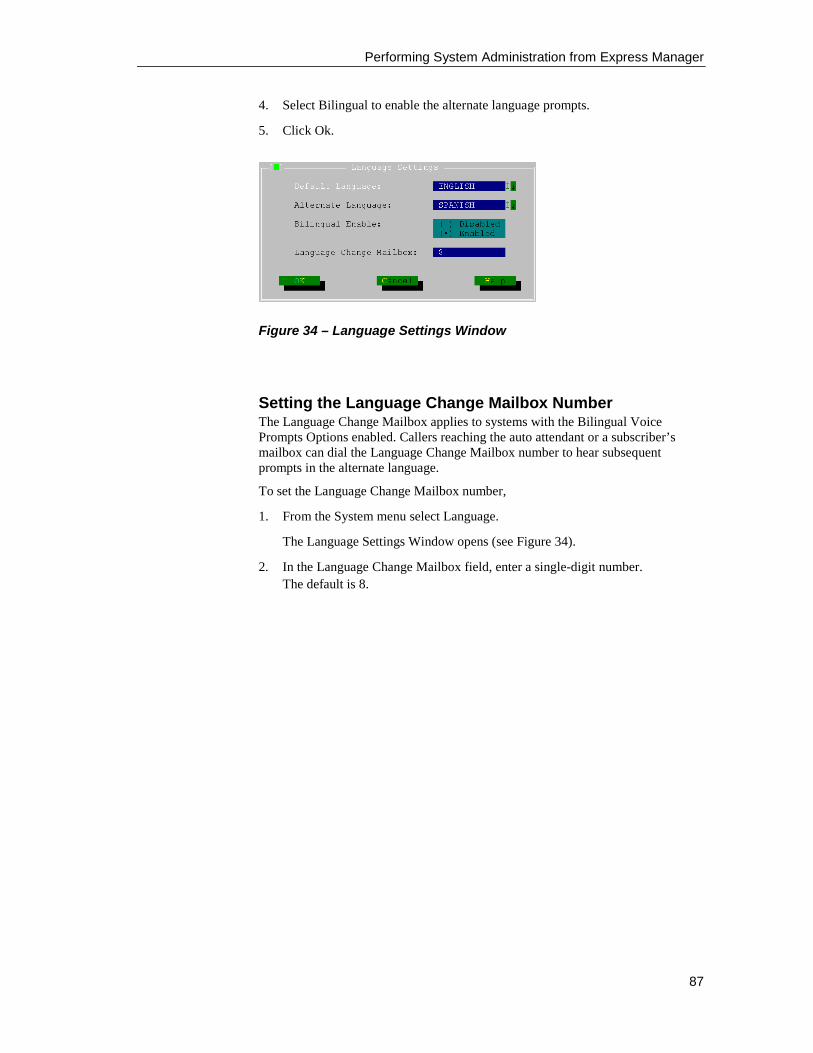
Performing System Administration from Express Manager
87
4. Select Bilingual to enable the alternate language prompts.
5. Click Ok.
Figure 34 – Language Settings Window
Setting the Language Change Mailbox NumberThe Language Change Mailbox applies to systems with the Bilingual VoicePrompts Options enabled. Callers reaching the auto attendant or a subscriber’smailbox can dial the Language Change Mailbox number to hear subsequentprompts in the alternate language.
To set the Language Change Mailbox number,
1. From the System menu select Language.
The Language Settings Window opens (see Figure 34).
2. In the Language Change Mailbox field, enter a single-digit number.The default is 8.
Performing System Administration from Express Manager
88
Setting up RAD PortsExpress Messenger can provide recorded announcement device (RAD)functionality, eliminating the need for external tape machines or other audio-playing devices. RADs are commonly used to automatically answer lines anddeliver pre-recorded messages such as, “All of our representatives are busy helpingother callers, please continue to hold to maintain your call priority.” When theRAD message finishes playing, the caller usually hears music-on-hold whilewaiting for an agent to become available. RAD messages may also give the callerinformation, which answers their questions, thus resulting in a 'good’ abandonedcall. They may also provide advertising or promotional information to callers whilethey’re waiting for someone to take their call.
Any number of Express Messenger ports can function as RAD ports. (See the next pagefor considerations concerning RAD-only cards.) Each RAD port is assigned a set of upto five messages (called “greetings”) that play one after another. When the entiregreeting set has played, the port will either hang up or replay the entire set the numberof times specified. Up to 16 RAD greeting sets can be recorded for a total of 80greetings (16 sets multiplied by 5 greetings per set). RAD greetings can be recorded inmultiple languages, although callers cannot choose the language they want to hear asthey can for other greetings in systems that are set up for bilingual operation.
Two or more ports can share the same set or subset of greetings. Shared greetingsare common in ACD applications. For instance, ACD groups, each serviced by aseparate RAD port, can all use the RAD message “Please hold to maintain yourcall priority,” By comparison, only a Sales ACD group can use the RAD message“Please hold to speak with a sales representative.” Combining generic andapplication-specific messages from different greeting sets in this fashioneffectively reduces the number of RAD ports required.
NOTE: Determining which outside lines the RAD ports should answer isdone through PBX programming. For help setting up lines, contact yourMitel Networks dealer.
Setting up RAD ports is a 3-step process:
1. Record RAD greetings.
You can record up to 80 individual greetings that can be then be configured asRAD greeting sets.
2. Configure RAD greetings sets.
In this step you define up to five RAD greetings which constitute the RADgreeting set and define how many times the set should play. You mayconfigure up to 16 RAD greeting sets.
3. Assign RAD greeting sets to voice mail ports.
In this step you specify which RAD greeting set plays when a call arrives on aparticular voice mail port.
Step 1: Record RAD Greetings
Express Messenger has no restriction on the length of the RAD messages;however, the PBX does. It has timers that need to be set to the length of the longestRAD greeting set. Contact your Mitel Networks dealer for assistance.
To record RAD greetings,
Performing System Administration from Express Manager
89
1. Access the System Administrator’s mailbox.
2. Press [8] to select the RAD Greetings menu.
3. Press [1] to record a greeting.
4. Select the number of the RAD greeting to record (1- 80).
If the selected RAD greeting already exists, you will hear it alongwith prompts to accept, review or re-record it.
5. Record the greeting, speaking clearly into a handset, not a speaker phone.
6. Follow the voice prompts to record each additional greeting set.
Step 2: Configure RAD Greeting Sets
You can configure RAD greeting sets before recording the RAD greetings.However, it’s a good idea to script and number the greetings first to avoid mistakeswhen it’s time to configure RAD greeting sets.
To configure RAD greetings sets using a telephone,
1. Access the System Administrator’s mailbox.
2. Press [8] to select the RAD Greetings menu.
3. Press [2] to configure a RAD greeting set.
4. Select the number of the RAD greeting set to configure (10 – 25).
The first of the five greetings in the set plays (if previously recorded)followed by prompts to assign a different first greeting or to skip to thenext greeting in the set.
5. When prompted, specify the number of times from 1 to 99 that youwant the greeting set to play. Enter 99 to play the set continuouslyuntil the caller hangs up.
Step 3: Assign RAD greeting sets to voice mail ports
You can use either a telephone or Express Manager to assign RAD greetings tovoice mail ports.
To assign RAD greeting sets to ports from a telephone,
1. Access the System Administrator’s mailbox.
2. Press [5] to select the System Parameters menu.
3. Press [2] to assign greeting sets to be used by each port
4. When prompted, for each port enter a System Greeting number from 1to 9 or a RAD greeting set number from 10 to 25.
To assign RAD greeting sets to ports from Express Manager,
1. From the System menu, select System Greetings followed byConfigure.
2. Select a RAD greeting set from the Set column.
Performing System Administration from Express Manager
90
3. In each Greetings column, enter the number (1 - 80) of the individualgreetings that this port should play.
Greetings play in order from left to right. Leave boxes empty if you requireless than the maximum five greetings per set.
4. In the Times to Play column, enter a number from 1 to 99 to specifyhow many times you want the greeting set to play. Enter 99 to play theset continuously until the caller hangs up.
5. Repeat steps 2 to 4 for each greeting set.
RAD-only cards
All ports on an Express Messenger card can operate as dedicated RAD ports.However, a least one non-RAD port is required to record RAD greetings andadminister the voice mail system by telephone. To get around this requirement,temporarily assign a System greeting set to one of the ports. Then, log into theadministrator’s mailbox and record the RAD greetings by telephone. After thegreetings are recorded, use Express Manager or the telephone to reassign a RADgreeting to the port.
Performing System Administration from Express Manager
91
Setting up a DID ServerExpress Messenger 4.0 provides a built-in DID server for use in hospitalityenvironments. The server manages DID numbers within the PBX, which allows thehotel-keeper to easily assign personal DID to guests for the duration of their stay.With DID service, outside callers can reach guests without having to go throughthe front desk.
NOTES:
1) The DID Server is an optional feature of Express Messenger Release4.0. For information on enabling the feature, see page 98.
2) The PMS Option must be enabled to use the DID Server (see Enablingthe PMS Option on page 96).
3) The DID server requires special integration with your PBX and DIDphone lines from your local telephone company. Contact your MitelDealer for assistance.
DID Server features
• DID number assignment is by PMS terminal only – i.e, assignmentby telephone through the Front Desk mailbox is not supported.
NOTE: Express Messenger provides an option that automatically assignsDID numbers on check-in. Use this option if the PMS system does notsupport manual assignment. See the next page for details.
• Assignment of numbers is done either automatically by the system on a“first-in, first-out” (FIFO) basis, or manually by Front Desk staff usingthe PMS terminal. Manual assignment means guests can get specificnumbers if requested. FIFO assignment takes numbers out of service foras long as possible before re-assigning them, which helps prevent guestsfrom receiving unwanted calls on their DID number.
• Each guest mailbox is permitted one DID number.
• DID numbers follow guests if they change rooms during the samestay – no manual re-assignment required.
• Currently assigned DID numbers can be temporarily disabledwithout having to check out the guest.
• Guest rooms can be assigned a fax extension that shares a mailbox anda DID number with the room phone. The server relies on FAX tonedetection to route incoming fax calls to the fax extension.
• Guests logging into their mailboxes for the first time hear, as partof the tutorial, the message, “The direct number to reach yourroom is …..” The system automatically inserts the correct number,which the guest can replay at any time by pressing a key.
Performing System Administration from Express Manager
92
Enabling or disabling the DID Server
The DID server can be enabled or disabled by telephone or by using ExpressManager as described in Setting up the DID server later in this section.
To enable or disable the DID server by telephone
1. Log into the administrator mailbox.
2. When prompted for a passcode, dial the Technician’s passccode(default 8642).
3. Dial 9.
Express Messenger prompts for another Technician’s function code.
4. Dial 20101 to enable the DID Server. To disable it, dial 20102.
Express Messenger responds with “Enabled” or “Disabled.”
5. Hang up.
Enabling or disabling Automatic DID Number Assignment
Automatic DID Number Assignment is a feature designed for PMS systems that donot support manual number assignment. The feature, when enabled, automaticallyassigns a DID number to a guest room upon check-in and returns the number to theDID pool upon check-out.
To enable or disable Automatic DID Number Assignment by telephone
1. Log into the administrator mailbox.
2. When prompted for a passcode, dial the Technician’s passccode(default 8642).
3. Dial 9.
Express Messenger prompts for another Technician’s function code.
4. Dial 20103 to enable the Automatic DID Number Assignment. To disableit, dial 20104.
Express Messenger responds with “Enabled” or “Disabled.”
5. Hang up.
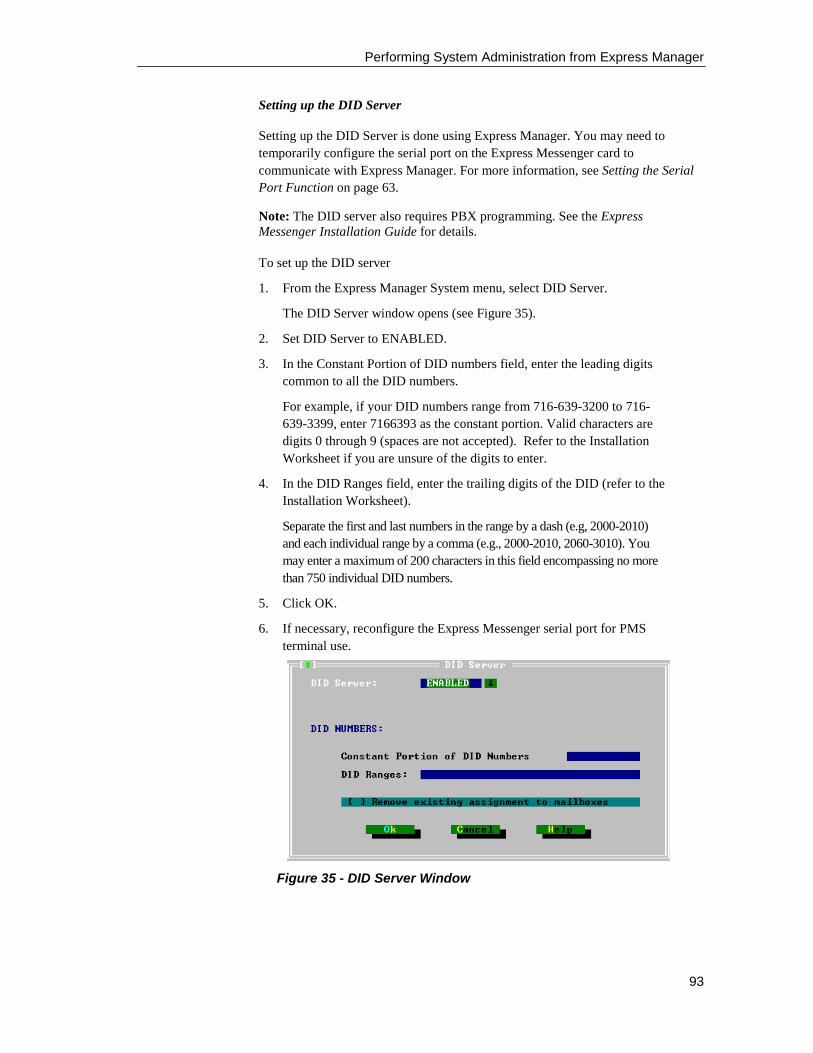
Performing System Administration from Express Manager
93
Setting up the DID Server
Setting up the DID Server is done using Express Manager. You may need totemporarily configure the serial port on the Express Messenger card tocommunicate with Express Manager. For more information, see Setting the SerialPort Function on page 63.
Note: The DID server also requires PBX programming. See the ExpressMessenger Installation Guide for details.
To set up the DID server
1. From the Express Manager System menu, select DID Server.
The DID Server window opens (see Figure 35).
2. Set DID Server to ENABLED.
3. In the Constant Portion of DID numbers field, enter the leading digitscommon to all the DID numbers.
For example, if your DID numbers range from 716-639-3200 to 716-639-3399, enter 7166393 as the constant portion. Valid characters aredigits 0 through 9 (spaces are not accepted). Refer to the InstallationWorksheet if you are unsure of the digits to enter.
4. In the DID Ranges field, enter the trailing digits of the DID (refer to theInstallation Worksheet).
Separate the first and last numbers in the range by a dash (e.g, 2000-2010)and each individual range by a comma (e.g., 2000-2010, 2060-3010). Youmay enter a maximum of 200 characters in this field encompassing no morethan 750 individual DID numbers.
5. Click OK.
6. If necessary, reconfigure the Express Messenger serial port for PMSterminal use.
Figure 35 - DID Server Window
Performing System Administration from Express Manager
94
NOTE: The “Remove existing assignment to mailboxes” option clearsDID numbers from all mailboxes. This option is rarely used as the PMSsystem handles clearing DID numbers from guest mailboxes at check-outtime. Use the option when ALL mailboxes need to be cleared at the sametime—for example, following changes to the DID numbers.
Enabling the Bilingual Voice Prompts OptionThis option provides simultaneous prompts in two of the three available languages:English, French, and Spanish. Callers reaching the auto attendant or a subscriber’smailbox can dial 8 (the Language Change Mailbox number) to hear subsequentprompts in the alternate language.
NOTE: This option requires Mitel Express Messenger Release 3.0 systemsoftware or later. The SX-200 EL/ML PBX must have LIGHTWARE 16,Release 1.1, UR1 software or later.
1. If required, upgrade the card to Release 3.0 system software. SeePerforming Upgrades on page 102.
2. Obtain the card’s model and serial number. See Obtain the Cardsmodel and serial number on page 110 for instructions.
3. Call the Mitel Corporation order desk. The part number for the ExpressMessenger Bilingual Prompts option is 9109-542-104-NA.
4. Give the operator the serial number and model number of your card.
5. The operator will give you an 11-digit passcode. Record this code:_________________.
6. From any internal DTMF telephone, obtain dial tone.
7. Dial the Express Messenger message center number. ExpressMessenger answers and plays a greeting.
8. Dial ∗ when you hear the greeting. Express Messenger prompts you fora mailbox number.
9. Dial the system administrator mailbox number: 99 or 999 or 9999.Express Messenger prompts you for a passcode.
10. Dial the technician’s passcode: 8642
11. Dial 9 to access a menu of options. Express Messenger responds with,“Please enter a Technician’s function code”.
12. Dial 20272. Express Messenger responds with, “Please enter aTechnician’s function code”. Enter the 11-digit passcode. ExpressMessenger responds with “Enabled.”
Performing System Administration from Express Manager
95
13. Set the default language (if different than the installation language) bydialing 20001 for English, 20002 for Spanish, or 20003 for French.
14. Set the alternate language by dialing 20011 for English, 20012 forSpanish, or 20013 for French.
15. Dial 10281 to reset the system.
16. After the system resets, log into the System Administrator Mailboxagain.
17. When prompted, enter the default passcode (1234).
18. Using the Greetings menu (press 4 from the main menu) record theBilingual Welcome greeting and new greetings in the alternatelanguage. Also, verify the default language greetings and record againif necessary.
19. Choose a different Language Change Mailbox number if the default number(8) is already in use. To perform this task from a telephone, see page 63. Toperform this task from Express Manager, see page 87.
Enabling the Hospitality OptionThis option provides guest mailboxes and front desk mailboxes for hotel and motelapplications.
NOTE: This option requires Mitel Express Messenger Release 2.1 systemsoftware or later. The SX-200 EL/ML PBX must have LIGHTWARE 17,Release 3.1, UR1 software or later.
1. If required, upgrade the card to Release 2.1system software. SeePerforming Upgrades on page 102.
2. Obtain the card’s model and serial number. See Obtain the Cardsmodel and serial number on page 110 for instructions.
3. Call the Mitel Corporation order desk. The part number for the ExpressMessenger Hospitality option is 9109-542-100-NA.
4. Give the operator the serial number and model number of your card.
5. The operator will give you an 11-digit passcode. Record this code:_________________.
6. From any internal DTMF telephone, obtain dial tone.
7. Dial the Express Messenger message center number. ExpressMessenger answers and plays a greeting.
8. Dial ∗ when you here the greeting. Express Messenger prompts you fora mailbox number.
9. Dial the system administrator mailbox number: 99 or 999 or 9999.Express Messenger prompts you for a passcode.
Performing System Administration from Express Manager
96
10. Dial the technician’s passcode: 8642
11. Dial 9 to access a menu of options. Express Messenger responds with,“Please enter a Technician’s function code”.
12. Dial 20272. Express Messenger responds with, “Please enter aTechnician’s function code”. Enter the 11-digit passcode. ExpressMessenger responds with “Enabled.”
13. Dial 10281 to reset the Express Messenger card with the HospitalityOption software.
14. Hang up. After the card resets, the Hospitality Option is enabled.
15. Set the mailbox type for the front desk extension to “Front Desk” and setthe mailbox type of the guest room extensions to “Guest”. To perform thesetasks from a telephone, see Edit Mailbox on page 40 for instructions. Toperform these tasks from Express Manager, see on page 45.
16. Select Notification from the System menu. Enter the Automatic Wake-Upfeature access code in the System Notification window (see Figure 31). Thisfeature access code must match the code that you programmed in Form 02 ofthe PBX.
Enabling the PMS OptionThis option adds support for Property Management System integration to thehospitality options described in the previous section.
NOTE: This option requires Mitel Express Messenger Release 3.0 systemsoftware or later. The SX-200 EL/ML PBX must have LIGHTWARE 17,Release 3.1, UR1 software or later.
1. If required, upgrade the card to Release 3.0 system software. SeePerforming Upgrades on page 102.
2. Obtain the card’s model and serial number. See Obtain the Cardsmodel and serial number on page 110 for instructions.
3. Call the Mitel Corporation order desk. The part number for the ExpressMessenger Hospitality option with PMS Support is 9109-542-101-NA.
4. Give the operator the serial number and model number of your card.
5. The operator will give you an 11-digit passcode. Record this code:_________________.
6. From any internal DTMF telephone, obtain dial tone.
7. Dial the Express Messenger message center number. ExpressMessenger answers and plays a greeting.
Performing System Administration from Express Manager
97
8. Dial ∗ when you here the greeting. Express Messenger prompts you fora mailbox number.
9. Dial the system administrator mailbox number: 99 or 999 or 9999.Express Messenger prompts you for a passcode.
10. Dial the technician’s passcode: 8642
11. Dial 9 to access a menu of options. Express Messenger responds with,“Please enter a Technician’s function code”.
12. Dial 20272. Express Messenger responds with, “Please enter aTechnician’s function code”. Enter the 11-digit passcode. ExpressMessenger responds with “Enabled.”
13. Dial 10281 to reset the Express Messenger card.
14. Hang up. After the card resets, the Hospitality option with PMS Support isenabled.
15. Set the mailbox type for the front desk extension to “Front Desk” and setthe mailbox type of the guest room extensions to “Guest”. To perform thesetasks from a telephone, see Edit Mailbox on page 40 for instructions. Toperform these tasks from Express Manager, see on page 45.
16. Select Notification from the System menu. Enter the Automatic Wake-Upfeature access code in the System Notification window (see Figure 31). Thisfeature access code must match the code that you programmed in Form 02 ofthe PBX.
17. Exit Express Messenger, and then disconnect the PC from the ExpressMessenger card.
18. Connect the PMS to the Express Messenger card. For instructions, see theExpress Messenger Installation Guide. See also the SX-200 TechnicalReference for information on connecting a PMS to theSX-200.
19. Set the serial port on the Express Messenger card to PMS function. This task is performedfrom a telephone. For instructions, see page 63.
Performing System Administration from Express Manager
98
Enabling Express Messenger Release 4.0 OptionsThe following are optional features in Express Messenger Release 4.0:
• Personal Contact Numbers – allows mailbox owners to programalternate numbers (cell phone, pager or fax) where they can becontacted while away from their desk or room. Callers reaching theowner's mailbox will hear the owner's greeting followed byprompts such as "...to reach this guest's cellular phone, press C, the2 key." This feature is available to both extension-type and guest-type mailboxes, although the latter is limited to two numbers only:cell phone and pager.
• DID Server – manages DID numbers within the PBX, whichallows the hotel-keeper to assign personal DID to guests for theduration of their stay. With DID service, outside callers can reachguests without having to go through the front desk.
To enable Release 4.0 options,
1. If you have not already done so, upgrade the card to Release 4.0 systemsoftware. See Performing Upgrades on page 102.
2. Obtain the card’s model and serial number. See Obtain the Cardsmodel and serial number on page 110 for instructions.
3. Call the Mitel Corporation order desk and specify which options you want toenable. Each option has a separate part number as follows:
Personal Contact Numbers: 54000620.
DID Server: 54000614.
4. Give the operator the serial number and model number of your card.
5. The operator will give you a separate 11-digit passcode for each option.Record the codes
Personal Contact Numbers: ________________________________
Hospitality Enhancements: ________________________________
6. From any internal DTMF telephone, obtain dial tone.
7. Dial the Express Messenger message center number. ExpressMessenger answers and plays a greeting.
8. Dial ∗ when you here the greeting. Express Messenger prompts you fora mailbox number.
9. Dial the system administrator mailbox number: 99 or 999 or 9999.Express Messenger prompts you for a passcode.
10. Dial the technician’s passcode: 8642
11. Dial 9 to access a menu of options. Express Messenger responds with,“Please enter a Technician’s function code”.
Performing System Administration from Express Manager
99
12. Dial 20272. Express Messenger responds with, “Please enter aTechnician’s function code”. Enter the first 11-digit passcode. ExpressMessenger responds with “Enabled.”
13. Dial 10281 to reset the Express Messenger card.
14. Hang up. After the card resets, the Hospitality option with PMS Support isenabled.
15. Repeat steps 6 through 14 for each additional option.
NOTE: Once enabled, the Personal Contact Numbers feature can bedisabled system-wide. For more information see 86. The same applies tothe DID server feature – see page 92.
Performing BackupsSelect Backup from the Administration menu to display the window(Figure 36).
To ensure recovery 100 percent of the time, back up your system whenever youmake any system administration changes.
NOTE: Backing up Express Messenger data at regular intervals ensuresthat, in the unlikely event of a system failure, some or all of themodifications you made to Express Messenger are recoverable.
Figure 36 - Backup Window
Perform a backup of Express Messenger's current settings to a designated file onyour PC's hard drive or to a file on a removable disk. Complete the fields in theBackup window using the following information as a guide.
Performing System Administration from Express Manager
100
Backup
Field: Enter as follows:
Backup Type Click on the appropriate field to select the kind of backupyou want the system to perform.
Quick: Backs up only data for system mailboxattributes, system attributes, voice/ telephoneattributes, the company’s primary and alternategreetings, and the business hours.
Medium: Backs up the data listed above as well asrecorded names and greetings for all mailboxes.
Full: Backs up the data included in a medium backupas well as all mailbox data and messages.
Destination Enter the full pathname to the file where you want backupdata stored, for example,
c:\backup\weekly.
Do not type a file extension.
The filename defaults to VMAIL and, without a pathname,is created in the current directory.
Continue anuninterruptedbackup
If a previous backup attempt was interrupted in any way,press the space bar while in the check box or use the mouseto click in the check box. Express Manager starts thisbackup from the point of the previous interruption if it can.Otherwise, the backup starts from the beginning.
While backup is occurring, a window (Figure 37) shows you the progress of the backupprocess. You can press [Esc] or select CANCEL to stop the backup at any time.
Figure 37 - Operation Progress Display
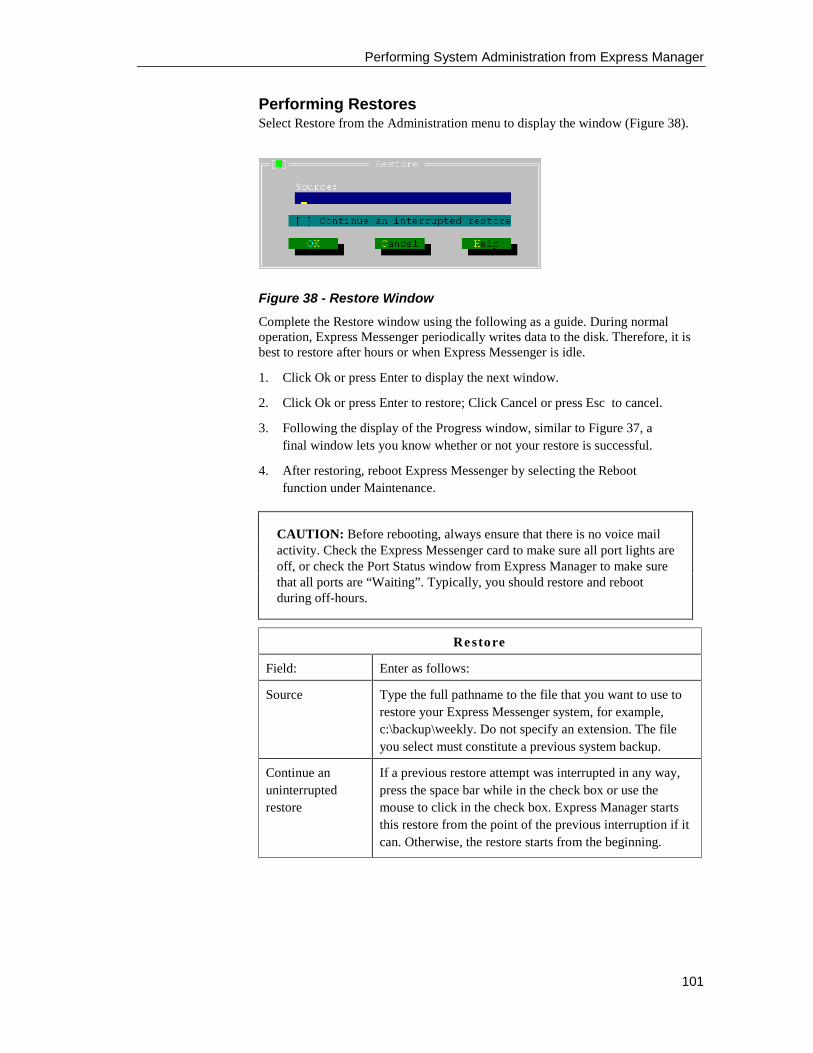
Performing System Administration from Express Manager
101
Performing RestoresSelect Restore from the Administration menu to display the window (Figure 38).
Figure 38 - Restore Window
Complete the Restore window using the following as a guide. During normaloperation, Express Messenger periodically writes data to the disk. Therefore, it isbest to restore after hours or when Express Messenger is idle.
1. Click Ok or press Enter to display the next window.
2. Click Ok or press Enter to restore; Click Cancel or press Esc to cancel.
3. Following the display of the Progress window, similar to Figure 37, afinal window lets you know whether or not your restore is successful.
4. After restoring, reboot Express Messenger by selecting the Rebootfunction under Maintenance.
CAUTION: Before rebooting, always ensure that there is no voice mailactivity. Check the Express Messenger card to make sure all port lights areoff, or check the Port Status window from Express Manager to make surethat all ports are “Waiting”. Typically, you should restore and rebootduring off-hours.
Restore
Field: Enter as follows:
Source Type the full pathname to the file that you want to use torestore your Express Messenger system, for example,c:\backup\weekly. Do not specify an extension. The fileyou select must constitute a previous system backup.
Continue anuninterruptedrestore
If a previous restore attempt was interrupted in any way,press the space bar while in the check box or use themouse to click in the check box. Express Manager startsthis restore from the point of the previous interruption if itcan. Otherwise, the restore starts from the beginning.
Performing System Administration from Express Manager
102
Performing UpgradesYou load upgrade software into an Express Messenger card from a floppy disk thatis supplied by your dealer or from the Mitel Online web page at www.mitel.com.Typically, the disk contains four files (xxx is the version number of ExpressMessenger software). Always read the readme.txt file first. The four files are
• readme.txt
• xxx.upg
• xxx.zip (zipped file)
• upgrade.bat
The Express Messenger card is available in the following configurations:
• PN 9109-080-001-NA - supports 2 voice mail ports
• PN 9109-080-002-NA - supports 4 voice mail ports
• PN 9109-080-009-NA - supports 6 voice mail ports
• PN 9109-080-008-NA - supports 8 voice mail ports.
The following system upgrade software is available:
• 9109-080-007-NA - Mitel Express Manager Software
• 50002672 - Mitel Express Manager Release 4.0 Software
• 9109-540-001-NA - Mitel Express Messenger Release 2.0Software
• 9109-540-002-NA - Mitel Express Messenger Release 2.1Software
• 9109-540-003-NA - Mitel Express Messenger Release 3.0Software
• 54000613 - Mitel Express Messenger Release 4.0 Software
The following optional software is available:
• 9109-542-100-NA - Mitel Express Messenger Hospitality Option(Note that this option requires Mitel Express Messenger Release2.1 system software or later).
• 9109-542-101-NA - Mitel Express Messenger PMS Option.
• 9109-542-104-NA - Mitel Express Messenger Bilingual PromptsOption.
• 54000614 - DID Server Option
• 54000620 - Personal Contact Numbers Option
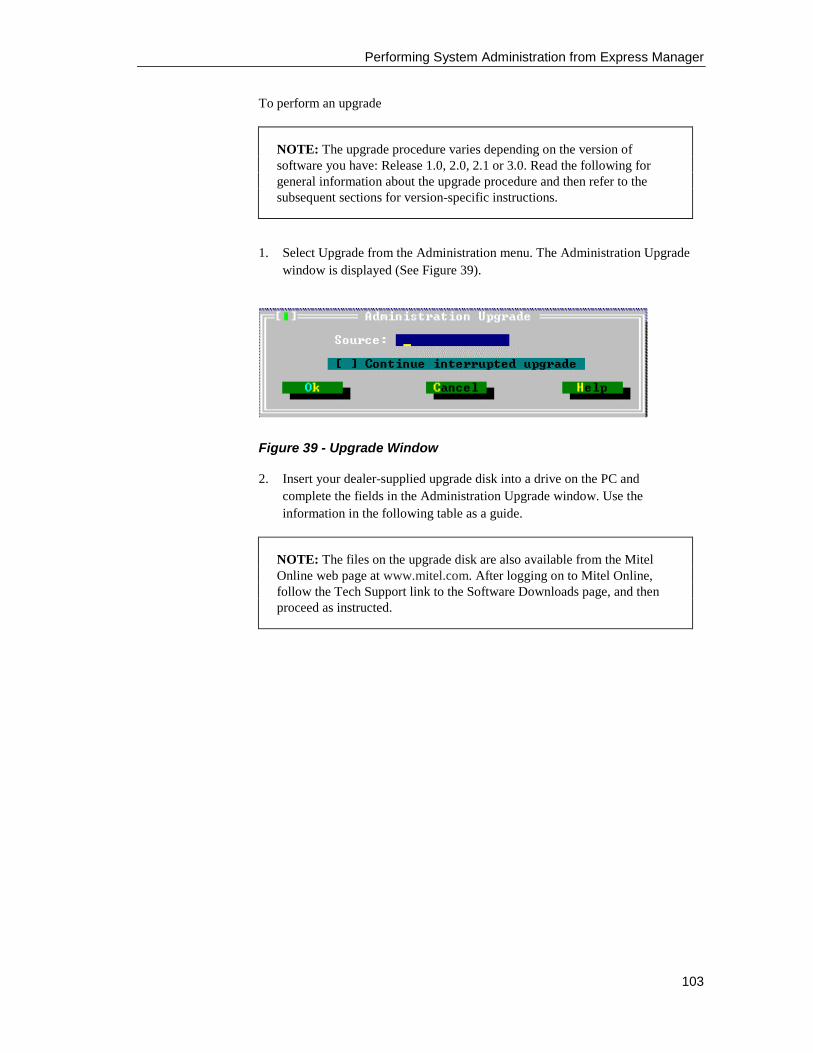
Performing System Administration from Express Manager
103
To perform an upgrade
NOTE: The upgrade procedure varies depending on the version ofsoftware you have: Release 1.0, 2.0, 2.1 or 3.0. Read the following forgeneral information about the upgrade procedure and then refer to thesubsequent sections for version-specific instructions.
1. Select Upgrade from the Administration menu. The Administration Upgradewindow is displayed (See Figure 39).
Figure 39 - Upgrade Window
2. Insert your dealer-supplied upgrade disk into a drive on the PC andcomplete the fields in the Administration Upgrade window. Use theinformation in the following table as a guide.
NOTE: The files on the upgrade disk are also available from the MitelOnline web page at www.mitel.com. After logging on to Mitel Online,follow the Tech Support link to the Software Downloads page, and thenproceed as instructed.
Performing System Administration from Express Manager
104
Upgrade
Field: Enter as follows:
Source Type the full pathname to the upgrade source file assupplied by your Express Messenger dealer (typically it isa:\xxx.upg).
Continue aninterruptedupgrade
If a previous upgrade attempt was interrupted in any way,press the space bar while in the check box or use themouse to click in the check box. Express Manager startsthis upgrade from the point of the previous interruption ifit can. Otherwise, the upgrade starts from the beginning.
3. After upgrading, reboot the Express Messenger by selecting the Rebootfunction under Maintenance.
CAUTION: Before rebooting, always ensure that there is no voice mailactivity. Check the Express Messenger card to make sure all port lights areoff, or check the Port Status window from Express Manager to make surethat all ports are “Waiting”. Typically, you should restore and rebootduring off-hours.
Performing System Administration from Express Manager
105
Upgrading from Release 1.0 to Release 2.0 SoftwareYou upgrade an Express Messenger card from Release 1.0 to Release 2.0 softwarein two parts:
1. First, you upgrade the system with the software that provides theRelease 2.0 functionality.
2. Then, you upgrade the system with the software that provides theNuPoint voice prompts (new telephone user interface). If you want tokeep the Release 1.0 voice prompts, do not install the NuPoint voiceprompts.
NOTE: A Release 1.0 card stores approximately 32 hours of messages. ARelease 2.0 card stores approximately 100 hours of messages. If youupgrade a Release 1.0 card with Release 2.0 software, the messagestorage remains at 32 hours because the message storage limit is carddependent.
To install the system software that provides the Release 2.0 functionality:
1. Copy the following files into a directory on a floppy disk or hard drivethat is accessible from the PC that you use to run Express Manager:
200part1.upg, 200part1.zip and upgrade1.bat
2. Select Upgrade from the Administration menu. The AdministrationUpgrade window is displayed (See Figure 39).
3. In the Source field, specify the path to the 200part1.upg file and clickOK.
4. Select Reboot from the Maintenance menu. You must reboot thesystem for the new software to take effect.
To install the system software that provides the NuPoint voice prompts:
1. Copy the following files into a directory on a floppy disk or hard drivethat is accessible from the PC that you use to run Express Manager:
200part2.upg, 200part2.zip and upgrade2.bat
2. Select Upgrade from the Administration menu. The AdministrationUpgrade window is displayed (See Figure 39).
3. In the Source field, specify the path to the 200part2.upg file and clickOK.
4. Select Reboot from the Maintenance menu. You must reboot thesystem for the new software to take effect.

Performing System Administration from Express Manager
106
Upgrading from Release 1.0 to Release 2.1 SoftwareYou cannot upgrade directly from Release 1.0 software to Release 2.1 software.You must first upgrade from Release 1.0 to Release 2.0; and then from Release 2.0to Release 2.1.
Upgrading from Release 2.0 to Release 2.1 SoftwareYou can install the Release 2.1 software with or without the Hospitality option. Ifyou do not require the Hospitality option, you can reduce the time that it takes tocomplete the upgrade by not installing it.
To install the Release 2.1 system software without the Hospitality option:
1. Insert the floppy disk labeled Part 2 of 2 in the disk drive of the PC that youuse to run Express Manager. This disk contains the files: 210part2.upg,210part2.zip, and upgrade2.bat.
Skip this step if you downloaded the upgrade software to the PC from MitelOnline. For more information, see page 103.
2. Select Upgrade from the Administration menu. The AdministrationUpgrade window is displayed (See Figure 39).
3. In the Source field, specify the path to the 210part2.upg file and clickOK.
4. After the upgrade is complete, select Reboot from the Maintenancemenu. You must reboot the system for the new software to take effect.
5. Enable Softkey Support, if required. See Enabling Softkey Support onpage 84 for instructions.
To install the Release 2.1 system software with the Hospitality option:
1. Insert the floppy disk labeled Part 1 of 2 in the disk drive of the PC thatyou use to run Express Manager. This disk contains the files:210part1.upg and 210part1.zip.
Skip this step if you downloaded the upgrade software to the PC from MitelOnline. For more information, see page 103.
2. Select Upgrade from the Administration menu. The Administration Upgradewindow is displayed (See Figure 39).
3. In the Source field, specify the path to the 210part1.upg file and click OK.A window displays the progress of the upgrade. After this upgrade iscomplete, you do not need to reboot the system.
4. Insert the floppy disk labeled Part 2 of 2 in the disk drive of the PC that youuse to run Express Manager. This disk contains the files: 210part2.upg,210part2.zip, and upgrade2.bat.
5. Select Upgrade from the Administration menu.
Performing System Administration from Express Manager
107
6. In the Source field, specify the path to the 210part2.upg file and clickOK. After this upgrade is complete, select Reboot from theMaintenance menu. You must reboot the system for the new softwareto take effect.
6. Enable Softkey Support, if required. See Enabling Softkey Support onpage 84 for instructions.
7. Enable the Hospitality Option. See Enabling the Hospitality Option onpage 95 for instructions.
Upgrading to Release 3.0 SoftwareYou cannot upgrade directly from Release 1.0 or 2.0 software to Release 3.0software. You must first upgrade from Release 1.0 to Release 2.0; and then fromRelease 2.0 to Release 2.1.
A full upgrade adds Release 3.0 features in English and Spanish, plus support forbilingual (English and Spanish) systems.
NOTE: French prompts and support for PMS integration require orderinga Express Messenger card. You cannot upgrade the Express Messengersoftware to get these features.
The upgrade is done in three parts, with two parts optional. Do only the partsrequired to get the features and prompts you need.
For... Do Part...
Release 3.0 features in English 1
Release 3.0 features in English and Spanish 1 and 2
Release 3.0 features for bilingual systems inEnglish and Spanish.
1, 2, and 3
Performing System Administration from Express Manager
108
Part 1 – Release 3.0 features in English
1. Insert the floppy disk labeled Part 1 of 4 in the disk drive of the PC that youuse to run Express Manager. This disk contains the files: 300part1.upg,300part1.zip, and upgrade.bat.
Skip this step if you downloaded the upgrade software to the PC from MitelOnline. For more information, see page 103.
2. Select Upgrade from the Administration menu. The AdministrationUpgrade window is displayed (See Figure 39).
3. In the Source field, specify the path to the 300part1.upg file and clickOK.
4. After the upgrade is complete proceed to the next part.
Or
5. Select Reboot from the Maintenance menu if you do not require thefeatures in the remaining upgrade parts. You must reboot the system forthe new software to take effect.
Part 2 – Release 3.0 features in English and Spanish
1. Perform Part 1 of the upgrade.
2. Insert the floppy disk labeled Part 2 of 2 in the disk drive of the PC that youuse to run Express Manager. This disk contains the files: 300part2.upg and300part2.zip.
Skip this step if you downloaded the upgrade software to the PC from MitelOnline. For more information, see page 103.
3. Select Upgrade from the Administration menu.
4. In the Source field, specify the path to the 300part2.upg file and clickOK.
5. After the upgrade is complete proceed to the next part.
Or
6. Select Reboot from the Maintenance menu if you do not require thefeatures in the remaining upgrade parts. You must reboot the system forthe new software to take effect.
Performing System Administration from Express Manager
109
Part 3 – Release 3.0 features for bilingual (English and Spanish) systems
1. Perform Parts 1 and 2 of the upgrade.
2. Insert the floppy disk labeled Part 3 of 4 in the disk drive of the PC that youuse to run Express Manager. This disk contains the files: 300part3.upg and300part3.zip.
Skip this step if you downloaded the upgrade software to the PC from MitelOnline. For more information, see page 103.
3. Select Upgrade from the Administration menu.
4. In the Source field, specify the path to the 300part3.upg file and clickOK.
5. Repeat steps 2 to 4 with the floppy disk lableled Part 4 of 4. This disk containsthe files: 300part4.upg and 300part4.zip.
6. After this upgrade is complete, select Reboot from the Maintenancemenu. You must reboot the system for the new software to take effect.
7. Enable the Bilingual Voice Prompts Options. See Enabling theBilingual Prompts Option on page 94 for instructions.
Performing System Administration from Express Manager
110
Upgrading an Express Messenger Card to SupportAdditional Ports or Release 3.0 Software FeaturesYou can upgrade a card to support up to 8 ports or to access certain Release 3.0software features (French prompts and PMS support) by enabling software that ison the card with a passcode. To upgrade a card
1. Obtain the model number and serial number of the card
2. Obtain a passcode from Mitel Corporation
3. Enable the software.
NOTE: A Release 1.0 card stores approximately 32 hours of messages. ARelease 2.0 card stores approximately 100 hours of messages. If youupgrade a Release 1.0 card with Release 2.0 software, the message storageremains at 32 hours because the message storage limit is card dependent.
Obtain the card’s model and serial number
NOTE: Ensure that you have a pen or pencil handy.
1. From any internal DTMF telephone, obtain dial tone.
2. Dial the Express Messenger message center number. ExpressMessenger answers and plays a greeting.
3. Dial * when you hear the greeting. Express Messenger prompts you fora mailbox number.
4. Dial the system administrator mailbox number: 99 or 999 or 9999.Express Messenger prompts you for a passcode.
5. Dial the Technician’s passcode: 8642 (or 412 for Release 1.0 systems).
6. Dial a Technician Function code.
7. Dial 9 to access a menu of options.
8. Dial 10273. Express Messenger gives the model number of the card.Record the model number: ___________.
9. Dial 10272. Express Messenger gives the serial number of the card.Record the serial number: _________.
10. Hang up.
Performing System Administration from Express Manager
111
Obtain an upgrade passcode from Mitel Corporation
Ensure that you have the model number and serial number of your card available.You will need a pen or pencil.
1. Call Mitel Corporation order desk. The part number for the upgradesare
− 2-port to 4-port software upgrade is PN 9109-542-000-NA
− 2-port to 6-port software upgrade is PN 9109-542-001-NA
− 2-port to 8-port software upgrade is PN 9109-542-002-NA
− 4-port to 6-port software upgrade is PN 9109-542-003-NA
− 4-port to 8-port software upgrade is PN 9109-542-004-NA.
− 6-port to 8-port software upgrade is PN 9109-542-005-NA.
2. Give the operator the serial number and model number of your card.
3. The operator will give you an 11-digit passcode. Record this code:_________________
Enable the software
CAUTION: This procedure takes the Express Messenger system out ofservice for approximately 3 minutes. Perform this procedure after hours.
1. From any internal DTMF telephone, obtain dial tone.
2. Dial the Express Messenger message center number. ExpressMessenger answers and plays a greeting
3. Dial * when you hear the greeting. Express Messenger prompts you fora mailbox number.
4. Dial the system administrator mailbox number: 99 or 999 or 9999.Express Messenger prompts you for a passcode.
5. Dial the Technician’s passcode: 8642 (the passcode for Release 1.0cards is 412).
6. Dial 9 to access a menu of options. Express Messenger responds with,“Please enter a Technician’s function code”.
7. Dial 20272. Express Messenger responds with, “Please enter atechnician’s function code”. Enter the 11-digit passcode.
8. Express Messenger announces the new model number of the card.
9. Dial 10281 to reset the Express Messenger card with the upgradedsoftware.
10. Hang up. After the card resets, the additional ports will be enabled.
Performing System Administration from Express Manager
112
NOTE: Ensure that you complete the required CDE programming for thetwo additional ports (that is, Form 09, Form 17, and Form 19).
NOTE: The following ports of an Express Messenger card CANNOT beprogrammed as phantom lines:
- Ports 3 through 12 of a 2-port card
- Ports 5 through 12 of a 4-port card
- Ports 7 through 12 of a 6-port card
- Ports 9 through 12 of an 8-port card.
Upgrading to Release 4.0 Software FeaturesYou cannot upgrade directly from pre-Release 3.0 software to Release 4.0software. See the previous sections for information on upgrading to Release 3.0. Toupgrade from Release 3.x to Release 4.0, follow the procedure on page 102. Forinformation on enabling optional features in Release 4.0, see page 98.
Viewing System LogsSelect System Log from the Administration menu to view log messages. Logmessages are described in Appendix C: Express Manager System Messages and inAppendix D: Express Manager System Log Messages (diag.dat).
Performing Maintenance and Troubleshooting
113
Section 7: Performing Maintenance andTroubleshooting
MaintenanceMitel Express Messenger is self-maintaining.
Disk Management ProgramsTwo disk management programs (SCANDISK and CHKDSK) run automatically at3 AM every day. At that time, Express Messenger shuts down for approximately10 minutes, but the telephone system is still operational. If someone calls in duringthe time SCANDISK and CHKDSK are running, the telephone will ring but theauto attendant will not answer and the caller cannot perform any voice mail ormessaging functions.
CHKDSK searches for logical disk errors, and SCANDISK maps out bad sectorsand runs a hard disk surface test. Neither program affects data on the hard drive.Program results are written to the files c:\scandisk.log and c:\chkdsk.log. To viewthe log files, you must use Express Manager.
Express Messenger can be reconfigured to run these programs at other intervals,such as weekly, monthly, or not at all. Check with your Express Messenger dealerif you wish to change the disk management configuration.
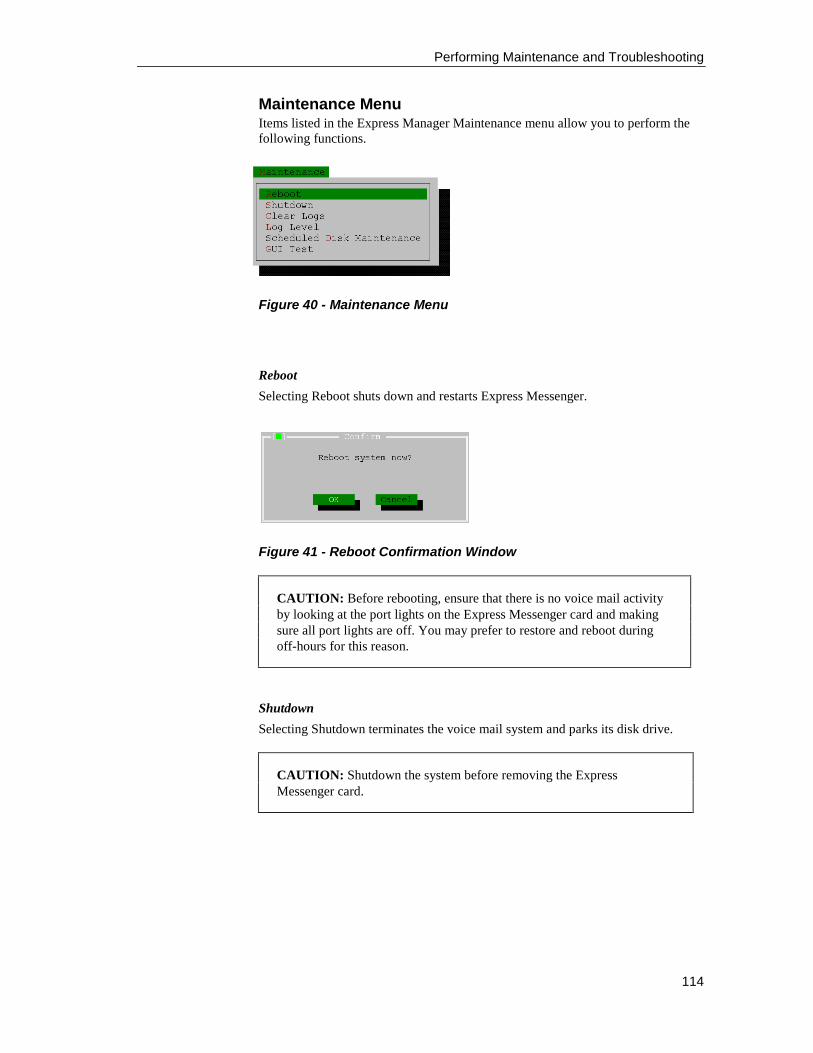
Performing Maintenance and Troubleshooting
114
Maintenance MenuItems listed in the Express Manager Maintenance menu allow you to perform thefollowing functions.
Figure 40 - Maintenance Menu
Reboot
Selecting Reboot shuts down and restarts Express Messenger.
Figure 41 - Reboot Confirmation Window
CAUTION: Before rebooting, ensure that there is no voice mail activityby looking at the port lights on the Express Messenger card and makingsure all port lights are off. You may prefer to restore and reboot duringoff-hours for this reason.
Shutdown
Selecting Shutdown terminates the voice mail system and parks its disk drive.
CAUTION: Shutdown the system before removing the ExpressMessenger card.
Performing Maintenance and Troubleshooting
115
Clear Logs
Clear the contents of either or both types of log items. The confirmation windowshown in Figure 42 appears.
Figure 42 - Clear Log Confirmation Windows
Log Level
Permits you to set levels for the Application and Driver Log events.
The default setting for both is INFO.
Figure 43 - Log Level Parameters
The windows display the levels in alphabetical order. The following table showsthe levels arranged in order of least detail to greatest detail. Maximum levels arerecommended only for temporary use during troubleshooting.
Log Levels for Error and for Voice Driver
DetailLogged
Level Designation Description of Events included
Minimum FATAL Logs the most critical events only
ERROR All above plus non-fatal system errors
WARNING All above plus approach to limits
INFO Displays all above plus programmedsystem events – (default level)
TRACE Shows all above plus manual commands
Maximum DEBUG Documents all above plus technicianentries
Performing Maintenance and Troubleshooting
116
Scheduled Disk Maintenance
Two disk management programs (SCANDISK and CHKDSK) run automatically at3 AM every day. Express Messenger can be reconfigured to run these programs atother intervals, such as weekly, monthly, or not at all:
Select the Scheduled Disk Maintenance window to select the frequency of runningthe disk maintenance program.
Figure 44 - Scheduled Disk Maintenance
Express Messenger Diagnostics and System Utilities
STATUS LED
Express Messenger status is displayed on ten status LEDs. The STATUS LED istri-color and shows overall system status and hard drive write activity. Eight bi-color LEDs detail self-test status during Power-on Self Tests (POST) and showport status after Express Messenger is initialized. The ALARM LED indicates analarm signal sent from the PBX main processor.
The STATUS LED shows when the system is performing power-on diagnostics,when diagnostics have failed, or when the system is operating correctly. The statesdisplayed by the STATUS LED are listed in below.
Performing Maintenance and Troubleshooting
117
STATUS LED State Express Messenger State
Dark No Power
Blinking Amber Power-on Self Test in progress.
Red Self Test Failed, see LINE or DIAGLEDs for failure code.
Green Self Test has passed, system isoperational.
If the Power-on Self Test fails (STATUS LED is RED), each LINE or DIAG LEDdisplays the result of one diagnostic to indicate which component(s) failed, aslisted following.
LED Failure
LINE 1 DRAM
LINE 2 RTC
LINE 3 EEPROM
LINE 4 EPROM Checksum
DIAG 1 Hard Disk
DIAG 2 Integration Processor
DIAG 3 DSP
DIAG 4 General Application Error
LINE or DIAG LEDs
After completing the Power-on Self Test, Express Messenger becomes operationaland the LINE LEDs display the state of each voice mail port as defined below.
LINE LED State Port State
OFF The port is on-hook and idle.
ON The port is off-hook and is in use
Performing Maintenance and Troubleshooting
118
ALARM LED
The ALARM LED indicates whether or not an alarm signal has been detected bythe PBX main processor and sent to Express Messenger.
LED State PBX Alarm State
OFF The PBX has not detected and signaled an alarmcondition on the voice mail card.
ON The PBX has detected and signaled an alarm conditionon the voice mail card.
chkdsk.log, scandisk.logOnce the BIOS POST completes and the operating system boots, autoexec.bat willinvoke the chkdsk utility program. This program will check for and correct logical(File Allocation Table) errors and log the results to \chkdsk.log.
The scandisk utility program runs at the scheduled maintenance time (default isdaily at 3 AM). The system performs housecleaning chores specific to voice mailas well as system-wide maintenance such as scandisk, where the disk is scannedfor physical errors (unreadable clusters). Bad clusters are mapped out of the FileAllocation Table and results are written (appended) to \scandisk.log.
System log file, diag.datThe voice driver then starts, just prior to the voice mail application program. Theapplication reports diagnostic and trace information. The logs are output to thediskfile (\vm\diag.dat). The format of the file breaks out into the following fields:
DATE TIME LEVEL MSG#-PORT MESSAGE
• DATE and TIME indicates when the event occurred.
• LEVEL indicates the message category and therefore the level setting requiredto include such messages in the output stream.
FATAL = 0ERROR = 1WARNING = 2INFO = 3TRACE = 4DEBUG = 5
• MSG# is a unique identifier for each message.
• PORT is the single-digit voice mail port associated with the message (or 0 ifnot port-specific).
• MESSAGE provides text indicating the event.
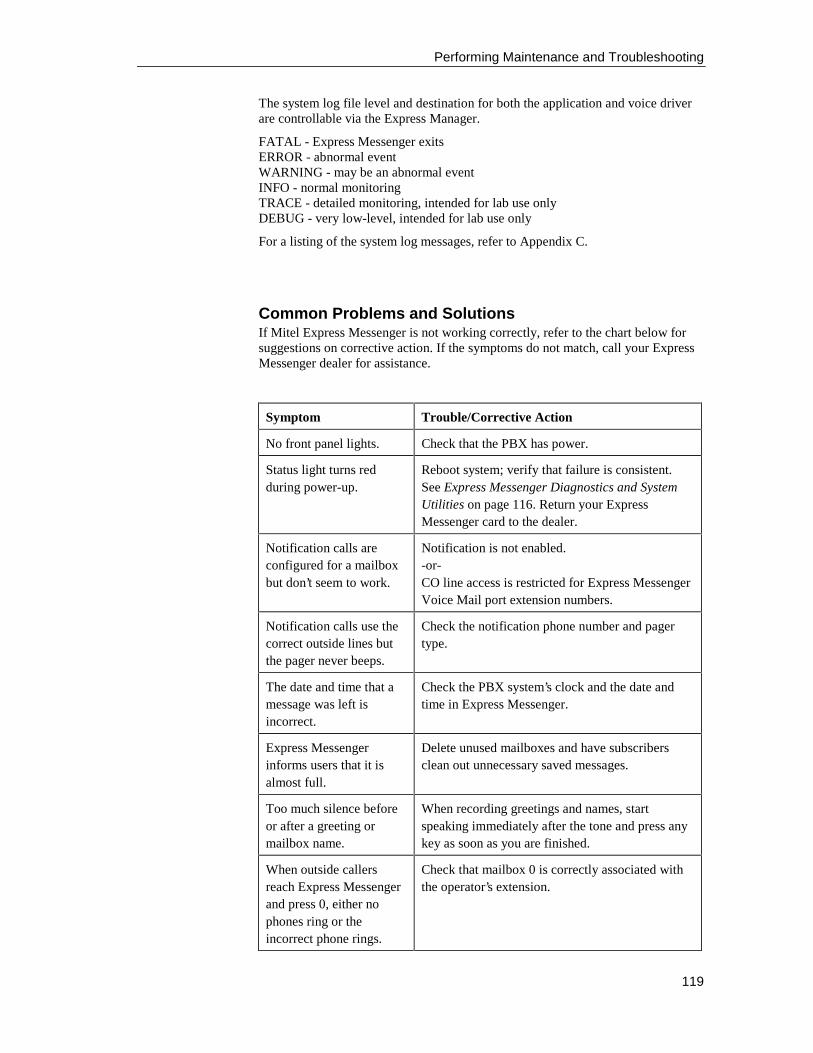
Performing Maintenance and Troubleshooting
119
The system log file level and destination for both the application and voice driverare controllable via the Express Manager.
FATAL - Express Messenger exitsERROR - abnormal eventWARNING - may be an abnormal eventINFO - normal monitoringTRACE - detailed monitoring, intended for lab use onlyDEBUG - very low-level, intended for lab use only
For a listing of the system log messages, refer to Appendix C.
Common Problems and SolutionsIf Mitel Express Messenger is not working correctly, refer to the chart below forsuggestions on corrective action. If the symptoms do not match, call your ExpressMessenger dealer for assistance.
Symptom Trouble/Corrective Action
No front panel lights. Check that the PBX has power.
Status light turns redduring power-up.
Reboot system; verify that failure is consistent.See Express Messenger Diagnostics and SystemUtilities on page 116. Return your ExpressMessenger card to the dealer.
Notification calls areconfigured for a mailboxbut don’t seem to work.
Notification is not enabled.-or-CO line access is restricted for Express MessengerVoice Mail port extension numbers.
Notification calls use thecorrect outside lines butthe pager never beeps.
Check the notification phone number and pagertype.
The date and time that amessage was left isincorrect.
Check the PBX system’s clock and the date andtime in Express Messenger.
Express Messengerinforms users that it isalmost full.
Delete unused mailboxes and have subscribersclean out unnecessary saved messages.
Too much silence beforeor after a greeting ormailbox name.
When recording greetings and names, startspeaking immediately after the tone and press anykey as soon as you are finished.
When outside callersreach Express Messengerand press 0, either nophones ring or theincorrect phone rings.
Check that mailbox 0 is correctly associated withthe operator’s extension.
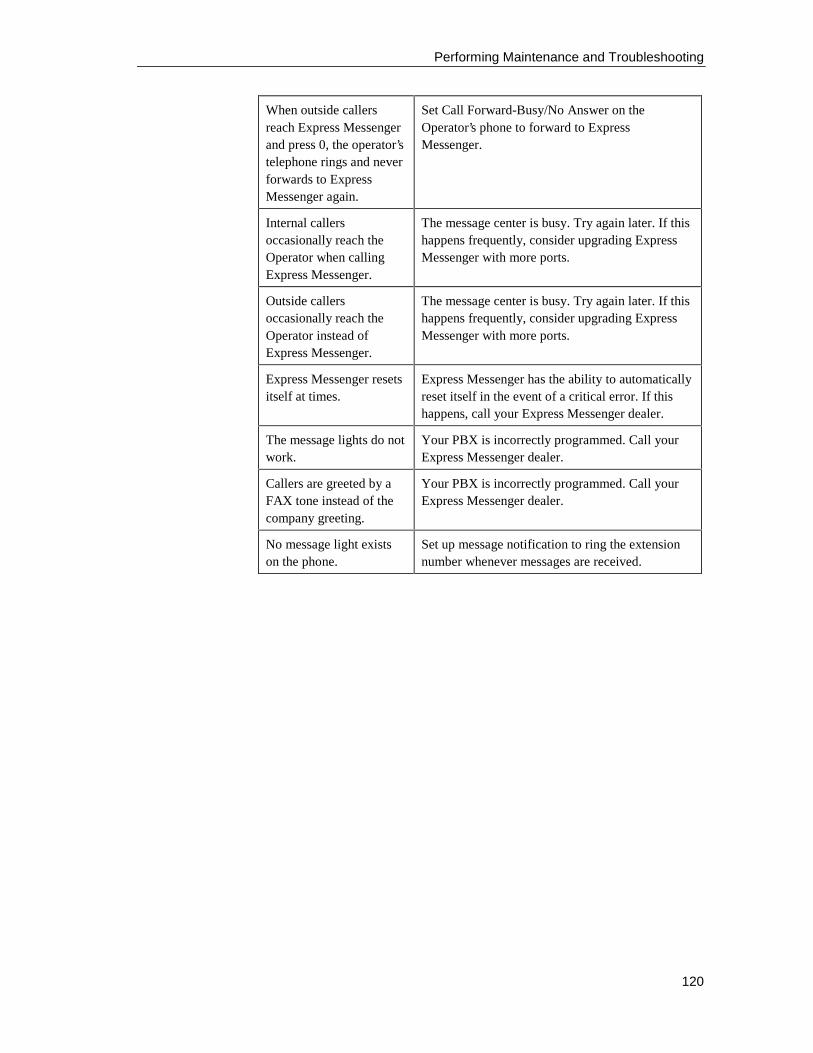
Performing Maintenance and Troubleshooting
120
When outside callersreach Express Messengerand press 0, the operator’stelephone rings and neverforwards to ExpressMessenger again.
Set Call Forward-Busy/No Answer on theOperator’s phone to forward to ExpressMessenger.
Internal callersoccasionally reach theOperator when callingExpress Messenger.
The message center is busy. Try again later. If thishappens frequently, consider upgrading ExpressMessenger with more ports.
Outside callersoccasionally reach theOperator instead ofExpress Messenger.
The message center is busy. Try again later. If thishappens frequently, consider upgrading ExpressMessenger with more ports.
Express Messenger resetsitself at times.
Express Messenger has the ability to automaticallyreset itself in the event of a critical error. If thishappens, call your Express Messenger dealer.
The message lights do notwork.
Your PBX is incorrectly programmed. Call yourExpress Messenger dealer.
Callers are greeted by aFAX tone instead of thecompany greeting.
Your PBX is incorrectly programmed. Call yourExpress Messenger dealer.
No message light existson the phone.
Set up message notification to ring the extensionnumber whenever messages are received.
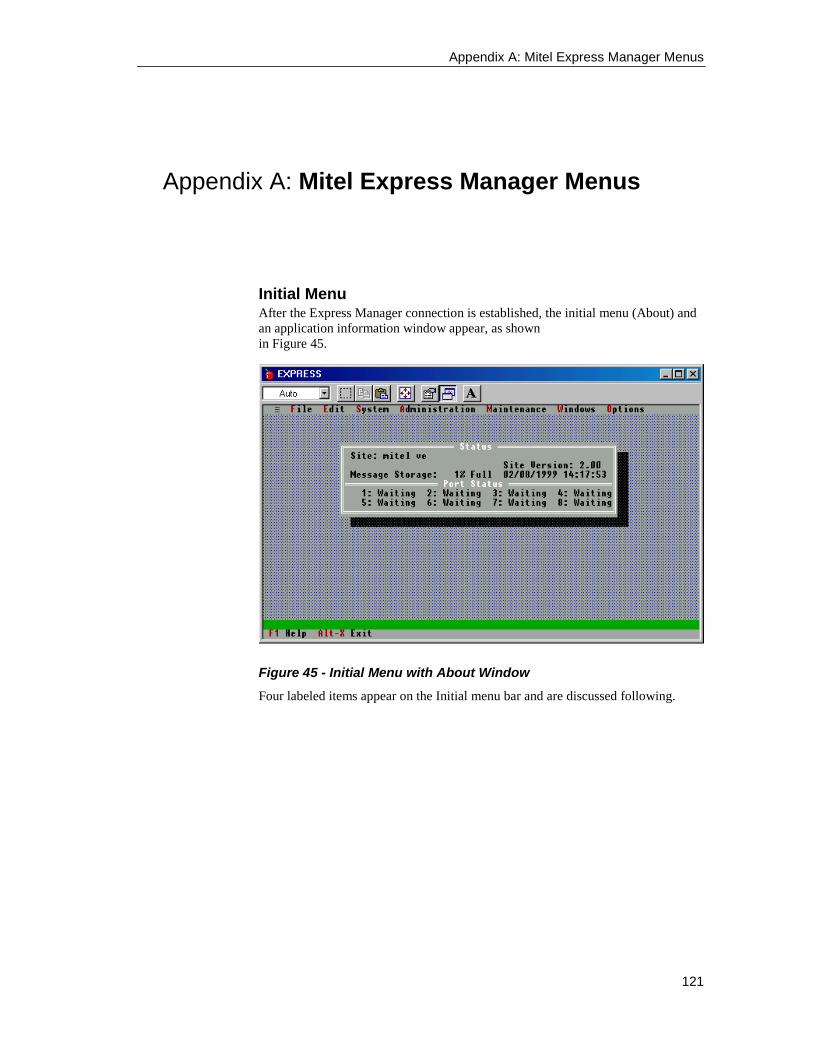
Appendix A: Mitel Express Manager Menus
121
Appendix A: Mitel Express Manager Menus
Initial MenuAfter the Express Manager connection is established, the initial menu (About) andan application information window appear, as shownin Figure 45.
Figure 45 - Initial Menu with About Window
Four labeled items appear on the Initial menu bar and are discussed following.
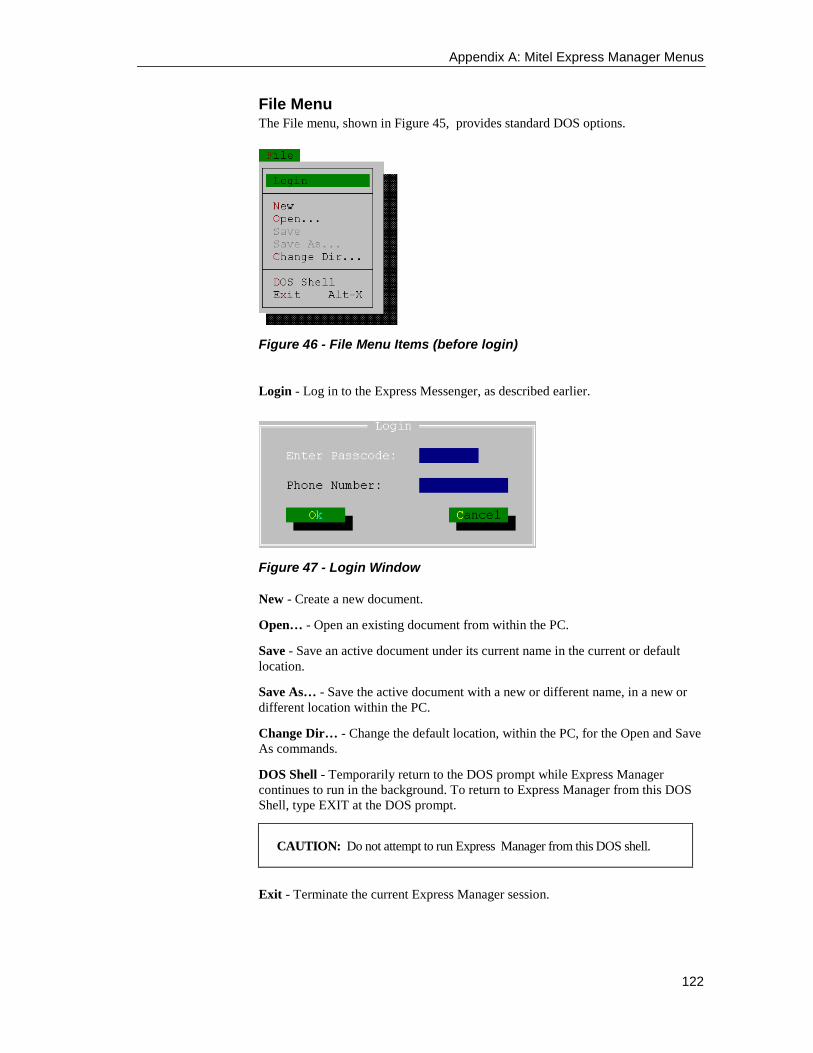
Appendix A: Mitel Express Manager Menus
122
File MenuThe File menu, shown in Figure 45, provides standard DOS options.
Figure 46 - File Menu Items (before login)
Login - Log in to the Express Messenger, as described earlier.
Figure 47 - Login Window
New - Create a new document.
Open… - Open an existing document from within the PC.
Save - Save an active document under its current name in the current or defaultlocation.
Save As… - Save the active document with a new or different name, in a new ordifferent location within the PC.
Change Dir… - Change the default location, within the PC, for the Open and SaveAs commands.
DOS Shell - Temporarily return to the DOS prompt while Express Managercontinues to run in the background. To return to Express Manager from this DOSShell, type EXIT at the DOS prompt.
CAUTION: Do not attempt to run Express Manager from this DOS shell.
Exit - Terminate the current Express Manager session.
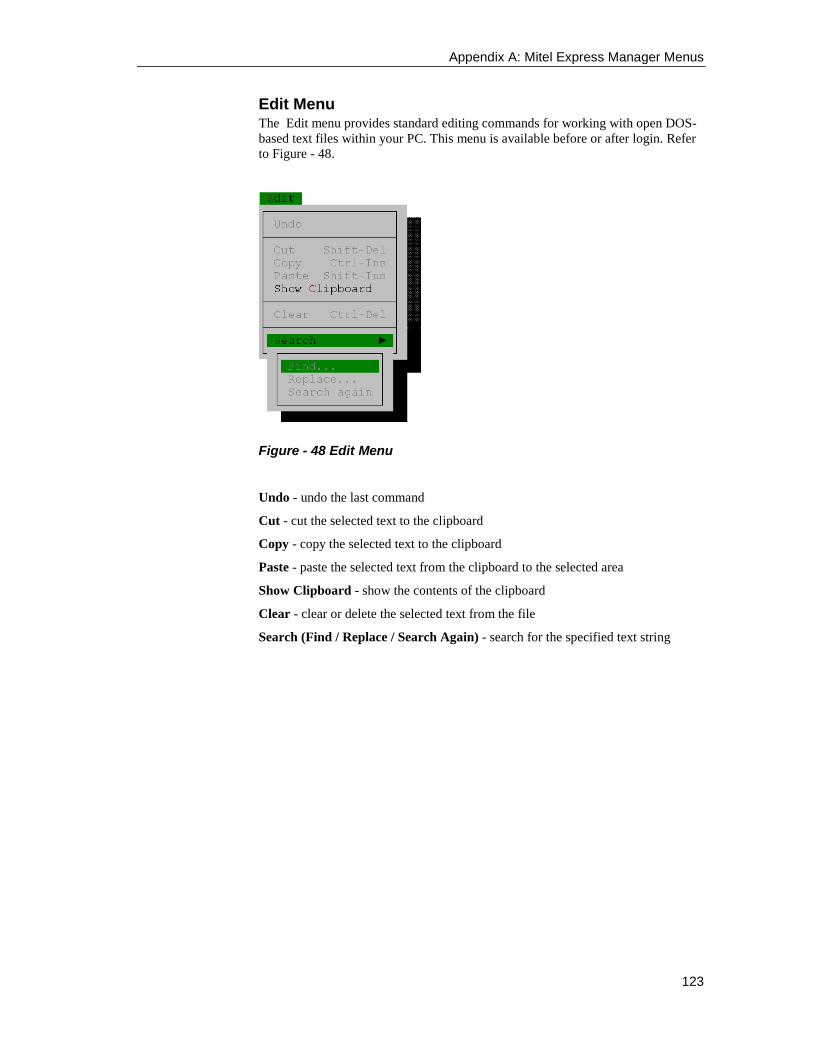
Appendix A: Mitel Express Manager Menus
123
Edit MenuThe Edit menu provides standard editing commands for working with open DOS-based text files within your PC. This menu is available before or after login. Referto Figure - 48.
Figure - 48 Edit Menu
Undo - undo the last command
Cut - cut the selected text to the clipboard
Copy - copy the selected text to the clipboard
Paste - paste the selected text from the clipboard to the selected area
Show Clipboard - show the contents of the clipboard
Clear - clear or delete the selected text from the file
Search (Find / Replace / Search Again) - search for the specified text string
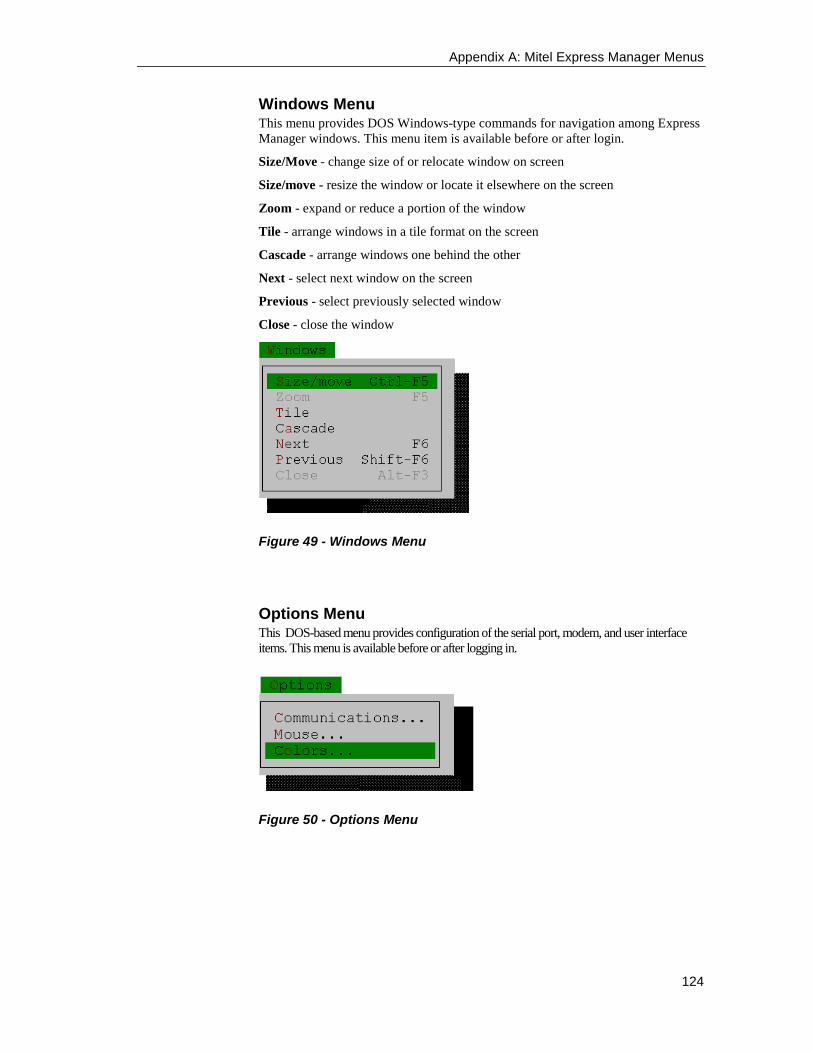
Appendix A: Mitel Express Manager Menus
124
Windows MenuThis menu provides DOS Windows-type commands for navigation among ExpressManager windows. This menu item is available before or after login.
Size/Move - change size of or relocate window on screen
Size/move - resize the window or locate it elsewhere on the screen
Zoom - expand or reduce a portion of the window
Tile - arrange windows in a tile format on the screen
Cascade - arrange windows one behind the other
Next - select next window on the screen
Previous - select previously selected window
Close - close the window
Figure 49 - Windows Menu
Options MenuThis DOS-based menu provides configuration of the serial port, modem, and user interfaceitems. This menu is available before or after logging in.
Figure 50 - Options Menu
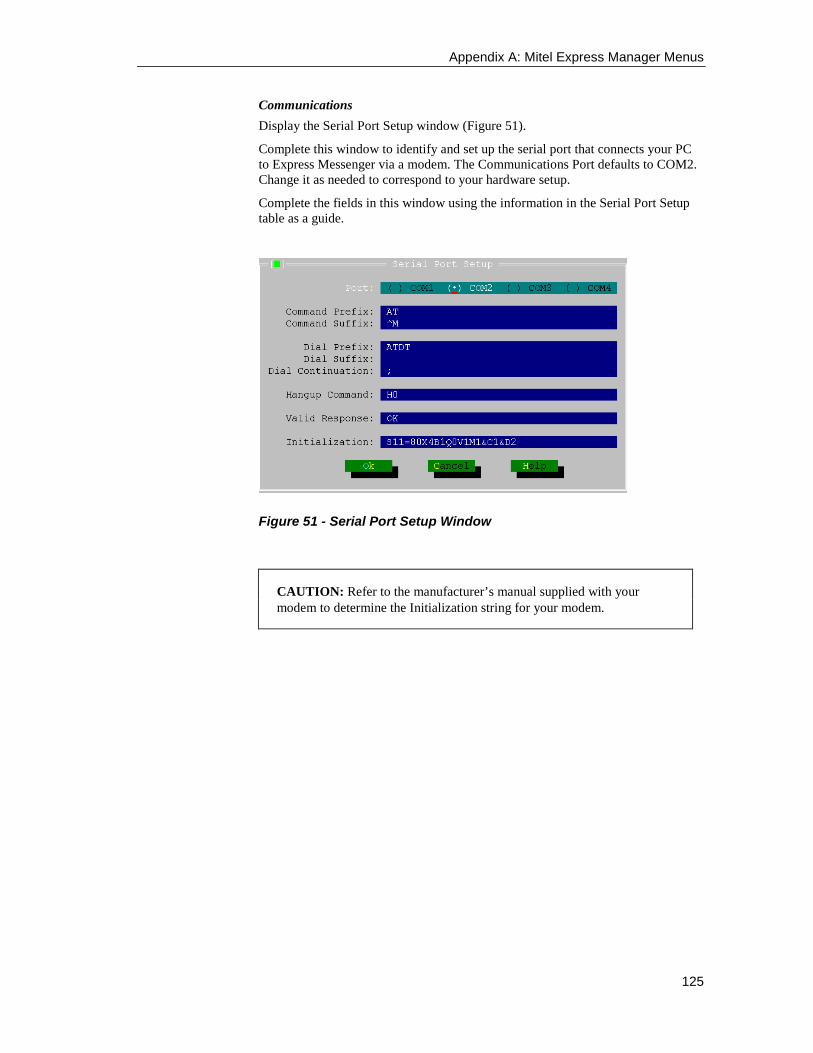
Appendix A: Mitel Express Manager Menus
125
Communications
Display the Serial Port Setup window (Figure 51).
Complete this window to identify and set up the serial port that connects your PCto Express Messenger via a modem. The Communications Port defaults to COM2.Change it as needed to correspond to your hardware setup.
Complete the fields in this window using the information in the Serial Port Setuptable as a guide.
Figure 51 - Serial Port Setup Window
CAUTION: Refer to the manufacturer’s manual supplied with yourmodem to determine the Initialization string for your modem.
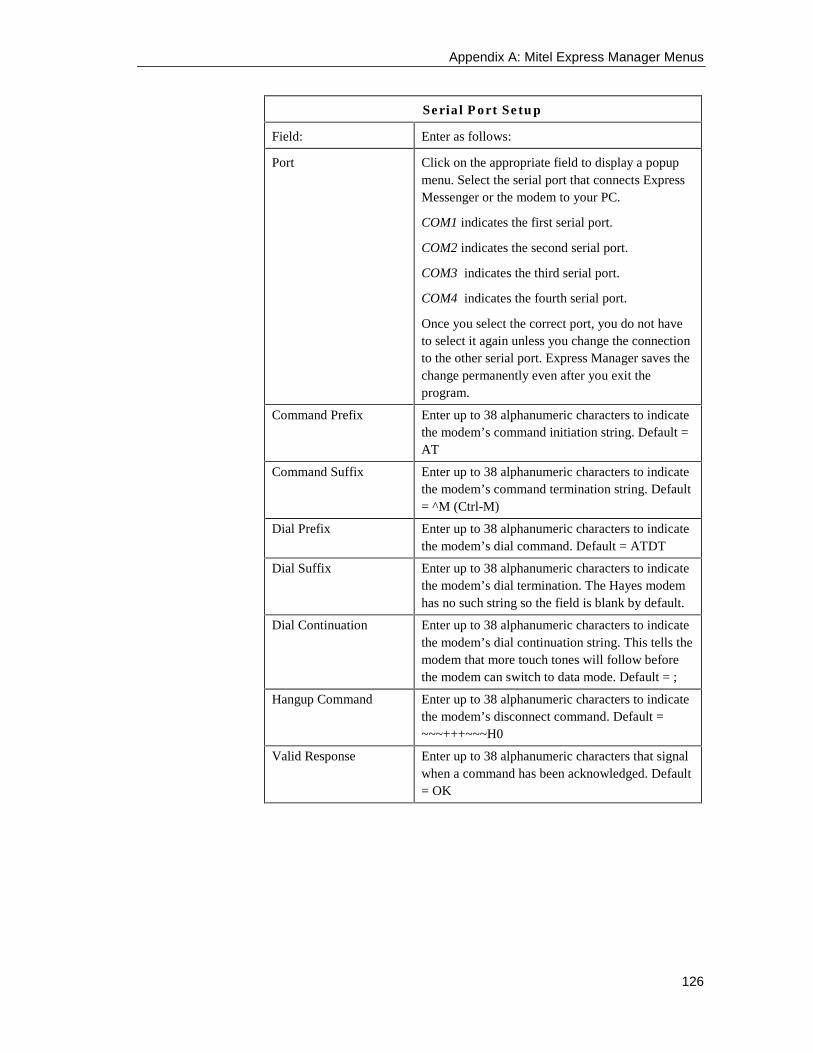
Appendix A: Mitel Express Manager Menus
126
Serial Port Setup
Field: Enter as follows:
Port Click on the appropriate field to display a popupmenu. Select the serial port that connects ExpressMessenger or the modem to your PC.
COM1 indicates the first serial port.
COM2 indicates the second serial port.
COM3 indicates the third serial port.
COM4 indicates the fourth serial port.
Once you select the correct port, you do not haveto select it again unless you change the connectionto the other serial port. Express Manager saves thechange permanently even after you exit theprogram.
Command Prefix Enter up to 38 alphanumeric characters to indicatethe modem’s command initiation string. Default =AT
Command Suffix Enter up to 38 alphanumeric characters to indicatethe modem’s command termination string. Default= ^M (Ctrl-M)
Dial Prefix Enter up to 38 alphanumeric characters to indicatethe modem’s dial command. Default = ATDT
Dial Suffix Enter up to 38 alphanumeric characters to indicatethe modem’s dial termination. The Hayes modemhas no such string so the field is blank by default.
Dial Continuation Enter up to 38 alphanumeric characters to indicatethe modem’s dial continuation string. This tells themodem that more touch tones will follow beforethe modem can switch to data mode. Default = ;
Hangup Command Enter up to 38 alphanumeric characters to indicatethe modem’s disconnect command. Default =~~~+++~~~H0
Valid Response Enter up to 38 alphanumeric characters that signalwhen a command has been acknowledged. Default= OK
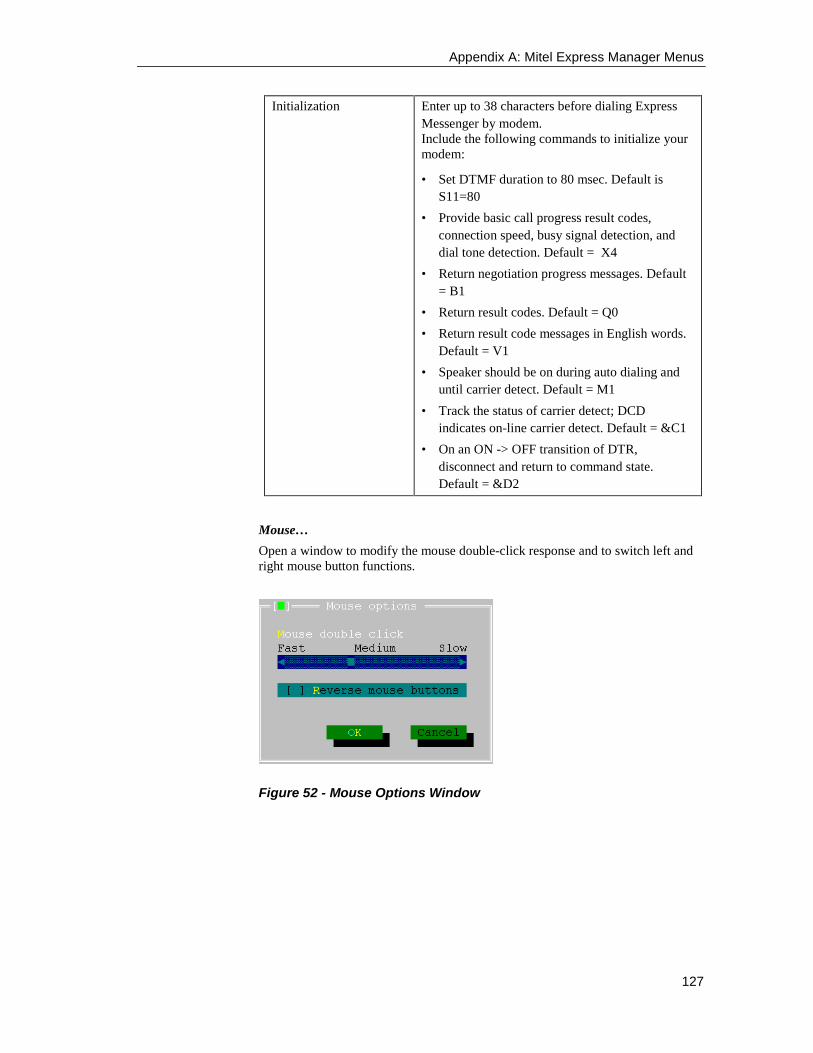
Appendix A: Mitel Express Manager Menus
127
Initialization Enter up to 38 characters before dialing ExpressMessenger by modem. Include the following commands to initialize yourmodem:
• Set DTMF duration to 80 msec. Default isS11=80
• Provide basic call progress result codes,connection speed, busy signal detection, anddial tone detection. Default = X4
• Return negotiation progress messages. Default= B1
• Return result codes. Default = Q0
• Return result code messages in English words.Default = V1
• Speaker should be on during auto dialing anduntil carrier detect. Default = M1
• Track the status of carrier detect; DCDindicates on-line carrier detect. Default = &C1
• On an ON -> OFF transition of DTR,disconnect and return to command state.Default = &D2
Mouse…
Open a window to modify the mouse double-click response and to switch left andright mouse button functions.
Figure 52 - Mouse Options Window
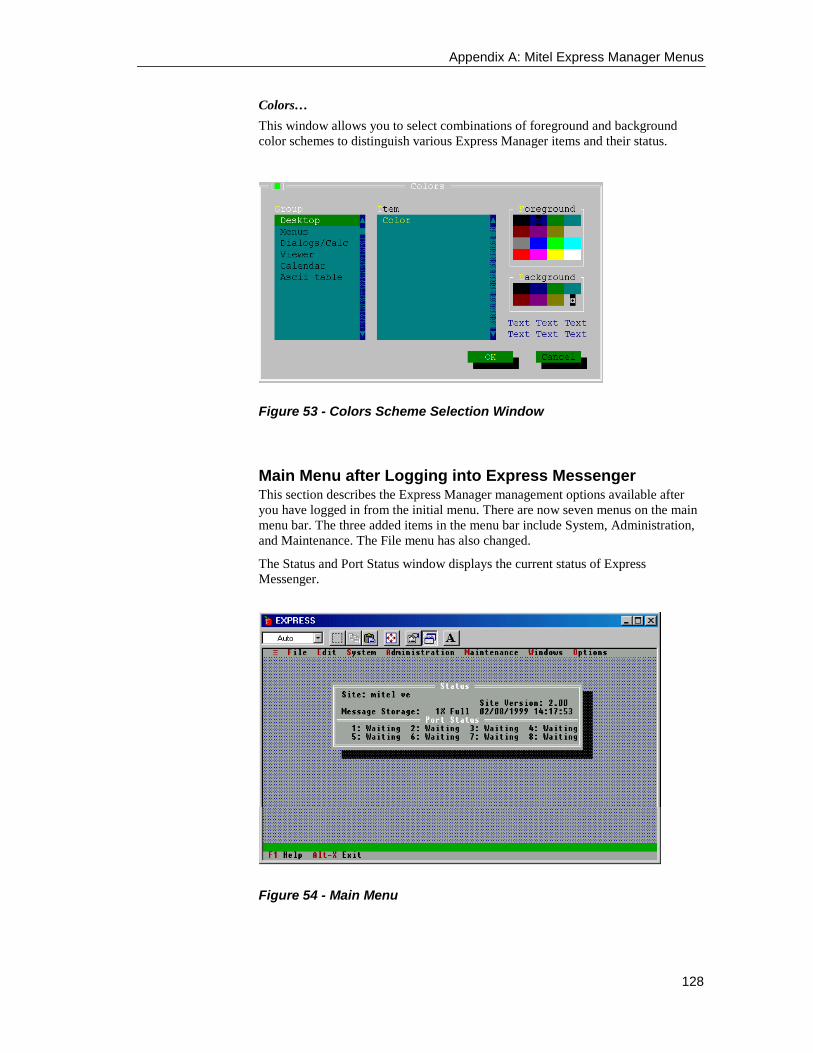
Appendix A: Mitel Express Manager Menus
128
Colors…
This window allows you to select combinations of foreground and backgroundcolor schemes to distinguish various Express Manager items and their status.
Figure 53 - Colors Scheme Selection Window
Main Menu after Logging into Express MessengerThis section describes the Express Manager management options available afteryou have logged in from the initial menu. There are now seven menus on the mainmenu bar. The three added items in the menu bar include System, Administration,and Maintenance. The File menu has also changed.
The Status and Port Status window displays the current status of ExpressMessenger.
Figure 54 - Main Menu
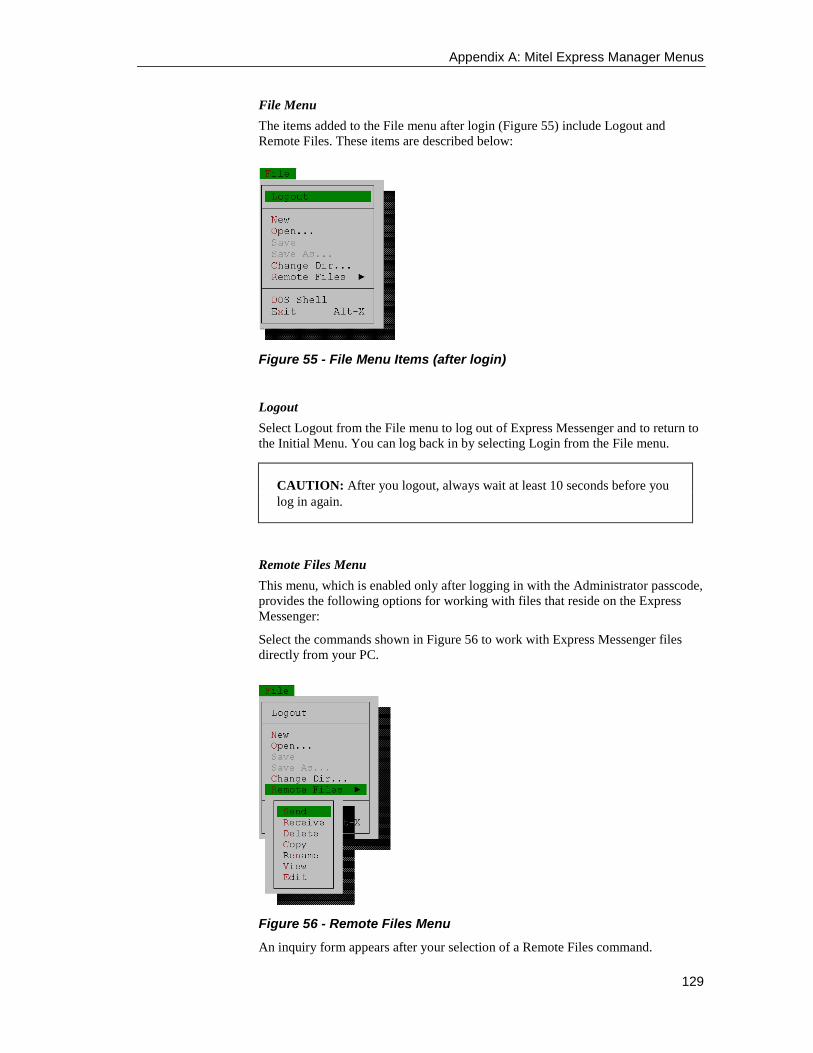
Appendix A: Mitel Express Manager Menus
129
File Menu
The items added to the File menu after login (Figure 55) include Logout andRemote Files. These items are described below:
Figure 55 - File Menu Items (after login)
Logout
Select Logout from the File menu to log out of Express Messenger and to return tothe Initial Menu. You can log back in by selecting Login from the File menu.
CAUTION: After you logout, always wait at least 10 seconds before youlog in again.
Remote Files Menu
This menu, which is enabled only after logging in with the Administrator passcode,provides the following options for working with files that reside on the ExpressMessenger:
Select the commands shown in Figure 56 to work with Express Messenger filesdirectly from your PC.
Figure 56 - Remote Files Menu
An inquiry form appears after your selection of a Remote Files command.
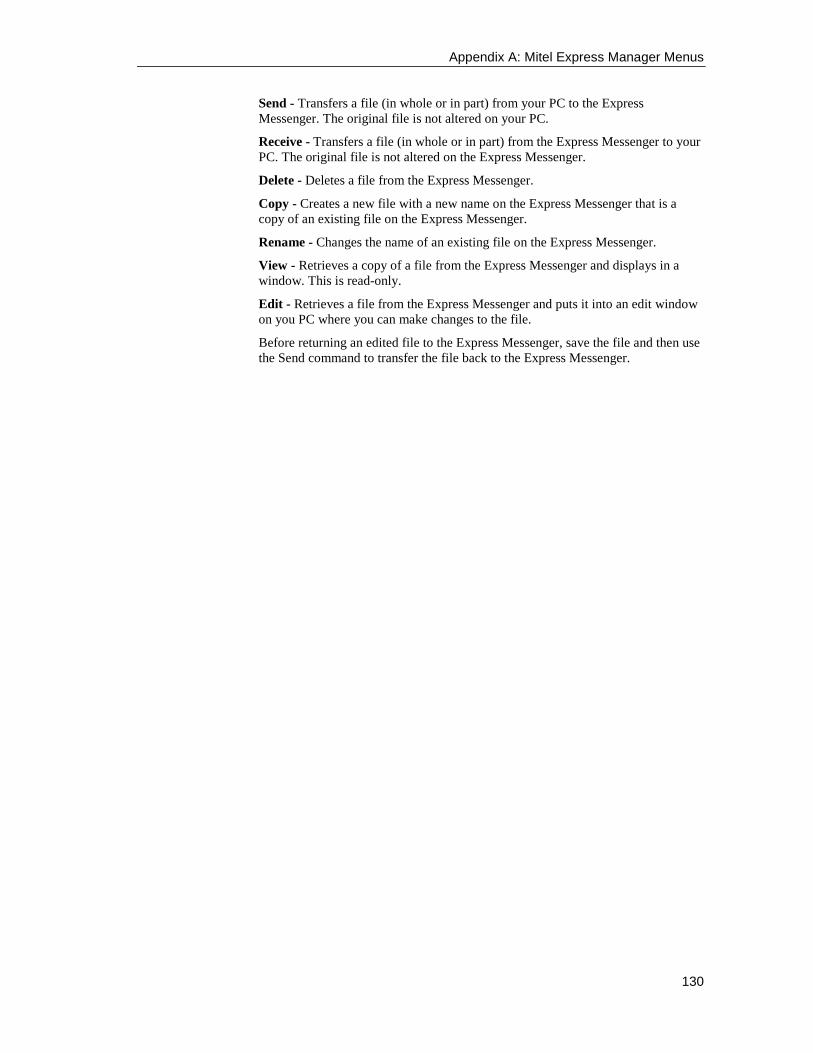
Appendix A: Mitel Express Manager Menus
130
Send - Transfers a file (in whole or in part) from your PC to the ExpressMessenger. The original file is not altered on your PC.
Receive - Transfers a file (in whole or in part) from the Express Messenger to yourPC. The original file is not altered on the Express Messenger.
Delete - Deletes a file from the Express Messenger.
Copy - Creates a new file with a new name on the Express Messenger that is acopy of an existing file on the Express Messenger.
Rename - Changes the name of an existing file on the Express Messenger.
View - Retrieves a copy of a file from the Express Messenger and displays in awindow. This is read-only.
Edit - Retrieves a file from the Express Messenger and puts it into an edit windowon you PC where you can make changes to the file.
Before returning an edited file to the Express Messenger, save the file and then usethe Send command to transfer the file back to the Express Messenger.
Appendix A: Mitel Express Manager Menus
131
System MenuThe System menu is shown in Figure 57. Mailboxes activities are described inSection Section 4: Changing Mailbox Parameters. The remaining activities aredescribed in Section 4: Changing System Administration From a Telephone and inSection.6: Performing System Administration from Express Manager.
Figure 57 - System Menu
Administration MenuAdministration activities, shown in Figure 58 are described in Section 6:Performing System Administration from Express Manager. The System Log optionis described below.
Figure 58 - Administration Menu
Appendix A: Mitel Express Manager Menus
132
System Log
Select this option from the Administration menu to display the current event logfile. Figure 59 displays a typical system log.
Figure 59 - System Log (typical)
The system log displays a read-only chronological record of Express Messengerevents and informational messages it has received. The scroll bar at the right of thewindow allows you to view the entire record.
The system log displays both the date and time of each event. This information can be useful inanalyzing system problems. See Log Level, page 115, for instructions on how to select thetypes (levels) of system events to record. For a listing of the system log messages, seeAppendix D.
Maintenance MenuMaintenance activities are described in Section 7, Performing Maintenance andTroubleshooting.
Appendix B: Glossary
133
Appendix B: Glossary
AdministratorMailbox
The Administrator mailbox is a special reservedmailbox that can only be accessed by the SystemAdministrator.
Auto Attendant The process of having calls answered, thentransferred, using an automated device instead of alive operator.
Backup The process that copies the data stored on ExpressMessenger to a disk file on the PC.
Company Greeting A general purpose announcement telling callers thecompany they have reached and giving themoptions for proceeding. Also known as a SystemGreeting.
Directory A listing of Express Messenger subscriber nameshaving associated mailboxes.
Extension The name for an individual phone connected to thePBX. Also known as the prime number.
Extension Mailbox A type of mailbox associated with an extension; ithas the capability to record, send, and listen tomessages.
Information-OnlyMailbox
A type of mailbox that plays informationalgreetings but does not record messages.
Intercom An extension that is on the internal companytelephone network.
Key System A telephone system in which telephones havemultiple buttons permitting users to select outgoingor incoming CO lines directly.
Mailbox Just like a postal mailbox, except that it uses thetelephone for sending and receiving voicemessages.
Message-OnlyMailbox
A type of mailbox having the capability to recordand listen to messages. It may be, but does not haveto be, associated with an extension number.
MWI Message Waiting Indication -- a way of notifyingpeople that they have messages. It is usually thelight on your telephone.
Notification The various methods used to notify people: ringinganother extension, calling a pocket pager, calling acellular phone, etc.
Appendix B: Glossary
134
Operator The person in your company who would normallyhandle telephone calls. Also referred to asAttendant or Receptionist.
Passcode The 3 to 6-digit security number that eachsubscriber uses to access their mailbox.
PBX or PABX Private Branch Exchange or Private AutomatedBranch Exchange. A telephone system in which thetelephones can call other internal telephones orexternal telephones by dialing.
Port Seen as a light on the Express Messenger printedcard, each port can supervise one telephone call.Express Messenger is available in a two-port orfour-port model. More ports enable ExpressMessenger to handle more simultaneous calls.
Port Status A section of the Status Box at the bottom of yourscreen. It shows the state of each port on theExpress Messenger system. The status of a portmay be "Waiting" or in some other state of activity.Port status can also be observed by the LEDs on thefaceplate of the Express Messenger card.
RAD Recorded Announcement Device. RADs arecommonly used to automatically answer lines anddeliver pre-recorded messages. Express Messengerports can function as RADs.
Receptionist The person in your company who would normallyhandle telephone calls. Also referred to asAttendant or Operator.
Restore The process that copies the backup data stored ondisk to Express Messenger for the purpose ofrecovering lost data.
Station The name for an individual phone connected to thesystem (see ’extension’).
Subscriber A person having a Express Messenger mailbox (see’user’).
System Administrator The person responsible for maintaining the ExpressMessenger system.
Transfer-Only Mailbox A type of mailbox which cannot record messagesand instructs callers to dial another number or todial 0 to reach the Operator.
Upgrade The process that updates your Express Messengersoftware using a designated file(s) on disk.
User A person having a Express Messenger mailbox (see’subscriber’).
Voice MessagingSystem
Also known as a voice mail system. A recordingsystem designed for receiving messages frompeople using a telephone. It eliminates incorrect orincomplete messages taken by a third party andallows for full 24 hour communications.
Appendix C: Express Manager System Messages
135
Appendix C: Express Manager SystemMessages
Under normal conditions, Mitel Express Messenger and Express Manager are easyto set up and use. However, three types of system messages may display withinboxes on your Express Manager screen.
• ErrorDisplay when there is a problem with communication between thePC and Express Messenger or there is an error with the data youentered. You must resolve an error condition before continuingwith Express Manager.
• WarningAlert you to a particular condition within Express Manager. Thesemessages are less serious in nature than error messages and do notrequire action to proceed with Express Manager.
• InformationProvide additional status information.
If a message displays, refer to the message list. Messages are listed numericallyfollowed by an explanation and a recommended action.
Other ProblemsIf Express Messenger is not working correctly, refer to the Troubleshooting sectionof this manual, which lists common error conditions and recommended correctiveactions.
If the problem persists, call your Express Messenger dealer. Have the serialnumber of your Express Messenger unit ready for reference when you call.
NOTE: The SITE INFORMATION screen located on the ’System’ menudisplays your company’s serial number.
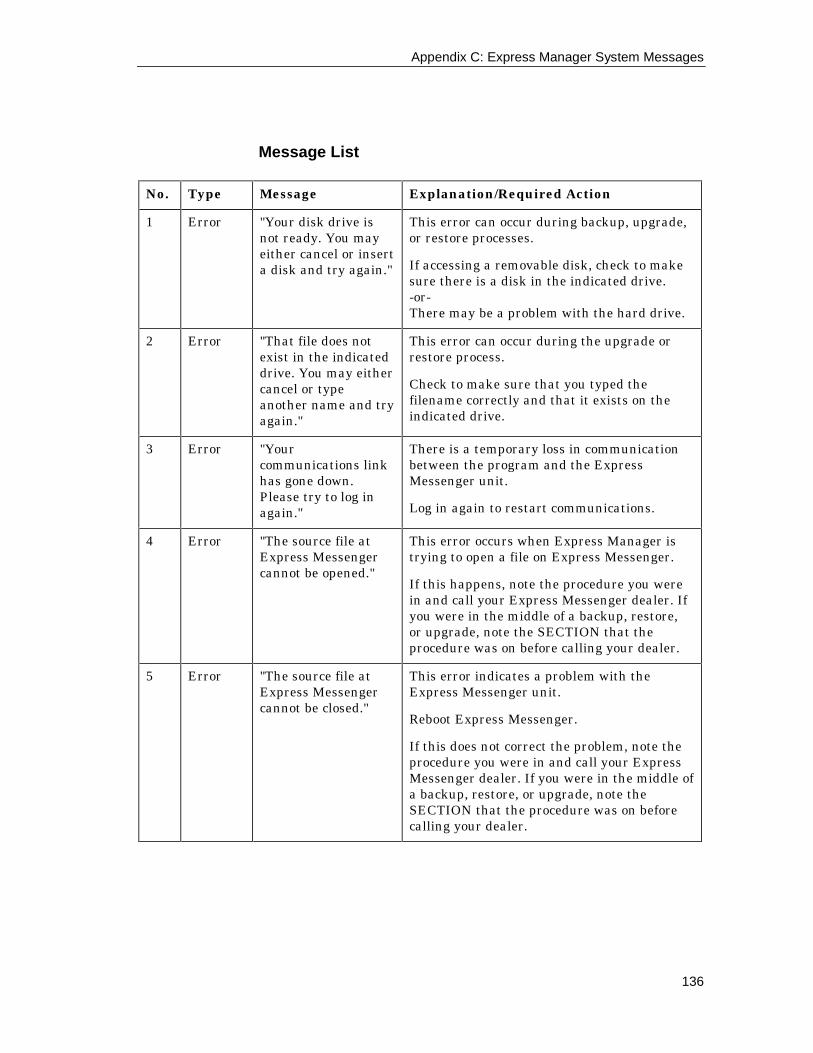
Appendix C: Express Manager System Messages
136
Message List
No. Type Message Explanation/Required Action
1 Error "Your disk drive isnot ready. You mayeither cancel or inserta disk and try again."
This error can occur during backup, upgrade,or restore processes.
If accessing a removable disk, check to makesure there is a disk in the indicated drive.-or-There may be a problem with the hard drive.
2 Error "That file does notexist in the indicateddrive. You may eithercancel or typeanother name and tryagain."
This error can occur during the upgrade orrestore process.
Check to make sure that you typed thefilename correctly and that it exists on theindicated drive.
3 Error "Yourcommunications linkhas gone down.Please try to log inagain."
There is a temporary loss in communicationbetween the program and the ExpressMessenger unit.
Log in again to restart communications.
4 Error "The source file atExpress Messengercannot be opened."
This error occurs when Express Manager istrying to open a file on Express Messenger.
If this happens, note the procedure you werein and call your Express Messenger dealer. Ifyou were in the middle of a backup, restore,or upgrade, note the SECTION that theprocedure was on before calling your dealer.
5 Error "The source file atExpress Messengercannot be closed."
This error indicates a problem with theExpress Messenger unit.
Reboot Express Messenger.
If this does not correct the problem, note theprocedure you were in and call your ExpressMessenger dealer. If you were in the middle ofa backup, restore, or upgrade, note theSECTION that the procedure was on beforecalling your dealer.
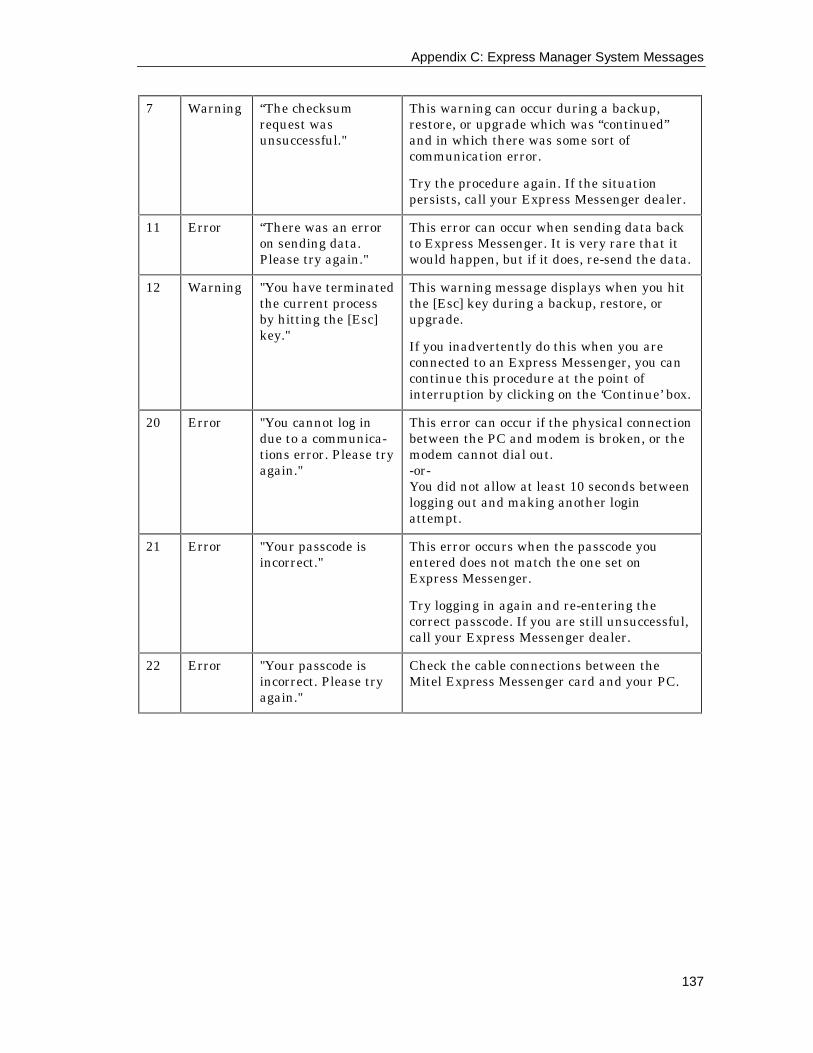
Appendix C: Express Manager System Messages
137
7 Warning “The checksumrequest wasunsuccessful."
This warning can occur during a backup,restore, or upgrade which was “continued”and in which there was some sort ofcommunication error.
Try the procedure again. If the situationpersists, call your Express Messenger dealer.
11 Error “There was an erroron sending data.Please try again."
This error can occur when sending data backto Express Messenger. It is very rare that itwould happen, but if it does, re-send the data.
12 Warning "You have terminatedthe current processby hitting the [Esc]key."
This warning message displays when you hitthe [Esc] key during a backup, restore, orupgrade.
If you inadvertently do this when you areconnected to an Express Messenger, you cancontinue this procedure at the point ofinterruption by clicking on the ‘Continue’ box.
20 Error "You cannot log indue to a communica-tions error. Please tryagain."
This error can occur if the physical connectionbetween the PC and modem is broken, or themodem cannot dial out.-or-You did not allow at least 10 seconds betweenlogging out and making another loginattempt.
21 Error "Your passcode isincorrect."
This error occurs when the passcode youentered does not match the one set onExpress Messenger.
Try logging in again and re-entering thecorrect passcode. If you are still unsuccessful,call your Express Messenger dealer.
22 Error "Your passcode isincorrect. Please tryagain."
Check the cable connections between theMitel Express Messenger card and your PC.
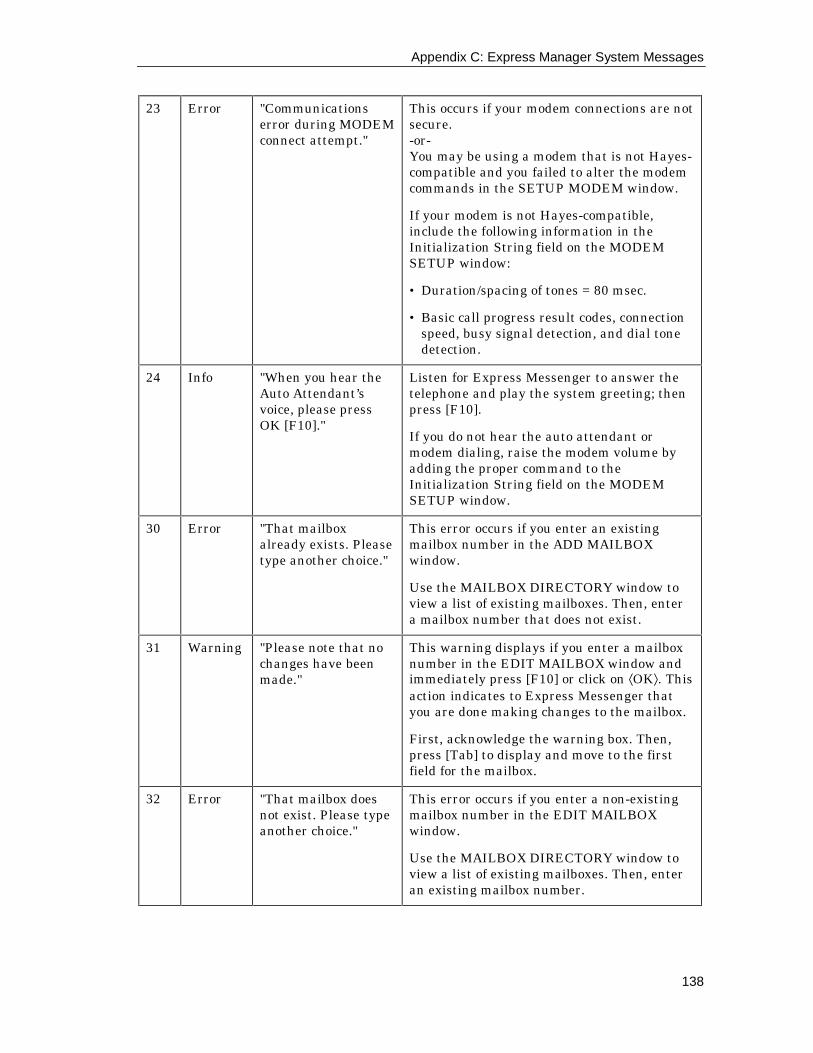
Appendix C: Express Manager System Messages
138
23 Error "Communicationserror during MODEMconnect attempt."
This occurs if your modem connections are notsecure.-or-You may be using a modem that is not Hayes-compatible and you failed to alter the modemcommands in the SETUP MODEM window.
If your modem is not Hayes-compatible,include the following information in theInitialization String field on the MODEMSETUP window:
• Duration/spacing of tones = 80 msec.
• Basic call progress result codes, connectionspeed, busy signal detection, and dial tonedetection.
24 Info "When you hear theAuto Attendant’svoice, please pressOK [F10]."
Listen for Express Messenger to answer thetelephone and play the system greeting; thenpress [F10].
If you do not hear the auto attendant ormodem dialing, raise the modem volume byadding the proper command to theInitialization String field on the MODEMSETUP window.
30 Error "That mailboxalready exists. Pleasetype another choice."
This error occurs if you enter an existingmailbox number in the ADD MAILBOXwindow.
Use the MAILBOX DIRECTORY window toview a list of existing mailboxes. Then, entera mailbox number that does not exist.
31 Warning "Please note that nochanges have beenmade."
This warning displays if you enter a mailboxnumber in the EDIT MAILBOX window andimmediately press [F10] or click on ⟨OK⟩. Thisaction indicates to Express Messenger thatyou are done making changes to the mailbox.
First, acknowledge the warning box. Then,press [Tab] to display and move to the firstfield for the mailbox.
32 Error "That mailbox doesnot exist. Please typeanother choice."
This error occurs if you enter a non-existingmailbox number in the EDIT MAILBOXwindow.
Use the MAILBOX DIRECTORY window toview a list of existing mailboxes. Then, enteran existing mailbox number.

Appendix C: Express Manager System Messages
139
34 Error "Mailbox in use byanother subscriber."
This error occurs if you attempt to perform anadd, edit, or delete function on a mailbox atthe same time the subscriber is checking formessages or someone is leaving a message inthe mailbox.
Wait a few minutes and try again.
35 Error "There are noexisting mailboxes."
This error indicates that no mailboxes,including the supervisor’s or operator’smailboxes, exist on the Express Messengersystem.
Restore your system from a previous backup.Restoring may result in substantial data lossif you did not have or are not using a recentbackup.
Call your Express Messenger dealer if therestored Express Messenger system does notdisplay both the supervisor’s and operator’smailboxes in the MAILBOX DIRECTORYwindow.
36 Warning "The changes youhave made to mailbox## have not beensaved. Please pressOK [F10] to acceptthe changes orCANCEL [Esc] toabandon thechanges."
This error occurs if you exit the EDITMAILBOX screen without saving yourchanges.
Press OK [F10] to accept the changes orCANCEL [Esc] to abandon the changes.
38 Error "There was an errorretrieving mailboxdata."
This error occurs when the system cannotdisplay MAILBOX DIRECTORY information.
Call your Express Messenger dealer.
40 Error "The requestedinformation cannotbe retrieved. Pleasecall your servicerepresentative."
This error indicates that there is a problemretrieving data for the SYSTEM FAXSETTINGS window because the data does notexist or a communications problem is present.
Be sure that your Express Messenger systemhas been configured. If it has and you stillhave this error, restore your system from aprevious backup to recover the missing data.Restoring may result in substantial data lossif you do not have or are not using a recentbackup.
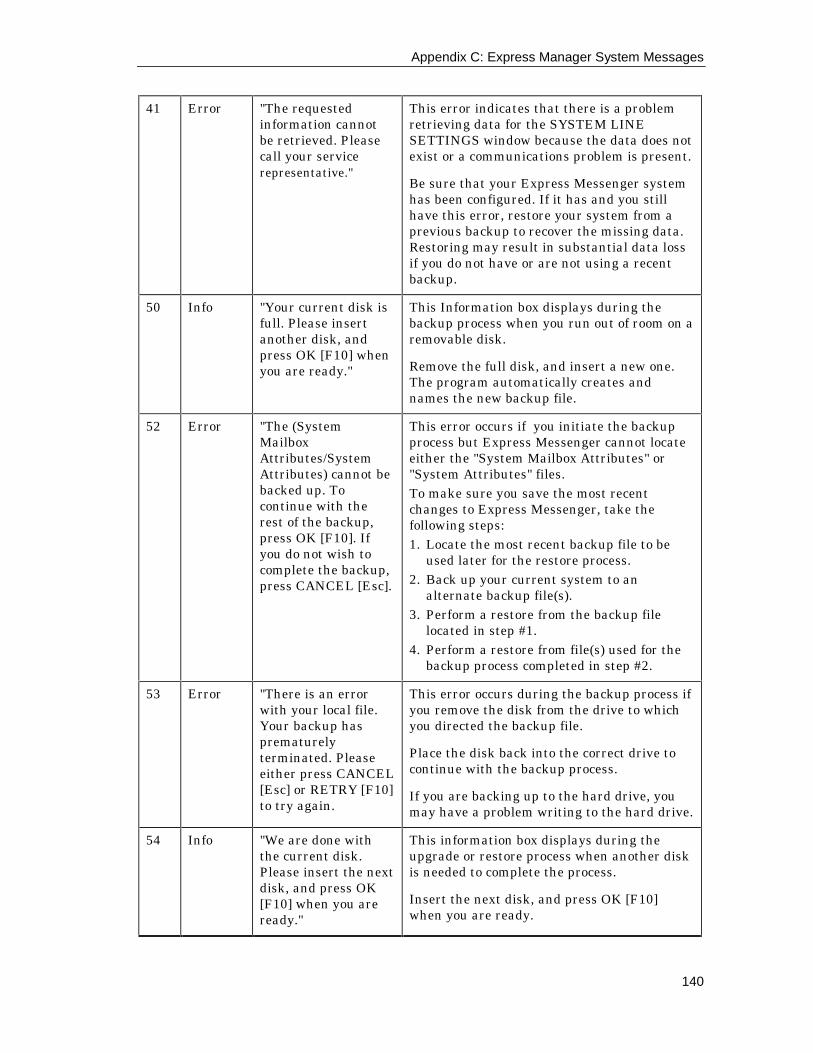
Appendix C: Express Manager System Messages
140
41 Error "The requestedinformation cannotbe retrieved. Pleasecall your servicerepresentative."
This error indicates that there is a problemretrieving data for the SYSTEM LINESETTINGS window because the data does notexist or a communications problem is present.
Be sure that your Express Messenger systemhas been configured. If it has and you stillhave this error, restore your system from aprevious backup to recover the missing data.Restoring may result in substantial data lossif you do not have or are not using a recentbackup.
50 Info "Your current disk isfull. Please insertanother disk, andpress OK [F10] whenyou are ready."
This Information box displays during thebackup process when you run out of room on aremovable disk.
Remove the full disk, and insert a new one.The program automatically creates andnames the new backup file.
52 Error "The (SystemMailboxAttributes/SystemAttributes) cannot bebacked up. Tocontinue with therest of the backup,press OK [F10]. Ifyou do not wish tocomplete the backup,press CANCEL [Esc].
This error occurs if you initiate the backupprocess but Express Messenger cannot locateeither the "System Mailbox Attributes" or"System Attributes" files. To make sure you save the most recentchanges to Express Messenger, take thefollowing steps: 1. Locate the most recent backup file to be
used later for the restore process. 2. Back up your current system to an
alternate backup file(s). 3. Perform a restore from the backup file
located in step #1. 4. Perform a restore from file(s) used for the
backup process completed in step #2.
53 Error "There is an errorwith your local file.Your backup hasprematurelyterminated. Pleaseeither press CANCEL[Esc] or RETRY [F10]to try again.
This error occurs during the backup process ifyou remove the disk from the drive to whichyou directed the backup file.
Place the disk back into the correct drive tocontinue with the backup process.
If you are backing up to the hard drive, youmay have a problem writing to the hard drive.
54 Info "We are done withthe current disk.Please insert the nextdisk, and press OK[F10] when you areready."
This information box displays during theupgrade or restore process when another diskis needed to complete the process.
Insert the next disk, and press OK [F10]when you are ready.
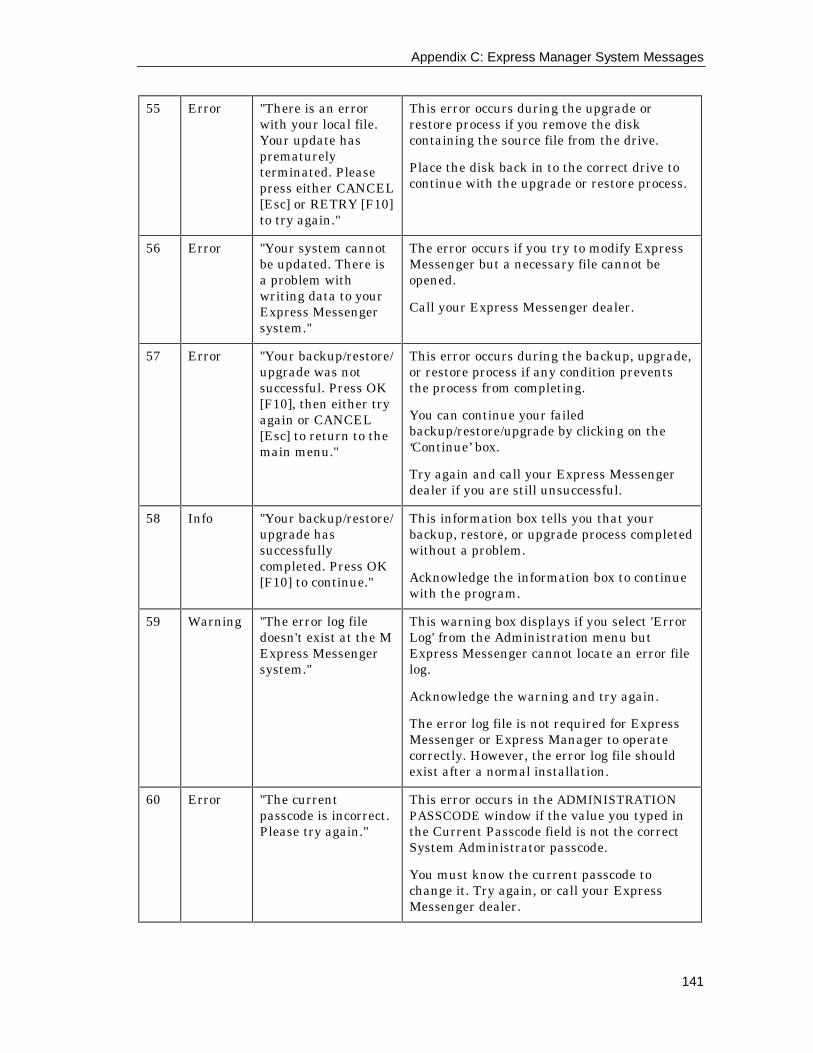
Appendix C: Express Manager System Messages
141
55 Error "There is an errorwith your local file.Your update hasprematurelyterminated. Pleasepress either CANCEL[Esc] or RETRY [F10]to try again."
This error occurs during the upgrade orrestore process if you remove the diskcontaining the source file from the drive.
Place the disk back in to the correct drive tocontinue with the upgrade or restore process.
56 Error "Your system cannotbe updated. There isa problem withwriting data to yourExpress Messengersystem."
The error occurs if you try to modify ExpressMessenger but a necessary file cannot beopened.
Call your Express Messenger dealer.
57 Error "Your backup/restore/upgrade was notsuccessful. Press OK[F10], then either tryagain or CANCEL[Esc] to return to themain menu."
This error occurs during the backup, upgrade,or restore process if any condition preventsthe process from completing.
You can continue your failedbackup/restore/upgrade by clicking on the‘Continue’ box.
Try again and call your Express Messengerdealer if you are still unsuccessful.
58 Info "Your backup/restore/upgrade hassuccessfullycompleted. Press OK[F10] to continue."
This information box tells you that yourbackup, restore, or upgrade process completedwithout a problem.
Acknowledge the information box to continuewith the program.
59 Warning "The error log filedoesn't exist at the MExpress Messengersystem."
This warning box displays if you select 'ErrorLog' from the Administration menu butExpress Messenger cannot locate an error filelog.
Acknowledge the warning and try again.
The error log file is not required for ExpressMessenger or Express Manager to operatecorrectly. However, the error log file shouldexist after a normal installation.
60 Error "The currentpasscode is incorrect.Please try again."
This error occurs in the ADMINISTRATIONPASSCODE window if the value you typed inthe Current Passcode field is not the correctSystem Administrator passcode.
You must know the current passcode tochange it. Try again, or call your ExpressMessenger dealer.
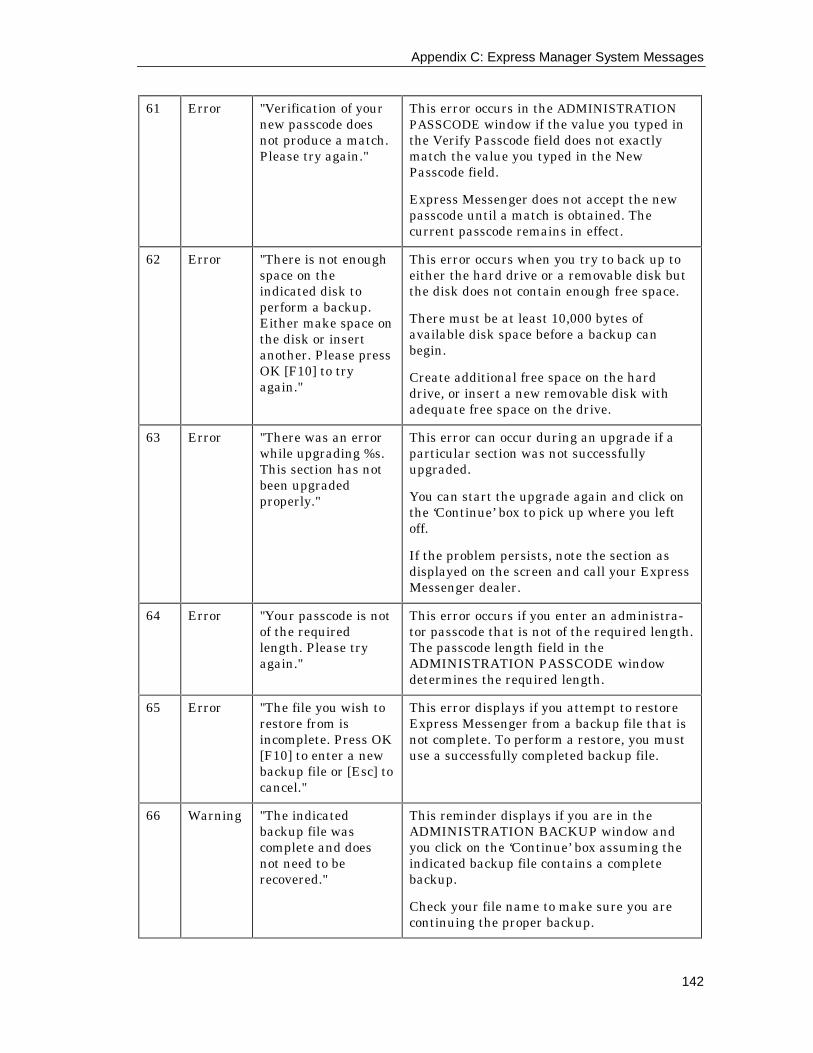
Appendix C: Express Manager System Messages
142
61 Error "Verification of yournew passcode doesnot produce a match.Please try again."
This error occurs in the ADMINISTRATIONPASSCODE window if the value you typed inthe Verify Passcode field does not exactlymatch the value you typed in the NewPasscode field.
Express Messenger does not accept the newpasscode until a match is obtained. Thecurrent passcode remains in effect.
62 Error "There is not enoughspace on theindicated disk toperform a backup.Either make space onthe disk or insertanother. Please pressOK [F10] to tryagain."
This error occurs when you try to back up toeither the hard drive or a removable disk butthe disk does not contain enough free space.
There must be at least 10,000 bytes ofavailable disk space before a backup canbegin.
Create additional free space on the harddrive, or insert a new removable disk withadequate free space on the drive.
63 Error "There was an errorwhile upgrading %s.This section has notbeen upgradedproperly."
This error can occur during an upgrade if aparticular section was not successfullyupgraded.
You can start the upgrade again and click onthe ‘Continue’ box to pick up where you leftoff.
If the problem persists, note the section asdisplayed on the screen and call your ExpressMessenger dealer.
64 Error "Your passcode is notof the requiredlength. Please tryagain."
This error occurs if you enter an administra-tor passcode that is not of the required length.The passcode length field in theADMINISTRATION PASSCODE windowdetermines the required length.
65 Error "The file you wish torestore from isincomplete. Press OK[F10] to enter a newbackup file or [Esc] tocancel."
This error displays if you attempt to restoreExpress Messenger from a backup file that isnot complete. To perform a restore, you mustuse a successfully completed backup file.
66 Warning "The indicatedbackup file wascomplete and doesnot need to berecovered."
This reminder displays if you are in theADMINISTRATION BACKUP window andyou click on the ‘Continue’ box assuming theindicated backup file contains a completebackup.
Check your file name to make sure you arecontinuing the proper backup.
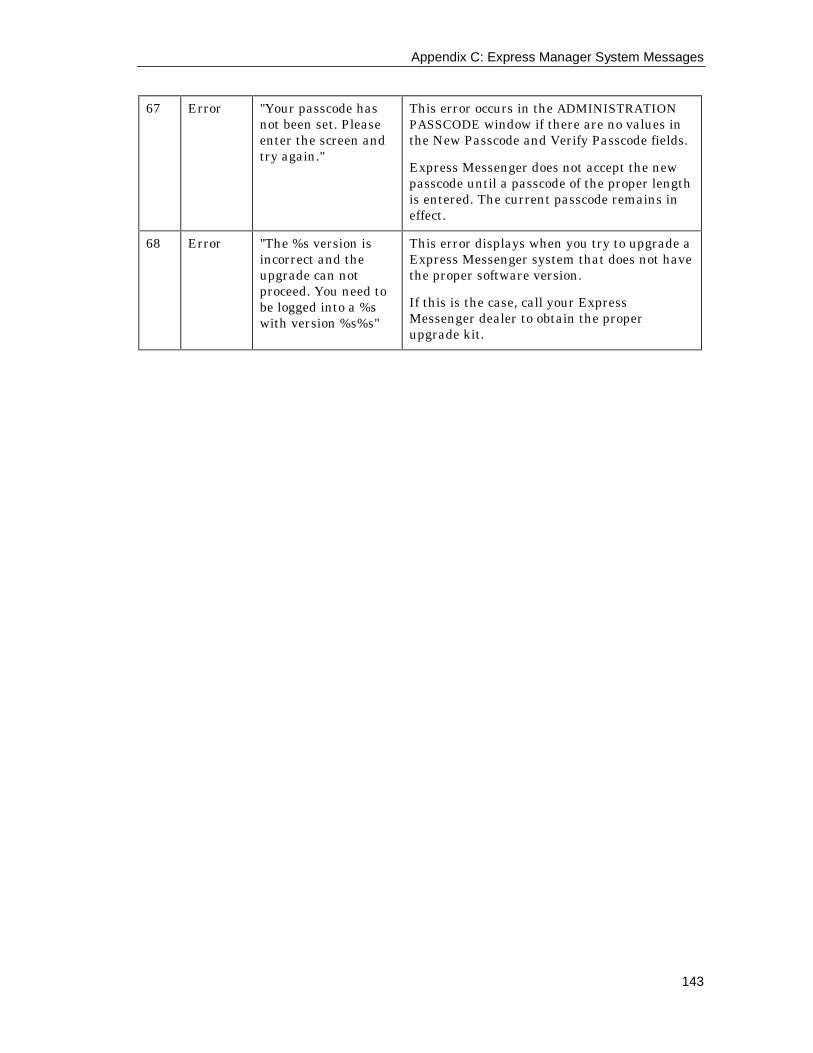
Appendix C: Express Manager System Messages
143
67 Error "Your passcode hasnot been set. Pleaseenter the screen andtry again."
This error occurs in the ADMINISTRATIONPASSCODE window if there are no values inthe New Passcode and Verify Passcode fields.
Express Messenger does not accept the newpasscode until a passcode of the proper lengthis entered. The current passcode remains ineffect.
68 Error "The %s version isincorrect and theupgrade can notproceed. You need tobe logged into a %swith version %s%s"
This error displays when you try to upgrade aExpress Messenger system that does not havethe proper software version.
If this is the case, call your ExpressMessenger dealer to obtain the properupgrade kit.

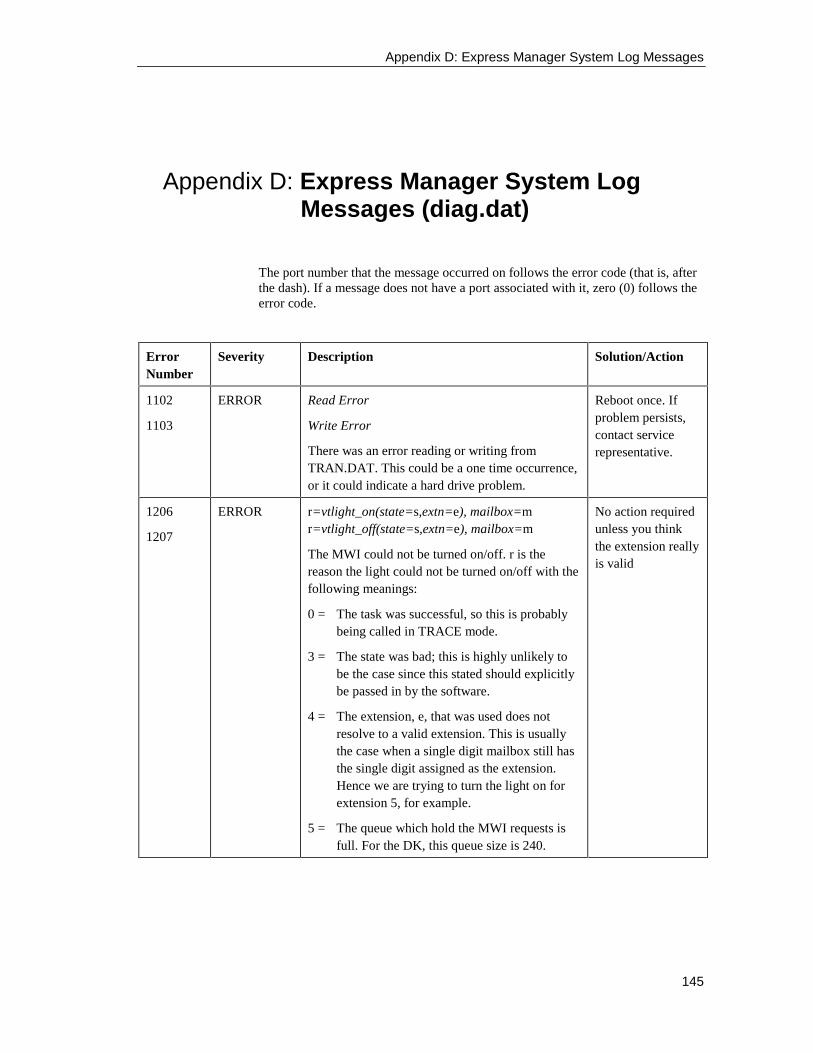
Appendix D: Express Manager System Log Messages
145
Appendix D: Express Manager System LogMessages (diag.dat)
The port number that the message occurred on follows the error code (that is, afterthe dash). If a message does not have a port associated with it, zero (0) follows theerror code.
ErrorNumber
Severity Description Solution/Action
1102
1103
ERROR Read Error
Write Error
There was an error reading or writing fromTRAN.DAT. This could be a one time occurrence,or it could indicate a hard drive problem.
Reboot once. Ifproblem persists,contact servicerepresentative.
1206
1207
ERROR r=vtlight_on(state=s,extn=e), mailbox=mr=vtlight_off(state=s,extn=e), mailbox=m
The MWI could not be turned on/off. r is thereason the light could not be turned on/off with thefollowing meanings:
0 = The task was successful, so this is probablybeing called in TRACE mode.
3 = The state was bad; this is highly unlikely tobe the case since this stated should explicitlybe passed in by the software.
4 = The extension, e, that was used does notresolve to a valid extension. This is usuallythe case when a single digit mailbox still hasthe single digit assigned as the extension.Hence we are trying to turn the light on forextension 5, for example.
5 = The queue which hold the MWI requests isfull. For the DK, this queue size is 240.
No action requiredunless you thinkthe extension reallyis valid

Appendix D: Express Manager System Log Messages
146
1208 WARNING vtlight_extn: no dextens for mailbox m, state=s
The MWI could not be turned on(s=1)/off(s=0) formailbox m because of an invalid mailboxextension.
Check/set themailbox extensionby using the EditMailbox systemadministrationfunction.
1210 WARNING vta_s9: entered undefined state
The application entered a state in its state machine,which is undefined.
Contact yourservicerepresentative
1216 INFO An Administrator has logged in.
The system administrator’s mailbox has beenlogged into using the BOX_ADMIN passcode
A Technician has logged in.
The system administrator’s mailbox has beenlogged into using the BOX_MAN1 passcode
A Manager has logged in
The system administrator’s mailbox has beenlogged into using the BOX_MAN2 passcode
No action required.
1221 ERROR Error calling VTGSERVICE, channel=channel
Unable to start service function to initiate modemanswer tone on port channel
Contact servicerepresentative.
1230 ERROR Record-a-call: recording stopped on tsig=t
Recording has unexpectedly stopped. t containsthe driver event that stopped the recording.
No action isgenerally required.
1231 ERROR Record-a-call: invalid log_event=evt
An incoming event has been translated to aninvalid logical event. This should never happenand indicates a programming error.
Contact servicerepresentative.
1241 ERROR Record-a-call: disconnecting due to error.
Record-a-call is indicating an error condition tothe PBX by hanging up. A previous messageshould give the reason for the error.
Contact servicerepresentative.
1243 WARN Record-a-call: unexpected event evt ignored,continuing.
An unexpected event was received, but therecording session is continuing.
No action required.
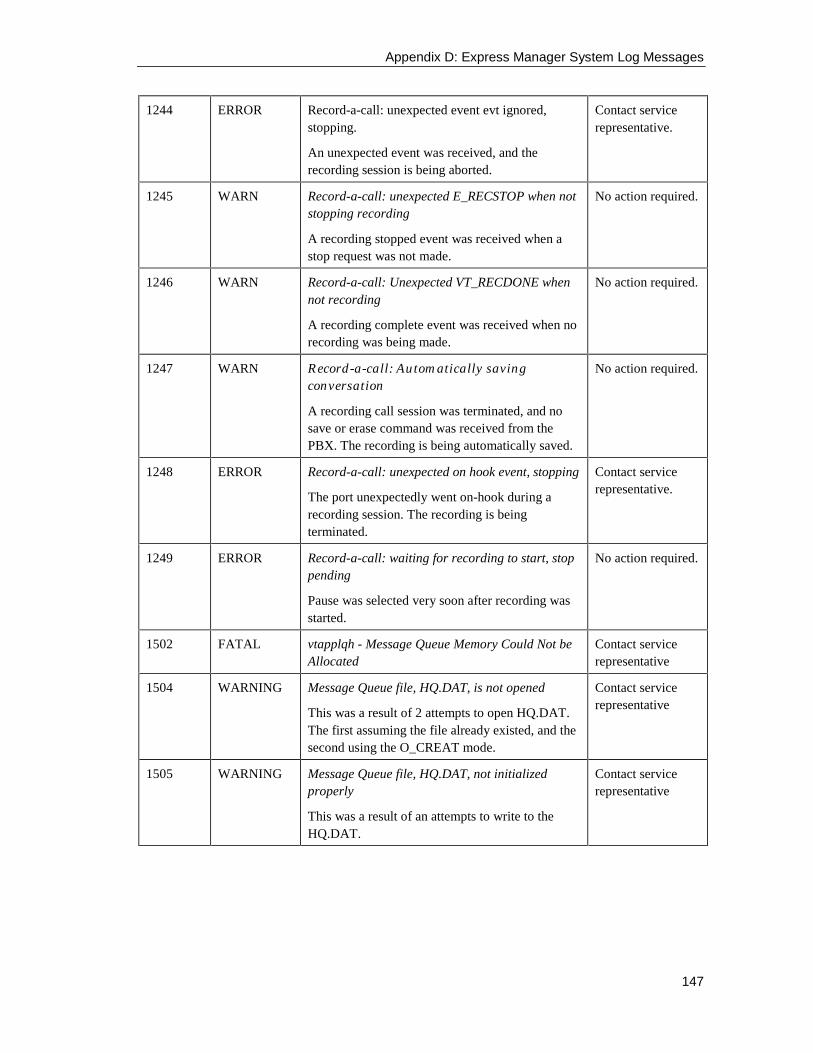
Appendix D: Express Manager System Log Messages
147
1244 ERROR Record-a-call: unexpected event evt ignored,stopping.
An unexpected event was received, and therecording session is being aborted.
Contact servicerepresentative.
1245 WARN Record-a-call: unexpected E_RECSTOP when notstopping recording
A recording stopped event was received when astop request was not made.
No action required.
1246 WARN Record-a-call: Unexpected VT_RECDONE whennot recording
A recording complete event was received when norecording was being made.
No action required.
1247 WARN Record-a-call: Automatically savingconversation
A recording call session was terminated, and nosave or erase command was received from thePBX. The recording is being automatically saved.
No action required.
1248 ERROR Record-a-call: unexpected on hook event, stopping
The port unexpectedly went on-hook during arecording session. The recording is beingterminated.
Contact servicerepresentative.
1249 ERROR Record-a-call: waiting for recording to start, stoppending
Pause was selected very soon after recording wasstarted.
No action required.
1502 FATAL vtapplqh - Message Queue Memory Could Not beAllocated
Contact servicerepresentative
1504 WARNING Message Queue file, HQ.DAT, is not opened
This was a result of 2 attempts to open HQ.DAT.The first assuming the file already existed, and thesecond using the O_CREAT mode.
Contact servicerepresentative
1505 WARNING Message Queue file, HQ.DAT, not initializedproperly
This was a result of an attempts to write to theHQ.DAT.
Contact servicerepresentative
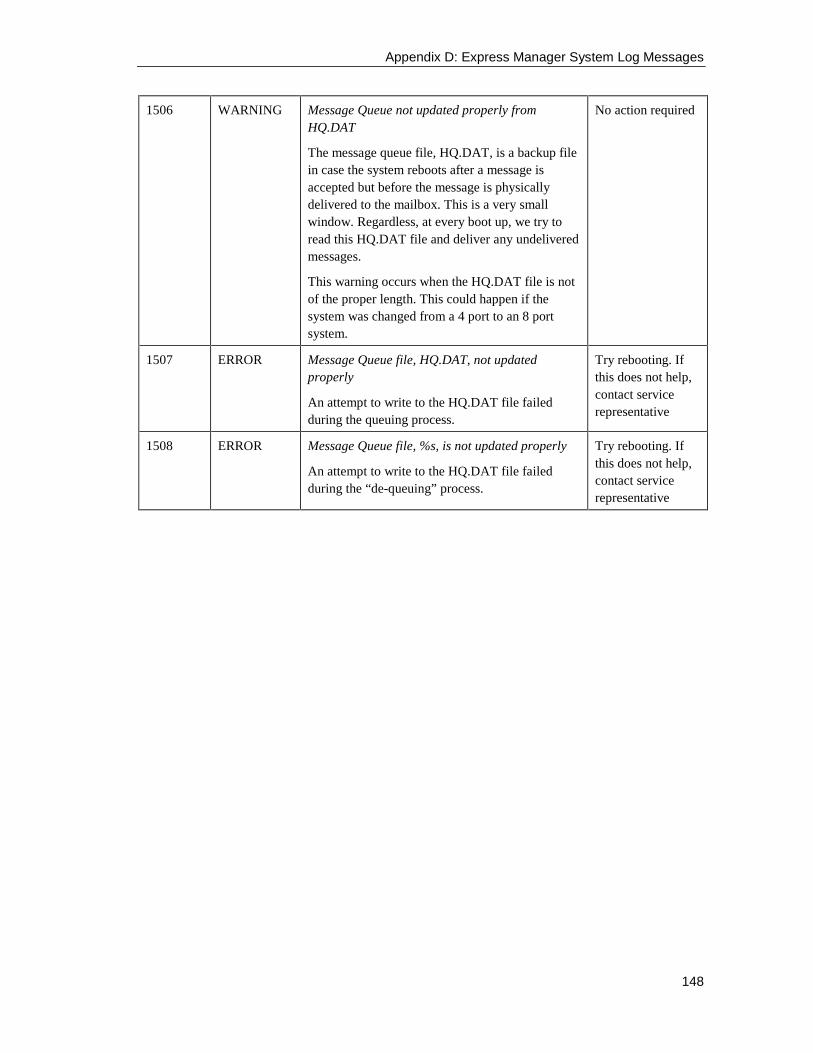
Appendix D: Express Manager System Log Messages
148
1506 WARNING Message Queue not updated properly fromHQ.DAT
The message queue file, HQ.DAT, is a backup filein case the system reboots after a message isaccepted but before the message is physicallydelivered to the mailbox. This is a very smallwindow. Regardless, at every boot up, we try toread this HQ.DAT file and deliver any undeliveredmessages.
This warning occurs when the HQ.DAT file is notof the proper length. This could happen if thesystem was changed from a 4 port to an 8 portsystem.
No action required
1507 ERROR Message Queue file, HQ.DAT, not updatedproperly
An attempt to write to the HQ.DAT file failedduring the queuing process.
Try rebooting. Ifthis does not help,contact servicerepresentative
1508 ERROR Message Queue file, %s, is not updated properly
An attempt to write to the HQ.DAT file failedduring the “de-queuing” process.
Try rebooting. Ifthis does not help,contact servicerepresentative
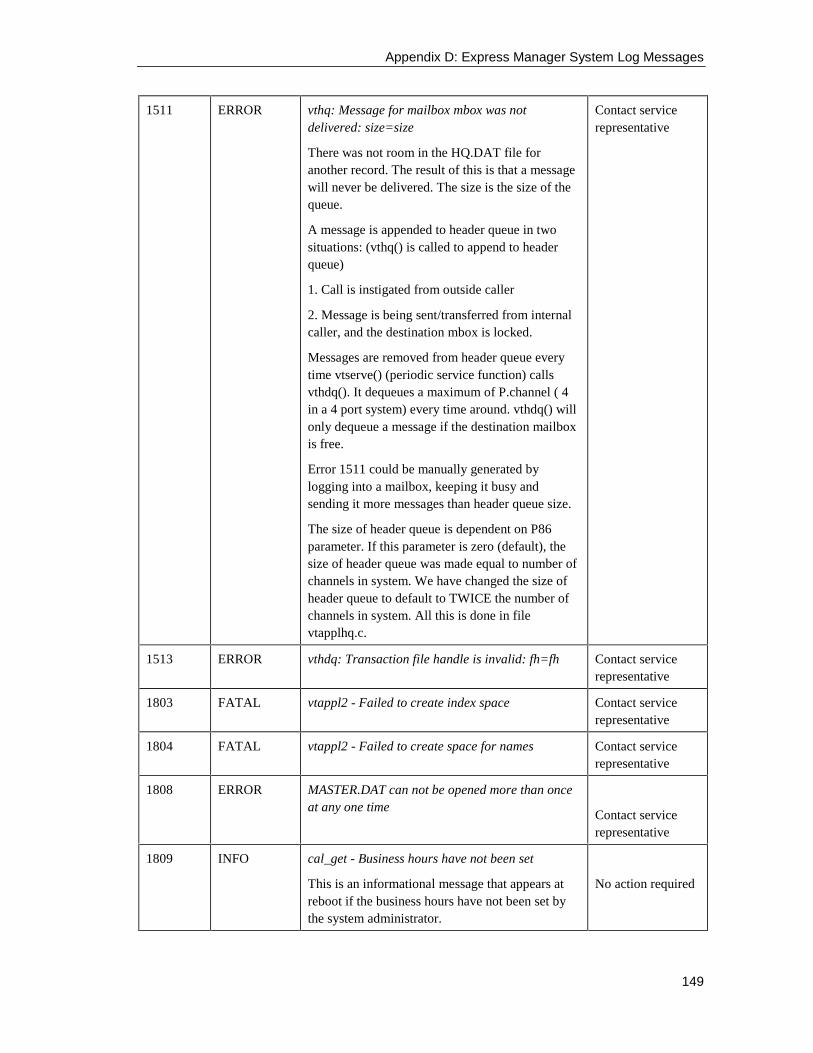
Appendix D: Express Manager System Log Messages
149
1511 ERROR vthq: Message for mailbox mbox was notdelivered: size=size
There was not room in the HQ.DAT file foranother record. The result of this is that a messagewill never be delivered. The size is the size of thequeue.
A message is appended to header queue in twosituations: (vthq() is called to append to headerqueue)
1. Call is instigated from outside caller
2. Message is being sent/transferred from internalcaller, and the destination mbox is locked.
Messages are removed from header queue everytime vtserve() (periodic service function) callsvthdq(). It dequeues a maximum of P.channel ( 4in a 4 port system) every time around. vthdq() willonly dequeue a message if the destination mailboxis free.
Error 1511 could be manually generated bylogging into a mailbox, keeping it busy andsending it more messages than header queue size.
The size of header queue is dependent on P86parameter. If this parameter is zero (default), thesize of header queue was made equal to number ofchannels in system. We have changed the size ofheader queue to default to TWICE the number ofchannels in system. All this is done in filevtapplhq.c.
Contact servicerepresentative
1513 ERROR vthdq: Transaction file handle is invalid: fh=fh Contact servicerepresentative
1803 FATAL vtappl2 - Failed to create index space Contact servicerepresentative
1804 FATAL vtappl2 - Failed to create space for names Contact servicerepresentative
1808 ERROR MASTER.DAT can not be opened more than onceat any one time
Contact servicerepresentative
1809 INFO cal_get - Business hours have not been set
This is an informational message that appears atreboot if the business hours have not been set bythe system administrator.
No action required
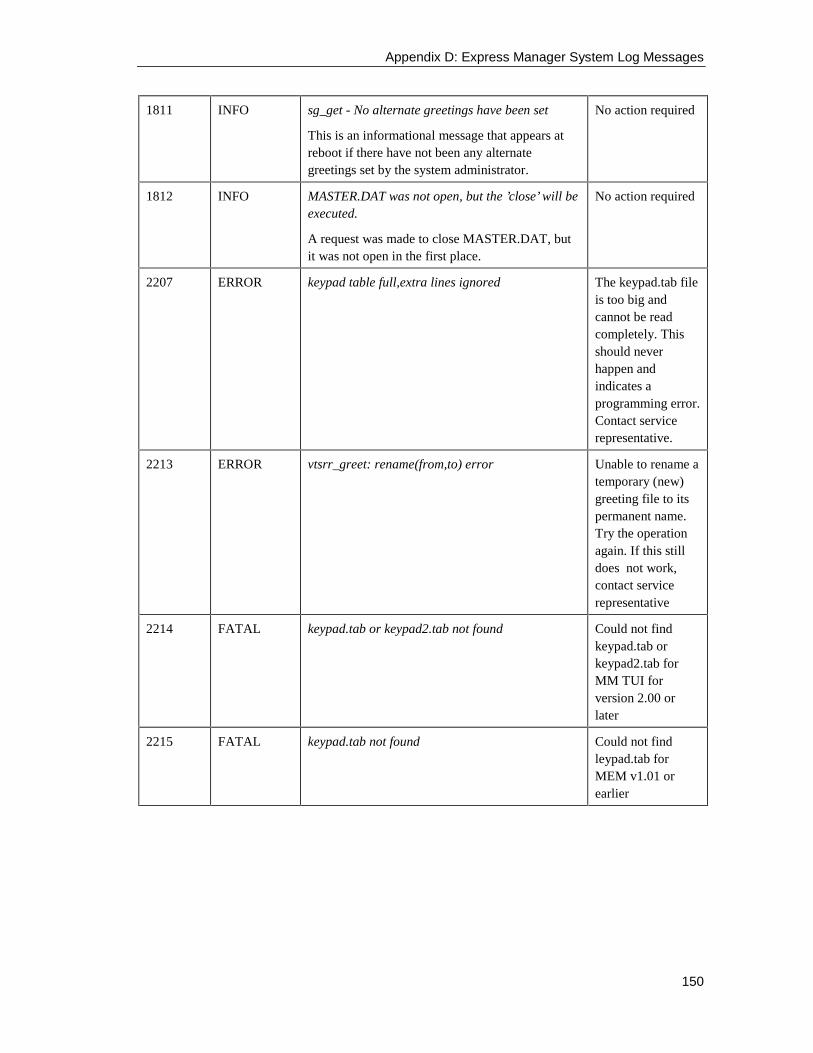
Appendix D: Express Manager System Log Messages
150
1811 INFO sg_get - No alternate greetings have been set
This is an informational message that appears atreboot if there have not been any alternategreetings set by the system administrator.
No action required
1812 INFO MASTER.DAT was not open, but the ’close’ will beexecuted.
A request was made to close MASTER.DAT, butit was not open in the first place.
No action required
2207 ERROR keypad table full,extra lines ignored The keypad.tab fileis too big andcannot be readcompletely. Thisshould neverhappen andindicates aprogramming error.Contact servicerepresentative.
2213 ERROR vtsrr_greet: rename(from,to) error Unable to rename atemporary (new)greeting file to itspermanent name.Try the operationagain. If this stilldoes not work,contact servicerepresentative
2214 FATAL keypad.tab or keypad2.tab not found Could not findkeypad.tab orkeypad2.tab forMM TUI forversion 2.00 orlater
2215 FATAL keypad.tab not found Could not findleypad.tab forMEM v1.01 orearlier
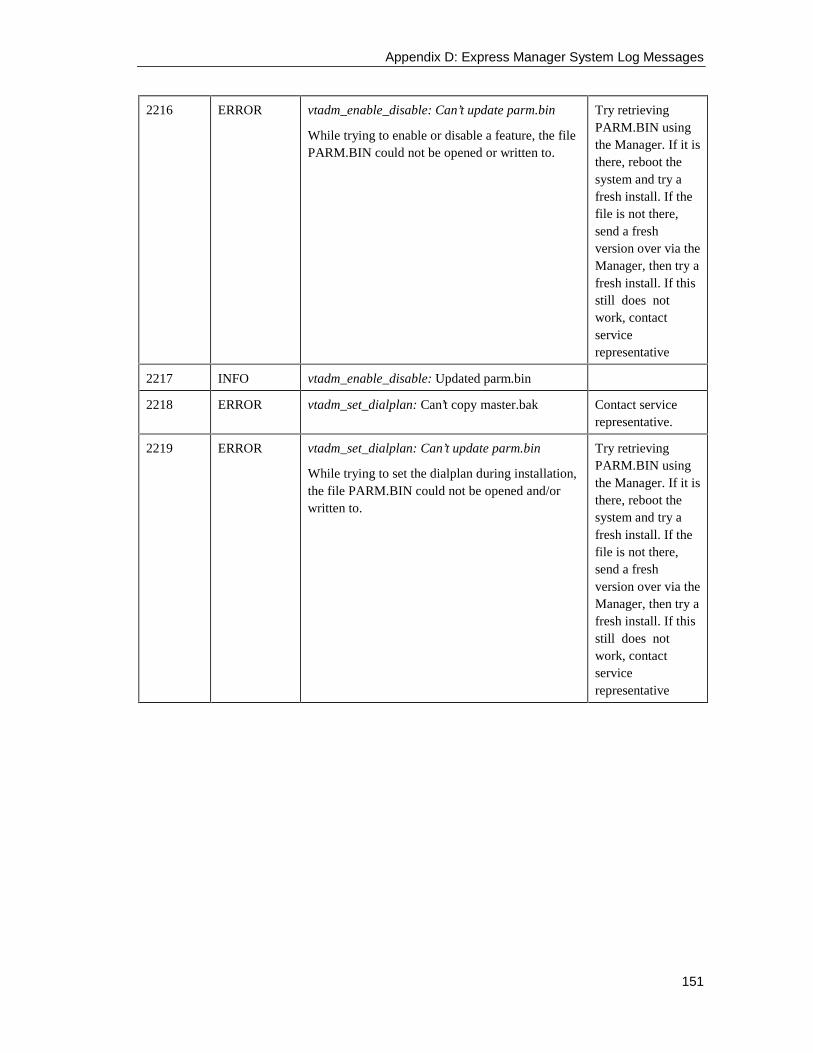
Appendix D: Express Manager System Log Messages
151
2216 ERROR vtadm_enable_disable: Can’t update parm.bin
While trying to enable or disable a feature, the filePARM.BIN could not be opened or written to.
Try retrievingPARM.BIN usingthe Manager. If it isthere, reboot thesystem and try afresh install. If thefile is not there,send a freshversion over via theManager, then try afresh install. If thisstill does notwork, contactservicerepresentative
2217 INFO vtadm_enable_disable: Updated parm.bin
2218 ERROR vtadm_set_dialplan: Can’t copy master.bak Contact servicerepresentative.
2219 ERROR vtadm_set_dialplan: Can’t update parm.bin
While trying to set the dialplan during installation,the file PARM.BIN could not be opened and/orwritten to.
Try retrievingPARM.BIN usingthe Manager. If it isthere, reboot thesystem and try afresh install. If thefile is not there,send a freshversion over via theManager, then try afresh install. If thisstill does notwork, contactservicerepresentative

Appendix D: Express Manager System Log Messages
152
2219 ERROR vtadm_set_dialplan: Can’t restore parm.bin
While trying to set the dialplan during installation,the file PARM.BIN could not be opened and/orwritten to.
Try retrievingPARM.BIN usingthe Manager. If it isthere, reboot thesystem and try afresh install. If thefile is not there,send a freshversion over via theManager, then try afresh install. If thisstill does notwork, contactservicerepresentative.
2219 ERROR vtadm_number_mailboxes=errflag, errno=errno Contact servicerepresentative.
2219 WARNING wakeup_notify_PBX:no dextens for mbox= boxno
No extension has been configured for mailboxboxno.
Edit the mailboxand configure itwith a validextension.
2229 WARNING Write Error Rec_no=nn
Write to MASTER.DAT failed.
Log the message indiag.dat andcontinue.
2230 WARNING Write Error Rec_no=nn
Write to MASTER.DAT failed.
Log the message indiag.dat andcontinue.
2230 ERROR Can’t update parm.bin Contact servicerepresentative.

Appendix D: Express Manager System Log Messages
153
2403 INFO VT_RECDONE:v
Indicates that a recording has terminated. Thevalue v tells how the termination happened:
2- A terminating DTMF was detected.
5- End of data reached (?)
7- Timed out, rarely happens
10- Terminated due to silence
12- Terminated due to loop current dropping.
13- Terminates on EOF, very rare
31- Terminated due to non-silence; i.e. sound isconstantly above a certain threshold.
VT_ON:vThe port has gone on hook.
VT_OFF:vThe port has gone off hook
VT_BUSY:vAn outdial (page) has resulted in a busy signal.
VT_NOAN:vAn outdial (page) has resulted in no answer.
VT_CONN:vAn outdial (page) has resulted in a connectionbeing made and the recipient hears/sees the resultof the page.
VT_INTER:vOperator intercept…will be treated as a no answer.
These are informational messages that come out tohelp give an idea as to the traffic of the system andhow recordings were terminated. v only hasmeaning when on the VT_RECDONE line:
No action required
3001 ERROR vtalist:ret=r,total_boxes=tb
The attempt build a list of mailbox records fromMASTER.DAT failed.
r = reason write failed:
-1 = could not open MASTER.DAT-2 = could allocate space (malloc)
tb = total number of records in MASTER.DAT
Contact servicerepresentative.
3201 FATAL vtv40 error,file=[filename]
The prompt filename cannot be found/opened.
Contact servicerepresentative

Appendix D: Express Manager System Log Messages
154
3207 INFO vtspeak - Prompt pp File VTP.VAP Missing
This means that a requested prompt could not beplayed. The reason is most likely that the VAP fileis corrupt, this usually means truncated. If theprompt number is between 1 and 100, the file inquestion is VTP.VAP. If the prompt number isgreater than 100, the file is VTE.VAP.
Contact servicerepresentative
3209 ERROR Prompt num File VTP.VAP Missing
Prompt number, num, does not exist in fileVTP.VAP.
Contact servicerepresentative
3210 ERROR MBox size incorrect File=f
There is something wrong with the MSG file, f.The most likely reason is that it is full and can notaccept new messages. If there is another reason, itwould be shown in error message 4706
Check how manymessages are in themailbox. If OK, seemessage 4706.
3213 ERROR Default Language nnn prompts missing,substituting English
The prompts for the configured default languageare not installed. English is being substituted.
The value of nnn indicates the configuredlanguage:
1 = English
2 = Spanish
3 = French
4 = Dutch
5 = UK English
Select a differentdefault language.
3214 ERROR Alternate language nnn prompts missing.Language ignored.
The prompts for the configured alternate languageare not installed. No alternate language has beenloaded.
The value of nnn indicates the configuredlanguage as defined above for message 3213.
Select a differentalternate language.
4001 ERROR utxopen(path=p,handle->h)=ret,errno=err,cid=cid
Error opening the file p.
cid represents the function that called ‘utxopen()’.
Contact servicerepresentative todetermine if thiscall was for acritical file.
4002 ERROR utxclose(hd=hd,handle=handle)=ret
Error closing file originally pointed to by hd
Contact servicerepresentative
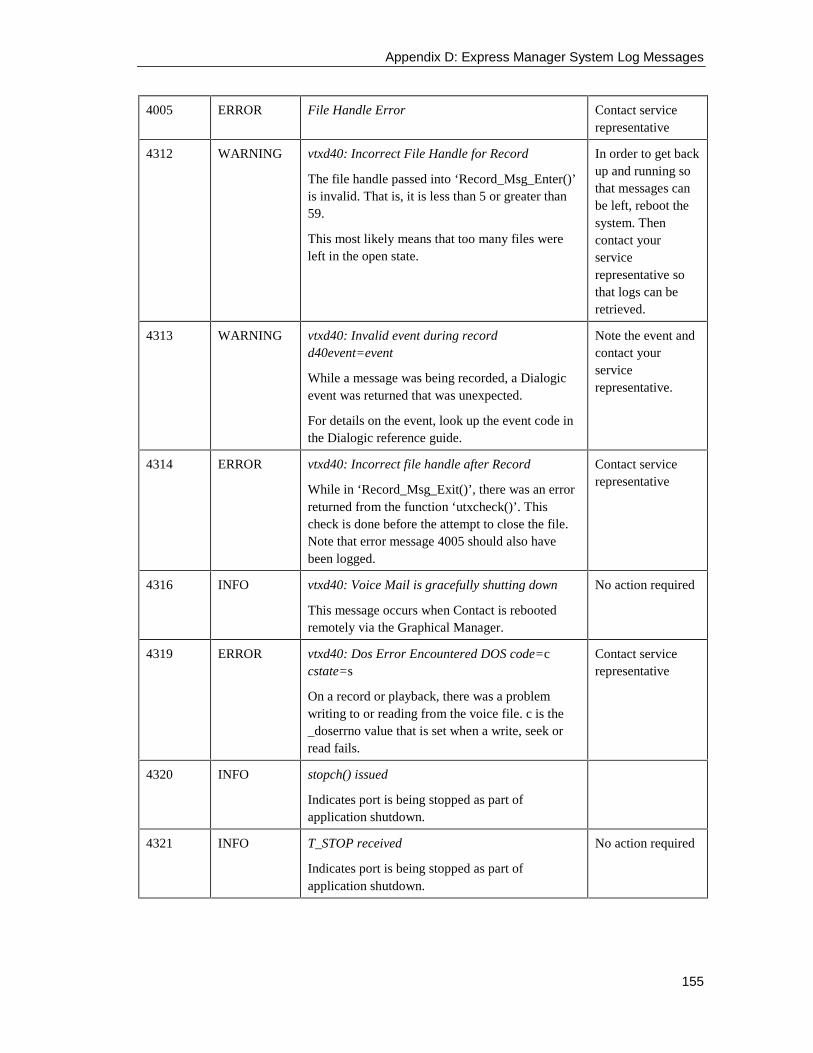
Appendix D: Express Manager System Log Messages
155
4005 ERROR File Handle Error Contact servicerepresentative
4312 WARNING vtxd40: Incorrect File Handle for Record
The file handle passed into ‘Record_Msg_Enter()’is invalid. That is, it is less than 5 or greater than59.
This most likely means that too many files wereleft in the open state.
In order to get backup and running sothat messages canbe left, reboot thesystem. Thencontact yourservicerepresentative sothat logs can beretrieved.
4313 WARNING vtxd40: Invalid event during recordd40event=event
While a message was being recorded, a Dialogicevent was returned that was unexpected.
For details on the event, look up the event code inthe Dialogic reference guide.
Note the event andcontact yourservicerepresentative.
4314 ERROR vtxd40: Incorrect file handle after Record
While in ‘Record_Msg_Exit()’, there was an errorreturned from the function ‘utxcheck()’. Thischeck is done before the attempt to close the file.Note that error message 4005 should also havebeen logged.
Contact servicerepresentative
4316 INFO vtxd40: Voice Mail is gracefully shutting down
This message occurs when Contact is rebootedremotely via the Graphical Manager.
No action required
4319 ERROR vtxd40: Dos Error Encountered DOS code=ccstate=s
On a record or playback, there was a problemwriting to or reading from the voice file. c is the_doserrno value that is set when a write, seek orread fails.
Contact servicerepresentative
4320 INFO stopch() issued
Indicates port is being stopped as part ofapplication shutdown.
4321 INFO T_STOP received
Indicates port is being stopped as part ofapplication shutdown.
No action required
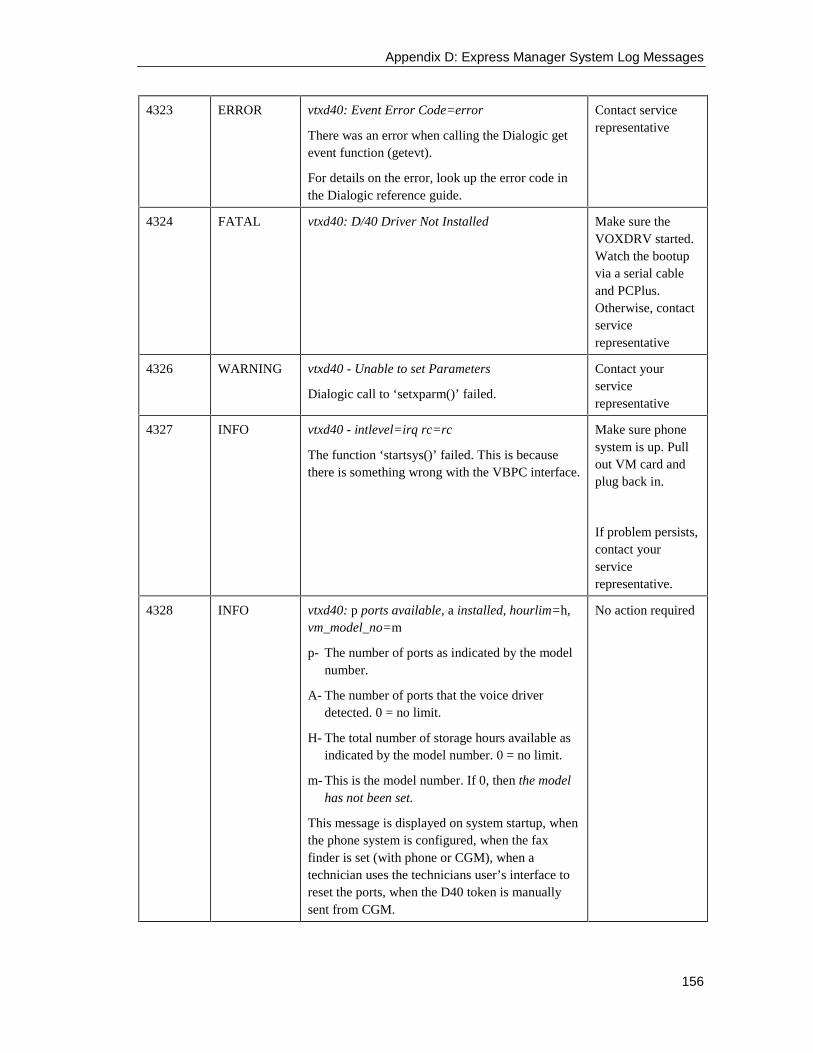
Appendix D: Express Manager System Log Messages
156
4323 ERROR vtxd40: Event Error Code=error
There was an error when calling the Dialogic getevent function (getevt).
For details on the error, look up the error code inthe Dialogic reference guide.
Contact servicerepresentative
4324 FATAL vtxd40: D/40 Driver Not Installed Make sure theVOXDRV started.Watch the bootupvia a serial cableand PCPlus.Otherwise, contactservicerepresentative
4326 WARNING vtxd40 - Unable to set Parameters
Dialogic call to ‘setxparm()’ failed.
Contact yourservicerepresentative
4327 INFO vtxd40 - intlevel=irq rc=rc
The function ‘startsys()’ failed. This is becausethere is something wrong with the VBPC interface.
Make sure phonesystem is up. Pullout VM card andplug back in.
If problem persists,contact yourservicerepresentative.
4328 INFO vtxd40: p ports available, a installed, hourlim=h,vm_model_no=m
p- The number of ports as indicated by the modelnumber.
A- The number of ports that the voice driverdetected. 0 = no limit.
H- The total number of storage hours available asindicated by the model number. 0 = no limit.
m- This is the model number. If 0, then the modelhas not been set.
This message is displayed on system startup, whenthe phone system is configured, when the faxfinder is set (with phone or CGM), when atechnician uses the technicians user’s interface toreset the ports, when the D40 token is manuallysent from CGM.
No action required
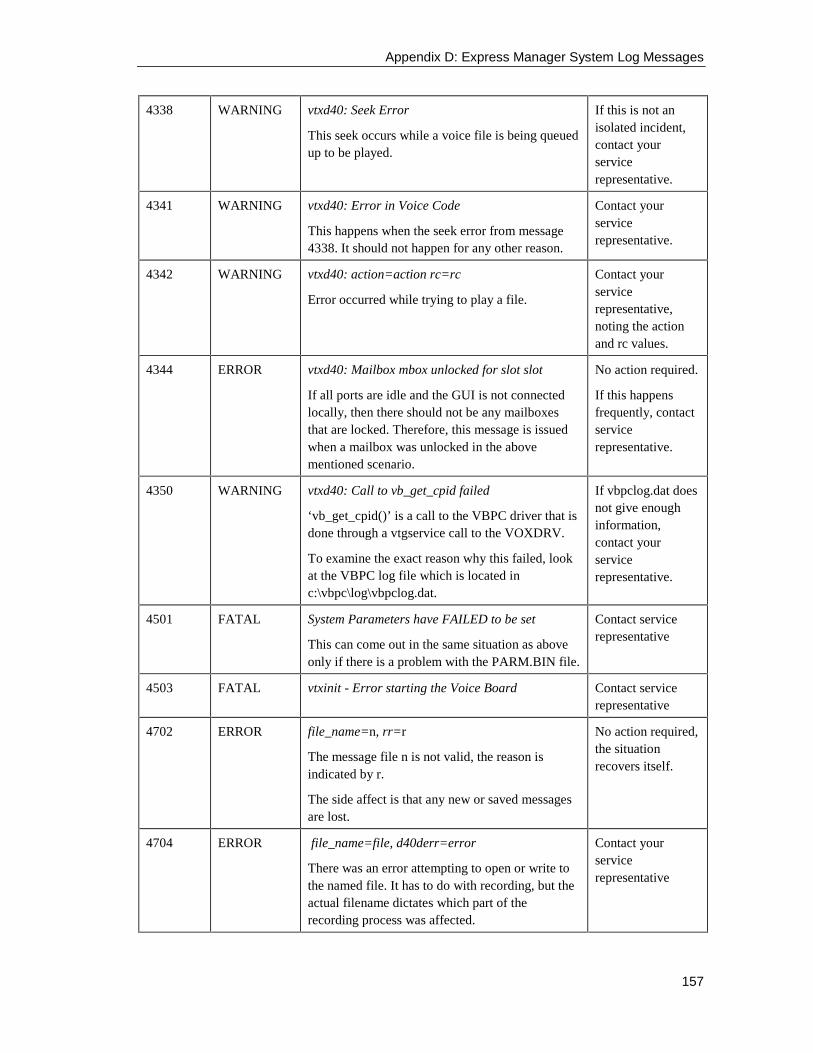
Appendix D: Express Manager System Log Messages
157
4338 WARNING vtxd40: Seek Error
This seek occurs while a voice file is being queuedup to be played.
If this is not anisolated incident,contact yourservicerepresentative.
4341 WARNING vtxd40: Error in Voice Code
This happens when the seek error from message4338. It should not happen for any other reason.
Contact yourservicerepresentative.
4342 WARNING vtxd40: action=action rc=rc
Error occurred while trying to play a file.
Contact yourservicerepresentative,noting the actionand rc values.
4344 ERROR vtxd40: Mailbox mbox unlocked for slot slot
If all ports are idle and the GUI is not connectedlocally, then there should not be any mailboxesthat are locked. Therefore, this message is issuedwhen a mailbox was unlocked in the abovementioned scenario.
No action required.
If this happensfrequently, contactservicerepresentative.
4350 WARNING vtxd40: Call to vb_get_cpid failed
‘vb_get_cpid()’ is a call to the VBPC driver that isdone through a vtgservice call to the VOXDRV.
To examine the exact reason why this failed, lookat the VBPC log file which is located inc:\vbpc\log\vbpclog.dat.
If vbpclog.dat doesnot give enoughinformation,contact yourservicerepresentative.
4501 FATAL System Parameters have FAILED to be set
This can come out in the same situation as aboveonly if there is a problem with the PARM.BIN file.
Contact servicerepresentative
4503 FATAL vtxinit - Error starting the Voice Board Contact servicerepresentative
4702 ERROR file_name=n, rr=r
The message file n is not valid, the reason isindicated by r.
The side affect is that any new or saved messagesare lost.
No action required,the situationrecovers itself.
4704 ERROR file_name=file, d40derr=error
There was an error attempting to open or write tothe named file. It has to do with recording, but theactual filename dictates which part of therecording process was affected.
Contact yourservicerepresentative
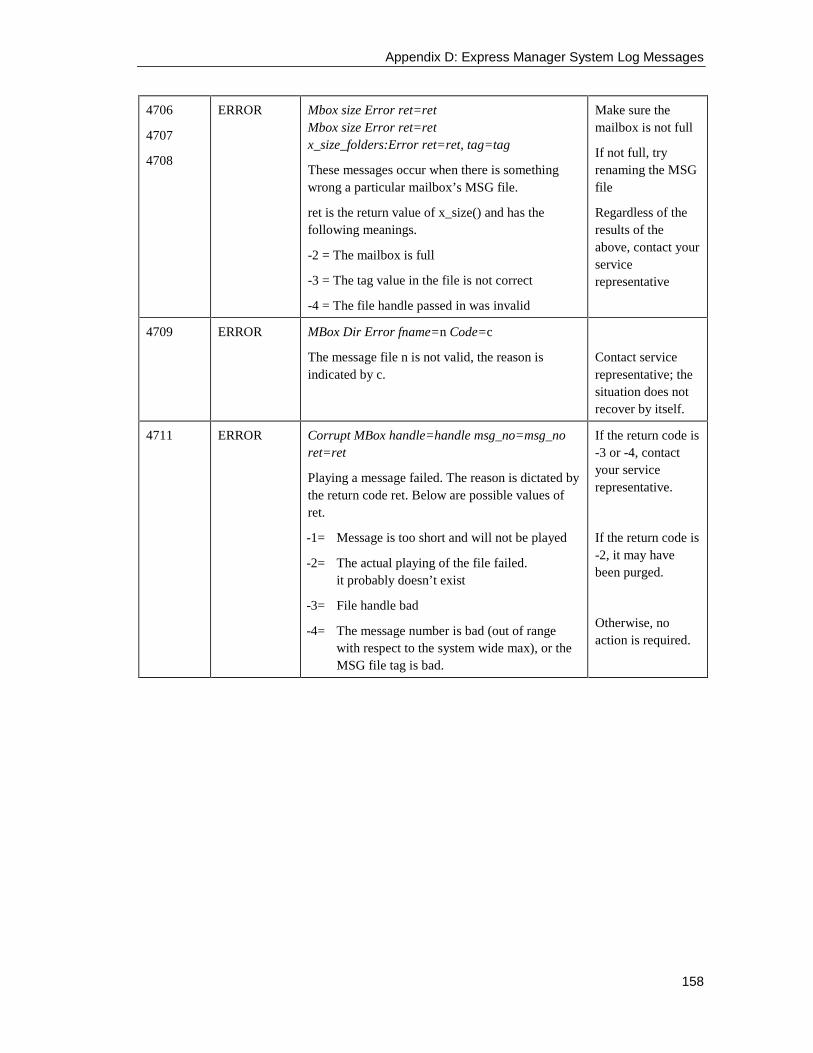
Appendix D: Express Manager System Log Messages
158
4706
4707
4708
ERROR Mbox size Error ret=retMbox size Error ret=retx_size_folders:Error ret=ret, tag=tag
These messages occur when there is somethingwrong a particular mailbox’s MSG file.
ret is the return value of x_size() and has thefollowing meanings.
-2 = The mailbox is full
-3 = The tag value in the file is not correct
-4 = The file handle passed in was invalid
Make sure themailbox is not full
If not full, tryrenaming the MSGfile
Regardless of theresults of theabove, contact yourservicerepresentative
4709 ERROR MBox Dir Error fname=n Code=c
The message file n is not valid, the reason isindicated by c.
Contact servicerepresentative; thesituation does notrecover by itself.
4711 ERROR Corrupt MBox handle=handle msg_no=msg_noret=ret
Playing a message failed. The reason is dictated bythe return code ret. Below are possible values ofret.
-1= Message is too short and will not be played
-2= The actual playing of the file failed.it probably doesn’t exist
-3= File handle bad
-4= The message number is bad (out of rangewith respect to the system wide max), or theMSG file tag is bad.
If the return code is-3 or -4, contactyour servicerepresentative.
If the return code is-2, it may havebeen purged.
Otherwise, noaction is required.
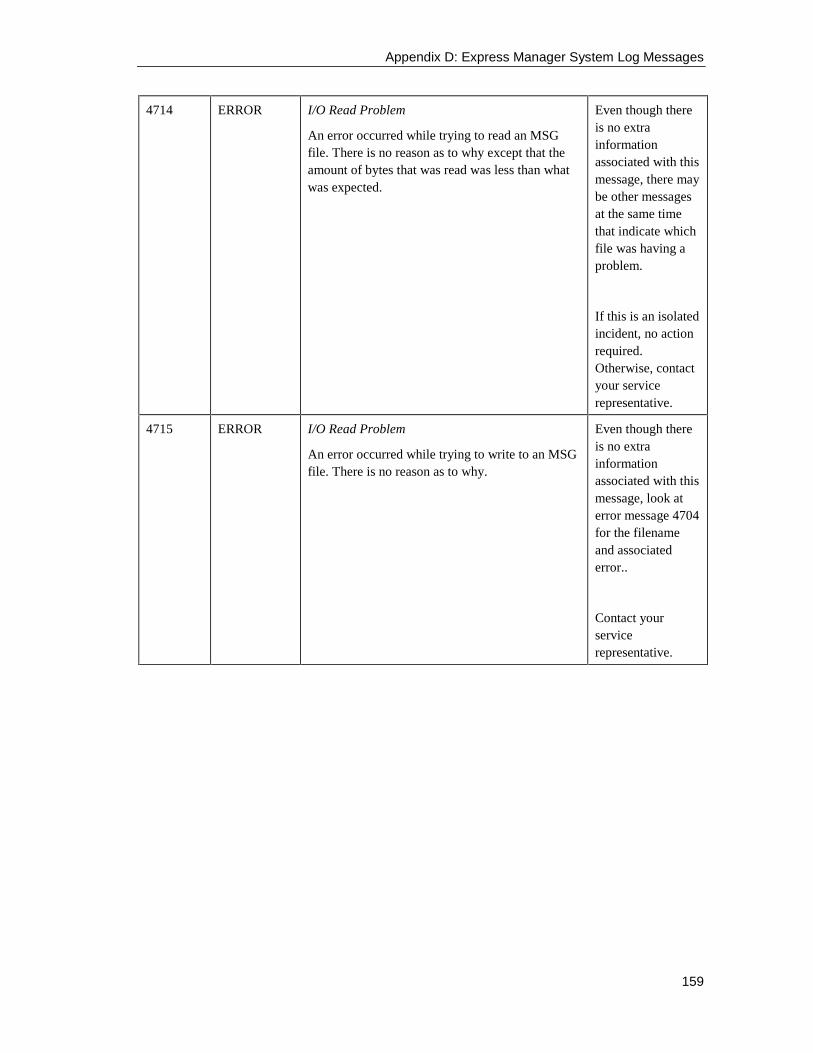
Appendix D: Express Manager System Log Messages
159
4714 ERROR I/O Read Problem
An error occurred while trying to read an MSGfile. There is no reason as to why except that theamount of bytes that was read was less than whatwas expected.
Even though thereis no extrainformationassociated with thismessage, there maybe other messagesat the same timethat indicate whichfile was having aproblem.
If this is an isolatedincident, no actionrequired.Otherwise, contactyour servicerepresentative.
4715 ERROR I/O Read Problem
An error occurred while trying to write to an MSGfile. There is no reason as to why.
Even though thereis no extrainformationassociated with thismessage, look aterror message 4704for the filenameand associatederror..
Contact yourservicerepresentative.
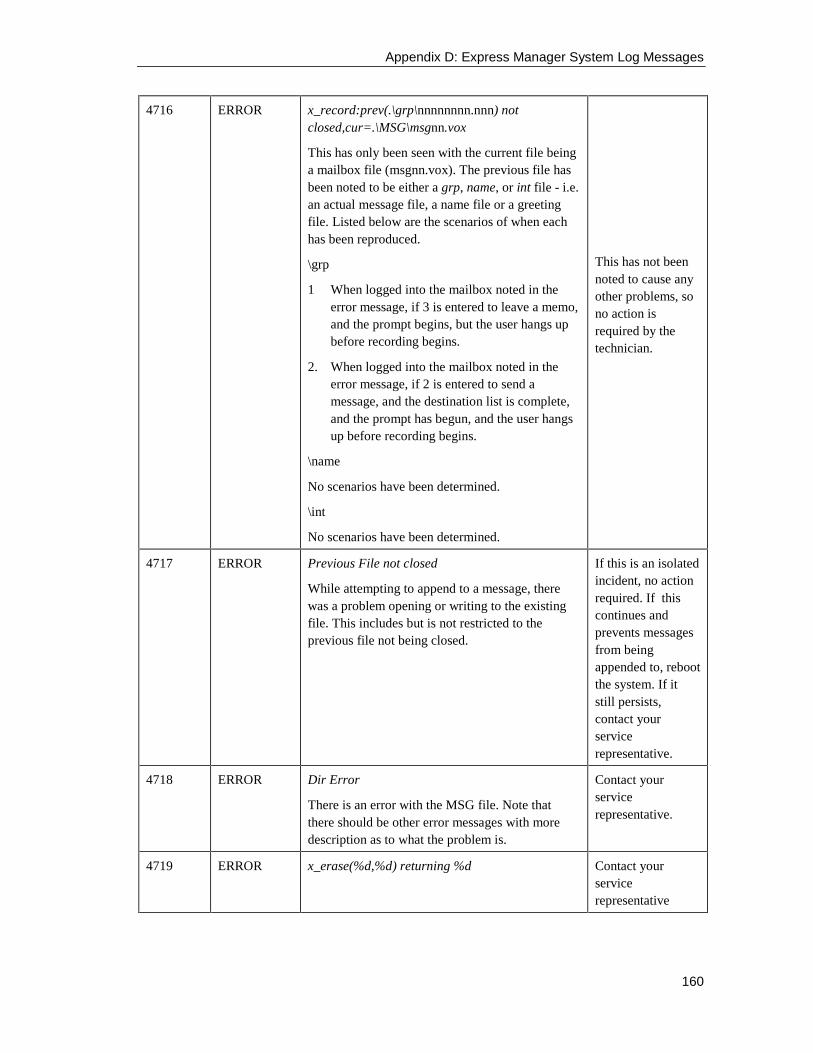
Appendix D: Express Manager System Log Messages
160
4716 ERROR x_record:prev(.\grp\nnnnnnnn.nnn) notclosed,cur=.\MSG\msgnn.vox
This has only been seen with the current file beinga mailbox file (msgnn.vox). The previous file hasbeen noted to be either a grp, name, or int file - i.e.an actual message file, a name file or a greetingfile. Listed below are the scenarios of when eachhas been reproduced.
\grp
1 When logged into the mailbox noted in theerror message, if 3 is entered to leave a memo,and the prompt begins, but the user hangs upbefore recording begins.
2. When logged into the mailbox noted in theerror message, if 2 is entered to send amessage, and the destination list is complete,and the prompt has begun, and the user hangsup before recording begins.
\name
No scenarios have been determined.
\int
No scenarios have been determined.
This has not beennoted to cause anyother problems, sono action isrequired by thetechnician.
4717 ERROR Previous File not closed
While attempting to append to a message, therewas a problem opening or writing to the existingfile. This includes but is not restricted to theprevious file not being closed.
If this is an isolatedincident, no actionrequired. If thiscontinues andprevents messagesfrom beingappended to, rebootthe system. If itstill persists,contact yourservicerepresentative.
4718 ERROR Dir Error
There is an error with the MSG file. Note thatthere should be other error messages with moredescription as to what the problem is.
Contact yourservicerepresentative.
4719 ERROR x_erase(%d,%d) returning %d Contact yourservicerepresentative
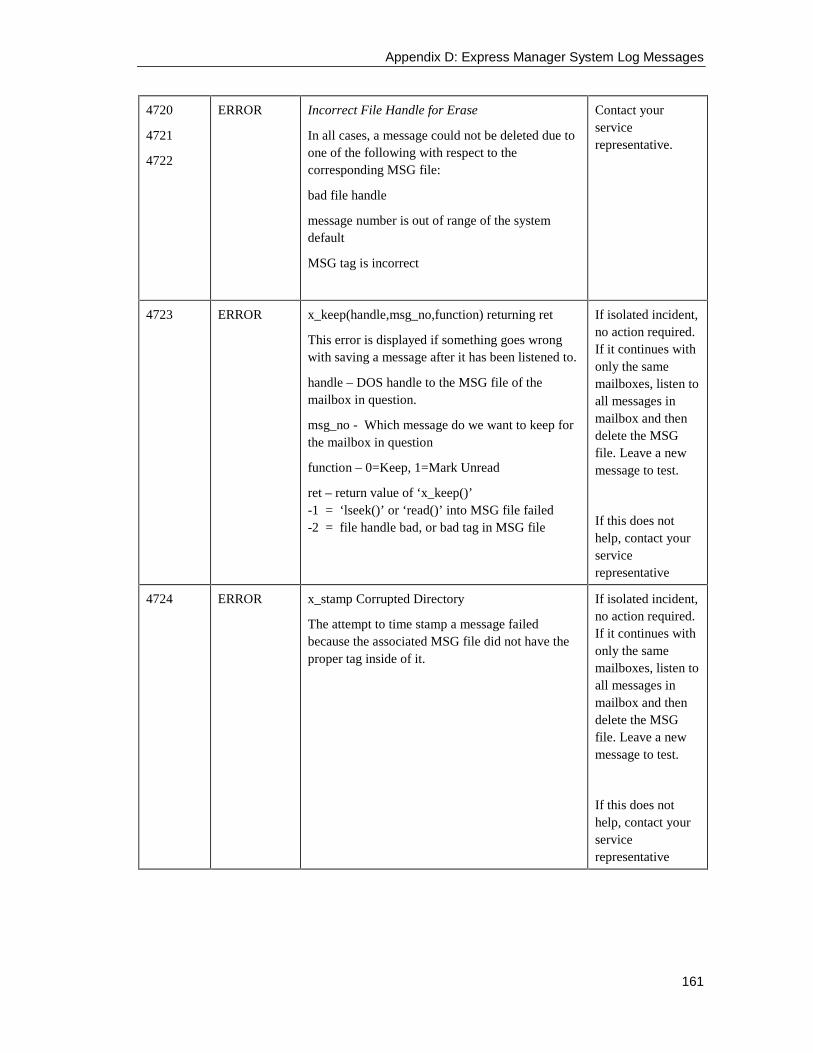
Appendix D: Express Manager System Log Messages
161
4720
4721
4722
ERROR Incorrect File Handle for Erase
In all cases, a message could not be deleted due toone of the following with respect to thecorresponding MSG file:
bad file handle
message number is out of range of the systemdefault
MSG tag is incorrect
Contact yourservicerepresentative.
4723 ERROR x_keep(handle,msg_no,function) returning ret
This error is displayed if something goes wrongwith saving a message after it has been listened to.
handle – DOS handle to the MSG file of themailbox in question.
msg_no - Which message do we want to keep forthe mailbox in question
function – 0=Keep, 1=Mark Unread
ret – return value of ‘x_keep()’-1 = ‘lseek()’ or ‘read()’ into MSG file failed-2 = file handle bad, or bad tag in MSG file
If isolated incident,no action required.If it continues withonly the samemailboxes, listen toall messages inmailbox and thendelete the MSGfile. Leave a newmessage to test.
If this does nothelp, contact yourservicerepresentative
4724 ERROR x_stamp Corrupted Directory
The attempt to time stamp a message failedbecause the associated MSG file did not have theproper tag inside of it.
If isolated incident,no action required.If it continues withonly the samemailboxes, listen toall messages inmailbox and thendelete the MSGfile. Leave a newmessage to test.
If this does nothelp, contact yourservicerepresentative
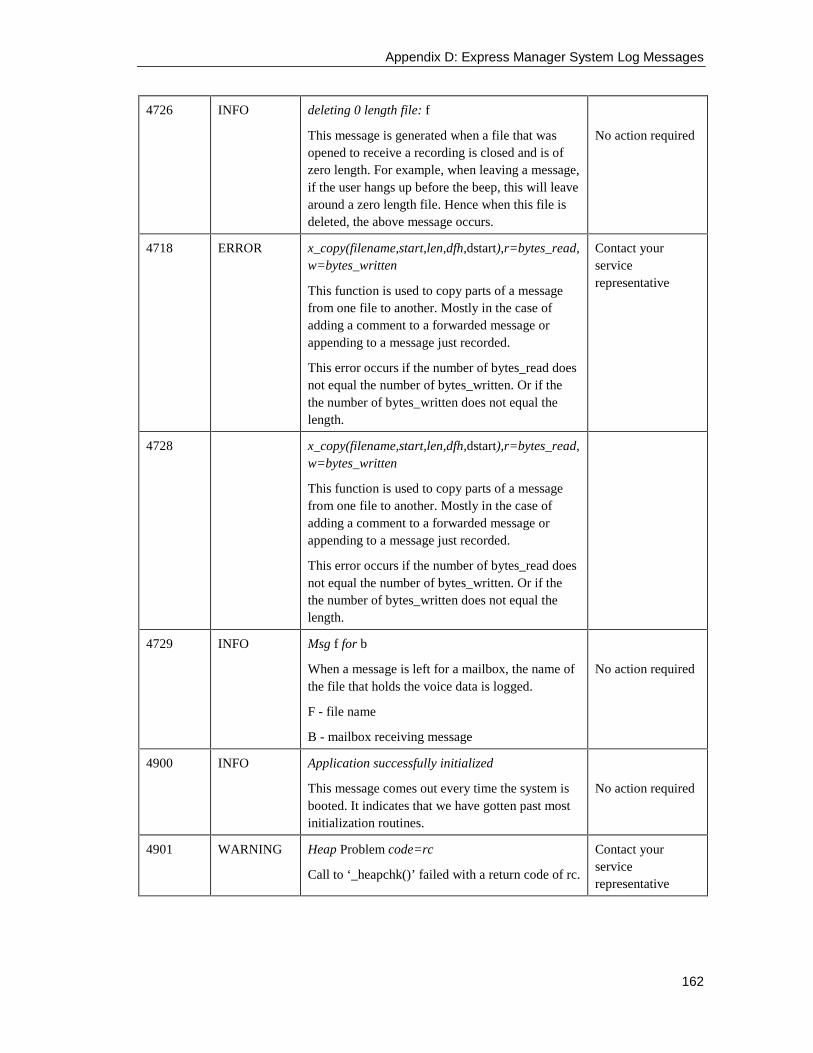
Appendix D: Express Manager System Log Messages
162
4726 INFO deleting 0 length file: f
This message is generated when a file that wasopened to receive a recording is closed and is ofzero length. For example, when leaving a message,if the user hangs up before the beep, this will leavearound a zero length file. Hence when this file isdeleted, the above message occurs.
No action required
4718 ERROR x_copy(filename,start,len,dfh,dstart),r=bytes_read,w=bytes_written
This function is used to copy parts of a messagefrom one file to another. Mostly in the case ofadding a comment to a forwarded message orappending to a message just recorded.
This error occurs if the number of bytes_read doesnot equal the number of bytes_written. Or if thethe number of bytes_written does not equal thelength.
Contact yourservicerepresentative
4728 x_copy(filename,start,len,dfh,dstart),r=bytes_read,w=bytes_written
This function is used to copy parts of a messagefrom one file to another. Mostly in the case ofadding a comment to a forwarded message orappending to a message just recorded.
This error occurs if the number of bytes_read doesnot equal the number of bytes_written. Or if thethe number of bytes_written does not equal thelength.
4729 INFO Msg f for b
When a message is left for a mailbox, the name ofthe file that holds the voice data is logged.
F - file name
B - mailbox receiving message
No action required
4900 INFO Application successfully initialized
This message comes out every time the system isbooted. It indicates that we have gotten past mostinitialization routines.
No action required
4901 WARNING Heap Problem code=rc
Call to ‘_heapchk()’ failed with a return code of rc.
Contact yourservicerepresentative
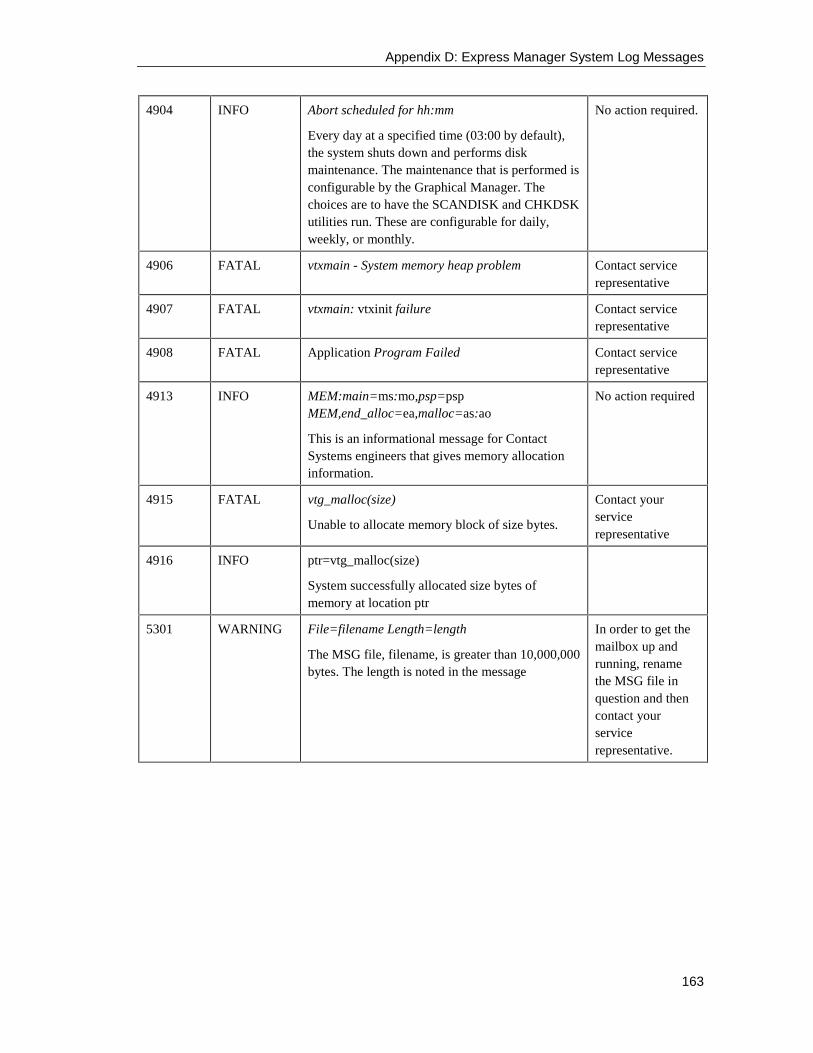
Appendix D: Express Manager System Log Messages
163
4904 INFO Abort scheduled for hh:mm
Every day at a specified time (03:00 by default),the system shuts down and performs diskmaintenance. The maintenance that is performed isconfigurable by the Graphical Manager. Thechoices are to have the SCANDISK and CHKDSKutilities run. These are configurable for daily,weekly, or monthly.
No action required.
4906 FATAL vtxmain - System memory heap problem Contact servicerepresentative
4907 FATAL vtxmain: vtxinit failure Contact servicerepresentative
4908 FATAL Application Program Failed Contact servicerepresentative
4913 INFO MEM:main=ms:mo,psp=pspMEM,end_alloc=ea,malloc=as:ao
This is an informational message for ContactSystems engineers that gives memory allocationinformation.
No action required
4915 FATAL vtg_malloc(size)
Unable to allocate memory block of size bytes.
Contact yourservicerepresentative
4916 INFO ptr=vtg_malloc(size)
System successfully allocated size bytes ofmemory at location ptr
5301 WARNING File=filename Length=length
The MSG file, filename, is greater than 10,000,000bytes. The length is noted in the message
In order to get themailbox up andrunning, renamethe MSG file inquestion and thencontact yourservicerepresentative.
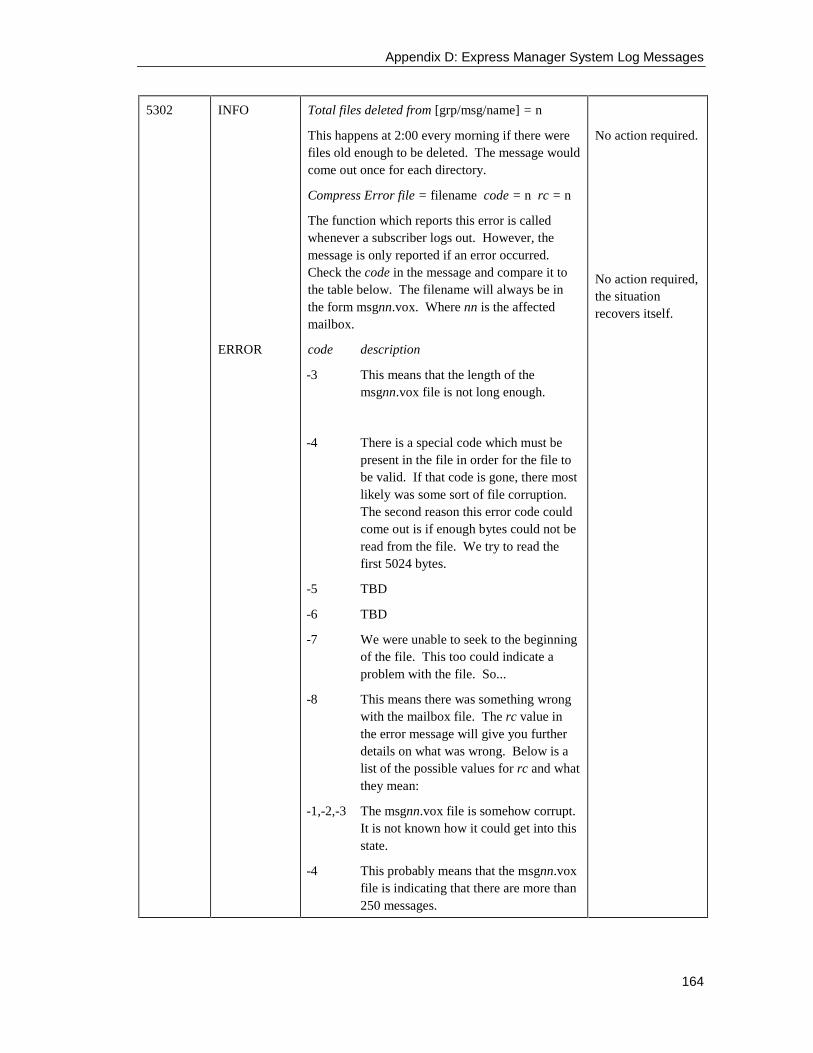
Appendix D: Express Manager System Log Messages
164
5302 INFO
ERROR
Total files deleted from [grp/msg/name] = n
This happens at 2:00 every morning if there werefiles old enough to be deleted. The message wouldcome out once for each directory.
Compress Error file = filename code = n rc = n
The function which reports this error is calledwhenever a subscriber logs out. However, themessage is only reported if an error occurred.Check the code in the message and compare it tothe table below. The filename will always be inthe form msgnn.vox. Where nn is the affectedmailbox.
code description
-3 This means that the length of themsgnn.vox file is not long enough.
-4 There is a special code which must bepresent in the file in order for the file tobe valid. If that code is gone, there mostlikely was some sort of file corruption.The second reason this error code couldcome out is if enough bytes could not beread from the file. We try to read thefirst 5024 bytes.
-5 TBD
-6 TBD
-7 We were unable to seek to the beginningof the file. This too could indicate aproblem with the file. So...
-8 This means there was something wrongwith the mailbox file. The rc value inthe error message will give you furtherdetails on what was wrong. Below is alist of the possible values for rc and whatthey mean:
-1,-2,-3 The msgnn.vox file is somehow corrupt.It is not known how it could get into thisstate.
-4 This probably means that the msgnn.voxfile is indicating that there are more than250 messages.
No action required.
No action required,the situationrecovers itself.
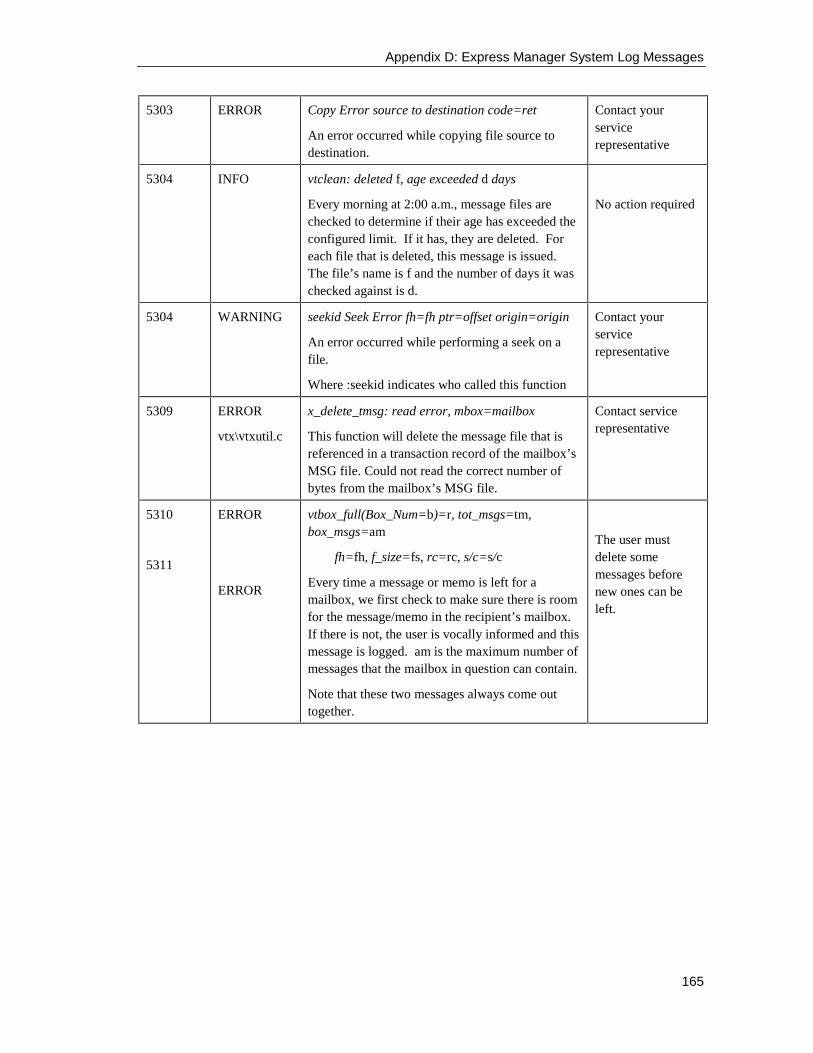
Appendix D: Express Manager System Log Messages
165
5303 ERROR Copy Error source to destination code=ret
An error occurred while copying file source todestination.
Contact yourservicerepresentative
5304 INFO vtclean: deleted f, age exceeded d days
Every morning at 2:00 a.m., message files arechecked to determine if their age has exceeded theconfigured limit. If it has, they are deleted. Foreach file that is deleted, this message is issued.The file’s name is f and the number of days it waschecked against is d.
No action required
5304 WARNING seekid Seek Error fh=fh ptr=offset origin=origin
An error occurred while performing a seek on afile.
Where :seekid indicates who called this function
Contact yourservicerepresentative
5309 ERROR
vtx\vtxutil.c
x_delete_tmsg: read error, mbox=mailbox
This function will delete the message file that isreferenced in a transaction record of the mailbox’sMSG file. Could not read the correct number ofbytes from the mailbox’s MSG file.
Contact servicerepresentative
5310
5311
ERROR
ERROR
vtbox_full(Box_Num=b)=r, tot_msgs=tm,box_msgs=am
fh=fh, f_size=fs, rc=rc, s/c=s/c
Every time a message or memo is left for amailbox, we first check to make sure there is roomfor the message/memo in the recipient’s mailbox.If there is not, the user is vocally informed and thismessage is logged. am is the maximum number ofmessages that the mailbox in question can contain.
Note that these two messages always come outtogether.
The user mustdelete somemessages beforenew ones can beleft.
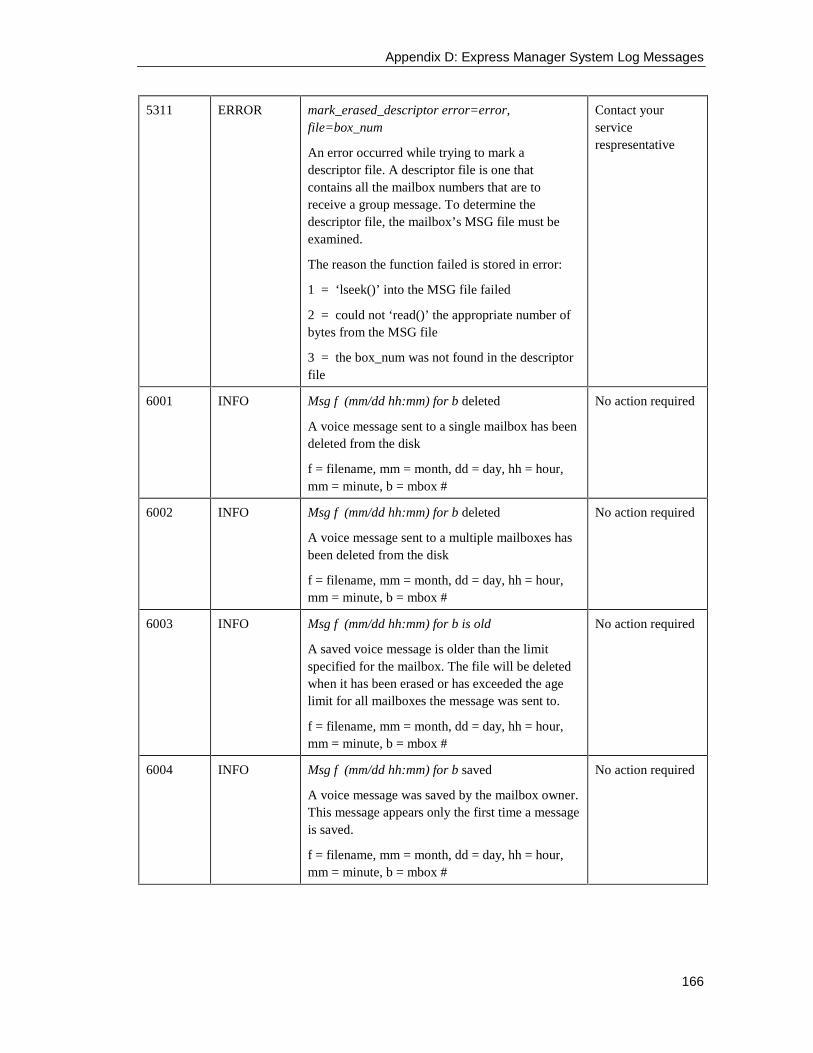
Appendix D: Express Manager System Log Messages
166
5311 ERROR mark_erased_descriptor error=error,file=box_num
An error occurred while trying to mark adescriptor file. A descriptor file is one thatcontains all the mailbox numbers that are toreceive a group message. To determine thedescriptor file, the mailbox’s MSG file must beexamined.
The reason the function failed is stored in error:
1 = ‘lseek()’ into the MSG file failed
2 = could not ‘read()’ the appropriate number ofbytes from the MSG file
3 = the box_num was not found in the descriptorfile
Contact yourservicerespresentative
6001 INFO Msg f (mm/dd hh:mm) for b deleted
A voice message sent to a single mailbox has beendeleted from the disk
f = filename, mm = month, dd = day, hh = hour,mm = minute, b = mbox #
No action required
6002 INFO Msg f (mm/dd hh:mm) for b deleted
A voice message sent to a multiple mailboxes hasbeen deleted from the disk
f = filename, mm = month, dd = day, hh = hour,mm = minute, b = mbox #
No action required
6003 INFO Msg f (mm/dd hh:mm) for b is old
A saved voice message is older than the limitspecified for the mailbox. The file will be deletedwhen it has been erased or has exceeded the agelimit for all mailboxes the message was sent to.
f = filename, mm = month, dd = day, hh = hour,mm = minute, b = mbox #
No action required
6004 INFO Msg f (mm/dd hh:mm) for b saved
A voice message was saved by the mailbox owner.This message appears only the first time a messageis saved.
f = filename, mm = month, dd = day, hh = hour,mm = minute, b = mbox #
No action required
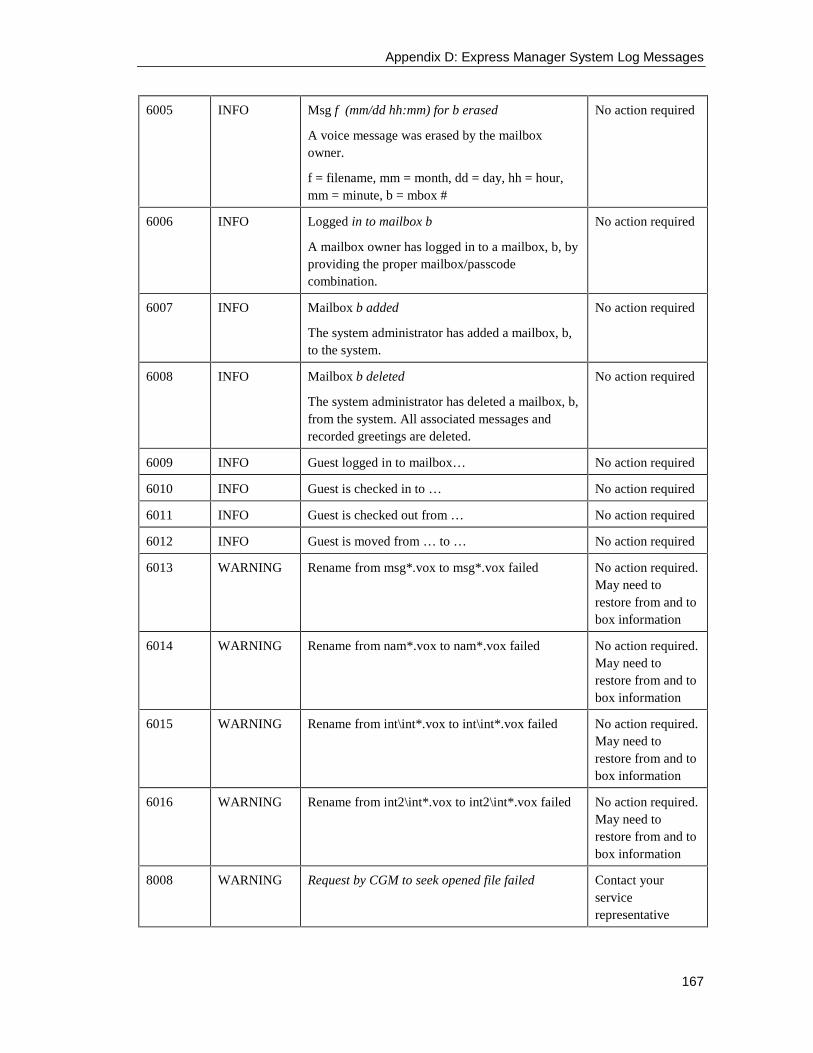
Appendix D: Express Manager System Log Messages
167
6005 INFO Msg f (mm/dd hh:mm) for b erased
A voice message was erased by the mailboxowner.
f = filename, mm = month, dd = day, hh = hour,mm = minute, b = mbox #
No action required
6006 INFO Logged in to mailbox b
A mailbox owner has logged in to a mailbox, b, byproviding the proper mailbox/passcodecombination.
No action required
6007 INFO Mailbox b added
The system administrator has added a mailbox, b,to the system.
No action required
6008 INFO Mailbox b deleted
The system administrator has deleted a mailbox, b,from the system. All associated messages andrecorded greetings are deleted.
No action required
6009 INFO Guest logged in to mailbox… No action required
6010 INFO Guest is checked in to … No action required
6011 INFO Guest is checked out from … No action required
6012 INFO Guest is moved from … to … No action required
6013 WARNING Rename from msg*.vox to msg*.vox failed No action required.May need torestore from and tobox information
6014 WARNING Rename from nam*.vox to nam*.vox failed No action required.May need torestore from and tobox information
6015 WARNING Rename from int\int*.vox to int\int*.vox failed No action required.May need torestore from and tobox information
6016 WARNING Rename from int2\int*.vox to int2\int*.vox failed No action required.May need torestore from and tobox information
8008 WARNING Request by CGM to seek opened file failed Contact yourservicerepresentative
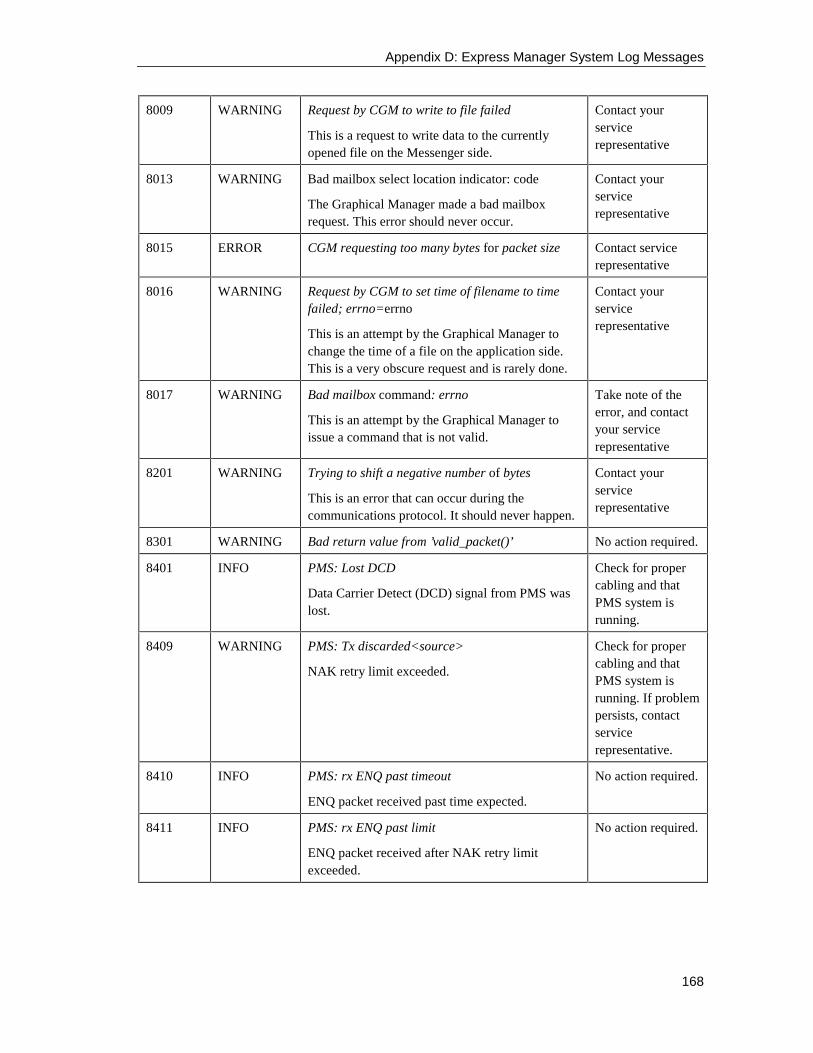
Appendix D: Express Manager System Log Messages
168
8009 WARNING Request by CGM to write to file failed
This is a request to write data to the currentlyopened file on the Messenger side.
Contact yourservicerepresentative
8013 WARNING Bad mailbox select location indicator: code
The Graphical Manager made a bad mailboxrequest. This error should never occur.
Contact yourservicerepresentative
8015 ERROR CGM requesting too many bytes for packet size Contact servicerepresentative
8016 WARNING Request by CGM to set time of filename to timefailed; errno=errno
This is an attempt by the Graphical Manager tochange the time of a file on the application side.This is a very obscure request and is rarely done.
Contact yourservicerepresentative
8017 WARNING Bad mailbox command: errno
This is an attempt by the Graphical Manager toissue a command that is not valid.
Take note of theerror, and contactyour servicerepresentative
8201 WARNING Trying to shift a negative number of bytes
This is an error that can occur during thecommunications protocol. It should never happen.
Contact yourservicerepresentative
8301 WARNING Bad return value from ’valid_packet()’ No action required.
8401 INFO PMS: Lost DCD
Data Carrier Detect (DCD) signal from PMS waslost.
Check for propercabling and thatPMS system isrunning.
8409 WARNING PMS: Tx discarded<source>
NAK retry limit exceeded.
Check for propercabling and thatPMS system isrunning. If problempersists, contactservicerepresentative.
8410 INFO PMS: rx ENQ past timeout
ENQ packet received past time expected.
No action required.
8411 INFO PMS: rx ENQ past limit
ENQ packet received after NAK retry limitexceeded.
No action required.
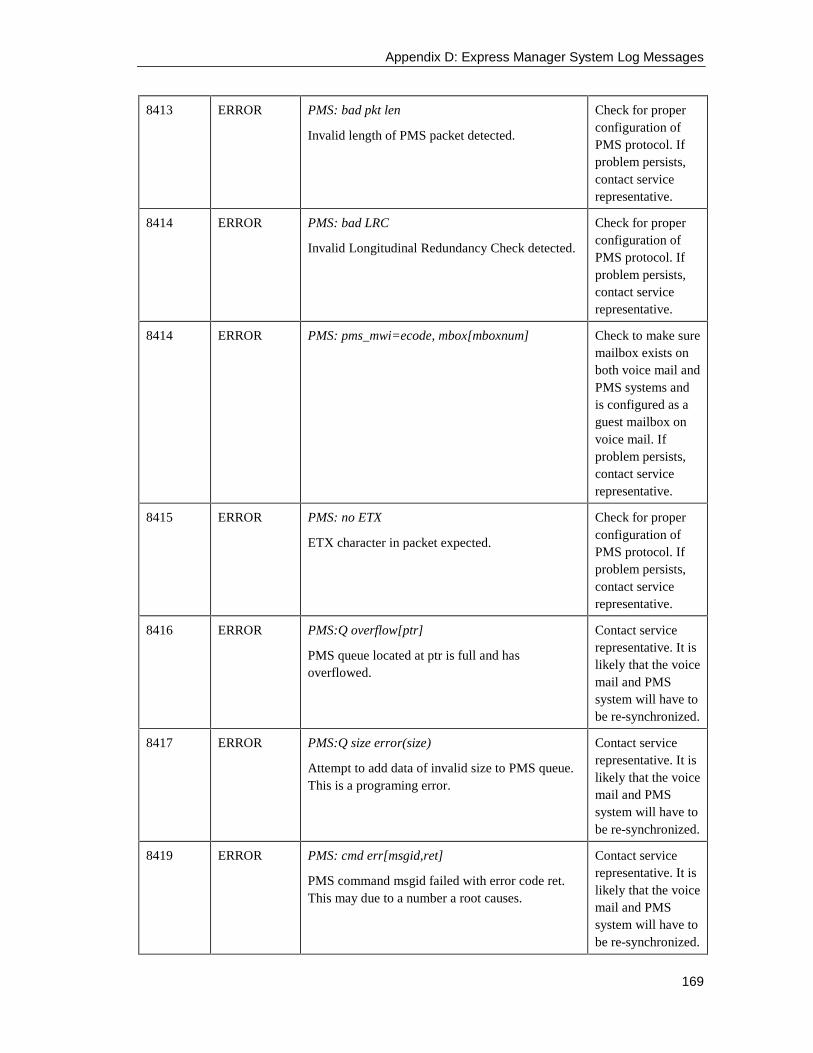
Appendix D: Express Manager System Log Messages
169
8413 ERROR PMS: bad pkt len
Invalid length of PMS packet detected.
Check for properconfiguration ofPMS protocol. Ifproblem persists,contact servicerepresentative.
8414 ERROR PMS: bad LRC
Invalid Longitudinal Redundancy Check detected.
Check for properconfiguration ofPMS protocol. Ifproblem persists,contact servicerepresentative.
8414 ERROR PMS: pms_mwi=ecode, mbox[mboxnum] Check to make suremailbox exists onboth voice mail andPMS systems andis configured as aguest mailbox onvoice mail. Ifproblem persists,contact servicerepresentative.
8415 ERROR PMS: no ETX
ETX character in packet expected.
Check for properconfiguration ofPMS protocol. Ifproblem persists,contact servicerepresentative.
8416 ERROR PMS:Q overflow[ptr]
PMS queue located at ptr is full and hasoverflowed.
Contact servicerepresentative. It islikely that the voicemail and PMSsystem will have tobe re-synchronized.
8417 ERROR PMS:Q size error(size)
Attempt to add data of invalid size to PMS queue.This is a programing error.
Contact servicerepresentative. It islikely that the voicemail and PMSsystem will have tobe re-synchronized.
8419 ERROR PMS: cmd err[msgid,ret]
PMS command msgid failed with error code ret.This may due to a number a root causes.
Contact servicerepresentative. It islikely that the voicemail and PMSsystem will have tobe re-synchronized.

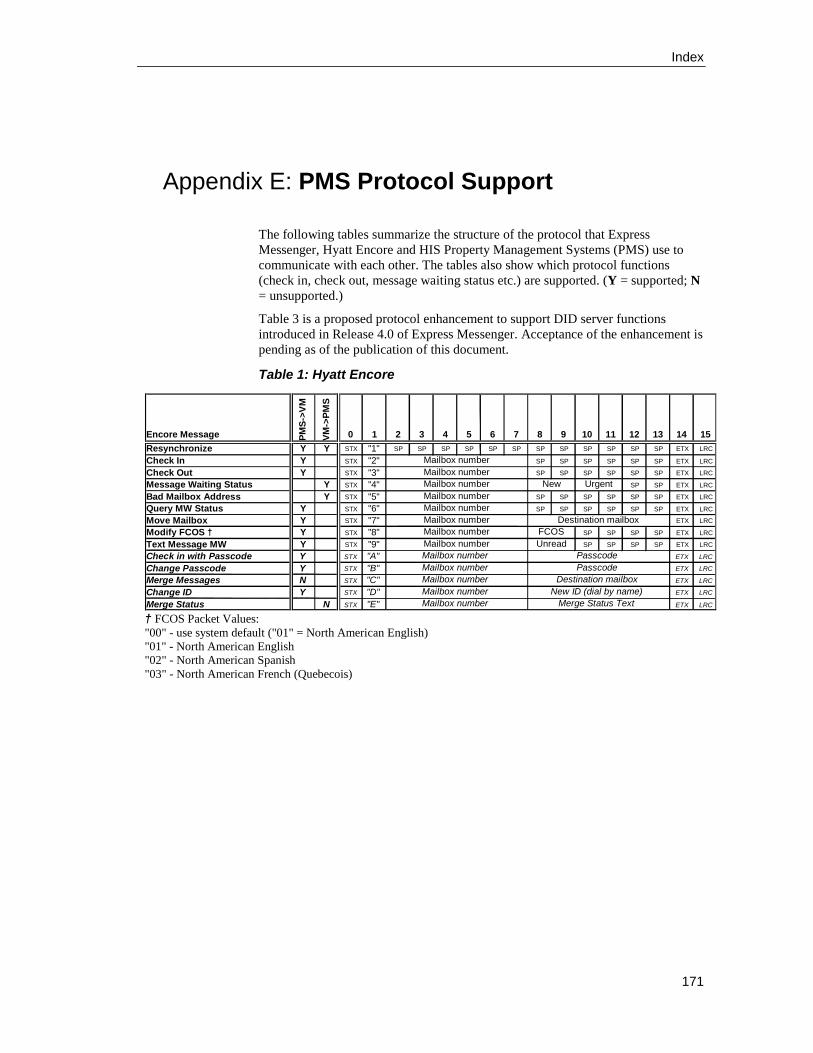
Index
171
Appendix E: PMS Protocol Support
The following tables summarize the structure of the protocol that ExpressMessenger, Hyatt Encore and HIS Property Management Systems (PMS) use tocommunicate with each other. The tables also show which protocol functions(check in, check out, message waiting status etc.) are supported. (Y = supported; N= unsupported.)
Table 3 is a proposed protocol enhancement to support DID server functionsintroduced in Release 4.0 of Express Messenger. Acceptance of the enhancement ispending as of the publication of this document.
Table 1: Hyatt Encore
† FCOS Packet Values:"00" - use system default ("01" = North American English)"01" - North American English"02" - North American Spanish"03" - North American French (Quebecois)
Encore Message PM
S->
VM
VM
->P
MS
0 1 2 3 4 5 6 7 8 9 10 11 12 13 14 15
Resynchronize Y Y STX "1" SP SP SP SP SP SP SP SP SP SP SP SP ETX LRC
Check In Y STX "2" SP SP SP SP SP SP ETX LRC
Check Out Y STX "3" SP SP SP SP SP SP ETX LRC
Message Waiting Status Y STX "4" SP SP ETX LRC
Bad Mailbox Address Y STX "5" SP SP SP SP SP SP ETX LRC
Query MW Status Y STX "6" SP SP SP SP SP SP ETX LRC
Move Mailbox Y STX "7" ETX LRC
Modify FCOS † Y STX "8" SP SP SP SP ETX LRC
Text Message MW Y STX "9" SP SP SP SP ETX LRC
Check in with Passcode Y STX "A" ETX LRC
Change Passcode Y STX "B" ETX LRC
Merge Messages N STX "C" ETX LRC
Change ID Y STX "D" ETX LRC
Merge Status N STX "E" ETX LRC
Mailbox number
Mailbox number
Mailbox numberMailbox numberMailbox numberMailbox number
New UrgentMailbox numberMailbox number
Destination mailboxFCOSUnread
Mailbox number
Mailbox numberMailbox numberMailbox numberMailbox number
Merge Status Text
PasscodePasscode
Destination mailboxNew ID (dial by name)
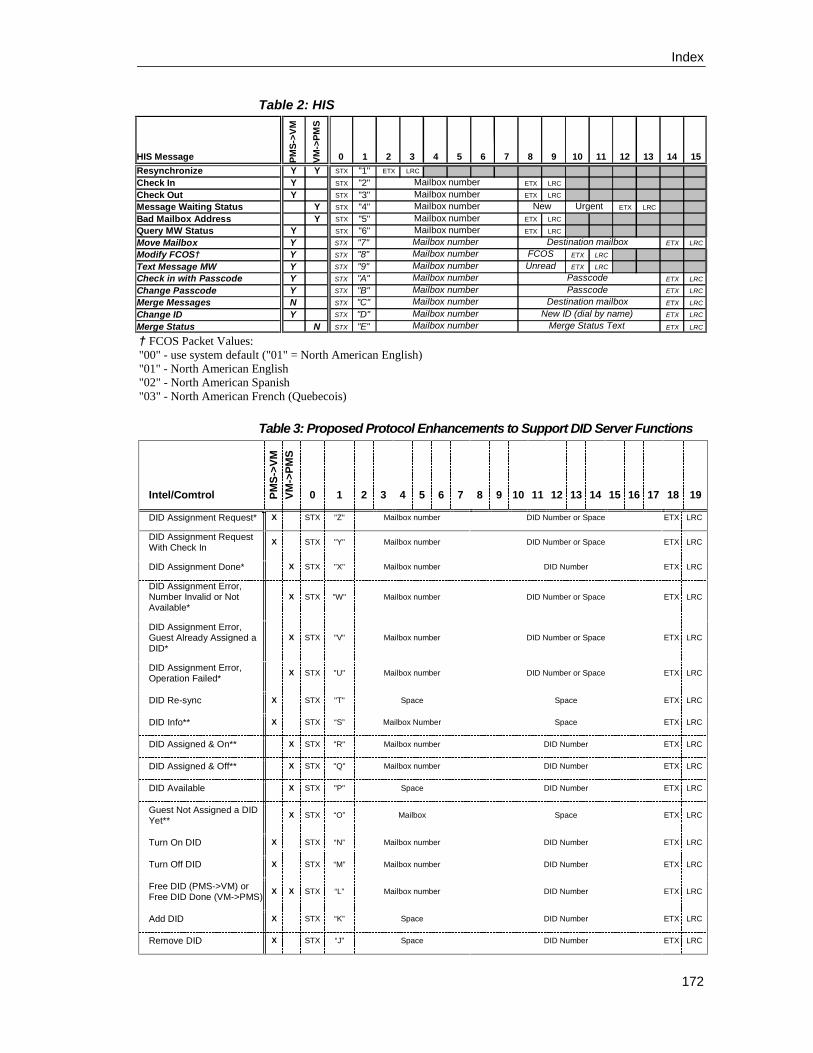
Index
172
Table 2: HIS
† FCOS Packet Values:"00" - use system default ("01" = North American English)"01" - North American English"02" - North American Spanish"03" - North American French (Quebecois)
Table 3: Proposed Protocol Enhancements to Support DID Server Functions
Intel/Comtrol PM
S->
VM
VM
->P
MS
0 1 2 3 4 5 6 7 8 9 10 11 12 13 14 15 16 17 18 19
DID Assignment Request* X STX "Z" Mailbox number DID Number or Space ETX LRC
DID Assignment RequestWith Check In
X STX "Y" Mailbox number DID Number or Space ETX LRC
DID Assignment Done* X STX "X" Mailbox number DID Number ETX LRC
DID Assignment Error,Number Invalid or NotAvailable*
X STX "W" Mailbox number DID Number or Space ETX LRC
DID Assignment Error,Guest Already Assigned aDID*
X STX "V" Mailbox number DID Number or Space ETX LRC
DID Assignment Error,Operation Failed*
X STX "U" Mailbox number DID Number or Space ETX LRC
DID Re-sync X STX "T" Space Space ETX LRC
DID Info** X STX “S” Mailbox Number Space ETX LRC
DID Assigned & On** X STX "R" Mailbox number DID Number ETX LRC
DID Assigned & Off** X STX "Q" Mailbox number DID Number ETX LRC
DID Available X STX "P" Space DID Number ETX LRC
Guest Not Assigned a DIDYet**
X STX “O” Mailbox Space ETX LRC
Turn On DID X STX “N” Mailbox number DID Number ETX LRC
Turn Off DID X STX “M” Mailbox number DID Number ETX LRC
Free DID (PMS->VM) orFree DID Done (VM->PMS)
X X STX “L” Mailbox number DID Number ETX LRC
Add DID X STX “K” Space DID Number ETX LRC
Remove DID X STX “J” Space DID Number ETX LRC
HIS Message PM
S->
VM
VM
->P
MS
0 1 2 3 4 5 6 7 8 9 10 11 12 13 14 15
Resynchronize Y Y STX "1" ETX LRC
Check In Y STX "2" ETX LRC
Check Out Y STX "3" ETX LRC
Message Waiting Status Y STX "4" ETX LRC
Bad Mailbox Address Y STX "5" ETX LRC
Query MW Status Y STX "6" ETX LRC
Move Mailbox Y STX "7" ETX LRC
Modify FCOS† Y STX "8" ETX LRC
Text Message MW Y STX "9" ETX LRC
Check in with Passcode Y STX "A" ETX LRC
Change Passcode Y STX "B" ETX LRC
Merge Messages N STX "C" ETX LRC
Change ID Y STX "D" ETX LRC
Merge Status N STX "E" ETX LRC
Mailbox numberMailbox numberMailbox number New UrgentMailbox numberMailbox numberMailbox number Destination mailboxMailbox number FCOSMailbox number UnreadMailbox number Passcode
Mailbox number New ID (dial by name)Mailbox number Merge Status Text
Mailbox number PasscodeMailbox number Destination mailbox
Index
173
Index
AAccess system administrator’s mailbox, 36
Account Code Access code, 85
Add distribution list, 66
Add mailbox, 39
Administration
backup, 99, 112
passcode length, 79
Restore, 101
system log, 132
upgrade software, 102
Administrator
passcode, 20
Administrator passcode, 64
Alternate
numbers for notification, 81
Alternate greetings, 56, 76
Analyze system problems, 132
Analyzing system problems, 135, 145
Audience definition, 5
Auto attendant, 4
Automatic Route Select code, 85
BBackup, 99, 112
destination, 100
type, 100
Beeper pager, 69
bilingual prompts, 94
Bilingual prompts, 10, 14
Box, messages, 135
Boxes, meaning of, 6
Bulletin board, 25
Business hours, 53
Buttons
mouse, 127
CCancel temporary greeting, 57
Carrier detect, 127
Cautions and warnings, 6
Change
administrator passcode, 64
business hours, 53
default location, 122
Express Messenger setup, 35
passcode length, 64, 65, 79
system parameters, 60
Change Dir…, 122
Characteristics, pager numbers, 70
Check
date and time, 54
operator mailbox, 9
Closed greeting, 57
Closed hours, 76
Colors, 128
COM ports, 125
COM1 and COM2, 126
Command
hangup, 126
Prefix, 126
Suffix, 126
Communication
port, 126
Communications, 125
Company directory, 21
Computer hardware, 16
Connecting your PC to Express Messenger, 16
Connection
remote, 16, 17
Continuation string, 126
Conventions, 6
Copy
remote files:, 130
Correcting problems, 119
Create
a new document, 122
DDate, 53
Index
174
incorrect, 119
of error, 132
Default
change location, 122
Default administrator passcode, 64
Delete
mailbox, 52
remote files, 130
Delete distribution list, 67
Delete mailbox, 44
Destination for backup, 100
Dial
Prefix, 126
Suffix, 126
DID server, 91
Digital pager, 69
Directory, 21
listing, 47, 52
mailbox, 45
name, 41, 47
Disable
FAX option, 78, 83
notification for subscriber, 50
notification for system, 82
Display
remote files, 130
Distribution lists, 65
Distribution Lists, 66
Document
conventions, 6
DOS
version, 15
DOS Shell
return temporarily, 122
Drives, 15
DTMF duration, 127
DTR, 127
EEdit, 123
remote files, 130
Edit mailbox, 41
Enable
FAX option, 78, 83
notification for subscriber, 50
notification for system, 82
End numerical entry, 41
Envelope, 49
Error. See Log level
Error levels. See Log levels
Error messages
explanation of, 136
Event
log. See System log
Exit, 122
Express Messenger unit, 16
Extension, 41
fax, 60
FAX, 78, 83
mailbox, 22
notification, 50
FFax
settings, 77, 83
FAX
extension, 60, 78, 83
finder, 73, 82
status, 78, 83
FAX finder
enable, 73
Features, of Express Messenger, 4
Field
backup type, 100
close hours, 76
communication port, 126
date, 76
directory name, 47
FAX extension, 78, 83
initialization string, 127
mailbox type, 48
maximum number, 49
message envelope, 49
message life, 49
Index
175
notification number, 50
notification schedule, 50
notification type, 50
open hours, 76
pager callback number, 82
passcode length, 79
subscriber passcode, 47
time, 76
upgrade source, 104
File
Change Dir..., 122
DOS Shell, 122
Exit, 122
Initial Menu, 122
Login, 122
Logout, 129
Main Menu, 129
Open, 122
Remote Files, 129
Save, 122
SaveAs..., 122
Floppy drive, 15
Forward message, useful tip, 8
Front desk mailbox, 32
Full backup, 100
Full disk, 119
GGeneral mailboxes, 22
Graphical Manager
installing, 15
Greetings, 54
alternate, 56, 76
Bilingual, 58
number of days to play, 57
open or closed, 57
port, 61
primary, 56
suggestions for use, 7
temporary, 57
Guest
greeting, 59
mailbox, 32
HHard drive, 15
Hardware, 16
Hints, 7
HIS PMS, 171
Hospitality
mailboxes, 32
option, enabling, 95
Hotel. See Hospitality
Hours, 76
Hyatt Encore PMS, 171
IIncoming FAX, 74
Incorrect date and time, 119
Increase
speed using prompts, 8
Information-only mailbox, 25
Initial Menu
File, 122
Installation, after PBX upgrade, 38
Installing
software, 15
Intercom, definition of. See Appendix A
Internal station notification, 68
KKey system
definition of. See Appendix A
LLanguage
change mailbox, 63, 87
enable bilingual operation, 94
voice prompt, 86
Length of message, 8
Level
log, 115
Index
176
Life of message, 49
Listing
of all errors, 132
of error messages, 136
Log
clear, 115
level, 115
system, 132
Log in, 36
Log level
settings, 115
Login, 122
passcode, 20
Logout, 129
MMailbox
add, 39
definition of. See Appendix A
delete, 44
directory, 45, 47, 52
edit, 41
management, 45
operator, 9, 47, 52
type, 48
Mailbox numbers, how represented in manual, 6
Mailbox types, 21
extension, 22
front desk, 32
guest, 32
information-only, 25
message-only, 23
single-digit, 26, 33
transfer-only, 25
tree node, 29
Main menu, 37
Main Menu
File, 129
Maintenance, 114
Maintenance
clear logs, 115
Reboot, 114
shutdown, 114
Maintenance menu, 114
Maintenance of system, 113
Manager
passcode, 20
Maximum number of messages to save, 49
Medium backup, 100
Memory, 16
Menu
Edit, 123
Main, 128
Options, 124
Windows, 124
Menus, 37
Message
deletion of, 8
envelope, 49
forward, 8
length, 8
life, 49
life of, 8
notification, 50
notification schedule, 50
notification type, 50
number to save, 49
pager notification, 50
phantom, 9
reply, 8
Message light not available, 23
Message notification, 67
no message light, 23
Message-only mailbox, 23
Messages
system, 135, 145
Messaging pager, 69
Modem
configuration for..., 125
Modem mailbox, 21
Modifying Express Messenger, 35
Monitor, 16
Motel. See Hospitality
Mouse, 127
Multi-level Routing, 29
Index
177
Music-on-hold, 9
MWI
definition of. See Appendix A
NName a distribution list, 67
Name for mailbox, 41
Negotiation progress, 127
New
create a document, 122
New installation, 38
Notification
description and procedures, 67
disable for subscriber, 50
disable for system, 82
enable for subscriber, 50
enable for system, 82
enable or disable, 41
internal stations, 68
not working, 119
number, 50
outside phone numbers, 68
pagers, 68
schedule, 50
system, 80
type, 50
Number
notification, 42
parameters for pagers, 69
OOpen
existing document, 122
Open greeting, 57
Open hours, 76
Operator mailbox, 21, 47, 52
checking, 9
Options, 124
Colors, 128
Communications, 125
Mouse, 127
Out of space, 119
Outgoing FAX, 74
Outside phone number notification, 68
PPager
notification, 68
number parameters, 69
types, 69
using, 69
Pager notification, 50
Panel lights not on, 119
Parameters
pager number, 69
system, 60
Passcode
administrator, 64
assigning to subscriber, 47
length, 64, 65, 79
log in, 20
operator mailbox, 21
reset subscriber, 41
subscriber mailbox, 41
Pathname
backup, 100
upgrade source file, 104
Pause
on pager, 69
PC, 16
Personal Contact Numbers, 85, 86
Personnel directory, 21
Phantom messages, 9
PMS
connecting terminal, 63, 93
option, enabling, 96
protocol support, 171
Port
COM1 and COM2, 126
communication, 126
serial,setup, 125
Port greetings, 61
Prefix
Command, 126
Index
178
dialing, 126
Primary greeting, 56
Problems
call your dealer, 135
Problems and solutions, 119
Prompts
skip, 41
Property Management System. See PMS
QQuick backup, 100
RRAD ports, 88
Reboot, 114
Receive
remote files, 130
Record A Call, 10
Record Announcement Device. See RAD ports
Record system greetings, 54
Reference manuals, 11
Remote connection, 16, 17
Remote Files, 129
Rename
remote files, 130
Repeat installation, 38
Reply to message, useful tip, 8
Required
hardware, 16
Reserved mailboxes, 21
Restore, 101
source, 101
Result codes, 127
Review distribution list, 66
SSave, 122
as a new document. See
Save As..., 122
Saved messages, 8
Send remote files, 130
Serial port
setup, 125
Set
business hours, 54
date and time, 53
FAX extension, 60
fax finder, 73, 82
mailbox type, 42
notification, 72
port greetings, 61
system parameters, 60
Shell
DOS, 122
Shutdown, 114
Silent messages, 9
Single-digit mailboxes
add, 39
description, 26, 33
Skip prompts, 41
Software
upgrade, 102
Solutions to problems, 119
Source
restore file, 101
upgrade file, 104
Speed, increase, 8
Station, definition of. See Appendix A
Status
FAX, 78, 83
Status light not green, 119
Subscriber, definition of. See Appendix A
Suffix
Command, 126
dialing, 126
Symptoms of problems, 119
System
Alternate greetings, 76
backing up the, 99, 112
fax settings, 77, 83
greetings, 54
Mailboxes, 45
maintenance, 113
messages, 135, 145

Index
179
notification, 80
parameters, 60
reboot the, 114
shutdown the, 114
System administrator
mailbox, 22
main menu, 37
System log, 132
System problems
error log, 132
TTelephone
extension, 41
Telephone notification, 50
Telephone number
notification, 50
pager display, 82
Temporary greetings, 57
Time, 53
incorrect, 119
of error, 132
Tips, 7
Transfer remote files, 130
Transfer to Any PBX Extension, 85
Transfer-only mailbox, 25
Transition of DTR, 127
Tree Node mailboxes, 29, 40
Troubleshooting, 119
trunks
preventing transfer to from Auto attendant, 85
Tutorial, 4
Type ahead, 8
Type of backup, 100
Types of pagers, 69
UUpgrade software, 102
User mailboxes, 22
Users without telephones, 23
Using pagers, 69
VVGA monitor, 16
View
remote files, 130
Voice messaging system
definition of. See Appendix A
WWarnings and cautions, 6
Windows, 124