mitel – msa sip technical - xo communications · creating and configuring a sip peer trunk group...
TRANSCRIPT
Configure the Mitel 5000 for use with XO Communications SIP Trunking
MSA SIP 10-4940-00160
MITEL – MSA SIP
Technical Configuration Notes
ii
NOTICE
The information contained in this document is believed to be accurate in all respects but is not warranted by Mitel Networks™ Corporation (MITEL®). The information is subject to change without notice and should not be construed in any way as a commitment by Mitel or any of its affiliates or subsidiaries. Mitel and its affiliates and subsidiaries assume no responsibility for any errors or omissions in this document. Revisions of this document or new editions of it may be issued to incorporate such changes.
No part of this document can be reproduced or transmitted in any form or by any means - electronic or mechanical - for any purpose without written permission from Mitel Networks Corporation.
TRADEMARKS
Mitel is a trademark of Mitel Networks Corporation.
Windows and Microsoft are trademarks of Microsoft Corporation.
Other product names mentioned in this document may be trademarks of their respective companies and are hereby acknowledged.
Mitel Technical Configuration Notes – Configure the Mitel 5000 Communications Platform for use with XO Communications SIP trunk
March 2011, 10-4940-00106_2
®,™ Trademark of Mitel Networks Corporation © Copyright 2011, Mitel Networks Corporation
All rights reserved
Table of Contents
iii
OVERVIEW ............................................................................................................... 1�
Interop History.................................................................................................................... 1�
Interop Status .................................................................................................................... 1�
Software & Hardware Setup ............................................................................................... 1�
Tested Features ................................................................................................................. 2�
Device Limitations and Known Issues ................................................................................ 3�
Network Topology .............................................................................................................. 4�
CONFIGURATION NOTES ....................................................................................... 5�
Mitel 5000 Communications Platform Configuration Notes ................................................. 5�
Network Requirements .................................................................................................................... 5�Assumptions for the Mitel 5000 Communications Platform Programming ...................................... 5�Licensing and Option Selection – SIP Licensing ............................................................................ 6�Creating and Configuring a SIP Peer Trunk Group ........................................................................ 7�Programming the Configuration ...................................................................................................... 8�Programming the Trunk Group Configuration properties .............................................................. 10�Programming the Trunks in Trunk Group Configuration Folder .................................................... 12�Phone Configurations .................................................................................................................... 13�Call Configurations ........................................................................................................................ 16�
MITEL BORDER GATEWAY SETUP ..................................................................... 19�
SIP Setup ...................................................................................................................................... 19�SIP Trunk Setup ............................................................................................................................ 20�

10-4940-00106_2 XO Communications
1
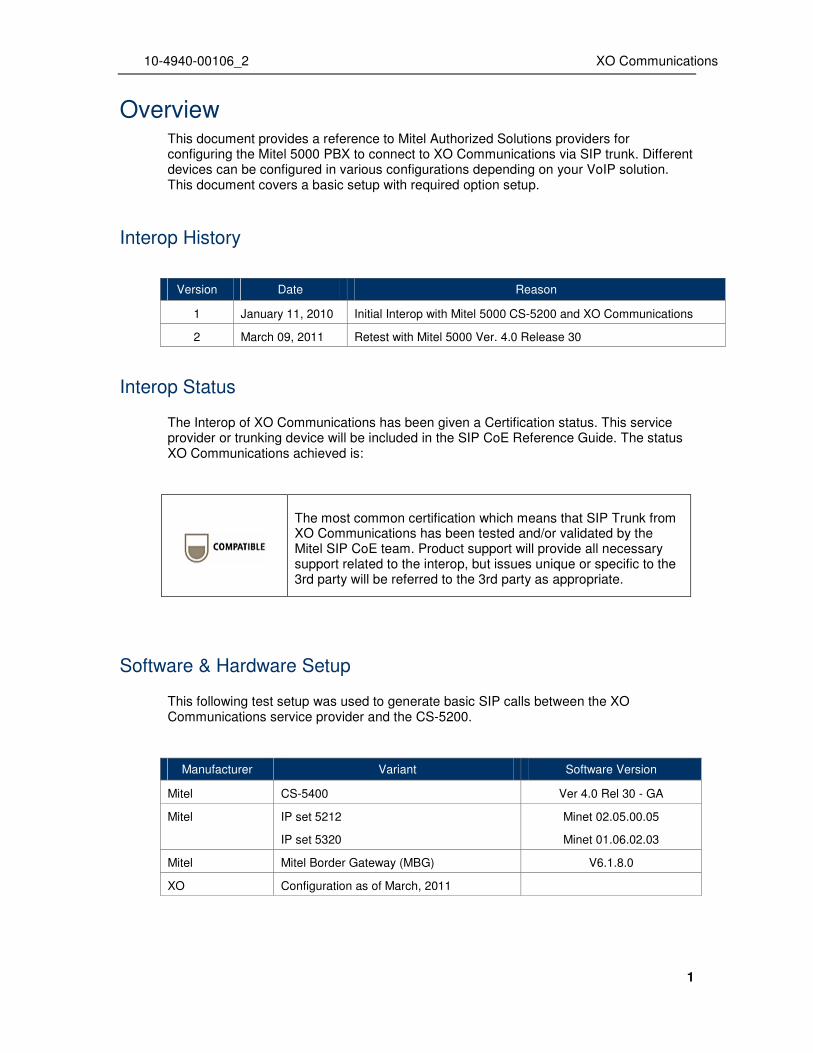
Overview This document provides a reference to Mitel Authorized Solutions providers for configuring the Mitel 5000 PBX to connect to XO Communications via SIP trunk. Different devices can be configured in various configurations depending on your VoIP solution. This document covers a basic setup with required option setup.
Interop History
Version Date Reason
1 January 11, 2010 Initial Interop with Mitel 5000 CS-5200 and XO Communications
2 March 09, 2011 Retest with Mitel 5000 Ver. 4.0 Release 30
Interop Status
The Interop of XO Communications has been given a Certification status. This service provider or trunking device will be included in the SIP CoE Reference Guide. The status XO Communications achieved is:
The most common certification which means that SIP Trunk from XO Communications has been tested and/or validated by the Mitel SIP CoE team. Product support will provide all necessary support related to the interop, but issues unique or specific to the 3rd party will be referred to the 3rd party as appropriate.
Software & Hardware Setup
This following test setup was used to generate basic SIP calls between the XO Communications service provider and the CS-5200.
Manufacturer Variant Software Version
Mitel CS-5400 Ver 4.0 Rel 30 - GA
Mitel IP set 5212
IP set 5320
Minet 02.05.00.05
Minet 01.06.02.03
Mitel Mitel Border Gateway (MBG) V6.1.8.0
XO Configuration as of March, 2011
10-4940-00106_2 XO Communications
2
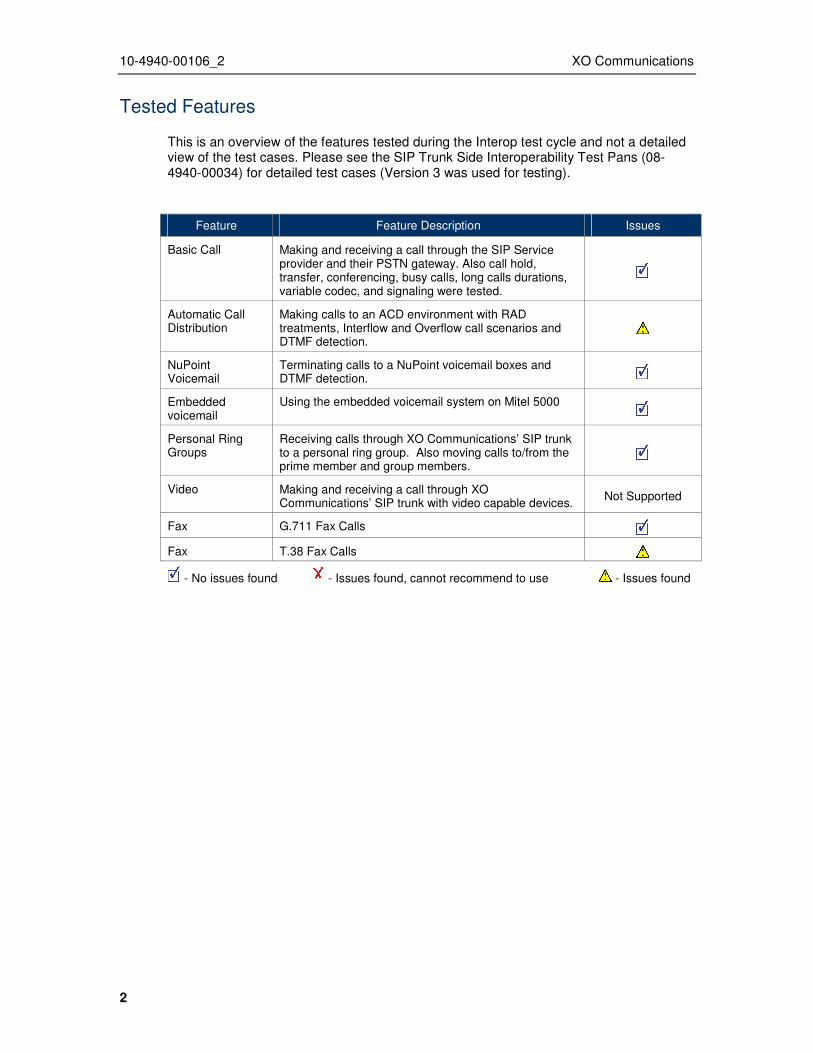
Tested Features
This is an overview of the features tested during the Interop test cycle and not a detailed view of the test cases. Please see the SIP Trunk Side Interoperability Test Pans (08-4940-00034) for detailed test cases (Version 3 was used for testing).
Feature Feature Description Issues
Basic Call Making and receiving a call through the SIP Service provider and their PSTN gateway. Also call hold, transfer, conferencing, busy calls, long calls durations, variable codec, and signaling were tested.
Automatic Call Distribution
Making calls to an ACD environment with RAD treatments, Interflow and Overflow call scenarios and DTMF detection.
NuPoint Voicemail
Terminating calls to a NuPoint voicemail boxes and DTMF detection.
Embedded voicemail
Using the embedded voicemail system on Mitel 5000
Personal Ring Groups
Receiving calls through XO Communications’ SIP trunk to a personal ring group. Also moving calls to/from the prime member and group members.
Video Making and receiving a call through XO Communications’ SIP trunk with video capable devices. Not Supported
Fax G.711 Fax Calls
Fax T.38 Fax Calls
- No issues found - Issues found, cannot recommend to use - Issues found
10-4940-00106_2 XO Communications
3
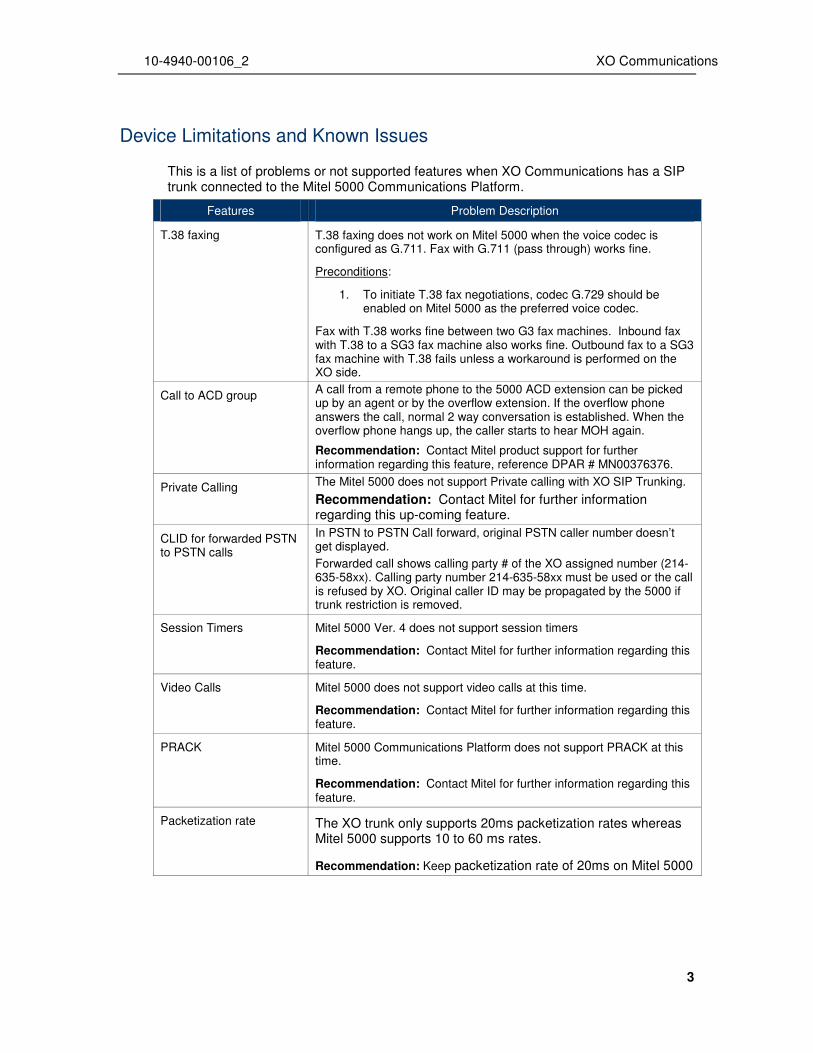
Device Limitations and Known Issues
This is a list of problems or not supported features when XO Communications has a SIP trunk connected to the Mitel 5000 Communications Platform.
Features Problem Description
T.38 faxing T.38 faxing does not work on Mitel 5000 when the voice codec is configured as G.711. Fax with G.711 (pass through) works fine.
Preconditions:
1. To initiate T.38 fax negotiations, codec G.729 should be enabled on Mitel 5000 as the preferred voice codec.
Fax with T.38 works fine between two G3 fax machines. Inbound fax with T.38 to a SG3 fax machine also works fine. Outbound fax to a SG3 fax machine with T.38 fails unless a workaround is performed on the XO side.
Call to ACD group A call from a remote phone to the 5000 ACD extension can be picked up by an agent or by the overflow extension. If the overflow phone answers the call, normal 2 way conversation is established. When the overflow phone hangs up, the caller starts to hear MOH again.
Recommendation: Contact Mitel product support for further information regarding this feature, reference DPAR # MN00376376.
Private Calling The Mitel 5000 does not support Private calling with XO SIP Trunking. Recommendation: Contact Mitel for further information regarding this up-coming feature.
CLID for forwarded PSTN to PSTN calls
In PSTN to PSTN Call forward, original PSTN caller number doesn’t get displayed. Forwarded call shows calling party # of the XO assigned number (214-635-58xx). Calling party number 214-635-58xx must be used or the call is refused by XO. Original caller ID may be propagated by the 5000 if trunk restriction is removed.
Session Timers Mitel 5000 Ver. 4 does not support session timers
Recommendation: Contact Mitel for further information regarding this feature.
Video Calls Mitel 5000 does not support video calls at this time.
Recommendation: Contact Mitel for further information regarding this feature.
PRACK Mitel 5000 Communications Platform does not support PRACK at this time.
Recommendation: Contact Mitel for further information regarding this feature.
Packetization rate The XO trunk only supports 20ms packetization rates whereas Mitel 5000 supports 10 to 60 ms rates.
Recommendation: Keep packetization rate of 20ms on Mitel 5000
10-4940-00106_2 XO Communications
4
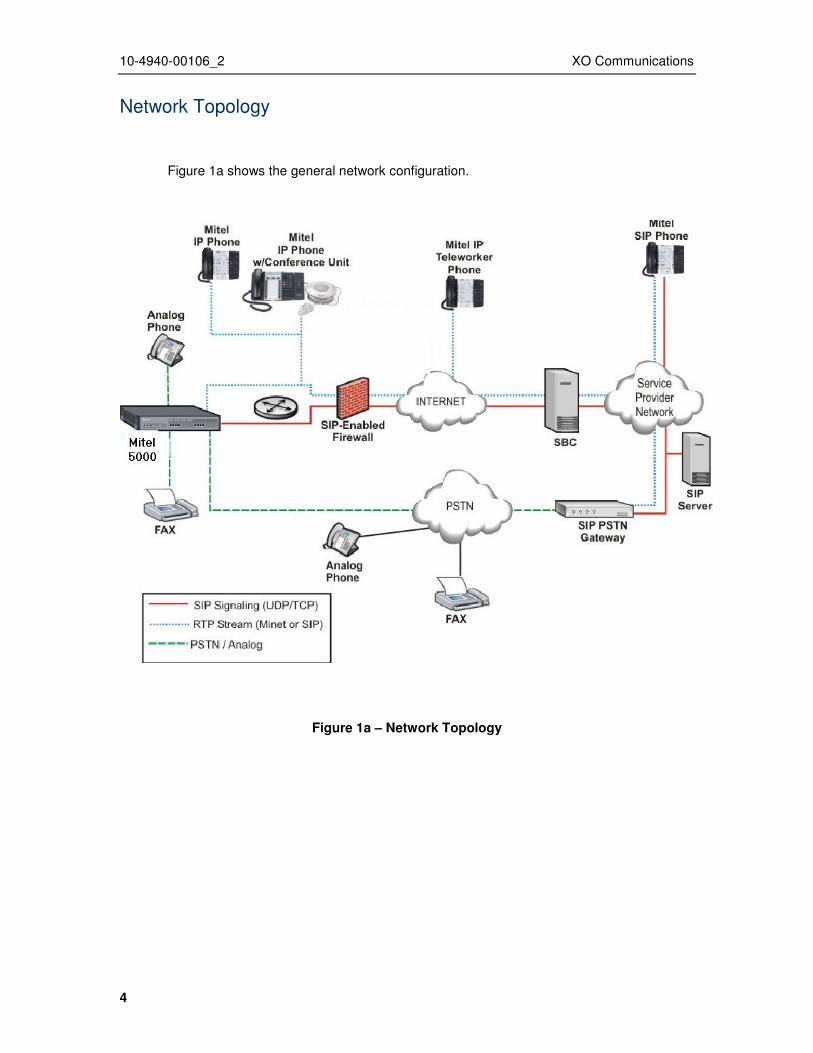
Network Topology
Figure 1a shows the general network configuration.
Figure 1a – Network Topology
10-4940-00106_2 XO Communications
5
Configuration Notes This section describes how the SIP Interop was configured. This provides a guideline on how the Mitel 5000 Communications Platform can be connected to the XO Communications service provider.
Disclaimer: Although Mitel has attempted to setup the interop testing facility as closely as possible to a customer premise environment, implementation setup could be different onsite. YOU MUST EXERCISE YOUR OWN DUE DILIGENCE IN REVIEWING, planning, implementing, and testing a customer configuration.
Mitel 5000 Communications Platform Configuration Notes
The following steps show how to program the Mitel 5000 Communications Platform to interconnect with the XO Communications Service Provider.
Network Requirements
• There must be adequate bandwidth to support the voice over IP. As a guide, the Ethernet bandwidth is approx 85 Kb/s per G.711 voice session and 29 Kb/s per G.729 voice session (assumes 20ms packetization). As an example, for 20 simultaneous SIP sessions, the Ethernet bandwidth consumption will be approx 1.7 Mb/s for G.711 and 0.6Mb/s for G.729. Almost all Enterprise LAN networks can support this level of traffic without any special engineering. Please refer to the 5200 Engineering guidelines for further information.
• For high quality voice, the network connectivity must support a voice-quality grade of service (packet loss <1%, jitter < 30ms, one-way delay < 80ms).
Assumptions for the Mitel 5000 Communications Platform Programming
The SIP signaling connection is configured to use UDP on Port 5060.
10-4940-00106_2 XO Communications
6
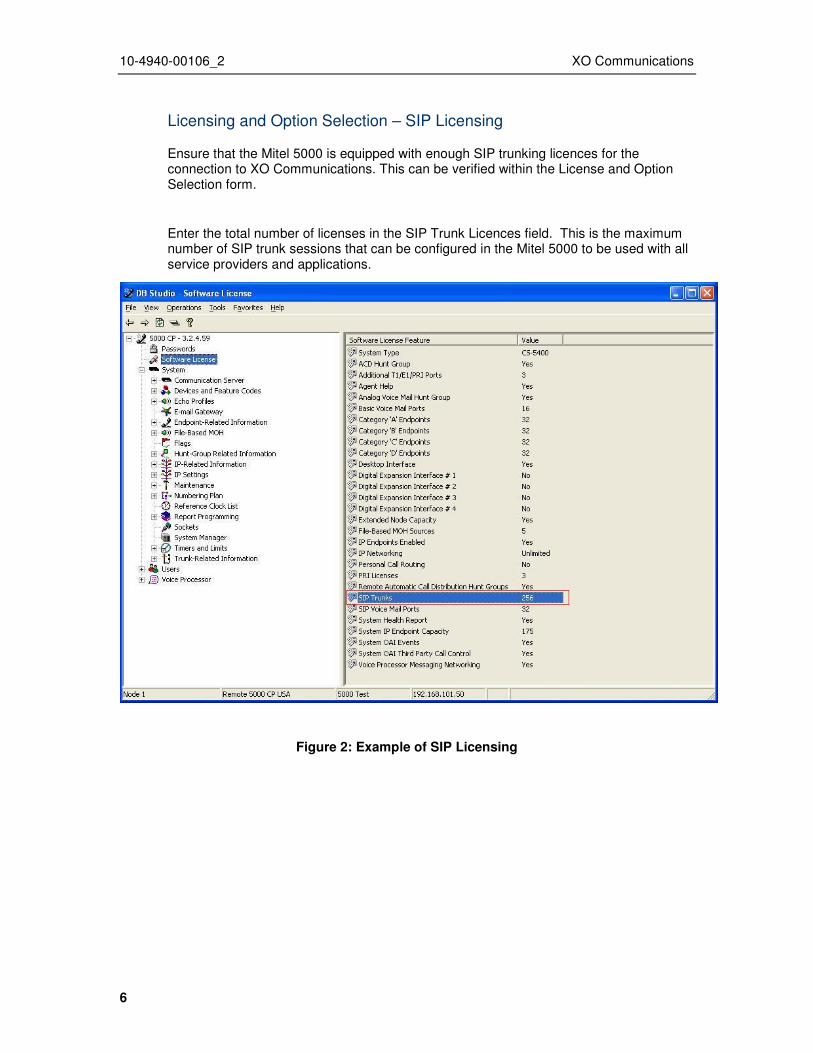
Licensing and Option Selection – SIP Licensing
Ensure that the Mitel 5000 is equipped with enough SIP trunking licences for the connection to XO Communications. This can be verified within the License and Option Selection form.
Enter the total number of licenses in the SIP Trunk Licences field. This is the maximum number of SIP trunk sessions that can be configured in the Mitel 5000 to be used with all service providers and applications.
Figure 2: Example of SIP Licensing
10-4940-00106_2 XO Communications
7
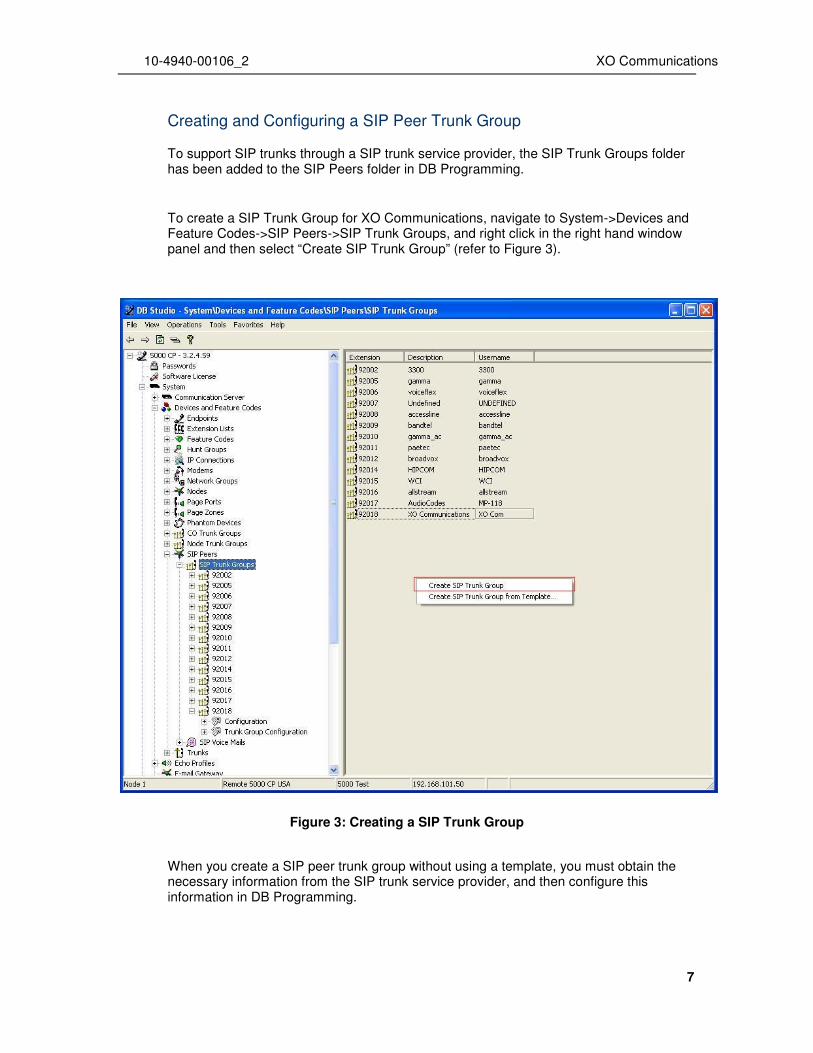
Creating and Configuring a SIP Peer Trunk Group
To support SIP trunks through a SIP trunk service provider, the SIP Trunk Groups folder has been added to the SIP Peers folder in DB Programming.
To create a SIP Trunk Group for XO Communications, navigate to System->Devices and Feature Codes->SIP Peers->SIP Trunk Groups, and right click in the right hand window panel and then select “Create SIP Trunk Group” (refer to Figure 3).
Figure 3: Creating a SIP Trunk Group
When you create a SIP peer trunk group without using a template, you must obtain the necessary information from the SIP trunk service provider, and then configure this information in DB Programming.
10-4940-00106_2 XO Communications
8
Programming the Configuration
• Registration: Since XO Communications’ SIP trunk does not require registration, the fields in this folder do not need to be configured. The Enable Registration option is set to No by default and the remaining fields appear with a red “X”.
• Authentication:
Username: This field applies only if the SIP peer requires registration or call authentication.
Password: This field applies only if the SIP peer requires registration or call authentication.
• Keep-Alive: The Keep-Alive option keeps refreshing the NAT bindings for any Firewall/NAT in the path. It also helps in determining whether the SIP peer is reachable or not. Enable Pinging and set the ping interval to 120 seconds.
• NAT Settings: Specifies the NAT address type. The default is “No NAT or SIP-Aware NAT” (for systems that are using a SIP-aware firewall). If you are not using a SIP-aware firewall, you must change the setting to “Non SIP-Aware NAT”. Leave the default values here.
• Alternate IP/FQDN List: Some providers use multiple IP addresses to send SIP messages to the Mitel 5000. You must add All IP addresses or FQDNs other than the primary IP/FQDN to the list for all calls to be successful. For this testing, 205.158.163.132 was entered.
• Route Sets: Double click. In the Route Sets menu, right click, add to route sets list. Enter the private side IP address of the MBG server, 192.168.101.205. Select the standard port # 5060 and UDP transport. Go back to the Configuration menu.
• IP Address: The IP address field in the “SIP Trunk Group” - “Configuration” menu indicates the IP address of the SIP peer trunk group. This IP address should be provided by the service provider (i.e. XO Communications). In this case, 205.158.163.138 was used.
• Port Number: Indicates the port that the system listens on the system for SIP peer messages. The range is 0–65535. Leave the default value of 5060.
• Fully Qualified Domain Name: Indicates the domain name of the SIP peer trunk group. In our test environment, the field was left blank.
• Call Configuration: Enter the call configuration number in Value field that you want to use with this trunk group.
Clicking Call Configuration takes you to the Call Configuration folder where you can add a new call configuration profile or configure the existing profile(s) (e.g. codecs for voice and faxing, DTMF settings, etc. See section Call Configurations). (System->IP-Related Information->Call Configurations-><call configuration number>).
• Camp-Ons Allowed: Leave this field at default value “No”.
• Operating State: Indicates the operating state of the SIP peer. If required, the status could be changed to “Out-of-Service – Maintenance”. Changing the state will not drop active calls (graceful take down).
• Maximum Number of Calls: Indicates the maximum number of concurrent calls that are permitted towards the SIP peer. This number is not configurable in here and depends on number of trunks added at System->Devices and Feature Codes->SIP Peers->SIP Trunk Groups-><SIP Trunk group #>->Trunk Group Configuration->Trunks (see next section for details)
10-4940-00106_2 XO Communications
9
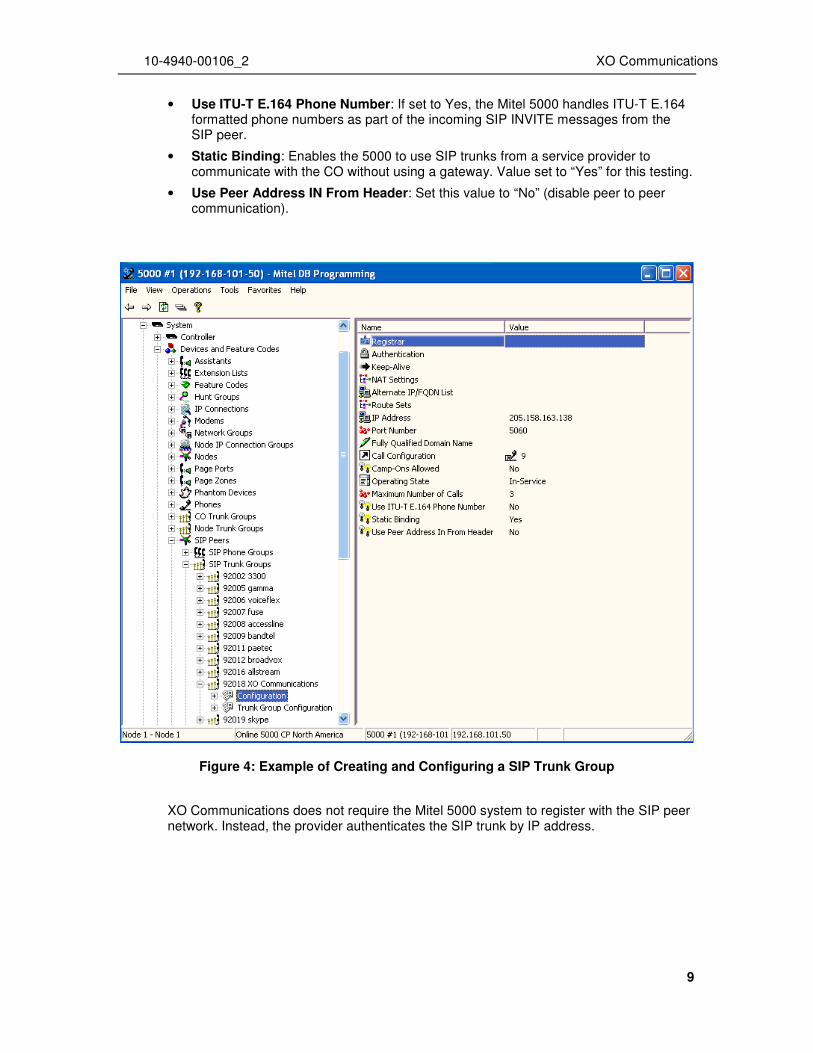
• Use ITU-T E.164 Phone Number: If set to Yes, the Mitel 5000 handles ITU-T E.164 formatted phone numbers as part of the incoming SIP INVITE messages from the SIP peer.
• Static Binding: Enables the 5000 to use SIP trunks from a service provider to communicate with the CO without using a gateway. Value set to “Yes” for this testing.
• Use Peer Address IN From Header: Set this value to “No” (disable peer to peer communication).
Figure 4: Example of Creating and Configuring a SIP Trunk Group
XO Communications does not require the Mitel 5000 system to register with the SIP peer network. Instead, the provider authenticates the SIP trunk by IP address.
10-4940-00106_2 XO Communications
10
Programming the Trunk Group Configuration properties
To program the Trunk Group Configuration properties, navigate to System->Devices and Feature Codes->SIP Peers->SIP Trunk Groups-><SIP Trunk group #>->Trunk Group Configuration:
As per Figure 5, there are several important parameters that need to be configured:
- Day and Night Ring-In Type – in our test environment we configured Single ring-in type with the value of 1009, where “1009” is the extension number where the incoming DID trunk calls are terminated.
- Calling Party Number – is the default calling party number presented by 5000 system to the provider’s SIP trunk. XO Communications should give this number to you. If this value is missing, the outbound calls will be rejected by XO Communications’ SIP trunk.
- Music On Hold – Recommended setting is “File-Based MOH”.
- Audio On Transfer to Ring – Recommended setting is “File-Based MOH”.
- Audio On Transfer to Hold – Recommended setting is “File-Based MOH”.
- Audio On Hold for Transfer Announcement – Recommended setting is “File-Based MOH”.
For the rest of the settings, refer to the DB Programming Help for trunk programming

10-4940-00106_2 XO Communications
11
Figure 5: Example of Trunk Group Configuration
10-4940-00106_2 XO Communications
12
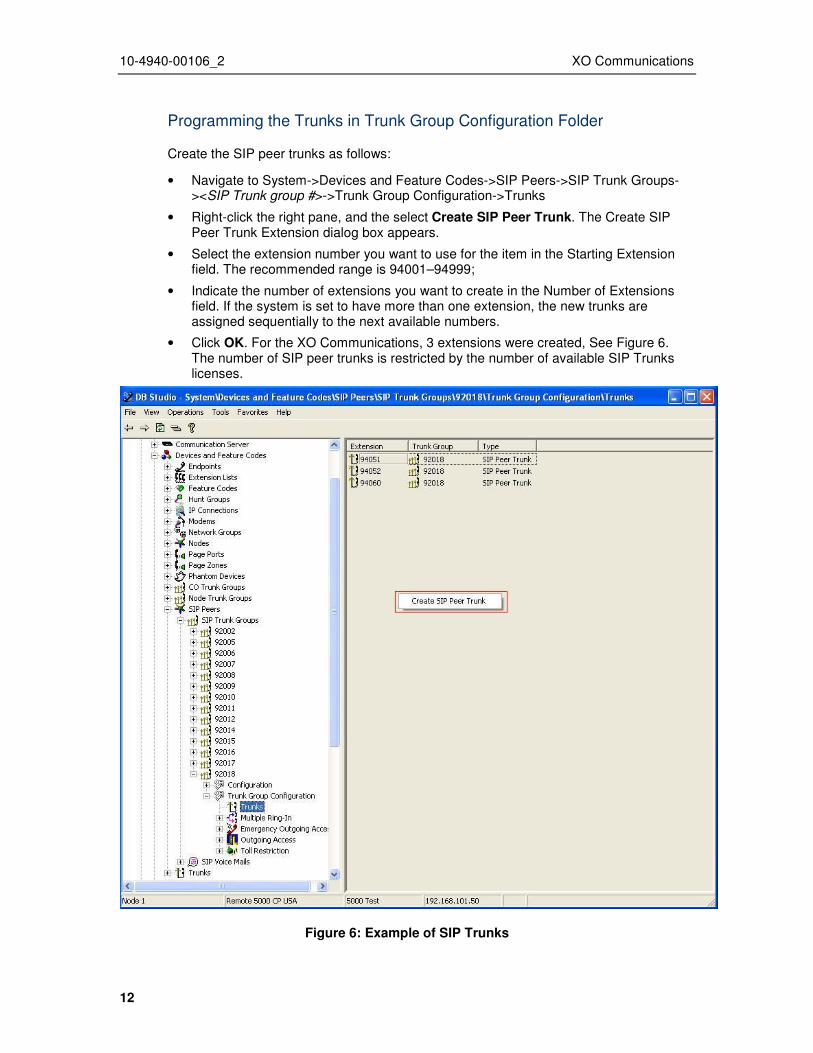
Programming the Trunks in Trunk Group Configuration Folder
Create the SIP peer trunks as follows:
• Navigate to System->Devices and Feature Codes->SIP Peers->SIP Trunk Groups-><SIP Trunk group #>->Trunk Group Configuration->Trunks
• Right-click the right pane, and the select Create SIP Peer Trunk. The Create SIP Peer Trunk Extension dialog box appears.
• Select the extension number you want to use for the item in the Starting Extension field. The recommended range is 94001–94999;
• Indicate the number of extensions you want to create in the Number of Extensions field. If the system is set to have more than one extension, the new trunks are assigned sequentially to the next available numbers.
• Click OK. For the XO Communications, 3 extensions were created, See Figure 6. The number of SIP peer trunks is restricted by the number of available SIP Trunks licenses.
Figure 6: Example of SIP Trunks
10-4940-00106_2 XO Communications
13
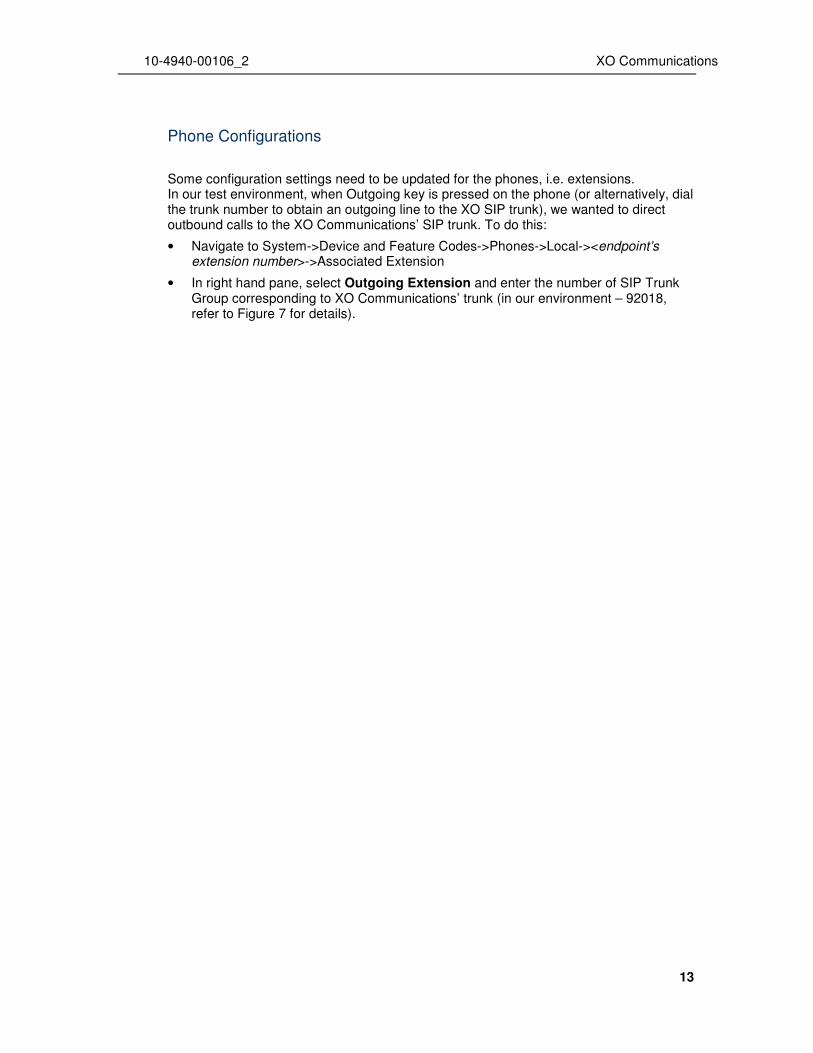
Phone Configurations
Some configuration settings need to be updated for the phones, i.e. extensions. In our test environment, when Outgoing key is pressed on the phone (or alternatively, dial the trunk number to obtain an outgoing line to the XO SIP trunk), we wanted to direct outbound calls to the XO Communications’ SIP trunk. To do this:
• Navigate to System->Device and Feature Codes->Phones->Local-><endpoint’s extension number>->Associated Extension
• In right hand pane, select Outgoing Extension and enter the number of SIP Trunk Group corresponding to XO Communications’ trunk (in our environment – 92018, refer to Figure 7 for details).
10-4940-00106_2 XO Communications
14
Figure 7: Example of outgoing extension for the Endpoint
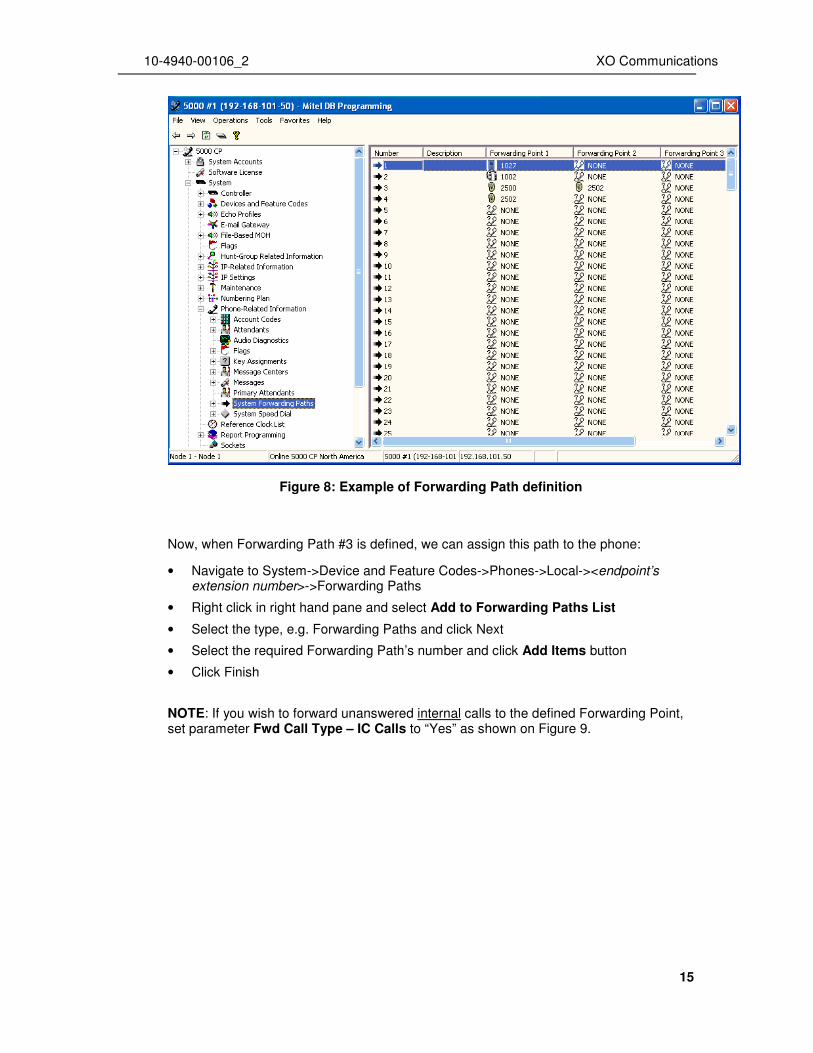
When configuring call forwarding to a voicemail box, it is not enough to create the mailbox and assign it to the endpoint. You also have to define a Forwarding Path and assigned it to the endpoint. To do this:
• Navigate to System-> Phone-Related Information->System Forwarding Paths
• Define at least Forwarding Point 1 for the selected path. In the example in Figure 8 we defined extension 2502 as the forwarding point for path #3. Extension 2502 is a NuPoint’s voicemail pilot number.
10-4940-00106_2 XO Communications
15
Figure 8: Example of Forwarding Path definition
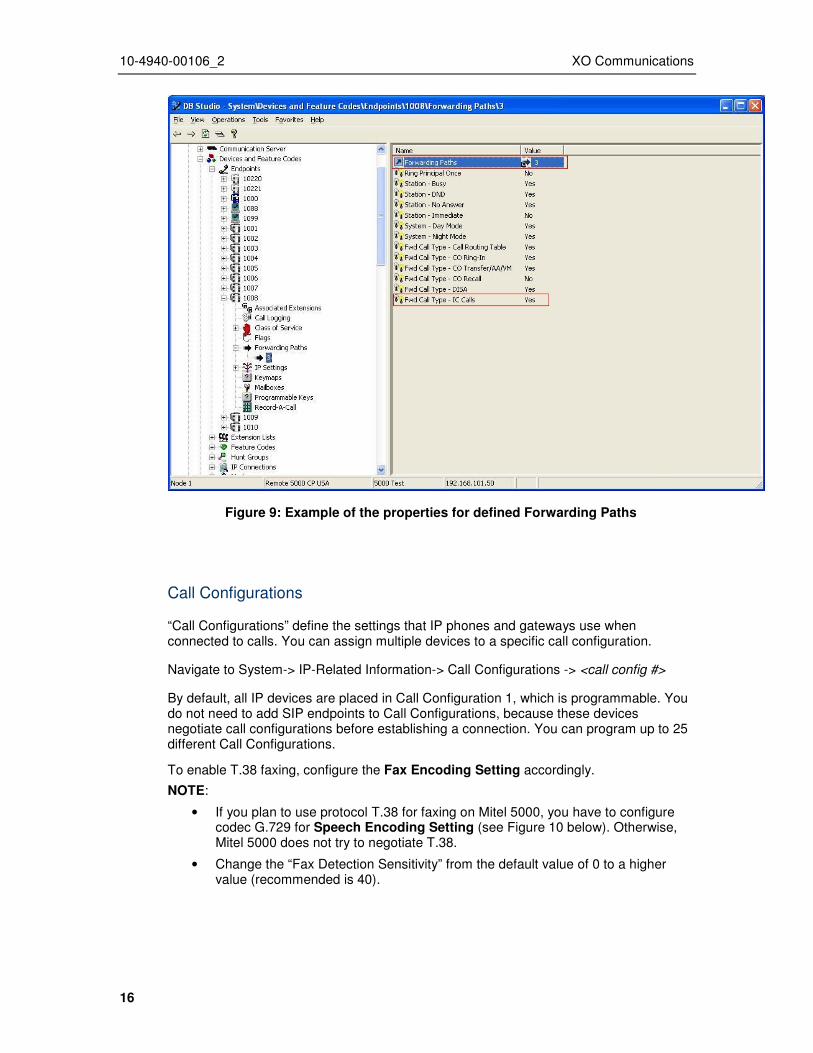
Now, when Forwarding Path #3 is defined, we can assign this path to the phone:
• Navigate to System->Device and Feature Codes->Phones->Local-><endpoint’s extension number>->Forwarding Paths
• Right click in right hand pane and select Add to Forwarding Paths List
• Select the type, e.g. Forwarding Paths and click Next
• Select the required Forwarding Path’s number and click Add Items button
• Click Finish
NOTE: If you wish to forward unanswered internal calls to the defined Forwarding Point, set parameter Fwd Call Type – IC Calls to “Yes” as shown on Figure 9.
10-4940-00106_2 XO Communications
16
Figure 9: Example of the properties for defined Forwarding Paths
Call Configurations
“Call Configurations” define the settings that IP phones and gateways use when connected to calls. You can assign multiple devices to a specific call configuration.
Navigate to System-> IP-Related Information-> Call Configurations -> <call config #>
By default, all IP devices are placed in Call Configuration 1, which is programmable. You do not need to add SIP endpoints to Call Configurations, because these devices negotiate call configurations before establishing a connection. You can program up to 25 different Call Configurations.
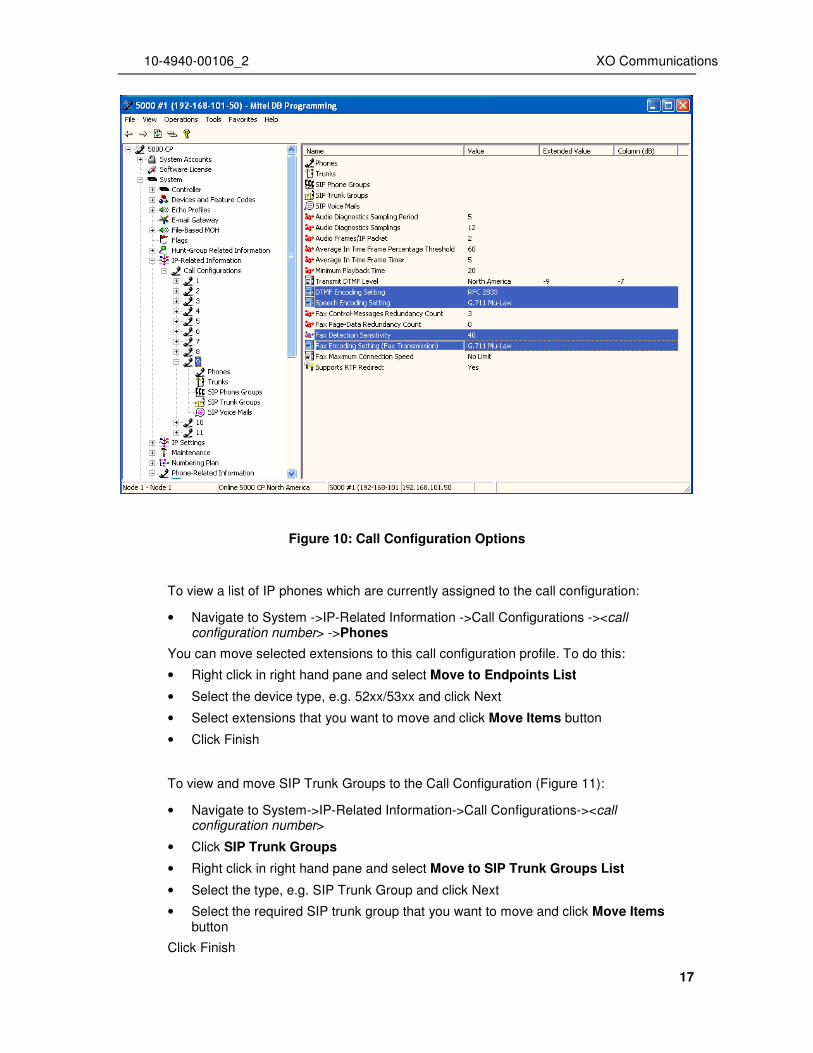
To enable T.38 faxing, configure the Fax Encoding Setting accordingly.
NOTE:
• If you plan to use protocol T.38 for faxing on Mitel 5000, you have to configure codec G.729 for Speech Encoding Setting (see Figure 10 below). Otherwise, Mitel 5000 does not try to negotiate T.38.
• Change the “Fax Detection Sensitivity” from the default value of 0 to a higher value (recommended is 40).
10-4940-00106_2 XO Communications
17
Figure 10: Call Configuration Options
To view a list of IP phones which are currently assigned to the call configuration:
• Navigate to System ->IP-Related Information ->Call Configurations -><call configuration number> ->Phones
You can move selected extensions to this call configuration profile. To do this:
• Right click in right hand pane and select Move to Endpoints List
• Select the device type, e.g. 52xx/53xx and click Next
• Select extensions that you want to move and click Move Items button
• Click Finish
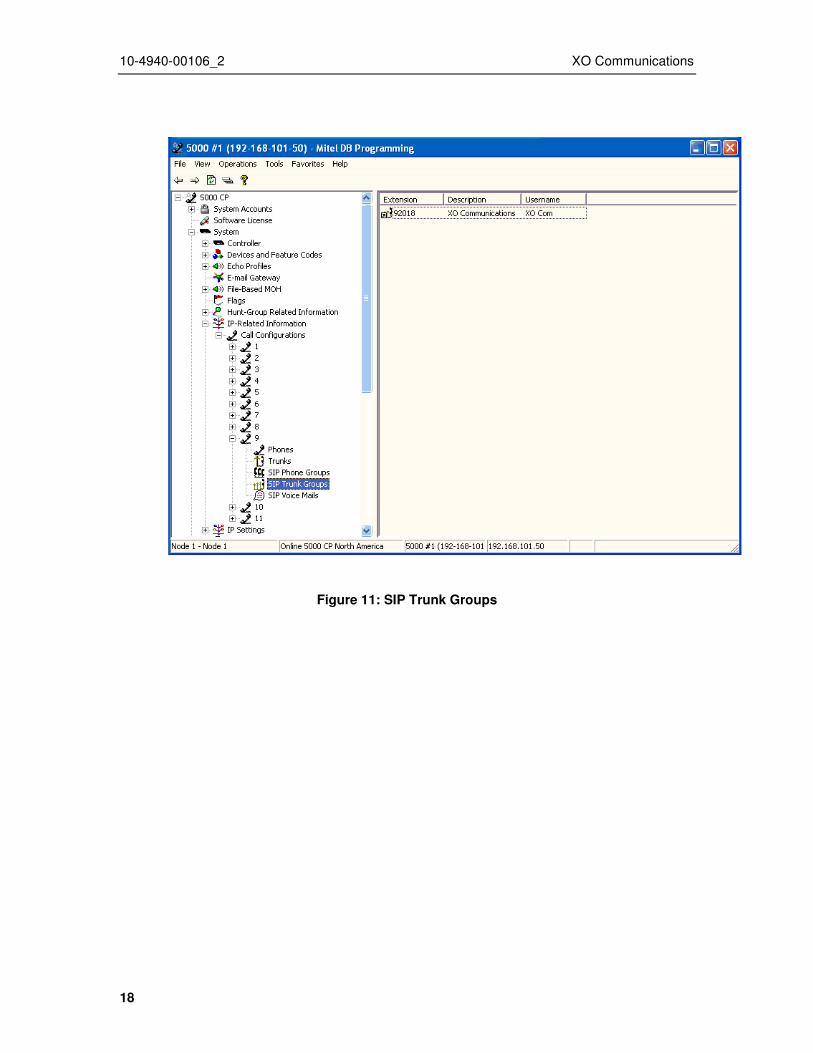
To view and move SIP Trunk Groups to the Call Configuration (Figure 11):
• Navigate to System->IP-Related Information->Call Configurations-><call configuration number>
• Click SIP Trunk Groups
• Right click in right hand pane and select Move to SIP Trunk Groups List
• Select the type, e.g. SIP Trunk Group and click Next
• Select the required SIP trunk group that you want to move and click Move Items button
Click Finish
10-4940-00106_2 XO Communications
18
Figure 11: SIP Trunk Groups
10-4940-00106_2 XO Communications
19
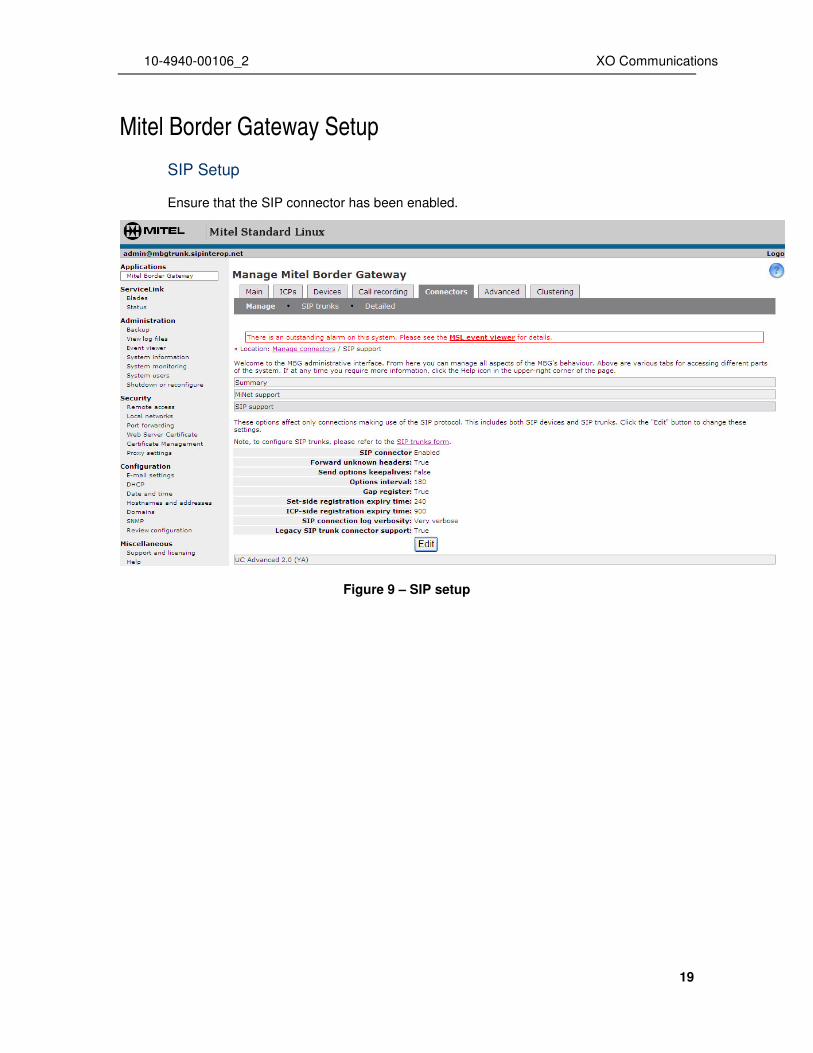
Mitel Border Gateway Setup
SIP Setup
Ensure that the SIP connector has been enabled.
Figure 9 – SIP setup
10-4940-00106_2 XO Communications
20
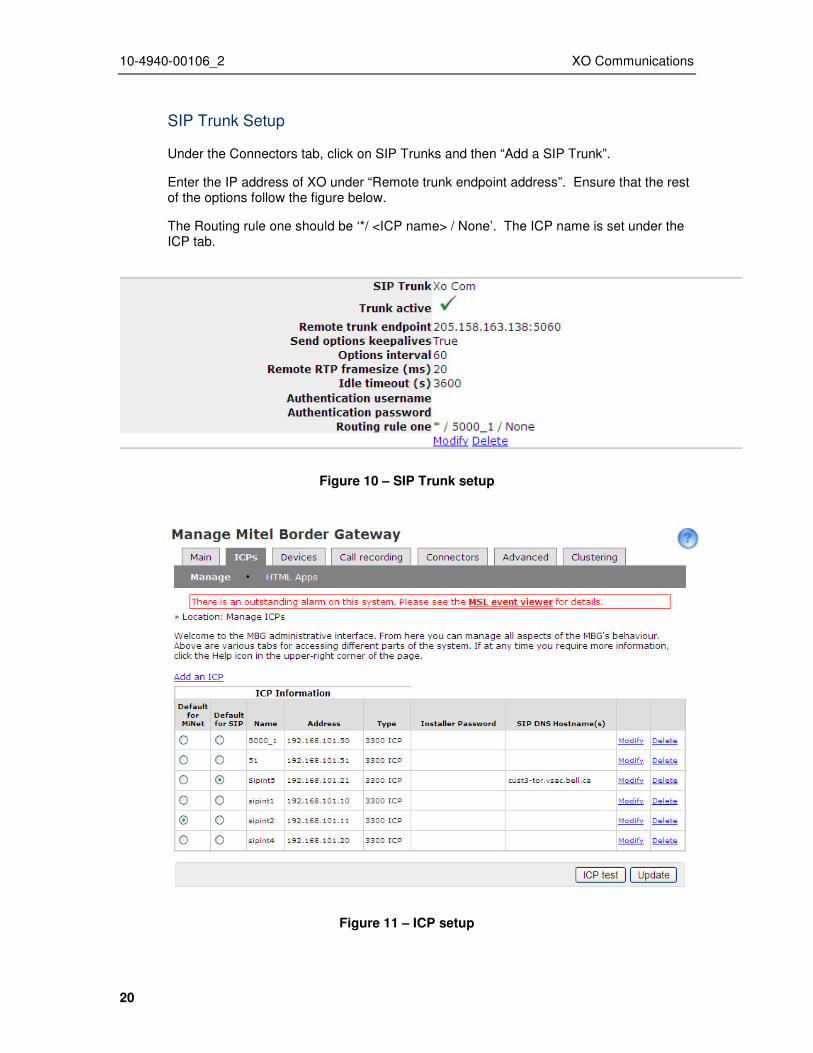
SIP Trunk Setup
Under the Connectors tab, click on SIP Trunks and then “Add a SIP Trunk”.
Enter the IP address of XO under “Remote trunk endpoint address”. Ensure that the rest of the options follow the figure below.
The Routing rule one should be ‘*/ <ICP name> / None’. The ICP name is set under the ICP tab.
Figure 10 – SIP Trunk setup
Figure 11 – ICP setup

10-4940-00106_2 XO Communications
21