mm112 maintenance work orders - cottonwood...
TRANSCRIPT

This product or document is protected by copyright, trademark and other intellectual property laws. Use of the product or document is subject to the terms and conditions of an authorized Yardi Systems, Inc. software license, non-disclosure agreement, confidentiality, or other agreement including, but not limited to, restrictions on its use, copying, disclosure, distribution and decompilation. No part of this product or document may be disclosed or reproduced in any form by any means without the prior written authorization of Yardi Systems, Inc. This product or document contains proprietary information about software processes, algorithms, and data models which are Confidential Information, and constitute trade secrets, and which are intended for utilization solely in connection with Yardi software licensees' use of Yardi software and for no other purpose.
MM112 - VOYAGER WORK ORDERS
About Work Orders Work Orders in Yardi Voyager are used to track maintenance work done on your properties. Using the Work Order Dashboard and the associated functions will let you process service requests from residents, perform routine scheduled maintenance, create work orders for your technicians, manage inventory, interface with your financials, and generate reports to analyze your costs and efficiency.
Work Flow There is no standard Workflow for Work Orders, so you can choose the extent of how your company implements Maintenance Work Orders. In general, there are four steps:
1. Creation: A Work Order can be generated from a Service Request, a Recurring
Work Order, a technician on a Mobile Maintenance, or a Unit Make Ready. At this step, the Work Order usually has a Status of ‘Call’.
2. Dispatch: A Work Order is assigned to a technician. This Work Order can be transmitted in various ways, including via email or Mobile Maintenance.
3. Processing: At this step, Work Orders assigned to technicians are updated with details like labor hours and materials used, and may move through different Statuses. Commonly, Work Orders will proceed through the “Scheduled”, “In Progress”, and “Work Completed” Status.
4. Paperwork: At this step, vendor payables and resident charges are created from the finished Work Order, units are marked as Ready, and analytic reporting is performed.

Yardi Advanced Solutions Conference MM112 - Voyager Work Orders
Page 2 of 16
Work Order Data Entry
Work Order > Add Work Order
Status – Defaults to Call when entering a Work Order. This indicates the current progress on the Work Order.
Property – The Property where the work will take place. Unit – The Unit where the work will take place. Bill To – The Tenant that will be charged for this work. Vendor – The Vendor performing the work. Asset – If this work is to be done on a Unit Asset, choose the Unit Asset here. Template – Templates are used to pre-fill certain fields on the Work Order
screen. Related WO – Enter a Work Order number here and the button will open it in a
separate window. Description – A brief description of the Work Order. This will appear on many
reports and dashboard views. Priority – A user-defined Lookup List that is used in many reports and functions. Category – A user-defined Lookup List that is used in many reports and
functions. Subcategory – A user-defined Lookup List that is based on and refines the
Category selection. Caller Name, Phone, and Email – This fills in from the current Tenant’s
information for the selected unit. It can be overridden by the user. Resolution – A user-defined Lookup List indicating the final resolution of the
Work Order. Access/Entry Notes – A field giving the onsite technician any special instructions
on accessing the unit. Problem Description – A more detailed description than the Description field.

Yardi Advanced Solutions Conference MM112 - Voyager Work Orders
Page 3 of 16
Buttons Save – Saves the current Work Order New – Clears the screen for entry of a new Work Order Print – Runs the Work Order Pay Detail report to screen for this Work Order Help – Brings up online Help Save/Print – A combination button to Save the Work Order and immediately run
the Pay Detail report. Get Defaults – Only available before a Work Order is saved, this will retrieve any
fields (Vendor, Caller Name, Phone, Email) that have default settings.
Other Info tab
General Information OK to Enter? – Indicate whether the tenant has given permission to enter the
unit, if applicable or required. Authorized by – This works in conjunction with the Not to Exceed box. If
authorized by a person on this list, the Work Order may exceed the amount. Not to Exceed – A hard cap on the Pay amount of the Work Order. This is a per-
property default. User-defined fields – Seven user-defined fields for client use.
Billing Information Batch Name – Used in the posting process to override the default batch name Invoice Date and Number – Used to pre-fill the Invoice Date and Number when
posting.
Status History Origin – A two-letter code for the method of data entry: WO for this form, SR for
Service Request, MR for Make Ready. Status, Date, and Time – Each time the Status is changed, the date and time is
recorded. Only one date and time is recorded for each Status change.

Yardi Advanced Solutions Conference MM112 - Voyager Work Orders
Page 4 of 16
Approval Information Required approvers and their date and type of action appear here.
Full Description – A space to enter more notes, also populated by using the
Complete button from the Residential Dashboard. A checkbox allows this to appear on the printed Work Order.
Technician Notes – A space to enter more notes, also populated by using the Reason Incomplete button from the Residential Dashboard or the technician using Mobile Maintenance
Labor Tab Data entry for tracking Labor is done on the Labor tab. The fields are explained below:
Employee – Use the button to open a Pick List to assign an Employee. Skill – Once an Employee is selected, use the button to display a Pick List and
choose a relevant Skill.
Schedule section Start Time and Date – Enter the scheduled start date and time here. Finish Time and Date – Enter the scheduled finish date and time here. When
Saved, the system will calculate the scheduled Hours only if the Hours field is blank.
Actual section Start Time and Date – Enter the actual start date and time here. Finish Time and Date – Enter the actual finish date and time here. When Saved,
the system will calculate the actual Hours only if the Hours field is blank. Hours – Calculated from the Schedule and Actual sections above only if the field
is blank. Any Hours entered by hand will override system calculations. Del – Check this box to delete the detail line. More Details – Add three more detail lines.
Material Tab Data entry for tracking Materials (Inventory and other items) is done on the Materials tab. Quantity – Enter the quantity of
material used. Stock/Item Type – Use the button to
open a Pick List to choose a Stock item or Item Type.

Yardi Advanced Solutions Conference MM112 - Voyager Work Orders
Page 5 of 16
Inventory Location – When using ICFA, use this button to open a Pick List to choose and Inventory Location.
Description – When using Stock items, leave this field blank so that the Stock Description will be populated. When not using Stock, enter a Description for the item used.
Del – Check this box to delete the detail line. More Details – Add three more detail lines.
Pay/Charge Tab The Pay/Charge tab is used to create GL transactions. Each line of detail on the Labor or Material tab will produce one line of detail here so that users can enter financial information.
L/M – Indicates whether this detail line comes from the Labor or Material tab. Empl/Item – The Employee or Stock code, if applicable. Description – The Stock Description or Employee name. Quantity – The Material Quantity for Stock items or the Hours for Labor items. Unit Pay - The Pay amount per unit. Pay Total – Unit Pay times Quantity; this will be the total for this detail line when
posted to a Payable. Pay Account – When posted to a Payable, this account will be used. Unit Chg – The Charge amount per unit. Charge Total – Unit Chg times Quantity; this will be the total for this detail line
when posted to a Charge. Chg Code – When posted to a Charge, this Charge Code will be used. Pay? – When checked, this line will create a Payable detail during the Posting
process. Checking this box does not automatically create a Payable! Chg? – When checked, this line will create a Charge detail during the Posting
process. Checking this box does not automatically create a Charge! Tax? – When checked, this line will be included in the Tax calculation. Comm? - If checked, this line will be included in the Commission calculation.

Yardi Advanced Solutions Conference MM112 - Voyager Work Orders
Page 6 of 16
Totals Commission - Choose Percent or Amount from the dropdown box and enter the
percentage or amount in the box. Labor and Material Pay and Charge – The totals for all Labor and Material line
items by Pay and Charge amounts. Commission Pay – The calculated Commission from all detail lines marked as
Commission. This is calculated by hand using the ‘Calc Tax + Commission’ button or automatically when Posting.
Tax + Commission Charge – The total calculated Tax and Commission from all detail lines marked as Tax. This is calculated by hand using the ‘Calc Tax + Commission’ button or automatically when Posting.
Calc Tax + Commission – Calculate the Tax and Commission amounts before Posting.
Total Pay and Total Charge – The Total of all Payables and Charges that will be created during Posting.
Posted When a Work Order has been posted, this area will be populated with links to the Payable and Charge control numbers.
Until a Work Order is posted, it has no impact on financial data. Posting a Work Order will gather the information necessary to create Payables and Charges from the Work Order and create batches for AR and AP processing. Creating a Payable or Charge from a Work Order requires the same information as creating a Payable or Charge by hand.
Payables A Payable must have a Vendor, and each detail line must have an Amount and Account. The Vendor for a Work Order is in the top section, and the Pay/Charge tab holds the rest of the information. All detail lines that should be posted to a payable must have a Pay Amount, Pay Account, and must also have the Pay box checked.
Charges A Charge must have a Property, Tenant, Charge Amount, and Charge Code. The Property and Tenant for a Work Order is in the top section, and the Pay/Charge tab holds the rest of the information. All detail lines that should be posted to a charge must have a Charge Amount, Charge Code, and must also have the Charge box checked.
Work Order> Post WO Payables and Work Order>Post WO Charges Each filter is the same, but will generate Payables and Charges respectively. Use as many or as few filter criteria as you want. Use the Report Only option to see what Work Orders meet your criteria before posting.

Yardi Advanced Solutions Conference MM112 - Voyager Work Orders
Page 7 of 16
Creating Work Orders
Service Requests The Service Request link is an alternate method of entering Work Orders. This was designed for call centers or Property Managers who do not enter Work Order details. There are four screens that step a user through selecting a Property and Unit, reviewing open Work Orders, and creating a new Work Order.
Service Request Page 1 is a filter for finding resident records. Once you have located the correct tenant, press Next.
The second page of the Service Request screen shows more information about the Resident, including 12 months of Work Order history. If this is a new request, press New WO.

Yardi Advanced Solutions Conference MM112 - Voyager Work Orders
Page 8 of 16
Since most of the Resident information is already determined, you only have to enter details about this Service Request. Fill in any desired fields and press Save.
The last page of the Service Request process allows you to Print the resulting Work Order, drill down to it to enter more detail, or start a new request. The Same Caller button will load Page 3 again to enter another request from the same Resident. The New Call button will load Page 1 to search for another Resident.
Work Order Templates Work Order templates are a way to make Work Order data entry more efficient and more consistent. Templates are intended to be used when a task occurs more than once but not on a scheduled basis. You will often already have a list of common maintenance tasks that are always completed in the same way which will translate into a Template list.
Work Order > Add/Review WO Template
Template Code: A unique identifier for this Template
Property: It is possible to restrict Templates to single Properties. There is no support for Property Lists yet!
The Labor Tab Enter an Employee, Skill, and Estimated Hours. Templates cannot supply the Scheduled or Actual Start/Finish times, only the Work Order.

Yardi Advanced Solutions Conference MM112 - Voyager Work Orders
Page 9 of 16
The Materials tab Enter Materials to be used on the Work Order. This is the same tab as on the Work Order screen.
The Pay/Charge tab Each line entered on the Labor or Materials tabs will create a line on this tab. Enter the Unit Pay, Unit Charge, Pay Account, Charge Code, and select the applicable checkboxes. This is the same tab as on the Work Order screen.
Using Templates To use a Work Order Template, create a new Work Order. Fill in the Property, then click on the Template link. Choose a Template from the list, and then press Go. The Work Order is populated with the information from the Template. You may then change or add details to the Work Order as normal.
Templates can also be used on Service Requests. Once you have chosen to create a New WO, choose a Template and then press Go as above.
Yardi Advanced Solutions Conference MM112 - Voyager Work Orders
Page 10 of 16
When to use Templates Templates are intended to be used for tasks that happen often, but not on a schedule. For scheduled tasks, use Recurring Work Orders.
Creative uses of Templates It is not possible to assign Employees from a Service Request. However, if you have a template that has no other details than an Employee in the Labor section; you can create a Service Request, load that Template, and then enter more details. The Work order will be created, and assigned to that Employee.
It is possible to use more than one Template on a Work Order. After loading a Template, just select another and press Go again. You can use this as a “Standard Tenant Charge” or “Management Commission” feature.
Recurring Work Orders Recurring Work Orders are intended for Preventive Maintenance or other tasks that happen on a schedule. They are set up with rules for posting, and then create Work Orders when posted. Recurring Work Orders also form the basis for Make Ready tasks.
Work Order > Add Recurring Work Order All of the fields on the Recurring Work Order screen will be familiar from the Work Order screen. Like Templates, populate these fields with the data you want posted to Work Orders.
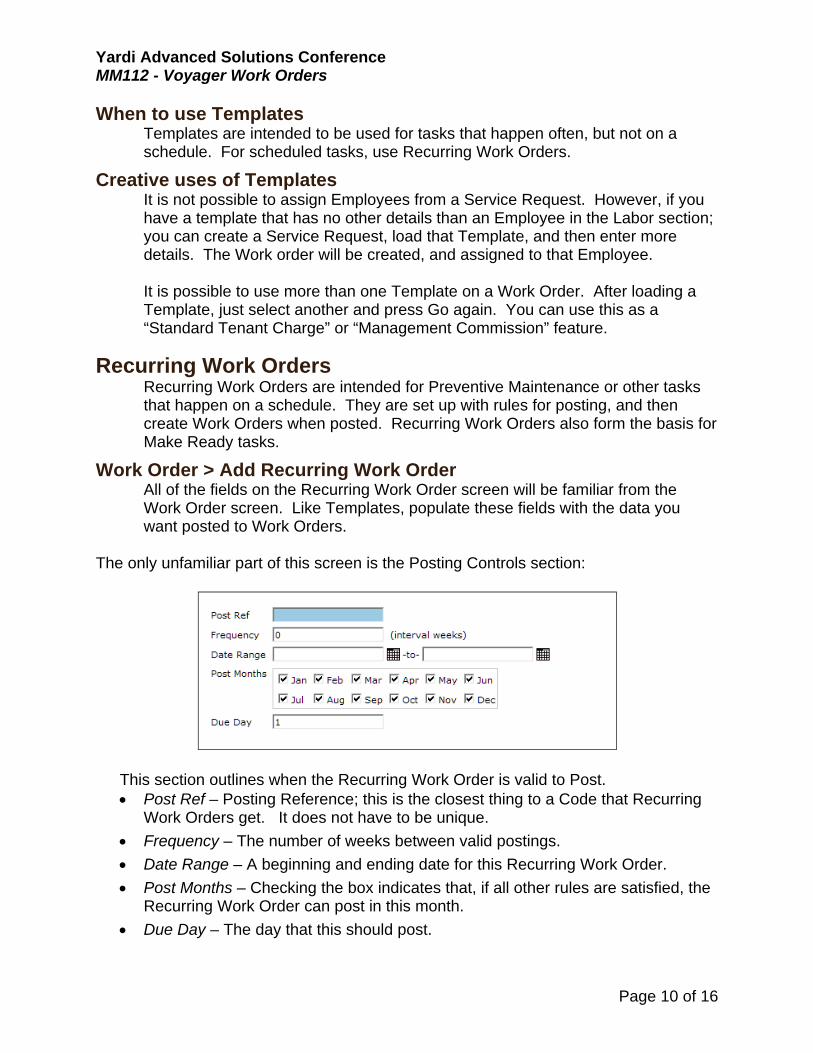
The only unfamiliar part of this screen is the Posting Controls section:
This section outlines when the Recurring Work Order is valid to Post. Post Ref – Posting Reference; this is the closest thing to a Code that Recurring
Work Orders get. It does not have to be unique.
Frequency – The number of weeks between valid postings.
Date Range – A beginning and ending date for this Recurring Work Order.
Post Months – Checking the box indicates that, if all other rules are satisfied, the Recurring Work Order can post in this month.
Due Day – The day that this should post.

Yardi Advanced Solutions Conference MM112 - Voyager Work Orders
Page 11 of 16
There are two “modes” for Recurring Work Orders, and both depend on the Frequency and Due Day.
Using Due Day: Set the Frequency to zero, and then set the Due Day to the day
of the month when the Recurring Work Order should post. This method will post on that day for any selected month.
Using Frequency: Set the Frequency to any number. The Recurring Work Order will post the first time that the Post function is run with valid dates, and then will become valid to post (Frequency) weeks again later.
Using Recurring Work Orders
Work Order > Post Recurring WO This is the usual Posting method. Fill in the filter criteria, run the Report Only, and then go back to tweak your Filter settings, or Post. This method will post the Recurring Work Orders using the options you entered, to only the Properties and Units you entered on the Recurring Work Order.
Work Order > Post Recurring WO – All Units This option is dangerous. Instead of posting only what you’ve entered on the Recurring Work Order screen, this function will create a Work Order for every unit on the specified Properties.
When to use RWOs You can use RWOs for Preventive Maintenance, contracts with vendors that create Work Orders, and for Make Ready setup.
Creative Uses of RWOs Using the Post Recurring WO – All Units function, you can easily create Work Orders for all Units on a Property. Common uses for this function are to create Work Orders for pest control services, common inspections, and other tasks that need to be performed and documented on all units at a given Property.

Yardi Advanced Solutions Conference MM112 - Voyager Work Orders
Page 12 of 16
Make Ready Make Ready Workflow begins when a Resident is placed on Notice. A Make Ready link will appear under Data when a Resident is placed on Notice:
Click this link to be taken to a screen where you can choose Make Ready tasks to perform. Click the Select box and enter a Start Date for each Make Ready task that should have a Work Order created, then press Submit:
A Work Order is created using the Recurring Work Order details for each task. The Problem Description will indicate which Recurring Work Order this used. These Work Orders are normal in all other respects; you can add or remove

Yardi Advanced Solutions Conference MM112 - Voyager Work Orders
Page 13 of 16
detail line items, track them through the normal Work Order workflow, and they can be posted into Payables.
Monitoring Make Ready Tasks The Residential Dashboard and Maintenance Dashboard can view units moving through Make Ready in a grid format that shows the tasks being performed and a completion date, either estimated based on your Make Ready setup or taken from Completed Work Orders.
Clicking on the Make Ready Details button for a given Unit brings up the following screen, allowing Property Managers or Maintenance Supervisors to see what tasks have been completed and mark other tasks as Complete:
Clicking on the Make Unit Ready button will set the “Rent Ready” checkbox on the Unit screen so that it can enter the Prospect Workflow as an available Unit.

Yardi Advanced Solutions Conference MM112 - Voyager Work Orders
Page 14 of 16
Dispatching Work Orders WO Dispatch Board
The Work Order Dispatch Board is designed to allow someone in a supervisory role to see what Work Orders are open, place emphasis on Work Orders that are not meeting performance goals, and Notify key personnel of those Work Orders. Each user can configure their own view of the Dispatch Board.
In addition to viewing Work Orders, the Dispatch Board also allows assignment, scheduling, and Status updates.
The Dispatch Board can also be set to automatically refresh on a time interval.
Mobile Maintenance
Mobile Maintenance is now available on the Android, BlackBerry, and iOS platforms. Technicians in the field can log in using the app and see Unassigned Work Orders, Work Orders assigned to them, and Completed Work Orders. Technicians can log time and materials to Work Orders, add their notes, attach photos and voice notes, and mark Work Orders as Complete from their device.

Yardi Advanced Solutions Conference MM112 - Voyager Work Orders
Page 15 of 16
For detailed documentation on Mobile Maintenance setup and use, see the Maintenance Management User’s Guide for Maintenance 10.1 on Client Central.
Processing Work Orders Bulk Processing of Work Order Labor and Material Details
Entering Work Order Labor and Material details can be a cumbersome process if the user has to Review each Work Order, enter those details, and Save. This inefficiency is compounded with a large number of Work Orders to process, and does not reflect the common real-world situation of a stack of Work Orders from a single Employee turned in from the previous days’ work. Two functions exist to aid processing of this type.
Employee WO Time This function allows a user to enter labor details for a large number of Work Orders at once. This screen is configurable to show or hide fields such as Skill, Time In/Time Out, Hours, Technician Notes, and the Statuses available in the dropdown list.

Yardi Advanced Solutions Conference MM112 - Voyager Work Orders
Page 16 of 16
Inventory Check Out This function allows a user to enter Material details for a large number of Work Orders at once.
Paperwork and Reporting It is very easy for Property Managers and Maintenance Supervisors to see open Work Orders for their Properties. Users with access to the Residential Dashboard can use the Pending Make Ready and Pending Work Requests links to monitor Work Order activity. The Work Order Dashboard provides more control over what Work Orders are displayed, allowing a user to filter for exactly what they need to see.
Work Order Analytics, available by default on the Work Order and Purchase Order Dashboards (but can be added to any menu) offer a suite of quick, exportable reports to monitor Cost, Trending, and Activity for Work Orders. In addition, there are numerous reports on the Reports menu that offer unique and customizable views of your data.