mobile device manual for 3g dvrs - searsdownload.sears.com/misc/spin_prod_744131812.pdf · mobile...
TRANSCRIPT

1
Mobile Device Manual for 3G DVRs
The 3G DVR can be monitored with APPS for supported mobile device operating systems. Please refer to the table below for your specific mobile device application. Please read the DVR owner’s manual on internet setup and computer connection viewing prior to establishing a connection with a smartphone or mobile device. The following operating systems have been tested; additional systems may be supported. Users can also connect directly without installing an application by using their mobile device web browser.
Operating
System
Web Browser Viewing Only
(See page 27)
Mobile Device Brand
Mobile Device Requirements
Software APP (the zip file contains the
software needed)
(See page 2) Opera Firefox
NOKIA N9X NOKIA N73 Sony Ericsson K618i K750i S700 W810i
Mobile service must support 3G/GPRS Mobile phone must support JAVA CLDC 1.0/MIDP 2.0 environment
DVRH264.jar (JAVA)
Download from Security Labs: “DVRH264.jar”
v5.0 or above (See page 8)
Internet Explorer Opera Firefox
HTC Samsung i908 HP iPAQ 612C ASUS Dopod 585 Dopod CHT9100 Dell X50V
Mobile service must support 3G/GPRS
H.264 Pocket.CAB Jrview_23.CAB
Download from Security Labs: “3GDVRWindowsMobile.zip”
(See page 13)
Default Browser Android OS Mobile service must
support 3G/GPRS Free program at Android Marketplace
(See page 19)
Opera Firefox 9000 series Mobile service must
support 3G/GPRS
dvrh264.alx dvrh264.cod
Download from Security Labs: “3GDVRBlackberryMobile.zip”
(See page 24)
Safari
Apple iPhone Apple iPad
Mobile service must support 3G/GPRS
SCDVR - free program at the Apple App Store
TEXTING (See page 27)
All SMS & MMS phones
All SMS & MMS phones
Service & device must support SMS or MMS
Insert appropriate address in “email notification” in DVR setup
Confirm that the network function of the DVR has been activated before attempting any mobile connection: Main menu Network Setup HTTP Setup Check the “Enable HTTP Server”
Check to see if a connection can be established from a computer to the DVR before attempting a mobile device connection. Refer to the DVR owner’s manual to correct errors before you proceed.
NOTE: Changes in hardware and operating systems by phone manufacturers, or a change in service from your telecom provider may cause viewing programs to become inoperable. Data charges from your ISP (Internet Service Provider) may apply for web connections. Please check your contract/plan details before connecting to the web to avoid additional charges from your mobile device service provider.

2
Symbian Application Installation and Operation
Mobile Devices: Nokia, SonyEricsson and other Symbian OS phones.
System requirements
GPRS/ 3G service from your mobile device provider.
:
The mobile device must support GPRS/ 3G protocol and Java cldc1.0/midp 2.0 environment
Mobile Application Installation
Please follow the steps shown below to install the mobile viewer on your device.
Step 1: Download the software from the website. You may need to extract the files from the zip. After extraction, look for the Symbian installation file “DVRH264.jar”. Move the file to your mobile device.
Step 2: “DVRH264.jar” is a compressed file that may open and run automatically after the file is placed on your mobile device. You can also run or open the file manually to install the APP on your device.
Mobile Application Operation
After the installation, enter the Program Files menu on your mobile device and run the program called “H264 MIDlet”.
Select “Menu” at the right lower corner of your mobile screen. Four commands will be shown” “Login”, “Add”, “Modify”, and “Delete”.
Step 3: Add a New Login DVR
To log into the DVR, first you need to enter the DVR login information. Find “Add” under the “Menu” then enter the IP address for accessing the DVR. Insert the port number, account name and password. Press “Add” to save this information.
TIP: See Overview of Networks: LAN/WAN/Routers at the end of this manual for more information on how to configure an IP address. Also consult the DVR manual under NETWORK SETUP.

3
Logging into the DVR
Use the Login command from the menu to view live images from the DVR. If multiple DVRs have been added to the mobile application they will be listed by name. You can select which DVR you wish to view on the phone.
Network connectivity speed will be affected by local and internet bandwidth and will vary with your location and connection. Live images will show up after a successful connection.
NOTE: If your mobile device is connected through WiFi to the same local area network (LAN) as the DVR, use the LAN IP address of the DVR to connect. If your mobile device WiFi service is turned OFF you may connect to the wide area address (WAN or Internet) of the DVR.

4
Modify the Login Information of the DVR
You can use the “Modify” command to edit the login information of the DVR. After changes are made, click “OK” to save or “Back” to cancel.
Delete the Login Information of the DVR
The “Delete” command can be used to remove the DVR information when it is no longer needed. Select the DVR on the name list, then select “Delete”.
Live Monitoring Operations
Scrolling the Image: You can use the keypad on your mobile device to scroll around the image when it is oversized.
Key Action 2 Scroll Up
4 Scroll Left 6 Scroll Right 8 Scroll Down

5
Image Quality Setup
Select “Quality” under “Menu”. There will be 5 levels to choose from: Low, Normal, Middle, High and Highest. NOTE: Quality selected only determines the streaming quality and does not affect the recorded video on the DVR hard drive. Lower quality settings will improve streaming speed to your device.
Channel Display
Select “Single” under the Menu to view all channels in list form. Choose which channel to view full screen.
TIP: To view Live images on your mobile device, “recording” must be set to “on” for each channel/camera on the DVR that is to be viewed.

6
Sizing the image
The screen size of mobile devices can vary. You can select “Size” under the “Menu” to choose from “Original” or “Fit Screen” to resize the image displayed.
Item Description
Original The image will be shown in the original size.
Fit Screen The image will be sized to fit the screen.
Rotate the image
The live image can be displayed normally or rotated by 900. Select “Rotate” under “Menu” to rotate the image.

7
Alarm
The alarm feature allows the user to remotely view the alarm that has been triggered by events such as “Motion Detected”, “Sensor”, “Triggered”, and “Video Loss”.
Select “Alarm” in the menu to switch this function on or off.
Item Description
Motion Detected
Sensor Triggered
Video Loss

8
Windows Mobile Application Installation and Operation
There are two kinds of viewing applications for Window’s Mobile OS: JPEG and H.264. The H.264 application allows both audio and video connections on your mobile device.
Mobile Device OS:Windows mobile version 5.0 and above. System Requirements:
GPRS/ 3G service from your mobile device provider Mobile Application Installation Please follow the steps below to install the surveillance viewer(s) on your mobile device.
Step 1: Download the software (contained in a zip file) from the website: “3GDVRWindowsMobile.zip”. Save the file to your PC. Unzip “3GDVRWindowsMobile.zip”and move the files inside the zip “Jrviewer.CAB” and “H264Pocket.CAB” to your mobile device.
Step 2: “Jrviewer.CAB” and “H264Pocket.CAB” are compressed files that may open and run automatically after the file is placed on your mobile device. You can also run or open the files to manually install the APPS on your device.

9
Mobile Application Operation
After the installation, enter the Program Files menu in your mobile device to run the viewing programs called “Jrviewer” and/or “H264Pocket”. These applications allow you to remotely logon and monitor the DVR. Press “OK” to bring up the operation menu. Refer to the chart below for further information.
Item Function Description
Add Add Login DVR Enter DVR’s name, IP address, Port, Account user, Password then press “OK”
Login Logon DVR Choose the DVR that you’d like to logon , then press “OK”
Modify Modify Login DVR Choose DVR, press “Modify” to edit settings, press ”OK” to save changes
Delete Delete Login DVR Choose DVR and press ”Delete” to delete the DVR information
TIP: To view Live images on your mobile device, “recording” must be set to “on” for each channel/camera on the DVR that is to be viewed.

10
Jrviewer application H264Pocket application
Operation during Live Monitoring:
After a successful logon to the DVR, press “View” to bring up operation menu. You can choose the channel, resize the image, choose the quality, turn on/off the status bar, alarm, & full screen display. NOTE: If your mobile device is connected through WiFi to the same local area network (LAN) as the DVR, use the LAN IP address of the DVR to connect. If your mobile device WiFi service is turned OFF you may connect to the wide area address (WAN or Internet) of the DVR.

11
LIVE monitoring with the JRViewer Program:
Item Function Description
Channel 1~16
Display for CH 1~16
Choose from CH1~16 to display
Screen Size of image
Original:original image size
Stretch:image stretched to full screen
Fit : resizes the image to fit the screen
Quality Quality Change the quality of image being streamed to your device. Lower quality settings result in faster streaming.
Status Bar Status Bar
The graphical icons indicated below will be shown on the status bar if there is an event such as “Motion Detect”, “Sensor trigger” or “Video Loss” on any channel. You can uncheck the “Status Bar” to turn this function off.
Icon Description
Motion Detect
Sensor Trigger
V-Loss
Alarm Alarm The alarm icon appears on the mobile device when an event is detected by the DVR. You can uncheck “Alarm” under “View” to disable this function.

12
LIVE Monitoring with the H264 Pocket Program:
Item Function Description
Channel 1~16 Display for CH 1~16 Choose from CH1~16 to display. CH1~4 can receive an audio signal from the DVR if audio is used.
Status Bar Status Bar
The graphical icons indicated below will be shown on the status bar if there is an event such as “Motion Detect”, “Sensor trigger” or “Video Loss” on any channel. You can also uncheck the “Status Bar” to turn this function off.
Icon Description
Motion Detect
Sensor Trigger
V-Loss
Alarm Alarm The alarm icon appears on the mobile device when an event is detected by the DVR. You can also uncheck “Alarm” under “View” to disable this function.
Full Screen Full screen display Check this function to choose one channel to display in full screen.

13
Google Android Application and Operation
System requirementsMobile Device operation platform:Google Android 2.1 System
:
Service: GPRS/ 3G service from your mobile device service provider Step 1: Open the Google browser on your device
Step 2: Using the Android Free Marketplace, find and download the free application called “Bubo Bubo”. This is the Android viewer app for the DVR. Downloading of the app is complete:

14
Step 3: When the Bubo Bubo viewer is opened for the first time an empty recorder (dvr1) will appear.
Step 5: Click the Edit button to begin the DVR connection configuration.
Step 6: Type in the DVR’s login information (DVR’s name / internet address/ port/ user name/ password ) and click “Save”.
Icon functions: JPEG / H264 : Choose which image format desired for viewing. Save : Save the information that was entered/edited to the mobile device. Clear: Clear the entry fields.

15
Cancel: Do not Save and return to the list. Delete: Delete the login settings for the DVR. NOTE: If your mobile device is connected through WiFi to the same local area network (LAN) as the DVR, use the LAN IP address of the DVR to connect. If your mobile device WiFi service is turned OFF you may connect to the wide area address (WAN or Internet) of the DVR.
Step 7: Clicking the New button adds new log-in information for another DVR or different log-in information for the same DVR. Note: Each DVR in the list name must have a different name.
Step 8: After completing editing or adding DVRs, click the Edit button to exit editing. The edit button will change to white.
Step 9: Click on the DVR name that you want to connect to.

16
Step 10: The H.264 DVR video stream from the DVR will start the connection process. Please be patient while the video loads.
Step 11: The lower right icon will show the video format - either H.264 or JPEG.
Step 12: Clicking this ICON will toggle between the two formats.

17
Step 13: Click the Ch icon and choose a single channel to view full screen.
Step 14: Click the Quarter icon for viewing 4 CHs simultaneously (1-4, 5-8, 9-12, or 13-16). This feature is supported only when using the JPEG format (not H.264).
Step 15: Click the Login icon to return to the login list.

18
Step 16: When in landscape view, the feature toolbar is hidden (by default).
Step 17: Click on the screen and the toolbar will appear. Click the screen again and the toolbar disappears.

19
BlackBerry Installation and Operation System RequirementsMobile device operation platform:BlackBerry 9000
:
Service: GPRS/ 3G service from your mobile device provider Software Installation Visit the BlackBerry official website and download the BlackBerry desktop manager V4.6 or higher and install it on your PC. The software can be downloaded from BlackBerry at: http://na.blackberry.com/eng/services/desktop/. If the desktop manager is already installed on your PC, skip this step. Step 1: Download the viewer software (contained in a zip file) from the website: “3GDVRBlackberryMobile.zip”. Save the file to your PC. Unzip “3GDVRBlackberryMobile.zip” and move the files inside the zip “dvrh264.alx” and “dvrh264.cod” to a folder on your PC. The BlackBerry Desktop Manager will move and install the programs on your mobile device. Step 2: Connect the mobile device via USB to your PC and then activate the BlackBerry desktop manager.

20
Step 3: Click the “Application Loader” on the PC
Step 4: Click “Add/Remove Application”

21
Step 6: Find “dvrh264.alx” file on the PC using the BlackBerry Desktop Manager. Press “Next”. The software will be installed automatically on your BlackBerry. Remove the USB cable after the installation is complete.
DVR connection
Step 7: From your BlackBerry mobile device, enter the “Download” menu and run the program “H.264Midlet”.

22
Step 8: In order to connect to DVR, input the DVR login information on your mobile device. Press “option” → “Add”, and then enter the “DVR IP”, “port”, “login account” (DVR’s user name), and, ”login password”. Press “OK” to save.
NOTE: If your mobile device is connected through WiFi to the same local area network (LAN) as the DVR, use the LAN IP address of the DVR to connect. If your mobile device WiFi service is turned OFF you may connect to the wide area address (WAN or Internet) of the DVR.
Step 9: Login to DVR
Login information for multiple DVRs may be saved with this software. Choose the DVR to connect to: Press “Option” → “Login”.

23
During the connection process a packet download confirmation message may appear. Press “Yes” to confirm and continue.
Connecting time depends on the Internet and/or LAN environment. After a successful connection the DVR live image will appear.
TIP: To view Live images on your mobile device, “recording” must be set to “on” for each channel/camera on the DVR that is to be viewed.

24
Apple iPhone/iPad Installation and Operation
The free application for viewing the DVR with your Apple mobile device is called “SCDVR”. The app uses the H.264 video streaming capabilities of the DVR for enhanced viewing. You may also monitor the DVR video using the iPhone’s Safari web browser (no app needed). See “DVR Viewing Using a Pre-Installed or Other Mobile Web Browser
Download SCDVR from Apple APP STORE ” in this manual.
STEP 1: Enter the App Store
Click the App Store icon Enter the app store. You may need a free
Apple/iTunes account to download apps.
STEP 2: Search for “SCDVR”
Click Search button Type “SCDVR” into search bar App located, click the app
25
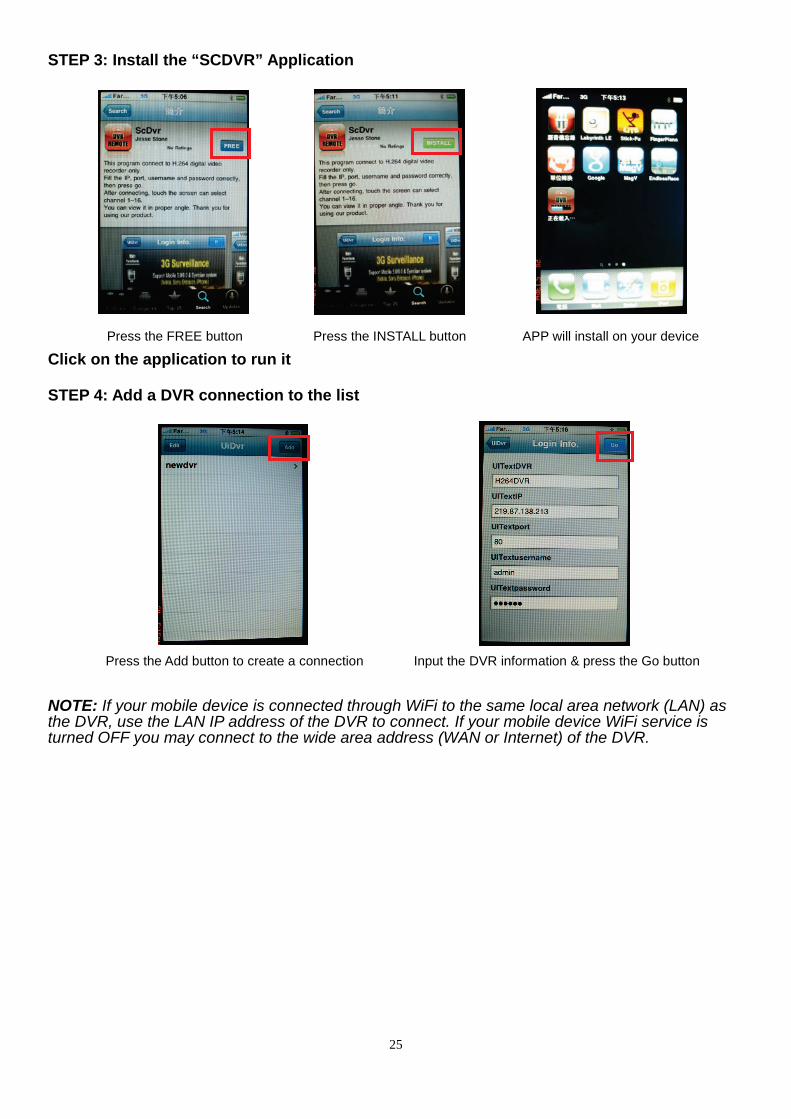
STEP 3: Install the “SCDVR” Application
Press the FREE button Press the INSTALL button APP will install on your device
Click on the application to run it
STEP 4: Add a DVR connection to the list
Press the Add button to create a connection Input the DVR information & press the Go button
NOTE: If your mobile device is connected through WiFi to the same local area network (LAN) as the DVR, use the LAN IP address of the DVR to connect. If your mobile device WiFi service is turned OFF you may connect to the wide area address (WAN or Internet) of the DVR.

26
STEP 5: Connect to the DVR
The channel 1 image will be shown on the screen. Click the number button to change the channel. To change the audio channel, press snd1~ snd4. Press R to rotate the image.
STEP 6: Delete the DVR from the list
Press the Edit button and will appear Press the and then click the Delete button
Direct viewing of the DVR is available on any device (PC, laptop, mobile device, tablet computer, etc) using the device’s web browser. Some of the features contained in the apps previously described are not available when using a browser; however software downloading and installation are not required. This is of benefit when using equipment not owned by you to monitor your DVR.
DVR Viewing Using a Pre-Installed or Other Mobile Web Browser
Open Safari, or an equivalent mobile browser, and input the IP address of DVR. See “NETWORK SETUP” in the DVR manual for additional information and to determine the actual IP address of the DVR. Example: “http://219.87.138.212/”. 219.87.138.212 refers to the IP address of the DVR over the WAN or Internet. To view the DVR locally over the LAN, replace the WAN address with the LAN address. The LAN address will be very similar to other devices on your network such as a PC.

27
Example of a LAN DVR connection: “http://192.168.1.12/”. A main page will appear in the browser with several links for viewers. Choose “JPEG VIEWER” from the list. This is a universal viewer that will work on any mobile or other internet connected device with a web browser. Choose which camera you desire to view from the drop down box. If your device supports active image resizing you may adjust the image to fit your screen
CH 1 image will be shown The image can be zoomed IN/OUT Select the channel
Refer to the DVR manual “MAIL SETUP” for additional information. An alarm notification can be sent to your mobile device as either a standard email or as a text message. The determining factor on how the notification is sent is based on the address you use in the mail setup. The email is transformed into a text message and sent to your device by your mobile device service provider.
TEXTING- Sending an Alarm Notification to a Mobile Device
TYPES OF TEXT MESSAGES There are two types of text messages: SMS (short message service) and MMS (multimedia message service). SMS is the popular 160 character feature used to send a text to another phone. MMS is similar but the user is allowed to attach a media file such as a photo or sound file. SETTING UP A TEXT MESSAGE Select your mobile device service provider from the following list to determine the format to use for text notification. Example # 1: My service provider is Verizon. My cell phone number is 214-555-2834. I want to send a SMS message (text only) when my DVR receives an alarm notification. The email address I would use in DVR mail setup is: [email protected] Example # 2: My service provider is ATT. I want to send a MMS (text + a snapshot of the alarm camera) when my DVR receives an alarm notification. The email address I would use in DVR mail setup is: [email protected] IMPORTANT NOTES ON TEXTING Your mobile device provider may delay MMS messages (or SMS messages) received from a device that is not a part of their service plan, or may not support image transfer as part of their MMS system. Send test alarm notifications to check this feature. Your mobile device and service must support SMS or MMS to receive texts. Check with your mobile device service provider to review your plan and determine if charges may apply for receiving SMS or MMS texts. Service providers may change access to their system at any time. Check with your service provider for the current address or if your provider is not listed below.

28
Alltel [10-digit phone number]@message.alltel.com Example: [email protected] AT&T (formerly Cingular) [10-digit phone number]@txt.att.net [10-digit phone number]@mms.att.net (MMS) [10-digit phone number]@cingularme.com Example: [email protected] Nextel (now Sprint Nextel) [10-digit telephone number]@messaging.nextel.com Example: [email protected] Sprint PCS (now Sprint Nextel) [10-digit phone number]@messaging.sprintpcs.com (SMS) [10-digit phone number]@pm.sprint.com (MMS) Example: [email protected] T-Mobile [10-digit phone number]@tmomail.net Example: [email protected] US Cellular [10-digit phone number]email.uscc.net (SMS) [10-digit phone number]@mms.uscc.net (MMS) Example: [email protected] Verizon [10-digit phone number]@vtext.com (SMS) [10-digit phone number]@vzwpix.com (MMS) Example: [email protected] Virgin Mobile USA [10-digit phone number]@vmobl.com (SMS) Example: [email protected]
DVR Mail Setup

29
E-mail can be used as a form of notification when an event occurs such as; VIDEO LOSS, MOTION DETECTION, and ALARM / SENSOR). Be sure to activate the check box next to “Enable E-mail Notification” and click “OK” after entering the information that is appropriate for your type of mail service. Click on the “Receiver E-mail” box to get the screen below.
Enter up to 10 addresses to receive notification. You may select or deselect the check box next to each address to change the receiver list as needed. Click OK when finished.
Most small business and residential internet broadband internet connections are DSL or cable. Your internet service provider (ISP) will run a connection to your location and provide you with a modem. Modern broadband modems will have a Ethernet connection in the back to allow you to distribute the connection throughout your location over the local area network (LAN). Your LAN can consist of numerous devices such as desktop computers, laptops, IP addressable devices such as game stations, blu-ray players, cell phones, tablet computers, and your DVR.
Overview of Networks: LAN/WAN/Routers
To keep all of these devices organized on the LAN, a protocol called DHCP (Dynamic Host Configuration Protocol) is used. One of the devices on your LAN will have a DHCP server running to assign every device a IP address when it connects. Connection can be either wired through an Ethernet jack or wireless through WiFi. Each IP address is unique to each device so they can communicate with each other and with the outside world (WAN or Internet).
Item Description Enable E-mail Notification Check the box to enable/disable E-mail the notification function.
SMTP Server Enter your Outgoing Mail Server
User Name Enter the user name listed for your e-mail account
Password Enter the password you use to access your e-mail account Sender E-mail Enter your e-mail address
Trigger Event Select the checkboxes you wish to serve as triggers for e-mail
Receiver E-mail Enter the addresses for up to 10 individual receivers

30
The most common device to provide DHCP is the router. A router will typically connect to your modem with an Ethernet or LAN cable and provides additional jacks for connecting PCs and other internet ready devices. Routers can also have wireless access available and may or may not have one or more antennas on the back. To configure your router, go to the router IP address with your PC web browser. Some routers don’t use a web page for configuration but supply a PC software program used to set configuration. Consult your router owner’s manual for instructions on the best way to access. For additional detailed information on setting up the IP address for the DVR and making it available for internet viewing, see the section on NETWORK SETUP in your DVR owner’s manual.