mobilizing an oracle 11g r2 database with sql anywhere
TRANSCRIPT

Mobilizing an Oracle 11g R2 Database

MOBILIZING AN ORACLE 11G R2 DATABASE
2
TABLE OF CONTENTS
DATA MOBILIZATION: AN OVERVIEW .......................................................................................................... 3
Prerequisites ........................................................................................................................................................... 3
SYNCHRONIZATION ENVIRONMENT ............................................................................................................ 4
CONSOLIDATED SCHEMA ............................................................................................................................. 5
PREPARING THE CONSOLIDATED DATABASE .......................................................................................... 7
CONNECTING WITH MOBILINK ..................................................................................................................... 8
CREATING A SYNCHRONIZATION PROJECT .............................................................................................. 9
CONFIGURING A SYNCHRONIZATION MODEL ......................................................................................... 11
DEPLOYING THE SYNCHRONIZATION MODEL ......................................................................................... 14
SYNCHRONIZING ........................................................................................................................................... 19
Starting the Consolidated Database ...................................................................................................................19
Starting the MobiLink Server ...............................................................................................................................19
Starting the Remote Database ............................................................................................................................20
Initializing the Remote ID .....................................................................................................................................21
Synchronizing the Remote Client .......................................................................................................................22
VIEWING REMOTE CLIENT DATA IN SYBASE CENTRAL ......................................................................... 24
UPDATING THE REMOTE FOR NON-QUERY ACTIONS ............................................................................ 25
ENSURING UNIQUE PRIMARY KEYS ACROSS REMOTE DATABASES .................................................. 27
RECREATING THE SYNCHRONIZATION SUBSCRIPTION ........................................................................ 28
CONCLUSION ................................................................................................................................................. 30
MOBILIZING AN ORACLE 11G R2 DATABASE
3
DATA MOBILIZATION: AN OVERVIEW
Data mobilization provides a method for enterprises to bring their mission-critical information to personnel at the front lines of business. It enables employees at remote or branch offices to access and manipulate corporate data without requiring a constant network connection to headquarters. This significantly reduces connectivity costs and issues, and ensures that remote office workers are productive because they can always have access to the data. MobiLink is a session-based synchronization system that allows two-way synchronization between a main database, called the consolidated database, and many remote databases. The consolidated database, which can be one of several ODBC-compliant databases, holds the master copy of all the data. Remote databases can be either SQL Anywhere or UltraLite databases. MobiLink synchronization is a component of SAP Sybase SQL Anywhere, the comprehensive package for mobile data management from SAP. Synchronization typically begins when a MobiLink remote client opens a connection to a MobiLink synchronization server. During synchronization, the MobiLink client uploads database changes that were made to the remote database since the previous synchronization. On receiving this data, the MobiLink synchronization server updates the consolidated database, and then downloads changes on the consolidated database to the remote database. MobiLink is proven to be a scalable, high-performance data synchronization technology placing SAP as significant leaders in the mobile workspace. It functions on multiple platforms (including Windows, OS X, Linux, Windows Mobile, iOS, BlackBerry and Android) and works across any type of wired or wireless connection. In terms of development and database design there is the option of the intuitive and easy-to-use graphical interface of Sybase Central, or alternatively for more advanced developers there is the option to configure the SQL code directly. This allows the developer to concentrate on their code. A wide variety of development technologies are supported, including .NET and Java. Other features include monitoring and reporting, performance tuning and security. For more information on each of the components in a MobiLink synchronization system, consult the product documentation. The section entitled “Introducing MobiLink Synchronization” in the book MobiLink - Getting Started gives an excellent overview. It is recommended that you read this section before proceeding with this whitepaper. SQL Anywhere documentation is available online at http://dcx.sybase.com. The rest of this document will walk through the mobilization of an Oracle database. Prerequisites
• Oracle 11g R2
• SQL Anywhere 16.0.0 or above
• MobiLink 16 (included in SQL Anywhere 16)
This demonstration uses the Order Entry (OE) and Human Relations (HR) sample schemas that are provided with the Oracle 11g R2 installation. Information about this sample can be found in the Oracle documentation or can be viewed online at: http://www.oracle.com/technetwork/tutorials/index.html.

MOBILIZING AN ORACLE 11G R2 DATABASE
4
SYNCHRONIZATION ENVIRONMENT
The purpose of this demonstration is to mobilize the data pertaining to a sales force team. The MobiLink synchronization server is capable of synchronizing with any type of SQL Anywhere remote client, such as SQL Anywhere or UltraLite. In this scenario, each remote client is a SQL Anywhere database running on a sales person’s laptop or handheld device. The diagram below illustrates the synchronization environment.
Each sales person in this scenario is a remote synchronization client. They each have a local SQL Anywhere database that is synchronized with a corporate Oracle database. A salesperson can download a subset of the corporate data to their laptop or handheld device, and manipulate that data from the remote database.

MOBILIZING AN ORACLE 11G DATABASE
5
CONSOLIDATED SCHEMA
The consolidated database schema encapsulates information about employees, orders, customers and products. The diagram below outlines the relationships between the different elements of the schema
1.
1 Oracle Database Sample Schemas Documentation
http://download.oracle.com/docs/cd/B28359_01/server.111/b28328/diagrams.htm

MOBILIZING AN ORACLE 11G DATABASE
6
Note: Above we demonstrate designing a remote schema by excluding tables and taking a subset of rows from
other tables. We can also take a subset of columns from a table if certain columns are not required on the
remote devices.
We are primarily interested in the OE schema; however, we need to refer to the HR schema to get information about each individual sales person from the EMPLOYEES table. Each entity above represents a table that exists in a consolidated Oracle database. Here is a brief description of each object.
• CUSTOMERS – customers whose information is kept on record
• INVENTORIES – how much of each product is stored in each warehouse
• ORDER_ITEMS – list of products included in each order
• ORDERS – record of a sale between a salesperson and a customer on a specific date
• PRODUCT_DESCRIPTION – descriptions of each product in different languages
• PRODUCT_INFORMATION – a record of each product in the system
This walk-through outlines how to make a subset of this data available locally to each person on the sales team. The first step is to design a remote schema. It is unnecessary and inefficient for each salesperson to have a copy of the entire consolidated database. The remote schema will be designed such that it only contains information relevant to one particular salesperson. To achieve this, it will be designed as a subset of the consolidated database in the following way:
• CUSTOMERS – all rows
• INVENTORIES – no rows
• ORDER_ITEMS – filter by sales_rep_id
• ORDERS – filter by sales_rep_id
• PRODUCT_DESCRIPTION – no rows
• PRODUCT_INFORMATION – all rows
Each salesperson needs to keep records of all customers and products, so that any product can be sold to any customer. We will assume a salesperson always speaks the same language as the customer they are selling to, so we do not need any rows from the product description table. Each salesperson needs information about orders and order items, but not ones related to other salespeople, this is achieved by filtering rows based on salesperson identifier.
The next step is to choose the synchronization direction of each table. What is important to consider here is what information does a remote need to read, and what information does a remote need to create. In our example, a specific salesperson will need a list of products and customers, but will never enter a new product into the system. We are making the restriction that products and customers will always enter the system from the consolidated database at headquarters. However, a salesperson needs to be able to record new orders on a regular basis. These factors lead to the following decisions about each table:
• CUSTOMERS – download to remote only
• ORDER_ITEMS – download and upload
• ORDER – download and upload
• PRODUCT_INFORMATION – download to remote only

MOBILIZING AN ORACLE 11G R2 DATABASE
7
PREPARING THE CONSOLIDATED DATABASE
Note: By default, the OE user is locked in the Oracle database. To unlock OE user, connect as SYS and execute the
following query (be sure to connect with SYSDBA privileges):
ALTER USER OE IDENTIFIED BY sql ACCOUNT UNLOCK;
The following statements are designed to prepare the Oracle database for use with MobiLink. Use the Oracle SQL Plus application to connect as OE and execute these queries:
ALTER TABLE customers DROP COLUMN cust_address;
ALTER TABLE customers DROP COLUMN phone_numbers;
ALTER TABLE customers DROP COLUMN cust_geo_location;
ALTER TABLE product_information DROP COLUMN warranty_period;
ALTER TABLE OE.ORDERS DROP CONSTRAINT ORDERS_CUSTOMER_ID_FK;
ALTER TABLE OE.ORDERS ADD CONSTRAINT ORDERS_CUSTOMER_ID_FK
FOREIGN KEY (CUSTOMER_ID) REFERENCES OE.CUSTOMERS (CUSTOMER_ID);
Certain columns are dropped because they were created as user-defined types. We could find out how to translate these user-defined types into types that SQL Anywhere will recognize, but doing so is not relevant to this paper. Next, we grant permission to user OE to create triggers because MobiLink needs to create a few triggers using OE's credentials.
These next statements will add unique primary keys to the consolidated database. Unique primary keys are essential for MobiLink synchronization and are used to identify a row.
ALTER TABLE OE.ORDERS DROP CONSTRAINT ORDERS_SALES_REP_FK;
UPDATE OE.ORDERS
SET SALES_REP_ID = 1
WHERE SALES_REP_ID IS NULL;
ALTER TABLE OE.ORDERS DROP PRIMARY KEY CASCADE;
ALTER TABLE OE.ORDERS
ADD CONSTRAINT salesrep_order_pk PRIMARY KEY (sales_rep_id, order_id);
After running the DDL commands listed above, the MobiLink server should have no trouble connecting to the database and setting it up for synchronization with any number of remote devices.

MOBILIZING AN ORACLE 11G R2 DATABASE
8
CONNECTING WITH MOBILINK
1. Verify that your Oracle service is running and that the OE database is configured properly.
2. Create an ODBC data source that points to OE. You should use the SQL Anywhere driver for Oracle2
that comes with SQL Anywhere. The configuration should look similar to the image below.
After configuring your ODBC data source, you can use the MobiLink plug-in to connect to the Oracle database and create a synchronization model
2 For more information about recommended ODBC drivers for MobiLink, see http://scn.sap.com/docs/DOC-40721.
MOBILIZING AN ORACLE 11G R2 DATABASE
9
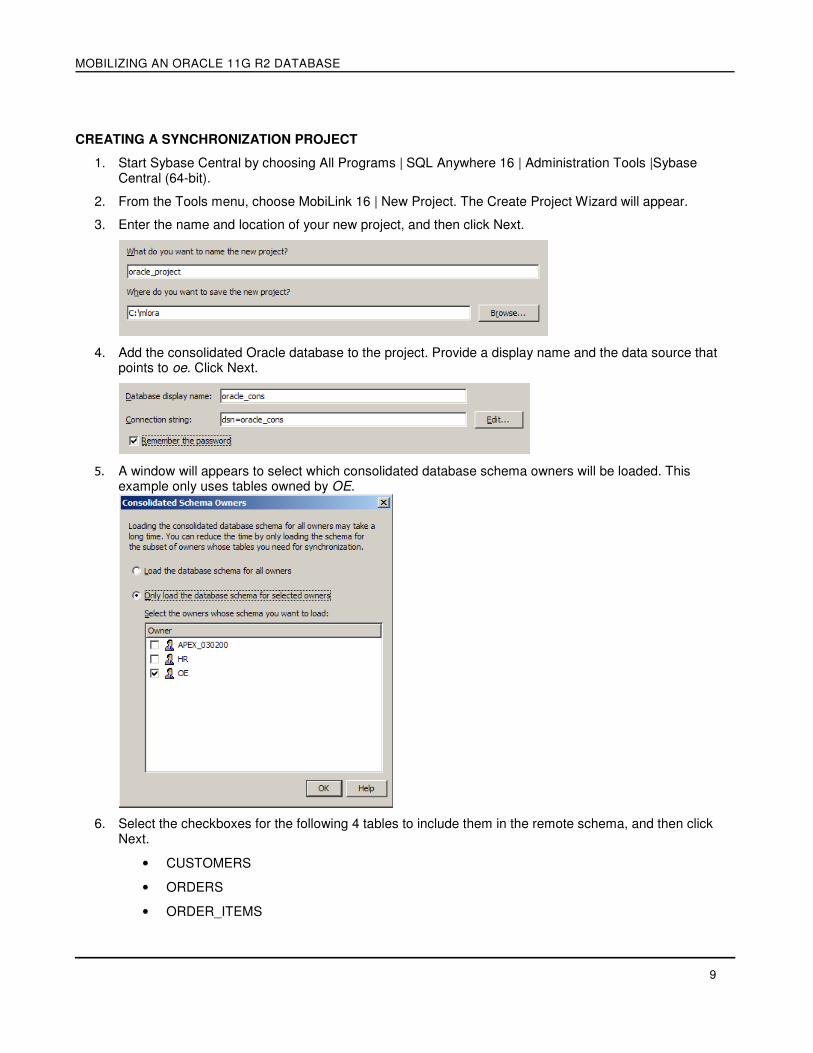
CREATING A SYNCHRONIZATION PROJECT
1. Start Sybase Central by choosing All Programs | SQL Anywhere 16 | Administration Tools |Sybase Central (64-bit).
2. From the Tools menu, choose MobiLink 16 | New Project. The Create Project Wizard will appear.
3. Enter the name and location of your new project, and then click Next.
4. Add the consolidated Oracle database to the project. Provide a display name and the data source that points to oe. Click Next.
5. A window will appears to select which consolidated database schema owners will be loaded. This example only uses tables owned by OE.
6. Select the checkboxes for the following 4 tables to include them in the remote schema, and then click Next.
• CUSTOMERS
• ORDERS
• ORDER_ITEMS

MOBILIZING AN ORACLE 11G DATABASE
10
• PRODUCT_INFORMATION
7. Specify a name for the remote schema.
8. Leave SQL Anywhere selected and click Finish.
9. If this is the first time your database has been used by MobiLink, the following dialog will appears.
Click Yes. MobiLink automatically creates all the tables necessary for the database to be used in a synchronization environment. This does not alter your existing schema; it only adds MobiLink system tables and procedures.
10. Once MobiLink is finished making the necessary modifications, click OK.

MOBILIZING AN ORACLE 11G R2 DATABASE
11
CONFIGURING A SYNCHRONIZATION MODEL
1. Click on the Mappings tab and select a table. Set the Download Type as Timestamp and select ‘Use shadow table to hold timestamp column’. Repeat this step for the rest of the tables.
2. Set the mapping direction as follows.
• ORDERS and ORDER_ITEMS are bi-directional
• The remaining tables are download only
3. Set up the row filtering procedure that was skipped previously. In a MobiLink environment, each remote database is given a remote ID. You can use this remote ID to filter rows. This is done in the download_cursor script for each synchronized table. The download cursor script specifies what columns and rows are downloaded from each table to the remote database. To filter rows by remote ID, add a restriction to the WHERE clause of the download cursor.
1) Click on the Download Subset tab at the bottom
2) For the ORDERS table, change the value in the Download Subset (Dnld. Sub.) column to Custom.
3) Fill in the text boxes as follows:

MOBILIZING AN ORACLE 11G DATABASE
12
4) Click on the Download Delete Subset tab at the bottom and change the Download Delete Subset to None.
4. In Folders view, click on MobiLink Server Command Line. Right-click on Default and select Properties.
5. Click on the Advanced tab and type ‘-s 1’ without the quotes in Other options field. The sample Oracle consolidated database includes a row-level trigger, INSERT_ORD_LINE, which fires before an insert into the Order_Items table. The trigger assigns the appropriate LINE_ITEM_ID. However, by default, MobiLink synchronizations will send up to 10 rows updates, inserts, or deletes in a single batch, causing an error with the row-level trigger. To maintain full compatibility with the existing INSERT_ORD_LINE trigger, the MobiLink server needs to be instructed to synchronize a single row update per block.

MOBILIZING AN ORACLE 11G DATABASE
13
6. Save the synchronization model. The synchronization model is complete and ready to be deployed.
Note: The default Conflicting Handling option is set to Row-based for ‘bi-direction’ and ‘uploads only’
mappings.

MOBILIZING AN ORACLE 11G R2 DATABASE
14
DEPLOYING THE SYNCHRONIZATION MODEL
1. In the left pane, right-click the synchronization model you just created and choose Deploy from the popup menu.

MOBILIZING AN ORACLE 11G DATABASE
15
2. Choose a directory to save all the deployment files.
3. Accept the default setting and click on [Next >].
4. Specify a MobiLink user name and password. The MobiLink user is stored in the MobiLink server and is used to authenticate the user during synchronization. Register the user in the consolidated database.

MOBILIZING AN ORACLE 11G DATABASE
16
5. Specify the synchronization profile name and click on [Next >].

MOBILIZING AN ORACLE 11G DATABASE
17
6. Accept the default setting and click on [Next >].
7. Close the dialog box after it finishes generating the deployment files.

MOBILIZING AN ORACLE 11G DATABASE
18
8. Accept the default setting and click on [Finish].
9. Your synchronization model will be deployed with the following default options:
• TCP/IP communication stream.
• MobiLink server address of ‘localhost’. You will need to change this if your MobiLink server is running on a different machine.
• No information, except warnings and errors, will be displayed in the MobiLink dialogs. All other messages will be outputted to a log file.
You are finished with the deployment wizard. All your files are initialized and can be found in the folder you specified earlier. Your consolidated database is fully configured for synchronization with many remote clients, and you have successfully deployed one remote client. If you want to deploy other remote clients, you can run this wizard again, making sure to create a new MobiLink user and opt out of deploying the consolidated database and MobiLink server. Since these have already been deployed, all you need to do is deploy other remote synchronization clients.

MOBILIZING AN ORACLE 11G R2 DATABASE
19
SYNCHRONIZING Starting the Consolidated Database
1. Ensure that your Oracle service is running.
The MobiLink server must interact with the consolidated database (oe) to synchronize the remote clients. Starting the MobiLink Server
Note: By default, MobiLink uses the snapshot/READ COMMITTED isolation level for upload and
download. For the MobiLink server to be able to make the most effective use of snapshot isolation,
the Oracle account used by the MobiLink server must have permission for the GV_$TRANSACTION
and V_$SESSION Oracle system views. If it does not, a warning is issued and rows may be missed on
download. Only SYS can grant this access. The Oracle syntax for granting this access is:
GRANT SELECT ON SYS.GV_$TRANSACTION TO oe;
GRANT SELECT ON SYS.V_$SESSION TO oe;
1. At a Command Prompt, navigate to the folder where you created the synchronization project (this is the root directory you chose in the first step of the synchronization project wizard.) If you used the suggested directory names, you should have the following directories located in the root directory: sync_model_oracle_deploy.
2. Run the following command from the mlsrv directory:
mlsrv "dsn=oracle_cons;uid=your-oracle_login;pwd=your-oracle-pwd"
• mlsrv.bat is the command file created to start the MobiLink server.
• dsn is your ODBC data source name.
• uid is the user name you use to connect to the consolidated database.
• pwd is the password you use to connect to the consolidated database.
If this command runs successfully, the MobiLink server starts and a window similar to the following appears:

MOBILIZING AN ORACLE 11G DATABASE
20
If the MobiLink server fails to start, check your consolidated database connection information. Starting the Remote Database
1. At a Command Prompt, navigate to the directory where the deployment wizard created your remote database. If you used the suggested directory names, you should have the following directories located in the root directory: sync_model_oracle\remote.
2. Start your remote SQL Anywhere database with the following command:
dbeng16 -n remote_eng sync_model_oracle_remote.db -n remote_db
• dbeng16 is the database server binary used to start the SQL Anywhere database
• remote_eng is the database server name.
• sync_model_oracle_remote.db is the database file that is started on remote_eng.
• remote_db is the name of the database on remote_eng.
If this command runs successfully, a SQL Anywhere database server named remote_eng starts and loads the database called remote_db. You should see a window that is similar to the following:

MOBILIZING AN ORACLE 11G DATABASE
21
Initializing the Remote ID In the remote schema, each remote database represents one salesperson. The synchronization scripts you wrote included logic that instructed the MobiLink server to download a subset of data based on the remote ID of the remote database. You must set the database’s remote ID to the value of a valid salesperson identifier. It is important to complete this step before the first synchronization because when the remote device synchronizes for the first time, it downloads all information related to the chosen salesperson.
1. Choose a valid sales rep identifier.
For a list of valid sales rep identifiers, use the Oracle SQL*Plus application to execute the statement:
SELECT COUNT(SALES_REP_ID), SALES_REP_ID
FROM OE.ORDERS GROUP BY SALES_REP_ID;
For example:
In our example, we will have the remote database represent the salesperson with a SALES_REP_ID of 154. Therefore, we need to set the database’s remote identifier to a value of ‘154’.
2. At a command prompt, execute the following command:
dbisql -c "server=remote_eng;dbn=remote_db;uid=DBA;pwd=sql;" "SET OPTION
PUBLIC.ml_remote_id='154'"
• dbisql is the application used to execute SQL commands against a SQL Anywhere database.
• server sets the database server name to remote_eng.

MOBILIZING AN ORACLE 11G DATABASE
22
• dbn sets the database name to remote_db.
• uid sets the user name DBA used to connect to your remote database.
• pwd sets the password sql used to connect to your remote database.
• SET OPTION PUBLIC.ml_remote_id=‘154’ is the SQL command used to set the remote ID to a value of 154.
Synchronizing the Remote Client Now you are ready to synchronize the remote client for the first time. This is done with the MobiLink client program dbmlsync. Dbmlsync connects to the remote database, authenticates itself with the MobiLink server, and performs all of the uploads and downloads necessary to synchronize the remote and consolidated databases based on a publication in the remote database.
1. At a command prompt, execute the following command:
dbmlsync -c "server=remote_eng;dbn=remote_db;uid=DBA;pwd=sql" -n
sync_model_oracle -u sync_mluser -mp pass_mluser
• dbmlsync is the synchronization application.
• server=remote_eng specifies the name of the remote database server.
• dbn=remote_db specifies the name of the remote database.
• uid is the user name used to connect to the remote database.
• pwd is the password used to connect to the remote database.
• sync_model_oracle is the publication on the remote device that will be used to perform the synchronization.
• sync_mluser is the user name used to authenticate with the MobiLink server.
• pass_mluser is the password used to authenticate with the MobiLink server.
If you are running the dbmlsync application on a different computer from your MobiLink server, you must pass in arguments that specify the location of the MobiLink server. Alternatively, you can execute the following command in the sync directory (same directory as mlsrv):
sync "server=remote_eng;dbn=remote_db;uid=DBA;pwd=sql" -n sync_model_oracle -
u sync_mluser -mp pass_mluser
sync.bat is the command file created to synchronize the data in remote database with consolidated database.
2. If this command runs successfully, the dbmlsync application (or sync command file) populates the remote database with a subset of information from the consolidated database. You should see a screen similar
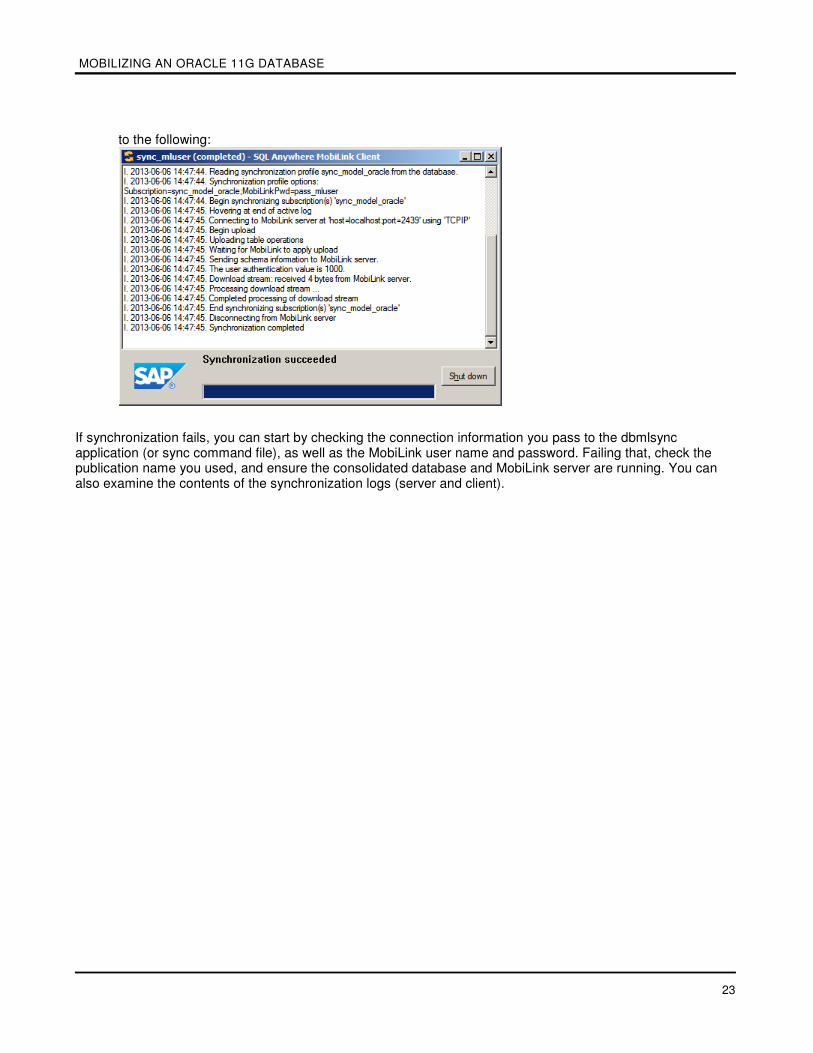
MOBILIZING AN ORACLE 11G DATABASE
23
to the following:
If synchronization fails, you can start by checking the connection information you pass to the dbmlsync application (or sync command file), as well as the MobiLink user name and password. Failing that, check the publication name you used, and ensure the consolidated database and MobiLink server are running. You can also examine the contents of the synchronization logs (server and client).

MOBILIZING AN ORACLE 11G R2 DATABASE
24
VIEWING REMOTE CLIENT DATA IN SYBASE CENTRAL
After successfully synchronizing the remote client to the consolidated database through the MobiLink server, the remote data should be populated with information relevant to one sales rep. You can verify this in Sybase Central using the SQL Anywhere 16 plug-in.
1. Open Sybase Central and use the SQL Anywhere 16 plug-in to make a new connection.
If you haven’t stopped the databases that were started in the above sections, your connection information should look like this:
• User name DBA
• Password sql
• Server name remote_eng
• Database name remote_db
Once you are connected, you can navigate to the remote tables to view your data.
2. Choose any table and then click the Data tab. The ORDERS table should look like the following:
Notice that all the records in this table are for a sales rep with an identifier of 154. This particular salesperson is not concerned with the sales information of other representatives. Now this representative’s database takes up less space, and requires less time to synchronize. Since the remote database size is kept to a minimum, frequently performed operations, such as entering a new order, can run to completion faster and more efficiently.
MOBILIZING AN ORACLE 11G R2 DATABASE
25
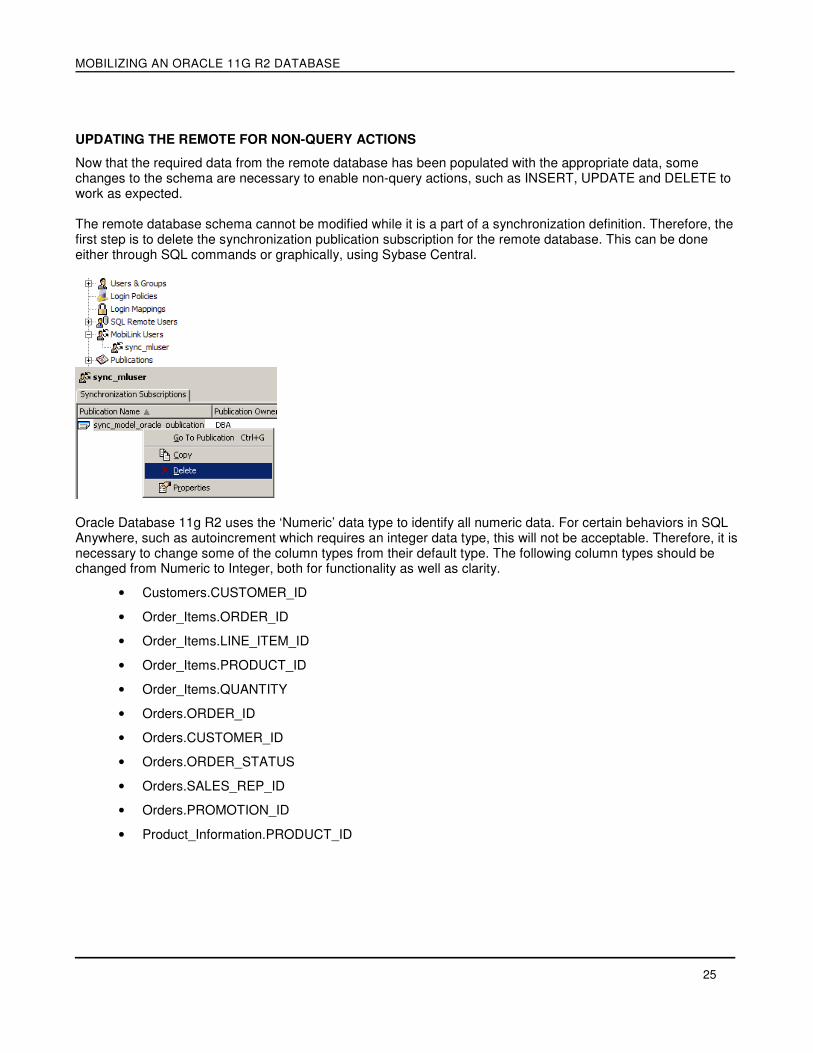
UPDATING THE REMOTE FOR NON-QUERY ACTIONS
Now that the required data from the remote database has been populated with the appropriate data, some changes to the schema are necessary to enable non-query actions, such as INSERT, UPDATE and DELETE to work as expected. The remote database schema cannot be modified while it is a part of a synchronization definition. Therefore, the first step is to delete the synchronization publication subscription for the remote database. This can be done either through SQL commands or graphically, using Sybase Central.
Oracle Database 11g R2 uses the ‘Numeric’ data type to identify all numeric data. For certain behaviors in SQL Anywhere, such as autoincrement which requires an integer data type, this will not be acceptable. Therefore, it is necessary to change some of the column types from their default type. The following column types should be changed from Numeric to Integer, both for functionality as well as clarity.
• Customers.CUSTOMER_ID
• Order_Items.ORDER_ID
• Order_Items.LINE_ITEM_ID
• Order_Items.PRODUCT_ID
• Order_Items.QUANTITY
• Orders.ORDER_ID
• Orders.CUSTOMER_ID
• Orders.ORDER_STATUS
• Orders.SALES_REP_ID
• Orders.PROMOTION_ID
• Product_Information.PRODUCT_ID

MOBILIZING AN ORACLE 11G DATABASE
26
To automatically insert the correct time stamp with a new order, the ORDERS.ORDER_DATE column’s value should be changed to the current timestamp value.
The next step is to take advantage of SQL Anywhere’s built in functionality to ensure primary key uniqueness. The changes to the column data types allow you to do this.

MOBILIZING AN ORACLE 11G R2 DATABASE
27
ENSURING UNIQUE PRIMARY KEYS ACROSS REMOTE DATABASES
One of the primary fundamentals of distributed database design is how to maintain unique primary keys. There are several ways to achieve unique keys across remotes and SQL Anywhere offers global autoincrementing fields as one possibility. This approach, as well as some others, is discussed in detail in our documentation. Please refer to the 'Synchronization Techniques' chapter located in the 'MobiLink – Server Administration' book as a starting point for a general understanding of synchronization techniques. Our documentation can be accessed online from the following URL: http://dcx.sybase.com. For a more detailed look at how to maintain a large number of remotes with unique keys and how to easily deploy new remotes against an Oracle consolidated database (and others), please consult the following whitepaper: Primary Keys in a Distributed Environment - http://scn.sap.com/docs/DOC-41242. Here is a summary of the contents of the above whitepaper:
• An introduction to the workings of global autoincrement
• How to setup Oracle sequences and make them emulate global autoincrementing fields
• How to include global autoincrementing fields in remote schema definitions
• How to quickly deploy new remotes with unique keys
In the whitepaper above, a general overview of maintaining primary keys across the consolidated Oracle and remote databases is presented. For the purposes of the Order Entry demo application, a more specific implementation of global autoincrement on the remote database follows, to give a concrete use-case. The consolidated Order Entry database includes an existing sequence for the ORDERS.ORDER_ID field. In order to give the remote databases some room for their primary keys, reduce the maximum value of the sequence to something more manageable, such as 1,000,000. For the purpose of the demo, assume the remotes may enter up to 100,000 orders. This means with a global autoincrement partition size of 100,000, the smallest database identifier that will not interfere with the sequence on the consolidated is 10. The consolidated can now enter up to 1,000,000 orders and the first remote database, with database identifier 10, can enter orders from 1,000,001 to 1,100,000. Of course it is always preferable to create partition sizes that are too large as opposed to too small on both the consolidated and remote databases. Keep the level of potential data growth in mind when creating the partition sizes. The values used in this example were for simplicity and may not be appropriate for other databases and circumstances.

MOBILIZING AN ORACLE 11G R2 DATABASE
28
RECREATING THE SYNCHRONIZATION SUBSCRIPTION
The next step is to recreate the subscription publication that was deleted prior to modifying the database schema. Again, this can be accomplished by directly executing SQL against the database or using Sybase Central. The following steps are for Sybase Central.
1. In Sybase Central, navigate to MobiLink Users and right click on sync_mluser. Create a new synchronization subscription.
2. Select the desired publication and click Finish to add a subscription.
A new subscription has now been created for the MobiLink user. Types have been updated and SQL Anywhere’s global autoincrement feature has been enabled to ensure primary key uniqueness. The above three sections detailing changes to the remote database schema have been rolled into a single SQL script which can be executed against the remote database. This is an alternative method, if the user does not wish to make changes through Sybase Central. /* Set the remote database ID to 10 */
SET OPTION "PUBLIC"."global_database_id" = '10';
/* Drop the subscription to sync_model_oracle so schema changes can be made */
IF EXISTS (
SELECT 1
FROM SYS.SYSSYNCSUBSCRIPTIONS
WHERE site_name = 'sync_mluser' AND publication_name='sync_model_oracle'
) THEN
DROP SYNCHRONIZATION SUBSCRIPTION TO "sync_model_oracle" FOR "sync_mluser";
END IF;
/*
The following are table columns which are to have their data type changed from the default numeric to
integer.
Customers.CUSTOMER_ID
Order_Items.ORDER_ID
Order_Items.LINE_ITEM_ID
Order_Items.PRODUCT_ID
Order_Items.QUANTITY
Orders.ORDER_ID
Orders.CUSTOMER_ID
Orders.ORDER_STATUS
Orders.SALES_REP_ID
Orders.PROMOTION_ID
Product_Information.PRODUCT_ID
*/

MOBILIZING AN ORACLE 11G DATABASE
29
ALTER TABLE "OE"."CUSTOMERS" DROP PRIMARY KEY;
ALTER TABLE "OE"."CUSTOMERS" ALTER "CUSTOMER_ID" integer;
ALTER TABLE "OE"."CUSTOMERS" ADD PRIMARY KEY ( "CUSTOMER_ID" ASC );
ALTER PRIMARY KEY ON "OE"."CUSTOMERS" RENAME TO "CUSTOMERS";
ALTER TABLE "OE"."ORDER_ITEMS" DROP PRIMARY KEY;
ALTER TABLE "OE"."ORDER_ITEMS" ALTER "ORDER_ID" integer;
ALTER TABLE "OE"."ORDER_ITEMS" ALTER "LINE_ITEM_ID" integer;
ALTER TABLE "OE"."ORDER_ITEMS" ADD PRIMARY KEY ( "ORDER_ID" ASC, "LINE_ITEM_ID" ASC );
ALTER TABLE "OE"."ORDER_ITEMS" ALTER "PRODUCT_ID" integer;
ALTER TABLE "OE"."ORDER_ITEMS" ALTER "QUANTITY" integer;
ALTER PRIMARY KEY ON "OE"."ORDER_ITEMS" RENAME TO "ORDER_ITEMS";
ALTER TABLE "OE"."ORDERS" DROP PRIMARY KEY;
ALTER TABLE "OE"."ORDERS" ALTER "ORDER_ID" integer;
ALTER TABLE "OE"."ORDERS" ADD PRIMARY KEY ( "ORDER_ID" ASC );
ALTER TABLE "OE"."ORDERS" ALTER "ORDER_ID" SET DEFAULT global autoincrement( 100000 );
ALTER TABLE "OE"."ORDERS" ALTER "ORDER_DATE" SET DEFAULT current timestamp;
ALTER TABLE "OE"."ORDERS" ALTER "CUSTOMER_ID" integer;
ALTER TABLE "OE"."ORDERS" ALTER "ORDER_STATUS" integer;
ALTER TABLE "OE"."ORDERS" ALTER "SALES_REP_ID" integer;
ALTER TABLE "OE"."ORDERS" ALTER "PROMOTION_ID" integer;
ALTER PRIMARY KEY ON "OE"."ORDERS" RENAME TO "ORDERS";
ALTER TABLE "OE"."PRODUCT_INFORMATION" DROP PRIMARY KEY;
ALTER TABLE "OE"."PRODUCT_INFORMATION" ALTER "PRODUCT_ID" integer;
ALTER TABLE "OE"."PRODUCT_INFORMATION" ADD PRIMARY KEY ( "PRODUCT_ID" ASC );
ALTER PRIMARY KEY ON "OE"."PRODUCT_INFORMATION" RENAME TO "PRODUCT_INFORMATION";
/* Recreate the subscription to the synchronization publication once the schema changes have been made
*/
IF NOT EXISTS (
SELECT 1
FROM SYS.SYSSYNCSUBSCRIPTIONS
WHERE site_name = 'sync_mluser' AND publication_name='sync_model_oracle'
) THEN
CREATE SYNCHRONIZATION SUBSCRIPTION TO "sync_model_oracle" FOR "sync_mluser"
TYPE tcpip ADDRESS 'host=localhost;port=2439;' OPTIONS
ScriptVersion='sync_model_oracle',MobiLinkPwd='pass_mluser';
END IF;
COMMIT;
MOBILIZING AN ORACLE 11G R2 DATABASE
30
CONCLUSION
Upon completion of this demonstration, you have successfully mobilized an Oracle database. It is now set up with one remote synchronization client, and is capable of deploying many more with little time or effort. To summarize, you completed the following tasks to configure the synchronization environment:
• Designed a remote schema based on a subset of the consolidated schema. You did this by choosing each remote to represent a particular salesperson. The remote database was given a remote ID equal to that rep’s identifier.
• Prepared the consolidated database.
• Ensured that each synchronized table had a primary key.
• Created an ODBC data source. The ODBC data source pointed to the Oracle database so that MobiLink could access it.
• Made the necessary modifications to the consolidated database to make it compatible with MobiLink and the SQL Anywhere remote database.
• Created a synchronization project and model.
• Defined how data was uploaded and downloaded to and from the consolidated database.
• Deployed the synchronization model.
• Set up the MobiLink server and server options to account for consolidated database requirements.
• Created a remote database.
• Generated command files to allow for simple initialization.
• Started the remote database.
• Started a new SQL Anywhere database server running the remote database.
• Set the remote database’s remote ID.
• Synchronized the remote database to the consolidated database.
• Viewed data in the remote database.
• Verified that data was in fact a subset of the consolidated database, all pertinent to the particular salesperson whose rep identifier you used.
• Removed the publication subscription to allow modifications to the remote database schema
• Made modifications to the remote database to ensure compatibility with consolidated database when inserting, updating or deleting rows.
• Recreated the publication subscription

www.sap.com
© 2013 SAP AG or an SAP affiliate company. All rights reserved.
No part of this publication may be reproduced or transmitted in any form or for any purpose without the express permission of SAP AG. The information contained herein may be changed without prior notice.
Some software products marketed by SAP AG and its distributors contain proprietary software components of other software vendors. National product specifications may vary.
These materials are provided by SAP AG and its affiliated companies (“SAP Group”) for informational purposes only, without representation or warranty of any kind, and SAP Group shall not be liable for errors or omissions with respect to the materials. The only warranties for SAP Group products and services are those that are set forth in the express warranty statements accompanying such products and services, if any. Nothing herein should be construed as constituting an additional warranty.
SAP and other SAP products and services mentioned herein as well as their respective logos are trademarks or registered trademarks of SAP AG in Germany and other countries.
Please see
http://www.sap.com/corporate-en/legal/copyright/index.epx#trademark
for additional trademark information and notices.