model 7001 battery operated irrigation controller i n s t
TRANSCRIPT

Features• Weeklyorcyclicalprogramming• 4starttimesperdayinweeklyprogram• Irrigationduration–from1minuteto11hours
and59minutesin1minuteincrements• Irrigationfrequency °Weeklyprogram:4starttimesperday °Cyclicalprogram:from8timesperday
(every3hours)tojustoncepermonth• Simple,four-buttonprogramming• Performmanualrunsviathecontroller• Poweredby1,9-voltalkalinebattery• Lowbatteryindicator• Weatherresistant
Model 7001Battery Operated Irrigation Controller
with Hose or Pipe Thread
in
st
ru
ct
io
n
ma
nu
al
2
table of contents
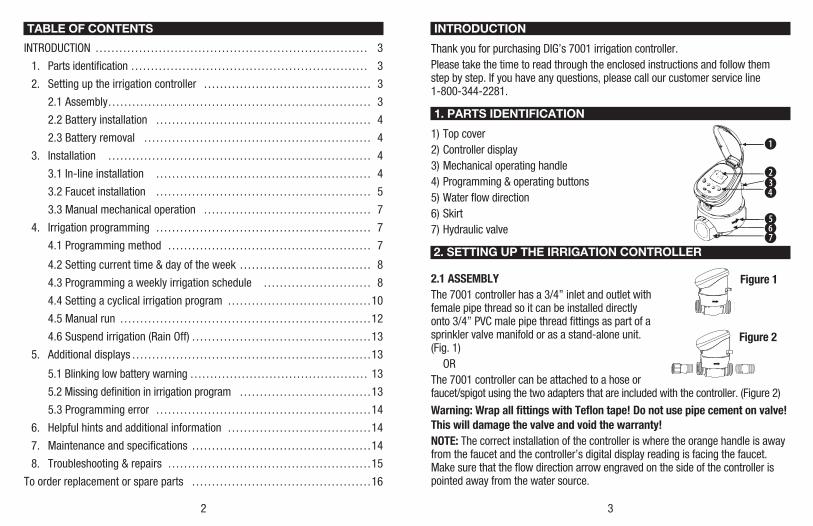
IntroduCtIon …………………………………………………………… 3
1. Partsidentification…………………………………………………… 3
2. Settinguptheirrigationcontroller …………………………………… 3
2.1Assembly………………………………………………………… 3
2.2Batteryinstallation ……………………………………………… 4
2.3Batteryremoval ………………………………………………… 4
3. Installation ………………………………………………………… 4
3.1In-lineinstallation ……………………………………………… 4
3.2Faucetinstallation ……………………………………………… 5
3.3Manualmechanicaloperation …………………………………… 7
4. Irrigationprogramming ……………………………………………… 7
4.1Programmingmethod …………………………………………… 7
4.2Settingcurrenttime&dayoftheweek…………………………… 8
4.3Programmingaweeklyirrigationschedule ……………………… 8
4.4Settingacyclicalirrigationprogram ………………………………10
4.5Manualrun ………………………………………………………12
4.6Suspendirrigation(rainoff)………………………………………13
5. Additionaldisplays……………………………………………………13
5.1Blinkinglowbatterywarning……………………………………… 13
5.2Missingdefinitioninirrigationprogram ……………………………13
5.3Programmingerror ………………………………………………14
6. Helpfulhintsandadditionalinformation ………………………………14
7. Maintenanceandspecifications………………………………………14
8. troubleshooting&repairs ……………………………………………15
toorderreplacementorspareparts ………………………………………16
introduction
thankyouforpurchasingdIG’s7001irrigationcontroller.Pleasetakethetimetoreadthroughtheenclosedinstructionsandfollowthemstepbystep.Ifyouhaveanyquestions,pleasecallourcustomerserviceline1-800-344-2281.
1. parts identification
1)topcover2)Controllerdisplay3)Mechanicaloperatinghandle4)Programming&operatingbuttons5)Waterflowdirection6)Skirt7)Hydraulicvalve
2. setting up the irrigation controller
2.1 AsseMBlythe7001controllerhasa3/4”inletandoutletwithfemalepipethreadsoitcanbeinstalleddirectlyonto3/4”PVCmalepipethreadfittingsaspartofasprinklervalvemanifoldorasastand-aloneunit.(Fig.1) orthe7001controllercanbeattachedtoahoseorfaucet/spigotusingthetwoadaptersthatareincludedwiththecontroller.(Figure2)
Warning: Wrap all fittings with Teflon tape! Do not use pipe cement on valve! This will damage the valve and void the warranty!NOTe:thecorrectinstallationofthecontrolleriswheretheorangehandleisawayfromthefaucetandthecontroller’sdigitaldisplayreadingisfacingthefaucet.Makesurethattheflowdirectionarrowengravedonthesideofthecontrollerispointedawayfromthewatersource.
Figure 2
3
Figure 1
b
cde
fgh

2.2 BATTery INsTAllATION1.Holdingtheuppersectionofthecontrollerabovethe
mechanicalhandle,useafirmupwardtwisttoreleasethecontrollerfromtheskirt.
2.Invertthecontrollerandusefirmpressuretoliftthebatterycompartmentcover(1).
3.Checkpolaritytheninsertthelowerendofthe9-voltalkalinebattery(2)first.thenpressonthetopend(3)tolockdownthebatteryinplace.
2.3 BATTery reMOvAl1.removethebatterycompartmentcover(4).2.Liftthelowerendofthebattery(5)first.
Ifnecessary,usetheflatendofasmallscrewdriver.
• Removing the batteries from the top end may damage the connections.
• Use alkaline batteries only.NOTe:Batterypolarityismarkedinthebatterycompartment.3.replacebatterycompartmentcoverinitsproperplace,ensuringatriangleis
formedontheundersideofthecontroller.
3. installation
recommended Working Pressure: 10-80 PsI3.1 IN-lINe INsTAllATION1.Shutoffmainwatersupply.2.Installa3/4”ballorgatevalve
ontothePVCpipeortothevalvemanifoldbeforeinstallingthecontroller(Figure3a).
4
Figure 3a
abovegroundinstallation
3.turnwatersupplyontoflushthelineandthenshutthewateroffusingtheballorgatevalve.
4.Installthecontrollerwrappingteflontapeonallmalethreadfittings.
5.turnwatersupplyontopressurizethesystem.thecontrollerwillopenmomentarilyandthenwillshutoff.
6.Programthecontroller(Section4–IrrigationProgramming).
3.2 FAuCeT INsTAllATION1.Firstattachtheswivelfemalehosethread(FHt)bymalepipethread(MnPt)
adaptertotheinletsideofthecontroller.dothisbythreadingthemalesideoftheadaptertothecontrollerinlet,seearrowforwaterflowdirection(Figure4a)MakesuretowrapMnPtwithteflontape.
2.Attachthemalehosethreadbymalepipethreadadaptertotheoutletsideofthecontroller(Figure4b).
3.Connectthecontrollertothefaucetusingtheswiveladapter(Figure5a).
5
Figure 3b
belowgroundinstallation
Figure 4
ba
Figure 5bFigure 5a
Basicinstallation.
3/4” FHT x MNPTSwivel Adapter/
___
Nipple Hose x Pipe Thread/___
b
cd
ef

Ifabackflowpreventerispartofthefaucet(newhouses)donotinstallanyotherbackflowpreventertothefaucet.Ifbackflowpreventersarepartofyourcitycodeandyouhavepurchasedaunitaspartofyourdripsystem,installthedeviceonthedownstreamsideofthe7001(Figure6a-b).
Itisbesttoincludeafilteronadripsystem.thefiltercleanssmallparticlesoutofthewaterthatwouldotherwiseclogthesmallorificesofthedrippers.Filterscanalsoautomaticallyapplyfertilizerthroughadripsystem(Figure7a-b).
4.turnthefauceton,thecontrollerwillopenmomentarilyandthenwillshutoff.5.Programthecontroller.(Section4–IrrigationProgramming)
6
dripsysteminstallationusingapressureregulator(Figures6a-b).
#4 Pressure Regulator with Hose Thread
#18 Swivel Adapter to Drip System
Figure 6a Figure 6b
/___/
___#10 Backflow Preventer/
___
dripsysteminstallationusingafilterandapressureregulator(Figures7a-b).
Figure 7bFigure 7a
#5 Pressure Regulator with Pipe Thread
#16 Swivel Adapter to Drip System/
___/___
#6 Filter/___
3.3 MANuAl MeCHANICAl OPerATIONtheirrigationvalvecanbeopenedandclosedindependentofcontrolleroperation.Manualoperationisusefulwhenirrigationisrequiredimmediatelybutthereisinadequatetimeand/orknowledgeforprogrammingorthebatteryisunavailable.themanualoperatinghandleislocatedinthefront,lowersectionoftheskirt.Ithastwosettings:open(1)andautomatic(2).NOTe: themanualoperatinghandlecanonlyopenthevalve,itcannotclosethevalveiftheirrigationcontrollerprogramopenedit.reMeMBer: themanualoperatinghandlemustbeonautomatic(Auto)forcontrolleroperatedirrigation.
4. irrigation programming
4.1 PrOgrAMMINg MeTHOD
Programmingstep–usedtoselecttheappropriateprogrammingmode(e.g.)clocksettingmode.
datadecrement(decrease)–lowersthevalueoftheselectedparameter(e.g.deductsanhour).
dataincrement(increase)–raisesthevalueoftheselectedparameter(e.g.addsonanhour).
Flashbutton–usedtoselecttheparametertobechanged(e.g.hour,minute,etc.)toimplementthechange,theselectedparametermustbeflashing.
Ifnochangesareimplemented,thecontrollerdisplaywillalwaysreverttothemainscreen(clock).NOTe:Ifthecontrollerisnotprogrammedtheclockwillflashcontinuously.After10minutesthecontrollerwillimplement5-minuteirrigationdurationona24-hourcycle(defaultmode).
7
b
c
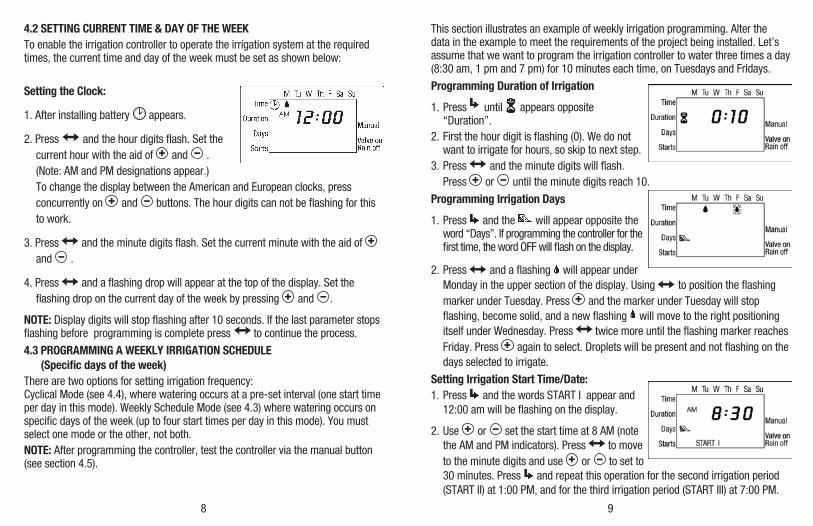
4.2 seTTINg CurreNT TIMe & DAy OF THe Weektoenabletheirrigationcontrollertooperatetheirrigationsystemattherequiredtimes,thecurrenttimeanddayoftheweekmustbesetasshownbelow:
setting the Clock:
1.Afterinstallingbattery appears.
2.Press andthehourdigitsflash.Setthecurrenthourwiththeaidof and .(note:AMandPMdesignationsappear.)tochangethedisplaybetweentheAmericanandEuropeanclocks,pressconcurrentlyon and buttons.thehourdigitscannotbeflashingforthistowork.
3.Press andtheminutedigitsflash.Setthecurrentminutewiththeaidof and .
4.Press andaflashingdropwillappearatthetopofthedisplay.Settheflashingdroponthecurrentdayoftheweekbypressing and .
NOTe:displaydigitswillstopflashingafter10seconds.Ifthelastparameterstopsflashingbeforeprogrammingiscompletepress tocontinuetheprocess.
4.3 PrOgrAMMINg A Weekly IrrIgATION sCHeDule (specific days of the week)
therearetwooptionsforsettingirrigationfrequency:CyclicalMode(see4.4),wherewateringoccursatapre-setinterval(onestarttimeperdayinthismode).WeeklyScheduleMode(see4.3)wherewateringoccursonspecificdaysoftheweek(uptofourstarttimesperdayinthismode).Youmustselectonemodeortheother,notboth.NOTe:Afterprogrammingthecontroller,testthecontrollerviathemanualbutton(seesection4.5).
8
thissectionillustratesanexampleofweeklyirrigationprogramming.Alterthedataintheexampletomeettherequirementsoftheprojectbeinginstalled.Let’sassumethatwewanttoprogramtheirrigationcontrollertowaterthreetimesaday(8:30am,1pmand7pm)for10minuteseachtime,ontuesdaysandFridays.
Programming Duration of Irrigation
1.Press until appearsopposite“duration”.
2.Firstthehourdigitisflashing(0).Wedonotwanttoirrigateforhours,soskiptonextstep.
3.Press andtheminutedigitswillflash.Press or untiltheminutedigitsreach10.
Programming Irrigation Days
1.Press andthe willappearoppositetheword“days”.Ifprogrammingthecontrollerforthefirsttime,thewordoFFwillflashonthedisplay.
2.Press andaflashing willappearunderMondayintheuppersectionofthedisplay.using topositiontheflashingmarkerundertuesday.Press andthemarkerundertuesdaywillstopflashing,becomesolid,andanewflashing willmovetotherightpositioningitselfunderWednesday.Press twicemoreuntiltheflashingmarkerreachesFriday.Press againtoselect.dropletswillbepresentandnotflashingonthedaysselectedtoirrigate.
setting Irrigation start Time/Date:1.Press andthewordsStArtIappearand
12:00amwillbeflashingonthedisplay.
2.use or setthestarttimeat8AM(notetheAMandPMindicators).Press tomovetotheminutedigitsanduse or tosetto30minutes.Press andrepeatthisoperationforthesecondirrigationperiod(StArtII)at1:00PM,andforthethirdirrigationperiod(StArtIII)at7:00PM.
9
10
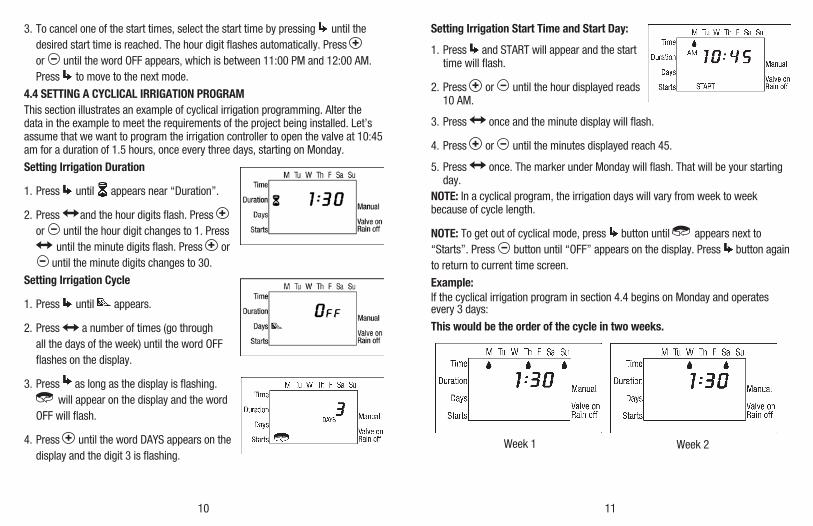
3.tocanceloneofthestarttimes,selectthestarttimebypressing untilthedesiredstarttimeisreached.thehourdigitflashesautomatically.Press or untilthewordoFFappears,whichisbetween11:00PMand12:00AM.Press tomovetothenextmode.
4.4 seTTINg A CyClICAl IrrIgATION PrOgrAMthissectionillustratesanexampleofcyclicalirrigationprogramming.Alterthedataintheexampletomeettherequirementsoftheprojectbeinginstalled.Let’sassumethatwewanttoprogramtheirrigationcontrollertoopenthevalveat10:45amforadurationof1.5hours,onceeverythreedays,startingonMonday.
setting Irrigation Duration
1.Press until appearsnear“duration”.
2.Press andthehourdigitsflash.Press or untilthehourdigitchangesto1.Press
untiltheminutedigitsflash.Press oruntiltheminutedigitschangesto30.
setting Irrigation Cycle
1.Press until appears.
2.Press anumberoftimes(gothroughallthedaysoftheweek)untilthewordoFFflashesonthedisplay.
3.Press aslongasthedisplayisflashing.willappearonthedisplayandtheword
oFFwillflash.
4.Press untiltheworddAYSappearsonthedisplayandthedigit3isflashing.
11
setting Irrigation start Time and start Day:
1.Press andStArtwillappearandthestarttimewillflash.
2.Press or untilthehourdisplayedreads10AM.
3.Press onceandtheminutedisplaywillflash.
4.Press or untiltheminutesdisplayedreach45.
5.Press once.themarkerunderMondaywillflash.thatwillbeyourstartingday.
NOTe:Inacyclicalprogram,theirrigationdayswillvaryfromweektoweekbecauseofcyclelength.
NOTe:togetoutofcyclicalmode,press buttonuntil appearsnextto“Starts”.Press buttonuntil“oFF”appearsonthedisplay.Press buttonagaintoreturntocurrenttimescreen.
example:Ifthecyclicalirrigationprograminsection4.4beginsonMondayandoperatesevery3days:
This would be the order of the cycle in two weeks.
Week1 Week2

12
Butiftheprogramstartsontuesday:
4.5 MANuAl ruN
Manualruntemporarilyturnsonthesystem.thevalvewillcloseautomaticallyattheendoftheirrigationperiod.
NOTe:theoriginallyprogrammedirrigationschedulewillcontinuetofunctionatthesettimes.thissettingcannotbeimplementedwhenthedisplayisflashing.
Manual Operation via the Controller:
Press untilcurrenttimeisdisplayed.Press
andthe willappearnexttotheword
“Manual”.the symbolwillappearunderneath
itandthevalvewillopen.
thedaysoftheweekandtheirrigationdurationthatwassetintheprogramwillappearonthedisplay.
Canceling Operation:
Press againandthe and symbolswilldisappearfromthedisplay.
notE:Iftheirrigationdurationissetatzero(0:00)inautomaticmode,irrigationwillnotoccurand willappearonthedisplay.
Week1 Week2
13
4.6 susPeND IrrIgATION (rain Off)
thisoptionisusedtotemporarilysuspendirrigationcontrolleroperation,forexample,whileitisraining.Programmedschedulesremaininthecontrollermemorybutarenotimplementeduntilthesuspensioniscancelled.
suspension:Press andholddownfor5consecutivesecondsuntilthe appears.
Cancel suspension:
Press andholddownfor5consecutivesecondstorestartthescheduledprogramsinthecontroller.the symbolwilldisappear.
NOTe:duringsuspensionthe buttonwillnotfunction.
5. additional displays
5.1 BlINkINg lOW BATTery WArNINgAflashingbatteryiconappearsonthedisplaywhenthebatteriesareweak.Atthispoint,thebatterystillcontainsalimitedamountofenergyforvalveoperation.thebatteryshouldbereplacedpromptly.Ifthebatteryisnotreplaced,theirrigationcontrollerwillcontinuetoopenthevalve8additionaltimesaccordingtotheprogram.ItwillthensuspendtheprogramandoFFwillappearonthescreen.Program data will be retained for 30 seconds during battery changing.Anirrigationcontrollerwithoutabatterywillnotoperatethevalve.
5.2 MIssINg DeFINITION IN IrrIgATION PrOgrAM
willappearifirrigationdayshavenotbeenspecifiedafterprogramming(seeSection4).Inthiscase,thevalvecannotbeopenedformanualoperation.
14
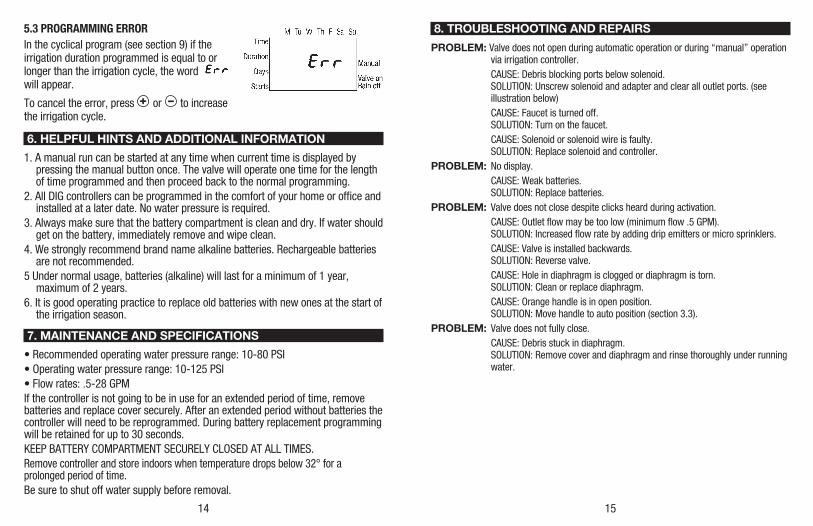
5.3 PrOgrAMMINg errOrInthecyclicalprogram(seesection9)iftheirrigationdurationprogrammedisequaltoorlongerthantheirrigationcycle,theword willappear.
tocanceltheerror,press or toincreasetheirrigationcycle.
6. helpful hints and additional information
1.Amanualruncanbestartedatanytimewhencurrenttimeisdisplayedbypressingthemanualbuttononce.thevalvewilloperateonetimeforthelengthoftimeprogrammedandthenproceedbacktothenormalprogramming.
2.AlldIGcontrollerscanbeprogrammedinthecomfortofyourhomeorofficeandinstalledatalaterdate.nowaterpressureisrequired.
3.Alwaysmakesurethatthebatterycompartmentiscleananddry.Ifwatershouldgetonthebattery,immediatelyremoveandwipeclean.
4.Westronglyrecommendbrandnamealkalinebatteries.rechargeablebatteriesarenotrecommended.
5undernormalusage,batteries(alkaline)willlastforaminimumof1year,maximumof2years.
6.Itisgoodoperatingpracticetoreplaceoldbatterieswithnewonesatthestartoftheirrigationseason.
7. maintenance and specifications
•recommendedoperatingwaterpressurerange:10-80PSI•operatingwaterpressurerange:10-125PSI•Flowrates:.5-28GPMIfthecontrollerisnotgoingtobeinuseforanextendedperiodoftime,removebatteriesandreplacecoversecurely.Afteranextendedperiodwithoutbatteriesthecontrollerwillneedtobereprogrammed.duringbatteryreplacementprogrammingwillberetainedforupto30seconds.KEEPBAttErYCoMPArtMEntSECurELYCLoSEdAtALLtIMES.removecontrollerandstoreindoorswhentemperaturedropsbelow32°foraprolongedperiodoftime.Besuretoshutoffwatersupplybeforeremoval.
15
8. troubleshooting and repairs
problem: Valvedoesnotopenduringautomaticoperationorduring“manual”operationviairrigationcontroller.
CAuSE:debrisblockingportsbelowsolenoid.SoLutIon:unscrewsolenoidandadapterandclearalloutletports.(seeillustrationbelow)
CAuSE:Faucetisturnedoff.SoLutIon:turnonthefaucet.
CAuSE:Solenoidorsolenoidwireisfaulty.SoLutIon:replacesolenoidandcontroller.
problem: nodisplay. CAuSE:Weakbatteries.
SoLutIon:replacebatteries.problem: Valvedoesnotclosedespiteclicksheardduringactivation. CAuSE:outletflowmaybetoolow(minimumflow.5GPM).
SoLutIon:Increasedflowratebyaddingdripemittersormicrosprinklers. CAuSE:Valveisinstalledbackwards.
SoLutIon:reversevalve. CAuSE:Holeindiaphragmiscloggedordiaphragmistorn.
SoLutIon:Cleanorreplacediaphragm. CAuSE:orangehandleisinopenposition.
SoLutIon:Movehandletoautoposition(section3.3).problem: Valvedoesnotfullyclose. CAuSE:debrisstuckindiaphragm.
SoLutIon:removecoveranddiaphragmandrinsethoroughlyunderrunningwater.

16
to order replacement or spare parts:please order online at WWW.digcorp.com
WeatdIGCorporationunderstandthatmostdealersdonotcarryspareparts.Foryourconvenience,ifyouneedoneoftheseparts,pleaseorderonlineatwww.digcorp.com.
*Pricessubjecttochangewithoutnotice.
ControllerwithSolenoid$42.50
ControllerSleeveBody$2.80
3/4”PlasticValve$12.00
3/4”FemaleSwivelAdapter,FHtxMnPt
$1.10
BottomSleeve$1.20
MaleAdapter3/4”MHtx3/4”MnPt
$0.80
17
WarrantydIGCorPorAtIonwarrantstheseproductstobefreefromdefectsinmaterialand
workmanshipforaperiodofthreeyearsfromdateofpurchase.thiswarrantydoesnotcoverdamageresultingfromaccident,misuse,neglect,modificationorimproperinstallation.thiswarrantyshallextendonlytotheoriginalpurchaseroftheproductforusebythepurchaser.thiswarrantyshallnotcoverbatteriesoranymalfunctionoftheproductduetobatteryfailure.theobligationofdIGCorPorAtIonunderthiswarrantyislimitedtorepairingorreplacingatitsfactorythisproductwhichshallbereturnedtothefactorywithinthreeyearsaftertheoriginalpurchaseandwhichonexaminationisfoundtocontaindefectsinmaterialandworkmanship.
dIGCorPorAtIonSHALLInnoEVEntBELIABLEForAnYInCIdEntALorConSEQuEntIALdAMAGESoFAnYKInd;tHESoLEoBLIGAtIonoFdIGBEInGLIMItEdtorEPAIrorrEPLACEMEntoFdEFECtIVEProduCtS.SoMEStAtESdonotALLoWtHEEXCLuSIonorLIMItAtIonoFInCIdEntALorConSEQuEntIALdAMAGES,SotHEABoVELIMItAtIonorEXCLuSIonMAYnotAPPLYtoYou.
unattendeduseforprolongedperiodswithoutinspectiontoverifyproperoperationisbeyondtheintendeduseofthisproduct,andanydamageresultingfromsuchuseshallnotbetheresponsibilityofdIGCorPorAtIon.therearenowarrantieswhichextendbeyondthedescriptiononthefacehereof.Inthecaseofpurchaseoftheproductforuseotherthan,forirrigationpurposes,dIGCorPorAtIonherebydisclaimsanyimpliedwarrantiesincludinganywarrantiesofmerchantabilityandfitnessforaparticularpurpose.Inthecaseofthepurchaseoftheproductforpersonal,familyorhouseholdpurposes,dIGCorPorAtIondisclaimsanysuchwarrantiestotheextentpermittedbylaw.totheextentthatanysuchdisclaimerorimpliedwarrantiesshallbeineffectual,thenanyimpliedwarrantiesshallbelimitedindurationtoaperiodofthreeyearsfromthedateoftheoriginalpurchaseforusebythepurchaser.Somestatesdonotallowlimitationonhowlonganimpliedwarrantylasts,sotheabovelimitationmaynotapplytoyou.
Inordertoobtainperformanceunderthiswarranty,theunitmustbereturnedtothefactory,alongwithproofofpurchaseindicatingoriginaldateofpurchase,shippingprepaid,addressedasfollows:
dIGCorPorAtIon,1210Activitydrive,Vista,CA92081-8510.repairedorreplacedunitswillbeshippedprepaidtothenameandaddresssuppliedwiththeunitreturnedunderwarranty.Allowfourweeksforrepairsandshippingtime.repairofdamagedunitsnototherwisewithinwarrantymayberefusedordoneatareasonablecostorchargeattheoptionofdIGCorPorAtIon.
thiswarrantygivesyouspecificlegalrights,andyoumayalsohaveotherrightswhichvaryfromstatetostate.

technical assistance
Shouldyouencounteranyproblem(s)withthisproductorifyoudonotunderstanditsmanyfeatures,pleaserefertothisinstructionmanualfirst.Iffurtherassistanceisreqired,dIGoffersthefollowingcustomersupport:TeCHNICAl servICe usA• DIg’s Technical service TeamisavailabletoanswerquestionsinEnglishand
Spanish from8:00AM to5:00PM (PSt)Monday-Friday (except holidays) at800-344-2281.
• QuestionsinEnglishandSpanishcanbee-mailedtoquestions@digcorp.comorfaxedto760-727-0282.
• SpecificationdocumentsandmanualsareavailablefordownloadinginEnglishandSpanishatwww.digcorp.com.
Website: Ewww.digcorp.come-mail:dig@digcorp.com062111dIGCorP26-020PrintedintheuSAdIGisaregisteredServiceMarkofdIGCorp.
1210ActivitydriveVista,CA92081-8510,uSA