model ar-m355n ar-m455n - lvcopiers.com · • machine maintenance ... page operation manual (for...
TRANSCRIPT

PART 1: GENERAL INFORMATION
• BEFORE USING THE PRODUCT
• MANAGING THE MACHINE• PERIPHERAL DEVICESPART 2: COPIER OPERATION
• MAKING COPIES• CONVENIENT COPY
FUNCTIONS• MACHINE MAINTENANCE
(FOR COPYING)• DOCUMENT FILING
FUNCTION• SPECIFICATIONS
1-12-13-1
4-1
5-1
6-1
7-18-1
Page
OPERATION MANUAL(for general information and copier operation)
MODEL
AR-M355NAR-M455N
LASER PRINTER
Be sure to become thoroughly familiar with this manual to gain the maximum benefit from the product. Before installing this product, be sure to read the installation requirements and cautions sections.
Be sure to keep all operation manuals handy for reference including this manual, the "Operation manual (for general information and copier operation)" and operation manuals for any optional equipment which has been installed.

The power switch positions are marked " I " to indicate power "ON" and " " to indicate stand-by.Caution:
For complete electrical disconnection, pull out the main plug.The socket-outlet should be installed near the equipment and should be easily accessible.
FOR YOUR RECORDS ...To protect against loss or theft, record and retain for reference the machine's serial number located on the back of the unit.
Model Number
Serial Number
Date of Purchase
Place of Purchase
Authorized Sharp Copier Service Department Number
This operation manual is also used for the AR-355 / AR-455 / AR-355 J /AR-455 J / AR-M355N J / AR-M455N J.
Shielded cables must be used with this equipment to maintain compliance with standard.
FCC Regulations state that any unauthorized changes or modifications tothis equipment not expressly approved by the manufacturer could void theuser's authority to operate this equipment.
Note:This equipment has been tested and found to comply with the limits for a ClassA digital device, pursuant to part 15 of the FCC Rules. These limits are designedto provide reasonable protection against harmful interference when theequipment is operated in a commercial environment. This equipment gener-ates, uses, and can radiate radio frequency energy and, if not installed andused in accordance with the operation manual, may cause harmful interfer-ence to radio communications. Operation of this equipment in a residential area islikely to cause harmful interference in which case the user will be required tocorrect the interference at his own expense.
This device complies with Part 15 of the FCC rules. Operation is subject to the following two conditions: (1) This device may not cause harmful interference, and (2) this device must accept any interference received, including interference that may cause undesired operation.
WARNING:
For users in the USA

Part 1: General Information

0-1
PRODUCT CONFIGURATIONSThe table below shows the product models covered by this manual.
(As of October 2004)
OPERATION MANUALSThe following operation manuals are provided for the machine. Please read the appropriate manuals as needed forthe features you wish to learn about.
● Operation manual (for general information and copier operation) (this manual):The first half of this manual provides general information about the machine, including safety information, loadingpaper, removing misfeeds, and regular maintenance.The second half of the manual explains how to use the copy and document filing functions.● Key operator's guide:This primarily explains key operator programs for machine management and copier related functions. Keyoperator programs for the fax, printer and network scanner functions are explained in the manuals for thosefunctions.Key operator programs are used by key operators to configure function settings to meet the needs of thecustomer.● Operation manual (for facsimile)This manual explains the procedures for using the machine as a facsimile. To use the fax function, the facsimileexpansion kit must be installed.● Software setup guide (for printer)This explains how to connect the machine to your computer, install the printer driver for Windows, and configurethe printer driver settings.● Operation manual (for printer)*This manual explains the procedures for using the machine as a printer.● Operation manual (for network scanner)*This manual explains the procedures for using the machine as a network scanner when connected to a computer.To use the network scanner function, the AR-NS3 network scanner expansion kit must be installed.* The Operation manual (for network scanner) is provided as PDF file in the CD-ROM.
This manual is not provided as printed manual.
NOTES● Considerable care has been taken in preparing this manual. If you have any comments or concerns about the
manual, please contact your nearest SHARP Service Department.● This product has undergone strict quality control and inspection procedures. In the unlikely event that a defect
or other problem is discovered, please contact your dealer or nearest SHARP Service Department.● Aside from instances provided for by law, SHARP is not responsible for failures occurring during use of the
product or its options, or failures due to incorrect operation of the product and its options, or other failures, or forany damage that occurs due to use of the product.
The display screens, messages, and key names shown in the manual may differ from those on the actual machinedue to product improvements and modifications.
Model Product configuration
AR-M355N/AR-M455N Laser printer
0-2
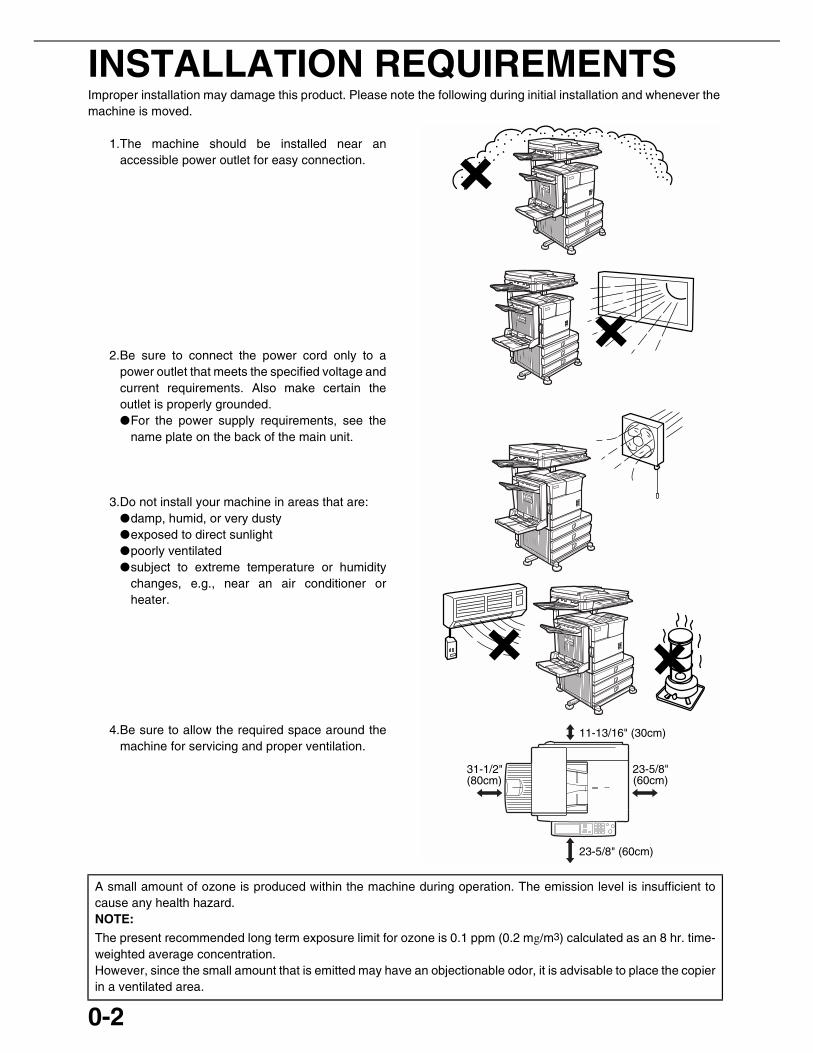
Improper installation may damage this product. Please note the following during initial installation and whenever themachine is moved.
1.The machine should be installed near anaccessible power outlet for easy connection.
2.Be sure to connect the power cord only to apower outlet that meets the specified voltage andcurrent requirements. Also make certain theoutlet is properly grounded.●For the power supply requirements, see the
name plate on the back of the main unit.
3.Do not install your machine in areas that are:●damp, humid, or very dusty ●exposed to direct sunlight ●poorly ventilated ●subject to extreme temperature or humidity
changes, e.g., near an air conditioner orheater.
4.Be sure to allow the required space around themachine for servicing and proper ventilation.
A small amount of ozone is produced within the machine during operation. The emission level is insufficient tocause any health hazard.NOTE:
The present recommended long term exposure limit for ozone is 0.1 ppm (0.2 mg/m3) calculated as an 8 hr. time-weighted average concentration.However, since the small amount that is emitted may have an objectionable odor, it is advisable to place the copierin a ventilated area.
23-5/8"(60cm)
31-1/2"(80cm)
11-13/16" (30cm)
23-5/8" (60cm)
INSTALLATION REQUIREMENTS

0-3
CAUTIONS1.Do not touch the photoconductive drum. Scratches or smudges on the
drum will cause dirty prints.
2.The fusing unit is extremely hot. Exercise care in this area.
3.Do not look directly at the light source. Doing so may damage youreyes.
4.Five adjusters are provided on all optional stand/paper drawer units.These adjusters should be lowered until they contact the floor. When moving the machine with the optional stand/paper drawer, besure to raise the adjusters. Also, unlock the two casters at the front ofthe optional stand/paper drawer. After moving the machine, lower thefour adjusters until they reach the floor and lock the two casters.
5.Do not make any modifications to this machine. Doing so may result inpersonal injury or damage to the machine.
6.Since this machine is heavy, it is recommended that it be moved bymore than one person to prevent injury.
7.When connecting this machine to a computer, be sure to first turn boththe computer and the machine off.
8.Do not make copies of anything which is prohibited from copying bylaw. The following items are normally prohibited from printing bynational law. Other items may be prohibited by local law.● Money ● Stamps ● Bonds ● Stocks ● Bank drafts ● Checks ● Passports ● Driver's licenses
The part indicated in the illustration is only to be handled by a service technician.Absolutely do not touch this part.
The machine includes the document filing function, which stores document image data on the machine's hard disk.Stored documents can be called up and printed or transmitted as needed. If a hard disk failure occurs, it will nolonger be possible to call up the stored document data. To prevent the loss of important documents in the unlikelyevent of a hard disk failure, keep the originals of important documents or store the original data elsewhere. With the exception of instances provided for by law, Sharp Corporation bears no responsibility for any damagesor loss due to the loss of stored document data.
"BATTERY DISPOSAL"
THIS PRODUCT CONTAINS A LITHIUM PRIMARY MEMORY BACK-UP BATTERY THAT MUST BEDISPOSED OF PROPERLY. PLEASE CONTACT YOUR LOCAL SHARP DEALER OR AUTHORIZED SERVICEREPRESENTATIVE FOR ASSISTANCE IN DISPOSING OF THIS BATTERY.
This product utilizes tin-lead solder, and a fluorescent lamp containing a small amount of mercury. Disposal of these materials may be regulated due to environmental considerations.For disposal or recycling information, please contact your local authorities or the Electronics Industries Alliance:www.eia.org
Fusing unit
Adjuster
Lock Release

CAUTIONS
0-4
Laser InformationWave length
785 nm+10 nm-15 nm
Pulse times North America: 35 cpm model: (4.1 µs ± 4.1 ns)/7 mm45 cpm model: (5.7 µs ± 5.7 ns)/7 mm
Europe: 35 cpm model: (3.8 µs ± 3.8 ns)/7 mm45 cpm model: (4.4 µs ± 4.4 ns)/7 mm
Output power 0.2 mW - 0.4 mW
At the production line, the output power of the scanner unit is adjusted to 0.4 MILLIWATT PLUS 8 % and is maintainedconstant by the operation of the Automatic Power Control (APC).
CautionUse of controls or adjustments or performance of procedures other than those specified herein may result in hazardousradiation exposure.
For North America:
SAFETY PRECAUTIONSThis Digital Equipment is rated Class 1 and complies with 21 CFR 1040.10 and 1040.11 of the CDRH standards. Thismeans that the equipment does not produce hazardous laser radiation. For your safety, observe the precautions below.
● Do not remove the cabinet, operation panel or any other covers.● The equipment's exterior covers contain several safety interlock switches. Do not bypass any safety interlock by
inserting wedges or other items into switch slots.
For Europe:
CLASS 1 LASER PRODUCT
LASER KLASSE 1
LUOKAN 1 LASERLAITE
KLASS 1 LASERAPPARAT
CAUTIONINVISIBLE LASER RADIATION WHEN OPEN INTERLOCKS DEFEATED. AVOID EXPOSURE TO BEAM.
VORSICHTUNSICHTBARELASERSTRAHLUNG WENN ABDECKUNG GEÖFFNET UND SICHERHEITSVERRIEGELUNGÜBERBRÜCKT. NICHT DEM STRAHL AUSSETZEN.
ADVARSELUSYNLIG LASERSTRÅLNING VED ÅBNING, NÅR SIKKERHEDSBRYDERE ER UDE AF FUNKTION. UNDGÅ UDSAETTELSE FOR STRÅLNING.
VAROITUS!LAITTEEN KÄYTTÄMINEN MUULLA KUIN TÄSSÄ KÄYTTÖOHJEESSA MAINITULLA TAVALLA SAATTAA ALTISTAA KÄYTTÄJÄN TURVALLISUUSLUOKAN 1 YLITTÄVÄLLE NÄKYMÄTTÖMÄLLE LASERSÄTEILYLLE.
VARNINGOM APPARATEN ANVÄNDS PÅ ANNAT SÄTT ÄN I DENNA BRUKSANVISNING SPECIFICERATS, KAN ANVÄNDAREN UTSÄTTAS FÖR OSYNLIG LASERSTRÅLNING, SOM ÖVERSKRIDER GRÄNSEN FÖR LASERKLASS 1.
CLASS 1LASER PRODUCT
LASER KLASSE 1
CAUTIONVORSICHTADVARSELADVERSELVARNINGVARO!
INVISIBLE LASER RADIATION WHEN OPEN AND INTERLOCKS DEFEATED. AVOID EXPOSURE TO BEAM.
Laserstrahl
UNSICHTBARE LASERSTRAHLUNG WENN ABDECKUNG GEÖFFNET UND SICHERHEITSVERRIEGELUNG ÜBERERÜCKT. NICHT DEM STRAHL AUSSETZEN.
USYNLIG LASERSTRÅLING VED ÅBNING, NÅR SIKKERHEDSAFBRYDERE ER UDE AF FUNKTION. UNDGÅ UDSAETTELSE FOR STRÅLNING.
USYNLIG LASERSTRÅLING NÅR DEKSEL ÅPNES OG SIKKERHEDSLÅS BRYTES.UNNGÅ EKSPONERING FOR STRÅLEN.
OSYNLIG LASERSTRÅLNING NÄR DENNA DEL ÄR ÖPPNAD OCH SPÄRRAR ÄR URKOPPLADE. STRÅLEN ÄR FARLIG. BETRAKTA EJ STRÅLEN.
AVATTAESSA JA SUOJALUKITUS OHITETTAESSA OLET ALTTIINA NÄKYMÄTÖNTÄLASERSÄTEILYLLE. ÄLÄ KATSO SÄTEESEEN.

0-5
CONTENTSPage
PRODUCT CONFIGURATIONS.................................. 0-1OPERATION MANUALS.............................................. 0-1INSTALLATION REQUIREMENTS.............................. 0-2CAUTIONS................................................................... 0-3
● Laser Information ................................................. 0-4CONTENTS ................................................................. 0-5
CHAPTER 1BEFORE USING THE PRODUCT
INTRODUCTION.......................................................... 1-2MAIN FEATURES........................................................ 1-3PART NAMES AND FUNCTIONS ............................... 1-9
● Exterior ................................................................. 1-9● Interior .................................................................. 1-10● Part names and functions of peripheral devices .. 1-11● Operation panel.................................................... 1-13● Touch panel ......................................................... 1-14
TURNING THE POWER ON AND OFF....................... 1-17AUDITING MODE ........................................................ 1-18
● Using the machine when the auditing mode isenabled ................................................................ 1-18
CHAPTER 2MANAGING THE MACHINE
LOADING PAPER........................................................ 2-2● Loading paper in paper tray 1 .............................. 2-2● Changing the paper size in paper tray 1 .............. 2-2● Specifications of paper trays ................................ 2-3● Setting the paper type and paper size ................. 2-5● Setting the paper size when a special size is
loaded .................................................................. 2-6● Programming and editing paper types ................. 2-7● Loading paper in the multi purpose drawer.......... 2-8● Specifications (multi purpose drawer) .................. 2-10● Loading paper in the stand/3 x 500 sheet paper
drawer .................................................................. 2-10● Specifications (stand/3 x 500 sheet paper
drawer) ................................................................. 2-10● Loading paper in the stand/MPD & 2000 sheet
paper drawer ........................................................ 2-11● Specifications (stand/MPD & 2000 sheet paper
drawer) ................................................................. 2-11CUSTOM SETTINGS................................................... 2-12
● General procedure for custom settings ................ 2-12● About the settings ................................................ 2-14
REPLACING THE TONER CARTRIDGE .................... 2-15STORAGE OF SUPPLIES........................................... 2-16MISFEED REMOVAL................................................... 2-17
● Misfeed removal guidance ................................... 2-17● Misfeed in the transport area, fusing area, and
exit area ............................................................... 2-18● Misfeed in the duplex module .............................. 2-19● Misfeed in the paper feed area ............................ 2-20
REMOVING AN ORIGINAL MISFEED ........................ 2-22● Removing a misfed original from the automatic
document feeder .................................................. 2-22TROUBLESHOOTING ................................................. 2-23
CHAPTER 3PERIPHERAL DEVICES
DUPLEX MODULE.......................................................3-2● Part names ...........................................................3-2● Specifications .......................................................3-2● Loading paper in the bypass tray .........................3-3● Troubleshooting (concerning the duplex module) ..3-4
MAIL-BIN STACKER ....................................................3-5● Part names ...........................................................3-5● Specifications .......................................................3-5● Misfeed in the mail-bin stacker .............................3-6
FINISHER.....................................................................3-7● Part names ...........................................................3-7● Specifications .......................................................3-7● Finisher functions .................................................3-8● Using the finisher functions ..................................3-9● Staple cartridge replacement................................3-10● Misfeed in the finisher...........................................3-12● Troubleshooting finisher problems .......................3-13
SADDLE STITCH FINISHER .......................................3-14● Part names ...........................................................3-14● Specifications .......................................................3-14● Saddle stitch finisher functions .............................3-15● Using the saddle stitch finisher.............................3-18● Staple cartridge replacement and staple jam
removal.................................................................3-19● Misfeed in the saddle stitch finisher......................3-22● Troubleshooting (concerning the saddle stitch
finisher).................................................................3-24
CHAPTER 4MAKING COPIES
AUTOMATIC DOCUMENT FEEDER ...........................4-2● Acceptable originals .............................................4-2
PLACING ORIGINALS .................................................4-3CHECKING THE SIZE OF A PLACED ORIGINAL ......4-5
● Manually setting the scanning size.......................4-5STORING, DELETING, AND USING ORIGINAL
SIZES ...........................................................................4-6● Storing or deleting an original size .......................4-6
NORMAL COPYING.....................................................4-7● Making copies with the automatic document
feeder ...................................................................4-7● Automatic two-sided copying using the automatic
document feeder...................................................4-10● Copying from the document glass ........................4-11● Automatic two-sided copying from the document
glass .....................................................................4-13ADJUSTING THE EXPOSURE ....................................4-14REDUCTION/ENLARGEMENT/ZOOM ........................4-15
● Automatic selection (auto image) .........................4-15● Manual selection (preset copy ratios/zoom) .........4-16● XY ZOOM .............................................................4-18
SPECIAL PAPERS.......................................................4-20
CONTENTS
0-6
CHAPTER 5CONVENIENT COPY FUNCTIONS
SPECIAL MODES ........................................................5-2● General procedure for using special functions .....5-2● Margin shift ...........................................................5-3● Erase ....................................................................5-4● Dual page copy.....................................................5-5● Pamphlet copy......................................................5-6● Job build ...............................................................5-8● Tandem copy........................................................5-9● Covers/inserts.......................................................5-11● Transparency film with insert sheets ....................5-22● Multi shot ..............................................................5-23● Book copy.............................................................5-25● Card shot ................................................................. 5-26● Mirror image .........................................................5-28● B/W reverse..........................................................5-28● Print menu ............................................................5-29
STORING, USING AND DELETING JOBPROGRAMS ................................................................5-41
● Storing a job program...........................................5-41● Calling up a job program ......................................5-42● Deleting a stored job program ..............................5-42
INTERRUPTING A COPY RUN ...................................5-43
CHAPTER 6MACHINE MAINTENANCE (FORCOPYING)
USER MAINTENANCE ................................................6-2● Cleaning the document glass and the automatic
document feeder...................................................6-2● Cleaning the main charger of the
photoconductive drum ..........................................6-2TROUBLESHOOTING .................................................6-3
CHAPTER 7DOCUMENT FILING FUNCTION
OVERVIEW ..................................................................7-2● Document filing function .......................................7-2
TO USE THE DOCUMENT FILING FUNCTION..........7-4● A look at the operation panel................................7-4● Saving files ...........................................................7-4● Main screen of document filing.............................7-5● Document filing icons ...........................................7-5
SAVING A DOCUMENT IMAGE FILE..........................7-6● Quick File..............................................................7-6● Filing.....................................................................7-7● Print jobs...............................................................7-9● Scan Save ............................................................7-10
CALLING UP AND USING A FILE ...............................7-13● Searching for and calling up a saved file .............. 7-13● Calling up and using a saved file..........................7-15
CUSTOM SETTINGS...................................................7-21● Creating, editing, and deleting user names and
folders...................................................................7-21ENTERING CHARACTERS .........................................7-26TROUBLESHOOTING .................................................7-28
CHAPTER 8SPECIFICATIONS
SPECIFICATIONS....................................................... 8-2LIST OF COMBINATION OF PERIPHERAL DEVICES .. 8-4INDEX.......................................................................... 8-5

1-1
CHAPTER 1BEFORE USING THE
PRODUCTThis chapter contains basic information that should be read before usingthe product.
Page
INTRODUCTION .................................................................................... 1-2MAIN FEATURES................................................................................... 1-3PART NAMES AND FUNCTIONS .......................................................... 1-9
● Exterior............................................................................................ 1-9● Interior ............................................................................................. 1-10● Part names and functions of peripheral devices ............................. 1-11● Operation panel............................................................................... 1-13● Touch panel .................................................................................... 1-14
TURNING THE POWER ON AND OFF.................................................. 1-17
AUDITING MODE ................................................................................... 1-18● Using the machine when the auditing mode is enabled.................. 1-18

1-2
INTRODUCTIONThank you for purchasing a SHARP digital multifunction copier.Please read this manual before using the machine. In particular, be sure to read "INSTALLATION REQUIREMENTS"before using the machine.Please keep this manual close at hand for reference whenever necessary.This manual provides general information on using the machine, such as routine maintenance and how to load paperand remove misfeeds. It also explains how to use the copier and document filing functions.Separate manuals have been provided for the fax function, printer function, and network scanner function.
■■■■ Original and paper sizesThis machine allows use of standard sizes in both the inch and AB systems.These are shown in the tables below.
■■■■ The meaning of "R" in original and paper size indicationsSome original and paper sizes can be placed in either the portrait or landscape orientations. To differentiatebetween landscape and portrait, the landscape orientation size indication will contain an "R". These are indicatedas 8-1/2" x 11"R, 5-1/2" x 8-1/2"R, A4R, B5R, etc. Sizes that can be placed only in the landscape orientation (11"x 17", 8-1/2" x 14", 8-1/2" x 13", A3, B4) do not contain the "R" in their size indication.
Sizes in the inch system Sizes in the AB system
11" x 17" (LEDGER) A3
8-1/2" x 14" (LEGAL) B4
8-1/2" x 13" (FOOLSCAP) A4
8-1/2" x 11" (LETTER) B5
7-1/4" x 10-1/2" (EXECUTIVE) A5
5-1/2" x 8-1/2" (INVOICE)
Size indicationwith "R"
Landscapeorientation
Size indicationwithout "R"
Portrait orientation

1-3
1
MAIN FEATURESThe digital multifunction copier is capable of performing a variety of functions. This page shows features related tothe copy function.
● Sort mode See page 1-3● Group mode See page 1-3● 2-sided Copy See page 1-3
(When the duplex module is installed.)● Exposure Adjustments See page 1-3● Reduction/Enlargement See page 1-4● XY Zoom See page 1-4● Margin Shift See page 1-4● Erase See page 1-4● Dual Page Copy See page 1-4● Pamphlet Copy See page 1-4● Job Build See page 1-5● Tandem Copy See page 1-5● Covers/inserts See page 1-5● Transparency Insert See page 1-5● Multi Shot See page 1-5● Book Copy See page 1-5● Card Shot See page 1-6
● Job programs See page 1-6● Mirror Image See page 1-6● B/W Reverse See page 1-6● Date See page 1-6● Stamp See page 1-6● Page numbering See page 1-7● Text See page 1-7● Interrupting a copy run See page 1-7● Offset mode See page 1-7
(When the Finisher or Saddle stitch finisher is installed.)● Staple sort mode See page 1-7
(When the Finisher or Saddle stitch finisher is installed.)● Saddle stitch See page 1-7
(When the Saddle stitch finisher is installed.)● Hole punching See page 1-8
(When the Saddle stitch finisher and PunchModule are installed.)
● Document filing function See page 1-8
Sort mode See page 4-9
Copies can be collated.
Group mode See page 4-9
Copies can be grouped by page.
2-sided Copy See pages 4-10, 4-13
Copy onto both sides of the paper using the documentglass or the automatic document feeder.
Exposure Adjustments See page 4-14
The desired image type for the original can beselected.
Original Copy
Original Copy
Original Copy
* When the duplex module is installed.
Exposure
Text Text/Photo Photo
Resolution ABCDE
ABCDE
DarkerLighter

MAIN FEATURES
1-4
Reduction / Enlargement See page 4-15
Copies can be enlarged or reduced to the desiredsize.
XY Zoom See page 4-18
Separate ratio settings can be selected for thelength and width of a copy.
Margin Shift See page 5-3
Margins can be added to copies.
Erase See page 5-4
Shadows that appear around the edges of copies ofbooks or thick originals can be erased.
Dual Page Copy See page 5-5
The left and right pages of a book can besuccessively copied onto separate sheets.
Pamphlet Copy See page 5-6
One-sided or two-sided pamphlet style copies canbe made.
Original
Enlargement Reduction
Copy
Original Copy
Image shiftedto the right
Image shiftedto the left
MarginMargin
One-sided copyingOriginal
Two-sided copyingOriginal
Image shiftedto the right
Margin
Image shiftedto the left
Margin
Or
Original Copy
Edge erase
Center erase
Edge+Centererase
CopyBook original
Finished copies arefolded in two.
Originals (one-sided)
12
34
56
78
7
8
5
6
3
4
Originals (two-sided)
1
2
Left binding
Right binding
First page
First page

MAIN FEATURES
1-5
1
Job Build See page 5-8
When you have a very large number of originals, thepages can be scanned in sets.
Tandem Copy See page 5-9
Two machines can be used to run a large copy jobin parallel.
Covers/inserts See page 5-11
Front covers, back covers, and inserts can beadded. These can also be copied on.
Transparency Insert See page 5-22
Inserts can be automatically inserted betweentransparencies.
Multi Shot See page 5-23
Multiple original pages can be copied onto asingle sheet of paper in a uniform layout.
Book Copy See page 5-25
Books and other bound originals can be copiedpamphlet style.
50 sheets100 sheets 50 sheets
100 sets of copies
50 sets ofcopies
50 sets ofcopies
Front cover
Back cover
Originals
Insert sheets
Insert sheets
Originals (1-sided)
Originals (2-sided)
Copy
Originals(1-sided)
Originals(2-sided)
Copy
CopyOriginal
Left binding
Right binding
First page
First page
First page
First page

MAIN FEATURES
1-6
Card Shot See page 5-26
The front and back of a card can be copied ontoone sheet of paper.This function is convenient for making copies forcertification purposes and helps save paper.
Job programs See page 5-41
Various steps of a copy operation can be storedas a program, and up to 10 programs can bestored. Saving frequently used sets of settings ina program saves you the trouble of selectingthose settings each time you wish to use them.
Mirror Image See page 5-28
A mirror image copy can be made.
B/W Reverse See page 5-28
White and black can be inverted on a copy toproduce a negative image.
Date See page 5-32
The date can be added to copies.
Stamp See page 5-33
Reverse text can be added to copies ("stamp").
Original
Example:Portrait8-1/2" x 11" (A4) size
Example:Landscape8-1/2" x 11" (A4) size
Copy
Back of card
Front of card
CARDCARD
CARD
JOB PROGRAMS
PRESS PROGRAM NUMBER.
RECALL
Original Copy
Original Copy
2004/OCT/1
CONFIDENTIAL
MAIN FEATURES
1-7
1
Page numbering See page 5-34
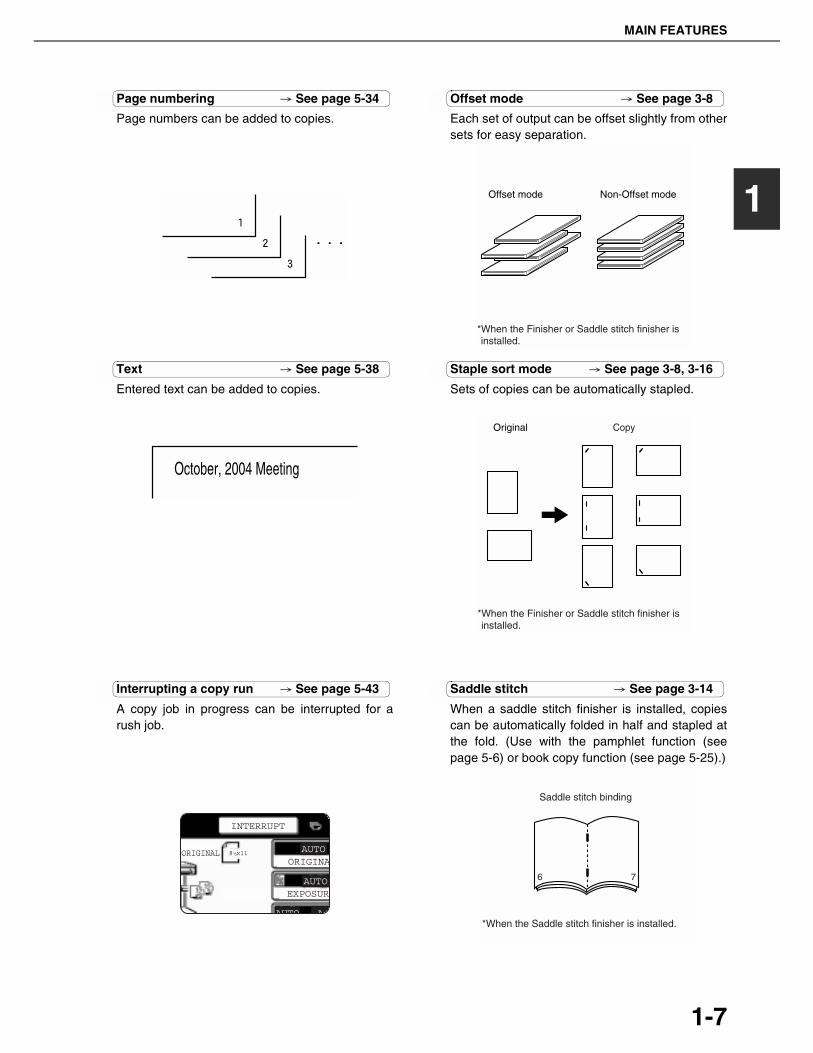
Page numbers can be added to copies.
Text See page 5-38
Entered text can be added to copies.
Interrupting a copy run See page 5-43
A copy job in progress can be interrupted for arush job.
Offset mode See page 3-8
Each set of output can be offset slightly from othersets for easy separation.
Staple sort mode See page 3-8, 3-16
Sets of copies can be automatically stapled.
Saddle stitch See page 3-14
When a saddle stitch finisher is installed, copiescan be automatically folded in half and stapled atthe fold. (Use with the pamphlet function (seepage 5-6) or book copy function (see page 5-25).)
October, 2004 Meeting
AUTO
AUTO
AUTO A4
ORIGINA
EXPOSUR
INTERRUPT
ORIGINAL 8 x111/ 2
Offset mode Non-Offset mode
*When the Finisher or Saddle stitch finisher is installed.
Original Copy
*When the Finisher or Saddle stitch finisher is installed.
6 7
Saddle stitch binding
*When the Saddle stitch finisher is installed.

MAIN FEATURES
1-8
Hole punching See page 3-17
Copies can be punched to add holes.
Document filing function See CHAPTER 7
A document image can be stored on the hard disk.A stored file can easily be called up and printed ortransmitted.
Energy saving featuresThis product has the following two power reducing modes to help conserve natural resources and reduceenvironmental pollution.
Preheat modeWhen the machine remains in the standby state for the amount of time set in the key operator programs, preheatmode automatically reduces the temperature of the fusing unit to save power while the machine is on standby.When a fax or print job is received, or keys are pressed on the operation panel, or an original is placed fora copy, fax, or network scanner job, preheat mode automatically turns off.
Auto power shut-off modeThe auto power shut-off mode is the second level of power reduction. In this mode power is shut off to thefusing unit and the touch panel. In this state more energy is saved than in the preheat mode but the timeto recover to the ready condition will be longer. The preset time to enter this mode can be set by a keyoperator program.
When this product is used as a printer, and either of the above modes is active, the mode will be deactivatedautomatically by an incoming job and the machine will automatically warm up and start to print when it hasreached the ready temperature.When this product is configured for multi-function operation, and either of the above modes is active, the modewill be deactivated as above by an incoming print job. Either mode will also be deactivated by operation ofDOCUMENT FILING, IMAGE SEND or COPY mode key.
Original Punch positions
* When the saddle stitch finisher and punch module are installed.
Save tomachine'shard disk
HDDDocumentImage
Call up a saved file to reuse
Printed
Transmitted
As an ENERGY STAR® Partner, SHARP has determined that this product meets theENERGY STAR® guidelines for energy efficiency.

1-9
1
PART NAMES AND FUNCTIONSExterior
(1) Bypass tray*
(2) Exit tray*
(3) Automatic document feeder (See page 4-2.)
This automatically feeds and scans multiple sheetoriginals. Both sides of two-sided originals can bescanned at once.
(4) Duplex module*
Module for two-sided printing
(5) Upper paper output area (Center tray)
Finished sheets are deposited here.
(6) Upper exit tray extension*
Provides support for large size paper.
(7) Operation panel
(8) Front cover
Open to add toner.
(9) Power switch
Press to turn power on and off.
(10) Paper tray 1
(11) Stand/3 x 500 sheet paper drawer*
(12) Stand/MPD & 2000 sheet paper drawer* (See
page 2-11.)
(13) Multi purpose drawer* (See page 2-8.)
* (1), (2), (4), (6), (11), (12) and (13) are peripheral devices. For description of these devices, see page 1-11.
(1) (2) (3) (4) (5) (6) (7) (8) (9) (10)
(11)
(12)
(13)
PART NAMES AND FUNCTIONS
1-10
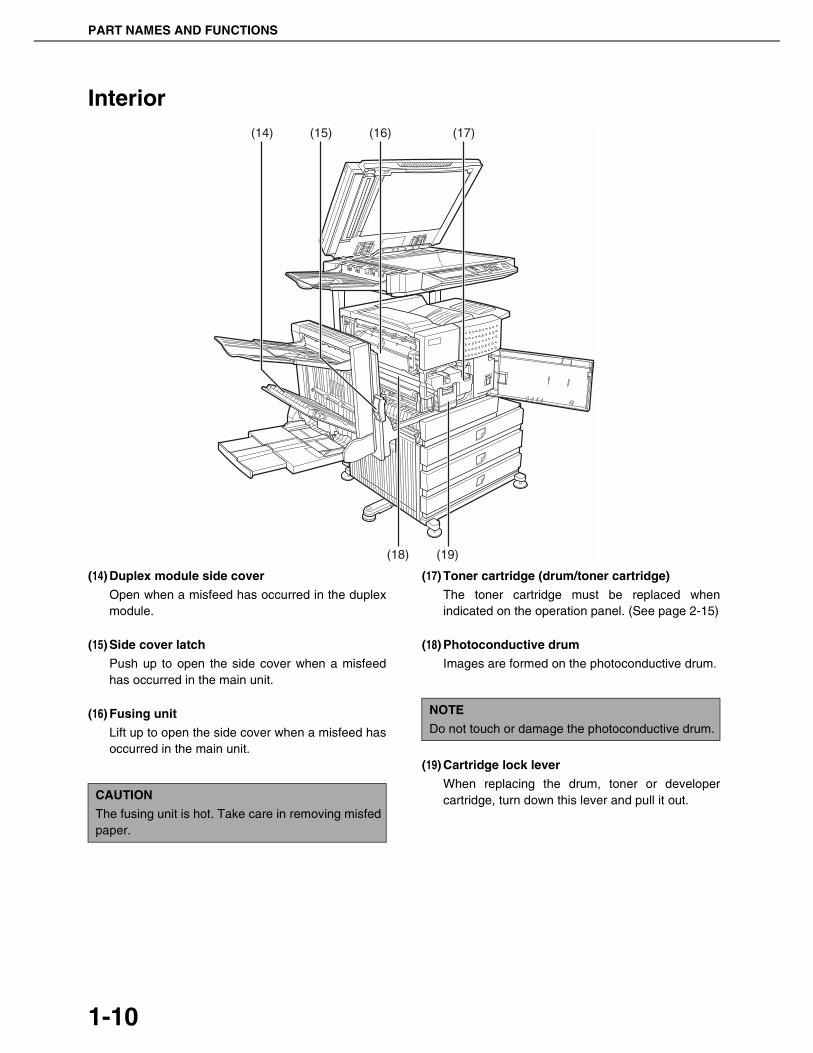
Interior
(14) Duplex module side cover
Open when a misfeed has occurred in the duplexmodule.
(15) Side cover latch
Push up to open the side cover when a misfeedhas occurred in the main unit.
(16) Fusing unit
Lift up to open the side cover when a misfeed hasoccurred in the main unit.
(17) Toner cartridge (drum/toner cartridge)
The toner cartridge must be replaced whenindicated on the operation panel. (See page 2-15)
(18) Photoconductive drum
Images are formed on the photoconductive drum.
(19) Cartridge lock lever
When replacing the drum, toner or developercartridge, turn down this lever and pull it out.
(14) (15) (16) (17)
(18) (19)
CAUTION
The fusing unit is hot. Take care in removing misfedpaper.
NOTE
Do not touch or damage the photoconductive drum.
PART NAMES AND FUNCTIONS
1-11
1
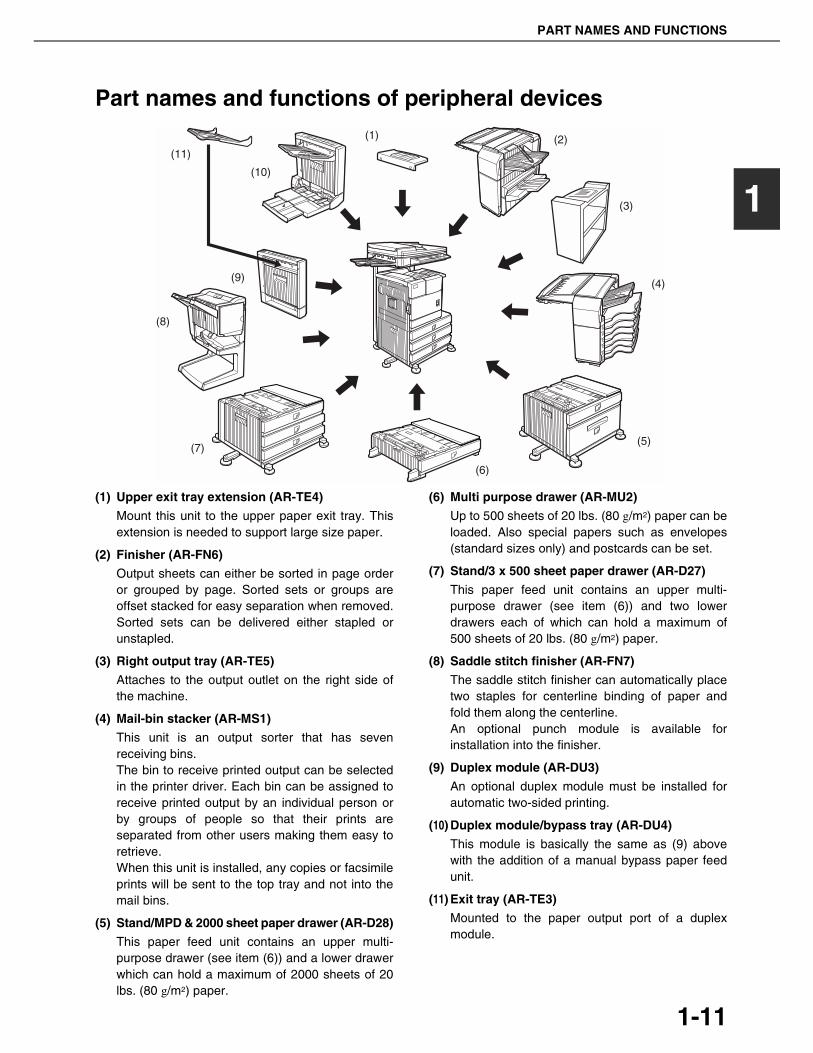
Part names and functions of peripheral devices
(1) Upper exit tray extension (AR-TE4)
Mount this unit to the upper paper exit tray. Thisextension is needed to support large size paper.
(2) Finisher (AR-FN6)
Output sheets can either be sorted in page orderor grouped by page. Sorted sets or groups areoffset stacked for easy separation when removed.Sorted sets can be delivered either stapled orunstapled.
(3) Right output tray (AR-TE5)
Attaches to the output outlet on the right side ofthe machine.
(4) Mail-bin stacker (AR-MS1)
This unit is an output sorter that has sevenreceiving bins.The bin to receive printed output can be selectedin the printer driver. Each bin can be assigned toreceive printed output by an individual person orby groups of people so that their prints areseparated from other users making them easy toretrieve.When this unit is installed, any copies or facsimileprints will be sent to the top tray and not into themail bins.
(5) Stand/MPD & 2000 sheet paper drawer (AR-D28)
This paper feed unit contains an upper multi-purpose drawer (see item (6)) and a lower drawerwhich can hold a maximum of 2000 sheets of 20lbs. (80 g/m2) paper.
(6) Multi purpose drawer (AR-MU2)
Up to 500 sheets of 20 lbs. (80 g/m2) paper can beloaded. Also special papers such as envelopes(standard sizes only) and postcards can be set.
(7) Stand/3 x 500 sheet paper drawer (AR-D27)
This paper feed unit contains an upper multi-purpose drawer (see item (6)) and two lowerdrawers each of which can hold a maximum of500 sheets of 20 lbs. (80 g/m2) paper.
(8) Saddle stitch finisher (AR-FN7)
The saddle stitch finisher can automatically placetwo staples for centerline binding of paper andfold them along the centerline.An optional punch module is available forinstallation into the finisher.
(9) Duplex module (AR-DU3)
An optional duplex module must be installed forautomatic two-sided printing.
(10) Duplex module/bypass tray (AR-DU4)
This module is basically the same as (9) abovewith the addition of a manual bypass paper feedunit.
(11) Exit tray (AR-TE3)
Mounted to the paper output port of a duplexmodule.
(1) (2)(11)
(3)
(4)
(5)
(6)
(7)
(8)
(9)
(10)

PART NAMES AND FUNCTIONS
1-12
■■■■ Other optional equipment
●●●●Barcode font kit (AR-PF1)This kit adds bar code fonts to the machine.
●●●● Data security kit (AR-FR21, AR-FR21U)This kit is used to erase electronic data from thehard disk and memory immediately after adocument is printed or transmitted.
●●●●PS3 expansion kit (AR-PK6)This kit provides compatibility of PostScript level 3to the printer.
●●●●Facsimile expansion kit (AR-FX12)This kit is required to add fax function.
●●●●Additional fax memory (8MB) (AR-MM9)
●●●●Network scanner expansion kit (AR-NS3)This kit is required to add the network scanningfeature.
Some peripheral devices cannot be installed together while others may require the installation of one or more othersto be functional. See page 8-4, "LIST OF COMBINATION OF PERIPHERAL DEVICES".Peripheral devices are basically optional, but some are provided as standard equipment for some models.

PART NAMES AND FUNCTIONS
1-13
1
Operation panel
(1) Touch panel
The machine status, messages and touch keys aredisplayed on the panel. The document filing, copy,network scanner*1, and fax*2 functions are used byswitching to the screen for the desired function.See the following page.
(2) Mode select keys and indicators
Use to change modes and the correspondingdisplay on the touch panel.[DOCUMENT FILING] key
Press to select the document filing mode. (Seepage 7-5.)
[IMAGE SEND] key/LINE indicator/DATAindicatorPress to change the display to network scannermode*1 or fax mode*2. (See the "Operationmanual (for network scanner)") and "Operationmanual (for facsimile)".)
[COPY] keyPress to select the copy mode.
(3) PRINT mode indicators
READY indicator
Print data can be received when this indicator islit.
DATA indicator
Lights up or blinks when print data is beingreceived. Also lights up or blinks when printing isbeing performed.
(4) [JOB STATUS] key
Press to display the current job status. (See page1-15.)
(5) [CUSTOM SETTINGS] key
This is used to store, edit, and delete user namesand folder names for the document filing function,and to configure the key operator programs andprinter configuration settings. (See page 7-21)
(6) Numeric keys
Use to enter numeric values for various settings.
(7) [ ] key ([ACC.#-C] key)
This key is used in copy mode, document filingmode, network scanner mode*1, and fax mode*2.
(8) [#/P] key
This is used as a program key when using the copyfunction, and to dial when using the fax function*2.
(9) [C] key (Clear key)
This key is used in copy mode, document filingmode, network scanner mode*1, and fax mode*2.
(10) [START] key
Use this key to start copying in copy mode, scan adocument in network scanner mode*1, or scan adocument for transmission in fax mode*2.
(11) [CA] key (Clear all key)
This key is used in copy mode, document filingmode, network scanner mode*1, and fax mode*2.Use the key to cancel settings and perform anoperation from the initial machine state.
*1 When the network scanner option is installed.*2 When the fax option is installed.
(2)
(9)(6) (10) (11)(7)
(1) (3)
(8)(4) (5)

PART NAMES AND FUNCTIONS
1-14
Touch panelThe touch panel screens shown in this manual areprinted images, and may appear different from theactual screens.
■■■■ Using the touch panel[Example 1]
Items on the touch panelare easily selectable bytouching the key associ-ated with the item with afinger. Selection of anitem will beaccompanied with abeep tone* to confirmthe item was selected.
Also, the key area for the item will be highlightedfor visual confirmation.
* If a grayed out key is touched, double beeps willsound.
[Example 2]Keys which are grayedout on any screen arenot selectable.
The confirmation beeps can be disabled by a keyoperator program. (See page 10 of the keyoperator's guide.)
■■■■ Selecting a function[Example 1]
If a key is highlighted in asetting screen at thetime the screen appears,the [OK] key can bepressed to store theselection without furtheroperation.
[Example 2]A function in the specialfunctions screen isselected by touching thekey so that it ishighlighted. To cancelthe selection, touch thehighlighted key onceagain.
[Example 3]
A corresponding iconrepresenting the featurewill appear on the touchpanel and on the mainscreen of the modeselected. If this icon istouched, the settingscreen of the function (ora menu screen) will
appear, allowing the settings to be checked oradjusted and the function to be canceled easily.
JOB QUEUE
COPY
Suzuki
0666211221
003 / 000
003 / 000
010 / 000
SETS / PROG
Beeptone
1/13 COMPLETE Copier feature
● Dual page copy● Job build● Tandem copy● Mirror image● B/W Reverse
PER. 0
COVERSETTING
RIGHTBINDING
LEFTBINDING
CANCEL OK
OK
DUAL PAGECOPY
TANDEMCOPY
8 x1411x17
1/ 2
8 x111/ 2
8 x111/ 2
READY TO SCAN FOR COPY.
SPECIAL MODES
2-SIDED COPY
OUTPUT
QUICK FILE
FILE
PART NAMES AND FUNCTIONS
1-15
1
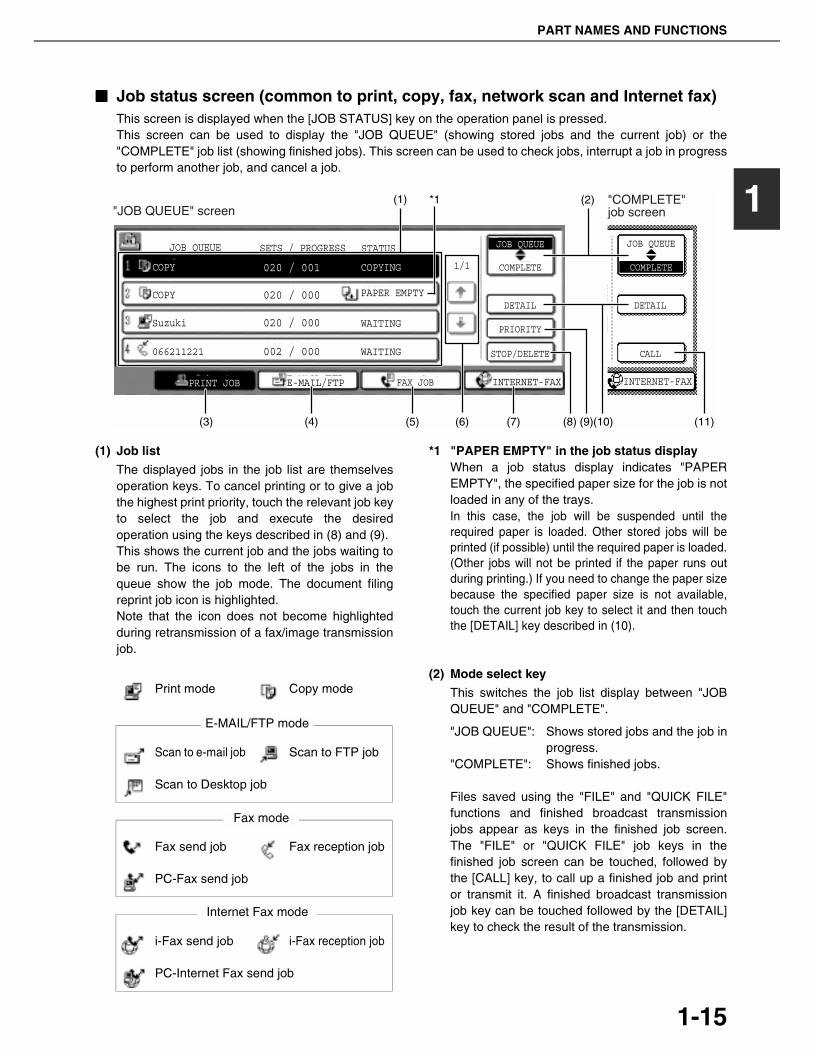
■■■■ Job status screen (common to print, copy, fax, network scan and Internet fax)This screen is displayed when the [JOB STATUS] key on the operation panel is pressed.This screen can be used to display the "JOB QUEUE" (showing stored jobs and the current job) or the"COMPLETE" job list (showing finished jobs). This screen can be used to check jobs, interrupt a job in progressto perform another job, and cancel a job.
(1) Job list
The displayed jobs in the job list are themselvesoperation keys. To cancel printing or to give a jobthe highest print priority, touch the relevant job keyto select the job and execute the desiredoperation using the keys described in (8) and (9).This shows the current job and the jobs waiting tobe run. The icons to the left of the jobs in thequeue show the job mode. The document filingreprint job icon is highlighted.Note that the icon does not become highlightedduring retransmission of a fax/image transmissionjob.
*1 "PAPER EMPTY" in the job status displayWhen a job status display indicates "PAPEREMPTY", the specified paper size for the job is notloaded in any of the trays. In this case, the job will be suspended until therequired paper is loaded. Other stored jobs will beprinted (if possible) until the required paper is loaded.(Other jobs will not be printed if the paper runs outduring printing.) If you need to change the paper sizebecause the specified paper size is not available,touch the current job key to select it and then touchthe [DETAIL] key described in (10).
(2) Mode select key
This switches the job list display between "JOBQUEUE" and "COMPLETE".
"JOB QUEUE": Shows stored jobs and the job inprogress.
"COMPLETE": Shows finished jobs.
Files saved using the "FILE" and "QUICK FILE"functions and finished broadcast transmissionjobs appear as keys in the finished job screen.The "FILE" or "QUICK FILE" job keys in thefinished job screen can be touched, followed bythe [CALL] key, to call up a finished job and printor transmit it. A finished broadcast transmissionjob key can be touched followed by the [DETAIL]key to check the result of the transmission.
JOB QUEUE
COPY
COPY
Suzuki
066211221
STATUS
020 / 001
020 / 000
020 / 000
002 / 000
PRINT JOB E-MAIL/FTP FAX JOB INTERNET-FAX INTERNET-FAX
JOB QUEUE
COMPLETE
JOB QUEUE
COMPLETE
DETAIL
PRIORITY
STOP/DELETE
DETAIL
CALL
PAPER EMPTY
WAITING
WAITING
1/1
SETS / PROGRESS
COPYING
"JOB QUEUE" screen"COMPLETE"job screen
*1(1) (2)
(3) (4) (5) (6) (7) (8) (9)(10) (11)
Print mode Copy mode
Scan to e-mail job Scan to FTP job
Scan to Desktop job
Fax send job Fax reception job
PC-Fax send job
i-Fax send job i-Fax reception job
PC-Internet Fax send job
Internet Fax mode
E-MAIL/FTP mode
Fax mode
PART NAMES AND FUNCTIONS
1-16
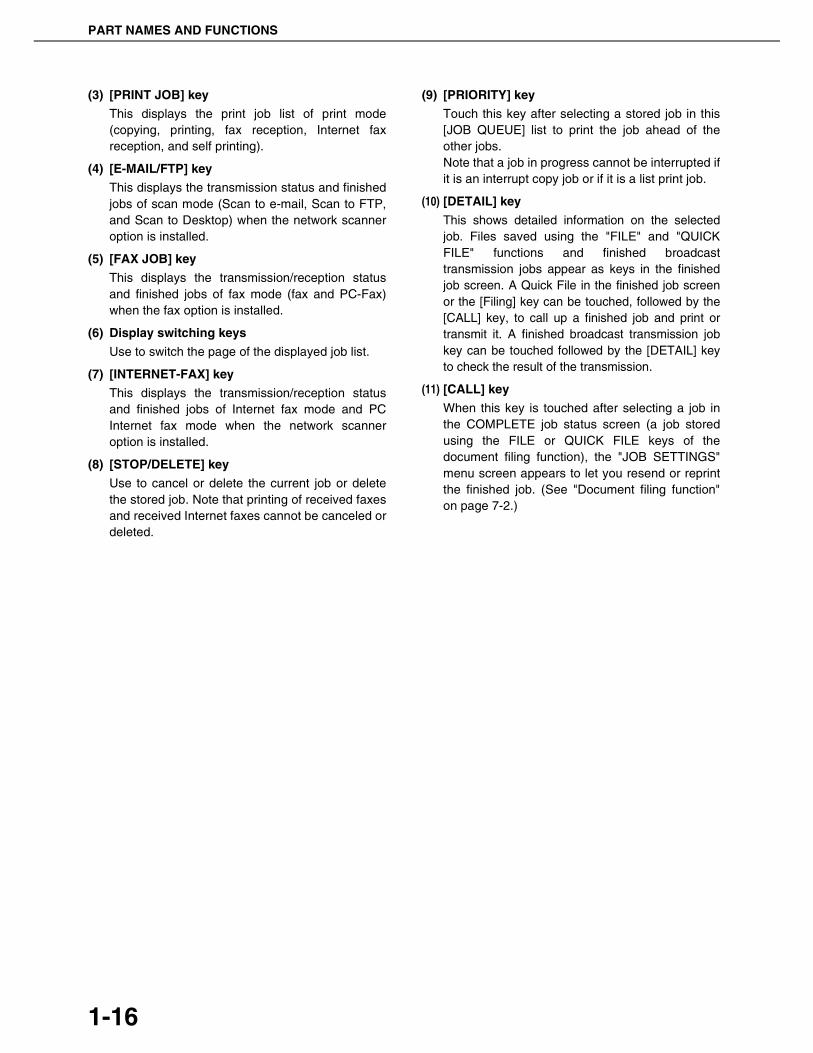
(3) [PRINT JOB] key
This displays the print job list of print mode(copying, printing, fax reception, Internet faxreception, and self printing).
(4) [E-MAIL/FTP] key
This displays the transmission status and finishedjobs of scan mode (Scan to e-mail, Scan to FTP,and Scan to Desktop) when the network scanneroption is installed.
(5) [FAX JOB] key
This displays the transmission/reception statusand finished jobs of fax mode (fax and PC-Fax)when the fax option is installed.
(6) Display switching keys
Use to switch the page of the displayed job list.
(7) [INTERNET-FAX] key
This displays the transmission/reception statusand finished jobs of Internet fax mode and PCInternet fax mode when the network scanneroption is installed.
(8) [STOP/DELETE] key
Use to cancel or delete the current job or deletethe stored job. Note that printing of received faxesand received Internet faxes cannot be canceled ordeleted.
(9) [PRIORITY] key
Touch this key after selecting a stored job in this[JOB QUEUE] list to print the job ahead of theother jobs.Note that a job in progress cannot be interrupted ifit is an interrupt copy job or if it is a list print job.
(10) [DETAIL] key
This shows detailed information on the selectedjob. Files saved using the "FILE" and "QUICKFILE" functions and finished broadcasttransmission jobs appear as keys in the finishedjob screen. A Quick File in the finished job screenor the [Filing] key can be touched, followed by the[CALL] key, to call up a finished job and print ortransmit it. A finished broadcast transmission jobkey can be touched followed by the [DETAIL] keyto check the result of the transmission.
(11) [CALL] key
When this key is touched after selecting a job inthe COMPLETE job status screen (a job storedusing the FILE or QUICK FILE keys of thedocument filing function), the "JOB SETTINGS"menu screen appears to let you resend or reprintthe finished job. (See "Document filing function"on page 7-2.)
1-17
1
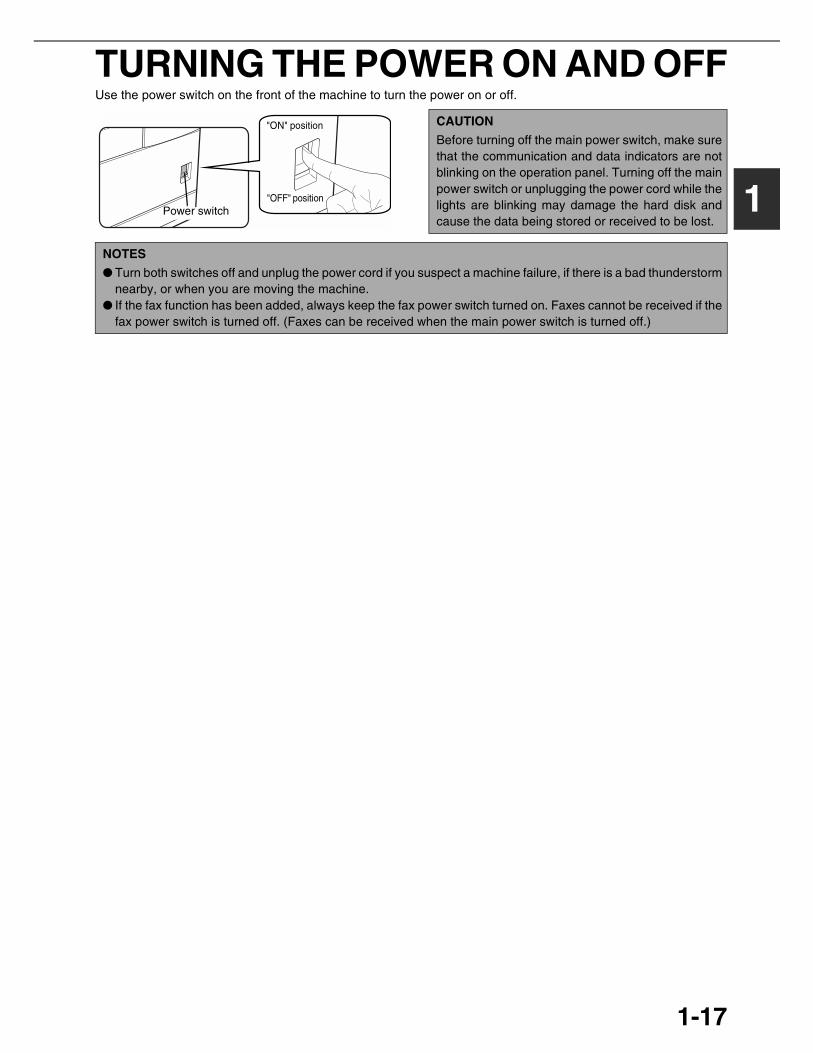
TURNING THE POWER ON AND OFFUse the power switch on the front of the machine to turn the power on or off.
Power switch"OFF" position
"ON" position CAUTION
Before turning off the main power switch, make surethat the communication and data indicators are notblinking on the operation panel. Turning off the mainpower switch or unplugging the power cord while thelights are blinking may damage the hard disk andcause the data being stored or received to be lost.
NOTES
● Turn both switches off and unplug the power cord if you suspect a machine failure, if there is a bad thunderstormnearby, or when you are moving the machine.
● If the fax function has been added, always keep the fax power switch turned on. Faxes cannot be received if thefax power switch is turned off. (Faxes can be received when the main power switch is turned off.)

1-18
AUDITING MODEAuditing mode can be enabled to keep track of the number of pages printed and transmitted (scanned) by each account(up to 500 accounts can be established). The page counts can be viewed and totaled as needed.<This mode is enabled in the key operator programs separately for the copy, printer, fax, Internet fax, network scanner,document filing functions. (Page 7 of the key operator's guide)>
Using the machine when the auditing mode is enabledThe procedure for making copies when auditing mode has been enabled for the copy function is explained below.
When the auditing mode is turned on, the rightmessage appears on the touch panel.
When the above screen appears, enter your 5-digit account number and then begin the copying procedure.
1 Enter your account number (5 digits) withthe numeric keys.
As you enter youraccount number, thehyphens (-) change toasterisks ( ). If youenter an incorrect digit,press the [C] (Clear) keyand re-enter the correct
digit.
When a correct account number is entered, thefollowing message will appear.
If a limit has been set by a key operator program forthe number of copies that can be made by theaccount, the remaining number that can be made isdisplayed.
Check the number in the display and touch the[OK] key.
2 Follow the appropriate steps to performthe copy job.
When copying is begun, the following messagewill appear.
To perform an interrupt copy job (page 5-43),touch the [INTERRUPT] key and then enter youraccount number as explained in step 1. Thefollowing message will appear.
3 When the copy job is finished, press the[ ] key ([ACC.#-C] key)
NOTES● When auditing mode is enabled for document filing and fax/image transmission, a message will appear asking you
to enter your account number each time you switch to the main screen of one of those functions in the touch panel.Enter your account number in the same way as for copy mode, and then begin the scanning procedure.
● When the account counter is turned on for the printer function, you must enter your account number in the setting screenof the printer driver on your computer in order to print.
ENTER YOUR ACCOUNT NUMBER.
NOTEIf "ACCOUNT NUMBER SECURITY" is enabled inthe key operator programs and an incorrect accountnumber is entered three times in a row, "PLEASESEE YOUR KEY OPERATOR FOR ASSISTANCE."will appear. (Page 8 of the key operator's guide.)Operation is not possible while this messageappears (about one minute).
ACCOUNT STATUS :MADE /REMAININGCOPIES :00,123,000/00,012,456
OK
READY TO SCAN FOR COPY.
PRESS [ACC.#-C] WHEN FINISHED.
COPY INTERRUPT MODE.
READY TO SCAN FOR COPY.
2-1
CHAPTER 2MANAGING THE MACHINEThis chapter explains how to load paper, replace the toner cartridge,and remove paper misfeeds. It also contains information about supplies.
Page
LOADING PAPER................................................................................... 2-2● Loading paper in paper tray 1 ......................................................... 2-2● Changing the paper size in paper tray 1 ......................................... 2-2● Specifications of paper trays ........................................................... 2-3● Setting the paper type and paper size ............................................ 2-5● Setting the paper size when a special size is loaded...................... 2-6● Programming and editing paper types ............................................ 2-7● Loading paper in the multi purpose drawer..................................... 2-8● Specifications (multi purpose drawer) ............................................. 2-10● Loading paper in the stand/3 x 500 sheet paper drawer................. 2-10● Specifications (stand/3 x 500 sheet paper drawer) ......................... 2-10● Loading paper in the stand/MPD & 2000 sheet paper drawer ........ 2-11● Specifications (stand/MPD & 2000 sheet paper drawer) ................ 2-11
CUSTOM SETTINGS ............................................................................. 2-12● General procedure for custom settings ........................................... 2-12● About the settings ........................................................................... 2-14
REPLACING THE TONER CARTRIDGE ............................................... 2-15
STORAGE OF SUPPLIES...................................................................... 2-16MISFEED REMOVAL ............................................................................. 2-17
● Misfeed removal guidance .............................................................. 2-17● Misfeed in the transport area, fusing area, and exit area................ 2-18● Misfeed in the duplex module ......................................................... 2-19● Misfeed in the paper feed area ....................................................... 2-20
REMOVING AN ORIGINAL MISFEED ................................................... 2-22● Removing a misfed original from the automatic document feeder .. 2-22
TROUBLESHOOTING............................................................................ 2-23

2-2
LOADING PAPERIf the paper runs out during printing, a message will appear in the display.Follow the procedure below to load paper.
Loading paper in paper tray 1
1 Pull out paper tray 1.
Gently pull the tray outuntil it stops.
2 Load paper into the tray.
Do not load paper abovethe maximum height line(approximately 500sheets of 20 lbs. (80g/m2) paper).
3 Gently push tray 1 into the machine.
Push the tray firmly all the way into the machine.
4 Set the paper type.
If you change the paper type setting if the papertype is changed in either paper tray, refer to"Setting the paper type and paper size" (page 2-5).
5 Loading paper in paper tray 1 is nowcomplete.
Changing the paper size in paper tray 1For paper tray 1, 8-1/2" x 11", A4 or B5 size paper can be set. Use the following procedure to change the size asneeded.
1 Pull out paper tray 1.
If paper remains in the tray, remove it.
2 Adjust the guide plates A and B in the trayto the length and width of the paper.
The guide plates A andB are slidable. Adjustthem to the paper size tobe loaded whilesqueezing their locklevers.
3 Load paper into the tray.
4 Gently push tray 1 into the machine.
Push the tray firmly all the way into the machine.
5 Set the paper size.
Be sure to set the paper size and paper typereferring to "Setting the paper type and paper size"(page 2-5).
If this is not done, paper misfeeds will occur.
6 Changing paper size in paper tray 1 is nowcomplete.
NOTES
● Do not use curled or folded paper. Doing so may cause a misfeed.● For best results use paper supplied by SHARP. (See page 2-4.)● When you change the paper type and size in paper tray 1, set the paper type and size referring to "Setting the
paper type and paper size" (page 2-5).● Do not place heavy objects or press hard on any tray which is pulled out.● Load paper with the print side face up. However, when the paper type is set to "PRE-PRINTED",
"PRE-PUNCHED" or "LETTER HEAD", load the paper face down*.* If the two-sided function is disabled using "DISABLING OF DUPLEX" in the key operator programs (page 11
of the key operator's guide), load the paper face up.

LOADING PAPER
2-3
2
Specifications of paper traysThe specifications for types and sizes of paper that can be used in each tray are shown below.
Tray Tray No.(tray name)
Applicable paper types Applicable paper sizes Paperweight
Paper tray 1 Tray 1 Plain paper (Refer to the next pagefor applicable plain papers.)
● 8-1/2" x 11", A4, B5 16 to 28 lbs. or60 to 105 g/m2
Multi purposedrawer/bypass tray
Tray 2/bypasstray
Plain paper (Refer to the next pagefor applicable plain papers.)
● If "AUTO-INCH" is selected in setting thepaper type and paper size (page 2-5),the following paper sizes can be usedwith the automatic detection function:11" x 17", 8-1/2" x 14", 8-1/2" x 11", 8-1/2"x 11"R, 7-1/4" x 10-1/2", 5-1/2" x 8-1/2"R
● If "AUTO-AB" is selected in setting thepaper type and paper size (page 2-5),the following paper sizes can be usedwith the automatic detection function:A3, B4, A4, A4R, B5, B5R, A5R, 8-1/2 x 13"
● Non-standard sizes
16 to 34 lbs. or60 to 128 g/m2
Special paper(Refer to thenext page forapplicablespecialpapers.)
● Thick paper● Labels,
transparency film
● If "AUTO-INCH" is selected in setting thepaper type and paper size (page 2-5), thefollowing paper sizes can be used withthe automatic detection function:8-1/2" x 11", 8-1/2" x 11"R
● If "AUTO-AB" is selected in setting thepaper type and paper size (page 2-5), thefollowing paper sizes can be used withthe automatic detection function:A4, A4R, B5, B5R
● Non-standard sizes
See theremarks forspecialpaper on thenext page.
Postcard ● Japanese official postcard
Envelopes can onlybe fed from themulti-purpose drawer.Applicable stockweight for envelopesis 20 to 23 lbs. or 75to 90 g/m2.
● Applicable standard size envelopes:COM-10, Monarch, DL, C5, ISO B5CHOKEI 3
● Non-standard size
Stand/3 x500 sheetpaper drawer
Upper Tray 2 Same as multi purpose drawer
Middle Tray 3 Plain paper (Refer to the next pagefor applicable plain papers.)
● If "AUTO-INCH" is selected in setting thepaper type and paper size (page 2-5),the following paper sizes can be usedwith the automatic detection function:11" x 17", 8-1/2" x 14", 8-1/2" x 11", 8-1/2"x 11"R, 7-1/4" x 10-1/2"
● If "AUTO-AB" is selected in setting thepaper type and paper size (page 2-5),the following paper sizes can be usedwith the automatic detection function:A3, B4, A4, A4R, B5, B5R, 8-1/2" x 13"
16 to 28 lbs. or60 to 105g/m2
Lower Tray 4
Stand/MPD & 2000sheet paperdrawer
Upper Tray 2 Same as multi purpose drawer
Lower Tray 3 Plain paper (Refer to the next pagefor applicable plain papers.)
● 8-1/2" x 11", A4 16 to 28 lbs.or60 to 105g/m2

LOADING PAPER
2-4
■■■■ Applicable plain paperFor satisfactory results, plain paper must conform to the following requirements.
■■■■ Applicable special paperFor satisfactory results, special paper must conform to the following requirements.
■■■■ Paper that can be used for automatic two-sided printingPaper used for automatic two-sided printing (paper that can be fed through the duplex module) must meet thefollowing conditions:
Paper type :Plain paper as specified above.Paper size :Must be one of the following standard sizes: 11" x 17", 8-1/2" x 14", 8-1/2" x 13", 8-1/2" x 11", 8-1/2"
x 11"R or 5-1/2" x 8-1/2"R (A3, B4, A4, A4R, B5, B5R or A5R)Paper weight :16 to 28 lbs. (64 to 105 g/m2)
Paper in AB system Paper in inch system
A5 to A3 5-1/2" x 8-1/2" to 11"x17"
Plain paper 16 to 28 lbs. or 60 to 105 g/m2
Recycled, colored, pre-punched, pre-printed and letterhead papers must conform to the same conditions as above.
Type Remarks
Special paper Thick paper ● For 5-1/2" x 8-1/2" to 8-1/2" x 11" or A5 to A4 sizes, thick paper rangingfrom 16 to 34 lbs. or 60 to 128 g/m2 can be used.
● For sizes larger than 8-1/2" x 11" or A4, thick paper ranging from 16 to 28lbs. or 60 to 105 g/m2 can be used.
● Other thick papers Index stock (65 lbs. or 176 g/m2) can be used.Cover stock (110 lbs. or 200 to 205 g/m2) can be used but only for 8-1/2x 11, A4 paper in the portrait orientation.
● For 5-1/2" x 8-1/2" or A5 paper, the orientation must be landscape.
Transparency film, labels,and tracing paper
● Use SHARP recommended paper. Do not use labels other than SHARPrecommended labels. Doing so may leave adhesive residue in themachine, causing paper misfeeds, smudges on prints or other machinetrouble.
Postcards ● Japanese official postcards can be used.
Envelopes ● Applicable standard envelopes: COM-10, Monarch, DL, C5, ISO B5,CHOKEI 3
● Envelopes can only be fed from the tray 2.Applicable paper stock weight for envelopes is 20 to 23 lbs. or 75 to 90 g/m2.
NOTES
● Special papers (explained above) cannot be used for automatic two-sided printing. ● Various types of plain paper and special paper are sold. Some of these cannot be used in the machine. Please
consult your retailer or your dealer when buying paper.● The image quality and toner fusibility of special papers may change due to ambient conditions, operating
conditions, and paper characteristics, resulting in image quality inferior to that of SHARP standard paper.

LOADING PAPER
2-5
2
Setting the paper type and paper sizeFollow these steps to change the paper type setting if the paper type is changed in either paper tray. For the papertypes that can be used in each tray, see page 2-3.
1 Press the [CUSTOM SETTINGS] key.
The custom settingmenu screen willappear.
2 Touch the [PAPER TRAY SETTINGS] key.
The paper tray selectionscreen will appear.
3 Touch the [TRAY SETTINGS] key.
4 Display the setting screen of the desiredpaper tray.
Touch the key or key to display thesetting screen of the desired paper tray.
5 Touch the [TYPE / SIZE] key.
6 Select the type of paper that was loaded inthe tray.
Example: The paper type of tray 2 is selected
Touch the desired paper type to select it. Thepaper size setting screen will appear.
■■■■ User typeSet a user type when a paper type is not availableas an option. To select a user type, touch the key in the screen of step 6 to display the user typeselection screen. To store or edit a user type nameor set tray attributes, see "Programming andediting paper types" on page 2-7.
NOTE
To automatically switch to a tray with the same sizeand type of paper (if there is one) in the event that thepaper tray runs out of paper, display the last screenwith the key and select [AUTO TRAYSWITCHING].
PAPER TRAY SETTINGS
TAORWARD
RINT
PRINTERCONDITION
TRAY SETTINGS
PAPER TRAY SETTINGS
CUSTOM SETTINGS
1/4PLAIN / 8 x11
OK
PAPER TRAY SETTINGS
TYPE / SIZE
CUSTOM SETTINGS
TRAY 1
FAX I-FAXCOPYDOC.
FILING
FIXED PAPER SIDE
DISABLE DUPLEX
DISABLE STAPLE
DISABLE PUNCH
1/ 2
NOTE
Heavy paper, label sheets and transparency filmcannot be used in trays 1, 3, and 4. Envelopes canonly be placed in tray 2.
TYPE / SIZE
TRAY 2
PER TRAY SETTINGS
PRINT COPY I-FAXDOC.
FILINGFAX
PLAIN / 8 x111/ 2
CANCEL
1/2
PLAIN
RECYCLED
PRE-PRINTED PRE-PUNCHED
LETTER HEAD
COLOR
HEAVY PAPER ENVELOPE
LABELS
TRANSPARENCY
TRAY 2 TYPE/SIZE SETTING
SELECT THE PAPER TYPE.
CUSTOM SETTINGS
1/2
CUSTOM SETTINGS
TRAY 2 TYPE/SIZE SETTING
2/2
USER TYPE 1
USER TYPE 5 USER TYPE 6 USER TYPE 7
USER TYPE 2 USER TYPE 3 USER TYPE 4
CANCEL
SELECT THE PAPER TYPE
1/2
LOADING PAPER
2-6
7 Select the size of paper that was loaded inthe tray.Touch the appropriate keys (checkboxes).
8 Touch the [OK] key in the size settingscreen.You will return to the tray setting screen of step 4.
9 Select output functions that can be usedwith the selected tray.
Touch the checkboxesunder the desired itemsto select them.Checkboxes that can beselected will varydepending on the optionsthat are installed.
10Configure paper settings for each tray andthen touch the [OK] key to exit.
Setting the paper size when a special size is loaded
Tray 2 and the bypass tray
1 Perform steps 1 through 6 of "Setting thepaper type and paper size" (see page 2-5).
2 Touch the [SIZE INPUT] key and thentouch the [INCH] tab.
The size entry paletteappears.
3 Touch the key or the key to enterthe X (width) and Y (length) dimensions ofthe paper.
Entry of the X dimension(width) is initiallyselected. Touch the [Y]key and enter the Ydimension (length) in thesame way as the Xdimension.
4 Touch the [OK] key.
You will return to the sizesetting screen of step 2.
5 If the paper is a non-standard size, selectthe [NON STANDARD SIZE] checkbox.
6 Perform steps 8 through 10 of "Setting thepaper type and paper size" (See page 2-6).
[AUTO-INCH] key : Select when you have loadedan inch-based size of paper.
[AUTO-AB] key : Select when you haveloaded an AB size of paper.
[SIZE INPUT] key : Select to directly enter apaper size (see page 2-6).
[NON STANDARDSIZE] checkbox
: Select when you haveloaded a non-standard sizeof paper (see page 2-6).
[POST] key : Select this when you haveloaded postcards.
NOTE
Sizes that can be selected vary depending on theselected paper type.
11X17,8 X14,8 X118 X11R,7 X10 ,5 X8 R
1/ 21/ 2
1/ 21/ 2
1/ 41/ 2
1/ 2
A3,A4,A4R,A5R,B4,B5B5R,216X330(8 X13)1/ 2
TYPE OK
PLAIN
TRAY 2 TYPE/SIZE SETTING
CUSTOM SETTINGS
TYPE
AUTO-INCH
SIZE INPUT
AUTO-AB
SIZE
X17 Y11 NON STANDARD SIZE
2/2
POST
NOTE
The type and size of paper loaded in the bypass traycan also be set from the paper selection screen.Touch the [PAPER SELECT] key at the top of thebase screen to display the paper selection screen,touch the [PAPER SELECT] key for the bypass tray,and then go to step 6.
PRINT COPY FAX I-FAXDOC.FILING
NOTE
Special sizes of paper cannot be loaded in trays 1, 3 and 4.
AB
Y 11
17X (5 1/2 17)inch
INCH
OK
(5 1/2 11 5/8)inch
Y
X
AB
Y 11
17
Y
X
INCH
OK
(5 1/2 17)inch
(5 1/2 11 5/8)inch
X
AB
Y 11
17
Y
X
INCH
OK
(5 1/2 17)inch
(5 1/2 11 5/8)inch
NON STANDARDSIZE
11X17,8 X14,8 X111/ 2 1/ 2
8 X11R,7 X10 ,5 X8 R1/ 21/ 4 1/ 2 1/ 21/ 2
A3,A4,A4R,A5R,B4,B5B5R,216x330(8 x13)
X17 Y115/ 8
1/ 2
LOADING PAPER
2-7
2
Programming and editing paper typesTo program or edit the name of a paper type or set paper attributes, follow the steps below.
1 Follow steps 1 and 2 of "Setting the papertype and paper size" (page 2-5)
2 Touch the [PAPER TYPE REGISTRATION]key.
3 Select the paper type that you wish toprogram or edit.
4 Touch the [TYPE NAME] key.
A character entry screenappears.Enter a type name(maximum of 14characters). (See page7-26 to enter characters.)
5 Set the attributes of the paper tray.
Touch the checkboxesto the left of the items toselect them.
6 Touch the [EXIT] key to exit theprogramming/editing procedure.
OK
PAPER TYPE REGISTRATION
CUSTOM SETTINGS
TRAY 2 TYPE/SIZE SETTING
USER TYPE 1
USER TYPE 5 USER TYPE 6 USE
USER TYPE 2 USE
SELECT THE PAPER TYPE
FIXED PAPER SIDE
TYPE NAME
PAPER TYPE REGISTRATION
No.01
USER TYPE 1
DISABLE STAPLE
DISAB
DISAB
FIXED PAPER SIDE
TYPE NAME
PAPER TYPE REGISTRATION
No.01
USER TYPE 1
DISABLE STAPLE
DISAB
DISAB
"FIXED PAPER SIDE" : Select when paper is to beloaded print side down in thetray. Make sure a checkmarkdoes not appear when paper isto be loaded print side up.• If the two-sided function is
prohibited in "DISABLING OFDUPLEX" in the key operatorprograms (page 11 of the Keyoperator’s guide), do not usethis setting.
"DISABLE DUPLEX" : Prohibits two-sided printing.Enable when the back side ofthe paper cannot be printed on.
"DISABLE STAPLE" : Prohibits stapling. Enablewhen using special paperssuch as transparency film andlabel sheets.
"DISABLE PUNCH" : Prohibits punching. Enablewhen using special paperssuch as transparency film andlabel sheets.
NOTE
"FIXED PAPER SIDE" and "DISABLE DUPLEX"cannot be simultaneously enabled.
DISABLE DUPLEX
DISABLE PUNCH
EXITCANCEL

LOADING PAPER
2-8
Loading paper in the multi purpose drawerThe method of loading paper into the multipurpose drawer is the same as for paper tray 1 described on page 2-2.For specifications of paper, see page 2-3. When loading envelopes, postcards or transparency film, follow thedescriptions below.● Two maximum height lines are indicated: one for plain paper and one for special paper.
■■■■ How to change the paper sizeTo change the paper size or paper type when paper is loaded into the multi purpose drawer, refer to page 2-5 fordetails.
■■■■ Setting envelopes or postcardsWhen setting envelopes or postcards in the multi purpose drawer, set them in the orientation shown below.
Loading postcardsLoad postcards print side up to the rear left of the trayas shown.
Loading envelopesEnvelopes can only be printed on the address side. Besure to place envelopes with the address side up andthe top of the envelope to the rear.
Printing onto envelopes or postcards● Attempting to print onto both sides of envelopes or postcards may result in misfeeds or poor prints.● Do not use paper that has already been printed on by a thermal transfer or inkjet printer. In particular, paper
that has been printed on by a thermal transfer printer (such as a word processor that uses a cassette) maycause missing characters and smudges.
● To avoid wrinkling, misfeeds or poor printing, make sure the postcard or envelopes stock is not curled.
Maximum height line for plain paperDo not exceed this line when loading plain paper.
Maximum height line special paper (red line)Do not exceed this line when loading special paper.
LOADING PAPER
2-9
2
Printing onto envelopes● Do not use envelopes that have metal clasps, plastic snaps, string closures, windows, linings, self-adhesive
patches or synthetic materials. Attempting to print on these may cause misfeeds, inadequate toner adherence orother trouble.
● Creases or smudging may occur. This is especially true of embossed surfaces and other irregular surfaces.● Under high humidity and temperature conditions the glue flaps on some envelopes may become sticky and be
sealed closed when printed.● Use only envelopes which are flat and crisply folded. Curled or poorly formed envelopes may be poorly printed or
may cause misfeeds.
Fusing unit pressure adjusting leversWhen feeding envelopes from the multi purpose drawer, damage to the envelopes or smudges on prints may occureven if envelopes within specification are used. In this case, the problem may be reduced by shifting the fusing unitpressure adjusting levers from the normal position to the lower pressure position. Follow the procedure below.
1 Unlatch the duplex module and slide it tothe left.
Unlatch the module andgently move the moduleaway from the machine.If the machine is notequipped with a duplexmodule, open the sidecover similarly.
2 Lower the two fusing unit pressureadjusting levers marked A and B in theillustration.
3 Gently close the duplex module.
If the machine is notequipped with a duplexmodule, close the sidecover.
NOTE
Be sure to return the lever to the normal position when finished feeding envelopes. If not, inadequate toneradherence, paper misfeeds or other trouble may occur.
Normal position
Lower pressure position
A: Rear side offusing unit
B: Front side offusing unit
LOADING PAPER
2-10
■■■■ Loading transparency filmBe sure to load the transparency film with the white label side up. Make sure no image will be printed on the label.Printing on the label may cause smudges on prints. Transparency film must be set in the portrait orientation.
Specifications (multi purpose drawer)
Specifications are subject to change for improvement without notice.
Loading paper in the stand/3 x 500 sheet paper drawer
Upper paper tray:The upper tray is the same as the multi-purpose drawer. Use the upper tray according to the instructions for themulti-purpose drawer on page 2-8.
Middle and lower paper trays:Up to 500 sheets of SHARP recommended plain paper can be loaded in these trays. The method of loading paperis the same as for paper tray 1 in the main unit. See the description (page 2-2).
Specifications (stand/3 x 500 sheet paper drawer)
Name Multi purpose drawer
Paper size/weight See specifications of paper trays on page 2-3.
Paper capacity500 sheets (20 lbs. (80 g/m2 )) of paper, 40 envelopes, 40 postcards, 40 sheetsof transparency film
Dimensions25-3/4" (W) x 22-21/64" (D) x 5-43/64" (H)(654 mm (W) x 567 mm (D) x 144 mm (H))
Weight Approximately 24.3 lbs. or 11 kg
NOTE
If the paper size or paper type is changed in either paper tray, the tray settings must be changed in custom settings.Refer to "Setting the paper type and paper size" on page 2-5.
Name Stand/3 x 500 sheet paper drawer
Paper size/weight See specifications of paper trays on page 2-3.
Paper capacity(ordinary paper)
500 sheets (20 lbs. (80 g/m2 ) each
Dimensions24-3/8" (W) x 26-5/32" (D) x 15-29/32" (H)(619 mm (W) x 664 mm (D) x 404 mm (H))
Weight Approximately 70.6 lbs. or 32.9 kg
LOADING PAPER
2-11
2
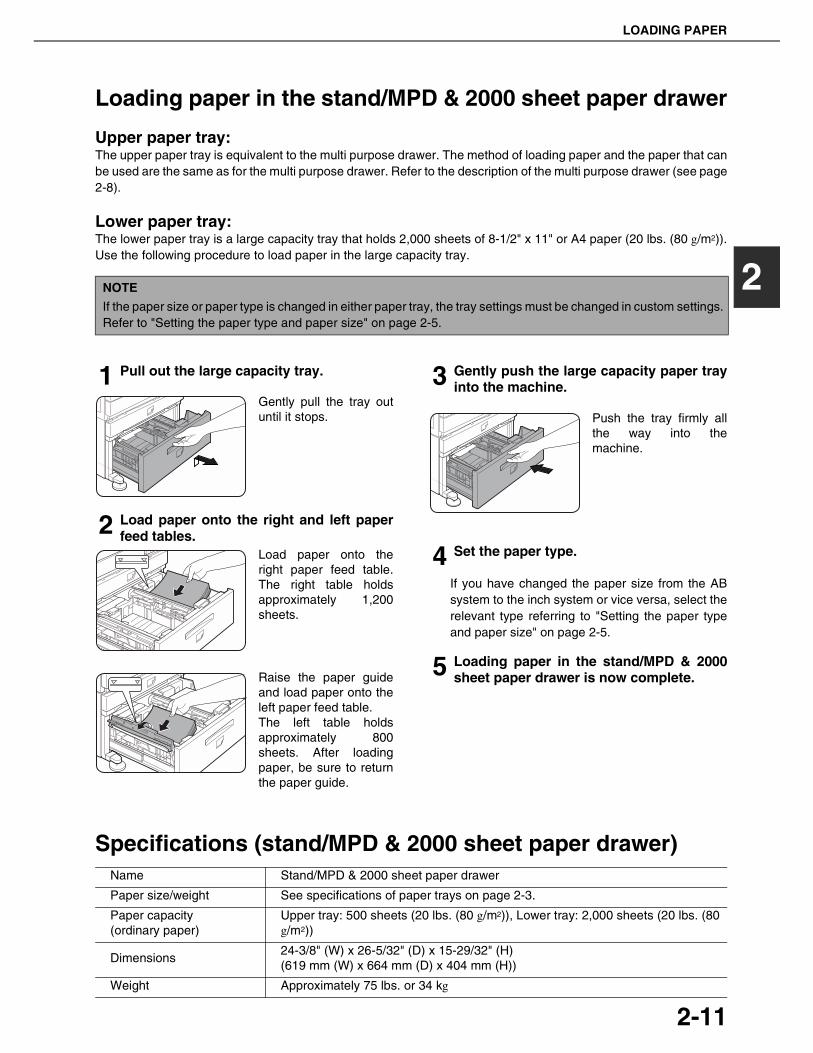
Loading paper in the stand/MPD & 2000 sheet paper drawer
Upper paper tray:The upper paper tray is equivalent to the multi purpose drawer. The method of loading paper and the paper that canbe used are the same as for the multi purpose drawer. Refer to the description of the multi purpose drawer (see page2-8).
Lower paper tray:The lower paper tray is a large capacity tray that holds 2,000 sheets of 8-1/2" x 11" or A4 paper (20 lbs. (80 g/m2)).Use the following procedure to load paper in the large capacity tray.
1 Pull out the large capacity tray.
Gently pull the tray outuntil it stops.
2 Load paper onto the right and left paperfeed tables.
Load paper onto theright paper feed table.The right table holdsapproximately 1,200sheets.
Raise the paper guideand load paper onto theleft paper feed table.The left table holdsapproximately 800sheets. After loadingpaper, be sure to returnthe paper guide.
3 Gently push the large capacity paper trayinto the machine.
Push the tray firmly allthe way into themachine.
4 Set the paper type.
If you have changed the paper size from the ABsystem to the inch system or vice versa, select therelevant type referring to "Setting the paper typeand paper size" on page 2-5.
5 Loading paper in the stand/MPD & 2000sheet paper drawer is now complete.
Specifications (stand/MPD & 2000 sheet paper drawer)
NOTE
If the paper size or paper type is changed in either paper tray, the tray settings must be changed in custom settings.Refer to "Setting the paper type and paper size" on page 2-5.
Name Stand/MPD & 2000 sheet paper drawer
Paper size/weight See specifications of paper trays on page 2-3.
Paper capacity(ordinary paper)
Upper tray: 500 sheets (20 lbs. (80 g/m2)), Lower tray: 2,000 sheets (20 lbs. (80g/m2))
Dimensions24-3/8" (W) x 26-5/32" (D) x 15-29/32" (H)(619 mm (W) x 664 mm (D) x 404 mm (H))
Weight Approximately 75 lbs. or 34 kg
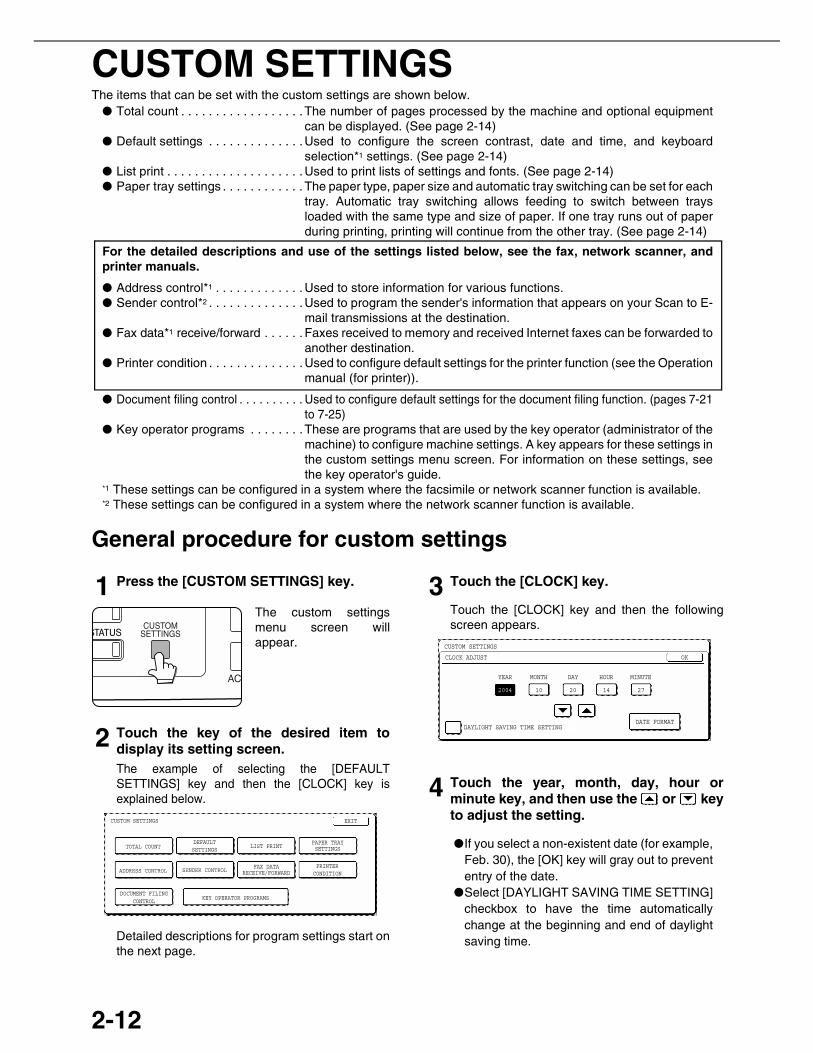
2-12
CUSTOM SETTINGSThe items that can be set with the custom settings are shown below.
● Total count . . . . . . . . . . . . . . . . . .The number of pages processed by the machine and optional equipmentcan be displayed. (See page 2-14)
● Default settings . . . . . . . . . . . . . .Used to configure the screen contrast, date and time, and keyboardselection*1 settings. (See page 2-14)
● List print . . . . . . . . . . . . . . . . . . . . Used to print lists of settings and fonts. (See page 2-14)● Paper tray settings . . . . . . . . . . . . The paper type, paper size and automatic tray switching can be set for each
tray. Automatic tray switching allows feeding to switch between traysloaded with the same type and size of paper. If one tray runs out of paperduring printing, printing will continue from the other tray. (See page 2-14)
For the detailed descriptions and use of the settings listed below, see the fax, network scanner, andprinter manuals.
● Address control*1 . . . . . . . . . . . . . Used to store information for various functions.● Sender control*2 . . . . . . . . . . . . . .Used to program the sender's information that appears on your Scan to E-
mail transmissions at the destination.● Fax data*1 receive/forward . . . . . . Faxes received to memory and received Internet faxes can be forwarded to
another destination.● Printer condition . . . . . . . . . . . . . .Used to configure default settings for the printer function (see the Operation
manual (for printer)).
● Document filing control . . . . . . . . . . Used to configure default settings for the document filing function. (pages 7-21to 7-25)
● Key operator programs . . . . . . . .These are programs that are used by the key operator (administrator of themachine) to configure machine settings. A key appears for these settings inthe custom settings menu screen. For information on these settings, seethe key operator's guide.
*1 These settings can be configured in a system where the facsimile or network scanner function is available.*2 These settings can be configured in a system where the network scanner function is available.
General procedure for custom settings
1 Press the [CUSTOM SETTINGS] key.
The custom settingsmenu screen willappear.
2 Touch the key of the desired item todisplay its setting screen.The example of selecting the [DEFAULTSETTINGS] key and then the [CLOCK] key isexplained below.
Detailed descriptions for program settings start onthe next page.
3 Touch the [CLOCK] key.
Touch the [CLOCK] key and then the followingscreen appears.
4 Touch the year, month, day, hour orminute key, and then use the or keyto adjust the setting.
●If you select a non-existent date (for example,Feb. 30), the [OK] key will gray out to prevententry of the date.
●Select [DAYLIGHT SAVING TIME SETTING]checkbox to have the time automaticallychange at the beginning and end of daylightsaving time.
CUSTOM SETTINGS
LIST PRINT
FAX DATARECEIVE/FORWARD
PAPER TRAYSETTINGS
PRINTERCONDITION
EXIT
DEFAULTSETTINGS
SENDER CONTROL
KEY OPERATOR PROGRAMS
ADDRESS CONTROL
TOTAL COUNT
DOCUMENT FILINGCONTROL
CUSTOM SETTINGS
CLOCK ADJUST
DATE FORMAT
YEAR MONTH DAY HOUR MINUTE
2004 10 20 14 27
OK
DAYLIGHT SAVING TIME SETTING

CUSTOM SETTINGS
2-13
2
5 Touch the [DATE FORMAT] key.
The following screen appears.
6 If you wish to change the format of the dateand time, touch the desired format keys.
Touched keys are highlighted.The selected format is applied to lists printed out in"LIST PRINT".
7 Touch the [OK] key.
You will return to thedate and time settingscreen.
8 Touch the [OK] key.
9 To exit the settings, touch the [EXIT] key.
CUSTOM SETTINGS
DATE FORMAT
YYYY/MM/DD
MM/DD/YYYY
DAY-NAMEPOSITION
OK
FIRST 12-HOUR
24-HOURLAST
2004/10/20/MON 14:27
DD/MM/YYYY
MEON
OK
T 12-HOUR
CUSTOM SETTINGS
LIST PRINT
FAX DATARECEIVE/FORWARD
PAPER TRAYSETTINGS
EXIT
DEFAULTSETTINGS
SENDER CONTROL
KEY OPERATOR PROGRAMS
ADDRESS CONTROL
TOTAL COUNT
DOCUMENT FILINGCONTROL
PRINTERCONDITION
More information on setting proceduresIn the following type of screen, a setting is selectedby touching the key so that a checkmark ( )appears. The settings below are configured toallow use of tray 1 in print, copy, and fax modes. Todisplay the next screen, touch the or keys.
FAXCOPYPRINT
TRAY1
TYPE / SIZE
CUSTOM SETTINGS
PAPER TRAY SETTINGS
PLAIN / 8 X111/ 2
FIXED PAPER SIDE1/4
OK
DOC.FILINGI-FAX
DISABLE DUPLEX
DISABLE STAPLE
DISABLE PUNCH
CUSTOM SETTINGS
2-14
About the settings■■■■ Total count
This displays the following sheet counts (thecounts that can be displayed vary depending onthe options installed):
(1) Number of pages output by the machine.(2) Number of original pages transmitted by the
machine.(3) Number of times the automatic document
feeder was used to feed original pages andnumber of times the stapler was used (ifinstalled).
(4) Number of pages stored by document filing.In the case of (1) only,●11" x 17" (A3) size paper is counted as two
sheets.●Each sheet of paper used for automatic two-
sided copying is counted as two sheets (11" x17" (A3) paper is counted as four sheets).
●Paper with an entered size of 15-1/8" (384 mm)or larger is counted as two sheets (four sheetsduring automatic two-sided copying).
■■■■ Default settingsThe following settings can be configured:
●Display contrastScreen contrast adjustment is used to make theLCD touch panel easier to view under variouslighting conditions. Touch the [LIGHTER] key tomake the screen lighter, or the [DARKER] keyto make the screen darker.
●ClockUse this to set the date and time in themachine's built-in clock. This clock is used byfunctions that require date and time information.
●Keyboard selectThe layout of the keyboard that appears in letterentry screens can be changed.Select the arrangement of the letter keys thatyou find easiest to use.
The following three alphabet keyboardconfigurations are available:
● Keyboard 1 (QWERT... configuration)*● Keyboard 2 (AZERTY...configuration)● Keyboard 3 (ABCDEF...configuration)* The default setting is "Keyboard 1".
(Example: Character entry screen whenKeyboard 3 is selected)
■■■■ List printThis is used to print lists of machine settings and atest page to check resident fonts.The following lists and pages are available:
●All custom setting listShows the hardware status, software status,printer configuration settings, tray settings, andcounts.
●Printer test pageShows the PCL symbol set list, fonts, networkinterface (NIC interface) settings, and settingsused for the NIC card.
●Sending address listOne touch destination list, group list, programlist, and memory box list.
●Document filing user / folder listShows the user names and folder names fordocument filing.
●Sender control listShows the senders that have been stored.
■■■■ Paper tray settingsThe paper type, paper size, enabled modes andautomatic tray switching can set for each tray. Seepage 2-5 to 2-7 for details on setting the paper typeand paper size. Automatic switching to anotherpaper tray is used to automatically switch toanother tray with the same size and type of paperin the event that the paper runs out duringcontinuous printing. This requires that the trays beloaded with the same size of paper. The paper traysettings can be enabled or disabled for each tray,and for printer mode, copy mode, fax mode,Internet fax mode, and document filing mode. Toenable any function, touch the check box key sothat a checkmark ( ) appears.
ABC abc
NOTE
A test page cannot be printed if "PROHIBIT TESTPAGE PRINTING" (See the "Operation manual (forprinter)".) has been set to "prohibited" in the keyoperator programs.

2-15
2
REPLACING THE TONER CARTRIDGEWhen toner runs low, a message will appear to inform you that the toner cartridge must be replaced.
Follow the steps below to replace the toner cartridge.
1 Open the front cover.
2 Lower the cartridge lock lever.
3 While depressing the lock release button,pull out the toner cartridge and remove it.
4 Remove a new toner cartridge from thepackage and shake it horizontally five orsix times.
5 Insert a new toner cartridge.
Push the cartridge inuntil it locks securely intoplace.
6 Gently remove the sealing tape from thecartridge.
Once the seal is pulledout, the toner in the tonercartridge is supplied tothe developer cartridge.
7 Return the cartridge lock lever.
8 Close the front cover.
NOTE
To view the approximate amount of toner remaining, hold down the [COPY] key during printing or when themachine is on standby. The percentage of toner remaining will appear in the display while you hold down the key.When the percentage falls to "25-0%" , obtain a new toner cartridge and keep it ready for replacement.
NOTE
Shake the tonercartridge well toensure that the tonerflows well and will notstick to the inside ofthe cartridge.
CAUTION
● Do not throw the toner cartridge into a fire. Toner may fly and cause burns.● Store toner cartridges out of the reach of small children.
NOTE
Place the used toner cartridge in the plastic bag and store it. When placing the toner cartridge in the bag, insert ithorizontally, not vertically. If the cartridge is stood on end, the collected used toner may spill out and soil the flooror your clothes.

2-16
STORAGE OF SUPPLIESStandard supplies for this product that can replaced by the user include paper, toner cartridges, and staple cartridgesfor the finisher.
■■■■ Proper storage1. Store the supplies in a location that is:● clean and dry,● at a stable temperature,● not exposed to direct sunlight.
2. Store paper in the wrapper and lying flat.3. Paper stored in packages standing up or out of
the wrapper may curl or become damp, resultingin paper misfeeds.
4. Store a new toner cartridge box horizontally. Donot store it standing on end. If stored standing onend, the toner may not distribute well even aftershaking the cartridge vigorously, and will remaininside the cartridge without flowing out.
For best copying results, be sure to use only Sharp Genuine Supplies which are designed,engineered, and tested to maximize the life and performance of Sharp products. Look forthe Genuine Supplies label on the toner package.
GENUINE SUPPLIES
Supply and Consumables The supply of spare parts for a repair of the appliance is guaranteed for at least 7 years following the terminationof production. Spare parts are those parts of the apparatus which may break down within the scope of the ordinaryuse of the product - whereas those parts which normally exceed the life of the product are not to be consideredas spare parts. Consumables too, are available for 7 years following the termination of production.
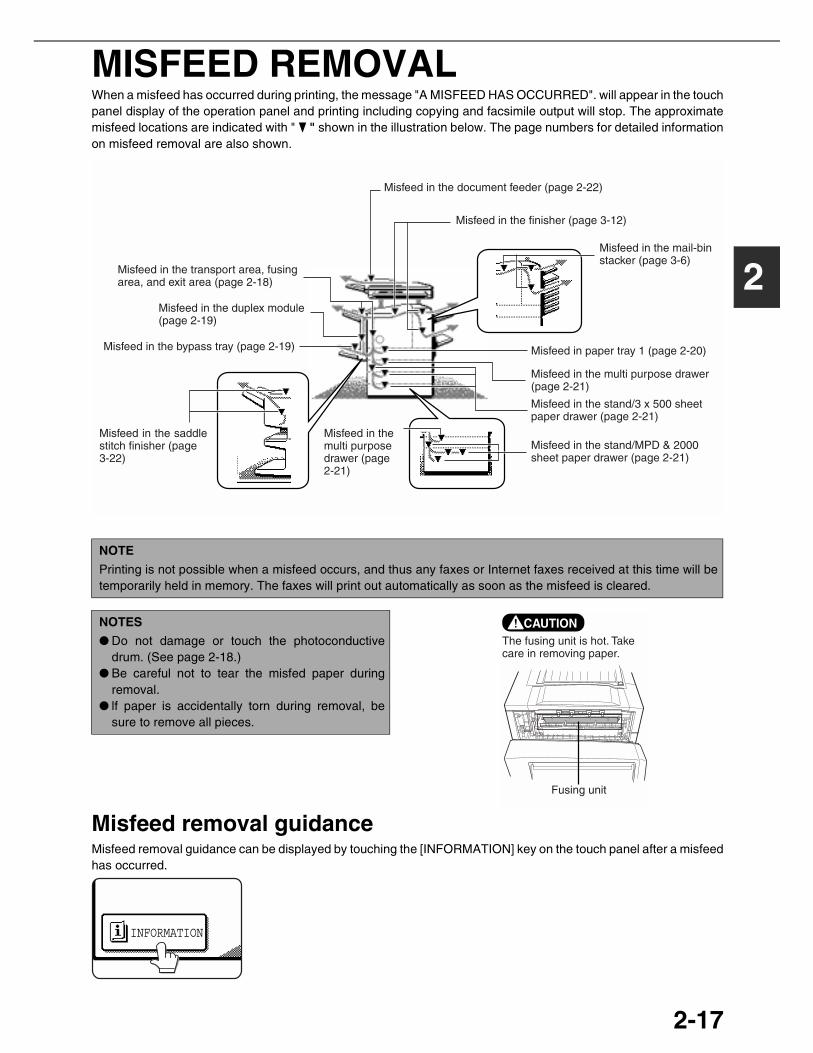
2-17
2
MISFEED REMOVALWhen a misfeed has occurred during printing, the message "A MISFEED HAS OCCURRED". will appear in the touchpanel display of the operation panel and printing including copying and facsimile output will stop. The approximatemisfeed locations are indicated with " " shown in the illustration below. The page numbers for detailed informationon misfeed removal are also shown.
Misfeed removal guidanceMisfeed removal guidance can be displayed by touching the [INFORMATION] key on the touch panel after a misfeedhas occurred.
Misfeed in the transport area, fusing area, and exit area (page 2-18)
Misfeed in the mail-bin stacker (page 3-6)
Misfeed in paper tray 1 (page 2-20)
Misfeed in the multi purpose drawer (page 2-21)
Misfeed in the stand/MPD & 2000 sheet paper drawer (page 2-21)
Misfeed in the stand/3 x 500 sheet paper drawer (page 2-21)
Misfeed in the document feeder (page 2-22)
Misfeed in the finisher (page 3-12)
Misfeed in the duplex module (page 2-19)
Misfeed in the bypass tray (page 2-19)
Misfeed in the saddle stitch finisher (page 3-22)
Misfeed in the multi purpose drawer (page 2-21)
NOTE
Printing is not possible when a misfeed occurs, and thus any faxes or Internet faxes received at this time will betemporarily held in memory. The faxes will print out automatically as soon as the misfeed is cleared.
NOTES
● Do not damage or touch the photoconductivedrum. (See page 2-18.)
● Be careful not to tear the misfed paper duringremoval.
● lf paper is accidentally torn during removal, besure to remove all pieces.
Fusing unit
CAUTIONThe fusing unit is hot. Take care in removing paper.
INFORMATION
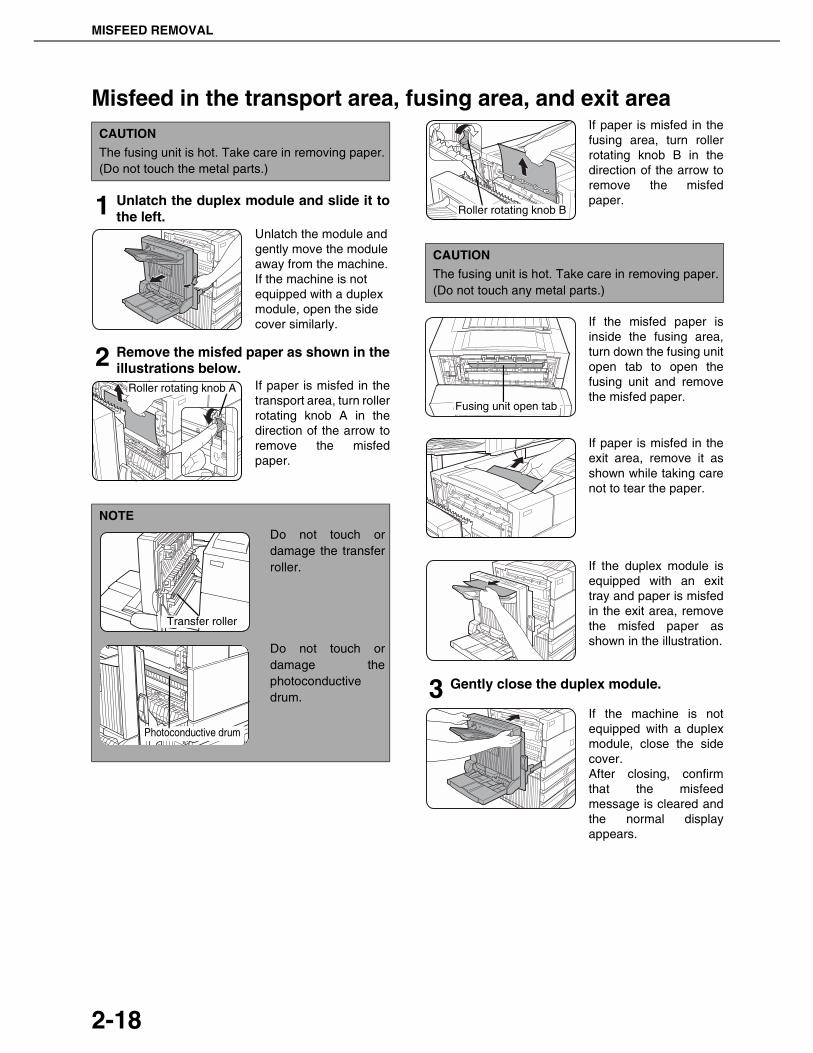
MISFEED REMOVAL
2-18
Misfeed in the transport area, fusing area, and exit area
1 Unlatch the duplex module and slide it tothe left.
Unlatch the module andgently move the moduleaway from the machine.If the machine is notequipped with a duplexmodule, open the sidecover similarly.
2 Remove the misfed paper as shown in theillustrations below.
If paper is misfed in thetransport area, turn rollerrotating knob A in thedirection of the arrow toremove the misfedpaper.
o
If paper is misfed in thefusing area, turn rollerrotating knob B in thedirection of the arrow toremove the misfedpaper.
If the misfed paper isinside the fusing area,turn down the fusing unitopen tab to open thefusing unit and removethe misfed paper.
If paper is misfed in theexit area, remove it asshown while taking carenot to tear the paper.
If the duplex module isequipped with an exittray and paper is misfedin the exit area, removethe misfed paper asshown in the illustration.
3 Gently close the duplex module.
If the machine is notequipped with a duplexmodule, close the sidecover.After closing, confirmthat the misfeedmessage is cleared andthe normal displayappears.
CAUTION
The fusing unit is hot. Take care in removing paper.(Do not touch the metal parts.)
NOTE
Do not touch ordamage the transferroller.
Do not touch ordamage thephotoconductivedrum.
Roller rotating knob A
Transfer roller
Photoconductive drum
CAUTION
The fusing unit is hot. Take care in removing paper.(Do not touch any metal parts.)
Roller rotating knob B
Fusing unit open tab

MISFEED REMOVAL
2-19
2
Misfeed in the duplex module
1 Unlatch the duplex module and slide it tothe left.
Unlatch the unit andgently move the moduleaway from the machine.
2 If the duplex module has an exit tray,rotate it up out of the way and open thecover of the duplex module.
If no exit tray is attached,just open the cover ofthe duplex module andignore any reference tothe tray in the followingsteps.
3 While holding the exit tray up, remove themisfed paper as shown in the illustrationsbelow.
If paper is misfed at theupper part of the duplexmodule, gently remove itwhile taking care not totear the paper.
If paper is misfed at thelower part of the duplexmodule, gently remove itwhile taking care not totear the paper.
4 Close the cover of the duplex module andlower the exit tray.
5 Gently close the duplex module.
After closing the duplexmodule, confirm that themisfeed message iscleared and the normaldisplay appears.
■■■■ Misfeed in the bypass tray
1 Unlatch the duplex module and slide it tothe left.
Unlatch the unit andgently move the moduleaway from the machine.
2 Remove the misfed from the bypass tray.
Be careful not to tear themisfed paper duringremoval.
3 Gently close the duplex module.
After closing the duplexmodule, confirm that themisfeed message iscleared and that thenormal display appears.

MISFEED REMOVAL
2-20
Misfeed in the paper feed area
■■■■ Misfeed in paper tray 1
1 Unlatch the duplex module and slide it tothe left.
Unlatch the module andgently move the moduleaway from the machine.If the machine is notequipped with a duplexmodule, open the sidecover similarly.
2 Remove the misfed paper.
Be careful not to tear themisfed paper duringremoval.
3 If misfed paper is not found in step 2, pullout paper tray 1 and remove the misfedpaper.
Be careful not to tear themisfed paper duringremoval.
4 Gently close the paper tray.
Push the paper trayback into the machine.
5 Gently close the duplex module.
If the machine is notequipped with a duplexmodule, close the sidecover.After closing, confirmthat the misfeedmessage is cleared andthe normal displayappears.
NOTE
Be sure to follow the misfeed removal sequence. Do not pull the tray out immediately as the misfeed may haveoccurred with paper partially fed out of the tray. Open the left cover and see if there is misfed paper first (steps 1and 2). If you open the tray without checking, the partially fed paper may tear and leave torn pieces in the machine,increasing the difficulty of removal.
NOTE
The paper may not be extending out far from insidethe machine but must be removed if it is possible tograsp it. If it is not possible to grasp it, go to the nextstep.
NOTE
If paper drops beyond the rear side of the paper traythat has been pulled out, remove the paper tray andthen remove the paper. (For removal of the papertray, see the illustration below.)
After pulling out thepaper tray until itstops, gently lift andpull the tray to removeit. To reinstall thepaper tray, insert it atan angle and thenpush it into themachine.
To remove a paper tray from a stand/paper drawer,pull the tray out until it stops then rotate it to the leftto disengage it from the stand. When reinstalling it,place the left rear or the drawer into the slot androtate the drawer to the right and into the stand.
Installation of trays in the stand/3x500 sheetpaper drawer
The middle and lower trays cannot be installed in theupper tray position and the upper tray cannot beinstalled to the middle and lower tray positions.(These cannot be pushed into the machine.)Take care not to install a tray to an improper positionafter removing the tray.

MISFEED REMOVAL
2-21
2
■■■■ Misfeed in the multi purpose drawer
1 Unlatch the duplex module and slide it tothe left.
Unlatch the module andgently move the moduleaway from the machine.If the machine is notequipped with a duplexmodule, open the sidecover similarly.
2 Open the left cover of the stand/paperdrawer.
Hold the knob and gentlyopen the cover.If the machine is notequipped with a stand/paper drawer, open theleft cover of the multipurpose drawer.
3 Remove the misfed paper.
Be careful not to tear themisfed paper duringremoval.
4 Close the left cover of the stand/paperdrawer.
5 Gently close the duplex unit.
If the machine is notequipped with a duplexmodule, close the sidecover.After closing, confirm thatthe misfeed message hasbeen cleared and thenormal display appears.
6 If misfed paper is not found in step 3, refer to"Misfeed in paper tray 1" (steps 1 to 5 on theprevious page) to remove the misfed paper.
■■■■ Misfeed in the stand/3 x 500 sheet paperdrawerFor misfeed removal in the upper tray, follow theprocedure of "Misfeed in the multi purpose drawer"shown to the left to remove the misfed paper.
■■■■ Misfeed in the stand/MPD & 2000 sheetpaper drawerFor misfeed removal in the upper tray, follow theprocedure of "Misfeed in the multi purpose drawer"shown to the left to remove the misfed paper. Formisfeed removal in the lower large capacity tray,follow the procedure below.
1 Follow steps 1 to 4 of "Misfeed in the multipurpose drawer" shown to the left.
2 If misfed paper is not found in step 1, referto "Misfeed in paper tray 1" on theprevious page.
3 If misfed paper is not found in steps 1 and2, pull out the large capacity tray (lowertray) and remove the misfed paper asshown in the illustrations below.
Raise the paper guide andremove the misfed paper.After removing themisfed paper, be sure toreturn the paper guide.
4 Gently close the large capacity tray.
Push the paper tray allthe way into themachine.
5 Gently close the duplex module.If the machine is not equipped with a duplexmodule, close the side cover. After closing, confirm that the misfeed messagehas been cleared and the normal display appears.
NOTE
The paper may not be extending out far from insidethe machine but must be removed if it is possible tograsp it. If it is not possible to grasp it, go to the nextstep.

2-22
REMOVING AN ORIGINAL MISFEEDRemoving a misfed original from the automatic document feederIf an original misfeed occurs in the automatic document feeder, follow the steps below to remove the misfed original.
Check locations A and B in the diagram at left toremove the original.
1 Removing misfeeds from each location.
●●●● Check location AOpen the documentfeeding area cover andgently remove the misfedoriginal without tearing it.
Close the cover securelyso that cover clicks intoplace.
●●●● Check location B●●●● Misfeed in the transfer unit
Open the documentfeeder and turn thegreen rotating knob inthe direction of the arrowto remove any misfedoriginals.
2 Open and close the document feeder.
Opening and closing thecover clears the misfeeddisplay. Copying cannotbe resumed until thisstep is performed.However, this step is notnecessary after a
misfeed is removed from location B.
A message may appear indicating the number oforiginals which must be returned to the documentfeeder tray. Return the originals to the documentfeeder tray and press the [START] key.
NOTES
● For misfeed removal in the main unit and other peripheral devices, see page 2-17● When a misfeed occurs, touch the [INFORMATION] key to display detailed information for misfeed removal.
Document feeding areacover
2-23
2
TROUBLESHOOTINGCheck the following troubleshooting list before requesting service as many problems can be fixed by the user. If youare unable to solve the problem by checking the list, turn off the power switch, unplug the power cord.Problems related to general use of the machine are described below. For problems related to the copy function, seepage 6-3. For problems related to document filing, see page 7-28. For fax, printer, and network scanner problems,see the manuals for those functions. For peripheral device problems, see the explanation of the device.
If the message "CALL FOR SERVICE. CODE:**-**"(Note) appears in the touch panel, turn off the power switch, waitabout 10 seconds, and then turn the power switch back on. If the message still appears after turning the powerswitch off and on several times, it is likely that a failure has occurred that requires service. In this event, stop usingthe machine, unplug the power cord, and contact your Sharp dealer.Note: Letters and numbers appear in "**-**". When you contact your Sharp dealer, please tell your dealer what
letters and numbers appear.
Problem Check Solution or cause
The machine doesnot operate.
Machine plugged in? Plug the machine into a grounded outlet.
The power switch are not turned on? Turn on the power switch. (Page 1-17)
READY indicator off?The machine is warming up. (Warm-up time isapproximately 120 seconds.) Wait until theREADY indicator lights up.
Message indicating need to load paperdisplayed?
Load paper. (Page 2-2)
Message indicating need to replace thetoner cartridge displayed?
Replace the toner cartridge. (Page 2-15)
Message indicating a paper misfeeddisplayed?
Remove misfed paper. (Page 2-17)
Copying/printing isnot possible
A message appears saying that this typeof paper cannot be used for two-sidedcopying.
Two-sided printing is not possible on specialpaper. Use paper that can be used for automatictwo-sided printing. (Page 2-4)

TROUBLESHOOTING
2-24
Printing stopsbefore the job isfinished
If too many pages collect on the outputtray, the tray full sensor activates andstops printing.
Remove the paper from the output tray.
You have run out of paper. Load paper. (Page 2-2)
Smudges on printedsheets
Does a message appear indicating theneed for maintenance?
Please contact the your dealer as soon aspossible.
The displayedpaper size or papertype does not matchthe loaded papersize or paper type.
The correct paper size or paper type isnot set in the paper tray settings of thecustom settings.
When loading paper, if you change the papersize from an inch size to an AB size, or from anAB size to an inch size, or change the papertype, be sure to set the new paper type asexplained in "Setting the paper type and papersize" (see page 2-5).
When printing on aspecial size ofpaper, part of theprinted image ismissing.
The paper size setting is not setcorrectly in the paper tray settings of thecustom settings.
When using a special size of paper, set thecorrect paper size as explained in "Setting thepaper type and paper size" on page 2-5. If thepaper size setting is not correct, part of the imagemay be cut off or the image may not print.
Paper misfeedsfrequently.
Is paper other than SHARP-recommended paper being used?
Use SHARP-recommended paper. (Page 2-16)
Paper curled or damp?
Do not use curled or crimped paper. If you willnot use the paper for a long time, remove thepaper from the tray and store it in the wrapper ina cool and dark location so that it will not absorbmoisture.
Is the paper curled and does itfrequently misfeed in the finisher orsaddle stitch finisher?
Paper may be curled when output depending onthe paper type and quality.In some cases turning the paper over in the traywill reduce misfeeding due to curling.
Multiple sheets of paper fedsimultaneously?
Remove the paperfrom the papertray or the bypasstray, fan the paperas shown in theillustration, andthen load it again.
The paper in the tray is not stackedevenly.
Make sure that the paper in the paper tray isstacked evenly. If the stack is not even, papermisfeeds will occur.
Problem Check Solution or cause
TROUBLESHOOTING
2-25
2
Printed paper iswrinkled or theimage rubs offeasily.
Is paper other than SHARP-recommended paper being used?
Use SHARP-recommended paper. (Page 2-16)
Is paper size or weight out of theallowable range?
Use paper in the allowable range.
Paper damp?
Be sure to store paper in the wrapper in a drylocation and do not store paper in a location that is●humid●at a high temperature or an extremely low
temperature●exposed to direct sunlight●dusty.
The contrast on thetouch panel is toohigh or too low.
Is LCD contrast properly adjusted?Adjust the screen contrast using "DISPLAYCONTRAST" in "Default settings" of the customsettings. (Page 2-14)
Printing takes placeon the wrong side ofthe paper.
The paper is loaded in the tray with theprint side face down*.* Face up if the paper type is "PRE-
PRINTED", "PRE-PUNCHED" or"LETTER HEAD".
Load paper in the tray with the print side face up.However, if the paper type is "PRE-PRINTED","PRE-PUNCHED" or "LETTER HEAD", load thepaper with the print side face down*.* If the two-sided function has been prohibited
using "DISABLING OF DUPLEX" in the keyoperator programs (page 11 of the Keyoperator's guide), load the paper face up.
Marks appear atregular intervals onprinted pages.
Paper with punch holes is being used.
If the original image overlaps the punch holes,marks will appear at the position of the holes onthe back of the paper after one-sided printing, oron the front and back of the paper after two-sided printing. Make sure that the original imagedoes not overlap the punch holes.
Problem Check Solution or cause


3-1
CHAPTER 3PERIPHERAL DEVICES
This chapter describes operating instructions for the Mail-Bin Stacker,the Finisher, the Saddle Stitch Finisher, and the Duplex Module.
Page
DUPLEX MODULE ................................................................................. 3-2● Part names...................................................................................... 3-2● Specifications.................................................................................. 3-2● Loading paper in the bypass tray .................................................... 3-3● Troubleshooting (concerning the duplex module) ........................... 3-4
MAIL-BIN STACKER .............................................................................. 3-5● Part names...................................................................................... 3-5● Specifications.................................................................................. 3-5● Misfeed in the mail-bin stacker........................................................ 3-6
FINISHER ............................................................................................... 3-7● Part names...................................................................................... 3-7● Specifications.................................................................................. 3-7● Finisher functions............................................................................ 3-8● Using the finisher functions ............................................................. 3-9● Staple cartridge replacement .......................................................... 3-10● Misfeed in the finisher ..................................................................... 3-12● Troubleshooting finisher problems.................................................. 3-13
SADDLE STITCH FINISHER.................................................................. 3-14● Part names...................................................................................... 3-14● Specifications.................................................................................. 3-14● Saddle stitch finisher functions........................................................ 3-15● Using the saddle stitch finisher ....................................................... 3-18● Staple cartridge replacement and staple jam removal .................... 3-19● Misfeed in the saddle stitch finisher ................................................ 3-22● Troubleshooting (concerning the saddle stitch finisher).................. 3-24
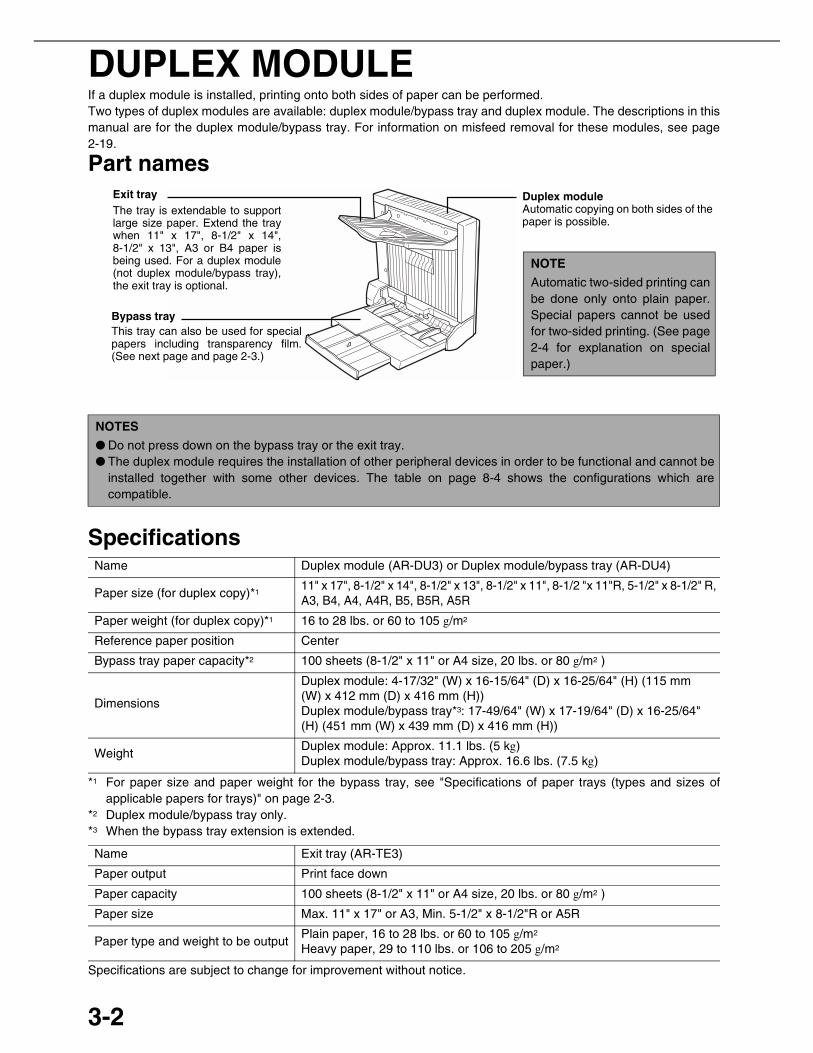
3-2
DUPLEX MODULEIf a duplex module is installed, printing onto both sides of paper can be performed.Two types of duplex modules are available: duplex module/bypass tray and duplex module. The descriptions in thismanual are for the duplex module/bypass tray. For information on misfeed removal for these modules, see page2-19.
Part names
Specifications
*1 For paper size and paper weight for the bypass tray, see "Specifications of paper trays (types and sizes ofapplicable papers for trays)" on page 2-3.
*2 Duplex module/bypass tray only.*3 When the bypass tray extension is extended.
Specifications are subject to change for improvement without notice.
NOTES
● Do not press down on the bypass tray or the exit tray.● The duplex module requires the installation of other peripheral devices in order to be functional and cannot be
installed together with some other devices. The table on page 8-4 shows the configurations which arecompatible.
Name Duplex module (AR-DU3) or Duplex module/bypass tray (AR-DU4)
Paper size (for duplex copy)*111" x 17", 8-1/2" x 14", 8-1/2" x 13", 8-1/2" x 11", 8-1/2 "x 11"R, 5-1/2" x 8-1/2" R,A3, B4, A4, A4R, B5, B5R, A5R
Paper weight (for duplex copy)*1 16 to 28 lbs. or 60 to 105 g/m2
Reference paper position Center
Bypass tray paper capacity*2 100 sheets (8-1/2" x 11" or A4 size, 20 lbs. or 80 g/m2 )
Dimensions
Duplex module: 4-17/32" (W) x 16-15/64" (D) x 16-25/64" (H) (115 mm(W) x 412 mm (D) x 416 mm (H))Duplex module/bypass tray*3: 17-49/64" (W) x 17-19/64" (D) x 16-25/64"(H) (451 mm (W) x 439 mm (D) x 416 mm (H))
WeightDuplex module: Approx. 11.1 lbs. (5 kg)Duplex module/bypass tray: Approx. 16.6 lbs. (7.5 kg)
Name Exit tray (AR-TE3)
Paper output Print face down
Paper capacity 100 sheets (8-1/2" x 11" or A4 size, 20 lbs. or 80 g/m2 )
Paper size Max. 11" x 17" or A3, Min. 5-1/2" x 8-1/2"R or A5R
Paper type and weight to be outputPlain paper, 16 to 28 lbs. or 60 to 105 g/m2
Heavy paper, 29 to 110 lbs. or 106 to 205 g/m2
Exit trayThe tray is extendable to supportlarge size paper. Extend the traywhen 11" x 17", 8-1/2" x 14",8-1/2" x 13", A3 or B4 paper isbeing used. For a duplex module(not duplex module/bypass tray),the exit tray is optional.
This tray can also be used for specialpapers including transparency film.(See next page and page 2-3.)
Bypass tray
Duplex moduleAutomatic copying on both sides of thepaper is possible.
NOTE
Automatic two-sided printing canbe done only onto plain paper.Special papers cannot be usedfor two-sided printing. (See page2-4 for explanation on specialpaper.)
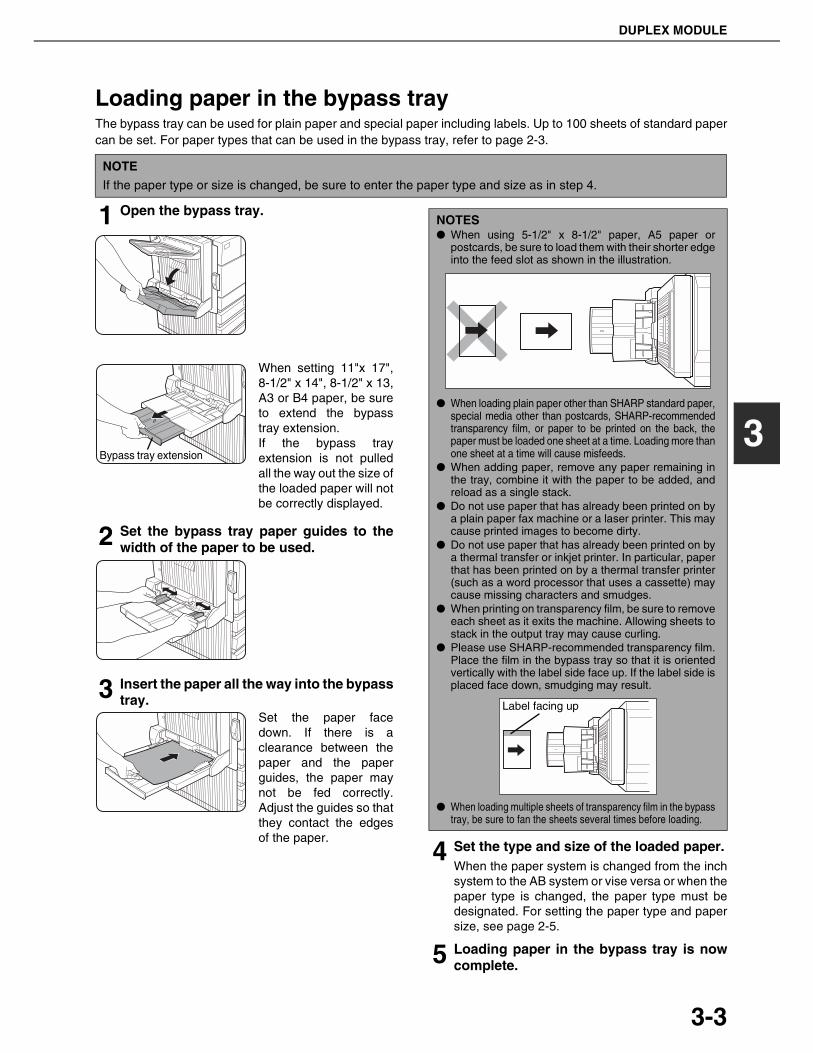
DUPLEX MODULE
3-3
3
Loading paper in the bypass trayThe bypass tray can be used for plain paper and special paper including labels. Up to 100 sheets of standard papercan be set. For paper types that can be used in the bypass tray, refer to page 2-3.
1 Open the bypass tray.
When setting 11"x 17",8-1/2" x 14", 8-1/2" x 13,A3 or B4 paper, be sureto extend the bypasstray extension.If the bypass trayextension is not pulledall the way out the size ofthe loaded paper will notbe correctly displayed.
2 Set the bypass tray paper guides to thewidth of the paper to be used.
3 Insert the paper all the way into the bypasstray.
Set the paper facedown. If there is aclearance between thepaper and the paperguides, the paper maynot be fed correctly.Adjust the guides so thatthey contact the edgesof the paper.
4 Set the type and size of the loaded paper.When the paper system is changed from the inchsystem to the AB system or vise versa or when thepaper type is changed, the paper type must bedesignated. For setting the paper type and papersize, see page 2-5.
5 Loading paper in the bypass tray is nowcomplete.
NOTE
If the paper type or size is changed, be sure to enter the paper type and size as in step 4.
Bypass tray extension
NOTES● When using 5-1/2" x 8-1/2" paper, A5 paper or
postcards, be sure to load them with their shorter edgeinto the feed slot as shown in the illustration.
● When loading plain paper other than SHARP standard paper,special media other than postcards, SHARP-recommendedtransparency film, or paper to be printed on the back, thepaper must be loaded one sheet at a time. Loading more thanone sheet at a time will cause misfeeds.
● When adding paper, remove any paper remaining inthe tray, combine it with the paper to be added, andreload as a single stack.
● Do not use paper that has already been printed on bya plain paper fax machine or a laser printer. This maycause printed images to become dirty.
● Do not use paper that has already been printed on bya thermal transfer or inkjet printer. In particular, paperthat has been printed on by a thermal transfer printer(such as a word processor that uses a cassette) maycause missing characters and smudges.
● When printing on transparency film, be sure to removeeach sheet as it exits the machine. Allowing sheets tostack in the output tray may cause curling.
● Please use SHARP-recommended transparency film.Place the film in the bypass tray so that it is orientedvertically with the label side face up. If the label side isplaced face down, smudging may result.
● When loading multiple sheets of transparency film in the bypasstray, be sure to fan the sheets several times before loading.
Label facing up

DUPLEX MODULE
3-4
Troubleshooting (concerning the duplex module)Check the list below before calling for service.
Problem Check Solution or cause
The machine will notprint duplex prints.
Message indicating the paper typecannot be used for two-sided printingdisplayed?
Special paper cannot be used for two-sidedprinting. Use a paper type adequate fortwo-sided printing. (See pages 2-4 and 3-2.)
Message indicating the paper sizecannot be used for two-sided printingdisplayed?
Use a paper size adequate for two-sidedprinting. (See pages 2-4 and 3-2.)
Bypass tray extension not extended?When using 11" x 17", 8-1/2" x 14", 8-1/2 "x 13",A3 or B4 paper, the bypass tray extension mustbe extended.
Printed images ontopaper from thebypass tray areskewed.
Does the number of sheets exceed thelimit?
Set paper within the allowable range.
Paper guides properly set? Set the paper guides properly to the paper size.
A paper misfeedoccurs in the bypasstray.
Paper size and type set properly?When using non-standard size paper or specialpaper, be sure to set the paper size and type.(See pages 2-3 to 2-5.)
Does the number of sheets exceed thelimit?
Set paper within the allowable range.
Paper guides properly set? Set the paper guides properly to the paper size.
When printing on aspecial size ofpaper, part of theprinted image ismissing.
The paper size setting is not setcorrectly in the paper tray settings of thecustom settings.
When using a special size of paper, set thecorrect paper size as explained in "Setting thepaper type and paper size" on page 2-5. If thepaper size setting is not correct, part of the imagemay be cut off or the image may not print.

3-5
3
MAIL-BIN STACKERThe mail-bin stacker has 7 mail bins which can each be designated to receive printed output from a user or a groupof users .Output paper in the copy mode and the fax mode will be delivered to the top tray of the stacker separated from printedoutput. (Printed output can also be delivered to the top tray.)
Part names
Specifications
Specifications are subject to change for improvement without notice.
NOTES
● Do not put pressure on the mail-bin stacker, particularly on the top tray and mail bins.● Do not place anything on the top cover. Doing so will interfere with the machine’s paper handling during duplex
printing.● The top tray and each mail bin are extendable. To print onto large paper (11" x 17", 8-1/2" x 14", 8-1/2" x 13",
A3 or B4), extend the tray.● The mail-bin stacker requires the installation of other peripheral devices in order to be functional and cannot be
installed together with some other devices. The table on page 8-4 shows the configurations which arecompatible.
Name Mail-bin stacker (AR-MS1)Number of trays 8 (Top tray and seven mail bins)Paper output Print face downTray type Top tray: normal tray, Mail bins: mail bin tray
Tray capacityTop tray: 250 sheets (8-1/2" x 11" or A4 size, 20 lbs. or 80 g/m2)Mail bins: 100 sheets each (8-1/2" x 11" or A4 size, 20 lbs. or 80 g/m2)
Paper sizesTop tray: same as the specifications of paper for feeding in the main unitMail bins: 11" x 17", 8-1/2" x 14", 8-1/2" x 13", 8-1/2" x 11", 8-1/2" x 11"R, 7-1/4" x 10-1/2", A3, B4, A4, A4R, B5, B5R
Paper weightTop tray: same as the specifications of paper for feeding in the main unitMail bins: 15 to 34 lbs. or 60 to 105 g/m2
Paper typesTop tray: same as the specifications of paper for feeding in the main unitMail bins: plain paper only
Tray full detection Provided in both the top tray and the mail binsPower supply Supplied from machineDimensions 18-5/16" (W) x 20-7/8" (D) x 20" (H) (465 mm (W) x 530 mm (D) x 508 mm (H))Weight Approx. 41.9 lbs. (19 kg)
Each bin can be designatedto receive printed output forassigned users. These binscannot be used for copier orfacsimile output.
Top coverOpen for misfeed removal.
Open for misfeed removal.Front cover
Output paper from the printer,copier, and facsimile featurescan be delivered here.
Top tray
Mail bins
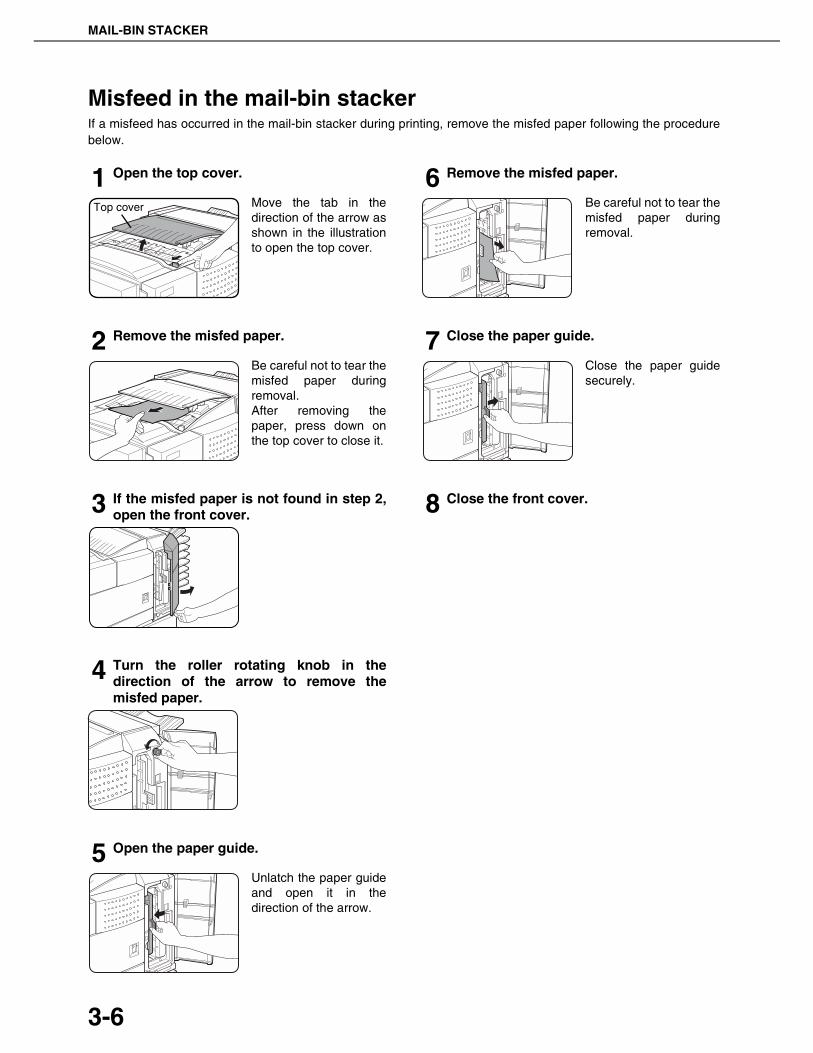
MAIL-BIN STACKER
3-6
Misfeed in the mail-bin stackerIf a misfeed has occurred in the mail-bin stacker during printing, remove the misfed paper following the procedurebelow.
1 Open the top cover.
Move the tab in thedirection of the arrow asshown in the illustrationto open the top cover.
2 Remove the misfed paper.
Be careful not to tear themisfed paper duringremoval.After removing thepaper, press down onthe top cover to close it.
3 If the misfed paper is not found in step 2,open the front cover.
4 Turn the roller rotating knob in thedirection of the arrow to remove themisfed paper.
5 Open the paper guide.
Unlatch the paper guideand open it in thedirection of the arrow.
6 Remove the misfed paper.
Be careful not to tear themisfed paper duringremoval.
7 Close the paper guide.
Close the paper guidesecurely.
8 Close the front cover.
Top cover

3-7
3
FINISHERThe finisher can deliver collated sets either stapled or unstapled. Unstapled sets can be offset stacked from theprevious set for easy separation of the sets.
Part names
Specifications
Specifications are subject to change for improvement without notice.
SuppliesAR-SC1 staple cartridges must be used for this finisher. The cartridgepackage contains three cartridges approx. 3000 staples each.
NOTES
● Do not put pressure on the finisher (particularly each tray).● Do not place anything on the top cover. Doing so will interfere with the machine’s paper handling during duplex
printing.● The tray moves up and down during operation. Be careful not to impede its movement.● The finisher requires the installation of other peripheral devices in order to be functional and cannot be installed
together with some other devices. The table on page 8-4 shows the configurations which are compatible.
Name Finisher (AR-FN6)Number of trays 2Paper output Print face downTray type Top tray: normal tray, Lower tray: offset tray
Tray capacity Top tray: 500 sheets (8-1/2" x 11" or A4 size, 20 lbs. or 80 g/m2)Lower tray: 750 sheets (8-1/2" x 11" or A4 size, 20 lbs. or 80 g/m2)
Paper sizes Top tray: same as the specifications of paper for feeding in the main unitLower tray: Max. 8-1/2" x 11" or A4, Min. B5
Paper weight Top tray: same as the specifications of paper for feeding in the main unitLower tray: 16 to 34 lbs. or 60 to 128 g/m2
Paper types Top tray: same as the specifications of paper for feeding in the main unit Lower tray:plain paper only
Tray full detection Provided in both the top tray and the lower trayOffset function Provided for the lower tray only. The offset amount is approx. 1 inch (25 mm)Paper sizes for stapling 8-1/2" x 11", A4, and B5
Stapling capacity 30 sheets* (8-1/2" x 11" or A4 or smaller 20 lbs. or 80 g/m2)*Up two sheets of cover stock (34 lbs. or 128 g/m2) can be included.
Staples Single staple can be placed in the top left or lower left corners or two staples can becentered on the left side
Power supply Supplied from machineDimensions 18-1/8" (W) x 20-7/8" (D) x 20" (H) (460 mm (W) x 530 mm (D) x 508 mm (H))Weight Approx. 46.3 lbs. (21 kg)
Latch
Release the latch to open thefinisher for misfeed removal.
Pull the box out toreplace the staplecartridge or toremove jammedstaples.
Staple box
Printer, copier and faxoutput can be deliveredhere.To print onto large paper(11" x 17", 8-1/2" x 14",8-1/2" x 13", A3 or B4),extend the tray.
Top tray
Top coverOpen for misfeedremoval.
Offset trayStapled sets or sets to beoffset will be deliveredhere.

FINISHER
3-8
Finisher functions■■■■ Sort mode
Sorted sets will be delivered.
■■■■ Offset mode
■■■■ Group modeGroups of prints or copies of the same page will bedelivered.
Sets will move from side to side so that each set orgroup will be offset from the previous set or groupfor easy separation. The offset function can only beused in the offset tray.Stapled sets will not be offset.
■■■■ Staple sort modeCollated sets will be stapled and delivered to the offset tray. The stapling positions, orientation, paper size forstapling, and stapling capacity are shown below.
Original Printouts
Offset mode Non-offset mode
Original Printouts
Stapling positions
Top left corner of printouts
Center left two positions of printouts
Lower left corner of printouts
Portrait orientation Landscape orientation
Available paper sizes: 8-1/2" x 11", A4 and B5Stapling capacity: Up to 30 sheets for any available sizes
Same as above
Same as above
Stapling cannot be made.
NOTES
● Stapling can only be done when the offset tray has been selected.● If mixed paper sizes are selected for stapling jobs, stapling will be automatically canceled.
NOTE
Transparency film heavy paper, punched paper, labels , envelopes and postcards cannot be stapled.

FINISHER
3-9
3
Using the finisher functionsWhen the [OUTPUT] key on the main screen of copy mode is touched, a screen for selecting the sort/group/staplesort functions and selecting an exit tray will appear. As a selection is made, the touch key for the selection will behighlighted.
(1) [GROUP] key (See page 3-8.)
When Group is selected, all copies of the sameoriginal will be grouped.
(2) [STAPLE SORT] key (See page 3-8.)
When Staple Sort is selected, sorted sets will bestapled and delivered to the offset tray. (They willnot be offset stacked.)
(3) [SORT] key (See page 3-8.)
When Sort is selected, sets of copies will besequentially delivered.
(4) Icon display
An icon representing a selected function (sort,staple sort or group) is displayed.
(5) [OFFSET] key (See page 3-8.)
If Offset is checked, offset is enabled. If notchecked, offset will not function. If staple sort isselected, the check mark of offset will beautomatically canceled. If the staple sort function isselected, the checkmark in the offset checkbox isautomatically removed.
(6) [OFFSET TRAY] key (See page 3-8.)
When the offset tray is selected, copies will bedelivered to the offset tray. When staple sort isselected, the offset tray will be automaticallyselected.
(7) [TOP TRAY] key
When top tray is selected, copies will be deliveredto the top tray.
(8) [OK] key
Press to close the output screen and to return tothe main screen.
OK
STAPLESORT
OUTPUT
GROUP
SORT
OFFSETTRAY
TOP TRAY
OFFSET
(1) (2) (3) (4) (5)
(6)
(7)
(8)

FINISHER
3-10
Staple cartridge replacementWhen the staple cartridge becomes empty, the message "Add staples." will appear in the message display of theoperation panel.Follow the procedure below to replace the staple cartridge.
1 Open the front cover.
2 Turn the staple unit to face up.
3 Pull the release lever for the staple boxand remove the box.
4 Remove the empty staple cartridge fromthe staple box.
5 Insert a new staple cartridge into thestaple box aligning the arrow of the staplecartridge with that of the staple box.
When reinstalling thestaple box, push it inuntil it clicks into place.
6 Remove the tape from the staple cartridgeby pulling it straight.
7 Reinstall the staple box.
Push the staple box inuntil it clicks into place.
8 While pushing the staple unit release leverto the left, rotate the staple unit to facedown.
9 Close the front cover.
NOTES
● Do not remove the tape from the cartridge beforeinserting the staple cartridge into the box.
● When reinstalling the staple box, push it in until itclicks into place.
NOTE
Make a test print or copy in the staple sort mode toensure that stapling is performed properly.
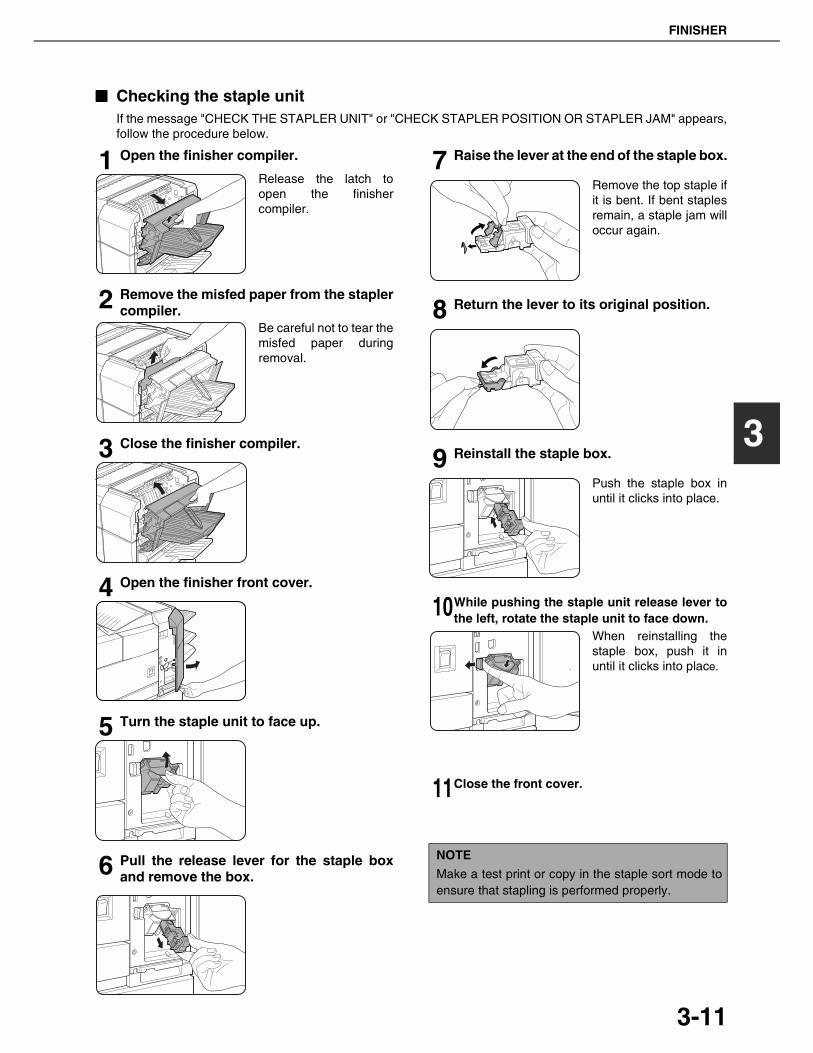
FINISHER
3-11
3
■■■■ Checking the staple unitIf the message "CHECK THE STAPLER UNIT" or "CHECK STAPLER POSITION OR STAPLER JAM" appears,follow the procedure below.
1 Open the finisher compiler.
Release the latch toopen the finishercompiler.
2 Remove the misfed paper from the staplercompiler.
Be careful not to tear themisfed paper duringremoval.
3 Close the finisher compiler.
4 Open the finisher front cover.
5 Turn the staple unit to face up.
6 Pull the release lever for the staple boxand remove the box.
7 Raise the lever at the end of the staple box.
Remove the top staple ifit is bent. If bent staplesremain, a staple jam willoccur again.
8 Return the lever to its original position.
9 Reinstall the staple box.
Push the staple box inuntil it clicks into place.
10While pushing the staple unit release lever tothe left, rotate the staple unit to face down.
When reinstalling thestaple box, push it inuntil it clicks into place.
11Close the front cover.
NOTE
Make a test print or copy in the staple sort mode toensure that stapling is performed properly.
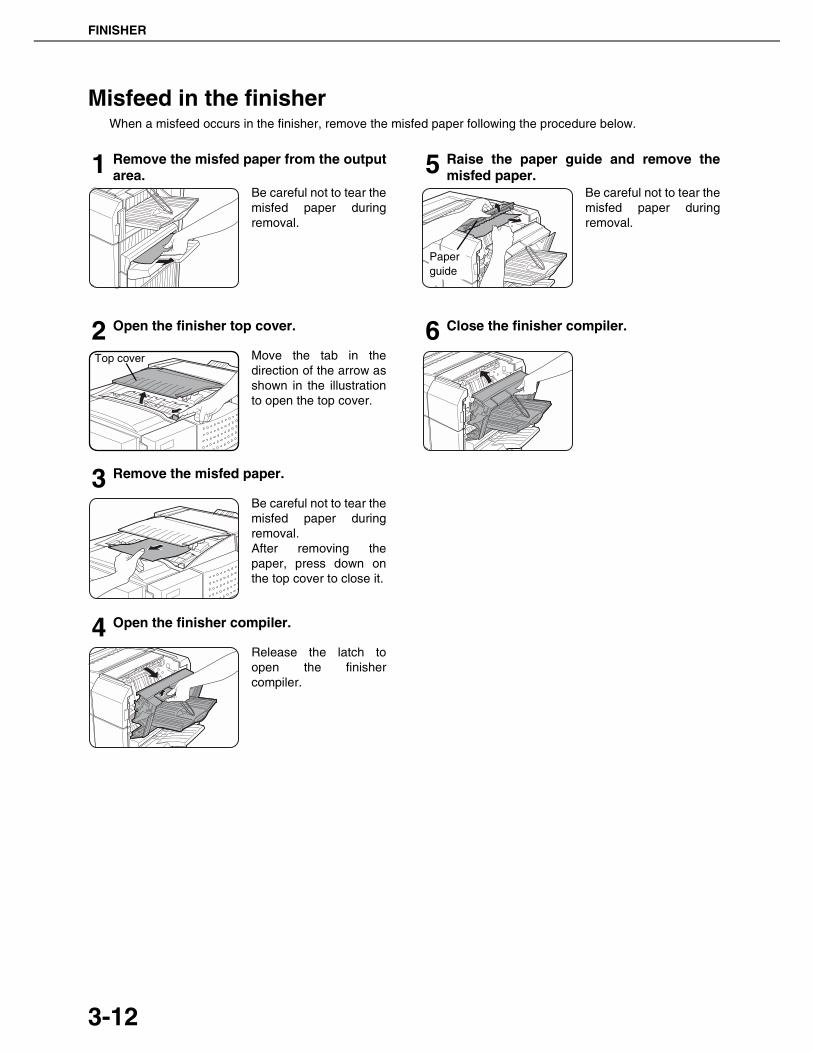
FINISHER
3-12
Misfeed in the finisherWhen a misfeed occurs in the finisher, remove the misfed paper following the procedure below.
1 Remove the misfed paper from the outputarea.
Be careful not to tear themisfed paper duringremoval.
2 Open the finisher top cover.
Move the tab in thedirection of the arrow asshown in the illustrationto open the top cover.
3 Remove the misfed paper.
Be careful not to tear themisfed paper duringremoval.After removing thepaper, press down onthe top cover to close it.
4 Open the finisher compiler.
Release the latch toopen the finishercompiler.
5 Raise the paper guide and remove themisfed paper.
Be careful not to tear themisfed paper duringremoval.
6 Close the finisher compiler.
Top cover
Paperguide

FINISHER
3-13
3
Troubleshooting finisher problemsCheck the list below before calling for service.
Problem Check Solution or cause
The finisher doesnot operate.
Are any finisher covers open? Close all covers.
Message indicating need to removepaper from the stapler compilerdisplayed?
Open the finisheras described instep 4 on page3-12 and removeall paper from thestapler compiler.
Stapling cannot beperformed.
Is a "CHECK THE STAPLER UNIT" or"CHECK STAPLER POSITION ORSTAPLER JAM" message displayed?
Check the staple unit. (See page 3-11.)
Is a message "ADD STAPLES"displayed?
Replace the staple cartridge. (See page 3-10.)
Different size paper included?Stapling cannot be performed onto different sizepaper.
Stapled sets are notstacked correctly orsome sheets in a setare not stapled.
Paper heavily curled?
Paper may be curled heavily depending on thepaper type and quality. Remove paper from thepaper tray or the bypass tray, turn it upsidedown, and load it again.

3-14
SADDLE STITCH FINISHERThe saddle stitch finisher can automatically place two staples for centerline binding of prints or copies and fold themalong the centerline.An optional hole punching unit is available for installation into the finisher.
Part names
Specifications
(Continued on next page)
NOTES
● Do not press on the saddle stitch finisher (particularly the offset tray).● Be careful about the offset tray during printing because the tray moves up and down.● The saddle stitch finisher requires the installation of other peripheral devices in order to be functional and cannot
be installed together with some other devices. The table on page 8-4 shows the configurations which arecompatible.
Name Saddle stitch finisher (AR-FN7)
Number of trays 2
Paper output Print face down
Tray system Upper tray: offset tray, Lower tray: saddle stitch tray
Tray capacity
Upper tray:Non-stapling: Max. 1,000 sheets for 8-1/2" x 11" or A4 or smaller sizes (20 lbs. or 80g/m2), max. 500 sheets for 8-1/2" x 13" or B4 or larger sizes (20 lbs. or 80 g/m2)Stapling: Max. 30 stapled sets and max. 1,000 sheets for 8-1/2" x 11" or A4 or smallersizes (20 lbs. or 80 g/m2), max. 30 stapled sets and max. 500 sheets for 8-1/2" x 13"or B4 or larger sizes (20 lbs. or 80 g/m2)Lower tray: Stapled print capacity is (6 - 10) sheets x 10 sets or (1 - 5) sheets x 20sets.
Paper sizeUpper tray: 11" x 17", 8-1/2" x 14", 8-1/2" x 13", 8-1/2" x 11", 8-1/2" x 11"R, 7-1/4" x10-1/2", 5-1/2" x 8-1/2"R, A3, B4, A4, A4R, B5, B5R, A5RLower tray: max. 11" x 17", 8-1/2" x 11"R, A3, B4, A4R
Paper weightUpper tray: 16 to 54 lbs. or 60 to 205 g/m2
Lower tray: 17 to 34 lbs. or 64 to 80 g/m2
Paper typesUpper tray: plain paper, thick paperLower tray: plain paper only
Tray full detection Provided in both trays
Offset function Upper tray only
Paper sizes for staplingUpper tray: 11" x 17", 8-1/2" x 14", 8-1/2" x 13", 8-1/2" x 11", 8-1/2" x 11"R, A3,B4, A4, A4R, and B5Lower tray: 11" x 17", 8-1/2" x 11"R, A3, B4, and A4R
Saddle stitched output is deliveredhere.
Saddle stitch tray
Output which is stapled or offset willbe delivered to this tray.
Offset tray Open the front cover andpull out this section toreplace the staplecartridge or to removejammed staples.
Stapler section
Paper to be stapled is stackedtemporarily.
Stapler compiler
Open the front cover and pull out thissection for staple cartridge replacementor to remove jammed staples.
Front cover
Open for misfeed removal.Top cover

SADDLE STITCH FINISHER
3-15
3
Specifications are subject to change for improvement without notice.
SuppliesAR-SC2 staple cartridges must be used for this finisher. The cartridge packagecontains three cartridges approx. 5000 staples each.
Saddle stitch finisher functions■■■■ Sort mode
Sorted sets will be delivered.
■■■■ Offset mode
■■■■ Group modeGroups of copies of the same page will bedelivered.
Sets will move from side to side so that each set orgroup will be offset from the previous set or groupfor easy separation. The offset function can only beused in the offset tray.Stapled sets will not be offset.
Stapling capacity8-1/2" x 11" or A4 or smaller size: 50 sheets*(20 lbs. or 80 g/m2)8-1/2" x 14" or B4 or larger size: 25 sheets*(20 lbs. or 80 g/m2)*Up to two sheets of 34 lbs. or 128 g/m2 paper can be included as covers.
StaplesUpper tray: Single staple can be placed in the top left or lower left corners or twostaples can be centered on the left side.Lower tray: 4-47/64" (120 mm) pitch from the center of paper
Power supply Supplied from machine
Dimensions28-9/32"* (W) x 23-3/4" (D) x 39-3/8" (H) (718 mm* (W) x 603 mm (D) x 1000 mm (H))*When the top tray is extended.
Weight Approx. 86 lbs. (39 kg)
Name Punch module
Paper sizes for holepunching
3 holes: 11" x 17", 8-1/2" x 11", A3, A42 holes: 8-1/2" x 14", 8-1/2" x 11"R
PrintoutsOriginal
Offset mode Non-offset mode
PrintoutsOriginal
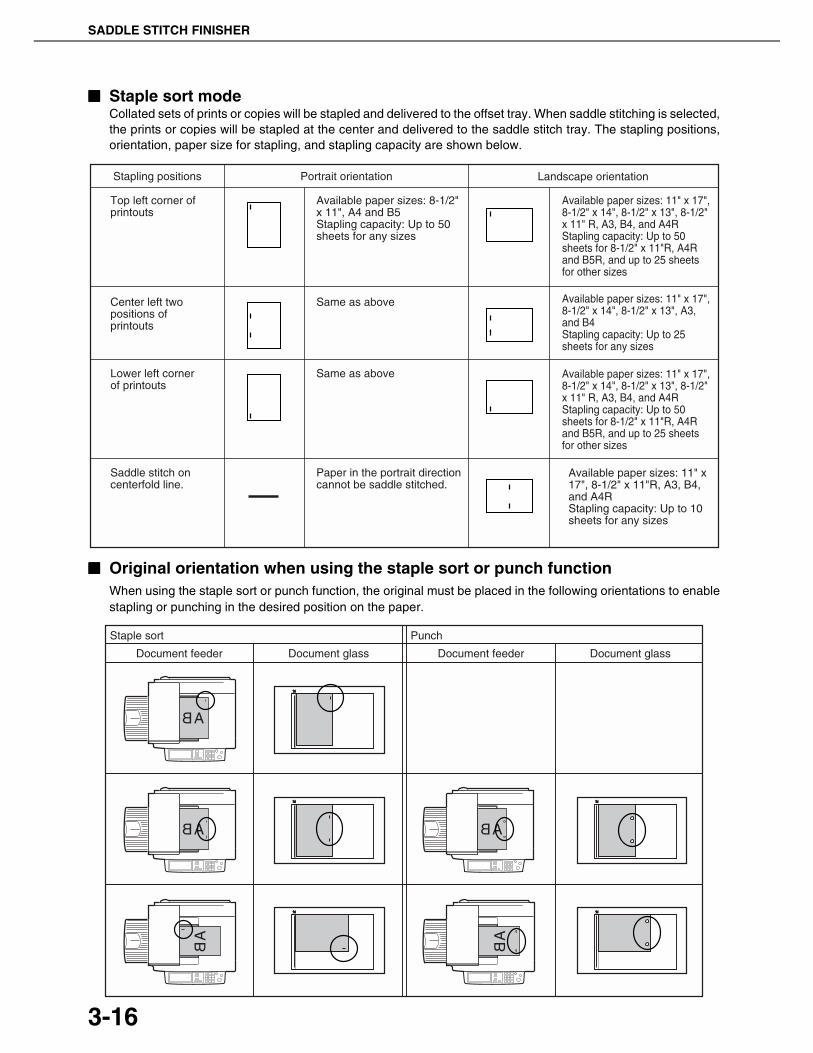
SADDLE STITCH FINISHER
3-16
■■■■ Staple sort modeCollated sets of prints or copies will be stapled and delivered to the offset tray. When saddle stitching is selected,the prints or copies will be stapled at the center and delivered to the saddle stitch tray. The stapling positions,orientation, paper size for stapling, and stapling capacity are shown below.
■■■■ Original orientation when using the staple sort or punch functionWhen using the staple sort or punch function, the original must be placed in the following orientations to enablestapling or punching in the desired position on the paper.
Stapling positions
Top left corner of printouts
Center left two positions of printouts
Lower left corner of printouts
Portrait orientation Landscape orientation
Available paper sizes: 8-1/2" x 11", A4 and B5Stapling capacity: Up to 50 sheets for any sizes
Same as above
Same as above
Available paper sizes: 11" x 17", 8-1/2" x 14", 8-1/2" x 13", 8-1/2" x 11" R, A3, B4, and A4RStapling capacity: Up to 50 sheets for 8-1/2" x 11"R, A4R and B5R, and up to 25 sheets for other sizes
Available paper sizes: 11" x 17", 8-1/2" x 14", 8-1/2" x 13", 8-1/2" x 11" R, A3, B4, and A4RStapling capacity: Up to 50 sheets for 8-1/2" x 11"R, A4R and B5R, and up to 25 sheets for other sizes
Saddle stitch on centerfold line.
Paper in the portrait direction cannot be saddle stitched.
Available paper sizes: 11" x 17", 8-1/2" x 11"R, A3, B4, and A4RStapling capacity: Up to 10 sheets for any sizes
Available paper sizes: 11" x 17", 8-1/2" x 14", 8-1/2" x 13", A3, and B4Stapling capacity: Up to 25 sheets for any sizes
Staple sort
Document feeder Document glass
Punch
Document feeder Document glass

SADDLE STITCH FINISHER
3-17
3
■■■■ Saddle stitch functionThe saddle stitch finisher can automatically place twostaples for centerline binding of prints or copies and foldthem along the centerline.
■■■■ Hole punching (only if a punch module isinstalled)
If the saddle stitch finisher is equipped with a hole punchmodule, printed paper can be hole punched and deliveredto the offset tray. Saddle stitching and hole punchingcannot be selected at the same time. The automatic imagerotation will not function when the hole punching functionis used.Two or three holes can be punched depending on thepaper size. (See paper sizes for hole punching on page4-4.)If the punching function is enabled for a paper size thatcannot be punched, the paper will be output without beingpunched. (For paper sizes that can be punched, see thespecifications on page 3-15.) When using the punchingfunction in copy mode, place the original with the top edgetoward the back of the machine. If the original is not placedin this orientation, punching will not take place at thecorrect positions.
911
7
24
6
<Example>
{Original 2} {Punch positions}
{Original 1} {Punch positions}
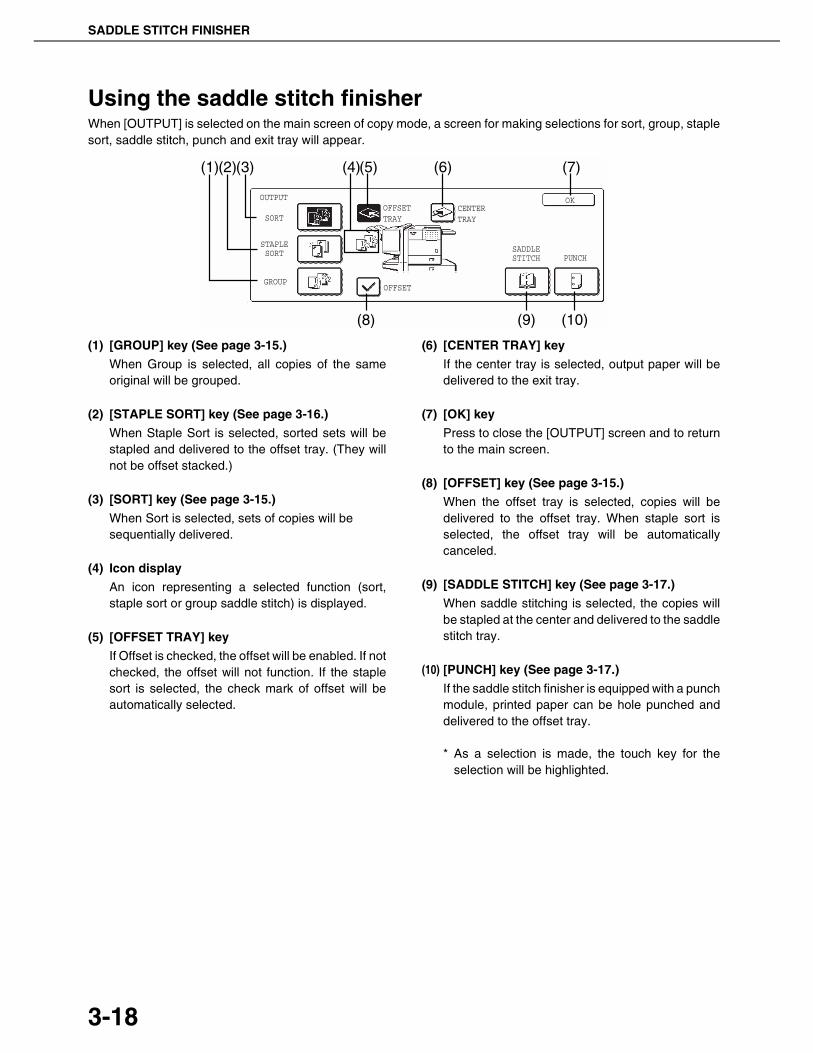
SADDLE STITCH FINISHER
3-18
Using the saddle stitch finisherWhen [OUTPUT] is selected on the main screen of copy mode, a screen for making selections for sort, group, staplesort, saddle stitch, punch and exit tray will appear.
(1) [GROUP] key (See page 3-15.)
When Group is selected, all copies of the sameoriginal will be grouped.
(2) [STAPLE SORT] key (See page 3-16.)
When Staple Sort is selected, sorted sets will bestapled and delivered to the offset tray. (They willnot be offset stacked.)
(3) [SORT] key (See page 3-15.)
When Sort is selected, sets of copies will besequentially delivered.
(4) Icon display
An icon representing a selected function (sort,staple sort or group saddle stitch) is displayed.
(5) [OFFSET TRAY] key
If Offset is checked, the offset will be enabled. If notchecked, the offset will not function. If the staplesort is selected, the check mark of offset will beautomatically selected.
(6) [CENTER TRAY] key
If the center tray is selected, output paper will bedelivered to the exit tray.
(7) [OK] key
Press to close the [OUTPUT] screen and to returnto the main screen.
(8) [OFFSET] key (See page 3-15.)
When the offset tray is selected, copies will bedelivered to the offset tray. When staple sort isselected, the offset tray will be automaticallycanceled.
(9) [SADDLE STITCH] key (See page 3-17.)
When saddle stitching is selected, the copies willbe stapled at the center and delivered to the saddlestitch tray.
(10) [PUNCH] key (See page 3-17.)
If the saddle stitch finisher is equipped with a punchmodule, printed paper can be hole punched anddelivered to the offset tray.
* As a selection is made, the touch key for theselection will be highlighted.
OUTPUT
OFFSET
OK
SADDLESTITCH PUNCH
OFFSETTRAY
CENTERTRAY
STAPLESORT
SORT
GROUP
(1)
(8)
(2)
(9) (10)
(4)(5) (6) (7)(3)

SADDLE STITCH FINISHER
3-19
3
Staple cartridge replacement and staple jam removalWhen the staple cartridge becomes empty or staples become jammed, a message will appear in the messagedisplay of the operation panel.Follow the procedure below to replace the staple cartridge or remove jammed staples.
■■■■ Staple cartridge replacement
1 Open the front cover.
2 Pull out the stapler section.
3 Turn roller rotating knob A in the directionof the arrow to move the staple unit to thefront.
Turn the roller rotatingknob until the trianglemark is aligned with theindex.
4 Remove the empty staple box.
5 Remove the empty staple cartridge.
Press the lock button tounlock the staple boxcover and remove thestaple cartridge.
6 Insert a new staple cartridge into thestaple box.
After inserting the staplecartridge, press down onthe staple box cover tolock the cartridge inplace.
7 Remove the tape from the staple cartridgeby pulling it straight.
8 Insert the staple box.
Push the staple box inuntil it clicks into place.
9 Push the stapler section back into thefinisher.
10Close the front cover.
NOTE
If staples remain, the staple cartridge cannot beremoved.
Roller rotating
Staple unitknob A
NOTES
● Do not remove the tape from the cartridge beforeinserting the staple cartridge into the box.
● Make sure that the staple cartridge is securedfirmly.
● When reinstalling the staple box, push it in until itclicks into place.
NOTE
Make a test print or copy in the staple sort mode toensure that stapling is performed properly.
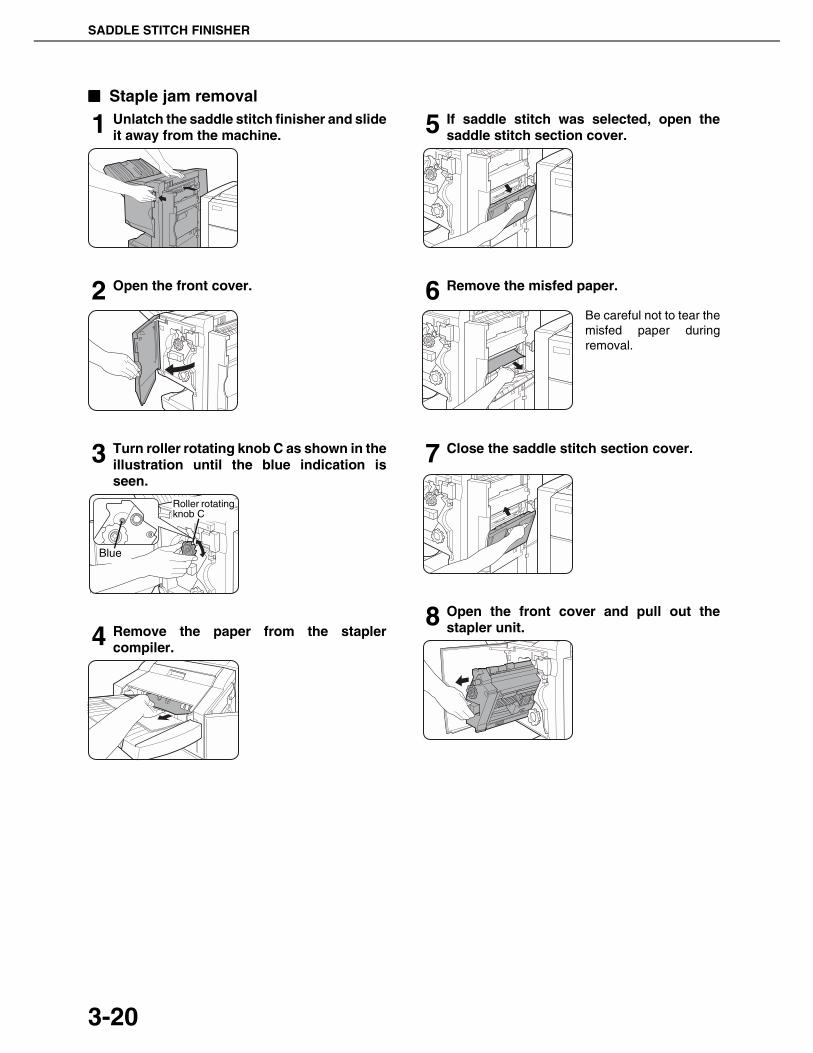
SADDLE STITCH FINISHER
3-20
■■■■ Staple jam removal
1 Unlatch the saddle stitch finisher and slideit away from the machine.
2 Open the front cover.
3 Turn roller rotating knob C as shown in theillustration until the blue indication isseen.
4 Remove the paper from the staplercompiler.
5 If saddle stitch was selected, open thesaddle stitch section cover.
6 Remove the misfed paper.
Be careful not to tear themisfed paper duringremoval.
7 Close the saddle stitch section cover.
8 Open the front cover and pull out thestapler unit.
Roller rotatingknob C
Blue
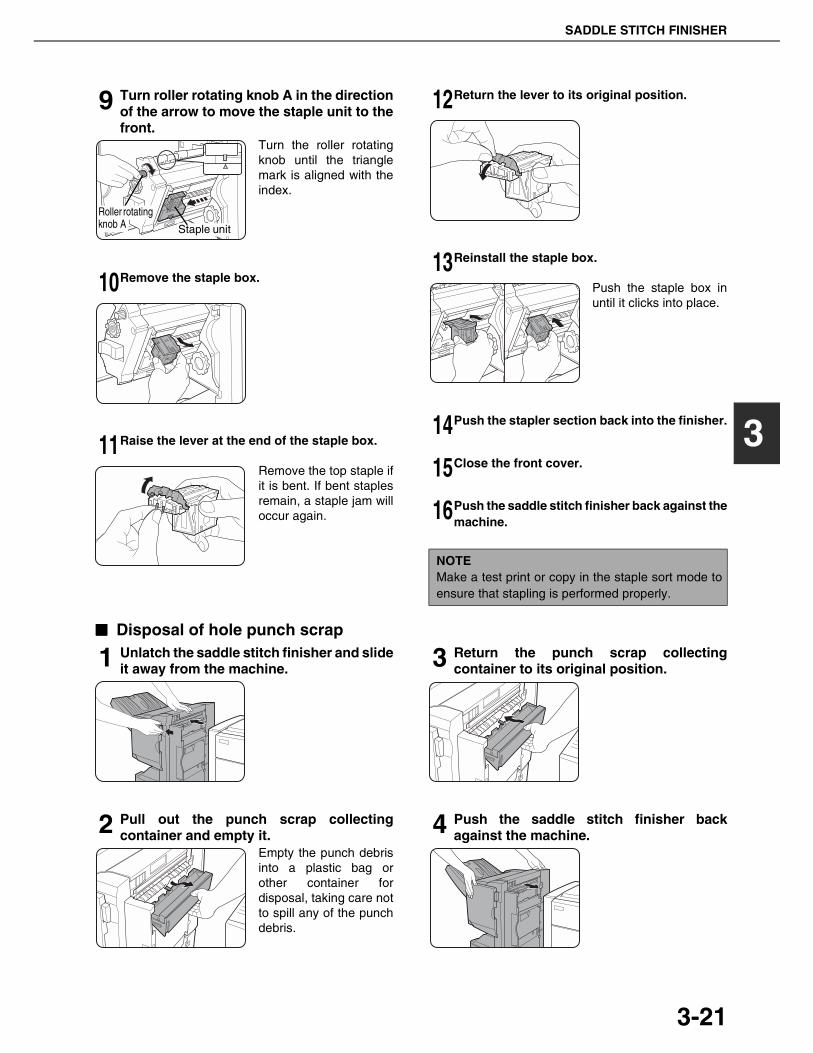
SADDLE STITCH FINISHER
3-21
3
9 Turn roller rotating knob A in the directionof the arrow to move the staple unit to thefront.
Turn the roller rotatingknob until the trianglemark is aligned with theindex.
10Remove the staple box.
11Raise the lever at the end of the staple box.
Remove the top staple ifit is bent. If bent staplesremain, a staple jam willoccur again.
12Return the lever to its original position.
13Reinstall the staple box.
Push the staple box inuntil it clicks into place.
14Push the stapler section back into the finisher.
15Close the front cover.
16Push the saddle stitch finisher back against themachine.
■■■■ Disposal of hole punch scrap
1 Unlatch the saddle stitch finisher and slideit away from the machine.
2 Pull out the punch scrap collectingcontainer and empty it.
Empty the punch debrisinto a plastic bag orother container fordisposal, taking care notto spill any of the punchdebris.
3 Return the punch scrap collectingcontainer to its original position.
4 Push the saddle stitch finisher backagainst the machine.
Staple unit
Roller rotating knob A
NOTEMake a test print or copy in the staple sort mode toensure that stapling is performed properly.

SADDLE STITCH FINISHER
3-22
Misfeed in the saddle stitch finisherWhen a misfeed occurs in the saddle stitch finisher, remove the misfed paper following the procedure below.
1 Press the detach button and separate thesaddle stitch finisher from the machine.
2 Remove any misfed paper from themachine.
3 If there was no misfed paper in step 2, pullroller rotating knob B on the punch unittoward you and rotate it. (Only when anoptional punch unit is installed.)
Rotating roller rotatingknob B releases thecaught paper.
4 Open the top cover.
5 Remove the misfed paper.
Remove the papergently, taking care not totear it.
6 Close the top cover.
7 Remove any misfed paper from the staplercompiler.
Remove the papergently, taking care not totear it.
8 Open the cover of the saddle stitchsection.
9 Remove the misfed paper.
Remove the papergently, taking care not totear it.
CAUTION
The saddle stitch finisher and the machine areconnected at the rear. Exercise caution when pullingthem apart.
Roller rotatingknob B
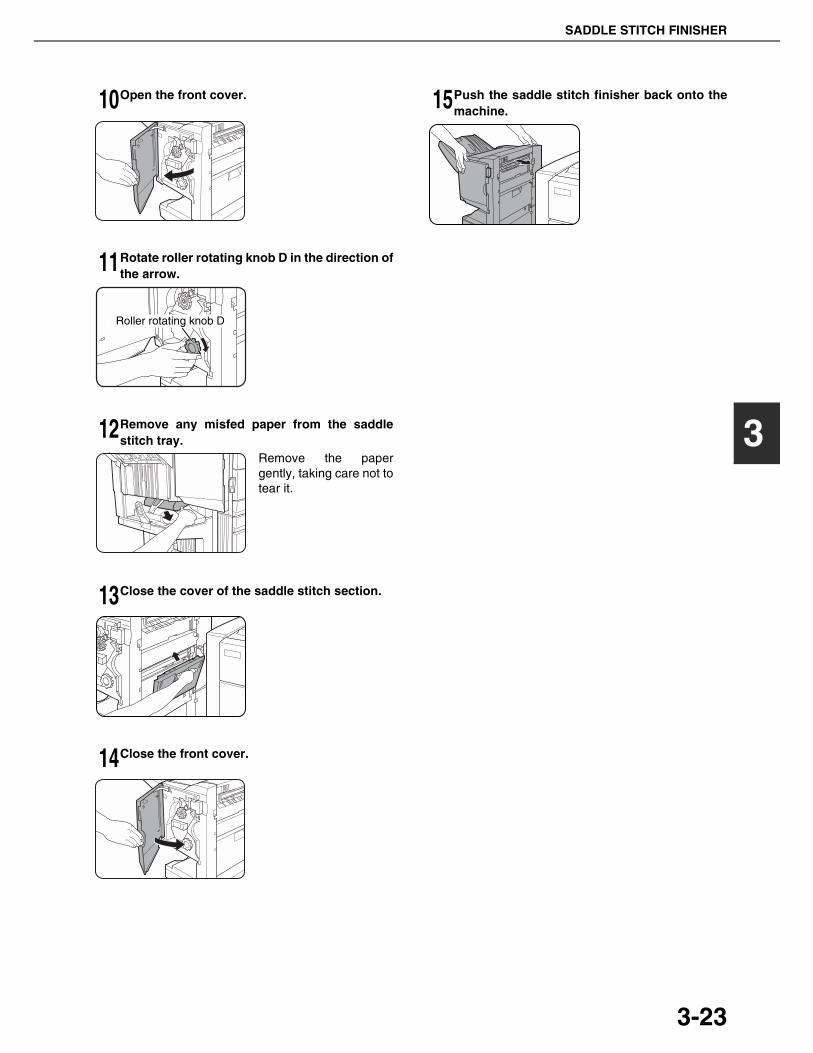
SADDLE STITCH FINISHER
3-23
3
10Open the front cover.
11Rotate roller rotating knob D in the direction ofthe arrow.
12Remove any misfed paper from the saddlestitch tray.
Remove the papergently, taking care not totear it.
13Close the cover of the saddle stitch section.
14Close the front cover.
15Push the saddle stitch finisher back onto themachine.
Roller rotating knob D

SADDLE STITCH FINISHER
3-24
Troubleshooting (concerning the saddle stitch finisher)Check the list below before calling for service.
* When a punch module is installed
Problem Check Solution or cause
The saddle stitchfinisher does notoperate.
Are any saddle stitch finisher covers open? Close all covers. (See page 3-14.)
Message indicating need to remove paperfrom the stapler compiler displayed?
Remove all remaining paper from the staplercompiler referring to step 4 on page 3-20.
Stapling cannot beperformed (includingsaddle stitch).
Message requesting check for the stapleunit displayed?
Remove jammed staples. (See page 3-20.)
Message requesting adding staplesdisplayed?
Replace the staple cartridge. (See page3-19.) Check that a staple cartridge has beeninstalled. (See page 3-20.)
Different size paper included?Stapling cannot be performed onto differentsize paper.
Stapled sets are notstacked correctly orsome sheets in a setare not stapled.
Paper heavily curled?
Paper may be curled heavily depending onthe paper type and quality. Remove paperfrom the paper tray or the bypass tray, turn itupside down, and load it again.
Punching does nottake place in thecorrect positions.*
The punching function is not set for thecorrect positions.
Check the positions where punching ispossible.
Cannot be punched.*
Message requesting check for punchmodule displayed?
Dispose of punch scraps. (See page 3-21.)
Different size paper included?Stapling cannot be performed onto differentsize paper.
The paper is badly curled and is notpunched.
Some types and qualities of paper may curlbadly when printed on. Remove the paperfrom the tray or bypass tray, turn it around toreverse the top and bottom, and then place itback in the tray.

Part 2: Copier Operation


4-1
CHAPTER 4MAKING COPIES
This chapter explains the basic procedures for making copies, includingselection of the copy ratio and other copy settings.
PageAUTOMATIC DOCUMENT FEEDER...................................................... 4-2
● Acceptable originals ........................................................................ 4-2
PLACING ORIGINALS............................................................................ 4-3CHECKING THE SIZE OF A PLACED ORIGINAL................................. 4-5
● Manually setting the scanning size ................................................. 4-5
STORING, DELETING, AND USING ORIGINAL SIZES ........................ 4-6● Storing or deleting an original size .................................................. 4-6
NORMAL COPYING ............................................................................... 4-7● Making copies with the automatic document feeder ....................... 4-7● Automatic two-sided copying using the automatic document feeder.... 4-10● Copying from the document glass................................................... 4-11● Automatic two-sided copying from the document glass .................. 4-13
ADJUSTING THE EXPOSURE .....................................................................4-14REDUCTION/ENLARGEMENT/ZOOM................................................... 4-15
● Automatic selection (auto image).................................................... 4-15● Manual selection (preset copy ratios/zoom).................................... 4-16● XY ZOOM........................................................................................ 4-18
SPECIAL PAPERS ................................................................................. 4-20

4-2
AUTOMATIC DOCUMENT FEEDERThe automatic document feeder automatically feeds originals into the machine, making continuous copying possible.In addition, both sides of two-sided sheet originals can be simultaneously scanned. This function is convenient whenyou have a large number of original pages to scan.
Acceptable originalsA stack of up to 50 original sheets (30 original sheets*1 for 8-1/2" x 14" (B4) or larger) of the same size paper can beset in the document feeder tray provided the stack height is within the limit shown below.A stack of up to 30 mixed size originals can be set if the width of the originals is the same and the stack height is withinthe limit shown below. In this case, however, stapling and duplex will not function and some special functions maynot give the expected result.*1 For paper heavier than 28 lbs. (105 g/m2), only a stack of up to 15 sheets can be set. Setting 16 or more sheets
may cause incorrect scanning of original and scanned image may become expanded compared with originalitself.
■■■■ Size and weight of acceptableoriginals
■■■■ Total number of originals that canbe set in the document feeder tray
■■■■ Notes on use of the automatic document feeder●Use originals within the specified size and weight ranges. Use of originals out of the specified range may cause
an original misfeed.●Before loading originals into the document feeder tray, be sure to remove any staples or paper clips.●If originals have damp spots from correction fluid, ink or glue from pasteups, be sure they are dried before they
are fed. If not, the interior of the document feeder or the document glass may be soiled.●Do not use the following originals. These originals may cause incorrect original size detection, original
misfeeds, and smudges on copies.● Transparency film, tracing paper, carbon paper, thermal paper or originals printed with thermal transfer ink
ribbon should not be fed through the document feeder. Originals to be fed through the feeder should not bedamaged, crumpled or folded or have loosely pasted paper on them or cutouts in them. Originals withmultiple punched holes other than two-hole or three-hole punched paper may not feed correctly.
●When using originals with two or three holes, place them so that thepunched edge is at a position other than the feed slot.
22
Original size:
(148 x 210 mm)
5-1/2" x 8-1/2"or A5
11" x 17"or A3
(297 x 420 mm)
Weight (thickness):
14 lbs. or 50g/m2 34 lbs. or 128 g/m2
g/m ... Weight of a sheet of paper of 1 m
Total aggregate thickness must not exceed 1/4" or6.5 mm (for 14 to 21 lbs. or 50 to 80 g/m paper).
1/4" or 6.5 mmor less
Total aggregate thickness must not exceed 3/16" or5.0 mm (for 21 to 34 lbs. or 80 to 128 g/m paper).
3/16" or 5.0 mmor less
Hole positions
Hole positions
Hole positions
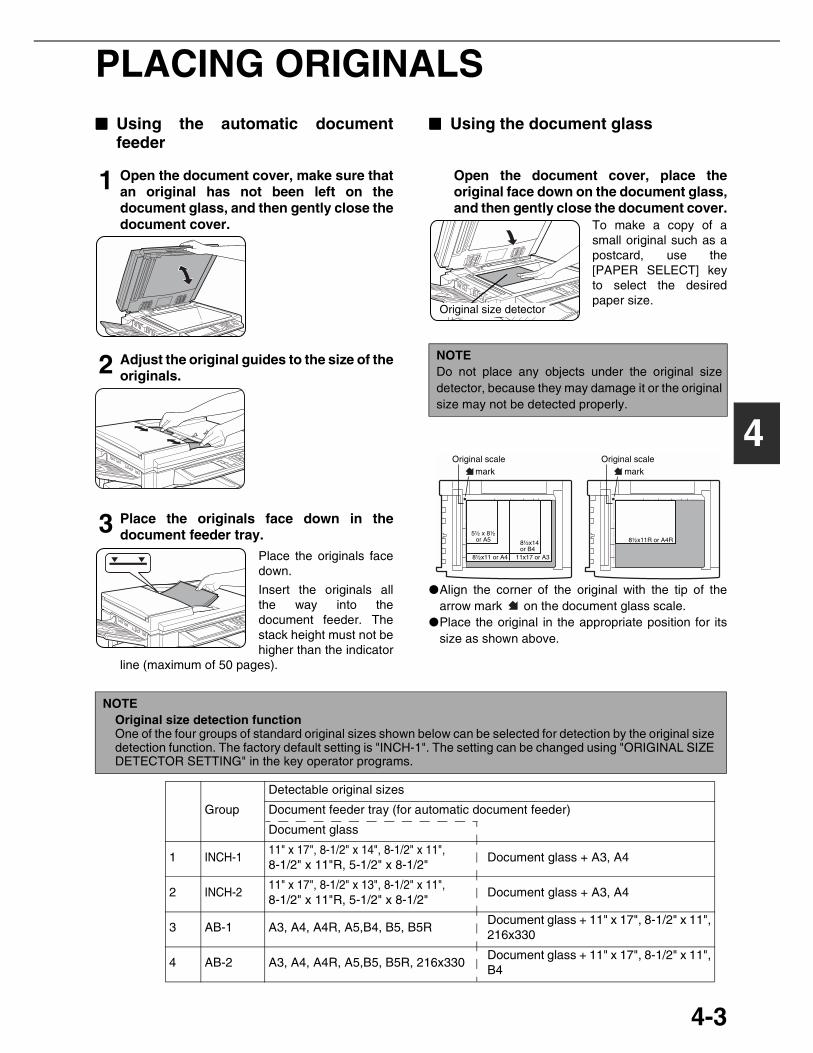
4-3
4
PLACING ORIGINALS■■■■ Using the automatic document
feeder
1 Open the document cover, make sure thatan original has not been left on thedocument glass, and then gently close thedocument cover.
2 Adjust the original guides to the size of theoriginals.
3 Place the originals face down in thedocument feeder tray.
Place the originals facedown.
Insert the originals allthe way into thedocument feeder. Thestack height must not behigher than the indicator
line (maximum of 50 pages).
■■■■ Using the document glass
Open the document cover, place theoriginal face down on the document glass,and then gently close the document cover.
To make a copy of asmall original such as apostcard, use the[PAPER SELECT] keyto select the desiredpaper size.
●Align the corner of the original with the tip of thearrow mark on the document glass scale.
●Place the original in the appropriate position for itssize as shown above.
NOTEDo not place any objects under the original sizedetector, because they may damage it or the originalsize may not be detected properly.
Original size detector
Original scalemark
Original scalemark
5½ x 8½or A5
8½x11 or A4 11x17 or A3
8½x14or B4
8½x11R or A4R
NOTEOriginal size detection functionOne of the four groups of standard original sizes shown below can be selected for detection by the original sizedetection function. The factory default setting is "INCH-1". The setting can be changed using "ORIGINAL SIZEDETECTOR SETTING" in the key operator programs.
Group
Detectable original sizes
Document feeder tray (for automatic document feeder)
Document glass
1 INCH-111" x 17", 8-1/2" x 14", 8-1/2" x 11", 8-1/2" x 11"R, 5-1/2" x 8-1/2"
Document glass + A3, A4
2 INCH-211" x 17", 8-1/2" x 13", 8-1/2" x 11", 8-1/2" x 11"R, 5-1/2" x 8-1/2"
Document glass + A3, A4
3 AB-1 A3, A4, A4R, A5,B4, B5, B5RDocument glass + 11" x 17", 8-1/2" x 11",216x330
4 AB-2 A3, A4, A4R, A5,B5, B5R, 216x330Document glass + 11" x 17", 8-1/2" x 11",B4
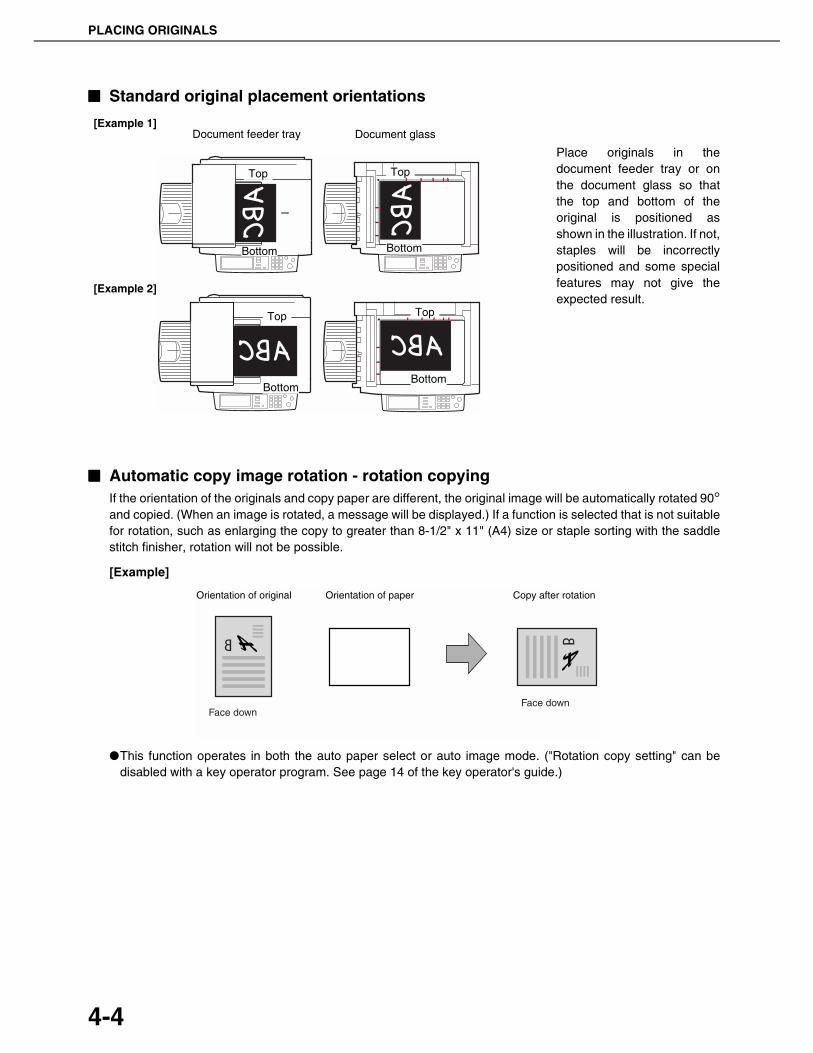
PLACING ORIGINALS
4-4
■■■■ Standard original placement orientations
Place originals in thedocument feeder tray or onthe document glass so thatthe top and bottom of theoriginal is positioned asshown in the illustration. If not,staples will be incorrectlypositioned and some specialfeatures may not give theexpected result.
■■■■ Automatic copy image rotation - rotation copyingIf the orientation of the originals and copy paper are different, the original image will be automatically rotated 90°and copied. (When an image is rotated, a message will be displayed.) If a function is selected that is not suitablefor rotation, such as enlarging the copy to greater than 8-1/2" x 11" (A4) size or staple sorting with the saddlestitch finisher, rotation will not be possible.
[Example]
●This function operates in both the auto paper select or auto image mode. ("Rotation copy setting" can bedisabled with a key operator program. See page 14 of the key operator's guide.)
Top
Bottom
Top
Bottom
Top
Bottom
Top
Bottom
Document feeder tray Document glass[Example 1]
[Example 2]
Orientation of original Orientation of paper Copy after rotation
Face downFace down
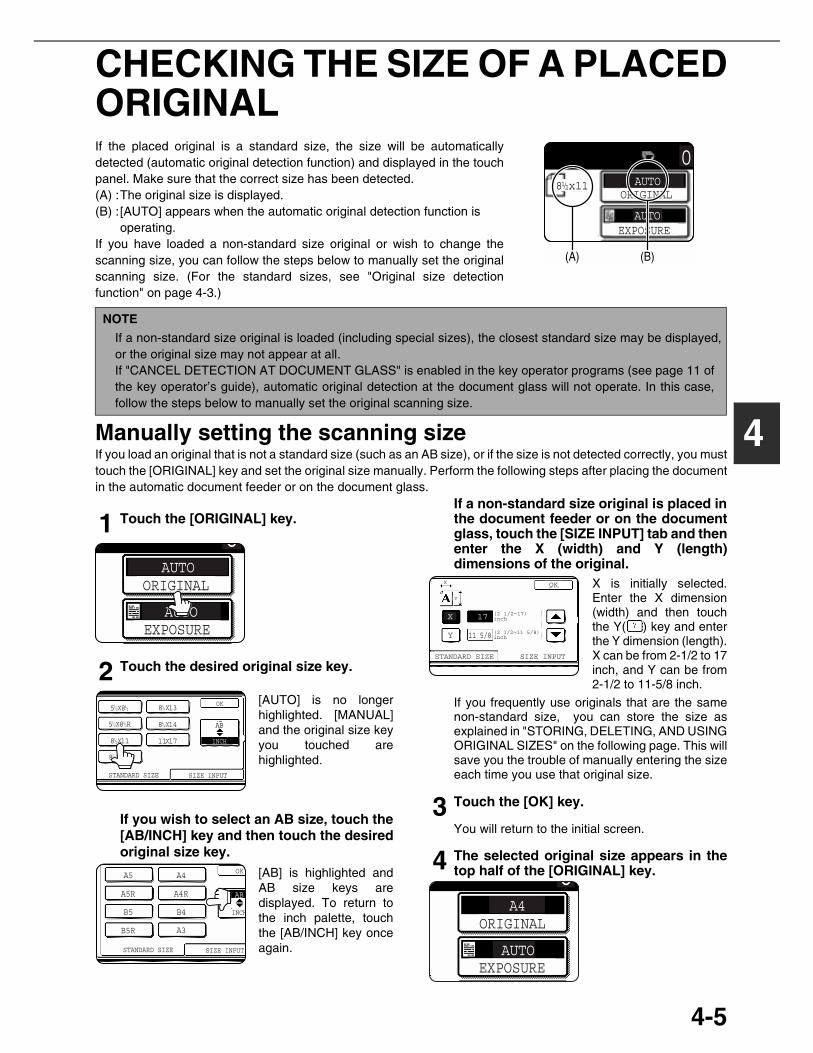
4-5
4
CHECKING THE SIZE OF A PLACEDORIGINALIf the placed original is a standard size, the size will be automaticallydetected (automatic original detection function) and displayed in the touchpanel. Make sure that the correct size has been detected.(A) :The original size is displayed.(B) :[AUTO] appears when the automatic original detection function is
operating.If you have loaded a non-standard size original or wish to change thescanning size, you can follow the steps below to manually set the originalscanning size. (For the standard sizes, see "Original size detectionfunction" on page 4-3.)
Manually setting the scanning sizeIf you load an original that is not a standard size (such as an AB size), or if the size is not detected correctly, you musttouch the [ORIGINAL] key and set the original size manually. Perform the following steps after placing the documentin the automatic document feeder or on the document glass.
1 Touch the [ORIGINAL] key.
2 Touch the desired original size key.
[AUTO] is no longerhighlighted. [MANUAL]and the original size keyyou touched arehighlighted.
If you wish to select an AB size, touch the[AB/INCH] key and then touch the desiredoriginal size key.
[AB] is highlighted andAB size keys aredisplayed. To return tothe inch palette, touchthe [AB/INCH] key onceagain.
If a non-standard size original is placed inthe document feeder or on the documentglass, touch the [SIZE INPUT] tab and thenenter the X (width) and Y (length)dimensions of the original.
X is initially selected.Enter the X dimension(width) and then touchthe Y( ) key and enterthe Y dimension (length).X can be from 2-1/2 to 17inch, and Y can be from2-1/2 to 11-5/8 inch.
If you frequently use originals that are the samenon-standard size, you can store the size asexplained in "STORING, DELETING, AND USINGORIGINAL SIZES" on the following page. This willsave you the trouble of manually entering the sizeeach time you use that original size.
3 Touch the [OK] key.
You will return to the initial screen.
4 The selected original size appears in thetop half of the [ORIGINAL] key.
AUTO
AUTO
ORIGINAL
EXPOSURE
08 x111/ 2
(B)(A)
NOTE
If a non-standard size original is loaded (including special sizes), the closest standard size may be displayed,or the original size may not appear at all.If "CANCEL DETECTION AT DOCUMENT GLASS" is enabled in the key operator programs (see page 11 ofthe key operator’s guide), automatic original detection at the document glass will not operate. In this case,follow the steps below to manually set the original scanning size.
AUTO
AUTO
ORIGINAL
EXPOSURE
0
STANDARD SIZE SIZE INPUT
INCH
AB
OK5 X8
5 X8 R
8 X11R
8 X11
8 X13
8 X14
11X17
1/ 21/ 2
1/ 21/ 2
1/ 2
1/ 2
1/ 2
1/ 2
A5
B5
A5R
A4
B4
A3
STANDARD SIZE SIZE INPUT
INCH
AB
OK
A4R
B5R
(2 1/2 11 5/8)inch
(2 1/2 17)inchX
Y
X
Y
STANDARD SIZE SIZE INPUT
17
11 5/8
OK
AUTO
ORIGINAL
EXPOSURE
0 A4
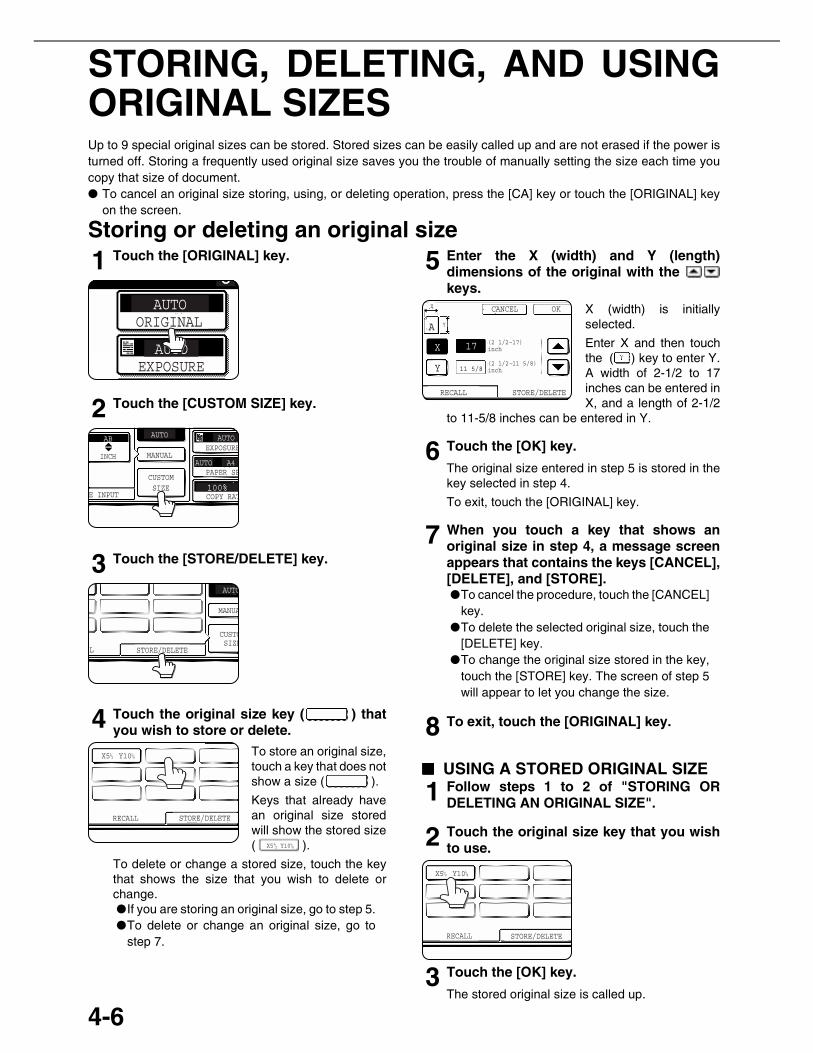
4-6
STORING, DELETING, AND USINGORIGINAL SIZESUp to 9 special original sizes can be stored. Stored sizes can be easily called up and are not erased if the power isturned off. Storing a frequently used original size saves you the trouble of manually setting the size each time youcopy that size of document.● To cancel an original size storing, using, or deleting operation, press the [CA] key or touch the [ORIGINAL] key
on the screen.
Storing or deleting an original size1 Touch the [ORIGINAL] key.
2 Touch the [CUSTOM SIZE] key.
3 Touch the [STORE/DELETE] key.
4 Touch the original size key ( ) thatyou wish to store or delete.
To store an original size,touch a key that does notshow a size ( ).
Keys that already havean original size storedwill show the stored size( ).
To delete or change a stored size, touch the keythat shows the size that you wish to delete orchange.●If you are storing an original size, go to step 5.●To delete or change an original size, go to
step 7.
5 Enter the X (width) and Y (length)dimensions of the original with the keys.
X (width) is initiallyselected.
Enter X and then touchthe ( ) key to enter Y.A width of 2-1/2 to 17inches can be entered inX, and a length of 2-1/2
to 11-5/8 inches can be entered in Y.
6 Touch the [OK] key.
The original size entered in step 5 is stored in thekey selected in step 4.
To exit, touch the [ORIGINAL] key.
7 When you touch a key that shows anoriginal size in step 4, a message screenappears that contains the keys [CANCEL],[DELETE], and [STORE].●To cancel the procedure, touch the [CANCEL]
key.●To delete the selected original size, touch the
[DELETE] key.●To change the original size stored in the key,
touch the [STORE] key. The screen of step 5will appear to let you change the size.
8 To exit, touch the [ORIGINAL] key.
■■■■ USING A STORED ORIGINAL SIZE
1 Follow steps 1 to 2 of "STORING ORDELETING AN ORIGINAL SIZE".
2 Touch the original size key that you wishto use.
3 Touch the [OK] key.
The stored original size is called up.
AUTO
ORIGINAL
EXPOSURE
0AUTO
E INPUT
CUSTOMSIZE
EXPOSURE
PAPER SE
COPY RAT100%
AUTO
AUTO A4MANUAL
AUTO
INCH
AB
L STORE/DELETE
CUSTOSIZE
MANUA
AUTO
RECALL STORE/DELETE
X5 Y101/ 21/ 8
X5 Y101/ 21/ 8
CANCEL OK
17
11 5/8
(2 1/2 17)inch
RECALL
Y
X
A
X
Y
STORE/DELETE
(2 1/2 11 5/8)inch
RECALL STORE/DELETE
X5 Y101/ 21/ 8

4-7
4
NORMAL COPYINGThis section describes the normal copying procedure.
Making copies with the automatic document feeder■■■■ 1-sided copies of 1-sided originals
1 Place the originals in the document feedertray. (pages 4-3 to 4-6)
2 Make sure that the 1-sided to 1-sided copymode is selected.
The one-sided to one-sided mode is selectedwhen no icon for a two-sided mode appears inthe dashed area on thedisplay. If the 1-sided to1-sided copy mode is
already selected, steps 3 to 5 are not needed.
3 Touch the [2-SIDED COPY] key.
4 Touch the [1-sided to 1-sided copy] key.
Touch the [1-sided to 1-sided copy] key.
5 Touch the [OK] key.
6 Make sure that paper of the same size asthe originals is automatically selected*.
The selected tray will behighlighted or themessage "LOAD xxxxxxPAPER." will appear. Ifthe message appears,load paper in a papertray with paper of therequired size.
Even if the message above appears, copying canbe performed onto the currently selected paper.
*The following requirements must be satisfied.
Originals of a standard size (11" x 17", 8-1/2" x14", 8-1/2" x 11", 8-1/2" x 11"R or 5-1/2" x 8-1/2R"(A3, B4, A4, A4R, B5, B5R or A5)) are set and theauto paper select function is enabled.
If originals of a size otherthan the sizes above areto be copied, manuallyselect the desired papersize by touching the[PAPER SELECT] keyand then touching the
desired paper size selection key.
The selected key will be highlighted and the paperselection screen will close. To close the paperselection screen without making a selection, touchthe [PAPER SELECT] key.
Original Copy
ORIGINAL 8 x111/ 2
8 x111/ 2
8 x111/ 2
8 x111/ 2
11x178 x11R1/ 2
SPECIAL MODES
2-SIDED COPY
OUTPUT
OK
0
UTO
AUTO
100%
8 x11PAPER SELECT
O
EXPOSURE
1/ 2
READY TO SCAN FOR COPY.
8 x111/ 2
PLAIN
1. 8 x111/ 2
2. 11x17
3. 11x17
4. 8 x111/ 2
PLAIN
PLAIN
PLAIN
PLAIN

NORMAL COPYING
4-8
7 Select the desired output mode (page 4-9).
The sort mode is thedefault mode.To select the groupmode, touch the[OUTPUT] key, thentouch the [GROUP] keyon the output setting
screen, and then touch the [OK] key on the settingscreen.
8 Use the numeric keys to set the desirednumber of copies.
Up to 999 can be set.
If you are only making asingle copy, the copycan be made with thecopy number displayshowing "0". Use the [C](clear) key to cancel an
entry if a mistake has been made.
9 If needed, touch the [FILE] key or the[QUICK FILE] key.
Either key can betouched to store thescanned documentimage on the machine'shard disk. The storedimage can be re-usedlater.
For more information on this function, see"Document filing function" in chapter 7.If the [FILE] key is grayed out, only the [QUICKFILE] key can be selected.When you touch the [QUICK FILE] key, amessage asking you to confirm the save willappear. Touch the [OK] key in the messagescreen and go to the next step.If you wish to cancel the save, touch the [QUICKFILE] key after touching the [OK] key so that the[QUICK FILE] key is no longer highlighted.
10Press the [START] key.
If the [C] key is pressedwhile originals are beingscanned, scanning willstop. If copying hadalready started, copyingand scanning will stopafter the original in
progress is output to the original exit area. In thesecases the copy quantity will be reset to "0".
2-SIDED COPY
OUTPUT
FILE
QUICK FILE
FILE
NOTES● The 1-sided to 1-sided copying mode is set as the
default in the initial settings. If the default settinghas not been changed using the "Initial statussettings" program (key operator program), steps 3to 5 on page 4-7 can be omitted.
To cancel copying...To cancel a copy job in progress, press the [CA]key. A confirmation message will appear. Touchthe [YES] key to cancel copying.

NORMAL COPYING
4-9
4
■■■■ Copy output (sort and group)Example: Making five sets or five copies each of three originals●●●● Sorting copies into sets
●●●● Grouping copies by page
■■■■ Selecting the output tray (when an optional finisher or saddle stitch finisher isinstalled)When the [OFFSET TRAY] key is highlighted, output pages are delivered to the offset tray of the finisher orsaddle stitch finisher. When the "CENTER TRAY" key is highlighted, output pages are delivered to the centertray. Touch the appropriate key to select the desired output tray.
This screen appears when a saddle stitch finisher is installed.The screen that appears when a finisher is installed is slightly different.
SPECIAL MODES
2-SIDED COPY
OUTPUT
OUTPUT
SORT
GROUP
Original
Press the [START]key
Set the number of copies (5)
Touch the [OUTPUT] key
Touch the [SORT] key
Five sets of copies
When using the automatic document feeder, sorting isautomatically selected when the original is placed in thedocument feeder.
SPECIAL MODES
2-SIDED COPY
OUTPUT
OUTPUT
SORT
GROUP
Press the [START]key
Set the number of copies (5)
Touch the [OUTPUT] key
Touch the[GROUP] key
"Group" is automatically selected when theoriginal is placed on the document glass.
5 copies per page
Original
OUTPUT
SORT
GROUP
STAPLESORT
OFFSETTRAY
CENTERTRAY
OFFSET
PUNCHSADDLESTITCH
OK
0
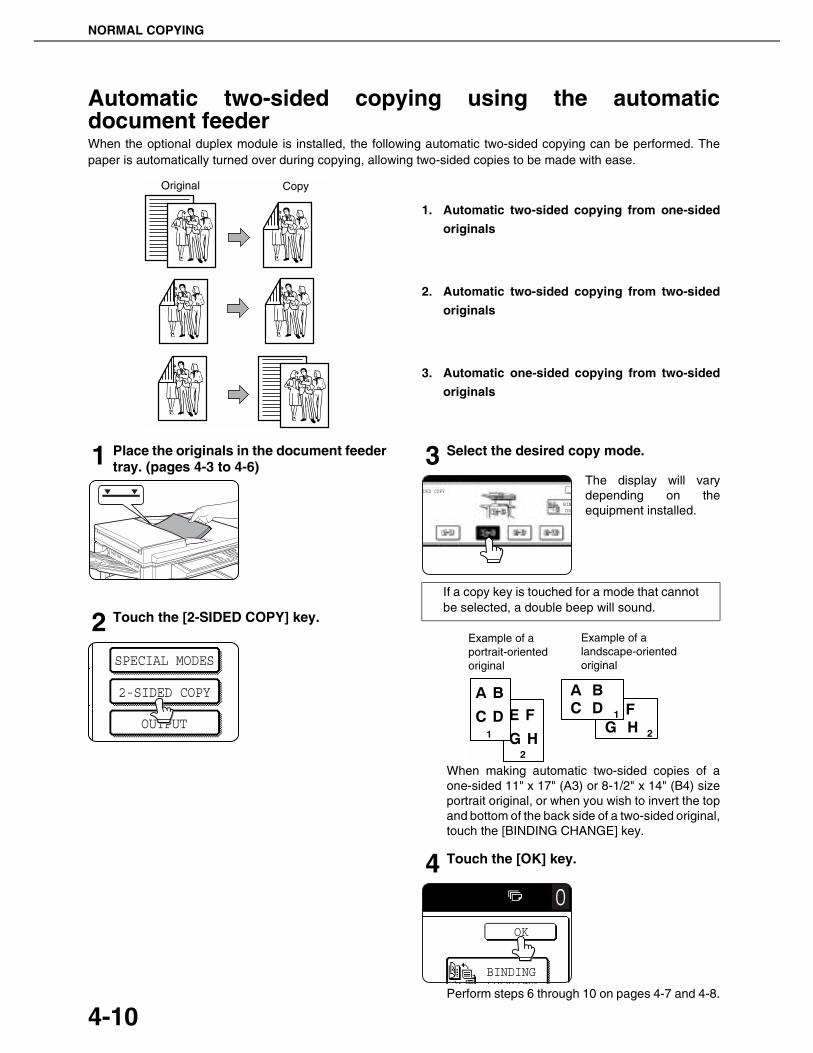
NORMAL COPYING
4-10
Automatic two-sided copying using the automaticdocument feederWhen the optional duplex module is installed, the following automatic two-sided copying can be performed. Thepaper is automatically turned over during copying, allowing two-sided copies to be made with ease.
1. Automatic two-sided copying from one-sided
originals
2. Automatic two-sided copying from two-sided
originals
3. Automatic one-sided copying from two-sided
originals
1 Place the originals in the document feedertray. (pages 4-3 to 4-6)
2 Touch the [2-SIDED COPY] key.
3 Select the desired copy mode.
The display will varydepending on theequipment installed.
When making automatic two-sided copies of aone-sided 11" x 17" (A3) or 8-1/2" x 14" (B4) sizeportrait original, or when you wish to invert the topand bottom of the back side of a two-sided original,touch the [BINDING CHANGE] key.
4 Touch the [OK] key.
Perform steps 6 through 10 on pages 4-7 and 4-8.
Original Copy
SPECIAL MODES
2-SIDED COPY
OUTPUT
If a copy key is touched for a mode that cannotbe selected, a double beep will sound.
DED COPY
BINDCHA
Example of a portrait-orientedoriginal
Example of a landscape-orientedoriginal
OK
0
BINDING

NORMAL COPYING
4-11
4
Copying from the document glassWhen copying originals which cannot be fed from the automatic document feeder such as thick originals, open thedocument cover and copy the originals from the document glass.
■■■■ 1-sided copies of 1-sided originals
1 Place the original on the document glass.(pages 4-3 to 4-6)
●Align the corner of the original with the tip of thearrow mark on the document glass scale.
●Place the original in the appropriate position for itssize as shown above.
2 Ensure that the 1-sided to 1-sided copymode is selected.
The one-sided to one-sided mode is selectedwhen no icon for a two-sided mode appears inthe dashed area on thedisplay. If an iconappears, perform steps
3 to 5 on page 4-7 and then go to step 3.
3 Ensure that paper of the same size as theoriginal is automatically selected*.
The selected tray will behighlighted or themessage "LOAD xxxxxxPAPER." will appear. Ifthe message appears,load paper in a papertray with paper of the
required size. Even if the message above is displayed, copyingcan be performed onto the currently selectedpaper.* The following requirements must be satisfied.Originals of a standard size (11" x 17", 8-1/2" x 14",8-1/2" x 11", 8-1/2" x 11"R or 5-1/2" x 8-1/2"R (A3,B4, A4, A4R, B5, B5R or A5)) are set and the autopaper select function is enabled.
If originals of a size otherthan the sizes above areto be copied, manuallyselect the desired papersize by touching the[PAPER SELECT] keyand then touching the
desired paper size selection key.
The selected key will be highlighted and the paperselection screen will close. To close the paperselection screen without making a selection, touchthe [PAPER SELECT] key.
Original Copy
Original scalemark
Original scalemark
5½ x 8½or A5
8½x11 or A4 11x17 or A3
8½x14or B4
8½x11R or A4R
ORIGINAL 8 x111/ 2
8 x111/ 2
8 x111/ 2
8 x111/ 2
11x178 x11R1/ 2
UTO
AUTO
100%
8 x11PAPER SELECT
OPY RATIO
EXPOSURE
1/ 2
READY TO SCAN FOR COPY.
8 x111/ 2
PLAIN
1. 8 x111/ 2
2. 11x17
3. 11x17
4. 8 x111/ 2
PLAIN
PLAIN
PLAIN
PLAIN
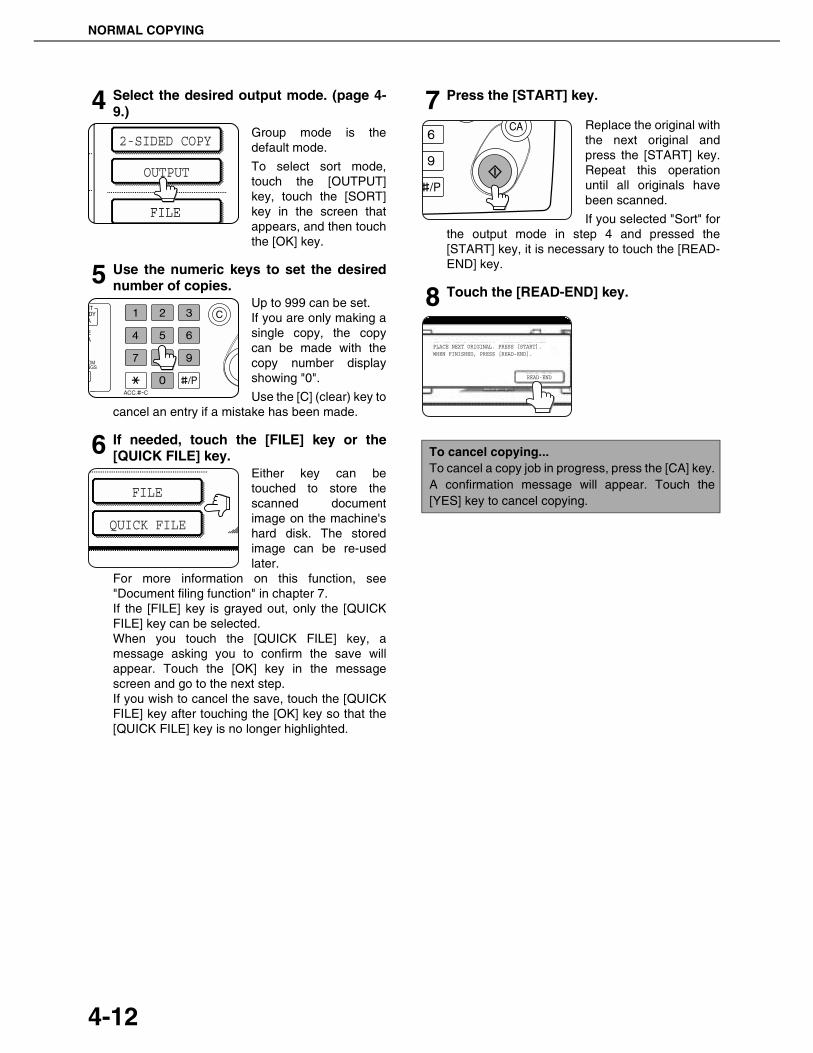
NORMAL COPYING
4-12
4 Select the desired output mode. (page 4-9.)
Group mode is thedefault mode.
To select sort mode,touch the [OUTPUT]key, touch the [SORT]key in the screen thatappears, and then touchthe [OK] key.
5 Use the numeric keys to set the desirednumber of copies.
Up to 999 can be set.If you are only making asingle copy, the copycan be made with thecopy number displayshowing "0".
Use the [C] (clear) key tocancel an entry if a mistake has been made.
6 If needed, touch the [FILE] key or the[QUICK FILE] key.
Either key can betouched to store thescanned documentimage on the machine'shard disk. The storedimage can be re-usedlater.
For more information on this function, see"Document filing function" in chapter 7.If the [FILE] key is grayed out, only the [QUICKFILE] key can be selected.When you touch the [QUICK FILE] key, amessage asking you to confirm the save willappear. Touch the [OK] key in the messagescreen and go to the next step.If you wish to cancel the save, touch the [QUICKFILE] key after touching the [OK] key so that the[QUICK FILE] key is no longer highlighted.
7 Press the [START] key.
Replace the original withthe next original andpress the [START] key.Repeat this operationuntil all originals havebeen scanned.
If you selected "Sort" forthe output mode in step 4 and pressed the[START] key, it is necessary to touch the [READ-END] key.
8 Touch the [READ-END] key.
2-SIDED COPY
OUTPUT
FILE
QUICK FILE
FILE
To cancel copying...To cancel a copy job in progress, press the [CA] key.A confirmation message will appear. Touch the[YES] key to cancel copying.
READ-END
PLACE NEXT ORIGINAL. PRESS [START].WHEN FINISHED, PRESS [READ-END].
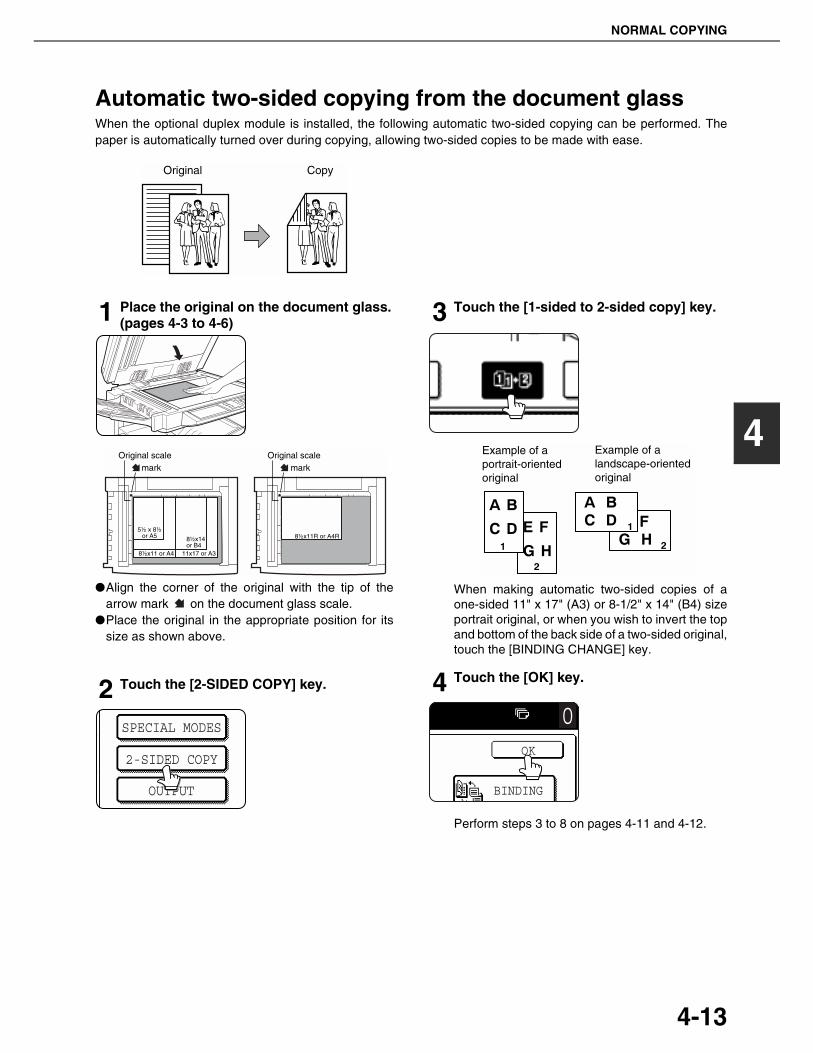
NORMAL COPYING
4-13
4
Automatic two-sided copying from the document glassWhen the optional duplex module is installed, the following automatic two-sided copying can be performed. Thepaper is automatically turned over during copying, allowing two-sided copies to be made with ease.
1 Place the original on the document glass.(pages 4-3 to 4-6)
●Align the corner of the original with the tip of thearrow mark on the document glass scale.
●Place the original in the appropriate position for itssize as shown above.
2 Touch the [2-SIDED COPY] key.
3 Touch the [1-sided to 2-sided copy] key.
When making automatic two-sided copies of aone-sided 11" x 17" (A3) or 8-1/2" x 14" (B4) sizeportrait original, or when you wish to invert the topand bottom of the back side of a two-sided original,touch the [BINDING CHANGE] key.
4 Touch the [OK] key.
Perform steps 3 to 8 on pages 4-11 and 4-12.
Original Copy
Original scalemark
Original scalemark
5½ x 8½or A5
8½x11 or A4 11x17 or A3
8½x14or B4
8½x11R or A4R
SPECIAL MODES
2-SIDED COPY
OUTPUT
Example of a portrait-orientedoriginal
Example of a landscape-orientedoriginal
OK
0
BINDING
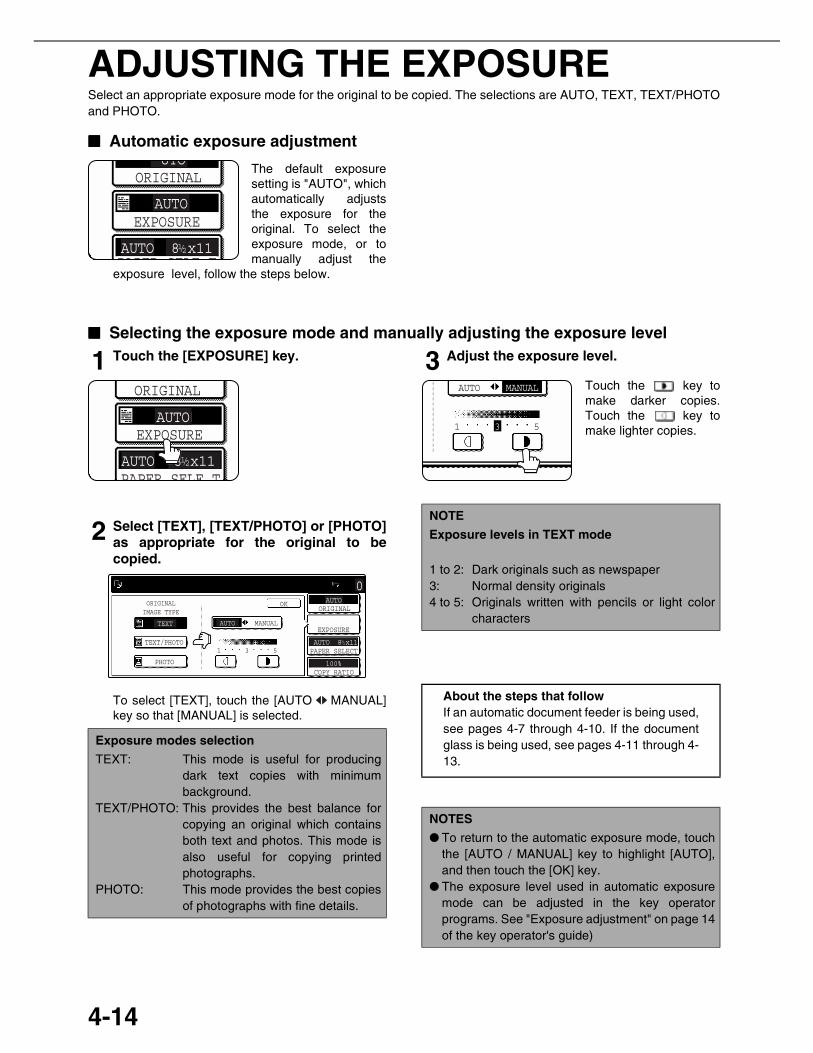
4-14
ADJUSTING THE EXPOSURESelect an appropriate exposure mode for the original to be copied. The selections are AUTO, TEXT, TEXT/PHOTOand PHOTO.
■■■■ Automatic exposure adjustment
The default exposuresetting is "AUTO", whichautomatically adjuststhe exposure for theoriginal. To select theexposure mode, or tomanually adjust the
exposure level, follow the steps below.
■■■■ Selecting the exposure mode and manually adjusting the exposure level
1 Touch the [EXPOSURE] key.
2 Select [TEXT], [TEXT/PHOTO] or [PHOTO]as appropriate for the original to becopied.
To select [TEXT], touch the [AUTO MANUAL]key so that [MANUAL] is selected.
3 Adjust the exposure level.
Touch the key tomake darker copies.Touch the key tomake lighter copies.
UTO
AUTO
AUTO 8 x11
ORIGINAL
PAPER SELE T
EXPOSURE
1/ 2
Exposure modes selection
TEXT: This mode is useful for producingdark text copies with minimumbackground.
TEXT/PHOTO: This provides the best balance forcopying an original which containsboth text and photos. This mode isalso useful for copying printedphotographs.
PHOTO: This mode provides the best copiesof photographs with fine details.
AUTO
AUTO 8 x11
ORIGINAL
PAPER SELE T
EXPOSURE
1/ 2
ORIGINALIMAGE TYPE
TEXT AUTO MANUAL
531
OK
TEXT/PHOTO
PHOTO
AUTO
AUTO 8 x11
100%
ORIGINAL
PAPER SELECT
COPY RATIO
EXPOSURE
0
1/ 2
NOTE
Exposure levels in TEXT mode
1 to 2: Dark originals such as newspaper3: Normal density originals4 to 5: Originals written with pencils or light color
characters
About the steps that followIf an automatic document feeder is being used,see pages 4-7 through 4-10. If the documentglass is being used, see pages 4-11 through 4-13.
NOTES
● To return to the automatic exposure mode, touchthe [AUTO / MANUAL] key to highlight [AUTO],and then touch the [OK] key.
● The exposure level used in automatic exposuremode can be adjusted in the key operatorprograms. See "Exposure adjustment" on page 14of the key operator's guide)
AUTO MANUAL
1 3 5

4-15
4
REDUCTION/ENLARGEMENT/ZOOMReduction and enlargement ratios can be selected automatically or manually.● Automatic selection: Auto image (see below)● Manual selection: Preset copy ratios/zoom (see page 4-16)
Automatic selection (auto image)The reduction or enlargement ratio will be selected automatically based on the original size and the selected paper size.
1 Place the original in the document feedertray or on the document glass. (pages 4-3to 4-6)The detected original size will be displayed.
2 Touch the [PAPER SELECT] key and thenselect the desired paper size.
The selected paper sizekey is highlighted andthe paper selectionscreen closes.
3 Touch the [AUTO IMAGE] key.
The [AUTO IMAGE] keywill be highlighted andthe best reduction orenlargement ratio for theoriginal size and theselected paper size willbe selected and
displayed in the copy ratio display.
4 Use the numeric keys to set the desirednumber of copies.
Up to 999 can be set.If you are only making asingle copy, the copycan be made with thecopy number displayshowing "0".
Use the [C] (clear) key tocancel an entry if a mistake has been made.
5 If needed, touch the [FILE] key or the[QUICK FILE] key.
Either key can be touchedto store the scanneddocument image on themachine's hard disk. Thestored image can be re-used later. For more information on
this function, see "Document filing function" inchapter 7.If the [FILE] key is grayed out, only the [QUICKFILE] key can be selected. When you touch the[QUICK FILE] key, a message asking you toconfirm the save will appear. Touch the [OK] key inthe message screen and go to the next step.If you wish to cancel the save, touch the [QUICKFILE] key after touching the [OK] key so that the[QUICK FILE] key is no longer highlighted.
6 Press the [START] key.
If you placed the originalon the document glass,set the output mode to"Sort", and pressed the[START] key, you musttouch the [READ-END]key after all pages of the
original have been scanned. (Step 8 on page 4-12)
NOTEAutomatic ratio adjustment can only be used for thefollowing original and paper sizes. It cannot be usedfor other sizes. However, in the case of non-standardoriginal and paper sizes, the sizes can be entered tomake automatic ratio adjustment possible for thosesizes.
Original sizes:Standard sizes (see "Original sizedetection function" on page 4-3.)
Paper size: 11" x 17", 8-1/2" x 14", 8-1/2" x 11", 8-1/2" x 11"R, or 5-1/2" x 8-1/2"R (A3,B4, A4, A4R, B5, B5R, or A5R)
NOTEIf paper of the desired size is not loaded in any tray,load paper of the required size in a paper tray. (See"Setting the paper type and paper size" on page 2-5.)
READY TO SCAN FOR COPY.
8 x111/ 2
PLAIN
1. 8 x111/ 2
2. 11x17
3. 11x17
4. 8 x111/ 2
PLAIN
PLAIN
PLAIN
PLAIN
5.8 x11
AUTOIMAGE
1/ 2
OGE 129%
PAPER SELECT
COPY RATIO
NOTEIf the message "ROTATE ORIGINAL FROM TO
" is displayed, change the orientation of theoriginal as indicated in the message. When themessage above is displayed, copying can be donewithout changing the orientation, but the image willnot fit the paper correctly.
To cancel the auto image mode, touch the [CA] key.
QUICK FILE
FILE

REDUCTION/ENLARGEMENT/ZOOM
4-16
Manual selection (preset copy ratios/zoom)Preset ratios (maximum 400%, minimum 25%) can be selected with the enlargement and reduction keys. In addition,the zoom keys can be used to select any ratio from 25% to 400% in increments of 1%.
<The key operator program on page 14 of the key operator's guide can be used to set two additional enlargementratios and two additional reduction ratios.>
1 Place the original in the document feedertray or on the document glass. (pages 4-3to 4-6)
2 Touch the [COPY RATIO] key.
3 Use the [MENU] key to select menu " " ormenu " " for copy ratio selection.
Menu
●A.Preset reduction copy ratios are:77% and 64% (for the inch system).70%, 81% and 86% (for the AB system).
●B.Preset enlargement copy ratios are:121% and 129% (for the inch system).115%, 122% and 141% (for the AB system).
Menu
●A.Preset reduction copy ratios are: 50% and 25%.
●B.Preset enlargement copy ratios are: 200% and 400%.
(The custom ratios set by the key operator appearin ratio menu 2.)
4 Use the reduction, enlargement, and[ZOOM] keys on the touch panel to set thedesired copy ratio.
Zoom ratios: Any ratiofrom 25% to 400% canbe set in 1% increments.Touch the [ ] key toincrease the ratio, or the[ ] key to decreasethe ratio. (If you continue
to touch the [ ]/[ ] key, the ratio will changeautomatically. After 3 seconds, the ratio willchange rapidly.)
5 Touch the [OK] key.
NOTEWhen the original is placed in the document feeder,the ratio can be set from 25% to 200%.
UTO
100%
8 X11/ 2
PAPER SELECT
COPY RATIO
AUTO
AUTO
AUTO 8 x11
ORIGINAL
PAPER SELECT
COPY RATIO
AUTOIMAGE
EXPOSURE
0
XY ZOOM MENU
ZOOM
READY TO SCAN FOR COPY.
OK
1/ 2
AUTO
AUTO
AUTO 8 x11
ORIGINAL
PAPER SELECT
COPY RATIO
AUTOIMAGE
EXPOSURE
0
XY ZOOM
OK
MENU
ZOOM
1/ 2
NOTES● Touch a reduction or enlargement key to set the
approximate ratio, then touch the [ ] key toincrease the ratio or the [ ] key to decrease theratio.
● Automatic changing of the ratio when a zoom keyis continuously touched can be disabled in the keyoperator programs (see "Key operation setting(prohibit key repeat)" on page 10 of the keyoperator’s guide).
● If the message "IMAGE IS LARGER THAN COPYPAPER." appears when a ratio is selected, theimage may not fit on the copy paper.
● To set the horizontal and vertical copy ratiosseparately, use the XY ZOOM feature. See page4-18.
XY ZOOM MENU
ZOOM
XY ZOOM MENU
ZOOM
64
AUTO
AUTO
AUTO 8 x11
ORIGINAL
PAPER SELECT
COPY RATIO
AUTOIMAGE
EXPOSURE
0
IO
OK
1/ 2

REDUCTION/ENLARGEMENT/ZOOM
4-17
4
6 Make sure that an appropriate paper sizehas been selected based on the selectedratio.
Auto paper select display
7 Use the numeric keys to set the desirednumber of copies.
Up to 999 can be set.If you are only making asingle copy, the copycan be made with thecopy number displayshowing "0".
Use the [C] (clear) key tocancel an entry if a mistake has been made.
8 If needed, touch the [FILE] key or the[QUICK FILE] key.
Either key can betouched to store thescanned documentimage on the machine'shard disk. The storedimage can be re-usedlater.
For more information on this function, see"Document filing function" in chapter 7.If the [FILE] key is grayed out, only the [QUICKFILE] key can be selected.When you touch the [QUICK FILE] key, amessage asking you to confirm the save willappear. Touch the [OK] key in the messagescreen and go to the next step.If you wish to cancel the save, touch the [QUICKFILE] key after touching the [OK] key so that the[QUICK FILE] key is no longer highlighted.
9 Press the [START] key.
If you placed the originalon the document glass,set the output to "Sort",and pressed the[START] key, you musttouch the [READ-END]key after all pages of the
original have been scanned. (Step 8 on page 4-12)
NOTEIf the auto paper select display does not appear, atray with the correct size of paper for the selectedratio will not be automatically selected.
ORIGIN L
AUTOEXPOSURE
AUTO 8 x111/ 2
PAPER SELECT
64%COPY RATIO
To return the ratio to 100%To return the ratio setting to 100%, touch the [COPYRATIO] key to display the ratio menu and then touchthe [100%] key. (Steps 2 and 3 on page 4-16.)
QUICK FILE
FILE
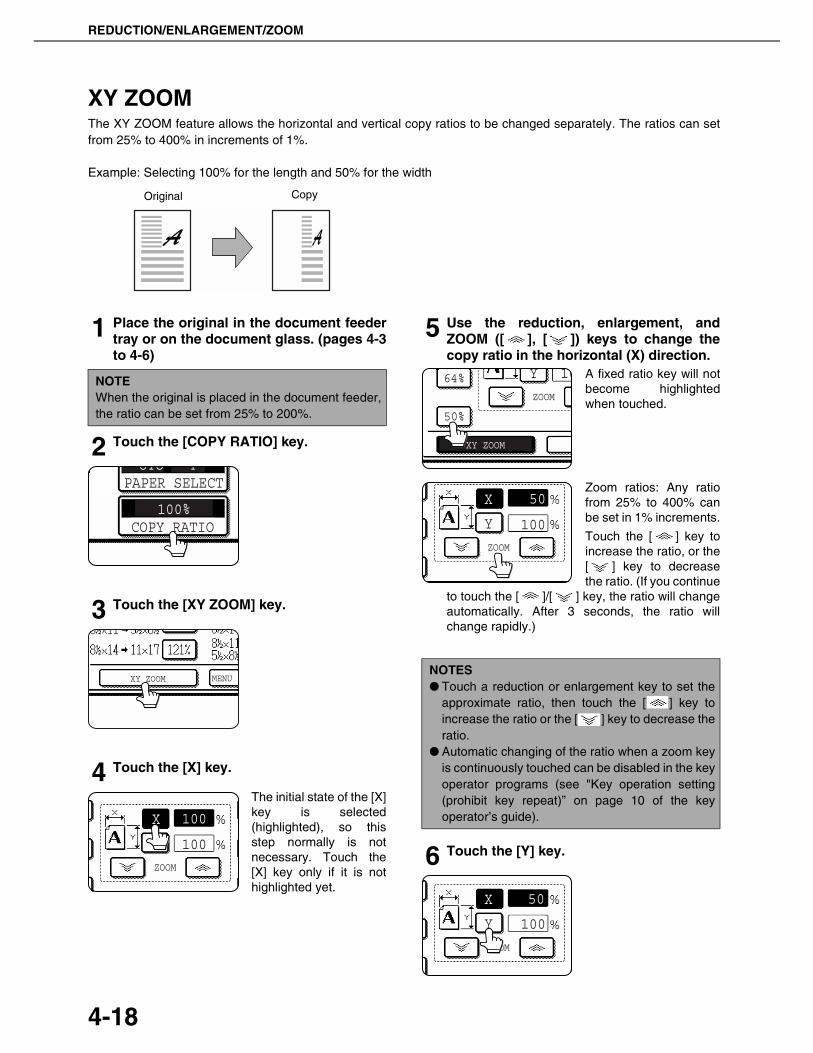
REDUCTION/ENLARGEMENT/ZOOM
4-18
XY ZOOMThe XY ZOOM feature allows the horizontal and vertical copy ratios to be changed separately. The ratios can setfrom 25% to 400% in increments of 1%.
Example: Selecting 100% for the length and 50% for the width
1 Place the original in the document feedertray or on the document glass. (pages 4-3to 4-6)
2 Touch the [COPY RATIO] key.
3 Touch the [XY ZOOM] key.
4 Touch the [X] key.
The initial state of the [X]key is selected(highlighted), so thisstep normally is notnecessary. Touch the[X] key only if it is nothighlighted yet.
5 Use the reduction, enlargement, andZOOM ([ ], [ ]) keys to change thecopy ratio in the horizontal (X) direction.
A fixed ratio key will notbecome highlightedwhen touched.
Zoom ratios: Any ratiofrom 25% to 400% canbe set in 1% increments.
Touch the [ ] key toincrease the ratio, or the[ ] key to decreasethe ratio. (If you continue
to touch the [ ]/[ ] key, the ratio will changeautomatically. After 3 seconds, the ratio willchange rapidly.)
6 Touch the [Y] key.
Original Copy
NOTEWhen the original is placed in the document feeder,the ratio can be set from 25% to 200%.
UTO
100%
4PAPER SELECT
COPY RATIO
XY ZOOM MENU
ZOOM
100
100Y
X
NOTES● Touch a reduction or enlargement key to set the
approximate ratio, then touch the [ ] key toincrease the ratio or the [ ] key to decrease theratio.
● Automatic changing of the ratio when a zoom keyis continuously touched can be disabled in the keyoperator programs (see "Key operation setting(prohibit key repeat)” on page 10 of the keyoperator’s guide).
XY ZOOM
ZOOM
50%
10Y64%
ZOOM
50
100Y
X
ZOOM
50
100Y
X
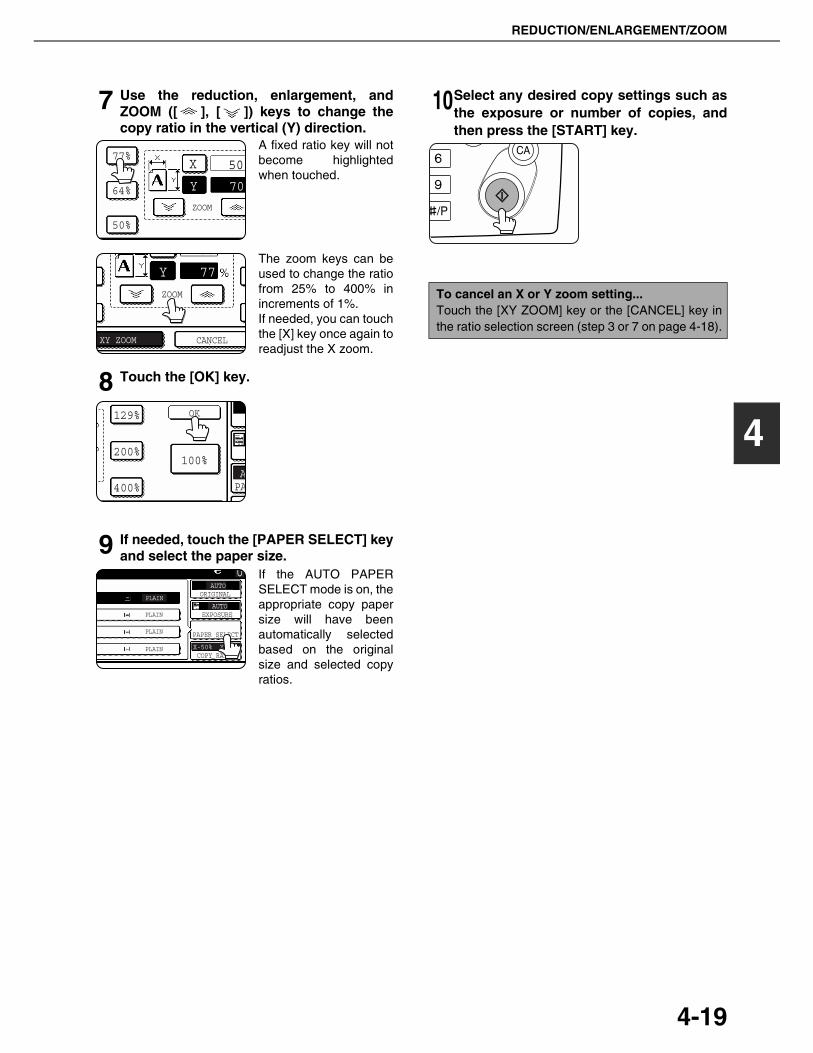
REDUCTION/ENLARGEMENT/ZOOM
4-19
4
7 Use the reduction, enlargement, andZOOM ([ ], [ ]) keys to change thecopy ratio in the vertical (Y) direction.
A fixed ratio key will notbecome highlightedwhen touched.
The zoom keys can beused to change the ratiofrom 25% to 400% inincrements of 1%.If needed, you can touchthe [X] key once again toreadjust the X zoom.
8 Touch the [OK] key.
9 If needed, touch the [PAPER SELECT] keyand select the paper size.
If the AUTO PAPERSELECT mode is on, theappropriate copy papersize will have beenautomatically selectedbased on the originalsize and selected copyratios.
10Select any desired copy settings such asthe exposure or number of copies, andthen press the [START] key.
ZOOM
50%
50
70Y
X
64%
77%
XY ZOOM CANCEL
ZOOM
50
77Y
A
OK
PA400%
200%100%
129%
0 AUTO
ORIGINAL
AUTOEXPOSURE
PAPER SELECT
X-50% Y-70%COPY RATIO
PLAIN
PLAIN
PLAIN
PLAIN
To cancel an X or Y zoom setting...Touch the [XY ZOOM] key or the [CANCEL] key inthe ratio selection screen (step 3 or 7 on page 4-18).

4-20
SPECIAL PAPERSThe tray 2 and the bypass tray on the optional duplex module with bypass tray can be used to make copies ontransparencies, postcards, label sheets, envelopes*1, and plain paper.
*1 Envelopes can be placed in the tray 2.
1 Place the original in the document feedertray or on the document glass. (pages 4-3to 4-6)
2 Load the special paper in the bypass tray.
Place the paper with theprinted side face down.See page 2-3 for thespecifications of paperthat can be used in thebypass tray.For the paper loadinginstructions, see"Loading paper in thebypass tray" (page 3-3).
3 Touch the [PAPER SELECT] key.
4 Set the type and size of paper loaded in thebypass tray.
(1)The (X) key showsthe currently selectedpaper type.
(2)The (Y) key showsthe size of paperloaded in the bypasstray.
(3)To change the displayed paper type, touch the(X) key before touching the (Y) key. Whenloading paper, if you changed the paper sizefrom an AB size to an inch size (or from an inchsize to an AB size), or if you changed the papertype, be sure to change the paper type and sizesettings as explained in steps 5 to 7 on page 2-5, and steps 8 to 10 on page 2-6.
5 Select the bypass tray.
6 Select any desired copy settings such asthe exposure or number of copies, andthen press the [START] key.
When copying from thedocument glass in thesort mode using the[START] key, touch the[READ-END] key afterall originals have beenscanned (step 8 on page4-12).
UTO
AUTO
100%
8 x11PAPER SELECT
OPY
EXPOSURE4
1/ 2
(X) (Y)
RE DY TO SC N FOR COPY
PLAIN
8 x111/ 2
8 x111/ 2
8 x111/ 2
11x17
11x17
P
P
P
P
RE DY TO SC N FOR COPY
PLAIN
8 x111/ 2
8 x111/ 2
8 x111/ 2
11x17
11x17
P
P
P
P
5-1
CHAPTER 5CONVENIENT COPY
FUNCTIONSThis chapter explains special-purpose functions, storing of copysettings, and other convenient functions. Please select and readsections of this chapter as needed.
Page
SPECIAL MODES................................................................................... 5-2● General procedure for using special functions................................ 5-2● Margin shift...................................................................................... 5-3● Erase............................................................................................... 5-4● Dual page copy ............................................................................... 5-5● Pamphlet copy ................................................................................ 5-6● Job build.......................................................................................... 5-8● Tandem copy .................................................................................. 5-9● Covers/inserts ................................................................................. 5-11● Transparency film with insert sheets............................................... 5-22● Multi shot......................................................................................... 5-23● Book copy ....................................................................................... 5-25● Card shot......................................................................................... 5-26● Mirror image.................................................................................... 5-28● B/W reverse .................................................................................... 5-28● Print menu....................................................................................... 5-29
STORING, USING AND DELETING JOB PROGRAMS......................... 5-41● Storing a job program...................................................................... 5-41● Calling up a job program................................................................. 5-42● Deleting a stored job program......................................................... 5-42
INTERRUPTING A COPY RUN.............................................................. 5-43

5-2
SPECIAL MODESTouch the [SPECIAL MODES] key in the main screen of copy mode to open the special modes screen. The followingfunctions can be selected in the special modes screen.
(1) Margin shift (page 5-3)
(2) Erase (page 5-4)
(3) Dual page copy (page 5-5)
(4) Pamphlet copy (page 5-6)
(5) Job build (page 5-8)
(6) Tandem copy (page 5-9)
(7) [OK] key on the special modes screen
Touch the [OK] key to return to the main screen ofcopy mode.
(8) / key
Touch these keys to change the special modesscreen.
There are three special modes screens.Touch the key to change to the other two screens.
●The following special functions can be selected in the 2nd screen (2/3).Covers/inserts (page 5-11)Transparency inserts (page 5-22)Multi shot (page 5-23)
Book copy (page 5-25)Card shot (page 5-26)Mirror image (page 5-28)
●The following special functions can be selected in the 3rd screen (3/3).B/W reverse (page 5-28) Print menu (page 5-29)
General procedure for using special functions1 Touch the [SPECIAL MODES] key.
2 Touch the key for the desired specialmode.
Example:Selecting the marginshift function
To select a special function in one of the other twoscreens, use the / keys to change thescreen.
SPECIAL MODES
MARGIN SHIFT
PAMPHLET COPY
ERASE
OK
1/3DUAL PAGE
COPY
JOBBUILD
TANDEMCOPY
SPECIAL MODES
2-SIDED COPY
OUTPUT
QUICK FILE
FILE
READY TO SCAN FOR COPY.
AUTO
100%
AUTO
AUTO 8 x11
ORIGINAL
EXPOSURE
PAPER
COPY RATIO
ORIGINAL
A41/ 2
8 x111/ 2
8 x111/ 2
8 x111/ 2
8 x111/ 2
8 x141/ 2
11x17
Touch the [SPECIAL MODES] key in the main screen.
(1) (2) (3)
(4) (5) (7)(6) (8)
SPECIAL MODES
2-SIDED COPY
OUTPUT
SPECIAL MODES
MARGIN SHIFT
PAMPHLET COPY
ERASE
JOBBUILD
Setting procedures for modes requiring settingscreens start on the next page.The dual page copy, job build, tandem copy,mirror image and B/W reverse functions do notrequire setting screens.

SPECIAL MODES
5-3
5
Margin shiftThe margin shift function will automatically shift the text or image on the copy paper approximately 1/2" (10 mm) inits initial setting. This function is convenient when stapling or binding copies with a string.
1 Touch the [MARGIN SHIFT] key on thespecial modes screen.
The margin shift settingscreen will appear.The margin shift icon( ) will also appear inthe upper left of thescreen to indicate thatthe function is turned on.
2 Select the shift direction.
Touch a shift directionkey to select right or left.The selected key will behighlighted.
3 Set the shift amount as needed and touchthe [OK] key.
Use the and the keys to set the shiftamount. The shiftamount can be set from0" to 1" in 1/8" (0 to 20mm in 1 mm)increments.
4 Touch the [OK] key on the special modesscreen.You will return to the main screen of copy mode.
NOTES
● The initial setting for the margin width can be changed in the key operator programs to any value from 0 to 1"(0 to 20 mm). (Page 15 of the Key operator's guide)
● When margin shift is selected, rotating copying will not operate even if the condition for rotate copying is met.
Image shiftedto the right
Image shiftedto the left
MarginMargin
Original
Two-sided copying
Image shiftedto the right
Margin
Image shiftedto the left
Margin
Or
One-sided copying
Original
●The shift direction can be selected from right or leftshift as shown in the illustration.
To display the special modes screen...See "General procedure for using specialfunctions" on page 5-2.
SPECIAL MODES
MARGIN SHIFT
PAMPHLET COPY
ERASE
JOBBUILD
RIGHT LEFT
About the steps that followIf an automatic document feeder is being used,see pages 4-7 through 4-10. If the documentglass is being used, see pages 4-11 through 4-13.
To cancel the margin shift function, touch the[CANCEL] key on the margin shift setting screen.
SIDE 1
(0 1)inch
(0 1)inch
SIDE 2
OKCANCEL
OK
1/2 1/2

SPECIAL MODES
5-4
EraseThe erase function is used to erase the shadow lines on copies produced when copying thick originals or books. Theerase modes that can be selected are shown below. The erase width is approximately 1/2" (10 mm) in it's initialsetting.
EDGE ERASEEliminates shadow lines around the edges ofcopies caused when heavy paper or a book is usedas an original.
CENTER ERASEEliminates shadow lines produced by the bindingsof bound documents.
EDGE + CENTER ERASEEliminates shadow lines around the edges of copiesand eliminates the shadow at the center of copies.
1 Touch the [ERASE] key on the specialmodes screen.
The erase setting screenwill appear.The erase icon ( ) willalso appear in the upperleft of the screen toindicate that the functionis turned on.
2 Select the desired erase mode.
Select one of the threeerase modes. Theselected key will behighlighted.
3 Adjust the amount of erase and touch the[OK] key.
Use the and keysto set the erase width toany value from 0" to 1" inincrements of 1/8" (0 to10 mm in 1 mm).
4 Touch the [OK] key on the special modesscreen.You will return to the main screen of copy mode.
NOTE
The initial setting for the erasure width can be changed in the key operator programs to any value from 0 to 1" (0to 20 mm). (Page 15 of the Key operator's guide)
Original Copy
To display the special modes screen...See "General procedure for using specialfunctions" on page 5-2.
MODES
RGIN SHIFT
PHLET COPY
ERASEDUAL
C
JOBBUILD
TANC
EDGEERASE
ERASE
CENTERERASE
EDGE+CENTERERASE
About the steps that followIf an automatic document feeder is being used,see pages 4-7 through 4-10. If the documentglass is being used, see pages 4-11 through 4-13.
NOTEWhen erase is used, edge erase takes place at theedges of the original image. If you also use a ratiosetting, the edge erase width will change accordingto the set ratio.
To cancel the erase function, touch the [CANCEL]key on the erase setting screen (step3).
EDGE
CANCEL OK
1/2 (0 1)inch

SPECIAL MODES
5-5
5
Dual page copyThe dual page copy function produces separate copies of two documents placed side by side on the document glass.This function is especially useful when copying books and other bound documents.
[Example] Copying right and left pages of a book
1 Touch the [DUAL PAGE COPY] key on thespecial modes screen.
The [DUAL PAGECOPY] key will behighlighted to indicatethat the function isturned on, and the dualpage copy icon ( ) willappear in the upper leftof the screen.
2 Touch the [OK] key on the special modesscreen.You will return to the main screen of copy mode.
3 Place the originals on the document glass.
When copying a thickbook, press down lightlyon the book to flatten itagainst the documentglass.
Place the opened original on the document glass sothat the first page you wish to copy is on the right andthe center of the original is aligned with the size mark.
4 Ensure that 8-1/2" x 11" (A4) size paper isselected.
If 8-1/2" x 11" (A4) sizepaper is not selected,touch the [PAPERSELECT] key to select8-1/2" x 11" (A4) sizepaper.
●The dual page copy function can be used onlywhen copying from the document glass. Theautomatic document feeder cannot be used withthis function.
●Only 8-1/2" x 11" (A4) paper can be used.
Book original Dual page copy
To display the special modes screen...See "General procedure for using specialfunctions" on page 5-2.
RASE
OK
1/3DUAL PAGE
COPY
JOBBUILD
TANDEMCOPY
Index
11" x 17"
Center line oforiginal
A4
This pageis copiedfirst.
8 " x 11"
8 " x 11"1/ 2
1/ 2
(A4) (A3)
About the steps that followFor two-sided copying, follow steps 2 through 4on page 4-13 and then follow steps 4 through 7on page 4-12.For one-sided copying, follow steps 4 through7 on page 4-12.
NOTE
To erase shadows caused by document binding, usethe edge erase function (page 5-4). (Center Eraseand Edge + Center Erase cannot be used incombination.)
To cancel the dual page copy function, touch the[DUAL PAGE COPY] key on the special modesscreen (screen of step 1).
UTO
AUTO
100%
8 x11PAPER SELECT
OPY RATIO
EXPOSURE
1/ 2

SPECIAL MODES
5-6
Pamphlet copyThe pamphlet copy function is used to arrange copies in proper order for eventual center-stapling and folding into abooklet. Two original pages are copied onto each side of copy paper. Four pages are, therefore, copied onto one sheet.This function is convenient for arranging copies into an attractive booklet or pamphlet.
[Example] Copying eight originals in the pamphlet copy mode● When using this function, a duplex module must
be installed.● Scan the originals from the first page to the last
page. The order of copying will be automaticallyadjusted by the machine.
● Either left binding (right to left turning) or rightbinding (left to right turning) can be selected.
● Four originals will be copied onto one sheet.Blank pages may be automatically produced atthe end depending on the number of the originals.
● If a saddle stitch finisher is installed, copies canbe stapled in two positions along the center ofcopies and folded at the center.
1 Touch the [PAMPHLET COPY] key on thespecial modes screen.
The PAMPHLET COPYsetting screen willappear. The pamphletcopy icon ( , etc.) willalso appear in the upperleft corner of the screento indicate that thefunction is turned on.
2 Designate the type of originals to becopied: 1-sided or 2-sided.
Select the [2-SIDED]key if you wish to scan atwo-sided original usingthe automatic documentfeeder.
3 Select the binding position (left binding orright binding).
If you wish to insert a different type of paper for use asa cover, follow steps 4 through 12 below.
If you do not wish to insert paper for a cover, continuefrom step 8 on the next page.
4 Touch the [COVER SETTING] key.
NOTE
To make pamphlet copies of a book or other bound original, use the book copy function (page 5-25). The bookcopy function scans the opened original in two-page units. (Two pages are scanned at each scan, reducing thenumber of repetitions of the scanning operation by a half.)
Finished copies arefolded in two.
Originals(one-sided)
12
34
56
78
7
8
5
6
3
4
Originals(two-sided)
1
2
Left binding
Right binding
First page
First page
To display the special modes screen...See "General procedure for using specialfunctions" on page 5-2.
SPECI L MODES
MARGIN SHIFT
PAMPHLET COPY
ERASE
JOBBUILD
2-SIDED
ORIGINAL
1-SIDED
RIGHTBINDING
CSE
LEFTBINDING
CANCEL OK
RIGHTBINDING
COVERSETTING
NG

SPECIAL MODES
5-7
5
5 Select whether or not you wish to copy onthe cover ("YES" or "NO").
6 Select the paper tray for the cover.
(1)The currently selectedpaper tray for thecover is displayed.
(2)The size and type ofpaper in the currentlyselected tray isdisplayed.
In the example screen above, 8-1/2" x 11" (A4)size plain paper is loaded.To change the paper tray for the cover, touch the trayselection key. (In the screen example, the " TRAY2"display is the tray selection key.)The tray selection screen appears when the trayselection key is touched. Select the desired tray inthis screen.
7 Touch the [OK] key.
8 Touch the [OK] key.
Return to the mainscreen of copy mode.
9 Place the original in the document feederor on the document glass. (page 4-3)
10Ensure that the desired paper size hasbeen automatically selected based on theoriginal size.
To select another sizepaper, select the desiredsize and touch the[AUTO IMAGE] key. Theappropriate copy ratiowill be selectedautomatically based on
the original size and the paper size. (See steps 2and 3 on page 4-15.)
11Select any desired copy settings such asthe exposure or number of copies, andthen press the [START] key.
12[When using the automatic documentfeeder:]Copying will start after all originals have beenscanned. (The next step is not needed.)
[When using the document glass:]Replace the original with the next original andpress the [START] key. Repeat this operation untilall originals have been scanned and then touchthe [READ-END] key.
NOTES
● Two-sided copying is not possible on label sheets,and transparency film. When copying on a cover,do not select a tray that has one of these types ofpaper.
● Select the same size of paper for the covers as forthe copies.
NO
PRINT ON COVER
YES
CANCEL OK
TRAY2
PAPER TRAY
8 x11PLAIN
1/ 2
(1)
(2)
CANCEL OK
RIGHTBINDING
COVERSETTING
G
CANCEL OK
OK
RIGHTBINDING
COVERSETTING
LEFTBINDING
NOTES
● When the pamphlet copy function is set, the two-sided copying mode will be automaticallyselected.
● If this function is used in combination with thepamphlet copy function (pamphlet stapling) andthe number of original pages exceeds the numberof pages that can be stapled, a message askingyou to select "CANCEL", "CONTINUE", or"DIVIDE" will appear.To cancel the job, select "CANCEL". To makepamphlet copies without stapling, select"CONTINUE". To divide the pages into sets thatcan be stapled, select "DIVIDE".If you performed steps 4 to 6 to insert cover paper,divided stapling is not possible. You can eithercontinue pamphlet copying without stapling, orcancel the job.
To cancel the pamphlet copy function, touch the[CANCEL] key on the pamphlet copy setting screen(step 7).
UTO
AUTO
100%
11x17PAPER SELECT
OPY RATIO
EXPOSURE
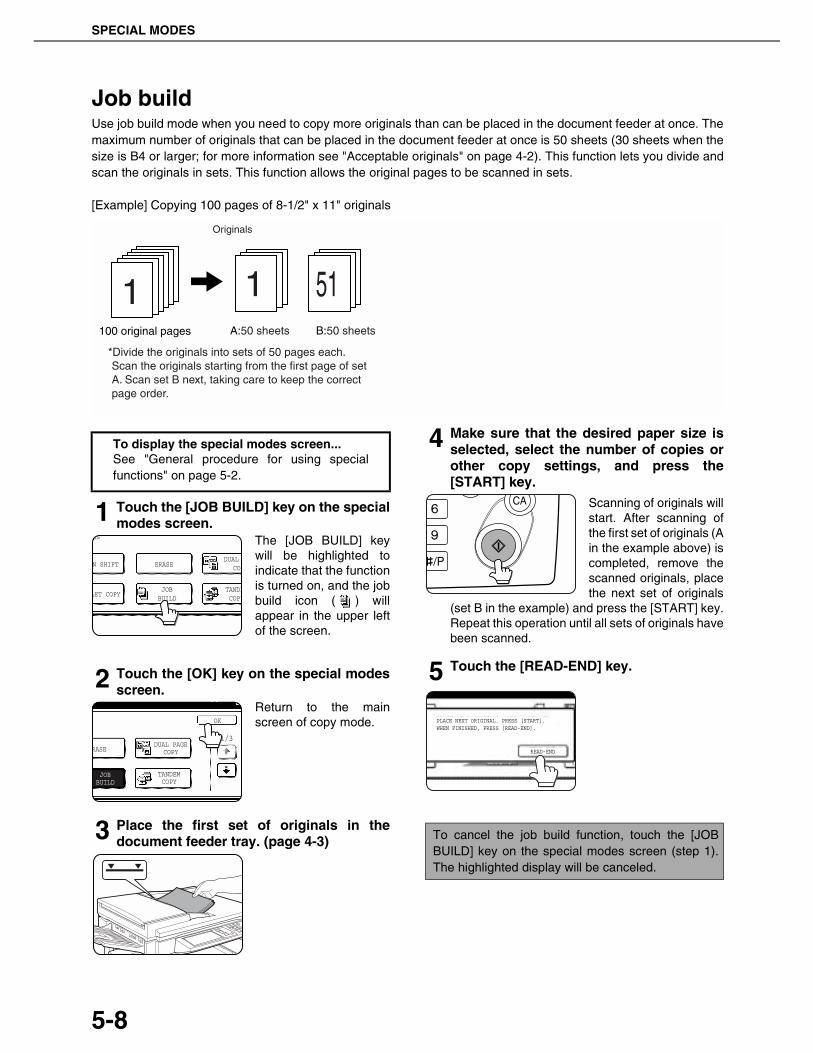
SPECIAL MODES
5-8
Job buildUse job build mode when you need to copy more originals than can be placed in the document feeder at once. Themaximum number of originals that can be placed in the document feeder at once is 50 sheets (30 sheets when thesize is B4 or larger; for more information see "Acceptable originals" on page 4-2). This function lets you divide andscan the originals in sets. This function allows the original pages to be scanned in sets.
[Example] Copying 100 pages of 8-1/2" x 11" originals
1 Touch the [JOB BUILD] key on the specialmodes screen.
The [JOB BUILD] keywill be highlighted toindicate that the functionis turned on, and the jobbuild icon ( ) willappear in the upper leftof the screen.
2 Touch the [OK] key on the special modesscreen.
Return to the mainscreen of copy mode.
3 Place the first set of originals in thedocument feeder tray. (page 4-3)
4 Make sure that the desired paper size isselected, select the number of copies orother copy settings, and press the[START] key.
Scanning of originals willstart. After scanning ofthe first set of originals (Ain the example above) iscompleted, remove thescanned originals, placethe next set of originals
(set B in the example) and press the [START] key.Repeat this operation until all sets of originals havebeen scanned.
5 Touch the [READ-END] key.
Originals
*Divide the originals into sets of 50 pages each. Scan the originals starting from the first page of set A. Scan set B next, taking care to keep the correct page order.
A:50 sheets B:50 sheets100 original pages
1 1 51
To display the special modes screen...See "General procedure for using specialfunctions" on page 5-2.
ES
N SHIFT
LET COPY
ERASEDUAL
COP
JOBBUILD
TANDECOPY
RASE
OK
1/3DUAL PAGE
COPY
JOBBUILD
TANDEMCOPY
To cancel the job build function, touch the [JOBBUILD] key on the special modes screen (step 1).The highlighted display will be canceled.
READ-END
PLACE NEXT ORIGINAL. PRESS [START].WHEN FINISHED, PRESS [READ-END].
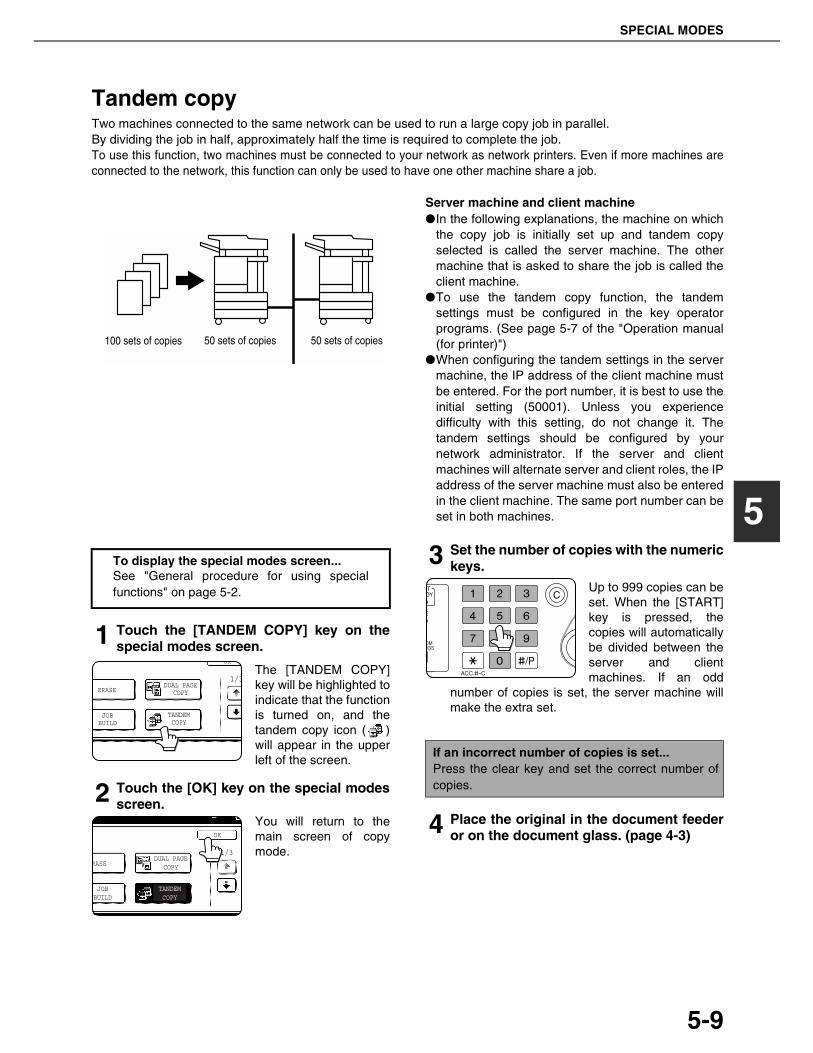
SPECIAL MODES
5-9
5
Tandem copyTwo machines connected to the same network can be used to run a large copy job in parallel.By dividing the job in half, approximately half the time is required to complete the job.To use this function, two machines must be connected to your network as network printers. Even if more machines areconnected to the network, this function can only be used to have one other machine share a job.
Server machine and client machine●In the following explanations, the machine on which
the copy job is initially set up and tandem copyselected is called the server machine. The othermachine that is asked to share the job is called theclient machine.
●To use the tandem copy function, the tandemsettings must be configured in the key operatorprograms. (See page 5-7 of the "Operation manual(for printer)")
●When configuring the tandem settings in the servermachine, the IP address of the client machine mustbe entered. For the port number, it is best to use theinitial setting (50001). Unless you experiencedifficulty with this setting, do not change it. Thetandem settings should be configured by yournetwork administrator. If the server and clientmachines will alternate server and client roles, the IPaddress of the server machine must also be enteredin the client machine. The same port number can beset in both machines.
1 Touch the [TANDEM COPY] key on thespecial modes screen.
The [TANDEM COPY]key will be highlighted toindicate that the functionis turned on, and thetandem copy icon ( )will appear in the upperleft of the screen.
2 Touch the [OK] key on the special modesscreen.
You will return to themain screen of copymode.
3 Set the number of copies with the numerickeys.
Up to 999 copies can beset. When the [START]key is pressed, thecopies will automaticallybe divided between theserver and clientmachines. If an odd
number of copies is set, the server machine willmake the extra set.
4 Place the original in the document feederor on the document glass. (page 4-3)
100 sets of copies 50 sets of copies 50 sets of copies
To display the special modes screen...See "General procedure for using specialfunctions" on page 5-2.
ERASE
OK
1/3DUAL PAGE
COPY
JOBBUILD
TANDEMCOPY
RASE
OK
1/3DUAL PAGE
COPY
JOBBUILD
TANDEMCOPY
If an incorrect number of copies is set...Press the clear key and set the correct number ofcopies.

SPECIAL MODES
5-10
5 Press the [START] key.
NOTES
● To perform tandem copying, the server machine and client machine must meet certain conditions.After the [START] key is pressed on the server machine, the server machine verifies that the conditions havebeen met. If the conditions have not been met, tandem copying does not begin and "TANDEM OUTPUT ISNOT ALLOWED. OUTPUT ALL SETS USING MASTER MACHINE?" appears in the display. To have theserver machine make all the copies, touch the [OK] key. To cancel the job, touch the [CANCEL] key.• As an example, the following conditions must be met when a staple finisher is installed on the server machine
and not on the client machine:(1) If tandem copying is executed for a two-sided copy job with the number of copies set to 999 and "Non-
staple" is selected, tandem copying will take place.(2) If tandem copying is executed for a two-sided copy job with the number of copies set to 999 and
"Staple" is selected, tandem copying will not take place because the client machine does not have afinisher.
● After the [START] key is pressed, if the client machine cannot print because it is out of paper or other reason,the server machine will print its half of the job. The other half of the job will be stored in the client machine andthe job will be printed when the client machine is able to print.
● If auditing mode is enabled on both the server and client machines, the same account number must be enteredon both machines.
● If auditing mode is enabled on the client machine but not on the server machine, tandem copying cannot beperformed.
To cancel the tandem copy function, touch the[TANDEM COPY] key on the special modes screen(step 2). The highlighted display will be canceled.
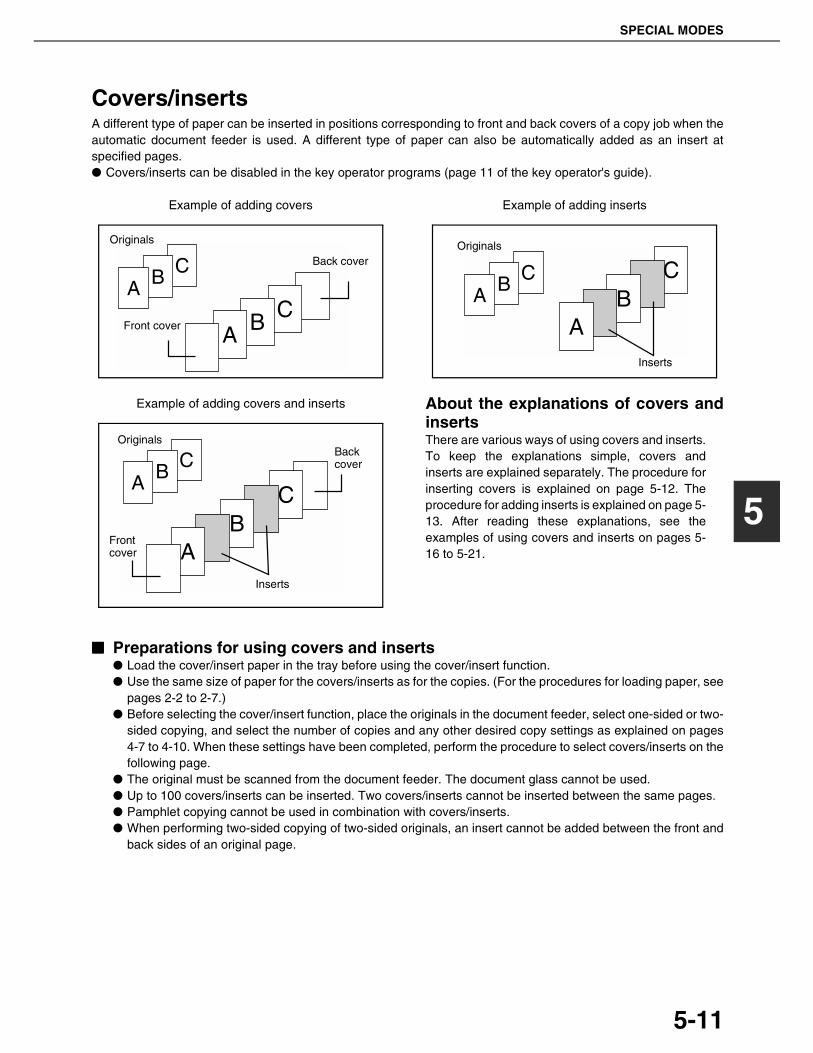
SPECIAL MODES
5-11
5
Covers/insertsA different type of paper can be inserted in positions corresponding to front and back covers of a copy job when theautomatic document feeder is used. A different type of paper can also be automatically added as an insert atspecified pages.● Covers/inserts can be disabled in the key operator programs (page 11 of the key operator's guide).
Example of adding covers
Example of adding covers and inserts
Example of adding inserts
About the explanations of covers andinsertsThere are various ways of using covers and inserts.To keep the explanations simple, covers andinserts are explained separately. The procedure forinserting covers is explained on page 5-12. Theprocedure for adding inserts is explained on page 5-13. After reading these explanations, see theexamples of using covers and inserts on pages 5-16 to 5-21.
■■■■ Preparations for using covers and inserts● Load the cover/insert paper in the tray before using the cover/insert function.● Use the same size of paper for the covers/inserts as for the copies. (For the procedures for loading paper, see
pages 2-2 to 2-7.)● Before selecting the cover/insert function, place the originals in the document feeder, select one-sided or two-
sided copying, and select the number of copies and any other desired copy settings as explained on pages4-7 to 4-10. When these settings have been completed, perform the procedure to select covers/inserts on thefollowing page.
● The original must be scanned from the document feeder. The document glass cannot be used.● Up to 100 covers/inserts can be inserted. Two covers/inserts cannot be inserted between the same pages.● Pamphlet copying cannot be used in combination with covers/inserts.● When performing two-sided copying of two-sided originals, an insert cannot be added between the front and
back sides of an original page.
Front cover
Back cover
Originals
Inserts
Frontcover
Backcover
Originals
Originals
Inserts

SPECIAL MODES
5-12
■■■■ Procedure for inserting front and back cover paperThe paper for the front cover is called the front cover paper ("FRONT COVER" in the touch panel). The paperfor the back cover is called the back cover paper ("BACK COVER" in the touch panel).●Examples of insertion methods for the front and back cover paper are given on pages 5-17 to 5-20.
1 Touch the [COVERS/INSERTS] key in thespecial modes screen (2nd screen).
2 Touch the [PAPER TRAY SETTINGS] key.
3 Select the tray used for the front coverpaper.
(1)The tray name (tray position) selected for thefront cover paper and the paper size and typeare shown in (X). If the tray in which youloaded paper for the front cover is shown, touchthe [OK] key. You will return to the screen ofstep 2.
(2)If the correct tray for the cover sheet paperdoes not appear in (X), touch the (Y) key. Thetray selection screen will appear. Select thetray in which you loaded paper for the frontcover. You will return to the screen of above.
4 Touch the [FRONT COVER] key in thescreen of step 2.
5 Set the insertion conditions for the frontcover paper.
(1) Select whether or not the front cover paper is to becopied on with the (X) keys ([YES] or [NO]).
(2)Select whether one-sided copying or two-sidedcopying is to be performed on the front coverpaper with the (Y) keys. This selection is onlypossible when the [YES] key of (X) has beenselected. (The one-sided/two-sided selectionmade here only applies to the front cover paper.When the back cover paper is selected, theselection only applies to the back cover paper.)
(3)The (Z) key shows the tray selected for the frontcover paper in step 3 and the paper size andtype.
6 Touch the [OK] key in the screen of step 5.You will return to the screen of step 2.When you return to the screen of step 2, the[FRONT COVER] key will be highlighted.
7 To insert back cover paper, repeat steps 2through 6, using the [BACK COVER] keyinstead of the [FRONT COVER] key.
8 Touch the [PAGE LAYOUT] key in thescreen of step 7 to display a list of theselected settings (page 5-15).To exit the cover/insert settings, touch theupper [OK] key in the screen of step 7.
9 Press the [START] key.
To display the special modes screen...See "General procedure for using specialfunctions" on page 5-2.
SPECIAL MODES
COVERS/INSERTSTRANSPARENCY
INSERTS
CARD SHOTBOOK COPY
FRONT COVER
BACK COVER
INSERTIONTYPE A SETTING
PAPER TRAYSETTINGS
PAGE LAYOUT
CANCEL OK
INSERTIONSETTINGS
COVERS/INSERTS
INSERTIONTYPE B SETTING
8 x11PLAIN
1/ 2
PAPER TRAY SETTINGS
FRONT COVER
TRAY2 TRAY2TRAY2 TRAY2 TRAY2
BACK COVERINSERTIONTYPE A
INSERTIONTYPE B
OK
8 x11PLAIN
1/ 2 8 x11PLAIN
1/ 2 8 x11PLAIN
1/ 2
(X) (Y)
To cancel covers/inserts settings...Touch the [CANCEL] key in the screen of step 2.
PLEASE SET UP A FRONT COVER.
FRONT COVER SETTING
PRINT ON FRONT COVER
YES NO 1-SIDED 2-SIDED
0OKCANCEL
PAPER TRAY
TRAY2
8 x11PLAIN
1/ 2
(X) (Y) (Z)
PLEASE SET UP COVERS/INSERTS.
SPECIAL MODES
COVERS/INSERTS
FRONT COVERINSERTION
TYPE A SETTINGSPAPER TRAYSETTINGS
PAGE LAYOUT
INSERTIONSETTINGSINSERTION
TYPE B SETTINGSBACK COVER
0OK
OKCANCEL

SPECIAL MODES
5-13
5
■■■■ Procedure for adding insertsYou can have different paper automatically inserted as an insert at a specified pages. Two types of insert papercan be used. These are specified with the [INSERTION TYPE A SETTING] key and [INSERTION TYPE BSETTING] in the touch panel.●Examples of insertion methods for insert paper are given on page 5-21.
1 Touch the [COVERS/INSERTS] key in thespecial modes screen (2nd screen).
2 Touch the [PAPER TRAY SETTINGS] key.
3 Select the tray used for insertion type A.
(1)The tray name (tray position) selected forinsertion type A and the paper size and type areshown in (X). If the tray in which you loadedpaper for insertion type A is shown, touch the[OK] key. You will return to the screen of step 2.
(2)If the correct tray for insertion type A does notappear in (X), touch the (Y) key. The trayselection screen will appear. Select the tray inwhich you loaded paper for insertion type A.You will return to the screen of step 2.
4 Touch the [INSERTION TYPE A SETTING]key in the screen of step 2
5 Set the insertion conditions for insertiontype A .
(1)Select whether or not insertion type A paper isto be copied on with the (X) keys ([YES] or[NO]).
(2)Select whether one-sided copying or two-sidedcopying is to be performed on insertion type Awith the (Y) keys. This selection is only possiblewhen the [YES] key of (X) has been selected.(The one-sided/two-sided selection made hereonly applies to insertion type A paper. Wheninsertion type B is selected, the selection onlyapplies to insertion type B paper.) The [2-SIDED]key appears when the duplex module is installed.
(3) The (Z) key shows the tray selected for insertiontype A in step 3 and the paper size and type.
6 Touch the [OK] key in the screen of step 5.You will return to the screen of step 2.When you return to the screen of step 2, the[INSERTION TYPE A SETTING] key will behighlighted.
7 If you wish to insert a different paper withthe [INSERTION TYPE B SETTING] key,repeat steps 2 through 6. Use the[INSERTION TYPE B SETTING] key insteadof the [INSERTION TYPE A SETTING] key,and the [INSERTION TYPE B] key insteadof the [INSERTION TYPE A] key.
To display the special modes screen...See "General procedure for using specialfunctions" on page 5-2.
SPECIAL MODES
COVERS/INSERTSTRANSPARENCY
INSERTS
CARD SHOTBOOK COPY
FRONT COVER
BACK COVER
INSERTIONTYPE A SETTING
PAPER TRAYSETTINGS
PAGE LAYOUT
CANCEL OK
INSERTIONSETTINGS
COVERS/INSERTS
INSERTIONTYPE B SETTING
PAPER TRAY SETTINGS
FRONT COVER
TRAY2 TRAY2 TRAY2 TRAY2
BACK COVERINSERTIONTYPE A
INSERTIONTYPE B
OK
8 x11PLAIN
1/ 2 8 x11PLAIN
8 x11PLAIN
1/ 21/ 2 8 x11
PLAIN
1/ 2
(X) (Y)
INSERTION TYPE A SETTING
PRINT ON INSERT SHEETS
YES NO 1-SIDED 2-SIDED
OKCANCEL
PAPER TRAY
8 x11PLAIN
1/ 2
TRAY2
(X) (Y) (Z)
TS
INSERTIONTYPE A SETTING
PAPER TRAYSETTINGS
PAGE LAYOUT
INSERTIONSETTINGSINSERTION
TYPE B SETTING
OK
OKCANCEL

SPECIAL MODES
5-14
8 Touch the [INSERTION SETTINGS] key tospecify the pages where you wish to insertthe insert papers of [INSERTION TYPE ASETTING] and [INSERTION TYPE BSETTING].
9 Touch the [INSERTION TYPE A] key or the[INSERTION TYPE B] key, enter the pagenumber where you wish to insert the insertpaper with the numeric keys, and thentouch the [ENTER] key.
(1)(X) shows the total number of inserts. Up to 100inserts can be added. When inserting multipleinserts, touch the [ENTER] key after each entryof an insertion page number (insertion position)with the numeric keys.
(2)(Y) shows the tray selected in step 3 for[INSERTION TYPE A SETTING] and the papersize and type.
(3)(Z) shows the tray selected in step 3 for[INSERTION TYPE B SETTING] and the papersize and type.
(4)When the [INSERTION TYPE A] key ishighlighted, the insert settings apply to[INSERTION TYPE A SETTING]. When the[INSERTION TYPE B] key is highlighted, theinsert settings apply to [INSERTION TYPE BSETTING].
10Touch the [OK] key in the screen of step 9.You will return to the screen of step 2.
11If you wish to insert a different paper withthe [INSERTION TYPE B SETTING] key,repeat steps 2 through 6. Use the[INSERTION TYPE B SETTING] key insteadof the [INSERTION TYPE A SETTING] key,and the [INSERTION TYPE B] key insteadof the [INSERTION TYPE A] key.
12Touch the [PAGE LAYOUT] key in thescreen of step 11 to display a list of theselected settings (page 5-15).To exit the cover/insert settings, touch theupper [OK] key in the screen of step 11.
13Press the [START] key.
INSERTIONSETTINGS
RTIONSETTING
TIONSETTING
CANCE
INSERTION SETTINGS
INPUT THE PAGE NUMBER ANDPRESS [ENTER]. USE [C] KEY TO AMEND.
INSERTIONTOTAL:0
ENTER8 x11PLAIN
1/ 2
INSERTION PAGE
TRAY2 TRAY2
8 x11PLAIN
1/ 28 x11PLAIN
1/ 2
INSERTIONTYPE A
3
INSERTIONTYPE B
OK
(X) (Y) (Z)
To cancel covers/inserts settings...Touch the [CANCEL] key in the screen of step 2.
TS
INSERTIONTYPE A SETTING
PAPER TRAYSETTINGS
PAGE LAYOUT
INSERTIONSETTINGSINSERTION
TYPE B SETTING
OK
OKCANCEL

SPECIAL MODES
5-15
5
■■■■ Checking, editing, and deleting cover/insert pagesThe [PAGE LAYOUT] key appears after covers/inserts settings are configured (the settings of step 1 throughstep 7 on pages 5-12 and 5-13).The [PAGE LAYOUT] key is used for the following:● To display the status of covers/inserts pages● To edit, delete, or add inserted pages
1 Touch the [PAGE LAYOUT] key.
2 The set covers/inserts pages are shown.
(1)If there are multiple screens, touch the or key to change screens.
(2)Displayed icons: : Front side copy only : Back side copy only : Two-sided copy : No copying
For inserts, the insertion page also appears." " represents a page number.
/- : Front side copy only at page
/ : Two-sided copy at page /
< : Insert non-copied insert at page
(3)To edit or delete the insertion page of an insert,touch the key of the insert that you wish to editor delete in the page layout screen. When thekey is touched, the [CANCEL], [DELETE], or[AMEND] keys appear.
●To cancel, touch the [CANCEL] key.●To delete an inserted page, touch the
[DELETE] key.●To edit an inserted page, touch the [AMEND]
key. The screen of step 9 on page 5-14appears. Edit the insertion page in the screenthat appears.
(4)To edit or delete a cover page, touch the [BACKCOVER] key in the page layout screen. Thescreen of step 5 on page 5-12 will appear. Editor delete the cover page in this screen.
3 When you have finished checking thepages, touch the [OK] key.
To display the [PAGE LAYOUT] key...Configure the settings in step 1 through step 7on pages 5-12 and 5-13.
TS
INSERTIONTYPE A SETTING
PAPER TRAYSETTINGS
PAGE LAYOUT
INSERTIONSETTINGSINSERTION
TYPE B SETTING
OK
OKCANCEL
PAGE LAYOUT
FRONT COVERINSERTIONTYPE A<4
INSERTIONTYPE B7/8
INSERTIONTYPE A12/-
OK
1/2
AMEND THE INSERTION?
CANCEL DELETE AMEND
INSERTIONTYPE A
OK
1/2
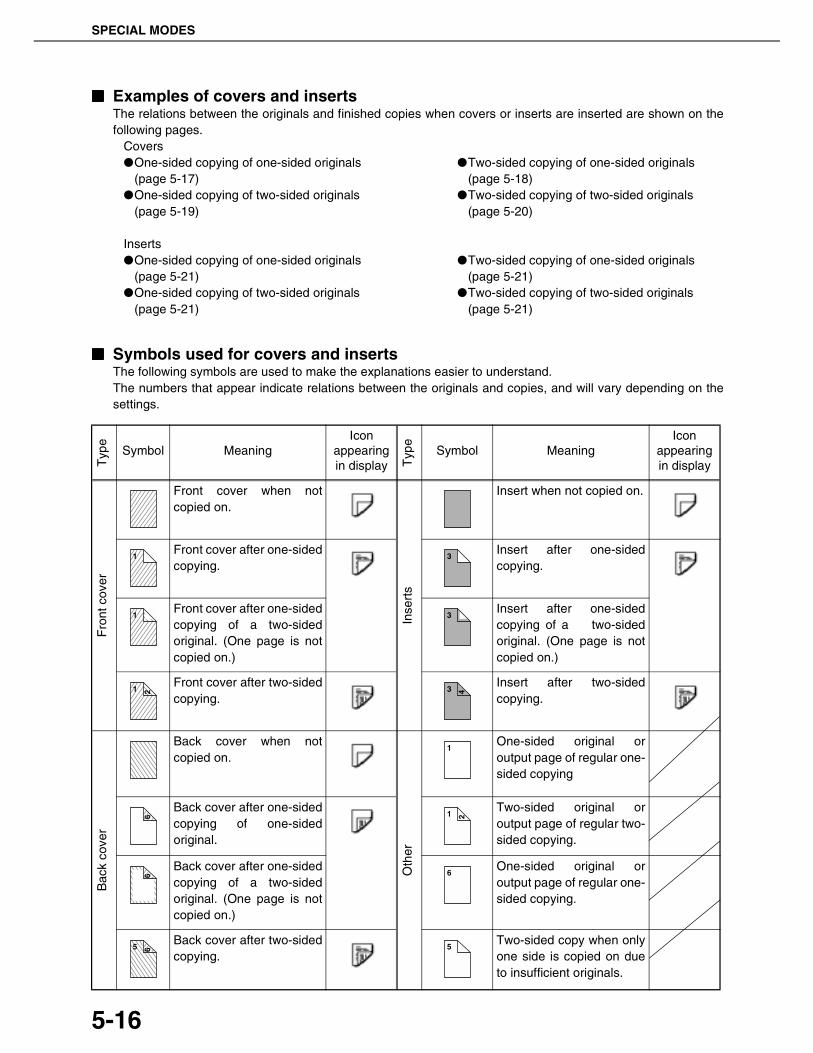
SPECIAL MODES
5-16
■■■■ Examples of covers and insertsThe relations between the originals and finished copies when covers or inserts are inserted are shown on thefollowing pages.
Covers●One-sided copying of one-sided originals
(page 5-17)●One-sided copying of two-sided originals
(page 5-19)
●Two-sided copying of one-sided originals(page 5-18)
●Two-sided copying of two-sided originals(page 5-20)
Inserts●One-sided copying of one-sided originals
(page 5-21)●One-sided copying of two-sided originals
(page 5-21)
●Two-sided copying of one-sided originals(page 5-21)
●Two-sided copying of two-sided originals(page 5-21)
■■■■ Symbols used for covers and insertsThe following symbols are used to make the explanations easier to understand.The numbers that appear indicate relations between the originals and copies, and will vary depending on thesettings.
Typ
e
Symbol MeaningIcon
appearing in display T
ype
Symbol MeaningIcon
appearing in display
Fro
nt c
over
Front cover when notcopied on.
Inse
rts
Insert when not copied on.
Front cover after one-sidedcopying.
Insert after one-sidedcopying.
Front cover after one-sidedcopying of a two-sidedoriginal. (One page is notcopied on.)
Insert after one-sidedcopying of a two-sidedoriginal. (One page is notcopied on.)
Front cover after two-sidedcopying.
Insert after two-sidedcopying.
Bac
k co
ver
Back cover when notcopied on.
Oth
er
One-sided original oroutput page of regular one-sided copying
Back cover after one-sidedcopying of one-sidedoriginal.
Two-sided original oroutput page of regular two-sided copying.
Back cover after one-sidedcopying of a two-sidedoriginal. (One page is notcopied on.)
One-sided original oroutput page of regular one-sided copying.
Back cover after two-sidedcopying.
Two-sided copy when onlyone side is copied on dueto insufficient originals.
1 3
1 3
1 2 3 4
1
6 1 2
6 6
65 5

SPECIAL MODES
5-17
5
■■■■ Covers (One-sided copying of one-sided originals)One-sided copies are made of the following one-sided originals.
1st page 2nd page 3rd page 4th page 5th page 6th page
1 2 3 4 5 6
Copying on coverResulting copies
Front cover Back cover
No copying No copying
One-sided copying
No copying
Two-sided copying
No copying
No copyingOne-sided
copying
No copyingTwo-sided
copying
One-sided copying
One-sided copying
One-sided copying
Two-sided copying
Two-sided copying
One-sided copying
Two-sided copying
Two-sided copying
1 2 3 4 5 6
1 2 3 4 5 6
1 2 3 4 5 6
1 2 3 4 5 6
1 2 3 4 65
1 2 3 4 5 6
1 2 3 4 65
1 2 3 4 5 6
1 2 3 4 65
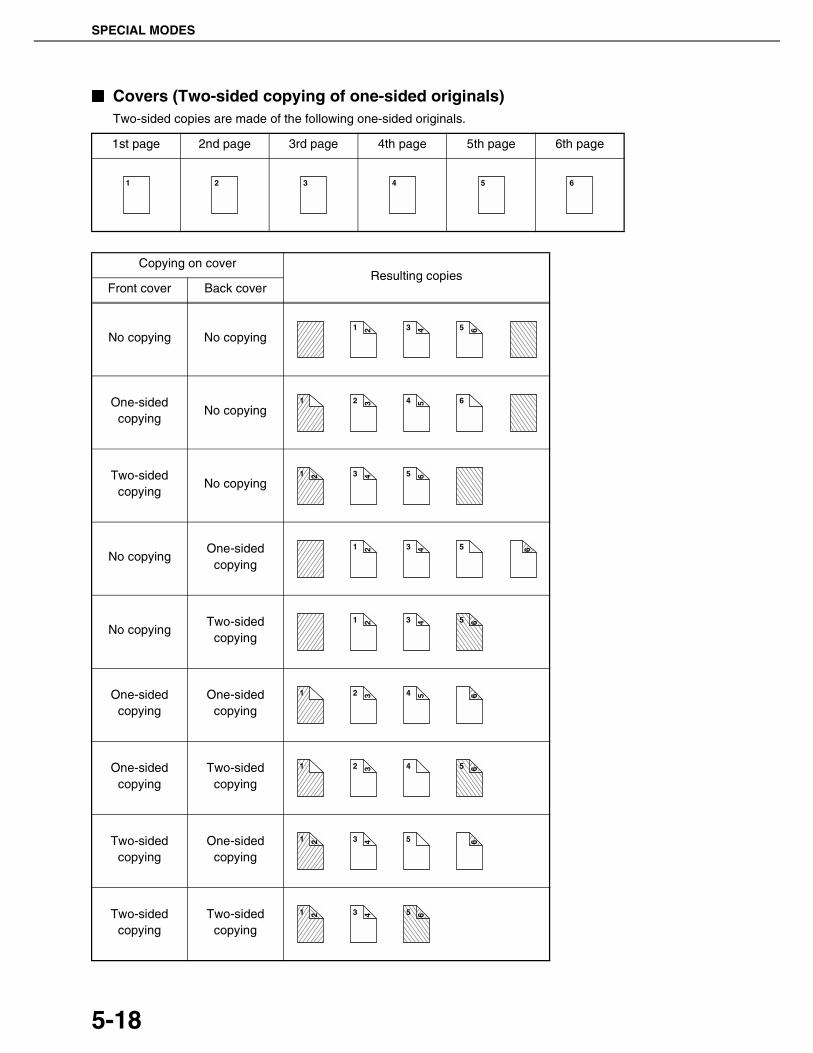
SPECIAL MODES
5-18
■■■■ Covers (Two-sided copying of one-sided originals)Two-sided copies are made of the following one-sided originals.
1st page 2nd page 3rd page 4th page 5th page 6th page
1 2 3 4 5 6
Copying on coverResulting copies
Front cover Back cover
No copying No copying
One-sided copying
No copying
Two-sided copying
No copying
No copyingOne-sided
copying
No copyingTwo-sided
copying
One-sided copying
One-sided copying
One-sided copying
Two-sided copying
Two-sided copying
One-sided copying
Two-sided copying
Two-sided copying
1 2 3 4 5 6
1 2 3 4 5 6
1 2 3 4 5 6
1 2 3 4 5 6
1 2 3 4 65
1 2 3 4 5 6
1 2 3 4 65
1 2 3 4 5 6
1 2 3 4 65

SPECIAL MODES
5-19
5
■■■■ Covers (One-sided copying of Two-sided originals)One-sided copies are made of the following two-sided originals.
1st page 2nd page 3rd page
1 2 3 4 5 6
Copying on coverResulting copies
Front cover Back cover
No copying No copying
One-sided copying
No copying
Two-sided copying
No copying
No copyingOne-sided
copying
No copyingTwo-sided
copying
One-sided copying
One-sided copying
One-sided copying
Two-sided copying
Two-sided copying
One-sided copying
Two-sided copying
Two-sided copying
1 2 3 4 5 6
1 2 3 4 5 6
1 2 3 4 5 6
1 2 3 4 5 6
1 2 3 4 65
1 2 3 4 5 6
1 2 3 4 65
1 2 3 4 5 6
1 2 3 4 65
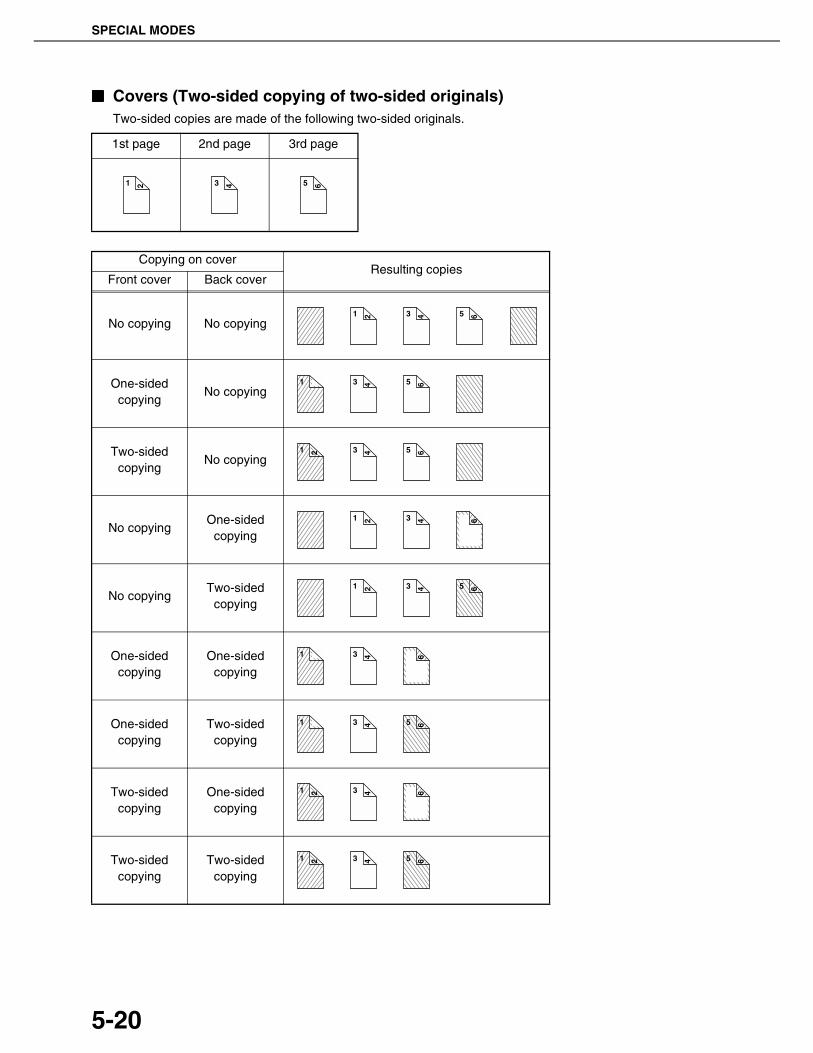
SPECIAL MODES
5-20
■■■■ Covers (Two-sided copying of two-sided originals)Two-sided copies are made of the following two-sided originals.
1st page 2nd page 3rd page
1 2 3 4 5 6
Copying on coverResulting copies
Front cover Back cover
No copying No copying
One-sided copying
No copying
Two-sided copying
No copying
No copyingOne-sided
copying
No copyingTwo-sided
copying
One-sided copying
One-sided copying
One-sided copying
Two-sided copying
Two-sided copying
One-sided copying
Two-sided copying
Two-sided copying
1 2 3 4 5 6
1 3 4 5 6
1 2 3 4 5 6
1 2 3 4 6
1 2 3 4 65
1 3 4 6
1 3 4 65
1 2 3 4 6
1 2 3 4 65

SPECIAL MODES
5-21
5
■■■■ Inserts (One-sided copying of one-sided originals)One-sided and two-sided copying is performed using the following one-sided originals. The insertion page ofthe insert is set to page 3.
■■■■ Inserts (One-sided copying of two-sided originals)One-sided and two-sided copying is performed using the following two-sided originals. The insertion page ofthe insert is set to page 3
1st page 2nd page 3rd page 4th page 5th page 6th page
1 2 3 4 5 6
Copying on insert
Resulting copies (one-sided copying)Resulting copies
(two-sided copying)
No copying
One-sided copying
Two-sided copying
1 2 3 4 5 6 1 2 3 4 5 6
1 2 3 4 5 6 1 2 3 4 5 6
1 2 3 4 5 6 1 2 3 4 5 6
1st page 2nd page 3rd page
1 2 3 4 5 6
Copying on insert
Resulting copies (one-sided copying)Resulting copies
(two-sided copying)
No copying
One-sided copying
Two-sided copying
1 2 3 4 5 6 1 2 3 4 5 6
1 2 3 4 5 6 1 2 3 5 6
1 2 3 4 5 6 1 2 3 4 5 6

SPECIAL MODES
5-22
Transparency film with insert sheetsWhen copying onto transparency film, blank insert sheets can be placed between transparent sheets.
● This function only operates in "one-sided to one-sided" and "two-sided to one-sided" modes.
● Multiple copies cannot be selected in this mode.● The inserts are inserted under each transparency
as shown at left.● Select insert paper that is the same size as the
transparencies.● Transparencies can be fed from the tray 2 or
bypass tray.● If the transparencies are loaded in tray 2, be sure
to set the paper size and paper type as explainedon pages 2-5 and 2-6.
1 Load transparency film into the tray 2.
Remove any paperalready in the tray 2before loading thetransparency film. (Toload paper in the tray 2,see pages 2-6 and 2-7.)
2 Press the [CUSTOM SETTINGS] key.
The custom settingsmenu screen willappear.
3 Touch the [PAPER TRAY SETTINGS] key.
The paper tray selectionscreen will appear.
4 Touch the [TRAY SETTINGS] key.
5 Touch the key to display the traysettings screen of tray 2.
6 Touch the [TYPE/SIZE] key.
7 Touch the [TRANSPARENCY] key.
8 Touch the [OK] key.
If the paper size was changed from an AB size to aninch size, or from an inch size to an AB size, be sureto set the paper type and size as explained on steps5 to 6 on page 2-5 and steps 7 to 10 on page 2-6.
Insert sheets
Example: Inserting insert sheets between transparencies
Originals (1-sided)
Originals (2-sided)
Two-sided originals are onlysupported when automaticdocument feeder is used.
Inserts can also becopied on.
PAPER TRAY SETTINGS
TAORWARD
RINT
PRINTERCONDITION
CUSTOM SETTINGS
PAPER TRAY SETTINGS
TRAY SETTINGS
1/4PLAIN / 8 x11
OK
PAPER TRAY SETTINGS
TYPE / SIZE
CUSTOM SETTINGS
TRAY 1
FAX I-FAXCOPYDOC.
FILING
FIXED PAPER SIDE
DISABLE DUPLEX
DISABLE STAPLE
DISABLE PUNCH
1/ 2
TYPE / SIZE
TRAY 2
PER TRAY SETTINGS
PRINT COPY I-FAXDOC.
FILINGFAX
PLAIN / 8 x111/ 2
HEAVY PAPER
TYPE.
LETTER HEAD
LABELSPRE-PUNCHED
COLOR TRANSPARENCY
TYPE OK
SIZE
AUTO-INCH
AUTO-AB
SIZE INPUT
8 X11
A4,B5
TYPE/SIZE SETTING
2/2
1/ 2
NON STANDARD SIZE

SPECIAL MODES
5-23
5
9 Select the tray 2.
10Touch the [TRANSPARENCY INSERTS]key in the special modes screen (2ndscreen).
The Transparency insertssetting screen will appear.The transparency insertsicon ( , etc.) will alsoappear in the upper leftcorner of the screen toindicate that the functionis turned on.
11Set the insertion conditions for the insertpaper.
(1) Select whether or not the insert paper will becopied on with the (X) keys ([YES] or [NO]).
(2) The (Y) key shows the tray selected for theinsert paper and the paper size and type. Toselect a different tray, touch this key to displaythe tray selection screen and select the tray thathas the insert paper.
12Touch the outer [OK] key in the screen ofstep 7.You will return to the main screen of copy mode.
Multi shotMultiple original pages can be copied onto one sheet of copy paper in a uniform layout. Select 2in1 to copy twooriginal pages onto one sheet, or 4in1 to copy four original pages onto one sheet. This function is convenient whenyou wish to present multiple pages in a compact format, or show a view of all pages in a document.
[Example] Copying 4 original pages onto one sheet of paper(Page number : 4in1, layout : left top : right top (see the next page))
● When using the multi shot function, place theoriginals, select the desired paper size, andselect the copying mode before selecting themulti shot function on the special modes screen.
● When using the multi shot function, theappropriate copy ratio will be automatically setbased on the original size, paper size, and thenumber of originals to be copied onto one sheet.The minimum reduction ratio is 25%. Theoriginal size, copy paper size, and selectednumber of original pages may require that theratio be less than 25%. As copying will takeplace at 25% in this case, part of the originalimages may be cut off.
To display the special modes screen...See "General procedure for using specialfunctions" on page 5-2.
OR COPY.
1. 8 x111/ 2
2. 8 x11
3. 11x17
4. 8 x111/ 2
1/ 2
PLAIN
TRANSPARENCY
PLAIN
PLAIN
AUTO
AUT
ORIGIN
EXPOS
PAPE
100COPY R
SPECIAL MODES
COVERS/INSERTSTRANSPARENCY
INSERTS
CARD SHOTBOOK COPY
About the steps that followIf an automatic document feeder is being used,see pages 4-7 through 4-10. If the document glassis being used, see pages 4-11 through 4-13.
To cancel the Transparency film with insert sheetsfunction, touch the [CANCEL] key on theTransparency film with insert sheets setting screen.
PRINT ON INSERT SHEETS
YES NO
OK
OKCANCEL
INSERTION SHEET
TRAY3
A4PLAIN
(X) (Y)
One-sided copies fromone-sided originals
One-sided copies fromtwo-sided originals
Copies

SPECIAL MODES
5-24
1 Touch the [MULTI SHOT] key in the specialmodes screen (2nd screen).
The MULTI SHOT settingscreen will appear.A multi shot icon ( ,etc.) will also appear inthe upper left of thescreen to indicate thatthe function is turned on.
2 Select the number of images to be copiedonto one sheet of copy paper.
If needed, theorientation of the copypaper and theorientation of the imageswill be rotated.
3 Select the layout.
Select the order in whichthe originals will bearranged on the copy.
The arrows in the above diagram indicate thedirections in which the images are arranged.
4 Touch the [OK] key (inside [OK] key) onthe multi shot setting screen.You will return to the special modes screen.
5 Touch the [OK] key in the special modesscreen.You will return to the main screen of copy mode.
To display the special modes screen...See "General procedure for using specialfunctions" on page 5-2.
TRANSPARENCYINSERTS MULTI SHOT
MIRRORIMAGE
CARD SHOT
SPECIAL MODES
MULTI SHOT
2in1 4in1
LAYOUT
CANCEL OK
OK
2in1
4in1
Shot number Layout
About the steps that followIf an automatic document feeder is being used, seepages 4-7 through 4-10. If the document glass isbeing used, see pages 4-11 through 4-13.
To cancel the multi shot function, touch the [CANCEL]key in the multi shot setting screen (the screen of step2).

SPECIAL MODES
5-25
5
Book copyThis function is convenient when you wish to compile copies of books or other bound originals into an attractivepamphlet format. The two pages of the open book are scanned as a set, and two pages each are copied onto thefront and back sides of the copy paper (four pages are copied onto one sheet of copy paper). This allows the copiesto be folded down the center and made into a pamphlet.
[Example] Book copying an 8-page pamphlet
● When using this function, a duplex module mustbe installed.
● Scan the originals from the first page to the lastpage. The order of copying will be automaticallyadjusted by the machine.
● Either left binding (right to left turning) or rightbinding (left to right turning) can be selected.
● Four originals will be copied onto one sheet.Blank pages may be automatically produced atthe end depending on the number of the originals.
● If a saddle stitch finisher is installed, book copycan be used in combination with the pamphletfunction to staple and fold the copies at thecenterline.
1 Touch the [BOOK COPY] key in the specialmodes screen (2nd screen).
The BOOK COPYsetting screen willappear. The book copyicon ( , etc.) will alsoappear in the upper leftcorner of the screen toindicate that the functionis turned on.
2 Select whether the book opens to the left orto the right, and touch the [OK] key in thebook copy setting screen.
You will return to thespecial modes screen.
3 Select any desired cover settings.
If you wish to use adifferent type of paper forthe cover, perform steps4 to 12 on pages 5-6 to 5-7.If you do not wish to usea different type of paper,continue from step 4.
4 Touch the [OK] key in the special modesscreen.You will return to the main screen of copy mode.
5 Place the originals on the document glass.(page 4-3)
Scan the original pages inthe following order:Opened front and backcoverOpened inside of frontcover and 1st pageOpened 2nd and 3rd page
Opened last page andinside of back cover
6 Make sure that the desired paper size hasbeen selected.
If the desired paper sizeis not selected, selectthe desired size.
7 Select the number of copies and any otherdesired copy settings, and then press the[START] key.
8 Place the next two pages and press the[START] key. Repeat until all pages havebeen scanned, and then touch the [READ-END] key.
Finished copies arefolded in two.
Originals
Left binding
Right binding
First page
First page
First page
First page
To display the special modes screen...See "General procedure for using specialfunctions" on page 5-2.
SPECIAL MODES
COVERS/INSERTS TRANSPARENCYINSERTS
CARD SHOTBOOK COPY
RIGHTBINDING
COSET
LEFTBINDING
CANCEL OK
RIGHTBINDING
COVERSETTING
NG
When book copy is selected, two-sidedcopying is automatically selected.
To cancel the book copy function, touch the [CANCEL] keyin the book copy setting screen (the screen of step 2).
UTO
AUTO
100%
11x17PAPER SELECT
OPY RATIO
EXPOSURE
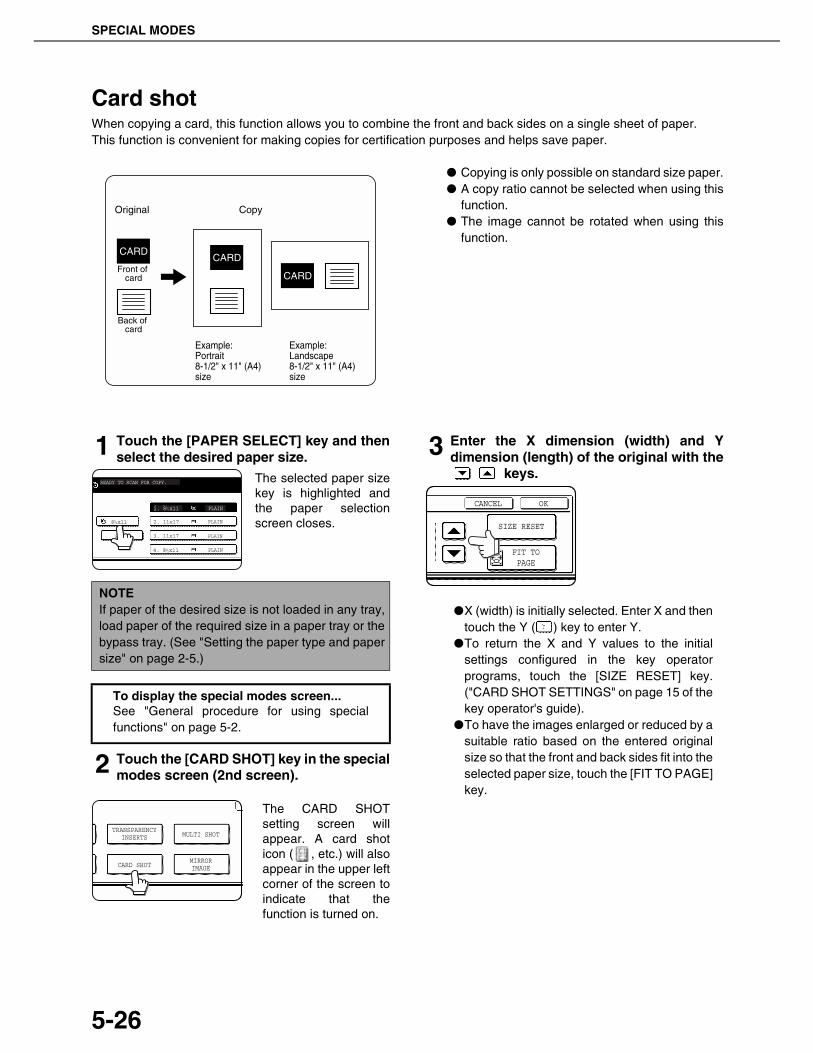
SPECIAL MODES
5-26
Card shotWhen copying a card, this function allows you to combine the front and back sides on a single sheet of paper.This function is convenient for making copies for certification purposes and helps save paper.
● Copying is only possible on standard size paper.● A copy ratio cannot be selected when using this
function.● The image cannot be rotated when using this
function.
1 Touch the [PAPER SELECT] key and thenselect the desired paper size.
The selected paper sizekey is highlighted andthe paper selectionscreen closes.
2 Touch the [CARD SHOT] key in the specialmodes screen (2nd screen).
The CARD SHOTsetting screen willappear. A card shoticon ( , etc.) will alsoappear in the upper leftcorner of the screen toindicate that thefunction is turned on.
3 Enter the X dimension (width) and Ydimension (length) of the original with the
keys.
●X (width) is initially selected. Enter X and thentouch the Y ( ) key to enter Y.
●To return the X and Y values to the initialsettings configured in the key operatorprograms, touch the [SIZE RESET] key.("CARD SHOT SETTINGS" on page 15 of thekey operator's guide).
●To have the images enlarged or reduced by asuitable ratio based on the entered originalsize so that the front and back sides fit into theselected paper size, touch the [FIT TO PAGE]key.
Original
Example:Portrait8-1/2" x 11" (A4)size
Example:Landscape8-1/2" x 11" (A4)size
Copy
Back of card
Front of card
CARDCARD
CARD
NOTEIf paper of the desired size is not loaded in any tray,load paper of the required size in a paper tray or thebypass tray. (See "Setting the paper type and papersize" on page 2-5.)
To display the special modes screen...See "General procedure for using specialfunctions" on page 5-2.
READY TO SCAN FOR COPY.
8 x111/ 2
PLAIN
1. 8 x111/ 2
2. 11x17
3. 11x17
4. 8 x111/ 2
PLAIN
PLAIN
PLAIN
PLAIN
TRANSPARENCYINSERTS MULTI SHOT
MIRRORIMAGECARD SHOT
SIZE RESET
CANCEL OK
FIT TOPAGE

SPECIAL MODES
5-27
5
4 Touch the outer [OK] key.
You will return to themain screen of copymode.
5 Place the original on the document glass.
Place the front side ofthe original face downand close thedocument cover.
6 Follow steps 4 through 6 of "Copying fromthe document glass" (page 4-11).
7 Press the [START] key.
The front side of thecard is scanned.
8 Place the back side of the original facedown on the document glass (see step 5).
9 Press the [START] key.
The back side of thecard is scanned.
10Touch the [READ-END] key.
SIZE RESET
CANCEL OK
OK
FIT TOPAGE
NOTE
The original must be placed on the document glass.The document feeder (automatic document feeder)cannot be used.
To cancel the card shot function, touch the[CANCEL] key in the card shot setting screen (thescreen of step 4).

SPECIAL MODES
5-28
Mirror imageThis function is used to print a mirror image of the original. The images will be inverted in the right to left direction onthe copies.
1 Touch the [MIRROR IMAGE] key in thespecial modes screen (2nd screen).
The [MIRROR IMAGE]key will be highlighted toindicate that the functionis turned on, and themirror image icon ( )will appear in the upperleft of the screen.
2 Touch the [OK] key on the special modesscreen.
You will return to the main screen of copy mode.
B/W reverseBlack and white are reversed in the copy to create a negative image.
1 Touch the [B/W REVERSE] key in thespecial modes screen (3rd screen).
The [B/W REVERSE]key will be highlighted toindicate that the functionis turned on, and themirror image icon ( )will appear in the upperleft of the screen.
2 Touch the [OK] key in the special modesscreen.
You will return to the main screen of copy mode.
Original Copy
To display the special modes screen...See "General procedure for using specialfunctions" on page 5-2.
TRANSPARENCYINSERTS MULTI SHOT
MIRRORIMAGECARD SHOT
About the steps that followIf an automatic document feeder is being used,see pages 4-7 through 4-10. If the documentglass is being used, see pages 4-11 through 4-13.
To cancel the mirror image function, touch the[MIRROR IMAGE] key in the special modes screen(the screen of step 1).
NOTES
● When this function is selected, the exposure mode setting (page 4-14) automatically changes to "Text".
● Originals with large black areas (which use a large amount of toner) can be printed with black/white reverseto reduce toner consumption.
Original B/W reverse copy
To display the special modes screen...See "General procedure for using specialfunctions" on page 5-2.
ECIAL MODES
PRINT MENUB/WREVERSE
About the steps that followIf an automatic document feeder is being used,see pages 4-7 through 4-10. If the documentglass is being used, see pages 4-11 through 4-13.
To cancel the B/W reverse function, touch the [B/WREVERSE] key in the special modes screen (thescreen of step 1).

SPECIAL MODES
5-29
5
Print menuThe date, a stamp, page numbers, and entered text can be printed on copies. Four selections are available for thePRINT MENU:
• Date print (page 5-32)This prints the date on the paper.[Example] Printing 2004/OCT/1 in the upper right-
hand corner of the paper
The format of the date and the character thatseparates the year, month, and day can be changed.
• Page numbering (page 5-34)Page numbers can be printed on copies.[Example] Printing page numbers in the bottom right-
hand corner of the paper
The format of the page number can be changed.
• Stamp (page 5-33)Print a message such as "CONFIDENTIAL" inreverse text on the paper.[Example] Printing "CONFIDENTIAL" in the upper
right-hand corner of the paper
One of 12 stamps can be selected.
• Text (page 5-38)Entered text can be printed.[Example] Printing "October, 2004 Meeting" in the
upper left-hand corner of the paper
Up to 50 characters can be printed. You can store upto 30 sequences of frequently used text.
Six printing positions are available: left, center, or right of the top or bottom of the page.Each printing position is divided into an area for the date, page number, and text (A below), and an area for the stamp(B below).
2004/OCT/1
CONFIDENTIAL
October, 2004 Meeting
Top left Top rightTop center
Bottom left Bottom rightBottom center
Print menuPrinting
areaMaximum number of
settings
DATE A One position only
STAMP B 6 positions
PAGENUMBERING
A One position only
TEXT A 6 positions
NOTES● A part that overlaps the printed text will not be copied.● If the set text content overlaps the print content of another position, the central print content will be moved to the
bottom, the content on the left will be next, and the content on the right will be placed on top in that order suchthat only the content visible at the top is printed. Content that is hidden due to overlapping will not be printed.
● The printed text will be printed at the set size regardless of the copy ratio or paper size.● The printed text will also be printed at the set density regardless of the copy exposure.● Some copy paper sizes may cause the printed contents to be cut off or the print position to shift.● If a copy job with a print menu setting is saved using the document filing function, the print menu setting will not
be saved. If you wish to print a file saved in copy mode and use a print menu setting, use the special modes inthe Job settings / print screen (or the document filing print screen in the Web page if the machine is connectedto a network) to select the print menu setting. (A print menu setting cannot be selected when printing a file savedin a mode other than copy mode.)

SPECIAL MODES
5-30
■■■■ Common operation procedure for using the print menu
1 Touch the [PRINT MENU] key in thespecial modes screen (3rd screen).
The print menu settingscreen will appear. Theprint menu icon ( ) willalso appear in the upperleft corner of the screento indicate that thefunction is turned on.
2 Select the print position.
Six positions areavailable: left, center,or right of the top orbottom of the page.The touched key ishighlighted.
The keys indicating the print position appear asfollows depending on the state of the setting:
The image displayed within each key variesdepending on the key position.
3 Select the print menu.
The settings screen ofthe print menuappears.For information oneach of the printmenus, see thesettings of each.
● DATE (page 5-32) ● STAMP (page 5-33)● PAGE NUMBERING (page 5-34)● TEXT (page 5-38)
4 To select print menu settings at anotherprint position, repeat steps 2 and 3.
5 Touch the key.
6 To specify the orientation of the original,touch the [ORIGINAL ORIENTATION] key.
If you placed a two-sided original, touch the[ ] key to specify the binding style (book ortablet). The icon of the selected binding style ishighlighted.
7 If you are adding covers or inserts, selectwhether or not you wish to print on thecovers or inserts.
If you do not wish to print on covers or inserts,touch the checkbox to remove the checkmark.
To display the special modes screen...See "General procedure for using special functions"on page 5-2.
Not selected, print menu setting has notbeen selected.
Selected during selection of the printmenu setting.
Not selected, print menu setting hasalready been selected.
PRINT MENUB/WREVERSE
SPECIAL MODES
PRINT MENU LAYOU
N
OK
OKCANCELLAYOUT
DATE STAMP
TEXTPAGENUMBERING
1/2
NOTES● If the [DATE], [PAGE NUMBERING], or [TEXT] key
is touched when other than a "STAMP" print menusetting has been selected for the print positionselected in step 2, a message will appear. Tooverwrite the previously set print content of theprint menu that you touched, touch the [YES] key.To keep the previous settings, touch the [NO] key.
● The "DATE" and "PAGE NUMBERING" cannot be setin multiple positions. If either of these keys is touchedwhen a date or page numbering setting has alreadybeen configured, a message will appear asking you ifyou wish to move the print settings to the position thatyou selected in step 2. To move the print settings,touch the [YES] key. Otherwise touch the [NO] key.
NOTES● If you are not copying on covers or inserts, printing will
not take place on these even if a checkmark appears.● A page number is never printed on covers or
inserts, regardless of the above setting.● If covers/inserts have been disabled in the key
operator programs, the checkbox will be grayed outto prevent selection.
1/2
LAYOUT CANCEL OK
STAMP
TEXT
DATE
PAGENUMBERING
OKCANCEL
OK
LAYOUT
SPECIAL MODES
PRINT MENU
ORIGINAL ORIENTATION 2-SIDED ORIGINAL TYPE
PRINT ON COVERS/INSERTS WHEN COPYING ON COVERS/INSERTS
2/2
OKCANCEL
OK
LAYOUT
SPECIAL MODES
PRINT MENU
ORIGINAL ORIENTATION 2-SIDED ORIGINAL TYPE
PRINT ON COVERS/INSERTS WHEN COPYING ON COVERS/INSERTS
2/2
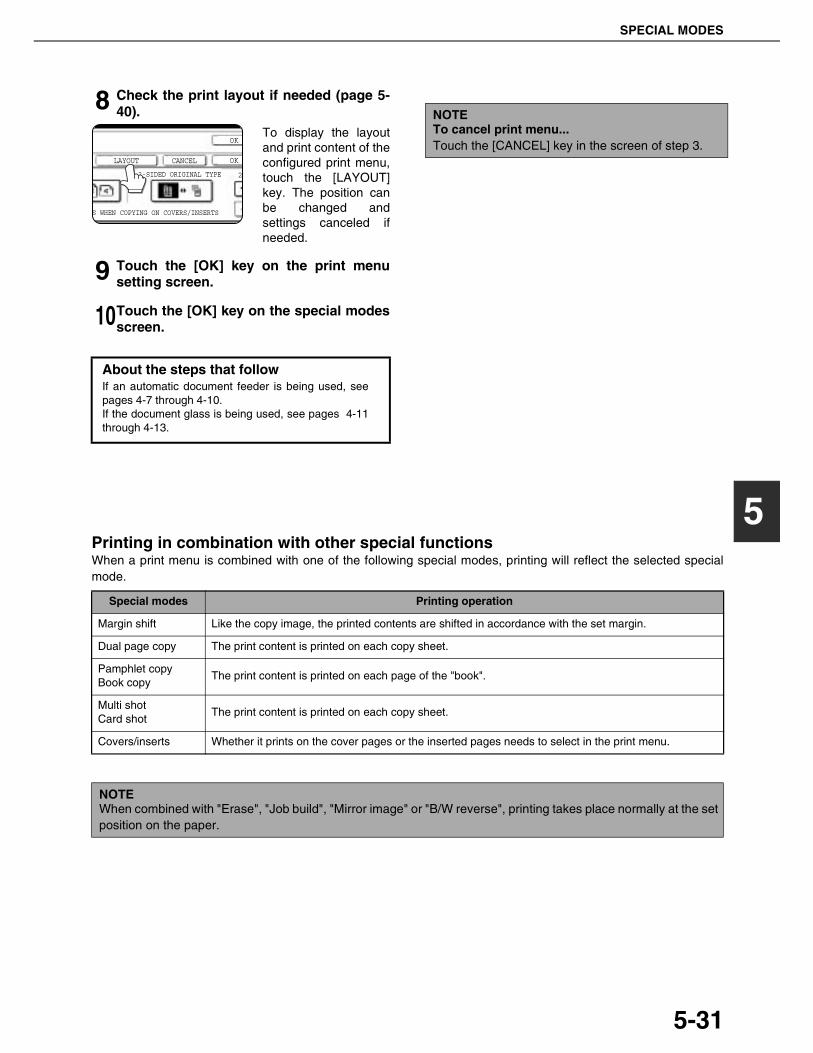
SPECIAL MODES
5-31
5
8 Check the print layout if needed (page 5-40).
To display the layoutand print content of theconfigured print menu,touch the [LAYOUT]key. The position canbe changed andsettings canceled ifneeded.
9 Touch the [OK] key on the print menusetting screen.
10Touch the [OK] key on the special modesscreen.
Printing in combination with other special functionsWhen a print menu is combined with one of the following special modes, printing will reflect the selected specialmode.
About the steps that followIf an automatic document feeder is being used, seepages 4-7 through 4-10.If the document glass is being used, see pages 4-11through 4-13.
2
OK
OKLAYOUT CANCEL
S WHEN COPYING ON COVERS/INSERTS
2-SIDED ORIGINAL TYPE
NOTETo cancel print menu...Touch the [CANCEL] key in the screen of step 3.
Special modes Printing operation
Margin shift Like the copy image, the printed contents are shifted in accordance with the set margin.
Dual page copy The print content is printed on each copy sheet.
Pamphlet copyBook copy
The print content is printed on each page of the "book".
Multi shotCard shot
The print content is printed on each copy sheet.
Covers/inserts Whether it prints on the cover pages or the inserted pages needs to select in the print menu.
NOTEWhen combined with "Erase", "Job build", "Mirror image" or "B/W reverse", printing takes place normally at the setposition on the paper.

SPECIAL MODES
5-32
■■■■ Printing the date on copiesThe date can be printed on copies. Four selections each are available for the date format and the character thatseparates the year, month, and day.
1 Follow steps 1 and 2 of "Commonoperation procedure for using the printmenu" (page 5-30).
2 Touch the [DATE] key.
3 Select the date format.
The selected date formatis highlighted.If you selected [YYYY/MM/DD], [MM/DD/YYYY],or [DD/MM/YYYY], youcan select the characterthat separates the year,
month, and date. Select [/] (slash), [,] (comma), [-]hyphen, or [ ] (space).
4 Check the date and format.
The date to be printedis displayed in"CURRENT SETTING"in the selected format.The date that appearsis the date set in themachine. If you need to
change the date, touch the [DATE CHANGE] key.The following screen appears.
Touch the key of the number (year, month, or day)that needs to be changed, and then adjust thenumber with the or key. When finished,touch the [OK] key.
5 Select the pages to be printed on.
Select whether to printon only the first page,or all pages. Thetouched key ishighlighted.
6 Touch the [OK] key.
7 Continue from step 4 of "Commonoperation procedure for using the printmenu" (page 5-30).
NOTEThe date must be previously set in the custom settings. (See page 2-13.)
NOTEIf you select a non-existent date (for example, Feb. 30),the [OK] key will gray out to prevent entry of the date.
PAGENUMBERING
OK
OKCANCELLAYOUT
STAMPDATE
TEXT
1/2
DATE
YYYY/MM/DD
MM/DD/YYYY
DD/MM/YYYY
MM DD, YYYY
OKCANCEL
FIRST PAGE
ALL PAGES
CURRENT SETTING
2004/AUG/01
DATE CHANGE
OKDATE CHANGE
08 012004
YEAR MONTH DAY
NOTETo cancel a date print setting...Touch the [CANCEL] key in the date selectionscreen. (The screen of step 6.)
OKCANCEL
FIRST PAGE
ALL PAGES
CURRENT SETTING
2004/AUG/01
DATE CHANGE
OKCANCEL
FIRST PAGE
ALL PAGES
CURRENT SETTING
2004/AUG/01
DATE CHANGE
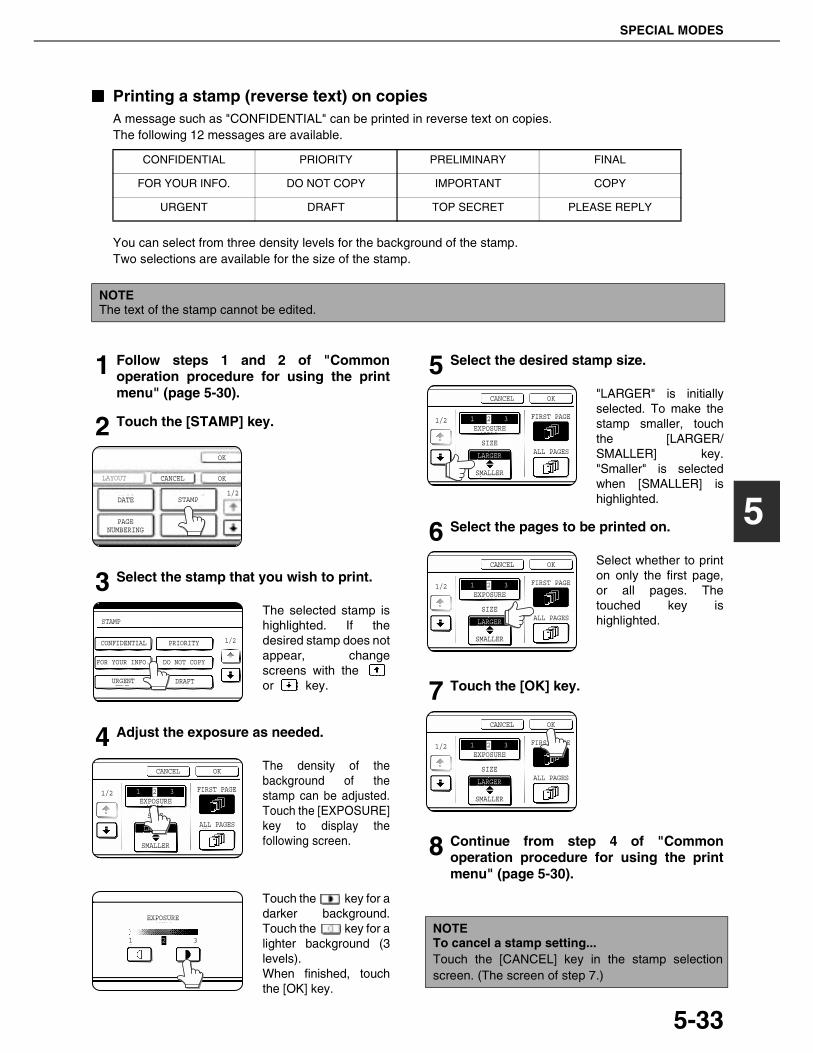
SPECIAL MODES
5-33
5
■■■■ Printing a stamp (reverse text) on copiesA message such as "CONFIDENTIAL" can be printed in reverse text on copies.The following 12 messages are available.
You can select from three density levels for the background of the stamp.Two selections are available for the size of the stamp.
1 Follow steps 1 and 2 of "Commonoperation procedure for using the printmenu" (page 5-30).
2 Touch the [STAMP] key.
3 Select the stamp that you wish to print.
The selected stamp ishighlighted. If thedesired stamp does notappear, changescreens with the or key.
4 Adjust the exposure as needed.
The density of thebackground of thestamp can be adjusted.Touch the [EXPOSURE]key to display thefollowing screen.
Touch the key for adarker background.Touch the key for alighter background (3levels).When finished, touchthe [OK] key.
5 Select the desired stamp size.
"LARGER" is initiallyselected. To make thestamp smaller, touchthe [LARGER/SMALLER] key."Smaller" is selectedwhen [SMALLER] ishighlighted.
6 Select the pages to be printed on.
Select whether to printon only the first page,or all pages. Thetouched key ishighlighted.
7 Touch the [OK] key.
8 Continue from step 4 of "Commonoperation procedure for using the printmenu" (page 5-30).
CONFIDENTIAL PRIORITY PRELIMINARY FINAL
FOR YOUR INFO. DO NOT COPY IMPORTANT COPY
URGENT DRAFT TOP SECRET PLEASE REPLY
NOTEThe text of the stamp cannot be edited.
PAGENUMBERING
OK
OKCANCELLAYOUT
STAMPDATE
TEXT
1/2
1/2PRIORITY
STAMP
CONFIDENTIAL
FOR YOUR INFO. DO NOT COPY
URGENT DRAFT
CANCEL OK
1/2EXPOSURE
SMALLER
FIRST PAGE
ALL PAGES
1 32
LARGER
SIZE
21 3
EXPOSURE
NOTETo cancel a stamp setting...Touch the [CANCEL] key in the stamp selectionscreen. (The screen of step 7.)
CANCEL OK
1/2EXPOSURE
SMALLER
FIRST PAGE
ALL PAGES
1 32
LARGER
SIZE
CANCEL OK
1/2EXPOSURE
SMALLER
FIRST PAGE
ALL PAGES
1 32
LARGER
SIZE
CANCEL OK
1/2EXPOSURE
SMALLER
FIRST PAGE
ALL PAGES
1 32
LARGER
SIZE
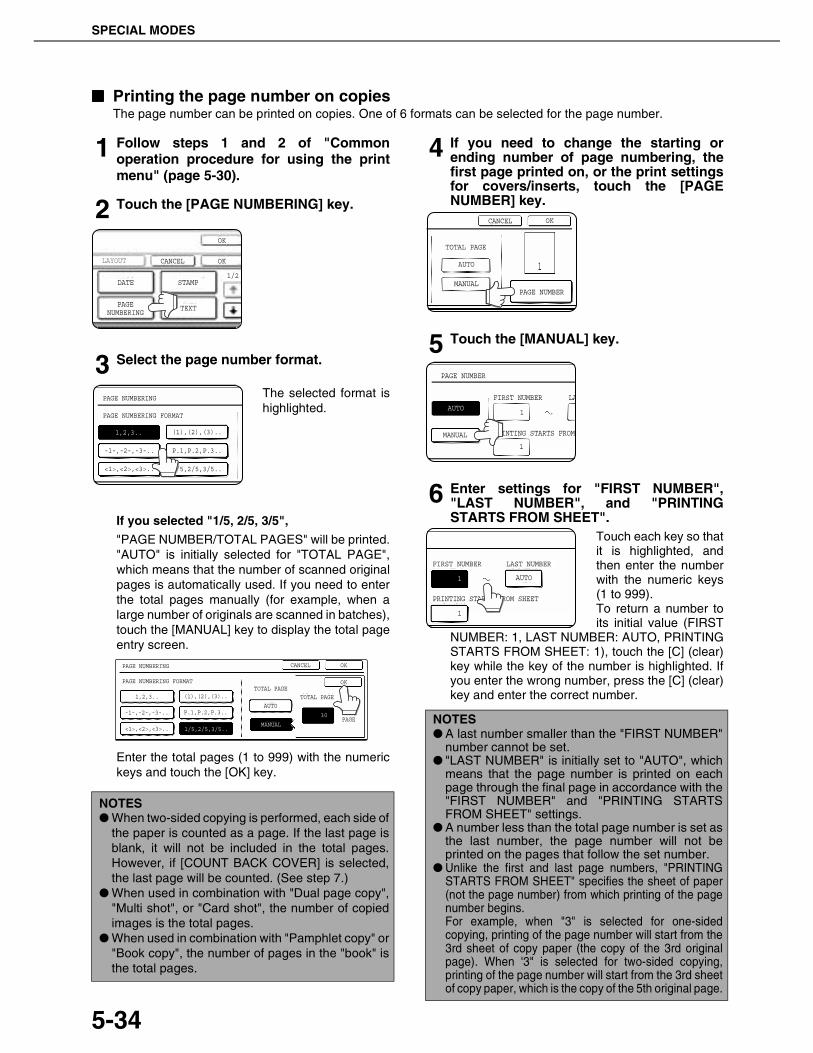
SPECIAL MODES
5-34
■■■■ Printing the page number on copiesThe page number can be printed on copies. One of 6 formats can be selected for the page number.
1 Follow steps 1 and 2 of "Commonoperation procedure for using the printmenu" (page 5-30).
2 Touch the [PAGE NUMBERING] key.
3 Select the page number format.
The selected format ishighlighted.
If you selected "1/5, 2/5, 3/5",
"PAGE NUMBER/TOTAL PAGES" will be printed."AUTO" is initially selected for "TOTAL PAGE",which means that the number of scanned originalpages is automatically used. If you need to enterthe total pages manually (for example, when alarge number of originals are scanned in batches),touch the [MANUAL] key to display the total pageentry screen.
Enter the total pages (1 to 999) with the numerickeys and touch the [OK] key.
4 If you need to change the starting orending number of page numbering, thefirst page printed on, or the print settingsfor covers/inserts, touch the [PAGENUMBER] key.
5 Touch the [MANUAL] key.
6 Enter settings for "FIRST NUMBER","LAST NUMBER", and "PRINTINGSTARTS FROM SHEET".
Touch each key so thatit is highlighted, andthen enter the numberwith the numeric keys(1 to 999).To return a number toits initial value (FIRST
NUMBER: 1, LAST NUMBER: AUTO, PRINTINGSTARTS FROM SHEET: 1), touch the [C] (clear)key while the key of the number is highlighted. Ifyou enter the wrong number, press the [C] (clear)key and enter the correct number.
NOTES● When two-sided copying is performed, each side of
the paper is counted as a page. If the last page isblank, it will not be included in the total pages.However, if [COUNT BACK COVER] is selected,the last page will be counted. (See step 7.)
● When used in combination with "Dual page copy","Multi shot", or "Card shot", the number of copiedimages is the total pages.
● When used in combination with "Pamphlet copy" or"Book copy", the number of pages in the "book" isthe total pages.
PAGENUMBERING
OK
OKCANCELLAYOUT
STAMPDATE
TEXT
1/2
PAGE NUMBERING
PAGE NUMBERING FORMAT
1,2,3.. (1),(2),(3)..
P.1,P.2,P.3..-1-,-2-,-3-..
<1>,<2>,<3>.. 1/5,2/5,3/5..
PAGE NUMBERING
PAGE NUMBERING FORMAT
1,2,3..
-1-,-2-,-3-..
<1>,<2>,<3>..
(1),(2),(3)..
P.1,P.2,P.3..
1/5,2/5,3/5..
OKCANCEL
OK
TOTAL PAGETOTAL PAGE
AUTO
MANUAL
30PAGE NOTES
● A last number smaller than the "FIRST NUMBER"number cannot be set.
● "LAST NUMBER" is initially set to "AUTO", whichmeans that the page number is printed on eachpage through the final page in accordance with the"FIRST NUMBER" and "PRINTING STARTSFROM SHEET" settings.
● A number less than the total page number is set asthe last number, the page number will not beprinted on the pages that follow the set number.
● Unlike the first and last page numbers, "PRINTINGSTARTS FROM SHEET" specifies the sheet of paper(not the page number) from which printing of the pagenumber begins.For example, when "3" is selected for one-sidedcopying, printing of the page number will start from the3rd sheet of copy paper (the copy of the 3rd originalpage). When '3" is selected for two-sided copying,printing of the page number will start from the 3rd sheetof copy paper, which is the copy of the 5th original page.
CANCEL OK
TOTAL PAGE
AUTO
MANUALPAGE NUMBER
PAGE NUMBER
AUTO
MANUAL
FIRST NUMBER
PRINTING STARTS FROM
LA
1
1
FIRST NUMBER
PRINTING STARTS FROM SHEET
1
1
LAST NUMBER
AUTO
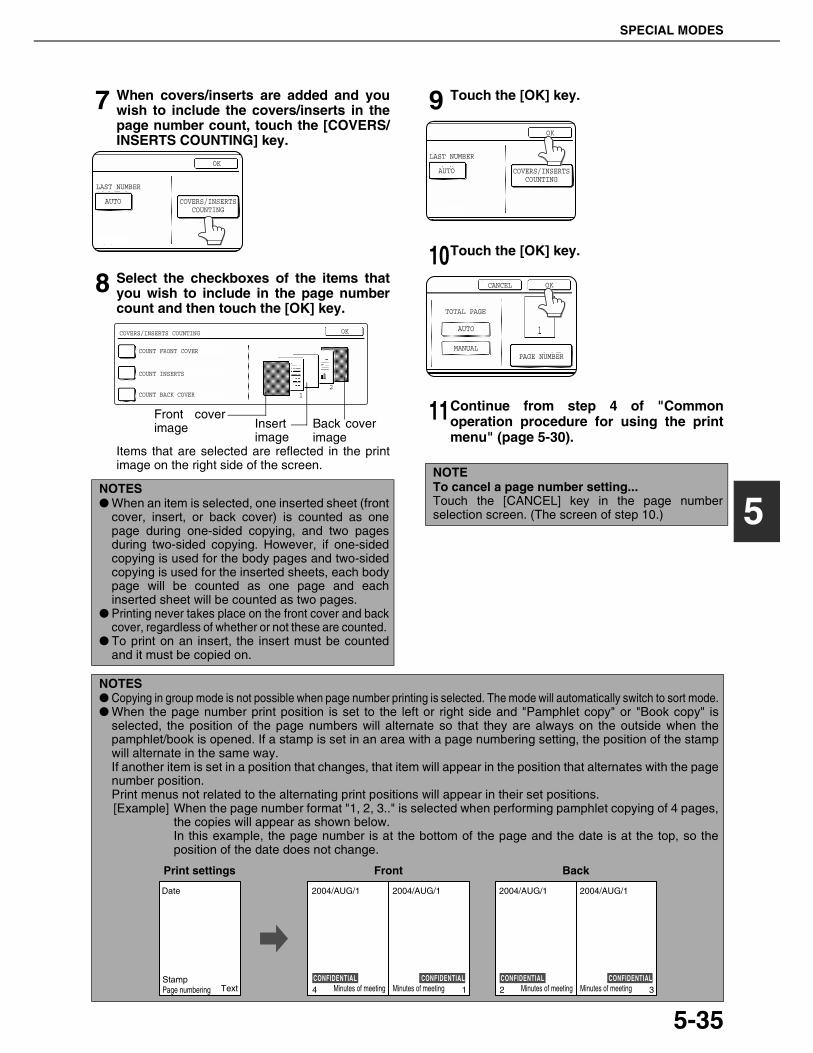
SPECIAL MODES
5-35
5
7 When covers/inserts are added and youwish to include the covers/inserts in thepage number count, touch the [COVERS/INSERTS COUNTING] key.
8 Select the checkboxes of the items thatyou wish to include in the page numbercount and then touch the [OK] key.
Items that are selected are reflected in the printimage on the right side of the screen.
9 Touch the [OK] key.
10Touch the [OK] key.
11Continue from step 4 of "Commonoperation procedure for using the printmenu" (page 5-30).
NOTES● When an item is selected, one inserted sheet (front
cover, insert, or back cover) is counted as onepage during one-sided copying, and two pagesduring two-sided copying. However, if one-sidedcopying is used for the body pages and two-sidedcopying is used for the inserted sheets, each bodypage will be counted as one page and eachinserted sheet will be counted as two pages.
● Printing never takes place on the front cover and backcover, regardless of whether or not these are counted.
● To print on an insert, the insert must be countedand it must be copied on.
OK
LAST NUMBER
AUTO COVERS/INSERTSCOUNTING
OKCOVERS/INSERTS COUNTING
COUNT FRONT COVER
COUNT INSERTS
COUNT BACK COVER2
1
Front coverimage Back cover
imageInsertimage
NOTETo cancel a page number setting...Touch the [CANCEL] key in the page numberselection screen. (The screen of step 10.)
OK
LAST NUMBER
AUTO COVERS/INSERTSCOUNTING
CANCEL OK
TOTAL PAGE
AUTO
MANUALPAGE NUMBER
NOTES● Copying in group mode is not possible when page number printing is selected. The mode will automatically switch to sort mode.● When the page number print position is set to the left or right side and "Pamphlet copy" or "Book copy" is
selected, the position of the page numbers will alternate so that they are always on the outside when thepamphlet/book is opened. If a stamp is set in an area with a page numbering setting, the position of the stampwill alternate in the same way.If another item is set in a position that changes, that item will appear in the position that alternates with the pagenumber position.Print menus not related to the alternating print positions will appear in their set positions.[Example] When the page number format "1, 2, 3.." is selected when performing pamphlet copying of 4 pages,
the copies will appear as shown below.In this example, the page number is at the bottom of the page and the date is at the top, so theposition of the date does not change.
Date
Page numbering TextStamp
2004/AUG/1 2004/AUG/1
4 1
Print settings Front
2004/AUG/1 2004/AUG/1
2 Minutes of meeting 3
Back
Minutes of meetingMinutes of meetingMinutes of meetingCONFIDENTIAL CONFIDENTIAL CONFIDENTIALCONFIDENTIAL

SPECIAL MODES
5-36
Examples of page number printingPage number printing during one-sided copying (5 originals)
Page number printing during two-sided copying (9 originals)
Page number printing during one-sided copying of body pages with covers inserted (4 originals)
When a back cover is inserted, page numbers are counted and printed in the same way.Note that page numbers are never printed on front and back covers.
Setting Value 1st page 2nd page 3rd page 4th page 5th page
TOTAL PAGE AUTO
FIRST NUMBER 1
LAST NUMBER AUTO
PRINTING STARTS FROM SHEET
1
Printed contents when settings are changed as follows
FIRST NUMBER: 11 11/15 12/15 13/15 14/15 15/15
FIRST NUMBER: 11LAST NUMBER: 13
11/13 12/13 13/13 Not printed Not printed
TOTAL PAGE: 2 1/2 2/2 Not printed Not printed Not printed
TOTAL PAGE: 15FIRST NUMBER: 11LAST NUMBER: 13
11/15 12/15 13/15 Not printed Not printed
PRINTING STARTS FROM SHEET: 3 Not printed Not printed 1/3 2/3 3/3
A1/5
B2/5
C3/5
D4/5
E5/5
Setting Value1st page 2nd page 3rd page 4th page 5th page
Front Back Front Back Front Back Front Back Front Back
TOTAL PAGE AUTO
FIRST NUMBER
1
LAST NUMBER AUTO
PRINTING STARTS FROM SHEET
1
Printed contents when settings are changed as follows
PRINTINGSTARTSFROM SHEET: 3
Not printed
Not printed
Not printed
Not printed
1/5 2/5 3/5 4/5 5/5Not
printed
A1/9
B2/9
C3/9
D4/9
E5/9
F6/9
G7/9
H8/9
I9/9
Setting Value1st page
(Front cover)
2nd page 3rd page 4th page 5th page
TOTAL PAGE AUTO
FIRST NUMBER 1
LAST NUMBER AUTO
PRINTING STARTS FROM SHEET
1
COUNT FRONT COVER Not selected
Printed contents when settings are changed as follows
PRINTING STARTS FROM SHEET: 2
Not printed Not printed 1/3 2/3 3/3
COUNT FRONT COVER: Selected
Not printed (count)
2/5 3/5 4/5 5/5
COUNT FRONT COVER: SelectedPRINTING STARTS FROM SHEET: 2
Not printed (count)
1/4 2/4 3/4 4/4
A1/4
B2/4
C3/4
D4/4

SPECIAL MODES
5-37
5
Page number printing during two-sided copying of body pages with covers (one-side copying) inserted (9 originals)
When a back cover is inserted, page numbers are counted and printed in the same way.Note that page numbers are never printed on front and back covers.
Page number printing during one-sided copying with inserts (4 originals; 5 originals when copying on inserts)
When inserts are not copied on, the page number is not printed.
Page number printing during two-sided copying of body pages with inserts (one-side copying) (9 originals)
Setting Value1st page
(front cover) 2nd page 3rd page 4th page 5th page
Front Back Front Back Front Back Front Back Front Back
TOTAL PAGE AUTO
FIRST NUMBER 1
LAST NUMBER AUTO
PRINTING STARTS FROM SHEET
1
COUNT FRONT COVER Not selected
Printed contents when settings are changed as follows
PRINTING STARTS FROM SHEET: 3
Not printed
Not printed
Not printed
Not printed
Not printed
Not printed 1/4 2/4 3/4 4/4
COUNT FRONT COVER: Selected
Not printed(count)
Not printed(count) 3/10 4/10 5/10 6/10 7/10 8/10 9/10 10/10
COUNT FRONT COVER: SelectedPRINTING STARTS FROM SHEET: 3
Not printed(count)
Not printed(count)
Not printed
Not printed 1/6 2/6 3/6 4/6 5/6 6/6
A B1/8
C2/8
D3/8
E4/8
F5/8
G6/8
H7/8
I8/8
Setting Value 1st page 2nd page 3rd page (insert) 4th page 5th page
TOTAL PAGE AUTO
FIRST NUMBER 1
LAST NUMBER AUTO
PRINTING STARTS FROM SHEET 1
COUNT INSERTS Not selected
Printed contents when copying on inserts and settings are changed as follows
PRINTING STARTS FROM SHEET: 3 Not printed Not printed Not printed 1/2 2/2
COUNT INSERTS: Selected 1/5 2/5 3/5 (count) 4/5 5/5
COUNT INSERTS: SelectedPRINTING STARTS FROM SHEET: 3 Not printed Not printed 1/3 (count) 2/3 3/3
Printed contents when not copying on inserts and settings are changed as follows
COUNT INSERTS: Selected 1/5 2/5 Not printed (count) 4/5 5/5
COUNT INSERTS: SelectedPRINTING STARTS FROM SHEET: 3 Not printed Not printed Not printed
(count) 2/3 3/3
A1/4
B2/4
C D3/4
E4/4
Setting Value1st page 2nd page 3rd page
(insert) 4th page 5th page
Front Back Front Back Front Back Front Back Front Back
TOTAL PAGE AUTO
FIRST NUMBER 1
LAST NUMBER AUTO
PRINTING STARTS FROM SHEET 1
COUNT INSERTS Not selected
Printed contents when settings are changed as follows
COUNT INSERTS:Selected
1/10 2/10 3/10 4/10 5/10Not
printed (count)
7/10 8/10 9/10 10/10
A1/8
B2/8
C3/8
D4/8
E F5/8
G6/8
H7/8
I8/8

SPECIAL MODES
5-38
■■■■ Printing entered text on copiesEntered text can be printed on copies. Up to 50 characters can be printed.Up to 30 sequences of frequently used text can be stored. See "Storing text sequences" (page 5-39).
1 Follow steps 1 and 2 of "Commonoperation procedure for using the printmenu" (page 5-30).
2 Touch the [TEXT] key.
3 If you wish to use one of the preset textsequences, touch the [RECALL] key. Todirectly enter the text, touch the [DIRECTENTRY] key.
If you touch the [DIRECT ENTRY] key, a characterentry screen will appear. For information onentering characters, see page 7-26. Whenfinished, click the [OK] key to close the characterentry screen. (Go to step 6.)
4 The stored text sequences will appear askeys. Touch the key of the desired textsequence.
The selected text sequence key is highlighted.If the desired text sequence key does not appear,change screens with the or key.The display is initially set to show 6 keys perscreen. This can be changed to 3 keys per screenby touching the [3 6] key. When 3 keys aredisplayed, the entire text sequence will appear ineach key. (When 6 keys are displayed, up to 22characters appear in each key.
5 Touch the [OK] key.
To edit the selectedtext sequence, touchthe [DIRECT ENTRY]key to display thecharacter entry screen.The selected textsequence is entered.
For information on entering characters, see page7-26. When finished, touch the [OK] key to closethe character entry screen.
6 Select the pages to be printed on.
Select whether to printon only the first page,or all pages. Thetouched key ishighlighted.
7 Touch the [OK] key.
8 Continue from step 4 of "Commonoperation procedure for using the printmenu" (page 5-30).
NOTEWhen the machine is connected to a network, the printed text sequences can be stored and deleted in the Webpage. For details, see Help in the Web page.
PAGENUMBERING
OK
OKCANCELLAYOUT
STAMPDATE
TEXT
1/2
TEXT OKCANCEL
FIRST PAGE
PRE-SET
ALL PAGES
DIRECT ENTRYSTORE/DELETERECALL
TEXT
RECALL
No.01 TARO YAMADA
No.02 October, 2004 Meeting
No.03
No.04
No.05
No.06
3 6 DIRECT ENTRY
1/5
OKCANCEL
NOTETo cancel a text setting...Touch the [CANCEL] key in the text print screen. (Thescreen of step 7.)
OKCANCEL
DIRECT ENTRY
1/5
63
04
05
06
OKCANCEL
FIRST PAGE
DIRECT ENTRY
ALL PAGES
OKCANCEL
FIRST PAGE
DIRECT ENTRY
ALL PAGES

SPECIAL MODES
5-39
5
Storing text sequences
1 Follow steps 1 and 2 of "Commonoperation procedure for using the printmenu" (page 5-30).
2 Touch the [TEXT] key.
3 Touch the [STORE/DELETE] key.
4 Touch a key that has not beenprogrammed (a key in which No. xxappears).
When touched, the character entry screenappears. Enter the text (max. 50 characters). Forinformation on entering characters, see page 7-26. When finished, touch the [OK] key to close thecharacter entry screen.If no free keys appear, change screens with the
or key.
5 Touch the [BACK] key.
The entered text isstored.
Editing and deleting stored text
1 Follow steps 1 and 2 of "Commonoperation procedure for using the printmenu" (page 5-30).
2 Touch the [TEXT] key.
3 Touch the [STORE/DELETE] key.
4 Touch the text key that you wish to edit ordelete.
5 To edit the text, touch the [AMEND] key. Todelete the text, touch the [DELETE] key.
When the [AMEND] key istouched, the characterentry screen appears.The selected textsequence is entered. Forinformation on enteringcharacters, see page 7-
26. When finished, touch the [OK] key to close thecharacter entry screen.If you touch the [DELETE] key, the text will be deletedand you will return to the screen of step 4.To cancel editing or deletion, touch the [CANCEL] key.
6 Touch the [BACK] key.
PAGENUMBERING
OK
OKCANCELLAYOUT
STAMPDATE
TEXT
1/2
RECALL STORE/DELETE
PRE-SET
TEXT
STORE/DELETE
No.01 TARO YAMADA
No.02 October, 2004 Meeting
No.03
No.04
No.05
No.06
BACK
1/5
3 6
3 6 BACK
1/5
06
05
04 Minutes of meeting
PAGENUMBERING
OK
OKCANCELLAYOUT
STAMPDATE
TEXT
1/2
RECALL STORE/DELETE
PRE-SET
TEXT
STORE/DELETE
No.01 TARO YAMADA
No.02 October, 2004 Meeting
No.03
No.04 Minutes of meeting
No.05
No.06
BACK
1/5
3 6
A TEXT HAS BEEN ALREADY STORED TO LOCATION.CHANGE THE TEXT?
No.06
CANCEL DELETE AMEND
3 6 BACK
1/5
06
05
04 Minutes of meeting

SPECIAL MODES
5-40
■■■■ Checking and changing the print layoutYou can check the print layout after the print items have been selected. If needed you can change the printposition or delete print content.
1 Touch the [LAYOUT] key on the printmenu screen.
2 Touch the key in which you wish tochange the print position or delete printcontent.
3 To change the print position, touch the[MOVE] key. To delete print content, touchthe [DELETE] key.
If you touched the[MOVE] key, the newposition selectionscreen appears.If you touched the[DELETE] key, theprint content is deleted.(Go to step 6.)
4 Touch the key of the new position.
The selected key ishighlighted and theprint position changesto the new position.
The keys indicating the print position appear asfollows depending on the state of the setting:
5 Touch the [OK] key.
If you attempt to moveprint content to aposition that alreadyhas print content set, amessage will appearasking you if you wishto overwrite thepreviously set content.
To overwrite the content, touch the [YES] key. Tocancel the move and return to the condition beforethe [OK] key was touched, touch the [NO] key.
6 Touch the [OK] key.
NOTEUp to 14 characters of the print text appears in thekey.
OK
OKCANCEL
STAMP
TEXT
1/
LAYOUT
DATE
PAGENUMBERING
LAYOUT
TARO YAMADA
CONFIDENTIAL
OK
DO NOT COPY
1,2,3..
DO YOU WANT TO MOVE OR DELETE THESELECTED ITEM?
CANCEL DELETE MOVE
1,2,3..
Print position without any set print menus.
Currently set print position.
Print position with another competing print menu set.(When moving a stamp, this indicates that another stamp has been set. When moving a print menu other than a stamp, this indicates that the date, page number, or text has been set.)
NOTEIf you wish to swap the contents of two positions,temporarily move the content of one position to anunused position and then complete the swap.
SELECTED ITEM.
OK
OK
DO NOT COPY
1,2,3...
CONFIDENTIAL

5-41
5
STORING, USING AND DELETINGJOB PROGRAMSThe steps of up to 10 copy jobs can be stored as job programs. Job programs can be called up with ease, and areretained even when the power is turned off. By storing frequently used copy settings in a job program, you caneliminate the bother of selecting the settings each time you use them for a copy job.●If any settings related to the steps of a job program are changed in the key operator programs after the job program
is stored, the steps related to the changed settings will not be included when the job program is called up.●To exit the job programs mode, press the [CA] (clear all) key on the operation panel or touch the [EXIT] key on the
touch panel.
Storing a job program1 Press the [#/P] key.
2 Touch the [STORE/DELETE] key.
3 Touch the number key ([1] to [10]) in whichyou wish to stored the job program.
Number keys in whichjob programs arealready stored arehighlighted.
4 Select the copy settings that you wish tostore in the job program.
The number of copiescannot be stored.
5 Touch the [OK] key.
The selected settingswill be stored in thenumber key selected instep 3.
■■■■ If a number key is selected in step 3 that hasalready been programmed.A setting confirmation screen will appear. To replacethe existing program with the new program, touchthe [STORE] key and continue from step 4. If you donot wish to replace the existing program, touch the[CANCEL] key to return to the screen of step 3 andselect a different number key.
M NUMBER.
RECALL STORE/DELETE
PROGRAMS
ESS PROGRAM NUMBER.
RECALL STORE/
SPECIAL MODES
TO STORE, MAKE SELECTIONS AND PRESS [OK], TO DELETE, PRESS [CANCEL].
2-SIDED COPY
OUTPUT
8 x118 x11
8 x1411x7
1/ 2
1/ 2
1/ 2
NOTE
If overwriting of programmed copy settings has beenprohibited in the key operator programs, you will notbe able to store a job program. (See page 15 of thekey operator's guide.)
AUTO
AUTO
ORIGINAL
OKNCEL

STORING, USING AND DELETING JOB PROGRAMS
5-42
Calling up a job program
1 Press the [#/P] key.
2 Touch the number key of the desired jobprogram.
The screenautomatically closes andthe job program is calledup. A number key thatdoes not have a jobprogram cannot beselected.
3 Set the number of copies if needed andthen press the [START] key.
Copying will begin usingthe settings of the jobprogram.
Deleting a stored job program
1 Press the [#/P] key.
2 Touch the [STORE/DELETE] key.
3 Select a storage register number of theprogram to be deleted.
If a number key for whichno job program hasbeen stored is selected,the screen will change tothe screen of step 4 onthe previous page (forstoring a job program).
4 Touch the [DELETE] key.
The selected program isdeleted and you returnto the screen of step 3.To return to the screenof step 3 without deletingthe job program, touchthe [CANCEL] key. Inboth cases, touch the
[EXIT] key on the screen displayed in the screen ofstep 3 to exit the job program mode.
JOB PROGRAMS
PRESS PROGRAM NUMBER.
RECALL
M NUMBER.
RECALL STORE/DELETE
EXIT
STORE/DELETE
NOTE
If overwriting of programmed copy settings has beenprohibited in the key operator programs, you will notbe able to clear a job program. (See page 15 of thekey operator's guide.)
REC LL STORE/DELETE
A JOB PROGRAM HAS BEEN ALREADY STOREDIN THIS LOCATION.
CANCEL DELETE STORE

5-43
5
INTERRUPTING A COPY RUNThe copy of the original scanned in interrupt mode is output before the remainder of the interrupted copy job.
1 Touch the [INTERRUPT] key.
If interrupt copying ispossible during a copyrun, the [INTERRUPT]key will appear. (If thekey does not appear,interrupt copying is notpossible.)
When the [INTERRUPT]key is touched in step 1,the [INTERRUPT] keywill be replaced by the[CANCEL] key as shownin the illustration.
To cancel an interruptcopy job while the interrupt original is beingscanned or while you are selecting copy settings,touch the [CANCEL] key.
2 Place the original for the interrupt copy jobin the document feeder or on thedocument glass (page 4-3).
3 Select the exposure mode, paper size,number of copies, and any other copysettings as needed, and then press the[START] key.
4 The previous copy job automaticallyresumes after the interrupt job finishes.
NOTES
● If you touch the [INTERRUPT] key when auditingmode is enabled, the display will prompt you toenter your account number. Enter your accountnumber with the numeric keys. The copies youmake will be added to the count of the enteredaccount number.
● If a copy is being printed when the [INTERRUPT]key is pressed, interrupt mode will begin after thecopy is finished.
● If the document glass is used for an interrupt copyjob, two-sided copying, sort copying, and staplesort copying cannot be selected. If any of thesefunctions are necessary, use the documentfeeder.
AUTO
AUTO
AUTO 8x
ORIGINARIGINAL
EXPOSUR
8 x11
INTERRUPT
1/ 2
CANCEL
ORIGINAL 8 x11
0 AUTO
EXPOSURE
AUTO 8 x111/ 2
EXPOSURE
AUTO 8 x111/ 2
PAPER SELECT
100%
1/ 2


6-1
CHAPTER 6MACHINE MAINTENANCE
(FOR COPYING)This chapter explains procedures for cleaning the machine, andtroubleshooting.
PageUSER MAINTENANCE........................................................................... 6-2
● Cleaning the document glass and the automatic document feeder ....... 6-2● Cleaning the main charger of the photoconductive drum....................... 6-2
TROUBLESHOOTING............................................................................ 6-3
6-2
USER MAINTENANCECleaning the document glass and the automatic document feederIf the document glass, document cover or automatic document scanning unit have dirty spots, these spots will formlines in scanned images. These will show up as defects when the images are printed. Always keep these parts clean.
\
Wipe with a clean, soft cloth. If necessary, moisten thecloth with water or a small amount of neutral detergent.When finished, wipe dry with a clean cloth. Whencleaning, do not use thinner, benzene, or similarvolatile cleaning agents.
If black or white stripes appear on printed images of originals that were fed through theautomatic document feeder, wipe the long narrow glasses in the scanning unit ((A) and(B) in the illustration).
Cleaning the main charger of the photoconductive drumIf black (or white) lines appear even after you have cleaned the document glass and document feeder, use thecharger cleaner to clean the main charger that charges the drum.
1 Switch off the power switch (see page 1-17).
2 Open the front cover.
3 Slowly pull out the green knob (chargercleaner).
4 Once the knob is pulled out, slowly push itback in.
5 Close the front cover and switch on thepower switch.
(A)
(B)
CAUTIONDo not use flammable spray to clean the machine. If gas from the spray comes in contact with hot electricalcomponents or the fusing unit inside the machine, fire or electrical shock may result.
Charger cleaner
NOTES● If this does not solve the problem, pull the knob out and push it back in 2 more times.● When pulling and pushing the knob to clean the charger, pull and push the knob slowly from one end to the other.
Example of dirty print image
Black stripes White stripes

6-3
6
TROUBLESHOOTINGCheck the following troubleshooting list before requesting service as many problems can be fixed by the user. If youare unable to solve the problem by checking the list, turn off the power switch, and unplug the power cord.Problems related to the copy function are described below. For problems related to general use of the machine, seepage 2-23.
Problem Check Solution
Machine does notoperate.
Is the [START] key indicator off? This indicates that the machine is warmingup (warming up lasts no more than 80seconds after the power switch is turned on).Copying is not possible during this time.Wait until the [START] key light illuminates.
Copies are too darkor too light.
Is the original image too dark or too light? Select an appropriate exposure mode forthe original being copied and adjust the copyexposure. (See page 4-14.)
Is the exposure mode set to "AUTO"? The exposure level for "AUTO" can beadjusted using the "Exposure adjustment"key operator program. Contact your keyoperator. (See page 14 of the key operator'sguide.)
An appropriate exposure mode for theoriginal has not been selected.
Change the exposure mode to "AUTO" ormanually select an appropriate resolutionsetting. (See page 4-14.)
Text is not clear on acopy.
An appropriate exposure mode for theoriginal has not been selected.
Change the exposure mode to "TEXT". (Seepage 4-14.)
Smudges appear oncopies.
Document glass or document cover dirty? Clean regularly. (See page 6-2.)
Black lines appear on copies when theautomatic document feeder is used.
Clean the original scanning area. (See page6-2.)
Original smudged or blotchy? Use a clean original.
Image cannot berotated.
Is the auto paper select or auto imagefunction selected?
Rotation copy functions only if the machineis either in the auto paper select mode or inthe auto image mode. (See page 4-15.)
Part of originalimage is not copied.
Is the original positioned correctly? Set the original properly. (See page 4-3.)
Is the copy ratio proper for the original andpaper sizes?
Use the auto image function to select theappropriate copy ratio based on the originaland copy sizes. (See page 4-15.)
Blank copies Is the original placed correctly? When using the document glass, place theoriginal face down. When using the automatic document feeder,place original face down. (See page 4-3.)
Order of copiesincorrect
Is the order of originals correct? When using the document glass, place theoriginals from the first page one sheet at atime.When using the automatic document feeder,place the originals with the first page down.
Job cancellationneeded
Is a message requesting cancellation of jobdisplayed?
Press the [CA] key to cancel the current job.

7-1
CHAPTER 7DOCUMENT FILING
FUNCTION
PageOVERVIEW............................................................................................. 7-2
● Document filing function.................................................................. 7-2
TO USE THE DOCUMENT FILING FUNCTION..................................... 7-4● A look at the operation panel .......................................................... 7-4● Saving files...................................................................................... 7-4● Main screen of document filing ....................................................... 7-5● Document filing icons ...................................................................... 7-5
SAVING A DOCUMENT IMAGE FILE .................................................... 7-6● Quick File ........................................................................................ 7-6● Filing................................................................................................ 7-7● Print jobs ......................................................................................... 7-9● Scan Save....................................................................................... 7-10
CALLING UP AND USING A FILE.......................................................... 7-13● Searching for and calling up a saved file ........................................ 7-13● Calling up and using a saved file .................................................... 7-15
CUSTOM SETTINGS ............................................................................. 7-21● Creating, editing, and deleting user names and folders.................. 7-21
ENTERING CHARACTERS.................................................................... 7-26TROUBLESHOOTING............................................................................ 7-28
7-2
OVERVIEWDocument filing functionThe document filing function allows you to save a document image in the machine's hard disk as a data file. Theimage can be called up and printed or transmitted as needed.The scanned document image is saved when printing or transmitting a document in copy mode, printer mode, orimage send mode ("QUICK FILE" or "FILE"). A document can also be scanned and saved without being printed,copied, or transmitted ("scan save").To allow you to search for the file and call it up, names (user name, file name, etc.) can be assigned to the file (exceptwhen using Quick File in copy mode or fax/image send mode).
■■■■ Data flow
File 1
File 2
QUICK FILE FOLDER
File 1
File 2
MAIN FOLDER CUSTOM FOLDER
A password can be set
Copier/printer model
A password can be set
A password can be set
Folder 1
Folder 2
Folder 3 File 1
File 2
Machine hard disk
Machine hard disk
Save to machine's hard disk HDD
and
Send(facsimile expansion kit or network scanner expansion kit required)
Printing in copy mode (Quick File saving, page 7-6)
Printing from a computer (printer data, page 7-9)
Transmission in fax/image send mode (filing, page 7-7)
Scanning a document only (scan save, page 7-10)
Data is saved by job A user name and file name is specified for each saved job
A user name and file name can be specified for each file and the file saved to a folder with any desired name assigned.
Call up a saved file to reuse it.
●A stored file can be moved to a different folder under certain conditions (page 7-19).
OVERVIEW
7-3
7
■■■■ Quick File folderWhen [QUICK FILE FOLDER] is selected in the main screen of any of the modes, the file is saved in this folder.Up to 1000 files can be saved in the Quick File folder. All files in the Quick File Folder can be deleted using a keyoperator program. If you have a file that you do not want deleted, set the file attribute to [PROTECT] (up to 500 filescan be protected). (See [Property change] on page 7-18)The following user and file names are automatically assigned (except when using Quick File in copy mode or fax/image send mode):User name : User unknownFile name (example) : COPY_10012004_014050PM (job mode and month, day, year, hour, minute, second, AM/PM of save). (In the example, the file was saved on 10/1/2004 at 13:40 and 50 sec in copy mode.) When saved, jobs are classified by mode. A saved job can be called up from the COMPLETE job status screen.
■■■■ Main folderWhen saving a file, a previously stored user name (see [CUSTOM SETTINGS] on page 7-21) can be specified andany file name can be assigned.A password can also be set for a saved file ([CONFIDENTIAL] save). (See [Property change] on page 7-18.)If a user name and file name are not selected, a name in the same format as Quick File is automatically assigned.
■■■■ Custom folderUp to 500 folders (named as desired) can be created in this folder. When saving a file in one of these folders, apreviously stored user name (see [CUSTOM SETTINGS] on page 7-21) can be specified and any file name can beassigned.A password can be set for a file saved in one of these folders.
■■■■ Attributes of saved filesThe protect setting can be selected for files saved with the document filing function. This prevents a file from beingmoved or automatically or manually deleted.Three attributes are available for saved files: [SHARING], [PROTECT], and [CONFIDENTIAL]. When saved withthe [SHARING] attribute, a file is not protected. When saved with the [PROTECT] or [CONFIDENTIAL] attribute, afile is protected.Files saved to the Quick File folder are all [SHARING]. When saving a file to the main folder or a custom folder,[SHARING] or [CONFIDENTIAL] can be selected.● A [SHARING] file can be changed to a [PROTECT] or [CONFIDENTIAL] file using [Property change] (page 7-18).● A password is set for a [CONFIDENTIAL] file to protect it. (The password must be entered to call up the file.)● A password cannot be set for a [PROTECT] file, however, as long as the file is not changed to [SHARING] with
[PROPERTY CHANGE], the file will be protected.
CAUTION● Documents saved with [QUICK FILE] are shared files that can be called up by anyone and printed or transmitted.
For this reason, do not use Quick File for sensitive documents or documents that you do not want to be reusedby others.
● When saving a document with [FILE], set the attribute to [CONFIDENTIAL] and set a password to prevent othersfrom reusing the document.
● Even when a file is saved with the [CONFIDENTIAL] attribute, the attribute can be changed afterward to[SHARING] using [Property change] (page 7-18). For this reason, do not save sensitive documents ordocuments that you do not want to be reused by others.
● Except in cases provided for by law, SHARP Corporation bears no responsibility for any damages that resultfrom the leaking of sensitive information due to 1) manipulation by a third party of any data saved using the QuickFile function or filing function, or 2) incorrect operation of the Quick File function or filing function by the operatorthat saves the data.

7-4
TO USE THE DOCUMENT FILING FUNCTIONA look at the operation panel
(1) Touch panel (see the next page)
This displays messages and keys. Keys can betouched to select and enter settings.When a key is touched, a beep will sound and thekey will be highlighted to indicate that it is selected.When a key cannot be selected in a screen, it willbe grayed out. If touched, a warning beep willsound to alert you that it cannot be selected.
(2) Mode select keys
Use this key to select the mode.
(3) [DOCUMENT FILING] key
Touch this key to display the main screen ofdocument filing mode.
(4) Numeric keys
Use these keys to enter a password or a numericvalue for a setting.
(5) [C] key (clear key)
Use this key if you make a mistake when enteringa password or numeric setting.This key is also used to cancel scanning of adocument.
(6) [CA] key
Use this key to cancel a setting procedure andreturn to the main screen. The key is also used tocancel a special function.
(7) [CUSTOM SETTINGS] key
Use this key to store, edit or delete a user name orcustom folder.
Saving filesTo save files to the main folder or custom folders, a user name must be previously stored. To create a folder in thecustom folder, the folder name must be stored. These settings are configured in the custom settings.Follow the procedures explained in "Programming a user name", "Editing and deleting a user name", "Creating acustom folder", and "Editing/deleting a custom folder" on pages 7-22 to 7-25.
(1) (2) (3) (4) (5) (6)
(7)

TO USE THE DOCUMENT FILING FUNCTION
7-5
7
Main screen of document filingTo display the main screen of document filing, pressthe [DOCUMENT FILING] key when the touch panelshows the copy mode screen, image send mode, or thejob status screen.The main screen shows messages, keys, and itemsthat can be selected for document filing.
(1) Message displayDisplays messages.
(2) [HDD STATUS] keyTouch to check the use of the machine's hard disk.
(3) [SEARCH] keyTouch to search for a file by user name, file name,or folder name.
(4) [SCAN TO HDD] keyTouch to select scan save. Scan save is used tosave the image file of a scanned document in themain folder or a custom folder without printing ortransmitting the document.
(5) [FILE FOLDER] keyTouch to call up a file from the main folder or thecustom folder. When the key is touched, the files inthe main folder or the folders in the custom folderappear.
(6) [QUICK FILE FOLDER] keyTouch to call up a file from the Quick File folder.When the key is touched, the files in the Quick Filefolder appear.
Document filing icons
The following icons may appear added to a main iconor alone.
HDD STATUS SEARCH
SCAN TO HDD FILE FOLDER
QUICK FILEFOLDER
FILE RETRIEVEFILE STORE
(4) (5) (6)
(1) (2) (3)
Main icon
Icon of confidential file or folder
Icon of protected file
Meaning
Folder
Copy job file
Print job file(including directprint jobs)
Fax transmissionjob file
PC-FAXtransmission jobfile
Internet faxtransmission jobfile
PC-Internet faxtransmission jobfile
Scan save file
E-mailtransmission jobfile
FTPtransmission jobfile
Desktoptransmission jobfile
Icon Meaning
Confidential file or folder
Protected file
NOTEWhen the file of a job that was saved using scansave is printed in job settings, the icon of the job ishighlighted.

7-6
SAVING A DOCUMENT IMAGE FILEQuick FileWhen printing or transmitting a document in copy mode, printer mode, or fax/image transmission mode, "QUICKFILE" can be selected to save an image of the document to the Quick File folder.The image can be called up at a later time, allowing you to print or transmit the document without having to locatethe original.
1 Place the originals in the document feedertray and select resolution and exposuresettings.
See steps 1 to 8 of"Making copies with theautomatic documentfeeder" on pages 4-7 to4-8 and "ADJUSTINGTHE EXPOSURE" onpage 4-14.
2 Touch the [QUICK FILE] key in the mainscreen.
The [QUICK FILE] keywill be highlighted toindicate that the functionis selected.If the [FILE] key isgrayed out, only the[QUICK FILE] key canbe selected.
When you touch the [QUICK FILE] key, amessage asking you to confirm the save willappear. Touch the [OK] key in the messagescreen and go to the next step.If you wish to cancel the save, touch the [QUICKFILE] key after touching the [OK] key so that the[QUICK FILE] key is no longer highlighted.
3 Press the [START] key on the operationpanel.
To prevent accidentalsaving of the document,the warning "THESCANNED DATA ISSTORED IN THEQUICK FILE FOLDER."appears for 6 seconds
after the [START] key is pressed.When copying begins, the image is saved.
4 The saved image can be called up from theQuick File folder or the job status screen.
●To call the image up from the Quick Filefolder, see "Calling up and using a saved file"on page 7-15.
●To call the job up from the finished job statusscreen, see "Calling up and manipulating afile from the job status screen" on page 7-20.
5 The following operations can beperformed on the image that was called upin step 4.
●Print the image (page 7-16)●Transmit the image (page 7-17)●Change the attribute (page 7-18)●Move the image (page 7-19)●Delete the image (page 7-19)●Check details on the image (page 7-19)
NOTEAs an example, the procedure for saving a document to the Quick File folder while copying using the automaticdocument feeder is explained below.
UTO
AUTO
AUTO A4
ORIGINAL
EXPOSURE
QUICK FILE
FILE
SAVING A DOCUMENT IMAGE FILE
7-7
7
FilingWhen printing or transmitting a document in copy mode, printer mode, or image send mode, "FILE" can be selectedto save an image of the document to the main folder or a previously created custom folder. The image can be calledup at a later time, allowing you to print or transmit the document without having to locate the original.
1 Place the originals in the document feedertray and select resolution and exposuresettings.
See steps 1 to 8 of"Making copies with theautomatic documentfeeder" on pages 4-7 to4-8 and "ADJUSTINGTHE EXPOSURE" onpage 4-14
2 Touch the [FILE] key in the main screen.
An information entryscreen appears.
3 Touch the [USER NAME] key.
4 Touch the desired user name in the list ofuser names that appears.
User names must be previously stored("Programming a user name" on page 7-22).
5 Touch the [OK] key.
The touched user name is selected and you return to thescreen of step 3. The selected user name appears.
6 Touch the [FILE NAME] key.
A character entry screenappears. Enter a filename (maximum of 30characters). (See page7-26 to entercharacters.)
7 Touch the [STORED TO:] key.
8 Touch the desired folder name in the list offolder names that appears
Folder names must be previously stored.("Creating a custom folder" on page 7-24). If apassword has been set for the folder, a passwordentry screen will appear. Enter the 5-digitpassword for the folder.
NOTEAs an example, the procedure for using the filing function while copying using the automatic document feeder isexplained below.
UTO
AUTO
AUTO A4
ORIGINAL
EXPOSURE
QUICK FILE
FILE
USER NAME
CONFIDENTIAL
MAI
COPYFILE NAME
STORED TO:
Suzuki
Ono
Hasegawa
Sasaki
UVWXYZOPQRSTJKLMNEFGHIABCDALL USERS
Yamada
Nakata
1/1
NOTEIf you do not select a user name, the following nameis automatically selected:Example : User unknown
NOTEIf you do not enter a file name, a file name in thefollowing format is automatically assigned:Auto generated file name : Month, day, year, hour,minute, second, AM/PM (Example : COPY_10012004_014050PM)
USER NAME
FILE NAME
STORED TO: MAI
COPY
USER NAME
FILE NAME
STORED TO: MAIN
COPY
ALL FOLDERS
CUSTOM FOLDER 1
CUSTOM FOLDER 3
CUSTOM FOLDER 5
CUSTOM FOLDER 7
CUSTOM FOLDER 6
CUSTOM FOLDER 4
CUSTOM FOLDER 2
CUSTOM FOLDER 8
ABCD EFGHI JKLMN OPQRS UVWXY
1/2

SAVING A DOCUMENT IMAGE FILE
7-8
9 Touch the [OK] key.
The touched folder isselected and you returnto the screen of step 7.The selected foldername is displayed.
10If needed, select the [CONFIDENTIAL]checkbox (only in copy mode).
When this is selected, thefile is stored with theattribute [CONFIDENTIAL].To call up the file, thepassword that will be set inthe following steps must beentered.
●If you selected the [CONFIDENTIAL]checkbox, touch the [PASSWORD] key andenter a password.
●If you did not select the [CONFIDENTIAL]checkbox, go to step 16. The file will be savedas a [SHARING] file.
11Touch the [PASSWORD] key.
The password entryscreen appears.
12Enter a 5-digit password with the numerickeys.
As each digit is entered,"-" changes to " ".
13Touch the [OK] key.
14You will return to the screen of step 10.The set password is displayed with " ".
15Touch the [OK] key.
You will return to the main screen.
16Press the [START] key on the operationpanel.
When copying begins,the image is saved.
17The saved image can be called up usingthe file name, folder name, or user name,or from the filing folder.
●To call up the image by entering the file name,folder name, or user name, see "Searchingfor and calling up a saved file" on page 7-13.
●To call up the image from the filing folder, see"Calling up and using a saved file" on page 7-15.
18The following operations can beperformed on the image that was calledup:
●Print the image (page 7-16)●Transmit the image (page 7-17)●Change the attribute (page 7-18)●Move the image (page 7-19)●Delete the image (page 7-19)●Check details on the image (page 7-19)
OKFOLDER
2/2
USER NAME
FILE NAME
CONFIDENTIAL
FILE INFORMATION
PASSWORD
CAN
XYYY
ENTER PASSWORD VIA THE 10-KEY PAD.
CANCEL
CANCEL
0OK
10-KEY PAD.
XYYY
OKCANCEL
PASSWORD
SAVING A DOCUMENT IMAGE FILE
7-9
7
Print jobsPrint jobs sent to the machine using the machine'sprinter driver can be saved in the main folder or apreviously created custom folder when printed. Thesaved print data can be called up and printed ortransmitted without having to open the original file onyour computer.This section gives an overview of this function andexplains the procedure for printing from the operationpanel of the machine.For the procedures that are performed at yourcomputer when initiating printing such as selecting thesave location and file attribute, see the printer driverHelp file.
■■■■ Using a print job file (printing,deleting, transmitting, etc.)
1 Press the [DOCUMENT FILING] key on theoperation panel.
2 Touch the [FILE FOLDER] key or the[QUICK FILE FOLDER] key depending onwhere the file is saved.
●Touch the [FILE FOLDER] key if the file issaved in the main folder or the custom folder.Touch the [QUICK FILE FOLDER] key if thefile is saved in the Quick File folder.If you touched the [FILE FOLDER] key, thefiles in the main folder or the folders in thecustom folder appear. If you open the wrongfolder, touch the [MAIN FOLDER] key or the[CUSTOM FOLDER] key and open thecorrect folder.
●If the desired file is saved in the main folder,go to step 4. If the desired file is saved in acustom folder, go to step 3.
●If you touched the [QUICK FILE FOLDER]key, the files in the Quick File folder appear.Go to step 4.
3 Touch the key of the folder that containsthe desired file.
If a password is set forthe selected folder, apassword entry screenwill appear. Enter the 5-digit password with thenumeric keys.
4 Touch the printer icon ( ) tab and thentouch the key of the desired file.
The following screen appears if the [QUICK FILEFOLDER] key is touched in step 2.
Touch the key of the file that you wish to call up. Amenu screen will appear. If a password is set for the file, a password entryscreen will appear. Enter the 5-digit password withthe numeric keys.
5 Touch the key of the operation that youwish to perform.
(1) [PRINT] key (see page 7-16)(2) [SEND] key (see page 7-17)(3) [PROPERTY CHANGE] key (see page 7-18)(4) [MOVE] key (see page 7-19)(5) [DELETE] key (see page 7-19)(6) [DETAIL] key (see page 7-19)
The setting screen of the selected operationappears. See the indicated page.
FILE FOLDER
QUICK FILEFOLDER
FILE RETRIEVE
OPQRSJKLMNEFGHIABCD
CUSTOM FOLDER
CUSTOM FOLDER 1
CUSTOM FOLDER 3
CUSTOM FOLDER 5
CUSTOM FOLDER 7
CUSTO
CUSTO
CUSTO
CUSTO
ALL FOLDERS
MAIN FOLDER
MAIN FOLDER SEARCHCUSTOM FOLDER BACK
1/1FILE NAME
Basic Yamada 2004/10/01
2004/10/01
2004/10/01
Sato
Akata
presentation
Product
PRINTS
USER NAME DATE 11
QUICK FILE FOLDER SEARCH BACK
FILE NAME
Tanaka7890123456 User unknown 2004/10/01
2004/10/01User unknownSuzuki7890123456
PRINTS
USER NAME DATE 11
(1) (2) (3)
(4) (5) (6)
SELECT THE JOB.
MOVE
SEND
DELETE
PROPERTYCHANGE
DETAIL
JOB SETTINGS
Basic specifications Yamada Taro
CANCEL
8 "x11"1/ 2
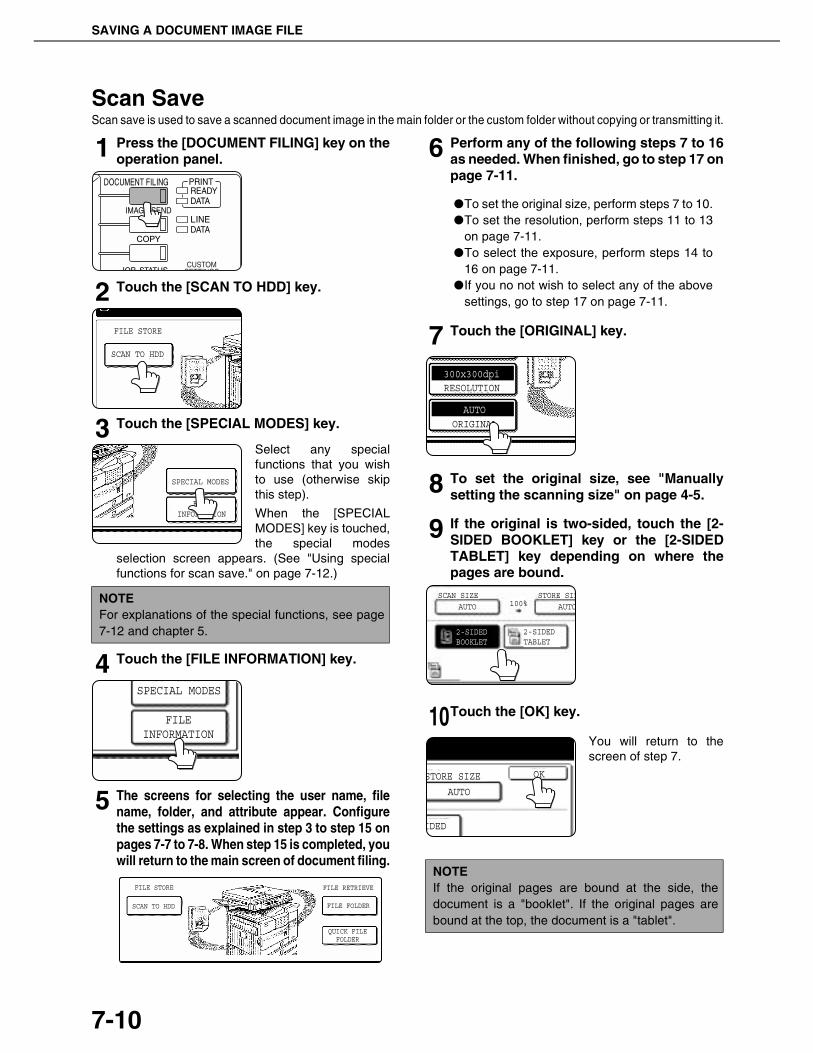
SAVING A DOCUMENT IMAGE FILE
7-10
Scan SaveScan save is used to save a scanned document image in the main folder or the custom folder without copying or transmitting it.
1 Press the [DOCUMENT FILING] key on theoperation panel.
2 Touch the [SCAN TO HDD] key.
3 Touch the [SPECIAL MODES] key.
Select any specialfunctions that you wishto use (otherwise skipthis step).
When the [SPECIALMODES] key is touched,the special modes
selection screen appears. (See "Using specialfunctions for scan save." on page 7-12.)
4 Touch the [FILE INFORMATION] key.
5 The screens for selecting the user name, filename, folder, and attribute appear. Configurethe settings as explained in step 3 to step 15 onpages 7-7 to 7-8. When step 15 is completed, youwill return to the main screen of document filing.
6 Perform any of the following steps 7 to 16as needed. When finished, go to step 17 onpage 7-11.
●To set the original size, perform steps 7 to 10.●To set the resolution, perform steps 11 to 13
on page 7-11.●To select the exposure, perform steps 14 to
16 on page 7-11.●If you no not wish to select any of the above
settings, go to step 17 on page 7-11.
7 Touch the [ORIGINAL] key.
8 To set the original size, see "Manuallysetting the scanning size" on page 4-5.
9 If the original is two-sided, touch the [2-SIDED BOOKLET] key or the [2-SIDEDTABLET] key depending on where thepages are bound.
10Touch the [OK] key.
You will return to thescreen of step 7.
NOTEFor explanations of the special functions, see page7-12 and chapter 5.
SCAN TO HDD
FILE STORE
SPECIAL MODES
FILEINFORMATION
FILEINFORMATION
SPECIAL MODES
SCAN TO HDD FILE FOLDER
QUICK FILEFOLDER
FILE RETRIEVEFILE STORE
NOTEIf the original pages are bound at the side, thedocument is a "booklet". If the original pages arebound at the top, the document is a "tablet".
ORIGINAL
RESOLUTION
AUTO
300x300dpi
2-SIDEDBOOKLET
2-SIDEDTABLET
SCAN SIZE STORE SIZ100%AUTO AUTO
OKSTORE SIZE
AUTO
IDED
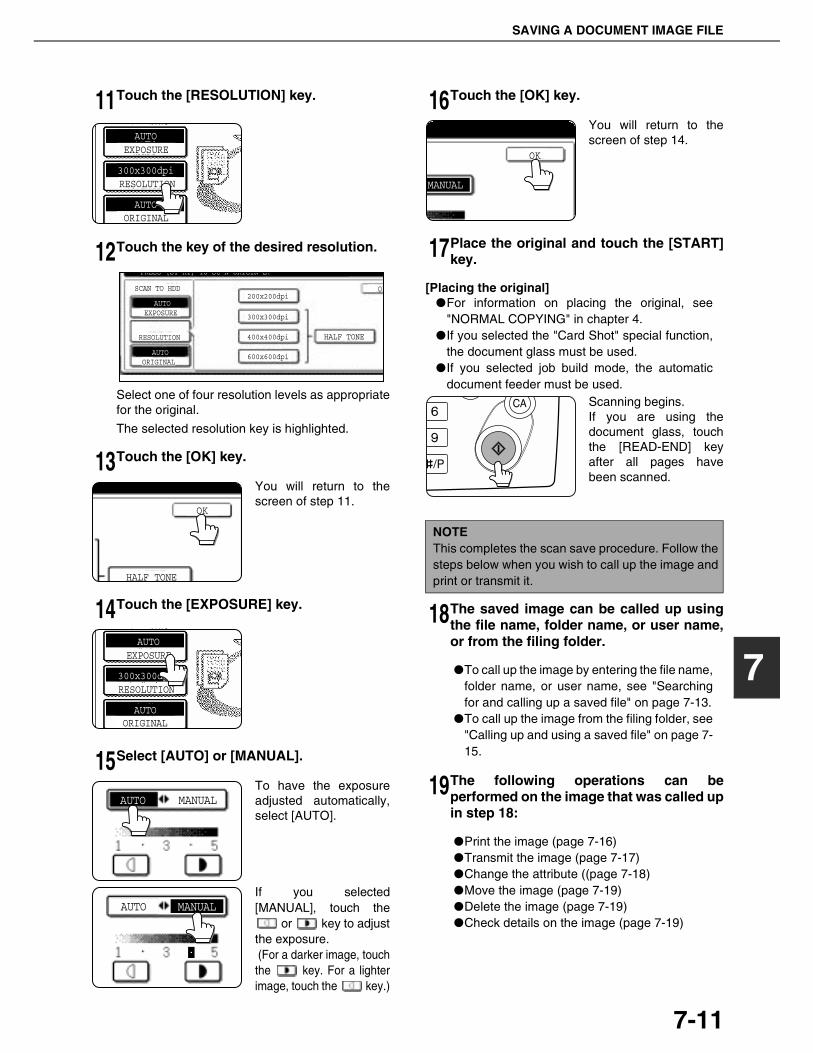
SAVING A DOCUMENT IMAGE FILE
7-11
7
11Touch the [RESOLUTION] key.
12Touch the key of the desired resolution.
Select one of four resolution levels as appropriatefor the original.
The selected resolution key is highlighted.
13Touch the [OK] key.
You will return to thescreen of step 11.
14Touch the [EXPOSURE] key.
15Select [AUTO] or [MANUAL].
To have the exposureadjusted automatically,select [AUTO].
If you selected[MANUAL], touch the
or key to adjustthe exposure. (For a darker image, touchthe key. For a lighterimage, touch the key.)
16Touch the [OK] key.
You will return to thescreen of step 14.
17Place the original and touch the [START]key.
[Placing the original]●For information on placing the original, see
"NORMAL COPYING" in chapter 4.●If you selected the "Card Shot" special function,
the document glass must be used.●If you selected job build mode, the automatic
document feeder must be used.Scanning begins.If you are using thedocument glass, touchthe [READ-END] keyafter all pages havebeen scanned.
18The saved image can be called up usingthe file name, folder name, or user name,or from the filing folder.
●To call up the image by entering the file name,folder name, or user name, see "Searchingfor and calling up a saved file" on page 7-13.
●To call up the image from the filing folder, see"Calling up and using a saved file" on page 7-15.
19The following operations can beperformed on the image that was called upin step 18:
●Print the image (page 7-16)●Transmit the image (page 7-17)●Change the attribute ((page 7-18)●Move the image (page 7-19)●Delete the image (page 7-19)●Check details on the image (page 7-19)
ORIGINAL
RESOLUTION
EXPOSURE
AUTO
AUTO
300x300dpi
PRESS [ST RT] TO SC N ORIGIN L.
SCAN TO HDD
EXPOSURE
ORIGINAL
RESOLUTION
200x200dpiOK
400x400dpi
600x600dpi
300x300dpi
HALF TONE
AUTO
AUTO
OK
HALF TONE
ORIGINAL
RESOLUTION
EXPOSURE
AUTO
AUTO
300x300dpi
MANUALAUTO
MANUALAUTO
NOTEThis completes the scan save procedure. Follow thesteps below when you wish to call up the image andprint or transmit it.
MANUAL
OK

SAVING A DOCUMENT IMAGE FILE
7-12
■■■■ Using special functions for scan save.Touch the [SPECIAL MODES] key in the main scan save screen to display the special modes screen.The functions below can be selected in this screen.
(1) [ERASE] key (see page 5-4)
Use this function to erase shadows that can appeararound the edges of the image when books andother thick originals are scanned.
(2) [DUAL PAGE SCAN] key (see page 5-5)
(Equivalent to Dual page copy in copy mode)
This function is used to save the opened pages ofa book in order one page at a time (left page thenright page).
(3) [2in1] key (see page 5-23)(When the fax or network scanner option isinstalled, this is equivalent to the 2in1 functiondescribed in the fax and network scannermanuals. It is also equivalent to the "Multi shot"function in copy mode; however, only 2in1 ispossible for scan save.)
This function reduces two original pages andarranges the images on a single page in a uniformlayout.
(4) [JOB BUILD] key (see page 5-8)
When you have more pages than can be placed inthe document feeder at once, this function allowsyou to scan the pages in sets.
(5) [CARD SHOT] key (see page 5-26)
This function allows you to save the front and backside of a card on a single page (instead of savingeach side as a separate file).
ORIGINAL
RESOLUTION
BACK
SPECIAL MODES
FILEINFORMATION
EXPOSURE
SCAN TO HDD
AUTO
AUTO
READY TO SCAN TO HDD.PRESS [START] TO SCAN ORIGINAL.
300x300dpi
[READY TO SCAN TO HDD.PRESS [START] TO SCAN ORIGINAL.
SPECIAL MODES
ERASEDUAL PAGE
SCAN
CARD SHOTJOBBUILD
2in121
OK
(1)
(4) (5)
(2) (3)
Touch the [SPECIAL MODES] key in the main screen.

7-13
7
CALLING UP AND USING A FILESearching for and calling up a saved fileWhen calling up a file, you can enter the file name, folder name, or user name to quickly search for the file.To search for a file, touch the [SEARCH] key in the main screen of document filing mode or in a screen that showsfolders or files in a folder. A data search screen will appear.
■■■■ Procedure for searching for a file
1 Touch the [SEARCH] key in the mainscreen of document filing mode or in ascreen that shows folders or files in afolder.
If you touch the[SEARCH] key in thescreen that shows thefolders in the customfolder or a screen thatshows the files in afolder, the [SEARCH
WITHIN CURRENT FOLDER] checkbox willappear. Select this checkbox to search for a fileonly in the selected folder.
2 In the data search screen, select whetheryou will search by [USER NAME] or [FILEOR FOLDER NAME].
●To search by user name, follow steps 3 to 6.●To search by file name or folder name,
perform step 8.●To stop searching, touch the [CANCEL]key.
[Searching by user name]
3 Touch the [USER NAME] key.
4 Touch the one-touch key of the user namethat you wish to use to search for the file.If you wish to directly enter the user name,touch the [DIRECT ENTRY] key.
●The selected user name is highlighted.●If you select the wrong user name, touch the
key of the correct name.●If you touch the [DIRECT ENTRY] key, a
character entry screen will appear. Enter theuser name.See page 7-26 for the procedure for enteringcharacters.
5 Touch the [OK] key.
You will return to thescreen of step 2 and theselected user name willappear.
6 Touch the [SEARCH START] key.
TUS SEARCH
FILE FOLDER
FILE RETRIEVE
CANCEL
USER NAME
SEARCH
FILE OR FOLDER NAME
SEARCH START
CANCEL
USER NAME
SEARCH
FILE OR FOLDER NAME
SEARCH START
SEARCH
SELECT USER NAME.
Suzuki
Ono
Hasegawa
Sasaki
CANCEL
DIRECT ENTRY
UVWXYZOPQRSTJKLMNEFGHIABCDALL USERS
OK
Yamada
Nakata
CANCEL
DIRECT ENTRY
OK
CANCEL SEARCH START
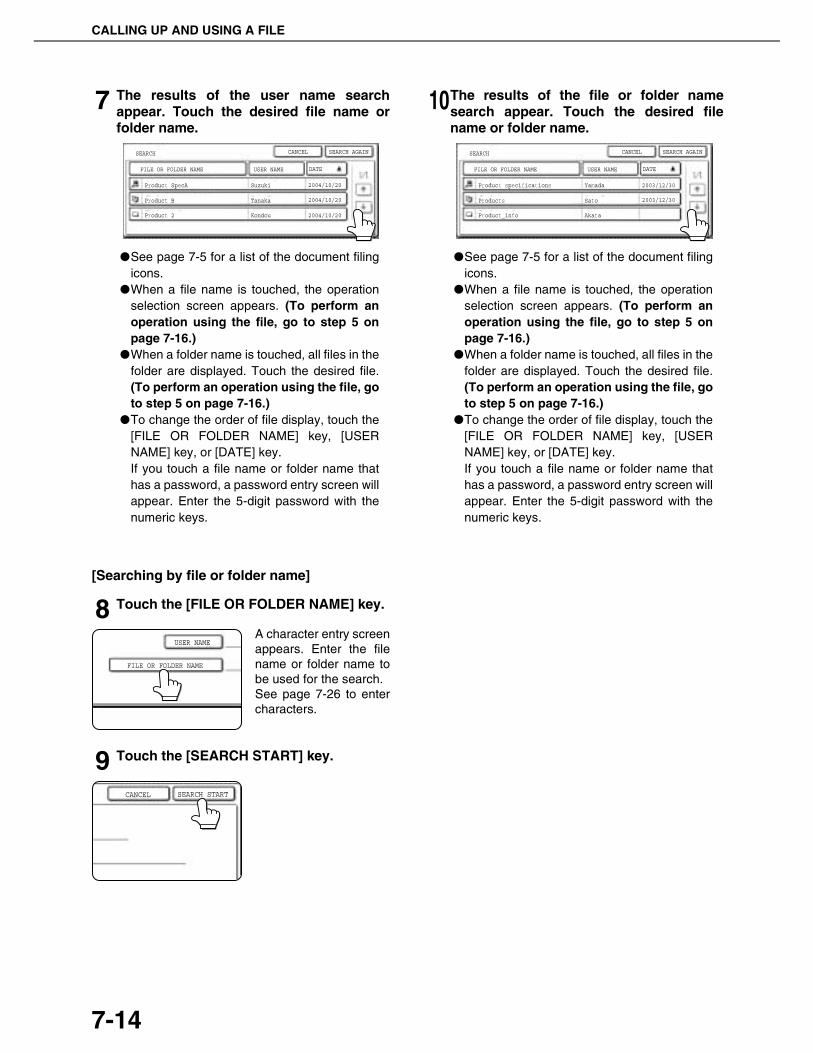
CALLING UP AND USING A FILE
7-14
7 The results of the user name searchappear. Touch the desired file name orfolder name.
●See page 7-5 for a list of the document filingicons.
●When a file name is touched, the operationselection screen appears. (To perform anoperation using the file, go to step 5 onpage 7-16.)
●When a folder name is touched, all files in thefolder are displayed. Touch the desired file.(To perform an operation using the file, goto step 5 on page 7-16.)
●To change the order of file display, touch the[FILE OR FOLDER NAME] key, [USERNAME] key, or [DATE] key.If you touch a file name or folder name thathas a password, a password entry screen willappear. Enter the 5-digit password with thenumeric keys.
[Searching by file or folder name]
8 Touch the [FILE OR FOLDER NAME] key.
A character entry screenappears. Enter the filename or folder name tobe used for the search.See page 7-26 to entercharacters.
9 Touch the [SEARCH START] key.
10The results of the file or folder namesearch appear. Touch the desired filename or folder name.
●See page 7-5 for a list of the document filingicons.
●When a file name is touched, the operationselection screen appears. (To perform anoperation using the file, go to step 5 onpage 7-16.)
●When a folder name is touched, all files in thefolder are displayed. Touch the desired file.(To perform an operation using the file, goto step 5 on page 7-16.)
●To change the order of file display, touch the[FILE OR FOLDER NAME] key, [USERNAME] key, or [DATE] key.If you touch a file name or folder name thathas a password, a password entry screen willappear. Enter the 5-digit password with thenumeric keys.
SEARCH
FILE OR FOLDER NAME USER NAME
Suzuki
Tanaka
Kondou
Product SpecA
Product B
Product 2
2004/10/20
2004/10/20
2004/10/20
SEARCH AGAINCANCEL
DATE
USER NAME
FILE OR FOLDER NAME
CANCEL SEARCH START
SEARCH
FILE OR FOLDER NAME USER NAME
SEARCH AGAINCANCEL
DATE
Yamada
Sato
Akata
Product specifications
Products
Product_info
2003/12/30
2003/12/30

CALLING UP AND USING A FILE
7-15
7
Calling up and using a saved fileA file saved with the document filing function can be called up and printed or manipulated as needed.The following operations can be performed:● [Print] : Print the file (page 7-16).● [Send] : Transmit the saved file (page 7-17). The file can be transmitted by Scan to E-mail, Scan to FTP, fax, or
Internet fax. (All of these methods require installation of the appropriate options.) (Page 1-11)● [Property change] : Change the attribute of the saved file (page 7-18).● [Move] : Move the file (page 7-19)● [Delete] : Delete the file (page 7-19)● [Detail] : Show details on the saved file (page 7-19).
■■■■ General procedure for using a saved file
1 Press the [DOCUMENT FILING] key on theoperation panel.
2 Touch the [FILE FOLDER] key or the[QUICK FILE FOLDER] key depending onwhere the file is saved.
●Touch the [FILE FOLDER] key if the file issaved in the main folder or the custom folder.Touch the [QUICK FILE FOLDER] key if thefile is saved in the Quick File folder.If you touched the [FILE FOLDER] key, thefiles in the main folder or the folders in thecustom folder appear. If you open the wrongfolder, touch the [MAIN FOLDER] key or the[CUSTOM FOLDER] key and open thecorrect folder.
●If the desired file is saved in the main folder,go to step 4. If the desired file is saved in acustom folder, go to step 3.
●If you touched the [QUICK FILE FOLDER]key, the files in the Quick File folder appear.Go to step 4.
3 Touch the key of the folder that containsthe desired file.
If there are more custom folder keys than canappear in one screen, touch the or keysto change screens.
If a password is set for the selected folder, apassword entry screen will appear. Enter the 5-digit password with the numeric keys.
4 Touch the desired file key.FILE FOLDER
QUICK FILEFOLDER
FILE RETRIEVE
UVWXYZOPQRSTJKLMNEFGHIABCD
CUSTOM FOLDER
CUSTOM FOLDER 1
CUSTOM FOLDER 3
CUSTOM FOLDER 5
CUSTOM FOLDER 7
CUSTOM FOLDER 2
CUSTOM FOLDER 4
CUSTOM FOLDER 6
CUSTOM FOLDER 8
ALL FOLDERS
MAIN FOLDER SEARCH BACK
1/1
MAIN FOLDER SEARCHCUSTOM FOLDER BACK
FILE NAME
Basic specifications Yamada 2003/10/20
2003/10/20
2003/10/20
Sato
Akata
presentaion_0903
Product_info
COPY
USER NAME DATE 11

CALLING UP AND USING A FILE
7-16
5 Touch the key of the operation that youwish to perform.
(1) [PRINT] key (see below)
(2) [SEND] key (see page 7-17)
(3) [PROPERTY CHANGE] key (see page 7-18)
(4) [MOVE] key (see page 7-19)
(5) [DELETE] key (see page 7-19)
(6) [DETAIL] key (see page 7-19)
The setting screen of the selected operationappears. See the indicated page.
■■■■ [Print]A saved file can be printed.The screen below appears when the [PRINT] key is selected in the operation selection screen. To begin printing,touch the [PRINT] (7) key. Printing settings can be selected in this screen before printing. The settings that werein effect when the file was saved appear initially. The settings can be changed as needed.
(1) [PAPER SELECT] key
Use this key to set the paper size.
(2) [OUTPUT] key
Use this key to select sort, group or staple sortfunctions, and to select the output tray.
(3) [2-SIDED] key
When performing two-sided printing, use this keyto select the orientation of the image on the backside of the paper. To have the front and backimages oriented in the same direction, touch the [2-SIDED BOOKLET] key. To have the front and backimages oriented opposite to each other, touch the[2-SIDED TABLET] key. Note that the size andorientation of the saved image may cause thesekeys to have the opposite effect. If neither key isselected, one-sided printing will take place.To perform two-sided printing, the optional duplexmodule is necessary.
(4) [TANDEM PRINT] key
If the conditions for tandem printing are met (page5-9), touch this key to enable tandem printing. Seepage 5-9 for more information.When printing a file that was saved in copy mode,this key changes to the [SPECIAL MODES] key.The [SPECIAL MODES] include [PRINT MENU]and [TANDEM PRINT]. For information on the printmenu, see page 5-29.
(5) [NUMBER OF PRINTS] setting key
Use this key to set the number of copies.
(6) [PRINT AND DELETE THE DATA] key
Touch this key to print a file and then have itautomatically deleted.
(7) [PRINT AND SAVE THE DATA] key
Touch this key to print a file. The file will not beautomatically deleted after printing.
(1) (2) (3)
(4) (5) (6)
SELECT THE JOB.
MOVE
SEND
DELETE
PROPERTYCHANGE
DETAIL
JOB SETTINGS
Basic specifications Yamada Taro
CANCEL
8 "x11"1/ 2
NOTES● When print settings are changed with this procedure, only the value for the number of copies is overwritten.● The printing speed will be slower for image files saved using certain resolution settings. (See page 7-28.)
PRINT AND DELETE THE DATA
PRINT AND SAVE THE DATA
NUMBER OF PRINTS
CANCEL
1 (1~999)
PAPER SELECT
TANDEM PRINT
2-SIDED
OUTPUT
AUTO
JOB SETTINGS / PRINT
Basic specifications Yamada Taro 8 x111/ 2
SPECIAL MODES
2-SIDED
(1) (2)
(4) (5) (6) (7)
(3)
CALLING UP AND USING A FILE
7-17
7
■■■■ [Send]A saved file can be transmitted by Scan to E-mail, Scan to FTP, fax, or Internet fax.These transmission methods require installation of the appropriate options.
The following screen appears when the [SEND] key is touched. Select the destination and other settings requiredfor transmission and then touch the [SEND] (10) key to transmit the file. Transmission settings include theresolution and transmission functions such as a timer setting. Change or select these settings as needed.
(1) [RESOLUTION] keyUse this key to set the resolution.
The resolution is set when performing Scan to E-mail/FTP and the resolution is set when performinga fax or Internet fax transmission.
(2) [FILE FORMAT] key [FILE FORMAT] key is displayed in E-mail/FTPmode. Touch this key to set the file format of scanimages that you transmit.
(3) [FILE NAME/USER NAME] displayThis shows the file name and user name of the fileto be transmitted.
(4) [ ] key (Speed dial key)Use this key to specify a destination by entering the3-digit number that is assigned to an e-mailaddress or fax number when it is stored in a one-touch key or group key.
(5) [MODE SWITCH] keyUse this key to select the transmission mode (Scanto E-mail/FTP, fax, or Internet fax).
(6) [CANCEL] keyTouch this key to return to the operation selectionscreen.
(7) [ADDRESS BOOK] keyTouch this key to display the destinations stored inthe directory.
(8) [ADDRESS REVIEW] keyTouch this key to display the destinations.
(9) [SPECIAL MODES] keyTouch this key to display the special functionmenu. The functions that can be selected varydepending on the transmission mode:● Scan to E-mail/FTP
TIMER : The transmission time can be specified.● FAX
TIMER : The transmission time can be specified.FAX OWN ADDRESS SENDING: Your sender'sinformation can be included on the fax pagesprinted out by the receiving machine.TRANSACTION REPORT: A transaction reportcan be printed based on the specified conditionsafter a transaction ends.
● Internet FAXTIMER : The transmission time can be specified.I-FAX OWN ADDRESS SEND: Your sender'sinformation can be included on the Internet faxpages printed out by the receiving machine.TRANSACTION REPORT: A transaction reportcan be printed based on the specified conditionsafter a transaction ends.
(10) [SEND] keyTouch this key after selecting transmission settingsto begin transmission. (The [START] key can alsobe pressed to begin transmission.)
NOTEJobs that use the following special functions cannot be transmitted when called up. (The [SEND] key is grayed outin the operation selection screen.)
Pamphlet copying, covers/insert, card shot, Multi shot.Jobs that use the following functions can be transmitted with certain restrictions when called up:
Card shot:Can be transmitted if saved by scan save or image send.Multi shot (2in1):Can be transmitted if saved as 2in1 using a portrait original.
CANCEL
ADDRESS BOOK
ADDRESS REVIEW
SPECIAL MODES
MODE SWITCHE-MAIL/FTP
RESOLUTION
Basic specifications
Yamada Taro
200x200dpi
FILE FORMATPDF NONE ADDRESS ENTRY
SEND SETTINGS
SEND
READY TO SEND
(1)
(2)
(3)
(4) (5) (6)
(7)
(8)
(9)
(10)
(11)(12)
[Example of E-MAIL/FTP mode]

CALLING UP AND USING A FILE
7-18
(11) [SEND SETTINGS] key[SEND SETTINGS] key is displayed in E-mail/FTPmode and Internet FAX mode.Touch this key to set the subject and file name. InE-mail/FTP mode, sender name can also be set.
(12) [SUB ADDRESS] key or [ADDRESS ENTRY] key● Touch this key to directly enter the destination
for a Scan to E-mail/FTP or Internet faxtransmission, .
● Touch this key to enter the sub-address andpasscode for an F-code fax transmission.
■■■■ [Property change]Select this operation to change the attribute of a saved file. Three attributes are available: [SHARING],[PROTECT], and [ CONFIDENTIAL].The following screen appears when the [PROPERTY CHANGE] key is selected in the operation selectionscreen. Note the restrictions below on changing the attribute.
[Restrictions on changing the attribute]●A file that is set to [SHARING] can be
changed to [PROTECT] or [CONFIDENTIAL].However, a [SHARING] file that is saved inthe Quick File folder can only be changed to[PROTECT].
●A file that is set to [PROTECT] can bechanged to [SHARING] or [CONFIDENTIAL].However, a [PROTECT] file that is saved inthe Quick File folder can only be changed to[SHARING].
●A file that is saved in the Quick File foldercannot be changed to [CONFIDENTIAL].
1 Touch the [PROPERTY CHANGE] key inthe operation selection screen.
2 Touch the key of the desired attribute.
If you are changing a[SHARING] or[PROTECT] file to[CONFIDENTIAL],touch the [PASSWORD]key and enter thepassword.
3 Touch the [OK] key.
NOTESee the "Operation manual (for facsimile)" and "Operation manual (for network scanner)" for detailed explanationsof (1), (2), (3), (4), (5), (6), (7), (8), (9), (11), and (12).
JOB SETTINGS / PROPERTY CHANGE
Basic specifications Yamada Taro A4
CANCEL OK
SHARING
CONFIDENTIAL
PROTECT
PASSWORD
PROPERTYCHANGE
DETAIL
SHARING
CONFIDENTIAL
PROTECT
PASSWORD
OKNCEL

CALLING UP AND USING A FILE
7-19
7
■■■■ [Move]This operation is used to move a file to a differentfolder.The following screen appears when the [MOVE]key is selected.Only [SHARING] and [CONFIDENTIAL] files canbe moved. A [PROTECT] file can be moved by firstusing [PROPERTY CHANGE] to change theattribute to [SHARING] or [CONFIDENTIAL].
1 Touch the [MOVE TO:] key and select thefolder to which you wish to move the file.●Select the main folder or a folder in the
custom folder. A file cannot be moved to theQuick File folder.
●The file name can be changed when moving afile. To change the name, touch the [FILENAME] key and enter the desired file name.See page 7-26 for the procedure for enteringcharacters.
2 Touch the [OK] key.
3 Touch the [MOVE] key.
4 Touch the [CANCEL] key.
You will return to theoperation selectionscreen.
■■■■ [Delete]This operation is used to delete the selected file.Touch the [DELETE] key in the operation selectscreen. A message asking you to confirm thedeletion will appear. Touch the [YES] key to deletethe file.Only [SHARING] or [CONFIDENTIAL] files can bedeleted. (A [PROTECT] file can be deleted by firstusing [PROPERTY CHANGE] to change theattribute to [SHARING].)
■■■■ [Detail]This operation is used to show detailed informationon the selected file.Touch the [DETAIL] key to display the information.The information appears on two screens. Touchthe key or key to move between the twoscreens.The file name can be changed in the informationscreen. To change the name, touch the [FILENAME] key and enter the desired file name in thecharacter entry screen that appears. See page 7-26 for the procedure for entering characters.
JOB SETTINGS / MOVE
SELECT THE FOLDER THE FILE IS MOVED TO.
FILE NAME
MOVE TO:
CANCEL
Basic specifications
Basic specifications
Yamada Taro A4
MOVE
8 x111/ 2
N FOLDER OK
OVED TO.
ations
amada Taro 4
MOVE
CANCEL
aro A48 x111/ 2

CALLING UP AND USING A FILE
7-20
■■■■ Calling up and manipulating a file from the job status screenFiles saved using the "FILE" and "QUICK FILE" functions appear as keys in the finished job status screen.You can view information on a file that appears in this screen and manipulate the file.
1 Press the [JOB STATUS] key.
The job status screenappears.
2 Touch the [COMPLETE] key.
The finished job screenappears.
3 Touch the key of the desired file.
If there are more keysthan can appear in onescreen and the desiredfile does not appear,touch the key or
key to changescreens.
The touched key is highlighted.
4 To view information on the file, touch the[DETAIL] key.
Use the keysto change screens.
When you are finished,touch the [OK] key toreturn to the screen of step3.
5 Touch the [CALL] key.
The operation selectionscreen appears.
Select and perform the desired operation asexplained in "Calling up and using a saved file"(page 7-15).
JOB QUEUE
DETAIL
1/8 COMPLETE
JOBS COMPLETED
Suzuki7890123456 14:09 12/09 00
COPY 13:27 12/09 00
COPY 14:38 12/09 00
Tanaka7890123456 14:38 12/09 01
SET TIME NUM
DETAIL
CALL
INTERNET FAXX JOB
FILE NAME:
DETAIL OFCOPY
COPY_20041021_153050
SIZE:8 x11
DATE:2004/10/10 15:30
RESOLUTION:600x600dpi
PAGES:10
OK
CALL
1/ 21/2
FILE NAME
DETAIL OF
DATA SIZE: 21,987,543KB 1-SIDED
OUTPUT:SPECIALMODES:
DOCUMENTSTYLE:
FILE FORMAT:
OK
COPY_20041021_153050 CALL
COPY
2/2
CALL
INTERNET-FAXX JOB

7-21
7
CUSTOM SETTINGSCreating, editing, and deleting user names and foldersThis section explains how to create, edit, and delete user names and custom folders for saving files with thedocument filing function. User names and custom folders are created and edited at the operation panel of themachine or in the Web page.
■■■■ General procedure for creating, editing, and deleting user names and foldersFollow steps 1 to 3 below to create, edit, or delete a user name or custom folder. In step 3, select the key for thespecific operation that you wish to perform.
1 Press the [CUSTOM SETTINGS] key.
2 Touch the [DOCUMENT FILINGCONTROL] key.
3 Touch the key of the operation that youwish to perform.Go to the page indicated below for the selectedoperation.
(1) [USER NAME REGISTRATION] key
Program a user name. (See the next page)
(2) [AMEND/DELETE USER NAME] key
Edit or delete a user name. (See page 7-23)
(3) [CUSTOM FOLDER REGISTRATION] key
Create a custom folder. (See page 7-24)
(4) [AMEND/DELETE CUSTOM FOLDER] key
Edit or delete a custom folder. (See page 7-25)
NOTES● A previously stored name cannot be used when creating a new user name or custom folder. However, the same
password can be used more than once.● A password cannot be omitted when creating a user name.
DEFAULTSETTINGS
SENDER CONTROL
KEY OPERATOR P
ADDRESS CONTROL
TOTAL COUNT
DOCUMENT FILINGCONTROL
CUSTOM SETTINGS
DOCUMENT FILING CONTROL
USER NAME REGISTRATION
CUSTOM FOLDER REGISTRATION
AMEND/DELETE USER NAME
AMEND/DELETE CUSTOM FOLDER
OK
(1) (2)
(3) (4)

CUSTOM SETTINGS
7-22
■■■■ Programming a user nameTo program a user name, follow steps 1 and 2 on page 7-21, touch the [USER NAME REGISTRATION] key instep 3, and then follow these steps:
1 Touch the [USER NAME] key.
The lowest number thathas not yet beenprogrammed appearsautomatically in "No.".Touch the number todisplay a character entryscreen and enter a user
name (maximum of 16 characters). See page 7-26for the procedure for entering characters.
2 Touch the [INITIAL] key.
A character entry screenappears. Enter up to 10search characters. Seepage 7-26 for theprocedure for enteringcharacters.
3 Touch the [PASSWORD] key.
A password cannot beomitted.
4 Set a password for the user name (enter a5-digit password with the numeric keys).
This will be the passwordfor the user nameentered in step 1.As each digit is entered,"-" changes to " ". Ifyou make a mistake,press the [C] key and
then enter the correct number.
5 Touch the [OK] key.
6 If you wish to specify a folder for the username, touch the [STORED TO:] key. If youwish to use the main folder, go to step 8.
7 The folders that have been created appear.Touch the desired folder. If you wish tocreate a new folder, or if no folders havebeen created, touch the [ADD NEW] key.
If you touched the [ADD NEW] key, program aname for the folder as explained on page 7-24.
The user name programmed in step 1 is selectedas the user name of the folder.
8 Touch the [EXIT] key.
You will return to the"USER NAMEREGISTRATION"screen."REGISTRATION ISCOMPLETED." willappear highlighted nextto "No.".
9 To exit, touch the [EXIT] key. To programanother user name, touch the [NEXT] key.
If you touched the [EXIT]key, you will return to thescreen of step 3 on page7-21. If you touched the[NEXT] key, a new userentry screen will appear.Repeat steps 1 to 9 toprogram a new user.
CUSTOM SETTINGS
No.001
USER NAME
PASSWORD
STORED TO:
SELECT THE DEFAULT FOLDER THE F
INITIAL
NEXT
R THE FILE WITH THIS USER NAME IS STORED.
CUSTOM
No.001
USER NAME
PASSWORD
STORED TO:
SELECT THE DEFAULT FOLDER THE FIL
Yamada
CANCEL
ENTER PASSWORD VIA THE 10-KEY PAD.
CANCEL
EXIT
OK
10-KEY PAD.
REGISTRATION IS COMPLETED.No.001
USER NAME
PASSWORD
STORED TO:
SELECT THE DEFAULT FOLDER THE FILE
Yamada
MAIN FOLDER
STORED TO:
ALL FOLDERS
CUSTOM FOLDER 1
CUSTOM FOLDER 3
CUSTOM FOLDER 5
CUSTOM FOLDER 7
CUSTOM FOLDER 6
CUSTOM FOLDER 4
CUSTOM FOLDER 2
CUSTOM FOLDER 8
ABCD EFGHI JKLMN OPQRS UVWXY
MAIN FOLDER ADD NEW
1/1
– – – – –
EXIT
INITIAL
EXITNEXT
WITH THIS USER NAME IS STORED.
Yamada

CUSTOM SETTINGS
7-23
7
■■■■ Editing and deleting a user nameTo edit or delete a user name, follow steps 1 and 2 on page 7-21 and then follow these steps:
1 Touch the [AMEND/DELETE USER NAME]key.
2 Touch the [USER NAME] key that you wishto edit or delete.
A password entry screen will appear.
3 Enter the 5-digit password with thenumeric keys.
After entering the password, the following screenwill appear.
● To edit a user name, perform steps 4 and 5.● To delete a user name, perform steps 6 and 7.
[Editing]
4 Touch the key of each item that you wishto edit (edit as explained in steps 1 to 9 in"Programming a user name" on page 7-22).
When you have finishedediting the items,"REGISTRATION ISCOMPLETED." willappear highlighted nextto "NO.".
5 When you have finished editing thedesired items, touch the [EXIT] key.
To edit another username, repeat steps 2 to4.
To exit, touch the [EXIT]key in the screen of step2.
[Deleting]
6 Touch the [DELETE] key.
7 Touch the [YES] key.
You will return to thescreen of step 2. Todelete another username, repeat steps 2, 3and 6.To exit, touch the [EXIT]key in the screen of step2.
OK
AMEND/DELETE USER NAME
AMEND/DELETE CUSTOM FOLDER
USER NAME / AMEND/DELETE
SELECT USER NAME TO AMEND/DELETE.
Suzuki
Ono
Hasegawa
Sasaki
EXIT
UVWXYZOPQRSTJKLMNEFGHIABCDALL USERS
Yamada
Nakata
1/1
ENTER PASSWORD VIA THE 10-KEY PAD.
CANCEL
BCD EFGHI JKLMN OPQRST UVWXYZ
USER NAME / AMEND/DELETE
No.001
USER NAME INITIAL YamadaYamada
MAIN FOLDER
PASSWORD
STORED TO:
SELECT THE DEFAULT FOLDER THE FILE WITH THIS USER NAME IS STORED.
DELETE EXIT
NOTEWhen a user name is changed, the change is notupdated to any previously saved data (files orfolders).
USER NAME / AMEND/DELETE
No.001 REGISTRATION IS COMPLETED.
USER NAME INITYamada
MAIN FOLDER
PASSWORD
STORED TO:
SELECT THE DEFAULT FOLDER THE FILE WITH
ITIAL Yamada
THIS USER N ME IS STORE
DELETE EXIT
ITIAL Yamada
H THIS USER N ME IS STORE
DELETE EXIT
DELETE THE USER NAME?
Yamada
NO YES

CUSTOM SETTINGS
7-24
■■■■ Creating a custom folderUp to 500 custom folders can be created. When no further folders can be created, delete unneeded folders (page7-25) and then create a new folder. A password can be omitted when creating a folder. To create a custom folder,follow steps 1 and 2 on page 7-21, touch the [CUSTOM FOLDER REGISTRATION] key in step 3, and then followthe steps below.
1 Touch the [FOLDER NAME] key.
The lowest number thathas not yet beenprogrammed appearsautomatically in "No.".Touch the number todisplay a character entryscreen and enter a
folder name (maximum of 28 characters). Seepage 7-26 for the procedure for enteringcharacters.
2 Touch the [INITIAL] key.
A character entry screenappears. Enter up to 10search characters. Seepage 7-26 for theprocedure for enteringcharacters.
3 If you wish to set a password for the newfolder, touch the [PASSWORD] key.
A password can beomitted.If you are omitting apassword, go to step 6.
4 Set a password for the folder (enter a 5-digit password with the numeric keys).
This will be the passwordfor the folder nameentered in step 1.
5 Touch the [OK] key.
6 Touch the [USER NAME] key.
You will select a username that will beassociated with thefolder name you areprogramming.Selection of a user namecannot be omitted.
7 The programmed user names appear.Touch the desired user name. If you do notwish to use any of the user names thatappear, touch the [ADD NEW] key toprogram a new user name.
When you touch a user name, a password entryscreen appears.If you touched the [ADD NEW] key, program auser name as explained on page 7-22. The foldername programmed in step 1 will be selected as thefolder for the user.
8 Enter the 5-digit password of the selecteduser name with the numeric keys.
CUSTOM FOLDER REGISTRATION
No.001
FOLDER NAME
INITIAL
USER NAME
CUSTOM FOLDER REGISTRATION
No.001
FOLDER NAME
INITIAL
USER NAME
USER FOLDER 1
P
CUSTOM FOLDER REGISTRATION
No.001
FOLDER NAME
INITIAL
USER NAME
USER FOLDER 1
PASSWORD
CANCEL
ENTER PASSWORD VIA THE 10-KEY PAD.
CANCEL
ENTER PASSWORD VIA THE 10-KEY PAD.
CANCEL
EXIT
OK
10-KEY PAD.
No.001
FOLDER NAME USER FOLDER 1
INITIAL USER1
USER NAME
PAS
CUSTOM FOLDER REGISTRATION
SELECT USER NAME. OK
ALL FOLDERS ABCD EFGHI JKLMN OPQRST UVWXYZ
ADD NEW
1/1 Suzuki Sasaki
Nakata
Yamada
Hasegawa
Ono
ENTER PASSWORD VIA THE 10-KEY PAD.
CANCEL
BCD EFGHI JKLMN OPQRST UVWXYZ
CUSTOM SETTINGS
7-25
7
9 Touch the [OK] key. 10To exit, touch the [EXIT] key. To createanother folder, touch the [NEXT] key.
If you touched the [EXIT]key, you will return to thescreen of step 3 on page7-21. If you touched the[NEXT] key, a new folderscreen will appear.Repeat steps 1 to 10 to
create a new folder.
■■■■ Editing/deleting a custom folderTo edit a previously created folder (change the folder name, initial, password, or user name), or to delete a folder,follow steps 1 and 2 on page 7-21 and then follow the steps below.
1 Touch the [AMEND/DELETE CUSTOMFOLDER] key.
2 Touch the [FOLDER NAME] key that youwish to edit or delete.
If a password has been set for the folder, apassword entry screen will appear. Enter thecorrect 5-digit password with the numeric keys.
3 Edit or delete the folder.
●To edit the folder, perform steps 4 and 5.●To delete the folder, perform steps 6 and 7.●To exit, touch the [EXIT] key.
[Editing]
4 Touch the key of each item that you wishto edit (edit as explained in steps 1 to 10 of"Creating a custom folder" on page 7-24).
After editing the items and returning to the screen ofstep 3, "REGISTRATION IS COMPLETED." will behighlighted to the right of "No.".To stop using a password, touch the[PASSWORD] key and then touch the [OK] keywithout entering anything for the password. [-] willappear and the password will be canceled.
5 When you have finished editing the items,touch the [EXIT] key.To edit another folder, repeat steps 2 to 5.
[Deleting]
6 Touch the [DELETE] key.
7 Touch the [YES] key.
You will return to thescreen of step 2.To delete another folder,repeat steps 2, 6, and 7.To exit, touch the [EXIT]key in the screen of step2.
OK
JKLMN OPQRST UVWXYZ
ADD NEW
1/1
SWORD
EXITNEXT
When deleting a folder...A folder that contains files cannot be deleted. Either move the files to a different folder or delete them before deleting the folder.: [MOVE] (see page 7-19) : [DELETE] (see page 7-19)
AMEND/DELETE USER NAME
AMEND/DELETE CUSTOM FOLDER
CUSTOM FOLDER 1
CUSTOM FOLDER 3
CUSTOM FOLDER 5
CUSTOM FOLDER 7
ALL FOLDERS
CUSTOM FOLDER / AMEND/DELETE
SELECT CUSTOM FOLDER TO AMEND/DELETE.
CUSTOM FOLDER 6
CUSTOM FOLDER 8
CUSTOM FOLDER 4
CUSTOM FOLDER 2
ABCD EFGHI JKLMN OPQRST UVWXYZ
EXIT
1/2
CUSTOM FOLDER / AMEND/DELETE
No.001
FOLDER NAME USER FOLDER 1
INITIAL USER1 *****
YamadaUSER NAME
EXITDELETE
PASSWORD
No.001
FOLDER NAME USER FOLDER 1
INITIAL USER1
YamadaUSER NAME
EXITDELETE
PASSWORD
REGISTRATION IS COMPLETED.
CUSTOM FOLDER / AMEND/DELETE
– – – – –
EXIT
ORD
DELETE
DELETE THE FOLDER?
USER FOLDER 1
NO YES

7-26
ENTERING CHARACTERSTo enter or edit characters in setting screens such as auto dial key programming screens, follow the steps below.Characters that can be entered are alphabetical characters, special characters, numbers, and symbols.
■■■■ Entering alphabetical characters(Example: Sharp äÄ)
1 Touch the [S] key.
To switch between upper case and lower case,touch the [ABC abc] key. When ABC ishighlighted, upper case letters are entered.
2 Touch the [ABC abc] key.
3 Touch the [h] key, [a] key, [r] key, and [p]key.
If you make a mistake, touch the key to movethe cursor ( ) back one space and then enter thecorrect character. You can also press the [AB/ab
12#$%] key during entry to enter a number orsymbol.
4 Touch the [SPACE] key.
The cursor ( ) moves forward and a space isentered.
5 Touch the [ ÃÄÂ/ãäâ] key.
6 Touch the [ä] key.
To switch between upper case and lower case,touch the [ÃÄÂ ãäâ] key. When ãäâ ishighlighted, lower case letters are entered.
7 Touch the [ÃÄÂ ãäâ] key.
8 Touch the [Ä] key.
You can press the [ABC/abc] key during entry toreturn to alphabetical character entry. You canalso enter numbers and symbols.
9 When finished, touch the [OK] key.
You will exit the character entry screen and returnto the programming screen. If you touch the[CANCEL] key, you will return to the programmingscreen without storing the entered characters.
Characters cannot be entered beyond the " " mark.
S
Shar
Sharp
Sharp
Sharp
Sharp ä
Sharp ä
Sharp äÄ
ENTERING CHARACTERS
7-27
7
■■■■ Entering numbers and symbols
1 Touch the [AB/ab 12#$%] key.
When the characters "12#$%" are highlighted,number/symbol entry mode is selected.
2 Enter the desired number or symbol.Numbers and symbols that can be entered are asfollows:
Screen 1/2
Screen 2/2
* Change screens by touching the key or key displayed in the screen. If you make amistake, touch the key to move the cursor( ) back one space and then enter the correctcharacter.You can continue touching keys to entercharacters. You can also touch anothercharacter type selection key ([ ÃÄÂ/ãäâ] keyor [AB/ab 12#$%] key) to enter charactersother than numbers and symbols.
3 When you have finished enteringcharacters, touch the [OK] key.
You will exit the character entry screen and returnto the programming screen. If you touch the[CANCEL] key, you will return to the programmingscreen without storing the entered characters.
NOTEThe following symbols cannot be used whenentering a file name or folder name.
1&1
:::
\ ? / " ; : ,
< > ! * | & #
7-28
TROUBLESHOOTINGThis section explains problems frequently encountered when using the document filing function. If you experienceany difficulty, refer to the following table. For information on general machine problems, printer problems, faxproblems, and network scanner problems, please see the troubleshooting sections of the appropriate manuals.
Problem Check Cause and solution
A saved file hasdisappeared.
Was the file called up and then printed bytouching the [PRINT AND DELETE THEDATA] key?
A file that is printed using the [PRINT ANDDELETE THE DATA] key is automaticallydeleted after being printed. To print a filewithout deleting it, use the [PRINT ANDSAVE THE DATA] key.
A file cannot bedeleted.
Is the file's attribute set to [PROTECT]? A file cannot be deleted when its attribute isset to [PROTECT]. Change the attribute to[SHARING] and then delete the file.
A file's attributecannot be set to[CONFIDENTIAL].
Is the file in the main or custom folder? A file in the Quick File folder cannot be set to[CONFIDENTIAL]. Move the file to adifferent folder or set it to [PROTECT].
A file's attributecannot be changedto [PROTECT].
Is the file set to [CONFIDENTIAL]? A file cannot be simultaneously set to[CONFIDENTIAL] and [PROTECT]. If set to[CONFIDENTIAL], use [PROPERTYCHANGE] (page 7-18) to change theattribute to [PROTECT].
A name in the QuickFile folder is cut off.
Was the name programmed in the advancedtransmission settings?
If the name was programmed in theadvanced transmission settings before thefile was saved in the Quick File folder, thatname will be used. However, if the name islonger than the maximum name length of theQuick File folder (30 characters), the excesscharacters will be discarded.
Resolution settingsare not possible.
Was the file saved at low resolution? A saved file cannot be transmitted at aresolution higher than the resolution atwhich it was saved.
A file name cannotbe programmed orchanged.
Have you entered prohibited characters inthe file name?
Certain characters (symbols) cannot beused in file names. See "ENTERINGCHARACTERS" (entering numbers andsymbols) on page 7-26.
A custom foldername cannot beprogrammed orchanged.
Have you entered prohibited characters inthe folder name?
Certain characters (symbols) cannot beused in folder names. See "ENTERINGCHARACTERS" (entering numbers andsymbols) on page 7-26.
The printing speedof a saved file isslow.
The file was saved using one of the followingresolution settings:● 200 x 200 dpi resolution.● STANDARD (200 x 100 dpi) or FINE (200
x 200 dpi)
When a file is saved using one of theresolutions setting at left, the printing speedwill be slower than when other resolutionsettings are used.
Black dots appearwhen a file that wassaved with thedocument filingfunction is printed.
Was the file saved at other than the followingresolutions?● 600 x 600 dpi● 600 x 600 dpi and HALF TONETo check the resolution of the saved file, touchthe [DETAIL] key in step 5 on page 7-16.
This problem can be alleviated by setting theresolution to 600x600dpi when saving a filewith scan save.The problem can be further alleviated byselecting HALF TONE after setting theresolution to 600x600dpi, as light imageswill be printed lightly.
8-1
CHAPTER 8SPECIFICATIONS
This chapter contains useful information about the machine.
PageSPECIFICATIONS .................................................................................. 8-2LIST OF COMBINATION OF PERIPHERAL DEVICES.......................... 8-4
INDEX ..................................................................................................... 8-5

8-2
SPECIFICATIONS
Automatic document feeder
* Maximum of 15 sheets when originals are heavier than 28 lbs.(105 g/m2). If the number of placed sheets exceedsthis, scanning of the originals will not take place correctly and an extended image may result.
Type Console
Print system Electrophotographic system
Photoconductive type OPC drum
Developer system Dry-type two-component magnetic brush development
Fusing system Heater roller
Resolution Scan: 600 x 600 dpi, output: 600 x 600 dpi
Gradation 256 levels
Originals Sheets, bound documentsMaximum size: 11" x 17" or A3
Copy paper Plain paper and special papers
Copy sizes Max. 11" x 17" or A3, min. 5-1/2" x 8-1/2"R or A5R, PostcardImage loss: Max 21/64" or 8 mm (leading edge and trailing edge in total), max. 21/64" or 8 mm (along all other edges in total)
Warm-up time 80 seconds or less
First-copy time AR-M351N4.9 seconds or less*AR-M451N4.4 seconds or less** Conditions: The document glass is used and A4 size paper is fed horizontally from
the machine tray (tray 1).
Copy ratio Variable: 25 to 400% in 1% increments, total 376 stepsFixed presets: 25%, 50%, 64%, 77%, 100%, 121%, 129%, 200% and 400% forinch system, 25%, 50%, 70%, 81%, 86%, 100%, 115%, 122%, 141%, 200% and400% for AB system.
Continuous copy 999 copies
Dimensions
(including automaticdocument feeder)
32-33/64" (W) x 26-11/64" (D) x 44-23/64" (H)(826 mm (W) x 665 mm (D) x 1127 mm (H))
Weight Approx. 220.5 lbs. (Approx. 100 kg)
Overall dimensions(When tray is extended)
37-29/32" (W) x 26-11/64"(D) (963 mm (W) x 665 mm (D))
Required power supply For power supply requirements, see the name plate located on the back of themain unit.
Operating conditions Temperature: 50°F to 86°F (10°C to 30°C)Humidity: 20% to 85%
Name B/W scanner module/DSPF
Original size 11" x 17" to 5-1/2" x 8-1/2" (A3 to A5)
Weight of originals 14 to 34 lbs. (50 to 128 g/m2)
Number of originals Maximum 50 sheets (maximum 30 11" x 17" or 8-1/2" x 14" (A3 or B4) sizesheets*), stack height must not exceed the heights indicated below.14 to 21 lbs. (50 to 80 g/m2): 17/64" (6.5 mm) or less21 to 34 lbs. (80 to 128 g/m2): 13/64" (5 mm) or less
Power supply Supplied from machine
Dimensions 32-7/16" (W) x 23-55/64" (D) x 7-31/64" (H) (824 mm (W) x 606 mm (D) x 190 mm (H))
Weight Approx. 46.3 lbs. (21.0 kg)
Some discrepancies may exist in the illustrations and content due to improvements to the machine.

SPECIFICATIONS
8-3
8
Continuous copying speed (when the offset function is not used)
AR-M355N AR-M455N
Copy paper size 100% / Reduced / Enlarged
11" x 17" (A3) 17 copies/min. 20 copies/min.
8-1/2" x 14" (B4) 20 copies/min. 22 copies/min.
8-1/2" x 11" (A4) 35 copies/min. 45 copies/min.
8-1/2" x 11"R (A4R) 25 copies/min. 30 copies/min.
7-1/4" x 10-1/2" (B5) 35 copies/min. 45 copies/min.
7-1/4" x 10-1/2"R (B5R) 15 copies/min. 18 copies/min.
8-1/2" x 5-1/2"R (A5R) 15 copies/min. 18 copies/min.
Center tray specifications
Output method Face-down output
Maximum numberof sheets(20lbs. (80g/m2)/recommendedpaper)
400 sheets*
Paper type Plain paper and special paper
* The maximum number of pages that can be held variesdepending on ambient conditions in the installationlocation, the type of paper, and the storage conditions ofthe paper.
Acoustic Noise Emission (measurement according to ISO7779)
Printing mode Standby mode
Sound power level LwA 6.8B or less 5.0B or less
Emission Concentration (measurement according to RAL-UZ85: Edition Mar. 2002)
Ozone 0.02 mg/m3 or less
Dust 0.075 mg/m3 or less
Styrene 0.07 mg/m3 or less

8-4
LIST OF COMBINATION OFPERIPHERAL DEVICESThe table below shows the possible system configurations. Some devices require the installation of others (B) to befunctional and some cannot be installed together (A).
Related to paper feed unit
(B)
(A)
Multi purpose drawer
Stand/3 x 500 sheet paper drawer
Stand/MPD & 2000 sheet paper drawer
Saddle stitch finisher
Finisher
Mail-bin stacker
Exit tray
Punch unit
PS3 expansion kit
Facsimile expansion kit
Duplex module/bypass tray
Duplex module
Mul
ti pu
rpos
e dr
awer
Stan
d/3
x 50
0 sh
eet p
aper
dra
wer
Sta
nd/M
PD
& 2
000
shee
t
Dup
lex
mod
ule/
bypa
ss tr
ay
Dup
lex
mod
ule
Upper exit tray extension
Fax memory (8 MB)
Sad
dle
stitc
h fin
ishe
r
Fin
ishe
r
Mai
l-bin
sta
cker
Exi
t tra
y
Pun
ch u
nit
PS
3 ex
pans
ion
kit
Facs
imile
exp
ansi
on k
it
Upp
er e
xit t
ray
exte
nsio
n
Fax
mem
ory
(8 M
B)
Network scanner expansion kit
Net
wor
k sc
anne
r exp
ansi
on k
it
*1
*1
*1
*1
*1
*1
*1
*1
*1
*1
*1
Output units
Related to extension of functions and others
= ( ) and ( ) must be installed together.= ( ) requires installation of one of the ( ) units.
= Cannot be installed together.
A
A
B
B
8-5
8
INDEX[ ] key ................................................................ 1-13[#/P] key ............................................................... 1-13
■■■■ Numerics1-sided copy
-Automatic document feeder ............................... 4-7-Document glass ............................................... 4-11
2in1 ............................................................. 5-23, 7-122-sided copy.........................................1-3, 4-10, 4-13
■■■■ AACC.#-C............................................................... 1-13[ACC.#-C] key ............................................. 1-13, 1-18Acceptable originals ............................................... 4-2Account number ................................................... 1-18Additional fax memory.......................................... 1-12Address control .................................................... 2-12Adjusting the exposure.................................. 1-3, 4-14All custom setting list............................................ 2-14Applicable plain paper............................................ 2-4Applicable special media........................................ 2-4Attributes ................................................................ 7-3Auditing mode ...................................................... 1-18Auto image ........................................................... 4-15Auto power shut-off mode ...................................... 1-8Automatic copy image rotation............................... 4-4Automatic document feeder ...................1-9, 2-22, 4-2
-1-sided copies.................................................... 4-7-Acceptable originals........................................... 4-2-Automatic two-sided copying ........................... 4-10-Misfeed original................................................ 2-22-Setting originals ................................................. 4-3-User maintenance.............................................. 6-2
Automatic exposure adjustment........................... 4-14Automatic selection .............................................. 4-15Automatic two-sided copying
-Automatic document feeder ............................. 4-10-Document glass ............................................... 4-13
Automatic two-sided printing .................................. 2-4
■■■■ BB/W reverse ...........................................1-6, 5-2, 5-28Barcode font kit .................................................... 1-12Binding change ........................................... 4-10, 4-13Book copy ..............................................1-5, 5-2, 5-25Book original .......................................................... 5-5Bypass tray ...................................1-9, 2-19, 3-2, 4-20Bypass tray extension ............................................ 3-3
■■■■ C[C] key ........................................................... 1-13, 7-4[CA] key......................................................... 1-13, 7-4Call for service ..................................................... 2-23[CALL] key............................................................ 1-16Calling up and using a file .................................... 7-13
Calling up and using a saved file ......................... 7-15-Delete............................................................... 7-19-Detail ................................................................ 7-19-Move ................................................................ 7-19-Print.................................................................. 7-16-Property change............................................... 7-18-Send................................................................. 7-17
Card shot.......................................1-6, 5-2, 5-26, 7-12Cartridge lock lever .............................................. 1-10Center erase .......................................................... 5-4Center tray ...................................................... 1-9, 4-9[CENTER TRAY] key ........................................... 3-18Changing the paper size in paper tray ................... 2-2Charger cleaner ..................................................... 6-2Clear all key .................................................. 1-13, 7-4Clear key ....................................................... 1-13, 7-4Clock .................................................................... 2-12Confidential ............................................................ 7-3Contents....................................................... 0-5 to 0-6Continuous copying speed..................................... 8-3[COPY] key .......................................................... 1-13Covers/inserts ........................................1-5, 5-2, 5-11Creating a custom folder ...................................... 7-24Custom folder...........................7-3, 7-21, 7-24 to 7-25Custom settings .......................................... 2-12, 7-21[CUSTOM SETTINGS] key ........................... 1-13, 7-4
■■■■ DData security kit.................................................... 1-12Date print..............................................1-6, 5-29, 5-32Default settings .................................................... 2-14[DETAIL] key ........................................................ 1-16Display contrast.................................................... 2-14Display switching keys ......................................... 1-16Disposal of hole punch scrap ............................... 3-21Document feeder tray...................................... 4-2, 4-3Document filing control......................................... 2-12Document filing function.................................. 1-8, 7-1Document filing user / folder list ........................... 2-14[DOCUMENT FILING] key ............................ 1-13, 7-4Document glass
-1-sided copies.................................................. 4-11-Automatic two-sided copying ........................... 4-13-Placing originals................................................. 4-3-User maintenance.............................................. 6-2
Document transfer cover ............................... 2-22, 4-3Dual page copy ........................................1-4, 5-2, 5-5DUAL PAGE SCAN.............................................. 7-12Duplex module ..............................1-9, 1-11, 2-19, 3-2Duplex module/bypass tray........................... 1-11, 3-2Duplex module side cover.................................... 1-10
■■■■ EEditing and deleting
-Custom folder................................................... 7-25-User names...................................................... 7-23
[E-MAIL/FTP] key................................................. 1-16Energy saving features .......................................... 1-8Energy Star guidelines ........................................... 1-8Enlargement ......................................................... 4-15
INDEX
8-6
Entering characters .................................. 7-26 to 7-27Erase...............................................1-4, 5-2, 5-4, 7-12Examples of covers and inserts ............... 5-16 to 5-21
-Covers.................................................. 5-17 to 5-20-Inserts .............................................................. 5-21
Exit tray ..................................................1-9, 1-11, 3-2
■■■■ FFacsimile expansion kit ........................................ 1-12Fax data receival/forward..................................... 2-12[FAX JOB] key...................................................... 1-16Features ................................................................. 1-3[FILE FOLDER] key ............................................... 7-5Finisher ......................................................... 1-11, 3-7Finisher compiler.................................................. 3-11Front cover .............................................1-9, 3-5, 3-14Fusing unit.......................................... 1-10, 2-17, 2-18Fusing unit pressure adjusting levers..................... 2-9
■■■■ GGeneral procedure for using special functions....... 5-2Grayed out ........................................................... 1-14Group ..............................................1-3, 3-8, 3-18, 4-9[GROUP] key ................................................ 3-9, 3-18
■■■■ H[HDD STATUS] key................................................ 7-5Heavy paper.................................................... 2-3, 2-4Highlighted ........................................................... 1-14Hole punching ............................................... 1-8, 3-17
■■■■ IIcon ......................................................1-14, 5-16, 7-5[IMAGE SEND] key .............................................. 1-13Information ........................................................... 2-17Installation requirements ........................................ 0-2Interior .................................................................. 1-10[INTERNET-FAX] key .......................................... 1-16Interrupting a copy run .................................. 1-7, 5-43
■■■■ JJob build..........................................1-5, 5-2, 5-8, 7-12Job programs .................................... 1-6, 5-41 to 5-42
-Calling up ......................................................... 5-42-Deleting............................................................ 5-42-Storing.............................................................. 5-41
Job status screen ................................................. 1-15[JOB STATUS] key .............................................. 1-13
■■■■ KKey operator programs ........................................ 2-12Keyboard select ................................................... 2-14
■■■■ LLabels..................................................................... 2-3Landscape.............................................................. 1-2Latch ...................................................................... 3-7List print................................................................ 2-14
Loading paper ........................................................ 2-2-Bypass tray ........................................................ 3-3-Multi purpose drawer ......................................... 2-8-Stand/3 x 500 sheet paper drawer................... 2-10-Stand/MPD & 2000 sheet paper drawer .......... 2-11-Tray 1................................................................. 2-2
Lower cover............................................................ 3-2
■■■■ MMail bins ................................................................. 3-5Mail-bin stacker ............................................. 1-11, 3-5Main charger .......................................................... 6-2Main features ............................................... 1-3 to 1-8Main folder ............................................................. 7-3Main screen............................................................ 5-2Manual exposure adjustment ............................... 4-14Manual selection .................................................. 4-16Margin shift...............................................1-4, 5-2, 5-3Meaning of "R" ....................................................... 1-2Mirror image ...........................................1-6, 5-2, 5-28Misfeed............... 2-17 to 2-22, 3-6, 3-12, 3-22 to 3-23Misfeed in the paper feed area ................ 2-20 to 2-21Misfeed original .................................................... 2-22Misfeed removal ................................................... 2-17
-Automatic document feeder ............................. 2-22-Bypass tray ...................................................... 2-19-Duplex module ................................................. 2-19-Finisher ............................................................ 3-12-Saddle stitch finisher........................................ 3-22-Stand/3 x 500 sheet paper drawer................... 2-21-Transport area, fusing area, and exit area....... 2-18-Tray 1............................................................... 2-20
Mode select key ................................................... 1-15Mode select keys .......................................... 1-13, 7-4Multi purpose drawer.......................1-9, 1-11, 2-3, 2-8Multi shot................................................1-5, 5-2, 5-23
■■■■ NNetwork scanner expansion kit ............................ 1-12Non-standard sizes ...........................2-3, 2-5, 2-6, 4-5Number of pages printed...................................... 1-18number of pages transmitted (scanned) .............. 1-18Numeric keys ................................................ 1-13, 7-4
■■■■ OOffset......................................................1-7, 3-8, 3-15[OFFSET] key ............................................... 3-9, 3-18Offset tray...................................................... 3-7, 3-14Operation panel............................................. 1-9, 1-13
-Document filing function..................................... 7-4Original guides ....................................................... 4-3Original orientation ........................................ 3-16, 4-4Original size .............................................4-2, 4-5, 4-6Output .......................... 3-8, 3-9, 3-16, 3-18, 4-9, 4-12Output tray ............................................................. 4-9
INDEX
8-7
8
■■■■ PPage numbering.......................1-7, 5-29, 5-34 to 5-37Pamphlet copy ......................................... 1-4, 5-2, 5-6Paper curled......................................................... 2-24Paper tray...................................................... 1-9, 2-20Paper tray settings ........................................ 2-5, 2-14Part names
-Duplex module ................................................... 3-2-Exterior............................................................... 1-9-Finisher .............................................................. 3-7-Interior.............................................................. 1-10-Mail-bin stacker.................................................. 3-5-Operation panel ........................................ 1-13, 7-4-Peripheral devices ........................................... 1-11-Saddle stitich finisher ....................................... 3-14
Password ............................................................... 7-8Peripheral devices....................................... 1-11, 1-12Photo.................................................................... 4-14Photoconductive drum .................................. 1-10, 6-2Placing originals ..................................................... 4-3Plain paper ................................................... 2-3 to 2-4Portrait.................................................................... 1-2Postcards ............................................................... 2-8Power .......................................................... 1-17, 2-23Power switch ................................................. 1-9, 1-17Preheat mode......................................................... 1-8Preset copy ratios ................................................ 4-16[PRINT JOB] key.................................................. 1-16Print menu................................................ 5-29 to 5-40
-Date ................................................................. 5-32-Stamp............................................................... 5-33-Page numbering............................................... 5-34-Text .................................................................. 5-38
PRINT mode indicators ........................................ 1-13Printer condition ................................................... 2-12Printer expansion kit............................................. 1-12Printer test page................................................... 2-14[PRIORITY] key.................................................... 1-16Proper storage ..................................................... 2-16Protect.................................................................... 7-3PS3 expansion kit ................................................ 1-11Punch module ...................................................... 3-15[PUNCH] key........................................................ 3-18
■■■■ QQuick File folder ..................................................... 7-3[QUICK FILE FOLDER] key ................................... 7-5[READ-END] key.................................................. 4-12
■■■■ RReduction ............................................................. 4-15Reduction/Enlargement................................. 1-4, 4-15Replacing the toner cartridges ............................. 2-15Right output tray................................................... 1-11Rotation copying .................................................... 4-4
■■■■ SSaddle stitch.........................................1-7, 3-14, 3-17Saddle stitch finisher ................................... 1-11, 3-14Saddle stitch tray.................................................. 3-14
[SADDLE STITCH] key ........................................ 3-18Saving a document image file .................... 7-6 to 7-12
-Filing ........................................................ 7-7 to 7-8-Print jobs ............................................................ 7-9-Quick file ............................................................ 7-6-Scan save ............................................ 7-10 to 7-11
[SCAN TO HDD] key.............................................. 7-5[SEARCH] key........................................................ 7-5Searching for a file ................................... 7-13 to 7-14Selecting a function.............................................. 1-14Selecting the exposure level ................................ 4-14Selecting the exposure mode............................... 4-14Selecting the output tray ........................................ 4-9Sender control ...................................................... 2-12Sender control list ................................................ 2-14Sending address list ............................................. 2-14Setting the paper size .................................. 2-5 to 2-6Setting the paper type .................................. 2-5 to 2-7Sharing................................................................... 7-3Side cover latch.................................................... 1-10Sort..................................................1-3, 3-8, 3-15, 4-9[SORT] key.................................................... 3-9, 3-18Special modes (Copier operation).......................... 5-2Special modes (Document filing function) ............ 7-12Special paper ............................................... 2-3 to 2-4Special papers ..................................................... 4-20Specifications ............................................... 8-2 to 8-3
-Duplex module ................................................... 3-2-Finisher .............................................................. 3-7-Mail-bin stacker.................................................. 3-5-Punch module .................................................. 3-15-Sadlle stitch finisher ......................................... 3-14-Stand/3 x 500 sheet paper drawer................... 2-10-Stand/MPD x 2000 sheet paper drawer........... 2-11
Specifications of paper trays .................................. 2-3Stamp...................................................1-6, 5-29, 5-33Stand/3 x 500 sheet paper drawer 1-9, 1-11, 2-3, 2-10Stand/MPD & 2000 sheet paper drawer.1-9, 1-11, 2-3, 2-11Standard sizes ................................................ 1-2, 2-4Standard sizes in both the inch and AB systems ... 1-2Staple box .............................................................. 3-7Staple cartridge ........................................... 3-10, 3-14Staple cartridge replacement ...................... 3-10, 3-19Staple jam removal .........................3-11, 3-20 to 3-21Staple sort ..............................................1-7, 3-8, 3-16[STAPLE SORT] key..................................... 3-9, 3-18Stapler compiler ................................................... 3-14Stapler section ..................................................... 3-14Stapling positions .......................................... 3-8, 3-16[START] key......................................................... 1-13[STOP/DELETE] key............................................ 1-16Storage of supplies .............................................. 2-16
■■■■ TTandem copy ...........................................1-5, 5-2, 5-9Text .............................................1-7, 4-14, 5-29, 5-38Text/photo ............................................................ 4-14The machine does not operate ..................... 2-23, 6-3Toner cartridge............................................ 1-10, 2-15Top cover ...............................................3-5, 3-7, 3-14

INDEX
8-8
Top tray ........................................................... 3-5, 3-7Total count ........................................................... 2-14Total number of originals........................................ 4-2Touch panel ..................................1-13, 1-14, 7-4, 7-5Transparency film....... 2-3, 2-4, 2-10, 2-16, 4-20, 5-22Transparency inserts..............................1-5, 5-2, 5-22Tray ........................................................................ 1-9Troubleshooting
-Copier operation ................................................ 6-3-Document filing function................................... 7-28-Duplex module ................................................... 3-4-Finisher ............................................................ 3-13-General information ............................. 2-23 to 2-25-Saddle stitch finisher........................................ 3-24
Types and sizes of paper ............................. 2-3 to 2-4Types and sizes of paper that can be used ........... 2-3
■■■■ UUpper exit tray extension .............................. 1-9, 1-11Upper paper output area ........................................ 1-9User maintenance .................................................. 6-2User name................................................ 7-21 to 7-23
■■■■ WWarming up.......................................................... 2-23
■■■■ XXY Zoom ....................................................... 1-4, 4-18
■■■■ ZZoom .................................................................... 4-16

NOTICEBE SURE TO ASK YOUR AUTHORIZED SHARP DEALER ABOUT THE WARRANTY THAT YOURSELLING DEALER EXTENDS TO YOU. In order to assure you, the end-user, of warrantyprotection, Sharp extends a limited warranty to each of its authorized dealers and, in turn, requireseach of its authorized dealers to extend its own warranty to you on terms that are no less favorablethan those given to the dealer by Sharp. You should be aware, however, that Sharp does not itselfextend any warranties, either express or implied, directly to you, the end-user and no one isauthorized to make any representations or warranties on behalf of Sharp. Specifically, SHARPDOES NOT EXTEND TO YOU, THE END-USER, ANY EXPRESS WARRANTY OR ANY IMPLIEDWARRANTY OF MERCHANTABILITY, FITNESS FOR USE OR FITNESS FOR ANY PARTICULARPURPOSE IN CONNECTION WITH THE HARDWARE, SOFTWARE OR FIRMWARE EMBODIEDIN, OR USED IN CONJUNCTION WITH THIS PRODUCT. Sharp is not responsible for anydamages or loss, either direct, incidental or consequential, which you, the end-user, may experienceas a result of your purchase or use of the hardware, software or firmware embodied in or used inconjunction with this Product. Your sole remedy, in the event that you encounter any difficulties withthis Product, is against the authorized dealer from which you purchased the Product. In the eventthat this authorized dealer does not honor its warranty commitments, please contact the GeneralManager, Business Products Group, Sharp Electronics Corporation, Sharp Plaza, Mahwah, NJ07430-1163, so that Sharp can try to help assure complete satisfaction of all the warranty rights towhich you are entitled from the authorized dealer.
In the event that this authorized dealer does not honor its warranty commitments, please contact theGeneral Manager, Business Products Group, Sharp Electronics Corporation, Sharp Plaza,Mahwah, NJ 07430-1163, so that Sharp can try to help assure complete satisfaction of all thewarranty rights to which you are entitled from the authorized dealer.