· unit model indoor ras-107skv-e outdoor ... (cooling / heating) 3.33 3.72 3.29/3.68 operating...
TRANSCRIPT

R410A
!""#!
Indoor Unit Outdoor Unit<High Wall, Heat Pump Type> <Heat Pump Type>
RAS-107SKV-E RAS-107SAV-E
March, 2008
FILE NO. SVM-08020

– 1 –
CONTENTS
1. SAFETY PRECAUTIONS .......................................................................... 2
2. SPECIFICATIONS ..................................................................................... 4
3. REFRIGERANT R410A ............................................................................. 6
4. CONSTRUCTION VIEWS ........................................................................ 14
5. WIRING DIAGRAM .................................................................................. 16
6. SPECIFICATIONS OF ELECTRICAL PARTS ......................................... 18
7. REFRIGERANT CYCLE DIAGRAM ........................................................ 20
8. CONTROL BLOCK DIAGRAM ................................................................ 22
9. OPERATION DESCRIPTION................................................................... 24
10. INSTALLATION PROCEDURE ................................................................ 46
11. HOW TO DIAGNOSE THE TROUBLE ...................................................... 58
12. HOW TO REPLACE THE MAIN PARTS................................................... 76
13. EXPLODED VIEWS AND PARTS LIST ................................................... 90
FILE NO. SVM-08020

– 2 –
1. SAFETY PRECAUTIONS
For general public usePower supply cord of outdoor unit shall be more than 1.5 mm2 (H07RN-F or 60245IEC66) polychloroprenesheathed flexible cord.
• Read this “SAFETY PRECAUTIONS” carefully before servicing.
• The precautions described below include the important items regarding safety. Observe them without fail.
• After the servicing work, perform a trial operation to check for any problem.
• Turn off the main power supply switch (or breaker) before the unit maintenance.
CAUTION
New Refrigerant Air Conditioner Installation
• THIS AIR CONDITIONER ADOPTS THE NEW HFC REFRIGERANT (R410A) WHICH DOES NOTDESTROY OZONE LAYER.
R410A refrigerant is apt to be affected by impurities such as water, oxidizing membrane, and oils becausethe working pressure of R410A refrigerant is approx. 1.6 times of refrigerant R22. Accompanied with theadoption of the new refrigerant, the refrigeration machine oil has also been changed. Therefore, duringinstallation work, be sure that water, dust, former refrigerant, or refrigeration machine oil does not enter intothe new type refrigerant R410A air conditioner circuit.
To prevent mixing of refrigerant or refrigerating machine oil, the sizes of connecting sections of chargingport on main unit and installation tools are different from those used for the conventional refrigerant units.
Accordingly, special tools are required for the new refrigerant (R410A) units. For connecting pipes, use newand clean piping materials with high pressure fittings made for R410A only, so that water and/or dust doesnot enter. Moreover, do not use the existing piping because there are some problems with pressure fittingsand possible impurities in existing piping.
CAUTION
TO DISCONNECT THE APPLIANCE FROM THE MAIN POWER SUPPLYThis appliance must be connected to the main power supply by a circuit breaker or a switch with a contactseparation of at least 3 mm.
DANGER
• ASK AN AUTHORIZED DEALER OR QUALIFIED INSTALLATION PROFESSIONAL TO IN-STALL/MAINTAIN THE AIR CONDITIONER.INAPPROPRIATE SERVICING MAY RESULT IN WATER LEAKAGE, ELECTRIC SHOCK OR FIRE.
• TURN OFF MAIN POWER SUPPLY BEFORE ATTEMPTING ANY ELECTRICAL WORK. MAKE SUREALL POWER SWITCHES ARE OFF. FAILURE TO DO SO MAY CAUSE ELECTRIC SHOCK.
DANGER: HIGH VOLTAGEThe high voltage circuit is incorporated.
Be careful to do the check service, as the electric shock may be caused in case of touching partson the P.C. board by hand.
• CORRECTLY CONNECT THE CONNECTING CABLE. IF THE CONNECTING CABLE IS INCOR-RECTLY CONNECTED, ELECTRIC PARTS MAY BE DAMAGED.
• CHECK THAT THE EARTH WIRE IS NOT BROKEN OR DISCONNECTED BEFORE SERVICE ANDINSTALLATION. FAILURE TO DO SO MAY CAUSE ELECTRIC SHOCK.
FILE NO. SVM-08020

– 3 –
• DO NOT INSTALL NEAR CONCENTRATIONS OF COMBUSTIBLE GAS OR GAS VAPORS. FAILURETO FOLLOW THIS INSTRUCTION CAN RESULT IN FIRE OR EXPLOSION.
• TO PREVENT THE INDOOR UNIT FROM OVERHEATING AND CAUSING A FIRE HAZARD, PLACETHE UNIT WELL AWAY (MORE THAN 2 M) FROM HEAT SOURCES SUCH AS RADIATORS, HEATREGISTORS, FURNACE, STOVES, ETC.
• WHEN MOVING THE AIR-CONDITIONER FOR INSTALLATION IN ANOTHER PLACE, BE VERY CARE-FUL NOT TO ALLOW THE SPECIFIED REFRIGERANT (R410A) TO BECOME MIXED WITH ANYOTHER GASEOUS BODY INTO THE REFRIGERATION CIRCUIT. IF AIR OR ANY OTHER GAS ISMIXED IN THE REFRIGERANT, THE GAS PRESSURE IN THE REFRIGERATION CIRCUIT WILLBECOME ABNORMALLY HIGH AND IT MAY RESULT IN THE PIPE BURSTING AND POSSIBLE PER-SONNEL INJURIES.
• IN THE EVENT THAT THE REFRIGERANT GAS LEAKS OUT OF THE PIPE DURING THE SERVICEWORK AND THE INSTALLATION WORK, IMMEDIATELY LET FRESH AIR INTO THE ROOM. IF THEREFRIGERANT GAS IS HEATED, SUCH AS BY FIRE, GENERATION OF POISONOUS GAS MAYRESULT.
WARNING
• Never modify this unit by removing any of the safety guards or bypass any of the safety interlockswitches.
• Do not install in a place which cannot bear the weight of the unit. Personal injury and propertydamage can result if the unit falls.
• After the installation work, confirm that refrigerant gas does not leak.If refrigerant gas leaks into the room and flows near a fire source, such as a cooking range, noxious gasmay generate.
• The electrical work must be performed by a qualified electrician in accordance with the InstallationManual. Make sure the air conditioner uses an exclusive circuit.An insufficient circuit capacity or inappropriate installation may cause fire.
• When wiring, use the specified cables and connect the terminals securely to prevent externalforces applied to the cable from affecting the terminals.
• Be sure to provide grounding.Do not connect ground wires to gas pipes, water pipes, lightning rods or ground wires for telephone cables.
• Conform to the regulations of the local electric company when wiring the power supply.Inappropriate grounding may cause electric shock.
CAUTION
• Exposure of unit to water or other moisture before installation may result in an electrical short.Do not store in a wet basement or expose to rain or water.
• Do not install in a place that can increase the vibration of the unit. Do not install in a place that can amplifythe noise level of the unit or where noise or discharged air might disturb neighbors.
• To avoid personal injury, be careful when handling parts with sharp edges.
• Perform the specified installation work to guard against an earthquake.If the air conditioner is not installed appropriately, accidents may occur due to the falling unit.
For Reference:If a heating operation would be continuously performed for a long time under the condition that the outdoortemperature is 0°C or lower, drainage of defrosted water may be difficult due to freezing of the bottom plate,resulting in a trouble of the cabinet or fan.
It is recommended to procure an antifreeze heater locally for a safe installation of the air conditioner.
For details, contact the dealer.
FILE NO. SVM-08020
– 4 –
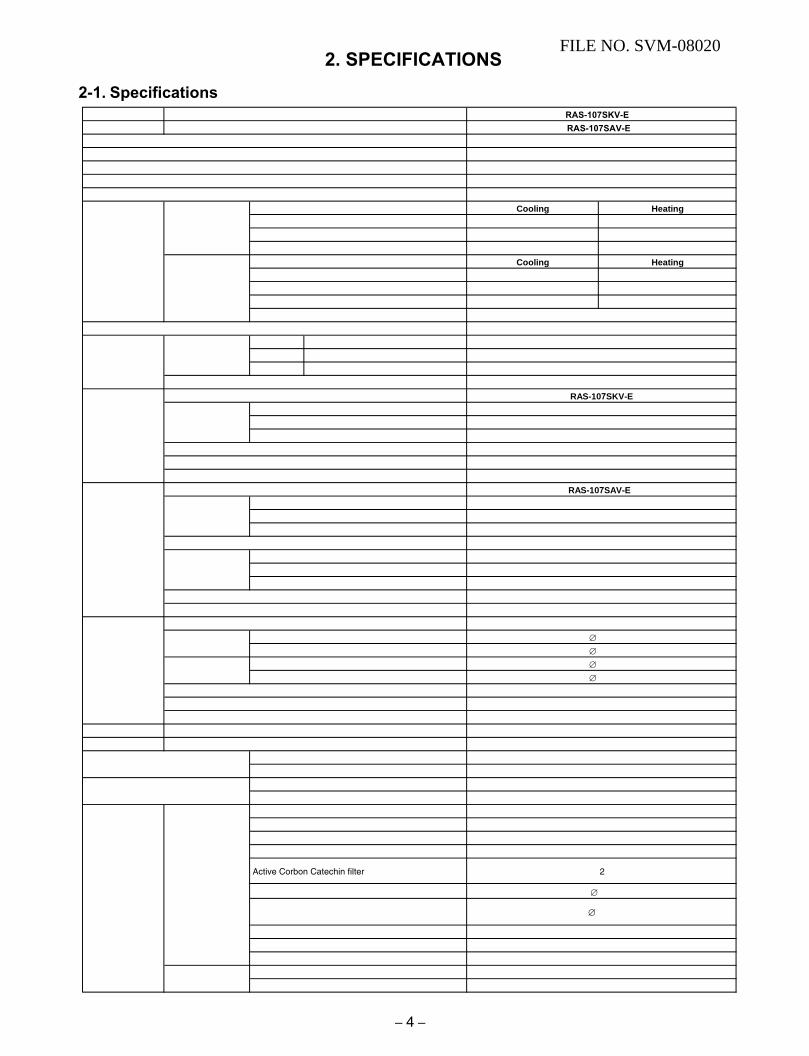
2. SPECIFICATIONS
2-1. Specifications Unit model Indoor RAS-107SKV-E
Outdoor RAS-107SAV-E
Cooling capacity (kW) 2.5Cooling capacity range (kW) 1.1 - 3.0Heating capacity (kW) 3.2Heating capacity range (kW) 0.9 - 4.1Power supply 1Ph/50Hz/220-240VElectric Indoor Operation mode Cooling Heatingcharacteristic Running current (A) 0.16 - 0.14 0.16 - 0.14
Power consumption (W) 30 30Power factor (%) 87 87
Outdoor Operation mode Cooling HeatingRunning current (A) 3.49 - 3.21 3.99- 3.66Power consumption (W) 730 840Power factor (%) 95 96Starting current (A) 4.15 - 3.80
COP (Cooling / Heating) 3.33 3.72 3.29/3.68Operating Indoor High (Cooling / Heating) (dB-A) 38/40noise Medium (Cooling / Heating) (dB-A) 33/35
Low (Cooling / Heating) (dB-A) 29/30Outdoor (Cooling / Heating) (dB-A) 48/50
Indoor unit Unit model RAS-107SKV-EDimension Height (mm) 250
Width (mm) 740Depth (mm) 195
Net weight (kg) 8Fan motor output (W) 20Air flow rate (Cooling / Heating) (m3 / min) 8.7/9.6
Outdoor unit Unit model RAS-107SAV-EDimension Height (mm) 530
Width (mm) 660Depth (mm) 240
Net weight (kg) 29Compressor Motor output (W) 750
Type Single rotary type with DC-inverter variable speed controlModel DA89X1C-23FZ
Fan motor output (W) 20Air flow rate (Cooling / Heating) (m3 / min) 27/27
Piping Type Flare connectionconnection Indoor unit Liquid side (mm) ∅6.35
Gas side (mm) ∅9.52Outdoor unit Liquid side (mm) ∅6.35
Gas side (mm) ∅9.52Maximum length (m) 10Maximun charge-less length (m) 10Maximum height difference (m) 8
Refrigerant Name of refrigerant R410AWeight (kg) 0.63
Wiring Power supply 3 Wires: Includes earth (Outdoor)connection Interconnection 4 Wires: Includes earth Usable temperature range Indoor (Cooling / Heating) (oC) 21 - 32/Up to 27
Outdoor (Cooling / Heating) (oC) 15 - 43/-10 - 24Accessory Indoor unit Installation plate 1
Wireless remote controller 1batteries 2Remote controller holder 1
Mounting screw 6 (∅4 x 25L)
Plasma air purifier -Installation manual 1Owner's manual 1
Outdoor unit Drain nipple 1Water proof rubber cap -
* The specification may be subject to change without notice for purpose of improvement.
FILE NO. SVM-08020
Pan head wood screw 2 (∅ 3.1 x 16L)
Active Corbon Catechin filter 2

2-2. Operation Characteristic Curve
– 5 –
FILE NO. SVM-08020
<Cooling> <Heating>
2-3. Capacity Variation Ratio According to Temperature
<Cooling> <Heating>
0
1
2
3
4
5
6
0 10 20 30 40 50 60 70 80 90 100 110 120Compressor Speed (rps)
Cu
rren
t (A
)
0
1
2
3
4
5
6
0 10 20 30 40 50 60 70 80 90 100 110 120Compressor Speed (rps)
Cu
rren
t (A
)
Conditions
Indoor : DB 27°C/WB 19°C
Outdoor : DB 35°C/WB 24°CAir Flow : HighPip Length : 5mVoltage : 230V
Conditions
Indoor : DB 20°C/WB 15°C
Outdoor : DB 7°C/WB 6°CAir Flow : HighPip Length : 5mVoltage : 230V
50
55
60
65
70
75
80
85
90
95
100
105
32 33 34 35 36 37 38 39 40 41 42 43
Coo
ling
Cap
acity
ratio
(%)
Outside Temperature ( oC)
0
20
40
60
80
100
120
-10 -5 0 5 10
Hea
ting
Cap
acity
ratio
(%)
Outside Temperature ( ºC)
Conditions
Indoor : DB 27°C/WB 19°CIndoor Air Flow : HighPip Length : 5mVoltage : 230V
Capacity ratio: 100%2.5kW (RAS-107SKV-E)
Conditions
Indoor : DB 20°C/WB 15°CIndoor Air Flow : HighPip Length : 5mVoltage : 230V

– 6 –
3. REFRIGERANT R410A
This air conditioner adopts the new refrigerant HFC(R410A) which does not damage the ozone layer.
The working pressure of the new refrigerant R410Ais 1.6 times higher than conventional refrigerant(R22). The refrigerating oil is also changed inaccordance with change of refrigerant, so be carefulthat water, dust, and existing refrigerant or refrigerat-ing oil are not entered in the refrigerant cycle of theair conditioner using the new refrigerant duringinstallation work or servicing time.
The next section describes the precautions for airconditioner using the new refrigerant. Conforming tocontents of the next section together with thegeneral cautions included in this manual, performthe correct and safe work.
3-1. Safety During Installation/Servicing
As R410A’s pressure is about 1.6 times higher thanthat of R22, improper installation/servicing maycause a serious trouble. By using tools and materi-als exclusive for R410A, it is necessary to carry outinstallation/servicing safely while taking the followingprecautions into consideration.
1. Never use refrigerant other than R410A in an airconditioner which is designed to operate withR410A.
If other refrigerant than R410A is mixed, pressurein the refrigeration cycle becomes abnormallyhigh, and it may cause personal injury, etc. by arupture.
2. Confirm the used refrigerant name, and use toolsand materials exclusive for the refrigerant R410A.
The refrigerant name R410A is indicated on thevisible place of the outdoor unit of the air condi-tioner using R410A as refrigerant. To preventmischarging, the diameter of the service portdiffers from that of R22.
3. If a refrigeration gas leakage occurs duringinstallation/servicing, be sure to ventilate fully.
If the refrigerant gas comes into contact with fire,a poisonous gas may occur.
4. When installing or removing an air conditioner, donot allow air or moisture to remain in the refrig-eration cycle. Otherwise, pressure in the refrig-eration cycle may become abnormally high sothat a rupture or personal injury may be caused.
5. After completion of installation work, check tomake sure that there is no refrigeration gasleakage.
If the refrigerant gas leaks into the room, cominginto contact with fire in the fan-driven heater,space heater, etc., a poisonous gas may occur.
6. When an air conditioning system charged with alarge volume of refrigerant is installed in a smallroom, it is necessary to exercise care so that,even when refrigerant leaks, its concentrationdoes not exceed the marginal level.
If the refrigerant gas leakage occurs and itsconcentration exceeds the marginal level, anoxygen starvation accident may result.
7. Be sure to carry out installation or removalaccording to the installation manual.
Improper installation may cause refrigerationtrouble, water leakage, electric shock, fire, etc.
8. Unauthorized modifications to the air conditionermay be dangerous. If a breakdown occursplease call a qualified air conditioner technicianor electrician.
Improper repair’s may result in water leakage,electric shock and fire, etc.
3-2. Refrigerant Piping Installation
3-2-1. Piping Materials and Joints Used
For the refrigerant piping installation, copper pipesand joints are mainly used. Copper pipes and jointssuitable for the refrigerant must be chosen andinstalled. Furthermore, it is necessary to use cleancopper pipes and joints whose interior surfaces areless affected by contaminants.
1. Copper PipesIt is necessary to use seamless copper pipeswhich are made of either copper or copper alloyand it is desirable that the amount of residual oilis less than 40 mg/10 m. Do not use copperpipes having a collapsed, deformed or discoloredportion (especially on the interior surface).
Otherwise, the expansion valve or capillary tubemay become blocked with contaminants.
As an air conditioner using R410A incurs pres-sure higher than when using R22, it is necessaryto choose adequate materials.
Thicknesses of copper pipes used with R410Aare as shown in Table 3-2-1. Never use copperpipes thinner than 0.8 mm even when it isavailable on the market.
FILE NO. SVM-08020

– 7 –
Table 3-2-1 Thicknesses of annealed copper pipes
Nominal diameter
1/4
3/8
1/2
5/8
Outer diameter (mm)
6.35
9.52
12.70
15.88
Thickness (mm)
R410A R22
0.80 0.80
0.80 0.80
0.80 0.80
1.00 1.00
2. JointsFor copper pipes, flare joints or socket joints are used. Prior to use, be sure to remove all contaminants.
a) Flare Joints
Flare joints used to connect the copper pipes cannot be used for pipings whose outer diameter exceeds20 mm. In such a case, socket joints can be used.
Sizes of flare pipe ends, flare joint ends and flare nuts are as shown in Tables 3-2-3 to 3-2-6 below.
b) Socket Joints
Socket joints are such that they are brazed for connections, and used mainly for thick pipings whosediameter is larger than 20 mm.
Thicknesses of socket joints are as shown in Table 3-2-2.
Table 3-2-2 Minimum thicknesses of socket joints
Nominal diameter
1/4
3/8
1/2
5/8
Reference outer diameter ofcopper pipe jointed (mm)
6.35
9.52
12.70
15.88
Minimum joint thickness(mm)
0.50
0.60
0.70
0.80
3-2-2. Processing of Piping Materials
When performing the refrigerant piping installation, care should be taken to ensure that water or dust does notenter the pipe interior, that no other oil than lubricating oils used in the installed air-water heat pump is used,and that refrigerant does not leak. When using lubricating oils in the piping processing, use such lubricating oilswhose water content has been removed. When stored, be sure to seal the container with an airtight cap or anyother cover.
1. Flare processing procedures and precautionsa) Cutting the Pipe
By means of a pipe cutter, slowly cut the pipe so that it is not deformed.
b) Removing Burrs and Chips
If the flared section has chips or burrs, refrigerant leakage may occur.Carefully remove all burrs and clean the cut surface before installation.
c) Insertion of Flare Nut
FILE NO. SVM-08020

– 8 –
AØD
d) Flare Processing
Make certain that a clamp bar and copperpipe have been cleaned.
By means of the clamp bar, perform the flareprocessing correctly.
Use either a flare tool for R410A or conven-tional flare tool.
Flare processing dimensions differ accordingto the type of flare tool. When using a con-ventional flare tool, be sure to secure “dimen-sion A” by using a gauge for size adjustment. Fig. 3-2-1 Flare processing dimensions
Table 3-2-3 Dimensions related to flare processing for R410A
Nominaldiameter
1/4
3/8
1/2
5/8
Outerdiameter
(mm)
6.35
9.52
12.70
15.88
Thickness(mm)
0.8
0.8
0.8
1.0
A (mm)
Flare tool for R410Aclutch type
0 to 0.5
0 to 0.5
0 to 0.5
0 to 0.5
Conventional flare tool
Clutch type Wing nut type
1.0 to 1.5 1.5 to 2.0
1.0 to 1.5 1.5 to 2.0
1.0 to 1.5 2.0 to 2.5
1.0 to 1.5 2.0 to 2.5
Table 3-2-4 Dimensions related to flare processing for R22
Nominaldiameter
1/4
3/8
1/2
5/8
Outerdiameter
(mm)
6.35
9.52
12.70
15.88
Thickness(mm)
0.8
0.8
0.8
1.0
A (mm)
Flare tool for R22clutch type
0 to 0.5
0 to 0.5
0 to 0.5
0 to 0.5
Conventional flare tool
Clutch type Wing nut type
0.5 to 1.0 1.0 to 1.5
0.5 to 1.0 1.0 to 1.5
0.5 to 1.0 1.5 to 2.0
0.5 to 1.0 1.5 to 2.0
Table 3-2-5 Flare and flare nut dimensions for R410A
Nominaldiameter
1/4
3/8
1/2
5/8
Outer diameter(mm)
6.35
9.52
12.70
15.88
Thickness(mm)
0.8
0.8
0.8
1.0
Dimension (mm)
A B C D
9.1 9.2 6.5 13
13.2 13.5 9.7 20
16.6 16.0 12.9 23
19.7 19.0 16.0 25
Flare nut width(mm)
17
22
26
29
FILE NO. SVM-08020

– 9 –
43˚ to 45˚
45˚ to 46˚
B A C D
Table 3-2-6 Flare and flare nut dimensions for R22
Nominaldiameter
1/4
3/8
1/2
5/8
3/4
Outer diameter(mm)
6.35
9.52
12.70
15.88
19.05
Thickness(mm)
0.8
0.8
0.8
1.0
1.0
Dimension (mm)
A B C D
9.0 9.2 6.5 13
13.0 13.5 9.7 20
16.2 16.0 12.9 20
19.7 19.0 16.0 23
23.3 24.0 19.2 34
Flare nut width(mm)
17
22
24
27
36
Fig. 3-2-2 Relations between flare nut and flare seal surface
2. Flare Connecting Procedures and Precautionsa) Make sure that the flare and union portions do not have any scar or dust, etc.
b) Correctly align the processed flare surface with the union axis.
c) Tighten the flare with designated torque by means of a torque wrench. The tightening torque for R410A isthe same as that for conventional R22. Incidentally, when the torque is weak, the gas leakage may occur.
When it is strong, the flare nut may crack and may be made non-removable. When choosing the tighten-ing torque, comply with values designated by manufacturers. Table 3-2-7 shows reference values.
NOTE :When applying oil to the flare surface, be sure to use oil designated by the manufacturer.If any other oil is used, the lubricating oils may deteriorate and cause the compressor to burn out.
Table 3-2-7 Tightening torque of flare for R410A [Reference values]
Nominaldiameter
1/4
3/8
1/2
5/8
Outer diameter(mm)
6.35
9.52
12.70
15.88
Tightening torqueN•m (kgf•cm)
14 to 18 (140 to 180)
33 to 42 (330 to 420)
50 to 62 (500 to 620)
63 to 77 (630 to 770)
Tightening torque of torquewrenches available on the market
N•m (kgf•cm)
16 (160), 18 (180)
42 (420)
55 (550)
65 (650)
FILE NO. SVM-08020

– 10 –
3-3. Tools
3-3-1. Required Tools
The service port diameter of packed valve of the outdoor unit in the air-water heat pump using R410A ischanged to prevent mixing of other refrigerant. To reinforce the pressure-resisting strength, flare processingdimensions and opposite side dimension of flare nut (For Ø12.7 copper pipe) of the refrigerant piping arelengthened.
The used refrigerating oil is changed, and mixing of oil may cause a trouble such as generation of sludge,clogging of capillary, etc. Accordingly, the tools to be used are classified into the following three types.
1. Tools exclusive for R410A (Those which cannot be used for conventional refrigerant (R22))
2. Tools exclusive for R410A, but can be also used for conventional refrigerant (R22)
3. Tools commonly used for R410A and for conventional refrigerant (R22)
The table below shows the tools exclusive for R410A and their interchangeability.
Tools exclusive for R410A (The following tools for R410A are required.)
Tools whose specifications are changed for R410A and their interchangeability
No.
1
2
3
4
5
6
7
8
9
10
Used tool
Flare tool
Copper pipe gauge foradjusting projectionmargin
Torque wrench(For Ø12.7)
Gauge manifold
Charge hose
Vacuum pump adapter
Electronic balance forrefrigerant charging
Refrigerant cylinder
Leakage detector
Charging cylinder
Usage
Pipe flaring
Flaring byconventional flare tool
Connection of flare nut
Evacuating, refrigerantcharge, run check, etc.
Vacuum evacuating
Refrigerant charge
Refrigerant charge
Gas leakage check
Refrigerant charge
R410Aair-water heat pump installation
Existence ofnew equipmentfor R410A
Yes
Yes
Yes
Yes
Yes
Yes
Yes
Yes
(Note 2)
Whether conven-tional equipmentcan be used
*(Note 1)
*(Note 1)
×
×
×××××
Conventional air-waterheat pump installation
Whether new equipmentcan be used withconventional refrigerant
*(Note 1)
×
×
×
×(Note 1) When flaring is carried out for R410A using the conventional flare tools, adjustment of projection
margin is necessary. For this adjustment, a copper pipe gauge, etc. are necessary.(Note 2) Charging cylinder for R410A is being currently developed.
General tools (Conventional tools can be used.)
In addition to the above exclusive tools, the following equipments which serve also for R22 are necessaryas the general tools.
1. Vacuum pumpUse vacuum pump by attachingvacuum pump adapter.
2. Torque wrench (For Ø6.35, Ø9.52)
3. Pipe cutter
4. Reamer
5. Pipe bender
6. Level vial
7. Screwdriver (+, –)
8. Spanner or Monkey wrench
9. Hole core drill (Ø65)
10. Hexagon wrench(Opposite side 4mm)
11. Tape measure
12. Metal saw
Also prepare the following equipments for other installation method and run check.
1. Clamp meter
2. Thermometer
3. Insulation resistance tester
4. Electroscope
FILE NO. SVM-08020

– 11 –
Connect the charge hose to packed valve service port at the outdoor unit’s gas side.
Recover the refrigerant, and check no refrigerant remains in the equipment.
(For refrigerant charging, see the figure below.)
Connect the charge hose to the vacuum pump adapter.
Open fully both packed valves at liquid and gas sides.
Place the handle of the gauge manifold Low in the fully opened position, and turn on the vacuum pump’s power switch. Then, evacuating the refrigerant in the cycle.
When the compound gauge’s pointer has indicated –0.1 Mpa (–76 cmHg), place the handle Low in the fully closed position, and turn off the vacuum pump’s power switch.
Keep the status as it is for 1 to 2 minutes, and ensure that the compound gauge’s pointer does not return.
Set the refrigerant cylinder to the electronic balance, connect the connecting hose to the cylinder and the connecting port of the electronic balance, and charge liquid refrigerant.
(Water heat exchanger unit)
(Outdoor unit)
Opened
Opened
Refrigerant cylinder (with siphon)
Check valve
Open/close valve for charging
Electronic balance for refrigerant charging
Opened
Closed
Service port
3-4. Recharging of Refrigerant
When it is necessary to recharge refrigerant, charge the specified amount of new refrigerant according to thefollowing steps.
1. Never charge refrigerant exceeding the specified amount.
2. If the specified amount of refrigerant cannot be charged, charge refrigerant bit by bit in COOL mode.
3. Do not carry out additional charging.
When additional charging is carried out if refrigerant leaks, the refrigerant composition changes in therefrigeration cycle, that is characteristics of the air conditioner changes, refrigerant exceeding thespecified amount is charged, and working pressure in the refrigeration cycle becomes abnormally highpressure, and may cause a rupture or personal injury.
Fig. 3-4-1 Configuration of refrigerant charging
FILE NO. SVM-08020

– 12 –
Gauge manifold
[ Cylinder with siphon ] [ Cylinder without siphon ]
OUTDOOR unitGauge manifold
OUTDOOR unit
Refrigerantcylinder
Electronic balance
Refrigerantcylinder
Electronic balance
Siphon
1. Be sure to make setting so that liquid can be charged.
2. When using a cylinder equipped with a siphon, liquid can be charged without turning it upside down.
It is necessary for charging refrigerant under condition of liquid because R410A is mixed type of refrigerant.Accordingly, when charging refrigerant from the refrigerant cylinder to the equipment, charge it turning thecylinder upside down if cylinder is not equipped with siphon.
R410A refrigerant is HFC mixed refrigerant.Therefore, if it is charged with gas, the composi-tion of the charged refrigerant changes and thecharacteristics of the equipment varies.
3-5. Brazing of Pipes
3-5-1. Materials for Brazing
1. Silver brazing fillerSilver brazing filler is an alloy mainly composedof silver and copper. It is used to join iron, copperor copper alloy, and is relatively expensive thoughit excels in solderability.
2. Phosphor bronze brazing fillerPhosphor bronze brazing filler is generally usedto join copper or copper alloy.
3. Low temperature brazing fillerLow temperature brazing filler is generally calledsolder, and is an alloy of tin and lead. Since it isweak in adhesive strength, do not use it forrefrigerant pipes.
1. Phosphor bronze brazing filler tends to reactwith sulfur and produce a fragile compoundwater solution, which may cause a gasleakage. Therefore, use any other type ofbrazing filler at a hot spring resort, etc., andcoat the surface with a paint.
2. When performing brazing again at time ofservicing, use the same type of brazing filler.
3-5-2. Flux
1. Reason why flux is necessary• By removing the oxide film and any foreign
matter on the metal surface, it assists the flowof brazing filler.
• In the brazing process, it prevents the metalsurface from being oxidized.
• By reducing the brazing filler’s surface tension,the brazing filler adheres better to the treatedmetal.
Fig. 3-4-2
FILE NO. SVM-08020

– 13 –
Nitrogen gascylinder
Pipe
Flow meterM
Stop valve
From Nitrogen cylinder
Nitrogen gas
Rubber plug
2. Characteristics required for flux• Activated temperature of flux coincides with the
brazing temperature.
• Due to a wide effective temperature range, fluxis hard to carbonize.
• It is easy to remove slag after brazing.
• The corrosive action to the treated metal andbrazing filler is minimum.
• It excels in coating performance and is harm-less to the human body.
As the flux works in a complicated manner asdescribed above, it is necessary to select anadequate type of flux according to the type andshape of treated metal, type of brazing filler andbrazing method, etc.
3. Types of flux• Noncorrosive flux
Generally, it is a compound of borax and boricacid.It is effective in case where the brazing tem-perature is higher than 800°C.
• Activated flux
Most of fluxes generally used for silver brazingare this type.It features an increased oxide film removingcapability due to the addition of compoundssuch as potassium fluoride, potassium chlorideand sodium fluoride to the borax-boric acidcompound.
4. Piping materials for brazing and usedbrazing filler/flux
1. Do not enter flux into the refrigeration cycle.
2. When chlorine contained in the flux remainswithin the pipe, the lubricating oil deteriorates.Therefore, use a flux which does not containchlorine.
3. When adding water to the flux, use waterwhich does not contain chlorine (e.g. distilledwater or ion-exchange water).
4. Remove the flux after brazing.
3-5-3. Brazing
As brazing work requires sophisticated techniques,experiences based upon a theoretical knowledge, itmust be performed by a person qualified.
In order to prevent the oxide film from occurring inthe pipe interior during brazing, it is effective toproceed with brazing while letting dry Nitrogen gas(N2) flow.
Never use gas other than Nitrogen gas.
1. Brazing method to prevent oxidation1) Attach a reducing valve and a flow-meter to
the Nitrogen gas cylinder.
2) Use a copper pipe to direct the piping mate-rial, and attach a flow-meter to the cylinder.
3) Apply a seal onto the clearance between thepiping material and inserted copper pipe forNitrogen in order to prevent backflow of theNitrogen gas.
4) When the Nitrogen gas is flowing, be sure tokeep the piping end open.
5) Adjust the flow rate of Nitrogen gas so that itis lower than 0.05 m3/Hr or 0.02 MPa(0.2kgf/cm2) by means of the reducing valve.
6) After performing the steps above, keep theNitrogen gas flowing until the pipe cools downto a certain extent (temperature at whichpipes are touchable with hands).
7) Remove the flux completely after brazing.
Fig. 3-5-1 Prevention of oxidation during brazing
Piping material
Copper - Copper
Copper - Iron
Iron - Iron
Used brazing filler
Phosphor copper
Silver
Silver
Used flux
Do not use
Paste flux
Vapor flux
FILE NO. SVM-08020

4. CONSTRUCTION VIEWS
4-1. Indoor Unit
Air inlet Air filter Heat exchanger
Air outlet
Front panel
Drain hose (0.5m) Connecting pipe (0.37m)
6055
50 505560
(Flare ∅ 9.52)
(Flare ∅ 6.35)
Connecting pipe (0.37m)Hanger
133.41499104.39
290
45.9
164.
1
38
40
90135
235
250
16
135
Wireless remote control
54
For stud bold (∅ 6)For stud bold (∅ 8~∅ 10)
Center lineInstallation plate outline
HangerHanger
Hanger
606
215
235
215
145145
26.6
45.9
90 135
Knock out system
252
60
58
739
8 8
52
195
Knock out system
– 14 –
FILE NO. SVM-08020

FILE NO. SVM-08020
− 15 −
4-2. Outdoor Unit
CL
CL

– 16 –
FILE NO. SVM-08020
5. WIRING DIAGRAM
5-1. Indoor Unit

FILE NO. SVM-08020
– 17 –
5-2.
Ou
tdo
or
Un
it

– 18 –
FILE NO. SVM-08020
6. SPECIFICATION OF ELECTRICAL PARTS
6-1. Indoor Unit
No. Parts name Type Specifications
1 Fan motor (for indoor) AFS-220-20-4AR AC Motor with 145°C thermo fuse
2 Thermo. sensor (TA-sensor) 10 kΩ at 25°C
3 Micro power module (T101) µRM1260V
4 Microcontroller unit (IC81)
5 Heat exchanger sensor10 kΩ at 25°C
(TC-sensor)
6 Line filter (L01) SS11V-R06270 27µ H, AC 0.6A
7 Diode (D01,D02,D03 and D04) S5688J
8 Capacitor (C03)
9 Fuse (F01) FJL250V3.15A 3.15A, 250 V
10 Regulator IC (IC12) S7805PIC 5VDC, 0.5A
11 Varistor (R21) TNR10V471K-T8 470V12 Louver motor MP24ZCT DC 12V
EKMH401VSN470MP20S
µPD780076GK-703-9ET-A
47µ F,400V

FILE NO. SVM-08020
– 19 –
6-2. Outdoor Unit
No. Parts name Model name Rating
1 SC coil L01 GET-0451 0.6mH, 15A
(Noise filter) L03 GET-0452 2.0 mH, 10A
Primary side DC280V, Secondary2 DC-DC transformer
SWT-72side 7.0 V x 1, 12 V x 1, 17V x 2
3 Reactor CH-51-Z-T L=19mH, 10A
4 Outside fan motor
WLF-240-20A-1 20W5 G5NB-1A Coil DC12V Contact AC250V-1.5A
6 Outside air temp. (Inverter attached) 10kΩ (25°C)sensor (TO sensor)
7 Heat exchanger temp. (Inverter attached) 10kΩ (25°C)sensor (TE sensor)
9 JX0-6B 20A, AC250VTerminal block (6P)
10
11
FuseFor protection of switching power source 3.15A, AC250V
For protection of inverter input overcurrent 25A, AC250V
12
Electrolytic capacitor LLQ2G501KHUATF 500µF, DC 400 V x 3 pieces
13
Compressor thermo. OFF: 125 ± 4°C, ON: 90 ± 5°C
Rectifier
14
Fan control relay
D15XB60-4001 15A, 600V
16 4-way valve coil − AC220-240V
IGBT GT15J321 15A, 600
Compressor DA89X1C-23FZ 3-phases 4-poles 750W
15
8Dischenge temp. (Inverter attached) 62kΩ (20°C)sensor (TD sensor)
17 Running capacitor DS451155NPQB AC 450V~, 1.5µF(for fan motor)
PW-2AL or CS-12AL

– 20 –
7. REFRIGERANT CYCLE DIAGRAM
7-1. Refrigerant Cycle Diagram
NOTE :• The maximum pipe length of this air conditioner is 10 m. The addition charging of refrigevant is
Deoxidized copper pipe Outer dia. : 9.52mm Thickness : 0.8mm
NOTE : Gas leak check positionRefrigerant flow (Cooling)Refrigerant flow (Heating)
INDOOR UNIT T1
TO
Temp. measurement
TC
TA
Indoor heatexchanger
Cross flow fan
Deoxidized copper pipe Outer dia. : 6.35mm Thickness : 0.8mm
Sectional shapeof heat insulator
Allo
wab
le h
eigh
tdi
ffere
nce
: 10m
Allo
wab
le p
ipe
leng
th
P Pressure measurementGauge attaching portVacuum pump connecting port
TD
4-way valve(STF-0108Z)
CompressorDA89X1C-23FZ
T2
Outdoor heat exchanger
Temp. measurement
Propeller fan Refrigerant amount : 0.63kg
OUTDOOR UNIT
Muffler
Muffler
Ø1.0 x 600
T E
Ø1.0 x 600
Min. : 1mChargeless : 10m
Max. : 10m
unnecessary because this air condition is design with charge-less specitication.
FILE NO. SVM-08020

– 21 –
7-2. Operation Data
<Cooling>
Model name Standard Indoor Outdoor CompressorRAS- pressure fan mode fan mode revolution
Indoor Outdoor P (MPa) T1 (°C) T2 (°C) (rps)condition(°C)Tempeature Heat exchanger
pipe temp.
Model name Standard Indoor Outdoor CompressorRAS- pressure fan mode fan mode revolution
Indoor Outdoor P (MPa) T1 (°C) T2 (°C) (rps)
Tempeature Heat exchangercondition(°C) pipe temp.
NOTES :1. Measure surface temperature of heat exchanger pipe around center of heat exchanger path U bent.
(Thermistor themometer)
2. Connecting piping condition : 5 m
<Heating>
FILE NO. SVM-08020
0.9 to 1.1 9 to 11 47 to 49 High High 54
2.4 to 2.6 43 to 45 0 to 3 High High 68
107SKV-E
107SKV-E
35/24
7/6
27/19
20/15

– 22 –
8. CONTROL BLOCK DIAGRAM
8-1. Indoor Unit
M.C.U. Indoor Unit Control Unit
From Outdoor Unit220-240V ~50Hz Serial Signal Communication
(Operation Command and Information)
Serial Signal Transmitter/Receiver
Converter(D.C circuit)
Noise Filter
IndoorFan Motor
LouverMotor
Louver MotorDrive Control
Indoor FanMotor Control
Initializing Circuit
Clock FrequencyOscillator Circuit
Power SupplyCircuit
Infrared Rays, 36.7kHzRemote Controller
Thermo. Setting
Fan Speed Selection
ON TIMER Setting
OFF TIMER Setting
Louver AUTO Swing
Louver Direction Setting
Operation Mode SelectionAUTO, COOL, DRY, HEAT
REMOTE CONTROLLER
ECO
Heat Exchanger Sensor (Tc)
Room Temperature Sensor (Ta)
Infrared Rays Signal Receiverand Indication
Functions
• Cold draft preventing Function
• 3-minute Delay at Restart for Compressor
• Fan Motor Starting Control
• Processing (Temperature Processing)
• Timer
• Serial Signal Communication
• Clean Function
Operation (START/STOP)
FILE NO. SVM-08020
QUIET

– 23 –
FILE NO. SVM-08020
8-2. Outdoor Unit (Inverter Assembly)
Fo
r IN
DO
OR
UN
IT
1 230V
50H
z
sign
al
Noi
sefil
ter
Inpu
tcu
rren
tse
nsor
Con
vert
er(A
C
DC
)
P.C
.B (
MC
C 5
009)
Ove
rcu
rren
tse
nsor
Gat
e dr
ive
circ
uit
Rot
or p
ositi
onde
tect
circ
uit
Rel
ay
Fan
mot
or4w
ayVa
lve
Rel
ay
Hig
h po
wer
fact
orco
rrec
tion
circ
uit
1. P
WM
syn
thes
is fu
nctio
n2.
Inpu
t cur
rent
rele
ase
cont
rol
3. IG
BT
over
-cur
rent
det
ect c
ontro
l4.
Out
door
fan
cont
rol
5. H
igh
pow
er fa
ctor
cor
rect
ion
cont
rol
6.S
igna
l com
mun
icat
ion
to in
door
uni
t M. C
. U
M. C
. U
Inve
rter
(DC
A
C)
Com
pres
sor
Dis
char
gete
mp.
sen
sor
Out
door
air
tem
p. s
enso
r
Hea
t Exc
hang
erte
mp.
sen
sor
MIC
RO
-CO
MP
UT
ER
BL
OC
K D
IAG
RA
M

– 24 –
9. OPERATION DESCRIPTION
9-1. Outline of Air Conditioner ControlThis air conditioner is a capacity-variable type airconditioner, which uses AC or DC motor for the indoor for motor and the outdoor fan motor. And the capacity-proportional control compressor which can change themotor speed in the range from 11 to 96 rps ismounted. The DC motor drive circuit is mounted to theindoor unit. The compressor and the inverter to controlfan motor are mounted to the outdoor unit.The entire air conditioner is mainly controlled by theindoor unit controller.The indoor unit controller drives the indoor fan motorbased upon command sent from the remote controller,and transfers the operation command to the outdoorunit controller.The outdoor unit controller receives operation com-mand from the indoor unit side, and controls theoutdoor fan and the pulse Modulating valve. (P.M.V)Besides, detecting revolution position of the compres-sor motor, the outdoor unit controller controls speed ofthe compressor motor by controlling output voltage ofthe inverter and switching timing of the supply power(current transfer timing) so that motors drive accordingto the operation command.And then, the outdoor unit controller transfers reverselythe operating status information of the outdoor unit tocontrol the indoor unit controller.
As the compressor adopts four-pole brushlessDC motor, the frequency of the supply powerfrom inverter to compressor is two-times cyclesof the actual number of revolution.
1. Role of indoor unit controllerThe indoor unit controller judges the operationcommands from the remote controller and assumesthe following functions.• Judgment of suction air temperature of the indoor
heat exchanger by using the indoor temp. sensor.(TA sensor)
• Judgment of the indoor heat exchanger tempera-ture by using heat exchanger sensor (TC sensor)(Prevent-freezing control, etc.)
• Louver motor control• Indoor fan motor operation control• LED (Light Emitting Diode) display control• Transferring of operation command signal (Serial
signal) to the outdoor unit• Reception of information of operation status
(Serial signal including outside temp. data) to theoutdoor unit and judgment/display of error
• Air purifier operation control
2. Role of outdoor unit controllerReceiving the operation command signal (Serialsignal) from the indoor unit controller, the outdoorunit performs its role.• Compressor operation control• Operation control of outdoor fan motor• P.M.V. control• 4-way valve control
Operations followed to judgmentof serial signal from indoor side.
• Detection of inverter input current and currentrelease operation
• Over-current detection and prevention operationto IGBT module (Compressor stop function)
• Compressor and outdoor fan stop function whenserial signal is off (when the serial signal does notreach the board assembly of outdoor control bytrouble of the signal system)
• Transferring of operation information (Serialsignal) from outdoor unit controller to indoor unitcontroller
• Detection of outdoor temperature and operationrevolution control
• Defrost control in heating operation (Temp.measurement by outdoor heat exchanger andcontrol for 4-way valve and outdoor fan)
3. Contents of operation command signal(Serial signal) from indoor unit controller tooutdoor unit controllerThe following three types of signals are sent fromthe indoor unit controller.• Operation mode set on the remote controller• Compressor revolution command signal defined
by indoor temperature and set temperature(Correction along with variation of room tempera-ture and correction of indoor heat exchangertemperature are added.)
• Temperature of indoor heat exchanger• For these signals ([Operation mode] and [Com-
pressor revolution] indoor heat exchanger tem-perature), the outdoor unit controller monitors theinput current to the inverter, and performs thefollowed operation within the range that currentdoes not exceed the allowable value.
4. Contents of operation command signal(Serial signal) from outdoor unit controllerto indoor unit controllerThe following signals are sent from the outdoor unitcontroller.• The current operation mode• The current compressor revolution• Outdoor temperature• Existence of protective circuit operation
For transferring of these signals, the indoor unitcontroller monitors the contents of signals, andjudges existence of trouble occurrence.Contents of judgment are described below.• Whether distinction of the current operation
status meets to the operation command signal• Whether protective circuit operates
When no signal is received from the outdoorunit controller, it is assumed as a trouble.
FILE NO. SVM-08020

– 25 −
9-2. Operation Description
1. Basic operation ........................................................................................................... 261. Operation control ................................................................................................... 262. Cooling/Heating operation ..................................................................................... 273. AUTO operation ..................................................................................................... 274. DRY operation ........................................................................................................ 27
2. Indoor fan motor control ............................................................................................. 283. Outdoor fan motor control ........................................................................................... 304. Capacity control .......................................................................................................... 315. Current release control ............................................................................................... 316. Release protective control by temperature of indoor heat exchanger ........................ 327. Defrost control (Only in heating operation) ................................................................ 338. Louver control ............................................................................................................. 34
1) Louver position ....................................................................................................... 342) Air direction adjustment ......................................................................................... 343) Swing ..................................................................................................................... 34
9. ECO operation ............................................................................................................ 3510. Temporary operation ................................................................................................... 3611. .................................................................................. 36Discharge temperature control 12. 13.
Self-Cleaning function ................................................................................................ 37
14. Selt-Cleaning function release ................................................................................... 38
15. Remote-A or B selection ............................................................................................ 39
9-3. Auto Restart Function ................................................................................................ 41
9-3-1. How to Set the A uto Restart Function .............................. ........................................ 41
9-3-2. How to Cancel the Au to Restar t Function ................................................................ 42
9-3-3. Power Failure During Timer Operation ................................................................... 42
9-4. Remote Controller and Its Fuctions ..................................................................... 43
9-4-1. Parts Name of Remote Contr oller ............................................................................. 43
9-4-2. Operation of remote control ...................................................................................... 43
Short Timer ................................... ............................................................................. 40
9-4-3. Name and Functions of Indications on Remote Contr oller ........................................ 45
FILE NO. SVM-08020

– 26 –
Item
1. Basicoperation
Operation flow and applicable data, etc.
1. Operation control
Description
Receiving the user’s operation condition setup, the operation statuses of indoor/outdoor units arecontrolled.
1) The operation conditions are selected by the remote controller as shown in the below.
2) A signal is sent by ON button of the remote controller.
3) The signal is received by a sensor of the indoor unit and processed by the indoor controllers asshown in the below.
4) The indoor controller controls the indoor fan motor and louver motor.
5) The indoor controller sends the operation command to the outdoor controller, and sends/receivesthe control status with a serial signal.
6) The outdoor controller controls the operation as shown in the left, and also controls the compres-sor, outdoor fan motor, 4-way valve and pulse Modulating valve.
Remote controller
Indoor unit
Control contents of remote controller• ON/OFF (Air conditioner/Air purifier)• Operation select (COOL/HEAT/AUTO/DRY)• Temperature setup• Air direction• Swing• Air volume select (AUTO/LOW/MED/HIGH)• ECO• ON timer setup• OFF timer setup
Indoor unit control• Command signal generating function of indoor unit operation• Calculation function (temperature calculation)• Activation compensation function of indoor fan• Cold draft preventive function• Timer function• Indoor heat exchanger release control
• Indoor fan motor• Louver motor
Outdoor unit
Outdoor unit control• Frequency control of inverter output• Waveform composite function• Calculation function (Temperature calculation)• AD conversion function• Quick heating function• Delay function of compressor reactivation• Current release function• GTr over-current preventive function• Defrost operation function
• Compressor• Outdoor fan motor• 4-way valve
Signal receiving
Indoor unit control
Operation command
Serial signal send/receive
Selection ofoperation conditions
ON/OFF
Serial signal send/receive
Outdoor unit control
Inverter
~
FILE NO. SVM-08020

− 27 −
Operation ON Setup of remote controller
Indoor fan motor control / Louver control / Operation HzControl (Requierment)Indoor unit control
Sending of operation command signal
Outdoor unit control [ ]Compressor revolution control / Outdoor fan motor control /
4-way valve control In cooling operation: ON In heating operation: OFF
Item
1. Basicoperation
Operation flow and applicable data, etc.
2. Cooling/Heating operation
Description
The operations are performed in the following parts by controls according to cooling/heating conditions.
1) Receiving the operation ON signal of the remote controller, the cooling or heating operation signalstarts being transferred form the indoor controller to the outdoor unit.
2) At the indoor unit side, the indoor fan is operated according to the contents of “2. Indoor fanmotor control” and the louver according to the contents of “9. Louver control”, respectively.
3) The outdoor unit controls the outdoor fan motor, compressor, pulse Modulating valve and4-way valve according to the operation signal sent from the indoor unit.
3. AUTO operationSelection of operation modeAs shown in the following figure, the operation starts byselecting automatically the status of room temperature(Ta) when starting AUTO operation.
*1. When reselecting the operation mode, the fanspeed is controlled by the previous operation mode.
4. DRY operationDRY operation is performed according to the differencebetween room temperature and the setup temperature asshown below.
In DRY operation, fan speed is controlled in order toprevent lowering of the room temperature and to avoid airflow from blowing directly to persons.
1) Detects the room temperature (Ta) whenthe DRY operation started.
2) Starts operation under conditions in theleft figure according to the temperaturedifference between the room tempera-ture and the setup temperature (Tsc).Setup temperature (Tsc)= Set temperature on remote controller (Ts) + (0.0 to 1.0)
3) When the room temperature is lower1°C or less than the setup temperature,turn off the compressor.
1) Detects the room temperature (Ta) whenthe operation started.
2) Selects an operation mode from Ta inthe left figure.
3) Fan operation continues until anoperation mode is selected.
4) When AUTO operation has startedwithin 2 hours after heating operationstopped and if the room temperature is20°C or more, the fan operation isperformed with ”Super Ultra LOW” modefor 3 minutes.Then, select an operation mode.
5) If the status of compressor-OFFcontinues for 15 minutes the roomtemperature after selecting an operationmode (COOL/HEAT), reselect anoperation mode.
Ts + 1
Ts – 1
TaCooling operation
Monitoring (Fan)
Heating operation
Tsc
+0.5
+1.0
[˚C]Ta
Fan speed
L– (W5)
(W5+W3) / 2
SUL (W3)
Operation Hz control (Include limit control)
FILE NO. SVM-08020

– 28 –
Item
2. Indoor fanmotor control
Operation flow and applicable data, etc.
<In cooling operation>(This operation controls the fan speed at indoor unit side.)
The indoor fan (cross flow fan) is operated by the phase-control induction motor. The fan rotates in 3 stages inMANUAL mode, and in 5 stages in AUTO mode, respec-tively. (Table 1)
Description
* SymbolsUH : Ultra HighH : HighM+ : Medium+M : MediumL+ : Low+L : LowL- : Low–UL : Ultra LowSUL : Super Ultra Low
* The fan speed broadly varies dueto position of the louver, etc.The described value indicates oneunder condition of incliningdownward blowing.
1) When setting the fan speed to L,M or H on the remotecontroller, the operation isperformed with the constantspeed shown in Fig. 1.
2) When setting the fan speed toAUTO on the remote controller,revolution of the fan motor iscontrolled to the fan speed levelshown in Fig. 2 and Table 1according to the setup tempera-ture, room temperature, and heatexchanger temperature.
(Fig. 1)
(Fig. 2)
(Table 1) Indoor fan air flow rate
+2.5
Ta[˚C]
+2.0
+1.5
+1.0
+0.5
Tsc
a
b
c
d
e
M+(WB)
*3
*4
*5
L(W6)
Air volume AUTO
Fan speed setup
COOL ON
AUTO
MANUAL
*3 : Fan speed = (M + –L) x 3/4 + L
*4 : Fan speed = (M + –L) x 2/4 + L
*5 : Fan speed = (M + –L) x 1/4 + L
(Linear approximation from M+ and L)
FILE NO. SVM-08020
L W6
Indication Fan speed
M W9
H WC
Fan speedlevel COOL HEAT DRY
WF UHWE HWD UH M+WC HWB M+WA W9 M L+W8 LW7 L+ L- L+W6 L LW5 L- UL L-W4 UL ULW3 SUL SULW2 SULW1
UH
H
M
M+M
Fan speed Air flow rate(rpm) (m3/h)1350 6071300 5761250 5541200 5221120 48611001040 444960 402910 376880 360830 334800 318700 266650 239600 213
RAS-107SKV-E
468

– 29 –
Item
2. Indoor fanmotor control
Operation flow and applicable data, etc.
<In heating operation>
Description
1) When setting the fan speed to L,M or H on the remotecontroller, the operation is per-formed with the constant speedshown in Fig. 3 and Table 1.
2) When setting the fan speed toAUTO on the remote controller,revolution of the fan motor iscontrolled to the fan speed levelshown in Fig. 5 according to the settemperature and room temperature.
3) Min air flow rate is controlled bytemperature of the indoor heatexchanger (Tc) as shown in Fig. 4.
4) Cold draft prevention, the fanspeed is controlled by temperatureof the indoor heat exchanger (Tc)as shown in Fig. 6.
[In starting and in stability]
(Fig. 3)
(Fig. 4)
(Fig. 5)
Cold draft preventive control
(Fig. 6)
Fan speedAUTO
Basic fan control
* No limitation while fan speed MANUAL mode is in stability.* A: When Tsc ≥ 24, A is 24, and when Tsc < 24, A is Tsc
Tsc: Set value
TSC
TA [˚C]b
–0.5c
–1.0d
–1.5e
–2.0f
–2.5g
–5.0
–5.5
L+ (W9)
M+ (WD)
*1
*2
*3
H (WE)
H (WE)
Line-approximateH and SUL with Tc.
SUL (W2)
Stop
46 46Tc
3445 45 33
33 33 2132 32 20
*A+4 *A+4 *A+4
*A-4 *A-4 *A-4
Fan speed MANUAL in startingFan speed AUTO in stabilityFan speed AUTO in starting
Fan speed setup
HEAT ON
AUTO
YES
NO
MANUAL
TC ≥ 42˚C Min air flow rate control
Tc5251
4241
Limited to Min WD tap
* Fan speed =Ð W8) + W8(TC - (42 + a)) / 10 x (WD - W8) + W8
a : In up operation 1, in down operation 0
No limit*
*1: Fan speed = (M + -L+) x 1 4 + L+*2: Fan speed = (M + -L+) x 2 4 + L+*3: Fan speed = (M + -L+) x 3 4 + L+(Calculated with linear approximation from M+ and L+)
FAN AUTO
FAN Manual
In starting
• Until 12 minutes passed after operation start• When 12 to 25 minutes passed after operation
start and room temp. is 3°C or lower than set temp.
• Room temp. < Set temp. –4°C
In stability
• When 12 to 25 minutes passed after operation startand room temp. is higher than (set temp. –3°C)
• When 25 minutes or more passed after operation start
• Room temp. ≥ Set temp. –3.5°C
5) In order to prevent Cold draft whencompressor step during heatingoperation. Then louver will move toupper position and fan speed willreduce or off.
FILE NO. SVM-08020
L W8
Indication Fan speed
M WA
H WE

– 30 –
Item
3. Outdoor fanmotor control
Operation flow and applicable data, etc.
The blowing air volume at the outdoor unit side is controlled.
Receiving the operation command from the controller ofindoor unit, the controller of outdoor unit controls fan speed.
* For the fan motor, a DC motor with non-stage variablespeed system is used. However, it is limited to 8 stages forreasons of controlling.
Description
1) The operation command sentfrom the remote controller isprocessed by the indoor unitcontroller and transferred to thecontroller of the outdoor unit.
2) When strong wind blows atoutdoor side, the operation of airconditioner continues with thefan motor stopped.
3) Whether the fan is locked or notis detected, and the operation ofair conditioner stops and analarm is displayed if the fan islocked.
4) According to each operationmode, by the conditions ofoutdoor temperature (To) andcompressor revolution, the speedof the outdoor fan shown in thetable is selected.
2) Fan speed ≥ 400when the motor stopped.
Air conditioner ON(Remote controller)
YES
YES
NO
NO
Indoor unit controller
Fan motor ON
3) Fan lock
OFF status offan motor continues.
4) Motor operates as shown in the table below.
1) Outdoor unit operation command (Outdoor fan control)
Air conditionerOFF
Alarmdisplay
Outdoor fan speed (rpm)
Tap
f 1f 2f 3f 4f 5f 6f 7f 8
107SAV-E
200300370440440500550600
Tapf 9f Af Bf Cf Df Ef F
650700700800800800800
Compressor speed (rps)
To > 38°CTo > 28°C
To To > 15°CTo > 5.5°CTo > 0°C
During To > 38°CECO mode To < 38°C
When To is abnormal
~ 13.8 ~ 31.7 32.3 ~ MAXMIN MAX MIN MAX MIN MAX
f 2 f 3 f A f C f D f Ff 2 f 3 f 7 f A f 9 f Cf 1 f 3 f 2 f 5 f 4 f 7f 1 f 1 f 1 f 2 f 2 f 4
f 2 f 3 f B f C f C f D
In cooling operationCompressor speed (rps)
To > 15°C
ToTo < 15°CTo < 5.5°CTo < − 5.0°CTo > 15°C
During To < 15°CECO mode To < 5.5°C
To < − 5.5°CWhen To is abnormal
~16.8 ~47.9 48.5 ~ MAXf 3 f 8 f 9f 3 f 9 f Af 8 f A f Df B f C f Df 3 f 3 f 6f 3 f 3 f 8f 5 f 9 f 9f 7 f A f Bf A f B f D
In Heating operation
f 2 f 3 f C f D f E f F
To < 0°C f 0 f 0 f 0 f 1 f 1 f 2
f D f F f D f F f Ff 2 f 3 f 2 f 3 f B f C
f D
f 0 0
FILE NO. SVM-08020
107SAV-E

– 31 –
Item
4. Capacitycontrol
Operation flow and applicable data, etc.
The cooling or heating capacity depending on the load isadjusted.
According to difference between the setup value of tempera-ture and the room temperature, the capacity is adjusted bythe compressor revolution.
Description
1) The difference between settemperature on remote controller(Ts) and room temperature (Ta)is calculated.
2) According to the temperaturedifference, the correction value ofHz signal which determines thecompressor speed is set up.
3) The rotating position and speedof the motor are detected by theelectromotive force occurred onthe motor winding with operationof the compressor.
4) According to the differenceresulted from comparison of thecorrection value of Hz signal withthe present operation Hz, theinverter output and the commuta-tion timing are varied.
5) Change the compressor motorspeed by outputting power to thecompressor.
* The contents of controloperation are same in coolingoperation and heatingoperation
This function prevents troubles on the electronic parts of thecompressor driving inverter.
This function also controls drive circuit of the compressorspeed so that electric power of the compressor drive circuitdoes not exceed the specified value.
5. Current releasecontrol
Set temp. (Ts) Room temp. (Ta)
Correction of Hz signal
Outdoor temp. To
Setup of current release point
Capacity control continues.
Detection of electromotive forceof compressor motor winding
Detection of motor speed and rotor position
Inverter output changeCommutation timing change
Change of compressor speed
Remote controller Indoor unit
Ts –Ta
Current decrease
Correction value of Hz signal ≤ Operating Hz
Outdoor unit inverter maincircuit control current
High
Low
Reduce compressor speedOperating current ≤Setup value
1) The input current of the outdoorunit is detected in the invertersection of the outdoor unit.
2) According to the detectedoutdoor temperature, thespecified value of the current isselected.
3) Whether the current valueexceeds the specified value ornot is judged.
4) If the current value exceeds thespecified value, this functionreduces the compressor speedand controls speed up to theclosest one commanded from theindoor unit within the rangewhich does not exceed thespecified value.
Outdoor temp.
45°C 40°C 44°C16°C 39°C11°C 15.5°C
10.5°C
Cooling current release value Heating current release value
FILE NO. SVM-08020
3.60A5.17A5.17A
7.72A
9.26A10.80A
107SAV-E 107SAV-E

– 32 –
Item
6. Release protectivecontrol by tempera-ture of indoor heatexchanger
Operation flow and applicable data, etc.
<In cooling/dry operation>(Prevent-freezing control for indoor heat exchanger)
In cooling/dry operation, the sensor of indoor heatexchanger detects evaporation temperature andcontrols the compressor speed so that temperature ofthe heat exchanger does not exceed the specifiedvalue.
Description
1) When temperature of the indoorheat exchanger drops below 5°C,the compressor speed isreduced. (P zone)
2) When temperature of the indoorheat exchanger rises in therange from 6°C to under 7°C, thecompressor speed is kept.(Q zone)
3) When temperature of the indoorheat exchanger rises to 7°C orhigher, the capacity controloperation returns to the usualcontrol in cooling operation.(R zone)
1) When temperature of the indoorheat exchanger rises in therange from 50°C to 55°C, thecompressor speed is kept.(Q zone)
When temperature of the indoorheat exchanger drops in therange from 46°C to under 55°C,the compressor speed is kept.(Q zone)
2) When temperature of the indoorheat exchanger rises to 55°C orhigher, the compressor speed isreduced. (P zone)
3) When temperature of the indoorheat exchanger does not rise to50°C, or when it drops below to46°C, the capacity controloperation returns to the usualcontrol in heating operation.(R zone)
<In heating operation>(Prevent-overpressure control for refrigerating cycle)
In heating operation, the sensor of indoor heat ex-changer detects condensation temperature and controlsthe compressor speed so that temperature of the heatexchanger does not exceed the specified value.
7˚C
6˚C
5˚C
R
Q
P
55˚C
52˚C
48˚C
P
Q
R
Usual cooling capacity control
Reduction of compressor speedIndo
or h
eat e
xcha
nger
tem
pera
ture
When the value is in Q zone, the compressor speed is kept.
Reduction of compressor speed
Usual heating capacity controlIndo
or h
eat e
xcha
nger
tem
pera
ture
When the value is in Q zone, the compressor speed is kept.
FILE NO. SVM-08020
– 33 –
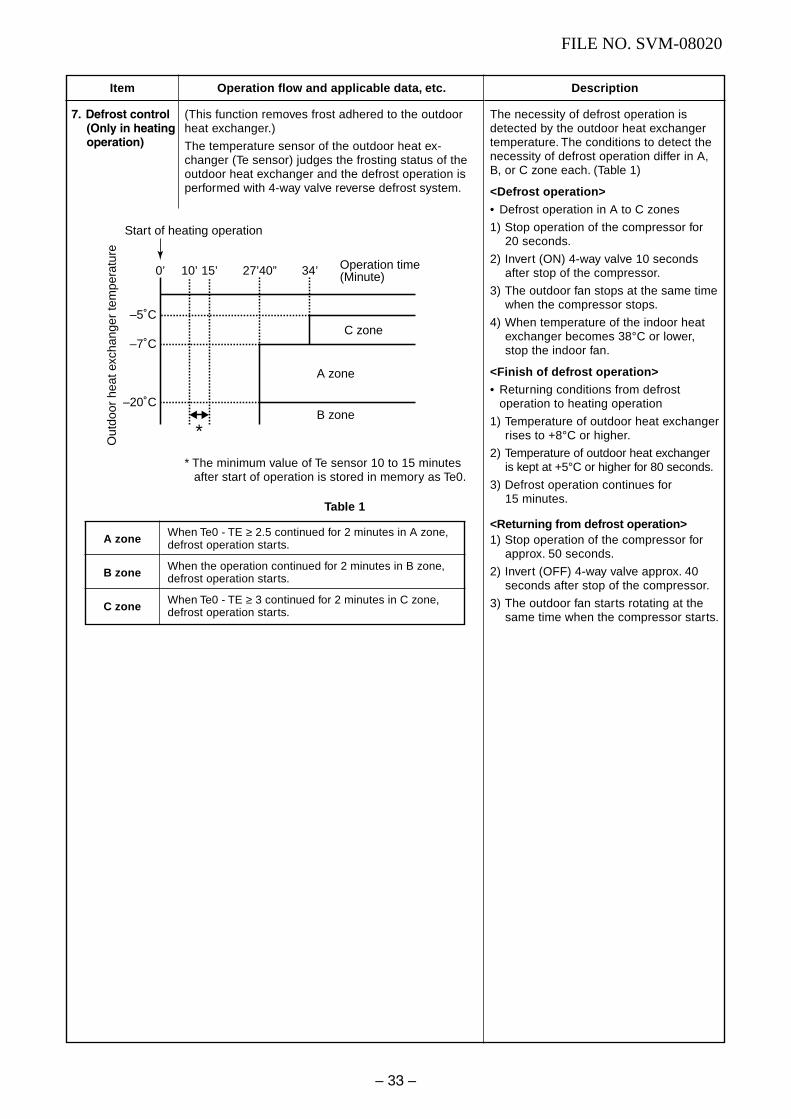
Item Operation flow and applicable data, etc. Description
7. Defrost control(Only in heatingoperation)
(This function removes frost adhered to the outdoorheat exchanger.)
The temperature sensor of the outdoor heat ex-changer (Te sensor) judges the frosting status of theoutdoor heat exchanger and the defrost operation isperformed with 4-way valve reverse defrost system.
The necessity of defrost operation isdetected by the outdoor heat exchangertemperature. The conditions to detect thenecessity of defrost operation differ in A,B, or C zone each. (Table 1)
<Defrost operation>• Defrost operation in A to C zones
1) Stop operation of the compressor for20 seconds.
2) Invert (ON) 4-way valve 10 secondsafter stop of the compressor.
3) The outdoor fan stops at the same timewhen the compressor stops.
4) When temperature of the indoor heatexchanger becomes 38°C or lower,stop the indoor fan.
<Finish of defrost operation>• Returning conditions from defrost
operation to heating operation
1) Temperature of outdoor heat exchangerrises to +8°C or higher.
2) Temperature of outdoor heat exchangeris kept at +5°C or higher for 80 seconds.
3) Defrost operation continues for15 minutes.
<Returning from defrost operation>1) Stop operation of the compressor for
approx. 50 seconds.
2) Invert (OFF) 4-way valve approx. 40seconds after stop of the compressor.
3) The outdoor fan starts rotating at thesame time when the compressor starts.
Table 1
* The minimum value of Te sensor 10 to 15 minutesafter start of operation is stored in memory as Te0.
–5˚C
0’ 10’ 15’ 27’40” 34’
–7˚C
–20˚C
Operation time (Minute)
Start of heating operation
*
Out
door
hea
t exc
hang
er te
mpe
ratu
re
C zone
A zone
B zone
A zone
B zone
C zone
When Te0 - TE ≥ 2.5 continued for 2 minutes in A zone,defrost operation starts.
When the operation continued for 2 minutes in B zone,defrost operation starts.
When Te0 - TE ≥ 3 continued for 2 minutes in C zone,defrost operation starts.
FILE NO. SVM-08020

Horizontalblowing
Inclinedblowing
Blowingdownward
Air direction
Inclinedblowing
Horizontalblowing
Initial setting of "Cooling storage position"Louver : Directs downward (35.3°)
Heating operation/AUTO (HEAT)
Initial setting of “Heating storage position”Louver : Directs downward (80.5˚)
Item
8. Louver control1) Louver
position
Operation flow and applicable data, etc.
This function controls the air direction of the indoor unit.
Description
• Swing operation is performed in width 35° with the stop position asthe center.
• If the stop position exceeds either upper or lower limit position,swing operation is performed in width 35° from the limit which thestop position exceeded.
3) Swing
2) Louver position in heating operation
2) Air direction adjustment
• The position is automatically controlled according to the operation
• The set louver position is stored in memory by the microcomputer,
The angle of the louver is indicated as the louver closes fully is 0°.
1) Louver position in cooling operation
mode (COOL/HEAT).
and the louver returns to the stored position when the next operationis performed. (Cooling/Heating memory position)
• SwingWhen pressing[SWING] button duringoperation, the louverstarts swinging.
• The louver position canbe arbitrarily set up bypressing [FIX] button.
– 34 –
FILE NO. SVM-08020

– 35 –
Item
9. ECOoperation
Operation flow and applicable data, etc.
When pressing [ECO] button on the remote controller, a Economic operation is performed. <Cooling operation>This function operates the air conditioner with the differencebetween the set and the room temperature as shown in thefollowing figure.
Description
<Heating operation> <Heating operation>1) Setting the compressor speed to
Max. aHz, the temperature zonein which the operation can beperformed with Max. cHz isgradually widened after 30minutes passed when startingECO operation.
* 12 (DRY max - COOL min) /6 x 5 + COOL min* 11 (DRY max - COOL min) /6 x 4 + COOL min* 10 (DRY max - COOL min) /6 x 3 + COOL min
* 9 (DRY max - COOL min) /6 x 2 + COOL min* 8 (DRY max - COOL min) /6 x 1 + COOL min
30 minutes
A
B
C
A
B
C
→ Time Compressorspeed 0Hz
A zoneaHz
B zonea to cHz
C zonecHz
0–0.5–1.0–1.5–2.0–2.5–3.0–4.0–5.0–6.0–7.0–8.0–9.0
–10.0–11.0
(Roo
m te
mp.
– S
et te
mp.
)
+3.5 +3.0 +2.5
+1.5 +1.0
TSC
-1.0
-2.0
+5.5
1H 2H
11 10
7 6
5 4 3
2
1
OFF
Dry Max *12 *11
*9*8
*10
TA
+6.0 +6.5
3H 4H
+5.0 +4.5 +4.0
+2.0
+0.5
-0.5
12
9 8
Time
Zone Frequency
MinHz
Hz 107SKV-E
Cool min
DRY max
20
37
Hz 107SKV-E
a
c
22
52
1) The control target temperatureincrease 0.5ºC per hour up to 2ºCstarting from the set temperaturewhen ECONO has been received.
2) The indoor fan speed iscontrolled between L+ and ULafter setting ECO operation.
<Cooling operation>
2) The indoor fan speed iscontrolled within L- as maximumspeed after setting ECO operation.
3) The compressor speed iscontrolled as shown in the leftfigure.
FILE NO. SVM-08020

– 36 –
Item
10. Temporaryoperation
Operation flow and applicable data, etc.
Pressing [RESET] button starts the temporary opera-tion of [AUTO] operation. When keeping [RESET]button pressed for 10 seconds or more, the temporary[COOL] operation is performed.
Description
1) When pressing [RESET] button, thetemporary [AUTO] operation starts.
2) When keeping [RESET] button pressedfor 3 seconds or more, Pi, Pi, Pi sound isheard and [AUTO RESTART] control ischanged.
3) When keeping [RESET] button pressedfor 10 seconds or more, “Pi” sound isheard and the temporary [COOL]operation starts.
4) If the filter lamp goes on, press [RESET]button to go off the filter lamp, and thenpress [RESET] button again.
5) To stop the temporary operation, pressthe button again.
Filter lamp ON Press RESET button.
Did you press [RESET] buttonfor 3 seconds or more?
Did you press [RESET] buttonfor 10 seconds or more?
Switch to [AUTO RESTART] control.
YES
YES
NO
NO
NO
YES
Temporary [AUTO] operation
Temporary [COOL] Operation
FILE NO. SVM-08020
11. Discharge temperature control 1. PurposeThis function detects error on therefrigerating cycle or error on the com-pressor, and performs protective control.
2. Operation• Control of the compressor speed
The speed control is performed asdescribed in the left table based uponthe discharge temperature.
Td value
117°C
112°C
108°C
105°C
98°C
Control operation
Judges as an error and stops the compressor.
Reduce the compressor speed.
Reduce slowly compressor speed.
Keeps the compressor speed.
If the operation is performed with lower speed than onecommanded by the serial signal, speed is slowly raisedup to the commanded speed.
Operates with speed commanded by the serial signal.

– 37 –
Item
12. Self-Cleaning
Operation flow and applicable data, etc.
1. PurposeThe Self-Cleaning operation is to minimize thegrowth of mold, bacteria etc. by runningthe fan and drying so as to keep theinside of the air conditioner clean.
Self-Cleaning operationWhen the cooling or dry operation shutsdown, the unit automatically starts the Self-Cleaning operation which is then performedfor the specified period based on durationof the operation which was performedprior to the shutdown, after which theSelf-Cleaning operation stops. (The Self-Cleaning operation is not performed after a heating operation.)
2. Operation1) When the stop signal from the remote
controller or timer-off function is received, only the timer indicator light.
2) The period of the Self-Cleaning operationis determined by the duration of theoperation performed prior to thereception of the stop code.
3) After the Self-Cleaning operation has been performed for the specified period, the unit stops operating.
Unit now performing cooling or dry operation
Press “STOP” button
Only timer indicator lights, and Self Cleaning operation starts
Time set now elapses
Operation stops
function
• During Self-Cleaning operations: The louver opensslightly. The indoor fan operates continuously ata speed of 500 rpm.
Cooling: Auto (cooling) Dry
Heating: Auto (heating)
Auto (fan only)
Shutdown
Operation time
Up to 10 minutesNo Self-Cleaning operationperformed (0 minutes)
10 minutes 30 mins.or longer
No Self-Cleaning operation performed
• To stop an ongoing Self-Cleaning operation at any timePress the start/stop button on the remote controller twice during the Self-Cleaningoperation. (After pressing the button for the first time, press it for the
Self-Cleaning operation times
second time without delay (within 10 minutes).)
Description
Self-Cleaning operation time
FILE NO. SVM-08020

Item Operation flow and applicable data, etc.
• Self-Cleaning diagram
Description
13. Self-Cleaningfunction release
Operation display ON OFF OFF
FCU fan ON ON
OFFrpm is depend on presetting. (500RPM)
FCU louver OPEN OPEN (12.7º) CLOSE
Timer displayON or OFF
ONON or OFF
depend on presetting of timer function. depend on presetting of timer function.
CompressorON or OFF
OFF OFFdepend on presetting per room temperature.
CDU fan ON or OFFOFF OFFdepend on presetting per room temperature.
Cool mode or dry modeoperation more than 10 mins.
Self-Cleaning modeoperate 30 mins.
Automatically turn-off.
Operation time
Turn off by remote controller ortimer-off function.
How to cencel Self-Cleaning function
To cancel the Self-Cleaning function, proceed asfollows:
• Press [RESET] button one time or use remotecontrol to turn on air conditioner. Display will show in green color.
• Hold down the [RESET] button for more than20 seconds. (The air conditioner will stop suddenlywhen the [RESET] is pressed but keep holding itcontinue. The will beep 3 times in the first3 seconds but it is not related to Self-Cleaningfunction)
• After holding about 20 seconds, the air conditionerwill beep 5 times without any blinking of display.
• The Self-Cleaning Operation had been cancelled.Remark
Presetting of Self-Cleaning function above, AUTO-
How to set Self-Cleaning function
To set the Self-Cleaning function, proceed as follows.• Press [RESET] button one time or use remote
control to turn on air conditioner. Display will show in green color.
• Hold down the [RESET] button for more than20 seconds. (The air conditioner will stop suddenlywhen the [RESET] is pressed but keep holding itcontinue. Then will beep 3 times is the first 3seconds but it is not related to Self-Cleaningfunction)
• After holding about 20 seconds, the air conditionerwill beep 5 times and OPERATION display blinks5 times.
• The Self-Cleaning function had been set.
RESTART function had been cancelled. To setAUTO-RESTART again, please follow item 9-3-1
RemarkPresetting of Self-Cleaning function above, AUTO-RESTART function had been cancelled. To setAUTO-RESTART again, please follow item 9-3-1
− 38 −
FILE NO. SVM-08020
RESET button

Item
14. Remote-A or Bselection
Operation flow and applicable data, etc. Description
1. PurposeThis operation is to operate only oneindoor unit using one remote controller.
2. DescriptionWhen operating one indoor unit in asituation where two indoor units havebeen installed in the same room ornearby rooms, this operation prevents theremote controller signal from beingreceived simultaneously by both units,thus preventing both units from operating.
3. OperationThe indoor unit on which the remotecontroller selection has been set to Breceives the signal of the remote control-ler also set to B.(At the factory the remote controllerselection is set to A on all the indoorunits. There is no A setting display.)
Setting the remote controllerTo separate using of remote control for each indoor unit in case of 2 air conditioner are installed nearly.
Remote Control B Setup.1) Press RESET button on the indoor unit to turn
2) Point the remote control at the indoor unit.
3) Push and hold CHK • button on the Remote Control by the tip of the pencil. "00" will be shown
the air conditioner ON.
shown on the display.4) Press CHK • during pushing MODE • . "B" will
show on the display and "00" will disappear and the air conditioner will turn OFF. The Remote Control B is memorized.
Note : 1. Repeat above step to reset Remote Controlto be A.
2. Remote Control A has not "A" display.3. Default setting of Remote Control from
factory is A.
− 39 −
FILE NO. SVM-08020
MODEAUTOCOOL
TEMP.
TEMP.
START/STOP
SWING
MODE
TIMER
ON OFF SET CLR
ECORST CHK
FIX FAN
AUTOQUIET
HEATDRY
FAN
button
button
B
[MODE]
[CHECK]
B
TOSHIBA

Item
15. Short Timer
Operation flow and applicable data, etc. Description
In the normal condition, after switching one circuitbreaker, 3-minute delay time for compressor and1 hour for plasma air purifier are set for the maintenance of the unit.
PurposeTo start the unit immediately for the purpose oftesting, trial...etc, short timer can be used.maintenance of the unit.
Short Timer Setting
purifier on the remote control without
[CHK] button and hold, "00" will show
to make "00" disappear.
setting on the remote operates
front panel turns ON continuously for
1 Press [ ] button to turn the unit OFF.2 Set the operation mode or plasma air
sending the signal to the unit.3 Use the tip of the pencil to push the
on display, them press [CLR] button
4 Press [ ] button to turn the unit ON.5 When short timer is activated, all
immediately, besides, all indicatiors on
3 seconds.
− 40 −
FILE NO. SVM-08020

– 41 –
Operation
Press [RESET] button for more thanthree seconds. (Less than 10 seconds)
Motions
The unit is on standby.
↓
The unit starts to operate. The green indicator is on.
↓ After approx. three seconds,
The unit beeps three times The green indicator flashesand continues to operate. for 5 seconds.
If the unit is not required to operate at this time, press [RESET]button once more or use the remote controller to turn it off.
Operation
Press [RESET] button for more thanthree seconds. (Less than 10 seconds)
Motions
The unit is in operation. The green indicator is on.
↓
The unit stops operating. The green indicator is turned off.
↓ After approx. three seconds,
The unit beeps three times. The green indicator flashesfor 5 seconds.
If the unit is required to operate at this time, press [RESET] buttononce more or use the remote controller to turn it on.
9-3. Auto Restart Function
This indoor unit is equipped with an automatic restarting function which allows the unit to restart operating withthe set operating conditions in the event of a power supply being accidentally shut down.The operation will resume without warning three minutes after power is restored.
This function is not set to work when shipped from the factory. Therefore it is necessary to set it to work.
9-3-1. How to Set the Auto Restart Function
To set the auto restart function, proceed as follows:
The power supply to the unit must be on ; the function will not set if the power is off.
Press the [RESET] button located in the center of the front panel continuously for three seconds.
The unit receives the signal and beeps three times.
The unit then restarts operating automatically in the event of power supply being accidentally shut down.
• When the unit is standby (Not operating)
• When the unit is in operation
• While the filter check indicator is on, the RESET button has the function of filter reset betton.
FILE NO. SVM-08020
RESET button
RESET button

– 42 –
Operation
Press [RESET] button for more thanthree seconds. (Less than 10 seconds)
Motions
The unit is on standby.
↓
The unit starts to operate. The green indicator is on.
↓ After approx. three seconds,
The unit beeps three times and continues to operate.
If the unit is not required to operate at this time, press [RESET]button once more or use the remote controller to turn it off.
Operation
Press [RESET] button for more thanthree seconds. (Less than 10 seconds)
Motions
The unit is in operation. The green indicator is on.
↓
The unit stops operating. The green indicator is turned off.
↓ After approx. three seconds,
The unit beeps three times.
If the unit is required to operate at this time, press [RESET] buttononce more or use the remote controller to turn it on.
9-3-2. How to Cancel the Auto Restart Function
To cancel auto restart function, proceed as follows :
Repeat the setting procedure : the unit receives the signal and beeps three times.
The unit will be required to be turned on with the remote controller after the main power supply is turned off.
• When the system is on stand-by (not operating)
• When the system is operating
9-3-3. Power Failure During Timer Operation
When the unit is turned off because of power failureduring timer operation, the timer operation is can-celled. In that case, set the timer operation again.
NOTE :The Everyday Timer is reset while a command signalcan be received from the remote controller even if itstopped due to a power failure.
FILE NO. SVM-08020
RESET button
RESET button

9-4. Remote control9-4-1. Remote control and its functions
− 43 −
9-4-2. Operation of remote control
1. AUTOMATIC OPERATIONTo automatically select cooling, heating, or fan only operation.
1. Press MODE : Select AUTO.
2. COOLING / HEATING OPERATION
1. Press MODE : Select Cool or Heat.
2. Press TEMP : Set the desired temperature.Cooling: Min. 17°C, Heating : Max, 30°C
3. Press FAN : Select AUTO, QUIET, LOW , MED or HIGH .
FILE NO. SVM-08020
MODEAUT OCOOL
FA NTEMP .
TEMP .
ST AR T/ST OP
SWING
MODE
TIMER
ON OFF SET CLR
ECORST CHK
FIX FA N
AUT OQUIET
HEATDR Y
Hr.ON OFF
B
1 Infrared signal emitter
2 Set louver button (FIX)
3 Auto louver button (SWING)
4 Mode select button (MODE)
5
6 On timer button (ON)
7
8
9
10
11
12
13
14
Reset button (RST)
Off timer button (OFF)
Reserve button (SET)
Cancel button (CLR)
Check button (CHK)
ECO button (ECO)
Fan speed button (FAN)
Start/Stop button (START/STOP)
Temperature button ( )
TOSHIBA
1
234567 8
910 1112 13
14

– 44 –
3. DRY OPERATION (COOLING ONLY)For dehumidification, a moderate cooling performance is controlled automatically.
1. Press MODE : Select DRY.
2. Press TEMP : Set the desired temperature.
4. ECO OPERATIONTo automatically control room to save energy (except in DRY mode)
Press ECO : Start and stop the operation.
Note: Cooling operation; the set temperature will increase automatically 1 degree/hour for 2 hours (maximum 2 degrees increase). For heating operation theset temperature will decrease.
5. TEMPORARY OPERATIONIn case of the misplaced or discharged remote control
• Pressing the RESET button, the unit can start or stopwithout using the remote control.
• Operation mode is set on AUTOMATICoperation, preset temperature is 24°Cand fan operation is automatic speed.
6. TIMER OPERATION
FILE NO. SVM-08020
Setting the ON Timer Setting the OFF Timer
Press TIMER ON : Set the desired ON timer.1
2
3
Press TIMER OFF : Set the desired ON timer.
Press TIMER SET : Set the timer.
Press TIMER CLR : Cancel the timer.
Press TIMER SET : Set the timer.
Press TIMER CLR : Cancel the timer.
Note: · Keep the remote control in accessible transmission to the indoor unit;
otherwise, the time lag of up to 15 minutes will occur.
7. AUTO RESTART OPERATIONTo automatically restart the conditioner after the power failure (Power of the unitmust be on.)
1. Press and hold the RESET button on the indoor unit for 3 seconds to set theoperation. (3 beep sound and OPERATION lamp blink 5 time/sec for 5 secpmds)• Do not operate ON timer and OFF timer.
2. Press and hold the RESET button on the indoor unit for 3 seconds to cancel the
Setting
operation. (3 beep sound but OPERATION lamp does not blink)
RESET button

– 45 –
9-4-3. Name and Functions of Indications on Remote Controller
[Display]
FILE NO. SVM-08020
All indications, except for the clock time indicator, are displayed by pressing the button.
1. Transmission markThis transmission mark indicates when theremote controller transmits signals to the indoorunit.
2. Mode indicatorIndicates the current operation mode.(AUTO, COOL, DRY and HEAT)
3. Temperature indicatorIndicates the temperature setting.(17°C to 30°C)
4. ECO indicatorIndicates when the ECO is in activated.Press the ECO button to start and press it again
6. OperationIndicate when press the operation ON/OFFbutton.
to stop operate.
5. A, B change indicator remote controllerWhen the remote controller switching function isset, "B" appears in the remote controller display(When the remote controller seting is "A", there isno indication at this position.)
7. FAN speed indicatorIndicates the selected fan speed.AUTO, QUIET or three fan speed levels
( LOW , MED , HIGH ) can be shown.Indicate Auto will be appear with Dry operationonly.
8. ON/OFF TIMER indicatorIndicate when the ON/OFF TIMER operation.(ON TIMER [Hr. ON], OFF TIMER [OFF]).
1 3
4
2
Hr.ON OFF
• •••
• ••B
•
6
58
7HEAT

10. INSTALLATION PROCEDURE
10-1. Installation Diagram of Indoor and Outdoor Units
FILE NO. SVM-08020
(Attach to the front panel)
2 Wireless remote control
5
Active carboncatechin
Active carboncatechin
6
or bottom left.
Insulate the refrigerant pipes separately with insulation, not together.
84
Insert the cushion between theindoor unit and wall, and tilt theindoor unit for better operation.
For the rear left and left piping
Make sure to run the drain hose sloped downward.
Do not allow the drain hose toget slack.
The auxiliary piping can beconnected to the left, rear left,rear right, right,bottom right
Right
Rear right
Bottomright
Rearleft Bottom left
Left
6 mm thick heat resistingpolyethylene foam
1
Pan headwood screw Remote control holder
Vinyl tapeApply after carryingout a drainage test.
Saddle
Extensiondrain hose(Not available,provided by installer)
Shield pipe
HookInstallationplate
Hook
65 m
m o
r m
ore
170 mm or more
170 mm or more
600
mm
or
mor
e
100 mm or more
45 mm or more
400 mm or more
600 mm or more
– 46 –
Before installing thewireless remote control
. With the remote control coveropen, load the batteries suppliedcorrectly, observing their polarity.
2 Wireless remote control
3
Batteries
Wall
Cut the piping hole sloped slightly.

– 47 –
10-2. Optional Parts, Accessories and Tools
10-2-1. Optional Installation Parts
Part Code
Y
Z
Parts name
Refrigerant piping
Indoor unit name Liquid side (Outer diameter) Gas side (Outer diameter)
Shield pipe (for extension drain hose) (polyethylene foam, 6 mm thick)
Q’ty
1 ea.
1
Attachment bolt arrangement of outdoor unit• Secure the outdoor unit with the attachment bolts and
nuts if the unit is likely to be exposed to a strong wind.
• Use Ø8 mm or Ø10 mm anchor bolts and nuts.
If it is necessary to drain the defrost water, attach drainnipple to the base plate of the outdoor unit beforeinstalling it.
10-2-2. Accessory and Installation Parts
Part name (Q’ty)
Installation plate × 1
Wireless remote control × 1
Battery × 2
Remote control holder × 1
Part No.
Part name (Q’ty)
Mounting screw Ø4 × 25L × 6
Remote controlholder mounting screw
Ø3.1 × 16L × 2
Part No.
Part name (Q’ty)
Drain nipple* x 1
This model is not equipped with an extension drain hose.
Part No.
FILE NO. SVM-08020
Active carbon catechin x 1
Active carbon catechin x 1
RAS-107SKV-E 6.35 mm 9.52 mm
∅25
500 mm
97 mm
53 m
m
280
mm
Drain outletAir outlet
Air inlet
Parts marked with asterisk (*) arepackaged with the outdoor unit.
<Others>
Name
Owner’s manual
Installation manual
Important information and warning*
B/W strips*(Energy efficiency labels)

– 48 –
10-2-3. Installation/Servicing Tools
Changes in the product and componentsIn the case of an air conditioner using R410A, in order to prevent any other refrigerant from being chargedaccidentally, the service port diameter of the outdoor unit control valve (3 way valve) has been changed.(1/2 UNF 20 threads per inch)
• In order to increase the pressure resisting strength of the refrigerant piping flare processing diameter and sizeof opposite side of flare nuts has been changed. (for copper pipes with nominal dimensions 1/2 and 5/8)
New tools for R410A
New tools for R410A
Gauge manifold
Charge hose
Electronic balancefor refrigerant charging
Torque wrench(nominal diam. 1/2, 5/8)
Flare tool (clutch type)
Gauge for projectionadjustment
Vacuum pump adapter
Gas leakage detector
Applicable to R22 model
×
×
×
— —
×
Changes
As pressure is high, it is impossible to measure by means ofconventional gauge. In order to prevent any other refrigerant frombeing charged, each port diameter has been changed.
In order to increase pressure resisting strength, hose materialsand port size have been changed (to 1/2 UNF 20 threads per inch).When purchasing a charge hose, be sure to confirm the port size.
As pressure is high and gasification speed is fast, it is difficult toread the indicated value by means of charging cylinder, as airbubbles occur.
The size of opposite sides of flare nuts have been increased.Incidentally,a common wrench is used for nominal diameters 1/4 and 3/8.
By increasing the clamp bar’s receiving hole, strength of spring inthe tool has been improved.
Used when flare is made by using conventional flare tool.
Connected to conventional vacuum pump. It is necessary to usean adapter to prevent vacuum pump oil from flowing back to thecharge hose. The charge hose connecting part has two ports-onefor conventional refrigerant (7/16 UNF 20 threads per inch) andone for R410A. If the vacuum pump oil (mineral) mixes with R410Aa sludge may occur and damage the equipment.
Exclusive for HFC refrigerant.
• Incidentally, the “refrigerant cylinder” comes with the refrigerant designation (R410A) and protector coating in theU. S’s ARI specified rose color (ARI color code: PMS 507).
• Also, the “charge port and packing for refrigerant cylinder” require 1/2 UNF 20 threads per inch corresponding tothe charge hose’s port size.
FILE NO. SVM-08020

– 49 –
10-3. Indoor Unit
10-3-1. Installation Place
• A place which provides enough spaces around theindoor unit as shown in the diagram.
• A place where there are no obstacle near the airinlet and outlet.
• A place which allows easy installation of the pipingto the outdoor unit.
• A place which allows the front panel to be opened.
• The indoor unit shall be installed so that the top ofthe indoor unit is positioned at least 2m in height.
• Also, avoid putting anything on the top of theindoor unit.
CAUTION
• Direct sunlight on the indoor unit wirelessreceiver should be avoided.
• The microprocessor in the indoor unit shouldnot be too close to r-f sources.(For details, see the owner's manual.)
Remote controller
• Should be placed where there are no obstacles,such as curtains, that may block the signal.
• Do not install the remote controller in a placeexposed to direct sunlight or close to a heatingsource, such as a stove.
• Keep the remote controller at least 1 m away fromthe nearest TV set or stereo equipment.(This is necessary to prevent image disturbances ornoise interference.)
• The location of the remote controller should bedetermined as shown below.
Fig. 10-3-1
10-3-2. Drilling a Hole and Mounting Instal-lation Plate
Drilling a hole
When install the refrigerant pipes from the rear.
1. After determining the pipe hole position on theinstallation plate ( ) drill the pipe hole (Ø65mm) at a slight downward slant to the outdoorside.
NOTE :• When drilling into a wall that contains a metal lath,
wire lath or metal plate, be sure to use a pipe holebrim ring sold separately.
Mounting the installation plate
Indoor unit
(Top view) (Side view)
Remotecontroller Remote controller
Indo
or u
nit
Receptionrange
Receptionrange
Fig. 10-3-3
Pipe hole
62
85
82.5
170
Indoor unitThread
Hook
Weight
Pipe hole
Mounting screw
Hook
Hook
Installationplate
Anchor bolt holes
2 m
or m
ore
from
floo
r
7
1
∅ 65 mm
100 mm
Pipehole
Fig. 10-3-2
FILE NO. SVM-08020

– 50 –
When the installation plate is directlymounted on the wall
1. Securely fit the installation plate onto the wall byscrews with the upper and lower catches, thathold the indoor unit, facing out.
2. To mount the installation plate on a concrete walluse anchor bolts. Drill the anchor bolt holes asillustrated in the above figure.
3. Install the installation plate horizontally and level.
CAUTION
When installing the installation plate with mount-ing screw, do not use the anchor bolt hole.Otherwise the unit may fall down and result inpersonal injury and property damage.
Fig. 10-3-4
Fig. 10-3-5
CAUTION
Failure to securely install the unit may result inpersonal injury and/or property damage if theunit falls.
• In case of block, brick, concrete or similar typewalls, drill 5 mm dia. holes in the wall.
• Insert clip anchors for the mounting screws.
NOTE :• Install the installation plate using mounting screws
between 4 to 6, being sure to secure all fourcorners.
Anchor bolt
Projection 15mm or less
5 mm dia. hole
Clip anchor(local parts)
7 Mounting screw Ø4 × 25L
10-3-3. Electrical Work
1. The supply voltage must be the same as therated voltage of the air conditioner.
2. Prepare a power source for the exclusive use ofthe air conditioner.
NOTE :• Wire type :
More than 1.5 mm2 H07RN-F or 60245IEC66.
CAUTION
• This appliance can be connected to a maincircuit breaker in either of the following twoways.
1. Connection to fixed wiring:
A switch or circuit breaker which discon-nects all poles and has a contact separa-tion of at least 3 mm must be incorporatedin the fixed wiring. An approved circuitbreaker or switch must be used.
2. Connection with power supply plug:
Attach power supply plug with power cordand plug it into wall outlet. An approvedpower supply cord and plug must be used.
NOTE :• Perform wiring work being sure the wire length is
long enough.
10-3-4. Wiring Connection
How to connect the connecting cable
Wiring the connecting cable can be carriedout without removing the front panel.1. Remove the air inlet grille. Open the air inlet grille
upward and pull it toward you.
2. Remove the terminal cover and cord clamp.
3. Insert the connecting cable (or as according tolocal regulations/codes) into the pipe hole on thewall.
4. Pull the connecting cable through the cable sloton the rear panel so that it protrudes about15 cm out of the front.
5. Insert the connecting cable fully into the terminalblock and secure it tightly with screws.
6. Tightening torque: 1.2 N•m (0.12 kgf•m)
7. Secure the connecting cable with the cord clamp.
8. Attach the terminal cover, rear plate bushing andair inlet grille on the indoor unit.
FILE NO. SVM-08020

– 51 –
CAUTION
• Be sure to refer to the wiring system diagramlabeled inside the front panel.
• Check local electrical regulations for anyspecific wiring instructions or limitations.
10-3-5. Piping and Drain Hose Installation
Piping and drain hose forming
• Since condensation results in machine trouble,make sure to insulate both the connecting pipesseparately.(Use polyethylene foam as insulating material.)
Fig. 10-3-6
Fig. 10-3-7
Fig. 10-3-8
Fig. 10-3-9
NOTE :WIRE TYPE : more than 1.0mm2
.(H07 RN-F or 60245IEC 66).
Fig. 10-3-10
1. Die-cutting front panel slitCut out the slit on the left or right side of the frontpanel for the left or right connection and the sliton the bottom left or side of thefront panel for thebottom left or right connection with a pair ofnippers.
2. Changing drain hoseFor left connection, left-bottom connection andrear-left connection’s piping, it is necessary torelocate the drain hose and drain cap.
CAUTION
Earth line
Connecting cable
about 15 cm
Connecting cableScrewScrew
Earth line
Terminal block
Screw
Cord clamp
Terminal cover
1 2 3
1 32
10 mm
10 mm50 mm
110 mm
Terminal block
How to remove the drain cap
Clip drain cap with needle-nose pliers, and pull out.
Fig. 10-3-11
How to remove the drain hose
The drain hose is secured in place by a screw.
Remove the screw securing the drain hose, then pullout the drain hose.
Die
-cut
ting
Fro
nt p
anel
slit
Cha
ngin
gdr
ain
hose
Pip
ing
prep
arat
ion
Rear right
Rear left
Bottom left
Left
Bottom right
Right
Screw Drain hose
Fig. 10-3-12
FILE NO. SVM-08020

– 52 –
4 mm
No gap
Insert a hexagonwrench (Ø4mm)
Do not apply lubricating oil(refrigerant machine oil) when inserting the drain cap.If applied, deterioration and drain leakage of the drain plug may occur.
How to attach the drain cap
1. Insert hexagonal wrench (4 mm).
Fig. 10-3-13
2. Firmly insert drain cap.
Fig. 10-3-14
How to attach the drain hose
Always use the original screw that secured thedrain hose to the unit. If using a different screwmay cause water to leak.Insert the drain hose firmly until the connectorcontacts with the insulation, then secure it in placeusing the original screw.
CAUTION
Securely insert the drain hose and drain cap;otherwise, water may leak.
In case of right or left piping
• After making slits on the front panel with a knife orsimilar tool, cut them out with a pair of nippers oran equivalent tool.
Fig. 10-3-15
Fig. 10-3-16
Left-hand connection with piping
Bend the connecting pipes so that they are posi-tioned within 43 mm above the wall surface.
If the connecting pipes are positioned more than43 mm above the wall surface, the indoor unit maybe unstable.
When bending the connecting pipe, make sure touse a spring bender to avoid crushing the pipe.
Refer to the table below for the bendingradius of each connection pipe.
Fig. 10-3-17
NOTE :If the pipe is incorrectly bent, the indoor unit may beunstable on the wall.
After passing the connecting pipe through the pipehole, connect the connecting pipe to the auxiliarypipes and wrap the facing tape around them.
In case of bottom right or bottom left piping
• After making slits on the front panel with a knife orsimilar tool, cut them out with a pair of nippers oran equivalent tool.
To connect the pipe after installation of theunit (figure)
Outer diameter
6.35 mm
9.52 mm
12.7 mm
Bending radius
30 mm
40 mm
50 mm
Slit
Slit
43 m
m
Use a screwdriver handle, etc.
(To the front flare)
Outward form of indoor unit
Gas side270 mm
230 mm
R30 or less (Ø6.35), R40 or less (Ø9. 52), R50 or less (Ø12. 7)Use polishing (polyethylene core or the like for bending pipe).
Liquid side
FILE NO. SVM-08020

– 53 –
CAUTION
• Bind the auxiliary pipes (two) and connectingcable with facing tape tightly.
In case of leftward piping and rear-leftwardpiping, bind the auxiliary pipes (two) only withfacing tape.
Fig. 10-3-18
• Carefully arrange the pipes so that none of thepipes stick out of the rear plate of the indoor unit.
• Carefully connect the auxiliary pipes andconnecting pipes to each other and cut off theinsulating tape wound on the connecting pipeto avoid double-taping at the joint, moreover,seal the joint with the vinyl tape, etc.
• Since condensation can result in machineperformance trouble, be sure to insulate bothconnecting pipes. (Use polyethylene foam asinsulating material.)
• When bending a pipe, be careful not to crush it.
10-3-6. Indoor Unit Installation
1. Pass the pipe through the hole in the wall, andhook the indoor unit on the installation plate atthe upper hooks.
2. Swing the indoor unit to right and left to confirmthat it is firmly hooked on the installation plate.
3. While pressing the indoor unit onto the wall, hookit at the lower part on the installation plate.Pull the indoor unit toward you to confirm that it isfirmly hooked on the installation plate.
Installation plate
Indoor unit
Connecting cable
Auxiliary pipes
10-3-7. Drainage
1. Run the drain hose at a downward sloped angle.
NOTE :• Hole should be made at a slight downward slant
on the outdoor side.
Fig. 10-3-21
2. Put water in the drain pan and make sure that thewater is being drained outside.
3. When connecting extension drain hose, insulatethe connection part of extension drain hose withshield pipe.
Fig. 10-3-22
CAUTION
Install the drain pipe for proper drainage.
Improper drainage can result in water drippinginside the room.
This air conditioner has been designed to drainwater collected from condensation which forms onthe back of the indoor unit, to the drain pan.
Therefore, do not locate the power cord and otherparts at a high place than the drain guide.
Fig. 10-3-19
• For detaching the indoor unit from the installationplate pull the indoor unit toward you while pushingthe bottom up at the specified places.
Fig. 10-3-20PushPush
Push (unhook)
1 Installation plate
Hook here
2
Hook
1
50 mmor more
Do not rise the drain hose. Do not form the drain hose into the waved shape.
Do not put the drain hose end into water.
Do not put the drain hose end in the drainage ditch.
Shield pipe
Extension drain hoseInside the roomDrain hose
Space for pipes
Wall
Drain guide
Fig. 10-3-23
FILE NO. SVM-08020

– 54 –
FILE NO. SVM-0802010-4-2. Refrigerant piping connection
<Flaring>
1. Cut the pipe with a pipe cutter.
Fig. 10-4-2
2. Insert a flare nut into the pipe, and flare the pipe. Projection margin in flaring : A (Unit : mm)
Fig. 10-4-3
ial (wing nut type)
<Tightening connection>
Align the centers of the connecting pipes and tightenthe flare nut as far as possible with your fingers. Thentighten the nut with a spanner and torque wrench asshown in the figure.
Fig. 10-4-4
10-4. Outdoor Unit
10-4-1. Installation place
• A place which provides the spaces around theoutdoor unit as shown in the left diagram.
• A place which can bear the weight of the outdoorunit and does not allow an increase in noise leveland vibration.
• A place where the operation noise and dischargedair do not disturb users neighbors.
• A place which is not exposed to a strong wind.• A place free of a leakage of combustible gases.• A place which does not block a passage.• When the outdoor unit is to be installed in an
elevated position, be sure to secure its feet.• An allowable length of the connecting pipe is up
15 m.• An allowable height level is up to 10 m.• A place where the drain water does not raise any
problem.
CAUTION1. Install the outdoor unit without anything blocking
the air discharging.2. When the outdoor unit is installed in a place
exposed always exposed to strong wind like acoast or on a high storey of a building, securethe normal fan operation using a duct or a windshield.
3. In particularly windy areas, install the unit suchas to avoid admission of wind.
4. Installation in the following places may result introuble.Do not install the unit in such places.• A place full of machine oil.• A saline-place such as the coast.• A place full of sulfide gas.• A place where high-frequency waves are likely
to be generated as from audio equipment,welders, and medical equipment.
Fig. 10-4-1
Strongwind
CAUTIONDo not apply excess torque.Otherwise, the nut may crack depending on theconditions.
••
6.35 0 to 0.5 1.0 to 1.5
9.52 0 to 0.5 1.0 to 1.5
90° RoughnessObliquity
A
Die Pipe
Warp
Outer dia. R410Aof copper pipe
6.35 1.5 to 2.0
9.52 1.5 to 2.0
Flare nutHalf union
Use a wrench to secure. Use a torque wrench to tighten.
Externallythreaded side
Internallythreaded side
Rigid (Clutch type)
Imper
Outer dia. R410A Conventionalof copper pipe tool used tool used

– 55 –
FILE NO. SVM-0802010-4-3. Evacuating
After the piping has been connected to the indoor unit,you can perform the air purge together at once.
AIR PURGEEvacuate the air in the connecting pipes and in theindoor unit using a vacuum pump. Do not use therefrigerant in the outdoor unit. For details, see themanual of the vacuum pump.
<Using a vacuum pump>Be sure to use a vacuum pump with counter-flowprevention function so that inside oil of the pump doesnot flow backward into pipes of the air conditionerwhen the pump stops. (If oil inside of the vacuum pumpenters into the air conditioner, which use R410A,refrigeration cycle trouble may result.)1. Connect the charge hose from the manifold valve to
the service port of the gas side packed valve.2. Connect the charge hose to the port of the vacuum
pump.3. Open fully the low pressure side handle of the
gauge manifold valve.4. Operate the vacuum pump to start evacuating.
Perform evacuating for about 15 minutes if thepiping length is 20 meters. (15 minutes for20 meters) (assuming a pump capacity of 27 litersper minute. Then confirm that the compoundpressure gauge reading is − 101 kPa (76 cmHg).
5. Close the low pressure side valve handle of gaugemanifold.
6. Open fully the valve stem of the packed valves(both side of Gas and Liquid).
7. Remove the charging hose from the service port.8. Securely tighten the caps on the packed valves.
Fig.10-4-7
Tightening torque of flare pipe connectionsThe operating pressure of R410A is higher than that ofR22. (Approx. 1.6 times).It is therefore necessary to firmly tighten the flare pipeconnecting sections (which connect the indoor andoutdoor units) up to the specified tightening torque.Incorrect connections may cause not only a gasleakage, but also damage to the refrigerant cycle.
Fig. 10-4-5
<Shaping pipes>
1. How to shape the pipesShape the pipes along the incused line on theoutdoor unit.
2. How to fit position of the pipesPut the edges of the pipes to the place with adistance of 85 mm from the incused line.
Fig. 10-4-6
(Unit : Nám)
Outer dia. Tightening torqueof copper pipe∅6.35 mm 16 to 18 (1.6 to 1.8 kgf·m)
9.52 mm 30 to 42 (3.0 to 4.2 kgf·m)
Flare atindoor unit side
Flare atoutdoor unit side
Incused line
∅
85mm
CAUTION• KEEP IMPORTANT 4 POINTS FOR PIPING
WORK(1) Take away dust and moisture (Inside of the
connecting pipes.)(2) Tight connection (between pipes and unit)(3) Evacuate the air in the connecting pipes using
VACUUM PUMP.(4) Check gas leak (connected points)
Pressure gauge
Manifold valve–101 kPa (76 cmHg)
Handle Lo
Connecting pipe
Compound pressure gauge
Vacuumpump
Handle Hi (Keep full closed)
Charge hose (For R410A only)
Vacuum pump adapter forcounter-flow prevention(For R410A only)
Service port (Valve core (Setting pin))
Packed valve at liquid side
Packed valve at gas side
Charge hose (For R410A only)

– 56 –
FILE NO. SVM-08020<Stripping length of connection cable>
CAUTION• Wrong wiring connection may cause some
electrical parts burn out.• Be sure to comply with local codes on running
the wire from indoor unit to outdoor unit (size ofwire and wiring method etc).
• Every wire must be connected firmly.• This installation fuse (25A
Model
Power source 50 Hz, 220 - 240 V Single phaseMaximum 8Arunning currentInstallation fuse 25Arating
Power cord H07RN-F or 245 IEC66 (1.5 mm2
or more)
RAS-107SKV-E / RAS-107SAV-E
) mustbe used for the power supply line of this airconditioner.
If incorrect or incomplete wiring is carried out, itwill cause an ignition or smoke.
Prepare the power supply for exclusive use withthe air conditioner.
This product can be connected to the mains.Connection to fixed wiring: A switch whichdisconnects all poles and has a contactseparation of at least 3 mm must be incorporatedin the fixed wiring.
NOTE: Connecting cable• Wire type: More than H07RN-F or 245 IEC66
(1.0 mm2 or more)
<Packed valve handling precautions>
Open the valve stem all the way out; but do not tryto open it beyond the stopper.
Securely tighten the valve stem cap with torque inthe following table:
Fig. 10-4-8
10-4-4. Wiring connection
1. Remove the valve cover from the outdoor unit.2. Connect the connecting cable to the terminal as
identified with their respective matched numbers onthe terminal block of indoor and outdoor unit.
3. When connecting the connecting cable to theoutdoor unit terminal, make a loop as shown in theinstallation diagram of indoor and outdoor unit, toprevent water coming in the outdoor unit.
4. Insulate the unused cords (conductors) from anywater coming in the outdoor unit. Proceed them sothat they do not touch any electrical or metal parts.
4 mm
Hexagonal wrenchis required.
Gas side 30 to 42 N·m(∅9.52 mm) (3.0 to 4.2 kgf·m)
Liquid side 16 to 18 N·m(∅6.35 mm) (1.6 to 1.8 kgf·m)
Service port 9 to 10 N·m(0.9 to 1.0 kgf·m)
Fig. 10-4-8
Terminal block
Connecting cable
Power cord
Earth line Earth line
Connecting cable Power cord
10
10 10
10
45 4060 50
L N1 2 3

– 57 –
FILE NO. SVM-0802010-4-5. Gas leak test
Fig. 10-4-10
• Check the flare nut connections for the gas leakwith a gas leak detector or soap water.
Check placesfor outdoor unit
Valve cover
Check places forindoor unit (Flarenut connection)
Electric partscover
10-4-8. Auto restart setting
This product is designed so that, after a power failure,it can restart automatically in the same operating modeas before the power failure.
InformationThe product was shipped with Auto Restart functionin the off position. Turn it on as required.
<How to set the auto restart>
• Press and hold the RESET button for about3 seconds. After 3 seconds, the electronic beepermakes three short beeps to tell you the AutoRestart has been selected.
• To cancel the Auto Restart, follow the stepsdescribed in the section Auto Restart Function ofthe Owner’s Manual.
10-4-7. Test operation
To switch the TEST RUN (COOL) mode, pressRESET button for 10 sec.(The beeper will make a short beep.)
Fig. 10-4-13
RESET button

– 58 –
FILE NO. SVM-08020
Inverter cover
P. C. board (Soldered surface)Discharging position
(Discharging period 10 seconds or more)
Plug of soldering iron
11. HOW TO DIAGNOSE THE TROUBLE
The pulse modulating circuits are mounted to bothindoor and outdoor units. Therefore, diagnose troublesaccording to the diagnosis procedure as describedbelow. (Refer to the check points in servicing writtenon the wiring diagrams attached to the indoor/outdoorunits.)
Table 11-1
No. Troubleshooting Procedure
1 First Confirmation
2 Primary Judgment
3 Judgment by Flashing LED of Indoor Unit
4 Self-Diagnosis by Remote Control
5 Judgment of Trouble by Every Symptom
6 How to Check Simply the Main Parts
Fig. 11-1
NOTE:A large-capacity electrolytic capacitor is used in theoutdoor unit control (inverter). Therefore, if the powersupply is turned off, charge (charging voltage DC280V)remains and discharging takes a lot of time. Afterturning off the power source, if touching the chargingsection before discharging, an electrical shock may becaused. Discharge the electrolytic capacitor completelyby using soldering iron, etc.
<Discharging method>(1) Remove the inverter cover (plating) by opening four
mounting claws.(2) As shown below, connect the discharge resistance
(approx. 100Ω40W) or plug of the soldering iron tovoltage between + – terminals of the C14(“CAUTION HIGH VOLTAGE 380 V” is indicated.)electrolytic capacitor (500µF/400 V) on P.C. board,and then perform discharging.
11-1. First Confirmation
11-1-1. Confirmation of power supply
Confirm that the power breaker operates (ON)normally.
11-1-2. Confirmation of power voltage
Confirm that power voltage is AC 220-240 V ± 10%. Ifpower voltage is not in this range, the unit may notoperate normally.

– 59 –
FILE NO. SVM-0802011-1-3. Operation which is not a trouble (Program operation)
For controlling the air conditioner, the program operations are built in the microcomputer as described in thefollowing table. If a claim is made for running operation, check whether or not it meets to the contents in thefollowing table. When it does, we inform you that it is not trouble of equipment, but it is indispensable for control-ling and maintaining of air conditioner.
11-2. Primary Judgment
To diagnose the troubles, use the following methods.(1) Judgment by flashing LED of indoor unit(2) Self-diagnosis by service check remote control(3) Judgment of trouble by every symptom
Firstly, use the method (1) for diagnosis. Then, use the method (2) and (3) to diagnose the details of troubles.
Table 11-1-1
1 When power breaker is turned “ON”,the operation lamp (Green) of theindoor unit flashes.
2 Compressor may not operate even ifthe room temperature is within range ofcompressor-ON.
3 In Dry and ECO. mode, FAN (air flow)display does not change even thoughFAN (air flow select) button is operated.
4 Increasing of compressor motor speedstops approx. 30 seconds afteroperation started, and then compressormotor speed increases again approx.30 seconds after.
5 The set value of the remote controlshould be below the room temperature.
6 In AUTO mode, the operation mode ischanged.
7 In HEAT mode, the compressor motorspeed does not increase up to themaximum speed or decreases beforethe temperature arrives at the settemperature.
No. Operation of air conditioner Description
The OPERATION lamp of the indoor unit flashes when power sourceis turned on. If [START/STOP] button is operated once, flashing stops.(Flashes also in power failure)
The compressor does not operate while compressor restart delaytimer (3-minutes timer) operates. The same phenomenon is foundafter power source has been turned on because 3-minutes timeroperates.
The air flow indication is fixed to [AUTO].
For smooth operation of the compressor, the compressor motor speedis restricted to Max. 41 rps for 2 minutes, and Max.91 rps for 2 minutesto 3 minutes, respectively after the operation has started.
If the set value is above the room temperature, Cooling operation isnot performed. And check whether battery of the remote control isconsumed or not.
After selecting Cool or Heat mode, select an operation mode again ifthe compressor keeps stop status for 15 minutes.
The compressor motor speed may decrease by high-temp. releasecontrol (Release protective operation by temp.-up of the indoor heatexchanger) or current release control.

11-3. Judgment by Flashing LED of Indoor Unit
While the indoor unit monitors the operation status of the air conditioner, if the protective circuit operates, thecontents of self-diagnosis are displayed with block on the indoor unit indication section.
Table 11-3-1
NOTES :1. The contents of items B and C and a part of item E are displayed when air conditioner operates.
2. When item B and C, and item B and a part of item E occur concurrently, priority is given to the block of item B.
3. The check codes can be confirmed on the remote controller for servicing.
OPERATION (Green)Flashing display (1 Hz)
OPERATION (Green)TIMER (Yellow)FILTER (Orange)Flashing display (5 Hz)
OPERATION (Green)FILTER (Yellow)Flashing display (5 Hz)
OPERATION (Green)TIMER (Yellow)Flashing display (5 Hz)
OPERATION (Green)Flashing display (5 Hz) Protective circuit operation for indoor P.C. board
Protective circuit operation for connecting cable and serial signal system
Protective circuit operation for outdoor P.C. board
Protective circuit operation for others(including compressor)
Power failure (when power is ON)Indoor indication
lamp flashes.
Which lamp does flash?
Item
A
B
C
D
E
Checkcode Block display Description for self-diagnosis
FILE NO. SVM-08020
– 60 –

– 61 –
11-4. Self-Diagnosis by Remote Controller (Check Code)
1. If the lamps are indicated as shown B to E in Table 11-3-1, execute the self-diagnosis by the remote controller.
2. When the remote controller is set to the service mode, the indoor controller diagnoses the operation condi-tion and indicates the information of the self-diagnosis on the display of the remote controller with the checkcodes. If a fault is detected, all lamps on the indoor unit will flash at 5Hz and it will beep for 10 seconds(Beep, Beep, Beep ... ). The timer lamp usually flashes (5Hz) during self-diagnosis.
11-4-1. How to Use Remote Controller in Service Mode
Fig. 11-4-1
FILE NO. SVM-08020
(1) Press [CHK] button with a tip of pencil to set theremote control to the service mode.• “00” is indicated on the display of the remote
control.• The timer lamp on the indoor unit blinks
continuously. (5 times per 1 sec.)
(2) Press [8TEMP.] button.If there is no fault with a code, the indoor unit willbeep once (Pi) and the display of the remotecontrol will change as follows:
• Check the unit with all 35 check codes (00 to 22).
• Press [9TEMP.] button to change the checkcode backwards.
If there is a fault, the indoor unit will beep for 10seconds (Pi, Pi, Pi...).Note the check code on the display of the remotecontrol.• 2-digits alphanumeric will be indicated on the
display.• All lamps on the indoor unit will blink. (5 times
per 1 sec.)
• Alphanumeric characters are used for the check code.
is 5. is 6.is A. is B.is C. is D.
00 01 1d 1E02 22
MODEAUTOCOOL
FANTEMP.
TEMP.
START/STOP
SWING
MODE
TIMER
ON OFF SET CLR
ECORST CHK
FIX FAN
AUTOQUIET
HEATDRY
Hr.ON OFF
B
(3) Press [START/STOP] button to release the servicemode.• The display of the remote control returns to as it
was before service mode was engaged.
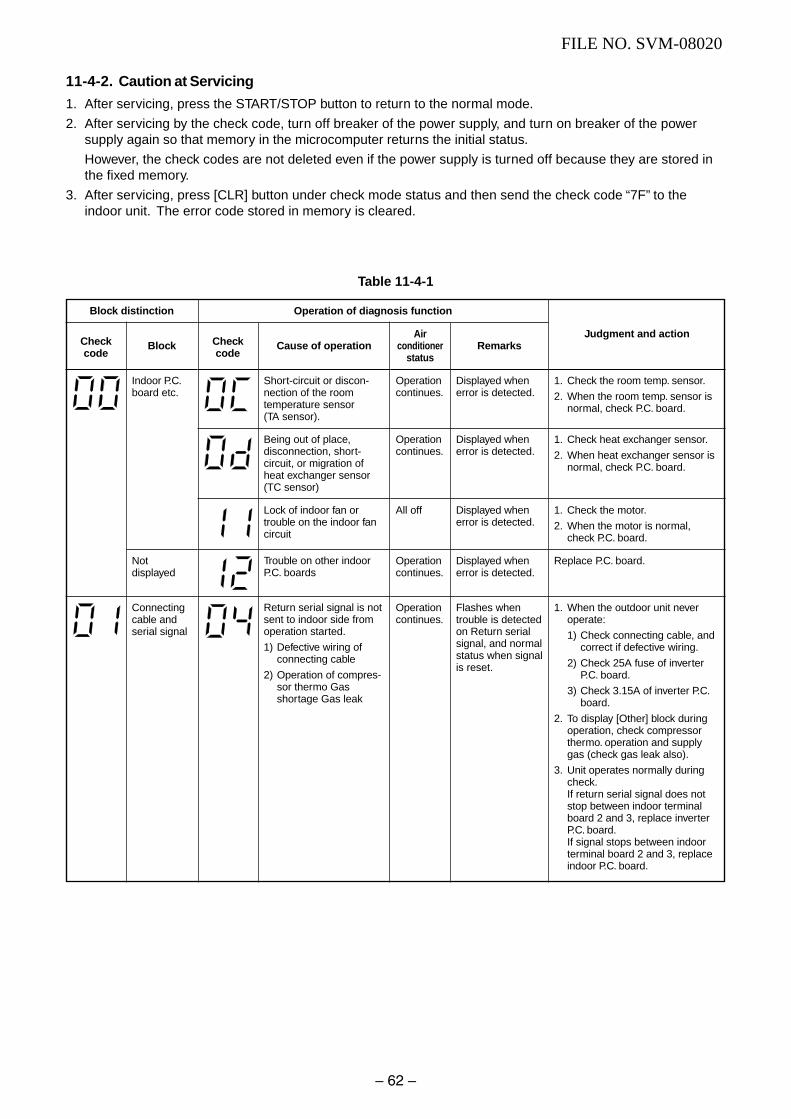
– 62 –
Checkcode
Checkcode
Judgment and action
1. Check the room temp. sensor.
2. When the room temp. sensor isnormal, check P.C. board.
1. Check heat exchanger sensor.
2. When heat exchanger sensor isnormal, check P.C. board.
1. Check the motor.
2. When the motor is normal,check P.C. board.
Replace P.C. board.
1. When the outdoor unit neveroperate:
1) Check connecting cable, andcorrect if defective wiring.
2) Check 25A fuse of inverterP.C. board.
3) Check 3.15A of inverter P.C.board.
2. To display [Other] block duringoperation, check compressorthermo. operation and supplygas (check gas leak also).
3. Unit operates normally duringcheck.If return serial signal does notstop between indoor terminalboard 2 and 3, replace inverterP.C. board.If signal stops between indoorterminal board 2 and 3, replaceindoor P.C. board.
11-4-2. Caution at Servicing
1. After servicing, press the START/STOP button to return to the normal mode.
2. After servicing by the check code, turn off breaker of the power supply, and turn on breaker of the powersupply again so that memory in the microcomputer returns the initial status.
However, the check codes are not deleted even if the power supply is turned off because they are stored inthe fixed memory.
3. After servicing, press [CLR] button under check mode status and then send the check code “7F” to theindoor unit. The error code stored in memory is cleared.
Table 11-4-1
Block distinction Operation of diagnosis function
Block
Indoor P.C.board etc.
Notdisplayed
Connectingcable andserial signal
Cause of operation
Short-circuit or discon-nection of the roomtemperature sensor(TA sensor).
Being out of place,disconnection, short-circuit, or migration ofheat exchanger sensor(TC sensor)
Lock of indoor fan ortrouble on the indoor fancircuit
Trouble on other indoorP.C. boards
Return serial signal is notsent to indoor side fromoperation started.
1) Defective wiring ofconnecting cable
2) Operation of compres-sor thermo Gasshortage Gas leak
Airconditioner
status
Operationcontinues.
Operationcontinues.
All off
Operationcontinues.
Operationcontinues.
Remarks
Displayed whenerror is detected.
Displayed whenerror is detected.
Displayed whenerror is detected.
Displayed whenerror is detected.
Flashes whentrouble is detectedon Return serialsignal, and normalstatus when signalis reset.
FILE NO. SVM-08020

– 63 –
Checkcode
Checkcode
Block distinction
Judgment and action
Even if trying operation again, alloperations stop immediately. :Replace P.C. board.
1. Even if connecting lead wire ofcompressor is removed,position-detect circuit erroroccurred. : Replace P.C. board.
2. Measure resistance betweenwires of compressor, andperform short-circuit. : Replacecompressor.
Even if trying operation again, alloperations stop immediately. :Replace P.C. board.
1. Check sensors (TE, TS).2. Check P.C. board.
1. Check discharge temp. sensor(TD).
2. Check P.C. board
Position-detect error, over-currentprotective operation of outdoor fandrive system, fan lock, etc. :Replace P.C. board or fan motor.
1. Check outdoor temp. sensor(TO).
2. Check P.C. board.
When 20 seconds passed afterstart-up, position-detect circuit erroroccurred. : Replace compressor.Trouble on P.M.V.
1. Repeat Start and Stop withinterval of approx. 10 to 40minutes. (Code is not displayedduring operation.)Supply gas.(Check also gas leak).
2. Unit operates normally duringcheck.If return serial signal does notstop between indoor terminalblock 2 and 3, replace inverterP.C. board.If signal stops between indoorterminal block 2 and 3, replaceindoor P.C. board.
1. Trouble on compressor2. Trouble on wiring of compressor
(Missed phase)
1. Check dischage temp. sensor(TD).
2. Gas leakage3. Trouble on P.M.V.
1. Check power voltage.(220–230–240 V +10%)
2. Overload operation of refrigera-tion cycleCheck installation condition(Short-circuit of outdoor diffuser).
1. Check 4-way valve operation.
Block
Outdoor P.C.board
Notdisplayed
Outdoor P.C.board
Others(includingcompressor)
Operation of diagnosis function
Cause of operation
Inverter over-currentprotective circuitoperates. (Short time)
Position-detect circuiterror or short-circuitbetween windings ofcompressor
Current-detect circuiterror
Being out of place,disconnection or short-circuit of the outdoorheat exchanger sensor(TE) or suction temp.sensor (Ts)
Disconnection or short-circuit of dischargetemp. sensor
Outdoor fan drivesystem error
Outdoor heat exchangertemp. sensor error
Compressor drive outputerror, Compressor error(lock, missing, etc.),Break down
Return serial signal hasbeen sent whenoperation started, but itis not sent from halfway.1) Compressor thermo.
operationGas shortageGas leak
2) Instantaneous powerfailure
Compressor does notrotate.(Current protectivecircuit does not operatewhen a specified timepassed after compressorhad been activated.)
Discharge temp.exceeded 117°C
Break down ofcompressor
4-way valve inverse error(TC sensor valuelowered during heatingoperation.)
Airconditioner
status
All off
All off
All off
All off
All off
All off
Operationcontinues
All off
Operationcontinues
All off
All off
All off
Operationcontinues
Remarks
Displayed whenerror is detected.
Displayed whenerror is detected.
Displayed whenerror is detected.
Displayed whenerror is detected.
Displayed whenerror is detected.
Displayed whenerror is detected.
——
Displayed whenerror is detected.
Flashes whentrouble is detectedon return serialsignal, and normalstatus when signalis reset.
Displayed whenerror is detected.
Displayed whenerror is detected.
Displayed whenerror is detected.
——
FILE NO. SVM-08020

– 64 –
11-5. Judgment of Trouble by Every Symptom
11-5-1. Indoor Unit (Including Remote Controller)
(1) Power is not turned on (Does not operate entirely)
<Primary check>1. Is the supply voltage normal?
2. Is the normal voltage provided to the outdoor unit?
3. Is the crossover cable connected properly?
4. Is the fuse (F01) blown?
• Be sure to disconnect the motor connector CN31 after shut off the power supply, or it will be a cause ofdamage of the motor.
(2) Power is not turned on though Indoor P.C. board is replaced
<Confirmation procedure>
NO
Turn off power supply once, and 5 second later, turn it on again.
Is OPERATION indicator flashing?
Is it possible to turn on power supply by pushing
[START/STOP] button on remote controller?
Is voltage (DC12V or 5V)
indicated on rear of indoor control board normal?
Does transmission mark on remote controller flash normally,and is its signal
transmitted properly?
Item by symptoms
Operation
Check Item
Considerable principle cause
Measures
Parts (R01, C01, C02, R02, C03, D01, D02, D03, D04,
Remote controller is defective.
Refer to (5) “Troubleshooting for remote controller”.
Parts of a power supply circuit defective.
Unit operates normally.
Replace main P.C. board
Is fuse (F01) of indoor control
board blown?
NO
NO NO
NO YES
YES
YES YES
YES
YES
NO NO
To item of “Power supply is not turned on”.
Turn on power supply.
Does OPERATION indicator flash? Is wired correctly to white andblack lead wires of terminal block? Correct wiring.
T101) are defective.
Microcomputeris defective.
YES
FILE NO. SVM-08020

FILE NO. SVM-08020
– 65 –
(3) Only the indoor fan does not operate.
Replace the fan motor.
YES
NO
NO
YES
YES
NO
NO
YES
YES
YES
NO
NO NO
YES
Does the fan stop inno operating status? Control P.C. board is defective.
Start the operationwith low fan settingin cool operation.
Does AC 120 Vor higher voltage apply
to between red and blacklead of fan motor?
Does the fan rotate?
Change the setting ofcooling to high fan.
Operationstops
Shut off the power supply.
Motor control circuit failure(IC31, D301) or 12 V
switching module failure (T101).
Does the cross flowfan rotate normally?
Is the rotation signal (DC+5 V−0 V)output between 2 (gray lead wire)
and 3 (brown lead wire) of the motor connector (CN11) when rotating the
cross flow fan by hand in no operatingstatus? (1 pulse/one turn)
Turn on the power supply.
Repair thebearing ofthe fan.
Turn the power supply.
Shut off thepower supply once.
Does connectingterminal, connecting
cable or power supplycord completely?
Does not found the shortwire about connectingcable and power cord?
Does the fan speedbecome higher?
Replace connecting thecable (or power cord)
and terminalblock.
Replace the P.C. board.
Replace the P.C. board.
NormalReplace the control
P.C. board.
<Check procedure>

<Inspection procedure>1. Remove the front panel. (Remove 2 screws.)
2. Remove the cover of the fan motor lead wires.
3. Check AC voltage with CN31 connector while the fan motor is rotating.
NOTE :• Using a tester, measure the resistance value of each winding coil.
• Use a thin test rod.
ate" of "Judgment of Trouble by Every Symptom".
AFS-220-20-4AR• Do not disconnect the connector while the fan motor is rotating.
• For P.C. board side, proceed to the item "Only indoor fan does not oper-
1
3
5
123
21
321
3
21
321
3CN31
CN33
P.C. board
WHI
BLK
REDBLK
REDWHI
BLUPURGRY
BLUPURGRY
Resistance valuePosition (P.C. board)
Between 3 (Black) - 1 (Red)
Between 3 (Black) - 5 (White)
Between 1 (Red) - 5 (White)
74 ± 15 Ω
100 ± 20 Ω
174 ± 35 Ω
BLKWHIRED
PURGRY
BLU
– 66 –
FILE NO. SVM-08020

– 67 –
NO
YES
Push the START/STOP button.
Is transmission mark indicated?
The unit does not beep at all.Operation lamp on indoor unit is not indicated.
NOTE : After replacing batteries,push the RESET buttonwith a tip of a pencil.
Is receiver on indoor unit
exposed to direct sunlight?
Avoid direct sunlight.
Is there any thyristor
fluorescent light nearly?
Keep indoor unitaway from thyristor fluorescent light.
Does indoor unit operate when moving
remote controller near receiver or
indoor unit?
Batteries areexhausted.
Does radio soundis affected by remote
controller when a signal is transmitted at distance of
5 cm from radio?
Is transmission mark indicated?
P.C. board is defective.
Replace P.C. board.
Replace batteries.
Replace remote controller.
Normaloperation
Remote controller is defective.
NO
YES
NO
YES
NO
YES
NO
YES
NO
YES
NO
YES
NO
YES
Does indoor unitstart to operate byautomatic restart
function?
Push the START/STOP button
Does indoor unitbeep and operate?
Push RESET buttonon remote controllerwith tip of pencil.
(4) Troubleshooting for remote controller
<Primary check>Check that A or B selected on the main unit is matched with A or B selected on the remote controller.
FILE NO. SVM-08020

– 68 –
Refer to the chart in 11-6.
Gas leak
P.M.V. is defective.
Miswiring of connecting wires of indoor/outdoor units
Clogging of pipe and coming-off of TC sensor
Gas circulation amount is down.
Measure gas pressure.
Gas shortage
Gas leak
Pipe clogging
Thermo. operation of compressor
Red
White
Terminal block
S5277G
Tester
3
2
1
Terminal block at indoor side
S5277G or equivalent (G or J type) (Diode with rated voltage of 400V or more is acceptable.)
To item of Outdoor unit does not operate.
11-5-2. Wiring Failure (Interconnecting and Serial Signal Wire)
(1) Outdoor unit does not operate1) Is the voltage between and of the indoor terminal block varied?
Confirm that transmission from indoor unit to outdoor unit is correctly performed based upon the follow-ing diagram.
NOTE:• Measurement should be performed 2 minutes and 30 seconds after starting of the operation.
• Be sure to prepare a diode for judgment.
Normal time : Voltage swings between DC15 and 60V. ................... Inverter Assembly check (11-8-1.)
Abnormal time : Voltage does not vary.
(2) Outdoor unit stops in a little while after operation started
<Check procedure> Select phenomena described below.1) The outdoor unit stops 10 to 20 minutes after operation started, and 10 minutes or more are required to
restart the unit.
2) If the unit stops once, it does not operate until the power will be turned on again.
3) The outdoor unit stops 10 minutes to 1 hour after operation started, and an alarm is displayed.(Discharge temp. error check code 03, 1E Sensor temp. error check code 02, 1C)
FILE NO. SVM-08020

– 69 –
11-6. How to Diagnose Trouble in Outdoor Unit
11-6-1. Summarized Inner Diagnosis of Inverter Assembly
Table 11-6-1
Diagnosis/Process flowchart Item
Preparation
Check
Check
Operation
Measure-ment
Check
Stop
CheckMeasure-
ment
Contents
Turn “OFF” the power supplybreaker, and remove 3Pconnector which connectsinverter and compressor.
• Check whether 25A fuseon the control boardassembly is blown or not.(F01)
Turn on the power breaker,and operate the air condi-tioner in COOL mode by timeshortening.
Measure terminal voltage ofthe electrolytic capacity.
After operation, turn off thepower breaker after 2minutes 20 seconds passed,and discharge the electro-lytic capacitor by solderingiron.Check voltage betweenmotor phases.
• Is not winding between -‚ -, or - openedor short-circuited?
• Is not frame grounded with, , or ?
Summary
If fuse was blown, be sure tocheck the electrolyticcapacitor and diode block.(DB01)
• Connect dischargeresistance (approx. 100Ω,40W) or soldering iron(plug) between +, –terminals of the electro-lytic capacitor (500µF or760µF) of C14 (with printedCAUTION HIGH VOLTAGE)on P.C. board.
OK if 500µF DC280to 380V
Remove CN703 whilepushing the part indicatedby an arrow because CN703is a connector with lock.
→ Resistance betweenphases should beapprox. 55 to 77Ω
→ Should be 10MΩ ormore.
Replace outdoor fan motor.
Remove connector of compressor.
NG
NG
NG
NO
OK
OK
OK
YES
Check 25A fuse(Part No.F01).
Does outdoor fan rotate?
Replace fuse.
Check electrolytic
capacitor, diodeblock (DB01),
etc.
Check electrolytic
capacitor, diode (DB01),
etc.
Remove connector CN703 of outdoor fan
motor, and using a tester, check resistance
value between every phases at motor side.
Check terminal voltageof electrolytic
capacitor.
BA
Discharging position (Discharging period 10 seconds or more) Plug of
soldering iron
500µF:400WV x 3
FILE NO. SVM-08020

– 70 –
Diagnosis/Process flowchart Item
Check
Operation
Contents
Check winding resistancebetween phases of compres-sor, and resistance betweenoutdoor frames by using atester.
• Is not grounded.
• Is not short-circuitedbetween windings.
• Winding is not opened.
Remove connector CN703 ofthe outdoor fan motor, turnon the power supply breaker,and perform the operation.(Stops though activation isprompted.)
Check operation within 2minutes 20 seconds afteractivation stopped.
NG
OK
BA
Replace control board assembly.
Replace control board.
Replace compressor.
Check compressor
winding resistance.
Summary
→ OK if 10MΩ or more
→ OK if 0.51Ω → 0.57Ω(Check by a digital tester.)
11-7. How to Check Simply the Main Parts
11-7-1. How to Check the P.C. Board (Indoor Unit)
(1) Operating precautions1) When removing the front panel or the P.C. board, be sure to shut off the power supply breaker.
2) When removing the P.C. board, hold the edge of the P.C. board and do not apply force to the parts.
3) When connecting or disconnecting the connectors on the P.C. board, hold the whole housing. Do not pullat the lead wire.
(2) Inspection procedures1) When a P.C. board is judged to be defective, check for disconnection, burning, or discoloration of the
copper foil pattern or this P.C. board.
2) The P.C. board consists of the following 2 parts
a. Main P.C. board part :DC power supply circuit, Indoor fan motor control circuit, CPU and peripheral circuits,buzzer, and Driving circuit of louver.
b. Indication unit of infrared ray receiving infrared ray receiving circuit, LED :To check defect of the P.C. board, follow the procedure described below.
FILE NO. SVM-08020

– 71 –
(3) Check procedures
Table 11-7-1
No.
1
2
3
4
5
6
7
Procedure
Turn off the power supply breakerand remove the P.C. boardassembly from electronic partsbase. Remove the connectingcables from the terminal block.
Remove the connector of themotor and turn on the powersupply breaker. If OPERATIONindicator flashes (once persecond), it is not necessary tocheck steps (1 to 3) in the rightnext column.
Push [START/STOP] button onceto start the unit. (Do not set themode to On-Timer operation.)
Shorten the restart delay timerand start unit.
Push [START/STOP] button onceto start the unit,• Shorten the restart delay timer.• Set the operation mode to
COOL.• Set the fan speed level to
AUTO.• Set the preset temperature
much lower than the roomtemperature. (The unit (com-pressor) operates continuouslyin the above condition.)
If the above condition (No. 5) stillcontinues, start the unit in thefollowing condition.• Set the operation mode to
HEAT.• Set the preset temperature
much higher than room tem-perature.
Connect the motor connector tothe motor and turn on the powersupply.Start the unit the followingcondition.• Set the fan speed level to HIGH.
(The unit (compressor) operatescontinuously in the abovecondition in No. 5.)
Check points
Check whether or not the fuse (F01)is blown.
Check power supply voltage :1. Between No. 1 and No. 3 of CN01
(AC 220–240V)2. Between and of C03
(DC 310–340V)3. Between 12V and GND4. Between 5V and GND
Check power supply voltage :1. Between CN51 and
No. 1 of CN01 (DC 15–60V)
Check whether or not all indicators(OPERATION, TIMER, FILTER,PURE) are lit for 3 seconds and theyreturn to normal 3 seconds later.
1. Check whether or not the com-pressor operates.
2. Check whether or not the OP-ERATION indicator flashes.
1. Check whether or not the com-pressor operates.
2. Check whether or not the OP-ERATION indicator flashes.
1. Check it is impossible to detectthe voltage (AC120V or highervoltage) between red and black
2. The motor does not operate orthe fan motor does not rotate withhigh speed.(But it is possible to receive thesignal from the remote controller.)
3. The motor rotates but vibrates
Causes
Impulse voltage was applied or theindoor fan motor short-circuited.
1. The terminal block or the crossovercable is connected wrongly.
2. The capacitor (C01), line filter(L01), resistor (R02), or the diode(D01, D02, D03, D04) is defective.
3. T101 is defective.4. IC12 and T101 are defective.
IC51 and IC52 are defective.
The indicators are defective or thehousing assembly (CN21) is defective.
1. The temperature of the indoor heatexchanger is extremely low.
2. The connection of the heat ex-changer sensor is loose.(The connector is disconnected.)(CN62)
3. The heat exchanger sensor and theP.C. board are defective.(Refer to Table 11-4-1.)
4. The main P.C. board is defective.
1. The temperature of the indoor heatexchanger is extremely high.
2. The connection of the heat ex-changer sensor short-circuited.(CN62)
3. The heat exchanger sensor and theP.C. board are defective.(Refer to Table 11-4-1.)
4. The main P.C. board is defective
1. The indoor fan motor is defective.(Protected operation of P.C. board.)
2. The P.C. board is defective.3. The connection of the motor
connector is loose.
lead of the motor.
strongly.
FILE NO. SVM-08020

11-7-2. P .C . Board Layout
+12V
100
30
40
50
60
70
80
90
20
10
00 10 20 30 40 50
Res
ista
nce
valu
e (k
)
Temperature (˚C)
TD : Discharge temp. sensorTA : Room temp. sensorTC : Heat exchanger temp. sensorTO : Outdoor temp. sensorTE : Outdoor heat exchanger temp. sensor
TA, TC, TO, TE
TD
[1] Sensor characteristic table
+5V
– 72 –
FILE NO. SVM-08020

– 73 –
11-7-3. Indoor Unit (Other Parts)
11-7-4. Outdoor Unit
No.
1
Part name
Room temp. (TA) sensorHeat exchanger (TC) sensor
Checking procedure
Disconnect the connector and measure the resistance value with tester.(Normal temp.)
No.
1
Part name
Compressor
Checking procedure
Measure the resistance value of winding by using the tester.
Red
White Black
Red
White Black
Measure the resistance value of winding by using the tester.
Resistance value
1500 ± 50Ω
Under 20°C
TemperatureSensor
TA, TC (kΩ)
10°C 20°C 25°C 30°C 40°C
20.7 12.6 10.0 7.9 4.5
54321White
YellowYellowYellowYellow 5
4321
Refer to 11-5-1. (5).
Measure the resistance value of each winding coil by using the tester.(Under normal temp. 25°C)
Position
1 to 21 to 31 to 41 to 5
Resistance value
250 ± 20Ω
Refer to 11-5-1. (3) and (4).
Disconnect the connector, and measure resistance value with the tester.(Normal temperature)
Outdoor temperature sensor(TO), discharge temperaturesensor (TD), suctiontemperature sensor (TS),outdoor heat exchangertemperature sensor (TE)
TemperatureSensor
TD (kΩ )
TO,TS,TE (kΩ )
10°C 20°C 25°C 30°C 40°C 50°C
100 64 50 41 27 18
20.7 12.6 10.0 7.9 4.5 —
2
3
Remote controller
Louver motorMP24ZCT
4 Indoor fan motor
Measure the resistance value of each winding by using the tester.
Position
Red - White White - BlackBlack - Red
Resistance value
0.88 to 0.98Ω
Under 20ºC
DA111A1F-20F1 DA89X1C-1F-23FZ
1.04 to 1.16Ω
Position
Red - White
White - Black
Black- Red
Resistance value
845Ω435Ω410Ω
2
3
4
Outdoor fan motorModel : WLF-240-20A-1
4-way valve coil
Model : DA89X1C-23FZ
FILE NO. SVM-08020

– 74 –
11-7-5. Checking Method for Each Part
No.
1
Part name
Electrolytic capacitor(For boost, smoothing)
Checking procedure
1. Turn OFF the power supply breaker.2. Discharge all three capacitors completely.3. Check that safety valve at the bottom of capacitor is not broken.4. Check that vessel is not swollen or exploded.5. Check that electrolytic liquid does not blow off.6. Check that the normal charging characteristics are shown in continuity test by
the tester.
MCC-5009SolderedsurfaceH
eat s
ink
IGB
T s
ide
C12 C13 C14 Case that product is good
Pointer swings once, and returnsslowly. When performing testonce again under anotherpolarity, the pointer should return.
C12, C13, C14 → 500µF/400V
Resistance value in good product
Tester rod
+ –~ 2
~ 3
~ 2
~ 3
– 4
~ ~ ~+ –~
1
1 2 3
(DBO1)
4
4
23+ 1
+
–10 to 20 Ω when the multimeter probeis reversed
2 Diode block 1. Turn OFF the power supply breaker.2. Completely discharge the four electrolytic capacitors.3. Remove the diode block from the PCB (which is soldered in place).4. Use a multimeter with a pointer to test the continuity, and check that the
diode block has the proper rectification characteristics.
FILE NO. SVM-08020
50 kΩ or more(OΩ in trouble)

– 75 –
11-8. How to Simply Judge Whether Outdoor Fan Motor is Good or Bad
1. Symptom• Outdoor fan motor does not rotate.
• Outdoor fan motor stops within several tens seconds though it started rotating.
• Outdoor fan motor rotates or does not rotate according to the position where the fan stopped, etc.
Remote controller check code “02 : Outdoor block, 1A : Outdoor fan drive system error”
2. CauseThe following causes are considered when the outdoor fan motor does not normally rotate.
1) Mechanical lock of the outdoor fan motor
2) Winding failure of the outdoor fan motor
3) Position-detect circuit failure inside of the outdoor fan motor
4) Motor drive circuit failure of the outdoor P.C. board
3. How to simply judge whether outdoor fan motor is good or bad
NOTE :However, GND circuit error inside of the motor may be accepted in some cases when the above check isperformed.
When the fan motor does not become normal even if P.C. board is replaced, replace the outdoor fan motor.
If the resistance value between 1 (Red lead) – 2 (White lead)2 (White lead) – 3 (Black lead)3 (Black lead) – 1 (Red lead)
of the connector motor
Turn OFF the breaker.
Fan motor is normal.
Does the fan rotate without trouble when rotating it with hands?
Disconnect two connectors (CN300) of theoutdoor fan motor from the outdoor P.C. board.
(Outdoor P.C. board error)
Fan motor error
YES
YES
NO
NO
Fan motor connector
FILE NO. SVM-08020

– 76 –
12. HOW TO REPLACE THE MAIN PARTS
FILE NO. SVM-08020
WARNING
• Since high voltages pass through the electrical parts, turn off the power without fail before proceeding withthe repairs.
Electric shocks may occur if the power plug is not disconnected.
• After the repairs have been completed (after the front panel and cabinet have been installed), perform atest run, and check for smoking, unusual sounds and other abnormalities.
If this check is omitted, a fire and/or electric shocks may occur.Before proceeding with the test run, install the front panel and cabinet.
• Ensure that the following steps are taken when doing repairs on the refrigerating cycle.
1. Do not allow any naked flames in the surrounding area. If a gas stove or other appliance is being used, extinguish the flames before proceeding.
If the flames are not extinguished, they may ignite any oil mixed with the refrigerant gas.
2. Do not use welding equipment in an airtight room.
Carbon monoxide poisoning may result if the room is not properly ventilated.
3. Do not bring welding equipment near flammable objects.
Flames from the equipment may cause the flammable objects to catch fire.
• If keeping the power on is absolutely unavoidable while doing a job such as inspecting the cir-cuitry, wear rubber gloves to avoid contact with the live parts.
Electric shocks may be received if the live parts are touched.High-voltage circuits are contained inside this unit.
Proceed very carefully when conducting checks since directly touching the parts on the control circuitboard may result in electric shocks.
12-1. Indoor Unit
No.
Part name
Front panel
Procedures
1) Stop operation of the air conditioner andturn off its main power supply.
2) Open the air inlet grille, push the armtoward the outside, and remove the grille.
3) Remove the left and right air filters.
Remarks

– 77 –
FILE NO. SVM-08020
No.
Part name
Front panel
Procedures
4) Press "PUSH" part under the front paneland remove hooks of the front panel fromthe installation plate.
Remarks
Press
Front panel
Installation plate
5) Remove the front panel fixing screws.(2 pcs.)
6) Take off three hooks of panel from rearside.
<How to assemble the front panel>
1) Press three center positions and two lower center positions of the air outlet, andthen hang the hanging hooks (3 pcs.) at the top side of the front panel to the rearplate.
2) Tighten two screws.• Incomplete hanging or incomplete pressing may cause a dewdrops or generation
of a fluttering sound.
2 Screws
Three hooks

– 78 –
FILE NO. SVM-08020
No. Part name
Electric partsbox assembly
Procedures
1) Follow the procedure 2) Remove screw of earth lead attached to the
end plate of the evaporator.3) Remove the lead wire cover, and remove
connector for the fan motor and connec-tor for the louver motor from the electricparts box assembly.
4) Pull out TC sensor from sensor holder of theevaporator.
Remarks
<How to assemble the electric parts box>1) Hook the top part of the electric parts box
assembly onto the claws on the back body,and secure it using the fixing screw.Now attach the display unit. Connect theconnectors for the fan motor and louver motor.
2) Secure the grounding wire using the fixingscrew. Insert the TC sensor into the sensorholder.* Be absolutely sure to loop the grounding
wire and TC sensor leads once at thebottom.
5) Disengage the display unit by simply pushingat the top of the display unit.
6) Remove the fixing screw that secures theelectric parts box assembly, and remove the
Electric part box cover
assembly.
connector
AC fan motor connector
Louver motor
Fixing screw
Earth Screw
TC sensor
connecto
Fan motor

– 79 –
FILE NO. SVM-08020
No.
Horizontal louver
Procedures
1) Remove shaft of the horizontallouver from the back body.(First remove the left shaft, andthen remove other shafts whilesliding the horizontal louverleftward.)
Evaporator(Heat exchanger)
1) Follow to the procedure in the item .2) Remove the pipe holder from the rear side of the main unit.3) Remove two fixing screws at the left side of the end plate of the heat exchanger.
Remarks
4) Remove one fixing screw on the heat exchage fixing holder to separate theheat exchage from the back body.
5) Remove right side of the end plate fromtwo fixing rib while sliding slightly theheat exchanger rightward.
2 screws
Heat exchanger fixing holder
Screw
Rib on the right side of the end plate

– 80 –
FILE NO. SVM-08020
No. Part name
Bearing
Procedures
1) Follow to the procedure in the item . 2) Remove the two screws used to secure the
bearing base.
3) Remove the bearing base.
<Caution at assembling>• If the bearing is out from the housing, push it
into the specified position and then incorporateit in the main body.
Remarks
Two screws
BearingBearing base

– 81 –
FILE NO. SVM-08020
No. Part name
Fan motor
Procedures
1) Follow to the procedure in the item .2) Loosen the set screw of the cross flow fan.3) Remove two fixing screws of the motor cover
and them remove the motor cover.4) Remove two more fixing screws of the
motor band and remove the motor band.
Remarks
5) Pull the fan motor outward.
Set screw
Motor cover
Two Screws
Two screws onmotor band

– 82 –
FILE NO. SVM-08020
No. Part name
Cross flow fan
Procedures
<Caution at reassembling>1) To incorporate the fan motor, remove the fan
motor rubber (at shaft core side), incorporatethe motor into the position in the followingfigure, and then install the fan motor.
Remarks
U groove
• Install the cross flow fan so that the rightend of the 1st joint from the right of thecross flow fan is set keeping 70.5 mm fromwall of rear plate of the main unit.
• Holding the set screw, install the cross flowfan so that U-groove of the fan motor comesto the mounting hole of the set screw.
• Perform positioning of the fan motor asfollows:
• When assembling the fan motor, the fanmotor must be installed in such a way thatthe fan motor leads will be taken out ispositioned at the bottom front.
• After assembling the two hooking claws ofthe motor band (right) into the main body,position the fan motor, insert it, and thensecure the motor band (right) using the twofixing screws.
5 mm

– 83 –
No.
Part name
Common procedure
Procedure
1) Turn the power supply off to stop theoperation of air-conditioner.
2) Remove the front panel.• Remove the 2 fixing screws.
3) Remove the electrical part base.
Remarks
Replace terminal block,microcomputer ass’y and theP.C. board ass’y.
12-2. Microcomputer
<P.C. board layout>
CN33CN31R02R01
C01
FUSE
L01
C02
C03
CN51T01
IC12C121 C133
FILE NO. SVM-08020

FILE NO. SVM-08020
– 84 –
12-3-1. Outdoor Unit
No. Part name Procedures Remarks
1. Detachment1) Stop operation of the air conditioner, and
turn off the main switch and breaker of theair conditioner.
2) Remove the valve cover. (ST1T∅ 4 x 10s1 pc)• After removing screw, remove the valve
cover pulling it downward.3) Remove the wiring cover (ST1T∅ 4 x 10s 2
pcs.), and then remove the power cord,connecting cable, and cord clamp(ST2T∅ 4 x 16s 3 pcs.).
4) Remove the upper cabinet.(ST1T∅ 4 x 10s 5 pcs.)• After removing screws, remove the
upper cabinet pulling it upward.
2. Attachment1) Attach the upper cabinet.
(ST1T∅ 4 x 10s 5 pcs.)• Hook the rear side of the upper cabinet
to the claw of the rear cabinet, and thenplace it on the front cabinet.
2) After connecting the power cord andconnecting cable, attach the cord clampand wiring cover.• Insert the upper part into the upper
cabinet, and insert the claw which hasbeen hooked to the lower part into thesquare hole, and then fix it with screw.(ST1T∅ 4 x 10s 1 pc.)
3) Attach the valve cover. (ST1T∅ 4 x 10s 1 pc.)• Insert the upper part to the upper
cabinet, set the hook claw of the valvecover to square holes (at threepositions) of the main unit, and attach itpushing upward.
1. Detachment1) Perform work of item 1 of 1.2) Remove upper screw (ST1T∅4 x 10s 4 pcs.)
of the front cabinet, and lower screws(ST1T∅ 4 x 10s 8 pcs.) of the front cabinet.• Both side of front cabinet envelop the
unit, so remove it by pulling sideward.
2. Attachment1) Assemble front cabinet to the unit.2) Attach the removed screws to the original
positions.
1 Commonprocedure
2 Front cabinet
Upper cabinet
Wiring cover
Valve cover
Upper cabinet

FILE NO. SVM-08020
– 85 –
No. Part name Procedures Remarks
1) Perform work of item 1 of 1.2) Remove screw (ST1T∅ 4 x 10s 1 pc.) of
the upper part of the front cabinet.• If removing the inverter cover in this
condition, the P.C. board can be checked.• If there is no space in the upper part of
the upper cabinet, perform work of 2.
Be careful when checking theinverter because high-voltagecircuit is incorporated in it.
3) Perform discharging by connecting thee,d polarities by discharging resistance(approx. 100Ω40W) or plug of solderingiron to e,d terminals of the C13 (printed“CAUTION HIGH VOLTAGE” is attached.)electrolytic capacitor (760 µF/400 WV) onthe P.C. board.
Be careful to discharge the capacitorbecause the electrolytic capacitorcannot naturally discharge andvoltage remains depending on themalfunction state in some cases.
NOTE :This capacitor has mass capacity.Therefore, it is dangerous that alarge spark generates if short-circuiting between the e,d polaritieswith screwdriver, etc. for discharging.
4) Perform the work of 2.5) Remove the screw (ST1T∅ 4 x 10s 1 pc.)
fixing the main body and the inverter box.6) Remove the lead wire from the holder on
the terminal block.7) Disconnect the connectors of various lead
wires.
Requirement :As each connector has a lockmechanism, avoid removing theconnector by holding the lead wire,but by holding the connector.
3 Inverterassembly
The connector is one with lock,so remove it while pushing thepart indicated by an arrow.
Be sure to remove the connectorby holding the connector, not bypulling the lead wire.
PC board(Soldered surface)
Inverter cover
Discharging time (Discharging period 10 seconds or more)
Plug of soldering iron
Partition
Terminal block

FILE NO. SVM-08020
– 86 –
No. Part name Procedures Remarks
1) Perform work of item 1 of 1 and 1 of 2.2) Remove the flange nut fixing the fan motor
and the propeller fan.• Flange nut is loosened by turning
clockwise.(To tighten the flange nut, turn counter-clockwise.)
3) Remove the propeller fan.4) Disconnect the connector for the fan motor
from the inverter.5) Remove the fixing screws (4 pcs.) holding
the fan motor by hand so that it does notfall.
6) Cut the motor lead at the point which is100 mm apart from the connector towardthe fan.
7) Use the connector used for the inverter,and pinch the lead wires using the closedend splice.
1) Perform work of item 1 of 1, 1 of 2
2) Extract refrigerant gas.3) Remove the partition board.
(ST1T∅ 4 x 10s 3 pcs.)4) Remove the sound-insulation material.5) Remove the terminal cover of the
compressor, and disconnect the lead wireof the compressor thermo and thecompressor from the terminal.
6) Remove the pipe connected to thecompressor with a burner.• Make sure the flame does not touch the
4 way valve.7) Remove the fixing screw of the base plate
and heat exchanger.(ST1T∅ 4 x 10s 2 pcs.)
8) Pull upward the refrigeration cycle.9) Remove the nut fixing the compressor to
the base plate.
1) Perform work of item 1 of 1, 1 of 2,and 3.
2) Remove the screw fixing the reactor.(ST1T∅ 4 x 10 2 PCS.)
Fan motor
Compressor
and
Reactor
Compressor
Reactor
100
Fan motorPropeller fan
Flange nut
Closed end splice
s
.

FILE NO. SVM-08020
– 87 –
No. Part name Procedures Remarks
1. Detachment1) Perform work of item 1 of 1 and 1 of 2.
Requirement:Perform the work on a corrugatedcardboard, cloth, etc. to preventscratches to the product.
2) Remove the front cabinet, and place itdown so that the fan guard side facesdownwards.
3) Remove the hooking claws by pushing aminus screwdriver according to the arrowmark in the right figure, and remove thefan guard.
2. Attachment1) Insert the claws of the fan guard in the
hole of the front cabinet. Push the hookingclaws (8 positions) by your hand and fixthe claws.
Requirement:This completes all the attachingwork. Check that all the hookingclaws are fixed to the specifiedpositions.
Fan guard
Minus screwdriver
Hooking claw
7

– 88 –
No. Part name
Control boardassembly
Procedure
1. Disconnect the leads and connectors connected tothe other parts from the control board assembly.1) Leads
• 3 leads (black, white, orange) connected toterminal block.
• Lead connected to compressor :Disconnect the connector (3P).
• Lead connected to reactor :Disconnect the two connectors (2P).
2) Connectors (×8)CN701 : Outdoor fan motor (3P: white)*(* : See Note)CN600 : TE sensor (2P: white)*CN700 : PMV (6P: white)CN603 : TS sensor (3P: white)*CN601 : TD sensor (3P: white)*CN602 :TO sensor (2P: white)
NOTE
These connectors have a disconnect preventionmechanism: as such, the lock on their housingmust be released before they are disconnected.
2. Remove the control board assembly from the P.C.board base. (Remove the heat sink and controlboard assembly while keeping them screwedtogether.)
NOTE
Disengage the four claws of the P.C. board base,hold the heat sink, and lift to remove it.
3. Remove the two fixing screws used to secure theheat sink and control board assembly.
4. Mount the new control board assembly.
NOTE
When mounting the new control board assembly,ensure that the P.C. board is inserted properlyinto the P.C. board support groove.
Remarks
CN300, CN701, CN600 andCN603 are connectors withlocking mechanisms: as such,to disconnect them, they mustbe pressed in the direction ofthe arrow while pulling themout.
P.C. board baseP.C. board
CN700 CN602
CN701
CN603
CN601 CN600
FILE NO. SVM-08020
8

– 89 –
No.
9
Part name
Replacement oftemperature sensorfor servicing only
Common serviceparts of sensor TO,TA, TE, TD
Procedure
1) Cut the sensor 100 mm longer than oldone.
2) Cut the protective tube after pulling outit (200 mm).
3) Move the protective tube toward thethermal sensor side and tear the tip oflead wire in two then strip the coveringpart.
4) Pass the stripped part through thethermal constringent tube.
5) Cut the old sensor 100 mm length onthe connector side, and recycle thatconnector.
6) Tear the lead wire in two on the con-nector side and strip the covering part.
7) Twist the leads on the connector andsensor sides, and solder them.
8) Move the thermal constringent tubestoward the soldered parts and heatthem with the dryer and constringthem.
9) Wind the attached color tape round theboth terminals of the protective tubewhen colored protective tube is used.
10) Fix the sensor again.
Remarks
1
2
3
4
5
6
Parts name
Sensor
Sensor Spring (A)
Sensor Spring (B)
Thermal constringent tube
Color tape
Terminal
Q'ty
1
1
1
3
1
3
Cutting here
Cutting here
Cutting here
Soldered part
Dryer
Winding the color tape
100
200
ConnectorThermal sensor part
Thermalconstringent tube
70
15
100
7015
NOTE
1) Store the joint part of the sensor and the connector in the electric partsbox.
2) Never joint them near the thermal sensor part. Otherwise it would causeinsulation inferiority because of dew drops.
3) When replacing the sensor using the colored protective tube, wind thecolor tape matching the color of that tube.
These are parts forservicing sensors.Please check thatthe accessoriesshown in the righttable are packed.
Remarks
Length : 3m
For spare
For spare
Including one spare
9 colors
FILE NO. SVM-08020

– 90 –
13. EXPLODED VIEWS AND PARTS LIST
13-1. Indoor Unit (1)
FILE NO. SVM-08020
Location Part Location Part
No. No. No. No.
201 43T00478 FRONT PANEL ASSY 217 43T22312 MOLD BEARING ASSEMBLY
202 43T09433 GRILLE OF AIR INLET 218 43T39323 BEARING BASE
203 43T03357 BACK BODY ASSY 219 43T20323 ASSY CROSS FLOW FAN
204 43T80317 AIR-FILTER 220 43T39324 MOTOR BAND (LEFT)
205 43T09392 HORIZONTAL LOUVER 221 43T39321 MOTOR BAND(RIGHT)
206 43T70313 DRAIN HOSE 222 43T21393 FAN MOTOR
207 43T79301 CAP-DRAIN 224 43T82309 INSTALLATION PLATE
208 43T21402 MOTOR; STEPPING 225 43T69426 WIRELESS-REMOCO
209 43T44387 REFRIGERATION CYCLE ASSY 226 43T63002 REMOTE CONTROL HOLDER
210 43T47353 PIPE; SUCTION (RAS-13) 227 43T62326 TERMINAL COVER
211 43T47355 PIPE; SUCTION (U1U2_GD) 228 43T60317 CORD MOTOR LOUVER
212 43T11319 PIPE SHIELD 229 43T07311 PIPE HOLDER
213 43T19333 SENSOR FIX PLATE
Description Description

– 91 –
Indoor Unit (2)
FILE NO. SVM-08020
Location Part Location Part
No. No. No. No.
401 43T60365 TERMINAL BLOCK; 3P 405 43T69612 DISPLAY UNIT
403 43T69319 TEMPERATURE SENSOR 410 43T62003 CORD CLAMP
404 43T69320 TEMPERATURE SENSOR 411 43T69628 ASM-PCB-SERV
Description Description

– 92 –
13-2. Outdoor Unit
FILE NO. SVM-08020
Location Part Location Part
No. No. No. No.
1 43T19335 FAN GUARD 15 43T49327 CUSHION,RUBBER
2 43T20324 PROPELLER FAN 17 43T50316 BIMETAL THERMO
3 43T00482 FRONT CABINET 18 43T41358 COMPRESSOR(Made in China)
4 43T43403 CONDENSOR ASSEMBLY 19 43T19337 PACKED VALVE COVER
5 43T62323 TERMINAL COVER 20 43T00481 UPPER CABINET
6 43T19336 FIN GUARD 21 43T00448 FIXING PLATE VALVE
7 43T47308 CAPILLARY TUBE; 1.0 DIA 22 43T42331 BASE PLATE ASSEMBLY
8 43T46331 VALVE;PACKED 9.52 DIA 23 43T79305 DRAIN NIPPLE
9 43T47332 BONNET, 9.52 DIA 24 43T46313 REACTOR
10 43T46332 VALVE;PACKED 6.35 DIA 25 43T46333 4 WAY VALVE
11 43T47331 BONNET, 6.35 DIA 26 43T46334 COIL-4WAY ASSEMBLY
12 43T21400 FAN-MOTOR 27 43T04303 PARTITION
13 43T47001 NUT FLANGE 28 43T39325 MOTOR BASE
14 43T19312 HANDLE 29 43T39326 MOTOR BASE CONNECTION PLATE
Description Description

– 93 –
13-3. P.C. Board Layout
FILE NO. SVM-08020
Location Part Location Part
No. No. No. No.
701 43T62320 HEATSINK 705 43T60377 TEMPERATURE SENSOR
702 43T69620 ASM-PCB-SERV 706 43T50304 SENSOR;HEAT EXCHANGER
703 43T60352 TERMINAL BLOCK; 6P 707 43T62313 BASE-PLATE-PC
704 43T60326 FUSE 708 43T55325 CAPACITOR; PLASTIC-FILM
Description Description

– 56 –
FILE NO. SVM-03005
TOSHIBA CARRIER (THAILAND) CO.,LTD.144/9 MOO 5, BANGKADI INDUSTRIAL PARK, TIVANON ROAD, TAMBOL BANGKADI,
AMPHUR MUANG, PATHUMTHANI 12000, THAILAND.