model: mp161 semiautomatic rifle · model: mp161 semi auto rifle. us sporting goods, inc. read this...
TRANSCRIPT

MODEL: MP161SEMIAUTOMATIC RIFLE
WARNINGS AND INSTRUCTION MANUAL
MANUAL FORMP161 22LR
MP161 22WMR
Important!Read these Warnings and Instructions before using firearm!
© Copyright 2011
WARNING!DO NOT USE +P Ammo orHigh Velocity High Pressure
Ammunition(factory or handloaded)

MODEL: MP161 Semi Auto RifleUS SPORTING GOODS, INC.
READ THIS MANUAL FOR USSG/BAIKAL MP161K BEFORE HANDLING YOUR FIREARM
The MP161KM is a semi-automatic rifle combining a powerful cartridge, 9 round magazine capacity, excellent design, anatomical grip, scope mount, and special features for accurate shooting.
CALIBERS: .22 LR, 22WMR FINISHES: BLUE
FOR YOUR SAFETY AND THE SAFETY OF OTHERS, this owner’s manual contains important warnings and safety procedures which must be understood BEFORE using this firearm. Read the entire manual and if you do not understand any part it or the operation of your pistol, stop and seek professional firearms instructions. You can get a copy of this manual from US SPORTING GOODS, Inc. on request.
Record the serial number of your firearm________________________________
and a description of it:____________________________________________________________________
Make a copy of this manual, proof of purchase/sales record for safekeeping in a secure safe or fireproof container. Such proof is necessary if the firearm is dam-aged, stolen or sent in for warranty repair.
Specifications of the BAIKAL MP161K Rifle:
Caliber 22LR , 22 WMR Length 39 inches Weight 102 ounces Barrel 19.75 inchesMagazine Capacity Full Size 9 plus 1 cartridges
2
1426 King StreetCocoa, FL 32922(321) 639-4842

W A R N I N G**YOU RISK PERSONAL INJURY OR DEATH
BY HANDLING THIS FIREARM**
BEFORE HANDLING THIS FIREARM, READ, UNDERSTAND AND FOLLOW THE INSTRUCTIONS IN THIS MANUAL. ALWAYS KEEP THIS MANUAL WITH THE FIREARM. IF YOU LEND, GIVE OR SELL THIS FIREARM, BE SURE THE MANUAL GOES WITH IT. IF THERE IS ANYTHING YOU DO NOT UNDER-STAND, SEEK ADVICE FROM SOMEONE QUALIFIED IN SAFE HANDLING OF FIREARMS.
*THIS FIREARM IS DESIGNED ONLY FOR TARGET OR COMPETITION AND SHOULD ALWAYS BE TRANSPORTED UNLOADED IN ITS CASE. DO NOT USE THIS FIREARM FOR CARRY, DUTY OR DEFENSIVE PURPOSES.*
TYPE OF AMMUNITION TO BE USED
It is suggested that high quality commercially manufactured ammunition be used in this firearm. Other types of ammunition may have feeding or extrac-tion problems. Some factory ammunition works better than others and you should stick with that brand you find works well in your semiautomatic rifle. Avoid military surplus or hot loaded ammo. The use of reloaded, +P, high pressure or hand loaded ammunition will void the warranty.
N O T I C E
RIFLES ARE CLASSIFIED AS FIREARMS OR DANGEROUS WEAPONS and are sold by US SPORTING GOODS, Inc. Corporation with the specific un-derstanding that we are not responsible in any manner what- so-ever for their safe handling or resale under local laws and regulations.
US SPORTING GOODS, Inc. shall not be responsible in any manner what-soever for malfunctioning of the firearm, for physical injury or for property damage resulting in whole or in part from (1) intentional or negligent dis-charge, (2) improper or careless handling, (3) unauthorized modifications, (4) defective, improper, hand-loaded, or reloaded ammunition, (5) corrosion and/or lack of proper maintenance (6) neglect, or (7) other influences be-yond our direct and immediate control. This limitation applies regardless of whether liability is asserted on the basis of contract, negligence or strict liability (including any failure to warn). Under no circumstance shall US SPORTING GOODS, Inc. Corporation be liable for incidental or consequen-tial damages, such as loss of use of property, commercial loss and loss of earnings or profits.
3

SAFETY PROCEDURES
1. We recommend that you get competent firearms instruction in safe handling before using this firearm. Please ask your dealer. All guns are extremely dangerous if carelessly handled or used. Remember that the gun user is the primary “safety” and to depend on any mechanical devices is to be only half safe.
EVEN WITH THE MAGAZINE REMOVED, THIS FIREARM WILL STILL FIRE IF A ROUND (LIVE BULLET) IS IN THE CHAMBER AND THE TRIGGER IS PULLED AND THE MANUAL SAFETY IS OFF.
2. NEVER carry this rifle with a cartridge loaded in the chamber. Remember the rifle will still fire without a magazine in the firearm. We recommend that you keep the Safety button in the safe position / engaged and always make sure the chamber is unloaded until you are ready to fire.
3. NEVER point this rifle at anything that is not your intended target, even if this rifle is unloaded. When loading, cleaning, unloading or handling, always be sure the muzzle is pointed in a safe direction and always keep your fingers off the trigger.
4. NEVER assume any gun is unloaded. Before handling this rifle, remove the magazine and retract the bolt assembly to check for any ammo in the firing chamber. See Unloading Instructions and then unload any ammunition. Make sure you know that this or any rifle is fully unloaded before handling or displaying it. When handling any firearm, keep your fingers away from the trigger at all times until you intend to fire the weapon.
5. WARNING: The actual firearm does not contain any lead; however, it does fire ammunition containing lead or lead compounds known to the State of California to cause cancer, birth defects and/or reproductive toxicity. Those who discharge a firearm, stand near someone who discharges a firearm or cleans firearms are hereby warned of the hazards and dangers presented by lead and lead compounds and should take protective health measures.
A M M U N I T I O N W A R N I N G
Old, Hot-loaded and/or re-loaded ammunition may be dangerous. Because of the poor or nonexistent quality control standards among some companies or people who make reloaded ammunition and the dangers of overloads and underloads (squib loads) which may occur, we recommend that only good quality new factory ammunition be fired in our firearms. [If you prepare your own handloads, do NOT exceed recommended pressures in line with those generated by standard factory loads as manufactured by Remington, Winchester, Federal, PMC or other reputable companies.] Do NOT use +P Ammo or High Velocity High Pressure Ammunition (factory or handloaded). Old ammunition may not fire with sufficient force to expel the projectile from the barrel.
4

-WARNINGS- READING THESE SAFETY RULES WILL SAVE YOUR LIFE OR THE LIFE OF SOMEONE ELSE
Get instructions from a competent firearms instructor before using this or any
firearm. Learn from a professional how to handle, load, unload, operate, fire and care for your gun.
NEVER PLAY with your firearm. It is not a toy but a very dangerous weapon that can cause serious personal injury or death.
Always keep the gun pointed in a safe direction. Treat every gun as if it is loaded...all the time. NEVER point any firearm (loaded or unloaded) at any person or anything you do not intend to shoot. Always keep your gun unloaded until ready to use and make sure that it is unloaded before cleaning.
Keep your finger OFF the trigger until you are actually aiming at the target and ready to shoot. Never rely on a gun’s “safety” to protect you from unsafe gun handling. A safety is only a mechanical device, not a substitute for common sense and gun safety procedures.
Never leave a gun unattended or where it could fall and fire.
Store guns and ammunition separately beyond the reach of children. Make sure that they are properly secured so untrained individuals and children will be denied access to your guns and ammo.
Test your gun’s operation and safeties ONLY at a shooting range while the firearm is pointed in a safe direction.
Know your target and what is beyond. Ask yourself what your bullet will hit if it misses the target or passes through the intended target. Remember, a fired bullet can travel over a mile (including a ricochet) and is capable of going through walls.
Guns and alcohol or drugs do not mix. Don’t take any alcoholic beverages and/or drugs before or during shooting activities.
Never pull a gun toward you by the muzzle. Don’t climb a tree, cross a ditch or fence with a loaded gun.
Always empty guns before entering a house, car, truck, boat, RV, camp or any building.
When receiving a gun, always open the action and check to make sure it is unloaded.
NEVER accept anyone’s word that a gun is “unloaded” or “empty”. You should immediately open the action and check to make sure it is unloaded.
5

-WARNINGS- READING THESE SAFETY RULES WILL SAVE YOUR LIFE OR THE LIFE OF SOMEONE ELSE
Be careful with ALL ammunition. Even “blank” cartridges are deadly at close range due to the muzzle blast. Make sure your ammunition is in new and in good clean condition. Do NOT oil or grease ammo as this may damage the cartridge primer. Do NOT tamper with or alter the standard factory ammunition.
Keep firearms unloaded when not actually in use. Load the gun only when on the range preparing to fire and unload it before leaving the range.
Never put your hand over the muzzle of a gun.
ALWAYS WEAR protective shooting glasses and hearing protection when us-ing firearms.
Spectators should be at least 10 feet behind and away from the shooter while the shooter is loading, shooting and unloading. Spectators should wear pro-tection for hearing and sight loss and they should avoid distracting those firing their weapons.
Never carry a rifle in your pocket, purse or tucked in a belt or waistband. Use a rifle case or a proper holster with safety flap or strap.
Never drop your gun. If you do drop it, unload it and check it for proper function before using it again.
Don’t alter or modify your gun. Don’t try to change your gun’s trigger pull, be-cause it may affect sear engagement and thereby cause accidental firing.
Do not remove any internal safety or safety device on the firearm. Safety mechanisms are designed to protect you from injury or death.
Do maintain and keep your gun clean. Keep in a dry place away from other metals and water. If your gun shows sign of corrosion or improper operation, have it serviced by a competent gunsmith.
Keep the muzzle pointed in a safe direction when loading and unloading your gun. Never point the muzzle at anyone.
Never shoot at hard flat surfaces or water....bullets ricochet.
If a gun fails to fire when the trigger is pulled, keep it pointed down range at the target for 30 seconds. Sometimes slow primer ignition will cause a “hang fire” and the cartridge will go off after a short pause. If it still fails to fire, keep muzzle pointed in safe direction and avoid exposure to the breech, as you at-tempt to unload your firearm.
When loading a semi-automatic rifle, make sure that the muzzle is pointed in a safe direction and you are not exposed to the breech and the bolt assembly’s
6

-WARNINGS- READING THESE SAFETY RULES WILL SAVE YOUR LIFE OR THE LIFE OF SOMEONE ELSE
ejector port or top opening as you release the bolt to travel forward.
Never let water, snow, mud or other material enter the barrel. Always be sure the barrel is free of any obstruction.
Since many ammunition identifications sound similar, be sure that you use only the correct ammunition for your gun. Do NOT use the wrong size or wrong strength ammunition in your firearm.
Repeated and prolonged exposure to gunfire may result in toxic levels of lead in your body. In addition, there are risks of cancer, impotency and birth defects. When shooting indoors, make sure there is proper ventilation.
Teach children: 1. NOT to touch guns, bullets, cartridges, shells or any explosive device and 2. if they discovery such a dangerous item or weapon, they must immediately report its location to their parents, school teacher and police.
Remember a firearm has the capability of taking your life or the life of someone else. Be careful with your firearm -- an accident is almost always the result of not following basic safety rules.
HOME SAFETY IS PROBABLY YOUR BIGGEST CONCERN. We suggest the following gun lock: Master Gun Lock. It works on most Firearms and is avail-able in gun shops and sporting goods departments. For more information write: Master Gun Locks; Master Lock Company LLC, P.O. Box 927, Oak Creek, WI. 53154. (Www.masterlock.com) After all you have invested this much in your new gun, now invest a little more in your family’s safety.
USED FIREARMS - If you got your US SPORTING GOODS, Inc. firearm as a used gun, BEFORE USING IT you should unload it and check all its functions to be sure it works correctly. Firearms are some times altered to work incorrectly, or parts may be removed, lost or replaced with incorrect parts. First, unload it and check it yourself and then take it to a good gunsmith who knows US SPORTING GOODS, Inc. Baikal firearms, and have him examine it.
WRITE US concerning any items or circumstances which you don’t understand and which might relate to your safety and the operation of your firearm.
W A R N I N G
ANY BORE OBSTRUCTION, EVEN IF IT IS ONLY PARTLY BLOCKED, MAY CAUSE THE GUN TO BLOW UP IF IT IS FIRED, OR MAY CAUSE DAMAGE TO THE GUN SUCH AS A BULGED BARREL. TO AVOID INJURY OR DEATH TO THE SHOOTER OR BYSTANDERS, CHECK THE BARREL BEFORE SHOOTING OR IF A SHOT DOES NOT SOUND NORMAL.
7

8
EXTERNAL CONTROL PARTS
DO NOT LOAD THIS Rifle UNTIL YOU UNDERSTAND THE SAFETIES AND HOW THIS Rifle OPERATES.
Manual Safety Button: Located behind the trigger and is a push button / trigger block safety. This safety blocks the trigger ( pushed from right to left, red ring showing on left side and safety is desengauged.... pushed from left to right red ring is covered and safety is engauged) . To fire, push safety from right hand side to left hand side to expose red ring. KEEP this rifle “on safe” (red ring covered and safety pushed from left hand side to right hand side) except at the actual moment of firing, to help protect against accidental firing and possible injury or death of yourself or oth-ers. (See Fig: 1a and 1b)
Cocking Indicator: located below trigger on outside of trigger guard and in front of the trigger. A black pin showing indicates that the rifle is cocked. (See Fig: 3)
Scope Mount: Mounted on top of receiver above bolt area. The top of the receiver is drilled and tapped for the mount. (See Fig: 4)
A d j u s t a b l e C h e c k Piece: Loosen two Philips screws below check piece with screw head on left hand side of stock. Adjust check piece up or down as required and then tighten screws so as to lock check piece in place. (See Fig: 5 and 5a)
Bolt Hold Back: The bolt is locked in the rearward position when the magazine is empty and in the rifle and the bolt is in the rearward position (See Fig: 6)

Adjustable Rear Sight: Located on the top of the rifle in front of the scope mount. The screw on the right hand side of the sight adjust for windage, clock wise turning will move the rear blade to the right side. The screw in the center of the sight on the top adjusts elevation, clockwise turning moves the rear blade up. (See Fig: 7a and 7b)
Trigger: Located in trigger guard and moves for and aft to fire rifle (See Fig: 8)
Magazine Catch: Lever type moves for and aft to release magazine located in front of the trigger guard and the bottom of the receiver. (See Fig: 9)
LOADING INSTRUCTIONS
1. Always use original high quality commercially manu-factured ammunition in good condition. Hollow point ammo can sometimes cause feeding problems in semi-automatic rifles. If you find one brand that works well, stick with it. Avoid the use of military surplus, reloaded, or hot loaded ammo. US SPORTING GOODS, Inc. assumes no responsibility for incidents which occur through the use of cartridges of non-standard dimension or those developing excessive pressures.
2. Before loading be sure the rifle is fully unloaded (See Unloading Instructions) and the MANUAL SAFETY BUTTON IS ENGAGED OR PUSHED FROM LEFT TO RIGHT SO THE RED RING IS COVERED.
3. Depress the magazine catch and remove the maga-zine.(See Fig: 10)
4. Load the magazine with cartridges by pushing the cartridge down and into the magazine and then sliding the cartridge rearward with your thumb. (See Fig: 10a)5. Insert the magazine in the receiver until the magazine catch secures it in the re-ceiver with a click. Avoid slamming the magazine into the rifle. Handle the magazine carefully when loading. Any damage by dropping may bend the magazine lips which
9

can cause mis-feeding.(See Fig: 10b)
6. To load the chamber, first be sure your fingers are out of the trigger guard, the gun is pointed in a safe direction and you are wearing eye & hearing protection. Holding the rifle grip, grasp the bolt handle with your other hand and pull the bolt assembly rearward until it cannot travel any further. Release the bolt and allow it to go forward into the closed position. As the bolt assembly travels forward, it will automatically strip a cartridge from the magazine lips and insert it into the firing chamber. WARNING Keep Your face away as bolt closes and never force the bolt assembly closed. WARNING Your rifle is now loaded and ready to fire. IMMEDIATELY MAKE SURE THE SAFETY BUT-TON IS ENGAUGED OR IN THE SAFE POSITION. At this point the safety is on and the gun is cocked, the cocking indicator is exposed at this point. (See Fig: 11a and 11b)
7. IF YOU DO NOT WISH TO FIRE THE RIFLE AFTER LOADING, UNLOAD IT IMMEDIATELY. See Unloading Instructions. NEVER CARRY, HANDLE, OR CLEAN THIS RIFLE WITH A LOADED CARTRIDGE IN THE CHAMBER. EVEN WITH THE MAGAZINE REMOVED, THIS FIREARM WILL STILL FIRE, IF A ROUND IS IN THE CHAMBER AND THE TRIGGER IS PULLED AND THE SAFETY IS DISENGAGED.
W A R N I N GAlways keep the muzzle pointed in a safe direction! Never attempt to load or unload any firearm inside a vehicle, building or other confined space (except a properly constructed shooting range). Enclosed areas frequently offer no completely safe direction in which to point the firearm. If an accidental discharge occurs, there is great risk of injury or property damage. Before loading, always clean all, grease and oil from the bore and chamber, and check to be certain that no obstruction is in the barrel. Any foreign matter in the barrel could result in a bulged or burst barrel or other damage to the firearm and could cause serious injury to the shooter or to others.
UNLOADING INSTRUCTIONS
1.ALWAYS keep your firearm pointed in a SAFE DIRECTION.2.BE SURE THE SAFETY BUTTON IS ON SAFE or engaged.3.Press the magazine release button and remove the magazine from the rifle.
10

WARNING removal of the maga-zine does NOT prevent this rifle from firing. If a bullet or round is in the firing chamber, that round can still be fired.(See Fig: 12)4.Unload the firing chamber by keeping the rifle pointed in a safe direction, keep your finger(s) outside of the trigger guard and off the trigger. (See Fig: 12a)5.Pull the bolt assembly (gripping the bolt handle) to the rear so that the extractor can pull out the cartridge in the chamber. Visually check to be sure that the chamber is completely empty and the cartridge has completely exited the firearm. The barrel may be checked by passing a cleaning rod through it. (See Fig: 12b and 12c)
WARNING
When you remove the magazine always double check the chamber to insure you have completely unloaded this firearm. Since the trigger will operate without a magazine inserted, make sure that the safety is ON SAFE or pushed from the left hand side to the right hand side.
1. Before firing, check to be sure you have a safe target and backstop. Never shoot at hard flat surfaces, rocks, water or anything that might make the bullet ricochet. Think about what you will hit if you miss the target. Put on your eye and hearing protection.
2. Load the magazine and chamber as discussed in the Loading Instructions. Keep the gun pointed toward the target.
3. Push the Safety Button from right to left to expose the red ring or disengaged, only disengaged the safety when you are ready to fire. (See Fig: 13)
4. Grasp the rifle by the grip and keep it forward away from the body. Never place your hand in front of the barrel at any time. Take aim by placing the front sight post exactly between the two rear sight posts and they are horizontally in line. Carefully align
11
Figure 13

the front sight and rear sight so that the top sur-faces mate at the lower or 6 o’clock position of the black portion of the target. Squeeze the trig-ger and the gun will fire. After the first shot, the action will automatically cock for successive firing and the action will be indicated as cocked by the cocking indicator (you can easily feel if the action is cocked by sliding your hand over the cocking indicator and it is protruding from the stock the action is cocked). A gentle squeeze of the trigger is all that is necessary for successive firing and is best for accuracy.(See Fig: 13a and 13b)5. The rifle will fire one shot with every squeeze of the trigger until the magazine is empty. When the guns stops firing, take your finger off the trigger and push the safety button from left to right so as to cover the red ring / engage the safety. Remove the magazine, check the chamber, make sure it is empty and then repeat loading and firing instructions as desired.
If you want to stop firing, immediately engage the safety button. Unload the firearm as stated in Un-loading Instructions. (See Fig: 13c)
W A R N I N G
If there is any reason to suspect that a bullet or projectile is obstructing the bar-rel, immediately unload the firearm (See Unloading Instructions) and check the firing chamber and the bore. It is not sufficient to merely retract the bolt and look at the rear of the barrel (firing chamber). A bullet may be lodged some distance down the barrel where it can not easily be seen. Check the bore by using a cleaning rod to pass through the barrel. If a bullet is in the bore, DO NOT ATTEMPT TO SHOOT IT OUT WITH ANOTHER CARTRIDGE, OR BLOW IT OUT WITH A BLANK CARTRIDGE OR A CARTRIDGE FROM WHICH THE BULLET HAS BEEN REMOVED. SUCH TECHNIQUE(S) CAN GENERATE EXCESSIVE PRESSURE, DAMAGE THE FIREARM AND CAUSE SERIOUS PERSONAL INJURY. If the bullet can be removed with a cleaning rod, clean any unburned powder grains from the bore, chamber & mechanism before resuming shooting. If the bullet can not be dislodged by tapping it with a cleaning rod, take the firearm to a gunsmith.
12

WARNING (Mechanical Malfunctions)
STOP SHOOTING IMMEDIATELY AND UNLOAD YOUR FIREARM if your fire-arm develops: a mechanical malfunction; binding or stoppage; spitting powder/gas; a cartridge primer is punctured; a cartridge case is bulged or ruptured; or the sound on firing does not sound quite right. Do NOT try one more shot but unload your firearm and take it and the ammunition to a gunsmith for examina-tion. Do not assume that the rifle is empty merely because the bolt remains open. An unfired cartridge or a fired cartridge case jammed between the bolt and the barrel can prevent the bolt from closing. Always look in the chamber to make sure! Should a jam occur, clear it as follows: 1. point the muzzle in a safe direction, engage the safety and remove the magazine 2. Pull back the bolt 3. remove the jammed cartridge or case by shaking the rifle or picking it out with your fingers.
CLEANING AND MAINTENANCE OF THE RIFLE
1. Materials needed to clean this rifle are a rifle cleaning rod, cotton bore patches, brass bore brush, powder solvent, a small soft brush and good quality gun oil.
2.Make sure the rifle is unloaded and the safety is engauged, see unloading instructions.
WARNING: Lead or lead compounds are known to the State of California to cause cancer, birth defects and/or reproductive toxicity. Those who clean firearms should take protective measures to avoid contact or exposure to such chemicals.
3. Using the bore brush with powder solvent scrub the barrel and chamber to remove any powder and lead residue in the bore. Secondly, swab the bore with cotton patches soaked in solvent. Always and lastly, swab with cotton patch with gun oil to coat and protect the bore from rust and corrosion.
4. Any powder fowling on the receiver or breech face of the bolt can be easily cleaned with a brush and powder solvent.
5. All external metal surfaces should be wiped down with light coat of rust pre-ventative. Avoid using too much oil as dust and/or debris can get trapped in the oil creating a gum that in time will cause misfires.
6. CAUTION in using solvents in gun bore cleaning. Prolonged or excess contact with finish or bluing can damage the gun’s finish. Be sure to wipe away all excess solvent and then lubricate with oil.
13

7. A gun should be cleaned after firing. In addition, metal external parts should be wiped with an oiled cloth after handling. A light oil is ordinarily all that is necessary in cleaning if the gun has not been fired or fired very little. If a gun is used frequently, it must be cleaned after each firing and regularly serviced by a professional gunsmith. If the gun has been stored, remove all excess oil and/or grease before firing. Always check to be sure that no cleaning patch or other obstruction remains in the bore or chamber before firing.
8. Make sure that polymer parts are not exposed to gun cleaning solvents and if so they should be wiped off as soon as possible. Polymer parts may be cleaned with a good polymer cleaning solution (see your local gun shop).
ONE YEAR LIMITED WARRANTY This US SPORTING GOODS, Inc. firearms is warranted to the original retail customer for One Year from date of purchase against defects in material and workmanship. All parts and labor or replacement at our option are covered. Transportation to and from our repair facilities, government fees, damage caused by failure to perform normal maintenance, sales outside the United States, damage due to use of high velocity, high pressure, reloaded or other nonstandard ammuni-tion, or any unauthorized repair, modification, misuse, abuse, or alteration of the product is not covered by this Limited Warranty.Any implied warranties, including the implied warranties of merchantability and fitness for a particular purpose, are limited to one year from date of original retail purchase. Consequential or incidental damages and/or expenses, or any other expenses are not covered by this warranty. To obtain warranty performance send your firearm with proof of retail purchase, freight prepaid to: US SPORTING GOODS, Inc.
14
1426 King StreetCocoa, FL 32922

W A R N I N GAltering or modifying parts and/or safeties is dangerous and will void the war-ranty. This recoil operated semi-automatic rifle was manufactured to perform properly with the original parts as designed. It is your duty to make sure any parts you buy are made for this firearm and are installed correctly and that neither the replacements nor originals are altered or changed. Your gun is a complex precision tool with many parts that must relate correctly to other parts in order for proper and safe operation. Putting a gun together wrong or with incorrect or modified parts can result in a damaged gun, danger, and injury or death to you and others through malfunction. Always have a qualified gunsmith work on your gun or at least check any work not performed by a gunsmith.
ALL PARTS ORDERS ARE SUBJECT TO A $10.00 CHARGE FOR SHIPPING AND HANDLING.
Please state Model, Caliber, Serial Number, and Finish Color when ordering. For parts and service contact: US SPORTING GOODS, Inc., 1426 King St., Cocoa, FL 32922. Phone: (321) 639-4842.
15

16
8
MP-1
61K
HUNTIN
G S
ELF-L
OA
DIN
G CA
RBIN
EIN
STRUCTIO
N M
ANUA
L
1 G
EN
ERA
L
WA
RNIN
G!
1.1
BEFO
RE U
SIN
G T
HE C
ARBIN
E,
FA
MIL
IARIZ
EYO
URSELF W
ITH THIS
IN
STRUCTIO
N M
ANUA
L.
Itco
ntai
ns the
bas
ic s
pec
ificat
ions
, w
arni
ngs,
des
crip
tions
of
des
ign
and o
per
atin
g ins
truc
tions
for
the
carb
ine.
1.2
W
ARN
ING
!REM
EM
BER T
HA
T A
NY F
IREA
RM
, THO
UG
H IT H
AS
VA
RIO
US S
AFETIE
S, IS
EXTREM
ELY D
ANG
ERO
US IF
CA
RELESSLY H
ANDLED.
THA
T IS W
HY R
EA
D A
ND
UN
DERSTA
ND TH
E O
PERA
TIN
G IN
STRU
CTIO
NS
CO
NTA
INED IN
SECTIO
NS 5
AND 6
OF T
HIS
MA
NUA
L.
1.3
WA
RN
ING
! Bef
ore
usi
ng t
he c
arbin
e, r
emove
fact
ory
lu
brica
nts
from
it an
d th
en ap
ply gun
oil
asdes
crib
ed u
nder
ite
m 7
.5 o
f th
is Ins
truc
tion
Man
ual.
1.4
Sin
ce the
car
bin
e is c
ons
tant
ly ref
ined
to im
pro
veits
relia
bili
ty a
nd p
erfo
rman
ce, it is
subje
ct t
o c
hang
ew
itho
ut s
pec
ial no
tice
in
this
Ins
truc
tion
Man
ual.
2 B
AS
IC D
ATA
2.1
The
MP-1
61K H
unting
Sel
f-lo
adin
g C
arbin
e is
inte
nded
for
smal
l-gam
e hu
ntin
g.
It c
an a
lso b
e us
ed
for
sport
ing and tr
ain
ing sh
ooting.
The Carb
ine is
cham
ber
ed f
or
a rim
fire
5,6
mm
(.2
2 L
R)
cart
ridge.
2.2
The
bas
ic p
aram
eter
s of
the
Car
bin
e an
d t
heir
valu
es a
re g
iven
in
Tab
le 1
.Tab
le 1 2.3
Firin
g a
ccur
acy
shoul
d b
e ch
ecke
d b
y sh
ooting
a 4-s
hot gro
up a
t a
100 m
ran
ge
from
a r
est in
sitting
position
and m
easu
ring
the
dista
nce
bet
wee
n th
e ce
nter
sof tw
o the
most
wid
ely
spac
ed h
its
(i.e
. th
e ce
nter
-to-
cent
er d
ista
nce)
. For good-q
ualit
y am
mun
itio
n, the
mea
nce
nter
-to-c
ente
r dis
tanc
e sh
oul
d n
ot
exce
ed 2
5 m
m. It
shoul
d b
e un
der
stood tha
t firing
acc
urac
y su
bst
anci
ally
Par
amet
er n
ame
Calib
er5,6
mm
(.2
2LR)
Mag
azin
e ca
pac
ity
9
Ove
rall dim
ensions
length
1000 m
mw
idth
75 m
mheig
ht
185 m
m
Bar
rel le
ngth
, m
ax500 m
m
Wei
ght
, m
ax2,9
Value

17
9
dep
ends
on
amm
unitio
n ch
arac
terist
ics
and m
ay w
idel
yva
ry. 3 CO
MPLETE D
ELIV
ERY
The
Car
bin
e c
om
es
com
ple
te a
s giv
en in
Tab
le 2
.Tab
le 2
Par
t Nam
eQty
Car
bin
e (w
/tw
o m
agaz
ines
)1
Pac
king
Box
1
Inst
ruct
ion
Man
ual
1
4
DES
IGN
AN
D O
PERA
TIO
N
4.1
The M
P-1
61K Hunting Self-loadin
g Carb
ine
cons
ists
of a
bar
rel w
ith
a re
ceiv
er a
nd a
fore
-end
and
a firing
mec
hani
sm w
ith
a st
ock
(Fig
. A
.2).
The barr
el
with re
ceiv
er
is fitt
ed to
th
e firing
mec
hani
sm w
ith
an a
ttac
hing
scr
ew 3
5.
4.2
The
aut
om
atic
sys
tem
of
the
Car
bin
e oper
ates
on
the
blo
w-b
ack
princ
iple
. The
aut
om
atic
cyc
le inv
olv
esth
e fo
llow
ing o
per
atio
nal st
eps:
- open
ing t
he a
ctio
n;- w
ithd
raw
al o
f a
live
cart
ridge
(or
spen
t ca
rtridge
case
) fr
om
th
e ch
amber
and
thr
ow
ing it
clea
r of
the
rece
iver
1;
- pul
ling the
trigger
bar
43 d
ow
nwar
d to d
isen
gag
eit f
rom
the
sea
r 42.
Forw
ard m
ove
men
t of
the
bolt c
ause
d b
y pre
ssur
eof
the re
coil spri
ng 28 acti
vate
s th
e fo
llow
ing
oper
atio
ns:
- fe
edin
g t
he c
artr
idge
from
the
mag
azin
e 36 int
oth
e ch
amber
;- pul
ling the
trigger
bar
upw
ard to a
llow
the
sea
r to
be
engag
ed b
y it;
- co
ckin
g t
he h
amm
er 3
8;
- closi
ng t
he a
ctio
n.4.
3 Saf
e ha
ndlin
g t
he C
arbine
is e
nsur
ed w
ith
a no
n-au
tom
atic s
afet
y. P
ush
the
safe
ty b
utto
n to
the
rig
ht t
oen
gag
e th
e sa
fety
. To d
isen
gag
e th
e sa
fety
pus
h th
is b
utto
nto
the
lef
t an
d a
red
ring w
ill b
e ex
pose
d o
n th
e but
ton.
Whe
n th
e ha
mm
er is
cock
ed, th
e ha
mm
er s
trut
will
par
tial
ly p
rotr
ude
ben
eath
the
trigger
gua
rd ind
icat
ing
that
the
Car
bin
e w
ill fire
if the
trigger
is
pul
led a
nd the
safe
ty is
dis
engag
ed.
Whe
n yo
u fire
in
the
dar
k, y
ou
may
eas
ily f
ind t
his
cock
ing ind
icat
or
by
touc
h.4.4
Aft
er a
ll ro
unds
are
fire
d fro
m the
cha
mber
, th
ebolt m
ove
s re
arw
ard a
nd lock
s.4.5
The
lis
t of
the
MP-1
61K par
ts an
d as
sem
bly
units
is in
Tab
le A
.1.
5 N
OTES
ON
US
E
5.1
Ste
ps
to b
e per
form
ed b
efore
sho
oting
:-
load
the
mag
azin
e w
ith
cart
ridges
as
follo
ws:
with th
e m
agazin
e held
w
ith yo
ur
hand in
sert
cart
ridges
one
by
one
int
o i
t. W
hile
ins
erting
, ap
ply
pre
ssur
e on
the
cart
ridge
with
your
thu
mb to a
llow
the
cart
ridge
to e
ngag
e th
e to
p lip
s on
the
side
wal
ls o
fth
e m
agaz
ine
body
and pus
h th
e ca
rtridge
until
its
flan
ge
is p
ress
ed a
gai
nst th
e re
ar w
all of th
e m
agaz
ine
body.
To e
ase
inse
rtio
n, y
ou
may
pul
l th
e but
ton
on
the
mag
azin
e si
de
wal
l dow
nwar
d;

18
10
- in
sert
the
mag
azin
e in
to the
open
ing in
front
of th
etr
igger
gua
rd;
- w
ith
the
bolt h
andle
move
the
bolt f
ully r
earw
ard
and relea
se it
. The
car
trid
ge
will b
e fe
d in
to the
cha
mber
;-
dis
engag
e th
e sa
fety
.5.2
Ste
ps
to b
e per
form
ed a
fter
sho
oting
:-
rem
ove
th
e m
agaz
ine
by
movi
ng th
e m
agaz
ine
catc
h fu
lly rea
rwar
d a
nd p
ullin
g d
ow
n at
the
sam
e tim
eth
e pro
trus
ion
on
the
mag
azin
e co
ver
with
your
ind
exfing
er;
- m
ove th
e bolt fu
lly re
arw
ard
and th
rough th
eopen
ing in
the
rec
eive
r ch
eck
that
the
cha
mber
is e
mpty
.Rele
ase
it.
- poin
t th
e Car
bin
e in
a s
afe
direc
tion
and p
ull th
etr
igger
to r
elea
se t
he h
amm
er;
- en
gag
e th
e sa
fety
.5.3
The
use
of
oth
er c
artr
idge
bra
nds
than
tho
seus
ed b
y th
e M
anuf
actu
rer fo
r zer
oin
g the
Car
bin
e m
ayca
use
the
dev
iation
of
the
mea
n poin
t of
impac
t fr
om
the poin
t of
aim
. Re-z
ero
th
e Carb
ine w
ith th
eam
mun
itio
n yo
u ar
e goin
g t
o u
se.
Fire
4-s
hot
gro
ups
at a
25-5
0 m
ran
ge.
Join
eac
h of
the
two p
airs
of
hits
with
a st
raig
ht li
ne. Det
erm
ine
a ce
nter
of ea
ch s
trai
ght
line
and join
the
cen
tres
with
a th
ird s
trai
ght
lin
e. T
hece
nter
of
this
thi
rd lin
e is
a m
ean
poin
t of
impac
t.To sh
ift
the m
ean poin
t of
impact
to
th
e right,
turn
the w
indage s
crew
(Fig
. A
.7)
counte
rclo
ckw
ise
or
turn
it
clock
wis
e t
o s
hift
the m
ean p
oin
t of
impact
to t
he left
.To s
hift
the
mea
n poin
t of im
pac
t up
war
d, tu
rn the
elev
atio
n sc
rew
19 (Fig
s A
.4, A
.8) co
unte
rclo
ckw
ise
or
turn
it clock
wis
e to
sh
ift
the
mea
n poin
t of
impac
tdow
nw
ard.
5.4
The
Car
bin
e is
fitte
d w
ith
a he
ight
adju
stab
lech
eekp
iece
and
a len
gth
adju
stab
le b
uttp
late
.For he
ight
adju
stm
ent of th
e ch
eekp
iece
33, lo
ose
ntw
o s
crew
s 32 (Fig
. A
.6) an
d a
dju
st the
che
ekpie
ce to
the
requi
red h
eight
. Tig
hten
the
scr
ews.
The
max
imum
heig
ht o
f th
e ch
eekp
iece
can
be
adju
sted
to 4
0 m
m.
For
leng
th a
dju
stm
ent
of
the
but
tpla
te 2
5,
loose
nfo
ur s
crew
s 32 (
Fig
. A
.6)
and a
dju
st t
he b
uttp
late
to
the
requi
red len
gth
. Tig
hten
the
scr
ews.
The
but
tpla
tele
ngth
can
be
ajus
ted w
ithi
n 24 m
m in
8 m
m s
teps.
6
SA
FE H
AN
DLIN
G R
ULES
6.1
Any
firea
rm,
thoug
h it h
as v
ario
us s
afet
ies
isDA
NG
ERO
US t
o p
eople
s’s
life
and h
ealth
if c
arel
essly
hand
led. Tha
t is
why
obse
rve
all sa
fety
mea
sure
s an
dke
ep in
min
d t
hat
igno
ranc
e of
safe
ty r
ules
may
cau
sese
rious
phy
sica
l in
jury
.6.2
ALW
AYS t
reat
your
Car
bin
e as
if
it is
load
edan
d re
ady
to fire
. NEVER poin
t th
is Car
bin
e at
an
ypeo
ple
, pet
s or
anyt
hing
you
do n
ot
inte
nd t
o s
hoot
even if it is
unlo
aded.
When lo
adin
g,
unlo
adin
g,
mai
ntai
ning
or clea
ning
, A
LW
AYS b
e su
re the
bar
rel is
poin
ted i
n a
safe
direc
tion
and A
LW
AYS k
eep y
our
fing
er o
ff t
he t
rigger
.6.3
DO
NO
T d
isen
gag
e th
e sa
fety
unt
il th
e Car
bin
eis p
oin
ted a
t a
targ
et. W
hen
poin
ting
, ke
ep y
our
fin
ger
off t
he t
rigger
unles
s yo
ur a
re r
eady
to f
ire.
Lea
rn t
ore
st y
our
fin
ger
on
the
trig
ger
gua
rd b
ut n
ot
on
the
trig
ger
.
11
6.4
Nev
er p
ull t
he C
arbin
e to
war
d y
ou
by
the
muz
zle.
Nev
er p
ut y
our
han
d o
ver
the
muz
zle
.6.5
NEVER lea
ve y
our
Car
bin
e w
here
it
coul
d f
all
and f
ire.
6.6
Kno
w y
our
tar
get
and
wha
t is b
eyond
it. A
skyo
urse
lf w
hat yo
ur b
ullets
will h
it if th
ey m
iss
the
targ
etor
pas
s th
roug
h th
e in
tend
ed t
arget
. NEVER s
hoot
atha
rd flat su
rfac
es o
r wat
er....th
ere
is a
dan
ger
of rico
chet
.6.7
W
hen re
ceiv
ing a Carb
ine,
NEVER accept
anyo
ne’s
w
ord
th
at
it is
“u
nlo
aded”.
Your
should
imm
edia
tely rem
ove
the
mag
azin
e, p
ull t
he b
olt rea
rwar
dan
d c
heck
to m
ake
sure
tha
t th
e ch
amber
is
empty
.6.8
Kee
p y
our
Car
bin
e se
par
atel
y fr
om
am
mun
itio
nand beyond th
e re
ach of
childre
n and untr
ain
ed
indiv
idua
ls. W
hen
out
of a
stora
ge
pla
ce, NEVER lea
veth
e Car
bin
ee u
natt
ended
.6.9
Bef
ore
per
form
ing a
ny o
per
atio
ns o
n th
e Car
bin
e(s
mooth
ham
mer
rel
ease
, clea
ning
, dis
asse
mbly,
etc)
,yo
ur M
UST c
heck
to m
ake
sure
it
is u
nload
ed.
6.1
0 A
LW
AYS e
mpty
the
Car
bin
e bef
ore
ent
erin
ga
hous
e, ca
r, boat
or
any
bui
ldin
g or
cam
p.
NEVER
load
/un
load
the
Car
bin
e in
side
a ve
hicle
or
bui
ldin
g(e
xcep
t a
shooting
room
).6.1
1 Car
bin
es an
d al
cohol
or
dru
gs
DO
N’T
M
IX!
DO
N’T
TA
KE a
ny a
lcoho
lic b
ever
ages
or
dru
gs
bef
ore
or
dur
ing s
hooting
act
ivitie
s.6.1
2 D
O N
OT a
lter
or
modify
your
Car
bin
e. D
o n
ot
try
to c
hang
e th
e tr
igger
pul
l, re
move
the
saf
ety
or an
yin
tern
al s
afet
y dev
ice
as it m
ay c
ause
acc
iden
tal firing
.6.1
3 W
ear he
arin
g p
rote
ctio
n an
d s
hooting
gla
sses
whe
n us
ing y
our
Car
bin
e.
6.1
4 Use
th
e am
mun
itio
n fo
r w
hich
yo
ur Car
bin
ew
as o
rigin
ally c
ham
ber
ed.
6.1
5 U
se c
artr
idges
bef
ore
the
dat
e in
dic
ated
on
aca
rtridge
box.
6.1
6 B
efore
load
ing,
mak
e su
re t
he b
arre
l bore
is
not
clogged
with
snow
, dirt
or
deb
ris.
6.1
7 S
top s
hooting
im
med
iate
ly if
soun
d o
n firing
diffe
rs f
rom
the
pre
vious
soun
d. Unl
oad
your
Car
bin
ean
d e
xam
ine
the
bar
rel,
rece
iver
and
oth
er p
arts
.If a
ny c
artr
idge
com
pone
nt p
arts
jam
med
ins
ide
the
bar
rel,
rem
ove
the
m b
efore
res
umin
g s
hooting
.If a
blo
ckag
e is
in
th
e bore
, do no
t at
tem
pt
tosh
oot it o
ut w
ith
anoth
er c
artr
idge
even
if it is
a bla
nkca
rtridge
or a
cart
ridge
from
whi
ch the
bul
let ha
s bee
nre
move
d.
6.1
8 W
ARNIN
G! N
ono
bse
rvan
ce o
f th
e re
qui
rem
ents
of
item
s 6.1
4-6
.17 m
ay c
ause
dam
age
to t
he b
arre
l or
serious
inj
ury
to a
sho
ote
r or
those
who
sta
nd n
ear
him
. 6.1
9 W
ARNIN
G! If y
our
Car
bin
e fa
ils t
o f
ire
whe
nth
e tr
igger
is
pul
led, ke
ep it
poin
ted a
t th
e ta
rget
for
60 s
econd
s. S
om
etim
es s
low
prim
er igni
tion
will c
ause
a “h
ang fire”
and
the
car
trid
ge
will g
o o
ff a
fter
a s
hot
pau
se. If it st
ill fai
ls to fire,
kee
p the
bar
rel poin
ted in
a sa
fe d
irec
tion
so t
hat
the
muz
zle
end
and
cha
mber
are
direc
ted a
way
fro
m y
ou,
and
unl
oad
your
Car
bin
e.6.2
0 If th
e bar
rel
on
your
Car
bin
e is
bul
ged
, its
mec
hani
sms
mai
lfun
ctio
n, a
car
trid
ge
case
is
ruptu
red
or
if it
has
som
e m
ore
dam
ages
, ha
ve it
exam
ined
and
repai
red by
a qua
lifie
d gun
smith.
DO
NO
T TRY O
NE
MORE S
HOT, if your
Car
bin
e dev
elops th
e ab
ove
def
ects
.

19
11
6.4
Nev
er p
ull t
he C
arbin
e to
war
d y
ou
by
the
muz
zle.
Nev
er p
ut y
our
han
d o
ver
the
muz
zle
.6.5
NEVER lea
ve y
our
Car
bin
e w
here
it
coul
d f
all
and f
ire.
6.6
Kno
w y
our
tar
get
and
wha
t is b
eyond
it. A
skyo
urse
lf w
hat yo
ur b
ullets
will h
it if th
ey m
iss
the
targ
etor
pas
s th
roug
h th
e in
tend
ed t
arget
. NEVER s
hoot
atha
rd flat su
rfac
es o
r wat
er....th
ere
is a
dan
ger
of rico
chet
.6.7
W
hen re
ceiv
ing a Carb
ine,
NEVER accept
anyo
ne’s
w
ord
th
at
it is
“u
nlo
aded”.
Your
should
imm
edia
tely rem
ove
the
mag
azin
e, p
ull t
he b
olt rea
rwar
dan
d c
heck
to m
ake
sure
tha
t th
e ch
amber
is
empty
.6.8
Kee
p y
our
Car
bin
e se
par
atel
y fr
om
am
mun
itio
nand beyond th
e re
ach of
childre
n and untr
ain
ed
indiv
idua
ls. W
hen
out
of a
stora
ge
pla
ce, NEVER lea
veth
e Car
bin
ee u
natt
ended
.6.9
Bef
ore
per
form
ing a
ny o
per
atio
ns o
n th
e Car
bin
e(s
mooth
ham
mer
rel
ease
, clea
ning
, dis
asse
mbly,
etc)
,yo
ur M
UST c
heck
to m
ake
sure
it
is u
nload
ed.
6.1
0 A
LW
AYS e
mpty
the
Car
bin
e bef
ore
ent
erin
ga
hous
e, ca
r, boat
or
any
bui
ldin
g or
cam
p.
NEVER
load
/un
load
the
Car
bin
e in
side
a ve
hicle
or
bui
ldin
g(e
xcep
t a
shooting
room
).6.1
1 Car
bin
es an
d al
cohol
or
dru
gs
DO
N’T
M
IX!
DO
N’T
TA
KE a
ny a
lcoho
lic b
ever
ages
or
dru
gs
bef
ore
or
dur
ing s
hooting
act
ivitie
s.6.1
2 D
O N
OT a
lter
or
modify
your
Car
bin
e. D
o n
ot
try
to c
hang
e th
e tr
igger
pul
l, re
move
the
saf
ety
or an
yin
tern
al s
afet
y dev
ice
as it m
ay c
ause
acc
iden
tal firing
.6.1
3 W
ear he
arin
g p
rote
ctio
n an
d s
hooting
gla
sses
whe
n us
ing y
our
Car
bin
e.
6.1
4 Use
th
e am
mun
itio
n fo
r w
hich
yo
ur Car
bin
ew
as o
rigin
ally c
ham
ber
ed.
6.1
5 U
se c
artr
idges
bef
ore
the
dat
e in
dic
ated
on
aca
rtridge
box.
6.1
6 B
efore
load
ing,
mak
e su
re t
he b
arre
l bore
is
not
clogged
with
snow
, dirt
or
deb
ris.
6.1
7 S
top s
hooting
im
med
iate
ly if
soun
d o
n firing
diffe
rs f
rom
the
pre
vious
soun
d. Unl
oad
your
Car
bin
ean
d e
xam
ine
the
bar
rel,
rece
iver
and
oth
er p
arts
.If a
ny c
artr
idge
com
pone
nt p
arts
jam
med
ins
ide
the
bar
rel,
rem
ove
the
m b
efore
res
umin
g s
hooting
.If a
blo
ckag
e is
in
th
e bore
, do no
t at
tem
pt
tosh
oot it o
ut w
ith
anoth
er c
artr
idge
even
if it is
a bla
nkca
rtridge
or a
cart
ridge
from
whi
ch the
bul
let ha
s bee
nre
move
d.
6.1
8 W
ARNIN
G! N
ono
bse
rvan
ce o
f th
e re
qui
rem
ents
of
item
s 6.1
4-6
.17 m
ay c
ause
dam
age
to t
he b
arre
l or
serious
inj
ury
to a
sho
ote
r or
those
who
sta
nd n
ear
him
. 6.1
9 W
ARNIN
G! If y
our
Car
bin
e fa
ils t
o f
ire
whe
nth
e tr
igger
is
pul
led, ke
ep it
poin
ted a
t th
e ta
rget
for
60 s
econd
s. S
om
etim
es s
low
prim
er igni
tion
will c
ause
a “h
ang fire”
and
the
car
trid
ge
will g
o o
ff a
fter
a s
hot
pau
se. If it st
ill fai
ls to fire,
kee
p the
bar
rel poin
ted in
a sa
fe d
irec
tion
so t
hat
the
muz
zle
end
and
cha
mber
are
direc
ted a
way
fro
m y
ou,
and
unl
oad
your
Car
bin
e.6.2
0 If th
e bar
rel
on
your
Car
bin
e is
bul
ged
, its
mec
hani
sms
mai
lfun
ctio
n, a
car
trid
ge
case
is
ruptu
red
or
if it
has
som
e m
ore
dam
ages
, ha
ve it
exam
ined
and
repai
red by
a qua
lifie
d gun
smith.
DO
NO
T TRY O
NE
MORE S
HOT, if your
Car
bin
e dev
elops th
e ab
ove
def
ects
.

20
12
7 M
AIN
TEN
AN
CE
7.1
Pro
per
han
dlin
g an
d m
aint
enan
ce ex
tend
th
ese
rvic
e lif
e of
the
Car
bin
e an
d e
nsur
e its
troub
le-fre
efu
nctioni
ng. Dis
asse
mble
the
Car
bin
e co
mple
tely w
hen
it is
nece
ssar
y onl
y.7.
2 Fo
r no
rmal car
e (ins
pec
tion,
clea
ning
and
oiling
) field
strip the
Car
bine
as follo
ws
(ref
er to F
igs
A.2
,A.3
, A.4
):-
pus
h th
e m
agaz
ine
catc
h to
the
rea
r an
d r
emove
the
mag
azin
e 36;
- m
ove
the
bolt 2
rea
rwaw
d a
nd c
heck
to m
ake
sure
that
the
cha
mber
is
empty
;-
engag
e th
e sa
fety
;-
rem
ove
the
att
achi
ng s
crew
35;
- se
par
ate
the
bar
rel gro
up (
bar
rel/
rece
iver
/fo
re-
end)
from
the
sto
ck;
- re
move
the
lock
ing p
in 1
5 b
y pul
ling it
upw
ard;
- re
move
th
e ca
p 16 to
get
her
with
reco
il sp
ring
gui
de
11 a
nd r
ecoil
spring
10;
- si
nk the
plu
nger
int
o the
han
dle
4 in
the
direc
tion
of ar
row
A. Tur
n th
e ha
ndle
in
the
direc
tion
of ar
row
Áan
d r
emove
it;
- re
move
the
bolt 2
.7.3
Reass
em
bly
is
in
th
e re
vers
e ord
er. A
fter
reas
sem
blin
g, ch
eck
the
Car
bin
e fo
r fu
nctioni
ng (do it
witho
ut m
agaz
ine)
:-
dis
engag
e th
e sa
fety
;- m
ove
the
bolt c
om
ple
tely rea
rwar
d a
nd rel
ease
it;
- th
e bolt bei
ng ac
ted up
on
by
the
reco
il sp
ring
shoul
d m
ove
rea
rwar
d f
ast
witho
ut s
tops;
- pul
ling t
he t
rigger
sho
uld r
elea
se t
he h
amm
er;
- ch
eck
the
safe
ty f
or
pro
per
fun
ctio
ning
.
7.4
For clea
ning
and
lubrica
ting
the
firin
g m
echa
nism
,re
move
the
scr
ews
32,
33 (
Fig
. A
.4)
whi
ch k
eep t
heright
-han
d a
nd le
ft-h
and s
tock
s to
get
her. S
epar
ate
thes
est
ock
s. N
ow
you
can
rem
ove
the
firin
g m
echa
nism
for
clea
ning
and
lub
rica
ting
.7.5
Cle
anin
g a
nd L
ubrica
ting
7.5
.1 Keep yo
ur
Carb
ine cl
ean and lu
brica
ted.
Cle
anin
g m
ater
ials (
soft
fab
ric,
cott
on
pat
ches
, flax
com
bin
gs)
mus
t be
clea
n an
d m
ust no
t co
ntai
n sa
nd o
rdus
t. T
he C
arbin
e sh
oul
d b
e clea
ned a
fter
eac
h firing
.In
win
ter, a
llow
the
Car
bin
e to
war
m-u
p ind
oors
for
2-
3 h
our
s an
d o
nly
then
cle
an it. A
lway
s clea
n th
e bar
rel
bore
fro
m t
he c
ham
ber
end
to t
he m
uzzle
end
. Nev
ertr
y to
pus
h th
e clea
ning
clo
th b
ack
from
the
muz
zle
end. TA
KE C
ARE:
As
usua
l bore
cle
anin
g s
olv
ents
are
stro
ng, pro
long
and
exc
ess
cont
act w
ith
fini
sh o
r blu
ing
can
dam
age
the
Car
bin
e’s
fini
sh. W
ipe
away
all
exce
ssso
lven
t an
d t
hen
lubrica
te w
ith
a gun
oil.
7.5
.2 T
o c
lean
the
bar
rel bore
:-
coat
the
bar
rel bore
with
a gun
oil;
- wip
e th
e bar
rel b
ore
and
cha
mber
with
a clea
ning
cloth
;- re
pea
t oili
ng a
nd c
lean
ing o
f th
e bar
rel bore
unt
ilpow
der
foul
ing a
nd lea
d a
re r
emove
d f
ully.
Note
tha
t th
e bar
rel bore
is
not
chro
me-
lined
for
ensu
ring
hig
h sh
ooting
acc
urac
y. T
here
fore
it
requi
res
clea
ning
aft
er e
ach
firing
and
reg
ular
rus
t pre
vent
ive
oili
ng.
7.5
.3 T
he C
arbin
e par
ts s
houl
d b
e giv
en o
nly
a lig
htco
at of
oil
espec
ially
w
hen
yo
u us
e th
e Car
bin
e at
negat
ive
tem
per
atur
es.
13
8 M
AN
UFA
CTU
RER
8.1
The
MP-1
61K C
arbin
e ha
s bee
n m
anuf
actu
red
by
FG
UP “
Izhe
vsky
Mek
hani
ches
ky Z
avod”.
8.2
The
Man
ufac
ture
r’s
addre
ss:
FG
UP “
Izhe
vsky
Mek
hani
ches
ky Z
avod”
Pro
mys
hlen
naya
, 8
Izhe
vsk
426063, Rus
sia
9 N
OTES
ON
CERTIF
ICA
TIO
N
The
M
P-1
61K H
unting
Sem
i A
uto C
arbin
e co
mplie
sw
ith th
e re
quirem
ents
of
the Speci
fica
tions
MP-
161K.7
76314.0
05 Ò
U, R
ussi
an s
tate
st
andar
d G
OST
P
50529-2
010 a
nd t
he c
rim
inal
istica
l re
qui
rem
ents
of
the Russ
ian M
inis
try
of
Inte
rnal
Aff
airs
conce
rnin
glim
itat
ions
on
circ
ulat
ion
of
civi
l an
d s
ervi
ce w
eapons
.The
M
P-1
61K H
unting
Sem
i A
uto C
arbin
e ha
sbee
n ce
rtifie
d a
s co
mplia
nt w
ith
the
sa
fety
re
qui
re-
ments
. It has Cert
ific
ate
of
Com
pliance PO
CC
RU.Ì
Æ03.B
01974 w
hic
h is
valid
fr
om
O
ctober
19,
2010 to
O
ctober
18,
2013.
The Cert
ific
ate
of
Com
plia
nce
has
bee
n g
rant
ed by
the
Udm
urt C
erti-
fica
tion
Cen
ter’s
Cer
tifier
of C
ivil
and
Ser
vice
W
ea-
pons
and
Am
munit
ion,
Reg.N
o.
PO
CC
RU
.0001.1
1Ì
Æ03.
10 C
ERTIF
ICA
TE O
F A
CCEPTA
NCE
AN
D P
ACK
ING
The M
P-1
61K
H
unti
ng S
em
i A
uto
C
arb
ine
No._
___________________ ha
s bee
n ac
cepte
d in
com
plia
nce
with
Spec
ific
atio
ns M
P-1
61K.7
76314.0
05
ÒU a
nd f
oun
d f
it f
or
serv
ice.
Dat
e of m
anuf
actu
re_____________________
Acc
epte
d b
y__________________________
s
igna
ture
of per
son
in c
har
ge
of ac
cepta
nce
It h
as b
een
giv
en a
pre
serv
ativ
e trea
tmen
t an
d p
acke
dby
the
Man
ufac
ture
r in
com
plia
nce
with
the
requi
rem
ents
spec
ifie
d in
the
effe
ctiv
e sp
ecific
atio
ns.
Dat
e of
pre
serv
atio
n____________________
Pre
serv
ed b
y__________________________
s
igna
ture
of per
son
in c
harg
e of pre
serv
atio
n
The
sto
rage
per
iod for th
e ca
rbin
e ke
pt in
the
fac
tory
inta
ct p
acki
ng is
24 m
ont
hs fro
m the
dat
e of pre
serv
atio
nby th
e M
anuf
actu
rer. U
pon
expirat
ion
of th
e ab
ove
per
iod
the
Car
bin
e m
ust
be
repre
serv
ed.
Thi
s st
ora
ge
per
iod is
for
the
carb
ine
kept
in a
ir-
vent
ilate
d s
tore
hous
es (lik
e st
one
, co
ncre
te, or th
erm
ally
insu
late
d m
etal s
tore
hous
es) w
here
am
bie
nt tem
per
atur
ean
d h
umid
ity
vary
less
tha
n out
doors
. Sto
reho
uses
may
be lo
cate
d in
various
macr
ocl
imatic
are
as
incl
udin
gtr
opic
al a
reas
.
Êàð
àáèí î
õîòí
è÷è
éñà
ìîçà
ðÿä
íûé Ì
Ð-1
61Ê.
Ïàñ
ïîðò
íà
ðóñ
ñ. è
àíãë
. ÿç
.È. Çàê
. 1814

12
7 M
AIN
TEN
AN
CE
7.1
Pro
per
han
dlin
g an
d m
aint
enan
ce ex
tend
th
ese
rvic
e lif
e of
the
Car
bin
e an
d e
nsur
e its
troub
le-fre
efu
nctioni
ng. Dis
asse
mble
the
Car
bin
e co
mple
tely w
hen
it is
nece
ssar
y onl
y.7.
2 Fo
r no
rmal car
e (ins
pec
tion,
clea
ning
and
oiling
) field
strip the
Car
bine
as follo
ws
(ref
er to F
igs
A.2
,A.3
, A.4
):-
pus
h th
e m
agaz
ine
catc
h to
the
rea
r an
d r
emove
the
mag
azin
e 36;
- m
ove
the
bolt 2
rea
rwaw
d a
nd c
heck
to m
ake
sure
that
the
cha
mber
is
empty
;-
engag
e th
e sa
fety
;-
rem
ove
the
att
achi
ng s
crew
35;
- se
par
ate
the
bar
rel gro
up (
bar
rel/
rece
iver
/fo
re-
end)
from
the
sto
ck;
- re
move
the
lock
ing p
in 1
5 b
y pul
ling it
upw
ard;
- re
move
th
e ca
p 16 to
get
her
with
reco
il sp
ring
gui
de
11 a
nd r
ecoil
spring
10;
- si
nk the
plu
nger
int
o the
han
dle
4 in
the
direc
tion
of ar
row
A. Tur
n th
e ha
ndle
in
the
direc
tion
of ar
row
Áan
d r
emove
it;
- re
move
the
bolt 2
.7.3
Reass
em
bly
is
in
th
e re
vers
e ord
er. A
fter
reas
sem
blin
g, ch
eck
the
Car
bin
e fo
r fu
nctioni
ng (do it
witho
ut m
agaz
ine)
:-
dis
engag
e th
e sa
fety
;- m
ove
the
bolt c
om
ple
tely rea
rwar
d a
nd rel
ease
it;
- th
e bolt bei
ng ac
ted up
on
by
the
reco
il sp
ring
shoul
d m
ove
rea
rwar
d f
ast
witho
ut s
tops;
- pul
ling t
he t
rigger
sho
uld r
elea
se t
he h
amm
er;
- ch
eck
the
safe
ty f
or
pro
per
fun
ctio
ning
.
7.4
For clea
ning
and
lubrica
ting
the
firin
g m
echa
nism
,re
move
the
scr
ews
32,
33 (
Fig
. A
.4)
whi
ch k
eep t
heright
-han
d a
nd le
ft-h
and s
tock
s to
get
her. S
epar
ate
thes
est
ock
s. N
ow
you
can
rem
ove
the
firin
g m
echa
nism
for
clea
ning
and
lub
rica
ting
.7.5
Cle
anin
g a
nd L
ubrica
ting
7.5
.1 Keep yo
ur
Carb
ine cl
ean and lu
brica
ted.
Cle
anin
g m
ater
ials (
soft
fab
ric,
cott
on
pat
ches
, flax
com
bin
gs)
mus
t be
clea
n an
d m
ust no
t co
ntai
n sa
nd o
rdus
t. T
he C
arbin
e sh
oul
d b
e clea
ned a
fter
eac
h firing
.In
win
ter, a
llow
the
Car
bin
e to
war
m-u
p ind
oors
for
2-
3 h
our
s an
d o
nly
then
cle
an it. A
lway
s clea
n th
e bar
rel
bore
fro
m t
he c
ham
ber
end
to t
he m
uzzle
end
. Nev
ertr
y to
pus
h th
e clea
ning
clo
th b
ack
from
the
muz
zle
end. TA
KE C
ARE:
As
usua
l bore
cle
anin
g s
olv
ents
are
stro
ng, pro
long
and
exc
ess
cont
act w
ith
fini
sh o
r blu
ing
can
dam
age
the
Car
bin
e’s
fini
sh. W
ipe
away
all
exce
ssso
lven
t an
d t
hen
lubrica
te w
ith
a gun
oil.
7.5
.2 T
o c
lean
the
bar
rel bore
:-
coat
the
bar
rel bore
with
a gun
oil;
- wip
e th
e bar
rel b
ore
and
cha
mber
with
a clea
ning
cloth
;- re
pea
t oili
ng a
nd c
lean
ing o
f th
e bar
rel bore
unt
ilpow
der
foul
ing a
nd lea
d a
re r
emove
d f
ully.
Note
tha
t th
e bar
rel bore
is
not
chro
me-
lined
for
ensu
ring
hig
h sh
ooting
acc
urac
y. T
here
fore
it
requi
res
clea
ning
aft
er e
ach
firing
and
reg
ular
rus
t pre
vent
ive
oili
ng.
7.5
.3 T
he C
arbin
e par
ts s
houl
d b
e giv
en o
nly
a lig
htco
at of
oil
espec
ially
w
hen
yo
u us
e th
e Car
bin
e at
negat
ive
tem
per
atur
es.
21
13
8 M
AN
UFA
CTU
RER
8.1
The
MP-1
61K C
arbin
e ha
s bee
n m
anuf
actu
red
by
FG
UP “
Izhe
vsky
Mek
hani
ches
ky Z
avod”.
8.2
The
Man
ufac
ture
r’s
addre
ss:
FG
UP “
Izhe
vsky
Mek
hani
ches
ky Z
avod”
Pro
mys
hlen
naya
, 8
Izhe
vsk
426063, Rus
sia
9 N
OTES
ON
CERTIF
ICA
TIO
N
The
M
P-1
61K H
unting
Sem
i A
uto C
arbin
e co
mplie
sw
ith th
e re
quirem
ents
of
the Speci
fica
tions
MP-
161K.7
76314.0
05 Ò
U, R
ussi
an s
tate
st
andar
d G
OST
P
50529-2
010 a
nd t
he c
rim
inal
istica
l re
qui
rem
ents
of
the Russ
ian M
inis
try
of
Inte
rnal
Aff
airs
conce
rnin
glim
itat
ions
on
circ
ulat
ion
of
civi
l an
d s
ervi
ce w
eapons
.The
M
P-1
61K H
unting
Sem
i A
uto C
arbin
e ha
sbee
n ce
rtifie
d a
s co
mplia
nt w
ith
the
sa
fety
re
qui
re-
ments
. It has Cert
ific
ate
of
Com
pliance PO
CC
RU.Ì
Æ03.B
01974 w
hic
h is
valid
fr
om
O
ctober
19,
2010 to
O
ctober
18,
2013.
The Cert
ific
ate
of
Com
plia
nce
has
bee
n g
rant
ed by
the
Udm
urt C
erti-
fica
tion
Cen
ter’s
Cer
tifier
of C
ivil
and
Ser
vice
W
ea-
pons
and
Am
munit
ion,
Reg.N
o.
PO
CC
RU
.0001.1
1Ì
Æ03.
10 C
ERTIF
ICA
TE O
F A
CCEPTA
NCE
AN
D P
ACK
ING
The M
P-1
61K
H
unti
ng S
em
i A
uto
C
arb
ine
No._
___________________ ha
s bee
n ac
cepte
d in
com
plia
nce
with
Spec
ific
atio
ns M
P-1
61K.7
76314.0
05
ÒU a
nd f
oun
d f
it f
or
serv
ice.
Dat
e of m
anuf
actu
re_____________________
Acc
epte
d b
y__________________________
s
igna
ture
of per
son
in c
har
ge
of ac
cepta
nce
It h
as b
een
giv
en a
pre
serv
ativ
e trea
tmen
t an
d p
acke
dby
the
Man
ufac
ture
r in
com
plia
nce
with
the
requi
rem
ents
spec
ifie
d in
the
effe
ctiv
e sp
ecific
atio
ns.
Dat
e of
pre
serv
atio
n____________________
Pre
serv
ed b
y__________________________
s
igna
ture
of per
son
in c
harg
e of pre
serv
atio
n
The
sto
rage
per
iod for th
e ca
rbin
e ke
pt in
the
fac
tory
inta
ct p
acki
ng is
24 m
ont
hs fro
m the
dat
e of pre
serv
atio
nby th
e M
anuf
actu
rer. U
pon
expirat
ion
of th
e ab
ove
per
iod
the
Car
bin
e m
ust
be
repre
serv
ed.
Thi
s st
ora
ge
per
iod is
for
the
carb
ine
kept
in a
ir-
vent
ilate
d s
tore
hous
es (lik
e st
one
, co
ncre
te, or th
erm
ally
insu
late
d m
etal s
tore
hous
es) w
here
am
bie
nt tem
per
atur
ean
d h
umid
ity
vary
less
tha
n out
doors
. Sto
reho
uses
may
be lo
cate
d in
various
macr
ocl
imatic
are
as
incl
udin
gtr
opic
al a
reas
.
Êàð
àáèí î
õîòí
è÷è
éñà
ìîçà
ðÿä
íûé Ì
Ð-1
61Ê.
Ïàñ
ïîðò
íà
ðóñ
ñ. è
àíãë
. ÿç
.È. Çàê
. 1814

22
14
ÏÐÈ
ËÎ
ÆÅÍ
ÈÅ À
(ñ
ïðàâî÷íîå)
APPEN
DIX
A
(r
efe
rence)
Ðèñóíîê À
.1 -
Êàðàáèí î
õîòí
è÷èé ñ
àìîçà
ðÿäíû
é Ì
Ð-1
61Ê
Fig
. A
.1 -
M
P-1
61K
Hunti
ng S
elf
-loadin
g C
arb
ine
15
Ðèñóíîê À
.2 -
Ñõåìà ÷
àñòå
é è
ìåõàíèçì
îâ ñ
àìîçà
ðÿäíîãî
êàðàáèíà Ì
Ð-1
61Ê ï
ðè í
åïîëíîé ð
àçá
îðêå.
Fig
. A
.2 -
MP-1
61K
Part
s a
nd M
echanis
ms. In
com
ple
te S
trip
pin
g.

14
ÏÐÈ
ËÎ
ÆÅÍ
ÈÅ À
(ñ
ïðàâî÷íîå)
APPEN
DIX
A
(r
efe
rence)
Ðèñóíîê À
.1 -
Êàðàáèí î
õîòí
è÷èé ñ
àìîçà
ðÿäíû
é Ì
Ð-1
61Ê
Fig
. A
.1 -
M
P-1
61K
Hunti
ng S
elf
-loadin
g C
arb
ine
23
15
Ðèñóíîê À
.2 -
Ñõåìà ÷
àñòå
é è
ìåõàíèçì
îâ ñ
àìîçà
ðÿäíîãî
êàðàáèíà Ì
Ð-1
61Ê ï
ðè í
åïîëíîé ð
àçá
îðêå.
Fig
. A
.2 -
MP-1
61K
Part
s a
nd M
echanis
ms. In
com
ple
te S
trip
pin
g.

24
16
Ðèñóíîê À
.3 -
Ñõåìà ð
àçá
îðêè ç
àòâ
îðà ñ
ðóêîÿòê
îé.
Fig
. A
.3 -
Dis
assem
bly
Dia
gra
m f
or
Bolt
and H
andle
.
ãíåòîê
plunger
16
Ðèñóíîê À
.3 -
Ñõåìà ð
àçá
îðêè ç
àòâ
îðà ñ
ðóêîÿòê
îé.
Fig
. A
.3 -
Dis
assem
bly
Dia
gra
m f
or
Bolt
and H
andle
.
ãíåòîê
plunger

16
Ðèñóíîê À
.3 -
Ñõåìà ð
àçá
îðêè ç
àòâ
îðà ñ
ðóêîÿòê
îé.
Fig
. A
.3 -
Dis
assem
bly
Dia
gra
m f
or
Bolt
and H
andle
.
ãíåòîê
plunger
25
16
Ðèñóíîê À
.3 -
Ñõåìà ð
àçá
îðêè ç
àòâ
îðà ñ
ðóêîÿòê
îé.
Fig
. A
.3 -
Dis
assem
bly
Dia
gra
m f
or
Bolt
and H
andle
.
ãíåòîê
plunger

26
17
Ðèñóíîê À
.4 - Ñ
áîðî÷íû
å å
äèíèöû
è ä
åòà
ëè ê
àðàáèíà
áåç
óäàðíî-ñ
ïóñêîâîãî
ìåõàíèçì
àFig
. A
.4 - A
ssem
blies a
nd P
art
s o
f Carb
ine w
ithout
Firin
g M
echanis
m

17
Ðèñóíîê À
.4 - Ñ
áîðî÷íû
å å
äèíèöû
è ä
åòà
ëè ê
àðàáèíà
áåç
óäàðíî-ñ
ïóñêîâîãî
ìåõàíèçì
àFig
. A
.4 - A
ssem
blies a
nd P
art
s o
f Carb
ine w
ithout
Firin
g M
echanis
m
27
18
Ðèñóíîê À
.5 -
Óäàðíî-ñ
ïóñêîâîé ì
åõàíèçì
êàðàáèíà.
Fig
. A
.5 -
Firin
g M
echanis
m.
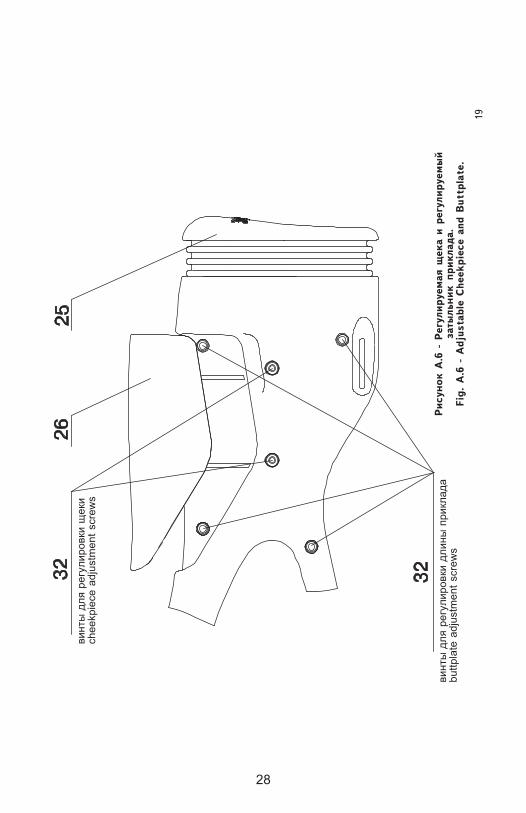
28
19
Ðèñóíîê À
.6 -
Ðåãó
ëèðóåìàÿ ù
åêà è
ðåãó
ëèðóåìû
éçà
òûëüíèê ïðèêëàäà.
Fig
. A
.6 -
Adju
sta
ble
Cheekpie
ce a
nd B
utt
pla
te.
âè
íòû
äë
ÿ ð
åãó
ëè
ðî
âêè
ùå
êèch
ee
kp
iece
ad
justm
en
t scre
ws
âè
íòû
äë
ÿ ð
åãó
ëè
ðî
âêè
äë
èíû
ïð
èêë
àä
àb
utt
pla
te a
dju
stm
en
t scre
ws
20
Òàá
ëèöà
À.1
Îáîçí
à-÷å
íèå
íà
ðèñ.
À.2
,À
.4, À
.5,
À.6
Íàè
ìåí
îâà
íèå
Êîëè÷å
ñòâî
12
3
1Êîæ
óõ ñ
î ñ
òâîëîì
1
2Çàòâ
îð
1
3Óäàðíèê
1
4Ðóê
îÿò
êà ñ
îáðàí
íàÿ
1
5Âûáðàñû
âàòå
ëü
1
6Ãí
åòîê
âûáðàñ
ûâà
òåëÿ
1
7Ïðóæ
èíà
âûáðàñ
ûâà
òåëÿ
1
8Î
ñü (
óäàð
íèêà
)1
9Î
ñü (
ðóê
îÿò
êè)
1
10
Ïðóæ
èíà
âîçâ
ðàò
íàÿ
1
11
Íàï
ðàâ
ëÿþ
ùàÿ
(âî
çâðàò
íîé ï
ðóæ
èíû)
1
12
Ìóø
êà1
13
Âèíò
(ìóø
êè)
1
14
Ïîëçó
í1
15
×åêà
1
16
Çàò
ûëüí
èê
1
17
Ïðèöåë
ñîáðàí
íûé
1
18
Îñü
(ïð
èöåë
à)1
19
Âèíò
âåðòè
êàëüí
ûõ ï
îïð
àâîê
1
20
Ôèêñ
àòîð (
ïðèöåë
à)1
Tab
le À
.1
Par
t No.
in F
igs
À.2
, À
.4,
À.5
, À
.6
Par
t Nam
eQ
ty
12
3
1Bar
rel w
/re
ceiv
er1
2Bolt
1
3Firin
g P
in1
4Han
dle
ass
y1
5Extr
act
or
1
6Extr
acto
r Plu
nger
1
7Extr
acto
r Spring
1
8Firin
g P
in1
9Han
dle
Pin
1
10
Rec
oil
Spring
1
11
Rec
oil
Spring
Gui
de
1
12
Fro
nt S
ight
1
13
Fro
nt S
ight
Pin
1
14
Slid
e1
15
Lock
ing P
in1
16
Cap
1
17
Rea
r Sig
ht
assy
1
18
Rea
r Sig
ht P
in1
19
Ele
vation
Scr
ew1
20
Rea
r Sig
ht
Ret
aine
r1

19
Ðèñóíîê À
.6 -
Ðåãó
ëèðóåìàÿ ù
åêà è
ðåãó
ëèðóåìû
éçà
òûëüíèê ïðèêëàäà.
Fig
. A
.6 -
Adju
sta
ble
Cheekpie
ce a
nd B
utt
pla
te.
âè
íòû
äë
ÿ ð
åãó
ëè
ðî
âêè
ùå
êèch
ee
kp
iece
ad
justm
en
t scre
ws
âè
íòû
äë
ÿ ð
åãó
ëè
ðî
âêè
äë
èíû
ïð
èêë
àä
àb
utt
pla
te a
dju
stm
en
t scre
ws
29
20
Òàá
ëèöà
À.1
Îáîçí
à-÷å
íèå
íà
ðèñ.
À.2
,À
.4, À
.5,
À.6
Íàè
ìåí
îâà
íèå
Êîëè÷å
ñòâî
12
3
1Êîæ
óõ ñ
î ñ
òâîëîì
1
2Çàòâ
îð
1
3Óäàðíèê
1
4Ðóê
îÿò
êà ñ
îáðàí
íàÿ
1
5Âûáðàñû
âàòå
ëü
1
6Ãí
åòîê
âûáðàñ
ûâà
òåëÿ
1
7Ïðóæ
èíà
âûáðàñ
ûâà
òåëÿ
1
8Î
ñü (
óäàð
íèêà
)1
9Î
ñü (
ðóê
îÿò
êè)
1
10
Ïðóæ
èíà
âîçâ
ðàò
íàÿ
1
11
Íàï
ðàâ
ëÿþ
ùàÿ
(âî
çâðàò
íîé ï
ðóæ
èíû)
1
12
Ìóø
êà1
13
Âèíò
(ìóø
êè)
1
14
Ïîëçó
í1
15
×åêà
1
16
Çàò
ûëüí
èê
1
17
Ïðèöåë
ñîáðàí
íûé
1
18
Îñü
(ïð
èöåë
à)1
19
Âèíò
âåðòè
êàëüí
ûõ ï
îïð
àâîê
1
20
Ôèêñ
àòîð (
ïðèöåë
à)1
Tab
le À
.1
Par
t No.
in F
igs
À.2
, À
.4,
À.5
, À
.6
Par
t Nam
eQ
ty
12
3
1Bar
rel w
/re
ceiv
er1
2Bolt
1
3Firin
g P
in1
4Han
dle
ass
y1
5Extr
act
or
1
6Extr
acto
r Plu
nger
1
7Extr
acto
r Spring
1
8Firin
g P
in1
9Han
dle
Pin
1
10
Rec
oil
Spring
1
11
Rec
oil
Spring
Gui
de
1
12
Fro
nt S
ight
1
13
Fro
nt S
ight
Pin
1
14
Slid
e1
15
Lock
ing P
in1
16
Cap
1
17
Rea
r Sig
ht
assy
1
18
Rea
r Sig
ht P
in1
19
Ele
vation
Scr
ew1
20
Rea
r Sig
ht
Ret
aine
r1

30
21
Ïðîäîëæ
åíèå
òàáëèöû À
.1
12
3
21
Ïðóæ
èíà
(ïðèöåë
à)
22
Ëåâ
àÿ ï
îëîâè
íêà
ïðèêë
àäà
1
23
Ïðàâ
àÿ ï
îëîâè
íêà
ïðèêë
àäà
1
24
Íàê
ëàä
êà í
à ïè
ñòîëåò
íóþ
ðóê
îÿò
êó1
25
Çàò
ûëüí
èê
ïðèêë
àäà
1
26
Ùåêà
1
27
Ëåâ
àÿ ï
îëîâè
íêà
öåâ
üÿ1
28
Ïðàâ
àÿ ï
îëîâè
íêà
öåâ
üÿ1
29
Íàê
ëàä
êà ö
åâüÿ
1
30
Âòó
ëêà
(ù
åêè)
2
31
Ãàéêà
(âò
óëêè
ùåê
è)
2
32
Âèíò
(Ì4õ1
6)
7
33
Âèíò
(Ì4õ3
0)
6
34
Ãëàç
îê
11
35
Âèíò
(ñòÿ
æíîé)
1
36
Ìàã
àçèí
1
37
Êîðïó
ñ ÓÑÌ
1
38
Êóð
îê
ñ òÿ
ãîé
1
39
Ïðóæ
èíà
áîåâ
àÿ7
40
Îñü
(êó
ðêà
)1
41
Êðþ
÷îê
ñïóñ
êîâî
é1
42
Øåïòà
ëî
1
43
Òÿã
à (ñ
ïóñê
à)1
44
Ïðóæ
èíà
øåï
òàëà
1
Continued
12
3
21
Rea
r Sig
ht
Scr
ew1
22
Lef
t-han
d S
tock
1
23
Rig
ht-han
d S
tock
1
24
Pis
tol G
rip S
trap
1
25
Butt
pla
te1
26
Cheekpie
ce1
27
Lef
t-Han
d F
ore
-end
1
28
Rig
ht-H
and F
ore
-end
1
29
Fore
-end
Str
ap1
30
Chee
kpie
ce B
ushin
g2
31
Che
ekpie
ce B
ushi
ng N
ut2
32
Scr
ew M
4x16
7
33
Scr
ew M
4x30
6
34
Was
her
11
35
Att
achi
ng S
crew
1
36
Mag
azin
e1
37
Firin
g M
echa
nism
Hous
ing
1
38
Ham
mer
w/st
rut
1
39
Main
spring
7
40
Ham
mer
Pin
1
41
Trigger
1
42
Sear
1
43
Trigger
Bar
1
44
Sea
r Spring
1
22
Ïðîäîëæ
åíèå
òàáëèöû À
.1
12
3
45
Ïðóæ
èíà
ñïóñ
êîâî
ãî ê
ðþ
÷êà
2
46
Îñü
(êð
þ÷ê
à)1
47
Îñü
(ø
åïòà
ëà)
1
48
Îñü
òÿã
è1
49
Ïðåäîõðàíèòå
ëü
1
50
Ãíåò
îê
ïðåä
îõðàí
èòå
ëÿ
1
51
Ïðóæ
èíà
ãíåò
êà1
52
Îñü
1
53
Çàä
åðæ
êà ç
àòâî
ðíàÿ
1
54
Ïðóæ
èíà
çàòâ
îðíîé ç
àäåð
æêè
1
55
Îñü
çàä
åðæ
êè1
56
Øàé
áà
(îñè
çàä
åðæ
êè)
1
57
Çàù
åëêà
ìàã
àçèíà
1
58
Ïðóæ
èíà
çàù
åëêè
ìàã
àçèíà
1
59
Øòè
ôò
(çàù
åëêè
ìàã
àçèíà)
1
45
Trigger
Spring
2
46
Trigger
Pin
1
47
Sea
r Pin
1
48
Trigger
Bar
Pin
1
49
Saf
ety
1
50
Saf
ety
Plu
nger
1
51
Plu
nger
Spring
1
52
Pin
1
53
Bolt S
top
1
54
Bolt S
top S
pring
1
55
Bolt S
top P
in1
56
Bolt S
top P
in W
ashe
r1
57
Mag
azin
e Cat
ch1
58
Mag
azin
e Cat
ch S
pring
1
59
Mag
azin
e Cat
ch P
in1
Continued
12
3

21
Ïðîäîëæ
åíèå
òàáëèöû À
.1
12
3
21
Ïðóæ
èíà
(ïðèöåë
à)
22
Ëåâ
àÿ ï
îëîâè
íêà
ïðèêë
àäà
1
23
Ïðàâ
àÿ ï
îëîâè
íêà
ïðèêë
àäà
1
24
Íàê
ëàä
êà í
à ïè
ñòîëåò
íóþ
ðóê
îÿò
êó1
25
Çàò
ûëüí
èê
ïðèêë
àäà
1
26
Ùåêà
1
27
Ëåâ
àÿ ï
îëîâè
íêà
öåâ
üÿ1
28
Ïðàâ
àÿ ï
îëîâè
íêà
öåâ
üÿ1
29
Íàê
ëàä
êà ö
åâüÿ
1
30
Âòó
ëêà
(ù
åêè)
2
31
Ãàéêà
(âò
óëêè
ùåê
è)
2
32
Âèíò
(Ì4õ1
6)
7
33
Âèíò
(Ì4õ3
0)
6
34
Ãëàç
îê
11
35
Âèíò
(ñòÿ
æíîé)
1
36
Ìàã
àçèí
1
37
Êîðïó
ñ ÓÑÌ
1
38
Êóð
îê
ñ òÿ
ãîé
1
39
Ïðóæ
èíà
áîåâ
àÿ7
40
Îñü
(êó
ðêà
)1
41
Êðþ
÷îê
ñïóñ
êîâî
é1
42
Øåïòà
ëî
1
43
Òÿã
à (ñ
ïóñê
à)1
44
Ïðóæ
èíà
øåï
òàëà
1
Continued
12
3
21
Rea
r Sig
ht
Scr
ew1
22
Lef
t-han
d S
tock
1
23
Rig
ht-han
d S
tock
1
24
Pis
tol G
rip S
trap
1
25
Butt
pla
te1
26
Cheekpie
ce1
27
Lef
t-Han
d F
ore
-end
1
28
Rig
ht-H
and F
ore
-end
1
29
Fore
-end
Str
ap1
30
Chee
kpie
ce B
ushin
g2
31
Che
ekpie
ce B
ushi
ng N
ut2
32
Scr
ew M
4x16
7
33
Scr
ew M
4x30
6
34
Was
her
11
35
Att
achi
ng S
crew
1
36
Mag
azin
e1
37
Firin
g M
echa
nism
Hous
ing
1
38
Ham
mer
w/st
rut
1
39
Main
spring
7
40
Ham
mer
Pin
1
41
Trigger
1
42
Sear
1
43
Trigger
Bar
1
44
Sea
r Spring
1
31
22
Ïðîäîëæ
åíèå
òàáëèöû À
.1
12
3
45
Ïðóæ
èíà
ñïóñ
êîâî
ãî ê
ðþ
÷êà
2
46
Îñü
(êð
þ÷ê
à)1
47
Îñü
(ø
åïòà
ëà)
1
48
Îñü
òÿã
è1
49
Ïðåäîõðàíèòå
ëü
1
50
Ãíåò
îê
ïðåä
îõðàí
èòå
ëÿ
1
51
Ïðóæ
èíà
ãíåò
êà1
52
Îñü
1
53
Çàä
åðæ
êà ç
àòâî
ðíàÿ
1
54
Ïðóæ
èíà
çàòâ
îðíîé ç
àäåð
æêè
1
55
Îñü
çàä
åðæ
êè1
56
Øàé
áà
(îñè
çàä
åðæ
êè)
1
57
Çàù
åëêà
ìàã
àçèíà
1
58
Ïðóæ
èíà
çàù
åëêè
ìàã
àçèíà
1
59
Øòè
ôò
(çàù
åëêè
ìàã
àçèíà)
1
45
Trigger
Spring
2
46
Trigger
Pin
1
47
Sea
r Pin
1
48
Trigger
Bar
Pin
1
49
Saf
ety
1
50
Saf
ety
Plu
nger
1
51
Plu
nger
Spring
1
52
Pin
1
53
Bolt S
top
1
54
Bolt S
top S
pring
1
55
Bolt S
top P
in1
56
Bolt S
top P
in W
ashe
r1
57
Mag
azin
e Cat
ch1
58
Mag
azin
e Cat
ch S
pring
1
59
Mag
azin
e Cat
ch P
in1
Continued
12
3

32
23
Ðèñóíîê À
.7 -
Ïðèöåëüíû
å ï
ðèñïîñîáëåíèÿ,
âèä
ñïðàâà.
Fig
. A
.7 -
Sig
hti
ng D
evic
es. Rig
ht-
sid
e v
iew
.
win
dage s
crew
ele
vatio
n s
crew
Ðèñóíîê À
.8 -
Ïðèöåëüíû
å ï
ðèñïîñîáëåíèÿ, âèä ñ
âåðõó.
Fig
. A
.8 -
Sughti
ng D
evic
es. Top v
iew
.

23
Ðèñóíîê À
.7 -
Ïðèöåëüíû
å ï
ðèñïîñîáëåíèÿ,
âèä
ñïðàâà.
Fig
. A
.7 -
Sig
hti
ng D
evic
es. Rig
ht-
sid
e v
iew
.
win
dage s
crew
ele
vatio
n s
crew
Ðèñóíîê À
.8 -
Ïðèöåëüíû
å ï
ðèñïîñîáëåíèÿ, âèä ñ
âåðõó.
Fig
. A
.8 -
Sughti
ng D
evic
es. Top v
iew
.
!
!
1426 King StreetCocoa, FL 32922
US SPORTING GOODS, Inc.