model sa8001 user guide - marantz usus.marantz.com/documentmaster/us/dfu_sa8001_final_eng.pdf ·...
TRANSCRIPT
Model SA8001 User Guide
Super Audio CD Player
CLASS 1 LASER PRODUCTLUOKAN 1 LASERLAITEKLASS 1 LASERAPPARAT
SA8001U_01_Cover 06.1.25, 3:40 PMPage 5 Adobe PageMaker 6.5J/PPC
CAUTION: TO REDUCE THE RISK OF ELECTRIC SHOCK,
DO NOT REMOVE COVER (OR BACK)
NO USER-SERVICEABLE PARTS INSIDE
REFER SERVICING TO QUALIFIED SERVICE PERSONNEL
The lightning flash with arrowhead symbol withinan equilateral triangle is intended to alert the userto the presence of uninsulated “dangerous voltage”within the product’s enclosure that may be of suffi-cient magnitude to constitute a risk of electric shockto persons.
The exclamation point within an equilateral triangleis intended to alert the user to the presence ofimportant operating and maintenance (servicing)instructions in the literature accompanying theproduct.
CAUTION: TO PREVENT ELECTRIC SHOCK, MATCH WIDEBLADE OF PLUG TO WIDE SLOT, FULLY INSERT.
ATTENTION: POUR ÉVITER LES CHOCS ÉLECTRIQUES,INTRODUIRE LA LAME LA PLUS LARGE DE LA FICHE DANSLA BORNE CORRESPON-DANTE DE LA PRISE ET POUSSERJUSQU’AU FOND.
WARNINGTO REDUCE THE RISK OF FIRE OR ELECTRIC SHOCK,DO NOT EXPOSE THIS APPLIANCE TO RAIN OR MOISTURE.
LASER SAFETYThis unit employs a laser. Only a qualified service person should removethe cover or attempt to service this device, due to possible eye injury.
CAUTION : USE OF CONTROLS OR ADJUSTMENTSOR PERFORMANCE OF PROCEDUREOTHER THAN THOSE SPECIFIED HEREINMAY RESULT IN HAZARDOUS RADIATIONEXPOSURE.
CAUTIONRISK OF ELECTRIC SHOCK
DO NOT OPEN
SA8001U_01_Cover 06.1.25, 3:40 PMPage 2 Adobe PageMaker 6.5J/PPC

IMPORTANT SAFETYINSTRUCTIONS
READ BEFORE OPERATING EQUIPMENTThis product was designed and manufactured to meet strict quality and safety standards. There are,however, some installation and operation precautions which you should be particularly aware of.
1. Read these instructions.
2. Keep these instructions.
3. Heed all warnings.
4. Follow all instructions.
5. Do not use this apparatus near water.
6. Clean only with dry cloth.
7. Do not block any ventilation openings. Install in accordance with the manufacture's instructions.
8. Do not install near any heat sources such as radiators, heat registers, stoves, or other apparatus(including amplifiers) that produce heat.
9. Do not defeat the safety purpose of the polarized or grounding-type plug. A polarized plug hastwo blades with one wider than the other. A grounding type plug has two blades and a thirdgrounding prong. The wide blade or the third prong are provided for your safety. If the providedplug does not fit into your outlet, consult an electrician for replacement of the obsolete outlet.
10. Protect the power cord from being walked on or pinched particularly at plugs, conveniencereceptacles, and the point where they exit from the apparatus.
11. Only use attachments/accessories specified by the manufacturer.
12. Use only with the cart, stand, tripod, bracket, or table specified by the manufacturer, or sold withthe apparatus. When a cart is used, use caution when moving the cart/apparatus combination toavoid injury from tip-over.
13. Unplug this apparatus during lightning storms or when unused for long periods of time.
14. Refer all servicing to qualified service personnel. Servicing is required when the apparatus hasbeen damaged in any way, such as power-supply cord or plug is damaged, liquid has beenspilled or objects have fallen into the apparatus, the apparatus has been exposed to rain ormoisture, does not operate normally, or has been dropped.
Additional Safety Information!• This product should not be placed in a built-in installation such as a bookcase or rack unless
proper ventilation is provided or the manufacturer’s instructions have been adhered to.
• Apparatus shall not be exposed to dripping or splashing and that no objects filled with liquids,such as vases, shall be placed on the apparatus.
• When the switch is in the OFF position, the apparatus isn’t completely switched-off from theMAINS.
This Class B digital apparatus complieswith Canadian ICES-003.
Cet appareil numérique de la Classe B estconforme á la norme NMB-003 du Canada.
NOTE:This equipment has been tested and found tocomply with the limits for a Class B digitaldevice, pursuant to Part 15 of the FCC Rules.These limits are designed to provide reason-able protection against harmful interference ina residential installation. This equipment gen-erates, uses and can radiate radio frequencyenergy and, if not installed and used in accor-dance with the instructions, may cause harmfulinterference to radio communications. How-ever, there is no guarantee that interferencewill not occur in a particular installation. If thisequipment does cause harmful interference toradio or television reception, which can bedetermined by turning the equipment off and
on, the user is encouraged to try to correct theinterference by one or more of the followingmeasures:– Reorient or relocate the receiving antenna.– Increase the separation between the equip-
ment and receiver.– Connect the equipment into an outlet on a
circuit different from that to which the re-ceiver is connected.
– Consult the dealer or an experienced radio/TV technician for help.
NOTE:Changes or modifications may cause
this unit to fail to comply with Part 15 of theFCC Rules and may void the user's authority
to operate the equipment.
SA8001U_01_Cover 06.1.25, 3:40 PMPage 3 Adobe PageMaker 6.5J/PPC

1
EN
GL
ISHCONTENTS FOREWORD
This section must be read before any connection ismade to the mains supply.
EQUIPMENT MAINS WORKINGSETTING
Your Marantz product has been prepared to complywith the household power and safety requirementsthat exist in your area.SA8001 can be powered by 120V AC only.
COPYRIGHTRecording and playback of any material may requireconsent. For further information refer to the following:— Copyright Act 1956— Dramatic and Musical Performers Act 1958— Performers Protection Acts 1963 and 1972— Any subsequent statutory enactments and
orders
FOREWORD ........................................ 1
EQUIPMENT MAINS WORKING SETTING .. 1
COPYRIGHT ................................................. 1
INTRODUCTION.................................. 2
PRODUCT FEATURES ................................. 2
ABOUT SUPER AUDIO ................................. 2
PLAYING CD-RW DISCS .............................. 2
APPLICABLE DISCS TO THE UNIT .............. 2
BEFORE USING .................................. 2
NOTES ABOUT THE DISCS ......................... 2
INAPPROPRIATE PLACES FOR INSTALLATION .. 3
PRECAUTIONS ............................................. 3
USING REMOTE CONTROL UNIT ............... 3
LOADING BATTERIES .................................. 3
NAMES AND FUNCTIONS ................. 4
FRONT PANEL .............................................. 4
REMOTE CONTROLLER .............................. 5
REAR PANEL ................................................ 6
DISPLAY ........................................................ 7
CONNECTIONS................................... 8
OPERATION ........................................ 9
CONNECTING THE POWER SUPPLY ......... 9
NORMAL PLAYBACK .................................... 9
START SOUND MODE ................................ 10
PLAYING YOUR FAVORITE TRACKS OF A
DISC ........................................................ 10
PLAYING YOUR FAVORITE PARTS OF A
DISC (SEARCH) ...................................... 10
REPEATED DISC PLAY (REPEAT PLAY) ... 10
PLAYING TRACKS IN A RANDOM
SEQUENCE (RANDOM PLAY) ............... 10
PLAYING TRACKS IN A SPECIFIC
SEQUENCE (PROGRAM PLAY) ............. 11
SEARCHING YOUR FAVORITE TRACKS
(AMS (AUTOMATIC MUSIC SCAN) PLAY) .. 11
QUICK REPLAY .......................................... 11
ABOUT THE TEXT INFORMATION DISPLAY ... 12
TIMER PLAY ................................................ 12
TROUBLE SHOOTING ...................... 12
SPECIFICATIONS ............................. 13
SA8001U_01_Eng 06.1.25, 3:41 PMPage 1 Adobe PageMaker 6.5J/PPC

2
EN
GL
ISH
ABOUT SUPER AUDIOThe Super Audio standard is based on Direct StreamDigital (DSD) technology. This new direct-streamdigital format comprises a 1-bit system that has adigital sampling frequency that is 64 times higherthan that of conventional audio CD. The results arespectacular: a frequency response of over 100k Hzand a 120 dB dynamic range over the entire audiblespectrum. Mixed with as many of the originalfrequencies as possible, the audio informationaudible for human ears sounds much more natural.All audible frequencies are, after all, embedded inthe frequency range as emitted by the sound source.A better reproduction does not exist! For the first timeyour ears will relive reality.
PLAYING CD-RW DISCSThis unit can play back the CD-RW (ReWritable)discs as well as ordinary Audio CD and CD-R(Recordable) discs.
• The CD-R and CD-RW discs should containproperly-recorded TOC information so that theycan be played back. In CD recorders, the task ofwriting TOC information is referred to as finalizingthe disc. Discs that are not finalized cannot beproperly recognized as an Audio CD and playedback by regular CD players and Super Audio CDplayers. For details, please read the instructionmanual provided with a CD recorder.
* TOC stands for Table Of Contents and containsinformation such as the total number of tracksand total playing time of the disc.
• This unit can play only the discs recorded in theCD-DA format designed for music reproduction.Do not attempt to play a disc containing otherdata, such as a CD-ROM for PCs, on this unit.
• As the playback of a CD-RW disc necessitatespartial change of the player setup, it may takelonger time for reading the TOC information thanwhen an Audio CD or CD-R disc is played.
APPLICABLE DISCS TO THE UNIT
1. Super Audio CD
There are three types of Super Audio CDs.
• Single-layer Disc• Dual-layer Disc• Hybrid-layer Disc
INTRODUCTIONThank you for selecting the Marantz SA8001 SuperAudio CD Player for your Audio system.This Player incorporates a number of featuresdesigned to enhance the listening of your favoriteaudio sources.Please read these operating instructions carefully.We recommend that you read the entire user guidebefore you attempt to connect or operate the player.After you have reviewed the contents of thismanual,we suggest that you make all systemconnections before you attempt ttêoperate the unit.
PRODUCT FEATURESThis unit can playback the outstanding soundperformance in Super Audio CD. This unit has thefollowing unique features.
• Low-noise low-distortion filter circuit and high-speed current-feedback-type output amplifier withthe differential input type HDAM.
• Text information display function that can displaydisc titles, track titles etc. in Super Audio CD.
• CD-R/CD-RW discs can be played.
• Newly Developed Toroidal TransformerA newly developed Toroidal power transformer,which produces less vibration and magneticleakage f lux than previously, has beenincorporated. The materials and manufacturingprocess of the ring-shaped core are strictlycontrolled to reduce vibration, while the short-ringattached to the perimeter of the transformerreduce magnetic leakage flux.
• Large Capacitance Block CapacitorA large capacity 3300µF block capacitor isincorporated into the power supply circuit.
• Film capacitors and electrolical capacitors etc.The capacitors used in high end models areincorporated into the SA8001 Super Audio CDplayer.
• Copper-coated Chassis• High Grade Audio Output Terminal
And each type may contain two areas of recordedinformation.
• High quality stereo area• High quality multi-channel area**
• Single Layer DiscIt can contain both high quality stereo area andhigh quality multi-channel area** information.
• Dual Layer DiscIt can contain both high quality stereo area andhigh quality multi-channel area** information. Anda double amount of information can be stored onthe disc thanks to the second layer.
• Hybrid Layer DiscNot only does this disc contain both high soundquality stereo area and high sound quality multi-channel area** information, it also has a CD layerin the second layer, so it can be played on a CDplayer.
The number of tracks recorded may vary per layer. Itwill be shown on the display window of the unit.
** This unit is a stereo-only player, and so it cannotplay high-quality multi-channel audio areas. (Itdoes not recognize multi-channel areas.)
2. Audio CD (CDDA)
Audio CDs contain music tracks only.
Hybrid Super AudioCD Disc
1 CD layer that plays on any of yourexisting CD players
High-Density layer containing:2 - High sound quality stereo3 - High sound quality multi-channel**
BEFORE USINGNOTES ABOUT THE DISCS
* Handle the discs carefully so as not to scratchtheir surfaces.
* Keep the surfaces of the discs clean at all times.When cleaning the surfaces of discs, always besure to use the special cleaner and wipe thesurfaces in the directions shown in the figure below.
* Do not attach pieces of paper or stickers to thelabel surfaces of the discs.When a disc has a piece of plastic tape or rentalCD label with paste protruding from the edge orwhen a disc still bears traces of sticky tape oradhesive labels, do not attempt to play it. If such adisc is played on the CD player, you may find thatyou cannot remove it or that some other kind ofmalfunctioning may occur.
* Do not use discs which come in special shapes.Do not attempt to play heart-shaped or octagonaldiscs or discs with any other special shapes. Youmay find that you cannot remove them or that someother kind of malfunctioning may occur in the player.
* Use discs which satisfy the CD standards suchas those with the “CD logo” or “ ” mark ontheir disc label surfaces.No guarantees are made for playback if discs whichdo not satisfy the appropriate CD standards areused.Similarly, no guarantees are made for their soundquality even if it is possible to play such discs.
• Wipe the surfaceradially from thecenter.
• Do not wipe the surface int h e c i r c u m f e r e n t i a ldirection.
Disc Types
Single-layer DiscDual-layer Disc Hybrid-layer Disc
HD layer HD layer CD layer HD layer
SA8001U_01_Eng 06.1.25, 3:41 PMPage 2 Adobe PageMaker 6.5J/PPC

3
EN
GL
ISH* To protect your discs from damage, avoid
placing them in the following locations.• Where they will be exposed to direct sunlight or
where they will be close to a heater or other heat-radiating appliance
• Where the humidity level is high or it is very dusty• Near a window or other such location where they
may be exposed to rain* Get into the habit of putting the discs back in
their cases after use.
INAPPROPRIATE PLACES FORINSTALLATION
To keep your player in perfect working order for thelongest possible time, avoid installing the player inthe following locations.
• Wherever it will be exposed to direct sunlight
• Wherever it will be close to a heater or other heat-radiating appliance
• Wherever the humidity is high or ventilation is poor
• Wherever it is very dusty
• Wherever it will be subject to vibration
• On top of a rickety stand or in an unstable locationwhich is tilted at an angle
• In an audio rack with little space at the top andbottom or other location where the heatdissipation will be obstructed
To ensure proper heat dissipation, install theplayer while leaving clearances between theplayer and wall or other components, as shownin the figure below.
• On top of an amplifier or other component whichdissipates a great deal of heat
* The quality of the laser and other componentscan be harmed if the player is placed directlyon top of an amplifier or other device whichgenerates heat.
SUPER AUDIO CD PLAYER SA8001
PROG ALL TOTAL SINGAMS
REMAIN SACDRNDM TRK A – B
1
1TEXT 2 3 4 5 6 7 8 9 10 11 12 13 14 15 16 17 18 19 20 STEREO
POWER ON/OFF
D I S P L A Y O F F T E X T T I M E S O U N D M O D E
Left 4 ins. (0.1 m) ormore
Above 4 ins. (0.1 m) ormore
Rear 4 ins. (0.1 m)or more
7 Do not place objects on top
• Refrain from placing any objects on top of theplayer.
7 Cautions on handling power cord
• Do not touch the power cord with wet hands.
• When disconnecting the power cord, always makesure that you take hold of the plug. Yanking outor bending the cord can damage it and/or causeelectric shocks or a fire.
• Get into the habit of disconnecting the power plugbefore leaving home.
7 Do not attempt repairs yourself
• Refrain from lubricating the player: doing so cancause malfunctioning.
• Only qualified engineers with specializedexpertise are authorized to repair the pick-up andparts inside the player.
PRECAUTIONS• In winter, droplets of water form on the insides of
the windows of a heated room: this is calledcondensation. This player uses an optical lens,so the condensation may form in the followingcases.
- In a room immediately after the heating hasbeen turned on
- In a room where the humidity level is high
- When the player has been suddenly broughtfrom a cold location into a warm room
Since, in cases like this, the track numbers maynot be read and the player is prevented fromoperating properly, wait about 30 minutes, andthen operate the player.
• This player may cause interference on a tuner orTV set. If this is the case, place it further awayfrom the tuner or TV set.
• Compact discs have much less noise than analogrecords and hardly any noise is heard before playstarts. Bear in mind, therefore, that if the volumecontrol on the amplifier is set too high, you willrisk damaging other audio components.
• This player is designed to play Super Audio CDand normal Audio CDs only. It cannot play CD-ROMs used with personal computers, game CDs,video CDs or DVDs (video/audio).
• We do not recommend the use of lens cleaners.
USING REMOTE CONTROL UNIT
Cautions on handling batteriesMisuse of the batteries can result in electrolyteleakage, rupturing, corrosion, etc.Bear in mind the following points when usingbatteries.
• Remove the batteries from the remote controlunit if the unit is not going to be used for aprolonged period (a month or more).
• Do not use an old battery together with a newone.
• Insert the batteries while ensuring that their and poles are properly aligned with
the corresponding markings on the remotecontrol unit.
• Batteries with the same shape may havedifferent voltages. Do not use different typesof batteries together.
• If electrolyte has leaked, thoroughly wipe theinside of the battery compartment, and theninsert new batteries.
• When batteries which are no longer requiredare to be discarded, follow the directions(regulations) laid down by the local authoritiesin the area concerned for their disposal.
LOADING BATTERIESBatteries in this remote control unit have a life ofapproximately 1 year under normal operatingconditions. If the remote control unit is not going tobe used for an extended period of time, remove thebatteries. Also, if you notice that the batteries arestarting to run down, replace them as soon aspossible.
q Remove the battery cover.
w Insert the batteries with correct +/– orientation.
e Close the battery cover until it clicks shut.
7 Remote control
Operate the remote control unit (RC8001SA) withina distance of approx. 5 m from the infrared signalreception window (remote sensor) on the front of theSuper Audio CD player.Remote control operation may not be possible if theremote control unit’s transmitter is not pointing in thedirection of the remote sensor or if there is anobstruction between the transmitter and the remotesensor.
Remote control operating range
Two AAA-size batteries
Remote control unit (RC8001SA)
Approx.16.4 ft. (5m)
Right 4 ins. (0.1 m) ormore
SA8001U_01_Eng 06.1.25, 3:41 PMPage 3 Adobe PageMaker 6.5J/PPC

4
EN
GL
ISH
NAMES AND FUNCTIONSFRONT PANEL
z POWER ON/OFF switchThis switch is used to turn the power ON andOFF. When it is pressed, the display windowlights up, and the power comes on. When it ispressed again, the d isplay window isextinguished, and the power goes off.
x Disc trayThe disc to be played is placed on the tray.* Close the tray by pressing the operation button,
not by pressing it in with your hand.
c Remote sensorThe infrared control signal emitted from theremote control unit are sensed here.
v Display windowThis screen shows the operating status.
b SOUND MODE buttonPress this button to select the Super Audio CDsound mode. Super Audio CD (stereo) or AudioCD (if discs are supported) (See page 9)
n , (Track Skip/Search buttons)These buttons can be used as both track skipand track search buttons. (The buttons on themain unit only.)
: Each time this button is pressed, thetrack being played is skippedforward. When this button is helddown, tracks are searched forward(Fast Forward).
: When this button is pressed, the unitgoes back to the beginning of thecurrent track. If the button is pressedmore times, the track being playedis skipped back. When this button isheld down, tracks are searchedbackward (Fast Rewind).
In program play, Fast Forward and Fast Rewindcan be done in the playing track only.
m PAUSE buttonPress this button to pause playback. If pressedagain, the unit returns to playback.
, STOP buttonPress this button to stop playback. Also thisbutton is used to clear all programs.
. PLAY buttonPress this button to start playback.
⁄0 OPEN/CLOSE buttonPress this button to open the tray. Put on a disclabel side up. Press the button again to closethe tray.
⁄1 PHONES (headphones)jackThe headphones are connected to this jack.* Use headphones with a standard plug.
⁄2 LEVEL (headphone volume) controlThis control is used to adjust the headphonevolume.Turn it clockwise to increase the headphonevolume.
SUPER AUDIO CD PLAYER SA8001
PROG ALL TOTAL SINGAMS
REMAIN SACDRNDM TRK A – B
1
1TEXT 2 3 4 5 6 7 8 9 10 11 12 13 14 15 16 17 18 19 20 STEREO
POWER ON/OFF
D I S P L A Y O F F T E X T T I M E S O U N D M O D E
x ⁄3 ⁄5 ⁄4 b¤8 ⁄1n⁄2z
⁄0vc . , m
⁄3 DISPLAY buttonThis button is used to turn lighting ON and OFFof the display window.Pressing this button once darkens the display.The third time this button is pressed, the displaywill be extinguished and the indicator in ¤8 lights.
⁄4 TIME buttonThis button is used to switch from the text displayto the time display when using a text-compatibleSuper Audio CD. It is also used to change thetime display. Each time that it is pressed, thedisplayed time cycles from track elapsed time→ track remaining time → total remaining time→ track elapsed time . (See page 9)
⁄5 TEXT buttonThis button is pressed to switch the main screenfrom the time display to the text display whenusing a text-compatible Super Audio CD. (Seepage 12)
¤8 DISPLAY OFF indicatorThis indicator turns on when the display screenis turned off (Off mode).
SA8001U_01_Eng 06.1.25, 3:41 PMPage 4 Adobe PageMaker 6.5J/PPC

5
EN
GL
ISHb SOUND MODE button
m PAUSE button
, STOP button
. PLAY button
⁄0 OPEN/CLOSE button
⁄3 DISPLAY button
⁄4 TIME button
⁄5 TEXT button
The buttons listed above are the same to thebuttons on the front panel of the main unit.Please see the correspond items in “Front Panel”section.
⁄6 0 - 9 (Numerical buttons)Use these buttons to select tracks directory.
⁄7 PROGRAM buttonThis button is for program play. (See page 11)
⁄8 , (Track skip buttons): When this button is pressed, the unit goes
back to the beginning of the current track.If the button is pressed more times, thetrack being played is skipped back.
: Each time this button is pressed, the trackbeing played is skipped forward.
* Search buttons are provided separately for theremote control unit. Use ⁄9 Search buttons forsearch function.
⁄9 , (Search buttons): While this button is pressed during
playback, tracks are searched backward.: While this button is pressed during
playback, tracks are searched forward.
REMOTE CONTROLLER ¤0 SCROLL/RECALL buttonUse this button to scroll text while displaying textinformation in a Super Audio CD disc thatsupports TEXT.This button is also used for checking theprogrammed tracks during a program or when aprogram is stopped. (See page 11)
¤1 CANCEL buttonUse this button to cancel a programmed track.(See page 11)
¤2 A-B (A-B Repeat button)This button is to determine starting and endingpoints for A-B repeat play. (See page 10)
¤3 RANDOM buttonThis button is for random play. (See page 10)
¤4 AMS (Automatic Music Scanbutton)Use this button for AMS play. (See page 11)
¤5 REPEAT buttonThis button is for repeat play. Each time thisbutton is pressed, repeat mode changes asfollows. “All Repeat” → “Track Repeat” → “RepeatOff” (See page 10)
¤6 MENU button and ENTER button(Menu setup)These buttons are used to set the time for quickreplay. (See page 11)
¤7 Q.REPLAY (Quick replay) buttonThis button is used to do quick replay of thetracks. (See page 11)
* In this instruction manual, some operations can only be performed with the remote control. For operations that can be performed with buttons both on themain unit and on the remote control, the button names are shown in the mark. And for operations that can only be performed with buttons on theremote control, the button names are shown in the mark.
OPEN/CLOSE
SOUNDMODE
DISPLAY TEXT TIME
AMS A - B
MUTE
1
4
7
MENU
REPEAT
REMOTE CONTROLLERRC8001SA
Q.REPLAY
INPUT VOLUME
RANDOM
PROGRAM CANCEL SCROLL/RECALL
2
5
8
0
3
6
9
ENTER
⁄0
¤4
¤5 ¤7m
,
b
¤3
¤0
⁄4
⁄5
⁄6
⁄9
⁄7
⁄3
‹0
⁄8
¤6
¤2¤1
¤9¤8
.
¤8 , buttonThese buttons can switch between devicescompatible with Marantz receivers. Refer to thereceiver instruction manual for further details.
¤9 , buttonThese buttons can adjust the volume of devicescompatible with Marantz receivers. Refer to thereceiver instruction manual for further details.
‹0 MUTE buttonThis button can activate the mute function ofdevices compatible with Marantz receivers. Referto the receiver instructions for further details.
SA8001U_01_Eng 06.1.27, 11:32 AMPage 5 Adobe PageMaker 6.5J/PPC

6
EN
GL
ISH
REAR PANEL
A ANALOG OUTPUT connectorsThese are the output jacks of the analog audiosignals. The supplied analog connection cord canbe connected to the CD, AUX, or otherconnectors on an amplifier. Be sure to connectthe L and R channels correct ly to thecorresponding jacks.* Never connect to the PHONO connector on the
amplifier.
B DIGITAL AUDIO OUT OPT.It outputs the playing Audio CD signal in digitalformat. This jack is to be connected with arecording device, amplifier, D/A converter, etcthat has optical digital input using an optionalsquare type optical digital cable.* No signal will be output when a Super Audio
CD is played.
C DIGITAL AUDIO OUT COAX.It outputs the playing Audio CD signal in digitalformat. This jack is to be connected with arecording device, amplifier, D/A converter, etcthat has coaxial digital input using an optionalcoaxial digital cable.* No signal will be output when a Super Audio
CD is played.
D REMOTE CONTROL IN, OUT (inputand output) connectorsWhen the remote control connectors on theplayer and on a Marantz AV component areconnected using the accessory remote controlconnecting cables, the components can beoperated as a system by remote control.• When connecting to a component which is
equipped with remote control connectors, theplayer’s REMOTE CONTROL IN connectormust always be connected to the REMOTECONTROL OUT connector on the othercomponent to be connected.
• When connecting a component which is notequipped with an infrared remote sensor, thiscomponent must always be connected to theplayer’s REMOTE CONTROL OUT connector.
E EXT./INT. (Ext./Internal switch)When this unit is used as a standalonecomponent, set this switch to the INT. side. Whenit is used connected to external component by aremote connect ing cable and to audiocomponent with a remote sensor that supportsremote controls by Marantz, set this switch tothe EXT. side.* If the unit is used as standalone and the
switch is set to EXT. position, remote controlunit cannot be used.
AC INAC IN
OPT. COAX.
DIGITAL AUDIO OUT REMOTE CONTROL
EXT.
INT.OUT
IN
RL
ANALOG OUTPUT
A BC D E
F
F AC POWER INPUT JACKConnect the supplied power cord to this jack anda household AC power outlet.
SA8001U_01_Eng 06.1.25, 3:41 PMPage 6 Adobe PageMaker 6.5J/PPC

7
EN
GL
ISHDISPLAY
PROG ALL TOTAL SINGAMS
REMAIN SACDRNDM TRK A – B
1
1 2 3 4 5 6 7 8 9 10 11 12 13 14 15 16 17 18 19 20 STEREO
a b
c id he jk l mf g
a Main displayThe time display and text information of the discto be played as well as the setting menus andother displays appear on the main display.
b 1-20, (music calendar)The number of tracks recorded on the disc to beplayed, the number of remaining tracks to beplayed, and the number of tracks programmedby program play appear here. “ ” light when21 or more tracks have been recorded on thedisc.
c RNDM (random) indicatorThis lights during random play.
d PROG (program) indicatorThis lights during program play.
e TRK (track) indicatorThis lights above the display of the track numbernow playing, for instance.
f A-B (A-B repeat) indicatorThis lights during A-B repeat play.
g , ALL, 1 (repeat) indicatorThis lights during repeat play.
h TOTAL (total time) indicatorWhen the total remaining time or the totalprogram time is displayed, this lights above thedisplay.
i AMS (auto music search) indicatorThis lights during AMS playback.
j SING indicatorThis lights when the remaining time of the tracknow playing is displayed.
k 8 (pause) indicatorThis lights when play is paused (temporarilystopped).
l 3 (play) indicatorThis lights during disc play.
m CD, SACD, STEREO Disc indicatorThis indicates the type of disc on the disc tray.
SA8001U_01_Eng 06.1.25, 3:41 PMPage 7 Adobe PageMaker 6.5J/PPC
8
EN
GL
ISH
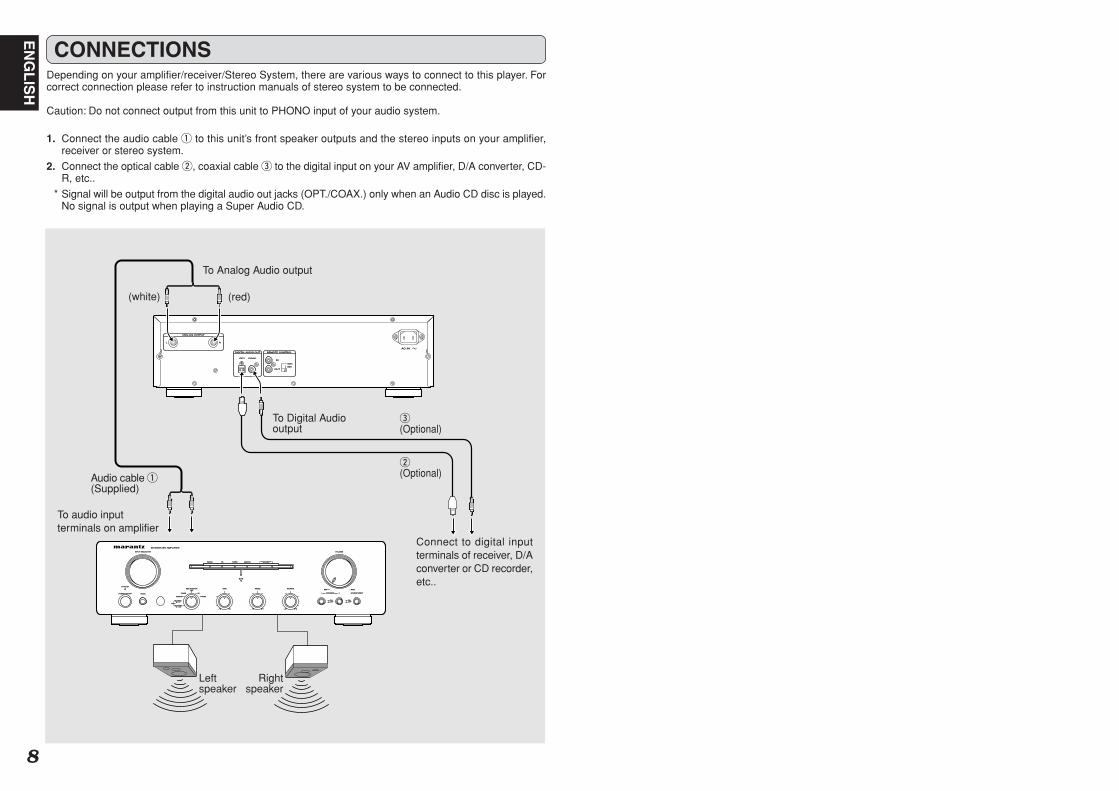
CONNECTIONSDepending on your amplifier/receiver/Stereo System, there are various ways to connect to this player. Forcorrect connection please refer to instruction manuals of stereo system to be connected.
Caution: Do not connect output from this unit to PHONO input of your audio system.
1. Connect the audio cable q to this unit’s front speaker outputs and the stereo inputs on your amplifier,receiver or stereo system.
2. Connect the optical cable w, coaxial cable e to the digital input on your AV amplifier, D/A converter, CD-R, etc..
* Signal will be output from the digital audio out jacks (OPT./COAX.) only when an Audio CD disc is played.No signal is output when playing a Super Audio CD.
AC INAC IN
OPT. COAX.
DIGITAL AUDIO OUT REMOTE CONTROL
EXT.
INT.OUT
IN
RL
ANALOG OUTPUT
MUTEMUTE
RECORDERRECORDER 2211AUX/DVDAUX/DVDTUNERTUNERPHONOPHONO CDCD
STANDBYSTANDBY
SPEAKERSSPEAKERS
OFFOFFONON
INTEGRATED AMPLIFIERINTEGRATED AMPLIFIER
TREBLETREBLE BALANCEBALANCE
POWER ON/OFFPOWER ON/OFF PHONESPHONES
BASSBASS
RECORDER2RECORDER2
INPUT SELECTORINPUT SELECTOR
RRLL
VOLUMEVOLUME
++--++--1 21 2
2 12 1RECORDERRECORDER
TUNERTUNER
PHONOPHONO
MAXMAXMINMIN
11 SOURCE DIRECTSOURCE DIRECT22
COPYCOPY
OFFOFF
REC SELECTORREC SELECTOR
CDCD
AUX/DVDAUX/DVD
ONONOFFOFF
To Analog Audio output
(white) (red)
To Digital Audiooutput
w(Optional)
e(Optional)
Leftspeaker
Rightspeaker
Audio cable q(Supplied)
To audio inputterminals on amplifier
Connect to digital inputterminals of receiver, D/Aconverter or CD recorder,etc..
SA8001U_01_Eng 06.1.25, 3:41 PMPage 8 Adobe PageMaker 6.5J/PPC

9
EN
GL
ISHOPERATION
* In this instruction manual, some operations can only be performed with the remote control. Foroperations that can be performed with buttons both on the main unit and on the remote control, thebutton names are shown in the mark. And for operations that can only be performed withbuttons on the remote control, the button names are shown in the mark.
CONNECTING THE POWERSUPPLY
1 Plug the power cable into AC IN jack on the backpanel.
2 Turn on the power switch of the audio unit(amplifier, etc.) that is connected with this unit.Set the selector on the connected unit to this unit.
3 Plug the power cable into an AC outlet.
NORMAL PLAYBACK
7 Super Audio CD player playback
SUPER AUDIO CD PLAYER SA8001
PROG ALL TOTAL SINGAMS
REMAIN SACDRNDM TRK A – B
1
1TEXT 2 3 4 5 6 7 8 9 10 11 12 13 14 15 16 17 18 19 20 STEREO
POWER ON/OFFPOWER ON/OFF
D I S P L A Y O F F T E X T T I M E S O U N D M O D E
q rw, e
q Press POWER switch to turn on.
Display
The display cycles from TOC Reading → NoDisc (when no disc is loaded) → Super AudioCD (when the start sound mode setting is SuperAudio CD).
w Press the OPEN/CLOSE buttonThe disc tray comes out. Place the disc with labelside up on the tray.To play a single (8cm) CD, place the disc withthe indentation at the center of the tray.
e Press OPEN/CLOSE button.
r Press PLAY button.Disc type is automatically detected and playbackis started. Track number and track elapsedtime(minute, second) appear on the display.
* For Super Audio CD/CD hybrid-layer discs (Seepage 2), the layer that is set in the start soundmode (See page 10) is played. To change thelayer, use the SOUND MODE button. (See page9)
(Exp.:Track 6, Elapsed time 2 min 8 sec)
PROG ALL TOTAL SINGAMS
REMAIN SACDRNDM TRK A – B
1
1TEXT 2 3 4 5 6 7 8 9 10 11 12 13 14 15 16 17 18 19 20 STEREO
Playback automatically stops at the end of thefinal track.
Number of current track Minutes Seconds
Remaining track numbers
To start playback form the first trackPress PLAY button.
To stop playbackPress STOP button.
To eject discPress OPEN/CLOSE button to open the disc trayand take the disc off. Press the button again to closethe tray.Disc tray must be closed when the unit is not beused.
To pause playbackPress PAUSE button.PAUSE indicator will light and playback is paused atthe point that the button is pressed. To restartplayback, press PAUSE button again or press
PLAY button.
To change time displayPress the TIME button on the remote control.Each time TIME button is pressed, display willchange in the following order. “Track elapsed time”→ “Track remaining time” → “Total remaining time”→ “Track elapsed time”.
• Track remaining time
(The remaining playing time from the playingpoint to the end of the current track)
PROG ALL TOTAL SINGAMS
REMAIN SACDRNDM TRK A – B
1
1TEXT 2 3 4 5 6 7 8 9 10 11 12 13 14 15 16 17 18 19 20 STEREO
• Total remaining time
(The remaining playing time from the playingpoint to the end of the last track)
PROG ALL TOTAL SINGAMS
REMAIN SACDRNDM TRK A – B
1
1TEXT 2 3 4 5 6 7 8 9 10 11 12 13 14 15 16 17 18 19 20 STEREO
* If TIME button is pressed when Super Audio CDdisc that supports text is in use, time display is givenpriority and the text information will not be displayeduntil the next track. To see the text information, pressTEXT button.
7 Switching Sound Mode(Super Audio CD)
q Press SOUND MODE button in stopmode (not playing).The currently selected layer or area is shown onthe display. (CD or Super Audio CD)If SOUND MODE button is pressed again, aplayable layer or area will be shown, and the layeror area will be switched to new one.
* When layer or area is switched, TOC will beread again.
* The sound mode cannot be changed for AudioCDs and discs with only a Super Audio CDarea.
* The sound mode on hybrid layer discs will bechanged in the following order.Super Audio CD stereo area → CD layer →Super Audio CD stereo area
* Sound mode can be selected while the tray isopen. Select a desired layer or area and press
PLAY button then the tray will close andplayback will be started.
w Press the SOUND MODE buttonduring playback.The currently selected layer or area is shown onthe display. (CD or Super Audio CD)If SOUND MODE button is pressed again, theplayback is stopped, and the layer or area willbe switched to new one.When you want to listen at that area, press
PLAY button again. The playback will bestarted.
“–” is displayed“SING REMAIN” is displayed
“–” is displayed“TOTAL REMAIN”is displayed
AC IN
SUPER AUDIO CD PLAYER SA8001
PROG ALL TOTAL SINGAMS
REMAIN SACDRNDM TRK A – B
1
1TEXT 2 3 4 5 6 7 8 9 10 11 12 13 14 15 16 17 18 19 20 STEREO
POWER ON/OFFPOWER ON/OFF
D I S P L A Y O F F T E X T T I M E S O U N D M O D E
SOUND MODE Button
SA8001U_01_Eng 06.1.25, 3:41 PMPage 9 Adobe PageMaker 6.5J/PPC

10
EN
GL
ISH
START SOUND MODEWhen a Super Audio CD hybrid layer discs that hasboth a Super Audio CD high sound quality stereoarea and an Audio CD area information are to beplayed, this player makes it possible to set the layer/area (Super Audio CD or Audio CD) to bepreferentially played.This setting can be made when the tray is closedand there is no disc in the disc tray.
q Press SOUND MODE button on the player.The currently selected layer/area is displayed.If the Super Audio CD is selected : Super Audio CDIf the Audio CD is selected : CD
w Press the SOUND MODE button again to displaythe layer/area to be played first, and then leavethe setting for at least two seconds to register thesetting for the start sound mode.
Caution* Start sound mode has a memory retention function
where the settings remain stored and unchangedeven when the disc is changed or the power isturned off.
* At the time of shipment, the sound mode is set toSuper Audio CD.
PLAYING YOUR FAVORITETRACKS OF A DISC
7 Specify track number to play(Direct Search)
Specify track number with numerical buttons (0-9)on the remote
(example)3rd track : Press 3 .
12th track : Press 1 and then press 2(w i t h i n app rox ima te l y 1 .5seconds).
If the first pressed number is only in the digit of onesand not in the digit of tens, search beginsapproximately 0.5 second after.
If a wrong number is pressedPress correct number again.
* If you specify a track number that doesn’t exist onthe disc, the indicator returns to the display shownprior to this operation. Please specify a correct track.
7 Skipping to the previous or nexttrack (Track Skip)
To listen to a track posterior to the current trackPress buttons on the main unit or button on the remote the number of times you wantto proceed tracks.
To listen to a track prior to the current trackPress buttons on the main unit or button on the remote go back to the beginning of thecurrent track. Then press buttons on themain unit or button on the remote the numberof times you want to go back.
PLAYING YOUR FAVORITEPARTS OF A DISC (SEARCH)
If , buttons on the main unit or, buttons on the remote are kept pressing
during playback, track search begins. Release thebutton when the point you want to listen to gets close.
* No sound is output during the search operation.
REPEATED DISC PLAY(REPEAT PLAY)
7 All track repeat
When REPEAT button on the remote is pressed,“ ” “ALL” indicator will light up and all track repeatplay begins.
To Return to Normal PlayPress REPEAT button two times. “ ” “ALL”indicator will disappear, repeat mode will be off andit returns to normal play mode.
* If REPEAT button is pressed when in programmode, programmed tracks are played repeatedly.
7 One Track Repeat
Press REPEAT button on the remote two times.“ ”, “1” indicators will light and the track will beplayed repeatedly.
To Exit from One Track RepeatPress REPEAT button. “ ” “1” indicator willdisappear, repeat mode will be off and it returns tonormal play mode.
7 A-B Repeat
q Press A–B button on the remote at your chosenstarting point. The “A-B” indicator will blink.
w Press A–B button again at your chosen endpoint. “A-B” “ ” indicator will light up and thechosen section will be played repeatedly.
To Exit from A-B RepeatPress A–B button on the remote. “A-B” “ ”indicator will disappear, A-B repeat mode will be offand it returns to normal play mode.
* A-B repeat cannot be done when random play isgoing on.
* The end point (where “A-B” indicator is blinks) ofthe repeat section cannot be set before the time ofthe starting point (where “A-B” “ ” indicator lightup) of the repeat section.
PLAYING TRACKS IN A RANDOMSEQUENCE (RANDOM PLAY)
When RANDOM button on the remote is pressedin stop mode, and then PLAY button is pressed,the unit shuffles track order automatically and playsall the tracks in the shuffled order. The RNDM(random) indicator lights.
• The gap between tracks will be approximately 2seconds during random play.
To Exit from Random Play and Return to Normal PlayPress the STOP button, and then press the
RANDOM button while playback is stopped.The RNDM (random) indicator goes off, and randomplay is released.
If buttons on the main unit or buttonon the remote are Pressed during Random PlayIt jumps to the next track of the shuffled order.
If , buttons on the main unit or, buttons on the remote are Pressed during
Random PlaySearch will be done only in the current track. Searchdoes not go to the previous or next track.
To Listen to Random Play RepeatedlyPress REPEAT button on the remote once duringrandom play. Every time the order will be shuffled.
• If RANDOM button is pressed during programplay, the programmed tracks will be shuffled.
SA8001U_01_Eng 06.1.25, 3:42 PMPage 10 Adobe PageMaker 6.5J/PPC

11
EN
GL
ISHPLAYING TRACKS IN A SPECIFIC
SEQUENCE (PROGRAM PLAY)You can arrange and play tracks in a specificsequence. Up to 30 tracks to be played can beprogrammed.
(Example: To program the 7th track after 15thtrack in a disc with 25 tracks)
PROG ALL TOTAL SINGAMS
REMAIN SACDRNDM TRK A – B
1
1TEXT 2 3 4 5 6 7 8 9 10 11 12 13 14 15 16 17 18 19 20 STEREO
q Press PROGRAM button on the remote in stopmode. “PROG” indicator will light up and it goesto program mode.
PROG ALL TOTAL SINGAMS
REMAIN SACDRNDM TRK A – B
1
1TEXT 2 3 4 5 6 7 8 9 10 11 12 13 14 15 16 17 18 19 20 STEREO
w Choose a track to be programmed with numericbuttons on the remote.
(Example: The 15th track is chosen and it’slength is 4min30sec)
PROG ALL TOTAL SINGAMS
REMAIN SACDRNDM TRK A – B
1
1TEXT 2 3 4 5 6 7 8 9 10 11 12 13 14 15 16 17 18 19 20 STEREO
e With the sequence described in step w above,program another track. Repeat that sequence toprogram all the tracks you want. You can programup to 30 tracks.
(Example: The 7th track is chosen and totallength of 7th and 15th is 7min50sec)
PROG ALL TOTAL SINGAMS
REMAIN SACDRNDM TRK A – B
1
1TEXT 2 3 4 5 6 7 8 9 10 11 12 13 14 15 16 17 18 19 20 STEREO
r Press PLAY button to starts playback inprogrammed order.
* When 21 or more tracks are programmed, willlight up instead of the track number indicator.
Lights up
Lights up
Only the numbers ofprogrammed tracks light up
1st track programmed
Lights up
Total playing time ofprogrammed tracks
Total programmed number
To Check the Programmed TracksPress the SCROLL/RECALL button on the remotecontrol during the program or when the program isstopped (“PROG” lights up).Every time press SCROLL/RECALL button, theprogrammed tracks will be displayed one after theother in order.
To Delete a Programmed Trackq Press CANCEL button in stop mode when program
has been made (When “PROG” indicator islighting up).
w Every time press CANCEL button, the programmedtracks are deleted in order from the last trackprogrammed.Also, the deleted track’s track number indicatorwill disappear.
To Clear Whole ProgramPress STOP button two times while in programplay. In the stop mode, press STOP button once.Program can also be cleared by pressing
OPEN/CLOSE key to open the disc tray.
To Add Tracks to ProgramTracks can be added to the end of program whenprogram is remaining (“PROG” indicator is lightingup) and in stop mode.However tracks cannot be added to the programwhen the RNDM (random) indicator is lighting up.
* Please be careful about the following matters.• When programming 1st through 9th tracks in a
disc that has over 10 tracks by using numericbuttons. For instance, programming the 3rd trackafter programming the 1st track, press 3 buttonmore than approximately 1.5 seconds after 1button is pressed. When a program is finalized,the time is updated.
• Likewise, when programming a track at 10th orafter. For example, to program 13th track, press3 button within approximately 1.5 seconds after1 button is pressed.
• When programming a track in a disc that has lessthan 9 tracks. For instance, to program the 5thtrack after 4th track has been programmed, press5 button more than approximately 0.5 second after4 button is pressed.
Q&A• How many tracks can be programmed?
Up to 30 tracks can be programmed forprogram play.
• Can I listen to program play repeatedly?Press REPEAT button once. “ ” “ALL”indicator will light and program play willbe repeated.
• Can I shuffle the programmed track order?Press RANDOM button in stop mode.
SEARCHING YOUR FAVORITETRACKS (AMS (AUTOMATIC MUSICSCAN) PLAY)
This feature is convenient to search where yourfavorite track is.If AMS button on the remote is pressed in stopmode, the PLAY “3” indicator will blink and thebeginnings of all the tracks will be played for 10seconds each starting from the first track.Also, if the AMS button is pressed during playback,the PLAY indicator “3” will blink, and the programwill jump to the next track after a display time ofapproximately 10 seconds.
PROG ALL TOTAL SINGAMS
REMAIN SACDRNDM TRK A – B
1
1TEXT 2 3 4 5 6 7 8 9 10 11 12 13 14 15 16 17 18 19 20 STEREO
When you find a song that you want to listen to, pressthe AMS button again or press the PLAY button.PLAY indicator will light up constantly and normalplayback will begin from the current track.
* If the AMS button is pressed after the tracks areprogrammed, only the programmed tracks areplayed by AMS.
Light up
QUICK REPLAYWhen Q.REPLAY button is pressed dur ingplayback, the unit goes back to the amount of timeset by the MENU and starts playback from there.
* Playback that goes beyond the track is not allowed.Also, when the total time of the track being playedis shorter than the time set for quick replay, or whenthe playback time is shorter than the time set forquick replay, if Q.REPLAY button is pressed, thetrack will be goes back to the start of that track andplayback is started from there.
To Set Quick Replay Timeq If a disc is loaded in the disc tray, eject the disc
and close the tray.
w Press the MENU button on the remote control.
e Press the ENTER button on the remote controlwhile Quick Replay is displayed (approx. 3seconds). The current time setting appears on thedisplay. (The default setting is 10 seconds.)
r Use the or button to set the time. (10seconds/20 seconds/30 seconds)
t After making the setting, press the MENU buttontwice. The display returns to the normal display.
y The time setting is retained even when the poweris turned off.
Caution:* When there is no key input for about 4 seconds
during this series of operations, the setting will beconfigured to the conditions at that time and thedisplay will return the time display.
SA8001U_01_Eng 06.1.25, 3:42 PMPage 11 Adobe PageMaker 6.5J/PPC

12
EN
GL
ISH
ABOUT THE TEXT INFORMATIONDISPLAY
The following items of text information in Super AudioCD discs can be displayed by pressing TEXT buttonon the remote.Nevertheless, which items of information arerecorded depends on discs so some information maynot be displayed. This unit skips unrecordedinformation to display.
• During playbackWhen TEXT button is pressed on the remote, “TrackTitle” of the currently playing will be displayed.
• In Stop ModeEach time TEXT button on the remote is pressed,text information will be displayed in the followingorder.
• This unit can display 12 characters in one time. Ifinformation is longer than 12 characters, thedisplay will scroll right to left.
• This unit can display only alphabets, numericnumbers and symbols. Chinese and Japanesecharacters cannot be displayed. If information isin Chinese and Japanese characters, the unitdisplays nothing.
Time Display
Album Title
Album Artist
TIMER PLAYThis unit can perform timer play by cooperating withyour audio timer.Connect this unit’s power cord to the audio timer’spower socket and the timer’s power cord to poweroutlet.
* For connection to audio timer and it’s operation,please refer to the instruction manual of your audiotimer.
AC INAC IN
Setting method of Timer Play
q Press POWER switch to turn ON the power.
w Insert the disc to be played.
* In timer play mode, tracks are played normally.
e Set the audio timer.
Audio Timer
TROUBLE SHOOTINGIf you think a malfunction has occurred, first checkthe points listed below. The problem is likely to havebeen caused by a simple operational error or aconnection problem. If the problem cannot becorrected even after carrying out the following checks,consult your dealer or nearest Marantz sales officeor service counter.
• The disc fails to rotate.1. Is the mains lead plugged in properly?
2. Is the POWER switch ON?
3. Is the disc placed in the correct position on thedisc tray?
4. Is the disc placed properly with the label sidefacing up?
5. Is the disc dirty?
6. Is the disc scratched?
7. Is the disc warped?
• The disc is rotating but no sound is heard.1. Are the amplifier and speakers connected
properly?
2. Is the amplifier switch ON?
3. Is the amplifier’s function or selector switch set to“CD” or “AUX” or such (to whatever you haveconnected this unit to)?
4. Is the amplifier’s volume control set at theminimum level?
• The disc stops in mid-operation.The sound drops out or noise is heard.
1. Is the disc dirty?
2. Is the disc scratched?
3. Is the disc warped?
* In the case of a CD-R or CD-RW disc, this problemmay occur when the conditions under which its datawas originally written were substandard or whenthe quality of the disc itself is poor.
* This condition may occur in Mixed-Mode CDs, CDExtra, and other discs that have CDDA format mixedwith other data.Noise may also be heard momentarily whenskipping tracks.
• Remote control operation is not possible.1. Is the transmitter of the remote control unit
(RC8001SA) pointed correctly at the remotesensor on the front of the player (this unit)?Or is there an obstruction between the transmitterand the remote sensor?
2. Are the batteries in the remote control unitexhausted?
3. Is there another strong light (from a window, etc.)striking the Super Audio CD player’s remotesensor?
• A Super Audio CD cannot be played.1. Is the disc scratched, dirty or warped?
2. Is the amplifier’s input selector set to digital?
* Digital audio signal will not be output when a SuperAudio CD is played.
3. Is the disc a Super Audio CD multi-channel onlydisc? (This unit does not support Super AudioCD multi-channel.)
• A CD-R/CD-RW disc cannot be played.1. Is the disc placed upside down?
2. Is the disc contains properly written TOC?
3. Is the recorded information in an audio (CD-DA)format?
• A specific CD cannot be playedCopy control CDs (CDs with copy guard) arespecial discs that do not comply with current CDstandards. Marantz cannot guarantee the abilityto play such discs on your CD player.When normal CDs can be played without aproblem and problems occur only when playingthese special discs, it is not a problem with thisunit.Please ask the seller of the copy control CD fordetailed information regarding copy control CDs.
• The unit makes a clicking sound when the trayclosesThis is the adhesion click of the clamper forsecuring the disc. This does not cause anyproblem in using the unit.
• While the disc is spinning, a spinning soundis heard or a slight vibration occur.Depending on the disc, a spinning sound mayoccur or the unit may vibrate slightly due to disceccentricity or such. This is not a problem withthis unit.
SA8001U_01_Eng 06.1.25, 3:42 PMPage 12 Adobe PageMaker 6.5J/PPC

13
EN
GL
ISHSPECIFICATIONS
Super Audio CD Audio CD
Audio CharacteristicsAnalog output
Channels 2channels 2channelsFrequency range 2Hz — 100kHz 2Hz — 20kHzFrequency characteristics 2Hz — 50kHz (-3dB) 2Hz — 20kHzDynamic range 112dB 100dBTHD (1kHz) 0.0010% 0.0020%wow & flutter Precision of quartz Precision of quartzOutput level
Unbalanced 2.3V RMS stereo 2.3V RMS stereoDigital output
output level (cinch JACK) — 0.5Vp-p (75Ω)output level (optical) — -19dBm
Optical Readout SystemLaser AlGaAs AlGaAsWave length 650nm 780nm
Signal format 1-bit DSD 16-bit linear PCMSampling frequency 2.8224MHz 44.1kHz
Power SupplyU Version ....................................................................................................... AC 120V 60HzPower Consumption ...................................................................................................... 20W
Cabinet, etc.Dimensions (Width × Height × Depth) ................................................... 440 × 128 × 339mmNet weight .................................................................................................................... 8.0kgOperating temperatures ................................................................................. +5°C ~ +35°COperating humidity ............................................................................ 5 ~ 90% (without dew)
Accessories• Remote control unit (RC8001SA) .................................................................................... 1• AAA (R03) Batteries ......................................................................................................... 2• AC Power cord ................................................................................................................. 1• Audio cable ...................................................................................................................... 1• Remote connection Cable ................................................................................................ 1• User’s Guide .................................................................................................................... 1• Warranty Card .................................................................................................................. 1
Specifications subject to change without prior notice.
Dimensions
PROG ALL TOTAL SINGAMS
REMAIN SACDRNDM TRK A – B
1
1TEXT 2 3 4 5 6 7 8 9 10 11 12 13 14 15 16 17 18 19 20 STEREO
POWER ON/OFFPOWER ON/OFF
SUPER AUDIO CD PLAYER SA8001
PROG ALL TOTAL SINGAMS
REMAIN SACDRNDM TRK A – B
1
1TEXT 2 3 4 5 6 7 8 9 10 11 12 13 14 15 16 17 18 19 20 STEREO
POWER ON/OFFPOWER ON/OFF
D I S P L A Y O F F T E X T T I M E S O U N D M O D E
15/1
6 (2
2.5)
4 5/
16 (1
10.0
)
13 3
/16
(334
.5)
3/4
(18.
0)
5 1/
16 (
128.
0)
7/16
(12
)
13 5/16 (339)
3/16(4.5)
13 3/16 (334.5)
17 5/16 (440)
Unit : inch (mm)
SA8001U_01_Eng 06.1.25, 3:42 PMPage 13 Adobe PageMaker 6.5J/PPC

02/2006 00M29AK851250 mzh-gPrinted in China
is a registered trademark.
www.marantz.comYou can find your nearest authorized distributor or dealer on our website.
U.S.A. Marantz America, Inc. 1100 Maplewood Drive, Itasca, IL 60143, U.S.A.
EUROPE Marantz Europe B.V. P.O. Box 8744, 5605 LS Eindhoven, The Netherlands
SA8001U_01_Cover 06.1.25, 3:40 PMPage 4 Adobe PageMaker 6.5J/PPC