model ut installation, operation & maintenance...
TRANSCRIPT

UT2-1116
IN UNITED STATES: 260 NORTH ELM ST. WESTFIELD, MA 01085 800-465-8558 / FAX (413) 564-5815IN CANADA: 7555 TRANMERE DRIVE, MISSISSAUGA, ONTARIO, L5S 1L4 (905) 670-5888 / FAX (905) 670-5782
SECTION 1: INTRODUCTION .................................................. 2
SECTION 2: SAFETY PRECAUTIONS .................................. 2
SECTION 3: SPECIFICATIONS3.1 Specification Table................................................................. 33.2 Working Conditions ............................................................... 3 3.3 Overall Dimensions ............................................................... 4
SECTION 4: INSTALLATION4.1 Installation Precautions ......................................................... 54.2 Installation: Positioning the Unit ............................................ 54.3 Minimum Clearances ............................................................. 54.3a Floor Installation .................................................................. 64.4 Water Connections ................................................................ 7-84.5 Condensate Discharge .......................................................... 94.6 Venting Air ............................................................................. 9
SECTION 5: START-UP AND OPERATION5.1 Control Function .................................................................... 105.2 Setting Temperature .............................................................. 11-125.3 Usage of Remote Control ...................................................... 13-145.4 Adjustable Parameters .......................................................... 14
SECTION 6: MAINTENANCE AND TROUBLE SHOOTING6.1 Maintenance .......................................................................... 15-166.2 Trouble Shooting ................................................................... 16
SECTION 7: WIRING7.1 Networking Wiring Diagram ................................................... 177.2 Connections .......................................................................... 177.3 Wiring Diagram ...................................................................... 18Warranty ...................................................................................... 19Terms and Conditions of Sale ..................................................... 19
MODEL UTINSTALLATION, OPERATION & MAINTENANCE
MANUALLow Temperature
ThinWall Heating/Cooling Fan Coil Units up to 1 Ton Capacity

2
Section 1: Introduction
Section 2: Safety Precautions
Thank you for choosing the ThinWall water fan coil. The products strictly comply with design and production standards to provide high quality operation, perfect performance, high reliability and good adaptability.
These units are designed to operate at water temperatures below 160°F. Operating at temperatures above 160°F may result in severe damage to the product and void the warranty.
Read this installation and maintenance manual carefully before installing and starting up the appliance. All repair or maintenance work must be performed by the technical service department or by professionally qualified personnel. Do not modify or attempt to repair the appliance as this could cause serious injury and void the manufacturer’s warranty.
This instruction manual must always accompany the appliance. If it is lost or damaged, contact the local manufacturer technical service center.
Failure to comply with these recommendations will void the warranty.
• This appliance must be installed by an authorized installer.
• All repair or maintenance work must be performed by the technical service department or by a professionally qualified personnel.
• All repair or maintenance work must be performed in the manufacturer’s specified period and times.
• Use genuine standard spare parts from the manufacturer for any necessary repairs.
To prevent injury to the users and others and avoid damage to the unit or other property, use the heat pump properly. Read this manual carefully and understand the following information.
The following terms are used throughout this manual and bring attention to the presence of potential hazards or to important information concerning the product:
Indicates an imminently hazardous situation which, if not avoided, will result in death, serious injury or substantial property damage.
Indicates an imminently hazardous situation which, if not avoided, will result in death, serious injury or substantial property damage.
Indicates an imminently hazardous situation which, if not avoided, may result in minor injury or property damage.
Used to notify of special instructions on installation, operation or maintenance which are important to equipment but not related to personal injury haz-ards.
In case of water leaks, turn the master switch of the system to “OFF” and close the water taps. As soon as possible call the manufacturer’s technical service department or professionally qualified personnel. Do not attempt to personally repair the appliance.
If the unit is not used for a long time, you should:
• Power off the unit.
• If there is no anti-freeze protection, drain out the water.
Packing list
Figure 1
P F P :
90
90
2 - 8
165mm
165mm
025~100
90
165mm
165mm
025~100
025
040
060
080
100
mm
0
200
400
600
800
90
025
040
060
080
100
mm
0
200
400
600
800
2- 8
TEMP
MOD E
FANON/O FF
PM 10:50
0 00
Screw cap
electrothermal 3-way valve
Feetoptional
ScrewToggle boltsBrackets
Installation TemplateVertical Water Fan Coil Manual Drain Pipe
Flexible WaterConnectors
Remote controller optional
Code ComplianceFan coil unit installation must conform to the requirements of the local authority having jurisdiction, or in the absence of such requirements, to the National Board of Fire Underwriters regulations. Fan coil unit meets ETL listing requirement.
All electrical wiring must be in accordance with the National Electrical Code ANSI/NFPA No. 70-latest edition and any additional state or local code requirements. If an external electrical source is utilized, the fan coil unit, when installed, must be electrically grounded.

3
Section 3: Specifications3.1 Specification Table
3.2 Working Conditions (1) Heating ambient temperature: 41-84.2°F, Inlet water temperature: 95-158°F.
(2) Cooling ambient temperature: 48.2-95°F, Inlet water temperature: 41-68°F.
Model UT-87 UT-135 UT-196 UT-246 UT-320Heating Capacity* BTU/H 8700 13500 19600 24600 32000Water Flow Rate GPM 1.0 1.5 2.2 2.8 3.5Pressure Drop PSI 1.5 1.8 3.8 4.0 4.1Cooling Capacity** TONS 1/4 1/2 3/4 1 1 1/4Water Flow Rate GPM 0.8 1.5 1.9 2.6 3.3Pressure Drop PSI 1.6 1.9 4 4.1 4.4Air Volume CFM 94 188 270 340 381Noise DB (A) 30 32 37 39 41Power Supply 120V/1PH/60HzPower Input W 12 16 20 24 30Water In/Out NPT 3/4Drain INCH 5/8
Net DimensionsLength
INCH27-5/8 35-3/8 43-5/16 51-1/2 59-1/8
Width 5 1/8Height 26 3/8
Shipping DimensionsLength
INCH29-1/8 37 44-7/8 52-13/16 60-5/8
Width 7-1/8Height 28-11/16
Net Weight LBS 35 44 53 62 73Ship Weight LBS 40 51 60 68 79
* Heating: Entering Water Temp. 158°F** Cooling: Entering Water Temp. 45°F
4
Section 3: Specifications (continued)
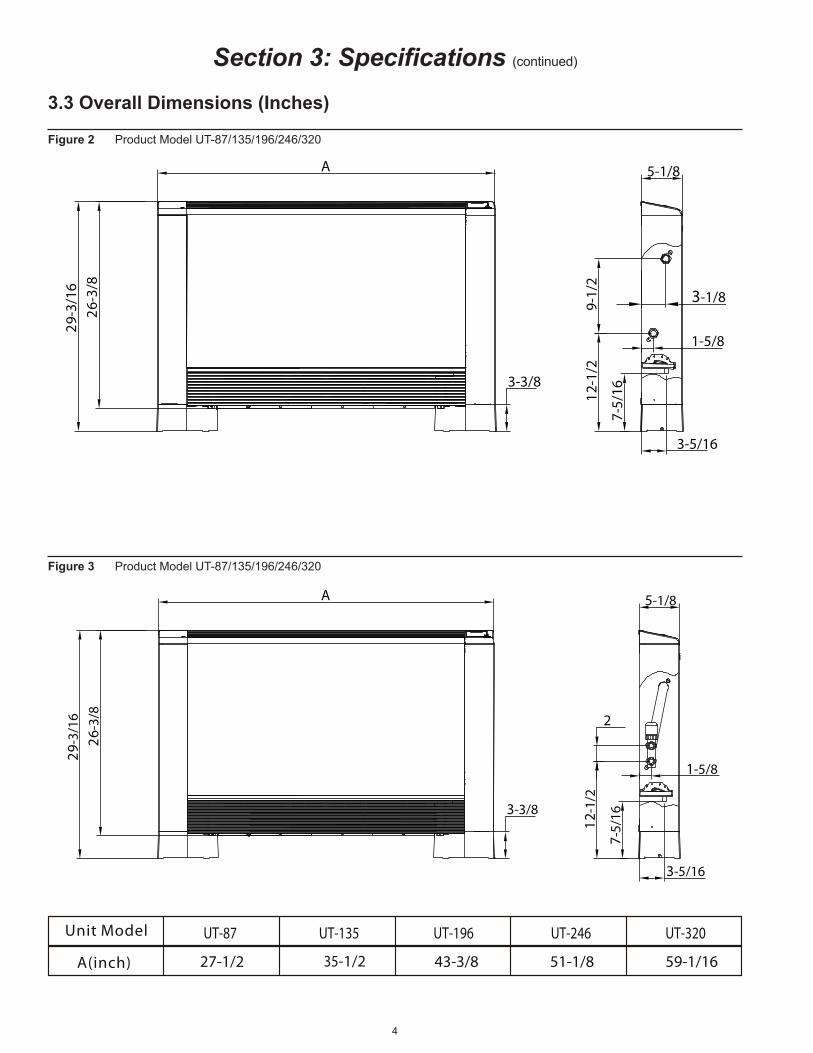
3.3 Overall Dimensions (Inches)
Figure 2 Product Model UT-87/135/196/246/320
Figure 3 Product Model UT-87/135/196/246/320
A
29-3
/16
26-3
/8
3-3/8
7-5/
16
3-5/16
12-1
/2
5-1/8
1-5/8
9-1/
2
3-1/8
Unit Model UT-87 UT-135 UT-196 UT-246 UT-320
35-1/227-1/2A(inch) 43-3/8 51-1/8 59-1/16
A
29-3
/16
26-3
/8
3-3/8
7-5/
16
3-5/16
12-1
/25-1/8
1-5/8
2

5
Section 4: Installation4.1 Installation Precautions To ensure that the installation is performed correctly
carefully follow the instructions indicated in this manual. Failure to follow instructions indicated not only can cause malfunctions of the appliance but also void the warranty.
It is important that the electrical installation is made in accordance with local codes, respects the data indicated in the technical sheet and is correctly earthed.
The appliance must be installed in a position that allows for routine maintenance, such as filter cleaning.
The system inlet water temperature must not exceed 160°F. Failure to comply can severly damage the unit and will void the warranty.
4.2 Positioning the Unit Avoid installing the unit in close proximity to:
-positions subject to exposure of direct sunlight
-in proximity to sources of heat
-in damp areas or places with probable contact with water
-in places with oil fumes
-places subject to high frequencies
Make sure that:
-the wall on which the unit is to be installed on is strong enough to support the weight
-the part of the wall being used does not have pipes or electric wires passing through
-is free of obstacles which could interfere with the inlet and outlet air flow
-is preferably an outside perimeter wall to allow the discharge of condensation outside.
4.3 Minimum Clearances Figure 5 indicates the minimum mounting distances be-
tween the wall-mounted cooler-convector and furniture present in the room.
Figure 5
0. 79 inch 0. 79 inch
3. 54 inch
15 .7 5inc h
5. 51 inch
A
B
C
E
Removal of Side Panel (Fig. 6)
Dismount the upper grill (Fig. 6 Ref. A) by unscrewing the fixing screws.
Lift the cover (Fig. 6 Ref. B) that protects the screw (Fig. 6 Ref. C) and unscrew it. Move the side panel slightly and lift it out.
Figure 6
Wall installation or vertical floor
Using the paper template, trace the position of the wall (Fig. 7). Use a suitable drill to make the holes with and insert the toggle bolts (2 for each bracket) (Fig. 8 Ref. A); affix the two brackets (Fig. 8 Ref. B).
Figure 7
Figure 8
P F P te mpla te code : 20000-230309
P a ra lle l to the floor
L e ve l c he ck line
165mm
90
L e ve l c he ck line
165mm
025
040
060
080
100
0
200
400
600
800
90
025
040
060
080
100
0
200
400
600
800
2- 8 L oca te hole
Make sure tha t the space be tween two templates
is according to the table requ irement when
installing PFP 025 to 100.
The distance from the center of
locate hole to the top edge of
machine is 165mm
The distance from the center of
locate hole to the top edge of
machine is 165mm
2- 8 L oca te hole
Make sure tha t the space be tween two templates
is according to the table requ irement when
installing PFP 025 to 100.
Water inlet hole
without electrothermal 3-way valve
Water inlet hole
Water outlet hole
Condensation drain hole
The distance between
two templates(mm)
The distance between
two templates(mm)
Model
Model
The bottom of machine
The bottom of machine
Fold 90 degree along this line
Fold 90 degree along this line
R e s e rve d a re a for wa te r pipe hole
P a ra lle l to the floor
A
B

6
Section 4: Installation (continued)
4.3a Floor Installation If installing the unit on the floor, the footing should be mounted (Feet shipped loose as optional equipment): First, lay down the unit and match up the screw holes (Ref. Fig. 10 Item A/B/C/D), finally apply four screws to each side to affix the feet. (See Fig. 9 and Fig. 10).
Figure 9
Figure 10
A
B C
D

7
Section 4: Installation (continued)
Do not over-tighten the screws so that the brackets can be adjusted with a spirit level (Fig. 11).
The fully tighten the four screws to block the two brackets.
Mount the unit, checking that it fits correctly onto the brackets and checking that it is stable (Fig. 12).
Figure 11
Figure 13
Figure 12
Figure 14
4.4 Water Connections Refer to Fig. 13 and Fig. 14 to connect the inlet and outlet
lines.
Figure 13 shows optional 3-way valve.
Piping system should be clean.
Insulate the lines after making the connections.
Y type filter should be installed in the water inlet of the unit.
Air release valve should be installed on top of the hydraulic lines to avoid air retention.
fig.8
W a ter outle twith 3 -wa y v a lve (optional)
W a ter inletwith 3 -wa y v a lve
W a ter inlet
W a ter outle t

8
Section 4: Installation (continued)
Connection methods for flexible water connectors
Figure 15 Connecting method I with valve (optional)
Figure 17 Connecting method I without valve
Figure 16 Connecting method II with valve (optional)
Figure 18 Connecting method II without valve
Flexible water connectorwater inlet
Flexible water connectorwater outlet
Flexible water connectorwater inlet
Flexible water connectorwater outlet
Flexible water connectorwater outlet
Flexible water connectorwater inlet
Flexible water connectorwater inlet
Flexible water connectorwater outlet

9
Section 4: Installation (continued)
4.5 Condensate Discharge When mounting the condensation discharge device,
connect to the condensate collection tray discharge union (Fig. 19 Ref. C) a pipe for the outflow of the liquid (Fig. 19 Ref. B) blocking it inadequately. The condensate discharge network must be suitably sized (minimum inside pipe diameter 5/8").
If the condensation needs to be discharged into a container, it must be open to the atmosphere and the tube must not be immerged in water to avoid problems of adhesiveness and counter-pressure that would interfere with the normal outflow.
4.6 Evacuating air while filling the system If there is no electric power and the thermo-valve has
already been powered use the special cap to press the valve stopper to open it.
Start filling by slowly opening the water system filling tap. Use a screwdriver to unscrew the side air vent valve (Fig. 20 Ref. A). When water starts coming out of the air vent of the appliance, close them and continue filling until each reaching the nominal value for the system.
Check the hydraulic seal of the gaskets.
It is advisable to repeat these operations after the appliance has been running for a few hours and periodically check the pressure of the system.
Figure 19
Figure 20
A
B
C
AA

10
Section 5: Start-Up and Operation5.1 Control Functionality
About buttons:
ON/OFF BUTTON. Pressing this button will start up or shut down the unit.
Press this button and select the mode you want set:
Cooling mode: cooling indicator light stays on (green)
Heating mode: heating indicator light stays on (red)
Automatic mode: cooling indicator light and heating indicator light flashes in turn
Ventilating mode: cooling and heating indicator lights are off, the fan indicator light stays on according to the chosen fan speed
Dehumidifying mode: cooling indicator light stays on for 2 seconds and off for 1 second
Note: Changes of mode can only be done on main interface.
Press this button to set the fan speed
High fan speed: high fan speed indicator light stays on (blue)
Medium fan speed: medium speed indicator light stays on (yellow)
Low fan speed: low speed indicator light stays on (orange)
Automatic: high fan speed indicator light, medium fan speed indicator light and low fan speed indicator light flashes in turn
Note: Changes of fan speed can only be done on main interface. You cannot choose the automatic fan speed when in ventilating mode. When in dehumidifying mode, the fan speed is fixed at low speed.
Check the set temperature of unit by pressing this button once.
Increase the set temperature by pressing this button again.
Check the set temperature of unit by pressing this button once.
Decrease the set temperature by pressing this button again.
HEATCOOLHIGH LOWMID
M
(Blue)high fan speed indicator light
(Yellow)medium fanspeed indicator light
(Orange)low fan speed indicator light
Heating indicator light red
Cooling indicator light green
M

11
Section 5: Start-Up and Operation (continued)
5.2 Temperature Setting
When on the main interface of heating, cooling and automatic mode, you can press or once to check the set temperature. Press or again to increase or decrease the set temperature. Press , or ON/OFF button to change mode, fan speed or shut down the unit and save settings.
or is invalid when the unit is in ventilating mode or dehumidifying mode.
MHEATCOOLHIGH LOWMID
M
Indoor ambient temperature
HEATCOOLHIGH LOWMID
M
Press or to check the setting temperature of current mode.
Set temperature in heating mode
Press or to set the setting temperature of current mode.

12
Section 5: Start-Up and Operation (continued)
HEATCOOLHIGH LOWMID
M
HEATCOOLHIGH LOWMID
M
HEATCOOLHIGH LOWMID
M
HEATCOOLHIGH LOWMID
M
HEATCOOLHIGH LOWMID
M
Press to save settings and change modes of the unit.
Press to save settings and change fan speed.
Press switch button to save settings and shut down the unit.
M
Set temperature in heating mode
System will save user's setting and return back to main interface if there is no operation on buttons in 5s.

13
Section 5: Start-Up and Operation (continued)
5.3 Using the Remote Control
POWER ON/OFF
Press this key to start up or shut down the unit
Mode Switch
Press this key to switch the mode among Auto, Cooling, Dehumidifying, Ventilating and Heating.
Fan Speed
Press this key to switch the fan speed among High, Medium, Low and Auto.
Press this button to increase the set value.
Press this button to decrease the set value.
Take out the batteries if you do not use the remote control for a long period of time. Take out the batteries for 35 minutes if there is a failure in the program of the remote controller. After 35 minutes, replace the batteries and the remote control should resume operation.
AMPM
Signal Emission
Wind Speed
Wind Direction
POWER ON/OFF
Time RegulationWind Direction Regulating Manually
Wind Direction Regulating Automatically
Mode Switch
Auto Mode
Cooling Mode Heating Mode
Temperature
Time Off
Wind Speed Regulation
Timing Start-Up
Fast Cool
Fast Heat
Timing Shut-Down
Low Wind Speed
Medium Wind Speed
High Wind Speed
Dehumidification ModeVentilation Mode
Sleeping Function
Set the Sleeping Function
LED Screen Light Up or Not
Celsius Fahrenheit Switch
/
TIME OFFTIME ON
AU TO
Time V alue
MO DE
FA N
14
Section 5: Start-Up and Operation (continued)
Functioning of “F.Cool” and “F.Heat”
By pressing the key “F.Cool”, the system will automatically set to the cooling mode with high fan speed.
By pressing the key “F.Heat”, the system will automatically set to the heating mode with high fan speed.
Time Setting
Press and hold the key until the time value flashes, then you can adjust the current time value by press the key “+” or “-“. To save the setting above, press the key again.
Timing Start-Up or Timing Shut-Down
This key is available only when the unit is POWER OFF, with no interruption of power supply.
TIME ON/1 One hour after setting Timing Start-Up, the unit will automatically start up. The number shown indicates amount of hours prior to start up.
This key is available when the unit is POWER ON.
TIME OFF/1 One hour after setting Timing Shut-Down, the unit will automatically shut down.
The range of timing is from 1 hour to 11 hours. If the setting value is over 11 hours, the time setting will be cancelled.
Sleep Function
(1) To start or cancel the sleep function, please press the key .
(2) The sleep function can only be set in the heating or cooling mode.
(3) When the sleep function is activated, the icon will be shown at the top right corner of the LCD screen on the remote. Meanwhile, the “TIME OFF” and “7” will be shown at the lower right corner of the LCD screen. This means the unit will automatically shut down 7 hours after the setting. To change the timing number or to cancel the timing function, press the key .
(4) 1 hour after setting the sleep function, the fan speed will automatically change to the low fan speed. To change the fan speed press FA N .
(5) 2 hours after setting the sleep function in the cooling mode, the set temperature will increase 1°C or about 2°F per hour.
(6) 3 hours after setting the sleep function in the heating mode, the set temperature will decrease 1°C or about 2°F per hour.
Switch to Celsius or Fahrenheit
Press the key.
LED Screen Light Up or Not
To illuminate or shut off the LED Screen press the key .
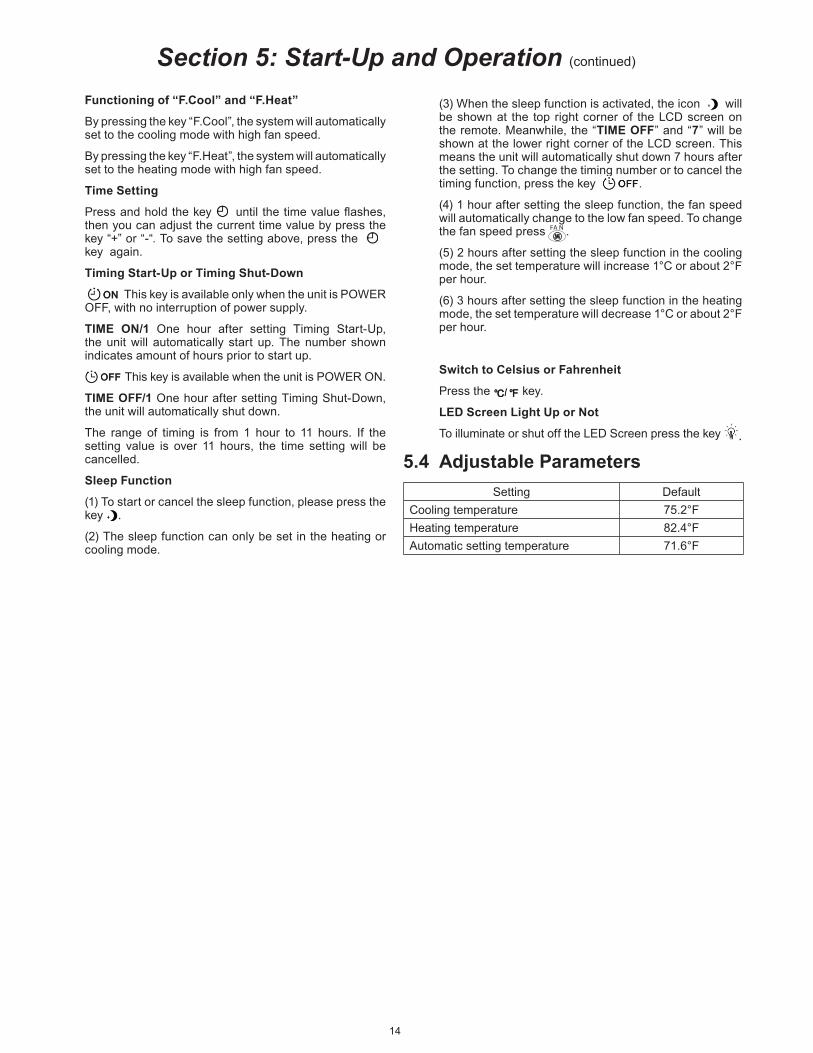
5.4 Adjustable ParametersSetting Default
Cooling temperature 75.2°FHeating temperature 82.4°FAutomatic setting temperature 71.6°F

15
Section 6: Maintenance and Trouble Shooting6.1 Maintenance
Cut off power supply before cleaning or maintaining the unit.
To guarantee reliable service and comfort, it is suggested to maintain and clean the unit every 6 months.
Take the following steps to clean up the filter regularly:
(1) Lift the grill (A) upward (Fig. 21), then pull out the grill (Fig. 22).
(2) Remove the grill (Fig. 23 and Fig. 24) and take out filter (Fig. 25), then wash the filter with water (Fig. 26).
Figure 22 Figure 21
Figure 24 Figure 23
Figure 26 Figure 25
A

16
Section 6: Maintenance and Trouble Shooting (continued)
(3) Set the filter net and the air return grill to the original place. (Fig. 27).
(4) Clean up the outer unit with a soft, damp rag (Fig. 28). To protect the paint-coat of the unit, do not use a rough sponge or corrosive detergent.
6.2 Trouble Shooting
Figure 28 Figure 27
Malfunction Code Cause MeasuresIndoor ambient temperature sensor P4 Ambient temperature sensor is
in open circuit or short circuitCheck or replace the ambient temperature sensor
Coil temperature sensor P5 Coil temperature sensor is in open circuit or short circuit
Check or replace the coil temperature sensor
Motor feedback signal E0 Feedback wire is not inserted well or Fan motor failure
Check the feedback wire or replace the motor

17
Section 7: Wiring7.1 Networking Wiring Diagram
7.2 PCB I/O port
K Y IN
G N D
He
atPum
pcontro
llerye llow
MD1001
MD1001 E lec trica l Control Module o f Vertical Water Fa n Coil
N E T c ommunica tion Port
K Y IN R emote on/ Off Signa l Input
G N D G rounding
blue
MD1001
MD1001
+12V NET GND
+12V NET GND
+12V NET GND
+12V NET GND
or on-line
N
O U T 2T E M P1
C N 1
O U T1
PROG1
L N
MD 100 1
14
CN
2
5
NET1

18
Section 7: Wiring (continued)
7.3 Wire Connection
Signal MeaningCN2 DC Fan Motor
OUT2* Output without connecting power, dry contactCN1 To wire controller (LED)
PROG1 Program burnTEMP1 To ambient and coil temperatureOUT1 To electromagnetic valve
L Live wireN Neutral wire
NET1 Communicate or On-line*End switch to energy source
Co
ntr
olle
r
B L K
Y /G
t
5K
14
T E MP
C N7
N L
O U T 1
MD1001
C T
ATt
5K
N
T O P O W E R S U P P LY110-120V~/60H z
B L K
W H T
R E D
B L U
L
W H T
NLN E T
O U T 2
CN
2
S S
F M
B L U
Y E L
W H TB L K
R E D
BL
U
O R G
O R G
E V
N
F M Fa n Motor
AT A m bie n t Te m pe r a tu r eC T C o il Te m pe r a tu r e
S S S ensit ive Switch
E V : E le c tr o m a g n e tic Valve
T C
24V
T C T r a n s fo r m e r

19
Limited WarrantyThinWall Fan Coil
Terms and Conditions of Sale
The Manufacturer warrants to the original owner at the original installation site that the Product will be free from defects in material or workmanship for a period not to exceed five (5) years from startup. If upon examination by the Manufacturer the Product is shown to have a defect in material or workmanship during the warranty period, the Manufacturer will repair or replace, at its option, that part of the Product which is shown to be defective.This limited warranty does not apply:
(a) if the Product has been subjected to misuse or neglect, has been accidentally or intentionally damaged, has not been installed, maintained or operated in accordance with the furnished written instructions, or has been altered or modified in any way.
(b) to any expenses, including labor or material, incurred during removal or reinstallation of the Product.
(c) to any workmanship of the installer of the Product.This limited warranty is conditional upon:
(a) shipment, to the Manufacturer, of that part of the Product thought to be defective. Goods can only be returned with prior written approval from the Manufacturer. All returns must be freight prepaid.
(b) determination, in the reasonable opinion of the Manufacturer, that there exists a defect in material or workmanship.
OrderingSend or fax all orders ($50.00 minimum billing) to:
Mestek260 North Elm StreetWestfield, MA 01085Tel. (413) 564-5530Fax (413) 564-5815
PricesPublished trade prices in effect at time of receipt of order at our office are firm provided the complete order is released by credit for fabrication and shipment.
TermsPayment terms are 2% 15 Prox. Net 16th.Prepaid freight or cartage charges paid by us are not subject to cash discount.
TaxesThe prices listed herein exclude Federal, State, or Municipal Tax applicable to the transaction. Such taxes, where applicable to the transaction, should be paid directly to the governing authority by the purchaser.
Valid OrdersAn order is not valid until acknowledged by the Manufacturer.
ClaimsAs all goods are shipped at buyer’s risk they should be examined carefully before signing transportation delivery receipts. If transportation company tenders delivery of goods in bad order, buyer should insist on transportation agent making notation of conditions on delivery receipt and request an inspection within 48 hours, thus enabling buyer to secure prompt payment of transportation claims filed by him for value of damaged material.
Repair or replacement of any part under this Limited Warranty shall not extend the duration of the warranty with respect to such repaired or replaced part beyond the stated warranty period.THIS LIMITED WARRANTY IS IN LIEU OF ALL OTHER WARRANTIES, EITHER EXPRESS OR IMPLIED, AND ALL SUCH OTHER WARRANTIES, INCLUDING WITHOUT LIMITATION IMPLIED WARRANTIES OF MERCHANTABILITY OR FITNESS FOR A PARTICULAR PURPOSE, ARE HEREBY DISCLAIMED AND EXCLUDED FROM THIS LIMITED WARRANTY. IN NO EVENT SHALL THE MANUFACTURER BE LIABLE IN ANY WAY FOR ANY CONSEQUENTIAL, SPECIAL, OR INCIDENTAL DAMAGES OF ANY NATURE WHATSOEVER, OR FOR ANY AMOUNTS IN EXCESS OF THE SELLING PRICE OF THE PRODUCT OR ANY PARTS THEREOF FOUND TO BE DEFECTIVE. THIS LIMITED WARRANTY GIVES THE ORIGINAL OWNER OF THE PRODUCT SPECIFIC LEGAL RIGHTS. YOU MAY ALSO HAVE OTHER RIGHTS WHICH MAY VARY BY EACH JURISDICTION.
The responsibility of this Company ceases upon delivery of goods in good order to transportation companies. All orders are accepted subject to delays on account of government requirements, strikes, accidents, or other causes beyond our control.
Minimum OrdersOrders with an invoice of less than $50.00 will be invoiced at $50.00.
Returned GoodsGoods must not be returned except by written permission, from the factory, and when so returned will be accepted only as stated in the following conditions:1. Special material is not subject to return.2. All transportation charges for returned goods must be prepaid by the
shipper.3. Standard catalogued products may be returned upon written permission.
After inspection at the factory, if they are found to be in good condition they will be accepted for credit, subject to a 25% handling charge, plus inbound and outbound freight.
4. No goods will be accepted for return more than 6 months after shipment.
Freight TermsWithin U.S.: less than $30,000.00 net: F.O.B., Farmville, North Carolina, freight not allowed.
$30,000.00 net or higher: full freight allowed, except to Alaska and Hawaii.

IN UNITED STATES: 260 NORTH ELM ST. WESTFIELD, MA 01085 800-465-8558 / FAX (413) 564-5815IN CANADA: 7555 TRANMERE DRIVE, MISSISSAUGA, ONTARIO, L5S 1L4 (905) 670-5888 / FAX (905) 670-5782