module 1: respiration 1: respiration 4th grade ... i. classroom teacher will run a group. groups...
TRANSCRIPT

Last Revised: 9/1/2016
1
Module 1: Respiration 4th Grade
About the Instructions:
This document is intended for use by classroom teachers, SciTrek leads, and SciTrek volunteers. The document has been composed with input from teachers, leads, volunteers, and SciTrek staff to provide suggestions to future teachers/leads/volunteers. The instructions are not intended to be used as a direct script but were written to provide teachers/leads/volunteers with a guideline to present the information that has worked in the past. Teachers/leads/volunteers should feel free to deviate from the instructions to help students reach the learning objectives of the module. Some places in which you can be creative and mold the program to meet your individual teaching style, or meet the needs of the students in the class are: during class discussions, managing the groups/class, generating alternative examples, and asking students leading questions. However, while running the module make sure to cover all the material each day within the scheduled 60 minutes. In addition, no changes should be made to the academic language surrounding procedures or the procedure activity.
Activity Schedule: Day 3 must be scheduled to allow students to record their results 24 hours later during day 3.5. Ideally day 1 should not be on a Monday. This will allow the bottles for the initial observation to be brought to the classroom 24 hours prior to the module starting.
Day 1: Procedure Assessment/Observations/Variables (60 minutes) Day 2: Question/Material Page/Experimental Set‐Up/Procedure Activity (60 minutes) Day 3: Procedure Activity/Procedure/Results Table/Experiment (60 minutes) Day 3.5: Experiment (15 minutes) Day 4: Results Summary/Poster Making (60 minutes) Day 5: Poster Presentations (60 minutes) Day 6: Procedure Assessment/Tie to Standards (60 minutes)
The exact module dates and times are posted on the SciTrek website (http://www.chem.ucsb.edu/scitrek/elementary) under the school/teacher. The times on the website include transportation time to and from the SciTrek office (Chem 1105). Thirty minutes are allotted for transportation before and after the module, therefore, if a module was running from 10‐11 then the module times on the website would be from 9:30‐11:30.
NGSS Performance Expectation Addressed: 4‐LS1‐1 Construct an argument that plants and animals have internal and external structures that
function to support survival, growth, behavior, and reproduction.

Last Revised: 9/1/2016
2
Learning Objectives:
1. Students will know that animals breathe in oxygen and breathe out carbon dioxide. 2. Students will know that plants take in carbon dioxide and release oxygen during photosynthesis. 3. Students will be able to identify if a possible procedure step contains information about the changing
variable, controls, and/or data collection. 4. Students will be able to determine if a statement could be a correct step for a procedure from a given
question and experimental set‐up. 5. Students will be able to identify the changing variable, at least one control, and what data was collected
from a given procedure. 6. Students will be able to list at least two ways that they behaved like scientists.
Classroom Teacher Responsibilities:
In order for SciTrek to be sustainable the program needs to work with teachers on developing their abilities to run student‐centered inquiry‐based science lessons on their own in their classroom. As teachers take over the role of SciTrek lead, SciTrek will expand to additional classrooms. Even when teachers lead the modules in their own classroom, SciTrek will continue to provide volunteers and all of the materials needed to run the module. Below is a sample timeline for teachers to take over the role as the SciTrek lead.
1. Module 1 & 2 (year 1) a. Classroom Teacher Runs a Group
i. Classroom teacher will run a group. Groups contain ~ten students and will be subdivided into two small groups, ~five students, to perform experiments.
2. Module 3 (year 2) a. Classroom Teacher Runs a Group and Starts Leading Class Discussions
i. Classroom teacher will run a group. Groups contain ~ten students and will be subdivided into two small groups, ~five students, to perform experiments.
ii. Classroom teacher will start leading parts of group discussions (examples: procedure activity, tie to standards, etc.).
3. Module 4 (year 2) a. Classroom Teacher Leads the Class with Co‐Lead Volunteer
i. Classroom teacher will be responsible for leading entire class discussions (examples: procedure activity, tie to standards, etc.).
ii. Classroom teacher will be responsible for time management. iii. Classroom teacher will be responsible for overseeing volunteers and helping
any groups that are struggling. iv. Classroom teacher will be responsible for all above activities, the SciTrek co‐
lead will only step in for emergencies. 4. Any Additional Modules (year 3 and beyond)
a. Classroom Teacher Leads the Class i. Classroom teacher will be responsible for leading entire class discussions
(examples: procedure activity, tie to standards, etc.). ii. Classroom teacher will be responsible for time management. iii. Classroom teacher will be responsible for overseeing volunteers and helping
any groups that are struggling. SciTrek staff will be counting on teacher involvement. Teachers should notify the SciTrek staff if they will not be present on any day(s) of the module. Additional steps can be taken to become a SciTrek lead faster than the proposed schedule above. Contact [email protected] to learn more.

Last Revised: 9/1/2016
3
In addition, teachers are required to come to UCSB for the module orientation, ~one week prior to the start of the module. Contact [email protected] for exact times and dates, or see our website at http://www.chem.ucsb.edu/scitrek/elementary under your class’ modules times. At the orientation teachers will go over module content, learn their responsibilities during the module, and meet the volunteers that will be helping in their classroom. If you are not able to come to the orientation at UCSB you must complete an online orientation. Failure to do an orientation for the module will result in loss of priority registration for next year.
Prior to the Module (at least 1 week):
1. Come to the SciTrek module orientation at UCSB. 2. Divide the class into three groups, ~ten students each. We find these groups work best when they
are mixed levels and mixed language abilities. These larger groups of students will be further subdivided into two small groups, ~five students each, when performing experiments. You can also designate the small groups if desired. Send your class list showing the large/small groups to [email protected] one week before the start of the module so that we can have nametags/notebooks made for students.
During the Module:
If possible have a document camera available to the SciTrek lead every day of the module. If you do not have a document camera please tell the SciTrek staff at orientation. Day 0:
24 hours before the SciTrek module starts, three sets of three bottles and a lamp (with 60 W equivalent LED bulb) will be brought to the classroom. Each set of bottles will contain: one bottle with only solution, one bottle with solution/aquatic snail, and one bottle with solution/aquatic plant. All of the bottles need to be under the provided light until the module starts the next day. When SciTrek brings the materials to your classroom they will need 5 minutes to talk to the students to explain the contents and conditions of each bottle.
Day 1: Have the students’ desks/tables moved into three groups and cleared off. This ensures that each student has a desk to sit at during SciTrek activities and that students can begin the module as soon as SciTrek arrives.
Day 2‐ 4: Have the students’ desks/tables moved into six groups and cleared off. This ensures that each student has a desk to sit at during SciTrek activities and that students can begin the module as soon as SciTrek arrives.
Day 3: Have a spot in your classroom where six Xerox boxes can sit. These boxes must be near plugs so that the lamps, which sit on top of the boxes, can be plugged in. These lamps need to be kept on from day 3 until day 3.5.
Day 5 and 6: Have the students’ desks/tables cleared off. The desks/tables do not need to be moved into groups.

Last Revised: 9/1/2016
4
Scheduling Alternatives
Some teachers have expressed interest in giving the students more time to work with the volunteers throughout the module. Below are options that will allow the students more time to work with the volunteers. If you plan to do any of the following options, please inform the SciTrek staff no later than your orientation date (~one week before your module, exact orientation times are found at: http://www.chem.ucsb.edu/scitrek/elementary). This will allow the SciTrek staff to provide you with all needed materials. Day 1:
If you would like to have more time for you students to make observations and generate variables you can do the procedure assessment before SciTrek arrives.
Day 2: If you would like to have more time for your students to determine their questions and experimental set‐up you can do one or both of the following activities:
1) Example question and experimental set‐up outlined in the introduction before SciTrek arrives
2) The first part of the procedure activity after SciTrek leaves (pages 7, 8, and 9) Day 3:
If you would like students to have more time for your students to write their procedures and start their experiments you can do the second part of the procedure activity (page 10) before SciTrek arrives.
Day 4: If you would like to have more time for your students to analyze their experiments and make posters you can go over the example results summary before SciTrek arrives.
Day 5: If you would like to have more time for your students to discuss their experiments during poster presentations, you may take more time for each presentation and finish the presentations after SciTrek leaves.
Day 6: If you would like more time for the tie to standards activity, you may give the procedure assessment before SciTrek arrives.
Materials Used for this Module:
1. Bromothymol blue (Fisher part number 10273370 ) Concentrated Solution
1. Mix 0.1 g of bromothymol blue powder with 10 ml of 1.0 M sodium hydroxide. 2. Add 20 ml of ethyl alcohol 3. The solution should be deep blue 4. Dilute with deionized water to 1 L
Solution for Bottles: 1. Remove 50 ml of water from a gallon bottle of distilled water (Note: The water must be
distilled. Drinking water cannot be used, or the experiment will not work.) 2. Put 50 ml of concentrated bromothymol blue into the remaining water in the gallon
bottle. 3. Shake the solution of water and bromothymol blue. 4. Pour solution into bottles and cap.
2. Bottles [8 oz (Costco), 10 oz (Dasani, Walmart), 16.9 oz/500 ml (Costco), 33.3 oz/985 ml (Costco)] 3. Mystery snails 4. African frogs 5. Mosquito fish

Last Revised: 9/1/2016
5
6. Algae Shrimp 7. Plant 1: Ludwigia 8. Plant 2: Hornswort 9. Plant 3: Anacharis 10. Plant 4: Wisteria 11. Tree leaves: 12. Flowers: Daisy and Jasmine 13. Gooseneck Desk Lamps (with adjustable heads) (Target part number: Room Essentials Gooseneck
Desk Lamp) 14. Light bulbs (60 W equivalent LED (800 lumen) light bulbs) (Philips part number: 046677455507) (Make
sure that you use LED light bulbs because these give off less heat than incandescent bulbs. If you use incandescent bulbs you will kill all of the animals.)
15. Extension cord 16. Boxes for different amounts of light are hand made by taking a Xerox box and cutting a 11.5 cm
diameter hole in the top of the box (when the box is on its side) and taping on a 13 cm x 14 cm polarizing filter over the hole (Education Innovations part number: PF‐12). The different amounts of light are then made by having the 60 W equivalent LED light bulb go through: one filter (level 4), two filters that are aligned (level 3), two filters that are 45° to each other (level 2), and two filters that are 75° to each other (level 1). All filters are taped to the top of the box so that they will not move. Another Xerox box is available with no holes to provide a dark environment (level 0). A picture of one of the boxes is seen below.
All printed materials used by SciTrek (student notebooks, materials page, lead picture packet, poster parts, instructions, and nametags) can be made available for use and/or editing by emailing [email protected].

Last Revised: 9/1/2016
6
Day 1: Procedure Assessment/Observations/Variables
Schedule:
Introduction (SciTrek Lead) – 2 minutes Procedure Assessment (SciTrek Lead) – 10 minutes Observation Discussion (SciTrek Lead) – 4 minutes Observations (SciTrek Volunteers) – 14 minutes Variable Discussion (SciTrek Lead) – 8 minutes Variables (SciTrek Volunteers) – 19 minutes Wrap‐Up (SciTrek Lead) – 3 minutes
Materials: (3) Volunteer Boxes:
☐ Student nametags
☐ (12) Student notebooks
☐ Volunteer instructions
☐ Volunteer lab coat
☐ (2) Wet erase markers
(3) Supplies Already in Classroom:
☐ (3) Bottles with solution (labeled “Bottle 1”)
☐ (3) Bottles with solution and an aquatic snail (labeled “Bottle 2”)
☐ (3) Bottles with solution and an aquatic plant (labeled “Bottle 3”)
Other Supplies:
☐ (3) Large group notepads
Lead Box:
☐ (5) Blank nametags
☐ (3) Extra student notebooks
☐ Lead instructions
☐ Respiration picture packet
☐ Lead lab coat
☐ (35) Procedure assessments
☐ Time card
☐ (2) Wet erase markers
☐ (2) Dry erase markers
☐ (3) Markers (orange, green, blue)
☐ Straw

Last Revised: 9/1/2016
7
SciTrek Notebook Pages Used With Students:
SciTrek Group Notepad Pages Used With Students:

Last Revised: 9/1/2016
8
Set‐Up:
SciTrek Lead: If the classroom has a document camera, ask the teacher to use it to show the initial bottle picture (page 1, picture packet) and class question (front cover, student notebook). If the classroom does not have a document camera, then write the class question on the board during the variable discussion.
SciTrek Volunteer:
Put your name, the teacher’s name, and your group color on the top of your group notepad. As students are taking the procedure assessment, walk around the room and quietly place the students’ nametags, which are in your group box, on each student’s desk. Once you have passed out the nametags, assemble the experimental set‐up (seen in picture below). Use the following steps to help you with the set‐up:
1. Get bottles 1‐ 3 for your group (under lamp in classroom) and have them ready to put on the table once your students come to your group. Your table will look like the set‐up seen below:
Introduction: (2 minutes – Full Class – SciTrek Lead)
“Hi, we are scientists from UCSB and we want to show you what we do as scientists. We will show you an experiment and then you can make observations, come up with a class question, and design your own experiment to help answer the class question. We want to show you that you can do science and have fun.” If you are a teacher that is leading the class tell your students that they are going to start a long‐term science investigation and you have asked some scientists from UCSB to come and help. Allow the UCSB volunteers to introduce themselves and share their majors.
Procedure Assessment: (10 minutes – Full Class – SciTrek Lead)
As the students are taking the assessment, the volunteers should get the student nametags out of their group boxes and walk around the room locating their students. Have the volunteers quietly lay each student’s nametag on their desk. If students do not have their name on their paper remind them to do so. After volunteers have handed out the nametags they should assemble the experimental set‐up. “Before we start with the module we will determine how your ideas on procedures are developing.” Pass out the procedure assessment and tell students to fill out their name, teacher’s name, and date at the top

Last Revised: 9/1/2016
9
of the assessment. Remind the students that it is important that they fill out this assessment on their own. For page 1, read the question, changing variable (example: the changing variable was solid amount), and controls (example: the controls were liquid type, time, container type…). You do not need to read the values of the changing variable or the controls. Then read the directions to the students. Read each of the statements and have students 1) underline controls/circle changing variables/box data collection, 2) write the appropriate letter(s) on the line (C/CV/D), and 3) circle if the statement could be an appropriate procedure step. As you are reading the statements walk around the room and verify that students have written their name at the top of the paper. For page 2, read the directions to the students and then have students underline controls/circle changing variables/box data collection while you read the procedure. After reading the procedure, read each question to the students, giving t hem a few minutes to answer the questions before moving on. When students are finished, collect the assessments and verify that the students’ names are on the top of the paper.
Observation Discussion: (4 minutes – Full Class – SciTrek Lead)
Tell the students that scientists make lots of observations. Ask the class, “What is an observation? What are the types of things that you can record for an observation?” If they have trouble, show them an object and let them make some observations. Turn these observations into general features of an observation. Examples of possible general observations are: color, texture, size, weight, temperature, material, etc.
“In this experiment we are going to use two terms to help us make observations: contents and conditions. Contents are defined as the materials that are inside the bottle besides the solution.” Hold up one of the bottles and ask the students to identify the contents in that bottle. Example answer: an aquatic plant. “We will use the term conditions to tell other variables that might affect the experimental results that are outside of the bottle.” Ask the students to identify the conditions of the bottles. Example answer: under light for 24 hours, room temp, etc. Tell the class they will now get in their groups and make observations. To determine their group they will need to look at the color of their nametag. Tell each colored group where to go and to bring a pencil. If a student does not have a nametag, identify the group with the least number of students in it and write the student’s name on one of the extra nametags that are in the lead box using that color of marker. As students are going to their groups put up the initial bottle picture (page 1, picture packet). If the classroom teacher took a picture of the bottles use that picture instead.

Last Revised: 9/1/2016
10
Observations: (14 minutes – Large Groups – SciTrek Volunteers)
Once the students come over to your group have them sit in boy/girl fashion. Make sure the table is set‐up as described in the set‐up section. A picture of the bottles from 24 hours earlier will be on the document camera (see example below). Pass out the SciTrek notebooks to each student. Have students fill out their group color (color of the name on their nametag: orange, blue, or green), their name, teacher’s name, and volunteer name on the front cover of their SciTrek notebook. Students will leave the group number and class question blank. Then have students turn to page 2 of their notebooks.
As a group, have the students fill in the table about the bottle contents and conditions and the color of the bottle before and after the 24 hours. While you are recording their answers on the group notepad have students fill in the table in their notebook. Ask the students what happened to the bottles over the course of 24 hours. If needed, probe students with questions such as: What is the biggest difference that you see between the bottles? How are the bottles different from 24 hours ago? By the end of the discussion make sure that students understand that over the course of 24 hours the bottle with the snail in it turned yellow while the bottles with just the solution and the plant remained blue. Some groups might notice that the plant bottle is a little lighter blue than the original bottle; you can record this in the table. Have students write one summary sentence about what happened to each bottle. If students are struggling, write the following sentence frame on the group notepad: The bottle with ______ started as ______ and after 24 hours turned ______.
If there is extra time have students generate a few more general observations about the bottles. An example of the group notepad/student notebook for all of the observations is seen below; feel free to deviate from the example.

Last Revised: 9/1/2016
11
Variable Discussion: (8 minutes – Full Class – SciTrek Lead)
Have the class identify the contents of each bottle, the conditions of each bottle, and the initial and final color of the solution in each bottle. By the end of the discussion make sure that the students have identified that the solution color in the bottle with no contents stayed blue, the solution color in the bottle with the aquatic plant stayed blue (or turned slightly green), and the solution color in the bottle with the snail turned yellow.
Ask the class what is the most interesting observation was. They should reply that the solution in the bottle with the snail turned yellow. Tell the class we will then work together to answer the question, “What variables affect the color of the solution?” Write this question on the front page of the example notebook under the document camera and have students copy this question onto their notebook.
Ask the class what does the word “variable” mean to a scientist? What is the definition of a variable in science? Possible answer: variables are parts of the experiment that you can change. What was the changing variable in the experiment that we just did? The students should say the contents of the bottle. Do you think that there are other variables that will affect the solution color? The students should respond that multiple variables might affect the solution color. This is why we will need to work as a class to answer the question, “What variables affect the color of the solution?” Tell the class that they are going to think about variables in the experiment that they could change to help us answer the class question. In addition to generating variables they should think about how these variables might affect the outcome of the experiment. Ask the class to give you a variable that they think might affect the color of the solution and have them tell you why or how they think that variable would affect the experiment. Probe them on how they would design an experiment to test if this variable affected the solution color. Finally, have the students make a prediction of the results for the experiment that they proposed.

Last Revised: 9/1/2016
12
Example: Variable: animal type Why might this variable might affect the solution color? The snail turned the color of the solution yellow so maybe all animals will have the same effect. How would you test this variable? Get bottles with blue solution and put different animals in each of the bottles Prediction: All bottles will turn yellow because the color is caused by something that all animals are producing.
Tell the students they will generate more variables and analyze them in their groups.
Variables: (19 minutes – Large Groups ‐ SciTrek Volunteers)
As a group, generate a variable and make a prediction about how it will affect the solution color. Encourage and challenge students to explain why they think their prediction is correct and how this variable will affect the solution color. Repeat this process three more times and record these ideas on the group notepad and then have students copy these into their notebooks. If students have different predictions they can write their own prediction in their notebook. Next, students will individually generate at least one additional variable and make a prediction about how different values of this variable will affect the solution color and record their ideas in their notebook. Have students share these ideas with the group. Prepare a student to share a variable and why they think it will affect the solution color during the group discussion.
Wrap‐Up: (3 minutes – Full Class – SciTrek Lead):
Last Revised: 9/1/2016
13
Have one student from each group share a variable that they generated and how they think it will affect the solution color. Make sure that students tell you their predictions about how different values of that variable will affect the solution color. Challenge students to justify their thinking and explore with them how this might help them design an experiment to answer the class question. For example, if a student’s variable was animal type and they predicted that any type of animal would produce a change in the color of the solution because all animals might be producing something that changes the color of the solution ask them if they would want all animals that were similar to one another when they select their animals for their experiment. Probe the students deeper by asking them questions such as: if you designed an experiment to test this do you think it would be easier or harder to see if this variable affected the color of the solution if you also added a plant to the bottle. Tell the students that the next time we meet they will design an experiment to answer the class question, “What variables affect the color of the solution?”
Clean‐Up:
Before you leave, have students attach their nametags to their notebooks and place them in the group box. Put all of the bottles used for observations into your group box. Bring all materials back to UCSB. In addition, put your lab coat back into your group box. If you would like to divide your large group (~ten students) into two smaller groups you can do this by writing a “1” or “2”on the top each student’s notebook to designate their group. Make sure that the groups are made up of mixed gender and mixed ability students.
Day 2: Question/Materials Page/Experimental Set‐Up/Procedure Activity
Schedule:
Introduction (SciTrek Lead) – 10 minutes Question (SciTrek Volunteers) – 5 minutes Materials Page (SciTrek Volunteers) – 5 minutes Experimental Set‐Up (SciTrek Volunteers) – 5 minutes Procedure Activity (SciTrek Lead) – 33 minutes Wrap‐Up (SciTrek Lead) – 2 minutes
Materials: (3) Volunteer Boxes:
☐ Student nametags
☐ Student notebooks
☐ Volunteer instructions
☐ Volunteer lab coat
☐ (2) Materials pages (group color & number indicated)
☐ Pencil
☐ (2) Red pens
☐ Notepad Lead Box:
☐ (5) Blank nametags
☐ (3) Extra student notebooks
☐ Lead instructions
☐ Respiration picture packet
☐ Lead lab coat
☐ (3) Materials pages
☐ Time card
☐ (2) Pencils
☐ (2) Red pens
☐ (2) Wet erase markers
☐ (3) Markers (orange, green, blue)
☐ Notepad
SciTrek Notebook Pages Used with Students:
Last Revised: 9/1/2016
14

Last Revised: 9/1/2016
15
Set‐Up:
SciTrek Lead: If the classroom has a document camera, ask the teacher to use it for the final bottle day 1 picture (page 2, picture packet), question (page 4, student notebook), lead materials page (page 3, picture packet), experimental plants pictures (page 4, picture packet), experimental set‐up (page 5, student notebook), and procedure activity (pages 7‐9, student notebook), and procedure activity experimental set‐up (page 5, picture packet). If the classroom does not have a document camera, then tape the example poster‐size notebook pages to the front board.
SciTrek Volunteer:
Set out student notebooks in a way that allows students within the same group number to work with each other.
If students are not in the classroom before SciTrek starts set out the notebooks where you want students to sit when they come into the classroom.
If students are in the classroom when SciTrek starts set out the notebooks where you want students to sit and students will move to these spots after the introduction.
Make sure you have two materials pages each filled out with a group number (1 or 2) and your group’s color. These will be given to students after they complete their question. Have a red pen available to approve students’ question and experimental set‐up (pages 4 and 5).
Introduction: (10 minutes – Full Class – SciTrek Lead)
If needed, while you are doing the introduction have the SciTrek volunteers pass out the SciTrek notebooks/nametags where they would like students to sit. Make sure that students with the same group number are sitting next to each other. Tell students that a notebook will be put on their desk which is not their notebook and they should not move it.

Last Revised: 9/1/2016
16
Put up the final bottle day 1 picture (page 2, picture packet) and ask the students what they did during the last meeting with SciTrek. They should reply that they were looking at bottles and they observed what happened to the solution in the bottle over the course of 24 hours. In the bottle with only solution and the bottle with solution and an aquatic plant the solution remained blue while in the bottle with solution and an aquatic snail the solution turned yellow. Ask the class if they remember the class question they decided to investigate. They should reply, “What variables affect the color of the solution?” Tell students that one way scientists answer questions is by performing experiments; today they will design an experiment to help answer the class question. Ask the class if they think there are multiple variables that could affect the solution’s color. They should respond that there probably are multiple variables. Therefore, each group is going to generate a smaller question about one changing variable to investigate. Once we put all the groups’ research together we should be able to answer the class question. Groups will first generate a question based on the changing variable that they plan to explore. They will then determine their experimental set‐up, which is where they will pick values of their changing variable, and then determine their controls. Tell the students that they need to keep a few things in mind while they are going through this process.
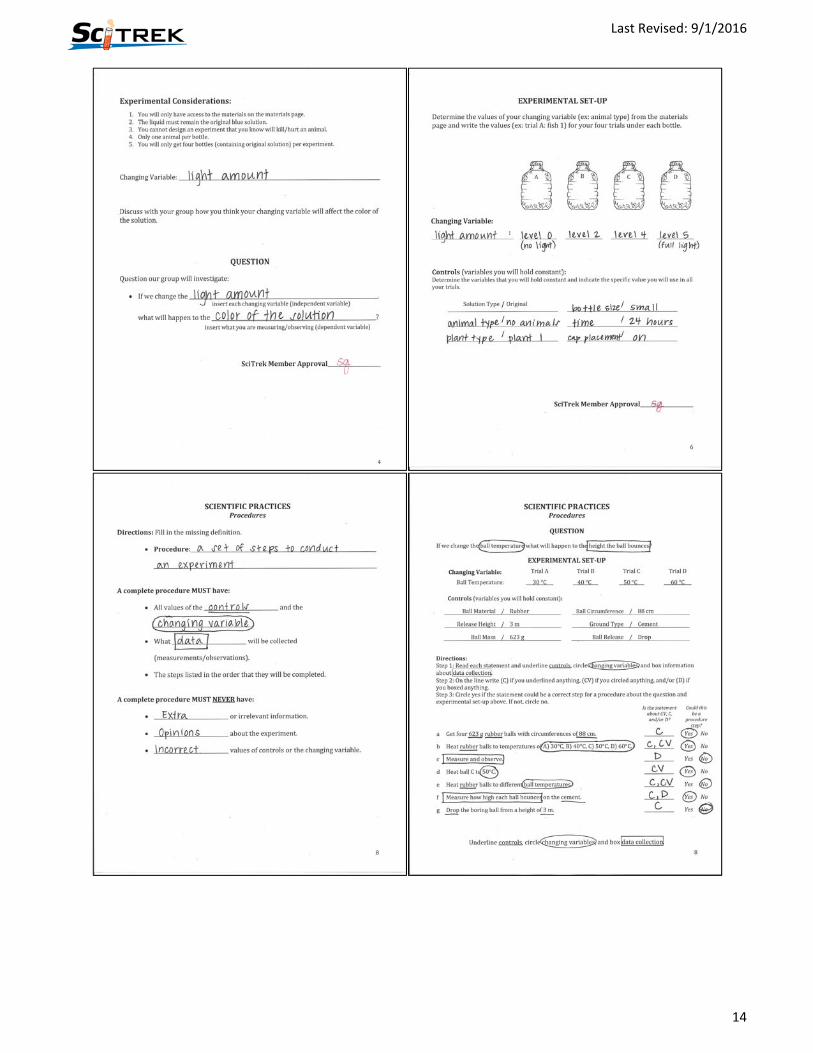
Experimental Considerations:
1. You will only have access to the materials on the materials page. 2. The liquid must remain the original blue solution. 3. You cannot design an experiment that you know will kill/hurt an animal. 4. Only one animal per bottle. 5. You will only get four bottles (containing original solution) per experiment.
Tell the students we are now going to generate an example question/experimental set‐up together and that you will write it in an example notebook so that they will be able to refer back to it when they are completing the process themselves. Make sure that students DO NOT fill out the example question/experimental set‐up in their notebooks. Tell students they first need to decide what the changing variable will be for the class experiment. Ask students who is interested in changing the animal type. Most or all students will raise their hand. Tell the students that since everyone is interested in animal type, this is what we will investigate as a class. Therefore, when they design an experiment with their group they will need to pick a variable other than animal type to investigate. This will allow us to have a wide range of variables tested, making poster day more interesting. Record animal type for the changing variable in the example notebook (page 4). Have the students tell you how they think changing animal type will affect the color of the solution (example answer: the snail turned the solution yellow the first day, therefore, maybe all animals will turn the solution yellow). Show students how to insert their changing variable and what they plan to measure/observe into the question frame to find the question that will be investigated: If we change the animal type, what will happen to the color of the solution? Explain to students that many times when there is a large question, like our class question, scientists break it down into smaller questions that individual scientists can investigate and then they can compile their work to answer the large question.

Last Revised: 9/1/2016
17
Tell them once they have determined their question and have approval, their SciTrek volunteer will give them a materials page for determining the values of their changing variable and controls. Ask students if they know how scientists define controls. Make sure that by the end of the conversation students understand that controls are variables that are held constant during an experiment. For example, if they kept the caps on all of the bottles then one of their controls would be cap placement. These controls can be different than the original experiment that they conducted on day one, but must remain constant throughout all the trials that they do for this experiment. Show students the lead materials page (page 3, picture packet) and select values for the changing variable and controls. Tell students when using the materials list they need to pay attention to the limitations listed for each of the materials. Go through the bottles, plants, and light amount sections of the materials page. For bottles, choose 4 small bottles because the class is not changing bottle size and small bottles are the only ones that groups can receive more than one. For plants, show students the experimental plants pictures (page 4, picture packet). Lead students to understand that it will be difficult to determine what is affecting the color of the solution if we use both plants and animals, then choose no plants. For light amount, choose level 5 light. Tell students that because there are only four choices for animal type and they have four trials, we will chose one of each type of animal. Tell students that once they have completed their materials page they will fill out their experimental set‐up. First they will fill out the information on the changing variable. Ask students what the changing variable was for our class experiment and fill in the values for all of the trials on page 5 of the example student notebook. Second they will fill in information about the controls. Ask students for one of the controls for the class experiment. Show students how to record the control on the left side of the slash (example: plant type) and the value of that control on the right side of the slash (example: no plants). Have students tell you the controls and the values until all of the blanks are filled. Four of the controls and values will come from the materials sheet and the last two controls and values will not be on the materials sheet. Two possible examples are time/24 hours and cap placement/on.

Last Revised: 9/1/2016
18
If needed tell the students that they will now get into their groups. Once there they will go through the same process to determine their question and experimental set‐up. Remind them that because we are exploring animal type as a class, they will not be able to change this variable and the only animals they will have access to are snails. Therefore, they will get a slightly modified materials page. Once their group has completed their experimental set‐up they should raise their hands and get it approved by their SciTrek volunteer. Place the question under the document camera so that students can refer back to it as they design their experiment. As groups move onto their materials page, put the experimental plants pictures (page 4, picture packet) under the document camera so that students can refer to it as they choose their materials. As groups move onto their experimental set‐up, put the example experimental set‐up (page 5, student notebook) under the document camera.
Question: (5 minutes – Small Groups – SciTrek Volunteers)
Have students determine what changing variable they want to explore for their experiment. If possible, encourage your small groups to have different changing variables. Each group should briefly discuss how they think the changing variable will affect the solution’s color. After groups have decided on their changing variable have them fill out their question. When you sign off on their question give them a materials page with their group color and number designated in the upper right hand corner. An example notebook is seen below.

Last Revised: 9/1/2016
19
Materials Page: (5 minutes – Small Groups – SciTrek Volunteers) Have groups use the materials page to determine the values for their changing variable and controls. Ask students to justify the values that they have chosen for their changing variable and controls and if these values will make it easier or harder to answer their question. Make sure that they have not gone over the maximum of any of the items on the materials page.

Last Revised: 9/1/2016
20
Experimental Set‐Up: (5 minutes – Small Groups – SciTrek Volunteers)
Have groups use the materials page to fill in their experimental set‐up on page 5. When you sign off on their experimental set‐up collect the materials page and verify that it is filled out correctly and completely. Having the materials pages filled out is essential for starting their experiments during the next SciTrek visit. An example of the experimental set‐up and materials page are seen above.
Procedure Activity: (33 minutes – Full Class – SciTrek Lead)
Tell students that you have heard some great experiments being designed and you are excited to see the outcomes of their experiments. Tell students that now that they have determined their experimental set‐up they are going to need to write a procedure. But before they write their own procedures, it is necessary that they know what information a procedure contains and what information should not be included. Tell the students to turn to page 7 in their notebooks. Put an example notebook under the document camera and turn to page 7. Ask the class, “What is a procedure?” After listening to the students’ answers make sure that the students understand that a procedure is a set of steps to conduct an experiment. Write this definition on page 7 of the example notebook for the students to copy. Tell the students that in order to write a procedure we need to make sure that we understand what information MUST be included in procedures. Ask students what information they think should be included in a procedure. Make sure that students generate the following three items: 1) all values of the controls and the changing variable (independent variable), 2) what data will be collected (dependent variable), and 3) the steps listed in the order that they will be completed. If students are having trouble

Last Revised: 9/1/2016
21
generating these ideas have them think back to their question and experiment set‐up and the information included. Once students have generated these ideas have them fill in the blanks in their notebooks with the underlined words above while you fill in the values in the example notebook. Tell students to help us recognize control values, changing variable values, and data collection information in procedural steps we will underline information about controls, circle information about changing variables, and box information about data collection. On the example notebook underline the word controls, circle the word changing variable, and box the words data and measurements/observations. Tell the students that we also need to discuss items that MUST NEVER be included in a procedure. Ask students what information they think should not be included in a procedure. Make sure that students generate the following three items: 1) extra or irrelevant information, 2) opinions about the experiment, and 3) incorrect values of controls or the changing variable. Have students fill in the blanks in their notebooks with the underlined words above while you fill in the values in the example notebook. ***Teacher Note: If students need help understanding what it means to have opinions or irrelevant information in a procedure, you can give them the following example: a scientist was designing an experiment to test which laundry detergent will have the largest reduction in size of grass stains on cotton. Below are examples of steps containing an opinion and irrelevant information:
Step with an Opinion: Example: Get three brands of good smelling laundry detergent A) Tide B) Gain C) All. Step with Irrelevant Information: Put on cotton pants and play soccer in them until you get a grass stain.
Have students turn to page 8 in their notebooks. Turn the example notebook to page 8 under the document camera. Tell students that we are now going to look at group of scientists’ question and experimental set‐up and we will then decide if the following seven statements would be appropriate procedural steps for those scientists’ experiment. Go over the question, changing variable, changing variable values, controls, and control values with the students.

Last Revised: 9/1/2016
22
Tell the students that the first thing that they should do when looking at a possible procedure step is identify the information in that statement. They will do this by underlining any information about controls, circling information about the changing variable, and boxing information about data collection. To practice have students look at the question and tell you what should be underlined, circled, or boxed. Within the question students should circle “ball temperature” and box “height the ball bounces.” Once the students have underlined, circled, or boxed all of the relevant information in the statement, they will write “C” (for controls) on the line if anything is underlined, “CV” (for changing variable) on the line if anything is circled, and “D” (for data collection) on the line if anything is boxed. Once they have determined what information is in the possible procedure step they will have to check if the statement could be a possible procedural step by looking at the information in the question and experimental set‐up. If the statement could be a possible procedure step they will circle “yes,” if not they will circle “no.” Tell students that they will now go over all of the statements together. Below are the explanations and answers to letters a‐g on page 8. Letter a: Get four 623 g rubber balls with circumferences of 88 cm. Controls (C) Correct – Set‐Up with Controls Only
What should be underlined, circled, or boxed? “623 g”, “rubber”, and “88 cm” should be underlined.
What should be written on the line? C for controls. Are there any opinions or incorrect/irrelevant information in this step? No. What is this step about?
This step is about the ball that will be used in the experiment. Is there any other information that should have been included in this step? No.
Could this be a correct procedural step? Yes (have students circle “yes”)
Letter b: Heat rubber balls to temperatures of A) 30°C, B) 40°C, C) 50°C, D) 60°C. Controls (C) and Changing Variable (CV) Correct – Changing Variable with Values
What should be underlined, circled, or boxed? “Rubber” should be underlined and “A) 30°C, B) 40°C, C) 50°C, D) 60°C” should be circled.
What should be written on the line? C for controls and CV for changing variable. Are there any opinions or incorrect/irrelevant information in this step? No What is this step about?
This step is about getting each ball ready to be bounced by heating them. Is there any other information that should have been included in this step?
No. Students may bring up that the ball is not fully described. If they do ask them if the ball could have been described in a previous step. Since the answer is yes this does not need to be included.
Could this be a correct procedural step? Yes (have students circle “yes”)

Last Revised: 9/1/2016
23
Letter c: Measure and observe. Data Collection (D) Incorrect – Vague Data Collection
What should be underlined, circled, or boxed? “Measure and observe” should be boxed.
What should be written on the line? D for data collection. Are there any opinions or incorrect/irrelevant information in this step? No What is this step about?
This step is data collection. Is there any other information that should have been included in this step?
Yes, this step does not include what data will be collected. Ask the students what data should be collected to answer the scientists’ question. They should say the height of the ball bounce.
Could this be a correct procedural step? No (have students circle “no”)
Letter d: Heat ball C to 50°C. Changing Variable (CV) Correct – One Changing Variable Value Explained
What should be underlined, circled, or boxed? “50˚C” should be circled.
What should be written on the line? CV for changing variable. Are there any opinions or incorrect/irrelevant information in this step? No What is this step about?
Getting ball C ready to be bounced by heating it. Is there any other information that should have been included in this step?
No. Students may bring up that only one changing variable value is listed. Ask students if the rest could be listed in other steps. They should answer yes therefore, this information does not need to be included.
Could this be a correct procedural step? Yes (have students circle “yes”)
Letter e: Heat rubber balls to different ball temperatures. Controls (C) and Changing Variable (CV) Incorrect – Changing Variable with No Values
What should be underlined, circled, or boxed? “Rubber” should be underlined and “ball temperatures” should be circled.
What should be written on the line? C for controls and CV for changing variable. Are there any opinions or incorrect/irrelevant information in this step? No What is this step about?
Getting each ball ready to be bounced by heating them. Is there any other information that should have been included in this step?
Yes, this step does not include the temperature the balls should be at. Since this information is missing, scientists who attempt to perform this experiment may use different temperatures from one another.

Last Revised: 9/1/2016
24
Could this be a correct procedural step? No (have students circle “no”)
Letter f: Measure how high each ball bounces on the cement. Controls (C) and Data Collection (D) Correct – Measurement
What should be underlined, circled, or boxed? “Cement” should be underlined and “measure how high each ball bounces” should be boxed.
What should be written on the line? C for controls and D for data collection. Are there any opinions or incorrect/irrelevant information in this step? No What is this step about?
This step is data collection. Is there any other information that should have been included in this step?
No. The step is about data collection and includes what data will be collected. Could this be a correct procedural step? Yes (have students circle “yes”)
Letter g: Drop the boring ball from a height of 3 m. Controls (C) Incorrect – Opinion during Experiment
What should be underlined, circled, or boxed? “Drop” and “3 m” should be underlined.
What should be written on the line? C for controls. Are there any opinions or incorrect/irrelevant information in this step? Yes, the word boring is an opinion and should not be included in a procedure. Could this be a correct procedural step? No (have the students circle “no”)

Last Revised: 9/1/2016
25
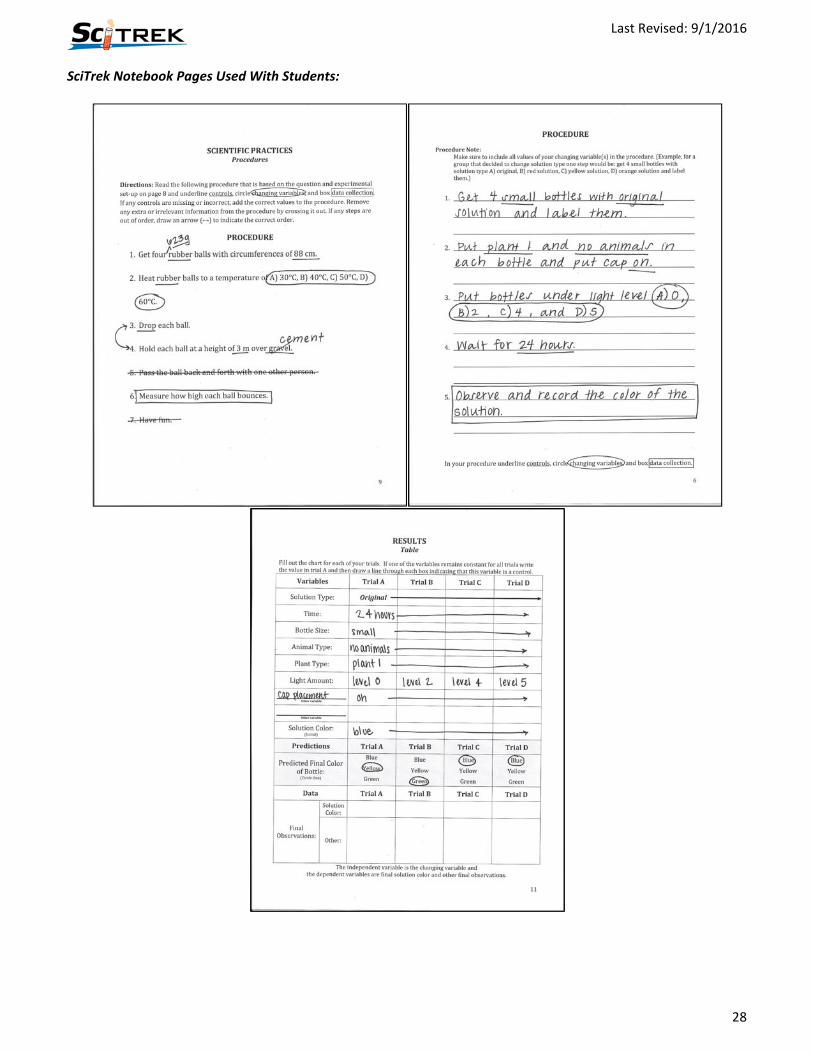
Tell students that now that they have an understanding about what steps could be correct steps for a given question and experimental set‐up, they are going to correct a possible procedure for the same experiment they were working with on page 8. Turn the picture packet to page 5 which shows the question and experimental set up from page 8 of the notebook and place it next to the example notebook. First, read each step of the procedure and have students tell you what you should underline/circle/box (controls/changing variable/data collection) for each step (see below). Ask students what needs to be included in order for a procedure to be complete. Students may answer any of the following listed in bold below. Cover each of the following points as they are brought up making sure to cover all of them by the end of the conversation.
A complete procedure must have all values of the controls and the changing variable.
Ask students if all controls are listed in the procedure. Go through the list of controls and put a check by them on the experimental set‐up as students identify them in the procedure. Students should notice that one of the controls, ball mass, is not included. Ask students what step this should be included in. They should respond step 1. Have students use a caret to write in 623 g before “rubber balls” in step 1 so that it reads: Get four 623 g rubber balls with circumferences of 88 cm.
A complete procedure must have what data will be collected (measurements/observations). Ask students if the data that will be collected is listed in the procedure. Students should say yes, the data that will be collected is listed in step 6. Students should notice that all of the information needed in step 6 is present, and that this aspect of the procedure is complete.
A complete procedure must have the steps listed in the order that they will be completed. Ask students if the steps are listed in the correct order. Go through the procedure steps once more and the students should notice that steps 3 and 4 are listed in the incorrect order. Draw a double sided arrow to indicate that steps 3 and 4 should be switched with one another.

Last Revised: 9/1/2016
26
A complete procedure must never have extra or irrelevant information. Ask students if there is any extra or irrelevant information about the experiment in this procedure. Students should notice that passing the ball back and forth with one other person does not help the scientist answer their original question, so this step is irrelevant. Have students cross out this step.
A complete procedure must never have opinions about the experiment. Ask students if any opinions are listed in the procedure. Students should notice that step 7, “Have fun,” is an opinion. Students should say that not every scientist who performs this experiment will think that bouncing different temperature rubber balls is fun, therefore, this is an opinion. Because opinions cannot be tested, this step is incorrect. Have students cross out this step.
A complete procedure must never have incorrect values of the controls or the changing variable. Ask students if all controls that are listed in the procedure are correct values. Go through the list of controls and confirm that all but one of the controls is correct. Students should identify that the ground type listed in step 4 is incorrect. Have students cross out “gravel” and write “cement.”
Note: In order for students to have time to write procedures and start their experiment on day 3, page 9 MUST be completed before the end of the day.
Wrap‐Up: (2 minutes – Full Class – SciTrek Lead)
Tell students that all of their experiments will help us answer the class question: What variables affect the color of the solution? Then tell them that next time that SciTrek visits they will write their procedure and then they will get to start their experiment.

Last Revised: 9/1/2016
27
Clean‐Up:
Before you leave, have the students attach their nametags to their notebooks and place them in the group box. Place the materials pages on top of the notebooks in your group box. Bring all materials back to UCSB. In addition, put your lab coat back in your group box.
Day 3: Procedure Activity/Procedure/Results Table/Experiment
Schedule: Introduction (SciTrek Lead) – 3 minutes Procedure Activity (SciTrek Lead) – 10 minutes Procedure Discussion/Procedure (SciTrek Lead/SciTrek Volunteers) – 29 minutes Results Table (SciTrek Volunteers) –5 minutes
Experiment (SciTrek Volunteers) – 11 minutes Wrap‐Up (SciTrek Lead) – 2 minutes
Materials:
(3) Volunteer Boxes:
☐ Student nametags
☐ Student notebooks
☐ Volunteer instructions
☐ Volunteer lab coat
☐ Pencil
☐ (2) Red pens
☐ (4) Black Sharpies
☐ Notepad
☐ Paper towels
Other Supplies:
☐ (32) Bottles of solution in a bucket (requested sizes + 8 additional small bottles)
☐ (3) White rags
☐ (2) Extension cords
☐ (5) Lamps with 60 W equivalent LED blubs
☐ (4) Boxes with polarizing filter taped to top labeled with light level
☐ Box with no holes labeled “level 0”
☐ (3) Plant/snail containers labeled with the appropriate group color
☐ Lead animal container ((2) fish, frog, shrimp, and (6) snails)
☐ Lead aquatic plant container (plant 1, plant 2, plant 3, plant 4, and (4) of the type of aquatic plant that is most abundant)
☐ Lead non‐aquatic bag (flower 1, flower 2, leaf 1, and leaf 2)
Lead Box:
☐ (3) Extra Student notebooks
☐ Lead instructions
☐ Respiration picture packet
☐ Lead lab coat
☐ Time card
☐ (2) Pencils
☐ (2) Red pens
☐ (2) Wet erase markers
☐ Notepad
☐ (3) Black Sharpies
☐ Paper towels
☐ Masking tape
Last Revised: 9/1/2016
28
SciTrek Notebook Pages Used With Students:

Last Revised: 9/1/2016
29
Set‐Up:
SciTrek Lead: If the classroom has a document camera, ask the teacher to use it for the procedure activity (page 10, student notebook), and the procedure (page 6, student notebook), results table (page 11, student notebook), and experimental plants pictures (page 4, picture packet). If the classroom does not have a document camera, then tape the example poster‐size notebook pages to the front board. Get all of the materials needed to start the class experiment and put them in the front of the class so that you will have them during the procedure discussion. Set‐up the light level boxes (levels 0‐4) in ascending order with the light turned on sitting on top of the boxes with the front lids removed. Set up an additional lamp for level 5 lighting (this will not be in a box). Do not plug extension cords into other extension cords. Make sure that you leave the classroom teacher the class notebook and the students’ notebooks for recording the data on day 3.5.
SciTrek Volunteers: Set out student notebooks in a way that allows students within the same group number to work with each other.
If students are not in the classroom before SciTrek starts set out the notebooks where you want students to sit when they come into the classroom.
If students are in the classroom when SciTrek starts set out the notebooks where you want students to sit and students will move to these spots after the introduction.
Introduction: (3 minutes – Full Class – SciTrek Lead)
If needed, while you are doing the introduction have the SciTrek volunteers pass out the SciTrek notebooks/nametags where they would like students to sit. Make sure that students with the same group number are sitting next to each other. Tell students that a notebook will be put on their desk which is not their notebook and they should not move it.
Ask the class “What is the class question that we are investigating.” The students should reply: “What variables affect the color of the solution?” Tell students that today they are going to get to write a procedure for their experiment and set‐up their experiment. Ask students what is the definition of a procedure. Students should reply that it is a set of steps to conduct an experiment. Tell students that before they work on their procedure they are going to look at a group of scientists’ procedure and try to determine what question they were investigating.
Procedure Activity: (10 minutes – Full Class – SciTrek Lead)
If needed, have students get into their groups. Have students turn to page 10 in their notebooks. Turn the example notebook to page 10. Tell students that now they will look at a procedure and try to determine what the changing variable and controls were as well as what data was collected. Once they determine these, they will figure out the question the scientists were investigating.
Last Revised: 9/1/2016
30
Read the procedure to the students. After each step have students tell you what they think should be underlined, circled, or boxed (controls, changing variable, or data collection). The following should be underlined: “100 mL”, “water”, “bowls”, “0°C”, and “30 g”. The following should be circled: “A) sugar, B) salt, C) baking soda.” The following should be boxed: “observe the order in which the ice melts.” Then ask students what was the changing variable in the experiment. Students should respond solid type. Write solid type on the line. Next ask students what were the controls and their values for the experiment. As students tell you these record them in the margins as seen in the example notebook. Controls and values that students could come up with include:
Water Amount/100 mL (This could be broken into Liquid Amount/100 mL and Liquid Type/Water) Container Type/Bowl Freezer Temperature/0°C Solid Amount/30 g
Have students record one of the controls and its value in their notebooks. Ask students what was the method of data collection, an observation or a measurement. Students should respond by saying observation. Circle observation. Next ask what was observed. Student should respond “the order in which the ice melts.” Finally, tell students that from the procedure other scientists should be able to determine the question the scientists were investigating. The general form of a scientific question is: If we change ________, what will happen to the ___________? Ask students if they think that a control, changing variable, or measurement/observation goes in the first blank. They should respond changing variable. Ask students what should be put into this blank for this experiment. They should respond solid type. Ask students if they think that a control, changing variable, or measurement/observation goes in the second blank. They should respond measurement/observation. Ask students what should be put into this blank for this experiment. They should respond the order in which the ice melts. If students struggle with determining what goes in the blanks have them think back to their question they wrote when designing their own experiments. Record these values in the example notebook and have students record them in their notebook and then read the question to the students. “If we change the solid type, what will happen to the order in which the ice melts?”

Last Revised: 9/1/2016
31
Procedure Discussion/Procedure: (29 minutes – Full Class/Small Groups – SciTrek Lead/SciTrek Volunteers)
Tell students that in order to give them an example of how to write a procedure for their experiments we will write a procedure together for the class experiment. Tell students that it is helpful to be able to see both their procedure and their experimental set‐up at the same time. Have students open their notebooks as seen in the picture below so that they can see both page 5 and 6. Ask the students what is the class experimental question that we will explore together. They should respond: If we change the animal type, what will happen to the color of the solution? Ask the students what needs to be included in a procedure. Make sure that students come up with the following three items: 1) all values of the controls and changing variable, 2) what data will be collected, and 3) the steps listed in the order that they will be completed.
Go over the experimental set‐up (page 5, student notebook) from day 2 for the class experiment. Tell students that you will write down a step of the procedure for the class experiment then they will write a

Last Revised: 9/1/2016
32
step for their experiment. Remind students that they should NOT copy the class procedure into their notebooks. Inform students that their requested bottles will already contain solution when they get them, knowing this ask them what they think the first step of procedure is about. Lead them to understand that it should be about getting their bottles and labeling them. Then turn to the experimental set‐up (page 5, student notebook) and ask them which of the controls/changing variable should be included in this step. Put a small check next to each one they suggest (solution type and bottle size). Ask a student to put these variables into a step that you can write down. (Get 4 small bottles with original solution and label them.) Write the step in the class notebook then ask students what you should underline/circle/box and underline/circle/box the first step. Tell students that in their group they will now write their first step in their procedure and then underline/circle/box the correct information in the step. Remind students that if their changing variable was bottle size they will need to include all of the bottle sizes in their first step. Read the example step on page 6, student notebook to give students an example of how to do this. Give students a few minutes to work in their group to finish step one. While groups are working their volunteers should help them. If needed groups can dictate the step to volunteers and they can write it on the notepad found in their box and give it to students to copy. Once students have written their first step ask them what they think the second step in the procedure should be about. Lead them to understand that it should be about filling the bottles with the needed materials. Then turn to the experimental set‐up (page 5, student notebook) and ask them which of the controls/changing variable should be included in this step. Put a small check next to each one they suggest (animal type, plant type, and cap placement). Ask a student to put these variables into a step that you can write down. (Put the animals in the bottles A) fish, B) frog, C) shrimp, and D snail with no plants and cap on.) Write the step in the class notebook then ask students what you should underline/circle/box and underline/circle/box the second step. Tell students that in their group they will now write their second step in their procedure and then underline/circle/box the correct information. Once students have written their second step ask them what they think the third step in the procedure should be about. Lead them to understand that it should be about putting the bottles under the correct light. Then turn to the experimental set‐up (page 5, student notebook) and ask them which of the controls/changing variable should be included in this step. Put a small check next to each one they suggest (light amount). Ask a student to put these variable into a step that you can write down. (Put the bottles under level 5 (full) light.) Write the step in the class notebook then ask students what you should underline/circle/box and underline/circle/box the third step. Tell students that in their group they will now write their third step in their procedure and then underline/circle/box the correct information. Once students have written their third step ask them what they think the fourth step in the procedure should be about. Lead them to understand that it should be about letting the bottles sit. Then turn to the experimental set‐up (page 5, student notebook) and ask them which of the controls/changing variable should be included in this step. Put a small check next to each one they suggest (time). Ask a student to put this variable into a step that you can write down. (Wait for 24 hours) Write the step in the class notebook then ask students what you should underline/circle/box and underline/circle/box the fourth step. Tell students that because all groups will use 24 hours as their time, this will be the fourth step for all groups. Give students a couple minutes to write this in their notebook and then underline/circle/box the correct information. Once students have written their fourth step ask them what they think the fifth step in the procedure should be about. Lead them to understand that it should be about data collection. Ask students what they will record at the end of the experiment and have them put this into a step you can write down (observe and record the color of the solution.) Write the step in the class notebook then ask students what you should underline/circle/box and underline/circle/box the fifth step. Tell students that because all groups

Last Revised: 9/1/2016
33
will observe and record the color of the solution, this will be the fifth step for all groups. Give students a couple minutes to write this in their notebook and then underline/circle/box the correct information. Below is an example experimental set‐up with all control and changing variable values checked to indicate they have been included in the procedure and class procedure. Below the class procedure and experimental set‐up is an example of a group procedure.
Last Revised: 9/1/2016
34
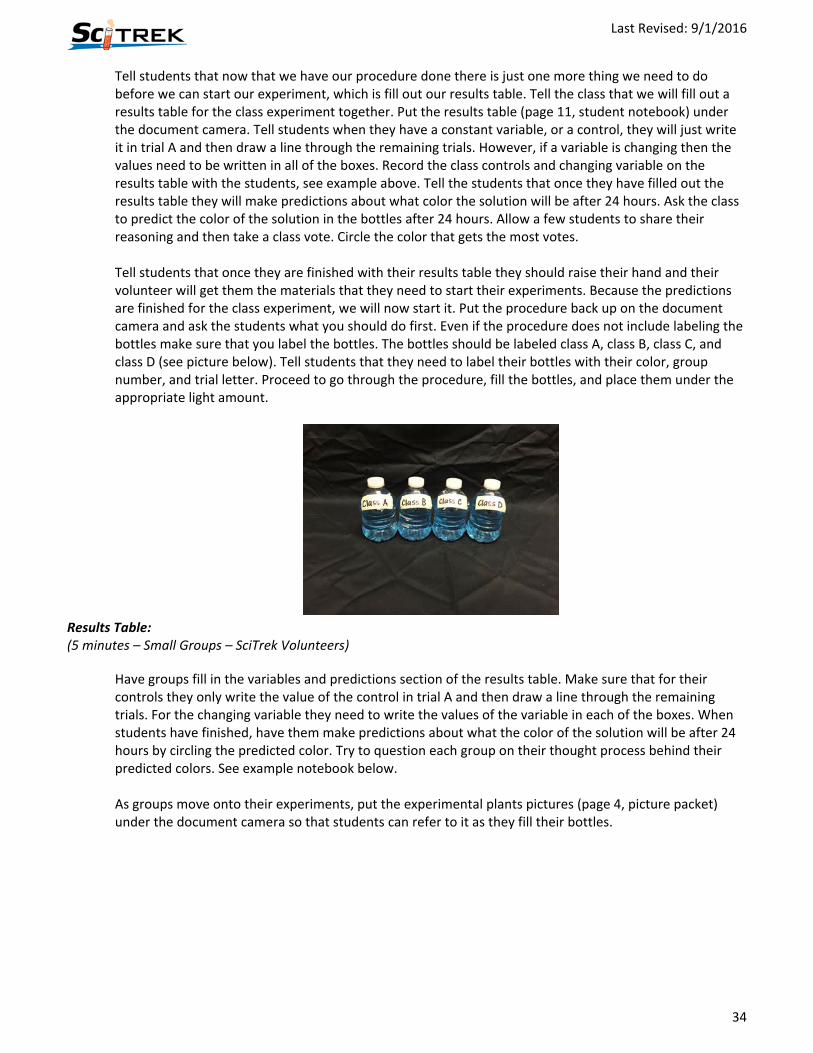
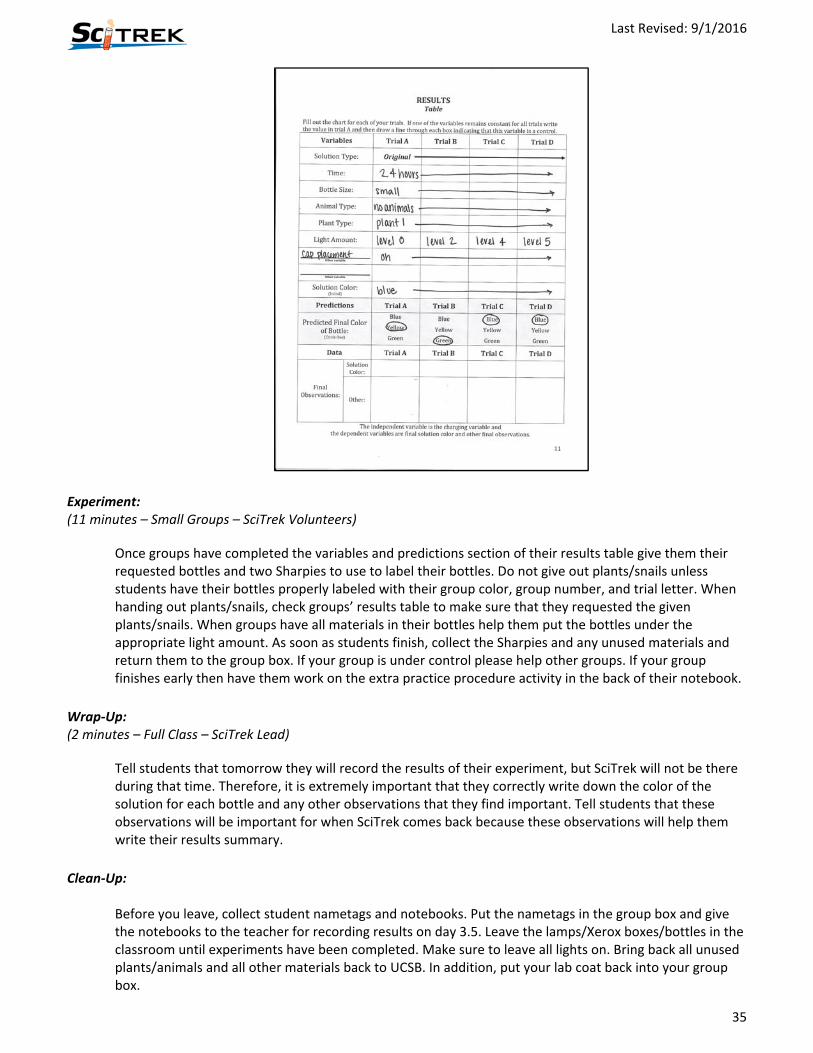
Tell students that now that we have our procedure done there is just one more thing we need to do before we can start our experiment, which is fill out our results table. Tell the class that we will fill out a results table for the class experiment together. Put the results table (page 11, student notebook) under the document camera. Tell students when they have a constant variable, or a control, they will just write it in trial A and then draw a line through the remaining trials. However, if a variable is changing then the values need to be written in all of the boxes. Record the class controls and changing variable on the results table with the students, see example above. Tell the students that once they have filled out the results table they will make predictions about what color the solution will be after 24 hours. Ask the class to predict the color of the solution in the bottles after 24 hours. Allow a few students to share their reasoning and then take a class vote. Circle the color that gets the most votes. Tell students that once they are finished with their results table they should raise their hand and their volunteer will get them the materials that they need to start their experiments. Because the predictions are finished for the class experiment, we will now start it. Put the procedure back up on the document camera and ask the students what you should do first. Even if the procedure does not include labeling the bottles make sure that you label the bottles. The bottles should be labeled class A, class B, class C, and class D (see picture below). Tell students that they need to label their bottles with their color, group number, and trial letter. Proceed to go through the procedure, fill the bottles, and place them under the appropriate light amount.
Results Table: (5 minutes – Small Groups – SciTrek Volunteers)
Have groups fill in the variables and predictions section of the results table. Make sure that for their controls they only write the value of the control in trial A and then draw a line through the remaining trials. For the changing variable they need to write the values of the variable in each of the boxes. When students have finished, have them make predictions about what the color of the solution will be after 24 hours by circling the predicted color. Try to question each group on their thought process behind their predicted colors. See example notebook below. As groups move onto their experiments, put the experimental plants pictures (page 4, picture packet) under the document camera so that students can refer to it as they fill their bottles.
Last Revised: 9/1/2016
35
Experiment: (11 minutes – Small Groups – SciTrek Volunteers)
Once groups have completed the variables and predictions section of their results table give them their requested bottles and two Sharpies to use to label their bottles. Do not give out plants/snails unless students have their bottles properly labeled with their group color, group number, and trial letter. When handing out plants/snails, check groups’ results table to make sure that they requested the given plants/snails. When groups have all materials in their bottles help them put the bottles under the appropriate light amount. As soon as students finish, collect the Sharpies and any unused materials and return them to the group box. If your group is under control please help other groups. If your group finishes early then have them work on the extra practice procedure activity in the back of their notebook.
Wrap‐Up: (2 minutes – Full Class – SciTrek Lead)
Tell students that tomorrow they will record the results of their experiment, but SciTrek will not be there during that time. Therefore, it is extremely important that they correctly write down the color of the solution for each bottle and any other observations that they find important. Tell students that these observations will be important for when SciTrek comes back because these observations will help them write their results summary.
Clean‐Up:
Before you leave, collect student nametags and notebooks. Put the nametags in the group box and give the notebooks to the teacher for recording results on day 3.5. Leave the lamps/Xerox boxes/bottles in the classroom until experiments have been completed. Make sure to leave all lights on. Bring back all unused plants/animals and all other materials back to UCSB. In addition, put your lab coat back into your group box.

Last Revised: 9/1/2016
36
Day 3.5: Experiment
Experiment: (15 minutes – Small Groups – Classroom Teacher)
Tell students that today they are going to record the data from their experiment. Before they record their data, as a class they will record the data from the class experiment. Show the students the four bottles from the class experiment and record the color of the solutions as well as any additional observations. An example of the class results can be seen below on the left.
Tell students they will now record their group’s data. Pass out student notebooks and have students get their experiment bottles and record their results. An example of a student’s results can be seen above on the right. Once this is complete have students place all of their bottles in a central location for the SciTrek staff member to come by and pick up later in the day. An example of student group results can be seen above on the right. Note: It is extremely important that each student in the group record the same solution color to ensure that the entire group can write a consistent results summary on day 4.
Day 4: Results Summary/Poster Making
Schedule:
Introduction (SciTrek Lead) – 7 minutes Results Summary (SciTrek Volunteers) – 15 minutes
Poster Making (SciTrek Volunteers) – 33 minutes Wrap‐Up (SciTrek Lead) – 5 minutes

Last Revised: 9/1/2016
37
Materials:
(3) Volunteer Boxes:
☐ Student nametags
☐ Volunteer instructions
☐ Volunteer lab coat
☐ Poster diagram (full page)
☐ (2) Stickers on how to present results (changing contents)
☐ (2) Stickers on how to present results (changing conditions)
☐ (2) Pencils
☐ Notepad
☐ (9) Paperclips
☐ Highlighter
☐ Scissors
☐ (2) Glues (2) Poster Parts Packs
☐ Scientists’ names
☐ Question
☐ Experimental set‐up
☐ Procedure
☐ Results table
☐ Results summary
☐ (6) “I acted like a scientist when ______”
☐ (6) Picture spaces
Other Supplies:
☐ Poster paper tube
Lead Box:
☐ (3) Extra student notebooks
☐ Lead instructions
☐ Respiration picture packet
☐ Lead lab coat
☐ Time card
☐ (2) Stickers on how to present results (changing contents)
☐ (2) Stickers on how to present results (changing conditions)
☐ (2) Pencils
☐ (2) Wet erase markers
☐ Notepad
☐ (9) Paperclips
☐ (2) Highlighters
☐ (2) Scissors
☐ (2) Glues
☐ Scotch tape
SciTrek Notebook Pages Used With Students:

Last Revised: 9/1/2016
38
Set‐Up:
SciTrek Lead: If the classroom has a document camera, ask the teacher to use it for the results summary (page 12, student notebook). If the classroom does not have a document camera, then tape the example poster‐size notebook pages to the front board. Get the students notebooks from the teacher and give them to the volunteers to separate into their groups and attach nametags. Ask the classroom teacher for a place to leave the student posters in the classroom.
SciTrek Volunteers: Get the students’ notebooks from the SciTrek lead and separate them into groups and attach students’ nametags to their notebook. Set out student notebooks after attaching nametags.
If students are not in the classroom after attaching nametags to notebooks set out the notebooks where you want students to sit when they come into the classroom.
If students are in the classroom after attaching nametags to notebooks set out the notebooks where you want students to sit and students will move to these spots after the introduction.
Introduction: (7 minutes – Full Class – SciTrek Lead)
If needed, while you are doing the introduction have the SciTrek volunteers set out the SciTrek notebooks/nametags where they would like students to sit. Make sure that students with the same group number are sitting next to each other. Tell students that a notebook will be put on their desk which is not their notebook and they should not move it. Ask the class, “What is the class question that we are investigating?” Students should reply: “What variables affect the color of the solution?” Tell the students they are going to analyze their results from their experiments which will allow them to start answering the class question. Tell students we will first start by analyzing the class data together. Put the filled out results table from the class experiment under the document camera (page 11, student notebook). Have students compare the actual and predicted colors to see if they match. Tell students we will now work together to try to determine what might be causing the solution to changing colors. Ask students what patterns they see in the results. Students should notice that all the bottles turned yellow regardless of what type of animal was in the bottle. Ask students if we can test if all animals turn the solution yellow. They should say yes. Tell them that if a statement is testable then it is called a claim and these are the first part of results summaries. Write “when an animal is present the solution turns yellow regardless of the animal type” in the example notebook. ** Teacher Note: If you would like to push student thinking further you can have them make a claim about why they think the solution is turning color. Such as these example claims:
My experiment shows that when animals go to the bathroom the solution turns yellow
My experiment shows that when animals breathe the solution turns yellow
My experiment shows that when animals produce CO2 the solution turns yellow

Last Revised: 9/1/2016
39
Tell students that they now need to use data to support their claim. Inform students that there are two forms of data: observations and measurements. Ask students what type of data we will use to support our claim. They should respond observations. Tell students in order for everyone to know that we carried out the experiment we will start the data statement with we observed. Write the following data statement in the example notebook after the claim, “because we observed that the fish, shrimp, frog, and snail turned the solution yellow.”
Tell students that result summaries are strongest when they allow us to make predictions. Ask students if based on our summary they can predict something else that would turn the solution yellow (worm, ). Tell students that after they summarize their experimental findings they will fill in the sentence frame “I acted like a scientist when____” stating how they acted like a scientist during their SciTrek experience. Challenge students to come up with a unique answer that no one else in their group has put down. Tell students that when scientists complete their experiments they make posters to present to their work to other scientists, therefore, we will create a poster to present to the class during the next SciTrek visit. This presentation will be their chance to tell the class what their group has discovered about the class question. Tell the students that they should write as neatly as possible on the poster parts so that the other class members can read their poster. Tell students they will now start working with their group to analyze their experimental results and then make a poster.
Results Summary: (15 minutes – Small Groups – SciTrek Volunteers)
Have students summarize their findings. Challenge students to think about how their changing variable did or did not affect the solution color.

Last Revised: 9/1/2016
40
When writing their results summary make sure that the students start the statement with a claim and then write “because” and use data to back up the claim. The data from this experiment is in the form of observations, therefore, all students should have the word “observed” or “recorded” in their data statements. The results summary is still valid, and important, if it shows that the changing variable tested did not affect the color of the solution. Even if their results summary is contrary to what you think, have students make a claim based solely on their data. An example results summary is seen below.
Once students have filled out their results summary have them fill in the sentence frame (page 12): “I acted like a scientist when_______.” Their response should be unique for each of the students. If students are having trouble with this sentence frame ask them what they did during each SciTrek visit.
Poster Making: (33 minutes – Small Groups – SciTrek Volunteers)
Each small group (five/six students) will make one poster of their experiment. Pass out the writing portions (general poster sections and “I acted like a scientist when____”) and have students write their name on them and complete them. In addition, have each student write their name on the scientists’ names part. Use the following guidelines when assigning poster parts:
1. Four student group: Any student, or all students, may present scientists’ names. Student 1: question, experimental set‐up, “I acted like a scientist when____” Student 2: procedure, “I acted like a scientist when____” Student 3: results table, “I acted like a scientist when____” (give to a student that is confident
in presenting) Student 4: results summary, “I acted like a scientist when____”
2. Five student group: Any student, or all students, may present scientists’ names. Student 1: question, “I acted like a scientist when____” Student 2: experimental set‐up, “I acted like a scientist when____”

Last Revised: 9/1/2016
41
Student 3: procedure, “I acted like a scientist when____” Student 4: results table, “I acted like a scientist when____” (give to a student that is confident in presenting) Student 5: results summary, “I acted like a scientist when____”
3. Six student group: Any student, or all students, may present scientists’ names. Student 1: question, “I acted like a scientist when____” Student 2: experimental set‐up, “I acted like a scientist when____” Student 3: first half of the procedure, “I acted like a scientist when____” Student 4: second half of the procedure, “I acted like a scientist when____” Student 4: results table, “I acted like a scientist when____” (give to a student that is confident
in presenting) Student 5: results summary, “I acted like a scientist when____”
Once all writing sections are completed, have students draw a picture of their experiment or how they acted like a scientist. In the students’ notebooks highlight and number the section that they will present. The parts should be numbered as follows: 1) scientists’ names, 2) question, 3) experimental set‐up, 4) procedure, 5) results table, and 6) results summary. If a student is presenting multiple sections, use the paperclips in your group box to clip together the sections that they are reading so that when presenting, it will be easy to flip back and forth between pages. Place the following sentence frame sticker on the top of the notebook page of the student that is completing the results table (page 11). The bottle that contained _________________________ was observed to be ___________________. The bottle that was in __________________________ was observed to be ______________________ . Then practice reading the four sentences with that student. For the poster below, the sentence frame would be: The bottle that was in level 0 light was observed to be yellow. To make this easier for students you can write level __ light on the first blank of the sentence frame if the group’s changing variable was light level. An example sentence frame for a group that changed the contents would be: The bottle that contained aquatic plant 1 was observed to be green. For groups that changed bottle size cross off “in” in the conditions sentence frame. An example sentence frame for a group that changed the size of the bottle would be: The bottle that was in small was observed to be yellow. As soon as students have completed some of their pieces, start gluing them onto the large poster paper exactly as they are arranged in the example below. Do not wait until students have completed all the pieces to start gluing them onto the poster. Once the poster is complete, have students start practicing for the presentation. Make sure that students read from their notebook instead of the poster. The poster should be presented in the following order: 1) scientists’ names, 2) question, 3) experimental set‐up, 4) procedure, 5) results table, and 6) results summary. They will NOT read the “I acted like a scientist when _______” because this will be discussed as a class.
content of bottle
condition of bottle
color
color

Last Revised: 9/1/2016
42
If there is time, try to ask each of your groups a few questions about their poster. Have them use their findings to predict the colors of other bottles that they did not try but are related to their experiment. For instance, if the group’s results summary was, “My experiment shows that when aquatic plants are in the bottles the solution stays blue because we observed that all of the bottles stayed blue even though they had different types of aquatic plants in them.,” ask the group to predict what the color of a bottle would be if it contained aquatic moss. They should be able to predict that it would be blue.
Wrap‐Up: (5 minutes – Full Class – SciTrek Lead):
Ask the students the following questions: How did you act like a scientist during this project? What did you do that scientists do?
After having a discussion about how they acted like scientists and talking about how everyone does things that scientists do in their everyday lives, tell students that they will present their findings during the next SciTrek visit and that you are looking forward to hearing about all of their experiments.
Clean‐Up:
Before you leave, have the students attach their nametags to their notebooks and place them in the group box. Leave student posters in the classroom. Bring all materials back to UCSB. In addition, put your lab coat back into your group box.

Last Revised: 9/1/2016
43
Day 5: Poster Presentations
Schedule: Introduction (SciTrek Lead) – 2 minutes Practice Posters (SciTrek Volunteers) – 10 minutes Poster Presentations (SciTrek Volunteers/SciTrek Lead) – 46 minutes Wrap‐Up (SciTrek Lead) – 2 minutes
Materials:
(3) Volunteer Boxes:
☐ Student nametags
☐ Student notebooks
☐ Volunteer instructions
☐ Volunteer lab coat
☐ Pencil
☐ (6) Paperclips
☐ Highlighter
☐ (12) Sharpened SciTrek pencils (all same color)
Lead Box:
☐ (3) Extra student notebooks
☐ Lead instructions
☐ Respiration picture packet
☐ Lead lab coat
☐ Time card
☐ (6) Stickers on how to present results (changing conditions)
☐ (6) Stickers on how to present results (changing contents)
☐ (2) Pencils
☐ (2) Wet erase markers
☐ (9) Paperclips
☐ (2) Highlighters
☐ Scotch tape *Student posters should already be in the classroom.
SciTrek Lead Picture Packet Pages Used with Students:
Last Revised: 9/1/2016
44
Set‐Up:
SciTrek Lead: If the classroom has a document camera, ask the teacher to use it for the notes on presentations (pages 7 and 8, picture packet). If the classroom does not have a document camera, then write the class question on the board “What variables affect the color of the solution?” Leave enough room to record student findings under the question. Organize the posters so that groups that had the same changing variable present one after the other. If there are four or more groups that did the same changing variable break these up so that they only go two or three in a row.
SciTrek Volunteer:
Set out the SciTrek notebooks/nametags. Today students will be sitting in their regular classroom seats during poster presentations.
Introduction: (2 minutes – Full Class – SciTrek Lead)
Tell students that today they will present their posters to the class. Inform students that this is a common practice in science. Scientists go to conferences where they present posters about the experiments they conducted. At these presentations other scientists give them feedback on their experiments, which allows them to return to the lab with new ideas for future experiments.
Tell the students that they will have 10 minutes to practice presenting their poster with their group. Remind students to read from their notebooks when presenting. Tell students that after practicing they will return to their normal classroom seats.
Practice Posters: (10 minutes – Small Groups – SciTrek Volunteers)
If the posters are not already in order, the lead should organize the posters such that the experiments that are about the same changing variable are presented back to back. Have groups practice their poster presentation making sure they are reading the poster parts in the correct order (scientists’ names, question, experimental set‐up, procedure, results table, and results summary). Make sure each student part is highlighted in their notebook. If students are reading from multiple pages use a paperclip to clip these pages together. Remind students to read from their notebook rather than from their poster. If there is extra time have the students put their notebooks away and tell each other about their experiment and what they learned. Do not let poster practice go over 10 minutes.
Poster Presentations: (46 minutes – Full Class – SciTrek Volunteers/SciTrek Lead):
Have students return to their original class seats. Ask the class, “What is the question that we have been working on solving?” Students should tell you, “What variables affect the color of the solution?” Tell the students that during the presentation you are going to take notes. Turn to page 7 in the picture packet. Tell them that you will record the groups’ changing variable when they say the question, the values of

Last Revised: 9/1/2016
45
that changing variable when they say the experimental set‐up, and the data that was taken when they present the graph. After each presentation they will be given the opportunity to ask scientific question to the presenting group to help them determine if the variable investigated affected the color of the solution. Students that ask a scientific question during the presentation will get a SciTrek pencil at the end of the presentation. Give the class one or two examples of scientific questions. Some examples of scientific questions are: Why did your group pick the controls that you did? Can you make a prediction about another bottle that you did not try that would turn yellow after 24 hours? Did your results agree with a previous group’s and why? Ask the class, “If a group’s changing variable was plant type would they be able to answer questions about light amount?” They should say no. “Therefore, we should ask the group questions that focus on their changing variable.” Tell the class once they have finished asking the group questions they will summarize what they learned from that group. Record the students’ summary in your presentation notes. Students will not record any of the notes. Volunteers should make sure that students are quiet and respectful when other groups are presenting. When one of your groups is presenting go to the front of the room with them and prompt students if they do not know who talks next and remind them to read out of their notebooks. During the student question time, the SciTrek lead and/or volunteers should ask at least one question. Example of possible questions are: “How do you know…?” or “Is there anything else you can do to get more information about your question?” Each group should answer approximately five questions (one question per student). Below are example notes that the lead could have taken during poster presentations.

Last Revised: 9/1/2016
46
After all poster presentations have been given, ask the class, “What did we learn about the color of the solution?” Have them summarize the class findings. The highlights from many experiments are seen below. Do not expect students to know highlights from experiments that were not run.
The bigger the snail the more yellow the solution
If only snails are present the solution will be yellow regardless of the light amount.
The amount of light affects the color of the solution when an aquatic plant is present. o Placing any type of aquatic plant in the light will keep the solution blue. o Placing any type of aquatic plant in the dark will turn the solution yellow.
Non‐aquatic plants (leaves/flowers) will turn the solution yellow/green regardless of the light amount. (Note: In general flowers do not undergo photosynthesis but they do undergo respiration. Tree leaves have not adapted (like aquatic plants have) to be able to take in CO2 from the water. This is because their stomata are blocked by the water which results in the leaf only undergoing respiration.)
Combining aquatic plants and snails in the light makes the solution be less yellow (more green) than with the animal alone.
If a snail is in a bottle, the larger the bottle size the less yellow the solution will be. (This would also hold true if an aquatic plant was put into the dark.)
Putting more plants in the solution will cause the solution to be more blue if the plant is in full light and more yellow if the plant is in no light
While summarizing experiments, use students’ collected data and not what they should have found from the list above. Ask students what values of variables they would use to get a solution to turn as yellow as possible after 24 hours.
Animal Type: Place the largest animal as possible in the bottle
Plant Type: Place an aquatic plant in the bottle
Light Amount: Place the bottle in the dark.
Bottle Size: Have the smallest bottle possible If no one in the class did experiments on one of the variables above, then they will not know how that variable affects the color of the solution and do not expect them to tell you which value to use. Tell students they have taught you a lot about when the solution turns colors. Each SciTrek volunteer should keep track of who asks a question and give these students a pencil at the end of the session. If a student does not ask a question during the poster presentations have them ask/answer a question about the experiment before you give them a pencil.
Wrap‐Up: (2 minutes – Full Class – SciTrek Lead)
Tell the students that the volunteers that have been working with them are undergraduate and graduate students that volunteer their time so that they can do experiments. Have the students say thank you to the volunteers. This is the last day with their SciTrek volunteers, therefore, they should say goodbye to them. Tell students that you will be back one more time.
Tell students to remove the paper part of their nametag from the plastic holder and that they can keep the paper nametag but need to give the plastic holder back to their SciTrek volunteer.
Clean‐Up:
Before you leave, collect the plastic holders and put them in the group box. Students can keep the paper part of their nametag. Collect notebooks and place them in the group box. Leave student posters in the classroom. Bring all materials back to UCSB. Remove tape from the lid of your group box and place into

Last Revised: 9/1/2016
47
your group box. In addition, remove all materials from lab coat pockets, remove your nametag, unroll lab coat sleeves, and put your lab coat back into your group box.
Day 6: Procedure Assessment/Tie to Standards
Schedule: Procedure Assessment (SciTrek Lead) – 10 minutes Tie to Standards (SciTrek Lead) – 50 minutes
Materials:
Lead Box:
☐ (3) Extra student notebooks
☐ Student notebooks
☐ Lead instructions
☐ Respiration picture packet
☐ Lead lab coat
☐ (35) Procedure assessments
☐ Time card
☐ (2) Pencil
☐ (2) Wet erase markers
☐ Straw Other Materials: (these bottles should be in a cardboard box so students cannot see them)
☐ B0, B00, and B000: 3 bottles of blue solution (half full)
☐ B1: snail/light for 24 hrs
☐ B2: frog/light for 24 hrs
☐ B3: fish/light for 24 hrs
☐ B4: plant 1/light for 24 hrs
☐ B5: plant 2/light for 24 hrs
☐ B6: snail/dark for 24 hrs
☐ B7: frog/dark for 24 hrs
☐ B8: fish/dark for 24 hrs
☐ B9: plant 1/dark for 24 hrs
☐ B10: plant 2/dark for 24 hrs
☐ Small piece of dry ice
☐ Balloon with car exhaust

Last Revised: 9/1/2016
48
SciTrek Notebook Pages Used With Students:

Last Revised: 9/1/2016
49
Set‐Up: SciTrek Lead:
If the classroom has a document camera, ask the teacher to use it for the tie to standards activity (pages 12‐15, student notebook). If the classroom does not have a document camera, then tape example poster‐size notebook pages to the front board. Make sure that the only blue bottles are B0, B00, B000, B4, and B5. These are the bottles with nothing in them and the bottles with plants in the light. Have the cardboard box with appropriate bottles ready with easy access to grab bottles after students make predictions. Pass out notebooks to students. If you do not have time to get set‐up before the start of the module ask the teacher to pass out notebooks during the procedure assessment. Remind the teacher to give you the lab coat at the end of the day.
Procedure Assessment: (10 minutes – Full Class – SciTrek Lead)
“Before we start our activity today we will determine how your ideas on procedures are developing. One of the ways that we get program funding is by demonstrating the program effectiveness. Therefore, we need you to do your best on the assessment.” Pass out the procedure assessment and tell students to fill out their name, teacher’s name, and date at the top of the assessment. Remind the students that it is important that they fill out this assessment on their own. For page 1, read the question, changing variable (example: the changing variable was liquid type), and controls (example: the controls were liquid amount, container type, object type…). You do not need to read the values of the changing variable or the controls. Then read the directions to the students. Read each of the statements and have students 1) underline controls/circle changing variables/box data collection, 2) write the appropriate letter(s) on the line (C/CV/D), and 3) circle if the statement could be an appropriate procedure step. As you are reading the statements walk around the room and verify that students have written their name at the top of the paper. For page 2, read the directions to the students and then have students underline controls/circle changing variables/box data collection while you read the procedure. After reading the procedure, read each question to the students, giving them a few minutes to answer the questions before moving on. When students are finished, collect the assessments and verify that the students’ names are on the top of the paper.
Tie to Standards: (50 minutes – Full Class – SciTrek Lead)
Predictions of Experimental Bottles in the Light: Bottles B1, B2, B3, B4, and B5 (12 minutes) Tell the students that today they are going to talk about their previous experiments and hopefully answer any questions that they may still have about what is changing the color of the solution. Have the students turn to page 12 in their notebooks. Tell the students that you did an experiment the previous day and you brought the bottles from your experiment for the class to observe. Tell the students that they will predict the color of the bottles based on the data from their own experiments and record these predictions into their notebooks. Tell students that for yellow they can record “Y,” for blue they can record “B,” and for green they can record “G.” Have the students do all of the predictions at one time. Then go over each of

Last Revised: 9/1/2016
50
the bottles with the students. Have one student share what they think the color of the solution will be and why. Then have the class vote, using thumbs up/thumbs down if they agree/disagree with the student. If many students are in disagreement ask one of the students that is in disagreement what they think and why. After show the students the experimental bottle and have them record the actual color on their chart as you record the color on the example notebook. After, leave each bottle on the table and continue onto the next bottle until you have gone through bottles B1‐B5.
Ask the students what all the bottles that turned yellow/green had in common. Students should say that they all contained animals. If they also bring up the fact that they were all in the light for 24 hours ask students if there were any bottles that were blue after being in the light 24 hours. They should respond that the aquatic plant bottles were blue. Tell them that since the aquatic plant bottles stayed blue it could not be the light alone that was changing the color of the solution therefore, the color change must be caused by the animals themselves. Record this for question 2 in the example notebook under the document camera for students to copy.
Have the students turn to page 13 in their notebooks. Ask the students if all of the bottles that were under the light for 24 hours changed color. Students should say “no” have them check this box in their notebook for question 3. Ask the students why some of the bottles remained blue. They should respond that they did not contain animals. Have students record their answer into their notebook. Ask one student to share his/her response and record this answer into the example notebook for question 4 for the students to copy.
Determination of What is Causing Color Change: Bottles B0 and B00 (12 minutes)
Ask the students what they think the animals are doing to change the color of the solution. Lead a discussion until students say that the animals are breathing in O2 and producing CO2 and the CO2 is changing the color of the solution to yellow. Many times students suggest that the animals are going to the bathroom and this is what is changing the color of the solution to yellow. If this comes up ask them if there is a way to test this. They should say that if some urine was placed in the solution without an animal then the solution should change yellow. Tell them that you have done this experiment and that there was no observed color change. Therefore, this is not the reason that the solution is changing colors.
Last Revised: 9/1/2016
51
Tell the class that their idea that CO2 is changing the solution color to yellow seems credible but ask the students if there is any other way that we could show definitely that CO2 changes the color of the solution. Ask students if we can purchase CO2 anywhere. If students do not know, tell them that dry ice is solid CO2 and can be purchased at the grocery store. If we get CO2 gas down to ~‐79˚C it will turn into a solid. Show the students the piece of dry ice. Tell students that as the dry ice heats up it turns back into CO2 gas. Ask the students what should happen if you put the piece of CO2 into the blue solution. They should respond that if CO2 is changing the color of the solution the solution will change color to yellow. Put the piece of dry ice into bottle B0 to verify for students that CO2 is changing the color of the solution. Ask the students, “Do you think I could change the color of the solution if I blew into the solution with a straw?” Have a few students share their ideas with the class and their reasoning behind the ideas. Do the experiment for the students. Remove the lid from the bottle B00, put the straw into the solution, and blow into the bottle for approximately 20 seconds. After 20 seconds the solution will be a pale yellow/green color. Ask the students how you were able to change the color of the solution. The students should start to realize that you breathe out the same product (CO2) as the animals in their experiments. Ask the students why you were able to change the color of the solution much quicker than the animals in their experiments. Students should realize that because your lungs are much bigger than the other animals you are able to produce more CO2 and therefore change the color of the solution to yellow faster. Ask the students why the plant bottles did not change color. Students should respond that plants in the light take in CO2 and give off O2 in a process called photosynthesis. Therefore, since they are not producing CO2 they should not change the color of the solution. Ask the class, “If you have a bottle of solution that has turned yellow how you could get it to turn back to blue?” Lead the students in coming up with the idea that if a plant was put into the bottle and it was left in the light it should turn back to blue. Note: if the class would like to see this happen you can leave an aquatic plant with yellow solution for them to observe. **Teacher Note: Why ONLY CO2 can be detected in the bottles (not to be discussed with students). When CO2 dissolves in liquid water (H2O) it produces carbonic acid (H2CO3) by the following reaction:
CO2(g) + H2O(l) ⇌ H2CO3(aq). Carbonic acid (H2CO3) is an acid and thus makes the solution in the bottle more acidic. Bromothymol blue is a common pH indicator (which tells the amount of H+ (or acid) in the solution), which changes colors when the pH of the solution changes. Thus the yellow color in the bottles indicates the presence of an acid (H2CO3) in the solution. With the bromothymol blue indicator we can NOT tell anything about the presence of oxygen (O2), since O2 does not form an acid or a base when dissolved in the solution. Therefore, it is important that we only say to the students that we know if plants or animals are producing carbon dioxide because of the color change.
Prediction of Experimental Bottles in the Dark: Bottles B6, B7, B8, B9, and B10 (12 minutes)
Now tell the students that they are going to make predictions about the experimental bottles that were left in the dark for 24 hours. Similar to before, students will record their predictions first for all of the bottles. You can then have one student share what they think the color of the bottle will be and why and use thumbs up/thumbs down to see if the class agrees. Then show students the bottle and have them record their observations on their chart as you record them in the example notebook for question 6.

Last Revised: 9/1/2016
52
After completing the table, ask the students what the color of the bottles tell us about animals in the dark. Students should be able to say that the bottles changed color, therefore animals are still producing CO2 in the dark. Write this response into the example notebook and have students copy the response into their own notebooks for question 6.
Ask the students what the color of the bottles tell us about plants in the dark. Students should say that the plants in the dark turned the solution yellow. Ask the students what this means. Make sure that by the end of the discussion students understand that the plants must be producing CO2 in the dark. Record this response into the example notebook for question 7 and have the students copy this into their notebooks.
Ask the students, “What is the process called where plants turn CO2 into O2?” They should know that this is called photosynthesis. Ask them, “What is needed for photosynthesis?” They should respond light and CO2. Tell students that just like animals, plants take in O2 and produce CO2. However, when there is light, plants are able to photosynthesize and the amount of CO2 that they produce is less than the amount of CO2 that they consume.
The Broader Picture: Bottle B000 (14 minutes) Have the students turn to page 14 in their notebooks.
Have the students look at the graph and answer questions a‐d. Go over each of the questions as a class, calling on students to provide the answers. Record the answers in the example notebook for questions 8a‐d for students to copy.

Last Revised: 9/1/2016
53
Ask the students to summarize what the graph tells us about carbon dioxide levels in the atmosphere. After students have told you their ideas write the answer in 8e.
Ask the students to think about what is different now than in the 1800’s and before. They should be able to come up with the fact that there were no cars in the 1800s. Ask students if they think cars produce CO2. Tell them that you have some exhaust from a car that you will bubble through the solution to see if cars produce CO2. If car exhaust has CO2 what color will the solution turn? (Yellow). If car exhaust does not contain CO2 what color will the solution be? (Blue). Get bottle B000 and bubble the exhaust through the solution. Do this by removing the binder clip from the balloon and carefully placing the opening over the straw and inserting the straw into the blue solution. The blue solution will turn yellow. If you do not use all of the exhaust replace the binder clip on the balloon to reseal the balloon. Because the solution turned yellow from the car exhaust we can conclude that cars are also producing CO2. Ask the students to compare how long it took you to turn the solution yellow compared to the exhaust from the car. The students should reply that the exhaust turned the solution yellow much quicker. Ask the students what this means. They should determine that the car exhaust is producing much more CO2 than is produced in respiration. Next have the students turn to page 15 in their notebooks. Ask the students, “What are 3 things that contribute to the increasing amounts of carbon dioxide in the atmosphere?” Write some of the student ideas onto the example notebook for question 9 and have them copy these or their own ideas into their notebook.
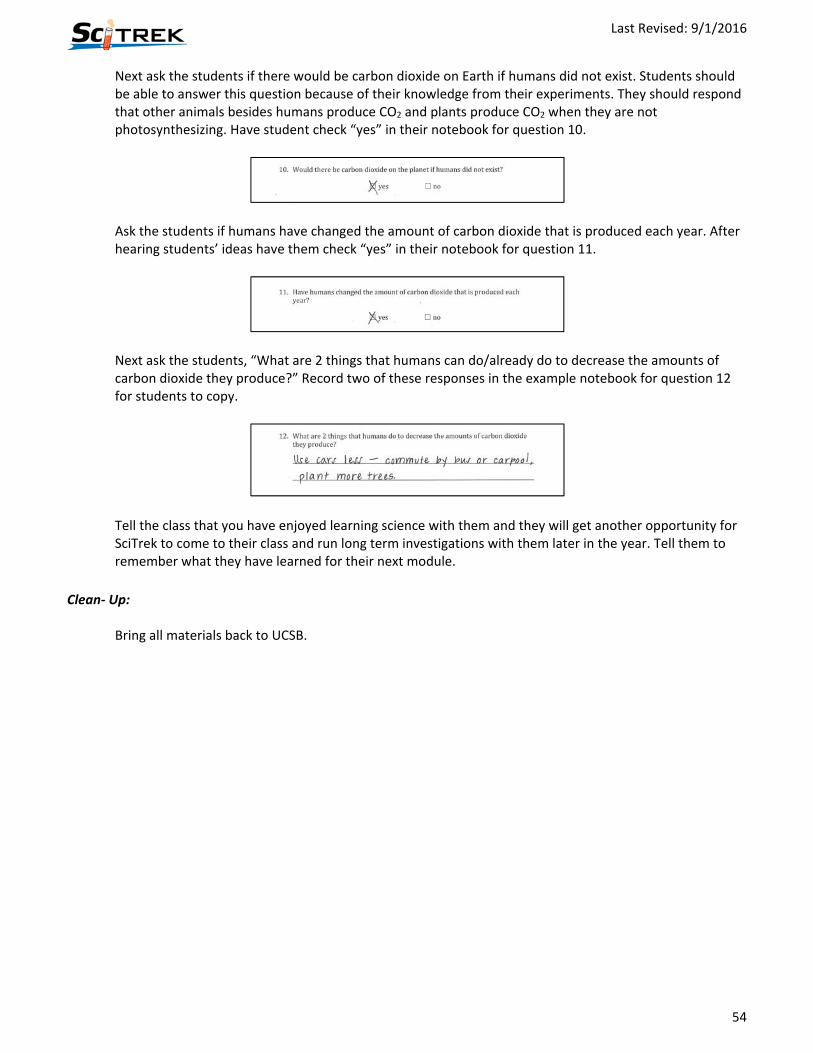
Last Revised: 9/1/2016
54
Next ask the students if there would be carbon dioxide on Earth if humans did not exist. Students should be able to answer this question because of their knowledge from their experiments. They should respond that other animals besides humans produce CO2 and plants produce CO2 when they are not photosynthesizing. Have student check “yes” in their notebook for question 10.
Ask the students if humans have changed the amount of carbon dioxide that is produced each year. After hearing students’ ideas have them check “yes” in their notebook for question 11.
Next ask the students, “What are 2 things that humans can do/already do to decrease the amounts of carbon dioxide they produce?” Record two of these responses in the example notebook for question 12 for students to copy.
Tell the class that you have enjoyed learning science with them and they will get another opportunity for SciTrek to come to their class and run long term investigations with them later in the year. Tell them to remember what they have learned for their next module.
Clean‐ Up:
Bring all materials back to UCSB.

Last Revised: 9/1/2016
55
Extra Practice Solutions: