module 2 creation
DESCRIPTION
By Zoe, Amanda and CharlotteTRANSCRIPT

1
DIGITAL DESIGN + FABRICATION SM1, 2016 M2 JOURNAL - Design
Zoe Bratcher, Amanda Sam & Charlotte Young787252, 759146 & 698416
Michelle James #9

2
Sketch Design Development
Concept 1- Supportive Head Cage Concept 2 - Folded Sleeping Pod
In this design concept we looked at the head as this is the most important part of the body and is in need of support when sleeping to avoid the user jerking awake. Moreover, the panels that fold up the cover the face gives some protection from the world for the wearer, giving them a ‘personal bub-ble’ and also some level of privacy. We created some sketch models out of satin fabric stuffed with cotton to test the effects of the design while resting. We found that although the design was soft, it offered little actual support.
In this concept we have explored the no-tion of building up a shell defined by our expression of personal space. The shell is arranged to give the user a large amount of personal space all over their body. A folding expandable screen is also utilised to create a sense of privacy for the user in the pod. We created a model of a seg-ment of the design using a thick card-board that was cut into panels and then joined together. The issue with this design was how comfort could be created with-in the space.
3
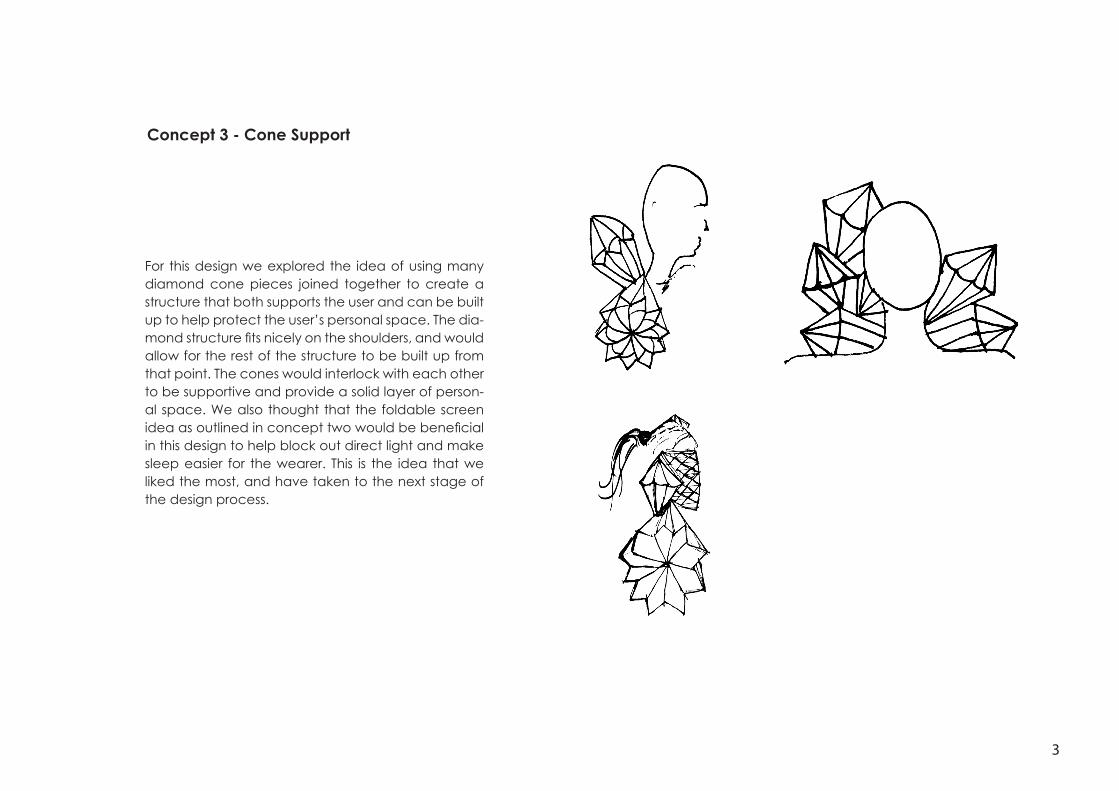
Concept 3 - Cone Support
For this design we explored the idea of using many diamond cone pieces joined together to create a structure that both supports the user and can be built up to help protect the user’s personal space. The dia-mond structure fits nicely on the shoulders, and would allow for the rest of the structure to be built up from that point. The cones would interlock with each other to be supportive and provide a solid layer of person-al space. We also thought that the foldable screen idea as outlined in concept two would be beneficial in this design to help block out direct light and make sleep easier for the wearer. This is the idea that we liked the most, and have taken to the next stage of the design process.

Refined Sketch Model
Our module 2 sketch model has been developed from a combination of two sketches models from our module 1 submissions. The first model was developed from a series of cone structures that interlocked to create a shape, and the second model was developed from folding the pages of a magazine to expand one side of the magazine in size, while the binding side remains narrow.
Folded Magazine
Modue 1 - Ideation Sketch Model
Charlotte Young
Combined Fan Cone
Modue 1 - Ideation Sketch Model
Zoe Bratcher
4

To create our cone sketch model we used a University of Melbourne Farrago magazine as an ode to the University where the sleeping pod will ultimately be a part of. Each page was folded to create a section of the cone, and then each segment was filled with cotton to make the design squishy and comfortable to rest against. The grooved exte-rior surface makes it possible for multiple cones to interlock together. The images to the right show the folding process for creating the cone.
5
6
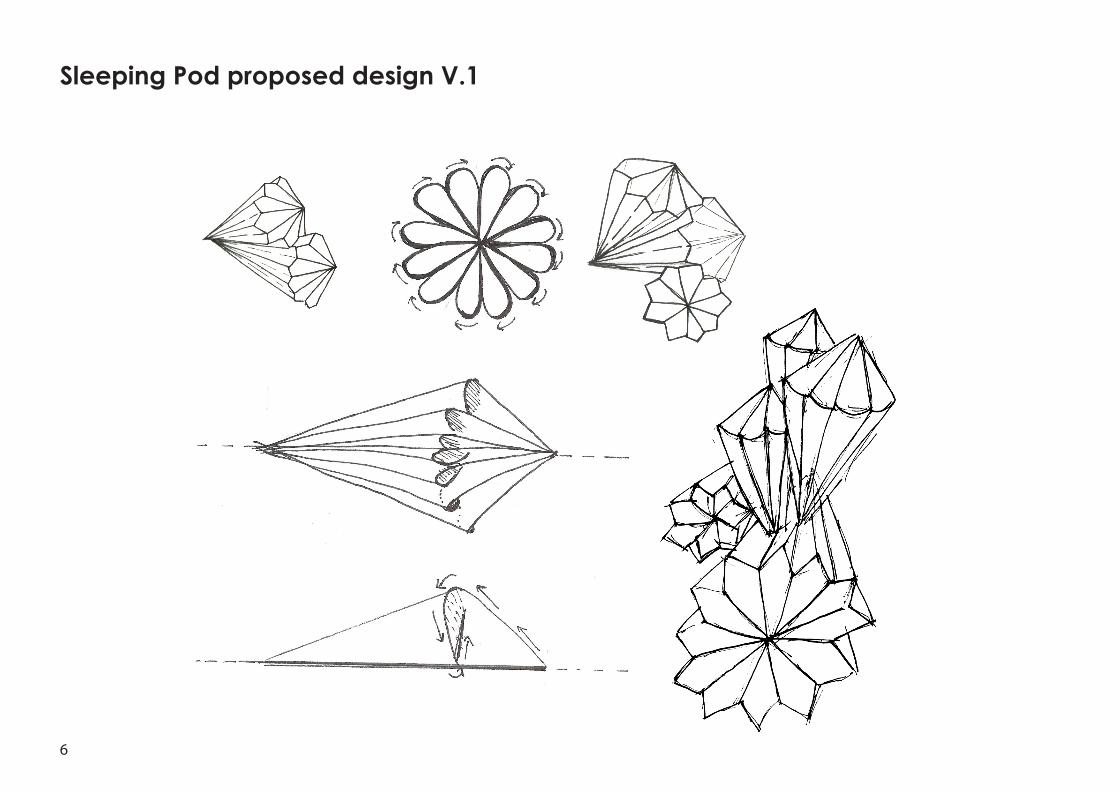
Sleeping Pod proposed design V.1

7
Through model making we explored how the cone structure could be built up to support the user while sleeping. We began by joining two cones and positioning them behind the neck to support the head while relaxed. We then positioned them around our model to get a sense of what was comfortable.
We explored also using two joint smaller cones in front of the neck to fully support the head as well. However, we ultimately decided that with a slightly reclined chair, the head would not slip forward, and having an element in front of the user would make for a claustrophobic design.
8
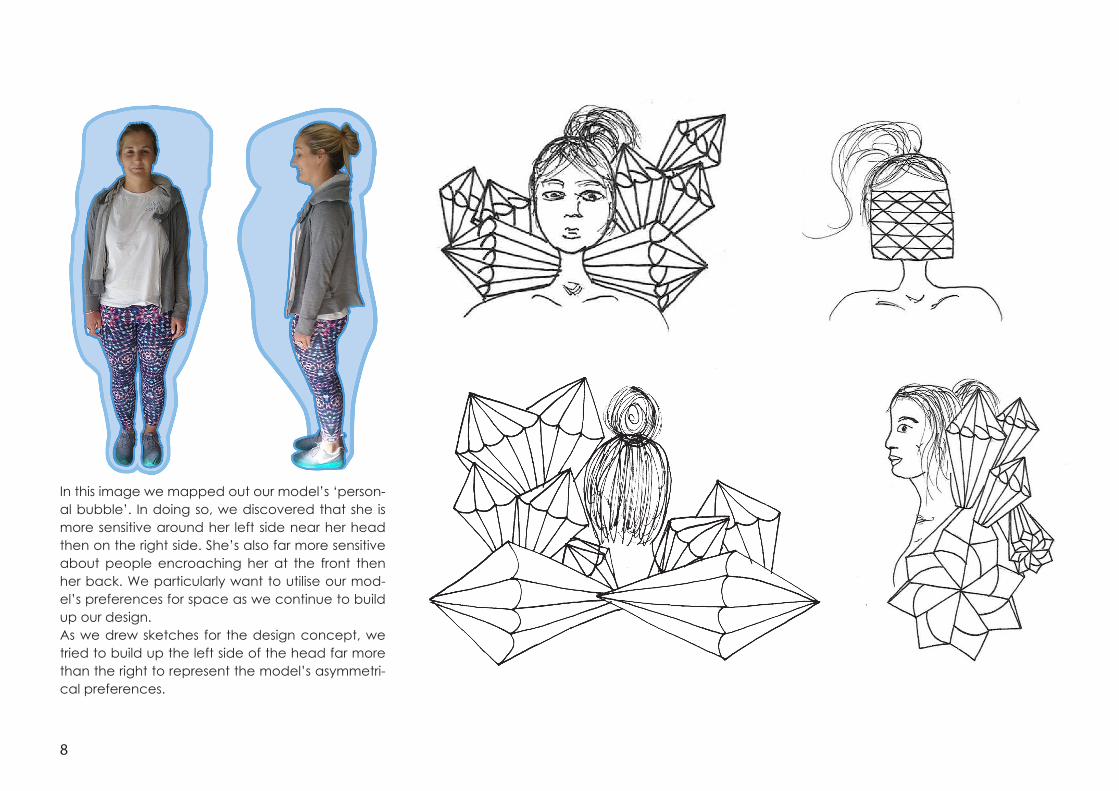
In this image we mapped out our model’s ‘person-al bubble’. In doing so, we discovered that she is more sensitive around her left side near her head then on the right side. She’s also far more sensitive about people encroaching her at the front then her back. We particularly want to utilise our mod-el’s preferences for space as we continue to build up our design. As we drew sketches for the design concept, we tried to build up the left side of the head far more than the right to represent the model’s asymmetri-cal preferences.

9
Left View
Front View
Isometric View
Rhino Model Development
10
Description of precedent
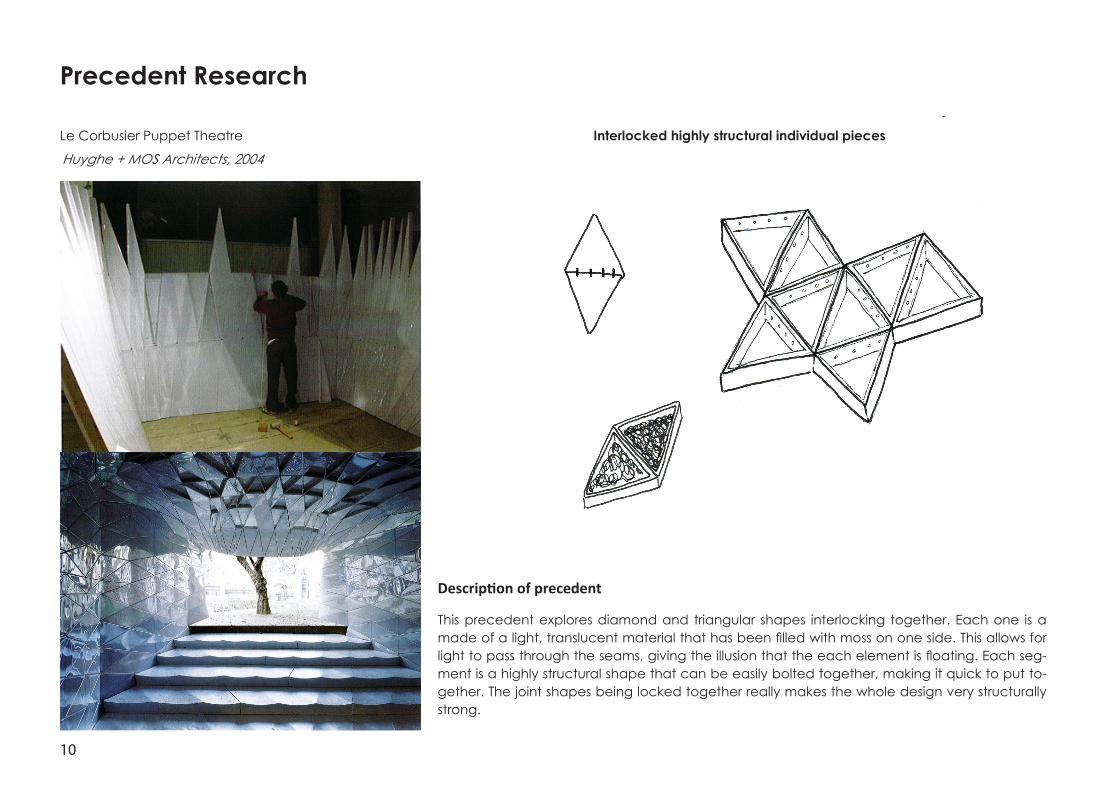
Precedent Research
Le Corbusier Puppet Theatre
Huyghe + MOS Architects, 2004 Interlocked highly structural individual pieces
This precedent explores diamond and triangular shapes interlocking together. Each one is a made of a light, translucent material that has been filled with moss on one side. This allows for light to pass through the seams, giving the illusion that the each element is floating. Each seg-ment is a highly structural shape that can be easily bolted together, making it quick to put to-gether. The joint shapes being locked together really makes the whole design very structurally strong.

11
Precedent applied to designInterlocked highly structural individual pieces
We hope to take the interlocking element of diamonds/triangles for our model. Using our magazines, we have found that the more folds the cone has, the more stable and less crushable the cone is to some pressure. We want to use this interlocking ele-ment to help us join the cones into one another.
How can you use this precedent to influence your design?

12
Description of precedent
Precedent Research
Veasyble by GAIARicardo Hernandez, 2010
Single Expandable Folded Screen
This precedent is made of one piece of paper that has been folded. This allows it to expand and contract, and keeps it compact. It is highly technical in the folding techniques utilised, and has been folded so that each segment creates a convex from the joint.

13
Precedent applied to design
How can you use this precedent to influence your design ?
In our design, we realised that we required a screen to provide privacy and personal space to the pod user, and also block out distracting light. Using techniques from the precedent, we tried various folds to test comfort levels and flexibility.
Single Expandable Folded Screen

14
Design development - Version #1
The method for incorporating the privacy screen wasn’t easy as we needed to find a way to support it from above the user’s face, so it could be extended down. In our first design, we thought about implementing a separate folded head-piece to incorporate the screen. To do this we used another magazine folding technique. The issue was that this created another element of the design that wasn’t connected to the other elements the design had. So we removed the head-piece.
Front View Back View

15

16
Design development - Version #2
After several trials, we had two final elements to work with – the main structure made of several cones and an incorporating a screen. This is asymmetrical mod-el is made of several cones, attached at the edges to create a superstructure. Two cones will be resting on the shoulder and several others growing from the back of the head. One cone will have a small chan-nel with the screen inbuilt into it, so that it is hidden when not in use. The design is particularly built up on the left hand side, where our model is more sensitive about her personal space.
The design will be able to be moved and attached to different chairs, and will feature a board that will function as the back of a chair, that can be slotted over pre-existing chairs, and the secured around the back.
Right ViewFront View
Right View (Screen Extended) Isometric View

17
Front ViewLeft ViewRight View
Top View
For Rhino screen captures and process of creating the model, please see the appendix.
18
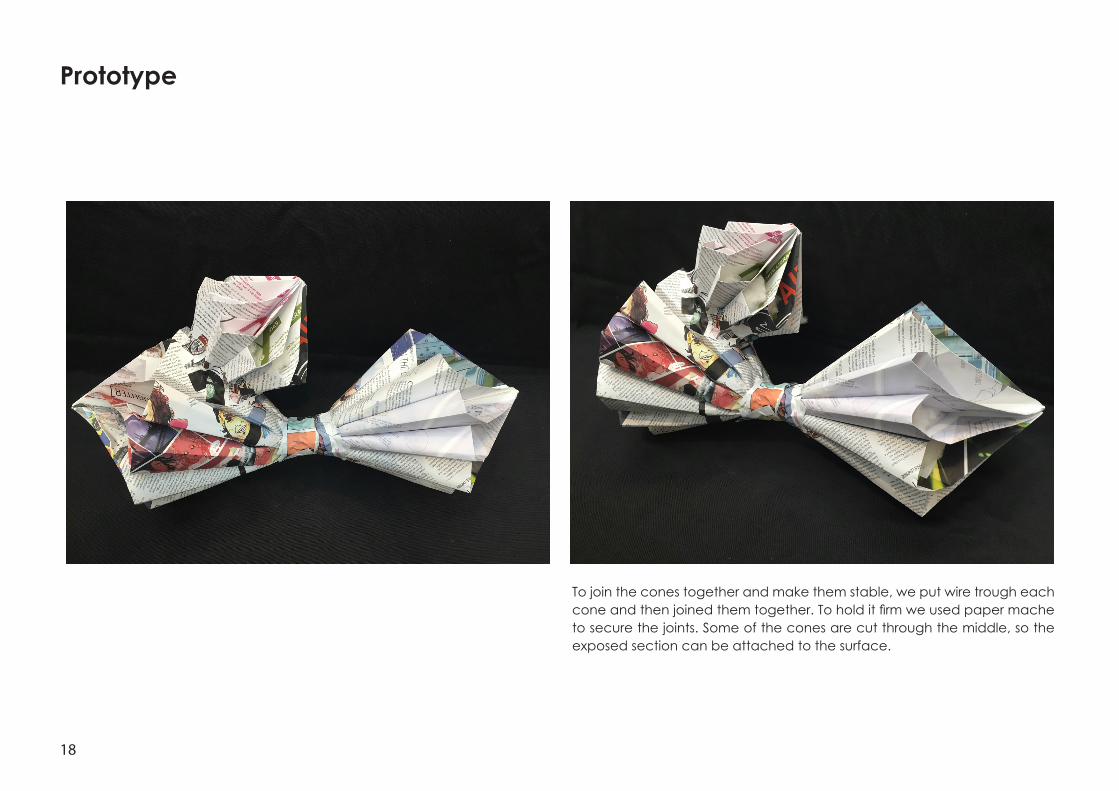
Prototype
To join the cones together and make them stable, we put wire trough each cone and then joined them together. To hold it firm we used paper mache to secure the joints. Some of the cones are cut through the middle, so the exposed section can be attached to the surface.

19
Testing Effects
The prototype was effective. We used this sec-tion as a pillow support around the neck leaving enough space to move around inside the pod. It was very comfortable to sleep in and the cone bounces back into shape after use because of the stuffing. Because the pod structure is sitting behind and cannot be seen in the peripheral vi-sion, it doesn’t make the user feel claustrophobic.

20
Appendix
1) Downloaded the human mesh template to create model around.
2) Set up reference images for front and side view of the design by using the ‘pictureframe’ command
3) Used the ‘polyline’ command to draw the out-line of one of the segments of the cone.
4) Selected the polylines and used the ‘PointsOn’ so the points could be pulled in profile to the appropriate shape.
5) Selected the polylines and used the “ExtrudeCrvTo-Point’ command to create one of the cone segments.
6) Selected the individual cone segment and used the ‘Array-Polar’ command to create the final cone shape.
7) Positioned two cones to create the shoulder support of the structure.
8) Continued to copy and paste cone shapes (and occasionally scale the size of them, in order to build up the top of the pod.