module 7: preparing to facilitate - education...
TRANSCRIPT

Module 1
Part 2: Training Mentors
Preparing to
Time: 2 hoursLimit: 20 participants
Facilitate

PART 2:Training Mentors
MODULE 1:Preparing to Facilitate
N O T E S
1
Introduction
Session Goals
As a first step toward providing training to their program’s mentors,participants will explore fundamentals that are important for becom-ing an effective facilitator. By the end of the workshop, they should:
• Have identified characteristics of adult learners
• Understand effective approaches for facilitating training sessions
• Be able to develop training activities for new mentors
• Understand the importance of reflection for strengthening theirskills as trainers
The Basics
1. Adult learners tend to be practical and goal-oriented. They wantto learn what they need to learn in order to succeed.
2. People are most likely to learn when they are active participantsin the learning experience.
3. “Facilitate” means “to make easier.” A good facilitator makes learn-ing “easier” for participants in the training session.
PART 2:Training Mentors
MODULE 1:Preparing to Facilitate
N O T E S
2
Agenda
1. Introductions (15 minutes) Participants describe what they want to strengthen about them-selves as trainers.
2. A Good Learning Experience (25 minutes) Small groups explore the question: “What makes a good learningexperience?”
3. Helping Mentors Learn (10 minutes) Participants discuss principles of adult learning.
4. Tips for Facilitating (15 minutes) Participants review characteristics of effective facilitation.
5. Planning an Activity (40 minutes) Small groups develop an activity for training new mentors.
6. Now What? (15 minutes) The group reflects on their experiences during this session.
Connections to Other Training Sessions
This session is intended as the first of four sessions designed to helpprograms train their mentors. The information and strategies referredto in this session are applied and expanded upon in these JUMP train-ings:
• “JUMPstarting Your Mentors”
• “Connecting and Communicating”
• “Keeping the Relationships Going”
If members of your training group have already attended any of thosesessions, you may want to draw on information they have learnedthere. If they have not yet attended those sessions, you will want to,where appropriate, encourage them to attend in order to reinforce andadd to the information that is covered during “Preparing to Facili-tate.”

PART 2:Training Mentors
MODULE 1:Preparing to Facilitate
N O T E S
3
Preparation
Note: This session focuses on preparing people to become effective trainers.Thus, one of your roles throughout the session is to model effective facil-itation strategies and approaches. (Also note that the words “trainer”and “facilitator” are used interchangeably in this module.)
1. Read the handouts. They contain much of the information you needfor leading this session. Handout #2, “Tips for Facilitators,” is thebasis for the discussion in Activity #4. This is a long handout thatis also intended to be a resource for participants to use when theyreturn to their programs. You will not be able to cover all the itemson the handout in depth during Activity #4; so as you read it,decide which items you think are most important to emphasize.Be prepared to use your own experiences as a trainer to illustratethe points you make during that activity.
2. Read the two trainer resources, “What Makes a Good LearningExperience?” (used during Activity #2) and “Four Layouts for Set-ting Up a Training Classroom” (used during Activity #4.)
3. Make five or six copies of the trainer resource, “What Makes aGood Learning Experience?,” so there will be one for the facilita-tor of each small group to use during Activity #2.
4. Review the three curriculum modules, listed on the previouspage, that include information and strategies relevant to “Prepar-ing to Facilitate.”
5. Prepare a set of handouts for each training participant. (Copy thehandouts onto paper with three-hole punches so participants cankeep them in a binder.)
6. Prepare transparencies of the five overheads.
7. Copy the goals of the session onto a flipchart. On a separatesheet of paper, copy the agenda.

PART 2:Training Mentors
MODULE 1:Preparing to Facilitate
N O T E S
4
Materials
Trainer Resources
• Trainer Resource #1: What Makes a Good Learning Experience?
• Trainer Resource #2: Four Layouts for Setting Up a Training Classroom
Overheads
• Overhead #1: Facilitate = To Make Easier
• Overhead #2: People Learn Best
• Overhead #3: A Facilitator Is...
• Overhead #4: Tips for Facilitators (a set of three overheads)
• Overhead #5: A Saying
Handouts
• Cover Page: Session Goals and Basics
• Agenda
• Handout #1: Principles of Adult Learning
• Handout #2: Tips for Facilitators
• Handout #3: Training Activity for New Mentors
• Handout #4: The Power of Discovery
• Handout #5: Resources for Preparing to Facilitate
You Will Need To Supply
Flipcharts, easels, markers, and masking tapeAn overhead projectorIndex cards

PART 2:Training Mentors
MODULE 1:Preparing to Facilitate
N O T E S
5
Activities
1. Introductions
Participants describe what they want to strengthen about themselves as trainers.
• Introduce yourself. Have each participant introduce herself/himselfand note whether they have any previous experience as trainers.
As they speak, ask participants who have experience to very brieflymention one strength they have as a trainer and one thing theywant to improve. Ask participants who do not have previous experi-ence to very briefly mention the one or two things they think aremost important for them to learn in order to be effective trainers.
• Display Overhead #1, “Facilitate = To Make Easier.”
Note that this session provides participants with an introduction forpreparing to train their program’s mentors. (Three additional trainingsessions provide opportunities for practice in delivering specificmentor training materials and adapting them to fit the characteris-tics of individual programs.)
Using the flipchart you have prepared, describe the goals of thistraining session. Then briefly review the agenda.
• Check to be sure each person has the handouts for this session.Note that you will be using most of the handouts during this ses-sion, and that they are also intended to be resources that partici-pants can use in their programs.
Refer participants to page 1 of the handouts, “Session Goals andBasics.”
Review the three “basics” that are listed there. This session will beexamining those points more fully.
#1

PART 2:Training Mentors
MODULE 1:Preparing to Facilitate
N O T E S
6
2. A Good Learning Experience
Small groups explore the question: “What makes a good learning experience?”
• Explain that you want to begin this session by talking about whatmakes a good learning experience for adults.
Organize participants into small groups of 5 or 6 people.
Ask for one person from each group to volunteer to be the facili-tator for that group. Then give each facilitator a copy of TrainerResource #1, “What Makes a Good Learning Experience?,” to use asa guide for the group’s discussion. While the groups are assembling,meet very briefly with the facilitators to quickly review the stepsoutlined on that trainer resource.
Make sure each group has a flipchart and markers. Allow about 15minutes for the groups to meet. (Give a “5-minute warning” after10 minutes so the groups know they have to begin to wrap-up.)
• Have the small groups report out to the whole group on their lists offactors that contribute to successful learning.
As they report, create two master lists on the flipchart. One listshould include items related to facilitation—title it “What Makes aSuccessful Learning Experience? Qualities of Facilitators.” Theother list should include items related to the learners—title it“What Makes a Successful Learning Experience? Characteristicsof Adult Learners.”
• Ask participants to reflect on this opening small-group activity.
You can ask, for example:
1. For small-group members: Did the process work well in your group?If so, why? What did your small-group facilitator do that con-tributed to your group’s success?
2. For the small-group facilitators: How did you feel as you were lead-ing your group? What did you think was going well? What, if any-thing, were you less comfortable with? In retrospect, would you haveliked to do anything differently?
#1

PART 2:Training Mentors
MODULE 1:Preparing to Facilitate
N O T E S
7
Throughout the discussion, add items, as appropriate, to the masterlists on the flipchart.
Add your own comments about the groups’ processes and the facil-itators’ styles that you noticed as you were observing the groupsduring their meetings.
3. Helping Mentors Learn
Participants discuss principles of adult learning.
• Display Overhead #2, “People Learn Best.”
Lead a brief discussion about the extent to which participants feelthe statistics reflect their own experiences—both positive and lesspositive ones. Have them give concrete examples of those experi-ences. (You can also ask if seeing the overhead will help themremember the information it contains.)
Connect this discussion to the items you recorded on the flipchartduring the previous activity under the heading, “What Makes aSuccessful Learning Experience? Characteristics of Adult Learners.”
• Then refer the group to Handout #1, “Principles of Adult Learning.”Note that these are generally agreed-upon principles, based onresearch into adult learning. Allow a few minutes for participants toread the handout.
Lead a discussion about each of the four principles on the handoutand their practical implications for facilitators. The discussion shouldcover at least these points:
1. Do the principles seem to be “on target”? Are they compatible withthe list of characteristics of adult learning that participants generatedbased on their own experiences?
2. Remind the group about the overhead you used in Activity #1:“Facilitate = To Make Easier.” Given these principles about howadults learn, what are the practical implications for trainers/ facili-tators? How can a trainer of mentors take advantage of each of theseprinciples in order to facilitate learning?
3. Are there other “practical implications for facilitators” they want toadd? (Have them refer back to the list of “Qualities of Facilitators”you recorded on the flipchart during the previous activity.)
#2
#1

PART 2:Training Mentors
MODULE 1:Preparing to Facilitate
N O T E S
8
4. Are there other principles they think should be added?
Write participants’ ideas on the flipchart, and note that there arealso spaces on the handout for them to write.
4. Tips for Facilitating
Participants review characteristics of effective facilitation.
• Tell participants that in a few minutes they will be meeting insmall groups to apply these ideas by developing a training activityfor new mentors. But first you want to review some “good practices”for facilitating.
Refer the group to Handout #2, “Tips for Facilitators,” and allowthem a few minutes to read it.
• Lead a discussion about the information on the handout. (Overhead#3, “A Facilitator Is...,” and the three parts of Overhead #4, “Tipsfor Facilitators,” reproduce major headings on the handout.)
You should limit this discussion to 10 or 15 minutes. Thus, you willnot be able to cover every point in detail. Decide in advance whichitems you want to focus on. You might, for example, want to spend afair amount of time on the roles of the facilitator, listed at the begin-ning of the handout, and discuss strategies for managing “groupprocess.”
In addition, Trainer Resource #2, “Four Layouts for Setting Up aTraining Classroom,” provides detailed information about strategiesfor setting up the room in ways that are conducive to group learn-ing—an essential but often overlooked aspect of facilitating. If timeallows, you might want to have the group try out different ways ofarranging the tables and seating in the room, so they can experiencecomfortable and less comfortable arrangements.
Connect the discussion to the points about facilitation that partici-pants have made during the previous activities.
At appropriate points during the discussion, have them suggestadditional facilitation tips and strategies, and write them in thespaces on the handout.
#3#4
#2
#2

PART 2:Training Mentors
MODULE 1:Preparing to Facilitate
N O T E S
9
At appropriate points, also note that other aspects of facilitating—including co-facilitating and strategies for dealing with the manythings that can go awry during a training session—are included inthe other three JUMP sessions that focus on training mentors.
5. Planning an Activity
Small groups develop an activity for training new mentors.
• Tell participants they are going to begin to apply all of this infor-mation by meeting in small groups to develop a training activity fornew mentors.
Ask what they want their new mentors to know and be able to doduring their first meeting with the mentees. Record their respons-es on the flipchart.
Responses might include: know how to communicate with thechild/youth; be a good listener; know how to work with the child/youthto set goals; understand cultural issues; understand principles ofyouth development; understand a mentor’s role; have reasonableexpectations for the relationship.
Lead a brief discussion about the items on the list, seeing if thereare any the group wants to modify or delete, or if there are anyitems they want to add.
Note that you have just been modeling a brainstorming activity.Before moving on to the next step, take a minute to reflect on thisbrainstorming activity with your group and to get feedback fromthem about its process and usefulness.
• Refer participants to Handout #3, “Training Activity for New Mentors.”
Note that the goal for the activity they create will be one of the itemson the list they have just generated (or some aspect of one of theitems). For example, the activity’s goal might be for “mentors to beable to communicate without imposing their values,” or for “mentorsto understand the children’s challenges in school.”
Organize participants into small groups by having them choosewhich item/goal they want to create an activity for. Try to have 4to 6 people in each group. If many people want to work on thesame item, organize those people into two or more smaller groups.
#3

PART 2:Training Mentors
MODULE 1:Preparing to Facilitate
N O T E S
10
Remind the groups to think about the principles of adult learningand of effective facilitation you have been discussing, and also tothink about strategies (such as brainstorming, role plays, groupwork, discussion) they will build into their activity.
Tell each group to select a facilitator. (It should not be someonewho served as a small-group facilitator during Activity #2.)
Make sure each group has a flipchart and markers.
Allow about 20 minutes for the small groups to meet. (Give a “5-minute warning” after 15 minutes so the groups know they haveto begin to wrap up.)
• Have the small groups report out to the whole group. Each small-group should describe the activity it has developed and the reasonswhy it decided on particular approaches and strategies for theactivity.
AS AN ALTERNATIVE: If there is time, and if any of the activitieslend themselves to immediate presentation, some of the smallgroups might choose to present their activity, or part of it, as arole-play. In this case, one of the small-group members would bethe facilitator, and all of the other participants in this trainingsession would play the role of new mentors who are taking partin the activity.
Allow time for feedback after each presentation, focusing onprinciples of effective learning and facilitating.
6. Now What?
The group reflects on their experiences during this session.
• Distribute an index card to each participant.
Ask them, on the front of the card, to list one or two positiveaspects of this training session—What was effective? Whatworked? On the back of the card, they should list one or twoaspects of the training that, if they were the trainer, they mightwant to change or modify. (Also complete an index card yourself.)

PART 2:Training Mentors
MODULE 1:Preparing to Facilitate
N O T E S
11
Ask for a few people to read one of their positive items. Then askfor a few people to read one of the items about something theywould change or modify. Where appropriate, lead brief discussionsabout the items (both positive and less positive) as they are read.
During this activity, you are modeling responding to feedback andbeing self-reflective. Thus, while you don’t want to dominate the con-versation, this is a good opportunity for you to talk about your roleas trainer for this session—including, for example, how or why youmade particular decisions about your approach to specific activities.
You can sum up this activity by displaying Overhead #5, “A Say-ing.” Note that it is also included in participants’ handout packets.
• Refer them to Handout #5, “Resources,” for additional resourcesfor preparing to facilitate.
Also remind the group that three additional JUMP training ses-sions provide them with opportunities to build on this session.In those sessions, they will explore skills and concepts that areimportant for their mentors to know, get additional experience indeveloping and modifying activities for training and supportingtheir mentors, and also gain practice in facilitating.
#5
#5

PART 2:Training Mentors
MODULE 1:Preparing to Facilitate
N O T E S
12
PART 2:Training Mentors
MODULE 1:Preparing to Facilitate
13
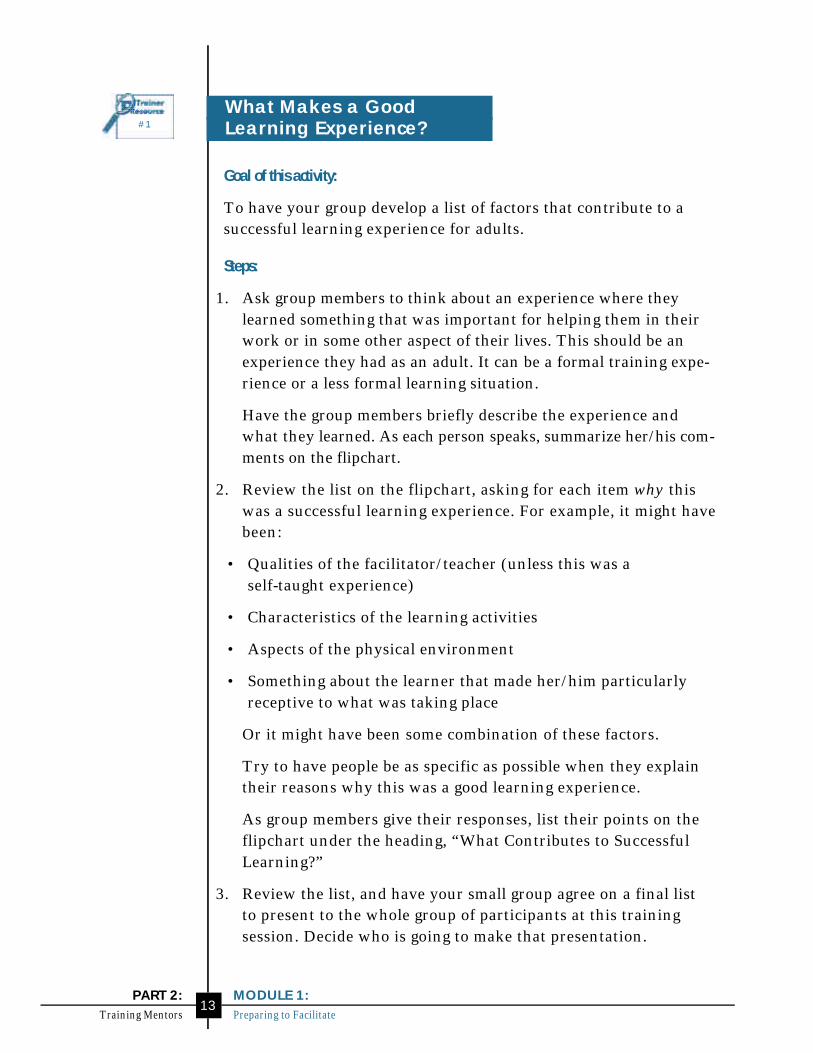
What Makes a Good Learning Experience?
Goal of this activity:
To have your group develop a list of factors that contribute to asuccessful learning experience for adults.
Steps:
1. Ask group members to think about an experience where theylearned something that was important for helping them in theirwork or in some other aspect of their lives. This should be anexperience they had as an adult. It can be a formal training expe-rience or a less formal learning situation.
Have the group members briefly describe the experience andwhat they learned. As each person speaks, summarize her/his com-ments on the flipchart.
2. Review the list on the flipchart, asking for each item why thiswas a successful learning experience. For example, it might havebeen:
• Qualities of the facilitator/teacher (unless this was a self-taught experience)
• Characteristics of the learning activities
• Aspects of the physical environment
• Something about the learner that made her/him particularlyreceptive to what was taking place
Or it might have been some combination of these factors.
Try to have people be as specific as possible when they explaintheir reasons why this was a good learning experience.
As group members give their responses, list their points on theflipchart under the heading, “What Contributes to SuccessfulLearning?”
3. Review the list, and have your small group agree on a final list to present to the whole group of participants at this training session. Decide who is going to make that presentation.
#1

PART 2:Training Mentors
MODULE 1:Preparing to Facilitate
N O T E S
14

PART 2:Training Mentors
MODULE 1:Preparing to Facilitate
15
Four Layouts for SettingUp a Training Classroom
The physical environment in a classroom can make or breakactive training. No setup is ideal but there are many options tochoose from. The “interior decorating” of active training is funand challenging (especially when the furniture is less than ideal).In some cases, furniture can be easily rearranged to create differentsetups. If you choose to do so, ask participants to help move tablesand chairs. That gets them “active,” too.
1. U shape. This is an all-purpose setup. The participants have areading and writing surface, they can see you and a visualmedium easily, and they are in face-to-face contact with oneanother. It is also easy to pair up participants, especially whenthere are two seats per table. The arrangement is ideal for dis-tributing handouts quickly to participants because you can enterthe U and walk to different points with sets of materials.
You can set up oblong tables in a squared-off U:
Be sure there is enough perimeter space in the room so that sub-groups of three or more participants can pull back from the tablesand face one another.
When there are more than sixteen participants, a U can start toresemble a bowling alley:
#2

PART 2:Training Mentors
MODULE 1:Preparing to Facilitate
N O T E S
16
or a bridge:
It is much better, in this case, to bring all participants in closercontact by seating some participants inside the U:
You can also arrange circular or oblong tables in a U that appearsmore like a semicircle or a horseshoe:
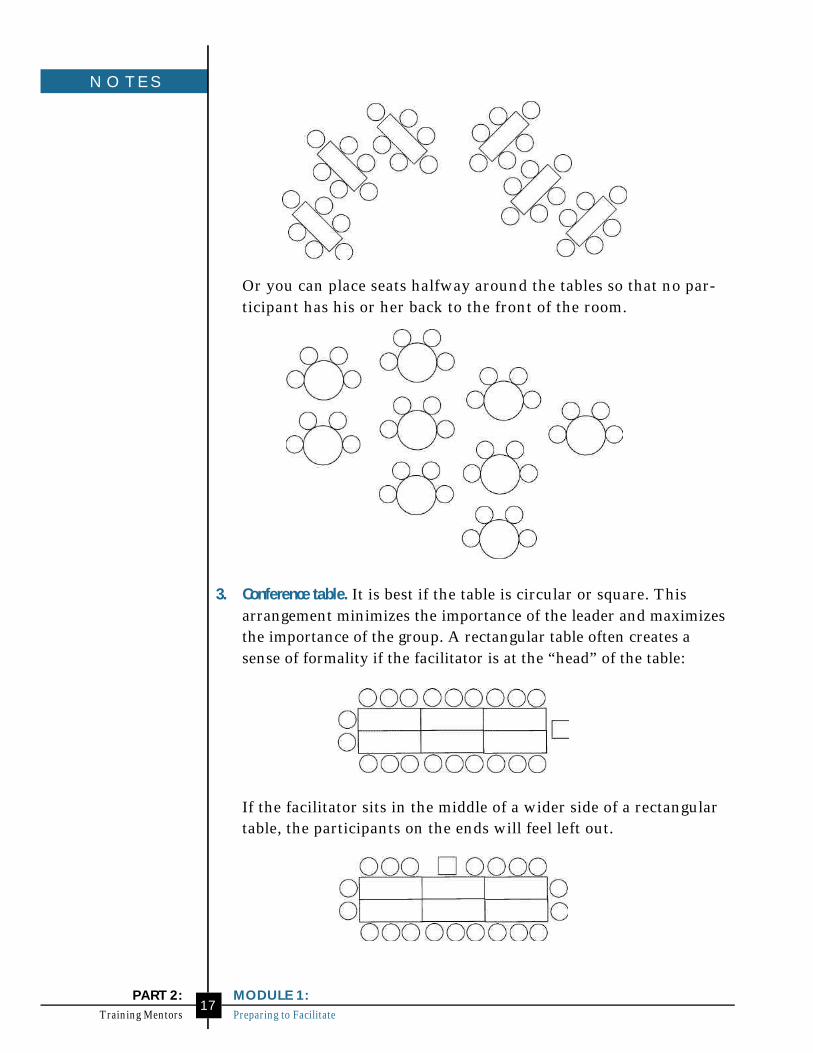
2. Team style. Grouping circular or oblong tables around the roomenables you to promote team interaction. You can place seats fullyaround the tables for the most intimate setting. If you do, some par-ticipants will have to turn their chairs around to face the front ofthe room to see you, a flipchart/blackboard, or a screen.
PART 2:Training Mentors
MODULE 1:Preparing to Facilitate
N O T E S
17
Or you can place seats halfway around the tables so that no par-ticipant has his or her back to the front of the room.
3. Conference table. It is best if the table is circular or square. Thisarrangement minimizes the importance of the leader and maximizesthe importance of the group. A rectangular table often creates asense of formality if the facilitator is at the “head” of the table:
If the facilitator sits in the middle of a wider side of a rectangulartable, the participants on the ends will feel left out.

PART 2:Training Mentors
MODULE 1:Preparing to Facilitate
N O T E S
18
You can form a conference table arrangement by joining togeth-er several smaller tables (the center will usually be hollow).
4. Circle. Simply seating participants in a circle without tablespromotes the most direct face-to-face interaction. A circle isideal for full-group discussion. Assuming there is enoughperimeter space, you can ask participants to quickly arrangetheir chairs into many subgroup arrangements.
If you want a table surface available for participants, use a peripheral arrangement.
[Reprinted with permission from Melvin L. Silberman and Karen Law-son. 101 Ways to Make Training Active, ©1995. Jossey-Bass Inc., Publish-ers, 350 Sansome Street, San Francisco, CA 94104, (415) 433-1740.]

Facilitate = to make easier
Good trainers are facilitators.
#1
PART 2: Training Mentors MODULE 1: Preparing to Facilitate Overheads 19

People learn best when they use multiple modes of learning.
People remember:
• 20 percent of what they hear
• 40 percent of what they hear and see
• 80 percent of what they discover for themselves
#2
PART 2: Training Mentors MODULE 1: Preparing to Facilitate Overheads 21

A facilitator is a:
• Coach
• Listener
• Trainer
• Learner
• Manager of group process
#3
PART 2: Training Mentors MODULE 1: Preparing to Facilitate Overheads 23
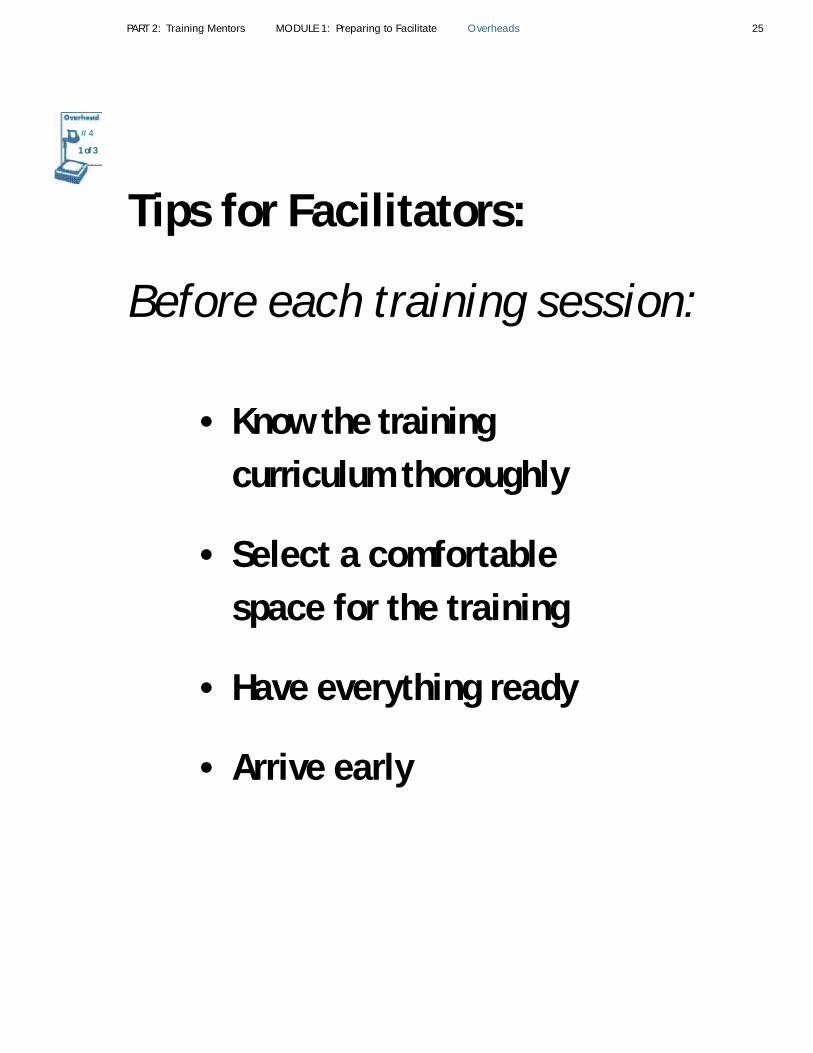
Tips for Facilitators:
Before each training session:
• Know the training curriculum thoroughly
• Select a comfortable space for the training
• Have everything ready
• Arrive early
PART 2: Training Mentors MODULE 1: Preparing to Facilitate Overheads 25
#4
1 of 3

During each training session:
• Create a comfortable learning environment
• Pace the training appropriately
• Model good listening, feedback, and problem-solving skills
• Think about how people learn best
• Be yourself
PART 2: Training Mentors MODULE 1: Preparing to Facilitate Overheads 27
#4
2 of 3

After each training session:
• Get feedback from participants
• Reflect on what worked well and what did not
• Follow-up on information you promised participantsyou would get for them
PART 2: Training Mentors MODULE 1: Preparing to Facilitate Overheads 29
#4
3 of 3

Tell me,and I’ll forget.
Show me, and I may not remember.
Involve me,and I’ll understand.
—Native American saying
#5
PART 2: Training Mentors MODULE 1: Preparing to Facilitate Overheads 31

Handouts
Session Goals and Basics 1
Agenda 2
Handout #1: Principles of Adult Learning 3
Handout #2: Tips for Facilitators 5
Handout #3: Training Activity for New Mentors 12
Handout #4: The Power of Discovery 13
Handout #5: Resources for Preparing to Facilitate 14
Preparing to
Facilitate
Page

Session Goals
• To identify characteristics of adult learners
• To understand effective approaches for facilitating training sessions
• To be able to develop training activities for new mentors
• To understand the importance of reflection for strengthening your skills astrainers
The Basics
1. Adult learners tend to be practical and goal-oriented. They want to learn whatthey need to learn in order to succeed.
2. People are most likely to learn when they are active participants in the learning experience.
3. “Facilitate” means “to make easier.” A good facilitator makes learning “easier”for participants in the training session.
PART 2: Training Mentors MODULE 1: Preparing to Facilitate Handouts 1

Agenda
1. Introductions
Notes:
2. A Good Learning Experience
Notes:
3. Helping Mentors Learn
Notes:
4. Tips for Facilitating
Notes:
5. Planning an Activity
Notes:
6. Now What?
Notes:
PART 2: Training Mentors MODULE 1: Preparing to Facilitate Handouts 2

Principles of Adult Learning
Learning results in a change in knowledge, skills, and/or attitudes. Some of the fac-tors that contribute to adult learning are not very different from those that con-tribute to learning by children and youth.
1. Adults learn what they are motivated to learn.
Adults want to see a reason for learning something—the learning has to beapplicable to their work or other responsibilities to be of value to them. Adultslearn in order to solve perceived problems.
Practical implications for facilitators:
• In planning a training session for mentors, first think through the concernsthat your participants are likely to have. Those concerns will change overtime and may include having a successful first meeting with their mentee,communicating effectively, dealing with a mentee’s apparent lack of interestin the relationship, or addressing problems that have arisen with thementee’s parent or guardian.
• Other:
• Other:
2. Adults are practical and goal-oriented.
They focus on aspects of a training that are most useful to them.
Practical implications for facilitators:
• Be explicit about how activities during the session will be of practical help to mentors.
• Other:
• Other:
PART 2: Training Mentors MODULE 1: Preparing to Facilitate Handouts 3
#1
page 1 of 2

Principles of Adult Learningpage 2 of 2
3. Adult teaching should be grounded in learners’ experiences.
Adults have accumulated a foundation of knowledge and life experiences that isa valuable resource. Adults learn best when new information and concepts arebuilt on this foundation.
Practical implications for facilitators:
• During the training session, draw out mentors’ experience and knowledgethat are relevant to the subject, and help them see new information in relationto what they already know.
• Other:
• Other:
4. Adults learn best when they are in a supportive environment.
They want guidance, not competition—they don’t want to be put on the spot orfeel like they are being tested. They learn best when they are both psychologicallyand physically comfortable.
Practical implications for facilitators:
• During the training session, create an environment that encourages mutualinquiry and shared learning.
• Other:
• Other:
5. Other principles:
PART 2: Training Mentors MODULE 1: Preparing to Facilitate Handouts 4

Tips for Facilitators
“Facilitate” means “to make easier.” Think about yourself as a “facilitator”—someone who helps mentors learn, rather than as someone who attempts toimpose learning upon them. “Facilitating” suggests the idea of a collaborativerelationship between the trainer and participants. A facilitator is a:
• Coach
• Listener
• Trainer
• Learner
• Manager of group process
What follows are some good practices for facilitating.
Before Each Training Session
1. Know the training curriculum thoroughly.
• As necessary, customize activities, handouts, and overheads so they bestaddress characteristics of your program, your specific group of mentors, andthe strengths and needs of the children and youth they will be mentoring. Beprepared to offer real-life examples that illustrate your program’s experiences.
• Think about how you will facilitate the session, and be prepared to make on-the-spot adjustments. Adjustments might be needed if, for example, an activi-ty is not working well or one activity takes longer than expected so that youhave to shorten another.
2. Select a space for the training that is physically comfortable and contributes to group interaction.
• The room should be:- Large enough for the number of participants, but not too large- Private (people from outside the group should not be walking in and out)- Quiet (traffic noises or loud voices from the next room can be very distracting)- Clean and well-lighted
PART 2: Training Mentors MODULE 1: Preparing to Facilitate Handouts 5
#2
page 1 of 7

Tips for Facilitatorspage 2 of 7
• Avoid a traditional classroom setup. Depending on the size of your group, have atable large enough for all the participants to sit around, or multiple tables(square or round) for smaller groups to sit around. If that is not possible,arrange chairs in a circle—this will facilitate discussion.
• If small groups are going to be meeting as part of the activities, make surethere are rooms available nearby, or be sure the training room is large enoughthat small groups can meet within it without distracting each other.
3. Have everything ready.
• Copy handouts and prepare overheads.
• Gather any required materials and equipment: flipcharts, markers, maskingtape, name tags, an overhead projector (and extension cord, if necessary),and anything else you might need for the session.
4. Arrive early.
• If necessary, be sure there are signs just inside the building entrance thatshow participants where to go for the training session.
• Get to the training room about 30 minutes early to set up the area: arrangechairs, do any necessary advance writing on flipcharts, and check equipment.
• Be sure that refreshments (coffee, water, soft drinks, etc.) are available.
• Greet participants as they arrive at the training room.
5. Other:
6. Other:
7. Other:
PART 2: Training Mentors MODULE 1: Preparing to Facilitate Handouts 6

Tips for Facilitatorspage 3 of 7
During Each Training Session
1. Create a comfortable learning environment.
• Be sure the physical space is conducive to group learning, and that participantscan hear each other as they speak.
• Create an atmosphere where participants are taken seriously and wherethey can also laugh. Think about ways to inject humor into the training session—for example, using relevant cartoons as overheads, or telling funnyanecdotes about experiences of mentors. People are usually most open tonew ideas when they are enjoying themselves and feel comfortable enoughto risk making mistakes.
2. Pace the training appropriately.
• Encourage the exchange of ideas and information, while also keeping activitieson track. Move things quickly enough to keep participants from being boredbut slowly enough to make sure they absorb what is being discussed.
• Allow time throughout the session for participants to ask questions. Whereappropriate, involve the whole group in answering questions—but also have afeel for which questions should be answered quickly so the session can proceed.
3. Model good listening, feedback, and problem-solving skills.
• Listen carefully and respectfully. Acknowledge what people say even if youdon’t agree. People need to feel they are being listened to and that their ideasand concerns are recognized as worthy contributions.
• Maintain eye contact with each person as he or she speaks. Monitor yournonverbal signals as well as your verbal comments.
• Respond by guiding, not imposing. Be nonjudgmental. Repeat and addresskey points.
• Help participants develop collaborative problem-solving skills. Involve themin answering other participants’ questions, and have them work together toarrive at solutions to problems.
PART 2: Training Mentors MODULE 1: Preparing to Facilitate Handouts 7

Tips for Facilitatorspage 4 of 7
4. Think about how people learn best.
• Keep this point in mind: People remember about 20 percent of what theyhear; 40 percent of what they hear and see; and 80 percent of what they dis-cover for themselves.
• Use overheads and flipcharts to help people see and remember. Flipcharts arealso a useful tool for group thinking and problem solving. Summarize majordiscussion points on flipcharts—it dramatizes the variety and extent of thegroup’s thinking. Post the flipchart pages on the walls around the room so youand your group can keep referring back to, and expanding upon, earlier ideasand contributions.
• Use the three effective strategies for facilitators—brainstorming, group work,and role-plays—that are described below.
• Build in success. People learn best when they experience success frequently.Structure activities so participants have a sense of accomplishment at the endof each. Structure the training session so participants’ sense of accomplishmentgrows throughout.
5. Be yourself.
• Know your limitations—if you don’t know the answer to a question, that’sokay. You don’t need to know all the answers. Just say you will try to findthe information they requested and get back to them. And then do it.
• Have a sense of humor.
6. Other:
7. Other:
8. Other:
PART 2: Training Mentors MODULE 1: Preparing to Facilitate Handouts 8
Tips for Facilitatorspage 5 of 7
After Each Training Session
1. Get feedback from participants.
• Prepare an evaluation form that asks for feedback on both the process andthe content of the training session. Distribute it at the end of the session,and ask participants to complete it before they leave.
• Schedule about 10 minutes at the end of the session for participants tocomplete this task, so they do not feel rushed and have time to writethoughtful feedback.
2. Reflect on what worked well and what did not.
• Don’t use the feedback forms to give yourself a rating. Instead, use the infor-mation to help you think through what went well from the participants’point of view, what you need to modify about the content, and what facilitationskills you want to work on.
• Along with participants’ feedback, give yourself your own feedback on thetraining. Think about the situations when participants seemed involved, bored,stimulated, confused, angry, or having fun. Based on your self-observations,make necessary adjustments in session content and your facilitation strategies.
3. Follow-up on information you promised participants you would get forthem.
• During the training session, keep a “to do” list of information (or answers toquestions) that you tell participants you will obtain for them.
• Try to get the information, and then contact the participants who requestedit. If you can’t find the information (or the answer to a question), contact theparticipant to let him or her know about the situation.
4. Other:
5. Other:
6. Other:
PART 2: Training Mentors MODULE 1: Preparing to Facilitate Handouts 9
Tips for Facilitatorspage 6 of 7
Three Strategies for Effective Facilitation
During training sessions for mentors, you will want to take advantage of threeimportant strategies: brainstorming, group work, and role-plays.
1. Brainstorming
Brainstorming is an excellent way to generate ideas—and it is an effective tech-nique for getting all of the participants involved and contributing, especially atthe beginning of a session when you are trying to get everyone focused on thesame subject.
When facilitating brainstorming activities, keep these points in mind:
• The purpose of brainstorming is to allow participants to generate ideas in anonjudgmental atmosphere.
• As participants offer ideas, record them—all of them—on a flipchart. Brain-storming is a free exchange of ideas on a topic. It is important to accept every-one’s contribution.
Then, after all ideas have been offered and recorded, the group can evaluatethem to identify those it considers most realistic or useful.
2. Group Work
During many activities, organizing the whole group into small groups of 4 to 6 peoplewill encourage participation, involvement, and collaborative problem solving.
In some cases, you might want to assign—or have group members assign to them-selves—these specific roles:
• The leader, who (like a facilitator) takes responsibility for helping the groupcomplete its task. She or he helps group members work together and encour-ages all members to participate in positive ways.
• The recorder, who writes down group members’ ideas, their answers toquestions assigned by the trainer, and anything else that needs to be recorded.
• The reporter, who presents the small group’s ideas and conclusions back tothe whole group. (You might want to combine the recorder and reporterroles, since it is sometimes hard to read from someone else’s notes.)
PART 2: Training Mentors MODULE 1: Preparing to Facilitate Handouts 10

Tips for Facilitatorspage 7 of 7
You will want to make sure that, over the course of several sessions, partici-pants’ group roles vary and that everyone has an opportunity to be the “leader.”You will also want to make sure participants understand that, whatever otherroles they may have, everyone in the group works together to complete thegroup task. Everyone suggests ideas, gives opinions, agrees or disagrees with oth-ers, asks questions, and offers solutions.
3. Role-Plays
When preparing to facilitate role-plays, keep these points in mind:
• Role-plays are informal dramatizations through which participants can tryout ways they might handle a potential situation with their mentee ormentee’s family, and increase their insight into someone else’s feelings, values, or attitudes.
• If the session’s curriculum materials include suggested scenarios and characteri-zations for the role-plays, you should modify these, where possible, to reflectactual situations that have arisen or are likely to arise in your particular pro-gram.
• Always allow time after the role-plays for participants to discuss their own andothers’ “performances” and to talk about what they learned from the activity.
Many people initially feel uncomfortable doing role-plays. However, once theyhave some practice with them, they usually enjoy the experience and see thatrole-playing is an effective way to develop skills. Most importantly, perhaps, theysee that practice in role-plays can make potentially uncomfortable situations feelmuch less uncomfortable when they actually occur during their experiences asmentors.
PART 2: Training Mentors MODULE 1: Preparing to Facilitate Handouts 11

Training Activity for New Mentors
Goal of this activity:
Materials and equipment I will need:
Steps:
1.
2.
3.
4.
PART 2: Training Mentors MODULE 1: Preparing to Facilitate Handouts 12
#3

The Power of Discovery
Tell me, and I’ll forget.
Show me, and I may not remember.
Involve me, and I’ll understand.
—A Native American saying
People remember:
20 percent of what they hear,
40 percent of what they hear and see,
80 percent of what they discover for themselves.
—A widely accepted principle about how people learn
PART 2: Training Mentors MODULE 1: Preparing to Facilitate Handouts 13
#4

Resources for Preparing to Facilitate
Curriculum
Mentor Training Curriculum. 1991. National Mentoring Working Group. Washington, D.C. Contains a unit on “training the trainer.” Available throughthe National Mentoring Partnership, (202) 338-3844, or through the “VolunteerMarketplace Catalog,” (800) 272-8306.
Books for trainers
Basic Training for Trainers: A Handbook for New Trainers. 1995. Gary Kroehnert.New York: McGraw-Hill.
101 Ways to Make Training Active. 1995. Melvin L. Silberman and Karen Lawson. San Francisco: Jossey-Bass, Inc.
The Trainer’s Tool Kit. 1997. Cyril Charney and Kathy Conway. New York: Amacom Books.
The Winning Trainer: Winning Ways to Involve People in Learning. 3rd Edition.1996. Julius E. Eitington. Houston: Gulf Publishing Company.
PART 2: Training Mentors MODULE 1: Preparing to Facilitate Handouts 14
#5