module warehouse management - disaster info wareh… · incorporating data from module warehouse...
TRANSCRIPT

_____________________________________________________SUMA WAREHOUSE MODULE
March, 1999
Humanitarian Supply Management System SUMA
Module Warehouse Management
USER’S MANUAL
VERSION 5.1 for Windows
Pan-American Health Organization Pan-American Sanitary Bureau •
Regional Office of the World Health Organization
525 Twenty-third, N.W. Washington D.C. 20037, EUA
May 2000
__________________________________________________SUMA WAREHOUSE MODULE
October, 1999 2
Table of contents
1. Introduction 04 Problems with the Arrival of Unsolicited Supplies 04 Suma objectives 04 Components of the system 05 SUMA CENTRAL 05 Field Unit 06 Warehouse Management 06 The consignment 07 Activities in the work area 08 Sorting supplies 08 Classifying supplies 09 Taking inventory 10 2. Installing and configuring the Warehouse Management Module
11
Technical Requirements 11 Installing SUMA Stock 11 Installation using a CD ROM 11 Starting a work session 13 Set up warehouse 13 The Main Menú 15 Choosing Options 15 The importance of Protecting Data 16 Ending the Work Session 16 Setting Up the Warehouse Management Module 17 Warehouse sector 17 Exchange rate 18 Destinations Sites 19 Points of Origin 19 Contact Directory 20 Minimum/Maximum Level 21 Resetting the System 22 Incorporating data from Module Warehouse Management 5.0/5.1 23 3. Registering Incoming Supplies 24 Manual Entry 24 Data input by Alphabetical list 26 Incremental Search 27 Data Input by Technical Categories 28 Registering Item Information 29 Registering Pharmaceutical Products 30 Registering Other Supplies 32 Items Defined by the User 34 General Remarks 35 Registering Unclassified Items 36 Entering a Registration Using a Diskette 38 4. Consulting and Modifying Entries 40 Consultations and Modifications on specific entries 41 List of entries 41

__________________________________________________SUMA WAREHOUSE MODULE
October, 1999 3
Consultation/modification by parameters 41 Entries Report by Class 42 5. Direct delivery 44 Enter requests 46 The creation of the request 47 Printing the Request 48 6. Authorizing Delivery of Supplies 49 The authorization process 49 Deliver the authorized request 51 Data transfer 52 Incorporating data from another Warehouse Module 53 Preparing data to another Warehouse Module or Central 53 View other Warehouse incorporated 54 7. Reports 55 Report on Stock 56 Entries by date and items delivered by destination. 57 Verifying Stock 58 Excel Interface 58 8. The Utility Menu 60 Index files 60 Protection of information 60 About SUMA 61

__________________________________________________SUMA WAREHOUSE MODULE
October, 1999 4
Introduction
The Humanitarian Supply Management System, SUMA, is a collective effort of Latin American and Caribbean countries, with the sponsorship of the Pan American Health Organization and the financial support of the Government and the People of the Netherlands, to improve the management of relief supplies, whether they come from provinces or cities in the disaster-affected country or from the international community.
Problems with the Arrival of Unsolicited Supplies
One of the main problems confronting national authorities in the aftermath of a disaster is identifying accurately what supplies have been received, where they are, and determining exactly how useful they are. Often, following a well-meaning but inadequate impulse of solidarity from possible donators, useless items take up attention and resources at the expense of other urgently needed articles. This situation presents a variety of problems with political repercussions1, including:
1. The space and means of transportation are limited. 2. Technical information on the supplies is often lacking. 3. The donors and the mass media receive a negative impression.
SUMA objectives The objective of SUMA is to provide a systematic approach to supply management problems, involving training personnel who, using a variety of materials and an easy-to-use and flexible electronic tool, ensure that the supplies are classified, inventoried, and prioritized at their point of entry. The following aspects of SUMA aid in solving the basic problems:
∗ Trained health personnel to sort and classify supplies ∗ Labels are attached to the boxes and/or packages with the
following information: - Distribution priority - Whether the shipment contains health items and/or
medicines - Whether items need refrigeration
∗ Inventory is made of valuable items, based on technical and
operational criteria
∗ Donations are registered at the point of entry using a computerized system
1 (1)Disasters, preparadness and Mitigation in the Americas, January 1993. SUMA special issue

__________________________________________________SUMA WAREHOUSE MODULE
October, 1999 5
∗ Daily reports for national authorities detail donors, addressees, type of supplies, etc.
∗ Donors receive immediate proof of delivery (via e-mail, Fax, etc.),
when the addressee receives the shipment. To attain this objective, all donations, regardless of their origin or addressee, should be processed by SUMA at their points of entry, before they are delivered to the addressee. This implies the adoption of operation policies and strategies by those organizations and institutions involved in relief management, whether governmental or non-governmental, before a disaster occurs.
As countries gain experience in operating SUMA, they use it to satisfy certain requirements, which perhaps were not foreseen in the original SUMA System, as in the case of local donors, or using a reception site both for receiving donations and administering distributions of the donations. Whatever the case may be, it should be emphasized that SUMA is not used only for large-scale emergencies that require international support, but also can be used locally when there is a need to mobilize supplies.
Components of the System
The system is composed of three levels:
∗ SUMA CENTRAL ∗ SUMA Field Unit ∗ Warehouse Management
SUMA CENTRAL is designed to operate at the site where national authorities are managing a disaster or emergency. At this level, the principal tasks are to:
∗ Establish parameters to be used by the Field Units, such as reception sites, shipment directories, define the main user, etc.
∗ Create Field Units
∗ Consolidate information sent by the Field Units
∗ Preparing reports to support the decision-making process and
promote inter-institutional coordination.
∗ Maintain the system tables (lists).
__________________________________________________SUMA WAREHOUSE MODULE
October, 1999 6
The FIELD UNIT is designed to work at the points of entry where supplies arrive during emergencies, such as borders, harbors, airports, etc.).
The main tasks at this level are to:
∗ Sort supplies and identify them using labels in the categories of: URGENT- IMMEDIATE DISTRIBUTION; NON-URGENT DISTRIBUTION; and NOT A PRIORITY ARTICLES.
∗ Classify supplies by categories, subcategories and items ∗ Conduct consultations on selected items ∗ Prepare various reports on the contents of the shipments registered
at that Field Unit ∗ Provide proof of delivery receipts for the addressees ∗ Consolidate data on diskettes to be sent to SUMA CENTRAL
The SUMA Field Unit team also uses paper forms in case the computers fail, or if data collection requires their use.
The WAREHOUSE MANAGEMENT MODULE is a tool that registers the arrival and departure of supplies from storage centers or warehouses. The warehouses receive the supplies and related data by diskettes from the Field Units and Central level. In this way the organizations can manage and control the supplies that receives and coordinate with other organizations. For example, of a shipment of medicines belonging to the Red Cross being assigned to the Ministry of Health. The main tasks carried out at this level are:
∗ Balancing the local inventory
∗ Preparing reports on existing supplies and deliveries, using a
variety of parameters ∗ Following up on the inventory of subsidiary warehouses

__________________________________________________SUMA WAREHOUSE MODULE
October, 1999 7
The following diagram shows how the system works:
The Consignment:
A consignment (or shipment) is a group of supplies, which arrive by the same means of transport, at the same time, with the same sender, and the same addressee. It is the basic reference unit for the System.
The point of entry is the place where all the consignments arrive: airports, harbors, land borders, warehouses, etc. Let’s take a look at some examples to illustrate these concepts, assuming that the supplies arrive by the same means of transport:
♦ A ship arrives with a load of eight tons of wheat, sent by the World
Food Program to the Costa Rican Red Cross. It is a single article for a single organization, therefore it will be registered as one consignment.
The information produced by the Field Units iscommunicated to the SUMA Central Level and theWarehouse Module by diskettes.
Capacity to produce reports for the nationalauthorities to support the decision-making process.
Emergency Operations Center
Central Level
Warehouse Management
__________________________________________________SUMA WAREHOUSE MODULE
October, 1999 8
♦ A plane arrives with consignments for several different addressees in
Honduras, from various senders in Mexico.
∗ The Civil Defense sends various supplies to the Honduras Emergency Commission.
∗ The Mexican Ministry of Health sends medical supplies to its
Honduran counterparts. ∗ Honduran residents in Mexico City send to the Red Cross food
and clothing.
Even though all supplies arrive on the same flight, from the same country, they come from different organizations and have different addressees, and must therefore be registered as three different consignments.
One organization might send supplies to four different destinations within the same country. Or because the size, the quantity of parcels or to facilitate the cargo, donations might be sent to a single consignee on four different flights. In both cases the supplies are registered as four different consignments.
Activities in the work area
Before delivering supplies to the addressees, there are three general phases of work:
- Sorting - Classification - Taking inventory
Sorting supplies
Supply management and distribution priorities are assigned in accordance with the supply requirements given by the Emergency Management Administration or by the Team Coordinator in the SUMA work area. These priorities depend on the type of disaster and the needs at that moment. For example, in case of an earthquake, medical supplies for the treatment of wounds and fractures would be priority, while in the case of floods the priority items would be food and water. All the boxes and packages will be labeled, showing clearly their priority level. Additionally, health supplies will have green labels. The SUMA priority levels and colors are:
Priority 1 URGENT - IMMEDIATE DISTRIBUTION: These items require immediate distribution at the site of the emergency. Label color: Red.
__________________________________________________SUMA WAREHOUSE MODULE
October, 1999 9
Priority 2 NON-URGENT DISTRIBUTION: These items are not of immediate use in the emergency phase, but they may be of use later during reconstruction or development. Label color: Blue. Priority 3: NOT A PRIORITY ARTICLES: Some supplies may be expired, damaged, useless or unidentifiable. They may arrive in combination with needed articles, making it difficult to classify them in the area of operations. The addressee should do classification of non-priority items after the emergency phase when time permits. Label color: Black.
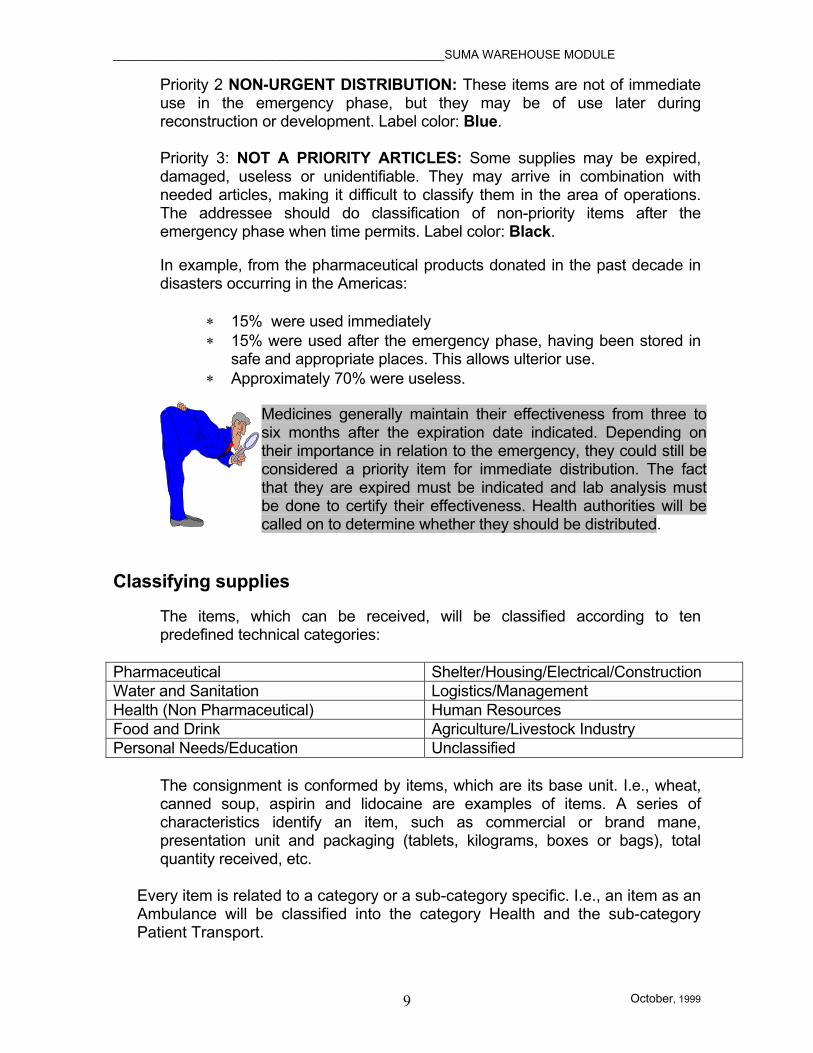
In example, from the pharmaceutical products donated in the past decade in disasters occurring in the Americas:
∗ 15% were used immediately ∗ 15% were used after the emergency phase, having been stored in
safe and appropriate places. This allows ulterior use. ∗ Approximately 70% were useless.
Classifying supplies The items, which can be received, will be classified according to ten predefined technical categories:
Pharmaceutical Shelter/Housing/Electrical/Construction Water and Sanitation Logistics/Management Health (Non Pharmaceutical) Human Resources Food and Drink Agriculture/Livestock Industry Personal Needs/Education Unclassified
The consignment is conformed by items, which are its base unit. I.e., wheat, canned soup, aspirin and lidocaine are examples of items. A series of characteristics identify an item, such as commercial or brand mane, presentation unit and packaging (tablets, kilograms, boxes or bags), total quantity received, etc.
Every item is related to a category or a sub-category specific. I.e., an item as an Ambulance will be classified into the category Health and the sub-category Patient Transport.
Medicines generally maintain their effectiveness from three to six months after the expiration date indicated. Depending on their importance in relation to the emergency, they could still be considered a priority item for immediate distribution. The fact that they are expired must be indicated and lab analysis must be done to certify their effectiveness. Health authorities will be called on to determine whether they should be distributed.

__________________________________________________SUMA WAREHOUSE MODULE
October, 1999 10
The Unsorted option, allows the operator to classify shipments with expired, useless items, or items that are too varied to classify on the spot. As mentioned previously, the addressee classifies these items once the human resources and time are made available, which could be during or after the emergency phase.
Taking Inventory
This stage allows preparing daily reports to the national or local authorities on supplies received, specifying the consignee, the sender, classification categories, quantities, etc. This allows the addressee to make appropriate emergency management decisions, and to confirm the receipt of the donations to donors.
Level 1: Categories
Level 2: Subcategories
Level 3: Items
Each category is composed of aseries of related subcategories
Each subcategory iscomposed of variousitems
Registration will always be done on these threelevels: category, subcategory and Item.Exceptions will be categorized under Unsorted,which only has two levels: category and generaltype of item

__________________________________________________SUMA WAREHOUSE MODULE
October, 1999 11
2. Installing and configuring the Warehouse Management Module Technical Requirements
1. The minimum computer requirements for implementing the Warehouse Management Module are as follows:
Computer Requirements Processor 486 or higher RAM 12 Mb Mouse Required Windows 3.1 or higher Free space on Hard Disk Drive 40 Mb (minimum) Printer Your PC’s Default Floppy Disk Drive 3.5 in., 1.44 MB
2. Verify that the time and date indicated by your computer are correct. This
verification is important because the program will use these settings when saving and searching for information.
3. Verify that you have enough memory on your hard disk drive to install the
Warehouse Management Module. If you do not have the minimum required memory, the program will not install and your computer will indicate an error message.
4. It is recommended that the computer on which you install the Warehouse
Module be used only for SUMA operations. You can also maintain a word processor, spreadsheet software, labeling software and any other software that may be necessary.
Installing SUMA STOCK The SUMA Warehouse Management Module can be installed using diskettes or a CD ROM. Installation using a CD ROM: If you are using a CD to install the SUMA software, after accessing the CD ROM you will find a directory with the following structure:
Find the SETUP.EXE file here, inDisk 1, in order to begin theinstallation.
In each one of the Disk(n) directories there is oneinstallation disk used to install SUMA CENTRAL forWindows.
__________________________________________________SUMA WAREHOUSE MODULE
October, 1999 12
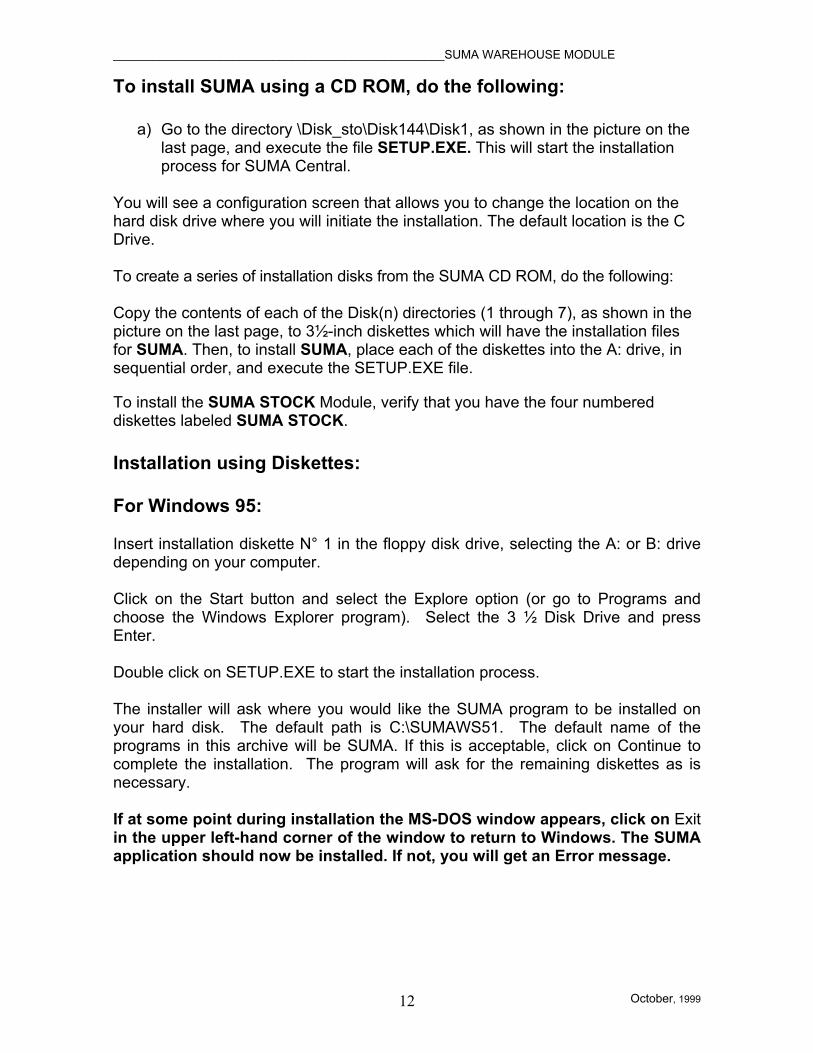
To install SUMA using a CD ROM, do the following:
a) Go to the directory \Disk_sto\Disk144\Disk1, as shown in the picture on the last page, and execute the file SETUP.EXE. This will start the installation process for SUMA Central.
You will see a configuration screen that allows you to change the location on the hard disk drive where you will initiate the installation. The default location is the C Drive. To create a series of installation disks from the SUMA CD ROM, do the following: Copy the contents of each of the Disk(n) directories (1 through 7), as shown in the picture on the last page, to 3½-inch diskettes which will have the installation files for SUMA. Then, to install SUMA, place each of the diskettes into the A: drive, in sequential order, and execute the SETUP.EXE file.
To install the SUMA STOCK Module, verify that you have the four numbered diskettes labeled SUMA STOCK. Installation using Diskettes: For Windows 95: Insert installation diskette N° 1 in the floppy disk drive, selecting the A: or B: drive depending on your computer. Click on the Start button and select the Explore option (or go to Programs and choose the Windows Explorer program). Select the 3 ½ Disk Drive and press Enter. Double click on SETUP.EXE to start the installation process. The installer will ask where you would like the SUMA program to be installed on your hard disk. The default path is C:\SUMAWS51. The default name of the programs in this archive will be SUMA. If this is acceptable, click on Continue to complete the installation. The program will ask for the remaining diskettes as is necessary. If at some point during installation the MS-DOS window appears, click on Exit in the upper left-hand corner of the window to return to Windows. The SUMA application should now be installed. If not, you will get an Error message.

__________________________________________________SUMA WAREHOUSE MODULE
October, 1999 13
Alternatively, in Windows 95 or 98:
Select the My PC icon on the main Windows desktop by double clicking on it with the left Mouse button. Double click on the 3½-inch disk icon and select Setup. Follow the steps outlined above.
You may also click on Start and select Control Panel. Next, select Add New Software and follow the on-screen instructions, choosing A:\SETUP.EXE. Follow the steps outlined above.
In Windows 3.x:
Go to the main menu of the Windows Program Manager and select File / Run. Click on the Browse button, choose A: \ and click on SETUP.EXE. This will launch the installation process.
After the last disk has been installed, the software will be fully installed on your hard disk drive, and the screen will open a window asking for the Configuration Password for the Warehouse Management Module. Type the password and press Enter.
IMPORTANT: This password will be required for process. Try to select a password that you can remember easily.
IMPORTANT: If you leave the SUMA program and you would like to restart it, do the following:
In Windows 95/98, press Start, then Programs. Look for SUMA in the list of programs and click on SUMA STOCK. In Windows 3.x, look for the SUMA program group and press Enter or double click on the SUMA STOCK icon.
Starting a work session To start a work session, select START, then PROGRAMS. Select SUMA and then SUMA STOCK from the Windows Taskbar. The program presentation screen will appear as follows: Set Up Warehouse
Set Up Warehouse is the most important step when setting up the Module. Here, you must define a password, reset the program (if necessary) and identify the warehouse. The first step is to define a password:

__________________________________________________SUMA WAREHOUSE MODULE
October, 1999 14
The password is a safety device used to minimize the risk of unauthorized personnel making modifications or deleting data. After entering the selected password, the program will request confirmation. Enter the password a second time. If it does not match the original password, the program will return to the Main Menu.
Once the password is confirmed, the specific information about the warehouse should be entered on the following screen:
∗ The SUMA program will automatically set the date. ∗ Next issue: is assigned by the program. This number corresponds to the
next consignment of supplies to be registered. ∗ Next receipt: is assigned by the program. This number corresponds to the
next arrival or delivery of supplies.
If you choose the option <Save>, the Warehouse Module will use the data entered on this screen as the default information.
__________________________________________________SUMA WAREHOUSE MODULE
October, 1999 15
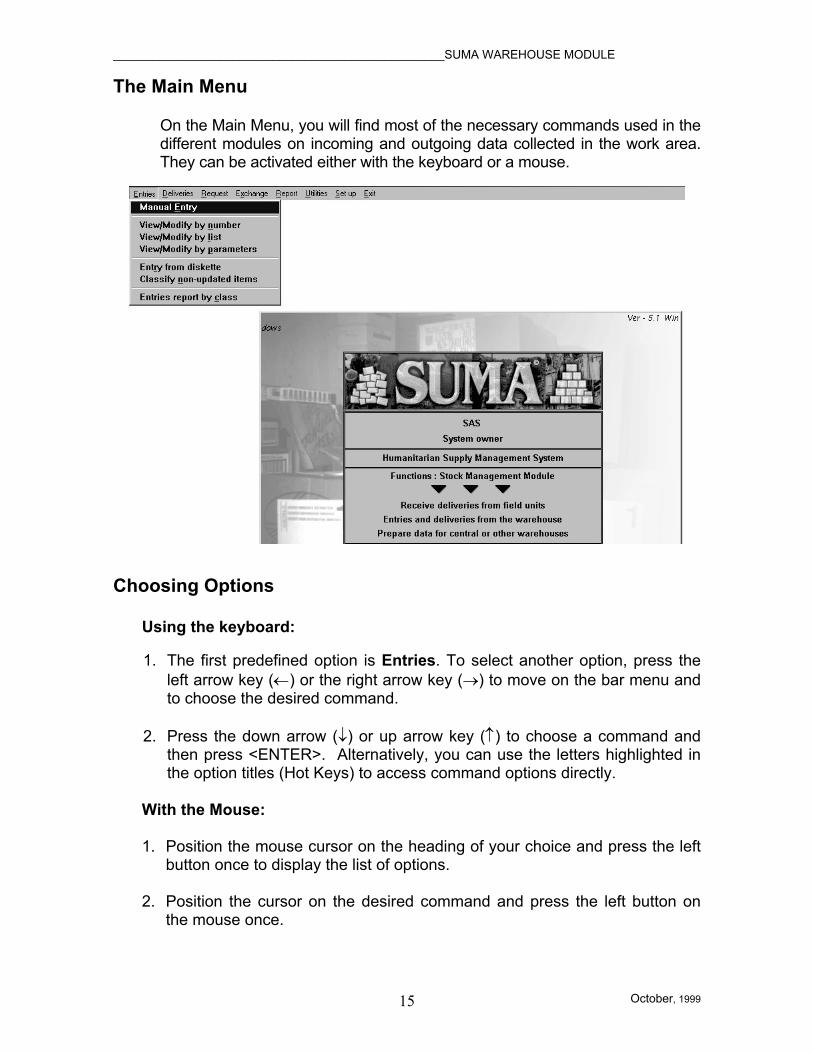
The Main Menu
On the Main Menu, you will find most of the necessary commands used in the different modules on incoming and outgoing data collected in the work area. They can be activated either with the keyboard or a mouse.
Choosing Options
Using the keyboard: 1. The first predefined option is Entries. To select another option, press the
left arrow key (←) or the right arrow key (→) to move on the bar menu and to choose the desired command.
2. Press the down arrow (↓) or up arrow key (↑) to choose a command and
then press <ENTER>. Alternatively, you can use the letters highlighted in the option titles (Hot Keys) to access command options directly.
With the Mouse: 1. Position the mouse cursor on the heading of your choice and press the left
button once to display the list of options. 2. Position the cursor on the desired command and press the left button on
the mouse once.

__________________________________________________SUMA WAREHOUSE MODULE
October, 1999 16
The Importance of Protecting Data
No software can offer total security for data and programs, especially considering the conditions under which SUMA teams work. The only way to protect data is to back up the data regularly on diskettes. The Warehouse Module has a backup mechanism and a tool to restore data in case of problems. These options are covered in the section on Utilities.
Ending the Work Session To end the work session, select Exit from the menu bar, and then the option Exit this program, as shown below:
You can adjust the colors of the Warehouse Module display by choosing Utilities onthe menu bar. Select the option Colors, and choose the color you prefer.
Always end a work session with the option Exit this program. If you turn thecomputer off without exiting correctly, you may damage or destroy the files andarchives of the program being used.

__________________________________________________SUMA WAREHOUSE MODULE
October, 1999 17
Setting Up the Warehouse Management Module The Set up heading includes the necessary steps to provide the program with important specifications.
The options available under Set Up are shown below:
Warehouse Sector
The different Warehouse Sectors are defined with this option; for example: Medicine Sector, or sector G2.
When the screen for identifying warehouse sectors appears, select the <Add option>.
IMPORTANT . . . In order to use this Module you must first access the “Set Up” option that appears inthe heading of the Main Menu.
IMPORTANT When receiving consignments, the program will ask you to name their location. For thisreason, it is very important to have the sectors well defined. You can use the SUMAtechnical classification categories described in the introduction of this manual toclassify different sectors.

__________________________________________________SUMA WAREHOUSE MODULE
October, 1999 18
The menu at the bottom of the screen has four options that allow you to review registered sectors:
<Top>: Takes you to the first registry on the list of sectors <Previous>: Takes you to the preceding registered sector (unless
you are at the top of the list <Next>: Takes you to the next registered sector (unless you are
at the end of the list) <Last>: Takes you to the last registered sector
The option <Browse> allows you to see the entire list of sectors. The other options have the following functions:
<Add>: allows the addition of a new sector <Save>: saves the information entered <Cancel>: cancels the information entered by the last registered user <Exit>: takes you to the main menu
Exchange rate
Traditionally the US dollar is the monetary unit of reference. SUMA allows you to access several exchange rates and will make automatic conversions. In the WAREHOUSE MANAGEMENT MODULE, this value is incorporated in the following screen:

__________________________________________________SUMA WAREHOUSE MODULE
October, 1999 19
The conversion value results from dividing: 1 US dollar / Local exchange rate Destinations Sites
This option allows you to create a directory of destination or distribution points. This information is mainly used to fill in delivery forms.
Points of Origin
The list in this section contains the majority of known countries, but because assistance can arrive from regions or provinces within a country, this module allows you to enter new places of origin.

__________________________________________________SUMA WAREHOUSE MODULE
October, 1999 20
Contact Directory
Due to the management of emergencies from preceding events, it is often possible to predict which national and international organizations or companies may send assistance when a disaster occurs. It is also possible to predict which organizations typically receive this aid. The Contact Directory allows you to create a list of those contacts, as shown in the following screen:
__________________________________________________SUMA WAREHOUSE MODULE
October, 1999 21
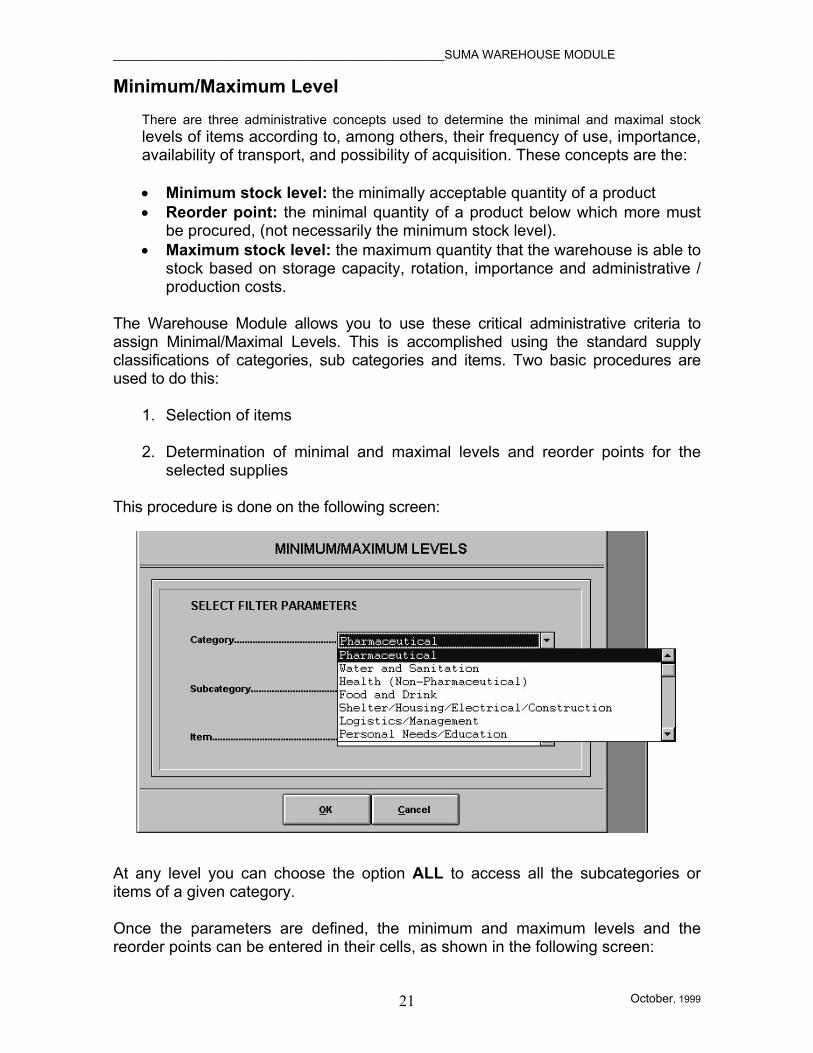
Minimum/Maximum Level
There are three administrative concepts used to determine the minimal and maximal stock levels of items according to, among others, their frequency of use, importance, availability of transport, and possibility of acquisition. These concepts are the: • Minimum stock level: the minimally acceptable quantity of a product • Reorder point: the minimal quantity of a product below which more must
be procured, (not necessarily the minimum stock level). • Maximum stock level: the maximum quantity that the warehouse is able to
stock based on storage capacity, rotation, importance and administrative / production costs.
The Warehouse Module allows you to use these critical administrative criteria to assign Minimal/Maximal Levels. This is accomplished using the standard supply classifications of categories, sub categories and items. Two basic procedures are used to do this:
1. Selection of items
2. Determination of minimal and maximal levels and reorder points for the selected supplies
This procedure is done on the following screen:
At any level you can choose the option ALL to access all the subcategories or items of a given category. Once the parameters are defined, the minimum and maximum levels and the reorder points can be entered in their cells, as shown in the following screen:
__________________________________________________SUMA WAREHOUSE MODULE
October, 1999 22
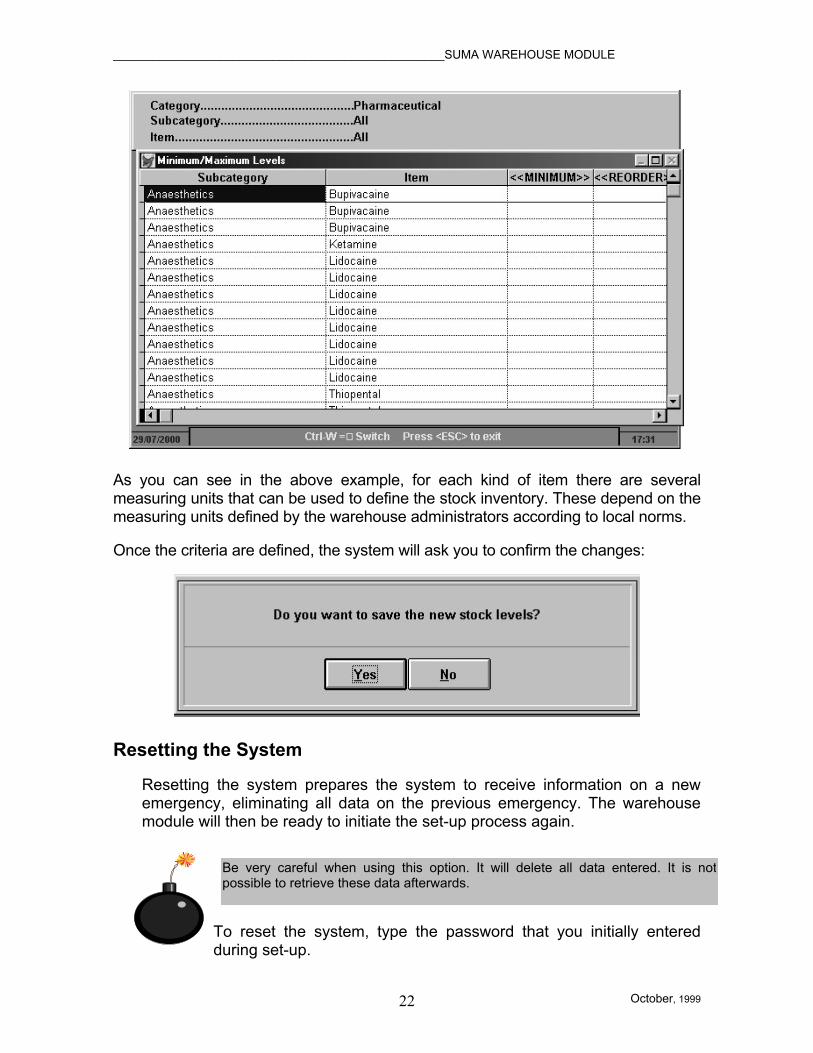
As you can see in the above example, for each kind of item there are several measuring units that can be used to define the stock inventory. These depend on the measuring units defined by the warehouse administrators according to local norms. Once the criteria are defined, the system will ask you to confirm the changes:
Resetting the System
Resetting the system prepares the system to receive information on a new emergency, eliminating all data on the previous emergency. The warehouse module will then be ready to initiate the set-up process again.
To reset the system, type the password that you initially entered during set-up.
Be very careful when using this option. It will delete all data entered. It is notpossible to retrieve these data afterwards.

__________________________________________________SUMA WAREHOUSE MODULE
October, 1999 23
If the correct password is entered and <OK> is chosen, the program will present two more confirmation screens. Following the confirmation, all warehouse data previously registered will be deleted and it will be necessary to set up the system again.
If there are data on a previous emergency, the program allows you to save this information on diskettes.
Incorporating data from the Warehouse Management Module 5.0/5.1
Version 5.1 allows you to incorporate data from the DOS version 5.0 or 5.1. This will enable you to update the system without entering all information again. The system will display the following screen:
__________________________________________________SUMA WAREHOUSE MODULE
October, 1999 24
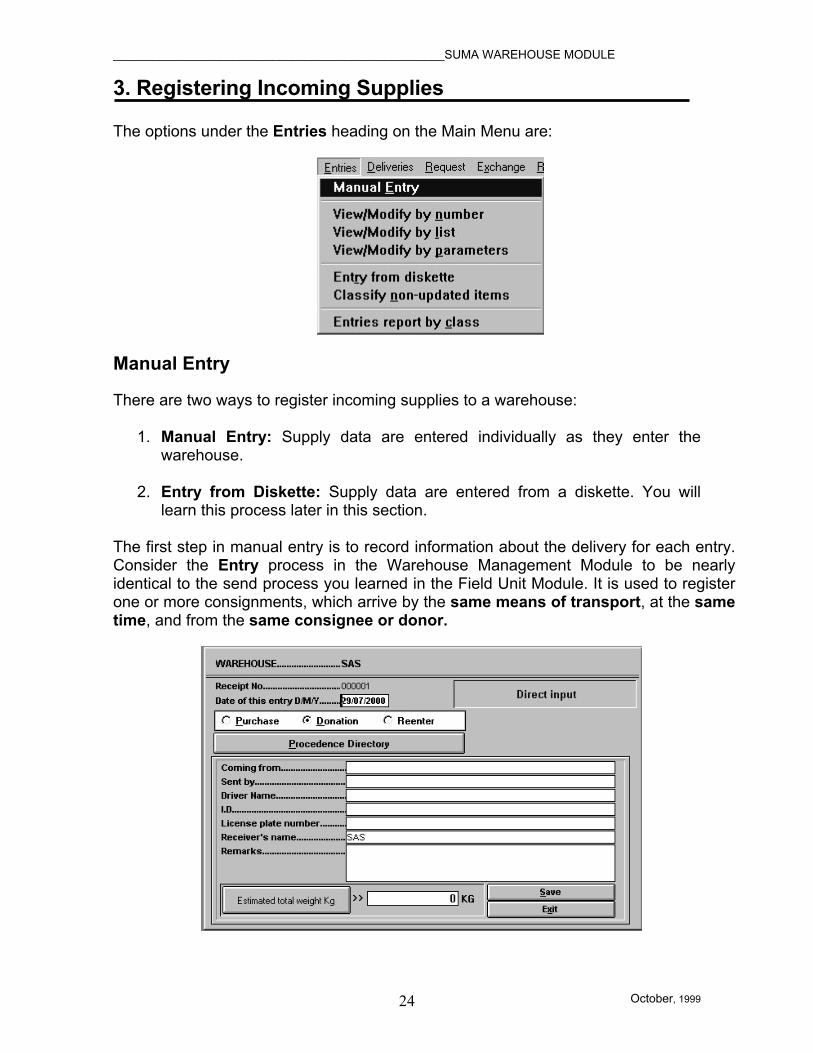
3. Registering Incoming Supplies The options under the Entries heading on the Main Menu are:
Manual Entry There are two ways to register incoming supplies to a warehouse:
1. Manual Entry: Supply data are entered individually as they enter the
warehouse.
2. Entry from Diskette: Supply data are entered from a diskette. You will learn this process later in this section.
The first step in manual entry is to record information about the delivery for each entry. Consider the Entry process in the Warehouse Management Module to be nearly identical to the send process you learned in the Field Unit Module. It is used to register one or more consignments, which arrive by the same means of transport, at the same time, and from the same consignee or donor.
__________________________________________________SUMA WAREHOUSE MODULE
October, 1999 25
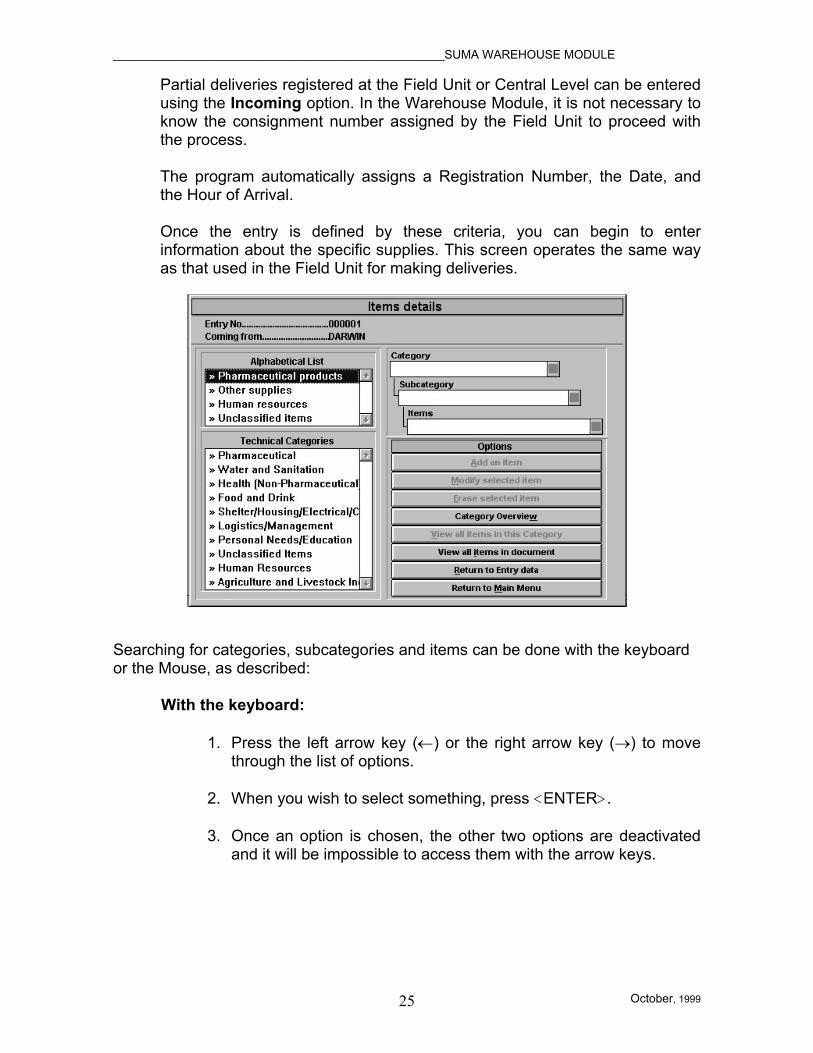
Partial deliveries registered at the Field Unit or Central Level can be entered using the Incoming option. In the Warehouse Module, it is not necessary to know the consignment number assigned by the Field Unit to proceed with the process. The program automatically assigns a Registration Number, the Date, and the Hour of Arrival. Once the entry is defined by these criteria, you can begin to enter information about the specific supplies. This screen operates the same way as that used in the Field Unit for making deliveries.
Searching for categories, subcategories and items can be done with the keyboard or the Mouse, as described:
With the keyboard:
1. Press the left arrow key (←) or the right arrow key (→) to move through the list of options.
2. When you wish to select something, press <ENTER>. 3. Once an option is chosen, the other two options are deactivated
and it will be impossible to access them with the arrow keys.

__________________________________________________SUMA WAREHOUSE MODULE
October, 1999 26
With the mouse:
1. Position the cursor on the desired option and press the left button once to activate this field.
2. Point on the field, which will identify the option you have chosen,
and press the Mouse’s left button once to begin entering data.
Data input by Alphabetical Listing
When you select one of the four fields and press <Enter>, you will have the option to begin inputting data by Alphabetical Listing:
To classify an item using this option, do the following:
With the keyboard:
1. Move the down arrow key (↓) or the right arrow key (→) until you reach the selection box (note that it will change color or tone). Press <ENTER>.
2. Note that you will have to choose one of the four categories in the
Alphabetical List. (Note however, that items listed as OTHER SUPPLIES are grouped into seven categories.) Again, press <ENTER> to choose one of the options under any of the headings, if you have not already.
3. An alphabetized list will appear with the names of the items in this
category.
4. Press the down arrow key (↓) or the up arrow key (↑) to move through the options and stop on the desired item. Press <ENTER> to make your selection or press <ESC> to cancel the operation and return to the Main Menu.

__________________________________________________SUMA WAREHOUSE MODULE
October, 1999 27
An Incremental Search allows you to find an item that requires classification from any position on the list by typing the first letters of its name. As you type each letter, the selection bar will move through the list. The selection bar will move to the end of the list if an item is not listed. For example, if you type amp, to register a consignment of Ampicillin, you will get closer to the ampicillin option with each letter that you type. The result of this search is as follows: Definition of Search Criteria Screen
You can observe what you have typed in a window above and to the right of the Selection Box. If you make a mistake and the bar goes to the end of the list, or if you want to change what you have typed, use the <BACKSPACE> key to delete characters. Press <ENTER> to select an item and return to the
There is a more efficient alternative to this kind of search. It is called an Incremental Search. See below for more information.
Selection bar
__________________________________________________SUMA WAREHOUSE MODULE
October, 1999 28
main editing screen, or press <ESC> to end the operation and return to the Main Registration Screen.
With the mouse:
1. Place the cursor on the selection box.
2. Press the left button on the mouse and maintain pressure. 3. Move through the list and place the cursor on the name you are
looking for, and release the button. The list of items related to the chosen option will appear on the screen.
4. The mouse will only let you select one option on the list. Press
<ENTER> to select it. In order to make it possible to do an Incremental Search, you must release pressure from the button on the Mouse.
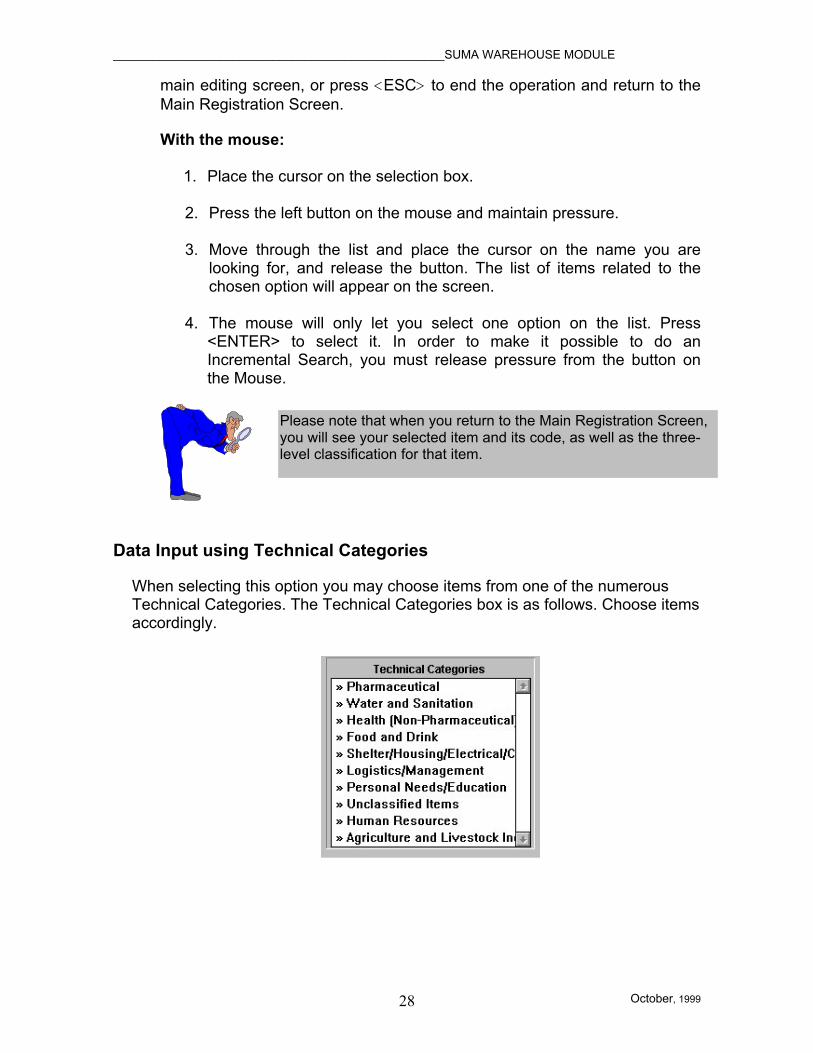
Data Input using Technical Categories
When selecting this option you may choose items from one of the numerous Technical Categories. The Technical Categories box is as follows. Choose items accordingly.
Please note that when you return to the Main Registration Screen, you will see your selected item and its code, as well as the three-level classification for that item.
__________________________________________________SUMA WAREHOUSE MODULE
October, 1999 29
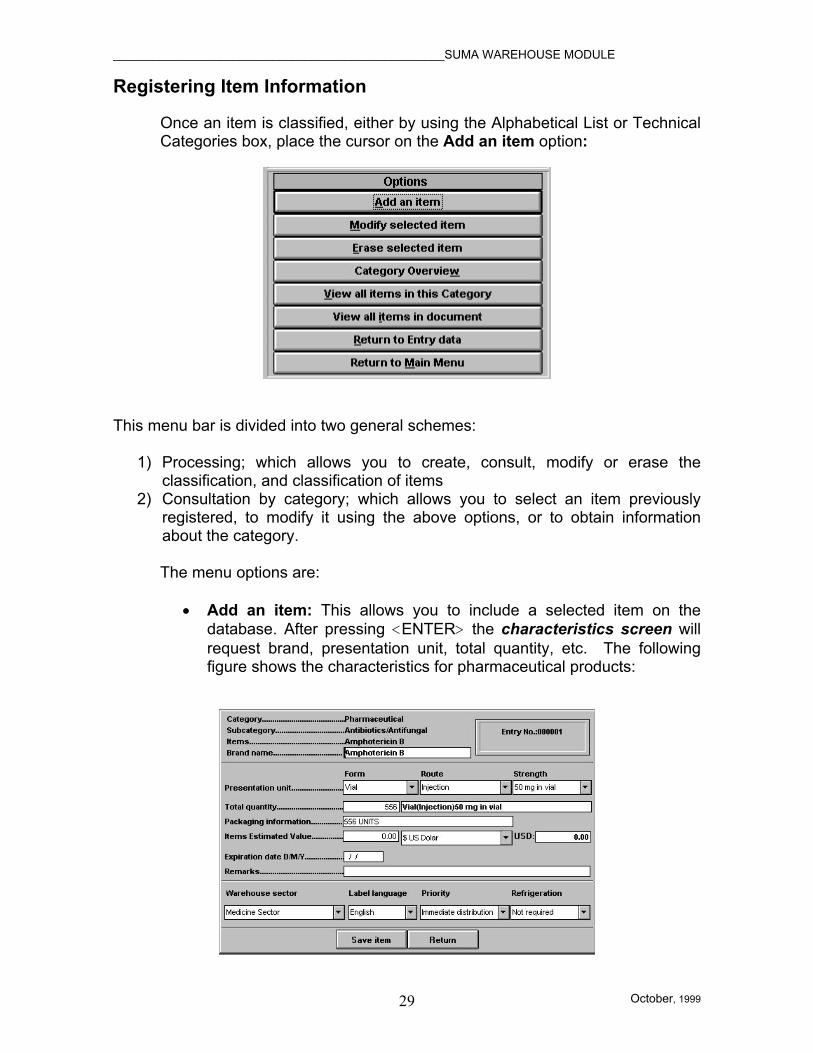
Registering Item Information
Once an item is classified, either by using the Alphabetical List or Technical Categories box, place the cursor on the Add an item option:
This menu bar is divided into two general schemes:
1) Processing; which allows you to create, consult, modify or erase the classification, and classification of items
2) Consultation by category; which allows you to select an item previously registered, to modify it using the above options, or to obtain information about the category. The menu options are:
• Add an item: This allows you to include a selected item on the database. After pressing <ENTER> the characteristics screen will request brand, presentation unit, total quantity, etc. The following figure shows the characteristics for pharmaceutical products:

__________________________________________________SUMA WAREHOUSE MODULE
October, 1999 30
• Modify selected item: If an item has already been registered as part of a consignment, this option allows you to consult general information on it, such as its name and its presentation units. To modify this information, press <ENTER> while the item is highlighted. The characteristics screen will display its data.
• Erase an item selected: Allows you to delete information about a
registered item. To erase, select the item and press <ENTER>. The characteristics screen will appear, but you will not have access to the editing fields. You will only have access to two options shown at the bottom of the screen, from which you must make your choice.
• View all items in this Category: Allows you to see the contents of a
category of a specific shipment. If you wish to check or modify the information, select the item and press <ENTER>. Then choose any of the options to process the item.
• Category Overview: Presents a screen indicating, by category,
which of the items have been registered. This facilitates the consultation and search for information.
• View all items of the document: Allows you to see a summary list of
all items in the entry.
• Return to entry data: This option returns you to the header of the entry.
• Return to main menu: Returns to the Main Menu.
Registering Pharmaceutical Products2
A significant addition to Version 5.1 of the SUMA software allows you to add new pharmaceutical items. You can do this by entering the pharmaceuticals in the Technical Categories box and selecting "Defined by user”, one of the listed options.
2 Categories, definition of presentation units, route and strength are based on the publication: The Use of Essential Drugs: Sixth Report of the WHO Expert Committee. WHO Technical Report Series - 850. Geneva: 1995.
Be very careful when modifying data using this option. Remember that supplies with different presentation units, and/or different administration methods, are not the same items. For example, Ampicillin in ampoules is not the same as Ampicillin in tablets. There are also different types of ampoules and tablets.
__________________________________________________SUMA WAREHOUSE MODULE
October, 1999 31
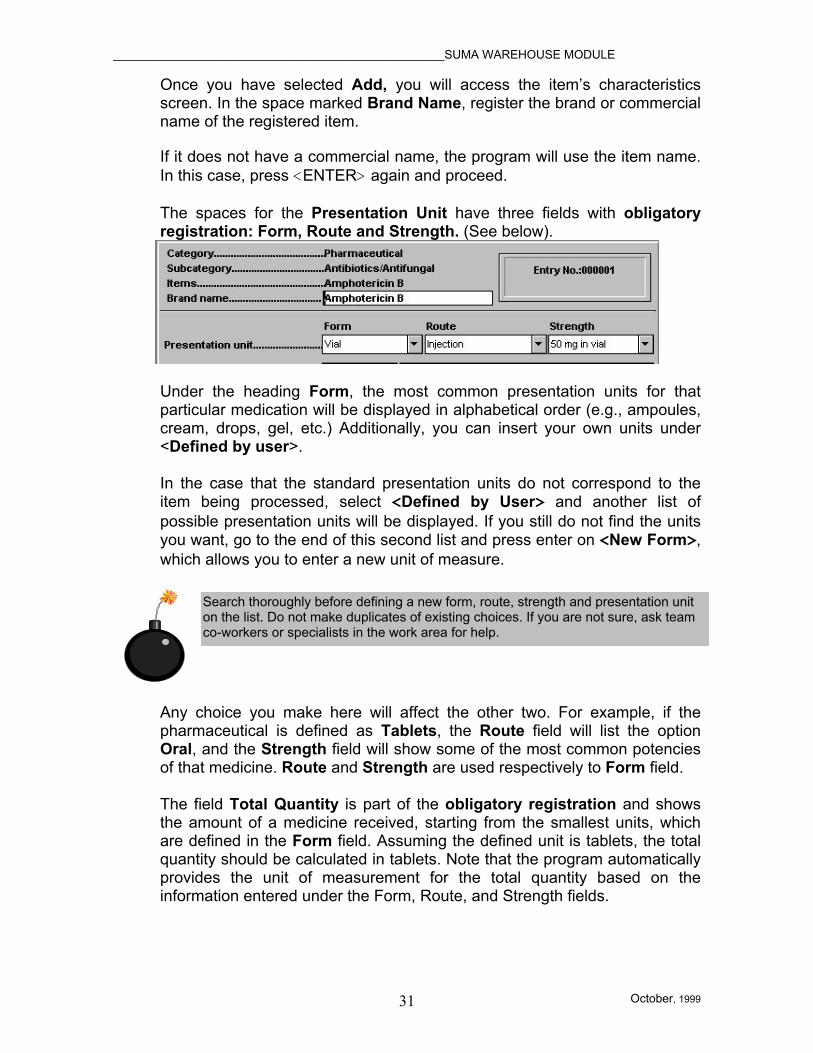
Once you have selected Add, you will access the item’s characteristics screen. In the space marked Brand Name, register the brand or commercial name of the registered item. If it does not have a commercial name, the program will use the item name. In this case, press <ENTER> again and proceed. The spaces for the Presentation Unit have three fields with obligatory registration: Form, Route and Strength. (See below).
Under the heading Form, the most common presentation units for that particular medication will be displayed in alphabetical order (e.g., ampoules, cream, drops, gel, etc.) Additionally, you can insert your own units under <Defined by user>. In the case that the standard presentation units do not correspond to the item being processed, select <Defined by User> and another list of possible presentation units will be displayed. If you still do not find the units you want, go to the end of this second list and press enter on <New Form>, which allows you to enter a new unit of measure.
Any choice you make here will affect the other two. For example, if the pharmaceutical is defined as Tablets, the Route field will list the option Oral, and the Strength field will show some of the most common potencies of that medicine. Route and Strength are used respectively to Form field. The field Total Quantity is part of the obligatory registration and shows the amount of a medicine received, starting from the smallest units, which are defined in the Form field. Assuming the defined unit is tablets, the total quantity should be calculated in tablets. Note that the program automatically provides the unit of measurement for the total quantity based on the information entered under the Form, Route, and Strength fields.
Search thoroughly before defining a new form, route, strength and presentation unit on the list. Do not make duplicates of existing choices. If you are not sure, ask team co-workers or specialists in the work area for help.
__________________________________________________SUMA WAREHOUSE MODULE
October, 1999 32
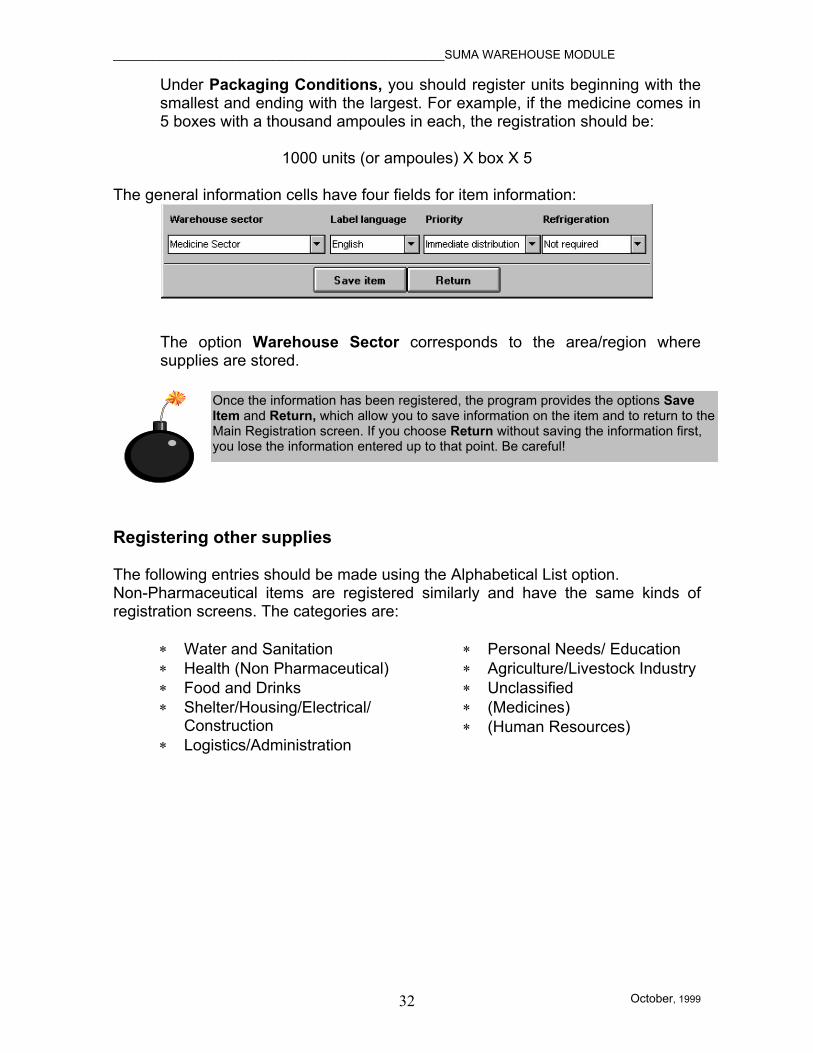
Under Packaging Conditions, you should register units beginning with the smallest and ending with the largest. For example, if the medicine comes in 5 boxes with a thousand ampoules in each, the registration should be:
1000 units (or ampoules) X box X 5
The general information cells have four fields for item information:
The option Warehouse Sector corresponds to the area/region where supplies are stored.
Registering other supplies The following entries should be made using the Alphabetical List option. Non-Pharmaceutical items are registered similarly and have the same kinds of registration screens. The categories are:
∗ Water and Sanitation ∗ Health (Non Pharmaceutical) ∗ Food and Drinks ∗ Shelter/Housing/Electrical/
Construction ∗ Logistics/Administration
∗ Personal Needs/ Education ∗ Agriculture/Livestock Industry ∗ Unclassified ∗ (Medicines) ∗ (Human Resources)
Once the information has been registered, the program provides the options Save Item and Return, which allow you to save information on the item and to return to the Main Registration screen. If you choose Return without saving the information first, you lose the information entered up to that point. Be careful!

__________________________________________________________SUMA WAREHOUSE MODULE
Octuber, 1999 33
Once you have initiated the search mode, locate the desired item, and press <ENTER>. After you select Add on the Options menu, you will see the characteristics screen for items under the Other Supplies heading:
To define the presentation unit, various options are available, according to the type of item. If the unit options are not adequate, either because they do not correspond to the actual unit or because you want to be more specific in describing the item, use the <Defined by User> option.
For example, when registering water pumps, you can either choose to record the presentation unit as “Units” or <Defined by User>. If you decide on the latter, you will see a list with existing definitions or you have the option to create a new unit:

__________________________________________________________SUMA WAREHOUSE MODULE
Octuber, 1999 34
The new unit will be registered in the program list and can be reused for other categories within the group.
You must enter a quantity under Total Quantity. If you do not, the program will not allow you to save the information. Technical information corresponds to specific characteristics of an item. If one or several of these cells are not applicable, simply press <ENTER> on each one, or move the cursor with the arrow keys (or Mouse) to bypass them. The Weight, Presentation of Unit and Total Weight are all associated with the table of measures that is defined at SUMA CENTRAL and the total weight is calculated automatically based on the total quantity.
Once the information has been registered, the system will ask if you wish to Save the item.
Items Defined by the User
In previous sections, we mentioned that the Field Unit, Central Level and the Warehouse Module that comprise the SUMA system have a predefined list of items, ordered by categories and subcategories. In emergency situations, where SUMA has been implemented, this list has proved to be complete enough to register the majority of emergency supplies. However, there are always exceptions. The option <Defined by User> can be used if an item does not appear on the list or if you want to provide more specific information.
Remember, if you choose Return, you will lose the information entered up to thatpoint if you have not already saved it. Be careful!

__________________________________________________________SUMA WAREHOUSE MODULE
Octuber, 1999 35
Some items, because of their unique use, have not been defined individually but are listed as generic items. For example, the item “drill” has not been defined in the subcategory Construction as a specific item. However, it can be registered under the description: Tool Kit. Other articles can be registered in a single generic group. For example, if you receive markers of various colors, sizes and brands, it is not necessary to define them separately (red markers, black markers, fluorescent markers etc.) It is sufficient to define an item marker and later specify details in the appropriate fields.
General Remarks about the <Defined by User> Option
• The category Unclassified does not have this option. • The option can only be used at the item level. The user cannot define new
categories or subcategories. This option should not be confused with the definition of new storage sectors.
• From the "Item Details Screen", the option can only be accessed by
choosing Technical Categories. - Unclassified
• Once the item has been defined, it is incorporated into the program lists so that it will be available for later use.
To define an item:
• Select the option Technical categories from the Main Menu (under managing items) and press <ENTER> to select it.
• Select the category and subcategory. • In the item selection area, choose Defined by User. This will appear
as follows:
Before registering an item in the <Defined by User> heading, be sure that you are classifying it correctly and that existing definitions are inadequate. If you have doubts, ask another team member. Avoid duplicating information. It will cause problems when locating and interpreting consultations and reports.
__________________________________________________________SUMA WAREHOUSE MODULE
Octuber, 1999 36
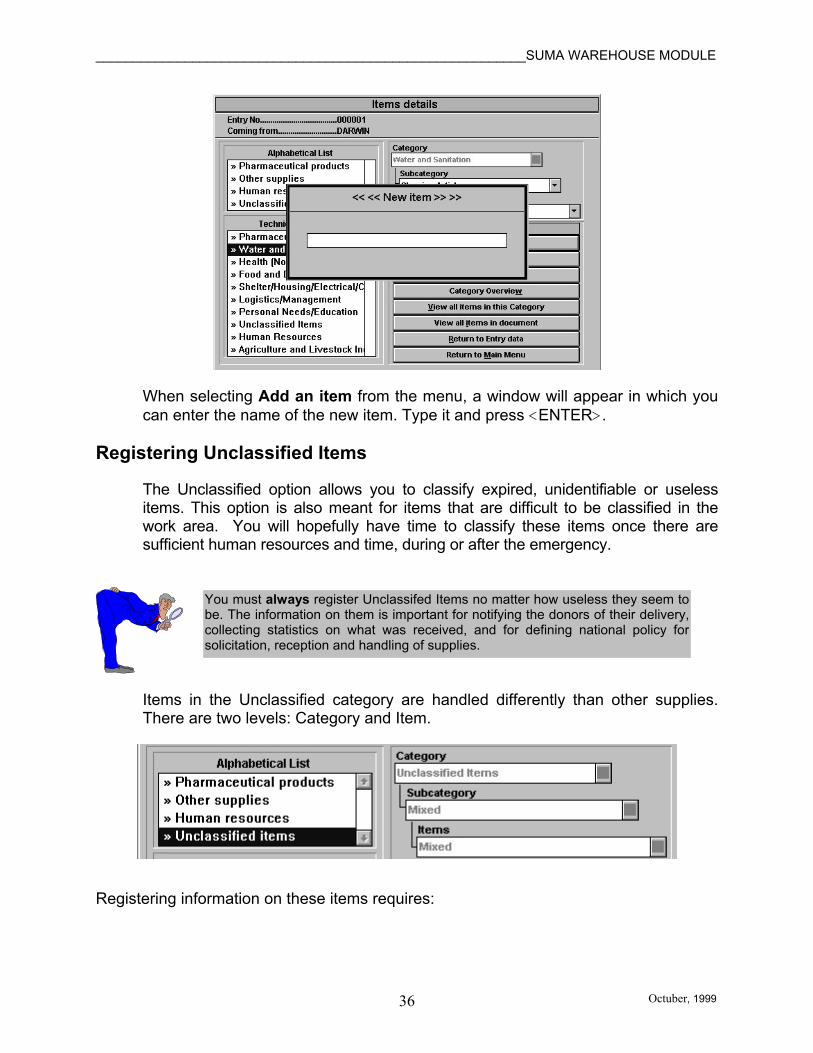
When selecting Add an item from the menu, a window will appear in which you can enter the name of the new item. Type it and press <ENTER>.
Registering Unclassified Items
The Unclassified option allows you to classify expired, unidentifiable or useless items. This option is also meant for items that are difficult to be classified in the work area. You will hopefully have time to classify these items once there are sufficient human resources and time, during or after the emergency.
Items in the Unclassified category are handled differently than other supplies. There are two levels: Category and Item.
Registering information on these items requires:
You must always register Unclassifed Items no matter how useless they seem tobe. The information on them is important for notifying the donors of their delivery,collecting statistics on what was received, and for defining national policy forsolicitation, reception and handling of supplies.
__________________________________________________________SUMA WAREHOUSE MODULE
Octuber, 1999 37
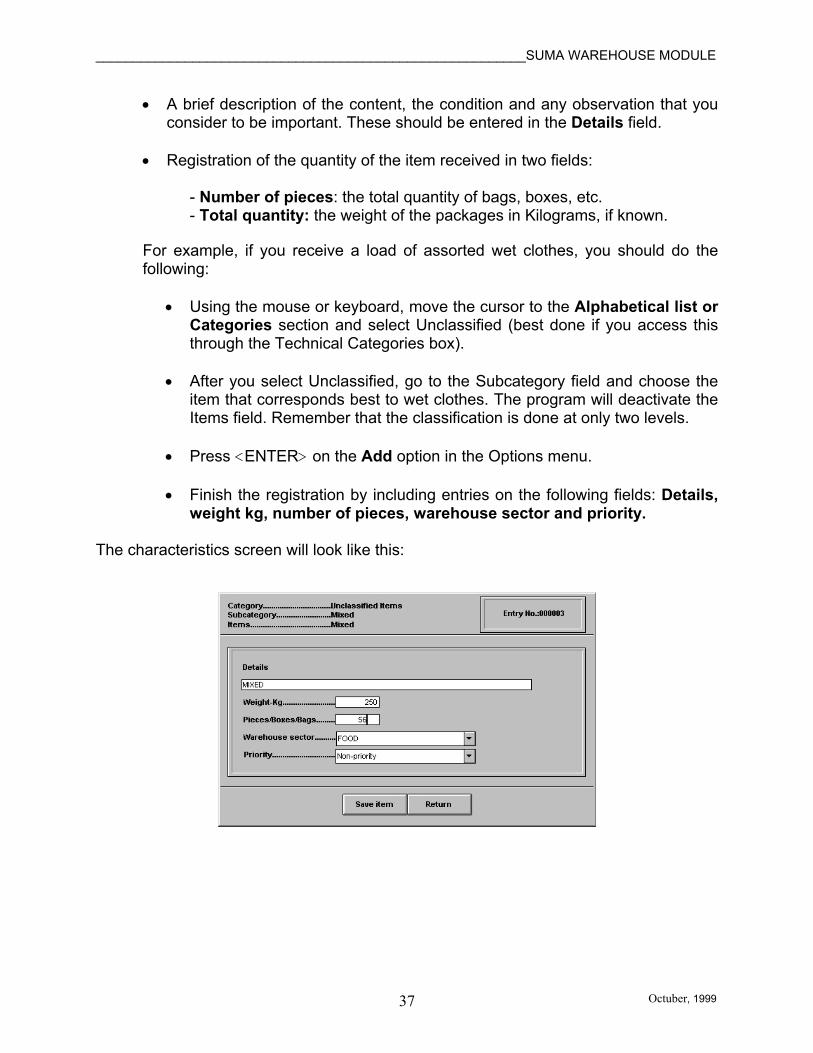
• A brief description of the content, the condition and any observation that you consider to be important. These should be entered in the Details field.
• Registration of the quantity of the item received in two fields:
- Number of pieces: the total quantity of bags, boxes, etc. - Total quantity: the weight of the packages in Kilograms, if known.
For example, if you receive a load of assorted wet clothes, you should do the following:
• Using the mouse or keyboard, move the cursor to the Alphabetical list or
Categories section and select Unclassified (best done if you access this through the Technical Categories box).
• After you select Unclassified, go to the Subcategory field and choose the
item that corresponds best to wet clothes. The program will deactivate the Items field. Remember that the classification is done at only two levels.
• Press <ENTER> on the Add option in the Options menu. • Finish the registration by including entries on the following fields: Details,
weight kg, number of pieces, warehouse sector and priority. The characteristics screen will look like this:

__________________________________________________________SUMA WAREHOUSE MODULE
Octuber, 1999 38
Registering Information Using a Diskette
Shipments of supplies may arrive accompanied by diskettes that contain information on the deliveries. SUMA allows you to load and read this information automatically. The data may come from a Field Unit or from another Warehouse. If there are items that cannot be classified, they should be temporarily stored and processed when conditions permit.
You must begin by choosing the disk drive where you will download information. Be sure that the unit is ready and that you have a large enough diskette. You must determine the files are on the hard drive of your computer (which drive), and then specify the path to access the appropriate directory. Important: Specify the path to the subdirectory and remember to insert a backslash (\) at the end of the designated path. If there are files in this subdirectory, they will be displayed. The following screen illustrates how to access files on the hard drive:
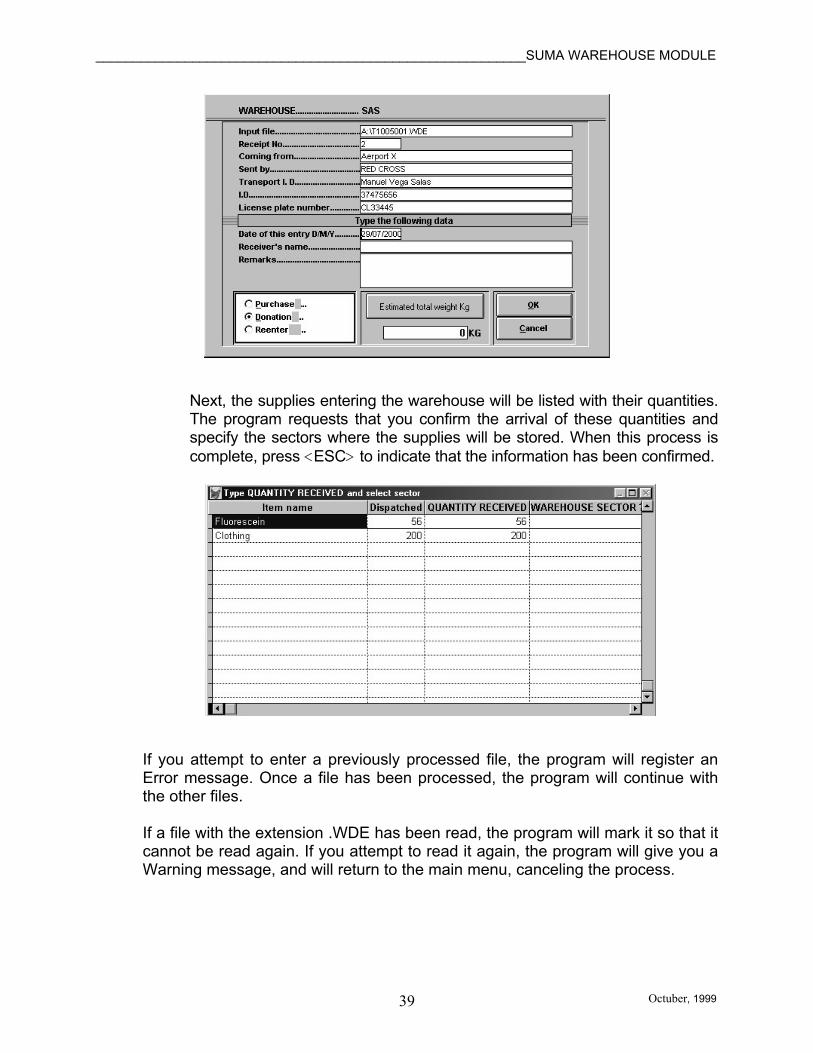
Once the file is accepted, the program will display a window identifying the entry:
__________________________________________________________SUMA WAREHOUSE MODULE
Octuber, 1999 39
Next, the supplies entering the warehouse will be listed with their quantities. The program requests that you confirm the arrival of these quantities and specify the sectors where the supplies will be stored. When this process is complete, press <ESC> to indicate that the information has been confirmed.
If you attempt to enter a previously processed file, the program will register an Error message. Once a file has been processed, the program will continue with the other files. If a file with the extension .WDE has been read, the program will mark it so that it cannot be read again. If you attempt to read it again, the program will give you a Warning message, and will return to the main menu, canceling the process.
__________________________________________________________SUMA WAREHOUSE MODULE
Octuber, 1999 40
4. Consulting and Modifying Entries
The options View/Modify by number, View/Modify by list and View/Modify by parameters permit access to the same screens you have learned to use for Manual Entry.
Consultations and Modifications on Specific Entries
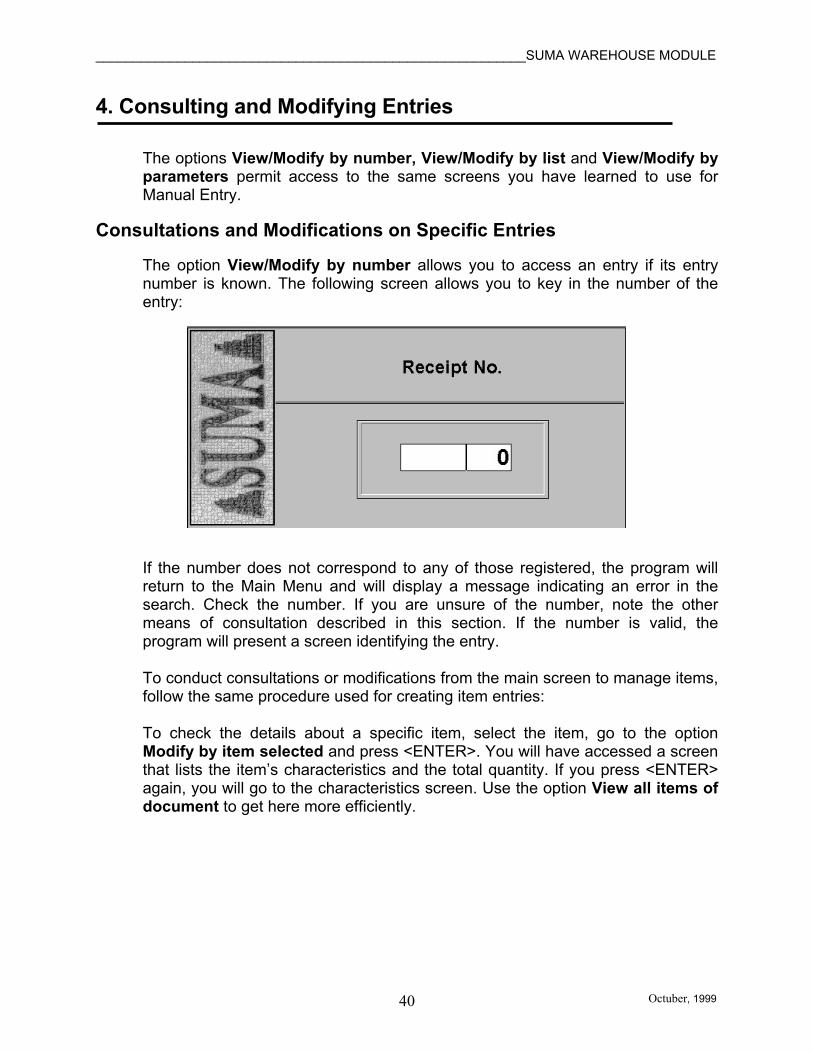
The option View/Modify by number allows you to access an entry if its entry number is known. The following screen allows you to key in the number of the entry:
If the number does not correspond to any of those registered, the program will return to the Main Menu and will display a message indicating an error in the search. Check the number. If you are unsure of the number, note the other means of consultation described in this section. If the number is valid, the program will present a screen identifying the entry. To conduct consultations or modifications from the main screen to manage items, follow the same procedure used for creating item entries: To check the details about a specific item, select the item, go to the option Modify by item selected and press <ENTER>. You will have accessed a screen that lists the item’s characteristics and the total quantity. If you press <ENTER> again, you will go to the characteristics screen. Use the option View all items of document to get here more efficiently.
__________________________________________________________SUMA WAREHOUSE MODULE
Octuber, 1999 41
List of entries
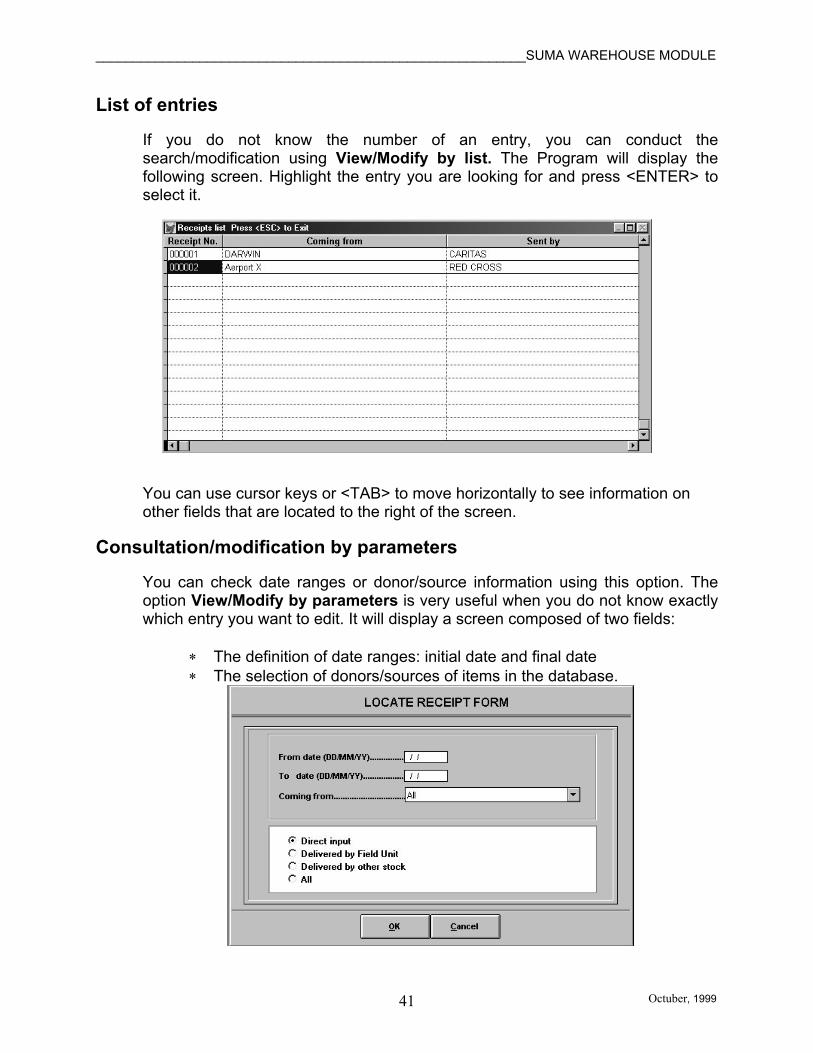
If you do not know the number of an entry, you can conduct the search/modification using View/Modify by list. The Program will display the following screen. Highlight the entry you are looking for and press <ENTER> to select it.
You can use cursor keys or <TAB> to move horizontally to see information on other fields that are located to the right of the screen.
Consultation/modification by parameters
You can check date ranges or donor/source information using this option. The option View/Modify by parameters is very useful when you do not know exactly which entry you want to edit. It will display a screen composed of two fields:
∗ The definition of date ranges: initial date and final date ∗ The selection of donors/sources of items in the database.

__________________________________________________________SUMA WAREHOUSE MODULE
Octuber, 1999 42
After you define the parameters and select OK, the program will display a list of selected entries. If you wish to make a query or edit without considering date ranges, simply press <ENTER> in the blank fields, or select All.
Entries Report by Class
This is the same as a search/edit/report by parameters. The option Entries Report by Class makes it possible for you to see what types of supplies have arrived in a given time period and in a specific class:
For example, if you want to know what types of supplies have arrived in the Personal/Education category during a certain timeframe, you need only define the selection parameters as shown on the following screen. Remember that if you choose All, the program will list the entire contents of the category or subcategory.

__________________________________________________________SUMA WAREHOUSE MODULE
Octuber, 1999 43
If there is no available information, the program will display an Error message and will return to the Main Menu. If the information is available, it will appear as shown below:
The next step is to print the report. In general, the mode you select for presentation is the same for all reports, whether the report is to be printed, filed with the .TXT extension, or viewed on the screen. The archive is stored in the working directory C:\SUMAWS51.

__________________________________________________________SUMA WAREHOUSE MODULE
Octuber, 1999 44
__________________________________________________________SUMA WAREHOUSE MODULE
Octuber, 1999 45
5. Direct Deliveries
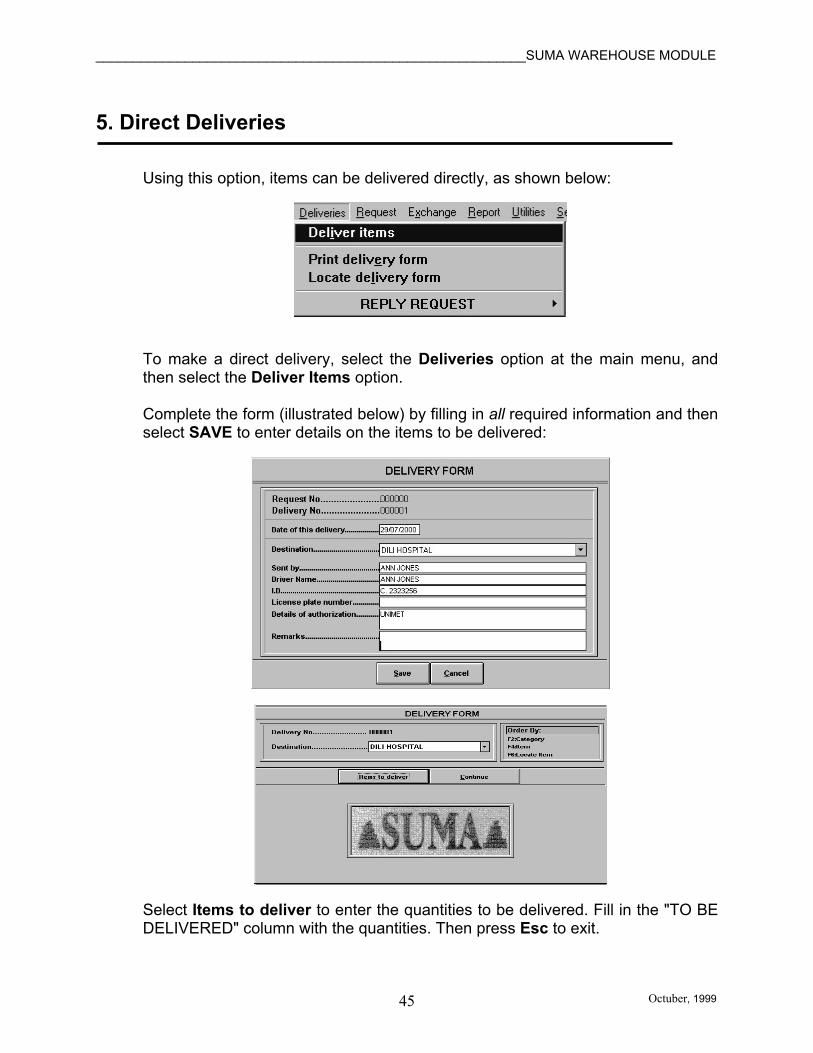
Using this option, items can be delivered directly, as shown below:
To make a direct delivery, select the Deliveries option at the main menu, and then select the Deliver Items option. Complete the form (illustrated below) by filling in all required information and then select SAVE to enter details on the items to be delivered:
Select Items to deliver to enter the quantities to be delivered. Fill in the "TO BE DELIVERED" column with the quantities. Then press Esc to exit.

__________________________________________________________SUMA WAREHOUSE MODULE
Octuber, 1999 46
The program will ask you the following confirmation: "Did you finish delivery?" You must press Continue to confirm the quantities to be delivered.
When you have finished the confirmation, you will be able to print the delivery form.
Entering Requests
The heading Request, on the Main Menu, has options for registering requests for items. However, you cannot fulfill requests for items in this heading. The available options are:
You must begin by identifying the organization that is requesting goods. Then, you must define the characteristics of the request.

__________________________________________________________SUMA WAREHOUSE MODULE
Octuber, 1999 47
The options View/Modify by request number and View/Modify by request list permit you to access the same screens you used for Manual Entries. To Create a Request
The first step in creating a request is to provide information about the request. As with the “Entries” option, the program will assign a consecutive number automatically for each request. It will also assign the date and time of registration. The Organization should be filled with the name of the requesting organization. If you cannot find an organization in the list provided, select New Organization to enter a new name. This field will also be available for later requests. Follow the same procedure for the Destination field. Now you must list the supplies that are being requested. The screen is the same as that used for Manual Entry. You can use Alphabetical Lists or Technical Categories to record information about each item. When a new item is added, the following screen will appear:

__________________________________________________________SUMA WAREHOUSE MODULE
Octuber, 1999 48
When you select Save item at the bottom of the box, the program will return to theregistration screen to repeat the process. To return to the main menu, choose Return to Main Menu.
Printing the Request
The procedure for printing requests is done in the following way: 1. Choose a range of dates in the date range parameter, or leave it blank in order
to consider all dates. 2. Choose an organization. 3. Highlight the desired request from the list of requests displayed by the system,
and press <ENTER>. 4. Print the desired document.
__________________________________________________________SUMA WAREHOUSE MODULE
Octuber, 1999 49
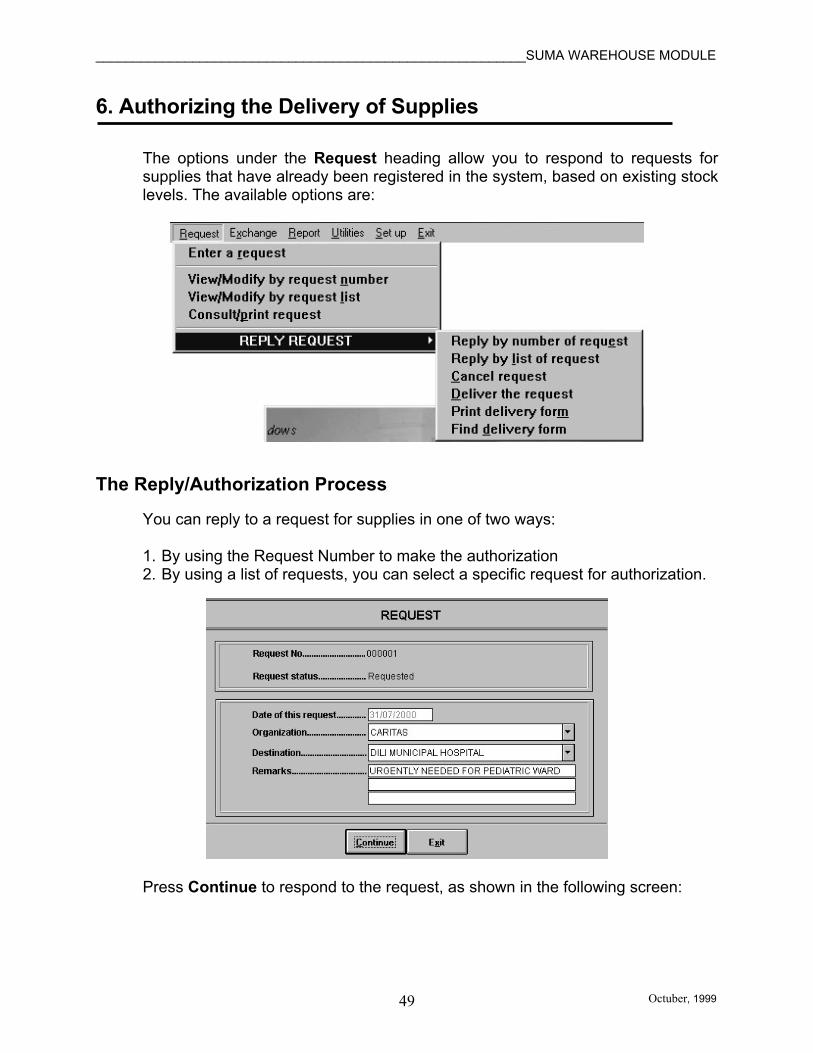
6. Authorizing the Delivery of Supplies
The options under the Request heading allow you to respond to requests for supplies that have already been registered in the system, based on existing stock levels. The available options are:
The Reply/Authorization Process
You can reply to a request for supplies in one of two ways: 1. By using the Request Number to make the authorization 2. By using a list of requests, you can select a specific request for authorization.
Press Continue to respond to the request, as shown in the following screen:

__________________________________________________________SUMA WAREHOUSE MODULE
Octuber, 1999 50
The menu at the center of the screen is used to manage responses to requests. The other fields provide information about the request. For example, if the request is for family rations, kitchen utensils, and personal hygiene kits, the system will respond to each request individually. The menu options are as follows: <Previous> Returns to the previous item on the request list (unless you
are at the beginning of the list). <Next> Advances to the next item on the request list (unless you are at the
end of the list). <Respond> Will begin the verification process of existing supply stock in order
to respond to the request.
Once you select Respond, the system will ask you if you will match the request with exactly what was requested, or if you will use alternative items from the subcategory:
Once you have selected an option, a list will appear in the lower half of the main screen with all existing items and their available quantities. You should enter the quantity to be assigned in the space labeled “TO BE DELIVERED:

__________________________________________________________SUMA WAREHOUSE MODULE
Octuber, 1999 51
Next, you will be prompted to select whether this will be a partial delivery or a total delivery.
To access a specific request, move the cursor onto the desired request and press <ENTER>. Follow the procedure described above for printing the delivery form.
Delivering an Authorized Request
This option allows you to access a list of authorized but undelivered requests. To print an authorization, use the following procedure: 1. From the list of authorized requests, select the request you would like to print. 2. Follow the procedure described below.

__________________________________________________________SUMA WAREHOUSE MODULE
Octuber, 1999 52
Printing the Delivery Form When you select this option, the screen will display a summary of all registered requests:
To access a request, highlight the desired request and press <ENTER>. A screen will appear summarizing the information. If you select Continue, the system will display a screen with the specific delivery information. Follow the procedure described above to print the delivery form.
Data transfer (Exchange)
The data transfer option enables you to send data from one Warehouse to another, or to SUMA CENTRAL. Information about existing stock is sent using this option, and can only be consulted in read-only reports. Using this option, you can also receive information from other warehouses. The Exchange option has four subheadings:
__________________________________________________________SUMA WAREHOUSE MODULE
Octuber, 1999 53
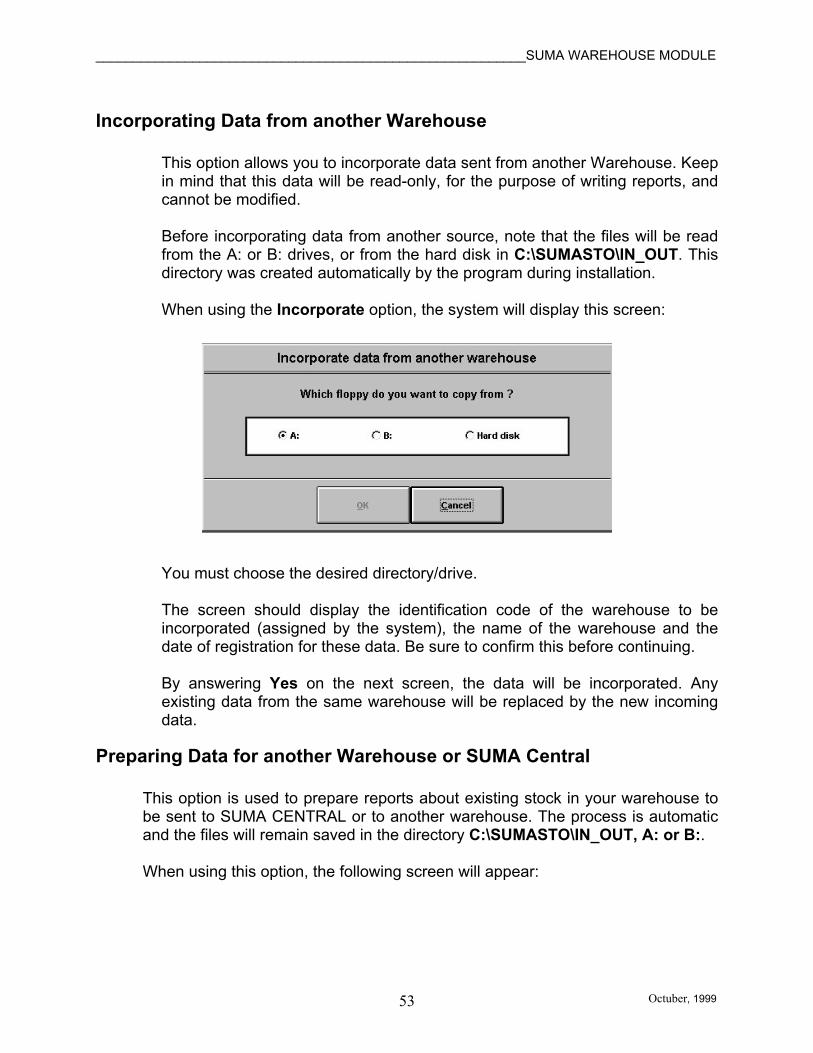
Incorporating Data from another Warehouse
This option allows you to incorporate data sent from another Warehouse. Keep in mind that this data will be read-only, for the purpose of writing reports, and cannot be modified. Before incorporating data from another source, note that the files will be read from the A: or B: drives, or from the hard disk in C:\SUMASTO\IN_OUT. This directory was created automatically by the program during installation. When using the Incorporate option, the system will display this screen:
You must choose the desired directory/drive. The screen should display the identification code of the warehouse to be incorporated (assigned by the system), the name of the warehouse and the date of registration for these data. Be sure to confirm this before continuing. By answering Yes on the next screen, the data will be incorporated. Any existing data from the same warehouse will be replaced by the new incoming data.
Preparing Data for another Warehouse or SUMA Central
This option is used to prepare reports about existing stock in your warehouse to be sent to SUMA CENTRAL or to another warehouse. The process is automatic and the files will remain saved in the directory C:\SUMASTO\IN_OUT, A: or B:. When using this option, the following screen will appear:

__________________________________________________________SUMA WAREHOUSE MODULE
Octuber, 1999 54
View Incorporated Data from another Warehouse This option allows you to view data from the list of warehouses that have been incorporated into your warehouse database. This will enable you to examine existing stock in a variety of places. You will see the following screen:
In this example there is only one warehouse with incorporated data. When there is more than one, you can examine details on each one by placing the cursor on and selecting it. To exit and return to the main menu, press <Esc>.

__________________________________________________________SUMA WAREHOUSE MODULE
Octuber, 1999 55
7. Reports
The Report subheadings from the Main Menu allow you to prepare and print reports about existing data.
SUMA uses a standard presentation mode for all reports whether they are being printed or viewed on-screen:
Before creating and printing a report, check that your printer is in working orderand that it is connected to the computer. Make sure it is loaded with paper, andthat the printer on-line. Remember that Warehouse Module reports should beprinted using printers with 80 or 132 columns. (See your printer documentation forSpecifications).

__________________________________________________________SUMA WAREHOUSE MODULE
Octuber, 1999 56
Reports on Stock
These reports summarize the existing stock level for a specific item or group of items in a specific warehouse. To a stock report, you should: 1. Select the desired warehouse.
__________________________________________________________SUMA WAREHOUSE MODULE
Octuber, 1999 57
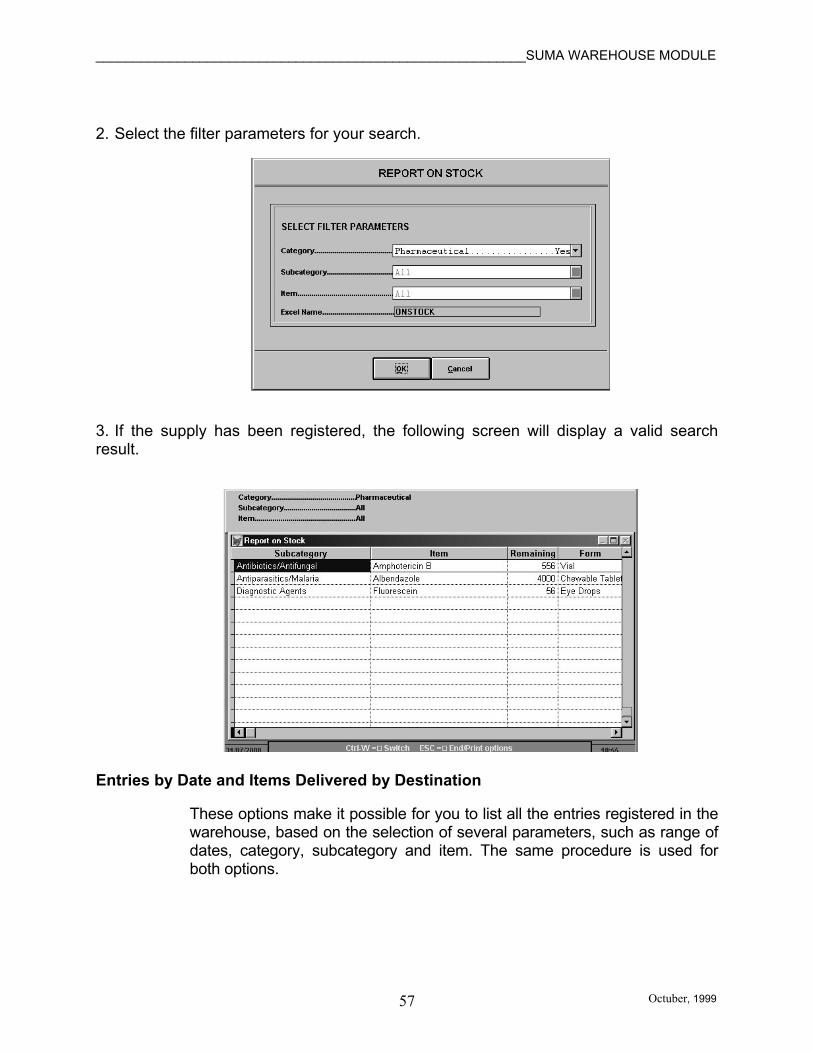
2. Select the filter parameters for your search.
3. If the supply has been registered, the following screen will display a valid search result.
Entries by Date and Items Delivered by Destination
These options make it possible for you to list all the entries registered in the warehouse, based on the selection of several parameters, such as range of dates, category, subcategory and item. The same procedure is used for both options.

__________________________________________________________SUMA WAREHOUSE MODULE
Octuber, 1999 58
Select the presentation mode (to the printer, to a text file, or to view on the screen).
Verifying Stock
Warehouse management requires that you define the minimum levels, maximum levels, and reorder points (when you must reorder an item because the inventory is low) of your stock. This ensures that important supplies will be available at any given moment. Using this reporting option, you can confirm the inventory for each item based on the definition of the levels you have assigned. To prepare this report: A) Define the minimum and maximum values based on the parameters and the criteria for the specific supply items. B) Review the list you have just created, paying special attention to the columns referring to the criteria for minimum and maximum levels and reorder points.
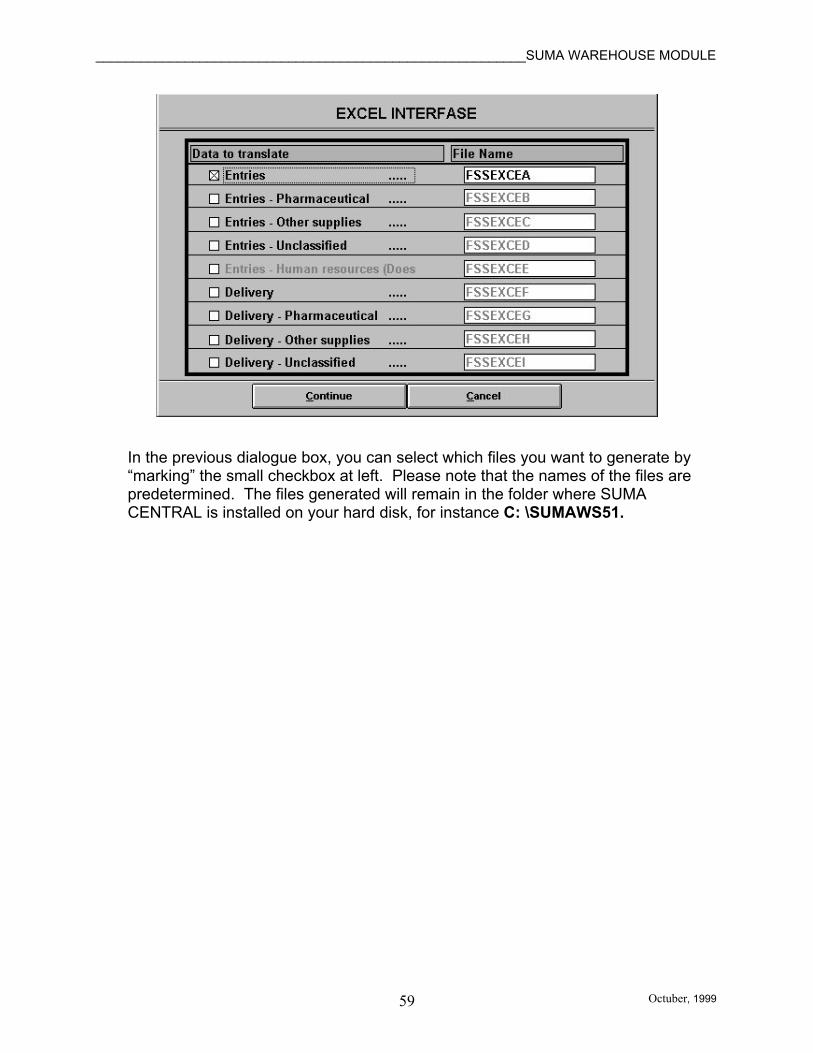
Excel Interfase
SUMA’s Version 5.1 for Windows enables the information to be generated in Excel type files, which increases flexibility in the handling of the information, since the user can manipulate these data in Excel in order to produce new reports or graphs.
Remember that if you leave the date field blank and press <ENTER> in the spaces,information for all registered dates will be listed.
__________________________________________________________SUMA WAREHOUSE MODULE
Octuber, 1999 59
In the previous dialogue box, you can select which files you want to generate by “marking” the small checkbox at left. Please note that the names of the files are predetermined. The files generated will remain in the folder where SUMA CENTRAL is installed on your hard disk, for instance C: \SUMAWS51.

__________________________________________________________SUMA WAREHOUSE MODULE
Octuber, 1999 60
8. The Utilities Menu
The Utilities heading on the main menu will display the following submenu:
Index files The index files option allows you to maintain the database index files. You should access it if you experience operational problems.
Protection of information
In the introduction of this manual, we stressed the importance of protecting program data. To help you protect data, there are two options for backing up and restoring data that have been installed in the Warehouse Module. These options are Back-up files, and Restore files. They can help you reconstruct a great deal of information that would otherwise be due to a virus, errors on the hard drive, or other problems.
To use the Back-up Files option, you should:
1. Select the data storage capacity that the disk unit requires for the back-up.
Generally the capacity is 360 KB or 1.2 MB for 5 ¼” diskettes or 720 KB or 1.44 MB for 3 ½” diskettes.
2. Select the A: or B: disk drive. 3. Once you confirm the selected drive, and that your disk is blank,
formatted, and placed in the correct drive, place the cursor on the option YES and press <ENTER>.
You should be very cautious when using these tools!

__________________________________________________________SUMA WAREHOUSE MODULE
Octuber, 1999 61
4. Wait for the process to begin. If successful, the program will display a
message and return to the main menu. If it does not work, it will display an error message.
To recover data with the Restore Files command, you should:
1. Insert the diskette in the disk drive.
2. Select disk drive (A: or B:) and press <ENTER>.
Wait for the transfer to be carried out. If it is successful, a message will appear and you will return to the main menu.
About SUMA The option About SUMA gives background information on the development of SUMA, such as the current version, development team, etc.
• Depending on the amount of stored information and the capacity of the selectedunit, the process might require more than one diskette. Be prepared withadditional blank and formatted diskettes.
• Label the diskettes clearly as back up diskettes, with the date, time of initiation,and field unit number.