moodle learning management system - application … learning management system basic introduction ....
TRANSCRIPT

Outreach and Distance Learning Technologies
Information Technology Services
Moodle
Learning Management System
Basic Introduction
Copyright © 2013 KSU Department of Information Technology Services
This document may be downloaded, printed, or copied for educational use without further permission
of the Information Technology Services Department (ITS), provided the content is not modified and
this statement is not removed. Any use not stated above requires the written consent of the ITS
Department. The distribution of a copy of this document via the Internet or other electronic medium
without the written permission of the KSU - ITS Department is expressly prohibited.
Published by Kennesaw State University – ITS 2013
The publisher makes no warranties as to the accuracy of the material contained in this document and
therefore is not responsible for any damages or liabilities incurred from its use.

Information Technology Services
Table of Contents Introduction ................................................................................................................................................ 4
Learning Objectives ..................................................................................................................................... 4
Accessing the Moodle Website................................................................................................................... 5
Preparing your Course for Editing .............................................................................................................. 6
Adding Activities or Resources to your Class .............................................................................................. 6
Adding Forums to a Section .................................................................................................................... 6
Creating a New Forum Topic .............................................................................................................. 9
Responding to a Forum Post ............................................................................................................. 10
Adding Files to a Section ....................................................................................................................... 11
Adding your own Custom Webpage to a Section ................................................................................. 12
Adding Web URLs to a Section .............................................................................................................. 14
Adding a YouTube Video to a Section ............................................................................................... 16
Adding Assignment Submissions to a Section ...................................................................................... 17
Grading Assignment Submissions ..................................................................................................... 19
Adding Quizzes to a Section .................................................................................................................. 22
Adding/Customizing Questions for a Quiz ........................................................................................ 27
Sending Messages in Moodle ................................................................................................................... 33
Receiving Messages in Moodle ................................................................................................................. 35
Accessing Course Grades .......................................................................................................................... 37
Gradebook Display ................................................................................................................................ 38
Gradebook Editing ................................................................................................................................ 39
Adding Students to your Class Roster ....................................................................................................... 39
Moodle
Learning Management System
Basic Introduction
4
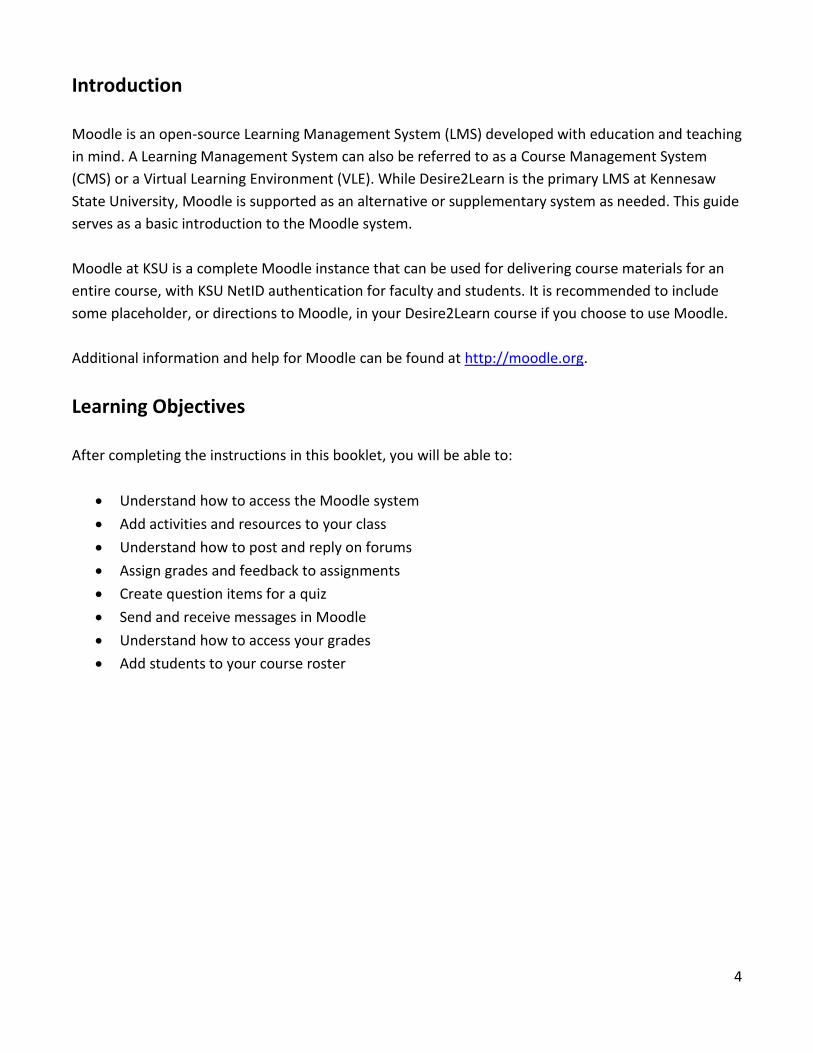
Introduction
Moodle is an open-source Learning Management System (LMS) developed with education and teaching
in mind. A Learning Management System can also be referred to as a Course Management System
(CMS) or a Virtual Learning Environment (VLE). While Desire2Learn is the primary LMS at Kennesaw
State University, Moodle is supported as an alternative or supplementary system as needed. This guide
serves as a basic introduction to the Moodle system.
Moodle at KSU is a complete Moodle instance that can be used for delivering course materials for an
entire course, with KSU NetID authentication for faculty and students. It is recommended to include
some placeholder, or directions to Moodle, in your Desire2Learn course if you choose to use Moodle.
Additional information and help for Moodle can be found at http://moodle.org.
Learning Objectives
After completing the instructions in this booklet, you will be able to:
Understand how to access the Moodle system
Add activities and resources to your class
Understand how to post and reply on forums
Assign grades and feedback to assignments
Create question items for a quiz
Send and receive messages in Moodle
Understand how to access your grades
Add students to your course roster
5
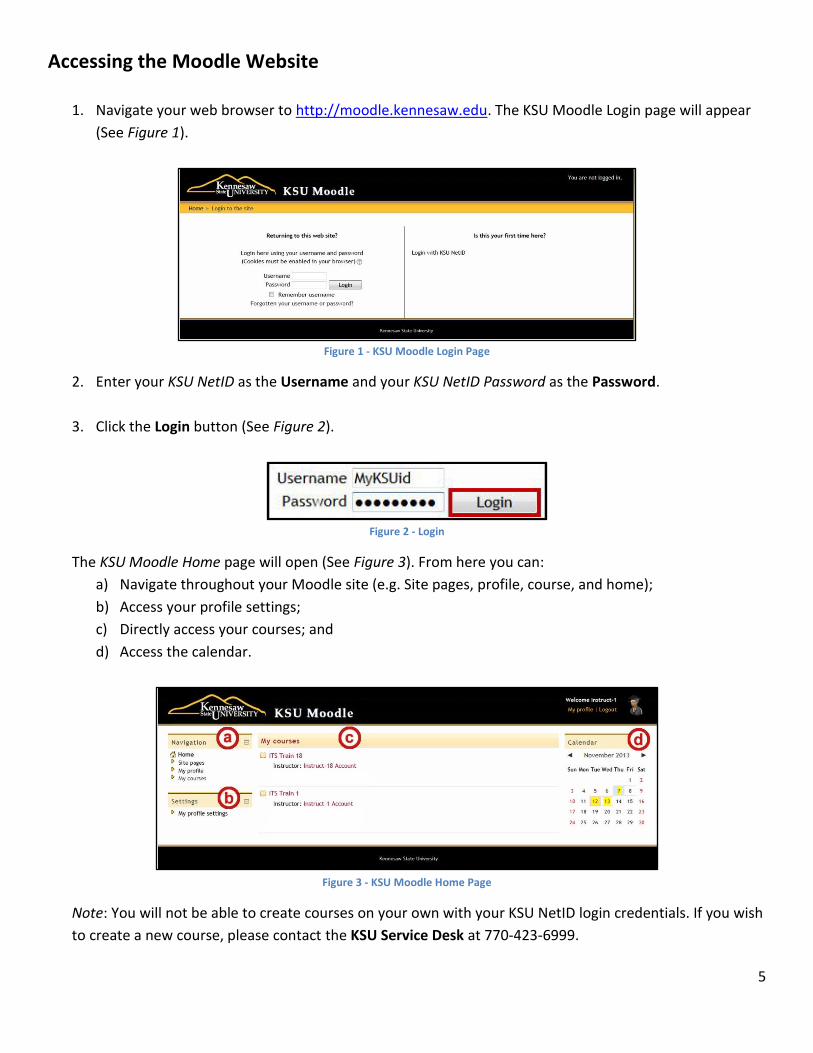
Accessing the Moodle Website
1. Navigate your web browser to http://moodle.kennesaw.edu. The KSU Moodle Login page will appear
(See Figure 1).
Figure 1 - KSU Moodle Login Page
2. Enter your KSU NetID as the Username and your KSU NetID Password as the Password.
3. Click the Login button (See Figure 2).
Figure 2 - Login
The KSU Moodle Home page will open (See Figure 3). From here you can:
a) Navigate throughout your Moodle site (e.g. Site pages, profile, course, and home);
b) Access your profile settings;
c) Directly access your courses; and
d) Access the calendar.
Figure 3 - KSU Moodle Home Page
Note: You will not be able to create courses on your own with your KSU NetID login credentials. If you wish
to create a new course, please contact the KSU Service Desk at 770-423-6999.
6
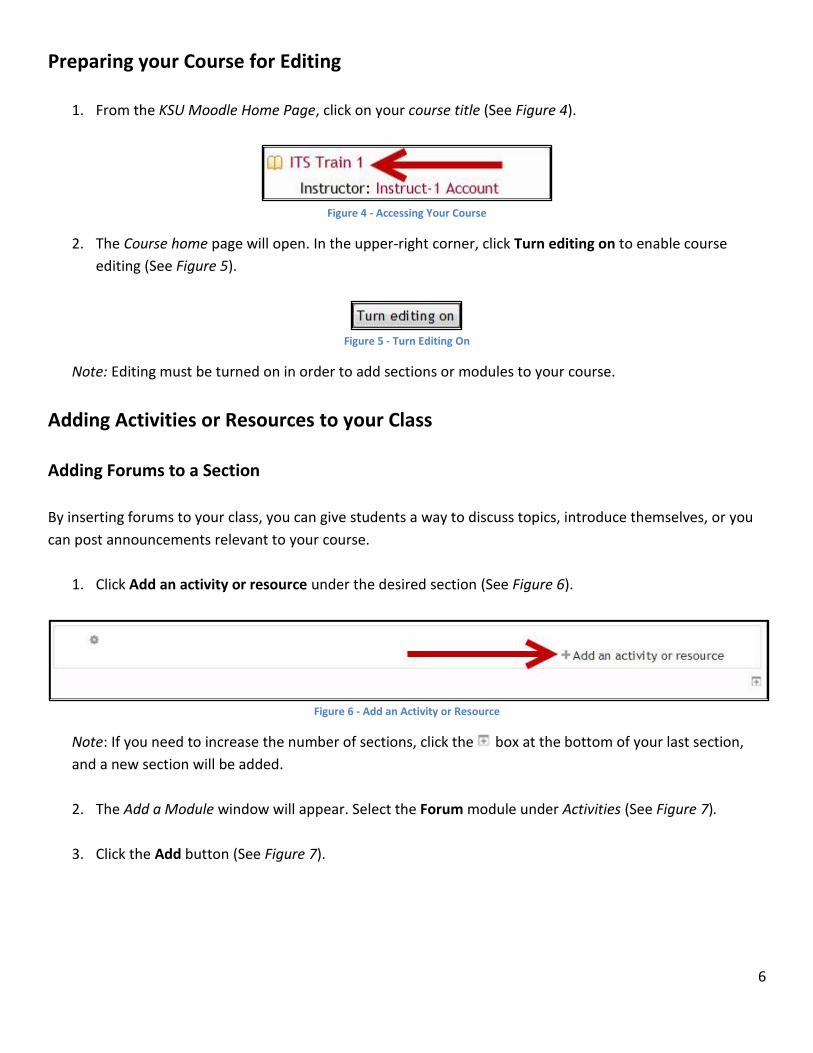
Preparing your Course for Editing
1. From the KSU Moodle Home Page, click on your course title (See Figure 4).
Figure 4 - Accessing Your Course
2. The Course home page will open. In the upper-right corner, click Turn editing on to enable course
editing (See Figure 5).
Figure 5 - Turn Editing On
Note: Editing must be turned on in order to add sections or modules to your course.
Adding Activities or Resources to your Class
Adding Forums to a Section
By inserting forums to your class, you can give students a way to discuss topics, introduce themselves, or you
can post announcements relevant to your course.
1. Click Add an activity or resource under the desired section (See Figure 6).
Figure 6 - Add an Activity or Resource
Note: If you need to increase the number of sections, click the box at the bottom of your last section,
and a new section will be added.
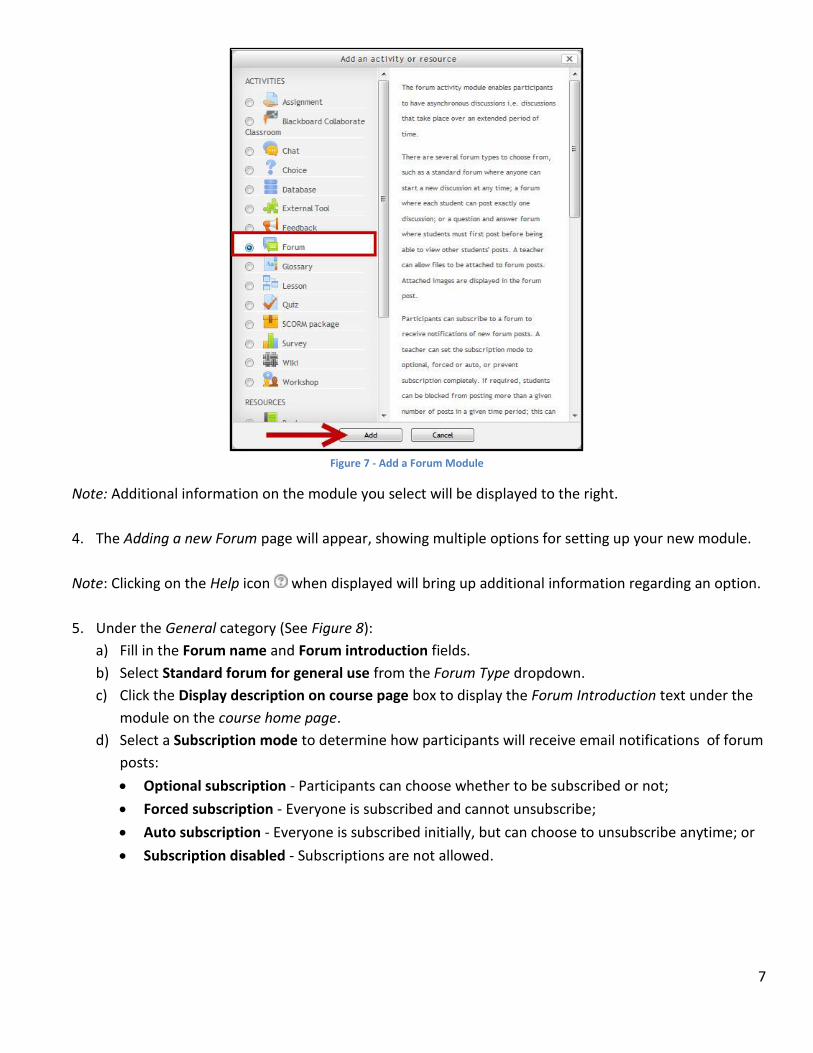
2. The Add a Module window will appear. Select the Forum module under Activities (See Figure 7).
3. Click the Add button (See Figure 7).
7
Figure 7 - Add a Forum Module
Note: Additional information on the module you select will be displayed to the right.
4. The Adding a new Forum page will appear, showing multiple options for setting up your new module.
Note: Clicking on the Help icon when displayed will bring up additional information regarding an option.
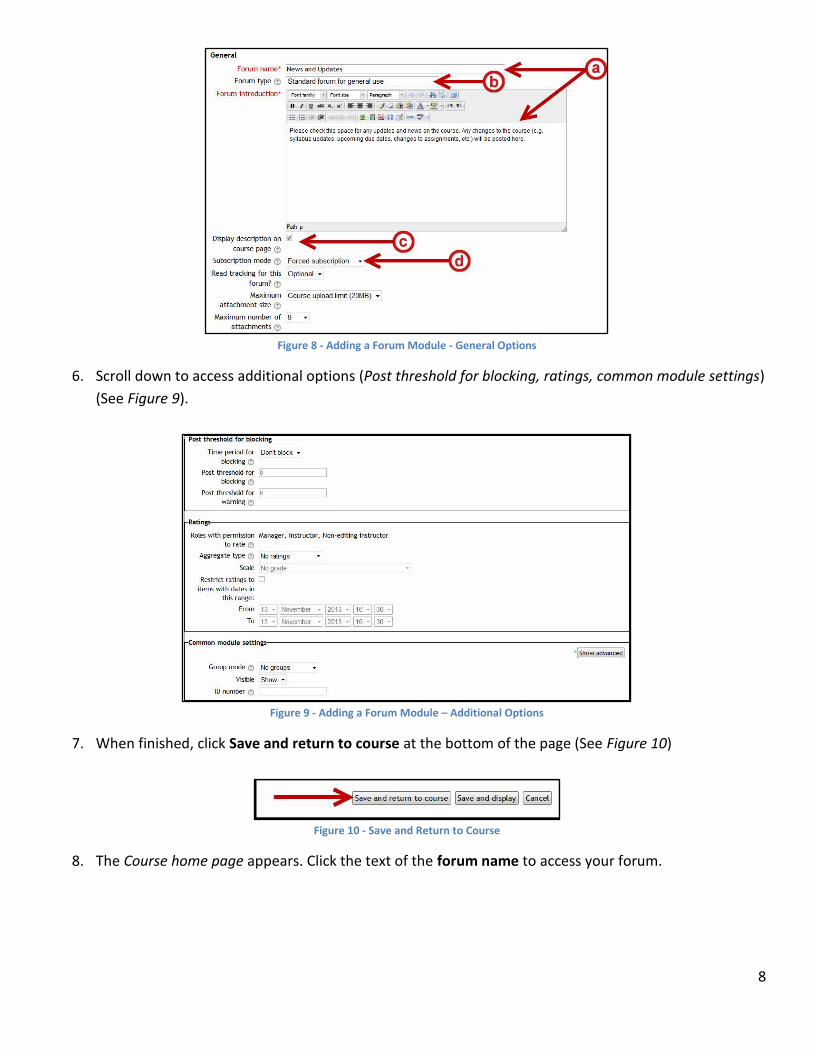
5. Under the General category (See Figure 8):
a) Fill in the Forum name and Forum introduction fields.
b) Select Standard forum for general use from the Forum Type dropdown.
c) Click the Display description on course page box to display the Forum Introduction text under the
module on the course home page.
d) Select a Subscription mode to determine how participants will receive email notifications of forum
posts:
Optional subscription - Participants can choose whether to be subscribed or not;
Forced subscription - Everyone is subscribed and cannot unsubscribe;
Auto subscription - Everyone is subscribed initially, but can choose to unsubscribe anytime; or
Subscription disabled - Subscriptions are not allowed.
8
Figure 8 - Adding a Forum Module - General Options
6. Scroll down to access additional options (Post threshold for blocking, ratings, common module settings)
(See Figure 9).
Figure 9 - Adding a Forum Module – Additional Options
7. When finished, click Save and return to course at the bottom of the page (See Figure 10)
Figure 10 - Save and Return to Course
8. The Course home page appears. Click the text of the forum name to access your forum.
9
Creating a New Forum Topic
1. From the Course Home page, click the forum you wish to enter.
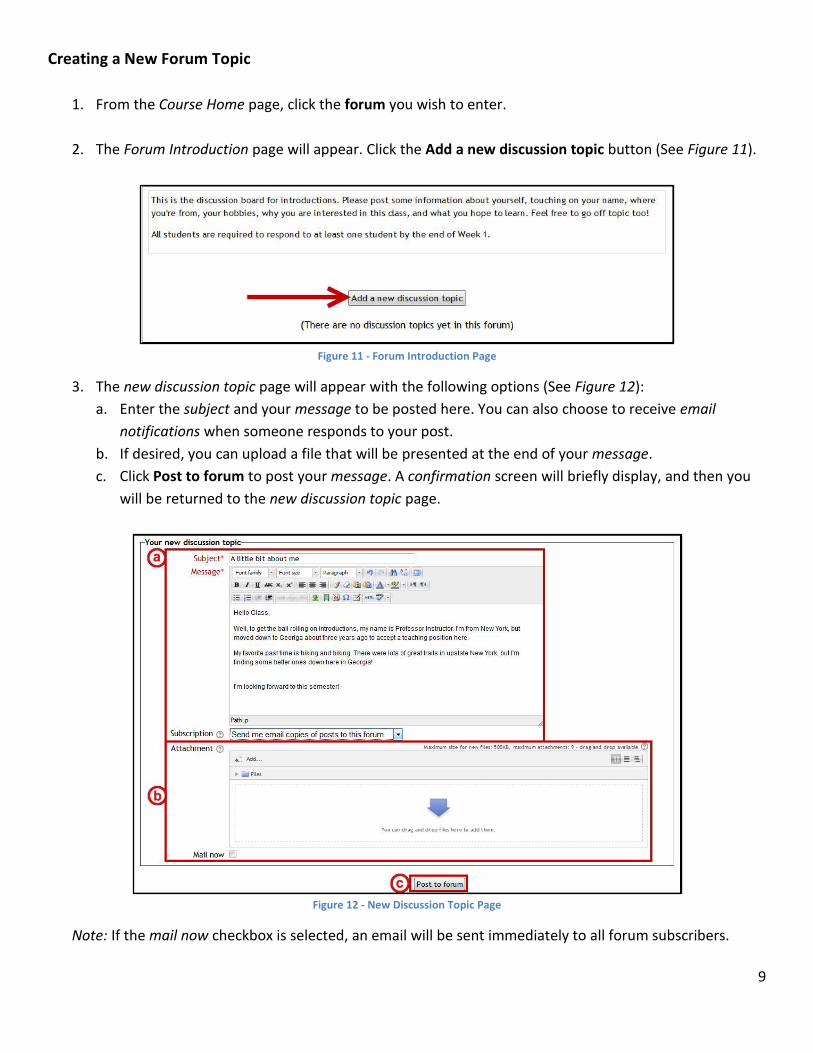
2. The Forum Introduction page will appear. Click the Add a new discussion topic button (See Figure 11).
Figure 11 - Forum Introduction Page
3. The new discussion topic page will appear with the following options (See Figure 12):
a. Enter the subject and your message to be posted here. You can also choose to receive email
notifications when someone responds to your post.
b. If desired, you can upload a file that will be presented at the end of your message.
c. Click Post to forum to post your message. A confirmation screen will briefly display, and then you
will be returned to the new discussion topic page.
Figure 12 - New Discussion Topic Page
Note: If the mail now checkbox is selected, an email will be sent immediately to all forum subscribers.
10
Responding to a Forum Post
1. From the Course Home page, click the forum you wish to enter.
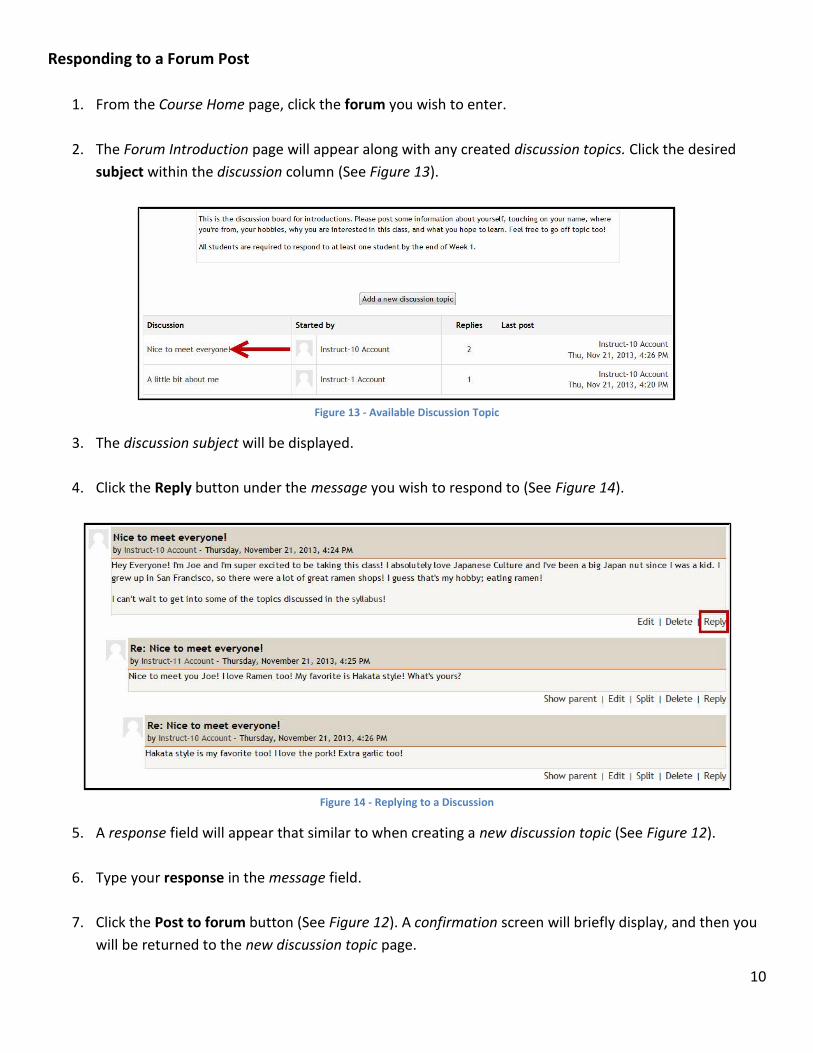
2. The Forum Introduction page will appear along with any created discussion topics. Click the desired
subject within the discussion column (See Figure 13).
Figure 13 - Available Discussion Topic
3. The discussion subject will be displayed.
4. Click the Reply button under the message you wish to respond to (See Figure 14).
Figure 14 - Replying to a Discussion
5. A response field will appear that similar to when creating a new discussion topic (See Figure 12).
6. Type your response in the message field.
7. Click the Post to forum button (See Figure 12). A confirmation screen will briefly display, and then you
will be returned to the new discussion topic page.
11
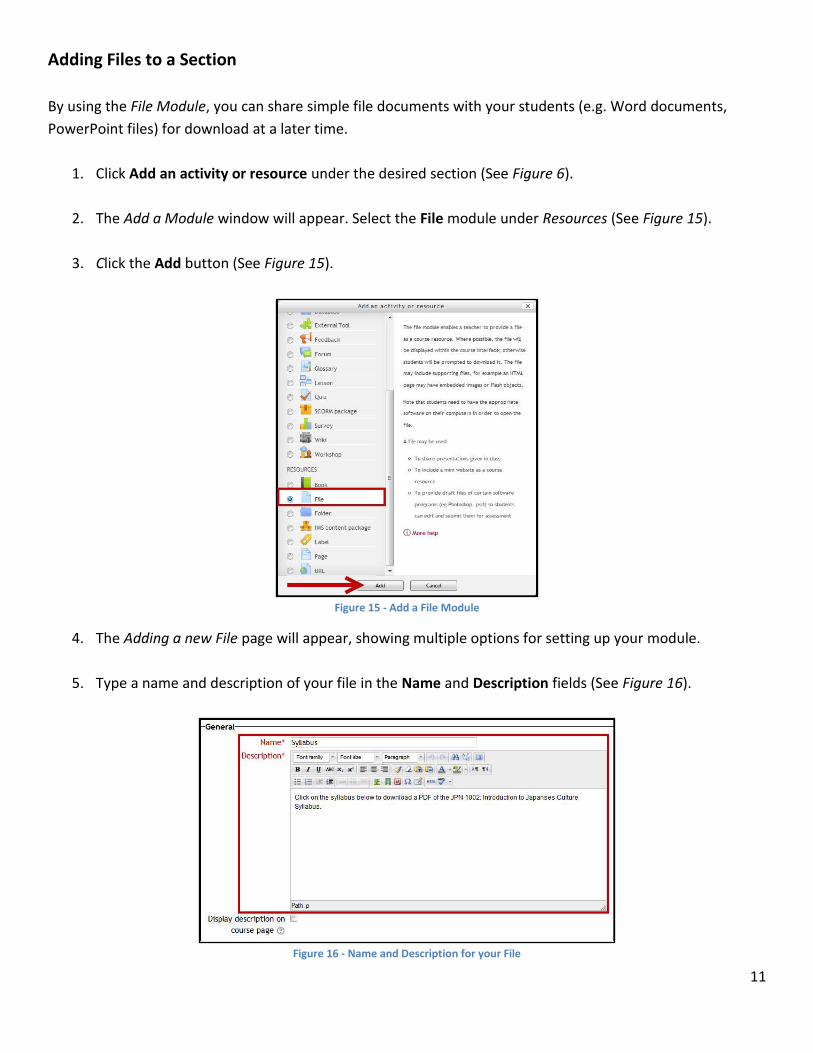
Adding Files to a Section
By using the File Module, you can share simple file documents with your students (e.g. Word documents,
PowerPoint files) for download at a later time.
1. Click Add an activity or resource under the desired section (See Figure 6).
2. The Add a Module window will appear. Select the File module under Resources (See Figure 15).
3. Click the Add button (See Figure 15).
Figure 15 - Add a File Module
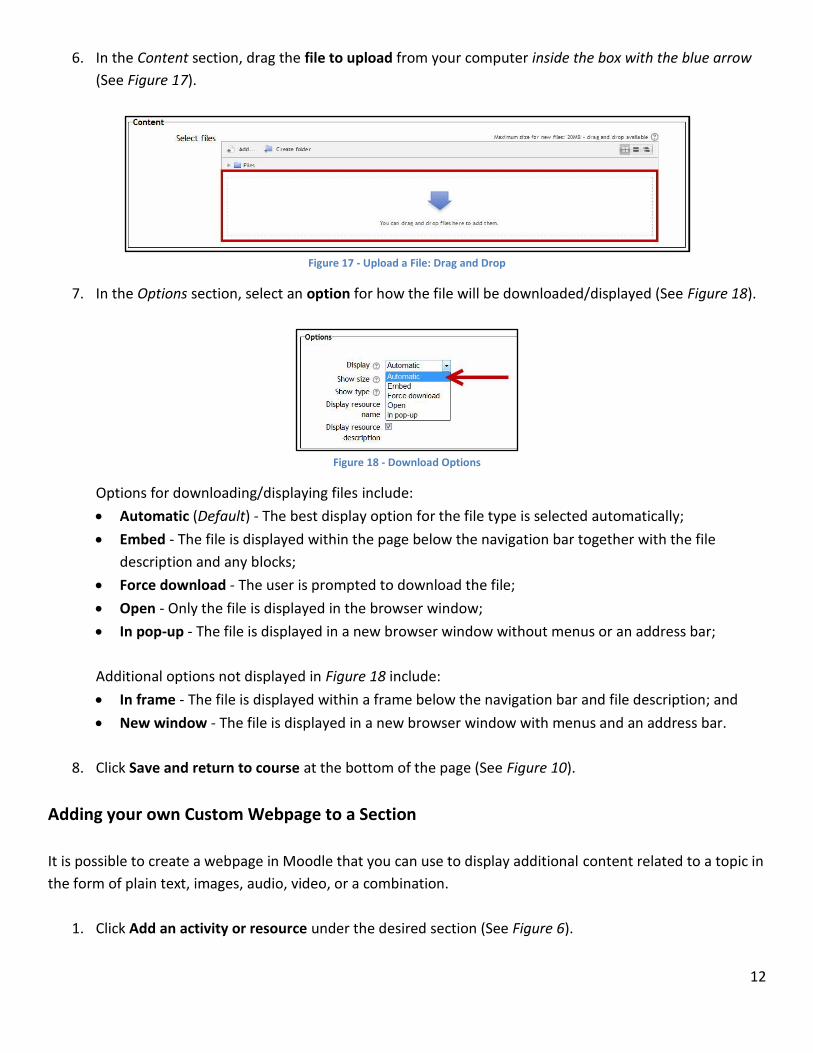
4. The Adding a new File page will appear, showing multiple options for setting up your module.
5. Type a name and description of your file in the Name and Description fields (See Figure 16).
Figure 16 - Name and Description for your File
12
6. In the Content section, drag the file to upload from your computer inside the box with the blue arrow
(See Figure 17).
Figure 17 - Upload a File: Drag and Drop
7. In the Options section, select an option for how the file will be downloaded/displayed (See Figure 18).
Figure 18 - Download Options
Options for downloading/displaying files include:
Automatic (Default) - The best display option for the file type is selected automatically;
Embed - The file is displayed within the page below the navigation bar together with the file
description and any blocks;
Force download - The user is prompted to download the file;
Open - Only the file is displayed in the browser window;
In pop-up - The file is displayed in a new browser window without menus or an address bar;
Additional options not displayed in Figure 18 include:
In frame - The file is displayed within a frame below the navigation bar and file description; and
New window - The file is displayed in a new browser window with menus and an address bar.
8. Click Save and return to course at the bottom of the page (See Figure 10).
Adding your own Custom Webpage to a Section
It is possible to create a webpage in Moodle that you can use to display additional content related to a topic in
the form of plain text, images, audio, video, or a combination.
1. Click Add an activity or resource under the desired section (See Figure 6).
13
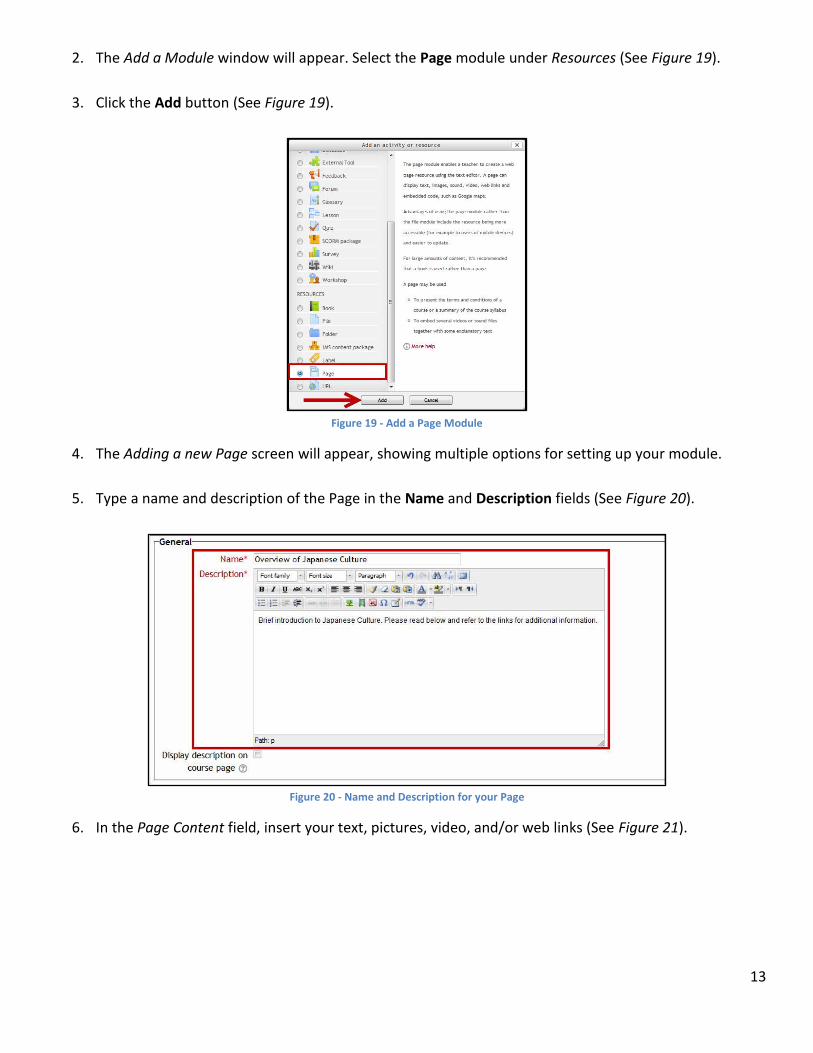
2. The Add a Module window will appear. Select the Page module under Resources (See Figure 19).
3. Click the Add button (See Figure 19).
Figure 19 - Add a Page Module
4. The Adding a new Page screen will appear, showing multiple options for setting up your module.
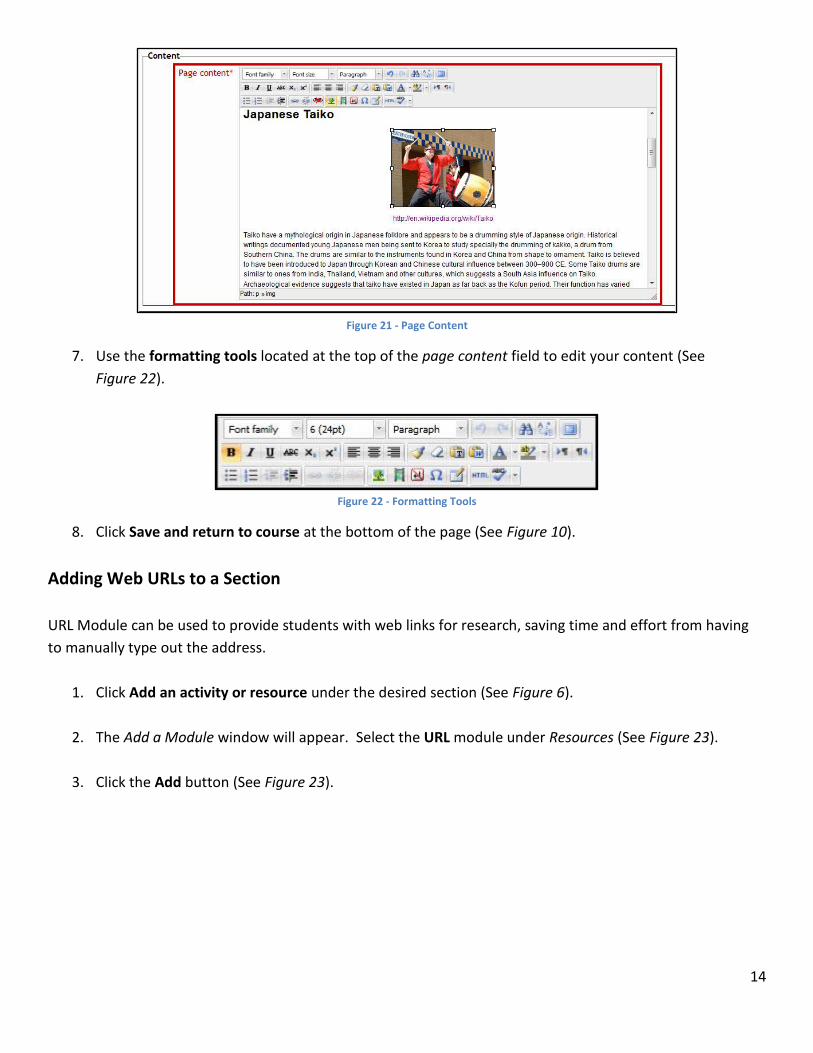
5. Type a name and description of the Page in the Name and Description fields (See Figure 20).
Figure 20 - Name and Description for your Page
6. In the Page Content field, insert your text, pictures, video, and/or web links (See Figure 21).
14
Figure 21 - Page Content
7. Use the formatting tools located at the top of the page content field to edit your content (See
Figure 22).
Figure 22 - Formatting Tools
8. Click Save and return to course at the bottom of the page (See Figure 10).
Adding Web URLs to a Section
URL Module can be used to provide students with web links for research, saving time and effort from having
to manually type out the address.
1. Click Add an activity or resource under the desired section (See Figure 6).
2. The Add a Module window will appear. Select the URL module under Resources (See Figure 23).
3. Click the Add button (See Figure 23).
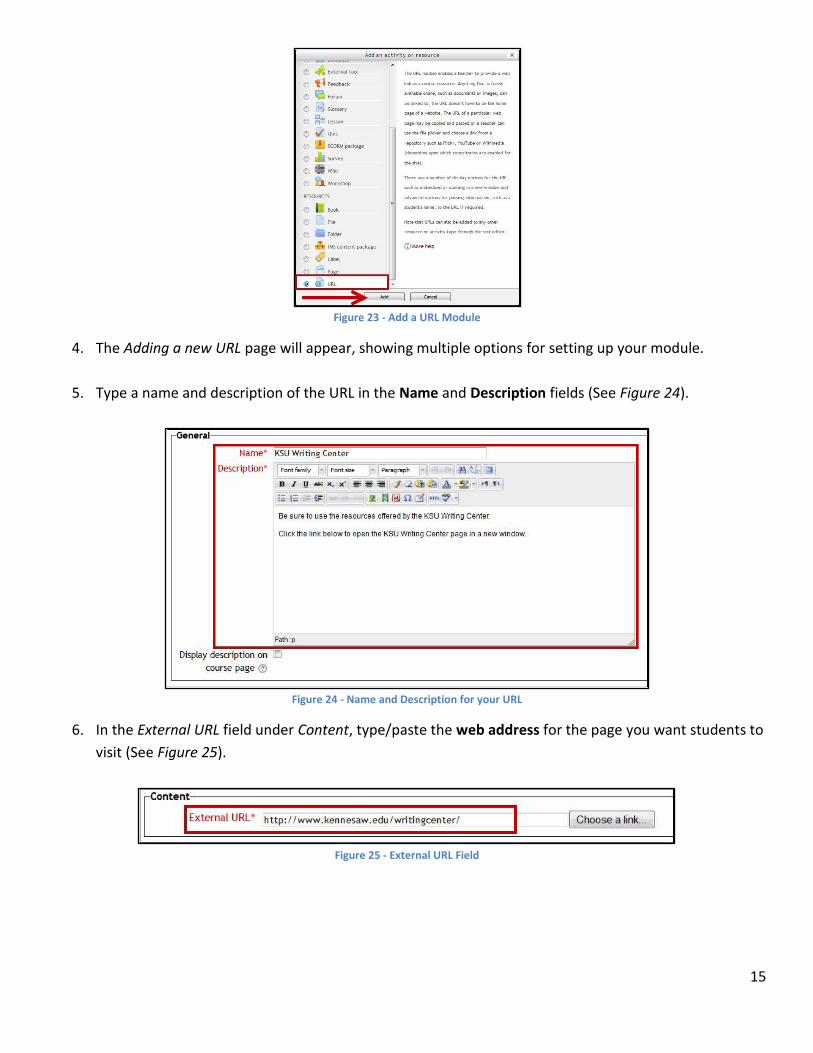
15
Figure 23 - Add a URL Module
4. The Adding a new URL page will appear, showing multiple options for setting up your module.
5. Type a name and description of the URL in the Name and Description fields (See Figure 24).
Figure 24 - Name and Description for your URL
6. In the External URL field under Content, type/paste the web address for the page you want students to
visit (See Figure 25).
Figure 25 - External URL Field
16
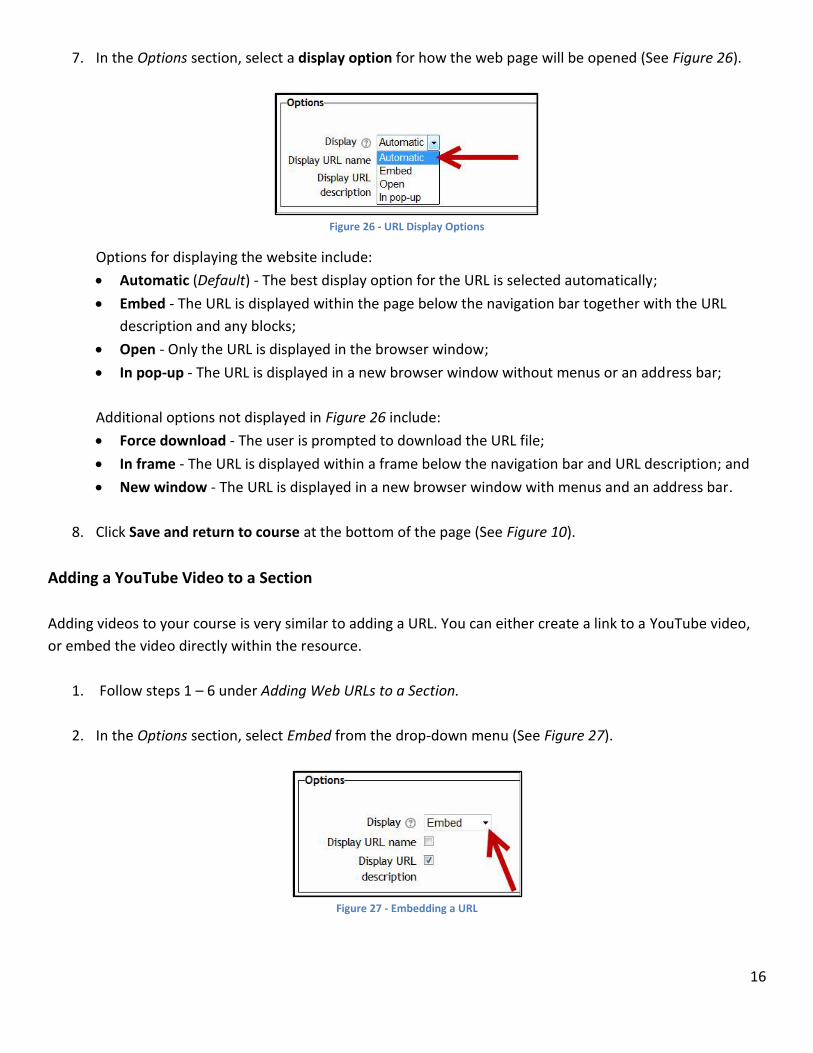
7. In the Options section, select a display option for how the web page will be opened (See Figure 26).
Figure 26 - URL Display Options
Options for displaying the website include:
Automatic (Default) - The best display option for the URL is selected automatically;
Embed - The URL is displayed within the page below the navigation bar together with the URL
description and any blocks;
Open - Only the URL is displayed in the browser window;
In pop-up - The URL is displayed in a new browser window without menus or an address bar;
Additional options not displayed in Figure 26 include:
Force download - The user is prompted to download the URL file;
In frame - The URL is displayed within a frame below the navigation bar and URL description; and
New window - The URL is displayed in a new browser window with menus and an address bar.
8. Click Save and return to course at the bottom of the page (See Figure 10).
Adding a YouTube Video to a Section
Adding videos to your course is very similar to adding a URL. You can either create a link to a YouTube video,
or embed the video directly within the resource.
1. Follow steps 1 – 6 under Adding Web URLs to a Section.
2. In the Options section, select Embed from the drop-down menu (See Figure 27).
Figure 27 - Embedding a URL
17
3. Click Save and return to course at the bottom of the page (See Figure 10).
Now when you open the resource, the YouTube video will display. Click on the video to play.
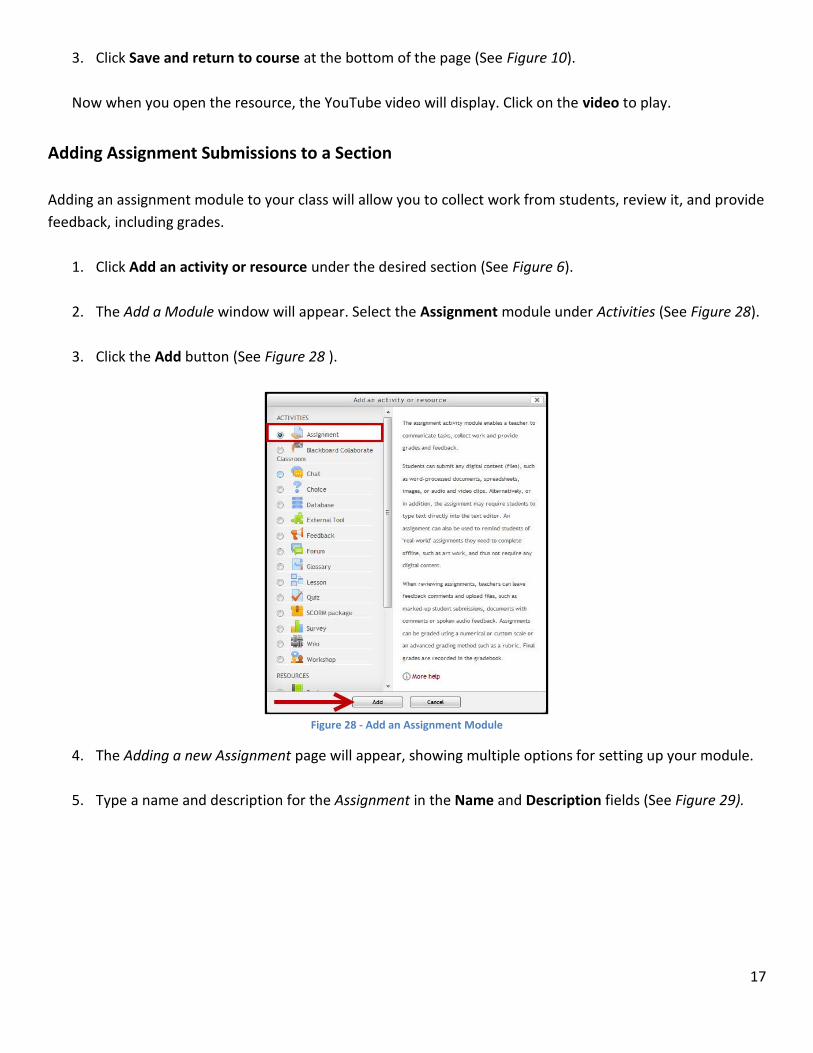
Adding Assignment Submissions to a Section
Adding an assignment module to your class will allow you to collect work from students, review it, and provide
feedback, including grades.
1. Click Add an activity or resource under the desired section (See Figure 6).
2. The Add a Module window will appear. Select the Assignment module under Activities (See Figure 28).
3. Click the Add button (See Figure 28 ).
Figure 28 - Add an Assignment Module
4. The Adding a new Assignment page will appear, showing multiple options for setting up your module.
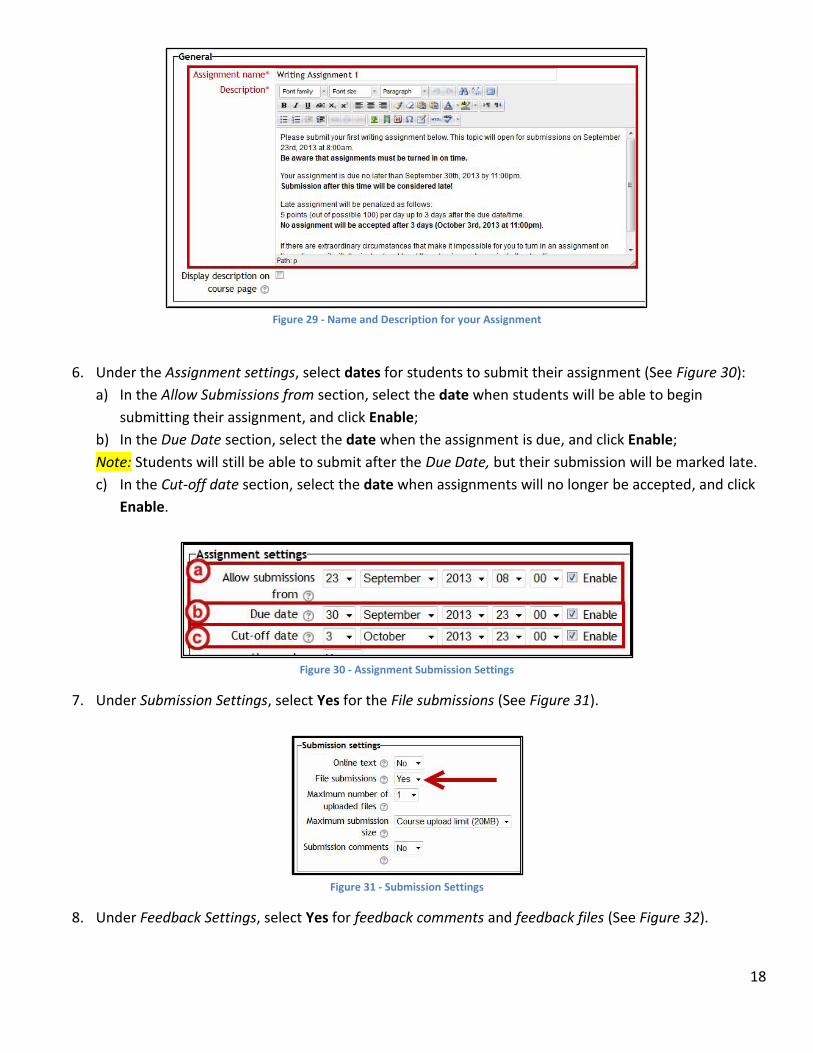
5. Type a name and description for the Assignment in the Name and Description fields (See Figure 29).
18
Figure 29 - Name and Description for your Assignment
6. Under the Assignment settings, select dates for students to submit their assignment (See Figure 30):
a) In the Allow Submissions from section, select the date when students will be able to begin
submitting their assignment, and click Enable;
b) In the Due Date section, select the date when the assignment is due, and click Enable;
Note: Students will still be able to submit after the Due Date, but their submission will be marked late.
c) In the Cut-off date section, select the date when assignments will no longer be accepted, and click
Enable.
Figure 30 - Assignment Submission Settings
7. Under Submission Settings, select Yes for the File submissions (See Figure 31).
Figure 31 - Submission Settings
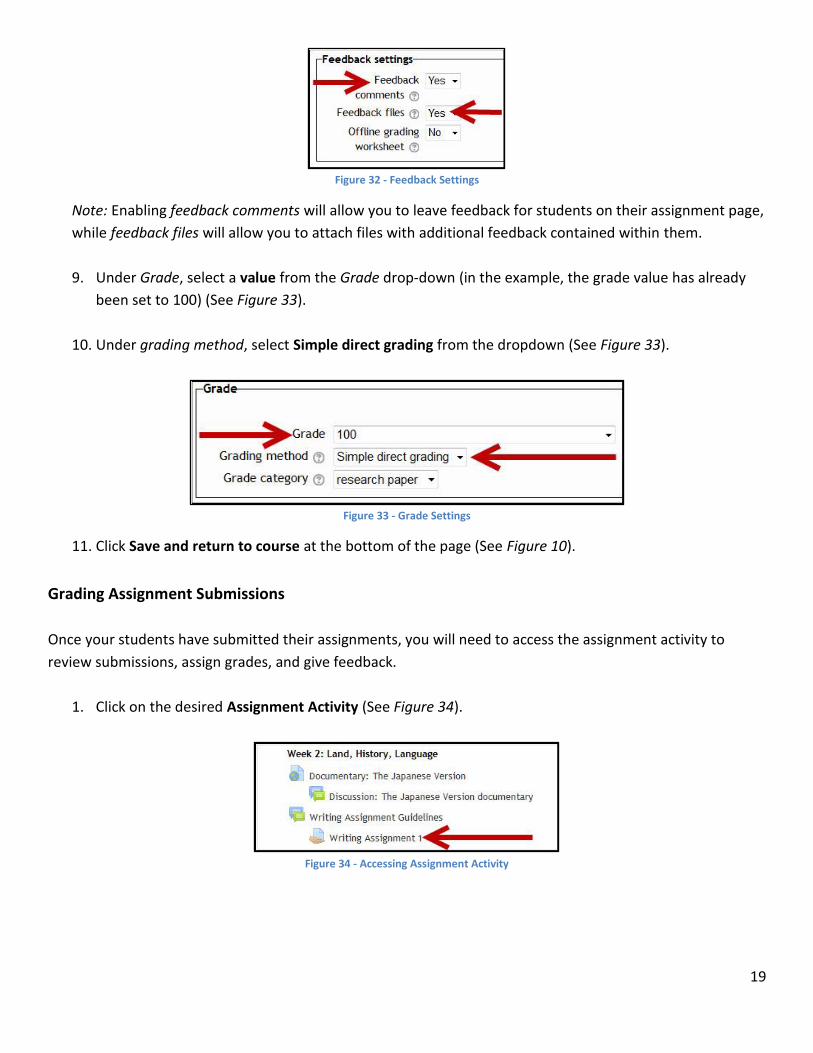
8. Under Feedback Settings, select Yes for feedback comments and feedback files (See Figure 32).
19
Figure 32 - Feedback Settings
Note: Enabling feedback comments will allow you to leave feedback for students on their assignment page,
while feedback files will allow you to attach files with additional feedback contained within them.
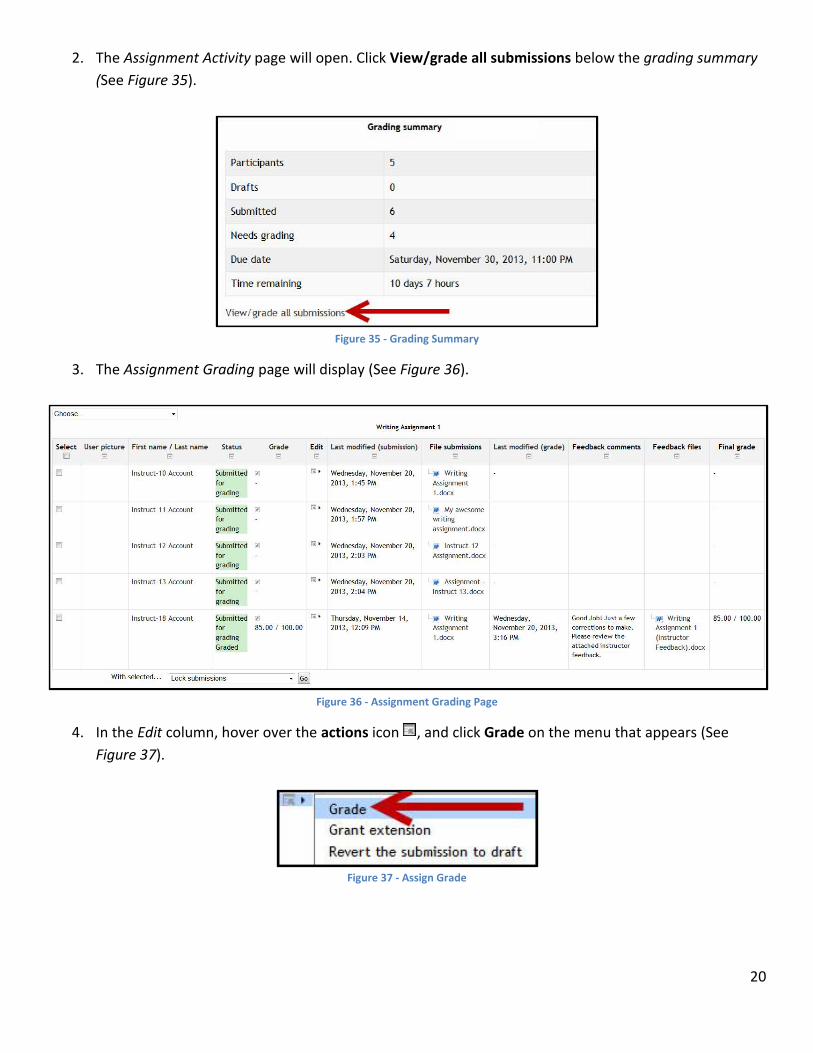
9. Under Grade, select a value from the Grade drop-down (in the example, the grade value has already
been set to 100) (See Figure 33).
10. Under grading method, select Simple direct grading from the dropdown (See Figure 33).
Figure 33 - Grade Settings
11. Click Save and return to course at the bottom of the page (See Figure 10).
Grading Assignment Submissions
Once your students have submitted their assignments, you will need to access the assignment activity to
review submissions, assign grades, and give feedback.
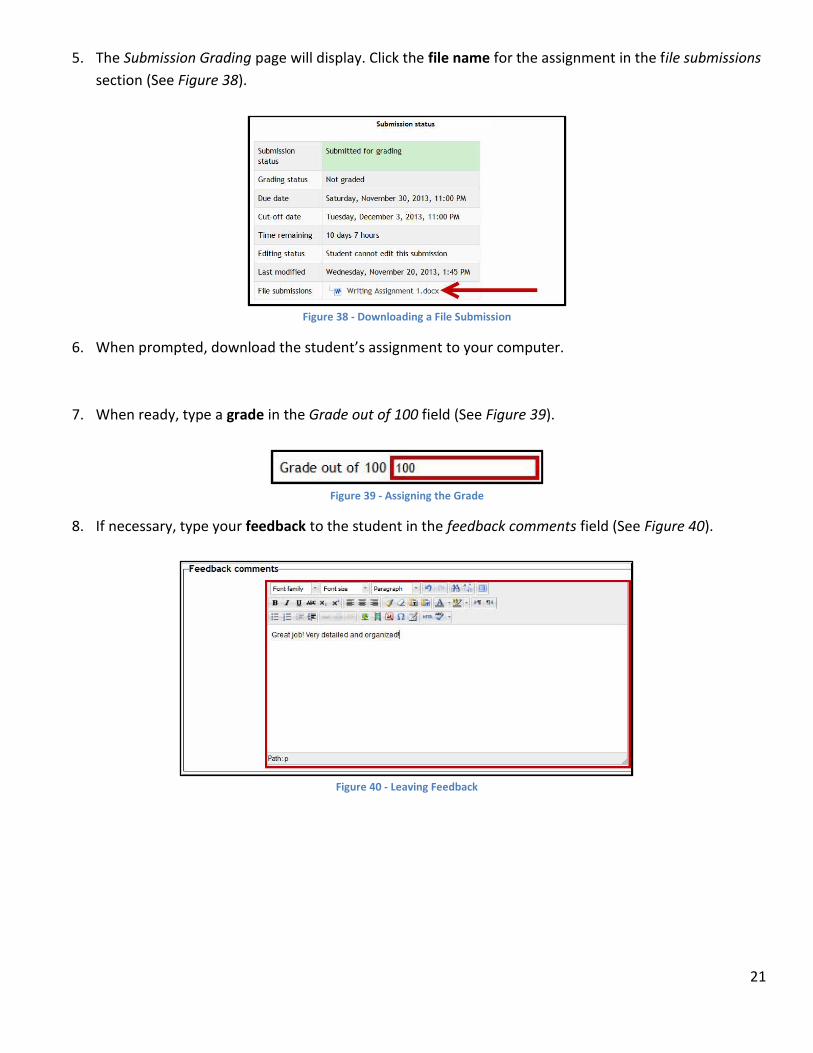
1. Click on the desired Assignment Activity (See Figure 34).
Figure 34 - Accessing Assignment Activity
20
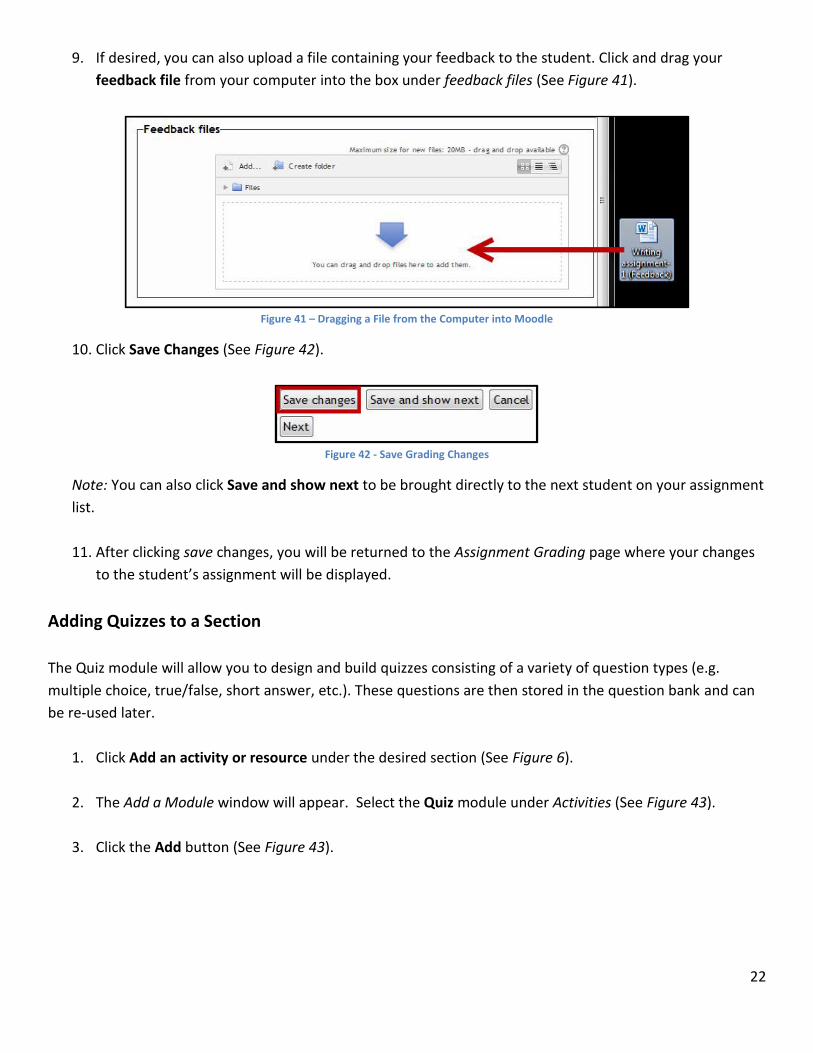
2. The Assignment Activity page will open. Click View/grade all submissions below the grading summary
(See Figure 35).
Figure 35 - Grading Summary
3. The Assignment Grading page will display (See Figure 36).
Figure 36 - Assignment Grading Page
4. In the Edit column, hover over the actions icon , and click Grade on the menu that appears (See
Figure 37).
Figure 37 - Assign Grade
21
5. The Submission Grading page will display. Click the file name for the assignment in the file submissions
section (See Figure 38).
Figure 38 - Downloading a File Submission
6. When prompted, download the student’s assignment to your computer.
7. When ready, type a grade in the Grade out of 100 field (See Figure 39).
Figure 39 - Assigning the Grade
8. If necessary, type your feedback to the student in the feedback comments field (See Figure 40).
Figure 40 - Leaving Feedback
22
9. If desired, you can also upload a file containing your feedback to the student. Click and drag your
feedback file from your computer into the box under feedback files (See Figure 41).
Figure 41 – Dragging a File from the Computer into Moodle
10. Click Save Changes (See Figure 42).
Figure 42 - Save Grading Changes
Note: You can also click Save and show next to be brought directly to the next student on your assignment
list.
11. After clicking save changes, you will be returned to the Assignment Grading page where your changes
to the student’s assignment will be displayed.
Adding Quizzes to a Section
The Quiz module will allow you to design and build quizzes consisting of a variety of question types (e.g.
multiple choice, true/false, short answer, etc.). These questions are then stored in the question bank and can
be re-used later.
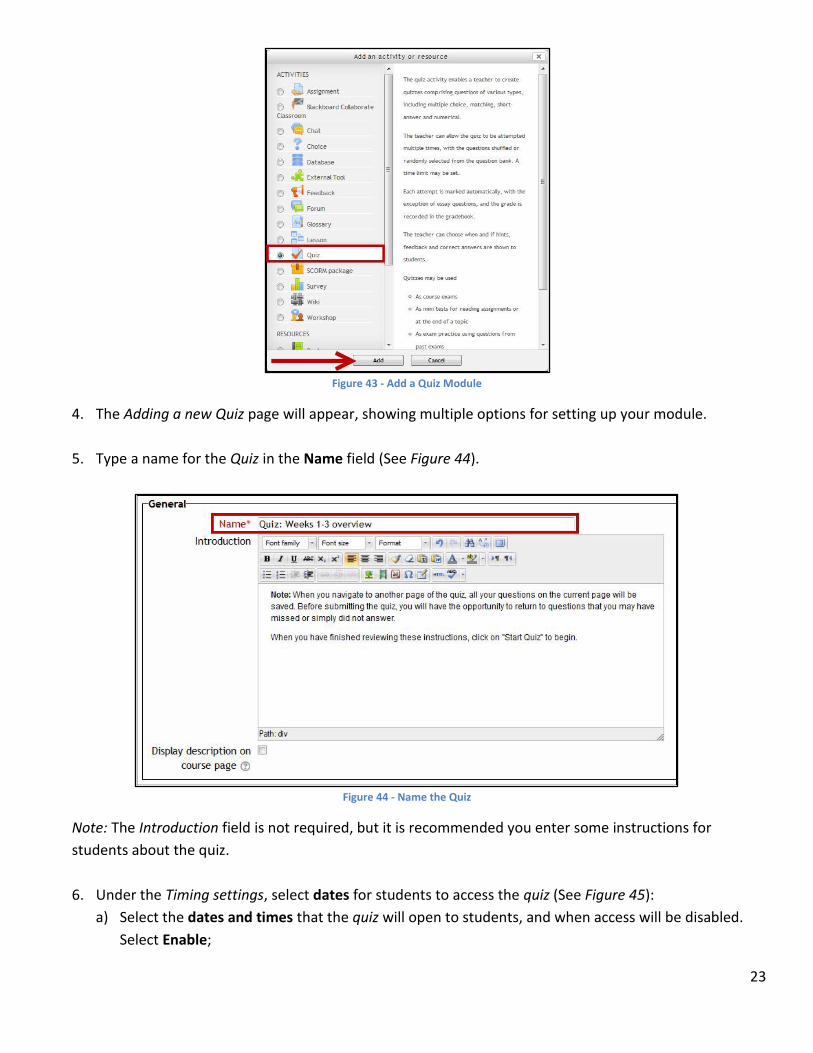
1. Click Add an activity or resource under the desired section (See Figure 6).
2. The Add a Module window will appear. Select the Quiz module under Activities (See Figure 43).
3. Click the Add button (See Figure 43).
23
Figure 43 - Add a Quiz Module
4. The Adding a new Quiz page will appear, showing multiple options for setting up your module.
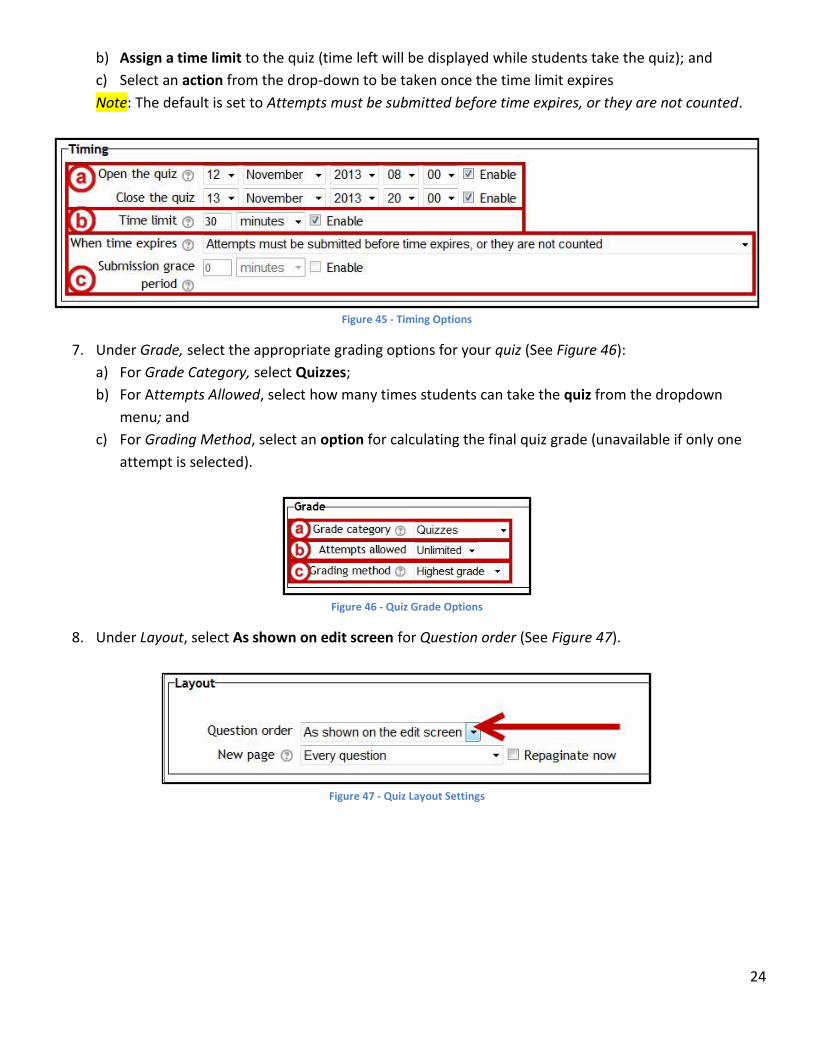
5. Type a name for the Quiz in the Name field (See Figure 44).
Figure 44 - Name the Quiz
Note: The Introduction field is not required, but it is recommended you enter some instructions for
students about the quiz.
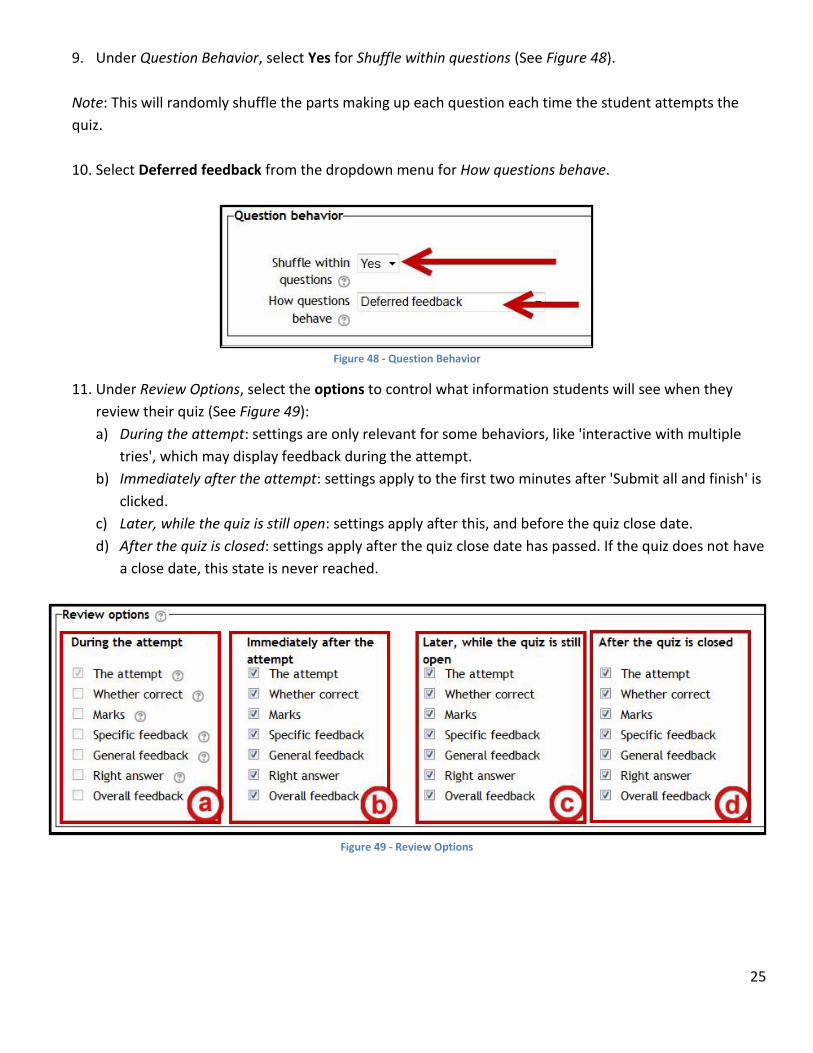
6. Under the Timing settings, select dates for students to access the quiz (See Figure 45):
a) Select the dates and times that the quiz will open to students, and when access will be disabled.
Select Enable;
24
b) Assign a time limit to the quiz (time left will be displayed while students take the quiz); and
c) Select an action from the drop-down to be taken once the time limit expires
Note: The default is set to Attempts must be submitted before time expires, or they are not counted.
Figure 45 - Timing Options
7. Under Grade, select the appropriate grading options for your quiz (See Figure 46):
a) For Grade Category, select Quizzes;
b) For Attempts Allowed, select how many times students can take the quiz from the dropdown
menu; and
c) For Grading Method, select an option for calculating the final quiz grade (unavailable if only one
attempt is selected).
Figure 46 - Quiz Grade Options
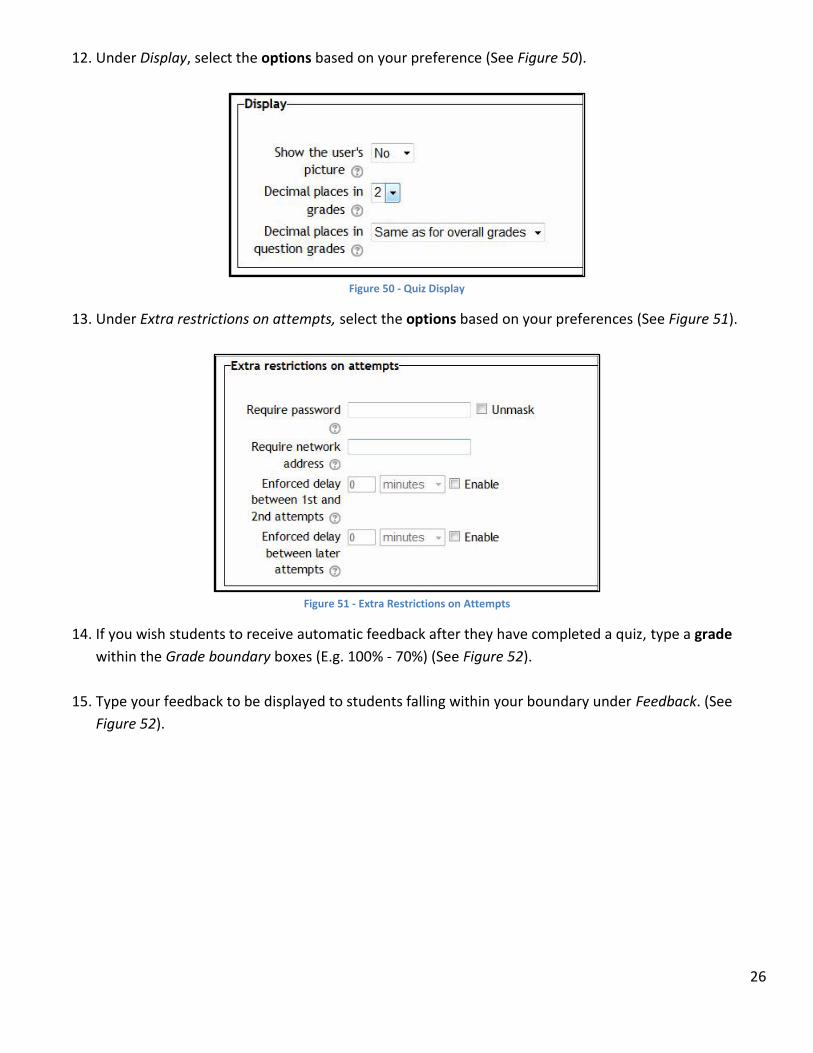
8. Under Layout, select As shown on edit screen for Question order (See Figure 47).
Figure 47 - Quiz Layout Settings
25
9. Under Question Behavior, select Yes for Shuffle within questions (See Figure 48).
Note: This will randomly shuffle the parts making up each question each time the student attempts the
quiz.
10. Select Deferred feedback from the dropdown menu for How questions behave.
Figure 48 - Question Behavior
11. Under Review Options, select the options to control what information students will see when they
review their quiz (See Figure 49):
a) During the attempt: settings are only relevant for some behaviors, like 'interactive with multiple
tries', which may display feedback during the attempt.
b) Immediately after the attempt: settings apply to the first two minutes after 'Submit all and finish' is
clicked.
c) Later, while the quiz is still open: settings apply after this, and before the quiz close date.
d) After the quiz is closed: settings apply after the quiz close date has passed. If the quiz does not have
a close date, this state is never reached.
Figure 49 - Review Options
26
12. Under Display, select the options based on your preference (See Figure 50).
Figure 50 - Quiz Display
13. Under Extra restrictions on attempts, select the options based on your preferences (See Figure 51).
Figure 51 - Extra Restrictions on Attempts
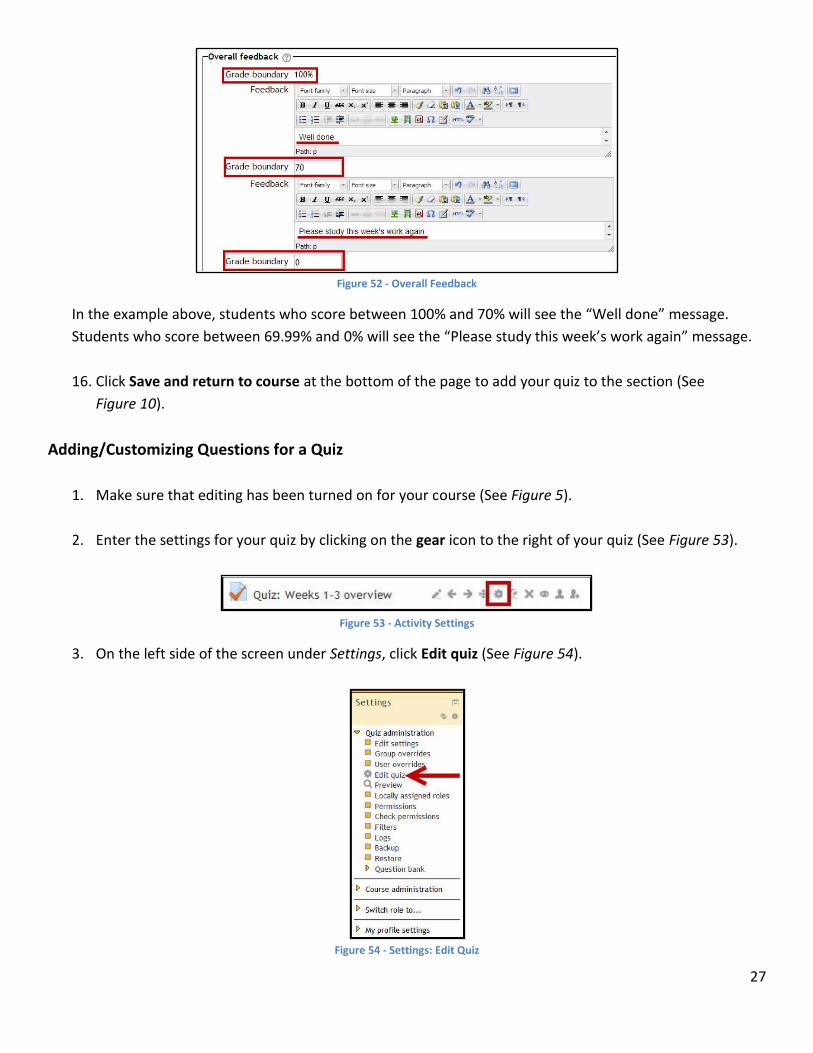
14. If you wish students to receive automatic feedback after they have completed a quiz, type a grade
within the Grade boundary boxes (E.g. 100% - 70%) (See Figure 52).
15. Type your feedback to be displayed to students falling within your boundary under Feedback. (See
Figure 52).
27
Figure 52 - Overall Feedback
In the example above, students who score between 100% and 70% will see the “Well done” message.
Students who score between 69.99% and 0% will see the “Please study this week’s work again” message.
16. Click Save and return to course at the bottom of the page to add your quiz to the section (See
Figure 10).
Adding/Customizing Questions for a Quiz
1. Make sure that editing has been turned on for your course (See Figure 5).
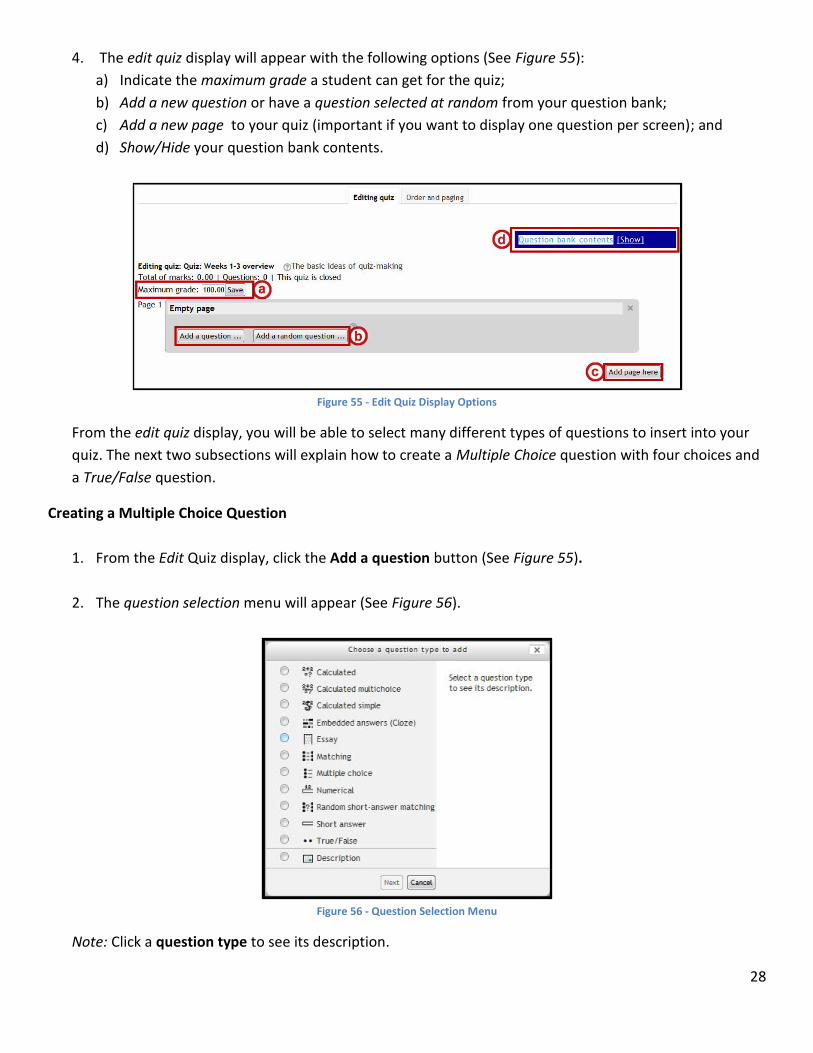
2. Enter the settings for your quiz by clicking on the gear icon to the right of your quiz (See Figure 53).
Figure 53 - Activity Settings
3. On the left side of the screen under Settings, click Edit quiz (See Figure 54).
Figure 54 - Settings: Edit Quiz
28
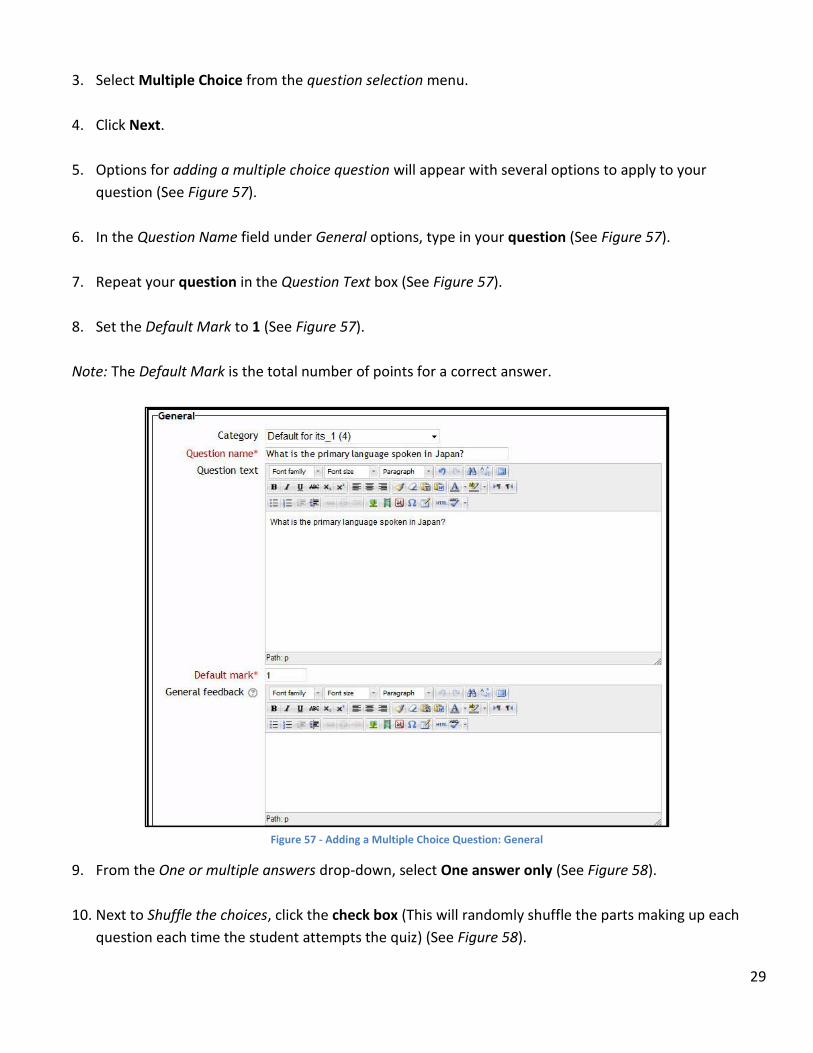
4. The edit quiz display will appear with the following options (See Figure 55):
a) Indicate the maximum grade a student can get for the quiz;
b) Add a new question or have a question selected at random from your question bank;
c) Add a new page to your quiz (important if you want to display one question per screen); and
d) Show/Hide your question bank contents.
Figure 55 - Edit Quiz Display Options
From the edit quiz display, you will be able to select many different types of questions to insert into your
quiz. The next two subsections will explain how to create a Multiple Choice question with four choices and
a True/False question.
Creating a Multiple Choice Question
1. From the Edit Quiz display, click the Add a question button (See Figure 55).
2. The question selection menu will appear (See Figure 56).
Figure 56 - Question Selection Menu
Note: Click a question type to see its description.
29
3. Select Multiple Choice from the question selection menu.
4. Click Next.
5. Options for adding a multiple choice question will appear with several options to apply to your
question (See Figure 57).
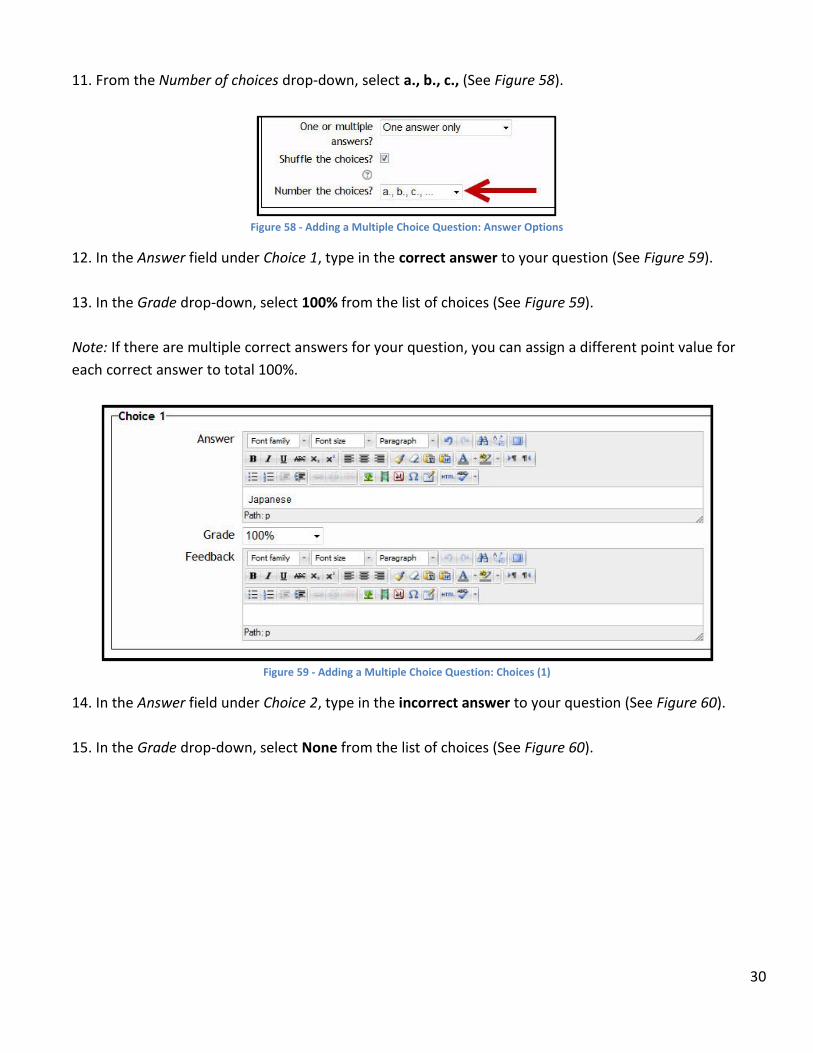
6. In the Question Name field under General options, type in your question (See Figure 57).
7. Repeat your question in the Question Text box (See Figure 57).
8. Set the Default Mark to 1 (See Figure 57).
Note: The Default Mark is the total number of points for a correct answer.
Figure 57 - Adding a Multiple Choice Question: General
9. From the One or multiple answers drop-down, select One answer only (See Figure 58).
10. Next to Shuffle the choices, click the check box (This will randomly shuffle the parts making up each
question each time the student attempts the quiz) (See Figure 58).
30
11. From the Number of choices drop-down, select a., b., c., (See Figure 58).
Figure 58 - Adding a Multiple Choice Question: Answer Options
12. In the Answer field under Choice 1, type in the correct answer to your question (See Figure 59).
13. In the Grade drop-down, select 100% from the list of choices (See Figure 59).
Note: If there are multiple correct answers for your question, you can assign a different point value for
each correct answer to total 100%.
Figure 59 - Adding a Multiple Choice Question: Choices (1)
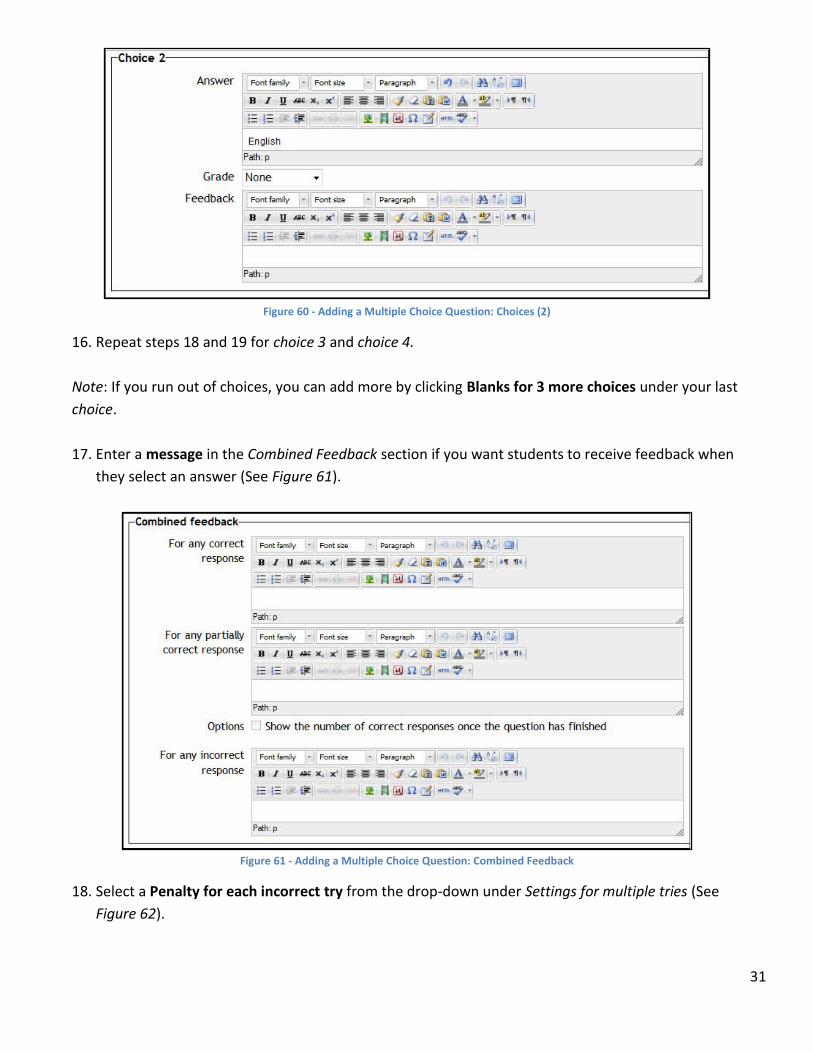
14. In the Answer field under Choice 2, type in the incorrect answer to your question (See Figure 60).
15. In the Grade drop-down, select None from the list of choices (See Figure 60).
31
Figure 60 - Adding a Multiple Choice Question: Choices (2)
16. Repeat steps 18 and 19 for choice 3 and choice 4.
Note: If you run out of choices, you can add more by clicking Blanks for 3 more choices under your last
choice.
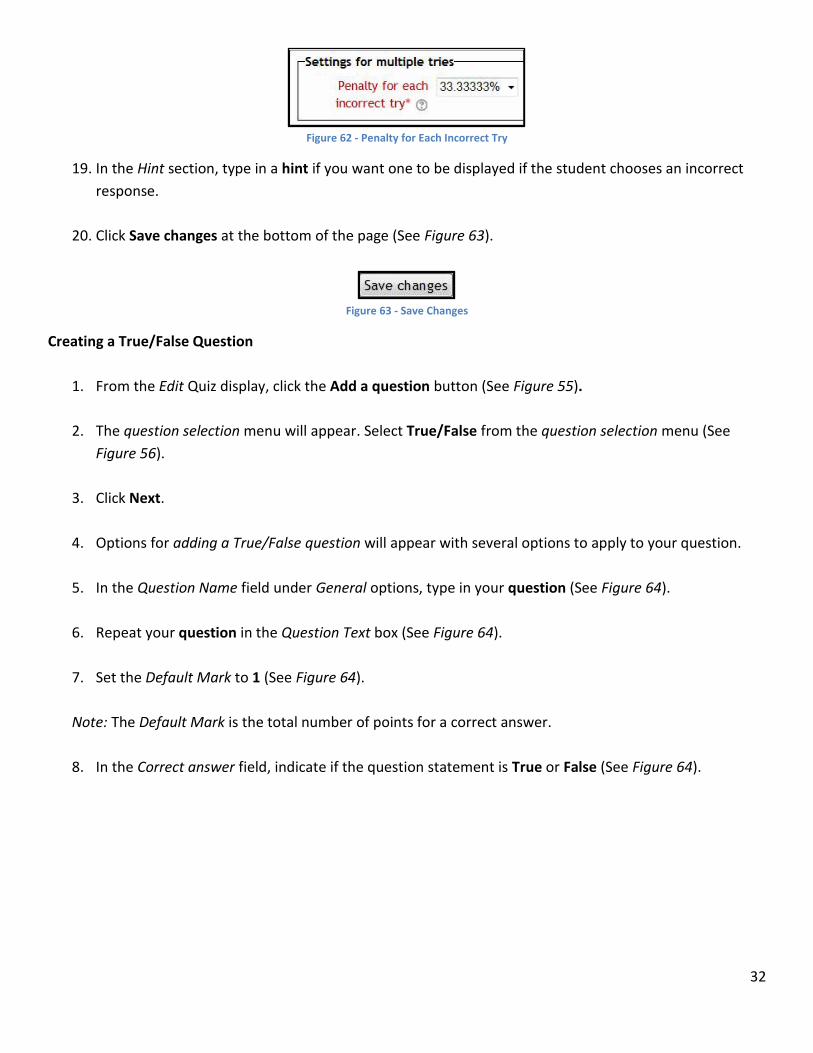
17. Enter a message in the Combined Feedback section if you want students to receive feedback when
they select an answer (See Figure 61).
Figure 61 - Adding a Multiple Choice Question: Combined Feedback
18. Select a Penalty for each incorrect try from the drop-down under Settings for multiple tries (See
Figure 62).
32
Figure 62 - Penalty for Each Incorrect Try
19. In the Hint section, type in a hint if you want one to be displayed if the student chooses an incorrect
response.
20. Click Save changes at the bottom of the page (See Figure 63).
Figure 63 - Save Changes
Creating a True/False Question
1. From the Edit Quiz display, click the Add a question button (See Figure 55).
2. The question selection menu will appear. Select True/False from the question selection menu (See
Figure 56).
3. Click Next.
4. Options for adding a True/False question will appear with several options to apply to your question.
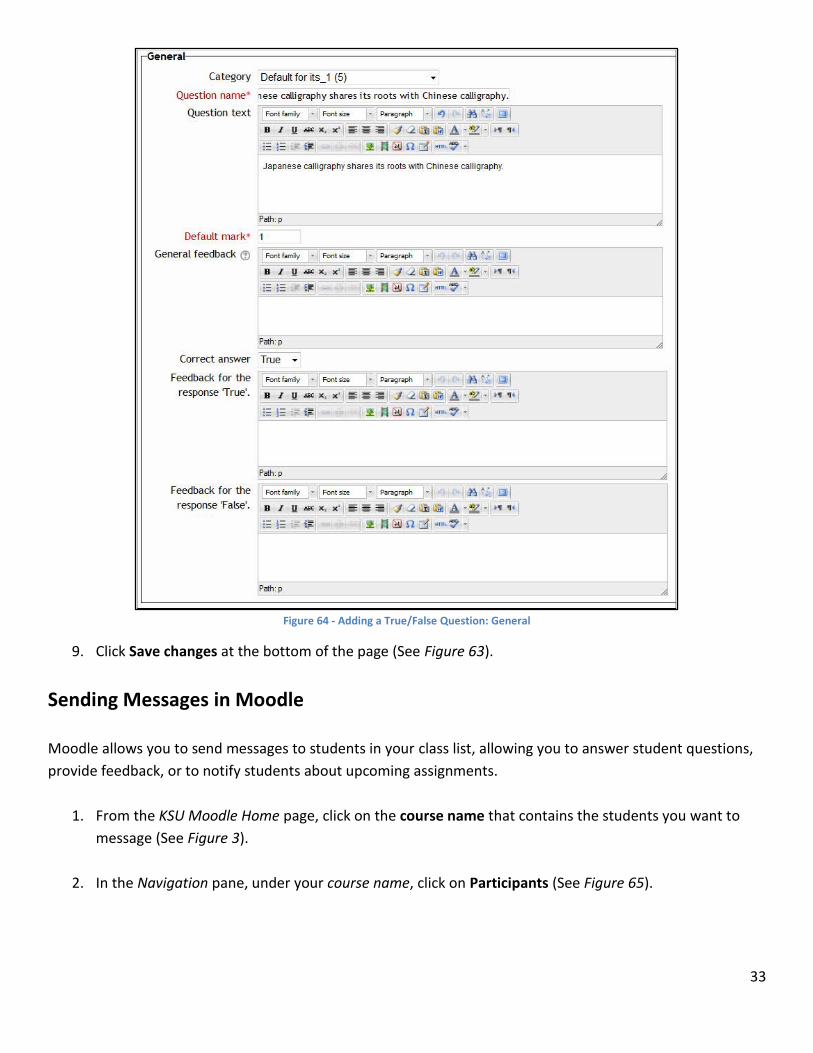
5. In the Question Name field under General options, type in your question (See Figure 64).
6. Repeat your question in the Question Text box (See Figure 64).
7. Set the Default Mark to 1 (See Figure 64).
Note: The Default Mark is the total number of points for a correct answer.
8. In the Correct answer field, indicate if the question statement is True or False (See Figure 64).
33
Figure 64 - Adding a True/False Question: General
9. Click Save changes at the bottom of the page (See Figure 63).
Sending Messages in Moodle
Moodle allows you to send messages to students in your class list, allowing you to answer student questions,
provide feedback, or to notify students about upcoming assignments.
1. From the KSU Moodle Home page, click on the course name that contains the students you want to
message (See Figure 3).
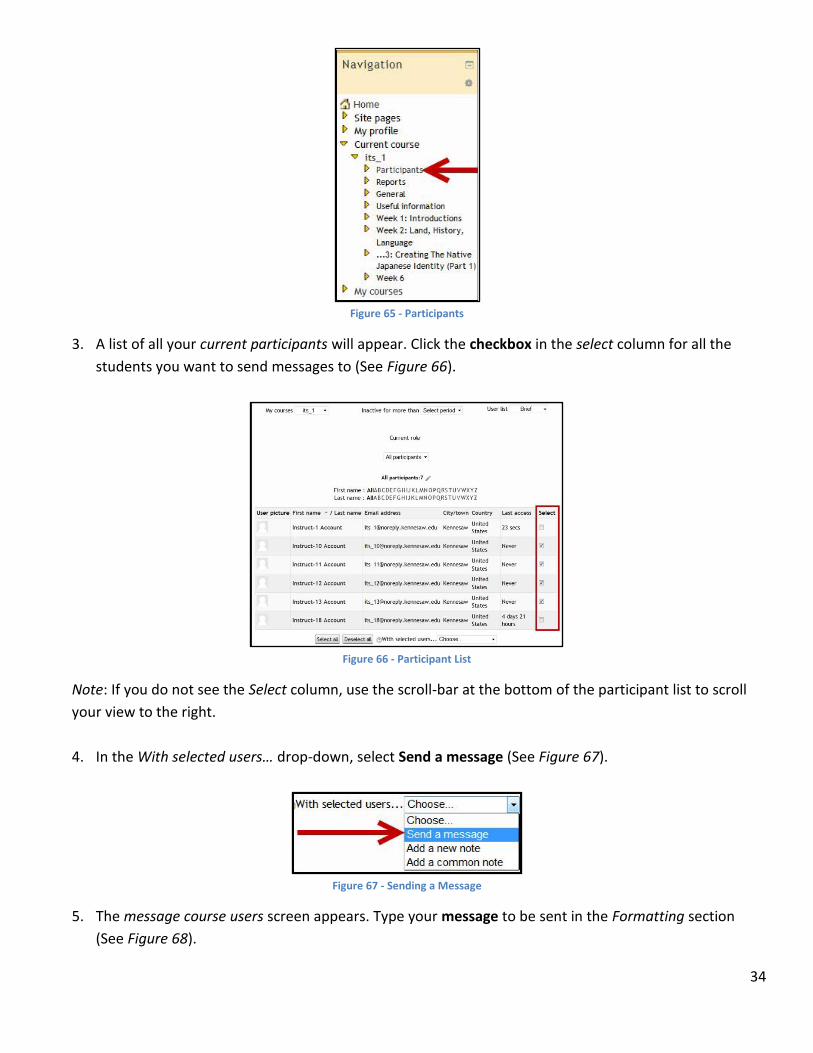
2. In the Navigation pane, under your course name, click on Participants (See Figure 65).
34
Figure 65 - Participants
3. A list of all your current participants will appear. Click the checkbox in the select column for all the
students you want to send messages to (See Figure 66).
Figure 66 - Participant List
Note: If you do not see the Select column, use the scroll-bar at the bottom of the participant list to scroll
your view to the right.
4. In the With selected users… drop-down, select Send a message (See Figure 67).
Figure 67 - Sending a Message
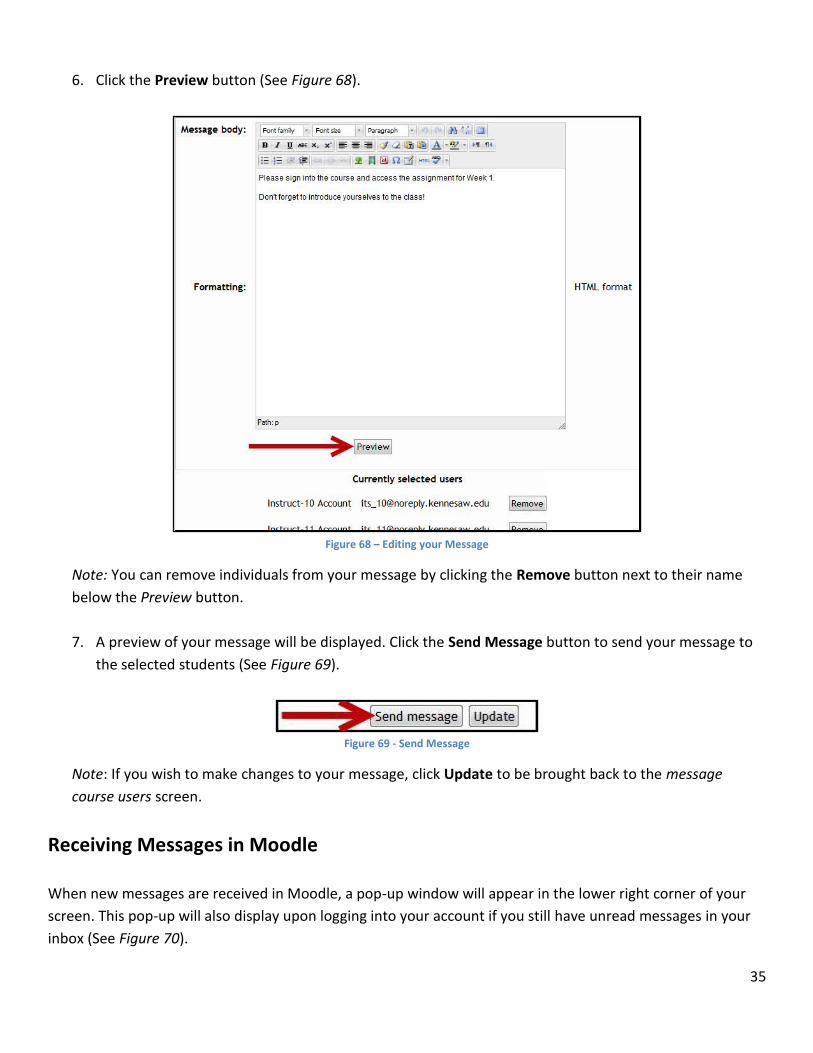
5. The message course users screen appears. Type your message to be sent in the Formatting section
(See Figure 68).
35
6. Click the Preview button (See Figure 68).
Figure 68 – Editing your Message
Note: You can remove individuals from your message by clicking the Remove button next to their name
below the Preview button.
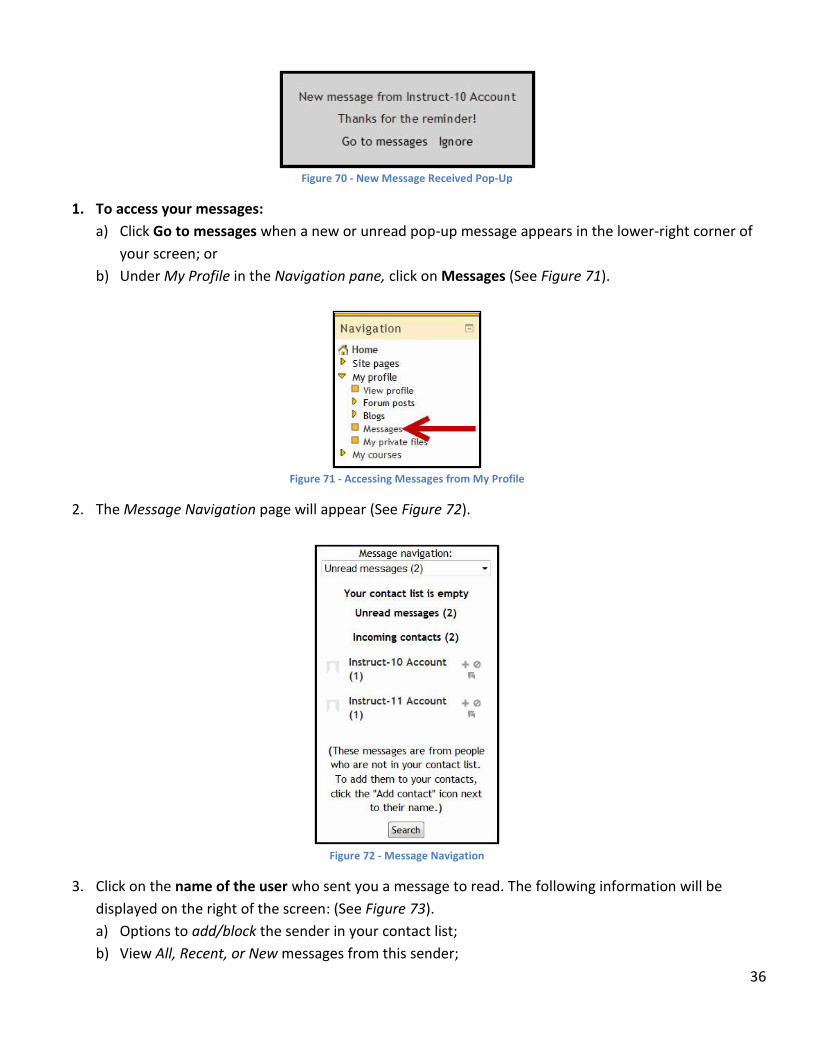
7. A preview of your message will be displayed. Click the Send Message button to send your message to
the selected students (See Figure 69).
Figure 69 - Send Message
Note: If you wish to make changes to your message, click Update to be brought back to the message
course users screen.
Receiving Messages in Moodle
When new messages are received in Moodle, a pop-up window will appear in the lower right corner of your
screen. This pop-up will also display upon logging into your account if you still have unread messages in your
inbox (See Figure 70).
36
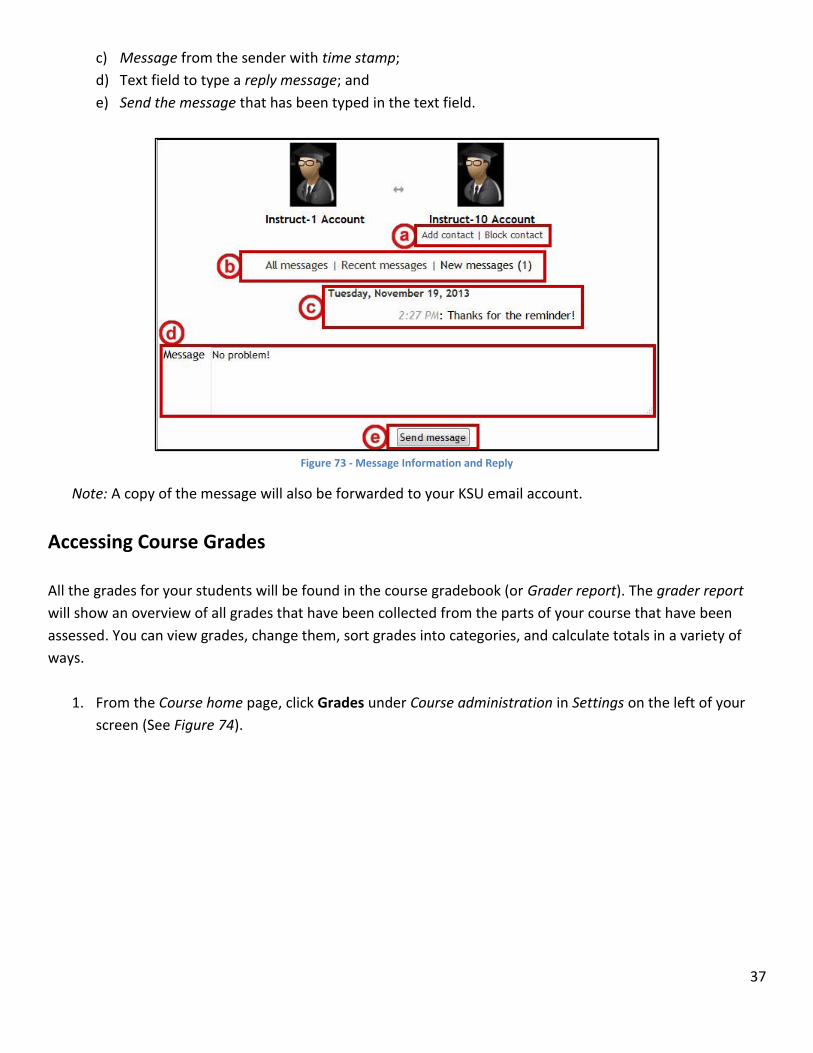
Figure 70 - New Message Received Pop-Up
1. To access your messages:
a) Click Go to messages when a new or unread pop-up message appears in the lower-right corner of
your screen; or
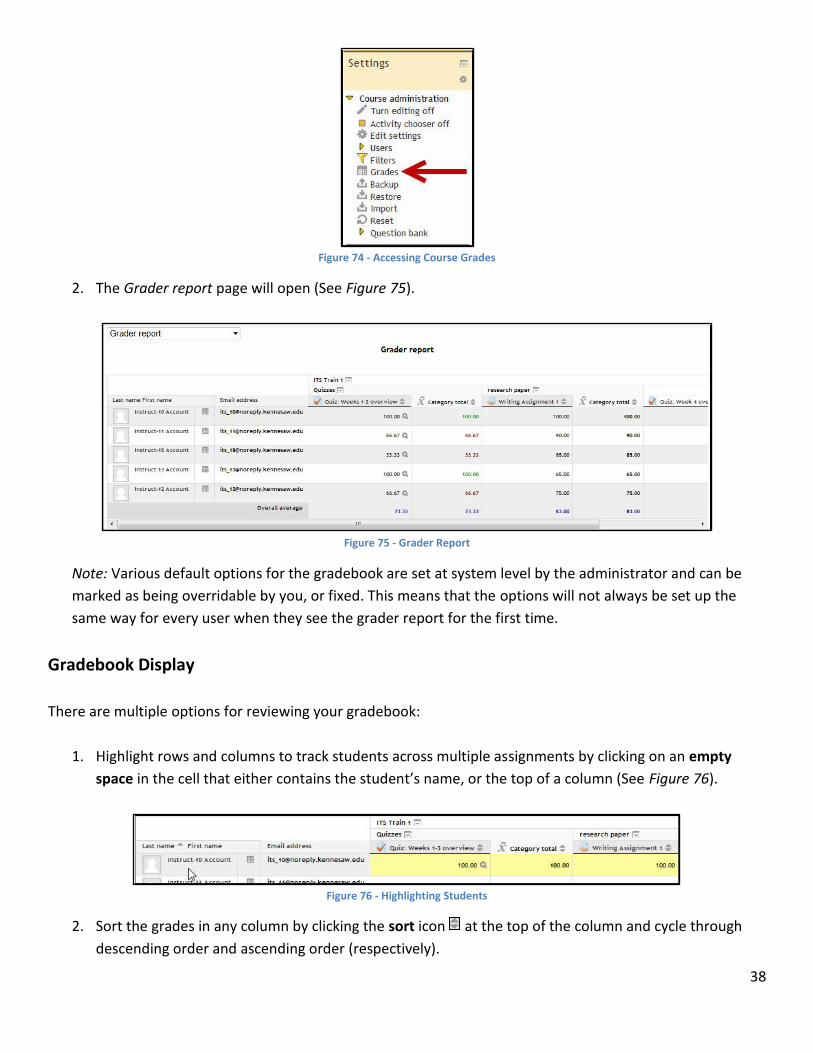
b) Under My Profile in the Navigation pane, click on Messages (See Figure 71).
Figure 71 - Accessing Messages from My Profile
2. The Message Navigation page will appear (See Figure 72).
Figure 72 - Message Navigation
3. Click on the name of the user who sent you a message to read. The following information will be
displayed on the right of the screen: (See Figure 73).
a) Options to add/block the sender in your contact list;
b) View All, Recent, or New messages from this sender;
37
c) Message from the sender with time stamp;
d) Text field to type a reply message; and
e) Send the message that has been typed in the text field.
Figure 73 - Message Information and Reply
Note: A copy of the message will also be forwarded to your KSU email account.
Accessing Course Grades
All the grades for your students will be found in the course gradebook (or Grader report). The grader report
will show an overview of all grades that have been collected from the parts of your course that have been
assessed. You can view grades, change them, sort grades into categories, and calculate totals in a variety of
ways.
1. From the Course home page, click Grades under Course administration in Settings on the left of your
screen (See Figure 74).
38
Figure 74 - Accessing Course Grades
2. The Grader report page will open (See Figure 75).
Figure 75 - Grader Report
Note: Various default options for the gradebook are set at system level by the administrator and can be
marked as being overridable by you, or fixed. This means that the options will not always be set up the
same way for every user when they see the grader report for the first time.
Gradebook Display
There are multiple options for reviewing your gradebook:
1. Highlight rows and columns to track students across multiple assignments by clicking on an empty
space in the cell that either contains the student’s name, or the top of a column (See Figure 76).
Figure 76 - Highlighting Students
2. Sort the grades in any column by clicking the sort icon at the top of the column and cycle through
descending order and ascending order (respectively).
39
3. Highlight scores in green for passing, or red for failing, by adjusting the grade students need to pass.
a) Click the Turn editing on button in the upper-left corner of your screen.
b) Click the Settings icon in the column for the assignment/quiz.
c) Under category total, click the Show advanced button to display additional options.
d) In the grade to pass field, type the minimum grade students need to pass.
e) Click Save changes at the bottom of the screen. You will be returned to the grader report page.
f) Click the Turn editing off button in the upper-left corner of your screen. Scores will now be
highlighted in green/red.
Gradebook Editing
There are also multiple options available for editing your gradebook:
1. Manually enter/change a grade for a student:
a) To alter student grades manually, click the Turn editing on button.
b) In the field for the student’s grade for an assignment/quiz, type in the new grade.
Note: If you manually enter/change a grade for a student, the cell will remain highlighted to indicate the
grade was changed manually. The student will also receive a notice on the assignment/quiz information
page that the grade has been altered.
2. Cycle through displaying the aggregate scores only, grades only, or both, by clicking the change view
icon .
Adding Students to your Class Roster
By adding students to your class roster, you can grant them access to your course materials, send messages
through Moodle, and add them to your gradebook.
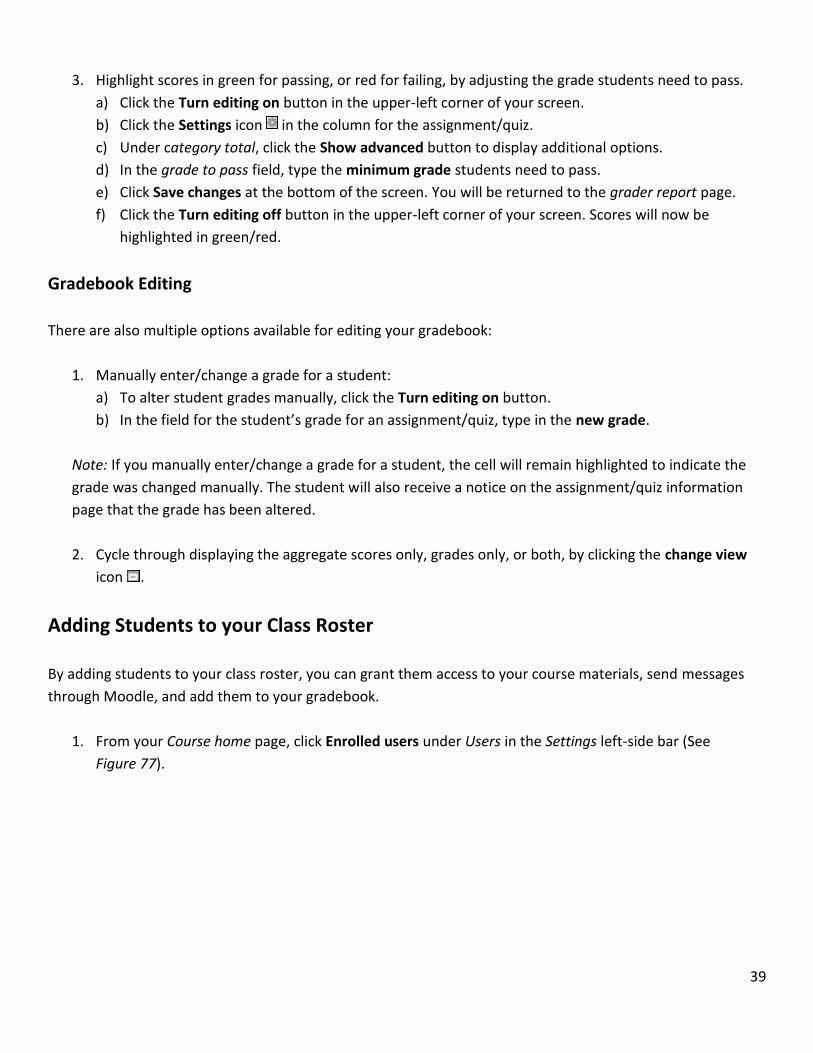
1. From your Course home page, click Enrolled users under Users in the Settings left-side bar (See
Figure 77).
40
Figure 77 - Enrolling Users
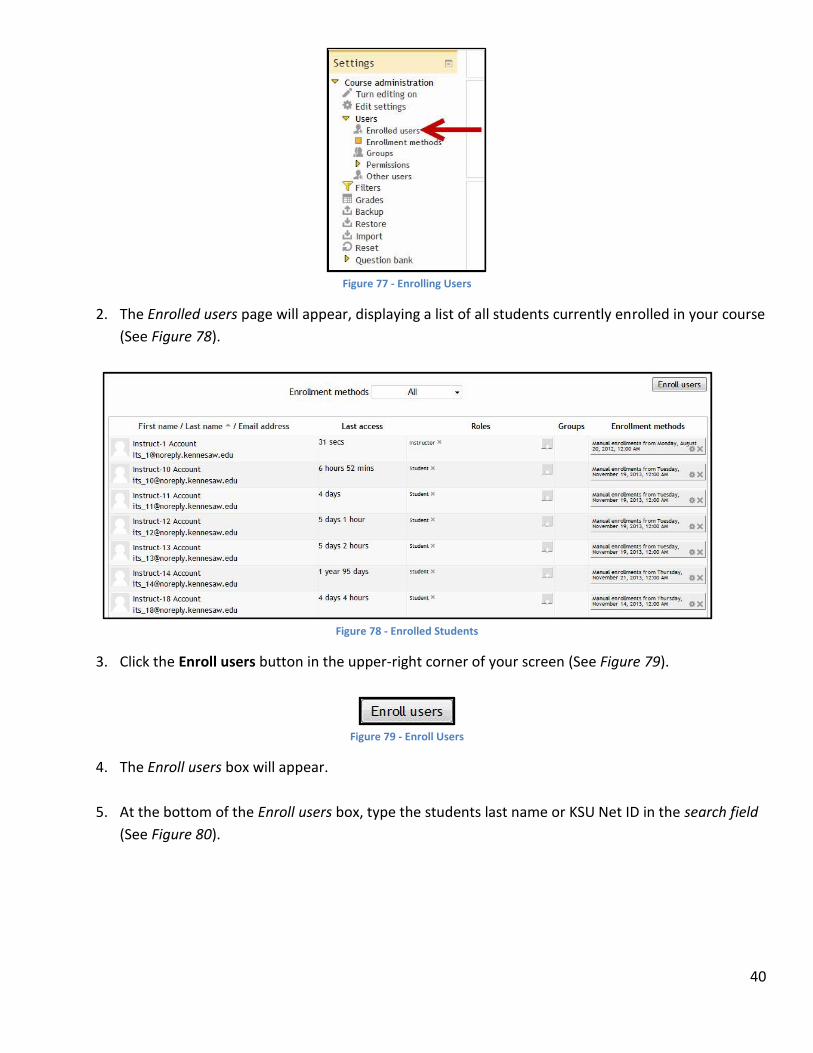
2. The Enrolled users page will appear, displaying a list of all students currently enrolled in your course
(See Figure 78).
Figure 78 - Enrolled Students
3. Click the Enroll users button in the upper-right corner of your screen (See Figure 79).
Figure 79 - Enroll Users
4. The Enroll users box will appear.
5. At the bottom of the Enroll users box, type the students last name or KSU Net ID in the search field
(See Figure 80).
41
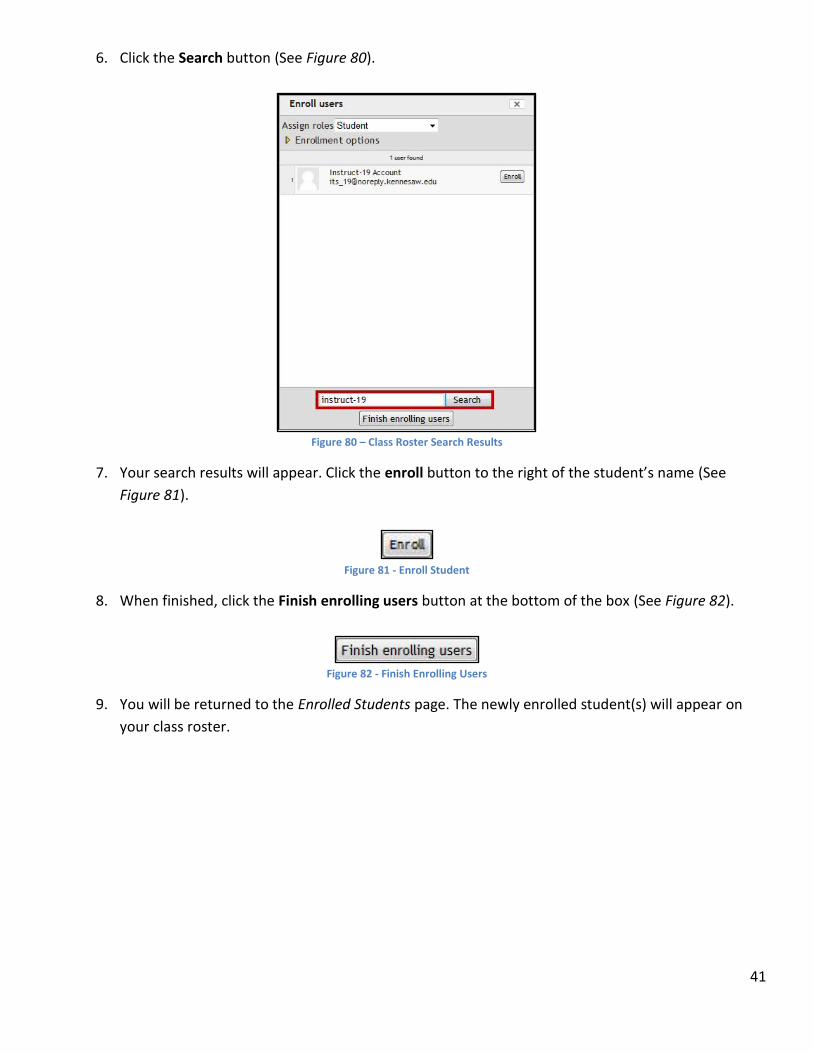
6. Click the Search button (See Figure 80).
Figure 80 – Class Roster Search Results
7. Your search results will appear. Click the enroll button to the right of the student’s name (See
Figure 81).
Figure 81 - Enroll Student
8. When finished, click the Finish enrolling users button at the bottom of the box (See Figure 82).
Figure 82 - Finish Enrolling Users
9. You will be returned to the Enrolled Students page. The newly enrolled student(s) will appear on
your class roster.