motec m400/m600/m800/m880 user’s manual sheets/ecu/m400_m600_m800_m880... · motec overview 3...
TRANSCRIPT

MoTeC M400/M600/M800/M880 User’s Manual
Contents Introduction ........................................................................ 1
Additional Documentation ...................................................................................1 Overview ............................................................................. 3
ECU Models........................................................................................................3 Options ...............................................................................................................4 ECU Inputs & Outputs.........................................................................................6 Calibration & Setup ...........................................................................................10 ECU Functions..................................................................................................11
MoTeC Software ................................................................ 15 PC Requirements..............................................................................................15 Connecting a PC to the ECU ............................................................................15 Installing the Software.......................................................................................16 Starting the Software ........................................................................................16 ECU Manager Software ....................................................................................16 Data Logging.....................................................................................................16 Telemetry..........................................................................................................17
Installation ........................................................................ 19 Throttle Position or MAP Load Sensing ............................................................19 Sensors.............................................................................................................20 Wiring................................................................................................................23 Fuel System......................................................................................................26 Ignition System .................................................................................................30 Auxiliary Valves.................................................................................................32 ECU Mounting...................................................................................................32 ECU Cleaning ...................................................................................................32
Initial Setup....................................................................... 33 Main Setup........................................................................................................33 Sensor Setup ....................................................................................................34 Input / Output Functions....................................................................................35 Other Functions ................................................................................................35
Initial Calibration .............................................................. 37 Fuel Tables .......................................................................................................37 Ignition Tables ..................................................................................................38
Initial Starting Procedure ................................................ 41 Pre Start Checks...............................................................................................41 Starting .............................................................................................................43 After Start Checks.............................................................................................44

Calibration ........................................................................ 47 Warning Alarms ................................................................................................47 Ensure that the engine is “On Site” ...................................................................47 Site Tables........................................................................................................48 Dyno .................................................................................................................48 Fuel - Main Table..............................................................................................48 Ignition - Main Table .........................................................................................49 Fuel - Injection Timing.......................................................................................50 Fuel - Cold Start................................................................................................51 Other Calibration Tables ...................................................................................51 Data Logging & Road Testing...........................................................................51
ECU Manager Software ................................................... 53 Introduction .......................................................................................................53 For EMP Users .................................................................................................54 Basics ...............................................................................................................55 Calibration Files ................................................................................................57 Versions & Upgrading .......................................................................................57 Screen Layouts .................................................................................................59 Making Adjustments..........................................................................................62 View Screen......................................................................................................72 Testing the ECU Outputs ..................................................................................73 ECU Password..................................................................................................73 File Encryption ..................................................................................................73 Enabling ECU Options ......................................................................................74 Keyboard Reference .........................................................................................75
Appendices....................................................................... 77 Appendix A: General Specifications..................................................................77 Appendix B: Sensor Supplies............................................................................78 Appendix C: Input Characteristics.....................................................................79 Appendix D: Auxiliary Output Characteristics....................................................81 Appendix E: Ignition Output Characteristics......................................................82 Appendix F: Injector Output Characteristics......................................................83 Appendix G: M880 Connector...........................................................................84 Appendix H: Wire Specifications .......................................................................85 Appendix J: CAN Wiring - Multiple Device ........................................................86 Appendix K: CAN Bus Wiring - Single Device...................................................87 Appendix L: Pin list by Function ........................................................................88
For racing and off highway use only Not legal on emissions controlled vehicles unless appropriately certified
Copyright – Motec Pty Ltd 2001-2003 The information in this document is subject to change without notice.
While every effort is taken to ensure correctness, no responsibility will be taken for the consequences of any inaccuracies or omissions in this manual.
7 November, 2003

MoTeC Introduction 1
Introduction
Thank you for purchasing a MoTeC Engine Management System.
This manual will help you understand the installation and calibration requirements of your MoTeC Engine Management System.
Additional Documentation
Additional documentation is available in the form of Drawings and Tech Notes. Please consult your local MoTeC distributor for details.
Drawing Categories Accessories ECUs Looms Ignition Modules Combined Module & Trigger Systems Trigger Systems Valves Sensors Miscellaneous
Tech Notes Traction Control Boost Control Idle Speed Control Closed Loop Lambda Control Wideband Lambda Sensor Others


MoTeC Overview 3
Overview
The MoTeC M400, M600, M800 & M880 ECU’s are powerful and compact programmable Engine Management Systems or Engine Control Units (ECUs).
ECU Models The different ECU’s are characterised by the following features:
M400 • 4 injector outputs • 4 ignition outputs • Waterproof plastic connector with gold plated contacts • 512kByte logging memory (option) • 1 wideband lambda input (option) • Other optional functions include: Traction Control , Boost Enhancement
(Anti-lag), Hi/Lo Injection, Gear Change Ignition Cut, CAM Control, Drive by Wire.
M600 • 6 injector outputs • 6 ignition outputs • Waterproof plastic connector with gold plated contacts • 512kByte logging memory (option) • 2 wideband lambda inputs (option) • Other optional functions include: Traction Control , Boost Enhancement
(Anti-lag), Hi/Lo Injection, Gear Change Ignition Cut, CAM Control, Drive by Wire.
M800 • 8 injector outputs standard • 12 injector outputs (option, occupies 4 ignition outputs) • 6 ignition outputs • Waterproof plastic connector with gold plated contacts • 1MByte logging memory (option) • 2 wideband lambda inputs (option)
4 Overview
• Other optional functions include: Traction Control , Boost Enhancement (Anti-lag), Hi/Lo Injection, Gear Change Ignition Cut, CAM Control, Drive by Wire, Pro Analysis, Telemetry, Multi Pulse Injection, Servo Motor Control.
M880 • 8 injector outputs standard • 12 injector outputs (option, occupies 4 ignition outputs) • 6 ignition outputs • Military style Autosport connector • 4MByte logging memory (option) • 2 wideband lambda inputs (option) • Other optional functions include: Traction Control , Boost Enhancement
(Anti-lag), Hi/Lo Injection, Gear Change Ignition Cut, CAM Control, Drive by Wire, Pro Analysis, Telemetry, Multi Pulse Injection, Servo Motor Control.
Options
A number of options are available which allow the ECU to be configured for a particular need and can also be updated later if necessary.
The options may be enabled at any time by entering an enable password.
Data Logging Option Allows logging of the ECU sensors and operating parameters to the internal data logging memory. The logged data may then be analysed in graphical format using the free MoTeC Interpreter Software.
Pro Analysis Enables more advanced functions in the data logging analysis software such as multiple graph overlays, XY plots, maths functions, advanced track map analysis. (Available on M800 & M880 only).
Wideband Lambda Option (Single or Dual) Allows Wideband Lambda (Air Fuel Ratio) measurement, which may be used for data logging or closed loop control of the Air Fuel Ratio. The ECU is compatible with Bosch LSU or NTK wideband lambda sensors, it is not

MoTeC Overview 5
compatible with the Bosch 4 wire LSM sensor. (Dual Lambda not available on M400)
Telemetry Enables the ECU to send telemetry data via a radio to the pits. The data can be viewed in graphical format using the MoTeC Telemetry Monitor program. (Available on M800 & M880 only).
Other Other options include CAM Control, Drive by Wire, Traction Control, Overrun Boost Enhancement (Anti-lag), Gear Change Ignition Cut, Hi/Lo Injection, Servo Motor Control (M800 & M880 only) & Multi-pulse Injection (M800 & M880 only).
6 Overview
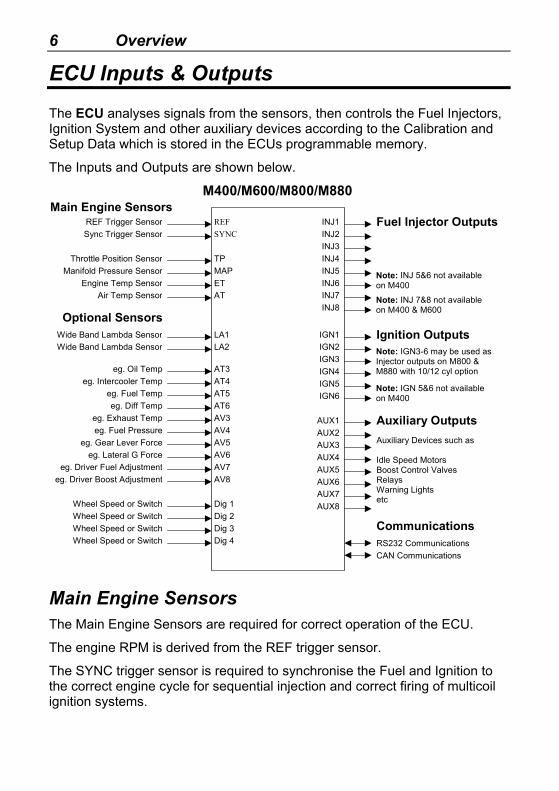
ECU Inputs & Outputs
The ECU analyses signals from the sensors, then controls the Fuel Injectors, Ignition System and other auxiliary devices according to the Calibration and Setup Data which is stored in the ECUs programmable memory.
The Inputs and Outputs are shown below.
REF Trigger Sensor REF INJ1Sync Trigger Sensor SYNC INJ2
INJ3Throttle Position Sensor TP INJ4
MAP INJ5Engine Temp Sensor ET INJ6
Air Temp Sensor AT INJ7INJ8
Wide Band Lambda Sensor LA1 Wide Band Lambda Sensor LA2
IGN1IGN2
eg. Oil Temp AT3 IGN3
eg. Fuel Pressure
AT4 IGN4
eg. Fuel Temp AT5 IGN5
eg. Gear Lever Force
AT6 IGN6
eg. Diff TempAV3
eg. Intercooler Temp
AV4 AUX1eg. Exhaust Temp
AV5 AUX2
eg. Lateral G Force AV6 AUX3
AV7 AUX4
AV8 AUX5eg. Driver Fuel Adjustment
AUX6
Manifold Pressure Sensor
eg. Driver Boost Adjustment
AUX7AUX8Wheel Speed or Switch Dig 1
Wheel Speed or Switch Dig 2 Wheel Speed or Switch Dig 3 Wheel Speed or Switch Dig 4
Note: IGN3-6 may be used as Injector outputs on M800 & M880 with 10/12 cyl option
A ili D i
Fuel Injector Outputs
Ignition Outputs
Main Engine Sensors
Optional Sensors
M400/M600/M800/M880
Auxiliary OutputsAuxiliary Devices such as Idle Speed Motors Boost Control Valves Relays Warning Lights etc
RS232 Communications CAN Communications
Communications
Note: INJ 7&8 not available on M400 & M600
Note: INJ 5&6 not available on M400
Note: IGN 5&6 not available on M400
Main Engine Sensors The Main Engine Sensors are required for correct operation of the ECU.
The engine RPM is derived from the REF trigger sensor.
The SYNC trigger sensor is required to synchronise the Fuel and Ignition to the correct engine cycle for sequential injection and correct firing of multicoil ignition systems.

MoTeC Overview 7
The Throttle Position, Manifold Pressure, Air Temp and Engine Temp are used as inputs to the various calibration tables.
Optional Sensors The Optional Sensors are not required for basic operation of the ECU.
The Lambda Inputs may be used for wideband air fuel ratio measurement or wideband or narrow band closed loop lambda control.
The Digital Inputs may be used for wheel speed measurement or to activate functions such as Dual RPM Limit, or Nitrous.
The other inputs may be used for data logging (eg. Exhaust Gas Temp, Gear Box Temp, Driver Boost adjustment etc) or for special calibration features.
Fuel Injector Outputs
M400 Up to four injectors may be driven fully sequentially including very low ohm types (0.5 ohms).
M600 Up to six injectors may be driven fully sequentially including very low ohm types (0.5 ohms).
M800 & M880 Up to twelve injectors may be driven fully sequentially by the ECU if the injectors are high resistance types (12 ohms or greater), otherwise up to eight injectors may be driven fully sequentially including very low ohm types (0.5 ohms).
Four of the Ignition Outputs are used for full sequential 12 cylinder operation.
Twelve cylinder engines may also be driven as six groups of 2 injectors which leaves all six Ignition outputs available for wasted spark ignition.
Outputs not used for Fuel Injection may be used as Auxiliary Outputs.
Ignition Outputs The Ignition Outputs may be used to drive many different types of ignition systems, which are detailed in the various ignition system drawings.

8 Overview
M400 Up to four ignition outputs are available for multi coil applications.
M600 Up to six ignition outputs are available for multi coil applications.
M800 & M800 Up to 6 ignition outputs are available for multi coil applications.
Outputs not used for ignition may be used as Auxiliary Outputs.
Up to 8 coils may be driven from one Ignition Output using a MoTeC CDI8 or MoTeC Ignition Expander .
Up to 12 coils may be driven from two Ignition Outputs using two MoTeC CDI8’s or two MoTeC Ignition Expanders.
Auxiliary Outputs The ECUs have eight Auxiliary Outputs that may be used for :
Turbo Waste Gate Control, Idle Speed Control, Gear Change Light, Driver Warning Alarm, Tacho Output, Fuel Pump Control, Thermatic Fan Control, Fuel Used Signal, Air Conditioner Fan Control, Air Conditioner Clutch Control, RPM / Load Activated Output, or other functions.
CAN Communications The CAN Communications system is a high speed network communications system that allows multiple devices to be connected and communicate with each other.
The CAN connection is used for all communications with the PC via the ECU Manager software which includes; calibration, diagnostics checking, retrieving the logged data, firmware upgrading and enabling options.
CAN may be used to communicate with the MoTeC ADL Dash Logger.
CAN will also be used to communicate with future MoTeC devices.
RS232 Serial Communications Optionally used to communicate with the MoTeC ADL Dash Logger. In this case the ADL is effectively picking up Telemetry data from the ECU. (Note that CAN communications may also be used to connect to the ADL)

MoTeC Overview 9
Used for Telemetry Output (M800 & M880 only).
10 Overview
Calibration & Setup
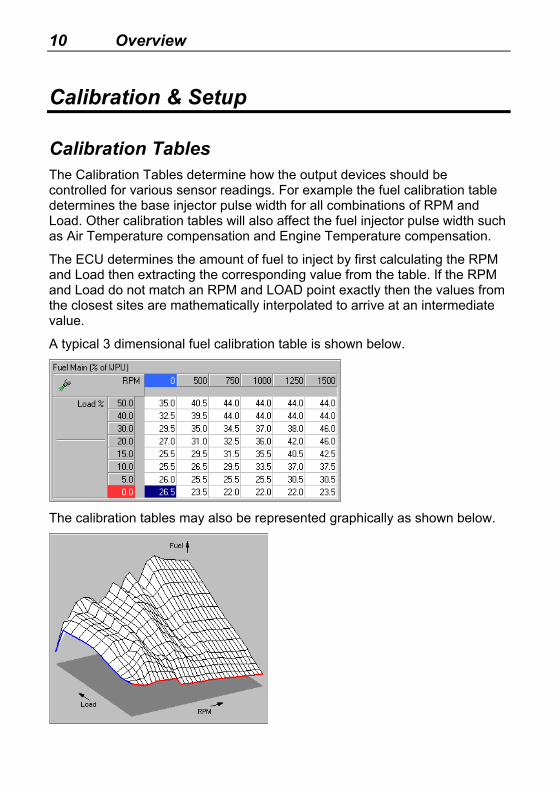
Calibration Tables The Calibration Tables determine how the output devices should be controlled for various sensor readings. For example the fuel calibration table determines the base injector pulse width for all combinations of RPM and Load. Other calibration tables will also affect the fuel injector pulse width such as Air Temperature compensation and Engine Temperature compensation.
The ECU determines the amount of fuel to inject by first calculating the RPM and Load then extracting the corresponding value from the table. If the RPM and Load do not match an RPM and LOAD point exactly then the values from the closest sites are mathematically interpolated to arrive at an intermediate value.
A typical 3 dimensional fuel calibration table is shown below.
The calibration tables may also be represented graphically as shown below.

MoTeC Overview 11
Setup Parameters The Setup Parameters allow the ECU to be configured for almost any engine. The Setup Parameters include Number of Cylinders, Ignition Type, Sensor Types, Injector Current, Auxiliary Output Functions etc.
The Setup Parameters must be correct before attempting to start the engine.
ECU Functions
The ECU’s can perform a large number of functions in addition to the normal Fuel and Ignition control capabilities including Hi /Lo injection, Individual Cylinder tables for Fuel and Ignition, Rotary ignition split and various sensor compensations
The functions are setup using ECU Manager either in the Functions menu, the Digital Input Functions menu or the Auxiliary Output Functions menu.
Help on each function is available from within ECU Manager by pressing the F1 key when the appropriate screen is shown.
Tech Notes are available from MoTeC on the more complicated functions such as Traction Control.
Note that some functions may not be available depending on the ECU Model and options.
The functions are as follows:
Functions The following functions are setup in the Functions menu
• Boost Control ** • Warning Alarms ** • Gear Detection * • Overrun Fuel Cut • Ground Sped Limiting * • Gear Change Ignition Cut * • Boost Enhancement (Antilag) * • Lambda Control • Traction Control *
* must also be setup in the Digital Input Functions
** must also be setup in the Auxiliary Output Functions
12 Overview
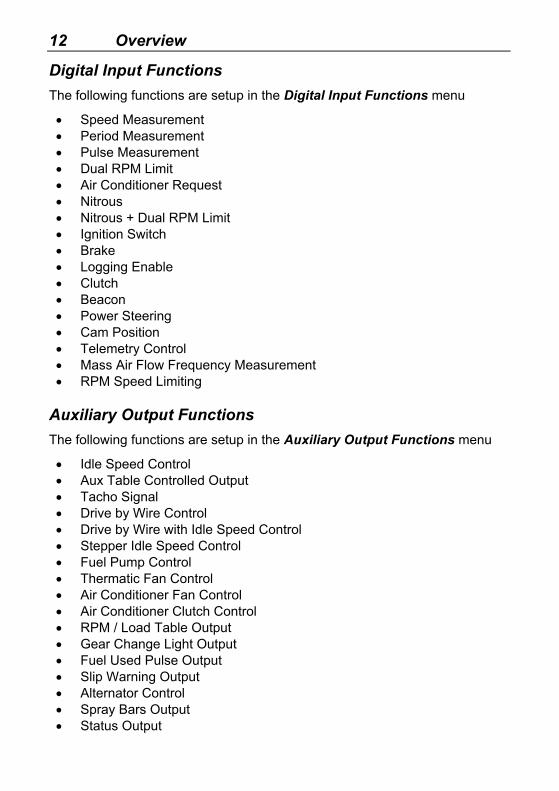
Digital Input Functions The following functions are setup in the Digital Input Functions menu
• Speed Measurement • Period Measurement • Pulse Measurement • Dual RPM Limit • Air Conditioner Request • Nitrous • Nitrous + Dual RPM Limit • Ignition Switch • Brake • Logging Enable • Clutch • Beacon • Power Steering • Cam Position • Telemetry Control • Mass Air Flow Frequency Measurement • RPM Speed Limiting
Auxiliary Output Functions The following functions are setup in the Auxiliary Output Functions menu
• Idle Speed Control • Aux Table Controlled Output • Tacho Signal • Drive by Wire Control • Drive by Wire with Idle Speed Control • Stepper Idle Speed Control • Fuel Pump Control • Thermatic Fan Control • Air Conditioner Fan Control • Air Conditioner Clutch Control • RPM / Load Table Output • Gear Change Light Output • Fuel Used Pulse Output • Slip Warning Output • Alternator Control • Spray Bars Output • Status Output

MoTeC Overview 13
• DC Servo Motor Control • Cam Control • Power Hold Output • Servo Stepper Motor Control • Fuel Pressure Control


MoTeC Software 15
MoTeC Software
The following software is available. Note that the same software is used for all ECU models.
ECU Manager: Used for calibration, setup, diagnostics, output testing, upgrading, unloading the logged data and enabling ECU options.
Interpreter: Used to analyse the logged data.
Telemetry Monitor: Used to show real time telemetry data.
PC Requirements
IBM PC compatible.
200 MHz Pentium or faster.
The PC must have a 25 pin printer port (parallel port) for connection of the MoTeC CAN Cable.
Operating System: Windows 95, 98, ME, NT4, 2000, XP.
Connecting a PC to the ECU
The PC must be connected to the ECU by a MoTeC CAN Cable. Note that the ECU must be wired with the mating connector.
MoTeC CAN CableConnected to the Printer Port

16 Software
Installing the Software
The MoTeC Software must be installed on to the PC hard disk before it can be used.
The main software required is the ECU Manager software, if Data Analysis is required then the Interpreter software should also be installed, if telemetry is required then the Telemetry Monitor software should be installed.
The software can be downloaded from the MoTeC web site at www.motec.com.au, or is available on CD.
MoTeC is continually updating the software and newer versions may be downloaded from the web site at no charge.
To install the software after downloading from the web double click on the downloaded file and follow the instructions.
Note that a separate folder (directory) is automatically created for each version of the software. Old versions are kept so that they may be used if necessary.
Do not change the MoTeC directory structure or move the software to a different directory, otherwise the software will not operate correctly.
Starting the Software
To start the MoTeC Software double click the appropriate icon on the desktop or select the appropriate program from the Start menu. For example: Start / Programs / MoTeC / M400 M600 M800 / ECU Manager 2.1
ECU Manager Software
The ECU Manager software is covered in more detail later in this manual.
Data Logging
Data Logging allows the ECU operational data to be recorded in a memory chip inside the ECU, the data may then be extracted for analysis on a PC. Data logging is extremely useful for checking mixture readings, sensor readings, diagnostics errors and other operating information.

MoTeC Software 17
The items to be logged and the logging rates must be setup using the MoTeC ECU Manager software. This is done in the Data Logging Setup screens.
The ECU will remember the logged data even if the ECU power is turned off.
If the logging memory becomes full the oldest data is overwritten so that the most recent data is always available.
The ECU must have the Logging option to perform data logging.
Pro Analysis If the Pro Analysis option is enabled then advanced analysis options such as Track maps, multiple graph overlays, XY plots, maths functions, advanced track map analysis. (Available on M800 & M880 only).
Unloading the Logged Data The logged data can be extracted by connecting the MoTeC CAN Cable to the ECU and selecting Utilities | Get Logged Data from the ECU Manager menu.
Data Logging Analysis The MoTeC Interpreter software may be used to analyse the logged data.
The Interpreter software is supplied separately to the ECU Manager software.
The Interpreter software makes it easy to analyse mixture readings and other sensor readings by presenting the data in various graphical formats.
Refer to the Interpreter help screen for more detail.
Telemetry
The MoTeC Telemetry Monitor software may be used to view live information from the ECU via a radio link.
The Telemetry Monitor software is supplied separately to the ECU Manager software.
The Telemetry Monitor software shows the ECU data in various graphical forms including dial gauges, bar graphs and chart recorders.


MoTeC Installation 19
Installation
Throttle Position or MAP Load Sensing
The load point for the fuel and ignition calibration tables may be based on any defined load measuring sensor.
The most commonly used are the Throttle Position sensor or the MAP (Manifold Pressure) sensor.
Mass Air flow (MAF) sensors are also used particularly where regulations state that the sensors cannot be changed from the factory fitted sensors.
Turbo Charged Engines Normally use Manifold Pressure load sensing (connect the MAP sensor to the inlet manifold).
A Throttle Position sensor is optional and will be used for acceleration enrichment if fitted.
Normally Aspirated Engines
3D Fuel and Ignition Tables Normally use Throttle Position load sensing.
The MAP sensor may be used to compensate for barometric pressure changes by venting it to atmospheric pressure.
If Idle Speed Control is used then the MAP sensor should be connected to the plenum or Manifold Pressure load sensing should be used. This is required so that the fuel is varied as the idle speed control valve opens and closes.

20 Installation
Sensors
Throttle Position Sensor The Throttle Position sensor must be a potentiometer type, older switch types are not suitable. The sensor will produce a voltage proportional to the angle of the throttle plate.
Throttle sensors generally have a dead band at either end and must be pre-loaded to avoid the dead band.
The Setup Parameters TPHI and TPLO must be set to indicate the fully closed and fully open positions. These parameters must be reset any time the sensor is moved or replaced. It is very important to set these parameters with the butterfly in exactly the same place each time.
The resistance element inside the sensor may wear due to vibration in high performance engines which can cause erratic readings. It is best to replace the throttle position sensor periodically.
Avoid high pressure washing as this may penetrate the seals and damage the sensor.
For wiring details refer to the appropriate MoTeC drawing.
MAP Sensor The MAP (Manifold Absolute Pressure) sensor measures Absolute Pressure (ie. pressure relative to a vacuum).
0 kPa Absolute = Complete Vacuum
100 kPa = 1 Bar = 14.5 PSI
Atmospheric Pressure at sea level is approximately 100 to 102 kPa, depending on the day.
MAP sensors normally produce a voltage between 0 and 5V, depending on the pressure.
The pressure sensor may be used to measure the inlet manifold pressure or to measure the barometric pressure depending on the Load Sensing arrangement detailed earlier.
The ECU Sensor Setup parameters must be set to indicate the type and pressure range of the sensor.
MoTeC Installation 21
Avoid severe vibration of the sensor as this can cause fluctuations in the reading. Do not mount rigidly to the engine. Normally the pressure sensor is mounted to the vehicle body.
If used for Manifold Pressure Sensing For normally aspirated engines use a 100 kPa sensor.
For turbo charged engines a 300 kPa absolute sensor will measure up to 200 kPa (29 psi) of boost (above Atmospheric). If higher boost will be achieved a sensor with a higher pressure range will be needed.
The sensor should be connected to the inlet manifold plenum via a short hose (less than 1m). The sensor should be mounted above the level of the plenum with the port facing down to avoid moisture accumulating on the sensor element. The hose should run downwards all the way to the plenum.
The plenum take off point should be at a position that best represents the average manifold pressure and has minimal pressure pulsations. A small restrictor may be needed at the manifold end of the hose to help reduce pressure pulsations. The take off point should not be teed in with other items such as idle speed control valves as they can affect the pressure reading.
If used for Barometric Pressure Sensing Use a 105 kPa sensor.
Vent the sensor to the atmosphere with the port facing down.
Avoid mounting at a point where air buffeting occurs, any pressure fluctuations will directly affect the mixture.
It may be desirable to sense the pressure at the air intake as the pressure may vary due to aerodynamic effects.
Air Temp Sensor The Air Temperature sensor is mainly used to correct for air density change due to air temperature variation.
The sensor contains a temperature dependant resistor and is designed for high speed response in an air flow.
The Air Temp sensor must be placed to measure the air temperature before the butterfly (and after the inter cooler on turbo charged engines).
Avoid placing the sensor too close to the stand-off vapour in a multi-runner manifold as this will cool the sensor and give a false reading.
22 Installation
The ECU Sensor Setup parameters must be set to indicate the particular type of sensor.
Engine Temp Sensor The Engine Temperature sensor is mainly used for cold start enrichment.
The sensor contains a temperature dependant resistor and is designed for water immersion.
The ECU Sensor Setup parameters must be set to indicate the particular type of sensor.
Trigger Sensors (REF & SYNC) The trigger sensors supply the necessary timing information to the ECU so that it knows when to fire the fuel injectors and ignition system. Normally two sensors are used, REF and SYNC.
Many different types of trigger sensors and chopper patterns may be used.
The wiring and ECU setup information for the trigger sensors are specific to the particular system. Refer to the appropriate MoTeC drawing.
Home made sensor systems often cause problems. Do not use Chrome molly for chopper disks as it is a non magnetic material. Runout of the disk, imperfections and bolt heads are also potential sources of problems. Where possible it is best to use the manufacturers trigger system.
REF Sensor Supplies the crank position information.
Some sensors supply one pulse per Top Dead Centre (4 pulses per engine revolution on a V8), others supply as many as 360 pulses per engine rev.
The Engine RPM is derived directly from this signal.
SYNC Sensor Used to indicate each engine cycle, which is required for sequential injection and multi coil operation.
Generally supplies one pulse per engine cycle (ie: once every 2 revs on a 4 stroke engine).
On some special trigger systems the ECU can be synchronised using the REF sensor only (eg. Ford Narrow Tooth)

MoTeC Installation 23
REF / SYNC Alignment Most modern distributors supply both REF and SYNC signals in which case the alignment is pre-set.
When using separate REF and SYNC sensors the alignment of the two sensors relative to one another is critical. Ensure that the sensors are aligned correctly for the type of trigger system being used. Refer to the appropriate drawing. Allow for any slop in the distributor drive system if the SYNC signal is derived from the distributor.
Exhaust Gas Sensor (Lambda Sensor) The ECU may optionally use a wideband exhaust gas sensor for data logging or closed loop control of the Air Fuel Ratio.
The ECU is compatible with the Bosch LSU wideband sensor and the NTK wideband sensor. These sensors are different to the sensors used on previous model ECUs.
Note that the sensor heater must be connected to these sensors at all times and must be controlled by the ECU by connecting it to one of the Auxiliary Outputs.
The sensor should preferably be placed within 0.5 m of the collector pipe on a normally aspirated engine or 0.5 m of the turbo on a turbo charged engine. If placed too close to the exhaust outlet the reading may be effected by the outside oxygen.
The sensor can be contaminated by exhaust manifold sealant - use an exhaust gas sensor friendly sealant.
The lifetime of the Sensor will be significantly reduced by leaded fuels.
Refer to the MoTeC Tech Notes and Drawings for more details.
Wiring
Wiring Drawings Refer to the Loom wiring diagram for the loom wiring details. Refer to the drawings at the back of this manual for more general wiring details.
The wiring details for the REF and SYNC Trigger Sensors and the Ignition Module are specific to the type of sensors and Ignition system. MoTeC can provide wiring diagrams for most Trigger Sensors and Ignition systems.
24 Installation
Wiring Reliability The wiring is critical for reliable operation of the ECU. The following points will help to ensure that the wiring is reliable.
Ground Wiring One of the most common wiring problems is poor ground wiring.
The ground wire must be grounded properly to the engine block. There should be no paint or anodising between the ground wire and the engine block. Temporary wiring is likely to cause problems, use a proper eyelet terminal that is securely crimped to the ground wire. Studs fixed in place by Loctite® can also cause a problem as the Loctite® becomes an insulator. These comments apply to both the ECU ground wire and the Ignition system ground wire.
The ground wire must be at least 12# (3.3 mm2) and must be kept as short as possible.
Power Wiring The power wire must be wired by the shortest path possible to the battery via a 30 Amp relay and a 20 Amp fuse. The relay and fuse must be in good condition and the wires must be crimped securely to the appropriate terminals. The relay should be activated by the Ignition Switch. The ECU power must NOT be fed directly from the Ignition switch because it probably wont handle the required current.
The power wire must be at least 12# (3.3 mm2) and must be kept as short as possible.
Spark Plug Leads The spark plug leads can cause interference in the ECU wiring. Keep the ECU wires away from the plug leads wherever possible (at least 100mm). If it is necessary to cross the plug leads, cross at right angles.
Terminal Crimping Use the correct crimping tool for each type of terminal. Do a pull test on a sample wire and terminal to verify that the crimp is sound. In theory the wire should break before the wire pulls out of the crimp.
Most crimp tools are only designed for a certain range of wire sizes so be sure to test the crimp with the particular wire size being used.
MoTeC Installation 25
Soldering the terminal is a last resort if the correct crimping tool is not available. Soldering will cause a stress point where the solder wicks up the wire which is likely to fracture unless all movement is avoided. Solder flux can also cause corrosion and may affect the contacts.
Terminal Damage The various connector terminals are easily damaged if probes are inserted into them. Do not insert probes of any kind into the terminals. If checking a circuit for continuity gently touch the side of the terminals only, or preferably attach a mating connector.
Wire Splicing Preferably use a crimp splice. If soldering a wire splice, wire movement near the joint must be avoided otherwise a fracture may occur at the stress point created by the solder. Use heatshrink sleeving to insulate and provide support to the wires.
Wire Strain Avoid pulling the wires tight at the connectors.
Wire Movement Avoid wire fatigue by tying the wires down close to the connectors.
Heat Keep the ECU wires away from the exhaust system.

26 Installation
Fuel System
An ideal race fuel system is shown below
Injectors
Fuel Rail
PressureRegulatorPressure
Pump Filter
SwirlPot
Lift Pump
Strainer / Water Separator
Tank Fuel
Strainer 100 micron 4 micron12 micron
Filter
Port
Lift Pump The Lift Pump is a low pressure pump designed to lift the fuel from the fuel tank to the swirl pot (header tank).
The Lift Pump must be capable of flowing enough fuel for full power operation.
Swirl Pot The swirl pot (header tank) maintains a reserve of fuel to avoid fuel starvation to the engine during cornering and acceleration. Fuel starvation can also cause damage to the pressure pump as it relies on the fuel for cooling, lubrication and speed limiting.
The swirl pot also forms a header tank for the pressure pump since the pressure pump is not capable of lifting the fuel from the tank if the tank is lower than the pump. Place the swirl pot at the same level, or higher than the pressure pump.
Pressure Pump The Pressure Pump is a high pressure pump that must be capable of delivering the required amount of fuel at the correct pressure at full power.

MoTeC Installation 27
It is very important that the pump is capable of maintaining the correct fuel pressure at full power otherwise the engine could be damaged due to a lean mixture.
A 600 hp engine requires a flow rate of approximately 250 lb/hr for petrol or gasoline.
Notes
The pressure pump must be lower than the outlet of the swirl pot.
Prime the pump with fuel before use.
The pumps flow capability is dependant on the required pressure, the flow capability of the pump will be less at higher pressures. A small pump will maintain correct pressure at light load but will not maintain correct pressure as the flow requirement increases.
On boosted engines the pressure required from the pump increases with boost pressure because the regulator maintains constant pressure above manifold pressure.
Avoid running the pump dry as this may destroy the pump.
Filters The filters are necessary to ensure that the fuel pump is not damaged and to ensure that the injectors do not become blocked.
The strainer before the pressure pump is essential to prevent the pump from seizing. A strainer is used because the pressure pump won’t suck through a paper filter.
Fuel Lines The fuel feed lines must be high pressure type and should be at least 8mm (5/16 inch) diameter. The return lines should also be at least 8mm (5/16 inch) diameter to ensure that the fuel is easily returned to the tank.
Use proper high pressure hose clamps to ensure that the lines do not blow off under pressure.
Keep the fuel lines as cool as possible to avoid fuel vaporisation. The temperature of the fuel will also affect the mixture due to the change in fuel density.
Avoid fire risk by ensuring that all hoses and fittings are in good condition and installed correctly.

28 Installation
Fuel Rails The fuel rails must be free of any debris that could block the injectors. Welded fuel rails can often cause a problem unless they have been properly treated to remove all scale and debris and even then they may corrode and cause problems. Aluminium fuel rails mounted directly on the injectors are recommended as they do not suffer these problems.
The fuel rails must have sufficient volume to minimise fuel pressure pulsation and resonance problems.
Fuel Pressure Regulator The fuel pressure regulator maintains constant fuel pressure to the injectors which is necessary to ensure constant metering of the fuel. Any variation in the fuel pressure will cause a corresponding mixture change.
The fuel pressure regulator should be mounted at the end of the fuel rail so that fuel is always flowing through the rail. This helps to avoid vapour locks.
Adjustable pressure regulators are available.
If using Manifold Pressure Load Sensing Connect the regulator port to the plenum as this ensures that constant pressure is maintained across the injectors.
Note that this will cause the fuel pressure required from the pump to increase as the manifold pressure increases.
If using Throttle Position Load Sensing Leave the regulator port open to the atmosphere, unless the MAP sensor is connected to the manifold as is recommended when using idle speed control, in which case the regulator port should be connected to the manifold.
Fuel Injectors The fuel injectors meter the fuel by opening for a short but defined time once per engine cycle (sequential operation).
The injectors must be wired in the firing order of the engine.
Sizing The size of the injector determines the maximum amount of fuel that can be delivered to the engine.

MoTeC Installation 29
As a rule of thumb the engine will require about 5cc per minute per horse power for petrol or gasoline. For alcohol a higher flow rate is required.
For example : A 600 hp V8 will require each injector to flow at least 600 hp x 5 cc/min/hp / 8 injectors = 600 x 5 / 8 = 275 cc/min.
Note that the flow rate of any particular injector is dependant on the fuel pressure applied to it.
Sometimes oversize injectors are used to maintain lower duty cycles, since high duty cycles reduce the effect of sequential injection, since the injectors are turned on for most of the time. However this can affect idle fuelling as the injector may have trouble delivering small amounts of fuel.
Flow Rate Matching The flow rate of injectors can vary between injectors of the same type. It is advisable to match the flow rates of injectors by testing each injector on a flow bench.
Fuel Pressure The fuel pressure applied to the injector will directly affect the amount of fuel that the injector delivers. Doubling the pressure however only increases the fuel flow by about 1.4 times.
Most injectors will only operate correctly over a certain range of fuel pressures. If the pressure is too low then the fuel may not atomise properly. If the pressure is too high then the injectors may not turn off fully. Many injectors will operate correctly at 2.5 bar (29 psi) and some will operate up to 5 bar (73 psi).
Current Different injectors require different operating currents. The ECU injector drives must be programmed to suit the injector using the Injector Current setup parameter.
Pulse Width The amount of time that the injector spends open during each injection pulse is called the Injector Pulse Width and is measured in milliseconds (thousandths of a second), abbreviated as msec.
The injector pulse width is controlled by the ECU according to the ECUs calibration data.

30 Installation
Duty Cycle The Injector Duty Cycle is a measure of the ratio of the time the injector is open (pulse width) to the available time per engine cycle. For example if the injectors where on for half the available time then the duty cycle would be 50%.
The maximum allowable duty cycle is about 85 percent, beyond this the injector does not have time to open and close and is therefore open continuously and cannot deliver more fuel.
The ECU will set a Diagnostics Error if the duty cycle exceeds the maximum allowed duty cycle.
Ignition System
Ignition System Types Many different types of ignition systems are available with some better suited to different applications than others.
CDI Distributed CDI systems are suited to high revving engines with 8 or more cylinders and are generally capable of at least 12,000 RPM on an 8 cylinder. CDIs are also good at firing fouled plugs.
HEI Distributed High Energy Inductive (HEI) distributed ignition systems are generally limited to about 8000 RPM on an 8 cylinder engine but will run a 6cylinder to 11,000 RPM and a 4 cylinder to 15,000 RPM.
Most modern road cars run HEI ignition systems that are equally well suited to high performance engines as long as the above RPM restrictions are observed.
Multi Coil (HEI or CDI) HEI or CDI multi coil systems will generally run any engine to 15,000 RPM.
Two types of Multi Coil systems are possible :

MoTeC Installation 31
Coil per plug One coil for each spark plug, fired sequentially.
Double Ended Wasted Spark Double ended coils have two high tension towers and fire two plugs at the same time, one on the compression stroke and the other on the exhaust stroke. Each coil is fired sequentially twice per engine cycle and must feed the appropriate two cylinders.
Ignition System Wiring & Setup The wiring and setup parameters are specific to the particular ignition system. Refer to the appropriate MoTeC Ignition System or Ignition Module drawing.
Distributor Button Alignment If using a distributor, the button must be aligned so that it is leaving the tower at Top Dead Centre for that cylinder.
Button Rotation
Button just leaving tower at TDC
The button must be a wide tip type to cater for a wide range of advance points since the advance is changed electronically rather than mechanically.
Make sure that the button still overlaps the tower at the maximum advance point.
The distributor should have no mechanical or vacuum advance as this is provided by the ECU.
Spark Plug Leads The spark plug leads should be high quality Inductive Suppression leads such as Magnicor® leads and must be in good condition.
Do not use wire leads as they can cause interference.

32 Installation
Do not use resistive suppression leads as they will reduce the spark energy.
Auxiliary Valves
The ECU can control various auxiliary valves such as Idle Speed or Turbo Boost control valves.
Refer to the appropriate MoTeC drawing for setup and wiring details. Refer also to any relevant Tech Notes.
ECU Mounting
The ECU should be mounted in an area where the internal temperature of the ECU will not exceed 85 °C, generally this is in the passenger compartment. Allow for adequate air circulation around the ECU. The ECU internal temperature may be viewed using the ECU Manager software or it may be recorded using the data logging.
Mount so as to minimise vibration, this will help to prolong the ECUs life.
ECU Cleaning
Avoid high pressure washing or degreasing of the ECU.

MoTeC Initial Setup 33
Initial Setup
Before attempting to start the engine the setup parameters must be correct.
Use the MoTeC ECU Manager software to adjust the setup parameters.
Preferably start with a calibration file from a similar engine as this will make setup faster and easier.
Main Setup
Injectors Injector Scaling (IJPU) Injector Current Injector Battery Compensation
Refer to the ECU Manager help screens for details.
Calculation Methods Efficiency Calculation Method.
Load Calculation Method.
Refer to the ECU Manager help screens for details.
Load Sites Selection Selects the range of load points to suit the selected sensors’ operational range. For example 0 to 100 for a Throttle position sensor.
Refer to the ECU Manager help screens for details.
Number of Cylinders CYLS 4 Stroke engines : use positive numbers eg. 8 for 8 cyl.
2 Stroke engines : use negative numbers eg. -2 for 2 cyl. Rotary engines : use -2 for 2 rotor and -3 for 3 rotor.
Trigger Setup Ref / Sync Mode (REF)

34 Initial Setup
Crank Reference Teeth (CRT) Crank Index Position (CRIP)
These parameters are dependant on the type of trigger system. Refer to the appropriate MoTeC Trigger drawing, or Ignition System drawing.
Note that the trigger sensor type (Hall / Mag, Edges etc) must be setup in the Sensor Setup screens.
Ignition Ignition Type (IGN) Number of Coils (COIL) Ignition Dwell Time (DELL) Ignition Delay Time
These parameters are dependant on the type of Ignition Module. Refer to the appropriate MoTeC Ignition Module drawing, or Ignition System drawing.
Sensor Setup
Throttle Position Sensor Hi / Lo TPLO Throttle Position LO (Closed Throttle)
TPHI Throttle Position HI (Wide Open Throttle)
The Throttle HI and LO points must be set every time the throttle position sensor is moved or replaced so that the throttle can be correctly scaled between 0 and 100%.
REF/SYNC Sensor Setup The REF/SYNC setup parameters must be set to suit the trigger sensors.
Refer to the MoTeC Trigger drawings for details.
Sensor Calibrations The sensors calibrations must be set to suit the connected sensors.
Refer to the ECU Manager help screens for details.

MoTeC Initial Setup 35
Input / Output Functions
Setup any essential Input / Output functions.
It may be best to start with any non essential functions turned off (eg. Idle Speed Control, Dual RPM Limit etc).
Refer to the ECU Manager help screens for details.
Other Functions
Ensure any other functions such as Boost Control, Traction Control etc are all set appropriately.
It may be best to start with any non essential functions turned off (eg. Traction Control, Lambda Control etc).
Refer to the ECU Manager help screens for details.

MoTeC Initial Calibration 37
Initial Calibration
Before attempting to start the engine the calibration tables should be initialised to sensible values.
Use the MoTeC ECU Manager software to initialise the ECU calibration tables.
Preferably start with a calibration file from a similar engine as this will make initial calibration faster and easier.
Clear any *s from the tables by selecting Clear *s from the ECU Manager software Tools Menu (Press the F9 key). The *s indicate values that have been set correctly, which is inappropriate at this stage.
Fuel Tables
Fuel - Main Table Check the Fuel - Main Table.
The table should be smooth.
In general turbo tables look quite different from throttle position tables, so it is best to start with a table from a similar engine.
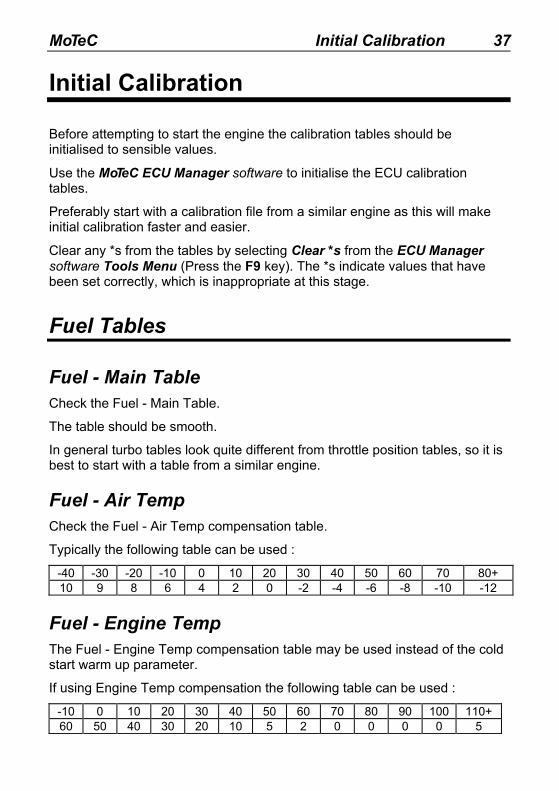
Fuel - Air Temp Check the Fuel - Air Temp compensation table.
Typically the following table can be used :
-40 -30 -20 -10 0 10 20 30 40 50 60 70 80+ 10 9 8 6 4 2 0 -2 -4 -6 -8 -10 -12
Fuel - Engine Temp The Fuel - Engine Temp compensation table may be used instead of the cold start warm up parameter.
If using Engine Temp compensation the following table can be used :
-10 0 10 20 30 40 50 60 70 80 90 100 110+ 60 50 40 30 20 10 5 2 0 0 0 0 5

38 Initial Calibration
Fuel - MAP Check the Fuel - MAP compensation table.
The fuel must be increased by 100% every 100 kPa increase in air pressure.
Normally the MAP table should contain the following values, with a straight line increase between values.
0 kPa 100 kPa 200 kPa 300 kPa 400 kPa 500 kPa -100 0 100 200 300 400
This table is equally applicable whether the MAP sensor is used for barometric pressure measurement or for manifold pressure measurement.
Note that the higher pressure sites will only be available if a high pressure MAP sensor is used.
Fuel - Cold Start Start with the typical values listed in the help.
Fuel - Acceleration Enrichment Start with the typical values listed in the help.
Generally acceleration enrichment is not required above 4000 RPM.
Other Fuel Compensation Tables Typically all other compensation tables should bet set to zero.
Ignition Tables
Ignition - Main Table The table should be smooth.
Make sure that the Ignition - Main Table is initialised with a conservative curve for the particular engine, not too advanced and not too retarded.
Ignition - Air Temp Check the Ignition - Air Temp compensation table.
Typically the following table can be used :

MoTeC Initial Calibration 39
-20 -10 0 10 20 30 40 50 60 70 80 90 100+ -12 -9 -6 -3 0 0 0 0 -3 -6 -9 -12 -15
Other Ignition Compensation Tables Typically all other ignition compensation tables should bet set to zero.


MoTeC Initial Starting Procedure 41
Initial Starting Procedure
The ECU Manager software should be used to assist during starting.
The ECU Manager software allows all diagnostics errors and sensor readings to be checked and allows the injectors, ignition system and auxiliary outputs to be tested while the engine is stopped. The calibration tables and setup parameters should also be checked.
Pre Start Checks
Calibration Tables & Setup Parameters Check that all Setup Parameters have been set appropriately.
Check that all calibration tables have sensible values in them.
Check that any advanced functions such as Traction Control are turned off.
Power to the ECU If the ECU has power then the ECU Manager software should indicate that the ECU is connected (At the bottom left corner of the screen)
Diagnostic Errors Before starting the engine check the diagnostics errors on the ECU Manager : Diagnostics Errors screen. Any errors must be rectified before starting the Engine.
To clear any non current errors press the Enter key on the PC while viewing the Diagnostics Errors screen.
Note that the Diagnostic Errors are lost if the ECU power is turned off.
Sensor Errors If an error is shown for a sensor that is not fitted the sensor should be disabled by setting the sensor setup number to zero.
Sensor Errors may be due to bad wiring to the Sensor (either short circuit or open circuit).
42 Initial Starting Procedure
Test the Sensors Before starting the engine test that all sensors are giving sensible readings by viewing their values on the ECU Manager : View screen. Vary the sensor readings if possible to check for correct operation.
Check that the Throttle Position Sensor varies smoothly from 0 to 100% when moved from fully closed to fully open. Note that the TPHI and TPLO setup parameters must have been set correctly for correct operation of the Throttle Position sensor.
The MAP sensor should read barometric pressure when the engine is stopped (approximately 100 to 102 kPa at sea level depending on the day).
The Engine Temp and Air Temp sensors must give correct readings.
Test the Ignition Use the ECU Manager : Ignition Test (On the Utilities menu) to ensure that the Ignition System is functioning correctly.
Some special ignition systems do not work in the Ignition Test screen. eg. Mazda Series 4 & 5 and other direct fire ignition systems.
If the Ignition System is wired via the Fuel Pump relay then the ignition test will not work unless this relay is activated.
It will be necessary to place a spark plug on the lead from the ignition coil if the ignition system uses a distributor.
Test the Injectors Use the ECU Manager : Injector Test (on the Utilities menu) to ensure that all injectors are working and that they are wired in the correct firing order for sequential operation.
WARNING: Ensure that the fuel pump is off during this test.
Initial Cranking Crank the engine without fuel pressure and check the RPM reading.
Check that the RPM reading is sensible, if the RPM is too high or too low or is erratic then the Setup may be incorrect or there may be a problem with the REF sensor signal. If there is no RPM reading then the REF sensor is not working.

MoTeC Initial Starting Procedure 43
Check that no REF or SYNC Diagnostic Errors occur during constant cranking. Diagnostic errors may occur as cranking winds up, this is OK, but the errors need to be cleared by pressing the Enter key while viewing the ECU Manager : Diagnostics Errors screen, so that constant cranking may be checked for errors. Diagnostic errors may occur as cranking winds down, this is also OK.
Cranking Ignition Timing Check that the Ignition Timing is correct during constant cranking.
This can best be done in the Crank Index Position setup screen under the ignition menu. While in this screen the ignition timing will stay fixed at the value set under ‘Test Advance’. This allows the CRIP to be adjusted if necessary until the timing matches the Test Advance.
Dial back timing lights such as the Snap-On® brand may not work correctly at cranking - use a traditional timing light.
For some trigger modes (one tooth per firing) the Ignition Timing is set by the sensor position only. In this case the ECU only controls the timing above 500 RPM.
If the spark is going to the wrong cylinder on a Direct Fire Ignition then the ignition may be wired incorrectly or the CRIP (Crank Index Position) setup parameter may be out by a multiple of the angle between cylinders.
Starting
Fuel System Power up the fuel pumps and check the fuel system for leaks before attempting to start the engine.
Fuel Overall Trim Use the FUEL - Overall Trim to vary the mixture when trying to start the engine to see if the engine needs more or less fuel, this ensures that the mixture is varied equally for all RPM and Load points.
Establish how much trim the engine needs on average then trim this out by adjusting the setup parameter IJPU (Injector Pulse Width Scaling), or by using the Overall Trim Table item in the Tools Menu.

44 Initial Starting Procedure
If the Engine won’t start Check for correct fuel pressure. Check for fouled plugs. Re-check for diagnostics errors. Re-check the Ignition Timing with a Timing Light. Check the setup parameters against the drawings. Check that the ignition is wired in the correct firing order. Check that the ignition is firing on the compression stroke, not the exhaust
stroke.
After Start Checks
Ignition Timing Check Check the Ignition Timing with a Timing Light to ensure that the actual Ignition Timing corresponds to the ECU Ignition Timing as shown on the ECU Manager : View screen. Check the timing at high and low RPM to ensure that it is correct at all revs. If the timing is correct at one RPM but incorrect at another RPM and the REF sensor is a magnetic type then the trigger edge may be incorrect or the sensor may be wired in the wrong polarity.
Adjust the setup parameter CRIP (Crank Index Position) to correct for small variations in the REF sensor positioning.
Adjust the Ignition - Individual Cylinder Trim for cylinder number 1 and verify that it changes the ignition timing for cylinder number 1 rather than any other cylinder, if not then the CRIP is incorrect and needs to be adjusted by multiples of the angle between cylinders.
Fuel Pressure Check that correct fuel pressure is maintained under all load conditions.
Operational Diagnostics Errors After the engine has started check for diagnostics errors.
To clear any non current errors press the Enter key while viewing the ECU Manager : Diagnostics Errors screen.
The following operational errors may occur in a new installation.

MoTeC Initial Starting Procedure 45
Injector Errors Open The Injector is open circuit - check the wiring.
Short The Injector is short circuit - check the wiring.
Peak The Injector peak current was not reached.
Possible causes :
The Injector Current Setup Parameter IJCU is set too high.
The battery voltage is too low.
Over Duty The injector duty cycle is too high, typically the duty cycle should not exceed 85%.
If the injectors exceed their maximum duty then larger injectors or higher fuel pressure is needed.
REF / SYNC Errors The possible causes of the various errors are detailed below :
REF Error Too many REF pulses have occurred between SYNC pulses.
Possible causes :
A bad REF signal has caused extra pulses or a SYNC pulse has been missed - check voltage levels with a scope. Bad REF / SYNC alignment. Incorrect Setup
No REF Two SYNC signals have occurred without a REF signal.
Possible causes :
If the RPM is 0 then there is no signal - check the wiring and sensor voltage levels with a scope. If RPM is not 0 then a bad SYNC signal has caused extra pulses -
check voltage levels with a scope. If RPM is low then the REF and SYNC signals may have been
swapped. Incorrect Setup
46 Initial Starting Procedure
SYNC Error The SYNC signal has occurred before expected.
Possible causes :
A bad SYNC signal has caused extra SYNC pulses - check voltage levels with a scope. A bad REF signal has caused missing REF pulses - check voltage
levels with a scope. Bad REF / SYNC alignment. Incorrect Setup
No SYNC Two or more consecutive SYNC pulses are missing.
Possible causes :
No SYNC signal - check the wiring and SYNC sensor voltage levels with a scope. A bad REF signal has caused many extra pulses - check voltage
levels with a scope. Incorrect Setup
Multiple REF / SYNC Errors Multiple REF / SYNC errors may occur, often the first error to occur is the correct error.
Multiple errors may also occur due to incorrect Setup.

MoTeC Calibration 47
Calibration
The Calibration Tables determine how the output devices should be controlled for various sensor readings. For example the Fuel - Main Table determines the pulse width for the Fuel Injectors for all combinations of RPM and Load.
The ECU Manager software should be used to adjust the various calibration tables to suit the engine.
Warning Alarms
Set the Warning Alarms to warn if the engine temperature goes too high. (The warning alarms may be set in the functions menu).
Ensure that the engine is “On Site”
The engine must be “On Site” for changes to the table values to affect the tuning, this means that the engine must be operating at the same RPM and Load as the currently selected site in the calibration table.
Note that when the engine RPM (or Load) is between table sites the current fuel value (or Ignition value etc) is effected by the sites to either side. For this reason when adjusting the calibration values it is important that the engine RPM and Load are centred on the current adjustment site to ensure that the values from the adjacent sites have minimal influence on the value being adjusted. Use the Target (at the left of the table) to ensure that the engine operating point is centred on the site being adjusted.
During initial tuning, if large adjustments are required to a particular site ensure that the sites around it are also adjusted to a similar value so that the adjacent sites have minimal influence.
Use the SPACEBAR key to quickly move the adjustment cursor to the engines current operating point.

48 Calibration
Site Tables
The RPM and Load sites for the various calibration tables may be modified in the Setup Sites screen.
A number of site tables are available which affect different calibration tables. Use the help to check which calibration tables are effected by which site tables.
To insert or delete sites use the Tools menu (press the F9 key). When sites are inserted or deleted the calibration tables may be adjusted so that the new sites do not affect the tuning.
Dyno
The alternator should be connected while tuning the engine to ensure that the injectors are working at normal operating voltage.
The exhaust system should be the same as that in the vehicle as it will effect the engine tuning.
On multi runner intake manifolds the air box should be fitted as it is an integral part of the intake system and will effect the engine tuning.
The fuel pressure is critical to the injector flow and should be monitored during dyno tuning. Incorrect fuel pressure will result in incorrect tuning. Note that on turbo engines the fuel pressure will vary as the manifold pressure varies because the regulator maintains a fixed pressure above manifold pressure.
Fuel - Main Table
The Fuel - Main Table allows adjustment of the fuel at various RPM and Load points.
Work through all the table values systematically so that all points are adjusted for the correct Air Fuel Ratio reading.
Use extreme caution when adjusting the fuel to ensure that the engine does not run lean at high loads. It is best to start rich. A temperature compensated wideband Air Fuel Ratio Meter is essential to ensure correct air fuel ratio.
If the engine is missing for any reason (including over rich) the sensor may falsely read lean due to the oxygen in the unburnt mixture.

MoTeC Calibration 49
The Air Fuel Ratio should be adjusted according to the engine load and the desired results, e.g. power, economy, emissions etc. At high loads the mixture should be approximately 0.89 Lambda for maximum power. On turbo charged engines a richer mixture may be required to reduce exhaust temperatures and help avoid knocking. At lighter loads the mixture may be adjusted for best emissions (1.00 Lambda) or best economy (1.05 Lambda).
The cranking (starting) fuel may be adjusted by adjusting the 0 RPM load sites. Typically more fuel is required at cranking than at idle RPM.
The Quick Lambda feature may be used to quickly adjust each table value with one key stroke (Press the Q key). The adjustment is made to the value closest to the current engine operating point. The Quick Lambda feature may only be used if the ECU is directly measuring the lambda reading. The desired lambda value must be set in the Functions - Lambda Control Table.
If the maximum value in the table falls bellow 60 then the setup parameter IJPU should be decreased to increase the table values. This ensures that the table has sufficiently fine resolution. Similarly if the table values reach the maximum of 99.5 the IJPU setup parameter should be increased to decrease the table values.
Use the F5 key to change quickly between the Fuel - Main Table and the Ignition - Main Table.
Use the F6 key to change quickly between the Fuel - Main Table and Fuel - Timing Table.
Use the View - Fuel Screens to check that all the fuel trims and compensations are correct (Press the V key).
Refer to the ECU Manager software help for more details (Press F1).
Ignition - Main Table
The Ignition - Main Table allows adjustment of the Ignition Timing at various RPM and Load points.
Start with a conservative curve for the particular engine, not too advanced and not too retarded.
Use extreme caution when adjusting the Ignition Timing to ensure that the engine does not knock due to excessive advance. Re-check the Ignition Timing with a Timing Light to ensure that the what the ECU thinks is the ignition advance is in fact the actual advance.

50 Calibration
The Ignition Timing should be adjusted for maximum torque without knocking, by increasing the advance until the torque stops increasing. Make sure there is at least 3 or 4 degrees margin to the knock limit.
Too much retard will cause excessive exhaust gas temperature.
At idle a more retarded ignition setting is desirable (approximately 10 to 15 degrees). This makes the idle speed less sensitive to load changes. Also the ignition should be flat over the idle RPM range so that timing variations do not cause the engine to hunt, since variations in the timing will vary the engine torque.
The Quick Lambda feature may also be used from the Ignition Main Table, which allows ignition timing adjustments to be made while also maintaining correct mixture readings.
Use the View - Ignition Screen to check that all the fuel trims and compensations are correct (Press the V key).
Refer to the ECU Manager software help for more details (Press F1).
Fuel - Injection Timing
The Fuel - Injection Timing table allows adjustment of the Fuel End of Injection Timing at various RPM points and optionally at various Load points.
This table is only effective if the injectors are fired sequentially.
Adjusting the Injection Timing ensures that the fuel is injected at the optimum point in the engine cycle, so that the engine makes best use of the fuel. In theory the fuel should end injection at a point where all the fuel will be sucked into the current induction stroke, therefore the end of injection point should be some time before the intake valve closes. The optimum point depends on the engine RPM and load.
Torque, economy, emissions and idle quality are all effected by the Injection Timing.
At high duty cycles the Injection Timing will have minimal influence since the injectors are on for most of the engine cycle.
Refer to the ECU Manager software help for more details (Press F1).

MoTeC Calibration 51
Fuel - Cold Start
The Cold Start parameters may be adjusted after the Fuel - Main Table has been adjusted and the 0 RPM sites have been adjusted for good hot starting.
Refer to the ECU Manager software help for more details (Press F1).
Other Calibration Tables
The other calibration tables may be adjusted as necessary.
Refer to the ECU Manager software help for more details (Press F1).
Data Logging & Road Testing
The calibration must be verified on the road This is best done by logging the air fuel ratio and other sensors and checking them using the MoTeC Interpreter software.
Data Logging is also very useful for identifying unexpected problems such as an incorrect air temperature reading due to fuel vapour cooling the sensor or excessive air temperature due to hot air entering the intake system.
Data logging may also be used to verify and fine tune the operation of the various advanced functions such as traction control.
The light load and overrun calibration must also be completed on the road as these areas cannot be adjusted on a dyno.


MoTeC ECU Manager Software 53
ECU Manager Software
Introduction
The following is an overview of the main concepts of the ECU Manager software. More detailed information is available from the online help.
The ECU Manager software is used for : • Calibration and Setup • Sending calibration files to the ECU • Viewing Sensor readings • Viewing Diagnostics information • Testing the Outputs • Unloading the logged data • Upgrading the ECU firmware • Enabling ECU options.

54 ECU Manager Software
PC Requirements See the MoTeC Software section earlier in this manual.
Connecting a PC to the ECU See the MoTeC Software section earlier in this manual.
Installing the Software See the MoTeC Software section earlier in this manual.
This topic covers information that may be helpful for users that have previously used the MoTeC EMP Software, which ECU Manager supersedes.
For EMP Users
Windows The main difference between ECU Manager and the old EMP software is that it is a full Windows application. This has allowed a significant number of improvements to be made, the most obvious being the improved graphical user interface.
Familiarity The operation of ECU Manager is very similar to EMP, including most keyboard shortcuts such as: F5 to switch between Fuel and Ignition and V to show the view screen.
The Adjust menu item is the same as the EMP Select Screen menu and may still be activated by pressing the Esc key. Pressing the Esc key has the advantage of highlighting the currently selected screen item which often makes navigation to the next screen easier.
All the adjustment screens should be familiar so there is no need to relearn how to configure the ECU.
The Tools menu replaces the old Function menu and may still be activated by pressing the F9 key.
Communications All communication is done using the MoTeC CAN Cable (No need for both a Serial Cable and a CAN Cable).

MoTeC ECU Manager Software 55
This also allows the configuration to be sent and retrieved much faster.
Making Adjustments To enter adjust mode select Open File or Open ECU from the Adjust or File menus. This is equivalent to selecting Adjust from the EMP main menu.
The usual keys are used for making adjustment: Arrow keys to move around, PgUp and PgDn for making changes, Enter to set the value.
Screen Layouts A major new feature of ECU Manager is that multiple screen layouts can be created by the user to suit the users preference and the task at hand.
See the topic on Layouts for more detail.
Utility Programs The utility programs such as Upgrade and Enable ECU Options are built in to ECU Manager rather than being separate programs and may be selected from the Utilities menu.
Note that Convert Files is selected from the File menu.
Notes Note that because the F10 key is used to access the menu (as dictated by Windows) the old F10 function of Copy Site up and Right has been reassigned to the F11 key.
Basics
Starting ECU Manager To start ECU Manager double click the icon on the desktop or select ECU Manager from the Start menu, for example: Start / Programs / MoTeC / M400 M600 M800 / ECU Manager 2.1.
Note that the desktop icon will start the latest version of ECU Manager.
Online Help Online help is available in two forms:

56 ECU Manager Software
Context sensitive help is available by pressing F1 or clicking on the help button, this shows help that is relevant to the current screen.
General help is available from the Help menu.
Main Menu
The Main Menu is used to access all of the features of the ECU Manager software.
Select a menu item by using the mouse or use the keyboard by holding down the Alt key followed by the keys corresponding to the underlined letter of the menu items to be selected. For example to select File | Exit hold down the Alt key then press F then X. Alternatively press the F10 key then use the arrow keys and the Enter key to select the desired menu item.
Unavailable Menu Items Note that some menu items may be unavailable if the ECU is not connected or a file is not opened.
Unavailable items appear grey.
Button Bar (Toolbar)
The Button Bar provides an alternative way of activating some of the commonly used items on the main menu. To find out what each item does hold the mouse pointer over the button of interest until a hint appears.
Note that some items will not be available depending on whether the ECU is connected and if a calibration file is open.
Status Bar
The bottom line on the screen is called the Status Bar and shows the following:
ECU Status: Connected or NOT Connected (if the ECU is connected the ECU firmware version is also shown). If the ECU is not connected the

MoTeC ECU Manager Software 57
reason that it is not connected is shown where the Diagnostics Errors are normally shown.
The number of diagnostics errors (if the ECU is connected)
Calibration Files
ECU Manager records the ECU calibration and setup data in files that are stored on the PC hard disk, this ensures that a permanent record of the data is kept. The files also record comments to allow easy identification of each file. Any file may be sent to any ECU which will totally re-configure the ECU according the calibration and setup data contained in the file.
Creating a New Calibration File To create a new calibration file open an existing file and save it to a new file by selecting Save As from the File menu.
Sending a Calibration File to the ECU To send a calibration file to the ECU select Send File to ECU from the File menu. Note that the ECU must be connected to the PC using a MoTeC CAN Cable.
Changing the Comments To change the file comments select Edit Comments from the File menu.
Versions & Upgrading
MoTeC is continually updating the software and newer versions may be downloaded from the web site at no charge ( www.motec.com.au )
The software consists of the ECU Manager software that runs on the PC and the control software (firmware) that runs inside the ECU.
The ECU firmware may be updated at any time by the user which allows the latest features to be used.
The ECU Manager version may be viewed by selecting About from the Help menu.
The ECU firmware version is shown on the ECU Manager status line when the ECU is connected.

58 ECU Manager Software
Matching Versions The version of ECU Manager and the version of the firmware in the ECU must match in order to be able to communicate with each other.
To communicate with an ECU that has older firmware in it, either the matching ECU Manager software must be used or the ECU firmware must be upgraded to match the version of ECU Manager on the PC.
Upgrading the ECU To upgrade the ECU firmware select Upgrade ECU Version from the Utilities menu. This will send the new firmware to the ECU and automatically convert the calibration data in the ECU to ensure it is compatible with the new firmware.
Calibration File Versions The calibration files that are stored on the PC must also match the version of software being used.
To ensure that older version calibration files are not rendered useless the older version calibration files may be converted in order to be used with the new version of the software. To convert older files select Convert from the File menu.
Calibration files may also be converted from some older ECU models (M4, M48 & M8).
Minor Version Updates Minor version updates do not require the calibration data to be converted but still require the firmware to be sent to the ECU by selecting Upgrade ECU Version from the Utilities menu.
Minor updates usually contain bug fixes or minor enhancements.
A minor update is one where the number before the decimal point and immediately after do not change, for example 2.10A, 2.10C, 2.11A are all minor updates of version 2.1.
Software Version Release Notes The changes between the various software versions may be viewed by selecting Release Notes from the Help menu.

MoTeC ECU Manager Software 59
Screen Layouts
The screen layouts are completely user definable and may be optimised to suit the user’s preference, the screen resolution and the task to be performed. For example it may be useful to have screen layouts to suit different types of engines or to perform particular tasks such as CAM Control or individual Cylinder tuning.
The image above shows one possible screen layout that suits an 800x600 screen.
Layout Pages Separate layouts may be defined on separate pages. A number of pages may be loaded at once and may then be selected by clicking on the tabs at the top of the pages or by pressing the Tab or the Ctrl+Tab keys.
The layout pages are saved to files. To open, close or create new pages, select the appropriate menu item from the Layout menu.

60 ECU Manager Software
Layout Objects To add an object to the layout page select Add from the Layout menu or right click on an empty space in the layout page and select Add.
To change the properties (settings) of any object right click on the object and select Properties.
To delete an object right click on the object and select Delete.
Adjust Tables and Adjust Graph Objects In order to make adjustments the layout page must contain an Adjust Table or an Adjust Graph or both.
Note that only one Adjust Table and one Adjust Graph are allowed per page.
Adjust Tables Adjust Tables show the values for the currently selected table and allow adjustments to be made. They also show axis indicators and a target to help positioning of the engine operating point.
Adjust Graphs The table values may also be shown graphically in an Adjust Graph.
The graph may be rotated if necessary by clicking on the rotation buttons or by holding down the Ctrl key while using the arrow keys.
Graph Table If there is no graph displayed the table object may be switched between table mode and graph mode by pressing the G key.

MoTeC ECU Manager Software 61
Y Axis Reversing On certain graphs it may be desirable to reverse the Y axis so that the graph surface is easier to see.
To do this select Reverse Y-Axis on the Tools menu or press the Y key.

62 ECU Manager Software
Making Adjustments
On Line / Offline Changes may be made directly to the ECU (Online) or to a file (Off line).
Online (ECU Connected) To make changes directly to the ECU, connect the ECU then select Open ECU from the File menu.
When the ECU is opened the calibration data is first retrieved from the ECU then matched to a file. If the ECU data does not match an existing file then a new file will be created, at which point an Engine Description and Comment should be entered to describe the file.
Changes to the ECU are also saved to this file when the ECU is closed.
Offline (ECU not Connected) To make changes to a file with the ECU offline select Open from the File menu.
The file may be sent to the ECU at a latter date by selecting Send File to ECU from the File menu.
Closing the ECU or File When the changes are completed the ECU or file should be closed by selecting Close from the File menu, this will ensure that changes are saved to the associated file.
Warning Alarms If the Warning Alarms have been set then a warning screen will be displayed if any sensor goes outside its alarm limits. This can be particularly useful for automatically monitoring engine temperature during a dyno session. The alarms can be configured in the Functions table.
Help Context sensitive help is available by pressing F1 or clicking on the help button, this shows help that is relevant to the current screen.

MoTeC ECU Manager Software 63
Selecting the Adjust Table Once a file or the ECU has been opened the appropriate table or setup screen may be selected from the Adjust menu by using the mouse or the keyboard.
To select the Adjust menu using the keyboard hold down the Alt key followed by the A key then use the arrow keys and the Enter key to make a selection.
Alternatively the Adjust menu may be displayed by pressing the Esc key. This has the advantage that it shows the Adjust menu with the current table selected which often makes it easier to select the next table.
Fuel / Ignition Toggle (F5 key) The F5 key will quickly toggle the screen between the current Fuel table and the corresponding Ignition table or vice versa.
F6, F7, F8 Key Assignment The F6, F7,or F8 keys may be assigned to any table by pressing Alt+F6, Alt+F7 or Alt+F8. This assigns the current table to the F6, F7 or F8 keys which allows that table to be returned to quickly.

64 ECU Manager Software
Changing Table Values
Selecting the Item to be Adjusted The cursor selects the table value that may be adjusted.
The cursor may be moved using the arrow keys, or by pressing the Space Bar which will automatically move the cursor to the current engine operating point.
Note that the table does not show all values at once. To view the additional values move the adjustment cursor to the edges of the table using the arrow keys, this will cause the table to scroll and show the hidden values.
Make sure the Engine is “On Site” For adjustments to affect the current engine operation the engine operating point must be at the centre of the selected site. The Adjust Table object provides Indicators and a Target to assist in this.
Table Indicators Indicators are shown at the top and side of the table (the black triangles). The indicators show the current engine operating point and therefore indicate which table value (or values) the ECU is currently using. The indicators must point to the same site as the adjustment cursor for any adjustments to change the current engine tuning.
The site that is closest to the current operating point is also indicated by a red rectangle.
Table Target A target is shown at the left of the table. This allows more accurate positioning of the engine operating point.

MoTeC ECU Manager Software 65
For best calibration the indicator should be within or close to the centre rectangle, this ensures that the ECU tuning is determined mainly by the site being adjusted and not by the adjacent sites.
Up / Down Adjustment Up or Down adjustments may be made to the selected table value using the PgUp and PgDn keys.
Fast adjustments may be made by holding the Ctrl key down while pressing the PgUp or PgDn keys. This will increment the value by ten times the normal amount.
If the PgUp or PgDn keys are held down the value will continue to change until the key is released.
Locking in the New Value When the desired adjustment has been made the new value must be locked in (“Set”) by pressing the Enter key, this stores the new adjustment in the ECUs programmable memory.
If the cursor is moved before pressing the Enter key the value will revert to its previous unadjusted value.
Direct Entry The table values may also be entered directly using the number keys followed by the Enter key.
Maths Operations Mathematical operations may be performed on the currently selected value or the WHOLE table or a BLOCK within a table.
To perform a maths function enter the value followed by an operation key (+, -, *, / ), for example 2.5+ will add 2.5 to the current table value.
To apply the maths operation to the whole table type a T before pressing the operation key, for example: 2.5T+ will add 2.5 to the whole table.
Block Operations To mark a block hold down the shift key while pressing the arrow keys then perform a maths operation.
66 ECU Manager Software
Quick Lambda The Quick Lambda feature allows the Fuel - Main Table values to be adjusted to the correct lambda by simply pressing the Q key. This feature uses the Wideband Lambda reading and the value from the Lambda Table to calculate the new fuel table value.
The Lambda Table may be accessed by pressing the F8 key.
Note that this feature requires a Wideband Lambda sensor or meter to be connected to the ECU.
Set Indicators (*) A * will appear next to items that have been set, with the exception of tables that are dependent on the engine operating point where a * will only appear if the engine operating point corresponds to the currently selected site. The * indicates that the point has been tuned.
The *'s may be cleared individually or all *'s may be cleared at once. To clear an individual * press the Delete key. To clear ALL *'s select Clear ALL*'s from the Tools menu.

MoTeC ECU Manager Software 67
Tools The Tools Menu allows selection of various functions as listed on the menu below.
The Tools Menu may also be displayed by pressing the F9 key, in this case the previously selected item will be highlighted which makes it easier to do repetitive operations.
Note that the items on the menu will changes depending on which adjust table is shown, for example Quick Lambda is not available for all tables
The letter to the right of some menu items is the “hot key”. Pressing this key will activate the item without selecting the Tools menu.
Compare Mode On / Off Turns Compare Mode on or off.
Compare Mode shows the difference between the current file and the selected comparison file.
When Compare Mode is turned on the selected compare file description is shown on the status line at the bottom of the screen.

68 ECU Manager Software
The comparison file may be selected by choosing Select Compare File from the Tools menu.
When Compare Mode is turned on an icon will appear at the left of the Adjust Menu items that contain differences.
Select Compare File Selects the file used for Compare Mode.
Jump to Site Moves the Cursor block to the Site closest to the current engine operating point.
Quick Lambda Adjusts the fuel value to achieve the lambda value in the Wideband Lambda table. The Lambda Table may be accessed from the Functions | Lambda Control menu or by pressing the F8 key.
The new fuel value is calculated by checking the difference between the Lambda sensor reading and the value in the Wideband Lambda Table.
The Lambda reading may be either Lambda 1, Lambda 2 or the Average of both, this is configured in the Wideband Lambda setup.
The engine must be operating near the centre of the site for the calculation to give correct results.
Quick Lambda may be used from the Fuel Main Table, Fuel Injection Timing Table, Ignition Main Table, Fuel Second Load Table & Fuel Individual Tables.
When used from the Fuel Main Table the cursor jumps to the closest site if the cursor is not on site.
When used from the Ignition main Table or Fuel Injection Timing Table the Fuel Main Table site closest to the current operating point is adjusted.
When used from the Fuel Second Load Table or the Fuel Individual Tables the change is made to that table rather than the Fuel Main Table.
Quick Lambda + Copy Up & Right As for Quick Lambda except that the new value is copied to the sites immediately above, right and diagonally above and right if the sites do not contain a *.

MoTeC ECU Manager Software 69
Lambda Was Adjusts the fuel table value by an appropriate amount by comparing the value entered by the user to the desired lambda value in the Lambda Table.
The value that is entered may be either the current lambda reading from a lambda meter if tuning online or the lambda reading from the logged data if tuning offline.
Note that if a lambda sensor is directly connected to the ECU then online tuning may be performed more easily using the Quick Lambda function.
Overall Trim Table Trims the whole Table by the percentage indicated by the Overall Trim then sets the Overall Trim back to 0.
This is useful during initial tuning of the Fuel Main Table since an existing table can be used then trimmed to take into account variations in injector sizing etc. Note that it is better to change the IJPU setup parameter if large changes are required as this will ensure that the Table numbers maintain sufficient range and resolution i.e. ensures that the table numbers do not become too small or too large.
Note that during the interpolation the engine may run incorrectly. It is therefore best if the engine is stopped during the interpolation. If the engine is running a warning will be given before the interpolation is started.
Interpolate Vertical Column Linearly interpolates the current Column between the Upper most value and the Lower most value leaving the Upper most value, the Lower most value and points marked with an * unchanged.
Note that it may be necessary to use the Backspace key to mark the desired points with an *.
Interpolate Horizontal Row Linearly interpolates the current Row between the left most value and the right most value leaving the left most value, the right most value and any points marked with an * unchanged.
Note that it may be necessary to use the Backspace key to mark the desired points with an *.

70 ECU Manager Software
Copy Vertical Column Right Copies the data in the current Column to the Column immediately to its right.
Copy Horizontal Row Up Copies the data in the current row to the row above.
Copy Site Up And Right Copies the value of the current site to the sites immediately above, right and diagonally above and right if the sites do not contain an *.
Reverse Y-Axis Reverses the Y axis for the Graph or Table or both. This makes some graphs easier to see.
Toggle Table Mode If a table is displayed and there is no graph displayed this will switch the table between table mode and graph mode.
Set All Values To Current Set all values in the current table to the value of the current site.
Reset ECU Resets the ECU. This can be useful if changes have been made to a setup item that requires the ECU to be reset, normally this does not happen until a different screen is selected.
Clear All * Clears all *'s in either the currently displayed table or all tables.
The *’s are normally used to indicate which sites have been tuned.
Clear Current * Clears the * on the current site.
Set with * Sets an * on the current site whether or not the engine is currently at that site.

MoTeC ECU Manager Software 71
Copy Table from Another File Copy a table from another calibration file into the current table.
Warning - The current table data will be overwritten.
Import CSV File Read a CSV (Comma Separated Value) file into the current calibration table.
Normally the CSV file is one that has been written out from another configuration file, possibly for a different ECU type.
Warning - The current table data will be overwritten.
Note that the CSV file must be for the same type of table.
Note also that the site values are not imported therefore the site values must be the same as the sites in the CSV file for the table to have the same result.
Export CSV File Write the current table to a CSV (Comma Separated Value) file.
May be used to transfer data between different ECU types or for use in a spreadsheet.
Insert Site Insert a site to the left of the current site.
The new site value will be half way between the value of the current site the value of the site to the left.
(Available only in the Site setup screens)
Delete Site Delete the current site.
(Available only in the Site setup screens)

72 ECU Manager Software
View Screen
The View Screen may be shown by pressing the V key or by selecting the desired view page from the View menu. The View Screen displays all the operating details of the ECU including:
Sensor data Diagnostics errors Fuel injection detail including all trims and compensations Ignition detail including all trims and compensations Boost control detail Status information Output Status Internal Voltages etc
The View Screen has a number of pages that may be accessed by pressing Tab while holding down the Ctrl key or by pressing the first letter of the screen name.
It also allows resetting of The Diagnostic Errors, Maximum RPM and the Fuel Used. The Diagnostic Errors Screen may be accessed directly by pressing the F3 key.
Note that the view screen may be viewed with or without the ECU open (but only if the ECU is connected).
MoTeC ECU Manager Software 73
Testing the ECU Outputs
The ECU Outputs (Fuel Injectors, Ignition Outputs and Auxiliary Outputs) may be tested by selecting Test Outputs from the Utilities menu.
This allows verification of the operation of the wiring and actuators. It is also very useful in checking that the injectors are wired in firing order.
ECU Password
A password may be set in the ECU to stop unauthorised access to the ECU configuration data.
The password may be set by selecting Adjust | Security Setup from the main menu.
Channel Locking Note that the live channel information (RPM, Engine Temp) may still be viewed even when the password is set unless the particular channel has been locked using the Channel Locking feature.
Channels that have been locked cannot be viewed on the View screens or sent as Telemetry data once the ECU password has been set.
Channel locking may be set by selecting Adjust | Security Setup from the main menu.
File Encryption
File Encryption allows a configuration file to be distributed to a customer without the customer being able to view the contents of the file.
An encrypted file can only be sent to an ECU that has it's password set to the same value as the Encryption Number that was used to encrypt the file. An encrypted file cannot be sent to an ECU with no password.
The data in an encrypted file cannot be viewed.
The comments for an encrypted file are the same as those of the file from which it was created. The comments cannot be edited. It is possible to create files with the same comments so care needs to be taken to ensure the correct files are used. Any unnecessary files should be deleted.

74 ECU Manager Software
Enabling ECU Options
A number of options are available which allows the ECU to be configured for a particular need or updated later if necessary. The options include Data Logging, Wideband Lambda measurement, Drive by Wire and more.
The options may be enabled at any time by selecting Utilities | Enable ECU Options from the main menu and entering the enabling password.

MoTeC ECU Manager Software 75
Keyboard Reference PgUp Adjust Up PgDn Adjust Down Ctrl + PgUp Fast Adjust Up Ctrl + PgDn Fast Adjust Down Shift + PgUp Slow Adjust Up (Not available on all tables) Shift + PgDn Slow Adjust Down (Not available on all tables) Enter Set the adjusted Value Alt+X Close the ECU or File Esc Show the Adjust menu with the current screen item highlight Tab Select the next Layout page Spacebar Jump the cursor to the site closest to the current engine
operating point. F1 Show Help F3 Show the Diagnostics Errors screen F5 Toggle between the Fuel and Ignition screens Alt+F6 Remember the current screen, Show it when F6 is pressed Alt+F7 Remember the current screen, Show it when F7 is pressed Alt+F8 Remember the current screen, Show it when F8 is pressed F6 Select the Fuel Timing screen (or the Remembered screen) F7 Select the Boost Limit screen (or the Remembered screen) F8 Select the Lambda Table screen (or the Remembered
screen) F9 Show the Tools menu F10 Select the main menu F11 Copy site up and right C Turn Compare Mode Off / On E Edit the File Comments G Switch table between table mode and graph mode L Lambda Was Q Quick Lambda W Quick Lambda plus copy up and right V Show the last View screen S Show the sensors tab on view screen Y Reverse the Y axis on the table, graph or both. Delete Delete * at the current site Backspace Place * at the current site Home Select one of a number of default view angles for the graph. Ctrl+Arrrow Change the view angle of the graph Shift+Arrow Mark a block on the table (mathematics may be applied to
the block) Ctrl+Shift+Arrow Copy the current table value to an adjacent cell.

76 ECU Manager Software
Alt+1...0 Select Individual Cyl 1…10 table (Only when an Individual Table is currently selected)

MoTeC Appendices 77
Appendices
Appendix A: General Specifications
Physical Case Size 147mm x 105mm x 40mm (5.8in x 4.1in x 1.6in)
Weight M400, M600, M800: 0.50 kg (1.10lb)
M880: 0.525kg (1.16 lb)
Power Supply Operating Voltage: 6 to 22 Volts DC
Operating Current: 0.5 Amps Max (excluding sensor and load currents)
Reverse Battery Protection via External Fuse
Battery Transient Protection
Operating Temperature Internal Temperature Range: -10 to 80°C (14 to 176°F)
Ambient Temperature Range: -10 to 70°C (14 to 158°F) typical, depending on output loading

78 Appendices
Appendix B: Sensor Supplies
Maximum Current 5V ENG Sensor Supply: 0.20 Amps Max
5V AUX Sensor Supply: 0.15 Amps Max
8V ENG Sensor Supply: 0.30 Amps Max
8V AUX Sensor Supply: 0.30 Amps Max
Accuracy / Temp Drift 5V ENG Sensor Supply: ± 0.5% max at 25°C + 100ppm/°C max
5V AUX Sensor Supply: ± 0.5% max at 25°C + 100ppm/°C max
8V ENG Sensor Supply: ± 5% max over entire temperature range
8V AUX Sensor Supply: ± 5% max over entire temperature range
Protection Short to ground
Short to battery
Thermal overload

MoTeC Appendices 79
Appendix C: Input Characteristics
Analog Voltage Inputs Suitable for: Potentiometers, Voltage output sensors & Variable resistance sensors.
• Note that variable resistance sensors require a pullup resistor to the 5V sensor supply. (Normally a 1000 ohm resistor is used)
Measurement Voltage Range: 0 to 15 V
• Note that voltages outside this range may affect the readings on other inputs.
Input Resistance: 100k ohms to 0V
Resolution: 3.74 mV
Filter: 150Hz 1st order
Measurement Method: Absolute
Analog Temp Inputs Suitable for: 2 wire variable resistance sensors and some voltage output sensors.
• Note that some voltage output sensors may not be able to drive input resistance.
Measurement Voltage Range: 0 to 15 V
• Note that voltages outside this range may affect the readings on other inputs.
Input Resistance: 1000 ohms to the 5V sensor supply and 100k ohms to 0V.
Resolution: 3.74 mV
Filter: 150Hz 1st order
Measurement Method: Absolute
When used as Switch Inputs The Analog Temp Inputs may also be used as Switch Inputs
Trigger Levels: Programmable 0 to 15V
Hysteresis: Individually programmable high and low levels.

80 Appendices
Lambda Inputs
Wideband Sensor Type: NTK or Bosch LSU
Measurement Range : 0.70 to 32.0 Lambda
Narrow Band The LA1S and LA2S inputs may be used to measure the voltage of normal narrow band oxygen sensors.
Note: If closed loop control is to be used then an external 33k ohm bias resistor from the input to 0V is required to bias the input to stoichiometric (0.45V) while the sensor is cold.
Voltage Input The LA1S and LA2S inputs may be used as ordinary voltage inputs.
Specifications are the same as the Analog Voltage inputs except the inputs include a 220k ohm resistor to 5V.
Digital Inputs Suitable for : Switch to 0V, Logic signal & open collector device (eg Hall Switch)
Pullup Resistor : 4700 ohms to 5V
Voltage Range : 0 to 15V
Positive Trigger Threshold : 3.5 V max
Negative Threshold : 1.0 V min
Hysteresis : 0.5 V Min
Filter Time Constant : 22usec
Trigger Edge: Programmable
Measurement Methods: Switched, Speed / Frequency, Period, Pulse Width

MoTeC Appendices 81
Appendix D: Auxiliary Output Characteristics
The following tables list the characteristics for the Auxiliary Outputs, including the Ignition and Injector Outputs when used as Auxiliary Outputs.
Output Low Side Driver High Side Driver General Nominal
Max Current (A)
Min Current Limit (A)
Nominal Max Current (A)
Min Current Limit (A)
Fly-Back Voltage (V)
Max Freq (Hz)
AUX1 5 7 * 5 7 Recirculate 10000 AUX2 5 7 * 5 7 Recirculate 10000 AUX3 1 3 - - 60V 10000 AUX4 1 3 - - 60V 10000 AUX5 1 3 0.7 0.7 * Recirculate 200 AUX6 1 3 0.7 0.7 * Recirculate 200 AUX7 1 3 0.7 0.7 * Recirculate 200 AUX8 1 3 0.7 0.7 * Recirculate 200 IGN1 1 3 - - 60V 5000 IGN2 1 3 - - 60V 5000 IGN3 1 3 - - 60V 5000 IGN4 1 3 - - 60V 5000 IGN5 1 3 - - 60V 5000 IGN6 1 3 - - 60V 5000 INJ1 2 4 - - 60V 5000 INJ2 2 4 - - 60V 5000 INJ3 2 4 - - 60V 5000 INJ4 2 4 - - 60V 5000 INJ5 2 4 - - 60V 5000 INJ6 2 4 - - 60V 5000 INJ7 2 4 - - 60V 5000 INJ8 2 4 - - 60V 5000
Normally the current should not exceed the Nominal Max Current but in some circumstances it may exceed this value for a short period of time as long as it does not exceed the Min Current Limit and as long as the duty cycle is low. The limiting factor is thermal dissipation in the output driver.
The total maximum low side current should not exceed 15A.
The minimum frequency for all outputs is 15Hz (except when used as a switched output).
Items marked * use a linear current limit, all other outputs shutdown at the current limit.

82 Appendices
Appendix E: Ignition Output Characteristics
Source Current: 20mA (Single Coil / Coil per Plug) / 40mA (Wasted Spark)
Source Voltage: 5.7V max at 20mA, 4.6V max at 40mA
Sink Current: 1 Amp max nominal (3 Amp current limit)
MoTeC Appendices 83
Appendix F: Injector Output Characteristics
The Injector outputs can operate in two modes: Peak and Hold mode and Saturated mode.
Peak and Hold Mode This mode is normally required for low resistance injectors (5 ohms or less). This mode allows the injector current to build up to a high value to open the injector and is then reduced to minimise power dissipation in the injector. Normally this means that the ECU has to dissipate a large amount of power. MoTeC uses a switch mode technique to minimise power dissipation in the ECU. The opening current is referred to as the Peak current and the reduced current as the Holding current.
The peak current is fully programmable from 0 to 6 Amps and is suitable for very low ohm injectors including 0.5 ohms.
Holding Current: 25% of Peak Current
Flyback Voltage: 60V
Diagnostics: Open Circuit, Short to Battery, Peak current not reached.
Saturated Drive Mode This mode is normally used for high resistance injectors (12 ohms or greater).
Nominal Maximum Current: 2 Amps
Current Limit: 4 Amps
Flyback Voltage: 60V
Diagnostics: Open Circuit, Short to Battery
High / Low Injection The injector output characteristics may be set independently for High/Low injectors allowing two different types of injectors to be used.
84 Appendices
Appendix G: M880 Connector
Mating Connector (for M880 only) Deutsch : AS6-18-35SN
Wire Wire to suit connector : 22# Tefzel, Mil Spec : M22759/16-22
Crimp Tool Crimp Tool : M22520/2-01
Positioner for Crimp Tool : M22520/2-07
• Note that the Crimp Contacts are type 22D (this is needed to set the crimp tool correctly)
Wire Stripping Tool The following tool is recommended
Ideal Industries 45-2133 stripping tool with LB1195 wire stop.
Heatshrink Boots Straight : Racychem 202K153, Hellermann 156-42-G
Right Angle : Racychem 222K153, Hellermann : 1156-4-G

MoTeC Appendices 85
Appendix H: Wire Specifications
M22759/16 Wire Ratings (For Various Wire Gauges) Insulation Material : Tefzel Conductor : Tin Plated Copper Voltage Rating : 600 V Maximum Temperature : 150 °C Wire Gauge (AWG)
Cross Sectional Area (mm2)
Max Current at 100 °C Ambient (Amps)
Resistance ( ohm / m )
Resistance ( ohm / 1000 ft )
22 0.38 5 0.045 14
20 0.61 6 0.028 8.5
18 0.96 9 0.018 5.5
16 1.2 12 0.014 4.3
14 1.9 18 0.009 2.7
12 3.0 24 0.006 1.8
Wire Stripping Tool The following tool is recommended
Ideal Industries 45-2133 stripping tool with LB1195 wire stop.

86 Appendices
Appendix J: CAN Wiring - Multiple Device
The CAN bus should consist of a twisted pair trunk with 100R (0.25Watt) terminating resistors at each end of the trunk.
The preferred cable for the trunk is 100R Data Cable but twisted 22# Tefzel is usually OK.
The maximum length of the bus is 16m (50ft) including the MoTeC CAN Cable (PC to CAN Bus Communications Cable)
CAN Devices (such as MoTeC ADL, BR2 etc) may be connected to the trunk with up to 500mm (20in) of twisted wire.
The connector for the CAN Communications Cable may also be connected to the trunk with up to 500mm (20in) of twisted wire and should be within 500mm of one end of the trunk. If desired two CAN Cable connectors may be used so that the MoTeC CAN Cable may be connected to either side of the vehicle. Both connectors must be within 500mm of each end of the trunk.
CAN-LO CAN-HI
100R
100R
CAN
-LO
C
AN-H
I
CAN Device
500mm Max
CA
N-L
O
CA
N-H
I
CAN Cable Connector
500mm Max<< CAN Bus >>
500mm Max
100R Terminating Resistors at each end of the CAN Bus
CAN
-LO
C
AN-H
I
CAN Device
CAN
-LO
C
AN-H
I
CAN Device
0V 8V
5 4 3 1
These wires must be Twisted Minimum one twist per 50mm (2in)
Short CAN Bus If the CAN Bus is less than 2m (7ft) long then a single termination resistor may be used. The resistor should be placed at the opposite end of the CAN Bus to the CAN Cable connector.
Single Device See Appendix K: CAN Bus Wiring - Single Device.

MoTeC Appendices 87
Appendix K: CAN Bus Wiring - Single Device
When a single device (such as an ECU) is connected to the CAN bus then the wiring scheme shown below may be used to provide a connection point for the MoTeC CAN cable.
If the wiring length is less than 2m (7ft) then the terminating resistor is recommended but not essential.
If other devices are connected to the CAN bus a special wiring scheme is required, see Appendix J: CAN Wiring - Multiple Device.
1 2 3 4 5
B14 / 13
A13 / 2B24 / 47B23 / 48
Black
Red Green White
5 Pin Connector M800/M8800V
CAN-LO CAN-HI
8V
These wires must be Twisted Minimum one twist per 50mm (2in)
100R Resistor * Not essential if the w iring length is less than 2m (7ft)
5 Pin Connector Type : Deltron 716-0-0501 (Non Latching)
Neutrik NC5FDL1 (Latching)

88 Appendices
Appendix L: Pin list by Function M400 M600 M800 M880 Pin No Pin No Abrev Description
Battery A26 23,32,41 VBAT Battery Positive A10,A11 14,15,19 GND Battery Negative
Sensor Supplies A12 3 8V-ENG 8V Engine Sensor Supply A2 16 5V-ENG 5V Engine Sensor Supply B16 27 0V-ENG 0V Engine Sensor Supply A13 2 8V-AUX 8V Auxiliary Sensor and CAN Supply A9 34 5V-AUX 5V Auxiliary Sensor Supply B15 11 0V-AUX 0V Auxiliary Sensor Supply
Auxiliary Outputs A18 9 AUX1 Auxiliary Output 1 A1 8 AUX2 Auxiliary Output 2 A23 43 AUX3* Auxiliary Output 3 A24 51 AUX4* Auxiliary Output 4 A31 59 AUX5 Auxiliary Output 5 A32 65 AUX6 Auxiliary Output 6 A33 58 AUX7 Auxiliary Output 7 A34 64 AUX8 Auxiliary Output 8
Ignition Outputs A3 1 IGN1* Ignition Output 1 A4 5 IGN2* Ignition Output 2 A5 4 IGN3* Ignition Output 3 A6 10 IGN4* Ignition Output 4 A7 17 IGN5* Ignition Output 5 (Not available on M400) A8 25 IGN6* Ignition Output 6 (Not available on M400)
Injector Outputs A19 33 INJ1 Injector Output 1 A20 50 INJ2 Injector Output 2

MoTeC Appendices 89
A21 63 INJ3 Injector Output 3 A22 66 INJ4 Injector Output 4 A27 24 INJ5 Injector Output 5 (Not available on M400) A28 42 INJ6 Injector Output 6 (Not available on M400) A29 57 INJ7 Injector Output 7 (Not available on M400 & M600) A30 62 INJ8 Injector Output 8 (Not available on M400 & M600)
Analog Voltage Inputs A14 26 AV1 Analog Voltage Input 1 A15 18 AV2 Analog Voltage Input 2 A16 6 AV3 Analog Voltage Input 3 A17 7 AV4 Analog Voltage Input 4 A25 12 AV5 Analog Voltage Input 5 B20 36 AV6 Analog Voltage Input 6 B21 35 AV7 Analog Voltage Input 7 B22 44 AV8 Analog Voltage Input 8
Analog Temp Inputs B3 28 AT1 Analog Temperature Input 1 B4 38 AT2 Analog Temperature Input 2 B5 30 AT3 Analog Temperature Input 3 B6 39 AT4 Analog Temperature Input 4 B7 29 AT5 Analog Temperature Input 5 B19 37 AT6 Analog Temperature Input 6
Digital Inputs B8 46 DIG1 Digital Input 1 B9 45 DIG2 Digital Input 2 B10 52 DIG3 Digital Input 3 B11 53 DIG4 Digital Input 4
Trigger Inputs B1 49 REF Crank Reference Timing Input B2 56 SYNC Cam Sync Timing Input
Lambda Inputs B26 60 LA1-P Lambda1 Pump Current B25 54 LA1-S Lambda1 Sense Voltage B13 61 LA2-P Lambda2 Pump Current (Not available on M400) B12 55 LA2-S Lambda2 Sense Voltage (Not available on M400)

90 Appendices
Comms B17 40 TX-232 RS232 Transmit Data B18 31 RX-232 RS232 Receive Data B24 47 CAN-LO Can Bus Low B23 48 CAN-HI Can Bus High B14 13 0V-COM 0V Comms A13 2 8V-AUX 8V Auxiliary Sensor and CAN Supply Note Outputs marked * do not have a recirculation diode, see the Output Specifications for more detail.

MoTeC 91
Blac
k
Gre
y
Yello
w
Whi
te
Red
Not
Use
dH
eate
r +12
Hea
ter-
Sens
or 0
VVs Ip
6 5 4 3 2 1
ECU
Set
up
La1
( La
2 )
VA
LUE
38
=
La2
VAL
UE
1
0=
SEN
SOR
SE
TUP
- S
ENS
OR
CA
LIBR
ATIO
N
La1
VAL
UE
9=
Aux
Out
put
FU
NC
TIO
N 9
=IN
PU
T/O
UTP
UT
FUN
CTI
ON
S -
AU
XILI
ARY
OU
TPU
T
SEN
SO
R S
ETU
P -
CH
AN
NEL
AS
SIG
NM
ENTS
- SC
RE
EN 1
Qui
ck L
ambd
aM
ode
Type
VA
LUE
1=SE
NS
OR
SE
TUP
- L
AM
BDA
SEN
SO
R S
ETU
P
Cal
Num
ber
VAL
UE
n
umbe
r eng
rave
d on
sen
sor
=W
ill de
pend
on
how
may
sen
sors
are
used
and
cha
nnel
ass
ighn
men
ts
E
nsur
e th
e fo
llow
ing
"Lam
bda
Sen
sor"
par
amet
ers
are
set.
12V
Fro
m E
CU
rela
y
B26
(B
13)
LA
1P (
LA2P
)
23, 3
2, 4
1 +
12 V
olt
NO
TE 2
Hea
ter +
12
Hea
ter-
Sens
or 0
V
B25
(B
12)
LA
1S (
LA2S
)VsIp 12
V F
rom
EC
U re
lay
60 (
61)
LA
1P (L
A2P
)
27
Eng
ine
Sens
or
0 V
olt
NO
TE 2
Hea
ter +
12
Hea
ter-
Sens
or 0
V
54 (
55)
LA
1S (
LA2S
)VsIp
B16
En
gine
Sen
sor
0
Vol
t
A26
+1
2 Vo
lt
Not
e 1
Not
e 2
Info
rmat
ion
in b
rack
ets
() in
dica
tes
wiri
ngfo
r Lam
bda
2 in
put.
Any
AU
X, In
ject
or o
r Ign
ition
out
put c
an b
eus
ed fo
r the
Hea
ter c
ontro
l.
Not
e 1

92
REF(Magnetic)
ManifoldPressure
ThrottlePosition
A13
B2
B1
A15
A14
AV 2
AV 1
A20
AUX OUTPUTS
Stepper Motor, Relays or Valves
Injector 2
IgnitionSystem
See DetailDrawings
A10, A11
- +12 VoltBattery
ChassisEarth
12V
GND
20 AmpFuse
Refer to theTrigger Drawingsfor details
Sensors InjectorsECU Connect in firing orderfor sequential operation
2 nd
A19Injector 1 1 st
A21Injector 3 3 rdA22Injector 4 4 th
A1Aux 2A18Aux 1A23Aux 3 A24Aux 4
A32Aux 6A31Aux 5A33Aux 7
A26Aux 8
A4Ignition 2A3Ignition 1A5Ignition 3 A6Ignition 4
Note 2
Note 3
Note 120 AmpFuse
+
_
SYNC(Magnetic)
+
_
REF(Hall or Optical)
B2
B1
8V Aux Power
REF+
_Sig
SYNC(Hall or Optical)
+
_Sig SYNC
A12 8V Eng
AirTemp
B3 AT 1
EngineTemp B16 0V Eng
Lambda 1
B25LA1PB26 LA1S
5V EngA2
B4 AT 2
A9 5V Aux Power Power to Auxiliary sensors
0V Aux PowerB15
DIGITALINPUTS
AT 4AT 3
AT 5AT 6
AV 8
CAN LO
B5B6B7
B19
B22
Dig 1
Dig 3Dig 4
B8B9B10B11
ANALOGTEMP INPUTS
CAN HI
RS 232 Rx0V Comms
235
ANALOGVOLT INPUTS
IgnitionSwitch
CAN ConnectorDeltron716-0-0501
AV 7B21
AV 3
AV 5AV 6
A16A17A25B20
Note 2To avoid the fuse blowing due to reversebattery polarity use a diode activated relayeg. Bosch 0332 014 112
Note 1The Fuse is essential to ensure that theECU is not damaged by reversed batterypolarity
Auxiliary Sensor 0 Volt
A9
A10 A17
A18 A25
A26 A34
B1A1 B7
B8
B14
B20
B13
B19
B26
Looking into Connector on ECU
B24B23
B17B18B14
Note 4
See drawingX25 for wiringdetails
A34
Relays or Valves
14
35
Serial ConnectorD9 female

MoTeC 93
REF(Magnetic)
ManifoldPressure
ThrottlePosition
A13
B2
B1
A15
A14
AV 2
AV 1
A20
AUX OUTPUTS
Stepper Motor, Relays or Valves
Injector 2
IgnitionSystem
See DetailDrawings
A10, A11
- +12 VoltBattery
ChassisEarth
12V
GND
20 AmpFuse
Refer to theTrigger Drawingsfor details
Sensors InjectorsECU Connect in firing orderfor sequential operation
2 nd
A19Injector 1 1 st
A21Injector 3 3 rdA22Injector 4 4 th
A28Injector 6 6 th
A27Injector 5 5 th
A1Aux 2A18Aux 1A23Aux 3 A24Aux 4
A32Aux 6A31Aux 5A33Aux 7
A26Aux 8
A4Ignition 2A3Ignition 1A5Ignition 3 A6Ignition 4A8Ignition 6A7Ignition 5
Note 2
Note 3
Note 120 AmpFuse
+
_
SYNC(Magnetic)
+
_
REF(Hall or Optical)
B2
B1
8V Aux Power
REF+
_Sig
SYNC(Hall or Optical)
+
_Sig SYNC
A12 8V Eng
AirTemp
B3 AT 1
EngineTemp B16 0V Eng
Lambda 1
B25LA1PB26 LA1S
Lambda 2
B12LA2PB13LA2S
5V EngA2
B4 AT 2
A9 5V Aux Power Power to Auxiliary sensors
0V Aux PowerB15
DIGITALINPUTS
AT 4AT 3
AT 5AT 6
AV 8
CAN LO
B5B6B7
B19
B22
Dig 1
Dig 3Dig 4
B8B9B10B11
ANALOGTEMP INPUTS
CAN HI
RS 232 Rx0V Comms
235
ANALOGVOLT INPUTS
IgnitionSwitch
CAN ConnectorDeltron716-0-0501
AV 7B21
AV 3
AV 5AV 6
A16A17A25B20
Note 2To avoid the fuse blowing due to reversebattery polarity use a diode activated relayeg. Bosch 0332 014 112
Note 1The Fuse is essential to ensure that theECU is not damaged by reversed batterypolarity
Auxiliary Sensor 0 Volt
A9
A10 A17
A18 A25
A26 A34
B1A1 B7
B8
B14
B20
B13
B19
B26
Looking into Connector on ECU
B24B23
B17B18B14
Note 4
See drawingX25 for wiringdetails
A34
Relays or Valves
14
35
Serial ConnectorD9 female

94
REF(Magnetic)
ManifoldPressure
ThrottlePosition
A13
B2
B1
A15
A14
AV 2
AV 1
A20
AUX OUTPUTS
Stepper Motor, Relays or Valves
Injector 2
IgnitionSystem
See DetailDrawings
A10, A11
- +12 VoltBattery
ChassisEarth
12V
GND
20 AmpFuse
Refer to theTrigger Drawingsfor details
Sensors InjectorsECU Connect in firing orderfor sequential operation
2 nd
A19Injector 1 1 st
A21Injector 3 3 rdA22Injector 4 4 th
A28Injector 6 6 th
A27Injector 5 5 th
A29Injector 7 7 thA30Injector 8 8 th
A1Aux 2A18Aux 1A23Aux 3 A24Aux 4
A32Aux 6A31Aux 5A33Aux 7
A26Aux 8
A4Ignition 2A3Ignition 1A5Ignition 3 A6Ignition 4A8Ignition 6A7Ignition 5
Note 2
Note 3
Note 120 AmpFuse
+
_
SYNC(Magnetic)
+
_
REF(Hall or Optical)
B2
B1
8V Aux Power
REF+
_Sig
SYNC(Hall or Optical)
+
_Sig SYNC
A12 8V Eng
AirTemp
B3 AT 1
EngineTemp B16 0V Eng
Lambda 1
B25LA1PB26 LA1S
Lambda 2
B12LA2PB13LA2S
5V EngA2
B4 AT 2
A9 5V Aux Power Power to Auxiliary sensors
0V Aux PowerB15
DIGITALINPUTS
AT 4AT 3
AT 5AT 6
AV 8
CAN LO
B5B6B7
B19
B22
Dig 1
Dig 3Dig 4
B8B9B10B11
ANALOGTEMP INPUTS
CAN HI
RS 232 Rx0V Comms
235
ANALOGVOLT INPUTS
IgnitionSwitch
CAN ConnectorDeltron716-0-0501
AV 7B21
AV 3
AV 5AV 6
A16A17A25B20
Note 2To avoid the fuse blowing due to reversebattery polarity use a diode activated relayeg. Bosch 0332 014 112
Note 1The Fuse is essential to ensure that theECU is not damaged by reversed batterypolarity
Auxiliary Sensor 0 Volt
A9
A10 A17
A18 A25
A26 A34
B1A1 B7
B8
B14
B20
B13
B19
B26
Looking into Connector on ECU
B24B23
B17B18B14
Note 4
See drawingX25 for wiringdetails
A34
Relays or Valves
14
35
Serial ConnectorD9 female

MoTeC 95
REF(Magnetic)
ManifoldPressure
ThrottlePosition
2
56
49
18
26
AV 2
AV 1
50
AUX OUTPUTS
Stepper Motor, Relays or Valves
Injector 2
IgnitionSystem
See DetailDrawings
14,15,19
- +12 VoltBattery
ChassisEarth
12V
GND
20 AmpFuse
Refer to theTrigger Drawingsfor details
Sensors InjectorsECU Connect in firing orderfor sequential operation
2 nd
33Injector 1 1 st
63Injector 3 3 rd66Injector 4 4 th
42Injector 6 6 th
24Injector 5 5 th
57Injector 7 7 th62Injector 8 8 th
8Aux 29Aux 143Aux 3
Aux 4
65Aux 659Aux 558Aux 7
23,32,41Aux 8
5Ignition 21Ignition 14Ignition 3 10Ignition 425Ignition 617Ignition 5
Note 2
Note 3
Note 120 AmpFuse
+
_
SYNC(Magnetic)
+
_
REF(Hall or Optical)
56
49
8V Aux Power
REF+
_Sig
SYNC(Hall or Optical)
+
_Sig SYNC
3 8V Eng
AirTemp
28 AT 1
EngineTemp 27 0V Eng
Lambda 1
54LA1P60 LA1S
Lambda 2
55LA2P61LA2S
5V Eng16
38 AT 2
34 5V Aux Power Power to Auxiliary sensors
0V Aux Power11
DIGITALINPUTS
AT 4AT 3
AT 5AT 6
AV 8
30392937
44
Dig 1
Dig 3Dig 4
46455253
ANALOGTEMP INPUTS
ANALOGVOLT INPUTS
IgnitionSwitch
AV 735
AV 3
AV 5AV 6
67
1236
Note 2To avoid the fuse blowing due to reversebattery polarity use a diode activated relayeg. Bosch 0332 014 112
Note 1The Fuse is essential to ensure that theECU is not damaged by reversed batterypolarity
0V To AuxiliarySensors
Looking intoConnector on ECU
4748
403113
Note 4
See drawingX25 for wiringdetails
64
Relays or Valves
20,21,22
CAN LOCAN HI
RS 232 Rx0V Comms
235
CAN ConnectorDeltron716-0-0501
14
35
Serial ConnectorD9 female

96 Notes

MoTeC Notes 97

98 Notes

MoTeC Notes 99