motherboards chapter 6. overview in this chapter, you will learn to –explain how motherboards work...
TRANSCRIPT

MotherboardsChapter 6

Overview
• In this chapter, you will learn to– Explain how motherboards work– Identify the types of motherboards– Explain chipset varieties– Upgrade and install motherboards– Troubleshoot motherboard problems

How Motherboards Work

Motherboard Layouts
• The particular way in which the components are positioned on a motherboard is called the form factor

The AT Form Factor
• IBM invented the AT form factor in the early 80s– Massive in size as they carry a large number of
individual chips– Lacked support for any connections other than the
keyboard– Expansion slots were used to add additional
connectors to the motherboard– As the technology grew demand for smaller PCs led
to creating a smaller motherboard called the Baby AT

An AT Motherboard
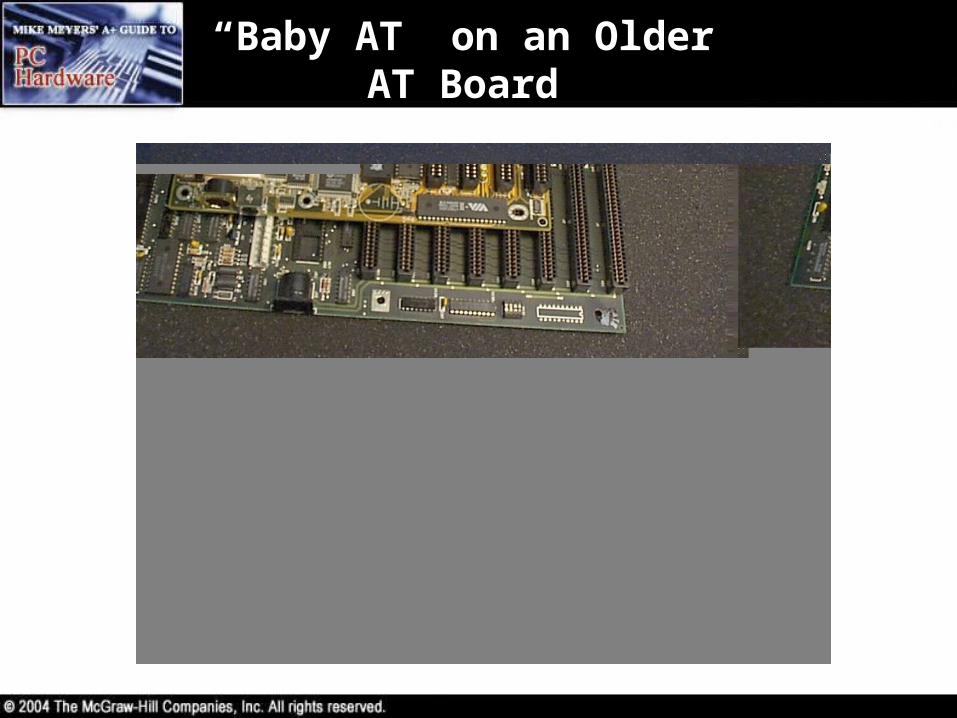
“Baby AT” on an Older AT Board

The Need for a New Form Factor
• Added components such as a mouse and modem created a demand for a new form factor with more dedicated connectors
• The new form factors integrated dedicated connectors for the mouse and printer, as well as added connectors for video, sound, and phone

The Need for a New Form Factor
• The first slimline form factor was known as LPX and was replaced by the NLX form factor
• The LPX, and now the NLX, provide a slot for the insertion of a special riser card
• Inflexibility was the main problem with form factors like the LPX

ATX
• The ATX form factor was created in 1995– Uses the soft power feature to turn a PC on and off
through software
• Micro ATX and Flex ATX two smaller versions of ATX– Many techs and web sites use the term mini-ATX to
describe these boards
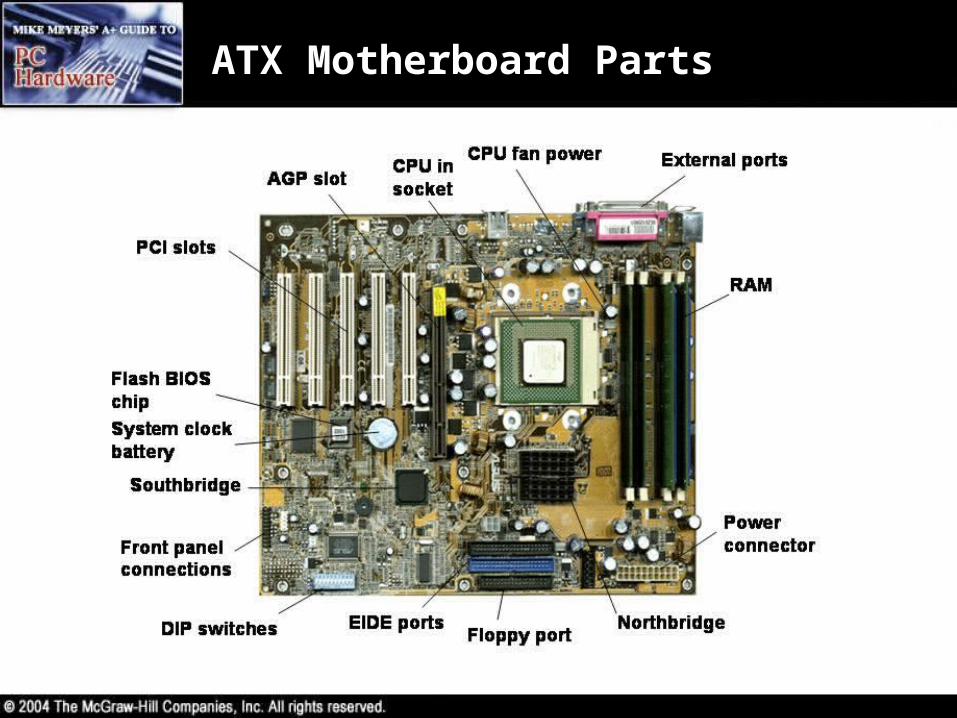
ATX Motherboard Parts

ATX Motherboard External Connection Ports

Micro ATX

Layers of the PCB
• Motherboards are officially printed circuit boards (PCBs)– PCBs come in multiple
layers with highways of wires (bus systems) in the layers carrying data back and forth between the CPU, Northbridge, RAM, and peripherals
• These highways of wires are called traces as can be seen coming from the CPU on the back of the motherboard shown

Chipset Varieties

Chipsets
• A chipset defines the processor type, type and capacity of RAM, and what internal and external devices the motherboard will support– Serves as an electronic interface among the CPU,
RAM, and input/output devices

Chipset Chips
• Northbridge– Helps the CPU work with RAM– Also called the Memory Controller Hub (MCH) or
system controller
• Southbridge– Handles expansion devices and mass storage
drives– Sits between expansion slots and the EIDE and FDD
controllers– Also called the I/O Controller Hub (ICH5) or
peripheral bus controller
• Super I/O Chip– Provides legacy support

Who Makes PC Chipsets?
• Intel• VIA• AMD • SiS• Ali• NVidia

Schematic for VIA KT400A Chipset

Chipset Comparison Chart
• Chipsets change constantly but here’s a partial look and comparison…
Legacy-free Motherboards
• Intel along with chipset manufacturers like VIA, NVIDIA, and others have dropped support for ISA slots, serial and parallel ports, infrared, PS/2 ports, and floppy drives– But many motherboards on the market today that
use these new chipsets include other chips to still support some of these legacy features
– Some of these motherboards also support better technology than provided by the chipset alone

Upgrading and Installing Motherboards

• Modern motherboards can fit into any type of case manufactured today– Use AT boxes for AT motherboards– Use ATX boxes for ATX motherboards
• Make the seller guarantee the CPU and motherboard will work together
• Cases come in five basic sizes: slimline, desktop, mini-tower, mid-tower, tower– Most Micro and Flex ATX cases are too small for a
regular ATX motherboard– Best thing to do is to physically check to make sure the
motherboard fits in the case– Cases come with different options
Choosing the Motherboard and Case

Removable Face or Bezel

Motherboard Tray

Removing the Motherboard
1. Remove all the cards2. Remove obstructing drives3. Remove the power supply (only if
necessary)4. Document the position for wires for the
speaker, turbo switch, turbo light5. Unscrew the old motherboard
– The motherboard mounts to the case with small connectors called standouts

Installing the New Motherboard
1. Install the CPU and RAM on the new motherboard before putting it in the case
2. Mount the new motherboard in the case3. Reinstall the hard drive(s), power
supply, and so forth that had to be removed to get the old motherboard out
4. Insert the power connections and other wires
5. Test!

LED and Switch Connections

Troubleshooting Motherboards

Troubleshooting Symptoms
• Catastrophic failure– System will not boot– Although uncommon most motherboards will fail (if
they’re going to) within the first 30 days due to manufacturing defects – called burn-in failure
– Electrostatic discharge is the other most common cause
– To fix, replace the motherboard

More Troubleshooting Symptoms
• Component failure– Intermittent problems– Examples include a hard drive that shows up in
CMOS but not in Windows– Most common causes are electrical surges and ESD– Sometimes a BIOS upgrade may solve this problem
if the issue is lack of BIOS support for a newer technology
– Fixes include replacing the component with an add-on card or flashing the BIOS

More Troubleshooting Symptoms
• Ethereal symptoms– Things just don’t work all the time– PC reboots itself for no apparent reason– Blue screens of death – Causes include faulty components, buggy device
drivers or application software, slight corruption of the operating system, and power supply problems
– Fixes include flashing the BIOS or replacing the motherboard

Troubleshooting Techniques
• Isolate the problem by eliminating potential factors– If the hard drive doesn’t work, try a different hard
drive or try the same hard drive with a different motherboard
• If the new hard drive works, then it wasn’t the motherboard• If the same hard drive with a different motherboard works,
then suspect the motherboard

Beyond A+
• Relatively new in PC technology– Intel’s WTX standard for multi-processor servers– VIA’s two tiny form factors called ITX and Mini-ITX– Shuttle’s new form factor resulting in PCs the size
of a toaster but still just as powerful
