motor programming instructions ac mechanical limit tubular …
TRANSCRIPT
FEATURES:
• Line Voltage available in 120V (US applications) and 240V (AU and EU applications)
• “Slim Head” design minimizes light gap
• Low Operating Noise Levels.
• Adjustable Mechanical Limits
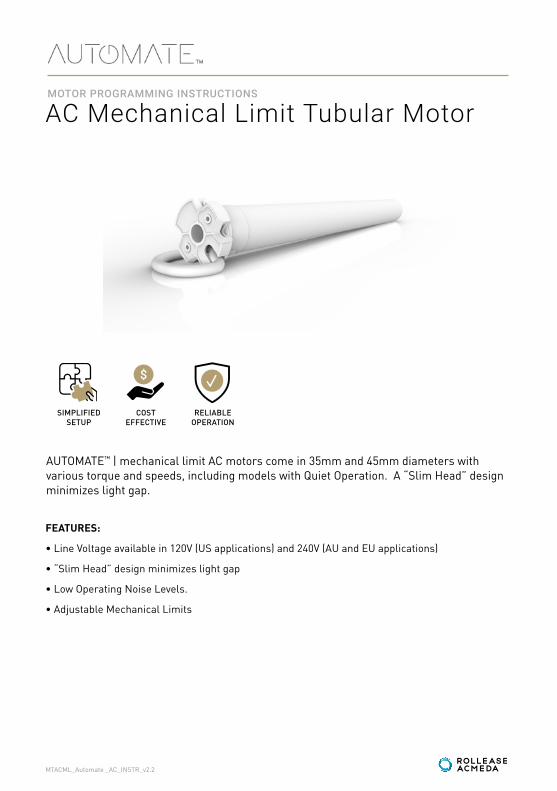
AUTOMATE™ | mechanical limit AC motors come in 35mm and 45mm diameters with various torque and speeds, including models with Quiet Operation. A “Slim Head” design minimizes light gap.
AC Mechanical Limit Tubular MotorMOTOR PROGRAMMING INSTRUCTIONS
SIMPLIFIED SETUP
COST EFFECTIVE
RELIABLE OPERATION
MTACML_Automate _AC_INSTR_v2.2
2 | Automate™ Programming Instructions | AC Mechanical ROLLEASE ACMEDA
SAFETY INSTRUCTIONS
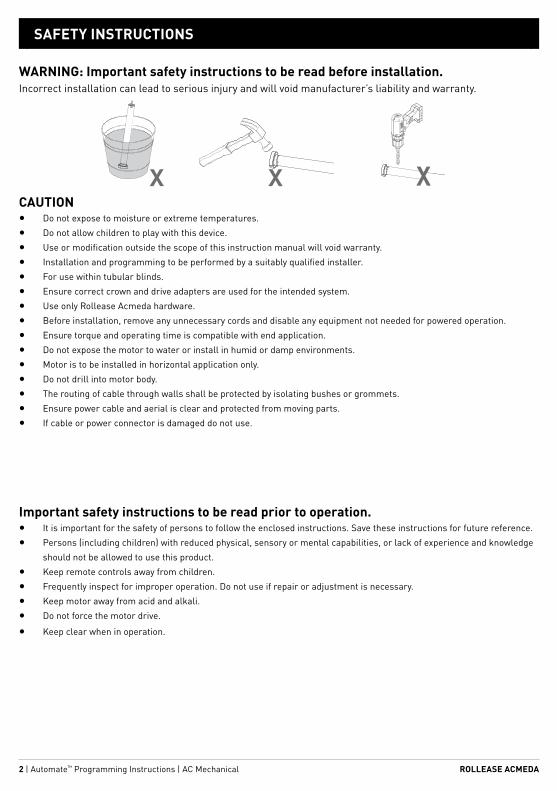
WARNING: Important safety instructions to be read before installation.Incorrect installation can lead to serious injury and will void manufacturer’s liability and warranty.
CAUTION• Do not expose to moisture or extreme temperatures.
• Do not allow children to play with this device.
• Use or modification outside the scope of this instruction manual will void warranty.
• Installation and programming to be performed by a suitably qualified installer.
• For use within tubular blinds.
• Ensure correct crown and drive adapters are used for the intended system.
• Use only Rollease Acmeda hardware.
• Before installation, remove any unnecessary cords and disable any equipment not needed for powered operation.
• Ensure torque and operating time is compatible with end application.
• Do not expose the motor to water or install in humid or damp environments.
• Motor is to be installed in horizontal application only.
• Do not drill into motor body.
• The routing of cable through walls shall be protected by isolating bushes or grommets.
• Ensure power cable and aerial is clear and protected from moving parts.
• If cable or power connector is damaged do not use.
Important safety instructions to be read prior to operation.• It is important for the safety of persons to follow the enclosed instructions. Save these instructions for future reference.
• Persons (including children) with reduced physical, sensory or mental capabilities, or lack of experience and knowledge
should not be allowed to use this product.
• Keep remote controls away from children.
• Frequently inspect for improper operation. Do not use if repair or adjustment is necessary.
• Keep motor away from acid and alkali.
• Do not force the motor drive.
• Keep clear when in operation.

3 | Automate™ Programming Instructions | AC Mechanical ROLLEASE ACMEDA
CONTENTS
1 ASSEMBLY 4
2 WIRING 5
2.1 Power options 5
2.2 Check direction 5
3 ADJUST LIMITS 6
3.1 Adjust Upper Limit 6
3.2 Adjust Lower Limit 7
4 MOTOR OPERATION 8
5 TROUBLE SHOOTING 8
FCC & ISED STATEMENT
This device complies with part 15 of the FCC Rules. Operation is subject to the following two conditions: (1) This device may not cause harmful interference, and (2) this device must accept any interference received, including interference that may cause undesired operation.
Caution: Changes or modifications to this unit not expressly approved by the party responsible for compliance could void the user’s authority to operate the equipment.
This device contains licence-exempt transmitter(s)/receiver(s) that comply with Innovation, Science and Economic Development Canada’s licence-exempt RSS(s). Operation is subject to the following two conditions:
(1) This device may not cause interference.
(2) This device must accept any interference, including interference that may cause undesired operation of the device.
L’émetteur/récepteur exempt de licence contenu dans le présent appareil est conforme aux CNR d’Innovation, Sciences et Développement économique Canada applicables aux appareils radio exempts de licence. L’exploitation est autorisée aux deux conditions suivantes :
1) L’appareil ne doit pas produire de brouillage.
2) L’appareil doit accepter tout brouillage radioélectrique subi, même si le brouillage est susceptible d’en compromettre le fonctionnement.
NOTE: This equipment has been tested and found to comply with the limits for a Class B digital device, pursuant to part 15 of the FCC Rules. These limits are designed to provide reasonable protection against harmful interference in a residential installation. This equipment generates, uses and can radiate radio frequency energy and, if not installed and used in accordance with the instructions, may cause harmful interference to radio communications. However, there is no guarantee that interference will not occur in a particular installation. If this equipment does cause harmful interference to radio or television reception, which can be determined by turning the equipment off and on, the user is encouraged to try to correct the interference by one or more of the following measures:
• Reorient or relocate the receiving antenna.
• Increase the separation between the equipment and receiver.
• Connect the equipment into an outlet on a circuit different from that to which the receiver is connected.
• Consult the dealer or an experienced radio/TV technician for help.
Do not dispose of in general waste. Please recycle batteries and damaged electrical products appropriately. 5005833

4 | Automate™ Programming Instructions | AC Mechanical ROLLEASE ACMEDA
1 ASSEMBLY
Step 1. Cut roller tube to required length.
Step 2. Ensure roller tube is clean and free from burrs.
Step 3. Fit required crown, drive and bracket adapters.
Tube must be close fitting with chosen crown and drive adapters. Refer to Rollease Acmeda System Assembly Manual for recommended crown, drive, and bracket adapter kits.
Step 4. Slide Motor into tube.
Insert by aligning keyway in crown and drive wheel to the tube.
Step 5. Mount motorized tube onto brackets.
Refer to Rollease Acmeda System Assembly Manual for recommended crown, drive, and bracket adapter kits.
NOTE: Two limit apertures, red and white, should be orientated to users for easy limit adjustment
Please refer to Rollease Acmeda System Assembly Manual for full assembly instructions relevant to the hardware system being used.
Crown
Drive
Retaining Clip
Motor Head
AdapterBracket

5 | Automate™ Programming Instructions | AC Mechanical ROLLEASE ACMEDA
2 WIRING
2.1 Power options
Ensure mains power supply is off if you are adjusting cables
During operation DO NOT turn on 2 switches at the same time
MOTOR Neutral Direction 1 Direction 2 Earth
RB24-4502-xxx003 Blue Black Brown Green/Yellow
MTACQML35-6
White Red Black GreenMTACML35-6
MTAC45-20-M
MTACQ45-10-M
Cut off the mains power supply
• Connect the motor accordingly
• Ensure cable is kept clear of fabric:
After connection, switch on the “UP” button and check the shade rotating direction. If the direction does not follow the “UP” or “DOWN” mark, swap the brown and black or red and black wires to those two buttons.
NEUTRAL
Single - channel mechanical switch
N L
LIVEEARTH
2.2 Check Direction

6 | Automate™ Programming Instructions | AC Mechanical ROLLEASE ACMEDA
3 ADJUST LIMITS
3.1 Adjust upper limit
Identify the right aperture for upper limit adjustment:
• Top aperture for upper limit adjustment if the shade moves upward with clockwise rotation viewed from the right side of the shade.
• Bottom aperture for upper limit adjustment if the shade moves upward with anticlockwise rotation viewed from the right side of the shade.
Adjust the upper limit:
• Insert a Motor Limit Adjuster into the right aperture. Turn it toward the “+” mark, the upper limit is raised; turn it towards the “-” mark, the upper limit is lowered. Five revolutions of the adjuster’s rotation make the upper limit adjust by one revolution of the tube.
Upper limit is lowered
+
-
-
+
BACK ROLL
Upper limit is lowered Upper limit is raised
Upper limit is raised
+
+-
-+
+-
-+
+-
-+
+-
-
FRONT ROLL
+
-
-
+

7 | Automate™ Programming Instructions | AC Mechanical ROLLEASE ACMEDA
Identify the right aperture for lower limit adjustment:
• Bottom aperture for lower limit adjustment if the shade moves upward with clockwise rotation viewed from the right side of the shade.
• Top aperture for lower limit adjustment if the shade moves upward with anticlockwise rotation viewed from the right side of the shade.
Adjust the lower limit:
• Insert a Motor Limit Adjuster into the right aperture. Turn it toward the “+” mark, the lower limit is lowered; turn it towards the “-” mark, the upper limit is raised. Five revolutions of the adjuster’s rotation make the lower limit adjust by one revolution of the tube.
3.2 Adjust lower limit
+
+-
-+
+-
-+
+-
-+
+-
-
Lower limit is lowered
Lower limit is lowered
Lower limit is raised
Lower limit is raised
FRONT ROLL
BACK ROLL
-
+
+
-
-
+
+
-

8 | Automate™ Programming Instructions | AC Mechanical
4 MOTOR OPERATION
5 TROUBLE SHOOTING
After setup, move the shade upward by continuously pressing the UP button; move the shade downward by holding the DOWN button.
NOTE: Shade movement stops immediately if the button is released.
Problem Cause Remedy
Shade moves upward but the DOWN button is pressed. Incorrect wire connection. Swap the black and brown/red and
black wire inside the button.
After power is turned on, the motor does not move or moves slowly.
Low power voltage. Use the nominal power source.
Incorrect wire connection. Check and correct wire connection.
Overload.Check the nominal load of the motor and use the high torque motor.
Installation problem. Reinstall the motor.
Motor’s movement suspends.Rotation time is longer than 4 minutes and motor suspends due to thermal protection.
Allow the motor to cool for 20 minutes. After cooling, the motor should work normally.
ROLLEASE ACMEDA
ROLLEASE ACMEDA | AUSTRALIA
110 Northcorp Boulevard, Broadmeadows VIC 3047, AUS
T +61 3 9355 0100 | F +61 3 9355 0110
ROLLEASE ACMEDA | USA
Level 7 / 750 East Main StreetStamford, CT 06902, USA
T +1 800 552 5100 | F +1 203 964 0513
ROLLEASE ACMEDA | EUROPE
Via Conca Del Naviglio 18,
Milan (Lombardia) Italy
T +39 02 8982 7317 | F +39 02 8982 7317
automateshades.com