mr. t's book of esl activites
DESCRIPTION
Use this book for after test and free day activities in your ESL class.TRANSCRIPT

Mr. T’s Book of
Time Consumin’ Whatnot
I pity da foo’ who don’ plan their test classes and final classes!
Cuz if you don’ plan, you’ll hurt.
Endorsed by Colonel Hannibal
Stuff for after YL Tests, During Speaking Tests, and Final Classes.Plus! Some suggestions and activities for TE.

Mr. T - Cha
Teachers!
Do you know me? Of course you do. 'Cause I'm famous! Now quit your jibba-jabba and read up on my book. It’s full of stuff I found on the internets and stuff I made. It’s compiled here widda intention of keeping your kiddos from drivin’ you in-sane after written tests, during speaking tests, and during final classes. There ain’t no educational value in these activities. So don’t be no fool and use them in your usual classes! Hear?! …
(That is, of course, unless you add an educational component.)

The PLAN
Stuff Class Level Page
Suggestions for after YL and TE tests and during Speaking Tests
and Final Classes
All YL and TE 1-3
1) Super You Investigation Helmet Starters 1 – Movers 2 4
2) Macaronisaurus Starters 1 – Flyers 4 7
3) Rabid Bear Starters 1 – Starters 3 10
4) Frog Headband Starters 1 – Starters 3 10
5) Class is Better Under the Sea Starters 1 – Movers 2 13
6) Fold-n-Cut Butterfly Starters 1 – Movers 2 13
7) No David! Mask Starters 1 – Flyers 4 17
8) 3-D Raptor Starters 1 – Flyers 4 19
9) Dino Skeleton Starters 1 – Flyers 4 19
T Time: “You gotta have a plan. Like I tell anybody, if you fail to plan, you're planning to fail. I've been planning ever since I was a youngster. You've got to start from somewhere. There's nothing wrong or demeaning in flipping burgers.”

The PLAN
Stuff Class Level Page
10) Dinosaur Masks Starters 1 – Movers 3 22
11) Animal Finger Puppets Starters 1 – Starters 3 26
12) Dressy Cats Starters 1 – Flyers 4 26
13) Paperclip Toys Starters 1 – Flyers 4 30
14) Welcome to Paper Town Movers 1 – Flyers 4 33
15) Making Max Starters 1 – Movers 2 37
16) Making Your Very Own Paper Person!
Starters 1 – Movers 2 37
17) Coloring Sheets Starters 1 – Flyers 4 40
18) Halloween Scene Starters 3 – Flyers 4 51
19) Bienvenue à Paper Paris Flyers 1 + and TE Elem 3 + 54
Make-a-Manga All TE 56
20) Paper iPhone All TE 59
T Time: “Where's the meat? This sandwich is full of weeds! I ain't eatin' nothing I don't understand!”

After YL and TE Tests, during Speaking Tests, and during Final Classes you can…
After YL Tests and During YL Speaking Tests
•Write a schedule on the board that looks something like the box to the right.
•The kids cannot do the next thing on the schedule until they have done what comes before.
1. Do your test2. Read a book
3. Do an activity4. Play Uno/Play with toys/Do word searches/ Coloring
5. Play cards
2. The students can read books from the collection of picture books in the Teacher’s Room or the RC.
3. These activities are contained within this book. Several of them should take your students the entire remaining class period.
4. ‘Uno’ should be available at your school. There are instructions online. You can create word-searches at puzzlemaker.com, toolsforeducators.com, or
discoveryeducation.com/freepuzzlemaker (thanks Sherry).
5. Playing cards should be a last resort since they are completely non-educational. But, it seems as though even Starters 1 students can play some
card games and absolutely love it. They will play for hours if allowed to. (Don’t allow them to.)
Students CANNOT go to the Resource Center. They are your responsibility. 1

After TE Tests and During TE Speaking Tests
Write a schedule on the board that looks something like this:
1. Do your test2A. Do one of their written
assignments2B. Read a book/Magazine
3. Do an activity4. Play Uno/Play Cards
2A: If it is a speaking test day, save one of their four written assignments that they have to do for homework. They can at least start it in class. Don’t do this for a test
day. That would be too much to ask.
2B: The students can read books from the collection of chapter books in the the RC. As far as magazines, ‘The Word’ magazine is a pretty safe choice. Grab a handful
from around town if there are not any at your school (it is free). It is a good idea to flip through and remove any swimsuit pictures and whatnot before class.
3: These activities are contained within this book. Activities 19 and 20 are the most likely to engage teens. There are also fun activities in Teen World, Pairwork and
Groupwork, and Film, TV, and Music. (These books should be in your school’s resource library.)
4: ‘Uno’ should be available at your school. There are instructions online. Playing cards should be a last resort since they are completely non-educational.
Students CANNOT go to the Resource Center or leave the building. They are your responsibility.
After YL and TE Tests, during Speaking Tests, and during Final Classes you can…
2

After YL and TE Tests, during Speaking Tests, and during Final Classes you can…
Final YL and TE ClassesWrite a schedule on the board that looks
something like this:
1. Game2. Party
3. Test Review4. Project5. Game
6. Hand Out Certificates7. Bye-Bye
1: Play their favorite warmer or game.
2: Have a ‘party’ with the snacks that are provided to you by Admin.
3: Play a game with the test answers. Focus on reviewing sections the students struggled with.
4: Do a lengthy activity from this book or Walker, Project Maker.
5: Play another game
6: Make sure to hand out their certificates and report cards.(Don’t forget to sign the report cards!)
7: No need to explain.
T Time: Don't make me mad, Arrr! 3

1) Super You Investigation HelmetBrought to you by Grover, resident of Sesame Street NYC
Source: sesamestreet.org
T Time: Quit yo Jibber-jabber! You ain't hurt, yo pathetic!, Argh! If I ever catch you acting like a crazy fool again, you're gonnameet my friend pain! Snickers, get some nuts!
Levels: Starters 1 – Movers 2Materials: copies of the ‘Super You Investigation Helmet’ parts one and
two, scissors, crayons, tape
Instructions1. Allow the interested students to take a copy of the ‘Investigation
Helmet.’ Have another activity for the students to choose from as well.
2. They can color the helmet as they like. Then they should cut it out.5. While they are working you can make a whole bunch of little pieces
of tape and stick them to the bottom of the board so that they hang down a little bit. When the students are ready, they can come up and get three pieces of tape. They should use the tape to stick the sides of the helmet to the front and to close the helmet’s headband.
6. This could be extended by having them write about the super powers the helmet gives them. Example: “Now I can fly . Now I can speak Hawiian.”
Picture below from teezeria.comPicture from sesamestreet.org
4

Super You, Part 1
5

Super You, Part 2
6
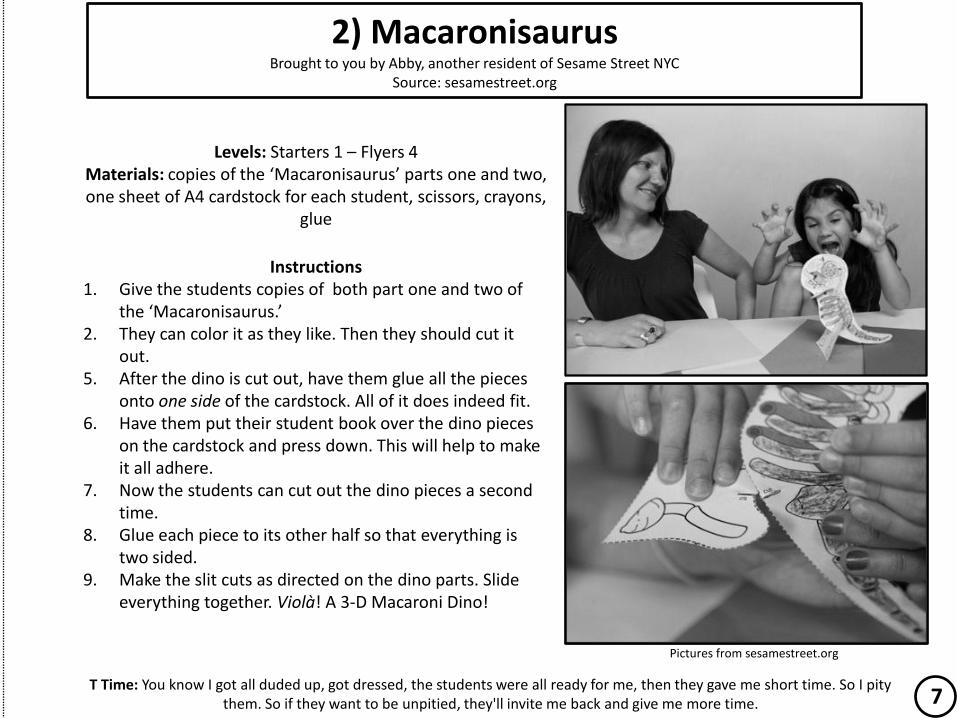
2) MacaronisaurusBrought to you by Abby, another resident of Sesame Street NYC
Source: sesamestreet.org
T Time: You know I got all duded up, got dressed, the students were all ready for me, then they gave me short time. So I pity them. So if they want to be unpitied, they'll invite me back and give me more time.
Pictures from sesamestreet.org
Levels: Starters 1 – Flyers 4Materials: copies of the ‘Macaronisaurus’ parts one and two, one sheet of A4 cardstock for each student, scissors, crayons,
glue
Instructions1. Give the students copies of both part one and two of
the ‘Macaronisaurus.’ 2. They can color it as they like. Then they should cut it
out.5. After the dino is cut out, have them glue all the pieces
onto one side of the cardstock. All of it does indeed fit. 6. Have them put their student book over the dino pieces
on the cardstock and press down. This will help to make it all adhere.
7. Now the students can cut out the dino pieces a second time.
8. Glue each piece to its other half so that everything is two sided.
9. Make the slit cuts as directed on the dino parts. Slide everything together. Violà! A 3-D Macaroni Dino!
7
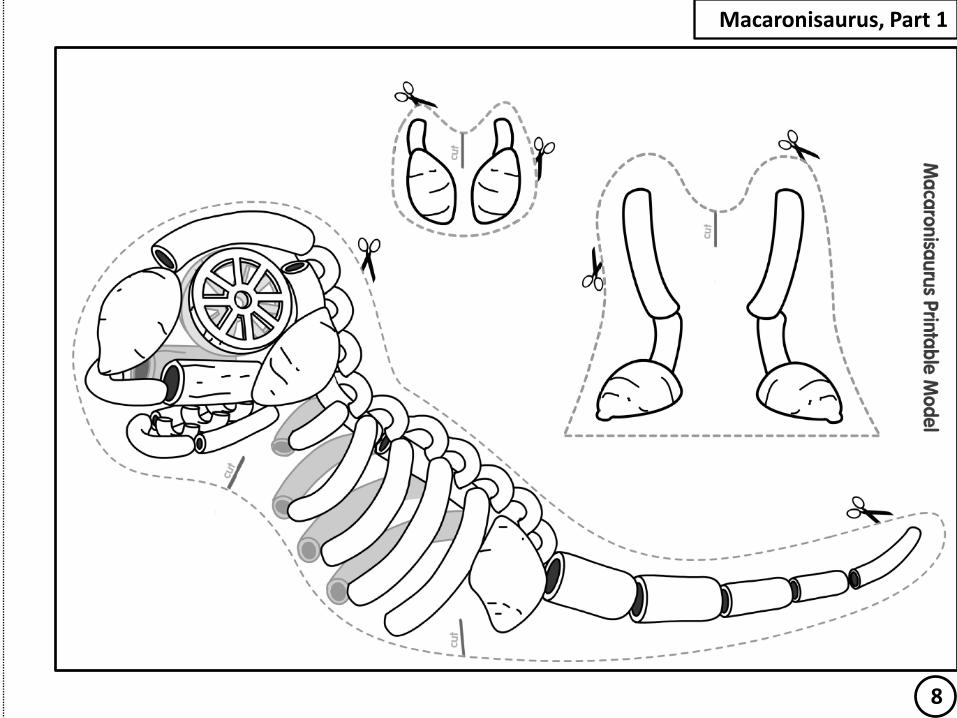
Macaronisaurus, Part 1
8

Macaronisaurus, Part 2
9

3) Rabid BearHe looks cute, but don’t get too close…
Source: A filing cabinet at Milliken Elementary
T Time: SPEEDWALKING?! I pity you fool! You a disgrace to the man race! It's time to run like a real man! Take that speedwalker! Do it again sucker, and there's going to be trouble! With a capital Mr.T! Snickers, get some nuts!
4) Frog HeadbandIt gives you warts.
Source: sesamestreet.org
Levels: Starters 1 – Starters 3Materials: copies of the ‘Rabid Bear’ parts, scissors, crayons, glue
Instructions1. Allow the interested students to take a copy of the bear parts. Have
another activity for the students to choose from as well. 2. They can decorate the bear as they like, cut it out, and glue it together.3. If you are doing this with a low level class, an example will be invaluable.
Materials on page 11
Levels: Starters 1 – Starters 3Materials: copies of the ‘Frog Headband,’ scissors, crayons, tape
Instructions1. Allow the interested students to take one copy of the headband. Have
another activity for the students to choose from as well. 2. They can decorate it, cut it out, and tape the loop together.3. If you are doing this with a low level class, an example will be valuable.
Materials on page 12
10

Rabid Bear
11

Frog Headband
12

5) Class is Better Under the SeaTake it from me.
T Time: First name Mr, middle name 'period', last name T!
6) Fold-n-Cut ButterflyLevels: Starters 1 – Movers 2
Materials: copies of the ‘Fold-n-Cut’ sheet, scissors, crayons, tape, stringInstructions
1. Draw an example butterfly on the WB. Show them how the patterns on the wings are symmetrical.2. Allow the students who are interested to take a copy of the sheet. This activity is good to do in
conjunction with the ‘Class is Better Under the Sea’ fish since neither one is very time consuming.3. Show them how to fold the paper over on the dotted line and cut so that the butterfly is shaped
symmetrically.4. The students decorate.5. Have them tape a piece of string to the back with a paperclip attached. Just like with the fish above.
Materials on page 16
Levels: Starters 1 – Movers 2Materials: copies of the ‘Class is Better Under the Sea’ fish, scissors, crayons,
tape, stringInstructions
1. Allow the interested students to take one fish each.2. They can decorate the fish as they like. This activity can be extended
with Hooray for Fish students can write the adjectives in the book on the back of their fish.
3. Once they are done, give them a foot and a half length string with a paperclip attached. They should tape this to the back of their fish. After class, you can push the paper clips between the ceiling tiles and the metal borders to create an ‘under the sea classroom’ for next time.
Materials on page 14 & 15
13

Class is Better Under the Sea
14

Class is Better Under the Sea
15

Fold-n-CutButterfly
16

T Time: Anger - use it, but don't lose it!
7) No David! MaskLevels: Starters 1 – Flyers 4
Materials: copies of the ‘David Mask’, scissors, crayons, tape, glue, popsicle sticks
This activity was borrowed with permission from Bruce Lee.If you have already done this with your kids, you can still bring it in as one of the optional activities for
after the test. You might be surprised how many kids choose to make it again.
Instructions1. Make sure you have read the students No David!2. The students can cut everything out and glue the features on the face. Show them how they can
make David happy, sad, or even angry.3. Tape the face onto a popsicle stick or a chopstick. Now you have a mask…of sorts.4. For Starters 1 or 2 you can play a game of ‘David Says’ at the end of class. Unlike ‘Simon Says,’ don’t
omit saying ‘David Says’ to trick the kids. They never understand that at low levels.
17

No David Puppet Mask
18

8) 3-D RaptorSource: I can’t remember
Levels: Starters 1 – Flyers 4Materials: copies of the Raptor sheet, scissors, crayons, tape or glue
Instructions1. Read and follow the instructions on the sheet to make an example before class or with the students. 2. It is best to put this out with the ‘Dino Skeleton’ activity and/or some other activities since this one
won’t take much time. Materials on page 20
9) Dino SkeletonSource: Internets Land
Levels: Starters 1 – Flyers 4Materials: copies of the Dino Skeleton sheet, scissors, crayons, glue.
Instructions1. Put out the copies of the ‘Dino Skeleton’ sheet
along with some other activities. 2. The students should color the Dinosaur, cut it
out, and put it together.3. To make the dinosaur skeleton stand, follow
the instructions for making a ‘Paperclip Toy.’4. To extend this activity for a low level class,
have them label the body parts on the back (head, neck, tail, etc.)
Materials on page 21
T Time: As a kid, I got three meals a day. Oatmeal, miss-a-meal and no meal. 19

Raptor
20

Dino Skeleton
21

“Now this end is called the Thagomizer…after the late Thag
Simmons.”Gary Larson, The Far Side
10) Dinosaur Masks Source: The Cretaceous
Levels: Starters 1 – Movers 3Materials: photocopies of the three Dino masks, scissors, crayons,
tape popsicle sticks/string.
Instructions1. Let students choose which mask they want to
make.2. Students color and cut out the masks.3. If available, help the students to put string on
the back of the masks so that they can wear them. If there is no string available, you can tape popsicle sticks onto the back.
T Time: Calvin Klein and Gloria Vanderbilt don't wear clothes with your name on it, so why should you wear their name?
Although it lasted only 2 million years,
the Awkward Age was considered a
hazardous time for most species.
Gary Larson, The Far Side
22

Dino Mask 1
23

Dino Mask 2
24

Dino Mask 3
25

11) Animal Finger PuppetsSource: madebyjoel.com
T Time: Hey, you with the teeth...
Levels: Starters 1 – Starters 3Materials: copies of the ‘Animal Finger Puppets’ sheet, crayons, scissors, tape.
Instructions1. Review/Teach the animals on the sheet before handing it out. Your guess is as good as mine what
animal is in the upper left corner. 2. Hand out the sheet and have the students color them.3. Cut them out.4. Have the students wrap them around their fingers. Either you our each students’ parter can put
tape down the side of the puppet.5. Have fun.
12) Dressy CatsDressy Cats from: madebyjoel.com
Levels: Starters 1 – Flyers 4Materials: copies of the ‘Dressy Cats,’ scissors, crayons, tape, paperclips,
and (ideally) sheets of cardstock).
This is a good activity to in conjunction with the ‘Paperclip Toys’ (next activity) so that students can have a choice between two fairly
genderized activities. Instructions
1. Put out the copies of the ‘Paperclip Toys’ and ‘Dressy Cats’ sheets along with the ‘Paperclip Toys’ and allow students to choose what they want to do. They can choose one sheet.
2. For the ‘Dressy cats’ they should first color then cut-out and dress the cats.3. Next, bend the ‘tape and glue’ flap around to make a cone tube-cat.4. Last, they can color the cat-house and fold it so it stands.
Materials on page 28 & 2926
Materials on page 27

Animal Finger Puppets
27
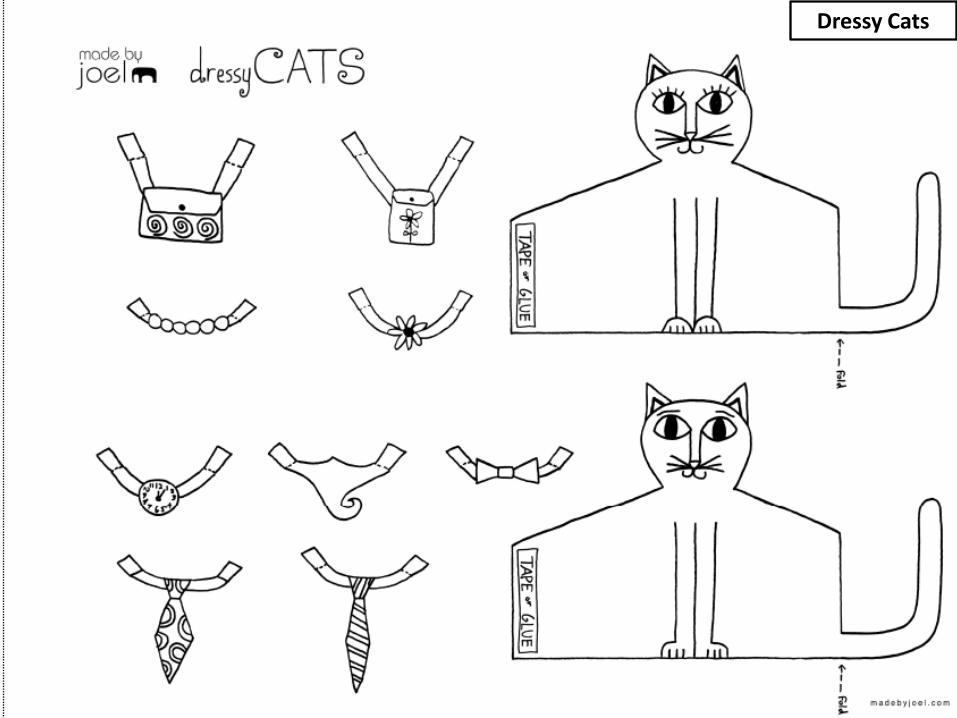
Dressy Cats

Fold
Fold
Dressy Cat-House
1) Cut the black lines 2) Fold the dotted lines
29

13) Paperclip Toys
Levels: Starters 1 – Flyers 4Materials: copies of the ‘Paperclip Toys,’ scissors, crayons, tape,
paperclips, and (ideally) sheets of cardstock).
This is a good activity to in conjunction with the ‘Dressy Cats’ (prior activity) so that students can have a choice between uber-boy
activity and non-uber-boy activity.
Picture from madebyjoel.comInstructions1. Put out the copies of the ‘Paperclip Toys’ and ‘Dressy Cats’ sheets and allow students to choose what they
want to do. They can choose one sheet. 2. For the ‘Paperclip Toys’ they should first color. Then glue the un-cut toy sheet to a piece of cardstock. They
can put the glued together sheets on the floor, put their book over it, and sit on it. This will help the glue adhere and it will be funny.
3. After they have sat on it for a minute, then they can cut out each toy.4. Give each student enough paperclips for each toy and show them how
to bend them at a 90 degree angle5. While they are working you can make a whole bunch of little pieces of
tape and stick them to the bottom of the board so that they hang down a little bit. When the students are ready, they can come up and get pieces of tape. They should use the tape to stick the paperclip to the back of their toy.
6. Now the Dinos, Zombies, Ben 10s, Angry Birds, Storm Troopers, and Evil Pigs can all fight to the death.
T Time: That's the message the kids need to hear coming from me. I tell them, "If I fought every time somebody called me a name, I would never get out of jail. But I'm disciplined. I'm smarter than that." So I tell them, like my mother said, "Consider
the source." When you see who called you the name, then you understand why they're doing it. Then you don't have to stoop that low.
30

Paperclip ToysSheet 1
31

Paperclip ToysSheet 2
32

14) Welcome to Paper Town(Including Assorted Denizens and Transportation)
Source: madebyjoel.com
T Time: Hey, everybody gotta’ put on clothes and if you don’t you get arrested.
Pictures from madebyjoel.com
Levels: Movers 1 – Flyers 4Materials: copies of ‘Paper Town’ and ‘Paper People and Vehicles’
sheets, scissors, crayons, tape, a bunch of paper clips.
Paper town is an activity that will last longer than any one after test period. It may be ideal for doing after the final test and then
continuing during a final class.
Instructions1. Give each student a paper town sheet. First, they should color
the town as they see fit.2. Next, have them cut the town out along the solid black lines.
NOT the dotted lines.3. Now the students should fold the town along the dotted lines
in a crenellated pattern so that the ‘made by Joel’ building is sitting forward, the clock tower is sitting back, the helicopter building is sitting forward, etc. Below is an example of ‘crenellated.’
4. Once it is folded, give them two paperclips and two pieces of tape. Have them (or help them to) bend the paper clips at a 90 degree angle (see bottom picture) and tape them to the back. Now Paper town can stand!
5. Finally, give them the Paper People and Paper Vehicles sheets. 6. Put paper clips on the backs of the people. Fold over the
vehicles to make them stand.6. Play!
33
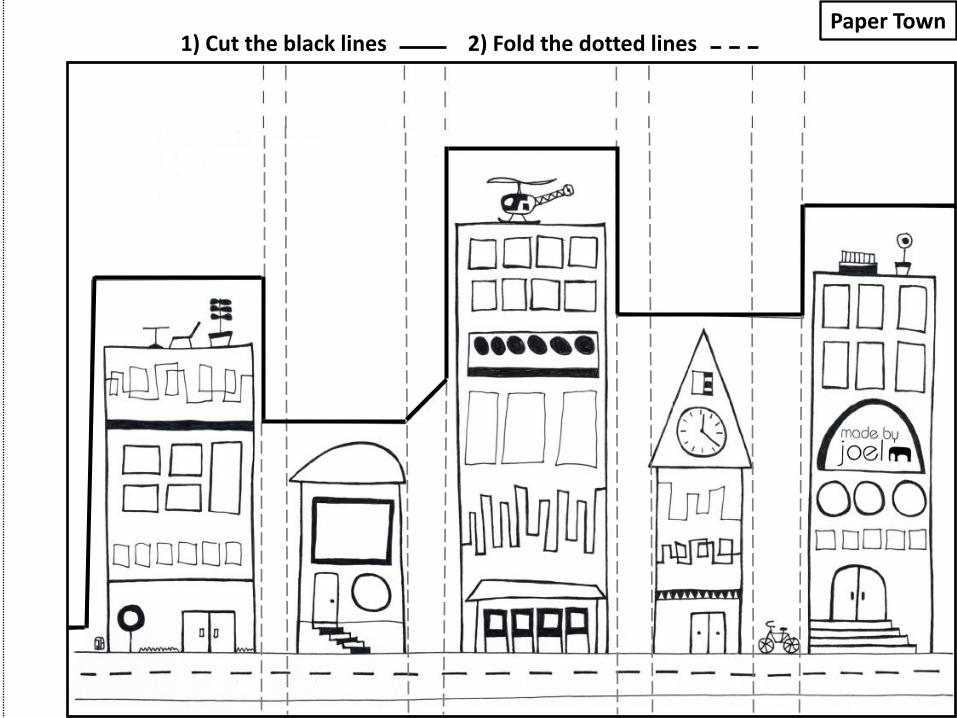
Paper Town1) Cut the black lines 2) Fold the dotted lines

Paper Town People1. Color the people.2. Cut out the people.3. Bend a paper clip to 90 degrees.4. Tape to the back of the people and put two on the back of the
town.
35

Paper Town Vehicles
1) Color the vehicles.2) Cut them out
3) Fold them over so they stand.
36

Project 14Levels: Movers 3– Flyers 4
Materials: copies of Max, scissors, glue or tape, crayons
Instructions1. Color Max, cut him out, fold along the dotted lines.2. Glue/Tape him together so that he looks like the picture.3. To put his arms in, use the pointy end of a pair of scissors to cut
a line along the arm holes on the sides. Then stick the arms throughthe body.
4. Eat him up.
Materials on page 38
What he is supposed to look like.
15) Making Max from Where the Wild Things Are!Source: toy-a-day.blogspot.com
16) Making Your Very Own Paper Person! Source: toy-a-day.blogspot.com
Everything is the same as above. BUT, with this one your students can first draw a person onto the template, color it, and then fold it into a 3-D Paper Person.
Materials on page 39
T Time: I say, “"If you wash up more often, you won't have to grab your crotch." I'm telling these guys, "Why you gotta grab your crotch?" Then you see Michael Jackson grabbing his crotch 50 times. What's with him?” 37

Wh
ere
the W
ild T
hin
gs A
re
-M
ax -
38

Make
You
r Ow
n
Pap
er P
erso
n!
39

17) Coloring Sheets(‘Colouring Sheets’ for British Speakers)
Source: madebyjoel.com
Yeah. That’s right Sucka!
I like to color… Whadaboudit?
Levels: Starters 1 – Movers 2Materials: Self explanatory
Instructions1. Color ‘em foo’!2. Next, pity da foo’!
40

Coloring Page 1 (Easter)

Coloring Page 2

Coloring Page 3

Coloring Page 4
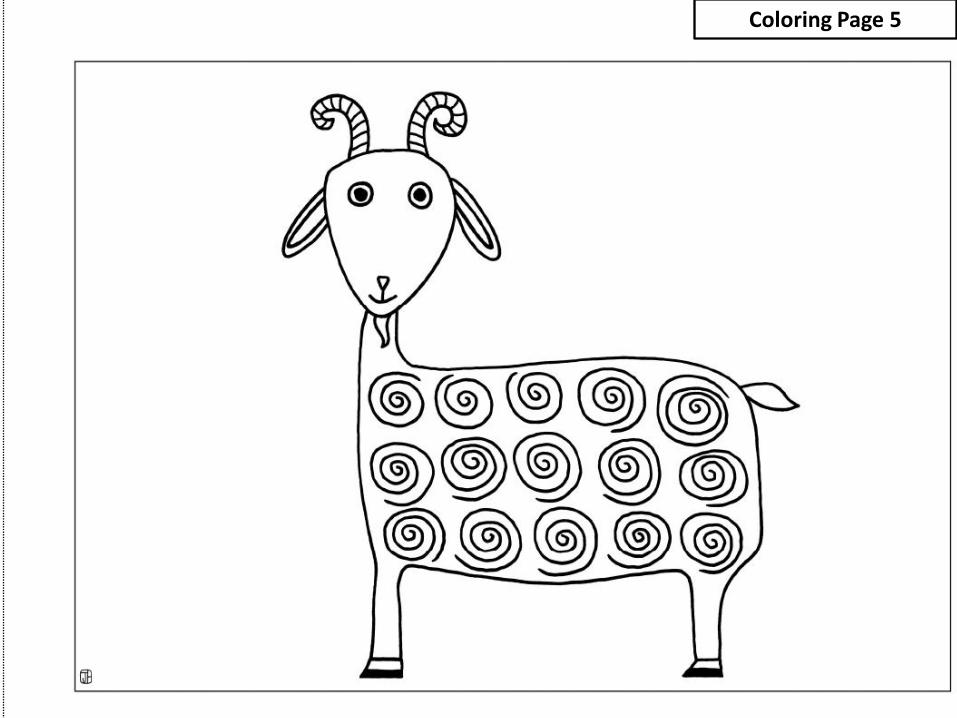
Coloring Page 5

Coloring Page 6

Coloring Page 7

Coloring Page 8

Coloring Page 9

Connect the Dots and Color
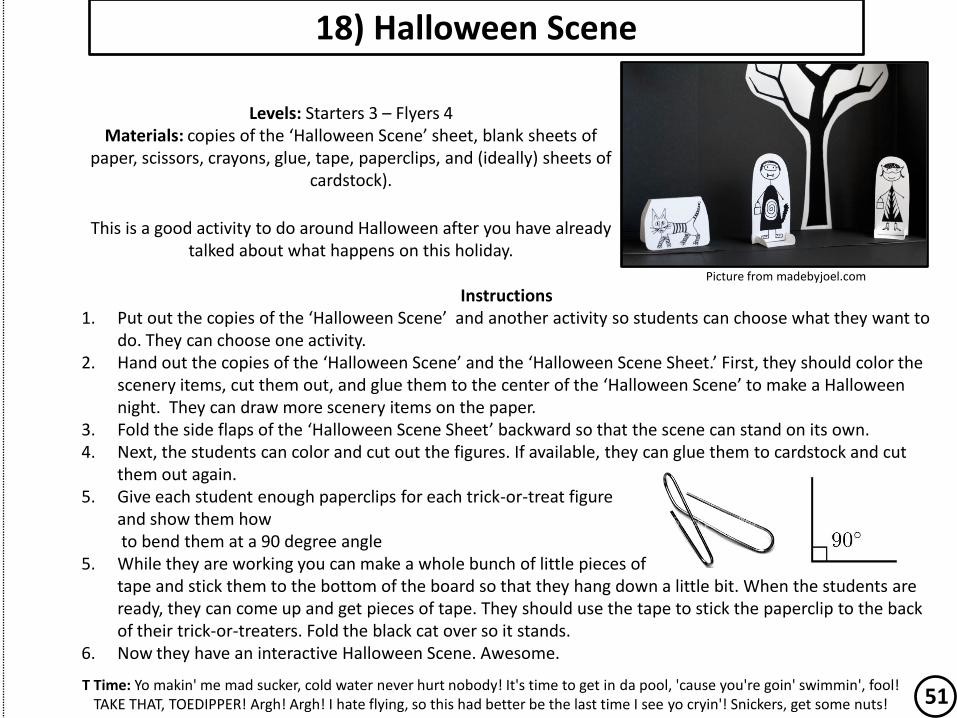
18) Halloween Scene
Levels: Starters 3 – Flyers 4Materials: copies of the ‘Halloween Scene’ sheet, blank sheets of
paper, scissors, crayons, glue, tape, paperclips, and (ideally) sheets of cardstock).
This is a good activity to do around Halloween after you have already talked about what happens on this holiday.
Picture from madebyjoel.com
Instructions1. Put out the copies of the ‘Halloween Scene’ and another activity so students can choose what they want to
do. They can choose one activity. 2. Hand out the copies of the ‘Halloween Scene’ and the ‘Halloween Scene Sheet.’ First, they should color the
scenery items, cut them out, and glue them to the center of the ‘Halloween Scene’ to make a Halloween night. They can draw more scenery items on the paper.
3. Fold the side flaps of the ‘Halloween Scene Sheet’ backward so that the scene can stand on its own.4. Next, the students can color and cut out the figures. If available, they can glue them to cardstock and cut
them out again.5. Give each student enough paperclips for each trick-or-treat figure
and show them howto bend them at a 90 degree angle
5. While they are working you can make a whole bunch of little pieces oftape and stick them to the bottom of the board so that they hang down a little bit. When the students are ready, they can come up and get pieces of tape. They should use the tape to stick the paperclip to the back of their trick-or-treaters. Fold the black cat over so it stands.
6. Now they have an interactive Halloween Scene. Awesome.
T Time: Yo makin' me mad sucker, cold water never hurt nobody! It's time to get in da pool, 'cause you're goin' swimmin', fool! TAKE THAT, TOEDIPPER! Argh! Argh! I hate flying, so this had better be the last time I see yo cryin'! Snickers, get some nuts! 51

Halloween Scene
Use paper clips to stand up.
Cut out and fold over.
Halloween Figures
Halloween Scenery Items 52

Hallo
ween
Scen
e Sh
eet

19) Bienvenue à Paper Paris Source: madebyjoel.com
Levels: Flyers 1 + and TE Elem 3 +Materials: copies of ‘Paper Town’ and ‘Paper People and Vehicles’
sheets, scissors, crayons, tape, a bunch of paper clips.
Oui, we also have Paper Paris! This activity works better with colored pencils than with crayons. Also, it would be good to bring the students envelopes for taking the finished product home. You can get them from the CSOs. Ask for the cheap envelopes, not the
nice ones with the LLV logo on them.
Instructions1. Give each student that is interested a ‘Paper Paris’ sheet. Bring another activity or two that students can
choose from as well.2. The students can color and then cut everything out. 3. Have them fold along the dotted lines so that all the pieces stand.4. You can write on the whiteboard what each of the three landmarks is called. The students can write the
names on the backs of the landmarks.1. Arc De Triomphe. Commissioned by Napoleon in 1806 and completed in 1836.2. Notre Dame de Paris (Our Lady of Paris). Completed in 1345.3. Eiffel Tower. Built in 1889 by Gustave Eiffel for that year’s World’s Fair.
Je plains l‘foo’ Sucka!
54

1
2
3
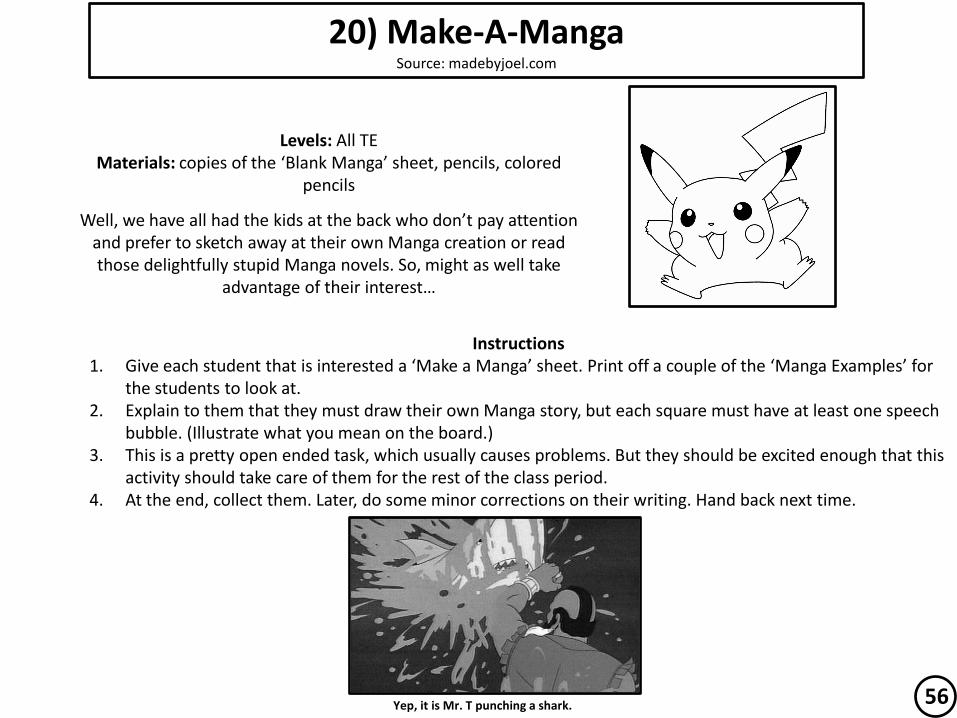
20) Make-A-MangaSource: madebyjoel.com
Levels: All TEMaterials: copies of the ‘Blank Manga’ sheet, pencils, colored
pencils
Well, we have all had the kids at the back who don’t pay attention and prefer to sketch away at their own Manga creation or read those delightfully stupid Manga novels. So, might as well take
advantage of their interest…
Instructions1. Give each student that is interested a ‘Make a Manga’ sheet. Print off a couple of the ‘Manga Examples’ for
the students to look at.2. Explain to them that they must draw their own Manga story, but each square must have at least one speech
bubble. (Illustrate what you mean on the board.)3. This is a pretty open ended task, which usually causes problems. But they should be excited enough that this
activity should take care of them for the rest of the class period.4. At the end, collect them. Later, do some minor corrections on their writing. Hand back next time.
Yep, it is Mr. T punching a shark. 56

Source: Mangahere.com
Manga Example
57

Blank Manga Strip

21) Paper iPhoneLevels: All Teens
Instructions: Color, cut, fold, talk, pity the fools with fake iPhones.
Source: ww2.iphonecountdown.com 59

This book was brought to you by the letter…
Created by Mitchell Willcox August 2012