ms word 2010 introduction - north-west university · part of the microsoft office fluent user...
TRANSCRIPT

MS Word 2010 Introduction ITC
February 2014
Table of Contents
1 MS Word screen layout ......................................................................................... 1
2 Toolbars .................................................................................................................. 1
2.1 Quick Access toolbar ........................................................................................................... 1
2.2 Status Bar and Zoom Controls ............................................................................................ 2
3 The Ribbon ............................................................................................................. 2
4 Tabs ........................................................................................................................ 3
4.1 File Tab .................................................................................................................................. 3
4.2 Home tab ............................................................................................................................... 4
4.3 Insert tab ................................................................................................................................ 5
4.4 Page Layout tab .................................................................................................................... 5
4.5 References tab ...................................................................................................................... 6
4.6 Mailings tab ........................................................................................................................... 6
4.7 Review tab ............................................................................................................................. 6
4.8 View tab ................................................................................................................................. 7
5 Key Tips .................................................................................................................. 7
6 Tips ......................................................................................................................... 8
7 NWU Templates ..................................................................................................... 8
8 Available Training .................................................................................................. 8
8.1 Online Training ..................................................................................................................... 9
Table of Contents i

MS Word 2010 Introduction
1 MS Word screen layout
Figure 1: MS Word 2010 screen layout
The Status Bar is at the bottom of the screen and displays information about the current worksheet or file.
The Zoom Controls are situated at the bottom right of the screen and can be used to zoom in or out to view your current document.
2 Toolbars
2.1 Quick Access toolbar The Quick Access toolbar is the small row of icons, above the ribbon, located in the top left corner of the program window and offers quick access to commonly used commands, such as Save and Undo.
The Quick Access toolbar can be customized to include other commands clicking on the down arrow ↓ next to the quick access bar. You can add your favourite commands to it so that they are available no matter which tab you are on.
Defaults: Save, Undo, Repeat typing.
Figure 2: Quick Access toolbar
The small arrow in the lower-right corner of a group, is called the Dialog Box Launcher , and points to more detailed or advanced options available for the commands in the group. Click the arrow to open a dialog box or a task pane where you can work with the available options.
Click on the black triangle to add icons for commands that you use often.
Choose More Commands to show more options.
MS Word 2010 Introduction 1
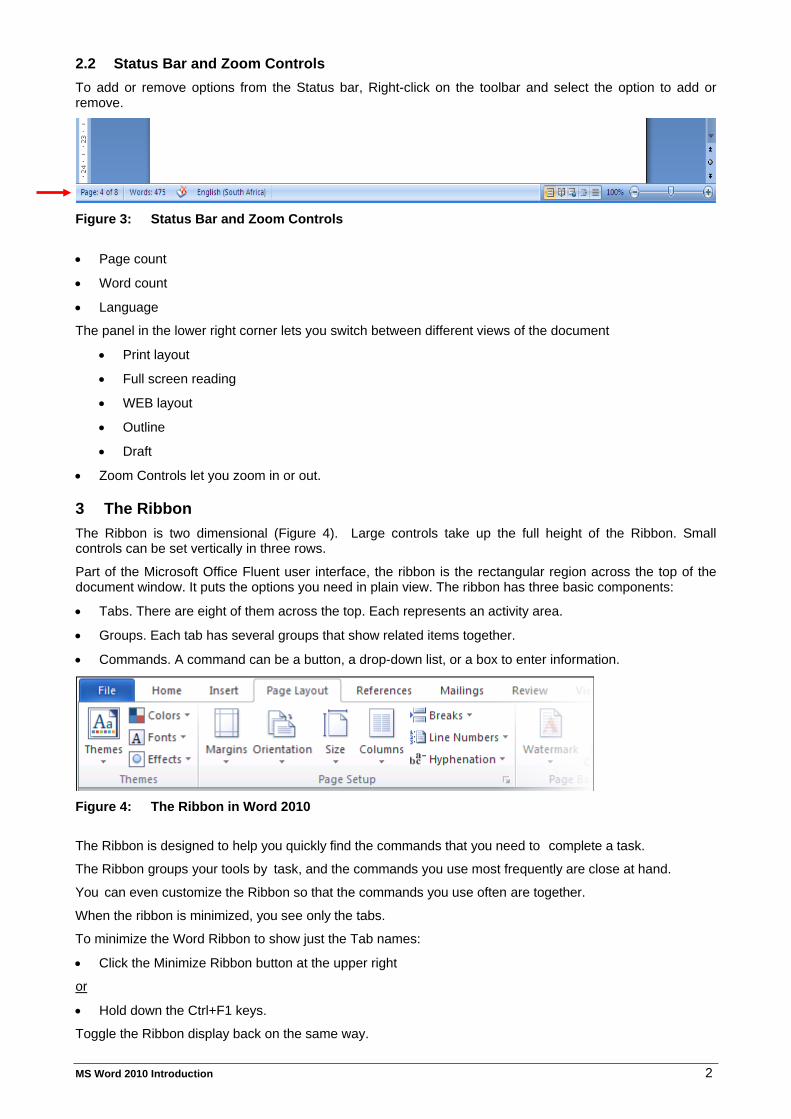
2.2 Status Bar and Zoom Controls To add or remove options from the Status bar, Right-click on the toolbar and select the option to add or remove.
Figure 3: Status Bar and Zoom Controls
• Page count
• Word count
• Language
The panel in the lower right corner lets you switch between different views of the document
• Print layout
• Full screen reading
• WEB layout
• Outline
• Draft
• Zoom Controls let you zoom in or out.
3 The Ribbon The Ribbon is two dimensional (Figure 4). Large controls take up the full height of the Ribbon. Small controls can be set vertically in three rows.
Part of the Microsoft Office Fluent user interface, the ribbon is the rectangular region across the top of the document window. It puts the options you need in plain view. The ribbon has three basic components:
• Tabs. There are eight of them across the top. Each represents an activity area.
• Groups. Each tab has several groups that show related items together.
• Commands. A command can be a button, a drop-down list, or a box to enter information.
Figure 4: The Ribbon in Word 2010
The Ribbon is designed to help you quickly find the commands that you need to complete a task.
The Ribbon groups your tools by task, and the commands you use most frequently are close at hand.
You can even customize the Ribbon so that the commands you use often are together.
When the ribbon is minimized, you see only the tabs.
To minimize the Word Ribbon to show just the Tab names:
• Click the Minimize Ribbon button at the upper right
or
• Hold down the Ctrl+F1 keys.
Toggle the Ribbon display back on the same way.
MS Word 2010 Introduction 2

4 Tabs
4.1 File Tab Clicking the File tab opens a large window called the Backstage. The File tab contains commands such as Save, Open, and Print.
Figure 5: File Tab
• Click the File tab to see the Backstage view.
The Backstage view will open which displayed information about File permissions, versions, file size.
Figure 6: Backstage view
Tip: to quickly return to your document from the Backstage view, click the Home Tab, or press Esc on your keyboard.
The Recent Tab on the left display recent documents.
MS Word 2010 Introduction 3

• Click on Print. The right side of the window shows a preview of how the current document will look when printed.
You can use the left side of the window to fine-tune your preferences — for example, to change the orientation from Portrait to Landscape, to change the paper size, or to select the option to print the current page only instead of the entire document.
• Save, Open, Close, New, Print
• Options (colour scheme, language, Autocorrect, automatic save, measurements, file locations etc.)
4.2 Home tab
Figure 7: Home tab
Normal editing tools such as:
• Clipboard
• Cut, copy, paste, format painter, and the clipboard
• Font
• Paragraph
• Styles
• Editing: Find and replace
MS Word 2010 Introduction 4

4.3 Insert tab
Figure 8: Insert tab
• Pages including page breaks
• Tables
• Illustrations
• Links
• Header & Footer
• Text
• Symbols and special characters
4.4 Page Layout tab
Figure 9: Page Layout Tab
• Themes
• Page setup
• Margins
• Orientation
• Size
• Section breaks
• Columns
• Hyphenation
• Page background
• Watermark
• Page colour
• Page border
• Paragraph: indents and spacing
• Arrange – Group, rotate, Bring to front, etc.
MS Word 2010 Introduction 5

4.5 References tab
Figure 10: References tab
• Table of contents
• Footnotes
Note: The arrow in the right bottom corner activates the same menu as in previous versions.
• Citations and Bibliography
• Captions
• Index
• Table of authorities
4.6 Mailings tab
Figure 11: Mailings tab
• Create
• Start mail merge
• Write & insert fields
• Preview results
• Finish
4.7 Review tab
Figure 12: Review tab
• Proofing – Spell checking, Comments, Tracking, Changes, Compare, Protect document
MS Word 2010 Introduction 6

4.8 View tab
Figure 13: View tab
• Document views
• Print Layout: view the document as it will appear on the printed page.
• Full Screen Reading: Maximize the space for reading.
• Web Layout: View the document as it would look as a web page.
• Outline: view document as an outline and show outlining tools.
• Draft: view for quick editing.
• Show/hide
• The Navigation Pane provides multiple ways to find what you’re looking for in your document. You can also search and find text within your document.
• Zoom, Window, Macros
5 Key Tips Word 2010 provides shortcuts for the ribbon, called KeyTips, so you can quickly perform tasks without using your mouse.
Figure 14: KeyTips
• To make KeyTips appear on the ribbon, press the ALT key. Press the key shown on the KeyTip for the tab or Quick Access Toolbar command that you want.
• Next, to switch to a tab on the ribbon using your keyboard, press the key of the letter displayed under that tab. In the example shown above, you would press N to open the Insert tab, P to open the Page Layout tab, S to open the References tab, and so on.
• Once you’ve switched to a ribbon tab in this way, all available KeyTips for that tab appear on the screen. You can then finish the sequence by pressing the final key for the command you want to use.
• To go back one level while in a sequence, press the ESC key. Doing so multiple times in a row cancels KeyTips mode.
MS Word 2010 Introduction 7

6 Tips • Ensure that the non-printing symbols ¶ (on the Home tab) show on your screen so that you can see
what is really going on.
• Click the Office Button, and then click Word Options.
• On the Display tab, select Show all formatting marks (unselect the other options).
• Also select Update fields before printing (so that the cross-references are updated before you print).
Figure 15: MS Word display options
• Don’t leave any empty paragraph marks.
• To toggle between All Caps and Small Caps, select the text and press Shift+F3
• For an unbreakable space press Ctrl+Shift+space.
• Save as you type (Alt+F+S).
• Use Ctrl+- for hyphenation as you type. MS Word will then use the appropriate -. This will prevent sentences with long words from stretching out.
• Use Ctrl+Shift+- for an unbreakable Hyphen (-) to keep 2 words together.
7 NWU Templates The NWU has created templates for creating minutes, agendas, exam papers, to name a few.
• For more information on using the WU Standard Templates go to: www.nwu.ac.za/ithome
• Select Service Catalogue (in list to the left of the page).
• In the Service Catalogue, click on Office Automation and then click on NWU Templates for Office.
• The manual can be found under Documentation.
8 Available Training • For more information on other IT training go to: http://www.nwu.ac.za/ithome
• Select Training (in list to the left of the page).
• Information on the courses provided by IT as well as the training calendar for each Campus, the IT training registration form and online training can be found on this page.
MS Word 2010 Introduction 8

8.1 Online Training The Basic IT Skill Set, was developed according to SAQA (NQF Level 3) guidelines and has been registered as a short course in ICAS (T15 100 1).
The training material is made up of VTC training videos, documentation and custom made videos and presented in eFundi.
Assessment is also done in eFundi and after successful completion of all modules a certificate is obtained.
The Basic IT Skills Set allows staff to go through the following basic modules at their own pace:
• Computer Basics
• Windows 7
• IT@NWU
• Word Processing
• Spreadsheets
• Internet & Share
• Telephony
To access the training visit www.nwu.ac.za/bitss Original details: Riaan van der Walt(10059253) P:\Dokumente\Word\Word 2010 introduction.docm 10 February 2014
Current details: Riaan van der Walt(10059253) P:\Training Docs Final\Word 2010 introduction.docm 19 February 2014
MS Word 2010 Introduction 9