mt-300s elib.roland.co.jp/support/en/manuals/res/1811169/mt-300s... · 2012-07-03 · caution risk...
TRANSCRIPT
MUSIC PLAYER
OWNER'S MANUAL
Before using this unit, carefully read the sections entitled: “IMPOR-TANT SAFETY INSTRUCTIONS” ( p. 2), “USING THE UNIT SAFE-LY” ( p. 3), and “IMPORTANT NOTES” ( p. 4).
These sections provide important information concerning the properoperation of the unit. Additionally, in order to feel assured that you havegained a good grasp of every feature provided by your new unit,Owner's manual should be read in its entirety. The manual should besaved and kept on hand as a convenient reference.
Copyright © 1998 ROLAND CORPORATIONAll rights reserved. No part of this publication may be reproduced in anyform without the written permission of ROLAND CORPORATION.
MT
300s
01344778 ’01-8-A2-71N
InformationWhen you need repair service, call your nearest Roland Service Center or authorized Roland distributor in your country as shown below.
As of May 15, 2001 (Roland)
ARGENTINAInstrumentos Musicales S.A.Florida 656 2nd Floor Office Number 206ABuenos AiresARGENTINA, CP1005TEL: (54-11) 4- 393-6057 BRAZILRoland Brasil LtdaRua San Jose, 780 Sala BParque Industrial San JoseCotia - Sao Paulo - SP, BRAZILTEL: (011) 4615 5666
CANADA Roland Canada Music Ltd.(Head Office)5480 Parkwood Way Richmond B. C., V6V 2M4 CANADA TEL: (0604) 270 6626
Roland Canada Music Ltd.(Toronto Office)Unit 2, 109 Woodbine Downs Blvd, Etobicoke, ONM9W 6Y1 CANADA TEL: (0416) 213 9707
MEXICOCasa Veerkamp, s.a. de c.v.Av. Toluca No. 323, Col. Olivar de los Padres 01780 Mexico D.F. MEXICOTEL: (525) 668 04 80
PANAMASUPRO MUNDIAL, S.A.Boulevard Andrews, Albrook,Panama City,REP. DE PANAMATEL: (507) 315-0101
U. S. A. Roland Corporation U.S.5100 S. Eastern AvenueLos Angeles, CA 90040-2938,U. S. A.TEL: (323) 890 3700
VENEZUELAMusicland Digital C.A.Av. Francisco de Miranda,Centro Parque de Cristal, Nivel C2 Local 20 CaracasVENEZUELATEL: (02) 285 9218
AUSTRALIA Roland Corporation Australia Pty., Ltd. 38 Campbell Avenue Dee Why West. NSW 2099 AUSTRALIA TEL: (02) 9982 8266 NEW ZEALAND Roland Corporation Ltd.32 Shaddock Street, Mount Eden, Auckland, NEW ZEALAND TEL: (09) 3098 715
HONG KONGTom Lee Music Co., Ltd. Service Division22-32 Pun Shan Street, Tsuen Wan, New Territories, HONG KONGTEL: 2415 0911
CHINABeijing Xinghai Musical Instruments Co., Ltd.6 Huangmuchang Chao Yang District, Beijing, CHINATEL: (010) 6774 7491
Shanghai Xingtong Acoustics Equipment CO.,Ltd.Rm.1108, No.2240 Pudong South Road Shanghai, CHINATEL: (021) 6873 4123
INDIARivera Digitec (India) Pvt. Ltd.409, Nirman Kendra Mahalaxmi Flats Compound Off. Dr. Edwin Moses Road, Mumbai-400011, INDIATEL: (022) 498 3079 INDONESIAPT Citra IntiRamaJ1. Cideng Timur No. 15J-150 Jakarta PusatINDONESIATEL: (021) 6324170
MALAYSIABENTLEY MUSIC SDN BHD140 & 142, Jalan Bukit Bintang 55100 Kuala Lumpur,MALAYSIATEL: (03) 2144-3333
PHILIPPINESG.A. Yupangco & Co. Inc.339 Gil J. Puyat AvenueMakati, Metro Manila 1200,PHILIPPINESTEL: (02) 899 9801
SINGAPORESwee Lee Company150 Sims Drive,SINGAPORE 387381TEL: 846-3676
TAIWANROLAND TAIWAN ENTERPRISE CO., LTD.Room 5, 9fl. No. 112 Chung Shan N.Road Sec.2, Taipei, TAIWAN, R.O.C.TEL: (02) 2561 3339 THAILANDTheera Music Co. , Ltd.330 Verng NakornKasem, Soi 2, Bangkok 10100, THAILANDTEL: (02) 2248821
BAHRAINMoon StoresBab Al Bahrain Road, P.O. Box 20077State of BAHRAINTEL: 211 005
VIETNAMSaigon Music138 Tran Quang Khai St., District 1Ho Chi Minh CityVIETNAMTEL: (08) 844-4068
JORDANAMMAN Trading Agency Prince Mohammed St. P.O. Box 825 Amman 11118 JORDANTEL: (06) 4641200 KUWAITEasa Husain Al-YousifiAbdullah Salem Street,Safat KUWAITTEL: 5719499 LEBANONA. Chahine & FilsP.O. Box 16-5857 Gergi Zeidan St. Chahine Building, AchrafiehBeirut, LEBANONTEL: (01) 335799 QATARAl Emadi Co. (Badie Studio & Stores)P.O. Box 62, DOHA QATARTEL: 4423-554 SAUDI ARABIAaDawliah Universal Electronics APLCorniche Road, Aldossary Bldg., 1st FloorSAUDI ARABIA
P.O.Box 2154, Alkhobar 31952SAUDI ARABIA TEL: (03) 898 2081 SYRIATechnical Light & Sound CenterKhaled Ibn Al Walid St.P.O. Box 13520Damascus - SYRIATEL: (011) 2235 384 TURKEY Barkat muzik aletleri ithalat ve ihracat Ltd StiSiraselviler cad.Guney is hani 84-86/6, Taksim. Istanbul. TURKEYTEL: (0212) 2499324 U.A.E.Zak Electronics & Musical Instruments Co. L.L.C.Zabeel Road, Al Sherooq Bldg., No. 14, Grand Floor DUBAI U.A.E.TEL: (04) 3360715
EGYPTAl Fanny Trading OfficeP.O. Box 2904, El Horrieh Heliopolos, Cairo, EGYPTTEL: (02) 4185531 REUNIONMaison FO - YAM Marcel25 Rue Jules Hermann,Chaudron - BP79 97 491Ste Clotilde Cedex,REUNION ISLANDTEL: 28 29 16 SOUTH AFRICAThat Other Music Shop (PTY) Ltd.11 Melle St., Braamfontein, JohannesbourgRepublic of SOUTH AFRICA
P.O.Box 32918, Braamfontein 2017 Republic of SOUTH AFRICATEL: (011) 403 4105
Paul Bothner (PTY) Ltd.17 Werdmuller Centre Claremont 7700 Republic of SOUTH AFRICA
P.O. Box 23032Claremont, Cape TownSOUTH AFRICA, 7735TEL: (021) 674 4030
CYPRUSRadex Sound Equipment Ltd.17 Diagorou St., P.O. Box 2046, Nicosia CYPRUSTEL: (02) 453 426
DENMARK Roland Scandinavia A/SNordhavnsvej 7, Postbox 880,DK-2100 CopenhagenDENMARK TEL: (039)16 6200 FRANCERoland France SA4, Rue Paul Henri SPAAK, Parc de l'Esplanade, F 77 462 St. Thibault, Lagny Cedex FRANCETEL: 01 600 73 500 FINLANDRoland Scandinavia As, Filial FinlandLauttasaarentie 54 BFin-00201 Helsinki, FINLANDTEL: (9) 682 4020 GERMANY Roland Elektronische Musikinstrumente HmbH.Oststrasse 96, 22844 Norderstedt, GERMANY TEL: (040) 52 60090
GREECESTOLLAS S.A.Music Sound Light155, New National Road26422 Patras, GREECETEL: 061-435400 HUNGARYIntermusica Ltd.Warehouse Area ‘DEPO’ Pf.83H-2046 Torokbalint, HUNGARYTEL: (23) 511011 IRELANDRoland IrelandAudio House, Belmont Court,Donnybrook, Dublin 4.Republic of IRELANDTEL: (01) 2603501
ITALYRoland Italy S. p. A. Viale delle Industrie 8, 20020 Arese, Milano, ITALYTEL: (02) 937-78300 NORWAYRoland Scandinavia Avd. Kontor NorgeLilleakerveien 2 Postboks 95 Lilleaker N-0216 Oslo NORWAYTEL: 273 0074 POLANDP. P. H. BrzostowiczUL. Gibraltarska 4.PL-03664 Warszawa POLANDTEL: (022) 679 44 19 PORTUGALTecnologias Musica e Audio, Roland Portugal, S.A.Cais Das Pedras, 8/9-1 Dto4050-465 PORTOPORTUGALTEL: (022) 608 00 60
RUSSIAMuTek3-Bogatyrskaya Str. 1.k.l107 564 Moscow, RUSSIA TEL: 095 169 5043
SPAINRoland Electronics de España, S. A. Calle Bolivia 239, 08020 Barcelona, SPAINTEL: (93) 308 1000
SWITZERLANDRoland (Switzerland) AGMusitronic AG Gerberstrasse 5, Postfach,CH-4410 Liestal, SWITZERLANDTEL: (061) 921 1615
SWEDEN Roland Scandinavia A/S SWEDISH SALES OFFICEDanvik Center 28, 2 tr. S-131 30 Nacka SWEDEN TEL: (08) 702 0020
UKRAINETIC-TACMira Str. 19/108P.O. Box 180 295400 Munkachevo, UKRAINETEL: (03131) 414-40 UNITED KINGDOM Roland (U.K.) Ltd.Atlantic Close, Swansea Enterprise Park, SWANSEASA7 9FJ, UNITED KINGDOMTEL: (01792) 700139
KOREACosmos Corporation1461-9, Seocho-Dong,Seocho Ku, Seoul, KOREATEL: (02) 3486-8855
AUSTRIARoland Austria GES.M.B.H.Siemensstrasse 4, P.O. Box 74,A-6063 RUM, AUSTRIATEL: (0512) 26 44 260 BELGIUM/HOLLAND/LUXEMBOURGRoland Benelux N. V.Houtstraat 3, B-2260, Oevel (Westerlo) BELGIUMTEL: (014) 575811
AFRICA
CHILEComercial Fancy ΙΙ S.A.Avenida Rancagua #0330Providencia Santiago, CHILETEL: 56-2-373-9100
URUGUAYTodo Musica S.A.Cuareim 1844, Montevideo,URUGUAY, CP11200TEL: 5982-924-2335
EUROPEAUSTRALIA/NEW ZEALAND
ASIA
CENTRAL/LATINAMERICA
NORTH AMERICA
MIDDLE EAST
AFRICA
EL SALVADOROMNI MUSIC75 Avenida Notre YY Alameda, Juan Pablo 2, No. 4010 San Salvador, EL SALVADORTEL: (503) 262-0788
ROMANIAFBS LINESPiata Libertatii 1,RO-4200 GheorghehiTEL: (066) 164-609
PARAGUAYDistribuidora De Instrumentos MusicalesJ.E. Olear y ESQ. Manduvira Edeficio, El Dorado Planta Baja Asuncion PARAGUAYTEL: 595-21-492147 PERUVIDEO Broadcast S.A.Portinari 199 (ESQ. HALS), San Borja, Lima 41,REP. OF PERUTEL: 51-14-758226
COSTA RICAJUAN Bansbach Instrumentos MusicalesAve.1. Calle 11, Apartado 10237,San Jose, COSTA RICATEL: (506)258-0211
CRISTOFORI MUSIC PTE LTDBlk 3014, Bedok Industrial Park E, #02-2148, SINGAPORE 489980TEL: 243 9555
IRANMOCO, INC.No.41 Nike St.Dr.Shariyati Ave.Roberoye Cerahe MirdamadTehran, IRANTEL: 285 4169
ISRAELHalilit P. Greenspoon & Sons Ltd.8 Retzif Ha'aliya Hashnya St.Tel-Aviv-Yafo ISRAELTEL: (03) 6823666
CAUTIONRISK OF ELECTRIC SHOCK
DO NOT OPEN
ATTENTION: RISQUE DE CHOC ELECTRIQUE NE PAS OUVRIR
CAUTION: TO REDUCE THE RISK OF ELECTRIC SHOCK,
DO NOT REMOVE COVER (OR BACK).
NO USER-SERVICEABLE PARTS INSIDE.
REFER SERVICING TO QUALIFIED SERVICE PERSONNEL.
The lightning flash with arrowhead symbol, within an equilateral triangle, is intended to alert the user to the presence of uninsulated “dangerous voltage” within the product’s enclosure that may be of sufficient magnitude to constitute a risk of electric shock to persons.
The exclamation point within an equilateral triangle is intended to alert the user to the presence of important operating and maintenance (servicing) instructions in the literature accompanying the product.
INSTRUCTIONS PERTAINING TO A RISK OF FIRE, ELECTRIC SHOCK, OR INJURY TO PERSONS.
IMPORTANT SAFETY INSTRUCTIONSSAVE THESE INSTRUCTIONS
WARNING - When using electric products, basic precautions should always be followed, including the following:
Read all the instructions before using the product.Do not use this product near water — for example, near a bathtub, washbowl, kitchen sink, in a wet basement, or near a swimming pool, or the like.This product should be used only with a cart or stand that is recommended by the manufacturer.This product, either alone or in combination with an amplifier and headphones or speakers, may be capable of producing sound levels that could cause permanent hearing loss. Do not operate for a long period of time at a high volume level or at a level that is uncomfortable. If you experience any hearing loss or ringing in the ears, you should consult an audiologist.The product should be located so that its location or position does not interfere with its proper ventilation.The product should be located away from heat sources such as radiators, heat registers, or other products that produce heat.The product should be connected to a power supply only of the type described in the operating instructions or as marked on the product.
1.2.
3.
4.
5.
6.
7.
8.
9.
10.
11.
A.B.
C.D.
E.
The power-supply cord of the product should be unplugged from the outlet when left unused for a long period of time.Care should be taken so that objects do not fall and liquids are not spilled into the enclosure through openings.The product should be serviced by qualified service personnel when:
The power-supply cord or the plug has been damaged; orObjects have fallen, or liquid has been spilled into the product; orThe product has been exposed to rain; orThe product does not appear to operate normally or exhibits a marked change in performance; orThe product has been dropped, or the enclosure damaged.
Do not attempt to service the product beyond that described in the user-maintenance instructions. All other servicing should be referred to qualified service personnel.
IMPORTANT: THE WIRES IN THIS MAINS LEAD ARE COLOURED IN ACCORDANCE WITH THE FOLLOWING CODE.
BLUE: BROWN:
As the colours of the wires in the mains lead of this apparatus may not correspond with the coloured markings identifying the terminals in your plug, proceed as follows:The wire which is coloured BLUE must be connected to the terminal which is marked with the letter N or coloured BLACK.The wire which is coloured BROWN must be connected to the terminal which is marked with the letter L or coloured RED.Under no circumstances must either of the above wires be connected to the earth terminal of a three pin plug.
NEUTRALLIVE
For the U.K.
This product may be equipped with a polarized line plug (one blade wider than the other) . This is a safety feature. If you are unable to insert the plug into the outlet, contact an electrician to replace your obsolete outlet. Do not defeat the safety purpose of the plug.
For Polarized Line Plug
CAUTION:ATTENTION:
TO PREVENT ELECTRIC SHOCK, MATCH WIDE BLADE OF PLUG TO WIDE SLOT, FULLY INSERT.
POUR ÉVITER LES CHOCS ÉLECTRIQUES, INTRODUIRE LA LAME LA PLUS LARGE DE LA FICHE DANS LA BORNE CORRESPONDANTE DE LA PRISE ET POUSSER JUSQU' AU FOND.
For the USA
For Canada
For the USA
FEDERAL COMMUNICATIONS COMMISSIONRADIO FREQUENCY INTERFERENCE STATEMENT
This equipment has been tested and found to comply with the limits for a Class B digital device, pursuant to Part 15 of the FCC Rules. These limits are designed to provide reasonable protection against harmful interference in a residential installation. This equipment generates, uses, and can radiate radio frequency energy and, if not installed and used in accordance with the instructions, may cause harmful interference to radio communications. However, there is no guarantee that interference will not occur in a particular installation. If this equipment does cause harmful interference to radio or television reception, which can be determined by turning the equipment off and on, the user is encouraged to try to correct the interference by one or more of the following measures:
– Reorient or relocate the receiving antenna.– Increase the separation between the equipment and receiver.– Connect the equipment into an outlet on a circuit different from that to which the receiver is connected.– Consult the dealer or an experienced radio/TV technician for help.
Unauthorized changes or modification to this system can void the users authority to operate this equipment.This equipment requires shielded interface cables in order to meet FCC class B Limit.
This product complies with the requirements of European Directives EMC 89/336/EEC and LVD 73/23/EEC.
For EU Countries
For Canada
This Class B digital apparatus meets all requirements of the Canadian Interference-Causing Equipment Regulations.
Cet appareil numérique de la classe B respecte toutes les exigences du Règlement sur le matériel brouilleur du Canada.
NOTICE
AVIS
3
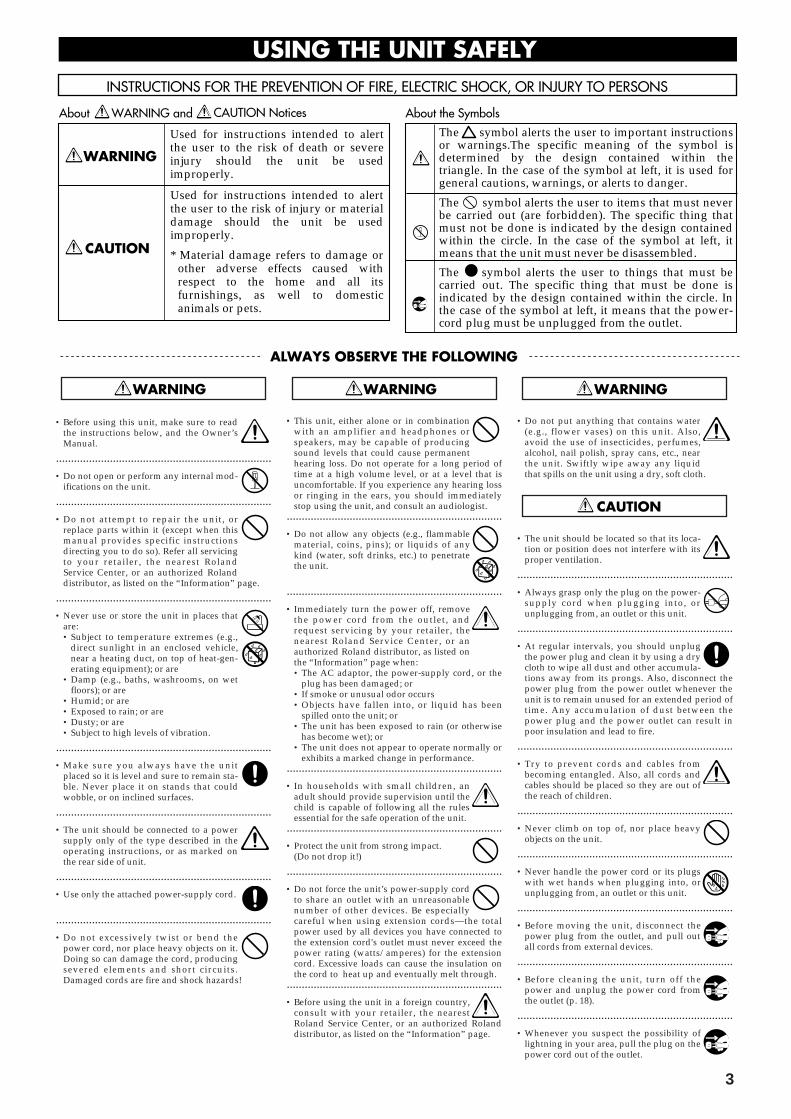
Used for instructions intended to alert the user to the risk of injury or material damage should the unit be used improperly.
* Material damage refers to damage or other adverse effects caused with respect to the home and all its furnishings, as well to domestic animals or pets.
Used for instructions intended to alert the user to the risk of death or severe injury should the unit be used improperly.
The ● symbol alerts the user to things that must be carried out. The specific thing that must be done is indicated by the design contained within the circle. In the case of the symbol at left, it means that the power-cord plug must be unplugged from the outlet.
The symbol alerts the user to important instructions or warnings.The specific meaning of the symbol is determined by the design contained within the triangle. In the case of the symbol at left, it is used for general cautions, warnings, or alerts to danger.
The symbol alerts the user to items that must never be carried out (are forbidden). The specific thing that must not be done is indicated by the design contained within the circle. In the case of the symbol at left, it means that the unit must never be disassembled.
• Before using this unit, make sure to readthe instructions below, and the Owner’sManual.
........................................................................• Do not open or perform any internal mod-
ifications on the unit.
........................................................................• Do not attempt to repair the unit, or
replace parts within it (except when thismanual provides specific instructionsdirecting you to do so). Refer all servicingto your retailer, the nearest RolandService Center, or an authorized Rolanddistributor, as listed on the “Information” page.
........................................................................• Never use or store the unit in places that
are:• Subject to temperature extremes (e.g.,
direct sunlight in an enclosed vehicle,near a heating duct, on top of heat-gen-erating equipment); or are
• Damp (e.g., baths, washrooms, on wetfloors); or are
• Humid; or are• Exposed to rain; or are• Dusty; or are• Subject to high levels of vibration.
........................................................................• Make sure you always have the unit
placed so it is level and sure to remain sta-ble. Never place it on stands that couldwobble, or on inclined surfaces.
........................................................................• The unit should be connected to a power
supply only of the type described in theoperating instructions, or as marked onthe rear side of unit.
........................................................................• Use only the attached power-supply cord.
........................................................................• Do not excessively twist or bend the
power cord, nor place heavy objects on it.Doing so can damage the cord, producingsevered elements and short circuits.Damaged cords are fire and shock hazards!
• This unit, either alone or in combinationwith an amplifier and headphones orspeakers, may be capable of producingsound levels that could cause permanenthearing loss. Do not operate for a long period oftime at a high volume level, or at a level that isuncomfortable. If you experience any hearing lossor ringing in the ears, you should immediatelystop using the unit, and consult an audiologist.
........................................................................• Do not allow any objects (e.g., flammable
material, coins, pins); or liquids of anykind (water, soft drinks, etc.) to penetratethe unit.
........................................................................• Immediately turn the power off, remove
the power cord from the outlet, andrequest servicing by your retailer, thenearest Roland Service Center, or anauthorized Roland distributor, as listed onthe “Information” page when:• The AC adaptor, the power-supply cord, or the
plug has been damaged; or• If smoke or unusual odor occurs• Objects have fallen into, or liquid has been
spilled onto the unit; or• The unit has been exposed to rain (or otherwise
has become wet); or• The unit does not appear to operate normally or
exhibits a marked change in performance.........................................................................• In households with small children, an
adult should provide supervision until thechild is capable of following all the rulesessential for the safe operation of the unit.
........................................................................• Protect the unit from strong impact.
(Do not drop it!)
........................................................................• Do not force the unit’s power-supply cord
to share an outlet with an unreasonablenumber of other devices. Be especiallycareful when using extension cords—the totalpower used by all devices you have connected tothe extension cord's outlet must never exceed thepower rating (watts/amperes) for the extensioncord. Excessive loads can cause the insulation onthe cord to heat up and eventually melt through.
........................................................................• Before using the unit in a foreign country,
consult with your retailer, the nearestRoland Service Center, or an authorized Rolanddistributor, as listed on the “Information” page.
• Do not put anything that contains water(e.g., flower vases) on this unit. Also,avoid the use of insecticides, perfumes,alcohol, nail polish, spray cans, etc., nearthe unit. Swiftly wipe away any liquidthat spills on the unit using a dry, soft cloth.
• The unit should be located so that its loca-tion or position does not interfere with itsproper ventilation.
........................................................................• Always grasp only the plug on the power-
supply cord when plugging into, orunplugging from, an outlet or this unit.
........................................................................• At regular intervals, you should unplug
the power plug and clean it by using a drycloth to wipe all dust and other accumula-tions away from its prongs. Also, disconnect thepower plug from the power outlet whenever theunit is to remain unused for an extended period oftime. Any accumulation of dust between thepower plug and the power outlet can result inpoor insulation and lead to fire.
........................................................................• Try to prevent cords and cables from
becoming entangled. Also, all cords andcables should be placed so they are out ofthe reach of children.
........................................................................• Never climb on top of, nor place heavy
objects on the unit.
........................................................................• Never handle the power cord or its plugs
with wet hands when plugging into, orunplugging from, an outlet or this unit.
........................................................................• Before moving the unit, disconnect the
power plug from the outlet, and pull outall cords from external devices.
........................................................................• Before cleaning the unit, turn off the
power and unplug the power cord fromthe outlet (p. 18).
........................................................................• Whenever you suspect the possibility of
lightning in your area, pull the plug on thepower cord out of the outlet.

In addition to the items listed under “IMPORTANTSAFETY INSTRUCTIONS” and “USING THE UNITSAFELY” on pages 2 and 3, please read and observethe following:
Power Supply• Do not use this unit on the same power circuit with
any device that will generate line noise (such as anelectric motor or variable lighting system).
• Before connecting this unit to other devices, turn offthe power to all units. This will help prevent mal-functions and/or damage to speakers or otherdevices.
• Although the LCD and LEDs are switched off whenthe POWER switch is switched off, this does notmean that the unit has been completely disconnectedfrom the source of power. If you need to turn off thepower completely, first turn off the POWER switch,then unplug the power cord from the power outlet.For this reason, the outlet into which you choose toconnect the power cord's plug should be one that iswithin easy reach.
Placement• Using the unit near power amplifiers (or other
equipment containing large power transformers)may induce hum. To alleviate the problem, changethe orientation of this unit; or move it farther awayfrom the source of interference.
• This device may interfere with radio and televisionreception. Do not use this device in the vicinity ofsuch receivers.
• Observe the following when using the unit’s floppydisk drive. For further details, refer to “Before UsingFloppy Disks” (p. 5).
• Do not place the unit near devices that produce astrong magnetic field (e.g., loudspeakers).
• Install the unit on a solid, level surface. • Do not move the unit or subject it to vibration
while the drive is operating.
• Do not expose the unit to direct sunlight, place itnear devices that radiate heat, leave it inside anenclosed vehicle, or otherwise subject it to tempera-ture extremes. Excessive heat can deform or discolorthe unit.
• To avoid possible breakdown, do not use the unit ina wet area, such as an area exposed to rain or othermoisture.
Maintenance• For everyday cleaning wipe the unit with a soft, dry
cloth or one that has been slightly dampened withwater. To remove stubborn dirt, use a cloth impreg-
nated with a mild, non-abrasive detergent.Afterwards, be sure to wipe the unit thoroughlywith a soft, dry cloth.
• Never use benzine, thinners, alcohol or solvents ofany kind, to avoid the possibility of discolorationand/or deformation.
Additional Precautions• Unfortunately, it may be impossible to restore the
contents of data that was stored on a floppy diskonce it has been lost. Roland Corporation assumesno liability concerning such loss of data.
• Use a reasonable amount of care when using theunit’s buttons, sliders, or other controls; and whenusing its jacks and connectors. Rough handling canlead to malfunctions.
• Never strike or apply strong pressure to the display.
• When connecting / disconnecting all cables, graspthe connector itself—never pull on the cable. Thisway you will avoid causing shorts, or damage to thecable’s internal elements.
• A small amount of heat will radiate from the unitduring normal operation.
• To avoid disturbing your neighbors, try to keep theunit’s volume at reasonable levels. You may preferto use headphones, so you do not need to be con-cerned about those around you (especially when it islate at night).
• When you need to transport the unit, package it inthe box (including padding) that it came in, if possi-ble. Otherwise, you will need to use equivalentpackaging materials.
• Use a cable from Roland to make the connection. Ifusing some other make of connection cable, pleasenote the following precautions.
• Some connection cables contain resistors. Do notuse cables that incorporate resistors for connect-ing to this unit. The use of such cables can causethe sound level to be extremely low, or impossi-ble to hear. For information on cable specifica-tions, contact the manufacturer of the cable.
* GS ( ) is a registered trademark of RolandCorporation.
* Apple is a registered trademark of Apple Computer, Inc.
* Macintosh is a registered trademark of Apple Computer,Inc.
* IBM PC is a registered trademark of InternationalBusiness Machines Corporation.
IMPORTANT NOTES
4
Handling the Floppy Disk Drive• Install the unit on a solid, level surface in an area
free from vibration. If the unit must be installed atan angle, be sure the installation does not exceed thepermissible range.
• Avoid using the unit immediately after it has beenmoved to a location with a level of humidity that isgreatly different than its former location. Rapidchanges in the environment can cause condensationto form inside the drive, which will adversely affectthe operation of the drive and/or damage floppydisks. When the unit has been moved, allow it tobecome accustomed to the new environment (allowa few hours) before operating it.
• To insert a disk, push it gently but firmly into thedrive—it will click into place. To remove a disk,press the EJECT button firmly. Do not use excessiveforce to remove a disk which is lodged in the drive.
• Never attempt to remove a floppy disk from thedrive while the drive is operating (the indicator isbrightly lit); damage could result to both the diskand the drive.
• Remove any disk from the drive before powering upor down.
• To prevent damage to the disk drive’s heads, alwaystry to hold the floppy disk in a level position (nottilted in any direction) while inserting it into thedrive. Push it in firmly, but gently. Never use exces-sive force.
• To avoid the risk of malfunction and/or damage,insert only floppy disks into the disk drive. Neverinsert any other type of disk. Avoid getting paperclips, coins, or any other foreign objects inside thedrive.
Handling Floppy Disks• Floppy disks contain a plastic disk with a thin coat-
ing of magnetic storage medium. Microscopic preci-sion is required to enable storage of large amountsof data on such a small surface area. To preservetheir integrity, please observe the following whenhandling floppy disks: • Never touch the magnetic medium inside the
disk.• Do not use or store floppy disks in dirty or dusty
areas. • Do not subject floppy disks to temperature
extremes (e.g., direct sunlight in an enclosed vehi-cle). Recommended temperature range: 10 to 50°C (50 to 122° F).
• Do not expose floppy disks to strong magneticfields, such as those generated by loudspeakers.
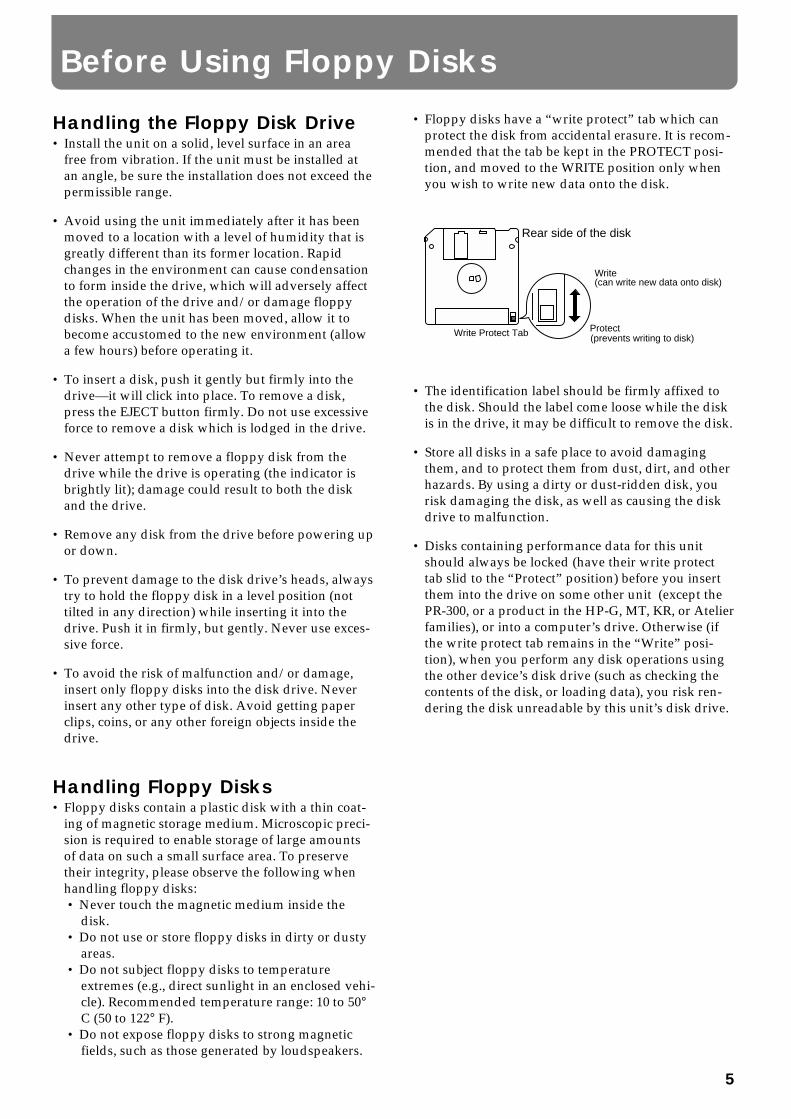
• Floppy disks have a “write protect” tab which canprotect the disk from accidental erasure. It is recom-mended that the tab be kept in the PROTECT posi-tion, and moved to the WRITE position only whenyou wish to write new data onto the disk.
• The identification label should be firmly affixed tothe disk. Should the label come loose while the diskis in the drive, it may be difficult to remove the disk.
• Store all disks in a safe place to avoid damagingthem, and to protect them from dust, dirt, and otherhazards. By using a dirty or dust-ridden disk, yourisk damaging the disk, as well as causing the diskdrive to malfunction.
• Disks containing performance data for this unitshould always be locked (have their write protecttab slid to the “Protect” position) before you insertthem into the drive on some other unit (except thePR-300, or a product in the HP-G, MT, KR, or Atelierfamilies), or into a computer’s drive. Otherwise (ifthe write protect tab remains in the “Write” posi-tion), when you perform any disk operations usingthe other device’s disk drive (such as checking thecontents of the disk, or loading data), you risk ren-dering the disk unreadable by this unit’s disk drive.
Write
Protect
Rear side of the disk
Write Protect Tab
(can write new data onto disk)
(prevents writing to disk)
Before Using Floppy Disks
5
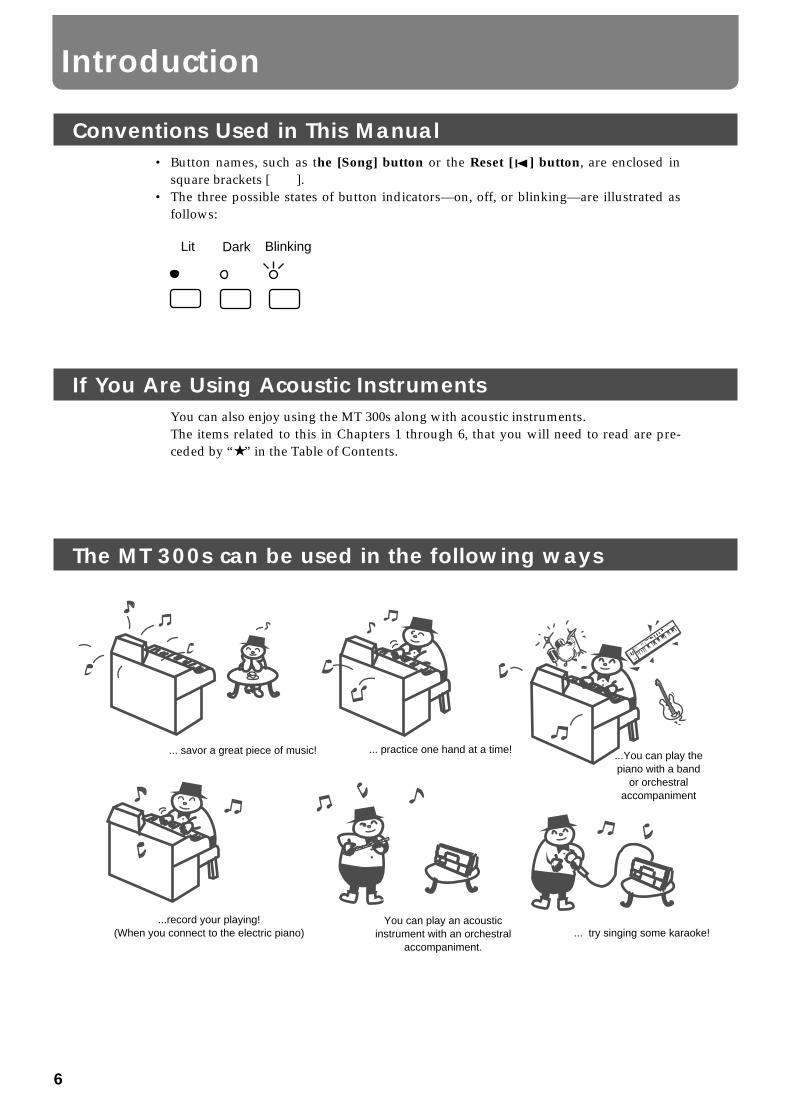
Conventions Used in This Manual• Button names, such as t
he [Song] button or the Reset [ ] button, are enclosed insquare brackets [ ].
• The three possible states of button indicators—on, off, or blinking—are illustrated asfollows:
fig.1_30
If You Are Using Acoustic InstrumentsYou can also enjoy using the MT 300s along with acoustic instruments.The items related to this in Chapters 1 through 6, that you will need to read are pre-ceded by “★ ” in the Table of Contents.
The MT 300s can be used in the following waysfig.1-2_30
Lit Dark Blinking
... savor a great piece of music! ... practice one hand at a time!...You can play thepiano with a band
or orchestralaccompaniment
...record your playing!(When you connect to the electric piano)
You can play an acousticinstrument with an orchestral
accompaniment.... try singing some karaoke!
Introduction
6
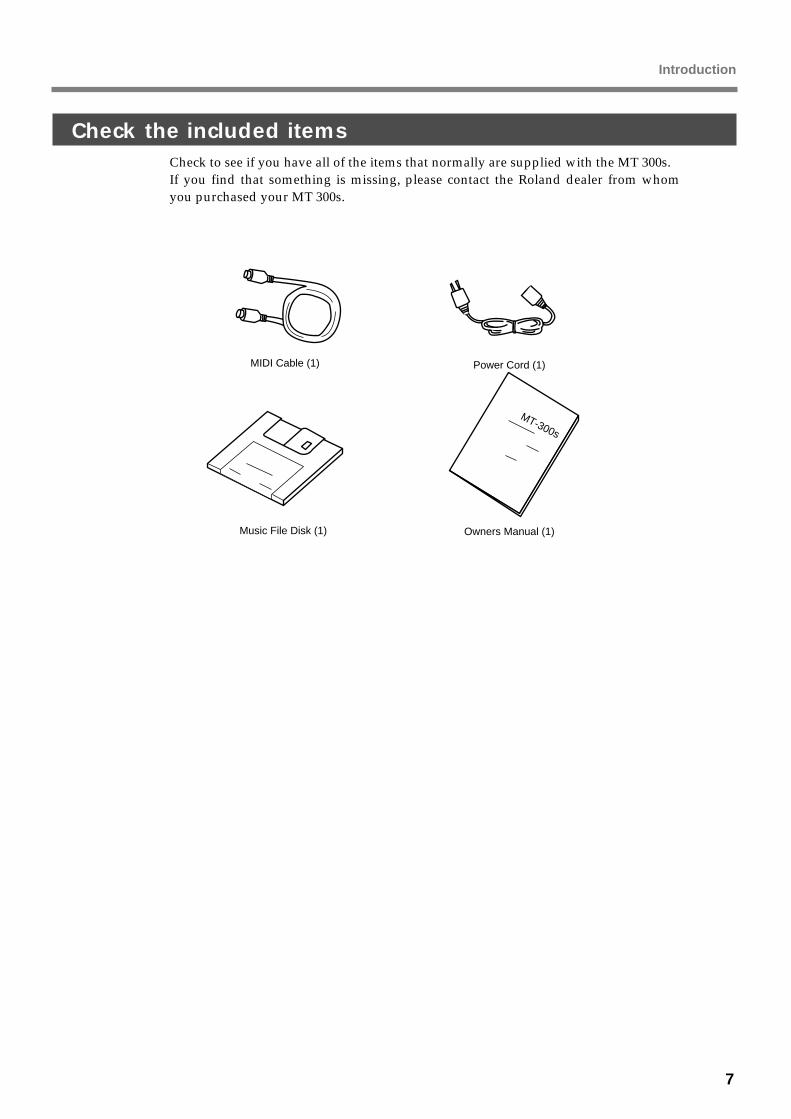
Check the included itemsCheck to see if you have all of the items that normally are supplied with the MT 300s.If you find that something is missing, please contact the Roland dealer from whomyou purchased your MT 300s.
fig.2-1_20
Music File Disk (1) Owners Manual (1)
MIDI Cable (1) Power Cord (1)
MT-300s
Introduction
7
Using the Unit Safely ............................................................................................3Important Notes ....................................................................................................4Before Using Floppy Disks ..................................................................................5Introduction............................................................................................................6Main Features of the MT 300s............................................................................11Names of Things and What They Do: 1—The Front Panel ...........................12Names of Things and What They Do: 2—The Rear Panel ............................14About the Display Screen...................................................................................15
If You are Connecting an Electronic Keyboard..16Connection Procedure .......................................................................................................16Turning the Power On and Off ........................................................................................18Adjusting the Volume........................................................................................................19Tuning the MT 300s to Electronic Keyboards ................................................................19Adding Reverberation to the Sound................................................................................20Selecting Piano Sounds......................................................................................................21
If You are Using Acoustic Instruments ...23Turning the Power On and Off ........................................................................................23Adjusting the Volume........................................................................................................23Matching your instrument to the pitch of the MT 300s ................................................24
Chapter 1 Mastering the Basics.............25How to Listen to Songs......................................................................................................25 ★
Inserting and Removing Floppy Disks ................................................................25Starting and Stopping Songs .................................................................................26To Play a Song Repeatedly ....................................................................................26Listening to All Songs Played Back Continuously.............................................27
Moving to a Desired Location in a Song.........................................................................28 ★
To Return to the Biginning of the Song ...............................................................28To Go to the End of the Song.................................................................................28Moving to Marked Locations ................................................................................29
Repeating the Same Part of a Song ..................................................................................31 ★
Moving a Repeating Segment ...............................................................................32Changing the Song’s Tempo.............................................................................................33 ★
Setting the Tempo by Pressing the Button in Time (Tap Tempo)....................33Playing Without Tempo Changes (Tempo Mute) ..............................................34
How to Transpose a Song .................................................................................................35 ★
Sounding the Metronome .................................................................................................36 ★
Practicing a Song ................................................................................................................38 ★
Synchronizing the Timing When You Come into a Song (Count In) ..............39Practicing the Right-Hand Part.............................................................................39Practicing the Left-Hand Part................................................................................40Using Both Hands to Play Along with Accompaniment ..................................40
Contents
8
Try Recording Your Own Performance ..........................................................................41Recording Along with Songs.................................................................................42Recording New Songs ............................................................................................45Deleting Sounds Recorded to Track Buttons ......................................................48Deleting Recorded Songs .......................................................................................48
How to Save Songs.............................................................................................................49Before Using Floppy Disks (Format)...................................................................49Saving Songs to Floppy Disks ...............................................................................50Changing the Song Order on Floppy Disks ........................................................52
Deleting Songs from Floppy Disks ..................................................................................53Performing Karaoke and Accompanying Yourself on the Keyboard.........................54 ★
Chapter 2 Convenient Functions............55Getting Various Instruments Sounds from the Keyboard ...........................................55Listening to Songs after Changing Instrument Sounds or Making Other Changes .....56 ★
Changing the Basic Tempo of the Song ..........................................................................59 ★
Preventing Only One Instrument from Being Played...................................................60 ★
Chapter 3 Recording Functions..............61The MT 300s’s Recording Functions................................................................................61Recording Ensemble Works..............................................................................................62Using the Ordinary Recording Process...........................................................................67Recording by Layering Sounds ........................................................................................68Repeated Recording of the Same Segment .....................................................................69Recording Certain Segments Over Again.......................................................................70Recording Songs Starting with Pickups..........................................................................73Creating Songs Featuring Tempo Changes ....................................................................74Creating Songs Featuring Beat Changes.........................................................................76Creating Rhythm Parts Easily ..........................................................................................77
Chapter 4 Editing Functions ..................78Undoing Edits .....................................................................................................................78Copying Measures..............................................................................................................79Copying Rhythm Pattarns.................................................................................................82Correcting Unvenness in the Rhythm (Quantize) .........................................................85Deleting Measures (Delete)...............................................................................................86Inserting Blank Measures (Insert) ....................................................................................87Erasing Measures (Erase) ..................................................................................................88Transposing Parts Individually (Transpose)..................................................................90Exchanging Parts (Part Exchange) ...................................................................................91Making Revisions One Note at a Time (Note Edit) .......................................................92Editing Tone Changes Within a Song (PC Edit) ............................................................93
Contents
9
Chapter 5 Other Functions ....................95 ★
Restoring the Original Settings ........................................................................................95 ★
Changing the Metronome Settings ..................................................................................95 ★
Changing the Count Sound Settings ...............................................................................96 ★
Setting Markers Within Measures....................................................................................97 ★
Adding Various Effects to Sounds...................................................................................97 ★
Changing the Pedal Functions..........................................................................................98 ★
Turnig off the Bouncing Ball.............................................................................................98 ★
Turning Off the Display of Lyrics ....................................................................................99 ★
Switching the Language on the Display Screen.............................................................99 ★
Chapter 6 Connecting to MIDI Devices ...100About MIDI .......................................................................................................................100Making MIDI Settings......................................................................................................100About the MT 300s’s Sound Generator .........................................................................101Selecting the Sound Generator .......................................................................................101Converting MIDI Channels.............................................................................................102Synchronizing with Connected MIDI Devices.............................................................102Transmitting Synchronization Messages......................................................................103Outputting Received MIDI Messages ...........................................................................103Connecting to Computers ...............................................................................................103
Troubleshooting.................................................................................................104If You See This Screen Displayed ....................................................................106List of Tone Names............................................................................................107List of Rhythm Patterns ....................................................................................111Music Files that can be Used with the MT 300s ............................................112Specifications......................................................................................................113Optional Accessories.........................................................................................113Glossary ..............................................................................................................114Easy Operation List ...........................................................................................115MIDI Implementation Chart ............................................................................116Index....................................................................................................................118
If You Are Using Acoustic Instruments
The items related to this in Chapters 1 through 6, that you will need to read are pre-ceded by “★ ”.
Contents
10
Thank you, and congratulations on your choice of the Roland MT 300s Music Player.You can use the MT 300s not only on its own; by connecting a digital piano, you’llhave even more ways to play sounds.
What You Can Do with the MT 300s as a Stand-Alone MachineListen to music files
Using the built-in disk drive, you can listen to songs in a wide variety of musical gen-res formatted as music files (p.25).
Practice instrumentsThe MT 300s features a variety of convenient functions for changing song tempos(p.33), practicing each hand’s part (p.38), playing back the same section of a songrepeatedly (p.31), and other functions useful for playing songs.
Perform accompanied by orchestral backing from music filesYou can mute specific parts contained in music files and play those parts yourself(p.38), or listen only to specific selected parts (p.60).
Enjoy karaokeThe MT 300s features a microphone input jack. You can also add echo, and change thekey of the accompaniment (p.54).
Your original performances using acoustic instruments cannot be recorded with the MT 300s.
What you can do with a digital piano connected:Record your own performances
Just as with a regular tape recorder, you can record performances onto the fiveTrack/TRACK buttons (p.41).
Create authentic ensemble piecesWith so many different recording and performance functions, creating your ownsongs is a snap (p.61, 78).
Save the songs you create to floppy disks, and then make andcopy original song collections.
Using the built-in disk drive, you can save recorded songs (p.49).
Perform with various instrument sounds played from a connectedkeyboard.
The MT 300s includes an internal GS sound generator with a selection of over 300sounds to choose from (p.55, 56).
NOTE
Main Features of the MT 300s
11
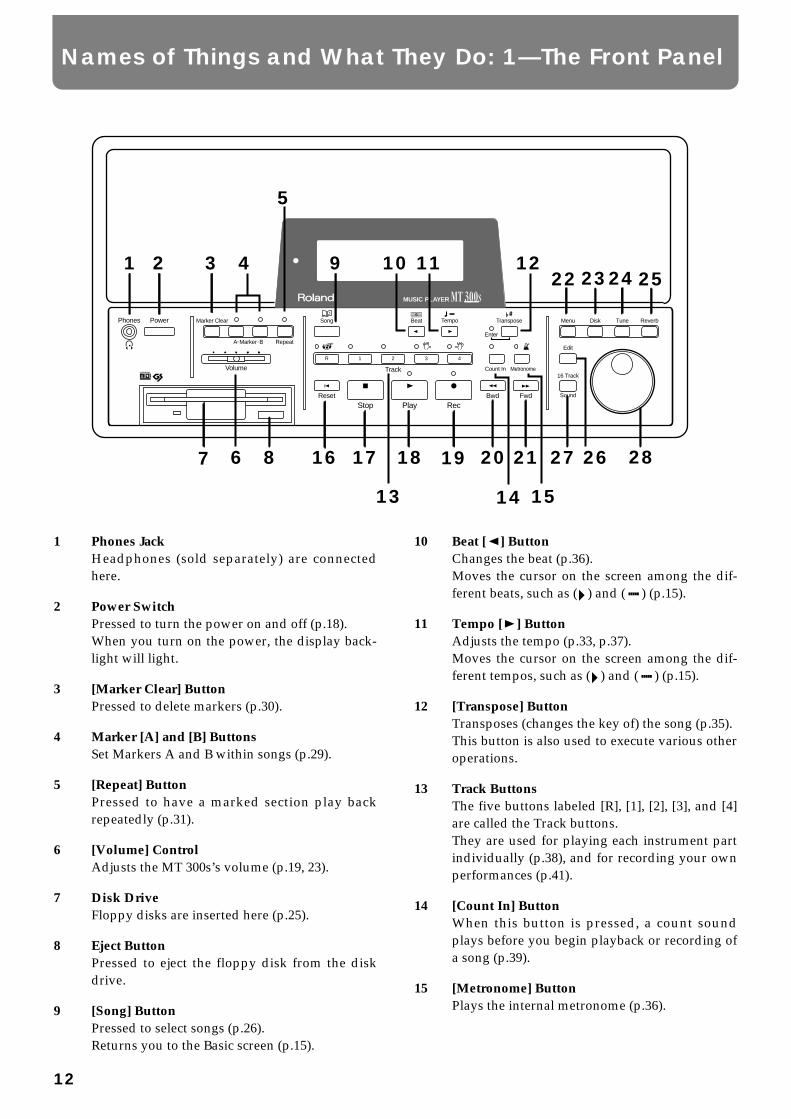
fig.2_50
4321R
PowerPhones Marker Clear
RepeatA-Marker-B
Volume
Song
Track Count In Metronome
Bwd FwdReset
Stop Play Rec
Menu
Edit
16 Track
ReverbDisk TuneBeat Tempo Transpose
Sound
Enter
MUSIC PLAYER
22 2324 25
2827 2620 211918171687
13 14 15
9 10 11 121 2
6
3 4
5
Names of Things and What They Do: 1—The Front Panel
12
1 Phones JackHeadphones (sold separately) are connectedhere.
2 Power SwitchPressed to turn the power on and off (p.18).When you turn on the power, the display back-light will light.
3 [Marker Clear] ButtonPressed to delete markers (p.30).
4 Marker [A] and [B] ButtonsSet Markers A and B within songs (p.29).
5 [Repeat] ButtonPressed to have a marked section play backrepeatedly (p.31).
6 [Volume] ControlAdjusts the MT 300s’s volume (p.19, 23).
7 Disk DriveFloppy disks are inserted here (p.25).
8 Eject ButtonPressed to eject the floppy disk from the diskdrive.
9 [Song] ButtonPressed to select songs (p.26).Returns you to the Basic screen (p.15).
10 Beat [ ] ButtonChanges the beat (p.36).Moves the cursor on the screen among the dif-ferent beats, such as ( ) and ( ) (p.15).
11 Tempo [ ] ButtonAdjusts the tempo (p.33, p.37).Moves the cursor on the screen among the dif-ferent tempos, such as ( ) and ( ) (p.15).
12 [Transpose] ButtonTransposes (changes the key of) the song (p.35).This button is also used to execute various otheroperations.
13 Track ButtonsThe five buttons labeled [R], [1], [2], [3], and [4]are called the Track buttons.They are used for playing each instrument partindividually (p.38), and for recording your ownperformances (p.41).
14 [Count In] ButtonWhen this button is pressed, a count soundplays before you begin playback or recording ofa song (p.39).
15 [Metronome] ButtonPlays the internal metronome (p.36).
16 Reset [ ] ButtonReturns you to the beginning of the currentsong (p.28).
17 Stop [ ] ButtonStops playback or recording of the song.
18 Play [ ] ButtonBegins playback or recording of the song.
19 Rec [ ] ButtonPuts the keyboard in record standby mode(p.41).
20 Bwd [ ] Button“Rewinds,” or takes you to an earlier point inthe song (p.28).
21 Fwd [ ] ButtonAdvances, or “fast-forwards” the song (p.28).
22 [Menu] ButtonAllows you to select from various functions,including recording functions.
23 [Disk] ButtonPressed to save songs to (p.49), or delete songsfrom floppy disks (p.53).
24 [Tune] ButtonWith this button you can adjust the keyboard’stuning (p.19, p.24).
25 [Reverb] ButtonPress this button to apply reverberation to thesound (p.20).
26 [Edit] ButtonUse this button in editing recorded songs (p.78).
27 [16 Track] ButtonYou can select instrument sounds (p.55) andcreate ensemble pieces using this button (p.61).
28 [Dial]Changes the value of the item designated by thecursor on the screen, such as ( ) and ( ).
Names of Things and What They Do: 1—The Front Panel
13
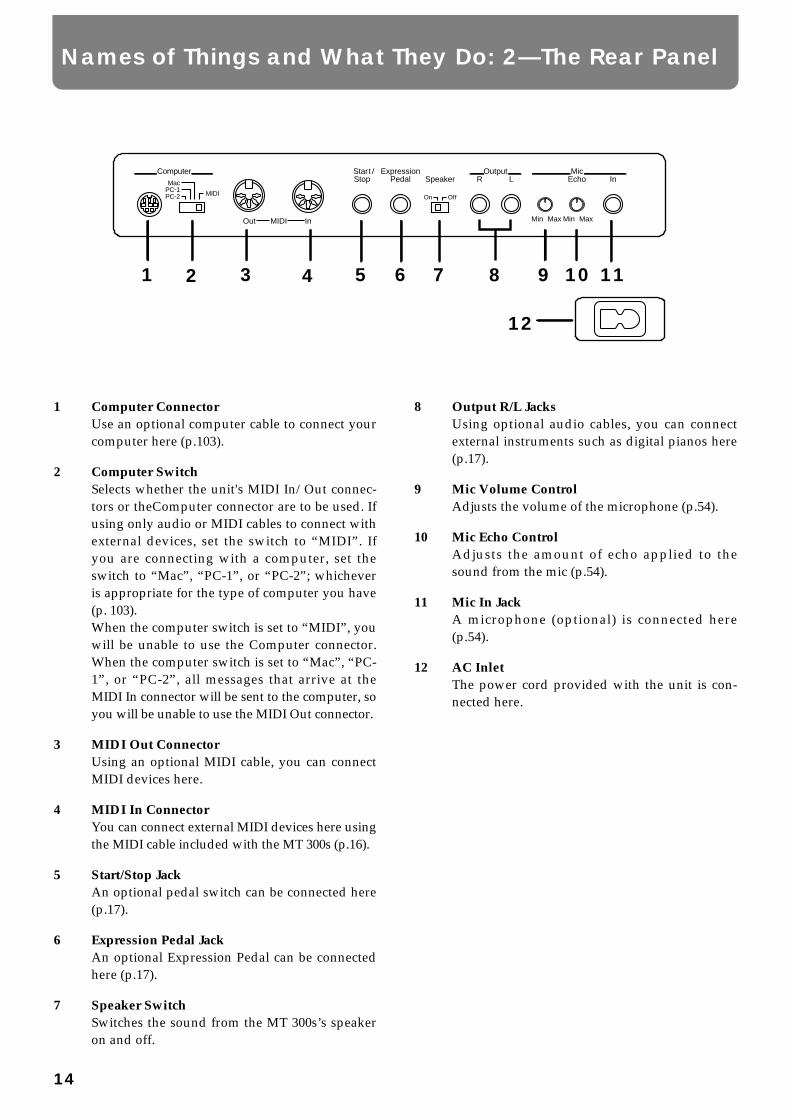
fig.3_50
LROutputExpression
SpeakerPedal
MaxMin MaxMin
InEchoMic
MIDI
Computer
PC-2PC-1Mac
Off
InOut MIDI
On
StopStartl
87 9 10 111 2 63 4 5
12
Names of Things and What They Do: 2—The Rear Panel
14
1 Computer ConnectorUse an optional computer cable to connect yourcomputer here (p.103).
2 Computer SwitchSelects whether the unit's MIDI In/Out connec-tors or theComputer connector are to be used. Ifusing only audio or MIDI cables to connect withexternal devices, set the switch to “MIDI”. Ifyou are connecting with a computer, set theswitch to “Mac”, “PC-1”, or “PC-2”; whicheveris appropriate for the type of computer you have(p. 103).When the computer switch is set to “MIDI”, youwill be unable to use the Computer connector.When the computer switch is set to “Mac”, “PC-1”, or “PC-2”, all messages that arrive at theMIDI In connector will be sent to the computer, soyou will be unable to use the MIDI Out connector.
3 MIDI Out ConnectorUsing an optional MIDI cable, you can connectMIDI devices here.
4 MIDI In ConnectorYou can connect external MIDI devices here usingthe MIDI cable included with the MT 300s (p.16).
5 Start/Stop JackAn optional pedal switch can be connected here(p.17).
6 Expression Pedal JackAn optional Expression Pedal can be connectedhere (p.17).
7 Speaker SwitchSwitches the sound from the MT 300s’s speakeron and off.
8 Output R/L JacksUsing optional audio cables, you can connectexternal instruments such as digital pianos here(p.17).
9 Mic Volume ControlAdjusts the volume of the microphone (p.54).
10 Mic Echo ControlAdjusts the amount of echo applied to thesound from the mic (p.54).
11 Mic In JackA microphone (optional) is connected here(p.54).
12 AC InletThe power cord provided with the unit is con-nected here.
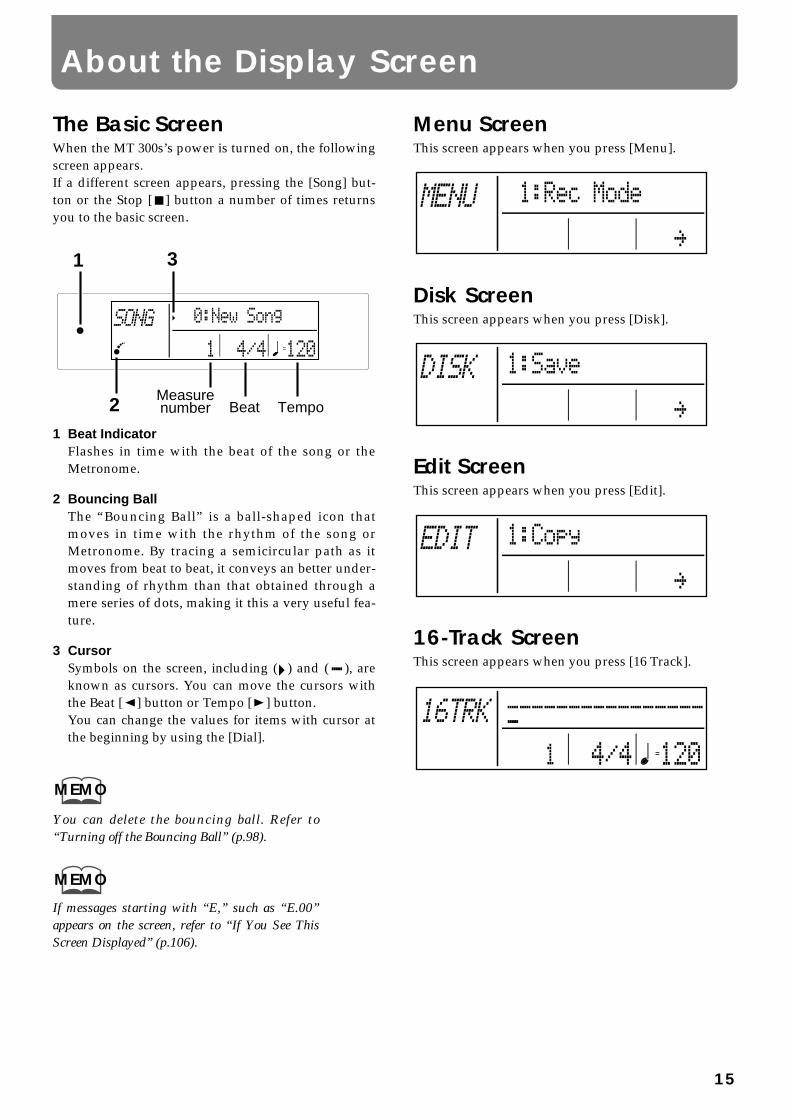
The Basic ScreenWhen the MT 300s’s power is turned on, the followingscreen appears.If a different screen appears, pressing the [Song] but-ton or the Stop [ ] button a number of times returnsyou to the basic screen.fig.04-01_50 (Screen)
1 Beat IndicatorFlashes in time with the beat of the song or theMetronome.
2 Bouncing BallThe “Bouncing Ball” is a ball-shaped icon thatmoves in time with the rhythm of the song orMetronome. By tracing a semicircular path as itmoves from beat to beat, it conveys an better under-standing of rhythm than that obtained through amere series of dots, making it this a very useful fea-ture.
3 CursorSymbols on the screen, including ( ) and ( ), areknown as cursors. You can move the cursors withthe Beat [ ] button or Tempo [ ] button.You can change the values for items with cursor atthe beginning by using the [Dial].
You can delete the bouncing ball. Refer to“Turning off the Bouncing Ball” (p.98).
If messages starting with “E,” such as “E.00”appears on the screen, refer to “If You See ThisScreen Displayed” (p.106).
Menu ScreenThis screen appears when you press [Menu].fig.4-2_30
Disk ScreenThis screen appears when you press [Disk].fig.4-3_30
Edit ScreenThis screen appears when you press [Edit].fig.4-4_30
16-Track ScreenThis screen appears when you press [16 Track].fig.4-5_30
1
Measurenumber Beat Tempo
3
2
MEMO
MEMO
About the Display Screen
15
Read this section if you are using the MT 300s with a digital piano connected.
If you are using the MT 300s along with acoustic instruments, please read p.23.
Connection ProcedureTo prevent malfunction and/or damage to speakers or other devices, always turn down the volume, and
turn off the power on all devices before making any connections. fig.5-1_150
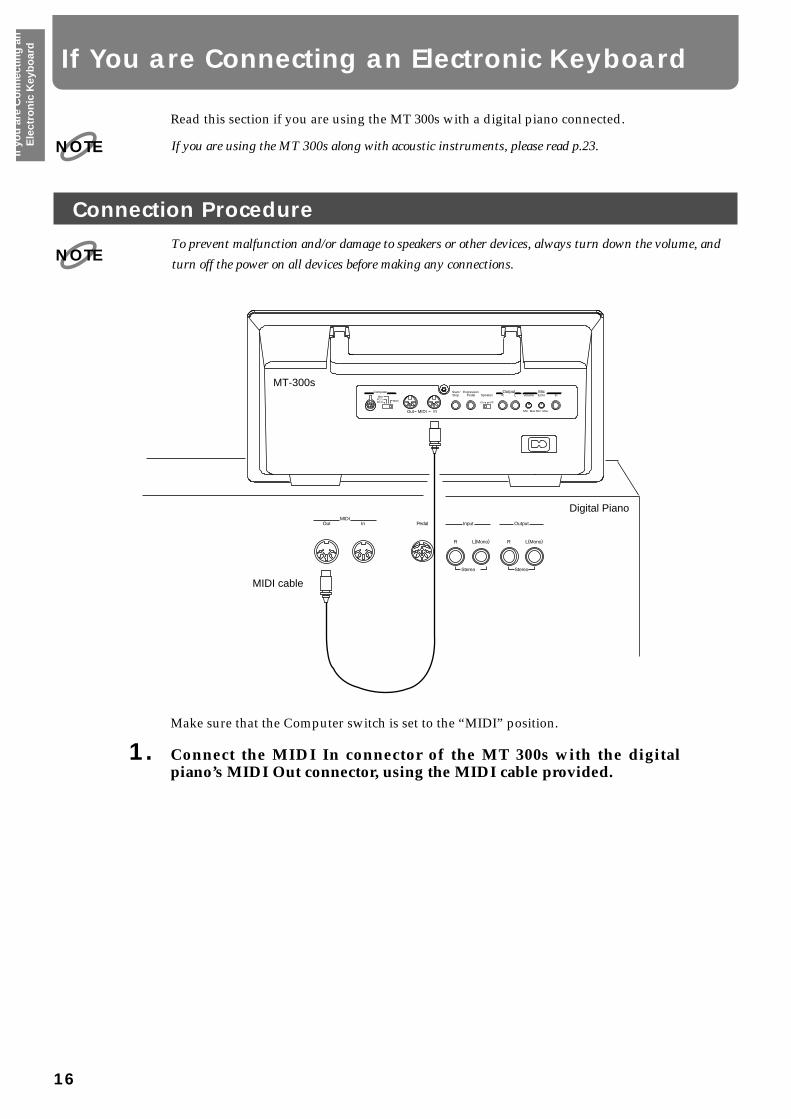
Make sure that the Computer switch is set to the “MIDI” position.
1. Connect the MIDI In connector of the MT 300s with the digitalpiano’s MIDI Out connector, using the MIDI cable provided.
NOTE
NOTE
LROutputExpression
SpeakerPedal
MaxMin MaxMin
InEchoMic
Volume
MIDI
Computer
PC-2PC-1Mac
Off
InOut MIDI
On
StopStartl
Output
R L(Mono)
Input
R L(Mono)
Stereo Stereo
PedalInOutMIDI
MT-300s
Digital Piano
MIDI cable
If You are Connecting an Electronic Keyboard
16
If y
ou
are
Co
nn
ecti
ng
an
Ele
ctro
nic
Key
bo
ard
To get even better soundYou can play the sound from the MT 300s through a digital piano’s speakers.
1. Using a commercially available audio cable, connect the Output R/Ljack of the MT 300s to the digital piano’s Input R/L jack.This lets you play the sound from the MT 300s through the digital piano speakers aswell as from the MT 300s’s own speaker.
2. Flip the Speaker switch on the rear panel of the MT 300s to “Off.”Sound from the MT 300s speaker now stops.If you turn the Speaker switch back to “On,” sound will again come from the MT300s’s speaker.
Please use an audio cable with a standard phone plug. Consult the retailer from whom you purchased the
MT 300s.
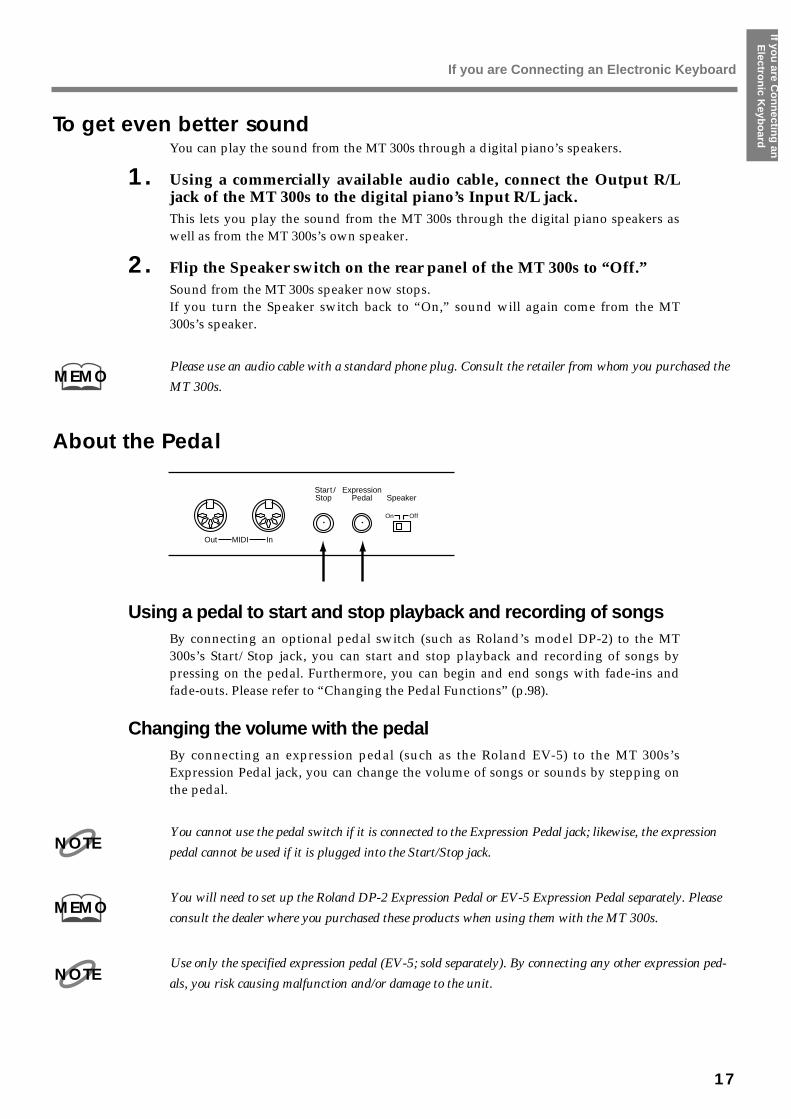
About the Pedalfig.5-2_30
Using a pedal to start and stop playback and recording of songsBy connecting an optional pedal switch (such as Roland’s model DP-2) to the MT300s’s Start/Stop jack, you can start and stop playback and recording of songs bypressing on the pedal. Furthermore, you can begin and end songs with fade-ins andfade-outs. Please refer to “Changing the Pedal Functions” (p.98).
Changing the volume with the pedalBy connecting an expression pedal (such as the Roland EV-5) to the MT 300s’sExpression Pedal jack, you can change the volume of songs or sounds by stepping onthe pedal.
You cannot use the pedal switch if it is connected to the Expression Pedal jack; likewise, the expression
pedal cannot be used if it is plugged into the Start/Stop jack.
You will need to set up the Roland DP-2 Expression Pedal or EV-5 Expression Pedal separately. Please
consult the dealer where you purchased these products when using them with the MT 300s.
Use only the specified expression pedal (EV-5; sold separately). By connecting any other expression ped-
als, you risk causing malfunction and/or damage to the unit.
MEMO
ExpressionSpeakerPedal
Off
InOut MIDI
On
StopStartl
NOTE
MEMO
NOTE
If you are Connecting an Electronic Keyboard
17
If you
are Co
nn
ecting
anE
lectron
ic Keyb
oard
Turning the Power On and OffOnce the connections have been completed (p. 16), turn on power to your variousdevices in the order specified.
By turning on devices in the wrong order, you risk causing malfunction and/or damage to speakers and
other devices.
Turning the Power On
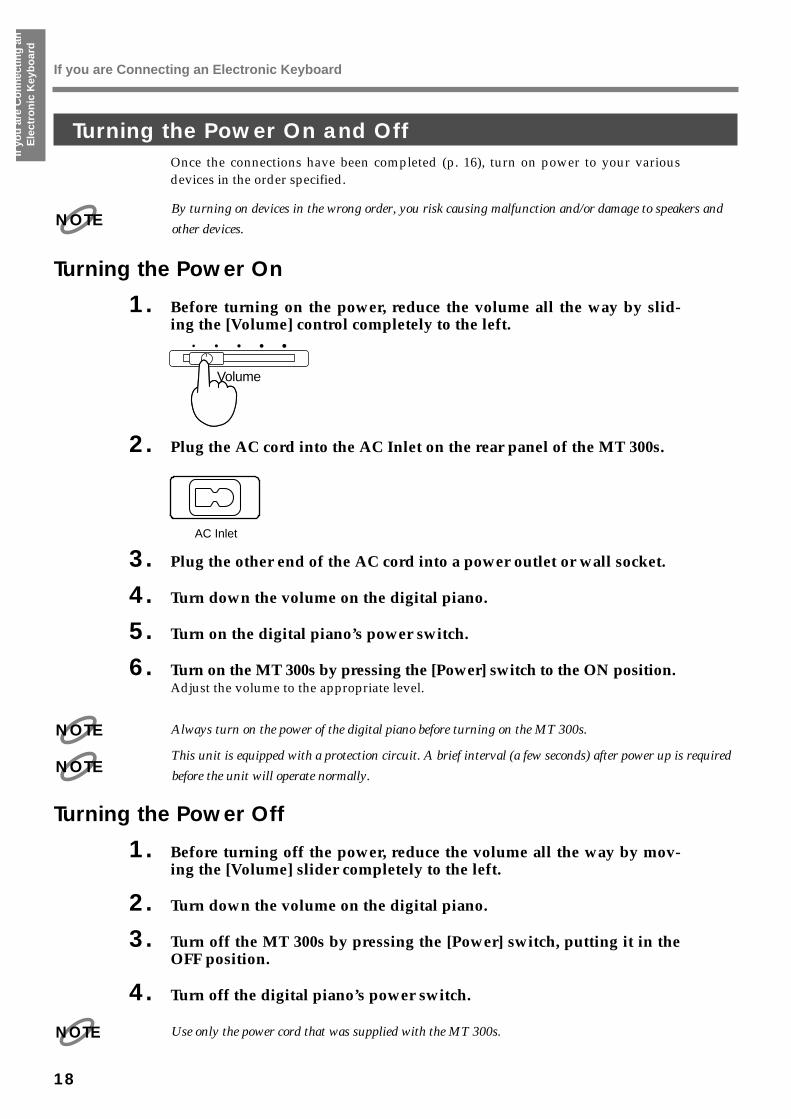
1. Before turning on the power, reduce the volume all the way by slid-ing the [Volume] control completely to the left.
fig.6-1_30
2. Plug the AC cord into the AC Inlet on the rear panel of the MT 300s.fig.6-2_30 (Only the AC Inlet is shown)
3. Plug the other end of the AC cord into a power outlet or wall socket.
4. Turn down the volume on the digital piano.
5. Turn on the digital piano’s power switch.
6. Turn on the MT 300s by pressing the [Power] switch to the ON position.Adjust the volume to the appropriate level.
Always turn on the power of the digital piano before turning on the MT 300s.
This unit is equipped with a protection circuit. A brief interval (a few seconds) after power up is required
before the unit will operate normally.
Turning the Power Off
1. Before turning off the power, reduce the volume all the way by mov-ing the [Volume] slider completely to the left.
2. Turn down the volume on the digital piano.
3. Turn off the MT 300s by pressing the [Power] switch, putting it in theOFF position.
4. Turn off the digital piano’s power switch.
Use only the power cord that was supplied with the MT 300s.
NOTE
Volume
AC Inlet
NOTE
NOTE
NOTE
If you are Connecting an Electronic Keyboard
18
If y
ou
are
Co
nn
ecti
ng
an
Ele
ctro
nic
Key
bo
ard

Adjusting the Volumefig.7-1_30
1. Adjust the volume with the [Volume] slider.Sliding the control to the right increases the volume, and sliding it to the left decreasesthe volume.
Tuning the MT 300s to Electronic KeyboardsWhen using the MT 300s with a digital piano or other instrument connected, you firsthave to tune the instruments’ standard pitches to each other.If, while playing ensemble pieces with other instruments, the pitches do not match,you will not be able to get pleasant sounding performances. Matching these standardpitches is called “tuning.”
What is the standard pitch?
In general, the pitch at Middle A on the piano is what is referred to as the standard pitch.
fig.8-1_30
Press the [Song] button to display the Basic screen.
1. Press the [Tune] button.The following screen is displayed.
fig.8-2_30 (screen)
PowerPhones
On Off
Marker Clear
RepeatA-Marker-B
Volume
MUSIC PLAYER
TERMS
4321R
12
4 35
PowerPhones
On Off
Marker Clear
RepeatA-Marker-B
Volume
Song
Track Count In Metronome
Bwd FwdResetStop Play Rec
Menu
Edit
16 Track
ReverbDisk TuneBeat Tempo Transpose
Sound
Enter
If you are Connecting an Electronic Keyboard
19
If you
are Co
nn
ecting
anE
lectron
ic Keyb
oard
2. Press the Beat [ ] button or Tempo [ ] button until “Tune” appearsin the upper part of the screen.When “Key” or “Sound” is displayed, you can use the [Dial] to change the pitch andsound type of the tuning reference sound.
Displayed DescriptionTune Changes the standard pitch.Key Changes the key of the tuning reference sound.Sound Changes the tuning sound type.
3. Rotate the [Dial] to change the pitch.Match the digital piano’s pitch with that of the MT 300s.The MT 300s’s standard pitch can be adjusted within the range from 415.3 to 466.2 Hz.
When adjusting the pitch of the digital piano, please refer to the owner’s manual for that instrument.
4. When you press the Play [ ] button, the tuning pitch is played. Confirm whether or not the MT 300s is in tune by playing the keyboard.
5. When you press the Stop [ ] button, the tuning pitch stops playing.
This setting is remembered, and will still be in effect the next time the MT 300s is switched on. Please
refer to “Restoring the Original Settings” (p.95) if you wish to restore the original settings.
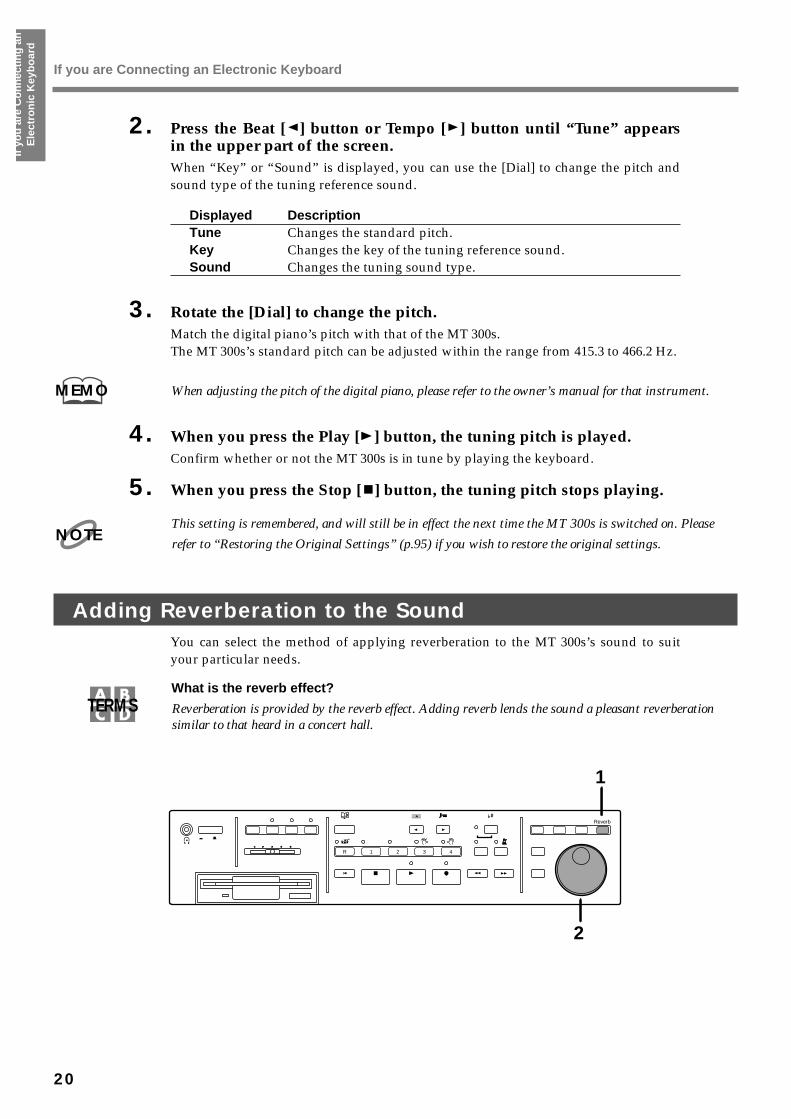
Adding Reverberation to the SoundYou can select the method of applying reverberation to the MT 300s’s sound to suityour particular needs.
What is the reverb effect?
Reverberation is provided by the reverb effect. Adding reverb lends the sound a pleasant reverberationsimilar to that heard in a concert hall.
fig.10-1_30
MEMO
NOTE
TERMS
4321R
1
2
PowerPhones
On Off
Marker Clear
RepeatA-Marker-B
Volume
Song
Track Count In Metronome
Bwd FwdResetRec
Edit
16 Track
ReverbDisk
Sound
Enter
If you are Connecting an Electronic Keyboard
20
If y
ou
are
Co
nn
ecti
ng
an
Ele
ctro
nic
Key
bo
ard
Press the [Song] button to display the Basic screen.
1. Press the [Reverb] button.The following screen is displayed.
fig.10-2_30
2. Rotate the [Dial] to select the amount of reverb to be used.When you select a different song, the reverb reverts to its original settings.
Displayed DescriptionNormal The song is played with the reverb settings set in the music file left
unchanged.Listening Adds an amount of reverb appropriate for music appreciation.Lesson Adds an amount of reverb appropriate for practicing piano and
other such times.
Some music files do not allow the reverb settings to be changed.
You can also change the type of reverb. Please refer to “Adding Various Effects to Sounds” (p.97).
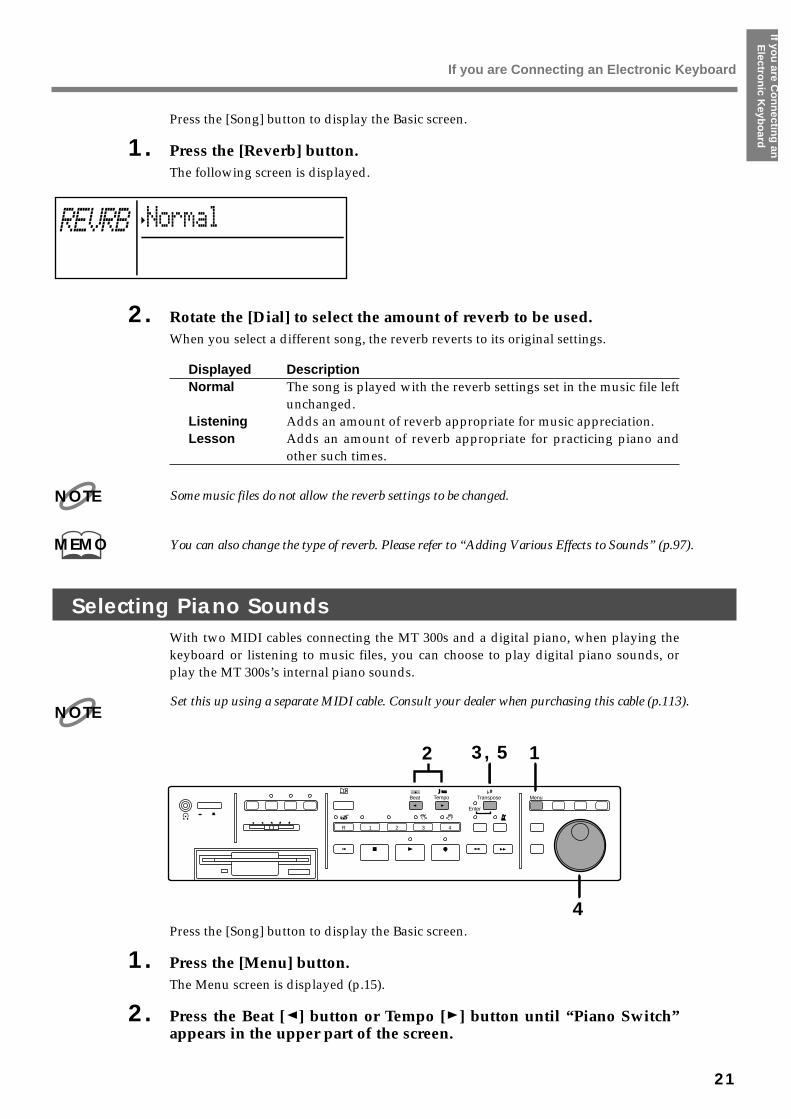
Selecting Piano SoundsWith two MIDI cables connecting the MT 300s and a digital piano, when playing thekeyboard or listening to music files, you can choose to play digital piano sounds, orplay the MT 300s’s internal piano sounds.
Set this up using a separate MIDI cable. Consult your dealer when purchasing this cable (p.113).fig.9-1_30
Press the [Song] button to display the Basic screen.
1. Press the [Menu] button.The Menu screen is displayed (p.15).
2. Press the Beat [ ] button or Tempo [ ] button until “Piano Switch”appears in the upper part of the screen.
NOTE
MEMO
NOTE
4321R
12 3, 5
4
PowerPhones
On Off
Marker Clear
RepeatA-Marker-B
Volume
Song
Track Count In Metronome
Bwd FwdResetRec
Menu
Edit
16 Track
ReverbDiskBeat Tempo Transpose
Sound
Enter
If you are Connecting an Electronic Keyboard
21
If you
are Co
nn
ecting
anE
lectron
ic Keyb
oard
3. When you press the [Transpose] button, the following screen is dis-played.
fig.9-2_30 (Screen)
4. With the [Dial], select [Int], [A], or [B].Pressing the [Song] button at this point undoes the change and returns you to theMenu screen.
5. Press the [Transpose] button.The setting is now changed, are you are returned to the Menu screen.
Displayed DescriptionInt At this setting, the MT 300s’s sounds are used when you play the
keyboard. When listening to music files, all parts are played usingthe MT 300s’s piano sounds.
A At this setting, the connected digital piano’s sounds are usedwhen you play the keyboard with Part 1 selected in the 16-TrackScreen (p.55). When listening to music files, Part 1 is played usingthe digital piano’s sounds. Use this setting when listening toRoland Digital Piano Compatible music files.
B At this setting, the connected digital piano’s sounds are usedwhen you play the keyboard with Parts 1, 3, and 4 selected in the16-Track Screen (p.55). When listening to music files, Parts 1, 3,and 4 are played using the digital piano’s sounds. Use this settingwhen playing Roland SMF format music files for piano lessons.
This setting is remembered, and will still be in effect the next time the MT 300s is switched on.Please refer to “Restoring the Original Settings” (p.95) if you wish to restore the original settings.
If the digital piano sounds are not being played, even with “A” or “B” selected, select “Piano”in the settings described in “Selecting the Sound Generator” (p.101).
For more about music file parts, please refer to “Listening to Songs after Changing InstrumentSounds or Making Other Changes” (p.56).
With this, your preparations are complete.When you are ready, continue with “Chapter 1 Mastering the Basics”(p.25)
NOTE
NOTE
MEMO
If you are Connecting an Electronic Keyboard
22
If y
ou
are
Co
nn
ecti
ng
an
Ele
ctro
nic
Key
bo
ard
Read this section if you going to use the MT 300s in combination with any acoustic instruments.
Turning the Power On and Off
Turning the Power OnBe sure to use the following procedure when turning the power on or off. Carryingout this procedure incorrectly may result in malfunctioning or in damage to the speak-ers and other parts.
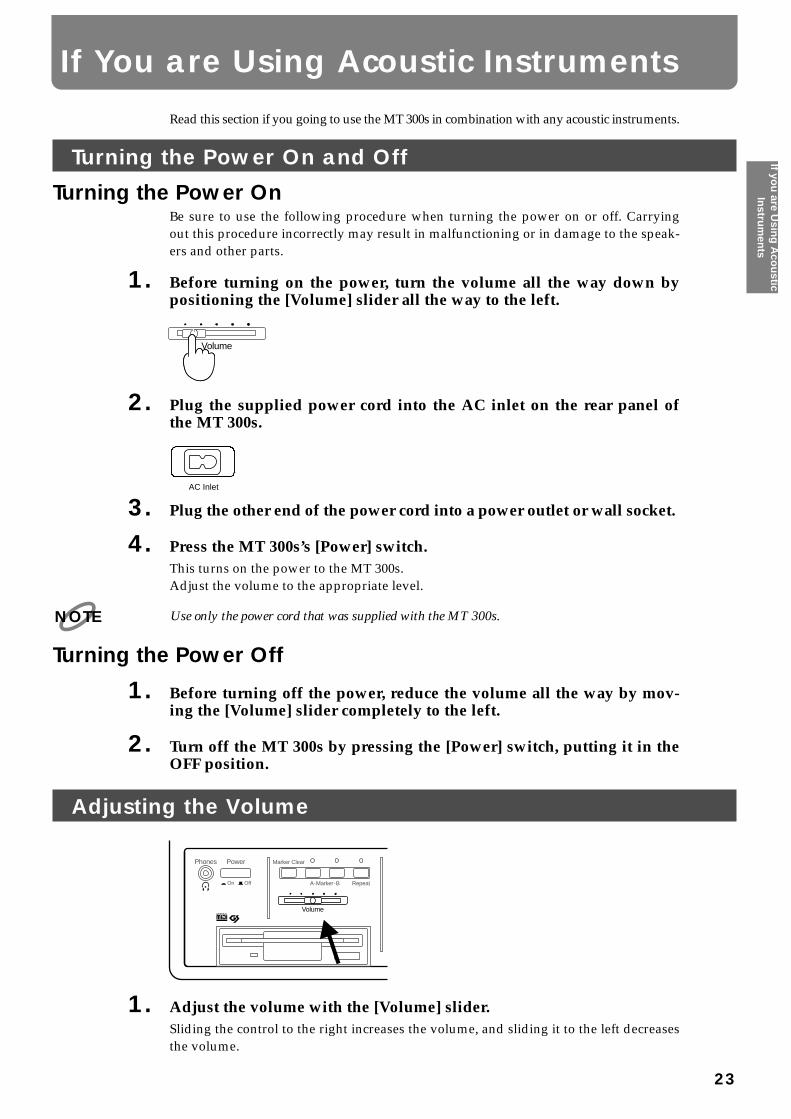
1. Before turning on the power, turn the volume all the way down bypositioning the [Volume] slider all the way to the left.
fig.6-1
2. Plug the supplied power cord into the AC inlet on the rear panel ofthe MT 300s.
fig.6-2
3. Plug the other end of the power cord into a power outlet or wall socket.
4. Press the MT 300s’s [Power] switch.This turns on the power to the MT 300s.Adjust the volume to the appropriate level.
Use only the power cord that was supplied with the MT 300s.
Turning the Power Off
1. Before turning off the power, reduce the volume all the way by mov-ing the [Volume] slider completely to the left.
2. Turn off the MT 300s by pressing the [Power] switch, putting it in theOFF position.
Adjusting the Volumefig.7-1_30
1. Adjust the volume with the [Volume] slider.Sliding the control to the right increases the volume, and sliding it to the left decreasesthe volume.
Volume
AC Inlet
NOTE
PowerPhones
On Off
Marker Clear
RepeatA-Marker-B
Volume
MUSIC PLAYER
If You are Using Acoustic Instruments
23
If you
are Usin
g A
cou
sticIn
strum
ents

Matching your instrument to the pitch of the MT 300sTo tune the standard pitch of the MT 300s so it matches that of an acoustic instrumentyou are using, perform the following. You will not be able to achieve a good sound ifthe standard pitches do not match. Matching these standard pitches is called“Tuning.”
What is the standard pitch?
In general, the pitch at Middle A on the piano is what is referred to as the standard pitch.fig.8-1
Press the [Song] button to display the Basic screen.
1. Press the [Tune] button.
2. Press the Beat [ ] button or Tempo [ ] button until “Tune” appearsin the upper part of the screen. When “Key” or “Sound” is displayed,you can use the [Dial] to change the pitch and sound type of the tun-ing reference soud.
Displayed DescriptionTune Changes the standard pitch.Key Changes the key of the tuning reference sound.Sound Changes the tuning sound type.
3. When you press the Play [ ] button, a reference pitch sounds. Play your instrument to see if it is in tune with the MT 300s.
4. If you need to adjust the pitch of the MT 300s, change the value usingthe [Dial].The MT300s's standard pitch can be adjusted within the range from 415.3 to 466.2 Hz.
5. When you are finished, press the Stop [ ] button.The pitch then stops sounding.
This setting is remembered, and will still be in effect the next time the MT 300s is switched on.
Please refer to “Restoring the Original Settings” (p.95) if you wish to restore the original set-tings.
With this, your preparations are complete. If you like, you might try adding reverbera-tion to the MT 300s’s sounds. Please refer to “Adding Reverberation to the Sound”(p.20).
When you are ready, continue with “Chapter 1 Mastering the Basics(p.25).”
TERMS
4321R
12
3 45
PowerPhones
On Off
Marker Clear
RepeatA-Marker-B
Volume
Song
Track Count In Metronome
Bwd FwdResetStop Play Rec
Menu
Edit
16 Track
ReverbDisk TuneBeat Tempo Transpose
Sound
Enter
NOTE
If you are Using Acoustic Instruments
24
If y
ou
are
Usi
ng
Aco
ust
icIn
stru
men
ts
How to Listen to SongsUsing the MT 300s’s internal disk drive, try listening to some of the songs on theMusic File Disk included with the unit.The Music File Disk is a floppy disk containing performance information for pianosongs and other kinds of music.
Inserting and Removing Floppy Disks
Before the first use of the disk drive, be sure to read the precautions on (p.5).
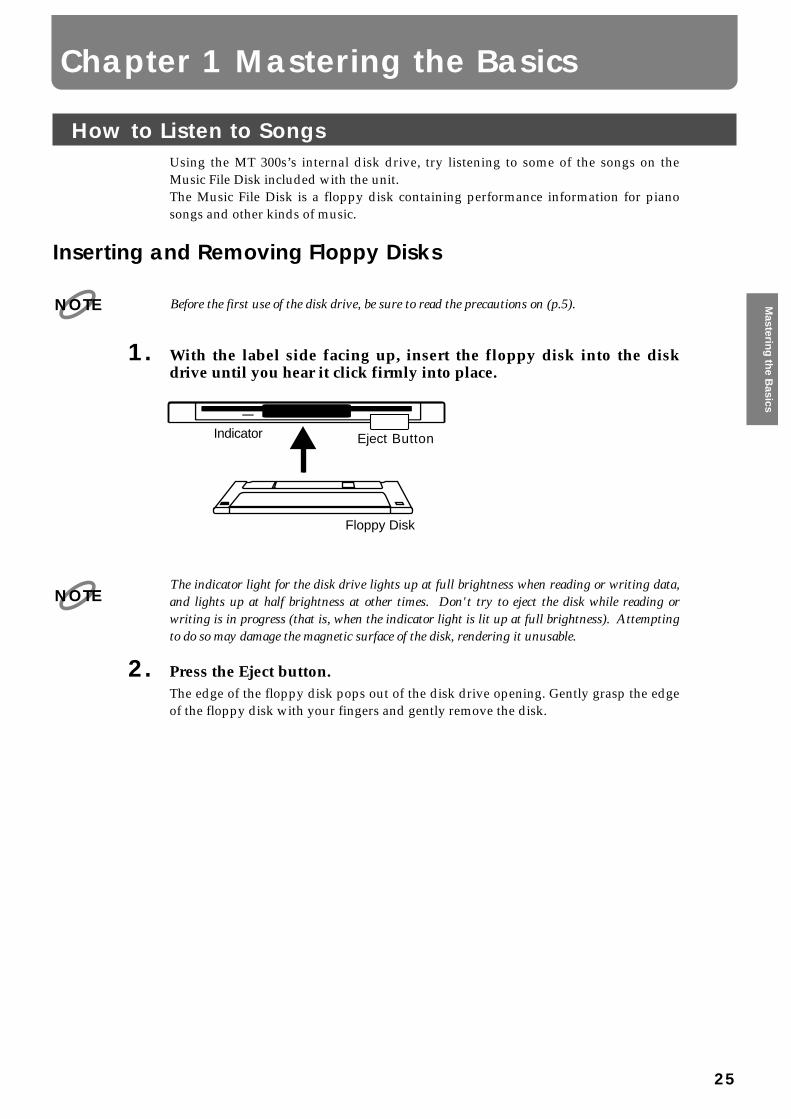
1. With the label side facing up, insert the floppy disk into the diskdrive until you hear it click firmly into place.
fig.12-1_50
The indicator light for the disk drive lights up at full brightness when reading or writing data,and lights up at half brightness at other times. Don't try to eject the disk while reading orwriting is in progress (that is, when the indicator light is lit up at full brightness). Attemptingto do so may damage the magnetic surface of the disk, rendering it unusable.
2. Press the Eject button.The edge of the floppy disk pops out of the disk drive opening. Gently grasp the edgeof the floppy disk with your fingers and gently remove the disk.
NOTE
Indicator Eject Button
Floppy Disk
NOTE
Chapter 1 Mastering the Basics
25
Masterin
g th
e Basics
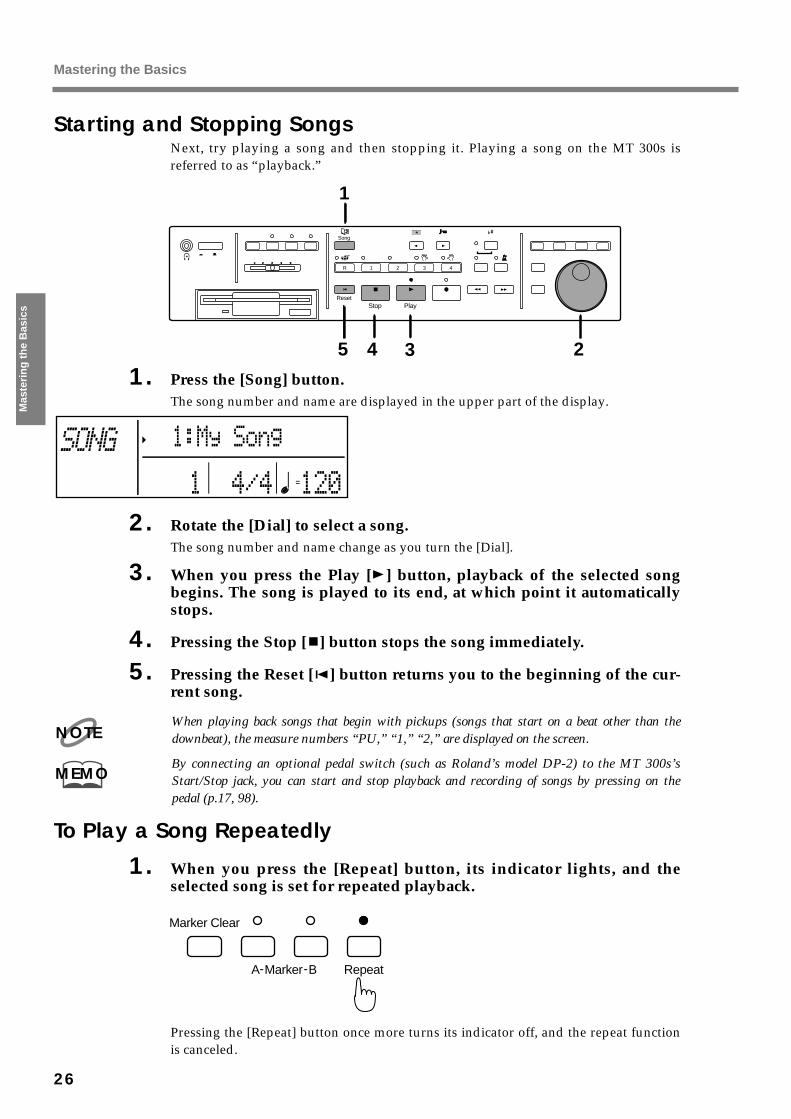
Starting and Stopping SongsNext, try playing a song and then stopping it. Playing a song on the MT 300s isreferred to as “playback.”fig.13-1_30
1. Press the [Song] button.The song number and name are displayed in the upper part of the display.flg.13-2_30 (Screen)
2. Rotate the [Dial] to select a song.The song number and name change as you turn the [Dial].
3. When you press the Play [ ] button, playback of the selected songbegins. The song is played to its end, at which point it automaticallystops.
4. Pressing the Stop [ ] button stops the song immediately.
5. Pressing the Reset [ ] button returns you to the beginning of the cur-rent song.
When playing back songs that begin with pickups (songs that start on a beat other than thedownbeat), the measure numbers “PU,” “1,” “2,” are displayed on the screen.
By connecting an optional pedal switch (such as Roland’s model DP-2) to the MT 300s’sStart/Stop jack, you can start and stop playback and recording of songs by pressing on thepedal (p.17, 98).
To Play a Song Repeatedly
1. When you press the [Repeat] button, its indicator lights, and theselected song is set for repeated playback.
fig.13-3_30
Pressing the [Repeat] button once more turns its indicator off, and the repeat functionis canceled.
4321R
1
2
PowerPhones
On Off
Marker Clear
RepeatA-Marker-B
Volume
Song
Track Count In Metronome
Bwd FwdResetStop Play Rec
Edit
16 Track
Disk
Sound
Enter
345
NOTE
MEMO
Marker Clear
RepeatA-Marker-B
Mastering the Basics
26
Mas
teri
ng
th
e B
asic
s
Listening to All Songs Played Back ContinuouslyYou can repeat playback of all of the MT 300s’s songs continuously. This function iscalled “All Song Play.”
1. While pressing the [Song] button, also press the Play [ ] button.Playback begins from the selected song. After playback of the last song is completed,the MT 300s returns to the first song, and continues playback from there.
2. Pressing the Stop [ ] button stops the song immediately.
If You See This Screen DisplayedWhen recording songs (p.41, 61) or changing a song’s basic settings (p.56, 59), if youtry to select another song, the following will appear on the display.
fig.15-1_30
When You Want to Save the Song
1. Pressing the [Song] button returns you to the Basic screen.Save the song to a floppy disk.For instructions on how to save songs, please refer to “How to Save Songs” (p.49).
When You Want to Delete the Song
1. Pressing the [Transpose] button deletes the recorded song or the songwhose basic settings have been changed.You are then returned to the Basic screen.
You cannot select another song until you have deleted the recorded song or the song whosebasic settings have been changed.NOTE
Mastering the Basics
27
Masterin
g th
e Basics

Moving to a Desired Location in a SongHere’s how to move to a measure somewhere within the song and begin playbackfrom that point.
fig.16-1_30
1. Using the Bwd [ ] button or Fwd [ ] button, “rewind” or fast for-ward to the measure you want to hear.Pressing these buttons once moves you forward or back one measure. You can moveforward and back continuously and more rapidly by holding the buttons down.
2. When you press the Play [ ] button, playback then begins from themeasure to which you’ve moved.You can also rewind and fast forward during playback of the song.
When you begin playback of a song, the measure number in the lower left part of the screenbegins flashing. This flashing indicates that the MT 300s is reading performance data from thefloppy disk. While this is in progress, you cannot rewind or fast forward. Please wait a momentfor this operation to finish.
To Return to the Beginning of the Song
1. Pressing the Reset [ ] button immediately returns you to the begin-ning of the song.
fig.16-3_20
To Go to the End of the Song
1. You can move directly to the end of a song by pressing the Fwd [ ]button while holding down the Stop [ ] button.
fig.16-4_30
4321R
12
PowerPhones
On Off
Marker Clear
RepeatA-Marker-B
Volume
Song
Track Count In Metronome
Bwd FwdResetPlay Rec
Edit
16 Track
ReverbDisk
Sound
Enter
NOTE
Bwd FwdReset
Stop Play Rec
Bwd FwdReset
Stop Play Rec
while holding down
Mastering the Basics
28
Mas
teri
ng
th
e B
asic
s
Moving to Marked LocationsBy placing markers at points in the song, you can then jump directly to those points.You can set two markers (A and B) within a song.You can also set markers and jump to marked locations during playback of the song.
fig.17-1_30
1. Using the Bwd [ ] button or Fwd [ ] button, move to the locationin the song where you want to set a marker.
2. Pressing the [A] button sets Marker [A] at that point in the song;pressing the [B] button sets Marker [B].When Marker [A] is set, the Marker [A] button indicator lights; when Marker [B] is set,the Marker [B] button indicator then lights.
3. After the markers are set, pressing the [A] button or [B] button takesyou directly to the locations where Marker [A] or Marker [B] wereplaced.
You cannot set Marker [A] and Marker [B] at the same point in the song. You also cannotplace Marker [B] at an earlier point in the song than Marker [A].
Although markers are normally placed at the beginning of measures, you can also place them
within measures. Please refer to “Setting Markers Within Measures” (p.97).
Checking Where Markers Are PlacedYou can check the display to confirm where markers are placed.
1. Press the [B] button while holding down the [A] button.While these buttons are pressed, the measure numbers where Marker [A] and Marker[B] are set appear on the screen.
fig.17-2_30
4321R
1
2, 3
PowerPhones
On Off
Marker Clear
RepeatA-Marker-B
Volume
Song
Track Count In Metronome
Bwd FwdResetRec
Edit
16 Track
ReverbDisk
Sound
Enter
NOTE
MEMO
Mastering the Basics
29
Masterin
g th
e Basics
Moving MarkersYou can move markers even after they have been set once.
1. While holding down the [A] button, press the Bwd [ ] button orFwd [ ] button.
fig.17-3_20
Marker [A] moves back or forward through the song one measure at a time. By hold-ing the buttons down, you can have Marker [A] move continuously.When moving Marker [B], press the Bwd [ ] button or Fwd [ ] button whileholding down the [B] button.
Deleting Markers
1. Pressing the [A] button while holding down the [Marker Clear] but-ton deletes Marker [A].
fig.17-4_20
Pressing the [B] button while holding down the [Marker Clear] button deletes Marker[B].
Markers are deleted when you select another song.
Marker Clear
RepeatA-Marker-B
while holding down
Bwd Fwd
Marker Clear
RepeatA-Marker-B
while holding down
NOTE
Mastering the Basics
30
Mas
teri
ng
th
e B
asic
s
Repeating the Same Part of a SongYou can have only a selected section of a song played back repeatedly. This is conve-nient when you want to practice the same passage a number of times. If there is a por-tion of a song you can’t seem to play the way you want, set markers there so you canpractice just that section.
fig.18-1_30
1. Using the Bwd [ ] button or Fwd [ ] button, move to the locationin the song where you want to set a marker.
2. Press the [A] button and [B] button.Marker [A] or Marker [B] is set at the location to which you’ve moved.For example, if you want to repeat playback of the section from Measure 5 to Measure8, place Marker A at the beginning of Measure 5 and Marker B at the beginning ofMeasure 9.
fig.18-2_30 (KR 375 fig.28-1)
3. Press the [Repeat] button; its indicator lights.The segment between Marker A and Marker B is set for repeated playback.
4. Press the Play [ ] button.Playback between Marker A and Marker B repeats.
• If only Marker A is set, playback repeats between Marker A and the end of the song.• If only Marker B, playback repeats between the beginning of the song and Marker B.
5. Press the Stop [ ] button, and playback of the song ceases.
When the [Count In] button indicator is on, the count sound plays only at the beginning of theplayback. If desired, you can have it so the count sound is played throughout the repeated play-back. Please refer to “Changing the Count Sound Settings” (p.96).
4321R
1
2
PowerPhones
On Off
Marker Clear
RepeatA-Marker-B
Volume
Song
Track Count In Metronome
Bwd FwdResetStop Play Rec
Edit
16 Track
ReverbDisk
Sound
Enter
3
45
1 5 9 132 3 4 6 7 8 10 11 12 14 15 16Measure
Mark A Mark B
MEMO
Mastering the Basics
31
Masterin
g th
e Basics
Moving a Repeating SegmentYou can move the interval of a repeated segment forward or back without changingthe length of the interval between the markers. This is effective when, for example,you have finished practicing one section and want to go on to practice the next section.
1. While simultaneously pressing the [A] button and [B] button, presseither the Bwd [ ] or Fwd [ ] button.The interval between Marker A and Marker B is shifted back or forward.
For example, with Marker A set at the beginning of Measure 5 andMarker B at the beginning of Measure 9
• Pressing the Bwd [ ] button moves the markers back one interval, with Marker Amoved to the beginning of Measure 1 and Marker B to the beginning of Measure 5.
fig.18-4_30 (KR 375 fig.28-3)
• Pressing the Fwd [ ] button moves the markers further along once, with Marker Amoved to the top of Measure 9 and Marker B to the top of Measure 13.
fig.18-3_30 (KR 375 fig.28-2)
1 5 9 132 3 4 6 7 8 10 11 12 14 15 16Measure
Mark A Mark B
1 5 9 132 3 4 6 7 8 10 11 12 14 15 16Measure
Mark A Mark B
Mastering the Basics
32
Mas
teri
ng
th
e B
asic
s
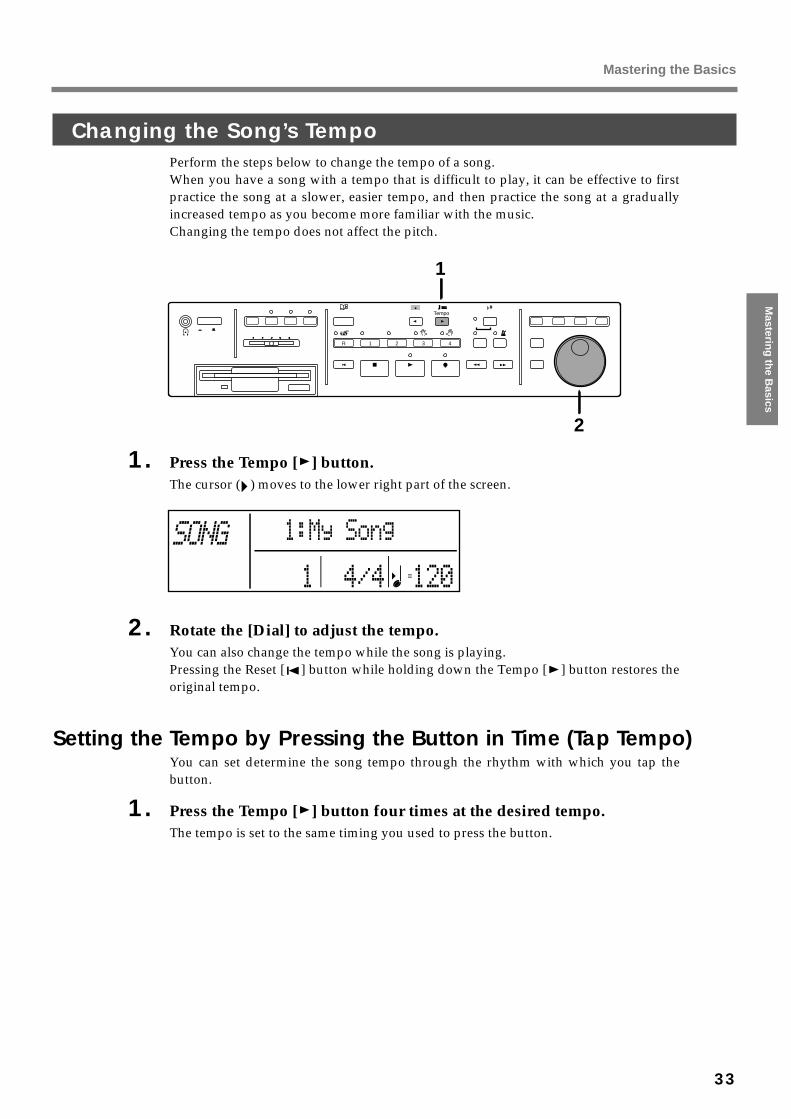
Changing the Song’s TempoPerform the steps below to change the tempo of a song.When you have a song with a tempo that is difficult to play, it can be effective to firstpractice the song at a slower, easier tempo, and then practice the song at a graduallyincreased tempo as you become more familiar with the music.Changing the tempo does not affect the pitch.
fig.19-1_30
1. Press the Tempo [ ] button.The cursor ( ) moves to the lower right part of the screen.
fig.19-2_30
2. Rotate the [Dial] to adjust the tempo.You can also change the tempo while the song is playing.Pressing the Reset [ ] button while holding down the Tempo [ ] button restores theoriginal tempo.
Setting the Tempo by Pressing the Button in Time (Tap Tempo)You can set determine the song tempo through the rhythm with which you tap thebutton.
1. Press the Tempo [ ] button four times at the desired tempo.The tempo is set to the same timing you used to press the button.
4321R
1
2
PowerPhones
On Off
Marker Clear
RepeatA-Marker-B
Volume
Song
Track Count In Metronome
Bwd FwdResetRec
Edit
16 Track
ReverbDiskTempo
Sound
Enter
Mastering the Basics
33
Masterin
g th
e Basics

Playing Without Tempo Changes (Tempo Mute)You can have songs that feature tempo changes played back at a fixed tempo.Playing back songs at a fixed tempo after suspending any tempo changes is called“Tempo Mute.”Try practicing a song that includes an increasing tempo, first setting a single tempowith Tempo Mute.
1. Press the Tempo [ ] button, and set the tempo with the [Dial].
2. While pressing the Tempo [ ] button, press the Stop [ ] button.The song is now set to be played back at the selected fixed tempo.
fig.19-3_20
You can cancel the Tempo Mute with the following procedure.
• Once more, while pressing the Tempo [ ] button, press the Stop [ ] button.• While pressing the Tempo [ ] button, press the Play [ ] button.
The following appears on the display while Tempo Mute is active.fig.19-4_30 (Screen)
Tempo Mute is canceled when you select a different song.
Stop while holding down
Tempo
MuteTempo
NOTE
Mastering the Basics
34
Mas
teri
ng
th
e B
asic
s

How to Transpose a SongYou can play back songs in different keys by transposing them.
The transposed setting is canceled when the power is turned off, or when you select a differentsong.
fig.20-1_20
1. Press the [Transpose] button.The following screen is displayed.
fig.20-2_30
2. Use the [Dial] to change the key.You can transpose the song within a range from -24 to +24 (in semitone steps).
3. Press the Play [ ] button, and the song is played in the new key.
NOTE
4321R
1
3
PowerPhones
On Off
Marker Clear
RepeatA-Marker-B
Volume
Song
Track Count In
Bwd FwdResetPlay Rec
Edit
16 Track
ReverbDiskTranspose
Sound
Enter
2
Mastering the Basics
35
Masterin
g th
e Basics
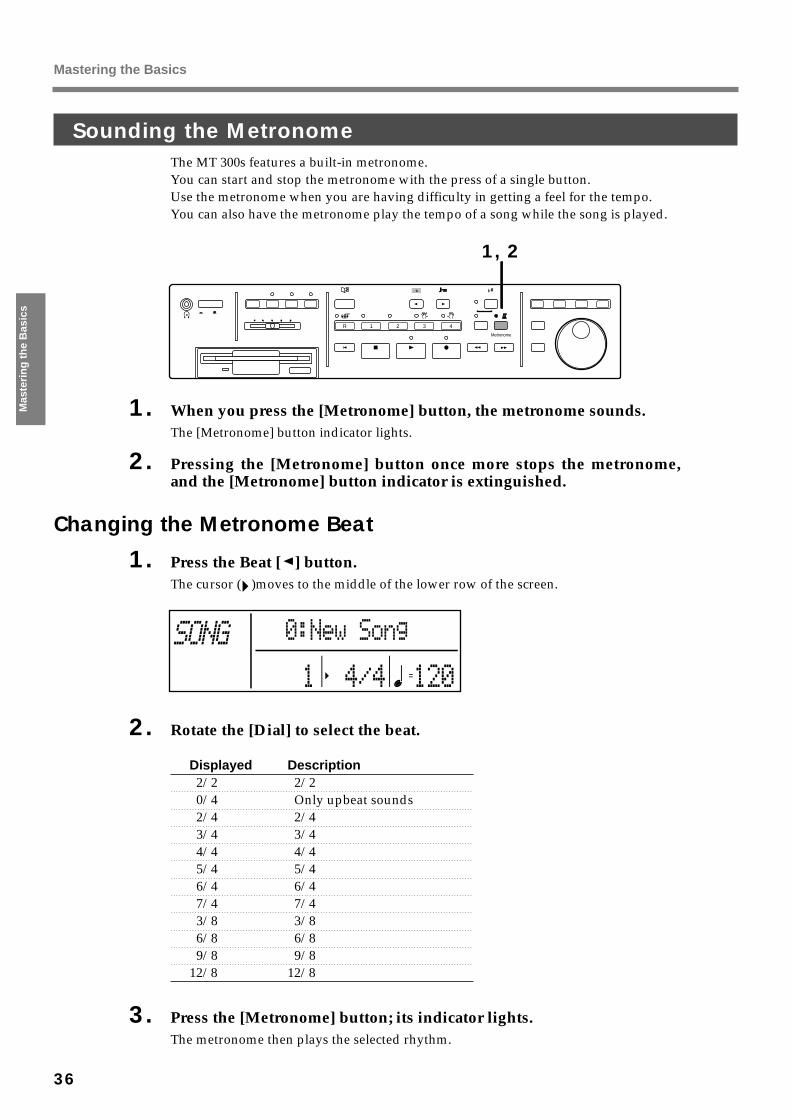
Sounding the MetronomeThe MT 300s features a built-in metronome.You can start and stop the metronome with the press of a single button.Use the metronome when you are having difficulty in getting a feel for the tempo.You can also have the metronome play the tempo of a song while the song is played.
fig.21-1_40
1. When you press the [Metronome] button, the metronome sounds.The [Metronome] button indicator lights.
2. Pressing the [Metronome] button once more stops the metronome,and the [Metronome] button indicator is extinguished.
Changing the Metronome Beat
1. Press the Beat [ ] button.The cursor ( )moves to the middle of the lower row of the screen.
fig.21-2_30
2. Rotate the [Dial] to select the beat.
Displayed Description2/2 2/20/4 Only upbeat sounds2/4 2/43/4 3/44/4 4/45/4 5/46/4 6/47/4 7/43/8 3/86/8 6/89/8 9/8
12/8 12/8
3. Press the [Metronome] button; its indicator lights.The metronome then plays the selected rhythm.
4321R
1, 2
PowerPhones
On Off
Marker Clear
RepeatA-Marker-B
Volume
Song
Track Count In Metronome
Bwd FwdResetRec
Edit
16 Track
ReverbDisk
Sound
Enter
Mastering the Basics
36
Mas
teri
ng
th
e B
asic
s

Adjusting the Metronome Tempo
1. Press the Tempo [ ] button.The cursor ( )moves to the lower right part of the screen.
fig.21-3_30 (Screen)
2. Rotate the [Dial] to select the tempo.
3. Press the [Metronome] button; its indicator lights.The metronome then plays the selected tempo.
Adjusting the Metronome VolumeYou can adjust the metronome volume, with ten volume levels available.
1. While pressing the [Metronome] button, adjust the metronome vol-ume level with the [Dial].The following screen is displayed.
fig.21-4_30
You can also change the metronome pattern and sound type. Please refer to “Changing the
Metronome Settings” (p.95).MEMO
Mastering the Basics
37
Masterin
g th
e Basics

Practicing a SongEach part of the piano songs on the Music File Disk included with the MT 300s can beplayed separately. So, whether you want to play the right-hand part, following alongwith the song's right hand; or play the left-hand part, following along the song's righthand, you can practice each hand’s part individually.The songs on the Music File Disk disk included with the MT 300s are assigned to thefive Track buttons as follows.
fig.22-1_20
Button indicators for Track buttons to which sounds are assigned shine in green.Indicators for buttons to which no sounds are assigned are not lit.
1. Press any of the Track buttons, turning on the button indicator.fig.22-2_30
2. Press the Play [ ] button.The sounds assigned to Track buttons whose indicators are turned on are played;sounds assigned to Track buttons whose indicators are not lit are not played.
3. Pressing Track buttons with indicators that are not lit then turns onthose indicators.Sounds on those Track buttons can then be heard.
fig.22-3_30
Temporarily stopping the sounds on tracks by turning off the Track indicators thisway is called “muting.”Try using this function in practicing the parts for each hand.
4. Press the Stop [ ] button to cease playback of the song.
By recording your own songs to the Track buttons this way, you can also use this function to
practice each part of your songs individually.
4321R
accompanimentpart
left-handpart
right-handpart
accompanimentpart
4321R
dark
The right-hand part is not played back
4321R
lit
The right-hand part is played back
MEMO
Mastering the Basics
38
Mas
teri
ng
th
e B
asic
s

Synchronizing the Timing when You Come into a Song (Count In)The function whereby a “count sound” is played in the leadup to playback of a song iscalled “Count In.”For example, when you want to play along with a song, by playing this count soundbefore playback starts, you can synchronize your timing with that of the song.fig.23-1_20
1. Press the [Count In] button, turning on its indicator.
2. When you press the Play [ ] button, two measures of count soundplays, after which playback of the song begins.
3. Pressing the [Count In] button once more turns off the button indica-tor, and Count In is canceled.
You can change the number of measures of count sound and the type of sound that is played
during Count In. Please refer to “Changing the Count Sound Settings” (p.96).
Practicing the Right-Hand PartTry practicing the right-hand part, playing along with the left-hand part of the song.First the tempo must be set.When using the count sound or metronome, press the [Count In] button or[Metronome] button, turning on the indicators.fig.24-1_20
1. Press the Reset [ ] button to go to the beginning of the song.
2. Press the [4] button, turning off its indicator.
3. When you press the Play [ ] button, and playback of the song begins.The right-hand part is not played.Play the right-hand part of the song along with the song’s left-hand part.
4. Press the Stop [ ] button, and playback of the song ceases.
4321R
1, 3
PowerPhones
On Off
Marker Clear
RepeatA-Marker-B
Volume
Song
Track Count In
Bwd FwdResetPlay Rec
Edit
16 Track
ReverbDisk
Sound
Enter
2
MEMO
321R
2
PowerPhones
On Off
Marker Clear
RepeatA-Marker-B
Volume
Song
Track
Bwd FwdResetStop Play Rec
Edit
16 Track
ReverbDisk
Sound
Enter
3
4
1 4
Mastering the Basics
39
Masterin
g th
e Basics
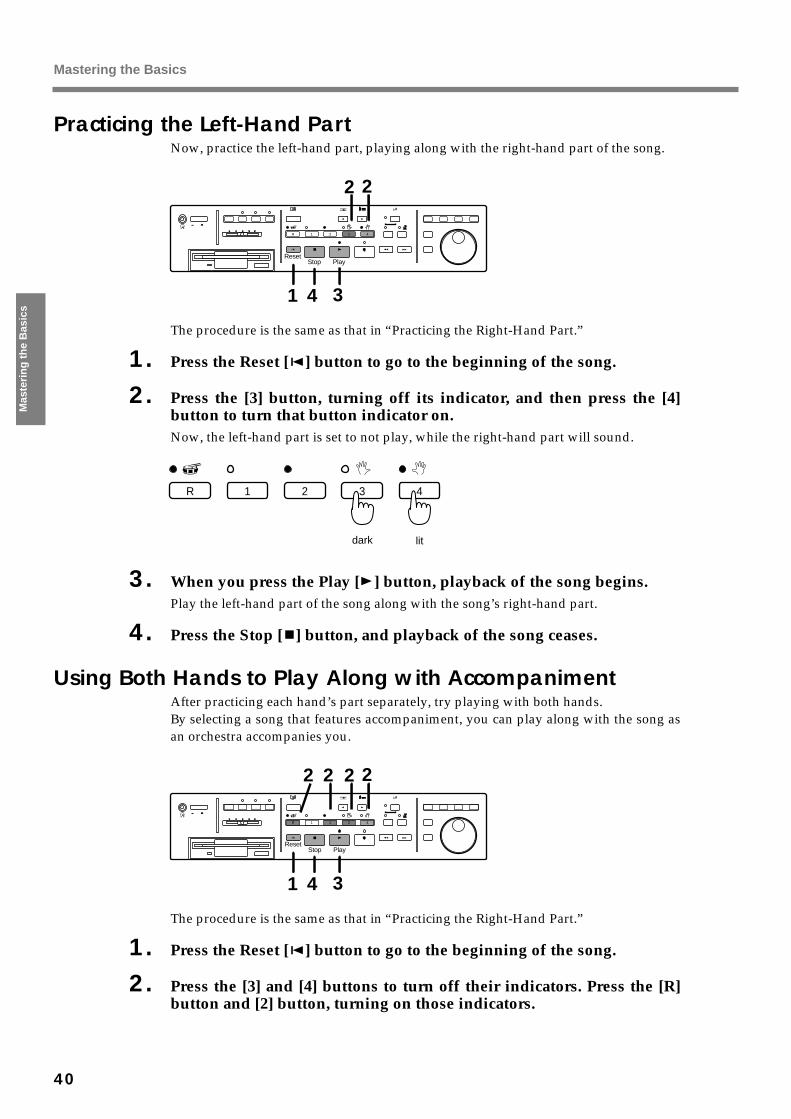
Practicing the Left-Hand PartNow, practice the left-hand part, playing along with the right-hand part of the song.
fig.24-4
The procedure is the same as that in “Practicing the Right-Hand Part.”
1. Press the Reset [ ] button to go to the beginning of the song.
2. Press the [3] button, turning off its indicator, and then press the [4]button to turn that button indicator on.Now, the left-hand part is set to not play, while the right-hand part will sound.
fig.24-2
3. When you press the Play [ ] button, playback of the song begins.Play the left-hand part of the song along with the song’s right-hand part.
4. Press the Stop [ ] button, and playback of the song ceases.
Using Both Hands to Play Along with AccompanimentAfter practicing each hand’s part separately, try playing with both hands.By selecting a song that features accompaniment, you can play along with the song asan orchestra accompanies you.
fig.24-5
The procedure is the same as that in “Practicing the Right-Hand Part.”
1. Press the Reset [ ] button to go to the beginning of the song.
2. Press the [3] and [4] buttons to turn off their indicators. Press the [R]button and [2] button, turning on those indicators.
21R
2
341
4
2
3
PowerPhones
On Off
Marker Clear
RepeatA-Marker-B
Volume
Song
Track Count In Metronome
Bwd FwdResetStop Play Rec
Menu
Edit
16 Track
ReverbDisk TuneBeat Tempo Transpose
Sound
Enter
4321R
dark lit
1
2
341
4
2
3
ResetStop Play
2R
22
Mastering the Basics
40
Mas
teri
ng
th
e B
asic
s

fig.24-3
3. When you press the Play [ ] button, playback of the song begins.
4. Press the Stop [ ] button, and playback of the song ceases.
When multiple instruments are included on the same Track button, and you want to play with
the sound of one of the instruments on that Track button muted, please refer to “PreventingOnly One Instrument from Being Played” (p.60).
If you are using an acoustic instrument, please go directly to “Performing Karaokeand Accompanying Yourself on the Keyboard” (p.54).If you are connecting a digital piano to the MT 300s, please go directly to “TryRecording Your Own Performance ”.
Try Recording Your Own PerformanceBy connecting a digital piano or other instrument to the MT 300s, you can record yourown performances.
Recorded performances are erased when the MT 300s’s power is turned off. Furthermore, youcannot select a different song until the recorded song is erased or deleted. If you do not want todelete a recorded performance, then you will want to save it to a floppy disk.
For instructions on how to save performances, please refer to “How to Save Songs” (p.49).
If You See This Screen DisplayedThe following screen is displayed when you try to select a different song without firstsaving the song you’ve recorded.
fig.15-1_30 (Screen)
When Saving the Song
1. Press the [Song] button to return to the Basic screen.Save the song to a floppy disk.
When Deleting the Song
1. When you press the [Transpose] button, the song is deleted.You are then returned to the Basic screen.
4321R
lit darkdarklit
MEMO
NOTE
MEMO
Mastering the Basics
41
Masterin
g th
e Basics

Recording Along with SongsYou can record your own performance while you play along with a song, and then lis-ten to the recorded performance.
Recording the Right-Hand PartYou can record and then listen to your performance of the right-hand part.
fig.25-1_40
1. Using the Tempo [ ] button and the [Dial], adjust the tempo to oneyou find is easy to play.
2. Press the Reset [ ] button to go to the beginning of the song.
3. Press the Rec [ ] button; its indicator lights.The MT 300s is put in record standby mode.To cancel recording, press the Stop [ ] button.When you press the Rec [ ] button and go into record standby, the [Count In] buttonindicator lights. If you don’t want the count sound to be played, press the [Count In]button, turning off the button indicator.When the [Count In] button indicator is turned off, recording begins after the two pre-vious measures of the song are played back. When you start recording from the begin-ning of the song, recording begins after two silent measures are played.
4. When you press the [4] button, its indicator begins flashing.Your performance is set for recording on the [4] button.
fig.25-3-30
5. If you want the metronome to play, press the [Metronome] button,turning on that button indicator.The sound of the metronome is not recorded.
321R
1
2
PowerPhones
On Off
Marker Clear
RepeatA-Marker-B
Volume
Song
Track Count In Metronome
Bwd FwdResetRec
Edit
16 Track
ReverbDiskTempo
Sound
Enter
4
3 54
1
4321R
Blinks alternately in red and green
Mastering the Basics
42
Mas
teri
ng
th
e B
asic
s

fig.25-3-1_30 (Screen)
6. Press the Play [ ] button.Recording begins after two measures of count sound.Play the right-hand part of the song along with the song’s left-hand part.You can also begin recording without pressing the Play [ ] button just by starting toplay the keyboard. There is no count sound played when you start in this manner.
7. Press the Stop [ ] button, and recording of the song ceases.“0 : New Song” in the upper part of the display.At this point, the recording to the Track button is as shown below.
fig.25-4_20
8. Press the Reset [ ] button to go to the beginning of the song.
9. When you press the Play [ ] button, the recorded performance isplayed back.Now, see how the recording of your performance of the right-hand part sounds.
321R
8
PowerPhones
On Off
Marker Clear
RepeatA-Marker-B
Volume
Song
Count In
Bwd FwdResetStop Play
Edit
16 Track
ReverbDisk
Sound
Enter
4
7 6, 9
4321R
accompanimentpart
left-handpart
yourperformance
accompanimentpart
Mastering the Basics
43
Masterin
g th
e Basics
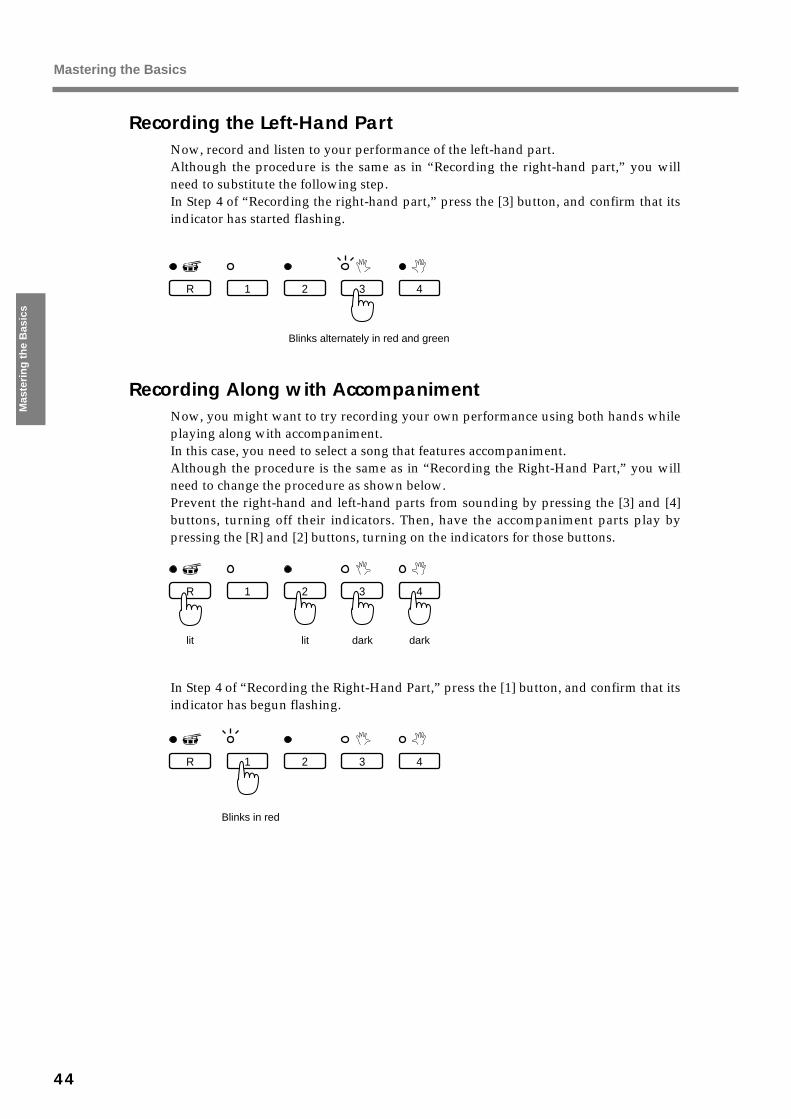
Recording the Left-Hand PartNow, record and listen to your performance of the left-hand part.Although the procedure is the same as in “Recording the right-hand part,” you willneed to substitute the following step.In Step 4 of “Recording the right-hand part,” press the [3] button, and confirm that itsindicator has started flashing.
fig.25-6_20
Recording Along with AccompanimentNow, you might want to try recording your own performance using both hands whileplaying along with accompaniment.In this case, you need to select a song that features accompaniment.Although the procedure is the same as in “Recording the Right-Hand Part,” you willneed to change the procedure as shown below.Prevent the right-hand and left-hand parts from sounding by pressing the [3] and [4]buttons, turning off their indicators. Then, have the accompaniment parts play bypressing the [R] and [2] buttons, turning on the indicators for those buttons.
fig.25-7_30
In Step 4 of “Recording the Right-Hand Part,” press the [1] button, and confirm that itsindicator has begun flashing.
fig.25-8_30
4321R
Blinks alternately in red and green
4321R
lit darkdarklit
4321R
Blinks in red
Mastering the Basics
44
Mas
teri
ng
th
e B
asic
s
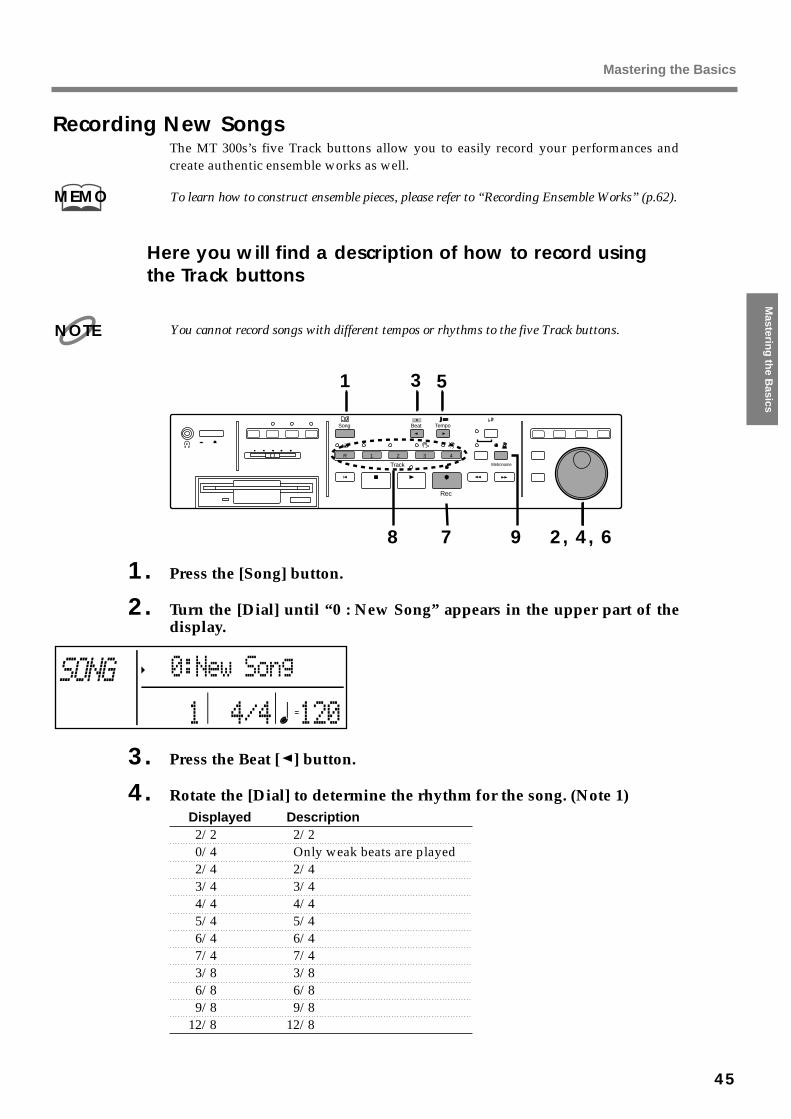
Recording New SongsThe MT 300s’s five Track buttons allow you to easily record your performances andcreate authentic ensemble works as well.
To learn how to construct ensemble pieces, please refer to “Recording Ensemble Works” (p.62).
Here you will find a description of how to record usingthe Track buttons
You cannot record songs with different tempos or rhythms to the five Track buttons.
fig.26-1
1. Press the [Song] button.
2. Turn the [Dial] until “0 : New Song” appears in the upper part of thedisplay.
fig.26-2 (Screen)
3. Press the Beat [ ] button.
4. Rotate the [Dial] to determine the rhythm for the song. (Note 1)Displayed Description
2/2 2/20/4 Only weak beats are played2/4 2/43/4 3/44/4 4/45/4 5/46/4 6/47/4 7/43/8 3/86/8 6/89/8 9/8
12/8 12/8
MEMO
NOTE
51
PowerPhones
On Off
Marker Clear
RepeatA-Marker-B
Volume
Song
Track Count In Metronome
Bwd FwdRec
Edit
16 Track
ReverbDiskBeat Tempo
Sound
Enter
4
7 9 2, 4, 6
321R
3
8
Mastering the Basics
45
Masterin
g th
e Basics

5. Press the Tempo [ ] button.
6. Rotate the [Dial] to determine the song’s basic tempo. (Note 2)
7. Press the Rec [ ] button, turning on the button indicator.The MT 300s is put into record standby mode.To cancel recording, press the Stop [ ] button.
8. Press the Track button for the track you want to record to, causing thebutton indicator to flash. (Note 3)
9. If you want the metronome to play while you record, press the[Metronome] button.The sound of the metronome is not recorded.
fig.26-1
10. Press the Play [ ] button.Recording begins after two measures of count sound. (Note 4)You can also begin recording without pressing the Play [ ] button just by starting toplay the keyboard. There is no count sound played when you start in this manner.
11. Press the Stop [ ] button, and playback of the song ceases.The button indicator of the Track button to which you have recorded lights.
12. Press the Reset [ ] button.This returns you to the beginning of the recorded song.
13. Press the Play [ ] button to play back the recorded performance.
321R
12
PowerPhones
On Off
Marker Clear
RepeatA-Marker-B
Volume
Song
Count In
Bwd FwdResetStop Play
Edit
16 Track
ReverbDisk
Sound
Enter
4
10, 1311
Mastering the Basics
46
Mas
teri
ng
th
e B
asic
s
(Note 1)You cannot change the song’s beat during or after recording. If you want to create andrecord a song that does include such rhythm changes in the course of the song, pleaserefer to “Creating Songs Featuring Beat Changes” (p.76).
(Note 2)To change the recorded song’s basic tempo, see “Changing the Basic Tempo of the Song” (p.59) for instructions.
If you want to create a song that does include tempo changes in the course of the song,please refer to “Creating Songs Featuring Tempo Changes” (p.74).
(Note 3)If you select a Track button to which something already has been recorded, then thepreviously recorded performance is replaced by the new material from the pointwhere the new recording begins to where it stops.
When you select a Track button which already has material recorded onto it, the but-ton indicator begins flashing in red and green.
Only the Drum Set and SFX (sound effects) Set tones are recorded to the [R] button.For more information on the Drum Set and SFX Set, please refer to “List of ToneNames” (p.107).
(Note 4)When you press the Rec [ ] button to put the MT 300s into record standby, the[Count In] button indicator lights. If you don’t want the count sound to be played,press the [Count In] button, turning off the button indicator.
When the [Count In] button indicator is turned off, recording begins after the two pre-vious measures of the song are played back. When you start recording from the begin-ning of the song, recording begins after two silent measures are played.
By connecting an optional pedal switch (such as Roland’s model DP-2) to the MT 300s’sStart/Stop jack, you can start and stop playback and recording of songs by pressing on thepedal (p.17, 98).
MEMO
Mastering the Basics
47
Masterin
g th
e Basics
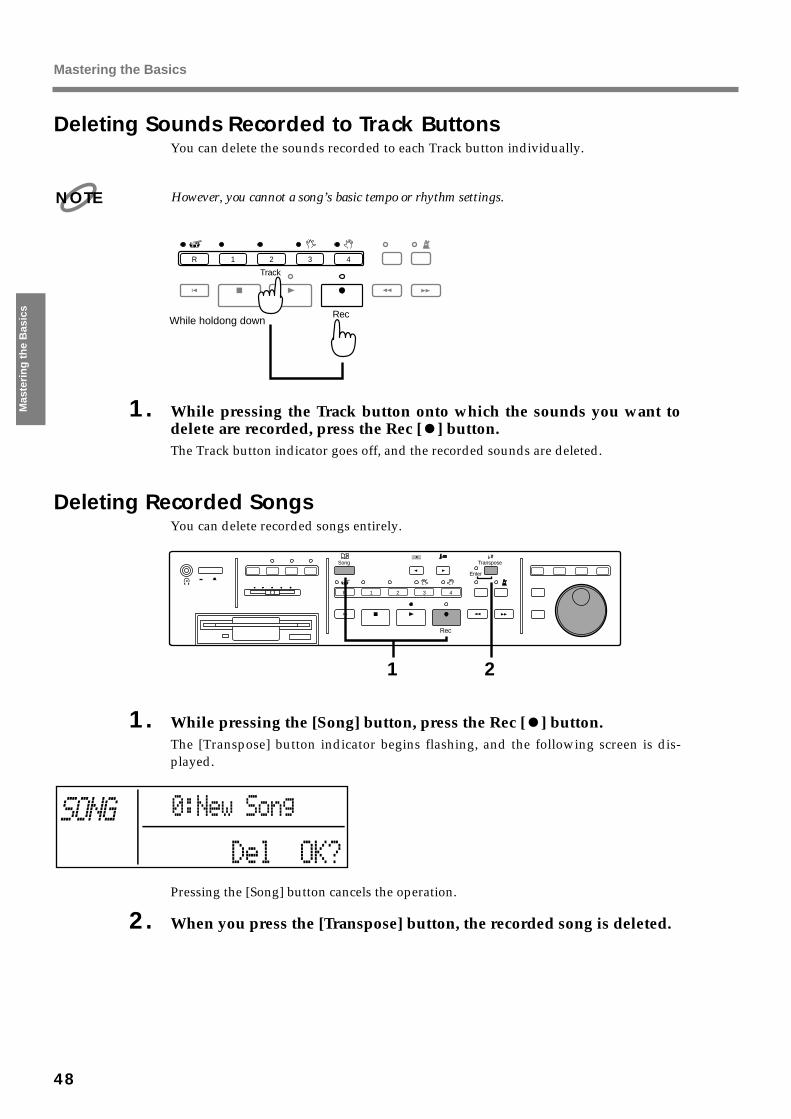
Deleting Sounds Recorded to Track ButtonsYou can delete the sounds recorded to each Track button individually.
However, you cannot a song’s basic tempo or rhythm settings.
fig.27-1_40
1. While pressing the Track button onto which the sounds you want todelete are recorded, press the Rec [ ] button.The Track button indicator goes off, and the recorded sounds are deleted.
Deleting Recorded SongsYou can delete recorded songs entirely.
fig.28-1_40
1. While pressing the [Song] button, press the Rec [ ] button.The [Transpose] button indicator begins flashing, and the following screen is dis-played.
fig.15-1_30
Pressing the [Song] button cancels the operation.
2. When you press the [Transpose] button, the recorded song is deleted.
NOTE
4321R
Track Count In Metronome
Bwd FwdResetStop Play Rec
While holdong down
4321R
PowerPhones
On Off
Marker Clear
RepeatA-Marker-B
Volume
Song
Track Count In Metronome
Bwd FwdResetStop Play Rec
Edit
16 Track
DiskTranspose
Sound
Enter
1 2
Mastering the Basics
48
Mas
teri
ng
th
e B
asic
s

How to Save SongsRecorded songs are deleted when the MT 300s is turned off. Furthermore, you cannotselect a different song until you delete the recorded performance. Thus, you will wantto save your important works to a floppy disk.
You can create your own original music files when you save recorded performances to floppydisks. Be sure to check out the many ways you can use floppy disks.
Before Using Floppy Disks (Format)Before a floppy disk can ever be used for saving songs with the MT 300s, you must“format” the disk.The deleting of data on a floppy disk and preparing the disk for the equipment it is tobe used with is known as “formatting.” Floppy disks cannot be used on the MT 300swithout changing the disk’s format to that of the MT 300s.
Formatting erases all the data stored on the floppy disk. When formatting a previously usedfloppy disk for reuse, make sure that it is all right to format the disk.
Before using the disk drive for the first time, be sure to read the related precautions on p.5.
fig.29-1_40
Press the [Song] button to display the Basic screen.
1. Press the [Disk] button.The Disk screen is displayed (p.15).
2. Press the Beat [ ] button or Tempo [ ] button until “Disk Format”appears in the upper part of the screen.
fig.29-03e
3. Confirm that the disk’s protect tab is in the “Write” position.fig.29-2_30 (MT 300s fig.36-1)
MEMO
NOTE
NOTE
4321R
2
PowerPhones
On Off
Marker Clear
Volume
Song
Track Count In Metronome
ResetRec
Edit
16 Track
ReverbDiskBeat Tempo Transpose
Sound
Enter
15, 6
4
Rear side of the disk
Protect (prevents writing to disk)
Write (can write new data onto disk)
Write Protect Tab
Mastering the Basics
49
Masterin
g th
e Basics
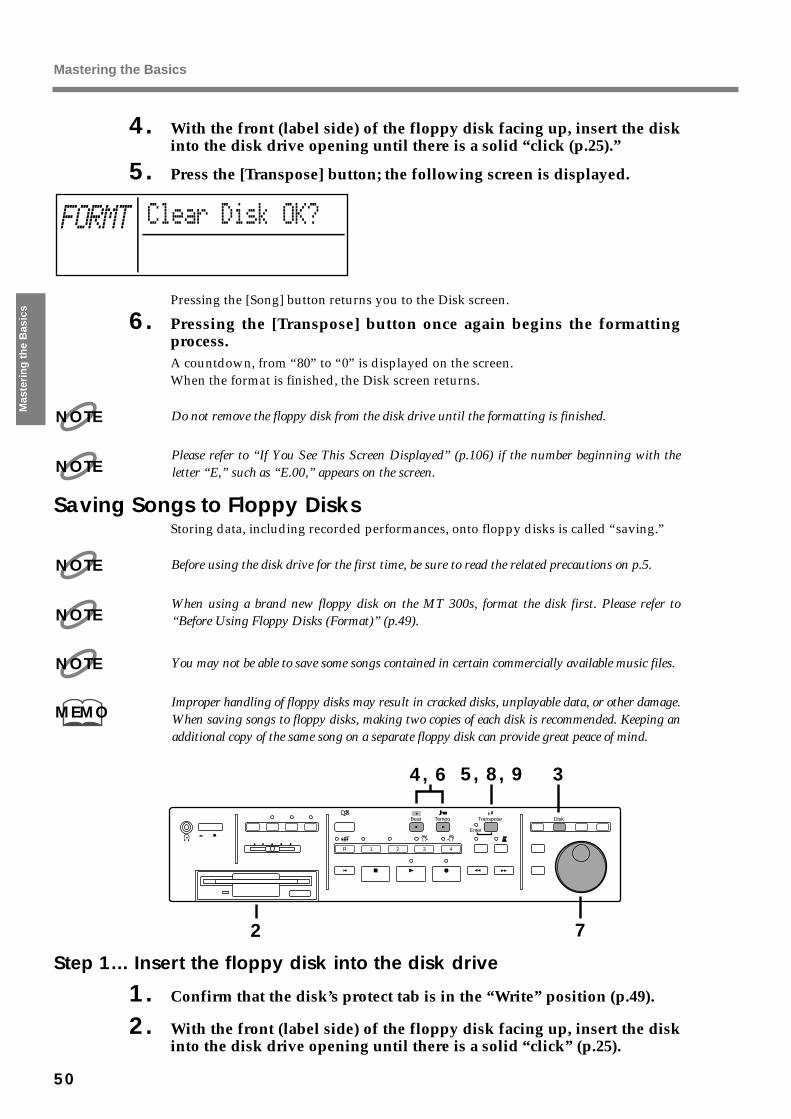
4. With the front (label side) of the floppy disk facing up, insert the diskinto the disk drive opening until there is a solid “click (p.25).”
5. Press the [Transpose] button; the following screen is displayed.fig.29-4_30
Pressing the [Song] button returns you to the Disk screen.
6. Pressing the [Transpose] button once again begins the formattingprocess.A countdown, from “80” to “0” is displayed on the screen.When the format is finished, the Disk screen returns.
Do not remove the floppy disk from the disk drive until the formatting is finished.
Please refer to “If You See This Screen Displayed” (p.106) if the number beginning with theletter “E,” such as “E.00,” appears on the screen.
Saving Songs to Floppy DisksStoring data, including recorded performances, onto floppy disks is called “saving.”
Before using the disk drive for the first time, be sure to read the related precautions on p.5.
When using a brand new floppy disk on the MT 300s, format the disk first. Please refer to“Before Using Floppy Disks (Format)” (p.49).
You may not be able to save some songs contained in certain commercially available music files.
Improper handling of floppy disks may result in cracked disks, unplayable data, or other damage.When saving songs to floppy disks, making two copies of each disk is recommended. Keeping anadditional copy of the same song on a separate floppy disk can provide great peace of mind.
fig.30-1_40
Step 1... Insert the floppy disk into the disk drive
1. Confirm that the disk’s protect tab is in the “Write” position (p.49).
2. With the front (label side) of the floppy disk facing up, insert the diskinto the disk drive opening until there is a solid “click” (p.25).
NOTE
NOTE
NOTE
NOTE
NOTE
MEMO
4321R
4, 6
PowerPhones
On Off
Marker Clear
Volume
Song
Track Count In Metronome
ResetRec
Edit
16 Track
ReverbDiskBeat Tempo Transpose
Sound
Enter
35, 8, 9
2 7
Mastering the Basics
50
Mas
teri
ng
th
e B
asic
s
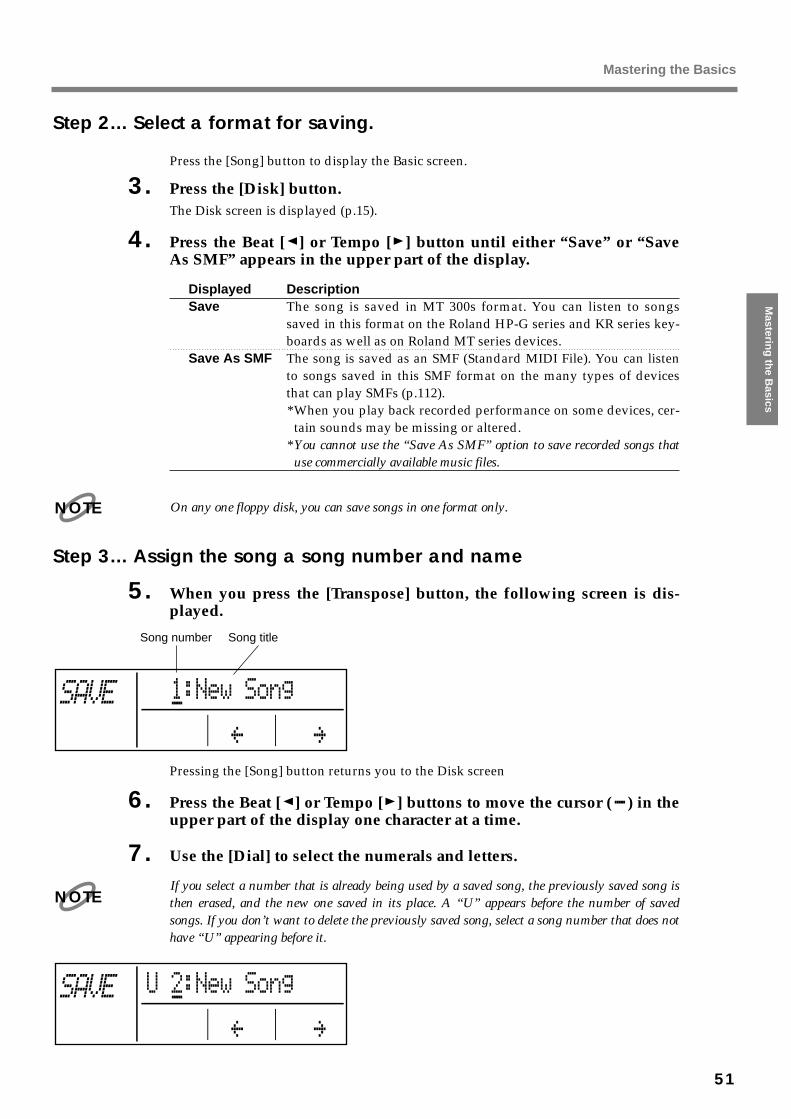
Step 2... Select a format for saving.
Press the [Song] button to display the Basic screen.
3. Press the [Disk] button.The Disk screen is displayed (p.15).
4. Press the Beat [ ] or Tempo [ ] button until either “Save” or “SaveAs SMF” appears in the upper part of the display.
Displayed DescriptionSave The song is saved in MT 300s format. You can listen to songs
saved in this format on the Roland HP-G series and KR series key-boards as well as on Roland MT series devices.
Save As SMF The song is saved as an SMF (Standard MIDI File). You can listento songs saved in this SMF format on the many types of devicesthat can play SMFs (p.112).* When you play back recorded performance on some devices, cer-
tain sounds may be missing or altered.* You cannot use the “Save As SMF” option to save recorded songs that
use commercially available music files.
On any one floppy disk, you can save songs in one format only.
Step 3... Assign the song a song number and name
5. When you press the [Transpose] button, the following screen is dis-played.
fig.30-2_30
Pressing the [Song] button returns you to the Disk screen
6. Press the Beat [ ] or Tempo [ ] buttons to move the cursor ( ) in theupper part of the display one character at a time.
7. Use the [Dial] to select the numerals and letters.
If you select a number that is already being used by a saved song, the previously saved song isthen erased, and the new one saved in its place. A “U” appears before the number of savedsongs. If you don’t want to delete the previously saved song, select a song number that does nothave “U” appearing before it.
fig.30-3_30
NOTE
Song number Song title
NOTE
Mastering the Basics
51
Masterin
g th
e Basics
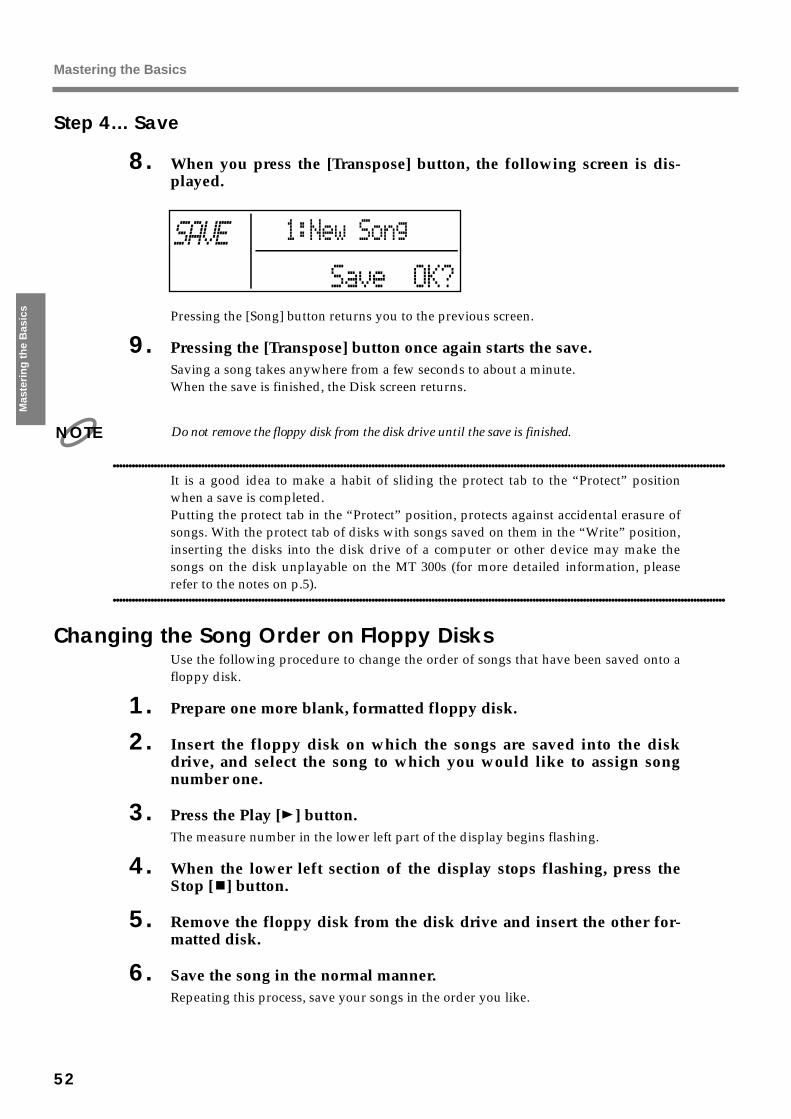
Step 4... Save
8. When you press the [Transpose] button, the following screen is dis-played.
fig.30-4_30
Pressing the [Song] button returns you to the previous screen.
9. Pressing the [Transpose] button once again starts the save.Saving a song takes anywhere from a few seconds to about a minute.When the save is finished, the Disk screen returns.
Do not remove the floppy disk from the disk drive until the save is finished.
●●●●●●●●●●●●●●●●●●●●●●●●●●●●●●●●●●●●●●●●●●●●●●●●●●●●●●●●●●●●●●●●●●●●●●●●●●●●●●●●●●●●●●●●●●●●●●●●●●●●●●●●●●●●●●●●●●●●●●●●●●●●●●● ●●●●●●●●●●●●●●●●●●●●●●●●●●●●●●●●●●●●●●●●●●●●●●●●●●●●●●●●●●●●●●●●●●●
It is a good idea to make a habit of sliding the protect tab to the “Protect” positionwhen a save is completed.Putting the protect tab in the “Protect” position, protects against accidental erasure ofsongs. With the protect tab of disks with songs saved on them in the “Write” position,inserting the disks into the disk drive of a computer or other device may make thesongs on the disk unplayable on the MT 300s (for more detailed information, pleaserefer to the notes on p.5).
●●●●●●●●●●●●●●●●●●●●●●●●●●●●●●●●●●●●●●●●●●●●●●●●●●●●●●●●●●●●●●●●●●●●●●●●●●●●●●●●●●●●●●●●●●●●●●●●●●●●●●●●●●●●●●●●●●●●●●●●●●●●●●● ●●●●●●●●●●●●●●●●●●●●●●●●●●●●●●●●●●●●●●●●●●●●●●●●●●●●●●●●●●●●●●●●●●●
Changing the Song Order on Floppy DisksUse the following procedure to change the order of songs that have been saved onto afloppy disk.
1. Prepare one more blank, formatted floppy disk.
2. Insert the floppy disk on which the songs are saved into the diskdrive, and select the song to which you would like to assign songnumber one.
3. Press the Play [ ] button.The measure number in the lower left part of the display begins flashing.
4. When the lower left section of the display stops flashing, press theStop [ ] button.
5. Remove the floppy disk from the disk drive and insert the other for-matted disk.
6. Save the song in the normal manner.Repeating this process, save your songs in the order you like.
NOTE
Mastering the Basics
52
Mas
teri
ng
th
e B
asic
s
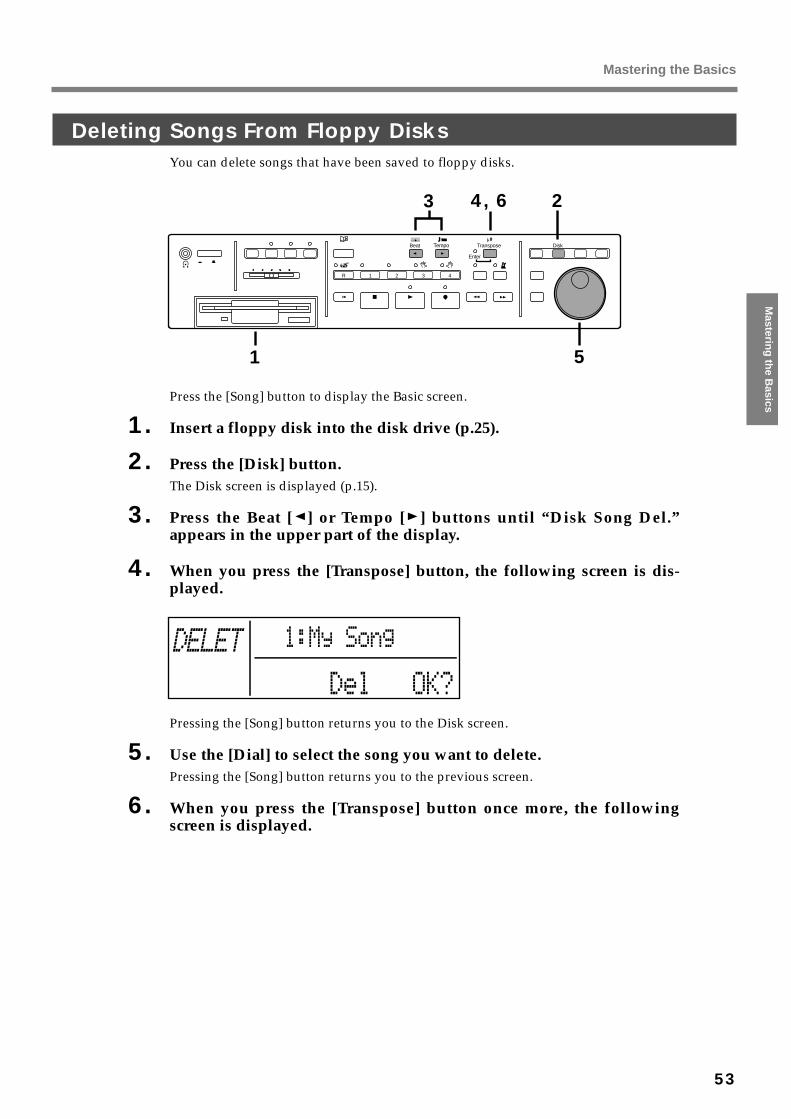
Deleting Songs From Floppy DisksYou can delete songs that have been saved to floppy disks.
fig.31-1_40
Press the [Song] button to display the Basic screen.
1. Insert a floppy disk into the disk drive (p.25).
2. Press the [Disk] button.The Disk screen is displayed (p.15).
3. Press the Beat [ ] or Tempo [ ] buttons until “Disk Song Del.”appears in the upper part of the display.
4. When you press the [Transpose] button, the following screen is dis-played.
fig.31-2_30 (Screen)
Pressing the [Song] button returns you to the Disk screen.
5. Use the [Dial] to select the song you want to delete.Pressing the [Song] button returns you to the previous screen.
6. When you press the [Transpose] button once more, the followingscreen is displayed.
4321R
3
PowerPhones
On Off
Marker Clear
Volume
Song
Track Count In Metronome
ResetRec
Edit
16 Track
ReverbDiskBeat Tempo Transpose
Sound
Enter
24, 6
1 5
Mastering the Basics
53
Masterin
g th
e Basics
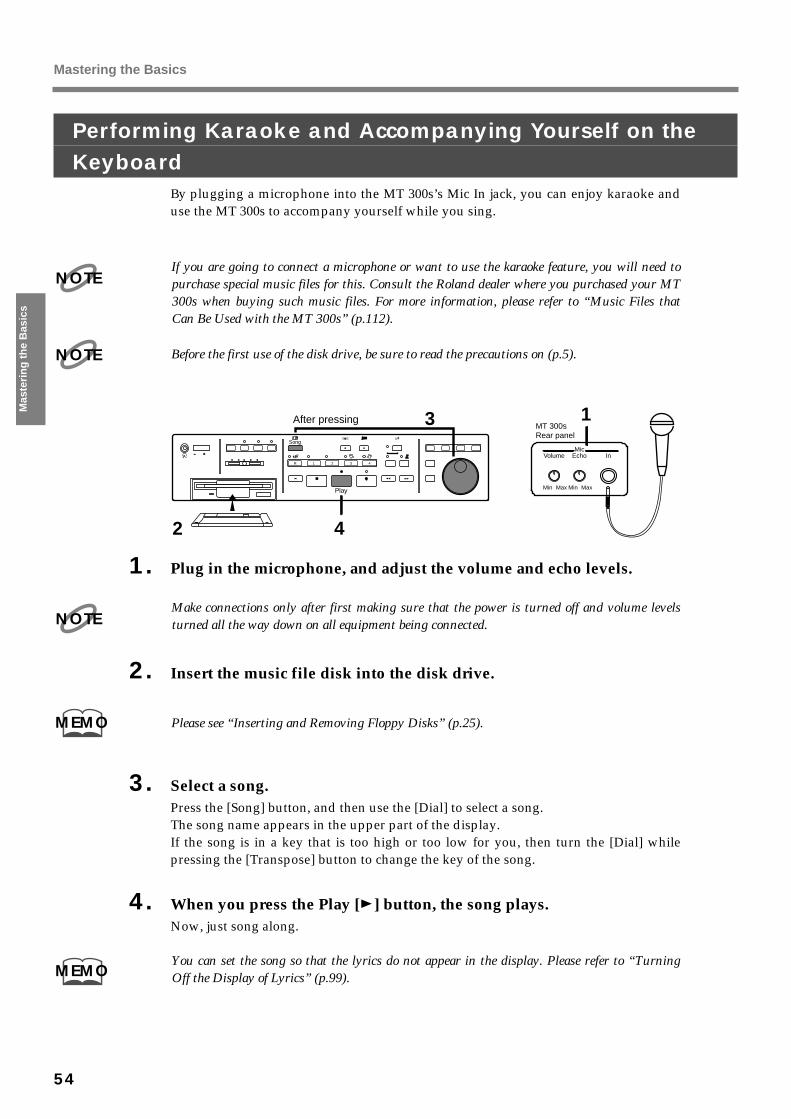
Performing Karaoke and Accompanying Yourself on the Keyboard
By plugging a microphone into the MT 300s’s Mic In jack, you can enjoy karaoke anduse the MT 300s to accompany yourself while you sing.
If you are going to connect a microphone or want to use the karaoke feature, you will need topurchase special music files for this. Consult the Roland dealer where you purchased your MT300s when buying such music files. For more information, please refer to “Music Files thatCan Be Used with the MT 300s” (p.112).
Before the first use of the disk drive, be sure to read the precautions on (p.5).
fig.31-4
1. Plug in the microphone, and adjust the volume and echo levels.
Make connections only after first making sure that the power is turned off and volume levelsturned all the way down on all equipment being connected.
2. Insert the music file disk into the disk drive.
Please see “Inserting and Removing Floppy Disks” (p.25).
3. Select a song.Press the [Song] button, and then use the [Dial] to select a song.The song name appears in the upper part of the display.If the song is in a key that is too high or too low for you, then turn the [Dial] whilepressing the [Transpose] button to change the key of the song.
4. When you press the Play [ ] button, the song plays.Now, just song along.
You can set the song so that the lyrics do not appear in the display. Please refer to “TurningOff the Display of Lyrics” (p.99).
NOTE
NOTE
4321R
1
2
3
4
MaxMin MaxMin
InEchoMic
Volume
MT 300s Rear panel
PowerPhones
On Off
Marker Clear
RepeatA-Marker-B
Volume
Song
Track Count In Metronome
Bwd FwdResetStop Play Rec
Menu
Edit
16 Track
ReverbDisk TuneBeat Tempo Transpose
Sound
Enter
After pressing
NOTE
MEMO
MEMO
Mastering the Basics
54
Mas
teri
ng
th
e B
asic
s
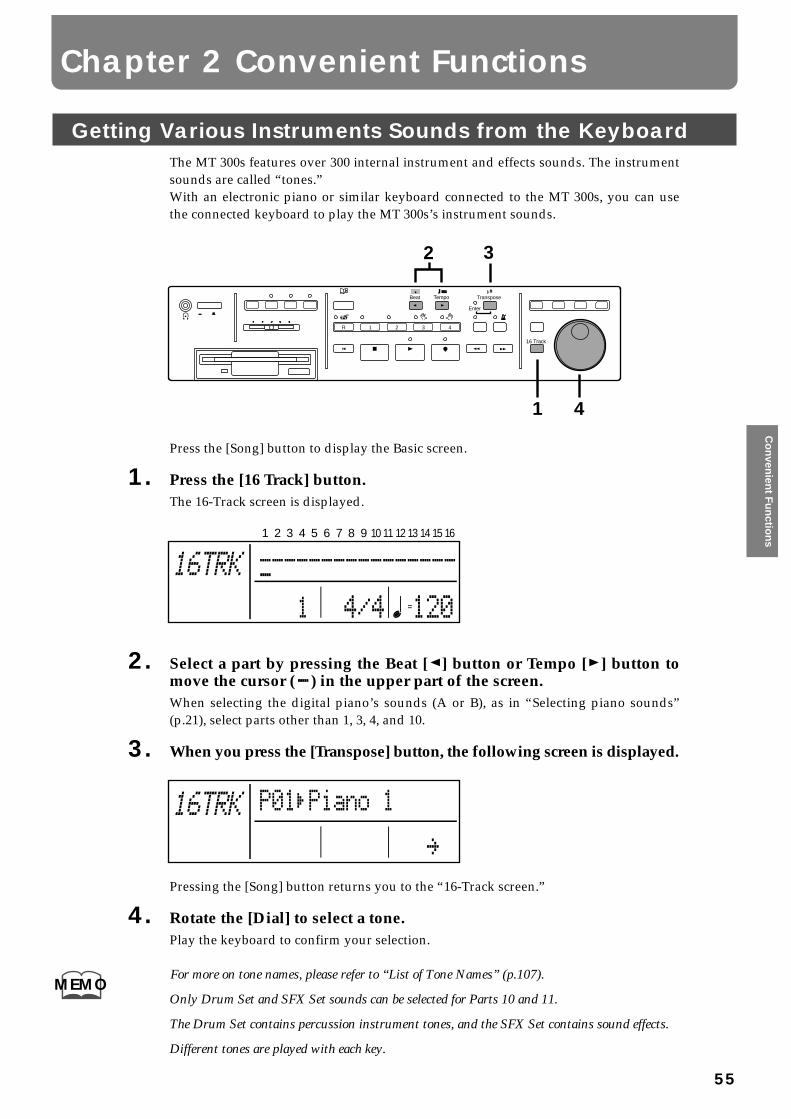
Getting Various Instruments Sounds from the KeyboardThe MT 300s features over 300 internal instrument and effects sounds. The instrumentsounds are called “tones.”With an electronic piano or similar keyboard connected to the MT 300s, you can usethe connected keyboard to play the MT 300s’s instrument sounds.
fig.32-1_40
Press the [Song] button to display the Basic screen.
1. Press the [16 Track] button.The 16-Track screen is displayed.
fig.4-5_40 (Screen)
2. Select a part by pressing the Beat [ ] button or Tempo [ ] button tomove the cursor ( ) in the upper part of the screen.When selecting the digital piano’s sounds (A or B), as in “Selecting piano sounds”(p.21), select parts other than 1, 3, 4, and 10.
3. When you press the [Transpose] button, the following screen is displayed.fig.32-3_30 (Screen)
Pressing the [Song] button returns you to the “16-Track screen.”
4. Rotate the [Dial] to select a tone.Play the keyboard to confirm your selection.
For more on tone names, please refer to “List of Tone Names” (p.107).
Only Drum Set and SFX Set sounds can be selected for Parts 10 and 11.
The Drum Set contains percussion instrument tones, and the SFX Set contains sound effects.
Different tones are played with each key.
4321R
2
PowerPhones
On Off
Marker Clear
Volume
Song
Track Count In Metronome
ResetRec
Edit
16 Track
ReverbBeat Tempo Transpose
Sound
Enter
1
3
4
1 2 3 4 5 6 7 8 9 10 11 12 13 14 15 16
MEMO
Chapter 2 Convenient Functions
55
Co
nven
ient F
un
ction
s

Listening to Songs after Changing Instrument Sounds or Making Other Changes
The songs on the Music File Disk and on commercially available music files are divid-ed into 16 separate parts, with each part containing different instrument sounds ortones.On the MT 300s, you can switch each part’s tones and change the volume levels andother settings of the tones on each part.
About a Song’s Basic SettingsTones, volume levels, basic tempos, and other settings for each part, as well as the set-tings determined at the beginning of each song are called “basic settings.” On the MT300s, you can listen to songs after temporarily making changes to the parameters of asong’s basic settings—the state of each part’s tone, volume, panpot, reverb, and cho-rus—and change the basic settings and basic tempo of the song itself.fig.33-1_40
Press the [Song] button to display the Basic screen.
1. Press the [16 Track] button.The 16-Track screen is displayed.fig.4-5_30 (Screen)
2. Select the part to which you want to make changes in the settings bypressing the Beat [ ] button or Tempo [ ] button to move the cursor( ) in the upper part of the screen.
3. When you press the [Transpose] button, the select part appears in the display.fig.33-3_30 (Screen)
You can change the tone for the selected part in this screen.If you have a digital piano or similar instrument connected, then you can play the key-board to hear the selected tone.
4321R
2
PowerPhones
On Off
Marker Clear
Volume
Song
Track Count In Metronome
ResetPlay Rec
Edit
16 Track
ReverbBeat Tempo Transpose
Sound
Enter
1
3, 10
8while holding down
12
4, 5, 6, 79
1 2 3 4 5 6 7 8 9 10 11 12 13 14 15 16
Convenient Functions
56
Co
nve
nie
nt
Fu
nct
ion
s
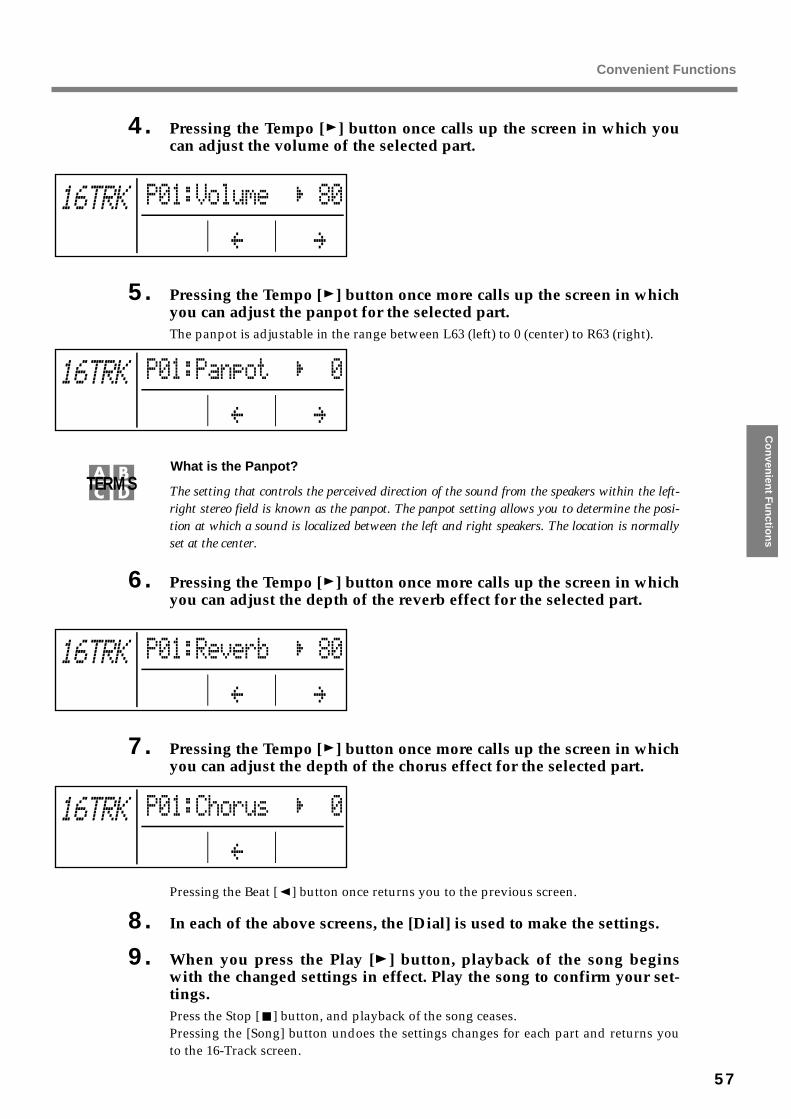
4. Pressing the Tempo [ ] button once calls up the screen in which youcan adjust the volume of the selected part.
fig.33-4_30 (Screen)
5. Pressing the Tempo [ ] button once more calls up the screen in whichyou can adjust the panpot for the selected part.The panpot is adjustable in the range between L63 (left) to 0 (center) to R63 (right).fig.33-5_30 (Screen)
What is the Panpot?
The setting that controls the perceived direction of the sound from the speakers within the left-right stereo field is known as the panpot. The panpot setting allows you to determine the posi-tion at which a sound is localized between the left and right speakers. The location is normallyset at the center.
6. Pressing the Tempo [ ] button once more calls up the screen in whichyou can adjust the depth of the reverb effect for the selected part.
fig.33-7_30
7. Pressing the Tempo [ ] button once more calls up the screen in whichyou can adjust the depth of the chorus effect for the selected part.
fig.33-6_30
Pressing the Beat [ ] button once returns you to the previous screen.
8. In each of the above screens, the [Dial] is used to make the settings.
9. When you press the Play [ ] button, playback of the song beginswith the changed settings in effect. Play the song to confirm your set-tings.Press the Stop [ ] button, and playback of the song ceases.Pressing the [Song] button undoes the settings changes for each part and returns youto the 16-Track screen.
TERMS
Convenient Functions
57
Co
nven
ient F
un
ction
s

10. Press the [Transpose] button.The changes for each part are saved, and you are then returned to the 16-Track screen.
11. Carry out Steps 2-10 of the settings change procedure for any otherparts as needed.
12. Pressing the Reset [ ] button while pressing the Rec [ ] buttonchanges the song’s basic settings.
Songs whose basic settings have been changed are deleted when the MT 300s is turned off.Furthermore, you cannot select a different song until you delete the song with its basic settingschanged. If you don’t want to delete the song, then save it to a floppy disk (p.49).
With some commercially available music files, you may be unable to make changes to the basicsettings.
You can select Drum Set and SFX Set for Parts 10 and 11. The Drum Set contains percussioninstrument sounds, and the SFX Set contains sound effects. A different sound will be heard foreach key.
With songs that feature tone changes during the course of the song, the tone at the beginning ofthe song is used until the point in the song where the tone first changes.
In “Selecting Piano Sounds” (p.21), when setting “A” and “B,” the tones that are played maysound different than what you intend, even if you change the tones for Parts 1, 3, and 4.
For more on tone names, please refer to “List of Tone Names” (p.107).
You can change the type of reverb and chorus effect applied to the sound. Please refer to“Adding Various Effects to Sounds” (p.97).
If You See This Screen DisplayedIf you attempt to display the Basic screen without having gone through the “press theReset [ ] button while pressing the Rec [ ] button” procedure, the song’s basic set-tings are left unchanged, and the following screen is displayed.
fig.33-8_30 (Screen)
When you are not going to undo the changes to the settings
1. Press the [Transpose] button.The basic settings are changed, and you are returned to the Basic screen.
When you wish to undo the changes to the settings
1. Press the [Song] button.The changes to the settings are deleted, and you are returned to the Basic screen.
NOTE
NOTE
MEMO
NOTE
NOTE
MEMO
Convenient Functions
58
Co
nve
nie
nt
Fu
nct
ion
s

Changing the Basic Tempo of the SongYou can change the song’s basic tempo.For example, after changing a song’s basic tempo, if you save the song to a floppy diskunder a different name, you will have the same song with a different tempo. This canbe convenient when you want to create a practice version of a song featuring a slowertempo.
fig.57-1_40
Press the [Song] button to display the Basic screen.
1. Press the Tempo [ ] button.
2. Set the tempo using the [Dial].
3. While pressing the Rec [ ] button, press the Reset [ ] button.This changes the song’s basic tempo.Save the song to a floppy disk (p.49).
Songs with their basic tempos changed are deleted when the power is turned off. Furthermore,you cannot select another song until the song with the altered basic tempo is deleted.
For songs that have tempo changes within the song, first press the Reset [ ] button to returnto the beginning of the song before carrying out this procedure. If you change the tempo with-out first returning to the beginning of the song, the relative change in tempo where the tempodoes change will affect the tempo of the entire song.
4321R
PowerPhones
On Off
Marker Clear
Volume
Song
Track Count In Metronome
ResetRec
Edit
ReverbTempo
Sound
Enter
while holding down
3 2
1
NOTE
NOTE
Convenient Functions
59
Co
nven
ient F
un
ction
s
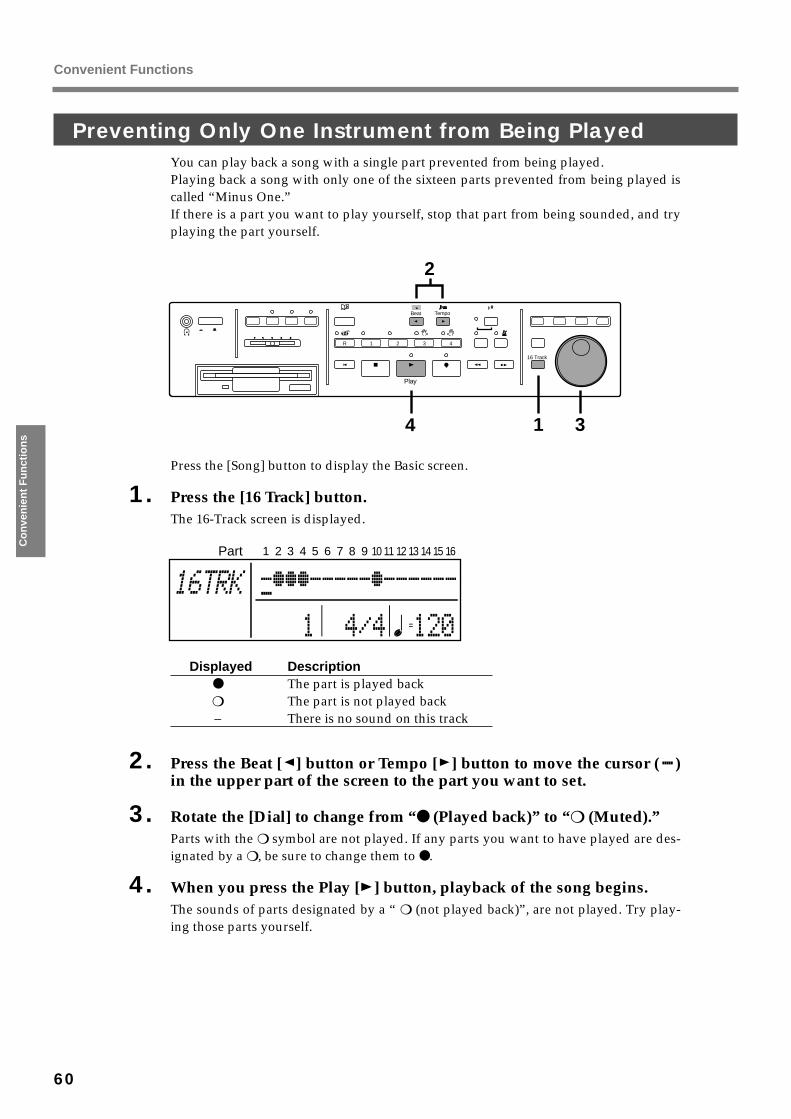
Preventing Only One Instrument from Being PlayedYou can play back a song with a single part prevented from being played.Playing back a song with only one of the sixteen parts prevented from being played iscalled “Minus One.”If there is a part you want to play yourself, stop that part from being sounded, and tryplaying the part yourself.
fig.34-1_40
Press the [Song] button to display the Basic screen.
1. Press the [16 Track] button.The 16-Track screen is displayed.
fig.33-2_30
Displayed Description● The part is played back❍ The part is not played back– There is no sound on this track
2. Press the Beat [ ] button or Tempo [ ] button to move the cursor ( )in the upper part of the screen to the part you want to set.
3. Rotate the [Dial] to change from “● (Played back)” to “❍ (Muted).”Parts with the ❍ symbol are not played. If any parts you want to have played are des-ignated by a ❍ , be sure to change them to ● .
4. When you press the Play [ ] button, playback of the song begins.The sounds of parts designated by a “ ❍ (not played back)”, are not played. Try play-ing those parts yourself.
4321R
2
PowerPhones
On Off
Marker Clear
Volume
Song
Track Count In Metronome
ResetPlay Rec
Edit
16 Track
ReverbBeat Tempo
Sound
Enter
14 3
1 2 3 4 5 6 7 8 9 10 11 12 13 14 15 16Part
Convenient Functions
60
Co
nve
nie
nt
Fu
nct
ion
s

The MT 300s’s Recording FunctionsThe MT 300s allow you to create ensemble works with ease.
A Variety of Ways to RecordThere are four ways to record with the MT 300s.
• Replace RecordingNew material is recorded as previously recorded material is erased (p.67).
• Mix RecordingNewly recorded material layered on previously recorded material (p.68).
• Loop RecordingA specified segment of the song is repeated, and the different sounds recorded witheach pass are layered on one another (p.69).
• Patch-In RecordingWhile listening to a recorded performance, only a specified segment of the perfor-mance is rerecorded (p.70).
Although the MT 300s is normally set to “replace” recording, set each of the fourrecording modes according to your particular situation.
The Relationship Between Track Numbers and PartsThe sixteen separate parts of the 16-track sequencer correspond to the MT 300s’s fivetrack buttons as shown below.
Track Button R 1 2 3 4Part 10, 11 1 2, 5-9, 12-16 3 4
For example, if you select the [1] button and then record, material is actually recordedto Part 1.However, the [R] button and [2] button include multiple parts; when the [R] is selectedfor recording, the material is recorded to Part 10; when the [2] button is selected, thesignal goes to Part 2.
On commercially available Roland SMF music files, Part 11 is included on Track 2. The corre-spondence of the other parts’ track buttons is identical.NOTE
Chapter 3 Recording Functions
61
Reco
rdin
g F
un
ction
s

Recording Ensemble WorksHere we introduce the basic procedure for creating ensemble works .This is a fundamental process. Combining this process with the MT 300s’s functions,try the composing techniques that appeal to you.
How to Create Ensemble WorksTo create an ensemble piece, first you must determine the imagery of the song, decid-ing which part will play what tone an so on. Then, after carrying out the sequence ofsetting rhythm patterns and bass, chord , and melody parts for each part’s tone, yougo on to record.
Determining the Basic Tempo and Beat for the SongLet’s set a song’s basic tempo and beat.
1. Press the [Song] button.
2. Use the [Dial] ; “0 : New Song” appears in the upper part of the dis-play screen.New Songs are assigned the number “0” and then recorded.
fig.35-15_30
3. After pressing the Tempo [ ] button, use the [Dial] to select the basictempo for the song.
4. After pressing the Beat [ ] button, use tthe [Dial] to select the basicbeat/rhythm for the song.
You cannot change the song’s beat (rhythm) after recording is done. If you want to create asong during which the rhythm does change, please refer to “Creating Songs Featuring BeatChanges” (p.76).
To change the basic tempo of a song, please refer to “Changing the Basic Tempo of the Song(p.59).
If you want to change the tempo on a recorded song, please refer to “Creating Songs FeaturingTempo Changes” (p.74).
NOTE
MEMO
Recording Functions
62
Rec
ord
ing
Fu
nct
ion
s

Recording Drum PartsFirst, let’s record the rhythm parts.
It’s easy to make your own rhythm part when you use the MT 300s’s internal rhythm Patterns.There’s no need to record each instrument’s part one at a time, making it very convenient.Please refer to “Creating Rhythm Parts Easily “ (p.77) and “Copying Rhythm Patterns” (p.82).
When you do want to record rhythm tracks one at a time, Loop Recording is a convenient wayto do this.
Loop RecordingWhat is Loop Recording?Loop Recording is a recording method in which a specified segment of the song is repeated, andthe different sounds recorded with each pass are layered on one another.
fig.35-4_30
1. First, record the length of the song using no input.If nothing has yet been recorded, selecting any track button or part in the 16-Trackscreen, prepare a “blank,” an empty recording with the number of measures neededfor the song, but without any performance input. This is called “Blank recording.”
2. Define the segment to be repeated with Markers A and B.Using the Bwd [ ] and Fwd [ ] buttons, move to the start of the segment to berepeated, then press the [A] button to set Marker A.Similarly, go to the end of the segment and press the [B] button to set Marker B.fig.35-4-1_20
If no segment is specified by markers, then the entire song, from beginning to end, willrepeat.fig.35-15
3. Press the [Repeat] button; the button’s indicator lights.This sets Loop Recording.If at this point you press the [Repeat] button once more, the button’s indicator goesoff, and Loop Recording is canceled.
TERMS
Measure
Marker A Marker B
Marker Clear
RepeatA-Marker-BBwd Fwd
4321R
5
PowerPhones
On Off
Marker Clear
Repeat
Volume
Song
Track Count In Metronome
Stop Play Rec
Edit
16 Track
ReverbBeat Tempo Transpose
Sound
Enter
4
3, 12
79
6
1011
8
Recording Functions
63
Reco
rdin
g F
un
ction
s

4. Press the [16 Track] button.The 16 track screen is displayed.
5. Press the Beat [ ] button or Tempo [ ] button to move the cursor ( )in the upper part of the screen to Part 10.
fig.35-06-01
You can select Drum Set, SFX Set, and other tones for Parts 10 and 11.When recording, you should assign rhythm parts that use rhythm patterns and DrumSet tones to Part 10, and SFX sound effects to Part 11.
6. When you press the [Transpose] button, the following screen is dis-played.
fig.35-8_30
Pressing the [Song] button returns you to the “16-Track screen. ”
7. Rotate the [Dial] to select the Drum Set type.
8. If you want to record with the metronome sound playing, press the[Metronome] button, turning on its indicator.The metronome sound is not recorded.
9. Press the Rec [ ] button, turning on the button indicator.The MT 300s is put into record standby mode.
10. Press the Play [ ] button, and after two measure of count sound,recording begins.After the segment from Marker A to Marker B is recorded, recording continues afterreturning to Marker A.Try recording the drum sounds in sequence, taking the kick drum first, followed bythe snare, toms, and so on.
11. When you press the Stop [ ] button, recording ceases.After you have finished recording the first segment, shift the segment between mark-ers A and B (p.32), and then record that section the same way.
12. After you have finished recording the drums, press the [Repeat] but-ton, turning off its indicator.
When the Performance is Unsatisfactory
By pressing the [Transpose] button while holding down the Rec [ ] button, you can delete thesound recorded on a selected part.
Using the “Delete” method (p.86), delete the recorded measure(s).
At times when you want to have the same rhythm pattern continued, copying the same mea-sures with the “Copy” method (p.79) is convenient.
1 2 3 4 5 6 7 8 9 10 11 12 13 14 15 16
Recording Functions
64
Rec
ord
ing
Fu
nct
ion
s

Recording the Bass PartNext, record the bass part.fig.35-14
1. In the 16-track screen, select the part you want to record.You should record the bass part to Part 2.
2. Pressing the [Transpose] button calls up the screen for the selectedpart.
3. Using the [Dial] , select the bass tone, for example “69:Acoustic Bs.”
4. Press the Rec [ ] button, turning on its indicator.This puts the keyboard in record standby.
5. Press the Play [ ] button, and after two measure of count sound,recording begins.
6. When you press the Stop [ ] button, recording ceases.
Recording Melody and Chord PartsAs with the bass part, record these after selecting the parts and tones in the 16-Trackscreen.When the chords and melody are recorded, the song is complete. If you want to makethe song even fancier or more fully developed, you can record ornamental phrases,percussion parts, and so on.
When you select a part that already has material recorded on it and then proceed with record-ing, then the previously recorded material is replaced by the newly-recorded material from thepoint where the new recording starts to where it stops.
When you want to listen to a part of the recorded performance, use rewind and fast forward to
go the part you want to hear, and then play back the song from there (p.28).
If you just want to record over a section of the song, move to the point you want to do over andbegin recording there. If you press the [Count In] button while in record standby, the button`sindicator goes off, and you can begin recording after the two measures leading up to the currentlocation are played back.
You can change the volume and other settings for each part. Please refer to “Listening to Songsafter Changing Instrument Sounds or Making Other Changes” (p.56).
You can record over sections specified using markers or the pedal. Please refer to “RecordingCertain Segments Over Again” (p.70).
By connecting a Roland EV-5 Expression Pedal (sold separately) to the Expression Pedal jack onthe rear panel of the MT 300s, you can create songs featuring crescendo and decrescendo. Youcan adjust the volume with the Expression Pedal of parts selected in the 16-Track screen (p.17).
If you connect an optionally available Roland DP-2 Pedal Switch to the Start/Stop jack on theunit's rear panel, you will be able to use the pedal to start and stop recording (p.17, 98).
4321R
1
2
3456
PowerPhones
On Off
Marker Clear
RepeatA-Marker-B
Volume
Song
Track Count In Metronome
Bwd FwdReset
Stop Play Rec
Menu
Edit
16 Track
ReverbDisk TuneBeat Transpose
Sound
Enter
NOTE
MEMO
MEMO
Recording Functions
65
Reco
rdin
g F
un
ction
s
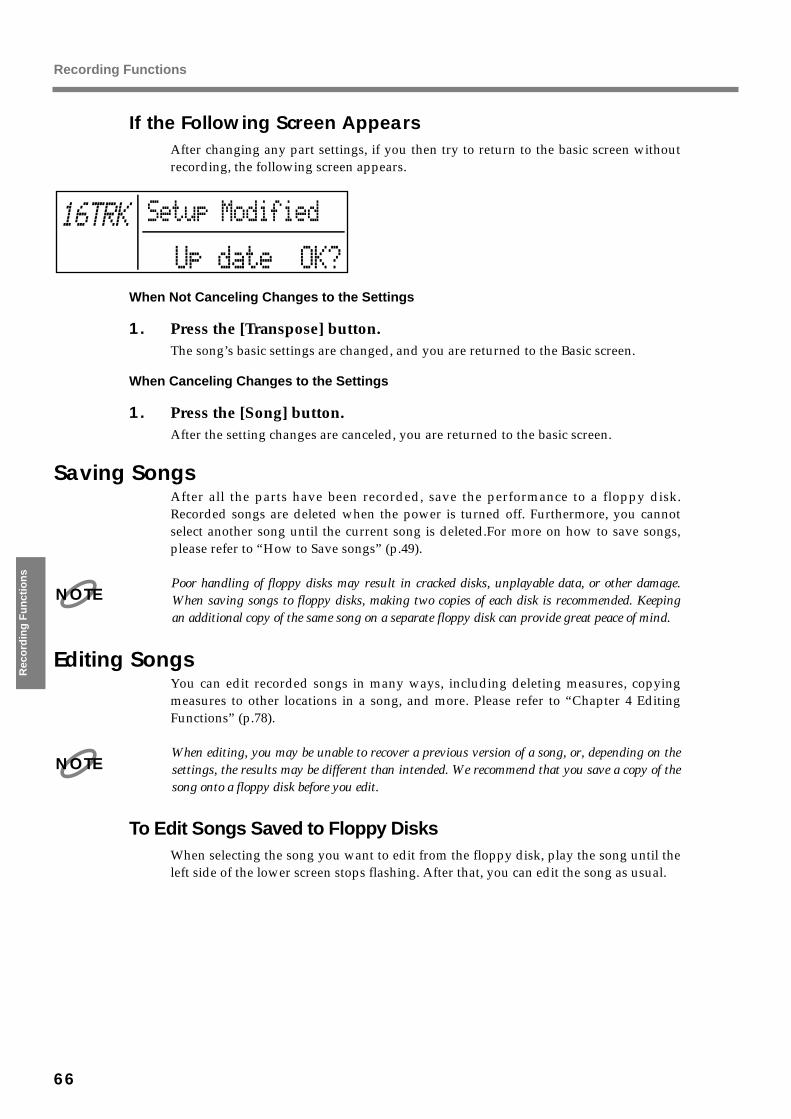
If the Following Screen AppearsAfter changing any part settings, if you then try to return to the basic screen withoutrecording, the following screen appears.
fig.33-8_30
When Not Canceling Changes to the Settings
1. Press the [Transpose] button.The song’s basic settings are changed, and you are returned to the Basic screen.
When Canceling Changes to the Settings
1. Press the [Song] button.After the setting changes are canceled, you are returned to the basic screen.
Saving SongsAfter all the parts have been recorded, save the performance to a floppy disk.Recorded songs are deleted when the power is turned off. Furthermore, you cannotselect another song until the current song is deleted.For more on how to save songs,please refer to “How to Save songs” (p.49).
Poor handling of floppy disks may result in cracked disks, unplayable data, or other damage.When saving songs to floppy disks, making two copies of each disk is recommended. Keepingan additional copy of the same song on a separate floppy disk can provide great peace of mind.
Editing SongsYou can edit recorded songs in many ways, including deleting measures, copyingmeasures to other locations in a song, and more. Please refer to “Chapter 4 EditingFunctions” (p.78).
When editing, you may be unable to recover a previous version of a song, or, depending on thesettings, the results may be different than intended. We recommend that you save a copy of thesong onto a floppy disk before you edit.
To Edit Songs Saved to Floppy DisksWhen selecting the song you want to edit from the floppy disk, play the song until theleft side of the lower screen stops flashing. After that, you can edit the song as usual.
NOTE
NOTE
Recording Functions
66
Rec
ord
ing
Fu
nct
ion
s
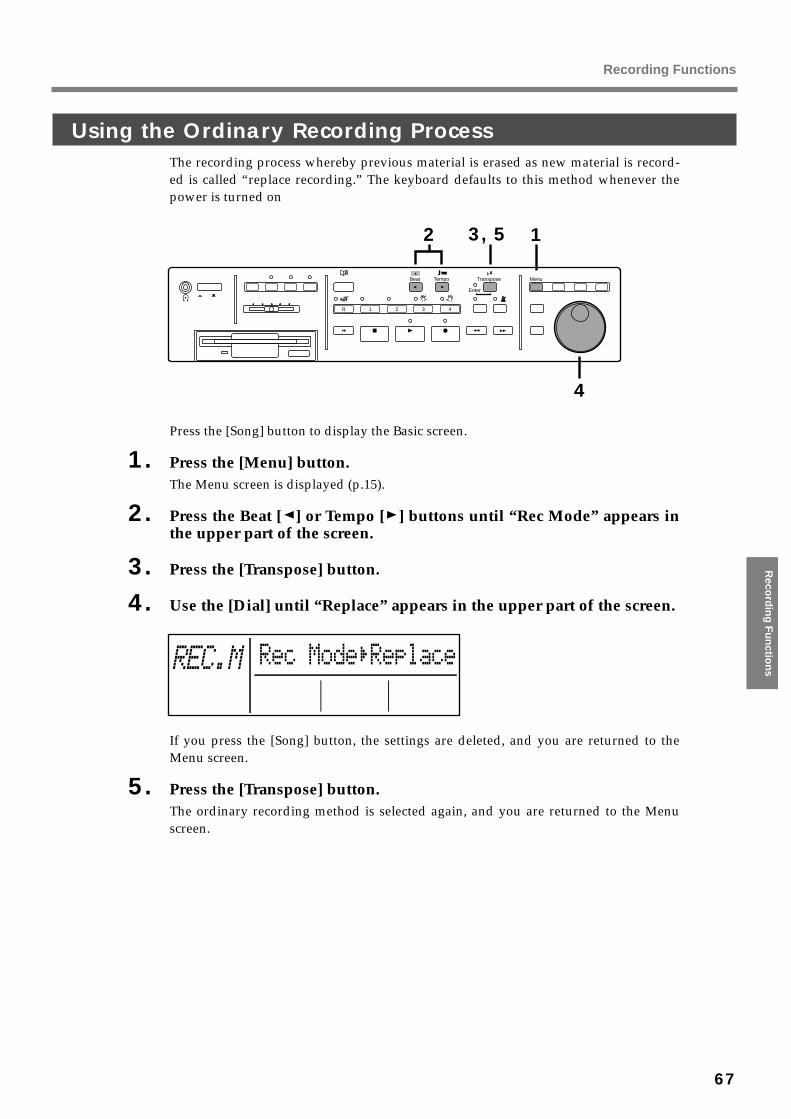
Using the Ordinary Recording ProcessThe recording process whereby previous material is erased as new material is record-ed is called “replace recording.” The keyboard defaults to this method whenever thepower is turned on
fig37-1_40
Press the [Song] button to display the Basic screen.
1. Press the [Menu] button.The Menu screen is displayed (p.15).
2. Press the Beat [ ] or Tempo [ ] buttons until “Rec Mode” appears inthe upper part of the screen.
3. Press the [Transpose] button.
4. Use the [Dial] until “Replace” appears in the upper part of the screen.fig.37-2_30
If you press the [Song] button, the settings are deleted, and you are returned to theMenu screen.
5. Press the [Transpose] button.The ordinary recording method is selected again, and you are returned to the Menuscreen.
4321R
2
PowerPhones
On Off
Marker Clear
Volume
Song
Track Count In Metronome
ResetRec
Menu
Edit
ReverbBeat Tempo Transpose
Sound
Enter
13, 5
4
Recording Functions
67
Reco
rdin
g F
un
ction
s
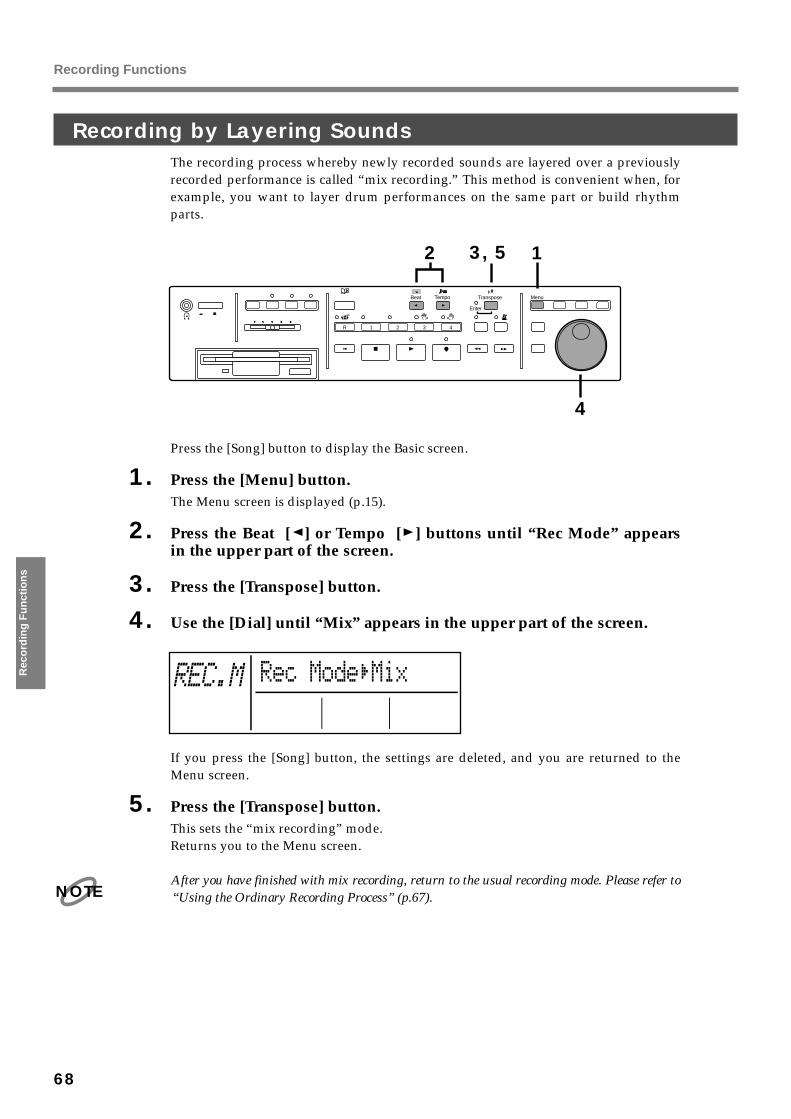
Recording by Layering SoundsThe recording process whereby newly recorded sounds are layered over a previouslyrecorded performance is called “mix recording.” This method is convenient when, forexample, you want to layer drum performances on the same part or build rhythmparts.
fig.37-1_40
Press the [Song] button to display the Basic screen.
1. Press the [Menu] button.The Menu screen is displayed (p.15).
2. Press the Beat [ ] or Tempo [ ] buttons until “Rec Mode” appearsin the upper part of the screen.
3. Press the [Transpose] button.
4. Use the [Dial] until “Mix” appears in the upper part of the screen.fig.38-1_20
If you press the [Song] button, the settings are deleted, and you are returned to theMenu screen.
5. Press the [Transpose] button.This sets the “mix recording” mode.Returns you to the Menu screen.
After you have finished with mix recording, return to the usual recording mode. Please refer to“Using the Ordinary Recording Process” (p.67).
4321R
2
PowerPhones
On Off
Marker Clear
Volume
Song
Track Count In Metronome
ResetRec
Menu
Edit
ReverbBeat Tempo Transpose
Sound
Enter
13, 5
4
NOTE
Recording Functions
68
Rec
ord
ing
Fu
nct
ion
s

Repeated Recording of the Same SegmentYou can layer recorded sounds in a specified segment of a song, repeating the sectionany number of times while recording new material with each pass. This type ofrecording process is called “loop recording.”Please see p.63 for the “loop recording” procedure.With the following procedure, you can perform “loop recording” even when the[Repeat] button’s indicator is not on.
fig.37-1_40
Press the [Song] button to display the Basic screen.
1. Press the [Menu] button.The Menu screen is displayed (p.15).
2. Press the Beat [ ] or Tempo [ ] buttons until “Rec Mode” appearsin the upper part of the screen.
3. Press the [Transpose] button.
4. Use the [Dial] until “Loop” appears in the upper part of the screen.fig.39-1_30
If you press the [Song] button, the settings are deleted, and you are returned to theMenu screen.
5. Press the [Transpose] button.This sets the “Loop Recording” mode.Returns you to the Menu screen.
After you have finished with loop recording, return to the usual recording mode. Please refer to“Using the Ordinary Recording Process” (p.67).
4321R
2
PowerPhones
On Off
Marker Clear
Volume
Song
Track Count In Metronome
ResetRec
Menu
Edit
ReverbBeat Tempo Transpose
Sound
Enter
13, 5
4
NOTE
Recording Functions
69
Reco
rdin
g F
un
ction
s
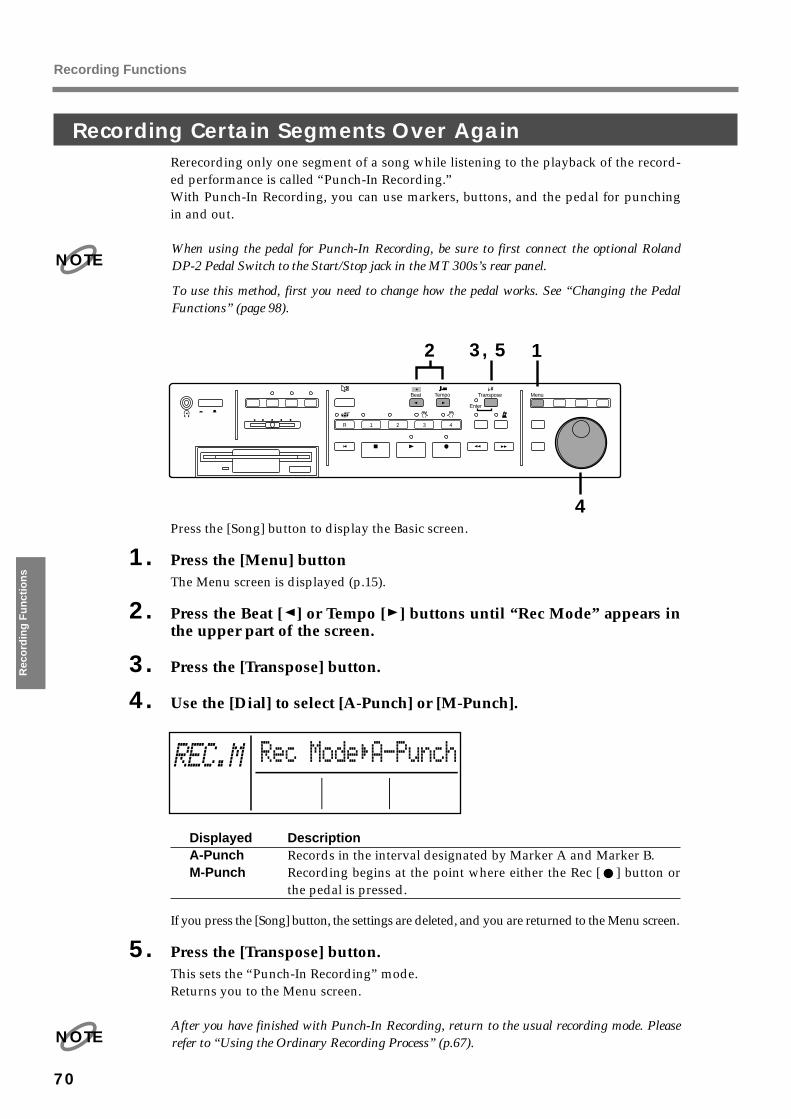
Recording Certain Segments Over AgainRerecording only one segment of a song while listening to the playback of the record-ed performance is called “Punch-In Recording.”With Punch-In Recording, you can use markers, buttons, and the pedal for punchingin and out.
When using the pedal for Punch-In Recording, be sure to first connect the optional RolandDP-2 Pedal Switch to the Start/Stop jack in the MT 300s’s rear panel.
To use this method, first you need to change how the pedal works. See “Changing the PedalFunctions” (page 98).
fig.37-1_40
Press the [Song] button to display the Basic screen.
1. Press the [Menu] buttonThe Menu screen is displayed (p.15).
2. Press the Beat [ ] or Tempo [ ] buttons until “Rec Mode” appears inthe upper part of the screen.
3. Press the [Transpose] button.
4. Use the [Dial] to select [A-Punch] or [M-Punch].fig.40-1_30
Displayed DescriptionA-Punch Records in the interval designated by Marker A and Marker B.M-Punch Recording begins at the point where either the Rec [ ] button or
the pedal is pressed.
If you press the [Song] button, the settings are deleted, and you are returned to the Menu screen.
5. Press the [Transpose] button.This sets the “Punch-In Recording” mode.Returns you to the Menu screen.
After you have finished with Punch-In Recording, return to the usual recording mode. Pleaserefer to “Using the Ordinary Recording Process” (p.67).
NOTE
4321R
2
PowerPhones
On Off
Marker Clear
Volume
Song
Track Count In Metronome
ResetRec
Menu
Edit
ReverbBeat Tempo Transpose
Sound
Enter
13, 5
4
NOTE
Recording Functions
70
Rec
ord
ing
Fu
nct
ion
s
Rerecording the Section Between Marker A and Marker B (A-Punch)After first setting Marker A and Marker B to define the segment you want to recordover and setting the recording process to “Punch-In Recording,” proceed with therecording. The MT 300s goes into recording mode only between Marker A and MarkerB, allowing you to record over the section from Marker A to Marker B.
1. When recording over only a certain part or parts, select such parts inthe 16-Track screen (p.64).
2. Set Marker A at the beginning of the section you want to record over,and set Marker B at the end of the section.Place Marker A and Marker B by using the Bwd [ ] button or Fwd [ ] button tomove the markers to the desired locations. Then, press the Marker [A] and [B] buttonsto set the markers.
3. Pressing the Marker [A] button takes you to the point where MarkerA is set.
4. Press the Bwd [ ] button to move to the point where you want play-back to begin.
5. Press the Rec [ ] button, turning on its indicator.The MT 300s is put into record standby mode.
6. If you are using the Track buttons in rerecording, press the Track but-tons for those tracks you want to record over.
7. Press the Play [ ] button.After two measures of count sound, playback begins.Recording begins at the point where Marker A is set.Recording stops where Marker B is located, and the MT 300s reverts to playback only.
8. When you press the Stop [ ] button, playback of the song ceases.
Recording Functions
71
Reco
rdin
g F
un
ction
s
Punching In and Out with the Buttons or the Pedal (M-Punch)You can begin recording while a song is played back by either pressing the Rec [ ]button or the pedal at a designated point. Pressing the Rec [ ] button or pedal onceagain stops the recording, after which the MT 300s returns to playback mode.
You must change the pedal’s function beforehand when you use it for recording. Please refer to“Changing the Pedal Functions” (p.98).
1. When recording over only a certain part or parts, select such parts inthe 16-Track screen (p. 64).
2. Press the Bwd [ ] button to move to the point where you want play-back to begin.
3. Press the Rec [ ] button, turning on its indicator.The MT 300s is put into record standby mode.
4. If you are using the Track buttons in rerecording, press the Track but-tons for those tracks you want to record over.
5. Press the Play [ ] button.After two measures of count sound, playback begins.
6. When you reach the point where you want recording to begin, pressthe Rec [ ] button or depress the pedal.
7. When you then reach the point where you want recording to stop,press the Play [ ] button or depress the pedal once more.When recording is stopped, the MT 300s reverts to playback mode.
8. When you press the Stop [ ] button, playback of the song ceases.
MEMO
Recording Functions
72
Rec
ord
ing
Fu
nct
ion
s
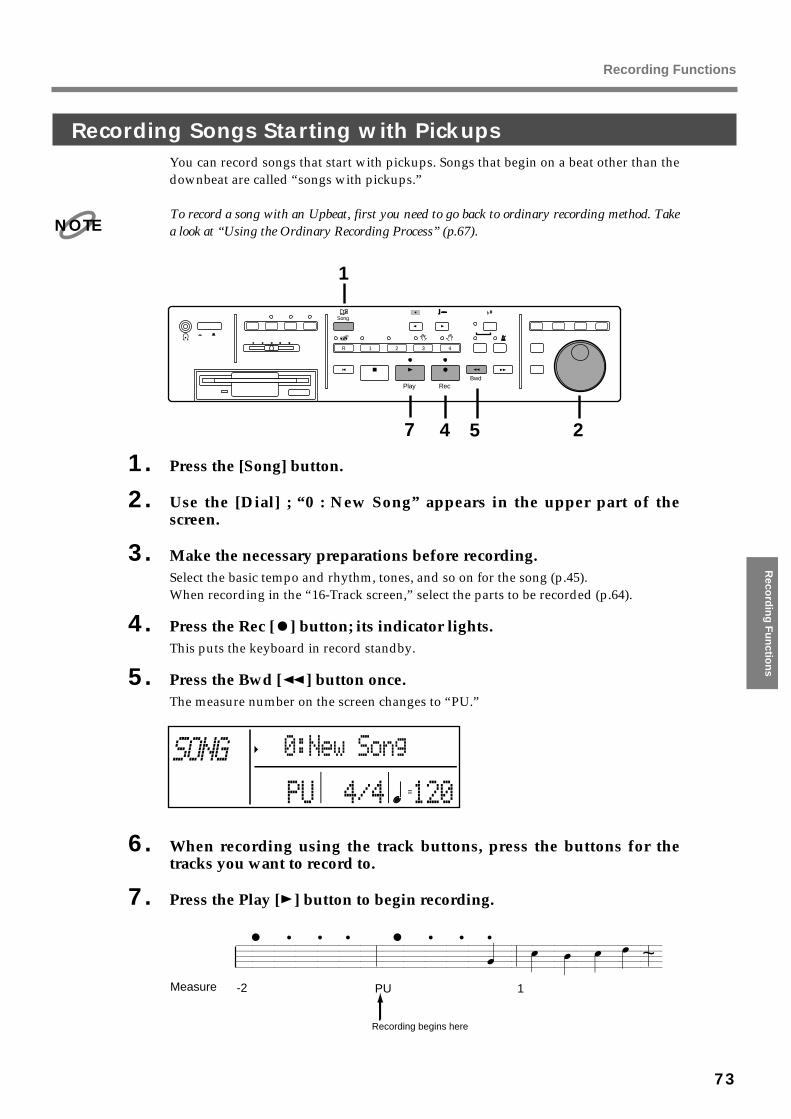
Recording Songs Starting with PickupsYou can record songs that start with pickups. Songs that begin on a beat other than thedownbeat are called “songs with pickups.”
To record a song with an Upbeat, first you need to go back to ordinary recording method. Takea look at “Using the Ordinary Recording Process” (p.67).
fig.41-1_40
1. Press the [Song] button.
2. Use the [Dial] ; “0 : New Song” appears in the upper part of thescreen.
3. Make the necessary preparations before recording.Select the basic tempo and rhythm, tones, and so on for the song (p.45).When recording in the “16-Track screen,” select the parts to be recorded (p.64).
4. Press the Rec [ ] button; its indicator lights.This puts the keyboard in record standby.
5. Press the Bwd [ ] button once.The measure number on the screen changes to “PU.”
fig.41-2_30
6. When recording using the track buttons, press the buttons for thetracks you want to record to.
7. Press the Play [ ] button to begin recording.fig.41-3_20
NOTE
4321R
7
PowerPhones
On Off
Marker Clear
Volume
Song
Track Count In Metronome
BwdResetPlay Rec
Edit
Reverb
Sound
Enter
4
1
25
Measure -2 PU 1
~
Recording begins here
Recording Functions
73
Reco
rdin
g F
un
ction
s
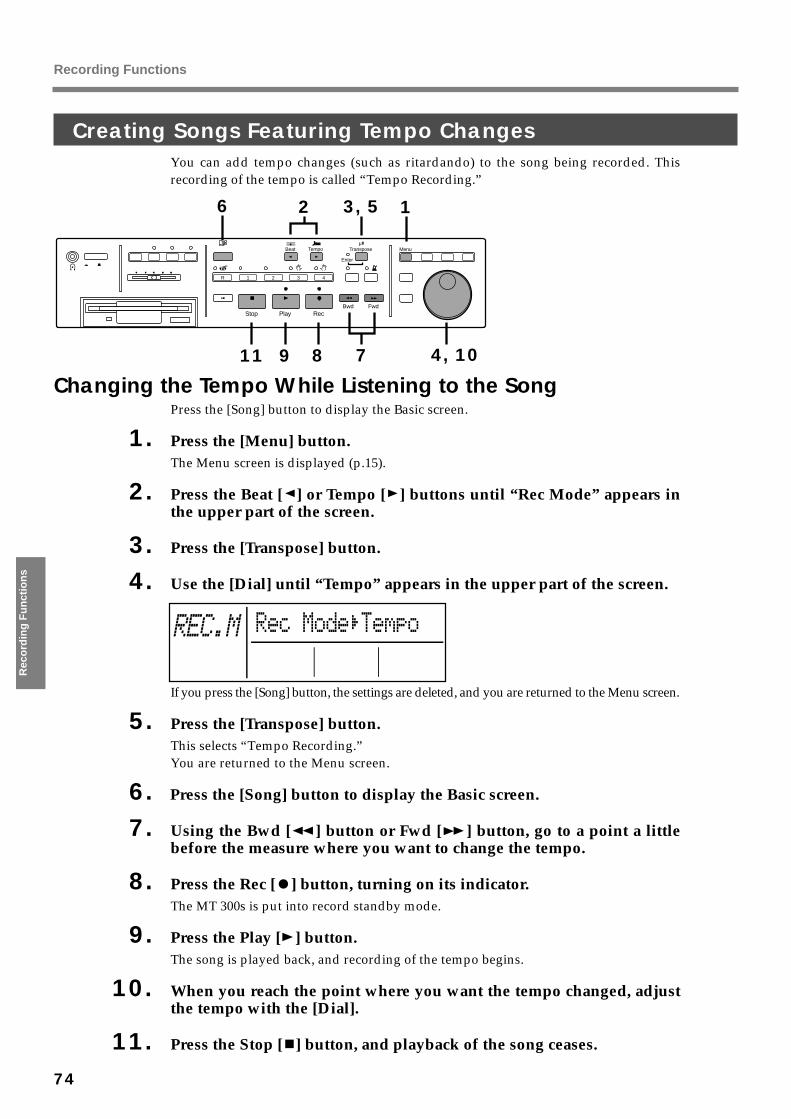
Creating Songs Featuring Tempo ChangesYou can add tempo changes (such as ritardando) to the song being recorded. Thisrecording of the tempo is called “Tempo Recording.”fig.42-1_40
Changing the Tempo While Listening to the SongPress the [Song] button to display the Basic screen.
1. Press the [Menu] button.The Menu screen is displayed (p.15).
2. Press the Beat [ ] or Tempo [ ] buttons until “Rec Mode” appears inthe upper part of the screen.
3. Press the [Transpose] button.
4. Use the [Dial] until “Tempo” appears in the upper part of the screen.fig.42-2_30
If you press the [Song] button, the settings are deleted, and you are returned to the Menu screen.
5. Press the [Transpose] button.This selects “Tempo Recording.”You are returned to the Menu screen.
6. Press the [Song] button to display the Basic screen.
7. Using the Bwd [ ] button or Fwd [ ] button, go to a point a littlebefore the measure where you want to change the tempo.
8. Press the Rec [ ] button, turning on its indicator.The MT 300s is put into record standby mode.
9. Press the Play [ ] button.The song is played back, and recording of the tempo begins.
10. When you reach the point where you want the tempo changed, adjustthe tempo with the [Dial].
11. Press the Stop [ ] button, and playback of the song ceases.
4321R
2
PowerPhones
On Off
Marker Clear
Volume
Song
Track Count In Metronome
Bwd FwdStop Play Rec
Menu
Edit
ReverbBeat Tempo Transpose
Sound
Enter
13, 5
4, 10811 9 7
6
Recording Functions
74
Rec
ord
ing
Fu
nct
ion
s

Changing the Tempo from a Designated MeasureYou can also change the tempo from the beginning of the measure to which you havemoved.
1. Select Tempo recording.Use the same procedure as in “Changing the Tempo While Listening to the Song.”
2. Press the Bwd [ ] button or Fwd [ ] button to go to the measurewhere you want the tempo changed.
3. Press the Rec [ ] button, turning on its indicator.The MT 300s is put into record standby mode.
4. Rotate the [Dial] to change the tempo.
5. Press the [Transpose] button.Recording of the tempo is finished, and the tempo of the song is changed, starting atthe beginning of the measure to which you moved.
After you have finished with Tempo Recording, return to the usual recording mode. Pleaserefer to “Using the Ordinary Recording Process” (p.67).
You cannot record performances while in Tempo Recording mode.
Even when you press the Rec [ ] button while pressing the Tempo [ ] button, you can stillgo make Tempo Recording settings. If you do, Tempo Recording is canceled when you stoprecording.
If you want to restore the previous tempo, delete the tempo data at the place where the tempowas recorded. For an explanation of how to delete the information of tempo setings, refer to the“Erasing Measures (Erase)” (p.88).
NOTE
NOTE
NOTE
MEMO
Recording Functions
75
Reco
rdin
g F
un
ction
s
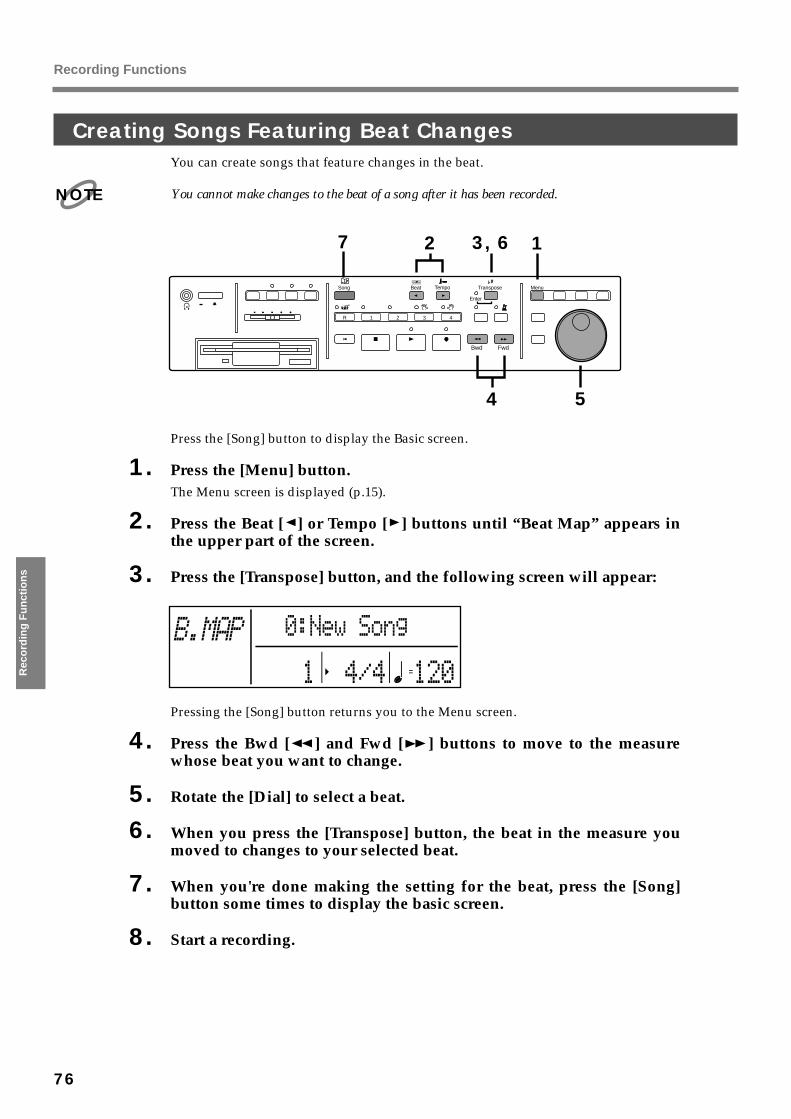
Creating Songs Featuring Beat ChangesYou can create songs that feature changes in the beat.
You cannot make changes to the beat of a song after it has been recorded.
fig.43-1_40
Press the [Song] button to display the Basic screen.
1. Press the [Menu] button.The Menu screen is displayed (p.15).
2. Press the Beat [ ] or Tempo [ ] buttons until “Beat Map” appears inthe upper part of the screen.
3. Press the [Transpose] button, and the following screen will appear:fig.43-2_30
Pressing the [Song] button returns you to the Menu screen.
4. Press the Bwd [ ] and Fwd [ ] buttons to move to the measurewhose beat you want to change.
5. Rotate the [Dial] to select a beat.
6. When you press the [Transpose] button, the beat in the measure youmoved to changes to your selected beat.
7. When you're done making the setting for the beat, press the [Song]button some times to display the basic screen.
8. Start a recording.
NOTE
4321R
2
PowerPhones
On Off
Marker Clear
Volume
Song
Track Count In Metronome
Bwd Fwd
Menu
Edit
ReverbBeat Tempo Transpose
Sound
Enter
13, 6
54
7
Recording Functions
76
Rec
ord
ing
Fu
nct
ion
s
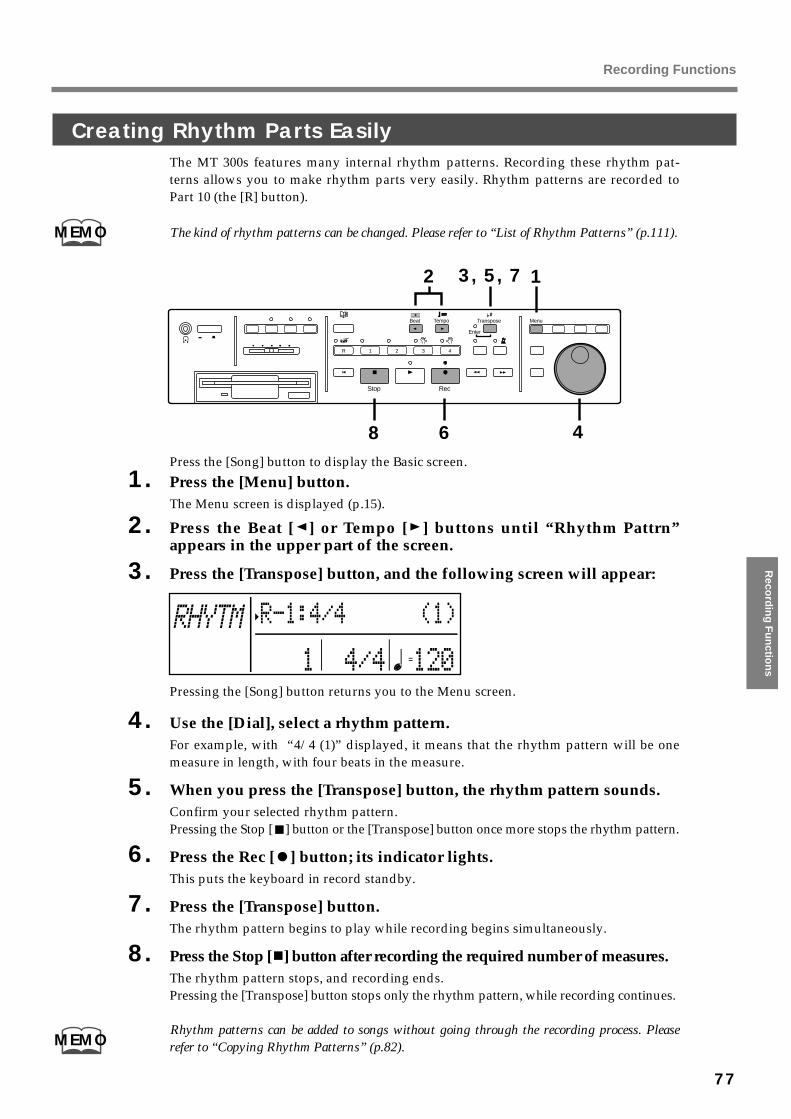
Creating Rhythm Parts EasilyThe MT 300s features many internal rhythm patterns. Recording these rhythm pat-terns allows you to make rhythm parts very easily. Rhythm patterns are recorded toPart 10 (the [R] button).
The kind of rhythm patterns can be changed. Please refer to “List of Rhythm Patterns” (p.111).
fig.44-1_40
Press the [Song] button to display the Basic screen.
1. Press the [Menu] button.The Menu screen is displayed (p.15).
2. Press the Beat [ ] or Tempo [ ] buttons until “Rhythm Pattrn”appears in the upper part of the screen.
3. Press the [Transpose] button, and the following screen will appear:fig.44-2_30
Pressing the [Song] button returns you to the Menu screen.
4. Use the [Dial], select a rhythm pattern.For example, with “4/4 (1)” displayed, it means that the rhythm pattern will be onemeasure in length, with four beats in the measure.
5. When you press the [Transpose] button, the rhythm pattern sounds.Confirm your selected rhythm pattern.Pressing the Stop [ ] button or the [Transpose] button once more stops the rhythm pattern.
6. Press the Rec [ ] button; its indicator lights.This puts the keyboard in record standby.
7. Press the [Transpose] button.The rhythm pattern begins to play while recording begins simultaneously.
8. Press the Stop [ ] button after recording the required number of measures.The rhythm pattern stops, and recording ends.Pressing the [Transpose] button stops only the rhythm pattern, while recording continues.
Rhythm patterns can be added to songs without going through the recording process. Pleaserefer to “Copying Rhythm Patterns” (p.82).
MEMO
4321R
2
PowerPhones
On Off
Marker Clear
Volume
Song
Track Count In Metronome
Stop Rec
Menu
Edit
ReverbBeat Tempo Transpose
Sound
Enter
13, 5, 7
468
MEMO
Recording Functions
77
Reco
rdin
g F
un
ction
s
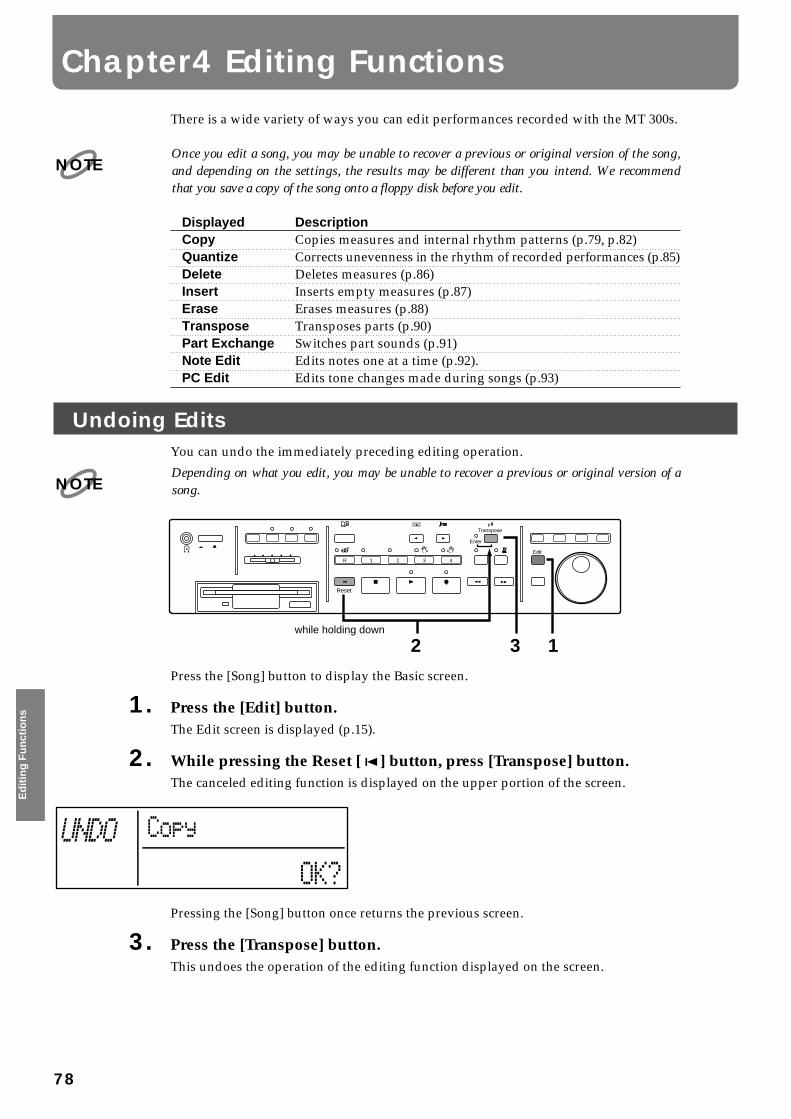
There is a wide variety of ways you can edit performances recorded with the MT 300s.
Once you edit a song, you may be unable to recover a previous or original version of the song,and depending on the settings, the results may be different than you intend. We recommendthat you save a copy of the song onto a floppy disk before you edit.
Displayed DescriptionCopy Copies measures and internal rhythm patterns (p.79, p.82)Quantize Corrects unevenness in the rhythm of recorded performances (p.85)Delete Deletes measures (p.86)Insert Inserts empty measures (p.87)Erase Erases measures (p.88)Transpose Transposes parts (p.90)Part Exchange Switches part sounds (p.91)Note Edit Edits notes one at a time (p.92).PC Edit Edits tone changes made during songs (p.93)
Undoing EditsYou can undo the immediately preceding editing operation.
Depending on what you edit, you may be unable to recover a previous or original version of asong.
fig.45-1
Press the [Song] button to display the Basic screen.
1. Press the [Edit] button.The Edit screen is displayed (p.15).
2. While pressing the Reset [ ] button, press [Transpose] button.The canceled editing function is displayed on the upper portion of the screen.
fig.45-2_30
Pressing the [Song] button once returns the previous screen.
3. Press the [Transpose] button.This undoes the operation of the editing function displayed on the screen.
NOTE
NOTE
4321R
PowerPhones
On Off
Marker Clear
Volume
Song
Track Count In Metronome
Reset
Edit
ReverbTranspose
Sound
Enter
while holding down
2 3 1
Chapter4 Editing Functions
78
Ed
itin
g F
un
ctio
ns
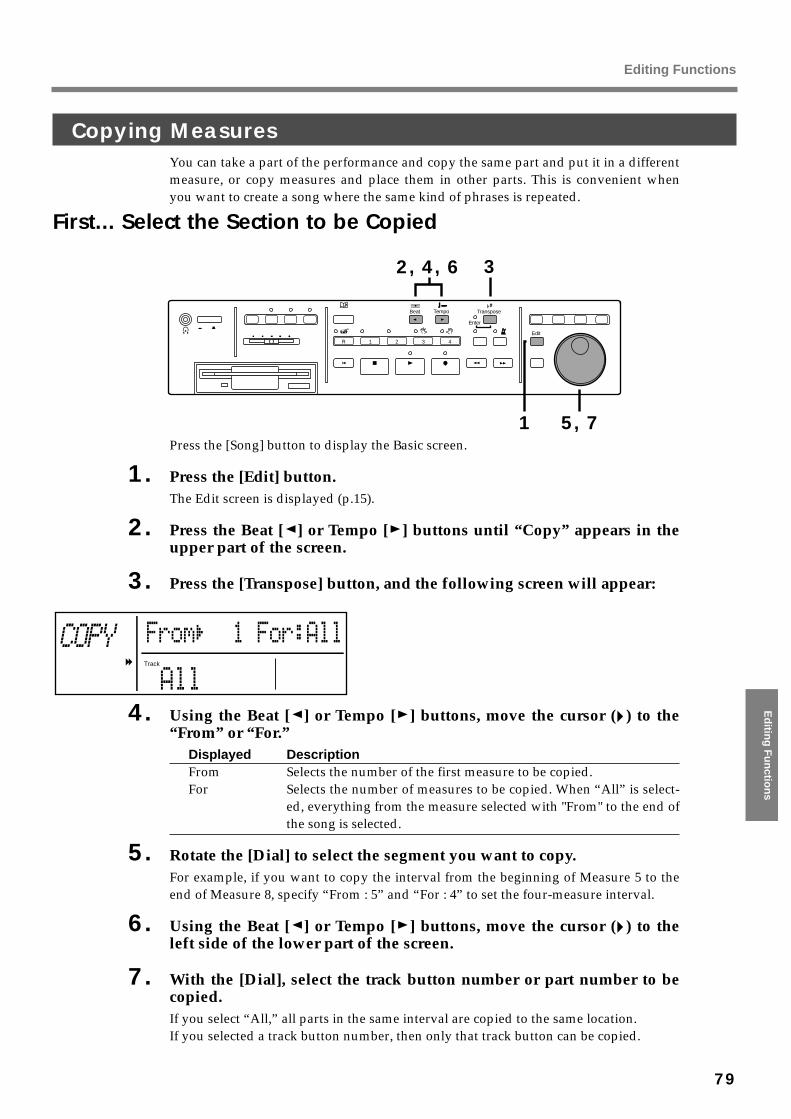
Copying MeasuresYou can take a part of the performance and copy the same part and put it in a differentmeasure, or copy measures and place them in other parts. This is convenient whenyou want to create a song where the same kind of phrases is repeated.
First... Select the Section to be Copiedfig.46-2_40
Press the [Song] button to display the Basic screen.
1. Press the [Edit] button.The Edit screen is displayed (p.15).
2. Press the Beat [ ] or Tempo [ ] buttons until “Copy” appears in theupper part of the screen.
3. Press the [Transpose] button, and the following screen will appear:fig.46-3_30
4. Using the Beat [ ] or Tempo [ ] buttons, move the cursor ( ) to the“From” or “For.”
Displayed DescriptionFrom Selects the number of the first measure to be copied.For Selects the number of measures to be copied. When “All” is select-
ed, everything from the measure selected with "From" to the end ofthe song is selected.
5. Rotate the [Dial] to select the segment you want to copy.For example, if you want to copy the interval from the beginning of Measure 5 to theend of Measure 8, specify “From : 5” and “For : 4” to set the four-measure interval.
6. Using the Beat [ ] or Tempo [ ] buttons, move the cursor ( ) to theleft side of the lower part of the screen.
7. With the [Dial], select the track button number or part number to becopied.If you select “All,” all parts in the same interval are copied to the same location.If you selected a track button number, then only that track button can be copied.
4321R
2, 4, 6
PowerPhones
On Off
Marker Clear
Volume
Song
Track Count In Metronome
Edit
ReverbBeat Tempo Transpose
Sound
Enter
1
3
5, 7
Track
Editing Functions
79
Ed
iting
Fu
nctio
ns
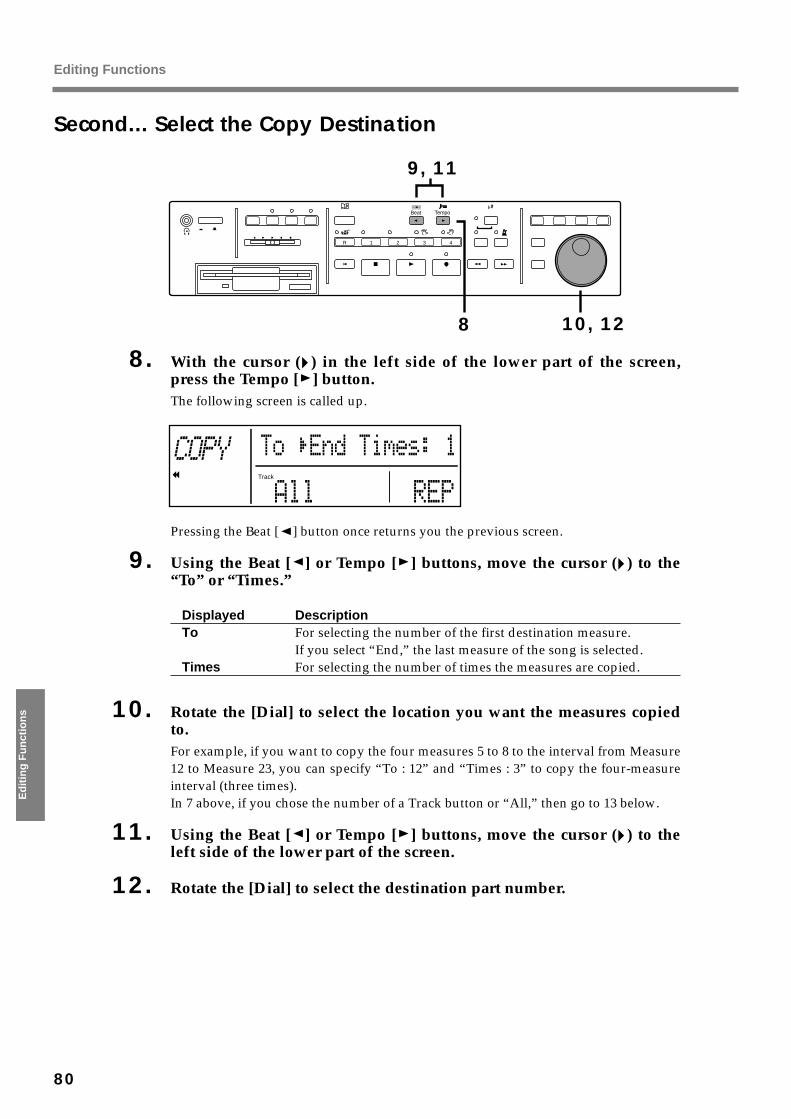
Second... Select the Copy Destinationfig.46-4_40
8. With the cursor ( ) in the left side of the lower part of the screen,press the Tempo [ ] button.The following screen is called up.
fig.46-5_30
Pressing the Beat [ ] button once returns you the previous screen.
9. Using the Beat [ ] or Tempo [ ] buttons, move the cursor ( ) to the“To” or “Times.”
Displayed DescriptionTo For selecting the number of the first destination measure.
If you select “End,” the last measure of the song is selected.Times For selecting the number of times the measures are copied.
10. Rotate the [Dial] to select the location you want the measures copiedto.For example, if you want to copy the four measures 5 to 8 to the interval from Measure12 to Measure 23, you can specify “To : 12” and “Times : 3” to copy the four-measureinterval (three times).In 7 above, if you chose the number of a Track button or “All,” then go to 13 below.
11. Using the Beat [ ] or Tempo [ ] buttons, move the cursor ( ) to theleft side of the lower part of the screen.
12. Rotate the [Dial] to select the destination part number.
4321R
9, 11
PowerPhones
On Off
Marker Clear
Volume
Song
Track Count In Metronome
ReverbBeat Tempo
Sound
Enter
8 10, 12
Track
Editing Functions
80
Ed
itin
g F
un
ctio
ns
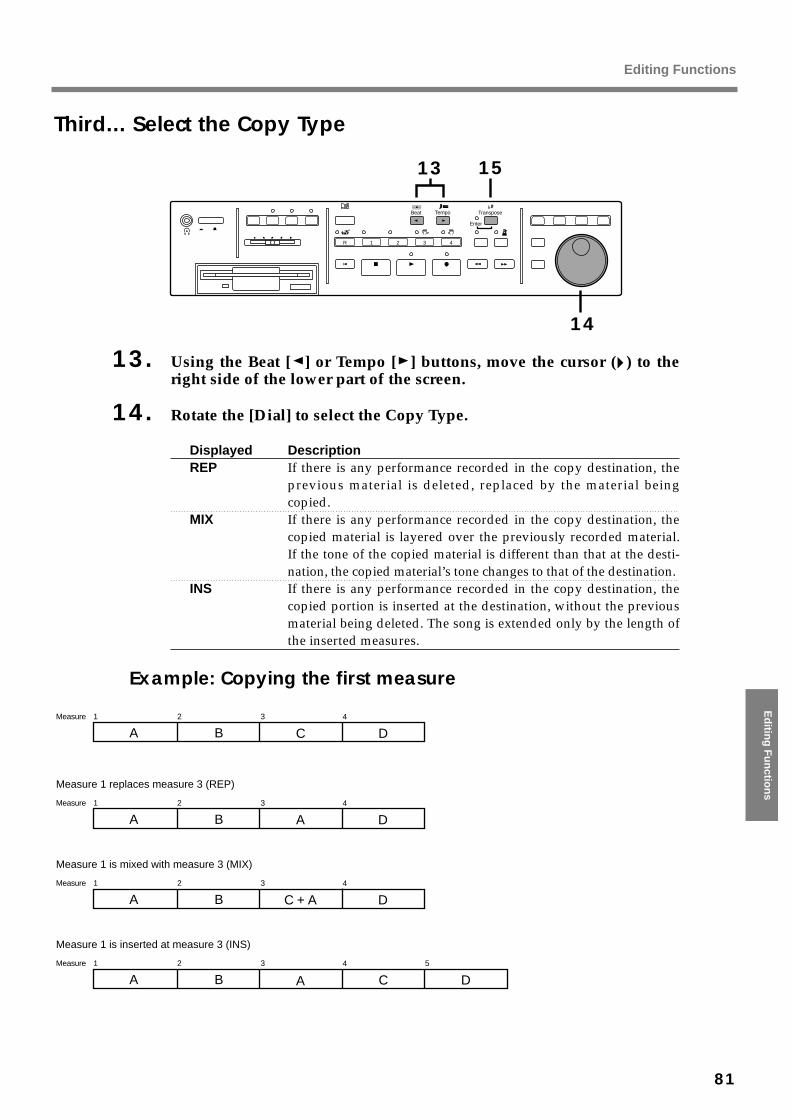
Third... Select the Copy Typefig.46-6_40
13. Using the Beat [ ] or Tempo [ ] buttons, move the cursor ( ) to theright side of the lower part of the screen.
14. Rotate the [Dial] to select the Copy Type.
Displayed DescriptionREP If there is any performance recorded in the copy destination, the
previous material is deleted, replaced by the material beingcopied.
MIX If there is any performance recorded in the copy destination, thecopied material is layered over the previously recorded material.If the tone of the copied material is different than that at the desti-nation, the copied material’s tone changes to that of the destination.
INS If there is any performance recorded in the copy destination, thecopied portion is inserted at the destination, without the previousmaterial being deleted. The song is extended only by the length ofthe inserted measures.
Example: Copying the first measurefig.46-1_20
fig.46-1-2_20
fig.46-1-3_20
fig.46-1-4_20
4321R
13
PowerPhones
On Off
Marker Clear
Volume
Song
Track Count In Metronome
ReverbBeat Tempo Transpose
Sound
Enter
15
14
A B C DMeasure 1 2 3 4
A B A DMeasure 1 2 3 4
Measure 1 replaces measure 3 (REP)
A B C + A DMeasure 1 2 3 4
Measure 1 is mixed with measure 3 (MIX)
A B C DMeasure 1 2 3 4
A
5
Measure 1 is inserted at measure 3 (INS)
Editing Functions
81
Ed
iting
Fu
nctio
ns
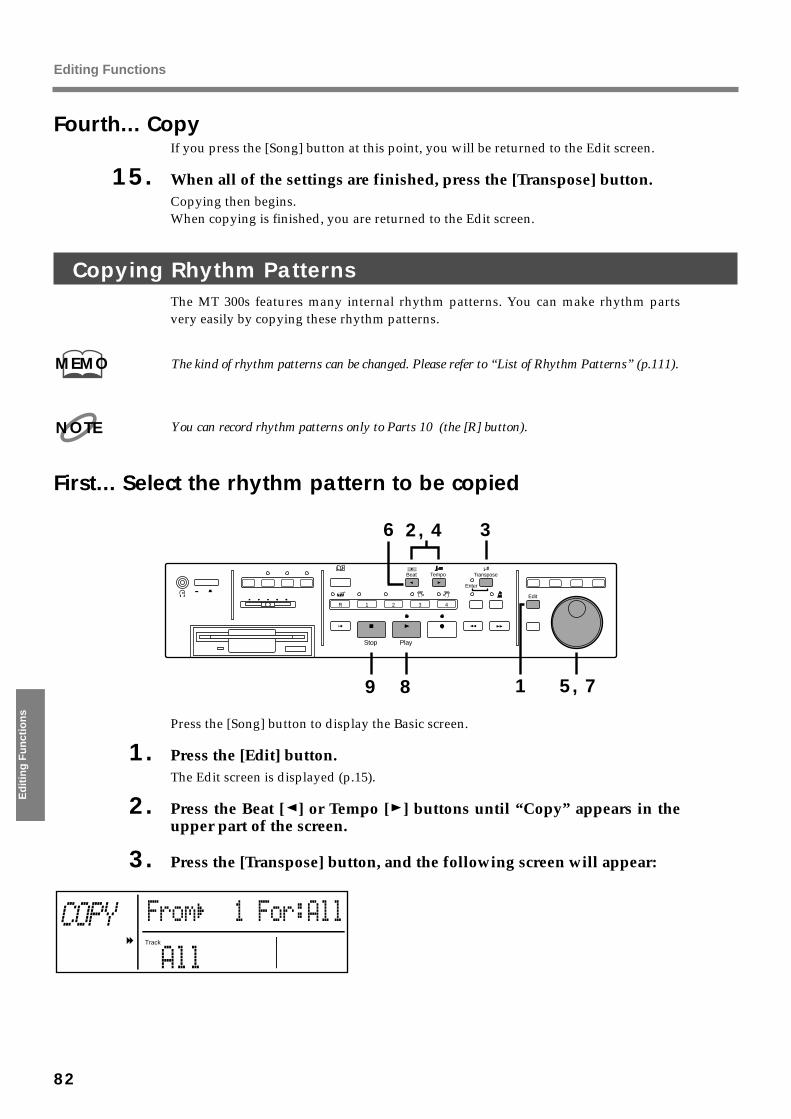
Fourth... CopyIf you press the [Song] button at this point, you will be returned to the Edit screen.
15. When all of the settings are finished, press the [Transpose] button.Copying then begins.When copying is finished, you are returned to the Edit screen.
Copying Rhythm PatternsThe MT 300s features many internal rhythm patterns. You can make rhythm partsvery easily by copying these rhythm patterns.
The kind of rhythm patterns can be changed. Please refer to “List of Rhythm Patterns” (p.111).
You can record rhythm patterns only to Parts 10 (the [R] button).
First... Select the rhythm pattern to be copiedfig.47-1-1_40
Press the [Song] button to display the Basic screen.
1. Press the [Edit] button.The Edit screen is displayed (p.15).
2. Press the Beat [ ] or Tempo [ ] buttons until “Copy” appears in theupper part of the screen.
3. Press the [Transpose] button, and the following screen will appear:fig.46-3_30
MEMO
NOTE
4321R
2, 4
PowerPhones
On Off
Marker Clear
Volume
Song
Track Count In Metronome
Stop Play
Edit
ReverbBeat Tempo Transpose
Sound
Enter
1
3
5, 79 8
6
Track
Editing Functions
82
Ed
itin
g F
un
ctio
ns

4. Using the Beat [ ] or Tempo [ ] buttons, move the cursor ( ) to theleft side of the lower part of the screen.
5. Rotate the [Dial] to select “R.Pt.”The changes the screen to the following.
fig.47-2_30
6. Using the Beat [ ] button, move the cursor ( ) to the upper part of thescreen.
7. Use the [Dial] to select the rhythm pattern.For example, with “4/4 (1)” displayed, it means that the rhythm pattern will one mea-sure in length, with four beats in the measure.
8. Press the Play [ ] button, and the rhythm pattern starts playing.
9. Press the Stop [ ] button and the rhythm pattern stops.
Second... Select the Copy Destinationfig.47-1-2
10. Press the Tempo [ ] button twice.The following screen is called up.
fig.47-4_30
Pressing the Beat [ ] button once returns you the previous screen.
4321R
11, 13
PowerPhones
On Off
Marker Clear
Volume
Song
Track Count In Metronome
ReverbBeat Tempo Transpose
Sound
Enter
10 12, 14
15
Track
Editing Functions
83
Ed
iting
Fu
nctio
ns
11. Using the Beat [ ] or Tempo [ ] buttons, move the cursor ( ) to the“To” or “Times.”
Displayed DescriptionTo Selects the number of the first destination measure.Times For selecting the number of times the pattern is copied.
12. Rotate the [Dial] to select the spot where you want the measurescopied.For example, if you want to create a song in which a one-measure rhythm pattern isrepeated from the first measure to the fourth measure, then you can make four copiesof the first measure by specifying “To : 1” and “For : 4” and placing them in the song,starting with Measure 1.
Third... Select the Copy Type
13. Using the Beat [ ] or Tempo [ ] buttons, move the cursor ( ) to theright side of the lower part of the screen.
14. Rotate the [Dial] to select the Copy Type.
Displayed DescriptionREP If there is any performance recorded in the copy destination, the
previous material is deleted, replaced by the material beingcopied.
MIX If there is any performance recorded in the copy destination, thecopied material is layered over the previously recorded material.If the sounds in the copied material are different than those at thedestination, the sounds in the copied material change to thoseused at the destination.
INS If there is any performance recorded in the copy destination, thecopied portion is inserted at the destination, without the previousmaterial being deleted. The song is extended only by the length ofthe inserted measures.
Fourth... CopyIf you press the [Song] button at this point, you will be returned to the Edit screen.
15. When all of the settings are finished, press the [Transpose] button.Copying then begins.When copying is finished, you are returned to the Edit screen.
You can record rhythm patterns. Please refer to “Creating Rhythm Parts Easily” (p.77).MEMO
Editing Functions
84
Ed
itin
g F
un
ctio
ns
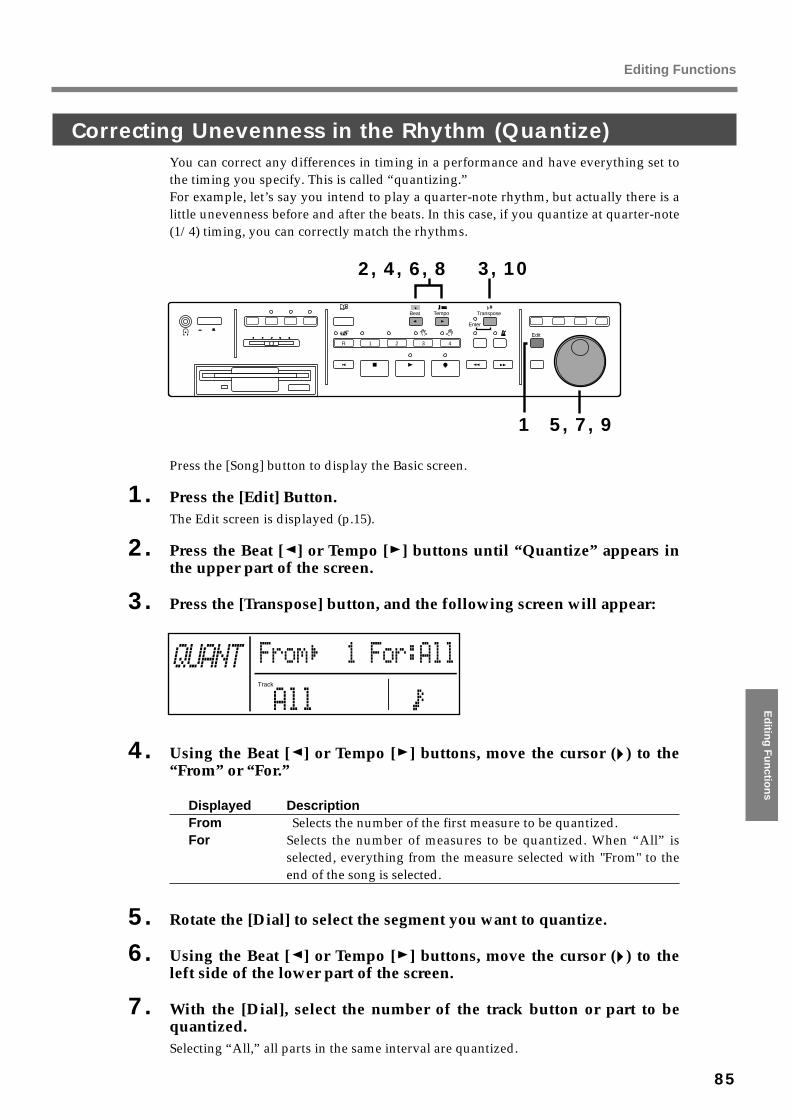
Correcting Unevenness in the Rhythm (Quantize)You can correct any differences in timing in a performance and have everything set tothe timing you specify. This is called “quantizing.”For example, let’s say you intend to play a quarter-note rhythm, but actually there is alittle unevenness before and after the beats. In this case, if you quantize at quarter-note(1/4) timing, you can correctly match the rhythms.
fig.48-1_40
Press the [Song] button to display the Basic screen.
1. Press the [Edit] Button.The Edit screen is displayed (p.15).
2. Press the Beat [ ] or Tempo [ ] buttons until “Quantize” appears inthe upper part of the screen.
3. Press the [Transpose] button, and the following screen will appear:fig.48-2_30
4. Using the Beat [ ] or Tempo [ ] buttons, move the cursor ( ) to the“From” or “For.”
Displayed DescriptionFrom Selects the number of the first measure to be quantized.For Selects the number of measures to be quantized. When “All” is
selected, everything from the measure selected with "From" to theend of the song is selected.
5. Rotate the [Dial] to select the segment you want to quantize.
6. Using the Beat [ ] or Tempo [ ] buttons, move the cursor ( ) to theleft side of the lower part of the screen.
7. With the [Dial], select the number of the track button or part to bequantized.Selecting “All,” all parts in the same interval are quantized.
4321R
2, 4, 6, 8
PowerPhones
On Off
Marker Clear
Volume
Song
Track Count In Metronome
Edit
ReverbBeat Tempo Transpose
Sound
Enter
3, 10
5, 7, 91
Track
Editing Functions
85
Ed
iting
Fu
nctio
ns
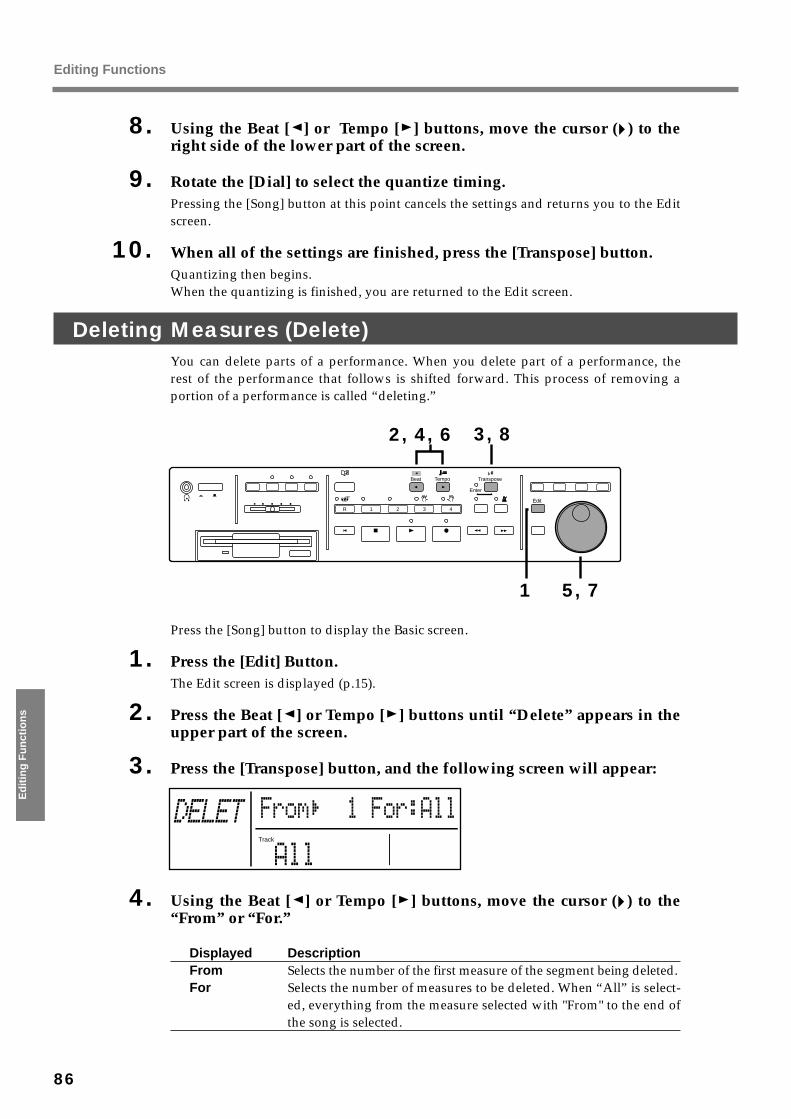
8. Using the Beat [ ] or Tempo [ ] buttons, move the cursor ( ) to theright side of the lower part of the screen.
9. Rotate the [Dial] to select the quantize timing.Pressing the [Song] button at this point cancels the settings and returns you to the Editscreen.
10. When all of the settings are finished, press the [Transpose] button.Quantizing then begins.When the quantizing is finished, you are returned to the Edit screen.
Deleting Measures (Delete)You can delete parts of a performance. When you delete part of a performance, therest of the performance that follows is shifted forward. This process of removing aportion of a performance is called “deleting.”
fig.49-1_50
Press the [Song] button to display the Basic screen.
1. Press the [Edit] Button.The Edit screen is displayed (p.15).
2. Press the Beat [ ] or Tempo [ ] buttons until “Delete” appears in theupper part of the screen.
3. Press the [Transpose] button, and the following screen will appear:fig.49-2_30
4. Using the Beat [ ] or Tempo [ ] buttons, move the cursor ( ) to the“From” or “For.”
Displayed DescriptionFrom Selects the number of the first measure of the segment being deleted.For Selects the number of measures to be deleted. When “All” is select-
ed, everything from the measure selected with "From" to the end ofthe song is selected.
4321R
2, 4, 6
PowerPhones
On Off
Marker Clear
Volume
Song
Track Count In Metronome
Edit
ReverbBeat Tempo Transpose
Sound
Enter
1
3, 8
5, 7
Track
Editing Functions
86
Ed
itin
g F
un
ctio
ns
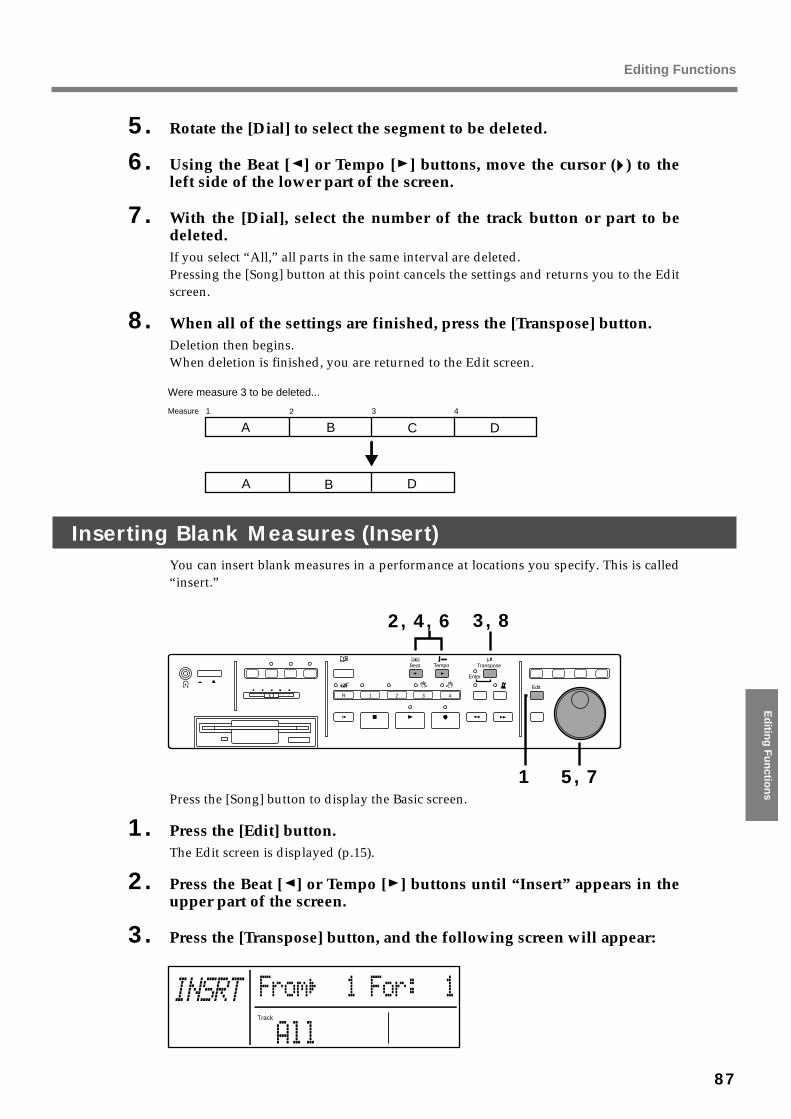
5. Rotate the [Dial] to select the segment to be deleted.
6. Using the Beat [ ] or Tempo [ ] buttons, move the cursor ( ) to theleft side of the lower part of the screen.
7. With the [Dial], select the number of the track button or part to bedeleted.If you select “All,” all parts in the same interval are deleted.Pressing the [Song] button at this point cancels the settings and returns you to the Editscreen.
8. When all of the settings are finished, press the [Transpose] button.Deletion then begins.When deletion is finished, you are returned to the Edit screen.
fig.49-3_40
Inserting Blank Measures (Insert)You can insert blank measures in a performance at locations you specify. This is called“insert.”
fig.49-1_40
Press the [Song] button to display the Basic screen.
1. Press the [Edit] button.The Edit screen is displayed (p.15).
2. Press the Beat [ ] or Tempo [ ] buttons until “Insert” appears in theupper part of the screen.
3. Press the [Transpose] button, and the following screen will appear:fig.50-1_30
A B C D
A DB
Measure 1 2 3 4
Were measure 3 to be deleted...
4321R
2, 4, 6
PowerPhones
On Off
Marker Clear
Volume
Song
Track Count In Metronome
Edit
ReverbBeat Tempo Transpose
Sound
Enter
1
3, 8
5, 7
Track
Editing Functions
87
Ed
iting
Fu
nctio
ns

4. Using the Beat [ ] or Tempo [ ] buttons, move the cursor ( ) to the“From” or “For.”
Displayed DescriptionFrom For selecting the number of the measure where the new measure
are inserted. If you select “End,” the end of the song is selected.For For selecting the number of measures to be inserted.
5. Rotate the [Dial] to select the segment into which the measures are tobe inserted.
6. Using the Beat [ ] or Tempo [ ] buttons, move the cursor ( ) to theleft side of the lower part of the screen.
7. With the [Dial], select the number of the track button or part to beinserted.If you select “All,” the same number of measures is inserted in all parts in the same place.Pressing the [Song] button at this point cancels the settings and returns you to the Edit screen.
8. When all of the settings are finished, press the [Transpose] button.Insertion then begins.When insertion is finished, you are returned to the Edit screen.
fig.50-2_40
Erasing Measures (Erase)You can empty measures in a specified segment of a song without cramping the songlength. This emptying of measures is called “erasing.”fig.51-1_30
Press the [Song] button to display the Basic screen.
1. Press the [Edit] button.The Edit screen is displayed (p.15).
2. Press the Beat [ ] or Tempo [ ] buttons until “Erase” appears in theupper part of the screen.
A B C D
A B C D
Measure 1 32 4
5
Here is what happens when an empty measure is inserted at measure 3...
4321R
2, 4, 6
PowerPhones
On Off
Marker Clear
Volume
Song
Track Count In Metronome
Edit
ReverbBeat Tempo Transpose
Sound
Enter
1
3, 10
5, 7, 98
Editing Functions
88
Ed
itin
g F
un
ctio
ns
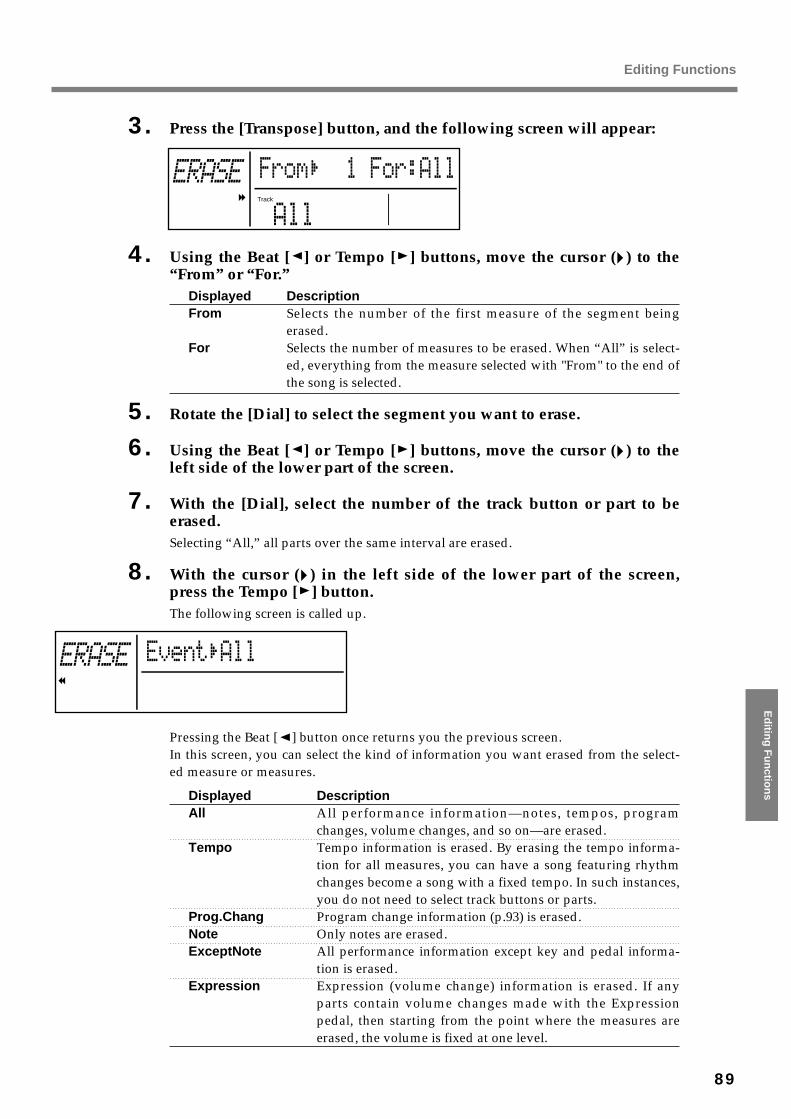
3. Press the [Transpose] button, and the following screen will appear:fig.51-2_30
4. Using the Beat [ ] or Tempo [ ] buttons, move the cursor ( ) to the“From” or “For.”
Displayed DescriptionFrom Selects the number of the first measure of the segment being
erased.For Selects the number of measures to be erased. When “All” is select-
ed, everything from the measure selected with "From" to the end ofthe song is selected.
5. Rotate the [Dial] to select the segment you want to erase.
6. Using the Beat [ ] or Tempo [ ] buttons, move the cursor ( ) to theleft side of the lower part of the screen.
7. With the [Dial], select the number of the track button or part to beerased.Selecting “All,” all parts over the same interval are erased.
8. With the cursor ( ) in the left side of the lower part of the screen,press the Tempo [ ] button.The following screen is called up.fig.52-3_30
Pressing the Beat [ ] button once returns you the previous screen.In this screen, you can select the kind of information you want erased from the select-ed measure or measures.
Displayed DescriptionAll All performance information—notes, tempos, program
changes, volume changes, and so on—are erased.Tempo Tempo information is erased. By erasing the tempo informa-
tion for all measures, you can have a song featuring rhythmchanges become a song with a fixed tempo. In such instances,you do not need to select track buttons or parts.
Prog.Chang Program change information (p.93) is erased.Note Only notes are erased.ExceptNote All performance information except key and pedal informa-
tion is erased.Expression Expression (volume change) information is erased. If any
parts contain volume changes made with the Expressionpedal, then starting from the point where the measures areerased, the volume is fixed at one level.
Track
Editing Functions
89
Ed
iting
Fu
nctio
ns

9. Rotate the [Dial] to select the information to be erased.Pressing the [Song] button at this point cancels the settings and returns you to the Edit screen.
10. When all of the settings are finished, press the [Transpose] button.Erasing then begins.When the erasing is finished, you are returned to the Edit screen.
Transposing Parts Individually (Transpose)You can transpose each part individually.fig.48-1_40
Press the [Song] button to display the Basic screen.
1. Press the [Edit] button.The Edit screen is displayed (p.15).
2. Press the Beat [ ] or Tempo [ ] buttons until “Transpose” appears inthe upper part of the screen.
3. Press the [Transpose] button, and the following screen will appear:fig.52-1_30
4. Using the Beat [ ] or Tempo [ ] buttons, move the cursor ( ) to the“From” or “For.”
Displayed DescriptionFrom Selects the number of the first measure of the segment being trans-
posed.For Selects the number of measures to be transposed. When “All” is
selected, everything from the measure selected with "From" to theend of the song is selected.
5. Rotate the [Dial] to select the segment you want to transpose.
6. Using the Beat [ ] or Tempo [ ] buttons, move the cursor ( ) to theleft side of the lower part of the screen.
7. With the [Dial], select the number of the track button or part to be transposed.
4321R
2, 4, 6, 8
PowerPhones
On Off
Marker Clear
Volume
Song
Track Count In Metronome
Edit
ReverbBeat Tempo Transpose
Sound
Enter
3, 10
5, 7, 91
Track
Editing Functions
90
Ed
itin
g F
un
ctio
ns

8. Using the Beat [ ] or Tempo [ ] buttons, move the cursor ( ) to theright side of the lower part of the screen.
9. Rotate the [Dial] to select the amount of transposition.You can transpose over a range of -24 to +24 (by semitones).Pressing the [Song] button at this point cancels the settings and returns you to the Editscreen.
10. When all of the settings are finished, press the [Transpose] button.Transposition then begins.When the transposition is finished, you are returned to the Edit screen.
Exchanging Parts (Part Exchange)You can switch sounds that have been recorded to one part with sounds recorded to adifferent part. This switching of material on parts is called “Part Exchange.”fig.53-1_40
Press the [Song] button to display the Basic screen.
1. Press the [Edit] button.The Edit screen is displayed (p.15).
2. Press the Beat [ ] or Tempo [ ] buttons until “Part Exchange”appears in the upper part of the screen.
3. Press the [Transpose] button, and the following screen will appear:fig.53-2_30
4. Using the Beat [ ] or Tempo [ ] buttons, move the cursor ( ).
5. Rotate the [Dial] to select the two parts you want to exchange.Pressing the [Song] button at this point cancels the settings and returns you to the Editscreen.
6. Press the [Transpose] button.Exchange of the parts begins.When the exchange is finished, you are returned to the Edit screen.
4321R
2, 4
PowerPhones
On Off
Marker Clear
Volume
Song
Track Count In Metronome
Edit
ReverbBeat Tempo Transpose
Sound
Enter
1
3, 6
5
Editing Functions
91
Ed
iting
Fu
nctio
ns
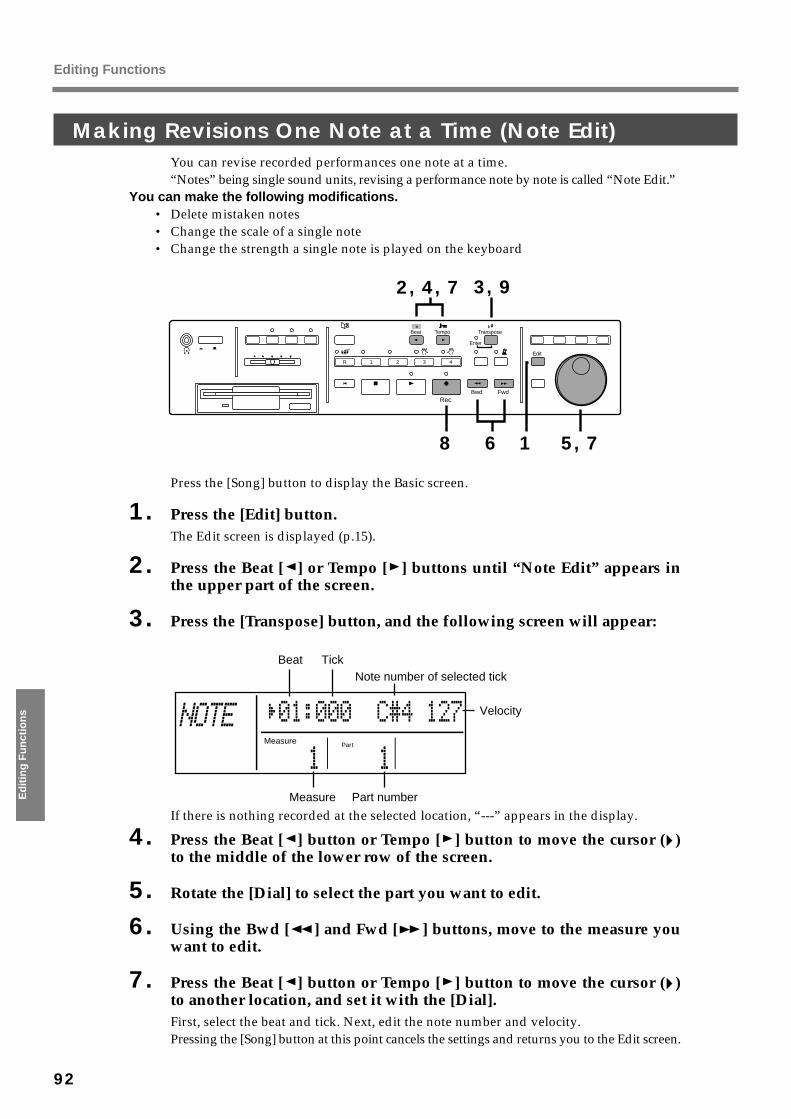
Making Revisions One Note at a Time (Note Edit)You can revise recorded performances one note at a time.“Notes” being single sound units, revising a performance note by note is called “Note Edit.”
You can make the following modifications.• Delete mistaken notes• Change the scale of a single note• Change the strength a single note is played on the keyboard
fig.54-1_40
Press the [Song] button to display the Basic screen.
1. Press the [Edit] button.The Edit screen is displayed (p.15).
2. Press the Beat [ ] or Tempo [ ] buttons until “Note Edit” appears inthe upper part of the screen.
3. Press the [Transpose] button, and the following screen will appear:fig.54-2_30
If there is nothing recorded at the selected location, “---” appears in the display.
4. Press the Beat [ ] button or Tempo [ ] button to move the cursor ( )to the middle of the lower row of the screen.
5. Rotate the [Dial] to select the part you want to edit.
6. Using the Bwd [ ] and Fwd [ ] buttons, move to the measure youwant to edit.
7. Press the Beat [ ] button or Tempo [ ] button to move the cursor ( )to another location, and set it with the [Dial].First, select the beat and tick. Next, edit the note number and velocity.Pressing the [Song] button at this point cancels the settings and returns you to the Edit screen.
4321R
2, 4, 7
PowerPhones
On Off
Marker Clear
Volume
Song
Track Count In Metronome
Bwd FwdRec
Edit
ReverbBeat Tempo Transpose
Sound
Enter
1
3, 9
5, 768
Measure
Beat TickNote number of selected tick
Velocity
Measure Part number
Part
Editing Functions
92
Ed
itin
g F
un
ctio
ns
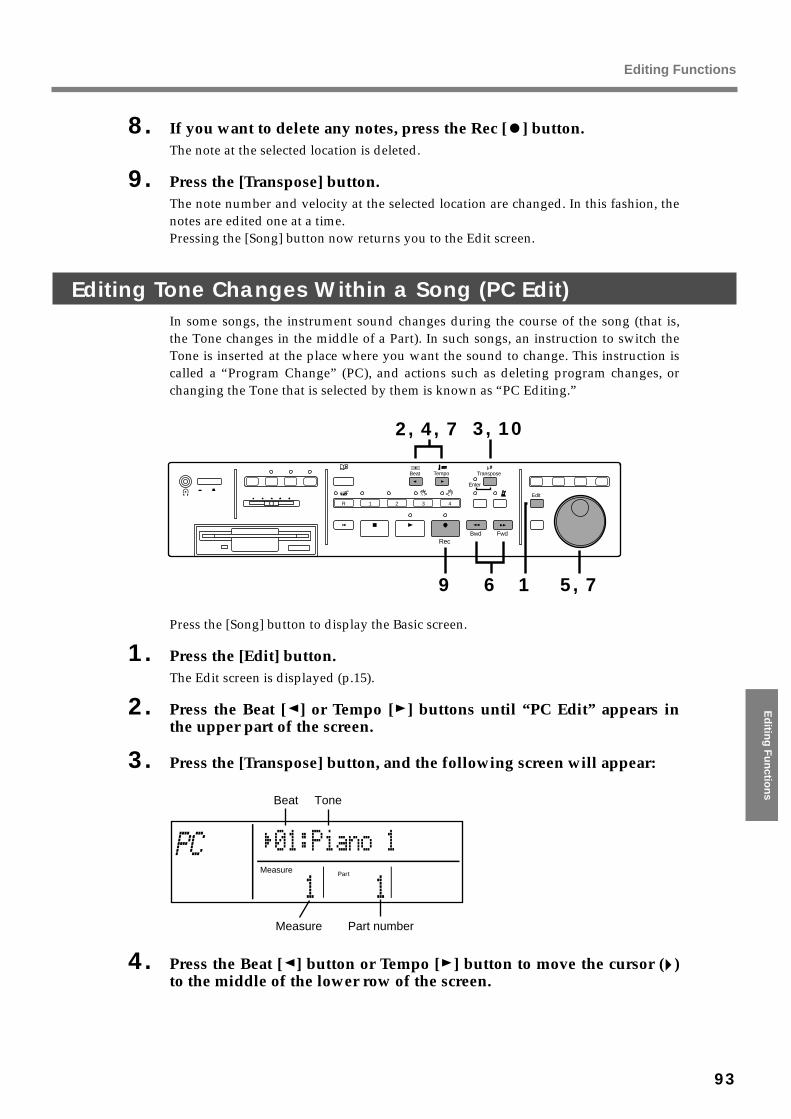
8. If you want to delete any notes, press the Rec [ ] button.The note at the selected location is deleted.
9. Press the [Transpose] button.The note number and velocity at the selected location are changed. In this fashion, thenotes are edited one at a time.Pressing the [Song] button now returns you to the Edit screen.
Editing Tone Changes Within a Song (PC Edit)In some songs, the instrument sound changes during the course of the song (that is,the Tone changes in the middle of a Part). In such songs, an instruction to switch theTone is inserted at the place where you want the sound to change. This instruction iscalled a “Program Change” (PC), and actions such as deleting program changes, orchanging the Tone that is selected by them is known as “PC Editing.”
fig.56-2_40
Press the [Song] button to display the Basic screen.
1. Press the [Edit] button.The Edit screen is displayed (p.15).
2. Press the Beat [ ] or Tempo [ ] buttons until “PC Edit” appears inthe upper part of the screen.
3. Press the [Transpose] button, and the following screen will appear:fig.56-1_40
4. Press the Beat [ ] button or Tempo [ ] button to move the cursor ( )to the middle of the lower row of the screen.
4321R
2, 4, 7
PowerPhones
On Off
Marker Clear
Volume
Song
Track Count In Metronome
Bwd FwdRec
Edit
ReverbBeat Tempo Transpose
Sound
Enter
1
3, 10
5, 769
Beat Tone
Measure Part number
Measure Part
Editing Functions
93
Ed
iting
Fu
nctio
ns
5. Rotate the [Dial] to select the part you want to edit.
6. Using the Bwd [ ] and Fwd [ ] buttons, move to the measure youwant to edit.
7. Press the Beat [ ] button or Tempo [ ] button to move the cursor ( )to the Beat position, and select the beat with the [Dial].
8. If you want to change the tone, move the cursor to the Tone position,and then select a tone with the [Dial].Pressing the [Song] button at this point cancels the settings and returns you to the Editscreen.
9. If you want to delete any program changes, press the Rec [ ] button.
10. Press the [Transpose] button.The program changes at the selected location are edited.Pressing the [Song] button at this point returns you to the Edit screen.
Measures or beats for which the upper line of the screen shows “01:------------” do not contain aprogram change. It is not possible to insert a program change into a measure or beat that doesnot contain a program change.
NOTE
Editing Functions
94
Ed
itin
g F
un
ctio
ns
Restoring the Original Settings
The following do not revert to their original settings,even when the MT 300s is turned off and then onagain. However, you can restore the original status forthese settings (that is, the settings as they were whenyour MT 300s was shipped from the factory). Thisrestoring of the original settings is call “FactoryPreset.”
Stored Settings• Tuning settings (p.19, 24)
• Piano sounds produced when the keyboard isplayed; piano settings when music files are playedback (p.21)
• The kind of metronome tones (p.95)
• The kind of Count Sound (p.96)
• Pedal functions (p.98)
• Screen language display settings (p.99)
• MIDI settings (p.100)
* The following MIDI settings are not stored in memory.
• Settings for individual Parts, when "Each" is selectedfor “MIDI Out”
• “MIDI Sync” settings
Press the [Song] button to display the Basic screen.
1.
Press the [Menu] button.The Menu screen is displayed (p.15).
2. Press the Beat [ ] button or Tempo [ ] buttonuntil “Factory Preset” appears in the upper part ofthe screen.
3. When you press the [Transpose] button, The fol-lowing screen is displayed.
fig.58-1_30 (Screen)
Pressing the [Song] button returns you to the Menuscreen.
4. Press the [Transpose] button once more.The [Transpose] button indicator turns off, and theoriginal settings are restored.
Changing the Metronome Settings
You can change the sound played and the patternused when you use the metronome.
Press the [Song] button to display the Basic screen.
1. Press the [Menu] button.The Menu screen is displayed (p.15).
2. Press the Beat [ ] or Tempo [ ] buttons until“Metronome” appears in the upper part of thescreen.
3. Press the [Transpose] button, and the followingscreen will appear:
fig.61-1_30
4. Press the Tempo [ ] button until items you wantto make settings to, for example “Mtr.Sound,”appear in the upper part of the screen.Pressing the Beat [ ] button returns you to theprevious screen.
Displayed MeaningMetronome Vol The metronome volume can be
adjusted in ten levels. The volumeis set to [5] when the keyboard isturned on.
Mtr. Sound You can change the metronomesound.
Mtr. Ptrn You can change the metronomepattern. The pattern is set to[Normal] when the keyboard isturned on.
5. Use the [Dial] to make your setting.Pressing the [Song] button at this point cancels thesettings and returns you to the Menu screen.
Metronome Tones
Displayed TypeClick Normal Metronome sound (Click
& Bell)Elec. Electronic Metronome SoundVoice Voice (One, two, three,..)Animal Dog & Cat Sounds
Chapter 5 Other Functions
95
Oth
er Fu
nctio
ns
Metronome Patterns
Type MeaningNormal Ordinary beat, with no pickup.
Plays with a dotted half note pickup beforethe beginning of the measure.Plays with a half note pickup before thebeginning of the measure.Plays with a dotted quarter note pickupbefore the beginning of the measure.Plays with a quarter note pickup before thebeginning of the measure.Plays with a dotted eighth note pickupbefore the beginning of the measure.Plays with an eighth note pickup beforethe beginning of the measure.Plays with a sixteenth note pickup beforethe beginning of the measure.
+Doubl Plays with backbeats as the added sound. +Tripl Plays with triplets as the added sound.+Shufl Adds a shuffle.
6. Press the [Transpose] button.The settings are changed, and you are returned tothe Menu screen.
→ “Sounding the Metronome” (p.36)
* The kind of metronome tones will be retained even whilethe MT 300s is switched off. Please refer to “Restoring theOriginal Settings” (p.95) if you wish to restore the origi-nal settings.
Changing the Count Sound Settings
You can change the number of measures and the typeof count sound used in the Count In function, and thecount sound settings used in repeating functions.
Press the [Song] button to display the Basic screen.
1. Press the [Menu] button.The Menu screen is displayed (p.15).
2. Press the Beat [ ] or Tempo [ ] buttons until“Count In” appears in the upper part of thescreen.
3. Press the [Transpose] button, and the followingscreen will appear:
fig.63-1_30
4. Press the Tempo [ ] button until items you wantto make settings to, for example “CounSound,”appear in the upper part of the screen.Pressing the Beat [ ] button returns you to theprevious screen.
Displayed DescriptionCount In Meas. You can set the number of measures
of count sound to “1” or “2.” “2”(two measures of count sound) is thepower-on default setting.
CounSound This selects the type of sound usedfor the Count In function.
CounRepeat This setting is used to determinewhether or not the count sound isplayed during repeating functions.“First” is the power-on default setting.
5. Select the count sound type and other settingswith the [Dial].If you press the [Song] button, the settings aredeleted, and you are returned to the Menu screen.
Count Sound Types
Displayed DescriptionSticks Sound of drumsticks beatingClick Bell sound or click trackElec. An “electronic” soundVoice Voice (One, Two, Three,...)Animal Dog & Cat sounds
Count Sound Settings for Repeating
Displayed DescriptionFirst The count sound is played the first
time only.Every The count sound is played with
every repeat.
6. Press the [Transpose] button.The settings are changed, and you are returned tothe Menu screen.
* Please refer to “Synchronizing the Timing when YouCome into a Song” (p.39) and “Repeating the Same Partof a Song” (p.31).
* The kind of count in sound will be retained even while theMT 300s is switched off. Please refer to “Restoring theOriginal Settings” (p.95) if you wish to restore the origi-nal settings.
Other Functions
96
Oth
er F
un
ctio
ns
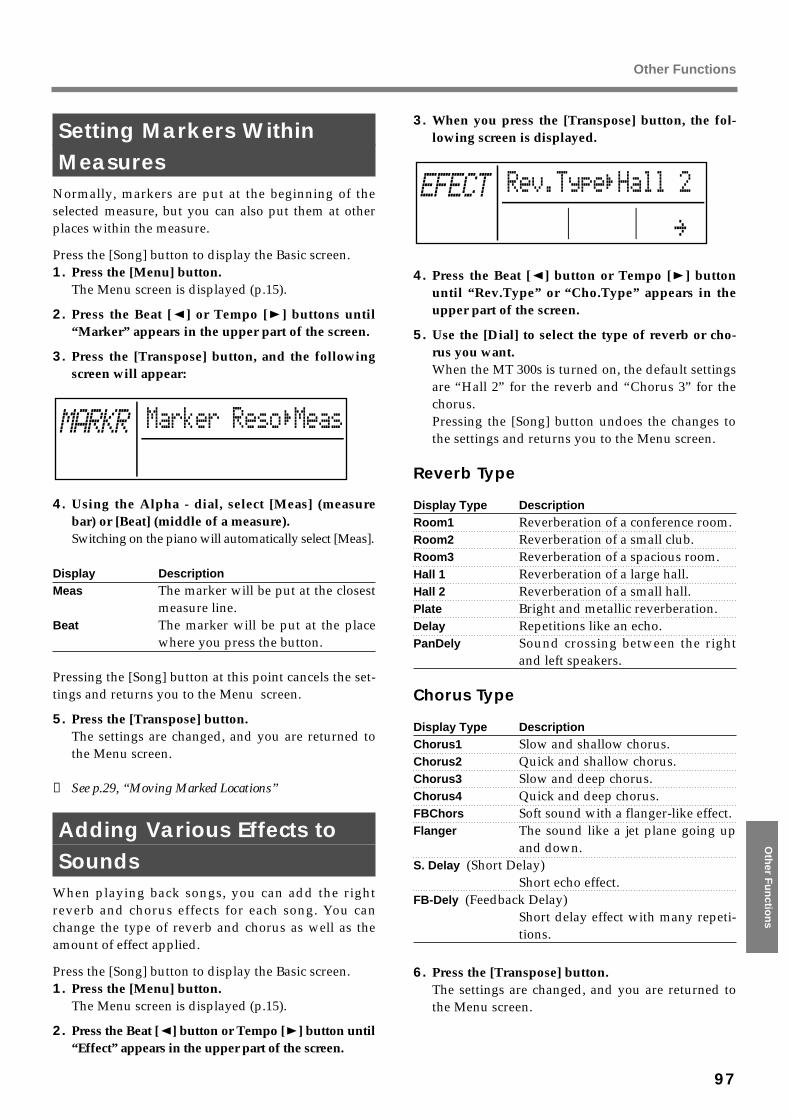
Setting Markers Within Measures
Normally, markers are put at the beginning of theselected measure, but you can also put them at otherplaces within the measure.
Press the [Song] button to display the Basic screen.1. Press the [Menu] button.
The Menu screen is displayed (p.15).
2. Press the Beat [ ] or Tempo [ ] buttons until“Marker” appears in the upper part of the screen.
3. Press the [Transpose] button, and the followingscreen will appear:
fig.60-1_30
4. Using the Alpha - dial, select [Meas] (measurebar) or [Beat] (middle of a measure).Switching on the piano will automatically select [Meas].
Display DescriptionMeas The marker will be put at the closest
measure line.Beat The marker will be put at the place
where you press the button.
Pressing the [Song] button at this point cancels the set-tings and returns you to the Menu screen.
5. Press the [Transpose] button.The settings are changed, and you are returned tothe Menu screen.
→ See p.29, “Moving Marked Locations”
Adding Various Effects to Sounds
When playing back songs, you can add the rightreverb and chorus effects for each song. You canchange the type of reverb and chorus as well as theamount of effect applied.
Press the [Song] button to display the Basic screen.1. Press the [Menu] button.
The Menu screen is displayed (p.15).
2. Press the Beat [ ] button or Tempo [ ] button until“Effect” appears in the upper part of the screen.
3. When you press the [Transpose] button, the fol-lowing screen is displayed.
fig.64-1_30
4. Press the Beat [ ] button or Tempo [ ] buttonuntil “Rev.Type” or “Cho.Type” appears in theupper part of the screen.
5. Use the [Dial] to select the type of reverb or cho-rus you want.When the MT 300s is turned on, the default settingsare “Hall 2” for the reverb and “Chorus 3” for thechorus.Pressing the [Song] button undoes the changes tothe settings and returns you to the Menu screen.
Reverb Type
Display Type DescriptionRoom1 Reverberation of a conference room.Room2 Reverberation of a small club.Room3 Reverberation of a spacious room.Hall 1 Reverberation of a large hall.Hall 2 Reverberation of a small hall.Plate Bright and metallic reverberation.Delay Repetitions like an echo.PanDely Sound crossing between the right
and left speakers.
Chorus Type
Display Type DescriptionChorus1 Slow and shallow chorus.Chorus2 Quick and shallow chorus.Chorus3 Slow and deep chorus.Chorus4 Quick and deep chorus.FBChors Soft sound with a flanger-like effect.Flanger The sound like a jet plane going up
and down.S. Delay (Short Delay)
Short echo effect.FB-Dely (Feedback Delay)
Short delay effect with many repeti-tions.
6. Press the [Transpose] button.The settings are changed, and you are returned tothe Menu screen.
Other Functions
97
Oth
er Fu
nctio
ns
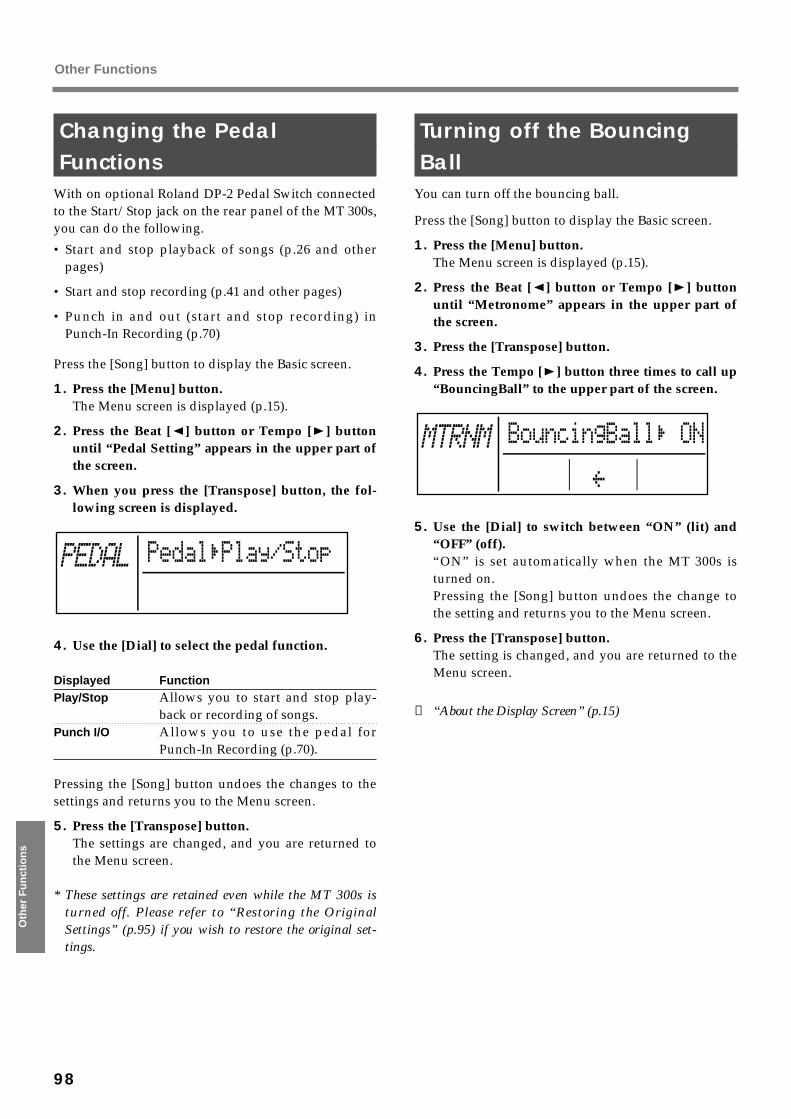
Changing the Pedal Functions
With on optional Roland DP-2 Pedal Switch connectedto the Start/Stop jack on the rear panel of the MT 300s,you can do the following.
• Start and stop playback of songs (p.26 and otherpages)
• Start and stop recording (p.41 and other pages)
• Punch in and out (start and stop recording) inPunch-In Recording (p.70)
Press the [Song] button to display the Basic screen.
1. Press the [Menu] button.The Menu screen is displayed (p.15).
2. Press the Beat [ ] button or Tempo [ ] buttonuntil “Pedal Setting” appears in the upper part ofthe screen.
3. When you press the [Transpose] button, the fol-lowing screen is displayed.
fig.65-1_30 (Screen)
4. Use the [Dial] to select the pedal function.
Displayed FunctionPlay/Stop Allows you to start and stop play-
back or recording of songs.Punch I/O Allows you to use the pedal for
Punch-In Recording (p.70).
Pressing the [Song] button undoes the changes to thesettings and returns you to the Menu screen.
5. Press the [Transpose] button.The settings are changed, and you are returned tothe Menu screen.
* These settings are retained even while the MT 300s isturned off. Please refer to “Restoring the OriginalSettings” (p.95) if you wish to restore the original set-tings.
Turning off the Bouncing Ball
You can turn off the bouncing ball.
Press the [Song] button to display the Basic screen.
1. Press the [Menu] button.The Menu screen is displayed (p.15).
2. Press the Beat [ ] button or Tempo [ ] buttonuntil “Metronome” appears in the upper part ofthe screen.
3. Press the [Transpose] button.
4. Press the Tempo [ ] button three times to call up“BouncingBall” to the upper part of the screen.
fig.66-1_30 (Screen)
5. Use the [Dial] to switch between “ON” (lit) and“OFF” (off).“ON” is set automatically when the MT 300s isturned on.Pressing the [Song] button undoes the change tothe setting and returns you to the Menu screen.
6. Press the [Transpose] button.The setting is changed, and you are returned to theMenu screen.
→ “About the Display Screen” (p.15)
Other Functions
98
Oth
er F
un
ctio
ns
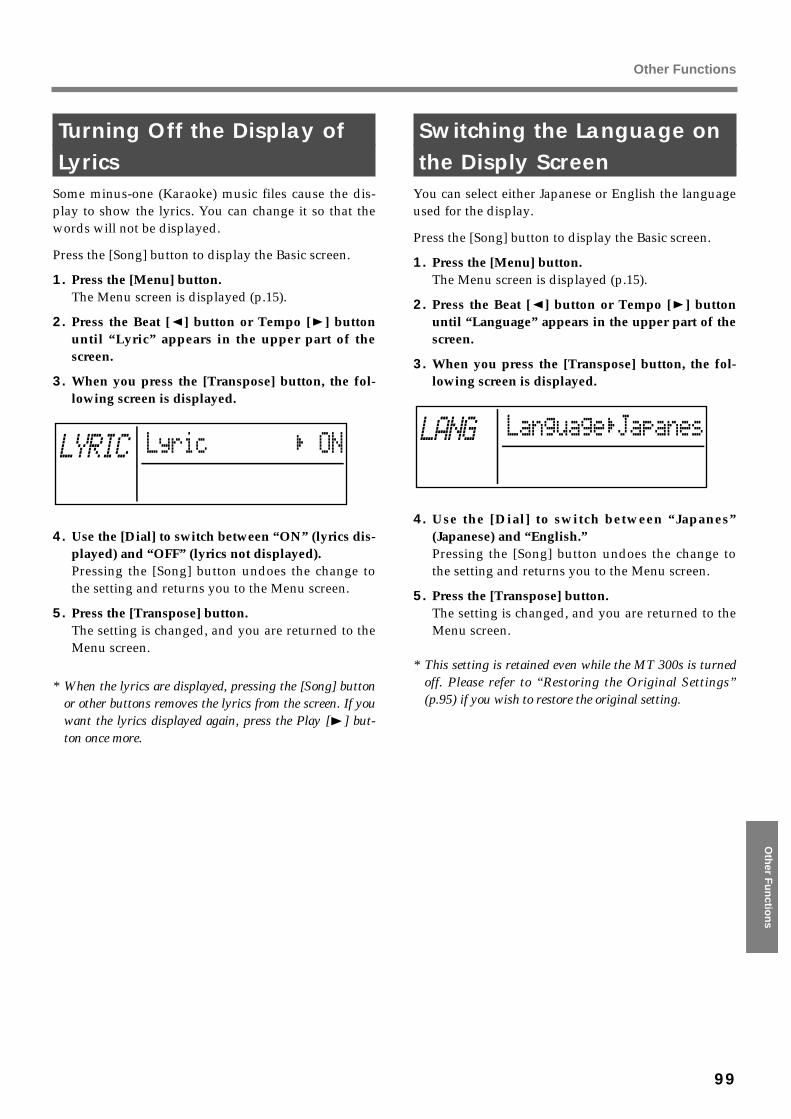
Turning Off the Display of Lyrics
Some minus-one (Karaoke) music files cause the dis-play to show the lyrics. You can change it so that thewords will not be displayed.
Press the [Song] button to display the Basic screen.
1. Press the [Menu] button.The Menu screen is displayed (p.15).
2. Press the Beat [ ] button or Tempo [ ] buttonuntil “Lyric” appears in the upper part of thescreen.
3. When you press the [Transpose] button, the fol-lowing screen is displayed.
fig.67-1_30 (Screen)
4. Use the [Dial] to switch between “ON” (lyrics dis-played) and “OFF” (lyrics not displayed).Pressing the [Song] button undoes the change tothe setting and returns you to the Menu screen.
5. Press the [Transpose] button.The setting is changed, and you are returned to theMenu screen.
* When the lyrics are displayed, pressing the [Song] buttonor other buttons removes the lyrics from the screen. If youwant the lyrics displayed again, press the Play [ ] but-ton once more.
Switching the Language on the Disply Screen
You can select either Japanese or English the languageused for the display.
Press the [Song] button to display the Basic screen.
1. Press the [Menu] button.The Menu screen is displayed (p.15).
2. Press the Beat [ ] button or Tempo [ ] buttonuntil “Language” appears in the upper part of thescreen.
3. When you press the [Transpose] button, the fol-lowing screen is displayed.
fig.68-1_30 (Screen)
4. Use the [Dial] to switch between “Japanes”(Japanese) and “English.”Pressing the [Song] button undoes the change tothe setting and returns you to the Menu screen.
5. Press the [Transpose] button.The setting is changed, and you are returned to theMenu screen.
* This setting is retained even while the MT 300s is turnedoff. Please refer to “Restoring the Original Settings”(p.95) if you wish to restore the original setting.
Other Functions
99
Oth
er Fu
nctio
ns

About MIDI
What is MIDI?MIDI, short for “Musical Instrument DigitalInterface,” is a standard that defines how theexchange of performance information between elec-tronic instruments and computers takes place.The MT 300s features a MIDI connector and a com-puter connector to allow performance information tobe exchanged with external devices. Connectingexternal equipment in this manner lets you use theMT 300s in an even greater variety of ways.●●●●●●●●●●●●●●●●●●●●●●●●●●●●●●●●●●●●●●●●●●●●●●●●●●●●●●●●●●●●●●●●●●●●●●●●●●●●●●●●●●●●●●●●●●●●●●●●●●●●
A separate publication titled “MIDI Implementation”is also available. It provides complete details concern-ing the way MIDI has been implemented on this unit.If you should require this publication (such as whenyou intend to carry out byte-level programming),please contact the nearest Roland Service Center orauthorized Roland distributor.●●●●●●●●●●●●●●●●●●●●●●●●●●●●●●●●●●●●●●●●●●●●●●●●●●●●●●●●●●●●●●●●●●●●●●●●●●●●●●●●●●●●●●●●●●●●●●●●●●●●
About the MIDI ConnectorsThe MT 300s features two types of MIDI connectors.When external devices are hooked up to these connec-tors, each device can be set up to control the other.Devices that are connected to the MT 300s’s MIDIconnector are referred to as “MIDI devices.”
MIDI Out ConnectorPerformance information output by, for example,playing the keyboard is sent to external MIDI devicesfrom this connector.
MIDI In ConnectorMIDI messages sent by external MIDI devices arereceived via this connector. MIDI devices from whichMIDI messages are received may perform suchactions as playing sounds and switching tones.fig.MIDI connector
Making MIDI SettingsTo learn about each of the following settings in greaterdetail, please refer to the pages for each particular item.
Press the [Song] button to display the Basic screen.1. Press the [Menu] button.
The Menu screen is displayed (p.15).
2. Press the Beat [ ] button or Tempo [ ] buttonuntil “MIDI Setting” appears in the upper part ofthe screen.
3. When you press the [Transpose] button, the fol-lowing screen is displayed.
fig.69-1_30 (Screen)
4. Press the Beat [ ] button or Tempo [ ] buttonuntil the item that you want to make settings forappears in the upper part of the screen.
DisplayedDescriptionMIDI OutThis switches the sound generator—the MT 300s’s orthat of the connected external MIDI device—that isused to produce the tones that are played for eachindividual part (p.101).Rx.Ch Conv.RX Channel Convert—This is used to select whetherchannels for MIDI messages sent from connected exter-nal MIDI devices are converted to part channels by theMT 300s (p.102).MIDI SyncMIDI Sync Switch—This is used to determinewhether the song uses the MT 300s’s tempo or thetempo from the external MIDI device connected to theMT 300s (p.102).MIDI ClockMIDI Clock Out—This selects whether or not mes-sages for synchronization with MIDI are transmittedthrough the MIDI Out connector (p.103).Soft ThruSelects whether or not MIDI messages received viathe MIDI In connector are output through the MIDIOut connector (p.103).5. Make the settings with the [Dial].
Pressing the [Song] button undoes changes to thesettings and returns you to the Menu screen.
6. Press the [Transpose] button.Settings are changed, and you are returned to theMenu screen.
* These MIDI settings do not return to their original settingswhen the power is switched off and back on (except for thetwo items shown below). If you want to return the settingsto the original values they had when you purchased theunit, refer to "Restoring the Original Settings" (p. 95).
❍ Settings That Return to Their Original Values When thePower Is Reset
• Settings for individual Parts, when “Each” is selected for“MIDI Out.”
• “MIDI Sync” settings
TERMS
InOut MIDI
Chapter 6 Connecting to MIDI Devices
100
Co
nn
ecti
ng
Ext
ern
alD
evic
es

About the MT 300s’s Sound Generator
The MT 300s’s internal sound generator supports boththe General MIDI System and the GS Format.You can also use the MT 300s’s sound generator forMIDI devices that do not contain sound generators byconnecting those devices to the MT 300s.
What is a Sound Generator?A sound generator does just what the name suggests,that is, it generates or creates and outputs sounds. TheMT 300s internal sound generator can produce soundsfor sixteen separate parts. In addition, you can selectthe tones to be played in each part, with a tremendousvariety of instrument sounds from which to choose.
* When using the MT 300s as a sound generator, set “RXChannel Convert” to “OFF” (p.102).
●●●●●●●●●●●●●●●●●●●●●●●●●●●●●●●●●●●●●●●●●●●●●●●●●●●●●●●●●●●●●●●●●●●●●●●●●●●●●●●●●●●●●●●●●●●●●●●●●●●●
General MIDI systemThe General MIDI system is a set of recommendations which seeks toprovide a way to go beyond the limitations of proprietary designs, andstandardize the MIDI capabilities of sound generating devices. Soundgenerating devices and music files that meets the General MIDI stan-dard bears the General MIDI logo ( ). Music files bearing theGeneral MIDI logo can be played back using any General MIDIsound generating unit to produce essentially the same musical per-formance.
GS formatThe GS Format ( ) is Roland’s set of specifications for standardiz-ing the performance of sound generating devices. In addition toincluding support for everything defined by the General MIDISystem, the highly-compatible GS Format additionally offers anexpanded number of sounds, provides for the editing of sounds,and spells out many details for a wide range of extra features,including effects such as reverb and chorus. Designed with the future in mind, the GS Format can readilyinclude new sounds and support new hardware features when theyarrive. Since it is upwardly compatible with the General MIDI System,Roland’s GS Format is capable of reliably playing back GM Scoresequally as well as it performs GS Music Files (music files that hasbeen created with the GS Format in mind).This product supports both the General MIDI system and the GSformat, and can be used to play back music files carrying either ofthese logos.●●●●●●●●●●●●●●●●●●●●●●●●●●●●●●●●●●●●●●●●●●●●●●●●●●●●●●●●●●●●●●●●●●●●●●●●●●●●●●●●●●●●●●●●●●●●●●●●●●●●
Selecting the Sound Generator
You can have the sound of any part produced byeither the MT 300s’s internal sound generator, or thesound generator of a connected MIDI device. This set-ting is called “MIDI Out.”
1. In Step 4 of the MIDI settings procedure (p.100),press the Beat [ ] button or Tempo [ ] buttonuntil “MIDI Out” appears in the upper part of thescreen.
2. Switch the setting with the [Dial].
Displayed DescriptionPiano As in “Selecting Piano Sounds”
(p.21), the sounds for parts are pro-duced by the MT 300s’s sound gen-erator, except for the part for whichthe piano sound from a connecteddigital piano is set.
All Music for all Parts will be soundedby the MT 300s's sound generator, aswell as by the connected device.
Each This setting allows you to select thesound generator, the MT 300s’s orthat of the connected MIDI device,to be used for each part.
3. Select “Each” and press the [Transpose] button;the following screen is displayed.
fig.70-1_30 (Screen)
4. Using the Beat [ ] button or Tempo [ ] button,select the part.
5. Use the [Dial] to switch between “INT” and“EXT.”
Displayed DescriptionINT The MT 300s’s internal sound gener-
ator is used.EXT The sound generator of the connect-
ed device is used.
* When the power is turned on, all channels will be set to“INT.”
TERMS
Connecting External Devices
101
Co
nn
ecting
Extern
alD
evices
Converting MIDI ChannelsIn general, when recording or playing back songs withMIDI devices and MIDI sequencers connected, materi-al is recorded to the sequencer channel (or part) withthe same number as the MIDI Transmit channel select-ed by the connected MIDI device. Therefore, it is nec-essary to match the channels (parts) of the MIDIdevice and the MIDI sequencer.With the MT 300s, you can play back songs and record toparts selected automatically by the MT 300s, even with-out changing the channel (part) of the connected MIDIdevice. This setting is called “RX Channel Convert.”
1. In Step 4 of the MIDI settings procedure (p.100),press the Beat [ ] button or Tempo [ ] buttonuntil “Rx.Ch Conv.” appears in the upper part ofthe screen.
fig.71-1_30
2. Switch the setting with the [Dial].Displayed DescriptionON Records to the parts selected by the
MT 300s, regardless of the channelsselected by the connected MIDI device.
OFF Records material to the MT 300sparts with the same numbers as thechannels selected by the connectedMIDI device.
* Ordinarily, you should set this to “ON.” Set it to “OFF”when using the MT 300s as a sound module.
Recording with the RX ChannelConverter Set to “OFF”Recording with the MT 300s with the RX ChannelConverter set to “ON” differs from when it is set to “OFF.”
1. Press the Rec [ ] button.The MT 300s is put into record standby mode.All Track buttons begin flashing.
* Pressing any Track button turns its indicator off.Nothing is recorded to Track buttons when their indica-tors are off.
2. When you press the Play [ ] button, recordingbegins.
3. Press the Stop [ ] button, and recording ceases.Material is recorded to the part with the same num-ber as that of the channel selected by the connectedMIDI device.
Channels correspond to Track buttons asshown below.Track Button R 1 2 3 4Channel 10 1 2, 5-9, 11-16 3 4
Synchronizing with Connected MIDI Devices
You can have connected MIDI devices played by the tempoproduced by the MT 300s; you can also have the tempoproduced by connected MIDI devices play the MT 300s.This setting for this is called the “MIDI Sync Switch.”Having connected MIDI devices work at the sametempo, and start and stop at the same timing is called“synchronization.”
1. In Step 4 of the MIDI settings procedure (p.100),press the Beat [ ] button or Tempo [ ] buttonuntil “MIDI Sync” appears in the upper part ofthe screen.fig.72-1_30 (Screen)
2. Switch the setting with the [Dial].Displayed DescriptionAuto The MT 300s’s tempo as well as the start-
ing and stopping of playback and record-ing is controlled by the MIDI device con-nected to the MT 300s’s MIDI In connec-tor. When there is no MIDI device con-nected, then these operations can be per-formed by the MT 300s.
Int Adjustment of the MT 300s’s tempo andstarting and stopping of playback andrecording is performed by the MT 300s.
Ext The MT 300s’s tempo as well as the start-ing and stopping of playback and record-ing is controlled by the MIDI device con-nected to the MT 300s’s MIDI In connec-tor. When there is no MIDI device con-nected, then these operations can not becontrolled by the MT 300s.
Remote Playback and recording of songs is con-trolled by the connected MIDI device.
* If the above is set to “EXT,” the MT 300s’s buttons can-not be used to adjust the MT 300s’s tempo, or to start andstop playback and recording of songs. Ordinarily, youshould set this to “Auto.”
Connecting External Devices
102
Co
nn
ecti
ng
Ext
ern
alD
evic
es
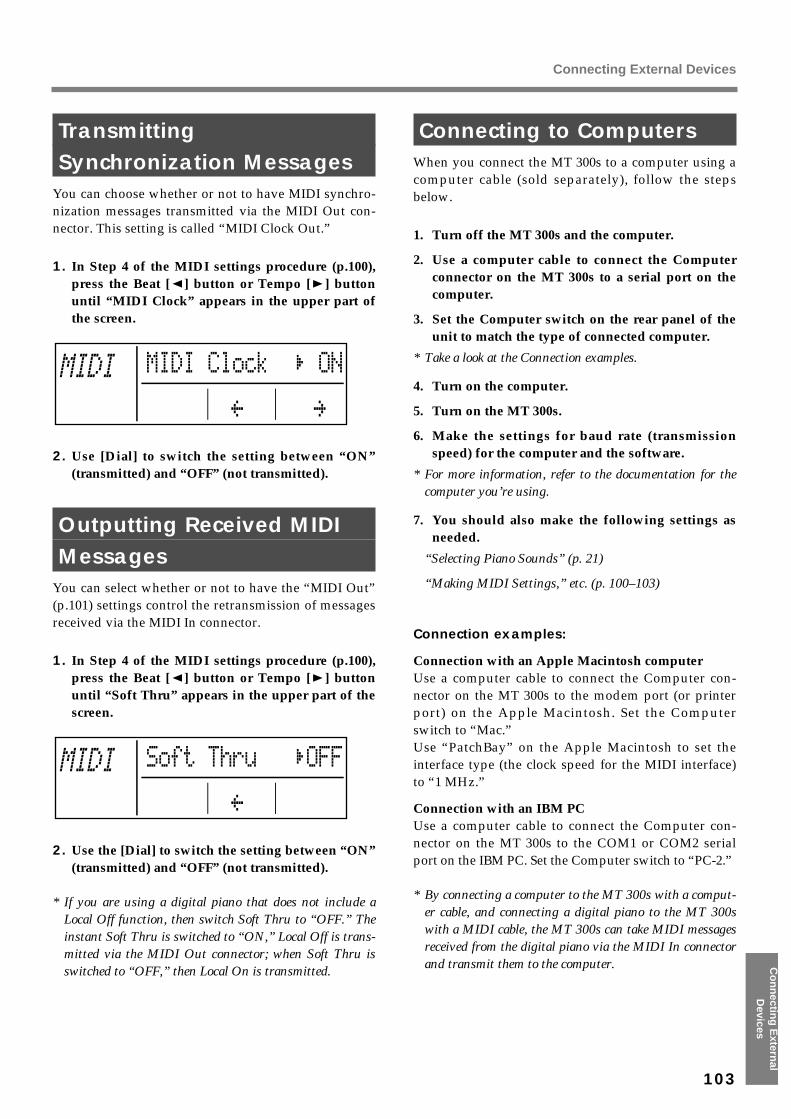
Transmitting Synchronization Messages
You can choose whether or not to have MIDI synchro-nization messages transmitted via the MIDI Out con-nector. This setting is called “MIDI Clock Out.”
1. In Step 4 of the MIDI settings procedure (p.100),press the Beat [ ] button or Tempo [ ] buttonuntil “MIDI Clock” appears in the upper part ofthe screen.
fig.73-1_30 (Screen)
2. Use [Dial] to switch the setting between “ON”(transmitted) and “OFF” (not transmitted).
Outputting Received MIDIMessages
You can select whether or not to have the “MIDI Out”(p.101) settings control the retransmission of messagesreceived via the MIDI In connector.
1. In Step 4 of the MIDI settings procedure (p.100),press the Beat [ ] button or Tempo [ ] buttonuntil “Soft Thru” appears in the upper part of thescreen.
fig.74-1_30 (Screen)
2. Use the [Dial] to switch the setting between “ON”(transmitted) and “OFF” (not transmitted).
* If you are using a digital piano that does not include aLocal Off function, then switch Soft Thru to “OFF.” Theinstant Soft Thru is switched to “ON,” Local Off is trans-mitted via the MIDI Out connector; when Soft Thru isswitched to “OFF,” then Local On is transmitted.
Connecting to ComputersWhen you connect the MT 300s to a computer using acomputer cable (sold separately), follow the stepsbelow.
1. Turn off the MT 300s and the computer.
2. Use a computer cable to connect the Computerconnector on the MT 300s to a serial port on thecomputer.
3. Set the Computer switch on the rear panel of theunit to match the type of connected computer.
* Take a look at the Connection examples.
4. Turn on the computer.
5. Turn on the MT 300s.
6. Make the settings for baud rate (transmissionspeed) for the computer and the software.
* For more information, refer to the documentation for thecomputer you’re using.
7. You should also make the following settings asneeded.
“Selecting Piano Sounds” (p. 21)
“Making MIDI Settings,” etc. (p. 100–103)
Connection examples:
Connection with an Apple Macintosh computerUse a computer cable to connect the Computer con-nector on the MT 300s to the modem port (or printerport) on the Apple Macintosh. Set the Computerswitch to “Mac.”Use “PatchBay” on the Apple Macintosh to set theinterface type (the clock speed for the MIDI interface)to “1 MHz.”
Connection with an IBM PCUse a computer cable to connect the Computer con-nector on the MT 300s to the COM1 or COM2 serialport on the IBM PC. Set the Computer switch to “PC-2.”
* By connecting a computer to the MT 300s with a comput-er cable, and connecting a digital piano to the MT 300swith a MIDI cable, the MT 300s can take MIDI messagesreceived from the digital piano via the MIDI In connectorand transmit them to the computer.
Connecting External Devices
103
Co
nn
ecting
Extern
alD
evices
If you are encountering any problems with the equipment, please read the section below before determining thatthere has been any malfunction.
Troubleshooting
104
Tro
ub
lesh
oo
tin
g The MT 300s does not switch on.
• Is the power cord properly connected? (p.18, 23)
No sound is produced.
• Is the volume slider completely to the left (turne-dompletely down)? (p.19, 23)
• Are the part volume levels turned down? (p.57)
• Are headphones connected? (p.12)
• Is the Speaker switch turned to “Off?” (p.14)
• Are the MT 300s and other devices properly con-nected? (p.16)
• Is the power to all equipment turned on?
• Is the computer switch on the backside of the MT300s set to “MIDI?” (p.14)
Only one tone is used for all the sounds.• Has “RX Channel Convert” been set to “OFF?”
(p.102)
Set this to “ON.”
The digital piano sound is not produced.
• Is the MT 300s’s piano sound set to play? (p.21)
• Is Soft Thru set to “OFF?” (p.103)
The piano sound from the digital piano is noisy.
• Were the digital piano and the MT 300s turned on inthe proper order? (p.18)
If the noise persists even when the digital piano isturned on first, set the digital piano to Local Off. Ifyou cannot set your piano to Local Off, then set “SoftThru” on the MT 300s to “OFF.” (p.103)
Some notes are missing.
• The MT 300s can play a maximum of 64 notes simul-taneously. When performing with a song on a flop-py disk, or when using the damper pedal a lot dur-ing a performance, the number of notes beingexpressed at any one moment may exceed 64. Whenthe total exceeds 64 notes, then some will be omitted.
The song does not play.
• Is the Track button indicator off? (p.38)
Sounds on buttons whose indicators are off are notplayed. Press the desired buttons to turn on theirindicators.
• Have you inserted the floppy disk containing thedesired song into the disk drive? (p.25)
I can’t play back songs on floppy disks right away.
• There are two types of SMFs, Format 0 and Format1. It can take a while for Format 1 data to begin play-back. To determine the format of the music files youare using, please refer to the documentation thatcame with the data.
Certain instrument sounds are missing.
• Have you selected the “Minus One” function? (p.60)
You cannot forward or rewind data.
• While the MT 300s is loading data from a floppydisk, you cannot fast-forward or rewind data (p.28).
• When the size of a song is too large, it cannot be for-warded or rewound.
The song goes out of tune, or the pitch drifts.
• Has the song been transposed? (p.35)
• Is the “Tuning” setting correct? (p.19, 24)
The indicator for a track button does not go out.
• Check if the display shows 16 tracks. While the 16-track display is active, you cannot turn off the indi-cators on the track buttons.
The pedals are not functioning, or function inter-mittently.
• Are the pedals connected properly? (p.17)
• Make sure that the cord from the pedal switch isconnected securely to the Start/Stop jack.
Make sure that the cord from the expression pedal isconnected securely to the Expression Pedal jack.
Can’t Record
• Have you selected a [Track] button for recording?(p.46)
• Has “Punch-In Recording” been selected? (p.70)
In “Punch-In Recording,” recording begins from thepoint in the song where you press the Rec [ ] but-ton or where Marker A is placed.
• Has “Tempo Recording” been selected? (p.74)
You cannot record performances while “TempoRecording” is active.
• Has “RX Channel Convert” been set to “OFF?”
Set this to “ON.” (p.102)
The recorded performance has been deleted.
• Recorded material is deleted when the keyboard isturned off. Deleted performances cannot beretrieved. Save the data onto a floppy disk beforeswitching the unit off (P.49).
The song cannot be saved.
• Some commercially available music files cannot besaved for copyright reasons.
• Songs on commercially available music disks cannotbe saved in SMF format.
The bouncing ball does not appear on the screen .
• Is the bouncing ball setting set to “Off?” Set thebouncing ball to “On” (p.98).
• The MT 300s features a liquid crystal display.Characters may begin to disappear in freezing con-ditions. Once above zero degrees Celsius (32 degreesFahrenheit), the characters reappear.
Lyrics are not indicated properly in the display.
• With some music files, the lyrics cannot be displayedcorrectly.
• After saving a song from music files in which lyricsare displayed, the lyrics of the saved song cannot bedisplayed.
• When the lyrics are displayed, pressing the [Song]button or other buttons removes the lyrics from thescreen. If you want the lyrics displayed again, pressthe Play [ ] button once more.
Troubleshooting
105
Tro
ub
lesho
otin
g

Indication: PUMeaning : When a song with a pickup (a song that does
not start on the first beat) is played back, themeasure numbers will be indicated in the dis-play as PU, 1, 2, and so forth.
Indication: New Song Del OK?Meaning : When you try to delete a recorded song (p.48),
to select a different song after recording a song(p.26) or to select a different song after editingthe basic settings of a song, this is shown in thedisplay (p.27, 41).
Indication: Setup Modified Up date OK?Meaning : This is shown in the display when you edit the
settings in each Part, then try to select a differ-ent song without changing the basic settings(p.58).
Indication: E.00:CopyProtectMeaning : To protect the copyright, this music file cannot
be saved onto a different floppy disk than theoriginal one.
Meaning : To protect the copyright, this music file cannotbe saved as an SMF.
Indication: E.01: Can’t SaveMeaning : This music file cannot be saved onto a floppy
disk.
Indication: E.02: ProtectedMeaning : The protect tub on the floppy disk is set to the
Protect position. Change it to the Write posi-tion (p.5).
Indication: E.03: Master DiskMeaning : This floppy disk cannot store the format.
Indication: E.04: Can’t SaveMeaning : The data cannot be saved onto this floppy disk
because the saving system is different. Use thefloppy disk that has the save saving system.
Indication: E.05: Read OnlyMeaning : A new song cannot be written on this song.
Select a different song number or use a differ-ent floppy disk.
Meaning :This song cannot be deleted.
Indication: E.10: No DiskMeaning : No floppy disk is connected to the disk drive.
Indication: E.11: Disk FullMeaning : There is not sufficient space left on the floppy
disk for the data to be saved. Save the dataonto a different floppy disk.
Indication: E.12: Unknown DiskMeaning : This floppy disk is not formatted or the songs
stored on this floppy disk cannot be played inthe MT 300s.
Indication: E.13: Disk EjectedMeaning : The floppy disk has been disconnected during
operation, repeat the procedure from thebeginning.
Indication: E.14: DamagedDiskMeaning : This floppy disk is damaged and cannot be
used.
Indication: E.15: Can’t ReadMeaning : This song cannot be read into the piano.
Indication: E.16: Can’t PlayMeaning : The MT 300s cannot read the floppy disk
quickly enough. Press the Stop [ ] button,then press the Reset [ ] button and Play [ ]button to play the song.
Indication: E.17:Can’t EditMeaning : Tones and other parameters of these music
files cannot be edited on the MT 300s. You canonly play back these music files.
Indication: E.30: Memory FullMeaning : The internal memory capacity of the MT 300s
is full. If you save the song data then play, theoperation may be carried out successfully.
Indication: E.40: Buffer FullMeaning : The MT 300s cannot deal with the excessive
MIDI data sent from the external MIDI device.Reduce the amount of MIDI data sent to theMT 300s.
Indication: E.41: Comm.ErrorMeaning : A MIDI cable or computer cable has been dis-
connected. Connect it properly and securely.
Indication: E.42: Can’t RecordMeaning : An excessive amount of performance informa-
tion has been sent to the piano in one time andtherefore could not be recorded.
Indication: E.43: Comp.I/F ErrMeaning : The Computer Switch is set to a wrong posi-
tion or the computer is set wrongly. Switch offthe piano then set the Computer Switch to thecorrect position and set the computer correctly(p.14).
Indication: E.51: Memory ErrorMeaning : There is something wrong with the system.
Repeat the procedure from the beginning. If itis not solved after you have tried severaltimes, contact the Roland service center.
If You See This Screen Displayed
106
If Y
ou
See
Th
is S
cree
nD
isp
laye
d

No. Tone Name1 Piano 12 Piano 1w3 Piano 1d4 Piano 25 Piano 2w6 Piano 37 Piano 3w8 Honky-tonk9 Honky-tonk 2
10 E.Piano 111 Detuned EP 112 E.Piano 1v13 60’s E.Piano14 E.Piano 215 Detuned EP 216 E.Piano 2v17 Harpsichord18 Coupled Hps.19 Harpsi.w20 Harpsi.o21 Clav.22 Celesta23 Glockenspiel24 Music Box25 Vibraphone26 Vibes w27 Marimba28 Marimba w29 Xylophone30 Tubular-bell31 Church Bell32 Carillon33 Santur34 Organ 135 Detuned Or.136 Pop Organ 137 Full Organ 438 Organ 239 Detuned Or.240 Jazz Organ 141 Rock Organ 242 Church Org.143 Church Org.244 Church Org.345 Reed Organ46 Accordion Fr47 Accordion It48 Harmonica49 Bandoneon50 Nylon-str.Gt51 Ukulele52 Nylon Gt.o53 Nylon Guitar54 Steel-str.Gt55 12-str.Gt56 Mandolin57 Jazz Guitar58 Hawaiian Gt.59 Clean Gt.60 Chorus Gt.
No. Tone Name61 Muted Gt.62 Funk Gt.63 Funk Gt.264 Overdrive Gt65 DistortionGt66 Feedback Gt.67 Gt.Harmonics68 Gt. Feedback69 Acoustic Bs.70 Fingered Bs.71 Picked Bs.72 Fretless Bs.73 Slap Bass 174 Slap Bass 275 Synth Bass 176 SynthBass10177 Synth Bass 378 Synth Bass 279 Synth Bass 480 Rubber Bass81 Violin82 Slow Violin83 Viola84 Cello85 Contrabass86 Tremolo Str87 PizzicatoStr88 Harp89 Timpani90 Strings91 Orchestra92 Slow Strings93 Syn.Strings194 Syn.Strings395 Syn.Strings296 Choir Aahs97 Choir98 Pop Voice99 SynVox
100 OrchestraHit101 Trumpet102 Trombone103 Trombone 2104 Tuba105 MutedTrumpet106 French Horns107 Fr.Horn 2108 Brass 1109 Brass 2110 Synth Brass1111 Synth Brass3112 AnalogBrass1113 Synth Brass2114 Synth Brass4115 AnalogBrass2116 Soprano Sax117 Alto Sax118 Tenor Sax119 Baritone Sax120 Oboe
No. Tone Name121 English Horn122 Bassoon123 Clarinet124 Piccolo125 Flute126 Recorder127 Pan Flute128 Bottle Blow129 Shakuhachi130 Whistle131 Ocarina132 Square Wave133 Square134 Sine Wave135 Saw Wave136 Saw137 Doctor Solo138 Syn.Calliope139 Chiffer Lead140 Charang141 Solo Vox142 5th Saw Wave143 Bass & Lead144 Fantasia145 Warm Pad146 Polysynth147 Space Voice148 Bowed Glass149 Metal Pad150 Halo Pad151 Sweep Pad152 Ice Rain153 Soundtrack154 Crystal155 Syn Mallet156 Atmosphere157 Brightness158 Goblin159 Echo Drops160 Echo Bell161 Echo Pan162 Star Theme163 Sitar164 Sitar 2165 Banjo166 Shamisen167 Koto168 Taisho Koto169 Kalimba170 Bagpipe171 Fiddle172 Shanai173 Tinkle Bell174 Agogo175 Steel Drums176 Woodblock177 Castanets178 Taiko179 Concert BD180 Melo. Tom 1
List of Tone Names
107
List o
f To
ne N
ames
→
See p.55 “Getting Various Instruments Sounds from the Keyboard”, p.56 “Listening to Songs after Changing InstrumentSounds or Making Other Changes.”

No. Tone Name181 Melo. Tom 2182 Synth Drum183 808 Tom184 Elec Perc.185 Reverse Cym.186 Gt.FretNoise187 Gt.Cut Noise188 String Slap189 Breath Noise190 Fl.Key Click191 Seashore192 Rain193 Thunder194 Wind195 Stream196 Bubble197 Bird198 Dog199 Horse-Gallop200 Bird 2201 Telephone 1202 Telephone 2203 DoorCreaking204 Door205 Scratch206 Windchime207 Helicopter208 Car-Engine209 Car-Stop210 Car-Pass211 Car-Crash212 Siren213 Train214 Jetplane215 Starship216 Burst Noise217 Applause218 Laughing219 Screaming220 Punch221 Heart Beat222 Footsteps223 Gun Shot224 Machine Gun225 Lasergun226 Explosion227 Piano 1*228 Piano 2*229 Piano 3*230 Honky-tonk*231 E.Piano 1*232 E.Piano 2*233 Harpsichord*234 Clav.*235 Celesta*236 Glocken*237 Music Box*238 Vibraphone*239 Marimba*240 Xylophone*
No. Tone Name241 Tubularbell*242 Santur*243 Organ 1*244 Pop Organ 1*245 Organ 2*246 Rock Organ2*247 ChurchOrg.1*248 Reed Organ*249 AccordionFr*250 Harmonica*251 Bandoneon*252 Nylon-strGt*253 Steel-strGt*254 Jazz Guitar*255 Clean Gt.*256 Muted Gt.*257 Funk Gt.*258 OverdriveGt*259 Dist.Guitar*260 Gt.Harmo*261 Acoustic Bs*262 Fingered Bs*263 Picked Bs.*264 Fretless Bs*265 Slap Bass 1*266 Slap Bass 2*267 Synth Bass1*268 Synth Bass2*269 Rubber Bass*270 Violin*271 Viola*272 Cello*273 Contrabass*274 Tremolo Str*275 Pizzicato*276 Harp*277 Timpani*278 Strings*279 SlowStrings*280 Syn.Str 1*281 Syn.Str 2*282 Choir Aahs*283 Pop Voice*284 SynVox*285 Orche.Hit*286 Trumpet*287 Trombone*288 Tuba*289 M.Trumpet*290 FrenchHorns*291 Brass 1*292 SynthBrass1*293 A.Brass 1*294 SynthBrass2*295 Soprano Sax*296 Alto Sax*297 Tenor Sax*298 BaritoneSax*299 Oboe*300 EnglishHorn*
No. Tone Name301 Bassoon*302 Clarinet*303 Piccolo*304 Flute*305 Recorder*306 Pan Flute*307 Bottle Blow*308 Shakuhachi*309 Whistle*310 Ocarina*311 Square Wave*312 Saw Wave*313 Doctor Solo*314 SynCalliope*315 ChifferLead*316 Charang*317 Solo Vox*318 5th SawWave*319 Bass & Lead*320 Fantasia*321 Warm Pad*322 Polysynth*323 Space Voice*324 Bowed Glass*325 Metal Pad*326 Halo Pad*327 Sweep Pad*328 Ice Rain*329 Soundtrack*330 Crystal*331 Syn Mallet*332 Atmosphere*333 Brightness*334 Goblin*335 Echo Drops*336 Star Theme*337 Sitar*338 Banjo*339 Shamisen*340 Koto*341 Kalimba*342 Bagpipe*343 Fiddle*344 Shanai*345 Tinkle Bell*346 Agogo*347 Steel Drums*348 Woodblock*349 Taiko*350 Melo.Tom 1*351 Synth Drum*352 ReverseCym.*353 Fret Noise*354 BreathNoise*355 Seashore*356 Bird*357 Telephone 1*358 Helicopter*359 Applause*360 Gun Shot*
List of Tone Names
108
Lis
t o
f T
on
e N
ames
* Tone with a “*” symbol appended to their name may not playback satisfactorily on other GS sound generating devices.
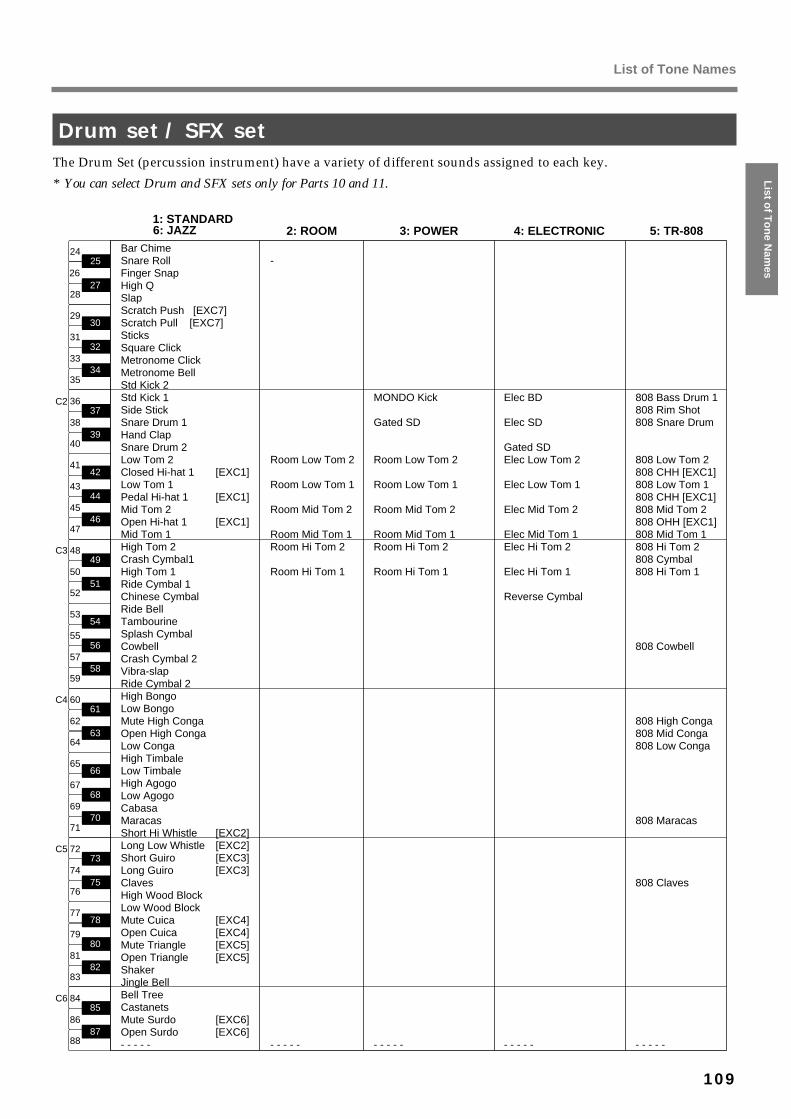
Drum set / SFX setThe Drum Set (percussion instrument) have a variety of different sounds assigned to each key.
* You can select Drum and SFX sets only for Parts 10 and 11.fig.Drum set 1.e_200
Bar ChimeSnare RollFinger SnapHigh QSlapScratch Push [EXC7]Scratch Pull [EXC7]SticksSquare ClickMetronome ClickMetronome BellStd Kick 2Std Kick 1Side StickSnare Drum 1Hand ClapSnare Drum 2Low Tom 2Closed Hi-hat 1 [EXC1] Low Tom 1 Pedal Hi-hat 1 [EXC1]Mid Tom 2Open Hi-hat 1 [EXC1]Mid Tom 1High Tom 2Crash Cymbal1High Tom 1Ride Cymbal 1Chinese CymbalRide BellTambourineSplash CymbalCowbellCrash Cymbal 2Vibra-slapRide Cymbal 2High BongoLow BongoMute High CongaOpen High CongaLow CongaHigh TimbaleLow TimbaleHigh AgogoLow AgogoCabasaMaracasShort Hi Whistle [EXC2]Long Low Whistle [EXC2] Short Guiro [EXC3] Long Guiro [EXC3] ClavesHigh Wood BlockLow Wood Block Mute Cuica [EXC4] Open Cuica [EXC4]Mute Triangle [EXC5]Open Triangle [EXC5]ShakerJingle BellBell TreeCastanetsMute Surdo [EXC6]Open Surdo [EXC6]- - - - -
-
Room Low Tom 2
Room Low Tom 1
Room Mid Tom 2
Room Mid Tom 1Room Hi Tom 2
Room Hi Tom 1
- - - - -
MONDO Kick
Gated SD
Room Low Tom 2
Room Low Tom 1
Room Mid Tom 2
Room Mid Tom 1Room Hi Tom 2
Room Hi Tom 1
- - - - -
Elec BD
Elec SD
Gated SDElec Low Tom 2
Elec Low Tom 1
Elec Mid Tom 2
Elec Mid Tom 1Elec Hi Tom 2
Elec Hi Tom 1
Reverse Cymbal
- - - - -
808 Bass Drum 1808 Rim Shot808 Snare Drum
808 Low Tom 2808 CHH [EXC1]808 Low Tom 1808 CHH [EXC1]808 Mid Tom 2808 OHH [EXC1]808 Mid Tom 1808 Hi Tom 2808 Cymbal808 Hi Tom 1
808 Cowbell
808 High Conga808 Mid Conga808 Low Conga
808 Maracas
808 Claves
- - - - -
2728
29
31
33
35
30
32
34
3940
41
43
45
47
42
44
46
36
3837
8788
84
8685
5152
53
55
57
59
54
56
58
48
5049
6364
65
67
69
71
66
68
70
60
6261
7576
77
79
81
83
78
80
82
72
7473
C2
C3
C4
C5
C6
26
2425
1: STANDARD6: JAZZ 2: ROOM 3: POWER 4: ELECTRONIC 5: TR-808
List of Tone Names
109
List o
f To
ne N
ames
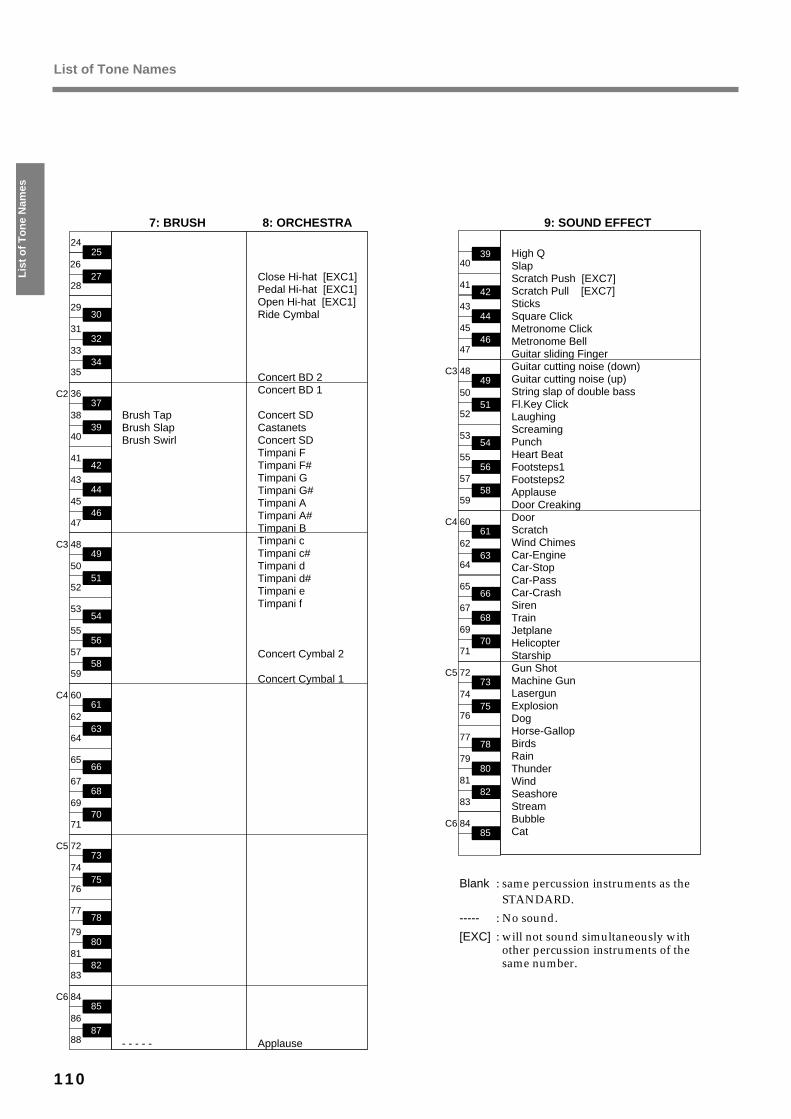
fig.Drum set 2.e_200
Blank
-----
[EXC]
: same percussion instruments as the STANDARD.
: No sound.
: will not sound simultaneously with other percussion instruments of the same number.
Brush TapBrush SlapBrush Swirl
- - - - -
2728
29
31
33
35
30
32
34
3940
41
43
45
47
42
44
46
36
3837
8788
84
8685
5152
53
55
57
59
54
56
58
48
5049
6364
65
67
69
71
66
68
70
60
6261
7576
77
79
81
83
78
80
82
72
7473
C2
C3
C4
C5
C6
26
2425
Close Hi-hat [EXC1]Pedal Hi-hat [EXC1]Open Hi-hat [EXC1]Ride Cymbal
Concert BD 2Concert BD 1
Concert SDCastanetsConcert SDTimpani FTimpani F#Timpani GTimpani G#Timpani ATimpani A#Timpani BTimpani cTimpani c#Timpani dTimpani d#Timpani eTimpani f
Concert Cymbal 2
Concert Cymbal 1
Applause
7: BRUSH 9: SOUND EFFECT8: ORCHESTRA
3940
41
43
45
47
42
44
46
8485
5152
53
55
57
59
54
56
58
48
5049
6364
65
67
69
71
66
68
70
60
6261
7576
77
79
81
83
78
80
82
72
7473
C3
C4
C5
C6
High QSlapScratch Push [EXC7]Scratch Pull [EXC7]SticksSquare ClickMetronome ClickMetronome BellGuitar sliding FingerGuitar cutting noise (down)Guitar cutting noise (up)String slap of double bassFl.Key ClickLaughingScreamingPunchHeart BeatFootsteps1Footsteps2ApplauseDoor CreakingDoorScratchWind ChimesCar-EngineCar-StopCar-PassCar-CrashSirenTrainJetplaneHelicopterStarshipGun ShotMachine GunLasergunExplosionDogHorse-GallopBirdsRainThunderWindSeashoreStreamBubbleCat
List of Tone Names
110
Lis
t o
f T
on
e N
ames
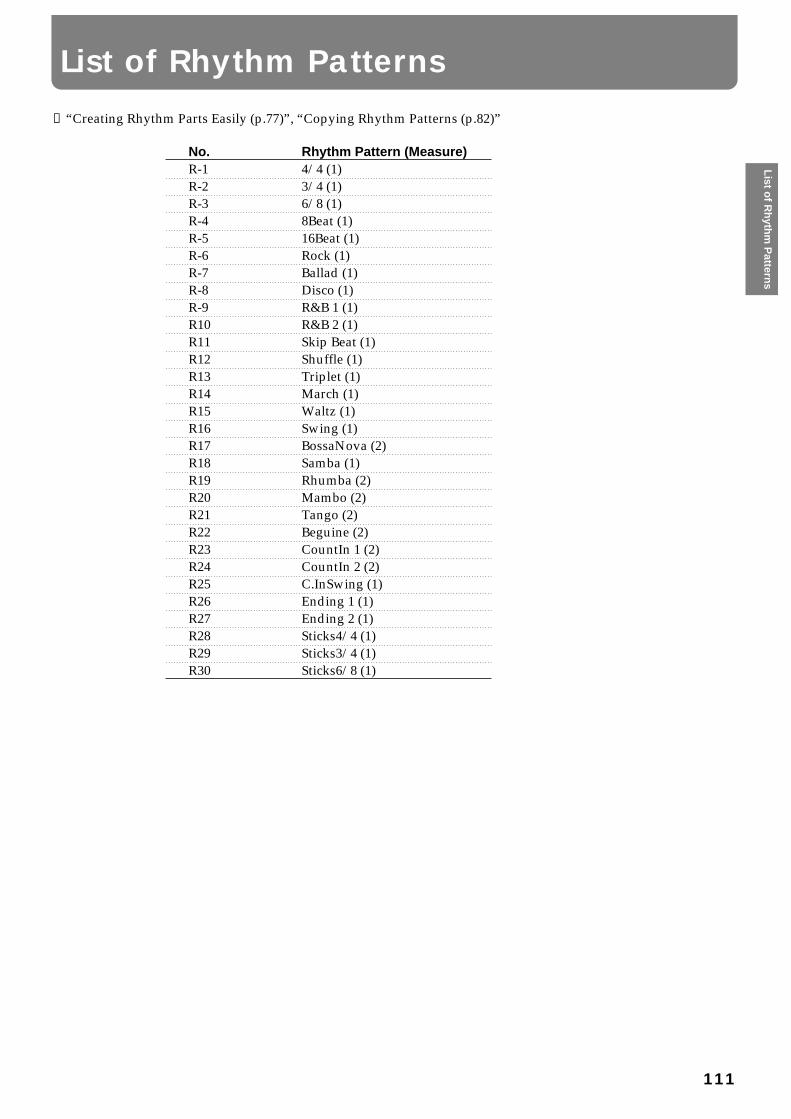
→“Creating Rhythm Parts Easily (p.77)”, “Copying Rhythm Patterns (p.82)”
No. Rhythm Pattern (Measure)R-1 4/4 (1)R-2 3/4 (1)R-3 6/8 (1)R-4 8Beat (1)R-5 16Beat (1)R-6 Rock (1)R-7 Ballad (1)R-8 Disco (1)R-9 R&B 1 (1)R10 R&B 2 (1)R11 Skip Beat (1)R12 Shuffle (1)R13 Triplet (1)R14 March (1)R15 Waltz (1)R16 Swing (1)R17 BossaNova (2)R18 Samba (1)R19 Rhumba (2)R20 Mambo (2)R21 Tango (2)R22 Beguine (2)R23 CountIn 1 (2)R24 CountIn 2 (2)R25 C.InSwing (1)R26 Ending 1 (1)R27 Ending 2 (1)R28 Sticks4/4 (1)R29 Sticks3/4 (1)R30 Sticks6/8 (1)
List of Rhythm Patterns
111
List o
f Rh
ythm
Pattern
s
What Are Music Files?Music files contain information describing the detailsof a musical performance, such as “the C3 key on akeyboard was pressed for this amount of time, usingthis amount of force.” By inserting the floppy diskinto the disk drive on the MT 300s, the performanceinformation is sent from the floppy disk to the piano,and played faithfully by the piano. This is differentthan a CD, since the music file does not contain arecording of the sound itself. This makes it possibleto erase certain parts, or to change instruments, tem-pos and keys freely, allowing you to use it in manydifferent ways.
Regarding CopyrightUse of the song data supplied with this product forany purpose other than private, personal enjoymentwithout the permission of the copyright holder is pro-hibited by law. Additionally, this data must not becopied, nor used in a secondary copyrighted workwithout the permission of the copyright holder. Usingexisting copyrighted material(commmercially avail-able SMF music files, etc.) to create your own compo-sition is permitted only for your private, personalenjoyment. Be aware that any other use may consti-tute copyright infringement. Roland Corporationassume no responsibility whatever for any copyrightinfringement that may result from a work that youcreate.
The MT 300s allows you to use the following music files:
The Music File Disk included with the MT 300s
Floppy disks saved on a Roland MT Series, orRoland Piano Digital HP-G/KR Series instrument
Roland Digital Piano Compatible music filesRoland`s original music file is made specifically forpracticing the piano. Some follow an instructionalcurriculum, allowing for a complete range of lessons,such as “practicing each hand separately” or “listen-ing to only the accompaniment.”
SMF Music files (720KB/1.44MB Format)SMF (Standard MIDI Files) use a standard format formusic file that was formulated so that files containingmusic file could be widely compatible, regardless ofthe manufacturer of the listening device. An enor-mous variety of music is available, whether it be forlistening, for practicing musical instruments, forKaraoke, etc.If you wish to purchase SMF music files, please con-sult the retailer where you purchased your MT 300s.
Floppy Disks Containing SMF (Standard MIDI File)Songs Created with a Computer SequencerThe MT 300s can play back SMF (Standard MIDI File)songs for GS sound generators that are created oncomputers and similar equipment.
* SMF songs created on IBM or IBM-compatible PCs, andplayable with GS sound generators can be played backand recorded upon as is. You can use other sequencersand computers (including Atari, Macintosh computers)to play back and record SMF songs created for GS soundgenerators by saving their files on a computer using 3.5-inch 2DD floppy disks formatted on the MT 300s.
* When you want to use the MT 300s to listen to songscreated on Atari series computers, first save the songs onfloppy disks that have been formatted on the MT 300s.However, you cannot put songs saved in a different for-mat on the same disk.
* Some songs may not be completely playable on the MT300s.
* Whenever possible, convert songs to Format 0.
Format 1 suffers the following limitations:
• Handles a maximum of only 33 data tracks.
• Cannot play back some songs containing largeamounts of data.
• Requires more time to begin playback of songs.
* Save SMF (Standard MIDI File) songs created onMacintosh computers onto MT 300s-formatted disks,using Apple File Exchange or Macintosh PC Exchangesoftware. When doing this, change the file name, using amaximum of eight characters followed by the .MIDextension.
Ex.: abcdefgh.MID
TERMS
Music Files that can be Used with the MT 300s
112
Mu
sic
File
s th
at c
an b
eU
sed
wit
h t
he
MT
300
s

<Sound Generator>Comforms to GM/GS
Max.Polyphony64 Voices
Tones369 variations (incl.8 drum sets, 1 SFX set)
Master Tuning415.3 Hz–466.2 Hz (0.1 Hz Steps)
Playback Transpose-24–+24 Half-steps
EffectsReverb (8 types)
Chorus (8 types)
<Composer>
MetronomeBeat (2/2, 0/4, 2/4, 3/4, 4/4, 5/4, 6/4, 7/4,3/8, 6/8, 9/8, 12/8)
Volume (10 levels)
Metronome Pattern (11 patterns)
Sounds (4 Types)
Tracks5/16 tracks
Song1 song
Note StorageApprox. 30,000 notes
TempoQuarter note= 20–250
Resolution120 ticks per quarter note
Recording MethodRealtime (Replace, Mix, Auto Punch In,Manual Punch In, Loop, Tempo)
Beat Map
EditCopy
Quantize
Delete
Insert
Erase
Transpose
Part Exchange
Note Edit
PC Edit
Rhythm Pattarn30 Pattarns
ControlSong Select
Reset, Stop, Play, Rec
Bwd, Fwd
All song Play
Track Select
Maker Set
Repeat
Count In
Tempo Mute
<Disk Drive/Disk Storage>3.5 inch Micro Floppy Disk Drive
Disk Format720 K bytes (2DD)/1.44 M bytes (2HD)
SongsMax. 99 Songs
Note StorageApprox. 120,000 notes (2DD)
Approx. 240,000 notes (2HD)
Playable SoftwareStandard MIDI Files (format 0/1)
Roland Original Format (i-format)
SaveStandard MIDI Files (format 0)
Roland Original Format (i-format)
<Others>
Rated Power Output10 W x 2
Speakers10 cm x 2
DisplayBeat Indicator
Large custum LCD
Bouncing Ball
LanguageEnglish/Japanese
LyricYes (Built-in Display, MIDI Out)
ControlVolume
Microphone Volume
Microphone Echo
Speaker Switch
Reverb Switch (One Touch 3 Types)
ConnectorsOutput jacks (Stereo/RCA-Pin)
Microphone jack (with echo)
Headphone jack (Stereo Mini)
MIDI In connector
MIDI Out connector
Computer connector
Expression pedal jack
Start/Stop jack
Power SupplyAC117 V/AC230 V/AC240 V
Power Consumption34 W (117 V)/34 W (230 V)/34 W (240 V)
Dimensions394 (W) x 223 (D) x 207 (H) mm
15-9/16 (W) x 8-13/16 (D) x 8-3/16 (H) inches
Weight4.2 kg/91 lbs 5 oz
AccessoriesOwner’s manual
Power Cord
MIDI Cable
Music File Disk
* In the interest of product improvement, the
specifications and/or appearance of this unit
are subject to change without prior notice.
Optional Accessories
Consult your MT 300s dealer whenpurchasing the items listed below.
MIDI Implementation
Pedal Switch: DP-2
Expression Pedal: EV-5
Stereo Headphones: RH-80/120
Microphone: DR-10/20
Microphone stand: ST-210/259
MIDI cable: MSC-15/25/50
Audio cable:
PCS-075W/150W/250W/100PW
Computer cable:
RSC-15APL/RSC-15AT/RSC-15N
* When purchasing headphones, make sure you
get stereo headphones.
* Please buy an audio cable with a standard
phone plug.
Specifications
113
Sp
ecification
s
Basic SettingsThe sounds and volume levels for each part, the basictempo, and other settings that are predetermined foreach song are called the “basic settings.” On the MT300s, you can listen to songs after temporarily makingchanges to the parameters of a song’s basic settings—the status of each part’s tone, volume, panpot, reverb,and chorus—and change the basic settings and basictempo of the song itself (p.56).
Bouncing BallThe flashing dot that moves in a semicircular patternacross the screen of the MT 300s is called a “bouncingball” (p.15).
Drum SetA Drum Set is a collection of percussive instrumentsounds. With drum sets, a different sound can beheard for each key on the keyboard. The specialeffects sound set is called the SFX Set (p.55, 58, 64,109).
EditingEditing is to change the song you have recorded, suchas by erasing part of the song, or copying a measure(p.78).
Ensemble“Ensemble” is when two or more instruments per-form at the same time.
PartOn the MT 300s, “Part” can have two different mean-ings. One meaning refers to a performance part, suchas the right-hand part of a piano song (p.38). Theother refers to the 16 parts in the 16-track sequencer(p.55, 56).
PickupA song with a pickup does not start on the first beat(p.73).
PlaybackThe MT 300s plays back the performance information(p.26).
PU (Pickup)A song that does not start on the first beat starts withwhat is called a pickup.When playing a pickup song,the measures will be shown in the display as “PU, 1,2...” (p.26).
SavingSaving is storing the recorded performance data ontoa floppy disk (p.49).
Sound GeneratorThe sound generator of the MT 300s supportsGM/GS, and can play more than 300 different sounds(p.101).
Standard PitchThe pitch of the sound created by playing the middleA on the keyboard is called the “standard pitch.”Changing the standard pitch of the MT 300s is called“Master Tuning,” and tuning to other musical instru-ment is called “Tuning” (p.19, 24).
ToneTones are the musical instruments or effect soundsstored in the internal memory of the MT 300s.
Glossary
114
Glo
ssar
y
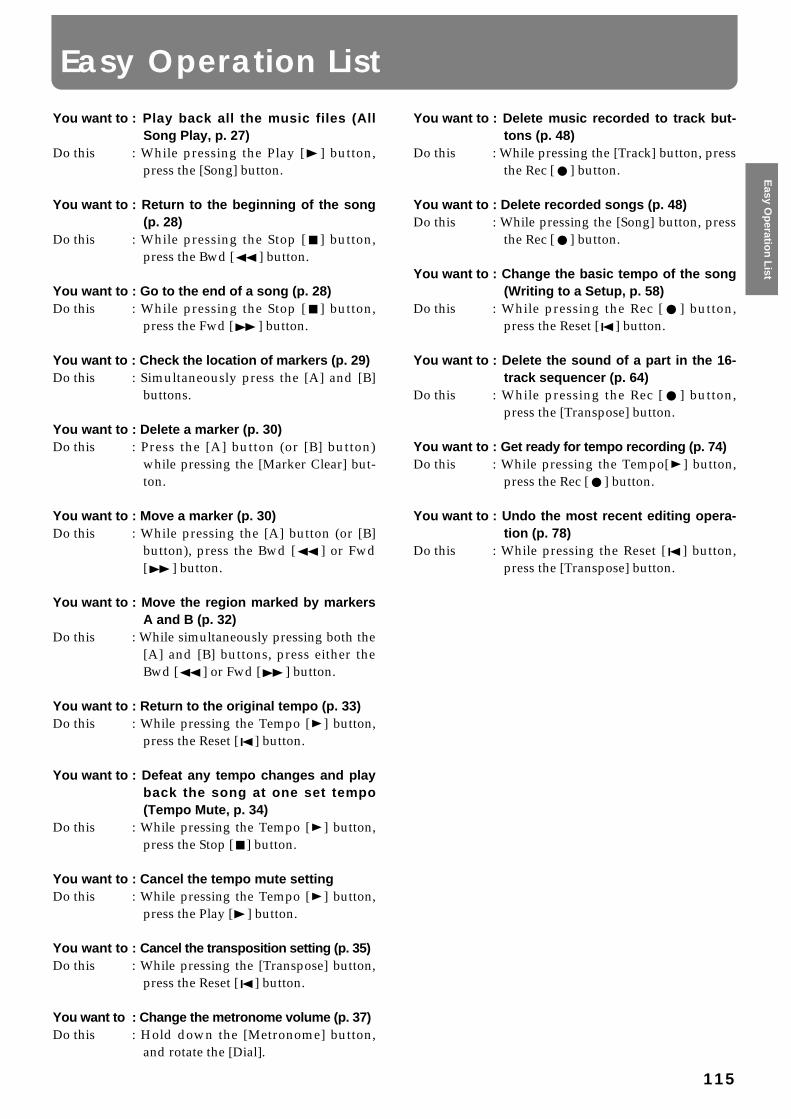
You want to : Play back all the music files (AllSong Play, p. 27)
Do this : While pressing the Play [ ] button,press the [Song] button.
You want to : Return to the beginning of the song(p. 28)
Do this : While pressing the Stop [ ] button,press the Bwd [ ] button.
You want to : Go to the end of a song (p. 28)Do this : While pressing the Stop [ ] button,
press the Fwd [ ] button.
You want to : Check the location of markers (p. 29)Do this : Simultaneously press the [A] and [B]
buttons.
You want to : Delete a marker (p. 30)Do this : Press the [A] button (or [B] button)
while pressing the [Marker Clear] but-ton.
You want to : Move a marker (p. 30)Do this : While pressing the [A] button (or [B]
button), press the Bwd [ ] or Fwd[ ] button.
You want to : Move the region marked by markersA and B (p. 32)
Do this : While simultaneously pressing both the[A] and [B] buttons, press either theBwd [ ] or Fwd [ ] button.
You want to : Return to the original tempo (p. 33)Do this : While pressing the Tempo [ ] button,
press the Reset [ ] button.
You want to : Defeat any tempo changes and playback the song at one set tempo(Tempo Mute, p. 34)
Do this : While pressing the Tempo [ ] button,press the Stop [ ] button.
You want to : Cancel the tempo mute setting Do this : While pressing the Tempo [ ] button,
press the Play [ ] button.
You want to : Cancel the transposition setting (p. 35)Do this : While pressing the [Transpose] button,
press the Reset [ ] button.
You want to : Change the metronome volume (p. 37)Do this : Hold down the [Metronome] button,
and rotate the [Dial].
You want to : Delete music recorded to track but-tons (p. 48)
Do this : While pressing the [Track] button, pressthe Rec [ ] button.
You want to : Delete recorded songs (p. 48)Do this : While pressing the [Song] button, press
the Rec [ ] button.
You want to : Change the basic tempo of the song(Writing to a Setup, p. 58)
Do this : While pressing the Rec [ ] button,press the Reset [ ] button.
You want to : Delete the sound of a part in the 16-track sequencer (p. 64)
Do this : While pressing the Rec [ ] button,press the [Transpose] button.
You want to : Get ready for tempo recording (p. 74)Do this : While pressing the Tempo[ ] button,
press the Rec [ ] button.
You want to : Undo the most recent editing opera-tion (p. 78)
Do this : While pressing the Reset [ ] button,press the [Transpose] button.
Easy Operation List
115
Easy O
peratio
n L
ist
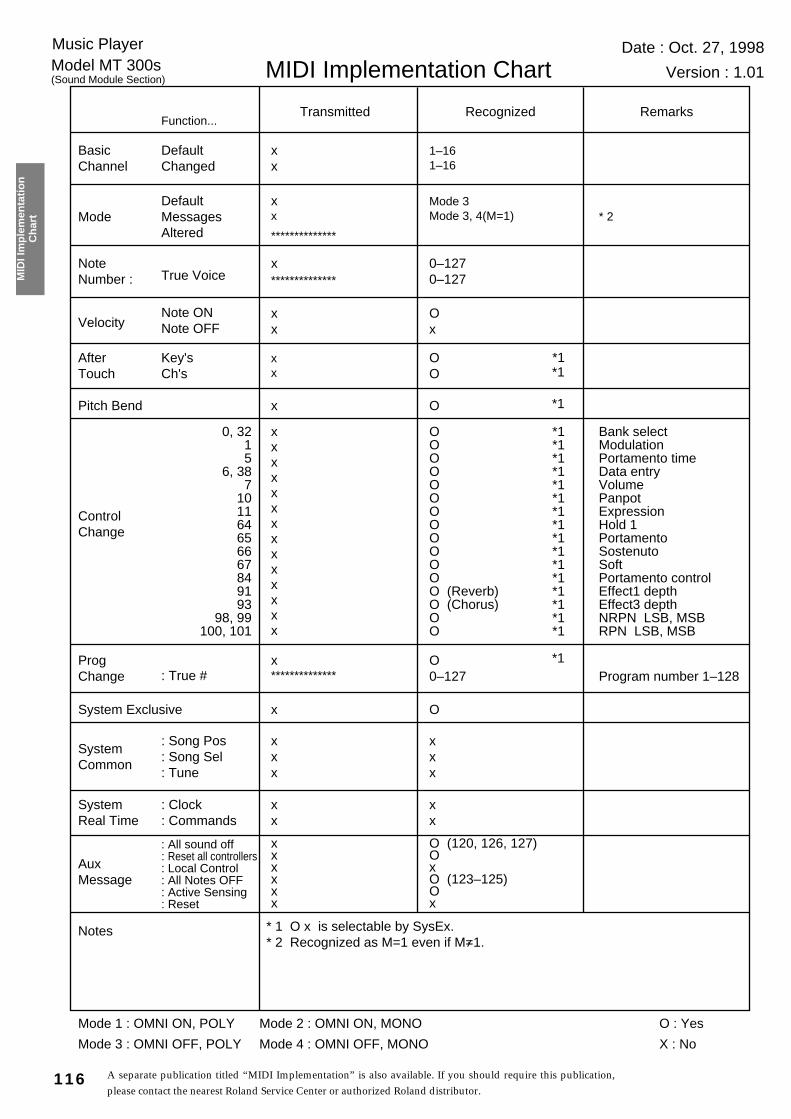
116
MID
I Im
ple
men
tati
on
Ch
art
A separate publication titled “MIDI Implementation” is also available. If you should require this publication,please contact the nearest Roland Service Center or authorized Roland distributor.
Function...
BasicChannel
Mode
NoteNumber :
Velocity
AfterTouch
Pitch Bend
ControlChange
ProgChange
System Exclusive
SystemCommon
SystemReal Time
AuxMessage
Notes
Transmitted Recognized Remarks
DefaultChanged
DefaultMessagesAltered
True Voice
Note ONNote OFF
Key'sCh's
0, 3215
6, 387
101164656667849193
98, 99100, 101
: True #
: Song Pos: Song Sel: Tune
: Clock: Commands
: All sound off: Reset all controllers: Local Control: All Notes OFF: Active Sensing: Reset
xx
xx
x x
x
xx
x
xxxxxxxxxxxxxx
OOOOOOOOOOOOO (Reverb)O (Chorus)OO
x **************
x
xxx
xx
xxxxxx
1–161–16
Mode 3Mode 3, 4(M=1)
Ox
0–127 0–127
OO
O
O0–127
O
xxx
xx
O (120, 126, 127)O xO (123–125)Ox
Bank selectModulationPortamento timeData entryVolumePanpotExpression Hold 1PortamentoSostenutoSoftPortamento controlEffect1 depthEffect3 depthNRPN LSB, MSBRPN LSB, MSB
* 1 O x is selectable by SysEx.* 2 Recognized as M=1 even if M=1.
Music PlayerModel MT 300s(Sound Module Section)
Date : Oct. 27, 1998
Version : 1.01MIDI Implementation Chart
**************
**************
Mode 1 : OMNI ON, POLY
Mode 3 : OMNI OFF, POLY
Mode 2 : OMNI ON, MONO
Mode 4 : OMNI OFF, MONO
O : Yes
X : No
* 2
Program number 1–128
*1*1*1*1*1*1*1*1*1*1*1*1*1*1*1*1
*1*1
*1
*1

117
MID
I Imp
lemen
tation
Ch
art
Function...
BasicChannel
Mode
NoteNumber :
Velocity
AfterTouch
Pitch Bend
ControlChange
ProgChange
System Exclusive
SystemCommon
SystemReal Time
AuxMessage
Notes
Transmitted Recognized Remarks
DefaultChanged
DefaultMessagesAltered
True Voice
Note ONNote OFF
Key'sCh's
0, 3215
6, 387
101164656667849193
98, 99100, 101(2 –119)
: True #
: Song Pos: Song Sel: Tune
: Clock: Commands
: All sound off: Reset all controllers: Local Control: All Notes OFF: Active Sensing: Reset
1–16x
Mode 3x
O x 8n v=64
0 –127
OO
O
OOOOOOOOOOOOOOOOO
OOOOOOOOOOOOO O OOO
O 0–127 **************
O
xxx
OO
OOOOOx
1–16x
Mode 3x
Ox
0–127 0–127
OO
O
O0–127
O
xxx
OO
O (120, 126, 127)O OO (123–125)Ox
Bank selectModulationPortamento timeData entryVolumePanpotExpression Hold 1PortamentoSostenutoSoftPortamento controlEffect1 depthEffect3 depthNRPN LSB, MSBRPN LSB, MSB
* 1 O x is selectable.* 2 Recognized as M=1 even if M=1.
Music PlayerModel MT 300s(Sequencer Section)
Date : Oct. 27, 1998
Version : 1.01MIDI Implementation Chart
**************
**************
Mode 1 : OMNI ON, POLY
Mode 3 : OMNI OFF, POLY
Mode 2 : OMNI ON, MONO
Mode 4 : OMNI OFF, MONO
O : Yes
X : No
Program number 1–128
*1 *1*1
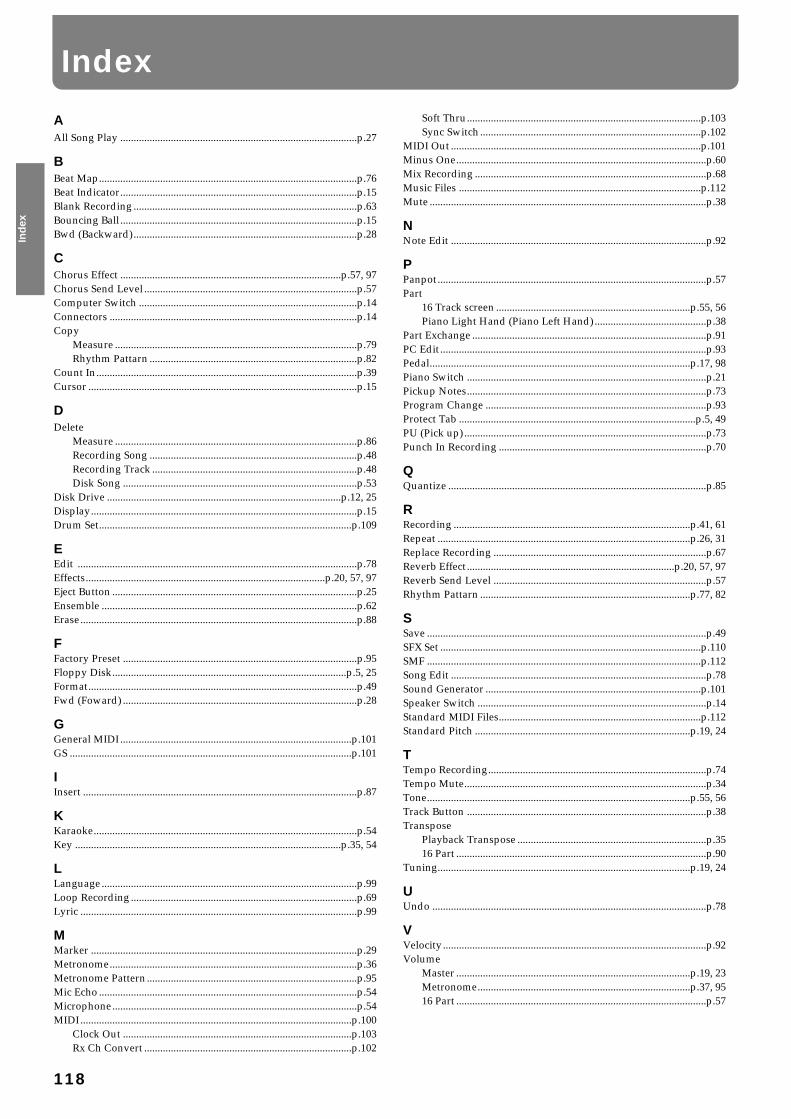
AAll Song Play .........................................................................................p.27
BBeat Map.................................................................................................p.76Beat Indicator.........................................................................................p.15Blank Recording ....................................................................................p.63Bouncing Ball .........................................................................................p.15Bwd (Backward)....................................................................................p.28
CChorus Effect ...................................................................................p.57, 97Chorus Send Level ................................................................................p.57Computer Switch ..................................................................................p.14Connectors .............................................................................................p.14Copy
Measure ...........................................................................................p.79Rhythm Pattarn ..............................................................................p.82
Count In..................................................................................................p.39Cursor .....................................................................................................p.15
DDelete
Measure ...........................................................................................p.86Recording Song ..............................................................................p.48Recording Track .............................................................................p.48Disk Song ........................................................................................p.53
Disk Drive ........................................................................................p.12, 25Display....................................................................................................p.15Drum Set...............................................................................................p.109
EEdit .........................................................................................................p.78Effects..........................................................................................p.20, 57, 97Eject Button ............................................................................................p.25Ensemble ................................................................................................p.62Erase........................................................................................................p.88
FFactory Preset ........................................................................................p.95Floppy Disk........................................................................................p.5, 25Format.....................................................................................................p.49Fwd (Foward) ........................................................................................p.28
GGeneral MIDI .......................................................................................p.101GS ..........................................................................................................p.101
IInsert .......................................................................................................p.87
KKaraoke...................................................................................................p.54Key ....................................................................................................p.35, 54
LLanguage................................................................................................p.99Loop Recording .....................................................................................p.69Lyric ........................................................................................................p.99
MMarker ....................................................................................................p.29Metronome.............................................................................................p.36Metronome Pattern...............................................................................p.95Mic Echo .................................................................................................p.54Microphone............................................................................................p.54MIDI......................................................................................................p.100
Clock Out ......................................................................................p.103Rx Ch Convert ..............................................................................p.102
Soft Thru........................................................................................p.103Sync Switch ...................................................................................p.102
MIDI Out ..............................................................................................p.101Minus One..............................................................................................p.60Mix Recording .......................................................................................p.68Music Files ...........................................................................................p.112Mute ........................................................................................................p.38
NNote Edit ................................................................................................p.92
PPanpot.....................................................................................................p.57Part
16 Track screen .........................................................................p.55, 56Piano Light Hand (Piano Left Hand)..........................................p.38
Part Exchange ........................................................................................p.91PC Edit ....................................................................................................p.93Pedal..................................................................................................p.17, 98Piano Switch ..........................................................................................p.21Pickup Notes..........................................................................................p.73Program Change ...................................................................................p.93Protect Tab .........................................................................................p.5, 49PU (Pick up)...........................................................................................p.73Punch In Recording ..............................................................................p.70
QQuantize .................................................................................................p.85
RRecording .........................................................................................p.41, 61Repeat ...............................................................................................p.26, 31Replace Recording ................................................................................p.67Reverb Effect..............................................................................p.20, 57, 97Reverb Send Level ................................................................................p.57Rhythm Pattarn ...............................................................................p.77, 82
SSave .........................................................................................................p.49SFX Set ..................................................................................................p.110SMF .......................................................................................................p.112Song Edit ................................................................................................p.78Sound Generator .................................................................................p.101Speaker Switch ......................................................................................p.14Standard MIDI Files............................................................................p.112Standard Pitch .................................................................................p.19, 24
TTempo Recording..................................................................................p.74Tempo Mute...........................................................................................p.34Tone...................................................................................................p.55, 56Track Button ..........................................................................................p.38Transpose
Playback Transpose .......................................................................p.3516 Part ..............................................................................................p.90
Tuning...............................................................................................p.19, 24
UUndo .......................................................................................................p.78
VVelocity...................................................................................................p.92Volume
Master ........................................................................................p.19, 23Metronome................................................................................p.37, 9516 Part ..............................................................................................p.57
Index
118
Ind
ex
For the USA
FEDERAL COMMUNICATIONS COMMISSIONRADIO FREQUENCY INTERFERENCE STATEMENT
This equipment has been tested and found to comply with the limits for a Class B digital device, pursuant to Part 15 of the FCC Rules. These limits are designed to provide reasonable protection against harmful interference in a residential installation. This equipment generates, uses, and can radiate radio frequency energy and, if not installed and used in accordance with the instructions, may cause harmful interference to radio communications. However, there is no guarantee that interference will not occur in a particular installation. If this equipment does cause harmful interference to radio or television reception, which can be determined by turning the equipment off and on, the user is encouraged to try to correct the interference by one or more of the following measures:
– Reorient or relocate the receiving antenna.– Increase the separation between the equipment and receiver.– Connect the equipment into an outlet on a circuit different from that to which the receiver is connected.– Consult the dealer or an experienced radio/TV technician for help.
Unauthorized changes or modification to this system can void the users authority to operate this equipment.This equipment requires shielded interface cables in order to meet FCC class B Limit.
This product complies with the requirements of European Directives EMC 89/336/EEC and LVD 73/23/EEC.
For EU Countries
For Canada
This Class B digital apparatus meets all requirements of the Canadian Interference-Causing Equipment Regulations.
Cet appareil numérique de la classe B respecte toutes les exigences du Règlement sur le matériel brouilleur du Canada.
NOTICE
AVIS
MUSIC PLAYER
OWNER'S MANUAL
Before using this unit, carefully read the sections entitled: “IMPOR-TANT SAFETY INSTRUCTIONS” ( p. 2), “USING THE UNIT SAFE-LY” ( p. 3), and “IMPORTANT NOTES” ( p. 4).
These sections provide important information concerning the properoperation of the unit. Additionally, in order to feel assured that you havegained a good grasp of every feature provided by your new unit,Owner's manual should be read in its entirety. The manual should besaved and kept on hand as a convenient reference.
Copyright © 1998 ROLAND CORPORATIONAll rights reserved. No part of this publication may be reproduced in anyform without the written permission of ROLAND CORPORATION.
MT
300s
01344778 ’03-7-9N
InformationWhen you need repair service, call your nearest Roland Service Center or authorized Roland distributor in your country as shown below.
As of July 1, 2003 (Roland)
ARGENTINAInstrumentos Musicales S.A.Av.Santa Fe 2055 (1123) Buenos AiresARGENTINATEL: (011) 4508-2700 BRAZILRoland Brasil LtdaRua San Jose, 780 Sala BParque Industrial San JoseCotia - Sao Paulo - SP, BRAZILTEL: (011) 4615 5666
MEXICOCasa Veerkamp, s.a. de c.v.Av. Toluca No. 323, Col. Olivar de los Padres 01780 Mexico D.F. MEXICOTEL: (55) 5668-6699 PANAMASUPRO MUNDIAL, S.A.Boulevard Andrews, Albrook, Panama City, REP. DE PANAMATEL: 315-0101
U. S. A. Roland Corporation U.S.5100 S. Eastern AvenueLos Angeles, CA 90040-2938,U. S. A.TEL: (323) 890 3700
VENEZUELAMusicland Digital C.A.Av. Francisco de Miranda,Centro Parque de Cristal, Nivel C2 Local 20 CaracasVENEZUELATEL: (212) 285-8586
AUSTRALIA Roland Corporation Australia Pty., Ltd. 38 Campbell Avenue Dee Why West. NSW 2099 AUSTRALIA TEL: (02) 9982 8266 NEW ZEALAND Roland Corporation Ltd.32 Shaddock Street, Mount Eden, Auckland, NEW ZEALAND TEL: (09) 3098 715
HONG KONGTom Lee Music Co., Ltd. Service Division22-32 Pun Shan Street, Tsuen Wan, New Territories, HONG KONGTEL: 2415 0911 Parsons Music Ltd. 8th Floor, Railway Plaza, 39 Chatham Road South, T.S.T,Kowloon, HONG KONGTEL: 2333 1863
INDIARivera Digitec (India) Pvt. Ltd.409, Nirman Kendra Mahalaxmi Flats Compound Off. Dr. Edwin Moses Road, Mumbai-400011, INDIATEL: (022) 2493 9051 INDONESIAPT Citra IntiRamaJ1. Cideng Timur No. 15J-150 Jakarta PusatINDONESIATEL: (021) 6324170
MALAYSIABENTLEY MUSIC SDN BHD140 & 142, Jalan Bukit Bintang 55100 Kuala Lumpur,MALAYSIATEL: (03) 2144-3333
PHILIPPINESG.A. Yupangco & Co. Inc.339 Gil J. Puyat AvenueMakati, Metro Manila 1200,PHILIPPINESTEL: (02) 899 9801
SINGAPORESwee Lee Company150 Sims Drive,SINGAPORE 387381TEL: 6846-3676
TAIWANROLAND TAIWAN ENTERPRISE CO., LTD.Room 5, 9fl. No. 112 Chung Shan N.Road Sec.2, Taipei, TAIWAN, R.O.C.TEL: (02) 2561 3339 THAILANDTheera Music Co. , Ltd.330 Verng NakornKasem, Soi 2, Bangkok 10100, THAILANDTEL: (02) 2248821
BAHRAINMoon StoresNo.16, Bab Al Bahrain Avenue, P.O.Box 247, Manama 304, State of BAHRAINTEL: 211 005
VIETNAMSaigon MusicSuite DP-840 Ba Huyen Thanh Quan StreetHochiminh City, VIETNAMTel: (08) 930-1969
JORDANAMMAN Trading Agency 245 Prince Mohammad St., Amman 1118, JORDANTEL: (06) 464-1200
KUWAITEasa Husain Al Yousifi Est.Abdullah Salem Street,Safat, KUWAITTEL: 243-6399 LEBANONChahine S.A.L.Gerge Zeidan St., Chahine Bldg., Achrafieh, P.O.Box: 16-5857Beirut, LEBANONTEL: (01) 20-1441
QATARAl Emadi Co. (Badie Studio & Stores)P.O. Box 62, Doha, QATARTEL: 4423-554
SAUDI ARABIAaDawliah Universal Electronics APLCorniche Road, Aldossary Bldg., 1st Floor, Alkhobar,SAUDI ARABIA
P.O.Box 2154, Alkhobar 31952SAUDI ARABIA TEL: (03) 898 2081
TURKEY Barkat muzik aletleri ithalat ve ihracat Ltd StiSiraselviler Caddesi Siraselviler Pasaji No:74/20 Taksim - Istanbul, TURKEYTEL: (0212) 2499324 U.A.E.Zak Electronics & Musical Instruments Co. L.L.C.Zabeel Road, Al Sherooq Bldg., No. 14, Grand Floor, Dubai, U.A.E.TEL: (04) 3360715
EGYPTAl Fanny Trading Office9, EBN Hagar A1 Askalany Street,ARD E1 Golf, Heliopolis, Cairo 11341, EGYPTTEL: 20-2-417-1828 REUNIONMaison FO - YAM Marcel25 Rue Jules Hermann,Chaudron - BP79 97 491Ste Clotilde Cedex,REUNION ISLANDTEL: (0262) 218-429
SOUTH AFRICAThat Other Music Shop (PTY) Ltd.11 Melle St., Braamfontein, Johannesbourg, SOUTH AFRICA
P.O.Box 32918, Braamfontein 2017 Johannesbourg, SOUTH AFRICATEL: (011) 403 4105
Paul Bothner (PTY) Ltd.17 Werdmuller Centre, Main Road, Claremont 7708SOUTH AFRICA
P.O.BOX 23032, Claremont 7735, SOUTH AFRICATEL: (021) 674 4030
CYPRUSRadex Sound Equipment Ltd.17, Diagorou Street, Nicosia, CYPRUSTEL: (022) 66-9426
DENMARK Roland Scandinavia A/SNordhavnsvej 7, Postbox 880,DK-2100 CopenhagenDENMARK TEL: 3916 6200 FRANCERoland France SA4, Rue Paul Henri SPAAK, Parc de l'Esplanade, F 77 462 St. Thibault, Lagny Cedex FRANCETEL: 01 600 73 500 FINLANDRoland Scandinavia As, Filial FinlandElannontie 5FIN-01510 Vantaa, FINLANDTEL: (0)9 68 24 020 GERMANY Roland Elektronische Musikinstrumente HmbH.Oststrasse 96, 22844 Norderstedt, GERMANY TEL: (040) 52 60090
GREECESTOLLAS S.A.Music Sound Light155, New National RoadPatras 26442, GREECETEL: 2610 435400 HUNGARYRoland East Europe Ltd.Warehouse Area ‘DEPO’ Pf.83H-2046 Torokbalint, HUNGARYTEL: (23) 511011
IRELANDRoland IrelandG2 Calmount Park, Calmount Avenue, Dublin 12Republic of IRELANDTEL: (01) 4294444
ITALYRoland Italy S. p. A. Viale delle Industrie 8, 20020 Arese, Milano, ITALYTEL: (02) 937-78300 NORWAYRoland Scandinavia Avd. Kontor NorgeLilleakerveien 2 Postboks 95 Lilleaker N-0216 Oslo NORWAYTEL: 2273 0074 POLANDP. P. H. BrzostowiczUL. Gibraltarska 4.PL-03664 Warszawa POLANDTEL: (022) 679 44 19 PORTUGALTecnologias Musica e Audio, Roland Portugal, S.A.Cais Das Pedras, 8/9-1 Dto4050-465 PORTOPORTUGALTEL: (022) 608 00 60
RUSSIAMuTek3-Bogatyrskaya Str. 1.k.l107 564 Moscow, RUSSIA TEL: (095) 169 5043
SPAINRoland Electronics de España, S. A. Calle Bolivia 239, 08020 Barcelona, SPAINTEL: (93) 308 1000
SWITZERLANDRoland (Switzerland) AG Landstrasse 5, Postfach,CH-4452 Itingen, SWITZERLANDTEL: (061) 927-8383
SWEDEN Roland Scandinavia A/S SWEDISH SALES OFFICEDanvik Center 28, 2 tr. S-131 30 Nacka SWEDEN TEL: (0)8 702 00 20
UKRAINETIC-TACMira Str. 19/108P.O. Box 180 295400 Munkachevo, UKRAINETEL: (03131) 414-40 UNITED KINGDOM Roland (U.K.) Ltd.Atlantic Close, Swansea Enterprise Park, SWANSEASA7 9FJ, UNITED KINGDOMTEL: (01792) 702701
KOREACosmos Corporation1461-9, Seocho-Dong,Seocho Ku, Seoul, KOREATEL: (02) 3486-8855
AUSTRIARoland Austria GES.M.B.H.Siemensstrasse 4, P.O. Box 74,A-6063 RUM, AUSTRIATEL: (0512) 26 44 260 BELGIUM/HOLLAND/LUXEMBOURGRoland Benelux N. V.Houtstraat 3, B-2260, Oevel (Westerlo) BELGIUMTEL: (014) 575811
AFRICA
CHILEComercial Fancy S.A.Rut.: 96.919.420-1Nataniel Cox #739, 4th FloorSantiago - Centro, CHILETEL: (02) 688-9540
URUGUAYTodo Musica S.A.Francisco Acuna de Figueroa 1771C.P.: 11.800 Montevideo, URUGUAYTEL: (02) 924-2335
EUROPE
AUSTRALIA/NEW ZEALAND
ASIA
CENTRAL/LATINAMERICA
NORTH AMERICA
MIDDLE EAST
AFRICA EL SALVADOROMNI MUSIC75 Avenida Norte y Final Alameda Juan Pablo , Edificio No.4010 San Salvador, EL SALVADORTEL: 262-0788
ROMANIAFBS LINESPiata Libertatii 1,RO-4200 GheorghehiTEL: (095) 169-5043
PARAGUAYDistribuidora De Instrumentos MusicalesJ.E. Olear y ESQ. Manduvira Asuncion PARAGUAYTEL: (021) 492-124
COSTA RICAJUAN Bansbach Instrumentos MusicalesAve.1. Calle 11, Apartado 10237,San Jose, COSTA RICATEL: 258-0211
CRISTOFORI MUSIC PTE LTDBlk 3014, Bedok Industrial Park E, #02-2148, SINGAPORE 489980TEL: 6243-9555
IRANMOCO, INC.No.41 Nike St., Dr.Shariyati Ave.,Roberoye Cerahe MirdamadTehran, IRANTEL: (021) 285-4169 ISRAELHalilit P. Greenspoon & Sons Ltd.8 Retzif Ha'aliya Hashnya St.Tel-Aviv-Yafo ISRAELTEL: (03) 6823666
SYRIATechnical Light & Sound CenterKhaled Ebn Al Walid St.Bldg. No. 47, P.O.BOX 13520, Damascus, SYRIATEL: (011) 223-5384
CANADA Roland Canada Music Ltd.(Head Office)5480 Parkwood Way Richmond B. C., V6V 2M4 CANADA TEL: (604) 270 6626
Roland Canada Music Ltd.(Toronto Office)170 Admiral BoulevardMississauga On L5T 2N6 CANADA TEL: (905) 362 9707
CHINARoland Shanghai Electronics Co.,Ltd.5F. No.1500 Pingliang Road Shanghai 200090, CHINATEL: (021) 5580-0800
Roland Shanghai Electronics Co.,Ltd.(BEIJING OFFICE)10F. No.18 AnhuaxiliChaoyang District, Beijing 100011 CHINATEL: (010) 6426-5050
Roland Shanghai Electronics Co.,Ltd.(GUANGZHOU OFFICE)2/F., No.30 Si You Nan Er Jie Yi Xiang, Wu Yang Xin Cheng,Guangzhou 510600, CHINATel: (020) 8736-0428