multi-circuit water leakage detector ad-as-10drm ... water leakage detector ad-as-10drm operation...
TRANSCRIPT
TTS-KS-W-5002-5
Multi-circuit Water Leakage Detector
AD-AS-10DRM
Operation Manual
Tatsuta Electric Wire & Cable Co., Ltd.
Electronics Division
System Department

<<<Important Safety Instructions>>>
Warning Erroneous operation of this water leakage detector not complying with the warning labels or the following
warnings may not only lead to possible fatality or serious injury, but also fire, electric shock or failure.
Warnings!
Strictly prohibited! □ Never modify or disassemble the detector. □ The unqualified persons are forbidden to carry out the installation and the internal inspection and spot check. □ Do not touch any internal component of the detector with wet hands. □When performing maintenance on the product, avoid using organic solvent. Use soft cotton wastes such as the gauze to wipe gently. □ After the detector is installed, do not leave the cover open, except for the periodic inspection and maintenance.
-{}- Checkpoits! □ Check detector supply voltage and rated voltage before installing. □ When installing and making electrical connections to this detector, follow the instructions in the operation manual. □When inspecting and carrying out maintenance on this detector, follow the instructions in the operation manual. □When using control output contacts, check the contact rated load in the operation manual.
Do not install the detector in the following locations! □ Locations easily accessible to the general public. □ Locations close to sources of vibration, corrosive gas or strong electromagnetic induction. □ Locations subject to excessive waste and dust. □ Locations where there is a possibility of exposure to water, or high temperature and humidity
Warranty Before shipping, this product is subjected to strict quality control and inspection. In the event of spontaneous failure resulting from defective manufacturing, we will repair or replace it according to the following provisions.
Warranty Provisions 1. Warranty period (one year after the delivery date of the product) Should the product fail during the warranty period under normal usage according to the operation manual, we will repair or replace it free of charge. Please contact us using the contact information given below. 2. Cases not covered by the warranty ① After the period of warranty ① Failures due to incorrect usage, and unauthorized repairs and modifications ① Failures or damages due to moving, dropping etc. after purchase ① Failures or damages due to fire and natural disasters ① Failures not attributable to this product ① Fees for on-site service (visiting fee and technical fee) Consultation Shanghai Representative Office: Room B28/F, Huadu Mansion, No.838 Zhang Yang Road, Pudong New Area, Shanghai, China, ZIP 200122 Tatsuta Electric Wire & Cable Co., Ltd. Tel:0086-21-5058-5177 Fax:0086-21-5058-5199 Headquarter: 〒578-8585 Tokyo Branch: 〒210-0015 2-3-1, Iwata-cho, Higashi-Osaka City, Osaka Prefecture 3rd floor, Nihon-Seimei Kawasaki Bldg., 1-1, Minami-machi, Kawasaki Ward, Kawasaki City, Kanagawa Prefecture Tatsuta Electric Wire & Cable Co., Ltd. System Electronics Division Tatsuta Electric Wire & Cable Co., Ltd. System Electronics Division System Department System Division System Department, Sales Division Tel :0081-6-6721-3335 Fax :0081-6-6725-0018 Tel :0081-044-221-7691 Fax :0081-44-221-7695

Table of contents
Page
1. Installation and Handling Precautions ....................................................................................................... 1 1-1 Installation 1-2 Handling Precautions 2. External Connection ...................................................................................................................................... 1~3
2-1 Power Connection 2-2 Water Leakage Sensor Connection 2-3 Main Control Output Contact Connection 2-4 Individual Control Output Contact Connection
3. Operation Check ......................................................................................................................................... 3~5
3-1 Power On 3-2 Check for Break Detection Function 3-3 Check for Water Leakage Detection Function
4. Operation Chart ........................................................................................................................................... 6~7
4-1 Standard Operation Chart 4-2 Operation Chart When Alarm Hold Setting is Activated
5. Adjustment of Water Leakage Detection Precision ............................................................................ 8 5-1 Adjustment Method 6. Buzzer Setting................................................................................................................................................ 8
6-1 Buzzer Volume Setting 6-2 Buzzer Stop Setting
7. Maintenance and Periodic Inspection ....................................................................................................... 9 8. Specifications .................................................................................................................................................. 10
8-1. Ratings 8-2 Performances 8-3 Control Output Contact Specifications
◇Attached Drawing 1 Outside Dimensions of Water Leakage Detector (AD-AS-10DRM) ◇Attached Drawing 2 Parts Layout of Water Leakage Detector (AD-AS-10DRM) ◇Attached Drawing 3 Parts Layout of CPU Unit (AD-AS-CPU) ◇Attached Drawing 4 Parts Layout of 5-circuit expansion unit ◇Attached Drawing 5 Instructions to the Resistance/ Detection Precision Operation ◇Attached Drawing 6 Instructions to Operation Switchover DIP Switch (AD-AS-10DRM)
First of all, thank you very much for purchasing the Water Leakage Detector AD-AS-10DRM. Before using, read this operation manual carefully to ensure correct operation. Keep this manual in a convenient place for quick reference.
1.Installation and Handling Precautions 1-1. Installation 1)Remove CPU unit and 5-circuit expansion unit from the body case. (Use M3 screw)
In winter, pay special attention to static electricity and install by holding board edge. 2) Drill installation hole and connecting hole on the body case, do not leave cutting power, etc. 3) After the body case is installed in the setting place, install various units removed in 1). 4) Install the terminal block wires and connectors on the CPU unit and 5-circuit expansion unit.
1-2 Handling Precautions 1) Use the detector in an environment with a temperature range between -10˚C and 50˚C, and a humidity range between 35%. and 85%. 2)Do not use the detector in any location close to sources of vibration and harmful gas, and strong electromagnetic inductive power sources, which may lead to malfunction and failure. 3) Avoid using the socket lead as the power source as far as possible, and use fixed wire to connect power source. 4) After installation, be sure to conduct tests in conformance with the operation check items described in Chapter 3.
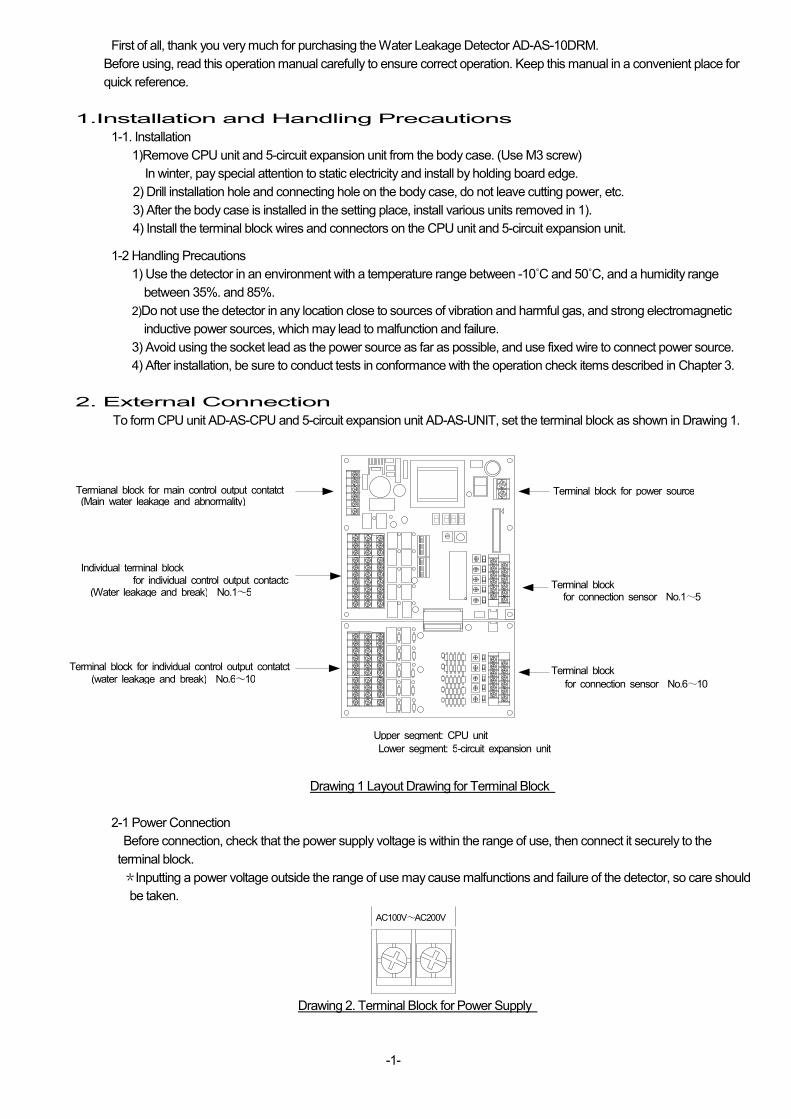
2. External Connection
To form CPU unit AD-AS-CPU and 5-circuit expansion unit AD-AS-UNIT, set the terminal block as shown in Drawing 1.
Drawing 1 Layout Drawing for Terminal Block
2-1 Power Connection Before connection, check that the power supply voltage is within the range of use, then connect it securely to the terminal block. *Inputting a power voltage outside the range of use may cause malfunctions and failure of the detector, so care should be taken.
Drawing 2. Terminal Block for Power Supply
-1-
Termianal block for main control output contatct (Main water leakage and abnormality)
Individual terminal block
(Water leakage and break) No.1~5
Terminal block for power source
Terminal block
Terminal block Terminal block for individual control output contatct (water leakage and break) No.6~10
Upper segment: CPU unit Lower segment: 5-circuit expansion unit
AC100V~AC200V
for individual control output contactc for connection sensor No.1~5
for connection sensor No.6~10

2-2 Water Leakage Sensor Connection (Refer to Attached Drawing 3 and Attached Drawing 4) Connect the water leakage sensor to the “S1”-“S10” of the sensor connection terminal block. The sensor has no polarity.
Example: For S1, connect the water leakage sensor to A-6 and B6. *Be sure to install break detection terminal on water leakage sensor. If it is the point sensor, use break detection terminal built-in product (AD-PA-R).
(Precautions) ◇ When sensor is not connected, set the DIP switch at the position “ON”. When not set “ON”, break alarm will be output. (Note) DIP switch dispatched by the factory has been set at the position “1”. ◇ When conducting wire change, etc., conduct it under the condition that the detector power source has been cut off. ◇ A-1 and B-1.are not used Do not connect water leakage sensor.
Drawing 3 Terminal Block for Sensor
2-3 Connection of Main Control Output Contact (Refer to Attached Drawing 3) Due to main output contact of water leakage and abnormalities (contact c), connect when external control is required.
Drawing 4 Main Control Output Contact
Water leakage contacts COM-NO: Closed when single-circuit water leakage is detected COM-NC: Open when single-circuit water leakage is detected Abnormality COM-NO: Closed when single-circuit water leakage or break is detected COM-NC: Open when single-circuit water leakage or break is detected
*Contact operation Setting SW2 on CPU unit can enable the alarm hold and the fail-safe function to be effective. * If the fail-safe function is effective, the contact will be operated reversely.
For details, refer to Attached Drawing 6 and the Operation Chart of Chapter 4. *Abnormal contact
Setting SW2 on CPU unit, the operation can be changed as activated only when the break and recovery occur. For details, refer to Attached Drawing 6.
-2-
S1
S2
S3
S4
S5
S6
S7
S8
S9
S10
ON
ON
ON
ON
ON
ON
ON
ON
ON
ON
1
1
1
1
1
1
1
1
1
1
CPU Unit Connection Sensor 1~5 Connection Sensor 6~10
5-Circuit Expansion Unit
Water leakage Abnormality
COM NC NO COM NC NO

2-4 Connection of Individual Control Output Contact (Refer to Attached Drawing 3 and Attached Drawing 4) Due to individual output of water leakage and break (contact c), connect when external control is required.
Drawing 5 Individual Control Output Contacts
Water leakage (Rn) COM-NO: Closed when water leakage is detected under n circuit COM-NC: Open when water leakage is detected under n circuit Break (Dn) COM-NO: Closed when break is detected under n circuit COM-NC: Open when break is detected under n circuit
*Contact operation Setting SW2 on the CPU unit, the function of alarm hold and fail-safe can be effective. * If the fail-safe function is effective, the contact will be operated reversely.
For details, refer to Attached Drawing 6 and the Operation Chart of Chapter 4.
3. Operation Check 3-1 Power-On (Refer to Attached Drawing 3) When the power source switch is at -, it is ON, when at o, it is OFF.
Set the CPU unit power source switch “ON” and check that the power source indication LED on the CPU unit is lighting up.
In the case that the LED does not light up, the detector may be out of order. Power off the detector promptly and contact the manufacturer.
Drawing 6 Power Switch
-3-
CPU Unit 5-Circuit Expansion Unit
Power Indicator LED Power Switch Thermistor
3-2 Check for Break Detection Function (Refer to Attached Drawing 3, Attached Drawing 4 and Drawing 3) 1) Check that the DIP switch for the circuit required to be checked has been set at “I”. 2) After powering off the detector, remove the water leakage sensor from the trunk terminal block and then power on the detector. 3) The buzzer sounds, the break Indicator LED flashes, and individual contacts (break) function. 4) After the operation check, power off the detector, and then connect the sensor and the DIP switch again.
*When water leakage sensor circuit is not connected, set the DIP switch at “ON”. *When water leakage sensor circuit is connected, set the DIP switch at “1”.
3-3 Check for Water Leakage Detection Function (Refer to Attached Drawing 3, Attached Drawing 4 and Drawing 3)
1) Check that the DIP switch for the circuit required to be checked has been set at “I”. 2) Drop tap water on the sensor. 3) The buzzer sounds, the water leakage Indicator LED flashes, and individual contacts (water leakage) function. 4) Wipe the tap water dropped on the sensor with dry rags, etc. and check that the water leakage status returns to normal.
-4-

4. Operation Chart 4-1 Standard Operation Chart
(* No setting of failure safety and alarm hold) For Operation Chart, refer to Drawing 7
Drawing 7 Operation Chart 1
Buzzer Operation Press the buzzer stop switch and the buzzer stops. However, if the same circuit or other circuits give the alarms again, the buzzer will re-sound. To make the buzzer not alarm, set SW2 and Bit 8 of the CPU unit ON.
Fail-safe function If the failure safety function is effective, the output contact will be operated reversely.
-5-
Power
Power Indicator LED
Indicator LED Test Switch
Water leakage detection function
Water leakage indicator LED
Break detection function
Break indicator LED
Buzzer Alarm Stop Switch
Buzzer stop indicator LED
Buzzer sounding
Total control output contact
Total control output contact
(water leakage: COM-NO)
(Abnormal: COM-NO)
(Water leakage: COM-NO)
(Break: COM-NO)
Individual control output contact
Individual control output contact
OFF
OFF
OFF
OFF
OFF
OFF
OFF
OFF
OFF
OFF OFF
OFF OFF OFF
ON
ON
ON
ON ON
ON ON ON
Lighting out
Lighting out
Lighting out
Lighting out
Lighting out Lighting out
Lighting out Lighting out
Lighting out Lighting out Lighting out
Lighting up
Lighting up Lighting up
Lighting up Lighting up
Lighting up Lighting up Lighting up
Open Open
Open Open Open
Open Open
Open Open
Closed
Closed
Closed
Closed
Closed

4-2 Operation Chart When Alarm Hold Setting is Activated (Water leakage, break indication, main control output contact and individual control output contacts are set to be alarm hold) For Operation Chart, refer to Drawing 8
Drawing 8 Operation Chart 2
When alarm holding is activated, the alarm status is held until the indicator LED test switch (alarm cancel switch) is pressed. Electric power failure or power off, alarm holding is canceled. * When alarm hold is not set for switch 1, 2 and 3, refer to Drawing 7 and Operation chart 1.
-6-
Power
Power Indicator LED
Indication LED test switch
Water leakage detection function
Water Leakage Indicator LED
Break detection function
Break Indicator LED
Buzzer alarm stop switch
Buzzer Stop Indicator LED
Buzzer sounding
Main control output contact
Main control output contact
(water leakage: COM-NO)
(Abnormal: COM-NO)
(water leakage: COM-NO)
(break: COM-NO)
Individual control output contact
Individual control output contact
OFF
OFF
OFF
OFF
OFF
OFF
OFF
OFF
OFF
OFF OFF
OFF OFF OFF
ON
ON
ON
ON ON
ON ON
Lighting out
Lighting out
Lighting out
Lighting out
Lighting
Lighting out Lighting out
Lighting up
Lighting up
Lighting up
Lighting up Lighting up
Open Open
Open Open
Open Open
Open Open
Closed
Closed
Closed
Closed
(alarm cancel switch)
Flashing twice
Flashing twice
Flashing twice
ON
out
Lighting out
out
Lighting
ON
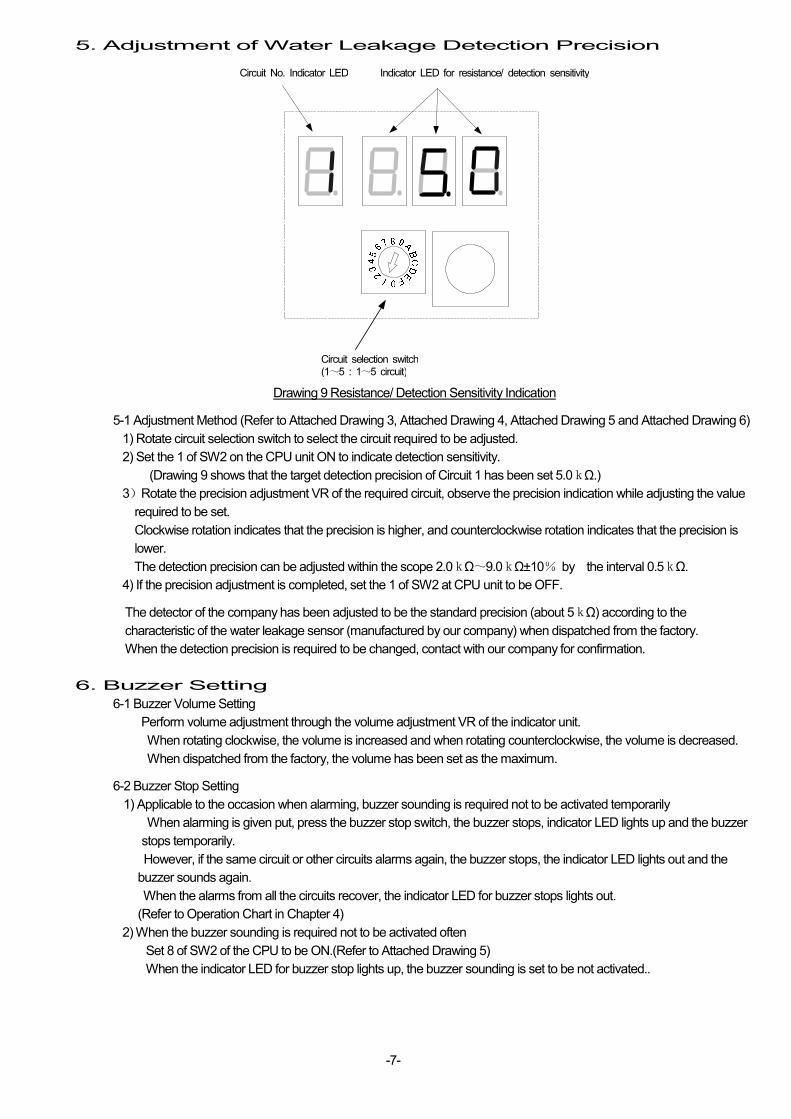
5. Adjustment of Water Leakage Detection Precision
Drawing 9 Resistance/ Detection Sensitivity Indication
5-1 Adjustment Method (Refer to Attached Drawing 3, Attached Drawing 4, Attached Drawing 5 and Attached Drawing 6) 1) Rotate circuit selection switch to select the circuit required to be adjusted. 2) Set the 1 of SW2 on the CPU unit ON to indicate detection sensitivity.
(Drawing 9 shows that the target detection precision of Circuit 1 has been set 5.0kΩ.) 3)Rotate the precision adjustment VR of the required circuit, observe the precision indication while adjusting the value required to be set. Clockwise rotation indicates that the precision is higher, and counterclockwise rotation indicates that the precision is lower. The detection precision can be adjusted within the scope 2.0kΩ~9.0kΩ±10% by the interval 0.5kΩ. 4) If the precision adjustment is completed, set the 1 of SW2 at CPU unit to be OFF.
The detector of the company has been adjusted to be the standard precision (about 5kΩ) according to the characteristic of the water leakage sensor (manufactured by our company) when dispatched from the factory. When the detection precision is required to be changed, contact with our company for confirmation.
6. Buzzer Setting
6-1 Buzzer Volume Setting Perform volume adjustment through the volume adjustment VR of the indicator unit.
When rotating clockwise, the volume is increased and when rotating counterclockwise, the volume is decreased. When dispatched from the factory, the volume has been set as the maximum.
6-2 Buzzer Stop Setting 1) Applicable to the occasion when alarming, buzzer sounding is required not to be activated temporarily
When alarming is given put, press the buzzer stop switch, the buzzer stops, indicator LED lights up and the buzzer stops temporarily.
However, if the same circuit or other circuits alarms again, the buzzer stops, the indicator LED lights out and the buzzer sounds again. When the alarms from all the circuits recover, the indicator LED for buzzer stops lights out. (Refer to Operation Chart in Chapter 4)
2) When the buzzer sounding is required not to be activated often Set 8 of SW2 of the CPU to be ON.(Refer to Attached Drawing 5) When the indicator LED for buzzer stop lights up, the buzzer sounding is set to be not activated..
-7-
Circuit No. Indicator LED Indicator LED for resistance/ detection sensitivity
Circuit selection switch (1~5 : 1~5 circuit)
7. Maintenance and Periodic Inspection ◇ When inspecting the facilities, conduct inspections in conformance with the operation check items described in Chapter 3. (Note)During inspection of the detector, the control output contacts are functioning, so if the control output contacts are used, adopt the measures such as underlay wiring in order not to affect other devices. ◇ Be careful to prevent oil-based substances, such as wax, from adhering to the sensor; this may repel water and interfere with correct detector operation. ◇ If the sensor is tainted with water absorbing substances, electrically conductive dirty water, etc., replace it with a new one.
-8-
8. Specifications 8-1. Ratings For ratings, see Table 1.
Table 1 Ratings Item Specification
Rated voltage AC100-200V (common to 50/60Hz) Range of fluctuation for supply
voltage ±10% of the rated voltage
Power consumption 20VA or less Control output contacts *Check Section 8-3, control output contact specifications
Applied voltage of sensor AC5.5V (maximum value) Working ambient temperature -10˚C~50˚C (no icing)
Working ambient humidity 35~85%RH (no condensation) 8-2 Performances For performances, refer to Table 2.
Table 2 Performances Item Specification
Number of sensor circuits 10 Water leakage detection
precision 5kΩ±10% (set at the range of 2-9kΩ± by interval 0.5 kΩ)
Precision in the case of recovery from water leakage
(detection precision+2kΩ)±10%
Break judgment precision 30kΩ±10% Surface operation panel
operation switch performance
For the buzzer alarm stop purpose For the indicator LED test use (alarm cancel)
Surface operation panel LED indication
Power indication, red: 1 (lighting up) Water leakage indication red: 10 (lighting up) Break indication red: 10 (lighting up) Indication during buzzer stop red: 1 (lighting up)
Alarm buzzer Maximum sound pressure: 70dB / 30 cm (Catalogue value by manufacturer), adjustable
Control output contact Contact configuration
◇Main contact (refer to Specification 8-3 ). Water leakage: 1c Abnormalities (water leakage or break): 1c ◇ Individual contact Water leakage: 1c×10 contacts Break: 1c×10 contacts
Withstand voltage AC1500V ( 50/60Hz ) / 1 minute (between power supply terminal and the body case)
Insulation resistance 10 kΩ or above (DC500V Megger ) / 1 minute (between power supply terminal and the body case)
Noiseproofing property ?1000V pulse width: 1μSEC (noise simulator ) /1 minute (between each phase and the grounding terminal)
Outside dimensions (W) 300 x (H) 330 x (D) 100 (unit: mm) (Refer to Attached Drawing 1) * Excluding the raised parts of hinges and handles.
Weight and color Approx. 5.5kg, gray ( 5Y7/1 semi-gloss) 8-3 Control output contact specifications For control output contacts, see Table 3
Table 3 Control Output Contact Specifications Item Resistance load Inductive load
Rated load AC125V 0.4A DC 30V 2.0A
AC125V 0.2A DC 30V 1.0A
Minimum applied load DC10mV 10μA (reference value) (Relay contacts: G6E-134P-US Catalogue values by OMRON Corporation)
-9-
330
Attached Drawing 1
Approved by Checked by Prepared by Scale
Unit
Prepared on
-/-
mm
2011.08
Tatsuta Electric Wire & Cable Co., Ltd.
Nam
e D
rawing
No. TTS-KS-W3150-2
Outer dimension drawing
AD-AS-10DRM of water leakage detector

Approved by Checked by Prepared by Scale
Unit
Prepared by
-/-
mm
2011.08
Tatsuta Electric Wire & Cable Co., Ltd.
Nam
e D
rawing
No.
Parts layout drawing
AD-AS-10DRM
TTS-KS-W3151-2
Attached Drawing 2
Power indicator LED
Break indicator LED
Water Leakage Indicator LED CPU unit
Buzzer
Buzzer alarm stop switch
Buzzer Stop Indicator LED Indicator Unit
Buzzer Volume Adjustment VR
Earth Wire Connection Terminal
Indicator LED switch (alarm cancel switch)
5-Circuit Expansion Unit
of water leakage detector

Wate
r Leakage
Abnom
al
CO
M
N
C
N
OC
OM
NC
NO
A-9
A-10
B-9
B-10
C-9
C-10
A-1
A-2
B-1
B-2
C-1
C-2 A
-6
A-5
A-4
A-3
A-2
A-1
B-6
B-5
B-4
B-3
B-2
B-1
Attached Drawing 3
Approved by Checked by Prepared by
Terminal block for
(Water leakage and abnormalities) Power Indcator LED Power Switch
Terminal block for
(water leakage and break) No.1~5
Sensor 1 Water leakage
Sensor 1 Break
Sensor 5 Water leakage
Snesor 5 Break
Scale
Unit
Prepared on
-/-
mm
2011.08
Nam
e D
rawing
No.
TATSUTA Electric Wire & Cable Co., Ltd.
Parts layout drawing
of CPU unit
TTS-KS-W3152-3
Power supply terminal block
DIP switch for operation setiong SW2,SW3
Indication of
Indicator unit connector
DIP switch setting for
*Setting OFF when connecting the sensor *Setting ON when not connecting the sensor
Detection precision adjustment
Terminal block for sensor No.1~5
A6-B6 Connection sensor 1
A5-B5 Connection sensor 2
A4-B4 Connection sensor 3
A3-B3 Connection sensor 4
A2-B2 Connection sensor 5
A1-B1 No connection
Expansion Unit Connector
Thermistor
main control output contacts
individual control output contacts
senser resistance/detection precision
sensor connection/non-connection
VR No.1~5
A
-9
A-10
B-9
B-10
C-9
C-10
A-1
A-2
B-1
B-2
C-1
C-2
A-6
A-5
A-4
A-3
A-2
A-1
B-6
B-5
B-4
B-3
B-2
B-1
Attached Drawing 3
Terminal block for (water leakage and break) No.6~10
Sensor 6 Water leakage
Sensor 6 Break
Sensor 10 Water leakage
Sensor 10 Break
CPU Unit Connector
DIP switch setting for *Setting OFF when connecting the sensor *Setting ON when not connecting the sens
Precision detection adjustment VR No.6~10
Terminal block for sensor No.6~10
A6-B6 Connection sensor 6
A5-B5 Connection sensor 7
A4-B4 Connection sensor 8
A3-B3 Connection sensor 9
A2-B2 Connection sensor 10
A1-B1 No connection
TTS-KS-W3153-2
Approved by Checked by Prepared by Scale
Unit
Prepared on
Tatsuta Electric Wire & Cable Co., Ltd.
Nam
e D
rawing
No.
-/-
mm
2011.08
Parts layout drauwing of
5-Circuit Expansion Unit
individual control output contacts
sensor connection/non-connection
4 C
23
56
9 AB
DEF
12
34
56
78
ON
Attached Drawing 5
Approved by Checked by Prepared by Scale
Unit
Prepared on
Tatsuta Electric Wire & Cable Co., Ltd.
-/-
mm
2011.08
Nam
e D
rawing
No.
Instructions to resistance/
TTS-KS-W3154-2
Circuit No. Indicator LED *1. Indicator LED for resistance/ detection precisio
Circuit Selection Switch (1~A : 1~10 Circuit)
Indicator LED for resistance / detection sensitivity lights out Has been set ”0” when dispatched from the factory, circuit No. Indicator
*2. Test Switch
*1. Indicate that the circuit selection switch has selected the circuit information.
SW2 No. 1 of DIP is set
ON ⇒⇒indicate detection sensitivity OFF ⇒ indicate sensor resistance E.g. Sensor resistance for No. 1 circuit is indicated as 20.0kΩ.
*2. Check the operation of individual control output contacts concerning indicator
Under this condition, when pressing the test switch, break indicator LED,
(water leakage and abnormality) for the No. 1 circuit are activated.
unit LED corresponding to the circuit selected through circuit selection switch.
water leakage indictor LED, individual control output contact (water leakage and break) and main control output contact
detection precision operation
12
34
56
78
ON
12
34
56
78
ON
Attached Drawing 6
Approved by Checked by Prepared by Scale
Unit
Prepared on
-/-
mm
2011.08
Nam
e
Tatsuta Electric Wire & Cable Co., Ltd.
Instructions to operation switchover DIP switch
AD-AS-10DRM
TTS-KS-W3155-3
No. Factory Operation
OFF
OFF
OFF
OFF
OFF
OFF
OFF
OFF
1
2
3
4
5
6
7
8
Resistance / detection sensitivity switchover OFF : Indicate the resistance of the sensor ON : Indicate detection sensitivity Main relay alarm hold OFF : Not activated ON : Activated
OFF : Not activated ON : Activated
OFF : Not activated ON : Activated
OFF : Not activated ON : Activated
OFF : Not activated ON : Activated
Individual relay alarm hold
Indicator LED alarm hold
Fail- safe performance (main relay) *relay operation when the sensor is normal.
Failure safe performance (individual relay) *relay operation when the sensor is normal.
Abnormal contact operation switchover OFF : Abnormal contact operation when water leakage and break occur ON : Abnormal contact operation only when break occurs Buzzer operation setting OFF : Activated ON : Not activated
*Changing setting of SW2, allows operations such as indication and relaInadvertent setting change may result in unintended operations, so care should be taken.
*SW3 is the setting dispatched from the factory, do not change. (For AD-AS-10DRM, please set OFF)
setting
Draw
ing N
o.