multifunction oven - 75cm pyrolytic - fulgor
TRANSCRIPT
MULTIFUNCTION OVEN - 75CMPyrolytic
MODEL OVP7-10

2
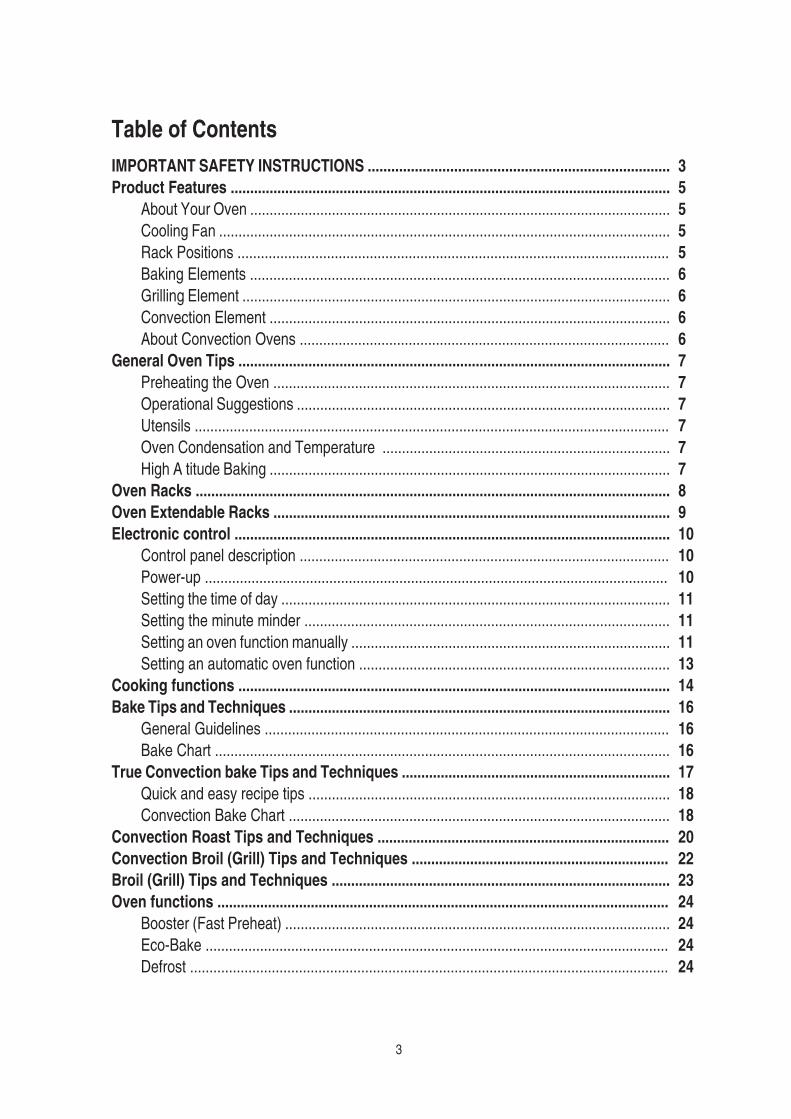
About Your Oven ............................................................................................................Cooling Fan ....................................................................................................................Rack Positions ...............................................................................................................Baking Elements ............................................................................................................Grilling Element ..............................................................................................................Convection Element .......................................................................................................About Convection Ovens ...............................................................................................
Preheating the Oven ......................................................................................................Operational Suggestions ................................................................................................Utensils ..........................................................................................................................Oven Condensation and Temperature ..........................................................................High A titude Baking .......................................................................................................
Control panel description ...............................................................................................Power-up .......................................................................................................................Setting the time of day ....................................................................................................Setting the minute minder ..............................................................................................Setting an oven function manually ..................................................................................Setting an automatic oven function ................................................................................
General Guidelines ........................................................................................................Bake Chart .....................................................................................................................
Quick and easy recipe tips .............................................................................................Convection Bake Chart ..................................................................................................
Booster (Fast Preheat) ...................................................................................................Eco-Bake .......................................................................................................................Defrost ...........................................................................................................................
3

Door and commands lock for children safety (pyro)........................................................Buzzer volume ..............................................................................................................Night mode .....................................................................................................................
If You Need Assistance or Service .................................................................................
Tools You Will Need .......................................................................................................Power Requirements .....................................................................................................Choosing Oven Location ................................................................................................Steps For Installation .....................................................................................................
Wiring Requirements .....................................................................................................Connecting The Oven To The Mains ..............................................................................
4
- When using this appliance, basic safety precautions should always be followed to
1. . 2. - Be sure your appliance is properly installed and grounded by a
3. .
4. . 5. - Children should not be left alone or unattended in area
appliance. 6.
to cool. 7.
8.
other bulky cloth. 9.
10. near surface units.
11.
12. rfood.
13. - Build-up of pressure ay cause the container
14. . 15.
5
element in the oven. 16.
. 17. - The door gasket is essential for a good seal. Care should
be taken not to rub, damage, or move gasket. 18. - No commercial oven cleaner or oven liner protective coating
of any kind should be used in or around any part of the oven. 19. . 20. - Remove oven racks and other utensils. 21. - Always check the position of
positions. 22. - Do not store items of interest to children in cabinets above the oven - children
climbing on the oven to reach items could be burned or seriously injured. 23. . 24. This appliance is not intended for use by persons (including children) with
reduced physical, sensory or mental capabilities, or lack of experience and knowledge, unless they have been given supervision or instruction concerning use of the appliance by a person responsible for their safety.
25. - Only use the temperature probe recommended for this oven.
6
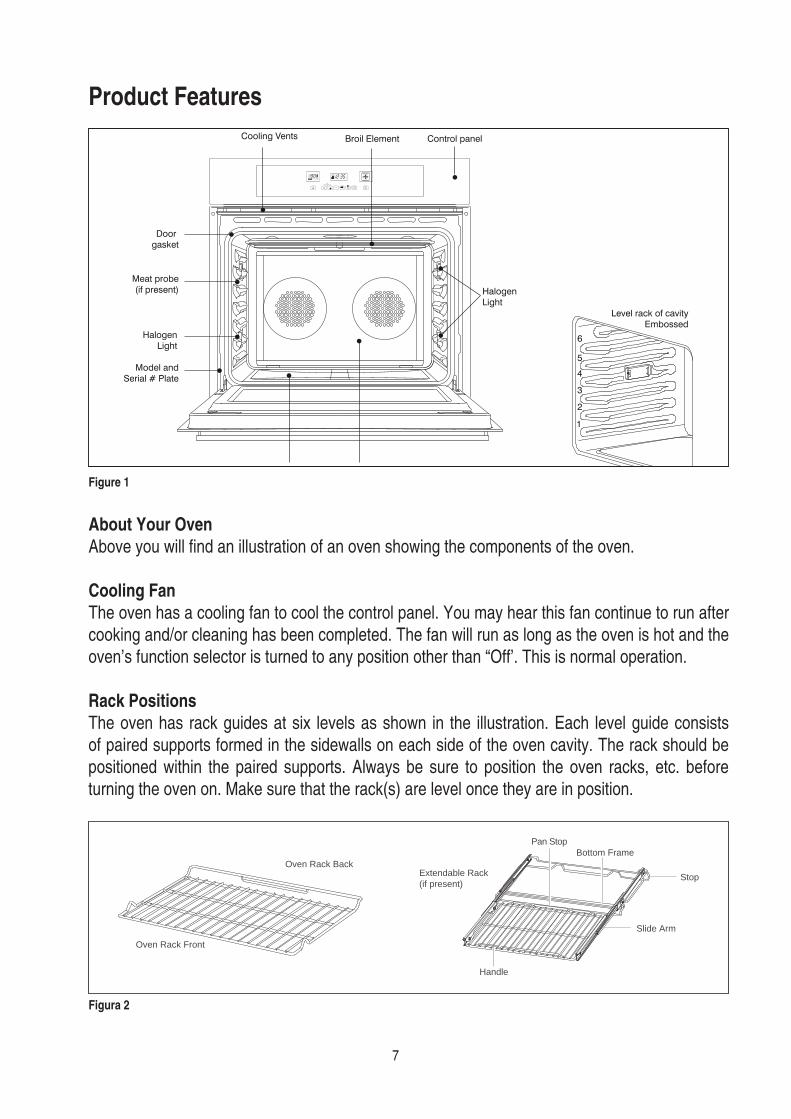
C
Model andSerial # Plate
B El
HalogenLight
Broil Element Control panel
HalogenLight
Level rack of cavityEmbossed
4
6
5
3
2
1
Cooling Vents
Meat probe(if present)
Door gasket
min
c
You will
level be
be
Extendable Rack (if present)
Stop
Pan StopBottom Frame
Slide Arm
Handle
Oven Rack Front
Oven Rack Back
7

The oven uses two elements for baking: one located at the top of the oven and the second located
The grilling element of the oven is located at the top of the oven Do not touch the heating element or let oven gloves touch the grilling Never use a towel or cloth for an oven
The convection elements (not visible) and fans are located at the back of the oven This element and fan combination performs the cooking when in the convection bake When in
In a conventional the heat sources on and off to maintain an average temperature in the oven As the temperature rises and gentle air currents are produced
and In this convection the heat is a fan that provides continuous
and advanced design to create the convection In standard convection a fan circutates the hot air around the The is characterized the combination
of an additional heating element located around the convection fan and the venting panel that distributes heated air in three dimensions: along the the top and the full depth of the oven
This aids in maintaining a more even oven temperature throughout the oven The circulating air aids in speeding up the baking process and cooks the food more controlling the movement of heated convection cooking produces
browned foods that are on the outside moist cooking works best for breads and pastries as well as meats and foods like angel food
and cream puffs rise higher than in a conventional Meats and tender while the outside is and using foods can be cooked at a lower temperature and cooking times can be When using this the standard oven temperature should be lowered 25°F Foods requiring less cooking time should be checked earlier than For best foods should be cooked
in pans to take advantage of the forced air When using the
8
• Preheat the oven when using the Bake, Convection Bake and Convection Roast modes. • Use BOOST mode when a short time is necessary to preheat the oven. • Selecting a higher temperature does not shorten the preheat time. • Preheating is necessary for good results when baking cakes, cookies, pastry and breads. • Preheating will help to sear roasts and seal in meat juices. • Place oven racks in their proper position before preheating. • During preheating, the selected cooking temperature is always displayed. •
• Use the cooking charts as a guide. • Do not set pans on the open oven door. • Use the interior oven lights to view the food through the oven door window rather than opening
the door frequently.
• Glass baking dishes absorb heat. Reduce oven temperature 25 °F (15 °C) when baking in glass. • he pan will help determine the
amount of browning that will occur. • eat, resulling in lighter, more
delicate browning. Cakes and cookies require this type of utensil. • Dark, rough or dull pans will absorb heat resulling in a browner, crisper crust. Use this type for
pies. • For brown, crisp crusts, use dark non-slick / anodized or dark, dull metal utensils or glass bake
ware. Insulated baking pans may increase the length of cooking time. • Do not cook with the empty broiler pan in the oven, as this could change cooking performance.
Store the broil pan outside of the oven.
• It is normal for a certain amount of moisture to evaporate from the food during any cooking process. The amount depends on the moisture content of the food. The moisture may condense on any surface cooler than the inside of the oven, such as the control panel.
• Your new oven has an electronic temperature sensor that allows maintaining the selected temperature accurately. Your previous oven may have had a mechanical thermostal that drifted gradually over time to a higher temperature. It is normal that you may need to adjust your favorite recipes when cooking in a new oven.
• When cooking at high altitude, recipes and cooking time will vary from the standard.
9

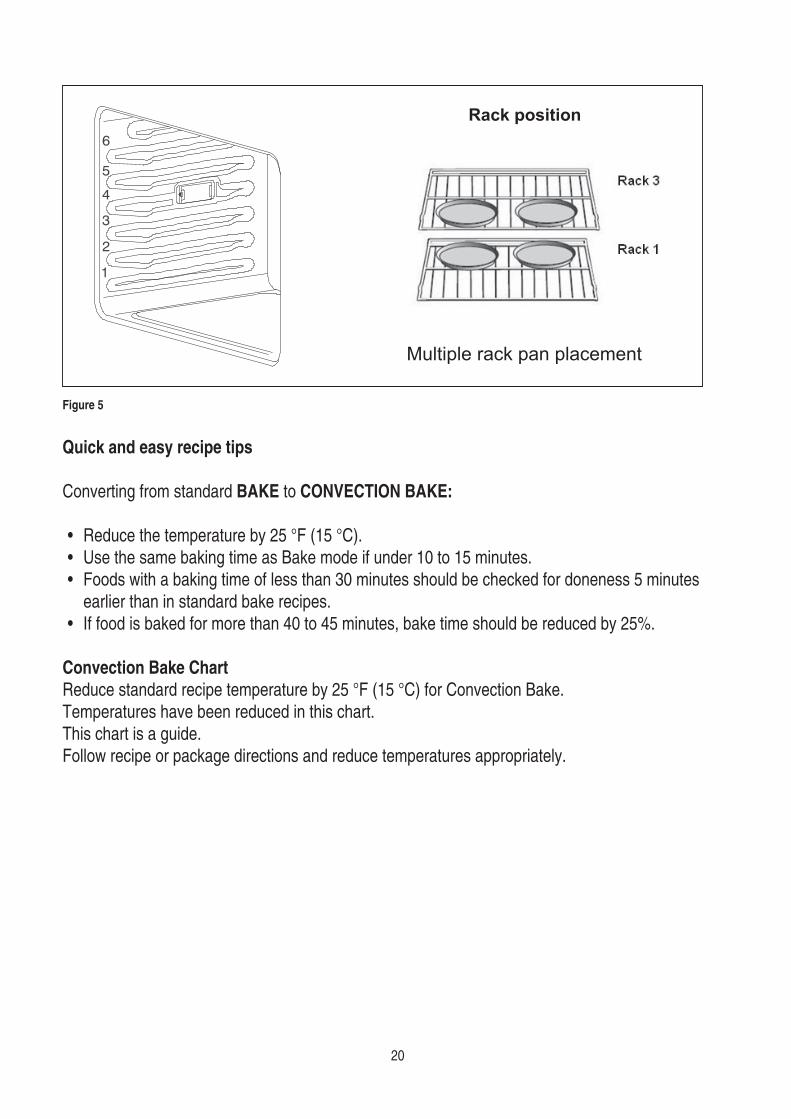
• The oven has rack guides at six levels as shown in the illustration on Page 5. • Rack positions are numbered from the bottom rack guide (#1) to the top (#6).• Check cooking charts for best rack positions to use when cooking. • Each level guide consists of paired supports formed in the walls on each side of the oven
cavity. • Always be sure to position the oven racks before turning on the oven. Make sure that the
racks are level once they are in position. Please refer to illustration on Page 5 if there is any question as to which side is the front of
the rack. • The racks are designed to stop when pulled forward to their limit.
Never use aluminum foil to cover the oven racks or to line the oven. It can cause damage to the oven liner if heat is trapped under the foil.
1. Pull rack forward
2. Lift rack up at front and then remove it
1. Place rear of rack between rack level guides
2. While lifting front of rack, slide rack in all the way while towering the front
10
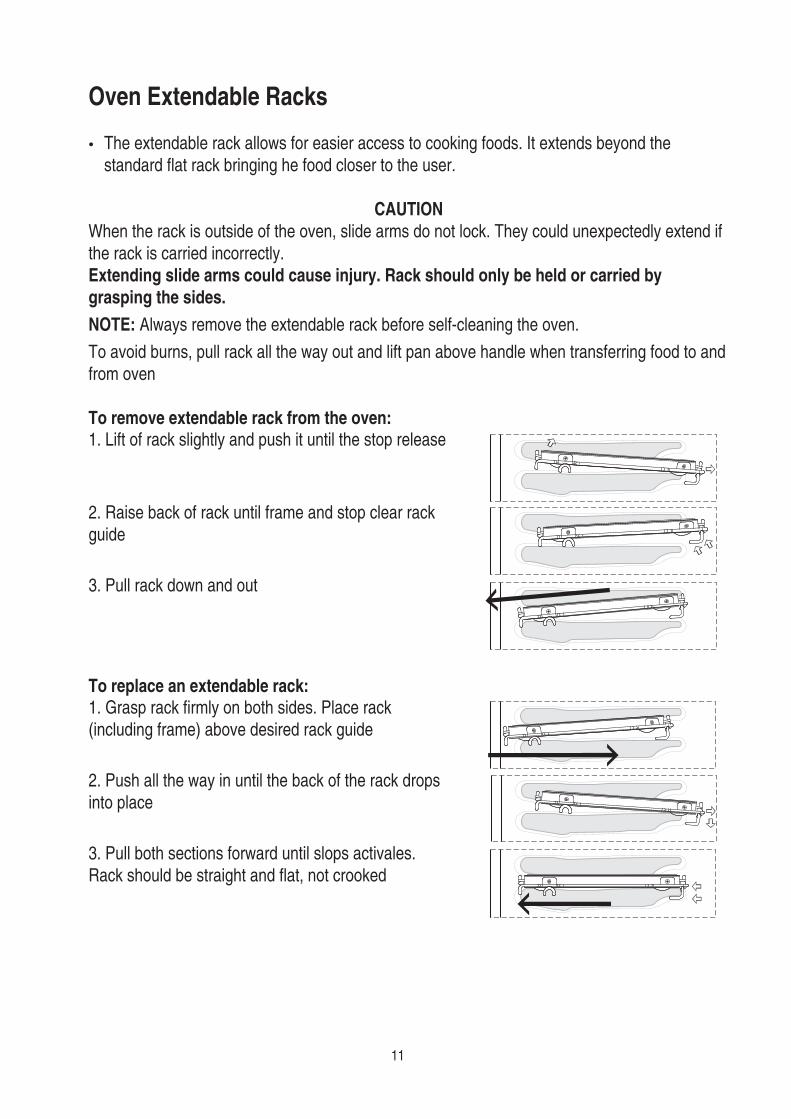
• The extendable rack allows for easier access to cooking foods. It extends beyond the
the rack is carried incorrectly.
11
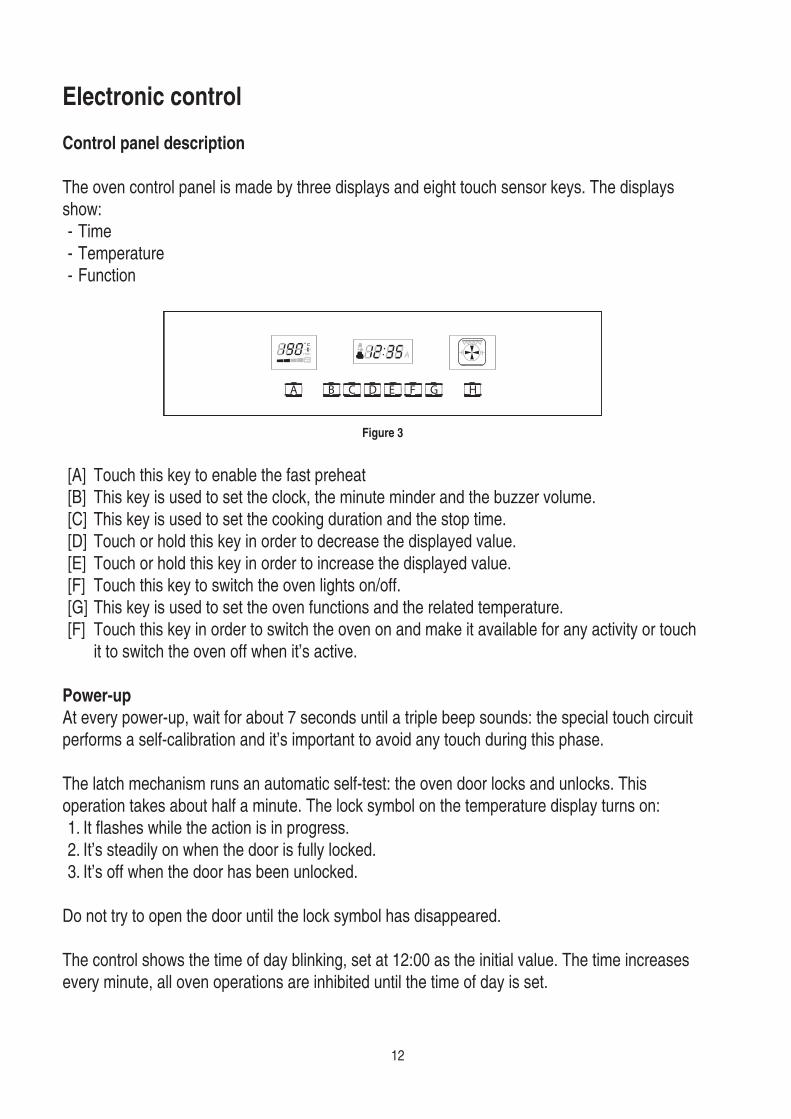
The oven control panel is made by three displays and eight touch sensor keys. The displays show: - Time- Temperature- Function
min
[A] Touch this key to enable the fast preheat [B] This key is used to set the clock, the minute minder and the buzzer volume. [C] This key is used to set the cooking duration and the stop time. [D] Touch or hold this key in order to decrease the displayed value. [E] Touch or hold this key in order to increase the displayed value. [F] Touch this key to switch the oven lights on/off. [G] This key is used to set the oven functions and the related temperature. [F] Touch this key in order to switch the oven on and make it available for any activity or touch
it to switch the oven off when it’s active.
At every power-up, wait for about 7 seconds until a triple beep sounds: the special touch circuit performs a self-calibration and it’s important to avoid any touch during this phase.
The latch mechanism runs an automatic self-test: the oven door locks and unlocks. This operation takes about half a minute. The lock symbol on the temperature display turns on: 1. It ashes while the action is in progress. 2. It’s steadily on when the door is fully locked. 3. It’s off when the door has been unlocked.
Do not try to open the door until the lock symbol has disappeared.
The control shows the time of day blinking, set at 12:00 as the initial value. The time increases every minute, all oven operations are inhibited until the time of day is set.
12
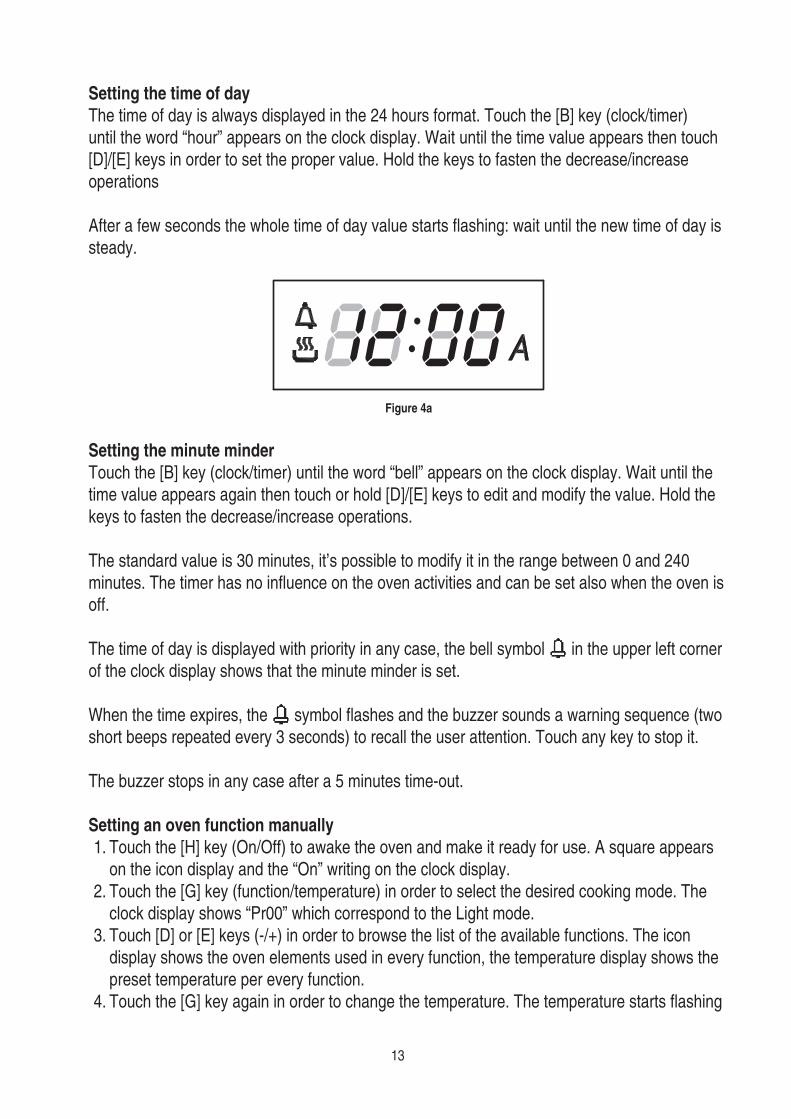
The time of day is always displayed in the 24 hours format. Touch the [B] key (clock/timer) until the word “hour” appears on the clock display. Wait until the time value appears then touch [D]/[E] keys in order to set the proper value. Hold the keys to fasten the decrease/increase operations
After a few seconds the whole time of day value starts ashing: wait until the new time of day is steady.
Touch the [B] key (clock/timer) until the word “bell” appears on the clock display. Wait until the time value appears again then touch or hold [D]/[E] keys to edit and modify the value. Hold the keys to fasten the decrease/increase operations.
The standard value is 30 minutes, it’s possible to modify it in the range between 0 and 240 minutes. The timer has no in uence on the oven activities and can be set also when the oven is off.
The time of day is displayed with priority in any case, the bell symbol in the upper left corner of the clock display shows that the minute minder is set.
When the time expires, the symbol ashes and the buzzer sounds a warning sequence (two short beeps repeated every 3 seconds) to recall the user attention. Touch any key to stop it.
The buzzer stops in any case after a 5 minutes time-out.
1. Touch the [H] key (On/Off) to awake the oven and make it ready for use. A square appears on the icon display and the “On” writing on the clock display.
2. Touch the [G] key (function/temperature) in order to select the desired cooking mode. The clock display shows “Pr00” which correspond to the Light mode.
3. Touch [D] or [E] keys (-/+) in order to browse the list of the available functions. The icon display shows the oven elements used in every function, the temperature display shows the preset temperature per every function.
4. Touch the [G] key again in order to change the temperature. The temperature starts ashing
13
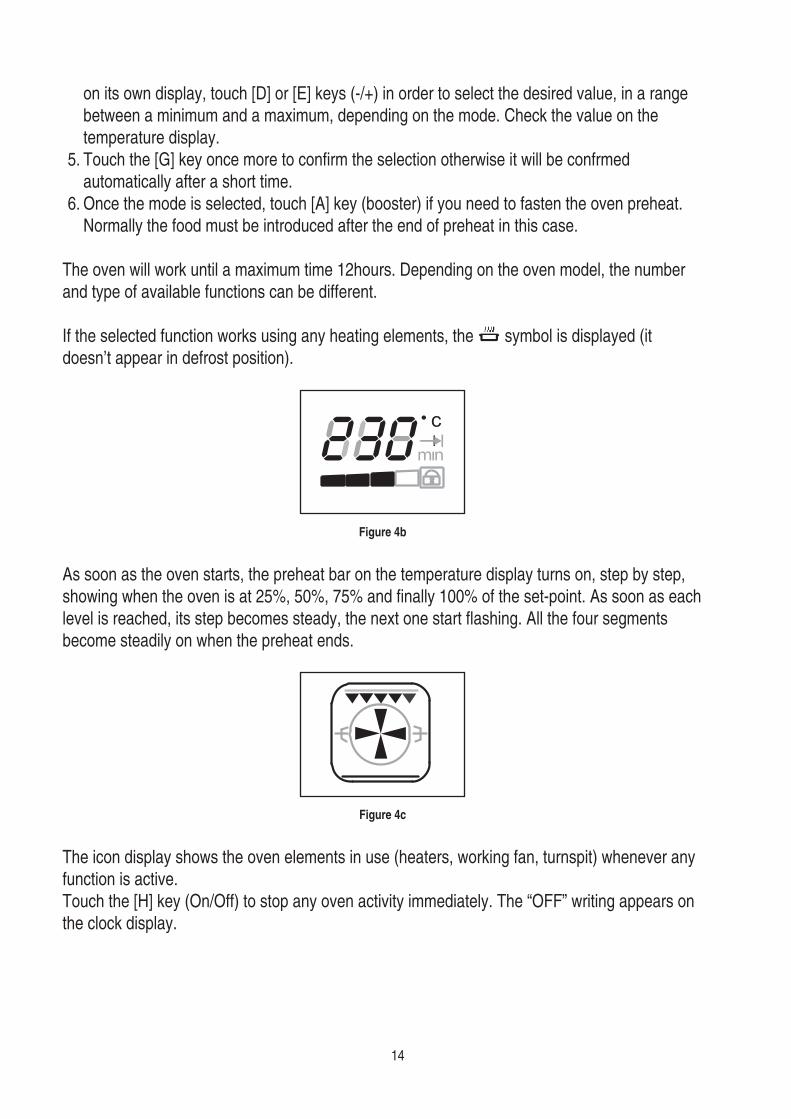
on its own display, touch [D] or [E] keys (-/+) in order to select the desired value, in a range between a minimum and a maximum, depending on the mode. Check the value on the temperature display.
5.
6.
The oven will work until a maximum time 12hours. Depending on the oven model, the number
symbol is displayed (it
min
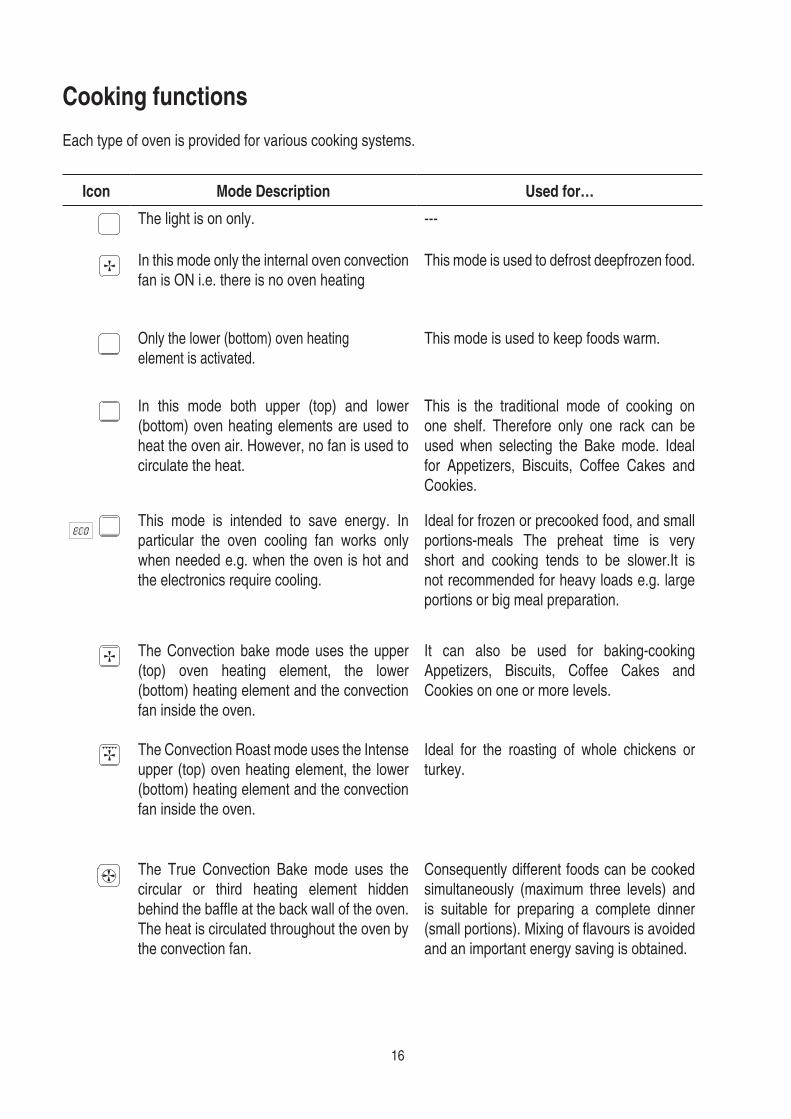
As soon as the oven starts, the preheat bar on the temperature display turns on, step by step,
become steadily on when the preheat ends.
the clock display.
14

After having selected a function as described before, the control can be programmed in order to set timed cooking activities. The time program remains active even if the function is changed (exception: pyrolyse). The following options are available:
1. Timed cooking setting the cooking time (duration). 2. Timed cooking setting the end of cooking time (stop time). 3. Delayed cooking setting duration and stop time.
Touch the [C] in order to toggle between cooking duration (cook time) and end of cooking time (stop time): the words “dur” or “End” are displayed respectively. Touch [D] or [E] keys (-/+) to edit the duration or the stop time when the proper word is displayed:
1. When the word “dur” is displayed, the control shows 30’ as the standard cooking duration. Touch [D] or [E] in order to set the actually desired cooking time in a range between 0 and 240 minutes. As soon as the value is accepted the display switches to clock mode. It will show the time of day, the pot symbol and the letter to indicate that a timed cooking is active. The end of cooking time is updated automatically.
2. When the word “End” is displayed, the control shows the current time as the initial stop time. In order to set the actually desired end of cooking time in a 24 hours range. As soon as the value is accepted the display switches to clock mode. It will show the time of day, the pot symbol and the letter to indicate that a timed cooking is active. The cooking time is updated automatically.
3. Repeat the same operations of point 1 then touch [C] key until End appears. The control shows the “current time + cooking time” as the initial stop time. It’s not possible to lower the end of cooking time below this value.
Touch [D] or [E] keys (-/+) in order to set the actually desired end of cooking time in a
then it will show the time of day and the letter to indicate that a delayed cooking has been programmed. As soon as the delay time expires, the oven starts and works for the programmed cooking time. The symbol is displayed.
At the end of any timed activity the control shuts down the oven, the buzzer sounds a warning sequence (two short beeps repeated every 3 seconds) to recall the user attention, for a maximum time of 5 minutes and makes the time related icons ( ,
Touch any keys to silent the buzzer and reset the warning message. The buzzer doesn’t sound between 22:00 and 8:00 (night mode). Touch the [H] key in order to stop any activity.
15
Each type of oven is provided for various cooking systems.
The light is on only. ---
In this mode only the internal oven convection fan is ON i.e. there is no oven heating
This mode is used to defrost deepfrozen food.
Only the lower (bottom) oven heatingelement is activated.
This mode is used to keep foods warm.
In this mode both upper (top) and lower (bottom) oven heating elements are used to heat the oven air. However, no fan is used to circulate the heat.
This is the traditional mode of cooking on one shelf. Therefore only one rack can be used when selecting the Bake mode. Ideal for Appetizers, Biscuits, Coffee Cakes and Cookies.
This mode is intended to save energy. In particular the oven cooling fan works only when needed e.g. when the oven is hot and the electronics require cooling.
Ideal for frozen or precooked food, and small portions-meals The preheat time is very short and cooking tends to be slower.It is not recommended for heavy loads e.g. large portions or big meal preparation.
The Convection bake mode uses the upper (top) oven heating element, the lower (bottom) heating element and the convection fan inside the oven.
It can also be used for baking-cooking Appetizers, Biscuits, Coffee Cakes and Cookies on one or more levels.
The Convection Roast mode uses the Intense upper (top) oven heating element, the lower (bottom) heating element and the convection fan inside the oven.
Ideal for the roasting of whole chickens or turkey.
The True Convection Bake mode uses the circular or third heating element hidden behind the at the back wall of the oven. The heat is circulated throughout the oven by the convection fan.
Consequently different foods can be cooked simultaneously (maximum three levels) and is suitable for preparing a complete dinner (small portions). Mixing of is avoided and an important energy saving is obtained.
16
The Ring + Down Convection mode uses the lower + circular heating elements and internal fan.
Useful for multilevel cooking of and pizzas.
The Convection Down mode uses the lower (Bottom) heating element and internal fan.
suitable for preparing a complete dinner (small portions). Mixing of is avoided
Ideal for chicken quarters or chicken breasts.
The Grill mode uses intense heat radiated from the upper (top) heating element.
Ideal for preparing browning and grilling.
The standard time is 1.30 h and can be changed. (see page 13)
PYRO or self-cleaning mode. Here the oven is cleaned burning-off cooking
residues at high temperature (about 475 °C) from 1h to 3h. During the self-cleaning all fumes produced are and then expelled to ambient.
17
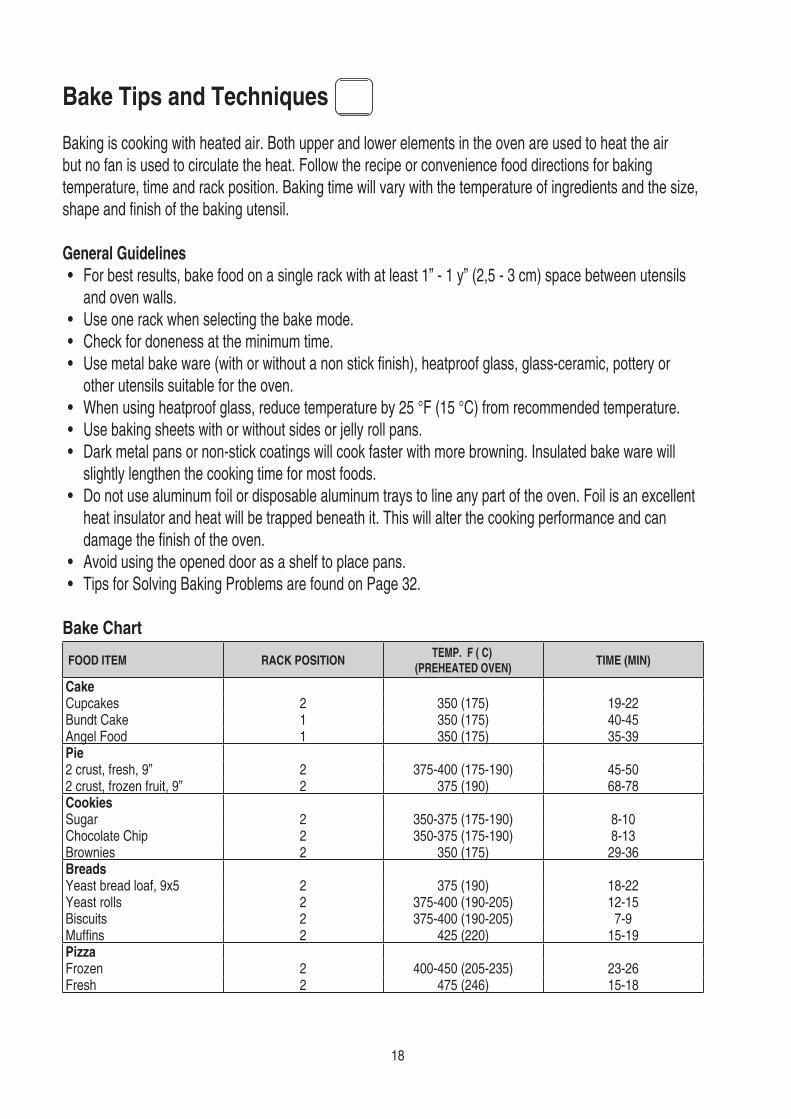
Baking is cooking with heated air. Both upper and lower elements in the oven are used to heat the air but no fan is used to circulate the heat. Follow the recipe or convenience food directions for baking temperature, time and rack position. Baking time will vary with the temperature of ingredients and the size,
• For best results, bake food on a single rack with at least 1” - 1 y” (2,5 - 3 cm) space between utensils and oven walls.
• Use one rack when selecting the bake mode. • Check for doneness at the minimum time. • ass-ceramic, pottery or
other utensils suitable for the oven.• When using heatproof glass, reduce temperature by 25 °F (15 °C) from recommended temperature. • Use baking sheets with or without sides or jelly roll pans. • Dark metal pans or non-stick coatings will cook faster with more browning. Insulated bake ware will
slightly lengthen the cooking time for most foods. • Do not use aluminum foil or disposable aluminum trays to line any part of the oven. Foil is an excellent
heat insulator and heat will be trapped beneath it. This will alter the cooking performance and can
• Avoid using the opened door as a shelf to place pans. • Tips for Solving Baking Problems are found on Page 32.
Cupcakes 2 350 (175) 19-22Bundt Cake 1 350 (175) 40-45Angel Food 1 350 (175) 35-39
2 crust, fresh, 9” 2 375-400 (175-190) 45-502 crust, frozen fruit, 9” 2 375 (190) 68-78
Sugar 2 350-375 (175-190) 8-10Chocolate Chip 2 350-375 (175-190) 8-13Brownies 2 350 (175) 29-36
Yeast bread loaf, 9x5 2 375 (190) 18-22Yeast rolls 2 375-400 (190-205) 12-15Biscuits 2 375-400 (190-205) 7-9
2 425 (220) 15-19
Frozen 2 400-450 (205-235) 23-26Fresh 2 475 (246) 15-18
18
Reduce recipe baking temperatures by 25 °F (15 °C). • For foods should be cooked uncovered, in low-sided pans to take advantage
of the forced air circulation. Use shiny aluminum pans for best results unless otherwise
• Heatproof glass or ceramic can be used. Reduce temperature by another 25 °F (15 °C) when using heatproof glass dishes for a total reduction of 50 °F (30 °C).
• Dark may be used. Note that food may brown faster when using dark metal bake ware.
• The of racks used is determined by the height of the food to be cooked. • Baked the most parl, cook extremely well in convection. Don’t try to convert recipes
such as custards, quiches, pumpkin pie , or convection-heating process. Use the regular Bake mode for these foods.
• Multiple for oven meals is done on rack positions 1, 2, 3 and 4. All four racks can be used for cookies, biscuits and appetizers. - 2 Rack baking: Use positions 1 and 3. - 3 rack baking: Use positions 2, 3 and 4 or 1, 3 and 5. - When baking four cake layers at the same time, stagger pans so that one pan is not directly
above another. For best results, place cake son front of upper rack and back of lower rack (See graphic at right). Allow 1”
- 1 y” (2,5 - 3cm).air space around pans. • Converling recipe can be easy. Choose a recipe that will work well in convection. • Reduce and cooking time if necessary. It may take some lrial and error to
achieve a perfect resull. Keep track of your technique for the next time you want to prepare the recipe using convection.
Tips for Solving Baking Problems are found on Page 32.
Appetizers Biscuits Coffee CakesCookies (2 to 4 racks) Yeast BreadsCream PuffsPopovers Casseroles and One-Dish EntreésOven Meals (rack positions 1, 2, 3)
ingue-Topped Desserts, Angel Food Cakes, Chiffon Cakes)
19
best results,
metal pans
numberitems, for
rack cooking
your ownthe temperature
Converting from standard to
• Reduce by 25 °F (15 °C).• Use baking time as Bake mode if under 10 to 15 minutes.• Foods time of less than 30 minutes should be checked for doneness 5 minutes
earlier than in standard bake recipes.• If baked for more than 40 to 45 minutes, bake time should be reduced by 25%.
Reduce standard recipe temperature by 25 °F (15 °C) for Convection Bake. Temperatures have been reduced in this chart.This chart is a guide.Follow recipe or package directions and reduce temperatures appropriately.
20
the temperaturethe same
with a baking
food is
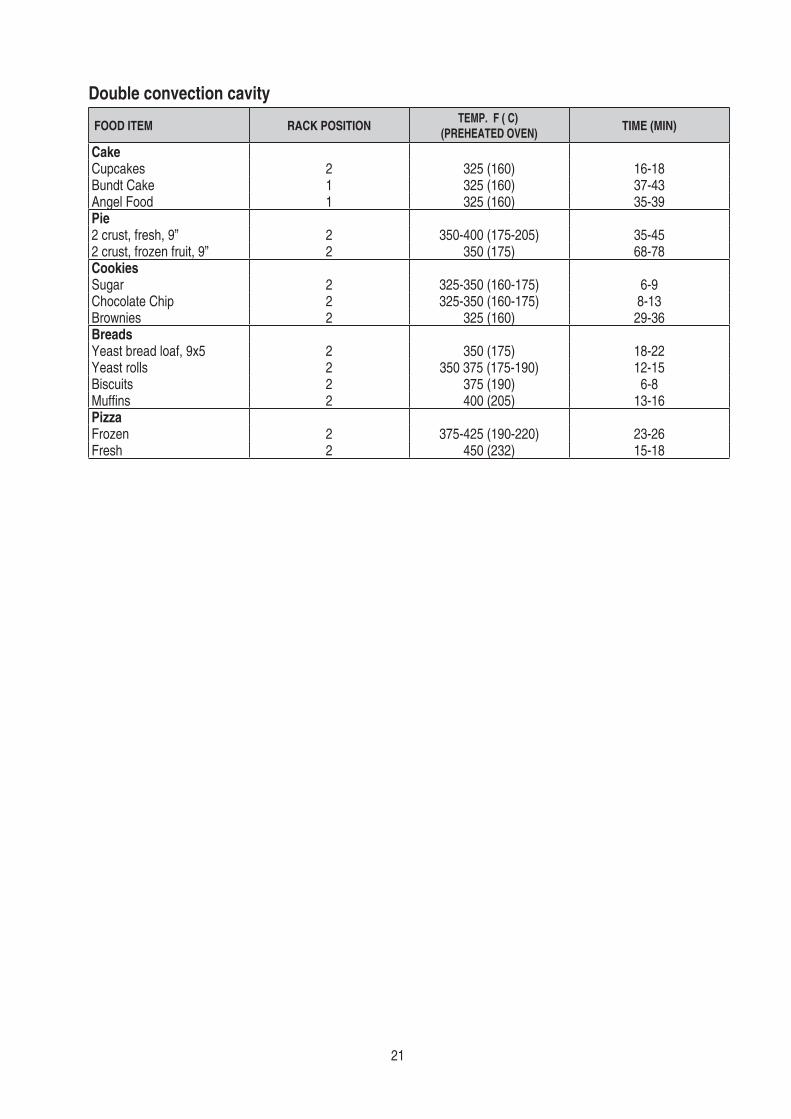
Cupcakes 2 325 (160) 16-18Bundt Cake 1 325 (160) 37-43Angel Food 1 325 (160) 35-39
2 crust, fresh, 9” 2 350-400 (175-205) 35-452 crust, frozen fruit, 9” 2 350 (175) 68-78
Sugar 2 325-350 (160-175) 6-9Chocolate Chip 2 325-350 (160-175) 8-13Brownies 2 325 (160) 29-36
Yeast bread loaf, 9x5 2 350 (175) 18-22Yeast rolls 2 350 375 (175-190) 12-15Biscuits 2 375 (190) 6-8
2 400 (205) 13-16
Frozen 2 375-425 (190-220) 23-26Fresh 2 450 (232) 15-18
21
• Preheat Roast. • Roast uncovered pan. • When whole chickens or turkey, tuck wings behind back and loosely tie legs with
kitchen string. • Use broil pan for roasting uncovered. • Use or a meat thermometer to determine the internal doneness on “END”
temperature (see cooking chart). • Double-check the internal temperature of meatlpoultry by inserting meat thermometer into
another position. • When a large roast or turkey, roasting pan may need to be rotated during roasting
time. This will allow for more even cooking. Large birds may also need to be covered with foil (and pan roasted) during a portion of the roasting time to prevent overbrowning.
Converting from standard to • Temperature does not have to be lowered.• Roasts, of meat and poultry generally take 10-20% less cooking time. Check
doneness early.• Casseroles or pot roasts that are baked covered in CONVECTION ROAST will cook in about
the same amount of time.• The safe temperature for in poultry is 165 °F (75 °C).
After removing the item from the oven, cover loosely with foil for 10 to 15 minutes before carving ure by 5° to 10°F (3° to 6° C)
22
for Convectionin a low-sided,roasting
the 2-piecethe probe
roasting
large cuts
minimum
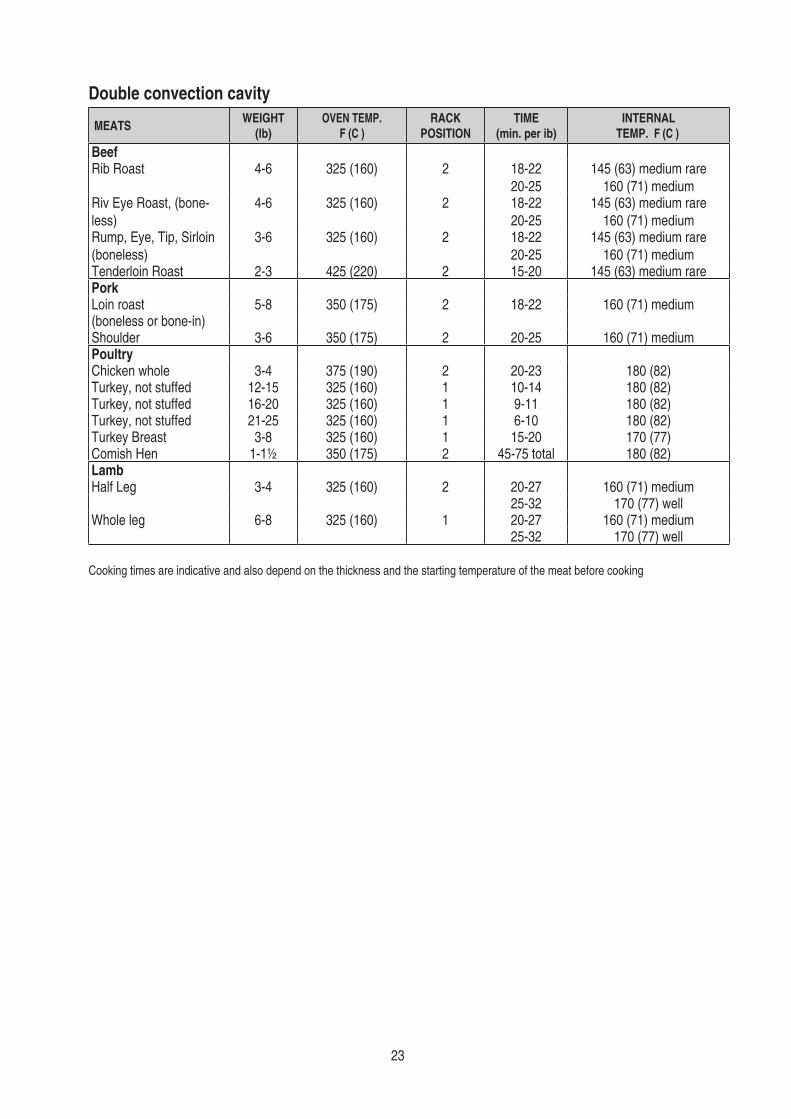
Rib Roast 4-6 325 (160) 2 18-2220-25
145 (63) medium rare160 (71) medium
Riv Eye Roast, (bone-less)
4-6 325 (160) 2 18-2220-25
145 (63) medium rare160 (71) medium
Rump, Eye, Tip, Sirloin (boneless)
3-6 325 (160) 2 18-2220-25
145 (63) medium rare160 (71) medium
Tenderloin Roast 2-3 425 (220) 2 15-20 145 (63) medium rare
Loin roast 5-8 350 (175) 2 18-22 160 (71) medium(boneless or bone-in)Shoulder 3-6 350 (175) 2 20-25 160 (71) medium
Chicken whole 3-4 375 (190) 2 20-23 180 (82)Turkey, not stuffed 12-15 325 (160) 1 10-14 180 (82)Turkey, not stuffed 16-20 325 (160) 1 9-11 180 (82)Turkey, not stuffed 21-25 325 (160) 1 6-10 180 (82)Turkey Breast 3-8 325 (160) 1 15-20 170 (77)Comish Hen 1-1½ 350 (175) 2 45-75 total 180 (82)
Half Leg 3-4 325 (160) 2 20-27 160 (71) medium25-32 170 (77) well
Whole leg 6-8 325 (160) 1 20-27 160 (71) medium25-32 170 (77) well
Cooking times are indicative and also depend on the thickness and the starting temperature of the meat before cooking
23
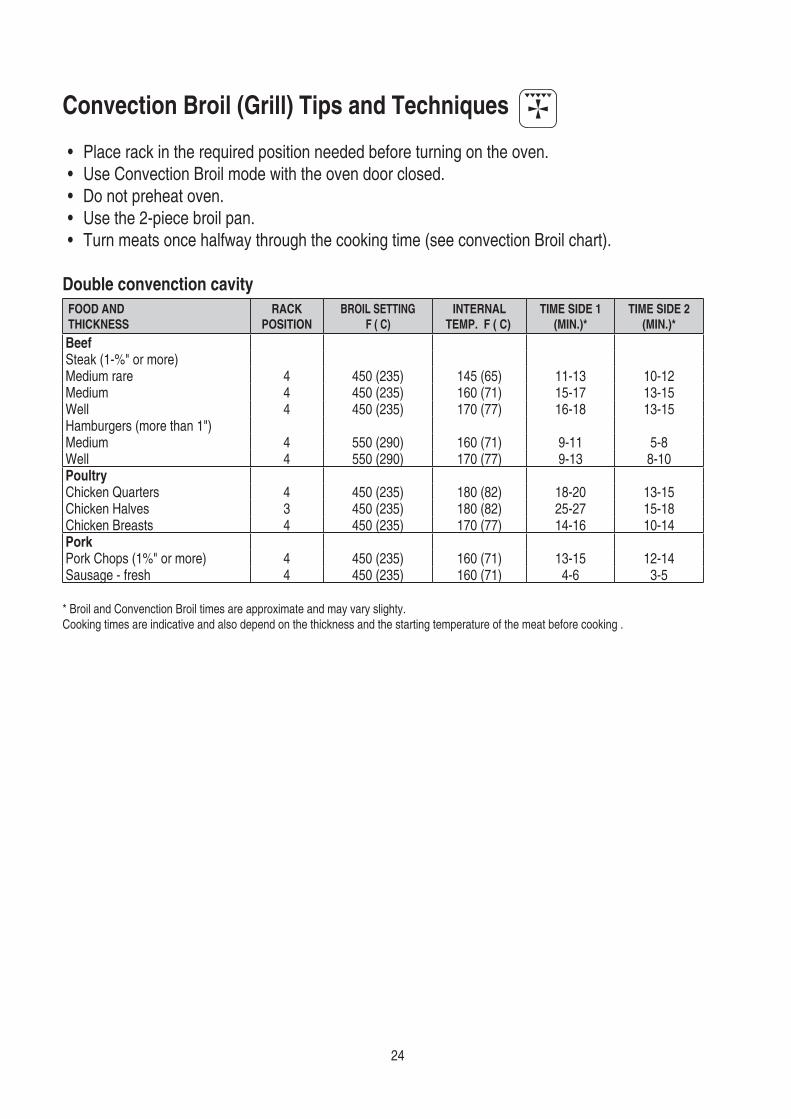
• in the required position needed before turning on the oven.• Use Convection Broil mode with the oven door closed.• Do not preheat oven. • Use the 2-piece broil pan.• Turn meats once halfway through the cooking time (see convection Broil chart).
Steak (1-%" or more) Medium rare 4 450 (235) 145 (65) 11-13 10-12Medium 4 450 (235) 160 (71) 15-17 13-15Well 4 450 (235) 170 (77) 16-18 13-15Hamburgers (more than 1") Medium 4 550 (290) 160 (71) 9-11 5-8Well 4 550 (290) 170 (77) 9-13 8-10
Chicken Quarters 4 450 (235) 180 (82) 18-20 13-15Chicken Halves 3 450 (235) 180 (82) 25-27 15-18Chicken Breasts 4 450 (235) 170 (77) 14-16 10-14
Pork Chops (1%" or more) 4 450 (235) 160 (71) 13-15 12-14Sausage - fresh 4 450 (235) 160 (71) 4-6 3-5
* Broil and Convenction Broil times are approximate and may vary slighty.Cooking times are indicative and also depend on the thickness and the starting temperature of the meat before cooking .
24
Place rack
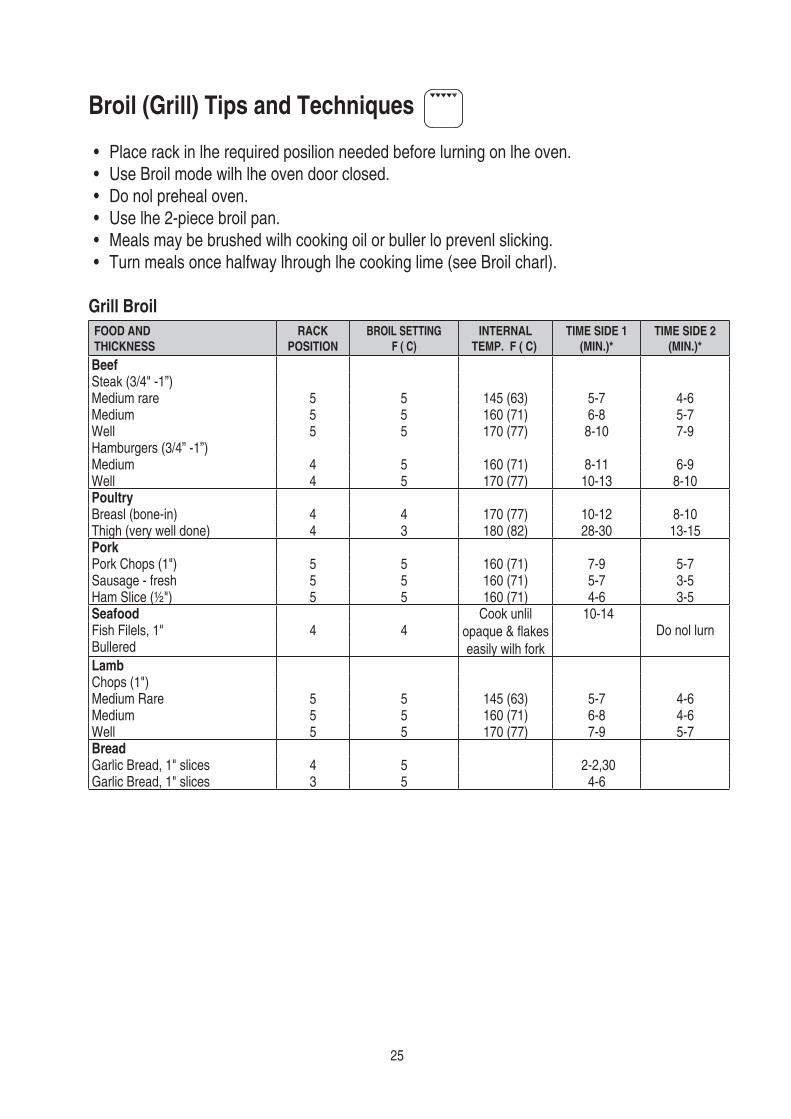
• Place rack in lhe required posilion needed before lurning on lhe oven.• Use Broil mode wilh lhe oven door closed.• Do nol preheal oven.• Use lhe 2-piece broil pan.• Meals may be brushed wilh cooking oil or buller lo prevenl slicking.• Turn meals once halfway lhrough lhe cooking lime (see Broil charl).
Steak (3/4" -1”) Medium rare 5 5 145 (63) 5-7 4-6 Medium 5 5 160 (71) 6-8 5-7 Well 5 5 170 (77) 8-10 7-9 Hamburgers (3/4” -1”) Medium 4 5 160 (71) 8-11 6-9 Well 4 5 170 (77) 10-13 8-10
Breasl (bone-in) 4 4 170 (77) 10-12 8-10Thigh (very well done) 4 3 180 (82) 28-30 13-15
Pork Chops (1") 5 5 160 (71) 7-9 5-7 Sausage - fresh 5 5 160 (71) 5-7 3-5 Ham Slice (½") 5 5 160 (71) 4-6 3-5
Cook unlil
easily wilh fork
10-14 Fish Filels, 1" 4 4 Do nol lurnBullered
Chops (1") Medium Rare 5 5 145 (63) 5-7 4-6 Medium 5 5 160 (71) 6-8 4-6 Well 5 5 170 (77) 7-9 5-7
Garlic Bread, 1" slices 4 5 2-2,30Garlic Bread, 1" slices 3 5 4-6
25
The control can manage many cooking functions, their number and availability depends on the oven model. The temperature range is between 75°C and 250°C for most functions. Preset temperatures are mainly 190°C for convection modes, 210°C for thermal modes and 230°C for grill functions. Exceptions are Eco-Bake (preset=190°C), Pyrolyse ( xed 475°C), and warming mode which range is between 50°C and 120°C.
This function allows to fasten the oven preheating, saving time. When the oven temperature reaches the set-point a continuous acoustic warning signal, about 5 seconds long, recall the attention of the user. Fast Preheat is not available in Grill, Pyrolyse, Eco-Bake, Keep Warm and Defrost. Touch [A] key to enable the function, the writing “Prh” appears on the clock display, the “°C” symbol on the temperature display ashes until the oven reaches the set temperature.
This function is de ned in order to obtain a consistent energy saving. The cooling fan is initially off and turns on only when the inner parts temperature gets high, then it works with the heating elements. Cooking might be a little bit slower than the standard Bake, especially when the oven is heavily loaded. When this function is active, the writing “Eco” ashes every 5 seconds on the temperature display.
This function is used to defrost frozen food in a short time. It doesn’t heat up the oven, only the convection fan works. The temperature display shows dEF to indicate that this special mode is active.
This is an additional safety functions. The door latch mechanism, managed automatically during pyrolyse can be actuated manually by the user in order to lock the oven door and prevent children from having free access to the oven. Hold and keys simultaneously for about 3 seconds to lock/unlock the door manually. Also the keyboard is disabled while this function is actuated: the display shows a key on the clock display in case of any attempt to touch inactive keys.
26
The buzzer volume can be set, when the control is in stand-by mode, touching rst the [B] key until the writing “L1”, ”L2” or ”L3” is displayed (depending on the set volume) then touching the [D]/[E] key. At any touch the buzzer sounds a double beep, selecting the volume out of three available levels.
This mode is active between 22:00 and 8:00 overnight. During this period, the buzzer is always silent and the background blue light of the clock display reduces its brightness. Touching any keys will not cause any acoustic feedback.
consuming manual scrubbing of the oven interior During self-cleaning the oven uses very high temperature [approx 470 °C (885 °F)] to burn away soil and grease The fumes produced during
residue will be left on the bottom of the oven after completion of self-cleaning Once the oven
instructions on use of the self-clean (pyrolytic) function on page 27.
Make sure all controls are OFF and the oven is cool before cleaning Failure to do so can result in burns or electrical shock.
For parts of the oven other than the oven cavity the following cleaning methods are recommended: • - Use warm soapy water or spray glass cleaner to clean the control panel
With a soft cloth or sponge wash rinse and dry the control panel thoroughly DO NOT use abrasive cleaners or steel wool pads hese will damage the surface.
• - To clean use a standard cleaner designed for stainless steel We
Follow manufacture instructions DO NOT
• - Use warm soapy water or spray glass cleaner to clean the glass door surface With a soft cloth or sponge rinse and dry the door front(s) and handle(s) thoroughly DO NOT use abrasive cleaners or steel wool pads These will damage the surface.
• - Use warm soapy water With a steel wool pad wash rinse and thoroughly dry the pan and/or rack(s) DO NOT clean the grill pans or racks by leaving them
27
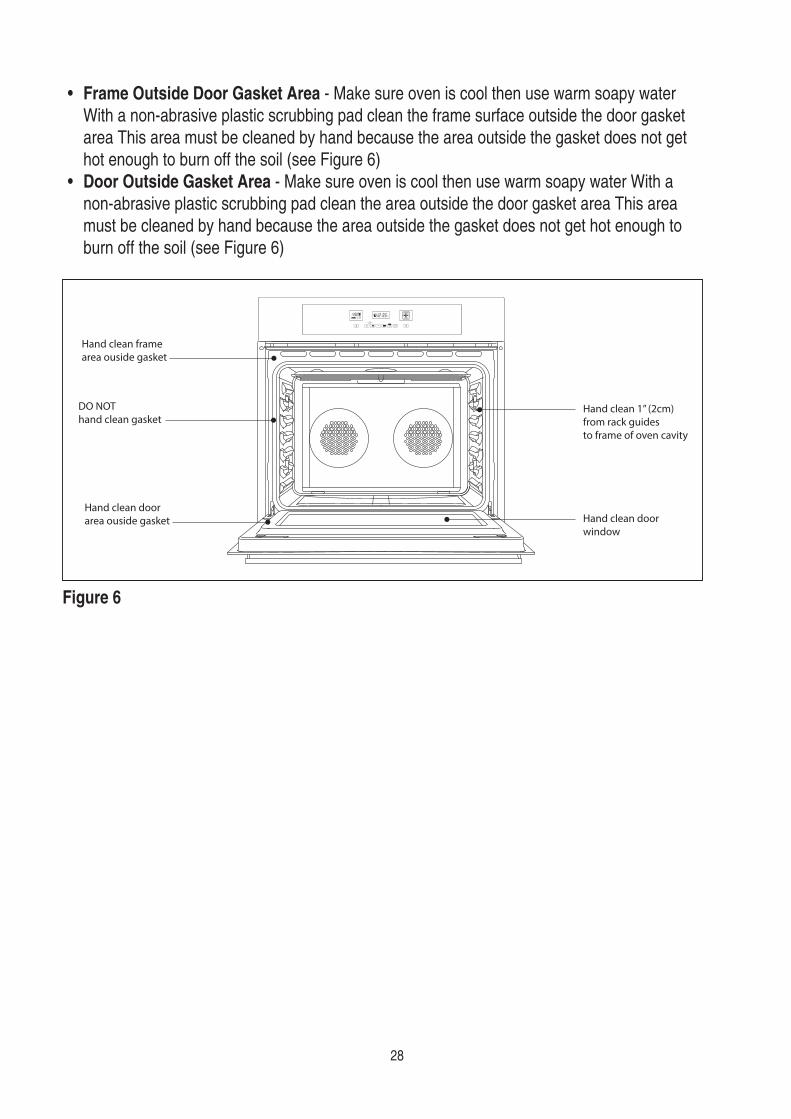
• - Make sure oven is cool then use warm soapy water With a non-abrasive plastic scrubbing pad clean the frame surface outside the door gasket area This area must be cleaned by hand because the area outside the gasket does not get hot enough to burn off the soil (see Figure 6)
• - Make sure oven is cool then use warm soapy water With a non-abrasive plastic scrubbing pad clean the area outside the door gasket area This area must be cleaned by hand because the area outside the gasket does not get hot enough to burn off the soil (see Figure 6)
Hand clean framearea ouside gasket
DO NOThand clean gasket
Hand clean doorarea ouside gasket
Hand clean 1” (2cm)from rack guidesto frame of oven cavity
Hand clean doorwindow
min
c
28
Prior to taking any action for cleaning, make sure the apparatus is cut-out from the mains. It is recommended that the oven interior be frequently cleaned. In particular, it should be cleaned every time the grill is used to prevent excessive fouling of the oven interior that may generate fumes or odours during subsequent cooking. Abrasive detergents and steam cleaning equipment should not be used for cleaning.
Ovens provided with the hot air system are less subject to dirt inside.
Although it is not necessary to perform the cleaning operation each time the oven has been used, do not let the oven get too dirty. Before performing self-cleaning, take out all accessories (grills, dishes, pans) to avoid damaging them, remove large cooking residues and then close the door, ensuring that it is closed properly.
Usually self-cleaning requires 2.30 to 3 hours according to the amount of residue to be removed.
When the cycle is and the oven has remove the burned-off residues of the self-cleaning cycle with a damp cloth.
Select the proper program to start a cleaning cycle. The temperature display show the writing and the icon display shows the elements in use. The clock display starts showing “Pyro” for
a few seconds.
The clean time can be set according to the same rules of the automatic functions, and therefore the pyrolitic cycle can be delayed.The maximum allowed clean time is 3 hours, the minimum 1 hour. The standard time is 1h:30min, the clock display shows . At the end of the self-cleaning activity the display shows “---“
29
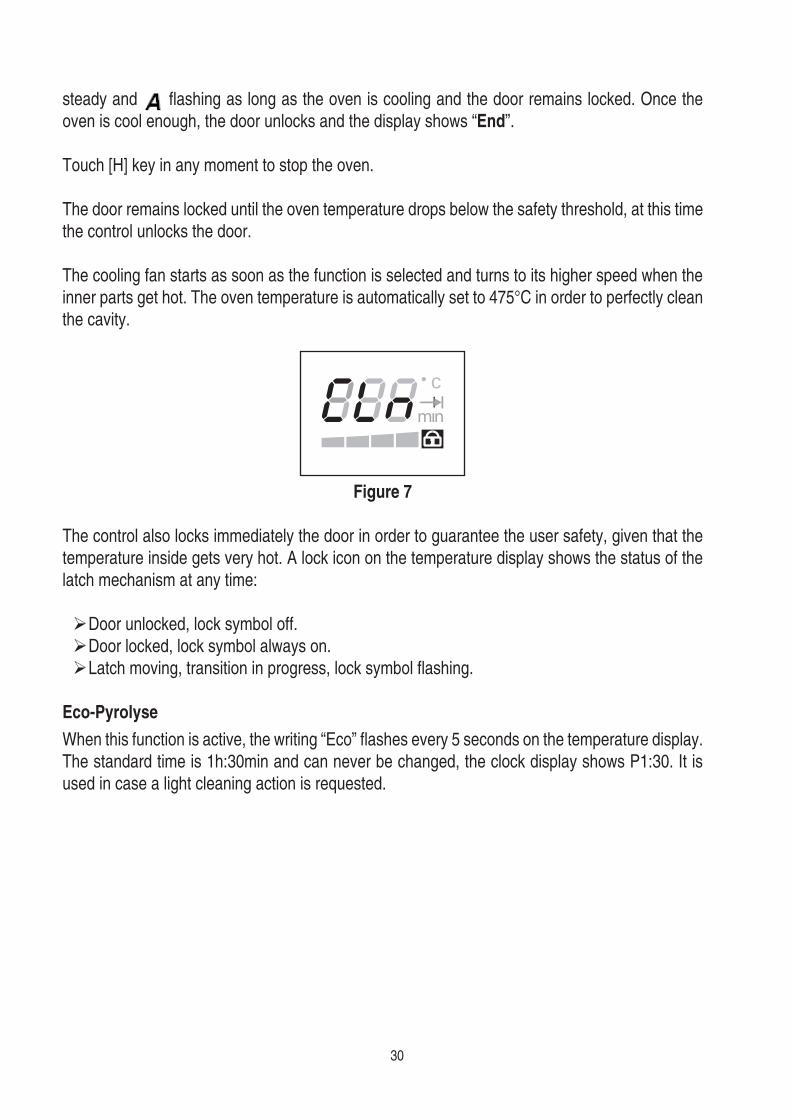
steady and as as oven and door locked. Once ”.
door locked oven safety at
fan starts as soon as selected and to oven set to 475°C order to clean
min
c
control also locks door order to very A lock on of
every 5 seconds on standard and can never be clock It
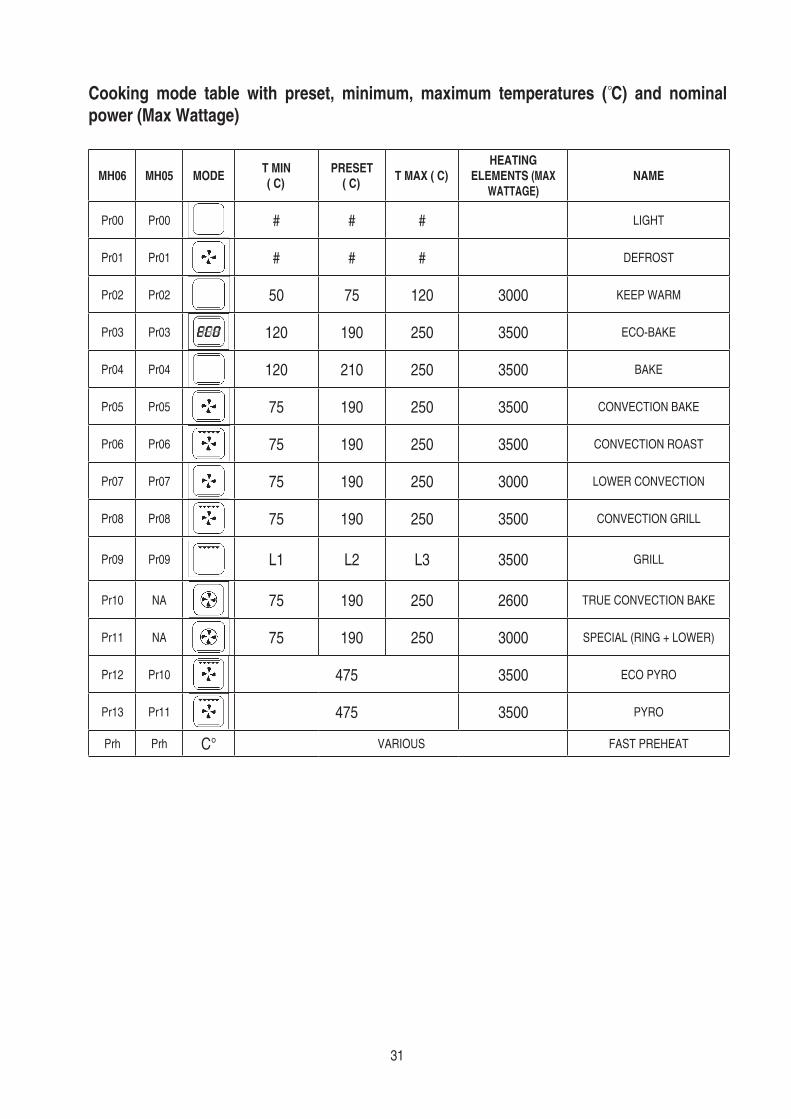
Pr00 Pr00 # # # LIGHT
Pr01 Pr01 # # # DEFROST
Pr02 Pr02 50 75 120 3000 KEEP WARM
Pr03 Pr03 120 190 250 3500 ECO-BAKE
Pr04 Pr04 120 210 250 3500 BAKE
Pr05 Pr05 75 190 250 3500 CONVECTION BAKE
Pr06 Pr06 75 190 250 3500 CONVECTION ROAST
Pr07 Pr07 75 190 250 3000 LOWER CONVECTION
Pr08 Pr08 75 190 250 3500 CONVECTION GRILL
Pr09 Pr09 L1 L2 L3 3500 GRILL
Pr10 NA 75 190 250 2600 TRUE CONVECTION BAKE
Pr11 NA 75 190 250 3000 SPECIAL (RING + LOWER)
Pr12 Pr10 475 3500 ECO PYRO
Pr13 Pr11 475 3500 PYRO
Prh Prh C° VARIOUS FAST PREHEAT
31
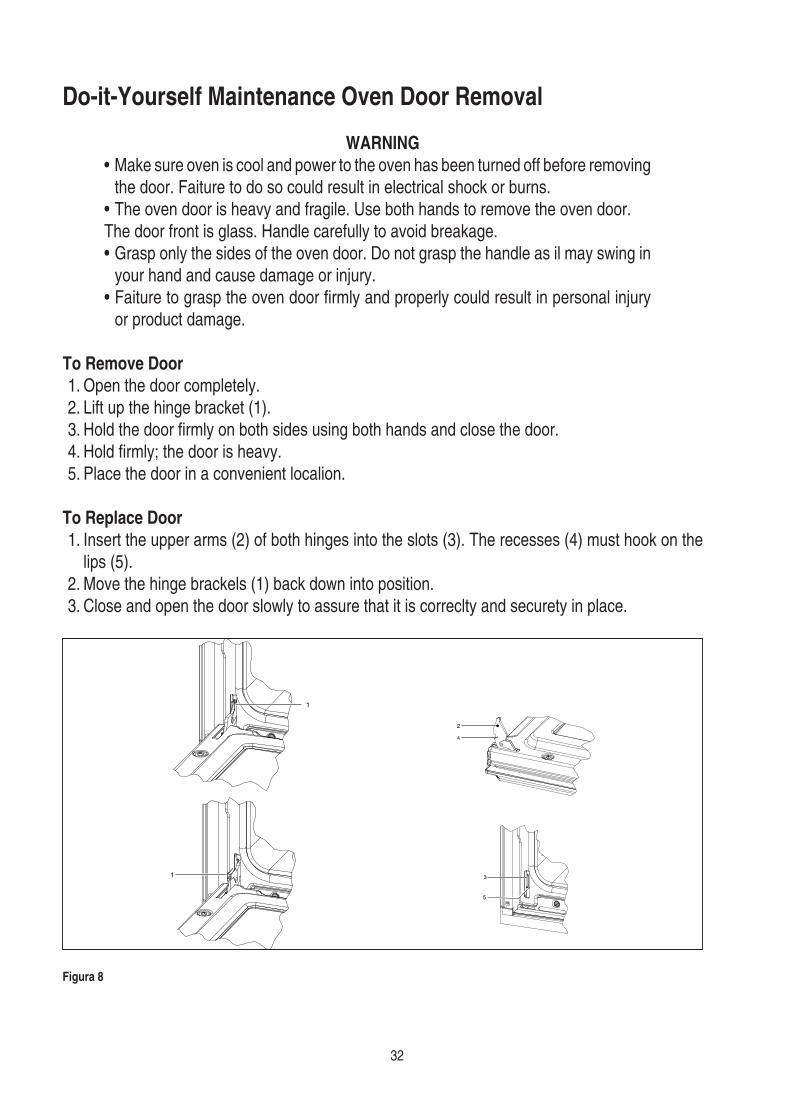
• Make sure oven is cool and power to the oven has been turned off before removing the door. Faiture to do so could result in electrical shock or burns.
• The oven door is heavy and fragile. Use both hands to remove the oven door. The door front is glass. Handle carefully to avoid breakage. • Grasp only the sides of the oven door. Do not grasp the handle as il may swing in
your hand and cause damage or injury. • Faiture to grasp the oven door and properly could result in personal injury
or product damage.
1. Open the door completely. 2. Lift up the hinge bracket (1). 3. 4. 5. Place the door in a convenient localion.
1. Insert the upper arms (2) of both hinges into the slots (3). The recesses (4) must hook on the lips (5).
2. Move the hinge brackels (1) back down into position. 3. Close and open the door slowly to assure that it is correclty and securety in place.
32

• Each oven is equipped with halogen lights located in the lateral walls of the oven. • The lights are switched on when the door is opened or when the oven is in a cooking cycle. • The oven lights are not illuminated during SELF- CLEAN. • Each light assembly consists of a removable lens a light bulb as well as a light socket housing
• Light bulb replacement is considered to be a routine maintenance item.
1. Read WARNING on this page. 2. 3. In ovens with lateral racks remove them by unscrewing the four screws. 4. Remove the lens to prise between screw and glass using a screw driver. 5. Remove the light bulb from its socket by pulling it. 6. Replace the bulb with a new one. Avoid touching the bulb with as oils from hands can
damage the bulb when it becomes hot. 7. The bulb is halogen: use one with the same type checking Voltage and Wattage. 8. Replace the lens back on. 9. Replace the racks if it is provided with the oven model.
• Make sure the oven and lights are cool and power lo the oven has been turned off before replacing the light Faiture lo do so could result in electrical shock or burns.
• The lenses must be in place when using the oven. • The lenses serve to protect the light bulb from breaking. • The lenses are made of glass. Handle carefully to avoid breakage. Broken glass
could cause an injury.
AA
A
33
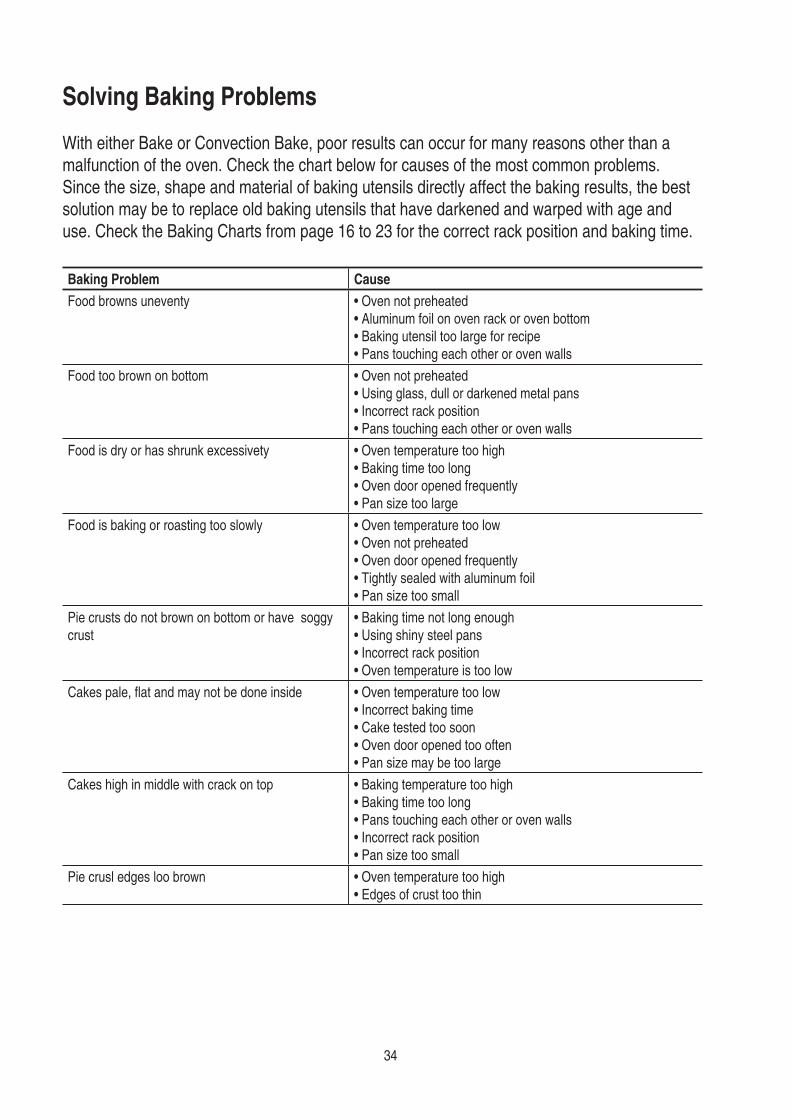
With either Bake or Convection Bake, poor results can occur for many reasons other than a malfunction of the oven. Check the chart below for causes of the most common problems. Since the size, shape and material of baking utensils directly affect the baking results, the best solution may be to replace old baking utensils that have darkened and warped with age and use. Check the Baking Charts from page 16 to 23 for the correct rack position and baking time.
Food browns uneventy • Oven not preheated• Aluminum foil on oven rack or oven bottom• Baking utensil too large for recipe• Pans touching each other or oven walls
Food too brown on bottom • Oven not preheated• Using glass, dull or darkened metal pans• Incorrect rack position• Pans touching each other or oven walls
Food is dry or has shrunk excessivety • Oven temperature too high• Baking time too long• Oven door opened frequently• Pan size too large
Food is baking or roasting too slowly • Oven temperature too low• Oven not preheated• Oven door opened frequently• Tightly sealed with aluminum foil• Pan size too small
Pie crusts do not brown on bottom or have soggy crust
• Baking time not long enough• Using shiny steel pans• Incorrect rack position• Oven temperature is too low
• Oven temperature too low• Incorrect baking time• Cake tested too soon• Oven door opened too often• Pan size may be too large
Cakes high in middle with crack on top • Baking temperature too high• Baking time too long• Pans touching each other or oven walls• Incorrect rack position• Pan size too small
Pie crusl edges loo brown • Oven temperature too high• Edges of crust too thin
34
The control is continuously checking the status of the system. If an abnormal condition is detected for more than 1 minute, a failure occurs:
- The heaters and the other loads are disabled.- ds on the kind of failure.- The control emits an acoustic warning signal that will last for some minutes.
e [H] key (OFF).
E001 Temperature sensor shorted.E004E008E016E017 Temperature sensor disconnected or brokenE032
Do not attempt to repair the appliance yourself. Any work performed by unauthorized personnel
35
Please read these instructions COMPLETELY AND CAREFULLY. They will save you time and effort and help to ensure optimum oven performance. Be sure to observe all WARNINGS.
instructions the oven must be installed in compliance with the current Australian Standard.
The following tools are needed to install your new oven:• Tape measure and straightedge or ruler • Pencil• Phillips screwdriver• Level • Wire cutters and wire stripper• 1” hole saw• Hand or saber saw.
The oven must be supplied with the proper voltage and frequency. The oven is manufactured to be connected to a three wire single phase 230-240 VAC 50/60 Hz electrical supply. The oven
wiring and hook-up of your oven. After installation is complete have the electrician show you where the main disconnection is and which of the circuit breakers/fuses are for the oven.
Carefully select the location where the oven will be placed. The oven should be located for convenient use in the kitchen but away from strong drafts. Strong drafts may be caused by open doors or windows or by heating and/or air conditioning vents or fans. Make sure that electrical power can be provided to the location selected.
36
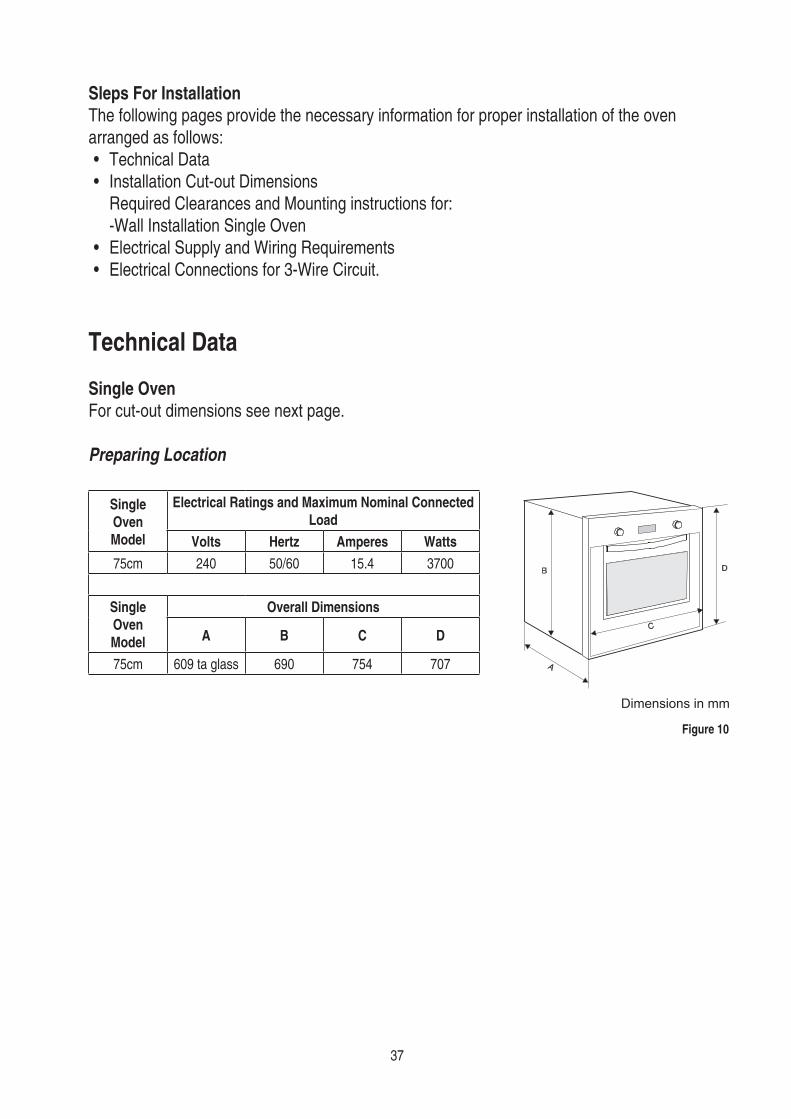
The following pages provide the necessary information for proper installation of the oven arranged as follows: • Technical Data• Installation Cut-out Dimensions Required Clearances and Mounting instructions for: -Wall Installation Single Oven • Electrical Supply and Wiring Requirements • Electrical Connections for 3-Wire Circuit.
For cut-out dimensions see next page.
75cm 240 50/60 15.4 3700
75cm 609 ta glass 690 754 707
37
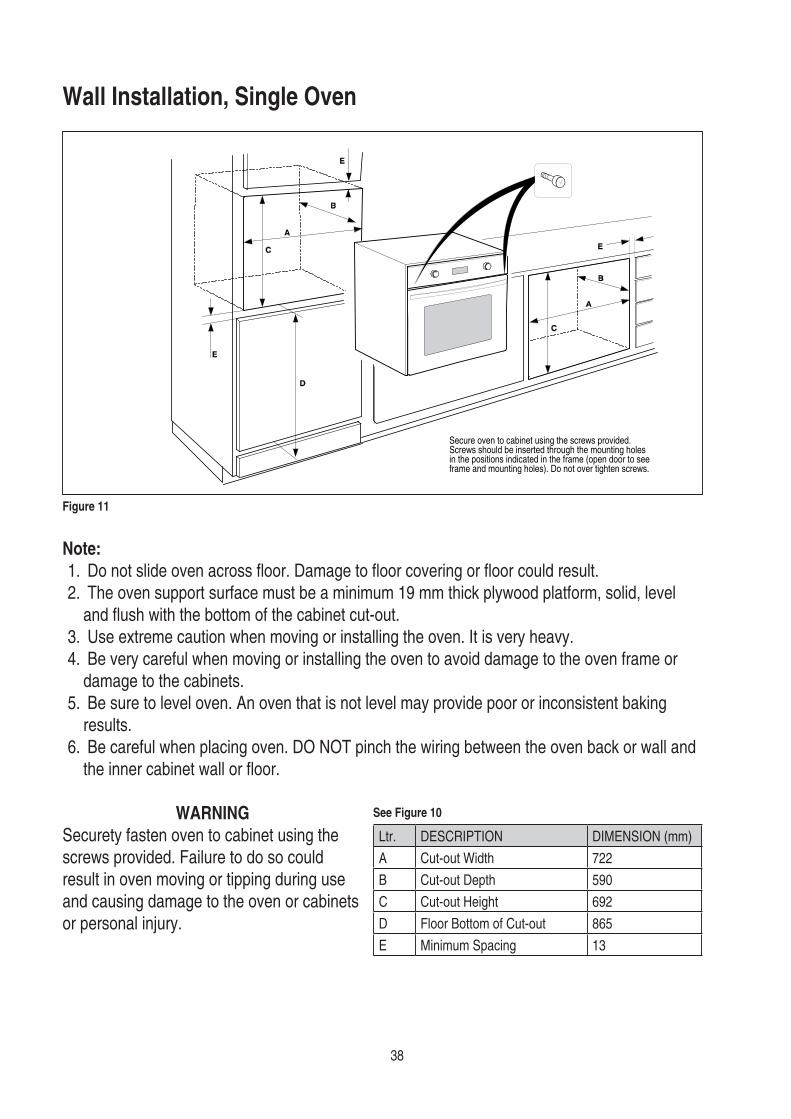
Secure oven to cabinet using the screws provided.Screws should be inserted through the mounting holesin the positions indicated in the frame (open door to seeframe and mounting holes). Do not over tighten screws.
1. 2. The oven support surface must be a minimum 19 mm thick plywood platform, solid, level
3. Use extreme caution when moving or installing the oven. It is very heavy. 4. Be very careful when moving or installing the oven to avoid damage to the oven frame or
damage to the cabinets. 5. Be sure to level oven. An oven that is not level may provide poor or inconsistent baking
results. 6. Be careful when placing oven. DO NOT pinch the wiring between the oven back or wall and
Securety fasten oven to cabinet using the screws provided. Failure to do so could result in oven moving or tipping during use and causing damage to the oven or cabinets or personal injury.
Ltr. DESCRIPTION DIMENSION (mm)
A 722
B 590
C 692
D 865
E Minimum Spacing 13
38
it is to be A single 230-240 V 50/60 Hz is
• The to the oven be shut off line
• Do not use an extension this • is on this
• A install the • The oven be in the Australian
• The oven be to the through a breaker
• A single 230-240V 50/60 Hz is for the oven • The oven be COPPER • The oven be to the Australian • Wire size (COPPER be suitable for the rating of the
2
39
1 Remove the two upper oven covers (1) by unfastening the relative self-tapping screws (2). Unfasten the nut (3) for the cable holder and feed the cable through the hole leaving enough cable slack to to avoid stretching.
2 Remove about 12 cm of outside insulation from the cable and shorten the two active wires (live and neutral) to 6cm. Leave the length of the earth wire as it is. Remove about 1cm of insulation from each of the three wires and then connect each wire to the terminal block. Ensure that each wire is connected appropriately (L is for the Live wire, N is for the Neutral wire and the earth wire is indicated with the traditional dashed triangle).
3 place.
40

41
NOTES

NOTES
1. Warranty Period
1.1 Domestic Warranty
Fulgor Milano Australasia warrants that any Product purchased from it, and when used in accordance with the Instructions for
household or personal use, shall be delivered free from defects in workmanship and materials and will perform for a period of two
(2) years from the date of purchase.
1.2 Commercial Warranty
Fulgor Milano Australasia warrants that any Product purchased from it, and when used in accordance with the Instructions for
Commercial Use, shall be delivered free from defects in workmanship and materials and will perform for a period of one (1) year
from the date of purchase.
2. Exclusions from Warranty
2.1 This Warranty does not cover:
i. Abuse;
ii. Misuse;
iii. Any damage sustained by a product whilst being transported;
iv. Other defects not related to materials or workmanship;
v. Consumable items including, but not limited to, replacement of light globes, glass breakage due to impact;
vi. Damage or failure caused to the Product by unsuitable physical or operating environment.
3. Warranty Claim
3.1 To make a Claim you must:
a) Contact your nearest Local Servicing Agent, details of which are on Fulgor Milano Australasia’s website listed
above; and
b) Provide Proof of Purchase and this Warranty to the Local Servicing Agent.
3.2 Upon receipt of a valid Claim, a Local Servicing Agent will attend your premises to inspectthe Product.
3.3 Where a Product is found to be defective, Fulgor Milano Australasia will, at its option and expense, repair or replace the
Product or the defective material or part. If Fulgor Milano Australasia repairs or replaces a defective Product, the warranty
period for any Product repaired or replaced does not extend beyond the original Warranty Period.
3.4 Where the Product is located outside the Normal Servicing Area, You must pay for the cost of the nearest Local Servicing
Agent to attend your premises.
Warranty StatementThis warranty is provided by:
Product Name:
Model Number:
Date of Purchase:
Name: Fulgor Milano Australasia Pty Ltd ACN 164 163 982
Address: 14/24-32 Lexington Drive, Bella Vista
Telephone Number: 1300 FULGOR (1300 385 467)
Email Address: [email protected]
Website: www.fulgor.com.au
3.5 If You are unable to provide Proof of Purchase, Fulgor Milano Australasia will not be obliged to repair or replace the
defective Product.
3.6 Fulgor Milano Australasia will not be responsible for any costs or expenses, loss or damage, associated with:
a) Any transport of the Product to a Local Servicing Agent;
b) Any consequential damages from the use of the Product;
c) The de-installation and re-installation of the Product at Your premises to make the Product available for
inspection and servicing/repair, or any consequential damage caused by de-installation and re-installation of the
Product.
3.7 You may assign this Warranty. An assignee of this Warranty may only make a Claim where the following conditions are met:
a) You have provided to the assignee, and the assignee produces, Your Proof of Purchase; and
b) Any claim by an assignee is made within the original Warranty Period.
4. Statutory and Other Legal Rights
4.1. under any law which relates to the Product.
4.2. Our goods come with guarantees that cannot be excluded under the Australian Consumer Law. You are entitled to a
replacement or refund for a major failure and compensation for any other reasonably foreseeable loss or damage. You are
also entitled to have the goods repaired or replaced if the goods fail to be of acceptable quality and the failure does not
amount to a major failure.
5.
“Claim” means a claim made under this Warranty.
“Commercial Use” means use that is not household or personal use;
“Fulgor Milano Australasia” means Fulgor Milano Australasia Pty Ltd ACN 164 163 982;
“Instructions” means any instructions provided by Fulgor Milano Australasia for the use of the Product;
“Local Servicing Agent” means a servicing agent which has been appointed by Fulgor Milano Australasia, to service a
Product;
“Normal Servicing Area” means an area where a Local Servicing Agent has been appointed by Fulgor Milano Australasia
to service Products;
“Product” means the product of Fulgor Milano Australasia that this Warranty applies to;
“Proof of Purchase” means the receipt issued to You at the point of sale;
“Warranty” means this warranty statement;
“Warranty Period” means the applicable warranty period depending on whether it is commercial warranty or domestic
warranty;
“You” means you the purchaser of the Fulgor Milano Australasia Product.