munis user manual - university of nevada, las vegas
TRANSCRIPT

UNIVERSITY OF NEVADA, LAS VEGAS Purchasing & Contracts Department
MUNIS User Manual
Volume
7.2

M U N I S V 7 . 2
P U R C H A S I N G & C O N T R A C T S D E P A R T M E N T
MUNIS Volume 7.2 User Manual
University of Nevada, Las Vegas 4505 S Maryland Pkwy • Mail Stop 1033
Las Vegas, NV 89154-1033 Phone 702.895.3521 • Fax 702.895.3859
Email: [email protected] Website: http://purchasing.unlv.edu/Munis%20home.htm

Table of ContentsIntroduction................................................................................ 1 How to Sign In ........................................................................... 2 Requisition Entry ....................................................................... 4 How to Approve/Reject a Requisition...................................... 17 How to Look Up a Vendor - Vendor Inquiry Screen................. 22 General Ledger Account Inquiry.............................................. 25 Reference Your MUNIS Issued Purchase Order..................... 31 Saving Your Requisition Number for Later Referencing ......... 37 General Information – How to Search in MUNIS..................... 43

Chapter
1
Introduction
MUNIS is an ERP solution that integrates the Purchase Order application with our Advantage System.
yler’s Procurement software gives agencies the ability to easily manage processes
associated with requesting, reviewing, contracting and purchasing from vendors. Procurement software manages the entire lifecycle of a vendor, from requisition to purchase, and integrates with other Tyler financial software to provide complete agency-wide organization and efficiency. Applications deliver a variety of power features so that purchasing agents can spend less time on paperwork and more time ensuring that the agencies needs are being met.
T
1

H O W T O S I G N I N
How to Sign In
1) Locate the MUNIS icon on your desktop and double-click it. 2) The Genero Desktop Client will appear.
3) Highlight the MUNIS Live line and click the Start It! button. 4) You will be prompted for your User Name.
o Type it in and click OK.
5) You will be prompted for your Password. o Type it in and click OK.
H O W T O E N T E R A R E Q U I S I T I O N
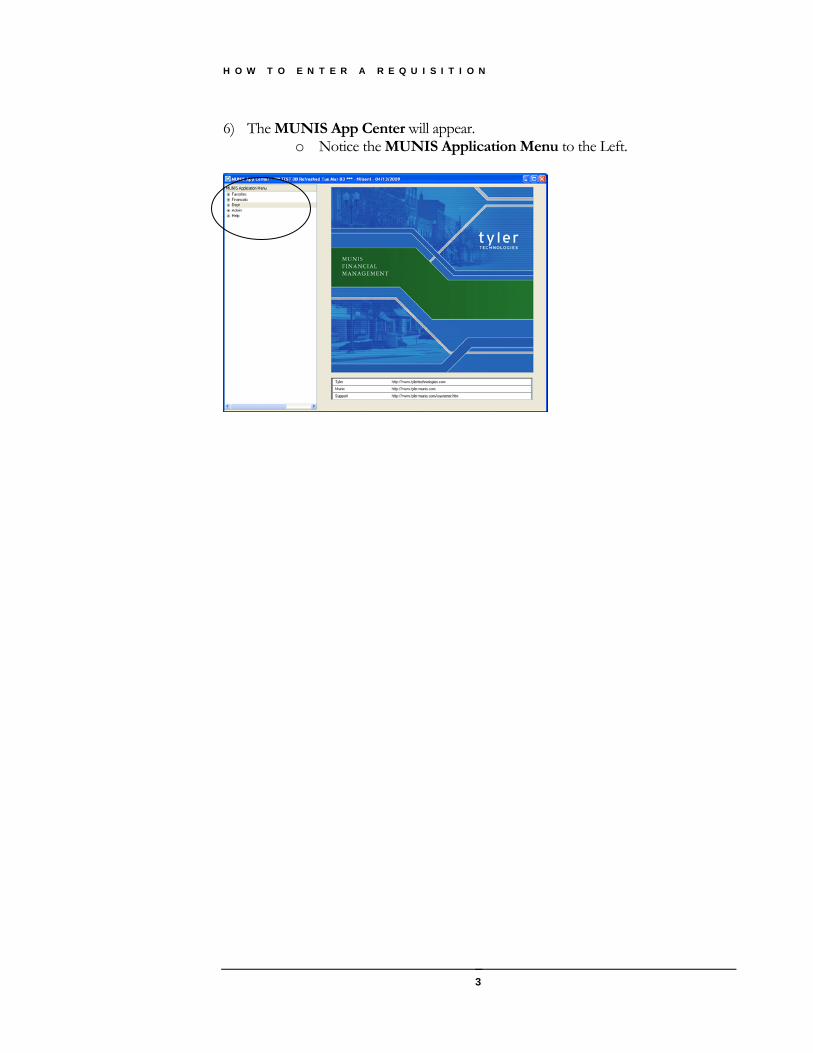
6) The MUNIS App Center will appear. o Notice the MUNIS Application Menu to the Left.
3

H O W T O E N T E R A R E Q U I S I T I O N
Requisition Entry Please Note: Prior to entering a Requisition you will want to make sure the accounts you will be using have available funds, see General Ledger Account Inquiry for assistance.
1) After logging in, change to ALL CAPS. 2) Go to the Tree Menu (Left of screen):
o Select Dept. o Then select G. Requisition Entry.
3) You will be directed to the Requisition File Maintenance Screen.
o Click the Add New Record button (on toolbar).
4) The Dept/Loc field should be automatically populated (highlighted in Blue).
Do not change this value unless you are authorized to purchase items for other departments.
4

H O W T O E N T E R A R E Q U I S I T I O N
5) Tab through the following fields: o Fiscal Year o Requisition Number (highlighted in Blue)
6) When you reach the General Commodity Code:
o Select a General Commodity code by clicking on the Ellipses within the General Commodity Code field.
o A list of commodity codes will come up. • Click on the Description line to sort the listing.
o Select the commodity code that best fits your type of purchase by double clicking on the commodity code. You will be directed back to the Requisition File Maintenance screen.
o Hit tab and the General Description field will auto fill with the
description. 7) Hit tab again and the Status and Entry Date will auto fill.
5

H O W T O E N T E R A R E Q U I S I T I O N
8) Tab to the Needed By field. o Fill in a date or click on calendar icon to select a date.
9) General Notes replaced the Post-it Notes.
o At least one General Note is required in all requisitions: • Name, Building, Room Number, & Mailstop.
The General Note is also used to communicate information that is helpful to you buyer to expedite the requisition such as Fax PO to Vendor; RUSH; etc. These types of comments must be entered on a separate Note than the delivery information.
o Click the General Notes button. o Click the Add New Record button.
6

H O W T O E N T E R A R E Q U I S I T I O N
• The Requisition; Date/Time; and Created By fields will auto fill. Your mouse will be positioned in the Notes Line field.
o Add your note, and then accept it by clicking on the Green Check (Top Left corner). • To add another note, click Add New Record button
and repeat same as above.
o When you have accepted your last note: • Close the General Notes screen by clicking on the Red
Box with the X in it (Top Right corner of screen). • You will be directed back to the Requisition File
Maintenance Screen.
10) Tab to the Vendor field.
o Select a vendor by clicking on the Ellipses within the Vendor Number field.
o You will see Vendor Help dialog box. o Type the first several characters of the vendor’s name or type in
the entire vendor name (this must be entered in ALL CAPS). o Hit Enter or the Accept icon (Green Check ).
7

H O W T O E N T E R A R E Q U I S I T I O N
• A listing of vendors that matched the spelling you entered will appear. Double click to select the vendor that you will be using.
If the address displayed is not the one you need click on the Ellipses just after the vendor number. The Vendor Address Help screen will come up. Select the correct address by double clicking on it.
11) If your Vendor is not listed, please let us know by Importing a note in the
Vendor/Sourcing Notes. o Click on the Vendor/Sourcing Notes
button. o Click on the Import button (Left of screen).
8

H O W T O E N T E R A R E Q U I S I T I O N
• The Requisition Notes screen will appear.
• Select New Vendor (#4581) by Double Clicking that line.
Click the Update the Current Record button.
Fill in the requested fields. Make sure the Vendor
Application & W-9 Forms are sent to the Vendor. (You can get these forms on our Website at: http://purchasing.unlv.edu/How%20to%20do%20Business.html
9

H O W T O E N T E R A R E Q U I S I T I O N
When the fields are complete, accept the note by clicking on the Approval icon button.
Close the Vendor/Sourcing
Notes screen by clicking on the Red Box with the X in it .
12) You will then return to the Requisition File Maintenance screen. o The Entered By and Ship To will be populated with default
values.
13) Tab to the Reference field.
o Fill in with the name of a Contact Person from your dept. and their full Phone Number including area code. This will be printed on the PO.
10

H O W T O E N T E R A R E Q U I S I T I O N
14) If you have a Cash With Order Requisition, press the tab key to get to the
Terms/Miscellaneous Tab. o If NO Cash With Order needed, Click on the Accept icon
button and you will be directed to the Line Detail screen. (Skip to Step# 19 on page 13).
15) Tab through the following fields (no entry required in these fields): o Discount % o Freight %
16) The Method/Terms field will default to Net 30 Days.
o This should remain unless you need a Cash With Order or Auto Payment Schedule.
• If so, delete the Net 30 Days wording and type in CASH WITH ORDER or AUTO PAYMENT.
11

H O W T O E N T E R A R E Q U I S I T I O N
17) Tab to the Bill To field.
o This will default to your Mail Stop. • If you need to change the Mail Stop, click on the ellipses
and a listing of valid Mail Stop codes will appear. (If you are unsure, leave it on the default value). This is an important step as this Mail Stop code will be used to ensure your invoices are mailed to you directly and NOT Accounts Payable.
18) Tab through the following fields (no entry required in these fields):
o Special Handling (it defaults as N-NONE) o Allocation field o Buyer field o Review field o Type (it defaults as N-NORMAL) o Notify originator when converted to PO o Notify originator of overages
12

H O W T O E N T E R A R E Q U I S I T I O N
o Contract Number o Work Order
19) The Line Detail screen will appear. o Enter your Quantity.
20) Tab to Commodity.
o Click the Ellipsis and the commodity you used in Main Tab will appear in the Commodity Help Screen.
o Click on the Accept icon to accept this line item. o A Commodities Screen will appear.
13

H O W T O E N T E R A R E Q U I S I T I O N
o Select the Object Code and the Sub Object Code that best fits your purchase by Double-Clicking it (Example: 0681-30-12).
21) Tab through the Item field. 22) Enter the Unit Price and Unit of Measure (Example: LOT, EA, MO).
23) Tab through:
o Freight o Discount Percent (If Discount Percentage by vendor is given,
then enter here) o Credit
24) Enter the Line Item Description (IN ALL CAPS). This must be a complete description of the item you are purchasing (part name, number, and item description). For multiple items you must use multiple lines on the requisition.
14

H O W T O E N T E R A R E Q U I S I T I O N
25) Tab through all remaining fields until you get to the Account field.
o Enter the Account Number you want to use. Enter in the fund, the agency, the organization number followed by .00, then the object code. (Example 2221-208-0870.00-30)
o Tab until the amount is highlighted (on the Account line). Due to our current financial systems only one account may be used per line item.
If you do not have funds available in the account that you chose to use, you will get an error message and you may not be able to complete the requisition.
Check your account balance in GL Inquiry, Data Warehouse or Advantage to make sure you have enough funds available for your requisition.
o Click on the Accept icon to accept this line item. 26) You will remain on the Line Item Detail screen. You may do one of the
following: o Update the information you have entered by clicking on the
Update the Current Data button. o Add a second line item to your Requisition by clicking on the Add
icon . o Accept the information by clicking on the Accept icon .
• Close the Line Detail screen by clicking on the Red Box with the X in it .
• You will be directed back to the Requisition File Maintenance Screen.
15
H O W T O E N T E R A R E Q U I S I T I O N
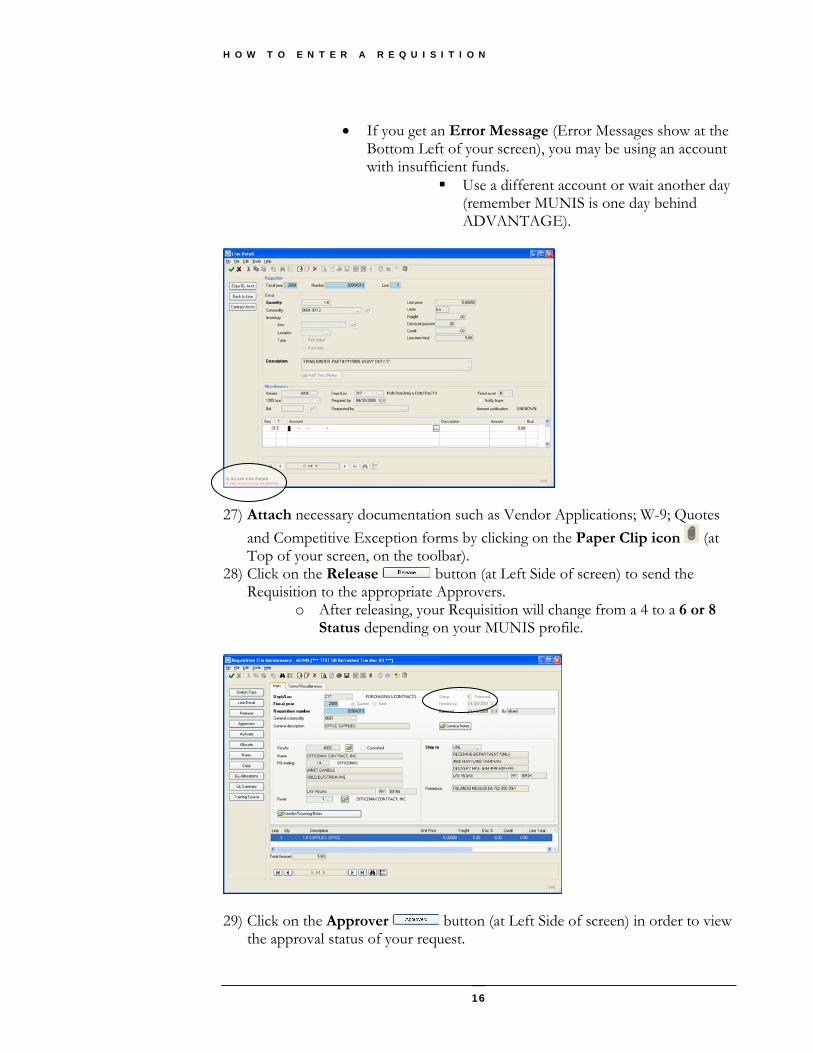
• If you get an Error Message (Error Messages show at the Bottom Left of your screen), you may be using an account with insufficient funds.
Use a different account or wait another day (remember MUNIS is one day behind ADVANTAGE).
27) Attach necessary documentation such as Vendor Applications; W-9; Quotes
and Competitive Exception forms by clicking on the Paper Clip icon (at Top of your screen, on the toolbar).
28) Click on the Release button (at Left Side of screen) to send the Requisition to the appropriate Approvers.
o After releasing, your Requisition will change from a 4 to a 6 or 8 Status depending on your MUNIS profile.
29) Click on the Approver button (at Left Side of screen) in order to view
the approval status of your request.
16

H O W T O A P P R O V E / R E J E C T A R E Q U I S I T I O N
How to Approve/Reject a Requisition 1) After logging in, change to ALL CAPS. 2) Go to the Tree Menu (Left of screen):
o Select Dept. o Then select I. Requisition Approvals.
3) If there are NO Requisitions in your cue to approve, this screen will appear:
4) If there ARE Requisitions in your cue to approve, this message will appear:
5) All requisitions awaiting approval will be displayed. This screen displays the
Fiscal Year, Requisition Number, Originator, Description and the amount of the requisition. In many instances there will only be one RX displayed.
6) Click the Update icon . o The first Requisition will be highlighted for you.
17

H O W T O A P P R O V E / R E J E C T A R E Q U I S I T I O N
7) Move the cursor to the desired line and click on the View Requisition
button.
8) The Requisition File Maintenance screen will appear.
9) Review the information on the requisition such as the Vendor Name and the
Total Amount. 10) If any changes need to be made, click on the Update icon ; then go to the
desired field and make the change. 11) Click on the Notes button to view any notes associated with this
requisition. o If there are no Notes for this requisition, you will see an error
message in Red at the bottom, left of this screen saying “No notes exist for this Requisition”.
12) Choose the Accept icon or the Line Detail button to view the individual line items and the description of what is being purchased.
18

H O W T O A P P R O V E / R E J E C T A R E Q U I S I T I O N
13) To return to the Requisition Approval screen, close out the Requisition
File Maintenance screen by clicking on the Red Box with the X in it (Top Right corner of screen).
14) Type one of the following for Approval in the Code column (in CAPS):
o H – The system will hold the requisition. • You will then be directed to the Comment field
for notes on why you are putting this requisition on hold.
• It will remain in hold status in this screen until processed as an Approved or Rejected status.
• Click the Approve button or hit Enter to accept the hold.
• An email will be sent to the originator notifying them the requisition is placed on hold; see email notification example on the next page.
19

H O W T O A P P R O V E / R E J E C T A R E Q U I S I T I O N
o A – Approves the requisition. • If the requisition requires a single approver, then
this approval turns the requisition status to 8-Approved. (The requisition is then ready for conversion.)
• If multiple approvers are necessary, this approval will send the requisition to the next approver. (The document will remain in status 6 until the final approval level has been completed.)
You will then be directed to the Comment field. You may add a comment if needed.
If not, hit enter and the requisition will disappear from this screen and will be approved.
An email will be sent to the originator notifying them the requisition has been approved; see email notification example on the below.
o R – Rejects the requisition. • A message will be displayed alerting that the
requisition will be closed. (This will change the status to a 1 on the requisition and will send the requisition back to Requisition Entry.
20

H O W T O A P P R O V E / R E J E C T A R E Q U I S I T I O N
Answer YES to Reject and a Standard Note screen will appear.
Enter the reason for the rejection and click on the Accept icon button.
An email notification will be sent to the originator, alerting that the requisition was rejected and why.
The department will be able to access this note by bringing up the requisition and make corrections.
Note: The previously allocated funds for the requisition will be released for other requisitions.
An email will be sent to the originator notifying them the requisition has been rejected; see email notification example on the below.
15) Choose the Accept icon button to process the Approvals, Rejections and
Holds batch. 16) Close the Requisition Approval screen by clicking on the Red Box with the
X in it .
17) Once the Departmental Approval is made, the requisition will be routed to the
appropriate Buyer in the Purchasing Department for to convert the requisition into a Purchase Order.
21

H O W T O L O O K U P A V E N D O R – V E N D O R I N Q U I R Y S C R E E N
How to Look Up a Vendor - Vendor Inquiry Screen 1) Go to the Tree Menu (Left of screen):
o Select Dept. o Then select C. Vendor Inquiry/Reports by Double Clicking it.
2) The Vendor Inquiry screen should appear. 3) Click on the Search icon (on the Toolbar). 4) Then Tab down to the Name field.
o Type an Asterisk * before and after your Vendor Name. (The Asterisk is a Wild Card that will pull up any vendor name with your search name in it.)
5) Hit Enter or the Accept icon (top Left). 6) Your search should reveal your Vendor. See the Page of field to see if there
are more selections.
22

H O W T O L O O K U P A V E N D O R – V E N D O R I N Q U I R Y S C R E E N
7) Use the Arrow keys to finish your search if applicable. 8) If you cannot locate your vendor using the Name field:
o You can search by virtually any field on this screen. • Click on the Search icon . • In any field, (Example: the Address line) use the Wild
Card * before and after for a more thorough search.
• Hit Enter or the Accept icon .
23

H O W T O L O O K U P A V E N D O R – V E N D O R I N Q U I R Y S C R E E N
• It will bring up every vendor in the MUNIS System with that address. There may be multiples.
• Use the Arrow keys to finish your search if applicable.
• If you still cannot find your vendor, please send them a new Vendor Application & W-9 form to fill out. You can find these forms on our website at: http://purchasing.unlv.edu/PDF_Files/NEw%20Vendor%20App%201.30.07.pdf
• Once you receive this back, you can attach them to your Requisition Electronically.
24

G E N E R A L L E D G E R A C C O U N T I N Q U I R Y
General Ledger Account Inquiry 1) From the Tree Menu:
o Click on Dept. Then Double-Click on A. G/L Account Inquiry.
2) The G/L Account Inquiry screen should appear o Click on Seg Find.
3) The Find by Segment screen should appear. o Enter in your
Fund, Agency & Org + SubOrg (if you DO NOT have a SubOrg, enter .00). See example below. Then hit Enter to start your search.
25

G E N E R A L L E D G E R A C C O U N T I N Q U I R Y
4) There are three Account Tabs associated with the GL Account Inquiry screen that give balance and expenditures: Current Year; 4 Year Comparison; and History.
5) You will be automatically on the 4 Year Comparison Tab. 6) Below is a Field Descriptions for clarification on any of the fields in this screen. Field Description Fund The fund (or account segment 1) to query. Org The org code for the account to query. Object The object code of the account to query. Project The project code, if applicable, of the account to include
in the query. Project codes are optional. Click the folder button for additional details on projects associated with this account.
Account The full general ledger account number. You can enter this number during the Find process; if you enter the org and object codes for the account, the program completes this box with the full account number.
Account Name The general ledger account description. The program completes this box according to the org/object code or account number entered; this box is accessible during the Find process.
26

G E N E R A L L E D G E R A C C O U N T I N Q U I R Y
Type The type of account: balance sheet, expense, revenue, or statistic. Select the blank option to include all types.
The current status of an account: active, inactive, next year, or closed. An account's status determines whether it appears on reports and if transactions can be posted to it. Active is the most common status. Active accounts can appear on all reports displaying account information and are generally available for posting. Next Year status indicates that a particular account is only available for next year budget entries and reports. You cannot post transaction to this account in the current year. The status of the account automatically changes once the Year End Close process is completed. Inactive status prevents all posting to the account. Accounts with the inactive status do print on all reports. An account can be rendered inactive at any time in the fiscal year, regardless of the presence of current year transactions. The account can be reactivated at any time.
Status
Closed status indicates that an account is completely closed to all input and only prints on those reports offering the option to print closed accounts. You may not enter any transactions against it. An account is designated as Closed if there has been no activity - other than budget activity if the fund is a multiyear fund - posted to it in the current year.
MultiYear Fund This check box indicates that the account is part of a multiyear fund.
Budget Group (These boxes are available when you click Bud Group during the Find process.) Rollup Code This box contains the rollup code associated with the
account. Rollup Year This box contains the fiscal year for which the rollup is
valid. Rollup Program This list indicates the program for which budget the
rollup group controls. Current Year Tab (Fields on this tab vary according to account type. This tab is not available if the selected account is in a NSFY fund. ) Balance Sheet Account (Balance sheet accounts display three columns: Current Month, Current Year, and Last Year.) Starting Balance The account balance at the beginning of the identified
accounting period (current month, current year, or last year).
Activity The amount for account activity during the identified account period (current month, current year, or last year).
Ending Balance The most recent account balance (the starting balance less any activity amounts).
Memo Balance The general ledger memo balance. Revenue Account (Revenue accounts display two columns: Current Year and Last
27

G E N E R A L L E D G E R A C C O U N T I N Q U I R Y
Year.) Orig Est Rev The estimated amount of the original budget for the
current or last year. Est Rev Adj The estimated amount of the transfers in and transfers
out for the current or last year. Rev Est Rev The estimated amount of the revised budget for the
current last year. Actual YTD Rev The actual amount of the revenue for the current or last
year. Remaining Rev The remaining revenue for multiyear accounts. Percent Collected The percentage of the estimated revenue actually
collected. Expense Account (Expense accounts display two columns when carryforward monies are not shown: Current Year and Last Year; expense accounts display three columns when carryforward monies are included: Current Year, Carry Forward, GAAP, and Totals.) Original Approp The starting account balance. Budget Xfrs/Adj The total of the transfers in and transfers out. Revised Budget The revised budget amount after adjustments. YTD Actual The actual balance at the end of the fiscal period or
year. Encumbrance Amounts intended for a specific purpose. The
encumbrance balance provides the total amount marked for outstanding purchase orders from the account. The available budget is reduced by the encumbrance amount.
Requisitions The amount for orders placed against the account but not yet deducted (that is, the total amount encumbered through requisitions).
Available Budget The total available budget. Percent Used The percentage of the total budget that has been used. Inception The inception to start of year balance plus the actual
balance in the account. Statistic Account (Statistic accounts display two columns: Current Year and Last Year.) Original Goal The original amount for the fiscal year. Goal Changes The amount of transfers in and transfers out. Revised Goal The revised budget after adjustments. YTD Actual The actual year-to-date balance. Percent Complete The revised budget's percentage of the original budget
amount. 4-Year Comparison Tab Yr/Per Fiscal years for standard fiscal year accounts are the
current year; fiscal years for nonstandard fiscal year account are the fiscal year based on the ending fiscal date of the nonstandard fiscal year (the calendar year in which the fiscal year ends will be the fiscal year for the fund).
28

G E N E R A L L E D G E R A C C O U N T I N Q U I R Y
Original Budget The original adopted budget amount for the identified fiscal year.
Transfers In Adjustments made to the original budget amounts. Budget Transfers In: The total budget amount transferred into an account from another account. Click the folder button for additional account details, if available.
Transfers Out Adjustments made to the original budget amounts. Budget Transfers Out: The total budget amount transferred out of an account to another account. Click the folder button for additional account details, if available.
Revised Budget The new budget amount after adjustments. Budget revisions can be the result of budget transfers or year-end purchase order processing.
Actual (Memo) The most current balance of the account; it is updated as transactions are entered. It is the real-time, online balance. Click the folder button for additional account details, if available.
Encumbrances The amount of money intended for a specific purpose. The encumbrance balance provides the total amount marked for outstanding purchase orders from the account. The available budget is reduced by the encumbrance amount. Click the folder button for additional account details, if available.
Requisitions The amount for orders placed against the account but not yet deducted (that is, the total amount encumbered through requisitions). Click the folder button to create an active set of requisitions for the associated year and account in Requisition Entry. The Requisition Entry program finds all requisitions for the selected fiscal year that contain the selected account on at least one detail line, that are status 4-Allocated or greater, and that have no associated contracts, or if there is a contract, it does not encumber GL accounts. Requisitions are display-only; however, you may add or import notes.
Inception to Date The inception to start of year balance, plus the actual balance in the account, plus the amount in the encumbrance balance for multiyear funds.
Available Amount remaining in the account. Percent Used Percent of the budget that has been spent, transferred
out, or encumbered. If you use percent as criteria for the Find process, type the smallest percent used you wish to find. For example, if you enter 10, the program finds 10 and everything up to 100 percent.
History Tab (The History tab displays columns for the current fiscal year and the three years prior.)
29

G E N E R A L L E D G E R A C C O U N T I N Q U I R Y
30
Orig Bud The original adopted budget amount for the current year is the amount that was activated as a result of an update from the Budget Completion Journal on the Budget menu.
Rev Bud The new amounts if the original budget is updated. Budget revisions can be the result of budget transfers or year-end purchase order processing.
Actual The most current balance of the account; it is updated as transactions are entered. It is the real-time, online balance.
Act/Bud % The percentage of budget to actual. Incep Original Budget The amount representing the original multiyear budget
for multiyear accounts. Incep Revised Budget The multiyear budget as revised for multiyear funds. Incep Activity To Date The inception to start of year balance, plus the actual
balance in the account, plus the amount in the encumbrance balance for multiyear funds.
Unencumbered Balance The value of the Inception Revised Budget box less the value of the Inception Activity to Date box.
Encumbrances Money intended for a specific purpose. The encumbrance balance provides the total amount marked for outstanding purchase orders from the account. The available budget is reduced by the encumbrance amount.

R E F E R E N C E Y O U R M U N I S I S S U E D P U R C H A S E O R D E R
Reference Your MUNIS Issued Purchase Order There are three ways to do this.
o ADVANTAGE o Data Warehouse o MUNIS
ADVANTAGE
• Type an “L” in Action and “OPOD” in Screen. Then type “N” in Action and press enter.
• Tab down to the first space under PO Number and type in your PO number and press enter. This will bring up your PO with several other PO numbers.
• Type an “L” in action, Tab down to the line where your PO number is and pres enter.
• This will take you to the “OPOH” screen. • Once in the OPOH screen you will be able to view some basic
information for your PO such as:
31

R E F E R E N C E Y O U R M U N I S I S S U E D P U R C H A S E O R D E R
• PO number; MUNIS vendor number and name.
• PO issue date and close date.
• Amount of the purchase
order; Amount liquidated against the purchase order; and the remaining balance on the purchase order.
• Next you can type an “L” in Action, hit Enter. This will take you to the “OPOL” screen.
• This will show you each line item and its dollar amount.
• If there are multiple lines
on the PO then hit Enter to view each line.
32

R E F E R E N C E Y O U R M U N I S I S S U E D P U R C H A S E O R D E R
Data Warehouse • Go to Business information and select Document Look-up.
• In the Enter a Document Number field enter your MUNIS PO number. In the Select a Document Type filed select PC-Purchase order Centralized. Click the Cross Reference button to perform the search.
• There will be displayed your PO number and additional entries. Click on your PO.
• MUNIS issue Purchase Order. PO20702211
• Vendor invoice keyed
into system. PV207SJ003224
• Check issued by
Accounts Payable. AD00000631382
• Each line, the account line used, and the original order amount, expended amount, and open amount will be available.
33

R E F E R E N C E Y O U R M U N I S I S S U E D P U R C H A S E O R D E R
• If you use the back arrow you will be able to view the previous screen and look up the invoice info as well as the data regarding the check issued.
34

R E F E R E N C E Y O U R M U N I S I S S U E D P U R C H A S E O R D E R
MUNIS • Go to the Tree Menu (Left of screen):
o Select Dept. o Then select D. Purchase Order Inquiry screen by Double
Clicking it.
• Click the Find button. This will position you in the purchase order number field of the inquiry screen.
• The most common way to find a purchase order is to type in the purchase order number or the requisition number and then click the Accept button.
• The Purchase Order Inquiry screen has summary information about the purchase order header and detail. It shows how much has been liquidated against a purchase order and the open balance.
• The Header section contains information relative to every Line Item – PO Number, fiscal year/period the PO was created, Department/Location, Vendor Number, etc.
• The Line Item section contains specific information on dollar amount ordered, amount liquidated, and balance.
35

R E F E R E N C E Y O U R M U N I S I S S U E D P U R C H A S E O R D E R
Header Section
Line Detail SectionAction Keys
Action Keys are found to the left of the purchase order header information. Each action key provides basic data including.
Accounts - Displays all of the GL Accounts for the current purchase order with the order amount and balance. Invoices – Summarizes invoice information related to the purchase order. We are not paying from MUNIS so this feature is unavailable. GL Find – Tool to find all purchase orders with a particular G/L Account. To query click the Find button, enter your information then click on the Accept button. Detail Find - Queries the active set of purchase orders by line item detail, i.e. information that comes from Commodity, Inventory; Fixed Assets (Y or N), 1099 and Bid information. Changes – Displays any changes for the purchase. For example, liquidation information, conversion of requisition to PO, and general status changes. Activity – Displays all activity associated with the current purchase order including the user ID of the person who performed the activity, the date of the activity, and document information. Approvals – Displays all workflow activity for a particular purchase order.
36

S A V I N G Y O U R R E Q U I S I T I O N N U M B E R F O R L A T E R R E F E R E N C I N G
Saving Your Requisition Number for Later Referencing Option 1: Printing Your Requisition • If you have your requisition on the screen in MUNIS then you can print
directly from this screen. • If you need to bring up you requisition click on the search icon button,
type in your requisition number in the Requisition Number field and hit Enter.
• You may now hit the Print icon button. You will get an Options window.
You should always select Req Format. Click .
• You will next see a Printing Options window. These options will default. Click the Accept icon .
37

S A V I N G Y O U R R E Q U I S I T I O N N U M B E R F O R L A T E R R E F E R E N C I N G
• You will next see a Print window. Your default printer should automatically be selected. You may now click OK.
• Your document will print. Be aware that the format is different that what is on
the screen. You will be able to view you requisition number, the vendor name, and the separate line items you entered on your requisition.
38
S A V I N G Y O U R R E Q U I S I T I O N N U M B E R F O R L A T E R R E F E R E N C I N G
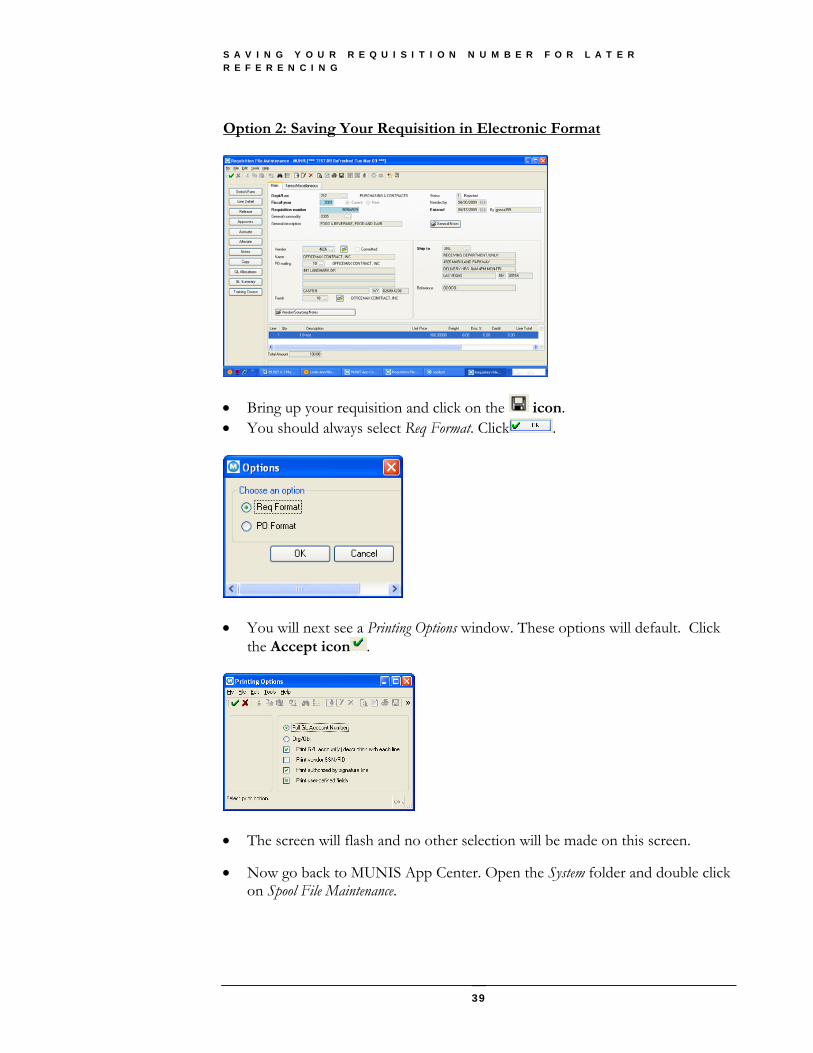
Option 2: Saving Your Requisition in Electronic Format
• Bring up your requisition and click on the icon. • You should always select Req Format. Click .
• You will next see a Printing Options window. These options will default. Click
the Accept icon .
• The screen will flash and no other selection will be made on this screen.
• Now go back to MUNIS App Center. Open the System folder and double click on Spool File Maintenance.
39

S A V I N G Y O U R R E Q U I S I T I O N N U M B E R F O R L A T E R R E F E R E N C I N G
• Click the Search icon button, then the Accept icon button.
• Highlight the requisition and click on the icon.
40

S A V I N G Y O U R R E Q U I S I T I O N N U M B E R F O R L A T E R R E F E R E N C I N G
• You will next see the screen below. Always select Windows (default) and click OK.
• Your requisition will appear. To save your requisition click on File → Save As.
• You will need to select your save location, change the File Name, and choose which file type to save as. You can leave as .txt or may change it to like to .doc.
41

S A V I N G Y O U R R E Q U I S I T I O N N U M B E R F O R L A T E R R E F E R E N C I N G
• Exit the screens.
42

G E N E R A L I N F O R M A T I O N – H O W T O S E A R C H I N M U N I S
43
General Information – How to Search in MUNIS
• When using the search/find icon function you are able to narrow your search. You may use an * as a wildcard. In this example, any record that begins with OFFIC will be found and displayed. You may use an * in front or behind a key phrase.
• After typing in the criteria for the search you may come up with a large list or only a
few items. • The various records can be viewed individually by clicking the forward and back
arrows or in a list by clicking .
New search
Last record in the set
Forward one record
First record in the set
Back one record
View record set in a list