my first metal swing set - academy sports · my first metal swing set model#msc-4070 owner’s...
TRANSCRIPT

My First Metal Swing Set
MODEL#MSC-4070 OWNER’S MANUAL
ASSEMBLY, INSTALLATION, CARE, MAINTENANCE AND USER INSTRUCTIONS
FOR RESIDENTIAL USE ONLY
For Customer Service, please call 1-866-370-2131 or visit www.sportspowerltd.net
Monday – Friday 9:00 AM – 5:00 PM Eastern Time Sportspower Ltd.
Flat M, Kaiser Estate Phase 3, 11 Hok Yuen Street, Hunghom, Kowloon, Hong Kong Corporate Office 1-800-497-6106
WARNING This product is designed to be used simultaneously by up to 4 children between ages 3 to 8. Maximum weight of each user is 100lbs(45kg). Combined weight of all users must not exceed
400lbs(180kg). Carefully read this entire instruction manual before you start to assemble or use this swing set. You must follow all instructions and warnings while using this equipment. Do not use this swing set on hard packed soil, concrete, or any kind of hard surface. This equipment must be anchored (anchors not included). You should consult your local contractor
regarding the best way to anchor the product in your location of installation. Assembly requires at least two adults.
Save this instruction manual for future reference

2
INTRODUCTION Dear Valued Customer,
Congratulations on your Sportspower play set purchase! Please read and completely understand the contents of this owner’s manual. This manual contains specific instructions and warnings that must be followed to prevent injuries.
This play set is for residential use only. This play set is NOT intended for public or commercial use. The warranty will be voided if the play set is used in a commercial application.
The product is designed for use by children between the ages of 3-8. Children must NOT play on this set until it is properly assembled and inspected by an adult. Adult supervision is required at all times while children are playing on the equipment. Do not allow children under six (6) years old to be near during the assembly of this product due to choking hazards of small parts.
The equipment must be installed on level ground. Uneven ground must be leveled prior to installation. Installation on sloping or uneven ground will put stress on the joints, causing the unit to become loose and unstable which may result in serious injuries. You must ensure there are no obstructions or structures (e.g. electrical wires, branches, house, fence, garage) within six (6) feet from the equipment.
The Consumer Product Safety Commission’s Outdoor Home Playground Safety Handbook recommend to install and maintain the playground equipment over at least 9 inches of wood chips, mulch or shredded rubber (for equipment up to 8 feet high) or sand or pea gravel (for equipment no more than 5 feet high) as shock absorbing material. Dirt and grass, which are the most prevalent surfaces under home playground equipment, do not adequately protect children from serious head injuries. Install protective surfacing at least six feet in all directions from play equipment. For swings, the surface should extend, in back and front, twice the height of the suspending bar. Do not install your play set over hard surface, e.g. asphalt, concrete, packed earth, tile or brick floor. Please refer to extracts from the CONSUMER PRODUCT SAFETY COMMISSION’S OUTDOOR HOME PLAYGROUND SAFETY HANDBOOK contained in this manual for further details.
Do not allow children to use the product during windy or wet weather conditions. The product must be anchored into the ground to prevent movement and to make the swing set more stable during use. You should consult a local contractor about ways to anchor the product in your location.
The equipment must be checked before each use and maintained regularly. This includes, but is not limited to inspecting the play set for cracks, excess wear, missing parts, loose connections and for overall integrity. When the equipment shows any signs of weakness or damage, you must stop using the play set immediately, properly store the set or restrict access by users until the condition is resolved.
Your product is warranted against defects in material and workmanship. Extended warranty is also
offered to those customers registering their products at www.sportspowerltd.net within 14 days from the date of purchase. Please refer to our warranty policy at the back of this manual for details.
If you experience any problems with your product, do not return to the store. For customer service,
please call 1-866-370-2131 Monday-Friday 9:00am-5:00pm Eastern Time or visit www.sportspowerltd.net.

3
TABLE OF CONTENTS
IMPORTANT INSTRUCTIONS AND WARNINGS ................................................................................................................ 4
IMPORTANT CONSUMER INFORMATION SHEET ............................................................................................................ 7
CARE AND MAINTENANCE CHECKLIST ......................................................................................................................... 10
TOOLS NEEDED ................................................................................................................................................................... 11
PARTS LIST ........................................................................................................................................................................... 12
ASSEMBLY AND INSTALLATION INSTRUCTIONS ......................................................................................................... 15
AREA OF INSTALLATION - SWING SET TOP BAR....................................................................................................... 15 AREA OF INSTALLATION - SIDE LEGS ......................................................................................................................... 16 AREA OF INSTALLATION - CROSS BARS .................................................................................................................... 18 AREA OF INSTALLATION - SWING ................................................................................................................................ 19 AREA OF INSTALLATION - TRAPEZE ........................................................................................................................... 20 AREA OF INSTALLATION - SLIDE .................................................................................................................................. 21
MANUFACTURER’S LIMITED WARRANTY ...................................................................................................................... 28

4
IMPORTANT INSTRUCTIONS AND WARNINGS
WARNING READ ALL INSTRUCTIONS BEFORE ASSEMBLING OR USING THIS EQUIPMENT AGE LIMIT This product is designed to be used by up to four (4) children between the ages of 3 to 8. Maximum user
weight is 100 pounds (45kg) each with a combined maximum weight of 400 pounds (180kg). The play set is designed for children over three (3) years of age. Use by smaller children can result in
entrapment. On-site adult supervision is required at all times for children of all ages. Do not allow use by children with any physical condition that may affect his/her ability to use this equipment
safely. BEFORE YOU BEGIN Carefully read all instructions in this manual before assembling and using this product. The unit must be assembled by adults. Heavy duty working gloves must be worn to avoid injuries during
assembly. Children must not use the equipment until it is properly assembled and anchored. Adult supervision is required during the use of this equipment at all times. Unpack all parts. Take a complete inventory of all parts and hardware using the parts and hardware lists in the
following pages. If any parts are missing, do not return to the store. Please call customer service toll-free number listed on the cover page for assistance. Store the product back in the original box and do not begin to install until all parts are obtained.
LOCATION OF PLAY SET The equipment must be placed more than six (6) feet (1.8 meters) from any structures or obstructions, including
but not limited to buildings, fence, garage, trees, laundry lines, electrical wires. Children can be seriously injured running or swinging into obstacles.
The play set must be installed on level ground. Uneven ground must be leveled prior to installation. Installation on sloping or uneven ground will put stress on the joints, causing the unit to become loose and unstable which may result in serious injuries.
Remove any tripping hazards from the safe play area, such as roots, tree stumps, rocks, landscaping, sprinkler heads, railroad ties, plumbing and electrical connections.
Do not install your play set over hard surface, e.g. asphalt, concrete, packed earth, tile or brick floor. A
fall onto a hard surface can result in serious injury or death to the user. The following is a list of recommended ground covers from the Consumer Product Safety Commission: SUGGESTED MATERIAL UNCOMPRESSED DEPTH Double Shredded Bark Mulch 9” Uniform Wood Chips 12” Fine Gravel 12” Fine Sand 12” The Consumer Product Safety Commission’s Outdoor Home Playground Safety Handbook recommend to
install and maintain the playground equipment over at least 9 inches of wood chips, mulch or shredded rubber (for equipment up to 8 feet high) or sand or pea gravel (for equipment no more than 5 feet high) as shock absorbing

5
material. Dirt and grass, which are the most prevalent surfaces under home playground equipment, do not adequately protect children from serious head injuries. Install protective surfacing at least six feet in all directions from play equipment. For swings, the surface should extend, in back and front, twice the height of the suspending bar. You should consult a local contractor about ways to secure the product in your location. Do not install your play set over hard surface, e.g. asphalt, concrete, packed earth, tile or brick floor. Please refer to the CONSUMER PRODUCT SAFETY COMMISSION’S OUTDOOR HOME PLAYGROUND SAFETY HANDBOOK for detailed guidelines to prevent injuries from falls and other hazards on public and home playgrounds. WARNINGS ON ANCHORING The product must be anchored into the ground to prevent movement and to make the swing set more stable during use. Some consumers want an anchoring system that allows the product to be moved to different locations. Other consumers want to keep their swing set in a permanent location. There are different types and different methods of anchoring this product. Sportspower does not make a specific anchoring recommendation as each consumer’s need and conditions can vary. It is highly recommended that you seek the opinion from a local licensed contractor on the best way to secure the swing set in your location. Whatever method you prefer for your location, an anchoring system for this product should be used at all times. WEATHER CONDITIONS DO NOT use this equipment if the swing seat, slide or any parts are wet. Use the play set only when the parts
are clean and dry. If the equipment is wet, the user could slip and suffer injuries. Please be aware of weather conditions when using the equipment. If it is too windy, users could lose control and
suffer injuries. The playground equipment must be properly anchored, stored away or restricted from use during inclement weather such as heavy winds or severe weather storms. You should consult a local contractor about ways to anchor the product in your location.
PLAY SUPERVISION DO NOT allow more than one child to play on the individual swing, slide or other component at any one time. DO NOT allow children to stand on any of the swing seats or slide. DO NOT allow children to walk too close to moving parts. ALWAYS keep a safe distance to avoid being struck
by other children while playing on swings, slides, etc. DO NOT allow children to twist the swing chains or ropes, or loop them over the top support bar as this may
reduce the strength of the chain or rope. DO NOT swing empty seats as this may cause injuries. ALWAYS guide children to sit in the center of swinging parts, with their full weight placed in the seat center and
holding on to the swing chains. DO NOT allow children to jump off the equipment while it is in motion. ALWAYS come to a full stop before
dismounting. ALWAYS dress children appropriately for proper play, e.g. wear well-fitted rubber sole shoes, and remove loose
or sharp items such as jewelry, hair accessories, scarves which may become entangled in the equipment or cause injuries.
ALWAYS make sure children remove their bike or other sports helmets before playing on the playground. DO NOT allow children to slide down the slide head first. DO NOT allow children to climb onto swing or jump to/from different play areas of the equipment. ALWAYS return safely to the ground before approaching another play area. DO NOT allow children to climb on structural parts (e.g. legs, top bar). These are structural components and
are not designed for play. ALWAYS check the slide or other parts exposed to the body for extreme heat from the sun before allowing
children to use the equipment.
6
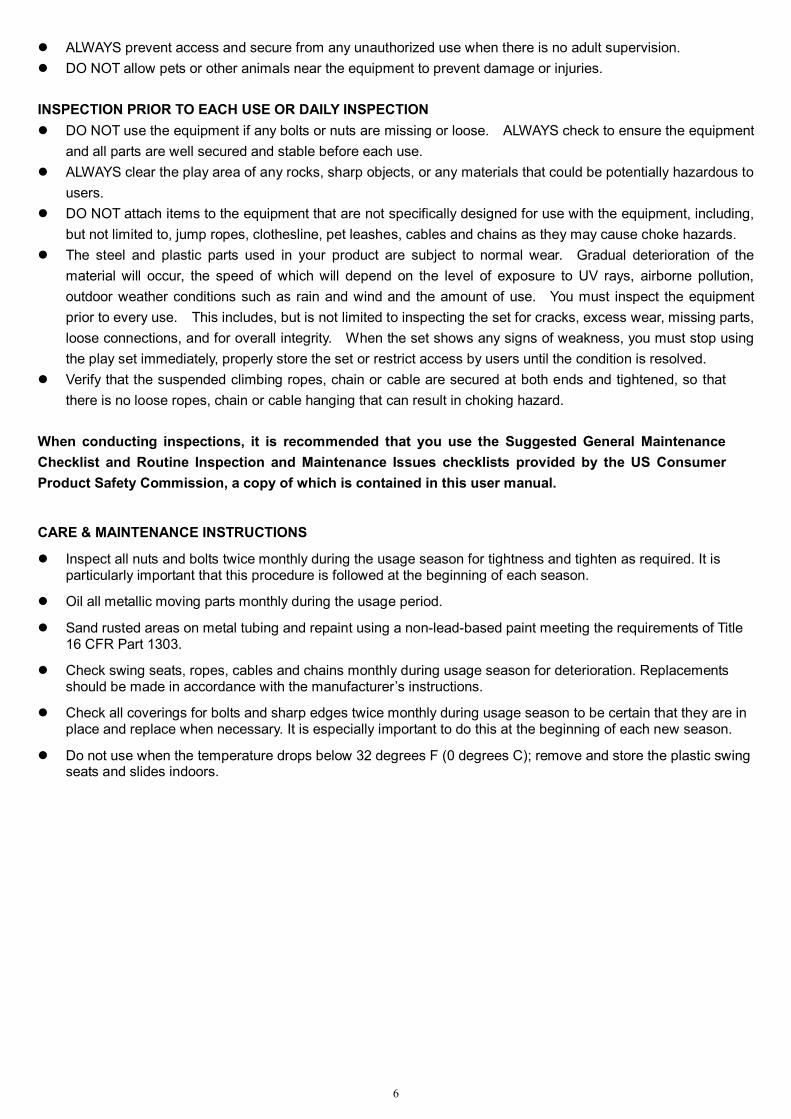
ALWAYS prevent access and secure from any unauthorized use when there is no adult supervision. DO NOT allow pets or other animals near the equipment to prevent damage or injuries. INSPECTION PRIOR TO EACH USE OR DAILY INSPECTION DO NOT use the equipment if any bolts or nuts are missing or loose. ALWAYS check to ensure the equipment
and all parts are well secured and stable before each use. ALWAYS clear the play area of any rocks, sharp objects, or any materials that could be potentially hazardous to
users. DO NOT attach items to the equipment that are not specifically designed for use with the equipment, including,
but not limited to, jump ropes, clothesline, pet leashes, cables and chains as they may cause choke hazards. The steel and plastic parts used in your product are subject to normal wear. Gradual deterioration of the
material will occur, the speed of which will depend on the level of exposure to UV rays, airborne pollution, outdoor weather conditions such as rain and wind and the amount of use. You must inspect the equipment prior to every use. This includes, but is not limited to inspecting the set for cracks, excess wear, missing parts, loose connections, and for overall integrity. When the set shows any signs of weakness, you must stop using the play set immediately, properly store the set or restrict access by users until the condition is resolved.
Verify that the suspended climbing ropes, chain or cable are secured at both ends and tightened, so that there is no loose ropes, chain or cable hanging that can result in choking hazard.
When conducting inspections, it is recommended that you use the Suggested General Maintenance Checklist and Routine Inspection and Maintenance Issues checklists provided by the US Consumer Product Safety Commission, a copy of which is contained in this user manual.
CARE & MAINTENANCE INSTRUCTIONS
Inspect all nuts and bolts twice monthly during the usage season for tightness and tighten as required. It is particularly important that this procedure is followed at the beginning of each season.
Oil all metallic moving parts monthly during the usage period.
Sand rusted areas on metal tubing and repaint using a non-lead-based paint meeting the requirements of Title 16 CFR Part 1303.
Check swing seats, ropes, cables and chains monthly during usage season for deterioration. Replacements should be made in accordance with the manufacturer’s instructions.
Check all coverings for bolts and sharp edges twice monthly during usage season to be certain that they are in place and replace when necessary. It is especially important to do this at the beginning of each new season.
Do not use when the temperature drops below 32 degrees F (0 degrees C); remove and store the plastic swing seats and slides indoors.

7
IMPORTANT CONSUMER INFORMATION SHEET The Consumer Product Safety Commission estimates there are about 200,000 playground related injuries involving children each year. Injuries involving this hazard pattern tend to be among the most serious of all playground injuries and have the potential to be fatal, particularly when the injury is to the head. The surface under and around playground equipment can be a major factor in determining the injury-causing potential of a fall. It is self evident that a fall onto a shock absorbing surface is less likely to cause a serious injury than a fall onto a hard surface. Playground equipment should never be placed on hard surfaces such as concrete or asphalt and while grass may appear to be acceptable it may quickly turn to hard packed earth in areas of high traffic. Shredded bark, mulch, wood chips, fine sand or fine gravel are considered to be acceptable shock absorbing surface when installed and maintained at a sufficient depth under and around playground equipment. Table below lists the maximum height from which a child would not be expected to sustain a life-threatening head injury in a fall onto four different loose-fill surfacing materials if they are installed and maintained at depths of 6” (15.25CM), 9” (22.9CM), and 12” (30.5CM). However, it should be recognized that all injuries due to falls cannot be prevented no matter what surfacing material is used. We recommend that a shock absorbing material should extend a minimum of 6ft in all directions from the perimeter of stationary equipment such as climbers and slides. However, because children may deliberately jump from a moving swing, the shock absorbing material should extend in the front and rear of a swing a minimum distance of 2 times the height of the pivot point measured from a point directly beneath the pivot on the supporting structure. This information is intended to assist in comparing the relative shock-absorbing properties of various materials. No particular material is recommended over another. However, each material is only effective when Properly maintained. Materials should be checked periodically and replenished to maintain correct depth as determined necessary for your equipment. The choice of a material depends on the type and height of the playground equipment, the availability of the material in your area and its cost. Note: The maximum fall height for this product is 6 feet. The minimum ground Clearance between the bottom of the suspended plays and the playing or ground service must be 8 inches.
This information has been extracted from the CPSC publication on" Playground Safety". You can obtain more information by sending a postcard to the:
Office of public Affairs,U.S. Consumer Product Safety Commission,Washington,D.C.20207
8
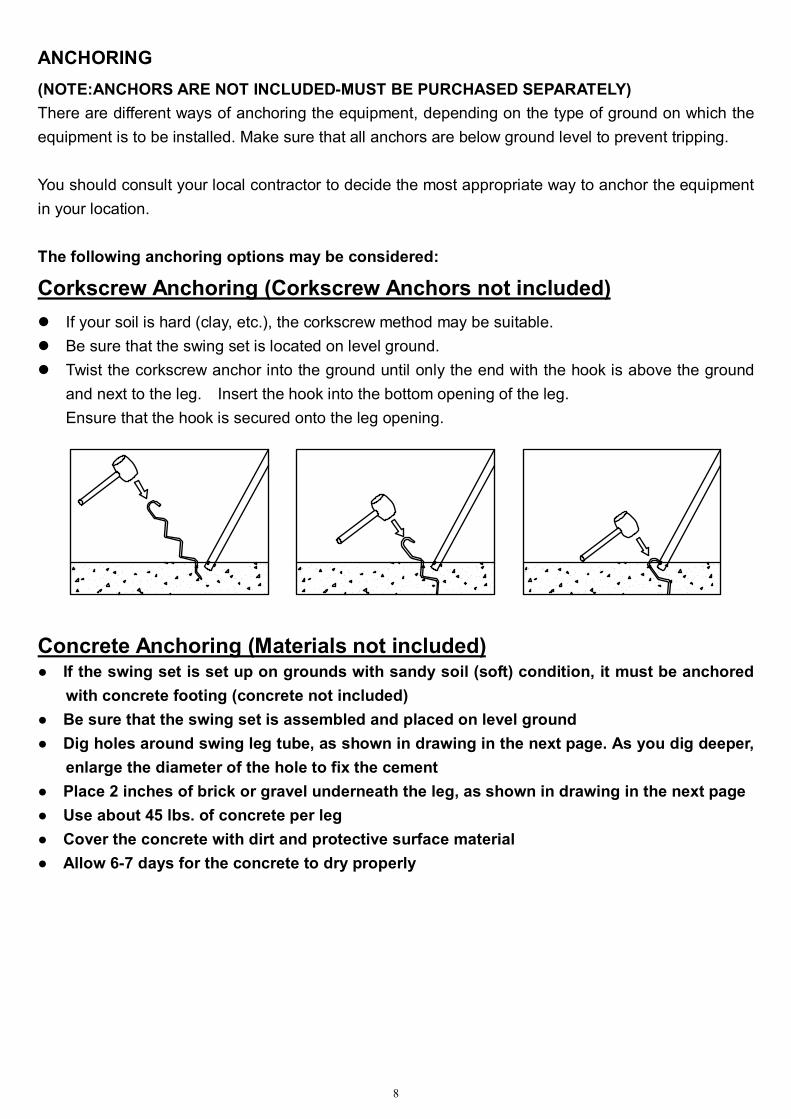
ANCHORING (NOTE:ANCHORS ARE NOT INCLUDED-MUST BE PURCHASED SEPARATELY) There are different ways of anchoring the equipment, depending on the type of ground on which the equipment is to be installed. Make sure that all anchors are below ground level to prevent tripping. You should consult your local contractor to decide the most appropriate way to anchor the equipment in your location. The following anchoring options may be considered:
Corkscrew Anchoring (Corkscrew Anchors not included) If your soil is hard (clay, etc.), the corkscrew method may be suitable. Be sure that the swing set is located on level ground. Twist the corkscrew anchor into the ground until only the end with the hook is above the ground
and next to the leg. Insert the hook into the bottom opening of the leg. Ensure that the hook is secured onto the leg opening.
Concrete Anchoring (Materials not included) ● If the swing set is set up on grounds with sandy soil (soft) condition, it must be anchored
with concrete footing (concrete not included) ● Be sure that the swing set is assembled and placed on level ground ● Dig holes around swing leg tube, as shown in drawing in the next page. As you dig deeper,
enlarge the diameter of the hole to fix the cement ● Place 2 inches of brick or gravel underneath the leg, as shown in drawing in the next page ● Use about 45 lbs. of concrete per leg ● Cover the concrete with dirt and protective surface material ● Allow 6-7 days for the concrete to dry properly

9
Note: The maximum fall height for this product is 6 feet. The minimum ground
clearance between the bottom of the suspended plays and the playing or
ground surface must be 8 inches.
You must maintain a minimum of 8 inches of ground clearance.
WARNING
Please properly anchor the swing set to minimize the risk of injury or death.
If the swing set is used without proper anchoring, it may be dangerous and may
tilt over.
FRAME LEG CONCRETE
BRICK OR GRAVEL BED
2”
12-5/8”
5”
10
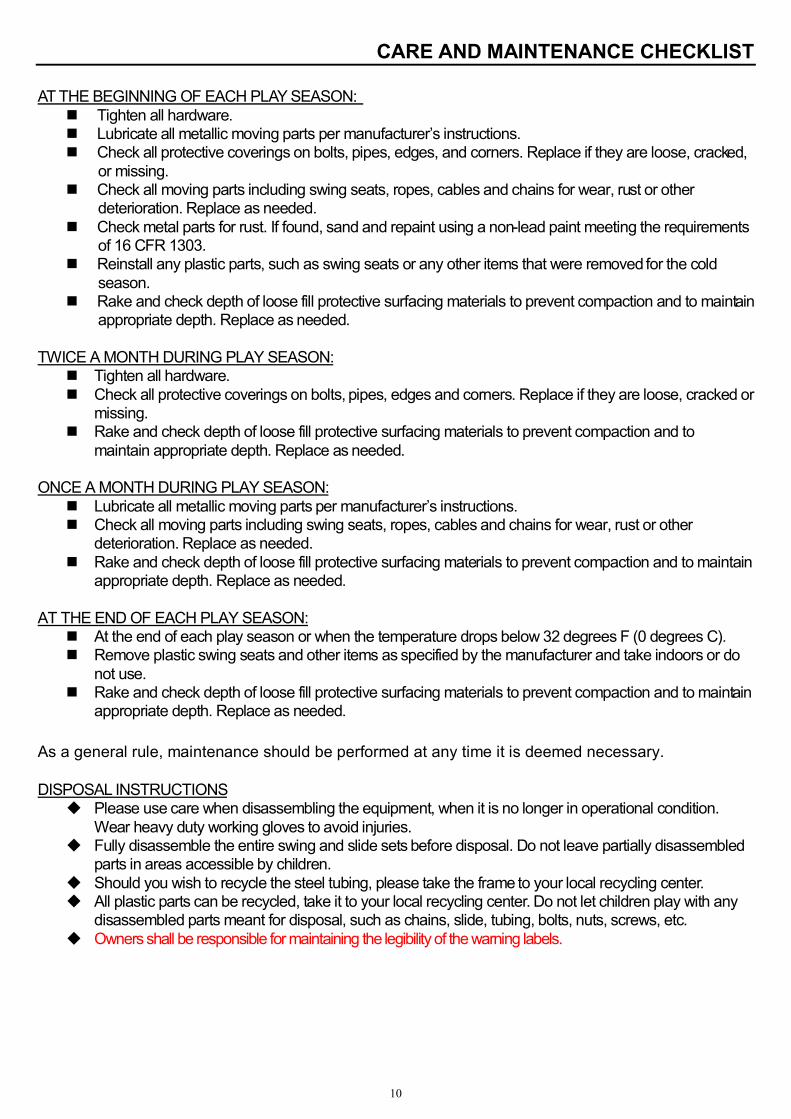
CARE AND MAINTENANCE CHECKLIST AT THE BEGINNING OF EACH PLAY SEASON: Tighten all hardware. Lubricate all metallic moving parts per manufacturer’s instructions. Check all protective coverings on bolts, pipes, edges, and corners. Replace if they are loose, cracked,
or missing. Check all moving parts including swing seats, ropes, cables and chains for wear, rust or other
deterioration. Replace as needed. Check metal parts for rust. If found, sand and repaint using a non-lead paint meeting the requirements
of 16 CFR 1303. Reinstall any plastic parts, such as swing seats or any other items that were removed for the cold
season. Rake and check depth of loose fill protective surfacing materials to prevent compaction and to maintain
appropriate depth. Replace as needed. TWICE A MONTH DURING PLAY SEASON: Tighten all hardware. Check all protective coverings on bolts, pipes, edges and corners. Replace if they are loose, cracked or
missing. Rake and check depth of loose fill protective surfacing materials to prevent compaction and to
maintain appropriate depth. Replace as needed. ONCE A MONTH DURING PLAY SEASON: Lubricate all metallic moving parts per manufacturer’s instructions. Check all moving parts including swing seats, ropes, cables and chains for wear, rust or other
deterioration. Replace as needed. Rake and check depth of loose fill protective surfacing materials to prevent compaction and to maintain
appropriate depth. Replace as needed.
AT THE END OF EACH PLAY SEASON: At the end of each play season or when the temperature drops below 32 degrees F (0 degrees C). Remove plastic swing seats and other items as specified by the manufacturer and take indoors or do
not use. Rake and check depth of loose fill protective surfacing materials to prevent compaction and to maintain
appropriate depth. Replace as needed. As a general rule, maintenance should be performed at any time it is deemed necessary. DISPOSAL INSTRUCTIONS Please use care when disassembling the equipment, when it is no longer in operational condition.
Wear heavy duty working gloves to avoid injuries. Fully disassemble the entire swing and slide sets before disposal. Do not leave partially disassembled
parts in areas accessible by children. Should you wish to recycle the steel tubing, please take the frame to your local recycling center. All plastic parts can be recycled, take it to your local recycling center. Do not let children play with any
disassembled parts meant for disposal, such as chains, slide, tubing, bolts, nuts, screws, etc. Owners shall be responsible for maintaining the legibility of the warning labels.


12
PARTS LIST
Part list for main frame assembly
Part No. Picture Description Quantity
A1
LEFT TOP BARS 1
A2
RIGHT TOP BAR 1
A3 TOP SECTION LEG 4
A4 BOTTOM SECTION LEG(WITH FOAM) 4
A5 CROSS BAR 1
A6 CROSS BAR (FOR SLIDE) 1
C2 END CAP (PRE-ASSEMBLED) 2
B1 BOLT 5/16” x 64mm 18
B3 NYLON NUT 5/16” 18
B4
PLASTIC CAP (WITH ARC WASHER) 18
B5 ARC WASHER 14
B6 FLAT WASHER 4
Part list for swing assembly
J1 SWING CHAIN
(WITH PLASTIC COVER) 4
J3 EYE BOLT FOR SWING CHAIN
(PRE-ASSEMBLED) 8
K1 SWING SEAT 2
J6 NYLON NUT 5/16” 8
J7 FLAT WASHER 4
J8 ARC PLASTIC CAP 4
J9 FLAT PLASTIC CAP 4
13
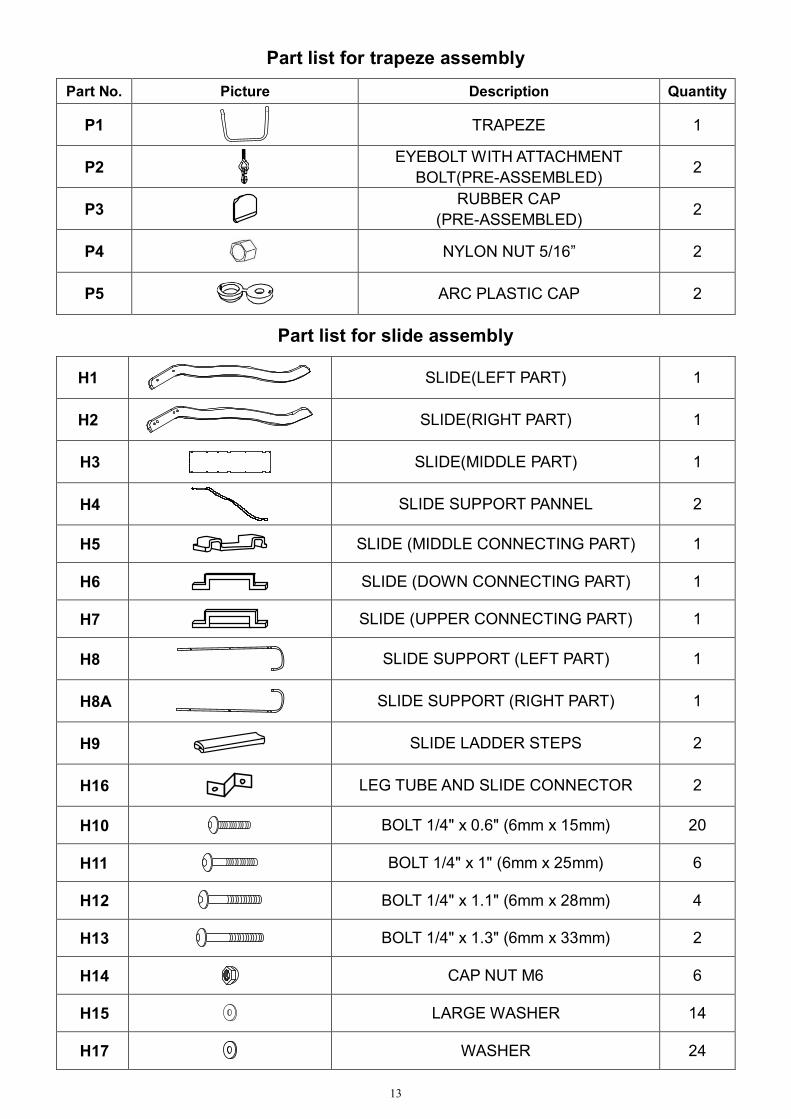
Part list for trapeze assembly Part No. Picture Description Quantity
P1
TRAPEZE 1
P2 EYEBOLT WITH ATTACHMENT BOLT(PRE-ASSEMBLED) 2
P3 RUBBER CAP
(PRE-ASSEMBLED) 2
P4 NYLON NUT 5/16” 2
P5 ARC PLASTIC CAP 2
Part list for slide assembly
H1 SLIDE(LEFT PART) 1
H2 SLIDE(RIGHT PART) 1
H3 SLIDE(MIDDLE PART) 1
H4
SLIDE SUPPORT PANNEL 2
H5 SLIDE (MIDDLE CONNECTING PART) 1
H6 SLIDE (DOWN CONNECTING PART) 1
H7 SLIDE (UPPER CONNECTING PART) 1
H8 SLIDE SUPPORT (LEFT PART) 1
H8A SLIDE SUPPORT (RIGHT PART) 1
H9 SLIDE LADDER STEPS 2
H16 LEG TUBE AND SLIDE CONNECTOR 2
H10 BOLT 1/4" x 0.6" (6mm x 15mm) 20
H11 BOLT 1/4" x 1" (6mm x 25mm) 6
H12 BOLT 1/4" x 1.1" (6mm x 28mm) 4
H13 BOLT 1/4" x 1.3" (6mm x 33mm) 2
H14 CAP NUT M6 6
H15 LARGE WASHER 14
H17 WASHER 24

14
ASSEMBLY INSTRUCTIONS Place the playground equipment on level ground and not less than 6ft (1.8m) from any
structure or obstruction such as a fence, garage, house, overhanging branches, laundry line, or electrical wires.
Do not install the playground equipment over concrete, asphalt, packed earth, or any other hard surface; a fall onto a hard surface can result in serious injury or death to the equipment user.
TIGHTENING NUTS & BOLTS For ease of installation, do not over-tighten the nuts and bolts initially when you are
starting to assemble the equipment. This will allow for adjustments during installation. After you have finished assembling the main components of the play set, go back and
fully tighten all nuts and bolts and close all plastic caps. Check the entire unit and make sure all parts are properly assembled before allowing children to use the playground equipment.

15
ASSEMBLY AND INSTALLATION INSTRUCTIONS
AREA OF INSTALLATION - SWING SET TOP BAR
STEP 1 – Assemble the top bar frame of the swing set Connect Top Bars (A1, A2) and secure them together using B1, B5, B4 and B3 as shown in the
enlarged diagram of FIGURE 1. Note: Please make sure that concave holes face down and round holes face up.
FIGURE 1

16
AREA OF INSTALLATION - SIDE LEGS
Step 2 – Assemble the support legs of swing set Connect Top Section Leg (A3) to Top Bars (A1, A2). Align holes and secure with B1, B5, B4 and
B3 as shown in the enlarged diagram of FIGURE 2. Note: Please make sure that concave holes face down and round holes face up.
FIGURE 2

17
STEP 3 – Assemble the lower side legs of swing set
Connect Leg with foam (A4) to Top Section Leg (A3) and secure them together using B1, B5, B4 and B3 as shown in the enlarged diagram of FIGURE 3.
Note: Repeat in the same manner for all four legs.
FIGURE 3

18
STEP 4 – Assemble the cross bar of the swing set Attach Cross Bars (A5 and A6) to the outer sides of Legs (A4), using B1, B6, B4 and B3 as
shown in the enlarged diagram in all places circled in FIGURE 4. IMPORTANT: Please note that A6 has two extra holes that will be used for connection to the
slide in later steps. These holes must be located closer towards the front of the swing set where the slide will go down to avoid the risk of entrapment. The slide can be installed on either side of the swing set. Should you wish to install the slide on the opposite side, swap A5 with A6.
FIGURE 4
19
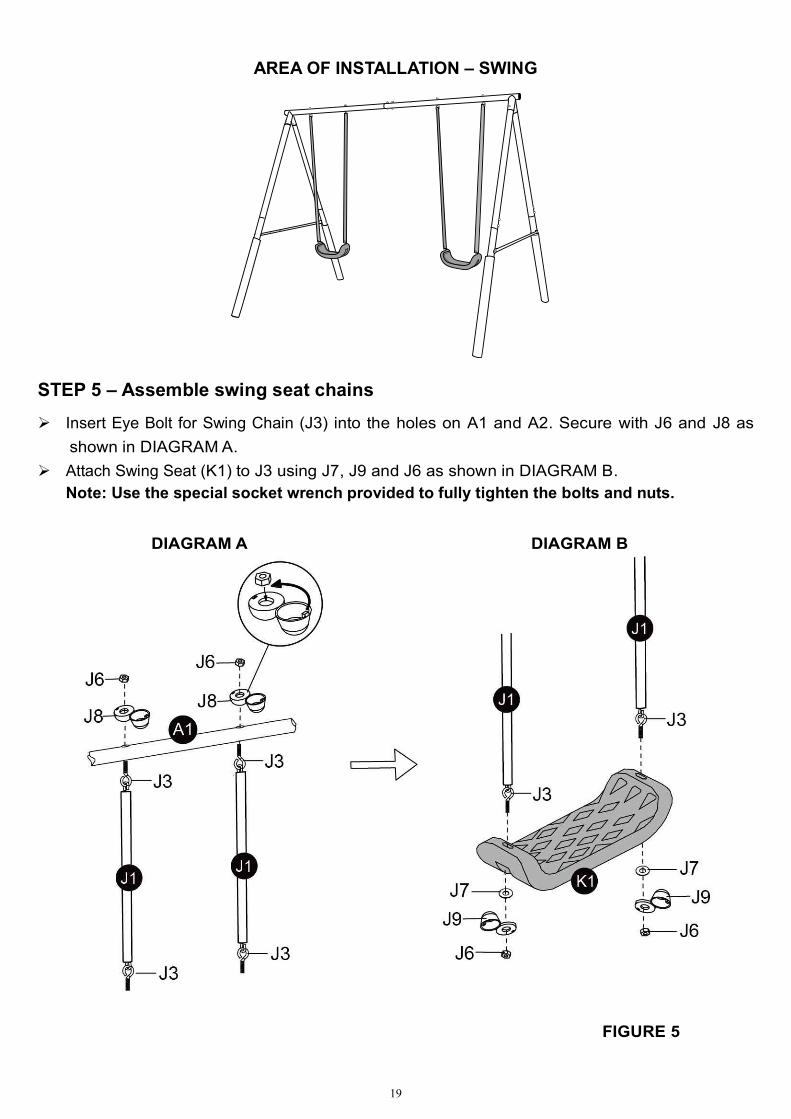
AREA OF INSTALLATION – SWING
STEP 5 – Assemble swing seat chains Insert Eye Bolt for Swing Chain (J3) into the holes on A1 and A2. Secure with J6 and J8 as
shown in DIAGRAM A. Attach Swing Seat (K1) to J3 using J7, J9 and J6 as shown in DIAGRAM B.
Note: Use the special socket wrench provided to fully tighten the bolts and nuts.
FIGURE 5
DIAGRAM A DIAGRAM B

20
AREA OF INSTALLATION –TRAPEZE
STEP 6 – Assemble trapeze Insert P2 (which is pre-assembled with P1 and P3) through the hole on A1 and A2. Secure using
P5 and P4 as shown in the FIGURE 6. Note: Use the special socket wrench provided to fully tighten the bolts and nuts.
FIGURE 6

21
AREA OF INSTALLATION – SLIDE
STEP 7 - Slide assembly Attach the two ends of Plastic Sheet (H3) to Plastic Panel with Two Holes (H1) and Plastic Panel
with Four Holes (H2) using H17 and H10 as shown in DIAGRAM A. Secure both sides using H10 and H15 as shown in DIAGRAM B.
FIGURE 7
DIAGRAM A
DIAGRAM B

22
STEP 8 - Slide assembly (continued) Turn slide over. Align the gears of H7 with H3 and slide it into place.
Tip: gently push the plastic sheet upward with one hand, line up the teeth with the corresponding indents on the bottom of H7 and push it gently to slide it into place.
After assembling H7, turn slide over and snap H4 into the slots on H7 as shown in FIGURE 8.
FIGURE 8

23
STEP 9 - Slide assembly (continued) Place H5 and H6 into the groove on H4 and secure with H11 and H17 as shown in the enlarged
diagram of FIGURE 9.
FIGURE9
24
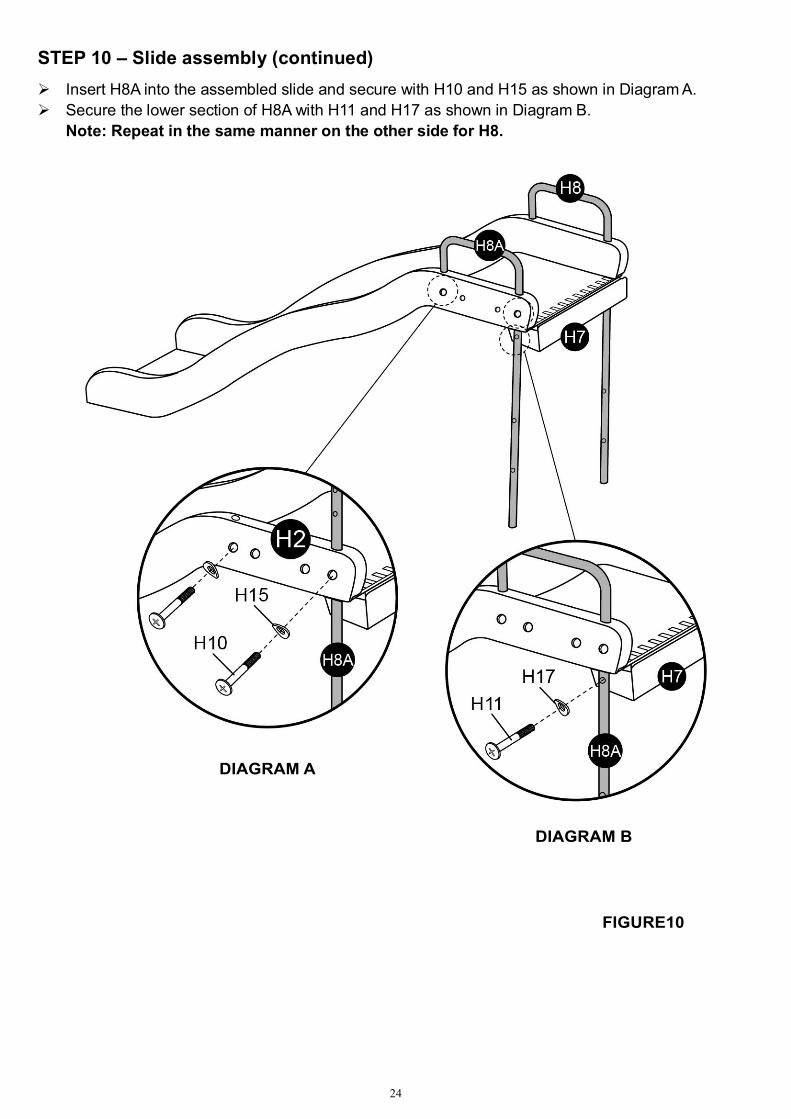
STEP 10 – Slide assembly (continued) Insert H8A into the assembled slide and secure with H10 and H15 as shown in Diagram A. Secure the lower section of H8A with H11 and H17 as shown in Diagram B.
Note: Repeat in the same manner on the other side for H8.
FIGURE10
DIAGRAM A
DIAGRAM B

25
STEP 11 – Assemble the step ladder Attach H16 to the side of H2 as shown and fasten securely with H10 and H17 as shown in Diagram
A. The brackets will be used to connect the slide to the swing set in the next step. To complete the slide assembly, attach H9 to H8 and H8A with H12, H17, H17 and H14 as shown in
Diagram B. Note: Check to make sure all bolts and nuts are securely fastened throughout the entire slide.
FIGURE11
DIAGRAM A
DIAGRAM B

26
STEP 12 – Connect the slide to the swing set Attach the slide to the swing set by securing H16 to A6 using H13, H17, H17 and H14 as shown in
FIGURE 12 for both brackets. IMPORTANT: After you have completed assembly of the swing set, you must go over the entire unit and make sure to fully tighten all bolts and close all plastic caps.
FIGURE12

27
Congratulations! You have now completed installing the equipment. Please make sure to go back and check all hardware and ensure all bolts and nuts are securely tightened before using the playground equipment.
Warning! Do not let children use the playground equipment until it is properly assembled and anchored (anchors not included). Constant adult supervision is required during use. Please make sure all supervisors have read and understand the warnings and use instructions contained in this manual. Do not allow access by children if any parts are missing or damaged. Call our customer service for assistance if any replacement parts are needed. Only official Sportspower genuine parts should be used. Use of non-authorized parts shall void the warranty on the product. WARNING! Please ensure the slide is attached towards the front of the swing set. This is to avoid the risk of entrapment.

28
MANUFACTURER’S LIMITED WARRANTY
Sportspower Ltd warrants its products to be free from defects in material and workmanship under normal use and service conditions for ninety (90) days after the date of purchase. Extended warranty from 90 to 180 days will be offered to those customers registering their products at www.sportspowerltd.net within 14 days from the date of purchase. The frame is warranted for 12 months after the date of purchase.
This warranty coverage extends only to the original purchaser with a receipt and is non-transferable. All products for which a warranty claim is made must be received by SPORTSPOWER’S authorized service center, freight prepaid, and accompanied by sufficient proof of purchase during the warranty period. This limited warranty does not cover our products which: fail due to (1) normal wear; (2) abuse and neglect; (3) improper maintenance; (4) unauthorized repairs or alterations or (5) are used for commercial or other income producing purposes or (6) accidents and misuse. All warranty repairs must be authorized by SPORTSPOWER Customer Service before repairs are made. IMPORTANT: A missing part is not considered the same thing as a defective part or unit. If a part is missing, there is no need to return the entire unit to the store. In order to obtain fast replacement parts or service as provided by this warranty, please call the number below. Proof of purchase required.
For Customer Service, please call 1-866-370-2131 or visit www.sportspowerltd.net
Monday - Friday 9:00 AM - 5:00 PM Eastern Time
Sportspower Ltd.
Flat M, Kaiser Estate Phase 3, 11 Hok Yuen Street, Hunghom, Kowloon, Hong Kong.
Corporate Office 1-800-497-6106
NA-KL-MSC4070-WM-15001