mycommpass upgrade 2018 - alliance pipeline
TRANSCRIPT

myCommPass Training
Shipper Training Manual
Updated July 2020

Changes in version 17 of myCommPass
1. Changing TSP's• To switch between TSP 1000 Alliance Pipeline Limited Partnership and TSP 2000 Alliance Pipeline LP, click the small triangle
in the upper left corner
• Click on the TSP name and then click the down arrow to change
2
2. Open Screens• To view all open screens click the orange Open Screens button at the bottom of the screen
3. Help Function• The help function has moved to the bottom right of the screen

Changes in version 17 of myCommPass
4. Dashboard Customization• You can customize the view of your own dashboard
• Click the More Actions button located in the top right of the screen and click Customize
• You have 4 different layout options to choose from
3

Changes in version 17 of myCommPass
• To add a new widget click on Add Widget and the full list of available widgets will appear. You will also be able to preview thewidget before adding it by clicking on the line. To add the widget to your dashboard check the box to the left and click ok
• When finished click Save then Return to Dashboard
4

Changes in version 17 of myCommPass
5. Back Button• In the bottom left of the screen is a back button. This will take you to the screen you were previously on
6. Reporting Screen• In the reporting screen there is now a TSP parameter. You can run reports for either TSP regardless of which one is
logged into the dashboard.
5

• Navigate to https://qcloudprd.qbsol.com/APL17ESUITE
• Enter your normal credentials and select “login”
Logging into the WEB
6
Dashboard

myCommPass Dashboard
The Dashboard is the landing page when logging in to myCommPass, it is the portal to the rest of the application
8

9
User
Persona
Alerts: to see alert/error messages
Search Function
Default TSP
To change TSP click on the TSP name and then click
the down arrow to switch.
Dashboard Header

Navigation
1. The Fly out Menu 2. By selecting the L3 link on a widget 3. Through the search function
10
There are multiple ways to navigate through the system:

• Clicking the orange open screen icon at the bottom of the screen will display open screens. Screens with unsaved changes are noted with an *
• Screens can be closed by clicking on the X. You can toggle between screens by clicking on the screen name
• Selecting View All will take you to a list of all open screens
Navigation CONT.
11

Dashboard Widgets – L1, L2 & l3
12
L1
L2
L3
The Widgets provide information at different levels
• L1 provides high level information in one central location
• Summary level data: “You have mismatched title transfers”
• Click in the body of the Widget to get to an L2 screen
• L2 provides links to more detailed information
• Focused read only data: “Contract 1000XXX has a different TT than downstream party”
• Click the blue links to get to a L3 screen
• L3 links take to you data entry screens to make changes to your nominations or link you to a report
• Data entry screens: i.e. Nom Submission
Dashboard Widgets – L1, L2 & l3
13
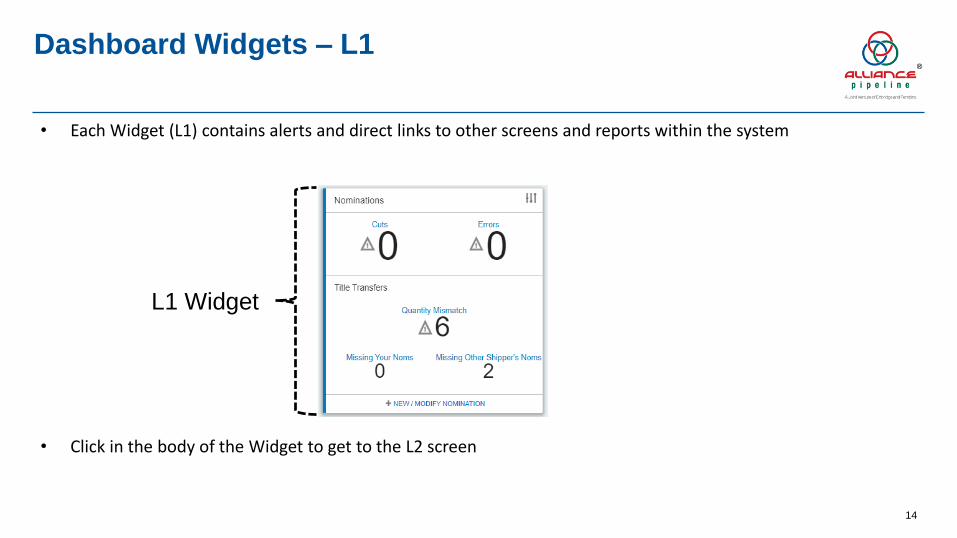
• Each Widget (L1) contains alerts and direct links to other screens and reports within the system
• Click in the body of the Widget to get to the L2 screen
Dashboard Widgets – L1
14
L1 Widget
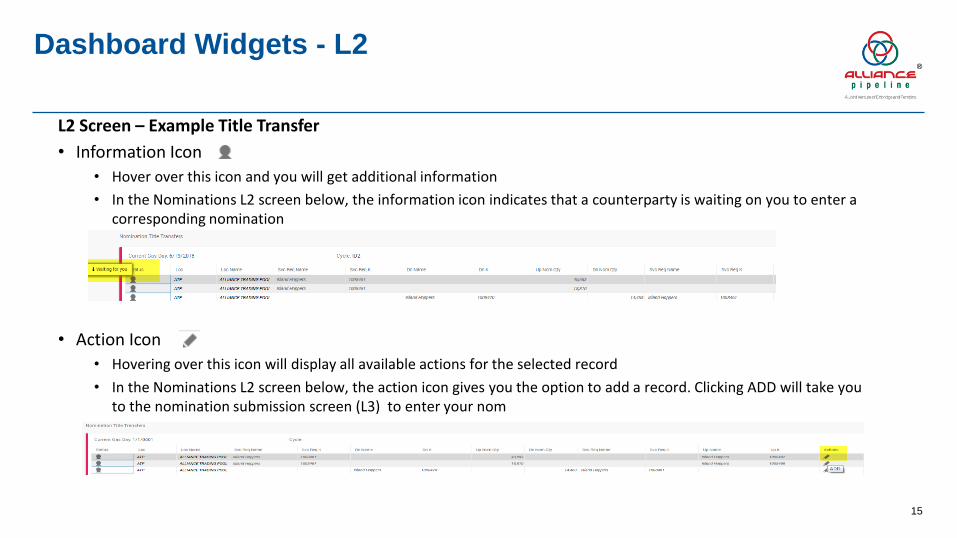
L2 Screen – Example Title Transfer
• Information Icon
• Hover over this icon and you will get additional information
• In the Nominations L2 screen below, the information icon indicates that a counterparty is waiting on you to enter a corresponding nomination
• Action Icon
• Hovering over this icon will display all available actions for the selected record
• In the Nominations L2 screen below, the action icon gives you the option to add a record. Clicking ADD will take you to the nomination submission screen (L3) to enter your nom
Dashboard Widgets - L2
15

Inventory Position Widget
• This will show you what your imbalance position from the previous gas day is, like the Imbalance Position Report (IN62)
Dashboard Widgets - Inventory Position
16
Clicking this link will take you directly to the Imbalance Trading Form screen to enter a YD trade
Clicking this link will run the Imbalance Position Report (IN62)
for the previous gas day

Nominations Widget
• The Nominations section gives a snapshot of all submitted nominations with cuts or errors
• The Title Transfers sections shows any unbalanced transactions within the pool, similar to the Pool Balance Report
Dashboard Widgets - Nominations
17
Indicates a confirmation cut in a previously scheduled cycle
You have a mismatch with a counterparty in the pool
Indicates that you have entered a nomination in the pool but your counterparty does not have a corresponding nomination
Indicates that a submitted nomination contains errors
Indicates that another shipper has entered a nomination with you in the pool but you do not have a corresponding nomination
This will take you to the nomination submission screen

Dashboard Widgets – IT & Daily Firm Bidding
18
Clicking this link takes you directly to the IPS posting
Clicking this link takes you directly the bidding screen for IT & Daily Firm
IT and Daily Firm Widget• This widget is where you need to go to enter your Daily IT and Firm bids in TSP 1000

Border Nominations Widget
• This will show if your nominations that cross the border are matching, similar to the Border Comparison Report
Dashboard Widgets – Border Nominations
19
Indicates that you have nominations where the quantity doesn’t match on both sides of the border
Indicates that nominations are missing either on your side or your counterparties side
L3 link that will take you directly to the Nomination Submission screen

Park and Loan Widget
• This will give you a summary of active Park and Loan contracts as well as expired contracts with a remaining balance
Dashboard Widgets – Park and Loan
20
Clicking this link will take you directly to the CommPassreporting portal to run the PAL Position Report

Dashboard Widgets - Imbalance Trading
21
Number of trades listed by status which you are the
initiating party
Imbalance Widget
• This will give you a summary of imbalance trades that are pending, rejected or confirmed
Number of trades listed by status which you are the confirming party
• Clicking on the body of the widget will take you to the L2 screen which summarizes the imbalance trades
• Click the action icon to go to the Imbalance Trading Form
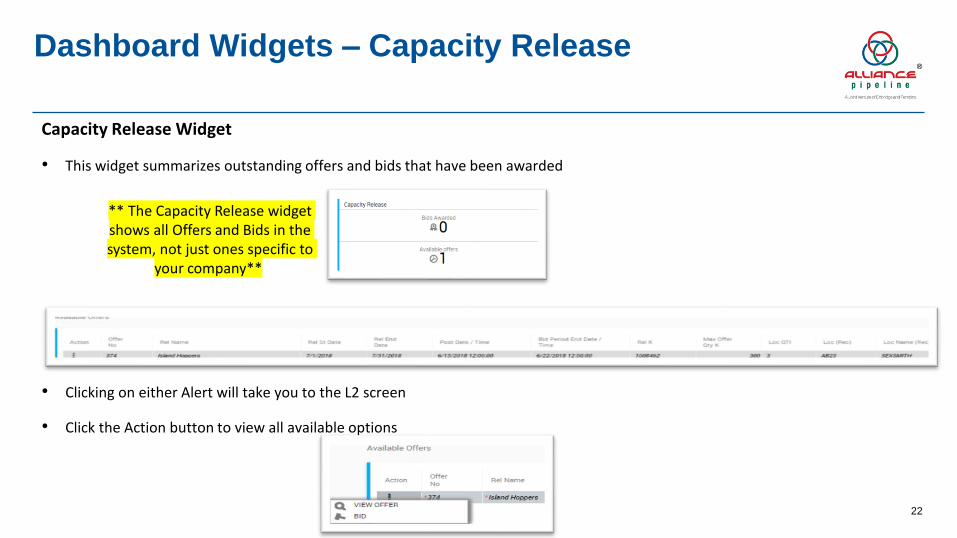
Capacity Release Widget
• This widget summarizes outstanding offers and bids that have been awarded
• Clicking on either Alert will take you to the L2 screen
• Click the Action button to view all available options
22
** The Capacity Release widget shows all Offers and Bids in the system, not just ones specific to
your company**
Dashboard Widgets – Capacity Release

Nomination Submission
23

Nomination Submission Screen
There are 3 options to get to the Nomination Submission screens:
1) Selecting the L3 Link on the widget ‘New/Modify Nomination’
2) Click on the "Flyout Menu" at the top left
3) Using the search function at the top right of the screen
24

Nomination Submission Screen

Nomination Submission Screen
Accordion Navigation:• Hide redundant info
• May need to open to change Svc Req IDs if you are attached to multiple entities
• Click the down arrow on the right to expand/minimize the menu
26

Nomination Submission Screen
• It is important to fill in all of the information required before retrieving the nomination, TSP/Gas Day/Cycle/Service Requestor (if you are attached to multiple entities):
1) Choose TSP 1000 or 2000 4) Cycle
2) Choose Gas Day Start 5) Type in Svc Req Name if attached to multiple entities
3) Choose Gas Day End 6) Retrieve
27

Nomination Submission- Path Records
• Once the required information has been filled in and nomination retrieved you will have the option to add a new row in the PNT Nominations Grid as seen below
* Nomination entry and submission are no different from the current system in that the first add is the Path Nomination, then you will populate the Upstream and Downstream grids.
28

Nomination Submission- Path Records Cont.
• Once a path line has been added, contract information can be populated into the cells. Any cell with a red asterisk requires theinformation to be populated before submission.
• The Svc Req K can be manually entered in by typing in the contract number, and a drop-down list of options based on service typewill populate, or you can use the search function on the right.
• All information required is the same as the current QPTM system. Svc Req K, Receipt Location, Receipt Qty, Delivery Location all need to be populated and the HF also needs to be updated every month.
29

• Once your Path grid has been populated, you will then add a line to your Upstream and Downstream Grids by clicking the + sign
• You will then use the toggle to scroll over to the right and find your Rec Qty column in the upstream, Del Qty in the Downstream
Nomination Submission - Up/Dn Records
30

• In the Path/Upstream/Downstream grids, you can select the X at the bottom of each screen to expand
Nomination Submission - Up/Dn Records CONT.
31

• Nomination Errors will show on the Errors Tab in the middle Path Grid & on the dashboard level widget & L2
Nomination Submission - Errors
32

• You can pull up a monthly view for each contract line to view the month’s nominations on that contract. To do this, you will go to your path grid, click on the ‘Actions’ toggle for that line, and the Monthly View will pop up.
Nomination Submission - 31 day Popup Action
33

To change the order of the columns on the nomination submission screen you have two options:
1. Drag and drop the cell where you would like it placed
2. Choose ‘Show/Hide Columns’ and check the columns you would like hidden
3. You will need to customize each of the path, upstream and downstream grids individually
Nomination Submission - Web Grids
34

Nomination Submission - Show/Hide Columns
35
Hide Path Grid Columns

Imbalance Trade Form

Header
1. To search for past trades click the pick list
2. The quantity field has moved from the bottom of the screen to the header
Imbalance Trade Form – TSP 1000
37

Imbalance Trade Form – TSP 1000
38
When entering an Imbalance Trade the highlighted fields are what must be entered on the Initiating Trader side.
1. Init Trdr Prop – Business Party Number
2. Init Trdr Contact – Type in your name
3. Init Trdr Phone – Type in you phone number
4. K-Init Trdr – Enter the contact number using the pick list (Typically your ATP Daily)
5. Imb Per – Init Trdr – Month the trade is in
6. Imb Trd Dir Desc – Direction of the trade
Submitting a Trade - Initiating Trader

Imbalance Trade Form – TSP 1000
39
Submitting a Trade - Confirming Trader Side
On the Confirming trader side of the screen you need to enter the highlighted fields.
1. Conf Trdr Prop – The business party number of the confirming trader. You will enter yourself if your are trading with your PAL
2. K-Conf Trdr – Enter the contract number using the pick list
3. Click Submit Request at the top of the screen.
You will then need to confirm the trade. See next page

Imbalance Trade Form – TSP 1000
40
Confirming your Imbalance Trade
Once you have submitted you need to enter the highlighted fields.
1. Conf Trdr Name – Type in the name
2. Conf Trdr Contact – Type in the phone number of the confirming trader
3. Click Confirm

IT & Daily Firm Bidding

New IT & Daily Firm Rate Request Bidding Screen TSP 1000
42
IT/Daily Firm Bidding Window Changes
• New bidding window allows customers to bid volume and rate on multiple contracts on the same screen
• One single submit for all IT and all Daily Firm bids
New myCommPass features – IT & Daily Firm Bidding screen
• Query Gas Day for your business and currently effective IT/Daily Firm contracts will populate upon retrieval
• Rate requests entered in bulk – one line per IT/Daily Firm contract
You can access the bidding screen from the dashboard widget or from the fly out menu

43
1 Select Request Type from drop down
2 Enter Business Party Name
3 Enter From/To Date
4 Click Retrieve. Currently effective IT or Daily Firm contracts will be populated in the grid.
5 Enter Request Qty for each contract line
6 Enter Requested Rate for each contract line
7 If you want to link your bids, enter the text in the Comments field
8 Click Submit to submit the requests for approval **ONLY CLICK SUBMIT ONCE**
9 Records will be flipped to Submitted status.
If you see errors and do not believe your bid was submitted please take
a screen shot of your completed bid screen and send it to
[email protected] BEFORE 7:30 am MDT
New IT & Daily Firm Rate Request Bidding Screen TSP 1000

New IT & Daily Firm Rate request Bidding ScreenTSP 1000
44
10 After approval process is done, the all bid records for the gas day will flip to a “PREAPPROVED”, “AWARDED” or “DENIED” status to let all shippers know at the
same time what bids were accepted or denied.
Re-retrieve the screen in order to see the new statuses of the records. Alliance will individually award these requests and new amendments will be created on an
individual basis.

New IT & Daily Firm Rate Request Bidding ScreenTSP 1000
45
To MODIFY your bid
• Retrieve your bidding screen and make the required changes to the Qty, Rate or comments
• Submit again – This will override the previous submission
• You cannot modify your bid down to zero, if you want to zero a bid out you will need to withdraw that single bid as shown below
To WITHDRAW one line of your bid
• Retrieve your bidding screen and under the Action column click on the magnifying glass on the line you want to withdraw (View RFS).
• Click withdraw in the upper right corner
If you experience issues with
modifying or withdrawing your bid
please email
before 7:30 AM MDT. Include the
details of your changes in the email.

Request for Service (RFS)
TSP 1000
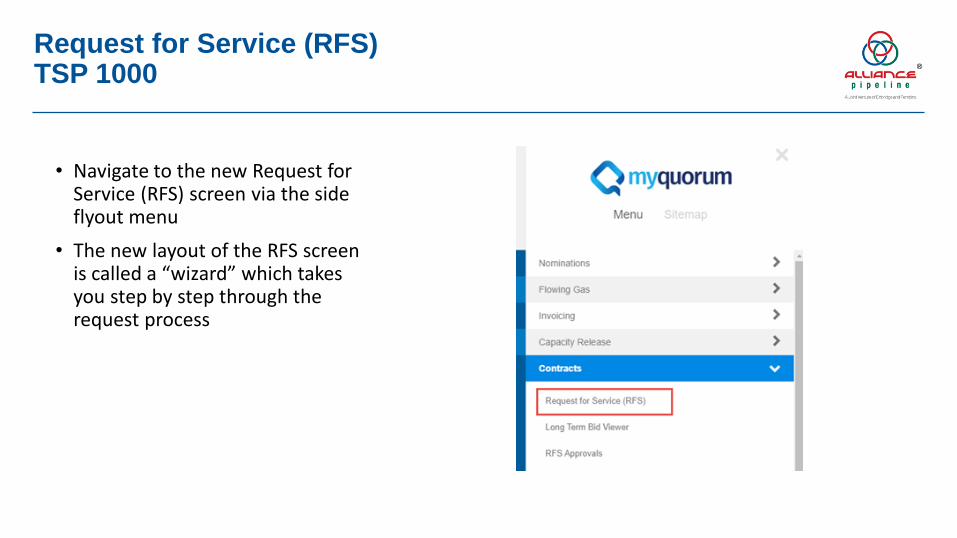
• Navigate to the new Request for Service (RFS) screen via the side flyout menu
• The new layout of the RFS screen is called a “wizard” which takes you step by step through the request process
47
Request for Service (RFS) TSP 1000

If you want to make changes to an existing contract, choose Amend Existing Contract.
Available request types:
If you do not have a current contract for the service, choose Create New Request for Service.
Available request types:
CREATE NEW REQUEST FOR SERVICE AMEND EXISTING CONTRACT
48
Request types are now split into two drop downs:
Request for Service (RFS) – Request TypesTSP 1000

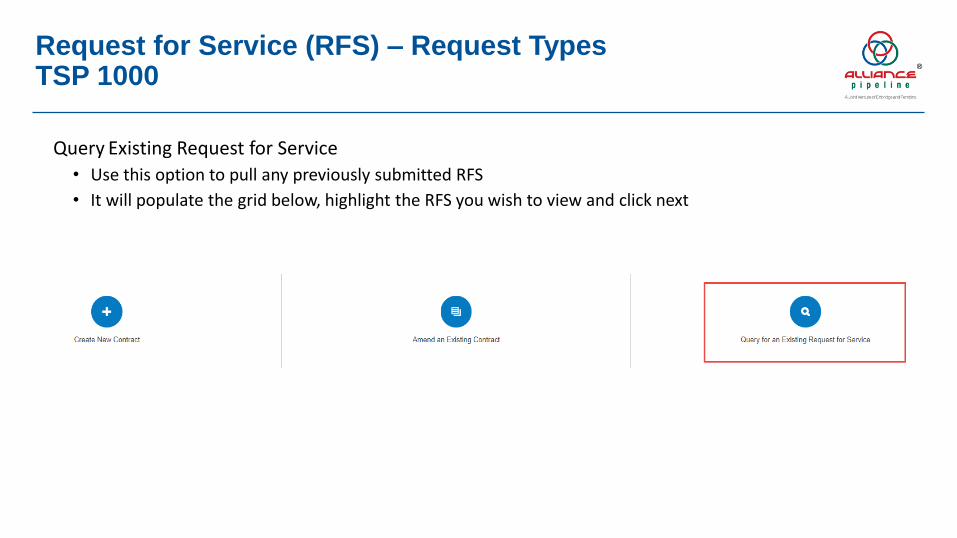
Query Existing Request for Service
• Use this option to pull any previously submitted RFS
• It will populate the grid below, highlight the RFS you wish to view and click next
49
Request for Service (RFS) – Request TypesTSP 1000

Request for Service (RFS) – Wizard Tabs
Tabs are now vertical instead of horizontal:
WebClassicTo navigate between
tabs:1. Click Next in the bottom
right corner and it will
bring you to the next tab in
line
50

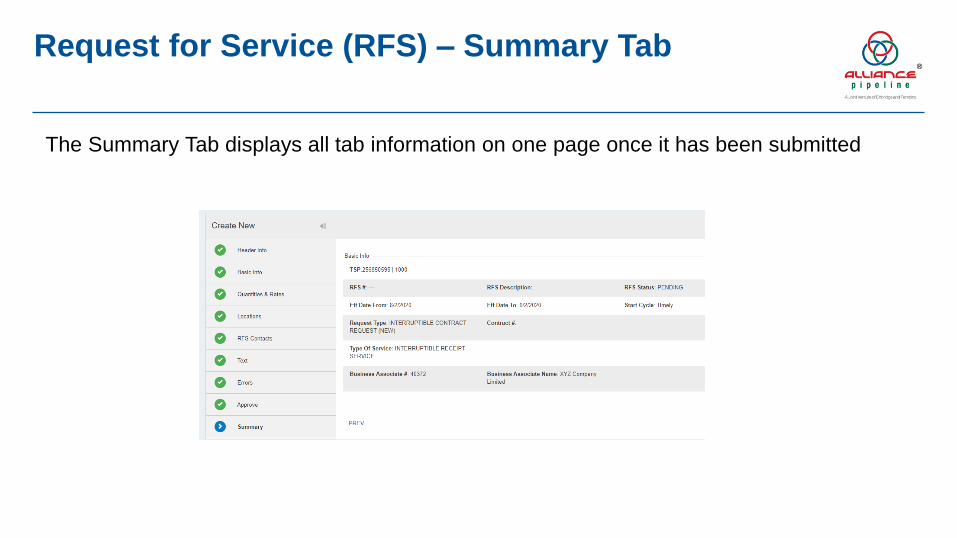
Request for Service (RFS) – Summary Tab
The Summary Tab displays all tab information on one page once it has been submitted
51

Request for Service (RFS) - Validation Alerts
The new validation alerts will display in the top right-hand corner of the screen.
Field errors will be highlighted, and more information can be displayed by hovering over them with your mouse.
52

RFS Quick Reference Guide
TSP 1000
53

New Contract Request for Daily IT and Firm - TSP 1000
54
Header:
1 Select Request Type ‘INTERRUPTIBLE CONTRACT REQUEST (NEW)’ or ‘DAILY FIRM CONTRACT (NEW)
2 Select Type of Service from drop down
3 Enter From Date or use Leave To Date Open Ended or click
4 Enter Business Party Name or select
5 Select Next to navigate to the next section
Locations Tab:
6 Add new location row 9 Click Validate
7/8 Enter Receipt & Delivery Location IDs 10 Click Submit

New Firm Seasonal Service Requests – TSP 1000Bidding on Open Season Monthly or seasonal strips (less than 1 year)
55
Header:
1 Select Request Type ‘FIRM SEASONAL SERVICE (NEW)’ from drop down
2 Select Type of Service from drop down
3 Enter Business Party Name or select
4 Enter From/To Date or use
5 Select Next to navigate to the next section
Locations Tab:
6 Add new location row
7 Enter Receipt & Delivery Location IDs
8 Enter Requested Qty Change
9 Select Requested Rate Type – ‘NEGOTIATED’
10 Enter Requested Rate
11 Click Validate
12 Click Submit

Firm Delivery Service – TSP 1000Bidding on long term (1 year or greater) delivery
56
Header:
1 Select Request Type ‘FIRM SERVICE (NEW)’ from drop down
2 Select Type of Service ‘FIRM DELIVERY SERVICE’ from drop down
3 Enter Business Party Name or select
4 Enter From/To Date or use
5 Select Next to navigate to the next section
Locations Tab:
6 Add new location row
7 Enter Receipt & Delivery Location IDs
8 Enter Requested Qty Change
9 Select Requested Rate Type – ‘NEGOTIATED’
10 Enter Requested Rate
11 Click Validate
12 Click Submit

Operational Temporary Relocation (OTR) - TSP 1000
57
Header:
1 Select Request Type ‘ OPERATIONAL TEMPORARY RELOCATION’ from drop down
2 Enter Business Party Name or select
3 Enter Contract # or use pick list
4 Enter From/To Date or use OTRs cannot cross months, cannot be for the current gas day and must be for 30 days or less
5 Select Next to navigate to the next section
Locations Tab:
6 Add new location row
7 Enter new Receipt & Delivery Location IDs
8 Enter Requested Qty Change
9 Enter reduced Requested Qty Change
Text Tab:
10 Add reasoning in Requested Text grid
11 Click Validate
12 Click Submit
Plant is down for maintenance

Monthly Temporary Relocation - TSP 1000
58
Header:
1 Select Request Type ‘TEMPORARY RELOCATION’ from drop down
2 Enter Business Party Name or select
3 Enter Contract # or use pick list
4 Enter From/To Date or use *must be for one month* From: must always be the 1st day of the month To: must always be last day of the month
5 Select Next to navigate to the next section
Locations Tab:
6 Add new location row
7 Enter new Receipt & Delivery Location IDs
8 Enter Requested Qty Change
9 Enter reduced Requested Qty Change
10 Click Validate
11 Click Submit
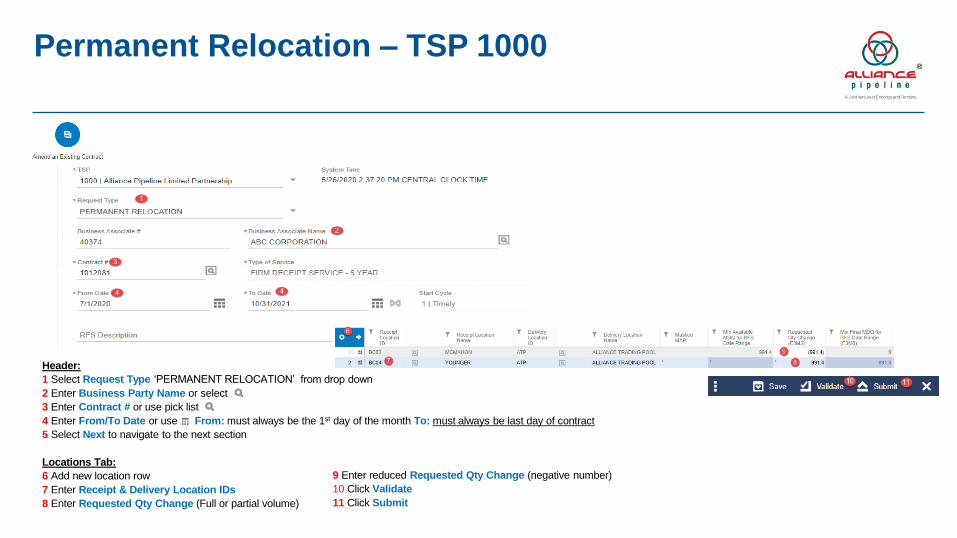
Permanent Relocation – TSP 1000
59
Header:
1 Select Request Type ‘PERMANENT RELOCATION’ from drop down
2 Enter Business Party Name or select
3 Enter Contract # or use pick list
4 Enter From/To Date or use From: must always be the 1st day of the month To: must always be last day of contract
5 Select Next to navigate to the next section
Locations Tab:
6 Add new location row
7 Enter Receipt & Delivery Location IDs
8 Enter Requested Qty Change (Full or partial volume)
9 Enter reduced Requested Qty Change (negative number)
10 Click Validate
11 Click Submit

Request for Service (RFS)
TSP 2000

Request for service (RFS) – TSP 2000
• Navigate to the new Request for Service (RFS) screen via the side flyout menu
• The new layout of the RFS screen is called a “wizard” which takes you step by step through the request process
61

If you want to make changes to an existing contract, choose Amend Existing Contract.
Available request types:
If you do not have a current contract for the service, choose Create New Request for Service.
Available request types:
CREATE NEW REQUEST FOR SERVICE AMEND EXISTING CONTRACT
62
Request types are now split into two drop downs:
Request for Service (RFS) – Request TypesTSP 1000
Query Existing Request for Service
• Use this option to pull any previously submitted RFS
• It will populate the grid below, highlight the RFS you wish to view and click next
63
Request for Service (RFS) – Request TypesTSP 1000

Request for Service (RFS) – Wizard Tabs
Tabs are now vertical instead of horizontal:
WebClassicTo navigate between
tabs:1. Click Next in the bottom
right corner and it will
bring you to the next tab in
line
64
Request for Service (RFS) – Summary Tab
The Summary Tab displays all tab information on one page once it has been submitted
65

Request for Service (RFS) - Validation Alerts
The new validation alerts will display in the top right hand corner of the screen.
Field errors will be highlighted and more information can be displayed by hovering over them with your mouse.
66

RFS Quick Reference Guide
TSP 2000
67

Navigate to the RFS Screen

New IT Contract Requests – TSP 2000
69
9 Click Validate
10 Click Submit
Header:
1 Select Request Type ‘INTERRUPTIBLE CONTRACT REQUEST (NEW)’
2 Select Type of Service from drop down
3 Enter Business Party Name or select
4 Enter From Date or use Leave To Date Open Ended or click
5 Select Next to navigate to the next section
Locations Tab:
6 Add new location row
7/8 Enter Receipt UX & Delivery Location ACE

IT Contract Rate Request– TSP 2000Bidding on existing monthly IT contract
70
7 Click Validate
8 Click Submit
Header:
1 Select Request Type ‘INTERRUPTIBLE RATE REQUEST’
2 Enter From/To Date or use
3 Enter Contract No or select
4 Select Next to navigate to the next section
Locations Tab:
5 Enter Requested Qty
6 Enter Requested Rate Type as Tariff Max (Requested Rate will auto populate)

New Firm Seasonal Service Requests – TSP 2000Bidding on new daily FT-1 service
71
Header:
1 Select Request Type ‘FIRM TRANSPORTATION (NEW)’ from drop down
2 Select Type of Service from drop down ‘FIRM TRANSPORTATION SERVICE’
3 Enter Business Party Name or select
4 Enter From/To Date or use
5 Select Next to navigate to the next section
Locations Tab:
6 Add new location row
7 Enter Receipt & Delivery Location IDs
10 Enter Requested Rate 12 Click Submit
11 Click Validate
8 Enter Requested Qty Change
9 Select Requested Rate Type – ‘DISCOUNT’

New Firm Seasonal Service Requests – TSP 2000Bidding on new FT-1 Monthly or seasonal strip
72
Header:
1 Select Request Type ‘FIRM TRANSPORTATION (NEW)’ from drop down
2 Select Type of Service from drop down ‘FIRM TRANSPORTATION SERVICE’
3 Enter Business Party Name or select
4 Enter From/To Date or use
5 Select Next to navigate to the next section
Locations Tab:
6 Add new location row
7 Enter Receipt & Delivery Location IDs
8 Enter Requested Qty Change
9 Select Requested Rate Type – ‘TARIFF MAX’
10 Enter Requested Rate
11 Click Validate
12 Click Submit

Permanent Relocation – TSP 2000
73
Header:
1 Select Request Type ‘PERMANENT RELOCATION’ from drop down
2 Enter From/To Date or use
3 Enter Contract # or use pick list
4 Select Next to navigate to the next section
Locations Tab:
5 Add new location row
6 Enter Receipt & Delivery Location IDs
7 Enter Requested Qty Change
8 Enter reduced Requested Qty Change (negative number)
9 Click Validate
10 Click Submit

Reporting

• You can access a report directly from your widgets as well as the Reports screen
• You can search for reports by the search function, category or ones you’ve most recently run
• You can also save a favorites list
Reporting Overview
75
Search Function
Favorites List
Recents List
Category List
Report Launcher
Add Favorite

You can save your most used reports to a Favorites list. You can also save the same report with different parameter eg. Daily vs Monthly
1. Click the Add Favorite icon
2. Enter the required fields that you want the report to default to. Click Add
Favorites List
76

3. The report will now show in your favorites list
Favorites List Cont.
77
Clicking on View All Favorites will display all of your Favorite reports. To remove a report from the list, click the heart icon

1. Click the Launch Report icon
2. In the Parameters screen you can
• Use Previous Run Parameters
• Use Default
• Enter new parameters
Launching Reports
78

3. Click Execute. In the bottom right corner a message box will appear, showing the progress of the report
4. If the report was successful, the box will turn green and the report automatically downloaded
Launching Reports
79

Common Reports & Parameters

This report shows your imbalance on a given day. You can run this for a single date or a date range.
• CAW INVENTORY – IMBALANCE POSITION REPORT (EXTERNAL) (RPT_INX62)
Inventory Position Report – INX62
81

This report shows if you are balanced within the ATP or ACE pool with yourself and 3rd parties.
• CAW NOMINATIONS – POOL BALANCE (EXTERNAL) (RPT_NNXO3)
Pool Balance Report – NNX03
82

This report shows all the activity for the month by location or by contract
• CAW NOMINATIONS – MONTHLY ACTIVITY – UP/DN (RPT_ALRX17)
Monthly Activity Report – ALRX17
83
To see your scheduled and allocated volumes by location
Sort By: LocationLocation ID: You can choose a specific receipt location, ATP, ACE, CX and UX.
To see all your scheduled and allocated volumes by contract
Sort by: Svc Req KLocation: Leave blank for all locations or choose individual location from the pick list

This report shows your cuts for a previously scheduled cycle
• CAW CAPACITY ALLOCATION SCHEDULING – SCHEDULED QUANTITY FOR SERVICE REQUESTOR (EXTERNAL) (RPT_CAX15)
Cut Report – CAX15
84

Capacity Release

You can access Capacity Release through the fly out menu.
Select Capacity Release, Offers, Offers
Capacity Release – Placing an Offer
86

To create a new offer from scratch:
Capacity Release – Placing an Offer
87

To copy an existing offer
Capacity Release – Placing an Offer
88

Basic Info
Capacity Release – Placing an Offer
89

Indicators & Disclosures
Capacity Release – Placing an Offer
90

Contact Info
Capacity Release – Placing an Offer
91
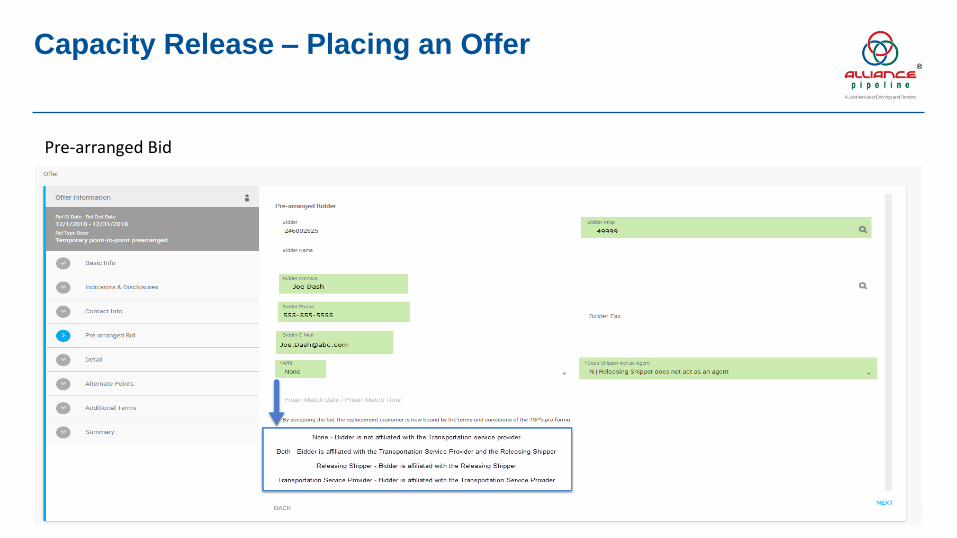
Pre-arranged Bid
Capacity Release – Placing an Offer
92

Recall Reput
Capacity Release – Placing an Offer
93

Detail – When creating an offer from scratch
Capacity Release – Placing an Offer
94

Detail – When creating an offer from scratch
Capacity Release – Placing an Offer
95

Detail – When copying an offer, click the pencil icon to edit the details
Capacity Release – Placing an Offer
96

Detail – When copying an offer
Capacity Release – Placing an Offer
97

Detail – When copying an offer
Capacity Release – Placing an Offer
98

Additional Terms
Capacity Release – Placing an Offer
99

Summary – Review the summary information. Validate and then if no errors Submit.
Capacity Release – Placing an Offer
100

You can navigate to the bid screen through the dashboard widget or the fly out menu
Capacity Release – Placing a Bid
101

Once in the bid screen, locate the pre-arranged bid from the list and a select next
Capacity Release – Placing a Bid
102

• Review the details of the bid in the summary screen.
• Check the Additional Terms Acknowledgement box is checked, if not click on the Additional Terms section on the left and check the Additional Terms Acknowledgement
• Validate and Submit
Capacity Release – Placing a Bid
103
Password Resets

You can reset your own password by going to https://qcctx02.qbsol.com/vpn/index_qbsol.html
1. Click on Forgot Password or Account Locked?
2. Choose Reset Password
Resetting your Password
105

3. Enter the email you provided for your Alliance account, the character code and click continue.
4. You will receive an email with a verification code to enter in the password reset page. You will be prompted to change your password at that time.
5. Once you have completed the reset you will be able to log back into the Citrix application. To get into the web application you will need to call the Hotline 403-517-6277 option 1. Please inform us that you are a web user and have reset your password and need us to unlock your account for web.
Resetting your Password
106

Error Messages

What to do with Errors
If you are getting an error or Alert message click on the Alerts box at the top of the screen and select View All
108

What to do with Errors
• Click on the cog wheel and select Actions, Export to Excel
• Send the excel file to [email protected]
109

Notes
110

Notes
111