mysql installation guide - university of kansas mysql server instance configuration wizard ..... 92...
TRANSCRIPT
MySQL Installation Guide

Abstract
This is the MySQL Installation Guide from the MySQL 5.5 Reference Manual.
For legal information, see the Legal Notices.
For help with using MySQL, please visit either the MySQL Forums or MySQL Mailing Lists, where you can discussyour issues with other MySQL users.
For additional documentation on MySQL products, including translations of the documentation into other languages,and downloadable versions in variety of formats, including HTML and PDF formats, see the MySQL DocumentationLibrary.
Licensing information—MySQL 5.5. This product may include third-party software, used under license. If you areusing a Commercial release of MySQL 5.5, see this document for licensing information, including licensing informationrelating to third-party software that may be included in this Commercial release. If you are using a Community releaseof MySQL 5.5, see this document for licensing information, including licensing information relating to third-partysoftware that may be included in this Community release.
Licensing information—MySQL Cluster NDB 7.2. This product may include third-party software, usedunder license. If you are using a Commercial release of MySQL Cluster NDB 7.2, see this document for licensinginformation, including licensing information relating to third-party software that may be included in this Commercialrelease. If you are using a Community release of MySQL Cluster NDB 7.2, see this document for licensinginformation, including licensing information relating to third-party software that may be included in this Communityrelease.
Document generated on: 2017-08-17 (revision: 53505)
iii
Table of ContentsPreface and Legal Notices .................................................................................................................. v1 Installing and Upgrading MySQL ...................................................................................................... 12 General Installation Guidance .......................................................................................................... 3
2.1 Which MySQL Version and Distribution to Install .................................................................... 32.2 How to Get MySQL .............................................................................................................. 42.3 Verifying Package Integrity Using MD5 Checksums or GnuPG ................................................ 5
2.3.1 Verifying the MD5 Checksum ..................................................................................... 52.3.2 Signature Checking Using GnuPG .............................................................................. 52.3.3 Signature Checking Using Gpg4win for Windows ...................................................... 132.3.4 Signature Checking Using RPM ............................................................................... 18
2.4 Installation Layouts ............................................................................................................. 192.5 Compiler-Specific Build Characteristics ................................................................................ 19
3 Installing MySQL on Unix/Linux Using Generic Binaries .................................................................. 214 Installing MySQL from Source ....................................................................................................... 25
4.1 MySQL Layout for Source Installation .................................................................................. 274.2 Installing MySQL Using a Standard Source Distribution ........................................................ 274.3 Installing MySQL Using a Development Source Tree ............................................................ 314.4 MySQL Source-Configuration Options ................................................................................. 334.5 Dealing with Problems Compiling MySQL ............................................................................ 464.6 MySQL Configuration and Third-Party Tools ........................................................................ 48
5 Installing MySQL on Microsoft Windows ......................................................................................... 495.1 MySQL Installation Layout on Microsoft Windows ................................................................. 525.2 Choosing An Installation Package ....................................................................................... 535.3 MySQL Installer for Windows .............................................................................................. 54
5.3.1 MySQL Installer Initial Setup .................................................................................... 555.3.2 Installation Workflow ................................................................................................ 595.3.3 MySQL Installer Product Catalog and Dashboard ...................................................... 665.3.4 MySQLInstallerConsole Reference ............................................................................ 69
5.4 MySQL Notifier ................................................................................................................... 735.4.1 MySQL Notifier Usage ............................................................................................. 735.4.2 Setting Up Remote Monitoring in MySQL Notifier ...................................................... 80
5.5 Installing MySQL on Microsoft Windows Using an MSI Package ........................................... 855.5.1 Using the MySQL Installation Wizard ........................................................................ 875.5.2 Automating MySQL Installation on Microsoft Windows Using the MSI Package ............ 905.5.3 Removing MySQL When Installed from the MSI Package .......................................... 91
5.6 MySQL Server Instance Configuration Wizard ...................................................................... 925.6.1 Starting the MySQL Server Instance Configuration Wizard ......................................... 925.6.2 Choosing a Maintenance Option ............................................................................... 935.6.3 Choosing a Configuration Type ................................................................................ 935.6.4 The Server Type Dialog ........................................................................................... 945.6.5 The Database Usage Dialog .................................................................................... 965.6.6 The InnoDB Tablespace Dialog ................................................................................ 975.6.7 The Concurrent Connections Dialog ......................................................................... 985.6.8 The Networking and Strict Mode Options Dialog ........................................................ 995.6.9 The Character Set Dialog ....................................................................................... 1005.6.10 The Service Options Dialog .................................................................................. 1005.6.11 The Security Options Dialog ................................................................................. 1015.6.12 The Confirmation Dialog ....................................................................................... 1035.6.13 MySQL Server Instance Config Wizard: Creating an Instance from the CommandLine ................................................................................................................................ 104
5.7 Installing MySQL on Microsoft Windows Using a noinstall Zip Archive .................................. 107

MySQL Installation Guide
iv
5.7.1 Extracting the Install Archive .................................................................................. 1075.7.2 Creating an Option File .......................................................................................... 1085.7.3 Selecting a MySQL Server Type ............................................................................. 1095.7.4 Starting the Server for the First Time ...................................................................... 1095.7.5 Starting MySQL from the Windows Command Line .................................................. 1115.7.6 Customizing the PATH for MySQL Tools ................................................................. 1115.7.7 Starting MySQL as a Windows Service ................................................................... 1125.7.8 Testing The MySQL Installation .............................................................................. 115
5.8 Troubleshooting a Microsoft Windows MySQL Server Installation ........................................ 1165.9 Windows Postinstallation Procedures ................................................................................. 1175.10 Upgrading MySQL on Windows ....................................................................................... 119
6 Installing MySQL on OS X ........................................................................................................... 1236.1 General Notes on Installing MySQL on OS X ..................................................................... 1236.2 Installing MySQL on OS X Using Native Packages ............................................................. 1246.3 Installing a MySQL Launch Daemon .................................................................................. 1306.4 Installing and Using the MySQL Preference Pane .............................................................. 133
7 Installing MySQL on Linux ........................................................................................................... 1397.1 Installing MySQL on Linux Using RPM Packages ............................................................... 1397.2 Installing MySQL on Linux Using Debian Packages ............................................................ 1447.3 Installing MySQL on Linux Using Native Package Managers ............................................... 145
8 Installing MySQL on Solaris ......................................................................................................... 1498.1 Installing MySQL on Solaris Using a Solaris PKG .............................................................. 150
9 Postinstallation Setup and Testing ................................................................................................ 1519.1 Initializing the Data Directory ............................................................................................. 151
9.1.1 Problems Running mysql_install_db ........................................................................ 1539.2 Starting the Server ............................................................................................................ 155
9.2.1 Troubleshooting Problems Starting the MySQL Server ............................................. 1569.3 Testing the Server ............................................................................................................ 1589.4 Securing the Initial MySQL Accounts ................................................................................. 1609.5 Starting and Stopping MySQL Automatically ...................................................................... 164
10 Upgrading or Downgrading MySQL ............................................................................................ 16710.1 Upgrading MySQL .......................................................................................................... 167
10.1.1 Changes Affecting Upgrades to MySQL 5.5 ........................................................... 17110.2 Downgrading MySQL ...................................................................................................... 177
10.2.1 Changes Affecting Downgrades from MySQL 5.5 ................................................... 18110.2.2 Downgrading from MySQL Enterprise Edition to MySQL Community Server ............. 181
10.3 Rebuilding or Repairing Tables or Indexes ....................................................................... 18210.4 Copying MySQL Databases to Another Machine .............................................................. 184
11 MySQL Program Environment Variables ..................................................................................... 18712 Perl Installation Notes ................................................................................................................ 189
12.1 Installing Perl on Unix ..................................................................................................... 18912.2 Installing ActiveState Perl on Windows ............................................................................ 19012.3 Problems Using the Perl DBI/DBD Interface ..................................................................... 191

v
Preface and Legal NoticesThis is the MySQL Installation Guide from the MySQL 5.5 Reference Manual.
Legal Notices
Copyright © 1997, 2017, Oracle and/or its affiliates. All rights reserved.
This software and related documentation are provided under a license agreement containing restrictionson use and disclosure and are protected by intellectual property laws. Except as expressly permittedin your license agreement or allowed by law, you may not use, copy, reproduce, translate, broadcast,modify, license, transmit, distribute, exhibit, perform, publish, or display any part, in any form, or by anymeans. Reverse engineering, disassembly, or decompilation of this software, unless required by law forinteroperability, is prohibited.
The information contained herein is subject to change without notice and is not warranted to be error-free.If you find any errors, please report them to us in writing.
If this is software or related documentation that is delivered to the U.S. Government or anyone licensing iton behalf of the U.S. Government, then the following notice is applicable:
U.S. GOVERNMENT END USERS: Oracle programs, including any operating system, integrated software,any programs installed on the hardware, and/or documentation, delivered to U.S. Government end usersare "commercial computer software" pursuant to the applicable Federal Acquisition Regulation and agency-specific supplemental regulations. As such, use, duplication, disclosure, modification, and adaptation of theprograms, including any operating system, integrated software, any programs installed on the hardware,and/or documentation, shall be subject to license terms and license restrictions applicable to the programs.No other rights are granted to the U.S. Government.
This software or hardware is developed for general use in a variety of information managementapplications. It is not developed or intended for use in any inherently dangerous applications, includingapplications that may create a risk of personal injury. If you use this software or hardware in dangerousapplications, then you shall be responsible to take all appropriate fail-safe, backup, redundancy, and othermeasures to ensure its safe use. Oracle Corporation and its affiliates disclaim any liability for any damagescaused by use of this software or hardware in dangerous applications.
Oracle and Java are registered trademarks of Oracle and/or its affiliates. Other names may be trademarksof their respective owners.
Intel and Intel Xeon are trademarks or registered trademarks of Intel Corporation. All SPARC trademarksare used under license and are trademarks or registered trademarks of SPARC International, Inc. AMD,Opteron, the AMD logo, and the AMD Opteron logo are trademarks or registered trademarks of AdvancedMicro Devices. UNIX is a registered trademark of The Open Group.
This software or hardware and documentation may provide access to or information about content,products, and services from third parties. Oracle Corporation and its affiliates are not responsible for andexpressly disclaim all warranties of any kind with respect to third-party content, products, and servicesunless otherwise set forth in an applicable agreement between you and Oracle. Oracle Corporation and itsaffiliates will not be responsible for any loss, costs, or damages incurred due to your access to or use ofthird-party content, products, or services, except as set forth in an applicable agreement between you andOracle.
This documentation is NOT distributed under a GPL license. Use of this documentation is subject to thefollowing terms:

Legal Notices
vi
You may create a printed copy of this documentation solely for your own personal use. Conversion to otherformats is allowed as long as the actual content is not altered or edited in any way. You shall not publishor distribute this documentation in any form or on any media, except if you distribute the documentation ina manner similar to how Oracle disseminates it (that is, electronically for download on a Web site with thesoftware) or on a CD-ROM or similar medium, provided however that the documentation is disseminatedtogether with the software on the same medium. Any other use, such as any dissemination of printedcopies or use of this documentation, in whole or in part, in another publication, requires the prior writtenconsent from an authorized representative of Oracle. Oracle and/or its affiliates reserve any and all rightsto this documentation not expressly granted above.

1
Chapter 1 Installing and Upgrading MySQLThis chapter describes how to obtain and install MySQL. A summary of the procedure follows and latersections provide the details. If you plan to upgrade an existing version of MySQL to a newer version ratherthan install MySQL for the first time, see Section 10.1, “Upgrading MySQL”, for information about upgradeprocedures and about issues that you should consider before upgrading.
If you are interested in migrating to MySQL from another database system, see MySQL 5.5 FAQ:Migration, which contains answers to some common questions concerning migration issues.
If you are migrating from MySQL Enterprise Edition to MySQL Community Server, see Section 10.2.2,“Downgrading from MySQL Enterprise Edition to MySQL Community Server”.
Installation of MySQL generally follows the steps outlined here:
1. Determine whether MySQL runs and is supported on your platform.
Please note that not all platforms are equally suitable for running MySQL, and that not all platformson which MySQL is known to run are officially supported by Oracle Corporation. For information aboutthose platforms that are officially supported, see http://www.mysql.com/support/supportedplatforms/database.html on the MySQL Web site.
2. Choose which distribution to install.
Several versions of MySQL are available, and most are available in several distribution formats. Youcan choose from pre-packaged distributions containing binary (precompiled) programs or source code.When in doubt, use a binary distribution. Oracle also provides access to the MySQL source code forthose who want to see recent developments and test new code. To determine which version and typeof distribution you should use, see Section 2.1, “Which MySQL Version and Distribution to Install”.
3. Download the distribution that you want to install.
For instructions, see Section 2.2, “How to Get MySQL”. To verify the integrity of the distribution, use theinstructions in Section 2.3, “Verifying Package Integrity Using MD5 Checksums or GnuPG”.
4. Install the distribution.
To install MySQL from a binary distribution, use the instructions in Chapter 3, Installing MySQL on Unix/Linux Using Generic Binaries.
To install MySQL from a source distribution or from the current development source tree, use theinstructions in Chapter 4, Installing MySQL from Source.
5. Perform any necessary postinstallation setup.
After installing MySQL, see Chapter 9, Postinstallation Setup and Testing for information about makingsure the MySQL server is working properly. Also refer to the information provided in Section 9.4,“Securing the Initial MySQL Accounts”. This section describes how to secure the initial MySQL useraccounts, which have no passwords until you assign passwords. The section applies whether youinstall MySQL using a binary or source distribution.
6. If you want to run the MySQL benchmark scripts, Perl support for MySQL must be available. SeeChapter 12, Perl Installation Notes.
Instructions for installing MySQL on different platforms and environments is available on a platform byplatform basis:

2
• Unix, Linux, FreeBSD
For instructions on installing MySQL on most Linux and Unix platforms using a generic binary (forexample, a .tar.gz package), see Chapter 3, Installing MySQL on Unix/Linux Using Generic Binaries.
For information on building MySQL entirely from the source code distributions or the source coderepositories, see Chapter 4, Installing MySQL from Source
For specific platform help on installation, configuration, and building from source see the correspondingplatform section:
• Linux, including notes on distribution specific methods, see Chapter 7, Installing MySQL on Linux.
• Solaris, including PKG and IPS formats, see Chapter 8, Installing MySQL on Solaris.
• IBM AIX, see Chapter 8, Installing MySQL on Solaris.
• FreeBSD, see Installing MySQL on FreeBSD.
• Microsoft Windows
For instructions on installing MySQL on Microsoft Windows, using either the MySQL Installer standaloneMSI, or Zipped binary, see Chapter 5, Installing MySQL on Microsoft Windows.
For information about managing MySQL instances, see Section 5.4, “MySQL Notifier”.
For details and instructions on building MySQL from source code using Microsoft Visual Studio, seeChapter 4, Installing MySQL from Source.
• OS X
For installation on OS X, including using both the binary package and native PKG formats, seeChapter 6, Installing MySQL on OS X.
For information on making use of an OS X Launch Daemon to automatically start and stop MySQL, seeSection 6.3, “Installing a MySQL Launch Daemon”.
For information on the MySQL Preference Pane, see Section 6.4, “Installing and Using the MySQLPreference Pane”.
3
Chapter 2 General Installation Guidance
Table of Contents2.1 Which MySQL Version and Distribution to Install ........................................................................... 32.2 How to Get MySQL ...................................................................................................................... 42.3 Verifying Package Integrity Using MD5 Checksums or GnuPG ....................................................... 5
2.3.1 Verifying the MD5 Checksum ............................................................................................. 52.3.2 Signature Checking Using GnuPG ...................................................................................... 52.3.3 Signature Checking Using Gpg4win for Windows .............................................................. 132.3.4 Signature Checking Using RPM ....................................................................................... 18
2.4 Installation Layouts ..................................................................................................................... 192.5 Compiler-Specific Build Characteristics ........................................................................................ 19
The immediately following sections contain the information necessary to choose, download, and verify yourdistribution. The instructions in later sections of the chapter describe how to install the distribution that youchoose. For binary distributions, see the instructions at Chapter 3, Installing MySQL on Unix/Linux UsingGeneric Binaries or the corresponding section for your platform if available. To build MySQL from source,use the instructions in Chapter 4, Installing MySQL from Source.
2.1 Which MySQL Version and Distribution to Install
MySQL is available on a number of operating systems and platforms. For information about thoseplatforms that are officially supported, see http://www.mysql.com/support/supportedplatforms/database.html on the MySQL Web site.
When preparing to install MySQL, decide which version and distribution format (binary or source) to use.
First, decide whether to install a development release or a General Availability (GA) release. Developmentreleases have the newest features, but are not recommended for production use. GA releases, also calledproduction or stable releases, are meant for production use. We recommend using the most recent GArelease.
The naming scheme in MySQL 5.5 uses release names that consist of three numbers and an optionalsuffix; for example, mysql-5.5.1-m2. The numbers within the release name are interpreted as follows:
• The first number (5) is the major version number.
• The second number (5) is the minor version number. Taken together, the major and minor numbersconstitute the release series number. The series number describes the stable feature set.
• The third number (1) is the version number within the release series. This is incremented for each newbugfix release. In most cases, the most recent version within a series is the best choice.
Release names can also include a suffix to indicate the stability level of the release. Releases within aseries progress through a set of suffixes to indicate how the stability level improves. The possible suffixesare:
• mN (for example, m1, m2, m3, ...) indicates a milestone number. MySQL development uses a milestonemodel, in which each milestone introduces a small subset of thoroughly tested features. Following thereleases for one milestone, development proceeds with another small number of releases that focuses
How to Get MySQL
4
on the next set of features. From one milestone to the next, feature interfaces may change or featuresmay even be removed, based on feedback provided by community members who try these earilyreleases. Features within milestone releases may be considered to be of pre-production quality.
• rc indicates a Release Candidate (RC). Release candidates are believed to be stable, having passed allof MySQL's internal testing. New features may still be introduced in RC releases, but the focus shifts tofixing bugs to stabilize features introduced earlier within the series.
• Absence of a suffix indicates a General Availability (GA) or Production release. GA releases are stable,having successfully passed through the earlier release stages, and are believed to be reliable, free ofserious bugs, and suitable for use in production systems.
Development within a series begins with milestone releases, followed by RC releases, and finally reachesGA status releases.
After choosing which MySQL version to install, decide which distribution format to install for your operatingsystem. For most use cases, a binary distribution is the right choice. Binary distributions are availablein native format for many platforms, such as RPM packages for Linux or DMG packages for OS X.Distributions are also available in more generic formats such as Zip archives or compressed tar files. OnWindows, you can use the MySQL Installer to install a binary distribution.
Under some circumstances, it may be preferable to install MySQL from a source distribution:
• You want to install MySQL at some explicit location. The standard binary distributions are ready to run atany installation location, but you might require even more flexibility to place MySQL components whereyou want.
• You want to configure mysqld with features that might not be included in the standard binarydistributions. Here is a list of the most common extra options used to ensure feature availability:
• -DWITH_LIBWRAP=1 for TCP wrappers support.
• -DWITH_ZLIB={system|bundled} for features that depend on compression
• -DWITH_DEBUG=1 for debugging support
For additional information, see Section 4.4, “MySQL Source-Configuration Options”.
• You want to configure mysqld without some features that are included in the standard binarydistributions. For example, distributions normally are compiled with support for all character sets. If youwant a smaller MySQL server, you can recompile it with support for only the character sets you need.
• You want to read or modify the C and C++ code that makes up MySQL. For this purpose, obtain asource distribution.
• Source distributions contain more tests and examples than binary distributions.
2.2 How to Get MySQL
Check our downloads page at http://dev.mysql.com/downloads/ for information about the current version ofMySQL and for downloading instructions. For a complete up-to-date list of MySQL download mirror sites,see http://dev.mysql.com/downloads/mirrors.html. You can also find information there about becoming aMySQL mirror site and how to report a bad or out-of-date mirror.
To obtain the latest development source, see Section 4.3, “Installing MySQL Using a Development SourceTree”.
Verifying Package Integrity Using MD5 Checksums or GnuPG
5
2.3 Verifying Package Integrity Using MD5 Checksums or GnuPGAfter downloading the MySQL package that suits your needs and before attempting to install it, make surethat it is intact and has not been tampered with. There are three means of integrity checking:
• MD5 checksums
• Cryptographic signatures using GnuPG, the GNU Privacy Guard
• For RPM packages, the built-in RPM integrity verification mechanism
The following sections describe how to use these methods.
If you notice that the MD5 checksum or GPG signatures do not match, first try to download the respectivepackage one more time, perhaps from another mirror site.
2.3.1 Verifying the MD5 Checksum
After you have downloaded a MySQL package, you should make sure that its MD5 checksum matchesthe one provided on the MySQL download pages. Each package has an individual checksum that you canverify against the package that you downloaded. The correct MD5 checksum is listed on the downloadspage for each MySQL product, and you will compare it against the MD5 checksum of the file (product) thatyou download.
Each operating system and setup offers its own version of tools for checking the MD5 checksum. Typicallythe command is named md5sum, or it may be named md5, and some operating systems do not ship it atall. On Linux, it is part of the GNU Text Utilities package, which is available for a wide range of platforms.You can also download the source code from http://www.gnu.org/software/textutils/. If you have OpenSSLinstalled, you can use the command openssl md5 package_name instead. A Windows implementationof the md5 command line utility is available from http://www.fourmilab.ch/md5/. winMd5Sum is a graphicalMD5 checking tool that can be obtained from http://www.nullriver.com/index/products/winmd5sum. OurMicrosoft Windows examples will assume the name md5.exe.
Linux and Microsoft Windows examples:
shell> md5sum mysql-standard-5.5.58-linux-i686.tar.gzaaab65abbec64d5e907dcd41b8699945 mysql-standard-5.5.58-linux-i686.tar.gz
shell> md5.exe mysql-installer-community-5.5.58.msiaaab65abbec64d5e907dcd41b8699945 mysql-installer-community-5.5.58.msi
You should verify that the resulting checksum (the string of hexadecimal digits) matches the one displayedon the download page immediately below the respective package.
Note
Make sure to verify the checksum of the archive file (for example, the .zip,.tar.gz, or .msi file) and not of the files that are contained inside of the archive.In other words, verify the file before extracting its contents.
2.3.2 Signature Checking Using GnuPG
Another method of verifying the integrity and authenticity of a package is to use cryptographic signatures.This is more reliable than using MD5 checksums, but requires more work.
We sign MySQL downloadable packages with GnuPG (GNU Privacy Guard). GnuPG is an Open Sourcealternative to the well-known Pretty Good Privacy (PGP) by Phil Zimmermann. Most Linux distributions ship

Signature Checking Using GnuPG
6
with GnuPG installed by default. Otherwise, see http://www.gnupg.org/ for more information about GnuPGand how to obtain and install it.
To verify the signature for a specific package, you first need to obtain a copy of our public GPG buildkey, which you can download from http://pgp.mit.edu/. The key that you want to obtain is named [email protected]. Alternatively, you can copy and paste the key directly from the following text:
-----BEGIN PGP PUBLIC KEY BLOCK-----Version: GnuPG v1.4.5 (GNU/Linux)mQGiBD4+owwRBAC14GIfUfCyEDSIePvEW3SAFUdJBtoQHH/nJKZyQT7h9bPlUWC3RODjQReyCITRrdwyrKUGku2FmeVGwn2u2WmDMNABLnpprWPkBdCk96+OmSLN9brZfw2vOUgCmYv2hW0hyDHuvYlQA/BThQoADgj8AW6/0Lo7V1W9/8VuHP0gQwCgvzV3BqOxRznNCRCRxAuAuVztHRcEAJooQK1+iSiunZMYD1WufeXfshc57S/+yeJkegNWhxwR9pRWVArNYJdDRT+rf2RUe3vpquKNQU/hnEIUHJRQqYHo8gTxvxXNQc7fJYLVK2HtkrPbP72vwsEKMYhhr0eKCbtLGfls9krjJ6sBgACyP/Vb7hiPwxh6rDZ7ITnEkYpXBACmWpP8NJTkamEnPCia2ZoOHODANwpUkP43I7jsDmgtobZX9qnrAXw+uNDIQJEXM6FSbi0LLtZciNlYsafwAPEOMDKpMqAK6IyisNtPvaLd8lH0bPAnWqcyefeprv0sxxqUEMcM3o7wwgfN83POkDasDbs3pjwPhxvhz6//62zQJ7Q2TXlTUUwgUmVsZWFzZSBFbmdpbmVlcmluZyA8bXlzcWwtYnVpbGRAb3NzLm9yYWNsZS5jb20+iGwEExECACwCGyMCHgECF4ACGQEGCwkIBwMCBhUKCQgCAwUWAgMBAAUCWKcFIAUJHirJFAAKCRCMcY07UHLh9VcFAJ46pUyVd8BZ2r5CppMC1tmyQ3ceRgCfVPwuVsiS0VER5WUqtAQDt+DoetCIaQQTEQIAKQIbIwYLCQgHAwIEFQIIAwQWAgMBAh4BAheAAhkBBQJTAdRmBQkaZsvLAAoJEIxxjTtQcuH1X4MAoKNLWAbCBUj96637kv6Xa/fJuX5mAJwPtmgDfjUe2iuhXdTrFEPT19SB6ohmBBMRAgAmAhsjBgsJCAcDAgQVAggDBBYCAwECHgECF4AFAk53PioFCRP7AhUACgkQjHGNO1By4fUmzACeJdfqgc9gWTUhgmcMAOmG4RjwuxcAoKfM+U8yMOGELi+TRif7MtKEms6piGkEExECACkCGyMGCwkIBwMCBBUCCAMEFgIDAQIeAQIXgAIZAQUCUZSROgUJFTchqgAKCRCMcY07UHLh9YtAAJ9XrA/ymlmozPZn+A9ls8/uwMcTsQCfaQMNq1dNkhH2kyByc3Rx9/W2xfqJARwEEAECAAYFAlAS6+UACgkQ8aIC+GoXHivrWwf/dtLk/x+NC2VMDlg+vOeM0qgG1IlhXZfiNsEisvvGaz4m8fSFRGe+1bvvfDoKRhxiGXU48RusjixzvBb6KTMuY6JpOVfz9Dj3H9spYriHa+i6rYySXZIpOhfLiMnTy7NH2OvYCyNzSS/ciIUACIfH/2NH8zNT5CNF1uPNRs7HsHzzz7pOlTjtTWiF4cq/Ij6Z6CNrmdj+SiMvjYN9u6sdEKGtoNtpycgD5HGKR+I7Nd/7v56yhaUe4FpuvsNXig86K9tI6MUFS8CUyy7Hj3kVBZOUWVBM053knGdALSygQr50DA3jMGKVl4ZnHje2RVWRmFTr5YWoRTMxUSQPMLpBNIkBHAQQAQIABgUCU1B+vQAKCRAohbcD0zcc8dWwCACWXXWDXIcAWRUw+j3ph8dr9u3SItljn3wBc7clpclKWPuLvTz7lGgzlVB0s8hH4xgkSA+zLzl6u56mpUzskFl7f1I3Ac9GGpM40M5vmmR9hwlD1HdZtGfbD+wkjlqgitNLoRcGdRf/+U7x09GhSS7Bf339sunIX6sMgXSC4L32D3zDjF5icGdb0kj+3lCrRmp853dGyA3ff9yUiBkxcKNawpi7Vz3D2ddUpOF3BP+8NKPg4P2+srKgkFbd4HidcISQCt3rY4vaTkEkLKg0nNA6U4r0YgOa7wITSsxFlntMMzaRg53QtK0+YkH0KuZR3GY8B7pi+tlgycyVR7mIFo7riQEcBBABCAAGBQJWgVd0AAoJEEZu4b/gk4UKk9MH/Rnt7EccPjSJC5CrB2AU5LY2Dsr+PePI2ubPWsEdG82qSjjGpbhIH8LSg/PzQoGHiFWMmmZWJktRT+dcgLbs3b2VwCNAwCE8jOHdUkQhEowgomdNvHiBHKHjP4/lF68KOPiO/2mxYYkmpM7BWf3kB57DJ5CTi3/JLoN7zF40qIs/p09ePvnwStpglbbtUn7XPO+1/Ee8VHzimABom52PkQIuxNiVUzLVn3bSWqrd5ecuqLk6yzjPXd2XhDHWC9Twpl68GePru6EzQtusi0m6S/sHgEXqh/IxrFZVJlljF75JvosZq5zeulr0i6kOij+Y1p6MFffihITZ1gTmk+CLvK2JASIEEAECAAwFAk53QS4FAwASdQAACgkQlxC4m8pXrXwJ8Qf/be/UO9mqfoc2sMyhwMpN4/fdBWwfLkA12FXQDOQMvwH9HsmEjnfUgYKXschZRi+DuHXe1P7l8G2aQLubhBsQf9ejKvRFTzuWMQkdIq+6Koulxv6ofkCcv3d1xtO2W7nb5yxcpVBPrRfGFGebJvZa58DymCNgyGtAU6AOz4veavNmI2+GIDQsY66+tYDvZ+CxwzdYu+HDV9HmrJfc6deM0mnBn7SRjqzxJPgoTQhihTav6q/R5/2p5NvQ/H84OgS6GjosfGc2duUDzCP/kheMRKfzuyKCOHQPtJuIj8++gfpHtEU7IDUX1So3c9n0PdpeBvclsDbpRnCNxQWU4mBot4kBIgQQAQIADAUCToi2GQUDABJ1AAAKCRCXELibyletfLZAB/9oRqx+NC98UQD/wlxCRytzvi/MuPnbgQUPLHEap10tvEi33S/H/xDR/tcGofY4cjAvo5skZXXeWq93Av7PACUbzkg0X0eSr2oL6wy66xfov72AwSuX+iUK68qtKaLqRLitM02y8aNRV/ggKvt7UMvGmOvs5yLaYlobyvGaFC2ClfkNOt2MlVnQZCmnYBCwOktPGkExiu2yZMifcYGxQcpHKVFG59KeF2cM2d4xYM8HJqkSGGW306LFVSyeRwG+wbttgLpD5bM/T2b3fF/J35raCSMLZearRTq8aygPl+XM7MM2eR946aw6jmOsgNBErbvvIdQj6LudAZj+8imcXV2KiQEiBBABAgAMBQJOmdnRBQMAEnUAAAoJEJcQuJvKV618AvIIAIEF1ZJ+Ry7WOdKF5oeQ/ynaYUigzN92fW/9zB8yuQlngkFJGidYMbci1tR1siziIVJFusR3ZonqAPGK/SUta9Y6KWLhmc7c5UnEHklq/NfdMZ2WVSIykXlctqw0sbb+z1ecEd4G8u9j5illMO1B36rQayYAPoeXLX8dY4VyFLVGaQ00rWQBYFZrpw16ATWbWGJP332NSfCk4zZq6kXEW07q0st3YBgAAGdNQyEeZCa4d4pBRSX6189Kjg6GDnIcaiOF6HO6PLr9fRlLr5ObCgU+G9gEhfiVwDEV9E+7/Bq2pYZ9whhkBqWQzdpXTNTM24uaEhE01EPO5zeCO214q6mJASIEEAECAAwFAk6rpgEFAwASdQAACgkQlxC4m8pXrXzAhwf/f9O99z16

Signature Checking Using GnuPG
7
3Y5FZVIxexyqXQ/Mct9uKHuXEVnRFYbA49dQLD4S73N+zN7gn9jFeQcBo4w8qVUV94U/ta/VbLkdtNREyplPM4XY8YE5Wfd9bfyg3q1PbEiVjk995sBF+2+To99YYKstgXPqjlH0jUfEyDmexOj+hsp8Rc63kvkIx36VBa4ONRYFefGAhKDMigL2YAhc1UkGtkGTuLmlCGwIV6lviDZD3RJf5375VFnaHv7eXfwQxCwE+BxG3CURrjfxjaxMTmMPyAG2rhDp5oTUEvqDYNbko5UxYOmrSjvF4FzXwqerElXJUkUzSh0pp7RxHB/1lCxDs7D1F1hlgFQuNIkBIgQQAQIADAUCTrzZHAUDABJ1AAAKCRCXELibyletfMUpB/4s07dREULIBnA1D6qr3fHsQJNZqbAuyDlvgGGLWzoyEDs+1JMFFlaa+EeLIo1386GU2DammDC23p3IB79uQhJeD2Z1TcVg4cA64SfF/CHca5coeRSrdAiudzU/cgLGtXIP/OaFamXgdMxAhloLFbSHPCZkyb00phVa8+xeIVDrK1HByZsNIXy/SSK8U26S2PVZ2o14fWvKbJ1Aga8N6DuWY/D8P2mi3RAbiuZgfzkmKL5idH/wSKfnFKdTgJzssdCc1jZEGVk5rFYcWOrJARHeP/tsnb/UxKBEsNtO7e3N2e/rLVnEykVIO066hz7xZK/VNBSpx3k3qj4XPK41IHy2iQEiBBABAgAMBQJOzqO8BQMAEnUAAAoJEJcQuJvKV6182twH/0IzjXLxN45nvIfEjC75a+i9ZSLlqR8lsHL4GpEScFKI0a0lT4IVAIY2RKG+MAs2eHm0UfKuwGs5jluRZ9RqKrc61sY0XQV9/7znY9Db16ghX04JjknOKs/fPi87rvKkB/QxJWS8qbb/erRmW+cPNjbRxTFPS5JIwFWHA16ieFEpvdAgKV6nfvJVTq1rjPDcnIA9CJN2SmUFx9Qx3SRc6ITbam1hjFnY6sCh6AUhxLI2f1mq1xH9PqEy42Um68prRqTyJ7Iox1g/UDDkeeUcAg7T1viTz7uXpS3Wrq4zzo4yOpaJfLDR3pI5g2ZkSNGTMo6aySE4OABt8i1Pc1Pm6AmJASIEEAECAAwFAk7yPFYFAwASdQAACgkQlxC4m8pXrXzXiAf9FrXe0lgcPM+tYOWMLhv5gXJi2VUBaLxpyRXm/kJcmxInKq1GCd3yD4/FLHNu3ZcCz/uklPAbZXWI0O6ewq0LWsRtklmJjWiedH+hGyaTv95VklojRIBd8nBaJ6M98rljMBHTFwWvjQFVf4FLRJQZqHlvjcCkq2Dd9BWJpGXvr/gpKkmMJYNK/ftfZRcChb35NI19WRpOhj9u808OPcqKVvZBcPwFGV5cEBzmAC94J7JcD8+S8Ik8iUJMQGGL3QcmZOBozovh86hj7KTSEBHlLXl832z89H1hLeuLbnXoGLv3zeUFSxkv1h35LhZLqIMDQRXLuUzxGHMBpLhPyGWRJ4kBIgQQAQIADAUCTwQJFwUDABJ1AAAKCRCXELibyletfABvB/9Cy69cjOqLGywITs3Cpg//40jmdhSAVxilJivP6J5bubFHDJlVTx541Dv5h4hTG2BQuueQ4q1VCpSGW+rHcdhPyvmZGRz1rxdQQGh1Dv0Bod2c3PJVSYPSrRSwCZJkJHOtVRBdjK4mkZb5aFTza+Tor9kxzj4FcXVd4KAS+hHQHYHcAr8tt2eOLzqdEFTULeGiSoNn+PVzvzdfhndphK+8F2jfQ2UKuc01O7k0Yn9xZVx0OG6fE1gStzLv7C5amWLRd8+xh+MN0G8MgNglpBoExsEMMlPBYSUHa6lxpdMNMuibrIyVncE9X8QOhImt8K0sNn/EdbuldJNGYbDLt7O4iQEiBBABAgAMBQJPFdTcBQMAEnUAAAoJEJcQuJvKV6184owH+wZ/uLpezXnSxigeH1sig72QEXMrNd5DVHCJdig3bo+K5YmmN710/m5z+63XKUEWpd6/knajObgckThzWftNeK1SSFQGPmoYZP9EZnSU7L+/dSUpExbj842G5LYagrCyMGtlxRywWEmbi72TKS/JOK0jLiOdvVy+PHrZSu0DTVQ7cJh1BmPsbz7zzxjmcI5l+7B7K7RHZHq45nDLoIabwDacj7BXvBK0Ajqz4QyJGQUjXC7q+88I+ptPvOXlE5nI/NbiCJOMI6d/bWN1KwYrC80fZuFaznfQFcPyUaDwyRaun+K3kEji2wXecq+yMmLUEp01TKsUeOL50HD6hHH07W+JASIEEAECAAwFAk85bQsFAwASdQAACgkQlxC4m8pXrXwKPQgAlkbUsTr7nkq+haOk0jKpaHWEbRMEGMrBI3F7E+RDO6V/8y4Jtn04EYDc8GgZMBah+mOgeINq3y8jRMYV5jVtZXv2MWYFUcjMkVBKeqhi/pGEjmUdmdt3DlPv3Z+fMTMRmAocI981iY/go8PVPg/+nrR6cFK2xxnOR8TacikJBFeSfkkORg1tDzjjYv1B5ZIEkpplepl5ahJBBq7cpYhTdY6Yk0Sz0J8wEdffLSaNxrRuWLrRhWzZU7p9bFzfb/7OHc21dJnB7wKv5VvtgE+jiQw9tOKaf5hcSgRYuF6heu+B25gc5Uu88lo409mZ7oxQ6hDCn7JHvzh0rhmSN+Kid4kBIgQQAQIADAUCT0qQrQUDABJ1AAAKCRCXELibyletfC9UB/4o2ggJYM0CLxEpP0GU8UKOh3+/zm1DN7Qe4kY2iCtF1plKHQaTgt5FlgRCFaiXcVv7WzGz/FnmxonR1leLl+kfRlwyPPnoI/AWPCy/NO4Cl5KnjsSmsdDUpObwZ4KYsdilZR7ViJu2swdAIgnXBUwrlRJR7CK4TAKrTeonRgVSrVx8Vt//8/cYj73CLq8oY/KK0iHiQrSwo44uyhdiFIAssjyXn6/2E+w0zgvPexNSNNROHQ8pjbq+NTY6GwKIGsaej3UTRwQ7psvKXz8y7xdzmOAr/khGvxB5gjkx02pimjeia8v66aH6rbnojJMAovNUS4EHdHnulv4rovC8Kf9iiQEiBBABAgAMBQJPVdsaBQMAEnUAAAoJEJcQuJvKV618vVEIALFXPBzcAO1SnQarBLzyYMVZZumPvSXKnUHAO+6kjApXPJ+qFRdUaSNshZxVKY9Zryblu4ol/fLUTt0CliSDIxD6L4GXEm4VYYCl4lPO3bVsJnGITLFwQGHM27EmjVoTiD8Ch7kPq2EXr3dMRgzjpdz+6aHGSUfOdLTPXufDvW83bEWGaRVuTJKw+wIrcuRqQ+ucWJgJGwcE4zeHjZadJx1XUm1X+BbI73uiQussyjhhQVVNU7QEdrjyuscaZ/H38wjUwNbylxDPB4I8quC1knQ0wSHr7gKpM+E9nhiS14poRqU18u78/sJ2MUPXnQA6533IC238/LP8JgqB+BiQBTSJASIEEAECAAwFAk9ng3cFAwASdQAACgkQlxC4m8pXrXxQRAf/UZlkkpFJj1om9hIRz7gS+l7YvTaKSzpo+TBcx3C7aqKJpir6TlMK9cb9HGTHo2Xp1N3FtQL72NvO6CcJpBURbvSyb4i0hrm/YcbUC4Y3eajWhkRS3iVfGNFbc/rHthViz0r6Y5lhXX16aVkDv5CIFWaF3BiUK0FnHrZiy4FPacUXCwEjv3uf8MpxV5oEmo8Vs1h4TL3obyUzqrImFrEMYE/12lkE8iR5KWCaF8eFyl56HL3PPl90JMQBXzhwsFoWCPuwjfM5w6sWLl//zynwxtlJ9CRz9c2vK6aJ8DRu3OfBKN1iiEcNEynksDnNXErn5xXKz3p5pYdqe9BLzUQCDYkBIgQQAQIADAUCT3inRgUDABJ1AAAKCRCXELibyletfGMKCADJ97qkgeBntQ+tZtKSFyXznAugYQmbzJld8U6eGSQnQkM40Vd62UZLdA8MjlWKS8y4A4L20cI14zs5tKG9Q72BxQOw5xkxlLASw1/8WeYEbw7ZA+sPG//q9v3kIkru3sv64mMAenZtxsykexRGyCumxLjzlAcL1drWJGUYE2Kl6uzQS7jb+3PNBloQvz6nb3YRZ+CgLy9D41SIK+fpnV8r4iqhu7r4LmAQ7Q1DF9aoGaYvn2+xLGyWHxJAUet4xkMNOLp6k9RF1nbNe4I/sqeCB25CZhCTEvHdjSGTD2yJR5jfoWkwO9w8DZG1Q9WrWqki4hSBl0cmcvO34pC1SJYziQEiBBABAgAMBQJPinQFBQMAEnUAAAoJEJcQuJvKV618CFEI

Signature Checking Using GnuPG
8
AJp5BbcV7+JBMRSvkoUcAWDoJSP2ug9zGw5FB8J90PDefKWCKs5Tjayf2TvM5ntq5DE9SGaXbloIwa74FoZlgqlhMZ4AtY9Br+oyPJ5S844wpAmWMFc6NnEPFaHQkQ+bdJYpRVNd9lzagJP261P3S+S9T2UeHVdOJBgWIq9Mbs4lnZzWsnZfQ4Lsz0aPqe48tkU8hw+nflby994qIwNOlk/u+I/lJbNz5zDY91oscXTRl2jV1qBgKYwwCXxyB3j9fyVpRl+7QnqbTWcCICVFL+uuYpP0HjdoKNqhzEguAUQQLOB9msPTXfa2hG+32ZYg5pzI5V7GCHq0KO6u5Ctj3TGJASIEEAECAAwFAk+cQEEFAwASdQAACgkQlxC4m8pXrXzi7AgAx8wJzNdD7UlgdKmrAK//YqH7arSssb33Xf45sVHDpUVA454DXeBrZpi+zEuo03o5BhAuf38cwfbkV6jN1mC2N0FZfpy4v7RxHKLYr7tr6r+DRn1L1giX5ybxCgY0fLAxkwscWUKGKABWxkz9b/beEXaO2rMt+7DBUdpAOP5FNRQ8WLRWBcMGQiaTS4YcNDAiNkrSP8CMLQP+04hQjahxwCgBnksylciqz3Y5/MreybNnTOrdjVDsF0Oet0uLOiWXUZV1FfaGIdb/oBQLg+e1B74p5+q3aF8YI97qAZpPa1qiQzWIDX8LX9QXEFyZ3mvqzGrxkFoocXleNPgWT8fRuokBIgQQAQIADAUCT64N/QUDABJ1AAAKCRCXELibyletfDOGCACKfcjQlSxrWlEUrYYZpoBP7DE+YdlIGumt5l6vBmxmt/5OEhqr+dWwuoiyC5tm9CvJbuZup8anWfFzTTJmPRPsmE4z7Ek+3CNMVM2wIynsLOt1pRFK4/5RNjRLbwI6EtoCQfpLcZJ//SB56sK4DoFKH28Ok4cplESPnoMqA3QafdSEA/FLqvZV/iPgtTz7vjQkMgrXAIUM4fvKe3iXkAExGXtmgdXHVFoKmHrxJ2DTSvM7/19zjGJeu2MhIKHyqEmCk6hLjxyCE5pAH59KlbAQOP1bS28xlRskBApm2wN+LOZWzC62HhEReQ50inCGuuubK0PqUQnyYc+lUFxrFpcliQEiBBABAgAMBQJPv9lVBQMAEnUAAAoJEJcQuJvKV618AzgH/iRFFCi4qjvoqji1fi7yNPZVOMMO2H13Ks+AfcjRtHuVaa30u50ND7TH+XQe6yerTapLh3aAm/sNP99aTxIuwRSlyKEoDs93+XVSgRqPBgbF/vxv0ykok3p6L9DxFO/w5cL8JrBhMZoJrEkIBFkwN8tWlcXPRFQvcdBYv3M3DTZUqY+UHnOxHvSzsl+LJ0S9Xcd9C5bvYfabmYJvG5eRS3pj1L/y3a6yw6hvY+JtnQAkt05TdeHMIgQH/zb8V9wxDzmE0un8LyoC2Jx5TpikQsJSejwK6b3coxVBlngku6+CqDAimObZLw6H9xYYIK0FoJs7j5bQZEwUO7OLBgjcMOqJASIEEAECAAwFAk/Rpc8FAwASdQAACgkQlxC4m8pXrXw49Qf/TdNbun2htQ+cRWarszOx8BLEiW/x6PVyUQpZnV/0qvhKzlJUjM9hQPcA0AsOjhqtCN6Cy8KXbK/TvPm9D/Nk6HWwD1PomzrJVFk2ywGFIuTR+lluKSp7mzm5ym0wJs5cPq731Im31RUQU8ndjLrq9YOf5FVL8NqmcOAU4E8d68BbmVCQC5MMr0901FKwKznShfpy7VYN25/BASj8dhnynBYQErqToOJB6CndJhdTlbfR4SirqAYZZg3XeqGhByytEHE1x7FMWWFYhdNtsnAVhYBbWqAzBs8lF9JdMhaf0VQU/4z10gVrRtXLR/ixrCi+P4cM/fOQkqd6pwqWkaXt6okBIgQQAQIADAUCT+NxIAUDABJ1AAAKCRCXELibyletfFBBCAC6+0TUJDcNaqOxOG1KViY6KYg9NCL8pwNK+RKNK/N1V+WGJQH7qDMwRoOn3yogrHax4xIeOWiILrvHK0O6drS1DjsymIhRSm2XbE/8pYmEbuJ9vHh3b/FTChmSAO7dDjSKdWD3dvaY8lSsuDDqPdTX8FzOfrXCM22C/YPg7oUG2A5svE1b+yismP4KmVNWAepEuPZcnEMPFgop3haHg9X2+mj/btDBYr6p9kAgIY17nigtNTNjtI0dMLu43aIzedCYHqOlNHiB049jkJs54fMGBjF9qPtcm0k44xyKd1/JXWMdNUmtwKsChAXJS3YOciMgIx6tqYUTndrP4I6q1rfriQEiBBABAgAMBQJP9T1VBQMAEnUAAAoJEJcQuJvKV618J9wIAI1lId9SMbEHF6PKXRe154lEpap5imMU/lGTj+9ZcXmlf8o2PoMMmb3/E1k+EZUaeSBoOmjS8C2gwd5XFwRrlwADRlK/pG5XsL4h5wmN2fj1ororrJXvqH427PLRQK9yzdwG4+9HTBOxjoS8qZT9plyKAJZzAydAMqyseRHgNo0vMwlgrs4ojo+GcFGQHrF3IaUjvVfUPOmIj7afopFdIZmIGaSF0TXBzqcZ1chFv/eTBcIuIKRvlaDee5FgV7+nLH2nKOARCLvV/+8uDi2zbr83Ip5x2tD3XuUZ0ZWxD0AQWcrLdmGb4lkxbGxvCtsaJHaLXWQ2m760RjIUcwVMEBKJASIEEAECAAwFAlAGYWsFAwASdQAACgkQlxC4m8pXrXwyVAgAvuvEl6yuGkniWOlvuHEusUv/+2GCBg6qV+IEpVtbTCCgiFjYR5GasSp1gpZ5r4BocOlbGdjdJGHTpyK8xD1i+6qZWUYhNRg2POXUVzcNEl2hhouwPLOifcmTwAKU76TEv3L5STviL3hWgUR2yEUZ3Ut0IGVV6uPER9jpR3qd6O3PeuFkwf+NaGTye4jioLAy3aYwtZCUXzvYmNLP90K4y+5yauZteLmNeq26miKC/NQu4snNFClPbGRjHD1ex9KDiAMttOgN4WEq7srTrYgtT531WY4deHpNgoPlHPuAfC0H+S6YWuMbgfcb6dV+Rrd8Ij6zM3B/PcjmsYUfOPdPtIkBIgQQAQIADAUCUBgtfQUDABJ1AAAKCRCXELibyletfAm3CACQlw21Lfegd8RmIITsfnFG/sfM3MvZcjVfEAtsY3fTK9NiyU0B3yX0PU3ei37qEW+50BzqiStf5VhNvLfbZR+yPou7o2MAP31mq3Uc6grpTV64BRIkCmRWg40WMjNI1hv7AN/0atgjATYQXgnEw7mfFb0XZtMTD6cmrz/A9nTPVgZDxzopOMgCCC1ZK4Vpq9FKdCYUaHpX3sqnDf+gpVIHkTCMgWLYQOeX5Nl+fgnq6JppaQ3ySZRUDr+uFUs0uvDRvI/cn+urri92wdDnczjFumKvz/cLJAg5TG2Jv1Jx3wecALsVqQ3gL7f7vr1OMaqhI5FEBqdN29L9cZe/ZmkriQEiBBIBCgAMBQJVoNxyBYMHhh+AAAoJEEoz7NUmyPxLD1EH/2eh7a4+8A1lPLy2L9xcNt2bifLfFP2pEjcG6ulBoMKpHvuTCgtX6ZPdHpM7uUOje/F1CCN0IPB533U1NIoWIKndwNUJjughtoRM+caMUdYyc4kQm29Se6hMPDfyswXE5BwePmoOm4xWPVOH/cVN04zyLuxdlQZNQF/nJg6PMsz4w5z+K6NGGm24NEPcc72iv+6RUc/ry/7v5cVu4hO5+r104mmNV5yLecQF13cHy2JlngIHXPSlxTZbeJX7qqxE7TQh5nviSPgdk89oB5jFSx4g1efXiwtLlP7lbDlxHduomyQuH9yqmPZMbkJt9uZDc8ZzMYsDDwlc7BIe5bGKfjqJAhwEEAECAAYFAlSanFIACgkQdzHqU52lcqLdvg//cAEPqdN5VTKWEoDFjDS4I6t8+0KzdDWDacVFwKJ8RAo1M2SklDxnIvnzysZd2VHp5Pq7i4LYCZo5lDkertQ6LwaQxc4X6myKY4LTA652ObFqsSfgh9kW+aJBBAyeahPQ8CDD+Yl23+MY5wTsj4qt7KffNzy78vLbYnVnvRQ3/CboVix0SRzg0I3Oi7n3B0lihvXy5goy9ikjzZevejMEfjfeRCgoryy9j5RvHH9PF3fJVtUtHCS4f+kxLmbQJ1XqNDVDhlFzjz8oUzz/8YXy3im5MY7Zuq4P4wWiI7rkIFMjTYSpz/evxkVlkR74qOngT2pYVHLyJkqwh56i0aXcjMZiuu2cymUt2LB9IsaMyWBNJjXr2doRGMAfjuR5ZaittmML

Signature Checking Using GnuPG
9
yZwix9mWVk7tkwlIxmT/IW6Np0qMhDZcWYqPRpf7+MqY3ZYMK4552b8aDMjhXrnOOwLsz+UI4bZa1r9dguIWIt2C2b5C1RQ9AsQBPwg7h5P+HhRuFAuDKK+vgV8FRuzRJeKkFqwB4y0Nv7BzKbFKmP+V+/krRv+/Dyz9Bz/jyAQgw02u1tPupH9BGhlRyluNyCJFTSNj7G+OLU0/l4XNph5OOC7sy+AMZcsL/gsT/TXCizRcCuApNTPDaenACpbvg8OoIzmNWhh4LXbAUHCKmY//hEw9PvTZA1xKHgyJAhwEEgECAAYFAlJYsKQACgkQoirk60MpxUV2XQ//b2/uvThkkbeOegusDC4AZfjnL/V3mgk4iYy4AC9hum0R9oNlXDR51P1TEw9mC1btHj+7m7Iq1a5ke5wIC7ENZiilr0yPqeWgL5+LC98dz/L85hqAwIoGeOfMhrlaVbAZEj4yQTAJDA35vZHVsQmp87il0m+fZX04OBLXBzw86EoAAZ7QEoH4qFcT9k1T363tvNnIm3mEvkQ5WjE1R9uchJa1g7hdlNQlVkjFmPZrJK9fl4z56Dto89Po4Sge48jDH0pias4HATYHsxW819nz5jZzGcxLnFRRR5iITVZi9qzsHP7NbUh3qxuWCHS9xziXpOcSZY848xXw63Y5jDJfpzupzu/KHj6CzXYJUEEqp9MluoGb/BCCEPzdZ0ovyxFutM/BRcc6DvE6sTDF/UES21ROqfuwtJ6qJYWX+lBIgyCJvj4oRdbzxUleePuzqCzmwrIXtoOKW0Rlj4SCeF9yCwUMBTGW5/nCLmN4dwf1KW2RP2Eg4ERbuUy7QnwRP5UCl+0ISZJyYUISfg8fmPIdQsetUK9Cj+Q5jpB2GXwELXWnIK6hK/6jXp+EGEXSqdIE53vAFe7LwfHiP/D5M71D2h62sdIOmUm3lm7xMOnM5tKlBiV+4jJSUmriCT62zo710+6iLGqmUUYlEll6Ppvo8yuanXkYRCFJpSSP7VP0bBqIZgQTEQIAJgUCTnc9dgIbIwUJEPPzpwYLCQgHAwIEFQIIAwQWAgMBAh4BAheAAAoJEIxxjTtQcuH1Ut4AoIKjhdf70899d+7JFq3LD7zeeyI0AJ9Z+YyE1HZSnzYi73brScilbIV6sbQ7TXlTUUwgUGFja2FnZSBzaWduaW5nIGtleSAod3d3Lm15c3FsLmNvbSkgPGJ1aWxkQG15c3FsLmNvbT6IbwQwEQIALwUCTnc9rSgdIGJ1aWxkQG15c3FsLmNvbSB3aWxsIHN0b3Agd29ya2luZyBzb29uAAoJEIxxjTtQcuH1tT0An3EMrSjEkUv29OX05JkLiVfQr0DPAJwKtL1ycnLPv15pGMvSzav8JyWN3IhlBBMRAgAdBQJHrJS0BQkNMFioBQsHCgMEAxUDAgMWAgECF4AAEgkQjHGNO1By4fUHZUdQRwABAa6SAJ9/PgZQSPNeQ6LvVVzCALEBJOBt7QCffgs+vWP18JutdZc7XiawgAN9vmmITAQTEQIADAUCPj6j0QWDCWYAuwAKCRBJUOEqsnKR8iThAJ9ZsR4o37dNGyl77nEqP6RAlJqaYgCeNTPTEVY+VXHR/yjfyo0bVurRxT2ITAQTEQIADAUCPkKCAwWDCWIiiQAKCRC29c1NxrokP5aRAKCIaaegaMyiPKenmmm8xeTJSR+fKQCgrv0TqHyvCRINmi6LPucxGKwfy7KIRgQQEQIABgUCP6zjrwAKCRCvxSNIeIN0D/aWAKDbUiEgwwAFNh2n8gGJSw/8lAuISgCdHMzLAS26NDP8T2iejsfUOR5sNriIRgQQEQIABgUCP7RDdwAKCRCFlq+rMHNOZsbDAJ0WoPV+tWILtZG3wYqg5LuHM03faQCeKuVvCmdPtro06xDzeeTXVrZ14+GIRgQQEQIABgUCQ1uz6gAKCRCL2C5vMLlLXH90AJ0QsqhdAqTAk3SBnO2wzuSOwiDIUwCdFExsdDtXf1cL3Q4ilo+OTdrTW2CIRgQTEQIABgUCRPEzJgAKCRD2ScT0YJNTDApxAKCJtqT9LCHFYfWKNGGBgKjka0zi9wCcCG3MvnvBzDUqDVebudUZ61Sont+ITAQQEQIADAUCQYHLAQWDBiLZiwAKCRAYWdAfZ3uh7EKNAJwPywk0Nz+ZLybw4YNQ7H1UxZycaQCePVhY4P5CHGjeYj9SX2gQCE2SNx+ITAQQEQIADAUCQYHLNAWDBiLZWAAKCRCBwvfr4hO2kiIjAJ0VU1VQHzF7yYVeg+bh31nng9OOkwCeJI8D9mx8neg4wspqvgXRA8+t2saITAQQEQIADAUCQYHLYgWDBiLZKgAKCRBrcOzZXcP0cwmqAJsFjOvkY9c5eA/zyMrOZ1uPB6pd4QCdGyzgbYb/eoPu6FMvVI9PVIeNZReITAQQEQIADAUCQdCTJAWDBdQRaAAKCRB9JcoKwSmnwmJVAKCG9a+Q+qjCzDzDtZKx5NzDW1+W+QCeL68seX8OoiXLQuRlifmPMrV2m9+ITAQQEQIADAUCQitbugWDBXlI0gAKCRDmG6SJFeu5q/MTAKCTMvlCQtLKlzD0sYdwVLHXJrRUvgCffmdeS6aDpwInU0/yvYjg1xlYiuqITAQSEQIADAUCQCpZOgWDB3pLUgAKCRA8oR80lPr4YSZcAJwP4DncDk4YzvDvnRbXW6SriJn1yQCdEy+d0CqfdhM7HGUs+PZQ9mJKBKqITAQSEQIADAUCQD36ugWDB2ap0gAKCRDy11xj45xlnLLfAKC0NzCVqrbTDRw25cUss14RRoUVPACeLpEc3zSahJUB0NNGTNlpwlTczlCITAQSEQIADAUCQQ4KhAWDBpaaCAAKCRA5yiv0PWqKX/zdAJ4hNn3AijtcAyMLrLhlZQvib551mwCgw6FEhGLjZ+as0W681lucwZ6PzW+ITAQSEQIADAUCQoClNAWDBSP/WAAKCRAEDcCFfIOfqOMkAJwPUDhS1eTzgnXclDKgf353LbjvXgCeLCWyyj/2d0gIk6SqzaPl2UcWrqiITAQTEQIADAUCPk1NhAWDCVdXCAAKCRAtu3a/rdTJMwUMAKCVPkbk1Up/kyPrlsVKU/Nv3bOTZACfW5zaHX38jDCuxsjIr/084n4kw/uITAQTEQIADAUCQdeAdgWDBc0kFgAKCRBm79vIzYL9Pj+8AJ9d7rvGJIcHzTCSYVnaStv6jP+AEACeNHa5yltqieRBCCcLcacGqYK81omITAQTEQIADAUCQhiBDgWDBYwjfgAKCRB2wQMcojFuoaDuAJ9CLYdysef7IsW42UfWhI6HjxkzSgCfeEpXS4hEmmGicdpRiJQ/W21aB0GIZQQTEQIAHQULBwoDBAMVAwIDFgIBAheABQJLcC/KBQkQ8/OnABIHZUdQRwABAQkQjHGNO1By4fWw2wCeJilgEarL8eEyfDdYTyRdqE45HkoAnjFSZY8Zg/iXeErHI0r04BRukNVgiHsEMBECADsFAkJ3NfU0HQBPb3BzLi4uIHNob3VsZCBoYXZlIGJlZW4gbG9jYWwhIEknbSAqc28qIHN0dXBpZC4uLgAKCRA5yiv0PWqKX+9HAJ0WjTx/rqgouK4QCrOV/2IOU+jMQQCfYSC8JgsIIeN8aiyuStTdYrk0VWCIjwQwEQIATwUCRW8Av0gdAFNob3VsZCBoYXZlIGJlZW4gYSBsb2NhbCBzaWduYXR1cmUsIG9yIHNvbWV0aGluZyAtIFdURiB3YXMgSSB0aGlua2luZz8ACgkQOcor9D1qil+g+wCfcFWoo5qUl4XTE9K8tH3Q+xGWeYYAnjiiKxjtOXc0ls+BlqXxbfZ9uqBsiQIiBBABAgAMBQJBgcuFBYMGItkHAAoJEKrj5s5moURoqC8QAIISudocbJRhrTAROOPoMsReyp46Jdp3iL1oFDGcPfkZSBwWh8L+cJjhdycIwwSeZ1D2h9S5Tc4EnoE0khsS6wBpuAuih5s//coRqIIiLKEdhTmNqulkCH5mimCzc5zXWZDW0hpLr2InGsZMuh2QCwAkB4RTBM+r18cUXMLV4YHKyjIVaDhsiPP/MKUj6rJNsUDmDq1GiJdOjySjtCFjYADlQYSD7zcd1vpqQLThnZBESvEoCqumEfOPxemNU6xAB0CL+pUpB40pE6Un6Krr5h6yZxYZ/N5vzt0Y3B5UUMkgYDSpjbulNvaUTFiOxEU3gJvXc1+h0BsxM7FwBZnuMA8LEA+UdQb76YcyuFBcROhmcEUTiducLu84

Signature Checking Using GnuPG
10
E2BZ2NSBdymRQKSinhvXsEWlH6Txm1gtJLynYsvPi4B4JxKbb+awnFPusL8W+gfzjbygeKdyqzYgKj3M79R3geaY7Q75Kxl1UogiOKcbI5VZvg47OQCWeeERnejqEAdxEQiwGA/ARhVOP/1l0LQA7jg2P1xTtrBqqC2ufDB+v+jhXaCXxstKSW1lTbv/b0d6454UaOUV7RisN39pE2zFvJvY7bwfiwbUJVmYLm4rWJAEOJLIDtDRtt2h8JahDObm3CWkpadjw57S5v1c/mn+xV9yTgVx5YUfC/788L1HNKXfeVDq8zbAiQIiBBMBAgAMBQJCnwocBYMFBZpwAAoJENjCCglaJFfPIT4P/25zvPp8ixqV85igs3rRqMBtBsj+5EoEW6DJnlGhoi26yf1nasC2frVasWG7i4JIm0U3WfLZERGDjR/nqlOCEqsP5gS343N7r4UpDkBsYh0WxH/ZtST5llFK3zd7XgtxvqKL98l/OSgijH2W2SJ9DGpjtO+Tiegq7igtJzw7Vax9z/LQH2xhRQKZR9yernwMSYaJ72i9SyWbK3k0+e95fGnlR5pFzlGq320rYHgD7v9yoQ2t1klsAxK6e3b7Z+RiJG6cAU8o8F0kGxjWzF4v8D1op7S+IoRdB0Bap01ko0KLyt3+g4/33/2UxsW50BtfqcvYNJvU4bZns1YSqAgDOOanBhg8Ip5XPlDxH6J/3997n5JNj/nk5ojfd8nYfe/5TjflWNiput6tZ7frEki1wl6pTNbvV9C1eLUJMSXfDZyHtUXmiP9DKNpsucCUeBKWRKLqnsHLkLYydsIeUJ8+ciKc+EWhFxEY+Ml72cXAaz5BuW9L8KHNzZZfez/ZJabiARQpFfjOwAnmhzJ9r++TEKRLEr96taUI9/8nVPvT6LnBpcM38Td6dJ639YvuH3ilAqmPPw50YvglIEe4BUYD5r52Seqc8XQowouGOuBX4vs7zgWFuYA/s9ebfGaIw+uJd/56Xl9ll6q5CghqB/yt1EceFEnFCAjQc2SeRo6qzx22iEYEEBECAAYFAkSAbycACgkQCywYeUxD5vWDcACfQsVk/XGiITFyFVQ3IR/3Wt7zqBMAoNhso/cX8VUfs2BzxPvvGS3y+5Q9iEYEEBECAAYFAkUwntcACgkQOI4l6LNBlYkyFgCbBcw5gIii0RTDJsdNiuJDcu/NPqEAniSq9iTaLjgFHZbaizUU8arsVCB5iEYEEBECAAYFAkWho2sACgkQu9u2hBuwKr6bjwCfa7ZK6O+XmT08Sysg4DEoZnK4L9UAoLWgHuYg35wbZYx+ZUTh98diGU/miF0EExECAB0FAj4+owwFCQlmAYAFCwcKAwQDFQMCAxYCAQIXgAAKCRCMcY07UHLh9XGOAJ4pVME15/DGrUDohtGv2z8a7yv4AgCeKIp0jWUWE525QocBWms7ezxd6syIXQQTEQIAHQUCR6yUzwUJDTBYqAULBwoDBAMVAwIDFgIBAheAAAoJEIxxjTtQcuH1dCoAoLC6RtsD9K3N7NOxcp3PYOzH2oqzAKCFHn0jSqxk7E8by3sh+Ay8yVv0BYhdBBMRAgAdBQsHCgMEAxUDAgMWAgECF4AFAkequSEFCQ0ufRUACgkQjHGNO1By4fUdtwCfRNcueXikBMy7tE2BbfwEyTLBTFAAnifQGbkmcARVS7nqauGhe1ED/vdgiF0EExECAB0FCwcKAwQDFQMCAxYCAQIXgAUCS3AuZQUJEPPyWQAKCRCMcY07UHLh9aA+AKCHDkOBKBrGb8tOg9BIub3LFhMvHQCeIOOot1hHHUlsTIXAUrD8+ubIeZaJARwEEgECAAYFAkvCIgMACgkQ3PTrHsNvDi8eQgf/dSx0R9Klozz8iK79w00NOsdoJY0Na0NTFmTbqHg30XJoG62cXYgc3+TJnd+pYhYi5gyBixF/L8k/kPVPzX9W0YfwChZDsfTw0iDVmGxOswiNjzSo0lhWq86/nEL30Khl9AhCC1XFNRw8WZYq9Z1qUXHHJ2rDARaedvpKHOjzRY0Ndx6R2zNyHDx2mlfCQ9wDchWEuJdAv0uHrQ0HV9+xq7lW/Q3L/V5AuU0tiowyAbBLPPYrB6x9vt2ZcXS7BOy8SfQ1i8W2QDQ/Toork4YwBiv6WCW/ociy7paAoPOWV/Nf2S6hDispeecbk7wqpbUj5klDmwrlgB/jmoAXWEnbsYkBIgQQAQIADAUCSSpooAUDABJ1AAAKCRCXELibyletfFOMCACpP+OVZ7lH/cNY+373c4FnSI0/S5PXS0ABgdd4BFWRFWKrWBeXBGc8sZfHOzVEwkzV96iyHbpddeAOAkEA4OVPW1MMFCmlHxi2s9/NJrSrTPVfQOH5fR9hn7Hbpq/ETw0IoX1FKo7vndMnHZnFEnI+PDXLcdMYQgljYzhTxER4vYY0UKu8ekSshUy4zOX7XSJxwqPUvps8qs/TvojIF+vDJvgFYHVkgvS+shp8Oh/exg9vKETBlgU87Jgsqn/SN2LrR/Jhl0aLd0G0iQ+/wHmVYdQUMFaCZwk/BKNaXPzmGZEUZ3RNbYa19Mo7hcE3js76nh5YMxFvxbTggVu4kdFkiQEiBBABAgAMBQJKM06IBQMAEnUAAAoJEJcQuJvKV618F4gH/innejIHffGMk8jYix4ZZT7pW6ApyoI+N9Iy85H4L+8rVQrtcTHyq0VkcN3wPSwtfZszUF/0qP6P8sLJNJ1BtrHxLORYjJPmgveeyHPzA2oJl6imqWUTiW822fyjY/azwhvZFzxmvbFJ+r5N/Z57+Ia4t9LTSqTNHzMUYaXKDaAqzZeK7P0E6XUaaeygbjWjBLQ1O0ezozAy+Kk/gXApmDCGFuHSFe7ZmgtFcbXLM2XFQpMUooETD2R8MUsd+xnQsff/k6pQOLxi+jUEsWSr/iqmvlk6gZ4DpemBjuhcXYlxJYjUaX9Zmn5s+ofF4GFxRqXoY7l9Z+tCM9AX37lm6S+JASIEEAECAAwFAkpEcgoFAwASdQAACgkQlxC4m8pXrXz2mgf/RQkpmMM+5r8znx2TpRAGHi5wktvdFxlvPaOBWE28NDwTrpcoMqo9kzAiuvEQjVNihbP21wR3kvnQ84rTAH0mlC2IuyybggpqwzOUl+Wi0o+vk8ZA0A0dStWRN8uqneCsd1XnqDe1rvqC4/9yY223tLmAkPvz54ka2vX9GdJ3kxMWewhrVQSLCktQpygU0dujGTDqJtnk0WcBhVF9T87lv3W2eGdPielzHU5trXezmGFj21d56G5ZFK8co7RrTt4qdznt80glh1BTGmhLlzjMPLTedcMusm3D1QB9ITogcG94ghSf9tEKmmRJ6OnnWM5Kn9KcL63E5oj2/lY9H54wSYkBIgQQAQIADAUCSlY+RwUDABJ1AAAKCRCXELibyletfOOQB/0dyJBiBjgf+8d3yNIDpDktLhZYw8crIjPBVdOgX12xaUYBTGcQITRVHSggzffDA5BQXeUuWhpL4QB0uz1cEPPwSMiWiXlBtwF5q6RVf3PZGJ9fmFuTkPRO7SruZeVDo9WP8HjbQtOLukYf566egrzAYR9p74UgWftpDtmrqrRTobiuvsFBxosbeRCvEQCrN0n+p5D9hCVB88tUPHnOWA4mlduAFZDxQWTApKQ92frHiBqy+M1JFezz2OM3fYN+Dqo/Cb7ZwOAA/2dbwS7oy4sXEHbfWonjskgPQwFYB23tsFUuM4uZwVEbJg+bveglDsDStbDlfgArXSL/0+aklFcHiQEiBBABAgAMBQJKaAqEBQMAEnUAAAoJEJcQuJvKV618rH0H/iCciD4U6YZNJBj0GN7/Xt851t9FWocmcaC+qtuXnkFhplXkxZVOCU4VBMs4GBoqfIvagbBTyfV4Di+W8Uxr+/1jiu3l/HvoFxwdwNkGG6zNBhWSjdwQpGwPvh5ryV1OfLX/mgQgdDmxvqz5+kFDUj4m7uLaeuU2j1T0lR4zU0yAsbt7J3hwfqJCXHOc9bm5nvJwMrSm+sdCTP5HjUlwHr9mTe8xuZvj6sO/w0P4AqIMxjC9W7pT9q0ofG2KSTwt7wFbh05sbG4UQYOJe4+Soh3+KjAa1c0cvmIh4cKX9qfCWwhhdeNfh1A9VTHhnl5zTv/UjvnQtjhlH/Fq1eBSKcSJASIEEAECAAwFAkp5LgoFAwASdQAACgkQlxC4m8pXrXwY6wgAg3f876L3qDZTYlFAWs3pXBl8GsUr1DEkTlEDZMZKDM3wPmhaWBR1hMA3y6p3aaCUyJIJ

Signature Checking Using GnuPG
11
BEneXzgyU9uqCxXpC78d5qc3xs/Jd/SswzNYuvuzLYOw5wN5L31SLmQTQ8KqE0uoRynBmtDCQ4M2UKifSnv+0+3mPh85LVAS481GNpL+VVfCYtKesWNu40+98Yg6L9NGWwRTfsQbcdokZo44Jz7Y7f81ObC4r/X1DgPj2+d4AU/plzDcdrbINOyprs+7340ecnaGO4Lsgd19b1CvcgJgltRquu3kRvd+Ero2RYpDv6GVK8Ea0Lto4+b/Ae8cLXAhQnaWQCEWmw+AU4Jbz4kBIgQQAQIADAUCSo5fvQUDABJ1AAAKCRCXELibyletfA08B/9w8yJdc8K+k07U30wR/RUg3Yb2lBDygmy091mVsyB0RGixBDXEPOXBqGKAXiV1QSMAXM2VKRsuKahY2HFkPbyhZtjbdTa7Pr/bSnPvRhAh9GNWvvRg2Kp3qXDdjv9xywEghKVxcEIVXtNRvpbqRoKmHzIExvUQck5DM1VwfREeYIoxgs4035WADhVMdngQS2Gt8P2WaU/p8EZhFGg6X8KtOlD68zGboaJe0hj2VDc+Jc+KdjRfE3fW5IToid/oDkUaIW6tB3WkXb0g6D/2hrEJbX3headChHKSB8eQdOR9bcCJDhhU8csd501qmrhCctmvlpeWQZdIQdk6sABPWeeCiQEiBBABAgAMBQJKoBJHBQMAEnUAAAoJEJcQuJvKV618Ml8H/1D88/g/p9fSVor4Wu5WlMbg8zEAik3BIxQruEFWda6nART6M9E7e+P1++UHZsWYs6l9ROpWxRLG1Yy9jLec2Y3nUtb20m65p+IVeKR2a9PHW35WZDV9dOYPGZabKkO1clLeWLVgp9LRjZ+AeRG+ljHqsULXro1dwewLTB/gg9I2vgNv6dKxyKaknM/GrqZLATAq2KoaE/u/6lzRFZIzZnLtjZh8X7+nS+V8v9IiY4ntrpkrbvFk30U6WJp79oBIWwnW/84RbxutRoEwSar/TLwVRkcZyRXeJTapbnLGnQ/lDO1o1d7+Vbjdq/Sg/cKHHf7NthCwkQNsCnHL0f51gZCJASIEEAECAAwFAkqoEAAFAwASdQAACgkQlxC4m8pXrXwE/Af/XD4R/A5R6Ir/nCvKwCTKJmalajssuAcLEa2pMnFZYO/8rzLO+Gp8p0qFH9C4LFwA0NvR5q6X/swuROf4zxljSvNcdlQVaAfJ2ZDEgJ5GXzsPplrvSAI9jS3LL7fSWDZgKuUe0a4qx7A0NgyGMUYGhP+QlRFa8vWEBI9fANd/0mMqAeBVqQyOH0X1FiW1Ca2Jn4NKfuMy9GEvRddVIbB1LvoNVtXPNzeeKMyNb9Jdx1MFWssyCOBP2DayJKTmjvqPEc/YOjOowoN5sJ/jn4mVSTvvlTooLiReSs6GSCAjMVxN7eYS/Oyq6Iu1JDcJvmB8N2WixAZtAVgF8OA7CWXKVYkBIgQQAQIADAUCSrnHiQUDABJ1AAAKCRCXELibyletfPChB/9uECti1dZeNuFsd0/RuGyRUVlrrhJE6WCcOrLO9parrPbewbKBmjSzB0MygJXGvcC06mPNuquJ7/WpxKsFmfg4vJBPlADFKtgRUy9BLzjCeotWchPHFBVW9ftPbaQViSUu7d89NLjDDM5xrh80puDIApxoQLDoIrh3T1kpZx56jSWv0gelFUMbXAzmqkJSyL4Xdh1aqzgUbREd7Xf2ICzuh0sV6V7c/AwWtjWEGEsAHZaiQDywZwbC18GwrMLiAzGWb/AScFDQRCZKJDjL+Ql8YT6z+ZMVr8gb7CIU5PKYdhiIf2UVTQwLAoW7lNRCQQAqcGjK3IMIz7SO/yk4HmVUiQEiBBABAgAMBQJK3gjGBQMAEnUAAAoJEJcQuJvKV618jkEH+wb0Zv9z7xQgpLMowVuBFQVu8/z7P5ASumyBPUO3+0JVxSHBhlCKQK7n11m1fhuGt2fCxXhSU6LzXj36rsKRY53lGZ9QhvqFUtQH3Xb2IQLIJC4UKjG2jSSCdcuA/x98bwp2v7O03rn7ndCS16CwXnRV3geQoNipRKMSDajKPpZv1RiZm8pMKqEb8WSw352xWoOcxuffjlsOEwvJ85SEGCAZ9tmIlkZOc7AiQONDvii9b8AYhQ60RIQC0HP2ASSmK0V92VeFPxHmAygdDQgZNVtbVxgnnt7oTNEuVRXNY+z4OfBArp7R+cTsvijDRZY4kML1n22hUybwoxUEvjqZV2+JASIEEAECAAwFAkrvOlQFAwASdQAACgkQlxC4m8pXrXxrPAgArXiNgZirNuBhfNCXlkzkCHLx5wnVe4SmTpbWzTwWw7+qk7d4l9hlWtdImISORINzo7f4ShSUzJX2GciNaXhaHRo7+y5OZbu82jQb09aQQj/nibKYuqxqUrobTEm+DuYz3JUQZm2PsPcHLS8mX9cxvrJUncPGnXEV0DRaq71SGWDprtkvBbp6i38aY3sIhYgz8wM5m1szKDtjywmBYcFehIdozt9zhm7wZshzRWQX1+Rf/pIsnk+OzBIa34crSemTnacbV/B7278z2XAyziPNFuqz0xu+iltOmYmayfNWAmumuw9NcuwWMlth6Mc2HLrpo0ZBheJ6iuDMPsHnwqdB/4kBIgQQAQIADAUCSwBd2gUDABJ1AAAKCRCXELibyletfP6tB/4m1w0BtlkJgtS6E+B/ns14z4A4PGors+n+MYm05qzvi+EnDF/sytCmVcKeimrtvDcfoDtKAFFvJjcYXfnJdGWmPu0SJMRL5KKCirAKwZmU/saxOgoB5QLNw+DHPteJ3w9GmWlGxIqG1r15WC5duzBCy3FsnjJYG3jaLnHOO9yXXb5h0kUTORfUKdvAr1gxF2KoatZWqGoaPPnHoqb88rjtzk8I7gDqoXnzh8wLxa0ZYvfTC/McxdWTrwXLft+krmMQ18iIZEne2hvVLNJVuluUoiWLeHA8iNCQ4W4WTdLc1mCnCjGTMX/MN41uLH0C9Ka4R6wEaqj4lPDk1B/1TV+QiQEiBBABAgAMBQJLEYGrBQMAEnUAAAoJEJcQuJvKV618naIH/2t9aH5mBTKBN6fUqhrf79vIsjtI/QNS5qisBISZMX3/1/0Gu6WnxkPSfdCUJMWCjMcnVj7KU2wxTHHGVpAStd9r2afUNxRyqZwzwyytktuZok0XngAEDYDDBS3ssu2R4uWLCsC2ysXEqO/5tI5YrTWJZrfeIphTaYP5hxrMujvqy3kEwKKbiMz91cDeiLS+YCBcalj5n/1dMYf78U8C6ieurxAg/L8h6x25VM4Ilx4MmG2T8QGtkkUXd+Fd/KYWmf0LE5LLPknf0HhwoVslPXeinp4FsHK/5wzviv4YZpzuTqs9NlKcMsa4IuuPOB0FDf0pn+OFQbEg9QwY2gCozK+JASIEEAECAAwFAksjTdQFAwASdQAACgkQlxC4m8pXrXwlogf/XBGbXRVXLMaRN4SczOjwT3/tUCriTkb3v+zKjRG90zFhYAccjn7w+7jKQicjq6quQG1EH2X4/Su6ps1lDLqGHHhiJW3ZhxQScLZmhdAYsh2qG4GP/UW3QjXG7c61t+H3olvWg2crwqCxxFZAgkAAkr9xcHWFZJEQeXoob6cCZObaUnHSANdmC6s5lUxXYa2bmL7Q3UB44KCzDvAfbPZKJOw9k0qb3lc11zx+vGdyZFbm4R0+3LPp/vT0b3GlSbbF9lU1GOXhVaphrgFFa76dmjfHCkPplXAkK1VSIU/aPGAefduTFMdlSZpdMtJ5AULjGcszBDlRpLlPxvqVa0ZpgIkBIgQQAQIADAUCSycmkgUDABJ1AAAKCRCXELibyletfHlNCACp1YespiHfQt2alcscE5zgfETEHHic8Ai6pNkU9HT4TeWcFHEDe5QqfYcpjLrQvBXSkSvxEittbyRdv+e+j5Z+HyHjiG8nAQBL6qy9eHqQE4+d7gYs6DTk7sG9ZMYphREbltzD+F4hVCQdLT8LNr0eVFN7ehqECScDaCG8/Qyti+l/0M902/Yn+mz0ilOiUdWJ9x6LPaIINtb1gsYDEylLjwGIZmI0r5Kh9wYoV4vnNezFbxO1uRiW0B7iaPjIEsbtOOKp7wx2aX+DM3N9F3BtaIY8XnzcnomNm83SNsgmgrZljpQltUnNqIhNM8DupQ+IWOV5gtl6pTC7CgeVTVyRiQEiBBABAgAMBQJLOGXuBQMAEnUAAAoJEJcQuJvKV618ll4IAKJ9mm4jb0c8fe9+uDI8eCJRbzNbVXm8zWzpA8GUtQAakwxoKv332QP1Wa1P
Signature Checking Using GnuPG
12
odni/e3EMhsSREOZJJv79YqGxGRBTE9Kb/VjM34nas4XSnXKW28XWhKyIw+XwQAinY2swFHh+83Htr/mwTdJfS2aEYl2zboBvd/JZCdhOGU2GH737S/3uEczoKkfVQ/wOTM8X1xWwlYWqx23k/DsGcuDs9lA2g7Mx7DSqBtVjaTkn9h0zATzXLDkmP4SAUVjcZ83WDpFre5WnizZjdXlBMM5OCexp5WpmzyHLTnaBFK4jEmnsk5C2Rnoyp8Ivz6gEcg1tRbEXijRw++d2TFYlJwLKtiJASIEEAECAAwFAktKMicFAwASdQAACgkQlxC4m8pXrXxqHQgAuYY5scKrh0m/GS9EYnyC9494lOlO6iytU0CpE6oBC31M3hfX/DbjUbcS5szZNU+2CPYo4ujQLZ7suN7+tTjG6pZFfMevajT9+jsL+NPMF8RLdLOVYmblTmSQGNO+XGEYaKYH5oZIeIW5AKCgi2ozkdFlBBLAx7Kqo/FyybhkURFEcvEyVmgf3KLV7IIiX/fYLfoCMCJ/Lcm9/llSFB1n8Nvg66Xd533DKoHjueD3jyaNAVlo2mq/sIAv++kntvOiB3GDK5pfwHZ78WWiCpsWZpE5gzAnzJ1Y0WEigRo0PVLu3cLO0jLG23d+H/CbfZ8rkajHJeCDQF7YVmP0t0nYpYkBIgQQAQIADAUCS1v+ZgUDABJ1AAAKCRCXELibyletfNS/CACqt2TkB86mjqM+cJ74+dWBvJ2aFuURuxzm95i9Q/W/hU082iMbC3+0k2oD8CrTOe61P+3oRyLjv/UEDUNzLncNe2YsA9JeV+4hvPwH5Vp3Om13089fCKZUbqslXNKkHiWYU+zAaZJXEuGRmRz0HbQIeAMOWF4oa226uo1e4ws1Jhc+F3E/ApCRyFBqBUdL05hapQLditYpsBjIdiBGpjzidMLE2wX2W4ZpAdN0U6BIyIqRmTPjbSkvzS9kSWFmfhQgnBDKEYJpVZgE1sN52rYC1sDeGeiuKxlzjVov9MMhYMWaZo3R5o3F2iIM/BK6FbC252lf/Mhu3ICuXujNBZNYiQEiBBABAgAMBQJLbSH4BQMAEnUAAAoJEJcQuJvKV618kd0IAJLLwDH6gvgAlBFklQJXqQxUdcSOOVMAWtlHgWOyozjgomZZBkRL8dtCDr9YBMcj5czcQ3qpmLJdppXhKB+kJV2iUXfDMSFXwJ4wLfIs8FNnXw8H5U01oBkGH/Ku6ngL9Vwt+MjYHtCWkw9QueUKZnDudX9qIzLAIt+mwSTuA6+fY4VWIg40AA0v3exaQM55YR/UhlKunpGG9o8Qkq77dMEbTMpOmBoLbOMRB3DdMAvVU6G2l6Pcb7KobVCuOBnb6batXARV/G8sw+nzfJ16fr/KobZT2A6m+Jrqk4dlF14ljLbz16O5JGUPAryN2G2ddBdSAy7dtFSVhWWiWC9n88q5Ag0EPj6jHRAIAO/hiX8WzHWOMLJT54x/axeDdqn1rBDf5cWmaCWHN2ujNNlgpx5emoU9v7QStsNUCOGBbXkeO4Ar7YG+jtSR33zqNh3y5kQ0YkY3dQ0wh6nsl+wh4XIIY/3TUZVtmdJeUBRHJlfVNFYad2hX1guFI37Ny1PoZAFsxO82g+XB/Se8r/+sbmVcONdcdIeFKrE3FjLtIjNQcxC6l9Q2Oy8KDxG/zvUZG3+H5i3tdRMyGgmuD6gEV0GXOHYUopzLeit1+Aa0bCk36Mwbu+BeOw/CJW3+b0mB27hOaf9aCA855IP6fJFvtxcblq8nHIqhU3Dc9tecsl9/S1xZ5S8ylG/xeRsAAwUH/i8KqmvAhq0X7DgCcYputwh37cuZlHOa1Ep07JRmBCDgkdQXkGrsj2Wzw7Aw/TGdWWkmn2pxb8BRui5cfcZFO7c6vryi6FpJuLucX975+eVY50ndWkPXkJ1HF4i+HJwRqE2zliN/RHMs4LJcwXQvvjD43EE3AO6eiVFbD+qAAdxUFoOeLblKNBHPG7DPG9xL+Ni5rkE+TXShxsB7F0z7ZdJJZOG0JODmox7IstQTGoaU9u41oyZTIiXPiFidJoIZCh7fdurP8pn3X+R5HUNXMr7M+ba8lSNxce/F3kmH0L7rsKqdh9d/aVxhJINJ+inVDnrXWVoXu9GBjT8Nco1iU9SIVAQYEQIADAUCTnc97QUJE/sBuAASB2VHUEcAAQEJEIxxjTtQcuH1FJsAmwWK9vmwRJ/y9gTnJ8PWf0BVroUTAKClYAhZuX2nUNwH4vlEJQHDqYa5yQ===HfUN-----END PGP PUBLIC KEY BLOCK-----
To import the build key into your personal public GPG keyring, use gpg --import. For example, if youhave saved the key in a file named mysql_pubkey.asc, the import command looks like this:
shell> gpg --import mysql_pubkey.ascgpg: key 5072E1F5: public key "MySQL Release Engineering<[email protected]>" importedgpg: Total number processed: 1gpg: imported: 1gpg: no ultimately trusted keys found
You can also download the key from the public keyserver using the public key id, 5072E1F5:
shell> gpg --recv-keys 5072E1F5gpg: requesting key 5072E1F5 from hkp server keys.gnupg.netgpg: key 5072E1F5: "MySQL Release Engineering <[email protected]>"1 new user IDgpg: key 5072E1F5: "MySQL Release Engineering <[email protected]>"53 new signaturesgpg: no ultimately trusted keys foundgpg: Total number processed: 1gpg: new user IDs: 1gpg: new signatures: 53
If you want to import the key into your RPM configuration to validate RPM install packages, you should beable to import the key directly:
Signature Checking Using Gpg4win for Windows
13
shell> rpm --import mysql_pubkey.asc
If you experience problems or require RPM specific information, see Section 2.3.4, “Signature CheckingUsing RPM”.
After you have downloaded and imported the public build key, download your desired MySQL packageand the corresponding signature, which also is available from the download page. The signature file hasthe same name as the distribution file with an .asc extension, as shown by the examples in the followingtable.
Table 2.1 MySQL Package and Signature Files for Source files
File Type File Name
Distribution file mysql-standard-5.5.58-linux-i686.tar.gz
Signature file mysql-standard-5.5.58-linux-i686.tar.gz.asc
Make sure that both files are stored in the same directory and then run the following command to verify thesignature for the distribution file:
shell> gpg --verify package_name.asc
If the downloaded package is valid, you will see a "Good signature" similar to:
shell> gpg --verify mysql-standard-5.5.58-linux-i686.tar.gz.ascgpg: Signature made Tue 01 Feb 2011 02:38:30 AM CST using DSA key ID 5072E1F5gpg: Good signature from "MySQL Release Engineering <[email protected]>"
The Good signature message indicates that the file signature is valid, when compared to the signaturelisted on our site. But you might also see warnings, like so:
shell> gpg --verify mysql-standard-5.5.58-linux-i686.tar.gz.ascgpg: Signature made Wed 23 Jan 2013 02:25:45 AM PST using DSA key ID 5072E1F5gpg: checking the trustdbgpg: no ultimately trusted keys foundgpg: Good signature from "MySQL Release Engineering <[email protected]>"gpg: WARNING: This key is not certified with a trusted signature!gpg: There is no indication that the signature belongs to the owner.Primary key fingerprint: A4A9 4068 76FC BD3C 4567 70C8 8C71 8D3B 5072 E1F5
That is normal, as they depend on your setup and configuration. Here are explanations for these warnings:
• gpg: no ultimately trusted keys found: This means that the specific key is not "ultimately trusted" by youor your web of trust, which is okay for the purposes of verifying file signatures.
• WARNING: This key is not certified with a trusted signature! There is no indication that the signaturebelongs to the owner.: This refers to your level of trust in your belief that you possess our real public key.This is a personal decision. Ideally, a MySQL developer would hand you the key in person, but morecommonly, you downloaded it. Was the download tampered with? Probably not, but this decision is up toyou. Setting up a web of trust is one method for trusting them.
See the GPG documentation for more information on how to work with public keys.
2.3.3 Signature Checking Using Gpg4win for Windows
The Section 2.3.2, “Signature Checking Using GnuPG” section describes how to verify MySQL downloadsusing GPG. That guide also applies to Microsoft Windows, but another option is to use a GUI tool like

Signature Checking Using Gpg4win for Windows
14
Gpg4win. You may use a different tool but our examples are based on Gpg4win, and utilize its bundledKleopatra GUI.
Download and install Gpg4win, and then load Kleopatra. The dialog should look similar to:
Figure 2.1 Initial screen after loading Kleopatra
Next, add the MySQL Release Engineering certificate. Do this by clicking File, Lookup Certificates onServer. Type "Mysql Release Engineering" into the search box and press Search.
Figure 2.2 Finding the MySQL Release Engineering certificate

Signature Checking Using Gpg4win for Windows
15
Select the "MySQL Release Engineering" certificate. The Fingerprint and Key-ID must be "5072E1F5", orchoose Details... to confirm the certificate is valid. Now, import it by clicking Import. An import dialog willbe displayed, choose Okay, and this certificate will now be listed under the Imported Certificates tab.
Next, configure the trust level for our certificate. Select our certificate, then from the main menu selectCertificates, Change Owner Trust.... We suggest choosing I believe checks are very accurate for ourcertificate, as otherwise you might not be able to verify our signature. Select I believe checks are veryaccurate and then press OK.
Figure 2.3 Changing the Trust level
Next, verify the downloaded MySQL package file. This requires files for both the packaged file, and thesignature. The signature file must have the same name as the packaged file but with an appended .ascextension, as shown by the example in the following table. The signature is linked to on the downloadspage for each MySQL product. You must create the .asc file with this signature.
Table 2.2 MySQL Package and Signature Files for MySQL Installer for Microsoft Windows
File Type File Name
Distribution file mysql-installer-community-5.5.58.msi
Signature file mysql-installer-community-5.5.58.msi.asc
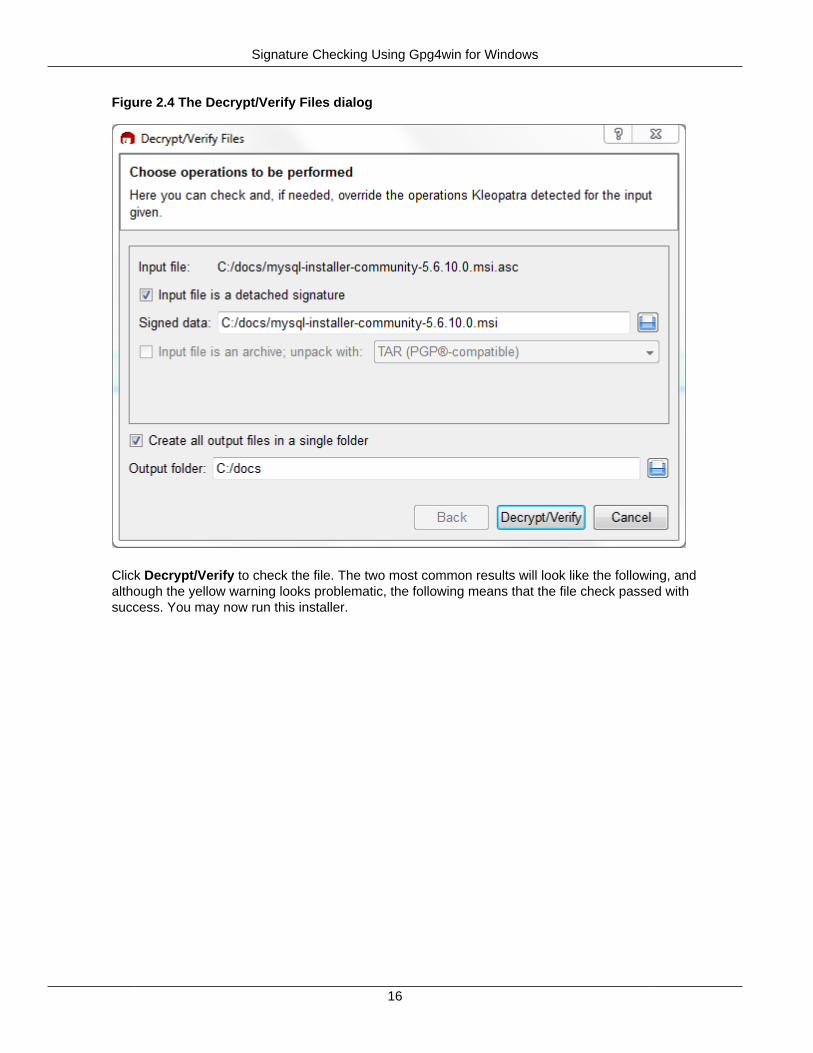
Make sure that both files are stored in the same directory and then run the following command to verify thesignature for the distribution file. Either drag and drop the signature (.asc) file into Kleopatra, or load thedialog from File, Decrypt/Verify Files..., and then choose either the .msi or .asc file.
Signature Checking Using Gpg4win for Windows
16
Figure 2.4 The Decrypt/Verify Files dialog
Click Decrypt/Verify to check the file. The two most common results will look like the following, andalthough the yellow warning looks problematic, the following means that the file check passed withsuccess. You may now run this installer.
Signature Checking Using Gpg4win for Windows
17
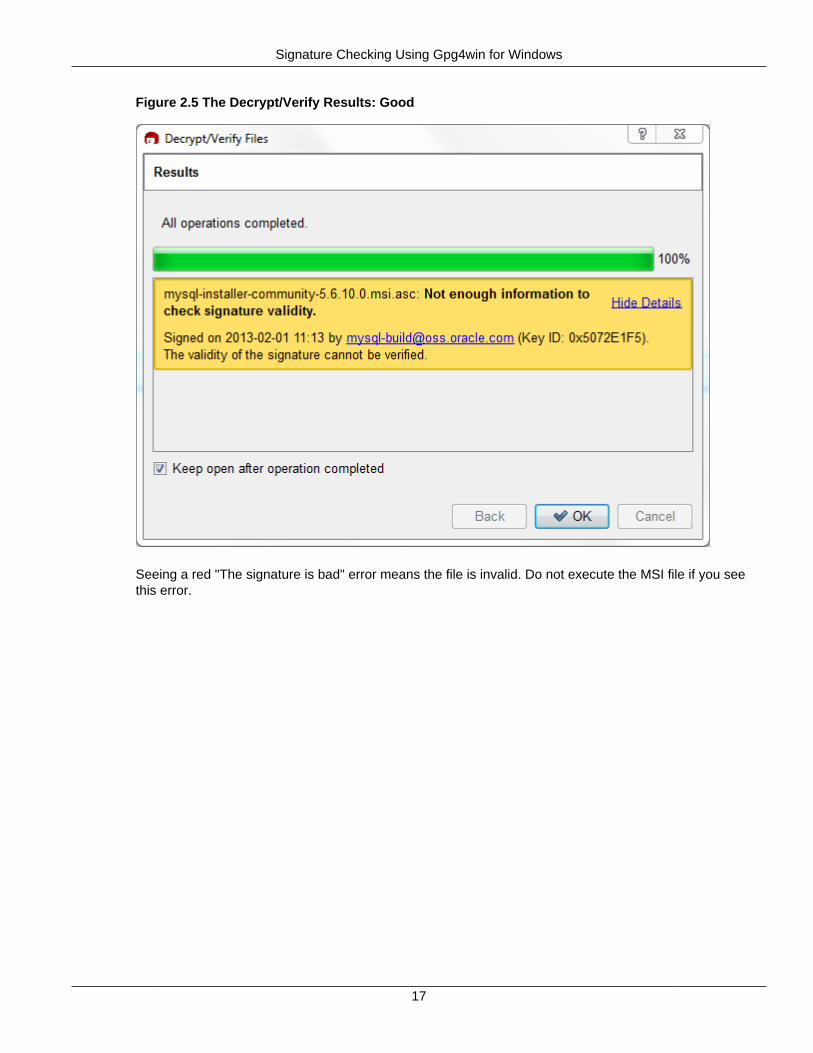
Figure 2.5 The Decrypt/Verify Results: Good
Seeing a red "The signature is bad" error means the file is invalid. Do not execute the MSI file if you seethis error.

Signature Checking Using RPM
18
Figure 2.6 The Decrypt/Verify Results: Bad
The Section 2.3.2, “Signature Checking Using GnuPG” section explains why you probably don't see agreen Good signature result.
2.3.4 Signature Checking Using RPM
For RPM packages, there is no separate signature. RPM packages have a built-in GPG signature andMD5 checksum. You can verify a package by running the following command:
shell> rpm --checksig package_name.rpm
Example:
shell> rpm --checksig MySQL-server-5.5.58-0.glibc23.i386.rpmMySQL-server-5.5.58-0.glibc23.i386.rpm: md5 gpg OK
Note
If you are using RPM 4.1 and it complains about (GPG) NOT OK (MISSINGKEYS: GPG#5072e1f5), even though you have imported the MySQL public build
Installation Layouts
19
key into your own GPG keyring, you need to import the key into the RPM keyringfirst. RPM 4.1 no longer uses your personal GPG keyring (or GPG itself). Rather,RPM maintains a separate keyring because it is a system-wide application and auser's GPG public keyring is a user-specific file. To import the MySQL public keyinto the RPM keyring, first obtain the key, then use rpm --import to import thekey. For example:
shell> gpg --export -a 5072e1f5 > 5072e1f5.ascshell> rpm --import 5072e1f5.asc
Alternatively, rpm also supports loading the key directly from a URL, and you can use this manual page:
shell> rpm --import http://dev.mysql.com/doc/refman/5.5/en/checking-gpg-signature.html
If you need to obtain the MySQL public key, see Section 2.3.2, “Signature Checking Using GnuPG”.
2.4 Installation Layouts
The installation layout differs for different installation types (for example, native packages, binary tarballs,and source tarballs), which can lead to confusion when managing different systems or using differentinstallation sources. The individual layouts are given in the corresponding installation type or platformchapter, as described following. Note that the layout of installations from vendors other than Oracle maydiffer from these layouts.
• Section 5.1, “MySQL Installation Layout on Microsoft Windows”
• Section 4.1, “MySQL Layout for Source Installation”
• Table 3.1, “MySQL Installation Layout for Generic Unix/Linux Binary Package”
• Table 7.1, “MySQL Installation Layout for Linux RPM Packages”
• Table 6.1, “MySQL Installation Layout on OS X”
2.5 Compiler-Specific Build Characteristics
In some cases, the compiler used to build MySQL affects the features available for use. The notes in thissection apply for binary distributions provided by Oracle Corporation or that you compile yourself fromsource.
icc (Intel C++ Compiler) Builds
A server built with icc has these characteristics:
• SSL support is not included.

20

21
Chapter 3 Installing MySQL on Unix/Linux Using GenericBinaries
Oracle provides a set of binary distributions of MySQL. These include generic binary distributions in theform of compressed tar files (files with a .tar.gz extension) for a number of platforms, and binaries inplatform-specific package formats for selected platforms.
This section covers the installation of MySQL from a compressed tar file binary distribution. For otherplatform-specific package formats, see the other platform-specific sections. For example, for Windowsdistributions, see Chapter 5, Installing MySQL on Microsoft Windows.
To obtain MySQL, see Section 2.2, “How to Get MySQL”.
MySQL compressed tar file binary distributions have names of the form mysql-VERSION-OS.tar.gz,where VERSION is a number (for example, 5.5.58), and OS indicates the type of operating system forwhich the distribution is intended (for example, pc-linux-i686 or winx64).
Warning
If you have previously installed MySQL using your operating system native packagemanagement system, such as yum or apt-get, you may experience problemsinstalling using a native binary. Make sure your previous MySQL installation hasbeen removed entirely (using your package management system), and that anyadditional files, such as old versions of your data files, have also been removed.You should also check for configuration files such as /etc/my.cnf or the /etc/mysql directory and delete them.
Warning
MySQL has a dependency on the libaio library. Data directory initializationand subsequent server startup steps will fail if this library is not installed locally. Ifnecessary, install it using the appropriate package manager. For example, on Yum-based systems:
shell> yum search libaio # search for infoshell> yum install libaio # install library
Or, on APT-based systems:
shell> apt-cache search libaio # search for infoshell> apt-get install libaio1 # install library
If you run into problems and need to file a bug report, please use the instructions in How to Report Bugs orProblems.
On Unix, to install a compressed tar file binary distribution, unpack it at the installation location youchoose (typically /usr/local/mysql). This creates the directories shown in the following table.
Table 3.1 MySQL Installation Layout for Generic Unix/Linux Binary Package
Directory Contents of Directory
bin, scripts mysqld server, client and utility programs
data Log files, databases

Create a mysql User and Group
22
Directory Contents of Directory
docs MySQL manual in Info format
man Unix manual pages
include Include (header) files
lib Libraries
share Miscellaneous support files, including error messages,sample configuration files, SQL for database installation
sql-bench Benchmarks
Debug versions of the mysqld binary are available as mysqld-debug. To compile your own debugversion of MySQL from a source distribution, use the appropriate configuration options to enabledebugging support. See Chapter 4, Installing MySQL from Source.
To install and use a MySQL binary distribution, the command sequence looks like this:
shell> groupadd mysqlshell> useradd -r -g mysql -s /bin/false mysqlshell> cd /usr/localshell> tar zxvf /path/to/mysql-VERSION-OS.tar.gzshell> ln -s full-path-to-mysql-VERSION-OS mysqlshell> cd mysqlshell> chown -R mysql .shell> chgrp -R mysql .shell> scripts/mysql_install_db --user=mysqlshell> chown -R root .shell> chown -R mysql data# Next command is optionalshell> cp support-files/my-medium.cnf /etc/my.cnfshell> bin/mysqld_safe --user=mysql &# Next command is optionalshell> cp support-files/mysql.server /etc/init.d/mysql.server
Note
This procedure assumes that you have root (administrator) access to your system.Alternatively, you can prefix each command using the sudo (Linux) or pfexec(Solaris) command.
Note
The procedure does not assign passwords to MySQL accounts. To do so, use theinstructions in Section 9.4, “Securing the Initial MySQL Accounts”.
A more detailed version of the preceding description for installing a binary distribution follows.
Create a mysql User and Group
If your system does not already have a user and group to use for running mysqld, you may need to createone. The following commands add the mysql group and the mysql user. You might want to call theuser and group something else instead of mysql. If so, substitute the appropriate name in the followinginstructions. The syntax for useradd and groupadd may differ slightly on different versions of Unix, orthey may have different names such as adduser and addgroup.
shell> groupadd mysqlshell> useradd -r -g mysql -s /bin/false mysql
Obtain and Unpack the Distribution
23
Note
Because the user is required only for ownership purposes, not login purposes, theuseradd command uses the -r and -s /bin/false options to create a userthat does not have login permissions to your server host. Omit these options if youruseradd does not support them.
Obtain and Unpack the Distribution
Pick the directory under which you want to unpack the distribution and change location into it. The examplehere unpacks the distribution under /usr/local. The instructions, therefore, assume that you havepermission to create files and directories in /usr/local. If that directory is protected, you must performthe installation as root.
shell> cd /usr/local
Obtain a distribution file using the instructions in Section 2.2, “How to Get MySQL”. For a given release,binary distributions for all platforms are built from the same MySQL source distribution.
Unpack the distribution, which creates the installation directory. Then create a symbolic link to thatdirectory. tar can uncompress and unpack the distribution if it has z option support:
shell> tar zxvf /path/to/mysql-VERSION-OS.tar.gzshell> ln -s full-path-to-mysql-VERSION-OS mysql
The tar command creates a directory named mysql-VERSION-OS. The ln command makes a symboliclink to that directory. This enables you to refer more easily to the installation directory as /usr/local/mysql.
To install MySQL from a compressed tar file binary distribution, your system must have GNU gunzip touncompress the distribution and a reasonable tar to unpack it. If your tar program supports the z option,it can both uncompress and unpack the file.
GNU tar is known to work. The standard tar provided with some operating systems is not able to unpackthe long file names in the MySQL distribution. You should download and install GNU tar, or if available,use a preinstalled version of GNU tar. Usually this is available as gnutar, gtar, or as tar within a GNUor Free Software directory, such as /usr/sfw/bin or /usr/local/bin. GNU tar is available fromhttp://www.gnu.org/software/tar/.
If your tar does not have z option support, use gunzip to unpack the distribution and tar to unpack it.Replace the preceding tar command with the following alternative command to uncompress and extractthe distribution:
shell> gunzip < /path/to/mysql-VERSION-OS.tar.gz | tar xvf -
Perform Postinstallation Setup
The remainder of the installation process involves setting distribution ownership and access permissions,initializing the data directory, starting the MySQL server, and setting up the configuration file. Forinstructions, see Chapter 9, Postinstallation Setup and Testing.

24
25
Chapter 4 Installing MySQL from Source
Table of Contents4.1 MySQL Layout for Source Installation .......................................................................................... 274.2 Installing MySQL Using a Standard Source Distribution ................................................................ 274.3 Installing MySQL Using a Development Source Tree .................................................................... 314.4 MySQL Source-Configuration Options ......................................................................................... 334.5 Dealing with Problems Compiling MySQL .................................................................................... 464.6 MySQL Configuration and Third-Party Tools ................................................................................ 48
Building MySQL from the source code enables you to customize build parameters, compiler optimizations,and installation location. For a list of systems on which MySQL is known to run, see http://www.mysql.com/support/supportedplatforms/database.html.
Before you proceed with an installation from source, check whether Oracle produces a precompiled binarydistribution for your platform and whether it works for you. We put a great deal of effort into ensuring thatour binaries are built with the best possible options for optimal performance. Instructions for installingbinary distributions are available in Chapter 3, Installing MySQL on Unix/Linux Using Generic Binaries.
Warning
Building MySQL with nonstandard options may lead to reduced functionality,performance, or security.
Note
This section describes how to build MySQL from source using CMake. BeforeMySQL 5.5, source builds used the GNU autotools on Unix-like systems. Sourcebuilds on Windows used CMake, but the process was different from that describedhere. For source-building instructions for older versions of MySQL, see the MySQL5.1 Reference Manual. If you are familiar with autotools but not CMake, you mightfind these transition instructions helpful: Autotools to CMake Transition Guide
Source Installation Methods
There are two methods for installing MySQL from source:
• Use a standard MySQL source distribution. To obtain a standard distribution, see Section 2.2, “How toGet MySQL”. For instructions on building from a standard distribution, see Section 4.2, “Installing MySQLUsing a Standard Source Distribution”.
Standard distributions are available as compressed tar files, Zip archives, or RPM packages.Distribution files have names of the form mysql-VERSION.tar.gz, mysql-VERSION.zip, ormysql-VERSION.rpm, where VERSION is a number like 5.5.58. File names for source distributionscan be distinguished from those for precompiled binary distributions in that source distribution namesare generic and include no platform name, whereas binary distribution names include a platform nameindicating the type of system for which the distribution is intended (for example, pc-linux-i686 orwinx64).
• Use a MySQL development tree. For information on building from one of the development trees, seeSection 4.3, “Installing MySQL Using a Development Source Tree”.

Source Installation System Requirements
26
Source Installation System Requirements
Installation of MySQL from source requires several development tools. Some of these tools are neededno matter whether you use a standard source distribution or a development source tree. Other toolrequirements depend on which installation method you use.
To install MySQL from source, the following system requirements must be satisfied, regardless ofinstallation method:
• CMake, which is used as the build framework on all platforms. CMake can be downloaded from http://www.cmake.org.
• A good make program. Although some platforms come with their own make implementations, it is highlyrecommended that you use GNU make 3.75 or higher. It may already be available on your system asgmake. GNU make is available from http://www.gnu.org/software/make/.
• A working ANSI C++ compiler. GCC 4.2.1 or later, Sun Studio 12 or later, Visual Studio 2008 or later,and many current vendor-supplied compilers are known to work.
• Sufficient free memory. If you encounter problems such as “internal compiler error” when compiling largesource files, it may be that you have too little memory. If compiling on a virtual machine, try increasingthe memory allocation.
• Perl is needed if you intend to run test scripts. Most Unix-like systems include Perl. On Windows, youcan use a version such as ActiveState Perl.
To install MySQL from a standard source distribution, one of the following tools is required to unpack thedistribution file:
• For a .tar.gz compressed tar file: GNU gunzip to uncompress the distribution and a reasonabletar to unpack it. If your tar program supports the z option, it can both uncompress and unpack the file.
GNU tar is known to work. The standard tar provided with some operating systems is not able tounpack the long file names in the MySQL distribution. You should download and install GNU tar, or ifavailable, use a preinstalled version of GNU tar. Usually this is available as gnutar, gtar, or as tarwithin a GNU or Free Software directory, such as /usr/sfw/bin or /usr/local/bin. GNU tar isavailable from http://www.gnu.org/software/tar/.
• For a .zip Zip archive: WinZip or another tool that can read .zip files.
• For an .rpm RPM package: The rpmbuild program used to build the distribution unpacks it.
To install MySQL from a development source tree, the following additional tools are required:
• The Git revision control system is required to obtain the development source code. The GitHubHelp provides instructions for downloading and installing Git on different platforms. MySQL officiallyjoined GitHub in September, 2014. For more information about MySQL's move to GitHub, refer to theannouncement on the MySQL Release Engineering blog: MySQL on GitHub
• bison 2.1 or higher, available from http://www.gnu.org/software/bison/. (Version 1 is no longersupported.) Use the latest version of bison where possible; if you experience problems, upgrade to alater version, rather than revert to an earlier one.
bison is available from http://www.gnu.org/software/bison/. bison for Windows can be downloadedfrom http://gnuwin32.sourceforge.net/packages/bison.htm. Download the package labeled “Completepackage, excluding sources”. On Windows, the default location for bison is the C:\Program Files\GnuWin32 directory. Some utilities may fail to find bison because of the space in the directory name.

MySQL Layout for Source Installation
27
Also, Visual Studio may simply hang if there are spaces in the path. You can resolve these problems byinstalling into a directory that does not contain a space; for example C:\GnuWin32.
• On Solaris Express, m4 must be installed in addition to bison. m4 is available from http://www.gnu.org/software/m4/.
Note
If you have to install any programs, modify your PATH environment variable toinclude any directories in which the programs are located. See Setting EnvironmentVariables.
If you run into problems and need to file a bug report, please use the instructions in How to Report Bugs orProblems.
4.1 MySQL Layout for Source InstallationBy default, when you install MySQL after compiling it from source, the installation step installs files under /usr/local/mysql. The component locations under the installation directory are the same as for binarydistributions. See Table 3.1, “MySQL Installation Layout for Generic Unix/Linux Binary Package”, andSection 5.1, “MySQL Installation Layout on Microsoft Windows”. To configure installation locations differentfrom the defaults, use the options described at Section 4.4, “MySQL Source-Configuration Options”.
4.2 Installing MySQL Using a Standard Source DistributionTo install MySQL from a standard source distribution:
1. Verify that your system satisfies the tool requirements listed at Chapter 4, Installing MySQL fromSource.
2. Obtain a distribution file using the instructions in Section 2.2, “How to Get MySQL”.
3. Configure, build, and install the distribution using the instructions in this section.
4. Perform postinstallation procedures using the instructions in Chapter 9, Postinstallation Setup andTesting.
In MySQL 5.5, CMake is used as the build framework on all platforms. The instructions given here shouldenable you to produce a working installation. For additional information on using CMake to build MySQL,see How to Build MySQL Server with CMake.
If you start from a source RPM, use the following command to make a binary RPM that you can install. Ifyou do not have rpmbuild, use rpm instead.
shell> rpmbuild --rebuild --clean MySQL-VERSION.src.rpm
The result is one or more binary RPM packages that you install as indicated in Section 7.1, “InstallingMySQL on Linux Using RPM Packages”.
The sequence for installation from a compressed tar file or Zip archive source distribution is similar tothe process for installing from a generic binary distribution (see Chapter 3, Installing MySQL on Unix/LinuxUsing Generic Binaries), except that it is used on all platforms and includes steps to configure and compilethe distribution. For example, with a compressed tar file source distribution on Unix, the basic installationcommand sequence looks like this:
# Preconfiguration setup
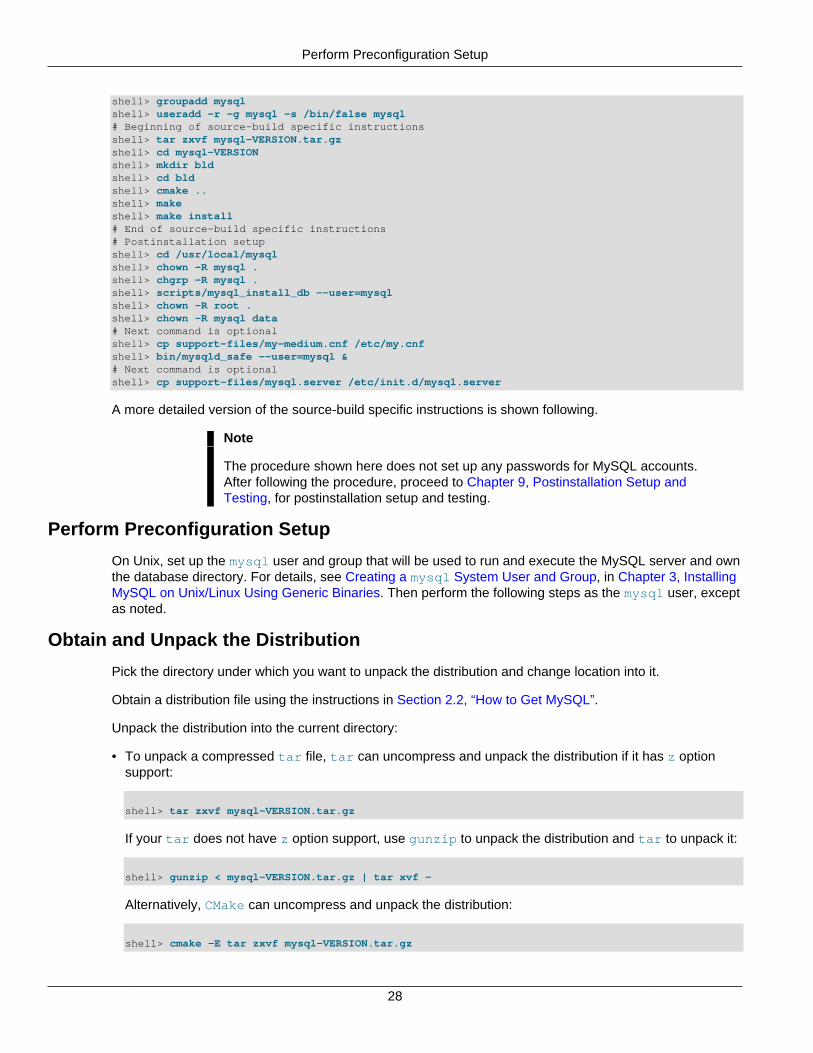
Perform Preconfiguration Setup
28
shell> groupadd mysqlshell> useradd -r -g mysql -s /bin/false mysql# Beginning of source-build specific instructionsshell> tar zxvf mysql-VERSION.tar.gzshell> cd mysql-VERSIONshell> mkdir bldshell> cd bldshell> cmake ..shell> makeshell> make install# End of source-build specific instructions# Postinstallation setupshell> cd /usr/local/mysqlshell> chown -R mysql .shell> chgrp -R mysql .shell> scripts/mysql_install_db --user=mysqlshell> chown -R root .shell> chown -R mysql data# Next command is optionalshell> cp support-files/my-medium.cnf /etc/my.cnfshell> bin/mysqld_safe --user=mysql &# Next command is optionalshell> cp support-files/mysql.server /etc/init.d/mysql.server
A more detailed version of the source-build specific instructions is shown following.
Note
The procedure shown here does not set up any passwords for MySQL accounts.After following the procedure, proceed to Chapter 9, Postinstallation Setup andTesting, for postinstallation setup and testing.
Perform Preconfiguration Setup
On Unix, set up the mysql user and group that will be used to run and execute the MySQL server and ownthe database directory. For details, see Creating a mysql System User and Group, in Chapter 3, InstallingMySQL on Unix/Linux Using Generic Binaries. Then perform the following steps as the mysql user, exceptas noted.
Obtain and Unpack the Distribution
Pick the directory under which you want to unpack the distribution and change location into it.
Obtain a distribution file using the instructions in Section 2.2, “How to Get MySQL”.
Unpack the distribution into the current directory:
• To unpack a compressed tar file, tar can uncompress and unpack the distribution if it has z optionsupport:
shell> tar zxvf mysql-VERSION.tar.gz
If your tar does not have z option support, use gunzip to unpack the distribution and tar to unpack it:
shell> gunzip < mysql-VERSION.tar.gz | tar xvf -
Alternatively, CMake can uncompress and unpack the distribution:
shell> cmake -E tar zxvf mysql-VERSION.tar.gz
Configure the Distribution
29
• To unpack a Zip archive, use WinZip or another tool that can read .zip files.
Unpacking the distribution file creates a directory named mysql-VERSION.
Configure the Distribution
Change location into the top-level directory of the unpacked distribution:
shell> cd mysql-VERSION
Build out of the source tree to keep the tree clean. If the top-level source directory is named mysql-srcunder your current working directory, you can build in a directory named bld at the same level. Create thedirectory and go there:
shell> mkdir bldshell> cd bld
Configure the build directory. The minimum configuration command includes no options to overrideconfiguration defaults:
shell> cmake ../mysql-src
The build directory needs not be outside the source tree. For example, you can build in a directory namedbld under the top-level source tree. To do this, starting with mysql-src as your current working directory,create the directory bld and then go there:
shell> mkdir bldshell> cd bld
Configure the build directory. The minimum configuration command includes no options to overrideconfiguration defaults:
shell> cmake ..
If you have multiple source trees at the same level (for example, to build multiple versions of MySQL),the second strategy can be advantageous. The first strategy places all build directories at the samelevel, which requires that you choose a unique name for each. With the second strategy, you can use thesame name for the build directory within each source tree. The following instructions assume this secondstrategy.
On Windows, specify the development environment. For example, the following commands configureMySQL for 32-bit or 64-bit builds, respectively:
shell> cmake .. -G "Visual Studio 9 2008"shell> cmake .. -G "Visual Studio 9 2008 Win64"
On OS X, to use the Xcode IDE:
shell> cmake .. -G Xcode
When you run cmake, you might want to add options to the command line. Here are some examples:
• -DBUILD_CONFIG=mysql_release: Configure the source with the same build options used by Oracleto produce binary distributions for official MySQL releases.
Build the Distribution
30
• -DCMAKE_INSTALL_PREFIX=dir_name: Configure the distribution for installation under a particularlocation.
• -DCPACK_MONOLITHIC_INSTALL=1: Cause make package to generate a single installation file ratherthan multiple files.
• -DWITH_DEBUG=1: Build the distribution with debugging support.
For a more extensive list of options, see Section 4.4, “MySQL Source-Configuration Options”.
To list the configuration options, use one of the following commands:
shell> cmake .. -L # overviewshell> cmake .. -LH # overview with help textshell> cmake .. -LAH # all params with help textshell> ccmake .. # interactive display
If CMake fails, you might need to reconfigure by running it again with different options. If you doreconfigure, take note of the following:
• If CMake is run after it has previously been run, it may use information that was gathered during itsprevious invocation. This information is stored in CMakeCache.txt. When CMake starts up, it looksfor that file and reads its contents if it exists, on the assumption that the information is still correct. Thatassumption is invalid when you reconfigure.
• Each time you run CMake, you must run make again to recompile. However, you may want to remove oldobject files from previous builds first because they were compiled using different configuration options.
To prevent old object files or configuration information from being used, run these commands in the builddirecotry on Unix before re-running CMake:
shell> make cleanshell> rm CMakeCache.txt
Or, on Windows:
shell> devenv MySQL.sln /cleanshell> del CMakeCache.txt
If you are going to send mail to a MySQL mailing list to ask for configuration assistance, first check the filesin the CMakeFiles directory for useful information about the failure. To file a bug report, please use theinstructions in How to Report Bugs or Problems.
Build the Distribution
On Unix:
shell> makeshell> make VERBOSE=1
The second command sets VERBOSE to show the commands for each compiled source.
Use gmake instead on systems where you are using GNU make and it has been installed as gmake.
On Windows:
shell> devenv MySQL.sln /build RelWithDebInfo
Install the Distribution
31
If you have gotten to the compilation stage, but the distribution does not build, see Section 4.5, “Dealingwith Problems Compiling MySQL”, for help. If that does not solve the problem, please enter it into ourbugs database using the instructions given in How to Report Bugs or Problems. If you have installed thelatest versions of the required tools, and they crash trying to process our configuration files, please reportthat also. However, if you get a command not found error or a similar problem for required tools, donot report it. Instead, make sure that all the required tools are installed and that your PATH variable is setcorrectly so that your shell can find them.
Install the Distribution
On Unix:
shell> make install
This installs the files under the configured installation directory (by default, /usr/local/mysql). Youmight need to run the command as root.
To install in a specific directory, add a DESTDIR parameter to the command line:
shell> make install DESTDIR="/opt/mysql"
Alternatively, generate installation package files that you can install where you like:
shell> make package
This operation produces one or more .tar.gz files that can be installed like generic binary distributionpackages. See Chapter 3, Installing MySQL on Unix/Linux Using Generic Binaries. If you run CMake with -DCPACK_MONOLITHIC_INSTALL=1, the operation produces a single file. Otherwise, it produces multiplefiles.
On Windows, generate the data directory, then create a .zip archive installation package:
shell> devenv MySQL.sln /build RelWithDebInfo /project initial_databaseshell> devenv MySQL.sln /build RelWithDebInfo /project package
You can install the resulting .zip archive where you like. See Section 5.7, “Installing MySQL on MicrosoftWindows Using a noinstall Zip Archive”.
Perform Postinstallation Setup
The remainder of the installation process involves setting up the configuration file, creating the coredatabases, and starting the MySQL server. For instructions, see Chapter 9, Postinstallation Setup andTesting.
Note
The accounts that are listed in the MySQL grant tables initially have no passwords.After starting the server, you should set up passwords for them using theinstructions in Chapter 9, Postinstallation Setup and Testing.
4.3 Installing MySQL Using a Development Source TreeThis section describes how to install MySQL from the latest development source code, which is hosted onGitHub. To obtain the MySQL Server source code from this repository hosting service, you can set up alocal MySQL Git repository.
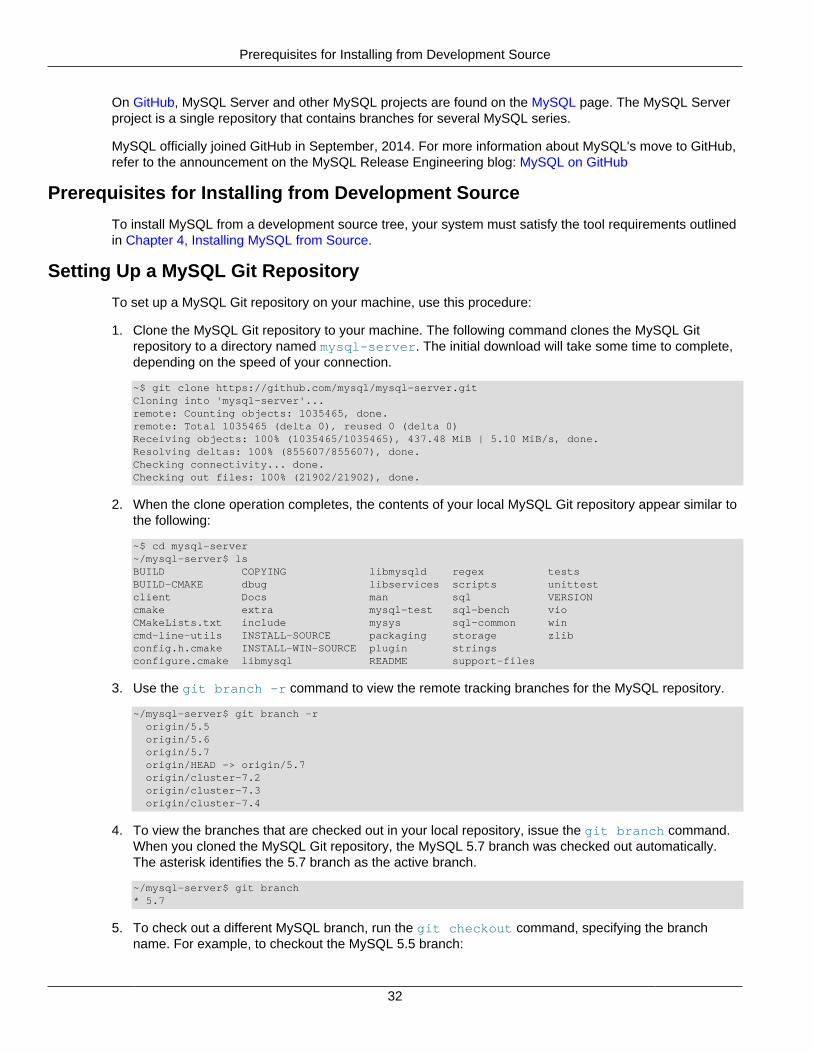
Prerequisites for Installing from Development Source
32
On GitHub, MySQL Server and other MySQL projects are found on the MySQL page. The MySQL Serverproject is a single repository that contains branches for several MySQL series.
MySQL officially joined GitHub in September, 2014. For more information about MySQL's move to GitHub,refer to the announcement on the MySQL Release Engineering blog: MySQL on GitHub
Prerequisites for Installing from Development Source
To install MySQL from a development source tree, your system must satisfy the tool requirements outlinedin Chapter 4, Installing MySQL from Source.
Setting Up a MySQL Git Repository
To set up a MySQL Git repository on your machine, use this procedure:
1. Clone the MySQL Git repository to your machine. The following command clones the MySQL Gitrepository to a directory named mysql-server. The initial download will take some time to complete,depending on the speed of your connection.
~$ git clone https://github.com/mysql/mysql-server.gitCloning into 'mysql-server'...remote: Counting objects: 1035465, done.remote: Total 1035465 (delta 0), reused 0 (delta 0)Receiving objects: 100% (1035465/1035465), 437.48 MiB | 5.10 MiB/s, done.Resolving deltas: 100% (855607/855607), done.Checking connectivity... done.Checking out files: 100% (21902/21902), done.
2. When the clone operation completes, the contents of your local MySQL Git repository appear similar tothe following:
~$ cd mysql-server~/mysql-server$ lsBUILD COPYING libmysqld regex testsBUILD-CMAKE dbug libservices scripts unittestclient Docs man sql VERSIONcmake extra mysql-test sql-bench vioCMakeLists.txt include mysys sql-common wincmd-line-utils INSTALL-SOURCE packaging storage zlibconfig.h.cmake INSTALL-WIN-SOURCE plugin stringsconfigure.cmake libmysql README support-files
3. Use the git branch -r command to view the remote tracking branches for the MySQL repository.
~/mysql-server$ git branch -r origin/5.5 origin/5.6 origin/5.7 origin/HEAD -> origin/5.7 origin/cluster-7.2 origin/cluster-7.3 origin/cluster-7.4
4. To view the branches that are checked out in your local repository, issue the git branch command.When you cloned the MySQL Git repository, the MySQL 5.7 branch was checked out automatically.The asterisk identifies the 5.7 branch as the active branch.
~/mysql-server$ git branch* 5.7
5. To check out a different MySQL branch, run the git checkout command, specifying the branchname. For example, to checkout the MySQL 5.5 branch:
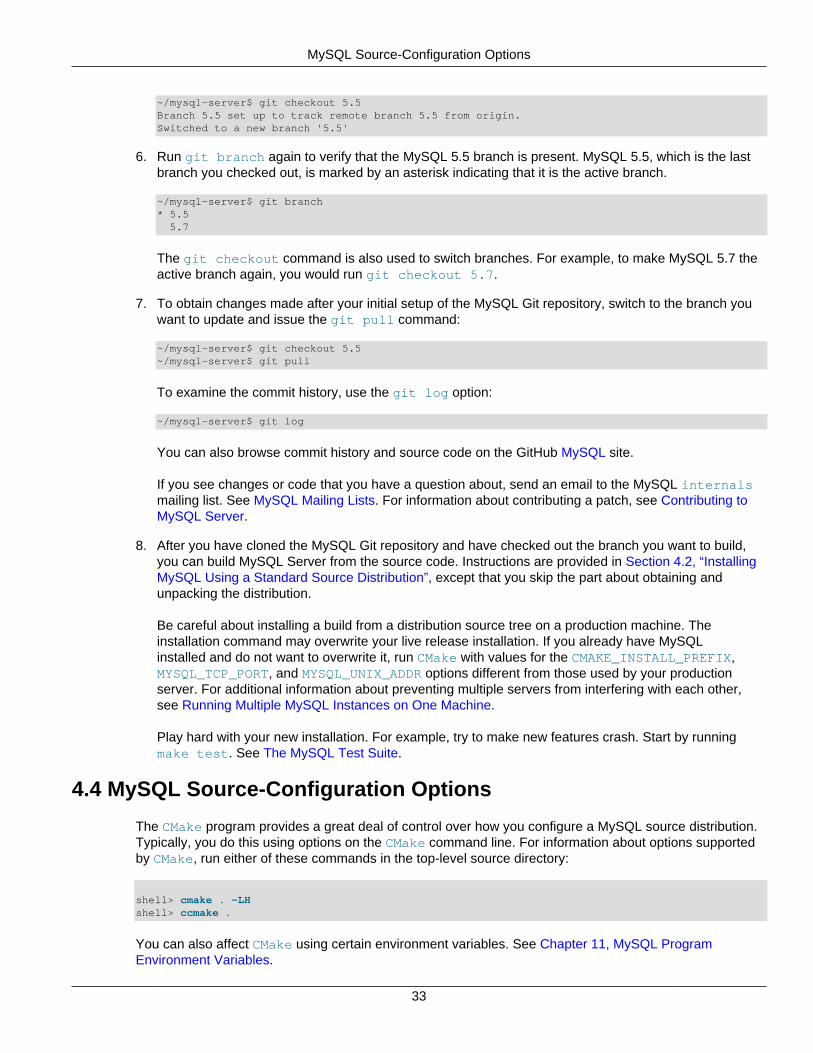
MySQL Source-Configuration Options
33
~/mysql-server$ git checkout 5.5Branch 5.5 set up to track remote branch 5.5 from origin.Switched to a new branch '5.5'
6. Run git branch again to verify that the MySQL 5.5 branch is present. MySQL 5.5, which is the lastbranch you checked out, is marked by an asterisk indicating that it is the active branch.
~/mysql-server$ git branch* 5.5 5.7
The git checkout command is also used to switch branches. For example, to make MySQL 5.7 theactive branch again, you would run git checkout 5.7.
7. To obtain changes made after your initial setup of the MySQL Git repository, switch to the branch youwant to update and issue the git pull command:
~/mysql-server$ git checkout 5.5~/mysql-server$ git pull
To examine the commit history, use the git log option:
~/mysql-server$ git log
You can also browse commit history and source code on the GitHub MySQL site.
If you see changes or code that you have a question about, send an email to the MySQL internalsmailing list. See MySQL Mailing Lists. For information about contributing a patch, see Contributing toMySQL Server.
8. After you have cloned the MySQL Git repository and have checked out the branch you want to build,you can build MySQL Server from the source code. Instructions are provided in Section 4.2, “InstallingMySQL Using a Standard Source Distribution”, except that you skip the part about obtaining andunpacking the distribution.
Be careful about installing a build from a distribution source tree on a production machine. Theinstallation command may overwrite your live release installation. If you already have MySQLinstalled and do not want to overwrite it, run CMake with values for the CMAKE_INSTALL_PREFIX,MYSQL_TCP_PORT, and MYSQL_UNIX_ADDR options different from those used by your productionserver. For additional information about preventing multiple servers from interfering with each other,see Running Multiple MySQL Instances on One Machine.
Play hard with your new installation. For example, try to make new features crash. Start by runningmake test. See The MySQL Test Suite.
4.4 MySQL Source-Configuration Options
The CMake program provides a great deal of control over how you configure a MySQL source distribution.Typically, you do this using options on the CMake command line. For information about options supportedby CMake, run either of these commands in the top-level source directory:
shell> cmake . -LHshell> ccmake .
You can also affect CMake using certain environment variables. See Chapter 11, MySQL ProgramEnvironment Variables.
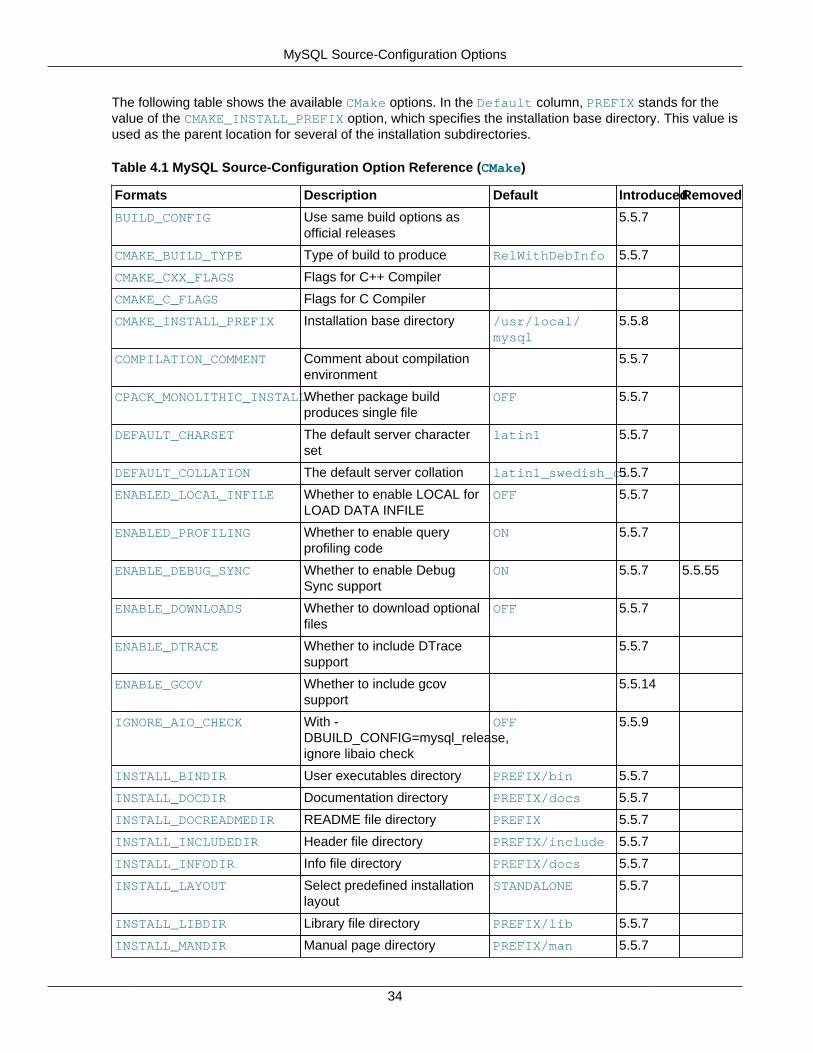
MySQL Source-Configuration Options
34
The following table shows the available CMake options. In the Default column, PREFIX stands for thevalue of the CMAKE_INSTALL_PREFIX option, which specifies the installation base directory. This value isused as the parent location for several of the installation subdirectories.
Table 4.1 MySQL Source-Configuration Option Reference (CMake)
Formats Description Default IntroducedRemoved
BUILD_CONFIG Use same build options asofficial releases
5.5.7
CMAKE_BUILD_TYPE Type of build to produce RelWithDebInfo 5.5.7
CMAKE_CXX_FLAGS Flags for C++ Compiler
CMAKE_C_FLAGS Flags for C Compiler
CMAKE_INSTALL_PREFIX Installation base directory /usr/local/mysql
5.5.8
COMPILATION_COMMENT Comment about compilationenvironment
5.5.7
CPACK_MONOLITHIC_INSTALLWhether package buildproduces single file
OFF 5.5.7
DEFAULT_CHARSET The default server characterset
latin1 5.5.7
DEFAULT_COLLATION The default server collation latin1_swedish_ci5.5.7
ENABLED_LOCAL_INFILE Whether to enable LOCAL forLOAD DATA INFILE
OFF 5.5.7
ENABLED_PROFILING Whether to enable queryprofiling code
ON 5.5.7
ENABLE_DEBUG_SYNC Whether to enable DebugSync support
ON 5.5.7 5.5.55
ENABLE_DOWNLOADS Whether to download optionalfiles
OFF 5.5.7
ENABLE_DTRACE Whether to include DTracesupport
5.5.7
ENABLE_GCOV Whether to include gcovsupport
5.5.14
IGNORE_AIO_CHECK With -DBUILD_CONFIG=mysql_release,ignore libaio check
OFF 5.5.9
INSTALL_BINDIR User executables directory PREFIX/bin 5.5.7
INSTALL_DOCDIR Documentation directory PREFIX/docs 5.5.7
INSTALL_DOCREADMEDIR README file directory PREFIX 5.5.7
INSTALL_INCLUDEDIR Header file directory PREFIX/include 5.5.7
INSTALL_INFODIR Info file directory PREFIX/docs 5.5.7
INSTALL_LAYOUT Select predefined installationlayout
STANDALONE 5.5.7
INSTALL_LIBDIR Library file directory PREFIX/lib 5.5.7
INSTALL_MANDIR Manual page directory PREFIX/man 5.5.7
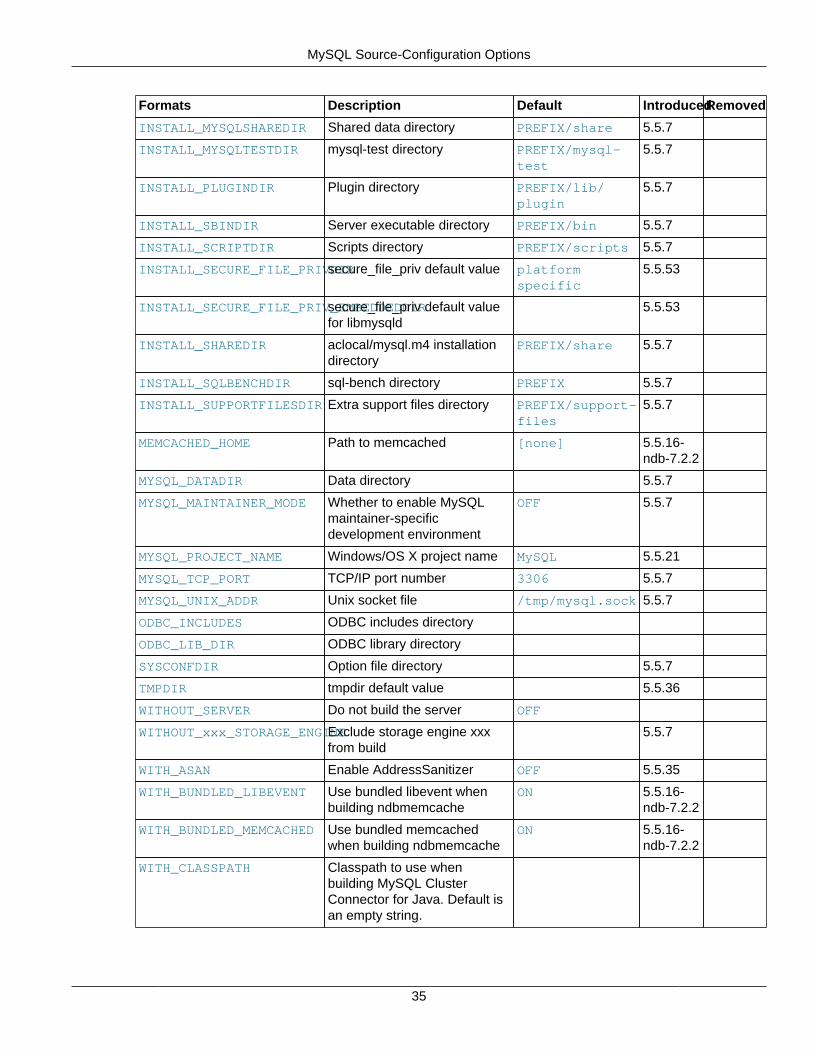
MySQL Source-Configuration Options
35
Formats Description Default IntroducedRemoved
INSTALL_MYSQLSHAREDIR Shared data directory PREFIX/share 5.5.7
INSTALL_MYSQLTESTDIR mysql-test directory PREFIX/mysql-test
5.5.7
INSTALL_PLUGINDIR Plugin directory PREFIX/lib/plugin
5.5.7
INSTALL_SBINDIR Server executable directory PREFIX/bin 5.5.7
INSTALL_SCRIPTDIR Scripts directory PREFIX/scripts 5.5.7
INSTALL_SECURE_FILE_PRIVDIRsecure_file_priv default value platformspecific
5.5.53
INSTALL_SECURE_FILE_PRIV_EMBEDDEDDIRsecure_file_priv default valuefor libmysqld
5.5.53
INSTALL_SHAREDIR aclocal/mysql.m4 installationdirectory
PREFIX/share 5.5.7
INSTALL_SQLBENCHDIR sql-bench directory PREFIX 5.5.7
INSTALL_SUPPORTFILESDIR Extra support files directory PREFIX/support-files
5.5.7
MEMCACHED_HOME Path to memcached [none] 5.5.16-ndb-7.2.2
MYSQL_DATADIR Data directory 5.5.7
MYSQL_MAINTAINER_MODE Whether to enable MySQLmaintainer-specificdevelopment environment
OFF 5.5.7
MYSQL_PROJECT_NAME Windows/OS X project name MySQL 5.5.21
MYSQL_TCP_PORT TCP/IP port number 3306 5.5.7
MYSQL_UNIX_ADDR Unix socket file /tmp/mysql.sock 5.5.7
ODBC_INCLUDES ODBC includes directory
ODBC_LIB_DIR ODBC library directory
SYSCONFDIR Option file directory 5.5.7
TMPDIR tmpdir default value 5.5.36
WITHOUT_SERVER Do not build the server OFF
WITHOUT_xxx_STORAGE_ENGINEExclude storage engine xxxfrom build
5.5.7
WITH_ASAN Enable AddressSanitizer OFF 5.5.35
WITH_BUNDLED_LIBEVENT Use bundled libevent whenbuilding ndbmemcache
ON 5.5.16-ndb-7.2.2
WITH_BUNDLED_MEMCACHED Use bundled memcachedwhen building ndbmemcache
ON 5.5.16-ndb-7.2.2
WITH_CLASSPATH Classpath to use whenbuilding MySQL ClusterConnector for Java. Default isan empty string.

MySQL Source-Configuration Options
36
Formats Description Default IntroducedRemoved
WITH_DEBUG Whether to include debuggingsupport
OFF 5.5.7
WITH_EMBEDDED_SERVER Whether to build embeddedserver
OFF 5.5.7
WITH_EMBEDDED_SHARED_LIBRARYWhether to build a sharedembedded server library
OFF 5.5.37
WITH_ERROR_INSERT Enable error injection inthe NDB storage engine.Should not be used forbuilding binaries intended forproduction.
OFF
WITH_EXTRA_CHARSETS Which extra character sets toinclude
all 5.5.7
WITH_LIBEDIT Use bundled libedit library ON 5.5.7
WITH_LIBWRAP Whether to include libwrap(TCP wrappers) support
OFF 5.5.7
WITH_NDBCLUSTER Build the NDB storageengine; alias forWITH_NDBCLUSTER_STORAGE_ENGINE
ON
WITH_NDBCLUSTER_STORAGE_ENGINEBuild the NDB storage engine ON
WITH_NDBMTD Build multi-threaded datanode.
ON
WITH_NDB_BINLOG Enable binary logging bydefault by mysqld.
ON
WITH_NDB_DEBUG Produce a debug build fortesting or troubleshooting.
OFF
WITH_NDB_JAVA Enable building of Java andClusterJ support. Enabled bydefault. Supported in MySQLCluster only.
ON 5.5.27-ndb-7.2.9
WITH_NDB_PORT Default port used by amanagement server builtwith this option. If this optionwas not used to build it, themanagement server's defaultport is 1186.
[none]
WITH_NDB_TEST Include NDB API testprograms.
OFF
WITH_READLINE Use bundled readline library OFF 5.5.7
WITH_SSL Type of SSL support bundled 5.5.7
WITH_UNIT_TESTS Compile MySQL with unit tests ON
WITH_UNIXODBC Enable unixODBC support OFF
WITH_VALGRIND Whether to compile in Valgrindheader files
OFF 5.5.6
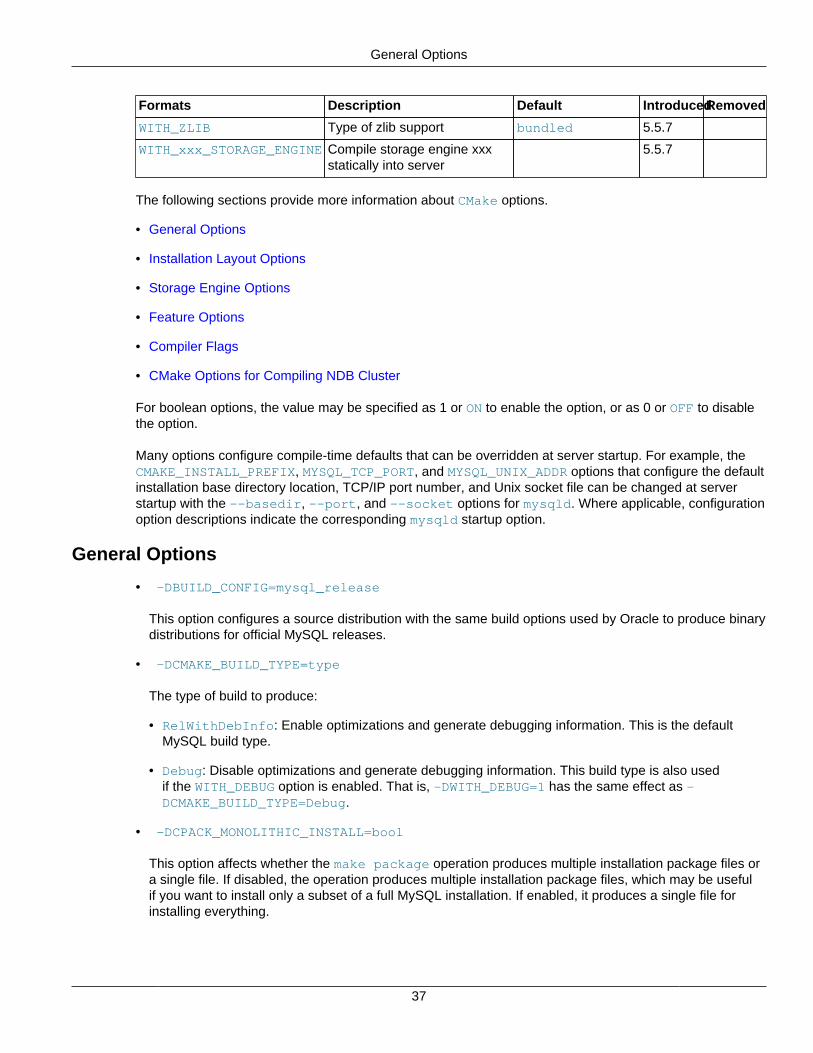
General Options
37
Formats Description Default IntroducedRemoved
WITH_ZLIB Type of zlib support bundled 5.5.7
WITH_xxx_STORAGE_ENGINE Compile storage engine xxxstatically into server
5.5.7
The following sections provide more information about CMake options.
• General Options
• Installation Layout Options
• Storage Engine Options
• Feature Options
• Compiler Flags
• CMake Options for Compiling NDB Cluster
For boolean options, the value may be specified as 1 or ON to enable the option, or as 0 or OFF to disablethe option.
Many options configure compile-time defaults that can be overridden at server startup. For example, theCMAKE_INSTALL_PREFIX, MYSQL_TCP_PORT, and MYSQL_UNIX_ADDR options that configure the defaultinstallation base directory location, TCP/IP port number, and Unix socket file can be changed at serverstartup with the --basedir, --port, and --socket options for mysqld. Where applicable, configurationoption descriptions indicate the corresponding mysqld startup option.
General Options
• -DBUILD_CONFIG=mysql_release
This option configures a source distribution with the same build options used by Oracle to produce binarydistributions for official MySQL releases.
• -DCMAKE_BUILD_TYPE=type
The type of build to produce:
• RelWithDebInfo: Enable optimizations and generate debugging information. This is the defaultMySQL build type.
• Debug: Disable optimizations and generate debugging information. This build type is also usedif the WITH_DEBUG option is enabled. That is, -DWITH_DEBUG=1 has the same effect as -DCMAKE_BUILD_TYPE=Debug.
• -DCPACK_MONOLITHIC_INSTALL=bool
This option affects whether the make package operation produces multiple installation package files ora single file. If disabled, the operation produces multiple installation package files, which may be usefulif you want to install only a subset of a full MySQL installation. If enabled, it produces a single file forinstalling everything.
Installation Layout Options
38
Installation Layout Options
The CMAKE_INSTALL_PREFIX option indicates the base installation directory. Other options with namesof the form INSTALL_xxx that indicate component locations are interpreted relative to the prefix and theirvalues are relative pathnames. Their values should not include the prefix.
• -DCMAKE_INSTALL_PREFIX=dir_name
The installation base directory.
This value can be set at server startup with the --basedir option.
• -DINSTALL_BINDIR=dir_name
Where to install user programs.
• -DINSTALL_DOCDIR=dir_name
Where to install documentation.
• -DINSTALL_DOCREADMEDIR=dir_name
Where to install README files.
• -DINSTALL_INCLUDEDIR=dir_name
Where to install header files.
• -DINSTALL_INFODIR=dir_name
Where to install Info files.
• -DINSTALL_LAYOUT=name
Select a predefined installation layout:
• STANDALONE: Same layout as used for .tar.gz and .zip packages. This is the default.
• RPM: Layout similar to RPM packages.
• SVR4: Solaris package layout.
• DEB: DEB package layout (experimental).
You can select a predefined layout but modify individual component installation locations by specifyingother options. For example:
shell> cmake . -DINSTALL_LAYOUT=SVR4 -DMYSQL_DATADIR=/var/mysql/data
• -DINSTALL_LIBDIR=dir_name
Where to install library files.
• -DINSTALL_MANDIR=dir_name
Where to install manual pages.
• -DINSTALL_MYSQLSHAREDIR=dir_name
Installation Layout Options
39
Where to install shared data files.
• -DINSTALL_MYSQLTESTDIR=dir_name
Where to install the mysql-test directory. As of MySQL 5.5.32, to suppress installation of thisdirectory, explicitly set the option to the empty value (-DINSTALL_MYSQLTESTDIR=).
• -DINSTALL_PLUGINDIR=dir_name
The location of the plugin directory.
This value can be set at server startup with the --plugin_dir option.
• -DINSTALL_SBINDIR=dir_name
Where to install the mysqld server.
• -DINSTALL_SCRIPTDIR=dir_name
Where to install mysql_install_db.
• -DINSTALL_SECURE_FILE_PRIVDIR=dir_name
The default value for the secure_file_priv system variable. The default value is platformspecific and depends on the value of the INSTALL_LAYOUT CMake option; see the description of thesecure_file_priv system variable in Server System Variables.
This option was added in MySQL 5.5.53. To set the value for the libmysqld embedded server, useINSTALL_SECURE_FILE_PRIV_EMBEDDEDDIR.
• -DINSTALL_SECURE_FILE_PRIV_EMBEDDEDDIR=dir_name
The default value for the secure_file_priv system variable, for the libmysqld embedded server.This option was added in MySQL 5.5.53.
• -DINSTALL_SHAREDIR=dir_name
Where to install aclocal/mysql.m4.
• -DINSTALL_SQLBENCHDIR=dir_name
Where to install the sql-bench directory. To suppress installation of this directory, explicitly set theoption to the empty value (-DINSTALL_SQLBENCHDIR=).
• -DINSTALL_SUPPORTFILESDIR=dir_name
Where to install extra support files.
• -DMYSQL_DATADIR=dir_name
The location of the MySQL data directory.
This value can be set at server startup with the --datadir option.
• -DODBC_INCLUDES=dir_name
The location of the ODBC includes directory, and may be used while configuring Connector/ODBC.
• -DODBC_LIB_DIR=dir_name
Storage Engine Options
40
The location of the ODBC library directory, and may be used while configuring Connector/ODBC.
• -DSYSCONFDIR=dir_name
The default my.cnf option file directory.
This location cannot be set at server startup, but you can start the server with a given option file usingthe --defaults-file=file_name option, where file_name is the full path name to the file.
• -DTMPDIR=dir_name
The default location to use for the tmpdir system variable. If unspecified, the value defaults toP_tmpdir in <stdio.h>. This option was added in MySQL 5.6.16.
Storage Engine Options
Storage engines are built as plugins. You can build a plugin as a static module (compiled into the server)or a dynamic module (built as a dynamic library that must be installed into the server using the INSTALLPLUGIN statement or the --plugin-load option before it can be used). Some plugins might not supportstatic or dynamic building.
The InnoDB, MyISAM, MERGE, MEMORY, and CSV engines are mandatory (always compiled into the server)and need not be installed explicitly.
To compile a storage engine statically into the server, use -DWITH_engine_STORAGE_ENGINE=1. Somepermissible engine values are ARCHIVE, BLACKHOLE, EXAMPLE, FEDERATED, NDBCLUSTER (NDB),PARTITION (partitioning support), and PERFSCHEMA (Performance Schema). Examples:
-DWITH_ARCHIVE_STORAGE_ENGINE=1-DWITH_BLACKHOLE_STORAGE_ENGINE=1-DWITH_PERFSCHEMA_STORAGE_ENGINE=1
Note
WITH_NDBCLUSTER_STORAGE_ENGINE is supported only when building NDBCluster using the NDB Cluster sources. It cannot be used to enable clusteringsupport in other MySQL source trees or distributions. In MySQL NDB Cluster 7.2source distributions, it is enabled by default. See Building NDB Cluster from Sourceon Linux, and Compiling and Installing NDB Cluster from Source on Windows, formore information.
To exclude a storage engine from the build, use -DWITHOUT_engine_STORAGE_ENGINE=1. Examples:
-DWITHOUT_EXAMPLE_STORAGE_ENGINE=1-DWITHOUT_FEDERATED_STORAGE_ENGINE=1-DWITHOUT_PARTITION_STORAGE_ENGINE=1
If neither -DWITH_engine_STORAGE_ENGINE nor -DWITHOUT_engine_STORAGE_ENGINE arespecified for a given storage engine, the engine is built as a shared module, or excluded if it cannot be builtas a shared module.
Feature Options
• -DCOMPILATION_COMMENT=string
A descriptive comment about the compilation environment.
Feature Options
41
• -DDEFAULT_CHARSET=charset_name
The server character set. By default, MySQL uses the latin1 (cp1252 West European) character set.
charset_name may be one of binary, armscii8, ascii, big5, cp1250, cp1251, cp1256,cp1257, cp850, cp852, cp866, cp932, dec8, eucjpms, euckr, gb2312, gbk, geostd8, greek,hebrew, hp8, keybcs2, koi8r, koi8u, latin1, latin2, latin5, latin7, macce, macroman,sjis, swe7, tis620, ucs2, ujis, utf8, utf8mb4, utf16, utf32. The permissible character sets arelisted in the cmake/character_sets.cmake file as the value of CHARSETS_AVAILABLE.
This value can be set at server startup with the --character_set_server option.
• -DDEFAULT_COLLATION=collation_name
The server collation. By default, MySQL uses latin1_swedish_ci. Use the SHOW COLLATIONstatement to determine which collations are available for each character set.
This value can be set at server startup with the --collation_server option.
• -DENABLE_DEBUG_SYNC=bool
Note
As of MySQL 5.5.55, ENABLE_DEBUG_SYNC is removed and enablingWITH_DEBUG enables Debug Sync.
Whether to compile the Debug Sync facility into the server. This facility is used for testing anddebugging. This option is enabled by default, but has no effect unless MySQL is configuredwith debugging enabled. If debugging is enabled and you want to disable Debug Sync, use -DENABLE_DEBUG_SYNC=0.
When compiled in, Debug Sync is disabled by default at runtime. To enable it, start mysqld with the --debug-sync-timeout=N option, where N is a timeout value greater than 0. (The default value is 0,which disables Debug Sync.) N becomes the default timeout for individual synchronization points.
For a description of the Debug Sync facility and how to use synchronization points, see MySQLInternals: Test Synchronization.
• -DENABLE_DOWNLOADS=bool
Whether to download optional files. For example, with this option enabled, CMake downloads the GoogleTest distribution that is used by the test suite to run unit tests.
• -DENABLE_DTRACE=bool
Whether to include support for DTrace probes. For information about DTrace, wee Tracing mysqld UsingDTrace
• -DENABLE_GCOV=bool
Whether to include gcov support (Linux only).
• -DENABLED_LOCAL_INFILE=bool
This option controls the compiled-in default LOCAL capability for the MySQL client library. Clients thatmake no explicit arrangements therefore have LOCAL capability disabled or enabled according to theENABLED_LOCAL_INFILE setting specified at MySQL build time.
Feature Options
42
By default, the client library in MySQL binary distributions is compiled with ENABLED_LOCAL_INFILEenabled. If you compile MySQL from source, configure it with ENABLED_LOCAL_INFILE disabled orenabled based on whether clients that make no explicit arrangements should have LOCAL capabilitydisabled or enabled, respectively.
ENABLED_LOCAL_INFILE controls the default for client-side LOCAL capability. For the server, thelocal_infile system variable controls server-side LOCAL capability. To explicitly cause the serverto refuse or permit LOAD DATA LOCAL statements (regardless of how client programs and librariesare configured at build time or runtime), start mysqld with local_infile disabled or enabled,respectively. local_infile can also be set at runtime. See Security Issues with LOAD DATA LOCAL.
• -DENABLED_PROFILING=bool
Whether to enable query profiling code (for the SHOW PROFILE and SHOW PROFILES statements).
• -DIGNORE_AIO_CHECK=bool
If the -DBUILD_CONFIG=mysql_release option is given on Linux, the libaio library must be linkedin by default. If you do not have libaio or do not want to install it, you can suppress the check for it byspecifying -DIGNORE_AIO_CHECK=1. This option was added in MySQL 5.5.9.
• -DMYSQL_MAINTAINER_MODE=bool
Whether to enable a MySQL maintainer-specific development environment. If enabled, this optioncauses compiler warnings to become errors.
• -DMYSQL_PROJECT_NAME=name
For Windows or OS X, the project name to incorporate into the project file name. This option was addedin MySQL 5.5.21.
• -DMYSQL_TCP_PORT=port_num
The port number on which the server listens for TCP/IP connections. The default is 3306.
This value can be set at server startup with the --port option.
• -DMYSQL_UNIX_ADDR=file_name
The Unix socket file path on which the server listens for socket connections. This must be an absolutepath name. The default is /tmp/mysql.sock.
This value can be set at server startup with the --socket option.
• -DWITH_ASAN=bool
Whether to enable AddressSanitizer, for compilers that support it. The default is off. This option wasadded in MySQL 5.5.35.
• -DWITH_DEBUG=bool
Whether to include debugging support.
Configuring MySQL with debugging support enables you to use the --debug="d,parser_debug"option when you start the server. This causes the Bison parser that is used to process SQL statementsto dump a parser trace to the server's standard error output. Typically, this output is written to the errorlog.

Feature Options
43
As of MySQL 5.5.55, enabling WITH_DEBUG also enables Debug Sync. For a description of the DebugSync facility and how to use synchronization points, see MySQL Internals: Test Synchronization.
• -DWITH_EMBEDDED_SERVER=bool
Whether to build the libmysqld embedded server library.
• -DWITH_EMBEDDED_SHARED_LIBRARY=bool
Whether to build a shared libmysqld embedded server library. This option was added in MySQL5.5.37.
• -DWITH_EXTRA_CHARSETS=name
Which extra character sets to include:
• all: All character sets. This is the default.
• complex: Complex character sets.
• none: No extra character sets.
• -DWITH_LIBEDIT=bool
Whether to use the libedit library bundled with the distribution.
• -DWITH_LIBWRAP=bool
Whether to include libwrap (TCP wrappers) support.
• -DWITH_READLINE=bool
Whether to use the readline library bundled with the distribution.
• -DWITH_SSL=ssl_type
The type of SSL support to include, if any:
• no: No SSL support. This is the default before MySQL 5.5.56. As of 5.5.56, this is no longer apermitted value and the default is bundled.
• yes: Use the system SSL library if present, else the library bundled with the distribution.
• bundled: Use the SSL library bundled with the distribution. This is the default as of MySQL 5.5.56.
• system: Use the system SSL library.
For information about using SSL support, see Using Secure Connections.
• -DWITH_UNIT_TESTS={ON|OFF}
If enabled, compile MySQL with unit tests. The default is ON unless the server is not being compiled.
• -DWITH_UNIXODBC=1
Enables unixODBC support, for Connector/ODBC.
• -DWITH_VALGRIND=bool
Compiler Flags
44
Whether to compile in the Valgrind header files, which exposes the Valgrind API to MySQL code. Thedefault is OFF.
To generate a Valgrind-aware debug build, -DWITH_VALGRIND=1 normally is combined with -DWITH_DEBUG=1. See Building Debug Configurations.
• -DWITH_ZLIB=zlib_type
Some features require that the server be built with compression library support, such as theCOMPRESS() and UNCOMPRESS() functions, and compression of the client/server protocol. TheWITH_ZLIB indicates the source of zlib support:
• bundled: Use the zlib library bundled with the distribution. This is the default.
• system: Use the system zlib library.
• -DWITHOUT_SERVER=bool
Whether to build without the MySQL server. The default is OFF, which does build the server.
Compiler Flags
• -DCMAKE_C_FLAGS="flags"
Flags for the C Compiler.
• -DCMAKE_CXX_FLAGS="flags"
Flags for the C++ Compiler.
To specify your own C and C++ compiler flags, for flags that do not affect optimization, use theCMAKE_C_FLAGS and CMAKE_CXX_FLAGS CMake options.
When providing your own compiler flags, you might want to specify CMAKE_BUILD_TYPE as well.
For example, to create a 32-bit release build on a 64-bit Linux machine, do this:
shell> mkdir bldshell> cd bldshell> cmake .. -DCMAKE_C_FLAGS=-m32 \ -DCMAKE_CXX_FLAGS=-m32 \ -DCMAKE_BUILD_TYPE=RelWithDebInfo
If you set flags that affect optimization (-Onumber), you must set the CMAKE_C_FLAGS_build_typeand/or CMAKE_CXX_FLAGS_build_type options, where build_type correspondsto the CMAKE_BUILD_TYPE value. To specify a different optimization for the defaultbuild type (RelWithDebInfo) set the CMAKE_C_FLAGS_RELWITHDEBINFO andCMAKE_CXX_FLAGS_RELWITHDEBINFO options. For example, to compile on Linux with -O3 and withdebug symbols, do this:
shell> cmake .. -DCMAKE_C_FLAGS_RELWITHDEBINFO="-O3 -g" \ -DCMAKE_CXX_FLAGS_RELWITHDEBINFO="-O3 -g"
CMake Options for Compiling NDB Cluster
45
CMake Options for Compiling NDB Cluster
The following options are for use when building MySQL NDB Cluster 7.2 or later. These options aresupported only with the MySQL NDB Cluster 7.2 and later NDB Cluster sources; they are not supportedwhen using sources from the MySQL 5.5 Server tree.
• -DMEMCACHED_HOME=dir_name
Perform the build using the memcached (version 1.6 or later) installed in the system directoryindicated by dir_name. Files from this installation that are used in the build include the memcachedbinary, header files, and libraries, as well as the memcached_utilities library and the header fileengine_testapp.h.
You must leave this option unset when building ndbmemcache using the bundled memcached sources(WITH_BUNDLED_MEMCACHED option); in other words, the bundled sources are used by default).
This option was added in MySQL NDB Cluster 7.2.2.
While additional CMake options—such as for SASL authorization and for providing dtrace support—are available for use when compiling memcached from external sources, these options are currently notenabled for the memcached sources bundled with NDB Cluster.
• -DWITH_BUNDLED_LIBEVENT={ON|OFF}
Use the libevent included in the NDB Cluster sources when building NDB Cluster withndbmemcached support (MySQL NDB Cluster 7.2.2 and later). Enabled by default. OFF causes thesystem's libevent to be used instead.
• -DWITH_BUNDLED_MEMCACHED={ON|OFF}
Build the memcached sources included in the NDB Cluster source tree (MySQL NDB Cluster 7.2.3 andlater), then use the resulting memcached server when building the ndbmemcache engine. In this case,make install places the memcached binary in the installation bin directory, and the ndbmemcacheengine shared library file ndb_engine.so in the installation lib directory.
This option is ON by default.
• -DWITH_CLASSPATH=path
Sets the classpath for building NDB Cluster Connector for Java. The default is empty. In MySQL NDBCluster 7.2.9 and later, this option is ignored if -DWITH_NDB_JAVA=OFF is used.
• -DWITH_ERROR_INSERT={ON|OFF}
Enables error injection in the NDB kernel. For testing only; not intended for use in building productionbinaries. The default is OFF.
• -DWITH_NDBCLUSTER_STORAGE_ENGINE={ON|OFF}
Build and link in support for the NDB (NDBCLUSTER) storage engine in mysqld. The default is ON.
• -DWITH_NDBCLUSTER={ON|OFF}
This is an alias for WITH_NDBCLUSTER_STORAGE_ENGINE.
• -DWITH_NDBMTD={ON|OFF}
Build the multi-threaded data node executable ndbmtd. The default is ON.
Dealing with Problems Compiling MySQL
46
• -DWITH_NDB_BINLOG={ON|OFF}
Enable binary logging by default in the mysqld built using this option. ON by default.
• -DWITH_NDB_DEBUG={ON|OFF}
Enable building the debug versions of the NDB Cluster binaries. OFF by default.
• -DWITH_NDB_JAVA={ON|OFF}
Enable building NDB Cluster with Java support, including ClusterJ.
This option was added in MySQL NDB Cluster 7.2.9, and is ON by default. If you do not wish to compileNDB Cluster with Java support, you must disable it explicitly by specifying -DWITH_NDB_JAVA=OFFwhen running CMake. Otherwise, if Java cannot be found, configuration of the build fails.
• -DWITH_NDB_PORT=port
Causes the NDB Cluster management server (ndb_mgmd) that is built to use this port by default. If thisoption is unset, the resulting management server tries to use port 1186 by default.
• -DWITH_NDB_TEST={ON|OFF}
If enabled, include a set of NDB API test programs. The default is OFF.
4.5 Dealing with Problems Compiling MySQL
The solution to many problems involves reconfiguring. If you do reconfigure, take note of the following:
• If CMake is run after it has previously been run, it may use information that was gathered during itsprevious invocation. This information is stored in CMakeCache.txt. When CMake starts up, it looksfor that file and reads its contents if it exists, on the assumption that the information is still correct. Thatassumption is invalid when you reconfigure.
• Each time you run CMake, you must run make again to recompile. However, you may want to remove oldobject files from previous builds first because they were compiled using different configuration options.
To prevent old object files or configuration information from being used, run the following commands beforere-running CMake:
On Unix:
shell> make cleanshell> rm CMakeCache.txt
On Windows:
shell> devenv MySQL.sln /cleanshell> del CMakeCache.txt
If you build outside of the source tree, remove and recreate your build directory before re-running CMake.For instructions on building outside of the source tree, see How to Build MySQL Server with CMake.
On some systems, warnings may occur due to differences in system include files. The following listdescribes other problems that have been found to occur most often when compiling MySQL:
Dealing with Problems Compiling MySQL
47
• To define which C and C++ compilers to use, you can define the CC and CXX environment variables.For example:
shell> CC=gccshell> CXX=g++shell> export CC CXX
To specify your own C and C++ compiler flags, use the CMAKE_C_FLAGS and CMAKE_CXX_FLAGSCMake options. See Compiler Flags.
To see what flags you might need to specify, invoke mysql_config with the --cflags option.
• To see what commands are executed during the compile stage, after using CMake to configure MySQL,run make VERBOSE=1 rather than just make.
• If compilation fails, check whether the MYSQL_MAINTAINER_MODE option is enabled. This mode causescompiler warnings to become errors, so disabling it may enable compilation to proceed.
• If your compile fails with errors such as any of the following, you must upgrade your version of make toGNU make:
make: Fatal error in reader: Makefile, line 18:Badly formed macro assignment
Or:
make: file `Makefile' line 18: Must be a separator (:
Or:
pthread.h: No such file or directory
Solaris and FreeBSD are known to have troublesome make programs.
GNU make 3.75 is known to work.
• The sql_yacc.cc file is generated from sql_yacc.yy. Normally, the build process does not need tocreate sql_yacc.cc because MySQL comes with a pregenerated copy. However, if you do need to re-create it, you might encounter this error:
"sql_yacc.yy", line xxx fatal: default action causes potential...
This is a sign that your version of yacc is deficient. You probably need to install a recent version ofbison (the GNU version of yacc) and use that instead.
Versions of bison older than 1.75 may report this error:
sql_yacc.yy:#####: fatal error: maximum table size (32767) exceeded
The maximum table size is not actually exceeded; the error is caused by bugs in older versions ofbison.
For information about acquiring or updating tools, see the system requirements in Chapter 4, InstallingMySQL from Source.
MySQL Configuration and Third-Party Tools
48
4.6 MySQL Configuration and Third-Party Tools
Third-party tools that need to determine the MySQL version from the MySQL source can read theVERSION file in the top-level source directory. The file lists the pieces of the version separately. Forexample, if the version is MySQL 5.7.4-m14, the file looks like this:
MYSQL_VERSION_MAJOR=5MYSQL_VERSION_MINOR=7MYSQL_VERSION_PATCH=4MYSQL_VERSION_EXTRA=-m14
If the source is not for a General Availablility (GA) release, the MYSQL_VERSION_EXTRA value will benonempty. For the example, the value corresponds to Milestone 14.
To construct a five-digit number from the version components, use this formula:
MYSQL_VERSION_MAJOR*10000 + MYSQL_VERSION_MINOR*100 + MYSQL_VERSION_PATCH
49
Chapter 5 Installing MySQL on Microsoft Windows
Table of Contents5.1 MySQL Installation Layout on Microsoft Windows ........................................................................ 525.2 Choosing An Installation Package ............................................................................................... 535.3 MySQL Installer for Windows ...................................................................................................... 54
5.3.1 MySQL Installer Initial Setup ............................................................................................ 555.3.2 Installation Workflow ........................................................................................................ 595.3.3 MySQL Installer Product Catalog and Dashboard .............................................................. 665.3.4 MySQLInstallerConsole Reference .................................................................................... 69
5.4 MySQL Notifier ........................................................................................................................... 735.4.1 MySQL Notifier Usage ..................................................................................................... 735.4.2 Setting Up Remote Monitoring in MySQL Notifier .............................................................. 80
5.5 Installing MySQL on Microsoft Windows Using an MSI Package ................................................... 855.5.1 Using the MySQL Installation Wizard ................................................................................ 875.5.2 Automating MySQL Installation on Microsoft Windows Using the MSI Package .................... 905.5.3 Removing MySQL When Installed from the MSI Package .................................................. 91
5.6 MySQL Server Instance Configuration Wizard .............................................................................. 925.6.1 Starting the MySQL Server Instance Configuration Wizard ................................................. 925.6.2 Choosing a Maintenance Option ....................................................................................... 935.6.3 Choosing a Configuration Type ........................................................................................ 935.6.4 The Server Type Dialog ................................................................................................... 945.6.5 The Database Usage Dialog ............................................................................................ 965.6.6 The InnoDB Tablespace Dialog ........................................................................................ 975.6.7 The Concurrent Connections Dialog ................................................................................. 985.6.8 The Networking and Strict Mode Options Dialog ................................................................ 995.6.9 The Character Set Dialog ............................................................................................... 1005.6.10 The Service Options Dialog .......................................................................................... 1005.6.11 The Security Options Dialog ......................................................................................... 1015.6.12 The Confirmation Dialog ............................................................................................... 1035.6.13 MySQL Server Instance Config Wizard: Creating an Instance from the Command Line ..... 104
5.7 Installing MySQL on Microsoft Windows Using a noinstall Zip Archive ......................................... 1075.7.1 Extracting the Install Archive .......................................................................................... 1075.7.2 Creating an Option File .................................................................................................. 1085.7.3 Selecting a MySQL Server Type ..................................................................................... 1095.7.4 Starting the Server for the First Time .............................................................................. 1095.7.5 Starting MySQL from the Windows Command Line .......................................................... 1115.7.6 Customizing the PATH for MySQL Tools ......................................................................... 1115.7.7 Starting MySQL as a Windows Service ........................................................................... 1125.7.8 Testing The MySQL Installation ...................................................................................... 115
5.8 Troubleshooting a Microsoft Windows MySQL Server Installation ................................................ 1165.9 Windows Postinstallation Procedures ......................................................................................... 1175.10 Upgrading MySQL on Windows ............................................................................................... 119
Important
MySQL Community 5.5 Server requires the Microsoft Visual C++ 2008Redistributable Package to run on Windows platforms. Users should make sure thepackage has been installed on the system before installing the server. The packageis available at the Microsoft Download Center.
MySQL Installer Method
50
MySQL is available for Microsoft Windows, for both 32-bit and 64-bit versions. For supported Windowsplatform information, see http://www.mysql.com/support/supportedplatforms/database.html.
There are different methods to install MySQL on Microsoft Windows.
MySQL Installer Method
The simplest and recommended method is to download MySQL Installer (for Windows) and let it install andconfigure all of the MySQL products on your system. Here is how:
1. Download MySQL Installer from http://dev.mysql.com/downloads/installer/ and execute it.
Note
Unlike the standard MySQL Installer, the smaller "web-community" version doesnot bundle any MySQL applications but it will download the MySQL productsyou choose to install.
2. Choose the appropriate Setup Type for your system. Typically you will choose Developer Default toinstall MySQL server and other MySQL tools related to MySQL development, helpful tools like MySQLWorkbench. Or, choose the Custom setup type to manually select your desired MySQL products.
Note
Multiple versions of MySQL server can exist on a single system. You canchoose one or multiple versions.
3. Complete the installation process by following the MySQL Installation wizard's instructions. This willinstall several MySQL products and start the MySQL server.
MySQL is now installed. If you configured MySQL as a service, then Windows will automatically startMySQL server every time you restart your system.
Note
You probably also installed other helpful MySQL products like MySQL Workbenchand MySQL Notifier on your system. Consider loading MySQL Workbench to checkyour new MySQL server connection, and Section 5.4, “MySQL Notifier” to viewthe connection's status. By default, these two programs automatically start afterinstalling MySQL.
This process also installs the MySQL Installer application on your system, and later you can use MySQLInstaller to upgrade or reconfigure your MySQL products.
Additional Installation Information
It is possible to run MySQL as a standard application or as a Windows service. By using a service, you canmonitor and control the operation of the server through the standard Windows service management tools.For more information, see Section 5.7.7, “Starting MySQL as a Windows Service”.
Generally, you should install MySQL on Windows using an account that has administrator rights.Otherwise, you may encounter problems with certain operations such as editing the PATH environmentvariable or accessing the Service Control Manager. Once installed, MySQL does not need to beexecuted using a user with Administrator privileges.
For a list of limitations on the use of MySQL on the Windows platform, see Windows Platform Limitations.
Additional Installation Information
51
In addition to the MySQL Server package, you may need or want additional components to use MySQLwith your application or development environment. These include, but are not limited to:
• To connect to the MySQL server using ODBC, you must have a Connector/ODBC driver. For moreinformation, including installation and configuration instructions, see MySQL Connector/ODBCDeveloper Guide.
Note
MySQL Installer will install and configure Connector/ODBC for you.
• To use MySQL server with .NET applications, you must have the Connector/Net driver. For moreinformation, including installation and configuration instructions, see MySQL Connector/Net DeveloperGuide.
Note
MySQL Installer will install and configure MySQL Connector/Net for you.
MySQL distributions for Windows can be downloaded from http://dev.mysql.com/downloads/. SeeSection 2.2, “How to Get MySQL”.
MySQL for Windows is available in several distribution formats, detailed here. Generally speaking, youshould use MySQL Installer. It contains more features and MySQL products than the older MSI, is simplerto use than the Zip file, and you need no additional tools to get MySQL up and running. MySQL Installerautomatically installs MySQL Server and additional MySQL products, creates an options file, starts theserver, and enables you to create default user accounts. For more information on choosing a package, seeSection 5.2, “Choosing An Installation Package”.
• Binary installer distributions. There are two different installable distributions that come packaged asa Microsoft Windows Installer (MSI) package that you can install manually or automatically on yoursystems. The preferred MySQL Installer package includes MySQL Server and additional MySQLproducts including MySQL Workbench, MySQL Notifier, and MySQL for Excel. MySQL Installer can alsobe used to upgrade these product in the future. The older MSI package contains all the files you need toinstall and configure MySQL server, but no additional components.
For instructions on installing MySQL using MySQL Installer, see Section 5.3, “MySQL Installer forWindows”.
• The standard binary distribution (packaged as a Zip file) contains all of the necessary files that youunpack into your chosen location. This package contains all of the files in the full Windows MSI Installerpackage, but does not include an installation program.
For instructions on installing MySQL using the Zip file, see Section 5.7, “Installing MySQL on MicrosoftWindows Using a noinstall Zip Archive”.
• The source distribution format contains all the code and support files for building the executables usingthe Visual Studio compiler system.
For instructions on building MySQL from source on Windows, see Chapter 4, Installing MySQL fromSource.
MySQL on Windows considerations:
• Large Table Support
If you need tables with a size larger than 4GB, install MySQL on an NTFS or newer file system. Do notforget to use MAX_ROWS and AVG_ROW_LENGTH when you create tables. See CREATE TABLE Syntax.
MySQL Installation Layout on Microsoft Windows
52
• MySQL and Virus Checking Software
Virus-scanning software such as Norton/Symantec Anti-Virus on directories containing MySQL data andtemporary tables can cause issues, both in terms of the performance of MySQL and the virus-scanningsoftware misidentifying the contents of the files as containing spam. This is due to the fingerprintingmechanism used by the virus-scanning software, and the way in which MySQL rapidly updates differentfiles, which may be identified as a potential security risk.
After installing MySQL Server, it is recommended that you disable virus scanning on the main directory(datadir) used to store your MySQL table data. There is usually a system built into the virus-scanningsoftware to enable specific directories to be ignored.
In addition, by default, MySQL creates temporary files in the standard Windows temporary directory.To prevent the temporary files also being scanned, configure a separate temporary directory forMySQL temporary files and add this directory to the virus scanning exclusion list. To do this, add aconfiguration option for the tmpdir parameter to your my.ini configuration file. For more information,see Section 5.7.2, “Creating an Option File”.
5.1 MySQL Installation Layout on Microsoft Windows
For MySQL 5.5 on Windows, the default installation directory is C:\Program Files\MySQL\MySQLServer 5.5. Some Windows users prefer to install in C:\mysql, the directory that formerly was used asthe default. However, the layout of the subdirectories remains the same.
All of the files are located within this parent directory, using the structure shown in the following table.
Table 5.1 Default MySQL Installation Layout for Microsoft Windows
Directory Contents of Directory Notes
bin, scripts mysqld server, client and utilityprograms
%ALLUSERSPROFILE%\MySQL\MySQL Server5.5\
Log files, databases (Windows XP,Windows Server 2003)
The Windows system variable%ALLUSERSPROFILE%defaults to C:\Documentsand Settings\All Users\Application Data
%PROGRAMDATA%\MySQL\MySQL Server 5.5\
Log files, databases (Vista, Windows 7,Windows Server 2008, and newer)
The Windows system variable%PROGRAMDATA% defaults toC:\ProgramData
examples Example programs and scripts
include Include (header) files
lib Libraries
share Miscellaneous support files, includingerror messages, character set files,sample configuration files, SQL fordatabase installation
If you install MySQL using a Windows MSI package, this package creates and sets up the data directorythat the installed server will use, but as of MySQL 5.5.5, it also creates a pristine “template” data directorynamed data under the installation directory. This directory can be useful when the machine will be usedto run multiple instances of MySQL: After an installation has been performed using an MSI package, the
Choosing An Installation Package
53
template data directory can be copied to set up additional MySQL instances. See Running Multiple MySQLInstances on One Machine.
5.2 Choosing An Installation Package
For MySQL 5.5, there are multiple installation package formats to choose from when installing MySQL onWindows.
Note
MySQL Installer and the "Complete Package" methods for installing MySQL aresimilar, but different. The MySQL Installer is the newer and more advanced option,and it includes all functionality found within the "Complete Package."
Note
Program Database (PDB) files (with file name extension pdb) provide informationfor debugging your MySQL installation in the event of a problem. These files areincluded in ZIP Archive distributions (but not MSI distributions) of MySQL.
• MySQL Installer: This package has a file name similar to mysql-installer-community-5.5.58.0.msi or mysql-installer-commercial-5.5.58.0.msi, and utilizes MSIsto automatically install MySQL server and other products. It will download and apply updates to itself,and for each of the installed products. It also configures the additional non-server products.
The installed products are configurable, and this includes: documentation with samples and examples,connectors (such as C, C++, J, NET, and ODBC), MySQL Workbench, MySQL Notifier, MySQL forExcel, and the MySQL Server with its components.
MySQL Installer will run on all Windows platforms that are supported by MySQL (see http://www.mysql.com/support/supportedplatforms/database.html).
Note
Because MySQL Installer is not a native component of Microsoft Windows anddepends on .NET, it will not work on minimal installation options like the "ServerCore" version of Windows Server 2008.
For instructions on installing MySQL using MySQL Installer, see Section 5.3, “MySQL Installer forWindows”.
• The Complete Package: This package has a file name similar to mysql-5.5.58-win32.msi ormysql-5.5.58-winx64.zip, and contains all files needed for a complete Windows installation,including the Configuration Wizard. This package includes optional components such as the embeddedserver and benchmark suite.
• The Noinstall Archive: This package has a file name similar to mysql-5.5.58-win32.zip ormysql-5.5.58-winx64.zip, and contains all the files found in the Complete install package, with theexception of the GUI. It also contains PDB files. This package does not include an automated installer,and must be manually installed and configured.
MySQL Installer is recommended for most users.
Your choice of install package affects the installation process you must follow. If you choose to use MySQLInstaller, see Section 5.3, “MySQL Installer for Windows”. If you choose to install a standard MSI package,see Section 5.5, “Installing MySQL on Microsoft Windows Using an MSI Package”. If you choose to
MySQL Installer for Windows
54
install a Noinstall archive, see Section 5.7, “Installing MySQL on Microsoft Windows Using a noinstall ZipArchive”.
5.3 MySQL Installer for WindowsMySQL Installer is a standalone application designed to ease the complexity of installing and managingMySQL products that run on Microsoft Windows. It supports the following MySQL products:
• MySQL Servers
A single MySQL Installer instance can install and manage multiple MySQL server versions. For example,a single MySQL Installer instance can install (and update) versions 5.6, 5.7, and 8.0 on the same host. Ahost cannot have both community and commercial editions of MySQL server installed.
• MySQL Applications
MySQL Workbench, MySQL Shell, MySQL Router, MySQL for Visual Studio, MySQL for Excel, MySQLNotifier, and MySQL Utilities.
• MySQL Connectors
MySQL Connector/Net, MySQL Connector/Python, Connector/ODBC, MySQL Connector/J, Connector/C, and Connector/C++.
• Documentation and Samples
MySQL Reference Manuals (by version) in PDF format and MySQL database samples (by version).
MySQL Installer Community Edition
Download this edition from http://dev.mysql.com/downloads/installer/ to install the community version of allMySQL products for Windows. Select one of the following MySQL Installer package options:
• Web: Contains MySQL Installer and configuration files only. The web package downloads onlythe MySQL products you select to install, but it requires an internet connection for each download.The size of this file is approximately 2 MB; the name of the file has the form mysql-installer-community-web-VERSION.N.msi where VERSION is the MySQL server version number such as 5.7and N is the package number, which begins at 0.
• Full: Bundles all of the MySQL products for Windows (including the MySQL server). The file size isover 300 MB, and its name has the form mysql-installer-community-VERSION.N.msi whereVERSION is the MySQL Server version number such as 5.7 and N is the package number, which beginsat 0.
MySQL Installer Commercial Edition
Download this edition from https://edelivery.oracle.com/ to install the commercial edition of all MySQLproducts for Windows. The Commercial Edition includes all of the products in the Community Edition andalso includes the following products:
• Workbench SE/EE
• MySQL Enterprise Backup
• MySQL Enterprise Firewall
This edition integrates with your My Oracle Support (MOS) account. For knowledge-base content andpatches, see My Oracle Support.
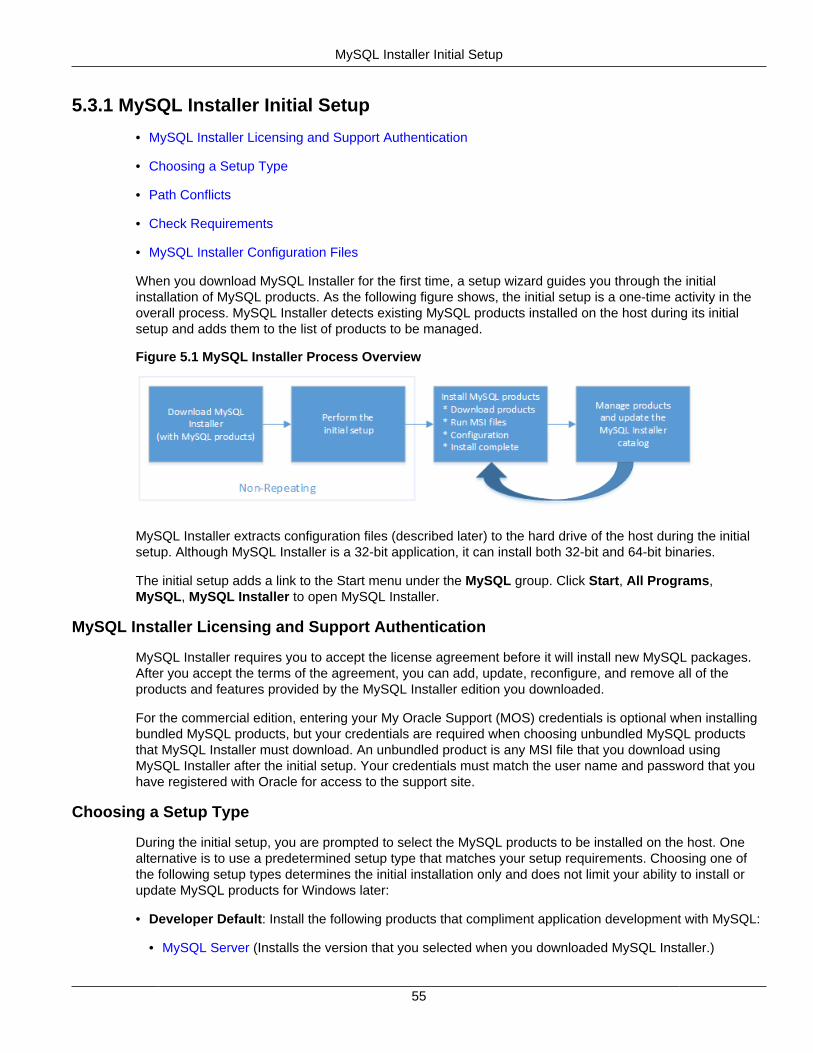
MySQL Installer Initial Setup
55
5.3.1 MySQL Installer Initial Setup
• MySQL Installer Licensing and Support Authentication
• Choosing a Setup Type
• Path Conflicts
• Check Requirements
• MySQL Installer Configuration Files
When you download MySQL Installer for the first time, a setup wizard guides you through the initialinstallation of MySQL products. As the following figure shows, the initial setup is a one-time activity in theoverall process. MySQL Installer detects existing MySQL products installed on the host during its initialsetup and adds them to the list of products to be managed.
Figure 5.1 MySQL Installer Process Overview
MySQL Installer extracts configuration files (described later) to the hard drive of the host during the initialsetup. Although MySQL Installer is a 32-bit application, it can install both 32-bit and 64-bit binaries.
The initial setup adds a link to the Start menu under the MySQL group. Click Start, All Programs,MySQL, MySQL Installer to open MySQL Installer.
MySQL Installer Licensing and Support Authentication
MySQL Installer requires you to accept the license agreement before it will install new MySQL packages.After you accept the terms of the agreement, you can add, update, reconfigure, and remove all of theproducts and features provided by the MySQL Installer edition you downloaded.
For the commercial edition, entering your My Oracle Support (MOS) credentials is optional when installingbundled MySQL products, but your credentials are required when choosing unbundled MySQL productsthat MySQL Installer must download. An unbundled product is any MSI file that you download usingMySQL Installer after the initial setup. Your credentials must match the user name and password that youhave registered with Oracle for access to the support site.
Choosing a Setup Type
During the initial setup, you are prompted to select the MySQL products to be installed on the host. Onealternative is to use a predetermined setup type that matches your setup requirements. Choosing one ofthe following setup types determines the initial installation only and does not limit your ability to install orupdate MySQL products for Windows later:
• Developer Default: Install the following products that compliment application development with MySQL:
• MySQL Server (Installs the version that you selected when you downloaded MySQL Installer.)
MySQL Installer Initial Setup
56
• MySQL Shell
• MySQL Router
• MySQL Workbench
• MySQL for Visual Studio
• MySQL for Excel
• MySQL Notifier
• MySQL Connectors (.NET / Python / ODBC / Java / C / C++)
• MySQL Utilities
• MySQL Documentation
• MySQL Samples and Examples
• Server only: Only install the MySQL server. This setup type installs the general availability (GA) ordevelopment release server that you selected when you downloaded MySQL Installer. It uses the defaultinstallation and data paths.
• Client only: Only install the most recent MySQL applications and MySQL connectors. This setup typeis similar to the Developer Default type, except that it does not include MySQL server or the clientprograms typically bundled with the server, such as mysql or mysqladmin.
• Full: Install all available MySQL products.
• Custom The custom setup type enables you to filter and select individual MySQL products from theMySQL Installer catalog.
Use the Custom setup type to install:
• A product or product version that is not available from the usual download locations. The catalogcontains all product releases, including the other releases between pre-release (or development) andGA.
• An instance of MySQL server using an alternative installation path, data path, or both. For instructionson how to adjust the paths, see Section 5.3.2.3, “Setting Alternative Server Paths”.
• Two or more MySQL server versions on the same host at the same time (for example, 5.6, 5.7, and8.0).
• A specific combination of products and features not offered as a predetermine setup type. Forexample, you can install a single product, such as MySQL Workbench, instead of installing all clientapplications for Windows.
Path Conflicts
When the default installation or data folder (required by MySQL server) for a product to be installed alreadyexists on the host, the wizard displays the Path Conflict step to identify each conflict and enable you totake action to avoid having files in the existing folder overwritten by the new installation. You see this stepin the initial setup only when MySQL Installer detects a conflict.
To resolve the path conflict, do one of the following:
MySQL Installer Initial Setup
57
• Select a product from the list to display the conflict options. A warning symbol indicates which path is inconflict. Use the browse button to choose a new path and then click Next.
• Click Back to choose a different setup type or product version, if applicable. The Custom setup typeenables you to select individual product versions.
• Click Next to ignore the conflict and overwrite files in the existing folder.
• Delete the existing product. Click Cancel to stop the initial setup and close MySQL Installer. OpenMySQL Installer again from the Start menu and delete the installed product from the host using theDelete operation from the dashboard.
Check Requirements
MySQL Installer uses entries in the package-rules.xml file to determine whether the prerequisitesoftware for each product is installed on the host. When the requirements check fails, MySQL Installerdisplays the Check Requirements step to help you update the host. The following figure identifies anddescribes the key areas of this step.
Figure 5.2 Check Requirements
Description of Check Requirements Elements
1. Shows the current step in the initial setup. Steps in this list may change slightly depending on theproducts already installed on the host, the availability of prerequisite software, and the products to beinstalled on the host.
2. Lists all pending installation requirements by product and indicates the status as follows:
• A blank space in the Status column means that MySQL Installer can attempt to download and installthe required software for you.
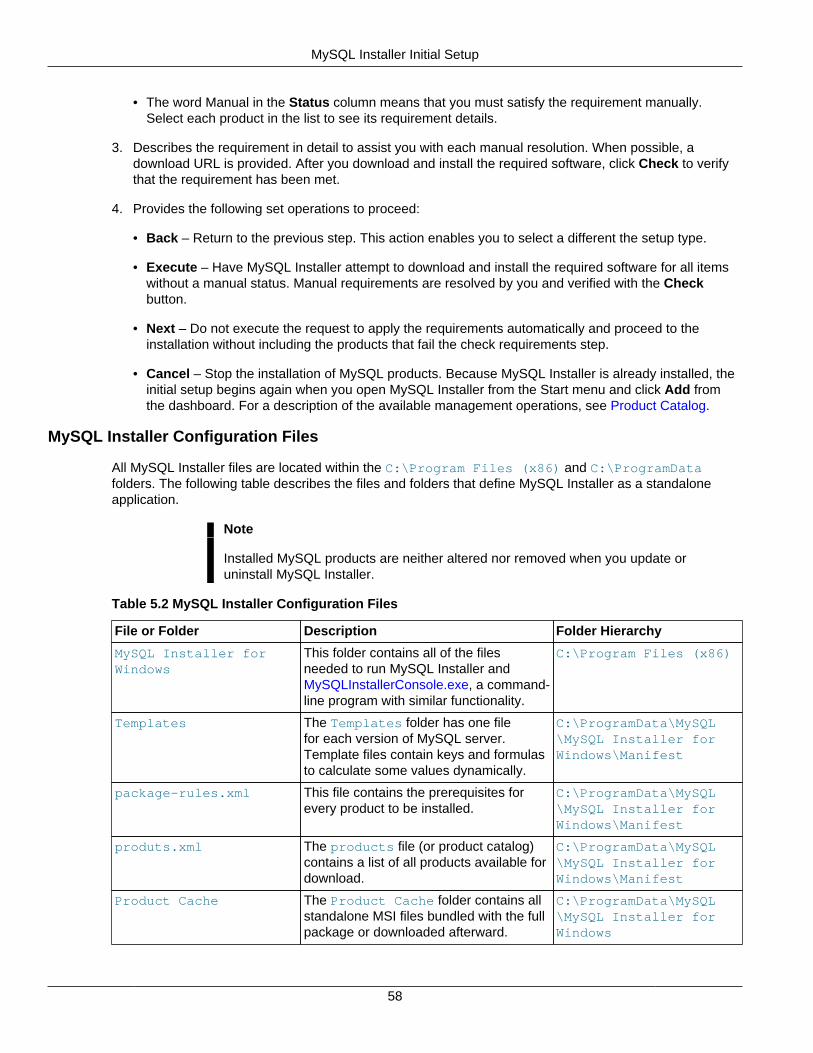
MySQL Installer Initial Setup
58
• The word Manual in the Status column means that you must satisfy the requirement manually.Select each product in the list to see its requirement details.
3. Describes the requirement in detail to assist you with each manual resolution. When possible, adownload URL is provided. After you download and install the required software, click Check to verifythat the requirement has been met.
4. Provides the following set operations to proceed:
• Back – Return to the previous step. This action enables you to select a different the setup type.
• Execute – Have MySQL Installer attempt to download and install the required software for all itemswithout a manual status. Manual requirements are resolved by you and verified with the Checkbutton.
• Next – Do not execute the request to apply the requirements automatically and proceed to theinstallation without including the products that fail the check requirements step.
• Cancel – Stop the installation of MySQL products. Because MySQL Installer is already installed, theinitial setup begins again when you open MySQL Installer from the Start menu and click Add fromthe dashboard. For a description of the available management operations, see Product Catalog.
MySQL Installer Configuration Files
All MySQL Installer files are located within the C:\Program Files (x86) and C:\ProgramDatafolders. The following table describes the files and folders that define MySQL Installer as a standaloneapplication.
Note
Installed MySQL products are neither altered nor removed when you update oruninstall MySQL Installer.
Table 5.2 MySQL Installer Configuration Files
File or Folder Description Folder Hierarchy
MySQL Installer forWindows
This folder contains all of the filesneeded to run MySQL Installer andMySQLInstallerConsole.exe, a command-line program with similar functionality.
C:\Program Files (x86)
Templates The Templates folder has one filefor each version of MySQL server.Template files contain keys and formulasto calculate some values dynamically.
C:\ProgramData\MySQL\MySQL Installer forWindows\Manifest
package-rules.xml This file contains the prerequisites forevery product to be installed.
C:\ProgramData\MySQL\MySQL Installer forWindows\Manifest
produts.xml The products file (or product catalog)contains a list of all products available fordownload.
C:\ProgramData\MySQL\MySQL Installer forWindows\Manifest
Product Cache The Product Cache folder contains allstandalone MSI files bundled with the fullpackage or downloaded afterward.
C:\ProgramData\MySQL\MySQL Installer forWindows
Installation Workflow
59
5.3.2 Installation Workflow
MySQL Installer provides a wizard-like tool to install and configure new MySQL products for Windows.Unlike the initial setup, which runs only once, MySQL Installer invokes the wizard each time you downloador install a new product. For first-time installations, the steps of the initial setup proceed directly into thesteps of the installation.
Note
Full permissions are granted to the user executing MySQL Installer to all generatedfiles, such as my.ini. This does not apply to files and directories for specificproducts, such as the MySQL server data directory in %ProgramData% that isowned by SYSTEM.
Products installed and configured on a host follow a general pattern that might require your input during thevarious steps. MySQL Installer loads all selected products together using the following workflow:
• Product download. If you installed the full (not web) MySQL Installer package, all MSI files were loadedto the Product Cache folder during the initial setup and are not downloaded again. Otherwise, thestatus of each product changes from Downloading to Downloaded.
• Product installation. The status of each product in the list changes from Ready to Install toInstalling to Complete. During the process, click Show Details to view the installation actions.
If you cancel the installation at this point, the products are installed, but the server (if installed) is not yetconfigured. To restart the server configuration, open MySQL Installer from the Start menu and click theReconfigure link next to the appropriate server in the dashboard.
• Product configuration. This step applies to MySQL server and samples in most cases. The status foreach item in the list should indicate, Ready to Configure. Click Next to begin the step-by-stepconfiguration of all items in the list.
The configuration options presented during this step depend on which version of the database youselected to install. After the installation completes, you can reconfigure MySQL server from the MySQLInstaller dashboard.
• Installation compete. This step finalizes the installation and enables you to start some applications whenthe installation finishes.
5.3.2.1 InnoDB Cluster Sandbox Test Setup
You have two options to implement a high-availability solution when you install MySQL Server 5.7.17 orhigher using MySQL Installer:
• Standalone MySQL Server / Classic MySQL Replication (default)
Select this option to begin the initial configuration of a standalone MySQL server. You can configuremultiple servers with classic MySQL Replication manually or use MySQL Shell 1.0.9 or higher toconfigure a production InnoDB cluster.
For a description of the server configuration options that apply to a standalone MySQL server onWindows, see Section 5.3.2.2, “Server Configuration”.
• InnoDB Cluster Sandbox Test Setup (for testing only)
Select this option to create and configure InnoDB cluster sandbox instances locally for testing. You canconfigure an InnoDB cluster sandbox to have three, five, seven, or nine MySQL server instances. Use
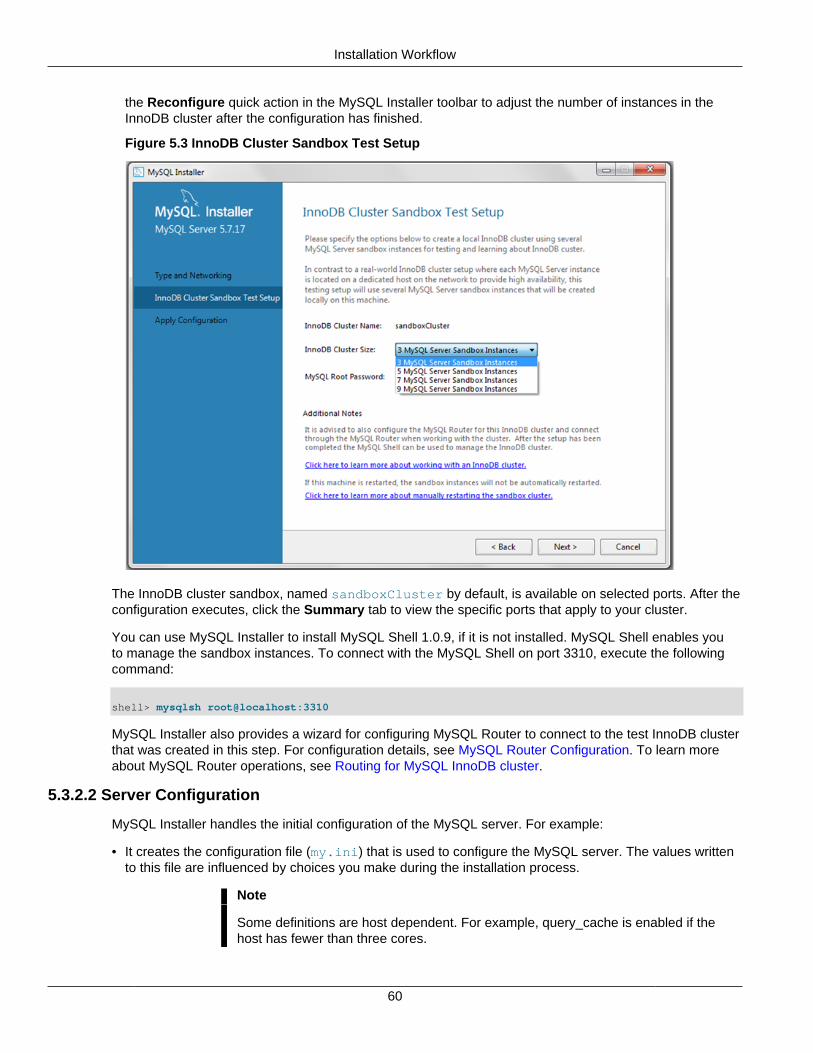
Installation Workflow
60
the Reconfigure quick action in the MySQL Installer toolbar to adjust the number of instances in theInnoDB cluster after the configuration has finished.
Figure 5.3 InnoDB Cluster Sandbox Test Setup
The InnoDB cluster sandbox, named sandboxCluster by default, is available on selected ports. After theconfiguration executes, click the Summary tab to view the specific ports that apply to your cluster.
You can use MySQL Installer to install MySQL Shell 1.0.9, if it is not installed. MySQL Shell enables youto manage the sandbox instances. To connect with the MySQL Shell on port 3310, execute the followingcommand:
shell> mysqlsh root@localhost:3310
MySQL Installer also provides a wizard for configuring MySQL Router to connect to the test InnoDB clusterthat was created in this step. For configuration details, see MySQL Router Configuration. To learn moreabout MySQL Router operations, see Routing for MySQL InnoDB cluster.
5.3.2.2 Server Configuration
MySQL Installer handles the initial configuration of the MySQL server. For example:
• It creates the configuration file (my.ini) that is used to configure the MySQL server. The values writtento this file are influenced by choices you make during the installation process.
Note
Some definitions are host dependent. For example, query_cache is enabled if thehost has fewer than three cores.
Installation Workflow
61
• By default, a Windows service for the MySQL server is added.
• Provides default installation and data paths for MySQL server. For instructions on how to change thedefault paths, see Section 5.3.2.3, “Setting Alternative Server Paths”.
• It can optionally create MySQL server user accounts with configurable permissions based on generalroles, such as DB Administrator, DB Designer, and Backup Admin. It optionally creates a Windows usernamed MysqlSys with limited privileges, which would then run the MySQL Server.
User accounts may also be added and configured in MySQL Workbench.
• Checking Show Advanced Options allows additional Logging Options to be set. This includesdefining custom file paths for the error log, general log, slow query log (including the configuration ofseconds it requires to execute a query), and the binary log.
During the configuration process, click Next to proceed to the next step or Back to return to the previousstep. Click Execute at the final step to apply the server configuration.
The sections that follow describe the server configuration options that apply to MySQL server on Windows.The server version you installed will determine which steps and options you can configure.
• Type and Networking
• Accounts and Roles
• Windows Service
• Plugins and Extensions
• Advanced Options
• Apply Server Configuration
Type and Networking
• Server Configuration Type
Choose the MySQL server configuration type that describes your setup. This setting defines the amountof system resources (memory) that will be assigned to your MySQL server instance.
• Development: A machine that will host many other applications, and typically this is your personalworkstation. This option configures MySQL to use the least amount of memory.
• Server: Several other applications will be running on this machine, such as a web server. This optionconfigures MySQL to use a medium amount of memory.
• Dedicated: A machine that is dedicated to running the MySQL server. Because no other majorapplications will run on this server, such as a web server, this option configures MySQL to use themajority of available memory.
• Connectivity
Connectivity options control how the connection to MySQL is made. Options include:
• TCP/IP: You may enable TCP/IP Networking here as otherwise only local host connections areallowed. Also define the Port Number and whether to open the firewall port for network access. If the
port number is in use already, you will see the information icon ( ) next to the default value andNext is disabled until you provide a new port number.
Installation Workflow
62
• Named Pipe: Enable and define the pipe name, similar to using the --enable-named-pipe option.
• Shared Memory: Enable and then define the memory name, similar to using the --shared-memoryoption.
• Advanced Configuration
Check Show Advanced Options to set additional logging options in a later step. This includes definingcustom file paths for the error log, general log, slow query log (including the configuration of seconds itrequires to execute a query), and the binary log.
• MySQL Enterprise Firewall (Commercial Edition only)
The Enable Enterprise Firewall check box is selected by default. For post-installation instructions, seeMySQL Enterprise Firewall.
Accounts and Roles
• Root Account Password
Assigning a root password is required and you will be asked for it when performing other MySQLInstaller operations. Password strength is evaluated when you repeat the password in the box provided.For descriptive information regarding password requirements or status, move your mouse pointer over
the information icon ( ) when it appears.
• MySQL User Accounts
Optionally, you can create additional MySQL user accounts with predefined user roles. Each predefinedrole, such as DB Admin, are configured with their own set of privileges. For example, the DB Admin rolehas more privileges than the DB Designer role. Click the Role drop-down list for a description of eachrole.
Note
If the MySQL server is installed, then you must also enter the current rootpassword.
Windows Service
On the Windows platform, MySQL server can run as a named service managed by the operating systemand be configured to start up automatically when Windows starts. Alternatively, you can configure MySQLserver to run as an executable program that requires manual configuration.
• Configure MySQL server as a Windows service (Selected by default.)
When the default configuration option is selected, you can also select the following:
• Start the MySQL Server at System Startup
When selected (default), the service startup type is set to Automatic; otherwise, the startup type is setto Manual.
• Run Windows Service as
When Standard System Account is selected (default), the service logs on as Network Service.
Installation Workflow
63
The Custom User option must have privileges to log on to Microsoft Windows as a service. The Nextbutton will be disabled until this user is configured with the required privileges.
A custom user is configured in Windows by searching for "local security policy" in the Start menu. Inthe Local Security Policy window, select Local Policies, User Rights Assignment, and then Log OnAs A Service to open the property dialog. Click Add User or Group to add the custom user and thenclick OK in each dialog to save the changes.
• Deselect the Windows Service option
Plugins and Extensions
The Plugins and Extensions step is visible during a new installation of MySQL server version 5.7.12 (orhigher) only. If you are upgrading from a previous MySQL version, then you need to open MySQL Installeragain and select the Reconfigure MySQL server option.
• Enable X Protocol / MySQL as a Document Store (Selected by default.)
When the X Protocol option is selected, MySQL Installer loads and starts the X Plugin. Without the XPlugin running, X Protocol clients cannot connect to the server.
• Port Number: 33060
Requires an unused port. The default port number is 33060.
• Open Firewall port for network access
Open by default when the X Protocol is selected.
For more information about using MySQL as a document store and the X Plugin, see Key Concepts andX Plugin.
Advanced Options
This step is available if the Show Advanced Configuration check box was selected during the Type andNetworking step. To enable this step now, click Back to return to the Type and Networking step andselect the check box.
Advanced configuration options are related to the following MySQL log files:
• Error log
• General log
• Slow query log
• Bin log
Apply Server Configuration
All configuration settings are applied to the MySQL server when you click Execute. Use the ConfigurationSteps tab to follow the progress of each action; the icon for each toggles from white to green on success.Otherwise, the process stops and displays an error message if an individual action times out. Click the Logtab to view the log.

Installation Workflow
64
When the installation is done and you click Finish, MySQL Installer and the installed MySQL products areadded to the Microsoft Windows Start menu under the MySQL group. Opening MySQL Installer loads thedashboard where installed MySQL products are listed and other MySQL Installer operations are available.
5.3.2.3 Setting Alternative Server Paths
You can change the default installation path, the data path, or both when you install MySQL server. Afteryou have installed the server, the paths cannot be altered without removing and reinstalling the serverinstance.
To change paths for MySQL server
1. Identify the MySQL server to change and display the Advanced Options link.
a. Navigate to the Select Products and Features step by doing one of the following:
i. If this is an initial setup, select the Custom setup type and click Next.
ii. If MySQL Installer is installed already, launch it from the Start menu and then click Add fromthe dashboard.
b. Click Edit to filter the list of products, locate the server instance to be installed in the AvailableProducts list.
c. With the server instance selected, use the arrow to move the selected server to the Products/Features To Be Installed list.
d. Click the server to select it. When you select the server, the Advanced Options link appears. Fordetails, see the figure that follows.
2. Click Advanced Options to open a dialog window with the path-setting options. After setting the path,click Next to continue with the configuration steps.
Installation Workflow
65
Figure 5.4 Change MySQL Server Path
5.3.2.4 MySQL Applications, Connectors, and Documentation
MySQL Installer provides you with a suite of tools for developing and managing business-criticalapplications on Windows. The suite consist of applications, connectors, documentation, and samples.
During the initial setup, choose any predetermined setup type, except Server only, to install the latestGA version of the tools. Use the Custom setup type to install an individual tool or specific version. IfMySQL Installer is installed on the host already, use the Add operation to select and install tools from theMySQL Installer dashboard.
MySQL Router Configuration
MySQL Installer provides a configuration wizard that can bootstrap an installed instance of MySQL Router2.1.3 or later to route traffic between MySQL applications and an InnoDB cluster. When configured,MySQL Router runs as a local Windows service. For detailed information about using MySQL Router withan InnoDB cluster, see Routing for MySQL InnoDB cluster.
To configure MySQL Router, do the following:
1. Set up InnoDB cluster. For instructions on how to configure an InnoDB cluster sandbox on the localhost using MySQL Installer, see Section 5.3.2.1, “InnoDB Cluster Sandbox Test Setup”. InnoDB clusterrequires MySQL Server 5.7.17 or higher.
For general InnoDB cluster information, see InnoDB Cluster.
2. Using MySQL Installer, download and install the MySQL Router application. After the installationfinishes, the configuration wizard prompts you for information. Select the Configure MySQL Router forInnoDB cluster check box to begin the configuration and provide the following configuration values:
MySQL Installer Product Catalog and Dashboard
66
• Hostname: localhost by default.
• Port: The port number of the primary server in the InnoDB cluster. The default is 3310.
• Management User: An administrative user with root-level privileges.
• Password: The password for the management user.
• Classic MySQL protocol connections to InnoDB cluster
Read/Write: Set the first base port number to one that is unused (between 80 and 65532) and thewizard will select the remaining ports for you.
The figure that follows shows an example of the MySQL Router configuration screen.
Figure 5.5 MySQL Router Configuration
3. Click Next and then Execute to apply the configuration. Click Finish to close MySQL Installer or returnto the MySQL Installer dashboard.
5.3.3 MySQL Installer Product Catalog and Dashboard
• Product Catalog
• MySQL Installer Dashboard
• Locating Products to Install
This section describes the MySQL Installer product catalog and the dashboard.
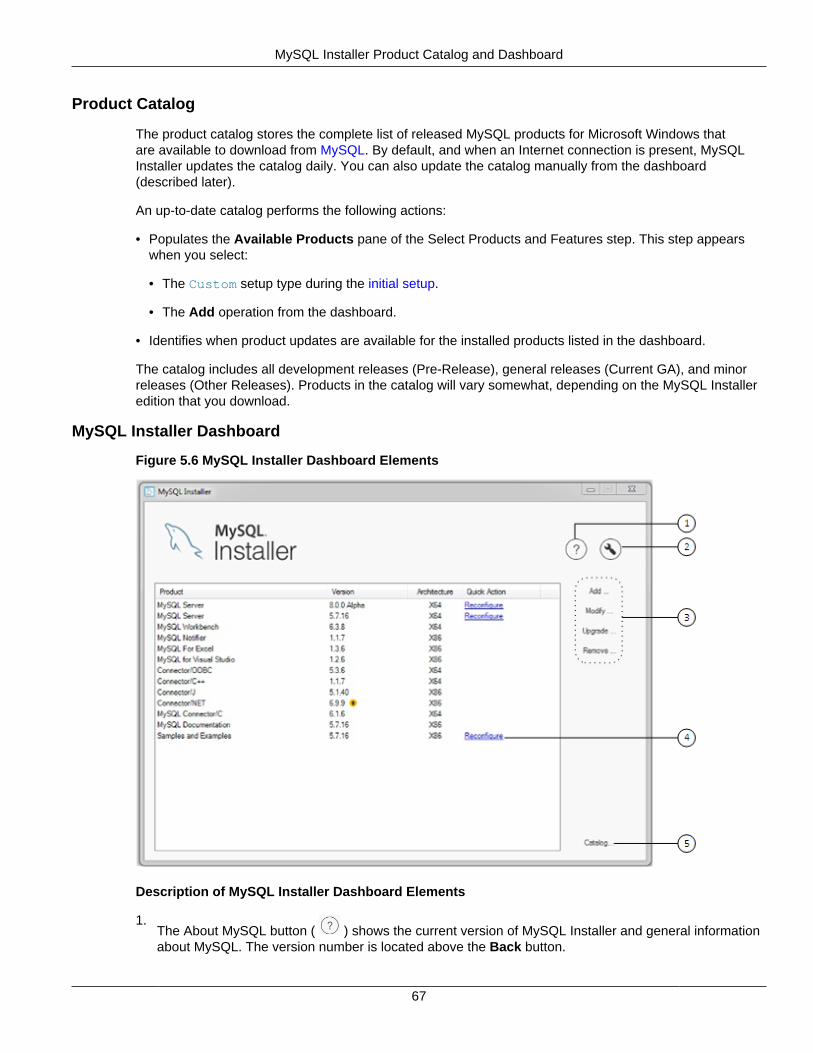
MySQL Installer Product Catalog and Dashboard
67
Product Catalog
The product catalog stores the complete list of released MySQL products for Microsoft Windows thatare available to download from MySQL. By default, and when an Internet connection is present, MySQLInstaller updates the catalog daily. You can also update the catalog manually from the dashboard(described later).
An up-to-date catalog performs the following actions:
• Populates the Available Products pane of the Select Products and Features step. This step appearswhen you select:
• The Custom setup type during the initial setup.
• The Add operation from the dashboard.
• Identifies when product updates are available for the installed products listed in the dashboard.
The catalog includes all development releases (Pre-Release), general releases (Current GA), and minorreleases (Other Releases). Products in the catalog will vary somewhat, depending on the MySQL Installeredition that you download.
MySQL Installer Dashboard
Figure 5.6 MySQL Installer Dashboard Elements
Description of MySQL Installer Dashboard Elements
1.The About MySQL button ( ) shows the current version of MySQL Installer and general informationabout MySQL. The version number is located above the Back button.

MySQL Installer Product Catalog and Dashboard
68
Always include this version number when reporting a problem with MySQL Installer.
2.The MySQL Installer Options button ( ) enables you to schedule daily automatic catalog updates.By default, catalog updates are scheduled at the hour when MySQL Installer was first installed. Whennew products or product versions are available, MySQL Installer adds them to the catalog and then
displays an arrow icon ( ) next to the version number of installed products listed in the dashboard.
Use this option to enable or disable automatic catalog updates and to reset the time of day whenthe MySQL Installer updates the catalog automatically. For specific settings, see the task namedManifestUpdate in the Windows Task Scheduler.
3. MySQL Installer dashboard operations provide a variety of actions that apply to installed products orproducts listed in the catalog. To initiate the following operations, first click the operation link and thenselect the product or products to manage:
• Add: This operation opens the Select Products and Features screen. From there, you can filter theproduct in the product catalog, select one or more products to download (as needed), and begin theinstallation. For hints about using the filter, see Locating Products to Install.
• Modify: Use this operation to add or remove the features associated with installed products.Features that you can modify vary in complexity by product. When the Program Shortcut check boxis selected, the product appears in the Start menu under the MySQL group.
• Upgrade: This operation loads the Select Products to Upgrade screen and populates it with all theupgrade candidates. An installed product can have more than one upgrade version and requires acurrent product catalog.
To choose a new product version:
a. Confirm that the check box next to product name in the Upgradeable Products pane has acheck mark. Deselect the products that you do not intend to upgrade at this time.
b. Click a product in the list to highlight it. This action populates the Upgradeable Versions panewith the details of each available version for the selected product: version number, publisheddate, and a Changes link to open the release notes for that version.
MySQL Installer upgrades all of the selected products in one action. Click Show Details to view theactions performed by MySQL Installer.
• Remove This operation opens the Remove Products screen and populates it with the MySQLproducts installed on the host. Select the MySQL products you want to remove (uninstall) and thenclick Execute to begin the removal process.
To select products to remove, do one of the following:
• Select the check box for one or more products.
• Select the Product check box to select all products.
4. The Reconfigure link in the Quick Action column next to each installed server loads the currentconfiguration values for the server and then cycles through all configuration steps enabling youto change the options and values. On completion, MySQL Installer stops the server, applies theconfiguration changes, and restarts the server for you. For a description of each configuration option,see Section 5.3.2.2, “Server Configuration”.

MySQLInstallerConsole Reference
69
Installed Samples and Examples associated with a specific MySQL server version can be also bereconfigured to apply feature-configuration changes, if any. You must provide credentials with rootprivileges to reconfigure these items.
5. The Catalog link enables you to download the latest catalog of MySQL products manually and then tointegrate those product changes with MySQL Installer. The catalog-download action does not performan upgrade of the products already installed on the host. Instead, it returns to the dashboard anddisplays an arrow icon in the Version column for each installed product that has a newer version. Usethe Upgrade operation to install the newer product version.
You can also use the Catalog link to display the current change history of each product withoutdownloading the new catalog. Select the Do not update at this time check box to view the changehistory only.
Locating Products to Install
MySQL products in the catalog are listed by category: MySQL Servers, Applications, MySQL Connectors,and Documentation. Only the latest GA versions appear in the Available Products pane by default. If youare looking for a pre-GA or older version of a product, it may not be visible in the default list.
To change the filter that displays available products in the Select Products and Features screen, click Edit.
Figure 5.7 Filter Available Products
Reset the following values to filter the list of available products:
• Text: Filter by text.
• Category: All Software (default), MySQL Servers, Applications, MySQL Connectors, or Documentation(for samples and documentation).
• Age: Pre-Release, Current GA (default), or Other Releases.
• Already Downloaded (the check box is deselected by default).
• Architecture: Any (default), 32-bit, or 64-bit.
5.3.4 MySQLInstallerConsole Reference
MySQLInstallerConsole.exe provides command-line functionality that is similar to MySQL Installer.It is installed when MySQL Installer is initially executed and then available within the MySQL Installer
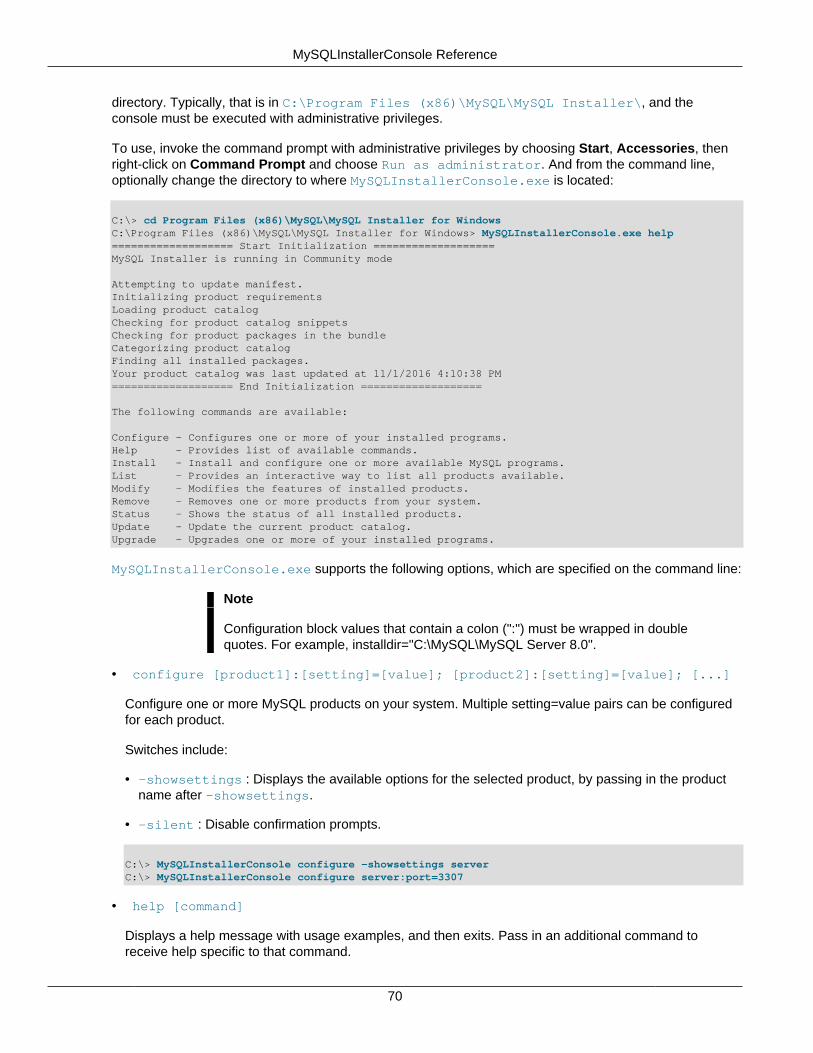
MySQLInstallerConsole Reference
70
directory. Typically, that is in C:\Program Files (x86)\MySQL\MySQL Installer\, and theconsole must be executed with administrative privileges.
To use, invoke the command prompt with administrative privileges by choosing Start, Accessories, thenright-click on Command Prompt and choose Run as administrator. And from the command line,optionally change the directory to where MySQLInstallerConsole.exe is located:
C:\> cd Program Files (x86)\MySQL\MySQL Installer for WindowsC:\Program Files (x86)\MySQL\MySQL Installer for Windows> MySQLInstallerConsole.exe help=================== Start Initialization ===================MySQL Installer is running in Community mode
Attempting to update manifest.Initializing product requirementsLoading product catalogChecking for product catalog snippetsChecking for product packages in the bundleCategorizing product catalogFinding all installed packages.Your product catalog was last updated at 11/1/2016 4:10:38 PM=================== End Initialization ===================
The following commands are available:
Configure - Configures one or more of your installed programs.Help - Provides list of available commands.Install - Install and configure one or more available MySQL programs.List - Provides an interactive way to list all products available.Modify - Modifies the features of installed products.Remove - Removes one or more products from your system.Status - Shows the status of all installed products.Update - Update the current product catalog.Upgrade - Upgrades one or more of your installed programs.
MySQLInstallerConsole.exe supports the following options, which are specified on the command line:
Note
Configuration block values that contain a colon (":") must be wrapped in doublequotes. For example, installdir="C:\MySQL\MySQL Server 8.0".
• configure [product1]:[setting]=[value]; [product2]:[setting]=[value]; [...]
Configure one or more MySQL products on your system. Multiple setting=value pairs can be configuredfor each product.
Switches include:
• -showsettings : Displays the available options for the selected product, by passing in the productname after -showsettings.
• -silent : Disable confirmation prompts.
C:\> MySQLInstallerConsole configure -showsettings serverC:\> MySQLInstallerConsole configure server:port=3307
• help [command]
Displays a help message with usage examples, and then exits. Pass in an additional command toreceive help specific to that command.
MySQLInstallerConsole Reference
71
C:\> MySQLInstallerConsole helpC:\> MySQLInstallerConsole help install
• install [product]:[features]:[config block]:[config block]:[config block];[...]
Install one or more MySQL products on your system.
Switches and syntax options include:
• -type=[SetupType] : Installs a predefined set of software. The "SetupType" can be one of thefollowing:
Note
Non-custom setup types can only be chosen if no other MySQL products areinstalled.
• Developer: Installs a complete development environment.
• Server: Installs a single MySQL server
• Client: Installs client programs and libraries
• Full: Installs everything
• Custom: Installs user selected products. This is the default option.
• -showsettings : Displays the available options for the selected product, by passing in the productname after -showsettings.
• -silent : Disable confirmation prompts.
• [config block]: One or more configuration blocks can be specified. Each configuration block isa semicolon separated list of key value pairs. A block can include either a "config" or "user" type key,where "config" is the default type if one is not defined.
Configuration block values that contain a colon (":") must be wrapped in double quotes. For example,installdir="C:\MySQL\MySQL Server 8.0".
Only one "config" type block can be defined per product. A "user" block should be defined for eachuser that should be created during the product's installation.
Note
Adding users is not supported when a product is being reconfigured.
• [feature]: The feature block is a semicolon separated list of features, or '*' to select all features.
C:\> MySQLInstallerConsole install server;5.6.25:*:port=3307;serverid=2:type=user;username=foo;password=bar;role=DBManagerC:\> MySQLInstallerConsole install server;5.6.25;x64 -silent
An example that passes in additional configuration blocks, broken up by ^ to fit this screen:
C:\> MySQLInstallerConsole install server;5.6.25;x64:*:type=config;openfirewall=true; ^
MySQLInstallerConsole Reference
72
generallog=true;binlog=true;serverid=3306;enable_tcpip=true;port=3306;rootpasswd=pass; ^ installdir="C:\MySQL\MySQL Server 5.6":type=user;datadir="C:\MySQL\data";username=foo;password=bar;role=DBManager
• list
Lists an interactive console where all of the available MySQL products can be searched. ExecuteMySQLInstallerConsole list to launch the console, and enter in a substring to search.
C:\> MySQLInstallerConsole list
• modify [product1:-removelist|+addlist] [product2:-removelist|+addlist] [...]
Modifies or displays features of a previously installed MySQL product.
• -silent : Disable confirmation prompts.
C:\> MySQLInstallerConsole modify serverC:\> MySQLInstallerConsole modify server:+documentationC:\> MySQLInstallerConsole modify server:-debug
• remove [product1] [product2] [...]
Removes one ore more products from your system.
• * : Pass in * to remove all of the MySQL products.
• -continue : Continue the operation even if an error occurs.
• -silent : Disable confirmation prompts.
C:\> MySQLInstallerConsole remove *C:\> MySQLInstallerConsole remove server
• status
Provides a quick overview of the MySQL products that are installed on the system. Information includesproduct name and version, architecture, date installed, and install location.
C:\> MySQLInstallerConsole status
• update
Downloads the latest MySQL product catalog to your system. On success, the download catalog will beapplied the next time either MySQLInstaller or MySQLInstallerConsole is executed.
C:\> MySQLInstallerConsole update
Note
The Automatic Catalog Update GUI option executes this command from theWindows Task Scheduler.
• upgrade [product1:version] [product2:version] [...]
Upgrades one or more products on your system. Syntax options include:
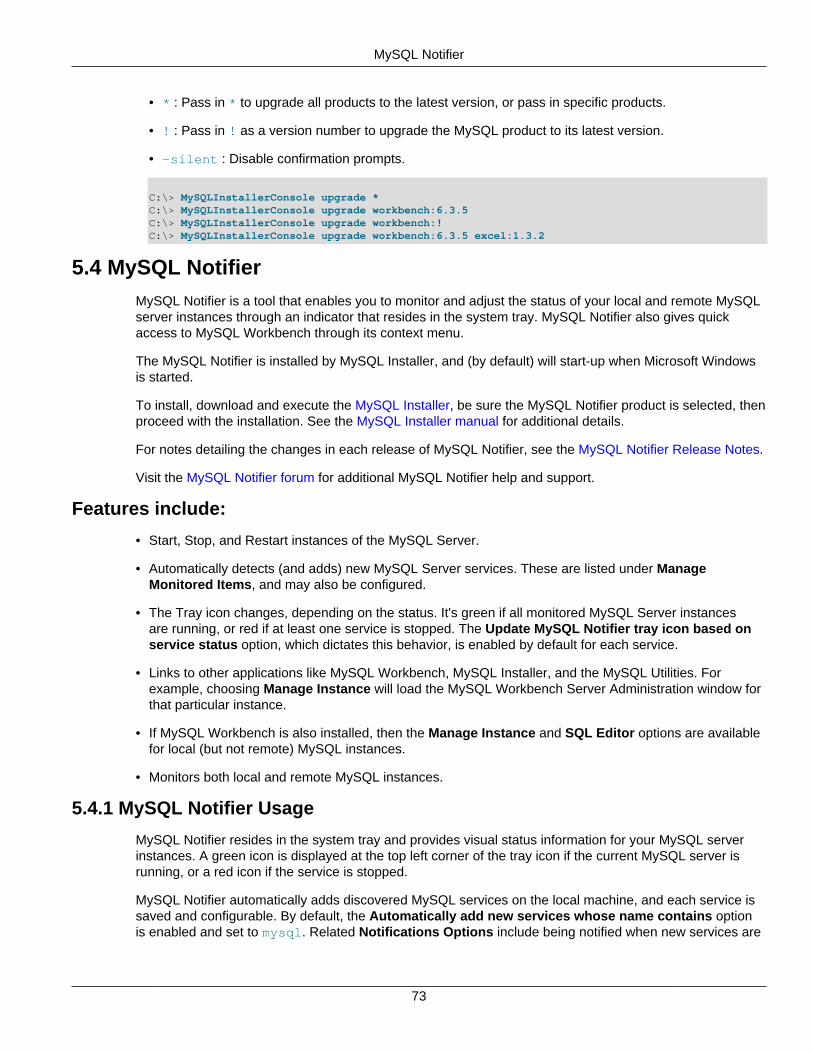
MySQL Notifier
73
• * : Pass in * to upgrade all products to the latest version, or pass in specific products.
• ! : Pass in ! as a version number to upgrade the MySQL product to its latest version.
• -silent : Disable confirmation prompts.
C:\> MySQLInstallerConsole upgrade *C:\> MySQLInstallerConsole upgrade workbench:6.3.5C:\> MySQLInstallerConsole upgrade workbench:!C:\> MySQLInstallerConsole upgrade workbench:6.3.5 excel:1.3.2
5.4 MySQL NotifierMySQL Notifier is a tool that enables you to monitor and adjust the status of your local and remote MySQLserver instances through an indicator that resides in the system tray. MySQL Notifier also gives quickaccess to MySQL Workbench through its context menu.
The MySQL Notifier is installed by MySQL Installer, and (by default) will start-up when Microsoft Windowsis started.
To install, download and execute the MySQL Installer, be sure the MySQL Notifier product is selected, thenproceed with the installation. See the MySQL Installer manual for additional details.
For notes detailing the changes in each release of MySQL Notifier, see the MySQL Notifier Release Notes.
Visit the MySQL Notifier forum for additional MySQL Notifier help and support.
Features include:
• Start, Stop, and Restart instances of the MySQL Server.
• Automatically detects (and adds) new MySQL Server services. These are listed under ManageMonitored Items, and may also be configured.
• The Tray icon changes, depending on the status. It's green if all monitored MySQL Server instancesare running, or red if at least one service is stopped. The Update MySQL Notifier tray icon based onservice status option, which dictates this behavior, is enabled by default for each service.
• Links to other applications like MySQL Workbench, MySQL Installer, and the MySQL Utilities. Forexample, choosing Manage Instance will load the MySQL Workbench Server Administration window forthat particular instance.
• If MySQL Workbench is also installed, then the Manage Instance and SQL Editor options are availablefor local (but not remote) MySQL instances.
• Monitors both local and remote MySQL instances.
5.4.1 MySQL Notifier Usage
MySQL Notifier resides in the system tray and provides visual status information for your MySQL serverinstances. A green icon is displayed at the top left corner of the tray icon if the current MySQL server isrunning, or a red icon if the service is stopped.
MySQL Notifier automatically adds discovered MySQL services on the local machine, and each service issaved and configurable. By default, the Automatically add new services whose name contains optionis enabled and set to mysql. Related Notifications Options include being notified when new services are
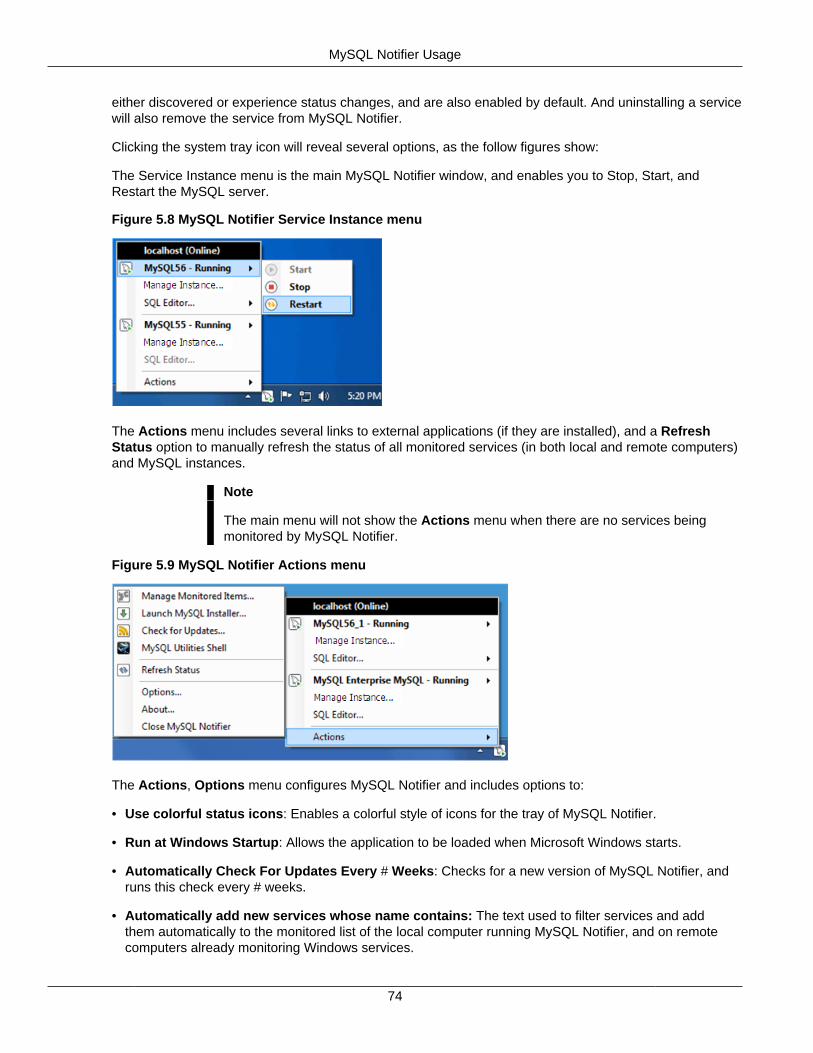
MySQL Notifier Usage
74
either discovered or experience status changes, and are also enabled by default. And uninstalling a servicewill also remove the service from MySQL Notifier.
Clicking the system tray icon will reveal several options, as the follow figures show:
The Service Instance menu is the main MySQL Notifier window, and enables you to Stop, Start, andRestart the MySQL server.
Figure 5.8 MySQL Notifier Service Instance menu
The Actions menu includes several links to external applications (if they are installed), and a RefreshStatus option to manually refresh the status of all monitored services (in both local and remote computers)and MySQL instances.
Note
The main menu will not show the Actions menu when there are no services beingmonitored by MySQL Notifier.
Figure 5.9 MySQL Notifier Actions menu
The Actions, Options menu configures MySQL Notifier and includes options to:
• Use colorful status icons: Enables a colorful style of icons for the tray of MySQL Notifier.
• Run at Windows Startup: Allows the application to be loaded when Microsoft Windows starts.
• Automatically Check For Updates Every # Weeks: Checks for a new version of MySQL Notifier, andruns this check every # weeks.
• Automatically add new services whose name contains: The text used to filter services and addthem automatically to the monitored list of the local computer running MySQL Notifier, and on remotecomputers already monitoring Windows services.
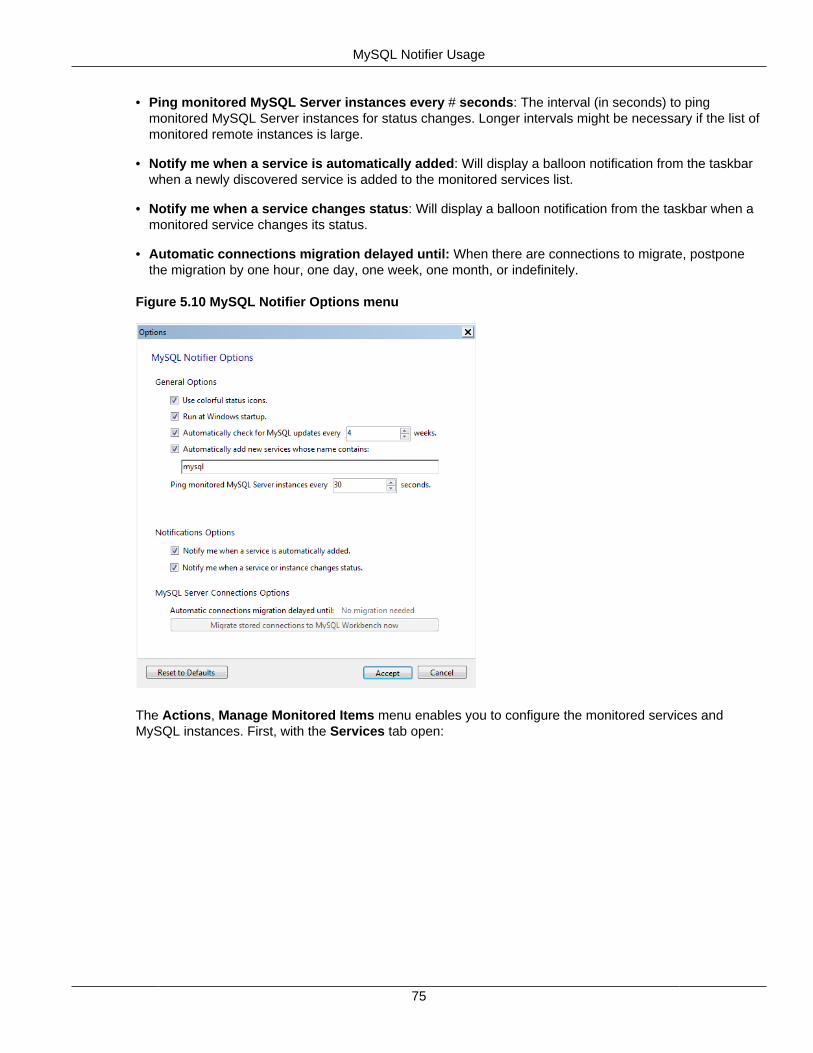
MySQL Notifier Usage
75
• Ping monitored MySQL Server instances every # seconds: The interval (in seconds) to pingmonitored MySQL Server instances for status changes. Longer intervals might be necessary if the list ofmonitored remote instances is large.
• Notify me when a service is automatically added: Will display a balloon notification from the taskbarwhen a newly discovered service is added to the monitored services list.
• Notify me when a service changes status: Will display a balloon notification from the taskbar when amonitored service changes its status.
• Automatic connections migration delayed until: When there are connections to migrate, postponethe migration by one hour, one day, one week, one month, or indefinitely.
Figure 5.10 MySQL Notifier Options menu
The Actions, Manage Monitored Items menu enables you to configure the monitored services andMySQL instances. First, with the Services tab open:
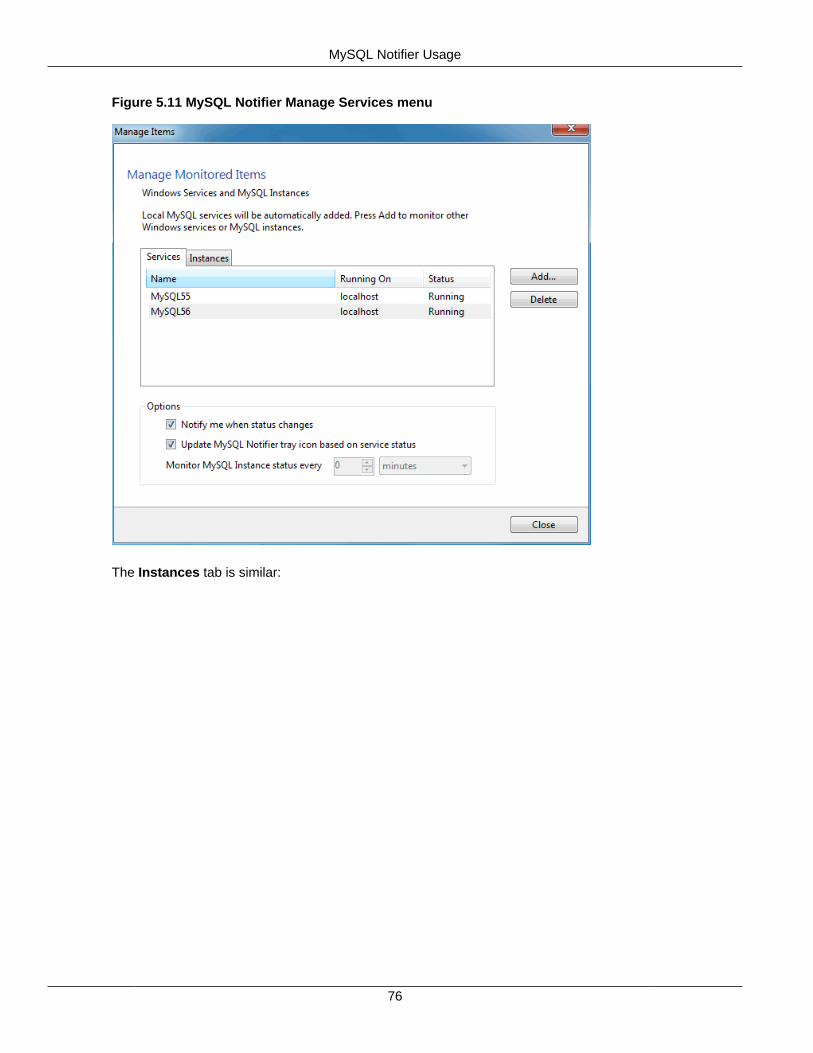
MySQL Notifier Usage
76
Figure 5.11 MySQL Notifier Manage Services menu
The Instances tab is similar:
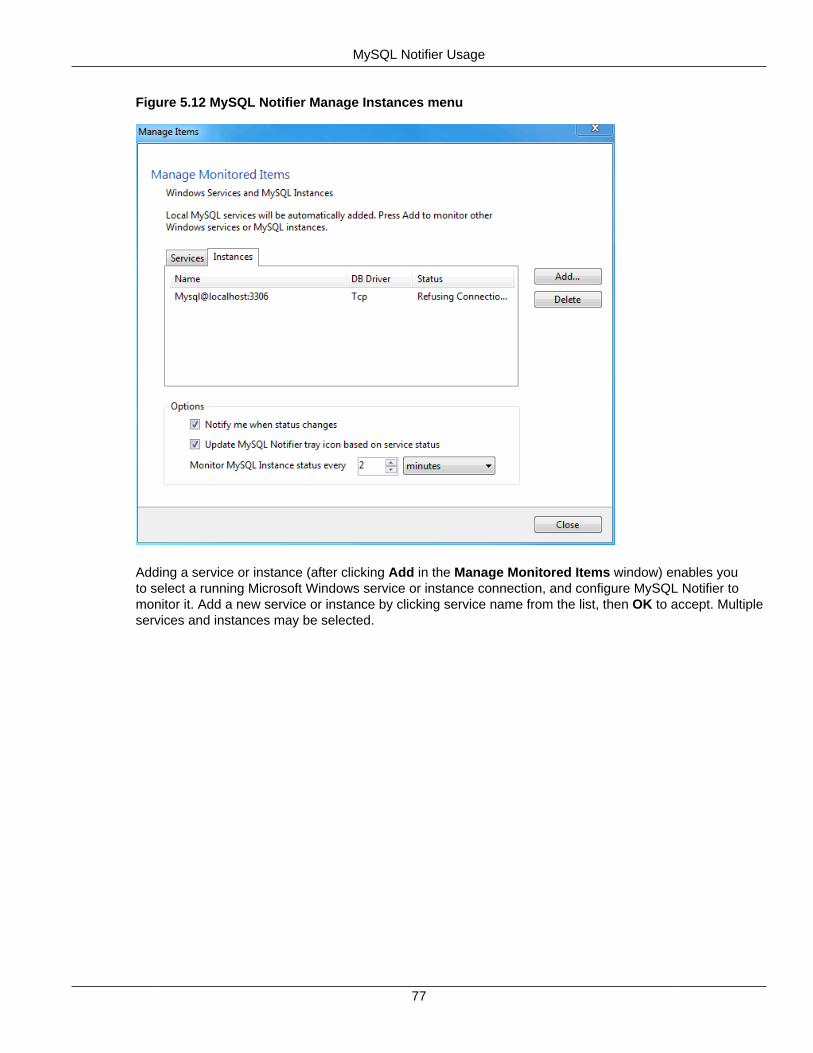
MySQL Notifier Usage
77
Figure 5.12 MySQL Notifier Manage Instances menu
Adding a service or instance (after clicking Add in the Manage Monitored Items window) enables youto select a running Microsoft Windows service or instance connection, and configure MySQL Notifier tomonitor it. Add a new service or instance by clicking service name from the list, then OK to accept. Multipleservices and instances may be selected.
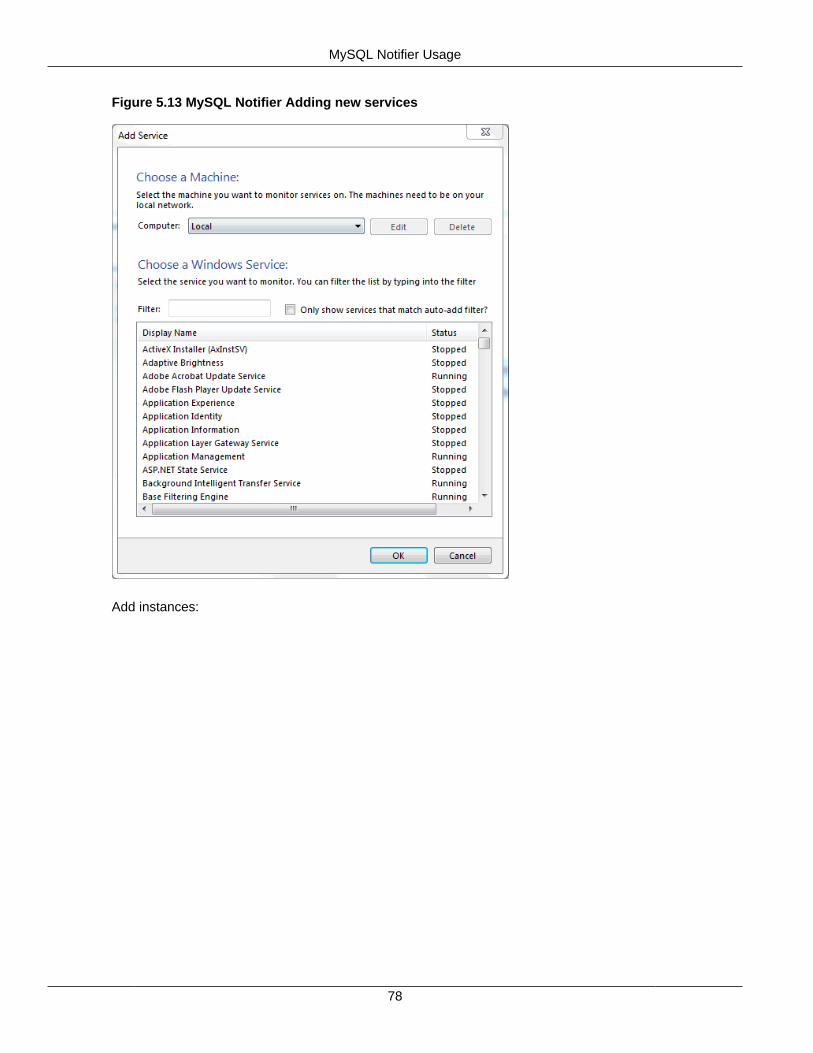
MySQL Notifier Usage
78
Figure 5.13 MySQL Notifier Adding new services
Add instances:
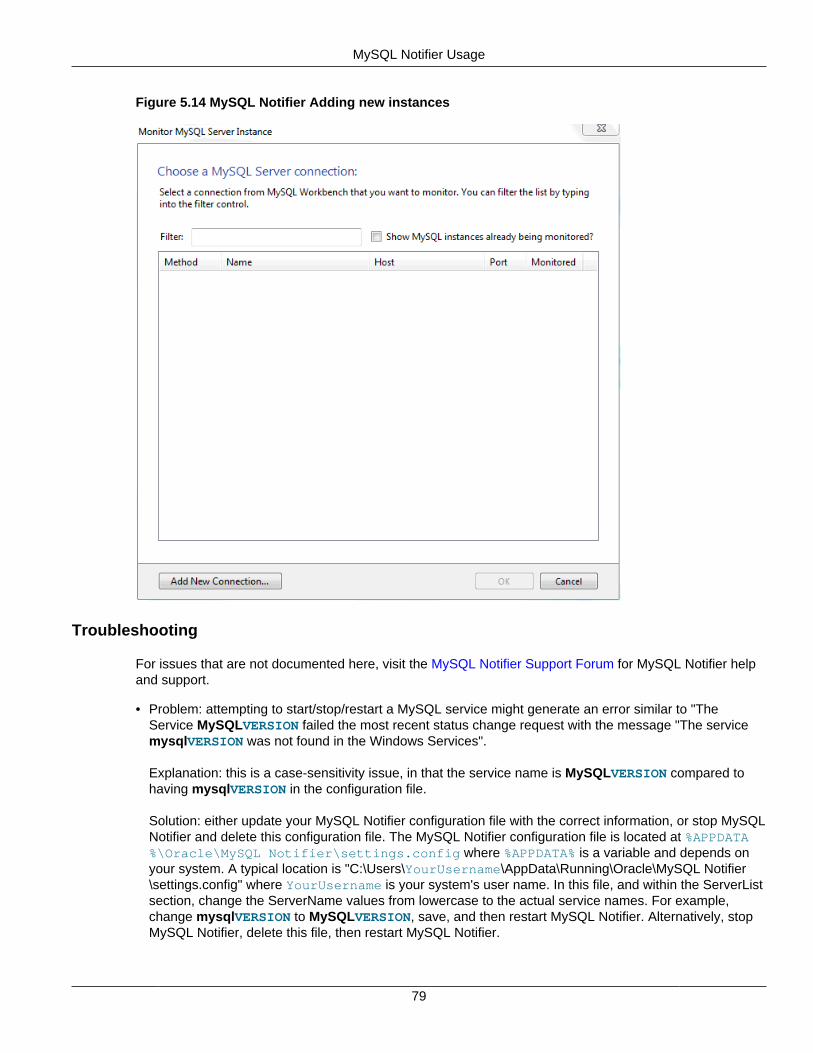
MySQL Notifier Usage
79
Figure 5.14 MySQL Notifier Adding new instances
Troubleshooting
For issues that are not documented here, visit the MySQL Notifier Support Forum for MySQL Notifier helpand support.
• Problem: attempting to start/stop/restart a MySQL service might generate an error similar to "TheService MySQLVERSION failed the most recent status change request with the message "The servicemysqlVERSION was not found in the Windows Services".
Explanation: this is a case-sensitivity issue, in that the service name is MySQLVERSION compared tohaving mysqlVERSION in the configuration file.
Solution: either update your MySQL Notifier configuration file with the correct information, or stop MySQLNotifier and delete this configuration file. The MySQL Notifier configuration file is located at %APPDATA%\Oracle\MySQL Notifier\settings.config where %APPDATA% is a variable and depends onyour system. A typical location is "C:\Users\YourUsername\AppData\Running\Oracle\MySQL Notifier\settings.config" where YourUsername is your system's user name. In this file, and within the ServerListsection, change the ServerName values from lowercase to the actual service names. For example,change mysqlVERSION to MySQLVERSION, save, and then restart MySQL Notifier. Alternatively, stopMySQL Notifier, delete this file, then restart MySQL Notifier.
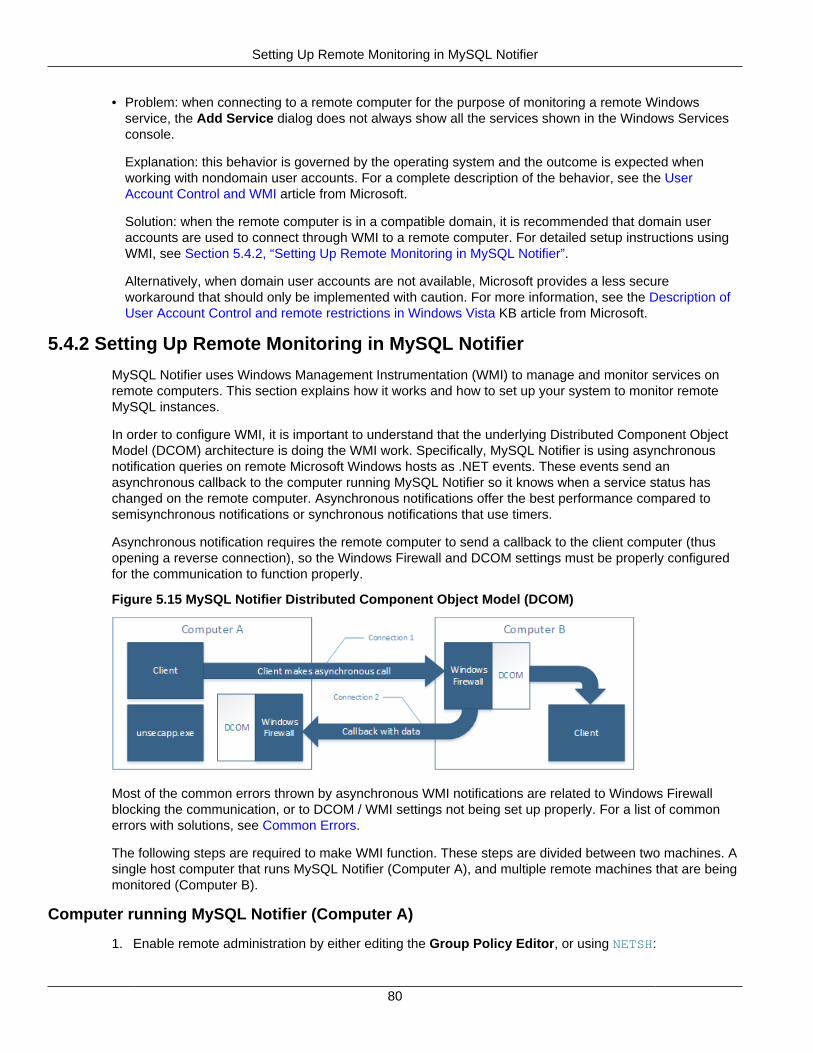
Setting Up Remote Monitoring in MySQL Notifier
80
• Problem: when connecting to a remote computer for the purpose of monitoring a remote Windowsservice, the Add Service dialog does not always show all the services shown in the Windows Servicesconsole.
Explanation: this behavior is governed by the operating system and the outcome is expected whenworking with nondomain user accounts. For a complete description of the behavior, see the UserAccount Control and WMI article from Microsoft.
Solution: when the remote computer is in a compatible domain, it is recommended that domain useraccounts are used to connect through WMI to a remote computer. For detailed setup instructions usingWMI, see Section 5.4.2, “Setting Up Remote Monitoring in MySQL Notifier”.
Alternatively, when domain user accounts are not available, Microsoft provides a less secureworkaround that should only be implemented with caution. For more information, see the Description ofUser Account Control and remote restrictions in Windows Vista KB article from Microsoft.
5.4.2 Setting Up Remote Monitoring in MySQL Notifier
MySQL Notifier uses Windows Management Instrumentation (WMI) to manage and monitor services onremote computers. This section explains how it works and how to set up your system to monitor remoteMySQL instances.
In order to configure WMI, it is important to understand that the underlying Distributed Component ObjectModel (DCOM) architecture is doing the WMI work. Specifically, MySQL Notifier is using asynchronousnotification queries on remote Microsoft Windows hosts as .NET events. These events send anasynchronous callback to the computer running MySQL Notifier so it knows when a service status haschanged on the remote computer. Asynchronous notifications offer the best performance compared tosemisynchronous notifications or synchronous notifications that use timers.
Asynchronous notification requires the remote computer to send a callback to the client computer (thusopening a reverse connection), so the Windows Firewall and DCOM settings must be properly configuredfor the communication to function properly.
Figure 5.15 MySQL Notifier Distributed Component Object Model (DCOM)
Most of the common errors thrown by asynchronous WMI notifications are related to Windows Firewallblocking the communication, or to DCOM / WMI settings not being set up properly. For a list of commonerrors with solutions, see Common Errors.
The following steps are required to make WMI function. These steps are divided between two machines. Asingle host computer that runs MySQL Notifier (Computer A), and multiple remote machines that are beingmonitored (Computer B).
Computer running MySQL Notifier (Computer A)
1. Enable remote administration by either editing the Group Policy Editor, or using NETSH:

Setting Up Remote Monitoring in MySQL Notifier
81
Using the Group Policy Editor:
a. Click Start, click Run, type GPEDIT.MSC, and then click OK.
b. Under the Local Computer Policy heading, expand Computer Configuration.
c. Expand Administrative Templates, then Network, Network Connections, and then WindowsFirewall.
d. If the computer is in the domain, then double-click Domain Profile; otherwise, double-clickStandard Profile.
e. Double-click Windows Firewall: Allow inbound remote administration exception to open aconfiguration window.
f. Check the Enabled option button and then click OK.
Using the NETSH command:
Note
The "netsh firewall" command is deprecated as of Microsoft Server 2008 andVista, and replaced with "netsh advfirewall firewall".
a. Open a command prompt window with Administrative rights (you can right-click the CommandPrompt icon and select Run as Administrator).
b. Execute the following command:
NETSH advfirewall firewall set service RemoteAdmin enable
2. Open the DCOM port TCP 135:
a. Open a command prompt window with Administrative rights (you can right-click the CommandPrompt icon and select Run as Administrator).
b. Execute the following command:
NETSH advfirewall firewall add rule name=DCOM_TCP135 protocol=TCP localport=135 dir=in action=allow
3. Add the client application that contains the sink for the callback (MySqlNotifier.exe) to theWindows Firewall Exceptions List (use either the Windows Firewall configuration or NETSH):
Using the Windows Firewall configuration:
a. In the Control Panel, double-click Windows Firewall.
b. In the Windows Firewall window's left panel, click Allow a program or feature through WindowsFirewall.
c. In the Allowed Programs window, click Change Settings and do one of the following:
• If MySqlNotifier.exe is in the Allowed programs and features list, make sure it is checked forthe type of networks the computer connects to (Private, Public or both).
• If MySqlNotifier.exe is not in the list, click Allow another program....
Setting Up Remote Monitoring in MySQL Notifier
82
i. In the Add a Program window, select the MySqlNotifier.exe if it exists in the Programslist, otherwise click Browse... and go to the directory where MySqlNotifier.exe wasinstalled to select it, then click Add.
ii. Make sure MySqlNotifier.exe is checked for the type of networks the computer connectsto (Private, Public or both).
Using the NETSH command:
a. Open a command prompt window with Administrative rights (you can right-click the CommandPrompt icon and click Run as Administrator).
b. Execute the following command, where you change "[YOUR_INSTALL_DIRECTORY]":
NETSH advfirewall firewall add rule name=MySqlNotifier program=[YOUR_INSTALL_DIRECTORY]\MySqlNotifier.exe action=allow dir=in
4. If Computer B is either a member of WORKGROUP or is in a different domain that is untrusted byComputer A, then the callback connection (Connection 2) is created as an Anonymous connection. Togrant Anonymous connections DCOM Remote Access permissions:
a. Click Start, click Run, type DCOMCNFG, and then click OK.
b. In the Component Services dialog box, expand Component Services, expand Computers, and thenright-click My Computer and click Properties.
c. In the My Computer Properties dialog box, click the COM Security tab.
d. Under Access Permissions, click Edit Limits.
e. In the Access Permission dialog box, select ANONYMOUS LOGON name in the Group or usernames box. In the Allow column under Permissions for User, select Remote Access, and then clickOK.
Monitored Remote Computer (Computer B)
If the user account that is logged on to the computer running the MySQL Notifier (Computer A) is a localadministrator on the remote computer (Computer B), such that the same account is an administrator onComputer B, you can skip to the "Allow for remote administration" step.
Setting DCOM security to allow a non-administrator user to access a computer remotely:
1. Grant "DCOM remote launch" and activation permissions for a user or group:
a. Click Start, click Run, type DCOMCNFG, and then click OK.
b. In the Component Services dialog box, expand Component Services, expand Computers, and thenright-click My Computer and click Properties.
c. In the My Computer Properties dialog box, click the COM Security tab.
d. Under Launch and Activation Permission, click Edit Limits.
e. In the Launch and Activation Permission dialog box, follow these steps if your name or yourgroup does not appear in the Groups or user names list:
i. In the Launch and Activation Permission dialog box, click Add.
Setting Up Remote Monitoring in MySQL Notifier
83
ii. In the Select Users or Groups dialog box, add your name and the group in the Enter the objectnames to select box, and then click OK.
f. In the Launch and Activation Permission dialog box, select your user and group in the Group oruser names box. In the Allow column under Permissions for User, select Remote Launch, selectRemote Activation, and then click OK.
Grant DCOM remote access permissions:
a. Click Start, click Run, type DCOMCNFG, and then click OK.
b. In the Component Services dialog box, expand Component Services, expand Computers, and thenright-click My Computer and click Properties.
c. In the My Computer Properties dialog box, click the COM Security tab.
d. Under Access Permissions, click Edit Limits.
e. In the Access Permission dialog box, select ANONYMOUS LOGON name in the Group or usernames box. In the Allow column under Permissions for User, select Remote Access, and then clickOK.
2. Allowing non-administrator users access to a specific WMI namespace:
a. In the Control Panel, double-click Administrative Tools.
b. In the Administrative Tools window, double-click Computer Management.
c. In the Computer Management window, expand the Services and Applications tree.
d. Right-click the WMI Control icon and select Properties.
e. In the WMI Control Properties window, click the Security tab.
f. In the Security tab, select the namespace and click Security. Root/CIMV2 is a commonly usednamespace.
g. Locate the appropriate account and check Remote Enable in the Permissions list.
3. Allow for remote administration by either editing the Group Policy Editor or using NETSH:
Using the Group Policy Editor:
a. Click Start, click Run, type GPEDIT.MSC, and then click OK.
b. Under the Local Computer Policy heading, double-click Computer Configuration.
c. Double-click Administrative Templates, then Network, Network Connections, and thenWindows Firewall.
d. If the computer is in the domain, then double-click Domain Profile; otherwise, double-clickStandard Profile.
e. Click Windows Firewall: Allow inbound remote administration exception.
f. On the Action menu either select Edit, or double-click the selection from the previous step.
Setting Up Remote Monitoring in MySQL Notifier
84
g. Check the Enabled radio button, and then click OK.
Using the NETSH command:
a. Open a command prompt window with Administrative rights (you can right-click the CommandPrompt icon and click Run as Administrator).
b. Execute the following command:
NETSH advfirewall firewall set service RemoteAdmin enable
4. Confirm that the user account you are logging in with uses the Name value and not the Full Namevalue:
a. In the Control Panel, double-click Administrative Tools.
b. In the Administrative Tools window, double-click Computer Management.
c. In the Computer Management window, expand the System Tools then Local Users and Groups.
d. Click the Users node, and on the right side panel locate your user and make sure it uses the Namevalue to connect, and not the Full Name value.
Common Errors
• 0x80070005
• DCOM Security was not configured properly (see Computer B, the Setting DCOM security...step).
• The remote computer (Computer B) is a member of WORKGROUP or is in a domain that is untrustedby the client computer (Computer A) (see Computer A, the Grant Anonymous connections DCOMRemote Access permissions step).
• 0x8007000E
• The remote computer (Computer B) is a member of WORKGROUP or is in a domain that is untrustedby the client computer (Computer A) (see Computer A, the Grant Anonymous connections DCOMRemote Access permissions step).
• 0x80041003
• Access to the remote WMI namespace was not configured properly (see Computer B, the Allowingnon-administrator users access to a specific WMI namespace step).
• 0x800706BA
• The DCOM port is not open on the client computers (Computer A) firewall. See the Open the DCOMport TCP 135 step for Computer A.
• The remote computer (Computer B) is inaccessible because its network location is set to Public. Makesure you can access it through the Windows Explorer.

Installing MySQL on Microsoft Windows Using an MSI Package
85
5.5 Installing MySQL on Microsoft Windows Using an MSI Package
The MSI package is designed to install and configure MySQL in such a way that you can immediately getstarted using MySQL.
The MySQL Installation Wizard and MySQL Configuration Wizard are available in the Complete installpackage, which is recommended for most standard MySQL installations. Exceptions include userswho need to install multiple instances of MySQL on a single server host and advanced users who wantcomplete control of server configuration.
• For information on installing using the GUI MSI installer process, see Section 5.5.1, “Using the MySQLInstallation Wizard”.
• For information on installing using the command line using the MSI package, see Section 5.5.2,“Automating MySQL Installation on Microsoft Windows Using the MSI Package”.
• If you have previously installed MySQL using the MSI package and want to remove MySQL, seeSection 5.5.3, “Removing MySQL When Installed from the MSI Package”.
The workflow sequence for using the installer is shown in the figure below:
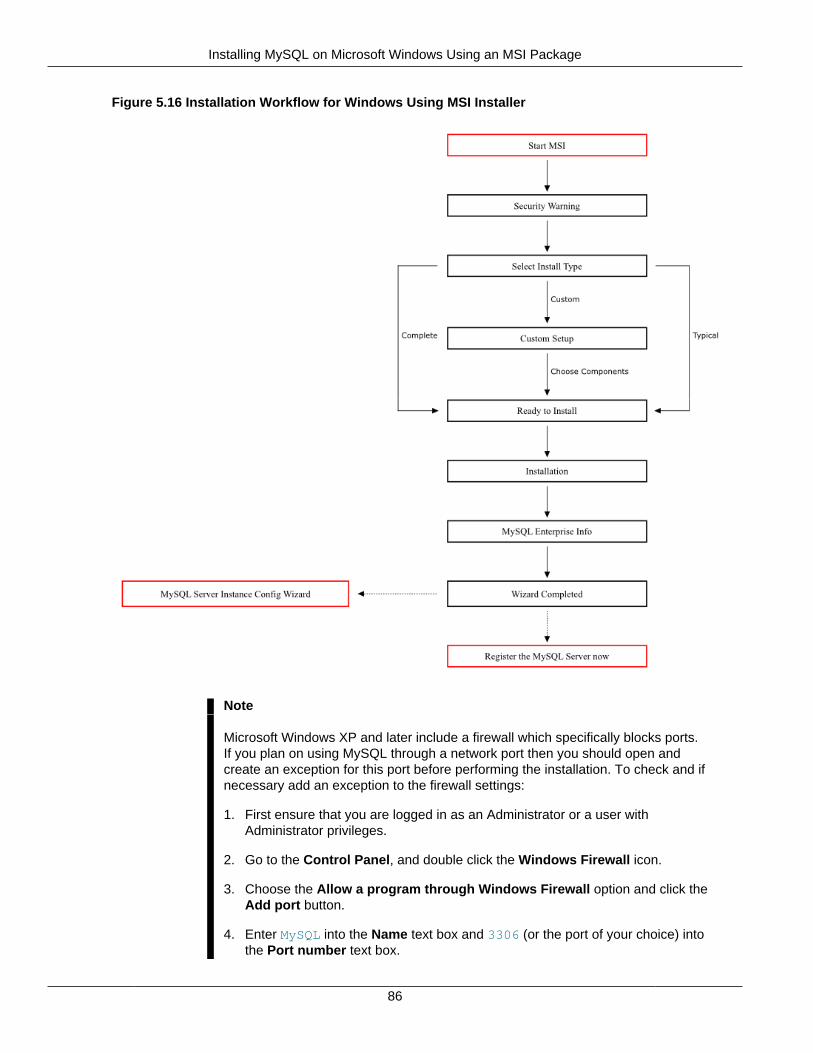
Installing MySQL on Microsoft Windows Using an MSI Package
86
Figure 5.16 Installation Workflow for Windows Using MSI Installer
Note
Microsoft Windows XP and later include a firewall which specifically blocks ports.If you plan on using MySQL through a network port then you should open andcreate an exception for this port before performing the installation. To check and ifnecessary add an exception to the firewall settings:
1. First ensure that you are logged in as an Administrator or a user withAdministrator privileges.
2. Go to the Control Panel, and double click the Windows Firewall icon.
3. Choose the Allow a program through Windows Firewall option and click theAdd port button.
4. Enter MySQL into the Name text box and 3306 (or the port of your choice) intothe Port number text box.
Using the MySQL Installation Wizard
87
5. Also ensure that the TCP protocol radio button is selected.
6. If you wish, you can also limit access to the MySQL server by choosing theChange scope button.
7. Confirm your choices by clicking the OK button.
Additionally, when running the MySQL Installation Wizard on Windows Vista ornewer, ensure that you are logged in as a user with administrative rights.
Note
When using Windows Vista or newer, you may want to disable User AccountControl (UAC) before performing the installation. If you do not do so, then MySQLmay be identified as a security risk, which will mean that you need to enableMySQL. You can disable the security checking by following these instructions:
1. Open Control Panel.
2. Under the User Accounts and Family Safety, select Add or remove useraccounts.
3. Click the Got to the main User Accounts page link.
4. Click on Turn User Account Control on or off. You may be prompted toprovide permission to change this setting. Click Continue.
5. Deselect or uncheck the check box next to Use User Account Control (UAC)to help protect your computer. Click OK to save the setting.
You will need to restart to complete the process. Click Restart Now to reboot themachine and apply the changes. You can then follow the instructions below forinstalling Windows.
5.5.1 Using the MySQL Installation Wizard
MySQL Installation Wizard is an installer for the MySQL server that uses the latest installer technologiesfor Microsoft Windows. The MySQL Installation Wizard, in combination with the MySQL ConfigurationWizard, enables a user to install and configure a MySQL server that is ready for use immediately afterinstallation.
The MySQL Installation Wizard is the standard installer for all MySQL server distributions, version 4.1.5and higher. Users of previous versions of MySQL need to shut down and remove their existing MySQLinstallations manually before installing MySQL with the MySQL Installation Wizard. See Section 5.5.1.6,“Upgrading MySQL with the Installation Wizard”, for more information on upgrading from a previousversion.
Microsoft has included an improved version of their Microsoft Windows Installer (MSI) in the recentversions of Windows. MSI has become the de-facto standard for application installations on Windows2000, Windows XP, and Windows Server 2003. The MySQL Installation Wizard makes use of thistechnology to provide a smoother and more flexible installation process.
The Microsoft Windows Installer Engine was updated with the release of Windows XP; those using aprevious version of Windows can reference this Microsoft Knowledge Base article for information onupgrading to the latest version of the Windows Installer Engine.

Using the MySQL Installation Wizard
88
In addition, Microsoft has introduced the WiX (Windows Installer XML) toolkit recently. This is the firsthighly acknowledged Open Source project from Microsoft. We have switched to WiX because it is an OpenSource project and it enables us to handle the complete Windows installation process in a flexible mannerusing scripts.
Improving the MySQL Installation Wizard depends on the support and feedback of users like you. If youfind that the MySQL Installation Wizard is lacking some feature important to you, or if you discover a bug,please report it in our bugs database using the instructions given in How to Report Bugs or Problems.
5.5.1.1 Downloading and Starting the MySQL Installation Wizard
The MySQL installation packages can be downloaded from http://dev.mysql.com/downloads/. If thepackage you download is contained within a Zip archive, you need to extract the archive first.
Note
If you are installing on Windows Vista or newer, it is best to open a network portbefore beginning the installation. To do this, first ensure that you are logged inas an Administrator, go to the Control Panel, and double-click the WindowsFirewall icon. Choose the Allow a program through Windows Firewalloption and click the Add port button. Enter MySQL into the Name text box and3306 (or the port of your choice) into the Port number text box. Also ensure thatthe TCP protocol radio button is selected. If you wish, you can also limit access tothe MySQL server by choosing the Change scope button. Confirm your choicesby clicking the OK button. If you do not open a port prior to installation, you cannotconfigure the MySQL server immediately after installation. Additionally, whenrunning the MySQL Installation Wizard on Windows Vista or newer, ensure that youare logged in as a user with administrative rights.
The process for starting the wizard depends on the contents of the installation package you download. Ifthere is a setup.exe file present, double-click it to start the installation process. If there is an .msi filepresent, double-click it to start the installation process.
5.5.1.2 Choosing an Install Type
There are three installation types available: Typical, Complete, and Custom.
The Typical installation type installs the MySQL server, the mysql command-line client, and thecommand-line utilities. The command-line clients and utilities include mysqldump, myisamchk, andseveral other tools to help you manage the MySQL server.
The Complete installation type installs all components included in the installation package. The fullinstallation package includes components such as the embedded server library, the benchmark suite,support scripts, and documentation.
The Custom installation type gives you complete control over which packages you wish to install and theinstallation path that is used. See Section 5.5.1.3, “The Custom Install Dialog”, for more information onperforming a custom install.
If you choose the Typical or Complete installation types and click the Next button, you advance to theconfirmation screen to verify your choices and begin the installation. If you choose the Custom installationtype and click the Next button, you advance to the custom installation dialog, described in Section 5.5.1.3,“The Custom Install Dialog”.
Using the MySQL Installation Wizard
89
5.5.1.3 The Custom Install Dialog
If you wish to change the installation path or the specific components that are installed by the MySQLInstallation Wizard, choose the Custom installation type.
A tree view on the left side of the custom install dialog lists all available components. Components thatare not installed have a red X icon; components that are installed have a gray icon. To change whether acomponent is installed, click that component's icon and choose a new option from the drop-down list thatappears.
You can change the default installation path by clicking the Change... button to the right of the displayedinstallation path.
After choosing your installation components and installation path, click the Next button to advance to theconfirmation dialog.
5.5.1.4 The Confirmation Dialog
Once you choose an installation type and optionally choose your installation components, you advance tothe confirmation dialog. Your installation type and installation path are displayed for you to review.
To install MySQL if you are satisfied with your settings, click the Install button. To change your settings,click the Back button. To exit the MySQL Installation Wizard without installing MySQL, click the Cancelbutton.
The final screen of the installer provides a summary of the installation and gives you the option to launchthe MySQL Configuration Wizard, which you can use to create a configuration file, install the MySQLservice, and configure security settings.
5.5.1.5 Changes Made by MySQL Installation Wizard
Once you click the Install button, the MySQL Installation Wizard begins the installation process and makescertain changes to your system which are described in the sections that follow.
Changes to the Registry
The MySQL Installation Wizard creates one Windows registry key in a typical install situation, located inHKEY_LOCAL_MACHINE\SOFTWARE\MySQL AB.
The MySQL Installation Wizard creates a key named after the release series of the server that is beinginstalled, such as MySQL Server 5.5. It contains two string values, Location and Version. TheLocation string contains the path to the installation directory. In a default installation it contains C:\Program Files\MySQL\MySQL Server 5.5\. The Version string contains the release number. Forexample, for an installation of MySQL Server 5.5.58, the key contains a value of 5.5.58.
These registry keys are used to help external tools identify the installed location of the MySQL server,preventing a complete scan of the hard-disk to determine the installation path of the MySQL server. Theregistry keys are not required to run the server, and if you install MySQL using the noinstall Zip archive,the registry keys are not created.
Changes to the Start Menu
The MySQL Installation Wizard creates a new entry in the Windows Start menu under a common MySQLmenu heading named after the release series of MySQL that you have installed. For example, if you installMySQL 5.5, the MySQL Installation Wizard creates a MySQL Server 5.5 section in the Start menu.
The following entries are created within the new Start menu section:
Automating MySQL Installation on Microsoft Windows Using the MSI Package
90
• MySQL Command-Line Client: This is a shortcut to the mysql command-line client and is configuredto connect as the root user. The shortcut prompts for a root user password when you connect.
• MySQL Server Instance Config Wizard: This is a shortcut to the MySQL Configuration Wizard. Usethis shortcut to configure a newly installed server, or to reconfigure an existing server.
• MySQL Documentation: This is a link to the MySQL server documentation that is stored locally in theMySQL server installation directory.
Changes to the File System
The MySQL Installation Wizard by default installs the MySQL 5.5 server to C:\Program Files\MySQL\MySQL Server 5.5, where Program Files is the default location for applications in your system, and5.5 is the release series of your MySQL server. This is the recommended location for the MySQL server,replacing the former default location C:\mysql.
By default, all MySQL applications are stored in a common directory at C:\Program Files\MySQL,where Program Files is the default location for applications in your Windows installation. A typicalMySQL installation on a developer machine might look like this:
C:\Program Files\MySQL\MySQL Server 5.5C:\Program Files\MySQL\MySQL Workbench 5.1 OSS
This approach makes it easier to manage and maintain all MySQL applications installed on a particularsystem.
The default location of the data directory is the AppData directory configured for the user that installed theMySQL application.
5.5.1.6 Upgrading MySQL with the Installation Wizard
The MySQL Installation Wizard can perform server upgrades automatically using the upgrade capabilitiesof MSI. That means you do not need to remove a previous installation manually before installing a newrelease. The installer automatically shuts down and removes the previous MySQL service before installingthe new version.
Automatic upgrades are available only when upgrading between installations that have the same majorand minor version numbers. For example, you can upgrade automatically from MySQL 5.5.5 to MySQL5.5.6, but not from MySQL 5.1 to MySQL 5.5.
See Section 5.10, “Upgrading MySQL on Windows”.
5.5.2 Automating MySQL Installation on Microsoft Windows Using the MSIPackage
The Microsoft Installer (MSI) supports a both a quiet and a passive mode that can be used to installMySQL automatically without requiring intervention. You can use this either in scripts to automaticallyinstall MySQL or through a terminal connection such as Telnet where you do not have access to thestandard Windows user interface. The MSI packages can also be used in combination with Microsoft'sGroup Policy system (part of Windows Server 2003 and Windows Server 2008) to install MySQL acrossmultiple machines.
To install MySQL from one of the MSI packages automatically from the command line (or within a script),you need to use the msiexec.exe tool. For example, to perform a quiet installation (which shows nodialog boxes or progress):
shell> msiexec /i mysql-5.5.58.msi /quiet
Removing MySQL When Installed from the MSI Package
91
The /i indicates that you want to perform an installation. The /quiet option indicates that you want nointeractive elements.
To provide a dialog box showing the progress during installation, and the dialog boxes providinginformation on the installation and registration of MySQL, use /passive mode instead of /quiet:
shell> msiexec /i mysql-5.5.58.msi /passive
Regardless of the mode of the installation, installing the package in this manner performs a 'Typical'installation, and installs the default components into the standard location.
You can also use this method to uninstall MySQL by using the /uninstall or /x options:
shell> msiexec /x mysql-5.5.58.msi /uninstall
To install MySQL and configure a MySQL instance from the command line, see Section 5.6.13, “MySQLServer Instance Config Wizard: Creating an Instance from the Command Line”.
For information on using MSI packages to install software automatically using Group Policy, see How touse Group Policy to remotely install software in Windows Server 2003.
5.5.3 Removing MySQL When Installed from the MSI Package
To uninstall MySQL when you installed it using the MSI package, you must use the Add/RemovePrograms tool within Control Panel. To do this:
1. Right-click the start menu and choose Control Panel.
2. If the Control Panel is set to category mode (you will see Pick a category at the top of the ControlPanel window), double-click Add or Remove Programs. If the Control is set to classic mode, double-click the Add or Remove Programs icon.
3. Find MySQL in the list of installed software. MySQL Server is installed against release series numbers(MySQL 5.1, MySQL 5.5, etc.). Select the version that you want to remove and click Remove.
4. You will be prompted to confirm the removal. Click Yes to remove MySQL.
When MySQL is removed using this method, only the installed components are removed. Any databaseinformation (including the tables and data), import or export files, log files, and binary logs produced duringexecution are kept in their configured location.
If you try to install MySQL again the information will be retained and you will be prompted to enter thepassword configured with the original installation.
If you want to delete MySQL completely:
• Delete the associated data directory. On Windows XP and Windows Server 2003, the default datadirectory is the configured AppData directory, which is C:\Documents and Settings\All Users\Application Data\MySQL by default.
• On Windows 7 and Windows Server 2008, the default data directory location is C:\ProgramData\Mysql.
Note
The C:\ProgramData directory is hidden by default. You must change yourfolder options to view the hidden file. Choose Organize, Folder and searchoptions, Show hidden folders.
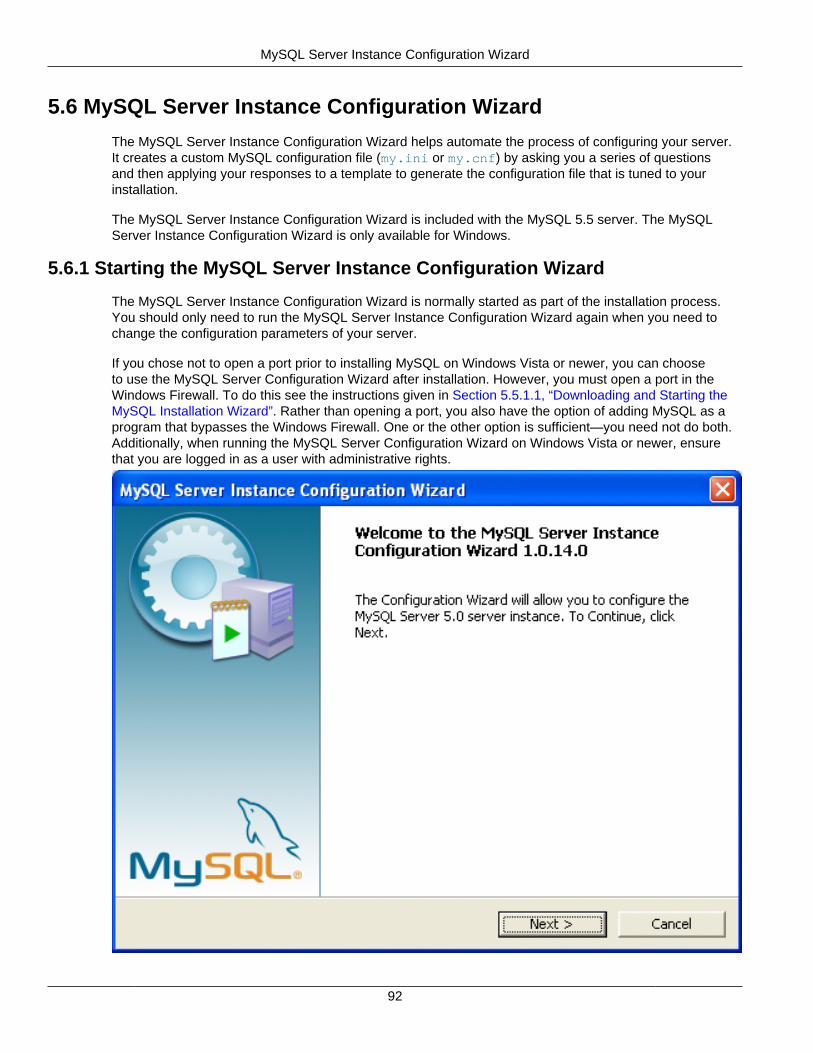
MySQL Server Instance Configuration Wizard
92
5.6 MySQL Server Instance Configuration Wizard
The MySQL Server Instance Configuration Wizard helps automate the process of configuring your server.It creates a custom MySQL configuration file (my.ini or my.cnf) by asking you a series of questionsand then applying your responses to a template to generate the configuration file that is tuned to yourinstallation.
The MySQL Server Instance Configuration Wizard is included with the MySQL 5.5 server. The MySQLServer Instance Configuration Wizard is only available for Windows.
5.6.1 Starting the MySQL Server Instance Configuration Wizard
The MySQL Server Instance Configuration Wizard is normally started as part of the installation process.You should only need to run the MySQL Server Instance Configuration Wizard again when you need tochange the configuration parameters of your server.
If you chose not to open a port prior to installing MySQL on Windows Vista or newer, you can chooseto use the MySQL Server Configuration Wizard after installation. However, you must open a port in theWindows Firewall. To do this see the instructions given in Section 5.5.1.1, “Downloading and Starting theMySQL Installation Wizard”. Rather than opening a port, you also have the option of adding MySQL as aprogram that bypasses the Windows Firewall. One or the other option is sufficient—you need not do both.Additionally, when running the MySQL Server Configuration Wizard on Windows Vista or newer, ensurethat you are logged in as a user with administrative rights.

Choosing a Maintenance Option
93
You can launch the MySQL Configuration Wizard by clicking the MySQL Server Instance Config Wizardentry in the MySQL section of the Windows Start menu.
Alternatively, you can navigate to the bin directory of your MySQL installation and launch theMySQLInstanceConfig.exe file directly.
The MySQL Server Instance Configuration Wizard places the my.ini file in the installation directory forthe MySQL server. This helps associate configuration files with particular server instances.
To ensure that the MySQL server knows where to look for the my.ini file, an argument similar to this ispassed to the MySQL server as part of the service installation:
--defaults-file="C:\Program Files\MySQL\MySQL Server 5.5\my.ini"
Here, C:\Program Files\MySQL\MySQL Server 5.5 is replaced with the installation path to theMySQL Server. The --defaults-file option instructs the MySQL server to read the specified file forconfiguration options when it starts.
Apart from making changes to the my.ini file by running the MySQL Server Instance ConfigurationWizard again, you can modify it by opening it with a text editor and making any necessary changes. Youcan also modify the server configuration with the http://www.mysql.com/products/administrator/ utility. Formore information about server configuration, see Server Command Options.
MySQL clients and utilities such as the mysql and mysqldump command-line clients are not able to locatethe my.ini file located in the server installation directory. To configure the client and utility applications,create a new my.ini file in the Windows installation directory (for example, C:\WINDOWS).
Under Windows Server 2003, Windows Server 2000, Windows XP, and Windows Vista, MySQL ServerInstance Configuration Wizard will configure MySQL to work as a Windows service. To start and stopMySQL you use the Services application that is supplied as part of the Windows Administrator Tools.
5.6.2 Choosing a Maintenance Option
If the MySQL Server Instance Configuration Wizard detects an existing configuration file, you havethe option of either reconfiguring your existing server, or removing the server instance by deleting theconfiguration file and stopping and removing the MySQL service.
To reconfigure an existing server, choose the Re-configure Instance option and click the Next button.Any existing configuration file is not overwritten, but renamed (within the same directory) using a timestamp(Windows) or sequential number (Linux). To remove the existing server instance, choose the RemoveInstance option and click the Next button.
If you choose the Remove Instance option, you advance to a confirmation window. Click the Executebutton. The MySQL Server Configuration Wizard stops and removes the MySQL service, and then deletesthe configuration file. The server installation and its data folder are not removed.
If you choose the Re-configure Instance option, you advance to the Configuration Type dialog whereyou can choose the type of installation that you wish to configure.
5.6.3 Choosing a Configuration Type
When you start the MySQL Server Instance Configuration Wizard for a new MySQL installation, or choosethe Re-configure Instance option for an existing installation, you advance to the Configuration Typedialog.
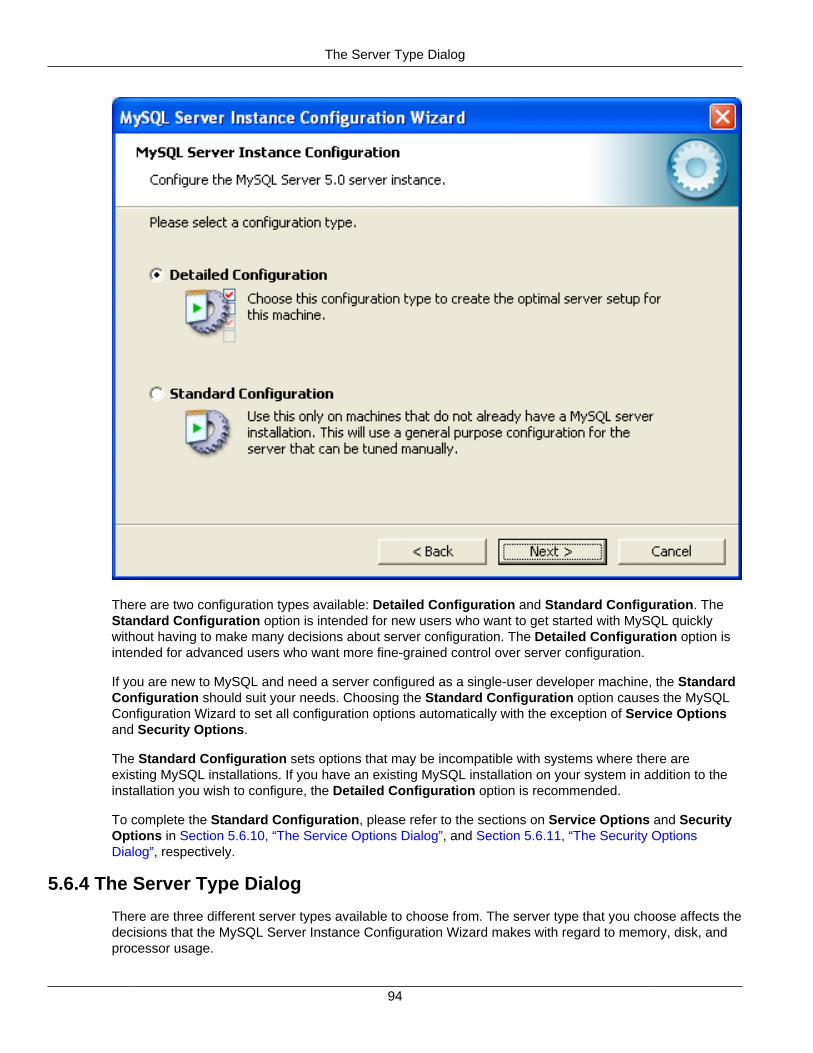
The Server Type Dialog
94
There are two configuration types available: Detailed Configuration and Standard Configuration. TheStandard Configuration option is intended for new users who want to get started with MySQL quicklywithout having to make many decisions about server configuration. The Detailed Configuration option isintended for advanced users who want more fine-grained control over server configuration.
If you are new to MySQL and need a server configured as a single-user developer machine, the StandardConfiguration should suit your needs. Choosing the Standard Configuration option causes the MySQLConfiguration Wizard to set all configuration options automatically with the exception of Service Optionsand Security Options.
The Standard Configuration sets options that may be incompatible with systems where there areexisting MySQL installations. If you have an existing MySQL installation on your system in addition to theinstallation you wish to configure, the Detailed Configuration option is recommended.
To complete the Standard Configuration, please refer to the sections on Service Options and SecurityOptions in Section 5.6.10, “The Service Options Dialog”, and Section 5.6.11, “The Security OptionsDialog”, respectively.
5.6.4 The Server Type Dialog
There are three different server types available to choose from. The server type that you choose affects thedecisions that the MySQL Server Instance Configuration Wizard makes with regard to memory, disk, andprocessor usage.
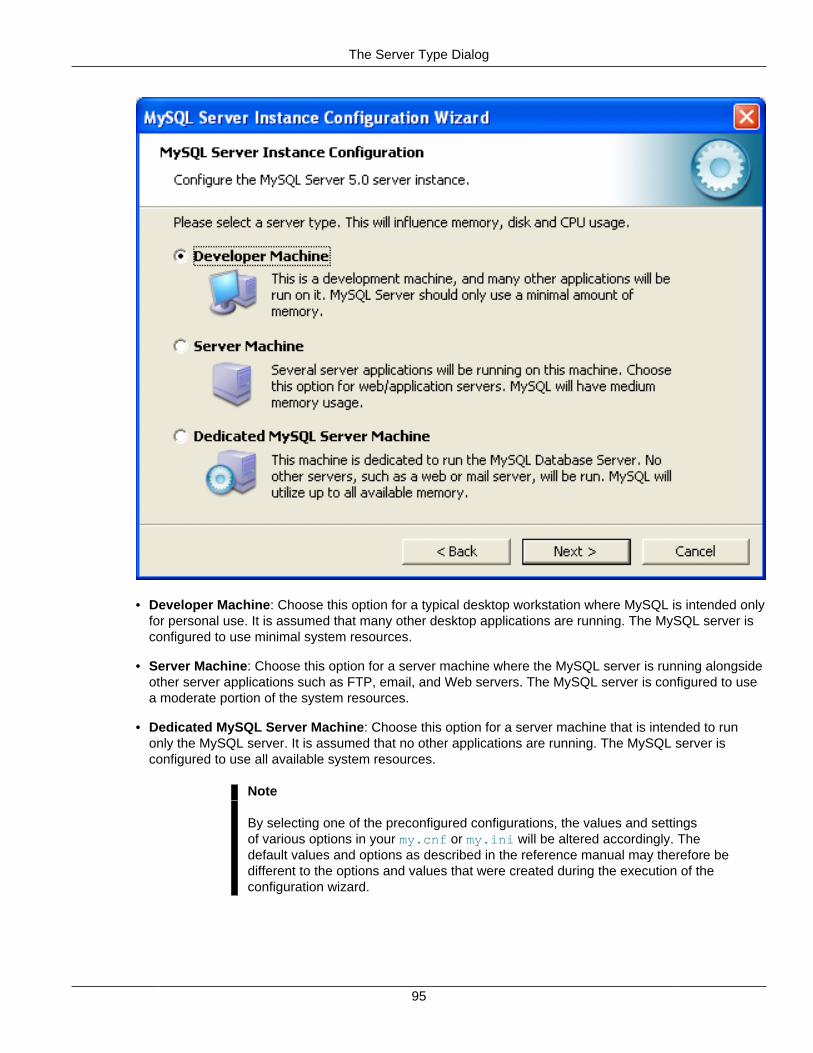
The Server Type Dialog
95
• Developer Machine: Choose this option for a typical desktop workstation where MySQL is intended onlyfor personal use. It is assumed that many other desktop applications are running. The MySQL server isconfigured to use minimal system resources.
• Server Machine: Choose this option for a server machine where the MySQL server is running alongsideother server applications such as FTP, email, and Web servers. The MySQL server is configured to usea moderate portion of the system resources.
• Dedicated MySQL Server Machine: Choose this option for a server machine that is intended to runonly the MySQL server. It is assumed that no other applications are running. The MySQL server isconfigured to use all available system resources.
Note
By selecting one of the preconfigured configurations, the values and settingsof various options in your my.cnf or my.ini will be altered accordingly. Thedefault values and options as described in the reference manual may therefore bedifferent to the options and values that were created during the execution of theconfiguration wizard.
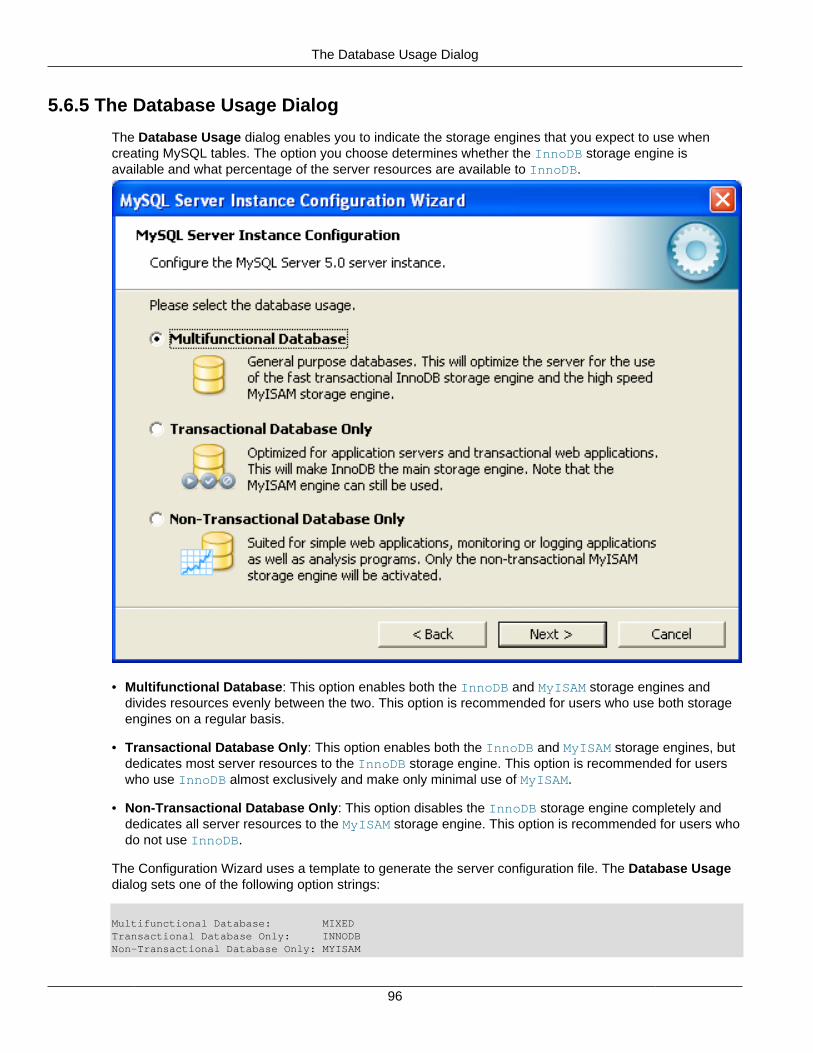
The Database Usage Dialog
96
5.6.5 The Database Usage Dialog
The Database Usage dialog enables you to indicate the storage engines that you expect to use whencreating MySQL tables. The option you choose determines whether the InnoDB storage engine isavailable and what percentage of the server resources are available to InnoDB.
• Multifunctional Database: This option enables both the InnoDB and MyISAM storage engines anddivides resources evenly between the two. This option is recommended for users who use both storageengines on a regular basis.
• Transactional Database Only: This option enables both the InnoDB and MyISAM storage engines, butdedicates most server resources to the InnoDB storage engine. This option is recommended for userswho use InnoDB almost exclusively and make only minimal use of MyISAM.
• Non-Transactional Database Only: This option disables the InnoDB storage engine completely anddedicates all server resources to the MyISAM storage engine. This option is recommended for users whodo not use InnoDB.
The Configuration Wizard uses a template to generate the server configuration file. The Database Usagedialog sets one of the following option strings:
Multifunctional Database: MIXEDTransactional Database Only: INNODBNon-Transactional Database Only: MYISAM
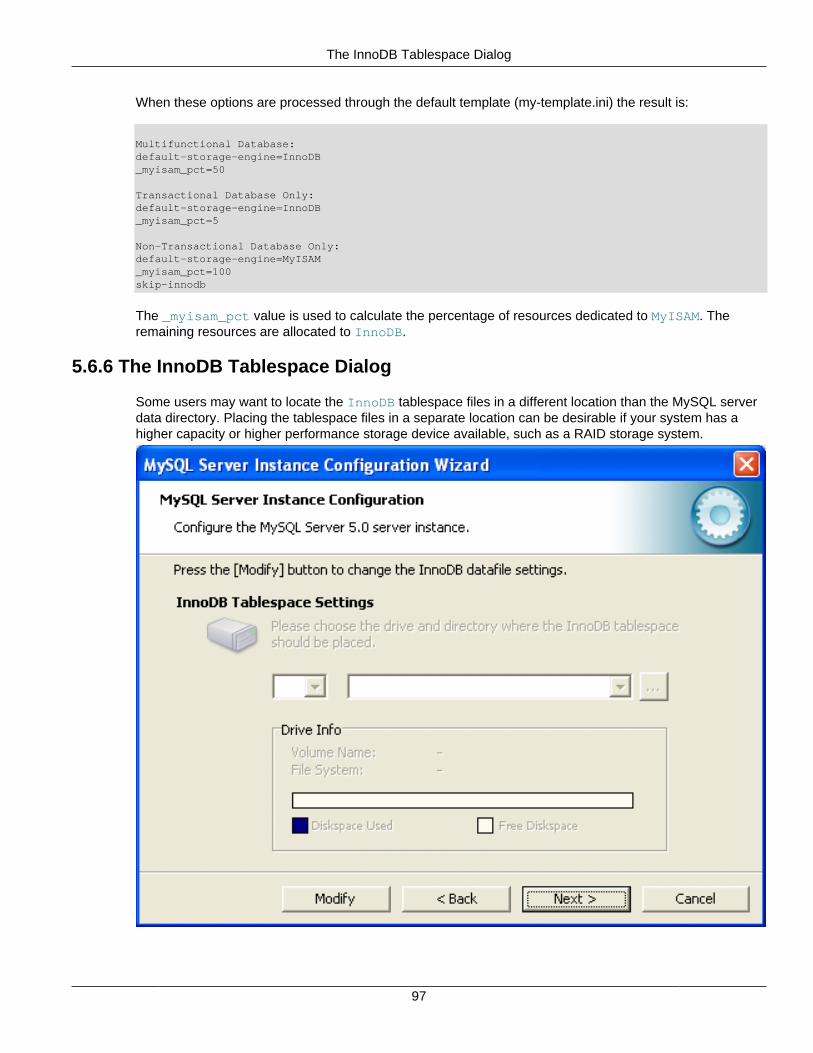
The InnoDB Tablespace Dialog
97
When these options are processed through the default template (my-template.ini) the result is:
Multifunctional Database:default-storage-engine=InnoDB_myisam_pct=50
Transactional Database Only:default-storage-engine=InnoDB_myisam_pct=5
Non-Transactional Database Only:default-storage-engine=MyISAM_myisam_pct=100skip-innodb
The _myisam_pct value is used to calculate the percentage of resources dedicated to MyISAM. Theremaining resources are allocated to InnoDB.
5.6.6 The InnoDB Tablespace Dialog
Some users may want to locate the InnoDB tablespace files in a different location than the MySQL serverdata directory. Placing the tablespace files in a separate location can be desirable if your system has ahigher capacity or higher performance storage device available, such as a RAID storage system.
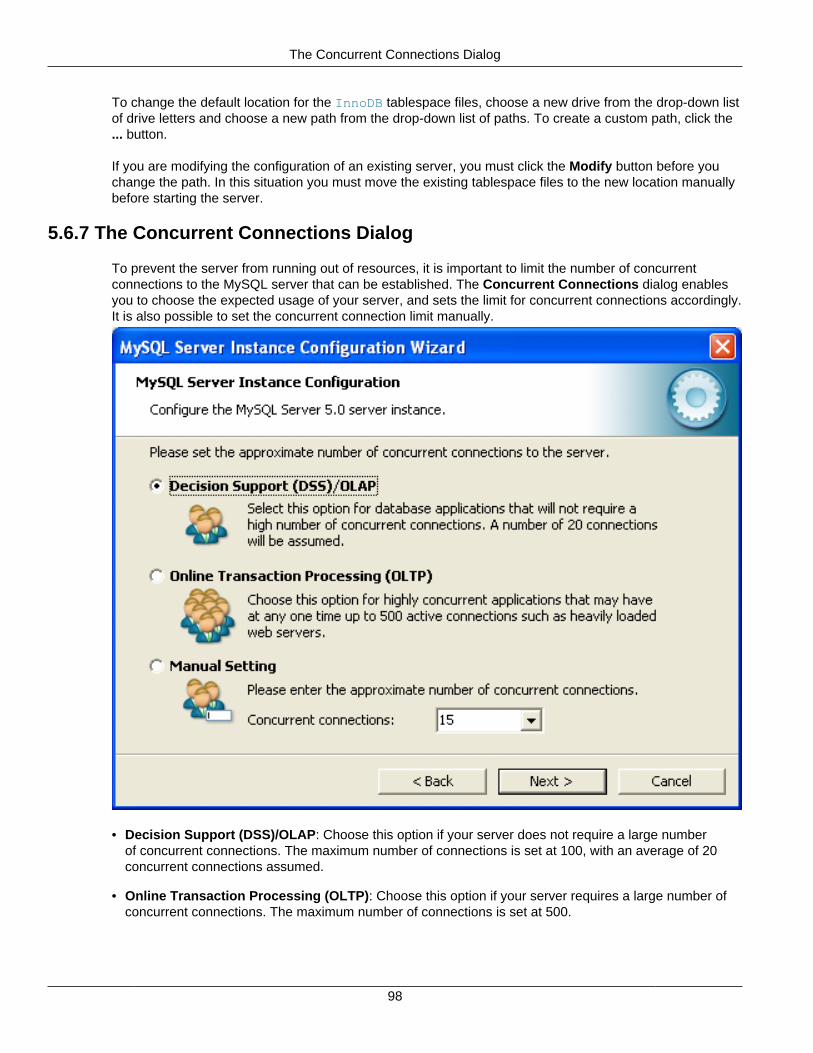
The Concurrent Connections Dialog
98
To change the default location for the InnoDB tablespace files, choose a new drive from the drop-down listof drive letters and choose a new path from the drop-down list of paths. To create a custom path, click the... button.
If you are modifying the configuration of an existing server, you must click the Modify button before youchange the path. In this situation you must move the existing tablespace files to the new location manuallybefore starting the server.
5.6.7 The Concurrent Connections Dialog
To prevent the server from running out of resources, it is important to limit the number of concurrentconnections to the MySQL server that can be established. The Concurrent Connections dialog enablesyou to choose the expected usage of your server, and sets the limit for concurrent connections accordingly.It is also possible to set the concurrent connection limit manually.
• Decision Support (DSS)/OLAP: Choose this option if your server does not require a large numberof concurrent connections. The maximum number of connections is set at 100, with an average of 20concurrent connections assumed.
• Online Transaction Processing (OLTP): Choose this option if your server requires a large number ofconcurrent connections. The maximum number of connections is set at 500.
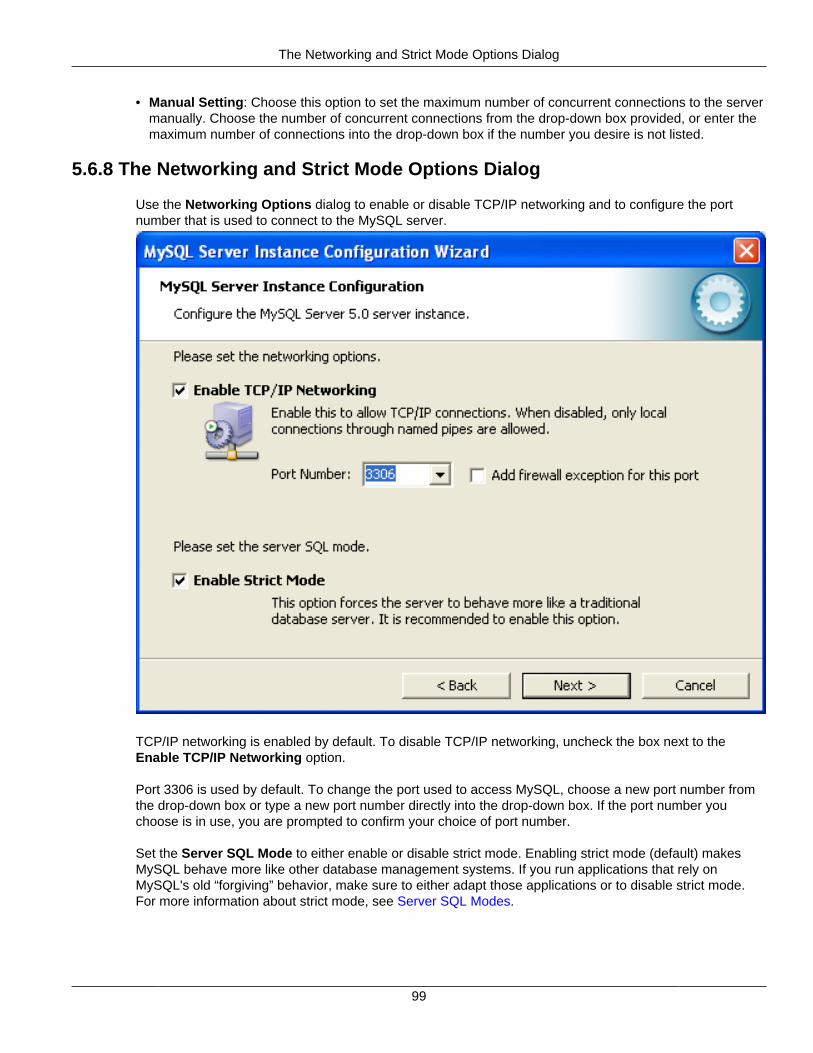
The Networking and Strict Mode Options Dialog
99
• Manual Setting: Choose this option to set the maximum number of concurrent connections to the servermanually. Choose the number of concurrent connections from the drop-down box provided, or enter themaximum number of connections into the drop-down box if the number you desire is not listed.
5.6.8 The Networking and Strict Mode Options Dialog
Use the Networking Options dialog to enable or disable TCP/IP networking and to configure the portnumber that is used to connect to the MySQL server.
TCP/IP networking is enabled by default. To disable TCP/IP networking, uncheck the box next to theEnable TCP/IP Networking option.
Port 3306 is used by default. To change the port used to access MySQL, choose a new port number fromthe drop-down box or type a new port number directly into the drop-down box. If the port number youchoose is in use, you are prompted to confirm your choice of port number.
Set the Server SQL Mode to either enable or disable strict mode. Enabling strict mode (default) makesMySQL behave more like other database management systems. If you run applications that rely onMySQL's old “forgiving” behavior, make sure to either adapt those applications or to disable strict mode.For more information about strict mode, see Server SQL Modes.
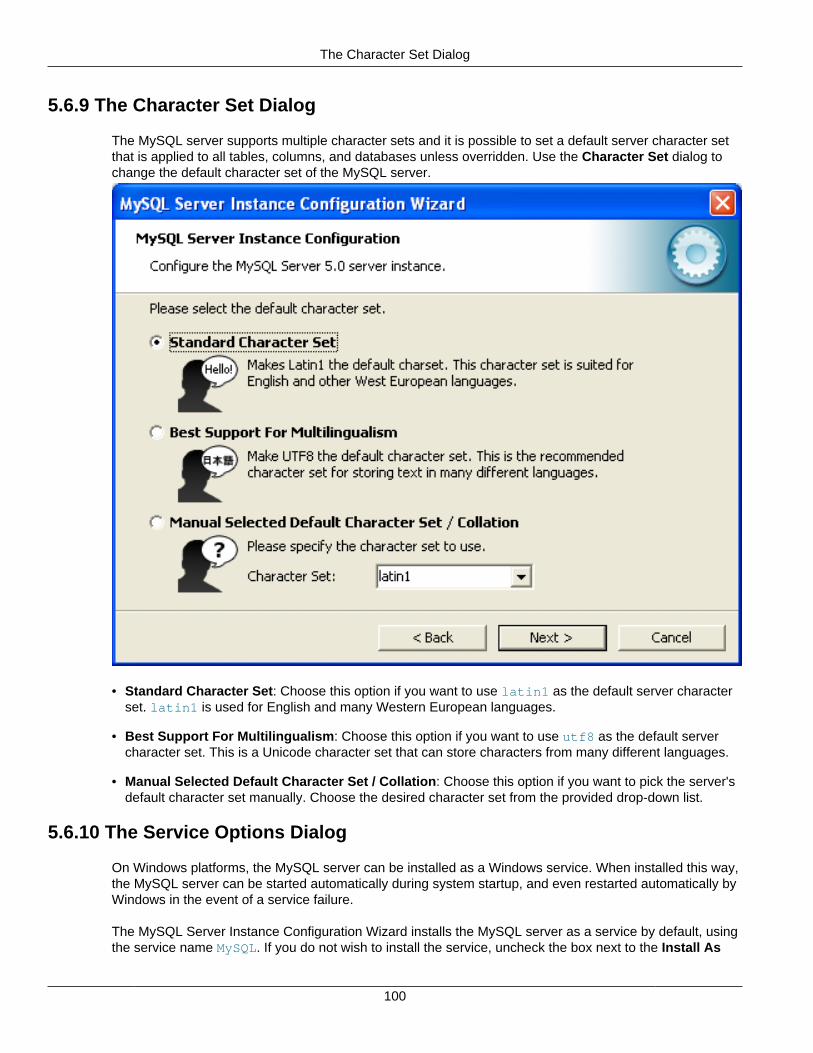
The Character Set Dialog
100
5.6.9 The Character Set Dialog
The MySQL server supports multiple character sets and it is possible to set a default server character setthat is applied to all tables, columns, and databases unless overridden. Use the Character Set dialog tochange the default character set of the MySQL server.
• Standard Character Set: Choose this option if you want to use latin1 as the default server characterset. latin1 is used for English and many Western European languages.
• Best Support For Multilingualism: Choose this option if you want to use utf8 as the default servercharacter set. This is a Unicode character set that can store characters from many different languages.
• Manual Selected Default Character Set / Collation: Choose this option if you want to pick the server'sdefault character set manually. Choose the desired character set from the provided drop-down list.
5.6.10 The Service Options Dialog
On Windows platforms, the MySQL server can be installed as a Windows service. When installed this way,the MySQL server can be started automatically during system startup, and even restarted automatically byWindows in the event of a service failure.
The MySQL Server Instance Configuration Wizard installs the MySQL server as a service by default, usingthe service name MySQL. If you do not wish to install the service, uncheck the box next to the Install As
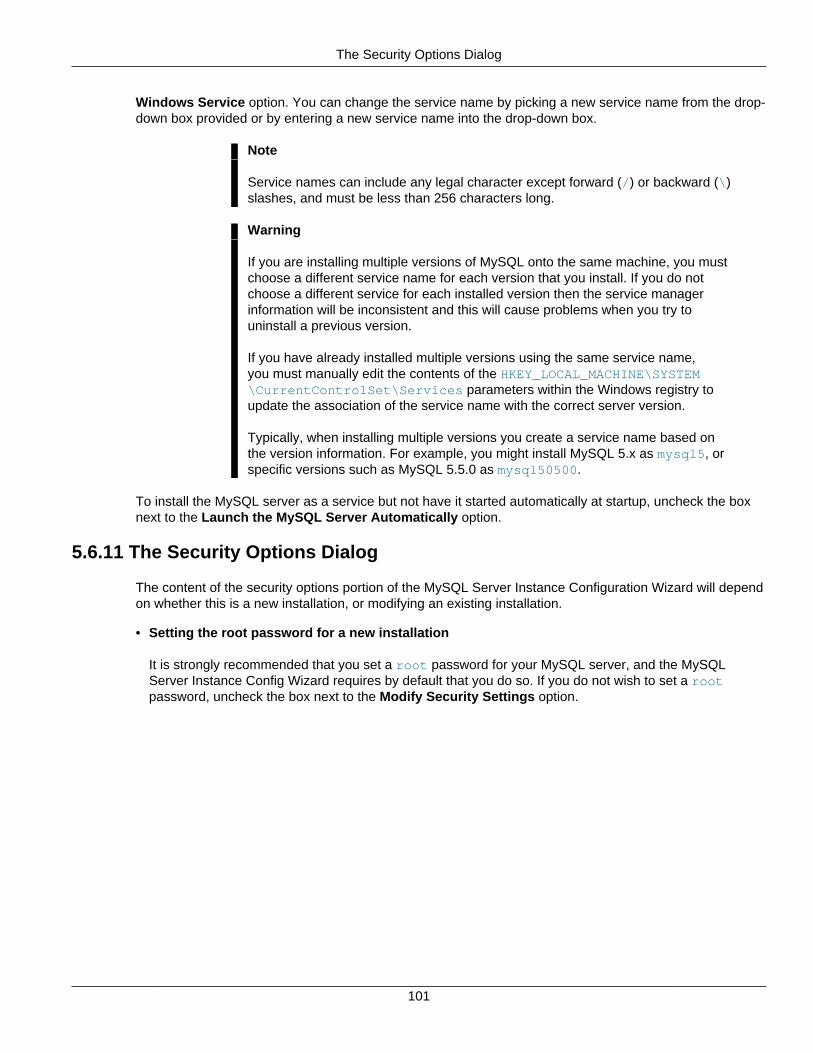
The Security Options Dialog
101
Windows Service option. You can change the service name by picking a new service name from the drop-down box provided or by entering a new service name into the drop-down box.
Note
Service names can include any legal character except forward (/) or backward (\)slashes, and must be less than 256 characters long.
Warning
If you are installing multiple versions of MySQL onto the same machine, you mustchoose a different service name for each version that you install. If you do notchoose a different service for each installed version then the service managerinformation will be inconsistent and this will cause problems when you try touninstall a previous version.
If you have already installed multiple versions using the same service name,you must manually edit the contents of the HKEY_LOCAL_MACHINE\SYSTEM\CurrentControlSet\Services parameters within the Windows registry toupdate the association of the service name with the correct server version.
Typically, when installing multiple versions you create a service name based onthe version information. For example, you might install MySQL 5.x as mysql5, orspecific versions such as MySQL 5.5.0 as mysql50500.
To install the MySQL server as a service but not have it started automatically at startup, uncheck the boxnext to the Launch the MySQL Server Automatically option.
5.6.11 The Security Options Dialog
The content of the security options portion of the MySQL Server Instance Configuration Wizard will dependon whether this is a new installation, or modifying an existing installation.
• Setting the root password for a new installation
It is strongly recommended that you set a root password for your MySQL server, and the MySQLServer Instance Config Wizard requires by default that you do so. If you do not wish to set a rootpassword, uncheck the box next to the Modify Security Settings option.
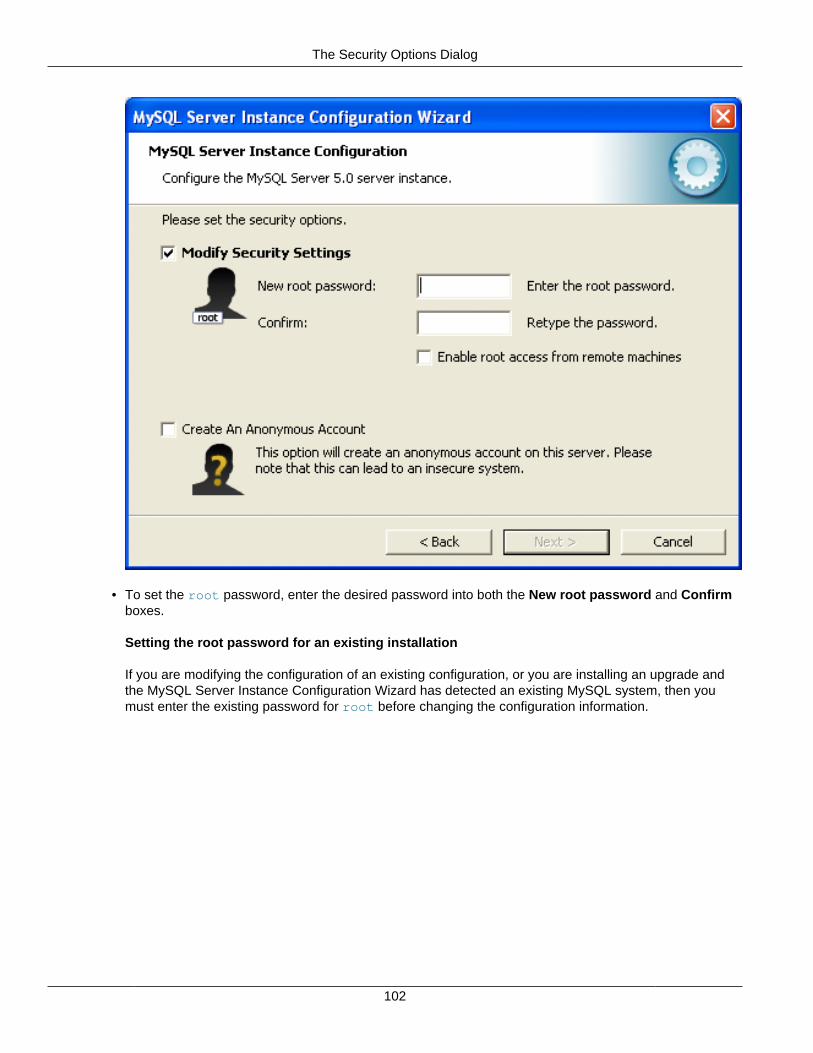
The Security Options Dialog
102
• To set the root password, enter the desired password into both the New root password and Confirmboxes.
Setting the root password for an existing installation
If you are modifying the configuration of an existing configuration, or you are installing an upgrade andthe MySQL Server Instance Configuration Wizard has detected an existing MySQL system, then youmust enter the existing password for root before changing the configuration information.
The Confirmation Dialog
103
If you want to change the current root password, enter the desired new password into both the Newroot password and Confirm boxes.
To permit root logins from across the network, check the box next to the Enable root access fromremote machines option. This decreases the security of your root account.
To create an anonymous user account, check the box next to the Create An Anonymous Account option.Creating an anonymous account can decrease server security and cause login and permission difficulties.For this reason, it is not recommended.
5.6.12 The Confirmation Dialog
The final dialog in the MySQL Server Instance Configuration Wizard is the Confirmation Dialog. To startthe configuration process, click the Execute button. To return to a previous dialog, click the Back button.To exit the MySQL Server Instance Configuration Wizard without configuring the server, click the Cancelbutton.
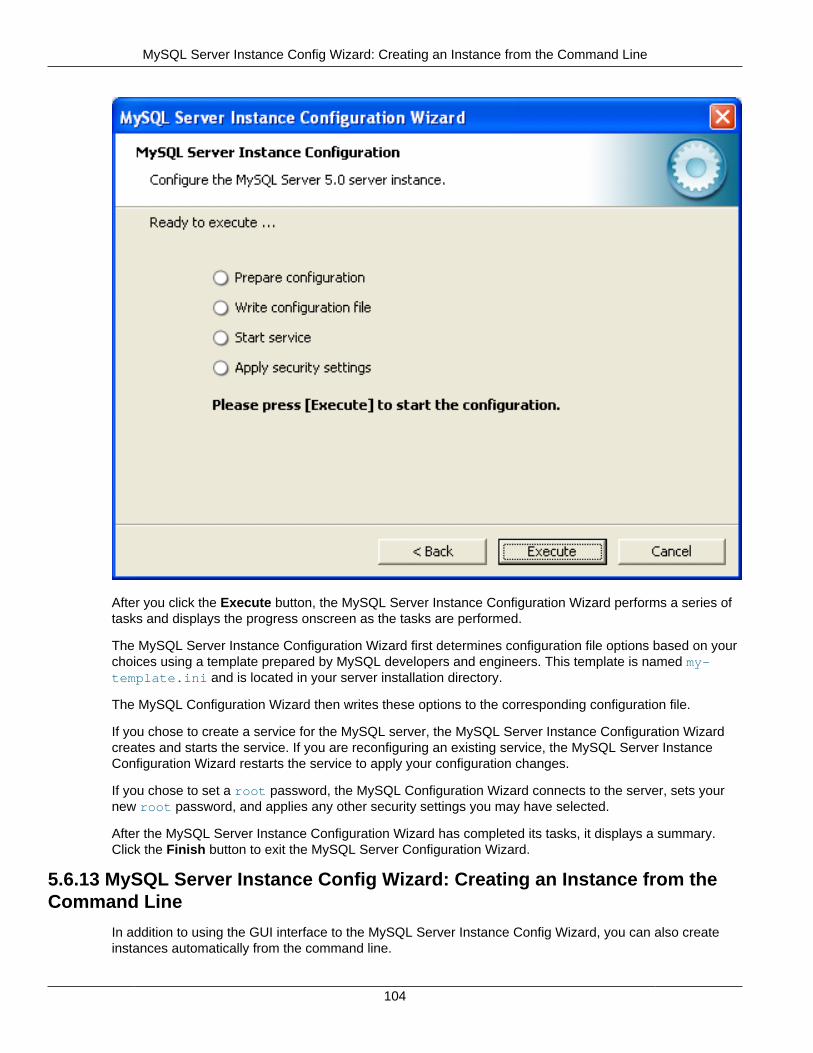
MySQL Server Instance Config Wizard: Creating an Instance from the Command Line
104
After you click the Execute button, the MySQL Server Instance Configuration Wizard performs a series oftasks and displays the progress onscreen as the tasks are performed.
The MySQL Server Instance Configuration Wizard first determines configuration file options based on yourchoices using a template prepared by MySQL developers and engineers. This template is named my-template.ini and is located in your server installation directory.
The MySQL Configuration Wizard then writes these options to the corresponding configuration file.
If you chose to create a service for the MySQL server, the MySQL Server Instance Configuration Wizardcreates and starts the service. If you are reconfiguring an existing service, the MySQL Server InstanceConfiguration Wizard restarts the service to apply your configuration changes.
If you chose to set a root password, the MySQL Configuration Wizard connects to the server, sets yournew root password, and applies any other security settings you may have selected.
After the MySQL Server Instance Configuration Wizard has completed its tasks, it displays a summary.Click the Finish button to exit the MySQL Server Configuration Wizard.
5.6.13 MySQL Server Instance Config Wizard: Creating an Instance from theCommand Line
In addition to using the GUI interface to the MySQL Server Instance Config Wizard, you can also createinstances automatically from the command line.
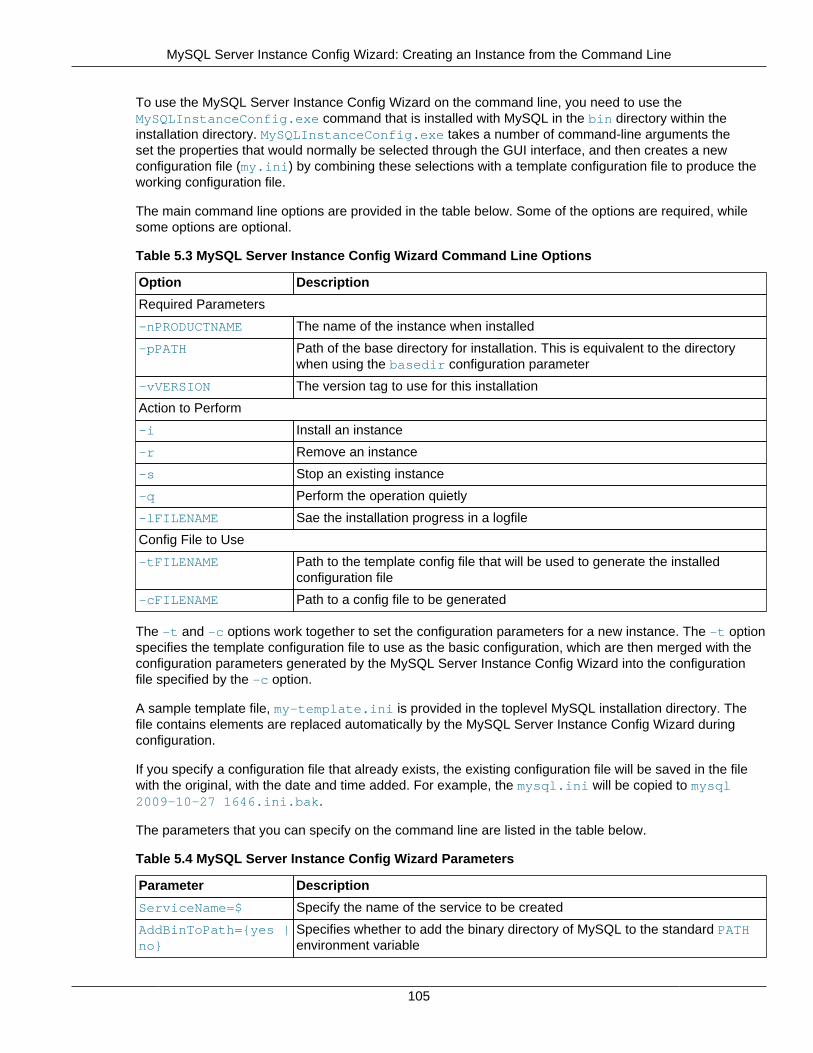
MySQL Server Instance Config Wizard: Creating an Instance from the Command Line
105
To use the MySQL Server Instance Config Wizard on the command line, you need to use theMySQLInstanceConfig.exe command that is installed with MySQL in the bin directory within theinstallation directory. MySQLInstanceConfig.exe takes a number of command-line arguments theset the properties that would normally be selected through the GUI interface, and then creates a newconfiguration file (my.ini) by combining these selections with a template configuration file to produce theworking configuration file.
The main command line options are provided in the table below. Some of the options are required, whilesome options are optional.
Table 5.3 MySQL Server Instance Config Wizard Command Line Options
Option Description
Required Parameters
-nPRODUCTNAME The name of the instance when installed
-pPATH Path of the base directory for installation. This is equivalent to the directorywhen using the basedir configuration parameter
-vVERSION The version tag to use for this installation
Action to Perform
-i Install an instance
-r Remove an instance
-s Stop an existing instance
-q Perform the operation quietly
-lFILENAME Sae the installation progress in a logfile
Config File to Use
-tFILENAME Path to the template config file that will be used to generate the installedconfiguration file
-cFILENAME Path to a config file to be generated
The -t and -c options work together to set the configuration parameters for a new instance. The -t optionspecifies the template configuration file to use as the basic configuration, which are then merged with theconfiguration parameters generated by the MySQL Server Instance Config Wizard into the configurationfile specified by the -c option.
A sample template file, my-template.ini is provided in the toplevel MySQL installation directory. Thefile contains elements are replaced automatically by the MySQL Server Instance Config Wizard duringconfiguration.
If you specify a configuration file that already exists, the existing configuration file will be saved in the filewith the original, with the date and time added. For example, the mysql.ini will be copied to mysql2009-10-27 1646.ini.bak.
The parameters that you can specify on the command line are listed in the table below.
Table 5.4 MySQL Server Instance Config Wizard Parameters
Parameter Description
ServiceName=$ Specify the name of the service to be created
AddBinToPath={yes |no}
Specifies whether to add the binary directory of MySQL to the standard PATHenvironment variable
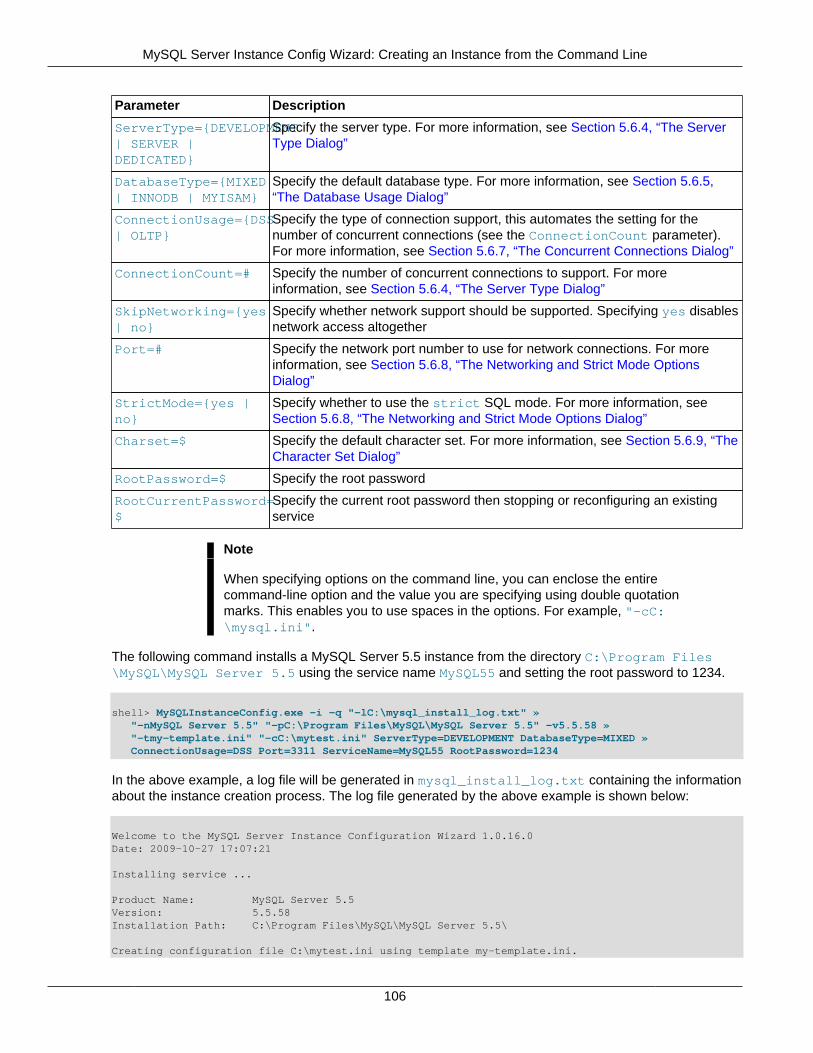
MySQL Server Instance Config Wizard: Creating an Instance from the Command Line
106
Parameter Description
ServerType={DEVELOPMENT| SERVER |DEDICATED}
Specify the server type. For more information, see Section 5.6.4, “The ServerType Dialog”
DatabaseType={MIXED| INNODB | MYISAM}
Specify the default database type. For more information, see Section 5.6.5,“The Database Usage Dialog”
ConnectionUsage={DSS| OLTP}
Specify the type of connection support, this automates the setting for thenumber of concurrent connections (see the ConnectionCount parameter).For more information, see Section 5.6.7, “The Concurrent Connections Dialog”
ConnectionCount=# Specify the number of concurrent connections to support. For moreinformation, see Section 5.6.4, “The Server Type Dialog”
SkipNetworking={yes| no}
Specify whether network support should be supported. Specifying yes disablesnetwork access altogether
Port=# Specify the network port number to use for network connections. For moreinformation, see Section 5.6.8, “The Networking and Strict Mode OptionsDialog”
StrictMode={yes |no}
Specify whether to use the strict SQL mode. For more information, seeSection 5.6.8, “The Networking and Strict Mode Options Dialog”
Charset=$ Specify the default character set. For more information, see Section 5.6.9, “TheCharacter Set Dialog”
RootPassword=$ Specify the root password
RootCurrentPassword=$
Specify the current root password then stopping or reconfiguring an existingservice
Note
When specifying options on the command line, you can enclose the entirecommand-line option and the value you are specifying using double quotationmarks. This enables you to use spaces in the options. For example, "-cC:\mysql.ini".
The following command installs a MySQL Server 5.5 instance from the directory C:\Program Files\MySQL\MySQL Server 5.5 using the service name MySQL55 and setting the root password to 1234.
shell> MySQLInstanceConfig.exe -i -q "-lC:\mysql_install_log.txt" » "-nMySQL Server 5.5" "-pC:\Program Files\MySQL\MySQL Server 5.5" -v5.5.58 » "-tmy-template.ini" "-cC:\mytest.ini" ServerType=DEVELOPMENT DatabaseType=MIXED » ConnectionUsage=DSS Port=3311 ServiceName=MySQL55 RootPassword=1234
In the above example, a log file will be generated in mysql_install_log.txt containing the informationabout the instance creation process. The log file generated by the above example is shown below:
Welcome to the MySQL Server Instance Configuration Wizard 1.0.16.0Date: 2009-10-27 17:07:21
Installing service ...
Product Name: MySQL Server 5.5Version: 5.5.58Installation Path: C:\Program Files\MySQL\MySQL Server 5.5\
Creating configuration file C:\mytest.ini using template my-template.ini.
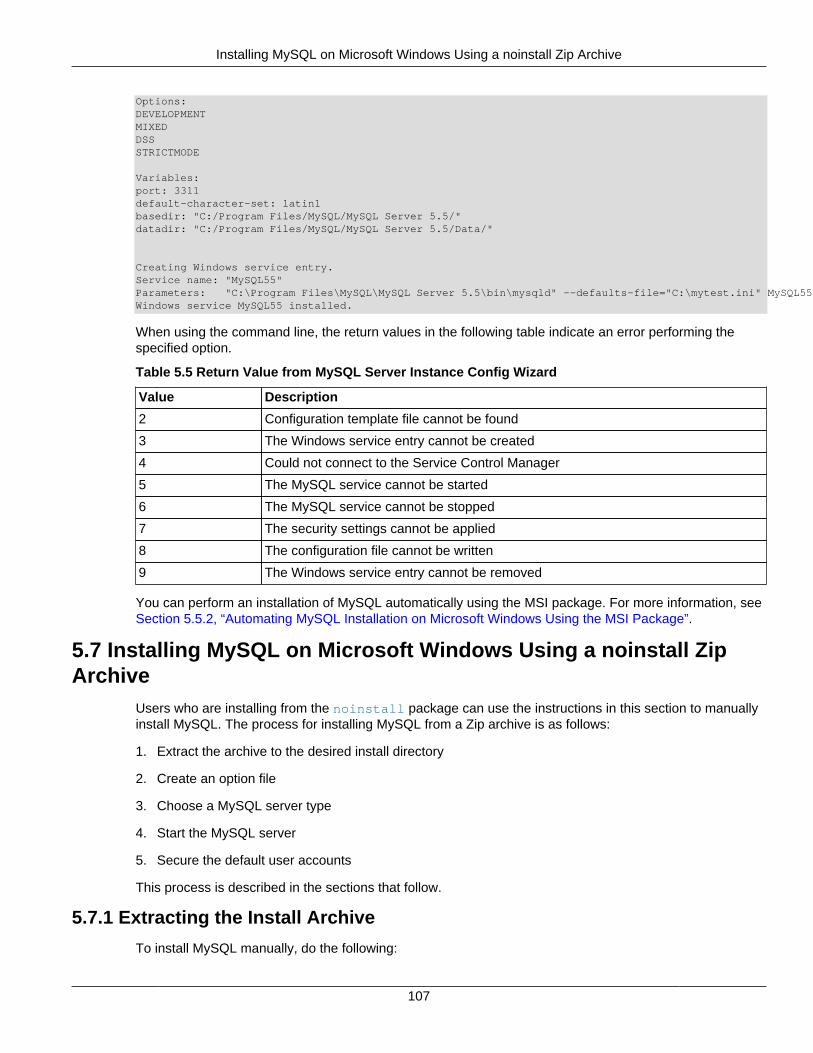
Installing MySQL on Microsoft Windows Using a noinstall Zip Archive
107
Options:DEVELOPMENTMIXEDDSSSTRICTMODE
Variables:port: 3311default-character-set: latin1basedir: "C:/Program Files/MySQL/MySQL Server 5.5/"datadir: "C:/Program Files/MySQL/MySQL Server 5.5/Data/"
Creating Windows service entry.Service name: "MySQL55"Parameters: "C:\Program Files\MySQL\MySQL Server 5.5\bin\mysqld" --defaults-file="C:\mytest.ini" MySQL55.Windows service MySQL55 installed.
When using the command line, the return values in the following table indicate an error performing thespecified option.
Table 5.5 Return Value from MySQL Server Instance Config Wizard
Value Description
2 Configuration template file cannot be found
3 The Windows service entry cannot be created
4 Could not connect to the Service Control Manager
5 The MySQL service cannot be started
6 The MySQL service cannot be stopped
7 The security settings cannot be applied
8 The configuration file cannot be written
9 The Windows service entry cannot be removed
You can perform an installation of MySQL automatically using the MSI package. For more information, seeSection 5.5.2, “Automating MySQL Installation on Microsoft Windows Using the MSI Package”.
5.7 Installing MySQL on Microsoft Windows Using a noinstall ZipArchive
Users who are installing from the noinstall package can use the instructions in this section to manuallyinstall MySQL. The process for installing MySQL from a Zip archive is as follows:
1. Extract the archive to the desired install directory
2. Create an option file
3. Choose a MySQL server type
4. Start the MySQL server
5. Secure the default user accounts
This process is described in the sections that follow.
5.7.1 Extracting the Install Archive
To install MySQL manually, do the following:
Creating an Option File
108
1. If you are upgrading from a previous version please refer to Section 5.10, “Upgrading MySQL onWindows”, before beginning the upgrade process.
2. Make sure that you are logged in as a user with administrator privileges.
3. Choose an installation location. Traditionally, the MySQL server is installed in C:\mysql. The MySQLInstallation Wizard installs MySQL under C:\Program Files\MySQL. If you do not install MySQLat C:\mysql, you must specify the path to the install directory during startup or in an option file. SeeSection 5.7.2, “Creating an Option File”.
Note
The MySQL Installer installs MySQL under C:\Program Files\MySQL.
4. Extract the install archive to the chosen installation location using your preferred Zip archive tool. Sometools may extract the archive to a folder within your chosen installation location. If this occurs, you canmove the contents of the subfolder into the chosen installation location.
5.7.2 Creating an Option File
If you need to specify startup options when you run the server, you can indicate them on the commandline or place them in an option file. For options that are used every time the server starts, you may find itmost convenient to use an option file to specify your MySQL configuration. This is particularly true underthe following circumstances:
• The installation or data directory locations are different from the default locations (C:\Program Files\MySQL\MySQL Server 5.5 and C:\Program Files\MySQL\MySQL Server 5.5\data).
• You need to tune the server settings, such as memory, cache, or InnoDB configuration information.
When the MySQL server starts on Windows, it looks for option files in several locations, such as theWindows directory, C:\, and the MySQL installation directory (for the full list of locations, see Using OptionFiles). The Windows directory typically is named something like C:\WINDOWS. You can determine its exactlocation from the value of the WINDIR environment variable using the following command:
C:\> echo %WINDIR%
MySQL looks for options in each location first in the my.ini file, and then in the my.cnf file. However, toavoid confusion, it is best if you use only one file. If your PC uses a boot loader where C: is not the bootdrive, your only option is to use the my.ini file. Whichever option file you use, it must be a plain text file.
Note
When using the MySQL Installer to install MySQL Server, it will create the my.iniat the default location. And as of MySQL Server 5.5.27, the user running MySQLInstaller is granted full permissions to this new my.ini.
In other words, be sure that the MySQL Server user has permission to read themy.ini file.
You can also make use of the example option files included with your MySQL distribution; see ServerConfiguration Defaults.
An option file can be created and modified with any text editor, such as Notepad. For example, if MySQLis installed in E:\mysql and the data directory is in E:\mydata\data, you can create an option filecontaining a [mysqld] section to specify values for the basedir and datadir options:
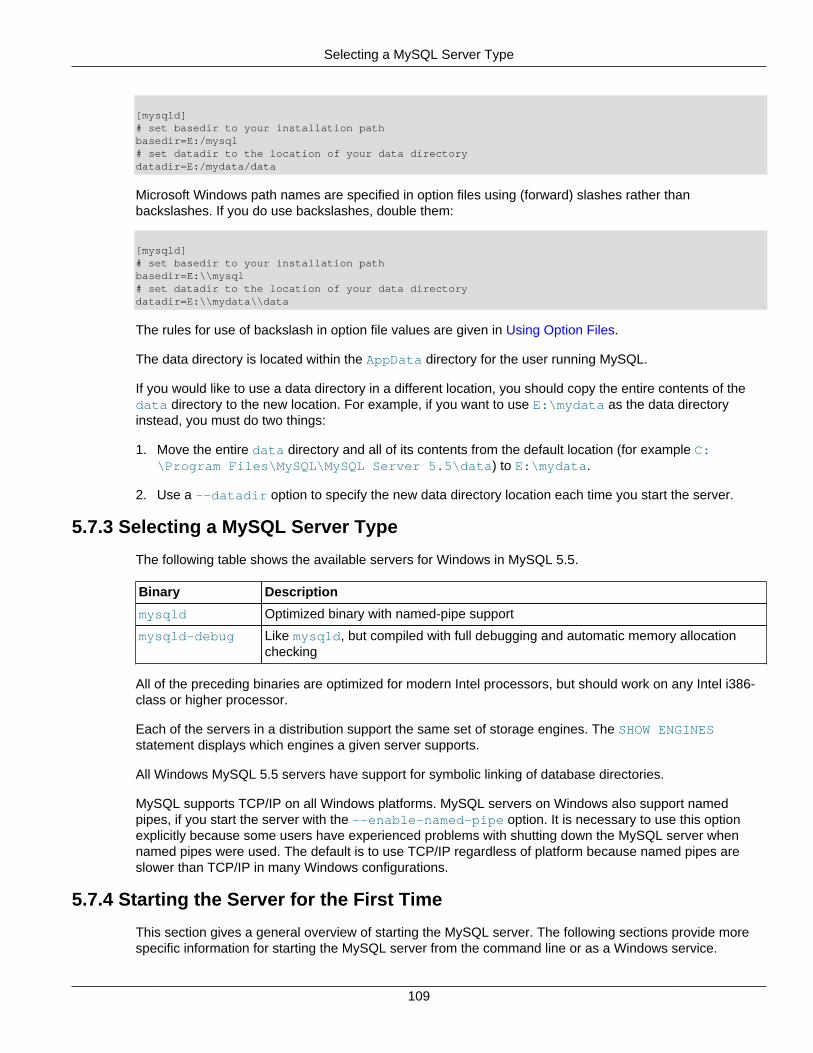
Selecting a MySQL Server Type
109
[mysqld]# set basedir to your installation pathbasedir=E:/mysql# set datadir to the location of your data directorydatadir=E:/mydata/data
Microsoft Windows path names are specified in option files using (forward) slashes rather thanbackslashes. If you do use backslashes, double them:
[mysqld]# set basedir to your installation pathbasedir=E:\\mysql# set datadir to the location of your data directorydatadir=E:\\mydata\\data
The rules for use of backslash in option file values are given in Using Option Files.
The data directory is located within the AppData directory for the user running MySQL.
If you would like to use a data directory in a different location, you should copy the entire contents of thedata directory to the new location. For example, if you want to use E:\mydata as the data directoryinstead, you must do two things:
1. Move the entire data directory and all of its contents from the default location (for example C:\Program Files\MySQL\MySQL Server 5.5\data) to E:\mydata.
2. Use a --datadir option to specify the new data directory location each time you start the server.
5.7.3 Selecting a MySQL Server Type
The following table shows the available servers for Windows in MySQL 5.5.
Binary Description
mysqld Optimized binary with named-pipe support
mysqld-debug Like mysqld, but compiled with full debugging and automatic memory allocationchecking
All of the preceding binaries are optimized for modern Intel processors, but should work on any Intel i386-class or higher processor.
Each of the servers in a distribution support the same set of storage engines. The SHOW ENGINESstatement displays which engines a given server supports.
All Windows MySQL 5.5 servers have support for symbolic linking of database directories.
MySQL supports TCP/IP on all Windows platforms. MySQL servers on Windows also support namedpipes, if you start the server with the --enable-named-pipe option. It is necessary to use this optionexplicitly because some users have experienced problems with shutting down the MySQL server whennamed pipes were used. The default is to use TCP/IP regardless of platform because named pipes areslower than TCP/IP in many Windows configurations.
5.7.4 Starting the Server for the First Time
This section gives a general overview of starting the MySQL server. The following sections provide morespecific information for starting the MySQL server from the command line or as a Windows service.

Starting the Server for the First Time
110
The information here applies primarily if you installed MySQL using the Noinstall version, or if you wishto configure and test MySQL manually rather than with the GUI tools.
Note
MySQL server will automatically start after using MySQL Installer, and MySQLNotifier can be used to start/stop/restart at any time.
The examples in these sections assume that MySQL is installed under the default location of C:\ProgramFiles\MySQL\MySQL Server 5.5. Adjust the path names shown in the examples if you have MySQLinstalled in a different location.
Clients have two options. They can use TCP/IP, or they can use a named pipe if the server supportsnamed-pipe connections.
MySQL for Windows also supports shared-memory connections if the server is started with the --shared-memory option. Clients can connect through shared memory by using the --protocol=MEMORYoption.
For information about which server binary to run, see Section 5.7.3, “Selecting a MySQL Server Type”.
Testing is best done from a command prompt in a console window (or “DOS window”). In this way you canhave the server display status messages in the window where they are easy to see. If something is wrongwith your configuration, these messages make it easier for you to identify and fix any problems.
To start the server, enter this command:
C:\> "C:\Program Files\MySQL\MySQL Server 5.5\bin\mysqld" --console
For a server that includes InnoDB support, you should see the messages similar to those following as itstarts (the path names and sizes may differ):
InnoDB: The first specified datafile c:\ibdata\ibdata1 did not exist:InnoDB: a new database to be created!InnoDB: Setting file c:\ibdata\ibdata1 size to 209715200InnoDB: Database physically writes the file full: wait...InnoDB: Log file c:\iblogs\ib_logfile0 did not exist: new to be createdInnoDB: Setting log file c:\iblogs\ib_logfile0 size to 31457280InnoDB: Log file c:\iblogs\ib_logfile1 did not exist: new to be createdInnoDB: Setting log file c:\iblogs\ib_logfile1 size to 31457280InnoDB: Log file c:\iblogs\ib_logfile2 did not exist: new to be createdInnoDB: Setting log file c:\iblogs\ib_logfile2 size to 31457280InnoDB: Doublewrite buffer not found: creating newInnoDB: Doublewrite buffer createdInnoDB: creating foreign key constraint system tablesInnoDB: foreign key constraint system tables created011024 10:58:25 InnoDB: Started
When the server finishes its startup sequence, you should see something like this, which indicates that theserver is ready to service client connections:
mysqld: ready for connectionsVersion: '5.5.58' socket: '' port: 3306
The server continues to write to the console any further diagnostic output it produces. You can open a newconsole window in which to run client programs.
Starting MySQL from the Windows Command Line
111
If you omit the --console option, the server writes diagnostic output to the error log in the data directory(C:\Program Files\MySQL\MySQL Server 5.5\data by default). The error log is the file with the.err extension, and may be set using the --log-error option.
Note
The accounts that are listed in the MySQL grant tables initially have no passwords.After starting the server, you should set up passwords for them using theinstructions in Section 9.4, “Securing the Initial MySQL Accounts”.
5.7.5 Starting MySQL from the Windows Command Line
The MySQL server can be started manually from the command line. This can be done on any version ofWindows.
Note
MySQL Notifier can also be used to start/stop/restart the MySQL server.
To start the mysqld server from the command line, you should start a console window (or “DOS window”)and enter this command:
C:\> "C:\Program Files\MySQL\MySQL Server 5.5\bin\mysqld"
The path to mysqld may vary depending on the install location of MySQL on your system.
You can stop the MySQL server by executing this command:
C:\> "C:\Program Files\MySQL\MySQL Server 5.5\bin\mysqladmin" -u root shutdown
Note
If the MySQL root user account has a password, you need to invoke mysqladminwith the -p option and supply the password when prompted.
This command invokes the MySQL administrative utility mysqladmin to connect to the server and tell it toshut down. The command connects as the MySQL root user, which is the default administrative accountin the MySQL grant system.
Note
Users in the MySQL grant system are wholly independent from any login usersunder Microsoft Windows.
If mysqld doesn't start, check the error log to see whether the server wrote any messages there to indicatethe cause of the problem. By default, the error log is located in the C:\Program Files\MySQL\MySQLServer 5.5\data directory. It is the file with a suffix of .err, or may be specified by passing in the --log-error option. Alternatively, you can try to start the server with the --console option; in this case,the server may display some useful information on the screen that will help solve the problem.
The last option is to start mysqld with the --standalone and --debug options. In this case, mysqldwrites a log file C:\mysqld.trace that should contain the reason why mysqld doesn't start. See TheDBUG Package.
Use mysqld --verbose --help to display all the options that mysqld supports.
5.7.6 Customizing the PATH for MySQL Tools
Starting MySQL as a Windows Service
112
To make it easier to invoke MySQL programs, you can add the path name of the MySQL bin directory toyour Windows system PATH environment variable:
• On the Windows desktop, right-click the My Computer icon, and select Properties.
• Next select the Advanced tab from the System Properties menu that appears, and click theEnvironment Variables button.
• Under System Variables, select Path, and then click the Edit button. The Edit System Variabledialogue should appear.
• Place your cursor at the end of the text appearing in the space marked Variable Value. (Use the Endkey to ensure that your cursor is positioned at the very end of the text in this space.) Then enter thecomplete path name of your MySQL bin directory (for example, C:\Program Files\MySQL\MySQLServer 5.5\bin)
Note
There must be a semicolon separating this path from any values present in thisfield.
Dismiss this dialogue, and each dialogue in turn, by clicking OK until all of the dialogues that wereopened have been dismissed. You should now be able to invoke any MySQL executable program bytyping its name at the DOS prompt from any directory on the system, without having to supply the path.This includes the servers, the mysql client, and all MySQL command-line utilities such as mysqladminand mysqldump.
You should not add the MySQL bin directory to your Windows PATH if you are running multiple MySQLservers on the same machine.
Warning
You must exercise great care when editing your system PATH by hand; accidentaldeletion or modification of any portion of the existing PATH value can leave you witha malfunctioning or even unusable system.
5.7.7 Starting MySQL as a Windows Service
On Windows, the recommended way to run MySQL is to install it as a Windows service, so that MySQLstarts and stops automatically when Windows starts and stops. A MySQL server installed as a service canalso be controlled from the command line using NET commands, or with the graphical Services utility.Generally, to install MySQL as a Windows service you should be logged in using an account that hasadministrator rights.
Note
MySQL Notifier can also be used to monitor the status of the MySQL service.
The Services utility (the Windows Service Control Manager) can be found in the Windows ControlPanel (under Administrative Tools on Windows 2000, XP, Vista, and Server 2003). To avoid conflicts, itis advisable to close the Services utility while performing server installation or removal operations fromthe command line.
Installing the service
Before installing MySQL as a Windows service, you should first stop the current server if it is running byusing the following command:
Starting MySQL as a Windows Service
113
C:\> "C:\Program Files\MySQL\MySQL Server 5.5\bin\mysqladmin" -u root shutdown
Note
If the MySQL root user account has a password, you need to invoke mysqladminwith the -p option and supply the password when prompted.
This command invokes the MySQL administrative utility mysqladmin to connect to the server and tell it toshut down. The command connects as the MySQL root user, which is the default administrative accountin the MySQL grant system.
Note
Users in the MySQL grant system are wholly independent from any login usersunder Windows.
Install the server as a service using this command:
C:\> "C:\Program Files\MySQL\MySQL Server 5.5\bin\mysqld" --install
The service-installation command does not start the server. Instructions for that are given later in thissection.
To make it easier to invoke MySQL programs, you can add the path name of the MySQL bin directory toyour Windows system PATH environment variable:
• On the Windows desktop, right-click the My Computer icon, and select Properties.
• Next select the Advanced tab from the System Properties menu that appears, and click theEnvironment Variables button.
• Under System Variables, select Path, and then click the Edit button. The Edit System Variabledialogue should appear.
• Place your cursor at the end of the text appearing in the space marked Variable Value. (Use the Endkey to ensure that your cursor is positioned at the very end of the text in this space.) Then enter thecomplete path name of your MySQL bin directory (for example, C:\Program Files\MySQL\MySQLServer 5.5\bin), and there should be a semicolon separating this path from any values presentin this field. Dismiss this dialogue, and each dialogue in turn, by clicking OK until all of the dialoguesthat were opened have been dismissed. You should now be able to invoke any MySQL executableprogram by typing its name at the DOS prompt from any directory on the system, without having tosupply the path. This includes the servers, the mysql client, and all MySQL command-line utilities suchas mysqladmin and mysqldump.
You should not add the MySQL bin directory to your Windows PATH if you are running multiple MySQLservers on the same machine.
Warning
You must exercise great care when editing your system PATH by hand; accidentaldeletion or modification of any portion of the existing PATH value can leave you witha malfunctioning or even unusable system.
The following additional arguments can be used when installing the service:
Starting MySQL as a Windows Service
114
• You can specify a service name immediately following the --install option. The default service nameis MySQL.
• If a service name is given, it can be followed by a single option. By convention, this should be --defaults-file=file_name to specify the name of an option file from which the server should readoptions when it starts.
The use of a single option other than --defaults-file is possible but discouraged. --defaults-file is more flexible because it enables you to specify multiple startup options for the server by placingthem in the named option file.
• You can also specify a --local-service option following the service name. This causes the serverto run using the LocalService Windows account that has limited system privileges. This account isavailable only for Windows XP or newer. If both --defaults-file and --local-service are givenfollowing the service name, they can be in any order.
For a MySQL server that is installed as a Windows service, the following rules determine the service nameand option files that the server uses:
• If the service-installation command specifies no service name or the default service name (MySQL)following the --install option, the server uses the a service name of MySQL and reads options fromthe [mysqld] group in the standard option files.
• If the service-installation command specifies a service name other than MySQL following the --installoption, the server uses that service name. It reads options from the [mysqld] group and the group thathas the same name as the service in the standard option files. This enables you to use the [mysqld]group for options that should be used by all MySQL services, and an option group with the service namefor use by the server installed with that service name.
• If the service-installation command specifies a --defaults-file option after the service name, theserver reads options the same way as described in the previous item, except that it reads options onlyfrom the named file and ignores the standard option files.
As a more complex example, consider the following command:
C:\> "C:\Program Files\MySQL\MySQL Server 5.5\bin\mysqld" --install MySQL --defaults-file=C:\my-opts.cnf
Here, the default service name (MySQL) is given after the --install option. If no --defaults-fileoption had been given, this command would have the effect of causing the server to read the [mysqld]group from the standard option files. However, because the --defaults-file option is present, theserver reads options from the [mysqld] option group, and only from the named file.
Note
On Windows, if the server is started with the --defaults-file and --installoptions, --install must be first. Otherwise, mysqld.exe will attempt to start theMySQL server.
You can also specify options as Start parameters in the Windows Services utility before you start theMySQL service.
Finally, before trying to start the MySQL service, make sure the user variables %TEMP% and %TMP% (andalso %TMPDIR%, if it has ever been set) for the system user who is to run the service are pointing to a folderto which the user has write access. The default user for running the MySQL service is LocalSystem, andthe default value for its %TEMP% and %TMP% is C:\Windows\Temp, a directory LocalSystem has write
Testing The MySQL Installation
115
access to by default. However, if there are any changes to that default setup (for example, changes to theuser who runs the service or to the mentioned user variables, or the --tmpdir option has been used toput the temporary directory somewhere else), the MySQL service might fail to run because write access tothe temporary directory has not been granted to the proper user.
Starting the service
Once a MySQL server has been installed as a service, Windows starts the service automatically wheneverWindows starts. The service also can be started immediately from the Services utility, or by using a NETSTART MySQL command. The NET command is not case sensitive.
When run as a service, mysqld has no access to a console window, so no messages can be seen there. Ifmysqld does not start, check the error log to see whether the server wrote any messages there to indicatethe cause of the problem. The error log is located in the MySQL data directory (for example, C:\ProgramFiles\MySQL\MySQL Server 5.5\data). It is the file with a suffix of .err.
When a MySQL server has been installed as a service, and the service is running, Windows stops theservice automatically when Windows shuts down. The server also can be stopped manually by using theServices utility, the NET STOP MySQL command, or the mysqladmin shutdown command.
You also have the choice of installing the server as a manual service if you do not wish for the service tobe started automatically during the boot process. To do this, use the --install-manual option ratherthan the --install option:
C:\> "C:\Program Files\MySQL\MySQL Server 5.5\bin\mysqld" --install-manual
Removing the service
To remove a server that is installed as a service, first stop it if it is running by executing NET STOP MySQL.Then use the --remove option to remove it:
C:\> "C:\Program Files\MySQL\MySQL Server 5.5\bin\mysqld" --remove
If mysqld is not running as a service, you can start it from the command line. For instructions, seeSection 5.7.5, “Starting MySQL from the Windows Command Line”.
If you encounter difficulties during installation, see Section 5.8, “Troubleshooting a Microsoft WindowsMySQL Server Installation”.
For more information about stopping or removing a MySQL Windows service, see Starting Multiple MySQLInstances as Windows Services.
5.7.8 Testing The MySQL Installation
You can test whether the MySQL server is working by executing any of the following commands:
C:\> "C:\Program Files\MySQL\MySQL Server 5.5\bin\mysqlshow"C:\> "C:\Program Files\MySQL\MySQL Server 5.5\bin\mysqlshow" -u root mysqlC:\> "C:\Program Files\MySQL\MySQL Server 5.5\bin\mysqladmin" version status procC:\> "C:\Program Files\MySQL\MySQL Server 5.5\bin\mysql" test
If mysqld is slow to respond to TCP/IP connections from client programs, there is probably a problem withyour DNS. In this case, start mysqld with the --skip-name-resolve option and use only localhost
Troubleshooting a Microsoft Windows MySQL Server Installation
116
and IP addresses in the Host column of the MySQL grant tables. (Be sure that an account exists thatspecifies an IP address or you may not be able to connect.)
You can force a MySQL client to use a named-pipe connection rather than TCP/IP by specifying the --pipe or --protocol=PIPE option, or by specifying . (period) as the host name. Use the --socketoption to specify the name of the pipe if you do not want to use the default pipe name.
If you have set a password for the root account, deleted the anonymous account, or created a new useraccount, then to connect to the MySQL server you must use the appropriate -u and -p options with thecommands shown previously. See Connecting to the MySQL Server.
For more information about mysqlshow, see mysqlshow — Display Database, Table, and ColumnInformation.
5.8 Troubleshooting a Microsoft Windows MySQL Server InstallationWhen installing and running MySQL for the first time, you may encounter certain errors that prevent theMySQL server from starting. This section helps you diagnose and correct some of these errors.
Your first resource when troubleshooting server issues is the error log. The MySQL server uses the errorlog to record information relevant to the error that prevents the server from starting. The error log is locatedin the data directory specified in your my.ini file. The default data directory location is C:\ProgramFiles\MySQL\MySQL Server 5.5\data, or C:\ProgramData\Mysql on Windows 7 and WindowsServer 2008. The C:\ProgramData directory is hidden by default. You need to change your folderoptions to see the directory and contents. For more information on the error log and understanding thecontent, see The Error Log.
For information regarding possible errors, also consult the console messages displayed when the MySQLservice is starting. Use the NET START MySQL command from the command line after installing mysqldas a service to see any error messages regarding the starting of the MySQL server as a service. SeeSection 5.7.7, “Starting MySQL as a Windows Service”.
The following examples show other common error messages you might encounter when installing MySQLand starting the server for the first time:
• If the MySQL server cannot find the mysql privileges database or other critical files, it displays thesemessages:
System error 1067 has occurred.Fatal error: Can't open and lock privilege tables:Table 'mysql.user' doesn't exist
These messages often occur when the MySQL base or data directories are installed in different locationsthan the default locations (C:\Program Files\MySQL\MySQL Server 5.5 and C:\ProgramFiles\MySQL\MySQL Server 5.5\data, respectively).
This situation can occur when MySQL is upgraded and installed to a new location, but the configurationfile is not updated to reflect the new location. In addition, old and new configuration files might conflict.Be sure to delete or rename any old configuration files when upgrading MySQL.
If you have installed MySQL to a directory other than C:\Program Files\MySQL\MySQL Server5.5, ensure that the MySQL server is aware of this through the use of a configuration (my.ini) file. Putthe my.ini file in your Windows directory, typically C:\WINDOWS. To determine its exact location fromthe value of the WINDIR environment variable, issue the following command from the command prompt:
C:\> echo %WINDIR%
Windows Postinstallation Procedures
117
You can create or modify an option file with any text editor, such as Notepad. For example, if MySQL isinstalled in E:\mysql and the data directory is D:\MySQLdata, you can create the option file and setup a [mysqld] section to specify values for the basedir and datadir options:
[mysqld]# set basedir to your installation pathbasedir=E:/mysql# set datadir to the location of your data directorydatadir=D:/MySQLdata
Microsoft Windows path names are specified in option files using (forward) slashes rather thanbackslashes. If you do use backslashes, double them:
[mysqld]# set basedir to your installation pathbasedir=C:\\Program Files\\MySQL\\MySQL Server 5.5# set datadir to the location of your data directorydatadir=D:\\MySQLdata
The rules for use of backslash in option file values are given in Using Option Files.
If you change the datadir value in your MySQL configuration file, you must move the contents of theexisting MySQL data directory before restarting the MySQL server.
See Section 5.7.2, “Creating an Option File”.
• If you reinstall or upgrade MySQL without first stopping and removing the existing MySQL service andinstall MySQL using the MySQL Installer, you might see this error:
Error: Cannot create Windows service for MySql. Error: 0
This occurs when the Configuration Wizard tries to install the service and finds an existing service withthe same name.
One solution to this problem is to choose a service name other than mysql when using the configurationwizard. This enables the new service to be installed correctly, but leaves the outdated service in place.Although this is harmless, it is best to remove old services that are no longer in use.
To permanently remove the old mysql service, execute the following command as a user withadministrative privileges, on the command line:
C:\> sc delete mysql[SC] DeleteService SUCCESS
If the sc utility is not available for your version of Windows, download the delsrv utility from http://www.microsoft.com/windows2000/techinfo/reskit/tools/existing/delsrv-o.asp and use the delsrv mysqlsyntax.
5.9 Windows Postinstallation ProceduresGUI tools exist that perform most of the tasks described in this section, including:
• MySQL Installer: Used to install and upgrade MySQL products.
• MySQL Workbench: Manages the MySQL server and edits SQL statements.
Windows Postinstallation Procedures
118
• MySQL Notifier: Starts, stops, or restarts the MySQL server, and monitors its status.
• MySQL for Excel: Edits MySQL data with Microsoft Excel.
On Windows, you need not create the data directory and the grant tables. MySQL Windows distributionsinclude the grant tables with a set of preinitialized accounts in the mysql database under the datadirectory.
Regarding passwords, if you installed MySQL using the MySQL Installer, you may have already assignedpasswords to the accounts. (See Section 5.3, “MySQL Installer for Windows”.) Otherwise, use thepassword-assignment procedure given in Section 9.4, “Securing the Initial MySQL Accounts”.
Before assigning passwords, you might want to try running some client programs to make sure that youcan connect to the server and that it is operating properly. Make sure that the server is running (seeSection 5.7.4, “Starting the Server for the First Time”). You can also set up a MySQL service that runsautomatically when Windows starts (see Section 5.7.7, “Starting MySQL as a Windows Service”).
These instructions assume that your current location is the MySQL installation directory and that it has abin subdirectory containing the MySQL programs used here. If that is not true, adjust the command pathnames accordingly.
If you installed MySQL using MySQL Installer (see Section 5.3, “MySQL Installer for Windows”), the defaultinstallation directory is C:\Program Files\MySQL\MySQL Server 5.5:
C:\> cd "C:\Program Files\MySQL\MySQL Server 5.5"
A common installation location for installation from a Zip package is C:\mysql:
C:\> cd C:\mysql
Alternatively, add the bin directory to your PATH environment variable setting. That enables yourcommand interpreter to find MySQL programs properly, so that you can run a program by typing only itsname, not its path name. See Section 5.7.6, “Customizing the PATH for MySQL Tools”.
With the server running, issue the following commands to verify that you can retrieve information from theserver. The output should be similar to that shown here.
Use mysqlshow to see what databases exist:
C:\> bin\mysqlshow+--------------------+| Databases |+--------------------+| information_schema || mysql || performance_schema || test |+--------------------+
The list of installed databases may vary, but will always include the minimum of mysql andinformation_schema.
The preceding command (and commands for other MySQL programs such as mysql) may not work if thecorrect MySQL account does not exist. For example, the program may fail with an error, or you may notbe able to view all databases. If you installed MySQL using MySQL Installer, the root user will have beencreated automatically with the password you supplied. In this case, you should use the -u root and -poptions. (You must use those options if you have already secured the initial MySQL accounts.) With -p, theclient program prompts for the root password. For example:
Upgrading MySQL on Windows
119
C:\> bin\mysqlshow -u root -pEnter password: (enter root password here)+--------------------+| Databases |+--------------------+| information_schema || mysql || performance_schema || test |+--------------------+
If you specify a database name, mysqlshow displays a list of the tables within the database:
C:\> bin\mysqlshow mysqlDatabase: mysql+---------------------------+| Tables |+---------------------------+| columns_priv || db || event || func || general_log || help_category || help_keyword || help_relation || help_topic || host || ndb_binlog_index || plugin || proc || procs_priv || proxies_priv || servers || slow_log || tables_priv || time_zone || time_zone_leap_second || time_zone_name || time_zone_transition || time_zone_transition_type || user |+---------------------------+
Use the mysql program to select information from a table in the mysql database:
C:\> bin\mysql -e "SELECT User, Host, plugin FROM mysql.user" mysql+------+-----------+-----------------------+| User | Host | plugin |+------+-----------+-----------------------+| root | localhost | mysql_native_password |+------+-----------+-----------------------+
For more information about mysql and mysqlshow, see mysql — The MySQL Command-Line Tool, andmysqlshow — Display Database, Table, and Column Information.
5.10 Upgrading MySQL on WindowsTo upgrade MySQL on Windows, follow these steps:
1. Review Section 10.1, “Upgrading MySQL”, for additional information on upgrading MySQL that is notspecific to Windows.
Upgrading MySQL on Windows
120
2. Always back up your current MySQL installation before performing an upgrade. See Database BackupMethods.
3. Download the latest Windows distribution of MySQL from http://dev.mysql.com/downloads/.
4. Before upgrading MySQL, stop the server. If the server is installed as a service, stop the service withthe following command from the command prompt:
C:\> NET STOP MySQL
If you are not running the MySQL server as a service, use mysqladmin to stop it. For example, beforeupgrading from MySQL 5.1 to 5.5, use mysqladmin from MySQL 5.1 as follows:
C:\> "C:\Program Files\MySQL\MySQL Server 5.1\bin\mysqladmin" -u root shutdown
Note
If the MySQL root user account has a password, invoke mysqladmin with the-p option and enter the password when prompted.
5. Before upgrading to MySQL 5.5 from a version previous to 4.1.5, or from a version of MySQL installedfrom a Zip archive to a version of MySQL installed with the MySQL Installation Wizard, you must firstmanually remove the previous installation and MySQL service (if the server is installed as a service).
To remove the MySQL service, use the following command:
C:\> C:\mysql\bin\mysqld --remove
If you do not remove the existing service, the MySQL Installation Wizard may fail to properlyinstall the new MySQL service.
6. If you are using the MySQL Installer, start it as described in Section 5.3, “MySQL Installer forWindows”.
If you are using the MySQL Installation Wizard, start the wizard as described in Section 5.5.1, “Usingthe MySQL Installation Wizard”.
7. If you are upgrading MySQL from a Zip archive, extract the archive. You may either overwrite yourexisting MySQL installation (usually located at C:\mysql), or install it into a different directory, such asC:\mysql5. Overwriting the existing installation is recommended. However, for upgrades (as opposedto installing for the first time), you must remove the data directory from your existing MySQL installationto avoid replacing your current data files. To do so, follow these steps:
a. Unzip the Zip archive in some location other than your current MySQL installation
b. Remove the data directory
c. Rezip the Zip archive
d. Unzip the modified Zip archive on top of your existing installation
Alternatively:
a. Unzip the Zip archive in some location other than your current MySQL installation
b. Remove the data directory
Upgrading MySQL on Windows
121
c. Move the data directory from the current MySQL installation to the location of the just-removed datadirectory
d. Remove the current MySQL installation
e. Move the unzipped installation to the location of the just-removed installation
8. If you were running MySQL as a Windows service and you had to remove the service earlier in thisprocedure, reinstall the service. (See Section 5.7.7, “Starting MySQL as a Windows Service”.)
9. Restart the server. For example, use NET START MySQL if you run MySQL as a service, or invokemysqld directly otherwise.
10. As Administrator, run mysql_upgrade to check your tables, attempt to repair them if necessary, andupdate your grant tables if they have changed so that you can take advantage of any new capabilities.See mysql_upgrade — Check and Upgrade MySQL Tables.
11. If you encounter errors, see Section 5.8, “Troubleshooting a Microsoft Windows MySQL ServerInstallation”.

122
123
Chapter 6 Installing MySQL on OS X
Table of Contents6.1 General Notes on Installing MySQL on OS X ............................................................................. 1236.2 Installing MySQL on OS X Using Native Packages ..................................................................... 1246.3 Installing a MySQL Launch Daemon .......................................................................................... 1306.4 Installing and Using the MySQL Preference Pane ...................................................................... 133
For a list of OS X versions that the MySQL server supports, see http://www.mysql.com/support/supportedplatforms/database.html.
MySQL for OS X is available in a number of different forms:
• Native Package Installer, which uses the native OS X installer (DMG) to walk you through the installationof MySQL. For more information, see Section 6.2, “Installing MySQL on OS X Using Native Packages”.You can use the package installer with OS X. The user you use to perform the installation must haveadministrator privileges.
• Compressed TAR archive, which uses a file packaged using the Unix tar and gzip commands. To usethis method, you will need to open a Terminal window. You do not need administrator privileges usingthis method, as you can install the MySQL server anywhere using this method. For more information onusing this method, you can use the generic instructions for using a tarball, Chapter 3, Installing MySQLon Unix/Linux Using Generic Binaries.
In addition to the core installation, the Package Installer also includes Section 6.3, “Installing a MySQLLaunch Daemon” and Section 6.4, “Installing and Using the MySQL Preference Pane”, both of whichsimplify the management of your installation.
For additional information on using MySQL on OS X, see Section 6.1, “General Notes on Installing MySQLon OS X”.
6.1 General Notes on Installing MySQL on OS X
You should keep the following issues and notes in mind:
• As of MySQL server 5.5.45, the DMG bundles a launchd daemon instead of the deprecated startup item.Startup items do not function as of OS X 10.10 (Yosemite), so using launchd is preferred. The availableMySQL preference pane under OS X System Preferences was also updated to use launchd.
• You may need (or want) to create a specific mysql user to own the MySQL directory and data. You cando this through the Directory Utility, and the mysql user should already exist. For use in singleuser mode, an entry for _mysql (note the underscore prefix) should already exist within the system /etc/passwd file.
• Because the MySQL package installer installs the MySQL contents into a version and platform specificdirectory, you can use this to upgrade and migrate your database between versions. You will needto either copy the data directory from the old version to the new version, or alternatively specify analternative datadir value to set location of the data directory. By default, the MySQL directories areinstalled under /usr/local/.
Installing MySQL on OS X Using Native Packages
124
• You might want to add aliases to your shell's resource file to make it easier to access commonly usedprograms such as mysql and mysqladmin from the command line. The syntax for bash is:
alias mysql=/usr/local/mysql/bin/mysqlalias mysqladmin=/usr/local/mysql/bin/mysqladmin
For tcsh, use:
alias mysql /usr/local/mysql/bin/mysqlalias mysqladmin /usr/local/mysql/bin/mysqladmin
Even better, add /usr/local/mysql/bin to your PATH environment variable. You can do thisby modifying the appropriate startup file for your shell. For more information, see Invoking MySQLPrograms.
• After you have copied over the MySQL database files from the previous installation and havesuccessfully started the new server, you should consider removing the old installation files to save diskspace. Additionally, you should also remove older versions of the Package Receipt directories located in/Library/Receipts/mysql-VERSION.pkg.
• Prior to OS X 10.7, MySQL server was bundled with OS X Server.
6.2 Installing MySQL on OS X Using Native Packages
The package is located inside a disk image (.dmg) file that you first need to mount by double-clicking itsicon in the Finder. It should then mount the image and display its contents.
Note
Before proceeding with the installation, be sure to stop all running MySQL serverinstances by using either the MySQL Manager Application (on OS X Server), thepreference pane, or mysqladmin shutdown on the command line.
When installing from the package version, you can also install the MySQL preference pane, which willenable you to control the startup and execution of your MySQL server from System Preferences. For moreinformation, see Section 6.4, “Installing and Using the MySQL Preference Pane”.
When installing using the package installer, the files are installed into a directory within /usr/local matching the name of the installation version and platform. For example, the installer filemysql-5.5.58-osx10.9-x86_64.dmg installs MySQL into /usr/local/mysql-5.5.58-osx10.9-x86_64/ . The following table shows the layout of the installation directory.
Table 6.1 MySQL Installation Layout on OS X
Directory Contents of Directory
bin, scripts mysqld server, client and utility programs
data Log files, databases
docs Helper documents, like the Release Notes and buildinformation
include Include (header) files
lib Libraries
man Unix manual pages
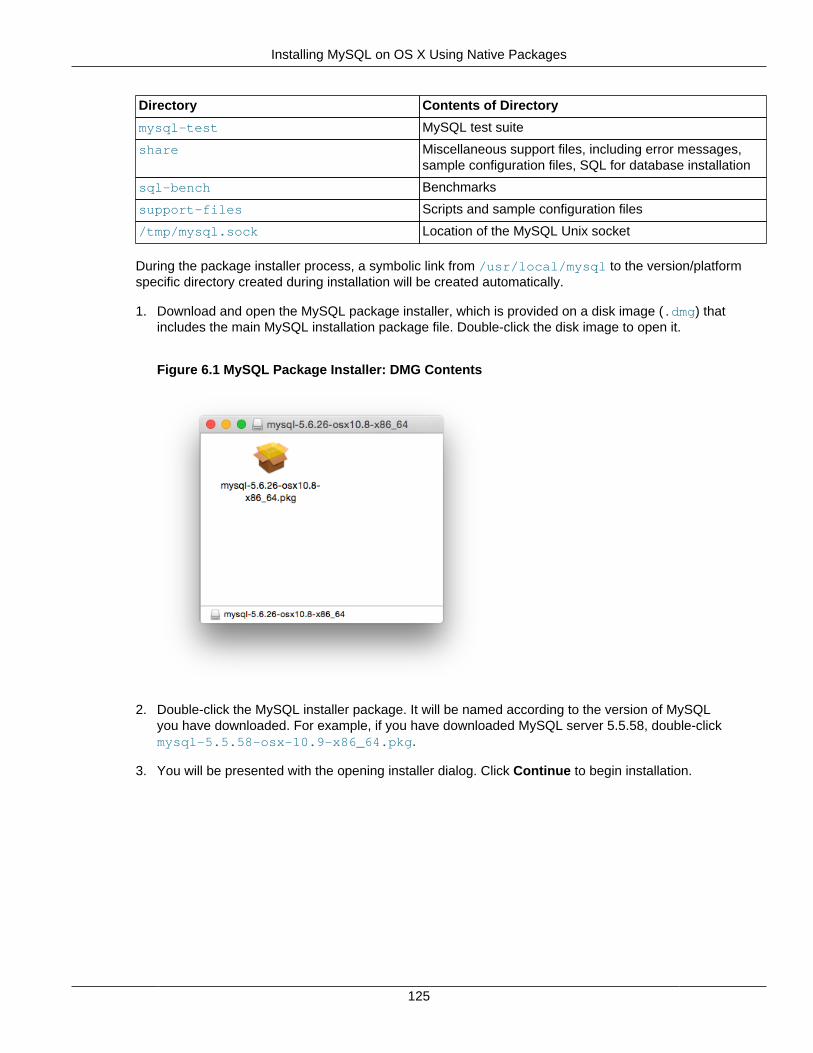
Installing MySQL on OS X Using Native Packages
125
Directory Contents of Directory
mysql-test MySQL test suite
share Miscellaneous support files, including error messages,sample configuration files, SQL for database installation
sql-bench Benchmarks
support-files Scripts and sample configuration files
/tmp/mysql.sock Location of the MySQL Unix socket
During the package installer process, a symbolic link from /usr/local/mysql to the version/platformspecific directory created during installation will be created automatically.
1. Download and open the MySQL package installer, which is provided on a disk image (.dmg) thatincludes the main MySQL installation package file. Double-click the disk image to open it.
Figure 6.1 MySQL Package Installer: DMG Contents
2. Double-click the MySQL installer package. It will be named according to the version of MySQLyou have downloaded. For example, if you have downloaded MySQL server 5.5.58, double-clickmysql-5.5.58-osx-10.9-x86_64.pkg.
3. You will be presented with the opening installer dialog. Click Continue to begin installation.
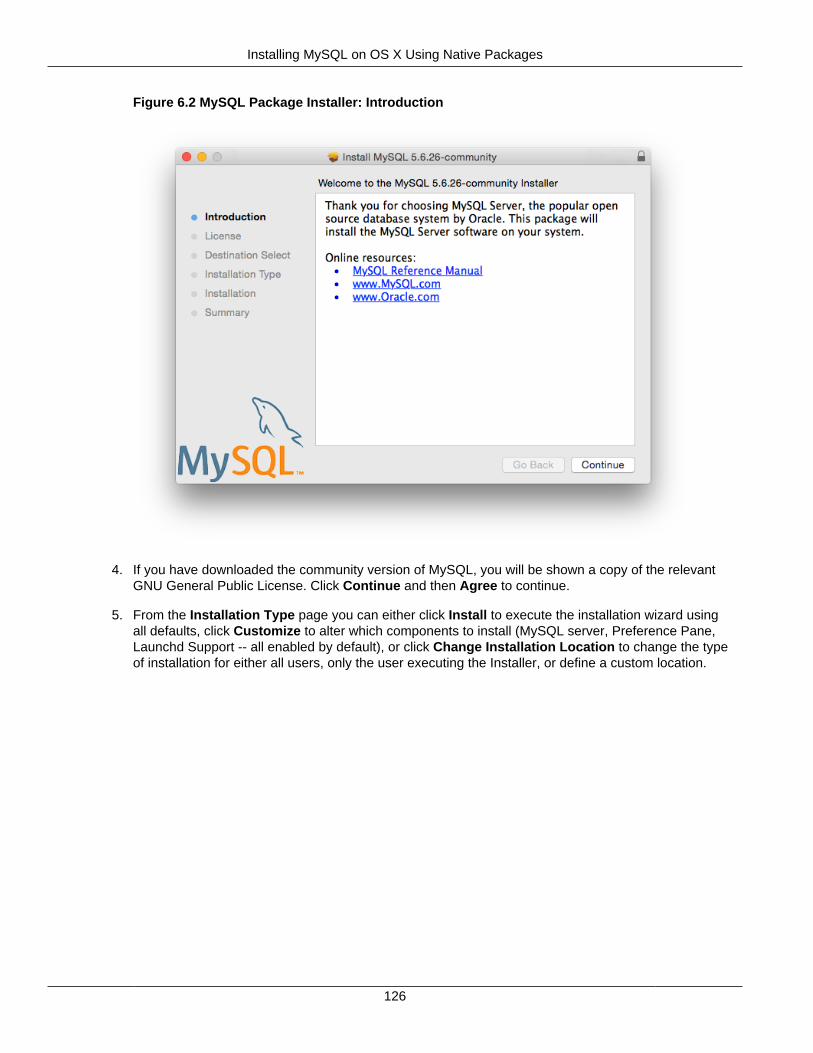
Installing MySQL on OS X Using Native Packages
126
Figure 6.2 MySQL Package Installer: Introduction
4. If you have downloaded the community version of MySQL, you will be shown a copy of the relevantGNU General Public License. Click Continue and then Agree to continue.
5. From the Installation Type page you can either click Install to execute the installation wizard usingall defaults, click Customize to alter which components to install (MySQL server, Preference Pane,Launchd Support -- all enabled by default), or click Change Installation Location to change the typeof installation for either all users, only the user executing the Installer, or define a custom location.
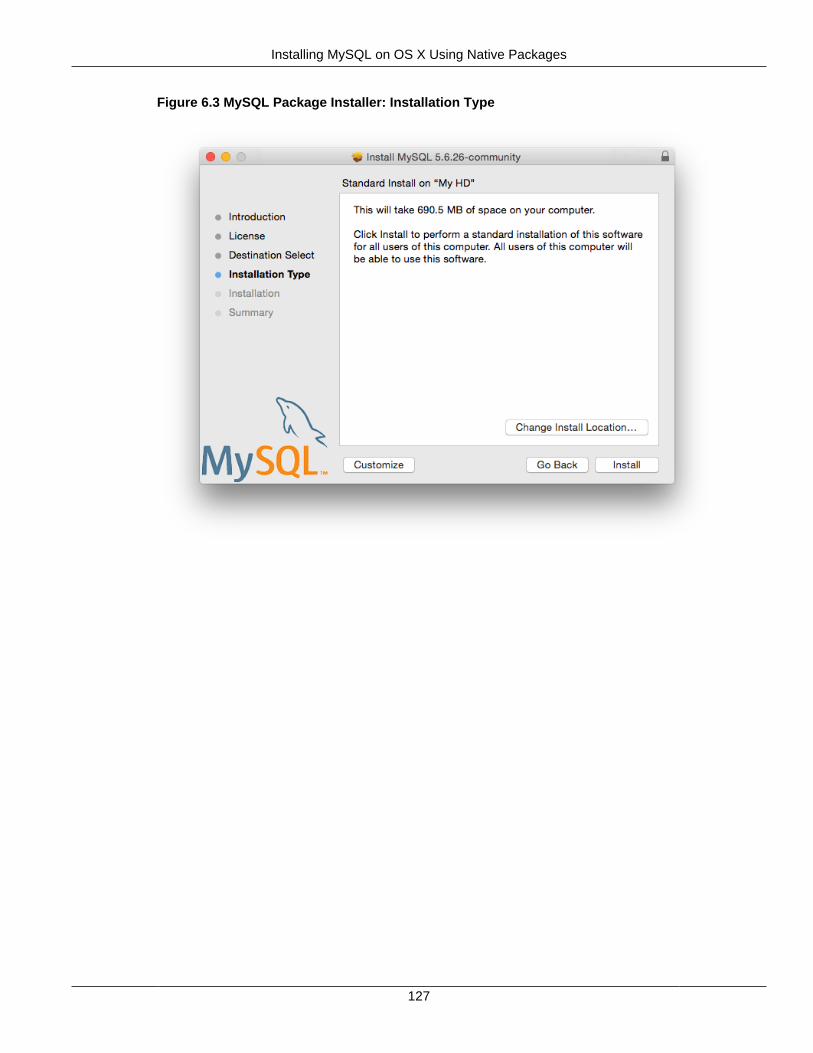
Installing MySQL on OS X Using Native Packages
127
Figure 6.3 MySQL Package Installer: Installation Type
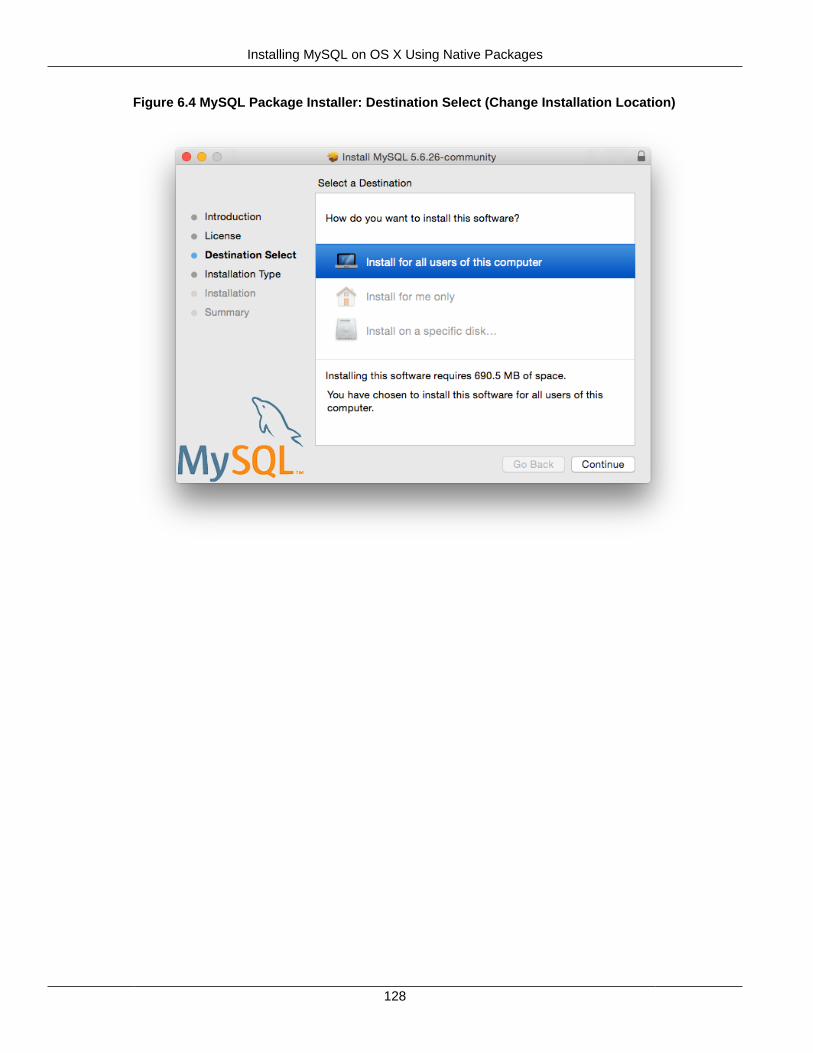
Installing MySQL on OS X Using Native Packages
128
Figure 6.4 MySQL Package Installer: Destination Select (Change Installation Location)
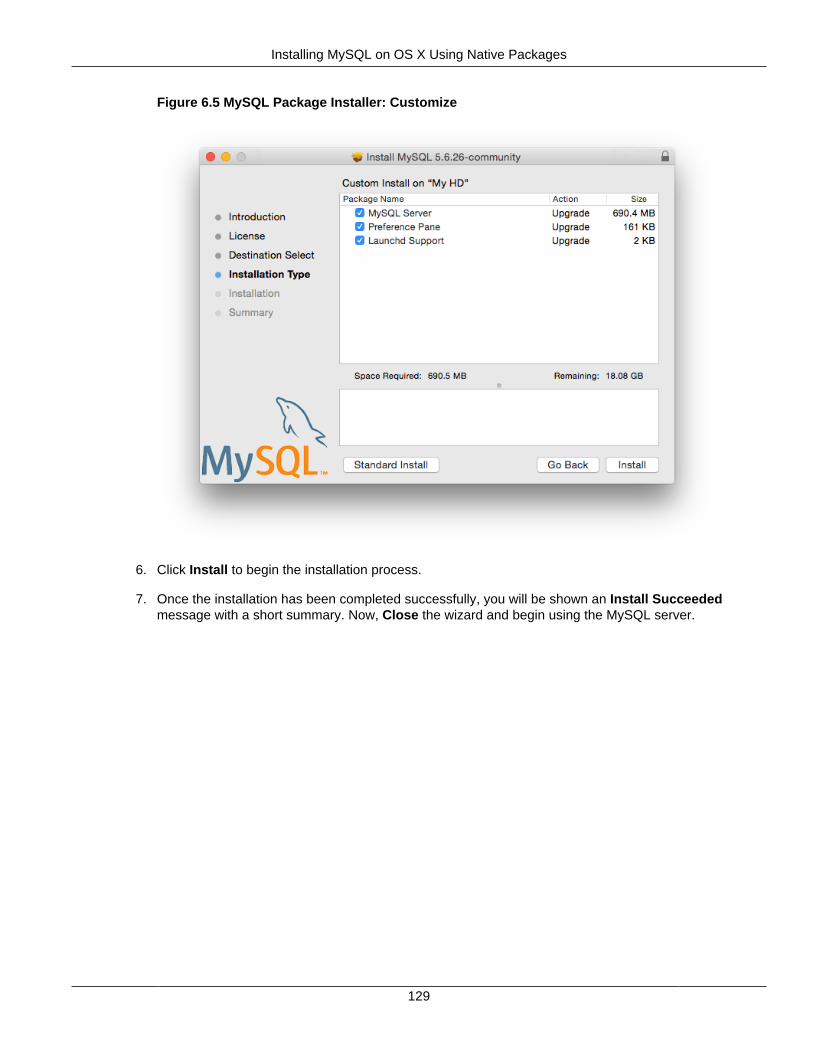
Installing MySQL on OS X Using Native Packages
129
Figure 6.5 MySQL Package Installer: Customize
6. Click Install to begin the installation process.
7. Once the installation has been completed successfully, you will be shown an Install Succeededmessage with a short summary. Now, Close the wizard and begin using the MySQL server.
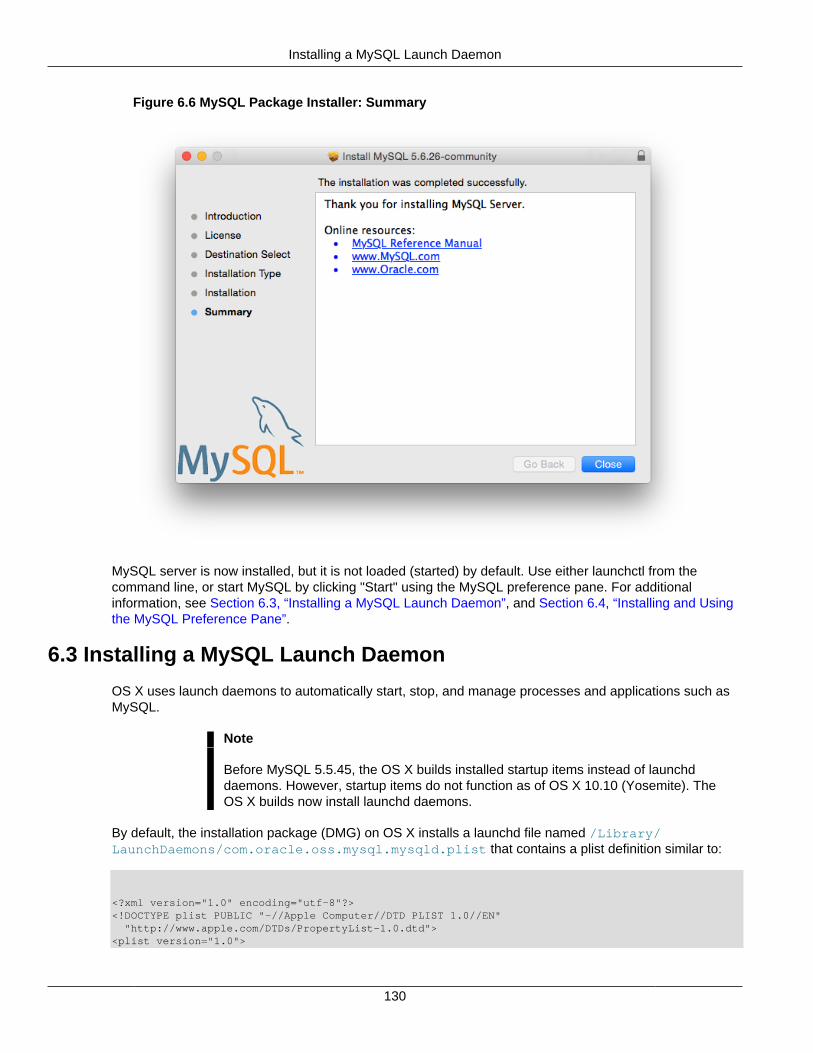
Installing a MySQL Launch Daemon
130
Figure 6.6 MySQL Package Installer: Summary
MySQL server is now installed, but it is not loaded (started) by default. Use either launchctl from thecommand line, or start MySQL by clicking "Start" using the MySQL preference pane. For additionalinformation, see Section 6.3, “Installing a MySQL Launch Daemon”, and Section 6.4, “Installing and Usingthe MySQL Preference Pane”.
6.3 Installing a MySQL Launch Daemon
OS X uses launch daemons to automatically start, stop, and manage processes and applications such asMySQL.
Note
Before MySQL 5.5.45, the OS X builds installed startup items instead of launchddaemons. However, startup items do not function as of OS X 10.10 (Yosemite). TheOS X builds now install launchd daemons.
By default, the installation package (DMG) on OS X installs a launchd file named /Library/LaunchDaemons/com.oracle.oss.mysql.mysqld.plist that contains a plist definition similar to:
<?xml version="1.0" encoding="utf-8"?><!DOCTYPE plist PUBLIC "-//Apple Computer//DTD PLIST 1.0//EN" "http://www.apple.com/DTDs/PropertyList-1.0.dtd"><plist version="1.0">
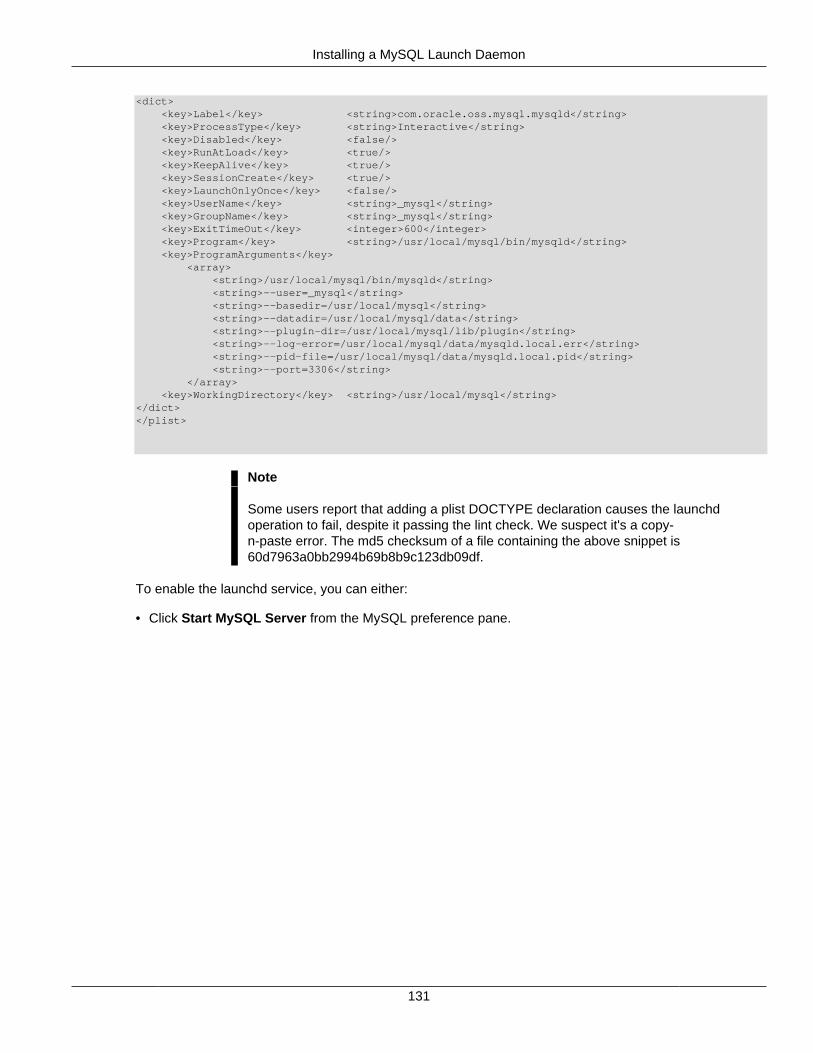
Installing a MySQL Launch Daemon
131
<dict> <key>Label</key> <string>com.oracle.oss.mysql.mysqld</string> <key>ProcessType</key> <string>Interactive</string> <key>Disabled</key> <false/> <key>RunAtLoad</key> <true/> <key>KeepAlive</key> <true/> <key>SessionCreate</key> <true/> <key>LaunchOnlyOnce</key> <false/> <key>UserName</key> <string>_mysql</string> <key>GroupName</key> <string>_mysql</string> <key>ExitTimeOut</key> <integer>600</integer> <key>Program</key> <string>/usr/local/mysql/bin/mysqld</string> <key>ProgramArguments</key> <array> <string>/usr/local/mysql/bin/mysqld</string> <string>--user=_mysql</string> <string>--basedir=/usr/local/mysql</string> <string>--datadir=/usr/local/mysql/data</string> <string>--plugin-dir=/usr/local/mysql/lib/plugin</string> <string>--log-error=/usr/local/mysql/data/mysqld.local.err</string> <string>--pid-file=/usr/local/mysql/data/mysqld.local.pid</string> <string>--port=3306</string> </array> <key>WorkingDirectory</key> <string>/usr/local/mysql</string></dict></plist>
Note
Some users report that adding a plist DOCTYPE declaration causes the launchdoperation to fail, despite it passing the lint check. We suspect it's a copy-n-paste error. The md5 checksum of a file containing the above snippet is60d7963a0bb2994b69b8b9c123db09df.
To enable the launchd service, you can either:
• Click Start MySQL Server from the MySQL preference pane.
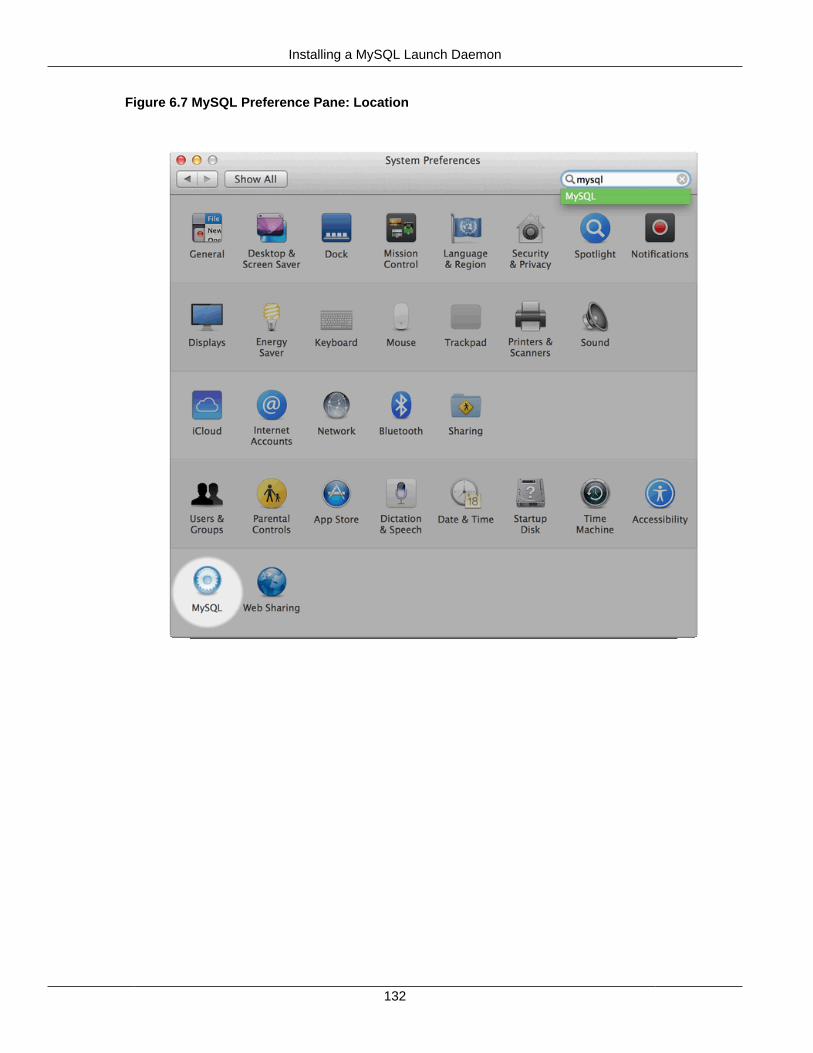
Installing a MySQL Launch Daemon
132
Figure 6.7 MySQL Preference Pane: Location
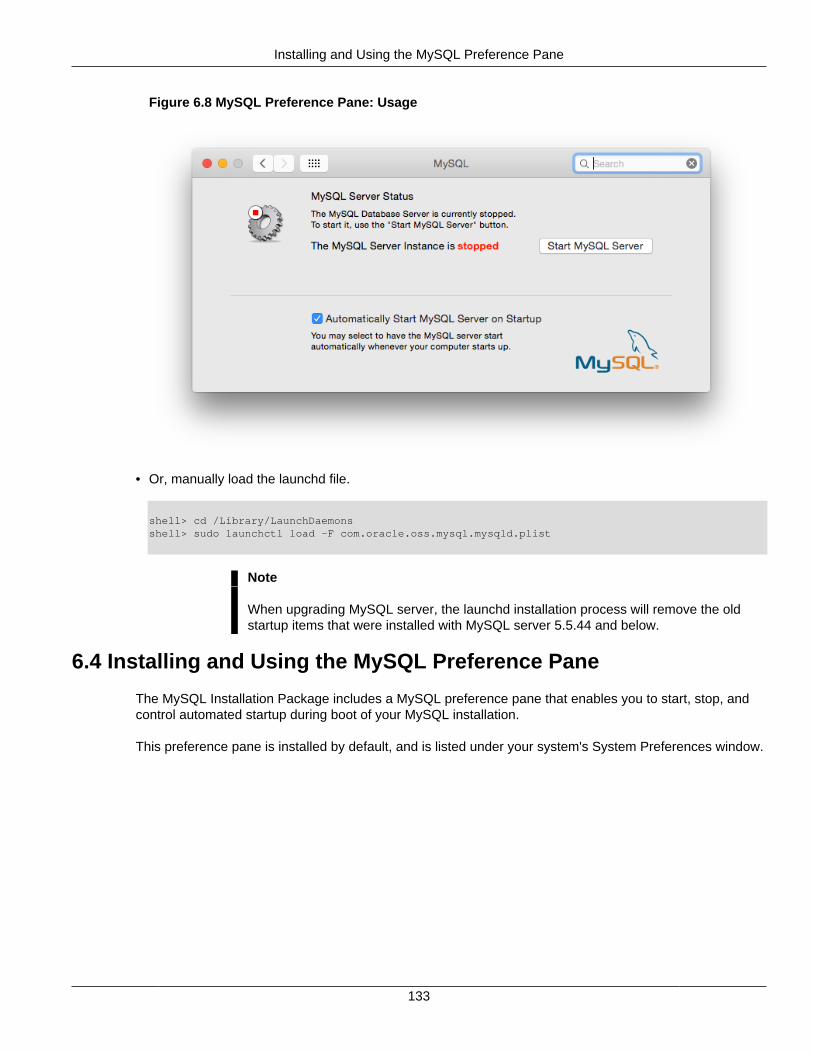
Installing and Using the MySQL Preference Pane
133
Figure 6.8 MySQL Preference Pane: Usage
• Or, manually load the launchd file.
shell> cd /Library/LaunchDaemonsshell> sudo launchctl load -F com.oracle.oss.mysql.mysqld.plist
Note
When upgrading MySQL server, the launchd installation process will remove the oldstartup items that were installed with MySQL server 5.5.44 and below.
6.4 Installing and Using the MySQL Preference Pane
The MySQL Installation Package includes a MySQL preference pane that enables you to start, stop, andcontrol automated startup during boot of your MySQL installation.
This preference pane is installed by default, and is listed under your system's System Preferences window.
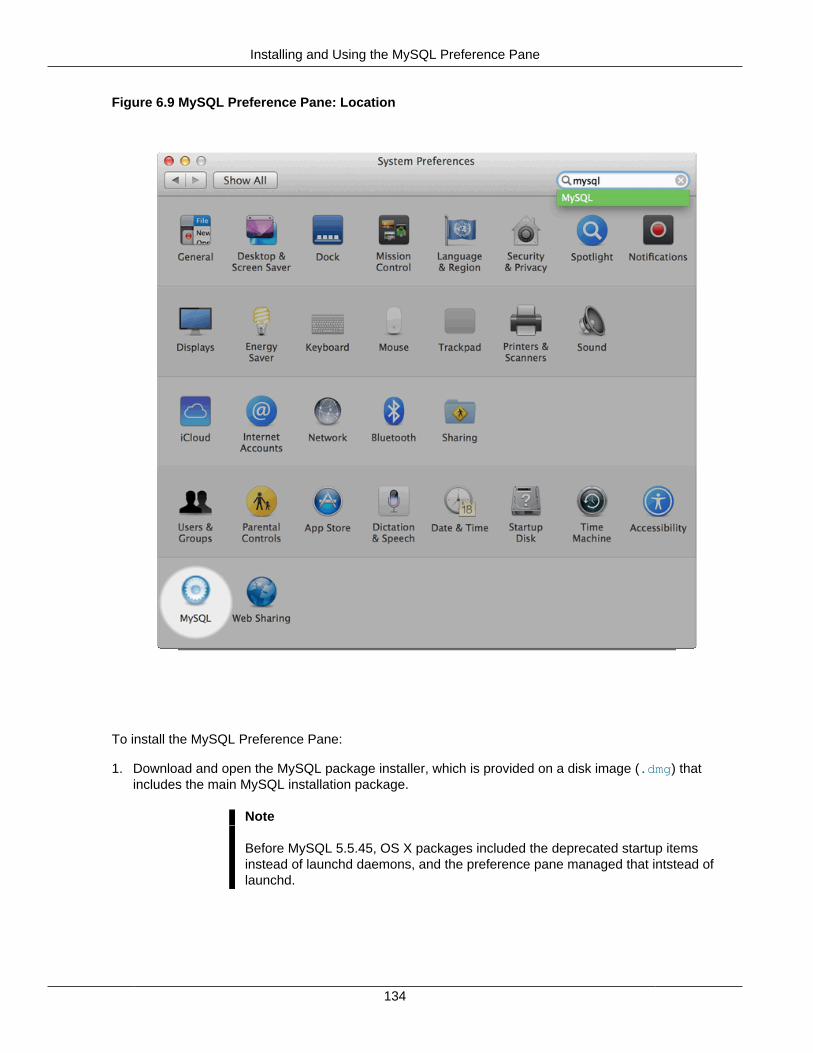
Installing and Using the MySQL Preference Pane
134
Figure 6.9 MySQL Preference Pane: Location
To install the MySQL Preference Pane:
1. Download and open the MySQL package installer, which is provided on a disk image (.dmg) thatincludes the main MySQL installation package.
Note
Before MySQL 5.5.45, OS X packages included the deprecated startup itemsinstead of launchd daemons, and the preference pane managed that intstead oflaunchd.
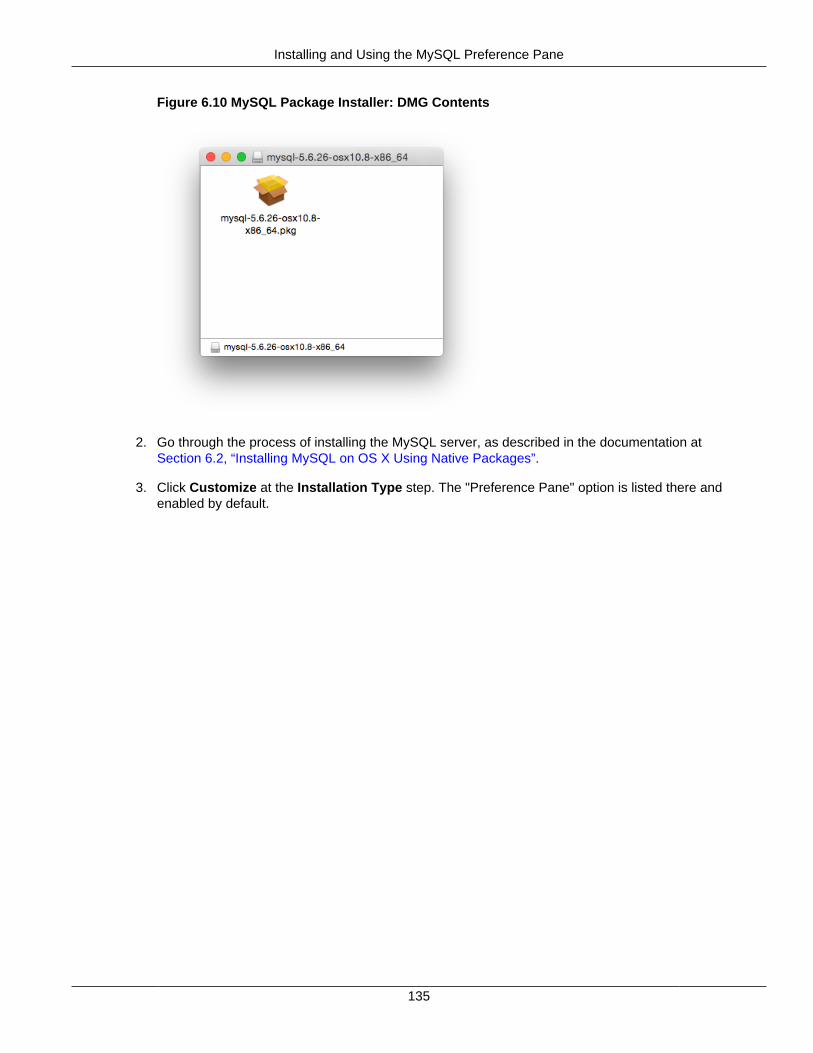
Installing and Using the MySQL Preference Pane
135
Figure 6.10 MySQL Package Installer: DMG Contents
2. Go through the process of installing the MySQL server, as described in the documentation atSection 6.2, “Installing MySQL on OS X Using Native Packages”.
3. Click Customize at the Installation Type step. The "Preference Pane" option is listed there andenabled by default.
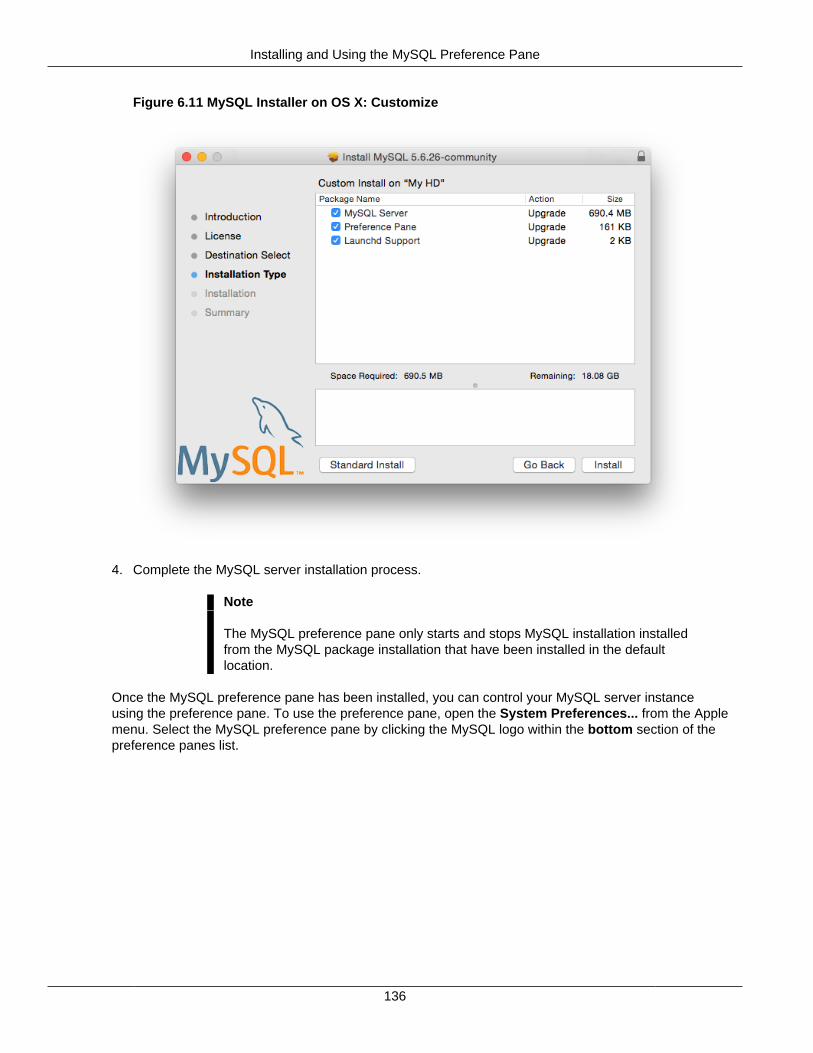
Installing and Using the MySQL Preference Pane
136
Figure 6.11 MySQL Installer on OS X: Customize
4. Complete the MySQL server installation process.
Note
The MySQL preference pane only starts and stops MySQL installation installedfrom the MySQL package installation that have been installed in the defaultlocation.
Once the MySQL preference pane has been installed, you can control your MySQL server instanceusing the preference pane. To use the preference pane, open the System Preferences... from the Applemenu. Select the MySQL preference pane by clicking the MySQL logo within the bottom section of thepreference panes list.
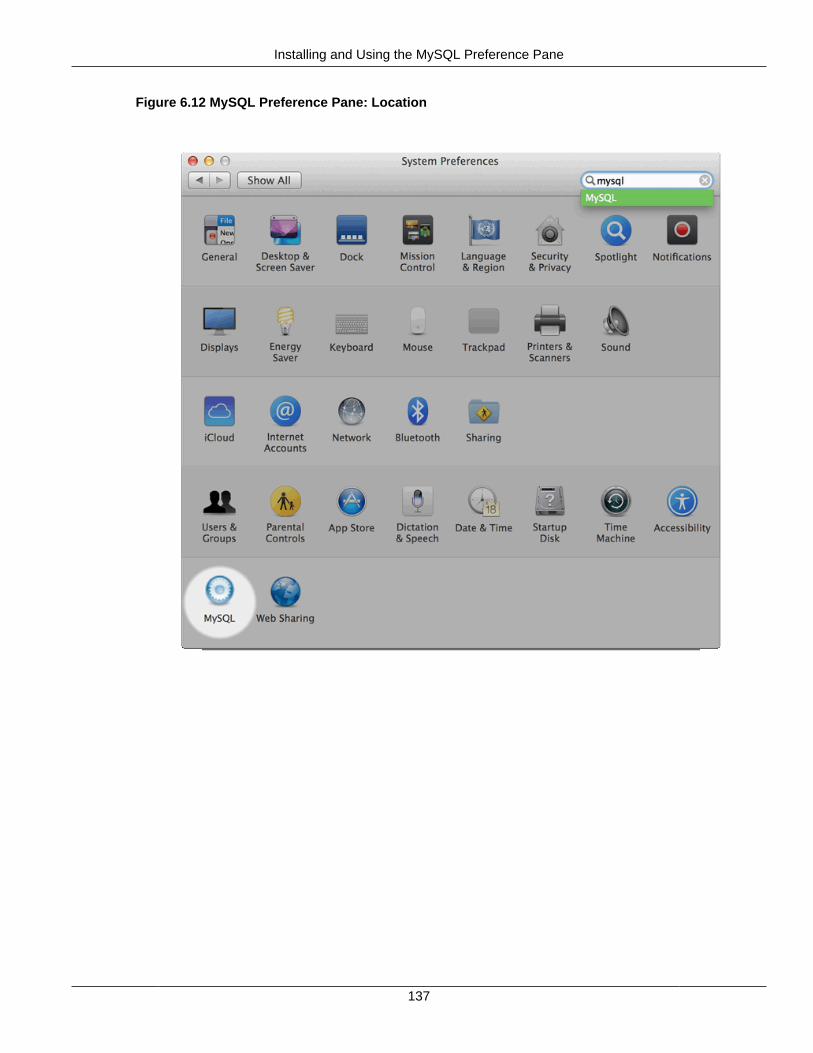
Installing and Using the MySQL Preference Pane
137
Figure 6.12 MySQL Preference Pane: Location
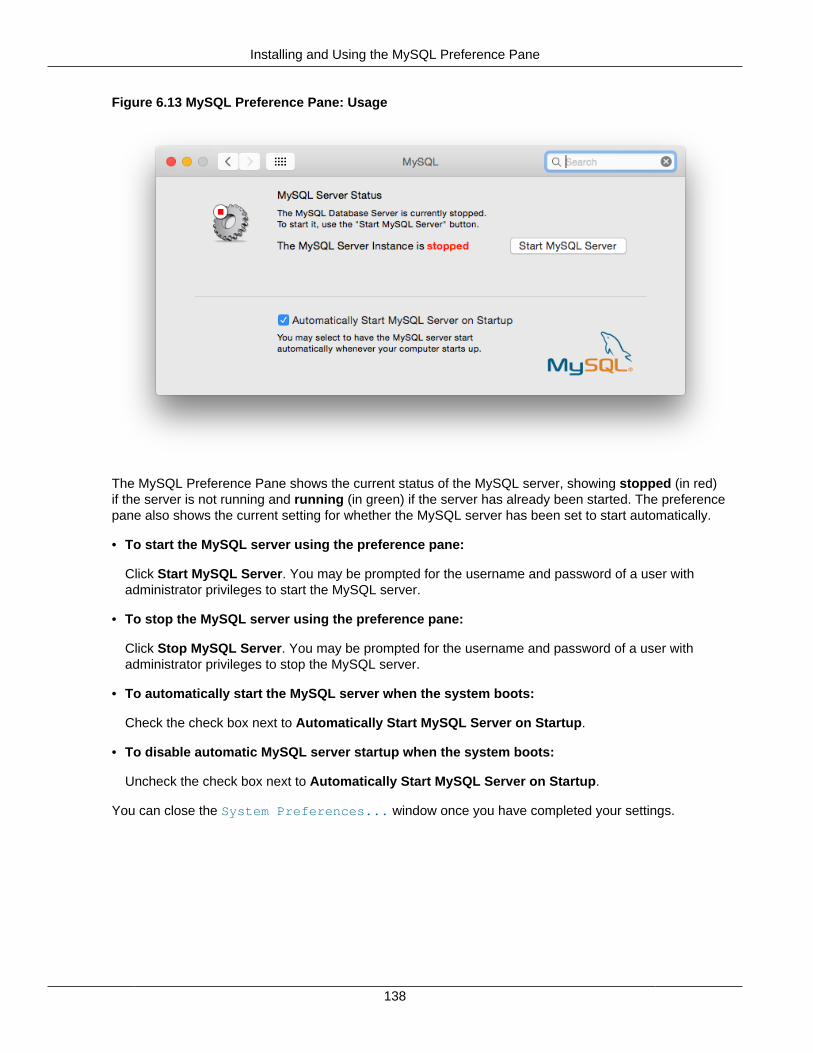
Installing and Using the MySQL Preference Pane
138
Figure 6.13 MySQL Preference Pane: Usage
The MySQL Preference Pane shows the current status of the MySQL server, showing stopped (in red)if the server is not running and running (in green) if the server has already been started. The preferencepane also shows the current setting for whether the MySQL server has been set to start automatically.
• To start the MySQL server using the preference pane:
Click Start MySQL Server. You may be prompted for the username and password of a user withadministrator privileges to start the MySQL server.
• To stop the MySQL server using the preference pane:
Click Stop MySQL Server. You may be prompted for the username and password of a user withadministrator privileges to stop the MySQL server.
• To automatically start the MySQL server when the system boots:
Check the check box next to Automatically Start MySQL Server on Startup.
• To disable automatic MySQL server startup when the system boots:
Uncheck the check box next to Automatically Start MySQL Server on Startup.
You can close the System Preferences... window once you have completed your settings.
139
Chapter 7 Installing MySQL on Linux
Table of Contents7.1 Installing MySQL on Linux Using RPM Packages ....................................................................... 1397.2 Installing MySQL on Linux Using Debian Packages .................................................................... 1447.3 Installing MySQL on Linux Using Native Package Managers ....................................................... 145
Linux supports a number of different solutions for installing MySQL. The recommended method is to useone of the distributions from Oracle. If you choose this method, there are several options available:
• Installing from a generic binary package in .tar.gz format. See Chapter 3, Installing MySQL on Unix/Linux Using Generic Binaries for more information.
• Extracting and compiling MySQL from a source distribution. For detailed instructions, see Chapter 4,Installing MySQL from Source.
• Installing using a precompiled RPM package. For more information, see Section 7.1, “Installing MySQLon Linux Using RPM Packages”.
• Installing using a precompiled Debian package. For more information, see Section 7.2, “InstallingMySQL on Linux Using Debian Packages”.
• Installing using Oracle's Unbreakable Linux Network (ULN). For more information, see Installing MySQLUsing Unbreakable Linux Network (ULN).
As an alternative, you can use the native package manager within your Linux distribution to automaticallydownload and install MySQL for you. Native package installations can take care of the download anddependencies required to run MySQL, but the MySQL version will often be some versions behind thecurrently available release. You will also normally be unable to install development releases, as theseare not usually made available in the native repository. For more information on using the native packageinstallers, see Section 7.3, “Installing MySQL on Linux Using Native Package Managers”.
Note
For many Linux installations, you will want to set up MySQL to be startedautomatically when your machine starts. Many of the native package installationsperform this operation for you, but for source, binary and RPM solutions you mayneed to set this up separately. The required script, mysql.server, can be foundin the support-files directory under the MySQL installation directory or in aMySQL source tree. You can install it as /etc/init.d/mysql for automaticMySQL startup and shutdown. See mysql.server — MySQL Server StartupScript.
7.1 Installing MySQL on Linux Using RPM PackagesNote
To install or upgrade to MySQL 5.5.31, be sure to read the special instructions atthe end of this section.
The recommended way to install MySQL on RPM-based Linux distributions is by using the RPM packages.The RPMs that we provide to the community should work on all versions of Linux that support RPMpackages and use glibc 2.3. To obtain RPM packages, see Section 2.2, “How to Get MySQL”.
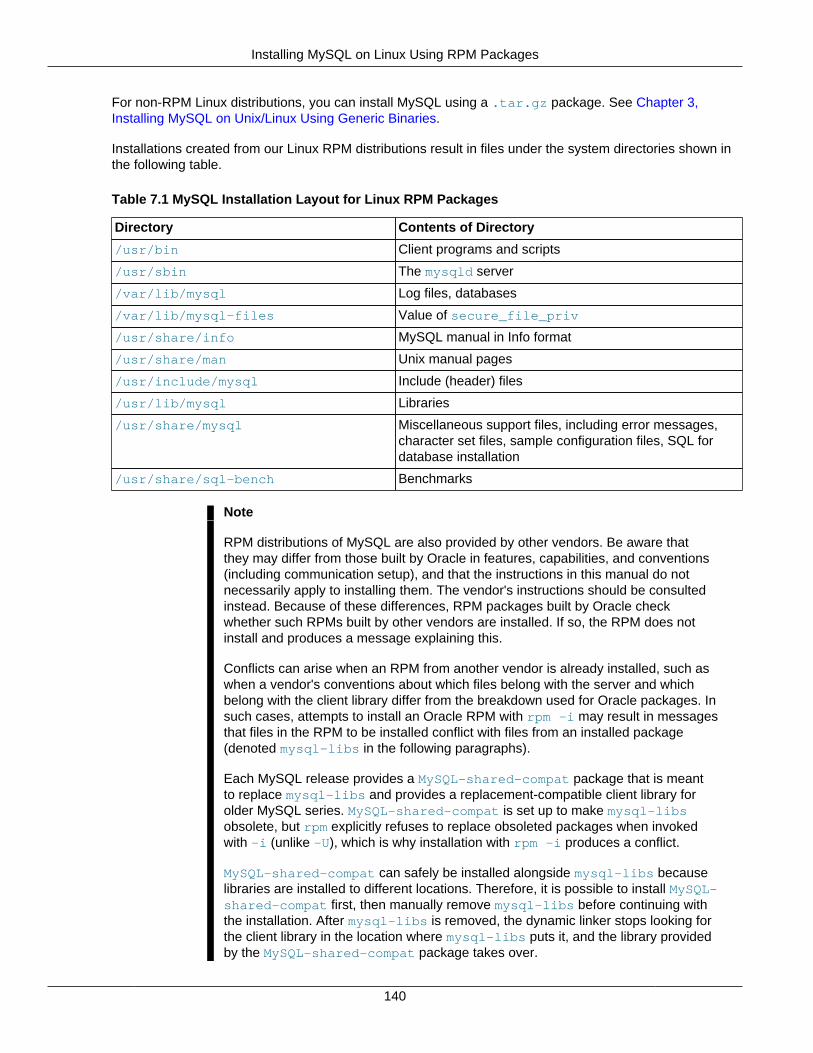
Installing MySQL on Linux Using RPM Packages
140
For non-RPM Linux distributions, you can install MySQL using a .tar.gz package. See Chapter 3,Installing MySQL on Unix/Linux Using Generic Binaries.
Installations created from our Linux RPM distributions result in files under the system directories shown inthe following table.
Table 7.1 MySQL Installation Layout for Linux RPM Packages
Directory Contents of Directory
/usr/bin Client programs and scripts
/usr/sbin The mysqld server
/var/lib/mysql Log files, databases
/var/lib/mysql-files Value of secure_file_priv
/usr/share/info MySQL manual in Info format
/usr/share/man Unix manual pages
/usr/include/mysql Include (header) files
/usr/lib/mysql Libraries
/usr/share/mysql Miscellaneous support files, including error messages,character set files, sample configuration files, SQL fordatabase installation
/usr/share/sql-bench Benchmarks
Note
RPM distributions of MySQL are also provided by other vendors. Be aware thatthey may differ from those built by Oracle in features, capabilities, and conventions(including communication setup), and that the instructions in this manual do notnecessarily apply to installing them. The vendor's instructions should be consultedinstead. Because of these differences, RPM packages built by Oracle checkwhether such RPMs built by other vendors are installed. If so, the RPM does notinstall and produces a message explaining this.
Conflicts can arise when an RPM from another vendor is already installed, such aswhen a vendor's conventions about which files belong with the server and whichbelong with the client library differ from the breakdown used for Oracle packages. Insuch cases, attempts to install an Oracle RPM with rpm -i may result in messagesthat files in the RPM to be installed conflict with files from an installed package(denoted mysql-libs in the following paragraphs).
Each MySQL release provides a MySQL-shared-compat package that is meantto replace mysql-libs and provides a replacement-compatible client library forolder MySQL series. MySQL-shared-compat is set up to make mysql-libsobsolete, but rpm explicitly refuses to replace obsoleted packages when invokedwith -i (unlike -U), which is why installation with rpm -i produces a conflict.
MySQL-shared-compat can safely be installed alongside mysql-libs becauselibraries are installed to different locations. Therefore, it is possible to install MySQL-shared-compat first, then manually remove mysql-libs before continuing withthe installation. After mysql-libs is removed, the dynamic linker stops looking forthe client library in the location where mysql-libs puts it, and the library providedby the MySQL-shared-compat package takes over.
Installing MySQL on Linux Using RPM Packages
141
Another alternative is to install packages using yum. In a directory containing allRPM packages for a MySQL release, yum install MySQL*rpm installs them inthe correct order and removes mysql-libs in one step without conflicts.
In most cases, you need install only the MySQL-server and MySQL-client packages to get a functionalstandard MySQL installation. The other packages are not required for a standard installation.
RPMs for NDB Cluster. Standard MySQL server RPMs built by MySQL do not provide support for theNDBCLUSTER storage engine.
Important
When upgrading an NDB Cluster RPM installation, you must upgrade all installedRPMs, including the Server and Client RPMs.
For more information about installing NDB Cluster from RPMs, see NDB Cluster Installation and Upgrades.
For upgrades, if your installation was originally produced by installing multiple RPM packages, it is best toupgrade all the installed packages, not just some. For example, if you previously installed the server andclient RPMs, do not upgrade just the server RPM.
If the data directory exists at RPM installation time, the installation process does not modify existing data.This has the effect, for example, that accounts in the grant tables are not initialized to the default set ofaccounts.
If you get a dependency failure when trying to install MySQL packages (for example, error: removingthese packages would break dependencies: libmysqlclient.so.10 is neededby ...), you should also install the MySQL-shared-compat package, which includes the sharedlibraries for older releases for backward compatibility.
The following list shows the available RPM packages. The names shown here use a suffix of.glibc23.i386.rpm, but particular packages can have different suffixes, described later. If you planto install multiple RPM packages, you may wish to download the RPM Bundle tar file instead, whichcontains multiple RPM packages so that you need not download them separately.
• MySQL-server-VERSION.glibc23.i386.rpm
The MySQL server. You need this unless you only want to connect to a MySQL server running onanother machine.
• MySQL-client-VERSION.glibc23.i386.rpm
The standard MySQL client programs. You probably always want to install this package.
• MySQL-devel-VERSION.glibc23.i386.rpm
The libraries and include files needed to compile other MySQL clients, such as the Perl MySQL module.Install this RPM if you intend to compile C API applications.
• MySQL-shared-VERSION.glibc23.i386.rpm
The shared libraries (libmysqlclient.so*) that certain languages and applications need todynamically load and use MySQL. It contains single-threaded and thread-safe libraries. Install thisRPM if you intend to compile or run C API applications that depend on the shared client library. Prior toMySQL 5.5.6, if you install this package, do not install the MySQL-shared-compat package.
• MySQL-shared-compat-VERSION.glibc23.i386.rpm

Installing MySQL on Linux Using RPM Packages
142
The shared libraries for older releases. It contains single-threaded and thread-safe libraries. Install thispackage if you have applications installed that are dynamically linked against older versions of MySQLbut you want to upgrade to the current version without breaking the library dependencies. Before MySQL5.5.6, MySQL-shared-compat also includes the libraries for the current release, so if you install it,you should not also install MySQL-shared. As of 5.5.6, MySQL-shared-compat does not include thecurrent library version, so there is no conflict.
As of MySQL 5.5.23, the MySQL-shared-compat RPM package enables users of Red Hat-providedmysql-*-5.1 RPM packages to migrate to Oracle-provided MySQL-*-5.5 packages. MySQL-shared-compat replaces the Red Hat mysql-libs package by replacing libmysqlclient.so filesof the latter package, thus satisfying dependencies of other packages on mysql-libs. This changeaffects only users of Red Hat (or Red Hat-compatible) RPM packages. Nothing is different for users ofOracle RPM packages.
• MySQL-embedded-VERSION.glibc23.i386.rpm
The embedded MySQL server library.
• MySQL-test-VERSION.glibc23.i386.rpm
The MySQL test suite.
• MySQL-VERSION.src.rpm
The source code for all of the previous packages. It can also be used to rebuild the RPMs on otherarchitectures (for example, SPARC).
In RPM package names, the suffix (following the VERSION value) has the following syntax:
.PLATFORM.CPU.rpm
The PLATFORM and CPU values indicate the type of system for which the package is built. PLATFORMindicates the platform and CPU indicates the processor type or family.
All packages are dynamically linked against glibc 2.3. The PLATFORM value indicates whether thepackage is platform independent or intended for a specific platform, as shown in the following table.
Table 7.2 MySQL Linux RPM Package Platforms
PLATFORM Value Intended Use
glibc23 Platform independent, should run on any Linux distribution that supportsglibc 2.3
rhel4, rhel5 Red Hat Enterprise Linux 4 or 5
el6 Enterprise Linux 6
sles10, sles11 SuSE Linux Enterprise Server 10 or 11
In MySQL 5.5, only glibc23 packages are available currently.
The CPU value indicates the processor type or family for which the package is built, as shown in thefollowing table.
Table 7.3 MySQL Linux RPM Package CPU Identifiers
CPU Value Intended Processor Type or Family
i386, i586, i686 Pentium processor or better, 32 bit
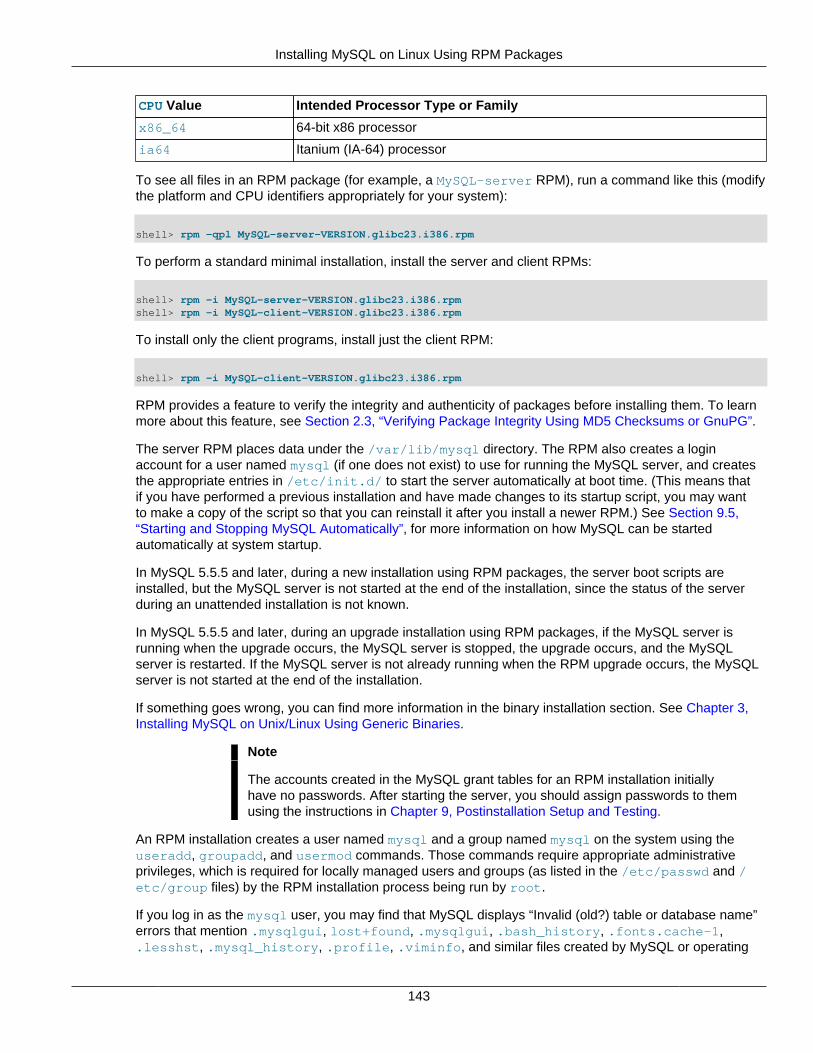
Installing MySQL on Linux Using RPM Packages
143
CPU Value Intended Processor Type or Family
x86_64 64-bit x86 processor
ia64 Itanium (IA-64) processor
To see all files in an RPM package (for example, a MySQL-server RPM), run a command like this (modifythe platform and CPU identifiers appropriately for your system):
shell> rpm -qpl MySQL-server-VERSION.glibc23.i386.rpm
To perform a standard minimal installation, install the server and client RPMs:
shell> rpm -i MySQL-server-VERSION.glibc23.i386.rpmshell> rpm -i MySQL-client-VERSION.glibc23.i386.rpm
To install only the client programs, install just the client RPM:
shell> rpm -i MySQL-client-VERSION.glibc23.i386.rpm
RPM provides a feature to verify the integrity and authenticity of packages before installing them. To learnmore about this feature, see Section 2.3, “Verifying Package Integrity Using MD5 Checksums or GnuPG”.
The server RPM places data under the /var/lib/mysql directory. The RPM also creates a loginaccount for a user named mysql (if one does not exist) to use for running the MySQL server, and createsthe appropriate entries in /etc/init.d/ to start the server automatically at boot time. (This means thatif you have performed a previous installation and have made changes to its startup script, you may wantto make a copy of the script so that you can reinstall it after you install a newer RPM.) See Section 9.5,“Starting and Stopping MySQL Automatically”, for more information on how MySQL can be startedautomatically at system startup.
In MySQL 5.5.5 and later, during a new installation using RPM packages, the server boot scripts areinstalled, but the MySQL server is not started at the end of the installation, since the status of the serverduring an unattended installation is not known.
In MySQL 5.5.5 and later, during an upgrade installation using RPM packages, if the MySQL server isrunning when the upgrade occurs, the MySQL server is stopped, the upgrade occurs, and the MySQLserver is restarted. If the MySQL server is not already running when the RPM upgrade occurs, the MySQLserver is not started at the end of the installation.
If something goes wrong, you can find more information in the binary installation section. See Chapter 3,Installing MySQL on Unix/Linux Using Generic Binaries.
Note
The accounts created in the MySQL grant tables for an RPM installation initiallyhave no passwords. After starting the server, you should assign passwords to themusing the instructions in Chapter 9, Postinstallation Setup and Testing.
An RPM installation creates a user named mysql and a group named mysql on the system using theuseradd, groupadd, and usermod commands. Those commands require appropriate administrativeprivileges, which is required for locally managed users and groups (as listed in the /etc/passwd and /etc/group files) by the RPM installation process being run by root.
If you log in as the mysql user, you may find that MySQL displays “Invalid (old?) table or database name”errors that mention .mysqlgui, lost+found, .mysqlgui, .bash_history, .fonts.cache-1,.lesshst, .mysql_history, .profile, .viminfo, and similar files created by MySQL or operating
Installing MySQL on Linux Using Debian Packages
144
system utilities. You can safely ignore these error messages or remove the files or directories that causethem if you do not need them.
For nonlocal user management (LDAP, NIS, and so forth), the administrative tools may require additionalauthentication (such as a password), and will fail if the installing user does not provide this authentication.Even if they fail, the RPM installation will not abort but succeed, and this is intentional. If they failed, someof the intended transfer of ownership may be missing, and it is recommended that the system administratorthen manually ensures some appropriate user and group exists and manually transfers ownership followingthe actions in the RPM spec file.
In MySQL 5.5.31, the RPM spec file has been updated, which has the following consequences:
• For a non-upgrade installation (no existing MySQL version installed), it possible to install MySQL usingyum.
• For upgrades, it is necessary to clean up any earlier MySQL installations. In effect, the update isperformed by removing the old installations and installing the new one.
Additional details follow.
For a non-upgrade installation of MySQL 5.5.31, it is possible to install using yum:
shell> yum install MySQL-server-NEWVERSION.glibc23.i386.rpm
For upgrades to MySQL 5.5.31, the upgrade is performed by removing the old installation and installing thenew one. To do this, use the following procedure:
1. Remove the existing 5.5.X installation. OLDVERSION is the version to remove.
shell> rpm -e MySQL-server-OLDVERSION.glibc23.i386.rpm
Repeat this step for all installed MySQL RPMs.
2. Install the new version. NEWVERSION is the version to install.
shell> rpm -ivh MySQL-server-NEWVERSION.glibc23.i386.rpm
Alternatively, the removal and installation can be done using yum:
shell> yum remove MySQL-server-OLDVERSION.glibc23.i386.rpmshell> yum install MySQL-server-NEWVERSION.glibc23.i386.rpm
For some Linux distributions, it might be necessary to increase the limit on number of file descriptorsavailable to mysqld. See File Not Found and Similar Errors
7.2 Installing MySQL on Linux Using Debian PackagesOracle provides Debian packages for installation on Debian or Debian-like Linux systems. To obtain apackage, see Section 2.2, “How to Get MySQL”.
Note
Debian distributions of MySQL are also provided by other vendors. Be aware thatthey may differ from those built by us in features, capabilities, and conventions(including communication setup), and that the instructions in this manual do not
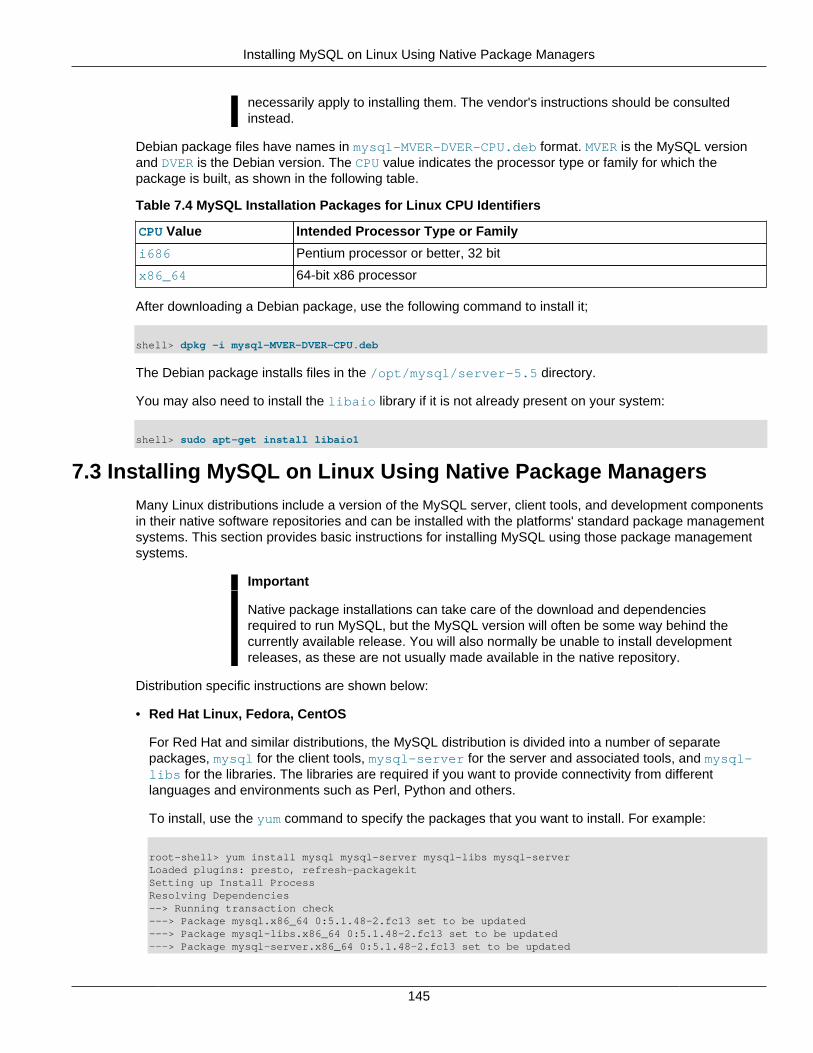
Installing MySQL on Linux Using Native Package Managers
145
necessarily apply to installing them. The vendor's instructions should be consultedinstead.
Debian package files have names in mysql-MVER-DVER-CPU.deb format. MVER is the MySQL versionand DVER is the Debian version. The CPU value indicates the processor type or family for which thepackage is built, as shown in the following table.
Table 7.4 MySQL Installation Packages for Linux CPU Identifiers
CPU Value Intended Processor Type or Family
i686 Pentium processor or better, 32 bit
x86_64 64-bit x86 processor
After downloading a Debian package, use the following command to install it;
shell> dpkg -i mysql-MVER-DVER-CPU.deb
The Debian package installs files in the /opt/mysql/server-5.5 directory.
You may also need to install the libaio library if it is not already present on your system:
shell> sudo apt-get install libaio1
7.3 Installing MySQL on Linux Using Native Package ManagersMany Linux distributions include a version of the MySQL server, client tools, and development componentsin their native software repositories and can be installed with the platforms' standard package managementsystems. This section provides basic instructions for installing MySQL using those package managementsystems.
Important
Native package installations can take care of the download and dependenciesrequired to run MySQL, but the MySQL version will often be some way behind thecurrently available release. You will also normally be unable to install developmentreleases, as these are not usually made available in the native repository.
Distribution specific instructions are shown below:
• Red Hat Linux, Fedora, CentOS
For Red Hat and similar distributions, the MySQL distribution is divided into a number of separatepackages, mysql for the client tools, mysql-server for the server and associated tools, and mysql-libs for the libraries. The libraries are required if you want to provide connectivity from differentlanguages and environments such as Perl, Python and others.
To install, use the yum command to specify the packages that you want to install. For example:
root-shell> yum install mysql mysql-server mysql-libs mysql-serverLoaded plugins: presto, refresh-packagekitSetting up Install ProcessResolving Dependencies--> Running transaction check---> Package mysql.x86_64 0:5.1.48-2.fc13 set to be updated---> Package mysql-libs.x86_64 0:5.1.48-2.fc13 set to be updated---> Package mysql-server.x86_64 0:5.1.48-2.fc13 set to be updated
Installing MySQL on Linux Using Native Package Managers
146
--> Processing Dependency: perl-DBD-MySQL for package: mysql-server-5.1.48-2.fc13.x86_64--> Running transaction check---> Package perl-DBD-MySQL.x86_64 0:4.017-1.fc13 set to be updated--> Finished Dependency ResolutionDependencies Resolved================================================================================ Package Arch Version Repository Size================================================================================Installing: mysql x86_64 5.1.48-2.fc13 updates 889 k mysql-libs x86_64 5.1.48-2.fc13 updates 1.2 M mysql-server x86_64 5.1.48-2.fc13 updates 8.1 MInstalling for dependencies: perl-DBD-MySQL x86_64 4.017-1.fc13 updates 136 kTransaction Summary================================================================================Install 4 Package(s)Upgrade 0 Package(s)Total download size: 10 MInstalled size: 30 MIs this ok [y/N]: yDownloading Packages:Setting up and reading Presto delta metadataProcessing delta metadataPackage(s) data still to download: 10 M(1/4): mysql-5.1.48-2.fc13.x86_64.rpm | 889 kB 00:04(2/4): mysql-libs-5.1.48-2.fc13.x86_64.rpm | 1.2 MB 00:06(3/4): mysql-server-5.1.48-2.fc13.x86_64.rpm | 8.1 MB 00:40(4/4): perl-DBD-MySQL-4.017-1.fc13.x86_64.rpm | 136 kB 00:00--------------------------------------------------------------------------------Total 201 kB/s | 10 MB 00:52Running rpm_check_debugRunning Transaction TestTransaction Test SucceededRunning Transaction Installing : mysql-libs-5.1.48-2.fc13.x86_64 1/4 Installing : mysql-5.1.48-2.fc13.x86_64 2/4 Installing : perl-DBD-MySQL-4.017-1.fc13.x86_64 3/4 Installing : mysql-server-5.1.48-2.fc13.x86_64 4/4Installed: mysql.x86_64 0:5.1.48-2.fc13 mysql-libs.x86_64 0:5.1.48-2.fc13 mysql-server.x86_64 0:5.1.48-2.fc13Dependency Installed: perl-DBD-MySQL.x86_64 0:4.017-1.fc13Complete!
MySQL and the MySQL server should now be installed. A sample configuration file is installed into /etc/my.cnf. An init script, to start and stop the server, will have been installed into /etc/init.d/mysqld. To start the MySQL server use service:
root-shell> service mysqld start
To enable the server to be started and stopped automatically during boot, use chkconfig:
root-shell> chkconfig --levels 235 mysqld on
Which enables the MySQL server to be started (and stopped) automatically at the specified the runlevels.
The database tables will have been automatically created for you, if they do not already exist. Youshould, however, run mysql_secure_installation to set the root passwords on your server.
• Debian, Ubuntu, Kubuntu
Installing MySQL on Linux Using Native Package Managers
147
On Debian and related distributions, there are two packages, mysql-client and mysql-server,for the client and server components respectively. You should specify an explicit version, for examplemysql-client-5.1, to ensure that you install the version of MySQL that you want.
To download and install, including any dependencies, use the apt-get command, specifying thepackages that you want to install.
Note
Before installing, make sure that you update your apt-get index files to ensureyou are downloading the latest available version.
A sample installation of the MySQL packages might look like this (some sections trimmed for clarity):
root-shell> apt-get install mysql-client-5.1 mysql-server-5.1Reading package lists... DoneBuilding dependency treeReading state information... DoneThe following packages were automatically installed and are no longer required: linux-headers-2.6.28-11 linux-headers-2.6.28-11-genericUse 'apt-get autoremove' to remove them.The following extra packages will be installed: bsd-mailx libdbd-mysql-perl libdbi-perl libhtml-template-perl libmysqlclient15off libmysqlclient16 libnet-daemon-perl libplrpc-perl mailx mysql-common postfixSuggested packages: dbishell libipc-sharedcache-perl tinyca procmail postfix-mysql postfix-pgsql postfix-ldap postfix-pcre sasl2-bin resolvconf postfix-cdbThe following NEW packages will be installed bsd-mailx libdbd-mysql-perl libdbi-perl libhtml-template-perl libmysqlclient15off libmysqlclient16 libnet-daemon-perl libplrpc-perl mailx mysql-client-5.1 mysql-common mysql-server-5.1 postfix0 upgraded, 13 newly installed, 0 to remove and 182 not upgraded.Need to get 1907kB/25.3MB of archives.After this operation, 59.5MB of additional disk space will be used.Do you want to continue [Y/n]? YGet: 1 http://gb.archive.ubuntu.com jaunty-updates/main mysql-common 5.1.30really5.0.75-0ubuntu10.5 [63.6kB]Get: 2 http://gb.archive.ubuntu.com jaunty-updates/main libmysqlclient15off 5.1.30really5.0.75-0ubuntu10.5 [1843kB]Fetched 1907kB in 9s (205kB/s)Preconfiguring packages ...Selecting previously deselected package mysql-common.(Reading database ... 121260 files and directories currently installed.)...Processing 1 added doc-base file(s)...Registering documents with scrollkeeper...Setting up libnet-daemon-perl (0.43-1) ...Setting up libplrpc-perl (0.2020-1) ...Setting up libdbi-perl (1.607-1) ...Setting up libmysqlclient15off (5.1.30really5.0.75-0ubuntu10.5) ...Setting up libdbd-mysql-perl (4.008-1) ...Setting up libmysqlclient16 (5.1.31-1ubuntu2) ...Setting up mysql-client-5.1 (5.1.31-1ubuntu2) ...Setting up mysql-server-5.1 (5.1.31-1ubuntu2) ... * Stopping MySQL database server mysqld ...done.100825 11:46:15 InnoDB: Started; log sequence number 0 46409100825 11:46:15 InnoDB: Starting shutdown...100825 11:46:17 InnoDB: Shutdown completed; log sequence number 0 46409100825 11:46:17 [Warning] Forcing shutdown of 1 plugins * Starting MySQL database server mysqld ...done. * Checking for corrupt, not cleanly closed and upgrade needing tables....
Installing MySQL on Linux Using Native Package Managers
148
Processing triggers for libc6 ...ldconfig deferred processing now taking place
Note
The apt-get command will install a number of packages, including the MySQLserver, in order to provide the typical tools and application environment. This canmean that you install a large number of packages in addition to the main MySQLpackage.
During installation, the initial database will be created, and you will be prompted for the MySQL rootpassword (and confirmation). A configuration file will have been created in /etc/mysql/my.cnf. Aninit script will have been created in /etc/init.d/mysql.
The server will already be started. You can manually start and stop the server using:
root-shell> service mysql [start|stop]
The service will automatically be added to the 2, 3 and 4 run levels, with stop scripts in the single,shutdown and restart levels.
• Gentoo Linux
As a source-based distribution, installing MySQL on Gentoo involves downloading the source, patchingthe Gentoo specifics, and then compiling the MySQL server and installing it. This process is handledautomatically by the emerge command.
The MySQL server and client tools are provided within a single package, dev-db/mysql. You canobtain a list of the versions available to install by looking at the portage directory for the package:
root-shell> ls /usr/portage/dev-db/mysql/mysql-5.5*mysql-5.5.46.ebuildmysql-5.5.47.ebuild
To install a specific MySQL version, you must specify the entire atom. For example:
root-shell> emerge =dev-db/mysql-5.5.46
After installation, you should initialize the data directory and set the password for the MySQL root user(see Section 9.1, “Initializing the Data Directory”). Alternatively, use the configuration interface to performthose tasks:
root-shell> emerge --config =dev-db/mysql-5.5.46
During installation, a sample configuration file is created for you in /etc/mysql/my.cnf, and an initscript is created in /etc/init.d/mysql.
To enable MySQL to start automatically at the normal (default) run levels, use this command:
root-shell> rc-update add mysql default
149
Chapter 8 Installing MySQL on Solaris
Table of Contents8.1 Installing MySQL on Solaris Using a Solaris PKG ...................................................................... 150
Note
MySQL 5.5 supports Solaris 10 (Update 11 and later), and Solaris 11 (Update 3 andlater).
MySQL on Solaris is available in a number of different formats.
• For information on installing using the native Solaris PKG format, see Section 8.1, “Installing MySQL onSolaris Using a Solaris PKG”.
• To use a standard tar binary installation, use the notes provided in Chapter 3, Installing MySQL onUnix/Linux Using Generic Binaries. Check the notes and hints at the end of this section for Solarisspecific notes that you may need before or after installation.
To obtain a binary MySQL distribution for Solaris in tarball or PKG format, http://dev.mysql.com/downloads/mysql/5.5.html.
Additional notes to be aware of when installing and using MySQL on Solaris:
• If you want to use MySQL with the mysql user and group, use the groupadd and useradd commands:
groupadd mysqluseradd -g mysql -s /bin/false mysql
• If you install MySQL using a binary tarball distribution on Solaris, because the Solaris tar cannot handlelong file names, use GNU tar (gtar) to unpack the distribution. If you do not have GNU tar on yoursystem, install it with the following command:
pkg install archiver/gnu-tar
• You should mount any file systems on which you intend to store InnoDB files with the forcedirectiooption. (By default mounting is done without this option.) Failing to do so will cause a significant drop inperformance when using the InnoDB storage engine on this platform.
• If you would like MySQL to start automatically, you can copy support-files/mysql.server to /etc/init.d and create a symbolic link to it named /etc/rc3.d/S99mysql.server.
• If too many processes try to connect very rapidly to mysqld, you should see this error in the MySQL log:
Error in accept: Protocol error
You might try starting the server with the --back_log=50 option as a workaround for this.
• To configure the generation of core files on Solaris you should use the coreadm command. Becauseof the security implications of generating a core on a setuid() application, by default, Solaris doesnot support core files on setuid() programs. However, you can modify this behavior using coreadm.
Installing MySQL on Solaris Using a Solaris PKG
150
If you enable setuid() core files for the current user, they will be generated using the mode 600 andowned by the superuser.
8.1 Installing MySQL on Solaris Using a Solaris PKG
You can install MySQL on Solaris using a binary package using the native Solaris PKG format instead ofthe binary tarball distribution.
To use this package, download the corresponding mysql-VERSION-solaris10-PLATFORM.pkg.gzfile, then uncompress it. For example:
shell> gunzip mysql-5.5.58-solaris10-x86_64.pkg.gz
To install a new package, use pkgadd and follow the onscreen prompts. You must have root privileges toperform this operation:
shell> pkgadd -d mysql-5.5.58-solaris10-x86_64.pkgThe following packages are available: 1 mysql MySQL Community Server (GPL) (i86pc) 5.5.58Select package(s) you wish to process (or 'all' to processall packages). (default: all) [?,??,q]:
The PKG installer installs all of the files and tools needed, and then initializes your database if one doesnot exist. To complete the installation, you should set the root password for MySQL as provided in theinstructions at the end of the installation. Alternatively, you can run the mysql_secure_installationscript that comes with the installation.
By default, the PKG package installs MySQL under the root path /opt/mysql. You can change only theinstallation root path when using pkgadd, which can be used to install MySQL in a different Solaris zone. Ifyou need to install in a specific directory, use a binary tar file distribution.
The pkg installer copies a suitable startup script for MySQL into /etc/init.d/mysql. To enableMySQL to startup and shutdown automatically, you should create a link between this file and the init scriptdirectories. For example, to ensure safe startup and shutdown of MySQL you could use the followingcommands to add the right links:
shell> ln /etc/init.d/mysql /etc/rc3.d/S91mysqlshell> ln /etc/init.d/mysql /etc/rc0.d/K02mysql
To remove MySQL, the installed package name is mysql. You can use this in combination with the pkgrmcommand to remove the installation.
To upgrade when using the Solaris package file format, you must remove the existing installation beforeinstalling the updated package. Removal of the package does not delete the existing database information,only the server, binaries and support files. The typical upgrade sequence is therefore:
shell> mysqladmin shutdownshell> pkgrm mysqlshell> pkgadd -d mysql-5.5.58-solaris10-x86_64.pkgshell> mysqld_safe &shell> mysql_upgrade
You should check the notes in Chapter 10, Upgrading or Downgrading MySQL before performing anyupgrade.
151
Chapter 9 Postinstallation Setup and Testing
Table of Contents9.1 Initializing the Data Directory ..................................................................................................... 151
9.1.1 Problems Running mysql_install_db ................................................................................ 1539.2 Starting the Server .................................................................................................................... 155
9.2.1 Troubleshooting Problems Starting the MySQL Server ..................................................... 1569.3 Testing the Server .................................................................................................................... 1589.4 Securing the Initial MySQL Accounts ......................................................................................... 1609.5 Starting and Stopping MySQL Automatically .............................................................................. 164
This section discusses tasks that you should perform after installing MySQL:
• If necessary, initialize the data directory and create the MySQL grant tables. For some MySQLinstallation methods, data directory initialization may be done for you automatically:
• Installation on Windows
• Installation on Linux using a server RPM distribution.
• Installation using the native packaging system on many platforms, including Debian Linux, UbuntuLinux, Gentoo Linux, and others.
• Installation on OS X using a DMG distribution.
For other platforms and installation types, including installation from generic binary and sourcedistributions, you must initialize the data directory yourself. For instructions, see Section 9.1, “Initializingthe Data Directory”.
• For instructions, see Section 9.2, “Starting the Server”, and Section 9.3, “Testing the Server”.
• Assign passwords to any initial accounts in the grant tables, if that was not already done during datadirectory initialization. Passwords prevent unauthorized access to the MySQL server. You may alsowish to restrict access to test databases. For instructions, see Section 9.4, “Securing the Initial MySQLAccounts”.
• Optionally, arrange for the server to start and stop automatically when your system starts and stops. Forinstructions, see Section 9.5, “Starting and Stopping MySQL Automatically”.
• Optionally, populate time zone tables to enable recognition of named time zones. For instructions, seeMySQL Server Time Zone Support.
When you are ready to create additional user accounts, you can find information on the MySQL accesscontrol system and account management in The MySQL Access Privilege System, and MySQL UserAccount Management.
9.1 Initializing the Data DirectoryAfter installing MySQL, you must initialize the data directory, including the tables in the mysql systemdatabase. For some MySQL installation methods, data directory initialization may be done automatically,as described in Chapter 9, Postinstallation Setup and Testing. For other installation methods, includinginstallation from generic binary and source distributions, you must initialize the data directory yourself.
Initializing the Data Directory
152
This section describes how to initialize the data directory on Unix and Unix-like systems. (For Windows,see Section 5.9, “Windows Postinstallation Procedures”.) For some suggested commands that you can useto test whether the server is accessible and working properly, see Section 9.3, “Testing the Server”.
In the examples shown here, the server runs under the user ID of the mysql login account. This assumesthat such an account exists. Either create the account if it does not exist, or substitute the name of adifferent existing login account that you plan to use for running the server. For information about creatingthe account, see Creating a mysql System User and Group, in Chapter 3, Installing MySQL on Unix/LinuxUsing Generic Binaries.
1. Change location into the top-level directory of your MySQL installation, represented here by BASEDIR:
shell> cd BASEDIR
BASEDIR is likely to be something like /usr/local/mysql or /usr/local. The following stepsassume that you have changed location to this directory.
You will find several files and subdirectories in the BASEDIR directory. The most important forinstallation purposes are the bin and scripts subdirectories, which contain the server as well asclient and utility programs.
2. If necessary, ensure that the distribution contents are accessible to mysql. If you installed thedistribution as mysql, no further action is required. If you installed the distribution as root, its contentswill be owned by root. Change its ownership to mysql by executing the following commands as rootin the installation directory. The first command changes the owner attribute of the files to the mysqluser. The second changes the group attribute to the mysql group.
shell> chown -R mysql .shell> chgrp -R mysql .
3. If necessary, initialize the data directory, including the mysql database containing the initial MySQLgrant tables that determine how users are permitted to connect to the server.
Typically, data directory initialization need be done only the first time you install MySQL. If you areupgrading an existing installation, you should run mysql_upgrade instead (see mysql_upgrade —Check and Upgrade MySQL Tables). However, the command that initializes the data directory does notoverwrite any existing privilege tables, so it should be safe to run in any circumstances.
shell> scripts/mysql_install_db --user=mysql
It is important to make sure that the database directories and files are owned by the mysql loginaccount so that the server has read and write access to them when you run it later. To ensure this ifyou run mysql_install_db as root, include the --user option as shown. Otherwise, you shouldexecute the program while logged in as mysql, in which case you can omit the --user option from thecommand.
The mysql_install_db command creates the server's data directory. Under the data directory, itcreates directories for the mysql database that holds the grant tables and the test database thatyou can use to test MySQL. The program also creates privilege table entries for the initial account oraccounts. test_. For a complete listing and description of the grant tables, see The MySQL AccessPrivilege System.
It might be necessary to specify other options such as --basedir or --datadir ifmysql_install_db does not identify the correct locations for the installation directory or datadirectory. For example:
Problems Running mysql_install_db
153
shell> scripts/mysql_install_db --user=mysql \ --basedir=/opt/mysql/mysql \ --datadir=/opt/mysql/mysql/data
If you do not want to have the test database, you can remove it after starting the server, using theinstructions in Section 9.4, “Securing the Initial MySQL Accounts”.
If you have trouble with mysql_install_db at this point, see Section 9.1.1, “Problems Runningmysql_install_db”.
4. After initializing the data directory, you can establish the final installation ownership settings. Toleave the installation owned by mysql, no action is required here. Otherwise, most of the MySQLinstallation can be owned by root if you like. The exception is that the data directory must be ownedby mysql. To accomplish this, run the following commands as root in the installation directory. Forsome distribution types, the data directory might be named var rather than data; adjust the secondcommand accordingly.
shell> chown -R root .shell> chown -R mysql data
If the plugin directory (the directory named by the plugin_dir system variable) is writable bythe server, it may be possible for a user to write executable code to a file in the directory usingSELECT ... INTO DUMPFILE. This can be prevented by making the plugin directory read only tothe server or by setting the secure_file_priv system variable at server startup to a directory whereSELECT writes can be performed safely.
5. If you installed MySQL using a source distribution, you may want to optionally copy one of the providedconfiguration files from the support-files directory into your /etc directory. There are differentsample configuration files for different use cases, server types, and CPU and RAM configurations. Touse one of these standard files, copy it to /etc/my.cnf, or /etc/mysql/my.cnf and edit and checkthe configuration before starting your MySQL server for the first time.
You can also create my.cnf yourself and place into it the options the server should use at startup. SeeServer Configuration Defaults.
If you do not copy one of the standard configuration files or create your own, the MySQL server startswith its default settings.
6. If you want MySQL to start automatically when you boot your machine, see Section 9.5, “Starting andStopping MySQL Automatically”.
Data directory initialization creates time zone tables in the mysql database but does not populate them. Todo so, use the instructions in MySQL Server Time Zone Support.
9.1.1 Problems Running mysql_install_db
The purpose of the mysql_install_db program is to initialize the data directory, including the tables inthe mysql system database. It does not overwrite existing MySQL privilege tables, and it does not affectany other data.
To re-create your privilege tables, first stop the mysqld server if it is running. Then rename the mysqldirectory under the data directory to save it, and run mysql_install_db. Suppose that your currentdirectory is the MySQL installation directory and that mysql_install_db is located in the bin directoryand the data directory is named data. To rename the mysql database and re-run mysql_install_db,use these commands.
Problems Running mysql_install_db
154
shell> mv data/mysql data/mysql.oldshell> scripts/mysql_install_db --user=mysql
When you run mysql_install_db, you might encounter the following problems:
• mysql_install_db fails to install the grant tables
You may find that mysql_install_db fails to install the grant tables and terminates after displaying thefollowing messages:
Starting mysqld daemon with databases from XXXXXXmysqld ended
In this case, you should examine the error log file very carefully. The log should be located in thedirectory XXXXXX named by the error message and should indicate why mysqld did not start. If you donot understand what happened, include the log when you post a bug report. See How to Report Bugs orProblems.
• There is a mysqld process running
This indicates that the server is running, in which case the grant tables have probably been createdalready. If so, there is no need to run mysql_install_db at all because it needs to be run only once,when you first install MySQL.
• Installing a second mysqld server does not work when one server is running
This can happen when you have an existing MySQL installation, but want to put a new installation in adifferent location. For example, you might have a production installation, but you want to create a secondinstallation for testing purposes. Generally the problem that occurs when you try to run a second serveris that it tries to use a network interface that is in use by the first server. In this case, you should see oneof the following error messages:
Can't start server: Bind on TCP/IP port:Address already in useCan't start server: Bind on unix socket...
For instructions on setting up multiple servers, see Running Multiple MySQL Instances on One Machine.
• You do not have write access to the /tmp directory
If you do not have write access to create temporary files or a Unix socket file in the default location (the/tmp directory) or the TMPDIR environment variable, if it has been set, an error occurs when you runmysql_install_db or the mysqld server.
You can specify different locations for the temporary directory and Unix socket file by executing thesecommands prior to starting mysql_install_db or mysqld, where some_tmp_dir is the full pathname to some directory for which you have write permission:
shell> TMPDIR=/some_tmp_dir/shell> MYSQL_UNIX_PORT=/some_tmp_dir/mysql.sockshell> export TMPDIR MYSQL_UNIX_PORT
Then you should be able to run mysql_install_db and start the server with these commands:
shell> scripts/mysql_install_db --user=mysql
Starting the Server
155
shell> bin/mysqld_safe --user=mysql &
If mysql_install_db is located in the scripts directory, modify the first command to scripts/mysql_install_db.
See How to Protect or Change the MySQL Unix Socket File, and Chapter 11, MySQL ProgramEnvironment Variables.
There are some alternatives to running the mysql_install_db program provided in the MySQLdistribution:
• If you want the initial privileges to be different from the standard defaults, use account-managementstatements such as CREATE USER, GRANT, and REVOKE to change the privileges after the grant tableshave been set up. In other words, run mysql_install_db, and then use mysql -u root mysql toconnect to the server as the MySQL root user so that you can issue the necessary statements. (SeeAccount Management Statements.)
To install MySQL on several machines with the same privileges, put the CREATE USER, GRANT,and REVOKE statements in a file and execute the file as a script using mysql after runningmysql_install_db. For example:
shell> scripts/mysql_install_db --user=mysqlshell> bin/mysql -u root < your_script_file
This enables you to avoid issuing the statements manually on each machine.
• It is possible to re-create the grant tables completely after they have previously been created. You mightwant to do this if you are just learning how to use CREATE USER, GRANT, and REVOKE and have madeso many modifications after running mysql_install_db that you want to wipe out the tables and startover.
To re-create the grant tables, stop the server if it is running and remove the mysql database directory.Then run mysql_install_db again.
9.2 Starting the ServerThis section describes how start the server on Unix and Unix-like systems. (For Windows, seeSection 5.7.4, “Starting the Server for the First Time”.) For some suggested commands that you can use totest whether the server is accessible and working properly, see Section 9.3, “Testing the Server”.
Start the MySQL server like this:
shell> bin/mysqld_safe --user=mysql &
It is important that the MySQL server be run using an unprivileged (non-root) login account. To ensurethis if you run mysqld_safe as root, include the --user option as shown. Otherwise, execute theprogram while logged in as mysql, in which case you can omit the --user option from the command.
For further instructions for running MySQL as an unprivileged user, see How to Run MySQL as a NormalUser.
If the command fails immediately and prints mysqld ended, look for information in the error log (which bydefault is the host_name.err file in the data directory).
If the server is unable to access the data directory it starts or read the grant tables in the mysql database,it writes a message to its error log. Such problems can occur if you neglected to create the grant tables by
Troubleshooting Problems Starting the MySQL Server
156
initializing the data directory before proceeding to this step, or if you ran the command that initializes thedata directory without the --user option. Remove the data directory and run the command with the --user option.
If you have other problems starting the server, see Section 9.2.1, “Troubleshooting Problems Starting theMySQL Server”. For more information about mysqld_safe, see mysqld_safe — MySQL Server StartupScript.
You can set up new accounts using the bin/mysql_setpermission script if you install the DBI andDBD::mysql Perl modules. See mysql_setpermission — Interactively Set Permissions in GrantTables. For Perl module installation instructions, see Chapter 12, Perl Installation Notes.
If you would like to use mysqlaccess and have the MySQL distribution in some nonstandard location,you must change the location where mysqlaccess expects to find the mysql client. Edit the bin/mysqlaccess script at approximately line 18. Search for a line that looks like this:
$MYSQL = '/usr/local/bin/mysql'; # path to mysql executable
Change the path to reflect the location where mysql actually is stored on your system. If you do not dothis, a Broken pipe error will occur when you run mysqlaccess.
9.2.1 Troubleshooting Problems Starting the MySQL Server
This section provides troubleshooting suggestions for problems starting the server. For additionalsuggestions for Windows systems, see Section 5.8, “Troubleshooting a Microsoft Windows MySQL ServerInstallation”.
If you have problems starting the server, here are some things to try:
• Check the error log to see why the server does not start.
• Specify any special options needed by the storage engines you are using.
• Make sure that the server knows where to find the data directory.
• Make sure that the server can access the data directory. The ownership and permissions of the datadirectory and its contents must be set such that the server can read and modify them.
• Verify that the network interfaces the server wants to use are available.
Some storage engines have options that control their behavior. You can create a my.cnf file and specifystartup options for the engines that you plan to use. If you are going to use storage engines that supporttransactional tables (InnoDB, NDB), be sure that you have them configured the way you want beforestarting the server:
If you are using InnoDB tables, see InnoDB Configuration.
Storage engines will use default option values if you specify none, but it is recommended that you reviewthe available options and specify explicit values for those for which the defaults are not appropriate for yourinstallation.
When the mysqld server starts, it changes location to the data directory. This is where it expects to finddatabases and where it expects to write log files. The server also writes the pid (process ID) file in the datadirectory.
The data directory location is hardwired in when the server is compiled. This is where the server looks forthe data directory by default. If the data directory is located somewhere else on your system, the server will
Troubleshooting Problems Starting the MySQL Server
157
not work properly. You can determine what the default path settings are by invoking mysqld with the --verbose and --help options.
If the default locations do not match the MySQL installation layout on your system, you can override themby specifying options to mysqld or mysqld_safe on the command line or in an option file.
To specify the location of the data directory explicitly, use the --datadir option. However, normally youcan tell mysqld the location of the base directory under which MySQL is installed and it looks for the datadirectory there. You can do this with the --basedir option.
To check the effect of specifying path options, invoke mysqld with those options followed by the --verbose and --help options. For example, if you change location into the directory where mysqldis installed and then run the following command, it shows the effect of starting the server with a basedirectory of /usr/local:
shell> ./mysqld --basedir=/usr/local --verbose --help
You can specify other options such as --datadir as well, but --verbose and --help must be the lastoptions.
Once you determine the path settings you want, start the server without --verbose and --help.
If mysqld is currently running, you can find out what path settings it is using by executing this command:
shell> mysqladmin variables
Or:
shell> mysqladmin -h host_name variables
host_name is the name of the MySQL server host.
If you get Errcode 13 (which means Permission denied) when starting mysqld, this means that theprivileges of the data directory or its contents do not permit server access. In this case, you change thepermissions for the involved files and directories so that the server has the right to use them. You can alsostart the server as root, but this raises security issues and should be avoided.
Change location into the data directory and check the ownership of the data directory and its contents tomake sure the server has access. For example, if the data directory is /usr/local/mysql/var, use thiscommand:
shell> ls -la /usr/local/mysql/var
If the data directory or its files or subdirectories are not owned by the login account that you use for runningthe server, change their ownership to that account. If the account is named mysql, use these commands:
shell> chown -R mysql /usr/local/mysql/varshell> chgrp -R mysql /usr/local/mysql/var
Even with correct ownership, MySQL might fail to start up if there is other security software running on yoursystem that manages application access to various parts of the file system. In this case, reconfigure thatsoftware to enable mysqld to access the directories it uses during normal operation.
If the server fails to start up correctly, check the error log. Log files are located in the data directory(typically C:\Program Files\MySQL\MySQL Server 5.5\data on Windows, /usr/local/mysql/
Testing the Server
158
data for a Unix/Linux binary distribution, and /usr/local/var for a Unix/Linux source distribution).Look in the data directory for files with names of the form host_name.err and host_name.log, wherehost_name is the name of your server host. Then examine the last few lines of these files. You can usetail to display them:
shell> tail host_name.errshell> tail host_name.log
The error log should contain information that indicates why the server could not start.
If either of the following errors occur, it means that some other program (perhaps another mysqld server)is using the TCP/IP port or Unix socket file that mysqld is trying to use:
Can't start server: Bind on TCP/IP port: Address already in useCan't start server: Bind on unix socket...
Use ps to determine whether you have another mysqld server running. If so, shut down the server beforestarting mysqld again. (If another server is running, and you really want to run multiple servers, you canfind information about how to do so in Running Multiple MySQL Instances on One Machine.)
If no other server is running, try to execute the command telnet your_host_nametcp_ip_port_number. (The default MySQL port number is 3306.) Then press Enter a couple oftimes. If you do not get an error message like telnet: Unable to connect to remote host:Connection refused, some other program is using the TCP/IP port that mysqld is trying to use. Youwill need to track down what program this is and disable it, or else tell mysqld to listen to a different portwith the --port option. In this case, you will also need to specify the port number for client programswhen connecting to the server using TCP/IP.
Another reason the port might be inaccessible is that you have a firewall running that blocks connections toit. If so, modify the firewall settings to permit access to the port.
If the server starts but you cannot connect to it, you should make sure that you have an entry in /etc/hosts that looks like this:
127.0.0.1 localhost
If you cannot get mysqld to start, you can try to make a trace file to find the problem by using the --debug option. See The DBUG Package.
9.3 Testing the Server
After the data directory is initialized and you have started the server, perform some simple tests to makesure that it works satisfactorily. This section assumes that your current location is the MySQL installationdirectory and that it has a bin subdirectory containing the MySQL programs used here. If that is not true,adjust the command path names accordingly.
Alternatively, add the bin directory to your PATH environment variable setting. That enables your shell(command interpreter) to find MySQL programs properly, so that you can run a program by typing only itsname, not its path name. See Setting Environment Variables.
Use mysqladmin to verify that the server is running. The following commands provide simple tests tocheck whether the server is up and responding to connections:
shell> bin/mysqladmin version
Testing the Server
159
shell> bin/mysqladmin variables
If you cannot connect to the server, specify a -u root option to connect as root. If you have assigned apassword for the root account already, you'll also need to specify -p on the command line and enter thepassword when prompted. For example:
shell> bin/mysqladmin -u root -p versionEnter password: (enter root password here)
The output from mysqladmin version varies slightly depending on your platform and version of MySQL,but should be similar to that shown here:
shell> bin/mysqladmin versionmysqladmin Ver 14.12 Distrib 5.5.58, for pc-linux-gnu on i686...Server version 5.5.58Protocol version 10Connection Localhost via UNIX socketUNIX socket /var/lib/mysql/mysql.sockUptime: 14 days 5 hours 5 min 21 secThreads: 1 Questions: 366 Slow queries: 0Opens: 0 Flush tables: 1 Open tables: 19Queries per second avg: 0.000
To see what else you can do with mysqladmin, invoke it with the --help option.
Verify that you can shut down the server (include a -p option if the root account has a password already):
shell> bin/mysqladmin -u root shutdown
Verify that you can start the server again. Do this by using mysqld_safe or by invoking mysqld directly.For example:
shell> bin/mysqld_safe --user=mysql &
If mysqld_safe fails, see Section 9.2.1, “Troubleshooting Problems Starting the MySQL Server”.
Run some simple tests to verify that you can retrieve information from the server. The output should besimilar to that shown here.
Use mysqlshow to see what databases exist:
shell> bin/mysqlshow+--------------------+| Databases |+--------------------+| information_schema || mysql || performance_schema || test |+--------------------+
The list of installed databases may vary, but will always include the minimum of mysql andinformation_schema.
If you specify a database name, mysqlshow displays a list of the tables within the database:
shell> bin/mysqlshow mysql
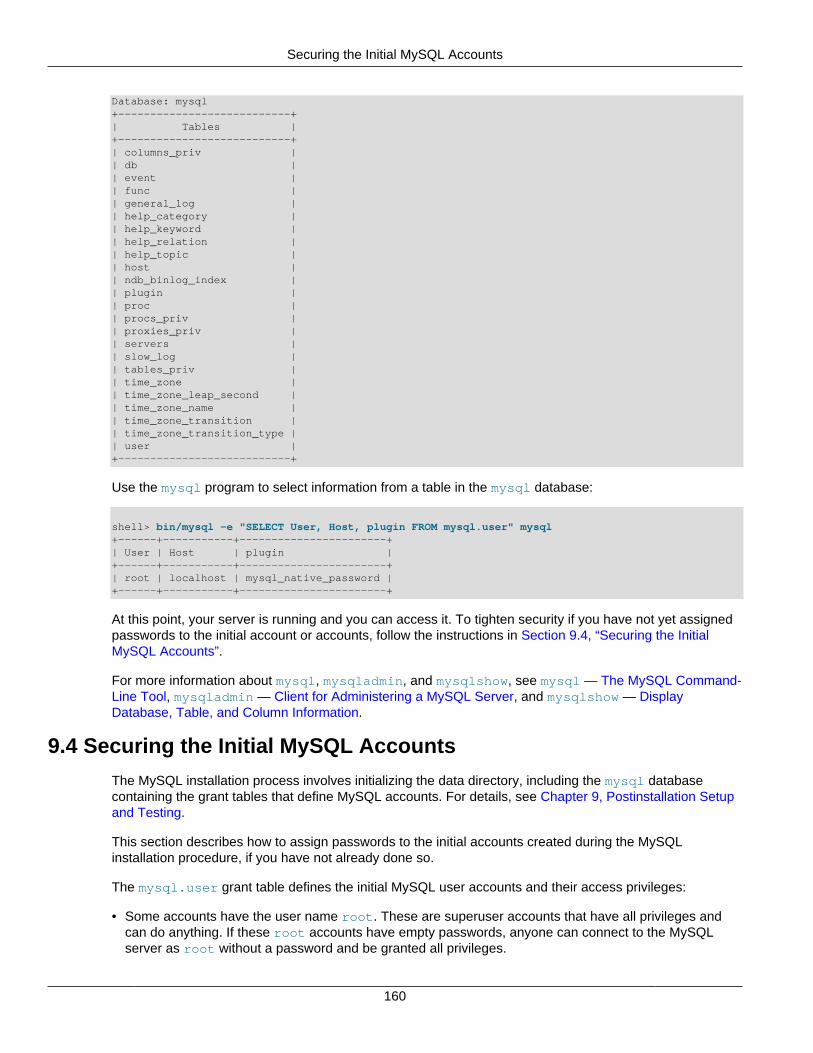
Securing the Initial MySQL Accounts
160
Database: mysql+---------------------------+| Tables |+---------------------------+| columns_priv || db || event || func || general_log || help_category || help_keyword || help_relation || help_topic || host || ndb_binlog_index || plugin || proc || procs_priv || proxies_priv || servers || slow_log || tables_priv || time_zone || time_zone_leap_second || time_zone_name || time_zone_transition || time_zone_transition_type || user |+---------------------------+
Use the mysql program to select information from a table in the mysql database:
shell> bin/mysql -e "SELECT User, Host, plugin FROM mysql.user" mysql+------+-----------+-----------------------+| User | Host | plugin |+------+-----------+-----------------------+| root | localhost | mysql_native_password |+------+-----------+-----------------------+
At this point, your server is running and you can access it. To tighten security if you have not yet assignedpasswords to the initial account or accounts, follow the instructions in Section 9.4, “Securing the InitialMySQL Accounts”.
For more information about mysql, mysqladmin, and mysqlshow, see mysql — The MySQL Command-Line Tool, mysqladmin — Client for Administering a MySQL Server, and mysqlshow — DisplayDatabase, Table, and Column Information.
9.4 Securing the Initial MySQL Accounts
The MySQL installation process involves initializing the data directory, including the mysql databasecontaining the grant tables that define MySQL accounts. For details, see Chapter 9, Postinstallation Setupand Testing.
This section describes how to assign passwords to the initial accounts created during the MySQLinstallation procedure, if you have not already done so.
The mysql.user grant table defines the initial MySQL user accounts and their access privileges:
• Some accounts have the user name root. These are superuser accounts that have all privileges andcan do anything. If these root accounts have empty passwords, anyone can connect to the MySQLserver as root without a password and be granted all privileges.
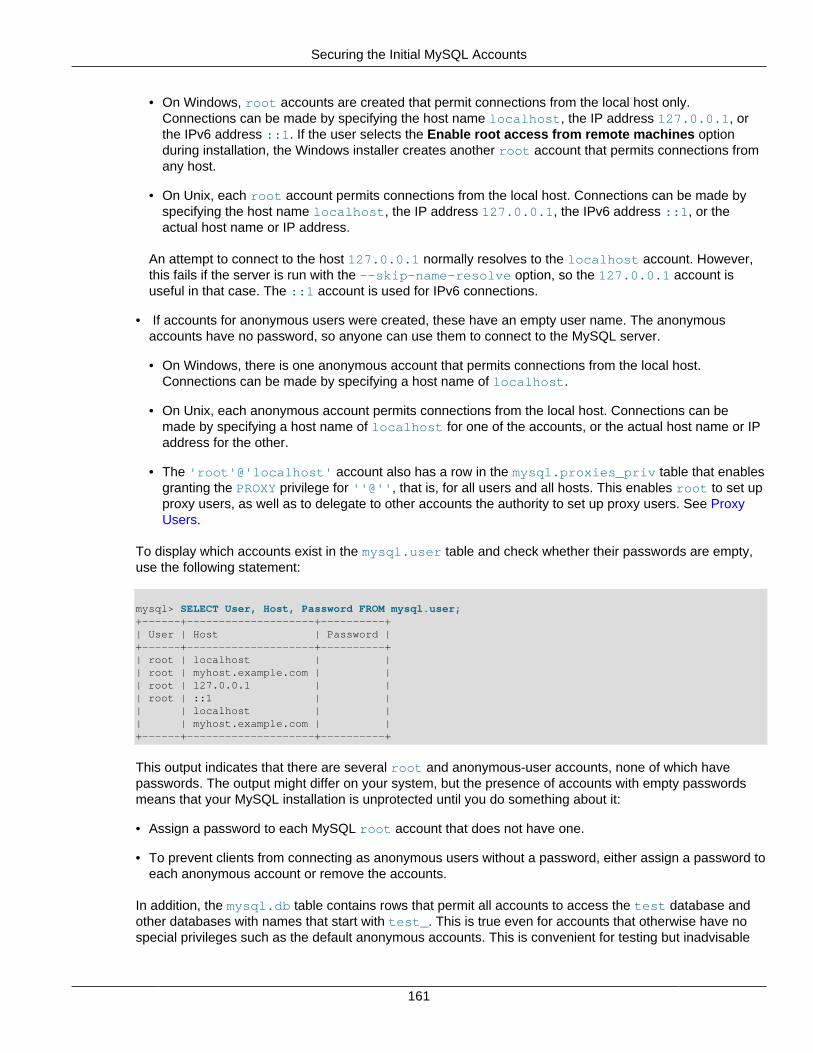
Securing the Initial MySQL Accounts
161
• On Windows, root accounts are created that permit connections from the local host only.Connections can be made by specifying the host name localhost, the IP address 127.0.0.1, orthe IPv6 address ::1. If the user selects the Enable root access from remote machines optionduring installation, the Windows installer creates another root account that permits connections fromany host.
• On Unix, each root account permits connections from the local host. Connections can be made byspecifying the host name localhost, the IP address 127.0.0.1, the IPv6 address ::1, or theactual host name or IP address.
An attempt to connect to the host 127.0.0.1 normally resolves to the localhost account. However,this fails if the server is run with the --skip-name-resolve option, so the 127.0.0.1 account isuseful in that case. The ::1 account is used for IPv6 connections.
• If accounts for anonymous users were created, these have an empty user name. The anonymousaccounts have no password, so anyone can use them to connect to the MySQL server.
• On Windows, there is one anonymous account that permits connections from the local host.Connections can be made by specifying a host name of localhost.
• On Unix, each anonymous account permits connections from the local host. Connections can bemade by specifying a host name of localhost for one of the accounts, or the actual host name or IPaddress for the other.
• The 'root'@'localhost' account also has a row in the mysql.proxies_priv table that enablesgranting the PROXY privilege for ''@'', that is, for all users and all hosts. This enables root to set upproxy users, as well as to delegate to other accounts the authority to set up proxy users. See ProxyUsers.
To display which accounts exist in the mysql.user table and check whether their passwords are empty,use the following statement:
mysql> SELECT User, Host, Password FROM mysql.user;+------+--------------------+----------+| User | Host | Password |+------+--------------------+----------+| root | localhost | || root | myhost.example.com | || root | 127.0.0.1 | || root | ::1 | || | localhost | || | myhost.example.com | |+------+--------------------+----------+
This output indicates that there are several root and anonymous-user accounts, none of which havepasswords. The output might differ on your system, but the presence of accounts with empty passwordsmeans that your MySQL installation is unprotected until you do something about it:
• Assign a password to each MySQL root account that does not have one.
• To prevent clients from connecting as anonymous users without a password, either assign a password toeach anonymous account or remove the accounts.
In addition, the mysql.db table contains rows that permit all accounts to access the test database andother databases with names that start with test_. This is true even for accounts that otherwise have nospecial privileges such as the default anonymous accounts. This is convenient for testing but inadvisable
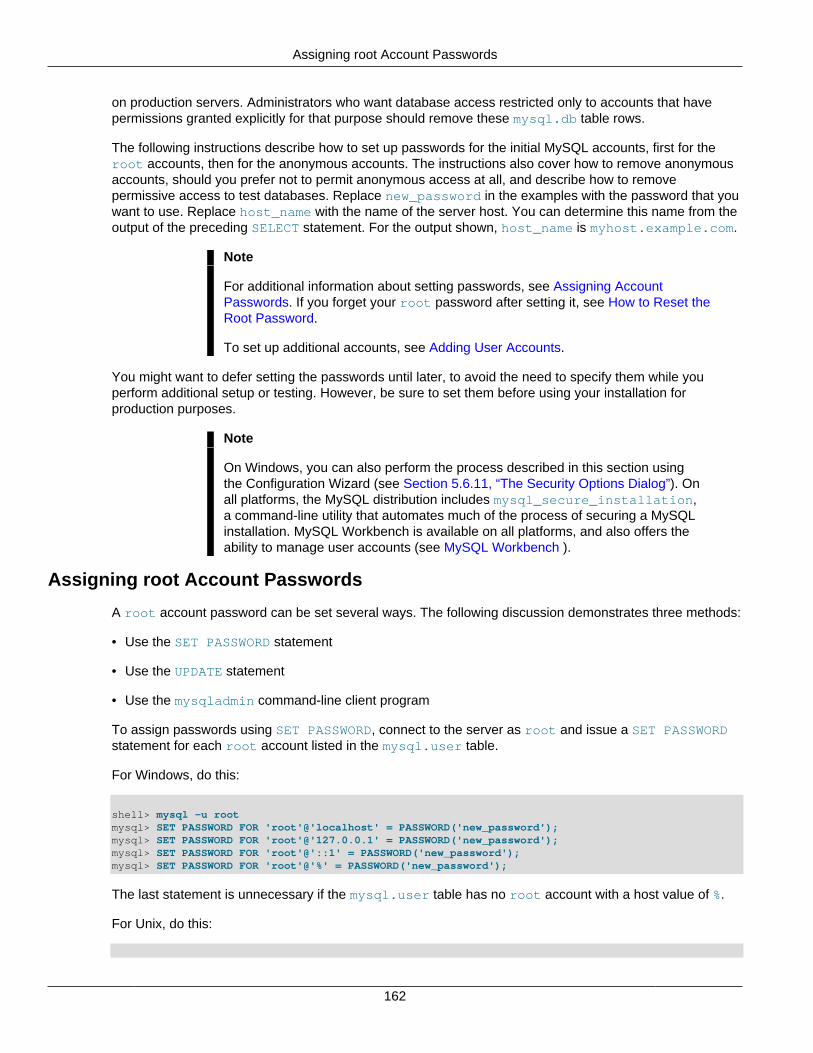
Assigning root Account Passwords
162
on production servers. Administrators who want database access restricted only to accounts that havepermissions granted explicitly for that purpose should remove these mysql.db table rows.
The following instructions describe how to set up passwords for the initial MySQL accounts, first for theroot accounts, then for the anonymous accounts. The instructions also cover how to remove anonymousaccounts, should you prefer not to permit anonymous access at all, and describe how to removepermissive access to test databases. Replace new_password in the examples with the password that youwant to use. Replace host_name with the name of the server host. You can determine this name from theoutput of the preceding SELECT statement. For the output shown, host_name is myhost.example.com.
Note
For additional information about setting passwords, see Assigning AccountPasswords. If you forget your root password after setting it, see How to Reset theRoot Password.
To set up additional accounts, see Adding User Accounts.
You might want to defer setting the passwords until later, to avoid the need to specify them while youperform additional setup or testing. However, be sure to set them before using your installation forproduction purposes.
Note
On Windows, you can also perform the process described in this section usingthe Configuration Wizard (see Section 5.6.11, “The Security Options Dialog”). Onall platforms, the MySQL distribution includes mysql_secure_installation,a command-line utility that automates much of the process of securing a MySQLinstallation. MySQL Workbench is available on all platforms, and also offers theability to manage user accounts (see MySQL Workbench ).
Assigning root Account Passwords
A root account password can be set several ways. The following discussion demonstrates three methods:
• Use the SET PASSWORD statement
• Use the UPDATE statement
• Use the mysqladmin command-line client program
To assign passwords using SET PASSWORD, connect to the server as root and issue a SET PASSWORDstatement for each root account listed in the mysql.user table.
For Windows, do this:
shell> mysql -u rootmysql> SET PASSWORD FOR 'root'@'localhost' = PASSWORD('new_password');mysql> SET PASSWORD FOR 'root'@'127.0.0.1' = PASSWORD('new_password');mysql> SET PASSWORD FOR 'root'@'::1' = PASSWORD('new_password');mysql> SET PASSWORD FOR 'root'@'%' = PASSWORD('new_password');
The last statement is unnecessary if the mysql.user table has no root account with a host value of %.
For Unix, do this:

Assigning Anonymous Account Passwords
163
shell> mysql -u rootmysql> SET PASSWORD FOR 'root'@'localhost' = PASSWORD('new_password');mysql> SET PASSWORD FOR 'root'@'127.0.0.1' = PASSWORD('new_password');mysql> SET PASSWORD FOR 'root'@'::1' = PASSWORD('new_password');mysql> SET PASSWORD FOR 'root'@'host_name' = PASSWORD('new_password');
You can also use a single statement that assigns a password to all root accounts by using UPDATE tomodify the mysql.user table directly. This method works on any platform:
shell> mysql -u rootmysql> UPDATE mysql.user SET Password = PASSWORD('new_password') -> WHERE User = 'root';mysql> FLUSH PRIVILEGES;
The FLUSH statement causes the server to reread the grant tables. Without it, the password changeremains unnoticed by the server until you restart it.
To assign passwords to the root accounts using mysqladmin, execute the following commands:
shell> mysqladmin -u root password "new_password"shell> mysqladmin -u root -h host_name password "new_password"
Those commands apply both to Windows and to Unix. The double quotation marks around the passwordare not always necessary, but you should use them if the password contains spaces or other charactersthat are special to your command interpreter.
The mysqladmin method of setting the root account passwords does not work for the'root'@'127.0.0.1' or 'root'@'::1' account. Use the SET PASSWORD method shown earlier.
After the root passwords have been set, you must supply the appropriate password whenever youconnect as root to the server. For example, to shut down the server with mysqladmin, use thiscommand:
shell> mysqladmin -u root -p shutdownEnter password: (enter root password here)
The mysql commands in the following instructions include a -p option based on the assumption thatyou have assigned the root account passwords using the preceding instructions and must specify thatpassword when connecting to the server.
Assigning Anonymous Account Passwords
To assign passwords to the anonymous accounts, connect to the server as root, then use either SETPASSWORD or UPDATE.
To use SET PASSWORD on Windows, do this:
shell> mysql -u root -pEnter password: (enter root password here)mysql> SET PASSWORD FOR ''@'localhost' = PASSWORD('new_password');
To use SET PASSWORD on Unix, do this:
shell> mysql -u root -pEnter password: (enter root password here)mysql> SET PASSWORD FOR ''@'localhost' = PASSWORD('new_password');
Removing Anonymous Accounts
164
mysql> SET PASSWORD FOR ''@'host_name' = PASSWORD('new_password');
To set the anonymous-user account passwords with a single UPDATE statement, do this (on any platform):
shell> mysql -u root -pEnter password: (enter root password here)mysql> UPDATE mysql.user SET Password = PASSWORD('new_password') -> WHERE User = '';mysql> FLUSH PRIVILEGES;
The FLUSH statement causes the server to reread the grant tables. Without it, the password changeremains unnoticed by the server until you restart it.
Removing Anonymous Accounts
If you prefer to remove any anonymous accounts rather than assigning them passwords, do so as followson Windows:
shell> mysql -u root -pEnter password: (enter root password here)mysql> DROP USER ''@'localhost';
On Unix, remove the anonymous accounts like this:
shell> mysql -u root -pEnter password: (enter root password here)mysql> DROP USER ''@'localhost';mysql> DROP USER ''@'host_name';
Securing Test Databases
By default, the mysql.db table contains rows that permit access by any user to the test database andother databases with names that start with test_. (These rows have an empty User column value, whichfor access-checking purposes matches any user name.) This means that such databases can be usedeven by accounts that otherwise possess no privileges. If you want to remove any-user access to testdatabases, do so as follows:
shell> mysql -u root -pEnter password: (enter root password here)mysql> DELETE FROM mysql.db WHERE Db LIKE 'test%';mysql> FLUSH PRIVILEGES;
The FLUSH statement causes the server to reread the grant tables. Without it, the privilege change remainsunnoticed by the server until you restart it.
With the preceding change, only users who have global database privileges or privileges granted explicitlyfor the test database can use it. However, if you prefer that the database not exist at all, drop it:
mysql> DROP DATABASE test;
9.5 Starting and Stopping MySQL Automatically
This section discusses methods for starting and stopping the MySQL server.
Generally, you start the mysqld server in one of these ways:
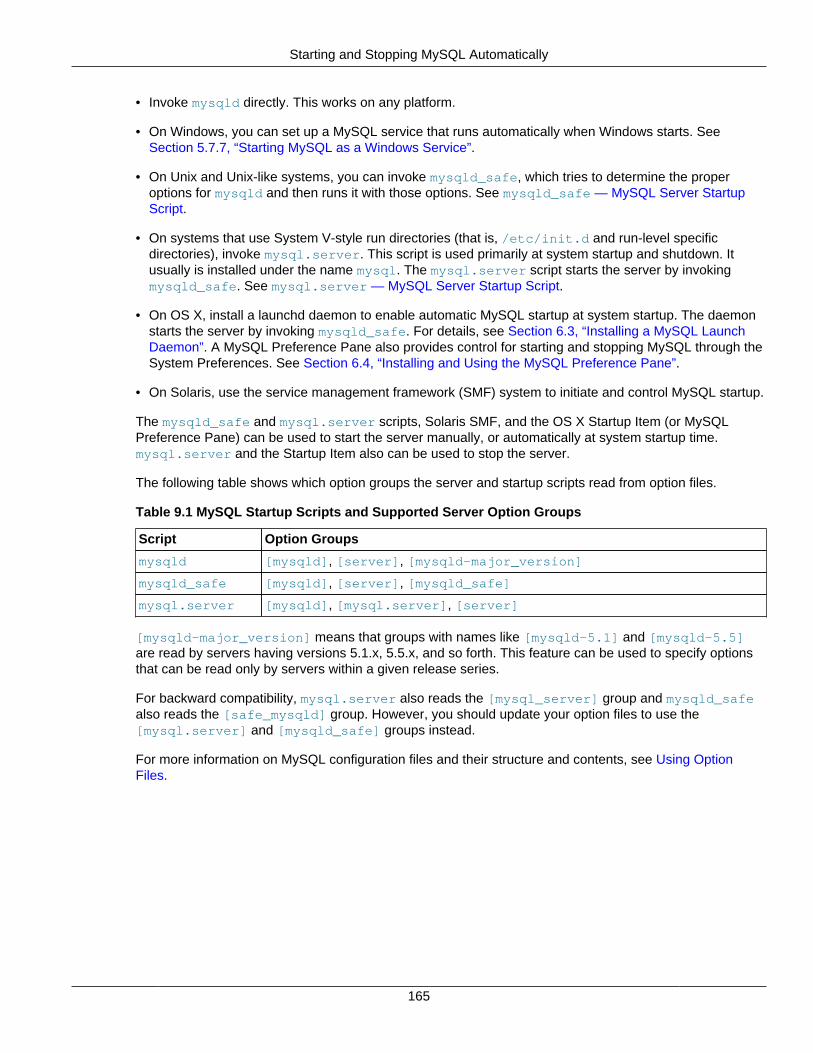
Starting and Stopping MySQL Automatically
165
• Invoke mysqld directly. This works on any platform.
• On Windows, you can set up a MySQL service that runs automatically when Windows starts. SeeSection 5.7.7, “Starting MySQL as a Windows Service”.
• On Unix and Unix-like systems, you can invoke mysqld_safe, which tries to determine the properoptions for mysqld and then runs it with those options. See mysqld_safe — MySQL Server StartupScript.
• On systems that use System V-style run directories (that is, /etc/init.d and run-level specificdirectories), invoke mysql.server. This script is used primarily at system startup and shutdown. Itusually is installed under the name mysql. The mysql.server script starts the server by invokingmysqld_safe. See mysql.server — MySQL Server Startup Script.
• On OS X, install a launchd daemon to enable automatic MySQL startup at system startup. The daemonstarts the server by invoking mysqld_safe. For details, see Section 6.3, “Installing a MySQL LaunchDaemon”. A MySQL Preference Pane also provides control for starting and stopping MySQL through theSystem Preferences. See Section 6.4, “Installing and Using the MySQL Preference Pane”.
• On Solaris, use the service management framework (SMF) system to initiate and control MySQL startup.
The mysqld_safe and mysql.server scripts, Solaris SMF, and the OS X Startup Item (or MySQLPreference Pane) can be used to start the server manually, or automatically at system startup time.mysql.server and the Startup Item also can be used to stop the server.
The following table shows which option groups the server and startup scripts read from option files.
Table 9.1 MySQL Startup Scripts and Supported Server Option Groups
Script Option Groups
mysqld [mysqld], [server], [mysqld-major_version]
mysqld_safe [mysqld], [server], [mysqld_safe]
mysql.server [mysqld], [mysql.server], [server]
[mysqld-major_version] means that groups with names like [mysqld-5.1] and [mysqld-5.5]are read by servers having versions 5.1.x, 5.5.x, and so forth. This feature can be used to specify optionsthat can be read only by servers within a given release series.
For backward compatibility, mysql.server also reads the [mysql_server] group and mysqld_safealso reads the [safe_mysqld] group. However, you should update your option files to use the[mysql.server] and [mysqld_safe] groups instead.
For more information on MySQL configuration files and their structure and contents, see Using OptionFiles.

166
167
Chapter 10 Upgrading or Downgrading MySQL
Table of Contents10.1 Upgrading MySQL .................................................................................................................. 167
10.1.1 Changes Affecting Upgrades to MySQL 5.5 ................................................................... 17110.2 Downgrading MySQL .............................................................................................................. 177
10.2.1 Changes Affecting Downgrades from MySQL 5.5 ........................................................... 18110.2.2 Downgrading from MySQL Enterprise Edition to MySQL Community Server .................... 181
10.3 Rebuilding or Repairing Tables or Indexes ............................................................................... 18210.4 Copying MySQL Databases to Another Machine ...................................................................... 184
This section describes the steps to upgrade or downgrade a MySQL installation.
Upgrading is a common procedure, as you pick up bug fixes within the same MySQL release series orsignificant features between major MySQL releases. You perform this procedure first on some test systemsto make sure everything works smoothly, and then on the production systems.
Downgrading is less common. Typically, you undo an upgrade because of some compatibility orperformance issue that occurs on a production system, and was not uncovered during initial upgradeverification on the test systems. As with the upgrade procedure, perform and verify the downgradeprocedure on some test systems first, before using it on a production system.
10.1 Upgrading MySQLThis section describes how to upgrade to a new MySQL version.
• Upgrade Methods
• Upgrade Paths
• Before You Begin
• Performing an In-Place Upgrade
• Performing a Logical Upgrade
• Upgrade Troubleshooting
Note
In the following discussion, MySQL commands that must be run using a MySQLaccount with administrative privileges include -u root on the command line tospecify the MySQL root user. Commands that require a password for root alsoinclude a -p option. Because -p is followed by no option value, such commandsprompt for the password. Type the password when prompted and press Enter.
SQL statements can be executed using the mysql command-line client (connect asroot to ensure that you have the necessary privileges).
Upgrade Methods
Supported downgrade methods include:
Upgrade Paths
168
• In-Place Upgrade: Involves shutting down the old MySQL version, replacing the old MySQL binariesor packages with the new ones, restarting MySQL on the existing data directory, and runningmysql_upgrade.
• Logical Upgrade: Involves exporting existing data from the old MySQL version using mysqldump,installing the new MySQL version, loading the dump file into the new MySQL version, and runningmysql_upgrade.
Note
MySQL recommends a mysqldump upgrade when upgrading from a previousrelease. For example, use this method when upgrading from 5.1 to 5.5.
For in-place and logical upgrade procedures, see Performing an In-Place Upgrade, and Performing aLogical Upgrade.
If you run MySQL Server on Windows, see Section 5.10, “Upgrading MySQL on Windows”.
Upgrade Paths
• Upgrade is only supported between General Availability (GA) releases.
• Upgrade from MySQL 5.1 to 5.5 is supported. Upgrading to the latest release is recommended beforeupgrading to the next version. For example, upgrade to the latest MySQL 5.1 release before upgradingto MySQL 5.5.
• Upgrade that skips versions is not supported. For example, upgrading directly from MySQL 5.0 to 5.5 isnot supported.
• Upgrade within a release series is supported. For example, upgrading from MySQL 5.5.x to 5.5.y issupported. Skipping a release is also supported. For example, upgrading from MySQL 5.5.x to 5.5.z issupported.
Before You Begin
Before upgrading, review the following information and perform the recommended steps:
• Before upgrading, protect your data by creating a backup of your current databases and log files. Thebackup should include the mysql system database, which contains the MySQL system tables. SeeDatabase Backup Methods.
• Review the Release Notes which provide information about features that are new in the MySQL5.5 or differ from those found in earlier MySQL releases. Some of these changes may result inincompatibilities.
For a description of MySQL server features that have been removed in MySQL 5.5, see FeaturesRemoved in MySQL 5.5. An upgrade requires changes with respect to those features if you use any ofthem.
• Review Section 10.1.1, “Changes Affecting Upgrades to MySQL 5.5”. This section describes changesthat may require action before or after upgrading.
• If you use replication, review Upgrading a Replication Setup.
• If you use XA transactions with InnoDB, run XA RECOVER before upgrading to check for uncommittedXA transactions. If results are returned, either commit or rollback the XA transactions by issuing an XACOMMIT or XA ROLLBACK statement.

Performing an In-Place Upgrade
169
• If your MySQL installation contains a large amount of data that might take a long time to convert afteran in-place upgrade, you might find it useful to create a “dummy” database instance for assessing whatconversions might be needed and the work involved to perform them. Make a copy of your MySQLinstance that contains a full copy of the mysql database, plus all other databases without data. Run yourupgrade procedure on this dummy instance to see what actions might be needed so that you can betterevaluate the work involved when performing actual data conversion on your original database instance.
• Rebuilding and reinstalling MySQL language interfaces is recommended whenever you install orupgrade to a new release of MySQL. This applies to MySQL interfaces such as PHP mysql extensions,the Perl DBD::mysql module, and the Python MySQLdb module.
Performing an In-Place Upgrade
This section describes how to perform an in-place upgrade. Review Before you Begin before proceeding.
Note
If you upgrade an installation originally produced by installing multiple RPMpackages, upgrade all the packages, not just some. For example, if you previouslyinstalled the server and client RPMs, do not upgrade just the server RPM.
To perform an in-place upgrade:
1. Review the changes described in Section 10.1.1, “Changes Affecting Upgrades to MySQL 5.5” forsteps to be performed before upgrading.
2. If you use InnoDB, configure MySQL to perform a slow shutdown by settinginnodb_fast_shutdown to 0. For example:
mysql -u root -p --execute="SET GLOBAL innodb_fast_shutdown=0"
With a slow shutdown, InnoDB performs a full purge and change buffer merge before shutting down,which ensures that data files are fully prepared in case of file format differences between releases.
3. Shut down the old MySQL server. For example:
mysqladmin -u root -p shutdown
4. Upgrade the MySQL binary installation or packages. If upgrading a binary installation, unpack thenew MySQL binary distribution package. See Obtain and Unpack the Distribution. For package-basedinstallations, replace the old packages with the new ones.
5. Start the MySQL 5.5 server, using the existing data directory. For example:
mysqld_safe --user=mysql --datadir=/path/to/existing-datadir
6. Run mysql_upgrade. For example:
mysql_upgrade -u root -p
mysql_upgrade examines all tables in all databases for incompatibilities with the current version ofMySQL. mysql_upgrade also upgrades the mysql system database so that you can take advantageof new privileges or capabilities.
Performing a Logical Upgrade
170
Note
mysql_upgrade does not upgrade the contents of the help tables. For upgradeinstructions, see Server-Side Help.
7. Shut down and restart the MySQL server to ensure that any changes made to the system tables takeeffect. For example:
mysqladmin -u root -p shutdownmysqld_safe --user=mysql --datadir=/path/to/existing-datadir
Performing a Logical Upgrade
This section describes how to perform a logical upgrade. Review Before you Begin before proceeding.
To perform a logical upgrade:
1. Review the changes described in Section 10.1.1, “Changes Affecting Upgrades to MySQL 5.5” forsteps to be performed before upgrading.
2. Export your existing data from the previous MySQL version:
mysqldump -u root -p --add-drop-table --routines --events --all-databases --force > data-for-upgrade.sql
Note
Use the --routines and --events options with mysqldump (as shownabove) if your databases include stored programs. The --all-databasesoption includes all databases in the dump, including the mysql database thatholds the system tables.
3. Shut down the old MySQL server. For example:
mysqladmin -u root -p shutdown
4. Install MySQL 5.5. For installation instructions, see Chapter 1, Installing and Upgrading MySQL.
5. Initialize a new data directory, as described at Section 9.1, “Initializing the Data Directory”. Forexample:
scripts/mysql_install_db --user=mysql --datadir=/path/to/5.5-datadir
6. Start the MySQL 5.5 server, using the new data directory. For example:
mysqld_safe --user=mysql --datadir=/path/to/5.5-datadir
7. Load the previously created dump file into the new MySQL server. For example:
mysql -u root -p --force < data-for-upgrade.sql
8. Run mysql_upgrade. For example:
Upgrade Troubleshooting
171
mysql_upgrade -u root -p
mysql_upgrade examines all tables in all databases for incompatibilities with the current version ofMySQL. mysql_upgrade also upgrades the mysql system database so that you can take advantageof new privileges or capabilities.
Note
mysql_upgrade does not upgrade the contents of the help tables. For upgradeinstructions, see Server-Side Help.
9. Shut down and restart the MySQL server to ensure that any changes made to the system tables takeeffect. For example:
mysqladmin -u root -p shutdownmysqld_safe --user=mysql --datadir=/path/to/5.5-datadir
Upgrade Troubleshooting
• If problems occur, such as that the new mysqld server does not start or that you cannot connect withouta password, verify that you do not have an old my.cnf file from your previous installation. You cancheck this with the --print-defaults option (for example, mysqld --print-defaults). If thiscommand displays anything other than the program name, you have an active my.cnf file that affectsserver or client operation.
• If, after an upgrade, you experience problems with compiled client programs, such as Commandsout of sync or unexpected core dumps, you probably have used old header or library files whencompiling your programs. In this case, check the date for your mysql.h file and libmysqlclient.alibrary to verify that they are from the new MySQL distribution. If not, recompile your programswith the new headers and libraries. Recompilation might also be necessary for programs compiledagainst the shared client library if the library major version number has changed (for example, fromlibmysqlclient.so.15 to libmysqlclient.so.16).
• If you have created a user-defined function (UDF) with a given name and upgrade MySQL to a versionthat implements a new built-in function with the same name, the UDF becomes inaccessible. To correctthis, use DROP FUNCTION to drop the UDF, and then use CREATE FUNCTION to re-create the UDFwith a different nonconflicting name. The same is true if the new version of MySQL implements a built-infunction with the same name as an existing stored function. See Function Name Parsing and Resolution,for the rules describing how the server interprets references to different kinds of functions.
10.1.1 Changes Affecting Upgrades to MySQL 5.5
Before upgrading to MySQL 5.5, review the changes described in this section to identify upgrade issuesthat apply to your current MySQL installation and applications.
Note
In addition to the changes outlined in this section, review the Release Notes andother important information outlined in Before You Begin.
Changes marked as either Known issue or Incompatible change are incompatibilities with earlierversions of MySQL, and may require your attention before you upgrade. Our aim is to avoid thesechanges, but occasionally they are necessary to correct problems that would be worse than anincompatibility between releases. If any upgrade issue applicable to your installation involves anincompatibility that requires special handling, follow the instructions given in the incompatibility description.
Changes Affecting Upgrades to MySQL 5.5
172
Sometimes this involves dumping and reloading tables, or use of a statement such as CHECK TABLE orREPAIR TABLE.
For dump and reload instructions, see Section 10.3, “Rebuilding or Repairing Tables or Indexes”. Anyprocedure that involves REPAIR TABLE with the USE_FRM option must be done before upgrading. Use ofthis statement with a version of MySQL different from the one used to create the table (that is, using it afterupgrading) may damage the table. See REPAIR TABLE Syntax.
• Configuration Changes
• Server Changes
• SQL Changes
Configuration Changes
• Incompatible change: The InnoDB Plugin is included in MySQL 5.5 releases. It becomes the built-in version of InnoDB in MySQL Server, replacing the version previously included as the built-in InnoDBengine. InnoDB Plugin is also available in MySQL 5.1 as of 5.1.38, but it is an optional storage enginethat must be enabled explicitly using two server options:
[mysqld]ignore-builtin-innodbplugin-load=innodb=ha_innodb_plugin.so
If you were using InnoDB Plugin in MySQL 5.1 by means of those options, you must remove themafter an upgrade to 5.5 or the server will fail to start.
In addition, in InnoDB Plugin, the innodb_file_io_threads system variable has beenremoved and replaced with innodb_read_io_threads and innodb_write_io_threads. If youupgrade from MySQL 5.1 to MySQL 5.5 and previously explicitly set innodb_file_io_threadsat server startup, you must change your configuration. Either remove any reference toinnodb_file_io_threads or replace it with references to innodb_read_io_threads andinnodb_write_io_threads.
• Incompatible change: In MySQL 5.5, the server includes a plugin services interface that complementsthe plugin API. The services interface enables server functionality to be exposed as a “service” thatplugins can access through a function-call interface. The libmysqlservices library provides accessto the available services and dynamic plugins now must be linked against this library (use the -lmysqlservices flag). For an example showing how to configure for CMake, see MySQL Services forPlugins.
Server Changes
• On Linux systems, the libaio library may be needed. Install it first, if it is not already present on yoursystem.
• Known issue: As of MySQL 5.5.32, for new installations, the url columns in the mysql database helptables are now created as type TEXT to accommodate longer URLs. For upgrades, mysql_upgradedoes not update the columns. Modify them manually using these statements:
ALTER TABLE mysql.help_category MODIFY url TEXT NOT NULL;ALTER TABLE mysql.help_topic MODIFY url TEXT NOT NULL;
• Incompatible change: As of MySQL 5.5.3, due to work done for Bug #989, FLUSH TABLES isnot permitted when there is an active LOCK TABLES ... READ. To provide a workaround for thisrestriction, FLUSH TABLES has a new variant, FLUSH TABLES tbl_list WITH READ LOCK, that
Changes Affecting Upgrades to MySQL 5.5
173
enables tables to be flushed and locked in a single operation. As a result of this change, applications thatpreviously used this statement sequence to lock and flush tables will fail:
LOCK TABLES tbl_list READ;FLUSH TABLES tbl_list;
Such applications should now use this statement instead:
FLUSH TABLES tbl_list WITH READ LOCK;
• Incompatible change: As of MySQL 5.5.7, the server requires that a new grant table, proxies_priv,be present in the mysql database. If you are upgrading to 5.5.7 from a previous MySQL release ratherthan performing a new installation, the server will find that this table is missing and exit during startupwith the following message:
Table 'mysql.proxies_priv' doesn't exist
To create the proxies_priv table, start the server with the --skip-grant-tables option to cause itto skip the normal grant table checks, then run mysql_upgrade. For example:
mysqld --skip-grant-tables &mysql_upgrade
Then stop the server and restart it normally.
You can specify other options on the mysqld command line if necessary. Alternatively, if yourinstallation is configured so that the server normally reads options from an option file, use the --defaults-file option to specify the file (enter each command on a single line):
mysqld --defaults-file=/usr/local/mysql/etc/my.cnf --skip-grant-tables &mysql_upgrade
With the --skip-grant-tables option, the server does no password or privilege checking, soany client can connect and effectively have all privileges. For additional security, use the --skip-networking option as well to prevent remote clients from connecting.
Note
This problem is fixed in MySQL 5.5.8; the server treats a missing proxies_privtable as equivalent to an empty table. However, after starting the server, youshould still run mysql_upgrade to create the table.
• Incompatible change: As of MySQL 5.5.7, InnoDB always uses the fast truncation technique,equivalent to DROP TABLE and CREATE TABLE. It no longer performs a row-by-row delete for tableswith parent-child foreign key relationships. TRUNCATE TABLE returns an error for such tables. Modifyyour SQL to issue DELETE FROM table_name for such tables instead.
• Incompatible change: Prior to MySQL 5.5.7, if you flushed the logs using FLUSH LOGS ormysqladmin flush-logs and mysqld was writing the error log to a file (for example, if it was startedwith the --log-error option), it renames the current log file with the suffix -old, then created a newempty log file. This had the problem that a second log-flushing operation thus caused the original errorlog file to be lost unless you saved it under a different name. For example, you could use the followingcommands to save the file:
Changes Affecting Upgrades to MySQL 5.5
174
mysqladmin flush-logsmv host_name.err-old backup-directory
To avoid the preceding file-loss problem, no renaming occurs as of MySQL 5.5.7; the server merelycloses and reopens the log file. To rename the file, you can do so manually before flushing. Thenflushing the logs reopens a new file with the original file name. For example, you can rename the file andcreate a new one using the following commands:
mv host_name.err host_name.err-oldmysqladmin flush-logsmv host_name.err-old backup-directory
• Incompatible change: As of MySQL 5.5.6, handling of CREATE TABLE IF NOT EXISTS ...SELECT statements has been changed for the case that the destination table already exists:
• Previously, for CREATE TABLE IF NOT EXISTS ... SELECT, MySQL produced a warning thatthe table exists, but inserted the rows and wrote the statement to the binary log anyway. By contrast,CREATE TABLE ... SELECT (without IF NOT EXISTS) failed with an error, but MySQL inserted norows and did not write the statement to the binary log.
• MySQL now handles both statements the same way when the destination table exists, in that neitherstatement inserts rows or is written to the binary log. The difference between them is that MySQLproduces a warning when IF NOT EXISTS is present and an error when it is not.
This change in handling of IF NOT EXISTS results in an incompatibility for statement-based replicationfrom a MySQL 5.1 master with the original behavior and a MySQL 5.5 slave with the new behavior.Suppose that CREATE TABLE IF NOT EXISTS ... SELECT is executed on the master and thedestination table exists. The result is that rows are inserted on the master but not on the slave. (Row-based replication does not have this problem.)
To address this issue, statement-based binary logging for CREATE TABLE IF NOT EXISTS ...SELECT is changed in MySQL 5.1 as of 5.1.51:
• If the destination table does not exist, there is no change: The statement is logged as is.
• If the destination table does exist, the statement is logged as the equivalent pair of CREATE TABLEIF NOT EXISTS and INSERT ... SELECT statements. (If the SELECT in the original statement ispreceded by IGNORE or REPLACE, the INSERT becomes INSERT IGNORE or REPLACE, respectively.)
This change provides forward compatibility for statement-based replication from MySQL 5.1 to 5.5because when the destination table exists, the rows will be inserted on both the master and slave. Totake advantage of this compatibility measure, the 5.1 server must be at least 5.1.51 and the 5.5 servermust be at least 5.5.6.
To upgrade an existing 5.1-to-5.5 replication scenario, upgrade the master first to 5.1.51 or higher. Notethat this differs from the usual replication upgrade advice of upgrading the slave first.
A workaround for applications that wish to achieve the original effect (rows inserted regardless ofwhether the destination table exists) is to use CREATE TABLE IF NOT EXISTS and INSERT ...SELECT statements rather than CREATE TABLE IF NOT EXISTS ... SELECT statements.
Along with the change just described, the following related change was made: Previously, if an existingview was named as the destination table for CREATE TABLE IF NOT EXISTS ... SELECT, rows

Changes Affecting Upgrades to MySQL 5.5
175
were inserted into the underlying base table and the statement was written to the binary log. As ofMySQL 5.1.51 and 5.5.6, nothing is inserted or logged.
• Incompatible change: Prior to MySQL 5.5.6, if the server was started with character_set_serverset to utf16, it crashed during full-text stopword initialization. Now the stopword file is loaded andsearched using latin1 if character_set_server is ucs2, utf16, or utf32. If any table wascreated with FULLTEXT indexes while the server character set was ucs2, utf16, or utf32, it should berepaired using this statement:
REPAIR TABLE tbl_name QUICK;
• Incompatible change: As of MySQL 5.5.5, all numeric operators and functions on integer, floating-pointand DECIMAL values throw an “out of range” error (ER_DATA_OUT_OF_RANGE) rather than returning anincorrect value or NULL, when the result is out of the supported range for the corresponding data type.See Out-of-Range and Overflow Handling.
• Incompatible change: In very old versions of MySQL (prior to 4.1), the TIMESTAMP data typesupported a display width, which was silently ignored beginning with MySQL 4.1. This is deprecated inMySQL 5.1, and removed altogether in MySQL 5.5. These changes in behavior can lead to two problemscenarios when trying to use TIMESTAMP(N) columns with a MySQL 5.5 or later server:
• When importing a dump file (for example, one created using mysqldump) created in a MySQL 5.0or earlier server into a server from a newer release series, a CREATE TABLE or ALTER TABLEstatement containing TIMESTAMP(N) causes the import to fail with a syntax error.
To fix this problem, edit the dump file in a text editor to replace any instances of TIMESTAMP(N)with TIMESTAMP prior to importing the file. Be sure to use a plain text editor for this, and not a wordprocessor; otherwise, the result is almost certain to be unusable for importing into the MySQL server.
• When trying replicate any CREATE TABLE or ALTER TABLE statement containing TIMESTAMP(N)from a master MySQL server that supports the TIMESTAMP(N) syntax to a MySQL 5.5.3 or higherslave, the statement causes replication to fail. Similarly, when you try to restore from a binary logwritten by a server that supports TIMESTAMP(N) to a MySQL 5.5.3 or higher server, any CREATETABLE or ALTER TABLE statement containing TIMESTAMP(N) causes the backup to fail. This holdstrue regardless of the logging format.
It may be possible to fix such issues using a hex editor, by replacing any width arguments used withTIMESTAMP, and the parentheses containing them, with space characters (hexadecimal 20). Besure to use a programmer's binary hex editor and not a regular text editor or word processor for this;otherwise, the result is almost certain to be a corrupted binary log file. To guard against accidentalcorruption of the binary log, you should always work on a copy of the file rather than the original.
You should try to handle potential issues of these types proactively by updating with ALTER TABLE anyTIMESTAMP(N) columns in your databases so that they use TIMESTAMP instead, before performing anyupgrades.
• Incompatible change: As of MySQL 5.5.3, the Unicode implementation has been extended to providesupport for supplementary characters that lie outside the Basic Multilingual Plane (BMP). Noteworthyfeatures:
• utf16 and utf32 character sets have been added. These correspond to the UTF-16 and UTF-32encodings of the Unicode character set, and they both support supplementary characters.
• The utf8mb4 character set has been added. This is similar to utf8, but its encoding allows up to fourbytes per character to enable support for supplementary characters.

Changes Affecting Upgrades to MySQL 5.5
176
• The ucs2 character set is essentially unchanged except for the inclusion of some newer BMPcharacters.
In most respects, upgrading to MySQL 5.5 should present few problems with regard to Unicode usage,although there are some potential areas of incompatibility. These are the primary areas of concern:
• For the variable-length character data types (VARCHAR and the TEXT types), the maximum length incharacters is less for utf8mb4 columns than for utf8 columns.
• For all character data types (CHAR, VARCHAR, and the TEXT types), the maximum number ofcharacters that can be indexed is less for utf8mb4 columns than for utf8 columns.
Consequently, if you want to upgrade tables from utf8 to utf8mb4 to take advantage ofsupplementary-character support, it may be necessary to change some column or index definitions.
For additional details about the new Unicode character sets and potential incompatibilities, see UnicodeSupport, and Converting Between 3-Byte and 4-Byte Unicode Character Sets.
• Incompatible change: As of MySQL 5.5.3, the server includes dtoa, a library for conversion betweenstrings and numbers by David M. Gay. In MySQL, this library provides the basis for improved conversionbetween string or DECIMAL values and approximate-value (FLOAT or DOUBLE) numbers.
Because the conversions produced by this library differ in some cases from previous results, thepotential exists for incompatibilities in applications that rely on previous results. For example,applications that depend on a specific exact result from previous conversions might need adjustment toaccommodate additional precision.
For additional information about the properties of dtoa conversions, see Type Conversion in ExpressionEvaluation.
• Incompatible change: In MySQL 5.5, several changes were made regarding the language andcharacter set of error messages:
• The --language option for specifying the directory for the error message file is now deprecated. Thenew lc_messages_dir and lc_messages system variables should be used instead, and the servertreats --language as an alias for lc_messages_dir.
• The language system variable has been removed and replaced with the new lc_messages_dirand lc_messages system variables. lc_messages_dir has only a global value and is read only.lc_messages has global and session values and can be modified at runtime, so the error messagelanguage can be changed while the server is running, and individual clients each can have a differenterror message language by changing their session lc_messages value to a different locale name.
• Error messages previously were constructed in a mix of character sets. This issue is resolved byconstructing error messages internally within the server using UTF-8 and returning them to the clientin the character set specified by the character_set_results system variable. The content of errormessages therefore may in some cases differ from the messages returned previously.
For more information, see Setting the Error Message Language, and Error Message Character Set.
• Incompatible change: MySQL 5.5 implements new functions used to calculate row placement for tablespartitioned by KEY and LINEAR KEY. Tables that were created using KEY or LINEAR KEY partitioningin MySQL 5.1 can be upgraded in MySQL 5.5.31 and later using ALTER TABLE ... PARTITION BYALGORITHM=2 [LINEAR] KEY (...). (Bug #14521864, Bug #66462)
Downgrading MySQL
177
SQL Changes
• Incompatible change: Previously, the parser accepted an INTO clause in nested SELECT statements,which is invalid because such statements must return their results to the outer context. As of MySQL5.5.3, this syntax is no longer permitted and statements that use it must be changed.
• Incompatible change: In MySQL 5.5.3, several changes were made to alias resolution in multiple-tableDELETE statements so that it is no longer possible to have inconsistent or ambiguous table aliases.
• In MySQL 5.1.23, alias declarations outside the table_references part of the statement weredisallowed for the USING variant of multiple-table DELETE syntax, to reduce the possibility ofambiguous aliases that could lead to ambiguous statements that have unexpected results such asdeleting rows from the wrong table.
As of MySQL 5.5.3, alias declarations outside table_references are disallowed for all multiple-table DELETE statements. Alias declarations are permitted only in the table_references part.
Incorrect:
DELETE FROM t1 AS a2 USING t1 AS a1 INNER JOIN t2 AS a2;DELETE t1 AS a2 FROM t1 AS a1 INNER JOIN t2 AS a2;
Correct:
DELETE FROM t1 USING t1 AS a1 INNER JOIN t2 AS a2;DELETE t1 FROM t1 AS a1 INNER JOIN t2 AS a2;
• Previously, for alias references in the list of tables from which to delete rows in a multiple-table delete,the default database is used unless one is specified explicitly. For example, if the default database isdb1, the following statement does not work because the unqualified alias reference a2 is interpretedas having a database of db1:
DELETE a1, a2 FROM db1.t1 AS a1 INNER JOIN db2.t2 AS a2WHERE a1.id=a2.id;
To correctly match an alias that refers to a table outside the default database, you must explicitlyqualify the reference with the name of the proper database:
DELETE a1, db2.a2 FROM db1.t1 AS a1 INNER JOIN db2.t2 AS a2WHERE a1.id=a2.id;
As of MySQL 5.5.3, alias resolution does not require qualification and alias references should not bequalified with the database name. Qualified names are interpreted as referring to tables, not aliases.
Statements containing alias constructs that are no longer permitted must be rewritten.
• Some keywords may be reserved in MySQL 5.5 that were not reserved in MySQL 5.1. See Keywordsand Reserved Words. This can cause words previously used as identifiers to become illegal. To fixaffected statements, use identifier quoting. See Schema Object Names.
10.2 Downgrading MySQLThis section describes how to downgrade to an older MySQL version.
• Downgrade Methods
Downgrade Methods
178
• Downgrade Paths
• Before You Begin
• Performing an In-Place Downgrade
• Performing a Logical Downgrade
• Downgrade Troubleshooting
Note
In the following discussion, MySQL commands that must be run using a MySQLaccount with administrative privileges include -u root on the command line tospecify the MySQL root user. Commands that require a password for root alsoinclude a -p option. Because -p is followed by no option value, such commandsprompt for the password. Type the password when prompted and press Enter.
SQL statements can be executed using the mysql command-line client (connect asroot to ensure that you have the necessary privileges).
Downgrade Methods
Supported downgrade methods include:
• In-Place Downgrade: Involves shutting down the new MySQL version, replacing the new MySQLbinaries or packages with the old ones, and restarting the old MySQL version on the new data files. In-place downgrades are supported for downgrades between GA versions within the same release series.For example, in-place downgrades are supported for downgrades from 5.5.46 to 5.5.45.
• Logical Downgrade: Involves using mysqldump to dump all tables from the new MySQL version,and then loading the dump file into the old MySQL version. Logical downgrades are supported fordowngrades between GA versions within the same release series and for downgrades between releaselevels. For example, logical downgrades are supported for downgrades from 5.5.46 to 5.5.45 and fordowngrades from 5.5 to 5.1.
For procedures, see Performing an In-Place Downgrade, and Performing a Logical Downgrade.
Downgrade Paths
• Downgrade is only supported between General Availability (GA) releases.
• Downgrade from MySQL 5.5 to 5.1 is supported using the logical downgrade method.
• Downgrade that skips versions is not supported. For example, downgrading directly from MySQL 5.5 to5.0 is not supported.
• Downgrade within a release series is supported. For example, downgrading from MySQL 5.5.z to 5.5.yis supported. Skipping a release is also supported. For example, downgrading from MySQL 5.5.z to5.5.x is supported.
Before You Begin
Before downgrading, the following steps are recommended:
• Review the Release Notes for the MySQL version you are downgrading from to ensure that there are nofeatures or fixes that you really need.
Performing an In-Place Downgrade
179
• Review Section 10.2.1, “Changes Affecting Downgrades from MySQL 5.5”. This section describeschanges that may require action before or after downgrading.
Note
The downgrade procedures described in the following sections assume you aredowngrading with data files created or modified by the newer MySQL version.However, if you did not modify your data after upgrading, downgrading usingbackups taken before upgrading to the new MySQL version is recommended.Many of the changes described in Section 10.2.1, “Changes AffectingDowngrades from MySQL 5.5” that require action before or after downgrading arenot applicable when downgrading using backups taken before upgrading to thenew MySQL version.
• Always back up your current databases and log files before downgrading. The backup should include themysql database, which contains the MySQL system tables. See Database Backup Methods.
• Use of new features, new configuration options, or new configuration option values that are notsupported by a previous release may cause downgrade errors or failures. Before downgrading,it is recommended that you reverse changes resulting from the use of new features and removeconfiguration settings that are not supported by the release you are downgrading to.
• If you use XA transactions with InnoDB, run XA RECOVER before downgrading to check for uncommittedXA transactions. If results are returned, either commit or rollback the XA transactions by issuing an XACOMMIT or XA ROLLBACK statement.
Performing an In-Place Downgrade
In-place downgrades are supported for downgrades between GA releases within the same release series.Before proceeding, review Before You Begin.
To perform an in-place downgrade:
1. Review the changes described in Section 10.2.1, “Changes Affecting Downgrades from MySQL 5.5” forsteps to be performed before downgrading.
2. If you use InnoDB, configure MySQL to perform a slow shutdown by settinginnodb_fast_shutdown to 0. For example:
mysql -u root -p --execute="SET GLOBAL innodb_fast_shutdown=0"
With a slow shutdown, InnoDB performs a full purge and change buffer merge before shutting down,which ensures that data files are fully prepared in case of file format differences between releases.
3. Shut down the newer MySQL server. For example:
mysqladmin -u root -p shutdown
4. After the slow shutdown, remove the InnoDB redo log files (the ib_logfile* files) from the datadirectory to avoid downgrade issues related to redo log file format changes that may have occurredbetween releases.
rm ib_logfile*
5. Downgrade the MySQL binaries or packages in-place by replacing the newer binaries or packages withthe older ones.
Performing a Logical Downgrade
180
6. Start the older (downgraded) MySQL server, using the existing data directory. For example:
mysqld_safe --user=mysql --datadir=/path/to/existing-datadir
7. Run mysql_upgrade. For example:
mysql_upgrade -u root -p
8. Shut down and restart the MySQL server to ensure that any changes made to the system tables takeeffect. For example:
mysqladmin -u root -p shutdownmysqld_safe --user=mysql --datadir=/path/to/existing-datadir
Performing a Logical Downgrade
Logical downgrades are supported for downgrades between releases within the same release series andfor downgrades to the previous release level. Only downgrades between General Availability (GA) releasesare supported. Before proceeding, review Before You Begin.
To perform a logical downgrade:
1. Review the changes described in Section 10.2.1, “Changes Affecting Downgrades from MySQL 5.5” forsteps to be performed before downgrading.
2. Dump all databases. For example:
mysqldump -u root -p --add-drop-table --routines --events --all-databases --force > data-for-downgrade.sql
3. Shut down the newer MySQL server. For example:
mysqladmin -u root -p shutdown
4. Initialize an older MySQL instance, with a new data directory. For example:
scripts/mysql_install_db --user=mysql
5. Start the older MySQL server, using the new data directory. For example:
mysqld_safe --user=mysql --datadir=/path/to/new-datadir
6. Load the dump file into the older MySQL server. For example:
mysql -u root -p --force < data-for-upgrade.sql
7. Run mysql_upgrade. For example:
mysql_upgrade -u root -p
8. Shut down and restart the MySQL server to ensure that any changes made to the system tables takeeffect. For example:
Downgrade Troubleshooting
181
mysqladmin -u root -p shutdownmysqld_safe --user=mysql --datadir=/path/to/new-datadir
Downgrade Troubleshooting
If you downgrade from one release series to another, there may be incompatibilities in table storageformats. In this case, use mysqldump to dump your tables before downgrading. After downgrading, reloadthe dump file using mysql or mysqlimport to re-create your tables. For examples, see Section 10.4,“Copying MySQL Databases to Another Machine”.
A typical symptom of a downward-incompatible table format change when you downgrade is that youcannot open tables. In that case, use the following procedure:
1. Stop the older MySQL server that you are downgrading to.
2. Restart the newer MySQL server you are downgrading from.
3. Dump any tables that were inaccessible to the older server by using mysqldump to create a dump file.
4. Stop the newer MySQL server and restart the older one.
5. Reload the dump file into the older server. Your tables should be accessible.
10.2.1 Changes Affecting Downgrades from MySQL 5.5
Before downgrading from MySQL 5.5, review the changes described in this section. Some changes mayrequire action before or after downgrading.
• System Tables. The mysql.proc.comment column definition changed between MySQL 5.1 and5.5. After downgrading from 5.5 to 5.1, this table is seen as corrupt and in need of repair. Runningmysql_upgrade from the version of MySQL to which you downgraded (as documented in thedowngrade procedures) reverts the mysql.proc.comment column definition.
• InnoDB. MySQL 5.5 uses InnoDB Plugin as the built-in version of InnoDB. MySQL 5.1 includesInnoDB Plugin as of 5.1.38, but as an option that must be enabled explicitly. See the Release Notesfor MySQL 5.1.38.
• InnoDB. In MySQL 5.5.14, the length limit for index prefix keys is increased from 767 bytes to 3072bytes, for InnoDB tables using ROW_FORMAT=DYNAMIC or ROW_FORMAT=COMPRESSED. See Limits onInnoDB Tables for details. If you downgrade from one of these releases or higher, to an earlier releasewith a lower length limit, the index prefix keys could be truncated at 767 bytes or the downgrade couldfail. This issue could only occur if the configuration option innodb_large_prefix was enabled on theserver being downgraded.
• Tables partitioned by [LINEAR] KEY. MySQL 5.5 implements new functions used to calculaterow placement for tables partitioned by KEY and LINEAR KEY. Tables that were created using KEYor LINEAR KEY partitioning in MySQL 5.5 cannot be used by a MySQL 5.1 server. In MySQL 5.5.31and later, you can downgrade such tables with ALTER TABLE ... PARTITION BY ALGORITHM=1[LINEAR] KEY (...) to make them compatible with MySQL 5.1.
10.2.2 Downgrading from MySQL Enterprise Edition to MySQL CommunityServer
This section describes the steps required to downgrade from MySQL Enterprise Edition to MySQLCommunity Edition. This can be done at any time, and is required at the expiration of a MySQL EnterpriseEdition subscription if you wish to continue using MySQL Server.

Rebuilding or Repairing Tables or Indexes
182
When you perform such a downgrade, all commercially licensed components of the MySQL EnterpriseEdition subscription must be uninstalled. These components and related considerations are described inthe rest of this section.
Note
The issues described in this section are in addition to any that may be encounteredas a result of any upgrade or downgrade of the MySQL Server version (such asbetween MySQL 5.5 and 5.1). Information about upgrading and downgradingbetween MySQL release series can be found elsewhere in this chapter; seeSection 10.1, “Upgrading MySQL”, and Section 10.2, “Downgrading MySQL”.
MySQL Enterprise Database Server. All commercial versions of MySQL Database Server must beuninstalled.
Commercially licensed extensions. All commercially licensed MySQL Enterprise Database Serverextensions must be uninstalled. This includes the following commercial extensions:
• MySQL External Authentication for Windows: Following uninstallation of this plugin, existing MySQL useraccounts must be re-created using local authentication. See MySQL User Account Management, formore information.
• MySQL External Authentication for PAM: Following uninstallation of this plugin, existing MySQL useraccounts must be re-created using local authentication. See MySQL User Account Management, formore information.
• MySQL Enterprise Thread Pool: Following uninstallation of this plugin, existing MySQL servers revert todefault thread and connection handling.
• MySQL Enterprise Audit: Following uninstallation of this plugin, no logging of user logins or query activityoccurs.
• MySQL High Availability: Following uninstallation of this plugin, automated failover is no longer available.
MySQL Enterprise Backup. MySQL Enterprise Backup must be uninstalled. Uninstalling thisapplication has the effects listed here:
• Automated backup scripts no longer work.
• Existing backup images taken with MySQL Enterprise Backup can no longer be used for recovery.
• Third-party integration with multimedia systems such as NetBackup, Tivoli, and Oracle Secure Backupno longer works.
MySQL Enterprise Monitor, MySQL Query Analyzer, agents. MySQL Enterprise Monitor, MySQLQuery Analyzer, and all server-side agents must be uninstalled. Uninstalling these applications and agentshas the following effects:
• Automated SNMP and SMTP alerts no longer work.
• All historical MySQL, OS monitoring, query, and performance metrics as well as all trending data arelost.
• All environment-specific monitoring templates, custom advisors, graphs and scripts are also lost.
10.3 Rebuilding or Repairing Tables or Indexes
Dump and Reload Method
183
This section describes how to rebuild or repair tables or indexes, which may be necessitated by:
• Changes to how MySQL handles data types or character sets. For example, an error in a collation mighthave been corrected, necessitating a table rebuild to update the indexes for character columns that usethe collation.
• Required table repairs or upgrades reported by CHECK TABLE, mysqlcheck, or mysql_upgrade.
Methods for rebuilding a table include:
• Dump and Reload Method
• ALTER TABLE Method
• REPAIR TABLE Method
Dump and Reload Method
If you are rebuilding tables because a different version of MySQL will not handle them after a binary(in-place) upgrade or downgrade, you must use the dump-and-reload method. Dump the tables beforeupgrading or downgrading using your original version of MySQL. Then reload the tables after upgrading ordowngrading.
If you use the dump-and-reload method of rebuilding tables only for the purpose of rebuilding indexes,you can perform the dump either before or after upgrading or downgrading. Reloading still must be doneafterward.
If you need to rebuild an InnoDB table because a CHECK TABLE operation indicates that a table upgradeis required, use mysqldump to create a dump file and mysql to reload the file. If the CHECK TABLEoperation indicates that there is a corruption or causes InnoDB to fail, refer to Forcing InnoDB Recoveryfor information about using the innodb_force_recovery option to restart InnoDB. To understand thetype of problem that CHECK TABLE may be encountering, refer to the InnoDB notes in CHECK TABLESyntax.
To rebuild a table by dumping and reloading it, use mysqldump to create a dump file and mysql to reloadthe file:
mysqldump db_name t1 > dump.sqlmysql db_name < dump.sql
To rebuild all the tables in a single database, specify the database name without any following table name:
mysqldump db_name > dump.sqlmysql db_name < dump.sql
To rebuild all tables in all databases, use the --all-databases option:
mysqldump --all-databases > dump.sqlmysql < dump.sql
ALTER TABLE Method
To rebuild a table with ALTER TABLE, use a “null” alteration; that is, an ALTER TABLE statement that“changes” the table to use the storage engine that it already has. For example, if t1 is an InnoDB table,use this statement:
REPAIR TABLE Method
184
ALTER TABLE t1 ENGINE = InnoDB;
If you are not sure which storage engine to specify in the ALTER TABLE statement, use SHOW CREATETABLE to display the table definition.
REPAIR TABLE Method
The REPAIR TABLE method is only applicable to MyISAM, ARCHIVE, and CSV tables.
You can use REPAIR TABLE if the table checking operation indicates that there is a corruption or that anupgrade is required. For example, to repair a MyISAM table, use this statement:
REPAIR TABLE t1;
mysqlcheck --repair provides command-line access to the REPAIR TABLE statement. This canbe a more convenient means of repairing tables because you can use the --databases or --all-databases option to repair all tables in specific databases or all databases, respectively:
mysqlcheck --repair --databases db_name ...mysqlcheck --repair --all-databases
10.4 Copying MySQL Databases to Another Machine
In cases where you need to transfer databases between different architectures, you can use mysqldumpto create a file containing SQL statements. You can then transfer the file to the other machine and feed itas input to the mysql client.
Note
You can copy the .frm, .MYI, and .MYD files for MyISAM tables between differentarchitectures that support the same floating-point format. (MySQL takes care of anybyte-swapping issues.) See The MyISAM Storage Engine.
Use mysqldump --help to see what options are available.
The easiest (although not the fastest) way to move a database between two machines is to run thefollowing commands on the machine on which the database is located:
mysqladmin -h 'other_hostname' create db_namemysqldump db_name | mysql -h 'other_hostname' db_name
If you want to copy a database from a remote machine over a slow network, you can use these commands:
mysqladmin create db_namemysqldump -h 'other_hostname' --compress db_name | mysql db_name
You can also store the dump in a file, transfer the file to the target machine, and then load the file into thedatabase there. For example, you can dump a database to a compressed file on the source machine likethis:
mysqldump --quick db_name | gzip > db_name.gz
Transfer the file containing the database contents to the target machine and run these commands there:
Copying MySQL Databases to Another Machine
185
mysqladmin create db_namegunzip < db_name.gz | mysql db_name
You can also use mysqldump and mysqlimport to transfer the database. For large tables, this is muchfaster than simply using mysqldump. In the following commands, DUMPDIR represents the full path nameof the directory you use to store the output from mysqldump.
First, create the directory for the output files and dump the database:
mkdir DUMPDIRmysqldump --tab=DUMPDIR db_name
Then transfer the files in the DUMPDIR directory to some corresponding directory on the target machineand load the files into MySQL there:
mysqladmin create db_name # create databasecat DUMPDIR/*.sql | mysql db_name # create tables in databasemysqlimport db_name DUMPDIR/*.txt # load data into tables
Do not forget to copy the mysql database because that is where the grant tables are stored. You mighthave to run commands as the MySQL root user on the new machine until you have the mysql databasein place.
After you import the mysql database on the new machine, execute mysqladmin flush-privilegesso that the server reloads the grant table information.

186
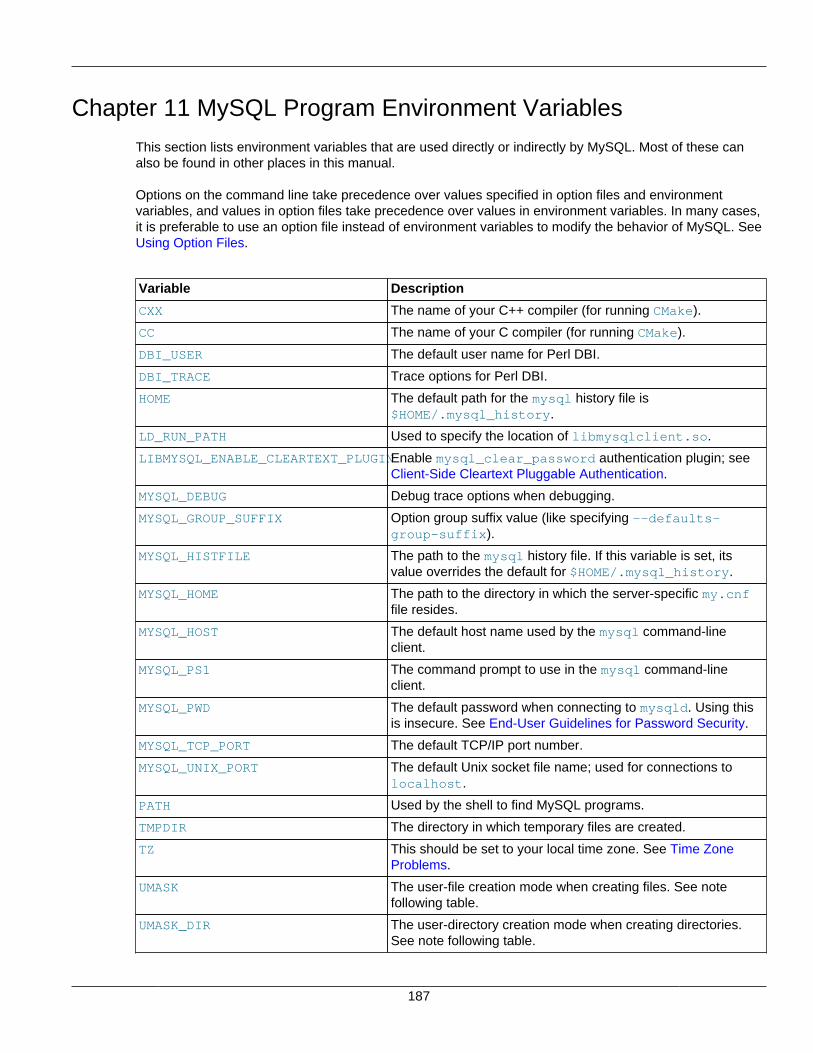
187
Chapter 11 MySQL Program Environment Variables
This section lists environment variables that are used directly or indirectly by MySQL. Most of these canalso be found in other places in this manual.
Options on the command line take precedence over values specified in option files and environmentvariables, and values in option files take precedence over values in environment variables. In many cases,it is preferable to use an option file instead of environment variables to modify the behavior of MySQL. SeeUsing Option Files.
Variable Description
CXX The name of your C++ compiler (for running CMake).
CC The name of your C compiler (for running CMake).
DBI_USER The default user name for Perl DBI.
DBI_TRACE Trace options for Perl DBI.
HOME The default path for the mysql history file is$HOME/.mysql_history.
LD_RUN_PATH Used to specify the location of libmysqlclient.so.
LIBMYSQL_ENABLE_CLEARTEXT_PLUGINEnable mysql_clear_password authentication plugin; seeClient-Side Cleartext Pluggable Authentication.
MYSQL_DEBUG Debug trace options when debugging.
MYSQL_GROUP_SUFFIX Option group suffix value (like specifying --defaults-group-suffix).
MYSQL_HISTFILE The path to the mysql history file. If this variable is set, itsvalue overrides the default for $HOME/.mysql_history.
MYSQL_HOME The path to the directory in which the server-specific my.cnffile resides.
MYSQL_HOST The default host name used by the mysql command-lineclient.
MYSQL_PS1 The command prompt to use in the mysql command-lineclient.
MYSQL_PWD The default password when connecting to mysqld. Using thisis insecure. See End-User Guidelines for Password Security.
MYSQL_TCP_PORT The default TCP/IP port number.
MYSQL_UNIX_PORT The default Unix socket file name; used for connections tolocalhost.
PATH Used by the shell to find MySQL programs.
TMPDIR The directory in which temporary files are created.
TZ This should be set to your local time zone. See Time ZoneProblems.
UMASK The user-file creation mode when creating files. See notefollowing table.
UMASK_DIR The user-directory creation mode when creating directories.See note following table.
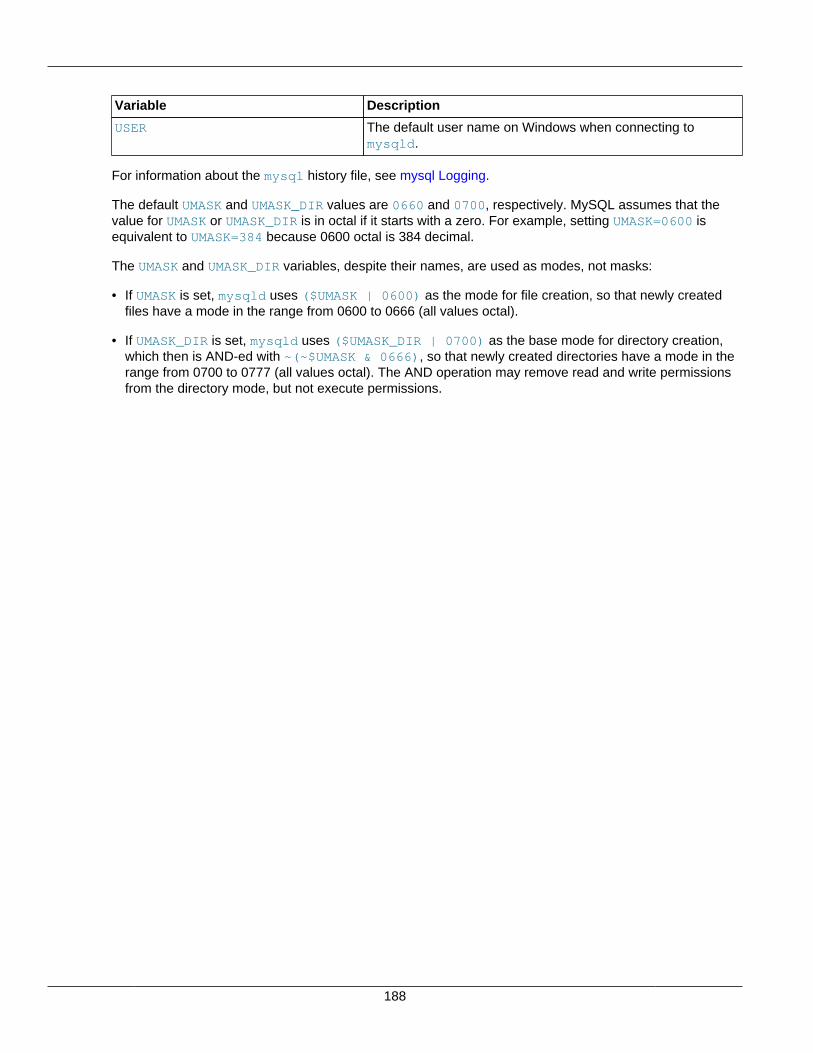
188
Variable Description
USER The default user name on Windows when connecting tomysqld.
For information about the mysql history file, see mysql Logging.
The default UMASK and UMASK_DIR values are 0660 and 0700, respectively. MySQL assumes that thevalue for UMASK or UMASK_DIR is in octal if it starts with a zero. For example, setting UMASK=0600 isequivalent to UMASK=384 because 0600 octal is 384 decimal.
The UMASK and UMASK_DIR variables, despite their names, are used as modes, not masks:
• If UMASK is set, mysqld uses ($UMASK | 0600) as the mode for file creation, so that newly createdfiles have a mode in the range from 0600 to 0666 (all values octal).
• If UMASK_DIR is set, mysqld uses ($UMASK_DIR | 0700) as the base mode for directory creation,which then is AND-ed with ~(~$UMASK & 0666), so that newly created directories have a mode in therange from 0700 to 0777 (all values octal). The AND operation may remove read and write permissionsfrom the directory mode, but not execute permissions.
189
Chapter 12 Perl Installation Notes
Table of Contents12.1 Installing Perl on Unix ............................................................................................................. 18912.2 Installing ActiveState Perl on Windows .................................................................................... 19012.3 Problems Using the Perl DBI/DBD Interface ............................................................................. 191
The Perl DBI module provides a generic interface for database access. You can write a DBI script thatworks with many different database engines without change. To use DBI, you must install the DBI module,as well as a DataBase Driver (DBD) module for each type of database server you want to access. ForMySQL, this driver is the DBD::mysql module.
Perl, and the DBD::MySQL module for DBI must be installed if you want to run the MySQL benchmarkscripts; see The MySQL Benchmark Suite. They are also required for the NDB Cluster ndb_size.plutility; see ndb_size.pl — NDBCLUSTER Size Requirement Estimator.
Note
Perl support is not included with MySQL distributions. You can obtain the necessarymodules from http://search.cpan.org for Unix, or by using the ActiveState ppmprogram on Windows. The following sections describe how to do this.
The DBI/DBD interface requires Perl 5.6.0, and 5.6.1 or later is preferred. DBI does not work if you havean older version of Perl. You should use DBD::mysql 4.009 or higher. Although earlier versions areavailable, they do not support the full functionality of MySQL 5.5.
12.1 Installing Perl on Unix
MySQL Perl support requires that you have installed MySQL client programming support (libraries andheader files). Most installation methods install the necessary files. If you install MySQL from RPM files onLinux, be sure to install the developer RPM as well. The client programs are in the client RPM, but clientprogramming support is in the developer RPM.
The files you need for Perl support can be obtained from the CPAN (Comprehensive Perl Archive Network)at http://search.cpan.org.
The easiest way to install Perl modules on Unix is to use the CPAN module. For example:
shell> perl -MCPAN -e shellcpan> install DBIcpan> install DBD::mysql
The DBD::mysql installation runs a number of tests. These tests attempt to connect to the local MySQLserver using the default user name and password. (The default user name is your login name on Unix,and ODBC on Windows. The default password is “no password.”) If you cannot connect to the server withthose values (for example, if your account has a password), the tests fail. You can use force installDBD::mysql to ignore the failed tests.
DBI requires the Data::Dumper module. It may be installed; if not, you should install it before installingDBI.
Installing ActiveState Perl on Windows
190
It is also possible to download the module distributions in the form of compressed tar archives and buildthe modules manually. For example, to unpack and build a DBI distribution, use a procedure such as this:
1. Unpack the distribution into the current directory:
shell> gunzip < DBI-VERSION.tar.gz | tar xvf -
This command creates a directory named DBI-VERSION.
2. Change location into the top-level directory of the unpacked distribution:
shell> cd DBI-VERSION
3. Build the distribution and compile everything:
shell> perl Makefile.PLshell> makeshell> make testshell> make install
The make test command is important because it verifies that the module is working. Note that when yourun that command during the DBD::mysql installation to exercise the interface code, the MySQL servermust be running or the test fails.
It is a good idea to rebuild and reinstall the DBD::mysql distribution whenever you install a new release ofMySQL. This ensures that the latest versions of the MySQL client libraries are installed correctly.
If you do not have access rights to install Perl modules in the system directory or if you want to install localPerl modules, the following reference may be useful: http://learn.perl.org/faq/perlfaq8.html#How-do-I-keep-my-own-module-library-directory-
12.2 Installing ActiveState Perl on WindowsOn Windows, you should do the following to install the MySQL DBD module with ActiveState Perl:
1. Get ActiveState Perl from http://www.activestate.com/Products/ActivePerl/ and install it.
2. Open a console window.
3. If necessary, set the HTTP_proxy variable. For example, you might try a setting like this:
C:\> set HTTP_proxy=my.proxy.com:3128
4. Start the PPM program:
C:\> C:\perl\bin\ppm.pl
5. If you have not previously done so, install DBI:
ppm> install DBI
6. If this succeeds, run the following command:
ppm> install DBD-mysql
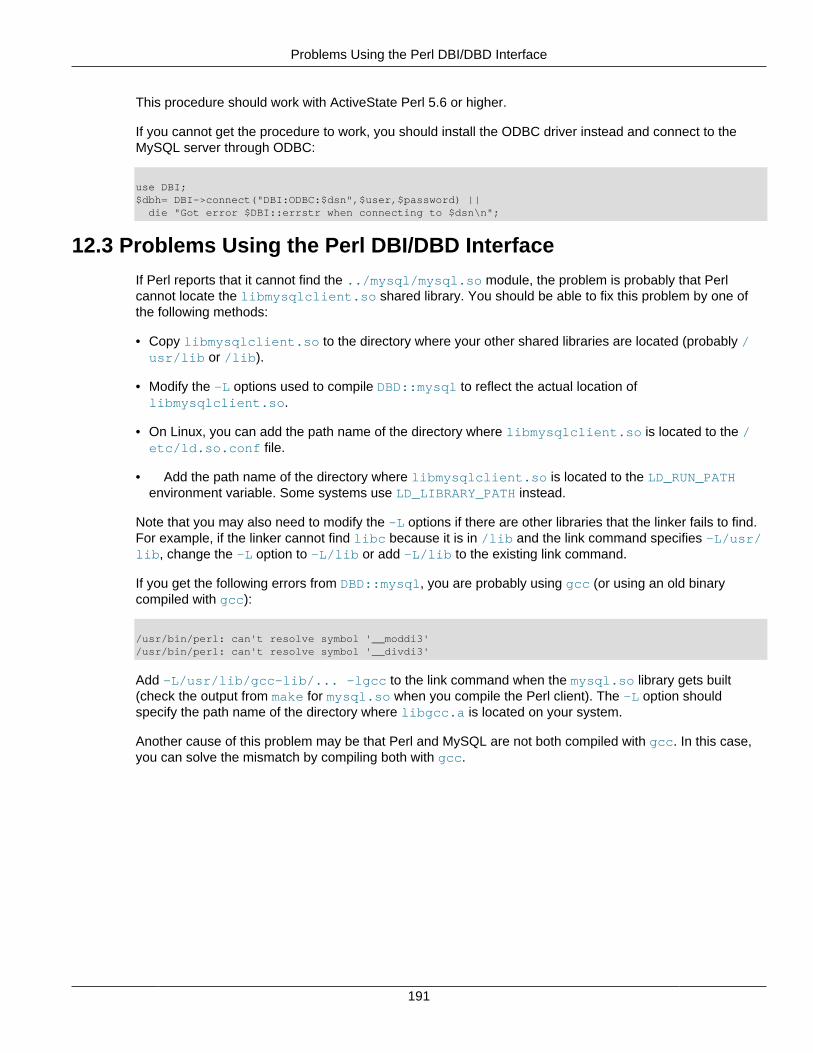
Problems Using the Perl DBI/DBD Interface
191
This procedure should work with ActiveState Perl 5.6 or higher.
If you cannot get the procedure to work, you should install the ODBC driver instead and connect to theMySQL server through ODBC:
use DBI;$dbh= DBI->connect("DBI:ODBC:$dsn",$user,$password) || die "Got error $DBI::errstr when connecting to $dsn\n";
12.3 Problems Using the Perl DBI/DBD Interface
If Perl reports that it cannot find the ../mysql/mysql.so module, the problem is probably that Perlcannot locate the libmysqlclient.so shared library. You should be able to fix this problem by one ofthe following methods:
• Copy libmysqlclient.so to the directory where your other shared libraries are located (probably /usr/lib or /lib).
• Modify the -L options used to compile DBD::mysql to reflect the actual location oflibmysqlclient.so.
• On Linux, you can add the path name of the directory where libmysqlclient.so is located to the /etc/ld.so.conf file.
• Add the path name of the directory where libmysqlclient.so is located to the LD_RUN_PATHenvironment variable. Some systems use LD_LIBRARY_PATH instead.
Note that you may also need to modify the -L options if there are other libraries that the linker fails to find.For example, if the linker cannot find libc because it is in /lib and the link command specifies -L/usr/lib, change the -L option to -L/lib or add -L/lib to the existing link command.
If you get the following errors from DBD::mysql, you are probably using gcc (or using an old binarycompiled with gcc):
/usr/bin/perl: can't resolve symbol '__moddi3'/usr/bin/perl: can't resolve symbol '__divdi3'
Add -L/usr/lib/gcc-lib/... -lgcc to the link command when the mysql.so library gets built(check the output from make for mysql.so when you compile the Perl client). The -L option shouldspecify the path name of the directory where libgcc.a is located on your system.
Another cause of this problem may be that Perl and MySQL are not both compiled with gcc. In this case,you can solve the mismatch by compiling both with gcc.

192