mysql notifier - mysql :: mysql community downloadsthis is the mysql™ notifier reference manual....
TRANSCRIPT
MySQL Notifier
Abstract
This is the MySQL™ Notifier Reference Manual. It documents the MySQL Notifier 1.1 release series.
For notes detailing the changes in each release, see the MySQL Notifier Release Notes.
For legal information, see the Legal Notices.
For help with using MySQL, please visit the MySQL Forums, where you can discuss your issues with other MySQLusers.
Document generated on: 2020-08-01 (revision: 66876)

Table of ContentsPreface and Legal Notices .................................................................................................................. v1 MySQL Notifier Overview ................................................................................................................ 1
1.1 MySQL Notifier Tasks ........................................................................................................... 11.2 MySQL Notifier Options ........................................................................................................ 21.3 Managing Monitored Items .................................................................................................... 31.4 Troubleshooting .................................................................................................................... 9
2 Setting Up Remote Monitoring in MySQL Notifier ............................................................................ 11
iii

iv
Preface and Legal NoticesThis is the User Manual for the MySQL Notifier.
Licensing information. This product may include third-party software, used under license. If you areusing a Commercial release of MySQL Notifier, see the MySQL Notifier Commercial License InformationUser Manual for licensing information, including licensing information relating to third-party software thatmay be included in this Commercial release. If you are using a Community release of MySQL Notifier,see the MySQL Notifier Community License Information User Manual for licensing information, includinglicensing information relating to third-party software that may be included in this Community release.
Legal NoticesCopyright © 2006, 2020, Oracle and/or its affiliates.
This software and related documentation are provided under a license agreement containing restrictionson use and disclosure and are protected by intellectual property laws. Except as expressly permittedin your license agreement or allowed by law, you may not use, copy, reproduce, translate, broadcast,modify, license, transmit, distribute, exhibit, perform, publish, or display any part, in any form, or by anymeans. Reverse engineering, disassembly, or decompilation of this software, unless required by law forinteroperability, is prohibited.
The information contained herein is subject to change without notice and is not warranted to be error-free.If you find any errors, please report them to us in writing.
If this is software or related documentation that is delivered to the U.S. Government or anyone licensing iton behalf of the U.S. Government, then the following notice is applicable:
U.S. GOVERNMENT END USERS: Oracle programs (including any operating system, integratedsoftware, any programs embedded, installed or activated on delivered hardware, and modifications ofsuch programs) and Oracle computer documentation or other Oracle data delivered to or accessed byU.S. Government end users are "commercial computer software" or "commercial computer softwaredocumentation" pursuant to the applicable Federal Acquisition Regulation and agency-specificsupplemental regulations. As such, the use, reproduction, duplication, release, display, disclosure,modification, preparation of derivative works, and/or adaptation of i) Oracle programs (including anyoperating system, integrated software, any programs embedded, installed or activated on deliveredhardware, and modifications of such programs), ii) Oracle computer documentation and/or iii) other Oracledata, is subject to the rights and limitations specified in the license contained in the applicable contract.The terms governing the U.S. Government's use of Oracle cloud services are defined by the applicablecontract for such services. No other rights are granted to the U.S. Government.
This software or hardware is developed for general use in a variety of information managementapplications. It is not developed or intended for use in any inherently dangerous applications, includingapplications that may create a risk of personal injury. If you use this software or hardware in dangerousapplications, then you shall be responsible to take all appropriate fail-safe, backup, redundancy, and othermeasures to ensure its safe use. Oracle Corporation and its affiliates disclaim any liability for any damagescaused by use of this software or hardware in dangerous applications.
Oracle and Java are registered trademarks of Oracle and/or its affiliates. Other names may be trademarksof their respective owners.
Intel and Intel Inside are trademarks or registered trademarks of Intel Corporation. All SPARC trademarksare used under license and are trademarks or registered trademarks of SPARC International, Inc. AMD,Epyc, and the AMD logo are trademarks or registered trademarks of Advanced Micro Devices. UNIX is aregistered trademark of The Open Group.
v
Access to Oracle Support
This software or hardware and documentation may provide access to or information about content,products, and services from third parties. Oracle Corporation and its affiliates are not responsible for andexpressly disclaim all warranties of any kind with respect to third-party content, products, and servicesunless otherwise set forth in an applicable agreement between you and Oracle. Oracle Corporation and itsaffiliates will not be responsible for any loss, costs, or damages incurred due to your access to or use ofthird-party content, products, or services, except as set forth in an applicable agreement between you andOracle.
This documentation is NOT distributed under a GPL license. Use of this documentation is subject to thefollowing terms:
You may create a printed copy of this documentation solely for your own personal use. Conversion to otherformats is allowed as long as the actual content is not altered or edited in any way. You shall not publishor distribute this documentation in any form or on any media, except if you distribute the documentation ina manner similar to how Oracle disseminates it (that is, electronically for download on a Web site with thesoftware) or on a CD-ROM or similar medium, provided however that the documentation is disseminatedtogether with the software on the same medium. Any other use, such as any dissemination of printedcopies or use of this documentation, in whole or in part, in another publication, requires the prior writtenconsent from an authorized representative of Oracle. Oracle and/or its affiliates reserve any and all rightsto this documentation not expressly granted above.
Access to Oracle Support
Oracle customers that have purchased support have access to electronic support through My OracleSupport. For information, visithttps://www.oracle.com/corporate/accessibility/learning-support.html#support-tab.
vi
Chapter 1 MySQL Notifier Overview
Table of Contents1.1 MySQL Notifier Tasks ................................................................................................................... 11.2 MySQL Notifier Options ................................................................................................................ 21.3 Managing Monitored Items ............................................................................................................ 31.4 Troubleshooting ............................................................................................................................ 9
MySQL Notifier is a tool that enables you to monitor and adjust the status of your local and remote MySQLserver instances through an indicator that resides in the Microsoft Windows taskbar. MySQL Notifier alsogives quick access to MySQL Workbench through its context menu.
MySQL Notifier is installed by using MySQL Installer. It can be loaded automatically when MicrosoftWindows is started.
To install, download and execute the MySQL Installer. With MySQL Notifier selected from Applications,proceed with the installation. See the MySQL Installer manual for additional details.
For notes detailing the changes in each release of MySQL Notifier, see the MySQL Notifier Release Notes.
Visit the MySQL Notifier forum for additional MySQL Notifier help and support.
Features Include:
• Start, stop, and restart instances of the MySQL server.
• Automatically detects (and adds) new MySQL server services. These are listed under ManageMonitored Items, and may also be configured.
• The Tray icon changes, depending on the status. It is a right-pointing green triangle if all monitoredMySQL server instances are running or a red square if at least one service is stopped. The UpdateMySQL Notifier tray icon based on service status option, which dictates this behavior, is enabled bydefault for each service.
• Links to other applications like MySQL Workbench, MySQL Installer, and the MySQL Utilities. Forexample, choosing Manage Instance will load the MySQL Workbench Server Administration window forthat particular instance.
• If MySQL Workbench is also installed, then the Manage Instance and SQL Editor options are availablefor local (but not remote) MySQL instances.
• Monitors both local and remote MySQL instances.
1.1 MySQL Notifier Tasks
MySQL Notifier provides visual status information for the MySQL servers that are monitored on both localor remote computers. The MySQL Notifier icon in the taskbar changes color to indicate the current status:Running or Stopped.
MySQL Notifier automatically adds discovered MySQL services on the local computer. By default, theAutomatically add new services whose name contains option is enabled and set to mysql. Related
1
MySQL Notifier Options
notification options include being notified when new services are either discovered or experience statuschanges, and are also enabled by default. Uninstalling a service removes the service from MySQL Notifier.
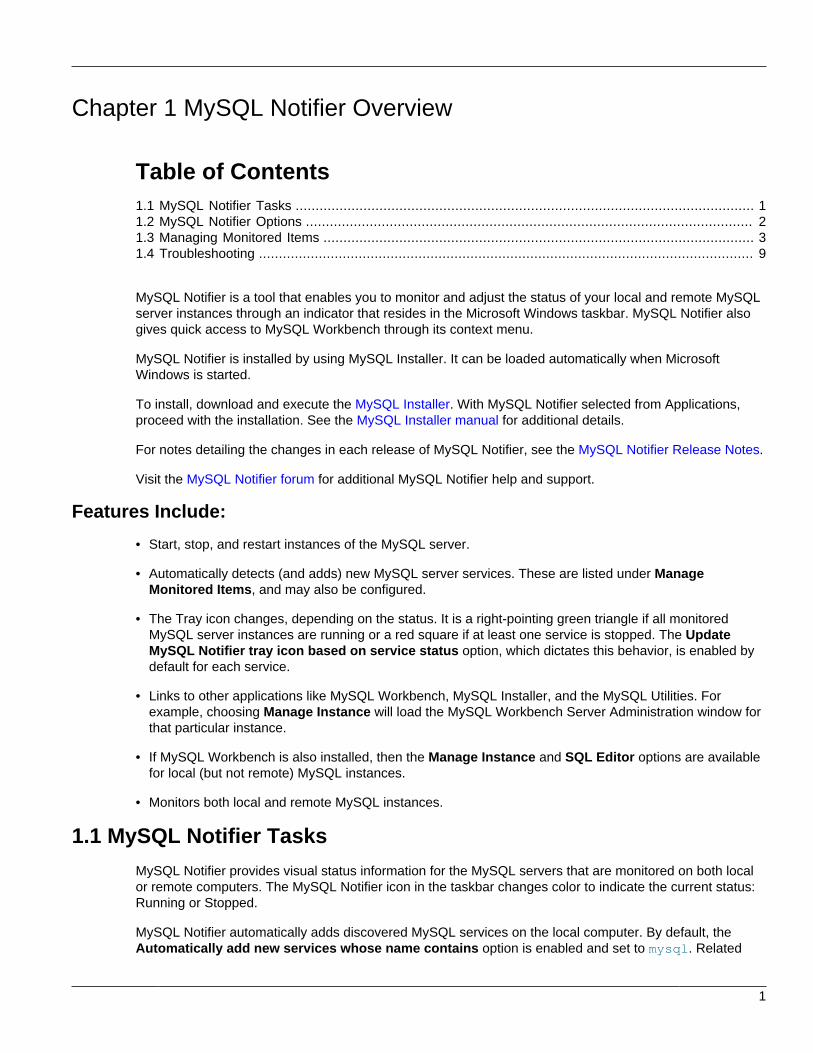
Clicking the MySQL Notifier icon from the Windows taskbar reveals the MySQL Notifier main menu, whichlists each MySQL server separately and displays its current status. You can start, stop, or restart eachMySQL server from the menu as the following figure shows. When MySQL Workbench is installed locally,the Manage Instance and SQL Editor menu items start the application.
Figure 1.1 MySQL Notifier Service Instance Menu
The Actions menu includes the following items:
• Manage Monitored Items
• Launch MySQL Installer (Only when the product is installed.)
• Check for Updates (Only when MySQL Installer is installed.)
• MySQL Utilities Shell (Only when the product is installed.)
• Refresh Status
• Options
• About
• Close MySQL Notifier
The main menu does not show the Actions menu when there are no services being monitored by MySQLNotifier.
1.2 MySQL Notifier Options
The Actions, Options menu provides a set of options that configure MySQL Notifier operations. Optionsare grouped into the following categories: General Options, Notification Options, and MySQL ServerConnections Options.
Click Accept to enable the selected options or Cancel to ignore all changes. Click Reset to Defaults andthen Accept to apply default option values.
General Options. This group includes:
• Use colorful status icons: Enables a colorful style of icons for the tray of MySQL Notifier. Selected bydefault.
• Run at Windows Startup: Allows the application to be loaded when Microsoft Windows starts.Deselected by default.
2
Managing Monitored Items
• Automatically Check For Updates Every # Days: Checks for a new version of MySQL Notifier, andruns this check every # days (1 to 365). This configurable option is enabled by default.
• Automatically add new services whose name contains: The text used to filter services and addthem automatically to the monitored list of the local computer running MySQL Notifier and on remotecomputers already monitoring Windows services. Selected by default for names containing mysql.
• Ping monitored MySQL Server instances every # seconds: The interval (in seconds) to pingmonitored MySQL Server instances for status changes. Longer intervals might be necessary if the list ofmonitored remote instances is large. 30 seconds by default.
Notification Options. This group includes:
• Notify me when a service is automatically added: Display a balloon notification from the taskbar whena newly discovered service is added to the monitored services list. Selected by default.
• Notify me when a service changes status: Displays a balloon notification from the taskbar when amonitored service changes its status. Selected by default.
MySQL Server Connections Options. This group includes:
• Automatic connections migration delayed until: When there are connections to migrate to MySQLWorkbench (if installed), this option postpones the migration by one hour, one day, one week, onemonth, or indefinitely.
1.3 Managing Monitored Items
Manage Monitored Items in the Actions menu enables you to add, configure, and delete the servicesand MySQL instances you intend to monitor. The Manage Items window has two tabs: Services andInstances. This section describes the following aspects of Managed Items window:
• Services Tab
• Instances Tab
• MySQL Server Connections
Services Tab
When MySQL is configured as a local service, MySQL Notifier adds the service to the Services tabautomatically. With the Services tab open, you can select the following options that apply to all servicesbeing monitored:
• Notify me when status changes
• Update MySQL Notifier tray icon based on service status
The next figure shows the Monitored Items windows with the Services tab open. This tab lists the servicename, the computer where the service is hosted, and the current status of each service monitored byMySQL Notifier.
3

Services Tab
Figure 1.2 MySQL Notifier: Manage Monitored Services
To stop monitoring a service, select it from the list of monitored services and click Delete.
To begin monitoring a service, click Add to open the Add Service window. Select a computer from thedrop-down list, locate and select the service to be monitored from the list, and then click OK. Use the Filterfield to reduce the set of services in the list or select Only show services that match auto-add filter toreuse the general-options filter from the Options menu.
A variety of Windows services (including MySQL) may be selected as the following figure shows. Inaddition to the service name, the list shows the current status of each Windows services for the selectedcomputer.
4
Instances Tab
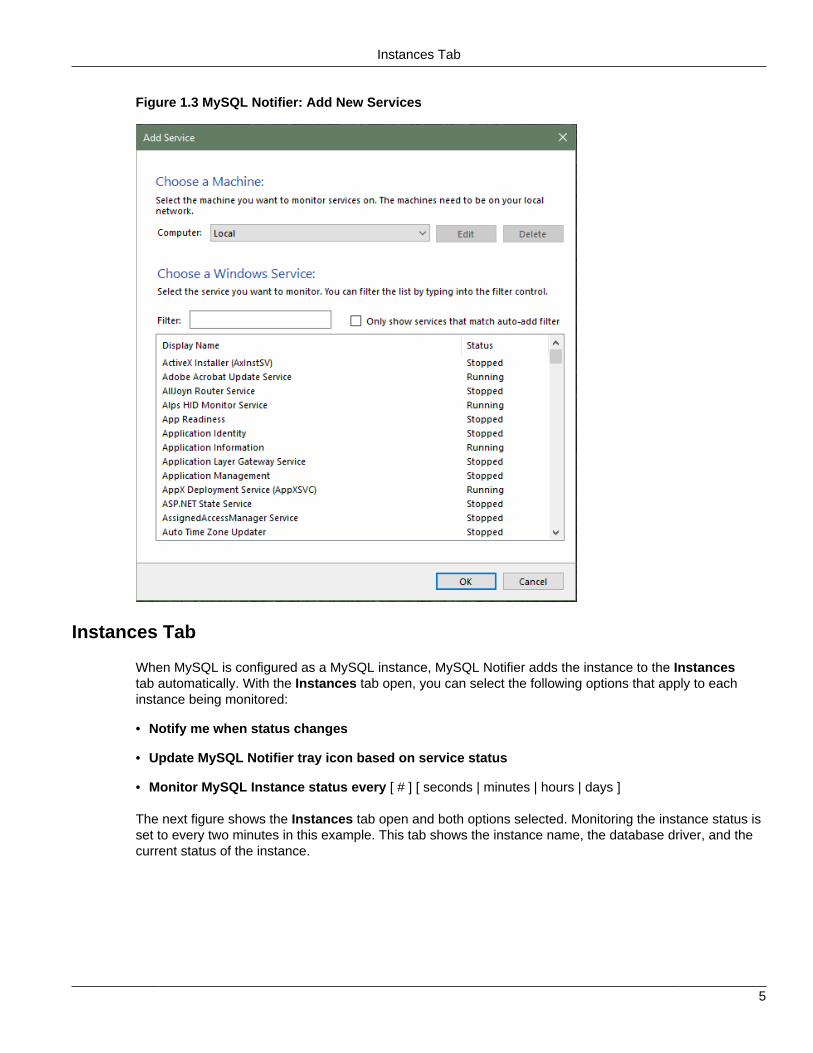
Figure 1.3 MySQL Notifier: Add New Services
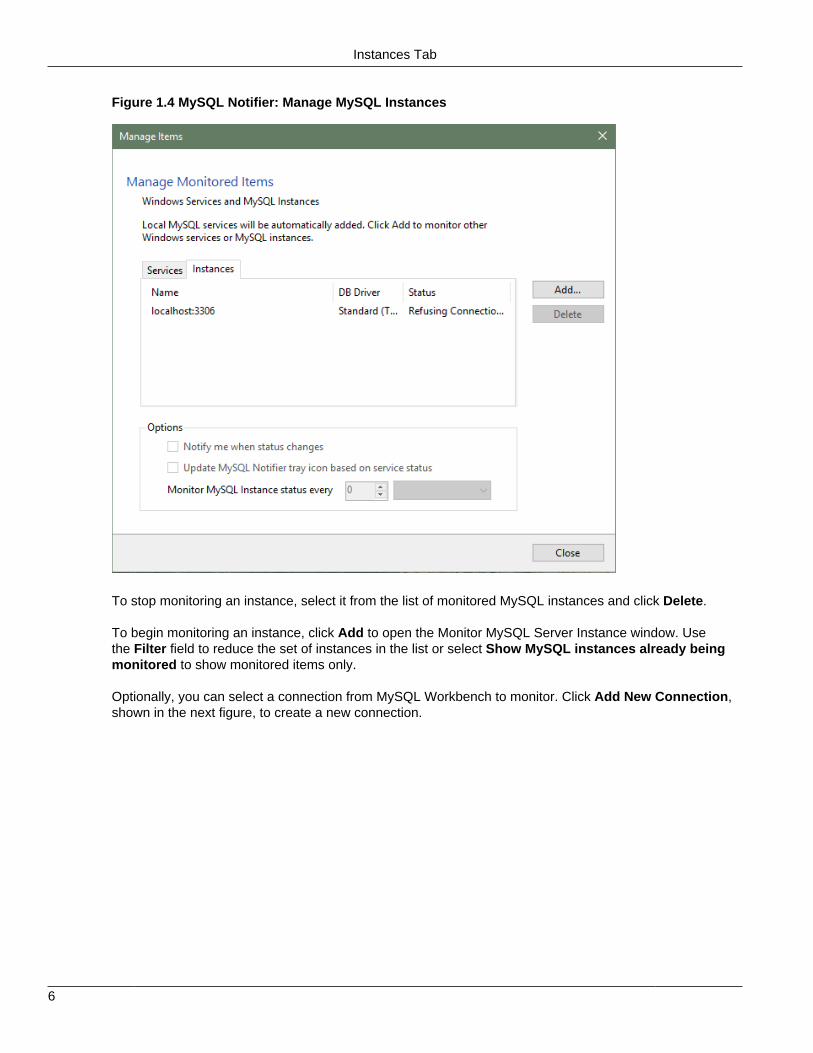
Instances Tab
When MySQL is configured as a MySQL instance, MySQL Notifier adds the instance to the Instancestab automatically. With the Instances tab open, you can select the following options that apply to eachinstance being monitored:
• Notify me when status changes
• Update MySQL Notifier tray icon based on service status
• Monitor MySQL Instance status every [ # ] [ seconds | minutes | hours | days ]
The next figure shows the Instances tab open and both options selected. Monitoring the instance status isset to every two minutes in this example. This tab shows the instance name, the database driver, and thecurrent status of the instance.
5
Instances Tab
Figure 1.4 MySQL Notifier: Manage MySQL Instances
To stop monitoring an instance, select it from the list of monitored MySQL instances and click Delete.
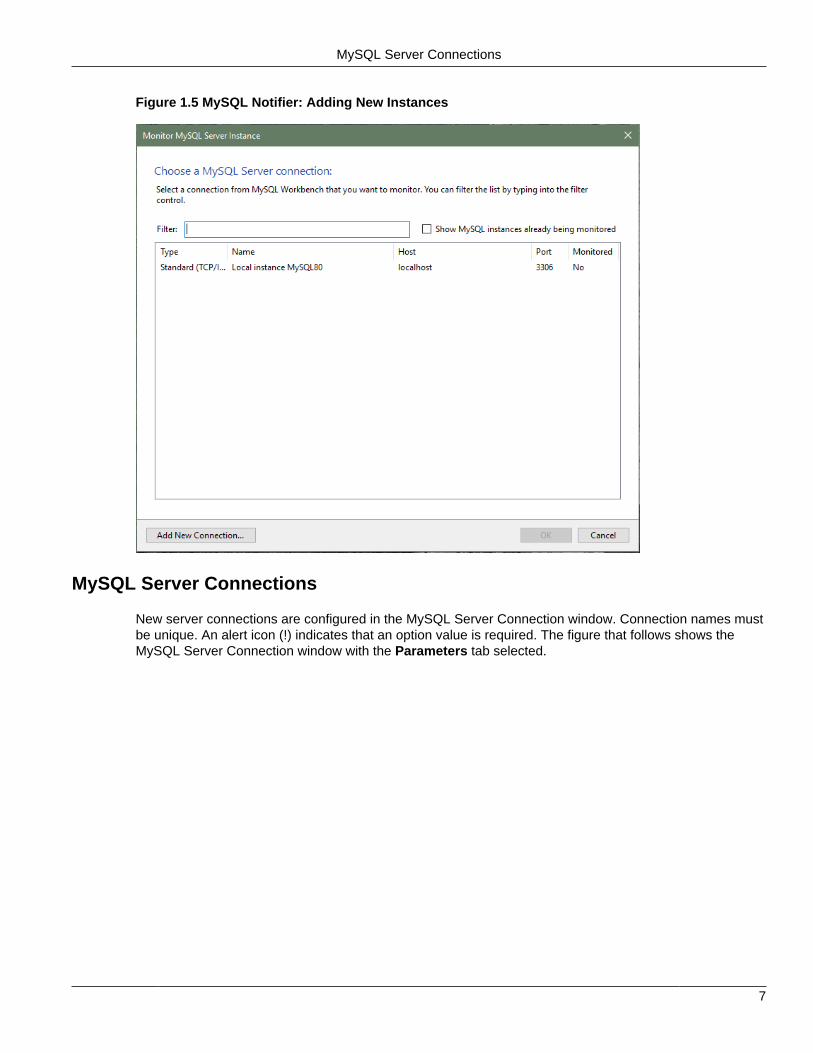
To begin monitoring an instance, click Add to open the Monitor MySQL Server Instance window. Usethe Filter field to reduce the set of instances in the list or select Show MySQL instances already beingmonitored to show monitored items only.
Optionally, you can select a connection from MySQL Workbench to monitor. Click Add New Connection,shown in the next figure, to create a new connection.
6
MySQL Server Connections
Figure 1.5 MySQL Notifier: Adding New Instances
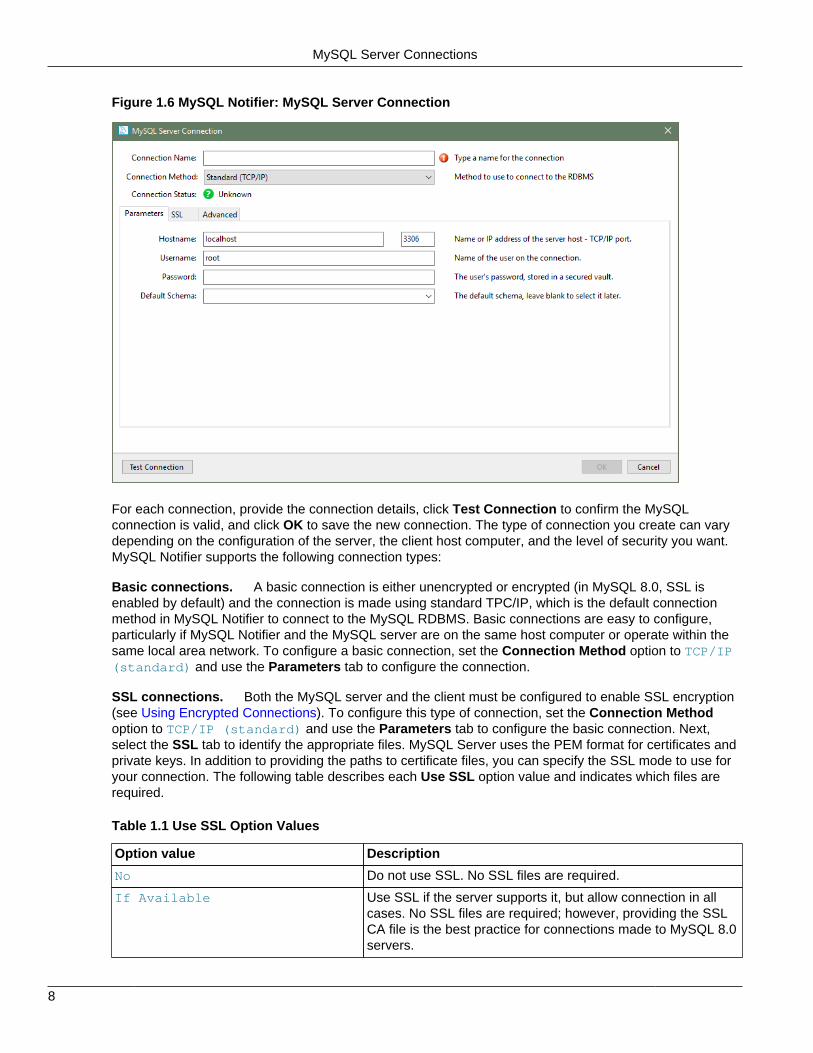
MySQL Server Connections
New server connections are configured in the MySQL Server Connection window. Connection names mustbe unique. An alert icon (!) indicates that an option value is required. The figure that follows shows theMySQL Server Connection window with the Parameters tab selected.
7
MySQL Server Connections
Figure 1.6 MySQL Notifier: MySQL Server Connection
For each connection, provide the connection details, click Test Connection to confirm the MySQLconnection is valid, and click OK to save the new connection. The type of connection you create can varydepending on the configuration of the server, the client host computer, and the level of security you want.MySQL Notifier supports the following connection types:
Basic connections. A basic connection is either unencrypted or encrypted (in MySQL 8.0, SSL isenabled by default) and the connection is made using standard TPC/IP, which is the default connectionmethod in MySQL Notifier to connect to the MySQL RDBMS. Basic connections are easy to configure,particularly if MySQL Notifier and the MySQL server are on the same host computer or operate within thesame local area network. To configure a basic connection, set the Connection Method option to TCP/IP(standard) and use the Parameters tab to configure the connection.
SSL connections. Both the MySQL server and the client must be configured to enable SSL encryption(see Using Encrypted Connections). To configure this type of connection, set the Connection Methodoption to TCP/IP (standard) and use the Parameters tab to configure the basic connection. Next,select the SSL tab to identify the appropriate files. MySQL Server uses the PEM format for certificates andprivate keys. In addition to providing the paths to certificate files, you can specify the SSL mode to use foryour connection. The following table describes each Use SSL option value and indicates which files arerequired.
Table 1.1 Use SSL Option Values
Option value Description
No Do not use SSL. No SSL files are required.
If Available Use SSL if the server supports it, but allow connection in allcases. No SSL files are required; however, providing the SSLCA file is the best practice for connections made to MySQL 8.0servers.
8
Troubleshooting
Option value Description
Require Always use SSL and deny a connection if the server does notsupport SSL. Do not perform server certificate validation. NoSSL files are required.
Require and Verify CA Always use SSL. Validate the certificate authorities (CA), buttolerate a name mismatch. Requires the SSL CA file.
Require and Verify Identity Always use SSL and fail if the host name is not correct.Requires valid SSL CA, SSL Cert, and SSL Key files.
SSH connections. SSH tunnels permit you to connect to a MySQL database from behind a firewallwhen the MySQL server port is blocked. To configure this type of connection, set the Connection Methodoption to Standard TCP/IP over SSH and use the Parameters tab to configure the connection.
Additional considerations:
• The SSH server communicates with a MySQL server instance in an unencrypted or encrypted mode,based on the value selected for the SSL mode (see Table 1.1, “Use SSL Option Values”). Select theSSL tab to specify a value for the Use SSL option.
• The account you use to run MySQL Notifier must be authorized on the SSH server in advance. Toauthenticate your account (specified by SSH User Name), you can use one of the following strategies:
• SSH User Name and SSH Password only
• SSH User Name and SSH Key File only
Your SSH server may require that you to also provide the SSH Passphrase property when using akey file. An invalid pass phrase generates an exception.
• SSH User Name and SSH Key File (SSH Passphrase) and SSH Password
The combination of user name + key file (passphrase) + password can perform fallback authenticationwhen the key file and pass phrase are valid, but an error occurs on the server. Specifically, the firstattempt to connect uses the key file, and if it fails, the next attempt to connect uses the passwordinstead. If the SSH key file is null or empty, but the SSH password is provided, MySQL Notifierattempts to connect using the SSH password only.
1.4 Troubleshooting
For issues that are not documented here, visit the MySQL Notifier Support Forum for MySQL Notifier helpand support.
• Problem: attempting to start/stop/restart a MySQL service might generate an error similar to "TheService MySQLVERSION failed the most recent status change request with the message "The servicemysqlVERSION was not found in the Windows Services".
Explanation: this is a case-sensitivity issue, in that the service name is MySQLVERSION compared tohaving mysqlVERSION in the configuration file.
Solution: either update your MySQL Notifier configuration file with the correct information, or stop MySQLNotifier and delete this configuration file. The MySQL Notifier configuration file is located at %APPDATA%\Oracle\MySQL Notifier\settings.config where %APPDATA% is a variable and depends onyour system. A typical location is "C:\Users\YourUsername\AppData\Roaming\Oracle\MySQL Notifier\settings.config" where YourUsername is your system user name. In this file, and within the ServerList
9
Troubleshooting
section, change the ServerName values from lowercase to the actual service names. For example,change mysqlVERSION to MySQLVERSION, save, and then restart MySQL Notifier. Alternatively, stopMySQL Notifier, delete this file, then restart MySQL Notifier.
• Problem: when connecting to a remote computer for the purpose of monitoring a remote Windowsservice, the Add Service window does not always show all the services shown in the Windows Servicesconsole.
Explanation: this behavior is governed by the operating system and the outcome is expected whenworking with nondomain user accounts. For a complete description of the behavior, see the UserAccount Control and WMI article from Microsoft.
Solution: when the remote computer is in a compatible domain, it is recommended that domain useraccounts are used to connect through WMI to a remote computer. For detailed setup instructions usingWMI, see Chapter 2, Setting Up Remote Monitoring in MySQL Notifier.
Alternatively, when domain user accounts are not available, Microsoft provides a less secureworkaround that should only be implemented with caution. For more information, see the Description ofUser Account Control and remote restrictions in Windows Vista KB article from Microsoft.
10
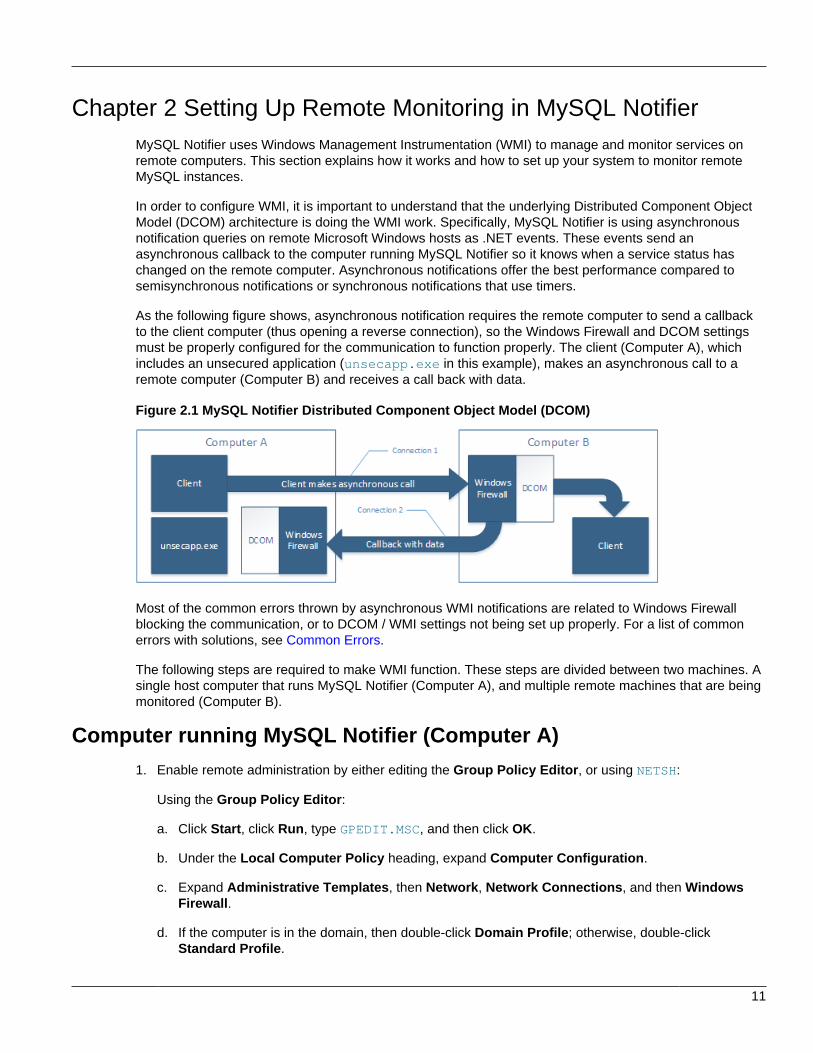
Chapter 2 Setting Up Remote Monitoring in MySQL NotifierMySQL Notifier uses Windows Management Instrumentation (WMI) to manage and monitor services onremote computers. This section explains how it works and how to set up your system to monitor remoteMySQL instances.
In order to configure WMI, it is important to understand that the underlying Distributed Component ObjectModel (DCOM) architecture is doing the WMI work. Specifically, MySQL Notifier is using asynchronousnotification queries on remote Microsoft Windows hosts as .NET events. These events send anasynchronous callback to the computer running MySQL Notifier so it knows when a service status haschanged on the remote computer. Asynchronous notifications offer the best performance compared tosemisynchronous notifications or synchronous notifications that use timers.
As the following figure shows, asynchronous notification requires the remote computer to send a callbackto the client computer (thus opening a reverse connection), so the Windows Firewall and DCOM settingsmust be properly configured for the communication to function properly. The client (Computer A), whichincludes an unsecured application (unsecapp.exe in this example), makes an asynchronous call to aremote computer (Computer B) and receives a call back with data.
Figure 2.1 MySQL Notifier Distributed Component Object Model (DCOM)
Most of the common errors thrown by asynchronous WMI notifications are related to Windows Firewallblocking the communication, or to DCOM / WMI settings not being set up properly. For a list of commonerrors with solutions, see Common Errors.
The following steps are required to make WMI function. These steps are divided between two machines. Asingle host computer that runs MySQL Notifier (Computer A), and multiple remote machines that are beingmonitored (Computer B).
Computer running MySQL Notifier (Computer A)
1. Enable remote administration by either editing the Group Policy Editor, or using NETSH:
Using the Group Policy Editor:
a. Click Start, click Run, type GPEDIT.MSC, and then click OK.
b. Under the Local Computer Policy heading, expand Computer Configuration.
c. Expand Administrative Templates, then Network, Network Connections, and then WindowsFirewall.
d. If the computer is in the domain, then double-click Domain Profile; otherwise, double-clickStandard Profile.
11
Computer running MySQL Notifier (Computer A)
e. Double-click Windows Firewall: Allow inbound remote administration exception to open aconfiguration window.
f. Check the Enabled option button and then click OK.
Using the NETSH command:
Note
The "netsh firewall" command is deprecated as of Microsoft Server 2008 andVista, and replaced with "netsh advfirewall firewall".
a. Open a command prompt window with Administrative rights (you can right-click the CommandPrompt icon and select Run as Administrator).
b. Execute the following command:
NETSH advfirewall firewall set service RemoteAdmin enable
2. Open the DCOM port TCP 135:
a. Open a command prompt window with Administrative rights (you can right-click the CommandPrompt icon and select Run as Administrator).
b. Execute the following command:
NETSH advfirewall firewall add rule name=DCOM_TCP135 protocol=TCP localport=135 dir=in action=allow
12

Monitored Remote Computer (Computer B)
3. Add the client application that contains the sink for the callback (MySqlNotifier.exe) to theWindows Firewall Exceptions List (use either the Windows Firewall configuration or NETSH):
Using the Windows Firewall configuration:
a. In the Control Panel, double-click Windows Firewall.
b. In the Windows Firewall window, click Allow a program or feature through Windows Firewall.
c. In the Allowed Programs window, click Change Settings and do one of the following:
• If MySqlNotifier.exe is in the Allowed programs and features list, make sure it is checked forthe type of networks the computer connects to (Private, Public or both).
• If MySqlNotifier.exe is not in the list, click Allow another program.
i. In the Add a Program window, select the MySqlNotifier.exe if it exists in the Programslist, otherwise click Browse and go to the directory where MySqlNotifier.exe wasinstalled to select it, then click Add.
ii. Make sure MySqlNotifier.exe is checked for the type of networks the computer connectsto (Private, Public or both).
Using the NETSH command:
a. Open a command prompt window with Administrative rights (you can right-click the CommandPrompt icon and click Run as Administrator).
b. Execute the following command, where you change "[YOUR_INSTALL_DIRECTORY]":
NETSH advfirewall firewall add rule name=MySqlNotifier program=[YOUR_INSTALL_DIRECTORY]\MySqlNotifier.exe action=allow dir=in
4. If Computer B is either a member of WORKGROUP or is in a different domain that is untrusted byComputer A, then the callback connection (Connection 2) is created as an Anonymous connection. Togrant Anonymous connections DCOM Remote Access permissions:
a. Click Start, click Run, type DCOMCNFG, and then click OK.
b. In the Component Services dialog box, expand Component Services, expand Computers, and thenright-click My Computer and click Properties.
c. In the My Computer Properties dialog box, click the COM Security tab.
d. Under Access Permissions, click Edit Limits.
e. In the Access Permission dialog box, select ANONYMOUS LOGON name in the Group or usernames box. In the Allow column under Permissions for User, select Remote Access, and then clickOK.
Monitored Remote Computer (Computer B)If the user account that is logged on to the computer running the MySQL Notifier (Computer A) is a localadministrator on the remote computer (Computer B), such that the same account is an administrator onComputer B, you can skip to the "Allow for remote administration" step.
Setting DCOM security to allow a non-administrator user to access a computer remotely:
1. Grant "DCOM remote launch" and activation permissions for a user or group:
13
Monitored Remote Computer (Computer B)
a. Click Start, click Run, type DCOMCNFG, and then click OK.
b. In the Component Services dialog box, expand Component Services, expand Computers, and thenright-click My Computer and click Properties.
c. In the My Computer Properties dialog box, click the COM Security tab.
d. Under Launch and Activation Permission, click Edit Limits.
e. In the Launch and Activation Permission dialog box, follow these steps if your name or yourgroup does not appear in the Groups or user names list:
i. In the Launch and Activation Permission dialog box, click Add.
ii. In the Select Users or Groups dialog box, add your name and the group in the Enter the objectnames to select box, and then click OK.
f. In the Launch and Activation Permission dialog box, select your user and group in the Group oruser names box. In the Allow column under Permissions for User, select Remote Launch, selectRemote Activation, and then click OK.
Grant DCOM remote access permissions:
a. Click Start, click Run, type DCOMCNFG, and then click OK.
b. In the Component Services dialog box, expand Component Services, expand Computers, and thenright-click My Computer and click Properties.
c. In the My Computer Properties dialog box, click the COM Security tab.
d. Under Access Permissions, click Edit Limits.
e. In the Access Permission dialog box, select ANONYMOUS LOGON name in the Group or usernames box. In the Allow column under Permissions for User, select Remote Access, and then clickOK.
2. Allowing non-administrator users access to a specific WMI namespace:
a. In the Control Panel, double-click Administrative Tools.
b. In the Administrative Tools window, double-click Computer Management.
c. In the Computer Management window, expand the Services and Applications tree.
d. Right-click the WMI Control icon and select Properties.
e. In the WMI Control Properties window, click the Security tab.
f. In the Security tab, select the namespace and click Security. Root/CIMV2 is a commonly usednamespace.
g. Locate the appropriate account and check Remote Enable in the Permissions list.
14
Common Errors
3. Allow for remote administration by either editing the Group Policy Editor or using NETSH:
Using the Group Policy Editor:
a. Click Start, click Run, type GPEDIT.MSC, and then click OK.
b. Under the Local Computer Policy heading, double-click Computer Configuration.
c. Double-click Administrative Templates, then Network, Network Connections, and thenWindows Firewall.
d. If the computer is in the domain, then double-click Domain Profile; otherwise, double-clickStandard Profile.
e. Click Windows Firewall: Allow inbound remote administration exception.
f. On the Action menu either select Edit, or double-click the selection from the previous step.
g. Check the Enabled radio button, and then click OK.
Using the NETSH command:
a. Open a command prompt window with Administrative rights (you can right-click the CommandPrompt icon and click Run as Administrator).
b. Execute the following command:
NETSH advfirewall firewall set service RemoteAdmin enable
4. Confirm that the user account you are logging in with uses the Name value and not the Full Namevalue:
a. In the Control Panel, double-click Administrative Tools.
b. In the Administrative Tools window, double-click Computer Management.
c. In the Computer Management window, expand the System Tools then Local Users and Groups.
d. Click the Users node, and on the right side panel locate your user and make sure it uses the Namevalue to connect, and not the Full Name value.
Common Errors
• 0x80070005
• DCOM Security was not configured properly (see Computer B, the Setting DCOM security...step).
• The remote computer (Computer B) is a member of WORKGROUP or is in a domain that is untrustedby the client computer (Computer A) (see Computer A, the Grant Anonymous connections DCOMRemote Access permissions step).
• 0x8007000E
• The remote computer (Computer B) is a member of WORKGROUP or is in a domain that is untrustedby the client computer (Computer A) (see Computer A, the Grant Anonymous connections DCOMRemote Access permissions step).
15
Common Errors
• 0x80041003
• Access to the remote WMI namespace was not configured properly (see Computer B, the Allowingnon-administrator users access to a specific WMI namespace step).
• 0x800706BA
• The DCOM port is not open on the client computers (Computer A) firewall. See the Open the DCOMport TCP 135 step for Computer A.
• The remote computer (Computer B) is inaccessible because its network location is set to Public. Makesure you can access it through the Windows Explorer.
16