myyooffa as scciiaall rreelleeasee -...
TRANSCRIPT

S:\2011 official handouts\Sessions handouts\Myofascial Release Techniques.doc1/28/2015
MMYYOOFFAASSCCIIAALL RREELLEEAASSEE
TTEECCHHNNIIQQUUEESS

S:\2011 official handouts\Sessions handouts\Myofascial Release Techniques.doc1/28/2015
S:\2011 official handouts\Sessions handouts\Myofascial Release Techniques.doc1/28/2015
TABLE OF CONTENTS
Myofascial Technique Overview
Superficial Back Line
Plantar Fascia 1-2
Gastrocnemius/Soleus 3
Hamstrings 4-5
Erector Spinae Prone 16
Seated 11-12
Mountains & Valleys 13-15
Scalp 17
Cervical Posterior 18
Suboccipital Traction 19
Superficial Front Line
Dorsal Foot 6-7
Anterior Tibialis 8-9
Rectus Femoris 10
Trunk 20-21
Neck Anterior & lateral 22-24
Leg Traction 25
Anatomy
Superficial Back Line 26-27
Superficial Front Line 28-29
This handout is laid out as it will be presented in class-lower body: superficial back and front line, the
upper body: superficial back and front line. It was documented this way for the student’s benefit so we
do not leave class feeling unbalanced.

S:\2011 official handouts\Sessions handouts\Myofascial Release Techniques.doc1/28/2015
Myofascial Techniques
In the following techniques we will be looking at affecting the fascia and myofascia of the body. This
in turn will affect the muscles increasing movement and generally creating space for not only muscle
but bones, nerves, blood and lymphatic vessels and organs to function unencumbered.
Fascia is the most abundant of tissues in the human body. It invests, surrounds, separates, and supports
other structures of the body. Dr. John Upledger, DO refers to it as “the inner body stocking”. When
healthy and non-restricting it could be described as a similar to a mesh much like a piece of cheese
cloth soaked in a semi-dried glue with a great amount of tensile strength. It can be stretched and return
to its original state. It can be shortened and returned to its original state. However, with lack of
movement, sustained lengthening or shortening or sudden injury over-stressing it’s anatomy it can
retain its new found position and take on the consistency of cheese cloth whose glue has hardened.
There are many varied techniques to treat the fascia ranging from John Barnes’ slow sustained
stretching and tractioning, CranioSacral’s even more subtle manipulations to more aggressive
interventions such as Rolfing.
In these classes you will be learning very simple techniques that you can apply in the context of a full
myofascial session or integrate pieces of this work into your myomassology sessions. The individual
techniques are not as important as is your general understanding of working with the fascial system
to enhance your effectiveness in soft tissue release and normalization.
The main differences between myofascial and other massage strokes are as follows:
Use little or no lubricant (Still staying within the clients tolerance)
Stroke with specific intent to affect the fascia (lengthen, widen, make more pliable)
Keep the fascia engaged (stroke/stretch)
Be aware of the connectiveness of this tissue to other tissues.
Finally, “Put it where it belongs and call for movement”. This quote from Ida Rolf, simple as it is,
leads us to a complex concept when applied to a case by case application. We will use it in its
simplest interpretation and applied to the work presented here to mean-
Stroke down on the tissues of the Superficial Back Line
Stroke up on the tissues of the Superficial Front Line
We will be following the concept and theory of Thomas Myers’ Anatomy Trains. We will only be
scratching the surface and this is intended to be an introduction to this work. If interested it is
suggested that you delve further into his writings and theories.

1
Superficial Back Line
Plantar Fascia
Clients Position- Prone with foot hanging off the table
Area of Treatment- Plantar fascia lateral arch
Using the knuckles stroke from the anterior calcaneus to base of
the fifth phalange
Area of Treatment- Plantar fascia medial arch
Using the knuckles stroke from the anterior calcaneus to base of the first
phalange
Note: You may hyperextend the toes and then stroke
Clients Position- Prone with foot hanging off the table

2
Area of Treatment- Plantar fascia midline
Using the knuckles stroke from the anterior calcaneus to base of the third phalange
Area of Treatment- Plantar fascia distal transverse arch
Using the knuckles beginning just medial to the fifth metatarsal head stroke across the arch ending just
medial to the first metatarsal head.

3
Gastrocnemius/Soleus
Area of Treatment- Gastrocnemius and soleus stroke
Using the posterior proximal phalanges of the “soft, conforming, open handed fists” to stroke
beginning 1-1 ½ “distal to the knee ending at the ankle. This stroke is performed by leaning your
weight over your arms until your hands glide in the desired direction. As the leg narrows taper your
stroke and focus to the index fingers.

4
Hamstrings
Area of Treatment-
Biceps femoris, semitendinosus, semimembranosus
Stroke from the ischial tuberosity to the lateral aspect of the knee
in the same manner used previously for the calf muscles.
Do not stroke into the popliteal space (behind the knee).
Area of Treatment-
Biceps femoris, semitendinosus, semimembranosus
With clients knee flexed palpate for the apex of the muscles outlining the popliteal (where the medial
and lateral hamstrings separate).

5
Utilizing three fingers of each hand place your fingertips into the “valley” between the medial and
lateral hamstrings. Perform a deep gliding friction movement in a superior then inferior direction.
Most inferior finger
As you perform this friction movement have
client medially then laterally rotate the lower leg.

6
Superficial Front Line
Dorsal Foot
Area of Treatment- Extensor tendons of the foot
Engage the fascia of the tendons and stroke from the toes to the ankle.
Area of Treatment- Intrinsic muscles of the foot
Stroke between the metatarsals from the toe web to the tarsals.

7
Extensor Retinaculum
Area of Treatment- Anterior ankle
Using a molding-conforming non-fist stroke from the
tarsals up over the retinaculum.

8
Anterior Tibialis
Area of Treatment- Anterior leg compartment between anterior tibialis and the tibia
Using knuckles engage and stroke the area just lateral
to the tibialis and medial to the anterior tibialis from the
ankle to the tibial condyle.

9
Area of Treatment- Anterior leg compartment between anterior tibialis and the tibia
Place knuckles (or fingertips as shown below) Into
the space between the tibia and the anterior tibialis.
Allow them to sink into the tissues. While applying
pressure without movement instruct client to plantar
then dorsiflex their foot.
Area of Treatment- Anterior tibial fascia
Place knuckles together forming a “roof”. Place this
roof over the tibia with the lateral edge of the tibia
riding in the peak of the roof. Engage and stroke from
the ankle to the tibial condyles then separate hands as
you spread laterally and medially.

10
Thigh
Area of Treatment- Rectus Femoris
Using either the fist surface of the hand or your forearm stroke
from 1-11/2” above the knee to the ASIS (anterior superior iliac
spine) of the ilium.
You may wish to repeat this stroke over the lateral
quadriceps muscles if either feels more toned than the
other.
Instruct client to raise their knee from the table and lower with the stroke.

11
Superficial Back Line
The following movement is performed with client in a seated position as shown:
Hips above knees Feet together
Slight extension at knees Weight forward on fe
Area of Treatment- Longissimus, iliocostals, spinalis, semispinalis rotatores & multifidus
Standing behind client place flat of fists along both sides of the spine on level of C7.
Instruct client to perform the following movements in progression slowly, one vertebra at a time:
1. tilt their head forward
2. using the weight of the head round their neck
3. using the weight of the neck and shoulders arch their back
4. using the weight of the torso round the lumbar and posteriorly rotate/tilt their pelvis
Keep the fascia of each region engaged as you stroke from C7 as far down the spine as possible.
(See following page)

12
This movement should be performed by keeping your body weight over the
client and not forcing but allowing your hands to move down along the spine.

13
Next we evaluate for “valleys and mountains”.
A valley is an area of the spine whereby the spine seems to sit in a “valley” of muscle (more anterior).
This is commonly found where there is a lordotic spine.
Valley
The opposite a mountain is where the spine is projected posterior to the paraspinal muscle
Mountains
Evaluate for mountains and valleys in a seated or standing position only (not while they are bent
over). Take note of your findings and treat accordingly.

14
A simple rule is used for treatment- Pile up on the mountains –Dig out the valleys
Following assessment instruct the client to perform the movement on the previous page.
.
As they do- Pile up on the mountains –Dig out the valleys in the following manner
Stroke diagonally into the lateral aspect of the
erector spinae “piling up on the mountains”.

15
Place knuckles medial to the muscles on both
Sides of the valley and stroke laterally
“digging out the valley”.

16
Erector Spinae
Area of Treatment- Longissimus, iliocostals, spinalis, semispinalis rotatores & multifidus
Using the flat of the forearm near the elbow stroke from the upper
trapezius to the iliac crest and over the sacral fascia
At level of scapular inferior angle
“turn the corner” and stroke with
position shown
Ask client to inhale and hold their
breath as you continue to stroke
over the lumbar onto the sacrum.
Have client exhale.

17
Scalp Fascia
Area of Treatment- Galea aponeurotica
Galea aponeurotica
Client positioned supine as you sit at the head of the
table place your fingers on the posterior skull feeling
for ridges in the scalp. To do this have fingers contact
the scalp through the hair. If found take these fascial
ridges and stretch them slowly and gently in an inferior
direction.

18
Cervical Region
Area of Treatment- Erector spinae (Longissimus cervicis, spinalis, semispinalis, etc.)
Contact the erector spinae muscles (anterior to the
upper trapezius and behind the sternocleidomastoid)
on level of C6 and stroke up to the occiput.
Swing your elbow using the entire arm for this move.
You may also reverse the direction by un-curling
your fingers and stroking down the erector spinae.

19
Suboccipital Region
Area of Treatment- Erector spinae (Longissimus cervicis, spinalis, semispinalis, etc.)
Cup clients head in your pals and curl your
fingers back to almost 180° and contact the
occipital “ledge” gently with your fingertips.
Next bring your hands down and into the
table. As you do so traction the head toward
you.

20
Superficial Front Line
Trunk
Area of Treatment- Rectus Abdominis
Begin this technique with your fingers curled
placed on level of the umbilicus just off the
midsaggital line.
Uncurl your fingers, engaging the fascia, and stroke up over the costal cartilage to approx. the fifth rib.
Do not stroke or put pressure on the xiphoid process.

21
Area of Treatment- Obliques and sternal fascia
Stroke just inferior to the lower margin of the costal
cartilage following the contour moving onto the cartilage
just lateral to the sternum to the clavicle.
Continue just inferior to the clavicle laterally ending
at the pectoralis major insertion on the arm.
Neck

22
Area of Treatment- Sternocleidomastoid and posterior neck
Do not contact the neck anterior to the sternocleidomastoid!
Use your conforming non-fist to contact the lateral neck
with your knuckles resting at the anterior border of the
sternocleidomastoid (see below). Pressure should be
sufficient to engage the fascia using little compressive force.
Instruct client to rotate head/neck away from you (rotate on the midsaggital plane – not rolling the
back of their head on the table) as their movement stretches the fascia.
As they rotate head/neck lower elbow and stroke across back of neck
Alternate technique
Area of Treatment- Sternocleidomastoid and posterior neck
23
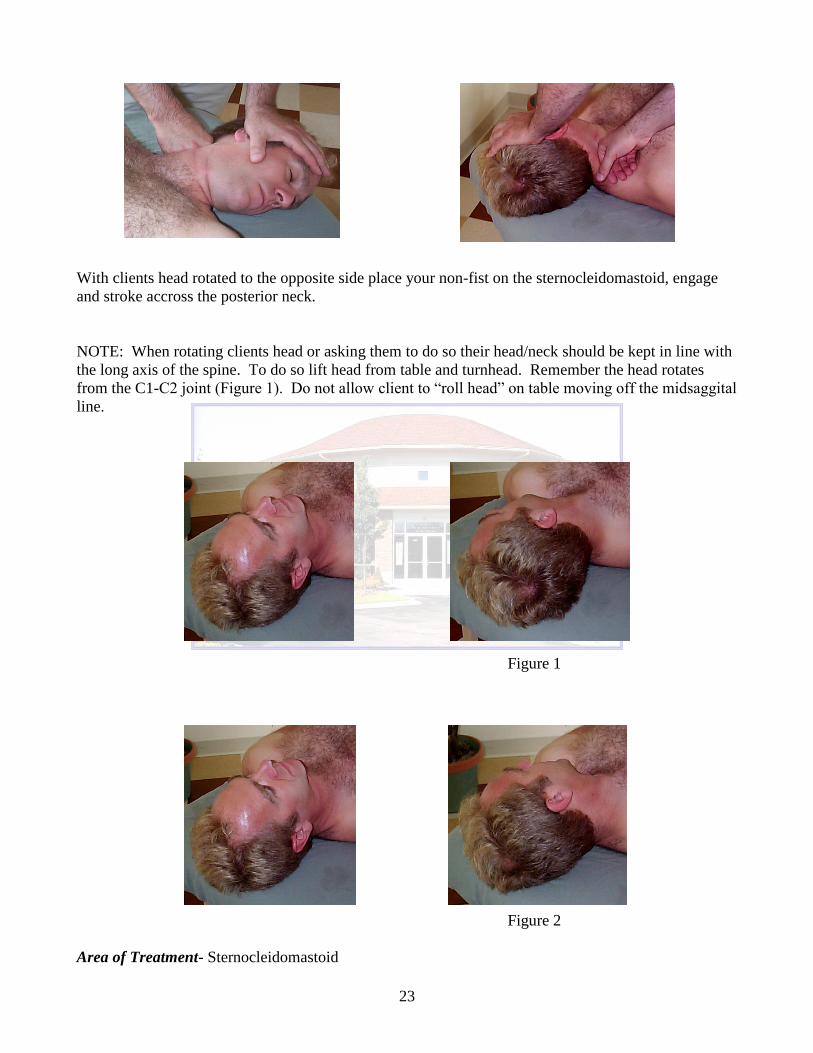
With clients head rotated to the opposite side place your non-fist on the sternocleidomastoid, engage
and stroke accross the posterior neck.
NOTE: When rotating clients head or asking them to do so their head/neck should be kept in line with
the long axis of the spine. To do so lift head from table and turnhead. Remember the head rotates
from the C1-C2 joint (Figure 1). Do not allow client to “roll head” on table moving off the midsaggital
line.
Figure 1
Figure 2
Area of Treatment- Sternocleidomastoid

24
With the head turned engage then stroke from the sterrnomastoid origin to the insertion. Using very
little compressive force and by lowering your elbow use a “scooping” motion to lift as you stroke and
stretch the fascia. Take your stroke over the mastoid and onto the occiput.

25
To integrate the superficial back line cup clients calcaneus’ and traction with focus of stretching the
achilles tendon. Then allow the stretch to travel up the back line.

26
BONY STATIONS
13. Frontal brow ridge
11. Occipital ridge
9. Sacrum
7. Ischial tuberosity
5. Condyles of femur
3. Calcaneus
1. Plantar surface of toe phalanges
MYOFASCIAL TRACKS
12. Galea aponeurotica/scalp fascia
10. Sacrolumbar fascia/erector spinae
8. Sacrotuberous ligament
6. Hamstrings
4. Gastrocnemius/Achilles tendon
2. Plantar fascia and short toe flexors

27
13
11
9
7
5
3
1
2. Plantar fascia and short toe flexors
4. Gastrocnemius/
Achilles tendon
6. Hamstrings
8. Sacrotuberous ligament
10. Erector spinae/
Sacrolumbar fascia
12. Galea aponeurotica/scalp fascia

28
BONY STATIONS
12. Mastoid process
10. Sternal manubrium
8. 5th
rib
6. Pubic tubercle
5. Anterior inferior iliac spine
Patella
3. Tibial tuberosity
1. Dorsal surface of toe phalanges
MYOFASCIAL TRACKS
Scalp fascia
11. Sternocleidomastoid
9. Sternalis/stenochondral fascia
7. Rectus abdominis
4. Rectus femoris/quadriceps
Subpatellar tendon
2. Short and long toe extensors, tibialis
anterior, anterior crural compartment

29
1
3
5
6
8
10
12
2. Short and long toe extensors, tibialis
anterior, anterior crural compartment
4. Rectus femoris/quadriceps
7. Rectus abdominis
9. Sternalis/stenochondral fascia
11. Sternocleidomastoid
Patella
Subpatellar tendon