n-up printing with coreldraw - buyarip.com · how to do n-up printing from corel draw using...
TRANSCRIPT

How to do N-UP printing from CorelDraw using AccuRIP.
These instructions apply to CorelDraw versions 10, 12 and X3. The menu locations are exactly the same althoughsome of the selection and option layouts within each window may vary from version to version, but they are all there. The examples in the tutorial are from CorelDraw X3.
N-UP (automatic nesting) printing is an advanced and automatic way to save film when printing a multi-color separation that is smaller than the page (sheet/roll/film) specified in AccuRIP.
Example: Lets say you have chosen a Tabloid (11x17) page size in the AccuRIP Setup window. If you setupCorelDraw to print to the same size page then you’ll receive one color separation per page regardlessof the actual size of your image. This means that a small 2”x2” six color logo would actually print on six 11x17pages, one color separation per page. That is a waste of film. N-UP printing resolves this issue.
What to do:
1. In the Setup menu of AccuRIP choose the proper page (sheet) or roll size for your printer.
2. In CorelDraw access the “layout Menu” and choose “Page Setup”. Set the “paper” size to custom and choose pagedimensions that are “smaller” than the Media size choosen in AccuRIP. For this example we used 2”x2”.
3. AccuRIP will do the math for you and print as many color separations as possible in a row across the page,then start a second row or more if needed. This will continue until the separations are completedon that single page. If a second or third page is required AccuRIP will continue to print until completed.
If printing to a roll, the printing will simply continue until completed, simple and cost effective.
CorelDraw X3 Page Setup Window:
How to do N-UP printing from CorelDraw using AccuRIP.
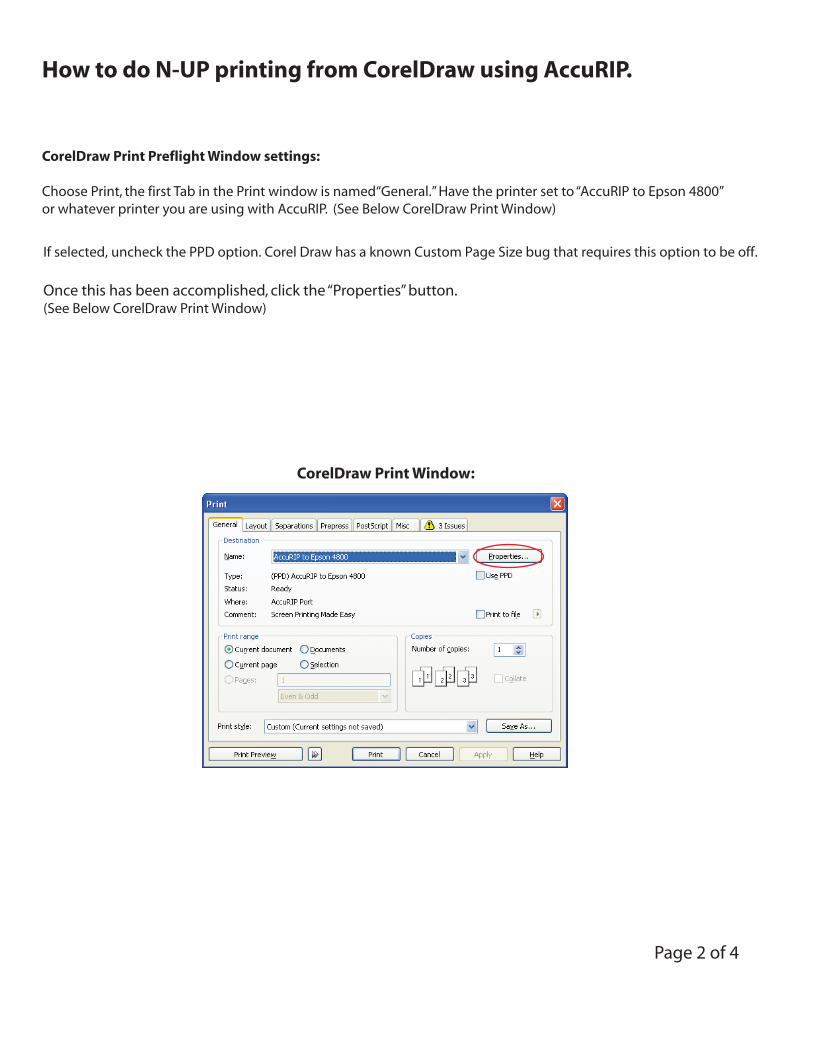
CorelDraw Print Preflight Window settings:
Choose Print, the first Tab in the Print window is named“General.” Have the printer set to “AccuRIP to Epson 4800” or whatever printer you are using with AccuRIP. (See Below CorelDraw Print Window)
It’s critical that you have “use PPD” checked and that you choose the Postscript Printer Description file that isright for your printer. All AccuRIP PPD files are saved in your computer and located in the Progams and Files Folder>Fawkes Engineering>AccuRIP. (See Below Programs Folder>Fawkes>AccuRIP Folder Window)
Here you will find a list of printers you have setup in AccuRIP named “AccuRIP to Epson 4800xp.ppd” (choose the ppd that is right for your printer model, 4800 is shown as an example).
Once you have the proper PPD selected click “Open” and you’ll be brought back to the CorelDraw Print window.
Once this has been accomplished, click the “Properties” button next to the Name field.(See Below CorelDraw Print Window)
Programs Folder>Fawkes>AccuRIP Folder:
Page 1 of 4 Page 2 of 4
How to do N-UP printing from Corel Draw using AccuRIP.
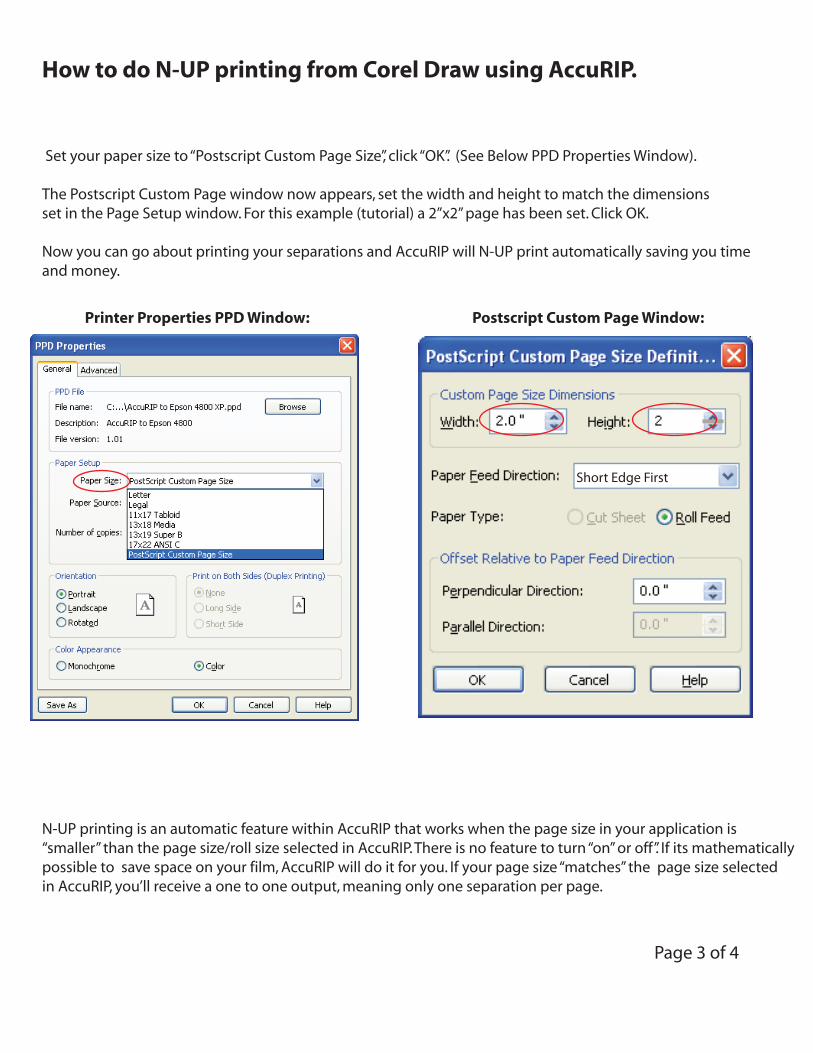
Set your paper size to “Postscript Custom Page Size”, click “OK”. (See Below PPD Properties Window).
The Postscript Custom Page window now appears, set the width and height to match the dimensionsset in the Page Setup window. For this example (tutorial) a 2”x2” page has been set. Click OK.
Now you can go about printing your separations and AccuRIP will N-UP print automatically saving you time and money.
N-UP printing is an automatic feature within AccuRIP that works when the page size in your application is “smaller” than the page size/roll size selected in AccuRIP. There is no feature to turn “on” or off”. If its mathematically possible to save space on your film, AccuRIP will do it for you. If your page size “matches” the page size selectedin AccuRIP, you’ll receive a one to one output, meaning only one separation per page.
Page 3 of 4
CorelDraw Print Window:
Printer Properties PPD Window: Postscript Custom Page Window:
How to do N-UP printing from Corel Draw using AccuRIP.
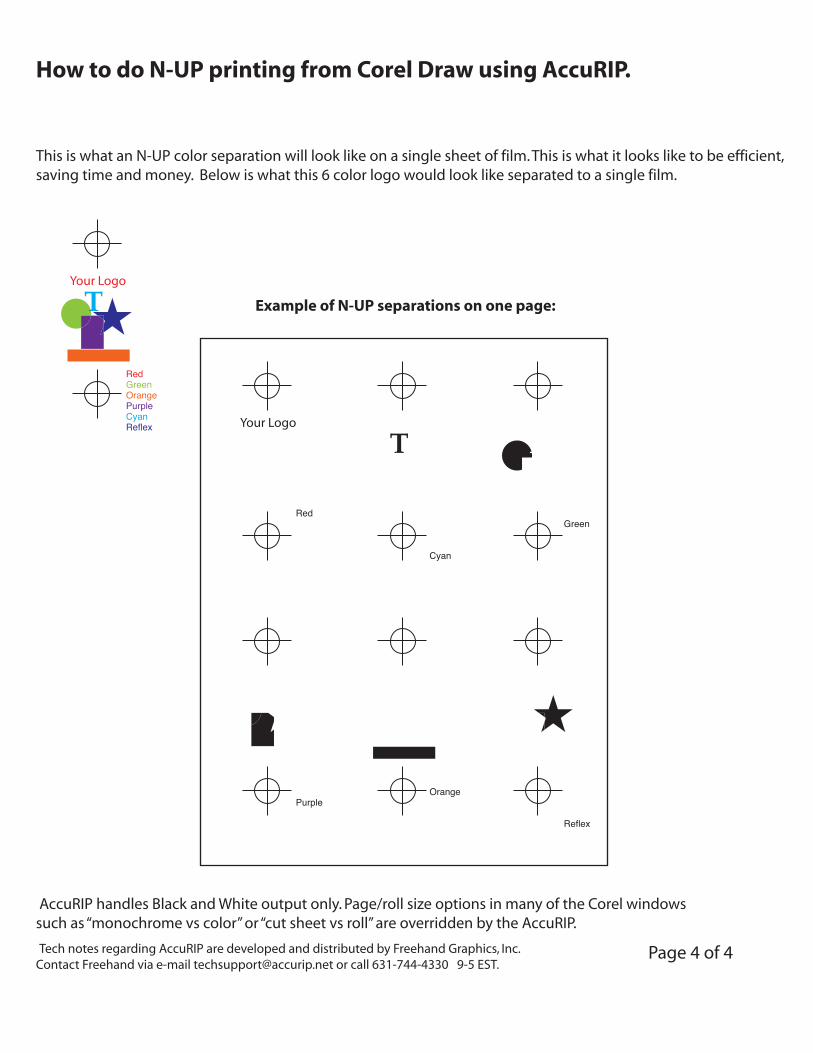
This is what an N-UP color separation will look like on a single sheet of film. This is what it looks like to be efficient, saving time and money. Below is what this 6 color logo would look like separated to a single film.
AccuRIP handles Black and White output only. Page/roll size options in many of the Corel windows such as “monochrome vs color” or “cut sheet vs roll” are overridden by the AccuRIP.
Tech notes regarding AccuRIP are developed and distributed by Freehand Graphics, Inc.Contact Freehand via e-mail [email protected] or call 631-744-4330 9-5 EST.
Page 4 of 4
Example of N-UP separations on one page:
Your Logo
Your Logo
RedGreenOrangePurpleCyanReflex
The following instructs assumes you have already setup your printer with AccuRIP and that you have a generalworking knowledge of both AccuRIP and CorelDraw.
How to do N-UP printing from CorelDraw using AccuRIP.
CorelDraw Print Preflight Window settings:
Choose Print, the first Tab in the Print window is named“General.” Have the printer set to “AccuRIP to Epson 4800” or whatever printer you are using with AccuRIP. (See Below CorelDraw Print Window)
Page 2 of 4
If selected, uncheck the PPD option. Corel Draw has a known Custom Page Size bug that requires this option to be off.
Once this has been accomplished, click the “Properties” button.(See Below CorelDraw Print Window)
CorelDraw Print Window:
How to do N-UP printing from Corel Draw using AccuRIP.
Set your paper size to “Postscript Custom Page Size”, click “OK”. (See Below PPD Properties Window).
The Postscript Custom Page window now appears, set the width and height to match the dimensionsset in the Page Setup window. For this example (tutorial) a 2”x2” page has been set. Click OK.
Now you can go about printing your separations and AccuRIP will N-UP print automatically saving you time and money.
N-UP printing is an automatic feature within AccuRIP that works when the page size in your application is “smaller” than the page size/roll size selected in AccuRIP. There is no feature to turn “on” or off”. If its mathematically possible to save space on your film, AccuRIP will do it for you. If your page size “matches” the page size selectedin AccuRIP, you’ll receive a one to one output, meaning only one separation per page.
Page 3 of 4
Printer Properties PPD Window: Postscript Custom Page Window:
Short Edge First
How to do N-UP printing from CorelDraw using AccuRIP.
These instructions apply to CorelDraw versions 10, 12 and X3. The menu locations are exactly the same althoughsome of the selection and option layouts within each window may vary from version to version, but they are all there. The examples in the tutorial are from CorelDraw X3.
N-UP (automatic nesting) printing is an advanced and automatic way to save film when printing a multi-color separation that is smaller than the page (sheet/roll/film) specified in AccuRIP.
Example: Lets say you have chosen a Tabloid (11x17) page size in the AccuRIP Setup window. If you setupCorelDraw to print to the same size page then you’ll receive one color separation per page regardlessof the actual size of your image. This means that a small 2”x2” six color logo would actually print on six 11x17pages, one color separation per page. That is a waste of film. N-UP printing resolves this issue.
What to do:
1. In the Setup menu of AccuRIP choose the proper page (sheet) or roll size for your printer.
2. In CorelDraw access the “layout Menu” and choose “Page Setup”. Set the “paper” size to custom and choose pagedimensions that are “smaller” than the Media size choosen in AccuRIP. For this example we used 2”x2”.
3. AccuRIP will do the math for you and print as many color separations as possible in a row across the page,then start a second row or more if needed. This will continue until the separations are completedon that single page. If a second or third page is required AccuRIP will continue to print until completed.
If printing to a roll, the printing will simply continue until completed, simple and cost effective.
CorelDraw X3 Page Setup Window:
How to do N-UP printing from CorelDraw using AccuRIP.
CorelDraw Print Preflight Window settings:
Choose Print, the first Tab in the Print window is named“General.” Have the printer set to “AccuRIP to Epson 4800” or whatever printer you are using with AccuRIP. (See Below CorelDraw Print Window)
It’s critical that you have “use PPD” checked and that you choose the Postscript Printer Description file that isright for your printer. All AccuRIP PPD files are saved in your computer and located in the Progams and Files Folder>Fawkes Engineering>AccuRIP. (See Below Programs Folder>Fawkes>AccuRIP Folder Window)
Here you will find a list of printers you have setup in AccuRIP named “AccuRIP to Epson 4800xp.ppd” (choose the ppd that is right for your printer model, 4800 is shown as an example).
Once you have the proper PPD selected click “Open” and you’ll be brought back to the CorelDraw Print window.
Once this has been accomplished, click the “Properties” button next to the Name field.(See Below CorelDraw Print Window)
Programs Folder>Fawkes>AccuRIP Folder:
Page 1 of 4 Page 2 of 4
How to do N-UP printing from Corel Draw using AccuRIP.
Set your paper size to “Postscript Custom Page Size”, click “OK”. (See Below PPD Properties Window).
The Postscript Custom Page window now appears, set the width and height to match the dimensionsset in the Page Setup window. For this example (tutorial) a 2”x2” page has been set. Click OK.
Now you can go about printing your separations and AccuRIP will N-UP print automatically saving you time and money.
N-UP printing is an automatic feature within AccuRIP that works when the page size in your application is “smaller” than the page size/roll size selected in AccuRIP. There is no feature to turn “on” or off”. If its mathematically possible to save space on your film, AccuRIP will do it for you. If your page size “matches” the page size selectedin AccuRIP, you’ll receive a one to one output, meaning only one separation per page.
Page 3 of 4
CorelDraw Print Window:
Printer Properties PPD Window: Postscript Custom Page Window:
How to do N-UP printing from Corel Draw using AccuRIP.
This is what an N-UP color separation will look like on a single sheet of film. This is what it looks like to be efficient, saving time and money. Below is what this 6 color logo would look like separated to a single film.
AccuRIP handles Black and White output only. Page/roll size options in many of the Corel windows such as “monochrome vs color” or “cut sheet vs roll” are overridden by the AccuRIP.
Tech notes regarding AccuRIP are developed and distributed by Freehand Graphics, Inc.Contact Freehand via e-mail [email protected] or call 631-744-4330 9-5 EST.
Page 4 of 4
Example of N-UP separations on one page:
Your Logo
Your Logo
RedGreenOrangePurpleCyanReflex
The following instructs assumes you have already setup your printer with AccuRIP and that you have a generalworking knowledge of both AccuRIP and CorelDraw.