n wrix active directory change reporter active directory ... the supported environments and...
TRANSCRIPT

NETWRIX ACTIVE DIRECTORY
CHANGE REPORTER
INSTALLATION AND CONFIGURATION GUIDE
Copyright © 2012 NetWrix Corporation. All Rights Reserved.
November 2012
Product Version: 7.2

NetWrix Active Directory Change Reporter Installation and Configuration Guide
Page 2 of 34
Copyright © 2012 NetWrix Corporation. All Rights Reserved
Suggestions or comments about this document? www.netwrix.com/feedback
Legal Notice
The information in this publication is furnished for information use only, and does not constitute a
commitment from NetWrix Corporation of any features or functions discussed. NetWrix Corporation
assumes no responsibility or liability for the accuracy of the information presented, which is subject
to change without notice.
NetWrix is a registered trademark of NetWrix Corporation. The NetWrix logo and all other NetWrix
product or service names and slogans are registered trademarks or trademarks of NetWrix
Corporation. Active Directory is a trademark of Microsoft Corporation. All other trademarks and
registered trademarks are property of their respective owners.
Disclaimers
This document may contain information regarding the use and installation of non-NetWrix products.
Please note that this information is provided as a courtesy to assist you. While NetWrix tries to
ensure that this information accurately reflects the information provided by the supplier, please refer
to the materials provided with any non-NetWrix product and contact the supplier for confirmation.
NetWrix Corporation assumes no responsibility or liability for incorrect or incomplete information
provided about non-NetWrix products.
© 2012 NetWrix Corporation.
All rights reserved.

NetWrix Active Directory Change Reporter Installation and Configuration Guide
Page 3 of 34
Copyright © 2012 NetWrix Corporation. All Rights Reserved
Suggestions or comments about this document? www.netwrix.com/feedback
Table of Contents
1. INTRODUCTION ................................................................................ 4
1.1. Overview .............................................................................. 4
1.2. How This Guide is Organized ....................................................... 4
1.3. Free Pre-Sales Support .............................................................. 5
2. INSTALLATION PREREQUISITES ................................................................. 6
2.1. Deployment Options ................................................................. 6
2.2. Hardware Requirements ............................................................ 6
2.3. Software Requirements ............................................................. 6
2.4. Supported Environments ............................................................ 7
2.5. Supported Microsoft SQL Server Versions ......................................... 7
3. INSTALLING NETWRIX ACTIVE DIRECTORY CHANGE REPORTER PACK ........................... 9
4. UPGRADING FROM PREVIOUS VERSIONS ...................................................... 10
5. UNINSTALLING NETWRIX ACTIVE DIRECTORY CHANGE REPORTER PACK ...................... 11
6. CONFIGURING TARGET ENVIRONMENT........................................................ 12
6.1. Configuring Target Environment Automatically ................................. 12
6.2. Configuring Target Environment Manually ....................................... 16
6.2.1. . Configuring Rights and Permissions ...................................... 16
6.2.2. . Configuring Object-Level Auditing ....................................... 20
6.2.3. . Adjusting Configuration and Schema Containers Audit Settings ..... 22
6.2.4. . Configuring Domain Controller Audit Policy Settings .................. 24
6.2.5. . Configuring Security Event Log Size and Retention Settings ......... 25
6.2.6. . Configuring Exchange Server AAL Settings .............................. 29
6.2.7. . Adjusting AD Tombstone Lifetime ........................................ 31
A APPENDIX: SUPPORTING DATA ............................................................... 33
A.1 Related Documentation ........................................................... 33

NetWrix Active Directory Change Reporter Installation and Configuration Guide
Page 4 of 34
Copyright © 2012 NetWrix Corporation. All Rights Reserved
Suggestions or comments about this document? www.netwrix.com/feedback
1. INTRODUCTION
1.1. Overview
This guide provides detailed instructions on how to install and set up NetWrix Active Directory Change Reporter. It lists all product requirements and guides you through the installation process.
NetWrix Active Directory Change Reporter can be purchased separately, but it is installed as part of a larger change reporter pack which automates auditing of the entire Active Directory infrastructure.
The NetWrix Active Directory Change Reporter installation package installs the following modules on your computer:
NetWrix Active Directory Change Reporter
NetWrix Group Policy Change Reporter
NetWrix Exchange Change Reporter
This guide contains system requirements for all modules that form the pack, as well
as the information on the supported SQL Server versions.
For information on how to configure and use these products, refer to NetWrix Active Directory Change Reporter Administrator’s Guide, NetWrix Group Policy Change
Reporter Administrator’s Guide and NetWrix Exchange Change Reporter Administrator’s Guide respectively.
1.2. How This Guide is Organized
This section explains how this guide is organized and provides a brief overview of each chapter.
Chapter 1 Introduction is the current chapter. It explains the purpose of this document, defines its audience and explains its structure.
Chapter 2 Installation Prerequisites lists all product hardware and software requirements, the supported environments and Microsoft SQL Server versions.
Chapter 3 Installing NetWrix Active Directory Change Reporter Pack contains
instructions on how to install NetWrix Active Directory Change Reporter, NetWrix Group Policy Change Reporter, and NetWrix Exchange Change Reporter.
Chapter 4 Upgrading from Previous Versions explains how to upgrade the product to the latest released version.
Chapter 5 Uninstalling NetWrix Active Directory Change Reporter Pack
provides detailed instructions on how to uninstall the product and remove all of its components.
Chapter 6 Configuring Target Environment explains how to configure your
target Active Directory environment for change auditing.
A Appendix: Supporting Data contains a list of all documentation published to support NetWrix Active Directory Change Reporter, NetWrix Group Policy
Change Reporter and NetWrix Exchange Change Reporter.

NetWrix Active Directory Change Reporter Installation and Configuration Guide
Page 5 of 34
Copyright © 2012 NetWrix Corporation. All Rights Reserved
Suggestions or comments about this document? www.netwrix.com/feedback
1.3. Free Pre-Sales Support
You are eligible for free technical support during the evaluation period of all NetWrix products. If you encounter any problems, or would like assistance with the installation, configuration or implementation of NetWrix Active Directory Change Reporter, NetWrix Group Policy Change Reporter or NetWrix Exchange Change
Reporter, contact NetWrix Technical Support.

NetWrix Active Directory Change Reporter Installation and Configuration Guide
Page 6 of 34
Copyright © 2012 NetWrix Corporation. All Rights Reserved
Suggestions or comments about this document? www.netwrix.com/feedback
2. INSTALLATION PREREQUISITES This chapter lists all hardware and software requirements for the installation of NetWrix Active Directory Change Reporter, NetWrix Group Policy Change Reporter and NetWrix Exchange Change Reporter, and recommendations on how to deploy these
products.
2.1. Deployment Options
The NetWrix Active Directory Change Reporter pack can be installed on any computer that belongs to the monitored domain. If you want to monitor several domains, you
must establish a trust relationship between these domains and the domain where the product is installed.
The account under which data is collected from trusted domains must have the
Manage auditing and security log right enabled. For details on how to configure an account for data collection, refer to Section 6.2.1 Configuring Rights and Permissions.
2.2. Hardware Requirements
Before installing the NetWrix Active Directory Change Reporter pack, make sure that your hardware meets the following requirements:
Table 1: Active Directory Change Reporter Pack Hardware Requirements
Hardware Component Minimum Recommended
Processor Intel or AMD 32 bit, 2GHz Intel Core 2 Duo 2x 64 bit, 3GHz
Memory* 2 GB RAM 8 GB RAM
Disk space 50MB physical disk space for product installation.
Additional space is required for the Audit Archive and depends on the number of AD objects and changes per day.
Two physical drives with a total of 50GB free space
* These are rough estimations. The actual required memory size depends on the
average number of changes per day in your monitored environment.
2.3. Software Requirements
This section lists the minimum software requirements for the NetWrix Active Directory Change Reporter pack. Make sure that this software has been installed
before proceeding with the installation.

NetWrix Active Directory Change Reporter Installation and Configuration Guide
Page 7 of 34
Copyright © 2012 NetWrix Corporation. All Rights Reserved
Suggestions or comments about this document? www.netwrix.com/feedback
Table 2: Active Directory Change Reporter Pack Software Requirements
Component Requirement
Operating System Windows XP SP3 (both 32-bit and 64-bit systems) and above
Additional software .NET Framework 2.0, 3.0 or 3.5
Windows Installer 3.1 or later
Microsoft Management Console 3.0 or later
Group Policy Management Console*
Windows PowerShell 2.0**
IIS 5.1 or later (IIS 7.0 or later requires IIS 6 Management Compatibility – all components)***
* Only required for the NetWrix Group Policy Change Reporter module.
** Only required for the NetWrix Exchange Change Reporter module if your
monitored domain has an Exchange organization running Microsoft Exchange
Server 2010.
*** Only required if you are going to use SQL Server 2005 to store audit data.
2.4. Supported Environments
This section provides a list of AD environments and Microsoft Exchange Server versions supported by NetWrix Active Directory Change Reporter, NetWrix Group
Policy Change Reporter and NetWrix Exchange Change Reporter.
Table 3: Active Directory Change Reporter Pack Supported Environments
Component Version
Active Directory environment Windows 2000
Windows Server 2003 (any forest mode: mixed/native/2k3)
Windows Server 2008/2008 R2
Windows Server 2012
Microsoft Exchange Server Microsoft Exchange Server 2003
Microsoft Exchange Server 2007
Microsoft Exchange Server 2010
2.5. Supported Microsoft SQL Server Versions
Microsoft SQL Server provides the Reporting Services that enable creating, viewing and managing reports based on data stored in a local SQL Server database. NetWrix Active Directory Change Reporter, NetWrix Group Policy Change Reporter and NetWrix Exchange Change Reporter use these Reporting Services to generate reports on
changes to your Active Directory environment and reports on its configuration snapshots.
To use the Reports functionality, Microsoft SQL Server must be installed on a
computer that can be accessed by a NetWrix change reporting product.
The following Microsoft SQL Server versions are supported:

NetWrix Active Directory Change Reporter Installation and Configuration Guide
Page 8 of 34
Copyright © 2012 NetWrix Corporation. All Rights Reserved
Suggestions or comments about this document? www.netwrix.com/feedback
Table 4: Supported Microsoft SQL Server Versions
Version Edition
SQL Server 2005 Express Edition with Advanced Services (SP3 or above)
Standard or Enterprise Edition
SQL Server 2008 Express Edition with Advanced Services
Standard or Enterprise Edition
SQL Server 2008 R2 Express Edition with Advanced Services
Standard or Enterprise Edition
SQL Server 2012 Express Edition with Advanced Services
Standard or Enterprise Edition
Microsoft SQL Server is not included in the product installation package and must be
installed manually or automatically through the Reports Configuration wizard.
For your convenience, we have provided instructions on the manual installation of Microsoft SQL Server with configuration specific for the Reporting Services to
function properly. Refer to the following NetWrix Technical Article for detailed instructions: Installing Microsoft SQL Server and Configuring the Reporting Services.
For full installation and configuration details, refer to the documentation provided
by Microsoft.
Note: If you install a NetWrix change auditing product on a read-only domain controller, SQL Server installation will fail (both manual or automatic through the Reports Configuration wizard). This is a known
issue, for details refer to the following Microsoft Knowledge Base Article: You may encounter problems when installing SQL Server on a domain controller. To fix the issue, install the NetWrix product on a different
computer, or perform manual SQL Server installation on a different computer that can be accessed by the NetWrix product.

NetWrix Active Directory Change Reporter Installation and Configuration Guide
Page 9 of 34
Copyright © 2012 NetWrix Corporation. All Rights Reserved
Suggestions or comments about this document? www.netwrix.com/feedback
3. INSTALLING NETWRIX ACTIVE DIRECTORY CHANGE
REPORTER PACK To install NetWrix Active Directory Change Reporter, NetWrix Group Policy Change Reporter, and NetWrix Exchange Change Reporter, perform the following procedure:
Procedure 1. To install the NetWrix Active Directory Change Reporter pack
1. Download the NetWrix Active Directory Change Reporter pack.
2. Run the setup package called adcrfull_setup.msi.
3. Follow the instructions of the installation wizard.
4. When prompted, accept the license agreement and specify the installation
folder.
5. On the last step, click Finish to complete the installation.
Shortcuts of all products forming the NetWrix Active Directory Change Reporter pack
will be added to your Start menu, as well as shortcuts to the following tools:
Active Directory Object Restore: this wizard provides granular restore capabilities (object- and attribute-level) allowing you to roll back your
Active Directory changes using snapshots made by the product, or partially restore Active Directory objects from AD tombstones. For detailed instructions on how to use NetWrix Active Directory Object Restore, refer
to Chapter 9 Active Directory Object Restore of NetWrix Active Directory Change Reporter Administrator’s Guide.
Active Directory Audit Configuration: this wizard helps automatically
verify and adjust your object-level audit settings, audit policies, rights and permissions, the Security log size and retention settings, and Exchange Server Administrator Audit Logging (required for MS Exchange 2010) in your
monitored Active Directory environment. Incorrect audit settings may result in errors in change reports and partial data loss. For more information on the Active Directory Audit Configuration wizard, refer to
Section 6.1 Configuring Target Environment Automatically of this guide)
DB Importer: this tool is intended for importing data from the Audit Archive to a SQL database. You can use it if you did not enable the Reports
functionality on Managed Object creation and decided to save audit data locally, or for data recovery in case your SQL database is corrupted. For detailed instructions on how to use the DB Importer tool, refer to Section
6.2.3. Importing Audit Data to SQL database of NetWrix Active Directory Change Reporter Administrator’s Guide.
Report Viewer: this tool allows generating a Change Summary for a
selected Managed Object for a specified period of time. For detailed instructions on how to use this tool, refer to Section 5.2.3 Viewing Change Summary for a Specified Date Range of NetWrix Active Directory Change
Reporter Administrator’s Guide.

NetWrix Active Directory Change Reporter Installation and Configuration Guide
Page 10 of 34
Copyright © 2012 NetWrix Corporation. All Rights Reserved
Suggestions or comments about this document? www.netwrix.com/feedback
4. UPGRADING FROM PREVIOUS VERSIONS To upgrade NetWrix Active Directory Change Reporter, NetWrix Group Policy Change Reporter, and NetWrix Exchange Change Reporter to the latest released version, perform the following procedure:
Procedure 2. To upgrade the NetWrix Active Directory Change Reporter Pack
1. Download the NetWrix Active Directory Change Reporter pack.
2. On the computer where the product is installed, close all program windows
(NetWrix Enterprise Management Console, wizards, etc.).
3. Open the Task Scheduler and disable all Active Directory Change Reporter tasks. Wait until all product processes finish.
4. Create a backup of the following folder: %ProgramData%\NetWrix\AD Change Reporter\Rules. This folder contains the NetWrix Active Directory Change Reporter Real-Time Alerts that will be overwritten during the upgrade
process.
5. Run the setup package called adcrfull_setup.msi.
6. When the installation is complete, enable the NetWrix Active Directory
Change Reporter tasks in the Task Scheduler.
7. Open NetWrix Enterprise Management Console, expand your Managed Object Active Directory Change Reporter Real-Time Alerts node and re-enable
the alerts that were active before the upgrade process. If you made changes to alert definitions, you can restore them from the backup folder.
All other current product settings will be preserved during the upgrade and no re-
configuration is required.

NetWrix Active Directory Change Reporter Installation and Configuration Guide
Page 11 of 34
Copyright © 2012 NetWrix Corporation. All Rights Reserved
Suggestions or comments about this document? www.netwrix.com/feedback
5. UNINSTALLING NETWRIX ACTIVE DIRECTORY CHANGE
REPORTER PACK To uninstall NetWrix Active Directory Change Reporter, NetWrix Group Policy Change Reporter, and NetWrix Exchange Change Reporter from your computer, perform the following procedures in the order they are provided:
Delete agents
Uninstall the product
Procedure 3. To delete agents
Note: It is only necessary to perform this procedure if you used agents for data collection (i.e. the Network Traffic Compression option was
enabled). Agents are stopped, but not deleted during the uninstallation process, so they have to be removed manually. Perform this procedure on the computer running NetWrix Active Directory Change Reporter before
uninstalling the product.
1. Navigate to Start Run and type cmd.
2. In the command line prompt, execute the following command:
<ADCR_installation_folder>\adcr.exe /removeagents domain=<domain name>
where <domain name> is the name of the monitored domain in the FQDN
format.
E.g.: C:\Program Files\NetWrix\AD Change Reporter Full Version\adcr.exe /removeagents domain=domain.local
3. To delete agents from a specific domain controller, execute the following command:
<ADCR_installation_folder>\adcr.exe /removeagents dс=<domain
controller name>
Procedure 4. To uninstall NetWrix the Active Directory Change Reporter pack
1. Navigate to Start Control Panel Programs and Features (Add or Remove Programs in Windows 2003).
2. Locate NetWrix Active Directory Change Reporter and start the uninstallation wizard. The program will be deleted automatically.

NetWrix Active Directory Change Reporter Installation and Configuration Guide
Page 12 of 34
Copyright © 2012 NetWrix Corporation. All Rights Reserved
Suggestions or comments about this document? www.netwrix.com/feedback
6. CONFIGURING TARGET ENVIRONMENT Successful change monitoring requires a certain configuration of the audit settings in your monitored Active Directory domain. Otherwise, your change reports may contain errors and incomplete audit data. For example, you can receive a report containing
the “System” value instead of an account name in the “Who changed” column.
It is also necessary to assign certain rights and permissions to the Data Processing Account, under which the product scheduled task is run, to be able to collect audit
data.
You may also need to adjust your Security event log size to prevent audit data loss if log overwrites occur.
To use the Active Directory Object Restore tool, you need to adjust your AD tombstone lifetime property, so that it agrees with the retention period of the Audit Archive.
You can configure your target environment for change auditing in one of the following ways:
Automatically
Manually
6.1. Configuring Target Environment Automatically
You can configure the monitored Active Directory domain automatically, through the Active Directory Audit Configuration wizard.
Note: The AD tombstone lifetime property is not adjusted automatically through the Active Directory Audit Configuration wizard. For instructions on how to configure it manually, refer to Section 6.2.7 Adjusting AD Tombstone Lifetime of this guide.
Procedure 5. To configure target environment automatically
1. Launch the Active Directory Audit Configuration wizard (Start All Programs NetWrix Active Directory Change Reporter Active Directory Audit
Configuration Wizard).
Note: For the wizard to work properly, you must run it under a Domain admin or an Enterprise admin account.
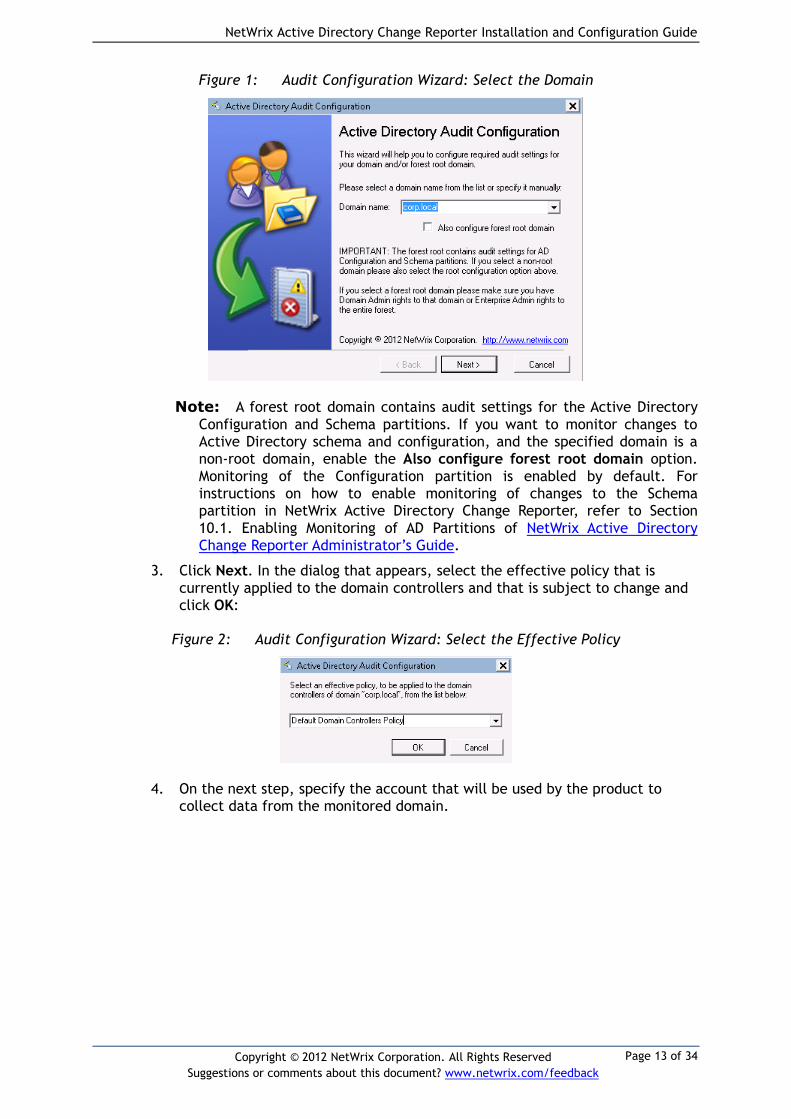
2. On the first step of the wizard, specify the name of the domain where you
want to configure audit settings:
NetWrix Active Directory Change Reporter Installation and Configuration Guide
Page 13 of 34
Copyright © 2012 NetWrix Corporation. All Rights Reserved
Suggestions or comments about this document? www.netwrix.com/feedback
Figure 1: Audit Configuration Wizard: Select the Domain
Note: A forest root domain contains audit settings for the Active Directory
Configuration and Schema partitions. If you want to monitor changes to Active Directory schema and configuration, and the specified domain is a non-root domain, enable the Also configure forest root domain option.
Monitoring of the Configuration partition is enabled by default. For instructions on how to enable monitoring of changes to the Schema partition in NetWrix Active Directory Change Reporter, refer to Section
10.1. Enabling Monitoring of AD Partitions of NetWrix Active Directory Change Reporter Administrator’s Guide.
3. Click Next. In the dialog that appears, select the effective policy that is
currently applied to the domain controllers and that is subject to change and click OK:
Figure 2: Audit Configuration Wizard: Select the Effective Policy
4. On the next step, specify the account that will be used by the product to collect data from the monitored domain.

NetWrix Active Directory Change Reporter Installation and Configuration Guide
Page 14 of 34
Copyright © 2012 NetWrix Corporation. All Rights Reserved
Suggestions or comments about this document? www.netwrix.com/feedback
Figure 3: Audit Configuration Wizard: Specify the Data Processing Account
5. Click the Detect button. A report will be displayed showing your current audit policy settings in the monitored domain as in the example below:
Figure 4: Audit Policy Settings Report
6. Click the Adjust button. Your audit policy settings and the Data Processing Account permissions will be adjusted automatically.
7. On the next step, repeat these operations for the object-level audit settings. Object-level auditing must be configured so that the “Who” and “When” information appears in audit reports:

NetWrix Active Directory Change Reporter Installation and Configuration Guide
Page 15 of 34
Copyright © 2012 NetWrix Corporation. All Rights Reserved
Suggestions or comments about this document? www.netwrix.com/feedback
Figure 5: Audit Configuration Wizard: Adjust the Object-Level Audit Settings
8. On the next step, repeat these operations for your Security event log retention settings. On clicking the Adjust button, the size of your Security event log will be set to 300 MB, and the event log auto backup will be enabled
if needed:
Figure 6: Audit Configuration Wizard: Adjust the Event Log Retention Settings
9. On the next step, repeat these operations for the Exchange Server Administrator Audit Logging Settings:
Note: Configuration of these settings is only required if you are going to use the NetWrix Exchange Change Reporter module, and your monitored AD
domain has an Exchange organization running Microsoft Exchange Server 2010.

NetWrix Active Directory Change Reporter Installation and Configuration Guide
Page 16 of 34
Copyright © 2012 NetWrix Corporation. All Rights Reserved
Suggestions or comments about this document? www.netwrix.com/feedback
Figure 7: Audit Configuration Wizard: Adjust the Exchange Server AAL Settings
10. On the last step, review your settings and exit the wizard.
6.2. Configuring Target Environment Manually
If you prefer to configure audit settings, rights and permissions, the Security event log size and retention policies, and the AD tombstone lifetime manually, refer to the sections below for detailed instructions:
Configuring Rights and Permissions
Configuring Object-Level Auditing
Adjusting Configuration and Schema Containers Audit Settings
Configuring Domain Controller Audit Policy Settings
Configuring Security Event Log Size and Retention Settings
Configuring Exchange Server AAL Settings
Adjusting AD Tombstone Lifetime
6.2.1. Configuring Rights and Permissions
To audit object security changes, the Data Processing Account used to collect data from the monitored environment must be a domain admin account or an account
with the Manage auditing and security log right enabled.
If you are going to use the NetWrix Exchange Change Reporter module, and your monitored AD domain has an Exchange organization running Microsoft Exchange
Server 2010, the Data Processing Account must also belong to the Organization Management or the Records Management group. Alternatively, the Audit Logs management role must be assigned to this account.
The account that will be used to access the SQL database with audit data must belong to the target Database owner (dbo) role. You can assign this role to the Default Data Processing Account or any other account of your choice.
Perform the following procedures to configure the Data Processing Account:
NetWrix Active Directory Change Reporter Installation and Configuration Guide
Page 17 of 34
Copyright © 2012 NetWrix Corporation. All Rights Reserved
Suggestions or comments about this document? www.netwrix.com/feedback
To assign the Manage auditing and security log right
To assign the Database owner (dbo) role
To add an account to the Organization Management group
To assign the Audit Logs role to an account
Procedure 6. To assign the Manage auditing and security log right
1. Navigate to Start Administrative Tools Group Policy Management.
2. In the left pane, navigate to Forest: <domain_name> Domains <domain_name> Domain Controllers. Right-click the effective domain
controllers policy (by default, it is the Default Domain Controllers Policy) node and select Edit from the popup menu.
3. In the Group Policy Management Editor, in the left pane, navigate to
Computer Configuration Policies Windows Settings Security Settings and select Local Policies.
4. On the right, double-click the User Rights Assignment policy.
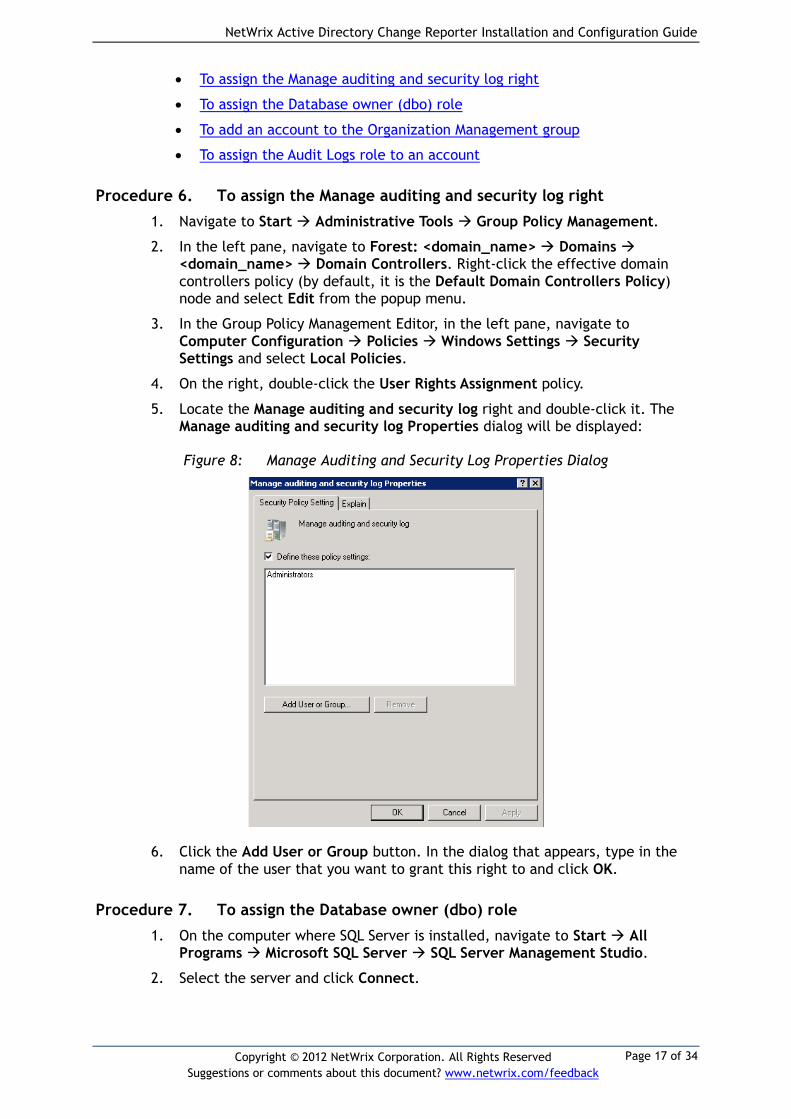
5. Locate the Manage auditing and security log right and double-click it. The Manage auditing and security log Properties dialog will be displayed:
Figure 8: Manage Auditing and Security Log Properties Dialog
6. Click the Add User or Group button. In the dialog that appears, type in the
name of the user that you want to grant this right to and click OK.
Procedure 7. To assign the Database owner (dbo) role
1. On the computer where SQL Server is installed, navigate to Start All Programs Microsoft SQL Server SQL Server Management Studio.
2. Select the server and click Connect.

NetWrix Active Directory Change Reporter Installation and Configuration Guide
Page 18 of 34
Copyright © 2012 NetWrix Corporation. All Rights Reserved
Suggestions or comments about this document? www.netwrix.com/feedback
3. In the left pane, expand the Security node. Right-click the Logins node and select New Login from the popup menu. The Login – New dialog will be
displayed:
Figure 9: Login – New: General
4. Click the Search button next to the Login Name field and specify the user that you want to assign the dbo role to.
5. If you are assigning the Database owner role to the Data Processing Account,
make sure the Windows authentication option is selected. If this is a different account, select the SQL Server authentication option.
6. In the left pane, select Server Roles:
Figure 10: Login – New: Server Roles

NetWrix Active Directory Change Reporter Installation and Configuration Guide
Page 19 of 34
Copyright © 2012 NetWrix Corporation. All Rights Reserved
Suggestions or comments about this document? www.netwrix.com/feedback
7. You can assign the sysadmin role to the new login: all members of this role have the dbo role by default. If you do not want to assign the sysadmin role
to this user, select public as server role. Then select User Mapping in the left pane.
8. Select the database used by NetWrix Active Directory Change Reporter to
store audit data in the upper pane and check db_owner in the lower pane:
Figure 11: Login – New: User Mapping
9. Click OK to save the changes.
Note: If the account that you want to assign the Database owner role to has already been added to SQL Server Logins, expand the Security Logins node, right-click this account, select Properties from the popup
menu, and edit its roles.
Procedure 8. To add an account to the Organization Management group
1. On any domain controller in the root domain of the forest where Microsoft Exchange Server 2010 is installed, navigate to Start Administrative Tools Active Directory Users and Computers.
2. In the left pane, navigate to <domain_name> Microsoft Exchange Security
Groups.
3. On the right, locate the Organization Management group and double-click it.
4. In the Organization Management Properties dialog that opens, select the
Members tab and click the Add button to add an account to this group:

NetWrix Active Directory Change Reporter Installation and Configuration Guide
Page 20 of 34
Copyright © 2012 NetWrix Corporation. All Rights Reserved
Suggestions or comments about this document? www.netwrix.com/feedback
Figure 12: Organization Management Properties: Add User
Note: If for some reason you do not want this account to belong to the Organization Management group, you can add it to the Records Management group in the same way. The Records Management group is
less powerful, and accounts belonging to it have fewer rights and permissions.
Procedure 9. To assign the Audit Logs role to an account
Note: You only need to perform this procedure if you do not want to add
the Data Processing Account to the Organization Management or the Records Management group.
1. On the computer where Microsoft Exchange Server 2010 is installed, open the
Exchange Management Shell under an account that belongs to the Organization Management group.
2. Use the following syntax to assign the Audit Log role to a user:
New-ManagementRoleAssignment -Name <assignment name> -User <UserName> -Role <role name>
For example:
New-ManagementRoleAssignment -Name "AuditLogsNetWrixRole" -User Administrator -Role "Audit Logs"
6.2.2. Configuring Object-Level Auditing
Object-level Active Directory auditing must be configured so that the “Who” and “When” information appears in audit reports. To do this, perform the following procedure:
Procedure 10. To configure Active Directory auditing
3. Navigate to Start Programs Administrative Tools Active Directory Users and Computers. In the Active Directory Users and Computers dialog,
click View in the main menu and ensure that the Advanced Features option is selected.

NetWrix Active Directory Change Reporter Installation and Configuration Guide
Page 21 of 34
Copyright © 2012 NetWrix Corporation. All Rights Reserved
Suggestions or comments about this document? www.netwrix.com/feedback
Figure 13: Active Directory Users and Computers Dialog
4. Right-click the <domain_name> node and select Properties. In the domain
Properties dialog, open the Security tab and click the Advanced button. The Advanced Security Settings dialog will open. Select the Auditing tab:
Figure 14: Advanced Security Settings: Auditing
5. Press the Add button. In the Select user, Computer, Service account, or Group
dialog, type ‘Everyone’ in the Enter the object name to select entry field and click OK.
6. In the Audit Entry dialog that opens, set the Successful parameter for all
access entries except the following: Full Control, List Contents, Read All Properties and Read Permissions:

NetWrix Active Directory Change Reporter Installation and Configuration Guide
Page 22 of 34
Copyright © 2012 NetWrix Corporation. All Rights Reserved
Suggestions or comments about this document? www.netwrix.com/feedback
Figure 15: Audit Entry Dialog
7. Make sure that the Apply these auditing entries to objects and/or containers within this container only check-box is not selected. Also, make sure that the Apply onto parameter is set to This object and all descendant objects.
8. Click OK to save the changes.
6.2.3. Adjusting Configuration and Schema Containers Audit Settings
If you want to track changes to the domain Configuration and/or Schema containers, you must enable object-level auditing for these containers. To do this, perform the following procedure:
Procedure 11. To enable object-level auditing for the Configuration and Schema containers
Note: To perform this procedure, you will need the ADSI Edit utility. In
Windows 2003 systems, this utility is a component of Windows Server Support Tools. If it has not been installed, download Windows Server
Support Tools from the official website. On Windows 2008 systems and above, this component is installed together with the AD DS role.
1. Navigate to Start Programs Administrative Tools ADSI Edit. The ADSI
Edit dialog will open.

NetWrix Active Directory Change Reporter Installation and Configuration Guide
Page 23 of 34
Copyright © 2012 NetWrix Corporation. All Rights Reserved
Suggestions or comments about this document? www.netwrix.com/feedback
Figure 16: ADSI Edit dialog
2. Right-click the ADSI Edit node and select the Connect To option. In the Connection Settings dialog, enable the Select a well-known Naming Context option and select Configuration from the drop-down list. Click OK:
Figure 17: Connection Settings Dialog
3. Expand the Configuration <Your_Root_Domain_Name> node. Right-click the
CN=Configuration, DC=… node and select Properties.
4. In the CN=Configuration, DC=company, DC=local Properties dialog select the Security tab and press the Advanced button. In the Advanced Security
Settings for Configuration dialog open the Auditing tab and press the Add button.
5. In the Select User, Computer, Service Account, or Group dialog type
‘Everyone’ in the Enter the object name to select entry field and click OK. The Auditing Entry for Configuration dialog will open.
6. Set the Successful parameter for all access entries except the following: Full
Control, List Contents, Read All Properties and Read Permissions:

NetWrix Active Directory Change Reporter Installation and Configuration Guide
Page 24 of 34
Copyright © 2012 NetWrix Corporation. All Rights Reserved
Suggestions or comments about this document? www.netwrix.com/feedback
Figure 18: Auditing Entry for Configuration Dialog
7. Make sure that the Apply these auditing entries to objects and/or containers within his container only check-box is not selected. Also, make sure that the Apply onto parameter is set to This object and all descendant
objects.
8. Click OK to save the changes.
9. Repeat steps 2-8 for the Schema container if necessary.
6.2.4. Configuring Domain Controller Audit Policy Settings
For the product to collect audit data correctly, you must enable the Audit directory service access and the Audit account management policies. To do this, perform the
following procedure:
Procedure 12. To configure audit policy settings
1. Navigate to Start Programs Administrative Tools Group Policy Management. The Group Policy Management dialog will open:
Figure 19: Group Policy Management Console
2. In the left pane, navigate to Forest: <domain_name> Domains <domain_name> Domain Controllers. Right-click the effective domain

NetWrix Active Directory Change Reporter Installation and Configuration Guide
Page 25 of 34
Copyright © 2012 NetWrix Corporation. All Rights Reserved
Suggestions or comments about this document? www.netwrix.com/feedback
controllers policy (by default, it is the Default Domain Controllers Policy), and select Edit from the popup menu.
3. In the Group Policy Management Editor dialog, navigate to Computer Configuration Policies Windows Settings Security Settings Local Policies Audit Policy.
4. Ensure that the Audit account management and Audit directory service access options are set to Success (or Success and Failure):
Figure 20: Group Policy Management Editor Dialog
6.2.5. Configuring Security Event Log Size and Retention Settings
Defining the Security event log size is essential for change auditing. If your Security log size is insufficient, overwrites may occur before data is written to the Audit Archive and the SQL database, and some audit data may be lost. To prevent
overwrites, you must increase the maximum size of the Security event log.
On Windows Server 2003 systems, where the maximum size of the Security event log cannot exceed 300 MBs (according to the following Microsoft Knowledge Base article:
Event log may not grow to configured size), it is also recommended to enable automatic backup of the event log. With this option, the event log will be archived and log overwrites will not occur on domain controllers.
To adjust your Security event log size and retention settings, perform the following procedures:
Increase the maximum size of the Security event log and set its retention
method
Enable event log Auto archiving
Configure backup logs retention
Procedure 13. To increase the maximum size of the Security event log and set its retention method
1. Navigate to Start Programs Administrative Tools Group Policy Management. The Group Policy Management dialog will open:

NetWrix Active Directory Change Reporter Installation and Configuration Guide
Page 26 of 34
Copyright © 2012 NetWrix Corporation. All Rights Reserved
Suggestions or comments about this document? www.netwrix.com/feedback
Figure 21: Group Policy Management Console
2. In the left pane, navigate to Forest: <domain_name> Domains
<domain_name> Domain Controllers. Right-click the effective domain controllers policy (by default, it is the Default Domain Controllers Policy), and select Edit from the popup menu.
3. Navigate to Computer Configuration Policies Windows Settings Security Settings Event Log:
Figure 22: Group Policy Management Editor Dialog
4. Double-click Maximum security log size. In the Maximum security log size Properties dialog, select the Define this policy setting option and set
Maximum security log size to 299968 kilobytes.

NetWrix Active Directory Change Reporter Installation and Configuration Guide
Page 27 of 34
Copyright © 2012 NetWrix Corporation. All Rights Reserved
Suggestions or comments about this document? www.netwrix.com/feedback
Figure 23: Maximum security log size Properties Dialog
5. Click OK to save the changes.
6. Double-click Retention method for security log. In the Retention method for security log Properties dialog, select the Define this policy setting option and select Overwrite events as needed:
Figure 24: Retention method for security log Properties Dialog
7. Click OK to save the changes.
8. Navigate to Start Run and execute the “cmd” command. Type the “gpupdate” command and press Enter. The group policy will be updated.
NetWrix Active Directory Change Reporter Installation and Configuration Guide
Page 28 of 34
Copyright © 2012 NetWrix Corporation. All Rights Reserved
Suggestions or comments about this document? www.netwrix.com/feedback
Procedure 14. To enable Auto archiving centrally on all Domain Controllers
Note: This procedure can be performed on any domain controller.
1. Navigate to Start Programs Administrative Tools Group Policy
Management.
2. In the left pane, navigate to Forest: <domain_name> Domains <domain_name> Domain Controllers. Right-click the effective domain
controllers policy (by default, it is the Default Domain Controllers Policy), and select Edit from the popup menu.
3. Navigate to Computer Configuration Policies. Right-click Administrative
Templates: Policy definitions and select Add/remove templates. In the Add/Remove Templates dialog, click the Add button.
4. In the Policy Templates dialog, navigate to the Active Directory Change
Reporter installation directory, select the Log Autobackup.adm file (if the product is installed on a different computer, copy this file to the domain controller), and click Open.
5. Click the Close button in the Add/Remove Templates dialog.
Note: If you are running Widows Server 2003 or below, after step 4, click View in the Main menu, select Filtering and deselect the Only show policy settings that can be fully managed option.
6. Navigate to Administrative Templates: Policy definitions Classic
Administrative Templates System Event Log.
7. Double-click Automatically clear a full security event log and back up the
log file. Select the Enabled option and click OK to save the changes.
8. Navigate to Start Run and execute the ‘cmd’ command. Type the ‘gpupdate’ command and press Enter. The group policy will be updated.
Note: Depending on the activity in the monitored environment, the Security log auto backup files can fill the free space on your disk drive before the product removes them. To prevent disk drive overfilling, if needed, change the behavior of the backup logs by performing Procedure 15 To configure
the retention period for the backup logs below.
Procedure 15. To configure the retention period for the backup logs
Note: Perform this procedure on the computer where NetWrix Active Directory Change Reporter is installed.
1. Navigate to Start Run, type the ‘regedit’ command and click OK.
2. Navigate to HKEY_LOCAL_MACHINE SOFTWARE NetWrix AD Change Reporter (for 32-bit OS), or HKEY_LOCAL_MACHINE SOFTWARE
Wow6432Node NetWrix AD Change Reporter (for 64-bit OS).
3. Double-click CleanAutoBackupLogs. The Edit DWORD Value dialog will open.
4. This value defines the time period (in hours) after which archives will be
deleted automatically. By default, it is set to 50 (decimal). Modify this value, if necessary, and click OK to save the changes.

NetWrix Active Directory Change Reporter Installation and Configuration Guide
Page 29 of 34
Copyright © 2012 NetWrix Corporation. All Rights Reserved
Suggestions or comments about this document? www.netwrix.com/feedback
Figure 25: Edit DWORD Value Dialog
Note: If the CleanAutoBackupLogs registry value is set to 0, you will have to
remove the old automatic backups manually, or you may run out of space on your hard drive.
6.2.6. Configuring Exchange Server AAL Settings
If you are going to use the NetWrix Exchange Change Reporter module, and your monitored domain has an Exchange organization running Microsoft Exchange Server 2010 SP1, you must configure the Exchange server Administrator Audit Logging (AAL)
settings. To do this, perform the following procedure:
Procedure 16. To configure Exchange Server AAL settings
1. On the computer where the target Microsoft Exchange Server 2010 is installed, navigate to Start Programs Exchange Management Shell.
2. Execute the following command:
[PS] C:\Windows\system32>Set-AdminAuditLogConfig -
AdminAuditLogEnabled $true -AdminAuditLogAgeLimit 30 -AdminAuditLogCmdlets *
3. On the computer where NetWrix Exchange Change Reporter is installed,
browse to the product installation folder, locate the SetAALExcludedCmdlets.ps1 file and copy it to the Exchange server.
4. In Exchange Management Shell, in the command line, execute this file by
specifying the path to it:
<Path_To_ SetAALExcludedCmdlets_File>\SetAALExcludedCmdlets.ps1
5. On the computer where the target Exchange Server 2010 is installed, navigate to Start Administrative Tools Internet Information Services (IIS) Manager.
6. In the left pane, navigate to <server_name> Sites <site_name> PowerShell and double-click Application Settings in the right pane:

NetWrix Active Directory Change Reporter Installation and Configuration Guide
Page 30 of 34
Copyright © 2012 NetWrix Corporation. All Rights Reserved
Suggestions or comments about this document? www.netwrix.com/feedback
Figure 26: IIS Manager: PowerShell Home
7. In the Application Settings page, double-click the PSLanguageMode parameter
and set its value to ‘FullLanguage’.
8. In the left pane, navigate to <server_name> Application Pools. Select MSExchangePowerShellAppPool on the right, and click Recycle in the Actions
pane:
Figure 27: IIS Manager: Application Pools
Note: Steps 1-4 (AAL configuration) of this procedure can be performed on any of the monitored Exchange servers, as these settings will then be replicated to all Exchange servers in the domain. Steps 5-8 (IIS
configuration) must be performed on each of the monitored Exchange servers.

NetWrix Active Directory Change Reporter Installation and Configuration Guide
Page 31 of 34
Copyright © 2012 NetWrix Corporation. All Rights Reserved
Suggestions or comments about this document? www.netwrix.com/feedback
6.2.7. Adjusting AD Tombstone Lifetime
You can restore deleted Active Directory objects and their attributes using the Active Directory Object Restore tool integrated with NetWrix Active Directory Change Reporter. The tool finds the information on deleted objects in the product snapshots (this data is stored in the Audit Archive, a local file-based storage of audit data) and
AD tombstones. To be able to restore deleted AD objects, you must adjust the AD tombstone lifetime property (set by default to 60 days in Windows 2003 and to 180 days in Windows 2008 and higher) so that it agrees with the Audit Archive retention
period (2 years by default).
Procedure 17. To change the tombstone lifetime attribute
Note: To perform this procedure, you will need the ADSI Edit utility. In Windows 2003 systems, this utility is a component of Windows Server
Support Tools. If it has not been installed, download Windows Server Support Tools from the official website. On Windows 2008 systems and above, this component is installed together with the AD DS role.
1. Navigate to Start Programs Administrative Tools ADSI Edit. The ADSI
Edit dialog will open.
Figure 28: ADSI Edit dialog
2. Right-click the ADSI Edit node and select the Connect To option. In the Connection Settings dialog, enable the Select a well-known Naming Context
option and select Configuration from the drop-down list. Click OK:

NetWrix Active Directory Change Reporter Installation and Configuration Guide
Page 32 of 34
Copyright © 2012 NetWrix Corporation. All Rights Reserved
Suggestions or comments about this document? www.netwrix.com/feedback
Figure 29: Connection Settings Dialog
3. In the left pane, navigate to Configuration <Your_Root_Domain_Name> CN=Configuration,DC=corp,DC=local CN=Services CN=Windows NT CN=Directory Service node. Right-click it and select Properties from the
popup menu.
4. In the CN=Directory Service Properties dialogue, in the Attribute Editor tab, locate the tombstoneLifetime attribute:
Figure 30: CN=Directory Service Properties: tombstoneLifetime Attribute
5. Select this attribute and click the Edit button.
6. In the dialogue that opens, set the value of this attribute to 730 (which equals
2 years).

NetWrix Active Directory Change Reporter Installation and Configuration Guide
Page 33 of 34
Copyright © 2012 NetWrix Corporation. All Rights Reserved
Suggestions or comments about this document? www.netwrix.com/feedback
A APPENDIX: SUPPORTING DATA
A.1 Related Documentation
The table below lists all documents available to support NetWrix Active Directory Change Reporter, NetWrix Group Policy Change Reporter and NetWrix Exchange
Change Reporter:
Table 5: Product Documentation
Document Name Overview
NetWrix Active Directory Change Reporter Installation and Configuration Guide
The current document.
NetWrix Active Directory Change Reporter Quick-Start Guide
Provides an overview of the product functionality and instructions on how to install, configure and start using the product. This guide can be used for evaluation purposes.
NetWrix Active Directory Change Reporter Administrator’s Guide
Provides a detailed explanation of the NetWrix Active Directory Change Reporter features and step-by-step instructions on how to configure and use the product.
NetWrix Active Directory Change Reporter User Guide
Provides the information on different NetWrix Active Directory Change Reporter reporting capabilities, lists all available reports and explains how they can be viewed and interpreted.
NetWrix Group Policy Change Reporter Quick-Start Guide
Provides an overview of the product functionality and instructions on how to install, configure and start using the product. This guide can be used for evaluation purposes.
NetWrix Group Policy Change Reporter Administrator’s Guide
Provides a detailed explanation of the NetWrix Group Policy Change Reporter features and step-by-step instructions on how to configure and use the product.
NetWrix Group Policy Change Reporter User Guide
Provides the information on different NetWrix Group Policy Change Reporter reporting capabilities, lists all available reports and explains how they can be viewed and interpreted.
NetWrix Exchange Change Reporter Quick-Start Guide
Provides an overview of the product functionality and instructions on how to install, configure and start using the product. This guide can be used for evaluation purposes.
NetWrix Exchange Change Reporter Administrator’s Guide
Provides a detailed explanation of the NetWrix Exchange Change Reporter features and step-by-step instructions on how to configure and use the product.
NetWrix Exchange Change Reporter User Guide
Provides the information on different NetWrix Exchange Change Reporter reporting capabilities, lists all available reports and explains how they can be viewed and

NetWrix Active Directory Change Reporter Installation and Configuration Guide
Page 34 of 34
Copyright © 2012 NetWrix Corporation. All Rights Reserved
Suggestions or comments about this document? www.netwrix.com/feedback
interpreted.
NetWrix Active Directory Change Reporter Freeware Edition Quick-Start Guide
Provides instructions on how to install, configure and use NetWrix Active Directory Change Reporter, NetWrix Group Policy Change Reporter and NetWrix Exchange Change Reporter Freeware Edition.
NetWrix Active Directory Change Reporter Release Notes
Contains a list of the known issues that customers may experience with NetWrix Active Directory Change Reporter 7.2, and suggests workarounds for these issues.
Troubleshooting Incorrect Reporting of the “Who Changed” Parameter
Step-by-step instructions on how to troubleshoot incorrect reporting of the ‘who changed’ parameter.
Configuring Real-Time Alerts in NetWrix Active Directory Change Reporter
This technical article provides detailed instructions on how to configure real-time alerts, as well as an algorithm for selecting the correct attribute for the type of change you want to track. It also contains step-by-step procedures that will guide you through configuration of some most commonly used alerts.
Installing Microsoft SQL Server and Configuring the Reporting Services
This technical article provides instructions on how to install Microsoft SQL Server 2005/2008 R2/2012 Express and configure the Reporting Services.
How to Subscribe to SSRS Reports This technical article explains how to configure a subscription to SSRS reports using the Report Manager.
Integration with Third Party SIEM Systems This article explains how to enable integration with third-party Security Information and Event Management (SIEM) systems.
Native AD Auditing Cheat Sheet Provides an Active Directory auditing configuration checklist.