n1mm logger quick -...
TRANSCRIPT

N1MM Logger Quick http://www.pvrc.org/~n4zr/Quick.htm
1 of 48 10/28/2008 2:47 PM
N1MM Logger Quick-Start Guide
The purpose of this guide is to give the brand-new user an easy path to getting the software runningfor the first time. That means using it without any external interfaces, initially and only then addingradio control. Further interfacing (such as CW, PTT and transmit audio) is covered in later chapters,along with related operating techniques.I have not tried to address digital modes in this guide, because while some aspects of programoperation are identical, most are different, because of using MMTTY, MMVARI or a terminal unit todecode the digital transmissions.
Special thanks to Bob, K0RC, for his contributions to this second draft. He sanity-tested the originalby installing N1MM from scratch and uncovered some errors and omissions that are (hopefully)corrected below.
Before we start, let me make a pitch right now for the excellent Google search capability built intoN1MM Logger. You'll find it on the Help menu in the Entry Window (see below). It searches the300-plus pages of the manual for keywords you select, exactly as Google does searches of theInternet. You may have to adjust your searches to get the terminology exactly right, but when you do,you'll be glad you did. With this capability you always get access to the latest version of the manualwithout having to download it, and you can almost always find what you want within a minute or two -highly recommended!
Chapter 1 – Getting Started
Setup
I’m assuming that you followed the instructions for downloading the program on the website(http://www.n1mm.com/), first installing Version 8.0.0 and then updating to the latest version. I’m alsoassuming that during the base installation you installed the Help files, downloaded the manual, andinstalled dlportio if needed by your operating system (Windows XP, Windows 2K, and Windows NT).
All this having been done, you’re ready to start the program for the first time. The first time you run it,the very first thing you’ll see is the following notice:
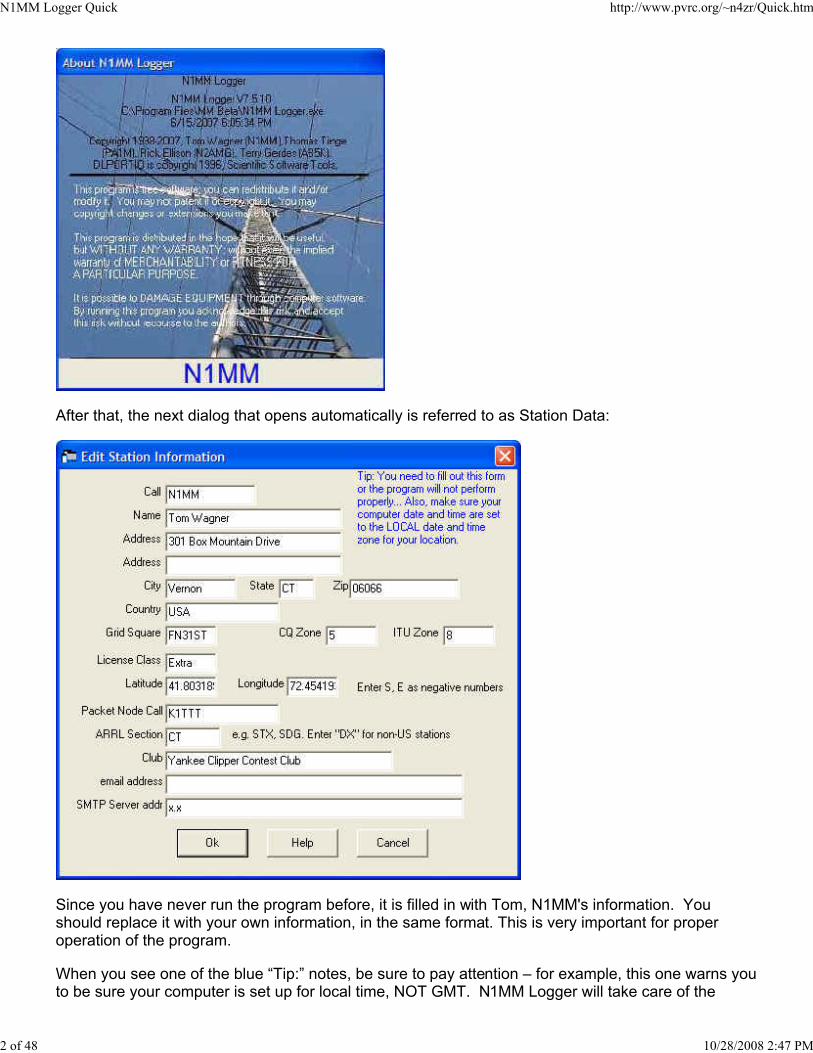
Click on OK, and what comes next is what we call the "splash screen."
.
N1MM Logger Quick http://www.pvrc.org/~n4zr/Quick.htm
2 of 48 10/28/2008 2:47 PM
After that, the next dialog that opens automatically is referred to as Station Data:
Since you have never run the program before, it is filled in with Tom, N1MM's information. Youshould replace it with your own information, in the same format. This is very important for properoperation of the program.
When you see one of the blue “Tip:” notes, be sure to pay attention – for example, this one warns youto be sure your computer is set up for local time, NOT GMT. N1MM Logger will take care of the

N1MM Logger Quick http://www.pvrc.org/~n4zr/Quick.htm
3 of 48 10/28/2008 2:47 PM
conversion for you. Don't worry about the SMTP server address unless you know it off-hand - it is only useful for bugreporting. When you have completed the form, click OK.
Next comes what looks like an error message:
Don’t take it seriously – this is related to playback of audio files, something you won’t need for a longtime yet. Just OK out.
After that you will see an Entry Window, at the upper left of your screen. :
Let’s get a little terminology out of the way first. The top blue part of this (or any) window is calledthe Title Bar. It displays the current frequency, mode (if one has been selected), and which radio it is(nominally, Radio A). You will have to enter a mode before you begin to operate, and a band and/or mode each time youchange either. You do that simply by typing a frequency in KHz (3500, 7000, etc.) in the Call-SignField (to the far left) and hitting [Enter]; then typing a mode (CW, USB, LSB) there, hitting [Enter]again, and you're set.
The first menu row is standard Windows style, and we’ll be using it in a minute. Below the menu is aset of entry textboxes. This row is where you log your contest QSOs. The left-most field is the Call-Sign field. You always enter the call sign of the station you are working into this field.
The rest of the data entry fields are titled above them - depending on how you have resized thewindow, they may not line up perfectly with the entry fields, but they are always in the samesequence as those fields are. Depending upon the specific contest and the required contestexchange, the number and titles above these windows can be different. The example window shownabove would be used during the IARU Contest. This contest requires a call sign, sent and receivedsignal reports, and the IARU Zone be logged for each contact

N1MM Logger Quick http://www.pvrc.org/~n4zr/Quick.htm
4 of 48 10/28/2008 2:47 PM
For now, you can ignore the “Running” check-box, as well as the rest of the buttons alongside it. Thiscontrols one of the most important features of N1MM Logger – it distinguishes between Run andSearch and Pounce modes, providing different features for each. However, these aren’t reallyrelevant until you get into sending stored CW and phone messages, which are covered in Chapter 4. The rest of the buttons in the Entry Window are related to this, and to other advanced capabilities.
If you want to save space on your screen, you can reduce the size of the Entry Window, like this. Just use your mouse to grab the lower right corner or lower edge of the window and drag it upward.
There are two more useful features of the Entry Window. The box in the lower left corner, called theStatus Line, provides a lot of useful program status information. For example, if you enter a call sign,the Status Line will tell you what country it represents. If you have set up the Entry Window just alittle bigger than the minimum, it will also show you the distance and bearing, like this.
To the right of the Status Line is the progress box, where you can keep track of your QSOs andmultipliers without having another window open, and to its right is a running score.
If you press the backslash (\) key, the program opens a second, almost- identical entry window. Theonly difference is that it will have a "B" instead of the "A" in the title bar of the first entry window, and itmay well have a different frequency and/or mode as well. But if you pop up the second Entry Windowby mistake, and want to get rid of it, you simply close it by clicking the big red X.
The idea is this - most modern transceivers have two VFOs, or a main VFO and a sub-VFO. Therewill be circumstances - during a contest on 40 meter SSB, for example - when you will want toreceive on one frequency and transmit on another, widely-separated one. Since we haven't yetgotten to controlling a radio (that's in chapter 2) it's not appropriate now to get into a lot of details, andin any case different transceivers (or brands of transceivers) manage dual VFOs differently. If youare running two radios (SO2R), the second Entry window controls the second radio.
If you really want to disable the second entry window until your radio is interfaced., select the Config

N1MM Logger Quick http://www.pvrc.org/~n4zr/Quick.htm
5 of 48 10/28/2008 2:47 PM
menu, and under the dropdown menu, select Configure Ports, Telnet Address, Other.
That opens this rather intimidating dialog:

N1MM Logger Quick http://www.pvrc.org/~n4zr/Quick.htm
6 of 48 10/28/2008 2:47 PM
Ignore everything else, and just select your operating mode, from among the choices "SO1V","SO2V" and "SO2R." SO2V is the normal default - it stands for "Single Operator 2 VFOs", andassumes that you will want, at some point, to use the second VFO of your radio for things likeworking split in SSB contests. Select SO1V if you wish to disable this (it prevents the program fromopening the second entry window any time you press the "\" key). SO2R stands for Single Operator 2Radios. To disable the second radio or VFOs Entry Window, select "SO1V". Now OK out.
In the row below the entry fields in the Entry Window are two colored dots – the green dot denoteswhich Entry window (if you are using two VFOs, or have more than one radio) has the Entry orReceive Focus. That is, it’s where information will be entered if you type it, and also the radio (orVFO) which will transmit any Function Key you press on the keyboard. The blinking Windows cursordenotes the same thing, and so does the change in color of the title bar and frame of the entrywindow. The red dot denotes the Transmit Focus, which frankly is not very useful, because itdenotes the radio (or VFO) that transmitted the last message. More on this whole 2-radio/2-VFO business later.

N1MM Logger Quick http://www.pvrc.org/~n4zr/Quick.htm
7 of 48 10/28/2008 2:47 PM
A word about fonts. Windows defaults to a sans-serif font that does not distinguish well between "oh"and zero. If you click on View in the menu row, you'll see "Set Font" as one of the options. Click onthat and you'll be given a list of available fonts, like this:
I have chosen Monaco for my font, even though it is normally used by Macintoshes, because it givesa good clear 0/O and l/1 distinction. In addition Monaco bold is a little bit bigger than the unboldedtype-face in a given size, which helps legibility in some windows. You can make similar choices inthe Log and Check windows, by right-clicking them to get the appropriate sub-menu. You may haveto play around a bit with the window size and font characteristics (Bold/Regular, or point size) to fiteverything in the exchange field - this is particularly true of the signal reports "59" and "599".
Now, we’re ready to set up a contest. Note that the first database the program creates is namedham.mdb by default - you can have as many databases as you want, and name them what you want. I'm using ham.mdb, but my program directory is named MM Beta (for historical reasons). Some

N1MM Logger Quick http://www.pvrc.org/~n4zr/Quick.htm
8 of 48 10/28/2008 2:47 PM
people prefer to create a database for every contest, while others create one for a period of time, likeevery year. If you want to create a database, for example "2007.mdb", just click Files to drop downthe menu, and then click on "New Database".
That will open a standard file creation dialog in your program directory

N1MM Logger Quick http://www.pvrc.org/~n4zr/Quick.htm
9 of 48 10/28/2008 2:47 PM
Name your new database and click Save. You'll be switched to the new database and ready to go.
Back to the Files menu again. This time click “New Log in Database: C:\Program Files\N1MMLogger\ham.mdb" A new dialog opens.
The first thing to do is to click on the down button of the Log Type field. That will open a list ofabbreviated contest names, as I already have done above. You can use your mouse to scroll throughthe list, or type the first letter of the contest to jump to the right general area. Once you have foundthe contest you want and highlighted it, click back in the original field and the drop-down list will close.

N1MM Logger Quick http://www.pvrc.org/~n4zr/Quick.htm
10 of 48 10/28/2008 2:47 PM
Fill in the start date for that instance of the contest, in the format shown. This is a good idea forcalculations of total contest time and to keep track in case you have logs for many different instancesof the same contest name, such as QSO parties. Since I'm just illustrating here, the date is today.
Next, fill in the information in the next few fields, denoting the class and category you intend to enterin the contest. In each case, you have drop-down lists available. “Overlay category” refers tocontests like WPX, which have both regular classes and categories like Rookie or “Tri-bander pluswires”. In most cases, “N/A”, for not applicable, is the answer you want there.
Next comes the most important part of this dialog, the Sent Exchange field.
For many contests, the program guesses what you will want – for example, in this case, since theCQWW contest uses CQ zones, it has already picked zone 5 for me. Note the “Omit RST” warning. If the contest you choose has serial numbers, like WPX or the NA Sprint, then you need to put "001"at the start of the Sent Exchange field. Hence, for WPX, my Sent Exchange would read 001. Animportant exception is the ARRL Sweepstakes. The serial number is "assumed" for this contest only,so my Sent Exchange for SS would read B 54 WV. More information on the Sent Exchange is in theSupported Contests section of the manual.
Once you have filled in the Sent Exchange, you’re done for now. Just Click OK and hit [Enter]. Nowyou’re almost ready to operate in the contest, but first it’s time to open a few more windows. Go backto the Menu line in the Entry Window, and Click “Window”. A sub-menu will open, like this:

N1MM Logger Quick http://www.pvrc.org/~n4zr/Quick.htm
11 of 48 10/28/2008 2:47 PM
To begin with, click on the “Log” window. That will open a Log window on the screen, like this:
First, you should notice that the title bar gives the current date and exact time, the name of thecontest, and the database in use. As you log QSOs, they will appear in the log. I have logged oneabove just to indicate how it looks. The most recent last QSO is highlighted. You’ll note that eachcolumn has a fixed label – these labels do not change. CQWW is a 2-multiplier contest, so the logshows columns for "Mult" which is the country, and "Mult2" which is the CQ Zone. The "yes" in eachsimply means that it is the first of that multiplier on that band. If you click on any column heading, the entire log is sorted by that attribute –for example, if you click on the Mult heading, the log will be sorted so that all of your first QSOs with agiven kind of multiplier (in this case, a new country) will be moved up to the front. Click on TS (fortimestamp) to switch back to the normal log order.
A further nice touch - if you click a second time on the column heading, for example the "Call", thesort order switches from Ascending to Descending, so that all your "Z" QSOs come first, and your"As" last. Same goes for the TS (TimeStamp) heading - normally, you'll want to leave the LogWindow in TS ascending, so that each QSO you log appears immediately at the bottom of the list.
The Log window has two “panes” – the one above the dark-grey line is the normal log, while the one

N1MM Logger Quick http://www.pvrc.org/~n4zr/Quick.htm
12 of 48 10/28/2008 2:47 PM
below the line is to show you previous QSOs with a station, each time you type its call into the EntryWindow. You can resize the entire log window, or move the separator to make the previous QSOpane bigger.
This makes it very easy to see, quickly, all the information about previous QSOs, for that specialsomeone who drops by and asks, “What was the serial number you gave me yesterday.”
Like all windows in N1MM Logger, the Log window is resizable, as are the individual log columns – toresize the whole window, use your mouse to drag and drop the lower right corner, and to resize acolumn grab the between-column divider and drag it right or left. You can move any window aroundthe screen by dragging and dropping its title bar. Also, as I mentioned above, you can change thefont in the Log window by right-clicking in the window, and choosing your font as you did for the Entrywindow.
OK, another important window – the Check window. You open it the same way as you did the Logwindow., and set the font the same way (with a right-click menu choice). This window is used todisplay the results of checking a call-sign against your log and also against a master list of calls,variously called the master.dta or Super Check Partial file. One is provided when you install theprogram, and the process of updating is covered in the manual.
First things first, though. When you type a call-sign in the Entry Window, the Check window displayswhether a match was found or not. If the match is in your current log, it is shown in the first line of thewindow, like this:
Note the program warns you that you have already worked that station, and can’t do so again on thecurrent band (or maybe in the entire contest, like SS). Also note that two lines below are two possiblematches from the master database.
Had the station you copied been W1AWB, when you entered the “B” the Check window wouldchange to reflect that, as follows:

N1MM Logger Quick http://www.pvrc.org/~n4zr/Quick.htm
13 of 48 10/28/2008 2:47 PM
Note that the station’s call appears in blue, meaning that to work the station would not be a newmultiplier, but would be a valid non-dupe QSO. This color coding is consistent throughout theprogram. Because it appears in the second row, you know that it is from the database and not fromyour log (if for example, you had worked him on another band, the call would appear on the first line,in blue).
OK, that’s probably enough about the Check window for now. These are really the only windows youneed to operate your first contest with N1MM Logger. Now let’s sit down and operate.
For the purpose of this guide, we’ll assume that you’re operating in the CQWW SSB contest. In thatcase, the Entry Window will look like this:
I’m assuming that you’re going to operate phone to start, so I have typed in USB in the call-sign field,and hit [Enter]. I have left the default frequency (20M phone) in place, but if I wanted to show anotherband, I need only type a frequency (in KHz) in that band (like 21200, for example) in the call-sign fieldand hit [Enter] to change bands.
When I’ve done these things, I then type a call-sign in the call-sign field. Even before I look at theCheck window, I see that the call sign is color-coded green. This means that it is both a new contactand a double multiplier (in this case, both the new country of Martinique and the new Zone 8). Thebeam heading is displayed below, as are the country, its zone and continent (which affects points perQSO). If I have already worked Zone 8 on this band, then the call sign will be color-coded red,signifying just a new country. If both the country and zone had been worked before, but the stationhas not, then the color code will be blue. If it is a dupe, the call sign will be coded grey, and thewarning “Dupe!” appears to the right of the entry fields.
So, you call him, and he answers. At this point, just hit [Space] to fill in the expected signal reportsand move the cursor to the Zone field. N1MM Logger uses the [Space] bar as a “smart tab”. The

N1MM Logger Quick http://www.pvrc.org/~n4zr/Quick.htm
14 of 48 10/28/2008 2:47 PM
idea is that it will skip fields you are unlikely to want to change and move immediately to the one youmay need to. Note, too, that the Zone is highlighted. This means that if you need to change it – forexample, if FM5BH really was in Zone 9 (he isn't) – you would just type “9” and the “8” would bereplaced.
Ok, but suppose he’s a wise-guy and gives you a “57” report instead. No problem – you just use the[Tab] key twice, and the cursor will be on the second digit of the received signal report, ready for youto type over. The [Tab] and [Shift]+[Tab] work just as you’d expect in Windows, moving forward orbackward one field. Here’s how it looks:
If you need to correct the call-sign, use the [Space] bar to get you quickly there and edit asnecessary. Then, once everything is as you want it (and the QSO is done), all you do is hit [Enter],and the QSO will be logged.
One thing that trips everyone up at least once is that the program checks to make sure that you haveentered everything, and that everything is correctly formatted. For example, if you accidentallyfatfinger the zone number, like "89", the program won't let you enter the QSO. This can bedisconcerting at first - you get an error message in the status line, like this:

N1MM Logger Quick http://www.pvrc.org/~n4zr/Quick.htm
15 of 48 10/28/2008 2:47 PM
f the program has blocked you from logging the QSO, just use the [Space] bar to move to theappropriate field, correct it, and hit [Enter} to log. If you absolutely can't figure out what the correctionshould be (for instance, with an ARRL section in Sweepstakes), you can hit [Ctrl]+[Alt]+[Enter] tobypass the exchange checking and log the QSO "as is." Just in case you want to put a note in thelog, when you do this a note window opens. Type whatever note you want and Hit [Enter], or just hit[Enter] to skip it and get back to the contest.
Suppose you miscopied a call sign, or he didn't really come back to your call, so you now have amistake in your log. If you need to delete the QSO altogether, just hit [Ctrl]+D. The program will askyou if you really want to move the QSO to a Deleted QSOs file. Just hit [Enter] to do so, or type N forNo.
If you need to edit the QSO, hit [Ctrl]+Q, and put the program in QuickEdit mode.
You’ll notice the words QuickEdit above the call-sign field, and that the background of all of the entryfields is now blue. You can move through the fields as before and make your corrections. Then hit[Enter] and the QSO will be corrected in the log, or else hit [Esc] to get back to normal logging modeand cancel any changes.Be careful not to leave the program in QuickEdit mode for your next QSO, or you'll screw up twoQSOs at once!

N1MM Logger Quick http://www.pvrc.org/~n4zr/Quick.htm
16 of 48 10/28/2008 2:47 PM
As you log more QSOs, you’ll note that the call-sign of your last previous QSO will appear in thespace right above the call-sign field. This area, called the Call-Frame, will be very important onceyou have interfaced the program with your radio, but for the moment it is just a reminder of who thatlast guy was.
Remember, each time you change bands, you need to enter the frequency of that band in thecall-sign field, and, if you change modes, enter that there too. For example, if you switch to40M CW, you would need to enter 7000 and then enter CW (separately) before you beginlogging QSOs on that band.
So, you’ve logged a bunch of QSOs, the contest is over, and it’s time to send in your log. Almost allcontests these days accept Cabrillo-format logs, and that’s what N1MM Logger usually provides(check contest rules for any exceptions). To export your log in Cabrillo format, go to the File Menu inthe entry window and select “Export Cabrillo to file.”
The program will first check to be sure you have the Sent Exchange you want:
If it’s OK, then click OK or [Enter]. Next you will see a standard Windows “Save-as” dialog. Bydefault, the program goes to the program directory, but I usually change that to Desktop for

N1MM Logger Quick http://www.pvrc.org/~n4zr/Quick.htm
17 of 48 10/28/2008 2:47 PM
convenience:
You can name the Cabrillo file as anything you want ([Call sign].log is suggested), and then clickSave and your Cabrillo file is automatically produced and saved.
Next, and this is important, open your Cabrillo file in Notepad and check to be sure that theinformation in the header is in accordance with the instructions for the contest. N1MM Logger tries tokeep up with Cabrillo file format changes, but nobody’s perfect, so save yourself some hassle anddouble-check. Contest categories seem to be a particularly tricky area. You also need to be verysure that you specified the Sent Exchange correctly during contest setup - one common mistake is toput the signal report in as part of the exchange.

N1MM Logger Quick http://www.pvrc.org/~n4zr/Quick.htm
18 of 48 10/28/2008 2:47 PM
Okay – that pretty well wraps up the first chapter. Don't hesitate to use the Google Help facility(“Search Help Using Google (Internet)”) to look up more information on any of these topics. It workstremendously well for looking up more details on any of the windows, or exploring any other aspect ofthe program. In the next chapter, you may need this capability a lot, because so much of interfacingis specific to a particular radio, and you really need more detail than I can provide here.
Chapter 2 – Basic Radio Control Interfacing
Regardless of whether you want to operate phone, CW or digital modes, the most useful andimportant interface is the one between your computer, N1MM Logger and your radio. Fortunately,most radios now incorporate an RS-232 serial port to enable them to swap information andcommands with the computer.
A first step is to look up your transceiver in the manual section titled Supported Radios. Assumingyou find your radio there, look for any specific settings or peculiarities that need to be addressed andmake a note of them.
Many modern laptops and a growing number of desktop computers lack both RS-232 serial portsand an LPT parallel port, having replaced both with one or more USB ports. Fortunately, once youhave purchased a USB-to-serial converter and installed the drivers for it, MM can work with your radiojust fine.
Once you have the hardware hooked up between your computer and your radio, start N1MM Loggerand open the Config menu in the Entry window. Choose Configure Ports, Telnet Address, Other. Ignore all the other stuff for now.

N1MM Logger Quick http://www.pvrc.org/~n4zr/Quick.htm
19 of 48 10/28/2008 2:47 PM
That brings up the following, rather intimidating dialog. Don’t worry, we’ll walk you through the partyou need now.

N1MM Logger Quick http://www.pvrc.org/~n4zr/Quick.htm
20 of 48 10/28/2008 2:47 PM
You may want to select SO1V if this is your first experience with N1MM. SO1V allows N1MM tocontrol VFO A in your transceiver. If you are an experienced contester and understand how tooperator in split mode (for example, working DX on 40 meter sideband) you may want to selectSO2V. It allows N1MM to simultaneously control both VFO A and VFO B in your transceiver. If youare an advanced contester, whose station is configured with TWO transceivers (one for runningcontacts and the other for searching for new multipliers), then you will want to select SO2R.
Now identify which port you have physically connected between your computer and the radio (or inthe case of USB, the virtual serial port it has created). Click the drop-down arrow under Radio, andselect your specific radio model. For this example, I’ve assumed COM3 and a Yaesu radio. Virtuallyall Kenwood models use the one common radio configuration, while Yaesu and Icom radios aregenerally designated by the specific model number - refer to the manual under "Supported Radios"for more information. Icom radios require a Radio Address (Hex Code) - see the manual for moreinformation.
Now click the "Set" button next to the port you have chosen.

N1MM Logger Quick http://www.pvrc.org/~n4zr/Quick.htm
21 of 48 10/28/2008 2:47 PM
That will bring up this dialog, with connection details. Normally, N1MM Logger chooses theparameters in the first two rows for you, and does a good job. You might want to verify them withyour radio manual, just in case. Radio/VFO number should be 1, so that your main VFO will bedisplayed in the main (first) entry window. The rest of the stuff on this dialog is not important rightnow, so just click OK to get back to the previous dialog, and then OK again to return to the EntryWindow.
If all is well (you did turn your radio on, right?), when that big multi-tabbed dialog closes and the EntryWindow reappears, the title bar of the Entry Window will display the radio’s frequency and mode. It’smagic. The “+0.00” simply means that RIT is turned on, but set to zero (no offset)
Now that you have radio control, you can do a lot of neat things, but one of the most basic is that youwill never again have to worry about accidentally logging QSOs on the wrong band or mode.
With an interfaced radio, you will find it useful to open a Bandmap window. Click Window, then selectBandmap, and the Bandmap corresponding to your entry window will be displayed.

N1MM Logger Quick http://www.pvrc.org/~n4zr/Quick.htm
22 of 48 10/28/2008 2:47 PM
In the example at left, I have filled the bandmap with spots from a packet cluster, just to illustrate howspots are displayed. The stuff in the top bar is pretty self-explanatory. The SH/DX button, whenmouse-clicked, sends that request to the cluster (which you don't know how to set up yet). Thebutton labeled “Wide” toggles filters in your radio, though you may have to set it up first (the processis explained in the manual). In any case, clicking on it switches TO the filter mode shown. The redRIT means that RIT is on, and the number left of it is the amount of offset. The black XIT means thatXIT is not selected. Turn on XIT and you’ll see it turn red.
The color-coding of spots in the Bandmap is the same as in the Entry Window, so each of those redcalls represents a new multiplier in the contest. If you want, you can mouse over a spot, and theprogram will tell you more about it, like this:
The “–635 min” tells you how long ago the spot was posted. Generally, you won’t want to keep spotsdisplayed that long, and a little later I’ll explain how to clear spots after a certain amount of time haselapsed.

N1MM Logger Quick http://www.pvrc.org/~n4zr/Quick.htm
23 of 48 10/28/2008 2:47 PM
In a busy contest, certain parts of the band can get pretty crowded with spots. Pressing the numerickeypad [+] key will zoom the bandmap in and spread the spots out, like this:
Pressing the numeric keypad [-] key will have the opposite effect. You can also zoom the bandmapusing the scroll wheel on your mouse, if it has one.
Another useful thing about the bandmap. If you single -click on a spot, your radio will automaticallybe sent to that spot. If, instead, you click on the frequency scale (anywhere within the width of thefrequency hash marks), the radio will go to that frequency. There are also keyboard shortcuts thatwill move your radio from spot to spot up and down the band. This might be a good time to look atthe Key Assignments section in the manual, to get a feel for what’s there.
When you single-click on a spot, something else useful happens – the call sign of that station iscopied to the Call-Frame of the Entry Window, like this. This is done this way so that if you discoverthat the station on that frequency isn’t OK1XJ after all, you can just type in the correct call. This doeshappen now and then with packet spots.

N1MM Logger Quick http://www.pvrc.org/~n4zr/Quick.htm
24 of 48 10/28/2008 2:47 PM
However, let’s assume it’s OK. In that case, all you have to do is call the station, get him to answeryou, and hit [Space]. Here’s what happens – the call sign is pulled down into the Call-sign field, andthe QSO is all set for logging, once you complete the exchange.
Another good thing can happen on the band-map when you complete a QSO and tune off thefrequency – the spot’s color code turns to grey, so that you know at a glance that you have workedthe station already, and won’t waste time when you come back to that frequency again.
To turn on this feature, click Config, and then, in the dropdown menu, click on the two items checked(see below). You need them both because grey spots are regarded as non-workable, and they willdisappear unless “Show non-workable spots” is checked. If you don't work a station, and tune off hisfrequency, his call sign will appear in the appropriate color to denote whether he's a new multiplier orsimply a valid QSO; either way you know to go back and work him later, if he's still there.

N1MM Logger Quick http://www.pvrc.org/~n4zr/Quick.htm
25 of 48 10/28/2008 2:47 PM
By the way, even if you never plan to use packet spots, the Bandmap is a very useful window. Asyou S&P your way up and down the band, each station you’ve worked will be marked with a greyself-spot, so you can skip by them the next time even if you have no packet spots.
You may be wondering how to move quickly up and down the bandmap, hitting only the workablespots, or those that represent multipliers. This might be a good time to introduce another very usefulsection of the Manual. N1MM Logger makes extensive use of "hot-keys" to largely or entirelyeliminate the use of the mouse during contest operations. There is a very useful section in themanual titled "Key Assignments" which explains each and every such key combination. For example,under "Active Radio/Bandmap Key Assignments" it lists:
Jump to Spots
Note: If you are operating single mode, your mode won't change when jumpingbetween spots.
Ctrl+Down Arrow - Get next spot higher in frequency.Ctrl+Up Arrow - Get next spot lower in frequency.Alt+Ctrl+Down Arrow - Get next spot higher in frequency that is a multiplier.Alt+Ctrl+Up Arrow - Get next spot lower in frequency that is a multiplier
Try these and see - with a full bandmap and these keystrokes, it is easy to work 100+ search andpounce QSOs per hour, something that used to be regarded as impossible.
As we’re finishing up this introduction to the Bandmap, it might be a good idea to offer anothergeneral hint when you’re exploring the program. Be sure to right-click on each new window (other
N1MM Logger Quick http://www.pvrc.org/~n4zr/Quick.htm
26 of 48 10/28/2008 2:47 PM
than the Entry Window), to see what options involving that window might be available to you. Each ofthese options is explained in the section of the manual dealing with that window.
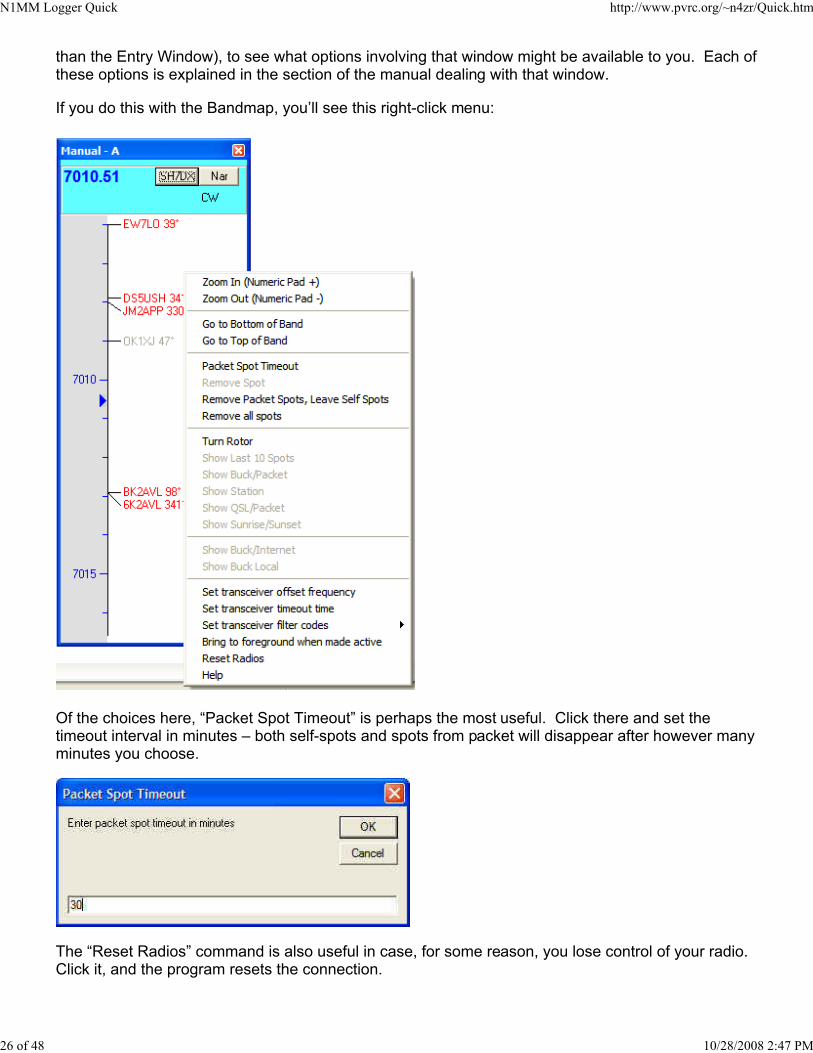
If you do this with the Bandmap, you’ll see this right-click menu:
Of the choices here, “Packet Spot Timeout” is perhaps the most useful. Click there and set thetimeout interval in minutes – both self-spots and spots from packet will disappear after however manyminutes you choose.
The “Reset Radios” command is also useful in case, for some reason, you lose control of your radio. Click it, and the program resets the connection.

N1MM Logger Quick http://www.pvrc.org/~n4zr/Quick.htm
27 of 48 10/28/2008 2:47 PM
Again, if you go to the manual, you’ll find much more exhaustive discussion of each menu option, butthat’s enough for us right now.
So really, that’s all you need to operate contests with N1MM Logger controlling your radio – the EntryWindow, the Check Window, the Log Window and the Bandmap. Of course, there are a zillion morecapabilities you’ll want to explore, beginning with the capability for sending stored messages, but Ihave to stop somewhere, at least for now.
Chapter 3 - Interfacing for Phone, CW and PTT
Of course, controlling your radio through a serial port isn't the only way to interface N1MM Loggerand your radio - in fact, long before there were computer-controllable radios, early logging softwareauthors developed several standards for CW and PTT interfacing, using either serial or LPT (printer)ports.
The use of your computer sound card to provide "canned" transmit audio in conjunction with loggingsoftware came along a little later, but since the target of this guide is new contesters, I'm going toassume that you'd like to hear about it first. Also, over the years, problems with transmit audio havebeen a leading source of questions on the reflector.
The following discussion is cribbed almost verbatim from audio trouble-shooting notes by DaveRobbins, K1TTT. If any mistakes have crept in, blame me, not him.
To begin with, make sure you close Windows Media Player, RealPlayer, Audacity, or any other soundplayback/recording program you may have open. Start N1MM Logger and open the Configure|Ports,Other tab.

N1MM Logger Quick http://www.pvrc.org/~n4zr/Quick.htm
28 of 48 10/28/2008 2:47 PM
Now select the Audio tab. As shown here, select option 1 "zero or single sound card" from thedrop-down list. Select "default" in the first "select device" list:
Now OK out to save that setting, and close N1MM Logger.
Plug your microphone directly into the microphone jack on your sound card. Plug your headset directly into its speaker output. Open the Windows Volume Control. It should come up witha set of sliders, like this:

N1MM Logger Quick http://www.pvrc.org/~n4zr/Quick.htm
29 of 48 10/28/2008 2:47 PM
Set all the sliders to mid range, and un-mute everything. You may have to go into Options|Propertiesto check the box to let you see the microphone volume control and those for other sound sources.
5. In Options|Properties, now , click the 'Recording' radio button, and make sure the microphone ischecked on the list of controls:
Now OK out. Make sure the Microphone slider is at mid-range and that there is a check in the Selectbox. If you are using a typical ham microphone, such as a Heil, and you have the "Advanced" button,click on it and select Mic Boost if that option is available, because it provides a 20 dB preamp.

N1MM Logger Quick http://www.pvrc.org/~n4zr/Quick.htm
30 of 48 10/28/2008 2:47 PM
Now, when you talk in the microphone, you should be able to hear yourself in the headset. If youcan't, then something is wrong with your settings, hardware or drivers. Try playing existing .wav filesusing the Windows Control Panel's Sounds option. Recheck volume and mute settings, check thatthe microphone is plugged into the right jack, try a different microphone, try a different headset. Getyour 8 year old kid to help. DO NOT PASS THIS POINT UNTIL YOU CAN HEAR YOURSELF!
Now open Windows Sound Recorder, which is usually found in the Accessories category in yourprogram list. DO NOT open Audacity, any of the audio tools that came with your sound card, or yourother favorite tool. Some of them play with the mixer settings and we don't want that now that theyare set.
Click the Record button in Windows Sound Recorder, and speak a few words into the microphone. You should see the green trace deflect in time with your voice. Now press Stop. Press the Playbutton and you should hear what you just said. If you don't there is something wrong with yourhardware or drivers. Check recording control settings, adjust volume, make sure the microphone isselected as the recording source, and get that 8 year old back to help again! DO NOT PASS THISPOINT UNTIL YOU CAN RECORD AND PLAY. If Windows Sound Recorder doesn't work, thenN1MM likely won't work and since N1MM is much more complicated it is harder to troubleshoot.
Now close the Windows Sound Recorder and start N1MM Logger. Put your radio in SSB mode, andmake sure that the Entry Window's title bar specifies either USB or LSB (if you don't have a radioconnected, type the appropriate mode in the callsign box and hit [Enter].
Right-click on any of the message buttons in the entry window. That will bring up this table:

N1MM Logger Quick http://www.pvrc.org/~n4zr/Quick.htm
31 of 48 10/28/2008 2:47 PM
The filenames in the table are the default filenames that are put into the table when you first installMM. Depending on how long ago you first loaded MM, the ones above may not be the same onesyou see.
The easiest way to visualize this is that rows 1-12 represent the 12 function keys in "Run" mode,while rows 13-24 represent the 12 function keys in S&P ("Search and Pounce") mode. We'll get intowhy there are two sets of function key definitions in a little while. But for the moment, let's concentrateon programming the Run F1 function key. If you click in the first box under Button Caption, you'llnotice that the "pencil" icon moves to that row, and that the cursor will be in the box. Now you canedit the button caption to whatever you want it to be. Then hit [Tab], and the cursor moves to the.WAV File column. In the example above, I'm assuming that you have a \WAV subdirectory in theN1MM program directory, and that you want to name your CQ file as I have.
One last thing - if your SSB function keys have something in the 13th row (S&P F1), temporarily usethe Edit function to delete that row, because it will just confuse things right now.
All right - now OK out, and the definition is saved.
A caution - unless you have something in both boxes in each row, the cursor will not move on to thenext row. You'll note that it looks like F5 violates that rule, but it really doesn't, because there is asingle empty space in that row, which I put there to meet the requirement.
Now watch the bottom of the Entry Window and press Ctrl+Shift+F1. You should see:

N1MM Logger Quick http://www.pvrc.org/~n4zr/Quick.htm
32 of 48 10/28/2008 2:47 PM
If you speak into the microphone at this point, whatever you say will be recorded in the file CQ.WAV. Press Ctrl+Shift+F1 again to stop the recording, and look for this report in the same place:
Now press F1. You should hear what you just recorded in the speaker. If you don't, look for an errormessage in the status bar. The most common problem affecting playback is that you recorded thefile with a different program, using a compression or other parameters that are not supported byN1MM Logger. Another common one is to be looking for a filename that is different than the one thatappears in the key definition table. For both these reasons, we suggest using the Ctrl+Shift+Fxprocess to record within N1MM Logger, at least until you get truly comfortable with audio files.
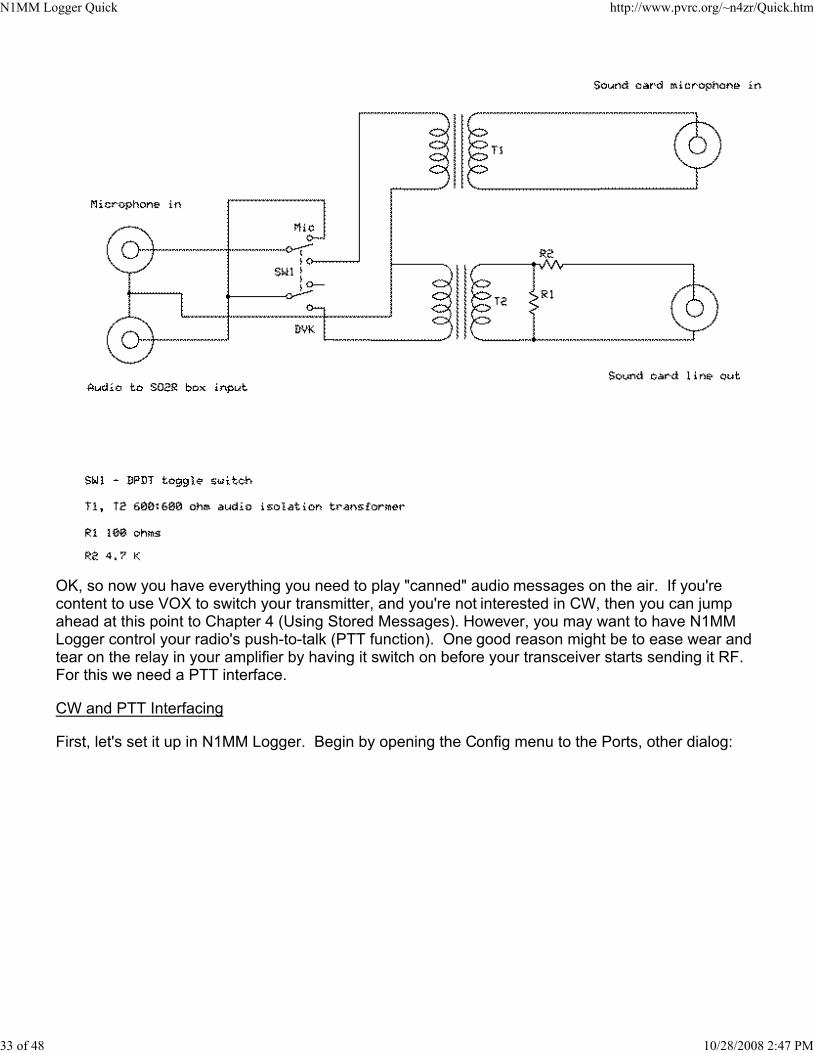
Now that you've got things working, you need to program at least the first few function keys. It's bestto follow the order in the example above, at least for F1-F8, because a little later, when we talk aboutESM (Enter Sends Messages) mode, the order is important. You will also need an interface betweenyour sound card's Line Out jack and the microphone jack on your rig. Typically, this can be as simpleas a 10:1 voltage divider (the Line Out signal level is much higher than the microphone jack canhandle) and isolation transformers (to avoid feeding AC hum into the sensitive microphone jack oneither your sound card or your rig). You can also use any of the commercial interfaces (RigBlasters,for example) designed for digital modes using AFSK.
Here's a simple schematic
N1MM Logger Quick http://www.pvrc.org/~n4zr/Quick.htm
33 of 48 10/28/2008 2:47 PM
OK, so now you have everything you need to play "canned" audio messages on the air. If you'recontent to use VOX to switch your transmitter, and you're not interested in CW, then you can jumpahead at this point to Chapter 4 (Using Stored Messages). However, you may want to have N1MMLogger control your radio's push-to-talk (PTT function). One good reason might be to ease wear andtear on the relay in your amplifier by having it switch on before your transceiver starts sending it RF. For this we need a PTT interface.
CW and PTT Interfacing
First, let's set it up in N1MM Logger. Begin by opening the Config menu to the Ports, other dialog:

N1MM Logger Quick http://www.pvrc.org/~n4zr/Quick.htm
34 of 48 10/28/2008 2:47 PM
N1MM Logger Quick http://www.pvrc.org/~n4zr/Quick.htm
35 of 48 10/28/2008 2:47 PM
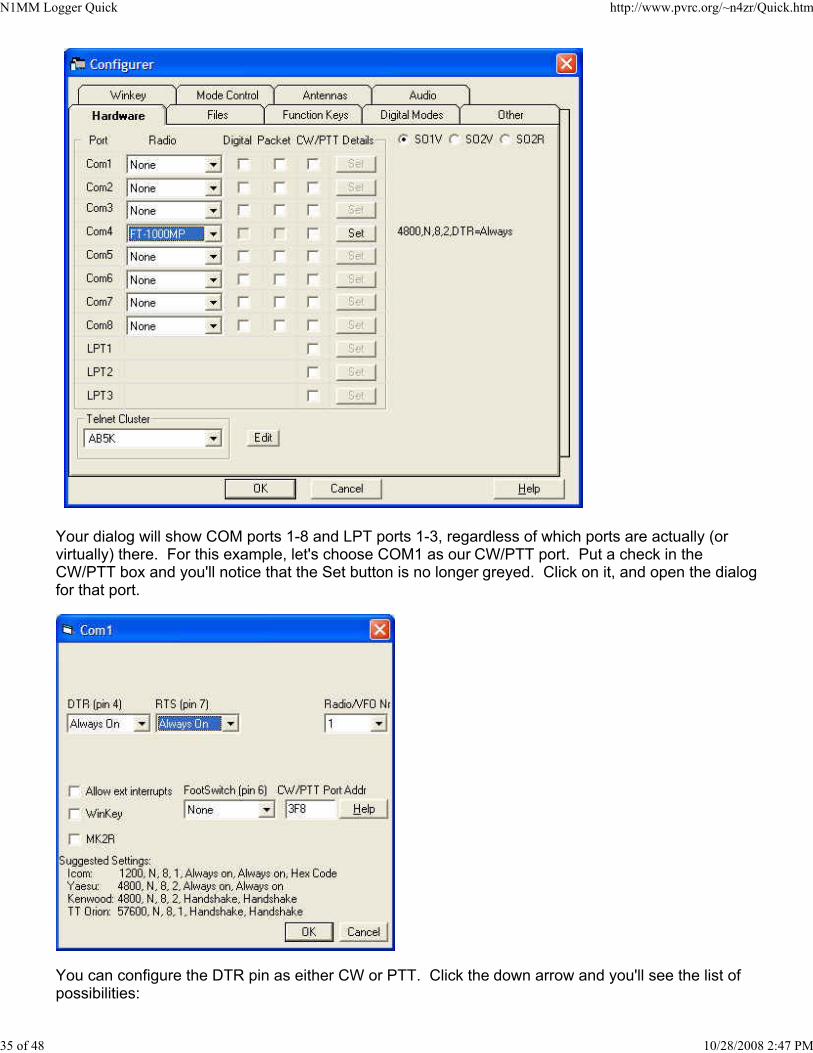
Your dialog will show COM ports 1-8 and LPT ports 1-3, regardless of which ports are actually (orvirtually) there. For this example, let's choose COM1 as our CW/PTT port. Put a check in theCW/PTT box and you'll notice that the Set button is no longer greyed. Click on it, and open the dialogfor that port.
You can configure the DTR pin as either CW or PTT. Click the down arrow and you'll see the list ofpossibilities:

N1MM Logger Quick http://www.pvrc.org/~n4zr/Quick.htm
36 of 48 10/28/2008 2:47 PM
Highlight the one you want, depending on your interface. Now do the same with the RTS pin:
You'll note that the choices are different. This is because commercial interfaces generally do not useRTS for CW, while many default to RTS for PTT. If you are building your own . Just make sure youplug the correct one into the key jack.
Set the Radio/VFO Nr to 1. The PTT Delay setting is to protect the relays in an amplifier by makingsure that the T/R relay is closed before the program starts sending CW. The default value of 30 Ms.is fine even if you don't have an amplifier.
Unless you know that you have your COM1 at a non-standard memory address, assume that N1MMknows best and accept the default address it suggests. If it is a USB virtual port, this setting doesn'tmatter anyway.
OK, now to interface to the rig. The very simplest interface imaginable will work just fine for either theCW or PTT functions with any modern radio; again, there are many commercial options, but here'sthe Radio Shack parts solution:

N1MM Logger Quick http://www.pvrc.org/~n4zr/Quick.htm
37 of 48 10/28/2008 2:47 PM
CW Messages
From the Tools menu, select Change CW/SSB/Digital Message Buttons, and then Change CWButtons.
Now this dialog appears:

N1MM Logger Quick http://www.pvrc.org/~n4zr/Quick.htm
38 of 48 10/28/2008 2:47 PM
Again, depending on when you downloaded N1MM Logger, your table may have various messagesalready in it. No matter - just click on Edit and delete rows until you get all the way back to the emptytable above.
As you discovered with voice messages, the database table editor is a little quirky, so let's walkthrough the process for F1. Click in the first box under "Button Caption", next to the cute little drawingof a pencil. Type a caption, for example F1, and hit [Tab]. Instead of jumping to the next box, theprogram highlights what you just entered, to give you a chance to change it. Hit [Tab] again and thecursor finally moves to the first box under "CW Message". Now type a message that you want tosend frequently, such as a CQ, like this:

N1MM Logger Quick http://www.pvrc.org/~n4zr/Quick.htm
39 of 48 10/28/2008 2:47 PM
OK, what's that asterisk (*)? This is the first and one of the most useful Macros. It denotes yourcallsign. There are two types of macros, text macros and action macros - text macros substitute astring of text for the macro, while action macros perform some program action. Both are often used incombination with regular text in a message, as shown here - when you press the function key or clickthe on-screen F1 button, the program will send CQ TEST N4ZR N4ZR TEST (substituting my call forthe asterisk).
There's a table of the various sorts of Macros in the chapter by that name in the manual, but for nowlet's go on. Hit [Tab} twice again, and this happens:

N1MM Logger Quick http://www.pvrc.org/~n4zr/Quick.htm
40 of 48 10/28/2008 2:47 PM
The "pencil" icon has moved to the second row, and your cursor is there. Conventionally, F2 is usedfor your contest exchange, so let's fill one in:
{EXCH} is a text macro that substitutes whatever you put in the Sent Exchange part of your contestsetup. Say, for example, we were setting up for a contest where the exchange is signal report, yourname and your state. When I set up the contest, I put PETE WV in the Sent Exchange. Now when Ipress or click F2, the program will send 5NN PETE WV.

N1MM Logger Quick http://www.pvrc.org/~n4zr/Quick.htm
41 of 48 10/28/2008 2:47 PM
A couple of fine points - you might think of putting the 5NN in your sent exchange - after all,everyone's 599, right? Well, don't, because it will screw up your Cabrillo log. Just resign yourself toputting 5NN (or 599, if you insist) anywhere you want it sent. Also, most macros are in the form of{WORD}, where "word" is the macro. The curly brackets are necessary so that the program knowsit's time to substitute something or take some action.
Two messages will do for right now, so OK out, and get back to the Entry window.
From now on, if you want to change the content of any message buttons, there's a shortcut - justright-click in the area of the buttons, and the table we just left will reappear.
OK - you've hooked up your interface, so now you're ready to send some canned CW. As I saidabove, you can either hit the function key F1, or click on the F1 button. Either way, the program willswitch your radio from Receive to Transmit (assuming you have PTT connected - you can also useVOX or break-in, of course) send the message, and then go back to Receive again.
There are two easy ways to adjust the speed of your CW - either click the up and down arrows next tothe CW speed box (where it says "30" in the picture above), or press [Page Up] or [Page Down], toincrease or decrease speed in 2 word per minute increments. If you hit the wrong key or button, noproblem - hit the [Esc] key to stop sending immediately.
If you want to send CW manually, the easiest way is to parallel a keyer with the computer CW at thetransceiver's key jack. Alternatively, hit [Ctrl + K], and a CW window appears:
Type the CW you want, and hit [Enter] when you're done. As soon as you begin typing, the programbegins sending; you can type ahead, and the program will finish sending the CW before the windowcloses.
Chapter 4 - Using Stored Messages in Contests
Now the real fun begins. You have interfaced your radio to the program, so MM knows what bandand mode you're using. You can send "canned" voice messages to your radio, as well as CW, andyou can control its PTT.
So now it's time to put all these bells and whistles to work. There are several ways to do this,depending on how much you want to automate the process. The details are the same for eitherphone or CW messages, so let's look at the possibilities.

N1MM Logger Quick http://www.pvrc.org/~n4zr/Quick.htm
42 of 48 10/28/2008 2:47 PM
First, let's reopen the voice message table, by right-clicking on the message buttons while in USB orLSB.
If you don't already have all of these messages, use the Ctrl+Shift+Fx process to record them, andthen OK out.
Now open the CW message table.

N1MM Logger Quick http://www.pvrc.org/~n4zr/Quick.htm
43 of 48 10/28/2008 2:47 PM
You need to load CW messages corresponding to the phone list above For Function keys 1-8. Here'swhat it should look like when you finish.
There are 4 main ways you can use the stored messages, listed here in ascending order of speedand convenience.
One key at a time- press a function key when you want to send the associated message. Use the Space bar to moveyour cursor. When you have everything filled in, press [Enter], and the QSO will be logged. Done thisway, a typical Run (CQ) QSO would look like this:
F1 (CQ)Station answers - copy call in callsign boxSay his callsign (phone) or press F5 to send it (CW)Press F2 to send the exchange (either a stored voice message or CW)Press [Space] to move the cursor to the exchange fieldType in the received exchangePress F3 to send your acknowledgementPress [Enter] to log the QSO
Semi-CT Style- Enter the callsign of the station calling you. Press the [Ins] key to send his call and your exchange(CW), or speak his call and then press [Ins]. Once you have copied his exchange, press F3 (TU) and[Enter to Log]. If you are calling other stations (Search and Pounce, or S&P), you would first pressF4 to send your call, and when the station responds follow the sequence as above.
Early N1MM style - Enter the callsign of the station calling you. Press the [;] key to send his call andyour exchange. Copy his exchange and press the ['] key (right next to it on US keyboards). Theprogram sends the F3 (TU) message and logs the QSO. In S&P, you would hit F4 first, then [;], andthen ['].

N1MM Logger Quick http://www.pvrc.org/~n4zr/Quick.htm
44 of 48 10/28/2008 2:47 PM
This saves some keystrokes, but there's an easier way. A decade ago, N6TR developed the idea ofmaking TR Log "modal." By that, he meant that the program would behave differently depending onwhether you were in Run or S&P mode. Making this distinction let him massively simplify andshorten the sequence of keystrokes required to complete a QSO.
N1MM Logger has now evolved N6TR's invention into what is called Enter Sends Messages, or ESM for short.
The first step is to turn it on. Open the Config menu in the Entry Window, and select ESM
Now close the menu and enter any call in the entry window. We're assuming that you are doing S&P.

N1MM Logger Quick http://www.pvrc.org/~n4zr/Quick.htm
45 of 48 10/28/2008 2:47 PM
What's different? Take a look at the F4 button. The highlight means that if you press [Enter] at thispoint, the F4 message will be sent (which is what you want - your call). Press [Enter], your call issent, but the cursor remains in the callsign field, and F4 is still highlighted. If he doesn't answer thefirst time, just press [Enter] again. If he answers you, hit [Space], and look!
The cursor has moved to the Exchange box, and now F2 is highlighted. That means that the nexttime you hit [Enter], the program sends F2 and logs the QSO.
So instead of an 8 step process to work an S&P QSO, you have either 3 or 4:
Enter the callsignPress[Enter](optional) If he doesn't answer, press [Enter] when it's time to call him again; if he does, press[Space] and copy his exchangePress [Enter] again to send your exchange to him and log the QSO.
But suppose you're Running (Calling CQ)? The first thing to do is tell the program. You do that bychecking the box next to the word "Running", either with your mouse or by hitting [Alt]+U. Now yourEntry Window looks a bit different:

N1MM Logger Quick http://www.pvrc.org/~n4zr/Quick.htm
46 of 48 10/28/2008 2:47 PM
Note the highlight is now on F1, because the first thing in most Run QSOs is a CQ. Press [Enter] andthe program will send F1.
Now someone answers. Type in his callsign and the window changes.
You're starting to get the hang of this - the highlights mean that when you hit [Enter] the program willsend F5 followed by F2 (on CW - on phone you would speak the callsign and then press [Enter] tosend your exchange).
Once you have done that, the window changes again.

N1MM Logger Quick http://www.pvrc.org/~n4zr/Quick.htm
47 of 48 10/28/2008 2:47 PM
Now the highlights tell you that you have copied a legitimate exchange (in this case the program hassupplied it from the callsign, and that the next [Enter] will send your F3 message and log the QSO.
So, type a callsign, hit [Enter] 3 times, and you've logged a QSO. Pretty slick!
Now suppose you're like me and you fat-finger copying the exchange, so that you have nonsense inthe Exchange box, like this. In that case, the program reminds you:
If you hit [Enter] with an incorrect exchange, the program will send the F8 message and request arepeat. Alternatively, if you see your mistake and correct it, the screen changes again to show the"F3 and Log It" highlights. Just press [Enter], the program sends the F3 message, logs the QSO, andyou're done.
Once you've used ESM, I predict you'll never go back to the old way again.
Two further refinements, and then this chapter is done. Open the Config menu again, and then openthe "Configure Ports, Telnet Address, Other" sub-menu. Click on the Function Keys tab:

N1MM Logger Quick http://www.pvrc.org/~n4zr/Quick.htm
48 of 48 10/28/2008 2:47 PM
In the left-hand column, note that I have checked "Send Corrected Call." This neat feature, in Runmode, keeps track of whether you have changed the callsign in the callsign box. For example, sayyou only copied "DL6A" at first, and filled in the rest later. Eventually, you copy DL6ABC, and whenyou press Enter to send the F3 (TU message), on CW the program sends "DL6ABC TU ..." Onphone, you'll need to supply the correction.
In the right-hand column, the third checkbox is cumbersomely titled "ESM only sends your call oncein S&P, then ready to copy received exchange." In shorthand, we call this the "Big Gun switch." Ifyou nearly always get stations you call the first time, you can save a keystroke by having the cursoradvance automatically to the exchange box after the first time you call. If you often need to callagain, don't check it. If you have checked it, and need to call a station more than once, you just press[F4], regardless of where the cursor is.
A caution - don't change the "key mappings" (below the red type) unless you absolutely knowwhat you're doing - it can make a horrible hash out of ESM.