name: ________________________________ - … · web viewyou can use digital pictures as background...
TRANSCRIPT

PowerPoint Tutorial Day 2
PicturesDigital Pictures – You can use digital pictures as background objects for your slides. Digital pictures that you take can also be used to help show experiment set-up, data collection techniques, group members, or experiment results. Digital images that are used in PowerPoint slides should have a file size of 100kb or smaller. Be very careful with picture file size, so you don’t create a huge PowerPoint. Large files are slower to load, and don’t fit on a floppy disk.
There are many sites that allow educational use of photographs, and other images. Again, make sure to reduce the file size if it is over 100kb. Directions on resizing pictures will come later, when you are managing your experiment pictures. For any image you obtain online, you must credit the source.
To insert a digital picture as a background:1. Click on Insert Pictures From File.
2. Browse your files to find your picture and select it.3. Drag your picture and resize it to exactly fit the slide. 4. Right click on the picture and select “Format Picture”.5. Click on the triangle next to “Automatic” (Image Control: Color) and select Washout. This
will give you a starting point for a faded out image. 6. Adjust the brightness and contrast until you are happy with the coloring of the faded image.
Click preview to view the adjustments. Click OK to accept it. Note: You can also adjust brightness and contrast by % increments.
7. Right click on the picture, and select Order Send to Back.
To insert digital pictures as a background for ALL slides:1. Go to the Slide Master (View Master Slide Master) and follow the same steps
described above.
Click here for the dropdown menu.
Adjust brightness and contrast

Open a new presentation and use the default (blank white) template. On the title slide, insert the picture file “PlantExp075”. You will find this picture in the Tutorial Day 2 folder. Resize the picture to fit the whole slide and set it to a brightness of 75% and a contrast of 25%. Send the picture to the back. In the textboxes provided, type “PowerPoint Tutorial, Day 2, your name”. To the right is a sample of the slide.
ClipArt Images and Slide LayoutsAnytime you can represent your ideas in a creative visual format, you provide the audience with an image to hang the information you are telling them. You can also use clipart to design your own templates, using Slide Master.
To insert clipart: 1. Select Insert Picture ClipArt. Find your image from the immediate collection OR go
to Clips Online for a larger selection. Click on the image and select to insert it.
Using the slide layout to help insert pictures: 1. Select the slide layout that has a picture of a cartoon person in it. 2. Follow the directions above for inserting pictures OR drag a picture into this box. Open a
small window with your desired image in it – keep the PowerPoint slide visible in the background. Click on the image, continue to hold the mouse button down and drag your image onto your PowerPoint slide. Release to drop the image into the box. This is an easier and faster way to add pictures to slides.
Insert a new blank slide and select the layout with the cartoon person on the left. Insert the
Small window displaying desired picture.
Click on your picture and hold the mouse button down. Drag the picture and drop it onto your slide.
Note: If your picture doesn’t fall into the box, click-hold-drag it and drop it into the picture box on your slide. The picture will then automatically be resized.

bean picture from the file “PlantExp083”. On the title type “Phototropism” and make it bold. In the top right corner, insert a ClipArt image of a sun (any sun is OK). In the text box type:
Plant movement Leaves face the sun Growth towards light
Make the text bold with font 32 pt.
Getting Pictures OnlineIf the picture you use is not your own, you must cite your source. Copy the http address and paste in a small text at the bottom of the image. The source should be readable up close, but not by the audience. Use a font size of 8-10 pt.
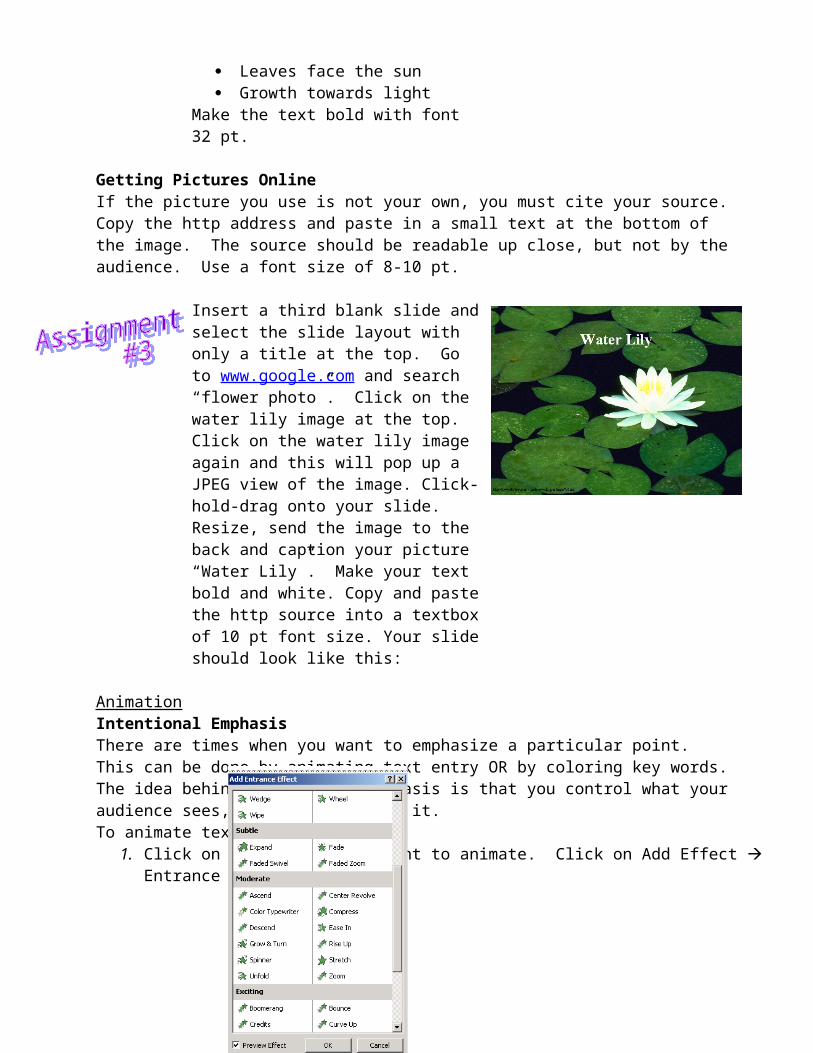
Insert a third blank slide and select the slide layout with only a title at the top. Go to www.google.com and search “flower photo”. Click on the water lily image at the top. Click on the water lily image again and this will pop up a JPEG view of the image. Click-hold-drag onto your slide. Resize, send the image to the back and caption your picture “Water Lily”. Make your text bold and white. Copy and paste the http source into a textbox of 10 pt font size. Your slide should look like this:
AnimationIntentional EmphasisThere are times when you want to emphasize a particular point. This can be done by animating text entry OR by coloring key words. The idea behind intentional emphasis is that you control what your audience sees, and when they see it. To animate text:
1. Click on the textbox you want to animate. Click on Add Effect Entrance select method.
Grouping Features
There are a lot of effects to choose from!
Make sure the movement isn’t too slow, or too fast causing the animation to distract or annoy your audience.
Select from the popular list, or go to “More Effects” for the complete list.
There are times when you want several separate items to appear at the same time. You can do this by grouping objects. You can have a lot of control over your animations when you master the art of grouping!
To group objects: 1. Hold down the Shift key and click on all the items you want to group together. Right click
on one of these items and select Grouping Group. 2. To make a change to any object in a group, you need to ungroup it. Right click on the
group and select Grouping Ungroup. After the change is made, you can the regroup by again right clicking on any of the objects and select Grouping Regroup.
Text Motion PathOccasionally you may want to animate a word or phrase giving it a motion path to add extra emphasis to that concept. Its fun, but be careful to use this animation appropriately, otherwise it could be distracting instead of helpful.
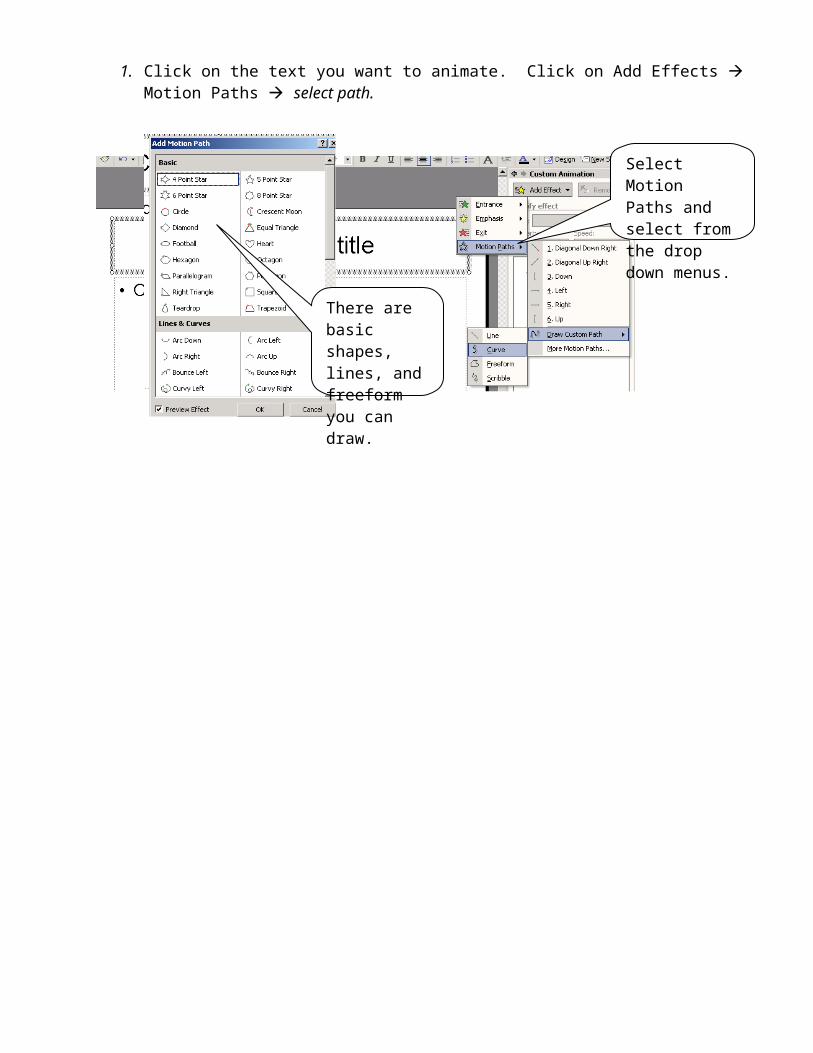
To give text a motion path:1. Click on the text you want to animate. Click on Add Effects Motion Paths select path.
Select Motion Paths and select from the drop down menus.
There are basic shapes, lines, and freeform you can draw.

Open the PPT Day 2 Tutorial Slides file (read-only is OK). Copy all three slides and paste them into your PowerPoint (slides 4,5,6). Use the animation directions described above to animate each slide as indicated in the callout captions.
Slide 4
Slide 5
Slide 6
Group the “Physiologists…text” with the experiment image.Animate this group to fly in from the left.
Make the bold words (physiology, depends on, anatomy) red.Animate this textbox to wipe to the right.
The slide should appear with the title, the two bullets of text, and skull.
Animate this text so that it is appealing.not too slow…not too fast…
Group the objects “Food” and “Oxygen” together.Animate so that each word or group appears in a different way. You will have four WordArt animations.
The slide should appear with the title, “Anatomists…” text, and images of the magnifying glass and bones only. You will need to un-animate some features to do this.
The slide should appear with the picture, numbers and question only.
Animate this text so it appears after 3 seconds.Create a motion path for this word so that it moves around the slide after 2 more seconds.
Again, save your file under your folder. Then Save As to submit it under SWAP Ms. Wing Day 2 Tutorial your name day 2. Print out a Handout with 6 slides on one sheet to hand in.