naneye gs usb3 evaluation kit - awaiba.com gs usb3 evaluationkit_v1.0.1.pdf · naneye gs usb3...
TRANSCRIPT
NanEye GS USB3 Evaluation Kit
NanEye GS
USB3 Evaluation Kitwww.awaiba.com
Revision History:
Version Date Modifications Author
1.0.0 20/03/15 Document creation Fátima Gouveia
1.0.1 19/05/15 Updated Document Fátima Gouveia
DATE: 19/05/15 Version 1.0.1 PAGE: 2/16
NanEye GS
USB3 Evaluation Kitwww.awaiba.com
Table of Contents 1 Overview ........................................................................................................................................................................5
2 USB3 Evaluation Board...................................................................................................................................................6
3 Operating Instructions.......................................................................................................................................................8
3.1 Recommended Equipment ........................................................................................................................................8
3.2 Basic operational instructions ....................................................................................................................................8
4 Evaluation Software..........................................................................................................................................................9
5 Troubleshooting..............................................................................................................................................................10
5.1 How to Install Awaiba Viewer..................................................................................................................................10
5.2 How to Start Awaiba Viewer ...................................................................................................................................10
5.3 How to Use NanEye GS Awaiba Viewer ..............................................................................................................11
5.4 How to Debug USB3 board ...................................................................................................................................11
5.4.1 NanEye GS.......................................................................................................................................................11
5.4.2 NanEye GS Stereo ...........................................................................................................................................13
DATE: 19/05/15 Version 1.0.1 PAGE: 3/16

NanEye GS
USB3 Evaluation Kitwww.awaiba.com
Index of Tables
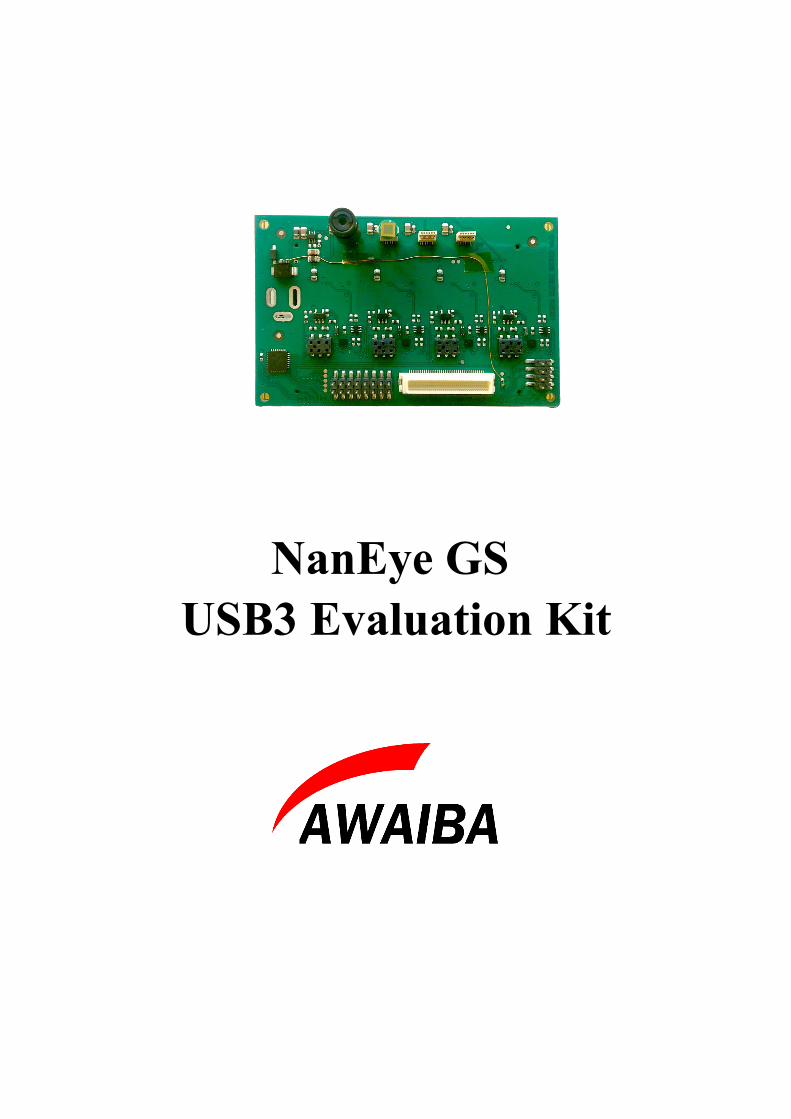
Index of FiguresFigure 1: NanEye GS Evaluation Kit....................................................................................................................................5
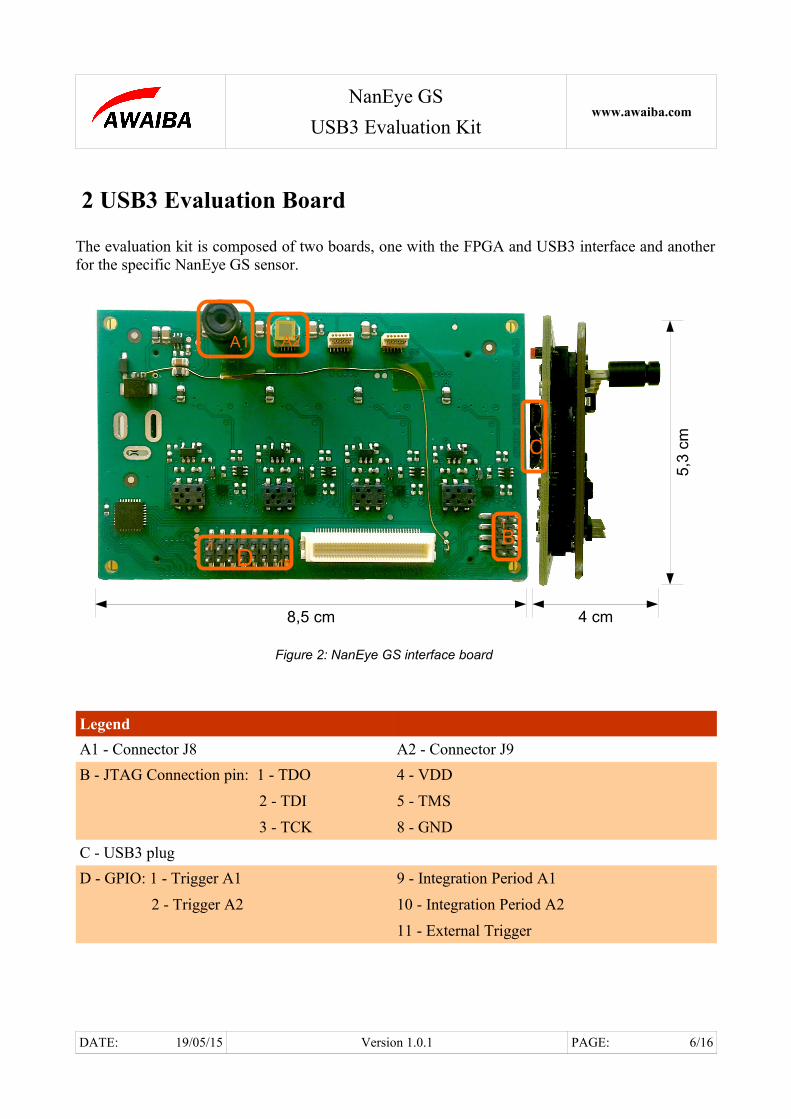
Figure 2: NanEye GS interface board...................................................................................................................................6
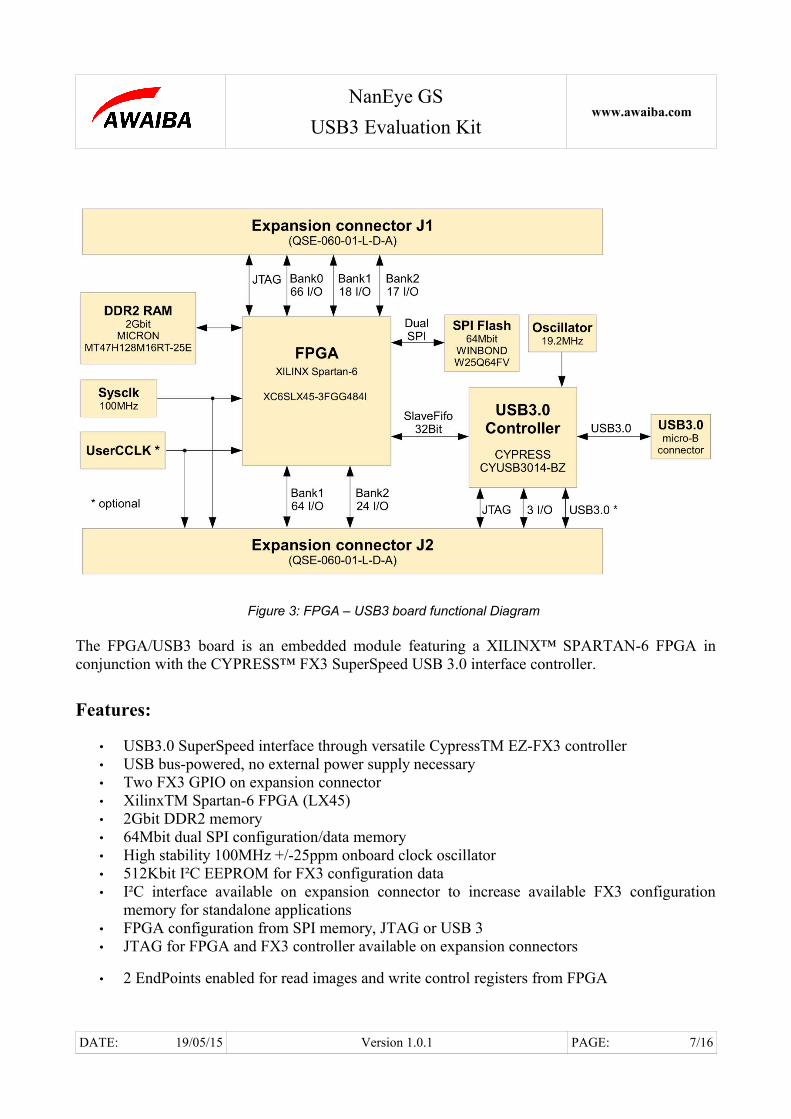
Figure 3: FPGA – USB3 board functional Diagram ............................................................................................................7
Figure 4: Start the Viewer with the sensor connected on the J8 connector........................................................................10
Figure 5: FPGA Configuration for NanEye GS..................................................................................................................12
Figure6: Orion USB3 Endpoints list...................................................................................................................................12
Figure 7: Streamer example data from endpoint 0x81........................................................................................................13
Figure 8: FPGA configuration for NanEye GS Stereo.......................................................................................................14
Figure 9: Orion USB3 Endpoints list..................................................................................................................................14
Figure 10: Streamer example data from endpoint 0x81......................................................................................................15
DATE: 19/05/15 Version 1.0.1 PAGE: 4/16

NanEye GS
USB3 Evaluation Kitwww.awaiba.com
1 Overview
The NanEye GS is a small form factor high sensitivity global shutter sensor with external triggerproperties and frame rate up to 100Fps. The sensors data Interface provides a bit serial LVDS datastream easy to receive in standard FPGA’s. The device is directly mounted on the interface board.
The supplied viewer software allows to display the images from the sensor on a screen and alsomanipulate the sensor registers.
DATE: 19/05/15 Version 1.0.1 PAGE: 5/16
Figure 1: NanEye GS Evaluation Kit
NanEye GS
USB3 Evaluation Kitwww.awaiba.com
2 USB3 Evaluation Board
The evaluation kit is composed of two boards, one with the FPGA and USB3 interface and anotherfor the specific NanEye GS sensor.
Legend
A1 - Connector J8 A2 - Connector J9
B - JTAG Connection pin: 1 - TDO
2 - TDI
3 - TCK
4 - VDD
5 - TMS
8 - GND
C - USB3 plug
D - GPIO: 1 - Trigger A1
2 - Trigger A2
9 - Integration Period A1
10 - Integration Period A2
11 - External Trigger
DATE: 19/05/15 Version 1.0.1 PAGE: 6/16
Figure 2: NanEye GS interface board
8,5 cm 4 cm
5,3
cm
A1 A2
B
C
D1
16
1
NanEye GS
USB3 Evaluation Kitwww.awaiba.com
The FPGA/USB3 board is an embedded module featuring a XILINX™ SPARTAN-6 FPGA inconjunction with the CYPRESS™ FX3 SuperSpeed USB 3.0 interface controller.
Features:
• USB3.0 SuperSpeed interface through versatile CypressTM EZ-FX3 controller • USB bus-powered, no external power supply necessary • Two FX3 GPIO on expansion connector • XilinxTM Spartan-6 FPGA (LX45) • 2Gbit DDR2 memory • 64Mbit dual SPI configuration/data memory • High stability 100MHz +/-25ppm onboard clock oscillator • 512Kbit I²C EEPROM for FX3 configuration data • I²C interface available on expansion connector to increase available FX3 configuration
memory for standalone applications • FPGA configuration from SPI memory, JTAG or USB 3 • JTAG for FPGA and FX3 controller available on expansion connectors
• 2 EndPoints enabled for read images and write control registers from FPGA
DATE: 19/05/15 Version 1.0.1 PAGE: 7/16
Figure 3: FPGA – USB3 board functional Diagram
NanEye GS
USB3 Evaluation Kitwww.awaiba.com
3 Operating Instructions
3.1 Recommended Equipment
– Oscilloscope– Desktop PC, Portable– USB3 – Signal Generator
3.2 Basic operational instructions
When the USB3 board is connected to a PC it is reconsigned as Cypress FX3 USB BootLoaderDevice, on Device Manager.
When you install the Awaiba Viewer software the Cypress drivers are installed.
When you run the program (as shown in figure 4, for instance) the firmware is loaded to the RAMand the board is recognised as Cypress FX3 USB StreamerExample Device. Also the bit file isprogrammed in the FPGA.
DATE: 19/05/15 Version 1.0.1 PAGE: 8/16
NanEye GS
USB3 Evaluation Kitwww.awaiba.com
4 Evaluation Software
Along with the USB3 board to evaluate NanEye GS sensors, a windows software is provided todisplay and store images from the sensor.
The Viewer Software has the following features:
• Possibility to save directly to .avi streams of the processed image, or save the raw data in theawvideo format
• Possibility to save snapshots in PNG and in PGM (saving the 10 bit raw data)• Possibility to display the pixel graphic • Pre-scaler, Dynamic Gain, Offset and Exposure switching• Internal or External trigger for NanEye GS• Possibility to acquire black and white gain masks • Possibility to adjust white balance automatically
This software also contains some Image processing algorithms:
• Colour Reconstruction • Adjust colour saturation• Gamma Correction (only for colour version)• Adjust brightness
An API interface to the data stream is available for easy integration in existing display systems andevaluation of image processing algorithms.
The most recent version of the software and manuals are available under: http://www.awaiba.com/software/
DATE: 19/05/15 Version 1.0.1 PAGE: 9/16
NanEye GS
USB3 Evaluation Kitwww.awaiba.com
5 Troubleshooting
5.1 How to Install Awaiba Viewer
Please take a look into page 10, section 3, on Awaiba Viewer Quick Start file. Please find herehttp://www.awaiba.com/software/ the file.
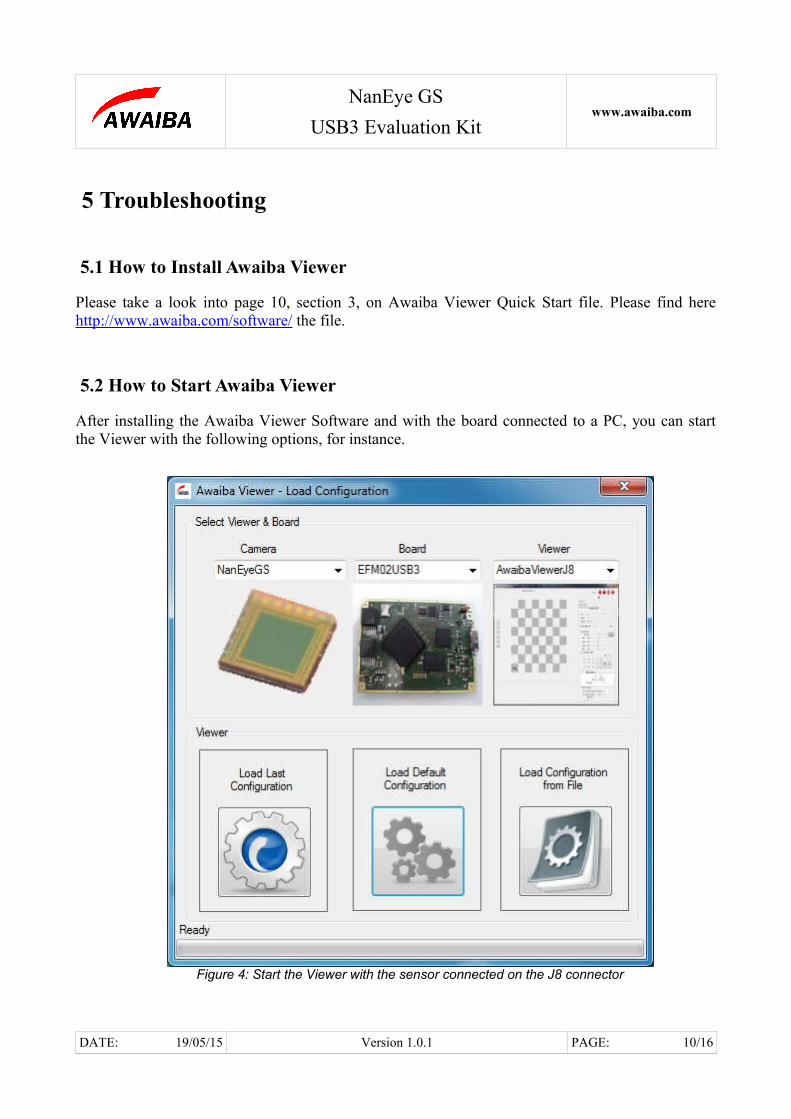
5.2 How to Start Awaiba Viewer
After installing the Awaiba Viewer Software and with the board connected to a PC, you can startthe Viewer with the following options, for instance.
DATE: 19/05/15 Version 1.0.1 PAGE: 10/16
Figure 4: Start the Viewer with the sensor connected on the J8 connector

NanEye GS
USB3 Evaluation Kitwww.awaiba.com
5.3 How to Use NanEye GS Awaiba Viewer
Please take a look into the NanEye GS - Awaiba Viewer file. Please findherehttp://www.awaiba.com/software/ the file.
To enable the high dynamic range mode please take a look into page 10, section 2.2, on NanEyeGS - Awaiba Viewer file.
5.4 How to Debug USB3 board
If you can not receive images, this section can help you to debug the board.
When the viewer is installed, inside the application/debug/USB3 folder, there is several programsthat can be used to debug the user's problem.
5.4.1 NanEye GS
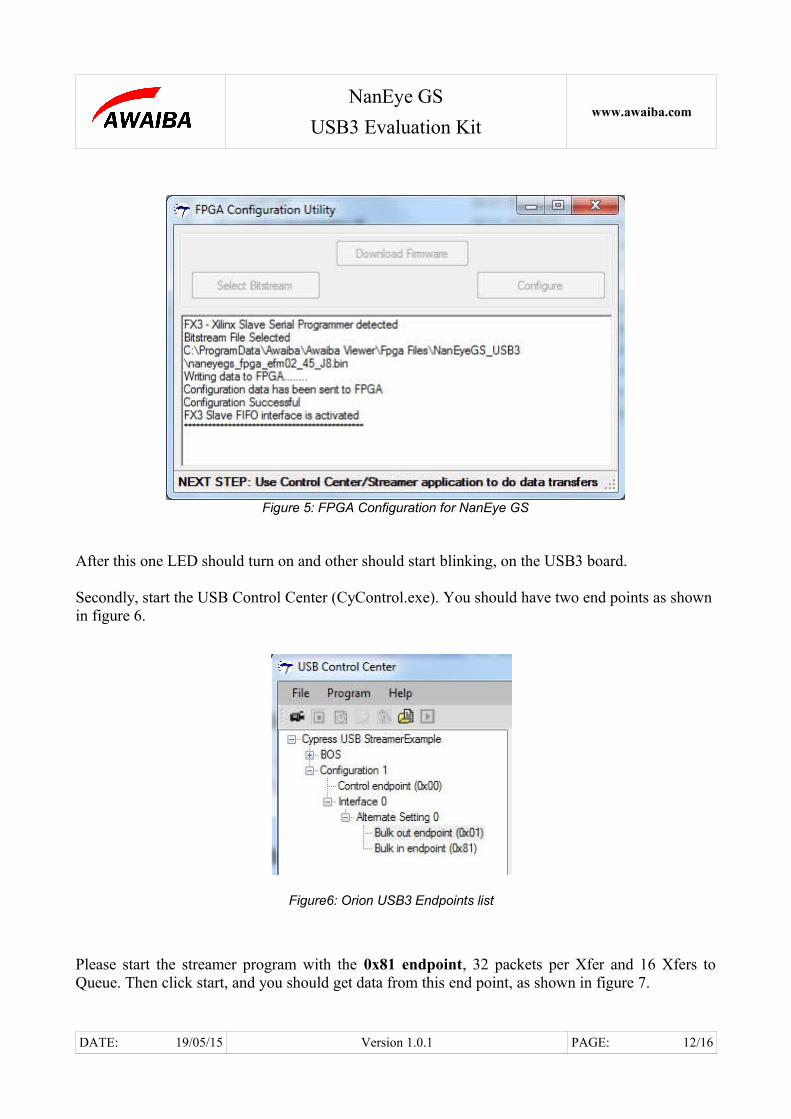
First, you should start the Template. Following the instructions on that window you shoulddownload the firmware and then program the FPGA. You can find the bit file at\ProgramData\Awaiba\Awaiba Viewer\Fpga Files\NanEyeGS_USB3.
When this task is completed you should be able to have the information as in the image 5.
DATE: 19/05/15 Version 1.0.1 PAGE: 11/16
NanEye GS
USB3 Evaluation Kitwww.awaiba.com
After this one LED should turn on and other should start blinking, on the USB3 board.
Secondly, start the USB Control Center (CyControl.exe). You should have two end points as shown in figure 6.
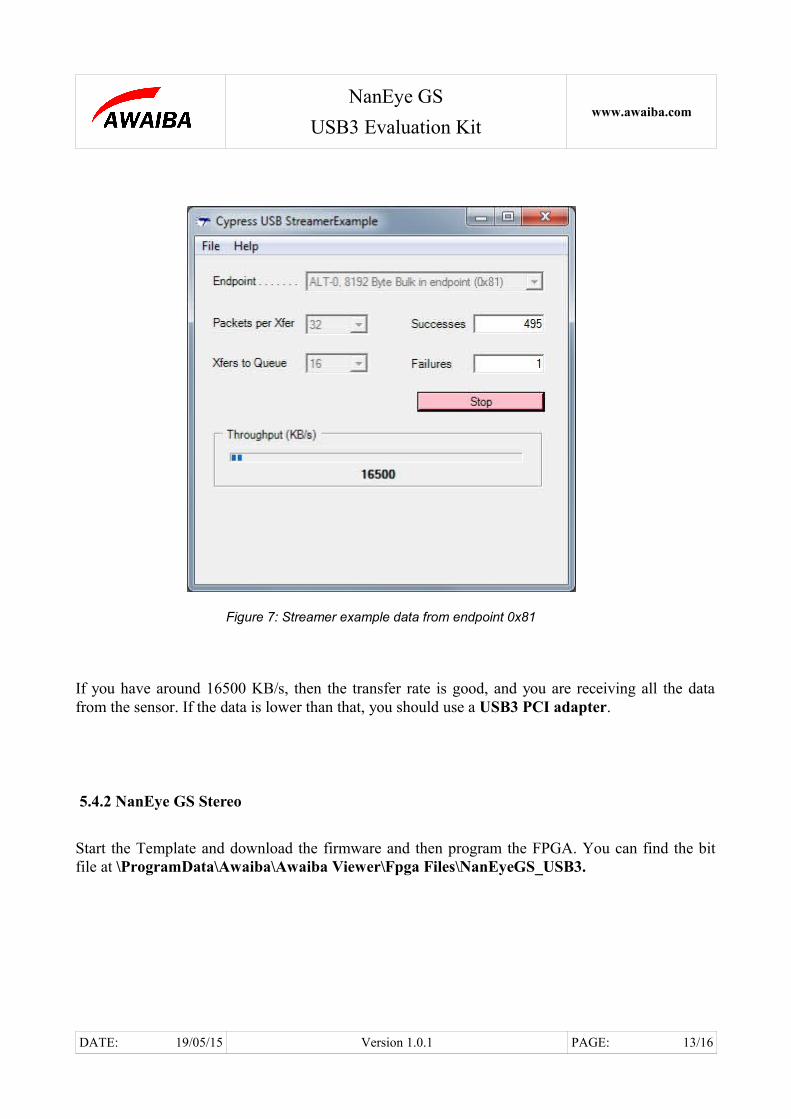
Please start the streamer program with the 0x81 endpoint, 32 packets per Xfer and 16 Xfers toQueue. Then click start, and you should get data from this end point, as shown in figure 7.
DATE: 19/05/15 Version 1.0.1 PAGE: 12/16
Figure6: Orion USB3 Endpoints list
Figure 5: FPGA Configuration for NanEye GS
NanEye GS
USB3 Evaluation Kitwww.awaiba.com
If you have around 16500 KB/s, then the transfer rate is good, and you are receiving all the datafrom the sensor. If the data is lower than that, you should use a USB3 PCI adapter.
5.4.2 NanEye GS Stereo
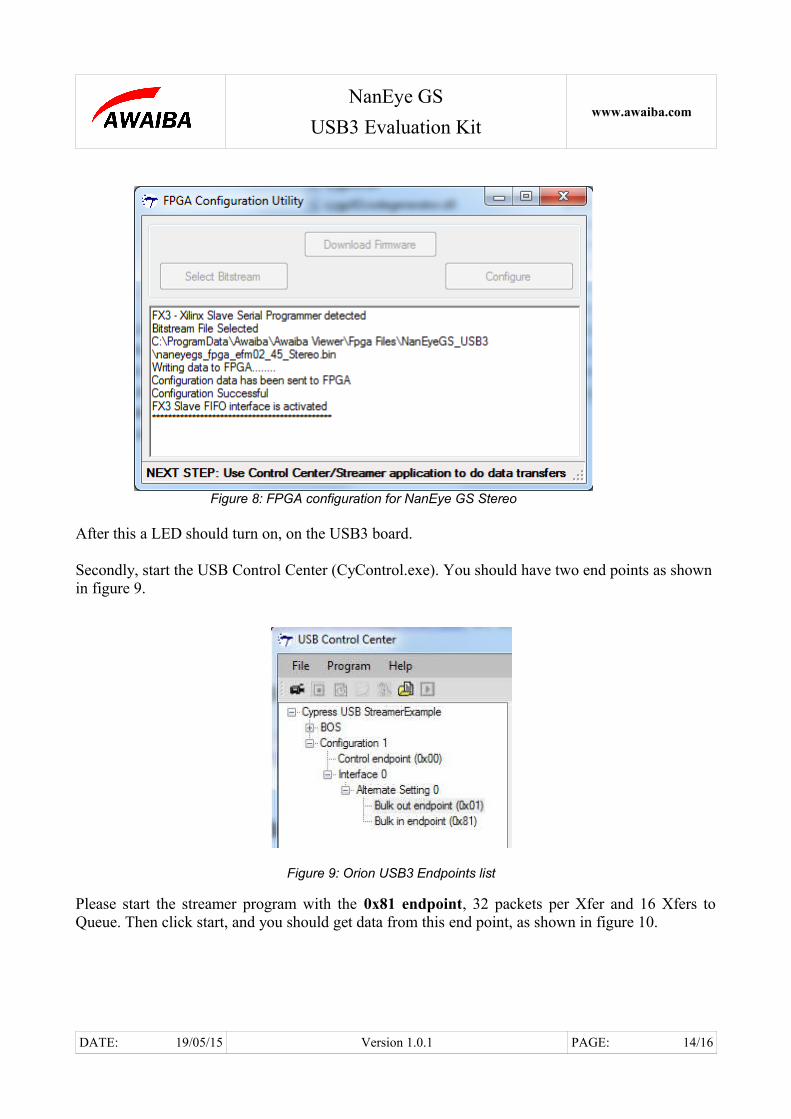
Start the Template and download the firmware and then program the FPGA. You can find the bitfile at \ProgramData\Awaiba\Awaiba Viewer\Fpga Files\NanEyeGS_USB3.
DATE: 19/05/15 Version 1.0.1 PAGE: 13/16
Figure 7: Streamer example data from endpoint 0x81
NanEye GS
USB3 Evaluation Kitwww.awaiba.com
After this a LED should turn on, on the USB3 board.
Secondly, start the USB Control Center (CyControl.exe). You should have two end points as shown in figure 9.
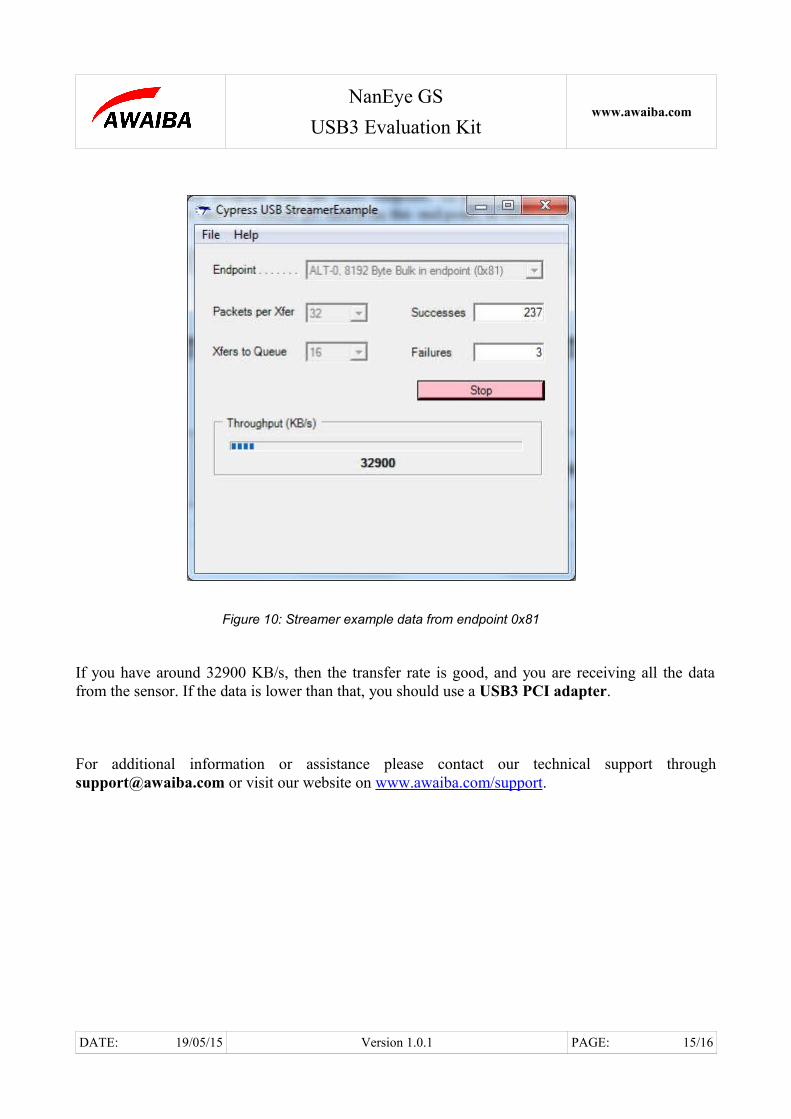
Please start the streamer program with the 0x81 endpoint, 32 packets per Xfer and 16 Xfers toQueue. Then click start, and you should get data from this end point, as shown in figure 10.
DATE: 19/05/15 Version 1.0.1 PAGE: 14/16
Figure 9: Orion USB3 Endpoints list
Figure 8: FPGA configuration for NanEye GS Stereo
NanEye GS
USB3 Evaluation Kitwww.awaiba.com
If you have around 32900 KB/s, then the transfer rate is good, and you are receiving all the datafrom the sensor. If the data is lower than that, you should use a USB3 PCI adapter.
For additional information or assistance please contact our technical support [email protected] or visit our website on www.awaiba.com/support.
DATE: 19/05/15 Version 1.0.1 PAGE: 15/16
Figure 10: Streamer example data from endpoint 0x81

NanEye GS
USB3 Evaluation Kitwww.awaiba.com
End of Document
DATE: 19/05/15 Version 1.0.1 PAGE: 16/16