napoleon's victory - spi gamesspigames.net/movesscans/moves34/napoleonsvictorym34.pdf ·...
TRANSCRIPT

OPERA TlONAL ANAL YSIS
NAPOLEON'S VICTORY A 'French Plan for Wellington's Victory by Jerrold Thomas
The problem w ith a game as large and intense as Wellington's Victory is tha t to do it any justice at all one must use a great nu mber of pages of the Magazine. I feel that th is article is a nice com panion piece to the one on page 4. Please don' t get the idea that all of this is a plot to get yo u to buy the game - it's simply that I bel ieve it deserves the coverage. - RAS
Players of Wellington's Victory , who will normally want to get right into the Campaign Game Scenario, should not reject the Historical Scenario as unbalanced. It is badly balanced only if the French Player insists on following Napoleon's uninspired plan of battle.
Napoleon simply charged right in - his assault center, diversion left , plan is nearly the poorest possible. Napoleon tackled the strongest points in the Anglo-Allied position, those which negated the French cavalry and Artillery advantages, and emphasized the only French inferiority - skirmish power.
The Anglo.AlIied Defense T he Anglo-Allied position con tains weaknesses of terrain and unit deployment, and the Anglo-Allied army has inherent command and structure flaws . A review of these weak points will introduce the French plan developed in this article.
First, the Anglo-Allied position is too long. The position is over 80 straight-l ine hexes across , and over 100 hexes in actual perimeter. This length leaves less than 5000 Class J and Class 3 infantry per mile, with no considera tion for losses or skirmishers. (5000 men/mile was a minimum ratio for successful defense in Napoleonic battles .) The situation is aggravated because the AngloAllies cannot readi ly abandon the flanks of the position without compromising the center.
Second, the "reverse-slope" deployment can be used agains t the Anglo-Allies. At several points along the ridgetop, adoptio n of a reverse-slope position allows the French to advance to a hex protected only from the north by soft cover. Should the french place their large batteries in a few of these hexes, the Anglo-Allied situation would become almost impossible. Examples of such positions are hexes A5422 and A5522; A4623 and A4724; and A3925, A4024, and A4124.
Third, the key positions of Hougomont and La Haye Sainte, which the Anglo-Allies must defend because of their intrinsic morale values, are too far forwa rd of the main Allied lines . The French Player can set up an artillery gauntlet around these positions with
relative ease, making reinforcement prohibit ively expensive.
Fourth, the AnglO-Allied deployment is unbalanced. A line drawn through the A4 1xx row of hexes, approximately a t the geographical center of the posit ion, finds seven infantry brigades east of the line and thirteen west of it. If the quality of the units is considered , the imbalance is even greater. Using the morale values given in the "Designer's Notes", for battalions only, the ratio is 54/122 .
Fifth , the Anglo-A llied deployment aggravates the command problems of their army. The First Corps is deployed across the ent ire fro nt of the army, with units isolated out on each extreme flank, and a front of over 70 hexes. The Cavalry Division is deployed across more than 40 hexes. This division has no corps commander, as Wellington has both Reserve Corps and Army command responsibilities. Wellington also has two independent brigades which only he can commit. This can mean that a given commander might not be able to reach a needed brigade in one turn, and it will tend to keep Wellington near the center of the position.
Six th, the Anglo-Allied deployment (and organizat ion) tends to complicate their nationality problems. The d ifferent national forces are a ll dispersed except for the Brunswickers, and this will often lead to difficu lties with skirmisher movement and supply , as well as command. Command problems can become severe after a few command units become depleted, particularly on the AnglO-Allied left, where four or five nationalit ies can become mixed as a matter of course. T he isola ted Hanoverian and Netherlands skirmishers near Hougomont a re examples of this problem in action at the very start.
Before setting forth a plan, there are some questions about the ini tial set-up . Normally, if Napoleon starts at Rossomme, then Wellington should be deployed on hex A3027. Usually, 1 give the Anglo-Allied player the option of starling Napoleon at Rossomme or deploying him in a reduced state, but freely. I allow free deployment for Orange, Uxbridge, and Ney, and allow deployment of one French Corps commander (simulating the actual situat ion in which orders had already gone to the troops for some French attacks by II :00; historical fanat ics should deploy Reille on a II Corps unit instead of any commander), and then the Anglo-Allied Brigadeers are placed with the committed brigades, and play commences.
Basic French Plan Outline The following plan of battle is aimed at maximizing the French chances by:
1) Forcing the Anglo-Allied Player to s hi ft his forces to the greatest extent;
2) Making the AnglO-Allied player stretch his defense across the whole width of the posit ion;
3) Setting the crucial actions in terrain that most favors the attacker;
4) Capitalizing on the initial lack of skirmishers on the Anglo-Allied left and center.
Broadly, this plan en visions three separated advances, on the flanks and center. Ini tially more strength is placed on the flanks, but the emphasis can be changed later, and the center is more easily reinforced in any case. For convenience and ease of understanding, the ac tions in each sector will be discussed separa te ly , phase by phase.
The plan, it should be noted, does not envision the demoralization of the Anglo-Allies before turn 24, but before turn 34 or so. The Prussians are sufficient ly handicapped that their initial morale ad vantage can be nullified, and points can be piled up against the demoralized Anglo-Allies . The plan proceeds in Phases, which have related objectives on each sector, as follows:
P hase One (Initial Advance) This phase is planned to seize a fe",,·' Anglo-Allied positions, and force the reinforcement of others, generating the most possible Anglo-Allied movement in the process.
Phase Two (Establishment of Primary Line of Departure - LOD) The phase involves furt her posit ion-clearing, and the advancing and si ting of artillery to provide a base for furt her operations; most Anglo-Allied units are to be forced to the rear slopes.
Phase Three (General Advance) This phase is intended to break the Anglo-Allied posit ion and put French Artillery on the ridgetop at several places .
Phase F'our (Pursuit) This phase encompasses the demoralization of the AngloAllies, exiting units to prevent deactivation, and routing the Anglo-Allies as their effectiveness d rops .
Phase Five (Defense) This phase involves shifting al l artillery with ammo to the east and defending behind it, while picking off the Prussian Cavalry to the greatest extent and deact ivat ing as many brigades as possible to delay the French Demoralization.
Phase One, East Flank The French Player will commit 31I and 4/1, and deploy sixteen skirmishers on Turn II.
11
12
This force will advance down the road to Pappelotte. On Turn 12 or 13, depending on the Anglo-Allied reaction, the French Player will commit 2/ICav/l, 2I13/IVCav, and possibly I/LC/ IG. Jl ICav/ 1 and 1/ 13 / 1VCav are in immediate reserve for this flank and 2/3/IG is en route . Final Reserves include 2/ IIIG, 2/ lC/ IG, and 2I19/VI.
This force will capitalize on Weimar's Brigade's unsuitability for defending obstructed terrain (i.e. its lack of skirmishers) to seize Pappelotte, La Haye, and Smohain, in that order, in the first two to
HANDLING UNITS: Tactics in Wellington's Victory Commitment Since players will want to commil. brigades only when necessary (Le., at the last effective moment) , response time can be crucial. The best way to shorten this time is to deploy, as soon as possible, all superior (Division and Corps) commanders. While this can expose them to fire, it can also be a lifesaver when a brigade is needed right now! The French have an advantage in that they have never more than two brigades per division, an d no independent brigades except in the Imperial Guard.
Superior Commanders Th e above brings us to the points of what to do with these commanders once deployed. Profitab le employment includes rallying units and moving artillery. Artillery movement can be done even if their brigades are not yet committed. The French uniform nationality helps with this use, as each superior can command two artillery batteries; the one subordinate to him in his command range, and any other one that he is stacked with. The French can also do more cross-formation command, though t use superior commanders for morale in melee only as a last resort , as two victory and morale points for their loss is expensive.
Deploying Skirmishers Always, first thing, detach a skirmish company from each committed Class 2 battalion - this preserves your options in case t.he battalion later takes a loss. With Class 1 battalions, usuaJly you should keep a one strength point "cadre" even when you are detaching the rest of the battalion . This not only preserves your option to reform , but can be vital for the Anglo-Allied player in preventing movement restrictions which can comc from the Allied nationality problems.
Small BaTtalions and Regiments These units should be preserved since they can be especially useful in maintaining effectiveness in shock combat when heavy losses are expected, si nce severe losses will
four turns. Once Pappelotte is occupied the other positions become untenable for a force I',,'ithout adequate skirmishers, and their reinforcement becomes difficult as well.
The cavalry can be especially useful if \Veimar attempts an early retreat. The routing of any of his battalions leaves Weimar with the unhappy choice of rallying that battalion or moving the rest of the brigade - the nationality problem. PULting the Prince of Orange on this flank will aUeviate this problem somew'hat, but iL leaves 3Neth/ 1 horribly at risk on the right - un-
eliminate the whole unit, leaving a "fresh" unit on the top of the stack. Examples of these units are the French 3-5-4 infantry and 1-6-6 and 2-5 -6 cavalry; the Anglo-Allied 2-5-4 infantry and 1-4-6 and 2-6-6 cavalry; and the Prussian 2-5-6 and 2-4-6 cavalry. Remnants of Class I battalions can be used on top of reserve stacks, to prevent their need to check morale should a C lass 2 battalion pass by in a rout or disordered retreat.
Class 3 InjantlY This is a constant problem. The safest way to use it is columns stacked with a Class 2 or I unit. It can also be used as "fi ller" between better infantry, eit.her in line or column, since its routing will not affect the adjacent unit.s of lower classes.
Cavalry Cavalry shou ld be used in brigade (8-12 strength point) stacks when formed infantry or enemy cavalry is present, and in regiments when only skirmishers are present. Against a large and vulnerable target, a "double" charge is excellent if the second cavalry unit is within two or three hexes of the original position of the stack. Should the first charge rout the stack, it will still be within the charge zone of the secone! cavalry, and subject to an automatic four strength point loss.
A rtillery Remember when firing aL soft cover, that a six-gun, Class 3 battery is just as good as an eight-gun, Class 1 battery. Class differences are most important du ring artillery duels, or when firing on skirmishers; the differences in expected loss may be grealer when firing on Class 1 targets, but the ratio of loss results is greatest with Class 3 targets .
Skirmisher and anti·Skirmisher Tactics The basic employment for skirmishers is firing from two-hex range, Slacked one per hex . They are preferably firing on formed infantry, but usually are firing on other skirmishers.
Skirmishers are a good weapon against other skirmishers. Since, in most skirmisher-skirmisher fire, every shot has
committable except by Wellington, who usually cannot afford to go so far out on one flank.
During this process, the artillery of 3/1,4/1, lCav/ l , 13/ IVC, 14/ IVC, and l / LC IG will be advancing, with 2/ 3/ IG artillery coming up with its brigade. The only derending arLillery of note is Rettberg, who is usually out of command control (if, as J assume, Braun/ SIR is the unit which actually belongs here, the batlcry will have fewer command problems), because the Anglo-Allied player will not want to commit a Landwehr brigade
a 116 chance of a hir., the goal is to get "free," or extra, shots against the opposing skirmishers. This can be done by massing against a few hexes of skirmishers and contacting all other nearby skirmishers. The ones massed against must withdraw, and give withdrawal fire, or be meleed at 300070 or 400070; any nearby skirmishers coming to reinforce will have given withdrawal fire to the units contacting thcm. Implicit in this tactic is the assumption that a unit gets only one withdrawal fire opportunity when a stack leaves its primary zone, no matter how many units the stack may contain.
Infantry in line formation can also be used against skirmishers where there are less than six companies in a hex. With nine or less strength points of units in Line formation, both sides will have a onethird chance for a hit, and the formed units will have a chance for a crushing melee. The French will usually get a withdrawal fire opportunity, since their melee phase comes before the fire phase.
Charging Cavalry can be the most effective weapon against skirmishers. Skirmishers can find security only in blocked terrain. Stacking the skirmishers six-high will at least guarantee a cavalry point lost, which can sometimes be as useful as the two points the skirmishers are likely to lose. T he real fear is that a cavalry unit '>',,'ill initiate a charge within two hexes of some skirmishers, so that if they rout they will still be within range and will lose four strength points. That is the time to have a horse artillery battery handy to protect the routed companies .
The French, as always, should exploit nationality problems with skirmishers - ini tially this can best be done near Hougomont. Single nationalities can be massed against since the French player will know th at the units cannot effectively be rei nforced and will have to withdraw. Also, once a Hanoverian or Netherlands skirmisher near Hougol11ont runs out of ammo, it can be attacked with impunity, since it dares not stack even with other skirmishers of the same nationality.
just to move the artillery. In any case the threat is minimal, since it is alone, and the Netherlands batteries are all but useless. There is one Landwehr (LW) battalion on hex A5721 which can be picked on early, but don't spend too many shots on him - your main goal is to auto-commit its brigade on turn 12 by infl icting one loss. (This also gives a small, but tantalizing, chance to rout all or part of the brigade away.) Phase One should end with French controlling at least Pappelotte, with I L W brigade committed and others entering the area by Turn 14.
The Allies have their own advantages when using cavalry against skirmishers -the movement sequence allows them to charge and then retreat between the fire phases, so that carelessly placed skirmishers can be attacked with impunity.
Combined Arms: Cavalry with Others
Cavalry charges can have a good effect even if the cavalry unit never melees anyone, when the charge is a part of a combined arms attack. Artillery, for example, can advance to place enemy uni ts in its primary fire zone, and then the units can be charged by cavalry. If the units attempt to change facing or form square they will have to give primary .zone fire to the artillery unit; twice if the unit attempts to change from line to square formation. Should the unit make a routed or disordered retreat, it may give withdrawal fire opportunities to the artillery, provided that the cavalry has left a field of fire.
Similarly, a brigade column of infantry can ad vance on a single 'ba ttalion, then a charge can be initiated close by - this might di sorder the unit, and even if the unit is not disordered, or is not in the charge zone, the movement res trictions will likely prevent its reinforcement. Should the infantry shock attack succeed in disordering or routing the defender, the
Phase One, West Flank On Turn 1 I, 611 [ and 1/ 9/ 11 are committed with 49 skirmishers, (keeping five Class I cadres); 2121II is committed on Turn 12. Immediate reserves are 1/2/ II, l/lO/lIICav, and 2/9/II. Reille, the corps commander, wiII go first to deploy Pire (212111) and then will go to pick up the II Corps artillery and bring it west of Hougomont.
and melee. They v,·ill initially outnumber the Anglo-Allies , who will also be having nationalitiy problems with the Hanoverians and Netherlanders.
A few of the French skirmishers, with the cavalry and artillery, wiII advance down the ridge crest (which runs roughly from C2404 to A 1421) in a northwesterly direction . This force will attempt to separate 3Neth/1 from the rest of the Anglo-Allied army. The skirmishers will advance with some
stacks of 8 or 9 units on the Hougomont Woods, intending to clear the woods of AnglO-Allied skirmishers throogh both fire
The Phase One objectives on this sector are to clear the outer row(5) of the Hougomont Woods, and advance the cavalry and artillery
cavalry can finish it off. This can work especially well when the infantry can drive a unit out of blocked terrain into the open, and into a charge zone. A continuous series of charges by several brigades or regiments can paralyze a whole sector while it is reduced .
Another use for the pinning effect of charge zones is to allow an enemy unit to rout off the map. Since the routing unit is unaffected by the charge zone while the leader is, the leader will not be able to catch up with the unit, and it will be as good as dead.
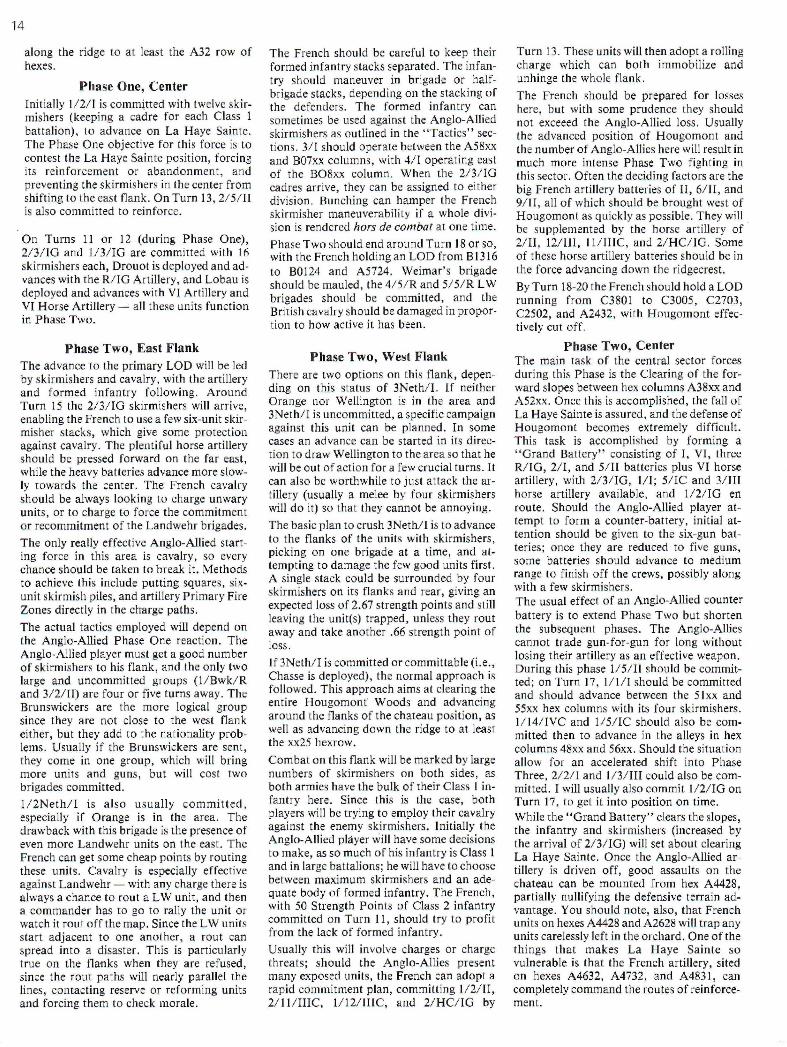
Assaulting Extended Lines The best tactic in assaulting extended lines is to assault the join ts (hexes Y or Z in Illustration I). Depending on your interpretation of the LOS Rules, this can result in disordered fire from both defending units. Even if this is not your interpretation, the fire can be blunted by adopting, in game terms, an "Ordre Mixte, " by placing two battalions in Line Formation in the hexes adjacent to the assaulting Column, as shown in Illustration 1.
This tac tic will not only screen the assault force; it will increase the Primary Zone fire should the defender attempt to change formation or withdraw. (Remember that an extended line cannot be reinforced .) It can also provide a chance for a follow-up assault should the
initial assault succeed only in getting a D J result. The best method is to use Class I battalions in line and Class 2 battalions in the assault; this way the line of battalions will not be affected by a morale failure or a bad melee result.
Artillery Firefights The AnglO-Allies must always be cautious with firefights as they stand to quickly be reduced to impotence from long range. Their 6-3-0 batteries are particularly weak against enemy artillery and skirmishers. The Anglo-Allies nationality problems haunt them again with artillery - the loss of a Brunswieker crew is a major disaster since you have only two; and likewise there may be shortages of other nationalities as well in certain sectors.
Basically the Anglo-Allies must find soft cover hexsides if they are to even attempt t.o come out ahead. Also, the Anglo-Allies should try to select the time and place for the inevitable firefight where they will gain the most lime; they should not expect to win the fircfight, just to create the maximum possible delay in their losing it.
The French should reduce the AngloAllied six-gun batteries to five-guns at long range, and then move in to medium range to pick off the crews; thc Class 2 and 3 batteries are best for the long range work, while the big Class I and 2 batteries should tackle the crew killing.
When the Enemy is Demoralized Cavalry becomes especially important. A charge can force the recommitment of a brigade by causing a morale check; howevcr, a few arti llery batteries should be in the area to prevent the defense of forming in square before deactivating. A single loss has the effect of committing the whole brigade just as a charge will. Also, as the demoralized army's effectiveness drops, each morale check is more likely to result in a roul which is permanent. Attention must be given to the defending artillery crews, as these are the only hits immune to the loss of effectiveness.
14
along the ridge to at least the A32 row of hexes.
Phase One, Center Initially 11211 is committed wit.h twelve skirmishers (keeping a cadre for each Class I bat.talion), to advance on La Haye Sainte. The Phase One objective for this force is to contest the La Haye Sainte position, forc ing its reinforcement or abandonment, and preventing the skirmishers in the center from shifting to the east flank. On Turn 13, 2/5/ II is a lso committed to reinforce.
On Turns 11 or 12 (during Phase One), 2/3/10 and 1/3/10 are committed with 16 skirmishers each, Drouol is deployed and advances with the R/ IO Artillery, and Lobau is deployed and advances with VI Artillery and VI Horse Artillery -' all these units function in Phase Two.
Phase Two, East Flank The advance to the primary LOD will be led by skirmishers and cavalry, with the artillery and formed infantry following . Around Turn 15 the 2/3/IO skirmishers will arr ive , enabling the French to use a few six-unit skirmisher stacks, which give some protection against cavalry. The plentiful horse artillery should be pressed forward on the far east, while the heavy batteries advance more slowly towards the center. The French cavalry should be always looking to charge unwary units, or to charge to force the commitment or recommitment of the Landwehr brigades .
The only really effective Anglo-Allied starting force in this area is cavalry, so every chance should be taken to break it. Methods to achieve this include putting squares, sixunit skirmish piles, and artillery Primary Fire Zones directly in the charge paths .
The actual tactics employed will depend on the Anglo-Allied Phase One reaction. The Anglo-Allied player must get a good number of skirmishers to his flank, and the only two large and uncommitted groups (l / Bwk/ R and 312/ 11) are four or five turns away. The Brunswickers are the more logical group since they are not close to the west flank either, but they add to the nationality problems. Usually if the Brunswickers are sent, they come in one group, which will bring more units and guns, but will cost two brigades committed .
II2N ethii is also usually committed, especially if Orange is in the area. The drawback with this brigade is the presence of even more Landwehr units on the east. The French can get some cheap points by routing these units. Cavalry is especially effective against Landwehr - with any charge there is always a chance to rout a LW unit, and then a commander has to go to rally the unit or watch it rout off the map. Since the L W units start adjacent to one another, a rout can spread in to a disaster. This is particularly true on the flanks when they are refused , since the rout paths will nearly parallel the lines, contacting reserve or reforming units and forcing them to check morale.
The French should be careful to keep their formed infantry stacks separated . The infantry should maneuver in brigade or halfbrigade stacks, depending on the stacking of the defenders. The formed infantry can sometimes be used against the Anglo-Allied skirmishers as outlined in the "Tactics" sections. 3/1 should operate between the A58xx and B07xx columns, with 4/T operating east of the B08xx column. When the 213/1G cadres arrive, they can be assigned to either division. Bunching can hamper the French skirmisher maneuverability if a whole division is rendered hors de combat at one time.
Phase Two should end around Turn 18 or so, with the French holding an LOD from BI316 to B0124 and A5724 . Weimar's brigade shou ld be mauled, the 4/5/ R and 5/ 5/ R L \V brigades should be committed, and the British cavalry should be damaged in proportion to how active it has been.
Phase Two, West Flank There are twO options on this flank, depending on this status of 3Neth/I. If neither Orange nor Wellington is in the area and 3Neth/l is uncommitted, a specific campaign against this unit can be planned. In some cases an advance can be started in its direction to draw Wellington to the area so that he will be out of action for a few crucial turns. It can also be worthwhile to just attack the artillery (usually a melee by four skirmishers will do it) so that they cannot be annoying.
The basic plan to crush 3Neth/ I is to advance to the flanks of the units with skirmishers, picking on one brigade at a time, and attempting to damage the few good units first. A single stack could be surrounded by four skirmishers on its flanks and rear, giving an expected loss of 2.67 strength points and still leaving the unites) trapped, unless they rout away and take another .66 strength point of loss .
If 3Neth/1 is committed or committable (i.e., Chasse is deployed), the normal approach is followed. This approach aims at clearing the entire Hougomont Woods and advancing around the flanks of the chateau position, as well as advancing down the ridge to at least the xx25 hexrow.
Combat on this flank will be marked by large numbers of skirmishers on both sides, as both armies have the bulk of their Class 1 infantry here. Since this is the case, both players will be trying to employ their cavalry against the enemy skirmishers. Initially the AnglO-Allied player will have some decisions to make, as so much of his infantry is Class I and in large battalions; he will have to choose between maximum skirmishers and an adequate body of formed infantry. The French, with 50 Strength Points of Class 2 infantry committed on Turn 11, should try to profit from the lack of formed infantry .
Usually this will involve charges or charge threats; should the Anglo-Allies present many exposed units, the French can adopt a rapid commitment plan, committing 112111, 2/II/IIIC, IIIUIIlC, and 2/ HC/ IG by
Turn 13. These units will then adopt a rolling charge which can both immobilize and unhinge the whole flank.
The French should be prepared for losses here, but wi th some prudence they should not exceeed the Anglo-Allied loss . Usually the advanced position of Hougomont and the number of Anglo-Allies here will result in much more intense Phase Two fighting in this sector . Often the deciding factors are the big French artillery batteries of 11, 6/ II, and 9/ 1I, all of which should be brought west of Hougomonl as quickly as possible. They will be supplemented by the horse artillery of 2/1I, 12/1l1, II/IIIC, and 2/HC/IG. Some of these horse artillery batteries should be in the force advancing down the ridgecrest.
ByTurn IS-20 the French should hold a LOD running from C3S01 to C3005, C2703, C2502, and A2432, with Hougomont effectively cut off.
Phase Two, Center The main task of the central sector forces during this Phase is the Clearing of the forward slopes between hex columns A38xx and A52xx. Once this is accomplished, the fall of La Haye Sainte is assured, and the defense of Hougomont becomes extremely difficult. This task is accomplished by forming a "Grand Battery" consisting of I, VI, three R / IO, 2/1, and 5/ II batteries plus VI horse artillery, with 2/3/10, III; 5/rC and 3/IlI horse artillery available, and 1121IG en route. Should the Anglo-Allied player attempt to form a counter-battery, initial attention should be given to the six-gun batteries; once they are reduced to five guns, some batteries should advance to medium range to finish off the crews, possibly along with a few skirmishers. The usual effect of an Anglo-Allied counter battery is to extend Phase Two but shorten the subsequent phases. The Anglo-Allies cannot trade gun-for-gun for long without losing their artillery as an effective weapon. During this phase 115/II should be committed; on Turn 17, 11 1/ 1 should be committed and should advance between the 51xx and 55xx hex columns with its four skirmishers . 1/14/ IVC and 1/ 5/IC should also be committed then to advance in the alleys in hex columns 4Sxx and 56xx. Should the situation allow for an accelerated shift into Phase Three, 212/1 and 1/3/III could also be committed. I will usually also commit l!2l IG on Turn 17, to get it into position on time. While the' 'Grand Ba ttery" clears the slopes, the infantry and skirmishers (increased by the arrival of 2/ 3/ l0) will set about clearing La Haye Sainte. Once the Anglo-Allied artillery is driven off, good assaults on the chateau can be mounted from hex A4428, partially nullifying the defensive terrain advantage . You should note, also, that French units on hexes A4428 and A2628 will trap any units carelessly left in the orchard. One of the things that makes La Haye Sainte so vulnerable is that the French artillery, sited on hexes A4632, A4732, and A4831, can completely command the routes of reinforcement.
Phase Two in this sector can end from Turn 18 to Turn 23, depending on the commitment of Anglo-Allied artillery. The French LOD should run from A5424 to A4728, A4527, and A3830; with La Haye Sainte surrounded if it has not yet fallen .
Phase Three, East and Center In both sectors the plan and process is the same. Skirmishers backed by infantry will advance on the "reverse-protected" positions while cavalry advances up the alleys. (An alley is a path of hexes completely free of blocked hexsides which goes entirely through the Allied position.) Closely following this advance will be the artillery, with some batteries unlimbered for cover, and other always limbered for maximum movement.
By this time the Anglo-Allies should be quite weak in good formed infantry, since a proper French strategy should have resulted in a heavy attrition of the Anglo-Allied skirmishers.
Since the Anglo-Allies have only about 200 strength points of Class 2 infantry, the removal of their Class J units through skirmisher attrition will leave them no adequate counter for the large body of French Class 1 and 2 units which cannot form skirmishers, and so will be available as formed units.
Should the Anglo-Allies attempt to fall further back beyond the ridge, the French should advance in the area parallel to the main road, where the ridgetop is so flat as to
provide no cover. Such an advance can outflank both wings of the Anglo-Allied army, allowing for a defeat in detail.
During this Phase, attention should be paid to distributing casualties among the AngloAllied battalions, rather than wholly eliminating a few. A point will be reached, as the Anglo-Allies near the Demoralization Level, when the French will want to go for routs to score a number of points in one turn, in order to get the Anglo-Allies over the limit. It is best to prepare for this situation by reducing the effectiveness of as many battalions as possible, so that there will not be a large body of intact infantry to provide a shield for the weaker units. The French should always keep at least one formed cavalry brigade in hand in each sector (in a pinch at least one good regiment) so that a charge can be announced at any time. This is necessary for the combined arms approach which will give the best chances for French success. This approach is covered in the "Units Handling" sections.
During this phase, the French may begin to have batteries run out of ammo. If the French player has been audacious with his artillery, this will usually be balanced by his loss of crews; but if he has some crews to spare, he can try some very bold tactics. One is to advance a battery adjacent to an enemy infantry unit and unlimber; should the crew be turned into a skirmisher by fire, anothercrew is brought up to handle the guns. Should the battery get unlimbered, the infantry unit is all but gone, facing a two or three strength point loss at least.
Another thing to consider is switching ammo; this can free some crews, and you can use the crews of guns which are not yet committed. You will need some batteries with full loads to handle the Prussian Cavalry.
One regiment (preferably a weak one which has taken losses) should be heading east by about Turn 22. In some cases, two regiments can be useful if they can be spared. The regiments are kept in the-woods or in towns; disordered, they have no command problems, and in blocked hexes they cannot be attacked by Prussian Cavalry. Their job is to prevent the Prussian artillery from using Grand Tactical Movement. The Prussians will enter 50-60 hexes from the French, and the presence of the cavalry can add five to six turns to the time when the Prussian Horse artillery can score a hit. Remember that you are not so concerned about losing the units so long as they cannot be hit by the artillery.
Unit commitment for the French is hard to predict, as it will depend on what is needed. I usually have the Guards around, though I don't like to expose them except for something special, like putting the AngloAllies over the limit. Otherwise, they are excellent for mop-up on disordered units, and can be useful as a cavalry defense force .
The Phase should end with French units holding the ridgecrest to about the A36xx column at least, with a number of French heavy batteries ensconced on the crest. The Allies should be only 50-45 points from demoralization, while the French should have around 110.
Phase Three, West Flank The strategy here will revolve around how stubbornly the Anglo-Allies defend Hougomont, a very strong defense should be countered by an effort at envelopment of the whole wing of the army (excepting 3Neth/ l), in cooperation with forces from the center. Normally, the artillery on both sides of the salient will begin to make things loa hot for the Anglo-Allies, who will fall back leaving a force in Hougomont.
Hougomont should be approached gingerly. Skirmishers should patiently peck away; up to nine hexes are available, since range means nothing; this gives an expected loss of 1.5 strength points per turn. The only counter for this loss rate would be a large body of infantry in the garden, and either skirmishers or other infantry in the woods can deal with them. Should the whole garden be occupied, 2.33 strength points per turn can be expected as losses, with no room at all in case of a rout. In fact, the French can sometimes "herd" Anglo-Allies into the Hougomont position, turning the fall of the Chateau into a major disaster .
During this Phase, another opportunity might present itself, as the units advance down the ridgecrest in a northwesterly direction, for some cheap shots at 3Neth/ I. These units have enough Landwehr to be vulnerable whether they stay in the town or not; and they can sometimes be ambushed as
they try to rejoin the main army. Should a unit be routed, the Anglo-Allies will face the same problem of rallying the unit or com-· manding the brigade, since there are no other Netherlands units nearby.
Cavalry should be kept in hand here, too, since a salient is especially vulnerable to being pinned by converging charge zones. A key decision will be when and where to use the lIHC/IG. The 1-6-6 placed on top of the 8-6-6 forms a nearly perfect force which can tackle even a strong position with good chances, or crush a weaker one. The little 2-5-6 cavalry can either be used as cheap charge zone makers, or stacked together to maintain effectiveness in an important charge assault.
When the final assault is going in on Hougomont, it should be launched from hex C3002, in the garden, since this will partially offset the defensive benefit of the Chateau hex. Nine skirmishers should take the hex in short order. Phase Three should end on this sector with Hougomont taken or with the AngloAllied wing enveloped. If 3Neth/ I has not joined the main force, it should be completely cut off from it. Morale should be as mentioned earlier.
PhaseFour, All Fronts During this Phase, the French player should risk having units routed to cause AngloAllied routs. With the French Morale advantage, they will stay in good order long enough to rally the units, while the Anglo-Allies, once over their limit, cannot rally.
Once demoralization has set in, the French should begin to disengage. They must keep a few cavalry brigades in contact, to launch charges as the Anglo-Allied effectiveness drops, but they should leave the fighting to the cavalry and a few skirmishers . The skirmishers can cause routs through fire losses, and can even begin to melee disordered allies at plus three. Should the Anglo-Allies attempt an exit, units must be gotten off the desired roads to prevent deactivation. One of the essences of the French plan is that the earlier (than the French) Anglo-Allied demoralization will allow them to make up any overall morale differential by crushing the Anglo-Allies more thoroughly.
Within three turns after the Anglo-Allied demoralization level is reached, the French should have no more than five brigades actively involved with them . Usually three Cavalry and two Infantry (to support the movement and supply of the skirmishers) brigades will be enough.
Phase Five, Defense There are two keys to successful defense against the Prussian Army; they are using blocking terrain, and reducing brigade commitment.
Each kind of cover presents special problems to the Prussian. Since the great bulk of Prussian firepower is Class 3, it is useless against hard cover. Stacks of skirmishers in places like Frischermont, Smohain, and Plancenoit can be very hard for the Prussians to handle.
{continued on page 29}
15
ferential. E.g., Caesar's best legion is his X, with a strength (for each of the ten cohorts) of '3' and an effectiveness of '9', highest in the game. Now no Pompeyan player will allow the X to face his worst legion, so let us compare the X to one of Pompey's better (but not best) legions, his Hispanic, rated at 4-7. NOW, if the Hispanic attacks the X it would be attacking at + 1, subtract two from the dierol!. It would have a 67070 chance of inflicting a greater result (albeit marginal in the majority of them) on the X than it would on itself. Conversely, if the X were to attack the Hispanic - at - J add two to the dieroll -the X would have to take a step loss no matter what the dieroll (as \vould the Hipanic). Since the strength of the X is only 75r.T7o of that of the Hispanic, simple addition reveals a maxim of attrition . And the X is by jar the best Caesarean legion. Add to this t.he fact that Pompey has three more legions than Caesar (11 -8), that two of Caesar's legions the VIII and IX - are virtually incapable of attacking, as well as the superiority of Pompey's cavalry and you have an inevitable end result.
I am not that familiar with the actual battle to know exactly how Caesar triumphed over Pompey's superior force. I do know that he wasn't working with the loaded deck that Loren has slipped to the gamer disguised as a CR T. I do know that both games [ played to conclusion had the same result: a surrender by Caesar after the loss of several legions in frui tless attacks after being pressed to the edge of the game-map by an inexorable Pompey advance. I fear that inadequate play testing and development - the bane of GDW's house - is at fault here. The differences in the CRT, and its fissures , are subtle; they are not faults easily discerned . But they are not so hidden that adequate developmental work could not have uncovered them. Inadequate development is a problem with every company today, regardless of the production time given to their games. And poor development can do more to harm a game than any other single aspect of production. So perhaps the blame should fall less on Loren Weisman, who has certainly evolved a nice system, and more on John Harshman, who was in charge of this portion of the game.
Be it as it may, it is frustrating for the player to encounter a game where so many things seem right yet the end result is useless. Pharsalus is not a convoluted game and it is not a bad game. It has a fair amount of flavor and shows the earmarks of a great deal of research. But it fails to convey any insight into how or why Caesar destroyed Pompey on the plains of Greece because it fails to make that result probable. It simply fails to give Caesar - and the player - his due.
Berg Pharsalus is available from GDW, Box-432,
onnal, Illinois for $8.75
o
Napoleon's Victory [continued from paf{r! 15/ ...
The French player should not even hesitate to fall back to the La Haye Sainte, La Belle Alliance, Plancenoit line if advantage can be gained from the shift.
Soft cover hexes (not hexsides) are a lso valuable since so much of the Prussian potential is in their cavalry, and since they have a limited ability to form the sI<itinishers which are most effective in the woods. Should the French be demoralized, they should place as many units as possible in blocked hexes (not hexsides), either soft or hard cover, to avoid routing from Prussian charge zones . Units in blocked hexes do not check morale, as charge zones do nO! extend into these hexes .
Blocked hexsides are most uscful as artillery sites; their morale benefits can be a real he lp, too, if the French find t.hemselves demoralized right at the end of the game, though units will still face morale checks from Prussian charges.
Brigades committed to the Prussian defense should not exceed five - usually three infantry and two cavalry. The defense should be anchored by the maximum number of skirmishers and artillery batterics - the Guard Artillery is especially useful because of the higher morale of the crews. The batteries should occupy the ridgecrests bet.ween the covered hex~s which are held by masses of skirmishers. The formed infantry and cavalry should be concealed on the reverse slopes to counterattack any charging Prussian cavalry, and to resupply the skirmishers . Maximum use is made of artillery and skirmishers because they do not require brigade commitment; also the morale loss should an art(11ery bat.tery be routed is only one point.
Throughout the entire battle, brigades which have been decimated should be pulled out of the battle and deactivated . This will be easier for the French since they will basically be advancing. The brigades should move south and west, dropping off all possible skirmishers, including removing any eligible damaged battalions (if optional rule 15.33 is being used). The brigades should move at the maximum possible rate until the first hour tu rn lhat they are far enough away, then they should deactivate. Don't waste an extra point; you can always re-commit the brigade lat.er if you must. Once the Anglo-Allies are demoralized, the movement should be more west than south, to put distance between the units and the Prussians . Whenever a brigade of infantry is to be deactivated, the units should go into "Square" formation; this will prevent their recommitment by Pruss ian cavalry, at least until they have actually been meleed, or unlillhe Prussian artillery arrives.
A successful defense will delay the French Demoralization past Turn 40, and if they can go beyond Turn 44 they are the likely winners . Should the Prussians get careless, t.hey can find t.hemselves demoralized, too. Vive la France!
Spanish Gold {contilwed from page 16/
worth marc in a close, safe (low in attrition level), doubled resource area than the ten victory points per turn it will cost to not replace a colonist lost in attrition . Of course, some other nation might do her a favor by mounting a war andlor occupying some of the vital hexes (4213 is an attractive spot if mines aren't depleted) . Let them have them.
The player with the best chance of winning is the one who makes friends and quiet ly minds his own business of placing his colonists on the eastern seaboard of North America (in areas of doubled resources and low bounds expense for transportation). To do so will require that he resist the urge to succumb to gold fever . Especially from Turn 17 on, wellplaced colonists are much more valuable collecting resources than wasting energies (and ducats for transportation) on an often fruitless searclfl 'ffi;. gold. ~-should con· centrate on the Caribbean. The Deep South and Rio are also good areas. California is a long way off, but could be supplied through Panama and a transfer of colonists from Atlantic to Pacific. Gold should be mined from Panama, Midwest Plateau, and Saguenay (Brazil also if Portugal plays) .
Players will be very unwise to let any other player quietly develop his empire in more than one doubled resource area . Colonists start paying off richly in the last half of this game (a nation with the maximum twenty colonists in the Atlantic Coast would dra\~ 200 ducats from that area on Turn 20) . A surprise attack designed to eliminate ports and colonists is in order to keep that player from running away with the game. Conversely, the player who is concentrating his efforts on resources while his friends go after the gold and Spain tries vainly to maintain her empire will be advised to garrison strategic ports and passes.
Beginning on Game-Turns 19-20, the players should make plans to expand their borders to include adjacent areas (and win political control victory points) by judicious replacement of co lonists and soldier detachments . Political control is worth 150 victory points. Also remember that in a close game, a careful placement of units can deny another player his 150 victory points for that area (75flio of so.ldiers in an area must be friendly to gain pol i tical control). Sold ier uni ts are especially dangerous because of their wide movement allowance that permits them to strike from distan t areas.
Wars should be carefully calculated as to expense versus gains. Eliminating five colonists could mean a loss of 40-50 ducats per turn for your opponent, which would be well worth the 40 ducats required in just one turn to buy an army .
The play of this scenario will be challenging and closely contested. It will give one the enjoyment of the military side of the game when borders start meeting as well as the feel of the economic decisions required to win.
29