nat proxy server - nc.dsg.com.twnc.dsg.com.tw/supports/download/doc/nat...
TRANSCRIPT

NAT Proxy Server Administrator Installation and Configuration Guide
08NATPM.IX2.00c.en2

DSG, DSG logo, InterPBX, InterServer, Blaze Series, Savanna, VG5000, VG6000, VG7000, IP590,
IP580, IP500, IP510, InterConsole, NAT Proxy, SIP Proxy and S300X are trademarks of DSG
Technology. Windows and Outlook Express are trademarks of Microsoft Inc. Other names used here
are trademarks of their respective owners.
Copyright © DSG Technology Inc. All rights reserved.
7F, 222 Cheng-Teh Road, Sec. 4, Taipei, Taiwan 111
Tel:886-2-88615558
Fax:886-2-88615557
E-mail: [email protected]
http://www.dsgtechnology.com

Content
3
Table of Contents
Chapter 1 Installing NAT Proxy Server ....................................................................... 5 Before You Start ...................................................................................................... 6 Installing NAT Proxy ............................................................................................. 6
Installing and Configuring NAT Proxy .......................................................... 6 Connecting NAT Proxy via Console Port ....................................................... 9
Chapter 2 Configuring NAT Proxy Server ................................................................. 11 System Information .............................................................................................. 12 InterServer Page ................................................................................................... 12 Force RTP Relay ................................................................................................... 13 Upload Pack.......................................................................................................... 14 Change Password ................................................................................................. 15 Reboot ................................................................................................................... 15
Chapter 3 Settings on InterPBX System...................................................................... 17 Settings on InterServer ......................................................................................... 18 Settings on Off-Premises Phones ......................................................................... 18 Settings on Off-Premises Voice Gateways ........................................................... 19
Appendix A: System Specification ............................................................................. 21 Index ............................................................................................................................ 22


Chapter 1 Installing NAT Proxy Server
5
Chapter 1 Installing NAT Proxy Server
Because of the lack of real IP addresses, many Internet facilities including
Blaze or Savanna Series IP PBX Communication Systems must be
installed behind NAT or firewall. When IP PBX system travels through
virtual or floating IP, sometimes the voice packets cannot traverse NAT
or firewall successfully and cause the problem of one-way or failed
phone communication.
This chapter guides you through the preparation, installation and basic
configuration of DSG NAT Proxy.
Chapter 1 Installing NAT Proxy Server 6
Before You Start DSG NAT Proxy is an electronic product. Please follow the
recommendations below when you install or operate your system in
order to avoid any injury and damage.
Safety Recommendations
Always use ESD-preventive tools when you plug the power cord. Do not
disassemble or remove chassis cover of the system. If there is any
problem of your system, please contact our service representatives.
Environmental Prerequisites
DSG NAT Proxy needs to be installed in clean, dry, adequately ventilated
areas. The system can be placed in a control room or on a rack. Please
remain the control room in a suitable temperature and adequately
ventilated environment.
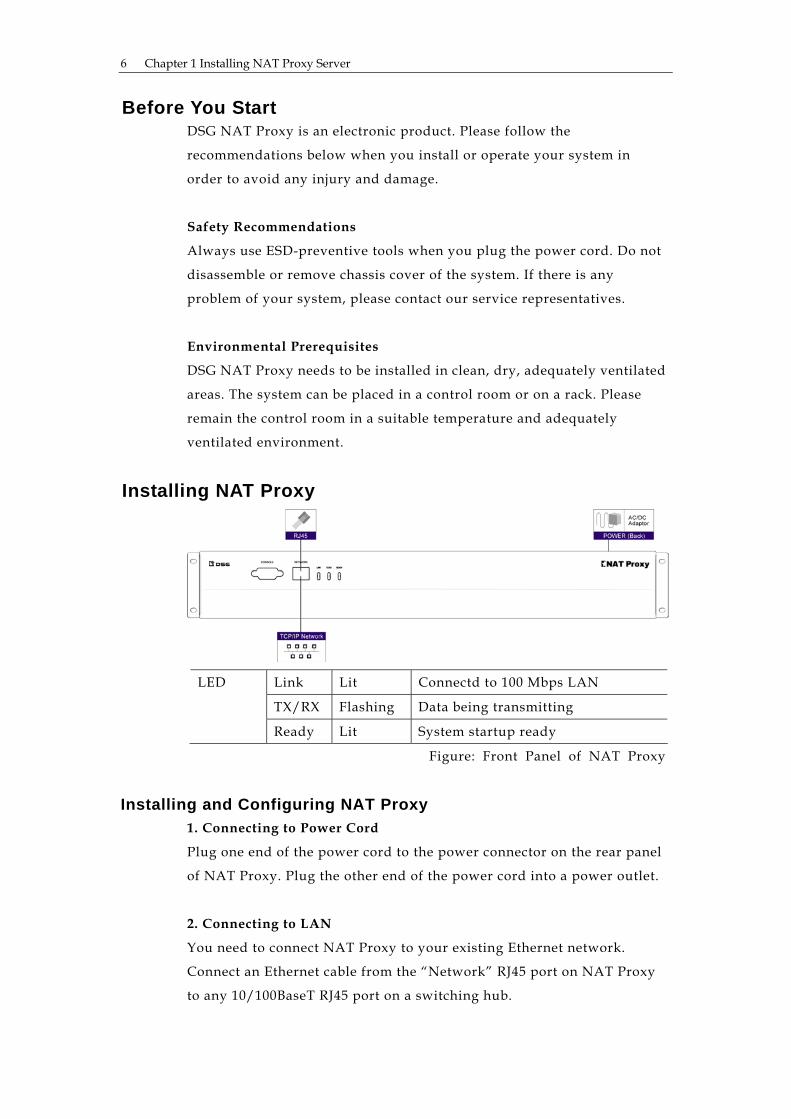
Installing NAT Proxy
LED Link Lit Connectd to 100 Mbps LAN
TX/RX Flashing Data being transmitting
Ready Lit System startup ready
Figure: Front Panel of NAT Proxy
Installing and Configuring NAT Proxy 1. Connecting to Power Cord
Plug one end of the power cord to the power connector on the rear panel
of NAT Proxy. Plug the other end of the power cord into a power outlet.
2. Connecting to LAN
You need to connect NAT Proxy to your existing Ethernet network.
Connect an Ethernet cable from the “Network” RJ45 port on NAT Proxy
to any 10/100BaseT RJ45 port on a switching hub.

Chapter 1 Installing NAT Proxy Server 7
3. Preparing a Computer
Prepare a computer with web browser and be sure it is on the same
subnet as of NAT Proxy. Change the computer’s IP settings if necessary.
The suggested web browser is Internet Explorer version 5.0 or later.
The default values of NAT Proxy are as follows:
Default IP Address: 192.168.1.204:88 (The service port is 88)
Default Gateway: 192.168.0.254
Default Subnet Mask: 255.255.0.0
4. Login NAT Proxy
Launch the web browser. On the address bar, type in the NAT Proxy’s
default IP address 192.168.1.204:88 to access the system. Then click on the
Login icon.
After you logged in, please input the default password “1234”, you may
change the password later.

Chapter 1 Installing NAT Proxy Server 8
The “System Information” page will be displayed on the screen as
follows.
5. Basic IP Settings
Go to Main Menu>System Information. Enter the IP address, Gateway IP,
and Subnet Mask that are assigned to your NAT Proxy. You can set the
other items later.

Chapter 1 Installing NAT Proxy Server 9
You may change your computer IP setting to the original values after you
complete the setup. You will need to enter the new IP address to connect
to the NAT Proxy next time.
Connecting NAT Proxy via Console Port When you forget the IP address of the NAT Proxy, you can connect a
computer to the console port of the NAT Proxy in order to check the
current IP address, gateway address, and subnet mask.
1. Connect one end of the RS232 transmission line to the computer’s
COM port and the other end to the Console port of NAT Proxy.
2. Open the Hyper Terminal program. Enter the connection name and
set the baud rate to 9600 bps.
3. Turn off the power of NAT Proxy. Wait for a while and then turn on
the power again. The computer can start to connect to the
InterServer.
4. You can see the IP address from the “Hyper Terminal” page. You can
also change the IP address here. If you are going to change the IP
address, please press any key within 3 seconds to setup.

Chapter 1 Installing NAT Proxy Server 10
NOTE: The RS-232 DB-9 connector enclosed with the package is with pin
2/3, pin 4/6, and pin 7/8 shorted.

Chapter 2 Configuring NAT Proxy
11
Chapter 2 Configuring NAT Proxy
This chapter guides you through the details of configuring DSG NAT
Proxy.

Chapter 2 Configuring NAT Proxy 12
System Information 1. Launch the web browser. On the address bar, enter NAT Proxy’s IP
address. (The default IP address is http://192.168.1.204:88.)
2. Input your password. (The default password is”1234”.)
3. Click on “System Information”, you may modify the basic IP settings
of NAT Proxy.
4. Input the IP address, gateway IP and subnet mask assigned to NAT
Proxy. It is recommended that you assign a real IP address to NAT
Proxy allowing PBX Server and extensions to get connected easily.
5. Alternatively, you could locate NAT Proxy on DMZ of a firewall.
Select the DMZ option and input the real external IP address
associated with NAT router. In this case, in the above Step 4, you
could assign pseudo IP address to NAT Proxy.
Note: You could also find the current software version and the MAC
address of NAT Proxy. To upgrade, please go to Main Menu>Upload
Packs.
InterServer Page Click on “InterServer Page”, you can create an InterServer list associated
with the NAT Proxy.

Chapter 2 Configuring NAT Proxy 13
Status icon: The connection status between NAT Proxy and
InterServer will be displayed in front of the entry. If there is a “@”
sign, it means the connection is available. If no, the connection is
failed or not established.
ID: Please input the ID of the dedicated InterServer. The ID is a
unique ID assigned to each InterServer and needs to conform to the
one set on InterServer. For more details, please refer to InterPBX
Administration Installation and Configuration Guide: Multi-Server
Management>Server Information. You could edit up to 20 PBX
Servers.
Server IP or MAC: Input the REAL IP address of the NAT router
where the InterServer is located. If a dynamic Internet connection is
adopted, such as PPPoE, and a fixed IP address for WAN connection is
not applicable, you may skip this item. Instead, please input the MAC
address of the InterServer as described below.
As long as listed on the InterServer Page, the InterServer and its
associated off-premises extensions and voice gateways will not need to
open specific service ports when they are deployed behind NAT. DSG
NAT Proxy will help voice packets traverse NAT automatically.
Force RTP Relay If NAT traverse does not work or you find it take time to complete, you
may force the connection using RTP Relay. Click on “Force RTP Relay”,
select the InterServer to apply. RTP Relay will speed up the
establishment of connection but it might consume extra bandwidth.

Chapter 2 Configuring NAT Proxy 14
Upload Pack When a new software version is available, you may save it to a location
where the computer can reach for updating. In addition to the NAT Proxy
software, you might need to upload appropriate IP phones and software
phones software allowing off-premises extensions registered to this NAT
Proxy to get upgraded.
1. Go to Main Menu> Upload Pack. You could find the current
endpoints software version at the bottom of the page.
2. Click on the Browse button and select the path and the file for
upgrade.
3. Click the Upload Application now! button to upgrade the system.
After the upgrade procedure is complete, please reboot the system.
Notice that there is no call on the system before you reboot.

Chapter 2 Configuring NAT Proxy 15
Change Password Please change your password periodically for security reason.
1. Go to Main Menu>Change Password.
2. Input your Current Password.
3. In “New Password”, input your new password and reconfirm it.
Note: Your password should not exceed 19 alphanumeric characters.
Reboot
After you change the IP address, you need to reboot the system. Click on
the Reboot button to restart the system.


Chapter 3 Settings on InterPBX System
17
Chapter 3 Settings on InterPBX System
When adopting NAT Proxy, your InterPBX IP Communication System,
including Blaze, Savanna series IP-PBX and the associated off-premise
extensions and voice gateways, needs to enable the NAT function as well.

Chapter 3 Settings on InterPBX System 18
Settings on InterServer You need to enroll the NAT Proxy IP address to the InterServer.
1. Launch the web browser. On the address bar, enter your InterServer’s
IP address. (Please use service port 88.)
2. Click on the Administrator icon and use your user name and
password to login.
3. Go to Main Menu>Gateway Configuration>NAT Proxy, the ”NAT
Proxy Parameter” page will be displayed.
4. On ”IP Address of Master Proxy”, input the primary NAT Proxy IP
address.
5. If you have more than one NAT Proxy, input its IP address at ”IP
Address of Slave Proxy”. When the Master does not function, the
Slave will take it over.
After you adopt the NAT Proxy, you will no longer need to open the
specific service ports on NAT Router where InterServer is located. When
traversing NAT or firewall is required, the NAT Proxy will redirect and
route the calls.
Please notice that, on your NAT Proxy, both Master and Slave, you have
to enroll the InterServer’s ID and IP address or MAC address.
Settings on Off-Premises Phones You need to register IP phones to your NAT Proxy allowing voice packets
to be traversed and transmitted via the NAT Proxy. On off-premises IP
phones, please set the NAT Proxy’s IP address on ”PBX Server IP” item.
IP Phone series (IP590, IP580, IP500, IP510): Press and hold the
MENU button for 3 seconds and enter the password to go to

Chapter 3 Settings on InterPBX System
19
setup mode. Press button several times till it shows ”PBX Server
IP” item. Press button to edit. Input the NAT proxy’s real IP
address. Press the button again to save.
SoftPhone: After launch the SoftPhone, on “Program Settings”
window, input NAT Proxy’s IP address at “Server IP” item.
When making calls from off-premises extensions registered to NAT Proxy,
opening specific service ports is no longer necessary even when installed
behind NAT. The NAT Proxy will help calls traverse NAT and
established the connection.
Settings on Off-Premises SLT Ports You need to register Voice Gateways to your NAT Proxy allowing voice
packets to be traversed and transmitted via the NAT Proxy. On
off-premises Voice Gateways, set the NAT Proxy’s IP address on ”PBX
Server IP” item.
1. Launch the web browser. On the address bar, enter your VG5000’s IP
address. (Please use service port 89.)
2. Click on the login icon and use your password to login.
3. Go to Main Menu>System Information. On “PBX Server” item, input
the NAT Proxy’s IP address.

Chapter 3 Settings on InterPBX System 20

Appendix A: System Specifications
21
Appendix A: System Specifications System Capacity 20 sets of Blaze or Savanna Server
30,000 channels
50 RTP relay sessions
CPU 32-bit
Memory 64MB
Network Interface 10/100 Mbps, RJ45 LAN Port
Network Protocol TCP/IP, FTP
Management Interface GUI, Console Port
Temperature 0 - 50 C (32 - 122 F)
Humidity 8% - 90% non-condensing
Power 100V AC – 240V AC, 45 Watt
Dimensions 65x270x440 mm (HxDxW)
Weight 3.8 kg

Index 22
Index
Change Password ........................................................................................................ 15
Connecting NAT Proxy via Console Port ..................................................................... 9
Force RTP Relay .......................................................................................................... 13
Installing NAT Proxy .................................................................................................... 6
InterServer Page .......................................................................................................... 12
Login NAT Proxy .......................................................................................................... 7
Off-premises Extensions ............................................................................................. 14
Reboot .......................................................................................................................... 15
Settings on InterServer ................................................................................................ 18
Settings on Off-Premises Phones ................................................................................ 18
Settings on Off-Premises Voice Gateways .................................................................. 19
System Information ..................................................................................................... 12
Upgrade Software........................................................................................................ 14