national 12 amateur boat building guide · national 12 owners association ? ? [email protected]...
TRANSCRIPT

National 12 Owners Association ? www.national12.org ? [email protected]
National 12 Amateur Boat Building Guide
Building in wood and still getting it down to weight 1. Tools and Techniques ................................................................................................................................... 2
1.1 For building in wood ................................................................................................................................... 2 1.2 Paint ......................................................................................................................................................... 3 1.3 Timber ...................................................................................................................................................... 3 1.4 Construction list for Paradise Pudding (2005)............................................................................................... 3
2. Transom and frames ..................................................................................................................................... 4 2.1 Make the transom ...................................................................................................................................... 4 2.2 Make a set of support frames for each section ............................................................................................. 4 2.3 Create a building frame and set it level ........................................................................................................ 5 2.4 Assemble the support frames and the bulk heads onto the building frame...................................................... 5
3. Stringers and planks...................................................................................................................................... 6 3.1 Cutting the planks ...................................................................................................................................... 6 3.2 Planking up ............................................................................................................................................... 7
4. The sheer line..............................................................................................................................................10 5. Knees ..........................................................................................................................................................11 6. Prepare for the floor .....................................................................................................................................11 7. Centre board case........................................................................................................................................12 8. Floor is bonded in.........................................................................................................................................13 9. Decks..........................................................................................................................................................14
9.1 Overview..................................................................................................................................................14 9.2 Decking ....................................................................................................................................................15 9.3 Finishing operations ..................................................................................................................................16
10. The final result .............................................................................................................................................17
1st revision 1978 Andrew Turner 2nd revision 2005 Dare Barry

National 12 Owners Association ? www.national12.org ? [email protected]
1. Tools and Techniques
1.1 For building in wood The basic tools are obvious however there are a few less obvious but nevertheless readily obtainable items which can come in handy. It goes without saying that plane and chisel blades must be kept sharp:nothing seems to blunt a cutting edge more rapidly (brass screws apart) than plywood. This is due to the glue rather than the wood. A honing guide is therefore a very useful tool for putting the correct cutting edge on all blades. The longer work progresses with blunt tools, he longer to both complete the job in hand and also to bring the edge of the tool in question back to a reasonable state. A spokeshave is an invaluable tool and has the advantage of being cheap to buy. For ensuring that plank bevels are flat and for general cleaning up a cabinet scraper can be used to good effect.. When using 2500 x 1250 mm (8' x 4') sheets of plywood it will be necessary to have at least one and preferably two scarfing clamps in order to hold the joint together while the glue cures. These can be made from scrap timber say 3" x 2” the clamping force being supplied by either ‘G' clamps or as shown in Figure 1, two coach bolts. Remember when using the scarfing clamps that it is essential to place polythene between the work piece and the bars of the clamp otherwise you will not be able to separate the work from the clamps! For winding screws in and out a screwdriver bit suitable for use in a carpenters brace can be used to great effect. It is essential that the bit is the correct size for the screw and practice is required if you are not to slip and so spoil most of the face veneer in the area of the screw hole.
1(a) Power tools Power tools certainly help to speed up the job. It is always handy to have;
? Electric Drill ? Jigsaw (integral rather than attachment). ? Power saw: If you are going to the expense of a power saw then a useful addition is a carbide tipped blade. My
own saw uses a 40 tooth 7¼" blade and it is possible to glue straight from the saw with no additional preparation.
? Power plane (hand held): Rapid stock removal is possible whilst a good finish is also easily obtained, practice is however needed. You will also find, hopefully by accident, that it makes an excellent milling machine for brass screws.

National 12 Owners Association ? www.national12.org ? [email protected]
1.2 Paint A lot will depend on your budget as to what type of paint is used, but whatever type you end up with it is no good applying two coats and hoping for protection. The paint of course has two functions, firstly as decoration and secondly it is there to prevent water absorption. No paint is totally water resistant, it is just that some paints are better than others. I would recommend the two-pot every time providing your budget runs to it. It is however essential as with any chemical type coating to follow the manufacturer's instructions to the letter otherwise coating failure can occur. As a rough guide a 500 ml. tin of paint is more than sufficient to cover the outside of the hull whereas the same quantity of varnish is only just sufficient to do the decks and inside. REMEMBER it is essential to coat the underside of all the decking and the inside of all tanks with epoxy (SP106) It is permissible to put one pot paints on the top of two-pot but not the other way round, otherwise a reaction will be set up and you will not have any paint left on the boat.
1.3 Timber The biggest failing of the amateur builder is usually the incorrect selection of suitable plywood. The choice is vast so where do we start? Firstly the construction: for the hull a minimum of 6mm plywood should be used with five ply construction. Always check that whichever ply is selected the cores are butted tightly together and reject any which has noticeable gaps. Some of the three ply available has very porous cores and poor face veneer and yet can still comply with B.S. 1088. Notable exceptions are tillers which can be made from ash and an increasing number of boats these days feature gunwales made from sycamore. The advant age of using sycamore over mahogany is that when damaged, sycamore retains a creamy white colour whilst mahogany tends to go black. The disadvantage is that sycamore is much more difficult to get hold of. Regarding the purchase of other solid wood the best advise I can give is to examine other well constructed boats taking careful notes of the shape and size of various components in order to come up with a cutting list. For details of suppliers of both solid wood and plywood you can always consult the yachting press, but it is much more convenient if you have a local supplier particularly for the solid wood and at best one who understands the art of boat building in order that he may advise on the suitability of certain timbers.
1.4 Construction list for Paradise Pudding (2005) Hull planking and centre board case: Gaboon ply 5mm x 5 ply, 5 sheets used Floor: Gaboon ply 6mm x 5 ply, 1 sheet Internal supports and transom Gaboon ply 3mm x 3 ply, 1 sheet required Stringers Red Cedar 15 x 15mm Gunwales Red Cedar 15 x 20 mm Outer gunwales Meranti Epoxy resin SP106 Filler paint for the hull SP203 HiBuild Deck coating Epifanes Rapid clear Estimated construction cost £600

National 12 Owners Association ? www.national12.org ? [email protected]
2. Transom and frames
2.1 Make the transom
Material: Gaboon ply 3mm. Mark on the centre line and cut notches for the stringers (labelled 1,2 and 3 above) Note: When the transom is bonded into the back of the shell, inset it by a minimum of 10mm. This enables a large epoxy fillet to strengthen both sides of the transom and also enables the boat to be trimmed to length easily. Around the rudder pintles it is wise to bond on an additional pad made out of 5mm plywood to spread the rudder loads.
2.2 Make a set of support frames for each section
Material: MDF Frames cut to extend past the sheer line, the picture above shows the floor level drawn on. Mark on the centre line and cut notches for the stringers (labelled 1,2 and 3 above)
National 12 Owners Association ? www.national12.org ? [email protected]
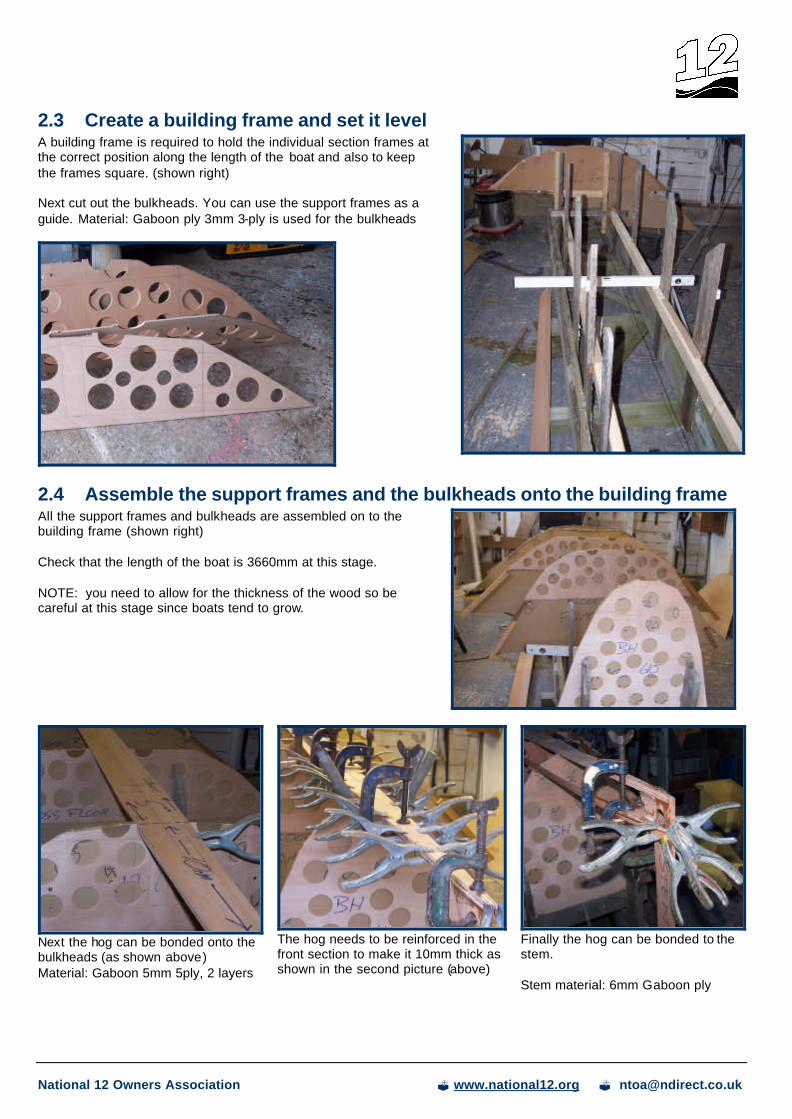
2.3 Create a building frame and set it level A building frame is required to hold the individual section frames at the correct position along the length of the boat and also to keep the frames square. (shown right) Next cut out the bulkheads. You can use the support frames as a guide. Material: Gaboon ply 3mm 3-ply is used for the bulkheads
2.4 Assemble the support frames and the bulkheads onto the building frame
Next the hog can be bonded onto the bulkheads (as shown above) Material: Gaboon 5mm 5ply, 2 layers
The hog needs to be reinforced in the front section to make it 10mm thick as shown in the second picture (above)
Finally the hog can be bonded to the stem. Stem material: 6mm Gaboon ply
All the support frames and bulkheads are assembled on to the building frame (shown right) Check that the length of the boat is 3660mm at this stage. NOTE: you need to allow for the thickness of the wood so be careful at this stage since boats tend to grow.

National 12 Owners Association ? www.national12.org ? [email protected]
3. Stringers and planks Stringers are made out of 10mm x 15mm plywood which are bent along the mould prior to planks being fitted. (right)
3.1 Cutting the planks Assuming that no plank templates are available we now have to obtain the shape of the first plank. The major problem is one of handling the large sheets of plywood whilst orientating them and holding them close to the frames for marking out. The use of 'G' clamps and additional helpers is ideal, the procedure being as follows: 1. Place the sheet of plywood on the
frames, starting at the transom such that it covers the bevels on the hog and first stringer and also protrudes slightly over the transom, use clamps where necessary to hold in position. Using a soft pencil (HB) draw the profile of the plank from the underside using the transom, hog and stringers as guide lines.
2. Remove the plywood from the frames,
the pencil lines indicate the shape of the plank minus the surplus required for gluing. Add sufficient surplus around the edge of the previously drawn pencil lines in order to arrive at the cutting line. When the plank has been cut out it should be checked against the frames for accuracy and then offered up to the opposite side in order to check the uniformity of the frames.
3. If everything has been set up correctly
the first plank may now be duplicated, remembering that they should be handed if a particular face is required for either the inside or outside of the boat.
4. When using standard size sheets of
plywood, 2500 x 1250 the above operation will only produce the rear section of the plank, the operation is therefore repeated, so giving the front sections. Remember to allow sufficient overlap (at least 50 mm) for the scarf joint.
Note: The first planks around the hull area should have a pre-cut centre-board slot.

National 12 Owners Association ? www.national12.org ? [email protected]
3.2 Planking up Firstly cut the plank to the correct size, since a boat is longer than a standard sheet of wood join two pieces together using a scarf joint
2(a) Making a scarf joint Follow the steps below to make a scarf joint in order to create a length of ply wood long enough to plank a Twelve
1. Place one plank on top of the other, place at the edge of your bench and offset the top one back from the bottom one by the width of the joint (say 50mm).
2. Take a plane to the joint and plane over both planks at the angle of the joint.
3. Apply epoxy and clamp the joint hard (with some plastic between the clamp and the wood to prevent sticking)

National 12 Owners Association ? www.national12.org ? [email protected]
2(b) Bond planks to stringers Butt joints can be used for the whole length between all planks. Before bonding the plank to the stringers, route out a depth of 1mm either side of the joint, this will enable glass fibre tape to added to the joint to strength it. With the 1mm strip routed to the edge of the wood, the plank can be bonded onto the stringer, a lot of clamps will be required as shown in the photo (right). When the glue has reached the plastic stage, (time dependent on temperature), the excess glue can be removed from where it has exuded by using either a blunt chisel (aren't they all?) or a scraper. Do not leave this until the hull has been turned over as hardened glue is almost impossible to remove
Continue planking until the hull is complete

National 12 Owners Association ? www.national12.org ? [email protected]
Once the hull is planked the joints can be reinforced using a combination of glass and carbon tape. It is best to mask the work area well as sanding epoxy after it is set is painful
After the epoxy has set, fill and fair the joint Caution note. Remove masking tape before glue sets and when doing fillets as soon as possible.
Finally coat the hull with epoxy to seal the wood.

National 12 Owners Association ? www.national12.org ? [email protected]
4. The sheerline Now is the time to turn the boat over and cut the sheerline which is a very important operation. It would be easy to gloss over this area and assume that there would be no problem in complying with the rules. From the frames we have (or should have) marked an indication of the sheerline. You can also mark it out using a laser level. Having marked the sheerline it is cut and planed to make a continuous concave curve. The longer a plane that you use the easier it is to overcome any undulation that would otherwise spoil the curve. There are three main problem areas: 1. The bulkheads. It is all too easy to achieve a bump at this position. 2. Midlength depth measurement, DO NOT continue planing the sheerline without constant checking of this measurement, some designs are more critical than others. 3. Having planed what we believe to be a continuous curve how do we check it? The following are two checking methods. There are others, if in doubt consult your local measurer and ascertain how he checks this particular item. Both of the two methods described depend on the hull being set up in such that all three known points on the sheer (apron and both corners of the transom) are in the same horizontal plane. METHOD ONE is to use a laser level. METHOD TWO is to use a length of clear plastic hose which is placed on the sheerline around the boat. A small quantity of water is introduced into the pipe and if the sheer line is correct it should collect at the centre. For this to be used as a reliable method you must check with a spirit level that the boat is set up correctly both fore and aft and across the beam After the sheerline is cut and checked the edge of the skin is reinforced by bonding on a strip of wood as shown below.
Picture (right) Laser
level
Picture (below) dotted line shows the marked
out sheerline
Picture (right) shows the hull with sheerline
trimmed

National 12 Owners Association ? www.national12.org ? [email protected]
5. Knees In order to both support the decking and transmit some of the loads, a number of knees need to be incorporated. There are a variety of solutions to this: the strongest method is as shown in the photo (right), using foam sandwich knees which extend into the floor, reinforced with carbon tape. If making the knee in wood, make a template from scrap plywood and fit to the hull. Once a good fit is obtained the knee can be cut from solid wood. The grain direction is important and therefore it is best to use long full length knees as shown. The knees can be made from wood 5mm thick.
6. Prepare for the floor 1. Use a spirit level to judge the angle of the floor along the bulk heads and ensure at least a 50 mm run off from the mast foot to the transom. Mark the floor heights onto each bulkhead.
3. Trim all the bulk heads to height and double check that the bulkheads now make a flat plane for the floor to seat on.
2. Bond on a reinforcing strip onto each bulkhead to spread the load of the floor and increase the bonding area (just visible below the holes in this bulkhead).
4. Now the floor can be marked out and cut. It is easiest to make a floor template to check the fit before the centreboard case is glued in place. Ensure not too much pressure is required to press the floor onto the bulk heads

National 12 Owners Association ? www.national12.org ? [email protected]
7. Centre board case The slot in the hull has already been cut but we need to make a case and bond it in. The inside faces of the two box halves may be painted or varnished and finally glued together using a 6 mm strip of ply. In the design below the case runs the full length of the boat to increase stiffness.
1(a) Fitting the centre board case With the hull the correct way up the centreboard case can be fitted. Take care to ensure the sides are vertical and parallel. A large epoxy fillet should be used on the joint between the hull and the case and glass tape can also be applied to strengthen the joint. With the case fitted the hull will become much stiffer. Picture (right) the centreboard case is bonded and clamped into position. Note: Reinforcing ridges are bonded on the side of the case for the floor to sit on.

National 12 Owners Association ? www.national12.org ? [email protected]
8. Floor is bonded in But first the under floor area is painted (any waterproof paint will do). Then the floor is bonded on.
Pressure needs to be applied to the floor whilst the epoxy sets. This can either be done by 1) Using temporary screws (and some sacrificial wooden pads to avoid damaging the floor) 2) Applying plenty of weight to the floor. If this methods is used ensure the load is spread uniformly to avoid deforming the floor. 50mm x 50mm wooden beams laid parallel to the centre line on top of the floor can help to spread the load.

National 12 Owners Association ? www.national12.org ? [email protected]
9. Decks
9.1 Overview The deck will take quite a lot of load as it takes the weight of the helm and crew hiking out and provides much of the boat’s torsional rigidity. It therefore needs to be supported in many places. The diagram (right) shows the best supporting structure. The diagram below shows a typical cross section through the deck at a knee.
Figure 30

National 12 Owners Association ? www.national12.org ? [email protected]
9.2 Decking To define the inner edge of the deck a piece of timber, spruce or mahogany is wrapped around the boat being notched and glued to the knees and slotted into the bulkhead and deck beams, Dependent on the size of the plywood sheet that you are using for the decking there will be at least two joints where the side deck joins to the foredeck. It is normal practice to butt joint the plywood in the areas of these joins using a scrap piece of plywood as a butt strap (a small piece of ply on the unseen side). When preparing the edges to be joined use a freshly sharpened plane and do not attempt to plane the edges at right angles, instead plane the edges, this way the edges will butt together tightly and when finished will almost become invisible. Picture (right) strip of wood bonded to knees to form inner edge of the deck, planed flat.
The inner deck is bonded and clamped onto the knees and the inner wooden strip, Many clamps are used The top deck is bonded on to the side and the foredeck and then the gunwales are added
Check the maximum width and gunwale overhang measurements to the class rules (as shown below)

National 12 Owners Association ? www.national12.org ? [email protected]
9.3 Finishing operations Before painting it is best to check over all the dimensions and compare to the class rules and if possible do a pressure test of the buoyancy tanks to ensure there are no leaks in the tanks. At this stage it is easy to patch things up seemlessly but when paint is applied it becomes harder to conceal the repair. Paint or varnish the decks and floor
To smooth the hull apply epoxy HyBuild to fill the small gaps and pin holes, then fair well (this may take several iterations \to get a smooth finish) before applying an undercoat and finally top coat.
For the size and shape of all other minor items, toe strap blocks, sheet anchorage blocks, shroud lever pads, etc. examine other boats.

National 12 Owners Association ? www.national12.org ? [email protected]
10. The final result Paradise Pudding
? Correctors: 4.5Kg ? Time to build: 5 Months ? Material Cost: ~£600 ? Effort: It was so much fun there’s no need to count