navigation: map reading
TRANSCRIPT
Navigation Resources
Navigation: Map Reading
What is a Map?
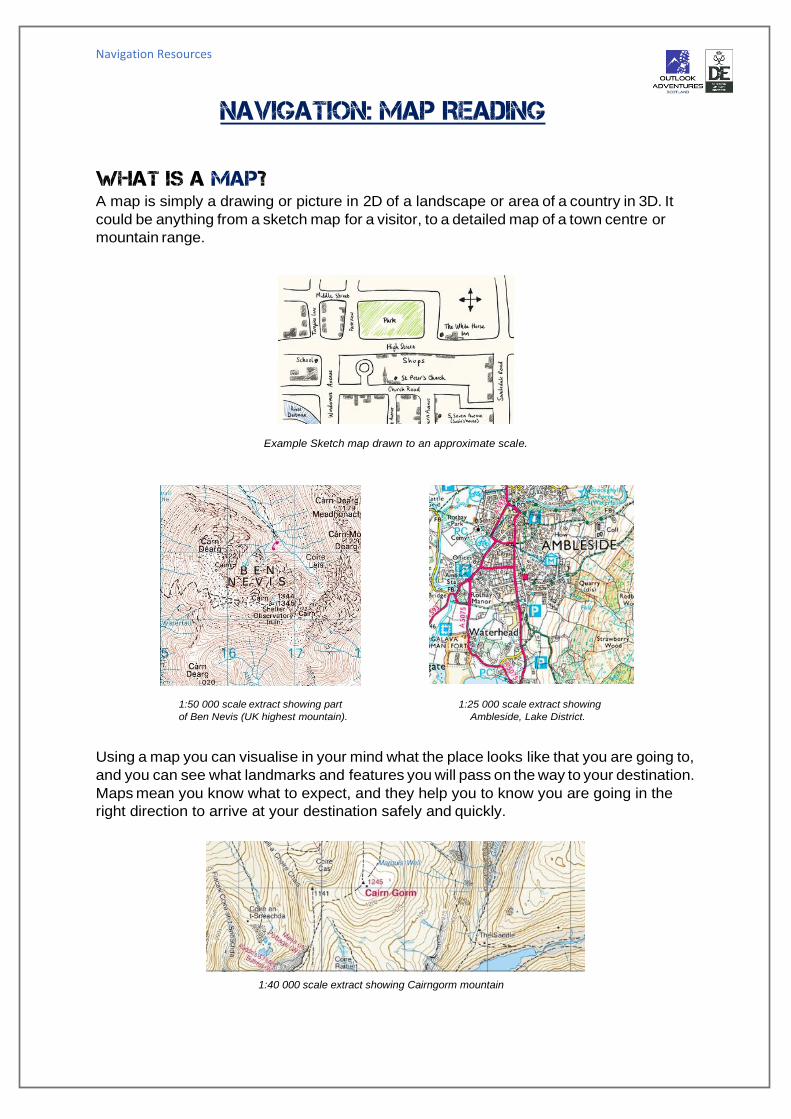
A map is simply a drawing or picture in 2D of a landscape or area of a country in 3D. It
could be anything from a sketch map for a visitor, to a detailed map of a town centre or
mountain range.
Example Sketch map drawn to an approximate scale.
1:50 000 scale extract showing part 1:25 000 scale extract showing
of Ben Nevis (UK highest mountain). Ambleside, Lake District.
Using a map you can visualise in your mind what the place looks like that you are going to,
and you can see what landmarks and features you will pass on the way to your destination.
Maps mean you know what to expect, and they help you to know you are going in the
right direction to arrive at your destination safely and quickly.
1:40 000 scale extract showing Cairngorm mountain
Navigation Resources
MAP SYMBOLS
When drawing a map, you will find that you have to label
lots of things you draw, such as a shop or a church, so other
people can tell what they are.
If Ordnance Survey had to do this on all maps there would be
too much writing and it would be very confusing. The way we
get around this problem is by using different shapes,
colours and symbols to show all the roads, buildings and
rivers and other interesting things in our landscape.
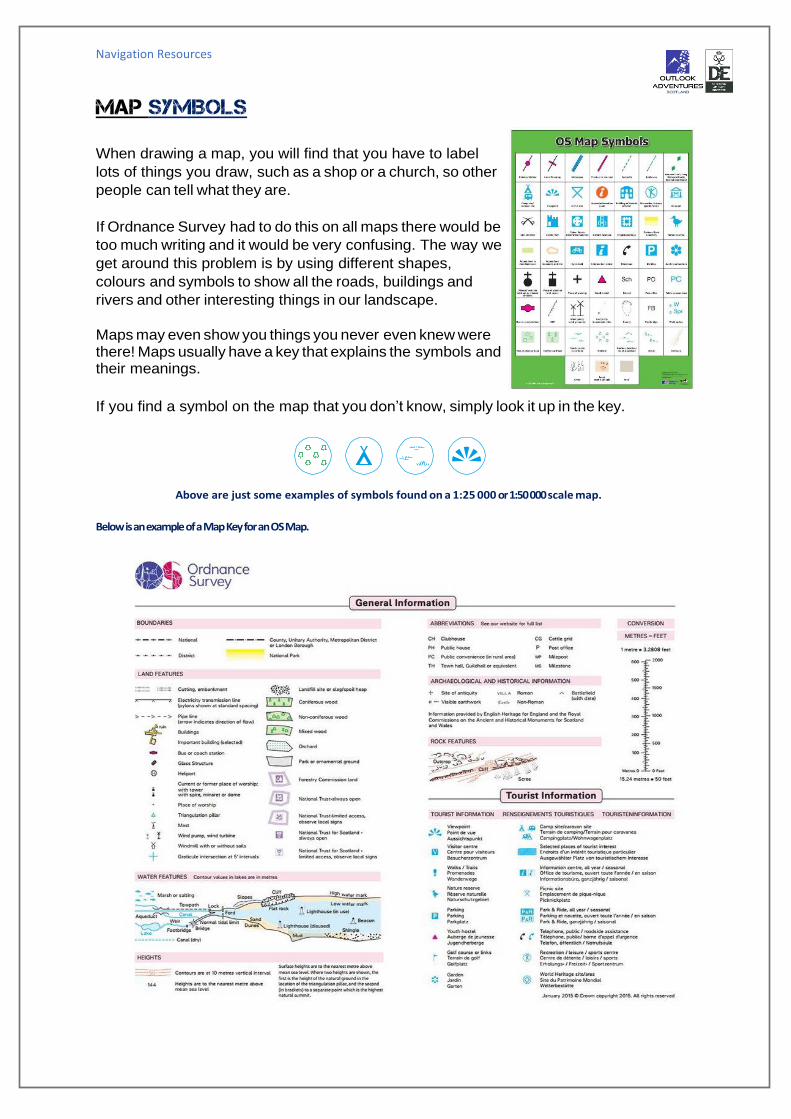
Maps may even show you things you never even knew were there! Maps usually have a key that explains the symbols and their meanings.
If you find a symbol on the map that you don’t know, simply look it up in the key.
Above are just some examples of symbols found on a 1:25 000 or 1:50 000 scale map.
Below is an example of a Map Key for an OS Map.
Navigation Resources
MAP SCALE
The scale of a map shows how much you would have to enlarge your
map to get the actual size of the piece of land you are looking at. For
example, your map has a scale of 1:25 000, which means that every 1cm
on the map represents 25 000 of those same units of measurement on the
ground (for example, 25 000cm = 250 metres).
That might sound a bit complicated, but OS maps have been designed to make
understanding scale easy. Look at the front of a 1:25 000 scale map and you will
see that the scale has been written out for you like this:
• 4cm to 1km
This means that every 4cm on a map = 1km in real life. To make it even easier,
the grid lines are exactly 4cm apart, so every square is 1km by 1km.
On a 1:50 000 Map 2cm =1km.
Maps are made at different scales for different purposes. The 1:25 000 scale map is very
useful for walking, but if you use it in a car you will quickly drive off the edge! Take a look at
the examples below:
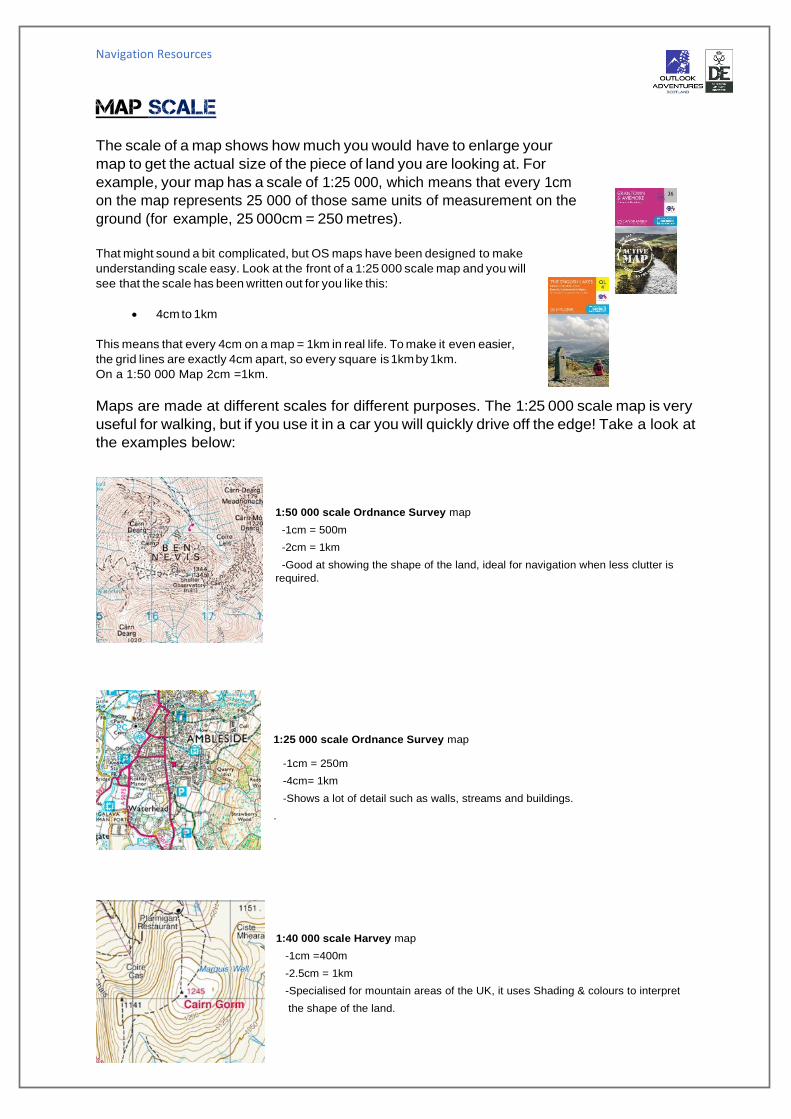
1:50 000 scale Ordnance Survey map
-1cm = 500m
-2cm = 1km
-Good at showing the shape of the land, ideal for navigation when less clutter is
required.
1:25 000 scale Ordnance Survey map
-1cm = 250m
-4cm= 1km
-Shows a lot of detail such as walls, streams and buildings.
.
1:40 000 scale Harvey map
-1cm =400m
-2.5cm = 1km
-Specialised for mountain areas of the UK, it uses Shading & colours to interpret
the shape of the land.

Navigation Resources
DIRECTION
Just as it is important to know which is your left and your right hand, in map reading it is
important to understand where north, east, south and west are. You can remember
where the points of the compass are by using one of these rhymes:
Naughty Elephants Squirt Water
or
Nobody Ever Swallows Whales
If you are walking in a direction half way between two of the points of a compass, you
can say you are heading north-east, south-east, south-west or north-west,
depending on the direction.
Using the Map below, if you were travelling on the RED highlighted route on the section
from CARNETHY HILL to SCALD LAW, you would be travelling South West (SW):
*Ordnance Survey maps are always printed so that NORTH is at the Top of the map sheet.
Navigation Resources
National Grid
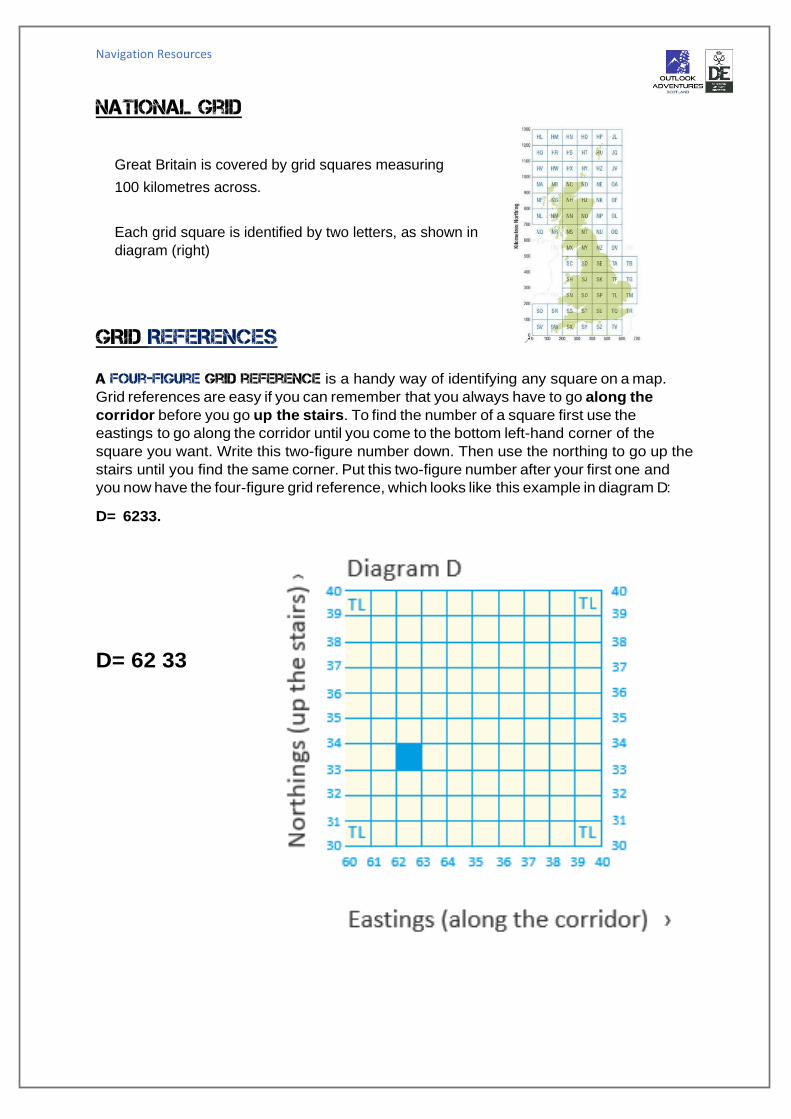
Great Britain is covered by grid squares measuring
100 kilometres across.
Each grid square is identified by two letters, as shown in
diagram (right)
GRID REFERENCES
A four-figure grid reference is a handy way of identifying any square on a map.
Grid references are easy if you can remember that you always have to go along the
corridor before you go up the stairs. To find the number of a square first use the
eastings to go along the corridor until you come to the bottom left-hand corner of the
square you want. Write this two-figure number down. Then use the northing to go up the
stairs until you find the same corner. Put this two-figure number after your first one and
you now have the four-figure grid reference, which looks like this example in diagram D:
D= 6233.
D= 62 33

Navigation Resources
Six-figure grid references
If you want to pinpoint an exact place on a map, such as your own house, you will need
to use a six-figure grid reference. First find the four-figure grid reference for the square
and write it down with a space after each set of numbers, like this: 62_ 33_
Now imagine this square is divided up into
100 tiny squares with 10 squares along
each side. Still remembering to go along
the corridor and up the stairs, work out the
extra numbers you need and put them into
your four figure grid reference like this in
diagram E:
E= 625 333.
*Always remember: along the corridor,THEN up the stairs
On this map we can find the
4 Figure Grid reference for the
Grid with a hill top called Holehead.
• 4 Figure= 6182
We can take a 6 Figure Grid Reference for the actual hilltop which has a spot height of 551
metres above sea level.
• Holehead 6 Figure Grid= 618 826
Navigation Resources
Measuring DISTANCE ON A MAP
It is always important to know how far you have to travel and how long it is going to
take you. By measuring a distance on your map, you can work out how far that is in
reality. You can measure this distance either in a straight line (as the crow flies) or
following a winding route such as a country lane. To get this information from a map is
very easy.
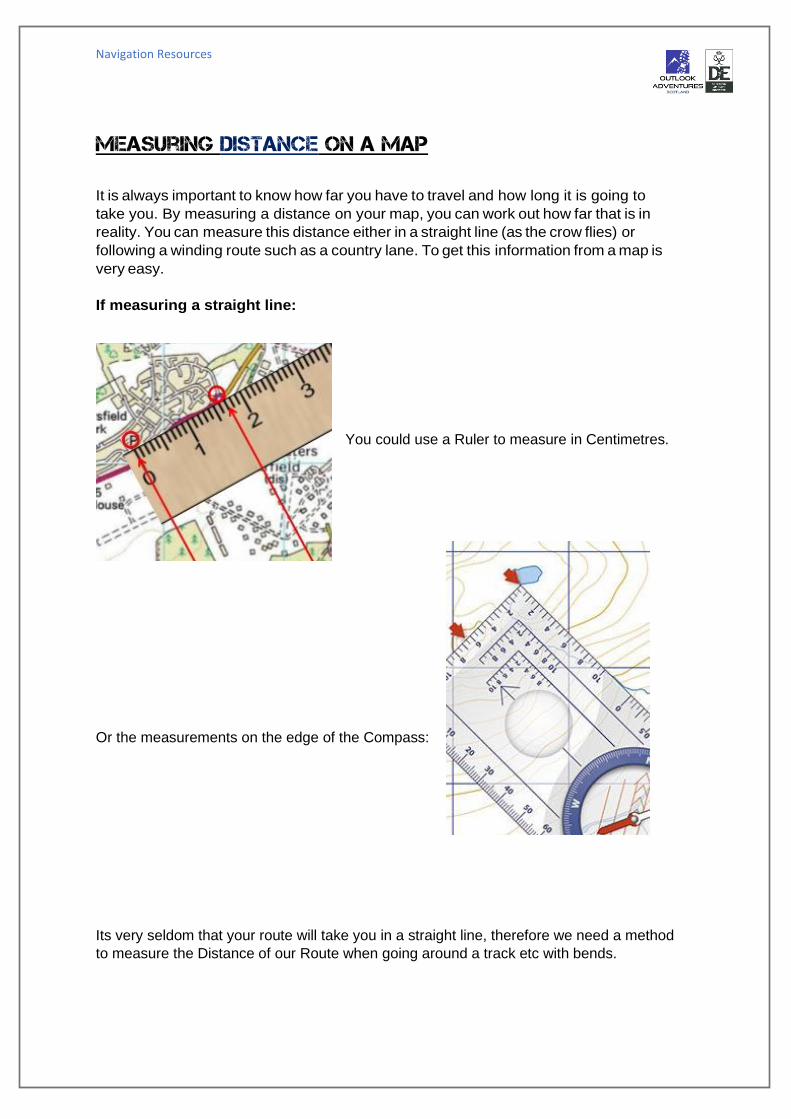
If measuring a straight line:
You could use a Ruler to measure in Centimetres.
Or the measurements on the edge of the Compass:
Its very seldom that your route will take you in a straight line, therefore we need a method
to measure the Distance of our Route when going around a track etc with bends.

Navigation Resources
l,000 Metres 0 Kilometres
l,000 Feet 0 Miles
Measuring around bends: You can measure between two points by using a piece of thin string. If you are
measuring the distance in a straight line, then simply stretch the string between the
two points. If you are following a road or track that’s not straight, bend the string to
follow the exact shape until you reach the second point.
Measuring distance using string
Now that you have a distance in centimetres marked on your string you can find out
the real distance. You can do this in a couple of ways:
By eye
Place string against the scale bar on the map. This is usually at the foot of the map
sheet.
By measuring
Measure your distance on your string with a ruler. Suppose your string is 10cms long.
On a 1:25 000 map 4cm = 1km, so the answer is 2.5km.
(Most people walk at 3km per hour, so it will take 20 minutes to walk in a straight line
across a 1km grid square).
*Remember that the grid lines on a map are 1km apart. A quick way of
estimating distance is to count each square you cross in a straight line. If
going diagonally the distance across the grid square is about 1½km.
Navigation Resources
CONTOUR LINES
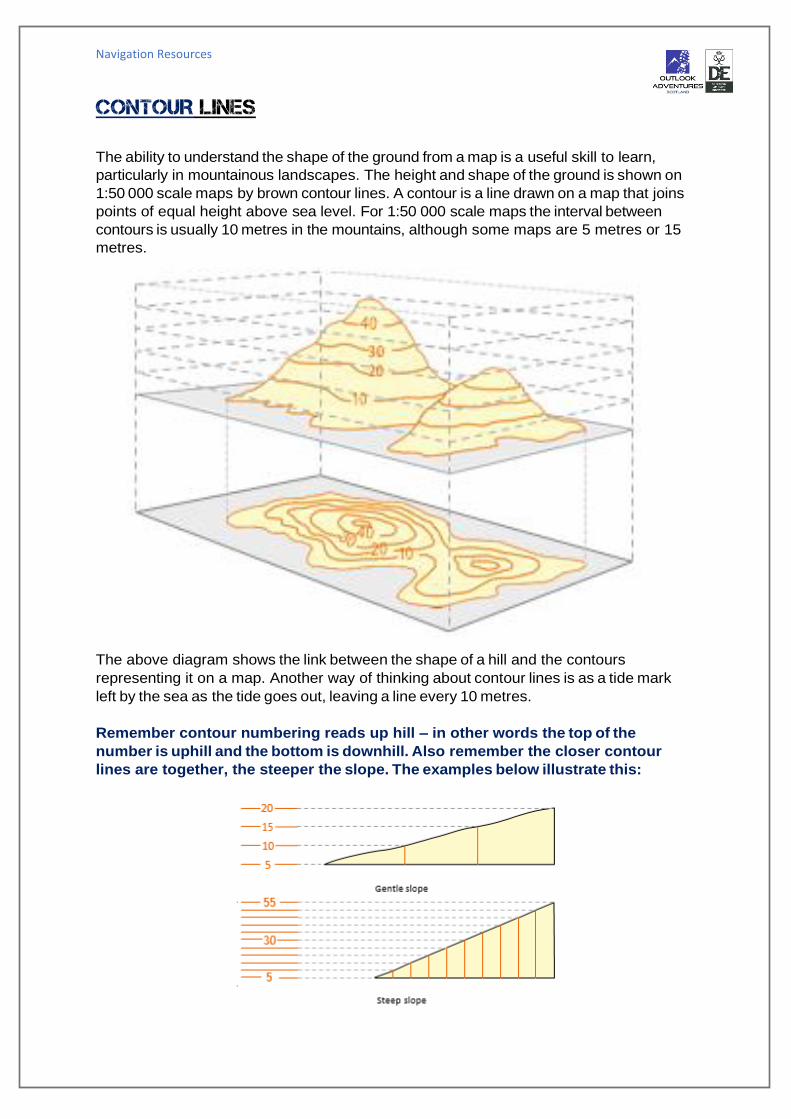
The ability to understand the shape of the ground from a map is a useful skill to learn,
particularly in mountainous landscapes. The height and shape of the ground is shown on
1:50 000 scale maps by brown contour lines. A contour is a line drawn on a map that joins
points of equal height above sea level. For 1:50 000 scale maps the interval between
contours is usually 10 metres in the mountains, although some maps are 5 metres or 15
metres.
The above diagram shows the link between the shape of a hill and the contours
representing it on a map. Another way of thinking about contour lines is as a tide mark
left by the sea as the tide goes out, leaving a line every 10 metres.
Remember contour numbering reads up hill – in other words the top of the
number is uphill and the bottom is downhill. Also remember the closer contour
lines are together, the steeper the slope. The examples below illustrate this: